


The purpose of this guide is to get you up to speed with how the program works and how to make it work better for
your purposes. We will show you step by step how to get up and running at fast as possible
Program setup
1. To begin go to File > Select Source and select the entry marked twain for your
scanner. If this box is empty then you will be unable to scan from Readiris. To
fix, install the latest version of the scanner software. Click on the Scanner button
and find the closest match to your scanner. This step selects the scanner profile.
If there is no match choose Twain other models. Note that you can use the
Open button to process already scanned images or PDF files.
2. Set the paper size and color. Grayscale or Color produces better results for
documents that your want to edit or change and makes available the image
adjustment option to improve results that will be discussed later.
3. ADF = Automatic Document Feeder. This is the on/off switch. Checked is on,
unchecked is off.
4. Scan another page after is for flat bed scanners to set a time interval to place
new pages on the glass and have the program continue automatically.
5. Invert is for situations where the scanner returns a black page with white text
6. Digital Cameras can be used to process images from that source
7. Process as 300 DPI is for existing image files that may have scanned at a lower
resolution. 300 is the optimal balance between good scan speed and accuracy.
Increased resolutions may actually degrade results.
8. Smoothen color images improves the appearance of grayscale and color images
that may be on your document.
Auto Exposure – Automatically sets brightness
and contrast for the scan. When unchecked
adjustment sliders will appear on the left, if
available for your scanner model.
Invert – Corrects white text on black background
problem.
Process as 300 DPI - Overrides scan settings to
force 300 DPI
Smoothen color images – Improves appearance
of images that are scanned with the text on the
Readiris Pro 12 Getting Started Guide
2/10
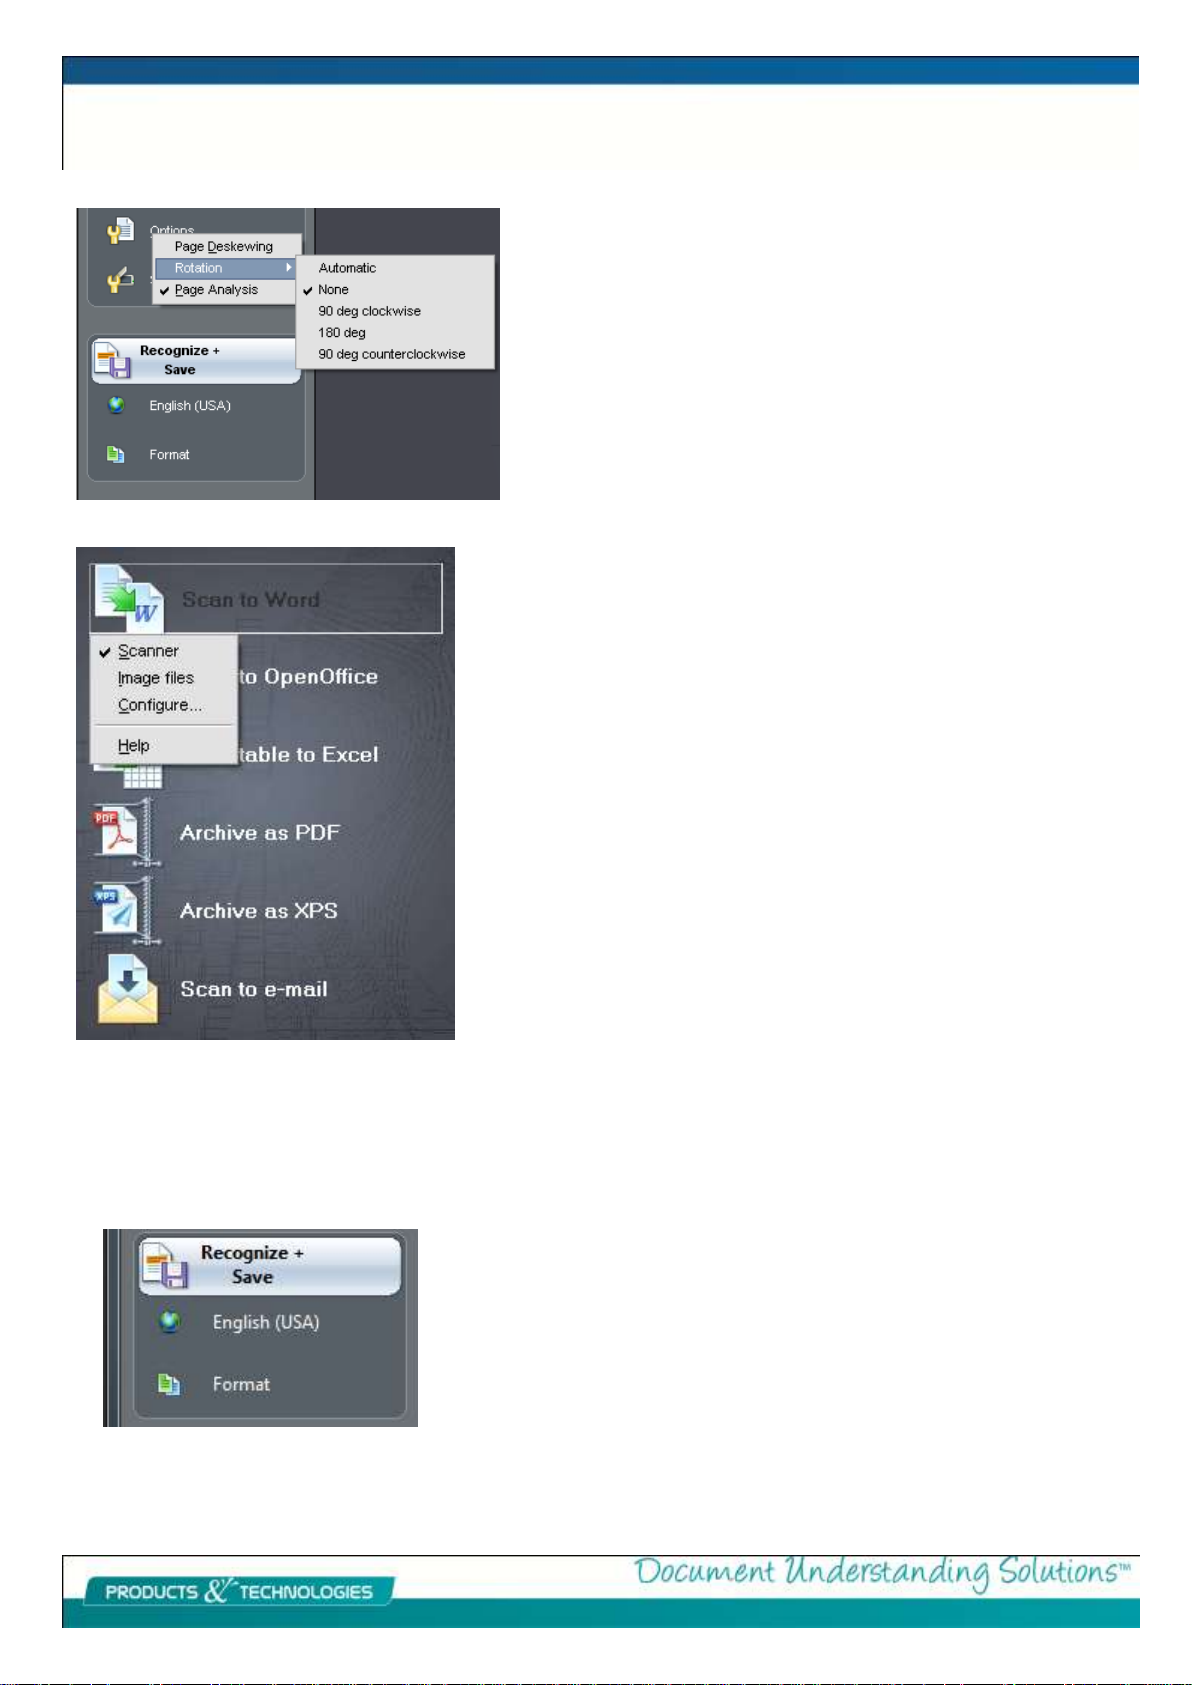
Prior to clicking on Scan or Open you can set the options
button to have the program perform automatic operations on
the scanned image.
If the pages are crooked use Page Deskewing. If they need to
be rotated then select the appropriate option there. Page
Analysis is set by default and is necessary for the OCR. Leave it
checked unless you intend to manually zone the document.
New to version 12 are smart tasks located in the main screen.
These allow you to quickly access the most commonly use
formats.
The output formats are restricted to those appropriate to the
option selected. To configure right click on the desired smart
task.
You can use your scanner or open a pre-scanned image or PDF
file. Then click configure to select other options.
Also new to this version is iHQC or intelligent high quality
compression for PDF and XPS formats. Level one is standard in
the Pro version with higher levels reserved for the Corporate
Edition. It allow the scanning and archiving of full color
document that are no bigger than comparable black and white
scans.
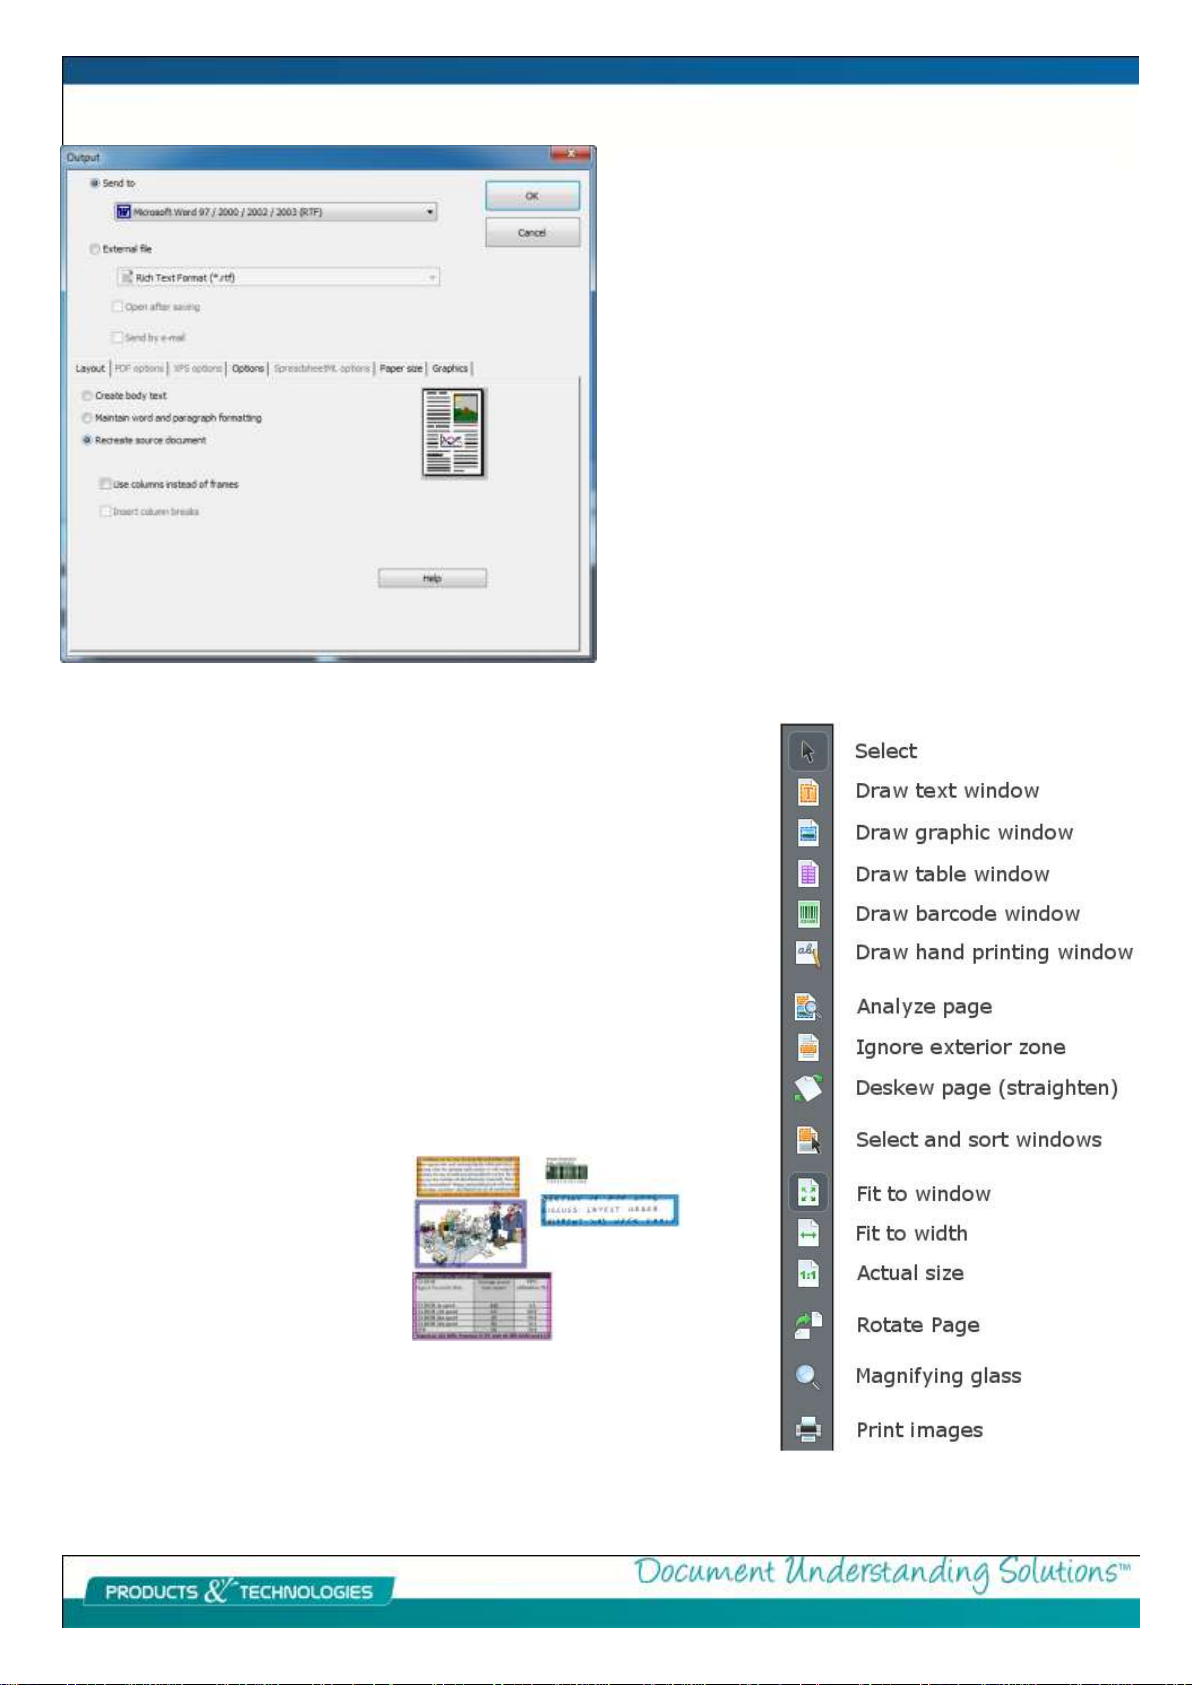
The flexibility to select other formats can be found by clicking
on the Format button at the bottom of the left toolbar. This
will display the window on the next page where you can
select between send to or External file.
Recognize + Save.
Process the images to the selected
output format.
3/10
Send to - When you process the document by
clicking on Recognize + Save it will prompt you to
save the file and then open it in the selected
Program.
External File - Allows you save the file without
opening, sending by email or opening the file as
with Sent to. Email works only with Outlook or
Outlook Express
The Layout tab has selections for the degree of
formatting accuracy that you will to apply. Pictured
is the maximum.
Note when on ly the Recreate sou r ce is
selected that e ach paragr aph is
contained wi thin a text box.
Zoning
When you scan or open your first image will notice the numbered and color
coded boxes that appear on screen when you scan a document. These are
called zones and correspond to the 2nd through 6th buttons on the right
toolbar. The numbers are the order in which they are processed.
It is crucial to know that Readiris is an Image and PDF processing software.
There is no editing of the document from within Readiris. Any needed editing
will be done in the output document. Instead it examines the picture that
comes from the scanner and decides what it can do with each section of the
document. The way it lets you know how it will process these sections is with
these color codes.
These zones are necessary because they direct how the processing occurs. If
there are no zones then there will be no output. This can be a way of excluding
unneeded information by simply deleting the zone over that area.
Text = Orange
Picture = Blue
Table = Purple
Bar Code = Green
Hand printing = Light blue
These can be altered in several ways if they don’t suit your purpose. They can
be deleted by selecting with the top arrow button then tapping the delete key
on your keyboard. The appropriate zone then can be redrawn using one of
those tools. Alternatively you can right click on the zone and choose Window >
Type and select the desired treatment.

4/10
Image Quality
Another aspect to consider is Readiris can only convert images that are correctly oriented. It will not work if they are
sideways or upside down. If you find this is happening use the rotate tool to turn the image or click the Options
button and select Detect page orientation prior to the scan and the program will do it for you.
Readiris works by comparing images of letters to known letter shapes and making the conversion. It depends on crisp
clean letter shapes to do this. If the image is to light or dark then the results suffer.
Below are actual results from the program and the images it was working with. Images are on the left
and the resultant text on the right
"Autoformatting" recreates a facsimile
copy of the original document: the text
blocks, graphics and tables are
recreated in the same place and the
word and paragraph formatting are
maintained across the recognition.
"Autoformatting" recreates a
f(ICsimile
cop."
of the original document: the te:\t
blocks. graphics and tables arc
recreated in the same place and the
word and paragraph formatting are
maintained across the recognition.
II
Autoformtlftina"
recreates
a
ltalmo.
copy
of the
arigiDal
docummt:
the tat
b1ocb, pIphics and tables
Il'e
recnatecl in
the IIIIIle
pl8ce
8Dd the
word
8Dd
paraanph
farmtlfti"l
Il'e
maintJtinM
ICI'OIIthe recopition.
Image
Text
Image
Image
Text
Text
The way to cope with the situation is to scan or rescan the document in grayscale. This will allow you to adjust
the image within Readiris to either lighten or darken as needed. See the next page for an explanation of this
process.
This is the ideal image to work with as seen from the perfect results.
This image is too light. The letter shapes begin to have gaps and incomplete
shapes. Since this is not too extreme there is about 75% accuracy. There would
be a lot of needless clean up to deal with in the output document.
This is too dark. Here the letter shapes begin to fill in and become fuzzy.
Letters like a, e, and o’s are almost completely obscured.
Accuracy is reduced to about 20% which is not usable.

5/10
Adjust Image
After scanning the document in Grayscale, go to View menu
and uncheck display documents in color. Go to view again
and click on Actual Size. This will magnify the image so you
can see the letter shapes to gauge how light or dark they are.
Next go to Process on the file menu and choose Adjust
Image. This brings up the window below. Move the
brightness slider and click apply. Repeat until satisfied with
the appearance and then click OK.
Click Recognize + Save and the results should be improved
for the problem image.
For documents that have stray marks scattered
across the page you can use the Despeckle (remove
specks) tool to remove them from the image. The
procedure is the same as above.

6/10
Se nd To—Formats
Exter nal File—F orm ats
Exter nal File—F orm ats
Output Formats
Readiris Pro 12 is about providing choices to help you accomplish your goals. Many times though it
may confusing to know what format to use in what situation.
Below are listed every file format available in the program. On the next page we will discuss these in
more detail. However these are most used formats.
Microsoft Word 2007/2010 (DOCX) – This is used when you want to edit, change or capture the text
from the scanned image.
Microsoft Word 97/2000/2003(RTF) - This is used when you want to edit, change or capture the text
from the scanned image. Cross platform and fully featured for a large number of programs
Adobe Acrobat / Reader - Image-Text - This is used when you just want a copy of the scanned image
and have no interest in changing the document. This creates a dual layer file with the picture of the
scan on top of and hiding the converted text. Using the iHQC you can achieve very small file sizes
while making the document searchable.
Microsoft Excel (HTML) - This is used to work with spreadsheets to convert and manipulate the
numbers and text.

7/10
There are two separate ways to output from Readiris. Either in the Send to, which uses a script to send the results to
the output application or in the External File which saves the file and opens it in the associated application.
PDF
Portable Document Format is a file format created by Adobe Systems Inc to enhance document exchange. Documents
in PDF are independent from device and display resolution and can be read on any operating system (Windows,
Macintosh, Linux). These files are a combination of vector graphics, text, and raster graphics. They support links
(internal and external), forms, JavaScript and 3D objects. PDF documents may have different levels of security (view,
print, select…) and even DRM.
Since the 90’s, Adobe’s PDF has become the standard file format for document exchange.
Readiris supports four different configurations. This format is used for documents for storage or transmittal where
editing the text is not needed.
Image only - No text layer.
Image over Text - Used for most purposes. Image of document covers converted text.
Text over Image - Rarely used but maintains unified background for easy capture by desktop publishing programs.
Text only - No image layer so OCR mistakes will be evident.
RTF
Rich Text Format is a free document file format developed by Microsoft in 1987 for cross-platform document
interchange. Most word processors are able to read and write RTF documents. Most word processing software
supports RTF format import and export, often making it a "common" format between otherwise incompatible word
processing software. RTF is capable of the same formatting precision as Microsoft .doc format without the threat of
macro viruses.
RTF is used for documents sent to Microsoft Word and is appropriate when the goal of the conversion is to edit the
final document or repurpose the text. Readiris provide options to choose what level of formatting accuracy is desired.
Create body text.
Use this option if you don't want Readiris to format your document. You get continuous, running text with no
differences in fonts or font sizes. All formatting, if any, is done afterwards by the user.
Retain word and paragraph formatting.
This option keeps the general format structure of the scanned document. However, no graphics are captured, the text
blocks and columns aren't recreated - the paragraphs just follow each other. The tables are recaptured correctly.
Recreate source document.
This option will make a true copy of the document you just scanned. The text blocks, tables and graphics are recreated
in the same place, and the word and paragraph formatting are maintained across the document. These sub options
are available depending on what degree of final editing is required.
- Use columns instead of frames
Uses columns instead of text boxes (frames) to position the information on the page
- Insert column breaks
Confines text to the column where located instead of flowing to the next column

8/10
Word (DOCX) for Word 2007 & 2010
Word Markup Language was introduced in Word 2003 and is the standard format in Word 2007 and is
based on XML (extensible markup language) replacing the binary format used in previous versions of
Word.
The same options that work for RTF apply here as well.
DOC
A binary format containing text formatting information (as well as scripts and undo information) used by
Microsoft Word versions prior to Word 2007.
Available only using the external file option.
ODT
Open Document Textfile are created by programs using the OASIS Open Document XML-based
standard. Open Document text files can be opened and edited with any Open Office-compatible
program, including NeoOffice (Mac), AbiWord (Mac & Windows), and KWord (Unix).
HTM
Hypertext markup language is the predominant markup language for web pages. It provides a means to
describe the structure and formatting of text-based information in a document.
This format can be used my Microsoft Excel or a Web browser such as Internet Explorer. Additionally it
can be used to send the result to a web page editor like Adobe Dreamweaver.
When used for Excel there are two relevant formatting options.
Create body text
Straight text using the same font and font sizes. There will be no text wrapping or merging of cells.
Retain Word and Paragraph Formatting
Maintains fonts and font sizes. Text wrapping and merging of cells will be used to position elements on
the page.
Excel Spreadsheet ML
SpreadsheetML is an XML dialect developed by Microsoft to represent information in an Excel workbook.
It was introduced in Excel 2003 and is the default format in Excel 2007.
The same formatting options for html also apply here. In this format there are these additional options.
Ignore all text outside of tables
Will include only the spreadsheet itself, no information outside the grid will be included.
Convert Figures into numbers
Numbers as text will be converted to numbers.
Create one worksheet per page
One worksheet is created per scanned page. If a page contains tables and text, all will be placed on the
same worksheet.
Create one worksheet per table
One worksheet is created per table in scanned page(s). Useful for tables of different sizes or headings

9/10
CSV
Comma Separated Value is a text format for storing tabular data which uses a comma to separate values. It is usually
associated with Excel on Windows machines. Since it can only display a single table it is sometimes referred to as a
flat file.
TXT
ANSI or ISO-8859
A single byte format for display and editing of plain text using Latin characters. Traditional format used for Window
now being replaced by Unicode.
Unicode or UTF-8
A double byte format capable of displaying Asian, Arabic or Cyrillic characters along with the traditional Latin
character set.
XPS
A Microsoft format similar to a PDF file, but is based on XML instead of the PostScript language. XPS files can be
opened with Microsoft's XPS Viewer, included with Windows Vista; it is also included with the XPS Essentials Pack,
which can be downloaded from Microsoft and used with Windows XP.

© Copyright 2010 I.R.I.S. s.a./n.v.
All rights reserved for all countries. I.R.I.S., I.R.I.S.’ product names, I.R.I.S.’ logos and I.R.I.S.’ product logos are I.R.I.S. trademarks.
All other products and names mentioned are trademarks or registered trademarks from their respective owners.
About Forms...
Readiris is a very good tool for converting scanned or pre-scanned images, including Adobe Acrobat PDF files into real
text documents. However, it cannot perform miracles. There are some kinds of documents it will have trouble working
with. While Readiris Pro 12 is vastly improved over previous versions it will have trouble with forms.
A form typically has lines, boxes, check boxes and the like and is intended to be filled out on screen. Readiris is
intended to convert pictures of letters and numbers to actual text and numbers. Lines and boxes are usually graphical
elements or table borders that require more advanced features of the word processor.
Below is an IRS 1040 form that Readiris has no hope of replicating. In fact if you tried to create this from scratch in
Microsoft Word it would be a long complex task if it is possible at all. That is the rule of thumb for these kinds of
documents. If they cannot be created in the word processor without extraordinary effort then Readiris will have the
same difficulty.
The form on the right would be processed and outputted into the word processor in reasonable shape. There would
be additional work entailed to get it into its final format. From that point it could be saved as a template for reuse.
 Loading...