

Page 1
Readiris 12 Pro
Readiris 12 Pro
This guide will help you through the basics of how to use Readiris 12 Pro and utilize most of its features so
that you will be able to OCR documents quickly, easily, and successfully. For first time users the program
may appear complicated because of all the toolbar buttons in the program. They are there to cope with specific issues you may find with your document. At the beginning you can ignore many of them until you encounter a situation where they may be needed. As a result we will not cover every option available in the program since the user manual already does that.
The program can accept images from a scanner, digital camera or pre-scanned image or PDF file.
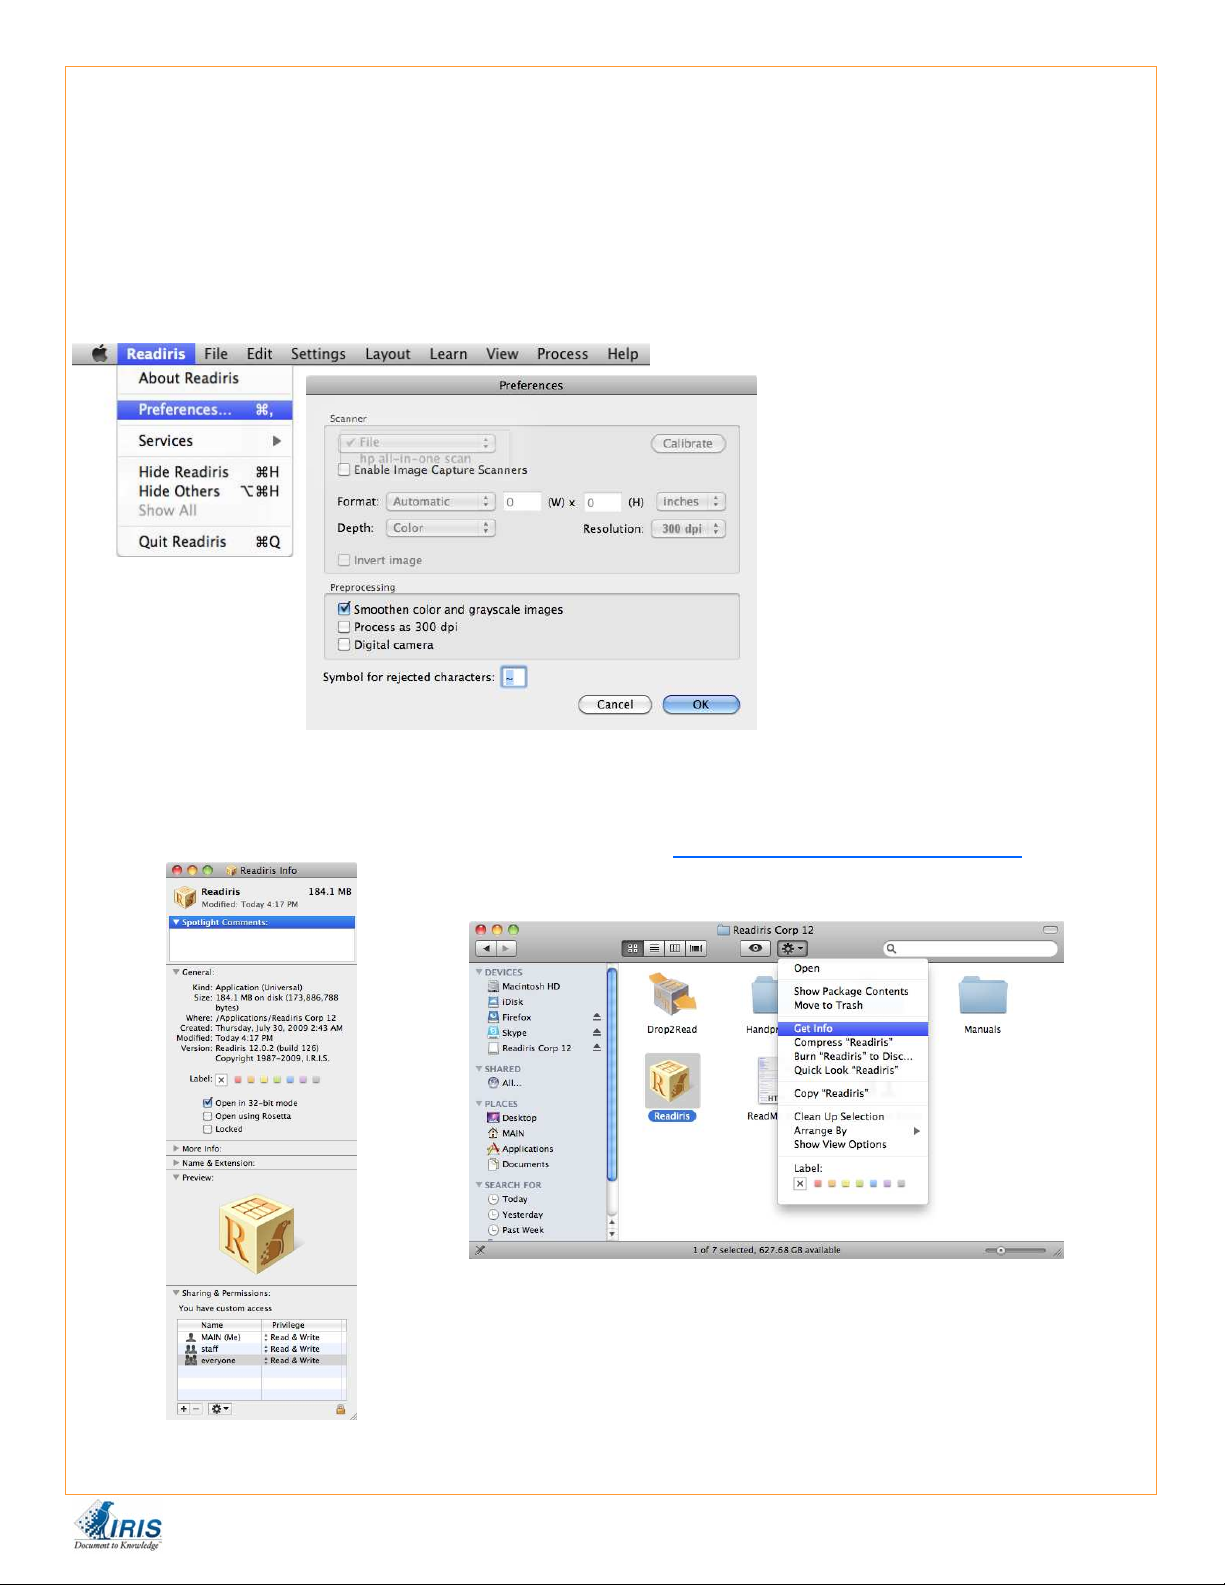
To setup your scanner go to the
Readiris menu and choose Preferences and select your scanner from
the list.
Make sure that you have the latest
update from your Scanner Manufacturer.
Readiris 12 Pro supports twain
based scanners. You can find the
drivers in the following location on
your hard drive:
Hard Drive/Library/Image Capture/
T
wain Data Sources
Getting Started
Getting Started
etting Started Getting Started
G
Getting Started
Getting Started
Getting Started Getting Started
Mac OS X v10.6 Snow Leopard includes drivers for many older printer and scanner
models built right into the operating system. These can be used by checking
the “enable image capture “ option.
More information can be found here;
Set the everyone permissions to
Read/Write
http://support.apple.com/kb/HT3669
In most cases you will need to run Readiris in 32 bit
mode since most scanner drivers are not 64 bit compatible. Go to the Readiris application and get info to
make that change.
Highlight the Readiris.app and click on the gear icon to
access the get info option.
Readiris 12 Pro Mac Getting Started Guide — I.R.I.S. Technical Support © 2009
Page 2
Zones and options
Zones and options
Readiris is a conversion tool to that transforms scans, images or PDF files into text based files. There is no
editing done within the program. That will be done in the output application. When a document is scanned or
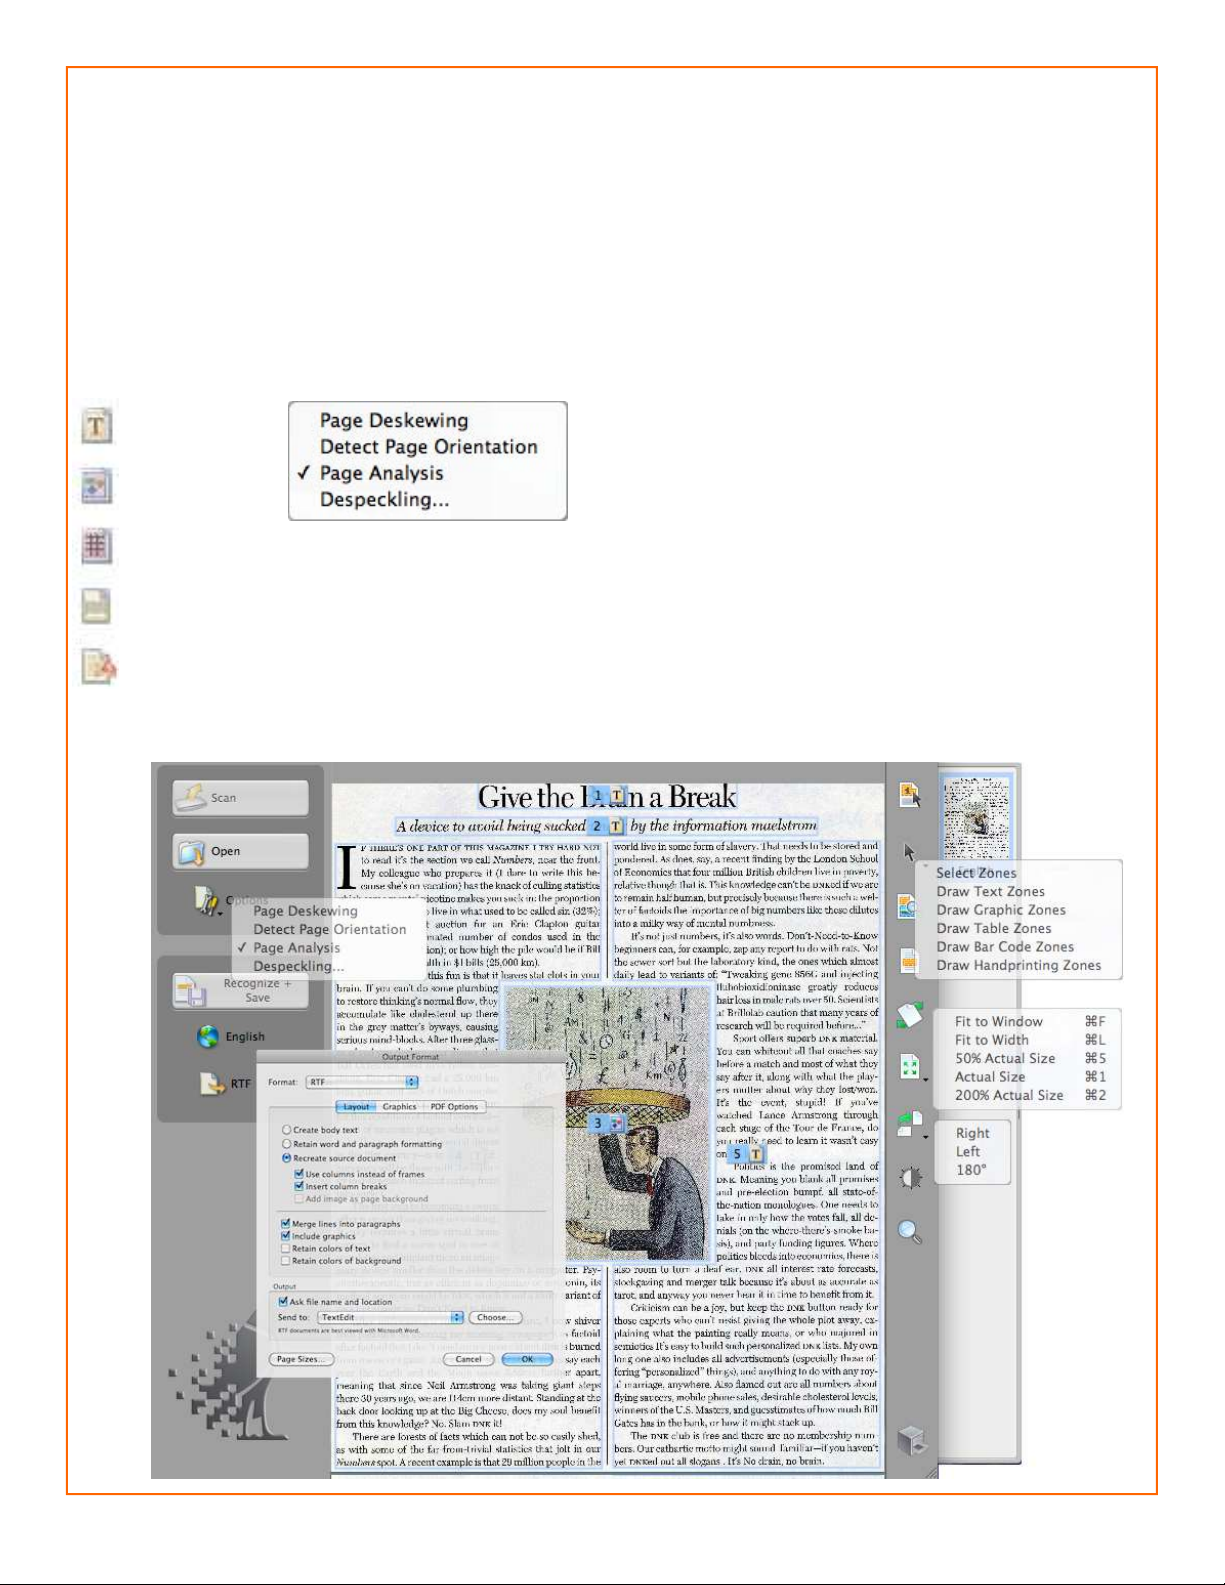
opened within Readiris it places labeled overlays called zones on the picture. These will be marked with these
icons which identify how those areas are going to be converted. To change these Control Click on them to
choose a different treatment or use the Select Zones tool to draw your own.
If those icons do not show up on your document then the Page Analysis was not turned on in the Options
button prior to the scan. You can do so after the fact by going to Process > Analyze Page.
Text
Graphic
Table
Barcode
Hand Printed
- Straightens crooked or skewed pages.
- Automatically rotates the page to face right side up.
- Analyzes image based on content
- Removes stray marks or speckles.
Below is a summary of the main program window with the numbered & labeled
zones shown on the input image. Realize that these zones can be changed if they
are not suitable for your purpose.
Beneath the language selection on the left is the output format selection. Clicking on
the Format dropdown reveals numerous other choices. To open the output directly in
the application of your choice click on choose and navigate to the program in Applications.
Page 3

Output Format
Output Format
Now it is time to set where the output is going by clicking on the bottom left button or Settings > Text Format. This brings up the Text Format dialogue. The choices are :
HTML - Used for Excel or Web pages
ODT - Open Document Format used with Open Office Word Processor
DOCX - Used with Word 2008
XLXS - Used with Excel 2008
PDF - Adobe Acrobat most often you will use the Image - Text option
RTF - Rich text format used for Word, Pages or Open Office, cross platform
Unicode - Straight text
Different options will appear with these selections. Pictured below left is the RTF which is
the most commonly used. The next decision to make is in Layout which deals with the formatting of the output
document. For the closest replication you would select
c
olumns instead of frames and Insert column breaks. There are occasions where such formatting is un-
needed so the Create body text or Retain word and paragraph formatting are other options.
The merge lines is checked by default but may be turned off if you are dealing with sentence fragments such
as found in poetry or song lyrics.
Page Sizes allows you to include or exclude output page dimensions.
We want Readiris to allow us to specify a file name and where to save it so the Ask file name and location
option should be checked. The Send to allows you to select which application you want the results sent to. If
it’s not in the list click on Choose to navigate to it in your Applications folder on your Mac and select the preferred application. Of course that application has to be able to work with the selected format.
Click OK and these options are now set. These can be saved as the default or a reusable profile by going to
the Settings menu and choosing Save as default or Save.
Recreate source document and the sub options; Use
Page 4

Image Quality
Image Quality
Another aspect to consider is Readiris can only convert images that are correctly oriented. It will not work if
they are sideways or upside down. If you find this happens use the rotate tool to turn the image or click the
Settings and select Detect page orientation prior to the scan and the program will do it for you.
Since Readiris works by comparing images of letters to known letter shapes and making the conversion. It
depends on crisp clean letter shapes to do this. If the image is to light or dark then the results suffer. Below
are actual results from the program and the images it was working with.
This is the ideal image to work with as
seen from the perfect results.
"Autoformatting" recreates a facsimile copy of the original document: the text blocks, graphics and tables are
recreated in the same place and the word and paragraph formatting are maintained across the recognition.
This image is too light. The letter shapes
begin to have gaps and incomplete
shapes. Since this is not to extreme
there is about 75% accuracy. There
would be a lot of needless clean up to
deal with in the output document.
"Autoformatting" recreates a
recreated in the same place and the word and paragraph formatting are maintained across the recognition.
II
Autoformtlftina"
recnatecl in
The way to cope with the situation is to scan or rescan the document in grayscale. This will allow you to adjust
the image within Readiris to either lighten or darken as needed. See the next page for an explanation of this
process.
the IIIIIle
recreates a ltalmo.
pl8ce
f(ICsimile cop."
8Dd the
word
of the original document: the te:\t blocks. graphics and tables arc
This is too dark. Here the letter shapes
begin to fill in and become fuzzy. Letters
like a, e, and o’s are almost completely
obscured.
Accuracy is reduced to about 20% which
is not usable.
copy
8Dd
of the
paraanph
arigiDal
farmtlfti"l
docummt:
the tat
Il'e
maintJtinM
b1ocb, pIphics and tables
ICI'OIIthe recopition.
Il'e
Page 5

Image Adjustment
Image Adjustment
After scanning you can adjust the brightness and contrast to compensate for quality problems on the original scan.
Go to the View menu and uncheck Image in Color. Return to View > Image Size and
select Actual Size. This will zoom in on the document so that you can see the character
shapes clearly.
Go to the Process Menu > Adjust Image to bring up the adjustment dialog pictured below.
The three controls let you brighten, adjust contrast and remove stray marks or specks. The idea is to adjust
the slider and click on Apply to see the affect that is has on the quality of the text. When satisfied click on
OK to save the changes. These changes apply only to the selected page.
If this needs to be done across a range of pages you may want to consider pre-processing them in an image editor.
Page 6

Processing
Processing
Once the document is scanned in or opened in the software the Recognize + Save button becomes available.
The software can handle multiple pages to output to a single file. As more documents
are added you will see thumbnails begin to line up on the fly out panel on the right.
The term recognize is both the action to process the document and a description of what is taking place. The
software looks at each character (letter, number or barcode) that appears in the image and compares it to a
known character shape and makes the conversion based on that.
The program will process the image and prompt you to select a file name and file save location. It will then
open the document in the program that was selected on the previous page. At this point the document has
been converted to text so that the desired edits can be made.
Limitations
Limitations
Readiris is a very good tool for converting scanned or pre-scanned images, including Adobe Acrobat PDF
files into real text documents. However it cannot perform miracles. There are some kinds of documents it will
have trouble working with. While Readiris Pro 12 is greatly improved over previous versions it will have trouble with forms.
A form typically has lines, boxes, check boxes and the like and is intended to be filled out on screen. Readiris
is intended to convert pictures of letters and numbers to actual text and numbers. Lines and boxes are usually
graphical elements or table borders that require more advanced features of the word processor.
Below is a IRS 1040 form that Readiris has no hope of replicating. In fact if you tried to create this from
scratch in Microsoft Word it would be a long complex task. That is the rule of thumb for these kinds of documents. If they cannot be created in the word processor without extraordinary effort then Readiris will have the
same difficulty.
The form on the right would be processed and outputted into the word processor in reasonable shape. There
would be additional work entailed to get it into its final form. From that point it could be saved as a template
for reuse.
If this is your primary purpose then a dedicated forms software may be more appropriate. On the Mac, the full
version of Adobe Acrobat is usually the best option.
 Loading...