

Page 1

Quick Start Guide
You write,
it types!
J120502-2
for Windows®
English
Français
Nederlands
Deutsch
Español
Italiano
Português
Русский
Page 2
Quick Start Guide
This Quick Start Guide provides general guidelines for installing and using IRISNotes
Express 2. For detailed instructions on IRISNotesTM' full range of functionalities, please
refer to the user guide and help file provided with the installation CD-ROM.
IRISNotesTMis a pen and mobile note taker that can capture handwritten notes and drawings, as
well as edit, save and export them. Your handwritten notes can be instantly converted into
editable text in a wide range of languages.
TM
Package contents
- IRISNotesTMinstallation CD-ROM
This CD-ROM contains the Easy Note Taker Application and MyScript
Notes Lite (PC only)
- Quick Start Guide
- Digital pen, receiver unit, retractable USB cable, two sets of batteries, three ink refills
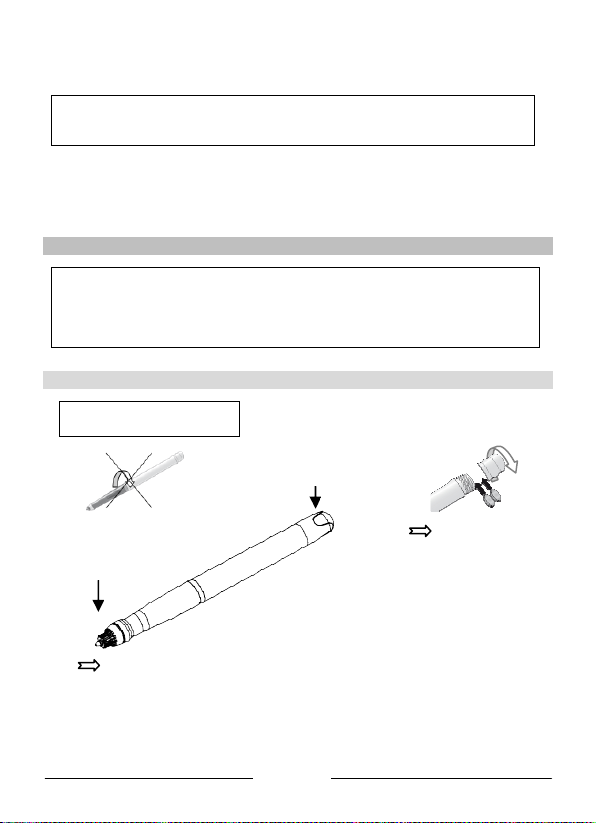
The digital pen
! Do not dismantle the pen.
This may damage it.
Batteries
Unscrew the battery
compartment cover and
Pen tip
Slide an ink refill into the pen tip (standard M21 refill of 67.0mm long X 2.35mm)
and press it gently until it is correctly lodged.
insert 2 batteries
(GPSR41 or GP392)
with positive polarity
facing up
English
Page 3
To replace the ink refill (the pen cap serves as an ink refill
extractor):
- Firmly press the top of the cap against the tip of the pen and pull
the used ink refill out.
- Slide the new ink refill in.
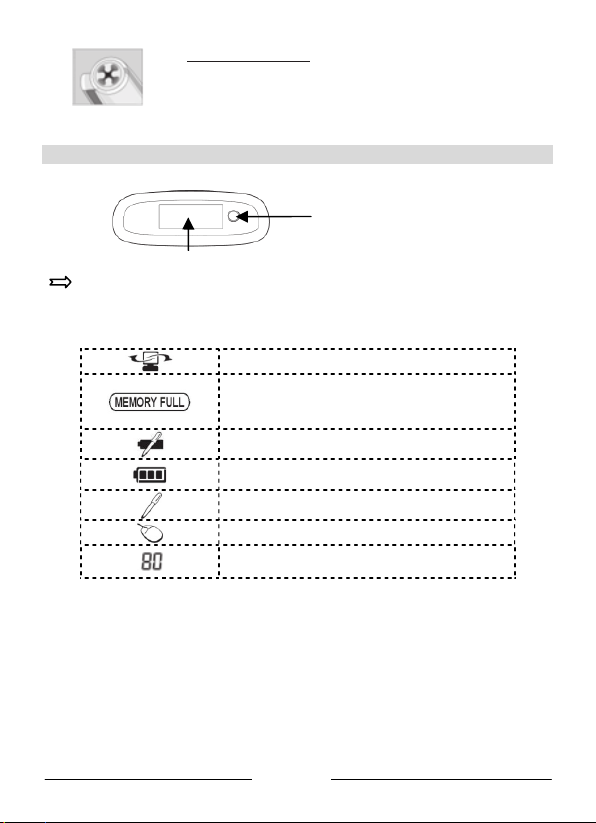
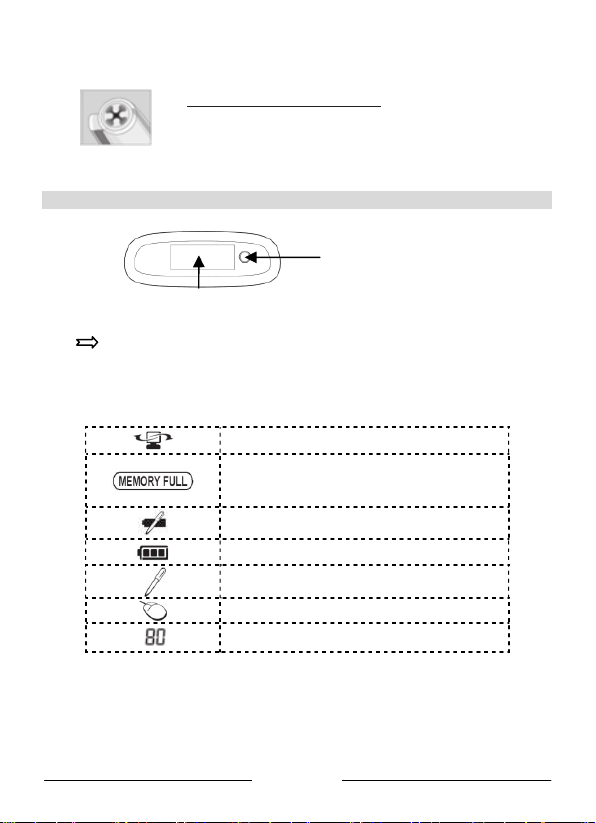
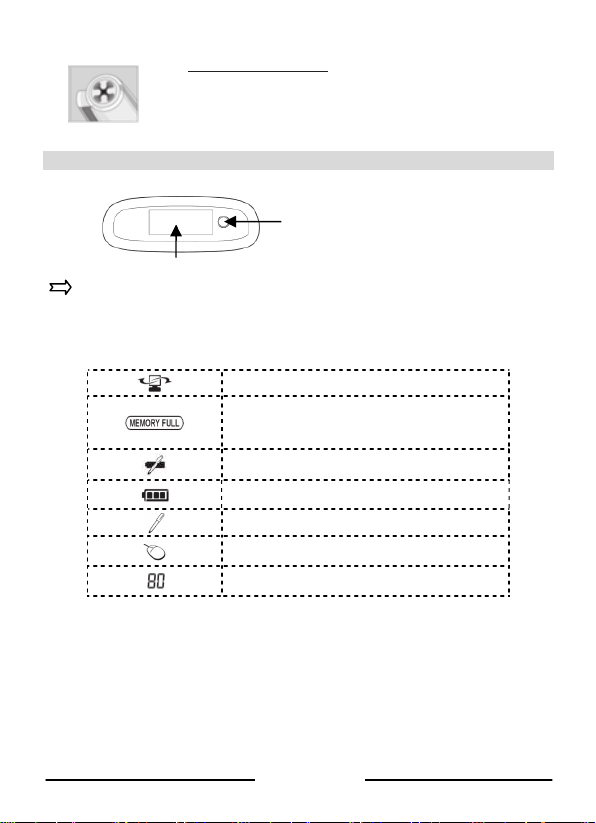
The receiver unit
ON/OFF button
Press for 5 seconds to turn
on
LCD screen
Charge the receiver unit at least 30 minutes before using the product (full charge time is
3.5 hours): plug the USB cable to the unit and connect it to your USB port.
The LCD screen displays the following status indications:
Receiver unit connected to PC
(upload your files to your PC and delete them from
Memory FULL
memory)
Pen low battery
Receiver unit low battery
Note mode
Mouse mode
Number of saved notes in memory
English
Page 4
How to use the digital pen?
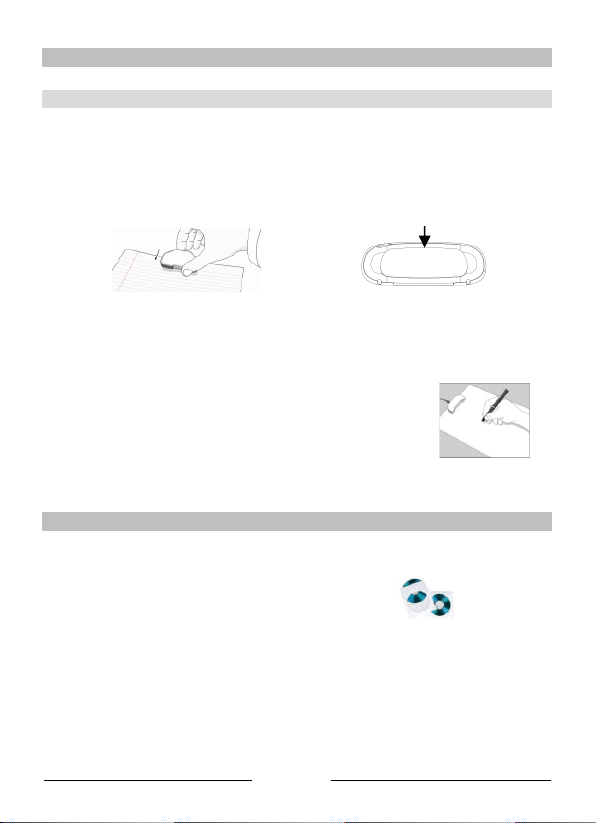
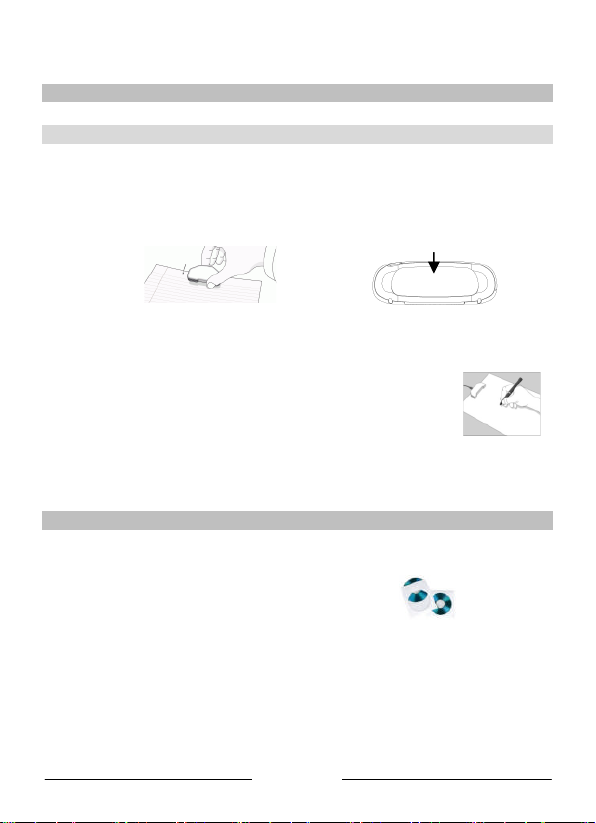
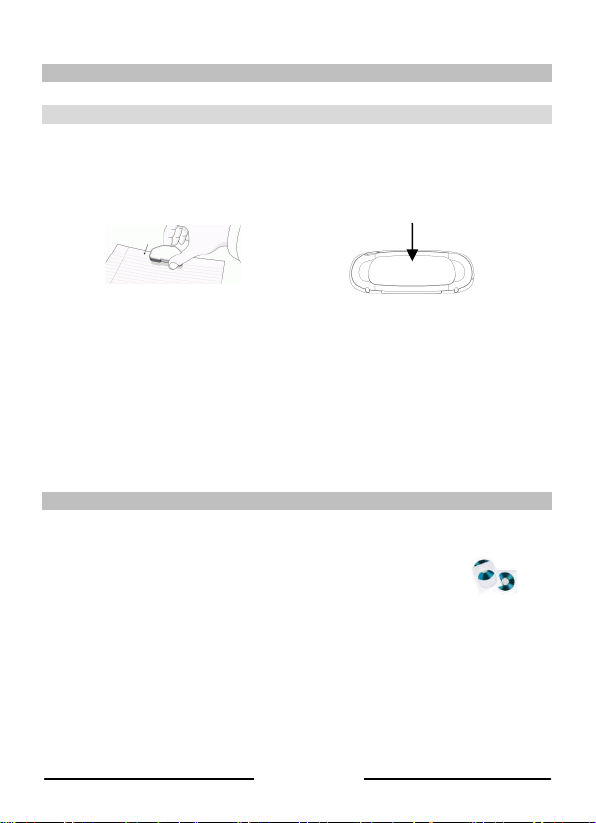
Writing notes
Position the receiver unit at the top center of your A4 paper sheets. Press the power button for
about 5 seconds to power it on.
Fix the receiver onto the edge of the
paper, face up
Hold the pen firmly and write normally. Try to avoid line skew.
When you are done writing a note, press the power button once. This saves to the note to the
receiver memory. The device is now ready to start a new note. You can store up to 100 notes of
A4 size.
! Hold the pen properly:
! Do not place your hand between the pen and the receiver unit
! Keep your fingers away from the pen tip crystal cone
In order to transfer your notes to your Windows PC or Mac OS computer you must first install
the corresponding software.
Use the paper clip
at the back of the receiver unit
Installing th e software on a Windows PC
1. To install the Easy Note Taker application, insert the IRISNotesTMCD-ROM in your
CD-ROM drive and follow the on-screen instructions.
When the installation is complete, click on Finish.
The Easy Note Taker icon appears on your desktop.
2. To install the MyScript Notes Lite application, explore the IRISNotes
Windows Explorer.
Open the Notes 2.2 Lite folder, then double-click on setup.exe to start the installation.
When the installation is complete, click on Finish, then remove the CD-ROM from the
CD-ROM drive.
TM
CD-ROM with
English
Page 5
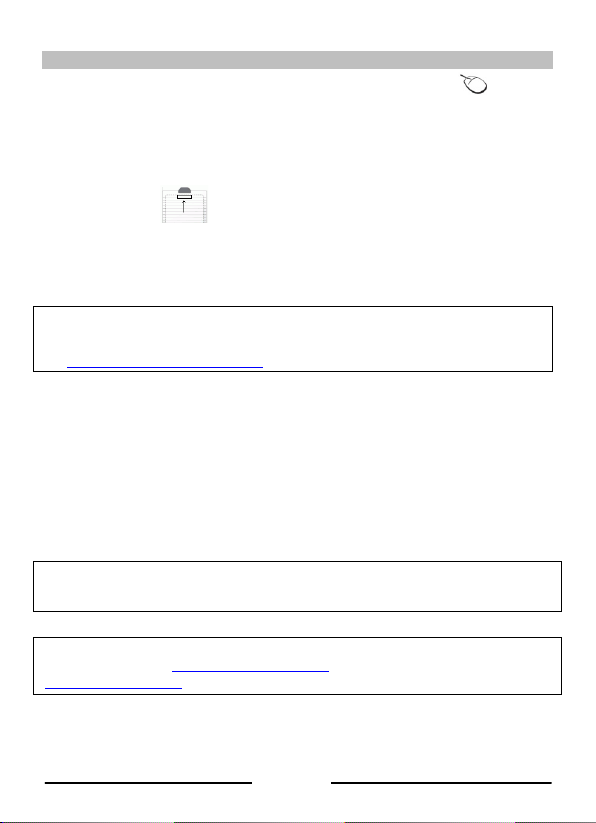
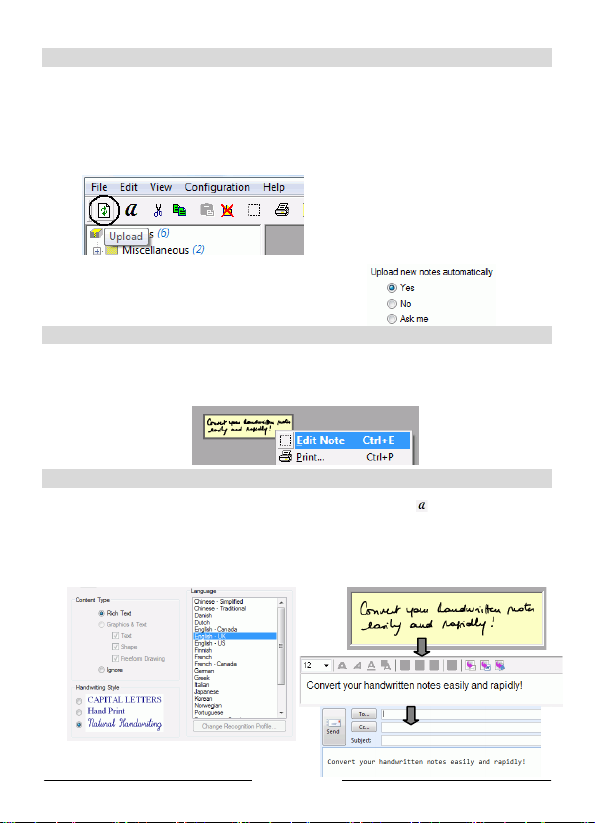
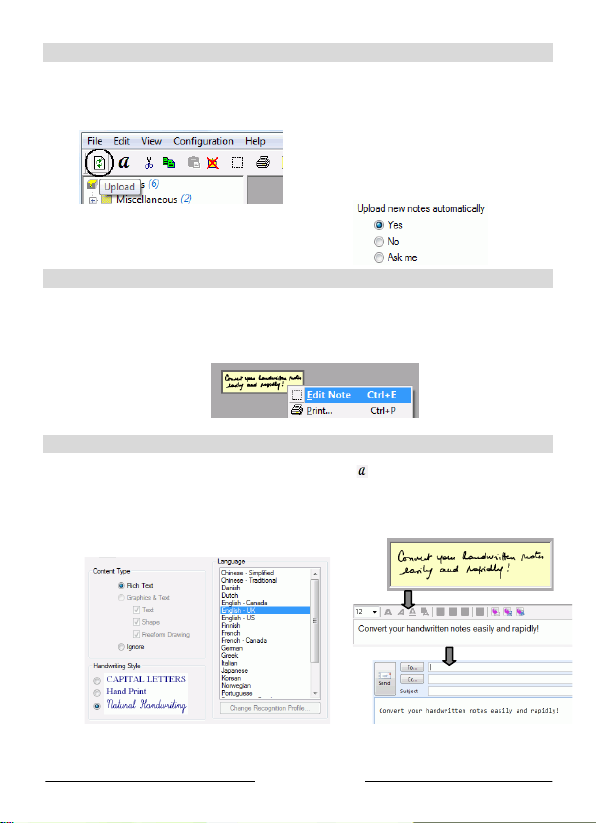
Uploading notes
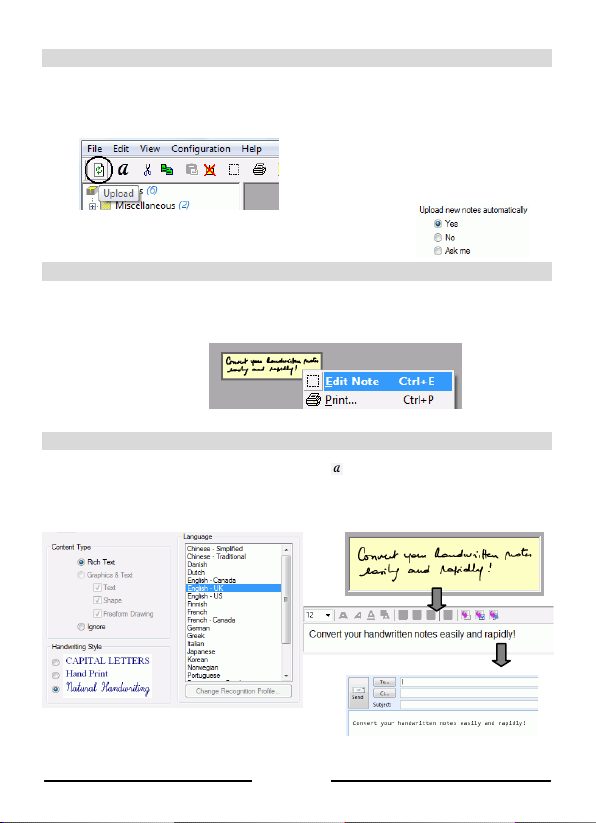
- Connect the receiver unit to your PC (using the USB cable) and launch Easy Note Taker.
- In the Note Manager, click on Upload on the main toolbar. All the notes get uploaded
from the receiver to your PC and can be viewed on screen.
You can select other preferences
for the upload. Select Preferences
from the Configuration menu and
get to the Mobile tab:
Managing notes
- The uploaded notes are available in the Mobile Notes folder. They can further
be edited using the Note Editor, sorted, saved,
exported and e-mailed as JPEG files.
Converting notes
- In the Note Manager, click on Convert to text on the main toolbar.
- Choose the conversion settings in MyScript Notes Lite. The conversion is performed
instantly.
- The resulting text can further be sent to other applications or sent by e-mail.
English
Page 6
Installing th e software on a Mac OS computer
1. Insert the IRISNotesTMCD-ROM in your CD-ROM drive, then double-click the
CD-ROM icon on the Desktop.
2. Double-click NoteTaker.pkg, and then follow the on-screen instructions.
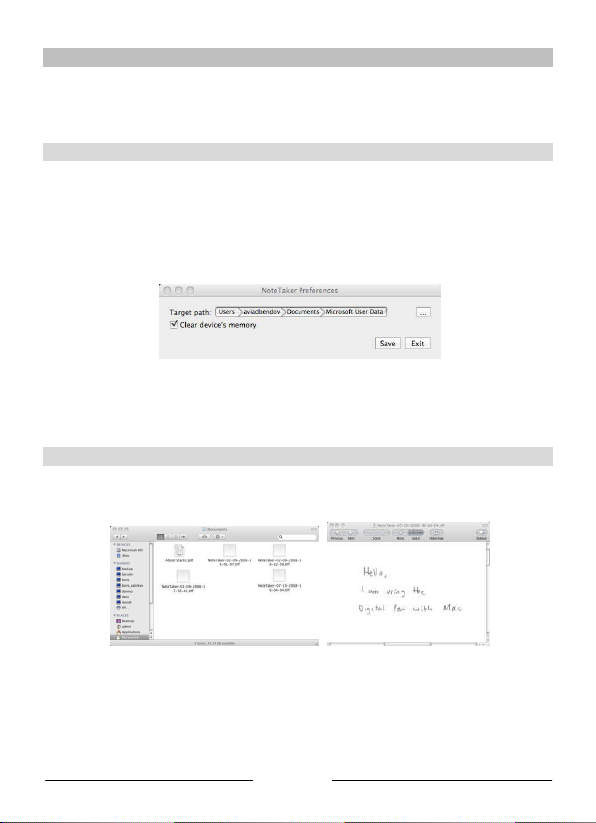
Set the upl oad preferences
When you use your digital pen to write text, everything you write is saved as a series of TIFF
(Tagged Image File Format) images in the Mobile NoteTaker memory. From there, they must be
uploaded to your Mac’s hard drive.
But before you do, first determine the upload settings in the NoteTaker Preference Tool:
- Click on the NoteTaker Preferences icon. The NoteTaker Preferences window opens:
- Click the browse icon (...) to determine where on your Mac you want to save the notes.
- Select the option Clear device’s memory if you want to erase the notes from memory
each time you transfer them.
- Then click Save to save the settings.
Uploading notes
Power on the receiver unit and connect it to your Mac. The notes are uploaded automatically.
They are saved in TIFF format. Double click on the desired TIFF file, in order to view the note.
Note that you cannot convert notes into editable text.
English
Page 7
Using the pen in mouse mode (PC and Mac)
You can also use the IRISNotesTMpen as mouse. To switch to mouse mode:
PC
- Connect the receiver to your PC.
- Hold the pen right in front of the
receiver, then press the power
button once.
- Tap the pen on a piece of paper. The cursor is now being controlled by the pen.
- Hover the pen above a page to move the cursor.
- To click an object, point with the cursor to the object, then tap with the pen to click it.
- To right-click an object, point to it, then tap and hold the pen for an instant.
Note: in Windows Vista
directly in Microsoft Office 2007 applications and higher. This also works on Mac OS 10.5 in
iWork®’08 applications and higher.
See www.irislink.com/support/userguides for more information.
For detailed instructions on IRISNotesTM, refer to:
- Easy Note Taker manual: available from Windows’ Start menu.
- MyScript Notes Lite help file: available from the software Help menu.
®
and Windows 7, you can also use the IRISNotesTMpen to write
Mac
- Connect the receiver to your Mac.
- IRISNotes
TM
switches
automatically to mouse mode.
Should you experience issues when using your IRISNotesTM, consult the Frequently Asked
question on our website www.irislink.com/support/faq or contact Technical Support at
www.irislink.com/support.
English
Page 8

Guide de démarrage rapide
Ce guide de démarrage rapide contient des instructions générales pour l'installation et
l'utilisation d'IRISNotesTMExpress 2. Pour une explication détaillée de toutes les
fonctionnalités d'IRISNotesTM, veuillez consulter le guide de l'utilisateur ou le fichier
d'aide fourni avec le CD-ROM d'installation.
IRISNotesTMest un stylo et un outil de prise de note mobile permettant de capturer des dessins et
des notes manuscrites mais aussi de les modifier, les enregistrer et les exporter. Vos notes
manuscrites peuvent être instantanément converties en texte modifiable dans un large éventail de
langues.
Contenu du coffret
- CD-ROM d'installation d'IRISNotes
Ce CD-ROM contient les application Easy Note Taker et MyScript
Notes Lite (PC uniquement)
- Guide de démarrage rapide
- Stylo numérique, récepteur, câble USB rétractable, deux jeux de piles, trois cartouches
d'encre
Stylo numérique
! Ne démontez pas le stylo. Cela
risquerait de l'endommager.
TM
Piles
Pointe
du stylo
Insérez une cartouche d'encre dans la pointe du stylo (cartouche M21 standard de
67 mm X 2,35 mm) et appuyez doucement jusqu'à ce qu'elle soit correctement placée.
Français
Dévissez le couvercle du
logement des piles et insérez
deux piles (GPSR41 ou
GP392) avec la borne positive
vers le haut
Page 9
Pour remplacer la cartouche d’encre (le capuchon du stylo sert à
Ecran LCD
extraire la cartouche) :
- Pressez fermement le dessus du capuchon contre la pointe du stylo
et retirez la cartouche d'encre usagée.
- Insérez la nouvelle cartouche.
Récepteu r
Bouton ON/OFF
Appuyez pendant 5 secondes pour
activer le dispositif
Chargez le récepteur pendant au moins 30 minutes avant d'utiliser le produit (le
temps de charge total dure 3,5 heures) : raccordez le câble USB au récepteur et au
port USB de l'ordinateur.
L'écran LCD affiche les messages de statut suivants :
Récepteur connecté à l'ordinateur
Memory FULL (Mémoire SATUREE) (téléchargez
vos fichiers sur l'ordinateur et effacez-les de la
Nombre de notes enregistrées en mémoire
mémoire)
Pile faible (stylo)
Pile faible (récepteur)
Mode Note
Mode Souris
Français
Page 10
Utilisation du stylo numérique
Fixez le récepteur sur le bord du
Rédaction de notes
Placez le récepteur au centre de la partie supérieure de vos feuilles A4. Appuyez sur le bouton de
marche/arrêt pendant 5 secondes pour l'activer.
papier, face vers le haut
Tenez fermement le stylo et écrivez normalement. Evitez le désalignement.
Lorsque vous avez terminé de rédiger la note, appuyez à nouveau sur le bouton de marche/arrêt.
La note est ainsi enregistrée dans la mémoire du récepteur. Le dispositif est prêt pour la rédaction
d'une nouvelle note. Vous pouvez enregistrer jusqu'à 100 notes au format A4.
! Tenez le stylo correctement :
! Ne placez pas votre main entre le stylo et le récepteur.
! Evitez tout contact de vos doigts avec le cône en cristal de la pointe
du stylo.
Pour transférer les notes vers un ordinateur Windows ou Mac OS, vous devez d'abord installer le
logiciel correspondant.
Utilisez les attaches situées à
l’arrière du récepteur
Installation du logiciel sur un ordinateur Windows
1. Pour installer l'application Easy Note Taker, insérez le CD-ROM d'IRISNotesTMdans le
lecteur de CD-ROM et suivez les instructions qui s'affichent à l'écran.
Au terme de l'installation, cliquez sur Terminer.
L’icône Easy Note Taker apparaît sur le Bureau.
2. Pour installer l'application MyScript Notes Lite , accédez au contenu du CD-ROM
d'IRISNotes
Ouvrez le dossier Notes 2.2 Lite, puis double-cliquez sur setup.exe pour lancer
l'installation.
Au terme de l'installation, cliquez sur Terminer, puis retirez le CD-ROM du lecteur.
TM
dans l'Explorateur Windows.
Français
Page 11
Chargement des notes
- Raccordez le récepteur à votre ordinateur (à l'aide du câble USB) et lancez Easy Note
Taker.
- Dans Gestionnaire de Notes, cliquez sur Téléchargement (Upload) (Télécharger) dans
la barre d'outils principale. Toutes les notes sont téléchargées du récepteur vers
l'ordinateur et peuvent être consultées à l'écran.
Vous pouvez sélectionner d'autres
préférences de téléchargement.
Sélectionnez Préférences dans le
menu Configuration et cliquez sur
l'onglet Portable :
Gestion des notes
- Les notes téléchargées sont disponibles dans le dossier Notes Portables. Vous pouvez les
modifier à l'aide de l’Editeur de notes, les trier, les enregistrer, les exporter et les
envoyer par e-mail en tant que fichiers JPEG.
Conversion des notes
- Dans le Gestionnaire de Notes, cliquez sur Convertir en texte dans la barre d'outils
principale.
- Sélectionnez les paramètres de conversion dans MyScript Notes Lite. La conversion est
instantanée.
- Le texte qui en résulte peut être envoyé vers d'autres applications ou par e-mail.
Français
Page 12

Installation du logiciel sur un ordinateur Mac OS
1. Insérez le CD-ROM d'IRISNotesTMdans le lecteur de CD-ROM, puis double-cliquez sur
l'icône du CD-ROM sur le Bureau.
2. Double-cliquez sur NoteTaker.pkg, puis suivez les instructions qui s'affichent à l'écran.
Configuration des préférences de téléchargement
Lorsque vous utilisez votre stylo numérique pour écrire du texte, tout ce que vous écrivez est
enregistré sous la forme d'images TIFF (Tagged Image File Format) dans la mémoire du Mobile
NoteTaker. Il faut ensuite les télécharger sur le disque dur de votre Mac.
Au préalable, vous devez définir les paramètres de téléchargement dans l'outil NoteTaker
Preferences :
- Cliquez sur l'icône NoteTaker Preferences. La fenêtre NoteTaker Preferences s'ouvre :
- Cliquez sur l'icône Parcourir (...) pour définir l'emplacement dans lequel enregistrer les
notes sur votre Mac.
- Sélectionnez l'option Clear device’s memory (Effacer la mémoire du périphérique) si
vous souhaitez effacer les notes chaque fois que vous les avez transférées.
- Ensuite cliquez sur Save (Enregistrer) pour enregistrer les paramètres.
Téléchargement des notes
Mettez le récepteur sous tension et connectez-le à votre Mac. Les notes sont automatiquement
téléchargées. Elles sont enregistrées au format TIFF. Double-cliquez sur le fichier TIFF de votre
choix afin de visualiser la note.
Notez que vous ne pouvez pas convertir les notes en texte modifiable.
Français
Page 13
Utilisation d'IRISNotes™ comme souris (PC et Mac)
Vous pouvez également utiliser le stylo IRISNotes™ comme souris. Pour activer le mode
Souris :
PC
- Connectez le récepteur à
l'ordinateur.
- Tenez le stylo devant le récepteur
et appuyez une seule fois sur le
bouton de marche/arrêt
- Tapez la pointe du stylo sur une feuille de papier. Le stylo contrôle désormais le
curseur.
- Faites passer le stylo au-dessus d'une page pour déplacer le curseur.
- Pour cliquer sur un objet, pointez sur l'objet avec le curseur puis tapez avec le stylo pour
le sélectionner.
- Pour effectuer un clic droit sur un objet, pointez sur celui-ci, tapez et maintenez le stylo
pendant un instant.
Remarque : dans Windows Vista
IRISNotes™ pour écrire directement dans les applications Microsoft Offi ce 2007 et ultérieures.
Il est également possible de l'utiliser avec le système d'exploitation Mac OS 10.5
dans les applications iWork® ’08 et ultérieures.
Pour plus d'informations, consultez la page www.irislink.com/support/userguides.
Pour obtenir des instructions détaillées sur IRISNotesTM, consultez la documentation suivante :
- Manuel Easy Note Taker : accessible à partir du menu Démarrer de Windows.
- Fichier d'aide MyScript Notes Lite : disponible dans le menu Help (Aide) du logiciel.
En cas de problèmes liés à l'utilisation d'IRISNotes™, consultez la page des questions
fréquentes (FAQ) sur le site www.irislink.com/support/faq ou contactez le support technique
via la page www.irislink.com/support.
® et Windows 7, vous pouvez également utiliser le stylo
Mac
- Connectez le récepteur à
l’ordinateur.
- IRISNotes
TM
bascule
automatiquement en mode souris
Français
Page 14

Snelstartgids
Deze Snelstartgids biedt algemene richtlijnen voor de installatie en het gebruik van
IRISNotesTMExpress 2. Gedetailleerde instructies over het complete functiebereik van
IRISNotesTMvindt u in de gebruikershandleiding en het Help-bestand die op de installatiecd-rom zijn geleverd.
IRISNotesTMis een mobiel notitieblok met pen waarmee u niet alleen handgeschreven notities
en tekeningen kan vastleggen, maar ze ook kunt bewerken, opslaan en exporteren. Uw
handgeschreven notities kunnen onmiddellijk worden geconverteerd naar bewerkbare tekst in
een groot aantal talen.
Inhoud verpakking
- IRISNotesTMinstallatiecd-rom
Deze cd-rom bevat de toepassing Easy Note Taker en MyScript Notes Lite
(alleen voor PC)
- Snelstartgids
- Digitale pen, ontvangereenheid, intrekbare USB-kabel, twee sets batterijen, drie
inktpatronen.
De digitale pen
! Neem de pen niet uit elkaar.
Hierdoor kan de pen schade
oplopen.
Pentip
Schuif een inktpatroon in de top van de pen (standaard M21 patroon of 67 mm lang x
2,35 mm) en druk er voorzichtig op tot het patroon correct op zijn plaats zit.
Batterijen
Schoef het deksel van het
batterijvak los en
plaats 2 batterijen
(GPSR41 of GP392)
waarbij de positieve pool
omhoog is gericht.
Nederlands
Page 15
Het inktpatroon vervangen (de pendop doet dienst als een soort tank
voor het verwijderen van het inktpatroon):
- Druk stevig op de bovenkant van de dop tegen de tip van de pen en
trek het lege inktpatroon uit.
- Schuif het nieuwe inktpatroon naar binnen.
De ontvangereenheid
Knop AAN/UIT
5 seconden indrukken voor
inschakelen
Laat de ontvangereenheid gedurende minstens 30 minuten opladen voordat u het product
Het LCD-scherm toont de volgende statusaanwijzingen:
LCD-scherm
gebruikt (de volledig oplaadduur bedraagt 3,5 uur). Sluit de USB-kabel aan op de
eenheid en sluit deze aan op de USB-poort van uw computer.
Ontvangereenheid aangesloten op pc
(upload uw bestanden naar uw pc en verwijder ze
Laag batterijvermogen ontvangereenheid
Geheugen VOL
uit het geheugen)
Laag batterijvermogen pen
Notitiemodus
Muismodus
Aantal opgeslagen notities in geheugen
Nederlands
Page 16
Hoe de digitale pen gebruiken?
Notities maken
Plaats de ontvangereenheid bovenaan in het midden van uw A4-vellen. Houd de aan/uit-knop
gedurende 5 seconden ingedrukt om deze in te schakelen.
Bevestig de ontvanger op de rand van
het papier met de voorzijde omhoog
Houd de pen stevig vast en schrijf normaal. Probeer schuine lijnen te vermijden.
Zodra u klaar bent met een notitie, drukt u 1 keer op de aan/uit-knop. Hiermee wordt de notitie in
het geheugen van de ontvanger opgeslagen. Het apparaat is nu klaar om een nieuwe notitie te
maken. U kunt tot 100 notities van A4-formaat opslaan.
Houd de pen juist vast:
! Plaats uw hand niet tussen de pen en de ontvangereenheid
! Houd uw vingers uit de buurt van de kristallen kegel van de pentip
Om uw notities over te dragen naar uw Windows PC of Mac OS computer moet u eerst de
bijhorende software installeren.
Gebruik de paperclip op de
achterkant van de ontvangereenheid
De software installeren op een Windows PC
1. Om de Easy Note Taker toepassing te installeren, plaats de IRISNotesTMcd-rom in uw
cd-romstation en volg de instructies op het scherm..
Klik op Voltooien nadat de installatie is voltooid.
Het pictogram Easy Note Taker verschijnt op uw bureaublad.
TM
2. Om de MyScript Notes Lite toepassing te installeren, verken de IRISNotes
met Windows Verkenner.
Open de map Notes 2.2 Lite, en dubbelklik op setup.exe om de installatie te starten.
Klik op Voltooien nadat de installatie is voltooid, en verwijder de cd-rom uit het cdromstation.
cd-rom
Nederlands
Page 17
Notities uploaden
- Sluit de ontvangereenheid aan op uw pc (met de USB-kabel) en start Easy Note Taker.
- Klik in Note Manager op Laden (U pload) in de hoofdwerkbalk. Alle notities worden
geüpload van de ontvanger naar uw pc en kunnen op het scherm worden weergegeven.
U kunt andere voorkeuren voor het
uploaden selecteren. Selecteer
Voorkeuren in het menu Configuratie en
open het tabblad Mobiel:
Notities beheren
- De geüploade notities zijn beschikbaar in de map Mobiele Nota’s. Ze kunnen verder
worden bewerkt met de Note Editor (Nota bewerken), gesorteerd, opgeslagen,
geëxporteerd en via e-mail worden verzonden als JPEG-bestanden.
Notities converteren
- Klik in het Note Manager op Omzetten naar tekst in de hoofdwerkbalk.
- Kies de conversie-instellingen in MyScript Notes Lite. De conversie wordt onmiddellijk
uitgevoerd.
- De resulterende tekst kan verder worden verzonden naar andere toepassingen of via email worden verzonden.
Nederlands
Page 18

De software op een MAC OS computer installeren
1. Plaats de cd-rom IRISNotesTMin uw cd-romstation en dubbelklik op het cdrompictogram op het Bureaublad.
2. Dubbelklik op NoteTaker.pkg, en volg de instructies op het scherm.
De voorkeuren voor uploaden instellen.
Wanneer u uw digitale pen gebruikt om tekst te schrijven, wordt alles wat u neerschrijft
opgeslagen als een reeks TIFF (Tagged Image File Format) bestanden in het geheugen van de
Mobile NoteTaker. Daar moeten ze dan naar de harde schijf van uw Mac worden geüpload.
Maar eerst moet u de uploadinstellingen in het NoteTaker Preference Tool instellen:
- Klik op het pictogram NoteTaker Preferences. Het NoteTaker instellingenvenster wordt
geopend:
- Klik op het pictogram Bladeren (...) om te bepalen waar uw Mac de notities moet opslaan.
- Selecteer de optie Apparaatgeheugen wissen als u de notities bij elke overdracht uit het
brongeheugen wilt wissen.
- Klik daarna op Opslaan om de instellin gen op te slaan.
Notities uploaden
Schakel de ontvanger in en sluit deze op uw Mac aan. De notities worden automatisch geüpload.
Ze worden in TIFF-formaat opgeslagen. Dubbelklik op het gewenste TIFF-bestand om de notitie
te bekijken.
U kunt uw notities echter niet converteren in een bewerkbare tekst.
Nederlands
Page 19

De pen in muismodus gebruiken (PC en Mac)
U kunt de IRISNotesTMpen ook als muis gebruiken. Om naar muismodus over te schakelen:
PC
- Sluit de ontvanger op uw PC aan.
- Houd de pen recht voor de
ontvanger, druk dan een keer op
de aan/uit-knop.
- Tik met de pen op een vel papier. De cursor wordt nu door de pen gestuurd.
- Beweeg de pen boven een pagina om de cursor te verplaatsen.
- Om een object aan te klikken, plaatst u de cursor boven het object en tikt u met de pen
erop.
- Om rechts te klikken op een object, plaatst u de cursor boven het object, tikt u met de
pen erop en houdt u het object kort vast.
Opmerking: in Windows Vista
pen om direct in Microsoft Office 2007 toepassingen en hoger te schrijven. Dit werkt ook met
Mac OS 10.5 in iWork®’08 toepassingen en hoger.
Zie www.irislink.com/support/userguides voor meer informatie.
Raadpleeg het volgende voor gedetailleerde instructies over IRISNotesTM:
- Handleiding Easy Note Taker: beschikbaar via het menu Start van Windows
- Help-bestand MyScript Notes Lite: beschikbaar via het Help-menu van de software
Als u problemen ondervindt tijdens het gebruik van IRISNotesTM, raadpleeg dan de
Frequently Asked question op onze website www.irislink.com/support/faq of neem contact
op met onze Technische Ondersteuning op www.irislink.com/support
®
en Windows 7 kunt u ook gebruik maken van de IRISNotes
Mac
- Sluit de ontvanger op uw Mac aan.
- IRISNotes
TM
schakelt automatisch
over naar muismodus.
TM
Nederlands
Page 20

Kurzanleitung
Diese Kurzanleitung enthält allgemeine Anleitungen zu Installation und Verwendung
von IRISNotes™ Express 2. Eine vollständige Beschreibung und Anleitung zu allen
Funktionen von IRISNotes™ finden Sie im Benutzerhandbuch und den Hilfedateien auf
der mitgelieferten Installations-CD-ROM.
IRISNotes™ ist ein Digitalstift, mit dem unterwegs handschriftliche Notizen und Zeichnungen
erfasst sowie bearbeitet, gespeichert und exportiert werden können. Ihre handschriftlichen
Notizen können umgehend in bearbeitbaren Text für zahlreiche Sprachen konvertiert werden.
Packungsinhalt
- IRISNotes™ Installations-CD-ROM.
Auf dieser CD-ROM befinden sich die Anwendungen Easy Note Taker und
MyScript Notes Lite (nur PC).
- Kurzanleitung
- Digitalstift, Empfänger, einziehbares USB-Kabel, 2 x Batterien, 3 Nachfüllminen
Der digitale Stift
Nehmen Sie den Stift nicht
auseinander! Dies kann zu
Beschädigungen führen.
Stiftspitze
Schieben Sie eine Kugelschreibermine in die Stiftspitze ein (M 21 Standardersatzmine
67 x 2,35 mm) und drücken Sie die Mine sanft hinein, bis sie richtig sitzt.
Batterien
Drehen Sie die
Batteriefachabdeckung ab
Legen Sie 2 Batterien ein
(GPSR41 oder GP392)
Der positive Pol muss
nach oben zeigen
Deutsch
Page 21

Auswechseln der Mine (die Mine wird mit der Kappe des Stiftes
herausgezogen):
- Drücken Sie das obere Ende der Kappe fest gegen die Stiftspitze.
- Schieben Sie die neue Mine ein.
Der Empfänger
Schalter EIN/AUS
Zum Einschalten 5 Sekunden
gedrückt halten
LCD-Bildschirm
Laden Sie den Empfänger für mindestens 30 Minuten vor Verwendung des Produkts auf
(die vollständige Ladedauer beträgt 3,5 Stunden): Stecken Sie das USB-Kabel in den
Empfänger und den USB-Anschluss Ihres PCs ein.
Der LCD-Bildschirm zeigt die folgenden Statusinformationen an:
Empfänger mit PC verbunden
(Laden Sie die Dateien auf den PC und löschen Sie
Speicher VOLL
sie aus dem Speicher)
Batterie im Stift schwach
Batterie des Empfängers schwach
Notizmodus
Mausmodus
Anzahl an gespeicherten Notizen
Deutsch
Page 22

Wie arbeite ich mit dem Digitalstift?
Schreiben von Notizen
Legen Sie den Empfänger mittig an den oberen Rand des A4-Blattes. Schalten Sie ihn ein, indem
Sie für ca. 5 Sekunden die Ein-/Austaste drücken.
Befestigen Sie den Empfänger am Papierrand,
mit der Vorderseite nach oben
Halten Sie den Digitalstift fest in der Hand und schreiben Sie normal. Vermeiden Sie schräge
Zeilen.
Wenn Sie Ihre Notiz aufgeschrieben haben, drücken Sie einmal auf die Ein-/Austaste. Damit
wird die Notiz im Speicher des Empfängers gespeichert. Das Gerät ist jetzt bereit für eine neue
Notiz. Sie können bis zu 100 Notizen im A4-Format speichern.
Halten Sie den Digitalstift richtig:
Halten Sie ihre Hand nicht zwischen den Digitalstift und den
Empfänger!
Berühren Sie die Schreibspitze des Digitalstifts nicht mit den Fingern!
Um Ihre Notizen auf einen Computer unter Windows oder Mac OS zu übertragen, müssen Sie
zuerst die entsprechende Software installieren.
Verwenden Sie dazu die Klammern
auf der Rückseite des Empfängers
Installieren der Software unter Windows
1. Um die Anwendung Easy Note Taker zu installieren, legen Sie die
2. Die Anwendung MyScript Notes Lite befindet sich ebenfalls auf derIRISNotes
™
IRISNotes
-CD-ROM in das CD-ROM-Laufwerk und
folgen Sie den Anweisungen auf dem Bildschirm.
Nachdem die Installation abgeschlossen ist, klicken Sie auf Fertig stellen.
Daraufhin wird das Symbol Easy Note Taker angezeigt.
™
-CDROM. Öffnen Sie zum Installieren den Ordner Notes 2.2 Lite auf der CD-ROM und
doppelklicken Sie dann auf setup.exe, um die Installation zu starten.
Klicken Sie nach Abschluss der Installation auf Fertig stellen und nehmen Sie die CDROM aus dem CD-ROM-Laufwerk.
Deutsch
Page 23

Hochladen von Notizen
- Schließen Sie den Empfänger mit dem USB-Kabel am PC an und starten Sie Easy Note
Taker.
- Klicken Sie im Notizenmanager in der Hauptfunktionsleiste auf Hochla den (U pload).
Es werden alle Notizen vom Empfänger auf den PC hochgeladen und Sie können sie auf
dem Bildschirm anzeigen.
Sie können zum Hochladen auch andere
Einstellungen auswählen. Wählen Sie
Präferenzen aus dem
Menü Konfiguration und gehen Sie zur
Registerkarte Mobil:
Verwaltung von Notizen
- Die hochgeladenen Notizen befinden sich im Ordner Mobile Notizen. Sie können mit
dem Notizen-Editor weiter bearbeitet, sortiert, exportiert und per E-Mail als JPEGDateien versendet werden.
Konvertieren von Notizen
- Klicken Sie im Notizenmanager in der Hauptfunktionsleiste auf In Text umwandeln .
- Wählen Sie die Konvertierungseinstellungen in MyScript Notes Lite. Die Konvertierung
wird umgehend durchgeführt.
- Der Text kann dann an andere Anwendungen oder per E-Mail gesendet werden.
Deutsch
Page 24

Installieren der Software unter Mac OS
1. Legen Sie die IRISNotes
auf das CD-ROM-Symbol auf dem Schreibtisch.
2. Doppelklicken Sie auf NoteTaker.pkg und folgen Sie den Anweisungen auf dem
Bildschirm.
TM-
CD-ROM in das CD-ROM-Laufwerk und doppelklicken Sie
Einstellungen zum Hochladen Ihrer Notizen
Wenn Sie mit dem Digitalstift schreiben, wird der gesamte Text als eine Serie von Bildern im
TIFF-Format im Speicher des Mobile NoteTaker gespeichert. Von dort müssen sie auf die
Festplatte Ihres Mac hochgeladen werden.
Vorher müssen Sie aber erst die Einstellungen zum Hochladen Ihrer Notizen im NoteTaker
Preference-Werkzeug festlegen.
- Klicken Sie auf das Symbol „NoteTaker Preferences“. Das Fenster NoteTaker
Preferences wird geöffnet:
- Klicken Sie auf das Symbol zum Durchsuchen (...) und legen Sie den Pfad fest, wo Ihr
Mac die Notizen speichern soll.
- Markieren Sie die Option Clear device’s memory (Gerätespeicher leeren), wenn Sie die
Notizen nach jeder Übertragung aus dem Speicher löschen möchten.
- Anschließend klicken Sie auf Save (Sichern), um die Einstellungen zu speichern.
Hochladen von Notizen
Schalten Sie den Empfänger ein und schließen Sie ihn an Ihren Mac an. Die Notizen werden
automatisch hochgeladen. Sie werden im TIFF-Format gespeichert. Doppelklicken Sie auf die
gewünschte TIFF-Datei, um die Notiz anzuzeigen.
Beachten Sie, dass Sie Ihre Notizen jedoch nicht in bearbeitbaren Text konvertieren können.
Deutsch
Page 25

Verwendung des Digitalstifts im Mausmodus (PC und Mac)
Sie können den IRISNotes™-Stift auch als Maus verwenden. So wechseln Sie in den
Mausmodus:
• Schließen Sie den
Empfänger an Ihren PC an.
• Halten Sie d en Stift direkt vor den
Empfänger und drücken Sie dann
einmal auf die Ein-/Austaste.
- Tippen Sie mit dem Stift auf ein Blatt Papier. Der Cursor wird nun vom Stift gesteuert.
- Bewegen Sie den Stift über einem Blatt, um den Cursor zu bewegen.
- Um ein Objekt anzuklicken, zeigen Sie mit dem Cursor auf das Objekt und tippen Sie
dann mit dem Stift darauf, um es anzuklicken.
- Für einen Rechtsklick auf ein Objekt, zeigen Sie auf das Objekt und tippen Sie mit
dem Stift etwas länger darauf.
Hinweis: Bei Windows Vista
direkt in Microsoft Office-Anwendungen ab Version 2007 schreiben. Dies funktioniert
auch für Mac OS 10.5 in iWork®-Anwendungen ab Version '08.
Weitere Informationen finden Sie unter www.irislink.com/support/userguides.
Weitere Informationen zum IRISNotesTMfinden Sie unter:
- Handbuch zu Easy Note Taker: verfügbar über das Menü Start von Windows
- Hilfedatei zu MyScript Notes Lite: verfügbar im Menü Hilfe der Software
PC
• Schließen Sie den
Empfänger an Ihren Mac an.
• IRISNotesTMwechselt
automatisch in den Mausmodus.
®
und Windows 7 können Sie mit dem IRISNotesTM-Stift auch
Mac
Sollten bei der Verwendung von IRISNotesTMProbleme auftreten, sehen Sie sich die häufig
gestellten Fragen auf unserer Website unter www.irislink.com/support/faq an oder wenden
Sie sich an den technischen Support unter www.irislink.com/support.
Deutsch
Page 26

Guía de inicio rápido
Esta Guía de inicio rápido proporciona instrucciones generales para instalar y utilizar
IRISNotesTMExpress 2. Si desea instrucciones detalladas sobre todas las funcionalidades de
IRISNotesTM, consulte la Guía del usuario y el archivo ayuda que encontrará en el CD-ROM
de instalación.
IRISNotesTMes un dispositivo portátil en forma de bolígrafo para tomar y capturar notas, que
luego podrá editar, guardar y exportar. Con IRISNotes
editable sus notas escritas a mano en una gran variedad de idiomas.
Contenido del paquete
- CD-ROM de instalación de IRISNotes
Este CD-ROM contiene las aplicaciones Easy Note Taker y MyScript Notes Lite
(solo para PC).
- Guía de inicio rápido
- Bolígrafo digital, unidad receptora, cable USB retráctil, dos juegos de pilas y tres recargas
de tinta
TM
El bolígrafo digital
! No desmonte el bolígrafo:
podría dañarlo.
TM
, podrá convertir al instante en texto
Pilas
Punta del
bolígrafo
Haga entrar una recarga de tinta por la punta del bolígrafo (recarga estándar M21
de 67 mm de longitud X 2,35 mm) y empújela hasta que quede bien colocada en el interior
del dispositivo.
Español
Desenrosque la tapa
compartimentode las pilas
e introduzca 2 pilas
(GPSR41 o GP392)
con el polo positivo
hacia arriba.
Page 27

Para reemplazar la recarga de tinta (el tapón del bolígrafo sirve
también para extraer las recargas de tinta vacías):
- Presione con fuerza la punta del bolígrafo con la parte superior del
tapón y saque la recarga de tinta gastada.
- A continuación, introduzca la recarga nueva del modo indicado
anteriormente.
La unidad receptora
Botón de encendido/apagado
Púlselo durante 5 segundos para
Cargue la unidad receptora como mínimo 30 minutos antes de utilizar el producto
La pantalla LCD muestra los siguientes indicadores de estado:
Pantalla LCD
(necesitará 3 horas y media para cargarla al completo): conecte el cable USB a la
unidad y a un puerto USB de su PC.
(transfiera los archivos al PC y elimínelos de la
Cantidad de notas almacenadas en la memoria
encender la unidad.
Unidad receptora conectada al PC
Memoria llena
memoria de la unidad)
Batería baja (bolígrafo)
Batería baja (unidad receptora)
Modo de toma de notas
Modo de ratón
Español
Page 28

¿Cómo se utiliza el bolígrafo digital?
Tomar notas
- Coloque la unidad receptora centrada en la parte superior de sus hojas de papel A4.
Mantenga pulsado el botón de encendido durante unos 5 segundos para encenderla.
Fije el receptor en el borde del papel y
boca arriba.
- Sujete el bolígrafo con firmeza y escriba como lo haría normalmente. Intente evitar que las
líneas queden inclinadas.
- Cuando haya terminado de escribir la nota, pulse el botón de encendido una vez. De este
modo, la nota se guardará en la memoria del receptor. El dispositivo ya estará a punto para
la creación de una nota nueva. Podrá almacenar hasta 100 notas (u hojas) de tamaño A4.
Sujete el bolígrafo correctamente:
! No ponga la mano entre el bolígrafo y la unidad receptora.
! Mantenga los dedos alejados del cono de cristal de la punta del
bolígrafo.
Para transferir sus notas a un PC equipado con Windows o a un ordenador que funcione con Mac
OS, primero deberá instalar el software correspondiente.
Utilice los clips sujetapapeles
que hay en la cara trasera de la unidad receptora.
Instalar el software en un PC con Windows
1. Para instalar la aplicación Easy Note Taker, introduzca el CD-ROM de IRISNotesTMen
el lector de CD del ordenador y siga las instrucciones que aparecen en pantalla.
Una vez haya finalizado la instalación, haga clic en Terminar.
El icono Easy Note Taker aparecerá en el escritorio.
2. Para instalar la aplicación MyScript Notes Lite, explore el CD-ROM de IRISNotes
con el Explorador de Windows.
Abra la carpeta Notes 2.2 Lite y haga doble clic en el archivo setup.exe para iniciar la
instalación.
Una vez haya finalizado la instalación, haga clic en Terminar y extraiga el CD-ROM del
lector.
TM
Español
Page 29

Transferir notas
- Conecte la unidad receptora a su PC (mediante el cable USB) y ejecute la aplicación
Easy Note Taker.
- En el Administrador de notas, haga clic en la opción Subir (Upload) de la barra de
herramientas principal. Todas las notas almacenadas en el receptor se transferirán al PC y
se podrán visualizar en el monitor.
También podrá seleccionar otras
preferencias para la operación de
carga. Seleccione Preferencias en el
menú Configuración y, a continuación,
diríjase a la ficha Móvil:
Gestionar notas
- Las notas que se hayan copiado al PC estarán en la carpeta Notas de Móvil. Podrá
editarlas utilizando la función de Editar notas, clasificarlas, guardarlas en otras carpetas,
exportarlas y enviarlas por correo electrónico en forma de archivos JPEG.
Convertir notas
- En el Administrator de notas, haga clic en la opción Convertir a texto de la barra de
herramientas principal.
- Seleccione los parámetros de conversión en MyScript Notes Lite. La conversión se
llevará a cabo al instante.
- El texto resultante puede enviarse a otras aplicaciones o por correo electrónico.
Español
Page 30

Instalar el software en un ordenador con Mac OS
1. Introduzca el CD-ROM de IRISNotesTMen el lector de CD del ordenador y haga doble
clic en el icono del CD-ROM del escritorio.
2. Haga doble clic en el archivo NoteTaker.pkg y siga las instrucciones que aparecen en
pantalla.
Defina las preferencias de carga
Cuando utilice el bolígrafo digital para tomar notas, todo lo que escriba se guardará en forma de
imágenes TIFF (Tagged Image File Format) en la memoria del Mobile NoteTaker. Desde aquí,
deberá transferirlas al disco duro de su Mac.
Antes de hacerlo, sin embargo, deberá determinar los parámetros de carga con la herramienta
NoteTaker Preferences:
- Haga clic en el icono de NoteTaker Preferences. Se abrirá la ventana de NoteTaker
Preferences:
- Haga clic en el icono de exploración (...) para determinar en qué carpeta del disco duro de
su Mac se guardarán las notas.
- Seleccione la opción Clear device’s memory (Borrar la memoria del dispositivo) si
desea borrar las notas de la memoria cada vez que las transfiera.
- A continuación, haga clic en Save (Guardar) para guardar las preferencias.
Transferir notas
Encienda la unidad receptora y conéctela a su Mac. Las notas se transferirán automáticamente y
se guardarán en formato TIFF. Haga doble clic en el archivo TIFF que desee para visualizar la
nota.
Tenga en cuenta que no podrá convertir las notas en texto editable.
Español
Page 31

Utilizar el bolígrafo en el modo de ratón (PC y Mac)
También puede utilizar el bolígrafo de IRIS NotesTMcomo ratón. Para activar el
modo de ratón:
• Conecte el receptor al PC.
PC
• Sujete el bolígrafo justo por delante del
receptor y, a continuación, pulse el botón
de encendido una vez.
- Toque un trozo de papel con la punta del bolígrafo. El bolígrafo pasará a controlar el
cursor de su pantalla.
- Desplace el bolígrafo por encima de la hoja de papel para mover el cursor.
- Para seleccionar un objeto, dirija el cursor hacia él y, a continuación, toque el papel
con la punta del bolígrafo para hacer clic.
- Para hacer clic con el botón derecho encima de un objeto, dirija el cursor hacia él y,
a continuación, toque el papel con la punta del bolígrafo y déjelo en esta posición
durante unos instantes.
®
Nota: en Windows Vista
escribir directamente en las aplicaciones de Microsoft Office 2007 y versiones posteriores.
También podrá hacerlo con las aplicaciones de iWork®’08 (y versiones posteriores) si dispone
del sistema operativo Mac OS 10.5. Encontrará más información en
www.irislink.com/support/userguides.
Encontrará instrucciones detalladas sobre IRISNotesTMen:
El manual de Easy Note Taker, al que podrá acceder desde el menú Inicio de Windows.
El archivo de ayuda de MyScript Notes Lite, accesible desde el menú Ayuda del software.
Si tiene algún problema al utilizar su IRISNotesTM, consulte el apartado de preguntas más
frecuentes de nuestro sitio web (www.irislink.com/support/faq) o contacte con el servicio de
soporte técnico de I.R.I.S. a través de www.irislink.com/support
y Windows 7, también podrá utilizar el bolígrafo de IRISNotesTMpara
• Conecte el receptor al Mac.
• El modo de ratón de IRISNotes
activará automáticamente.
Mac
TM
se
Español
Page 32

Guida rapida
Questo documento fornisce linee guida generali per l'installazione e l'uso di
IRISNotesTMExpress 2. Per istruzioni dettagliate sulle funzionalità complete di
IRISNotesTMconsultare la guida per l'uso e la guida in linea contenute nel CD ROM di
installazione.
IRISNotesTMè costituito da penna e Note Taker mobile, che consente di catturare note e schizzi
disegnati a mano, nonché di modificarli, salvarli ed esportarli. Le note scritte a mano verranno
convertite istantaneamente in testo modificabile in una vasta gamma di lingue.
Contenuto della confezione
- CD-ROM di installazione di IRISNotes
Questo CD-ROM contiene le applicazioni Easy Note Taker e MyScript Notes Lite
(solo PC)
- Guida rapida
- Penna digitale, unità ricevitore, cavo USB avvolgibile, due set di batterie, tre ricariche di
inchiostro
La penna digitale
Non smontare la penna, in
quanto potrebbe danneggiarsi.
TM
Batterie
Punta della penna
Inserire una ricarica di inchiostro nella punta della penna (ricarica M21 standard,
lunghezza 67,0 mm x 2,35 mm), quindi premere delicatamente finché non entra
correttamente in posizione.
Italiano
Svitare il coperchio del
vano batterie e
inserire 2 batterie
(GPSR41 o GP392)
con il polo positivo
rivolto vero l'alto
Page 33

Per sostituire la ricarica di inchiostro (il cappuccio della penna
funziona come un estrattore della ricarica):
- premere con decisione la parte superiore del cappuccio contro la
punta della penna, quindi estrarre la ricarica di inchiostro usata.
- Inserire la nuova ricarica di inchiostro.
L'unità ricevitore
Pulsante ON/OFF
Premere per 5 secondi per
Schermo LCD
Caricare l'unità ricevitore per almeno 30 minuti prima di utilizzare il prodotto (il
tempo richiesto per una carica completa è 3,5 ore): collegare il cavo USB all'unità e
alla porta USB del proprio PC.
Lo schermo LCD mostra le seguenti indicazioni di stato:
(in questo caso occorre caricare i file nel PC e
cancellarli dalla memoria del ricevitore)
accendere
Unità ricevitore collegata al PC
Memoria PIENA
Batteria della penna scarica
Batteria dell'unità ricevitore scarica
Modalità annotazione
Modalità mouse
Numero di note salvate in memoria
Italiano
Page 34

Come utilizzare la penna digitale ?
ricevitore
l'alto
Scrittura di note
Posizionare l'unità ricevitore in alto, al centro dei fogli formato A4. Tenere premuto il pulsante di
accensione per circa 5 secondi per accenderla.
Fissare il ricevitore al bordo del foglio,
con la parte superiore rivolta verso
Tenere saldamente la penna e scrivere normalmente. Cercare di evitare di scrivere in direzione
obliqua.
Dopo aver scritto una nota, premere il pulsante di accensione una volta. In questo modo la nota
viene salvata nella memoria del ricevitore. Il dispositivo ora è pronto per iniziare a scrivere una
nuova nota. È possibile salvare fino a 100 note in formato A4.
Tenere la penna correttamente:
Non inserire la mano tra la penna e l'unità ricevitore!
Tenere le dita lontano dal cono di cristallo nella punta della penna!
Per trasferire le note al PC Windows o al computer Mac OS, è necessario installare il software
corrispondente.
Utilizzare i fermacarte
situati nella parte posteriore dell'unità
Installazione del software su un PC Windows
1. Per installare l'applicazione Easy Note Taker, inserire il CD-ROM di IRISNotes
nell'apposita unità e seguire le istruzioni a video.
Una volta completata l'installazione, fare clic su Fine.
Sul desktop compare l'icona di Easy Note Taker.
2. Per installare l'applicazione MyScript Notes Lite , esplorare il CD-ROM di
IRISNotes
TM
con Windows Explorer.
Aprire la cartella Notes 2.2 Lite, quindi fare doppio clic su setup.exe per avviare
l'installazione. Una volta completata l'installazione, fare clic su Fine, quindi rimuovere il
CD-ROM dalla relativa unità.
Italiano
TM
Page 35

Upload delle note
- Collegare l'unità ricevitore al PC (utilizzando il cavo USB) e lanciare Easy Note Taker.
- In Gestore note, fare clic su Upload nella barra strumenti principale. Tutte le note
verranno trasferite dal ricevitore al PC e potranno essere visualizzate a video.
È possibile selezionare altre
preferenze per l'upload.
Selezionare Preferenze nel menu
Configurazione, quindi scegliere la
scheda Mobile:
Gestione delle note
- Le note trasferite su PC sono disponibili nella cartella Nota mobile. Tali note possono
essere modificate utilizzando Modifica nota, ordinate, salvate, esportate e inviate per
email come file JPEG.
Conversione delle note
- In Gestore note, fare clic su Converti in testo nella barra strumenti principale.
- Scegliere le impostazioni di conversione in MyScript Notes Lite. La conversione viene
eseguita istantaneamente.
- Il testo così ottenuto può essere inviato ad altre applicazioni o per e-mail.
Italiano
Page 36

Installazione del software su un computer Mac OS
1. Inserire il CD-ROM di IRISNotesTMnell'apposita unità, quindi fare doppio clic
sull'icona CD-ROM sul Desktop.
2. Fare doppio clic su NoteTaker.pkg, quindi seguire le istruzioni a video.
Impostare le pr eferenze per l'upload
Quando si utilizza la penna digitale per scrivere testo, tutto quanto si scrive viene salvato come
una serie di immagini TIFF (Tagged Image File Format) nella memoria di Mobile NoteTaker.
Queste devono essere caricate sul disco rigido del Mac.
Prima di procedere a questa operazione, scegliere le impostazioni per l'upload con lo Strumento
NoteTaker Preferences:
- Fare clic sull'icona NoteTaker Preferences. Si apre la finestra NoteTaker Preferences:
- Fare clic sull'icona Sfoglia (...) per stabilire il percorso di salvataggio delle note.
- Selezionare l'opzione Clear device’s memory se si desidera eliminare le note dalla
memoria dopo ogni trasferimento.
- Fare quindi clic su Salva per memorizzare le impostazioni.
Upload delle note
Accendere l'unità ricevitore e collegarla al Mac. Le note vengono caricate automaticamente. Le
note vengono salvate in formato TIFF. Fare doppio clic sul file TIFF desiderato per visualizzare
la nota.
Non è possibile convertire le note in testo editabile.
Italiano
Page 37

Uso della penna in modalità mouse (PC/Mac)
Anche la penna IRISNotesTMpuò essere utilizzata come mouse. Per passare alla modalità
mouse:
PC
- Collegare il ricevitore al PC.
- Tenere la penna di fronte al
ricevitore, poi premere una volta il
pulsante di accensione.
- Premere la penna su un foglio di carta. Il cursore viene ora controllato dalla penna.
- Muovere la penna sulla pagina per spostare il cursore.
- Per cliccare un oggetto, posizionare il cursore su di esso, poi premere con la penna
sull'oggetto stesso.
- Per fare clic col pulsante destro su un oggetto, posizionarsi su di esso e tenere premuta
la penna per un istante.
Nota: in Windows Vista
per scrivere direttamente nelle applicazioni di Microsoft Office 2007 e superiori. Questo
vale anche per le applicazioni iWork®’08 o superiori per Mac OS 10.5.
Visitare www.irislink.com/support/userguides per ulteriori informazioni.
Per istruzioni dettagliate su IRISNotesTM, consultare:
- Manuale di Easy Note Taker: accessibile dal menu Start di Windows
- Guida in linea di MyScript Notes Lite: accessibile dal menu Guida del software
In caso di problemi nell'utilizzo di IRISNotesTM, consultare la sezione FAQ sul nostro sito
web www.irislink.com/support/faq o contattare l'Assistenza Tecnica all'indirizzo
www.irislink.com/support.
®
e Windows 7, è possibile utilizzare la penna IRISNotesTManche
Mac
- Collegare il ricevitore al Mac.
- IRISNotes
TM
passa
automaticamente alla modalità
mouse.
Italiano
Page 38

Guia de Início Rápido
Este Guia de Início Rápido fornece indicações gerais para instalar e utilizar o
IRISnotesTMExpress 2. Para mais informações acerca de todas as funcionalidades do
IRISnotes, consulte o manual do utilizador e o ficheiro de ajuda fornecido com o CDROM de instalação.
O IRISNotesTMé uma caneta e um bloco de notas portátil que consegue capturar notas e
desenhos manuscritos, assim como editar, guardar e exportar os mesmos. As notas manuscritas
podem ser instantaneamente convertidas em texto editável num vasto conjunto de idiomas.
Conteúdo da embalagem
- CD-ROM de instalação do IRISNotes
Este CD-ROM contém a aplicação Easy Note Taker e MyScript Notes Lite
(Apenas PC)
- Guia de Início Rápido
- Caneta digital, receptor, cabo USB retráctil, dois conjuntos de pilhas, três recargas de
tinta
A caneta digital
! Não desmonte a caneta. Tal
poderá danificá-la.
TM
Pilhas
Ponta da
caneta
Faça deslizar uma recarga de tinta para a ponta da caneta (carga M21 padrão de
67,0 mm de comprimento X 2,35 mm) e prima suavemente até estar correctamente alojada.
Português
Desaperte a tampa
do compartimento para
pilhas e insira 2 pilhas
(GPSR41 ou GP392)
com o pólo positivo
virado para cima
Page 39

Para substituir a recarga de tinta (a tampa da caneta funciona como
um extractor de recarga de tinta):
- Prima com firmeza a parte superior da tampa contra a ponta da
caneta e puxe a carga de tinta utilizada para fora.
- Deslize a nova recarga para o interior.
O receptor
Botão LIGAR/DESLIGAR
Prima durante 5 segundos
para ligar
Ecrã LCD
Carregue o receptor pelo menos 30 minutos antes de utilizar o produto (o tempo
de carga completa é de 3,5 horas): ligue o cabo USB à unidade e à porta USB
do PC.
O ecrã LCD apresenta as seguintes indicações de estado:
(carregue os ficheiros para o PC e elimine-os da
Número de notas guardadas na memória
Receptor ligado ao PC
Memória CHEIA
memória)
Caneta com pilha fraca
Receptor com pilha fraca
Modo de tirar notas
Modo de rato
Português
Page 40

Como utilizar a caneta digital?
Escrever notas
Posicione o receptor no topo, ao centro da folha de papel A4. Prima o botão de alimentação
durante cerca de 5 segundos para o ligar.
Prenda o receptor à extremidade do
papel, virado para cima
Segure a caneta com firmeza e escreva normalmente. Tente evitar a inclinação das linhas.
Quando acabar de escrever, prima o botão de alimentação. Isto guarda a nota na memória do
receptor. O dispositivo está agora pronto a iniciar uma nota nova. Pode guardar até 100 notas de
tamanho A4.
! Segure a caneta de forma adequada:
! Não coloque a mão entre a caneta e o receptor!
! Mantenha os dedos afastados do cone de cristal da ponta da caneta!
De modo a transferir as notas para o seu computador Windows ou Mac OS, tem primeiro de
instalar o respectivo software.
Use os clips de papel
no verso do receptor
Instalar o software num computador Windows
1. Para instalar a aplicação Easy Note Taker, introduza o CD-ROM do IRISNotesTMna
unidade de CD-ROM e siga as instruções no ecrã.
Quando a instalação estiver concluída, clique em Concluir.
O ícone do Easy Note Taker é apresentado no ambiente de trabalho.
2. Para instalar a aplicação MyScript Notes Lite, explore o CD-ROM IRISNotes
Explorador do Windows.
Abra a pasta Notes 2.2 Lite, de seguida, clique duas vezes em set up.exe para iniciar a
instalação.
Quando a instalação estiver concluída, clique em Concluir, de seguida, retire o CD-ROM
da unidade de CD.
TM
com o
Português
Page 41

Carregar notas
- Ligue o receptor ao PC (utilizando o cabo USB) e inicie o Easy Note Taker.
- No Gerenciador de notas, clique em Carregar (Upload) na barra de ferramentas
principal. Todas as notas são carregadas do receptor para o PC e podem ser visualizadas
no ecrã.
Pode seleccionar outras preferências
para o carregamento. Seleccione
Preferências no menu Configuração e
aceda ao separador Móvel:
Gerir notas
- As notas carregadas estão disponíveis na pasta Notas móveis. Podem ser editadas
utilizando o Editor de notas, ordenadas, guardadas, exportadas e enviadas por correio
electrónico como ficheiros JPEG.
Converter notas
- No Gerenciador de notas, clique em Converter para texto na barra de ferramentas
principal.
- Seleccione as definições de conversão no MyScript Notes Lite. A conversão é efectuada
de forma instantânea.
- O texto resultante pode ser enviado para outras aplicações ou através de correio
electrónico.
Português
Page 42

Instalar o software num computador Mac OS
1. Introduza o CD-ROM IRISNotesTMna unidade de CD-ROM, de seguida, clique duas
vezes no ícone de CD-ROM no ambiente de trabalho.
2. Clique duas vezes em NoteTaker.pkg e, de seguida, siga as instruções no ecrã.
Defina as preferências de carregamento
Quando utiliza a caneta digital para escrever texto, tudo o que escreve é guardado como uma
série de imagens TIFF (Tagged Image File Format) na memória do NoteTaker. Depois, têm de
ser carregadas para o disco rígido do seu Mac.
Mas antes de o fazer, determine primeiro as definições de carregamento na ferramenta de
preferências do NoteTaker:
- Clique no ícone de preferências do NoteTaker. A janela de preferências do NoteTaker
abre:
- Clique no ícone de navegação (...) para determinar onde pretende guardar as notas no
Mac.
- Seleccione a opção Clear device’s memory se pretender apagar as notas da memória
sempre que as transfere.
- De seguida, clique em Guardar para guardar as definições.
Carregar notas
Ligue o receptor e ligue-o ao seu Mac. As notas são automaticamente carregadas. São guardadas
no formato TIFF. Clique duas vezes no ficheiro TIFF pretendido, de modo a visualizar a nota.
Lembre-se, não pode converter as notas em texto editável.
Português
Page 43

Utilizar o IRISNotesTMcomo ratos (PC/Mac)
Pode também utilizar a caneta IRISNotes™ como rato. Para mudar para o modo de rato:
PC
- Ligue o receptor ao seu PC.
- Segure a caneta à frente do
receptor, de seguida, prima o
botão de alimentação.
- Toque com a caneta numa folha de papel. Agora, o cursor está a ser controlado pela
caneta.
- Paire a caneta sobre uma página para mover o cursor.
- Para clicar num objecto, aponte com o cursor para o objecto, de seguida, toque com a
caneta para clicar.
- Para clicar com o botão direito num objecto, aponte para o mesmo, de seguida, segure a
caneta durante um momento.
Nota: no Windows Vista
escrever directamente nas aplicações Microsoft Offi ce 2007 e posteriores. Isto também
funciona no Mac OS 10.5, aplicações iWork®’08 e posteriores.
Consulte www.irislink.com/support/userguides para mais informações.
Para mais informações sobre o IRISNotesTM, consulte:
Manual do Easy Note Taker: disponível a partir do menu Iniciar do Windows
Ficheiro de ajuda do MyScript Notes Lite: disponível a partir do menu Ajuda do software
® e Windows 7, também pode utilizar a caneta IRISNotes
Mac
- Ligue o receptor ao seu Mac.
- IRISNotes
TM
muda
automaticamente para o modo de
rato.
TM
para
Caso tenha problemas na utilização do seu IRISNotes™, consulte as Perguntas frequentes no
nosso website www.irislink.com/support/faq ou contacte a Assistência técnica em
www.irislink.com/support.
Português
Page 44

Руководство по быстрой установке
Предупреждение
В этом руководстве по быстрой установке представлены общие рекомендации по
установке и использованию IRISNotesTM Express 2. Подробные инструкции по
работе со всеми функциями IRISNotesTM можно найти в руководстве пользователя
и файле справки на установочном компакт-диске.
IRISnotes — это ручка и мобильная система оцифровки записей, которая позволяет
оцифровывать рукописные записи и рисунки, а также редактировать, сохранять и
экспортировать их. Рукописные записи можно мгновенно преобразовать в редактируемый
текст на широком спектре языков.
Содержимое упаковки
- Установочный компакт-диск IRISNotesTM.
Этот компакт-диск содержит приложения Easy Note Taker и MyScript
Notes Lite (PC only)
- Установочный компакт-диск MyScript Notes Lite. (Только для PC)
- Руководство по быстрой установке
- Цифровая ручка, приемник, втягивающийся USB-кабель, два набора батареек,
три запасных стержня.
Цифровая ручка
! Не разбирайте ручку. Это
может привести к ее
повреждению.
Батарейки
Кончик
ручки
Русский
Открутите крышку отсека
с батарейками и вставьте
две батарейки (GPSR41 или
GP392) положительным
полюсом вверх
Page 45

Вставьте стержень со стороны кончика ручки (стандартный стержень M21
длиной 67,0 мм и диаметром 2,35 мм) и осторожно надавите на него, пока
стержень не встанет на место.
Замена стержня (для извлечения стержня используется
колпачок ручки):
- Сильно нажмите верхней частью колпачка на кончик ручки и
вытащите использованный стержень.
- Вставьте новый стержень.
Приемник
Кнопка Вкл./Выкл.
Для включения
ЖК-экран
Заряжайте приемник не менее 30 минут перед применением продукта (время
полной зарядки составляет 3,5 часа): вставьте USB-кабель в устройство
подключите его к USB-порту компьютера.
На ЖК-экране отображаются следующие индикаторы состояния:
Приемник подключен к компьютеру
(загрузите файлы на компьютер и удалите их из
Низкий уровень заряда батарейки ручки
Низкий уровень заряда батарейки приемника
нажмите и
удерживайте 5 секунд
Память ПЕРЕПОЛНЕНА
памяти)
Режим записи
Режим мыши
Количество записей в памяти
Русский
Page 46

Как использовать цифровую ручку?
лицевой стороной вверх
Создание записей
Поместите приемник рядом по центру на верхней стороне листа A4. Нажмите кнопку
питания и удерживайте ее около 5 секунд, чтобы включить приемник.
Закрепите приемник у края бумаги
Крепко держите ручку и пишите как обычно. Постарайтесь избежать наклона строк.
Закончив написание заметки, нажмите кнопку питания один раз. В результате заметка
будет сохранена в памяти приемника. Устройство готово к написанию новой замет
Можно сохранить до 100 заметок формата A4.
Держите ручку правильно:
! Рука пользователя не должна находиться между ручкой и
приемником.
! Не касайтесь кристаллического конуса на кончике ручки.
Чтобы передать заметки на компьютер под управлением Windows или Mac OS,
необходимо установить соответствующее ПО.
Используйте клипсы на задней
стороне приемника
ки.
Установка ПО на компьютере под управлением Windows
1. Чтобы установить приложение Easy Note Taker, вставьте компакт-диск
2. Чтобы установить приложение MyScript Notes Lite , откройте компакт-диск
TM
IRISNotes
с дисковод для компакт-дисков и следуйте инструкциям на экране.
По окончании установки нажмите кнопку Готово.
Значок Easy Note Taker появится на рабочем столе.
TM
IRISNotes
в проводнике Windows.
Откройте папку Notes 2.2 Lite и дважды щелкните файл setup.exe, чтобы начать
установку.
По ок
ончании установки нажмите кнопку Готово и вытащите компакт-диск из
дисковода для компакт-дисков.
Русский
Page 47

Загрузка записей
- Подключите приемник к компьютеру (с помощью USB-кабеля) и запустите Easy
Note Taker.
- В окне Менеджер записей нажмите кнопку Загрузка на главной панели
инструментов. Все записи будут переданы с приемника на компьютер и появятся на
экране.
Можно задать другие параметры
передачи. Выберите пункт
Настройки в меню Конфигурация и
перейдите на вкладку Мобильные:
Управление записями
Переданные записи будут помещены в папку Мобильные записи. Затем их можно
отредактировать с помощью функции Редактор записей, а также отсортировать,
сохранить, экспортировать и отправить по эл. почте в виде JPEG-файлов.
Преобразование записей
- В окне Менеджер записей нажмите кнопку Преобразовать в текст на главной
панели инструментов.
- Выберите параметры преобразования в ПО MyScript Notes Lite. Преобразование
начнется немедленно.
- Полученный текст можно передать в другие приложения или отправить по эл.
- почте.
Русский
Page 48

Установка ПО на компьютере под управлением Mac OS
1. Вставьте компакт-диск программного обеспечения IRISNotesTM в дисковод для
компакт-дисков и щелкните значок компакт-диска на рабочем столе.
2. Дважды щелкните файл NoteTaker.pkg и следуйте инструкциям на экране.
Настройте параметры передачи
При использовании цифровой ручки для записи текста заметки сохраняются в формате
TIFF в памяти приемника Mobile NoteTaker. Оттуда они могут быть переданы на жесткий
диск Mac.
Но перед этим необходимо настроить параметры передачи в NoteTaker Preference Tool:
- Щелкните значок NoteTaker Preferences. Откроется окно NoteTaker Preferences:
- Щелкните значок обзора (...), чтобы указать путь на Mac для сохранения заметок.
- Выберите параметр Clear device’s memory, чтобы стереть заметки из памяти после
каждой операции передачи.
- Затем нажмите кнопку Save для сохранения параметров.
Передача заметок
Включите приемник и подключите его к Mac. Заметки будут переданы автоматически.
Заметки будут сохранены в формате TIFF. Дважды щелкните нужный TIFF-файл, чтобы
просмотреть заметку.
Обратите внимание, что преобразование заметок в редактируемый текст не
поддерживается.
Русский
Page 49

Использование IRISNotes™ в качестве мыши (PC/Mac)
Ручку IRISNotesTM также можно использовать в качестве мыши. Чтобы перейти в режим
мыши:
PC
- Подключите приемник к
компьютеру.
- Поместите ручку над
приемником и нажмите кнопку
питания один раз.
Mac
- Подключите приемник к
компьютеру Mac.
- IRISNotes
TM
автоматически
переключится в режим мыши.
- Надавите ручкой на лист бумаги. Указатель мыши управляется ручкой.
- Двигай
- Чтобы щелкнуть объект, наведите указатель на этот объект и нажмите ручку,
- Чтобы щелкнуть объект правой кнопкой мыши, наведите указатель на этот
Примечание. В Windows Vista
использовать, чтобы писать непосредственно в приложениях пакета Microsoft Office 2007
и более поздних версий. Эта функция также будет работать на Mac OS 10.5 в
приложениях пакета iWork®’08 и более поздних версий. См. дополнительные сведения на
странице www.irislink.com/support/userguides.
Подробные инструкции по IRISnotes см. в следующих источниках.
-Руководство пользователя Easy Note Taker: доступно в меню Пуск Windows.
-Файл справки MyScript Notes Lite: доступен в меню Справка приложения.
Если у вас возникнут проблемы при использовании IRISNotes™, ознакомьтесь с
документом «Вопросы и ответы» на сайте www.irislink.com/support/faq или обратитесь в
службу технической поддержки по адресу www.irislink.com/support.
те ручкой по странице для перемещения указателя.
чтобы щелкнуть его.
объект, а затем нажмите и удерживайте ручку.
®
и Windows 7 ручку IRISNotesTM также можно
Русский
Page 50

ﺔّﯿﺑَﺮَﻌْﻟا
:ﻰﻟإ عﻮﺟﺮﻟا ءﺎﺟﺮﻟا ،
TM
ـﺑ ﺔﻘﻠﻌﺘﻤﻟا ﺔﻠﺼﻔﻤﻟا تﺎﻤﯿﻠﻌﺘﻟا ﻰﻠﻋ فﺮﻌﺘﻠﻟIRISNotes
- ﻞﯿﻟدEasy Note Taker: ﺔﻤﺋﺎﻗ ﻦﻣ ﺮﻓﻮﺘﻣStart(أﺪﺑا) مﺎﻈﻧ ﻲﻓWindows
- تﺎﻤﯿﻠﻌﺗ ﻒﻠﻣMyScript Notes Lite: ﺔﻤﺋﺎﻗ ﻦﻣ ﺮﻓﻮﺘﻣHe lp)(تﺎﻤﯿﻠﻌﺗﺞﻣﺎﻧﺮﺒﻟﺎﺑ ﺔﺻﺎﺨﻟا
اذإﺖﮭﺟاو ﻜﺸﻣتﻼءﺎﻨﺛأماﺪﺨﺘﺳاIRISNotes™صﺎﺨﻟا،ﻚﺑ ﻢﻘﻓ ﺔﻌﺟاﺮﻤﺑ ﻢﺴﻗ ﺔﻠﺌﺳﻷاةرﺮﻜﺘﻤﻟا ﻰﻠﻋ ﻊﻗﻮﻣ ﺐﯾﻮﻟا
www.irislink.com/support/faqصﺎﺨﻟا ﻚﺑ وألﺎﺼﺗﻻا ﻢﻋﺪﻟﺎﺑ ﻲﻨﻔﻟا ﻰﻠﻋ www.irislink.com/suppor.
Page 51

ﺔّﯿﺑَﺮَﻌْﻟا
ﺗتﺎﻈﺣﻼﻣ ﻞﯿﻤﺤ
زﺎﮭﺠﺑ ﺎﮭﻠﯿﺻﻮﺗو لﺎﺒﻘﺘﺳﻻا ةﺪﺣو ﻞﯿﻐﺸﺘﺑ ﻢﻗMacﻚﺑ صﺎﺨﻟا.ﺎًﯿﺋﺎﻘﻠﺗ تﺎﻈﺣﻼﻤﻟا ﻞﯿﻤﺤﺗ ﻢﺘﯾ. ﻢﺘﯾ
ﻖﯿﺴﻨﺘﺑ ﺎﮭﻈﻔﺣTIFF. ﻒﻠﻣ قﻮﻓ ﺎًﺟودﺰﻣ اًﺮﻘﻧ ﺮﻘﻧاTIFFﺔﻈﺣﻼﻤﻟا ضﺮﻌﺑ مﺎﯿﻘﻠﻟ بﻮﻠﻄﻤﻟا.
ﺮﯾﺮﺤﺘﻠﻟ ﻞﺑﺎﻗ ﺺﻧ ﻰﻟإ تﺎﻈﺣﻼﻤﻟا ﻞﯾﻮﺤﺗ ﻚﻨﻜﻤﯾ ﻻ ﮫﻧأ ﻆﺣﻻ.
ماﺪﺨﺘﺳاIRISNotes™سوﺎﻤﻛ
ماﺪﺨﺘﺳاIRISNotes™ماﺪﺨﺘﺳا .سوﺎﻤﻛIRISNotes™:سوﺎﻤﻛ
MAC
.ﺎًﯿﺋﺎﻘﻠﺗ سوﺎﻤﻟا ﻊﺿو
- زﺎﮭﺠﺑ لﺎﺒﻘﺘﺳﻻا ةﺪﺣو ﻞﯿﺻﻮﺘﺑ ﻢﻗ
MAC.ﻚﺑ صﺎﺨﻟا
- مﻮﻘﯾIRISNotes™ ﻰﻟإ ﻞﯾﺪﺒﺘﻟﺎﺑ
.ﻚﺑ صﺎﺨﻟا ﺮﺗﻮﯿﺒﻤﻜﻟا
ﺮﺗﻮﯿﺒﻤﻜﻟا زﺎﮭﺟ
- زﺎﮭﺠﺑ لﺎﺒﻘﺘﺳﻻا ةﺪﺣو ﻞﯿﺻﻮﺘﺑ ﻢﻗ
- كﺎﺴﻣﻹﺎﺑ ﻢﻗ ةﺪﺣو مﺎﻣأ ﻢﻠﻘﻟﺎﺑ
ﻰﻠﻋ ﻂﻐﺿا ﻢﺛ ًةﺮﺷﺎﺒﻣ لﺎﺒﻘﺘﺳﻻا
.ةﺪﺣاو ةﺮﻣ ﺔﻗﺎﻄﻟا رز
-ﺮﻘﻧا ﻢﻠﻘﻟﺎﺑ قﻮﻓﺔﻗرو.ﻢﺘﯾنﻵاﻢﻜﺤﺘﻟا ﻲﻓ ﺮﺷﺆﻤﻟاﺔﻄﺳاﻮﺑﻢﻠﻘﻟا.
-ﻢﻗ ﻚﯾﺮﺤﺘﺑﻢﻠﻘﻟاقﻮﻓﺔﺤﻔﺼﻟاﻚﯾﺮﺤﺘﻟ.ﺮﺷﺆﻤﻟا
ﺨﺘﺳﺎﺑﺮﺷﺆﻤﻟا ﻢﺛ ﺮﻘﻧا ﻢﻠﻘﻟﺎﺑ ﺮﻘﻨﻠﻟ ﮫﻗﻮﻓ.
و
Windows 7ﻚﻨﻜﻤﯾﺎًﻀﯾأماﺪﺨﺘﺳا ﻢﻠﻗIRISNotes™ﺔﺑﺎﺘﻜﻠﻟ ةﺮﺷﺎﺒﻣ ﻲﻓ تﺎﻘﯿﺒﻄﺗ
www.irislink.com/support/userguides
ﺰﻤﻟ.تﺎﻣﻮﻠﻌﻤﻟا ﻦﻣ ﺪﯾ
Microsoft Office 2007تاراﺪﺻﻹاوثﺪﺣﻷا.ﻞﻤﻌﯾاﺬھﺎًﻀﯾأ ﻰﻠﻋMac OS 10.5ﻲﻓ تﺎﻘﯿﺒﻄﺗiWork® ’08
-ﺮﻘﻨﻠﻟ قﻮﻓ،ﺮﺼﻨﻋ ﻢﻗ ةرﺎﺷﻹﺎﺑﻰﻟإﺮﺼﻨﻌﻟاماﺪ
-ﺮﻘﻨﻠﻟ رﺰﻟﺎﺑﻦﻤﯾﻷاقﻮﻓ،ﺮﺼﻨﻋ ﻢﻗ ةرﺎﺷﻹﺎﺑ،ﮫﯿﻟإ ﻢﺛ ﺮﻘﻧا ﻊﻣ راﺮﻤﺘﺳﻻاماﺪﺨﺘﺳﺎﺑﻢﻠﻘﻟا ﺔﻈﺤﻠﻟ.
ﻲﻓWindows Vista®
ﺔﻈﺣﻼﻣ :
تاراﺪﺻﻹاوثﺪﺣﻷا.
ﺮﻈﻧا
Page 52

ﺔّﯿﺑَﺮَﻌْﻟا
تﺎﻈﺣﻼﻤﻟا ﻞﯾﻮﺤﺗ
Note Manager(تﺎﻈﺣﻼﻤﻟا ﺮﯾﺪﻣ) قﻮﻓ ﺮﻘﻧا ،Convert to text(ﺺﻧ ﻰﻟإ ﻞﯾﻮﺤﺗ) ﻂﯾﺮﺷ ﻰﻠﻋ دﻮﺟﻮﻤﻟا
.ﻲﺴﯿﺋﺮﻟا تاودﻷا
MySc ript Notes Lite..رﻮﻔﻟا ﻰﻠﻋ ﻞﯾﻮﺤﺘﻟا ءاﺮﺟإ ﻢﺘﯾ
ﻲﻓ ﻞﯾﻮﺤﺘﻟا تاداﺪﻋإ ﺮﺘﺧا
.ﻲﻧوﺮﺘﻜﻟﻹا ﺪﯾﺮﺒﻟﺎﺑ ﮫﻟﺎﺳرإ وأ ىﺮﺧأ تﺎﻘﯿﺒﻄﺗ ﻰﻟإ ﺞﺗﺎﻨﻟا ﺺﻨﻟا لﺎﺳرإ ًﺎﻀﯾأ ﻦﻜﻤﯾ
مﺎﻈﻨﺑ ﻞﻤﻌﯾ ﺮﺗﻮﯿﺒﻤﻛ زﺎﮭﺟ ﻰﻠﻋ ﺞﻣﺎﻧﺮﺒﻟا ﺖﯿﺒﺜﺗMac OS
ﻲﻓ كﺮﺤﻣصاﺮﻗﻷاﺔطﻮﻐﻀﻤﻟاﻚﯾﺪﻟ ﻢﺛ ﺮﻘﻧااًﺮﻘﻧﺎًﺟودﺰﻣ
TM
1.ﻢﻗ لﺎﺧدﺈﺑصﺮﻘﻟاطﻮﻐﻀﻤﻟاIRISNotes
قﻮﻓﺰﻣرصﺮﻘﻟاطﻮﻐﻀﻤﻟا ﻰﻠﻋ ﺢﻄﺳ ﺐﺘﻜﻤﻟا.
2. قﻮﻓ ﺎًﺟودﺰﻣ اًﺮﻘﻧ ﺮﻘﻧاNoteTaker.pkg.ﺔﺷﺎﺸﻟا ﻰﻠﻋ ﺮﮭﻈﺗ ﻲﺘﻟا تﺎﻤﯿﻠﻌﺘﻟا عﺎﺒﺗﺈﺑ ﻢﻗ ﻢﺛ
ﻞﯿﻤﺤﺘﻟا تﻼﯿﻀﻔﺗ ﻦﯿﯿﻌﺗ
ﻣ ﻞﻛ ﻆﻔﺣ ﻢﺘﯾ ،ﺺﻧ ﺔﺑﺎﺘﻜﻟ ﻚﺑ صﺎﺨﻟا ﻲﻤﻗﺮﻟا ﻢﻠﻘﻟا ماﺪﺨﺘﺳﺎﺑ مﻮﻘﺗ ﺎﻣﺪﻨﻋ رﻮﺻ ﻦﻣ ﺔﻋﻮﻤﺠﻤﻛ ﮫﺘﺑﺎﺘﻜﺑ مﻮﻘﺗ ﺎTIFF
زﺎﮭﺠﺑ ﺐﻠﺼﻟا صﺮﻘﻟاMac.
تﻼﯿﻀﻔﺗ ةادأ ﻲﻓ ﻞﯿﻤﺤﺘﻟا تاداﺪﻋإ ﺪﯾﺪﺤﺘﺑ ًﻻوأ ﻢﻗ ،اﺬﮭﺑ مﺎﯿﻘﻟا ﻞﺒﻗ ﻦﻜﻟNoteTaker:
ﻲﻓ
)ةﺰﯿﻤﻤﻟا رﻮﺼﻟا تﺎﻔﻠﻣ ﻖﯿﺴﻨﺗ( ةﺮﻛاذ ﻲﻓMobile NoteTaker. كﺮﺤﻣ ﻰﻟإ ﺎﮭﻠﯿﻤﺤﺗ ﺐﺠﯾ ،ﻊﺿﻮﻤﻟا اﺬھ ﻦﻣ
- تﻼﯿﻀﻔﺗ ﺰﻣر قﻮﻓ ﺮﻘﻧاNoteTaker تﻼﯿﻀﻔﺗ رﺎطإ ﺢﺘﻔﯾ .NoteTaker:
-) ضاﺮﻌﺘﺳا ﺰﻣﺮﻟا قﻮﻓ ﺮﻘﻧا... زﺎﮭﺟ ﻰﻠﻋ تﺎﻈﺣﻼﻤﻟا ﻆﻔﺣ ﻲﻓ ﺐﻏﺮﺗ ﻦﯾأ ﺪﯾﺪﺤﺘﻟ (Mac.ﻚﺑ صﺎﺨﻟا
- رﺎﯿﺨﻟا ﺪﯾﺪﺤﺘﺑ ﻢﻗزﺎﮭﺠﻟا ةﺮﻛاذ ﺢﺴﻣ.ﺎﮭﻠﻘﻨﺑ مﻮﻘﺗ ةﺮﻣ ﻞﻛ ﻲﻓ ةﺮﻛاﺬﻟا ﻦﻣ تﺎﻈﺣﻼﻤﻟا ﺢﺴﻣ ﻲﻓ ﺐﻏﺮﺗ ﺖﻨﻛ اذإ
- قﻮﻓ ﺮﻘﻧا ﻢﺛﻆﻔﺣ .تاداﺪﻋﻹا ﻆﻔﺤﻟ
Page 53

لﺎﺒﻘﺘﺳﻻا ةﺪﺣوو ﻢﻠﻘﻟا ﻦﯿﺑ كﺪﯾ ﻊﻀﺗ ﻻ !
ﻢﻠﻘﻠﻟ يرﻮﻠﺒﻟا ﻲطوﺮﺨﻤﻟا ﻦﺴﻟا ﻦﻋ ﻚﻌﺑﺎﺻأ ﺪﻌﺑأ !
أﻨﻟا ﻰﻠﻋ ﻢﻠﻘﻟا ﻚﺴﻣ:ﺢﯿﺤﺼﻟا ﻮﺤ
مﺎﻈﻨﺑ ﻞﻤﻌﯾ ﺮﺗﻮﯿﺒﻤﻛ زﺎﮭﺟ ﻰﻟإ ﻚﺗﺎﻈﺣﻼﻣ ﻞﻘﻧ ﻦﻣ ﻦﻜﻤﺘﺘﻟWindows وأMac OS ًﻻوأ مﻮﻘﺗ نأ ﺐﺠﯾ
ﺔﻠﺼﻟا وذ ﺞﻣﺎﻧﺮﺒﻟا.
مﺎﻈﻨﺑ ﻞﻤﻌﯾ ﺮﺗﻮﯿﺒﻤﻛ زﺎﮭﺟ ﻰﻠﻋ ﺞﻣﺎﻧﺮﺒﻟا ﺖﯿﺒﺜﺗWindows
TM
ﻲﻓ كﺮﺤﻣصاﺮﻗﻷاﺔطﻮﻐﻀﻤﻟا
ﺘﻟا لﺎﻤﺘﻛا ﺪﻨﻋﺖﯿﺒﺜ قﻮﻓ ﺮﻘﻧا ،ءﺎﮭﻧإ.
ماﺪﺨﺘﺳﺎﺑWindows
TM
Easy Note Taker.ﻚﯾﺪﻟ ﺐﺘﻜﻤﻟا ﺢﻄﺳ ﻰﻠﻋ
MyScript Notes Lite، ﻢﻗ فﺎﺸﻜﺘﺳﺎﺑصﺮﻘﻟاطﻮﻐﻀﻤﻟاIRISNotes
ﺰﻣر ﺮﮭﻈﯿﺳ
تﺎﻈﺣﻼﻤﻟا ﻞﯿﻤﺤﺗ
USB ﻞﯿﻐﺸﺗ أﺪﺑاو ،(Easy Note Taker.
Note Managerتﺎﻈﺣﻼﻤﻟا ﺮﯾﺪﻣ) قﻮﻓ ﺮﻘﻧا ،(Upload(ﻞﯿﻤﺤﺗ).ﻲﺴﯿﺋﺮﻟا تاودﻷا ﻂﯾﺮﺷ ﻰﻠﻋ دﻮﺟﻮﻤﻟا ﻢﺘﯿﺳ
ﻜﻤﯾو ،ﻚﯾﺪﻟ ﺮﺗﻮﯿﺒﻤﻜﻟا زﺎﮭﺟ ﻰﻟإ لﺎﺒﻘﺘﺳﻻا ةادأ ﻦﻣ تﺎﻈﺣﻼﻤﻟا ﻊﯿﻤﺟ ﻞﯿﻤﺤﺗ.ﺔﺷﺎﺸﻟا ﻰﻠﻋ ﺎﮭﺘﯾؤر ﻦ
Preferences (تﻼﯿﻀﻔﺗ )
.ﻞﯿﻤﺤﺘﻠﻟ ىﺮﺧأ تﻼﯿﻀﻔﺗ ﺪﯾﺪﺤﺗ ﻚﻨﻜﻤﯾدﺪﺣ
Configuration)(ﻦﯾﻮﻜﺗﺐﯾﻮﺒﺘﻟا ﺔﻣﻼﻋ ﻰﻟإ ﻞﻘﺘﻧاو ،Mobile
ﺔﻤﺋﺎﻗ ﻦﻣ
(ﻞﻘﻨﺘﻣ):
تﺎﻈﺣﻼﻤﻟا ةرادإ
Mobile Notes(ﺔﻠﻘﻨﺘﻤﻟا تﺎﻈﺣﻼﻤﻟا).ماﺪﺨﺘﺳﺎﺑ ﺎھﺮﯾﺮﺤﺗ ﻦﻜﻤﯾ ﺎﻤﻛNote
ﺪﻠﺠﻣ ﻲﻓ ﺎﮭﻠﯿﻤﺤﺗ ﻢﺗ ﻲﺘﻟا تﺎﻈﺣﻼﻤﻟا ﺪﺟﻮﺗ
Explorer.
،ءﺎﮭﻧإ ﻢﺛ ﻢﻗ جاﺮﺧﺈﺑصﺮﻘﻟاطﻮﻐﻀﻤﻟا ﻦﻣ كﺮﺤﻣصاﺮﻗﻷاﺔطﻮﻐﻀﻤﻟا.
ﺻﻮﺘﺑ ﻢﻗ ﻞﺑﺎﻛ ماﺪﺨﺘﺳﺎﺑ) ﻚﯾﺪﻟ ﺮﺗﻮﯿﺒﻤﻜﻟا زﺎﮭﺠﺑ لﺎﺒﻘﺘﺳﻻا ةﺪﺣو ﻞﯿ
1.ﺖﯿﺒﺜﺘﻟﻖﯿﺒﻄﺘﻟاEasy Note Taker، ﻢﻗ لﺎﺧدﺈﺑصﺮﻘﻟاطﻮﻐﻀﻤﻟاIRISNotes
ﻢﺛ عﺎﺒﺗإتﺎﻤﯿﻠﻌﺘﻟاﻲﺘﻟاﺮﮭﻈﺗ ﻰﻠﻋ ﺔﺷﺎﺸﻟا.
2.ﺖﯿﺒﺜﺘﻟﻖﯿﺒﻄﺘﻟا
ﻢﻗ ﺢﺘﻔﺑ ﺪﻠﺠﻤﻟاNotes 2.2 Lite ﻢﺛ ﺮﻘﻧااًﺮﻘﻧﺎًﺟودﺰﻣقﻮﻓsetup.exe ءﺪﺒﻟ ﺖﯿﺒﺜﺘﻟا.ﺪﻨﻋ لﺎﻤﺘﻛا،ﺖﯿﺒﺜﺘﻟاﺮﻘﻧاقﻮﻓ
ﻲﻓ
Editor(تﺎﻈﺣﻼﻤﻟا رﺮﺤﻣ) تﺎﻔﻠﻣ ةرﻮﺻ ﻲﻓ ﻲﻧوﺮﺘﻜﻟﻹا ﺪﯾﺮﺒﻟﺎﺑ ﺎﮭﻟﺎﺳرإو ﺎھﺮﯾﺪﺼﺗو ﺎﮭﻈﻔﺣو ﺎﮭﻔﯿﻨﺼﺗوJPEG.
ﺔّﯿﺑَﺮَﻌْﻟا
Page 54

ﺔّﯿﺑَﺮَﻌْﻟا
ﺔﺷﺎﺷLCD
/
لﺎﺒﻘﺘﺳا ةﺪﺣوﺮﺗﻮﯿﺒﻤﻜﻟﺎﺑ ﺔﻠﺼﺘﻣ
MEMORY FULL(ﺔﺌﻠﺘﻤﻣ ةﺮﻛاﺬﻟا)
ﻚﯾﺪﻟ ﺮﺗﻮﯿﺒﻤﻜﻟا زﺎﮭﺟ ﻰﻠﻋ ﻚﺗﺎﻔﻠﻣ ﻞﯿﻤﺤﺘﺑ ﻢﻗ)
(ةﺮﻛاﺬﻟا ﻦﻣ ﺎﮭﻓﺬﺣاو
ﻦﺤﺸﻟا ﺔﻀﻔﺨﻨﻣ ﻢﻠﻘﻟا ﺔﯾرﺎﻄﺑ
لﺎﺒﻘﺘﺳﻻا ةﺪﺣو ﺔﯾرﺎﻄﺑﻦﺤﺸﻟا ﺔﻀﻔﺨﻨﻣ
ﻦﯾوﺪﺘﻟا ﻊﺿو
سوﺎﻤﻟا ﻊﺿو
ةﺮﻛاﺬﻟا ﻲﻓ ﺔظﻮﻔﺤﻤﻟا تﺎﻈﺣﻼﻤﻟا دﺪﻋ
ﻢﺠﺣ ﻚﺑ ﺔﺻﺎﺨﻟا قاروﻷا ﻒﺼﺘﻨﻣ ﻰﻠﻋأ لﺎﺒﻘﺘﺳﻻا ةﺪﺣو ﻊﺿﻮﺑ ﻢﻗA4. ةﺪﻤﻟ ﺔﻗﺎﻄﻟا رز ﻰﻠﻋ ﻂﻐﺿا5ﺎﮭﻠﯿﻐﺸﺘﻟ ﺎًﺒﯾﺮﻘﺗ ﻲﻧاﻮﺛ.
لﺎﺒﻘﺘﺳﻻا ةﺪﺣو
رزﻞﯿﻐﺸﺘﻟا
فﺎﻘﯾإ
ﻞﯿﻐﺸﺘﻟاﻂﻐﺿاﮫﯿﻠﻋ
ةﺪﻤﻟ5 ٍناﻮﺛﻞﯿﻐﺸﺘﻟ
ةﺪﺣﻮﻟا
ةﺪﻤﻟ لﺎﺒﻘﺘﺳﻻا ةﺪﺣو ﻦﺤﺸﺑ ﻢﻗ30ﻲﻓ ﻞﻣﺎﻜﻟﺎﺑ ﺔﯾرﺎﻄﺒﻟا ﻦﺤﺷ ﻢﺘﯾ) ﺞﺘﻨﻤﻟا ماﺪﺨﺘﺳا ﻞﺒﻗ ﻞﻗﻷا ﻰﻠﻋ ﺔﻘﯿﻗد ثﻼﺛ
USB ﺬﻔﻨﻤﺑ ﺎﮭﻠﯿﺻﻮﺘﺑ ﻢﻗو ،ةﺪﺣﻮﻟا ﻲﻓUSB.ﻚﯾﺪﻟ ﺮﺗﻮﯿﺒﻤﻜﻟا زﺎﮭﺟ ﻲﻓ دﻮﺟﻮﻤﻟا
:(ﻒﺼﻧو تﺎﻋﺎﺳ ﻞﺑﺎﻛ ﻊﺿ
LCD:ﺔﯿﻟﺎﺘﻟا ﺔﻟﺎﺤﻟا تارﺎﺷإ
ﺔﺷﺎﺷ ضﺮﻌﺗ
ﻒﯿﻛﻦﻜﻤﯾاماﺪﺨﺘﺳﻢﻠﻘﻟاﻲﻤﻗﺮﻟا؟
تﺎﻈﺣﻼﻤﻟا ﺔﺑﺎﺘﻛ
مﺪﺨﺘﺳاﻚﺑﺎﺸﻣقرﻮﻟاﻲﻓءﺰﺠﻟا
ﻲﻔﻠﺨﻟاﻦﻣةﺪﺣولﺎﺒﻘﺘﺳﻻا
ﻢﻗﺖﯿﺒﺜﺘﺑةادألﺎﺒﻘﺘﺳﻻاﻰﻠﻋﺔﻓﺎﺣ،ﺔﻗرﻮﻟا
ﺎﮭﮭﺟووﻰﻟإﻰﻠﻋأ
Page 55

ﻊﯾﺮﺴﻟا ءﺪﺒﻟا ﻞﯿﻟد
TM
Expre ss 2.فﺮﻌﺘﻠﻟ ﻰﻠﻋ
،ءﺎﺟﺮﻟاعﻮﺟﺮﻟاﻰﻟإﻞﯿﻟدمﺪﺨﺘﺴﻤﻟا
ﻂﺨﺑ ﺔﻣﻮﺳﺮﻤﻟاو ﺔﺑﻮﺘﻜﻤﻟا تﺎﻣﻮﺳﺮﻟاو تﺎﻈﺣﻼﻤﻟا طﺎﻘﺘﻟا ﮫﻨﻜﻤﯾ ﻞﻘﻨﺘﻣ تﺎﻈﺣﻼﻣ نّوﺪﻣو ﻢﻠﻗ ﻦﻋ ةرﺎﺒﻋ
ﺔﻄﺒﻟا ﺔﯾوﺎﺣ ءﺎﻄﻏ ﻚﻔﺑ ﻢﻗ
ﻦﯿﺘﯾرﺎﻄﺑ ﻞِﺧدأو
)
ﺔﺒﺟﻮﻤﻟا بﺎﻄﻗﻷا ﮫﯿﺟﻮﺗ ﻊﻣ
GPSR41 وأGP392(
ﻰﻠﻋأ ﻰﻟإ
ﻢﻠﻘﻟا ﻦﺳ
M21 ﺎﮭﻟﻮط ﻎﻠﺒﯾو67 ﻢﻣ ×2.35 ﻂﻐﺿاو ،(ﻢﻣ
:(ﺮﺒﺤﻟا ﺔﺒﻠﻋ جاﺮﺧﻹ ﻢﻠﻘﻟا ءﺎﻄﻏ مﺪﺨﺘﺴُﯾ) ﺮﺒﺤﻟا ﺔﺒﻠﻋ لاﺪﺒﺘﺳﻻ
لﻮﺣ ﺔﻣﺎﻋ تﺎﮭﯿﺟﻮﺗ اﺬھ ﻊﯾﺮﺴﻟا ءﺪﺒﻟا ﻞﯿﻟد ﺮﻓﻮﯾ ﺖﯿﺒﺜﺗ ماﺪﺨﺘﺳاوIRISNotes
TM
.ﺎھﺮﯾﺪﺼﺗو ﺎﮭﻈﻔﺣو ﺎھﺮﯾﺮﺤﺗ ﻚﻟﺬﻛو ﺪﯿﻟا ﺮﯾﺮﺤﺘﻠﻟ ﻞﺑﺎﻗ ﺺﻧ ﻰﻟإ رﻮﻔﻟا ﻰﻠﻋ ﺪﯿﻟا ﻂﺨﺑ ﺔﺑﻮﺘﻜﻤﻟا ﻚﺗﺎﻈﺣﻼﻣ ﻞﯾﻮﺤﺗ ﻚﻨﻜﻤﯾ
TM
IRISNotes
Notes Lite(ﻂﻘﻓ ﺮﺗﻮﯿﺒﻤﻜﻟا زﺎﮭﺟ)
.ﻢﻠﻘﻟا ءاﺰﺟأ ﻚﻔﺑ ﻢﻘﺗ ﻻ.ﮫﻓﻼﺗإ ﻰﻟإ ﻚﻟذ يدﺆﯾ ﺪﻘﻓ
تﺎﯾرﺎﻄﺑ
ﺔﯿﺳﺎﯿﻘﻟا ﺔﺒﻠﻌﻟا) ﻢﻠﻘﻟا ﻦﺳ ﻲﻓ ﺮﺒﺣ ةﻮﺒﻋ لﺎﺧدﺈﺑ ﻢﻗ
.جرﺎﺨﻟا ﻰﻟإ
ﯿﻠﻋ.ﺢﯿﺤﺼﻟا ﺎﮭﻧﺎﻜﻣ ﻲﻓ ﺮﻘﺘﺴﺗ ﻰﺘﺣ ﻖﻓﺮﺑ ﺎﮭ
-.ةﺪﯾﺪﺠﻟا ﺮﺒﺤﻟا ﺔﺒﻠﻋ ﻞِﺧدأ
ﺮﯾﺬﺤﺗ
تﺎﻤﯿﻠﻌﺘﻟاﺔﻠﺼﻔﻤﻟالﻮﺣﺔﻋﻮﻤﺠﻤﻟاﺔﻠﻣﺎﻜﻟاﻒﺋﺎظﻮﻟIRISNotes
ﻒﻠﻣوتﺎﻤﯿﻠﻌﺘﻟاﻦﯾدوﺰﻤﻟا ﻊﻣ ﺮﻘﻟاطﻮﻐﻀﻤﻟا ص صﺎﺨﻟاﺘﻟﺎﺑﺖﯿﺒﺜ.
IRISNotes
.تﺎﻐﻠﻟا ﻦﻣ ﺪﯾﺪﻌﻟﺎﺑ
ﺔﻣﺰﺤﻟا تﺎﯾﻮﺘﺤﻣ
-صﺮﻘﻟطﻮﻐﻀﻤﻟاصﺎﺨﻟاﺖﯿﺒﺜﺘﺑ
-ﻞﻤﺘﺸﯾاﺬھصﺮﻘﻟاطﻮﻐﻀﻤﻟا ﻰﻠﻋ ﻖﯿﺒﻄﺗEasy Note TakerوMySc r ipt
-ﻊﯾﺮﺴﻟا ءﺪﺒﻟا ﻞﯿﻟد
- ﻞﺑﺎﻛو لﺎﺒﻘﺘﺳا ةﺪﺣوو ﻲﻤﻗر ﻢﻠﻗUSBﺮﺒﺣ تاﻮﺒﻋ ثﻼﺛو تﺎﯾرﺎﻄﺒﻟا ﻦﻣ ﻦﯿﺘﻋﻮﻤﺠﻣو ﺐﺤﺴﻠﻟ ﻞﺑﺎﻗ
ا ﻢﻠﻘﻟاﻲﻤﻗﺮﻟ
- ﺔﻠﻤﻌﺘﺴﻤﻟا ﺮﺒﺤﻟا ﺔﺒﻠﻋ ﺐﺤﺳا ﻢﺛ ،ﻢﻠﻘﻟا ﻦﺳ ﺔﮭﺟاﻮﻣ ﻲﻓ ءﺎﻄﻐﻟا ﻦﻣ يﻮﻠﻌﻟا ءﺰﺠﻟا ﻰﻠﻋ ةﻮﻘﺑ ﻂﻐﺿا
TM
!
ﺔّﯿﺑَﺮَﻌْﻟا
Page 56

www.irislink.com
765010457769
I.R.I.S. Products & Technologies
I.R.I.S. - Louvain-la-Neuve (Belgium)
I.R.I.S. AG - Aachen (Germany)
I.R.I.S. Inc. - Delray Beach (United States)
I.R.I.S. HK Ltd - Hong Kong (China)
© Copyright 2012 I.R.I.S. s.a./n.v.
All rights reserved for all countries. I.R.I.S., I.R.I.S.’ product names, I.R.I.S.’ logos and
I.R.I.S.’ product logos are I.R.I.S. trademarks. All other products and names mentioned are trademarks or registered trademarks from their respective owners.
 Loading...