

Page 1

English English
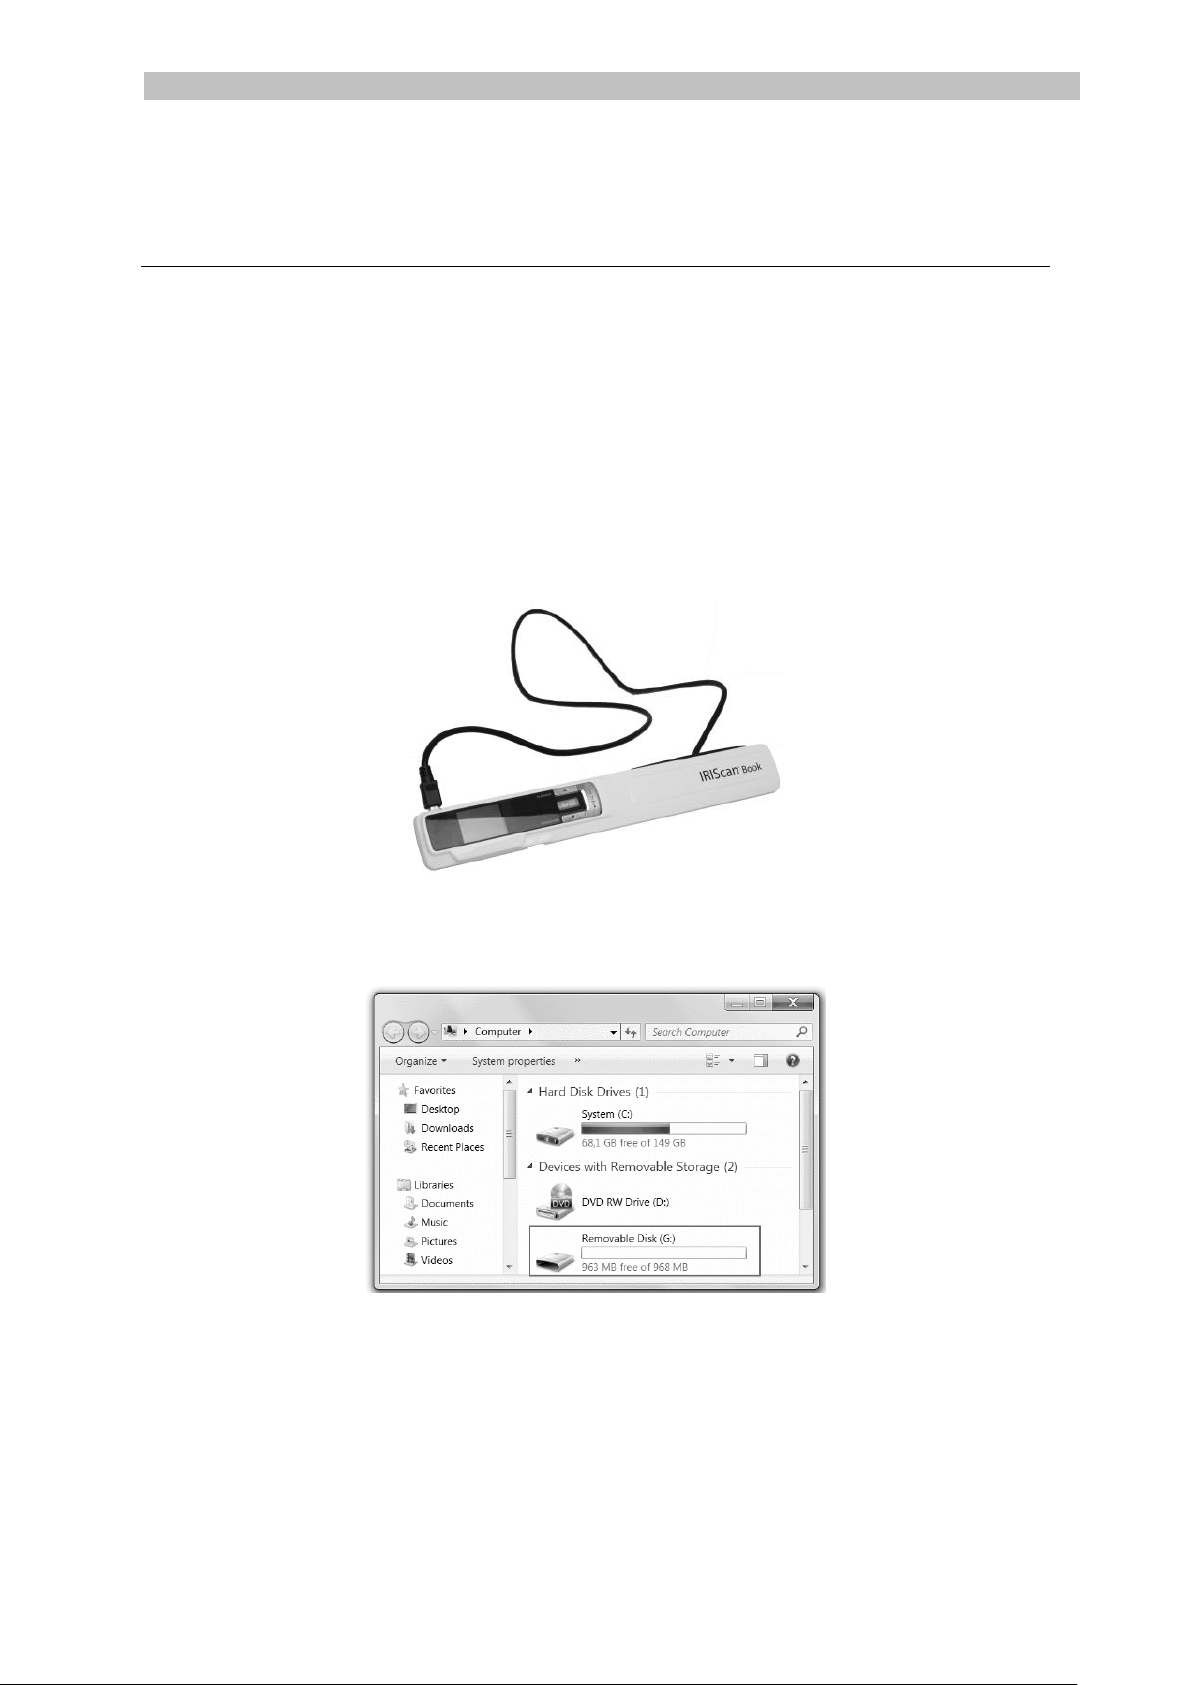
This Quick User Guide helps you get started with the IRIScan™ Book 3 scanner.
This scanner is supplied with the software applications Readiris™ Pro 12,
IRIScan™ Direct and IRISCompressor™. Corresponding Quick User Guides can
be found on the IRIScan™ Book CD-ROM. For detailed information about their full
range of features, consult the latest User Guides on www.irislink.com/support.
The descriptions in this guide are based on the Windows 7, Mac OS Lion and iOS 6
Operating Systems. Please read this guide before operating this scanner and its
software. All information is subject to change without prior notice.
Table of Contents
1. Check the Accessories
2. Prepare the Scanner
3. Choose the Scanner Settings
4. Scan Documents
5. Transfer Documents to your Computer / Tablet
6. Scan with IRIScan™ Direct (Windows only)
7. Technical Info
8. Troubleshooting Info
1
Page 2
English English
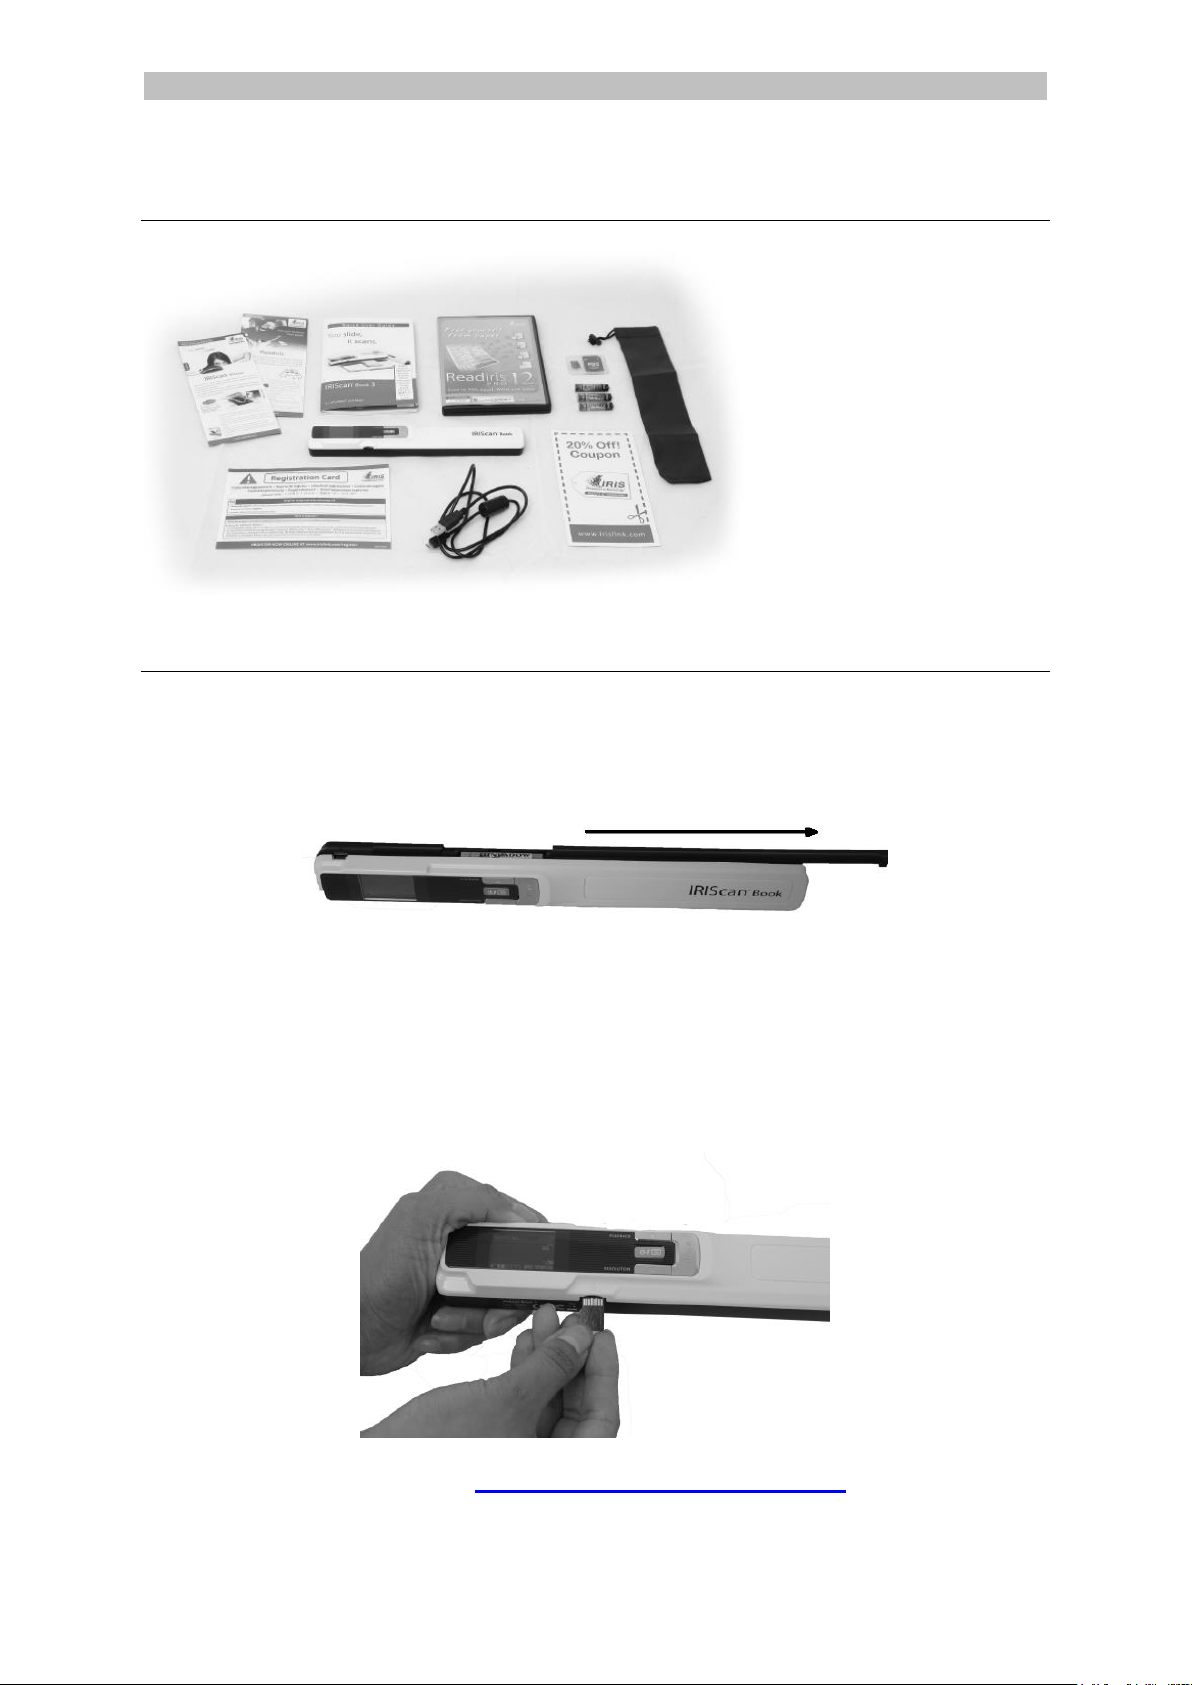
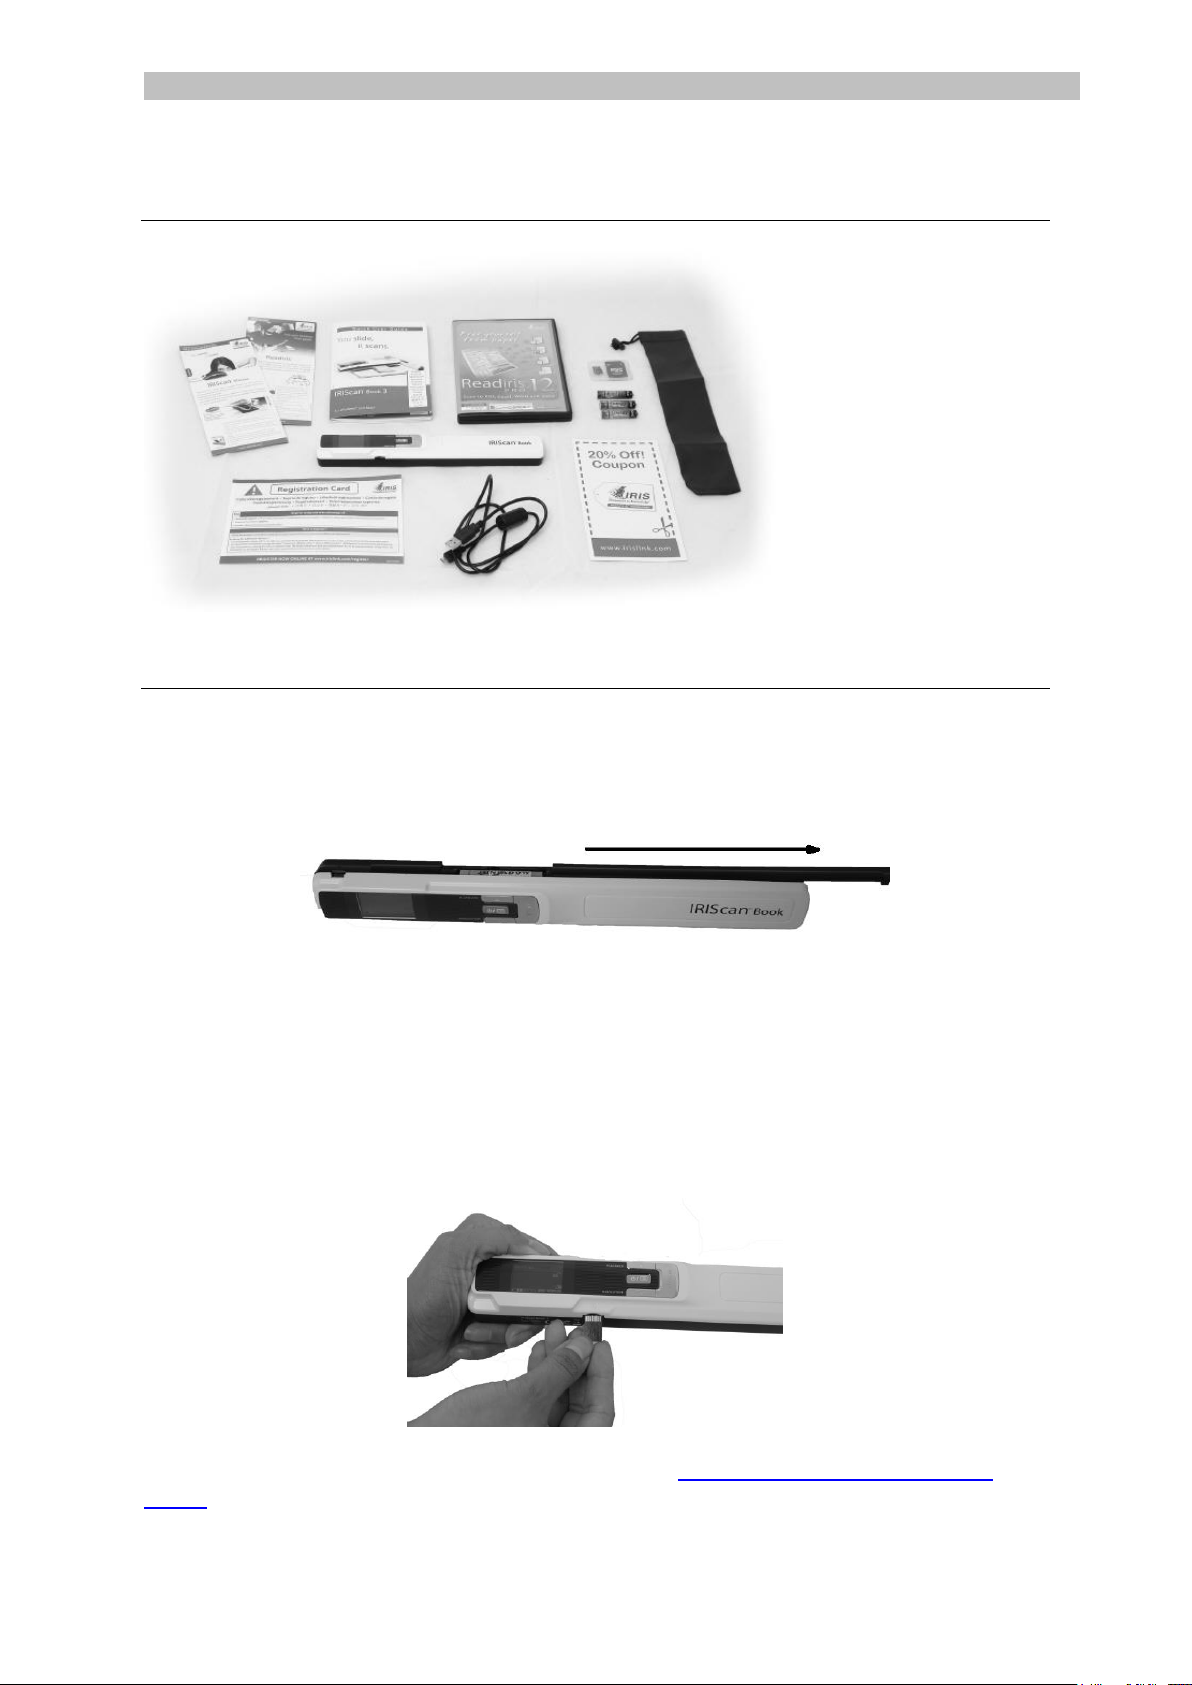
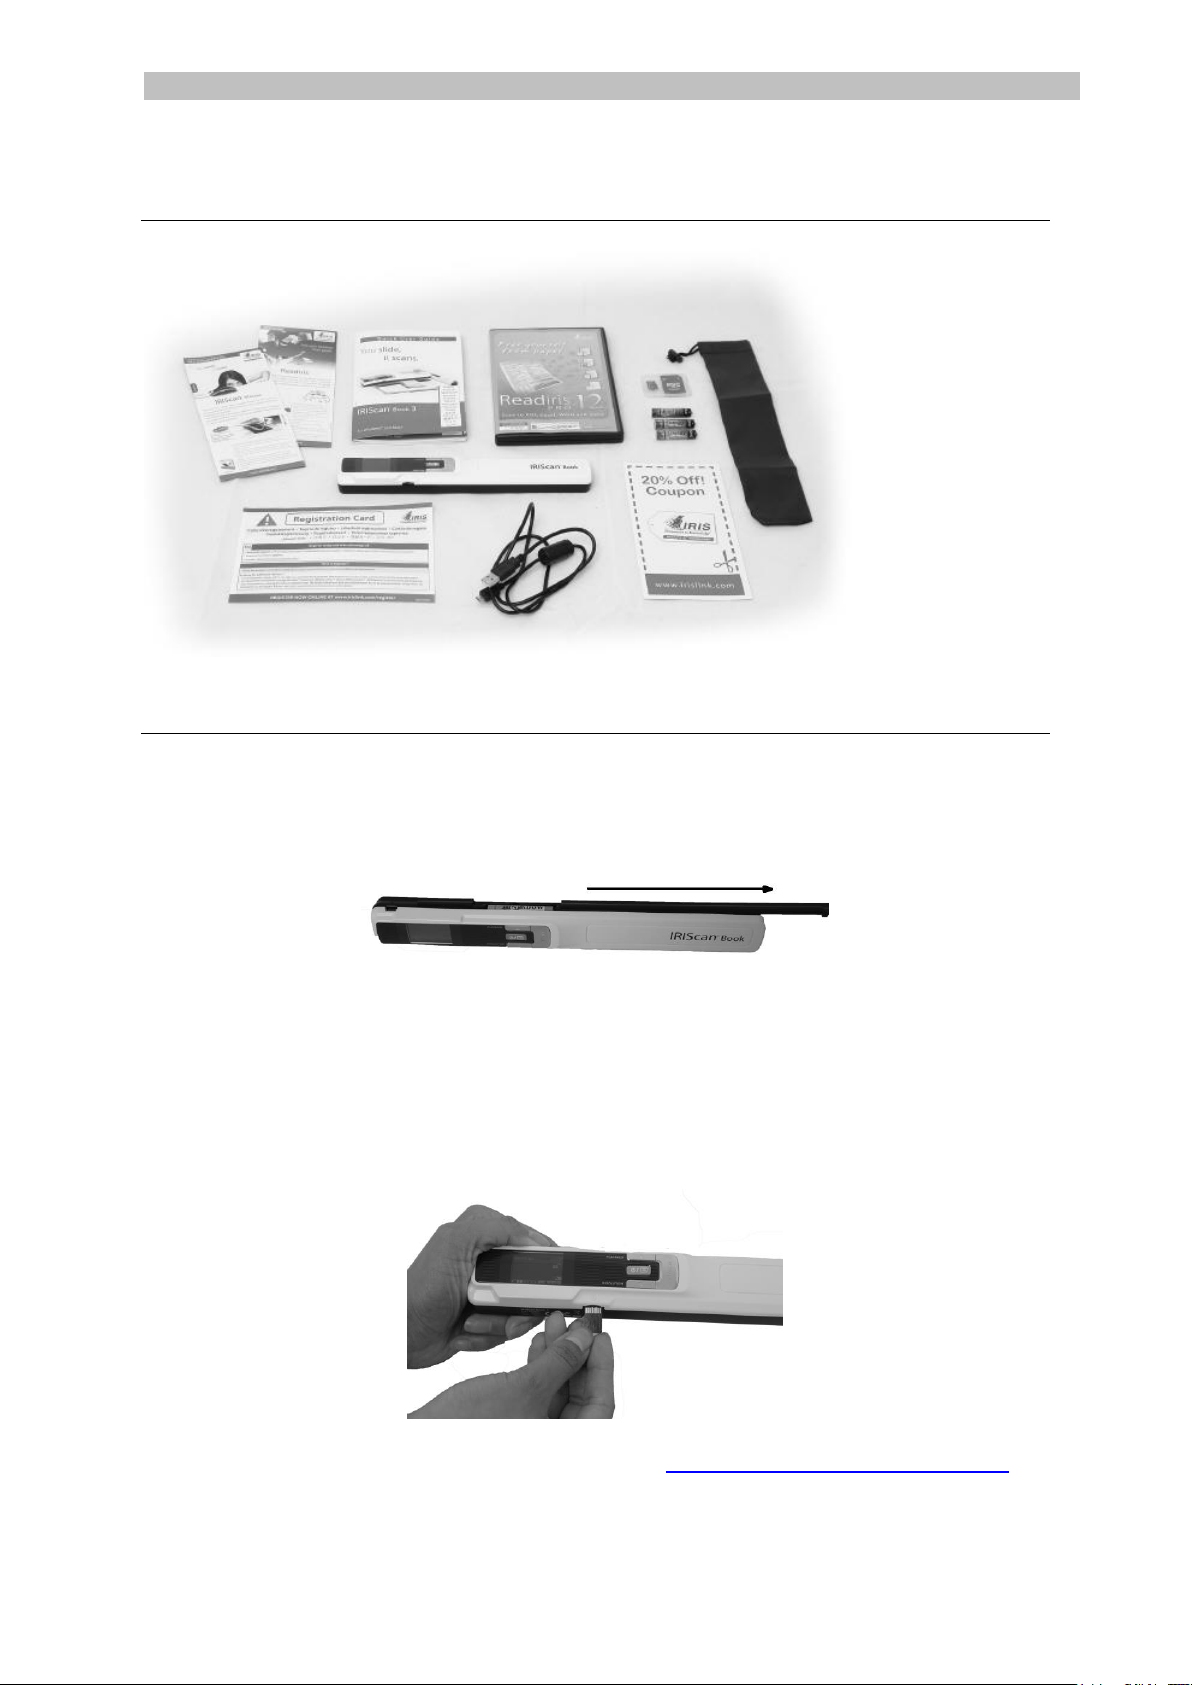
1. Check the Accessories
2. Prepare the Scanner
Insert the included batteries
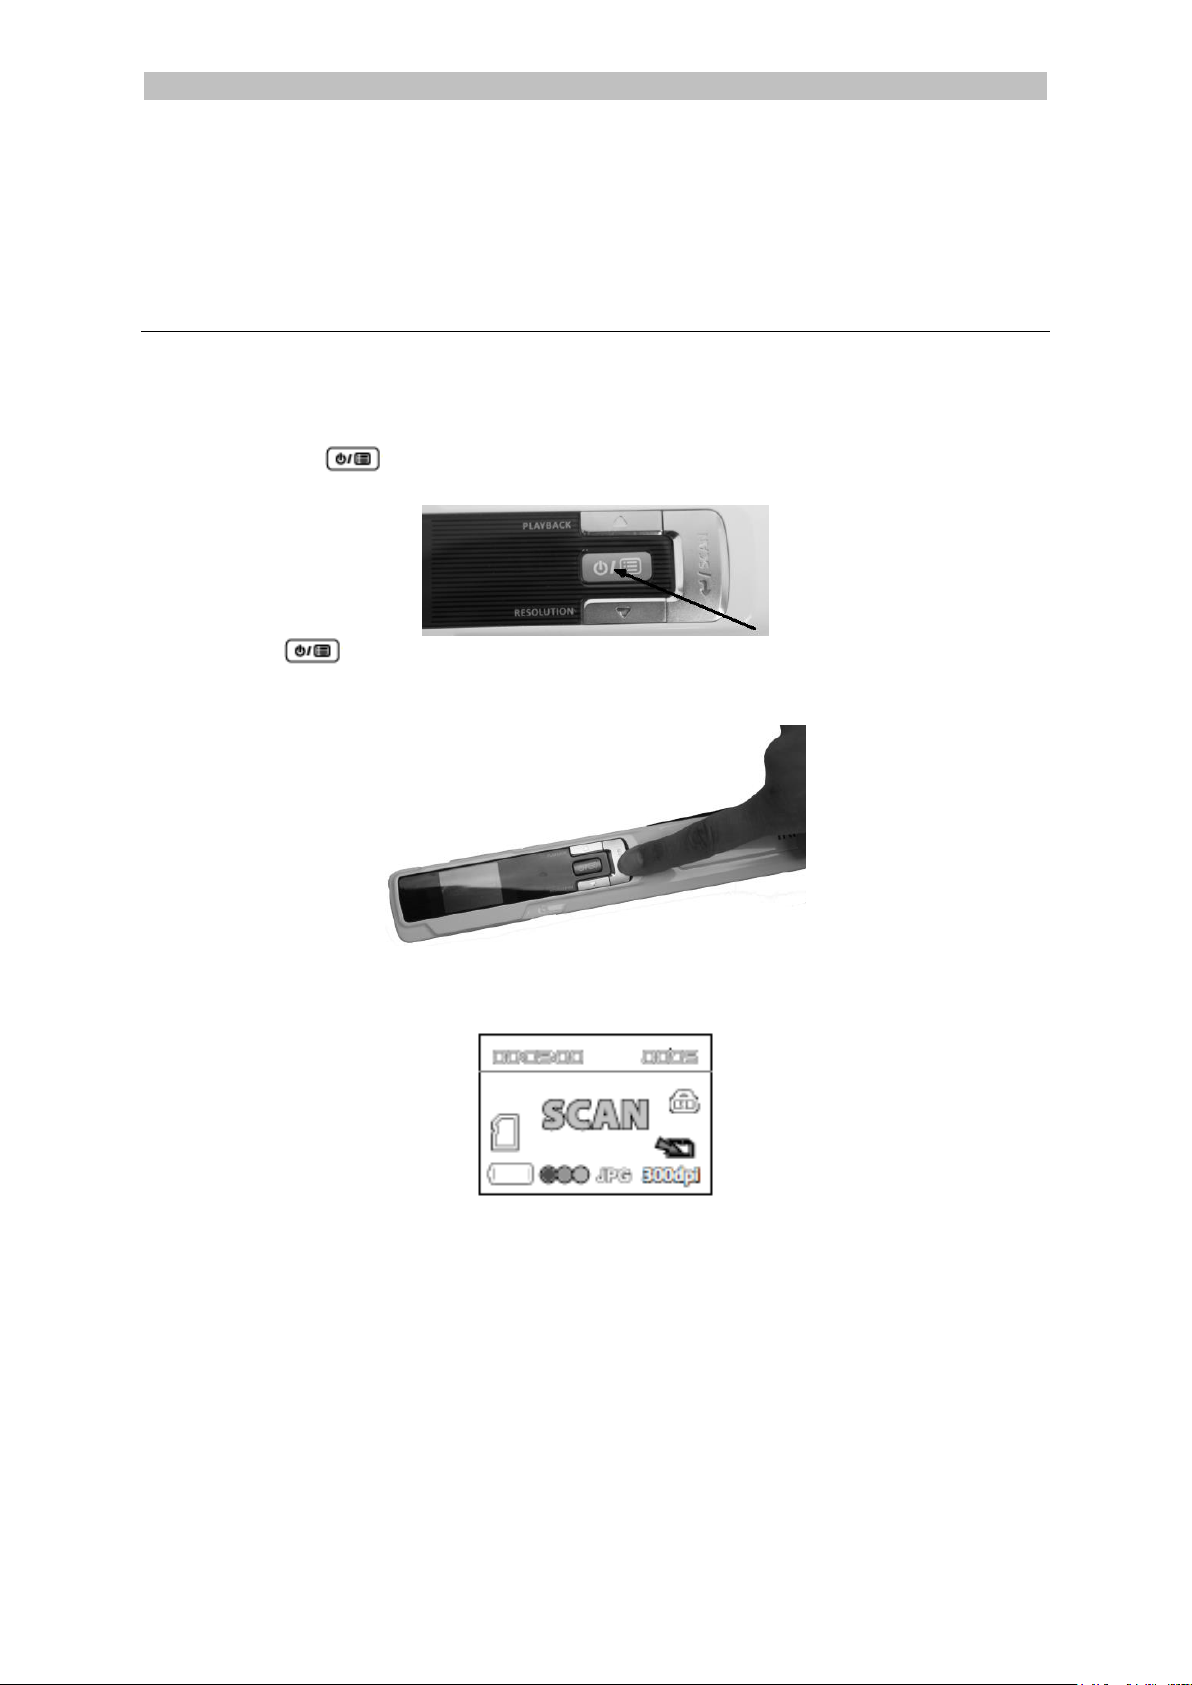
1. Open the battery compartment as shown in the image.
2. Insert the 3 alkaline batteries, minding the correct polarity.
The correct polarity is shown inside the scanner.
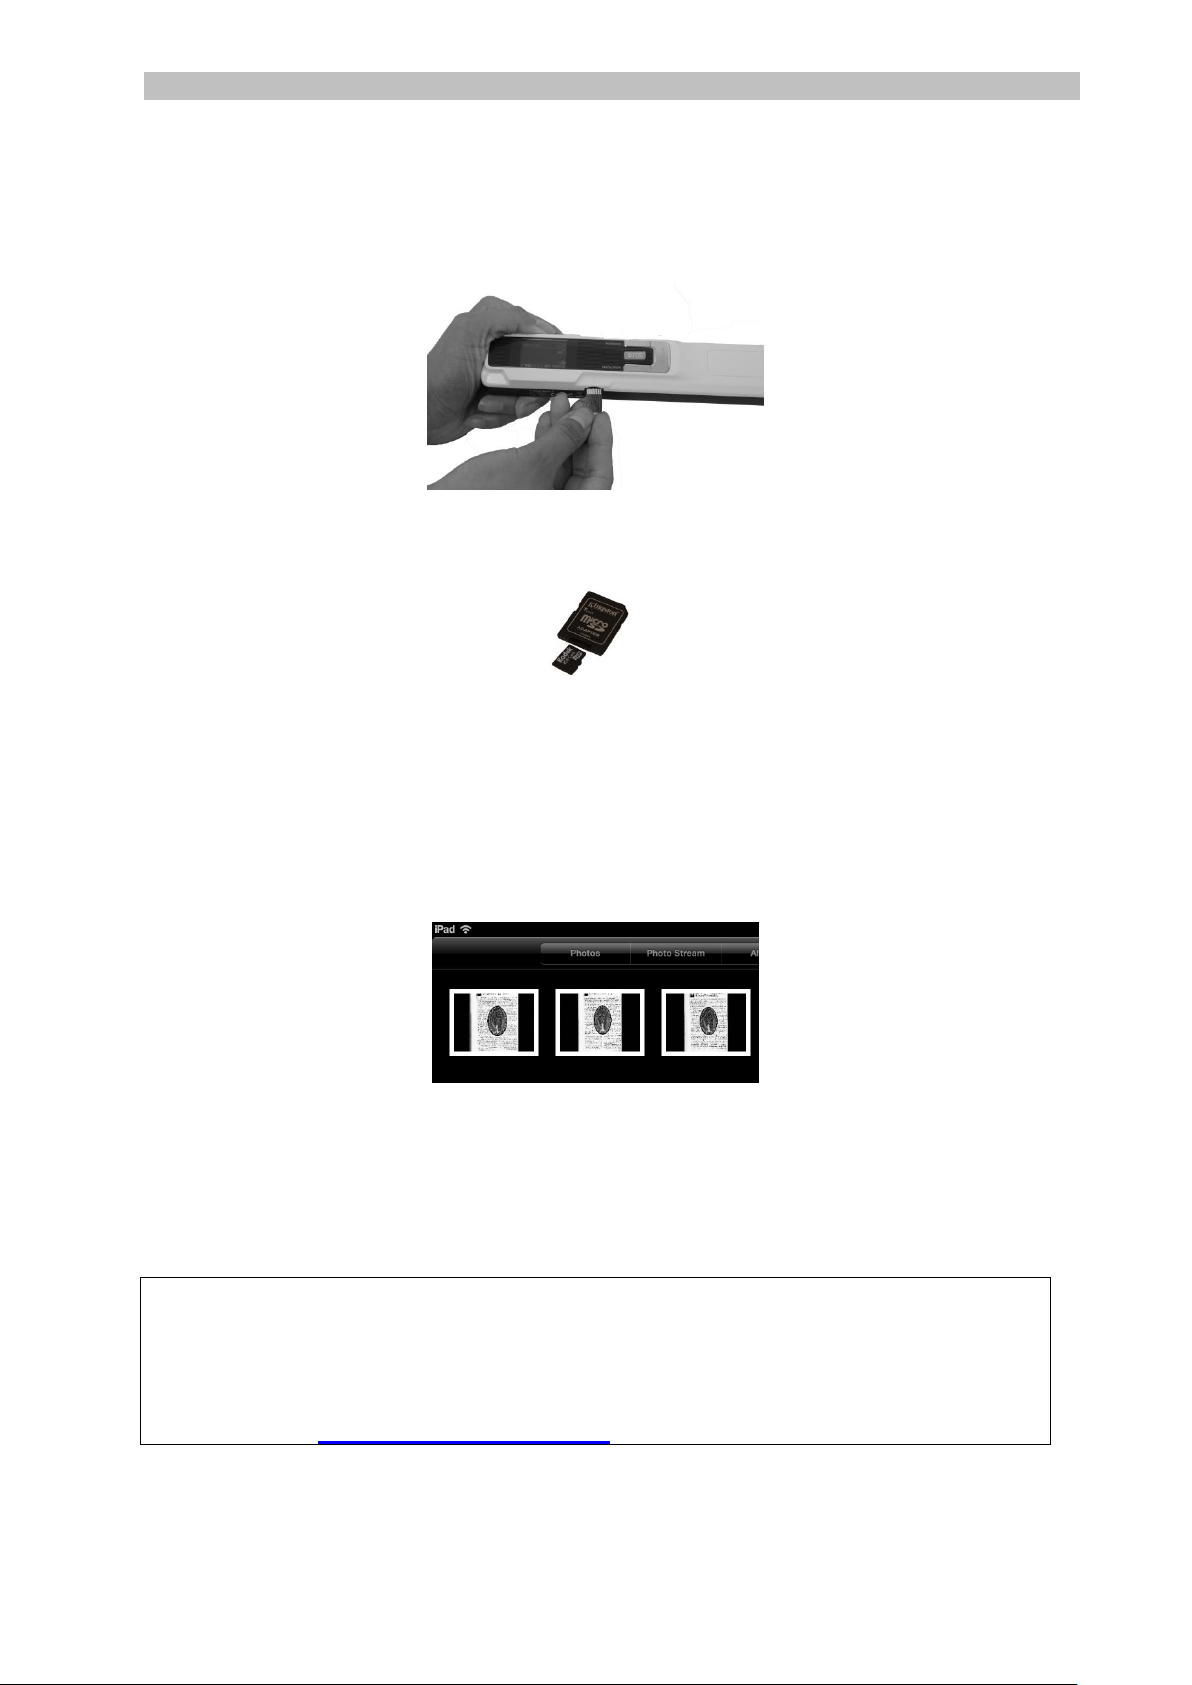
Insert the included microSD card
1. Insert the microSD card gently into the card slot until the card is latched.
Note: on a Windows PC, the IRIScan Book can also be used without batteries or
microSD card. See the section Scan Images with IRIScan Direct for more
information.
3
Page 3
English English
Format the microSD card
Some new microSD cards can only be used after formatting them. See section 3.
Choose the Scanner Settings to learn how to format the card.
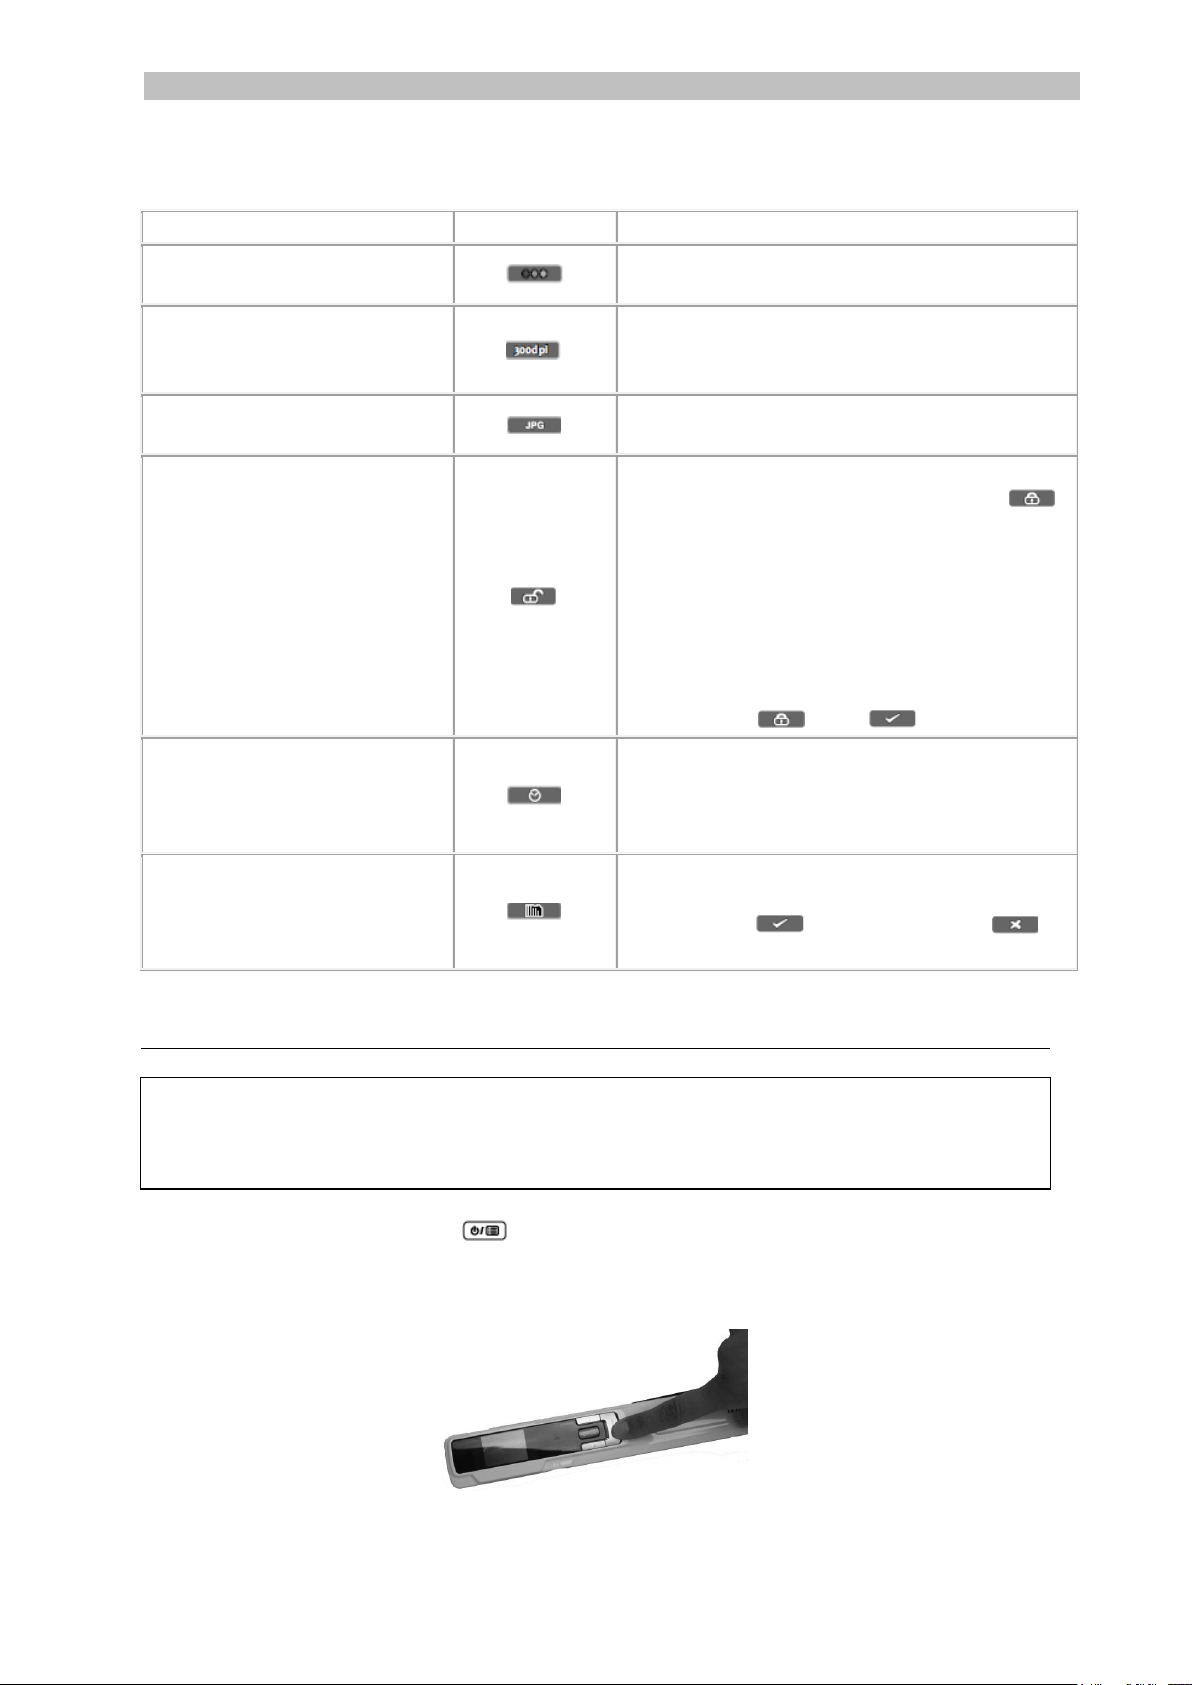
3. Choose the Scanner Settings
Note: before you try to access the scanner settings, make sure the provided
microSD card is inserted in the card slot.
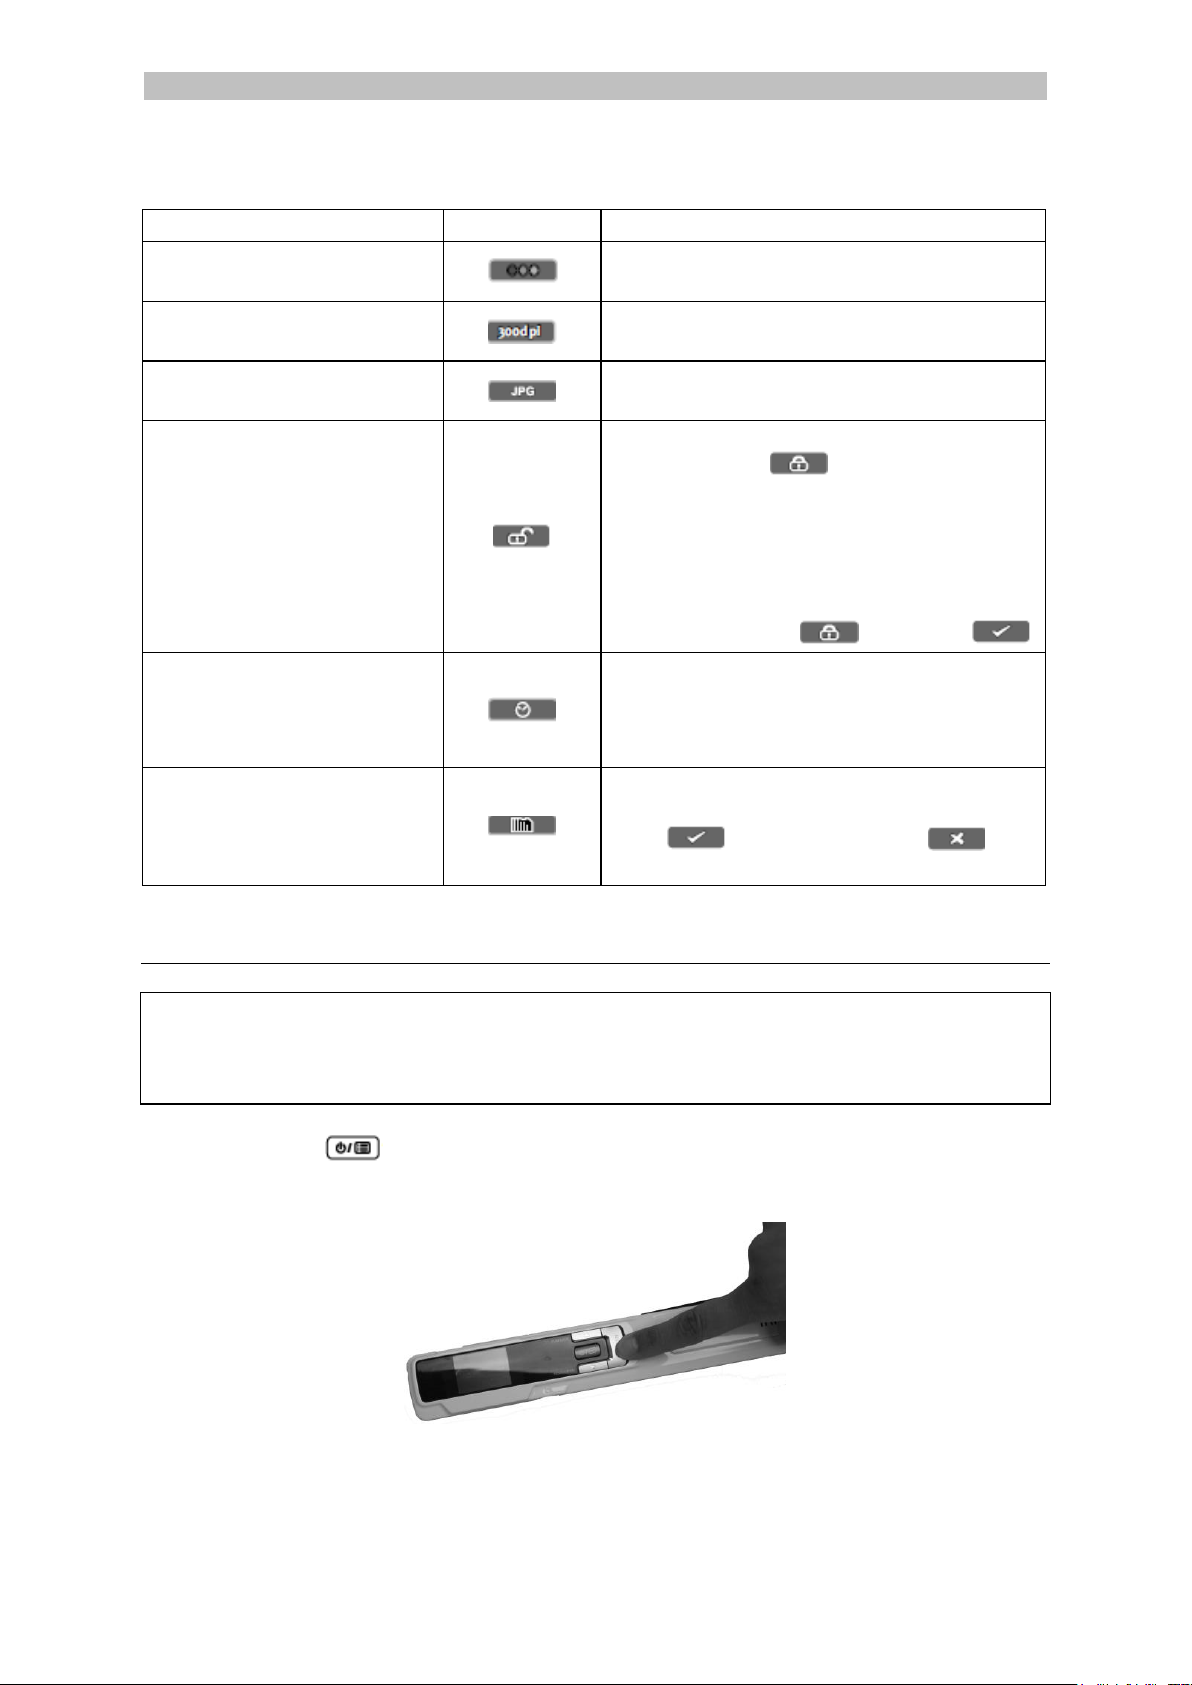
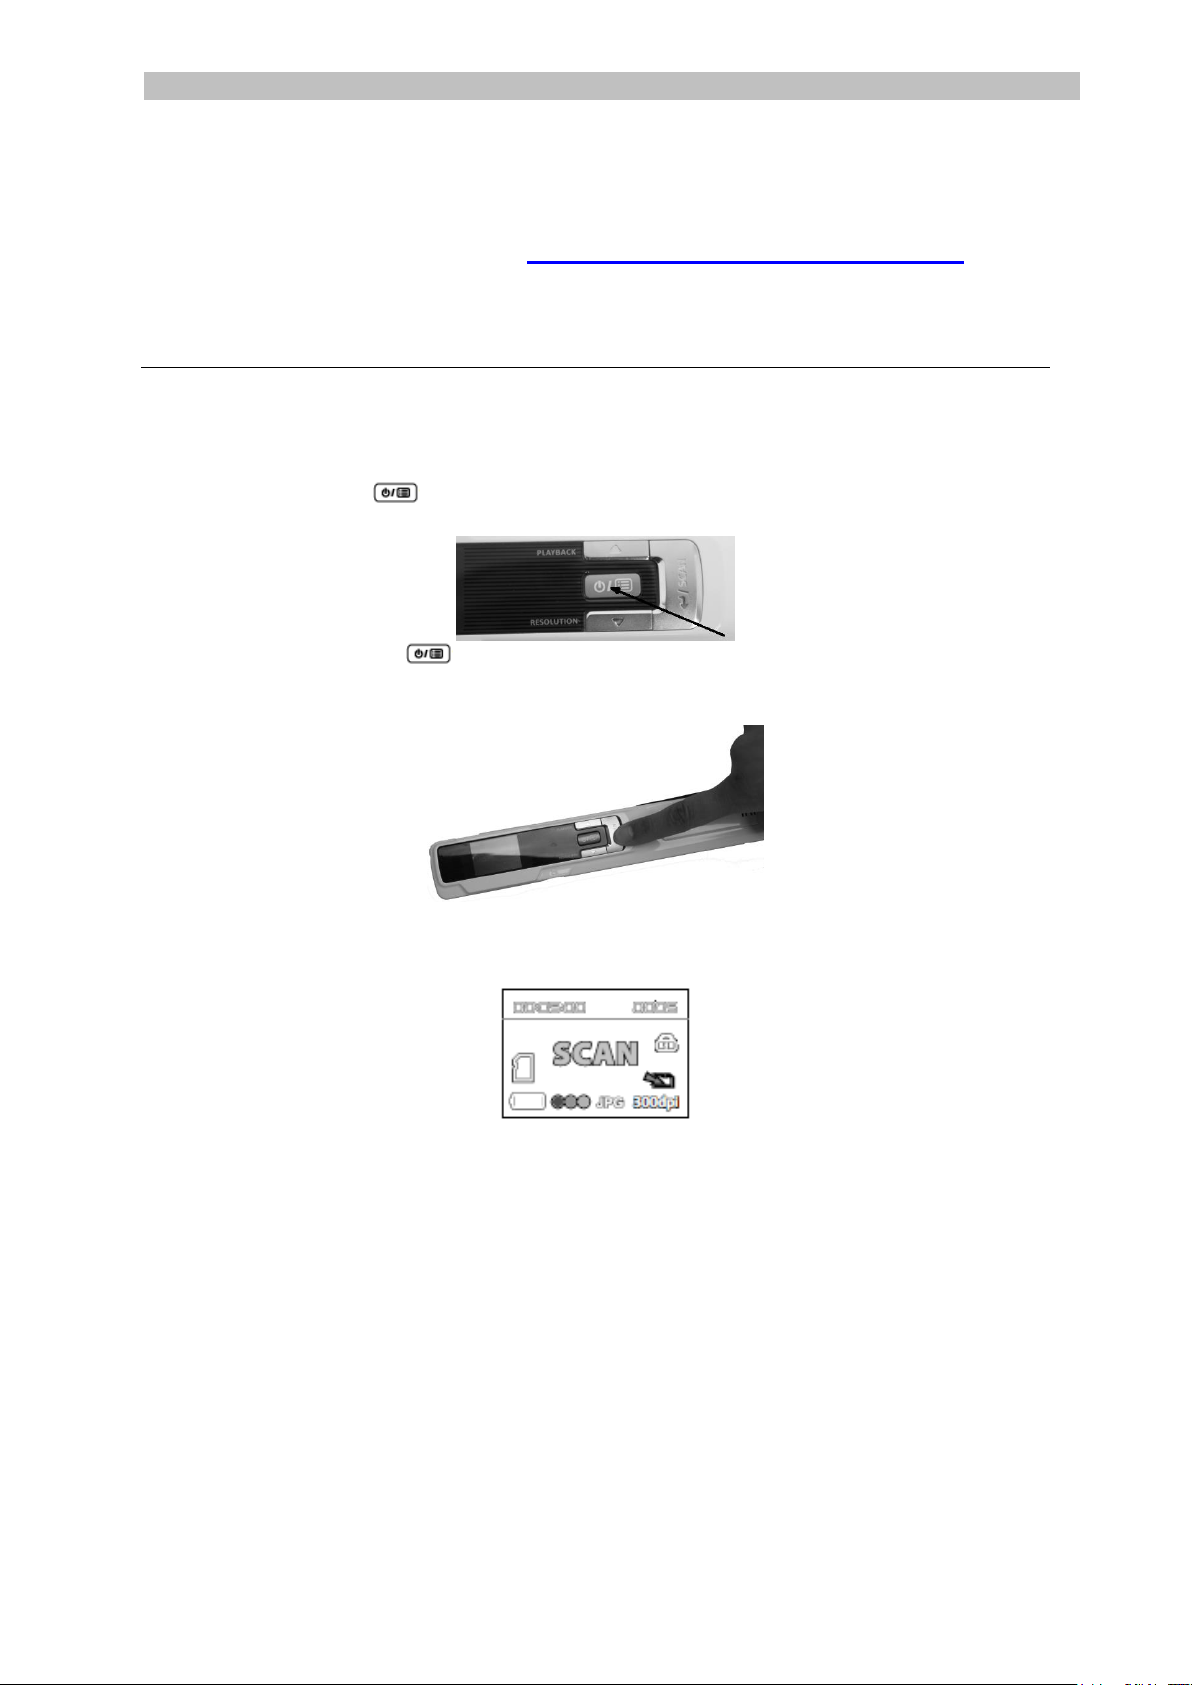
1. Press the button for 2 seconds to power on the scanner. The display
lights up.
2. Press once to access the scanner settings.
3. Use the up/down arrows to move to the required settings.
4. Then press Scan to open it.
5. Use the up/down arrows to move to the required setting.
6. Then press Scan again to confirm.
The settings you select appear on the display.
4
Page 4
English English
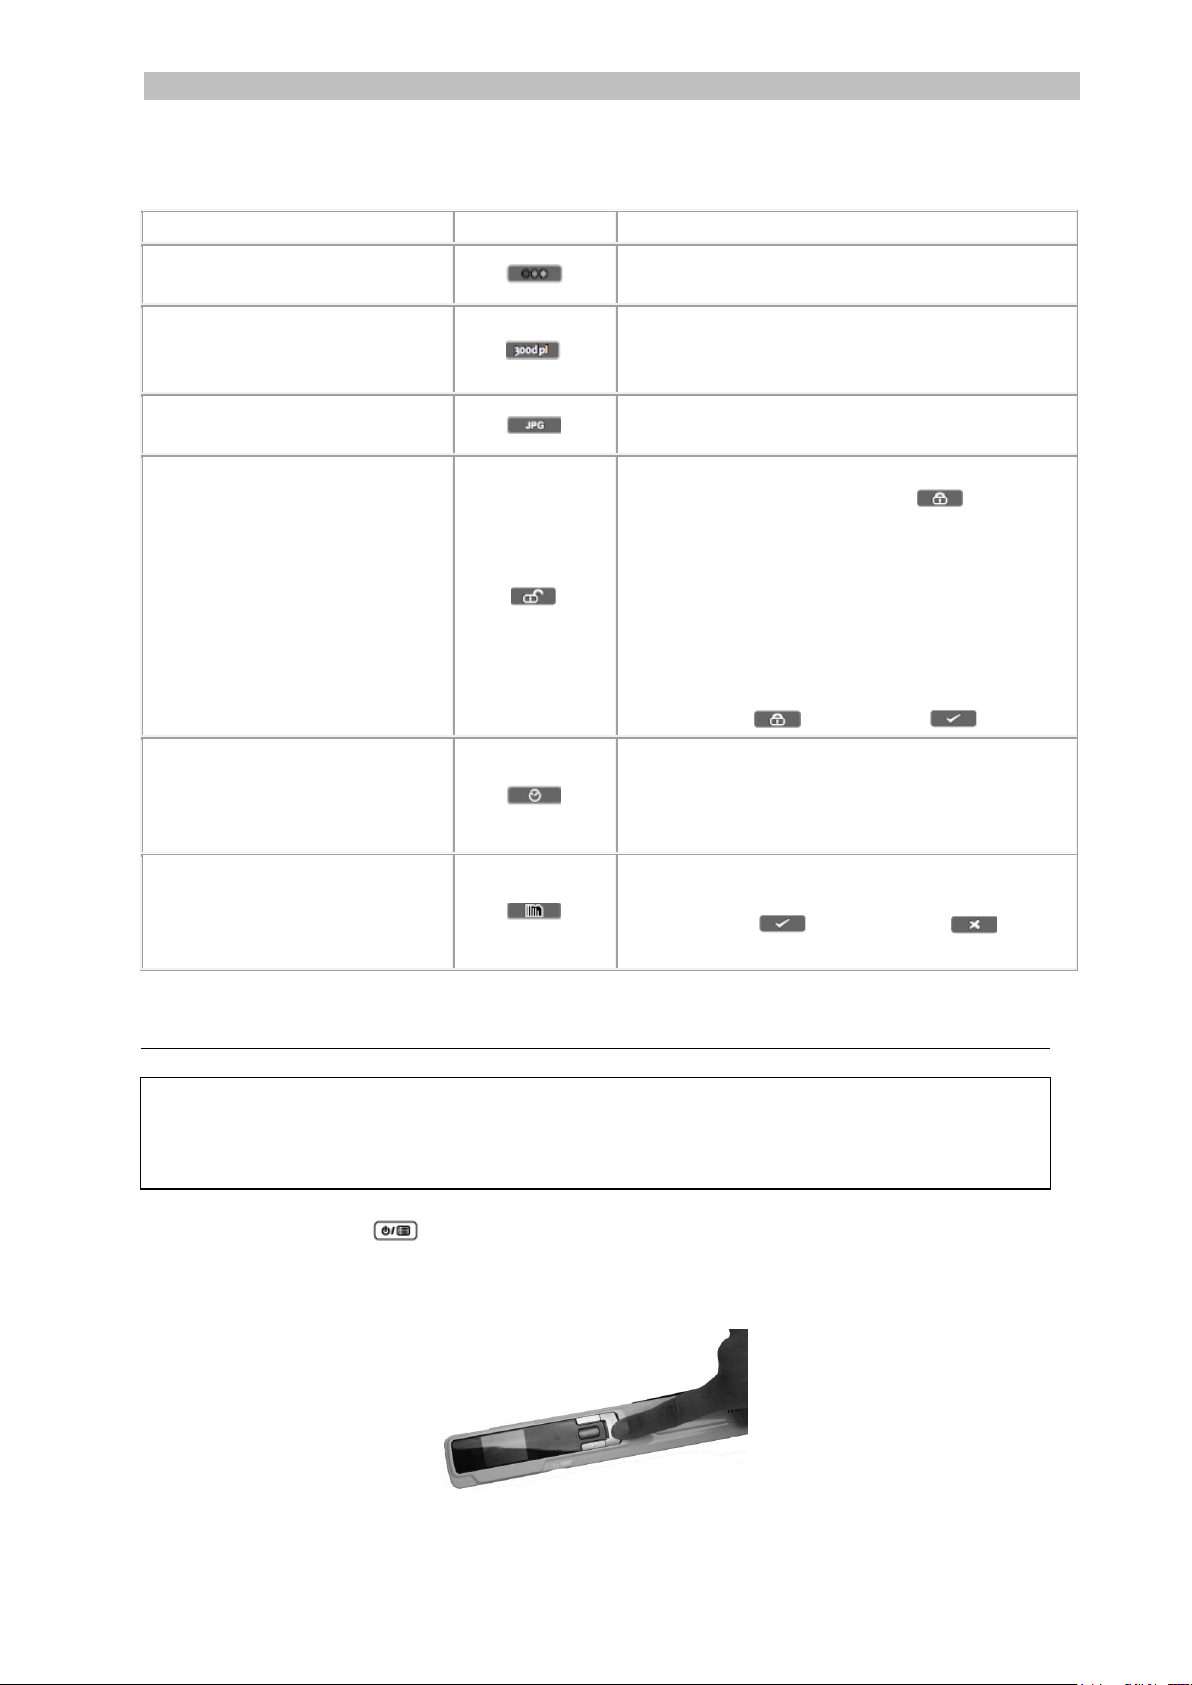
Scanner Setting
Icon
Description
Color mode
IRIScan™ Book scans images in color or
black-and-white.
Resolution
IRIScan™ Book scans images in a
resolution of 300 dpi, 600 dpi or 900 dpi.
Output format
IRIScan™ Book saves images either as
JPG image or PDF image.
Encryption
IRIScan™ Book can save images as
encrypted files. That way the files
can only be read on a computer if you
connect the scanner to it. The files will
not be readable directly on the microSD
card.
By default, files are not encrypted. To
encrypt file, select and then .
Date and Time
With this setting you can add date and
time info to your scans.
The date and time are also shown on the
display.
Card formatting
With this setting you can format the
microSD card.
Note: formats the card. does
not format the card.
Overview of the Scanner Settings
4. Scan Documents
Attention:
The IRIScan™ Book 3 is designed to scan one page at a time. It does not generate
multi-page PDF files.
Follow steps 2 to 5 below for each page that you scan.
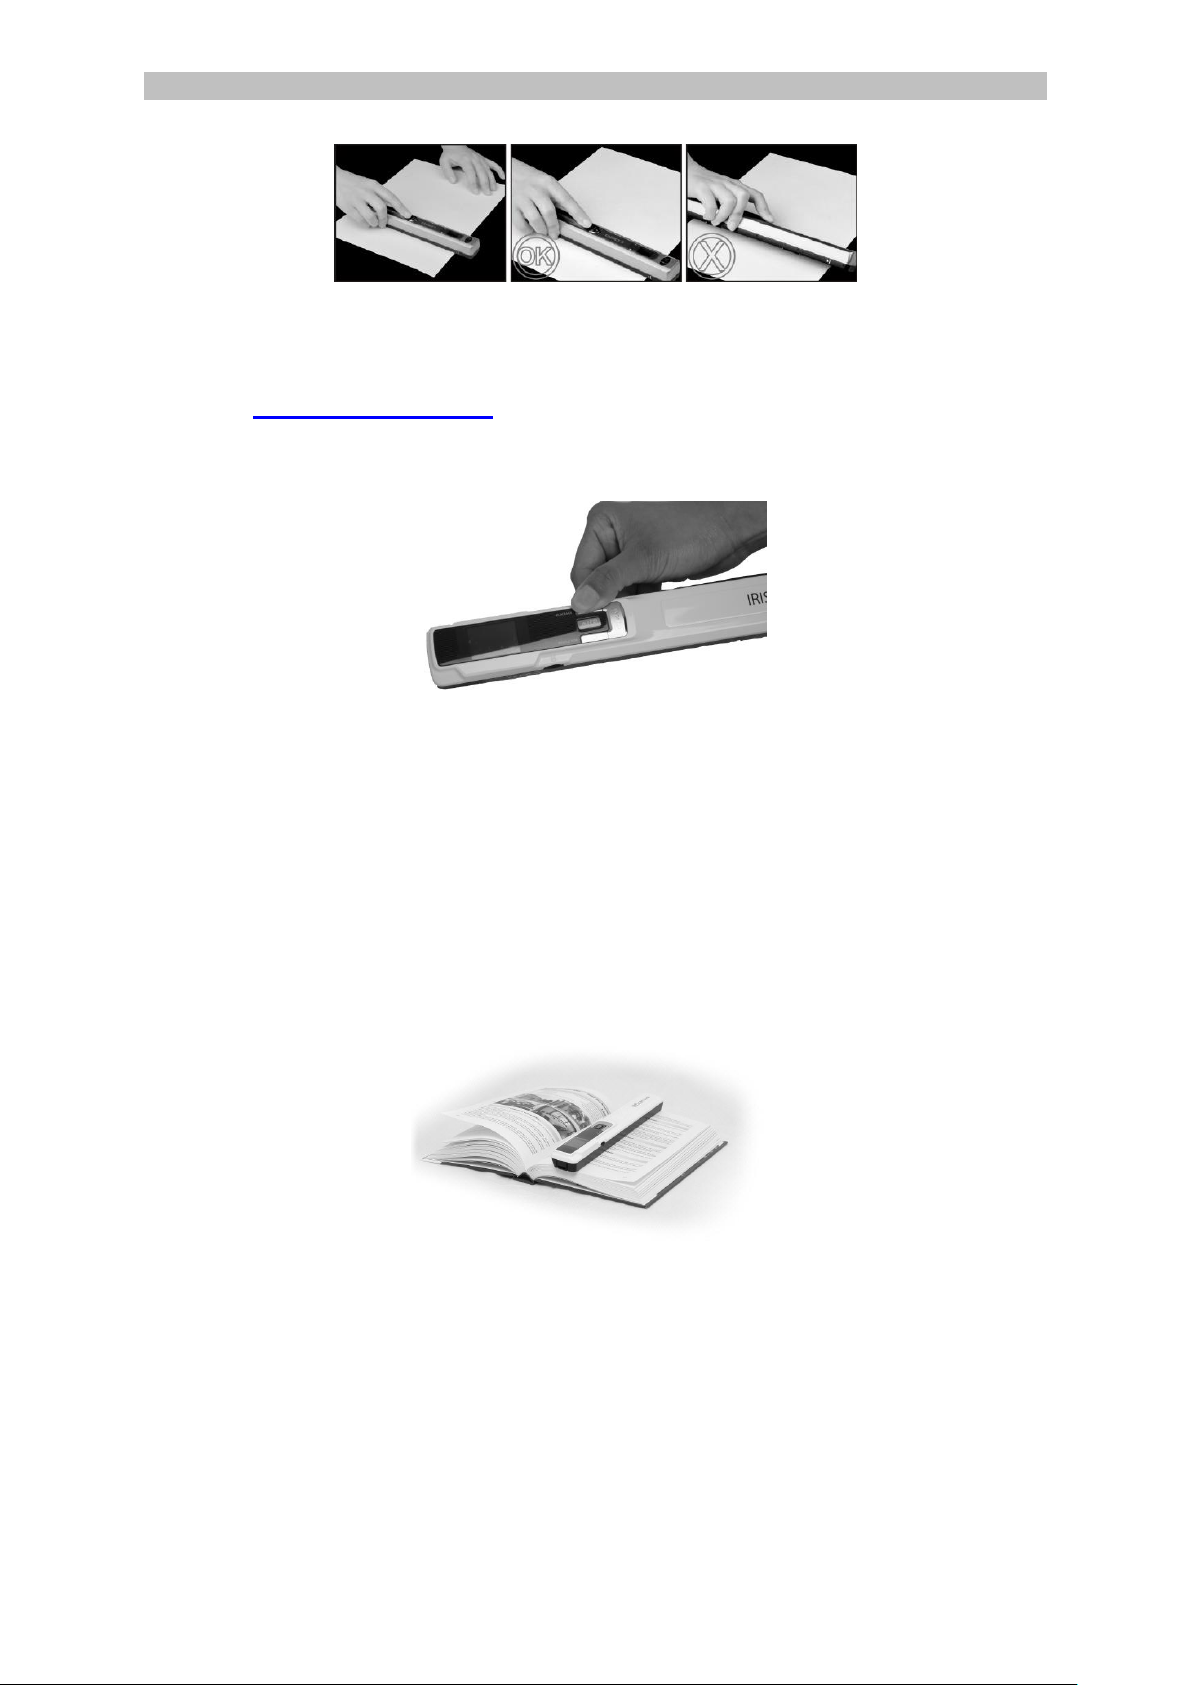
1. Press the button for 2 seconds to power on the scanner.
2. Place your scanner at the top of the page you want to scan.
3. Press the Scan button once. The word Scan appears in the display.
4. Slide the scanner slowly and steadily over the page.
Tip: hold the document steady with one hand while scanning.
5
Page 5
English English
5. When you have reached the bottom of the page, press the Scan button again
to stop scanning.
Note: in case an error occurs during scanning - when scanning too fast or
not levelly for instance - ERROR appears on the display. See the section
Troubleshooting Info for help.
6. The scan appears briefly on the display. To check it again, press the up
button next to Playback.
Tip:
In case you need to create multi-page PDF's:
Scan your pages one by one.
Transfer the image or single-page PDF files you scanned to your computer.
Use Readiris to generate multi-page PDF files.
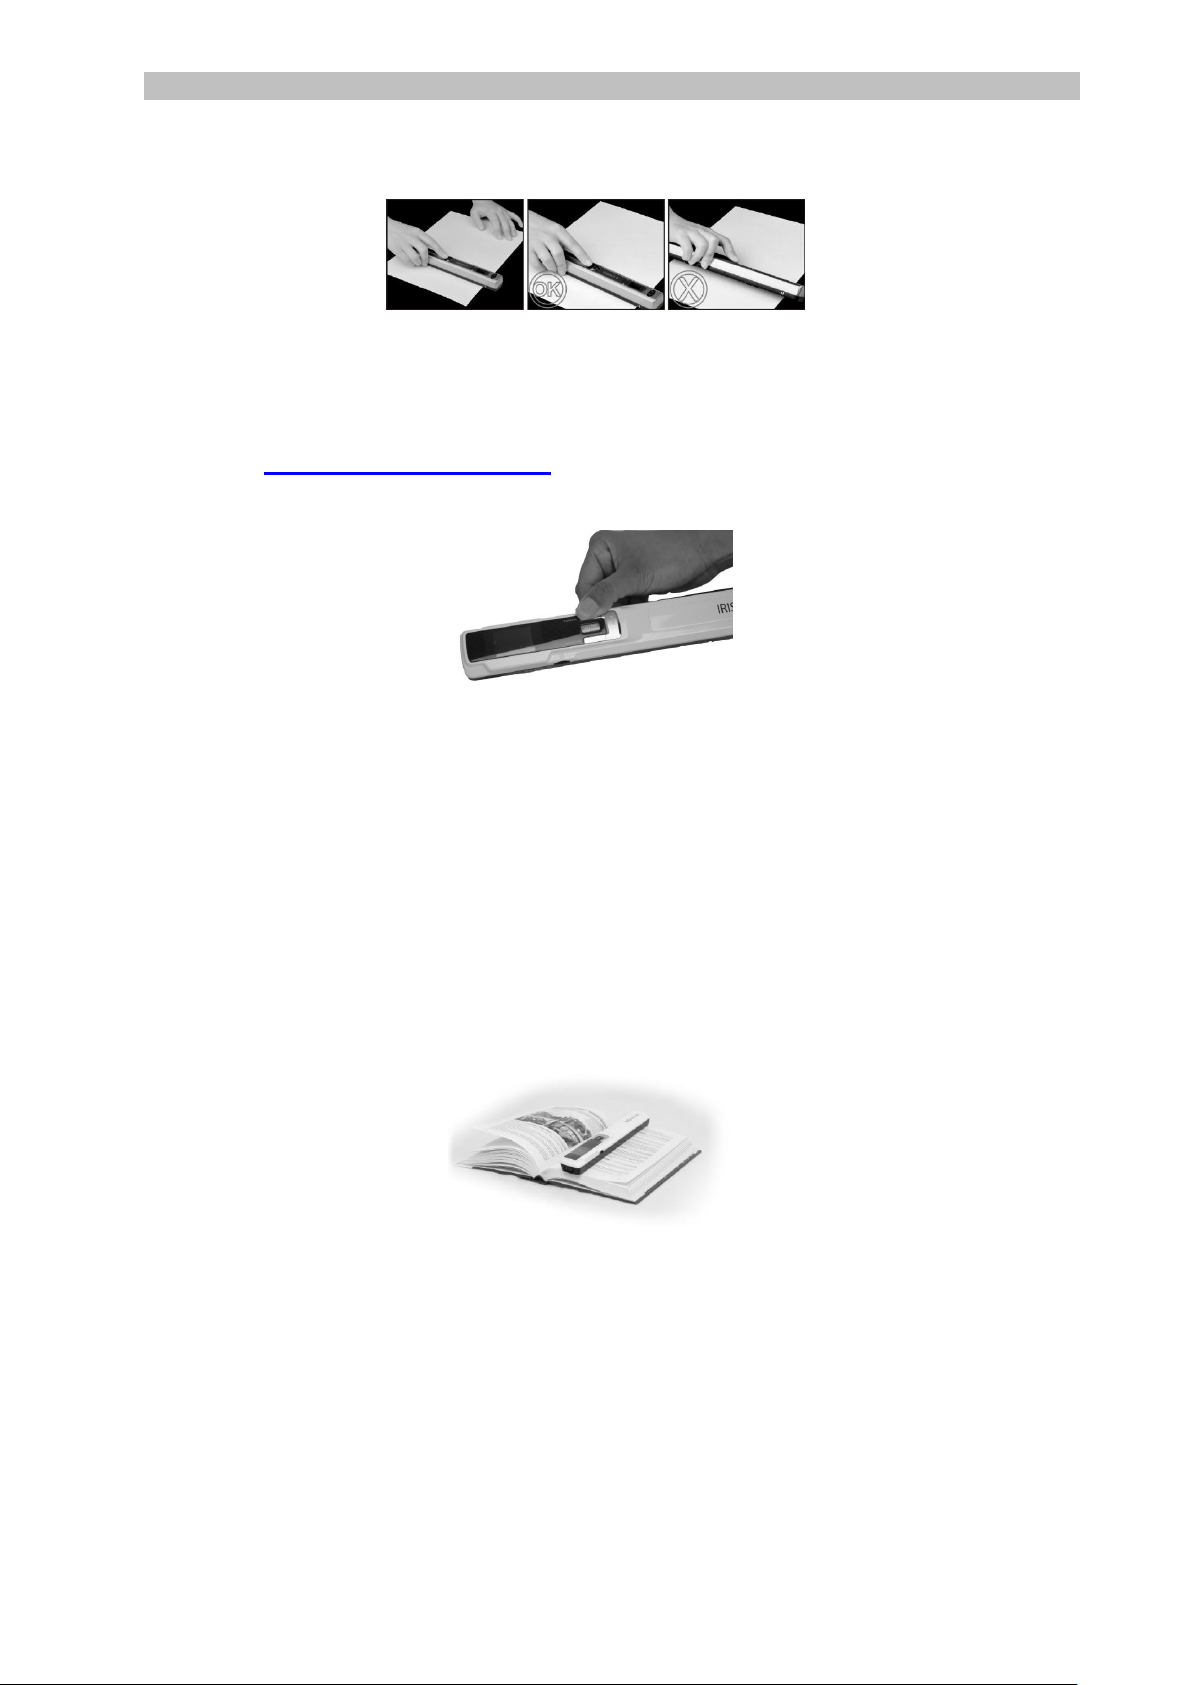
Scanning Tip:
When you're scanning a small, thick book it may occur that the margin is too narrow
and you're not able to scan the entire text.
You can solve this problem by scanning the pages horizontally and rotating your
images with IRISCompressor™ and Readiris™.
Another solution is to place the scanner at the bottom of the page, turn it upside
down and scan upwards. You'll notice that the scanner's right margin is smaller than
the left.
6
Page 6
English English
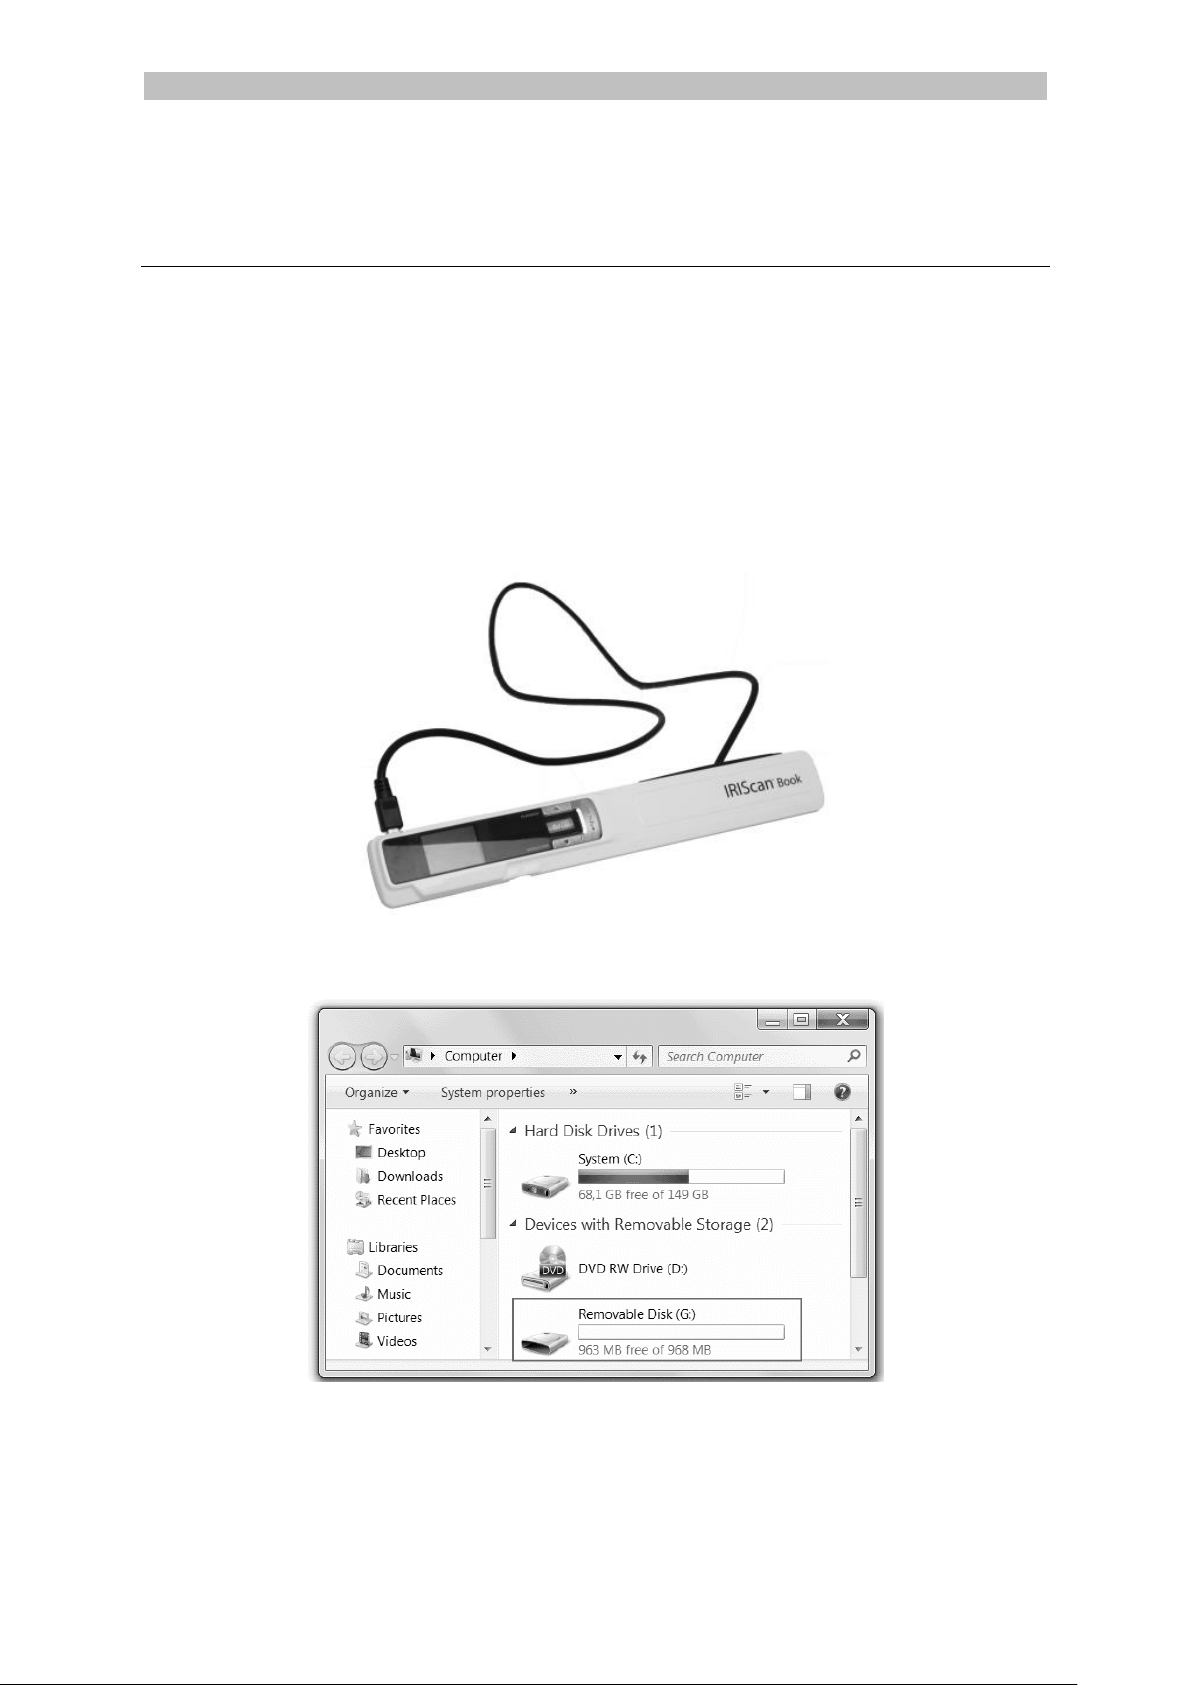
5. Transfer Scanned Documents to your Computer
There are two ways to transfer scanned documents to your computer: by using the
mini USB cable and by using the microSD card adapter.
Using the mini USB cable (Windows and Mac OS)
1. Power on the IRIScan™ Book.
2. Plug in the provided mini USB cable in both the IRIScan™ Book and your
computer.
3. The card memory containing your documents is displayed on your computer.
Example image for Windows
4. Open the card memory and move your documents to your computer. The
documents are located in the folder DCIM\100Media of the removable disk.
7
Page 7
English English
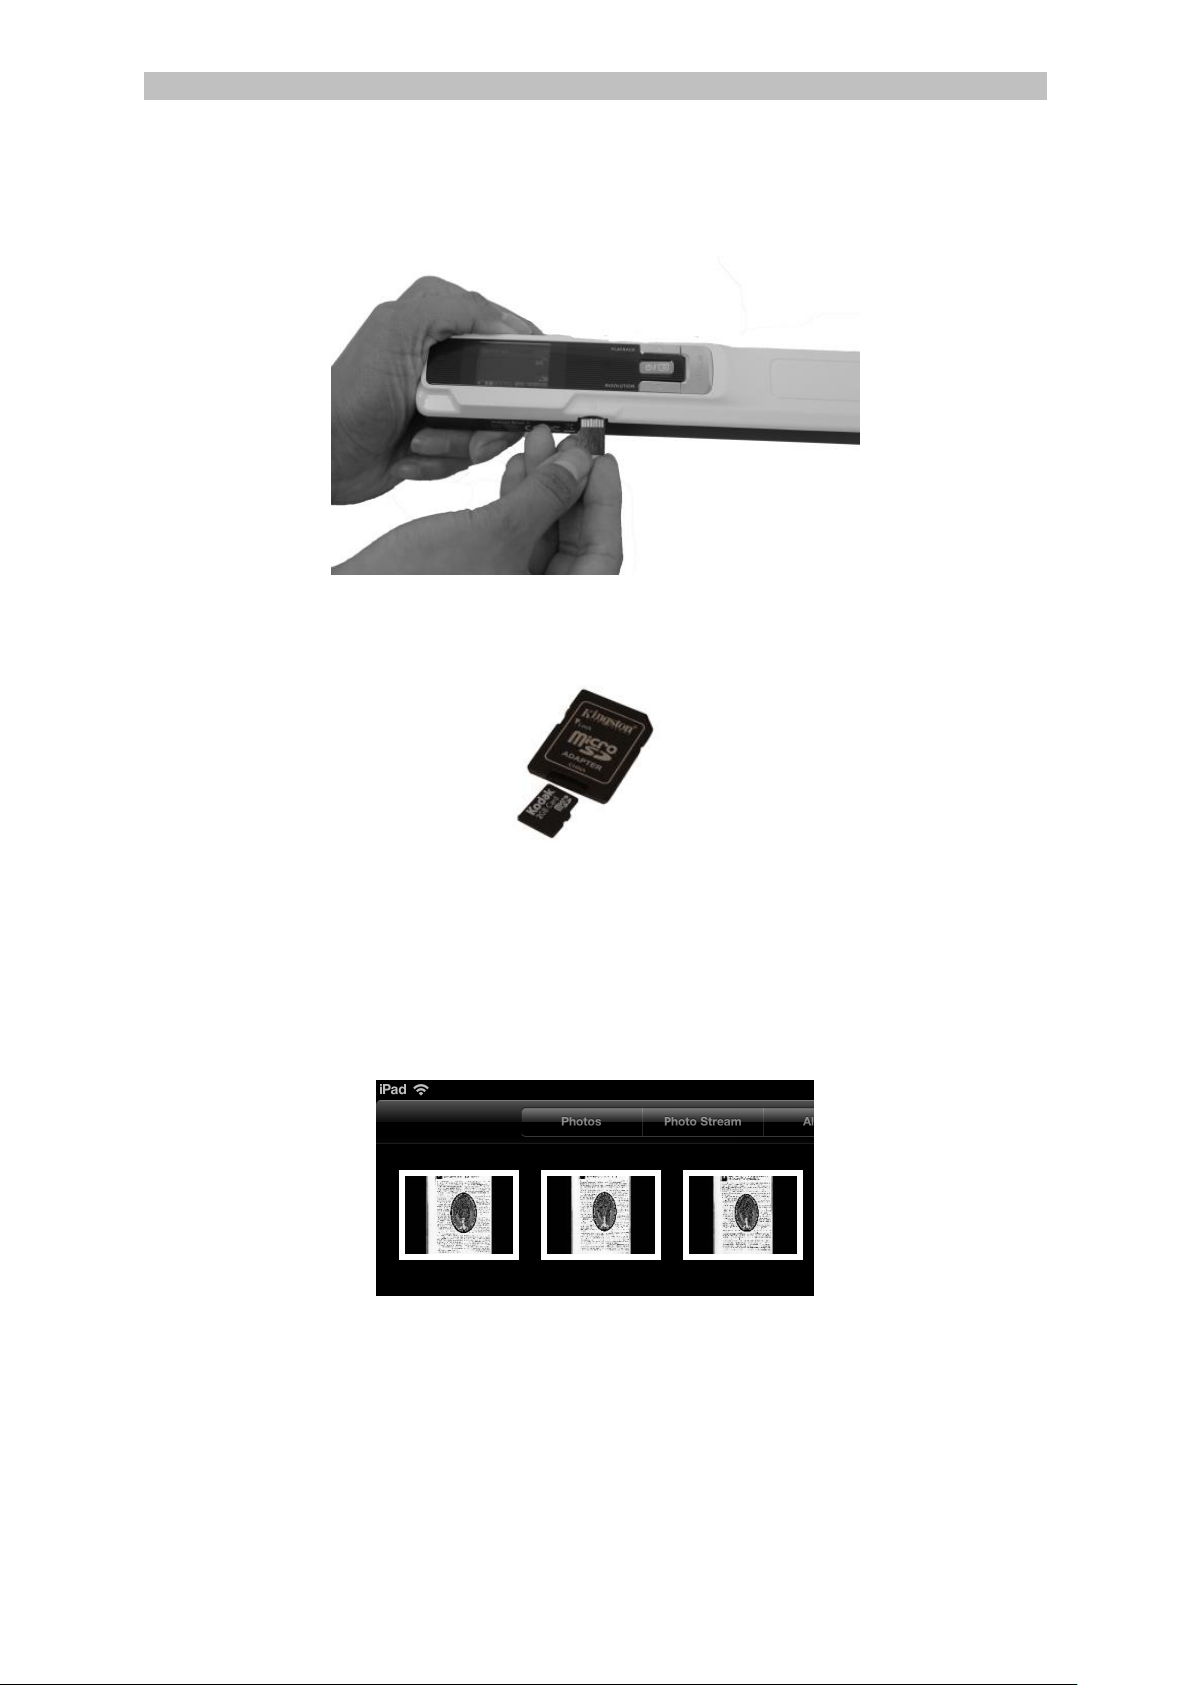
Using the microSD card adapter (Windows, Mac OS and Tablet)
1. Press the microSD card to unlatch it. Then remove it from the card slot.
2. Insert it in the provided microSD card adapter.
3. Insert the adapter into the SD card slot on your computer, or insert it in a
Camera Connection kit (not included) to connect it to a tablet.
4. The card memory containing your documents is displayed on your
computer/tablet.
Example image for iOS
5. Open the card memory and move your documents to your computer/tablet.
The documents are located in the folder DCIM\100Media of the removable
disk.
8
Page 8
English English
Once you've transferred your documents to your Windows PC or Mac, they can be
processed with Readiris™ and compressed with IRISCompressor™.
For information on how to process your documents with Readiris™ and
IRISCompressor™ see their Quick User Guides on the installation CD-ROM and
their complete User Guides on www.irislink.com/support.
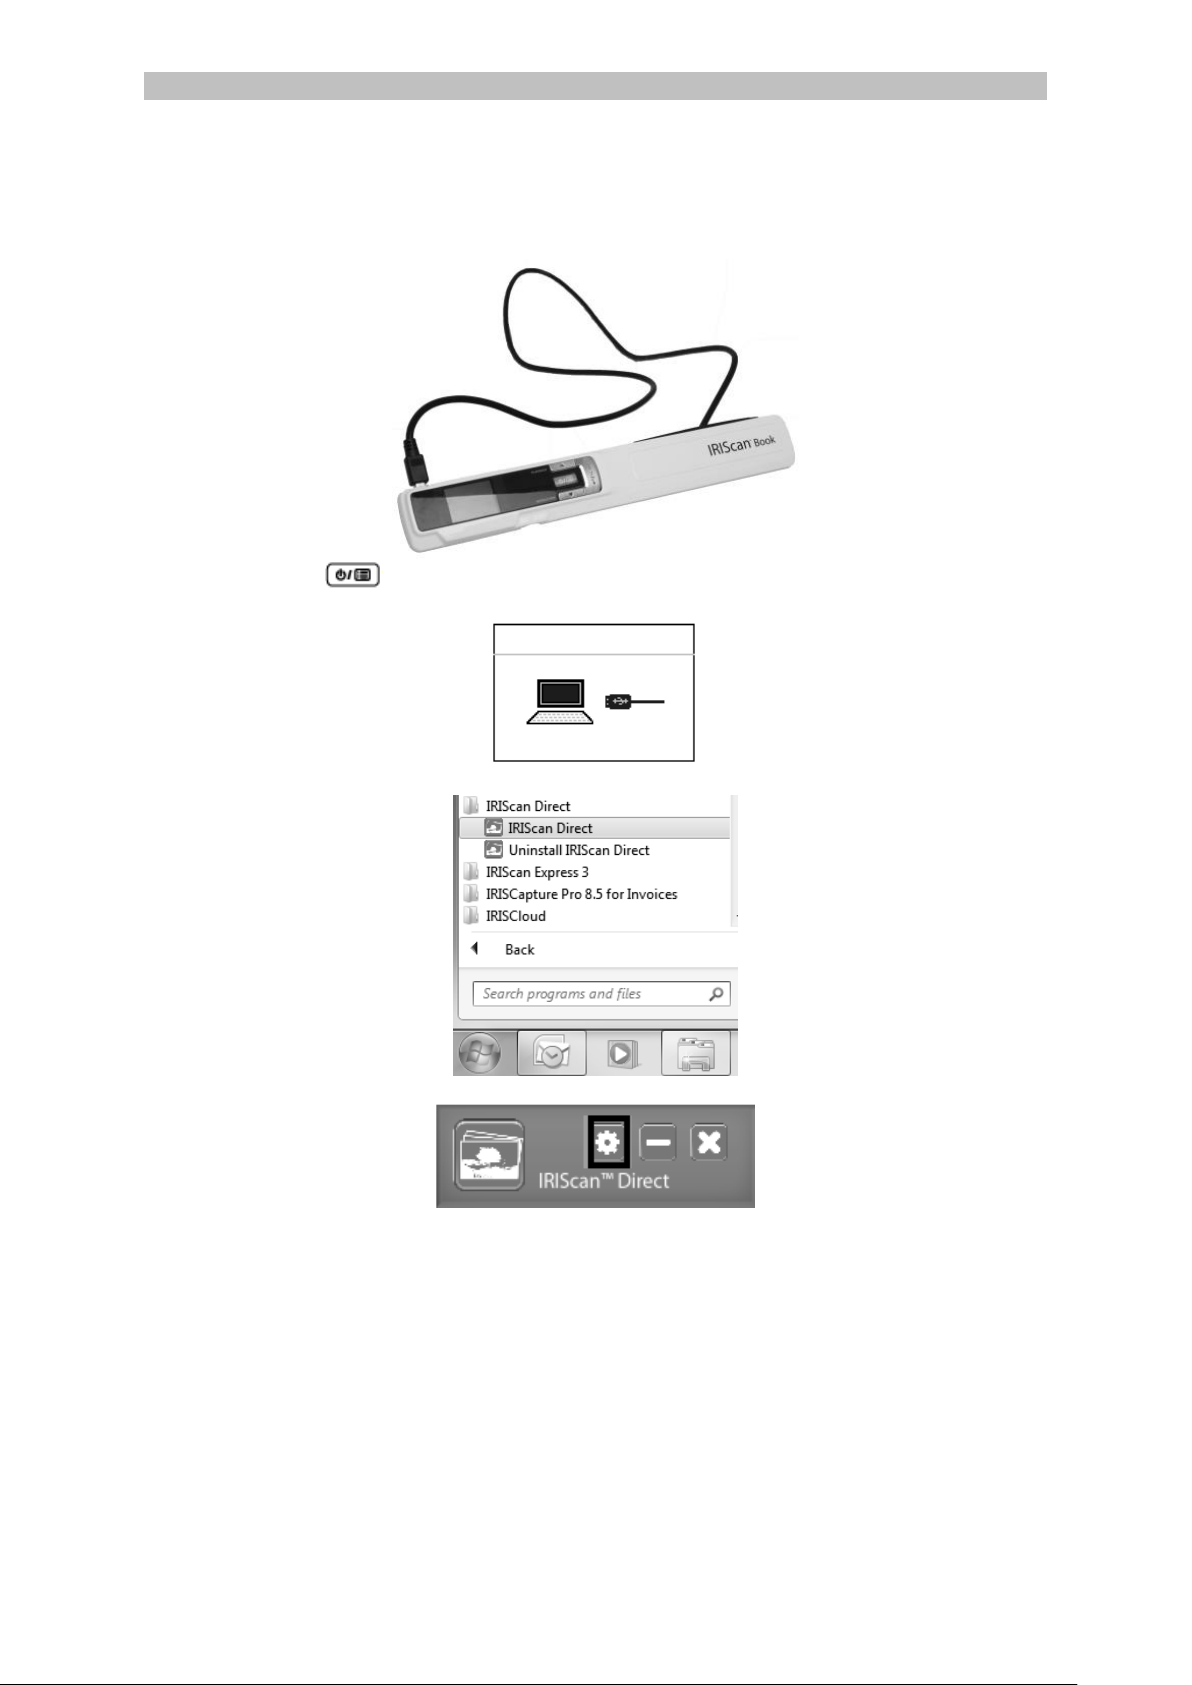
6. Scan Images with IRIScanTM Direct (Windows only)
With IRIScan™ Direct you can use the IRIScan™ Book even without batteries or
microSD card. You simply connect it to a Windows PC using the included mini USB
cable. The scans you make are stored as images on the Clipboard.
Install IRIScan™ Direct
1. Insert the installation disc in the CD-ROM drive of the computer.
The setup menu is displayed automatically. (If the menu does not start run
setup.exe from the disc.)
2. Click IRIScan™ Direct and follow the on-screen instructions.
3. Click Finish to complete the installation.
9
Page 9
English English
Using IRIScan™ Direct
1. Connect the IRIScan™ Book to your Windows PC using the included mini
USB cable.
2. Press the button for 2 seconds to power on the scanner.
Make sure the following icon is displayed on the display:
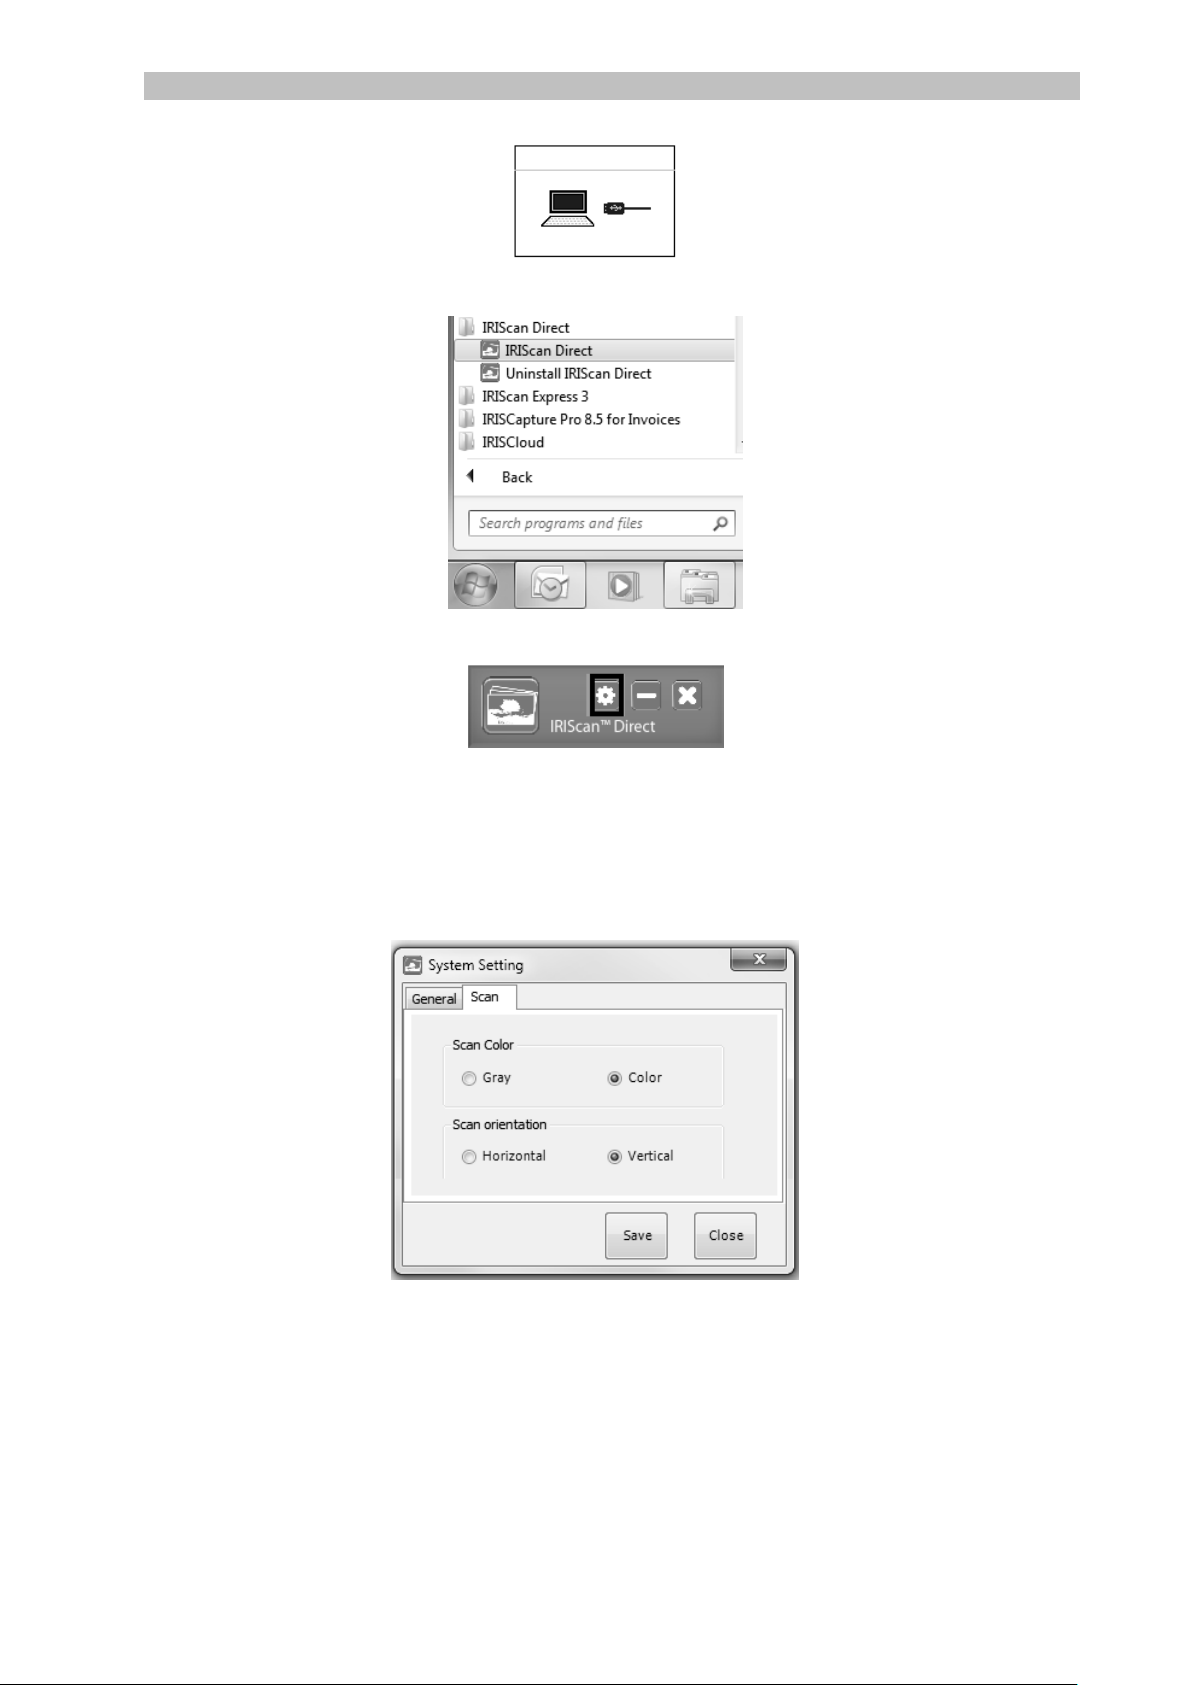
3. Start the IRIScan™ Direct application from the Windows Start menu.
4. Click the Settings icon to determine the IRIScan™ Direct settings.
Select the display language of IRIScan™ Direct.
Note: this setting only influences how IRIScan™ Direct is displayed. It
has nothing to do with the scan language or the language of your
documents.
On the Scan tab, choose the Scan Color (Gray or Color) and the Scan
Orientation (Horizontal or Vertical).
10
Page 10

English English
Then click Save to save the settings.
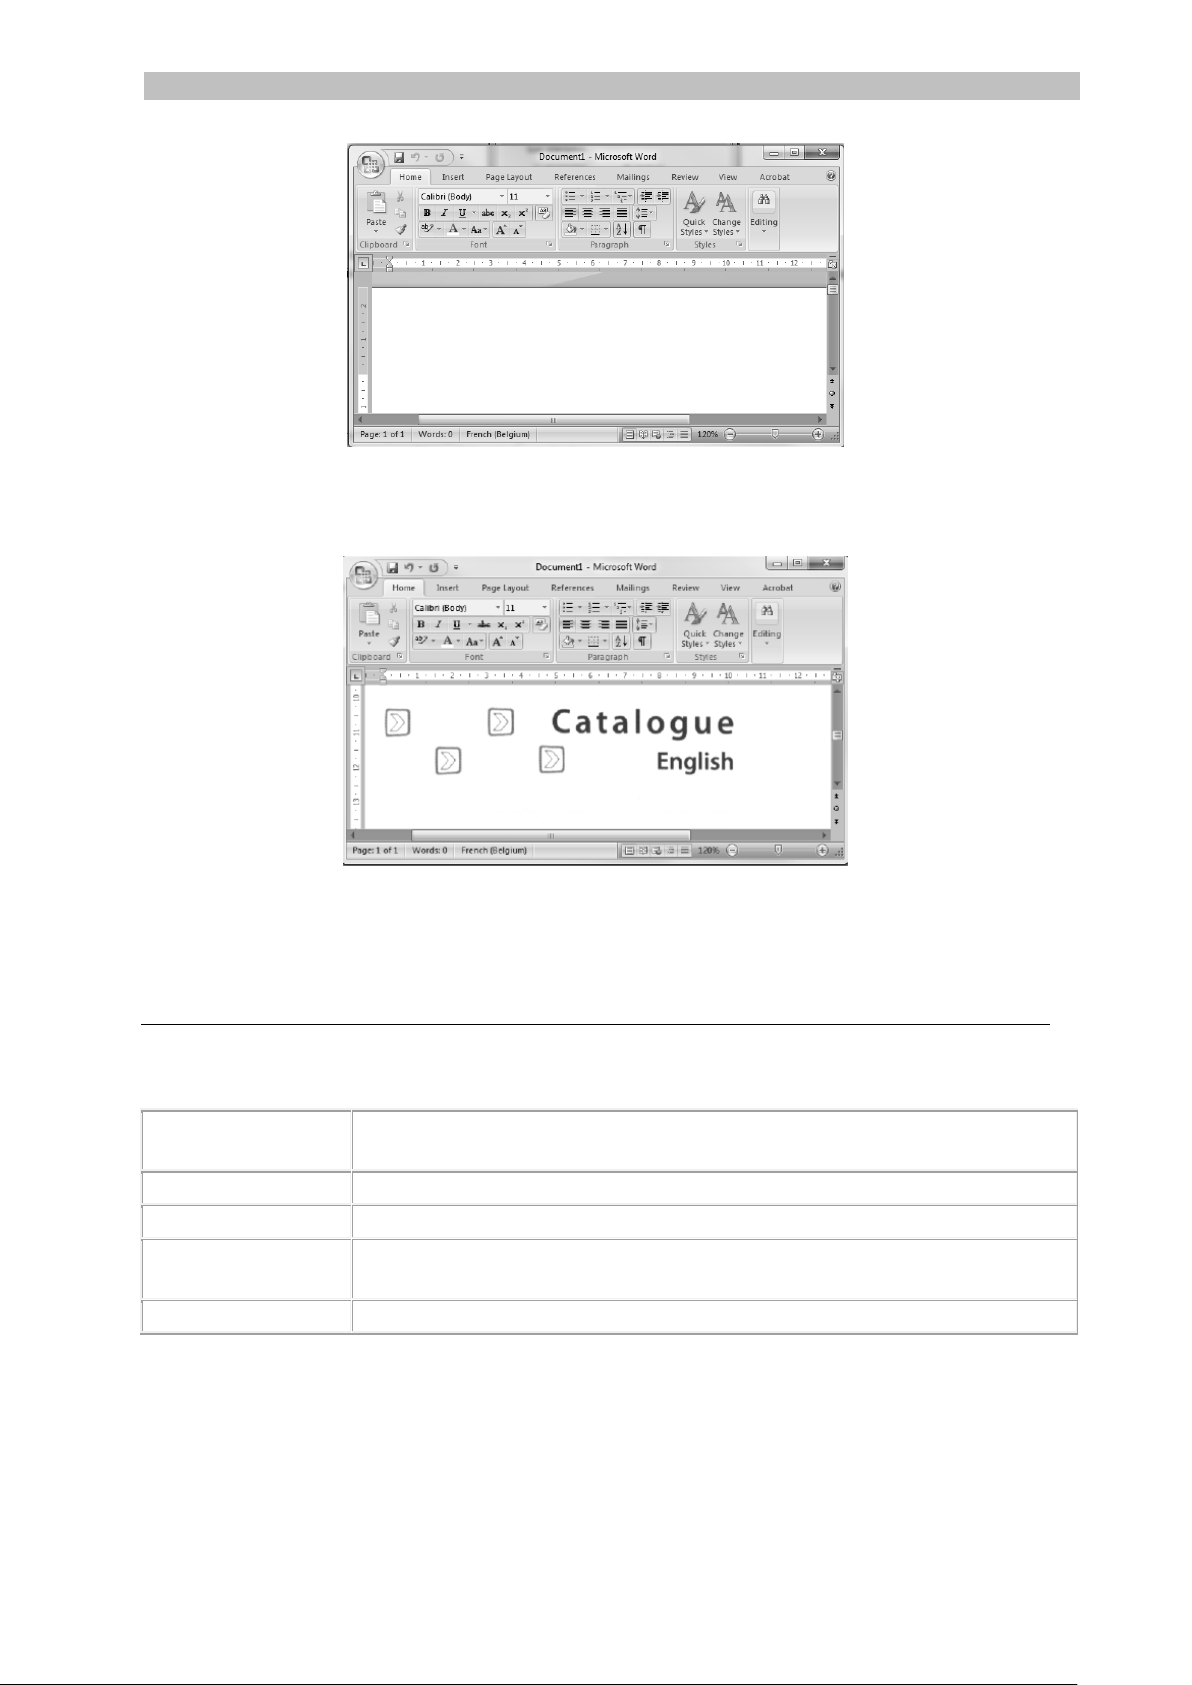
5. Now open an application where you want to paste the image (Word, Paint,
etc.) and click the mouse cursor inside the application.
6. Press the Scan button once. 'Scan' appears on the display.
7. Now roll the scanner over a document to scan it.
8. Press the Scan button again to stop scanning.
The scanned image is now pasted inside the application.
Note: when connected to a Windows PC, IRIScan™ Book uses a resolution of 300
dpi. The images are not stored on the microSD card but on the Clipboard.
11
Page 11
English English
Operating System
Windows 8, Windows 7 and Windows Vista (no driver installation
required)
CPU
Pentium IV or equivalent
RAM
1 GB
HD space
300 MB
Hardware
CD-ROM drive, 1 free USB port
Operating System
Mac OS Leopard, Snow Leopard, Lion and Mountain Lion (no
driver installation required)
CPU
Intel processor
RAM
1 GB
HD space
300 MB
Hardware
CD-ROM drive, 1 free USB port
Operating System
iOS 5.1 or later and Android OS 4.0 or later
Hardware
Camera connection kit
Image sensor
CIS
Resolution
300 dpi (default), 600 pi, 900 dpi
Maximum scanning speed
+- 3 seconds for A4 300 dpi color
+- 2 seconds for A4 300 dpi BW
Capacity (based on 2 GB microSD card*)
*The number of scans may vary
depending on the content complexity.
300 dpi
600 dpi
900 dpi
Color
1600
600
190
Mono
2000
800
190
Scan width
216mm
Scan length
1200mm
File format
JPG / PDF
Display panel
1.4" TFT LCD
USB Port
USB 2.0 high speed
External memory
MicroSD card (TF Card) up to 32 GB
Supported batteries
3 AAA alkaline or NiMh rechargeable
batteries. Or USB powered.
7. Technical Info
Minimum System Requirements Windows PC
Minimum System Requirements Mac OS
Minimum System Requirements iOS and Android OS
Scanner Specifications
12
Page 12

English English
Problem
Cause
Solution
I cannot turn on the
scanner.
Low battery power.
Battery not inserted
properly.
No batteries inserted.
Replace the batteries.
Insert the batteries
properly.
Connect the scanner to a
PC.
Pictures cannot be saved
after I've scanned them.
There's no microSD card in
the card slot.
The microSD card is full.
The microSD card has not
been formatted properly.
Insert a microSD card.
Move the images from the
microSD card to your
computer to clear storage
space on the card.
Properly format the card.
My computer does not
recognize the scanner
when I connect it.
Connection failure.
Make sure both ends of the
USB cable are connected
securely.
Restart your computer if
necessary.
The battery life is very
short.
The wrong type of batteries
is being used.
Replace the current
batteries with 3 new AAA
alkaline or NiMh
rechargeable batteries.
Or connect the scanner to
your computer and use
IRIScan™ Direct.
My scanner generates
blurry images.
The scanner lens is
probably dirty.
Clean the lens with a soft
dry cloth.
My scanner generates
skewed images.
The scanner has not been
calibrated correctly.
Calibrate the scanner using
a white sheet of paper. See
the FAQ on our website for
help.
8. Troubleshooting Info
13
Page 13

English English
ERROR appears when
scanning a document.
You're sliding the scanner
too quickly over your
documents.
Press the Scan button to
scan your document again,
steadily and slowly.
Should you experience issues when using IRIScan™ Book 3, consult the Frequently
Asked Questions on our website or contact Technical Support at
www.irislink.com/support/iriscanbook3.
14
Page 14
Français Français
Ce guide de démarrage rapide a pour but de vous aider dans l'installation et la mise
en route du scanneur IRIScan™ Book 3.
Ce scanneur est fourni avec les logiciels Readiris™ Pro 12, IRIScan™ Direct et
IRISCompressor™. Le CD-ROM d'IRIScan™ Book 3 contient les guides de
démarrage rapide des différentes applications. Pour des explications plus complètes
sur toutes leurs fonctionnalités, consultez les manuels d'utilisation récents sur le site
www.irislink.com/support.
Les descriptions données dans ce guide sont basées sur les systèmes d'exploitation
Windows® 7, Mac OS Lion et iOS 6. Veuillez lire ce guide avant d'utiliser ce
scanneur et son logiciel. Toutes les informations du présent guide peuvent être
modifiées sans préavis.
Table des matières
1. Vérification des accessoires
2. Préparation du scanneur
3. Sélection des paramètres du scanneur
4. Numérisation des documents
5. Transfert des documents vers l'ordinateur/la tablette
6. Numérisation avec IRIScan™ Direct (Windows uniquement)
7. Informations techniques
8. Résolution de problèmes
1
Page 15
Français Français
1. Vérification des accessoires
2. Préparation du scanneur
Insertion des piles fournies
1. Ouvrez le logement des piles comme illustré dans l'image.
2. Insérez les trois piles alcalines AAA en respectant la polarité indiquée.
La polarité correcte est indiquée à l'intérieur du logement.
Insertion de la carte microSD™ incluse
1. Insérez délicatement la carte microSD dans le logement prévu à cet effet
jusqu’à ce que la carte soit verrouillée.
Remarque : sur un ordinateur Windows, IRIScan™ Book peut être également utilisé
sans piles ou carte microSD. Consultez la section Numérisation avec IRIScan™
Direct.
3
Page 16

Français Français
Formatage de la carte microSD
Certaines nouvelles cartes microSD ne peuvent être utilisées qu'après avoir été
formatées. Consultez la section 3. Sélection des paramètres du scanneur pour
savoir comment formater la carte.
3. Sélection des paramètres du scanneur
Remarque : avant d'accéder à la configuration du scanneur, vérifiez que la carte
microSD fournie est insérée dans le logement correspondant.
1. Appuyez sur le bouton pendant 2 secondes pour mettre le scanneur
sous tension. L'écran LCD s'allume.
2. Appuyez une seule fois sur pour accéder aux paramètres du scanneur.
3. Utilisez les flèches vers le haut/bas pour accéder au paramètre voulu.
4. Ensuite, appuyez sur Scan pour l'ouvrir.
5. Utilisez les flèches vers le haut/bas pour accéder au paramètre voulu.
6. Ensuite, appuyez sur Scan pour valider votre choix.
Les paramètres sélectionnés doivent apparaître à l'écran.
4
Page 17
Français Français
Paramètre du scanneur
Icône
Description
Mode couleur
IRIScan™ Book numérise les images en
couleur ou en noir et blanc.
Résolution
IRIScan™ Book numérise les images
dans une résolution de 300, 600 ou 900
ppp.
Format de sortie
IRIScan™ Book enregistre les images au
format JPG ou PDF.
Chiffrement
IRIScan™ Book peut enregistrer les
images en tant que fichiers chiffrés :
e cette façon, les fichiers peuvent être
uniquement lus sur un ordinateur si vous
connectez le scanneur à ce dernier. Il ne
sera pas possible de lire directement les
fichiers sur la carte microSD.
Par défaut, les fichiers ne sont pas
chiffrés. Pour chiffrer les fichiers,
sélectionnez puis .
Date et heure
Ce paramètre vous permet d'horodater
vos fichiers numérisés.
La date et l'heure sont également
affichées à l'écran.
Formatage de la carte
Ce paramètre vous permet de formater la
carte microSD.
Remarque : formate la carte.
ne formate pas la carte.
Présentation des paramètres du scanneur
4. Numérisation des documents
Attention :
IRIScan™ Book 3 a été conçu pour numériser une seule page à la fois. Il ne génère
pas de fichiers PDF multipages.
Suivez les étapes 2 à 5 ci-dessous pour chacune des pages à numériser.
1. Appuyez sur le bouton pendant 2 secondes pour mettre le scanneur
sous tension.
2. Placez votre scanneur en haut de la page à numériser.
3. Appuyez une seule fois sur le bouton Scan. Le mot Scan apparaît à l'écran.
4. Faites glisser le scanneur sur la page de façon lente et régulière.
5
Page 18
Français Français
Conseil : maintenez fermement le document avec une main pendant la
numérisation.
5. Lorsque vous avez atteint le bas de la page, appuyez à nouveau sur le
bouton Scan pour arrêter la numérisation.
Remarque : en cas d'erreur au cours de la numérisation (par exemple si
vous scannez le document trop rapidement ou de façon irrégulière), le
voyant LED ERR s'allume. Pour obtenir de l'aide, consultez la section
Résolution de problèmes.
6. La numérisation apparaît brièvement à l'écran. Pour la revérifier, appuyez sur
le bouton situé à côté de Playback.
Conseil :
Si vous souhaitez créer des fichiers PDF multipages :
Numérisez les pages l'une après l'autre.
Transférez les fichiers images ou PDF monopages numérisés vers votre
ordinateur.
Utilisez Readiris pour générer des fichiers PDF multipages.
Conseil de numérisation :
Lorsque vous numérisez un livre petit et épais, il peut arriver que la marge soit trop
étroite et que vous ne puissiez pas numériser l'ensemble du texte.
Pour résoudre ce problème, vous pouvez numériser les pages horizontalement et
faire pivoter les images avec IRISCompressor™ and Readiris™.
Une autre solution consiste à placer le scanneur en bas de la page, à le retourner
puis à numériser la page de bas en haut. Vous remarquerez que la marge droite du
scanneur est plus petite que la gauche.
6
Page 19
Français Français
5. Transfert des documents vers l'ordinateur/la tablette
Pour transférer les documents numérisés vers votre ordinateur, deux possibilités
s'offrent à vous : vous pouvez utiliser le mini-câble USB ou l'adaptateur de carte
microSD.
Avec le mini-câble USB (Windows et Mac OS)
1. Assurez-vous qu'IRIScan™ Book est toujours sous tension.
2. Enfichez le câble USB fourni dans le port du scanneur IRIScan™ Book et
celui de votre ordinateur.
3. La mémoire de la carte contenant vos documents s’affiche sur votre
ordinateur.
Exemple illustré pour Windows
4. Accédez au contenu de la carte mémoire puis faites glisser et déposez vos
documents dans votre ordinateur/tablette. Les documents se trouvent dans le
répertoire DCIM\100MEDIA du disque amovible.
7
Page 20
Français Français
Utilisation de l'adaptateur de carte microSD (Windows, Mac OS et tablette)
1. Appuyez sur la carte microSD pour la déverrouiller. Retirez-la ensuite de son
logement.
2. Insérez-la dans l'adaptateur de carte microSD fourni.
3. Insérez l'adaptateur dans le logement pour carte SD de votre ordinateur ou
dans le kit de connexion d'appareil photo (pas inclus) pour le connecter à une
tablette.
4. La mémoire de la carte contenant vos documents s’affiche sur votre
ordinateur/tablette.
Exemple illustré pour iOS
5. Accédez au contenu de la carte mémoire puis faites glisser et déposez vos
documents dans votre ordinateur/tablette. Les documents se trouvent dans le
répertoire DCIM\100MEDIA du disque amovible.
Dès que vos documents sont transférés vers votre PC ou Mac, ils peuvent être
traités avec Readiris™ et compressés avec IRISCompressor™.
Pour en savoir plus sur le traitement des documents avec Readiris™ et
IRISCompressor™, consultez les guides de démarrage rapide correspondants
figurant sur le CD d'installation. Pour consulter les manuels d'utilisation complets,
accédez au site www.irislink.com/support.
8
Page 21
Français Français
6. Numérisation avec IRIScan™ Direct (Windows uniquement)
IRIScan™ Direct vous permet d'utiliser IRIScan™ Book sans piles ni carte microSD.
Il vous suffit de le connecter à un ordinateur Windows à l'aide du câble USB inclus.
Les documents numérisés sont stockés en tant qu'images dans le Presse-papiers.
Installation d'IRIScan™ Direct
1. Insérez le disque installation dans le lecteur CD de l'ordinateur.
Le menu d'installation s'affiche automatiquement. (S'il ne s'affiche pas,
exécutez setup.exe à partir du disque.)
2. Cliquez sur IRIScan™ Direct et suivez les instructions affichées à l'écran.
3. Cliquez sur Terminer pour finaliser l'installation.
Utilisation d'IRIScan™ Direct
1. Connectez IRIScan™ Book à un ordinateur Windows à l'aide du câble USB
inclus.
2. Appuyez sur le bouton pendant 2 secondes pour mettre le scanneur
sous tension.
Vérifiez que l'icône suivante est affichée à l'écran.
9
Page 22
Français Français
3. Lancez l'application IRIScan™ Direct à partir du menu Démarrer de
Windows.
4. Cliquez sur l'icône Configuration pour définir les paramètres d'IRIScan™
Direct.
Sélectionnez la langue d'affichage d'IRIScan™ Direct.
Remarque : ce paramètre affecte uniquement la langue d'affichage de
l'interface d'IRIScan™ Direct. Il n'a aucune incidence sur la langue de
numérisation ou celle de vos documents.
Dans l'onglet Scanner, sélectionnez la couleur de numérisation (gris
ou couleur) et l'orientation de la numérisation (horizontale ou
verticale).
Ensuite, cliquez sur Enregistrer pour enregistrer les paramètres.
5. Ouvrez l'application dans laquelle vous souhaitez coller l'image (Word, Paint,
etc.) puis cliquez sur le curseur de la souris dans l'application.
10
Page 23
Français Français
Système
d’exploitation
Windows 8, Windows 7 et Windows Vista (aucune installation de
pilote n'est nécessaire)
Processeur
Pentium® IV ou équivalent
Mémoire RAM
1 Go
Espace disque
disponible
300 MB
Matériel
Lecteur de CD-ROM, 1 port USB libre
6. Appuyez une seule fois sur le bouton Scan. Le voyant LED Scan s'allume.
7. A présent, faites glisser le scanneur sur un document pour le numériser.
8. Appuyez à nouveau sur le bouton Scan pour arrêter la numérisation.
L'image numérisée est collée dans l'application.
Remarque : lorsqu'il est connecté à un ordinateur Windows, IRIScan™ Book utilise
une résolution de 300 ppp. Les images ne sont pas stockées sur la carte microSD.
7. Informations techniques
Configuration minimale requise pour Windows
11
Page 24
Français Français
Système
d’exploitation
Mac OS X Leopard, Snow Leopard, Lion et Mountain Lion (aucune
installation de pilote requise)
Processeur
Processeur Intel
Mémoire RAM
1 Go
Espace disque
disponible
300 MB
Matériel
Lecteur de CD-ROM, 1 port USB libre
Système
d’exploitation
iOS 5.1 ou version ultérieure et Android OS 4.0 ou version
ultérieure
Matériel
Kit de connexion d'appareil photo
Capteur d'image
CIS
Résolution
300 ppp (par défaut), 600 ppp ou 900 ppp
Vitesse de numérisation maximale
+- 3 secondes par document (A4, 300 ppp,
couleur)
+- 2 secondes par document (A4, 300 ppp,
noir et blanc)
Capacité (basée sur une carte microSD de
2GB)*
*Le nombre d’images numérisées peut
varier suivant la complexité du contenu.
300 ppp
600 ppp
900 ppp
Colour
1600
600
190
Mono
2000
800
190
Largeur de numérisation
216mm
Longueur de numérisation
1200mm
Format de fichier
JPG / PDF
Ecran d'affichage
LCD TFT 1.4"
Port USB
USB 2.0 haute vitesse
Mémoire externe
Carte MicroSD (carte TF) d'une capacité
max. de 32 Go
Piles compatibles
3 piles alcalines AAA ou 3 piles NiMh
rechargeables.
Alimentation possible via un port USB.
Configuration minimale requise pour Mac OS
Configuration minimale requise pour les systèmes d'exploitation iOS et Android OS
Spécifications du scanneur
12
Page 25

Français Français
Problème
Cause
Solution
Je n’arrive pas à mettre le
scanneur sous tension.
Niveau des piles faible.
Piles mal installées.
Aucune pile insérée.
Remplacez les piles.
Insérez correctement les
piles.
Connectez le scanneur à un
ordinateur.
Impossible d’enregistrer les
images après les avoir
numérisées.
Il n’y a pas de carte
microSD dans le logement
prévu à cet effet
La carte microSD est
saturée.
La carte microSD n’a pas
été formatée correctement.
Insérez une carte microSD.
Transférez les images de la
carte microSD vers votre
ordinateur pour libérer de
l’espace sur la carte.
Formatez correctement la
carte.
Mon ordinateur ne reconnaît
pas le scanneur lorsque je le
connecte.
Echec de la connexion.
Assurez-vous que les deux
extrémités du câble USB
sont correctement
enfichées.
Redémarrez votre
ordinateur si nécessaire.
La durée de vie des piles est
très courte.
Vous utilisez un mauvais
type de piles.
Remplacez les piles par 3
nouvelles piles alcalines
AAA ou NiMh.
Vous pouvez également
connecter le scanneur à
l'ordinateur et utiliser
IRIScan™ Direct.
Les images générées par le
scanner sont floues.
La lentille du scanneur n’est
sans doute pas propre.
Nettoyez la lentille avec un
tissu sec et doux.
Les images générées par le
scanneur sont inclinées.
Le scanneur n’a pas été
correctement calibré.
Calibrez le scanneur avec
une feuille blanche. Pour
obtenir de l'aide, consultez
la page des questions
fréquentes (FAQ) de notre
site web.
ERROR s'affiche lors de la
numérisation d'un
document.
Vous faites glisser trop
rapidement le scanneur sur
les documents.
Appuyez sur le bouton Scan
pour numériser à nouveau
votre document de façon
plus lente et régulière.
8. Résolution de problèmes
13
Page 26

Français Français
En cas de problèmes liés à l'utilisation du scanneur IRIScan™ Book 3, consultez la
page des questions fréquentes (FAQ) sur notre site web ou contactez le Support
technique via la page www.irislink.com/support/iriscanbook3.
14
Page 27

Nederlands Nederlands
Deze verkorte handleiding helpt u om aan de slag te gaan met de IRIScan™ Book 3
scanner.
Deze scanner wordt geleverd met de softwaretoepassingen Readiris™ Pro 12,
IRIScan™ Direct en IRISCompressor™. De bijbehorende Verkorte handleidingen
vindt u op de IRIScan™ Book-cd-rom. Raadpleeg voor meer informatie over de
volledige functionaliteit de meest recente Gebruikershandleidingen op
www.irislink.com/support.
De beschrijvingen in deze handleiding zijn gebaseerd op de besturingssystemen
Windows 7, Mac OS Lion en iOS 6. Lees deze handleiding aandachtig door voor u
deze scanner en de bijbehorende software in gebruik neemt. Wijzigingen van alle
informatie voorbehouden zonder voorafgaande kennisgeving.
Inhoudsopgave
1. Controleren van de accessoires
2. Voorbereiden van de scanner
3. Selecteren van de scannerinstellingen
4. Scannen van documenten
5. Documenten overzetten naar uw computer / tablet
6. Scannen met IRIScan™ Direct (enkel Windows)
7. Technische gegevens
8. Probleemoplossing
1
Page 28
Nederlands Nederlands
1. Controleren van de accessoires
2. Voorbereiden van de scanner
Plaatsen van de bijgeleverde batterijen
1. Open het batterijvak zoals weergegeven in de afbeelding.
2. Plaats de 3 AAA-alkalinebatterijen en let hierbij op de juiste polariteit.
De polariteit staat aangegeven binnen in de scanner.
Plaatsen van de bijgeleverde microSD™-kaart
1. Schuif de microSD-kaart voorzichtig in de kaartsleuf tot de kaart vastklikt.
Opmerking: Bij een Windows-pc kan de IRIScan™ Book ook zonder batterijen of
microSD-kaart gebruikt worden. Zie hoofdstuk 6. Scannen met IRIScan™ Direct.
3
Page 29
Nederlands Nederlands
Formatteren van de microSD-kaart
Bepaalde nieuwe microSD-kaarten kunnen pas worden gebruikt nadat ze
geformatteerd zijn. Zie hoofdstuk 3. Selecteren van de scannerinstellingen om te
weten hoe u de kaart formatteert.
3. Selecteren van de scannerinstellingen
Opmerking: Zorg ervoor dat de bijgeleverde microSD-kaart in de kaartsleuf
geplaatst is vóór u begint met de scannerinstellingen.
1. Houd de knop gedurende 2 seconden ingedrukt om de scanner in te
schakelen. Het display gaat aan.
2. Druk eenmaal op om naar de scannerinstellingen te gaan.
3. Gebruik de pijltjes omhoog / omlaag om naar de gewenste instelling te gaan.
4. Druk vervolgens op Scan om deze te openen.
5. Gebruik de pijltjes omhoog / omlaag om naar de gewenste instelling te gaan.
6. Druk vervolgens nogmaals op Scan om te bevestigen.
De instellingen die u selecteert, verschijnen in het display.
4
Page 30
Nederlands Nederlands
Scannerinstelling
Pictogram
Beschrijving
Kleurmodus
De IRIScan™ Book scant beelden in kleur
of in zwart-wit.
Resolutie
De IRIScan™ Book scant beelden met
een resolutie van 300 dpi, 600 dpi of 900
dpi.
Uitvoerindeling
De IRIScan™ Book slaat beelden op als
JPG-afbeelding of als PDF-afbeelding.
Versleuteling
De IRIScan™ Book kan beelden opslaan
als versleutelde bestanden: Op die
manier kunnen de bestanden enkel
worden gelezen op een computer als u de
scanner erop aansluit. De bestanden zijn
dan onleesbaar direct vanaf de microSDkaart.
Standaard worden bestanden niet
versleuteld. Selecteer om bestanden te
versleutelen vervolgens .
Datum en tijd
Met deze instelling kunt u de datum en tijd
aan uw scans toevoegen.
De datum en tijd worden ook
weergegeven in het display.
Kaart formatteren
Met deze instelling kunt u de microSDkaart formatteren.
Opmerking: formatteert.
formatteert de kaart niet.
Overzicht van de scannerinstellingen
4. Scannen van documenten
Let op:
De IRIScan™ Book 3 is ontwikkeld om één pagina tegelijk te scannen. Er kunnen
geen PDF-bestanden met meerdere pagina's aangemaakt worden.
Volg de onderstaande stappen 2 tot 5 voor elke pagina die u scant.
1. Houd de knop gedurende 2 seconden ingedrukt om de scanner in te
schakelen.
2. Plaats de scanner bovenaan de pagina die u wilt scannen.
3. Druk eenmaal op de Scan-knop. Het woord Scan verschijnt in het display.
4. Verschuif de scanner langzaam en gelijkmatig over de pagina.
5
Page 31

Nederlands Nederlands
Tip: Houd het document met één hand op zijn plek tijdens het scannen.
5. Als u onder aan de pagina bent gekomen, druk dan opnieuw op de Scanknop om het scannen te beëindigen.
Opmerking: Als zich een fout voordoet tijdens het scannen (bijvoorbeeld
wanneer te snel of ongelijkmatig wordt gescand), dan verschijnt Error in
het display. Zie het hoofdstuk Probleemoplossing voor hulp.
6. De scan verschijnt kort in het display. Druk om opnieuw te controleren op de
knop omhoog naast Playback.
Tip:
Als u PDF's van meerdere pagina's wilt aanmaken:
Scan uw pagina's één voor één.
Zet het beeld of de PDF-bestanden van één pagina over naar uw computer.
Gebruik Readiris om PDF-bestanden met meerdere pagina's aan te maken.
Scantip:
Als u een klein, dik boek scant, dan kan het zijn dat de marge te smal is en dat u niet
de hele tekst kunt scannen.
U kunt dit probleem oplossen door de pagina's horizontaal te scannen en het beeld
achteraf te draaien in IRISCompressor™ en Readiris™.
Een andere oplossing is de scanner onderaan de pagina te plaatsen, deze om te
draaien en vervolgens de pagina van onder naar boven te scannen. U zult merken
dat de rechtermarge van de scanner kleiner is dan de linker.
6
Page 32

Nederlands Nederlands
5. Documenten overzetten naar uw computer / tablet
Er zijn twee manieren om uw gescande documenten over te zetten naar uw
computer: met behulp van de mini-USB-kabel en met behulp van de microSD-
kaartadapter.
Gebruik van de mini-USB-kabel (Windows en Mac OS)
1. Schakel de IRIScan™ Book in.
2. Sluit de bijgeleverde USB-kabel aan op zowel de IRIScan™ Book als uw
computer.
3. De geheugenkaart met uw bestanden wordt weergegeven op uw computer /
tablet.
Voorbeeldafbeelding voor Windows
4. Open de geheugenkaart en verplaats uw documenten naar uw computer /
tablet. De documenten bevinden zich in de map DCIM\100MEDIA van de
verwisselbare schijf.
7
Page 33

Nederlands Nederlands
Gebruik van de microSD-kaartadapter (Windows, Mac OS en Tablet)
1. Druk de microSD-kaart in om deze te ontgrendelen. Neem de kaart
vervolgens uit de kaartsleuf.
2. Schuif de kaart in de bijgeleverde microSD-kaartadapter.
3. Schuif de adapter in de SD-kaartsleuf op uw computer of schuif deze in een
camera-aansluitkit (niet bijgeleverd) om aan te sluiten op een tablet.
4. De geheugenkaart met uw bestanden wordt weergegeven op uw computer /
tablet.
Voorbeeldafbeelding voor iOS
5. Open de geheugenkaart en verplaats uw documenten naar uw computer /
tablet. De documenten bevinden zich in de map DCIM\100MEDIA van de
verwisselbare schijf.
Zodra u uw documenten heeft overgezet naar uw pc of Mac, dan kunnen ze worden
verwerkt met Readiris™ en gecomprimeerd met IRISCompressor™.
Zie voor meer informatie over het verwerken van uw documenten met Readiris™ en
IRISCompressor™ de betreffende Verkorte handleidingen op de installatie-cd-rom
en de volledige Gebruikershandleidingen op www.irislink.com/support.
8
Page 34

Nederlands Nederlands
6. Scannen met IRIScan™ Direct (enkel
Windows)
Met IRIScan™ Direct kunt u de IRIScan™ Book gebruiken zonder batterijen of
microSD-kaart. U hoeft de scanner alleen maar aan te sluiten op een Windows-pc
met behulp van de bijgeleverde USB-kabel. De scans die u maakt worden
opgeslagen als afbeeldingen op het Klembord.
Installeren van IRIScan™ Direct
1. Plaats de installatie-disk in het cd-romstation van de computer.
Het installatiemenu verschijnt automatisch. (Als het menu niet verschijnt, klik
dan op setup.exe vanaf de disk.)
2. Klik op IRIScan™ Direct en volg de instructies op het scherm.
3. Klik op Voltooien om de installatie te voltooien.
Gebruik van IRIScan™ Direct
1. Sluit de IRIScan™ Book aan op uw Windows-pc met behulp van de
bijgeleverde USB-kabel.
2. Houd de knop gedurende 2 seconden ingedrukt om de scanner in te
schakelen.
Controleer dat het volgende pictogram wordt weergegeven op het display:
9
Page 35

Nederlands Nederlands
3. Start de toepassing IRIScan™ Direct op via het menu Start van Windows.
4. Klik op het instellingenpictogram om de IRIScan™ Direct-instellingen op te
geven.
Selecteer de gewenste taal voor IRIScan™ Direct.
Opmerking: Deze instelling betreft enkel de taal die gebruikt wordt in
IRIScan™ Direct. Het heeft niets te maken met de scantaal of de taal
van uw documenten.
Selecteer op het tabblad Scannen de Scankleur (Grijs of Kleur) en de
Scanrichting (Horizontaal of Verticaal).
Klik vervolgens op Opslaan om de instellingen op te slaan.
5. Open een toepassing waar u het beeld in wilt plakken (Word, Paint enz.) en
klik vervolgens met de muisaanwijzer in de toepassing.
10
Page 36

Nederlands Nederlands
Besturingssysteem
Windows 8, Windows 7 en Windows Vista (installatie van
stuurprogramma niet nodig)
CPU
Pentium IV of gelijkwaardig
RAM
1 GB
HD-ruimte
300 MB
Hardware
Cd-romstation, 1 vrije USB-poort
6. Druk eenmaal op de Scan-knop. De Scan-indicator begint te branden.
7. Schuif nu de scanner over het document om het te scannen.
8. Druk opnieuw op de Scan-knop om het scannen te beëindigen.
Het gescande beeld wordt nu in de toepassing geplakt.
Opmerking: Als de IRIScan™ Book aangesloten is op een Windows-pc , dan wordt
een resolutie van 300 dpi gebruikt. De beelden worden niet opgeslagen op de
microSD-kaart.
7. Technische gegevens
Minimale systeemvereisten Windows-pc
11
Page 37

Nederlands Nederlands
Besturingssysteem
Mac OS X Leopard, Snow Leopard, Lion en Mountain Lion (installatie van
stuurprogramma niet nodig)
CPU
Intel-processor
RAM
1 GB
HD-ruimte
300 MB
Hardware
Cd-romstation, 1 vrije USB-poort
Besturingssysteem
iOS 5.1 of later en Android OS 4.0 of later
Hardware
Camera-aansluitkit
Beeldsensor
CIS
Resolutie
300 dpi (standaard), 600 dpi, 900 dpi
Maximale scansnelheid
+- 3 seconden voor A4, 300 dpi, kleur
+- 2 seconden voor A4, 300 dpi, zwart-wit
Capaciteit (op basis van MicroSD™-kaart van
2 GB*).
* Het aantal scans kan verschillen afhankelijk
van de complexiteit van de inhoud.
300 dpi
600 dpi
900 dpi
Kleur
1600
600
190
Zwart-wit
2000
800
190
Scanbreedte
216mm
Scanlengte
1200mm
Bestandsindelingen
JPG / PDF
Display
1.4" TFT LCD
USB-poort
USB 2.0 High Speed
Extern geheugen
microSD™-kaart (TF-kaart) tot 32 GB
Batterijen
3 AAA-alkaline- of oplaadbare NiMh-batterijen
Of voeding via USB
Minimale systeemvereisten Mac OS
Minimale systeemvereisten iOS en Android OS
Specificaties van de scanner
12
Page 38

Nederlands Nederlands
Probleem
Oorzaak
Oplossing
Ik kan de scanner niet
inschakelen.
De batterijen zijn bijna leeg.
De batterijen zijn niet correct
geplaatst.
Er zijn geen batterijen
geplaatst.
Vervang de batterijen.
Plaats de batterijen op de
juiste manier.
Sluit de scanner aan op een
pc.
De beelden kunnen niet
opgeslagen worden nadat ik ze
gescand heb.
Er zit geen microSD-kaart in de
kaartsleuf.
De microSD-kaart is vol.
De microSD-kaart is niet
correct geformatteerd.
Plaats een microSD-kaart.
Zet de beelden over van de
microSD-kaart naar uw
computer om opslagruimte vrij
te maken op de kaart.
Formatteer de kaart op de
juiste manier.
Mijn computer herkent de
scanner niet wanneer ik deze
aansluit.
Probleem met de aansluiting.
Zorg ervoor dat beide uiteinden
van de USB-kabel stevig
aangesloten zijn.
Start uw computer indien nodig
opnieuw op.
De batterijen gaan maar heel
kort mee.
U gebruikt een verkeerd type
batterijen.
Vervang de huidige batterijen
door 3 nieuwe AAA-alkaline- of
NiMh-batterijen.
Of sluit de scanner aan op uw
computer en gebruik
IRIScan™ Direct.
De beelden van mijn scanner
zijn onscherp.
Er zit waarschijnlijk vuil op de
scannerlens.
Maak de lens schoon met een
zachte, droge doek.
De beelden van mijn scanner
zijn scheef.
De scanner is niet correct
gekalibreerd.
Kalibreer de scanner met een
wit blad papier. Zie de
Veelgestelde vragen (FAQ) op
onze website voor hulp.
Bij het scannen van een
document verschijnt ERROR.
U schuift de scanner te snel
over uw documenten.
Druk op de knop Scan om uw
document opnieuw te scannen
en doe dit langzaam en
gelijkmatig.
8. Probleemoplossing
13
Page 39

Nederlands Nederlands
Als u problemen ondervindt tijdens het gebruik van de IRIScan™ Book 3, raadpleeg
dan de Veelgestelde vragen (FAQ) op onze website of neem contact op met de
Technische Support via www.irislink.com/support/iriscanbook3.
14
Page 40

Deutsch Deutsch
Diese Kurzanleitung beschreibt die ersten Schritte mit dem Scanner IRIScan™
Book 3.
Im Lieferumfang dieses Scanners sind die Software-Anwendungen Readiris™ Pro
12, IRIScan™ Direct und IRISCompressor™ enthalten. Entsprechende
Kurzanleitungen finden Sie auf der CD-ROM von IRIScan™ Book. Ausführliche
Informationen zum gesamten Funktionsumfang finden Sie in den aktuellen
Benutzerhandbüchern auf der Website unter www.irislink.com/support.
Die Beschreibungen in dieser Anleitung basieren auf den Betriebssystemen
Windows 7, Mac OS Lion und iOS 6. Lesen Sie sich diese Anleitung durch, bevor
Sie diesen Scanner und die Software verwenden. Alle Informationen können ohne
vorherige Ankündigung geändert werden.
Inhaltsverzeichnis
1. Überprüfen des Zubehörs
2. Vorbereiten des Scanners
3. Auswählen der Scanner-Einstellungen
4. Scannen von Dokumenten
5. Übertragen von Dokumenten an Ihren Computer bzw. Ihr Tablet
6. Scannen mit IRIScan™ Direct (nur Windows)
7. Technische Daten
8. Fehlerbehebung
1
Page 41

Deutsch Deutsch
1. Überprüfen des Zubehörs
2. Vorbereiten des Scanners
Einlegen der mitgelieferten Batterien
1. Öffnen Sie das Batteriefach, wie auf dem Bild gezeigt.
2. Legen Sie die 3 AAA Alkaline-Batterien unter Berücksichtigung der Pole ein.
Die richtige Polarität ist im Scanner angegeben.
Einlegen der enthaltenen microSD™-Karte
1. Schieben Sie die microSD-Karte vorsichtig in den Kartensteckplatz, bis die
Karte eingerastet ist.
Hinweis: Auf einem Windows-PC kann der IRIScan™ Book auch ohne Batterien
oder microSD-Karte verwendet werden. Siehe Abschnitt 8. Scannen mit IRIScan™
Direct.
3
Page 42

Deutsch Deutsch
Formatieren der microSD-Karte
Einige neue microSD-Karten können erst verwendet werden, nachdem sie formatiert
wurden. Siehe Abschnitt 3. Wählen Sie die Scanner-Einstellungen aus, um mehr
darüber zu erfahren, wie Sie die Karte formatieren.
3. Auswählen der Scanner-Einstellungen
Hinweis: Achten Sie darauf, dass Sie die microSD-Karte in den Kartensteckplatz
eingesteckt haben, bevor Sie versuchen, auf die Scanner-Einstellungen zuzugreifen.
1. Halten Sie die Taste für 2 Sekunden gedrückt, um den Scanner
einzuschalten. Das Display leuchtet.
2. Drücken Sie einmal , um die Scanner-Einstellungen aufzurufen.
3. Wählen Sie mit dem Pfeil nach oben bzw. nach unten die gewünschte
Einstellung aus.
4. Drücken Sie dann die Taste Scan, um sie anzuzeigen.
5. Wählen Sie mit dem Pfeil nach oben bzw. nach unten die gewünschte
Einstellung aus.
6. Drücken Sie dann zum Bestätigen erneut die Taste Scan.
Die von Ihnen ausgewählten Einstellungen werden auf dem Display
angezeigt.
4
Page 43

Deutsch Deutsch
Scanner-Einstellung
Symbol
Beschreibung
Farbmodus
IRIScan™ Book scannt Bilder in Farbe
oder Schwarzweiß.
Auflösung
IRIScan™ Book scannt Bilder mit einer
Auflösung von 300 dpi, 600 dpi oder 900
dpi.
Ausgabeformat
IRIScan™ Book speichert Bilder im
Format JPG oder PDF.
Verschlüsselung
IRIScan™ Book kann Bilder als
verschlüsselte Dateien speichern: Auf
diese Weise können die Dateien nur auf
einem Computer gelesen werden, wenn
der Scanner daran angeschlossen ist. Die
Dateien können dann nicht direkt von der
microSD-Karte gelesen werden.
Dateien werden standardmäßig nicht
verschlüsselt. Wählen Sie und dann
aus, um Dateien zu verschlüsseln.
Datum und Uhrzeit
Mit dieser Einstellung können Sie Ihren
Scans das Datum und die Uhrzeit
hinzufügen.
Das Datum und die Uhrzeit werden auch
auf dem Display angezeigt.
Formatieren von Karten
Mit dieser Einstellung können Sie die
microSD-Karte formatieren.
Hinweis: formatiert die Karte
formatiert die Karte nicht.
Übersicht über die Scanner-Einstellungen
5
Page 44

Deutsch Deutsch
4. Scannen von Dokumenten
Achtung:
Der IRIScan™ Book 3 dient zum Scannen von Einzelseiten. Er kann keine
mehrseitigen PDF-Dateien erstellen.
Führen Sie zum Scannen der jeweiligen Seite die nachfolgenden Schritte 2 bis 5
aus.
1. Halten Sie die Taste für 2 Sekunden gedrückt, um den Scanner
einzuschalten.
2. Legen Sie den Scanner oben auf der Seite, die Sie scannen möchten, auf.
3. Drücken Sie einmal auf die Taste Scan. Die Scan-Lampe leuchtet auf.
4. Schieben Sie den Scanner langsam und gleichmäßig über die Seite.
Tipp: Halten Sie das Dokument während des Scannens mit einer Hand
fest.
5. Wenn Sie unten auf der Seite angekommen sind, drücken Sie erneut die
Scan-Taste, um den Scanvorgang zu beenden.
Hinweis: Wenn während des Scannens ein Fehler auftritt (z. B. bei zu
schnellem oder ungleichmäßigem Scannen) leuchtet die ERR-Lampe
auf. Weitere Informationen finden Sie im Abschnitt Fehlerbehebung.
6. Der Scan wird kurz auf dem Display angezeigt. Wenn Sie ihn nochmals
überprüfen möchten, drücken Sie neben Playback die Taste nach oben.
Tipp:
Wenn Sie mehrseitige PDF-Dateien erstellen müssen:
Scannen Sie die Seiten einzeln nacheinander.
Speichern Sie die von Ihnen gescannten Einzelbilder oder einseitigen PDF-
Dateien auf Ihrem Computer.
Erstellen Sie dann mit Readiris mehrseitige PDF-Dateien.
7
Page 45

Deutsch Deutsch
Tipp zum Scannen:
Wenn Sie ein kleines, dickes Buch scannen, kann es vorkommen, dass der Rand zu
schmal ist und Sie nicht den gesamten Text scannen können.
Sie können dieses Problem beheben, indem Sie die Seiten horizontal scannen und
die Bilder mit IRISCompressor™ und Readiris™ drehen.
Eine andere Lösung wäre, dass Sie den Scanner unten auf der Seite ansetzen,
umdrehen und von unten nach oben scannen. Sie werden bemerken, dass der
rechte Rand des Scanners schmaler ist als der linke.
5. Übertragen von Dokumenten an Ihren Computer bzw. Ihr Tablet
Es gibt zwei Möglichkeiten, gescannte Dokumente auf Ihren Computer zu
übertragen: über ein Mini-USB-Kabel und über den microSD-Kartenadapter.
Mit dem Mini-USB-Kabel (Windows und Mac OS)
1. Schalten Sie den IRIScan™ Book ein.
2. Schließen Sie das USB-Kabel an den IRIScan™ Book und an Ihren Computer
bzw.
3. Auf Ihrem Computer wird dann der Kartenspeicher mit Ihren Dokumenten
angezeigt.
8
Page 46

Deutsch Deutsch
Beispielbild für Windows
4. Öffnen Sie den Kartenspeicher und kopieren Sie Ihre Dokumente auf Ihren
Computer bzw. Ihr Tablet. Die Dokumente befinden sich im Ordner
DCIM\100MEDIA des Wechseldatenträgers.
Mit dem microSD-Kartenadapter (Windows, Mac OS und Tablet)
1. Drücken Sie auf die microSD-Karte, um sie zu entsperren. Nehmen Sie sie
dann aus dem Kartensteckplatz.
2. Legen Sie sie in den mitgelieferten microSD-Kartenadapter ein.
3. Schieben Sie den Adapter in den SD-Kartensteckplatz Ihres Computers oder
in ein Camera Connection Kit zum Anschluss an ein Tablet ein. (nicht
enthalten)
4. Auf Ihrem Computer bzw. Ihrem Tablet wird dann der Kartenspeicher mit
Ihren Dokumenten angezeigt.
9
Page 47

Deutsch Deutsch
Beispielbild für iOS
5. ffnen Sie den Kartenspeicher und kopieren Sie Ihre Dokumente auf Ihren
Computer bzw. Ihr Tablet. Die Dokumente befinden sich im Ordner
DCIM\100MEDIA des Wechseldatenträgers.
Nachdem Sie Ihre Dokumente auf Ihren PC oder Mac übertragen haben, können
diese mit Readiris™ bearbeitet und mit IRISCompressor™ komprimiert werden.
Anleitungen zum Bearbeiten Ihrer Dokumente mit Readiris™ und
IRISCompressor™ finden Sie in den entsprechenden Kurzanleitungen auf der
Installations-CD-ROM sowie in den vollständigen Benutzerhandbüchern unter
www.irislink.com/support.
6. Scannen von Bildern mit IRIScan™ Direct
(nur Windows)
Mit IRIScan™ Direct können Sie den IRIScan™ Book auch ohne Batterien oder
microSD-Karte verwenden. Schließen Sie ihn einfach mit dem enthaltenen USBKabel an einem Windows-PC an. Die von Ihnen erstellten Scans werden als Bilder in
der Zwischenablage gespeichert.
Installieren von IRIScan™ Direct
1. Legen Sie die Installation-CD in das CD-ROM-Laufwerk des Computers ein.
Das Installationsmenü wird automatisch angezeigt. (Wenn das Menü nicht
automatisch angezeigt wird, führen Sie die setup.exe von der CD aus.)
2. Klicken Sie auf IRIScan™ Direct und folgen Sie den Bildschirmanweisungen.
3. Klicken Sie auf Finish (Fertigstellen), um die Installation abzuschließen.
10
Page 48

Deutsch Deutsch
Verwendung von IRIScan™ Direct
1. Schließen Sie den IRIScan™ Book mit dem enthaltenen USB-Kabel an einem
Windows-PC an.
2. Halten Sie die Taste für 2 Sekunden gedrückt, um den Scanner
einzuschalten.
Vergewissern Sie sich, dass das folgende Symbol auf dem Display angezeigt
wird:
3. Starten Sie die Anwendung IRIScan™ Direct über das Windows Start-Menü.
4. Klicken Sie auf das Symbol für die Einstellungen, um die IRIScan™ DirectEinstellungen festzulegen.
Wählen Sie die Display-Sprache für IRIScan™ Direct aus.
Hinweis: Diese Einstellung beinflusst lediglich, wie IRIScan™ Direct
angezeigt wird. Sie hat nichts mit der Scan-Sprache oder der Sprache
Ihrer Dokumente zu tun.
Wählen Sie auf der Registerkarte Scannen die Scanfarbe (Graustufen
oder Farbe) und die Scanausrichtung (horizontal oder vertikal) aus.
11
Page 49

Deutsch Deutsch
Klicken Sie anschließend auf Speichern, um die Einstellungen zu
speichern.
5. Öffnen Sie eine Anwendung, in die Sie das Bild (Word, Paint usw.) einfügen
möchten und klicken Sie mit dem Mauscursor in der Anwendung.
6. Drücken Sie einmal auf die Taste Scan. Die „Scan“-LED leuchtet.
7. Gleiten Sie jetzt mit dem Scanner über ein Dokument, um es zu scannen.
8. Drücken Sie erneute die Scan-Taste, um den Scanvorgang zu stoppen.
Das gescannte Bild wird nun in die Anwendung eingefügt.
Hinweis: Bei Anschluss an einen Windows-PC verwendet IRIScan™ Book eine
Auflösung von 300 dpi. Die Bilder werden nicht auf der microSD-Karte gespeichert.
12
Page 50

Deutsch Deutsch
Betriebssystem
Windows 8, Windows 7 und Windows Vista (keine
Treiberinstallation erforderlich)
CPU
Pentium® IV oder gleichwertig
RAM
1 GB
Festplattenspeicher
300 MB
Hardware
CD-ROM-Laufwerk, 1 freier USB-Anschluss
Betriebssystem
Mac OS X Leopard, Snow Leopard, Lion und Mountain Lion (keine
Treiberinstallation)
CPU
Intel-Prozessor
RAM
1 GB
Festplattenspeicher
300 MB
Hardware
CD-ROM-Laufwerk, 1 freier USB-Anschluss
Betriebssystem
iOS ab Version 5.1 und Android BS ab Version 4.0
Hardware
Camera Connection Kit
Bildsensor
CIS
Auflösung
300 dpi (Standard), 600 dpi, 900 dpi
Maximale Scan-Geschwindigkeit
+- 3 Sekunden für A4, 300 dpi, Farbe
+- 2 Sekunden für A4 300 dpi
Schwarzweiß
Kapazität (basierend auf einer 2 GB
microSD-Karte*)
*Die Anzahl an Scans kann in Abhängigkeit
von der Komplexität des Inhalts variieren.
300 dpi
600 dpi
900 dpi
Farbe
1600
600
190
Schwarzweiß
2000
800
190
Scanbreite
216mm
Scanlänge
1200mm
Dateiformat
JPG / PDF
Display
1.4" TFT LCD
USB-Anschluss
USB 2.0 Highspeed
Externer Speicher
MicroSD™-Karte (TF-Karte) bis zu 32 GB
7. Technische Daten
Mindestsystemanforderungen Windows PC
Mindestsystemanforderungen Mac OS
Mindestsystemanforderungen iOS und Android BS
Scanner-Spezifikationen
13
Page 51

Deutsch Deutsch
Unterstützte Batterien
3 AAA Alkaline oder wiederaufladbare
NiMh-Batterien
Oder Stromversorgung über USB.
Problem
Ursache
Lösung
Ich kann den Scanner nicht
einschalten.
Batterie ist schwach.
Batterie ist nicht richtig
eingelegt.
Keine Batterien!
Ersetzen Sie die Batterien.
Legen Sie die Batterien
richtig ein.
Anschluss des Scanners an
einen Computer
Die Bilder können nach dem
Scannen nicht gespeichert
werden.
Es ist keine microSD-Karte
in den Kartensteckplatz
eingelegt.
Die microSD-Karte ist voll.
Die microSD-Karte wurde
nicht richtig formatiert.
Legen Sie eine microSDKarte ein.
Verschieben Sie Bilder von
der microSD-Karte auf Ihren
Computer, um Speicherplatz
auf der Karte freizugeben.
Formatieren Sie die Karte
ordnungsgemäß.
Mein Computer erkennt den
Scanner nicht, wenn ich ihn
anschließe.
Verbindungsfehler.
Vergewissern Sie sich, dass
beide Enden des USBKabels richtig eingesteckt
sind.
Starten Sie Ihren Computer
ggf. neu.
Die Batterielaufzeit ist sehr
kurz.
Es ist der falsche Batterietyp
eingelegt.
Ersetzen Sie die aktuellen
Batterien durch 3 neue AAA
Alkaline- oder NiMhBatterien.
Oder schließen Sie den
Scanner an Ihren Computer
an und verwenden Sie
IRIScan™ Direct.
Mein Scanner erzeugt
verschwommene Bilder.
Wahrscheinlich ist das
Objektiv des Scanners
verschmutzt.
Reinigen Sie das Objektiv
mit einem weichen
trockenen Tuch.
8. Fehlerbehebung
14
Page 52

Deutsch Deutsch
Mein Scanner erzeugt
schiefe Bilder.
Der Scanner ist nicht richtig
kalibriert.
Kalibrieren Sie den Scanner
mit einem weißen Blatt
Papier. Weitere
Informationen finden Sie in
den FAQs auf unserer
Website.
Beim Scannen eines
Dokuments wird ERROR
angezeigt.
Sie gleiten mit dem Scanner
zu schnell über Ihre
Dokumente.
Drücken Sie die Taste
„Scan“ und scannen Sie Ihre
Dokumente erneut langsam
und gleichmäßig.
Sollten bei der Verwendung von IRIScan™ Book 3 Probleme auftreten, sehen Sie
sich die häufig gestellten Fragen (FAQs) auf unserer Website an oder wenden Sie
sich unter www.irislink.com/support/iriscanbook3 an den technischen Support.
15
Page 53

Español Español
Esta Guía rápida del usuario le ayudará a empezar a utilizar el escáner IRIScan™
Book 3.
unto con el escáner encontrará las aplicaciones Readiris™ Pro 12, IRIScan™
Direct e IRISCompressor™. Encontrará las Guías rápidas del usuario
correspondientes en el CD-ROM del IRIScan™ Book. Si necesita información
detallada sobre todas características y funcionalidades de estas aplicaciones,
consulte las versiones más actualizadas de las Guías del usuario en
www.irislink.com/support.
Las descripciones de esta guía están basadas en los sistemas operativos Windows
7, Mac OS Lion e iOS 6. Lea esta guía antes de utilizar el escáner y el software.
Toda la información contenida en esta guía puede modificarse sin previo aviso.
Índice
1. Comprobar los accesorios
2. Preparar el escáner
3. Seleccionar los ajustes del escáner
4. Escanear documentos
5. Transferir documentos al ordenador o tableta
6. Escanear con IRIScan™ Direct (solo Windows)
7. Información técnica
8. Información para resolver problemas
1
Page 54

Español Español
1. Comprobar los accesorios
2. Preparar el escáner
Insertar las pilas en el escáner
1. Abra el compartimiento de las pilas del modo mostrado en la imagen.
2. Inserte las 3 pilas alcalinas AAA asegurándose de hacerlo con la polaridad
correcta.
La polaridad correcta se muestra en el interior del escáner.
Insertar la tarjeta microSD™ incluida con el escáner
1. Introduzca la tarjeta microSD en la ranura correspondiente, empujándola
suavemente hasta que quede bloqueada.
Nota: el IRIScan™ Book también se puede utilizar sin pilas o sin tarjeta microSD
con un PC con Windows como sistema operativo. Consulte el apartado 6. Escanear
con IRIScan™ Direct.
3
Page 55

Español Español
Formatear la tarjeta microSD
Algunas tarjetas microSD nuevas solo se pueden utilizar tras formatearlas. Consulte
el apartado 3. En el apartado Seleccionar los ajustes del escáner se explica cómo
formatear la tarjeta.
3. Seleccionar los ajustes del escáner
Nota: antes de intentar acceder a la configuración del escáner, asegúrese de que la
tarjeta microSD incluida con el producto se encuentre en la ranura correspondiente.
1. Pulse el botón durante 2 segundos para encender el escáner. Las luces
indicadoras se encenderán.
2. Pulse una vez para acceder a la configuración del escáner.
3. Utilice las flechas arriba/abajo para desplazarse hasta el parámetro que
desee ajustar.
4. A continuación, pulse Scan para abrirlo.
5. Utilice las flechas arriba/abajo para desplazarse hasta el parámetro que
desee ajustar.
6. Seguidamente, vuelva a pulsar Scan para confirmar la selección.
Los valores que seleccione aparecerán en la pantalla del escáner.
4
Page 56

Español Español
Parámetro del escáner
Icono
Descripción
Modo de color
El IRIScan™ Book escanea imágenes en
color o blanco y negro.
Resolución
El IRIScan™ Book escanea imágenes con
una resolución de 300, 600 o 900 ppp.
Formato de salida
El IRIScan™ Book guarda imágenes en
los formatos JPG y PDF.
Cifrado
El IRIScan™ Book puede guardar
imágenes en forma de archivos cifrados:
Para poder leer estos archivos, el
escáner deberá estar conectado al
ordenador. Los archivos no se podrán leer
directamente de la tarjeta microSD. Por
defecto, los archivos no se cifran. Para
cifrarlos, seleccione y a
continuación, .
Fecha y hora
Este ajuste le permitirá añadir información
de la fecha y la hora a sus escaneos.
La fecha y la hora también se muestran
en la pantalla.
Formatear la tarjeta
Este parámetro permite formatear la
tarjeta microSD.
Nota: formatea la tarjeta. no
formatea la tarjeta.
Resumen de los ajustes del escáner
5
Page 57

Español Español
4. Escanear documentos
Atención:
IRIScan™ Book 3 se ha diseñado para escanear las páginas de una en una y no
genera archivos PDF de varias páginas.
Siga los pasos del 2 al 5 para cada página que quiera escanear.
1. Pulse el botón durante 2 segundos para encender el escáner.
2. Coloque el escáner encima de la página que desee escanear.
3. Pulse el botón Scan una vez. La palabra Scan aparece en la pantalla.
4. Deslice el escáner lentamente y a un ritmo constante por encima de la
página.
Consejo: sujete el documento con una mano mientras lo escanea.
5. Cuando llegue al final de la página vuelva a pulsar el botón Scan para
terminar.
Nota: en caso de producirse un error durante el escaneo –por ejemplo, si
escanea demasiado rápido o de manera desigual–, el mensaje Error
aparece en la pantalla. Para más información, consulte el apartado
Información para resolver problemas.
6. El texto escaneado aparece brevemente en la pantalla. Para volver a
comprobarlo, pulse el botón arriba que hay al lado del botón Playback.
Consejo:
Si necesita crear archivos PDF de varias páginas:
Escanee las páginas de una en una.
Transfiera los archivos de imagen o PDF de una sola página que haya
escaneado al ordenador.
Utilice Readiris para generar los archivos PDF de varias páginas.
7
Page 58

Español Español
Consejo para escanear:
Si escanea un libro pequeño pero grueso, puede que el margen sea demasiado
estrecho y no pueda escanear todo el texto.
Podrá solucionar este problema escaneando las páginas en sentido horizontal y
girando las imágenes con IRISCompressor™ y Readiris™.
Otra solución es colocar el escáner en la parte inferior de la página, girarlo del revés
y escanear en sentido ascendente. Observe que el margen derecho del escáner es
más pequeño que el izquierdo.
5. Transferir documentos al ordenador o tableta
Hay dos maneras de transferir documentos escaneados al ordenador: mediante el
cable mini-USB y por medio del adaptador de tarjetas microSD.
Utilizando el cable mini-USB (Windows y Mac)
1. Ponga en marcha el IRIScan™ Book.
2. Conecte el cable USB incluido con el escáner al IRIScan™ Book y al
ordenador.
3. El ordenador muestra la tarjeta de memoria que contiene sus documentos.
8
Page 59

Español Español
Imagen de ejemplo para Windows
4. Abra la memoria de la tarjeta y mueva los documentos al ordenador. Los
documentos se encuentran en la carpeta DCIM\100MEDIA de la unidad
extraíble.
Utilizando el adaptador de tarjetas microSD (Windows, Mac y tabletas)
1. Presione la tarjeta microSD para liberarla. A continuación, sáquela de la
ranura.
2. Introdúzcala en el adaptador de tarjetas microSD proporcionado.
3. Introduzca el adaptador en la ranura para tarjetas SD de su ordenador o
insértelo en un kit Camera Connection (no incluido) para conectar el escáner
a una tableta.
4. La memoria de la tarjeta en la que se almacenan los documentos aparecerá
en el ordenador o la tableta.
9
Page 60

Español Español
Imagen de ejemplo para iOS
5. Abra la memoria de la tarjeta y mueva los documentos a su ordenador o
tableta. Los documentos se encuentran en la carpeta DCIM\100MEDIA de la
unidad extraíble.
Una vez haya transferido los documentos a su PC o Mac, podrá procesarlos con
Readiris™ y comprimirlos con IRISCompressor™.
Para más información sobre cómo procesar sus documentos con Readiris™ e
IRISCompressor™ , consulte las Guías de inicio rápido correspondientes en el CD-
ROM de instalación y las Guías del usuario completas e www.irislink.com/support.
6. Escanear con IRIScan™ Direct (solo
Windows)
IRIScan™ Direct le permite utilizar su IRIScan™ Book incluso cuando no tenga pilas
o sin tarjeta microSD. Simplemente deberá conectarlo a un PC con Windows
utilizando el cable USB incluido. Los documentos escaneados se almacenarán en
forma de imágenes en el Portapapeles.
Instalar IRIScan™ Direct
1. Introduzca el disco de instalación en la unidad de CD-ROM del ordenador.
El menú de configuración aparece automáticamente. (Si el menú no aparece,
ejecute el archivo setup.exe del disco.)
2. Haga clic en IRIScan™ Direct y siga las instrucciones que aparecen en
pantalla.
3. Haga clic en Terminar para finalizar la instalación.
10
Page 61

Español Español
Utilizar IRIScan™ Direct
1. Conecte el IRIScan™ Book a su PC con Windows utilizando el cable USB
incluido.
2. Pulse el botón durante 2 segundos para encender el escáner.
Asegúrese de que el siguiente icono aparezca en la pantalla:
3. Ejecute la aplicación IRIScan™ Direct desde el menú Inicio de Windows.
4. Haga clic en el icono de configuración para ajustar la configuración de
IRIScan™ Direct.
Seleccione el idioma de la interfaz de IRIScan™ Direct..
Nota: este parámetro solo afecta a la visualización de la interfaz de
IRIScan™ Direct. No tiene nada que ver con el idioma o los idiomas de
los documentos escaneados.
En la pestaña Escanear, seleccione el Color de escaneo (Escala de
grises o Color) y la Orientación de escaneo (Horizontal o Vertical).
11
Page 62

Español Español
A continuación, haga clic en Guardar para guardar las preferencias.
5. Abra la aplicación en la que desee pegar la imagen (Word, Paint, etc.) y, a
continuación, haga clic con el cursor situado en el interior de la aplicación.
6. Pulse el botón Scan una vez. Se encenderá el LED correspondiente.
7. A continuación, deslice el escáner por el documento para escanearlo.
8. Vuelva a hacer clic en el botón Scan para detener la exploración.
La imagen escaneada se pegará en el interior de la aplicación.
Nota: cuando está conectado a un PC con Windows, IRIScan™ Book escanea a
una resolución de 300 ppp. Asimismo, las imágenes no se almacenan en la tarjeta
microSD.
12
Page 63

Español Español
Sistema operativo
Windows 8, Windows 7 y Windows Vista (no hay que instalar
controladores)
CPU
Pentium® 4 o equivalente
RAM
1 GB
Espacio en el
disco duro
300 MB
Hardware
Unidad de CD-ROM y un puerto USB libre
Sistema operativo
Mac OS X Leopard, Snow Leopard, Lion o Mountain Lion (sin
instalación de controladores)
CPU
Procesador Intel
RAM
1 GB
Espacio en el
disco duro
300 MB
Hardware
Unidad de CD-ROM y un puerto USB libre
Sistema operativo
iOS 5.1 o posterior y Android OS 4.0 o posterior
Hardware
Kit Camera Connection
Sensor de imagen
CIS
Resolución
300 ppp (por defecto), 600 ppp o 900 ppp
Máxima velocidad de escaneado
+- 3 egundos para una hoja tamaño A4, a
300 ppp y en color
+- 2 segundos para una hoja tamaño A4, a
300 ppp y en blanco y negro
Capacidad (en base a una tarjeta microSD
de 2GB*)
*El número de documentos escaneados
dependerá de la complejidad de su
contenido.
300 ppp
600 ppp
900 ppp
Color
1600
600
190
Monochrome
2000
800
190
Ancho de exploración
216mm
Longitud de exploración
1200mm
Formatos de archivo
JPG / PDF
Panel de indicadores
TFT LCD de 1,4"
7. Información técnica
Requisitos mínimos del sistema para Windows
Requisitos mínimos del sistema para Mac OS
Requisitos mínimos del sistema para iOS y Android OS
Especificaciones del escáner
13
Page 64

Español Español
Puerto USB
USB 2.0 de alta velocidad
Memoria externa
Tarjeta microSD™ (tarjeta TF) de hasta 32
GB
Alimentación
3 pilas AAA alcalinas o recargables de
NiMh
O mediante USB
Problema
Causa
Solución
No puedo encender el
escáner.
Las pilas están casi
descargadas.
Las pilas no se han
introducido correctamente.
No se han introducido pilas.
Cambie las pilas.
Introduzca las pilas
correctamente.
Conecte el escáner a un
ordenador.
No puedo guardar las
imágenes que escaneo.
No hay ninguna tarjeta
microSD en la ranura.
La tarjeta microSD está
llena.
La tarjeta microSD no se ha
formateado correctamente.
Inserte una tarjeta microSD.
Mueva las imágenes de la
tarjeta microSD al
ordenador para liberar
espacio en la tarjeta.
Formatee correctamente la
tarjeta.
Mi ordenador no reconoce el
escáner cuando lo conecto.
Error de conexión.
Asegúrese de que ambos
extremos del cable USB
estén bien conectados.
Si fuese necesario, reinicie
el ordenador.
Las pilas se descargan
enseguida.
Está utilizando pilas de un
tipo incorrecto.
Cambie las pilas por tres
pilas AAA alcalinas nuevas
o por unas pilas recargables
de NiMh.
O conecte el escáner al
ordenador y utilice
IRIScan™ Direct.
El escáner genera imágenes
borrosas.
Es probable que la lente del
escáner esté sucia.
Limpie la lente con un paño
suave y seco.
El escáner genera imágenes
torcidas.
El escáner no se ha
calibrado correctamente.
Calibre el escáner utilizando
una hoja de papel en
blanco. Encontrará ayuda
8. Información para resolver problemas
14
Page 65

Español Español
en el apartado de preguntas
frecuentes de nuestro sitio
web.
Aparece el mensaje ERROR
cuando escaneo un
documento.
Hace pasar el escáner
demasiado rápido por
encima de los documentos.
Pulse el botón Scan para
volver a escanear el
documento, más lentamente
y a un ritmo más constante.
Si tiene algún problema al utilizar IRIScan™ Book 3, consulte el apartado de
preguntas más frecuentes de nuestro sitio web o contacte con el servicio de soporte
técnico de I.R.I.S. a través de www.irislink.com/support/iriscanbook3.
15
Page 66

Italiano Italiano
La Guida rapida per l'uso viene fornita per aiutarvi a iniziare a usare lo scanner
IRIScan™ Book 3.
Questo scanner dispone delle applicazioni software Readiris™ Pro 12, IRIScan™
Direct e IRISCompressor™. Le relative Guide rapide per l'uso sono disponibili nel
CD-ROM di IRIScan™ Book. Per maggiori informazioni su tutte le funzionalità
offerte, consultare le Guide utente più aggiornate su www.irislink.com/support.
Le descrizioni riportate in questa guida si basano sui sistemi operativi Windows 7,
Mac OS Lion e iOS 6. Prima di utilizzare lo scanner e il software, leggere
attentamente la guida. Tutte le informazioni possono essere soggette a modifiche
senza preavviso.
Indice
1. Verifica degli accessori
2. Preparazione dello scanner
3. Scelta delle impostazioni dello scanner
4. Acquisizione dei documenti
5. Trasferimento dei documenti al computer / tablet
6. Acquisizione con IRIScan™ Direct (solo Windows)
7. Info tecniche
8. Risoluzione problemi
1
Page 67

Italiano Italiano
1. Verifica degli accessori
2. Preparazione dello scanner
Inserimento delle batterie incluse
1. Aprire il vano batterie, come illustrato nell'immagine.
2. Inserire le 3 batterie alcaline AAA, facendo attenzione a posizionare i poli nel
verso corretto.
All'interno dello scanner viene illustrato come posizionare i poli nel modo
corretto.
Inserimento della scheda microSD™ inclusa
1. Inserire delicatamente la scheda microSD nell'apposito slot fino a farla
scattare in posizione.
Nota: su un PC Windows, è possibile utilizzare IRIScan™ Book anche senza
batterie o una scheda microSD. Vedi Sezione Acquisizione con IRIScan™ Direct.
3
Page 68

Italiano Italiano
Formattazione della scheda microSD
Alcune nuove schede microSD possono essere utilizzate dopo la formattazione.
Vedere Sezione 3. Per ulteriori informazioni su come formattare la scheda
consultare la sezione Scelta delle impostazioni dello scanner.
3. Scelta delle impostazioni dello scanner
Nota: assicurati di aver inserito la scheda microSD in dotazione nello slot prima di
provare ad accedere alle impostazioni dello scanner.
1. Tenere premuto il pulsante per 2 secondi per accendere lo scanner. Il
display si accende.
2. Premere una volta per accedere alle impostazioni dello scanner.
3. Utilizzare le frecce su/giù per andare all'impostazione desiderata.
4. Quindi premere Scan per aprirla.
5. Utilizzare le frecce su/giù per andare all'impostazione desiderata.
6. Premere nuovamente Scan per confermare.
Le impostazioni selezionate vengono visualizzate sul display.
4
Page 69

Italiano Italiano
Impostazione scanner
Icona
Descrizione
Modalità colore
IRIScan™ Book acquisisce immagini a
colori o in bianco e nero.
Risoluzione
IRIScan™ Book acquisisce immagini con
una risoluzione di 300 dpi, 600 dpi o 900
dpi.
Formato di output
IRIScan™ Book salva le immagini sia
come immagini JPG sia come PDF
immagine.
Crittografia
IRIScan™ Book è in grado di salvare le
immagini come file criptati: In tal
modo è possibile leggere i file sul
computer solo se lo scanner è collegato.
Non sarà possibile leggere i file
direttamente sulla scheda microSD.
Per impostazione predefinita, i file non
sono criptati. Per criptare i file, selezionare
, quindi .
Data e ora
Questa impostazione consente di
aggiungere alle acquisizioni informazioni
relative alla data e all'ora.
La data e l'ora vengono inoltre visualizzate
sul display.
Formattazione della scheda
Questa impostazione consente di
formattare la scheda microSD.
Note: formatta la scheda. non
formatta la scheda.
Panoramica delle impostazioni dello scanner
5
Page 70

Italiano Italiano
4. Acquisizione dei documenti
Attenzione:
IRIScan™ Book 3 è progettato per acquisire una pagina alla volta. Non genera file
PDF multipagina.
Seguire i punti da 2 a 5 indicati di seguito per ciascuna pagina da acquisire.
1. Tenere premuto il pulsante per 2 secondi per accendere lo scanner.
2. Posizionare lo scanner nella parte superiore della pagina che si desidera
acquisire.
3. Premere una volta il pulsante Scan. La parola Scan viene visualizzata sul
display.
4. Far scorrere lo scanner lentamente e in modo regolare sulla pagina.
Suggerimento: tenere il documento ben fermo con una mano durante
l’acquisizione.
5. Una volta raggiunta la parte inferiore della pagina, premere di nuovo il tasto
Scan per interrompere l’acquisizione.
Nota: in caso di errore durante l'acquisizione (ad esempio, se si
acquisisce troppo velocemente o in maniera non regolare ) sul display
viene visualizzato il messaggio Error. Per ricevere assistenza, vedere la
sezione Risoluzione problemi.
6. L'acquisizione viene visualizzata per un momento sul display. Per
visualizzarla nuovamente, premere il pulsante in alto accanto a Playback.
Suggerimento:
Se si desidera creare PDF multipagina:
Acquisire le pagine una alla volta.
Trasferire le immagini o i file PDF monopagina sul computer.
Usare Readiris per generare file PDF multipagina.
7
Page 71

Italiano Italiano
Suggerimenti per la scansione:
Durante l'acquisizione di un libro di piccole dimensioni con molte pagine può
succedere che i margini siano troppo stretti e che non sia possibile acquisire l'intero
testo.
Il problema può essere risolto acquisendo le pagine in orizzontale e ruotando le
immagini con IRISCompressor™ e Readiris™.
In alternativa si può posizionare lo scanner in fondo alla pagina, capovolgerla e
acquisire verso l'alto. Il margine destro dello scanner è più piccolo rispetto al margine
sinistro.
5. Trasferimento dei documenti al computer / tablet
Esistono due modi per trasferire i documenti acquisiti sul computer: tramite un cavo
USB mini oppure tramite un adattatore per scheda microSD.
Uso del cavo USB mini (Windows e Mac)
1. Power on the IRIScan™ Book.
2. Collegare il cavo USB fornito sia ad IRIScan™ Book che al computer.
3. La scheda di memoria con i documenti acquisiti viene visualizzata sul
computer.
8
Page 72

Italiano Italiano
Immagine di esempio per Windows
4. Accedere alla scheda di memoria e spostare i documenti nel computer. I
documenti vengono salvati nella cartella DCIM\100MEDIA del disco
rimovibile.
Uso dell'adattatore per scheda micro SD (Windows, Mac e Tablet)
1. Premere la scheda microSD per sbloccarla. Quindi rimuoverla dallo slot.
2. Inserirla nell'adattatore per scheda microSD in dotazione.
3. Inserire l'adattatore nello slot della scheda SD del computer, oppure in un
Camera Connection Kit (non incluso) per collegarlo a un tablet.
4. La scheda di memoria con i documenti acquisiti viene visualizzata sul
computer/tablet.
9
Page 73

Italiano Italiano
Immagine di esempio per iOS
5. Accedere alla scheda di memoria e spostare i documenti nel computer/tablet.
I documenti vengono salvati nella cartella DCIM\100MEDIA del disco
rimovibile.
Una volta trasferiti al PC o su Mac, i documenti possono essere elaborati con
Readiris™ e compressi con IRISCompressor™.
Per ulteriori informazioni sull'elaborazione dei documenti con Readiris™ e
IRISCompressor™, consultare le relative Guide rapide sul CD-ROM di installazione
e le Guide complete per l'utente su www.irislink.com/support.
6. Acquisizione delle immagini con IRIScan™
Direct (solo Windows)
Con IRIScan™ Direct è possibile utilizzare IRIScan™ Book anche senza batterie o
una scheda microSD. Basta collegarlo a un PC Windows con il cavo USB incluso. Le
acquisizioni effettuate vengono salvate come immagini negli appunti.
Installazione di IRIScan™ Direct
1. Inserire il CD-ROM di Installazione nell'apposita unità del computer.
Il menu delle impostazioni viene visualizzato in automatico. (Se il menu non si
avvia, eseguire il file setup.exe dal disco.)
2. Fare clic su IRIScan™ Direct e seguire le istruzioni a video.
3. Fare clic su Fine per completare l'installazione.
10
Page 74

Italiano Italiano
Uso di IRIScan™ Direct
1. Collegare IRIScan™ Book al PC Windows con il cavo USB incluso.
2. Premere il pulsante per 2 secondi per accendere lo scanner.
Assicurarsi che la seguente icona venga visualizzata sullo schermo:
3. Avviare l'applicazione IRIScan™ Direct dal menu Start di Windows.
4. Fare clic sull'icona delle impostazioni per definire le impostazioni dello
scanner IRIScan™ Direct.
Selezionare la lingua di visualizzazione di IRIScan™ Direct.
Nota: questa impostazione riguarda solo la modalità di visualizzazione
di IRIScan™ Direct. Non ha niente a che vedere con la lingua di
acquisizione o con la lingua dei documenti.
Nella scheda Scansione, selezionare Colore scansione (grigio o a
colori) e Orientamento scansione (orizzontale o verticale).
11
Page 75

Italiano Italiano
Quindi, fare clic su Salva per memorizzare le impostazioni.
5. Aprire un'applicazione nella quale si desidera incollare l'immagine (Word,
Paint, ecc.) e fare clic con il puntatore del mouse all'interno dell'applicazione.
6. Premere una volta il pulsante Scan. Il led 'Scan' si accende.
7. Fare scorrere lo scanner sul documento per acquisirlo.
8. Per interrompere l'acquisizione premere di nuovo il pulsante Scan.
L'immagine acquisita viene incollata nell'applicazione.
Nota: quando è collegato a un PC Windows, IRIScan™ Book utilizza una risoluzione
di 300 dpi. Le immagini non vengono memorizzate nella scheda microSD.
12
Page 76

Italiano Italiano
Sistema operativo
Windows 8, Windows 7 e Windows Vista (non richiede
l'installazione di alcun driver)
CPU
Pentium® IV o equivalente
RAM
1 GB
Spazio su disco
300 MB
Hardware
Unità CD-ROM, 1 porta USB libera
Sistema operativo
Mac OS X Leopard, Snow Leopard, Lion e Mountain Lion (non
richiede l'installazione di driver)
CPU
Processore Intel
RAM
1 GB
Spazio su disco
300 MB
Hardware
Unità CD-ROM, 1 porta USB libera
Sistema operativo
iOS 5.1 o versione successiva e Android 4.0 o versione successiva
Hardware
Camera connection kit
Sensore immagine
CIS
Risoluzione
300 dpi (predefinita), 600 dpi, 900 dpi
Velocità di scansione massima
+- 3 secondi per A4, a 300 dpi, a colori
+- 2 secondi per A4, a 300 dpi, in bianco e
nero
Capacità (basata su scheda microSD da
2GB*) *Il numero di acquisizioni può
variare in base alla complessità dei
contenuti.
300 dpi
600 dpi
900 dpi
Colore
1600
600
190
Mono
2000
800
190
Larghezza di acquisizione
216mm
Lunghezza di acquisizione
1200mm
Formato file
JPG / PDF
Pannello di visualizzazione
1.4" TFT LCD
Porta USB
USB 2.0 alta velocità
Memoria esterna
Scheda MicroSD (scheda TF) fino a 32GB
7. Info tecniche
Requisiti minimi di sistema per PC Windows
Requisiti minimi di sistema per Mac OS
Requisiti minimi di sistema per i sistemi operativi iOS e Android
Specifiche dello scanner
13
Page 77

Italiano Italiano
Batterie supportate
3 batterie ricaricabili alcaline AAA o NiMh
Oppure alimentato tramite USB
Problema
Causa
Soluzione
Lo scanner non si accende.
Batteria scarica.
Batteria non inserita
correttamente.
Batterie non inserite.
Sostituire le batterie.
Inserire le batterie in modo
corretto.
Collegare lo scanner al
computer.
Non è possibile salvare le
immagini acquisite.
Non è stata inserita la
scheda microSD
nell’apposito slot.
La scheda microSD è piena.
La scheda microSD non è
stata formattata in modo
corretto.
Inserire la scheda microSD.
Trasferire le immagini dalla
scheda microSD al
computer per recuperare
spazio di memoria nella
scheda.
Formattare correttamente la
scheda.
Il computer non riconosce lo
scanner quando viene
collegato.
Errore di collegamento.
Assicurarsi che entrambe le
estremità del cavo USB
siano correttamente inserite.
Riavviare il computer, se
necessario.
La durata della batteria è
molto breve.
Utilizzo del tipo sbagliato di
batterie.
Sostituire le batterie
utilizzate con 3 batterie
alcaline AAA o NiMh nuove.
Oppure, collegare lo
scanner al computer e usare
IRIScan™ Direct.
Lo scanner genera immagini
sfocate.
La lente dello scanner
probabilmente è sporca.
Pulire la lente con un panno
morbido e asciutto.
Lo scanner genera immagini
inclinate.
Lo scanner non è stato
calibrato correttamente.
Per calibrare lo scanner
utilizzare un foglio di carta
bianco. Consultare la
sezione FAQ sul nostro sito
per ottenere assistenza.
8. Risoluzione problemi
14
Page 78

Italiano Italiano
Durante l'acquisizione di un
documento viene
visualizzato il messaggio
ERROR.
Lo scanner viene fatto
scorrere troppo velocemente
sui documenti.
Premere il pulsante Scan
per acquisire nuovamente il
documento; eseguire
l'operazione lentamente e
con un movimento costante.
In caso di problemi nell'utilizzo di IRIScan™ Book 3, consultare la sezione FAQ sul
nostro sito o contattare l'Assistenza Tecnica all'indirizzo
www.irislink.com/support/iriscanbook3.
15
Page 79

Português Português
Este Guia Rápido do Usuário ajuda você a começar a usar o scanner IRIScan™ Book
3.
Este scanner é fornecido com os aplicativos Readiris™ Pro 12, IRIScan™ Direct e
IRISCompressor™. Os Guias Rápidos do Usuário correspondentes podem ser
encontrados no CD-ROM do IRIScan™ Book. Para obter informações detalhadas sobre
todos os recursos, consulte os Guias do Usuário mais recentes em
www.irislink.com/support/iriscanbook3.
As descrições fornecidas neste guia são baseadas nos sistemas operacionais Windows
7, Mac OS Lion e iOS 6. Leia este guia antes de operar este scanner e seu software.
Todas as informações estão sujeitas a alterações sem aviso prévio.
Sumário
1. Verificar os acessórios
2. Preparar o scanner
3. Escolher as configurações do scanner
4. Digitalizar documentos
5. Transferir documentos para o seu computador/tablet
6. Digitalizar com o IRIScan™ Direct (somente Windows)
7. Informações técnicas
8. Informações para a solução de problemas
1
Page 80

Português Português
1. Verificar os acessórios
2. Preparar o scanner
Inserir as baterias incluídas
1. Abra o compartimento de bateria como mostrado na imagem.
2. Insira as três baterias AAA alcalinas, lembrando da polaridade correta.
A polaridade correta é mostrada no interior do scanner.
Inserir o cartão microSD™ incluído
1. Insira o cartão microSD delicadamente na entrada para cartão até que ele esteja
travado.
3
Page 81

Português Português
Nota: em um PC com Windows, o IRIScan™ Book pode também ser usado sem
baterias ou cartão microSD. Consulte a seção 6. Digitalizar com o IRIScan™ Direct.
Formatar o cartão microSD
Alguns cartões microSD novos só podem ser usados depois de formatados. Consulte a
seção 3. Escolha as configurações do scanner para saber como formatar o cartão.
3. Escolher as configurações do scanner
Nota: antes de tentar acessar as configurações do scanner, verifique se o cartão
microSD fornecido está inserido na entrada para cartão.
1. Pressione o botão por 2 segundos para ligar o scanner. A tela acende.
2. Pressione uma vez para acessar as configurações do scanner.
3. Use setas para cima/para baixo para acessar a configuração desejada.
4. Depois pressione Scan (Digitalizar) para abrí-la.
5. Use setas para cima/para baixo para acessar a configuração desejada.
6. Depois pressione Scan (Digitalizar) novamente para confirmar.
As configurações selecionadas aparecem na tela.
4
Page 82

Português Português
Configuração do scanner
Ícone
Descrição
Modo de cor
O IRIScan™ Book digitaliza as imagens
em cores ou em preto e branco.
Resolução
O IRIScan™ Book digitaliza as imagens
em uma resolução de 300 dpi, 600 dpi ou
900 dpi.
Formato de saída
O IRIScan™ Book salva as imagens como
imagem JPG ou PDF.
Criptografia
O IRIScan™ Book pode salvar as
imagens como arquivos criptografados:
Dessa maneira, os arquivos poderão
ser lidos em um computador apenas se
você conectar o scanner a ele. Os
arquivos não poderão ser lidos
diretamente no cartão microSD.
Por padrão, os arquivos não são
criptografados. Para criptografar arquivos,
selecione e, em seguida, .
Data e Hora
Com esta configuração, você pode
adicionar informações de data e hora às
digitalizações.
A data e hora também são mostradas na
tela.
Formatação do cartão
Com esta configuração, você pode
formatar o cartão microSD.
Nota: formata o cartão. não
formata o cartão.
Visão geral das configurações do scanner
5
Page 83

Português Português
4. Digitalizar documentos
Atenção:
O IRIScan™ Book 3 foi desenvolvido para digitalizar uma página de cada vez. Ele não
gera arquivos PDF de várias páginas.
Siga as etapas de 2 a 5 abaixo para cada página que digitalizar.
1. Pressione o botão por 2 segundos para ligar o scanner.
2. Posicione o scanner no topo da página que você deseja digitalizar.
3. Pressione o botão Scan (Digitalizar) uma vez. A palavra Scan (Digitalizar)
aparece na tela.
4. Deslize o scanner lenta e firmemente sobre a página.
Dica: segure o documento firmemente com uma mão ao digitalizar.
5. Quando chegar ao fim da página, pressione o botão Scan (Digitalizar)
novamente para parar a digitalização.
Nota: se ocorrer um erro durante a digitalização, por exemplo, ao digitalizar
muito rápido ou de forma desigual: - Error (Erro) aparecerá na tela. Consulte
a seção Informações para a solução de problemas para obter ajuda.
6. A digitalização aparecerá por alguns instantes na tela. Para verificá-la
novamente, pressione o botão para cima ao lado de Playback (Reproduzir).
Dica:
Caso precise criar PDFs com várias páginas:
Digitalize as páginas uma por uma.
Transfira os arquivos PDF de página única ou de imagem que digitalizou para o
seu computador.
Use o Readiris para gerar arquivos PDF de várias páginas.
7
Page 84

Português Português
Dica de digitalização:
Ao digitalizar um livro pequeno e grosso, a margem poderá ser muito estreita e você
não poderá digitalizar o texto inteiro.
Você poderá resolver esse problema ao digitalizar as páginas horizontalmente e girar
as imagens com o IRISCompressor™ e o Readiris™.
Outra solução é colocar o scanner na base da página, invertê-lo e digitalizar para cima.
Você observará que a margem direita do scanner é menor do que a esquerda.
5. Transferir documentos para o seu computador/tablet
Há duas maneiras de transferir documentos digitalizados para o seu computador:
usando o cabo mini USB e usando o adaptador de cartão microSD.
Using the mini USB cable (Windows and Mac OS)
1. Ligue o IRIScan™ Book.
2. Conecte o cabo USB fornecido ao IRIScan™ Book e ao seu computador.
3. O cartão de memória com os seus documentos é exibido no computador.
8
Page 85

Português Português
Exemplo de imagem para Windows
4. Abra a memória do cartão e mova os seus documentos para o computador. Os
documentos estão localizados na pasta DCIM\100MEDIA do disco removível.
Usar um adaptador de cartão microSD (Windows, Mac e Tablet)
1. Pressione o cartão microSD para destravá-lo. Depois remova-o da entrada para
cartão.
2. Insira-o no adaptador do cartão microSD fornecido.
3. Insira o adaptador na entrada para cartão SD no computador ou insira-o no kit
de conexão de câmera (não incluído) para conectá-lo a um tablet.
4. O cartão de memória com os seus documentos é exibido no computador/tablet.
9
Page 86

Português Português
Exemplo de imagem para iOS
5. Abra a memória do cartão e mova os seus documentos para o
computador/tablet. Os documentos estão localizados na pasta DCIM\100MEDIA
do disco removível.
Depois que você transferir os seus documentos para o PC ou o Mac, eles poderão ser
processados com o Readiris™ e compactados com o IRISCompressor™.
Para obter informações sobre como processar documentos com o Readiris™ e o
IRISCompressor™, consulte os Guias de Início Rápido no CD-ROM de instalação e os
Guias do Usuário completos em www.irislink.com/support.
6. Digitalizar imagens com o IRIScan™ Direct
(somente Windows)
Com o IRIScan™ Direct, você pode usar o IRIScan™ Book mesmo sem baterias ou
cartão microSD. Basta conectá-lo a um PC com Windows usando o cabo USB incluído.
As digitalizações que você fizer serão armazenadas como imagens na área de
transferência.
Instalar o IRIScan™ Direct
1. Insira o disco do Instalação na unidade de CD-ROM do computador.
O menu de configuração é exibido automaticamente. (Se o menu não iniciar,
execute o setup.exe no disco.)
2. Clique em IRIScan™ Direct e siga as instruções na tela.
10
Page 87

Português Português
3. Clique em Concluir para finalizar a instalação.
Usar o IRIScan™ Direct
1. Conecte o IRIScan™ Book ao PC com Windows usando o cabo USB incluído.
2. Pressione o botão por 2 segundos para ligar o scanner.
Verifique se o seguinte ícone está exibido na tela:
3. Inicie o aplicativo IRIScan™ Direct a partir do menu Iniciar do Windows.
4. Clique no ícone de configurações para determinar as configurações do
IRIScan™ Direct.
Selecione o idioma da tela do IRIScan™ Direct.
Nota: essa configuração influencia apenas a forma de exibição do
IRIScan™ Direct. Não tem nada a ver com o idioma de digitalização ou o
idioma de seus documentos.
Na guia Digitalizar, escolha Cor da Digitalização (Cinza ou Cor) e a
Orientação da Digitalização (Horizontal ou Vertical).
11
Page 88

Português Português
Em seguida, clique em Salvar para salvar as configurações.
5. Abra o aplicativo no qual você deseja colar a imagem (Word, Paint etc.) e, em
seguida, clique no cursor do mouse dentro do aplicativo.
6. Pressione o botão Digitalizar uma vez. O LED "Digitalizar" acende.
7. Agora passe o scanner sobre um documento para digitalizá-lo.
8. Pressione o botão Digitalizar novamente para interromper a digitalização.
A imagem digitalizada agora está colada no aplicativo.
Nota: quando conectado a um PC com Windows, o IRIScan™ Book usa uma resolução
de 300 dpi. As imagens não são armazenadas no cartão microSD.
12
Page 89

Português Português
Sistema operacional
Windows 8, Windows 7 e Windows Vista (não é necessário instalar
nenhum driver)
CPU
Pentium® IV ou equivalente
RAM
1 GB
Espaço no disco
rígido
300 MB
Hardware
Unidade de CD-ROM, 1 porta USB livre
Sistema operacional
Mac OS X Leopard, Snow Leopard, Lion e Mountain Lion (não é
necessário instalar nenhum driver)
CPU
Processador Intel
RAM
1 GB
Espaço no disco
rígido
300 MB
Hardware
Unidade de CD-ROM, 1 porta USB livre
Sistema operacional
iOS 5.1 ou posterior e Android OS 4.0 ou posterior
Hardware
Kit de conexão de câmera
Sensor de imagem
CIS
Resolução
300 dpi (padrão), 600 dpi, 900 dpi
Velocidade máxima de digitalização
+- 3 segundos para A4, 300 dpi e cor
+- 2 segundos para A4, 300 dpi e preto e
branco
Capacidade (com base no cartão microSD de
2 GB*) *O número de digitalizações pode
variar em função da complexidade do
conteúdo.
300 dpi
600 dpi
900 dpi
Cor
1600
600
190
Mono
2000
800
190
Largura da digitalização
216mm
Comprimento da digitalização
1200mm
Formato de arquivo
JPG / PDF
Painel da tela
1.4" TFT LCD
7. Informações técnicas
Requisitos mínimos de sistema - PC com Windows
Requisitos mínimos de sistema - PC com Mac OS
Requisitos mínimos de sistema para iOS e Android OS
Especificações do scanner
13
Page 90

Português Português
Porta USB
USB 2.0 de alta velocidade
Memória externa
Cartão microSD (cartão TF) de até 32 GB
Baterias compatíveis
3 baterias AAA alcalinas ou baterias NiMh
recarregáveis.
Ou com suporte USB.
Problema
Causa
Solução
Eu não consigo ligar o
scanner.
A carga da bateria está fraca.
A bateria não está inserida
corretamente.
Nenhuma bateria inserida.
Substitua as baterias.
Insira as baterias
corretamente.
Conecte o scanner a um PC.
Não consigo salvar as imagens
depois de digitalizá-las.
Não há cartão microSD na
entrada para cartão.
O cartão microSD está cheio.
O cartão microSD não foi
formatado corretamente.
Insira um cartão microSD.
Mova as imagens do cartão
microSD para o computador
para liberar espaço de
armazenamento no cartão.
Formate o cartão
corretamente.
Meu computador não
reconhece o scanner
conectado.
Falha na conexão.
Certifique-se de que as duas
extremidades do cabo USB
estejam conectadas com
firmeza.
Reinicie o computador se
necessário.
A duração da bateria é muito
curta.
Está sendo usado o tipo
incorreto de bateria.
Substitua as baterias atuais
por 3 baterias AAA alcalinas
ou NiMh novas.
Ou conecte o scanner ao seu
computador e use o IRIScan™
Direct.
Meu scanner gera imagens
borradas
Provavelmente a lente do
scanner está suja.
Limpe a lente com um pano
macio e úmido.
Meu scanner gera imagens
inclinadas.
O scanner não foi calibrado
corretamente.
Calibre o scanner usando uma
folha branca de papel.
Consulte as perguntas
frequentes no nosso site para
obter ajuda.
8. Informações para a solução de problemas
14
Page 91

Português Português
ERROR aparece durante a
digitalização de um
documento.
Você está deslizando o
scanner muito rapidamente
nos documentos.
Pressione o botão Scan
(Digitalizar) para digitalizar o
documento novamente, lenta e
firmemente.
Caso você encontre qualquer problema ao utilizar o IRIScan™ Book 3, consulte as
perguntas frequentes no nosso site ou entre em contato com o suporte técnico em
www.irislink.com/support/iriscanbook3.
15
Page 92

Pусский Pусский
Этот краткий справочник поможет приступить к работе со сканером IRIScan™
Book 3.
Этот сканер поставляется с программным обеспечением Readiris™ Pro 12,
IRIScan™ Direct и IRISCompressor™. Соответствующие краткие справочники
находятся на компакт-диске IRIScan™ Book. См. подробные сведения о
возможностях программного обеспечения в последних версиях руководств
пользователя по адресу www.irislink.com/support.
Сведения и процедуры, представленные в этой документации, относятся к ОС
Windows 7 и Mac OS Lion и iOS 6. Ознакомьтесь с этим руководством перед
использованием сканера и его программного обеспечения. Вся информация
может меняться без уведомления.
Содержание
1. Проверка комплекта поставки
2. Подготовьте сканер
3. Выбор параметров сканера
4. Сканирование документов
5. Передача документов на компьютер или планшет
6. Сканирование с помощью IRIScan™ Direct (только для Windows)
7. Техническая информация
8. Поиск и устранение неисправностей
1
Page 93

Pусский Pусский
1. Проверка комплекта поставки
2. Подготовка сканера
Вставьте батарейки, входящие в комплект поставки
1. Откройте крышку отсека с аккумуляторами, как показано на
изображении.
2. Вставьте 3 щелочные батареи типа AAA, обращая внимания на
полярность.
Полярность указана внутри сканера.
Вставьте входящую в комплект карту microSD™
1. Осторожно вставьте карту памяти microSD в слот до щелчка.
Примечание. На ПК под управлением Windows IRIScan™ Book также может
использоваться без батареек и карты microSD. См. раздел 6. Сканирование с
помощью IRIScan™ Direct.
3
Page 94

Pусский Pусский
Вставьте входящую в комплект карту microSD™
Некоторые новые карты microSD карты могут быть использованы только после
форматирования. См. дополнительные сведения о форматировании карты в
разделе 3 Настройка параметров сканера.
3. Выбор параметров сканера
Примечание. Перед настройкой сканера убедитесь, что карта microSD (входит
в комплект) вставлена в слот.
1. Нажмите и удерживайте кнопку в течение 2 секунд, чтобы включить
сканер. Включится подсветка экрана.
2. Нажмите один раз для перехода к параметрам сканера.
3. Используйте стрелки вверх и вниз, чтобы перейти к нужному параметру.
4. Затем нажмите кнопку Scan, чтобы открыть его.
5. Используйте стрелки вверх и вниз, чтобы перейти к нужному параметру.
6. Затем нажмите кнопку Scan для подтверждения.
Выбранные параметры отображаются на экране.
4
Page 95

Pусский Pусский
Параметр сканера
Значок
Описание
Режим цвета
IRIScan™ Book поддерживает два
режима сканирования: цветной и чернобелый.
Разрешение
IRIScan™ Book сканирует изображения
с разрешением 300, 600 или 900
точек/дюйм.
Формат вывода
IRIScan™ Book сохраняет изображения
в форматах JPG и PDF — изображение.
Шифрование
IRIScan™ Book может сохранять
изображения в виде зашифрованных
файлов: Таким образом, файлы
могут быть прочитаны только на
компьютере после подключения
сканера к нему. Файлы будут
недоступны для чтения с карты
microSD.
По умолчанию файлы не шифруются.
Чтобы зашифровать файлы, выберите
, а затем .
Дата и время
С помощью этого параметра вы можете
добавить дату и время к
отсканированным файлам.
Дата и время также отображаются на
экране.
Форматирование карты
Этот параметр позволяет
отформатировать карту microSD.
Примечание. форматирует карту.
не форматирует карту.
Обзор параметров сканера
5
Page 96

Pусский Pусский
4. Сканирование документов
Внимание!
Модель IRIScan™ Book 3 предназначена для сканирования отдельных страниц.
Она не поддерживает создание многостраничных PDF-файлов.
Выполните действия 2–5 для каждой сканируемой страницы.
1. Нажмите и удерживайте кнопку в течение 2 секунд, чтобы включить
сканер.
2. Поместите сканер в верхнюю часть страницы, которую следует
отсканировать.
3. Нажмите кнопку Scan один раз. Слово Scan появится на экране.
4. Медленно и уверенно проведите сканером по странице.
Совет. Удерживайте документ неподвижным одной рукой во время
сканирования.
5. Дойдя до конца страницы, нажмите кнопку Scan еще раз для остановки
сканирования.
Примечание. В случае возникновения ошибки во время
сканирования, например из-за слишком быстрого или
неравномерного сканирования, на экране появится слово - Error.
См. дополнительные сведения в разделе Устранение
неисправностей.
6. Отсканированное изображение ненадолго появится на экране. Чтобы
проверить его еще раз, нажмите стрелку вверх рядом с кнопкой
Playback.
Совет:
Если вам нужен многостраничный PDF-файл:
Отсканируйте страницы по одной.
Передайте изображение или одностраничные PDF-файлы на компьютер.
Воспользуйтесь Readiris для создания многостраничных PDF-файлов.
7
Page 97

Pусский Pусский
Кончик:
Это может произойти при сканировании небольших толстых книг, узкие поля
которых не позволяют отсканировать весь текст.
Вы можете решить эту проблему путем сканирования страниц по горизонтали и
поворота изображений в IRISCompressor™ и Readiris™.
Кроме того, можно перевернуть сканер, поместить его в нижнюю часть
страницы и отсканировать ее снизу вверх. Обратите внимание, что правое
поле сканера больше, чем левое.
5. Передача документов на компьютер или
планшет
Существует два способа передать отсканированные изображения на
компьютер: miniUSB-кабель и адаптер microSD.
Использование miniUSB-кабеля (Windows и Mac)
1. Включите IRIScan™ Book.
2. Подключите USB-кабель, входящий в комплект, к IRIScan™ Book и
компьютеру.
3. Карта памяти с документами появится на компьютере.
8
Page 98

Pусский Pусский
Пример изображения для Windows
4. Откройте карту памяти и переместите документы на компьютер.
Документы находятся в папке DCIM\100MEDIA на съемном диске.
Использование адаптера microSD (Windows, Mac и планшеты)
1. Нажмите на карту microSD, чтобы освободить ее, и вытащите карту из
слота.
2. Вставьте ее в адаптер microSD.
3. Вставьте адаптер в слот для карты SD на компьютере или в комплект
для подключения камеры для работы с планшетом. (не входит в
комплект)
4. Карта памяти с документами появится на компьютере или планшете.
9
Page 99

Pусский Pусский
Пример изображения для iOS
5. Откройте карту памяти и переместите документы на компьютер.
Документы находятся в папке DCIM\100MEDIA на съемном диске.
После передачи документов на ПК или Mac их можно будет обработать в
Readiris™ и сжать в IRISCompressor™.
Дополнительные сведения об обработке документов в Readiris™ и
IRISCompressor™ см. в соответствующих кратких справочниках на
установочном компакт-диске и в полных руководствах по адресу
www.irislink.com/support.
6. Сканирование с помощью IRIScan™ Direct
(только для Windows)
IRIScan™ Direct позволяет использовать IRIScan™ Book без батареек и карты
microSD. Вы просто подключаете сканер к компьютеру под управлением
Windows с помощью прилагаемого USB-кабеля. Отсканированные материалы
сохраняются как изображения в буфере обмена.
Установка IRIScan™ Direct
1. Вставьте диск Установка в дисковод для компакт-дисков своего
компьютера.
Меню установки откроется автоматически. (Если меню не отображается,
запустите файл setup.exe с диска.)
2. Щелкните IRIScan™ Direct и следуйте инструкциям на экране.
3. Нажмите кнопку Готово, чтобы завершить установку.
10
Page 100

Pусский Pусский
Использование IRIScan™ Direct
1. Подключите IRIScan™ Book к компьютеру под управлением Windows с
помощью прилагаемого USB-кабеля.
2. Нажмите и удерживайте кнопку в течение 2 секунд, чтобы включить
сканер.
Убедитесь, что на экране отображается следующий значок:
3. Запустите приложение IRIScan™ Direct из меню Пуск Windows.
4. Щелкните значок параметров, чтобы настроить параметры IRIScan™
Direct.
Выберите язык отображения IRIScan™ Direct.
Примечание. Этот параметр влияет только на отображение
IRIScan™ Direct. Он не связан с языком сканирования или языком
документов.
На вкладке Сканирование выберите Цвет сканирования (черно-
белое или цветное) и ориентацию сканирования (по горизонтали
или по вертикали).
11
 Loading...