

Page 1
®
SkyGuider™ Pro Camera Mount
Instruction Manual
Product #3550, #3551 and #3552
Page 2
Table of Content
Table of Content ...................................................................................................................... 2
1. SkyGuiderTM Pro Camera Mount Overview ......................................................................... 3
2. SkyGuiderTM Pro Camera Mount Assembly ......................................................................... 6
2.1. Introduction ................................................................................................................... 6
2.2. Parts List ....................................................................................................................... 6
2.3. Assembly Terms ........................................................................................................... 7
2.4. SkyGuiderTM Pro Camera Mount Assembly .................................................................. 9
3. Advanced Application ........................................................................................................ 17
3.1. Autoguide .................................................................................................................... 17
3.2. Attach a Telescope ..................................................................................................... 17
3.3. Dual Camera/Scope Mount ......................................................................................... 18
3.4. Use Optional 8408 Hand Controller ............................................................................ 18
3.4.1. Go2Nova® 8408 Hand Controller .......................................................................... 18
3.4.2. Go2Nova® 8408 Hand Controller Function ........................................................... 20
4. Maintenance and Servicing ............................................................................................... 25
4.1. Maintenance ............................................................................................................... 25
4.2. Trouble Shooting ......................................................................................................... 25
4.3. iOptron Customer Service ........................................................................................... 26
4.4. Product End of Life Disposal Instructions .................................................................... 26
4.5. Battery Replacement and Disposal Instructions .......................................................... 26
Appendix A. Technical Specifications (for #3550 only) .......................................................... 27
IOPTRON ONE YEAR TELESCOPE, MOUNT, AND CONTROLLER WARRANTY ............ 28
NEVER USE A TELESCOPE TO LOOK AT THE SUN WITHOUT A PROPER FILTER!
Looking at or near the Sun will cause instant and irreversible damage to your eye.
Children should always have adult supervision while observing.
Please don’t charge the battery or use USB power at or below 0°C (32°F), otherwise the
rechargeable battery might be permanently damaged.
Ver.1.0
iOptron Corp. reserves the rights to revise this instruction without notice. Actual color/contents/design may differ from those described in this
instruction.
WARNING!
2
Page 3
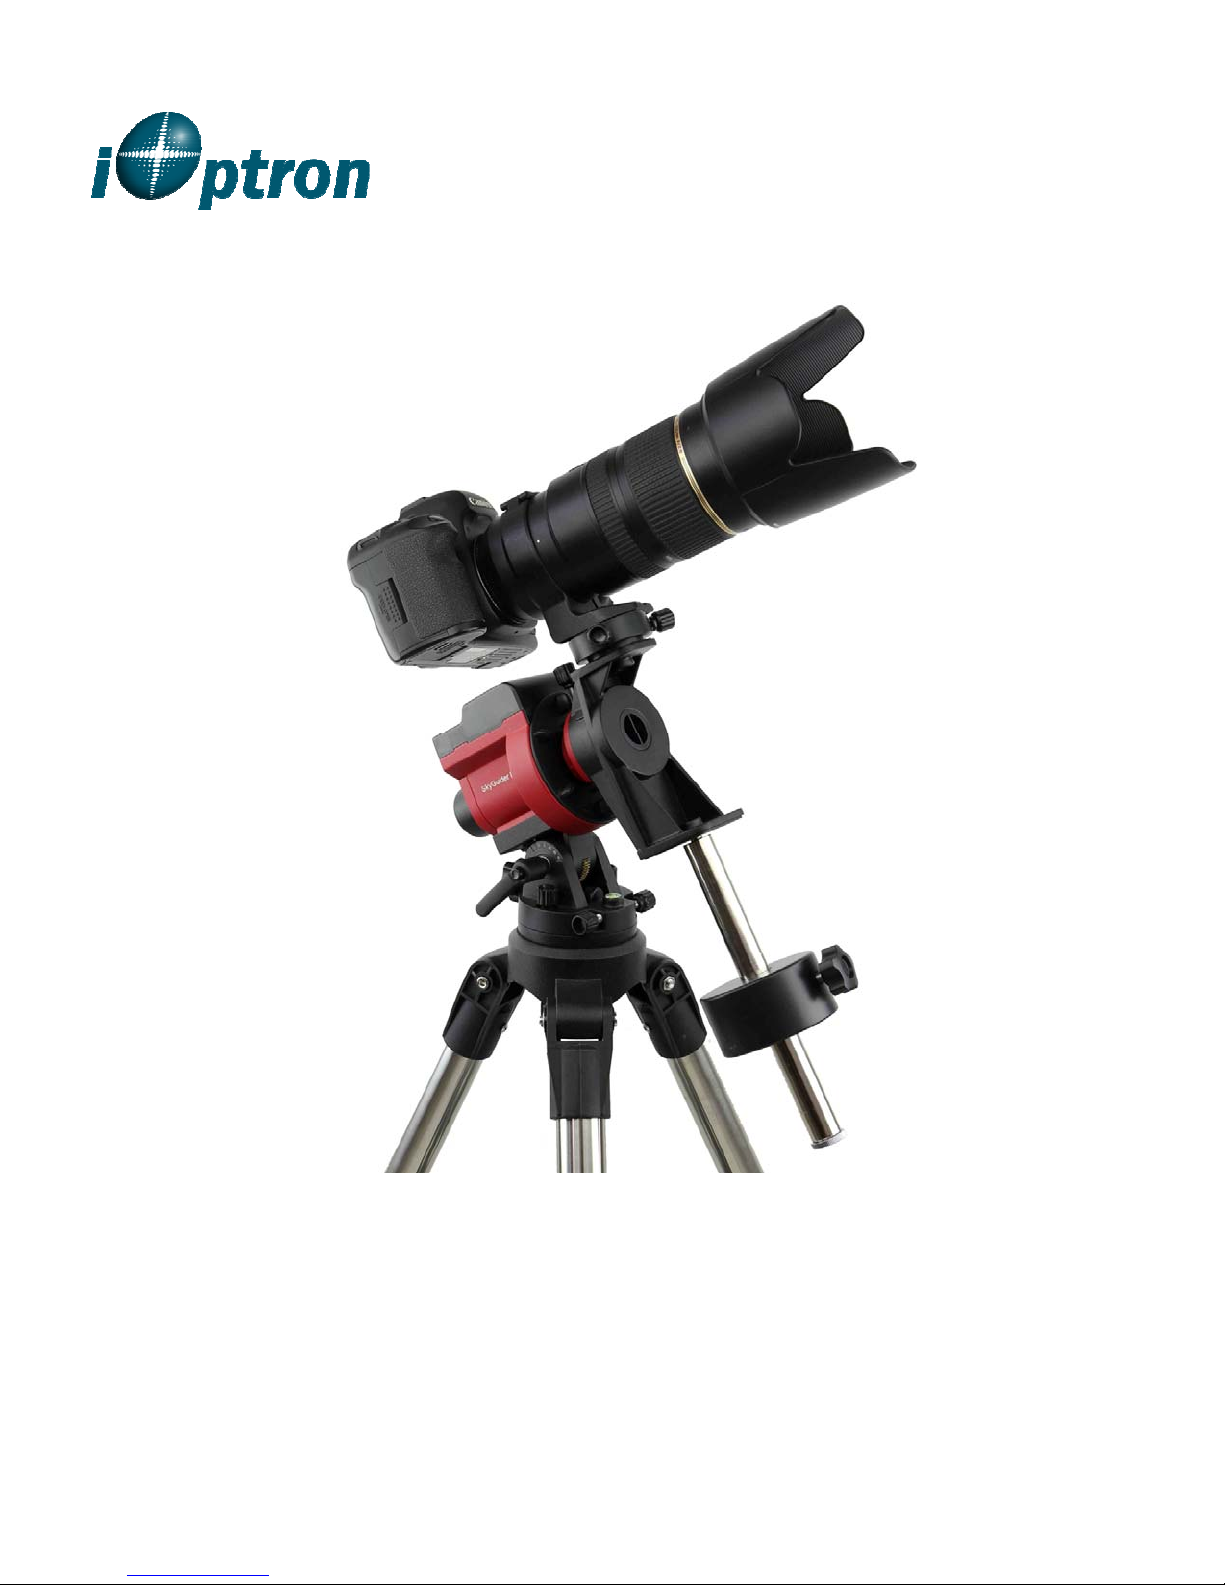
1. SkyGuiderTM Pro Camera Mount Overview
Introducing The SkyGuiderTM Pro -- iOptron’s next generation camera tracking device! Leading
the camera tracker market for nearly four years, iOptron's SkyGuider Pro pushes closer to perfection.
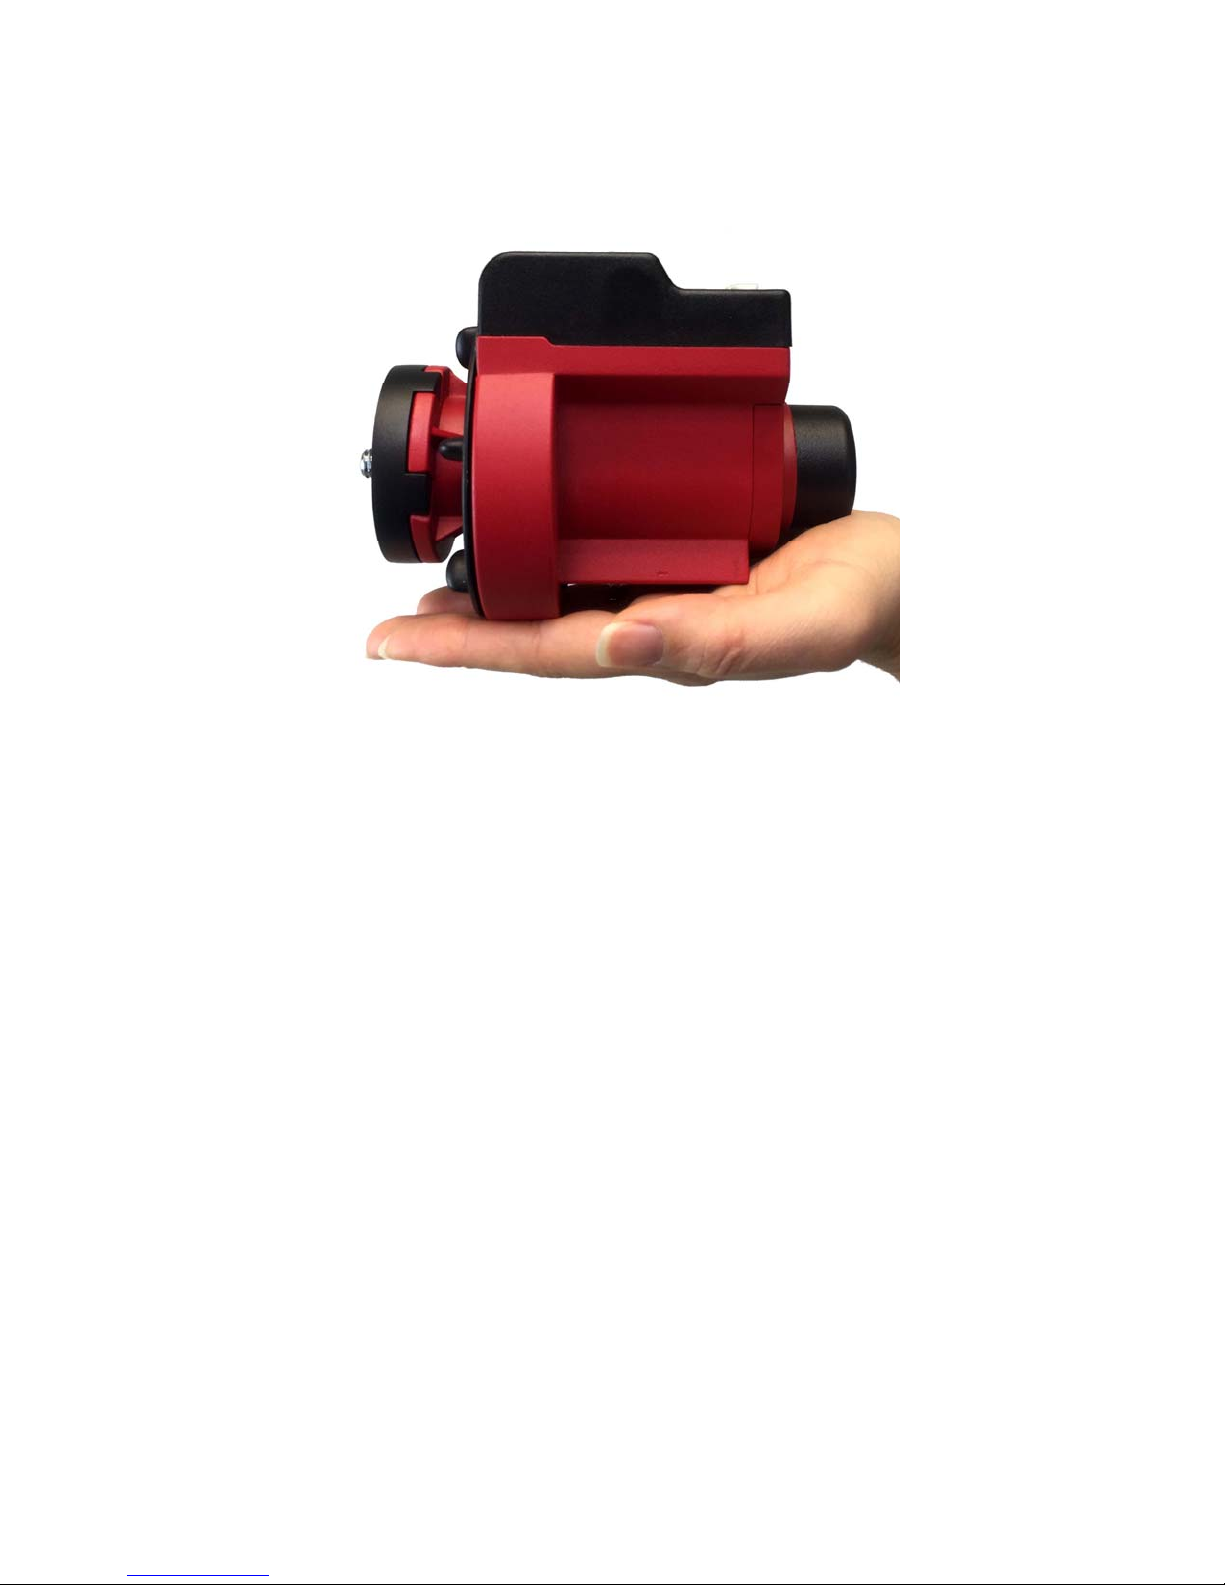
Figure 1. SkyGuider
TM
Pro mount head only
TM
The redesigned SkyGuiderr
Pro mount is more compact, small enough to fit on your palm,
better precision, silent tracking, built-in rechargeable power source, ST-4 guiding port and camera
trigger port. The improved precision polar scope maintains a fine engraved reticule, now features
adjustable illumination with different brightness levels. Using with our iOS app, quick and accurate
polar alignment is just a joy. The DEC mounting bracket allows you to balance a heavy camera and/or
lens better, or even mount a light telescope. The optional 8408 hand controller allows you to check
the Pole Star position for the polar alignment, slew the mount, adjust the guiding rate, change the
mount settings and control the camera trigger.
The SkyGuider
TM
Pro features four tracking rates, 1X or sidereal, 1/2X for sky and landscape
combind, solar and lunar. All 4 tracking rates work in both northern and southern hemispheres. We
have also added a quick slew mode with both forward and reverse to help quickly reframing your
image without disrupting the cameras position.
We have made big improvements on the SkyGuider
which features a precision bubble level, degree markings for the altitude and a built in post for the
azimuth control. You can also mount the SkyGuider
TM
Pro head (without the base) directly to any
TM
Pro’s removable alt-azimuth base,
standard photographic tripod with 1/4” or 3/8” threads.
The DEC mounting bracket package, which includes DEC mounting bracket, counterweight
shaft, counterweight and Vixen-type dovetail saddle, makes the SkyGuide
TM
Pro mount suitable for a
heavier camera/lens system, even a lightweight telescope.
TM
The SkyGuider
Pro is certainly a must have tool for any photographer interested in
astroscape or wide field astrophotography.
3
Page 4

Features:
All metal mechanical structure
Attaches to a camera tripod with 3/8” or 1/4” threads
Capable for dual mount application up to 11lbs (5kg) + 7.7lbs (3.5kg), balanced
Silent tracking for smooth camera motion, perfect for long-term exposures
Detachable alt-azi base with fine latitude and azimuth adjusters for easy polar alignment
Includes iOptron AccuAlign
Adjustable polar scope illumination
4 tracking speed (1X, 1/2X, solar and lunar). 1X celestial tracking for imaging the sky and
Operation in both northern and southern hemisphere
Quick slew (144X) for camera framing adjustment
Built-in rechargeable battery for up to 20 hours of operation (20°C)
Built-in ST-4 autoguiding port
HBX port for external hand controller
Micro USB port for power, charging and firmware upgrade
Built-in shutter triggering port
Padded carry bag included
DEC mounting bracket
Figure 2. SkyGuider
TM
Pro mount system (tripod not included)
TM
dark-field illuminated polar scope
stars; 1/2X tracking speed for imaging both the starry night and the landscapes at the
same time
4
Page 5

Counterweight and CW shaft
Vixen dovetail saddle for scope mounting
Optional ball head available separately (#3305A)
Optional tripod (#3221)
Optional Go2Nova® 8408 hand controller (#8408)
Optional DSLR camera shutter trigger cable
5
Page 6
2. SkyGuiderTM Pro Camera Mount Assembly
2.1. Introduction
You have just purchased a tracking camera mount that is capable of taking your
astrophotography to a new level.. When aligned the polar axis of the SkyGuider
TM
Pro camera mount
with the celestial North Pole (CNP), or celestial South Pole (CSP), the mount will provide rotation
matching the celestial sphere rotation around the Earth. Since all celestial objects appear to rotate
around the CNP, or CSP, the polar axis allows the mount to rotate with the celestial sphere and
provide accurate tracking for visual observations and astrophotography.
The AccuAlign
TM
polar scope, along with the Quick Polar Alignment procedure, will provide an
easy and accurate polar alignment for the mount.
The following sections of this manual provide detailed steps required to successfully set up
and operate the SkyGuiderTM Pro mount.
2.2. Parts List
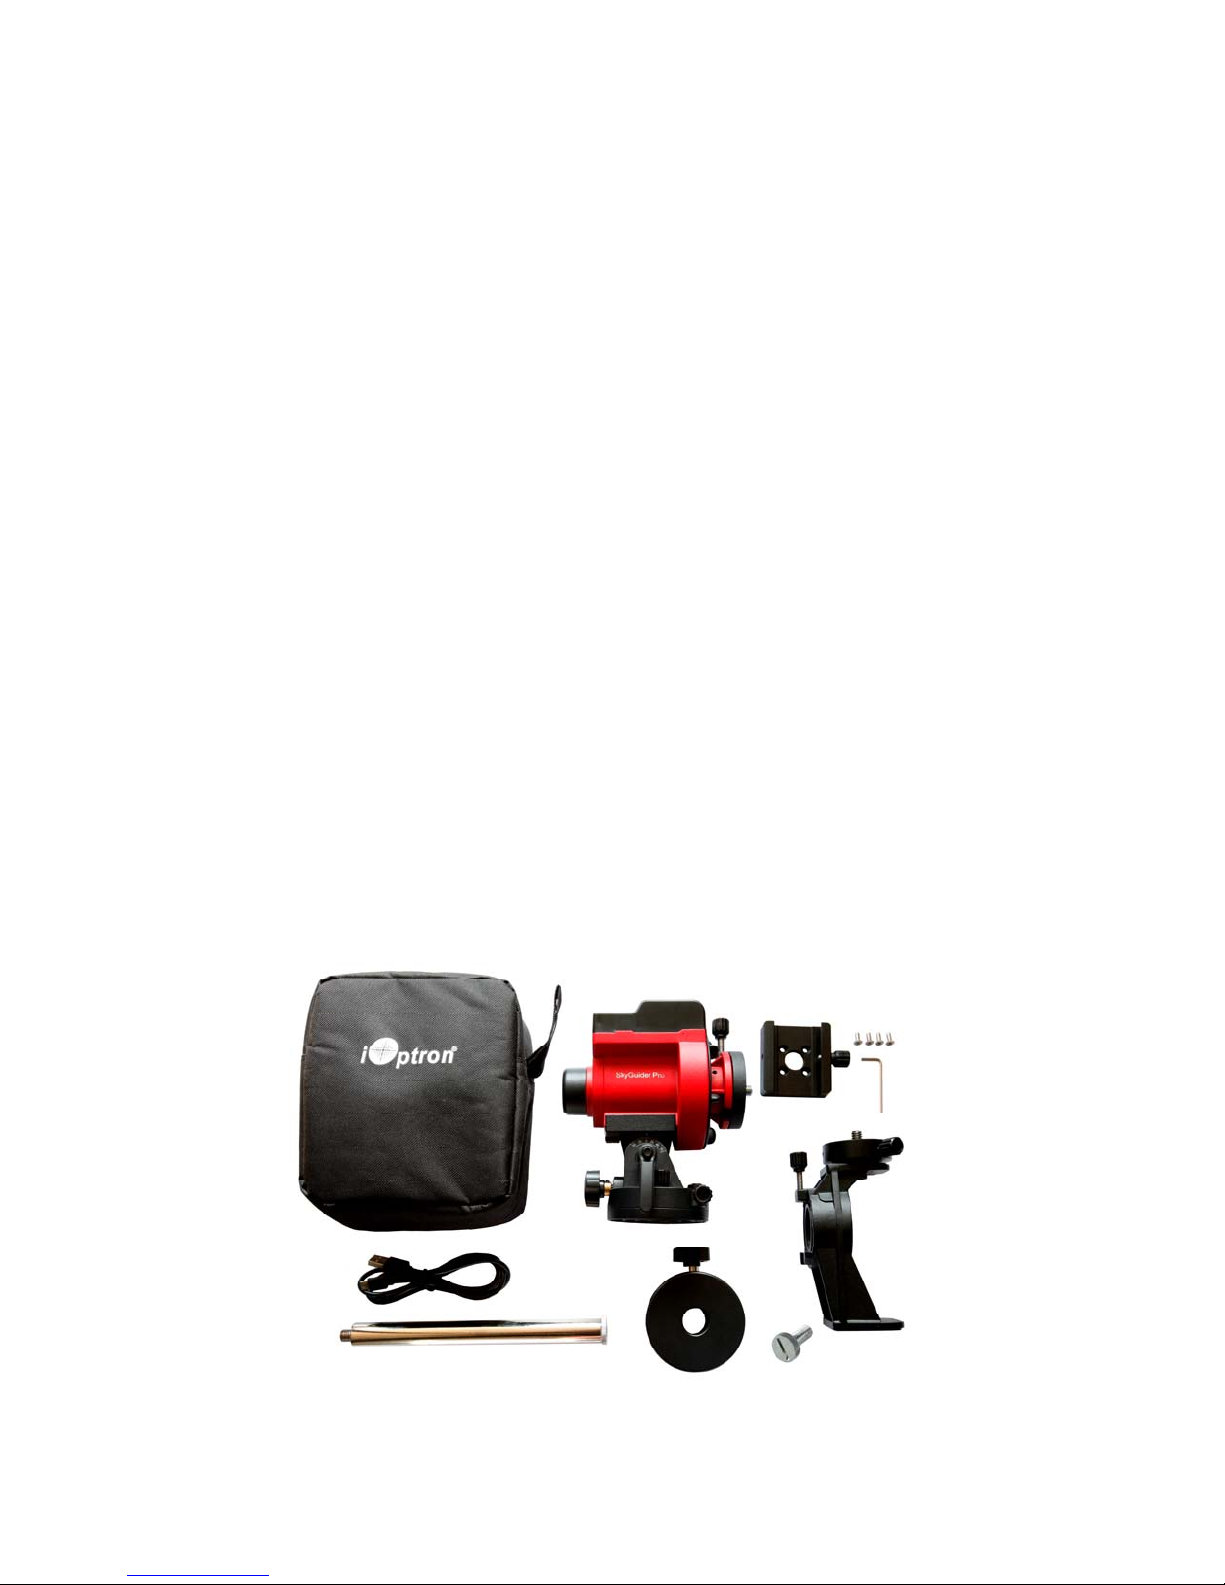
PARTS INCLUDED:
TM
The SkyGuider
SkyGuider
Alt-azi base (installed)
AccuAlign
Micro USB charging cable
Padded carry bag
DEC mounting bracket w/ camera mounting disk
1.35kg counterweight
CW shaft
One year limited warranty (90 day on battery)
Pro camera mount shipping box contains:
TM
Pro camera mount
TM
dark field illuminated polar scope (installed)
Figure 3. Parts in a SkyGuider
TM
Pro package
6
Page 7
OTHER ITEMS NEEDED:
The following items are needed for astrophotography or observation but are not included in the
package:
A sturdy tripod with 3/8” or 1/4” threaded post.
An power source with a USB port for mount charging, such as a smartphone charger, a
laptop with a USB port, or car cigarette adapter, or a portable battery pack
A camera
YOU MAY NEED IT FOR POLAR ALIGNMENT:
iPhone/iPad app for accurate polar alignment
(https://itunes.apple.com/us/app/ioptron-polar-scope/id564078961?mt=8
or Android phone polar finder app
(https://play.google.com/store/apps/details?id=com.techhead.polarfinder
Optional Go2Nova
Or other application/program to calculate the pole star position. Please refer to FAQ
session under Support at http://www.ioptron.com
ONLINE CONTENTS (click under “Support” menu) www.iOptron.com
This manual
Quick Start Guide
Video Instruction
Accessories
Tips for set up
Reviews and feedback from other customers
®
8408 hand controller
for more information.
)
)
2.3. Assembly Terms
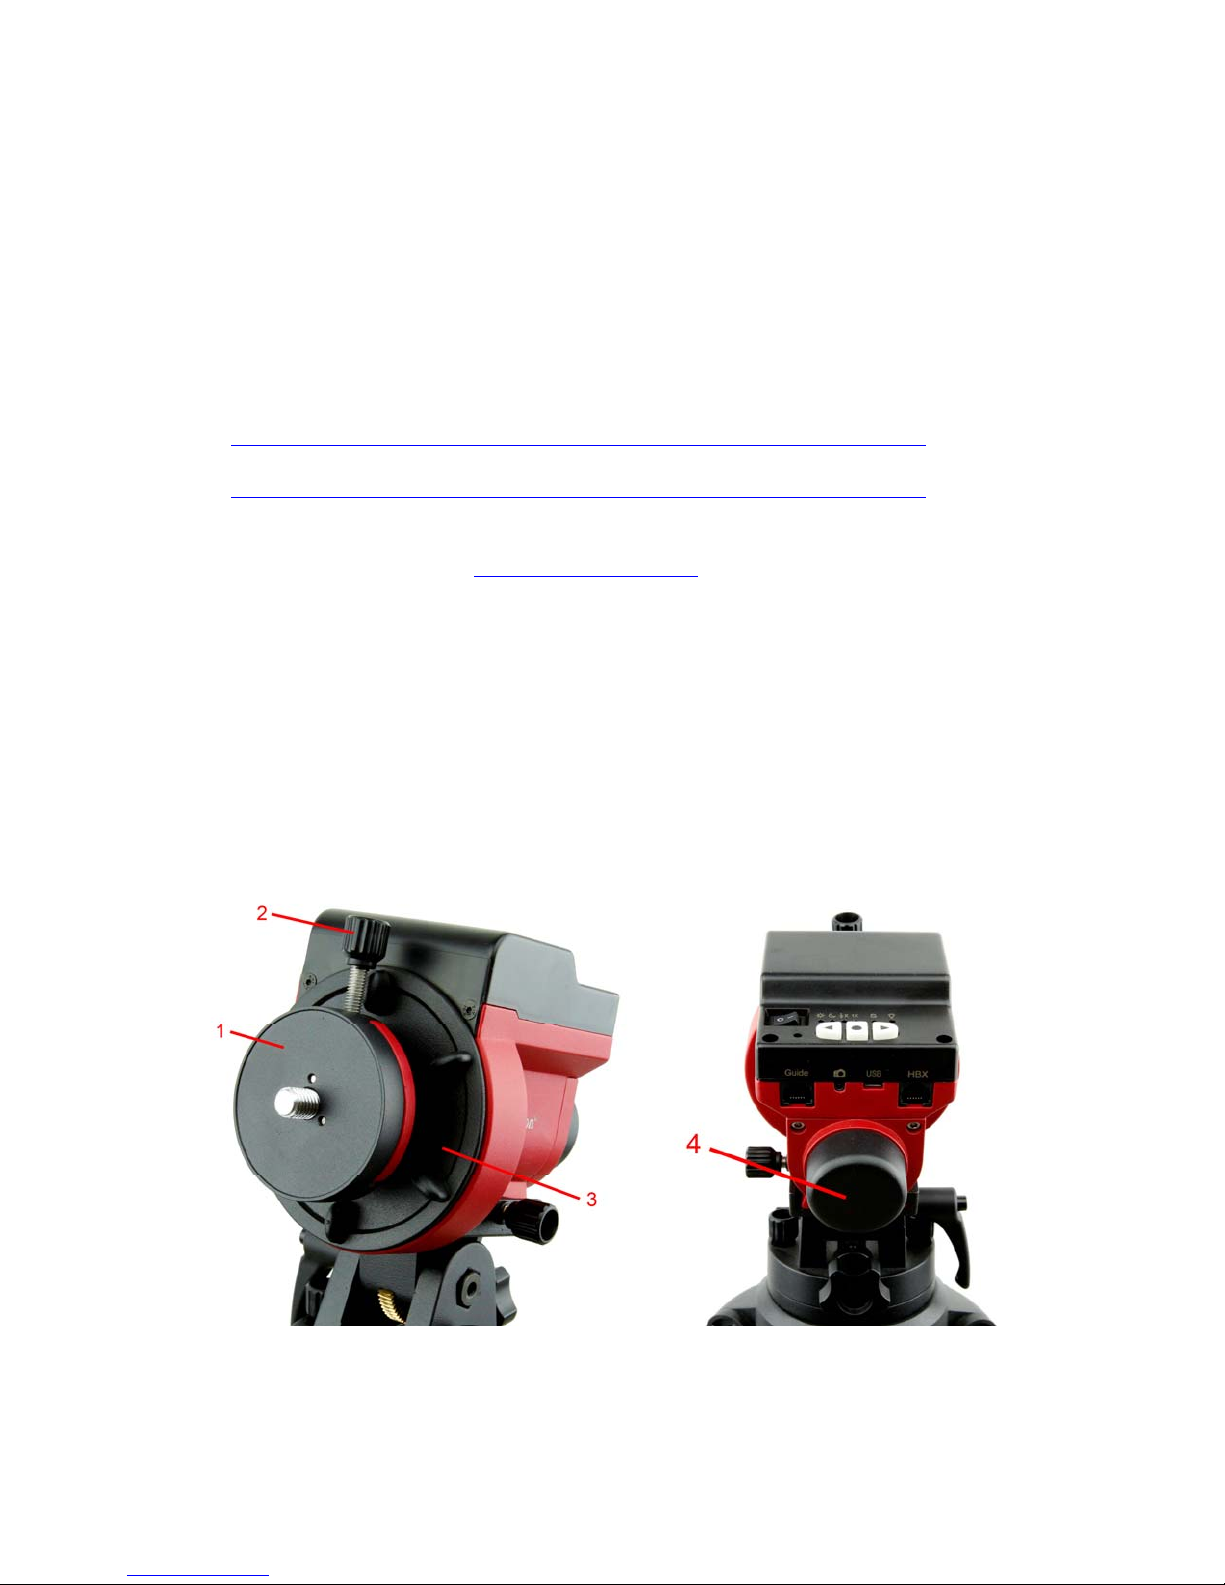
Figure 4. Front and back view of a SkyGuiderTM Pro mount head
1- Camera mounting block
2- Camera mounting block locking screw
3- RA clutch disk
4- Built-in polar scope
7
Page 8

Figure 5. Control panel and ports of a SkyGuider
5- Power switch
6- Battery status indicator
7- Function button
8- Direction button
9- Mount status indicator
14- Dovetail saddle
15- Latitude lock
16- Azimuth adjusting knob
17- Dovetail locking knob
18- Azimuth locking knob
TM
10- GUIDE port for ST-4 autoguiding
11- Camera shutter triggering port
12- Micro USB port
13- HBX port for optional hand controller
Figure 6. Alt-azi adjusting base
19- Base
20- Latitude adjustment knob
21- Latitude scale
22- Leveling bubble
Pro mount head
Page 9
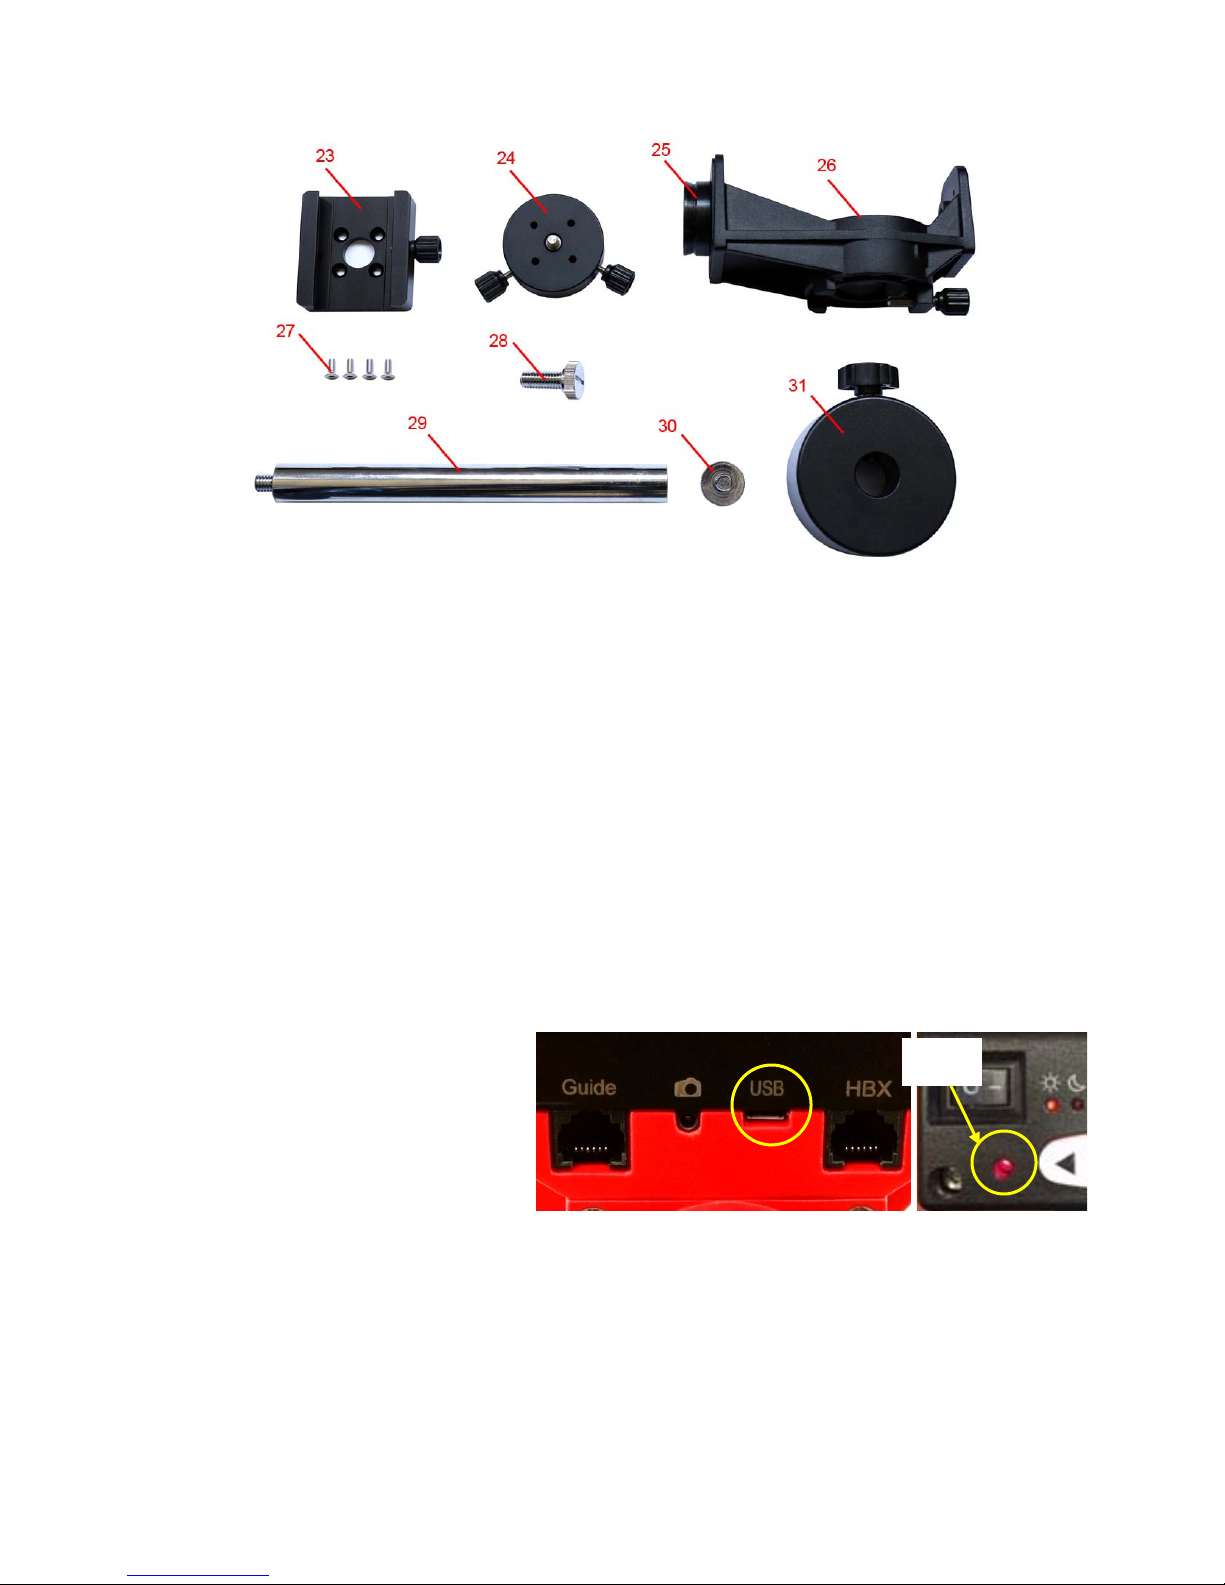
Figure 7. DEC mounting bracket and counterweight package
23- Vixen-type dovetail saddle
24- DEC camera mounting block
25- DEC base
26- DEC mounting bracket
27- Screws for dovetail saddle mounting
28- 3/8” Ball head mounting screw
29- Counterweight shaft
30- Counterweight shaft safety screw
31- Counterweight
2.4. SkyGuiderTM Pro Camera Mount Assembly
NOTE: The SkyGuiderTM Pro mount is a precision astronomical instrument. It is highly
recommended that you read the entire manual and become familiar with the nomenclature and
functions of all components before starting the assembly.
STEP 1. Check/charge the battery
The SkyGuider
TM
Pro is shipped
with battery partially charged. Please
fully charge the battery before the first
time use. Insert the micro USB plug into
the USB port at the back of the mount
(see Figure 8), and connect the other
end of the USB cable into a USB port of
a computer, a smart phone charger or a
portable battery pack (not included).
The input power should be 5V, 1A. It
usually takes 5 hours to charge the internal Li-Poly battery to reach 80% of full power. When the
battery is fully charged the battery status indicator should flash rapidly (about 5Hz). You may charge
the SkyGuider
TM
Pro with the power switch either ON or OFF. (However, when the power switch is
turned off, the battery status indicator does not function). When the indicator stays steady on, the
battery power should be sufficient for your session. When the indicator blinks slowly (about 0.5Hz), it
indicates the power is low and recharging is necessary.
Battery
Indicator
Figure 8. Micro USB powering/charging port
9
Page 10

You may use an external battery/power to power the mount through the USB port while using
the mount
Please don’t charge the battery or use USB power when temperature is at or below 0°C
(32°F), otherwise the rechargeable battery might be permanently damaged.
If the mount is not to be used for an extended period of time, charge the battery in full and
recharge every 6 months.
TM
STEP 2. Attach SkyGuider
The SkyGuider
TM
Pro mount to a tripod
Pro mount can be mounted to a stable tripod with or without the alt-azi base,
as shown in Figure 9. When the alt-azi base is not used, a ball head (#3305A, not included) is
suggested for easy adjustment.
Figure 9. Attach SkyGuiderTM Pro mount to a tripod
TM
The dovetail base of the SkyGuider
converter, as shown in Figure 9, It fits directly to the 3305A ball head quick release plate or any other
platform with 1/4” or 3/8” threads screw. The alt-azi base fits to any standard camera or
astrophotography tripod with 1/4" or 3/8” threads by insert the 1/4”-3/8” thread converter into it, as
needed.
Figure 10. Mount head dovetail base with 1/4"-3/8” thread converter
To use the alt-azi base, just simply slide the mount head base into the alt-azi base dovetail
saddle. You can slide the mount head in from either direction depending on your latitude position and
Pro mount head comes with a 1/4"-3/8” thread
10
Page 11

payload. The latitude adjustment range can be from -30° to 65°. If possible, choose the one with the
center of gravity of the system as close to the center of the base as possible. The factory default
mounting position is on 30° side.
Figure 11. Alt-azi base latitude settings
STEP 3. Install a ball head and mount a camera
TM
A DSLR camera can be mounted to the SkyGuider
Pro in many ways. Here are two most
common methods.
For a light payload (less than 1.5kg or 3.3lbs, including lens)
A DSLR can be attached directly to the SkyGuider
the camera mounting block Locking Screw to remove the Camera Mounting Block from the
SkyGuider
threaded mounting hole and turn the mounting block to secure it onto the ball head, as shown in
Figure 12. Reattach the mounting block to the SkyGuider
TM
Pro. Attach the Mounting Block to the base of a ball head (not included) with a 3/8”
TM
TM
Pro mount through a ball head. Loosen
Pro and tighten the Locking Screw.
(a)
(b)
(c)
Figure 12. Attach a ball head to the mounting block
Finally, attach the quick release plate of the ball head to the bottom of the DSLR camera and
secure it with the 1/4” screw, then attached the camera to the ball head (Figure 13).
11
Page 12

Figure 13. Attach a camera
For a heavy DSLR, especially with a long lens (more than 1.5kg or 3.3lbs, including lens)
A DEC Mounting Bracket with a counterweight (CW) and CW shaft (or Balance Package) is
needed for better balance and performance.
To install the DEC Mounting Bracket, remove the Camera Mounting Block from the mount.
Remove the polar scope cap. Install the DEC Bracket and tighten the locking screw to secure it.
Install the CW shaft and load the CW.
Loosen two DEC Camera Mounting Block locking screws to remove it from the DEC Base on
the DEC Mounting Bracket. Attach the DEC Camera Mounting Block to the bottom of the DSLR
camera and secure it by turning the block. Reattach the DEC Camera Mounting Block to the DEC
Base and tighten the two locking screws.
Figure 14. Mounting a camera with DEC mounting bracket and CW
DEC Camera Mounting Block
12
Page 13

Release the RA Clutch Disk by tuning it counterclockwise (CCW) while holding the DEC
Mounting Bracket. Slowly move the camera/CW to horizontal position and balance the load in RA
direction by moving the CW in or out. More than one CW may be used. Return the mount to upward
position and lock the RA Clutch Disk again.
Figure 15. Balance the payload
You can also remove the DEC Base from the short arm side of the DEC Mounting Bracket to
the long arm side (Figure 16a), or mount a ball head onto the DEC Camera Mounting Block (Figure
16b), or mount a ball head onto the DEC Mounting Bracket via Ballhead Mounting Screw 28 (Figure
16c).
(a) (b) (c)
Figure 16. Various mounting methods
13
Page 14

STEP 4. Set the SkyGuiderTM Pro mount
TM
Assuming you are using the SkyGuider
Pro mount with the alt-azi base and located in
northern hemisphere. Face the mount to the true north with assistance of a compass or an electronic
compass from your smart phone. Please note that true north is not necessarily aligned to the
magnetic north from you compass. However, some smart phone compass may display both magnetic
north and true north. Rotate the base to align the mount to the north as close as possible. Release the
Latitude Lock half a turn by simply rotating the locking lever counterclockwise. Set the latitude scale at
your current latitude by turning the Latitude Adjustment Knob and retighten the Latitude Lock. The
latitude lock laver can be rotated to any suitable position by pulling and turning.
Loosen two Azimuth Locking Knobs, adjust the Azimuth Adjusting Knobs to align the polar axis
to the north, and then tighten the Azimuth Locking Knobs. More details on polar alignment are in next
step.
When powering on, the SkyGuider
TM
Pro mount will be in tracking mode at a rate that shown
on the Mount Status Indicator. If your goal is only take the wide field image of the sky and stars, set
the tracking speed to 1X (celestial tracking speed). With a good polar alignment, this will keep the
stars rounded in your image. If you would like to take the image of both the starry sky and the night
landscape at the same time, you need to set the tracking speed at 1/2X. This will let you take clear
images of both the sky and the land objects at a proper exposure. Solar speed is for tracking the Sun
and lunar speed for the moon.
Keep pressing the center round Function Button to change the tracking speed from
Solar=>Lunar=>1/2X =>1X.
Figure 17 Change tracking speed
You may fast slew the RA axis by pressing ◄ or ► button while the mount is at tracking mode.
The letter “S” indicates if the mount is set to northern or southern hemisphere. If the LED
under “S” is on, it indicates the mount is set to southern hemisphere. To change this setting, press
and hold the Function Button until the LED under letter “S” starts to blink. Press the button to
toggle between the “S (LED on)” and “N (LED off)”.
Figure 18 Set southern or northern hemisphere
STEP 5. Polar Alignment
TM
To achieve accurate tracking, precise polar alignment is crucial. SkyGuider
Pro mount offers
a quick polar alignment.
14
Page 15

If you are using the mount without DEC Mounting Bracket, you need to remove the Camera
Mounting Block to perform the polar alignment. If you are using the mount with DEC Mounting
Bracket, you can do polar alignment with the payload.
1. Easy alignment through polar scope
Aiming through the polar scope to the Polaris (or Sigma Octantis) while adjusting the azimuth
and altitude angles until putting the Polaris at the cross hairs of the polar scope dial. Lock all the
knobs when done. The misalignment to North Pole is about 40 min (or about 1 degree in southern
hemisphere with Sigma Octantis).
2. Quick Polar Alignment
TM
You can use iOptron’s AccuAlign
dark field illuminated polar scope for easy and accurate
polar alignment. This is achieved by making the polar axis of the mount parallel to the Earth’s axis of
rotation.
As indicated in Figure 19, the Polar Scope Dial has been divided into 12 hours along the
angular direction with 10 min tics. There are 2 groups, 6 concentric circles marked from 36’ to 44’ and
60’ to 70’, respectively. The 36’ to 44’ concentric circles are for polar alignment in the northern
hemisphere using Polaris. While the 60’ to 70’ circles are for polar alignment in the southern
hemisphere using Sigma Octantis. The 12 o’clock mark should be on top.
Figure 19. Polar scope dial
To maximize the benefits of the iOptron polar scope for polar alignment, you need to know
where the Polaris is in the northern hemisphere. (or Sigma Octantis in southern hemisphere.) You
may find this information via an iPhone/iPad app (iOptron Polar Scope in Apple iTune store). Shown
in Figure 20 is a screen shot of an iPhone chart. For example, on August 10, 2016, 17:50:18 in
Boston, USA (Lat N42º30’28” and Long W71º08’49”), the Polaris Position is 00hr 18.4m and Radius is
40.2min (the green dot on the chart).
Android phone users may refer to a third party Android polar finder app
(https://play.google.com/store/apps/details?id=com.techhead.polarfinder
program/software to calculate the pole star position.
Figure 20. Polar scope app on an iPhone
). You may also use other
15
Page 16

Press the power switch on the mount to turn the SkyGuiderTM Pro mount on. Remove metal
polar scope cover in the back and polar axis cover in front. (If you are not using the DEC Mounting
Bracket, you have to remove the Camera Mounting Block and ball head to expose the polar
scope.) Look through the polar scope eyepiece. If you can not see red polar scope dial or 12 o’clock
mark is not on top, release RA Clutch Disk slightly. Rotate the RA axis until you see the red LED
illumination and/or adjust the 12 mark to the top. Lock the RA axis. Adjust the eyepiece to bring the
reticle dial in focus.
Figure 21. Adjust polar scope position if needed
Adjust the mount in altitude (using Latitude Adjustment Knob) and azimuth (Azimuth Adjusting
Knobs) directions to place Polaris in the same position on the Polar Scope Dial as indicated on your
iPhone/iPad screen. In this case, the Polaris will be located at a radius of 40.2’ and an angle of 00
hour 18.4 minute.
If you feel the polar scope LED is not bright enough, or too bright, you can adjust it. Press and
hold the Function Button until the LED under letter “S” starts to blink. Release and press and hold
button again until the LED beneath the “
scope illumination intensity.
Figure 22 Polar scope LED intensity adjustment
When done light intensity adjustment, double check the LED under letter “S” to make sure the
correct hemisphere is selected.
Now you are ready to track the sky! Point the camera to the sky you are interested in.
” is on. Now you can press ◄ or ► to adjust the polar
16
Page 17

3. Advanced Applications
The SkyGuiderTM Pro mount is a versatile mount that can be used in many ways. Here are
some advanced applications/functions.
3.1. Autoguide
The SkyGuiderTM Pro mount is equipped with a ST-4 compatible guiding port to enable
autoguiding while tracking. The default guiding speed is (1 ± 0.5X). You may change it from (1 ± 0.1X)
to (1 ± 0.9X) via an optional 8408 hand controller.
The guide port wiring is shown in Figure 23, which is same as that from Celestron / Starlight
Xpress / Orion Mount / Orion Autoguider/ QHY5 autoguider pinout.
Figure 23. Guide port pinout
If you have an autoguider that has a pinout similar to ST-i of SBIG, such as Meade/
Losmandy/ Takahashi/ Vixen, make sure a proper guiding cable is used with the SkyGuider
mount. Refer to your guiding camera and guiding software for detailed operation.
TM
Pro
3.2. Attach a Telescope
You can also attach a light weight (<11 lbs with all accessories) to a SkyGuiderTM Pro mount.
The mount comes with a Vixen-type dovetail saddle. Just remove the DEC Camera Mounting Block
(item 24 in Figure 7) from the DEC Mounting Bracket. Attach Vixen-type Dovetail Saddle (item 23 in
Figure 7) to the DEC Camera Mounting Block using 4 screws. RE attached the DEC Camera
Mounting Block back to the DEC Mounting Bracket. Now you and attach a telescope with Vixen-type
dovetail bar to the mount, as show in Figure 24.
Figure 24. Attach a telescope
17
Page 18

3.3. Dual Camera/Scope Mount
The SkyGuiderTM Pro mount is also capable of dual camera/scope mounting as shown below.
To maintain a proper balance, you may mount the cameras/scope to DEC mounting bracket with or
without extra ball heads, with or without counter weight shaft/CW, with additional accessories.
Figure 25. Dual mounting
3.4. Use Optional 8408 Hand Controller
A Go2Nova® 8408 hand controller, with latest firmware, can be plugged into the HBX port on a
SkyGuider
position, and control the camera shutter. You don’t need a hand controller to operate the mount.
3.4.1. Go2Nova® 8408 Hand Controller
TM
Pro mount to slew the mount in RA axis, set the mount parameters, display Pole Star
RA+
DEC+
RA-
DEC-
Figure 26. Go2Nova® 8408 hand controller
18
Serial
Port
HBX
Port
Page 19

The optional Go2Nova® 8408 hand controller (HC) shown in Figure 26 has a 4 line, 21
character large LCD screen. It has function keys, direction keys and number keys on the front; a HBX
port (6-pin) and a serial port (4-pin) at the bottom.
3.4.1.1. Key Description:
MENU Key: Press “MENU” to enter the Main Menu.
BACK Key: Move back to the previous screen.
ENTER Key: Confirm an input, go to the next menu or select a choice.
Arrow (▲▼◄►) Keys: The arrow keys are used to control the mount movement. Press and
hold ◄(R.A.+), ►(R.A.-) to move a telescope along the RA direction. (▲ and ▼ buttons do
not work for mount movement.) They are also used to browse the menu or move the cursor
while in the menu.
Number Keys: Input numerical values. Also used to adjust R.A. slewing speeds. 1: 1X; 2:
2X; 3: 8X; 4: 16X; 5: 64X; 6: 128X; 7-9: MAX (144X).
HBX (Handbox) port: connect the HC to a mount using a 6 pin RJ11 cable.
Serial port: connect the HC to a Computer via a RS232 to 4 pin 4 wire (4P4C) RJ9 cable
(iOptron item# 8412) for hand controller firmware upgrade. The pin out of the serial port is
shown in Figure 27.
Figure 27. Serial port pin out on an 8408 hand controller
3.4.1.2. The LCD Screen
When the mount is turned on, the HC screen will be displayed as shown in Figure 28, after
company logo, HC model and mount type displayed. It displays the mount type, Current GuideRate
(0.50), TrackingRate (Sidereal), Mount Status (Track), R.A. Slew Speed (MAX), Current Time
(09:20:15) and N/S Hemisphere (N).
Figure 28. 8408 HC LCD Information Screen
19
Page 20

3.4.1.3. Check the Battery
The hand controller has a real time clock (RTC) to keep date and time display correctly after
you set the Time Zone and Daylight Saving Time. If the time is incorrect, please check the
battery inside the hand controller and replace it if needed. The battery is a 3V, CR1220
button battery.
3.4.2. Go2Nova® 8408 Hand Controller Function
3.4.2.1. Polar Star Position
Press MENU button to bring the hand controller submenu, select Polar Star Position.
Polar Star Position
Settings
Tracking Photography
Firmware Information
This function displays the position of the Pole Star for Quick Polar Alignment using the
iOptron
®
AccuAlignTM polar scope. In the Northern Hemisphere the position of Polaris is displayed,
while in the Southern Hemisphere the position of Sigma Octantis is shown.
For example, on June 22, 2014, 20:19:42 in Boston, US (alt N42º30’32” and long W71º08’50”),
UTC -300 minutes, DST:Y, the Polaris Position is 0h45.8m and 40.4m,.as shown in Figure 29a.
Look through the polar scope to find the Polaris. Using Azimuth Adjustment Knob and Latitude
Adjustment Knob to adjust the mount in altitude and azimuth directions and put the Polaris in the
same position on the Polar Scope Dial as indicated on the HC LCD. In this case, the Polaris will be
located at a radius of 40.4’ and an angle of 0 hour 45.8 minute, as shown in Figure 29b.
(a) (b)
Figure 29. Polaris Position shown on HC (a) and where to put on polar scope dial (b)
NOTE: If you are located in southern hemisphere, Sigma Octantis will be chosen for Polar
Alignment. For example, on May 20, 2010, 20:00:00 in Sydney, Australia (Lat S33º51’36” and
Long E151º12’40”), 600 min ahead of UT, the Sigma Octantis Position is 1hr21.8m and 64.4m.
3.4.2.2. Settings
This submenu sets the parameters for hand controller as well as the SkyGuider
20
TM
Pro mount.
Page 21

Polar Star Position
Settings
Tracking Photography
Firmware Information
A. Set Time and Site
The correct time and coordinates are important to display the Pole star position correctly.
Press MENU=>Settings=>Set Time and Site
Set Time and Site
Set Beep
Set Display
Set Tracking Rate
Press ENTER. A time and site information screen will be displayed:
2013-04-01 12:01:36
UTC -300 Minute(s)
W071d08m50s DST: N
N42d30m32s Northern
Daylight Saving Time
Set Local Time
Use the ◄ or ► key to move the cursor _ and use the number keys to change the numbers.
Use the ▲ or ▼ button to toggle between “Y” and “N” for Daylight Saving Time, or “+” and “-“ for UTC
(Coordinated Universal Time) setting. Hold the arrow key to fast forward or rewind the cursor.
In order to make the Hand Controller reflect your correct local time, time zone information
has to be entered. Press the ◄ or ► key, move the cursor to the third line “UTC -300 Minute(s)” to
set the time zone information (add or subtract 60 minutes per time zone). For example:
Boston is “UTC -300 minutes”
Los Angeles is “UTC -480 minutes”
Rome is “UTC +60 minutes”
Beijing is “UTC +480 minutes”
Sydney is “UTC +600 minutes”
All the time zones in North America are “UTC –”, as shown in the following table, so ensure
the display shows “UTC -” instead of “UTC +” if in North or South America.
Time Zone Hawaii Alaska Pacific Mountain Central Eastern
Hour behind UT -10 -9 -8 -7 -6 -5
Enter UTC -600 -540 -480 -420 -360 -300
To adjust minutes, move the cursor to each digit and use the number keys to input the number
directly. Use ▲ or ▼ key to toggle between “+” and “-”. When the time information entered is correct,
press ENTER and go back to the previous screen.
Do not manually add or subtract an hour from displayed time to reflect Daylight Saving Time
(DST). Only select “Y” after DST begins.
For other parts of the world you can find your “time zone” information from internet.
21
Page 22

Set Observation Site Coordinate
The third and fourth lines display the longitude and latitude coordinates, respectively. “W/E”
means western/eastern hemisphere; “N/S” means northern/southern hemisphere; “d” means degree;
“m” means minute; and “s” means second.
Press ◄ or ► key to move the cursor and using ▲ or ▼ key to toggle between “W” and “E”,
“N” and “S”, using number key to change the numbers. It is always a good idea to do your home work
to get the GPS coordinates before traveling to a new observation site.
The site coordinates information can be found from your smart phone, GPS receiver or via the
internet. Site information in decimal format can be converted into d:m:s format by multiplying the
decimal numbers by 60. For example, N47.53 can be changed to N47º31'48”: 47.53º = 47º +0.53º,
0.53º=0.53x60'=31.8', 0.8'=0.8x60"=48". Therefore, 47.53º=47º31'48" or 47d31m48s.
Set Daylight Saving Time
Keep moving the cursor by pressing ► key after setting the coordinate until it moves on DST
section. Change the DST to “N” or “Y” accordingly.
Select N/S Hemisphere
If the polar axis is aligned to the North Celestial Pole, then set the mount to Northern
Hemisphere. If the polar axis is pointing to the South Celestial Pole, set the mount to Southern
Hemisphere. Press the ◄ or ► key to move the cursor and use the ▲ or ▼ key to toggle between
“Northern Hemisphere” and “Southern Hemisphere”.
As an example, select Northern Hemisphere if you are located in US and press ENTER to go
back to the main menu.
The time and site information will be stored inside the hand controller’s memory chip. If you
are not traveling to another observation site, they do not need to be changed.
B. Set Beep
The Hand Controller allows a user to turn off the beep partially, or even go to a silent mode.
To change this setting press MENU => “Settings” => “Set Beep”,
Set Up Time and Site
Set Beep
Set Display
Set Tracking Rate
Select one of three available modes:
"Always On” – a beep will be heard on each button operation or mount movement;
“On but Keyboard” – a beep will be heard only when the mount is slewing to the object or
there is a warning message;
“Always Off” – all sounds will be turned off, including the SUN warning message.
C. Set Display
Use the arrow keys to adjust LCD display contrast (LCD contrast), LCD backlight intensity
(LCD light), and keypad’s backlight intensity (Key light).
22
Page 23

D. Set Tracking Rate
Press MENU => “Settings” => “Set Tracking Rate,”
Set Display
Set Tracking Rate
Set Eyepiece Light
Language
Then you can select “Solar Rate”, “Lunar Rate”, “0.5 Sidereal Rate” or “Sidereal Rate”. The
Mount Status Indicator will reflect the setting changes.
Solar Rate
Lunar Rate
0.5X Sidereal Rate
Sidereal Rate
E. Set Eyepiece Light
Use this function to adjust the light intensity of SkyGuider Pro illuminated polar scope. If you
have an illuminated-reticule eyepiece and has the same socket, you may use this option to adjust its
light intensity.
F. Language
Select one of supported menu languages.
English
简体中文
G. Set Guiding Rate
The default guiding rate of the mount is 0.50 * Sidereal Rate, or (1± 0.5)X. This setting allows
you to change the guiding rate from 0.10 to 0.90 sidereal rate. The guiding rate will be reset to 0.5X
when power off the mount.
H. Start Delay Trig
This function only works when a camera is connected to the mount with electric shutter trigger
cable and Tracking Photography is chosen for imaging session.
Press MENU => “Settings” => “Start Delay Trig,”
Set Guiding Rate
Start Delay Trig
Set Time and Site
Set Beep
This setting will let you choose how long the camera will wait before taking the first photo after
the Tracking Photography parameter was set. It can start right away or delay 5, 10 or 20 seconds.
23
Page 24

3.4.2.3. Tracking Photography
When a supported camera is connected to the mount via a electric shutter trigger cable, the
camera can be controlled by the hand controller. You can set the camera Shutter Length, time
between each shot (Interval) and total Number of Shots. You may use these images to make time
lapse video later.
Press MENU => “Tracking Photography” => ENTER
Polar Star Position
Settings
Tracking Photography
Firmware Information
It will bring up the shutter setting menu. Start from “Input shutter length” field, Use ◄ or ►
key to move the cursor and number key to change the number. Keep pressing the ► to move the
cursor to next session: “Input interval,”, then to “Input the number of shots.” When finishing
settings, move the cursor to ► and press the ENTER to start take photo. If you set the delay trig, the
hand controller will beep before starting take photos.
Input shutter length
|---0001---|-010-| ►
|_______005______|
Input the number of shots
|---0010---|-020-|
|_______005______|
You may press the ENTER button again to stop the imaging process.
You have to turn off the auto focus of the camera and set camera accordingly.
3.4.2.4. Firmware Information
This function displays the firmware version of the hand controller and the SkyGuider
mount main board.
►
Input interval
|---0010---|-010-| ►
|_______005______|
Press the ENTER
Button to start:
|---0000---|-010-| ►
|_______010______|
TM
Pro
24
Page 25

4. Maintenance and Servicing
4.1. Maintenance
The SkyGuiderTM Pro camera mount is designed to be maintenance free. Do not overload the
mount. Do not drop the mount. This will damage the mount or degrade the tracking accuracy
permanently. Use a damp cloth to clean the mount if necessary. Do not use solvent.
4.2. Trouble Shooting
1. Unit does not power on?
Make sure battery is fully charged.
2. The battery status indicator is flashing quickly even the mount is unplugged from the
charger.
This is normal. The battery is fully charged and maintaining the power.
3. Polar scope dial is not illuminated or is not bright enough?
Make sure that the polar scope is rotated to the proper position so LED will illuminate the dial.
Follow the instruction to adjust the LED brightness.
4. Polar scope illumination is too bright.
Follow the instruction to adjust the polar scope LED brightness.
5. The polar scope dial is not focused?
Please adjust the polar scope eyepiece to focus your eye sight on to the polar scope dial.
6. Can’t see star clearly through the polar scope while doing polar alignment?
The polar scope is calibrated in factory for average eyesight. You need to remove the polar
scope from the mount and adjust objective lens. Contact iOptron for an instruction.
7. The star is trailing while imaging?
Polar alignment is critical to the tracking accuracy. Make sure your polar alignment is correct.
The tracking speed is set at 1X for sky imaging. Correct Northern/Southern hemisphere is selected.
8. Where should I put the Polaris when doing polar alignment?
You may have one of following choices:
iPhone App for iOptron polar scope available here:
https://itunes.apple.com/us/app/ioptron-polar-scope/id564078961?mt=8
Android app for iOptron polar alignment here:
https://play.google.com/store/apps/details?id=com.techhead.polarfinder
Or you can download and install a window based program:
http://www.polarfinder.com/windows.html
Or a Mac/windows based program:
http://www.trutek-uk.com/takahashi/polarisfinder1-2en.htm
position from the 24 hrs dial to iOptron polar scope, you need to divide it by 2, i.e. the
reading on the dial is 10 o’clock, then you should put the Polaris in your polar scope at 5
o’clock.
Or download and print the following table/chart to bring with you to the field if you don’t
what to carry any electronics, as stated:
http://www.covingtoninnovations.com/michael/blog/1302/index.html
The last approach is just putting the Polaris at the center. It may be good enough for a
short exposure depends on the lens you are using.
. When mapping the Polaris
25
Page 26

9. My mount still does not work properly after tried the above solution?
Contact iOptron at support@ioptron.com for technical support.
4.3. iOptron Customer Service
If you have any questions concerning your mount, contact iOptron Customer Service
Department. Customer Service hours are 9:00 AM to 5:00 PM, Eastern Time, Monday through Friday.
In the unlikely event that the mount requires factory servicing or repairing, write or call iOptron
Customer Service Department first to receive a RMA# before returning the mount to the factory.
Please provide details as to the nature of the problem as well as your name, address, e-mail address,
purchase info and daytime telephone number. We have found that most problems can be resolved by
e-mails or telephone calls. So please contact iOptron first to avoid returning the mount for repair.
It is recommended to send technical questions to support@ioptron.com
1.781.569.0200.
or call in the U.S.
4.4. Product End of Life Disposal Instructions
This electronic product is subject to disposal and recycling regulations that vary by
country and region. It is your responsibility to recycle your electronic equipment per your
local environmental laws and regulations to ensure that it will be recycled in a manner
that protects human health and the environment. To find out where you can drop off
your waste equipment for recycling, please contact your local waste recycle/disposal
service or the product representative.
4.5. Battery Replacement and Disposal Instructions
The internal rechargeable battery should be long life if used properly. Nevertheless if a
battery needs to be replaced within 90 days from purchase, contact iOptron for free
replacement. Otherwise new battery is available at www.ioptron.com
Battery Disposal- Batteries contain chemicals that, if released, may affect the
environment and human health. Batteries should be collected separately for recycling,
and recycled at a local hazardous material disposal location adhering to your country and local
government regulations. To find out where you can drop off your waste battery for recycling, please
contact your local waste disposal service or the product representative.
.
26
Page 27

Appendix A. Technical Specifications (for #3550 only)
Mount Compact single axis tracking EQ
Payload (MAX) 11 lbs (5kg)
Mount weight 2.2 lbs (1kg) with battery
Mount weight with base 3.2 lbs (1.450kg) with battery
Body material Die-cast aluminum
RA shaft Φ35mm, steel
Worm wheel Φ88mm, 144 teeth aluminum alloy
Worm gear Φ15.2mm, brass
Worm period 600 sec
Bearing 4 pieces
Motor drive DC servo with optical encoder
Tracking R.A. automatic
Tracking speed Solar, Lunar. 1X Cel, 1/2 Cel, and N/S
Fast slew speed 144X, forward and reverse
Guiding port ST-4 compatible
Polar scope AutoAlignTM dark field illuminated (~6º FOV)
Camera trigger Yes
Hand controller Yes (with optional 8408 HC)
Power requirement Internal rechargeable battery
Battery type Li-Poly, 3.7V, 2000mAh
Duration of operation Up to 20 hours at 20ºC
Power charge port Micro USB (5V), 80% charge in 5 hours
Camera mounting block Φ62mm, 3/8" post thread
Body-base connection Vixen dovetail, 3/8” socket (1/4” converter)
Alt-Azi adjustable Base Vixen style saddle, 3/8” socket
Alt-Azi adjustable base diameter Φ80 mm
Latitude adjustment range -30º ~ 65º (with Alt-azi base)
AZ adjustment range ±5°
Level indicator Level bubble
Body dimension 133x115x95 mm (w/o alt-azi base)
Counterweight shaft Φ20x200 mm w/ 3/8”-16 threads
Counterweight 1.35kg
Firmware upgrade Yes (via USB port)
Operation Temperature -10~40ºC
Warranty One year limited (90 day on battery)
27
Page 28

IOPTRON ONE YEAR TELESCOPE, MOUNT, AND CONTROLLER WARRANTY
A. iOptron warrants your telescope, mount, or controller to be free from defects in materials and workmanship for one year. iOptron will
repair or replace such product or part which, upon inspection by iOptron, is found to be defective in materials or workmanship. As a
condition to the obligation of iOptron to repair or replace such product, the product must be returned to iOptron together with proof-ofpurchase satisfactory to iOptron.
B. The Proper Return Merchant Authorization Number must be obtained from iOptron in advance of return. Call iOptron at 1.781.569.0200 to
receive the RMA number to be displayed on the outside of your shipping container.
All returns must be accompanied by a written statement stating the name, address, and daytime telephone number of the owner, together
with a brief description of any claimed defects. Parts or product for which replacement is made shall become the property of iOptron.
The customer shall be responsible for all costs of transportation and insurance, both to and from the factory of iOptron, and shall be required
to prepay such costs.
iOptron shall use reasonable efforts to repair or replace any telescope, mount, or controller covered by this warranty within thirty days of
receipt. In the event repair or replacement shall require more than thirty days, iOptron shall notify the customer accordingly. iOptron reserves
the right to replace any product which has been discontinued from its product line with a new product of comparable value and function.
This warranty shall be void and of no force of effect in the event a covered product has been modified in design or function, or subjected to
abuse, misuse, mishandling or unauthorized repair. Further, product malfunction or deterioration due to normal wear is not covered by this
warranty.
IOPTRON DISCLAIMS ANY WARRANTIES, EXPRESS OR IMPLIED, WHETHER OF MERCHANTABILITY OF FITNESS FOR A
PARTICULAR USE, EXCEPT AS EXPRESSLY SET FORTH HERE. THE SOLE OBLIGATION OF IOPTRON UNDER THIS LIMITED
WARRANTY SHALL BE TO REPAIR OR REPLACE THE COVERED PRODUCT, IN ACCORDANCE WITH THE TERMS SET FORTH
HERE. IOPTRON EXPRESSLY DISCLAIMS ANY LOST PROFITS, GENERAL, SPECIAL, INDIRECT OR CONSEQUENTIAL DAMAGES
WHICH MAY RESULT FROM BREACH OF ANY WARRANTY, OR ARISING OUT OF THE USE OR INABILITY TO USE ANY IOPTRON
PRODUCT. ANY WARRANTIES WHICH ARE IMPLIED AND WHICH CANNOT BE DISCLAIMED SHALL BE LIMITED IN DURATION TO A
TERM OF ONE YEAR FROM THE DATE OF ORIGINAL RETAIL PURCHASE.
Some states do not allow the exclusion or limitation of incidental or consequential damages or limitation on how long an implied warranty
lasts, so the above limitations and exclusions may not apply to you.
This warranty gives you specific legal rights, and you may also have other rights which vary from state to state.
iOptron reserves the right to modify or discontinue, without prior notice to you, any model or style telescope.
If warranty problems arise, or if you need assistance in using your telescope, mount, or controller contact:
NOTE: This warranty is valid to U.S.A. and Canadian customers who have purchased this product from an authorized iOptron dealer in the
U.S.A. or Canada or directly from iOptron. Warranty outside the U.S.A. and Canada is valid only to customers who purchased from an
iOptron Distributor or Authorized iOptron Dealer in the specific country. Please contact them for any warranty.
iOptron Corporation
Customer Service Department
6E Gill Street
Woburn, MA 01801
www.ioptron.com
support@ioptron.com
Tel. (781)569-0200
Fax. (781)935-2860
Monday-Friday 9AM-5PM EST
28
 Loading...