

iOptron PoleMaster 3338-25? PoleMaster 3338-34? PoleMaster 3338-60 Installation And User Manual
Page 1
®
TM
PoleMaster
Electronic Polar Scope
Installation and User manual
Product #3338-25, #3338-34, and #3338-60
Page 2

Ver. 1.0 2015.12
Rev.2.0 2016.2
iOptron reserves the rights to revise this instruction without notice. Actual color/contents/design/function of a product may differ from
those described in this instruction manual.
2
Page 3
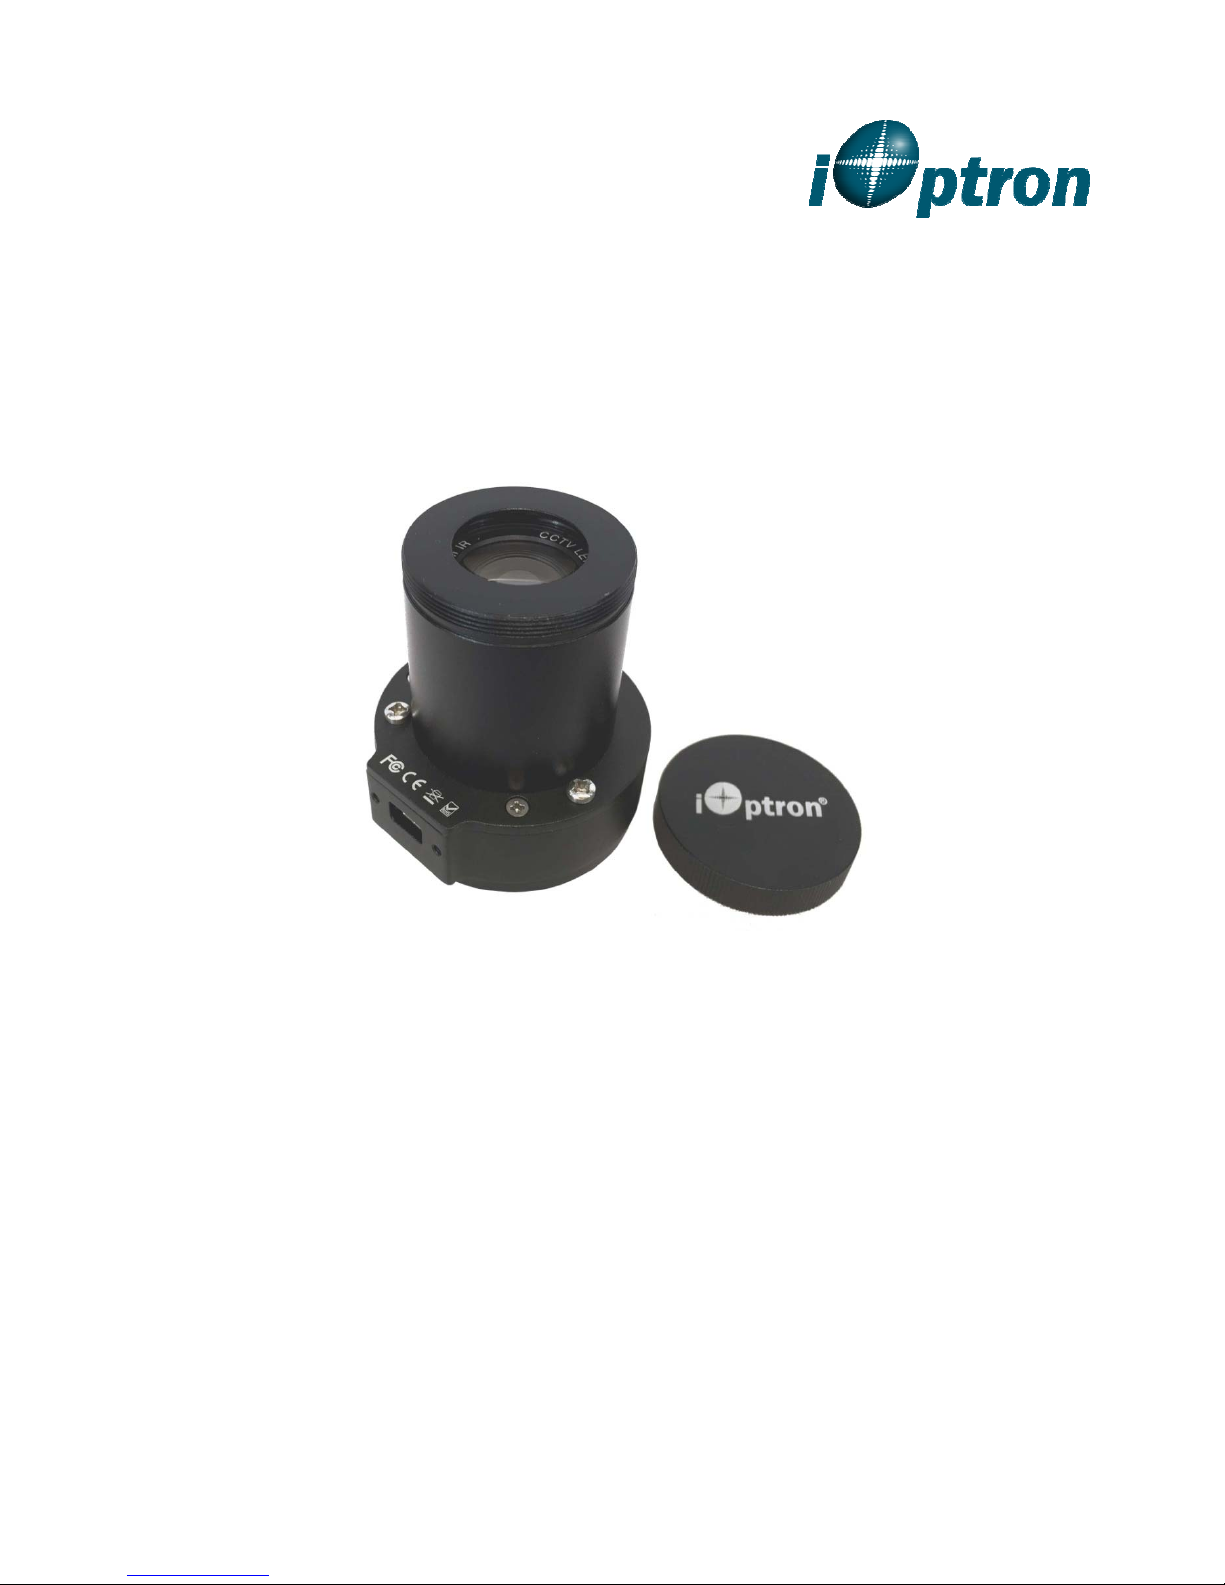
1. Overview
PoleMasterTM - a high precision, easy to use
electric polar scope.
Achieving a high precision polar alignment is
not an easy feat. You may spend tens of
minutes, if not hours, to have a good polar
alignment. After you get everything ready and
begin taking exposure, you bumped the mount,
and you have to restart from the beginning. An
iOptron’s Center-balanced Equatorial Mount
(CEM), such as CEM25 and CEM60, which
equipped with an all time accessible polar
scope, will allow you to make a quick and
precise polar alignment in a few minutes.
However, you still need to bend yourself, or
knee down on the ground to perform the polar
alignment
The most straight forward way for polar
alignment is just to find the true north point and
match its position with the rotation center of
your R.A. axis. The PoleMaster
polar scope employs this idea. This device can
be installed on front of the R.A. axis. It use a
highly sensitivity camera to capture the image
of northern sky. The sensitivity is much higher
than the naked eye, so it can see not only the
Polaris but also those faint stars nearby.
Based on the locations of these stars, it can
calculate the position of the true position of
North Pole. With some sophisticated methods
the PoleMaster can also detect the rotation
center of the R.A. axis. It will mark the two
points on the computer screen, one is the R.A.
rotation center, the other is the virtual polar
point. Adjust the mount and let them overlap
then the pole is well aligned.
PoleMaster
TM
electronic polar scope provides
a quick and easy solution. It gives you a direct
and simple way to align with the pole. Within
two minutes you could obtain a very high polar
alignment precision up to 30 arcsec.
TM
electronic
2. Electronic Polar Scope
Assembly
2.1. Parts List
Parts Included:
TM
PoleMaster
Mini USB cable;
1mm hex wrench;
And ONE of following:
o CEM60 mounting adapter (for
CEM60/CEM60EC, P/N #3338-060),
OR
o iEQ30/45 mounting adapter (for
iEQ30/iEQ45/iEQ30Pro/iEQ45Pro, P/N
#3338-034),
OR
o ZEQ25 mounting adapter and 5mm hex
wrench (for for
CEM25/CEM25EC/ZEQ25, P/N #3338-
025)
Electronic Polar Scope;
Features:
Fast, easy and comfortable
High precision, up to 30 arcsec
Easy to find the Polaris with a large
FOV
Compatible to variety of equatorial
mount with a proper adapter
Pole Monitor/align at any time.
Online Contents:
PoleMaster
PoleMaster
TM
camera driver
TM
polar alignment software
This Instruction Manual
3
Page 4

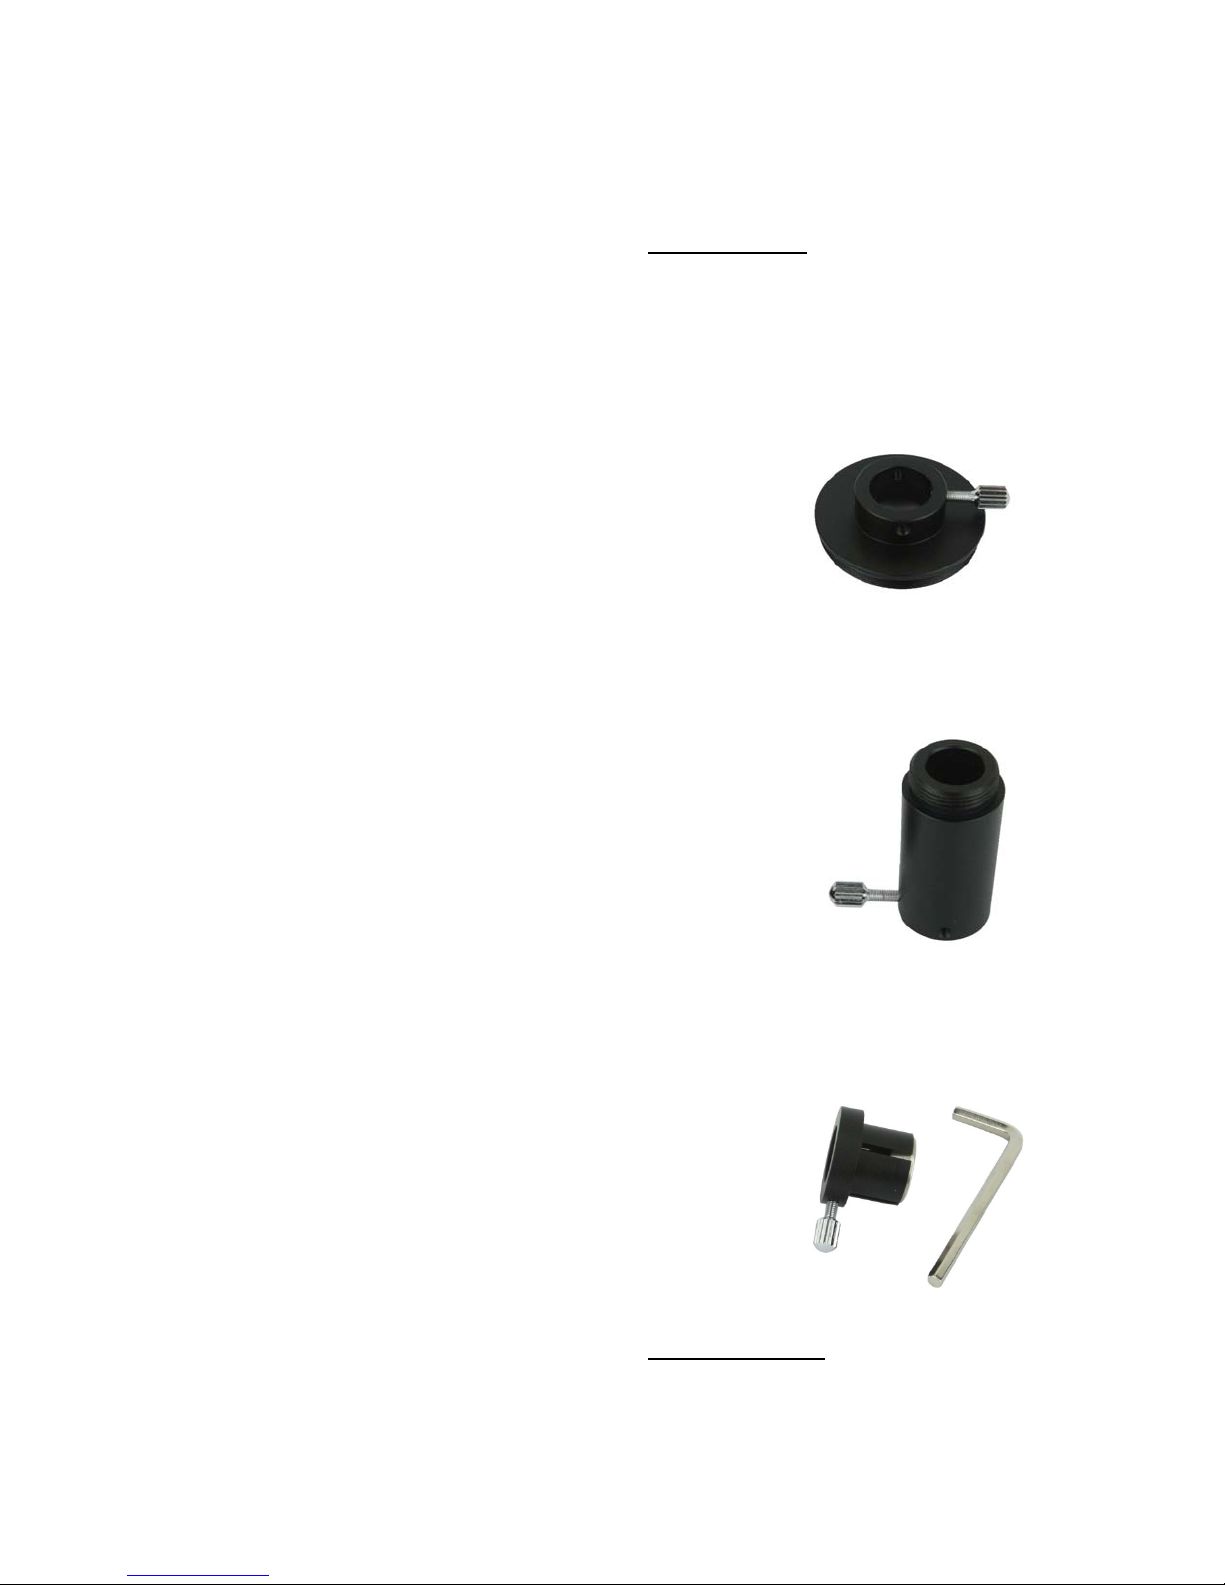
2.2. Assembly
2.2.1. CEM60
Set the mount in Zero Position. Remove the
polar scope cover and thread the CEM60
mounting adapter (#3337-060) on. Make sure
there is no debris on the thread and the
adapter is flash with the opening.
2.2.2. iEQ/iEQ Pro
Set the mount in Zero Position. Remove the
polar scope cover and thread the iEQ30/45
mounting adapter (#3337-034) on.
Retreat the thumb screw and insert the
electronic polar scope. Align the USB port to
the left side, as shown in the photo. This will
ensure that the image will be moved by altitude
and azimuth adjustment accordingly. Tighten
the thumb screw to lock the polar scope in
place.
Retreat the thumb screw and insert the
electronic polar scope. Align the USB port to
the left side, as shown in the photo. Tighten
the thumb screw to lock the polar scope in
place.
4
Page 5

2.2.3. CEM25/ZEQ25
Set the mount in Zero Position. Remove the
polar scope cover and thread the ZEQ25
mounting adapter (#3337-025) on. If the
adapter can’t insert into the polar scope
opening, insert the 5mm hex key and turn the
socket head screw counterclockwise a little.
Retreat the thumb screw and insert the
electronic polar scope. Align the USB port to
the left side, as shown in the photo. Tighten
the thumb screw to lock the polar scope in
place.
2.3. Focusing PoleMaster Polar Scope
Each PoleMaster’s lens is focused manually
before shipping from factory. Shall the needs
for refocusing arises, e.g., stars are not
sufficiently small and tight, please follow the
steps below to focus the lens:
1) Point the PoleMaster on bright stars
2) Holder the front protective tube by
rotation and turn CCW to remove it
3) Use a M1 hex key to unscrew the set
screw (focus locking screw) on the side
of the lens barrel
Push the ZEQ25 mounting adapter all the way
into the ZEQ25 polar scope opening. Turn the
socket head screw clockwise to tighten the
ZEQ25 mounting adapter.
4) Turn the lens slowly until the star is well
focused
5) Retighten the set screw and reinstall
the protective tube removed.
3. Install the Software and Use
the Polar Scope
There are two software need to be
downloaded: One is Camera Driver that will
provide the interface between the PoleMaster
Camera and your computer. The other is the
PoleMaster application software that will help
you to do the polar alignment.
1) Download and save PoleMaster camera
driver on your computer. Install it by click
on the downloaded file;
5
Page 6

2) Download and save PolaeMaster polar
alignment application software on your
computer. Install it by double click on the
downloaded file. There will be a
PoleMaster icon on your computer desktop
3) The software supports the southern
hemisphere. You may display a star
template for either northern or southern
hemisphere by pulling down the Tool
menu.
3) Setup your equatorial mount at Zero
Position (or Up North Park Position).
Roughly level the mount (precise leveling
via bubble is not needed). Point towards
the north as you normally do during polar
alignment process, if you are located in
northern hemisphere. Adjust the mount
latitude to match your location.
4) Launch PoleMaster application. Click on
the Connect button on the top menu bar. If
the PoleMaster is connected to the
computer correctly, the other function
buttons, such as Region Selection, will be
turning active. Select your region and
adjust the camera Exposure and Gain to
display many stars near the Polaris. As
PoleMaster has a very large field of view
(FOV) of 11ºX8°, Polaris should be readily
shown on screen which should the
brightest star in the FOV;
5) The application will assist you to confirm
the Polaris (or Sigma Octane) using the
Template from the Tools pull-down menu.
6) Follow the on screen instructions to
perform coarse (Rough) polar alignment.
The accuracy achievable in this stage is
around a few arcminutes. Now you can
start to observe;
7) If a higher alignment precision is needed,
follow the on-screen instructions to perform
fine polar alignment. The maximum
alignment accuracy achievable after this
stage is 30 arcseconds.
Note:
1) Current version is suitable for use from
November 2015 till June 2016.
2) The software has an option to correct
the atmospheric refraction effect at low
latitude. If you are at latitude lower than
30°, you may activate the correction
from Tools pull-down menu.
4) Under severe light pollution sky or
when transparency is low, PoleMaster
may fail to perform plate solving when
some faint target stars are invisible.
4. Maintenance and Servicing
4.1. Maintenance
The PoleMasterTM electronic polar scope is
designed to be maintenance free, except the
camera driver and/or application firmware
upgrade. Do not drop the camera. Do not plug
the camera using a different cable. Clean the
lens only with lint-free cloth and optical lens
cleaner, when needed. Use a damp cloth to
clean the camera outside. Do not use solvent.
4.2. iOptron Customer Service
If you have any question concerning your
mount, contact iOptron Customer Service
Department. Customer Service hours are 9:00
AM to 5:00 PM, Eastern Time, Monday
through Friday. In the unlikely event that the
mount requires factory servicing or repairing,
write or call iOptron Customer Service
Department first to receive a RMA# before
returning the mount to the factory. Please
provide details as to the nature of the problem
as well as your name, address, e-mail
address, purchase info and daytime telephone
number. We have found that most problems
can be resolved by e-mails or telephone calls.
So please contact iOptron first to avoid
returning the mount for repair.
It is recommended to send technical questions
to support@ioptron.com
1.781.569.0200.
or call in the U.S.
5. Product End of Life Disposal
Instructions
This electronic product is subject to disposal
and recycling regulations that vary by country
and region. It is your responsibility to recycle
your electronic equipment per your local
6
Page 7

environmental laws and
regulations to ensure that it will
be recycled in a manner that
protects human health and the
environment. To find out where
you can drop off your waste equipment for
recycling, please contact your local waste
recycle/disposal service or the product
representative.
6. FAQ
6.1. Why the calculated pole position is
jumping slightly?
Atmospheric agitation will cause the star
position changed a little and cause the results
jumping slightly. You can watch the most
common position of the calculated positions
and based on this position to adjust the mount.
In a low signal to noise condition, such as the
background light pollution is heavy or a lot of
cloud which will cause the star control is not
good, the calculation random error may
increase and the jumping will be bigger than
expected.
determined by calculation while rotating the
mount.
6.3. How to use in low latitude area?
At low latitude, the atmospheric refraction will
cause the Pole Position not on the geometric
position we are seeing. This effect has been
taken into account when calculating the Pole
Position in version V108 and later.
6.4. When use the mouse to click on the
star, do I need to move the mouse onto
the star precisely?
No, you don’t need to. The software will
calculate the star position rather than use the
mouse cursor XY position
6.5. Why some star is not round?
The lens used in PoleMaster is working at
maximum F-STOP. It has some optic
aberration and will cause some star not round.
However, it usually won’t affect the calculation
because the software use the weighted
centroid algorithm to determined the star
position.
If the jumping is very big, or sometime all over
the image, you need to check if there are
correct stars in the two green rectangle box.
Make sure the correct stars are in
them.
6.2. When installing PoleMaster, does it
need be parallel to the R.A. rotate axis?
No, it does need. Approximately aligned to the
RA axis is ok. The rotating center is
6.6. When using the PoleMaster, should
I stop the mount RA tracing?
No. It is best to keep the mount tracing while
using the PoleMaster.
7
Page 8

Appendix A. Technical Specifications
Field of View (FOV) 11 degree X 8 degree
Alignment Precision (Coarse) 5 arcmin approx.
Alignment Precision (Max.) 30 arcsec
Optical 25mm focal length
Image Capture Device MT9M034
Chip Size 1/3 inch
Pixel Number 1.2 million (1280X960)
Pixel Size 3.75μmX3.75μm
Interface Mini USB2.0
Power Consumption ~ 0.35 Watt (~70mA)
Software PoleMaster Software
Operation System Windows XP/ Vista/ 7 /8 /8.1 /10
Warranty One year limited
8
Page 9

Appendix B. Software Version History
Camera Driver
V150915
PoleMaster Software
V109
Initial Release
V110
Optimized UI interface.
Updated Japanese translation
V114
Added astronomical refraction calibration function
Added Southern Hemisphere Support.
Added manual adjustment for the two rectangle position squares after the mount GOTO.
Added the zoom function for the main image to fit the window
Fixed the zoom image get chaos issue in left toolbox
9
Page 10

IOPTRON ONE YEAR TELESCOPE, MOUNT, AND CONTROLLER WARRANTY
A. iOptron warrants your telescope, mount, or controller to be free from defects in materials and workmanship for one year. iOptron will
repair or replace such product or part which, upon inspection by iOptron, is found to be defective in materials or workmanship. As a
condition to the obligation of iOptron to repair or replace such product, the product must be returned to iOptron together with proof-ofpurchase satisfactory to iOptron.
B. The Proper Return Merchant Authorization Number must be obtained from iOptron in advance of return. Call iOptron at 1.781.569.0200
to receive the RMA number to be displayed on the outside of your shipping container.
All returns must be accompanied by a written statement stating the name, address, and daytime telephone number of the owner, together
with a brief description of any claimed defects. Parts or product for which replacement is made shall become the property of iOptron.
The customer shall be responsible for all costs of transportation and insurance, both to and from the factory of iOptron, and shall be
required to prepay such costs.
iOptron shall use reasonable efforts to repair or replace any telescope, mount, or controller covered by this warranty within thirty days of
receipt. In the event repair or replacement shall require more than thirty days, iOptron shall notify the customer accordingly. iOptron
reserves the right to replace any product which has been discontinued from its product line with a new product of comparable value and
function.
This warranty shall be void and of no force of effect in the event a covered product has been modified in design or function, or subjected to
abuse, misuse, mishandling or unauthorized repair. Further, product malfunction or deterioration due to normal wear is not covered by this
warranty.
IOPTRON DISCLAIMS ANY WARRANTIES, EXPRESS OR IMPLIED, WHETHER OF MERCHANTABILITY OF FITNESS FOR A
PARTICULAR USE, EXCEPT AS EXPRESSLY SET FORTH HERE. THE SOLE OBLIGATION OF IOPTRON UNDER THIS LIMITED
WARRANTY SHALL BE TO REPAIR OR REPLACE THE COVERED PRODUCT, IN ACCORDANCE WITH THE TERMS SET FORTH
HERE. IOPTRON EXPRESSLY DISCLAIMS ANY LOST PROFITS, GENERAL, SPECIAL, INDIRECT OR CONSEQUENTIAL DAMAGES
WHICH MAY RESULT FROM BREACH OF ANY WARRANTY, OR ARISING OUT OF THE USE OR INABILITY TO USE ANY IOPTRON
PRODUCT. ANY WARRANTIES WHICH ARE IMPLIED AND WHICH CANNOT BE DISCLAIMED SHALL BE LIMITED IN DURATION TO
A TERM OF ONE YEAR FROM THE DATE OF ORIGINAL RETAIL PURCHASE.
Some states do not allow the exclusion or limitation of incidental or consequential damages or limitation on how long an implied warranty
lasts, so the above limitations and exclusions may not apply to you.
This warranty gives you specific legal rights, and you may also have other rights which vary from state to state.
iOptron reserves the right to modify or discontinue, without prior notice to you, any model or style telescope.
If warranty problems arise, or if you need assistance in using your telescope, mount, or controller contact:
NOTE: This warranty is valid to U.S.A. and Canadian customers who have purchased this product from an authorized iOptron dealer in the
U.S.A. or Canada or directly from iOptron.
Warranty outside the U.S.A. and Canada is valid only to customers who purchased from an iOptron Distributor or Authorized iOptron Dealer
in the specific country. Please contact them for any warranty.
iOptron Corporation
Customer Service Department
6E Gill Street
Woburn, MA 01801
www.ioptron.com
support@ioptron.com
Tel. (781)569-0200
Fax. (781)935-2860
Monday-Friday 9AM-5PM EST
10
 Loading...