

Page 1

iOptron Corp. | 6E Gill Street | Woburn, MA 01801 USA | (781) 569-0200 | Toll Free (866) 399-4587 | www.iOptron.com
Quick Start Guide
AstroBoy® Computerized Telescope
#9401 (Pulsar Pink), #9402 (Astro Blue),
#9403 (Terra Green), #9404 (Cosmic Orange)
FEATURES
• Alt-Azimuth Mount with GOTONOVATM computer control technology
• Real-time GOTO and tracking features
• 4,000+ object database with 256 user-definable objects.
• 4 line, 20-character LCD hand controller with backlit LED buttons for easy operation
• Dual-axis servomotor with optical encoders
• Drive motor with 5-speed setting for precise tracking
• Tabletop base
• 60mm achromatic refractor telescope for land and celestial objects observation
• Optional tripod (part #9421)
• Also attaches to photo tripods with ¼” camera screw
PACKAGE CONTENTS
• AstroBoy
®
Telescope mount
• 60mm Refractor telescope
• Tabletop base
• #8404 Hand Controller
• 45º diagonal
• 1.25” H20mm eyepiece
• Plastic carrying case
ONLINE CONTENTS (click under “Support” menu button) www.iOptron.com
• Full manual
(you can refer to the full manual for more details on set-up and operation).
• Tips for operating
• Reviews and feedback from other customers
• Accessories information
(including AC adapter, tripod, and more)
NEVER USE A TELESCOPE TO LOOK AT THE SUN DIRECTLY!
Looking at or near the Sun will cause instant and irreversible damage to your eye.
Children should always have adult supervision while observing.
Assembly Terms
1. Telescope Tube
2. Dovetail Lock
3. #8404 Hand Controller
4. Altitude Lock
5. Mount
6. Focuser
7. Diagonal
8. Eyepiece
9. Tabletop Base
1
2
3
4
5
8
7
9
6
Page 2
iOptron Corp. | 6E Gill Street | Woburn, MA 01801 USA | (781) 569-0200 | Toll Free (866) 399-4587 | www.iOptron.com
Quick Start Guide for AstroBoy® Computerized Telescopes
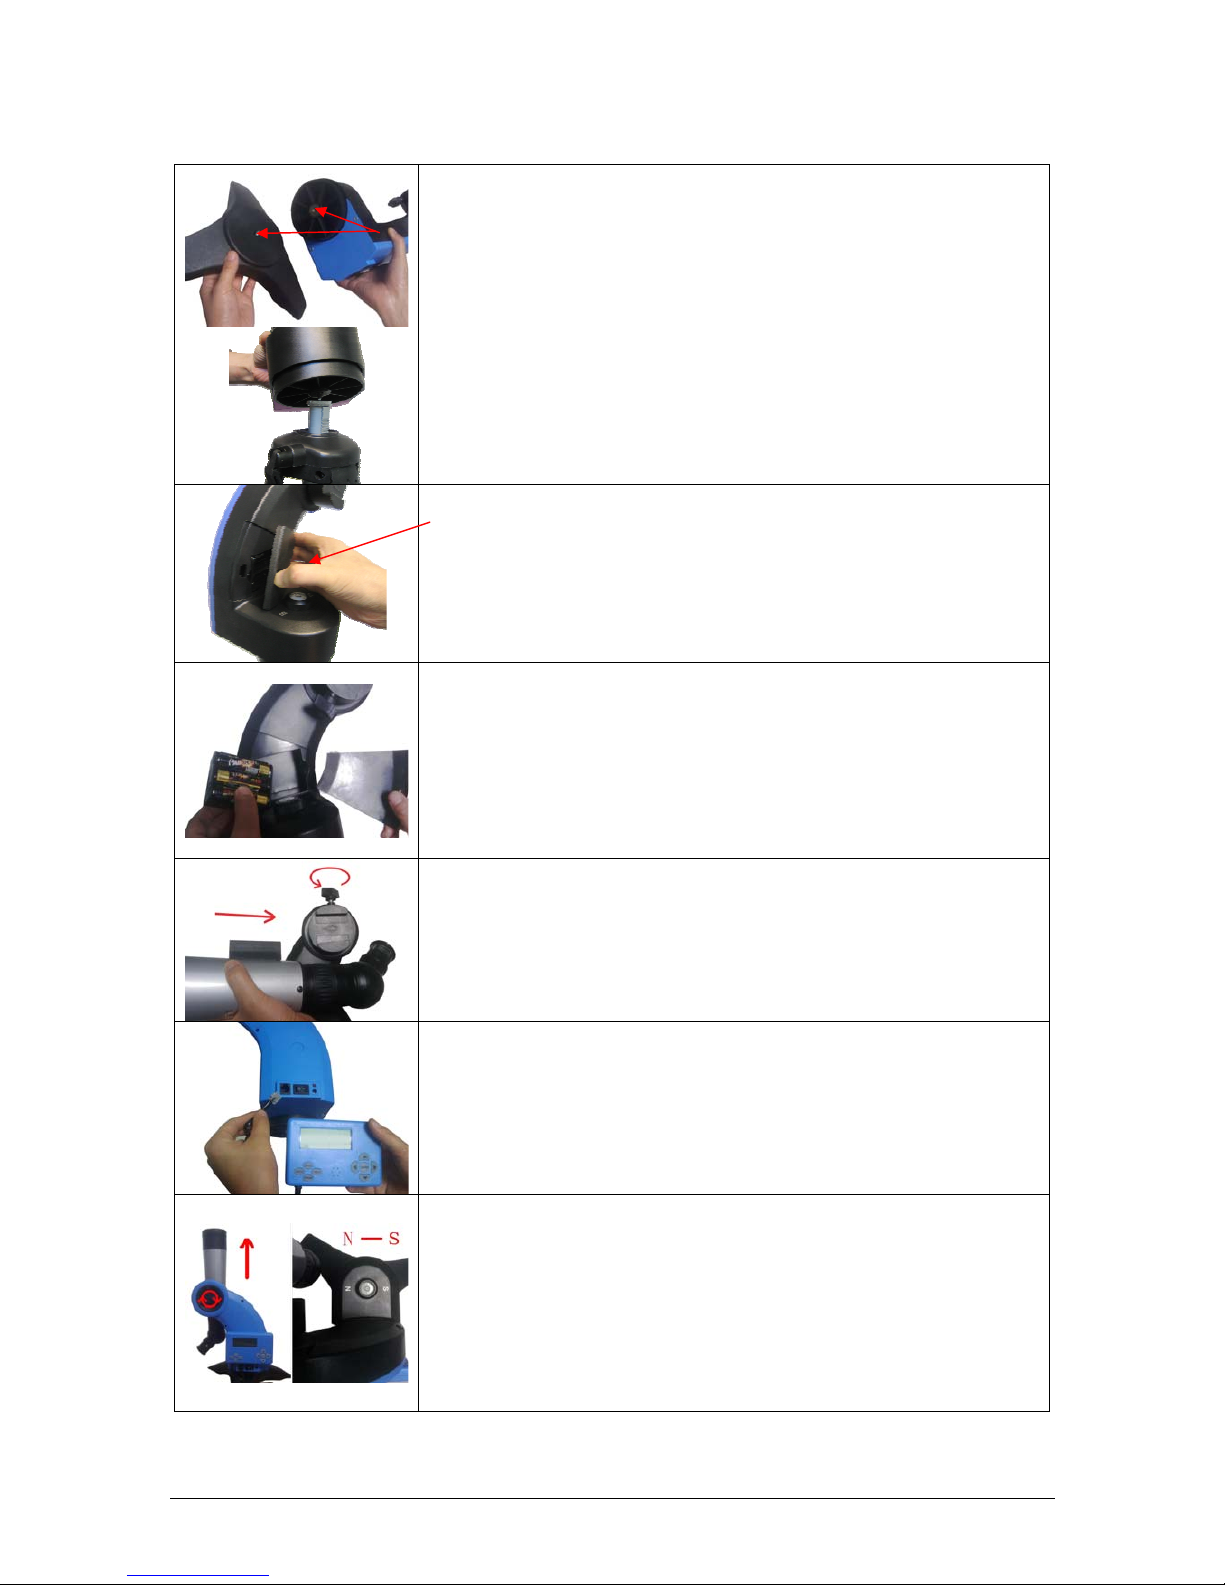
Step 1. (two options)
A. Attach to tabletop base. Take the mount and the tabletop base
out of the carrying box. Attach mount to base by securing the ¼”
screw onto the base.
B. Attach to tripod. Attach mount to tripod by hand tightening onto
the tripod. Tripod can be purchased separately (product #9421)
at www.iOptron.com.
Step 2.
Lift the battery cover. Carefully pull out the battery holder from the
compartment. Be sure not to accidentally disconnect the wires.
Step 2a.
Insert 6 AA batteries (not included) in the holder. Refer to the diagram
on the holder to orient the batteries properly. Replace the holder back
into the battery compartment and replace the lid.
Use only fresh batteries. Using old or low batteries may cause error
messages.
An optional AC adapter and 12V car plug cable are also available
for purchase at www.iOptron.com.
Step 3.
Slide the telescope into the dovetail slot on mount and secure the
telescope using dovetail lock knob (#2).
Note: that the dovetail is tapered and slides in one direction only (see
arrow in photo).
Step 4.
Plug hand controller into the HBX port on the mount. The hand controller
can attach magnetically to the mount arm.
Step 5. Set telescope to PARK POSITION
If you are using the telescope for land object observing, skip to Step 6.
(1) Loosen the altitude clutch; point the telescope tube directly up at the
zenith. Tighten the clutch.
(2) Position the mount so that the “N-S” mark is aligned with the earth’s
magnetic north and south poles (a compass may be helpful).
(3) Level the mount using the bubble on the mount by adjusting the
height of the mount base or tripod legs.
#2 knob
Page 3

iOptron Corp. | 6E Gill Street | Woburn, MA 01801 USA | (781) 569-0200 | Toll Free (866) 399-4587 | www.iOptron.com
Step 6.
Press the I/O power switch to turn the mount on (controller will light up).
Now “Set Local Time:” is displayed at the top. A blinking cursor is on the
second line.
.
Use ▲/▼ keys to change the numbers. Use ◄/► keys to scroll through
the fields.
The last field of this screen is for setting “Daylight Time saving”.
Use ▲/▼ keys to switch between “Y” (yes) and “N” (no).
Press ENTER when finished.
Step 7.
Now “Setup Site Info:” is displayed at the top. A blinking cursor is on the
second line. (“Longi” means longitude; “Lat” means latitude.)
Use ▲/▼ keys to change the numbers and letters. Use ◄/► keys to
scroll through the fields.
The last line of this screen is for setting time zone information (add or
subtract 60 minutes (Mins.) per time zone).
Examples: minutes “behind” UT or “ahead” of UT
New York: 300 Mins. “behind” UT
Los Angeles: 480 Mins. “behind” UT
Rome: 60 Mins. “ahead” of UT
Sydney: 600 Mins. “ahead” of UT
Press ENTER when finished.
The mount is now ready to observe
Use the 4 Arrow keys (▲▼◄►) to rotate the scope Up, Down, Left, and
Right. Use the SPEED key to change the slew rate from the slowest (2X)
to the fastest (MAX).
Step 8. Find (GOTO) and track objects.
Press Menu button.
Scroll to “Select and Slew”
Press ENTER.
Step 9.
Select a category (ex. “Planets, Sun, Moon”) by scrolling with the arrow
keys.
Press ENTER.
Then select an object (ex. “Moon”) by scrolling with the arrow keys.
Press ENTER.
The telescope will automatically slew to the object and lock on. It will
automatically begin to track once it locks on to the object.
Step 10. Sync to Target (Use this to center and synchronize the object
selected in Step 15).
Press MENU. Scroll to “Sync. To Target”. Press ENTER. Next use the
arrow keys (▲▼◄►) to center the object in the eyepiece. Then press
ENTER again to synchronize the object with the memory.
To slew to other objects simply repeat steps 8 and 9. You do not need to
repeat step 10 except for adjustments as needed.
(Refer to the full online manual for 1-star and 2-star alignments. Sync to
Target is the same as 1-star Alignment except that you choose the
object to align to.)
Page 4

iOptron Corp. | 6E Gill Street | Woburn, MA 01801 USA | (781) 569-0200 | Toll Free (866) 399-4587 | www.iOptron.com
IOPTRON ONE YEAR TELESCOPE, MOUNT, AND CONTROLLER WARRANTY
A. iOptron warrants your telescope, mount, or controller to be free from defects in materials and workmanship for one year. iOptron will
repair or replace such product or part which, upon inspection by iOptron, is found to be defective in materials or workmanship. As a
condition to the obligation of iOptron to repair or replace such product, the product must be returned to iOptron together with proof-ofpurchase satisfactory to iOptron.
B. The Proper Return Authorization Number must be obtained from iOptron in advance of return. Call iOptron at 1.866.399.4587 to
receive the number to be displayed on the outside of your shipping container.
All returns must be accompanied by a written statement stating the name, address, and daytime telephone number of the owner,
together with a brief description of any claimed defects. Parts or product for which replacement is made shall become the property of
iOptron.
The customer shall be responsible for all costs of transportation and insurance, both to and from the factory of iOptron, and shall be
required to prepay such costs.
iOptron shall use reasonable efforts to repair or replace any telescope, mount, or controller covered by this warranty within thirty days of
receipt. In the event repair or replacement shall require more than thirty days, iOptron shall notify the customer accordingly. iOptron
reserves the right to replace any product which has been discontinued from its product line with a new product of comparable value and
function.
This warranty shall be void and of no force of effect in the event a covered product has been modified in design or function, or
subjected to abuse, misuse, mishandling or unauthorized repair. Further, product malfunction or deterioration due to normal wear is not
covered by this warranty.
IOPTRON DISCLAIMS ANY WARRANTIES, EXPRESS OR IMPLIED, WHETHER OF MERCHANTABILITY OF FITNESS FOR A
PARTICULAR USE, EXCEPT AS EXPRESSLY SET FORTH HERE. THE SOLE OBLIGATION OF IOPTRON UNDER THIS LIMITED
WARRANTY SHALL BE TO REPAIR OR REPLACE THE COVERED PRODUCT, IN ACCORDANCE WITH THE TERMS SET FORTH
HERE. IOPTRON EXPRESSLY DISCLAIMS ANY LOST PROFITS, GENERAL, SPECIAL, INDIRECT OR CONSEQUENTIAL
DAMAGES WHICH MAY RESULT FROM BREACH OF ANY WARRANTY, OR ARISING OUT OF THE USE OR INABILITY TO USE
ANY IOPTRON PRODUCT. ANY WARRANTIES WHICH ARE IMPLIED AND WHICH CANNOT BE DISCLAIMED SHALL BE LIMITED
IN DURATION TO A TERM OF ONE YEARS FROM THE DATE OF ORIGINAL RETAIL PURCHASE.
Some states do not allow the exclusion or limitation of incidental or consequential damages or limitation on how long an implied
warranty lasts, so the above limitations and exclusions may not apply to you.
This warranty gives you specific legal rights, and you may also have other rights which vary from state to state.
iOptron reserves the right to modify or discontinue, without prior notice to you, any model or style telescope.
If warranty problems arise, or if you need assistance in using your telescope, mount, or controller contact:
iOptron Corporation
Customer Service Department
6E Gill Street
Woburn, MA 01801
www.ioptron.com
support@ioptron.com
Tel. (866)399-4597
Fax. (781)935-2860
Monday-Friday 9AM-5PM EST
NOTE: This warranty is valid to U.S.A. and Canadian customers who have purchased this product from an authorized iOptron dealer in
the U.S.A. or Canada or directly from iOptron. Warranty outside the U.S.A. and Canada is valid only to customers who purchased from
an iOptron Distributor or Authorized iOptron Dealer in the specific country. Please contact them for any warranty service.
 Loading...