

Page 1

li
QUICK PLAY LP
USB-POWERED LP-TO-MP3 TURNTABLE
QUICKSTART GUIDE
ENGLISH ( 3 – 4 )
MANUAL DE INICIO RÁPIDO
ESPAÑOL ( 5 – 6 )
GUIDE D’UTILISATION RAPIDE
FRANÇAIS ( 7 – 8 )
GUIDA RAPIDA
ITALIANO ( 9 – 10 )
KURZANLEITUNG
DEUTSCH ( 11 – 12 )
SNELSTARTGIDS
NEDERLANDS ( 13 – 14 )
Page 2

Page 3
QUICKSTART GUIDE
o Make sure that the items listed below are included in the box:
o READ SAFETY INSTRUCTION BOOKLET BEFORE USING THE PRODUCT
o Go to http://www.ionaudio.com
INTRODUCTION
You should install EZ Vinyl/Tape Converter to take advantage of
computer recording. EZ Vinyl/Tape Converter is the quickest and
easiest way to turn your recordings into digital media. EZ Vinyl/Tape
Converter conveniently saves your recordings in your iTunes*
library. We have included a handy software Quickstart Guide with
step-by-step instructions on software installation and operation.
To install the software: simply insert the included CD into your computer and follow the on-screen instructions. After you finish
converting your vinyl, you can then burn to CD or load onto portable media devices.
Visit www.ionaudio.com/computer-optimization for more information on optimizing your computer for audio.
FEATURES
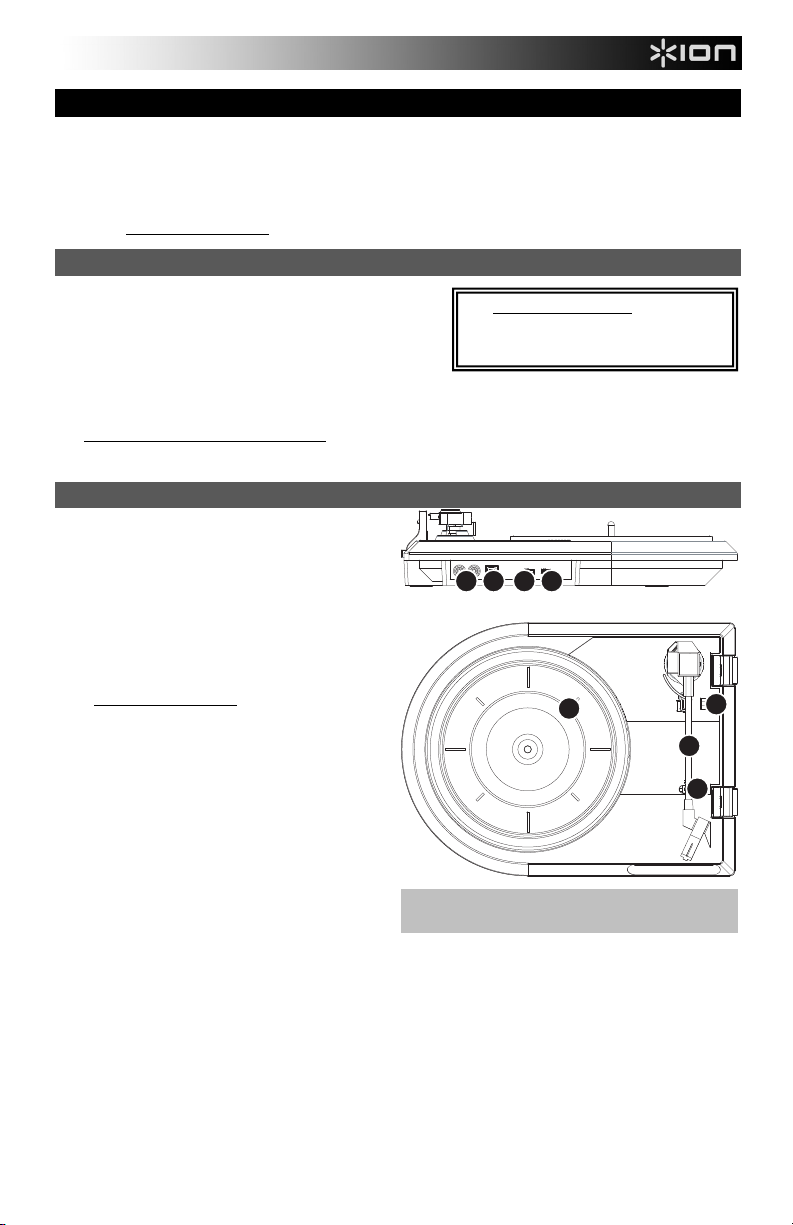
1. USB Cable – Use the included USB Cable to connect
2. Line Out – Use a standard stereo RCA cable to
3. Platter – Place your slipmat and record here.
4. Tonearm – QUICK PLAY LP comes with a ready to
5. Arm Clip – This specially designed arm clip secures
6. Raise / Lower Lever – Raises and lowers the tonearm.
7. Autostop – This switch turns autostop on or off. When autostop is on, the platter will start spinning when the tonearm is
8. 33 / 45 / 78 RPM Switch – This switch controls the RPM of the turntable platter.
QUICK PLAY LP CD
USB cable Slipmat
Quickstart Guide Safety Instructions & Warranty Information
for product registration.
Visit www.ionaudio.com/ezvc to download the
latest version of EZ Vinyl/Tape Converter
software or for helpful troubleshooting guide and
additional support.
* iTunes is a trademark of Apple, Inc., reg istered in the U.S.A. and other countrie s.
your turntable to your computer. The USB connection
will provide power to the turntable as well as the audio
from the turntable to your computer. For transferring
your vinyl records to your computer, we have provided
software on the included CD.
connect these outputs to the audio inputs of your
home stereo system. (Please note: you can still copy
music to a CD or to your computer even if the audio
outputs of the turntable are not connected to a stereo
system).
IMPORTANT WARNING: The RCA outputs are
LINE-level. Please only connect these outputs to
LINE-level inputs. You may damage your receiver
if you plug in a LINE-level into a PHONO input.
use pre-balanced tonearm and cartridge. The
tonearm can be raised and lowered by hand, or by
pressing the raise / lower lever. Please note that the
tonearm needs to be moved away from resting
position (on the arm clip) for the turntable motor to
activate. When the tonearm is placed back in its
resting position, the turntable motor will deactivate.
the tonearm while at rest or when not in use. The arm
clip has been designed to remain in the up position
while unlocked.
placed over the record and stop spinning when the record has reached the end. (When autostop is off, the platter will
always spin regardless of the position of the tonearm.)
Note: If your record stops before a song is done playing, set the Autostop Switch to "off."
IMPORTANT: Remove the plastic cartridge cover (needle
cover) before operating the turntable.
12
87
3
6
4
5
3
Page 4
put
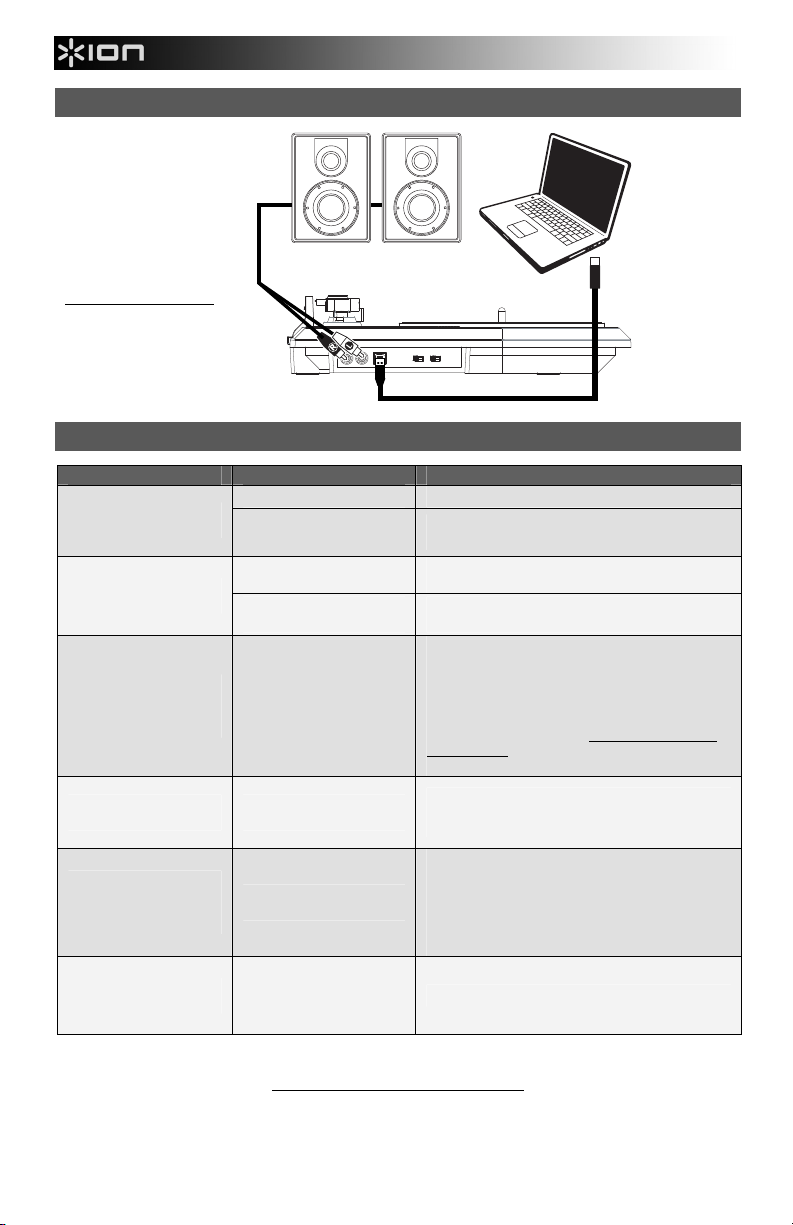
CONNECTION DIAGRAM
SPEAKERS
COMPUTER
IMPORTANT WARNING: The
RCA outputs are LINE-level.
Please only connect these
outputs to LINE-level inputs.
You may damage your receiver
if you plug in a LINE-level into a
PHONO in
.
TROUBLESHOOTING
PROBLEM CAUSE SOLUTION
I am not hearing any audio
when I am recording.
I am experiencing poor
sound quality.
When recording into my
computer on Windows Vista,
my recordings are mono
instead of stereo.
My music is playing at a
strange pitch.
When recording into my
computer on Windows 7,
music is distorted or
"clipping."
My record stopped playing
before the end of the song.
BEFORE RETURNING THE PRODUCT, please contact ION Audio for technical support:
Needle is not on the record. Place the needle on the record.
Turntable not powered.
Cartridge connection is not
secure.
Vinyl record is dirty or
scratched.
Recording input properties in
Vista not set to “stereo”.
Incorrect speed selected on
the turntable.
Your computer's recording
level is too high.
If you are playing a 45RPM
record, the Autostop feature
may have detected that the
tonearm is close enough to
the center to stop the record.
www.ionaudio.com/supporthome
Make sure that the turntable is connected to a computer
that is powered on.
Cartridge must be securely connected to the tonearm
whenever you are using the turntable.
Try dusting off and gently wiping the surface of the
record before playing it.
In Vista, you may need to manually specify “stereo” for
the recording input.
Go to Start Control Panel Sound (in Classic
View). Then, click on the Recording tab and highlight
the Microphone input (USB Audio Codec). Click on
Properties to bring up the input settings. Next, click on
the Advanced tab and select “2 channel, 16 bit, 44100
Hz (CD quality)” in the Default Format pull-down menu.
Lastly, click Apply to accept the settings.
Make sure that you are playing your records at the speed
they were intended to be played. Select between the
different speeds (33, 45 or 78 RPM).
Go to Start Control Panel Hardware and Sound
Sound. Click the Recording tab and select USB
Audio Codec as the default device. Click Properties in
the lower right-hand corner. In the new window, click the
Levels tab and set the slider to "4." Click OK to close
the Properties window, then click OK to close the Sound
control panel.
Set the Autostop Switch to "off."
4
Page 5
p
GUÍA DE INICIO RÁPIDO
o Asegúrese de que todos los elementos abajo indicados estén incluidos en la caja.
o LEA EL FOLLETO DE INSTRUCCIONES DE SEGURIDAD ANTES DE UTILIZAR EL PRODUCTO.
o Visite http://www.ionaudio.com
INTRODUCCIÓN
Debe instalar EZ Vinyl/Tape Converter para aprovechar la función
de grabación de su computadora. EZ Vinyl/Tape Converter es la
forma más rápida y fácil de convertir las grabaciones en medios
digitales. Este software guarda convenientemente sus
grabaciones en la biblioteca de iTunes. Incluimos una práctica
guía de inicio rápido con instrucciones paso a paso sobre la
instalación y la operación del software.
Para instalar el software: inserte simplemente el CD incluido en la computadora y siga las instrucciones de la pantalla. Después
de terminar de convertir su vinilo, puede quemarlo en CD o cargarlo en dispositivos de medios portátiles.
Visite www.ionaudio.com/computer-optimization para más información sobre la optimización de su computadora para audio.
CARACTERÍSTICAS
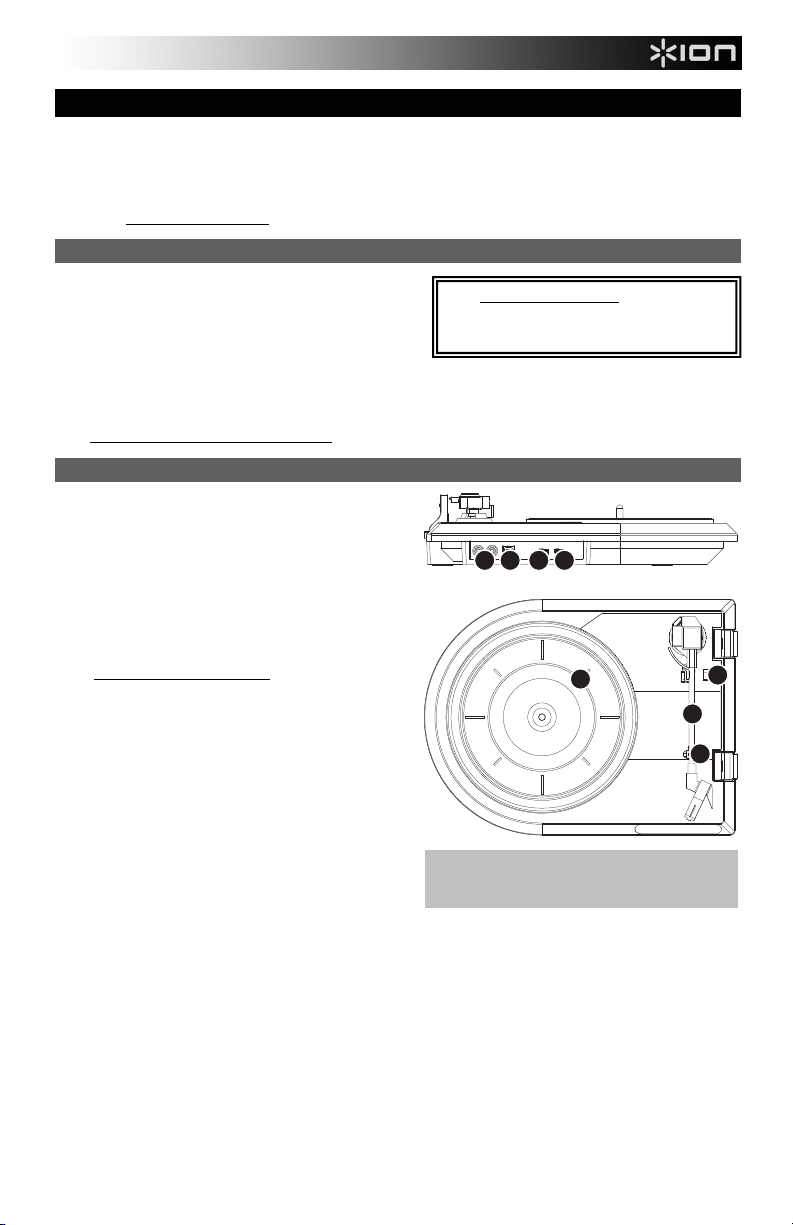
1. Cable USB – Use el cable USB incluido para conectar el
2. Line Out (Salida de línea) – Use un cable RCA estéreo
3. Plato – Coloque aquí el alfombrilla antideslizante y el
4. Brazo de lectura – El QUICK PLAY LP viene con un
5. Clip del brazo – Este clip diseñado especialmente fija el
6. Palanca de Subir / Bajar – Levanta y baja el brazo de lectura.
7. Parada automática – Este interruptor activa y desactiva la parada automática. Cuando la parada automática está
8. Conmutador de 33 / 45 / 78 RPM – Este conmutador controla las RPM del plato del giradiscos.
QUICK PLAY LP CD
Cable USB Alfombrilla Antideslizante
Guía de inicio rápido Folleto de información sobre la seguridad y la garantía
para registrar el producto.
Visite www.ionaudio.com/ezvc para descargar la
versión más reciente de EZ Vinyl/Tape Converter
software o para obtener una guía útil de solución de
roblemas y soporte adicional.
giradiscos a su computadora. Le conexión USB
suministrará alimentación al giradiscos, además del audio
del mismo a su computadora. Para transferir sus discos
de vinilo a la computadora, proporcionamos del software
en el CD incluido.
estándar para conectar estas salidas a las entradas de
audio de su sistema estéreo hogareño. (Para tener en
cuenta: igualmente se puede copiar música en un CD o
computadora, incluso si las salidas de audio del giradiscos
no están conectadas a un sistema estéreo).
ADVERTENCIA IMPORTANTE: Las salidas RCA son
para nivel de LÍNEA. Conecte estas salidas sólo a las
entradas de nivel de línea (LINE). Puede dañar el
receptor si enchufa un nivel de línea en una entrada
fonográfica.
disco.
brazo de lectura y una cápsula previamente balanceados
listos para usar. El brazo de lectura se puede subir y
bajar a mano o presionando la palanca de subir / bajar.
Tenga en cuenta que es necesario sacar el brazo de
lectura de la posición de reposo (clip del brazo) para que
se active el motor del giradiscos. Cuando el brazo de
lectura se coloca de nuevo en su posición de reposo, el
motor del giradiscos se desactiva.
brazo mientras está en reposo o no se usa. El clip ha sido diseñado para que permanezca hacia arriba mientras está
desbloqueado.
activada, el plato comienza a girar cuando el brazo se coloca sobre el disco y se detiene cuando llega al final del mismo.
(Si está desactivada, el plato gira siempre, independientemente de la posición del brazo.)
Nota: Si su disco se detiene antes de que termine de reproducirse un tema, coloque el interruptor parada automática en
"off".
IMPORTANTE : Retire la cubierta plástica de la
cápsula (cubierta de la púa) antes de hacer funcionar
el giradiscos.
12
87
3
6
4
5
5
Page 6

DIAGRAMA DE CONEXIÓN
ALTAVOCES
COMPUTADORA
ADVERTENCIA IMPORTANTE: Las
salidas RCA son para nivel de
LÍNEA. Conecte estas salidas
sólo a las entradas de nivel de
línea (LINE). Puede dañar el
receptor si enchufa un nivel de
línea en una entrada fonográfica.
SOLUCIÓN DE PROBLEMAS
PROBLEMA CAUSA SOLUCIÓN
La púa no está sobre el disco. Coloque la púa sobre el disco.
No oigo ningún audio
mientras grabo.
Experimento un sonido de
baja calidad.
Cuando grabo en la
computadora bajo
Windows Vista, mis
grabaciones son mono en
lugar de estéreo.
La música se reproduce
con un pitch extraño.
Cuando grabo en mi
computadora bajo
Windows 7, la música se
distorsiona o "recorta".
Mi disco dejó de
reproducirse antes del
final del tema.
El giradiscos no está encendido.
La conexión de la cápsula no es
firme.
El disco de vinilo está sucio o
rayado.
Propiedades de entrada de
grabación en Vista no
configuradas a “stereo” (estéreo).
Velocidad incorrecta
seleccionada en el giradiscos.
El nivel de grabación de su
computadora es demasiado alto.
Si está reproduciendo un disco
de 45 RPM, la característica
Autostop (Parada automática)
puede haber detectado que el
brazo está suficientemente cerca
del centro como para detener el
disco.
ANTES DE DEVOLVER ESTE PRODUCTO, comuníquese con ION Audio para obtener soporte técnico:
www.ionaudio.com/supporthome
Asegúrese de que el giradiscos esté conectado a una
computadora que está encendido.
La cápsula debe estar conectada firmemente al brazo
toda vez que use el giradiscos.
Pruebe desempolvando y limpiando suavemente la
superficie del disco antes de reproducirlo.
En Vista, es posible que sea necesario especificar
manualmente “stereo” para la entrada de grabación.
Vaya a Start Control Panel Sound (Inicio > Panel
de Control > Sonido) (en la vista clásica). Luego, haga
clic en la pestaña Recording (Grabación) y resalte la
entrada Microphone (USB Audio Codec). Haga clic en
Properties (Propiedades) para activar la configuración
de la entrada. Luego, haga clic en la pestaña
Advanced (Avanzadas) y seleccione “2 channel, 16 bit,
44100 Hz (CD quality)” (2 canales, 16 bits, 44100 Hz
(calidad de CD)) en el menú desplegable Default
Format (Formato por defecto). Finalmente, haga clic en
Apply (Aplicar) para aceptar los valores de
configuración.
Asegúrese de que esté reproduciendo sus discos a la
velocidad a la que están previstos. Seleccione entre las
velocidades diferentes (33, 45 o 78 RPM).
Vaya al menú Start Control Panel Hardware and
Sound Sound (Inicio > Panel de control >
Hardware y sonido > Sonido). Haga clic en la pestaña
Recording (Grabación) y7 seleccione USB Audio
Codec* (Códec de audio USB) como dispositivo
predeterminado. Haga clic en Properties (Propiedades)
en la esquina inferior derecha. En la nueva ventana,
haga clic en la pestaña Levels (Niveles) y coloque el
cursor en "4". Haga clic en OK (Aceptar) para cerrar la
ventana de propiedades y luego en OK para cerrar el
panel de control de sonido.
Coloque el interruptor Autostop en "off".
6
Page 7

GUIDE D’UTILISATION RAPIDE
o Veuillez vous assurer que les articles suivants sont dans la boîte.
QUICK PLAY LP CD
Câble USB Tapis
Guide d’utilisation rapide Le livret des consignes de sécurité et des informations concernant la garantie
o VEUILLEZ LIRE LE LIVRET DES CONSIGNES DE SÉCURITÉ AVANT D'UTILISER LE PRODUIT.
o Allez à http://www.ionaudio.com pour enregistrer le produit.
INTRODUCTION
Vous devez installer EZ Vinyl/Tape Converter afin d’enregistrer
sur ordinateur. EZ Vinyl/Tape Converter est la façon la plus rapide
et la plus simple de convertir vos enregistrements au média
numérique. EZ Vinyl/Tape Converter permet de sauvegarder vos
enregistrements dans votre bibliothèque iTunes. Nous avons
inclus un guide d'utilisation simplifié avec des instructions
détaillées sur l'installation et le fonctionnement du logiciel.
Installation du logiciel : Insérez simplement le CD dans le lecteur de votre ordinateur et suivez les instructions à l'écran. Lorsque
vous avez terminé la conversion du vinyle, vous le pouvez graver sur un CD ou le télécharger sur des lecteurs multimédia
portables.
Visitez le site www.ionaudio.com/computer-optimization
ordinateur pour une meilleure qualité audio.
CARACTÉRISTIQUES
1. Câble USB – Branchez le tourne-disque à votre ordinateur
en utilisant le câble USB fourni. La connexion USB permet
d’alimenter la platine tourne disque et d’acheminer le signal
audio de la platine à votre ordinateur. Pour transférer vos
disques vinyle sur votre ordinateur, nous vous avons fourni
du logiciel sur le CD.
2. Line Out – Utilisez un câble stéréo RCA standard pour relier
ces sorties aux entrées de votre chaîne stéréo. (Remarque :
vous pouvez copier des pistes sur un CD ou sur votre
ordinateur, même si les prises de sortie audio de la platine
ne sont pas reliées à une chaîne stéréo).
MISE EN GARDE : Les sorties RCA sont à niveau ligne
(LINE). Veuillez brancher ces sorties uniquement à des
entrées à niveau ligne (LINE). Vous pourriez
endommager votre récepteur si vous branchiez un câble
niveau ligne (LINE) dans une entrée PHONO.
3. Plateau – Veuillez placer le tapis et le disque sur ce plateau.
4. Bras de lecture – Le QUICK PLAY LP est doté d’un bras de
lecture équilibré et d’une cartouche. Le bras de lecture peut
être levé ou abaisser manuellement ou en utilisant le levier.
Veuillez noter que le bras de lecture doit être déplacé du
support (sur le serre-bras) afin que le moteur de la table
tournante soit activé. Lorsque le bras de lecture est à
nouveau sur le support, le moteur se désactive.
5. Serre-bras – Le serre-bras est conçu spécialement pour
maintenir le bras de lecture en place. Le serre-bras est conçu
pour demeurer en position élevée lorsqu’il n’est pas
verrouillé.
6. Levier – Permet de lever ou abaisser le bras de lecture.
7. Autostop – Ce commutateur permet d'activer et de désactiver la fonction autostop. Lorsqu’elle est activée, le plateau
commence à tourner dès que le bras de lecture est placé au dessus du disque et s’arrête lorsque l’aiguille a atteint la fin
du disque. (Lorsqu'elle est désactivée, le plateau tourne, peu importe l’emplacement du bras de lecture.)
REMARQUE : Si la lecture du disque s'arrête avant la fin de la chanson, désactivez la fonction Autostop.
8. Sélecteur de vitesses de lecture 33/45/78 (t/min) – Ce sélecteur contrôle nombre de tours/minute du plateau du
tourne-disque.
afin d’obtenir plus d’information concernant l’optimisation de votre
Visitez le site www.ionaudio.com/ezvc afin de
télécharger la toute dernière version du logiciel EZ
Vinyl/Tape Converter, ou afin d’accéder au guide de
dépannage ou d’obtenir de l’aide supplémentaire.
12
87
3
6
4
5
IMPORTANT : Assurez-vous de retirer le protègecartouche en plastique (protège-aiguille) avant de
faire fonctionner le tourne-disque.
7
Page 8

SCHÉMA DE CONNEXION
HAUT-PARLEURS
MISE EN GARDE : Les sorties RCA
sont à niveau ligne (LINE). Veuillez
brancher ces sorties uniquement à
des entrées à niveau ligne (LINE).
Vous pourriez endommager votre
récepteur si vous branchiez un câble
niveau ligne (LINE) dans une entrée
PHONO.
DÉPANNAGE
PROBLÈME CAUSE SOLUTION
Je n’entends pas de signal
audio lors de l’enregistrement.
L’aiguille n’est pas déposée
sur le vinyle.
La table tournante n’est pas
branchée.
Déposez l’aiguille sur le vinyle.
Assurez-vous que le tourne-disque est branché à un
ordinateur qui est sous tension.
ORDINATEUR
Le son est de mauvaise qualité.
Lorsque je fais l’enregistrement
sur mon ordinateur avec
Windows Vista, mes
enregistrements sont en mono
plutôt qu’en stéréo.
La musique joue à une vitesse
étrange.
Lorsque j’enregistre sur mon
ordinateur (Windows 7), il y a de
la distorsion ou de l’écrêtage.
La lecture du disque s'arrête
avant la fin de la chanson.
La cartouche n’est pas fixée
correctement.
Le vinyle est peut-être sale
ou égratigné.
Les paramètres d'entrée
pour l'enregistrement ne
sont pas réglés à « stéréo ».
La vitesse sélectionnée sur
le tourne-disque est
incorrecte.
Le volume d’enregistrement
de votre ordinateur est trop
élevé.
Si vous faites jouer un
disque 45 tr/min, la fonction
Autostop peut avoir détecté
que le bras de lecture est
assez proche du centre pour
arrêter la lecture.
La cartouche doit être fixée correctement au bras de
lecture.
Essayez de retirer toute poussière ou marque de
doigts en l’essuyant avant de le remettre sur la table
tournante.
Dans Vista, il se peut que vous deviez régler
manuellement l'entrée d'enregistrement à « stéréo ».
Allez à Démarrer Panneau de configuration
Son (mode de visualisation classique). Cliquez ensuite
sur l'onglet Enregistrement et mettez l'entrée
Microphone en surbrillance (USB Audio Codec).
Cliquez sur Propriétés pour voir les paramètres
d'entrée. Cliquez ensuite sur l'onglet Avancé et
sélectionnez « 2 canaux, 16 bits, 44100 Hz (qualité
CD) » dans le menu déroulant Format par défaut.
Puis, cliquez sur Appliquez pour confirmer les
réglages.
Assurez-vous de faire jouer les disques à la vitesse
appropriée. Sélectionnez la vitesse appropriée (33, 45
ou 78 RPM).
Cliquez sur Démarrer Panneau de configuration
Matériel et audio Son. Cliquez sur l’onglet
Enregistrement et sélectionnez USB audio codec
comme appareil par défaut. Cliquez sur Propriétés
dans le coin inférieur droit. Dans la nouvelle fenêtre,
cliquez sur l’onglet Niveaux et sélectionnez le niveau 4.
Cliquez OK pour fermer la fenêtre Propriétés, puis sur
OK pour fermer la fenêtre de configuration du son.
Désactivez la fonction Autostop.
AVANT DE RETOURNER CE PRODUIT, veuillez communiquer avec le service technique
de ION Audio : www.ionaudio.com/supporthome
8
Page 9

GUIDA RAPIDA
o Assicurarsi che gli elementi elencati di seguito siano contenuti nella confezione.
o LEGGERE ATTENTAMENTE IL LIBRETTO DI ISTRUZIONI PRIMA DI UTILIZZARE IL PRODOTTO
o Recarsi alla pagina http://www.ionaudio.com per la registrazione del prodotto.
INTRODUZIONE
Sarà necessario installare EZ Vinyl/Tape Converter per sfruttare la
registrazione su computer. EZ Vinyl/Tape Converter è il modo più
facile e veloce di trasformare le vostre registrazioni in media digitali.
EZ Vinyl/Tape Converter salva comodamente le vostre registrazioni
nella libreria iTunes. Abbiamo allegato una comoda Guida Rapida
con istruzioni passo passo circa l’installazione e l’uso del software.
Per installare il software: inserire il CD in dotazione nel computer e seguire le istruzioni da schermo. Una volta terminato di
convertire il vinile, lo si può masterizzare su un CD o caricare su dispositivi media portatili.
Recarsi alla pagina www.ionaudio.com/computer-optimization
l’audio.
CARATTERISTICHE
1. Cavo USB – Servirsi del cavo USB in dotazione per
2. Uscita di linea – Servirsi di un cavo stereo RCA
3. Piatto – Il tappetino e il disco va collocato qui.
4. Braccio – Il QUICK PLAY LP è dotato di un braccio e di
5. Ferma braccio – questo ferma braccio dal design
6. Levetta di Sollevamento / Abassamento – Alza e abbassa il braccio.
7. Autostop (arresto automatico) – Questo interruttore attiva o disattiva l'arresto automatico. Quando l'arresto automatico
8. Interruttore 33 / 45 / 78 giri – questo interruttore controlla il numero di giri al minuto del piatto del giradischi.
QUICK PLAY LP CD
Cavo USB Tappetino
Guida rapida Libretto di istruzioni di sicurezza e garanzia
Recarsi alla pagina www.ionaudio.com/ezvc per
scaricare l'ultima versione dei software EZ
Vinyl/Tape Converter oppure per ottenere un'utile
guida alla risoluzione dei problemi o ulteriore
assistenza.
per maggiori informazioni su come ottimizzare il computer per
collegare il giradischi al computer. Il collegamento USB
assicura l’alimentazione al giradischi oltre all’audio dal
giradischi al computer. Per il trasferimento dei dischi in
vinile al computer, abbiamo previsto software nel CD
incluso.
standard per collegare queste uscite agli ingressi audio
dell’impianto home stereo. (Nota bene: si può copiare
musica su CD o sul computer, anche se le uscite audio
del giradischi non sono collegate ad un impianto stereo).
AVVERTENZA IMPORTANTE: i uscite RCA sono a
livello di LINEA. Collegare queste uscite unicamente
a ingressi a livello di LINEA. Collegando un ingresso
a livello di LINEA ad un ingresso PHONO si rischia
di danneggiare il ricevitore.
una cartuccia pre-bilanciati pronti per l’uso. Il braccio
può essere alzato e abbassato a mano, oppure
premendo la levetta di sollevamento / abbassamento. Va
notato che il braccio deve essere allontanato dalla
posizione di riposo (sul ferma braccio) affinché il motore
del giradischi si attivi. Quando il braccio viene
nuovamente collocato in posizione di riposo, il motore si
disattiva.
speciale fissa il braccio quando è a riposo o quando non
è in uso. Il ferma braccio è stato progettato in modo che
resti sollevato quando sbloccato.
è attivo, il piatto inizierà a girare quando il braccio viene collocato sul disco e smetterà di girare quando il disco è arrivato
in fondo. (Quando la funzione di arresto automatico è disattiva, il piatto continuerà a girare indipendentemente dalla
posizione del braccio.)
Nota bene: se la riproduzione del disco si interrompe prima della fine di una canzone, impostare l'interruttore Autostop
su "off".
IMPORTANTE: Rimuovere il cappuccio della cartuccia
(copripuntina) prima di utilizzare il giradischi.
12
87
3
6
4
5
9
Page 10

SCHEMA DEI COLLEGAMENTI
ALTOPARLANTI
AVVERTENZA IMPORTANTE: i
uscite RCA sono a livello di
LINEA. Collegare queste uscite
unicamente a ingressi a livello di
LINEA. Collegando un ingresso a
livello di LINEA ad un ingresso
PHONO si rischia di danneggiare
il ricevitore.
COMPUTER
RISOLUZIONE DI PROBLEMI
PROBLEMA CAUSA SOLUZIONE
La puntina non è sul disco. Appoggiare la puntina sul disco.
Non si sente l’audio
mentre registro.
Scarsa qualità sonora.
Quando registro sul mio
computer con Windows
Vista, le mie registrazioni
risultano mono anziché
stereo.
La mia musica suona in
una tonalità strana.
Quando registro sul mio
computer con SO
Windows 7 la musica è
distorta o "salta".
La riproduzione del disco
si è interrotta prima della
fine della canzone.
Il giradischi non è alimentato.
Il collegamento della
cartuccia non è ben fisso.
Il vinile è sporco o graffiato.
Le proprietà di ingresso di
registrazione in Vista non
sono impostate su “stereo”.
Sul giradischi è stata
selezionata la velocità
sbagliata.
Il livello di registrazione del
computer è troppo elevato.
Se si sta suonando un 45 giri,
la funzione di interruzione
automatica (Autostop) può
aver individuato che il braccio
è abbastanza vicino al centro
da fermare il disco.
Assicurarsi che il giradischi sia collegato a un computer che
sia acceso.
La cartuccia va fissata saldamente al braccio ogni volta che
si utilizza il giradischi.
Provare a spolverare delicatamente con un panno la
superficie del disco prima di riprodurlo.
In Vista, va specificato “stereo” per l’ingresso di
registrazione.
Recarsi su Start Pannello di controllo Suono (in
Visuale Classica). Quindi, cliccare sulla linguetta
Registrazione ed evidenziare l’ingresso Microfono (USB
Audio Codec). Cliccare su Proprietà per richiamare le
impostazioni di ingresso. Quindi, cliccare sulla linguetta
Avanzate e selezionare “2 canali, 16 bit, 44100 Hz (qualità
CD)” nel menu a tendina Formato predefinito. Infine,
cliccare su Applica per accettare le impostazioni.
Assicurarsi di riprodurre i dischi alla velocità per cui sono
stati creati. Scegliere tra le diverse velocità 33, 45 o 78
RPM (33, 45 o 78 giri).
Recarsi su Start Pannello di controllo Hardware e
suoni Audio. Cliccare la linguetta Registrazione e
selezionare USB Audio Codec come periferica predefinita.
Cliccare su Proprietà nell’angolo inferiore destro. Nella
nuova finestra, cliccare sulla scheda Livelli e impostare il
cursore su "4". Cliccare su OK per chiudere la finestra
Proprietà, quindi cliccare su OK per chiudere il pannello di
controllo Audio.
Impostare l'interruttore Autostop su "off".
PRIMA DI RENDERE QUESTO PRODOTTO, contattare ION Audio per ricevere assistenza
tecnica: www.ionaudio.com/supporthome
10
Page 11

KURZANLEITUNG
o Überprüfen SIe bitte, dass sich die in der unteren Abbildung aufgeführten Gegenstände in der Produktverpackung
befinden.
QUICK PLAY LP CD
USB-Kabel Slipmat
o LESEN SIE BITTE DIE SICHERHEITSHINWEISE, BEVOR SIE DAS PRODUKT VERWENDEN
o Registrieren Sie Ihr Produkt online auf http://www.ionaudio.com.
EINFÜHRUNG
Sie sollten EZ Vinyl/Tape Converter installieren, um die Vorteile von
Computeraufnahmen zu nutzen. EZ Vinyl/Tape Converter ist die
schnellste und einfachste Lösung überhaupt, um Ihre Schallplatten
in das digitale Format umzuwandeln. EZ Vinyl/Tape Converter
speichert Ihre Aufnahmen für Sie direkt in Ihrer iTunes
Bibliothek. Sie finden in einer handlichen Kurzanleitung schrittweise
Anleitungen zur Softwareinstallation und zur Bedienung des
Programms.
Um die Softwareprogramme zu installieren, legen Sie einfach die mitgelieferte CD in das Laufwerk Ihres Computers ein und
folgen den Bildschirmanweisungen. Nachdem Sie Ihre Schallplatten digitalisiert haben, können Sie aus den Titeln eine CD
brennen oder die Songs auf einen portablen MP3-Player laden.
Auf der Webseite www.ionaudio.com/computer-optimization befinden sich weitere Informationen zur Audio-Optimierung des
Computers.
ÜBERSICHT
1. USB-Kabel – Mit dem beiliegenden USB Kabel können Sie
2. Line Out – Verwenden Sie ein normales Cinch (RCA) Kabel
3. Plattenteller – Hier Slipmat und Platte auflegen.
4. Tonarm – Der QUICK PLAY LP wird mit einem
5. Arm-Clip – Dieser speziell entworfene Arm-Clip sichert den
6. Tonarmlift – Hebt und senkt den tonarm.
7. Autostop – Dieser Schalter dient zum Ein- und Ausschalten der Funktion Autostop. Ist Autostop eingeschaltet, fängt der
8. 33 / 45 / 78 RPM Schalter – Dieser Schalter steuert die Drehzahl des Plattentellers.
Kurzanleitung Broschüre mit den Sicherheits- und Garantierichtlinien
Besuchen Sie www.ionaudio.com/ezvc, um die
neueste Version der EZ Vinyl/Tape Converter
Software herunter zu laden oder um eine hilfreiche
Anleitung zur Fehlerbehebung und zusätzliche
Unterstützung zu erhalten.
diesen USB Port mit Ihrem Computer verbinden. Die USBVerbindung versorgt den Plattenspieler mit Strom und liefert
Tonsignale vom Plattenspieler an den Computer. Zur
Übertragung Ihrer Schallplatten auf den Computer haben wir
Programme beigelegt.
zum Anschluss dieser Ausgänge an die Audioeingänge Ihrer
Stereoanlage. (Bitte beachten Sie: Sie können auch dann
Musik auf CD oder den Computer kopieren, wenn die
Audioausgänge nicht mit einer Stereoanlage verbunden sind).
WICHTIGER HINWEIS: Diese RCA Ausgänge führen einen
LINE-Pegel. Schließen Sie diese Ausgänge nur an LINEPegel Eingänge an. Wenn Sie einen Linepegel an
PHONO-Eingänge anschließen, könnten Sie Ihren
Receiver beschädigen.
betriebsfertigen, ausbalanciertem Tonarm mit System
ausgeliefert. Der Tonarm lässt sich per Hand anheben und
absenken oder alternativ durch Drücken des Tonarmlifts
betätigen. Beachten Sie bitte, dass der Tonarm von der
Ablage (siehe Arm-Clip) bewegt werden muss, damit der
Schallplattenmotor aktiviert wird. Wird der Tonarm zurück auf
seine Ablage gelegt, deaktiviert sich der Motor.
Tonarmwährend Pausen und bei Nichtgebrauch. Der ArmClip wurde so entworfen, dass er in der aufrechten Stellung verbleibt solang er geöffnet ist.
Plattenteller sich zu drehen an, sobald der Tonarm über die Platte bewegt wird und hält an, wenn das Ende der Platte
erreicht ist. (Falls Autostop ausgeschaltet ist, dreht sich der Plattenteller fortwährend, egal, wo sich der Tonarm
befindet.)
Hinweis: Wenn Ihre Platte stoppt, bevor das Lied fertig abgespielt wurde, stellen Sie den Autostop-Schalter auf "Aus".
WICHTIG: Bitte entfernen Sie die Nadelabdeckung
aus Plastik, bevor Sie den Plattenspieler verwenden.
12
87
3
6
4
5
11
Page 12

ANSCHLÜSSUBERSICHT
LAUTSPRECHER
WICHTIGER HINWEIS: Diese
RCA Ausgänge führen einen
LINE-Pegel. Schließen Sie diese
Ausgänge nur an LINE-Pegel
Eingänge an. Wenn Sie einen
Linepegel an PHONO-Eingänge
anschließen, könnten Sie Ihren
Receiver beschädigen.
FEHLERHILFE
PROBLEM URSACHE LÖSUNG
Ich höre bei der Aufnahme
kein Audiosignal.
Nadel liegt nicht auf der
Schallplatte.
Plattenspieler hat kein Strom.
Legen Sie die Nadel auf die Schallplatte auf.
Stellen Sie sicher, dass der Plattenspieler an einem Computer,
auf angeschlossen ist.
COMPUTER
Das Tonabnehmersystem muss fest am Tonarm sitzen, wenn
Sie den Plattenspieler verwenden.
Wischen Sie die Oberfläche der Schallplatte mit einem
antistatischen Tuch vorsichtig ab.
In Vista müssen Sie möglicherweise für den Aufnahmeeingang
den Stereo-Mode manuell auswählen.
Gehen Sie auf Start Systemsteuerung Sound (in der
klassischen Ansicht). Klicken Sie dann auf den Aufnahme Tab
und wählen Sie den Mikrofon Eingang (USB Audio Codec) an.
Klicken Sie auf Eigenschaften.. Klicken Sie dann auf den
Erweitert Tab und wählen Sie “2 Kanal, 16 Bit, 44100 Hz (CD
Qualität)” im Standardformat Aufklappmenü aus. Drücken Sie
dann auf Übernehmen, um die Änderung zu bestätigen.
Achten Sie darauf, dass die Schallplatten in der vorgesehenen
Geschwindigkeit abgespielt werden. Sie können mit den 33 / 45
/ 78 RPM Schalter zwischen zwei Geschwindigkeiten wählen.
Wählen Sie Start Systemsteuerung Hardware und
Sound Sound. Klicken Sie auf die Registerkarte
"Aufnahme" und wählen Sie "USB Audio Codec" als
Standard-Gerät aus. Klicken Sie in der rechten unteren Ecke
auf Eigenschaften. Im neuen Fenster klicken Sie auf die
Registerkarte Pegel und stellen den Schieberegler auf "4".
Klicken Sie auf OK, um das Fenster Eigenschaften zu
schließen und anschließend auf OK, um das Fenster Sound zu
schließen.
Stellen Sie den Autostop-Schalter auf "Aus".
Der Klang, den ich höre, ist
sehr schlecht.
Unter Windows Vista sind
meine Aufnahmen nur in
Mono anstatt in Stereo.
Meine Musik wird in der
falschen Tonhöhe
abgespielt.
Wenn ich unter Windows 7
auf meinen Computer
aufnehme, klingt die Musik
verzerrt oder "clippt".
Meine Platte stoppte bevor
sie das Ende des Liedes
erreicht hat.
Das System sitzt nicht richtig.
Die Schallplatte ist schmutzig
oder verkratzt.
Aufnahmeeinstellungen in
Vista stehen nicht auf
“Stereo”.
Falsche Geschwindigkeit am
Plattenspieler ausgewählt.
Der Aufnahmepegel Ihres
Computers ist zu hoch
eingestellt.
Wenn Sie eine 45RPM-Platte
spielen, kann es sein, dass
die Autostop-Funktion die
Nähe des Tonarms zum
Mittelpunkt erkannt hat und so
die Platte gestoppt hat.
BEVOR SIE DIESES PRODUKT EINSENDEN kontaktieren Sie bitte ION Audio für
technischen Support: www.ionaudio.com/supporthome
12
Page 13

SNELSTARTGIDS
o Controleer of onderstaande onderdelen in de doos zitten.
o LEES DE VEILIGHEIDSINSTRUCTIES VOOR HET PRODUCT GEBRUIKT WORDT
o Bezoek http://www.ionaudio.com voor productregistratie.
INTRODUCTIE
Wanneer u wilt genieten van de voordelen van opname naar een PC, u
moet de EZ Vinyl/Tape Converter-Software installeren. EZ Vinyl/Tape
Converter is de snelste en makkelijkste manier om uw opnamen om te
zetten in digitale media. EZ Vinyl/Tape Converter bewaart uw opnamen
voor uw gemak in uw iTunes-bibliotheek. We hebben een handige
snelstartgids meegeleverd met stap voor stap instructies voor installatie
en werking van de software.
Om de software te installeren kunt u eenvoudig de meegeleverde CD in de hiervoor geschikte drive op uw computer invoeren
waarna u de instructies op het scherm volgt. Na conversie van uw platen kunt u de opnamen op CD branden of op draagbare
media-apparatuur laden.
Bezoek www.ionaudio.com/computer-optimization voor meer informatie over het optimaliseren van uw computer voor
geluidsfunctionaliteit.
OVERZICHT
1. USB Kabel – Gebruik de meegeleverde USB-kabel voor
2. Line Out – Gebruik een standaard stereo RCA-kabel om
3. Plateau – Plaats uw slipmat en uw plaat hier.
4. Toonarm – De QUICK PLAY LP wordt geleverd met een
5. Armklem – Deze speciaal ontworpen armklem zorgt
6. Hendel voor Optillen / Neerlaten – Tilt de toonarm op en laat deze neer.
7. Autostop – Hiermee wordt automatisch stoppen in of uitgeschakeld. Wanneer deze functie is ingeschakeld zal het
8. 33 / 45 / 78 RPM schakelaar – Deze schakelaar regelt het toerental (RPM) van het plateau van de draaitafel.
QUICK PLAY LP CD
USB-kabel Slipmat
Snelstartgids Veiligheids- en garantie-informatie
Surf naar www.ionaudio.com/ezvc om de
laatste versie te downloaden van EZ
Vinyl/Tape Converter en voor een handige
probleemoplossingsgids en bijkomende
ondersteuning.
het aansluiten van de draaitafel op uw computer. De USBaansluiting voorziet in stroom naar de platenspeler en het
geluid van de platenspeler naar de computer. Voor het
overzetten van uw vinyl platen naar uw computer worden
software meegeleverd op de bijgeleverde CD.
deze uitgangen aan te sluiten op de geluidsingangen van
uw eigen stereosysteem. (N.B.: u kunt muziek naar een
CD of computer blijven opnemen, ook wanneer de
geluidsuitgangen van de draaitafel niet aangesloten zijn
op een stereosysteem).
BELANGRIJKE WAARSCHUWING: Deze RCAuitgangen zijn LINE-niveau. Gelieve alleen verbinding
deze uitgangen naar niveau ingangen LINE. U kan uw
ontvanger als u de stekker in een LINE-niveau in een
PHONO ingang.
direct bruikbare, voorgebalanceerde toonarm met
patroon. Deze toonarm kan met de hand of door
indrukken van hendel voor optillen / neerlaten worden
opgetild en neergelaten. Vergeet niet dat de toonarm uit
de rustpositie (op de armklem) genomen dient te worden
voordat de motor van de draaitafel geactiveerd wordt.
Wanneer de toonarm teruggeplaatst wordt in rustpositie,
wordt de motor van de draaitafel gedeactiveerd.
ervoor dat de toonarm in positie blijft wanneer deze niet
wordt gebruikt. De klem is ontworpen om in opwaartse positie te blijven staan wanneer ontgrendeld.
plateau beginnen te draaien wanneer de toonarm op de plaat geplaatst wordt, en stoppen wanneer de plaat afgelopen is.
(Wanneer de functie niet ingeschakeld is, zal het plateau altijd draaien, onafhankelijk van de positie van de toonarm.)
Opmerking: als uw plaat stopt voor het nummer is geëindigd, zet dan de Autostop-schakelaar op “off”.
BELANGRIJK: Verwijder het plastic elementkapje
(naaldbescherming) voor gebruik van de draaitafel.
12
87
3
6
4
5
13
Page 14

AANSLUITINGENDIAGRAM
LUIDSPREKERS
BELANGRIJKE WAARSCHUWING:
Deze RCA-uitgangen zijn LINEniveau. Gelieve alleen verbinding
deze uitgangen naar niveau
ingangen LINE. U kan uw ontvanger
als u de stekker in een LINE-niveau
in een PHONO ingang.
COMPUTER
PROBLEEMOPLOSSING
PROBLEEM OORZAAK OPLOSSING
Ik hoor geen geluid
wanneer ik aan het
opnemen ben.
De geluidskwaliteit is
slecht.
Bij het opnemen van
platen naar mijn computer
met Windows Vista zijn de
opnamen mono in plaats
van stereo.
Mijn muziek speelt af op
een vreemde toonhoogte.
Tijdens opnames op mijn
computer met Windows 7,
klinkt de muziek vervormd
of “afgeknipt”.
Mijn plaat stopte met
spelen voor het nummer
was geëindigd.
Neem contact op met ION Audio voor technische ondersteuning VOORALEER DIT PRODUCT TERUG
TE ZENDEN: www.ionaudio.com/supporthome
Naald staat niet op de plaat. Plaats de naald op de plaat.
Draaitafel heeft geen stroom.
Aansluiting van het element
is niet in orde.
Vinyl plaat is vuil of
beschadigd.
Ingangseigenschappen voor
opname onder Vista zijn niet
ingesteld op “stereo”.
Onjuiste snelheid
geselecteerd op de draaitafel.
Het opnameniveau van uw
computer is te hoog.
Als u een 45-toerenplaat
afspeelt, kan de Autostopfunctie gedetecteerd hebben
dat de toonarm zich
voldoende dicht bij het
centrum bevond om de plaat
stop te zetten.
Zorg ervoor dat de draaitafel is aangesloten op een
computer die is ingeschakeld.
Element dient stevig bevestigd te zijn aan de toonarm
wanneer de draaitafel in gebruik is.
Stof de plaat af en veeg het oppervlak voorzichtig schoon
voordat de plaat afgespeeld wordt.
In Vista kan het nodig zijn handmatig “stereo” te selecteren
voor opnemen.
Ga naar Start Configuratiescherm Geluid (in
Klassieke weergave). Klik op tab Opnemen en kies
Microfoon-ingang (USB Audio Codec). Klik op
Eigenschappen om de ingangsinstellingen te laten zien. Klik
hierna op tab Geavanceerd en selecteer “2 kanalen, 16 bit,
44100 Hz (CD-kwaliteit)” in het keuzemenu Standaard
opmaak. Als laatste klikt u op Toepassen om de
instellingen te bevestigen.
Zorg ervoor dat u uw platen op dezelfde snelheid afspeelt
als die waarvoor deze bedoeld zijn. Selecteer één van de
snelheden door te drukken op 33, 45 of 78 RPM.
Ga naar Start Bedieningspaneel Hardware en
Geluid Geluid. Klik op tabblad Opnemen en selecteer
USB Audiocodec als standaardapparaat. Klik op
Eigenschappen in de rechterbenedenhoek. Klik in het
nieuwe venster op het tabblad Niveaus en zet de
schuifregelaar op "4." Klik op OK om het venster
Eigenschappen te sluiten en daarna op OK om het
bedieningspaneel Geluid te sluiten.
Zet de Autostop-schakelaar op “off”.
14
Page 15

Page 16

www.ionaudio.com
MANUAL VERSION 1.3
 Loading...