

Page 1

PROFILE FLASH
LP-TO-SD CARD CONVERSION SYSTEM
QUICKSTART GUIDE
ENGLISH ( 1 – 4 )
MANUAL DE INICIO RÁPIDO
ESPAÑOL ( 5 – 8 )
GUIDE D’UTILISATION RAPIDE
FRANÇAIS ( 9 – 12 )
KURZANLEITUNG
DEUTSCH ( 13 – 16 )
MANUALE RAPIDO DI UTILIZZAZIONE
ITALIANO ( 17 – 20 )
SNELSTARTGIDS
NEDERLANDS ( 21 – 24 )
Page 2

Page 3
QUICKSTART GUIDE
o Make sure that the items listed below are included in the box:
PROFILE FLASH Turntable Slipmat
45 RPM Adapter Quickstart Guide
Safety Instructions & Warranty Information
o READ SAFETY INSTRUCTION BOOKLET BEFORE USING THE PRODUCT
o Go to http://www.ionaudio.com
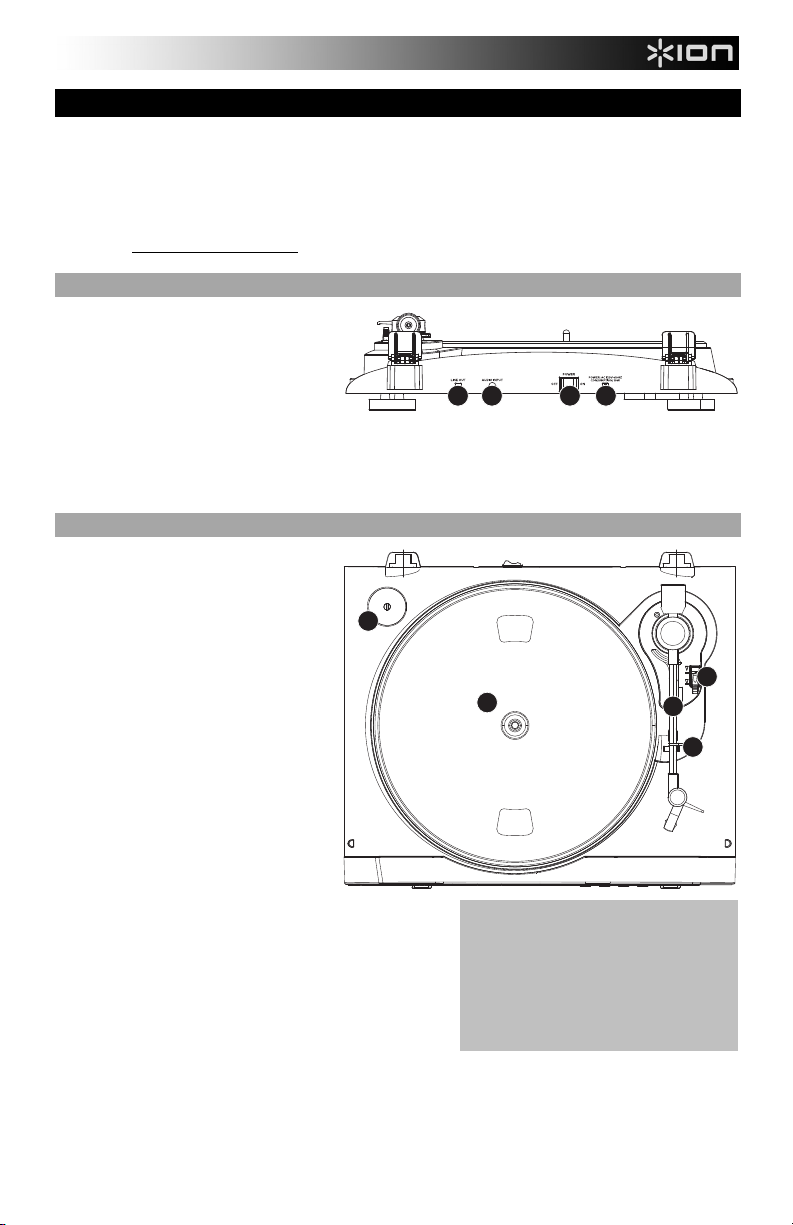
REAR PANEL FEATURES
1. POWER CABLE – This power cable
should be plugged into a wall receptacle
AFTER all audio connections are made.
2. POWER ON / OFF SWITCH – Turns
PROFILE FLASH on or off.
3. RCA AUDIO OUTPUT CABLES –
These cables should be plugged into the audio inputs of your home stereo system. (Please note: you can still
copy records to your USB device or SD card, even if the audio outputs of the turntable are not connected to a
stereo system).
4. AUDIO INPUT – Connect a tape player, reel-to-reel machine, or other audio source to this input using a 1/8”
stereo cable. Any signal entering this input will be included in the playback or recording mix.
TOP PANEL FEATURES
1. PLATTER – This platter must be
securely fastened to the turntable prior
to operation. The Motor Drive Belt can
be found on the drive ring underneath
the platter.
2. 45 RPM ADAPTER HOLDER – Holds
the included 45 RPM adapter. When
not using the adapter, please place it in
this holder.
3. TONEARM – PROFILE FLASH comes
with a ready to use pre-balanced
TONEARM and cartridge. The
TONEARM can be raised and lowered
by hand, or by pressing the RAISE /
LOWER LEVER. Please note that the
TONEARM needs to be moved away
from resting position (on the ARM CLIP)
for the turntable motor to activate.
When the TONEARM is placed back in
its resting position, the turntable motor
will deactivate.
4. ARM CLIP – This specially designed arm clip secures the
tone arm while at rest or when not in use. The arm clip has
been designed to remain in the up position while unlocked.
5. RAISE / LOWER LEVER – Raises and lowers the tonearm.
for product registration.
2
4
3
1
IMPORTANT
Make sure that the slipmat is always
placed on top of the platter while using the
turntable. Failure to use the slipmat may
cause damage to your media as well as
damage to the turntable.
Remove the plastic cartridge cover (needle
cover) before operating the turntable.
12
3
5
4
1
Page 4
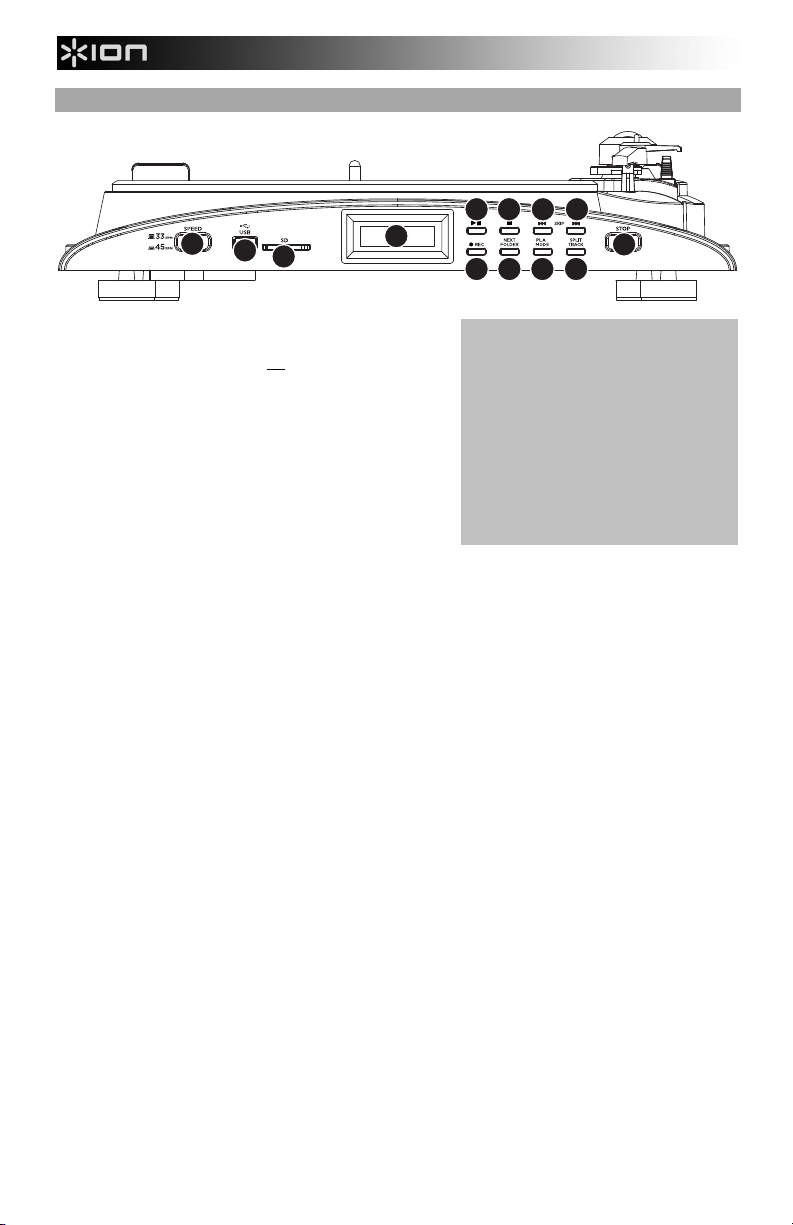
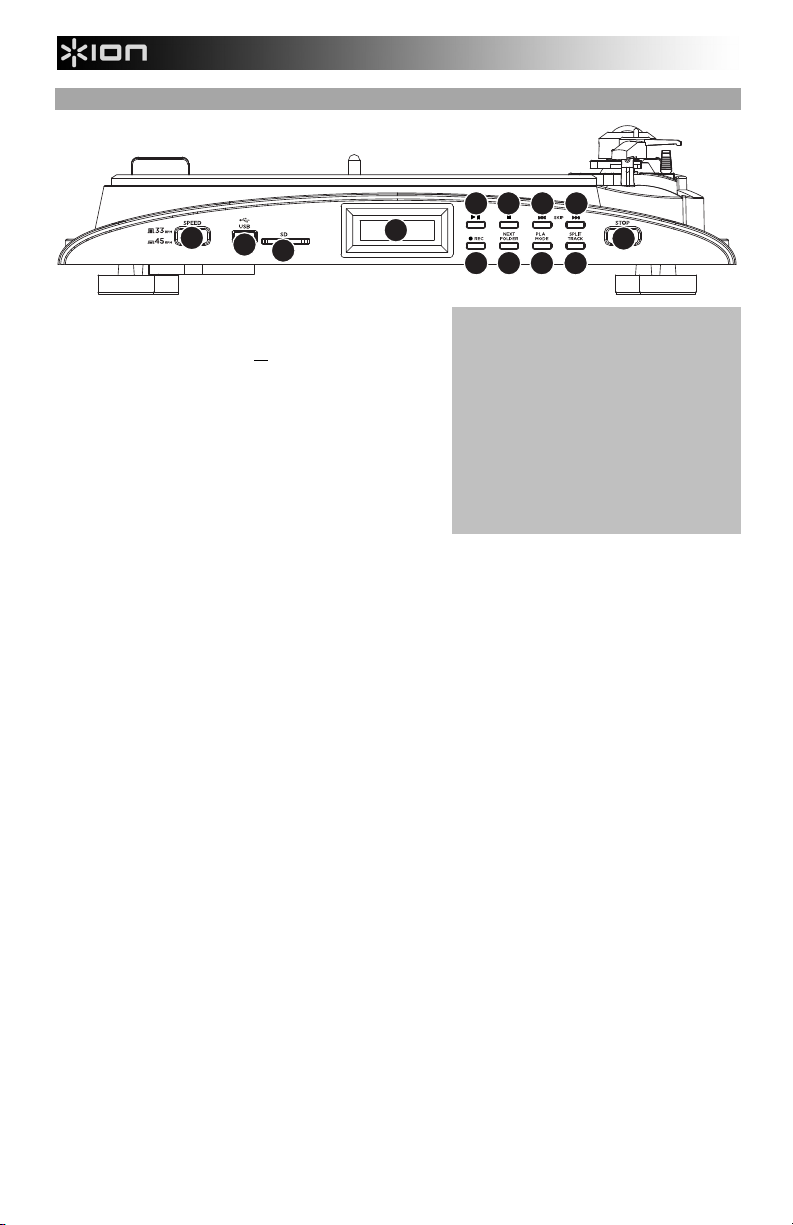
FRONT PANEL FEATURES
6 7 8 8
3
1
2
1. USB SLOT – Insert USB thumb-drive or connect USB harddrive (FAT16 or FAT32 only) to this input.
Note: PROFILE FLASH does not
2. SD CARD SLOT – Insert SD card into this slot until it clicks.
To eject it, push it in once until it clicks, then remove it from
the slot.
3. 33 / 45 RPM BUTTON – This button controls the RPM of the
turntable platter.
4. STOP RECORD – This button stops the turntable motor.
5. LCD – Shows information pertinent to unit operation.
6. PLAY / PAUSE – Press this button to play. While playing,
press again to pause. While paused, press again to resume
playback.
7. STOP () – Press this button to stop playback (or recording).
8. SKIP / – Skips to the previous track or next track (respectively). Press and hold the button down to rewind
or fast forward (respectively) through the current track.
9. REC – Press this button to enter Record Mode. Record Mode allows you to record music from the turntable
platter, or from external audio devices connected to the LINE IN, directly to a connected USB or SD device.
10. NEXT FOLDER – Press this button to skip to the next folder on your connected device and play the first
available MP3 in that folder.
11. PLAY MODE – Press this button to select how PROFILE FLASH will play your tracks:
a. Repeat: The current track will repeat.
b. Repeat All: The entire collection of tracks on your connected device will repeat.
c. Repeat Folder: The collection of tracks in the current folder will repeat.
d. Random: The entire collection of tracks on your connected device will play in random order.
12. SPLIT TRACK – When recording to your connected device, you can press this button to create a new track.
The new track number will be one higher than the previous one and saved to the same folder on your device.
support USB hubs.
5
9
IMPORTANT
• PROFILE FLASH can only recognize
• When PROFILE FLASH displays the
Y
4
10 11 12
one connected device (USB drive or SD
card) at a time.
available tracks on your connected USB
drive or SD card, instead of showing
folders on different "directory levels"
(i.e., folders within folders), it will move
through the folders as though were all
on the same level. Furthermore, only
folders containing MP3 files will be
displayed.
2
Page 5
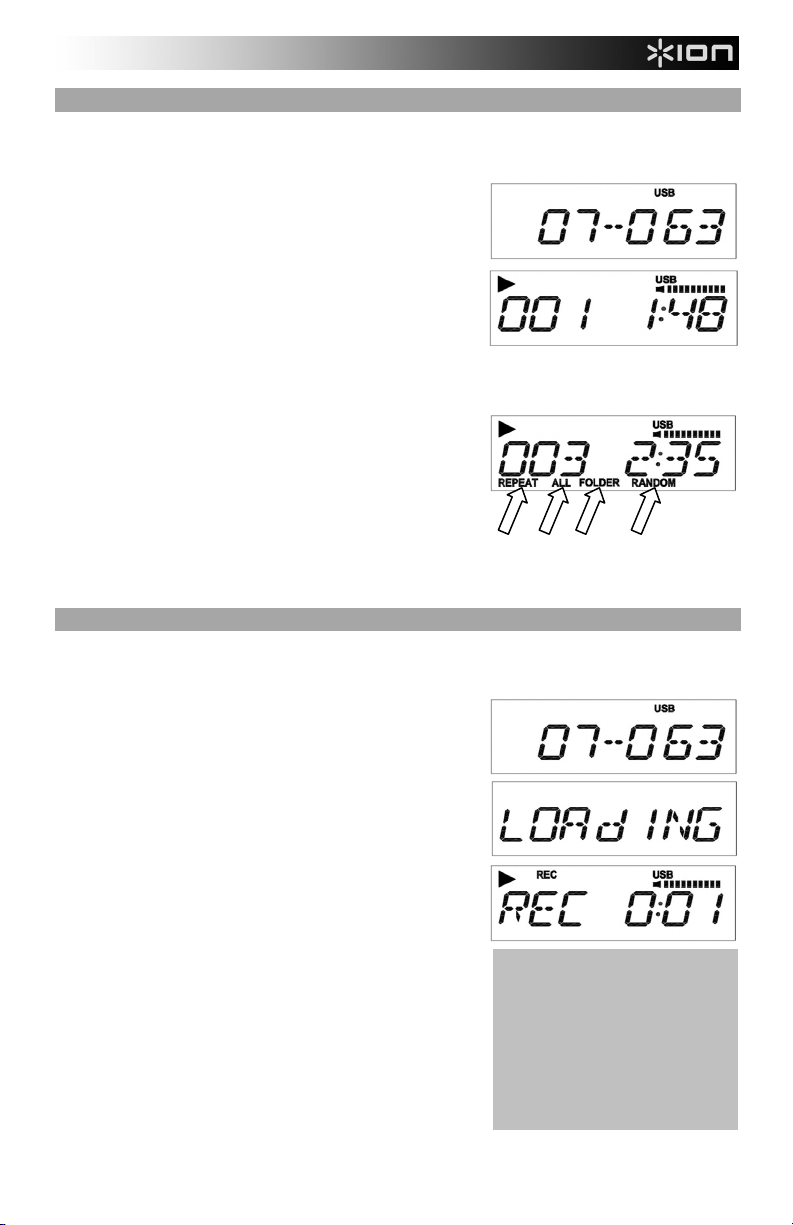
PLAYING MP3s FROM A DEVICE
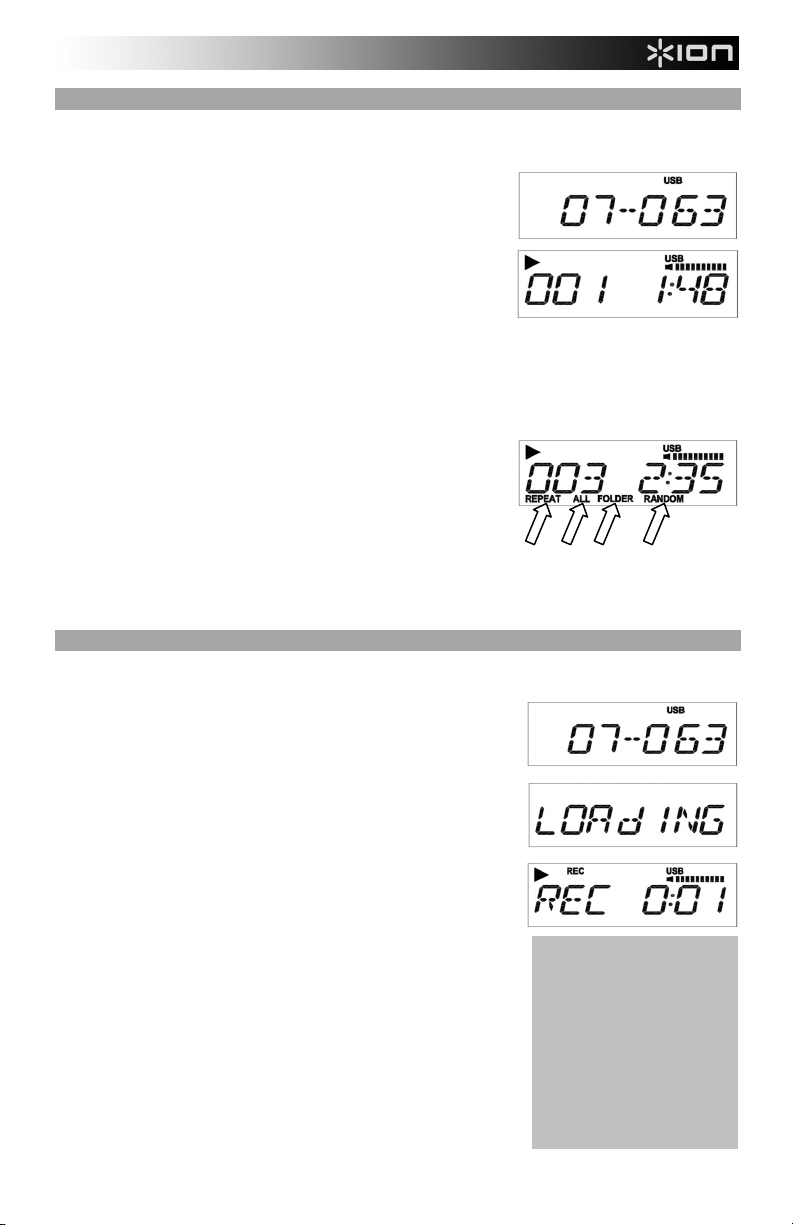
1. Connect a USB device or SD card with MP3 files to the USB SLOT or SD CARD SLOT respectively. The LCD
will show "USB READ" or "CARD READ" when it is properly connected, and "USB" or "CARD" will be shown in
the upper right corner.
2. The LCD will display the total number of folders on the device (on
the left) and the total number of available tracks (on the right).
Use the SKIP / buttons to move through the tracks. You
can also press the NEXT FOLDER button to jump to the first track
of the next folder. The current track will begin playing.
3. The LCD will show the "PLAY" icon, the track number, and the
time elapsed.
• To skip to another track, use the the SKIP / buttons.
The LCD will briefly show the number of the folder and new
track. (Note: Pressing NEXT FOLDER will immediately
play the first track of the next folder.)
• To pause playback, press the PLAY / PAUSE button. Press it again to resume playback.
• To stop playback, press the STOP () button.
• To change how PROFILE FLASH plays the tracks, press
the PLAY MODE button:
a. Repeat: The current track will repeat.
b. Repeat All: The entire collection of tracks on your
connected device will repeat.
c. Repeat Folder: The collection of tracks in the
current folder will repeat.
d. Random: The entire collection of tracks on your connected device will play in random order.
4. To eject the device, first stop the current track by pressing the STOP () button. If your device is a USB drive,
gently pull it from the slot. If your device is an SD card, push it into the slot until it clicks, then gently remove it.
RECORDING MP3s TO A DEVICE
1. Connect a USB device or SD card to the USB SLOT or SD CARD SLOT respectively. The LCD will show "USB
READ" or "CARD READ" when it is properly connected, and "USB" or "CARD" will be shown in the upper right
corner.
2. If the device already contains MP3s, the LCD will display the total
number of folders on the device (on the left) and the total number
of available tracks (on the right).
3. Cue up the music you want to record from a record on the
PLATTER or a device connected to the AUDIO INPUT.*
4. Press REC. The LCD will display "LOADING." When the "PLAY /
PAUSE" icon and time display are flashing on the LCD, PROFILE
FLASH is ready to record.
5. To begin recording, press PLAY / PAUSE. Items on the LCD will
flash briefly and "REC" will be shown to indicate PROFILE
FLASH is recording. The LCD will show the track number and
the time elapsed.
• To start a new track immediately without stopping the
recording process, press SPLIT TRACK. The currently
recording track will stop and a new recording will begin.
(Tracks that are split will be given sequential track numbers
and stored in the same folder.)
• To stop recording, press the STOP () button. (The LCD
will show "USB READ" or "CARD READ" to show it is
rescanning the connected device for your new tracks.)
6. After stopping the recording, you may play your new tracks or
eject your device. To eject the device, first stop the current track
by pressing the STOP () button. If your device is a USB drive,
gently pull it from the slot. If your device is an SD card, push it
into the slot until it clicks, then gently remove it.
* Note: If you are recording from a
device connected to the AUDIO
INPUT on the rear panel, we
recommend monitoring the volume
meter on the upper right corner of the
LCD while recording and adjusting
your device's volume accordingly.
Make sure the level is high enough to
be heard but not high enough to
produce "clipping" or distortion
(indicated by an "X" on the meter).
3
Page 6
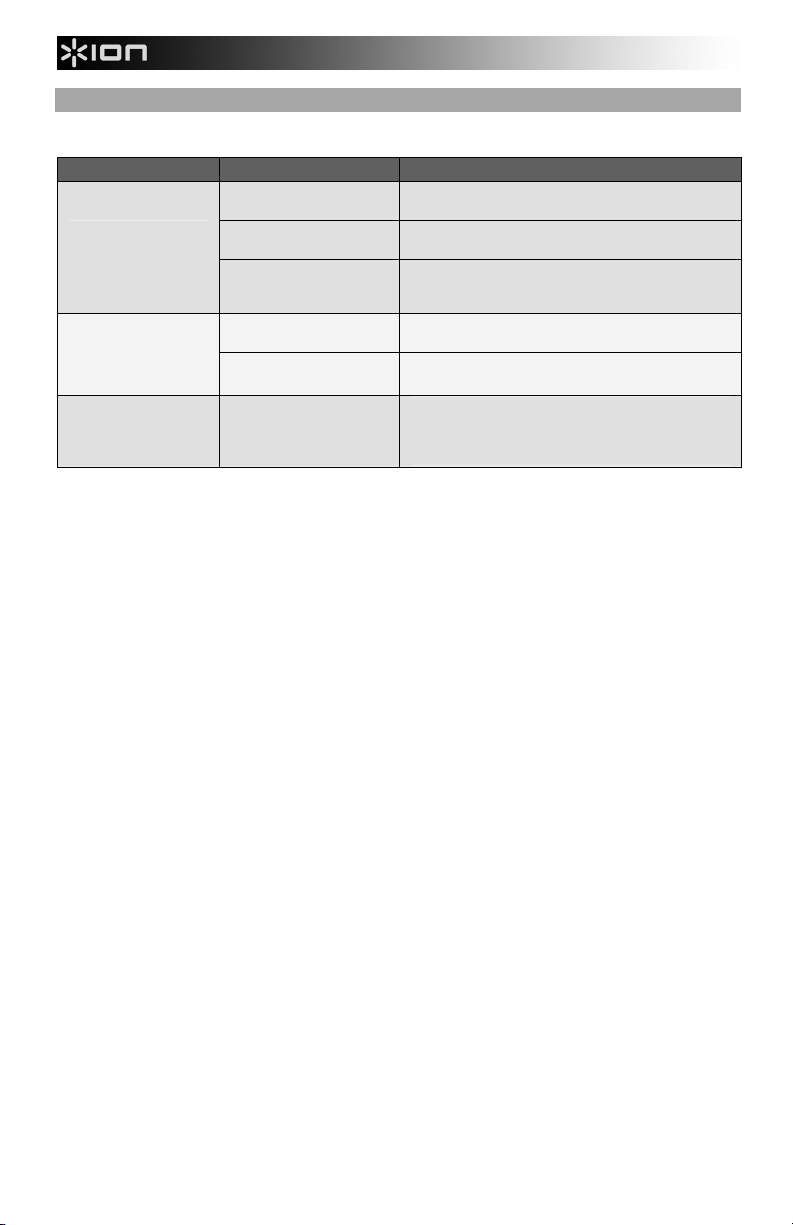
TROUBLESHOOTING
Refer to the following troubleshooting scenarios if you experience difficulty recording your vinyl.
PROBLEM CAUSE SOLUTION
Needle is not on the
record.
I am not hearing any
audio when I am
recording.
I am experiencing poor
sound quality.
My music is playing at a
strange pitch.
Turntable not powered.
RCA outputs not
connected to speaker
system.
Cartridge connection is not
secure.
Vinyl record is dirty or
scratched.
Incorrect speed selected
on the turntable.
BEFORE RETURNING THE PRODUCT, please contact ION Audio or your retailer for
technical support. Contact information can be found in the Safety Instruction Booklet
included with this product.
Place the needle on the record.
Make sure that the turntable is connected to a live
power outlet and that it is powered on.
Make sure you have connected the turntable’s RCA
outputs to a speaker system and that the speaker
system is powered on.
Cartridge must be securely connected to the tonearm
whenever you are using the turntable.
Try dusting off and gently wiping the surface of the
record before playing it.
Make sure that you are playing your records at the
speed they were intended to be played. Select
between the two different speeds by pressing 33RPM
or 45RPM.
4
Page 7

g
GUÍA DE INICIO RÁPIDO
o Asegúrese de que todos los elementos abajo indicados estén incluidos en la caja.
Giradiscos PROFILE FLASH Alfombrilla Antideslizante
Adaptador para 45 RPM Guía de inicio rápido
Folleto de información sobre la seguridad y la garantía
o LEA EL FOLLETO DE INSTRUCCIONES DE SEGURIDAD ANTES DE UTILIZAR EL PRODUCTO.
o Visite http://www.ionaudio.com
CARACTERÍSTICAS DEL PANEL TRASERO
1. CABLE DE ALIMENTACION – Este
cable de alimentación se debe
enchufar a un tomacorriente en la
pared DESPUÉS de que se hagan
todas las conexiones de audio.
2. INTERRUPTOR DE ENCENDIDO /
APAGADO – Enciende y apaga el
PROFILE FLASH.
3. CABLES RCA DE SALIDA DE AUDIO – Estos cables se deben enchufar en las entradas de audio de su
sistema estéreo hogareño. (Para tener en cuenta: igualmente se pueden copiar discos en su unidad USB o
tarjeta SD, incluso si las salidas de audio del giradiscos no están conectadas a un sistema estéreo).
4. ENTRADA DE LÍNEA – Conecte a esta entrada un reproductor de casetes, una máquina de cinta u otra fuente
de audio, usando un cable estéreo de 1/8”. Cualquier señal que entre por esta entrada se incluirá en la mezcla
para reproducción o grabación.
CARACTERÍSTICAS DEL PANEL SUPERIOR
1. PLATO – Este plato se debe ajustar
firmemente al giradiscos antes de hacerlo
funcionar. La correa de transmisión del motor
se puede encontrar en el aro impulsor debajo
del plato.
2. SOPORTE DEL ADAPTADOR DE 45 RPM –
Sostiene el adaptador de 45 RPM incluido.
Cuando no use el adaptador, póngalo en este
soporte.
3. BRAZO DE LECTURA – El PROFILE FLASH
viene con un BRAZO DE LECTURA y una
cápsula previamente balanceados listos para
usar. El BRAZO DE LECTURA se puede subir
y bajar a mano o presionando LA PALANCE
SUBIR / BAJAR. Tenga en cuenta que es
necesario sacar el BRAZO DE LECTURA de la
posición de reposo (CLIP DEL BRAZO) para
que se active el motor del giradiscos. Cuando
el BRAZO DE LECTURA se coloca de nuevo
en su posición de reposo, el motor del
giradiscos se desactiva.
4. CLIP DEL BRAZO – Este clip diseñado especialmente fija
el brazo mientras está en reposo o no se usa. El clip ha
sido diseñado para que permanezca hacia arriba mientras
está desbloqueado.
5. PALANCA DE SUBIR / BAJAR – Levanta y baja el brazo
de lectura.
para registrar el producto.
2
4
3
12
1
IMPORTANTE :
Asegúrese de que la alfombrilla esté siempre
colocada sobre el plato cuando se usa el
giradiscos. Si no se usa la alfombrilla,
puede dañarse el medio, así como el
giradiscos.
Retire la cubierta plástica de la cápsula
(cubierta de la púa) antes de hacer funcionar
el
iradiscos.
5
3
4
5
Page 8
CARACTERÍSTICAS DEL PANEL FRONTAL
6 7 8 8
3
1
2
1. RANURA USB SLOT – Inserte la unidad miniatura USB
(sólo FAT16 o FAT32) a esta entrada.
Nota: El PROFILE FLASH no
USB.
2. RANURA PARA TARJETA SD – Inserte la tarjeta SD en
esta ranura hasta que calce con un clic. Para expulsarla,
presiónela una vez hasta que haga un clic y luego retírela
de la ranura.
3. BOTÓN DE 33 / 45 RPM – Este botón controla las RPM
del plato del giradiscos.
4. BOTÓN STOP – Con este botón se detience el motor del
giradiscos.
5. PANTALLA – Muestra información pertinente al
funcionamiento de la unidad.
6. REPRODUCIR / PAUSA – Pulse este botón para reproducir. Mientras reproduce, púlselo nuevamente para
hacer una pausa. Mientras está en pausa, púlselo nuevamente para reanudar la reproducción.
7. PARAR () – Pulse este botón para detener la reproducción o la grabación.
8. SALTAR / – Para saltar a la pista anterior o siguiente (respectivamente). Pulse y mantenga pulsado el
botón para rebobinar o avance rápido (respectivamente) en la pista actual.
9. GRABAR – Pulse este botón para entrar al modo de grabación. Este modo le permite grabar música desde el
plato del giradiscos o desde dispositivos de audio externos conectados a la
en un dispositivo USB o SD conectado.
10. CARPETA SIGUIENTE – Pulse este botón para saltar a la carpeta siguiente existente en el dispositivo
conectado y reproducir el primer MP3 disponible en esa carpeta.
11. MODO DE REPRODUCCIÓN – Pulse este botón para seleccionar el modo en que PROFILE FLASH reproduce
las pistas:
a. Repeat (Repetir): Se repite la pista actual.
b. All (Todo): Se repite la colección completa de pistas existentes en el dispositivo conectado.
c. Folder (Carpeta): Se repite la colección de pistas incluidas en la carpeta actual.
d. Random (Aleatorio): Se repite en orden aleatorio la colección completa de pistas existentes en el
dispositivo conectado.
12. DIVIDIR PISTA – Cuando graba en el dispositivo conectado, puede pulsar este botón para crear una nueva
pista. El número de la pista nueva será superior en una unidad al anterior y se guarda en la misma carpeta del
dispositivo.
es compatible con los hubs
5
9
IMPORTANTE
• PROFILE FLASH puede reconocer sólo
un dispositivo conectado (unidad USB o
tarjeta SD) por vez.
• Cuando PROFILE FLASH muestra las
pistas disponibles en la unidad USB o
tarjeta SD conectada, en lugar de
presentar las carpetas en “niveles de
directorio” diferentes (es decir, carpetas
dentro de carpetas), se mueve por las
carpetas como si estuvieran todas en el
mismo nivel. Además, sólo aparecen las
carpetas que contienen archivos MP3.
Y
4
10 11 12
ENTRADA DE LÍNEA, directamente
6
Page 9
CÓMO REPRODUCIR MP3 DESDE UN DISPOSITIVO
1. Conecte un dispositivo USB o una tarjeta SD con archivos MP3 a la RANURA PARA USB o la RANURA PARA
TARJETA SD respectivamente. Cuando está conectado correctamente, aparece en la pantalla LCD "USB READ" (USB
leído) o "CARD READ" (Tarjeta leída) y se muestra "USB" o "CARD" en la esquina superior derecha.
2. La pantalla LCD muestra el número total de carpetas del dispositivo (a la
izquierda) y el número total de pistas disponibles (a la derecha). Use los
botones SKIP / para moverse por las pistas. También puede pulsar el
botón NEXT FOLDER (Carpeta siguiente) para saltar a la primera pista de
las carpeta siguiente. Comienza a reproducirse la pista actual.
3. Aparece en la pantalla LCD el icono "REPRODUCIR", el número de pista y
el tiempo transcurrido.
• Para saltar a otra pista, use los botones SKIP / . Aparece
brevemente en la pantalla LCD el número de la carpeta y la nueva
pista. (Nota: Al pulsar NEXT FOLDER, se reproduce
inmediatamente la primera pista de la carpeta siguiente.)
• Para hacer una pausa en la reproducción, pulse el botón REPRODUCIR / PAUSA. Púlselo nuevamente para
reanudar la reproducción.
• Para detener la reproducción, pulse el botón PARAR ().
• Para cambiar la manera en que PROFILE FLASH reproduce las pistas, pulse el botón PLAY MODE (Modo de
reproducción):
a. Repeat (Repetir): Se repite la pista actual.
b. All (Todo): Se repite la colección completa de pistas
existentes en el dispositivo conectado.
c. Folder (Carpeta): Se repite la colección de pistas incluidas
en la pista actual.
d. Random (Aleatorio): Se repite en orden aleatorio la
colección completa de pistas existentes en el dispositivo
4. Para expulsar el dispositivo, detenga primero la pista actual pulsando el botón PARAR (). Si el dispositivo es una
unidad USB, extráigalo cuidadosamente de la ranura. Si el dispositivo es una tarjeta SD, presiónela en la ranura hasta
que haga un clic y luego retírela cuidadosamente.
CÓMO GRABAR MP3 A UN DISPOSITIVO
1. Conecte un dispositivo USB o tarjeta SD a la RANURA PARA USB o la RANURA PARA TARJETA SD respectivamente.
Cuando está conectado correctamente, aparece en la pantalla LCD "USB READ" (USB leído) o "CARD READ" (Tarjeta
leída) y se muestra "USB" o "CARD" en la esquina superior derecha
2. Si el dispositivo ya contiene archivos MP3, aparece en la pantalla LCD el
número total de carpetas del dispositivo (a la izquierda) y el número total de
pistas disponibles (a la derecha)
3. Haga cue en la música que desea grabar desde un disco colocado en el
PLATO o un dispositivo conectado a la ENTRADA DE AUDIO*.
4. Pulse REC. Aparece "LOADING" (Cargando) en la pantalla LCD. Cuando el
icono "REPRODUCIR / PAUSA" y la hora destellan en la pantalla LCD,
PROFILE FLASH está listo para grabar.
5. Para comenzar la reproducción, pulse REPRODUCIR / PAUSA. Los
elementos mostrados en la pantalla LCD destellan brevemente y aparece
“REC” para indicar que PROFILE FLASH está grabando. La pantalla LCD
muestra el número de pista y el tiempo transcurrido.
• Para iniciar una nueva pista inmediatamente sin detener el proceso de
• Para detener la grabación, pulse el botón PARAR (). (Aparece en la
6. Después de detener la grabación, puede reproducir las nuevas pistas o
expulsar el dispositivo. Para expulsar el dispositivo, detenga primero la pista
actual pulsando el botón PARAR (). Si el dispositivo es una unidad USB,
extráigalo cuidadosamente de la ranura. Si el dispositivo es una tarjeta SD,
presiónela en la ranura hasta que haga un clic y luego retírela
cuidadosamente.
conectado.
grabación, pulse SPLIT TRACK (Dividir pista). Se detiene la grabación
de la pista que se estaba grabando y comienza una nueva grabación.
(Las pistas que se dividen reciben números de pista en secuencia y se
guardan en la misma carpeta.)
pantalla LCD "USB READ" (USB leído) o "CARD READ" (Tarjeta leída)
para mostrar que está explorando nuevamente el dispositivo conectado
para encontrar las nuevas pistas.)
* Nota: Si está grabando desde
un dispositivo conectado a la
ENTRADA DE AUDIO del panel
trasero, recomendamos
monitorear el medidor de
volumen de la esquina superior
derecha de la pantalla mientras
graba y ajusta el volumen del
dispositivo. Asegúrese de que el
nivel sea suficientemente alto
para que se oiga pero no tan alto
como para producir “recorte” o
distorsión (indicado por una “X”
en el medidor).
7
Page 10

SOLUCIÓN DE PROBLEMAS
Si experimenta dificultades al grabar sus vinilos, consulte los siguientes escenarios de solución de problemas.
PROBLEMA CAUSA SOLUCIÓN
No oigo ningún audio
mientras grabo.
Experimento un sonido
de baja calidad.
La púa no está sobre
el disco.
El giradiscos no está
encendido.
Las salidas RCA no
están conectadas al
sistema de
altavoces.
La conexión de la
cápsula no es firme.
El disco de vinilo
está sucio o rayado.
Coloque la púa sobre el disco.
Asegúrese de que el giradiscos esté conectado a un
tomacorriente alimentado y que esté encendido.
Asegúrese de haber conectado las salidas RCA del giradiscos
a un sistema de altavoces y que dicho sistema esté
encendido.
La cápsula debe estar conectada firmemente al brazo toda
vez que use el giradiscos.
Pruebe desempolvando y limpiando suavemente la superficie
del disco antes de reproducirlo.
La música se reproduce
con un pitch extraño.
Velocidad incorrecta
seleccionada en el
giradiscos.
Asegúrese de que esté reproduciendo sus discos a la
velocidad a la que están previstos. Seleccione entre las dos
velocidades diferentes pulsando 33RPM o 45RPM.
ANTES DE DEVOLVER EL PRODUCTO, comuníquese con ION Audio o con su
vendedor minorista para solicitar soporte técnico. La información de contacto se
encuentra en el folleto de instrucciones de seguridad incluido con este producto.
8
Page 11

GUIDE D’UTILISATION RAPIDE
o Veuillez vous assurer que les articles suivants sont dans la boîte.
Tourne-disque PROFILE FLASH Tapis
Adaptateur 45 t/min Guide d’utilisation rapide
Le livret des consignes de sécurité et des informations concernant la garantie
o VEUILLEZ LIRE LE LIVRET DES CONSIGNES DE SÉCURITÉ AVANT D'UTILISER LE PRODUIT.
o Allez à http://www.ionaudio.com
CARACTÉRISTIQUES DU PANNEAU ARRIÈRE
1. CÂBLE D’ALIMENTATION – Ce câble
d’alimentation doit être branché dans la
prise murale APRÈS avoir effectué tous
les autres branchements.
2. INTERRUPTEUR MARCHE/ARRÊT
(ON/OFF) – Permet de mettre le
PROFILE FLASH sous et hors tension.
3. CÂBLES STÉRÉO RCA – Ces câbles doivent être branchés dans les entrées audio de votre système stéréo.
(Remarque : vous pouvez copier des albums sur votre clé USB ou carte mémoire flash même si les sorties
audio du tourne-disque ne sont pas branchées à un système stéréo.
4. ENTRÉE AUDIO – Permet de brancher un lecteur de cassettes, un magnétophone ou une autre source audio à
l’aide d’un câble stéréo 1/8 po. Tout signal entrant par cette entrée sera inclus dans le mix de lecture ou
d’enregistrement.
CARACTÉRISTIQUES DU PANNEAU SUPÉRIEUR
1. PLATEAU – Le plateau doit être fixé
fermement au tourne-disque avant de
pouvoir l’utiliser. La courroie d’entraînement
se trouve sur l’anneau d’entraînement sous
le plateau. Voir les CONSIGNES
D’INSTALLATION pour de plus amples
informations sur l’installation de la courroie
d’entraînement.
2. EMPLACEMENT DE L’ADAPTATEUR 45
TR/MIN – Permet de ranger l’adaptateur
pour disques 45 tr/min. Lorsqu’il n’est pas
utilisé, veuillez mettre l'adaptateur dans cet
emplacement.
3. BRAS DE LECTURE – Le PROFILE FLASH
est doté d’un bras de lecture équilibré et
d’une cartouche. Le BRAS DE LECTURE
peut être levé ou abaisser manuellement ou
en utilisant le LEVIER. Veuillez noter que le
BRAS DE LECTURE doit être déplacé du
support (sur le SERRE-BRAS) afin que le
moteur de la table tournante soit activé. Lorsque le BRAS DE
LECTURE est à nouveau sur le support, le moteur se
désactive.
4. SERRE-BRAS – Le serre-bras est conçu spécialement pour
maintenir le bras de lecture en place. Le serre-bras est conçu
pour demeurer en position élevée lorsqu’il n’est pas verrouillé.
5. LEVIER – Permet de lever ou abaisser le bras de lecture.
pour enregistrer le produit.
2
4
3
12
1
IMPORTANT
Assurez-vous que le tapis est toujours
placé sur le plateau lors de l’utilisation
du tourne-disque. À défaut de respecter
cette condition, vous pourriez
endommager le support ainsi que le
tourne-disque.
Assurez-vous de retirer le protègecartouche en plastique (protègeaiguille) avant de faire fonctionner le
tourne-disque.
5
3
4
9
Page 12

CARACTÉRISTIQUES DU PANNEAU AVANT
6 7 8 8
3
1
2
5
9
1. PORT USB – Permet d’insérer une clé USB (FAT16 ou
FAT32 seulement).
Remarque : Le PROFILE FLASH ne prend pas en
charge les répéteurs USB.
2. EMPLACEMENT POUR CARTE MÉMOIRE FLASH –
Insérez une carte mémoire flash jusqu’à ce que vous
entendiez un clic. Pour l’éjecter, enfoncez-la dans la
fente jusqu’à ce que vous entendiez un clic, puis retirezla doucement.
3. SÉLECTEUR DE VITESSES DE LECTURE 33/45
(T/MIN) – Ce bouton contrôle nombre de tours/minute du
plateau du tourne-disque.
4. INTERRUPTEUR ARRÊT – Permet d’arrêter le moteur
du tourne-disque.
5. ÉCRAN D’AFFICHAGE – Indique l’information pertinente au fonctionnement de l’appareil.
6. PLAY / PAUSE – Cette touche permet de lancer la lecture. Appuyer de nouveau permet de faire un arrêt de
lecture momentanée. Appuyer de nouveau permet de relancer la lecture.
7. STOP ()
8. SKIP / – Ces touches permettent de retourner à la piste précédente ou de passer à la piste suivante.
9. RECORD – Permet de passer au mode d’enregistrement. Le mode d’enregistrement permet d’enregistrer de la
10. NEXT FOLDER – Cette touche permet de lancer le premier fichier MP3 du dossier suivant sur le périphérique
11. PLAY MODE – Cette touche permet de changer le mode de lecture du PROFILE FLASH :
12. SPLIT TRACK – Cette touche permet de créer de nouvelles pistes lors d'enregistrements sur périphérique. Le
– Ce bouton permet de faire un arrêt de lecture (ou d’enregistrement).
Maintenez les touches enfoncées afin de reculer ou d’avancer sur la piste en cours
musique de la table tournante, ou provenant d’une source externe branchée à l’entrée ENTRÉE AUDIO,
directement sur un appareil USB ou une carte mémoire flash branché.
branché.
a. Repeat : La piste sélectionnée sera répétée.
b. Repeat All : Toutes les pistes sur le périphérique branché seront répétées.
c. Repeat Folder : Toutes les pistes dans le dossier sélectionné seront répétées.
d. Random : Toutes les pistes sur le périphérique branché seront lues de manière aléatoire.
nouveau numéro de piste suivra le précédent et sera sauvegardé dans le même dossier sur le périphérique.
IMPORTANT
• Le PROFILE FLASH ne peut reconnaître
qu’un périphérique branché à la fois
(lecteur USB ou carte mémoire flash).
• Lorsque le PROFILE FLASH affiche toutes
les pistes du lecteur USB ou de la carte
mémoire flash, au lieu d’afficher les
différents niveaux de répertoires, il affiche
les répertoires comme s’ils étaient tous sur
le même niveau. De plus, seulement les
dossiers contenant des fichiers MP3 sont
affichés.
Y
10 11 12
4
10
Page 13

X
LECTURE DE MP3 À PARTIR D’UN PÉRIPHÉRIQUE OU D’UNE CARTE MÉMOIRE FLASH
1. Insérez un périphérique USB ou une carte mémoire flash contenant des fichiers MP3 dans le port USB ou dans la fente
pour carte mémoire flash respectivement. Lorsque le périphérique ou la carte mémoire flash sont insérés correctement le
message « USB READ », ou dans le cas de la carte, « CARD READ » s’affiche et le mot « USB », ou « CARD » s’affiche
dans le coin supérieur droit.
2. Le nombre total de dossiers que contient le périphérique s’affiche à gauche
et le nombre total de pistes s’affiche à droite. Utilisez les touches SKIP /
pour parcourir toutes les pistes. Vous pouvez également appuyer sur la
touche NEXT FOLDER afin de sauter à la première piste du dossier suivant.
La piste sélectionnée sera en cours de lecture.
3. L'icône « PLAY » s’affiche ainsi que le numéro de la piste et le temps écoulé.
• Afin d’accéder à une autre piste, utilisez les touches SKIP / . Le
numéro de dossier et le numéro de piste s’afficheront temporairement.
(Note : La touche NEXT FOLDER permet de sauter immédiatement à
la première piste du dossier suivant.)
• Pour faire un arrêt de lecture momentané, appuyez sur la touche
PLAY / PAUSE. Appuyez de nouveau pour relancer la lecture.
• Pour faire un arrêt de lecture, appuyez sur la touche STOP ().
• Pour changer le mode de lecture du PROFILE FLASH, appuyez sur la
touche PLAY MODE :
a. Repeat : La piste sélectionnée sera répétée.
b. Repeat All : Toutes les pistes sur le périphérique branché
seront répétées.
c. Repeat Folder : Toutes les pistes dans le dossier
sélectionné seront répétées.
d. Random : Toutes les pistes sur le périphérique branché
4. Pour éjecter le périphérique, vous devez d’abord faire un arrêt de lecture en appuyant sur la touche STOP (). Si le
périphérique est un lecteur USB, retirez-le doucement du port USB. Si le périphérique est une carte mémoire flash,
enfoncez-la dans la fente jusqu’à ce que vous entendiez un clic, puis retirez-la doucement.
ENREGISTREMENT DE FICHIERS MP3 SUR PÉRIPHÉRIQUE
1. Insérez un périphérique USB ou une carte mémoire flash contenant des
fichiers MP3 dans le port USB ou dans la fente pour carte mémoire flash
respectivement. Lorsque le périphérique ou la carte mémoire flash sont
insérés correctement le message « USB READ », ou dans le cas de la carte,
« CARD READ » s’affiche et le mot « USB » ou « CARD » s’affiche dans le
coin supérieur droit.
2. Si le périphérique contient déjà des fichiers MP3, le nombre total de dossiers
s’affichera à gauche et le nombre total de pistes s’affichera à droite.
3. Repérez la musique que vous désirez enregistrer sur le disque sur le plateau
ou sur un périphérique branché à l’entrée audio.*
4. Appuyez sur la touche REC. L’écran affichera le message « LOADING ».
Lorsque l’icône « PLAY / PAUSE » et l’affichage de la durée clignotent, le
PROFILE FLASH est prêt à enregistrer.
5. Appuyez sur la touche PLAY / PAUSE pour lancer l’enregistrement. Les items
sur l’écran clignoteront temporairement et « REC » s’affichera indiquant que le
PROFILE FLASH est en cours d’enregistrement. Le numéro de la piste et le
temps écoulé s’afficheront.
• Pour commencer une nouvelle piste immédiatement sans arrêter le
• Pour arrêter l’enregistrement, appuyez sur la touche STOP (). (Le
6. Une fois l’enregistrement arrêté, vous pouvez faire la lecture des nouvelles
pistes ou éjecter le périphérique. Pour éjecter le périphérique, vous devez
d’abord faire un arrêt de lecture en appuyant sur la touche STOP (). Si le
périphérique est un lecteur USB, retirez-le doucement de la fente. Si le
périphérique est une carte mémoire flash, enfoncez-la dans la fente jusqu’à ce
que vous entendiez un clic, puis retirez-la doucement.
seront lues de manière aléatoire.
processus d’enregistrement, appuyez sur la touche SPLIT TRACK. La
piste en cours d’enregistrement s’arrêtera et un nouvel enregistrement
débutera. (Les pistes séparées sont allouées des numéros de piste
séquentiels et sont sauvegardées dans le même dossier.)
message « USB READ », ou dans le cas de la carte, « CARD READ »
s’affiche indiquant que l’appareil procède à un balayage du périphérique
pour trouver les nouvelles pistes.
* Remarque : Si vous enregistrez
à partir d’un périphérique branché à
l’entrée audio du panneau arrière,
nous vous recommandons de
contrôler le vumètre du volume
dans le coin supérieur droit de
l'écran durant l'enregistrement et
d'ajuster les niveaux en
conséquence. Assurez-vous que
les niveaux soient assez élevés
pour que l’on puisse l’entendre,
mais sans qu’il y ait de l’écrêtage
ou de la distorsion (indiqué par un
» sur le vumètre).
«
11
Page 14

DÉPANNAGE
Veuillez consulter les scénarios suivants si vous avez des problèmes lors de l’enregistrement de vos vinyles.
PROBLÈME CAUSE SOLUTION
Je n’entends pas de
signal audio lors de
l’enregistrement.
Le son est de mauvaise
qualité.
La musique joue à une
vitesse étrange.
L’aiguille n’est pas
déposée sur le vinyle.
La table tournante n’est
pas branchée.
Les sorties RCA ne sont
pas branchées à un
système de sonorisation.
La cartouche n’est pas
fixée correctement.
Le vinyle est peut-être sale
ou égratigné.
La vitesse sélectionnée sur
le tourne-disque est
incorrecte.
Déposez l’aiguille sur le vinyle.
Assurez-vous que le tourne-disque est branché à prise
d’alimentation et qu’il est sous tension.
Assurez-vous que les sorties RCA du tourne-disque
sont branchées à un système de sonorisation et que ce
dernier est sous tension.
La cartouche doit être fixée correctement au bras de
lecture.
Essayez de retirer toute poussière ou marque de doigts
en l’essuyant avant de le remettre sur la table
tournante.
Assurez-vous de faire jouer les disques à la vitesse
appropriée. Sélectionnez la vitesse appropriée, soit
33RPM ou 45RPM.
AVANT DE RETOURNER CE PRODUIT, veuillez contacter ION Audio ou votre
détaillant pour du soutien technique. Toutes les coordonnées se trouvent dans
le livret des consignes de sécurité inclus avec de produit.
12
Page 15

KURZANLEITUNG
o Überprüfen SIe bitte, dass sich die in der unteren Abbildung aufgeführten Gegenstände in der
Produktverpackung befinden.
PROFILE FLASH Slipmat
45 RPM Adapter Kurzanleitung
o LESEN SIE BITTE DIE SICHERHEITSHINWEISE, BEVOR SIE DAS PRODUKT VERWENDEN
o Registrieren Sie Ihr Produkt online auf http://www.ionaudio.com
ÜBERSICHT ÜBER DIE ZURÜCK
1. NETZKABEL – Das Netzkabel
2. POWER ON/OFF SCHALTER –
3. RCA AUDIOAUSGANG – Diese Kabel schließen Sie an die Audioeingänge Ihrer Stereoanlage an. (Beachten
4. AUDIOEINGANG – Schließen Sie an diesen 3,5 mm Stereoklinkeneingang ein Kassettendeck, eine
ÜBERSICHT ÜBER DIE OBERSEITE
1. PLATTENTELLER – Der Plattenteller sollte
2. 45 RPM ADAPTER ABLAGE – Ablage für
3. TONARM – Der PROFILE FLASH wird mit
4. ARM CLIP – Dieser speziell entworfene
5. TONARMLIFT – Hebt und senkt den tonarm.
Broschüre mit den Sicherheits- und Garantierichtlinien
.
verbinden Sie mit einer
Steckdose, NACHDEM Sie alle
Audioverbindungen hergestellt
haben.
4
Schaltet den PROFILE FLASH
an oder aus.
Sie bitte: Sie können auch dann noch Musik auf Ihren USB Stick oder SD Card kopieren, wenn die
Audioausgänge des Gerätes nicht mit Ihrer Stereoanlage verbunden sind).
Bandmaschine oder andere Audioquellen an. Jedes hier anliegende Signal wird in die Wiedergabe oder die
Aufnahme integriert.
sicher auf dem Plattenspieler montiert
werden, bevor Sie das Gerät verwenden.
den beiliegenden 45 RPM Adapter. Lagen
Sie den Adapter hier ab, wenn Sie ihn nicht
verwenden.
einem betriebsfertigen, ausbalanciertem
TONARM mit System ausgeliefert. Der
TONARM lässt sich per Hand anheben und
absenken oder alternativ durch Drücken des
TONARMLIFTS betätigen. Beachten Sie
bitte, dass der TONARM von der Ablage
(siehe TONARM CLIP) bewegt werden
muss, damit der Schallplattenmotor aktiviert
wird. Wird der TONARM zurück auf seine
Ablage gelegt, deaktiviert sich der Motor.
Arm-Clip sichert den Tonarmwährend
Pausen und bei Nichtgebrauch. Der Arm-Clip wurde
so entworfen, dass er in der aufrechten Stellung
verbleibt solang er geöffnet ist.
3
2
1
WICHTIG
Achten Sie immer darauf, dass die Slipmat im auf
dem Plattenteller liegt, wenn Sie den
Schallplattenspieler verwenden. Anderenfalls
könnten Sie sowohl Ihre Schallplatten als auch
den Plattenspieler beschädigen.
Bitte entfernen Sie die Nadelabdeckung aus
Plastik, bevor Sie den Plattenspieler verwenden.
12
5
3
4
13
Page 16

ÜBERSICHT ÜBER DIE VORDERSEITE
6 7 8 8
3
1
2
1. USB SLOT – Schließen Sie an diesen USB Port einen
USB Stick an (FAT16 oder FAT32).
Hinweis: USB Hubs werden vom PROFILE FLASH nicht
unterstützt.
2. SD CARD SLOT – Stecken Sie die SD Card in den
Steckplatz, bis sie einrastet. Um sie wieder auszugeben,
schieben Sie sie erneut bis Sie ein Klicken hören. Dann
können Sie die Card entnehmen..
3. STOP TASTE – Diese Taste stoppt den Motor des
Schallplattenspielers.
4. 33 / 45 RPM TASTE – Diese Taste steuert die Drehzahl
des Plattentellers.
5. DISPLAY – Zeigt alle im Betrieb relevanten Informationen
an.
6. PLAY / PAUSE – Drücken Sie die Taste zur Wiedergabe. Drücken Sie diese Taste beim Abspielen, um die
Musik zu unterbrechen. Während der Pause führen Sie durch nochmaliges Drücken der Taste die Wiedergabe
fort.
7. STOP ()
8. SKIP / – Lässt Sie jeweils zum vorherigen oder zum nächsten Track springen. Halten Sie den Button
9. RECORD – Mit dieser Taste gehen Sie in den Aufnahmemodus. Im Aufnahmemodus können Sie die Musik
10. NEXT FOLDER – Drücken Sie diesen Button, um zum nächsten Ordner Ihres angeschlossenen Geräts zu
11. PLAY MODE – Drücken Sie diesen Button, um auszuwählen wie PROFILE FLASH Ihre Tracks abspielt:
12. SPLIT TRACK – Wenn Sie auf Ihr angeschlossenes Gerät aufnehmen, können Sie diesen Button drücken, um
– Drücken Sie diese taste, um die Wiedergabe oder die Aufnahme zu beenden.
gedrückt, um im aktuellen Track entweder zurückzuspulen oder den Schnellvorlauf zu betätigen. .
einer Schallplatte oder einer externen Signalquelle, die am AUDIOEINGANG angeschlossen ist, direkt auf ein
angeschlossenes USB oder SD Gerät aufnehmen.
springen und die ersten verfügbaren MP3s in diesem Ordner wiederzugeben.
a. Repeat: Der aktuelle Track wird wiederholt.
b. Repeat All: Die gesamte Track-Sammlung Ihres verbundenen Geräts wird wiederholt.
c. Repeat Folder: Die Track-Sammlung im aktuellen Ordner wird wiederholt.
d. Random: Die gesamte Track-Sammlung Ihres verbundenen Geräts wird nach dem Zufallsprinzip
wiedergegeben.
einen neuen Track zu erstellen. Die neue Tracknummer wird um eines höher sein, als die vorherige Nummer
und im selben Ordner auf Ihrem Gerät gespeichert werden.
5
9
WICHTIG
• PROFILE FLASH kann immer nur ein
• Wenn PROFILE FLASH die verfügbaren
Y
4
10 11 12
angeschlossenes Gerät erkennen (USB
Laufwerk oder SD Card).
Tracks auf Ihrem verbundenen USB
Laufwerk oder Ihrer SD Card anzeigt,
anstatt Ordner auf verschiedenen
“Ordnerebenen“ anzuzeigen (z.B. Ordner
in Ordnern), wird PROFILE FLASH sich
durch die Ordner bewegen, als befänden
sie sich alle auf gleicher Ebene. Weiters
werden nur Ordner angezeigt, die MP3Dateien enthalten.
14
Page 17

MP3s DIREKT VOM GERÄT ABSPIELEN
1. Verbinden Sie ein USB-Gerät oder eine SD Card mit MP3-Dateien entweder
mit der USB-BUCHSE oder dem SD CARD-STECKPLATZ. Wenn das Gerät
richtig angeschlossen ist, wird die LCD-Anzeige "USB READ" oder "CARD
READ" - und in der oberen, rechten Ecke "USB" oder "CARD" anzeigen. .
2. Die LCD-Anzeige wird die Gesamtanzahl der Ordner am Gerät anzeigen
(auf der linken Seite) und die Gesamtanzahl verfügbarer Tracks (auf der
rechten Seite). Verwenden Sie die SKIP / Buttons, um sich durch die
Tracks zu bewegen. Sie können auch den NEXT FOLDER Button drücken,
um zum ersten Track des nächsten Ordners zu springen. Der aktuelle Track
wird mit der Wiedergabe beginnen..
3. Die LCD-Anzeige wird das Symbol “PLAY”, die Tracknummer und die
verstrichene Zeit anzeigen.
• Um zu einem anderen Track zu springen, verwenden Sie die SKIP
/ Buttons. Die LCD-Anzeige wird kurz die Nummer des Ordners
und des neuen Tracks anzeigen. (Hinweis: Wenn Sie NEXT
FOLDER drücken, wird sofort der erste Track des nächsten Ordners
wiedergegeben.)
• Um die Wiedergabe zu pausieren, drücken Sie den Button PLAY
PAUSE. Drücken Sie ihn erneut um Fortzufahren.
• Um die Wiedergabe zu stoppen, drücken Sie den Button STOP ().
• Um zu ändern, wie PROFILE FLASH die Tracks wiedergibt, drücken Sie den Button PLAY MODE.
a. Repeat: Der aktuelle Track wird wiederholt. .
b. Repeat All: Die gesamte Track-Sammlung Ihres verbundenen Geräts wird wiederholt.
c. Repeat Folder: Die Track-Sammlung im aktuellen Ordner wird wiederholt.
d. Random: Die gesamte Track-Sammlung Ihres verbundenen Geräts wird nach dem Zufallsprinzip
4. Um das Gerät auszugeben, stoppen Sie zunächst den aktuellen Track mit dem STOP-Button ().
Falls es sich bei Ihrem Gerät um ein USB-Gerät handelt, entfernen Sie es vorsichtig aus dem Steckplatz. Falls es sich
bei Ihrem Gerät um eine SD Card handelt, schieben Sie sie noch ein Stück in den Steckplatz bis Sie ein Klicken hören.
Anschließend können Sie sie vorsichtig entfernen.
MP3s MIT DEM GERÄT AUFNEHMEN
1. Verbinden Sie ein USB-Gerät oder eine SD Card mit MP3-Dateien entweder
mit der USB-BUCHSE oder dem SD CARD-STECKPLATZ. Wenn das Gerät
richtig angeschlossen ist, wird die LCD-Anzeige "USB READ" oder "CARD
READ" - und in der oberen, rechten Ecke "USB" oder "CARD" anzeigen.
2. Falls sich am Gerät schon MP3s befinden, wird die LCD-Anzeige die
Gesamtanzahl an Ordnern am Gerät (auf der linken Seite) anzeigen und die
Gesamtanzahl der verfügbaren Tracks (auf der rechten Seite).
3. Reihen Sie die Musik, die Sie von einer Platte aufnehmen möchten, auf den
PLATTER oder ein Gerät, das mit dem AUDIO INPUT verbunden ist.*
4. Drücken Sie REC. Die LCD-Anzeige wird "LOADING" anzeigen. Wenn das
Symbol "PLAY / PAUSE" und die Zeitanzeige auf der LCD-Anzeige zu
blinken beginnen, ist PROFILE FLASH für die Aufnahme bereit.
5. Drücken Sie PLAY / PAUSE, um mit der Aufnahme zu beginnen. Die
Symbole auf der LCD-Anzeige werden kurz aufleuchten. Um anzuzeigen,
dass PROFILE FLASH aufnimmt, wird “REC” angezeigt. Die LCD-Anzeige
wird die Tracknummer und die verstrichene Zeit anzeigen.
• Um sofort einen neuen Track zu starten, ohne den Aufnahmeprozess
zu stoppen, drücken Sie SPLIT TRACK. Der aktuell aufgenommene
Track wird gestoppt, und eine neue Aufnahme beginnt. (Aufgeteilten
Tracks werden sequenzielle Nummern gegeben und im gleichen
Ordner gespeichert.)
• Um die Aufnahme zu beenden, drücken Sie den Button STOP (). Die
LCD-Anzeige wird "USB READ" oderr "CARD READ" anzeigen, um zu
zeigen, dass eine erneute Suche Ihrer neuen Tracks am verbundenen
6. Nachdem Sie Ihre Aufnahme gestoppt haben, können Sie Ihre neuen Tracks
Gerät durchgeführt wird.)
abspielen oder das Gerät auswerfen. Um das Gerät auszugeben, stoppen Sie
zunächst den aktuellen Track mit dem STOP-Button (). Falls es sich bei
Ihrem Gerät um ein USB-Gerät handelt, entfernen Sie es vorsichtig aus dem
Steckplatz. Falls es sich bei Ihrem Gerät um eine SD Card handelt, schieben
Sie sie noch ein Stück in den Steckplatz bis Sie ein Klicken hören.
Anschließend können Sie sie vorsichtig entfernen.
wiedergegeben.
* Hinweis: Falls Sie von einem
Gerät aufnehmen, das am AUDIO
INPUT auf der Rückseite verbunden
ist, empfehlen wir, dass Sie den
Aussteuerungsmesser an der
oberen rechten Ecke der LCDAnzeige bei der Aufnahme im Auge
behalten und den Pegel des Geräts
entsprechend adjustieren. Stellen
Sie sicher, dass der Pegel hoch
genug ist, um gehört zu werden,
aber nicht so hoch, dass es zu
Übersteuerung und Verzerrung
kommt (welche durch ein “X” in der
Anzeige gekennzeichnet werden).
15
Page 18

FEHLERHILFE
Sollten Sie bei der Verwendung Ihres Plattenspielers auf Probleme stoßen, können Sie die folgende
Fehlersuchtabelle verwenden, um eine Lösung zu finden.
PROBLEM URSACHE LÖSUNG
Nadel liegt nicht auf der
Schallplatte.
Ich höre bei der
Aufnahme kein
Audiosignal.
Der Klang, den ich höre,
ist sehr schlecht.
Plattenspieler hat kein
Strom.
RCA Ausgänge sind nicht
mit einem
Lautsprechersystem
verbunden.
Das System sitzt nicht
richtig.
Die Schallplatte ist
schmutzig oder verkratzt.
Legen Sie die Nadel auf die Schallplatte auf.
Vergewissern Sie sich, dass der Schallplattenspieler mit
einer funktionierenden Stromquelle verbunden und
eingeschaltet ist.
Überprüfen Sie, dass die RCA Ausgänge des
Plattenspielers mit einem Lautsprechersystem verbunden
sind und dieses eingeschaltet ist.
Das Tonabnehmersystem muss fest am Tonarm sitzen,
wenn Sie den Plattenspieler verwenden.
Wischen Sie die Oberfläche der Schallplatte mit einem
antistatischen Tuch vorsichtig ab.
Meine Musik wird in der
falschen Tonhöhe
abgespielt.
Falsche Geschwindigkeit
am Plattenspieler
ausgewählt.
Achten Sie darauf, dass die Schallplatten in der
vorgesehenen Geschwindigkeit abgespielt werden. Sie
können mit den Tasten 33RPM oder 45RPM zwischen
zwei Geschwindigkeiten wählen.
BEVOR SIE DIESES PROKT ZURÜCK SENDEN nehmen Sie bitte Kontakt mit ION Audio
oder Ihrem Fachhändler zur Behebung eines Problems auf. Die Kontaktinformationen
finden Sie in der Broschüre mit den Sicherheitshinweisen, die diesem Produkt beiliegt.
16
Page 19

GUIDA RAPIDA
o Assicurarsi che gli elementi elencati di seguito siano contenuti nella confezione.
Giradischi PROFILE FLASH Tappetino
Adattatore 45 giri Guida rapida
Libretto di istruzioni di sicurezza e garanzia
o LEGGERE ATTENTAMENTE IL LIBRETTO DI ISTRUZIONI PRIMA DI UTILIZZARE IL PRODOTTO
o Recarsi alla pagina http://www.ionaudio.com
CARATTERISTICHE PANNELLO POSTERIORE
1. CAVO DI ALIMENTAZIONE –
questo cavo di alimentazione va
inserito in una presa a muro DOPO
aver effettuato tutti i collegamenti
audio.
2. INTERRUTTORE ON/OFF
(ACCENSIONE / SPEGNIMENTO)
– accende o spegne il PROFILE FLASH.
3. CAVI DI USCITA RCA AUDIO – questi cavi vanno collegati a livello degli ingressi audio dell’impianto home
stereo (Nota bene: si possono copiare dischi sul thumb-drive USB o sulla scheda SD, anche se le uscite audio
del giradischi non sono collegate ad un impianto stereo).
4. INGRESSO AUDIO – Collegare un lettore nastro o reel-to-reel (bobina) o altre sorgenti audio a questo ingresso
servendosi di un cavo stereo da 1/8”. Qualsiasi segnale che entra in questo ingresso sarà incluso nella
riproduzione o nel mix di registrazione.
CARATTERISTICHE PANNELLO SUPERIORE
1. PIATTO – il piatto va fissato bene al
giradischi prima dell’uso. La cinghia di
trazione motore si trova sull’apposito anello
posto sotto al piatto.
2. SUPPORTO ADATTATORE 45 GIRI –
Regge l’incluso adattatore per 45 giri.
Quando l'adattatore non è in uso, può essere
collocato a questo livello.
3. BRACCIO – Il PROFILE FLASH è dotato di
un BRACCIO e di una cartuccia pre-bilanciati
pronti per l’uso. Il BRACCIO può essere
alzato e abbassato a mano, oppure
premendo la LEVETTA di SOLLEVAMENTO
/ ABBASSAMENTO. Va notato che il
BRACCIO deve essere allontanato dalla
posizione di riposo (sul FERMABRACCIO)
affinché il motore del giradischi si attivi.
Quando il BRACCIO viene nuovamente
collocato in posizione di riposo, il motore si
disattiva.
4. FERMA BRACCIO – questo ferma braccio
dal design speciale fissa il braccio quando è a riposo o quando
non è in uso. Il ferma braccio è stato progettato in modo che
resti sollevato quando sbloccato.
5. LEVETTA DI SOLLEVAMENTO / ABASSAMENTO – Alza e
abbassa il braccio.
per la registrazione del prodotto.
4
3
2
1
IMPORTANTE
Quando si usa il giradischi, assicurarsi
sempre che il tappetino sia posto sul
piatto. Il mancato utilizzo del tappetino
può provocare danni al disco, oltre a
danneggiare il giradischi stesso.
Rimuovere il cappuccio della cartuccia
(copripuntina) prima di utilizzare il
giradischi.
12
5
3
4
17
Page 20

CARATTERISTICHE PANNELLO ANTERIORE
6 7 8 8
3
1
2
1. PORTA USB – Inserire il thumb-drive USB (unicamente
FAT16 o FAT32) a questo ingresso.
Nota bene: Il PROFILE FLASH non
USB.
2. SLOT SCHEDA SD – Inserire la scheda SD in questo
slot fino a udire un clic. Per espellerla, premerla una
volta fino a udire un clic, quindi rimuoverla dallo slot.
3. TASTO 33 / 45 GIRI – questo tasto controlla il numero
di giri al minuto del piatto del giradischi.
4. TASTO STOP – questo tasto ferma il motore del
giradischi.
5. DISPLAY – Mostra informazioni pertinenti all’uso
dell’apparecchio.
6. PLAY / PAUSE – Premere questo tasto per la riproduzione. Durante la riproduzione, premere nuovamente per
mettere in pausa. In pausa, premere il tasto ancora una volta per riprendere la riproduzione.
7. STOP ()
8. SKIP / – Salta alla traccia precedente o successiva (rispettivamente). Tenere premuto il tasto per il
9. RECORD – Premere questo tasto per entrare in modalità Record. La modalità di registrazione vi permette di
10. CARTELLA SEGUENTE (NEXT FOLDER) – Premere questo tasto per saltare alla cartella successiva
11. MODALITÀ DI RIPRODUZIONE (PLAY) – Premere questo tasto per selezionare come il PROFILE FLASH
12. SPLIT TRACK (SUDDIVIDI TRACCIA) – Al momento di registrare sul dispositivo collegato, si può premere
– Premere questo tasto per interrompere la riproduzione (o la registrazione).
riavvolgimento o per l’avanzamento rapido (rispettivamente) della traccia corrente.
registrare musica dal piatto del giradischi o da dispositivi audio esterni collegati all’ingresso INGRESSO AUDIO
direttamente su un dispositivo USB o SD collegato.
contenuta sul dispositivo collegato e riprodurre il primo MP3 disponibile in tale cartella.
riprodurrà le tue tracce:
a. Repeat (Ripeti): la traccia corrente verrà ripetuta.
b. Repeat All (Ripeti tutte): l’intera collezione di tracce presenti sul dispositivo collegato verrà ripetuta.
c. Repeat Folder (Ripeti cartella): l’intera collezione di tracce presenti nella cartella attuale verrà ripetuta.
d. Random (Riproduzione casuale): l’intera collezione di tracce presenti sul dispositivo collegato verrà
ripetuta in ordine casuale.
questo tasto per creare una nuova traccia. Il nuovo numero di traccia sarà superiore di un’unità a quello
precedente e la traccia verrà salvata nella stessa cartella del dispositivo.
supporta gli hub
5
9
IMPORTANTE
• Il PROFILE FLASH è in grado di
• Quando PROFILE FLASH mostra a display
Y
4
10 11 12
riconoscere un solo dispositivo collegato
(drive USB o scheda SD) alla volta.
le tracce disponibili sul drive USB o sulla
scheda SD collegati, anziché mostrare le
cartelle su vari "livelli di directory" (vale a
dire cartelle nell’ambito di altre cartelle), si
muoverà da una cartella all’altra come se
queste si trovassero tutte sullo stesso
livello. Inoltre, verranno visualizzati a display
solo cartelle contenenti file MP3.
18
Page 21

RIPRODUZIONE DI MP3 DA UN DISPOSITIVO
1. Collegare un dispositivo USB o una scheda SD recante file MP3
rispettivamente allo SLOT USB o allo SLOT per SCHEDE SD. Sullo
schermo LCD apparirà la scritta "USB READ" o "CARD READ", quando è
debitamente collegato e "USB" o "CARD" apparirà a livello dell’angolo
superiore destro.
2. Sullo schermo LCD compare il numero totale di cartelle presenti sul
dispositivo (a sinistra) ed il numero totale di tracce disponibili (a destra).
Servirsi dei tasti SKIP / per passare da una traccia all’altra. Si può
anche premere il tasto NEXT FOLDER (cartella successiva) per saltare alla
prima traccia della cartella successiva. Verrà avviata la riproduzione della
traccia attuale.
3. Lo schermo LCD mostrerà l’icona "PLAY", il numero di traccia e il tempo
trascorso.
• Per passare a un’altra traccia, servirsi dei tasti SKIP / . Sullo
schermo LCD verrà brevemente mostrato il numero della cartella e la
nuova traccia. (Nota bene: premendo NEXT FOLDER viene
immediatamente riprodotta la prima traccia della cartella successiva.)
• Per interrompere momentaneamente la riproduzione, premere il tasto
PLAY / PAUSE. Premere il tasto ancora una volta per riprendere la riproduzione.
• Per interrompere la riproduzione, premere il tasto STOP ().
• Per cambiare la modalità di riproduzione delle tracce da parte di PROFILE FLASH, premere il tasto PLAY MODE:
a. Repeat (Ripeti): la traccia corrente verrà ripetuta.
b. Repeat All (Ripeti tutte): l’intera collezione di tracce presenti sul dispositivo collegato verrà ripetuta.
c. Repeat Folder (Ripeti cartella): l’intera collezione di tracce presenti nella cartella attuale verrà ripetuta.
d. Random (Riproduzione casuale): l’intera collezione di tracce presenti sul dispositivo collegato verrà
4. Per espellere il dispositivo, innanzitutto fermare la traccia corrente premendo il tasto STOP (). Se il dispositivo è una
periferica USB, estrarlo delicatamente dallo slot. Se il dispositivo è una scheda SD, premerlo nello slot fino a udire un
clic, quindi rimuoverlo delicatamente.
REGISTRAZIONE DI MP3 SU UN DISPOSITIVO
1. Collegare un dispositivo USB o una scheda SD rispettivamente allo SLOT
USB o allo SLOT per SCHEDE SD. Sullo schermo LCD apparirà la scritta
"USB READ" o "CARD READ", quando è debitamente collegato e "USB" o
"CARD" apparirà a livello dell’angolo superiore destro.
2. Se il dispositivo già contiene MP3, sullo schermo LCD compare il numero
totale di cartelle presenti sul dispositivo stesso (a sinistra) ed il numero
totale di tracce disponibili (a destra).
3. Scegliere la musica che si desidera registrare da un disco sul PIATTO o da
un dispositivo collegato all'INGRESSO AUDIO.*
4. Premere REC. Sullo schermo LCD comparirà la scritta "LOADING".
Quando l’icona "PLAY / PAUSE" e il tempo lampeggiano sullo schermo
LCD, il PROFILE FLASH è pronto a registrare.
5. Per iniziare a registrare, premere PLAY / PAUSE. Gli elementi presenti
sullo schermo LCD lampeggeranno brevemente e la scritta "REC"
comparirà a indicare che il PROFILE FLASH sta registrando. Lo schermo
LCD mostrerà il numero di traccia e il tempo trascorso.
• Per avviare immediatamente una nuova traccia, senza interrompere il
• Per interrompere la registrazione, premere il tasto STOP (). (Sullo
6. Dopo aver interrotto la registrazione, si possono riprodurre le nuove tracce o
espellere il dispositivo. Per espellere il dispositivo, innanzitutto fermare la
traccia corrente premendo il tasto STOP (). Se il dispositivo è una
periferica USB, estrarlo delicatamente dallo slot. Se il dispositivo è una
scheda SD, premerlo nello slot fino a udire un clic, quindi rimuoverlo
delicatamente.
ripetuta in ordine casuale.
processo di registrazione, premere SPLIT TRACK. La traccia
registrata in quel momento verrà interrotta e inizierà una nuova
registrazione. (Alle tracce suddivise verrà dato un numero di traccia
in sequenza e verranno memorizzate nella stessa cartella.)
schermo LCD comparirà la scritta "USB READ" (lettura USB) o
"CARD READ" (lettura scheda) per mostrare che sta effettuando una
scansione del dispositivo collegato in cerca di nuove tracce.)
* Nota bene: se si registra da un
dispositivo collegato all’INGRESSO
AUDIO sul pannello posteriore, si
raccomanda di monitorare il
misuratore del volume presente
nell’angolo superiore destro dello
schermo LCD mentre si registra e di
regolare il volume del dispositivo di
conseguenza. Assicurarsi che il livello
sia sufficientemente alto da essere
sentito, ma non abbastanza da
produrre "salti" o distorsione (indicati
da una "X" sul misuratore).
19
Page 22

RISOLUZIONE DI PROBLEMI
Fare riferimento ai seguenti casi di risoluzione di problemi nel caso in cui si avessero difficoltà a registrare i vinili.
PROBLEMA CAUSA SOLUZIONE
La puntina non è sul disco. Appoggiare la puntina sul disco.
Non si sente l’audio
mentre registro.
Scarsa qualità sonora.
Il giradischi non è
alimentato.
Le uscite RCA non sono
collegate all’impianto delle
casse.
Il collegamento della
cartuccia non è ben fisso.
Il vinile è sporco o graffiato.
Assicurarsi che il giradischi sia collegato ad una presa
di alimentazione funzionante e che sia acceso.
Assicurarsi di aver collegato le uscite RCA del
giradischi ad un impianto di casse e che questo sia
acceso.
La cartuccia va fissata saldamente al braccio ogni volta
che si utilizza il giradischi.
Provare a spolverare delicatamente con un panno la
superficie del disco prima di riprodurlo.
La mia musica suona in
una tonalità strana.
Sul giradischi è stata
selezionata la velocità
sbagliata.
Assicurarsi di riprodurre i dischi alla velocità per cui
sono stati creati. Scegliere tra le due diverse velocità
premendo 33RPM o 45RPM (33 o 45 giri).
PRIMA DI RESTITUIRE IL PRODOTTO, si prega di contattare ION Audio o il vostro
rivenditore per ottenere assistenza tecnica. Le informazioni di contatto sono reperibili nel
libretto di istruzioni di sicurezza in dotazione con questo prodotto.
20
Page 23

SNELSTARTGIDS
o Controleer of onderstaande onderdelen in de doos zitten.
o LEES DE VEILIGHEIDSINSTRUCTIES VOOR HET PRODUCT GEBRUIKT WORDT
o Bezoek http://www.ionaudio.com
OVERZICHT ACHTERPANEEL
1. NETSNOER – Deze kabel dient in
2. STROOM AAN/UIT SCHAKELAAR
3. RCA AUDIO UITGANGSKABELS – Deze kabels worden in de audio-ingangen van uw stereosysteem
4. AUDIO-INGANG – Sluit een cassettedeck, bandrecorder of andere geluidsbron aan op deze ingang met een
OVERZICHT BOVENPANEEL
1. PLATEAU – Dit plateau dient vóór gebruik
2. 45 TPM ADAPTERHOUDER – Voor de
3. TOONARM – De PROFILE FLASH wordt
4. ARMKLEM – Deze speciaal ontworpen armklem zorgt ervoor
5. HENDEL VOOR OPTILLEN / NEERLATEN – Tilt de toonarm
PROFILE FLASH draaita fel Slipmat
45 TPM adapter Snelstartgids
Veiligheids- en garantie-informatie
voor productregistratie.
een stopcontact te worden gestoken
NADAT alle audio-aansluitingen zijn
gemaakt.
4
– Schakelt de PROFILE FLASH in
of uit.
gestoken. (N.B.: u kunt platen naar uw USB-stick of SD-kaart blijven opnemen, ook wanneer de audiouitgangen van de draaitafel niet aangesloten zijn naar een stereosysteem).
1/8" stereokabel. Elk signaal dat door deze ingang gaat wordt meegenomen in de mix van afspelen of opnemen.
stevig bevestigd te zijn op de draaitafel. De
aandrijfriem voor de motor vindt u op de ring
onder het plateau.
meegeleverde 45 TPM-adapter. Wanneer de
adapter niet gebruikt wordt, kan deze in de
houder worden geplaatst.
geleverd met een direct bruikbare,
voorgebalanceerde TOONARM met patroon.
Deze TOONARM kan met de hand of door
indrukken van HENDEL VOOR
OPTILLEN/NEERLATEN worden opgetild en
neergelaten. Vergeet niet dat de TOONARM
uit de rustpositie (op de ARMKLEM)
genomen dient te worden voordat de motor
van de draaitafel geactiveerd wordt.
Wanneer de TOONARM teruggeplaatst
wordt in rustpositie, wordt de motor van de
draaitafel gedeactiveerd.
dat de toonarm in positie blijft wanneer deze niet wordt gebruikt.
De klem is ontworpen om in opwaartse positie te blijven staan
wanneer ontgrendeld.
op en laat deze neer.
3
2
1
BELANGRIJK
Zorg ervoor dat de slipmat altijd op het
plateau ligt bij gebruik van de
draaitafel. Het niet gebruiken van deze
slipmak kan zowel uw media als de
draaitafel beschadigen.
Verwijder het plastic elementkapje
(naaldbescherming) voor gebruik van
de draaitafel.
12
5
3
4
21
Page 24

OVERZICHT BOVENPANEEL
6 7 8 8
3
1
2
1. USB-SLEUF – Steek USB-stick (alleen FAT16 of FAT32)
in deze ingang.
N.B.: De PROFILE FLASH ondersteunt USB-hubs niet
2. SD CARD SLOT – (sleuf voor SD-kaart) Steek SD-kaart
in deze sleuf. Om de kaart uit te werpen wordt eerst
geduwd tot de klik en daarna uit de sleuf verwijderd.
3. 33 / 45 RPM knoppen – Deze knop regelt het toerental
(RPM) van het plateau van de draaitafel.
4. Stopknop – Deze knop stopt de motor van de draaitafel.
5. DISPLAY – Geeft informatie m.b.t. bediening van de unit.
6. AFSPELEN / PAUZEREN – Druk op deze knop om af te
spelen. Tijdens het afspelen opnieuw op de knop drukken
pauzeert het nummer; in pauzestand opnieuw op de knop
drukken hervat het afspelen.
7. STOP () – Druk op deze knop om het afspelen (of de opname) te stoppen.
8. SKIP / – (overslaan) gaat resp. terug naar vorig of vooruit naar volgend nummer. Druk knop in en houd
deze ingedrukt voor (rep.) snel terug- of vooruitspoelen door het huidige nummer
9. OPNEMEN – Druk op deze knop om te schakelen naar opnamemodus. Opnamemodus stelt u in staat muziek
op te nemen vanaf de draaitafel of externe geluidsapparatuur die aangesloten is op AUDIOINGANG, direct naar
een aangesloten USB- of SD-apparaat.
10. NEXT FOLDER – (volgende map) Druk op deze knop om naar de volgende map op het aangesloten apparaat
te gaan en de eerste MP3 die in deze map beschikbaar is, af te spelen.
11. PLAY MODE – (afspelen) Druk op deze knop om te selecteren hoe PROFILE FLASH uw nummers zal
afspelen:
a. Repeat: (herhalen) Het huidige nummer wordt herhaald.
b. Repeat All: (alles herhalen) De gehele verzameling van nummers op het aangesloten apparaat wordt
herhaald.
c. Repeat Folder: (herhalen map) De verzameling nummers in de huidige map wordt herhaald.
d. Random: (willekeurig) De gehele verzameling van nummers op het aangesloten apparaat wordt in
willekeurige volgorde afgespeeld.
12. SPLIT TRACK – (nummer splitsen) Bij opname naar het aangesloten apparaat kan op deze knop gedrukt
worden om een nieuw nummer te creëren. Het nummer van het nieuwe liedje zal één cijfer hoger zijn dan het
vorige en in dezelfde map op het apparaat worden opgeslagen.
5
9
BELANGRIJK
• PROFILE FLASH kan slechts één
.
aangesloten apparaat tegelijk herkennen
(USB-station of SD-kaart).
• Wanneer PROFILE FLASH, in plaats van
de mappen op verschillende niveaus, de
beschikbare nummers op een
aangesloten USB-station of SD-kaart
weergeeft, zal door de mappen worden
gebladerd of ze zich allemaal op hetzelfde
niveau bevinden. Daarnaast zullen alleen
mappen waarin MP3-bestanden staan,
worden weergegeven.
Y
10 11 12
4
22
Page 25

p
AFSPELEN MP3s VAN EEN APPARAAT
1. Sluit een USB-station of SD-kaart met MP3-bestanden aan op resp. USB SLOT of SD CARD SLOT. Op het LCD-scherm
wordt "USB READ" of "CARD READ" getoond wanneer e.e.a. juist is aangesloten; in de rechterbovenhoek zal "USB" of
"CARD" staan.
2. Het LCD-scherm zal het totaal aantal mappen op het apparaat (links) en
het totaal aantal beschikbare nummers (rechts) laten zien. Gebruik de
knoppen voor SKIP / om door de nummers te bladeren. Er kan ook
op knop NEXT FOLDER worden gedrukt om naar het eerste nummer in de
volgende map te gaan. Het huidige nummer wordt afgespeeld.
3. Het LCD-scherm zal het pictogram voor "PLAY" (afspelen) en de
verstreken tijd weergeven.
• Om naar een ander nummer te gaan worden de knoppen voor SKIP
/ gebruikt. Het LCD-scherm laat kort het nummer van de map
en het nieuwe nummer zien. (N.B.: Met een druk op NEXT
FOLDER wordt direct naar het eerste nummer in de volgende map
gegaan.)
• Om het afspelen te pauzeren wordt kop knop PLAY / PAUSE gedrukt. Druk opnieuw om het afspelen te
hervatten.
• Druk op knop STOP () om het afspelen te stoppen.
• Om de manier waarop PROFILE FLASH de nummers afspeelt, te wijzigen, wordt op knop PLAY MODE gedrukt:
a. Repeat: (herhalen) Het huidige nummer wordt herhaald.
b. Repeat All: (alles herhalen) De gehele verzameling van
nummers op het aangesloten apparaat wordt herhaald.
c. Repeat Folder: (herhalen map) De verzameling nummers
in de huidige map wordt herhaald.
d. Random: (willekeurig) De gehele verzameling van
nummers op het aangesloten apparaat wordt in
4. Om het apparaat uit te werpen moet eerst het nummer dat nu wordt afgespeeld, gestopt worden met een druk op knop
STOP () Als het een USB-apparaat betreft, trek dit dan voorzichtig uit de sleuf. Als het een SD-kaart is, druk deze dan
in de sleuf tot er een klik klinkt, en verwijder het apparaat hierna voorzichtig.
willekeurige volgorde afgespeeld.
OPNEMEN VAN MP3s NAAR EEN APPARAAT
1. Sluit een USB-station of SD-kaart aan op resp. USB SLOT of SD CARD
SLOT. Op het LCD-scherm wordt "USB READ" of "CARD READ" getoond
wanneer e.e.a. juist is aangesloten; in de rechterbovenhoek zal "USB" of
"CARD" staan.
2. Als het apparaat al MP3's bevat, zal het LCD-scherm het totaal aantal
mappen op het apparaat (links) en het totaal aantal beschikbare nummers
(rechts) laten zien.
3. Zoek de muziek op die u vanaf een plaat wilt opnemen op de DRAAITAFEL
of een apparaat dat is aangesloten op de AUDIO-INGANG.*
4. Druk op REC. Het LCD-scherm geeft "LOADING" (laden) weer. Wanneer
pictogram "PLAY/PAUSE" en tijdsweergave op de PROFILE FLASH
knipperen, is het apparaat klaar voor opname.
5. Om te beginnen met opnemen wordt op PLAY / PAUSE gedrukt. Items op
het LCD-scherm zullen kort knipperen en er wordt "REC" getoond om aan
te geven dat de PROFILE FLASH aan het opnemen is. Het LCD-scherm
zal het nummer van het liedje en de verstreken tijd weergeven.
• Om direct met een nieuw nummer te beginnen, zonder met het
opnameproces te stoppen, wordt op SPLIT TRACK gedrukt. Het
nummer dat nu wordt opgenomen, zal stoppen, en een nieuwe
opname begint. (Nummers die gesplitst zijn, krijgen opeenvolgende
cijfers en worden in dezelfde map opgeslagen.)
• Druk op knop STOP () om het opnemen te stoppen. (Het LCD-
scherm laat "USB READ" of "CARD READ" zien om te zien dat het
aangesloten apparaat opnieuw wordt gescand voor nieuwe
6. Nadat gestopt is met opnemen kunnen de nieuwe nummers worden
nummers.)
afgespeeld of kan het apparaat worden uitgeworpen. Om het apparaat uit
te werpen moet eerst het nummer dat nu wordt afgespeeld, gestopt worden
met een druk op knop STOP () Als het een USB-apparaat betreft, trek dit
dan voorzichtig uit de sleuf. Als het een SD-kaart is, druk deze dan in de
sleuf tot er een klik klinkt, en verwijder het apparaat hierna voorzichtig.
* N.B.: Bij opnemen vanaf een
apparaat dat is aangesloten op de
AUDIO-INGANG op het achterpaneel,
wordt aanbevolen de volumemeter in
de rechter bovenhoek van het LCDscherm in de gaten te houden tijdens
opnemen en het volume van het
betreffende apparaat overeenkomstig
aan te passen. Zorg ervoor dat het
niveau hoog genoeg is om gehoord te
worden, maar niet hoog genoeg om
"tikken" of vervorming (aangegeven
door een "X" op de meter) te
roduceren.
23
Page 26

PROBLEEMOPLOSSING
Raadpleeg de volgende probleemoplossingen wanneer u moeilijkheden ondervindt bij het opnemen van uw platen.
PROBLEEM OORZAAK OPLOSSING
Naald staat niet op de
plaat.
Ik hoor geen geluid
wanneer ik aan het
opnemen ben.
De geluidskwaliteit is
slecht.
Mijn muziek speelt af op
een vreemde
toonhoogte
Draaitafel heeft geen
stroom.
RCA-uitgangen niet
aangesloten op speakersysteem.
Aansluiting van het
element is niet in orde.
Vinyl plaat is vuil of
beschadigd.
Onjuiste snelheid
geselecteerd op de
draaitafel.
Plaats de naald op de plaat.
Zorg ervoor dat de draaitafel aangesloten is op een
actief stopcontact en dat deze is ingeschakeld.
Zorg ervoor dat de RCA-uitgangen van de draaitafel
aangesloten zijn op een speakersysteem en dat het
speakersysteem is ingeschakeld.
Element dient stevig bevestigd te zijn aan de toonarm
wanneer de draaitafel in gebruik is.
Stof de plaat af en veeg het oppervlak voorzichtig
schoon voordat de plaat afgespeeld wordt.
Zorg ervoor dat u uw platen op dezelfde snelheid
afspeelt als die waarvoor deze bedoeld zijn. Selecteer
één van de twee snelheden door te drukken op 33RPM
of 45RPM.
Voor technische ondersteuning wordt u verzocht VÓÓR RETOURNERING VAN HET
PRODUCT contact te zoeken met ION Audio of uw verkooppunt. Contactinformatie vindt
u in de Veiligheidsinstructies die bij het product geleverd worden.
24
Page 27

Tel: (U.S.) 401.658.3743
E-mail: support@ion-audio.com
MANUAL VERSION 1.0
ION Audio, LLC
Page 28

www.ionaudio.com
 Loading...