

Page 1

Party Starter
User Guide
English ( 2 – 5 )
Guía del usuario
Guide d'utilisation
Benutzerhandbuch
Gebruikershandleiding
Snabbstartsguide
Español ( 6 – 9 )
Français ( 10 – 13 )
Guida per l'uso
Italiano ( 14 – 17 )
Deutsch ( 18 – 21 )
Nederlands ( 22 – 25 )
Svenska ( 26 – 29 )
Pikakäyttöopas
Suomi ( 30 – 33 )
Appendix
English ( 34 )
Page 2

User Guide
Introduction
Box Contents
• Party Starter
• USB Charging Cable
• Quickstart Guide
• Safety & Warranty Manual
Support
For the latest information about this product (system requirements, compatibility
information, etc.) and product registration, visit ionaudio.com/partystarter.
For additional product support, visit ionaudio.com/support.
For safety and warranty information, see ionaudio.com/warranty.
WARNING: DO NOT splash or immerse in water or other liquids.
Not for use in rain. Use only in dry locations.
WARNING: DO NOT look directly into the dome light.
2
Page 3
Quick Setup
For optimal performance, place Party
Starter in a location that is unobstructed
by walls, furniture, etc.
*WARNING: Do not look directly into the
dome light. Do not apply pressure on the
dome light.
1. Turn up the Volume dial to power
Party Starter on.
2. Open Bluetooth settings on your music device (smartphone, tablet, etc.).
3. In Bluetooth settings, find and connect to ION Speaker.
4. Play music and adjust Party Starter's Volume dial. For best results, use it in a
dark room!
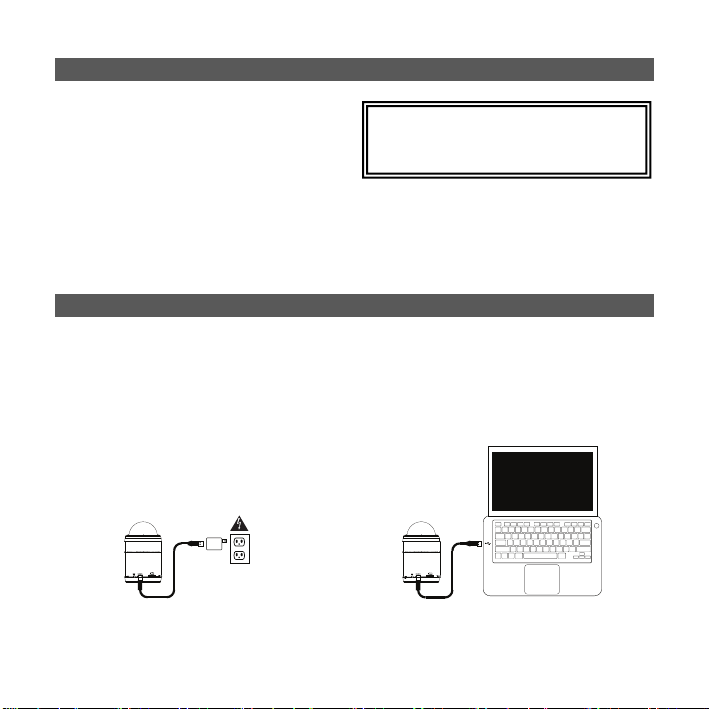
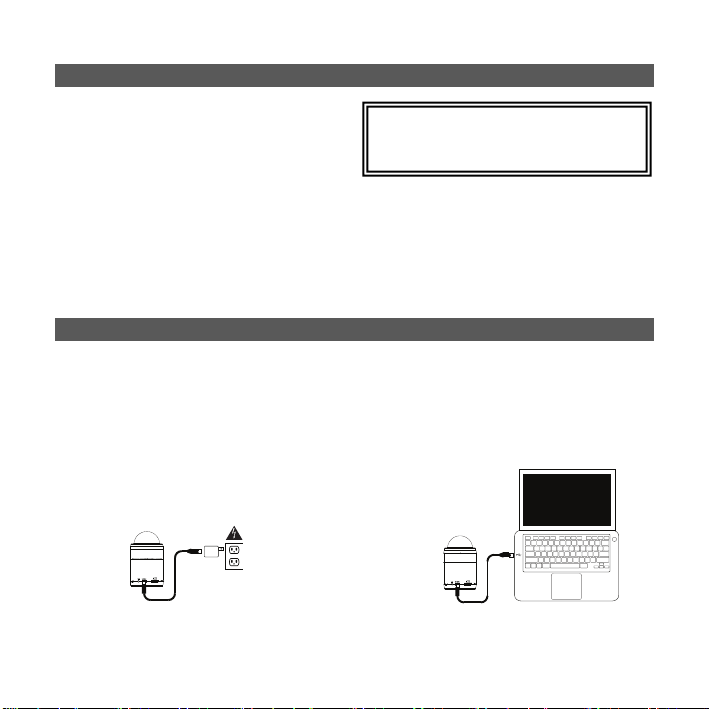
Charging Party Starter
If the party lights or LEDs appear dim, or if your music cuts out or fails to play, your
battery may require recharging.
Use the included mini-USB cable to connect Party Starter to (A) a USB power
adapter connected to a power outlet or (B) your computer (powered on) for 3
hours.
(A)
(B)
3
Page 4
Features
(
)
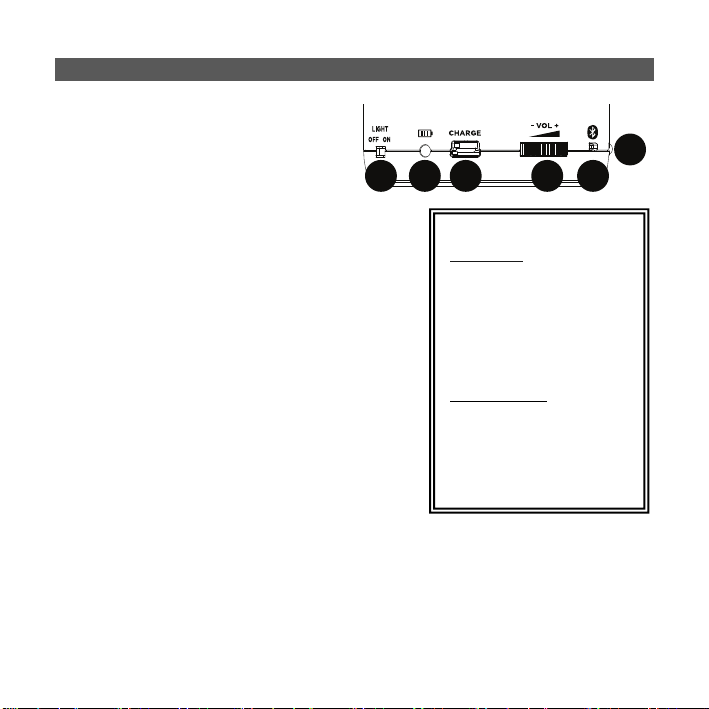
1. Volume / Power – Turn this dial to
the right to power on Party Starter
and also adjust the level of the
speaker volume.
2. Bluetooth Pairing Light – The
Paired LED will be lit when a
device is paired to Party Starter.
3. Bluetooth
to disconnect a paired Bluetooth device and
pair with another Bluetooth device.
4. Party Light Switch – Adjust this switch to
turn the lights on/off.
5. Power / Battery Light – Indicates whether
Party Starter is powered on and shows the
state of the battery. If the party lights or
LEDs appear dim, or if your music cuts out
or fails to play, your battery may require
recharging. See the Party Starter LED
activity box for more information on the
LED states.
6. Mini-USB Charging Port – Connect the
included mini-USB cable to connect Party
Starter to a USB power adapter connected to a power outlet or to your
computer.
Reset Button – Press this button
45
6
Party Starter LED activity:
Power LED
Green LED = Party Starter
is powered on
Orange LED = Battery is
charging with the power on
Red LED = Battery is
charging with the power off
Bluetooth LED
Solid Blue LED = Paired to
a Bluetooth device
No LED = Party Starter is
unpaired/in pairing mode
but powered on
1
2
3
4
Page 5

Connecting with a Bluetooth Device
1. Turn on your Bluetooth device.
2. Power on Party Starter and it will automatically go into pairing mode to search
for Bluetooth devices.
3. If your Bluetooth device is not able to pair to Party Starter, press the ‘reset’
button on Party Starter to break the previous Bluetooth connection and reset
the Bluetooth module.
4. Navigate to your Bluetooth device’s setup screen, find “ION Speaker” and
connect.
Note: If your Bluetooth device prompts for a pairing code, enter ‘0000’.
5. The Paired LED will light up solid when it is 'paired'.
Note: If you experience trouble pairing or playing music, update your device's
OS.
6. To disconnect a paired Bluetooth device, press the ‘reset’ button on Party
Starter.
7. To connect to another Bluetooth device, repeat steps 3-4.
Troubleshooting
If the sound is distorted: Try lowering the volume control of your sound source.
Also, try to reduce the overall volume of Party Starter.
If there is too much bass: Try adjusting the tone or EQ control on your sound
source to lower the bass level. This will allow you to play the music louder before
clipping (distortion) occurs.
5
Page 6

Guía del usuario
Introducción
Contenido de la caja
• Party Starter
• Cable de carga USB
• Guía de inicio rápido
• Manual sobre la seguridad y garantía
Soporte
Para obtener la información más reciente acerca de este producto (requisitos de
sistema, información de compatibilidad, etc.) y registrarlo, visite
ionaudio.com/partystarter.
Para soporte adicional del producto, visite ionaudio.com/support.
Para información sobre la seguridad y la garantía, consulte
ionaudio.com/warranty.
ADVERTENCIA: NO salpique ni sumerja el producto en agua u otros líquidos.
No lo use bajo la lluvia. Úselo sólo en lugares secos.
ADVERTENCIA: NO mire directamente a la luz cenital.
6
Page 7
Instalación rápida
Para lograr un funcionamiento óptimo,
coloque el Party Starter en un lugar en
el que no tenga obstrucciones de
*ADVERTENCIA: No mire directamente ni
aplique presión sobre la luz cenital.
paredes, mobiliario, etc.
1. Gire a la derecha el control de volumen para encender el Party Starter.
2. Abra la configuración de Bluetooth en su dispositivo musical (teléfono
inteligente, tableta, etc.).
3. En la configuración de Bluetooth, busque y conecte a ION Speaker.
4. Reproduzca la música y ajuste el control de volumen del Party Starter. ¡Para
obtener los mejores resultados, úselo en un ambiente oscuro!
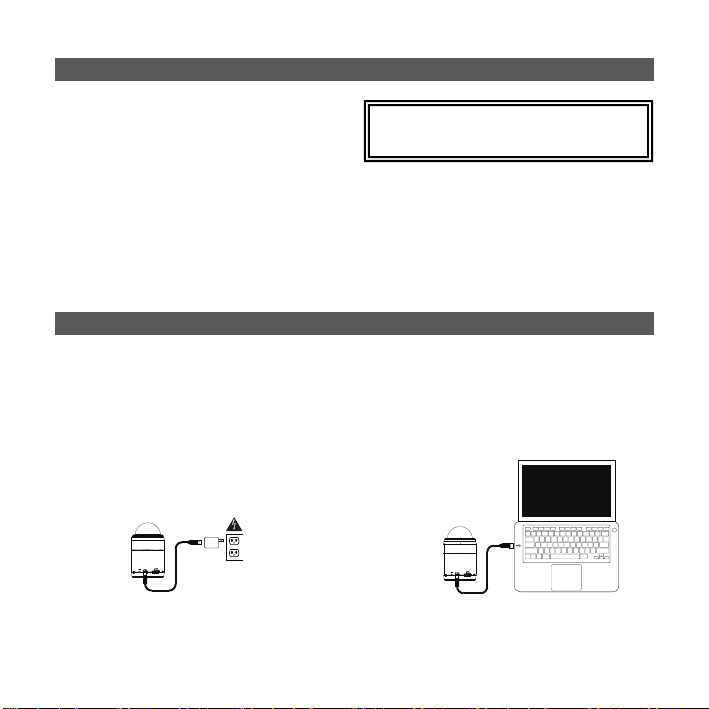
Cómo cargar el Party Starter
Si las luces festivas o los LED se atenúan, o si la música se corta o no se
reproduce, podría ser necesario recargar la batería.
Use el cable mini-USB incluido para conectar el Party Starter a (A) un adaptador de
alimentación USB conectado a una toma de corriente o (B) su ordenador
(encendido) durante 3 horas.
(A)
(B)
7
Page 8
Características
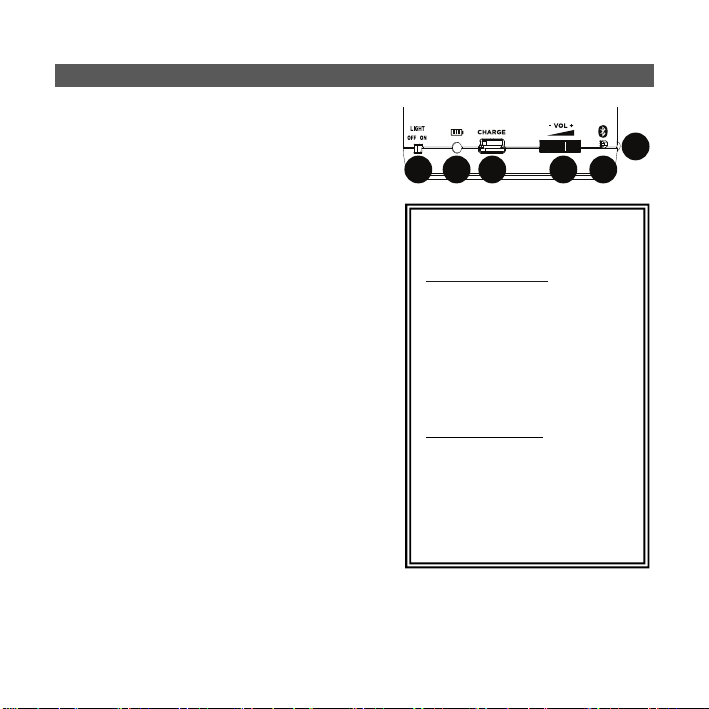
1. Volumen / Encendido – Gire este
control a la derecha para encender el
Party Starter y ajustar también el nivel
de volumen del altavoz.
2. Luz de conexión Bluetooth – El LED
Paired se enciende cuando hay un
dispositivo conectado al Party Starter.
3. Botón de reinicio
este botón para desconectar un
dispositivo Bluetooth conectado y
conectar otro dispositivo Bluetooth.
4. Interruptor de luces festivas – Ajuste
este interruptor para encender y apagar
las luces.
5. Luz de encendido / batería – Indica si
el Party Starter está encendido y
muestra el estado de la batería. Si las
luces festivas o los LED se atenúan, o si
la música se corta o no se reproduce,
podría ser necesario recargar la batería.
Para más información sobre los estados
de los LED, consulte el cuadro
Actividad de los LED del Party Starter.
6. Puerto de carga mini-USB – Conecte el
cable mini-USB incluido para conectar el
Party Starter a un adaptador de
alimentación USB conectado a su vez a
una toma de corriente o a su ordenador.
de Bluetooth – Pulse
45
6
Actividad de los LED del Party
Starter:
LED de encendido
LED verde = El Party Starter
está encendido
LED ámbar = Se está cargando
la batería con el equipo
encendido
LED rojo = Se está cargando la
batería con el equipo apagado
LED de Bluetooth
LED con luz azul permanente
= Conectado a un dispositivo
Bluetooth
LED apagado = El Party Starter
esta desconectado o en modo
de conexión (pero encendido)
1
3
2
8
Page 9

Conexión con un dispositivo Bluetooth
1. Encienda su dispositivo Bluetooth.
2. Encienda el Party Starter, que pasará automáticamente al modo de conexión
para buscar dispositivos Bluetooth.
3. Si su dispositivo Bluetooth no puede conectarse con el Party Starter, pulse el
botón "reset" (reinicio) del Party Starter para cancelar la conexión Bluetooth
anterior y reiniciar el módulo Bluetooth.
4. Navegue a la pantalla de configuración de su dispositivo Bluetooth, busque
“ION Speaker” y conecte.
Nota: Si su dispositivo Bluetooth solicita un código de conexión, introduzca
‘0000’.
5. Cuando está "conectado", se enciende el LED Paired con luz permanente.
Nota: Si tiene problemas para conectar su dispositivo o reproducir música,
actualice el sistema operativo de su dispositivo.
6. Para desconectar un dispositivo Bluetooth conectado, pulse el botón "reset"
del Party Starter.
7. Para conectarse a otro dispositivo Bluetooth, repita los pasos 3 y 4.
Solución de problemas
Si el sonido está distorsionado: trate de disminuir el volumen de su fuente de
sonido. Pruebe también reduciendo el volumen general del Party Starter.
Si los graves son demasiado fuertes: intente ajustar el control de tono o
ecualización de su fuente de sonido para reducir el nivel de graves. De esta forma
podrá reproducir la música con más volumen antes de que se produzca el recorte
(distorsión).
9
Page 10

Guide d’utilisation
Présentation
Contenu de la boîte
• Party Starter
• Câble de rechargement USB
• Guide d’utilisation simplifié
• Consignes de sécurité et informations concernant la garantie
Assistance technique
Pour les toutes dernières informations concernant la configuration système requise,
la compatibilité et l’enregistrement du produit, veuillez visiter
ionaudio.com/partystarter.
Pour de l’assistance supplémentaire, veuillez visiter le site ionaudio.com/support.
Pour des consignes de sécurité et des informations concernant la garantie : veuillez
visiter ionaudio.com/warranty.
MISE EN GARDE : NE PAS exposer l’appareil aux éclaboussures ou l’immerger
dans de l’eau ou autres liquides. Ne pas utiliser sous la pluie. Utiliser seulement
dans des endroits secs.
MISE EN GARDE : NE PAS regarder directement la lumière du dôme.
10
Page 11
Installation
Pour une performance optimale, placez
le Party Starter dans un endroit où il n’y
a aucune obstruction créée par des
murs, des meubles, etc.
1. Tournez la molette du volume pour mettre le Party Starter sous tension.
2. Accédez aux paramètres Bluetooth de votre lecteur de musique (smartphone,
tablette, etc.).
3. Dans les paramètres Bluetooth, trouvez ION Speaker et activez la connexion.
4. Écoutez de la musique et réglez la molette du volume du Party Starter. Pour
de meilleurs résultats, utilisez-le dans une pièce sombre.
Rechargement de la batterie du Party Starter :
Si le jeu de lumière ou les DEL apparaissent faibles, ou si la musique coupe ou ne
joue pas, il peut être nécessaire de recharger la batterie.
Utilisez le câble mini-USB inclus afin de brancher le Party Starter à (A) un
adaptateur d’alimentation USB branché à une prise secteur, ou (B) à un ordinateur
(sous tension) pendant 3 heures.
(A)
*MISE EN GARDE: NE PAS regarder
directement la lumière du dôme. Ne pas
exercer de pression sur le dôme.
(B)
11
Page 12

Caractéristiques
1. Volume/Interrupteur d’alimentation
– Tournez cette molette vers la droite
afin de mettre le Party Starter sous
tension et pour ajuster le niveau du
volume du haut-parleur.
2. Indicateur de jumelage Bluetooth –
Lorsqu'un appareil est jumelé au Party
Starter, la DEL de jumelage s’allume.
3. Touche de réinitialisation
Bluetooth – Cette touche permet de
supprimer la connexion à un appareil
Bluetooth afin de jumeler un autre
appareil Bluetooth.
4. Interrupteur d'éclairage – Cet
interrupteur permet d’allumer/éteindre
le jeu de lumière.
5. Indicateur d’alimentation/de charge –
Cet indicateur indique si le Party Starter
est sous tension et indique l'état de la
batterie. Si le jeu de lumière ou les DEL
apparaissent faibles, ou si la musique
coupe ou ne joue pas, il peut être
nécessaire de recharger la batterie.
Veuillez consulter l’encadré Légende
des indicateurs DEL pour plus de
détails sur les DEL.
6. Port de rechargement mini-USB – Utilisez le câble mini-USB inclus afin de
brancher le Party Starter à un adaptateur d’alimentation USB branché à une prise
secteur ou à un ordinateur.
45
Légende des indicateurs DEL :
Indicateur d'alimentation DEL
DEL verte = Party Starter sous
tension
DEL orange = rechargement de la
batterie et appareil sous tension
DEL rouge = rechargement de la
batterie et appareil hors tension
DEL Bluetooth
DEL de jumelage est bleue
foncée = jumelé à un appareil
Bluetooth
DEL éteinte = Party Starter n’est
pas jumelé (mais est sous tension)
6
1
12
2
3
Page 13

Jumelage d’un appareil Bluetooth
1. Mettez votre appareil Bluetooth sous tension.
2. Mettez le Party Starter sous tension et il passera automatiquement en mode
jumelage afin de rechercher les appareils Bluetooth.
3. Si votre appareil Bluetooth ne parvient pas à se jumeler au Party Starter,
appuyez sur la touche de réinitialisation Bluetooth du party Starter afin de
supprimer la connexion à d'autres appareils Bluetooth et remettre à zéro le
module Bluetooth.
4. Accédez à l'écran de configuration de votre appareil Bluetooth, recherchez
« ION Speaker » et lancez le jumelage.
Remarque : Si votre appareil Bluetooth vous demande de saisir un code de
jumelage, entrez « 0000 ».
5. L’indicateur de jumelage s’allume lorsqu’il est « jumelé ».
Remarque : Si vous éprouvez de la difficulté à jumeler votre appareil ou à
écouter de la musique, faites une mise à jour du système d'exploitation de
votre appareil.
6. Pour déjumeler un appareil Bluetooth, appuyez sur la touche de réinitialisation
Bluetooth du Party Starter.
7. Pour jumeler un autre appareil Bluetooth, répétez les étapes 3 et 4.
Guide de dépannage
Lorsqu’il y a de la distorsion : Essayez de diminuer le volume de votre appareil.
Essayez également d'abaisser le volume du Party Starter.
Lorsqu’il y a trop de basses fréquences : Essayez de régler le niveau de tonalité
et d’égalisation sur l’appareil de source d’entrée audio afin de diminuer le niveau
des basses fréquences. Cela vous permettra d'augmenter le volume de la musique
avant que l'écrêtage se produise.
13
Page 14

Guida per l'uso
Introduzione
Contenuti della confezione
• Party Starter
• Cavo di ricarica USB
• Guida rapida
• Istruzioni di sicurezza e garanzia
Assistenza
Per le ultime informazioni in merito a questo prodotto (requisiti di sistema,
informazioni sulla compatibilità, ecc.) recarsi alla pagina
ionaudio.com/partystarter.
Per ulteriore assistenza sul prodotto, recarsi alla pagina ionaudio.com/support.
Istruzioni di sicurezza e garanzia si veda la pagina ionaudio.com/warranty.
AVVERTENZA: NON schizzare il prodotto, né immergerlo in acqua o altri liquidi.
Non va utilizzato sotto la pioggia. Utilizzare il prodotto unicamente in luoghi asciutti.
AVVERTENZA: NON guardare direttamente la lampada a cupola.
14
Page 15

Configurazione rapida
Per ottenere le migliori prestazioni,
utilizzare il Party Starter in un luogo
che non sia bloccato da pareti,
mobili, ecc.
1. Alzare la manopola del Volume per accendere il Party Starter.
2. Aprire le impostazioni Bluetooth del proprio dispositivo musicale (smartphone,
tablet, ecc.).
3. Sotto impostazioni Bluetooth, trovare e collegare ION Speaker.
4. Riprodurre la musica e regolare la manopola del Volume del Party Starter. Per
ottenere i migliori risultati, utilizzare il prodotto in una stanza buia!
Ricarica del Party Starter
Se le luci o i LED appaiono offuscate o la musica salta o non suona, la batteria
deve essere ricaricata.
Servirsi del cavo mini-USB in dotazione per collegare il Party Starter a (A) un
adattatore di alimentazione USB collegato a una presa elettrica o (B) al computer
(acceso) per 3 ore.
(A)
*AVVERTENZA: non guardare direttamente la
lampada a cupola. Non applicare pressione
sulla lampada a cupola.
(B)
15
Page 16

Caratteristiche
1. Volume / Alimentazione –
Girare questa manopola verso
destra per accendere il Party
Starter e per regolare il volume
dell'altoparlante.
2. Spia di accoppiamento
Bluetooth – Il LED "Paired" sarà acceso
quando un dispositivo è collegato al Party
Starter.
3. Tasto reset Bluetooth
tasto per scollegare un dispositivo
Bluetooth collegato e collegarlo a un altro
dispositivo Bluetooth.
4. Interruttore Party Light – Regolare
questo interruttore per
accendere/spegnere le luci.
5. Spia alimentazione / batteria – Indica se
il Party Starter è acceso o meno e mostra
lo stato della batteria. Se le luci o i LED
appaiono offuscate o la musica salta o
non suona, la batteria deve essere
ricaricata. Si veda la casella Attività dei
LED del Party Starter per maggiori
informazioni sullo stato dei LED.
6. Porta di ricarica mini-USB – Collegare il
cavo mini-USB in dotazione per collegare
il Party Starter ad un adattatore di alimentazione USB collegato ad una presa
elettrica o al computer.
– Premere questo
45
6
Attività dei LED del Party
Starter:
LED di alimentazione
LED verde = il Party Starter è
acceso
LED arancione = la batteria è
in ricarica con l'alimentazione
accesa
LED rosso = la batteria è in
ricarica con l'alimentazione
spenta
LED Bluetooth
LED Blu fisso = collegato a un
dispositivo Bluetooth
Nessun LED = il Party Starter
è scollegato/in modalità di
collegamento (ma acceso)
1
2
3
16
Page 17

Collegamento a un dispositivo Bluetooth
1. Accendere il dispositivo Bluetooth.
2. Accendere il Party Starter: entrerà automaticamente in modalità di
accoppiamento per cercare dispositivi Bluetooth.
3. Se il dispositivo Bluetooth non è in grado di collegarsi al Party Starter,
premere il tasto reset a livello del Party Starter per interrompere precedenti
collegamenti Bluetooth e azzerare il modulo Bluetooth.
4. Navigare nella schermata di configurazione del dispositivo Bluetooth, trovare
“ION Speaker” e collegarlo.
Nota bene: Se il dispositivo Bluetooth richiede un codice, digitare ‘0000’.
5. Il LED
6. Per scollegare un dispositivo Bluetooth accoppiato, tenere premuto il tasto di
7. Per collegarlo ad un altro dispositivo Bluetooth, ripetere i passaggi 3-4.
Risoluzione di problemi
Il suono è distorto: provare ad abbassare il volume a livello della fonte audio.
Inoltre, provare a ridurre il volume complessivo del Party Starter.
Eccessivi bassi: provare a regolare la tonalità o il comando EQ a livello della fonte
audio per abbassare il livello dei bassi. Ciò permetterà di suonare la musica più
forte prima che salti (che si verifichi distorsione).
Paired rimarrà illuminato quando è "accoppiato".
Nota bene: in caso di problemi nell'accoppiare gli apparecchi o nel riprodurre
la musica, aggiornare il sistema operativo del dispositivo.
reset del Party Starter.
17
Page 18

Benutzerhandbuch
Einführung
Lieferumfang
• Party Starter
• USB-Ladekabel
• Schnellstart-Anleitung
• Sicherheitshinweise und Garantieinformationen
Kundendienst
Für die neuesten Informationen zu diesem Produkt (Systemanforderungen,
Informationen zur Kompatibilität etc.) und zur Produktregistrierung besuchen Sie
bitte ionaudio.com/partystarter.
Für zusätzlichen Produkt-Support besuchen sie ionaudio.com/support.
Für Sicherheits- und Garantieinformationen besuchen sie ionaudio.com/warranty.
ACHTUNG: VERMEIDEN Sie es, das Gerät mit Wasser oder anderen Flüssigkeiten
zu bespritzen und tauchen Sie das Gerät niemals in eine Flüssigkeit.
Verwenden Sie das Gerät nicht bei Regen. Verwenden Sie es nur in trockenen
Räumen.
WARNUNG: Blicken Sie NICHT direkt in das Licht der Kuppel.
18
Page 19

Schnelles Einrichten
Für eine optimale Leistung platzieren Sie
den Party Starter an einer Stelle, die nicht
durch Wände, Möbel etc. blockiert ist.
1. Betätigen Sie den Lautstärkeregler,
um den Party Starter einzuschalten.
2. Öffnen Sie die Bluetooth-Einstellungen auf Ihrem Musikgerät (Smartphone, Tablet,
etc.).
3. In den Bluetooth-Einstellungen navigieren Sie zu ION Speaker und stellen eine
Verbindung her.
4. Spielen Sie Ihre Musik und stellen den Lautstärkeregler am Party Starter nach
Wunsch ein. Verwenden Sie den Party Starter am besten in einem dunklen Raum!
Aufladen des Party Starter
Wenn die Party-Lichter oder LEDs schwach erscheinen oder die Musikwiedergabe
ausfällt oder überhaupt nicht mehr funktioniert, muss wahrscheinlich der Akku
aufgeladen werden.
Verwenden Sie das mitgelieferte Mini-USB-Kabel, um den Party Starter (A) mit einem
USB-Netzteil, das in einer Steckdose eingesteckt ist oder (B) mit Ihrem (eingeschalteten)
Computer für einen Zeitraum von 3 Stunden zu verbinden.
(A)
*WARNUNG: Blicken Sie nicht direkt in
das Licht der Kuppel. Vermeiden Sie
es, Druck auf die Kuppel auszuüben.
(B)
19
Page 20

Funktionen
1. Lautstärke / Power - Drehen Sie den
Regler nach rechts, um den Party
Starter einzuschalten und gleichzeitig
den Lautsprecherpegel einzustellen.
2. Leuchtanzeige für die Bluetooth-
Verbindung - Die Koppel-LED leuchtet,
wenn ein Gerät mit dem Party Starter
gekoppelt wird.
3. Zurücksetzen der
Drücken Sie diese Taste, um ein gekoppeltes
Bluetooth-Gerät zu trennen und eine
Verbindung mit einem anderen BluetoothGerät herzustellen.
4. Party-Lichtschalter - Betätigen Sie diesen
Schalter, um das Licht ein-/auszuschalten.
5. Power/Akkuleuchte - Zeigt an, ob der Party
Starter eingeschaltet ist und zeigt den
Akkuladestand. Wenn die Party-Lichter oder
LEDs schwach erscheinen oder die
Musikwiedergabe ausfällt oder überhaupt
nicht mehr funktioniert, muss wahrscheinlich
der Akku aufgeladen werden. Siehe Feld
LED-Aktivität des Party Starter für weitere
Informationen über die LED-Anzeige.
6. Mini-USB-Ladeanschluss - Stecken Sie hier
das mitgelieferte Mini-USB-Kabel ein, um den
Party Starter mit Ihrem Computer zu
verbinden oder mit einem USB-Netzteil zu
verbinden, das in eine Steckdose gesteckt wird.
Bluetooth-Verbindung -
45
6
LED-Aktivität des Party Starter:
Power-LED
Grüne LED = Party Starter ist
eingeschaltet
Orangefarbene LED = Gerät ist
eingeschaltet, Akku wird
aufgeladen
Rote LED = Gerät ist
ausgeschaltet, Akku wird
aufgeladen
Bluetooth-LED
Durchgehend blau leuchtende
LED = Das Gerät ist mit einem
Bluetooth-Gerät gekoppelt.
Keine LED = Party Starter ist
nicht gekoppelt/im Koppel-Modus
(aber eingeschaltet)
1
2
3
20
Page 21

Verbindung mit einem Bluetooth-Gerät
1. Schalten Sie Ihr Bluetooth-Gerät ein.
2. Wenn Sie den Party Starter einschalten, wechselt das Gerät automatisch in den Koppel-Modus,
um nach Bluetooth-Geräten zu suchen.
3. Wenn Ihr Bluetooth-Gerät nicht mit dem Party Starter gekoppelt werden kann, drücken Sie am
Party Starter die Taste "Zurücksetzen", um alte Bluetooth-Verbindungen zu trennen und das
Bluetooth-Modul zurückzusetzen.
4. Navigieren Sie zum Setup-Bildschirm Ihres Bluetooth-Geräts, suchen Sie "ION Speaker" und
verbinden Sie die Geräte.
Hinweis: Wenn Ihr Bluetooth-Gerät die Eingabe eines Koppel-Codes anfordert, geben Sie '0000'
ein.
5. Die Koppel-LED leuchtet dauerhaft, wenn die Geräte "gekoppelt" sind.
Hinweis: Wenn Sie Probleme bei der Musikwiedergabe oder beim Koppeln Ihres Gerätes
haben, aktualisieren Sie das OS Ihres Gerätes.
6. Um ein gekoppeltes Bluetooth-Gerät zu trennen, drücken Sie am Party Starter die Taste
"Zurücksetzen".
7. Um ein anderes Bluetooth-Gerät zu verbinden, wiederholen Sie die Schritte 3-4.
Fehlerbehebung
Der Ton klingt verzerrt: Reduzieren Sie die Lautstärke Ihrer Tonquelle oder Ihres Musikinstruments.
Versuchen Sie auch, das Gesamtvolumen des Party Starters zu reduzieren.
Zu viel Bass: Versuchen Sie den Ton oder den EQ-Regler Ihrer Tonquelle anzupassen, um den Bass
zu verringern. Dies ermöglicht Ihnen, die Musik lauter abzuspielen, bevor der Klang verzerrt.
Allgemeinhinweis zur Konformitätserklärung: Hiermit erklären wir, daß sich das Gerät
Party Starter in Übereinstimmung mit den grundlegenden Anforderungen der
europäischen Richtlinie 1999/5/EG befindet. Die vollständige EG Konformitätserklärung
kann unter folgender Adresse angefordert werden:
inMusic GmbH
Halskestrasse 16-18
D – 47877 Willich
GERMANY
21
Page 22

Gebruikershandleiding
Inleiding
Inhoud van de doos
• Party Starter
• USB-oplaadkabel
• Snelstartgids
• Veiligheidsvoorschriften en handleiding
Ondersteuning
Voor de laatste informatie over dit product (systeemvereisten, informatie over
compatibiliteit, enz.) en productregistratie, bezoek ionaudio.com/partystarter.
Bezoek voor bijkomende productondersteuning ionaudio.com/support.
Voor informatie over veiligheid en garantie, zie ionaudio.com/warranty.
OPGELET: NIET BESPATTEN of onderdompelen in water of andere vloeistoffen.
Niet gebruiken in de regen. Enkel op droge plekken gebruiken.
OPGELET: KIJK NIET RECHTSTREEKS in het licht van de koepel.
22
Page 23

Snelle opstelling
Plaats voor een optimale werking Party
Starter op een plaats die niet wordt
belemmerd door muren, meubels, enz.
1. Zet de volumeknop op een hogere
stand om Party Starter aan te zetten.
2. Open de Bluetooth-instellingen op uw muziekapparaat (smartphone, tablet,
enz.)
3. Zoek in de Bluetooth-instellingen ION Speaker en maak verbinding.
4. Speel muziek af en pas de volumeknop van Party Starter aan. Voor optimale
resultaten gebruikt u hem het beste in een donkere kamer!
Party Starter opladen
Als de feestverlichting of de LED's een zwak licht lijken te geven of als de muziek
uitvalt of niet wilt afspelen, moet de accu mogelijk worden opgeladen.
Gebruik de meegeleverde mini-USB-kabel om Party Starter gedurende 3 uur te
verbinden met (A) een USB-stroomadapter, aangesloten op een stopcontact, of (B)
uw pc (ingeschakeld).
(A)
*OPGELET: Kijk niet rechtstreeks in het
licht van de koepel. Oefen geen druk uit
op de lichtkoepel.
(B)
23
Page 24

Kenmerken
1. Volume/Stroom: Draai deze
knop naar rechts om Party
Starter in te schakelen en pas
ook ook het luidsprekervolume
aan.
2. Koppelingslampje voor
Bluetooth:
3. Wanneer een toestel aan
Party Starter wordt
gekoppeld, gaat de
Koppelings-LED branden.
4. Resetknop voor Bluetooth
Druk op deze knop om een
gekoppeld Bluetoothapparaat af te koppelen en te
koppelen aan een ander
Bluetooth-apparaat.
5. Schakelaar feestlicht:
Gebruik deze schakelaar om
het licht aan of uit te zetten.
6. Stroom-/acculampje: Geeft
aan of Party Starter aanstaat en toont de accustatus. Als de feestverlichting of
de LED's een zwak licht lijken te geven of als de muziek uitvalt of niet wilt
afspelen, moet de accu mogelijk worden opgeladen. Zie het vak LED-
activiteit van Party Startervoor meer informatie over de LED-status.
7. Oplaadpoort met Mini-USB-ingang: Gebruik de meegeleverde mini-USBkabel om Party Starter te verbinden met een stopcontact, of uw pc.
:
45
LED-activiteit van Party Starter:
Stroom-LED:
Groene LED = Party Starter is ingeschakeld
Oranje LED = De accu is aan het laden en
het toestel is ingeschakeld
Rode LED = De accu is aan het laden en het
toestel is uitgeschakeld
Bluetooth-LED
Brandende Blauwe LED = Gekoppeld aan
een Bluetooth-apparaat.
Geen LED = Party Starter is niet
gekoppeld/bevindt zich in koppelingsmodus
(maar is ingeschakeld)
6
1
2
3
24
Page 25

Een Bluetooth-apparaat koppelen
1. Zet uw Bluetooth-apparaat aan.
2. Bij het aanzetten van Party Starter zet het zich automatisch in koppelmodus
en zoekt het naar Bluetooth-apparaten.
3. Als uw Bluetooth-apparaat zich niet kan koppelen aan Party Starter, druk dan
op de resetknop van Party Starter om de vorige Bluetooth-verbindingen te
verbreken en de Bluetooth-module opnieuw in te stellen.
4. Navigeer naar het instelscherm van uw Bluetooth-apparaat, zoek naar "ION
Speaker" en maak verbinding.
Opmerking: Als uw Bluetooth-apparaat om een koppelingscode verzoekt,
voer dan '0000' in.
5. Na 'koppeling' gaat de Koppelings-LED ononderbroken branden.
Opmerking: Als u problemen ondervindt bij het koppelen van uw apparaat of
het afspelen van muziek, update dan het besturingssysteem van uw apparaat.
6. Om een gekoppeld Bluetooth-apparaat af te koppelen, moet u de resetknop
van Party Starter indrukken.
7. Om het te verbinden met een ander Bluetooth-apparaat, herhaalt u stappen 3-
4.
Problemen oplossen
Het geluid is vervormd: Probeer het volumeniveau van uw geluidsbron te
verlagen. Probeer ook het algemeen volume van Party Starter te verlagen.
Er zijn teveel bassen: Probeer op de toon- of EQ-bedieningsknoppen aan uw
geluidsbron het niveau van de lage tonen te verlagen. Dit stelt u in staat de muziek
luider te zetten vooraleer “afgeknipte” (vervormde) klanken optreden.
25
Page 26

Användarmanual (Svenska)
Inledning
Paketet innehåller
• Party Starter
• USB-laddningskabel
• Snabbstartguide
• Säkerhetsmanual & Underhållsmanual
Support
För senaste information om denna produkt (systemkrav, information om
kompabiliteten, osv.) och produktregistrering, besök ionaudio.com/partystarter.
För ytterligare produktsupport, besök ionaudio.com/support.
För säkerhets-och underhållsinformation, se ionaudio.com/warranty.
VARNING: Stänk INTE ned eller doppa INTE i vatten eller andra vätskor.
Använd inte vid regn. Använd endast på torra platser.
VARNING: Titta INTE direkt i kupolljuset.
26
Page 27

Snabb installation
För optimal prestanda skall du placera
Party Starter på platser som inte hindras
av väggar, möbler osv.
1. Öka volymratten för att sätta på Party Starter.
2. Öppna inställningarna för Bluetooth på din musikenhet (smartphone,
surfplatta, osv.).
3. I Bluettoth-inställningar, hitta och anslut till ION Speaker.
4. Spela musik och anpassa Party Starters volymratt. För bästa resultat använd
ett mörkt rum!
Hur du laddar Party Starter
Om partyljuset eller LED-lampan lyser svagt eller om musiken hänger sig eller inte
spelar, måste du kanske ladda batteriet.
Använd den medföljande mini-USB-kabeln för att ansluta Party Starter till (A) en
USB-strömadapter som finns ansluten till ett strömuttag eller (B) din dator (som är
på) i 3 timmar.
(A)
*VARNING: Titta inte direkt i kupolljuset.
Tryck inte direkt på kupolljuset.
(B)
27
Page 28

Funktioner
1. Volymen / Strömbrytare – Vrid
med denna ratt till höger för att
sätta på Party Starter och justera
volymen på högtalarna.
2. Bluetooth-parningslampa –
Parningslampan kommer att lysa
när enheten är parad med Party
Starter.
3. Bluetooth-återställningsknapp –
Tryck på denna knapp för att
koppla från en parad Bluetoothenhet och para med en annan
Bluetooth-enhet.
4. Brytare för partyljuset – Justera
denna brytare för att sätta
på/stänga av ljuset.
5. Strömbrytare / Batterilampa –
Visar om Party Starter är på och
visar batteriets status. Om
partyljuset eller LED-lampan lyser
svagt eller om musiken hänger sig
eller inte spelar, måste du kanske
ladda batteriet. Se rutan Party
Starter och aktivitet av LED-lampan för med information om LED-lampans
status.
6. Mini-USB-laddningsport – Anslut den medföljande mini-USB-kabeln för att
ansluta Party Starter till en USB-strömadapter som är ansluten till ett
strömuttag eller din dator.
45
Party Starter och aktivitet av LEDlampan:
Strömbrytarens LED-lampa
Grön LED-lampa = Party Starter är på
Orange LED-lampa = Batteriet laddas
och strömmen är på
Röd LED-lampa = Batteriet laddas
och strömmen är av
Bluetooth LED-lampa
Stadigt blå LED-lampa = Parad med
en Bluetooth-enhet
Ingen LED-lampa = Party Starter är
inte parad/ i parningsläge (med
strömmen är på)
28
6
1
2
3
Page 29

Ansluta med en Bluetooth-enhet
1. Sätt på din Bluetooth-enhet.
2. Sätt på Party Starter som kommer automatisk gå i parningsläge för att söka
efter Bluetooth-enheter.
3. Om din Bluetooth-enhet inte går att para med Party Starter, tryck på
"äterställningsknappen" för att avbryta den tidigare Bluetooth-anslutningen och
återställa Bluetooth-modulen.
4. Gå till startskärmen på din Bluetooth-enhet, hitta "ION Speaker" och anslut.
Anmärkning: Om din Bluetooth-enhet uppmanar dig att ange en parningskod,
mata in "0000".
5. Parningslampan kommer att lysa stadig, om "parad".
Anmärkning: Om du upplever problem med parningen eller
musikuppspelningen, uppdatera enhetens operativsystem.
6. För att koppla från en parad Bluetooth-enhet, tryck på "återställningsknappen"
på Party Starter.
7. För att ansluta en annan Bluetooth-enhet, upprepa stegen 3-4.
Felsökning
Om ljudet är förvridet: Försök att sänka volymknappen på din ljudkälla. Försök
också att sänka all volymen på Party Starter.
Om det finns för mycket bas: Försök att justera tonen eller EQ-knappen på din
ljudkälla för att sänka basnivån. Detta möjliggör att du kan spela musik med högre
volymen innan den hänger sig (blir förvriden).
29
Page 30

Käyttöopas (Suomi)
Johdanto
Laatikon sisältö
• Party Starter
• USB-latausjohto
• Pikaopas
• Turvallisuus- ja takuuohje
Tuki
Viimeisimmät tiedot tästä tuotteesta (järjestelmävaatimukset, yhteensopivuustiedot,
jne.) ja tuotteen rekisteröinti ovat saatavilla osoitteessa
ionaudio.com/partystarter.
Lisätuotetukea on saatavilla osoitteessa ionaudio.com/support.
Turvallisuus- ja takuutiedot löytyvät osoitteesta ionaudio.com/warranty.
VAROITUS: ÄLÄ roiskuta tai upota veteen tai muuhun nesteeseen.
Älä käytä sateessa. Käytä vain kuivissa paikoissa.
VAROITUS: ÄLÄ katso suoraan valonlähteeseen.
30
Page 31

Pika-asetus
Aseta Party Starter optimaalisen
toiminnan varmistamiseksi paikkaan,
jossa seinä, huonekalut, jne. eivät ole
esteenä.
1. Kytke Party Starter -laitteeseen virta kääntämällä äänenvoimakkuuden
valintakiekkoa ylös.
2. Avaa Bluetooth-asetukset musiikkilaitteessasi (älypuhelin, tabletti, jne.).
3. Etsi ja yhdistä Bluetooth-asetuksissa ION Speaker -kaiuttimeen.
4. Toista musiikkia ja säädä Party Starter -laitteen äänenvoimakkuuden
valintakiekkoa. Käytä sitä parhaiden tulosten saavuttamiseksi pimeässä
huoneessa!
Party Starter -laitteen lataus:
Jos party-valot tai merkkivalot ovat himmeät tai jos musiikki keskeytyy tai ei toista,
akku täytyy ehkä ladata.
Kytke mukana toimitetulla mini-USB-kaapelilla Party Starter (A) USBvirtasovittimeen, joka on kytketty USB-pistorasiaan tai (B) tietokoneeseesi (virta
päällä) 3 tunniksi.
(A)
*VAROITUS: Älä katso suoraan
valonlähteeseen. Älä käytä painetta
valonlähteeseen.
(B)
31
Page 32

Ominaisuudet
1. Äänenvoimakkuus/Virta – Käännä
tämä valintakiekko oikealle kytkeäksesi
virran päälle Party Starter -laitteeseen ja
säädä myös kaiuttimen
äänenvoimakkuuden tasoa.
2. Bluetooth-paritusvalo – Paritettumerkkivalo palaa, kun laite on paritettu
Party Starter -laitteeseen.
3. Bluetooth-palautuspainike – Irrota
yhteys paritettuun Bluetooth-laitteeseen
ja parita toisen Bluetooth-laitteen
kanssa painamalla tätä painiketta.
4. Party-valokatkaisija – Sytytä/sammuta
valot säätämällä tätä katkaisijaa.
5. Virran/Akun valo – Ilmaiseen, onko
Party Starter -laitteessa virta päällä ja
näyttää akun tilan. Jos party-valot tai
merkkivalot ovat himmeät tai jos
musiikki keskeytyy tai ei toista, akku
täytyy ehkä ladata. Katso lisätietoja
merkkivalon tiloista
laitteen merkkivalon toiminnot ruudusta.
6. Mini-USB -latausportti – Kytke mukana
toimitettu mini-USB-kaapeli ja yhdistä
Party Starter USB-virtasovittimeen, joka
on kytketty pistorasiaan tai tietokoneeseesi.
Party Starter -
2
45
Party Starter -laitteen
merkkivalon toiminnot:
Virran merkkivalo
Vihreä merkkivalo = Party
Starter -laitteessa on virta päällä
Oranssi merkkivalo = Akku
latautuu ja virta on päällä
Punainen merkkivalo = Akku
latautuu ja virta on pois päältä
Bluetooth-merkkivalo
Kiinteä sininen merkkivalo =
paritettu Bluetooth-laitteeseen
Ei merkkivaloa = Party Starter laitetta ei ole
paritettu/paritustilassa (mutta
virta päällä)
6
1
3
32
Page 33

Bluetooth-laitteeseeen kytkeminen
1. Kytke Bluetooth-laitteesi päälle.
2. Kytke virta päälle Party Starter -laitteeseen, ja se siirtyy automaattisesti
paritustilaan ja etsii Bluetooth-laitteita.
3. Jos Bluetooth-laitteesi ei pysty muodostamaan laiteparia Party Starter -laitteen
kanssa, katkaise aikaisempi Bluetooth-yhteys ja nollaa Bluetooth-tila
painamalla "Palauta"-painiketta Party Starter -laitteessa.
4. Siirry Bluetooth-laitteesi asetusnäytölle, etsi "ION Speaker" ja yhdistä.
Huomautus: Jos Bluetooth-laitteesi pyytää parituskoodia, kirjoita "0000".
5. Paired-merkkivalo palaa, kun se on "paritettu".
Huomautus: Jos koet ongelmia parituksessa tai musiikin toistossa, päivitä
laitteesi käyttöjärjestelmä.
6. Voit irrottaa paritetun Bluetooth-laitteen painamalla "Palauta"-painiketta Party
Starter -laitteessa.
7. Voit kytkeä toiseen Bluetooth-laitteeseen toistamalla vaiheet 3-4.
Vianmääritys
Jos ääni on vääristynyt: Yritä laskea äänilähteesi äänenvoimakkuuden säätöä.
Yritä myös vähentää Party Starter -laitteen kokonaisäänenvoimakkuutta.
Jos bassoa on liikaa: Yritä säätää äänilähteesi äänensävyä tai EQ-säätöä
laskeaksesi bassotasoa. Tämän avulla voit toistaa musiikkia äänekkäämmin ennen
kuin vääristymistä tapahtuu.
33
Page 34

Appendix (English)
Specifications
Power: 3.7v/500mAh battery (charges via mini-USB)
Battery Life: 1.5 hours with lights/3 hours with just music
Recharge time: 3 hours
Dimensions: 2.48” (diameter), 4.25” (height); 63 mm (diameter), 108 mm (height)
Weight: .41 lbs; .19 kg
Specifications are subject to change without notice.
Trademarks and Licenses
ION Audio is a trademark of ION Audio, LLC, registered in the U.S. and other
countries.
The Bluetooth word mark and logos are owned by the Bluetooth SIG, Inc. and any
use of such marks by ION Audio is under license.
All other product or company names are trademarks or registered trademarks of
their respective owners.
34
Page 35

35
Page 36

ionaudio.com
Manual Version 1.4
 Loading...