

Page 1

OMNI SCAN
QUICKSTART GUIDE
ENGLISH ( 3 – 7 )
GUÍA DE INICIO RÁPIDO
ESPAÑOL ( 8 – 12 )
GUIDE D’UTILISATION SIMPLIFIÉ
FRANÇAIS ( 13 – 17 )
ITALIANO ( 18 – 22 )
KURZANLEITUNG
DEUTSCH ( 23 – 27 )
SNELSTARTGIDS
NEDERLANDS ( 28 – 32 )
GUIDA RAPIDA
Page 2

Page 3
MAINTENANCE & CARE
We recommend cleaning your film before inserting it into the
scanner so dust or dirt does not mar the image. If you do not
have the materials to do this properly, consult a professional
film store.
We recommend using a clean, dry cotton swab to clean the
glass surface inside the FILM HOLDER SLOT periodically.
When OMNI SCAN is left unused for a long period of time,
disconnect the USB cable.
When connecting OMNI SCAN to your computer, try
connecting it to a USB port on your computer's rear panel.
If you have too many other USB devices connected to your
computer (or if OMNI SCAN is connected to a USB hub), there may not be enough power for OMNI SCAN
to operate properly.
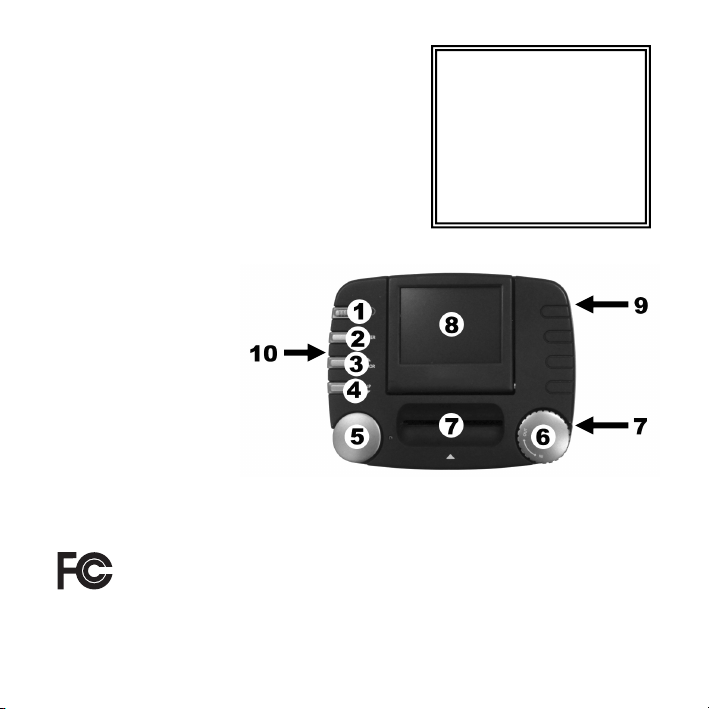
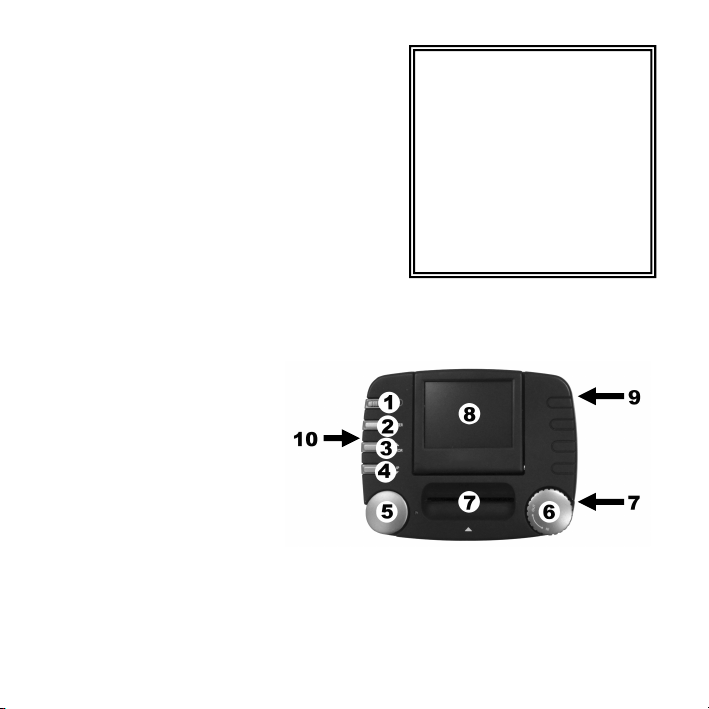
OVERVIEW
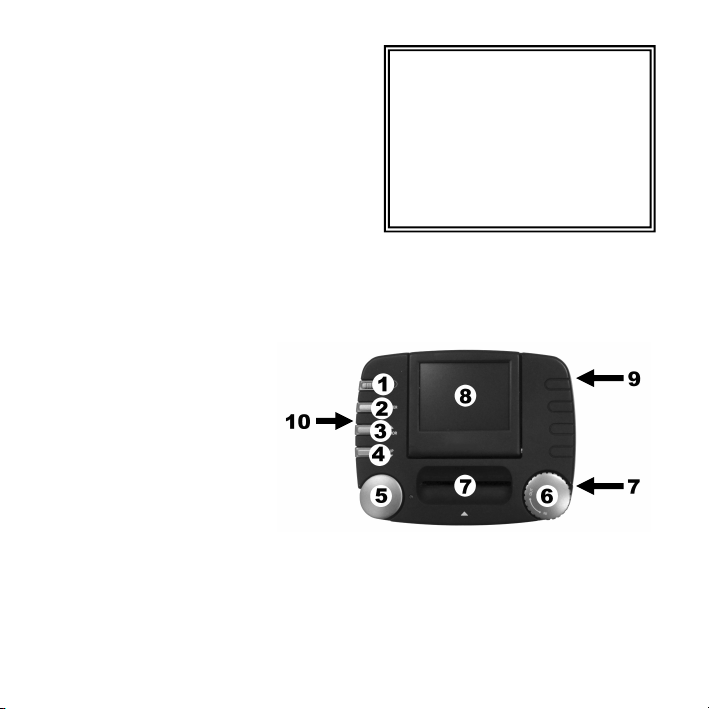
1. POWER button
2. ENTER button
3. UP/MIRROR button
4. DOWN/FLIP button
5. SCAN/HOME button
6. Film Feeder Wheel
7. Film Holder Slot
8. Display
9. USB Port
10. SD Card Slot
Note: Insert your SD card with the label facing down into the SD CARD SLOT. To eject your SD card from the
SD CARD SLOT, push it in first, then pull it out of the slot.
THIS DEVICE COMPLIES WITH PART 15 OF THE FCC RULES. OPERATION IS SUBJECT TO THE FOLLOWING
TWO CONDITIONS: (1) THIS DEVICE MAY NOT CAUSE HARMFUL INTERFERENCE, AND (2) THIS DEVICE
MUST ACCEPT ANY INTERFERENCE RECEIVED, INCLUDING INTERFERENCE THAT MAY CAUSE
UNDESIRED OPERATION.
BOX CONTENTS:
OMNI SCAN
Single Frame Holder
Strip Film Guide
Film Retrieval Strip
USB Cable
USB Power Adapter
Quickstart Guide
Safety Information & Warranty
Booklet
3
Page 4
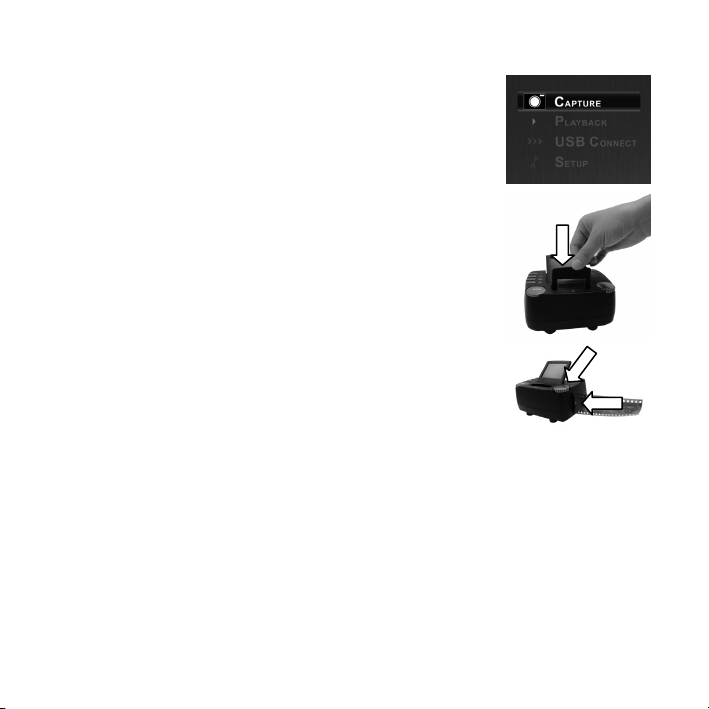
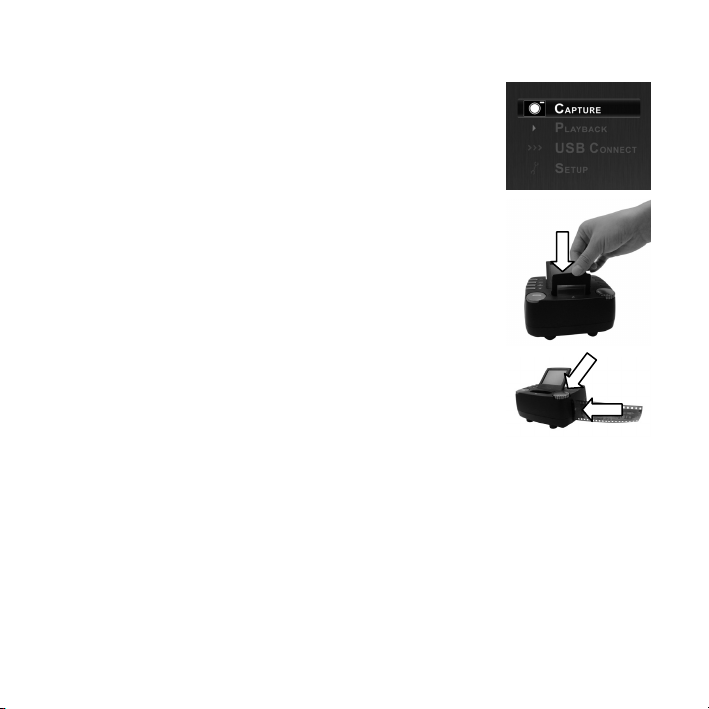
QUICKSTART
1. Connect OMNI SCAN to your computer’s USB port or to a power outlet
with the included power adapter.
2. Turn on the OMNI SCAN with the POWER button.
3. Press ENTER to select Capture Mode.
4. Insert your SD card (not included) with the label facing down into the SD
CARD SLOT. When you save your scanned images, they will be stored
on the SD card. If you do not have an SD card, you can save scanned
images to the device's internal memory (16 MB).
5. Insert your appropriate holder and film.
a. If you are scanning a slide, insert it into the FILM HOLDER SLOT
on the top of the device.
b. If you are scanning a strip of negatives, insert the included strip film
guide into the FILM HOLDER SLOT on the top of the device. Then
insert one end of the negative strip into the FILM HOLDER SLOT
on the right side of the device. Turn the FILM FEEDER WHEEL
counterclockwise while gently "feeding" the negative into the slot.
(If you want to go back to a previous frame or if the negative strip is
getting jammed, turn the FILM FEEDER WHEEL clockwise while
gently pulling the negative from the slot.)
Note: The negative strip itself must be at least three frames long.
Otherwise, it may get stuck in the device. If a negative strip
becomes jammed in the device, you can loosen it by inserting the
included film retrieval strip into the FILM HOLDER SLOT.
c. If you are scanning a single negative frame, insert it into the included single frame holder and
6. The current image will be shown on the display. Before capturing your image, you can:
7. Capture your image by pressing the SCAN/HOME button. A "disk" icon will appear to confirm the image
insert it into the FILM HOLDER SLOT on the top of the device.
a. re-orient it by pressing the UP/MIRROR or DOWN/FLIP buttons
b. toggle through three different color settings (color, negative, and black/white) by pressing the
ENTER button
is being saved.
4
Page 5
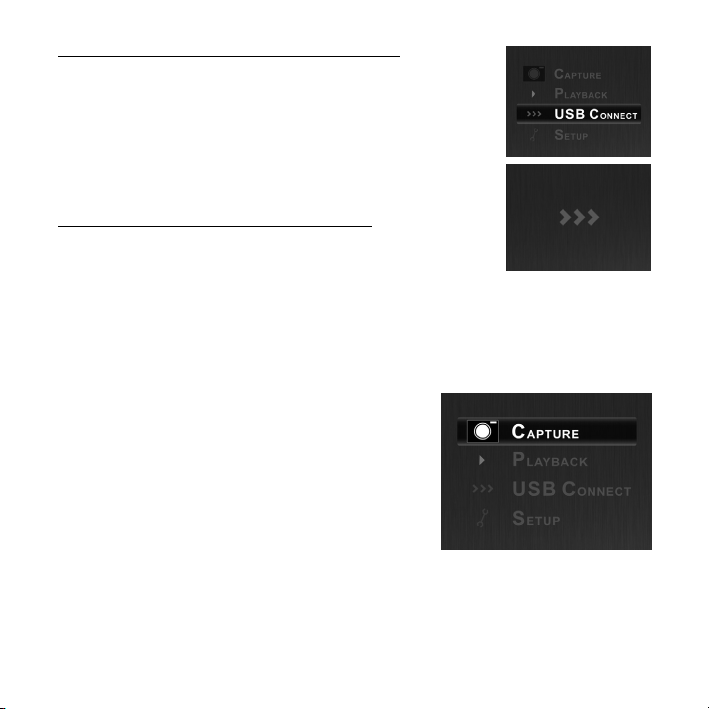
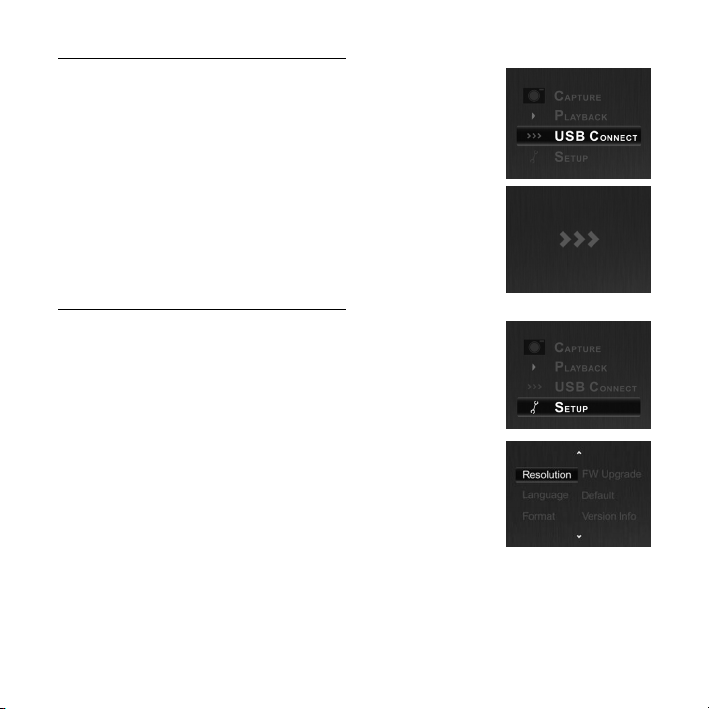
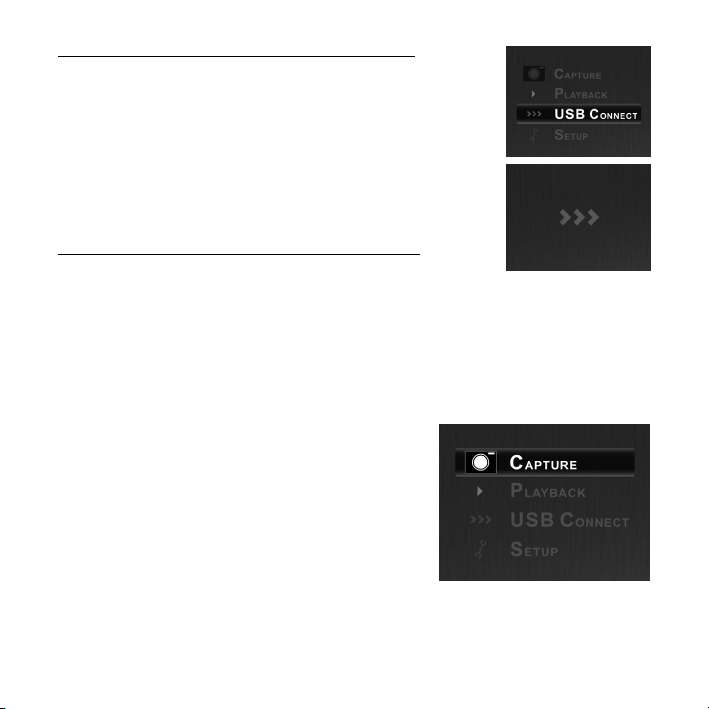
To transfer your images from the SD card to your computer:
1. On the Main Menu, use the UP/MIRROR and DOWN/FLIP buttons to
select USB Connect Mode, then press the ENTER button.
Note: While OMNI SCAN is in USB Connect Mode, you will not be able to
scan other pictures. To enable scanning again, press SCAN/HOME then
enter Capture Mode.
2. OMNI SCAN will appear as a removable drive in My Computer
(Windows) or on your Desktop (Mac). Open it, then click and drag the
files of your pictures onto your computer's hard drive.
3. When you are finished, press OMNI SCAN's power button to turn it off.
To remove the SD card to view your images elsewhere:
1. Turn OMNI SCAN off by pressing the power button.
2. Eject your SD card by pushing it in first, then pulling it out of the slot.
3. To view your pictures, insert the SD card into an SD-compatible device,
such as a digital picture frame, computer, or television.
OPERATION & FEATURES
When viewing any menus with multiple options, you can use the UP / MIRROR and DOWN / FLIP buttons to
move through them and press the ENTER button to select one.
MAIN MENU
1. Capture Mode: Allows you to capture images. OMNI SCAN
will enter Capture Mode automatically if no buttons are
pressed for five seconds.
2. Playback Mode: Allows you to view your images.
3. USB Connect Mode: Allows you to transfer your images to a
connected computer via USB. Once your images are on your
computer, you can view and edit them as you wish.
4. Setup Mode: Allows you to select various settings for the
device, such as image resolution, language, etc.
If there is no SD card in the SD Card Slot, "No Card" will appear on
the screen and scanned images will be stored in the device's internal memory (16 MB).
1
2
3
4
5
Page 6
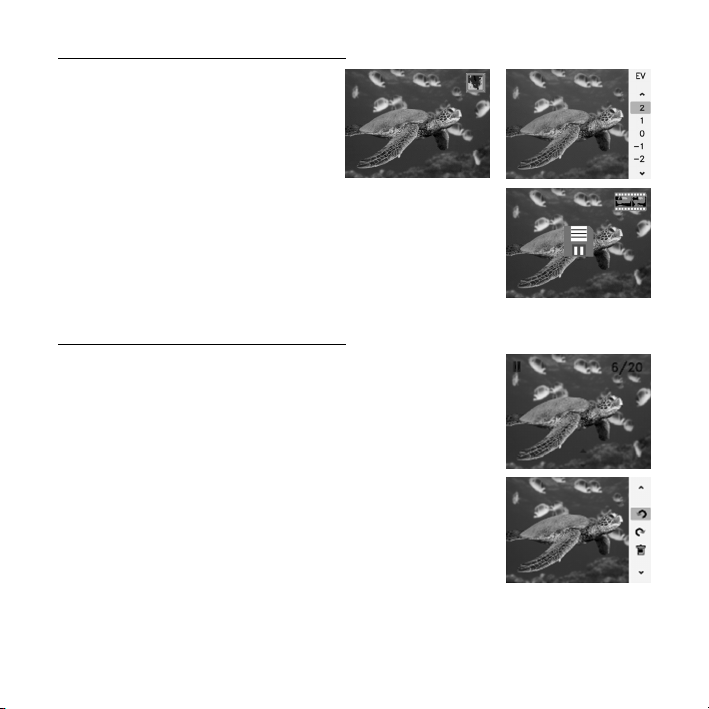
Capture Mode
In Capture Mode, simply press the SCAN/HOME
button to scan your image. You can change the
orientation of your image by pressing the
UP/MIRROR or DOWN/FLIP buttons before
scanning it.
Before capturing your image, you can:
a. re-orient it by pressing the
UP/MIRROR or DOWN/FLIP buttons
b. toggle through three different color settings (color, negative, and
black/white) by pressing the ENTER button
c. change the exposure by holding the ENTER button for 2 seconds,
using the UP/MIRROR or DOWN/FLIP buttons to select a new
Capture your image by pressing the SCAN/HOME button. A "disk" icon will
appear to confirm the image is being saved.
exposure setting
Playback Mode
When you enter Playback Mode, your captured images will be displayed in a
slideshow, allowing you to preview and/or edit them. To stop the slideshow,
press the ENTER button.
With the slideshow stopped, you can use the UP / MIRROR and DOWN / FLIP
buttons to move through your saved images one by one. Press the ENTER
button to select one to edit.
In Playback Mode, you will see the following menu options.
1. Rotate Left: Rotates the image counterclockwise by 90°.
2. Rotate Right: Rotates the image clockwise by 90°.
3. Delete: Deletes the image from the SD card or from the device's
Use the UP / MIRROR and DOWN / FLIP buttons to select one of the menu
options. Press ENTER to confirm your choice or press SCAN/HOME to return to
the slideshow.
internal memory.
6
Page 7
USB Connect Mode
USB Connect Mode allows you to transfer images from your SD card directly to
your computer. While in USB Connect Mode, OMNI SCAN becomes an SD card
reader for your computer. To enter USB Connect Mode, connect OMNI SCAN to
your computer’s USB port with the included USB cable. Then, select the USB
icon from OMNI SCAN’s Main Menu. A USB symbol should appear on the
DISPLAY, signifying that the connection has been established. OMNI SCAN will
appear as a removable device in "My Computer" (Windows) or on your Desktop
(Mac).
Note: While OMNI SCAN is in USB Connect Mode, you will not be able to scan
other pictures. To enable scanning again, press SCAN/HOME then enter
Capture Mode.
Setup Mode
In Setup Mode, you can adjust the following settings of OMNI SCAN. Use the
UP/MIRROR and DOWN/FLIP buttons to select any options and press the
ENTER button to confirm your choice:
• Resolution: Choose between 5-megapixel or 10-megapixel
interpolation resolution.
• Language: Choose between English, French, German, Italian,
Spanish, Traditional Chinese, Simplified Chinese, and Japanese.
• Format: This option will format an inserted SD card (or the internal
memory, if no SD card is inserted), which will delete all its contents.
Select "Yes" to confirm or "No" to cancel.
• FW Upgrade: If an inserted SD card contains an updated firmware
file for OMNI SCAN, this option will allow OMNI SCAN to upload
that firmware. Select "Yes" to confirm or No" to cancel.
• Default: This option will return OMNI SCAN to its original factory
settings. Select "Yes" to confirm or "No" to cancel.
• Version Info: This option will display the model, version, and firmware of the unit. Press ENTER
When you are finished, press SCAN/HOME to return to the Main Menu.
to return to the Setup Mode screen.
7
Page 8
MANTENIMIENTO Y CUIDADO
Recomendamos que limpie su película antes de
insertarlas en el escáner, de modo que el polvo o la
suciedad no arruinen la imagen. Si no cuenta con los
materiales para hacerlo correctamente, consulte en
una tienda profesional de fotografía.
Recomendamos usar un hisopo de algodón limpio y
seco para limpiar periódicamente la superficie de
vidrio interna de la RANURA PARA EL SOPORTE DE
PELÍCULA.
Cuando el OMNI SCAN se deja sin usar durante un
período prolongado, desconecte el cable USB.
Cuando conecte el OMNI SCAN a su computadora, trate de conectarlo a un puerto USB del panel trasero
de la misma.
Si tiene demasiados otros dispositivos USB conectados a la computadora (o si el OMNI SCAN está
conectado a un concentrador (hub) USB), es posible que no haya suficiente energía como para que el
OMNI SCAN funcione correctamente.
CONTENIDO DE LA CAJA
OMNI SCAN
Soporte para cuadro individual
Guía de la película
Banda de recuperación de película
Cable USB
Adaptador de alimentación USB
Manual del usuario
Folleto de información sobre la
seguridad y la garantía
DESCRIPCIÓN GENERAL
1. BOTÓN DE ENCENDIDO
2. BOTÓN ENTER
3. BOTÓN ARRIBA / ESPEJO
4. BOTÓN ABAJO / INVERTIR
5. BOTÓN ESCANEAR /INICIO
6. RUEDA DE AVANCE DE PELÍCULA
7. RANURA PARA EL SOPORTE DE PELÍCULA
8. PANTALLA
9. PUERTO USB
10. RANURA PARA TARJETA SD
Nota: Inserte su tarjeta SD con el rótulo mirando hacia abajo en la RANURA PARA LA TARJETA SD. Para
expulsar su tarjeta SD desde la RANURA PARA LA TARJETA SD, presiónela primero hacia adentro y luego
extráigala de la ranura.
8
Page 9
INICIO RÁPIDO
1. Conecte el OMNI SCAN al puerto USB de su computadora o a un
tomacorriente con el adaptador de alimentación incluido.
2. Encienda el OMNI SCAN con el botón de encendido.
3. Pulse ENTER para seleccionar el modo de captura.
4. Inserte su tarjeta SD (no incluida) con el rótulo mirando hacia abajo en la
RANURA PARA LA TARJETA SD. Cuando guarde sus imágenes
escaneadas, se almacenarán en la tarjeta SD. Si no cuenta con una
tarjeta SD, puede guardar las imágenes escaneadas en la memoria
interna del dispositivo (16MB).
5. Inserte el soporte y la película apropiados
a. Si va a escanear una diapositiva, insértela en la RANURA PARA
EL SOPORTE DE PELÍCULA de la parte superior del dispositivo.
b. Si va a escanear una tira de negativos, insértela en la RANURA
PARA EL SOPORTE DE PELÍCULA de la parte superior del
dispositivo. Luego, inserte un extremo de la tira de negativos en la
RANURA PARA EL SOPORTE DE PELÍCULA del lado derecho
del dispositivo. Gire la RUEDA DE AVANCE DE PELÍCULA en
sentido antihorario mientras “alimenta” suavemente el negativo por
la ranura. (Si desea volver a un cuadro anterior o si la tira de
negativos se atasca, gire la RUEDA DE AVANCE DE PELÍCULA
en sentido horario mientras tira suavemente del negativo para
extraerlo de la ranura.
Nota: La tira de negativos debe ser por lo menos de tres cuadros
de longitud. De lo contrario, puede atascarse en el dispositivo. Si una tira de negativos se atasca
en el dispositivo, puede aflojarla insertando la banda recuperadora de película incluida en la
RANURA PARA EL SOPORTE DE PELÍCULA.
c. Si va a escasear un solo negativo, insértelo en el soporte para cuadro individual incluido e
6. La imagen actual aparece en la pantalla. Antes de capturar la imagen, puede hacer lo siguiente:
7. Capture la imagen pulsando el botón ESCANEAR/INICIO. Aparece el icono de un "disco" para
insértelo en la RANURA PARA EL SOPORTE DE PELÍCULA de la parte superior del dispositivo
a. reorientarla pulsando los botones ARRIBA/ESPEJO o ABAJO/INVERSIÓN
b. conmutar entre tres ajustes de color diferentes (color, negativo, y blanco y negro) pulsando el
botón ENTER
confirmar que la imagen se está guardando.
9
Page 10
Para transferir las imágenes de la tarjeta SD a la computadora:
1. En el menú principal, use los botones ARRIBA/ESPEJO y
ABAJO/INVERSIÓN para seleccionar el modo USB Connect y luego
pulse el botón ENTER.
Nota: Cuando el OMNI SCAN está en modo USB Connect, no es posible
escanear otras fotografías. Para volver a habilitar el escaneo, pulse el
botón ESCANEAR/INICIO y entre al modo de captura.
2. OMNI SCAN aparece como dispositivo removible en My Computer (Mi
PC) (Windows) o en el escritorio (Mac). Ábralo y luego haga clic y
arrastre los archivos de sus fotos al disco duro de la computadora.
3. Cuando termine, pulse el botón de encendido del OMNI SCAN para
apagarlo.
Para retirar la tarjeta SD a fin de ver las imágenes en otro lugar:
1. Apague el OMNI SCAN pulsando el botón de encendido.
2. Expulse la tarjeta SD empujándola primero y luego tirando de ella para extraerla de la ranura.
3. Para ver las fotos, insértela en un dispositivo compatible con SD, como un marco de imágenes digitales,
computadora o televisor.
FUNCIONAMIENTO Y CARACTERÍSTICAS
Cuando vea menús con varias opciones, puede usar los botones UP / MIRROR (Arriba / Espejo) y DOWN /
FLIP (Abajo / Invertir) para recorrerlas y pulse el botón ENTER para seleccionar una.
MAIN MENU (Menú principal)
1. Capture Mode (Modo de captura): Permite capturar
imágenes. OMNI SCAN entra automáticamente al modo de
captura si no se pulsa ningún botón durante cinco segundos.
2. Playback Mode (Modo de reproducción): Permite ver las
imágenes.
3. USB Mode (Modo USB): Permite transferir sus imágenes a
una computadora conectada vía USB. Una vez que sus
imágenes estén en la computadora, puede verlas y editarlas
como desee.
4. Modo Setup (Configuración): Este modo le permite
seleccionar diversos parámetros del dispositivo, tal como la
resolución de imagen, el idioma, etc.
Si no hay una tarjeta SD en la ranura para la misma, aparece "No Card" (Sin tarjeta) en la pantalla y las
imágenes escaneadas se almacenan en la memoria interna del dispositivo (16 MB).
1
2
3
4
10
Page 11

Modo Capture (Captura)
En modo de captura, simplemente pulse el botón
ESCANEAR/INICIO para escanear la imagen.
Antes de escanearla, puede cambiar la orientación
de la imagen pulsando los botones
ARRIBA/ESPEJO o ABAJO/INVERSIÓN.
Antes de capturar la imagen, puede hacer lo
siguiente:
a. reorientarla pulsando los botones ARRIBA/ESPEJO o ABAJO/INVERSIÓN
b. conmutar entre tres ajustes de color diferentes (color, negativo, y blanco y
negro) pulsando el botón ENTER
c. cambiar la exposición manteniendo pulsado el botón ENTER durante 2
segundos, usando los botones ARRIBA/ESPEJO o ABAJO/INVERTIR
para seleccionar un nuevo valor de exposición.
Capture la imagen pulsando el botón ESCANEAR/INICIO. Aparece el icono de
un "disco" para confirmar que la imagen se está guardando.
Modo de Reproducción
Cuando se entra al modo Playback (Reproducción), sus imágenes capturadas
aparecerán en modo de “show”, permitiéndole visualizarlas previamente y/o
editarlas. Para detener la reproducción, pulse el botón ENTER.
Una vez detenida la reproducción, puede usar los botones UP / MIRROR y
DOWN / FLIP para recorrer las imágenes guardadas una por una. Pulse el botón
ENTER para seleccionar la que desea editar.
En modo Playback, verá las siguientes opciones de menú.
1. Rotate Left (Girar a la izquierda): Gira la imagen 90° en sentido
antihorario.
2. Rotate Right (Girar a la derecha): Gira la imagen 90° en sentido horario.
3. Delete (Eliminar): Permite eliminar la imagen de la tarjeta SD o de la
memoria interna del dispositivo.
También puede pulsar los siguientes botones del OMNI SCAN:
1. ENTER: Vuelve a la reproducción de diapositivas.
2. ESCANEAR/INICIO: Permite volver al menú principal.
11
Page 12

USB Mode (Modo USB)
El modo USB le permite transferir imágenes desde la tarjeta SD directamente a
su computadora. Cuando está en modo USB, el OMNI SCAN se convierte en
un lector de tarjetas SD para su computadora. Para entrar al modo USB,
conecte el OMNI SCAN al puerto USB de su computadora con el cable USB
incluido. Luego, seleccione el icono de USB en el menú principal de OMNI
SCAN. Debe aparecer un símbolo de USB en la PANTALLA, que significa que
se estableció la conexión. OMNI SCAN aparece como dispositivo removible en
"My Computer" (Mi PC) (Windows) o en el escritorio (Mac).
Nota: Cuando el OMNI SCAN está en modo USB Connect, no es posible
escanear otras fotografías. Para volver a habilitar el escaneo, pulse el botón
ESCANEAR/INICIO y entre al modo de captura.
Modo Setup (Configuración)
En el modo de configuración, puede ajustar los siguientes parámetros del OMNI
SCAN. Use los botones ARRIBA/ESPEJO y ABAJO/INVERSIÓN para
seleccionar las opciones y pulse el botón ENTER para confirmar su selección.
• Resolution (Resolución): Elija entre las resoluciones de interpolación de
5 ó 10 megapíxeles.
• Language (Idioma): Elija entre inglés, francés, alemán, italiano, español,
chino tradicional, chino simplificado y japonés.
• Format (Formateo): Con esta opción se formatea una tarjeta SD
insertada (o la memoria interna si no hay ninguna tarjeta insertada), con
lo que se borra todo su contenido. Seleccione "Yes" (Sí) para confirmar o
"No" para cancelar.
• FW Upgrade (Actualización de firmware): Si una tarjeta SD insertada
contiene un archivo firmware actualizado para OMNI SCAN, esta opción
permite que OMNI SCAN cargue ese firmware. Seleccione "Yes" (Sí)
para confirmar o "No" para cancelar.
• Default (Predeterminado): Con esta opción, el OMNI SCAN vuelve a sus
valores de parámetros originales de fábrica. Seleccione "Yes" (Sí) para confirmar o "No" para cancelar.
• Version Info (Información de versión): Con esta opción se muestra el modelo, la versión y el firmware
de la unidad: Pulse ENTER para volver a la pantalla del modo de configuración.
Cuando termine, pulse ESCANEAR/INICIO para volver al menú principal.
12
Page 13

ENTRETIEN ET NETTOYAGE
Nous vous recommandons de nettoyer le film avant de
les insérer dans le numériseur afin que la poussière ou
la saleté viennent gâter l’image. Si vous n’avez pas le
matériel adéquat pour faire le nettoyage, consultez
votre détaillant de produit professionnel.
Nous vous recommandons d’utiliser régulièrement un
coton-tige propre et sec afin de nettoyer la vitre
intérieure de l’emplacement pour porte-négatif.
Si l’OMNI SCAN ne doit pas être utilisé pendant un
certain temps, débrancher le câble USB.
Utilisez de préférence le port USB sur le panneau
arrière de l’ordinateur pour brancher l’OMNI SCAN.
Si beaucoup d'appareils USB sont branchés à votre ordinateur (ou si l’OMNI SCAN est branché à un
répéteur USB), il se peut qu’il n’y ait pas suffisamment de puissance pour faire fonctionner l’OMNI SCAN
correctement.
CONTENU DE LA BOÎTE
OMNI SCAN
Porte-négatif simple
Guide pour bande de négatifs
Bande d’extraction pour négatifs
Câble USB
Adaptateur CA USB
Guide d’utilisation
Consignes de sécurité et
information concernant la garantie
VUE D’ENSEMBLE
1. TOUCHE D'ALIMENTATION
2. TOUCHE ENTER
3. TOUCHE UP/MIRROR
4. TOUCHE DOWN/FLIP
5. TOUCHE SCAN/HOME
6. MOLETTE D’ALIMENTATION
POUR NÉGATIF
7. EMPLACEMENT POUR
PORTE-NÉGATIF
8. ÉCRAN D’AFFICHAGE
9. PORT USB
10. EMPLACEMENT POUR CARTE MÉMOIRE FLASH
Remarque: Insérez une carte mémoire flash, étiquette vers le bas, dans la fente pour carte mémoire flash.
Pour éjecter la carte mémoire, enfoncez-la d'abord, puis retirez-la de la fente.
13
Page 14

MISE EN ROUTE
1. Branchez l’OMNI SCAN à un port USB d’un ordinateur ou à une prise
d’alimentation murale à l’aide du câble d’alimentation inclus.
2. Mettez l’OMNI SCAN sous tension à l’aide de la touche d’alimentation.
3. Appuyez sur la touche ENTER pour sélectionner le mode Capture.
4. Insérez une carte mémoire flash (non inclus), étiquette vers le bas, dans
l’emplacement pour carte mémoire flash. Lorsque vous sauvegardez les
images balayées, elles se retrouvent sur la carte mémoire flash. Si vous
ne disposez pas de carte mémoire flash, vous pouvez sauvegarder les
images sur la mémoire interne du OMNI SCAN (16 Mo).
5. Insérez les négatifs dans le support approprié.
a. Si c’est une diapositive que vous désirez numériser, insérez-la
dans l’emplacement pour porte-négatif sur le dessus de l’appareil.
b. Si c’est une bande de négatifs que vous désirez numériser, insérez
le guide pour bande de négatifs dans l’emplacement pour portenégatif sur le dessus de l’appareil. Insérez ensuite l’extrémité de la
bande de négatifs dans l’emplacement pour porte-négatif sur le
côté droit de l’appareil. Tournez la molette d’alimentation dans le
sens antihoraire tout en insérant délicatement la bande de négatifs
dans l'emplacement. Si vous désirez revenir sur un des négatifs
précédents ou si la bande de négatifs se bloque, tournez la molette
dans le sens horaire tout en tirant délicatement sur la bande afin de
la retirer de la fente.
Remarque : La bande de négatifs doit être composée d’au moins
trois négatifs. Autrement, elle pourrait rester bloquée dans l'appareil. Si une bande de négatifs
reste bloquée dans l’appareil, vous pouvez la déloger en insérant la bande d'extraction dans
l’emplacement pour porte-négatif.
c. Si c’est un négatif unique que vous désirez numériser, insérez-le dans le porte-négatif simple,
6. L’image devrait s’afficher. Avant de numériser l’image, vous pouvez :
7. Faites la capture de l’image en appuyant sur la touche SCAN/HOME. L’icône Disque devrait s’afficher
puis insérez le porte-négatif dans l’emplacement sur le dessus de l’appareil.
a. réorienter l’image en appuyant sur la touche UP/MIRROR ou DOWN/FLIP
b. commuter entre trois réglages couleur différents (couleur, négatif et en noir et blanc) en appuyant
sur la touche ENTER
afin de confirmer que l’image est en cours de sauvegarde.
14
Page 15

Transfert d’images à partir d’une carte mémoire flash à un ordinateur :
1. À partir du menu principal, utilisez les touches UP/MIRROR et DOWN/FLIP
pour sélectionner le mode Connexion USB, puis appuyez sur la touche
ENTER.
Remarque : Lorsque l’OMNI SCAN est en mode Connexion USB, vous ne
pouvez pas numériser d’autres images. Afin de pouvoir numériser de
nouveau, vous devez mettre l’OMNI SCAN hors tension, appuyez la touche
SCAN/HOME et passer en mode Capture.
2. L’OMNI SCAN apparaît comme périphérique amovible sous « Poste de
travail » (Windows) ou sur le bureau (Mac). Ouvrez-le, puis cliquez et
glissez les fichiers de vos images sur le disque dur de votre ordinateur.
3. Lorsque vous avez terminé, appuyez sur la touche d'alimentation de l’OMNI
SCAN afin de le mettre hors tension.
Pour retirer la carte mémoire flash afin de visionner son contenu sur un
autre appareil :
1. Mettez l’OMNI SCAN hors tension à l’aide de la touche d’alimentation.
2. Éjectez la carte mémoire en l’enfonçant d'abord, puis en la retirant ensuite de la fente.
3. Vous pouvez maintenant retirer la carte mémoire flash et l’insérer dans n’importe lequel appareil
compatible avec ce format, tel qu’un cadre photo numérique, un ordinateur ou un téléviseur afin de
visionner vos photos.
CARACTÉRISTIQUES ET FONCTIONNEMENT
Lors du visionnement d’un menu avec de multiples options, vous pouvez utiliser les touches UP/MIRROR et
DOWN/FLIP afin de les parcourir, puis ensuite appuyer sur la touche ENTER pour en sélectionner une.
MAIN PRINCIPAL
1. Capture Mode: Permet de capturer les images. Le OMNI
SCAN entre automatiquement en Capture Mode lorsqu’aucune
touche n’est enfoncée pour plus de cinq secondes.
2. Playback Mode: Permet de visionner les images.
3. USB Mode: Permet de transférer les images à un ordinateur
branché via USB. Une fois que les images sont transférées sur
votre ordinateur, vous pouvez les visionner et les modifier
comme bon vous semble.
4. Mode Configuration : Ce mode vous permet de configurer
différents paramètres de l'appareil, tels que la résolution
d'image, la langue d'affichage, etc.
S’il n’y a pas de carte mémoire flash dans l’emplacement, « Aucune carte » s’affiche et les images seront
sauvegardées sur la mémoire interne du OMNI SCAN (16 Mo).
1
2
3
4
15
Page 16

Mode Capture
En mode Capture, vous n’avez qu’à appuyer sur la
touche SCAN/HOME pour numériser une image.
Vous pouvez modifier l’orientation de l’image en
appuyant sur la touche UP/MIRROR ou
DOWN/FLIP avant de la numériser.
Avant de numériser l’image, vous pouvez :
a. Réorienter l’image en appuyant sur la
touche UP/MIRROR ou DOWN/FLIP;
b. Commuter entre trois réglages couleur différents (couleur, négatif et en
noir et blanc) en appuyant sur la touche ENTER;
c. Modifier l’exposition en maintenant la touche ENTER enfoncée pendant 2
secondes et en appuyant sur les touches UP/MIRROR ou DOWN/FLIP
pour sélectionner le nouveau paramètre.
Faites la capture de l’image en appuyant sur la touche SCAN/HOME. L’icône
Disque devrait s’afficher afin de confirmer que l’image est en cours de sauvegarde.
Menu Playback
Lorsque l’appareil est en mode de lecture/modification, les images sont affichées
dans un diaporama, vous permettant de le visionner et/ou de les modifier. Afin
d'arrêter le diaporama, appuyez sur la touche ENTER.
Lorsque le diaporama est arrêté, vous pouvez utiliser les touches UP/MIRROR
et DOWN/FLIP afin de parcourir une à une les images sauvegardées. Appuyez
sur la touche ENTER afin d’en sélectionner une à modifier.
En mode Playback, les options suivantes s'affichent :
1. Rotate Left : Permet de pivoter l’image dans le sens antihoraire de 90°.
2. Rotate Right : Permet de pivoter l’image de 90°.
3. Delete : Permet de supprimer l’image de la carte mémoire flash ou de la
mémoire interne du OMNI SCAN.
Vous pouvez également appuyer sur les touches suivantes sur l'OMNI SCAN :
1. ENTER : Permet de retourner en mode diaporama.
2. SCAN/HOME : Permet de retourner au menu principal.
16
Page 17

USB Mode
Le mode USB vous permet de transférer les images sur une carte mémoire flash
à un ordinateur branché via USB. EN mode USB, le OMNI SCAN devient un
lecteur de cartes mémoire pour votre ordinateur. Pour passer au mode USB,
utilisez le câble USB inclus pour brancher le OMNI SCAN au port USB d’un
ordinateur. À partir du menu principal du OMNI SCAN, sélectionnez l’icône USB.
Un symbole USB devrait s’afficher sur l’écran, indiquant que la connexion est
établie. Le OMNI SCAN apparaît comme périphérique amovible sous « Poste de
travail » (Windows) ou sur le bureau (Mac).
Remarque : Lorsque l’OMNI SCAN est en mode Connexion USB, vous ne
pouvez pas numériser d’autres images. Afin de pouvoir numériser de nouveau,
vous devez mettre l’OMNI SCAN hors tension, appuyez la touche SCAN/HOME
et passer en mode Capture.
Mode Configuration
En mode Configuration, vous pouvez modifier les paramètres suivants de l’OMNI
SCAN. À l'aide des touches UP/MIRROR et DOWN/FLIP, vous pouvez parcourir
les options disponibles, puis sélectionner une des options en appuyant sur la
touche ENTER :
• Résolution : Sélectionnez entre les résolutions d'interpolation de 5 ou 10
mégapixels.
• Langue : Sélectionnez entre l’anglais, le français, l’allemand, l’italien,
l’espagnol, le chinois traditionnel, le chinois simplifié et le japonais.
• Formatage : Cette option permet de formater la carte mémoire flash
insérée (ou la mémoire interne si aucune carte n’est insérée) et de
supprimer tout son contenu. Sélectionnez « Oui » pour confirmer, ou
« Non » pour annuler l’opération.
• Mise à niveau du micrologiciel : Si la carte mémoire flash insérée
contient un nouveau fichier pour le micrologiciel de l’OMNI SCAN, cette
option permet de faire la mise à jour. Sélectionnez « Oui » pour confirmer,
ou « Non » pour annuler l’opération.
• Paramètres par défaut : Cette option permet de réinitialiser les paramètres d’usine de l’OMNI SCAN.
Sélectionnez « Oui » pour confirmer, ou « Non » pour annuler l’opération.
• Info version : Cette option permet d’afficher le modèle, la version et le micrologiciel de l’appareil.
Appuyez sur la touche ENTER pour retourner à la fenêtre du Mode Configuration.
Lorsque vous avez terminé, appuyez sur la touche SCAN/HOME pour retourner au menu principal.
17
Page 18
MANUTENZIONE E CURA
Si raccomanda di pulire la pellicola prima di inserirla nello
scanner in modo che la polvere o la sporcizia non
offuschino l’immagine. Se non si hanno i materiali adatti
per procedere adeguatamente a questa operazione,
rivolgersi ad un negozio specializzato in fotografia.
Si consiglia di utilizzare un batuffolo di cotone pulito e
asciutto per pulire periodicamente la superficie di vetro
interna dello SLOT PORTAPELLICOLA.
Quando OMNI SCAN è lasciato inutilizzato per lunghi
periodi di tempo, scollegare il cavo USB.
Quando si collega OMNI SCAN al computer, se possibile
collegarlo ad una porta USB presente sul pannello
posteriore del computer.
Se sono presenti troppi dispositivi USB collegati al
computer (oppure OMNI SCAN è collegato ad un hub USB), potrebbe non esservi energia sufficiente per far
funzionare OMNI SCAN in maniera adeguata.
CONTENUTI DELLA
CONFEZIONE
OMNI SCAN
Supporto fotogramma singolo
Fascetta guida per pellicola
Fascetta di recupero della
pellicola
Cavo USB
Adattatore di alimentazione
USB
Manuale per l'uso
Libretto di istruzioni di sicurezza
e garanzia
PANORAMICA
1. TASTO DI ALIMENTAZIONE
2. TASTO ENTER (INVIO)
3. TASTO UP/MIRROR
4. TASTO DOWN/FLIP
5. TASTO SCAN/HOME
6. ROTELLA DI ALIMENTAZIONE
DELLA PELLICOLA
7. SLOT PORTAPELLICOLA
8. DISPLAY
9. PORTA USB
10. SLOT SCHEDA SD
Nota Bene: Inserire la scheda SD con l’etichetta rivolta verso il basso nello SLOT per SCHEDA SD. espellere
la scheda SD dallo SLOT per SCHEDA SD, innanzitutto premerlo, quindi estrarla dallo slot.
18
Page 19

GUIDA RAPIDA
1. Collegare OMNI SCAN alla porta USB del computer o ad una presa di
alimentazione servendosi dell’adattatore in dotazione.
2. Accendere OMNI SCAN servendosi del tasto POWER.
3. Premere ENTER per selezionare la modalità di acquisizione.
4. Inserire la scheda SD (non in dotazione) con l’etichetta rivolta verso il
basso nello SLOT per SCHEDA SD. Quando si salvano le immagini
scannerizzate, queste verranno memorizzate sulla scheda SD. Se non si
dispone di una scheda SD, si possono salvare le immagini scannerizzate
nella memoria interna del dispositivo (16MB).
5. Inserire il supporto adeguato e la pellicola.
a. Se si desidera scannerizzare una diapositiva, inserirla nello SLOT
PORTAPELLICOLE in cima al dispositivo.
b. Se si scannerizza una striscia di negativi, inserire l'apposita guida
nello SLOT PORTAPELLICOLA in cima al dispositivo. Quindi
inserire un capo del negativo nello SLOT PORTAPELLICOLA a
destra del dispositivo. Girare la ROTELLA DI ALIMENTAZIONE
PELLICOLA in senso antiorario mentre si fa entrare delicatamente
il negativo nello slot (se si desidera tornare ad un fotogramma
precedente o se il negativo si sta inceppando, girare la ROTELLA
DI ALIMENTAZIONE PELLICOLA in senso orario tirando
delicatamente il negativo fuori dallo slot).
Nota bene: il negativo deve essere lungo almeno tre fotogrammi.
In caso contrario, potrebbe rimanere bloccato nel dispositivo. Se un
negativo dovesse rimanere inceppato nel dispositivo, allentarlo inserendo la fascetta di recupero
pellicola in dotazione nello SLOT PORTAPELLICOLA.
c. Se si sta scannerizzando un negativo composto da un singolo fotogramma, inserirlo nel supporto
per fotogramma singolo in dotazione e inserirlo nello SLOT PORTAPELLICOLA in cima al
6. L'immagine corrente verrà illustrata a display. Prima di acquisire l'immagine, è possibile:
7. Acquisire l’immagine premendo il tasto SCAN/HOME. Un'icona a forma di "disco" apparirà per
dispositivo.
a. ri-orientarla premendo i tasti UP/MIRROR (su/immagine speculare) o DOWN/FLIP (giù/capovolgi)
b. passare da una all'altra di tre diverse configurazioni di colore (a colori, negativo e bianco e nero),
premendo il tasto ENTER (invio)
confermare che l'immagine è stata salvata.
19
Page 20

Trasferimento delle immagini dalla scheda SD al computer.
1. Nel Menu principale, servirsi dei tasti UP/MIRROR e DOWN/FLIP per
selezionare la modalità USB Connect, quindi premere il tasto ENTER.
Nota bene: mentre OMNI SCAN si trova in modalità USB, non sarà
possibile effettuare la scansione di altre immagini. Per abilitare
nuovamente la scansione, premere SCAN/HOME ed entrare in Modalità di
acquisizione (Capture).
2. OMNI SCAN apparirà come una periferica rimuovibile in Risorse del
computer (Windows) o sul Desktop (Mac). Aprirlo, quindi cliccare sui file
immagine e trascinarli sul computer.
3. Una volta terminato, premere il tasto di accensione dell'OMNI SCAN per
spegnerlo.
Rimuovere la scheda SD per visualizzare le immagini altrove:
1. Spegnere OMNI SCAN premendo il tasto di alimentazione.
2. Espellere la scheda SD premendola verso l’interno e quindi estraendola dallo slot.
3. È ora possibile inserirla in un dispositivo compatibile SD quale un portafotografie digitale, un computer o
un televisore, per visualizzare le immagini.
USO E FUNZIONI
Quando si visualizzano menu con opzioni multiple, si possono utilizzare i tasti UP / MIRROR e DOWN / FLIP
per scorrere lungo i menu stessi e premere il tasto ENTER per selezionare una voce.
MAIN PRINCIPALE
1. Modalità Capture: permette di catturare le immagini. Il OMNI
SCAN entrerà automaticamente in modalità Capture se non
vengono premuti tasti per cinque secondi.
2. Modalità Playback (di riproduzione): permette di
visualizzare le immagini.
3. Modalità USB: permette di trasferire le immagini ad un
computer collegato tramite USB. Una volta che le immagini
si trovano sul computer, è possibile visualizzarle e modificarle
come desiderato.
4. Modalità di configurazione (Setup): consente di
selezionare varie configurazioni per il dispositivo, quali
risoluzione delle immagini, lingua, ecc.
Se non sono presenti schede SD nell'apposito Slot, sullo schermo compare la scritta "No Card" (nessuna
scheda) e le immagini scannerizzate verranno memorizzate nella memoria interna del dispositivo (16MB).
1
2
3
4
20
Page 21

Modalità di acquisizione (Capture)
In modalità di acquisizione, premere il tasto
SCAN/HOME per scannerizzare l'immagine. Si
può cambiare l'orientamento dell'immagine
premendo il tasto UP/MIRROR o DOWN/FLIP
prima di scannerizzarla.
Prima di acquisire l'immagine, è possibile:
a. ri-orientarla premendo i tasti UP/MIRROR
(su/immagine speculare) o DOWN/FLIP (giù/capovolgi)
b. passare da una all'altra di tre diverse configurazioni di colore (a colori,
negativo e bianco e nero), premendo il tasto ENTER (invio)
c. modificare l'esposizione tenendo premuto il tasto ENTER (Invio) per 2
secondi, servendosi dei tasti UP/MIRROR o DOWN/FLIP per selezionare
una nuova configurazione dell'esposizione
Acquisire l’immagine premendo il tasto SCAN/HOME. Un'icona a forma di
"disco" apparirà per confermare che l'immagine è stata salvata.
Modalità Playback (riproduzione)
Quando si entra in modalità di riproduzione, le immagini catturate verranno
visualizzate in una presentazione, potendo così visualizzarne un’anteprima o
modificarle. Per interrompere la presentazione, premere il tasto ENTER.
Quando la presentazione è stata interrotta, ci si può servire dei tasti UP /
MIRROR e DOWN / FLIP per passare da un’immagine salvata all’altra. Premere il
tasto ENTER per selezionarne una da modificare.
In modalità Playback appariranno le seguenti opzioni da menu:
1. Rotate Left (ruota a sinistra): ruota l’immagine in senso antiorario di 90°.
2. Rotate right (ruota a destra): ruota l’immagine in senso orario di 90°.
3. Delete (cancella): cancella l’immagine dalla scheda SD o dalla memoria
interna del dispositivo.
Si possono anche premere i seguenti tasti su OMNI SCAN:
1. ENTER: torna alla presentazione.
2. SCAN/HOME: torna al Menu principale.
21
Page 22

Modalità USB
La modalità USB permette di trasferire immagini dalla scheda SD direttamente
sul computer. In modalità USB, il OMNI SCAN diventa un lettore di schede SD
per il computer. Per entrare in modalità USB, collegare il OMNI SCAN alla porta
USB del computer servendosi del cavo USB in dotazione. Quindi, selezionare
l’icona USB dal Menu principale del OMNI SCAN. A DISPLAY apparirà un
simbolo USB a indicare che è stata stabilita la connessione. Il OMNI SCAN
apparirà come una periferica rimuovibile in "Risorse del computer" (Windows) o
sul Desktop (Mac).
Nota bene: mentre OMNI SCAN si trova in modalità USB, non sarà possibile
effettuare la scansione di altre immagini. Per abilitare nuovamente la scansione,
premere SCAN/HOME ed entrare in Modalità di acquisizione (Capture).
Setup Mode (modalità di configurazione)
In modalità setup è possibile regolare le seguenti configurazioni di OMNI SCAN:
servirsi dei tasti UP/MIRROR e DOWN/FLIP per selezionare una delle opzioni e
premere il tasto ENTER (invio) per confermare la scelta:
• Resolution (risoluzione): scegliere tra una risoluzione con
interpolazione a 5 megapixel o 10 megapixel.
• Language (lingua): scegliere tra inglese, francese, tedesco, italiano,
spagnolo, cinese tradizionale, cinese semplificato e giapponese.
• Format (formatta): questa opzione formatterà una scheda SD inserita (o
la memoria interna se non è stata inserita alcuna scheda SD),
cancellandone interamente il contenuto. Selezionare "Yes" (sì) per
confermare o "No" per annullare.
• FW Upgrade (aggiornamento FW): se una scheda SD contiene un file di
firmware aggiornato per OMNI SCAN, questa opzione consentirà a OMNI
SCAN di caricare tale firmware. Selezionare "Yes" (sì) per confermare o
"No" per annullare.
• Default (predefinito): questa opzione farà tornare OMNI SCAN alle
configurazioni originali di fabbrica. Selezionare "Yes" (sì) per confermare o "No" per annullare.
• Version Info (informazioni sulla versione): questa opzione mostrerà a display il modello, la versione
ed il firmware dell'apparecchio. Premere ENTER per tornare alla schermata della modalità di
configurazione.
Una volta terminato, premere SCAN/HOME per tornare al menu principale.
22
Page 23

REINIGUNG & PFLEGE
Wir empfehlen Ihnen, den Film vor dem Einlegen in
den Scanner zu reinigen, damit kein Staub oder
anderer Schutz die Bildqualität beeinträchtigt. Sollten
Ihnen dazu die passenden Materialien fehlen, wenden
Sie sich bitte an einen Fotofachgeschäft.
Wir empfehlen Ihnen, die Glasoberfläche im Inneren
des FILMSTREIFENHALTERS regelmäßig mit einem
sauberen, trockenen Wattestäbchen zu reinigen.
Wenn Sie den OMNI SCAN längere Zeit nicht
benutzen, trennen Sie das Gerät bitte vom USBKabel.
Wenn Sie den OMNI SCAN an Ihren Computer anschließen, verwenden Sie nach Möglichkeit einen USB-
Anschluss an der Rückseite Ihres Computers.
Wenn zu viele andere USB-Geräte an Ihren Computer angeschlossen sind (oder wenn Sie OMNI SCAN an
einen USB-Hub angeschlossen haben), kann es sein, dass dem OMNI SCAN für den Betrieb nicht genug
Strom zugeführt wird.
INHALT DER VERPACKUNG
OMNI SCAN
Einzelbildhalter
Filmstreifenführung
Rückholstreifen
USB Kabel
USB-Netzeil
Bedienungsanleitung
Broschüre mit Sicherheits- und
Garantiehinweisen
ÜBERBLICK
1. EIN-/AUS-SCHALTER
2. ENTER-TASTE
3. AUFWÄRTS/HORIZONTAL
SPIEGELN-TASTE
4. ABWÄRTS/VERTIKAL
SPIEGELN-TASTE
5. SCANNEN/ HOME-TASTE
6. FILMZUFÜHRRAD
7. FILMSTREIFENHALTER
8. DISPLAY
9. USB-ANSCHLUSS
10. SD-KARTEN-SLOT
Hinweis: Schieben Sie die SD Card mit der Beschriftung nach vorn in den SD CARD SLOT. Um die SD Card
aus dem SD CARD SLOT auszuwerfen, drücken Sie diese zunächst leicht nach unten und ziehen Sie sie
danach aus dem Slot.
23
Page 24

SCHNELLSTART
1. Verbinden Sie OMNI SCAN mit dem USB-Anschluss Ihres Computers
oder schließen Sie das Gerät mit dem mitgelieferten Netzteil an eine
Steckdose an.
2. Schalten Sie OMNI SCAN mit dem EIN-/AUS-SCHALTER ein.
3. Drücken Sie ENTER, um den Aufnahme-Modus auszuwählen.
4. Legen Sie Ihre SD-Karte (nicht im Lieferumfang enthalten) mit dem Etikett
nach unten in den SD-KARTEN-SLOT ein. Wenn Sie Ihre gescannten
Bilder speichern werden diese auf der SD-Karte abgelegt. Wenn Sie
keine SD-Karte besitzen, können Sie die eingescannten Bilder auch im
internen Speicher des Geräts (16MB) speichern.
5. Legen Sie den entsprechenden Halter und Film ein.
a. Wenn Sie ein Dia scannen, setzen Sie es in den
FILMSTREIFENHALTER an der Oberseite des Gerätes ein.
b. Wenn Sie Negativstreifen scannen, legen Sie die mitgelieferte
Filmstreifenführung in den FILMSTREIFENHALTER an der
Oberseite des Gerätes. Führen Sie anschließend ein Ende des
Negativstreifens in den FILMSTREIFENHALTER auf der rechten
Seite des Geräts ein. Drehen Sie das FILMZUFÜHRRAD gegen
den Uhrzeigersinn und führen Sie so den Negativstreifen vorsichtig
in den Slot. (Wenn Sie zurück zu einem vorherigen Frame
springen möchten, oder wenn der Negativstreifen klemmt, drehen
Sie das FILMZUFÜHRRAD vorsichtig im Uhrzeigersinn und ziehen
es so aus dem Slot heraus.)
Hinweis: Der Negativstreifen selbst muss mindestens eine Länge
von drei Frames besitzen. Andernfalls kann er im Gerät stecken bleiben. Wenn ein
Negativstreifen im Gerät eingeklemmt wird, können Sie ihn lockern, indem Sie den mitgelieferten
Rückholstreifen in den FILMSTREIFENHALTER einsetzen.
c. Falls Sie einen einzigen Negativ-Frame scannen, setzen Sie ihn in den mitgelieferten
Einzelbildhalter ein und stecken ihn in den FILMSTREIFENHALTER an der Oberseite des
6. Das aktuelle Bild wird auf dem Display angezeigt. Vor der Aufnahme Ihres Bildes können Sie:
7. Nehmen Sie Ihr Bild durch Drücken der SCANNEN/ HOME-Taste auf. Ein "Disk"-Symbol scheint auf,
Gerätes.
a. Es durch Drücken der Tasten AUFWÄRTS / HORIZONTAL SPIEGELN oder ABWÄRTS /
VERTIKAL SPIEGELN neu ausrichten
b. Durch Drücken der ENTER-Taste aus drei verschiedenen Farb-Einstellungen (Farbe, Negativ und
schwarz / weiß) wählen
um zu bestätigen, dass das Bild gespeichert wird.
24
Page 25

So übertragen Sie Ihre Bilder von der SD-Karte auf Ihren Computer:
1. Im Hauptmenü verwenden Sie die Tasten AUFWÄRTS / HORIZONTAL
SPIEGELN und ABWÄRTS / VERTIKAL SPIEGELN, um den USBVerbindungsmodus auszuwählen. Drücken Sie anschließend auf die
ENTER-TASTE.
Hinweis: Während sich OMNI SCAN im USB-Verbindungsmodus
befindet, können keine weiteren Bilder gescannt werden. Um wieder
scannen zu können, drücken Sie SCAN/HOME-Taste ein und aktivieren
den Aufnahme-Modus.
2. OMNI SCAN scheint als Wechseldatenträger unter Mein Computer
(Windows) oder auf Ihrem Desktop (Mac) auf. Klicken Sie auf das
Symbol und ziehen Sie die Dateien Ihrer Bilder auf die Festplatte Ihres
Computers.
3. Wenn Sie damit fertig sind, betätigen Sie den Ein-/Aus-Schalter des OMNI
SCAN, um das Gerät auszuschalten.
So entfernen Sie die SD-Karte, um Ihre Bilder auf anderen Geräten anzusehen:
1. Schalten Sie den OMNI SCAN mit Hilfe des Ein-/Aus-Schalters aus.
2. Entnehmen Sie die SD-Karte, indem Sie sie erst in den Slot drücken und anschließend herausziehen.
3. Um Ihre Bilder anzusehen, stecken Sie die SD-Karte in ein SD-kompatibles Gerät wie einen digitalen
Bilderrahmen, Computer oder Fernseher.
BEDIENUNG & EIGENSCHAFTEN
Wenn Sie die verschiedenen Menüs mit den vielfältigen Optionen ansehen, können Sie mit den UP / MIRROR
und DOWN / FLIP Tasten durch die Optionen wechseln, um mit der ENTER-Taste eine der Optionen
auswählen.
MAIN MENÜ
1. Aufnahme-Modus: Ermöglicht die Aufnahme von Bildern. OMNI
SCAN wechselt automatisch in den Aufnahme-Modus, falls für 5
Sekunden keine Taste gedrückt wurde.
2. Playback-Modus: Ermöglicht die Ansicht Ihrer Bilder.
3. USB-Modus: Gestattet es Ihnen, die Bilder über USB an einen
angeschlossenen Computer zu senden. Nach der Bildübertragung an
den Computer können Sie die Bilder dort ansehen und bearbeiten.
4. Konfigurationsmodus: Hier können Sie verschiedene Einstellungen
für das Gerät vornehmen, wie Bildauflösung, Sprache etc.
Wenn sich keine SD-Karte im SD-Karten-Slot befindet wird "Keine Karte" am Bildschirm erscheinen und die
gescannten Bilder werden im internen Speicher des Geräts (16 MB) gespeichert.
1
2
3
4
25
Page 26

Aufnahme-Modus
Im Aufnahme-Modus drücken Sie einfach die
SCANNEN / HOME-Taste, um Ihr Bild zu
scannen. Bevor Sie das Bild scannen, können Sie
die Ausrichtung des Bilds ändern, indem Sie die
Tasten AUFWÄRTS /HORIZONTAL SPIEGELN
oder ABWÄRTS/VERTIKAL SPIEGELN drücken.
Vor der Aufnahme Ihres Bildes können Sie:
a. Es durch Drücken der Tasten AUFWÄRTS / HORIZONTAL SPIEGELN
oder ABWÄRTS / VERTIKAL SPIEGELN neu ausrichten
b. Durch Drücken der ENTER-Taste aus drei verschiedenen Farb-
Einstellungen (Farbe, Negativ und schwarz / weiß) wählen
c. Die Belichtung anpassen, indem Sie die ENTER-Taste 2 Sekunden lang
gedrückt halten und die Tasten AUFWÄRTS / HORIZONTAL SPIEGELN
oder ABWÄRTS / VERTIKAL SPIEGELN betätigen, um eine neue
Belichtungseinstellung auszuwählen
Nehmen Sie Ihr Bild durch Drücken der SCANNEN/ HOME-Taste auf. Ein "Disk"-Symbol scheint auf, um zu
bestätigen, dass das Bild gespeichert wird.
Playback-Modus
Im Playback-Modus können Sie Ihre aufgenommenen Bilder als Diaschau
präsentieren sowie diese vorher ansehen und bearbeiten. Zum Beenden der
Diaschau drücken Sie die ENTER Taste.
Wenn die Diaschau gestoppt ist, können Sie mit den UP / MIRROR und DOWN /
FLIP Tasten nacheinander die einzelnen Bilder anwählen. Drücken Sie die
ENTER Taste zur Auswahl eines Bildes für die Bearbeitung.
Im Playback-Modus sehen Sie die folgenden Menüoptionen.
1. Rotate Left: Dreht das Bild 90° im entgegengesetzten Uhrzeigersinn.
2. Rotate Right: Dreht das Bild 90° im Uhrzeigersinn.
3. Delete: Löscht das Bild von der SD Card oder internen Speicher des
Geräts.
Sie können auch die folgenden Tasten am OMNI SCAN betätigen:
1. ENTER: Kehrt zur Diaschau zurück.
2. SCANNEN/ HOME: Kehrt zum Hauptmenü (Main Menu) zurück.
26
Page 27

USB-Modus
Der USB-Modus ermöglicht es Ihnen die Bilder auf Ihrer SD Card direkt auf
einen Computer zu übertragen. Im USB-Modus wird der OMNI SCAN zu einem
SD Card Reader für Ihren Computer. Zum Aufrufen des USB-Modus verbinden
Sie mit Hilfe des mitgelieferten USB Kabels den OMNI SCAN mit einem USB
Port Ihres Computers. Wählen Sie danach das USB Symbol aus dem Main
Menü des OMNI SCAN. Im DISPLAY erscheint ein USB Symbol und zeigt Ihnen
an, dass die Verbindung hergestellt wurde. OMNI SCAN erscheint als
Wechseldatenträger unter “Mein Computer” (Windows) oder auf Ihrem Desktop
(Mac).
Hinweis: Während sich OMNI SCAN im USB-Verbindungsmodus befindet,
können keine weiteren Bilder gescannt werden. Um wieder scannen zu können,
drücken Sie SCAN/HOME-Taste ein und aktivieren den Aufnahme-Modus.
Konfigurationsmodus
Im Konfigurationsmodus können Sie die folgenden Parameter des OMNI SCAN
einstellen. Verwenden Sie die Tasten AUFWÄRTS / HORIZONTAL SPIEGELN
und ABWÄRTS / VERTIKAL SPIEGELN, um beliebige Optionen auszuwählen.
Drücken Sie anschließend die ENTER-Taste zur Bestätigung Ihrer Wahl:
• Auflösung: Wählen Sie zwischen der 5-Megapixel-Auflösung oder der
interpolierenden 10-Megapixel-Auflösung.
• Sprache: Wählen Sie zwischen Englisch, Französisch, Deutsch,
Italienisch, Spanisch, traditionellem Chinesisch, vereinfachtem Chinesisch
und Japanisch.
• Formatierung: Diese Option formatiert eine eingelegte SD-Karte (oder
den internen Speicher, falls keine SD-Karte eingesetzt ist) und löscht so
all ihre Daten. Wählen Sie "Ja", um zu bestätigen oder "Nein", um
abzubrechen.
• FW-Upgrade: Falls sich eine aktualisierte Firmware-Datei für OMNI
SCAN auf einer eingelegten SD-Karte befindet, ist es möglich, dass OMNI
SCAN diese Firmware aufspielt. Wählen Sie "Ja", um zu bestätigen oder
"Nein", um abzubrechen.
• Standardeinstellung: Diese Option setzt OMNI SCAN auf die Werkseinstellungen zurück. Wählen Sie
"Ja", um zu bestätigen oder "Nein", um abzubrechen.
• Versions-Info: Diese Option zeigt Informationen zum Modell, zur Version und zur Firmware des Geräts
an. Drücken Sie die ENTER-Taste, um zum Bildschirm Konfigurationsmodus zurückzukehren.
Wenn Sie fertig sind, drücken Sie SCANNEN / HOME, um zum Hauptmenü zurückzukehren.
27
Page 28

ONDERHOUD & ZORG
Het wordt aanbevolen de film (en de laatjes van de
OMNI SCAN) schoon te maken voordat ze in de scanner
worden geplaatst om zo te voorkomen dat de beelden
niet ontsierd worden door stof. Als u niet over de
materialen beschikt om dit op juiste wijze te doen, raadpleeg dan een professional.
Wij raden aan om een schoon en droog wattenstaafje te
gebruiken om het glazen oppervlak van de SLEUF
VOOR FILMHOUDER regelmatig schoon te maken.
Wanneer de OMNI SCAN voor langere periode niet
gebruikt zal worden, ontkoppel dan de USB kabel.
Wanneer u de OMNI SCAN aansluit op uw computer, gebruik dan een USB poort aan de achterkant van uw
computer.
Indien er te veel andere apparaten via USB op uw computer zijn aangesloten (of wanneer de OMNI SCAN
via een USB-hub is aangesloten), zal er misschien niet genoeg vermogen zijn om te OMNI SCAN juist te
laten functioneren.
INHOUD VERPAKKING
OMNI SCAN
Enkele Frame Houder
Filmstrookgeleider
Terughaalstrook Film
USB-kabel
USB-stroomadapter
Gebruikshandleiding
Veiligheids- en garantie-informatie
OVERZICHT
1. AAN/UIT KNOP
2. ENTER KNOP
3. UP/MIRROR KNOP (op/spiegelen)
4. DOWN/FLIP KNOP (neer/omdraaien)
5. SCAN/HOME KNOP
6. FILMROLHOUDER
7. SLEUF VOOR FILMHOUDER
8. MONITOR
9. USB POORT
10. SLEUF VOOR SD-KAART
N.B.: Steek uw SD-kaart met het etiket naar beneden in de SLEUF VOOR SD-KAART. Om de SD-kaart uit de
SLEUF VOOR SD-KAART te laten werpen drukt u de kaart eerst naar binnen en trekt deze hierna uit de sleuf.
28
Page 29

SNEL BEGINNEN
1. Sluit de OMNI SCAN aan op de USB poort van uw computer of steek
deze in een stopcontact via de meegeleverde adapter.
2. Zet de OMNI SCAN aan met de AAN/UIT knop.
3. Druk op ENTER om de Capture Mode (vastleggen) te selecteren.
4. Steek de SD-kaart (niet meegeleverd) met het etiket naar beneden in de
SLEUF VOOR SD-KAART. Wanneer u de gescande afbeeldingen
opslaat, zullen ze worden bewaard op de SD-kaart. Als u geen SD-kaart
heeft, kunnen de gescande afbeeldingen worden opgeslagen in het
interne geheugen van het apparaat (16MB).
5. Plaats de juiste houder en film.
a. Als u een dia wilt scannen, plaats deze in de SLEUF VOOR
FILMHOUDER bovenaan het apparaat.
b. Als u een negatiefstrook wilt scannen, plaats de meegeleverde
filmstrookgeleider in de SLEUF VOOR FILMHOUDER aan de
bovenkant van het toestel. Plaats dan het uiteinde van het negatief
in de SLEUF VOOR FILMHOUDER aan de rechterkant van het
apparaat. Draai het FILMROLHOUDER tegen de klok in, terwijl u
het negatief voorzichtig in de sleuf begeleid. (Als u terug wilt gaan
naar een vorig fragment of wanneer de negatiefstrook vastloopt,
draait u het FILMROLHOUDER tegen de klok in, terwijl u het
negatief voorzichtig uit de sleuf trekt.)
Opmerking: De negatiefstrook moet minstens drie frames lang
zijn. Anders bestaat de kans dat deze in het apparaat vastloopt. Als
een negatiefstrook vastloopt in het apparaat, kunt u deze losmaken door de bijgeleverde
terughaalstrook in de SLEUF VOOR FILMHOUDER te steken.
c. Als u een enkele negatief frame wilt scannen, plaats deze in de bijgeleverde enkele framehouder
6. De huidige afbeelding zal worden weergeven op de monitor. Voordat u de afbeelding vastlegt, kunt u:
7. Leg de afbeelding vast door op SCAN/HOME te drukken. Een "disc” pictogram zal verschijnen om te
en plaats deze in de SLEUF VOOR FILMHOUDER aan de bovenkant van het apparaat.
a. deze heroriënteren door op de UP/MIRROR of DOWN/FLIP knoppen te drukken.
b. selecteren uit drie verschillende kleurinstellingen (kleur, negatief en zwart/wit) door op ENTER te
drukken.
bevestigen dat de afbeelding is bewaard.
29
Page 30
Het overzetten van uw afbeeldingen van de SD-kaart naar uw computer:
1. In het hoofdmenu, gebruik de UP/MIRROR en DOWN/FLIP knoppen om
de USB Connect Mode te selecteren, en druk dan op ENTER knop.
Opmerking: Terwijl de OMNI SCAN in de USB Connect Mode staat, zult
u geen andere afbeeldingen kunnen scannen. Om weer te kunnen
scannen, druk op SCAN/HOME knop en selecteer dan Capture Mode
(vastleggen).
2. OMNI SCAN zal verschijnen als een verwisselbare schijf in Mijn
Computer (Windows) of op uw Bureaublad (Mac). Open deze, klik en
sleep de bestanden van uw afbeeldingen naar de harde schijf van uw
computer.
3. Zodra u klaar bent, drukt u op de OMNI SCAN aan/uit knop om deze uit te
zetten.
Verwijder de SD-kaart om uw afbeeldingen elders te bekijken:
1. Zet OMNI SCAN uit door de aan/uit knop in te drukken.
2. Verwijder de SD-kaart door deze eerst in te drukken en daarna uit de sleuf te trekken.
3. Om uw afbeeldingen te bekijken, steekt u de SD-kaart in een SD-compatibel apparaat, zoals een digitale
fotolijst, computer of TV.
BEDIENING EN KENMERKEN
Bij het bekijken van menu's met meerdere opties kan met de knoppen UP/MIRROR en DOWN/FLIP door de
opties gebladerd worden en kan op ENTER knop te worden gedrukt om er één te selecteren.
HOOFDMENU
1. Capture Mode (vastleggen): Vastleggen van afbeeldingen.
De OMNI SCAN schakelt automatisch naar deze modus
wanneer er 5 seconden niet op een knop wordt gedrukt.
2. Playback Mode (afspelen): Bekijken van uw afbeeldingen.
3. USB Connect Mode (USB-modus): Via USB overzetten van
afbeeldingen naar een aangesloten PC. Wanneer de
afbeeldingen op de PC staan kunt u deze naar wens bekijken
en bewerken.
4. Setup Mode: Hiermee kunt u verschillende instellingen voor
het apparaat selecteren, zoals afbeeldingresolutie, taal, enz.
Indien er geen SD-kaart in de SD-Kaart Sleuf zit, zal er “No Card”
op het scherm verschijnen en de gescande afbeeldingen worden vervolgens worden opgeslagen in het interne
geheugen van het apparaat (16MB).
1
2
3
4
30
Page 31

Capture Mode (vastleggen)
In de Capture Mode, drukt u op SCAN/HOME om
de afbeelding te scannen. U kunt de oriëntatie van
uw afbeelding veranderen door op de
UP/MIRROR of DOWN/FLIP knoppen te drukken
voordat u gaat scannen.
Voordat u de afbeelding vastlegt, kunt u:
a. deze heroriënteren door op de UP/MIRROR of DOWN/FLIP knoppen te
drukken.
b. selecteren uit drie verschillende kleurinstellingen (kleur, negatief en
zwart/wit) door op ENTER te drukken.
c. de belichting veranderen door de ENTER knop voor 2 seconden in te
drukken, waarbij u de UP/MIRROR of DOWN/FLIP knoppen gebruikt om
een nieuwe belichting te selecteren.
Leg uw afbeelding vast door op SCAN/HOME te drukken. Een "disc” pictogram
zal verschijnen om te bevestigen dat de afbeelding is bewaard.
Playback Mode (afspelen)
Wanneer u naar deze modus schakelt, worden uw vastgelegde afbeeldingen
weergegeven in een diapresentatie, waarbij u ze kunt bekijken en/of bewerken.
Om de diapresentatie te stoppen, drukt u op knop ENTER.
Na het stoppen van de diapresentatie kan met de knoppen UP/MIRROR en
DOWN/FLIP één voor één door de opgeslagen afbeeldingen worden gebladerd.
Druk op knop ENTER om er één uit te kiezen om te bewerken.
In deze modus heeft u de volgende menuopties.
1. Rotate Left (links roteren): Afbeelding 90° tegen de klok in roteren.
2. Rotate Right (rechts roteren): Afbeelding 90° met de klok mee roteren.
3. Delete (verwijderen): Afbeelding van de SD-kaart (of interne geheugen
van het apparaat ) verwijderen.
U kunt ook de volgende knoppen op de OMNI SCAN gebruiken:
1. ENTER: Terugkeren naar de diapresentatie.
2. SCAN/HOME: Terugkeren naar het Main Menu (hoofdmenu).
31
Page 32

USB Connect Mode (USB-Modus)
In USB-modus kunnen afbeeldingen van de SD-kaart direct naar de PC worden
overgezet. De OMNI SCAN wordt bij gebruik in deze modus een SD-kaartlezer
voor de PC. Om te schakelen naar USB-modus, sluit u de OMNI SCAN met de
bijgeleverde USB-kabel aan op de USB-poort van uw PC. Selecteer hierna het
pictogram USB uit het Main Menu (hoofdmenu) van de OMNI SCAN. Er hoort
een USB-pictogram op de monitor te verschijnen dat aangeeft dat verbinding is
gemaakt. OMNI SCAN zal als apparaat voor verwisselbare opslag in “Computer”
(Windows) of op uw bureaublad (Mac) verschijnen.
N.B.: Terwijl de OMNI SCAN in de USB Connect Mode staat, zult u geen andere
afbeeldingen kunnen scannen. Om weer te kunnen scannen, druk op
SCAN/HOME knop en selecteer dan Capture Mode (vastleggen).
Setup Mode
In de Setup Mode, kunt u de volgende instelling van de OMNI SCAN aanpassen.
Gebruik de UP/MIRROR en DOWN/FLIP knoppen om de gewenste opties te
selecteren en druk op ENTER om uw keuze te bevestigen.
• Resolution (Resolutie): Kies uit interpolatie resolutie van 5 megapixels of
10 megapixels.
• Language (Taal): Kies uit Engels, Frans, Duits, Italiaans, Spaans,
Traditioneel Chinees, Vereenvoudigd Chinees en Japans.
• Formaat: Deze optie formatteert de ingestoken SD-kaart (of het interne
geheugen, indien geen SD-kaart is geplaatst), welke alle inhoud zal
verwijderen. Selecteer “Yes” om te bevestigen of “No” om te annuleren.
• FW Upgrade: Als een ingestoken SD-kaart een geupdate firmware-
bestand voor de OMNI SCAN bevat, zal deze optie toelaten dat OMNI
SCAN deze firmware upload. Selecteer “Yes” om te bevestigen of “No”
om te annuleren.
• Default (standaard): Deze optie zal ervoor zorgen dat OMNI SCAN naar
de oorspronkelijke instellingen terugkeert. Selecteer “Yes” om te bevestigen of “No” om te annuleren.
• Version Info (Info Versie): Deze optie zal het model, versie en firmware van de eenheid weergeven.
Druk op ENTER om terug te gaan naar het Setup Mode scherm.
Als u klaar bent, druk dan op SCAN/HOME om naar het hoofdmenu terug te gaan.
32
Page 33

SPECIFICATIONS
Lens: F/3.6, f=4.83
Sensor: 5.1 mega pixels CMOS sensor
Focus Range: 54 mm (2.13")
LCD: 2.36" LTPS
External memory: SD/MMC card
Exposure: Auto
Color balance: Auto
Scan high resolution: 10-megapixel interpolation resolution
Data conversion: 12 bits per color channel
Scan method: Single pass
Light source: Backlight (3 white LED)
Power: Powered from USB / 5V adapter
Interface: USB 2.0
Dimensions: 121 x 96 x 55 mm (4.76" x 3.78" x 2.17")
Weight: 214 g (0.47 lbs.)
Language: English , French, German, Italian, Spanish, Traditional Chinese,
Simplified Chinese, or Japanese.
www.ionaudio.com/omniscan
ION Audio, LLC
Tel: (U.S.) 401.658.3743
Web: www.ionaudio.com/supporthome
Page 34

Page 35

Page 36

www.ionaudio.com
Made in China
MANUAL VERSION 1.3
 Loading...