

Page 1
iPTUSB PORTABLE TURNTABLE
Quick Start Owner’s Manual
ENGLISH :::
Manual de inicio rápido del usuario
ESPAÑOL :::
Kurzbedienungsanleitung
DEUTSCH :::
Guide d’utilisation simplifié
FRANÇAIS :::
Manuale rapido di utilizzazione
ITALIANO :::
Page 2

Page 3
(ENGLISH) QUICK START GUIDE
BOX CONTENTS
• iPTUSB
• POWER ADAPTER
• USB CABLE
INTRODUCTION
The USB turntable connects directly to your computer to turn your treasured vinyl recordings into digital music. We
have included software to aid you in converting your vinyl recordings:
EZ Vinyl Converter is the quickest and easiest way to turn your recordings into digital media. EZ Vinyl
Converter conveniently saves your recordings in your iTunes library. Novice users may find this application
preferable. We have included a handy Quickstart Guide with step-by-step instructions on software installation
and operation.
To install the software: simply insert the included CD into your computer and follow the on-screen instructions. After
you finish converting your vinyl, you can then burn to CD or load onto portable media devices.
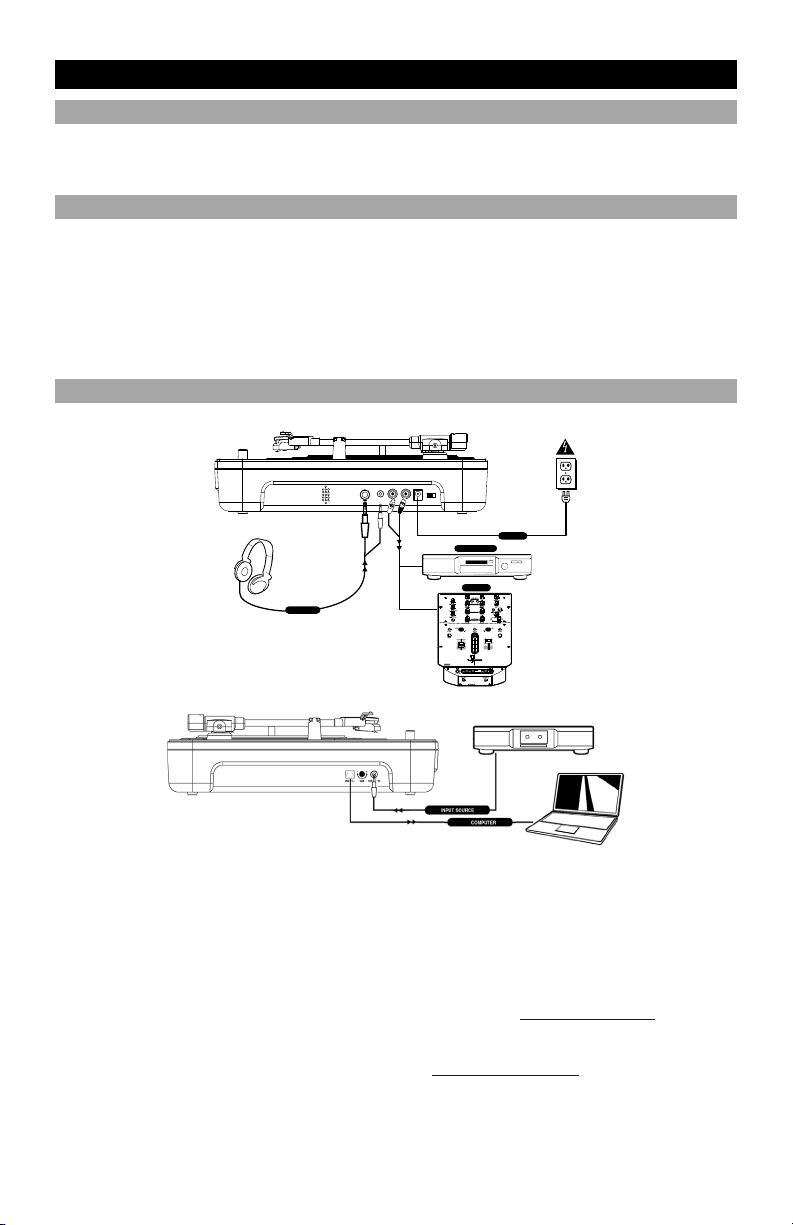
CONNECTION DIAGRAM
DJ HEADPHONE
• SOFTWARE INSTALLATION CD
• iPTUSB QUICKSTART MANUAL
• EZ VINYL CONVERTER QUICKSTART GUIDE
POWER
AUDIO RECORDER
MIXER
1. Make sure all items listed on the front of this
guide are included in the box.
2. READ SAFETY INSTRUCTION BOOKLET
BEFORE USING THE PRODUCT.
3. Study this setup diagram.
Note: This turntable can be used as a standalone
unit, as well as with the items listed in the quick
setup diagram.
4. Make sure all devices are turned off and all faders
and gain knobs are set to “zero”
5. Connect all stereo input sources as indicated in
the diagram.
6. Connect the stereo output devices to power
amplifier(s), tape decks, and/or other audio
sources.
7. Plug all devices into power.
NORMAL
FLANGER
AUTOCUT
LOPASS
LR
RATE
RATE
FILTERS
AUTOPAN
FILTERED
VARI-CUT
8. Switch everything on in the following order.
• Turntable
• Mixer (not included)
• last, any amplifiers or output devices (not
9. When turning off, always reverse this operation
10. Go to http://www.ion-audio.com
More information about this product may be found at
http://www.ion-audio.com
included)
by,
• turning off amplifiers (not included)
• mixer (not included)
• Turntable
registration.
for product
Page 4
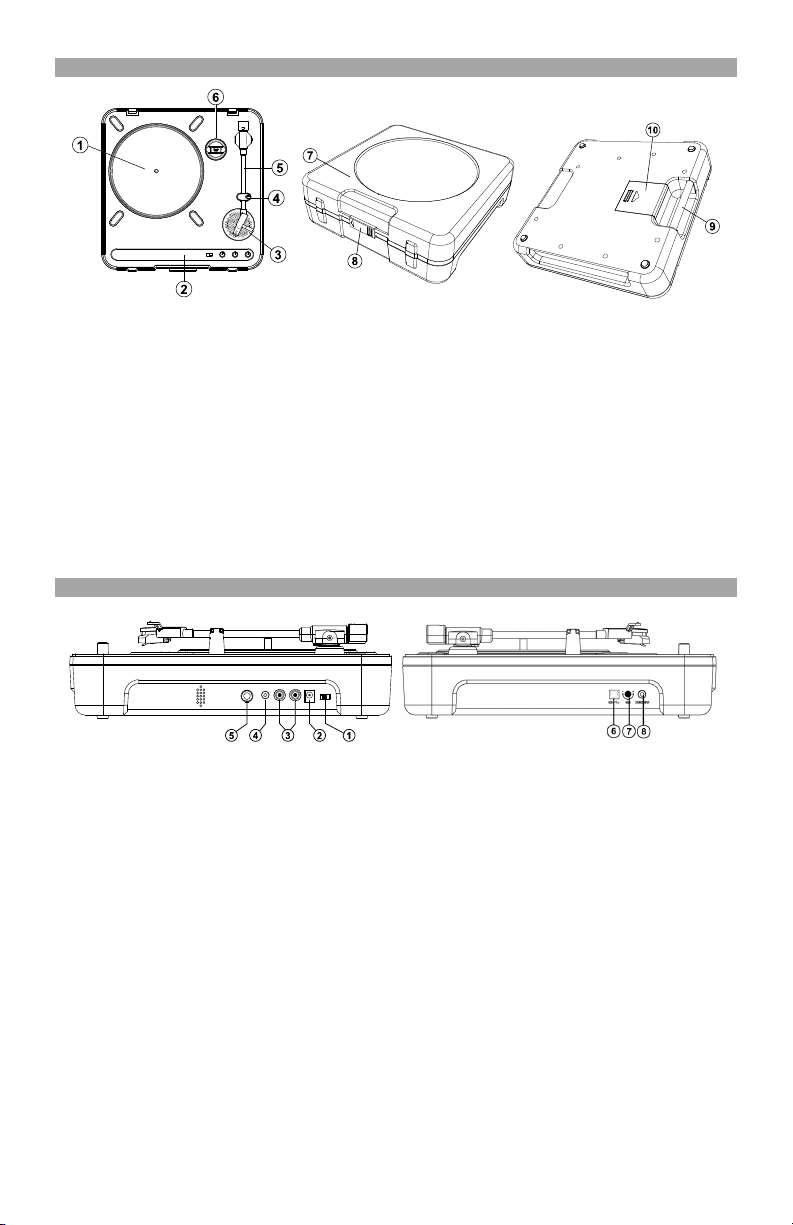
PRODUCT FEATURES
1. Platter: Place your record on the platter.
2. Control Panel: Please see the alternate
detailed section on the control panel features.
3. On Board Speaker: Use this speaker to
listen to the audio.
4. Tone Arm Clip: Use this clip to secure your
tonearm when storing and transporting the
unit.
5. Tonearm: This unit comes with a ready to
use pre-balanced tonearm and cartridge. The
cartridge is user replaceable with parts from
your distributor located in the warranty guide.
The platter starts spinning once the
tonearm is lifted over the record.
6. 45 Adapter: Use this adapter with 45 rpm
records.
OUTPUT PANEL FEATURES
Power Switch: Use this switch to turn the power on
1.
and off.
2. AC In: This turntable is designed to work with either
batteries or the power supply cord that comes with
it. While the power is switched off, plug the power
supply into the turntable first, then plug it into the
wall power outlet, then switch on. NOTE: This unit
can also be powered by 6 “D” Cell batteries (Not
Included).
3. Master Output (RCA): This “line level” output is for
connecting to the input of an external audio device
such as a DJ mixer, tape recorder, CD Burner, PA
system, powered speaker, or a home stereo. The
level of the master stereo output signal is controlled
by the audio level control.
4. 1/8” Headphone Jack: Use this jack with the 1/8”
mini headphone plug. NOTE: Be sure the volume
control is set to the OFF position before plugging in
any headphones to avoid permanent hearing
damage.
5. 1/4” Headphone Jack: Use this jack with the 1/4”
headphone plug. NOTE: Be sure the volume control
is set to the OFF position before plugging in any
headphones to avoid permanent hearing damage.
7. Dust Cover: This cover protects the turntable from
dust and abuse while not in use or while in
transport.
8. Dust Cover Latch: This latch holds the dustcover
securely in place, and can easily be opened by
sliding it to the left.
9. Carry Handle: Use this handle easily remove the
unit from record crates and bags, as well as carrying
it in transport.
10. Battery Cover: This holds the batteries securely in
place during use and transport. It easily slides open
and closed as indicated on the cover itself.
NOTE: This unit uses 6 “D” cell batteries (not
included). They should be installed in the proper
direction indicated.
6. USB Audio Output: Use the included USB Cable
to connect your turntable to your computer. Refer to
the software instruction guide before plugging in
your turntable.
7. Gain: This knob can be used to adjust the gain level
of the audio signal from the turntable. If the audio
from the turntable is too quiet or too loud, use this
knob to adjust the volume setting.
8. 1/8” Stereo Line Input: Connect Tape Players,
Reel to Reel, or any other audio source here. This
signal is sent to the computer through the USB
connection. Make sure that your phono cartridge
is installed while using this input for maximum
sound quality. Also make sure that your RCA
jacks are either plugged into an input device or not
in contact with metal.
Note: The 1/8" audio input is not routed to the
turntable's RCA output jacks, only to your computer
via USB.
Page 5
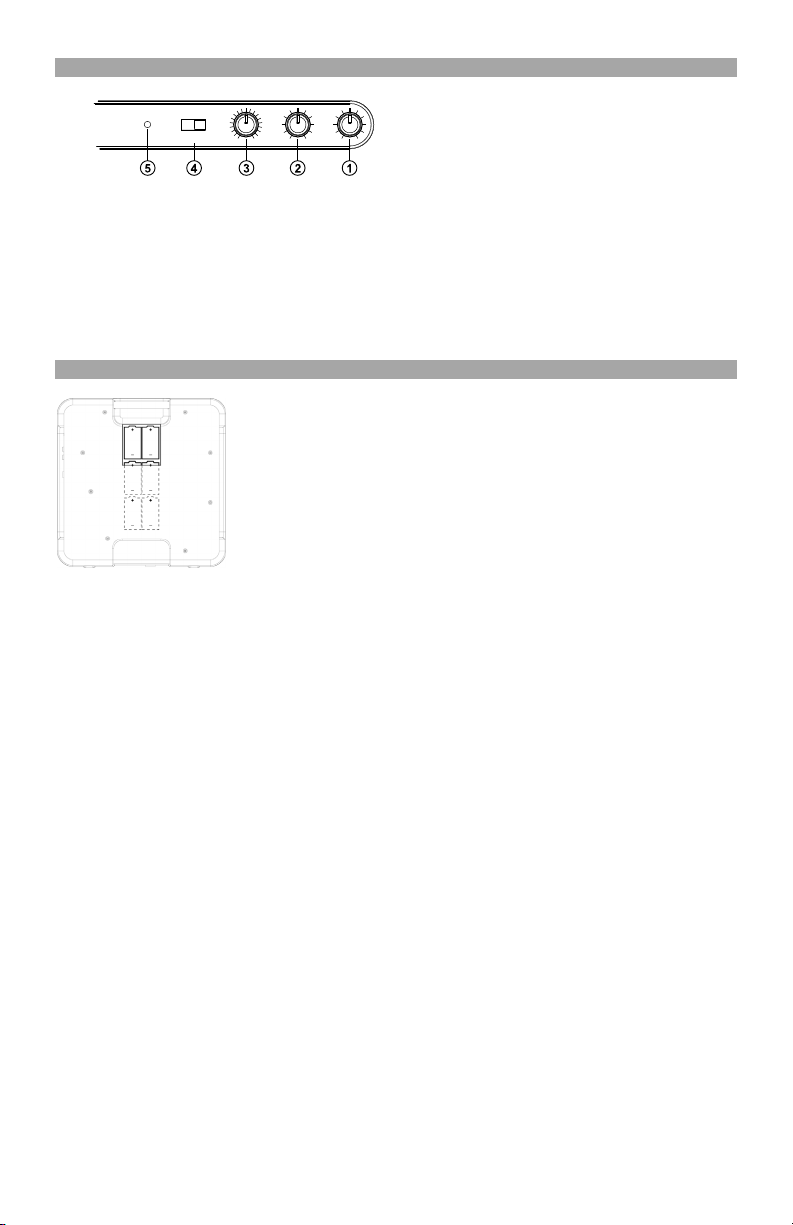
CONTROL PANEL FEATURES
1. Audio Level Control: This rotary control
2. Tone Control: This feature allows you to
BATTERY INSTALLATION
POWER
adjusts the volume level of the onboard
speaker, headphone and line out outputs.
NOTE: Make sure the Audio Level Control is
set to OFF when connecting any alternate
audio output devices.
adjust the low and high frequency audio
levels.
PITCH
RPM
33
7845
TONE
AUDIO
-10%
+10%
LOW HIGH
OFF
This product can be powered by 6 “D” Cell batteries. They should be loaded as show
above, with the positive end toward the handle.
3. Pitch Control: This knob adjusts the pitch of
the music +/- 10%. In the center position the
pitch is at 0%.
NOTE: In order for the pitch to be adjusted,
the tempo also changes according to what the
pitch setting.
4. RPM Selection Switch: This switch selects
the RPM of the turntable platter -- 33, 45, and
78 RPM.
5. Power LED: This LED indicates that the
power switch on. Make sure the power is off
when storing or transporting the unit, to avoid
wasting battery power.
Page 6

(ESPAÑOL) MANUAL DE COMIENZO RÁPIDO DEL LECTOR
CONTENIDO DE LA CAJA
• IPTUSB
• TRANSFORMADOR DE CORRIENTE
• CORDÓN USB
INTRODUCCIÓN
El giradiscos USB se conecta directamente a su computadora para convertir sus valiosos vinilos en música digital.
Hemos incluido software para ayudarle a convertir sus grabaciones de vinilo:
EZ Vinyl Converter es la forma más rápida y fácil de convertir las grabaciones en medios digitales. Este
software guarda convenientemente sus grabaciones en la biblioteca de iTunes. Es posible que los usuarios
novicios prefieran esta aplicación. Incluidos una práctica Guía de inicio rápido con instrucciones paso a paso
sobre la instalación y la operación del software.
Para instalar el software: inserte simplemente el CD incluido en la computadora y siga las instrucciones de la
pantalla. Después de terminar de convertir su vinilo, puede quemarlo en CD o cargarlo en dispositivos de medios
portátiles.
• CD DE INSTALACIÓN
• MANUAL DE INICIO RÁPIDO DE IPTUSB
• MANUAL DE INICIO RÁPIDO DE EZ VINYL CONVERTER
POWER
AUDIO RECORDER
MIXER
DJ HEADPHONE
1. Asegúrese de que todos los artículos incluidos al
inicio de este manual están incluidos en la caja.
2. LEA LAS INSTRUCCIONES DEL FOLLETO DE
SEGURIDAD ANTES DE UTILIZAR EL PRODUCTO.
3. Estudie este diagrama de instalación.
Nota: Este giradiscos puede utilizarse como unidad de
instalación local además de ser utilizado junto con los
artículos enumerados en el diagrama de instalación
rápida.
4. Asegúrese de que todos los dispositivos están
apagados y de que todos los faders y potenciómetros
de ganancia están en posición «cero».
5. Conecte todas las fuentes de entrada al estéreo como
se indica en el diagrama.
6. Conecte los dispositivos de salida del estéreo a los
amplificadores de alimentación, unidades de cinta
magnética y/o otras fuentes de audio.
AUTOCUT
LOPASS
NORMAL
FLANGER
LR
RATE
RATE
FILTERS
AUTOPAN
FILTERED
VARI-CUT
7. Enchufe todos los dispositivos a la fuente de
electricidad.
8. Prenda todo en el siguiente orden:
• el giradiscos
• el mezclador (no incluido)
• por último, cualquier amplificador o dispositivo de
salida (no incluido)
9. Al apagar, realice siempre esta operación al contrario:
• apague los amplificadores (no incluidos)
• el mezclador (no incluido)
• el giradiscos
10. Visite http://www.ion-audio.com para registrar el
producto.
Puede encontrar más información sobre este producto al
visitar http://www.ion-audio.com
Page 7

CARACTERÍSTICAS DEL PRODUCTO
1. Plato: Coloque su disco en el plato.
2. Panel de control: Por favor, véase la sección
detallada sobre las características del panel de
control.
3. Altavoz integrado: Use este altavoz para
escuchar el audio.
4. Clip del brazo de lectura: Utilice esta pinza (clip)
para proteger su brazo de lectura cuando guarde
o transporte la unidad.
5. Brazo de lectura: Esta unidad incluye un brazo
de lectura y una cápsula previamente
balanceados listos para usar. LA cápsula puede
ser reemplazada por el usuario con partes
procedentes del distribuidor que aparece en la
guía de garantía. El plato comienza a girar una
vez que el brazo de lectura penda sobre el disco.
6. Adaptador de 45: Utilice este adaptador con
discos de 45 rpm.
CARACTERÍSTICAS DEL PANEL DE SALIDA
7. Cubierta antipolvo: Esta cubierta protege el giradiscos
del polvo y la falta de uso mientras no se esté usando o
mientras se esté transportando.
8. Pestillo de la cubierta antipolvo: Este pestillo sostiene
la cubierta antipolvo de forma segura y puede abrirse
fácilmente desplazándolo hacia la izquierda.
9. Asa de transporte: Use este asa para fácilmente retirar
la unidad de los cajones y bolsas de discos además de
para transportarla.
10. Cubierta para pilas: Mantiene las pilas en su lugar de
forma segura durante el uso y transporte. Se abre y
cierra fácilmente tal y como se indica en la misma
cubierta.
NOTA: Esta unidad utiliza 6 pilas tipo «D» (no
incluidas).Deberían ser instaladas en la dirección que se
indica.
Interruptor de alimentación: Use este interruptor
1.
para encender y apagar la unidad.
2. AC In (Entrada de corriente alterna): Este giradiscos
está diseñado para funcionar tanto con pilas como con
el cable eléctrico que viene incluido. Mientras la
alimentación esté apagada, enchufe primero el
suministro eléctrico al giradiscos; a continuación,
enchúfelo a la toma de corriente de la pared y
enciéndalo. NOTA: Esta unidad funciona con 6 pilas
tipo «D» (no incluidas).
3. Salida Master (RCA): Esta salida de «nivel de línea»
sirve para la conexión a la salida de un dispositivo
externo de audio, como por ejemplo, un mezclador
para DJ, una grabadora de casete, una grabadora de
CD, un sistema PA, altavoces de potencia o un
estéreo doméstico. El nivel de la señal de salida del
estéreo principal está controlado por el control de nivel
de audio.
4. Jack de auriculares de 1/8”: Utilice este conector con
la entrada mini de 1/8”. NOTA: Asegúrese de que el
control del volumen está en posición OFF antes de
conectar los auriculares para prevenir daño auditivo
permanente.
5. Jack de auriculares de 1/4”: Utilice este conector con
la entrada de 1/4”. NOTA: Asegúrese de que el control
del volumen está en posición OFF antes de conectar
los auriculares para prevenir daño auditivo
permanente.
6. Salida de audio USB: Use el cable USB incluido para
conectar su giradiscos a su computadora. Consulte la
guía de instrucciones de software incluido en el CD
antes de enchufar el giradiscos.
7. Ganancia: Esta perilla se puede usar para ajustar el
nivel de ganancia de la señal de audio del giradiscos.
Si el audio del giradiscos es demasiado bajo o fuerte,
úsela para ajustar el nivel de volumen.
8. Entrada de línea estéreo de 1/8”: Puede conectar
aquí reproductores de casetes y cintas o cualquier otra
fuente de audio. Esta señal se envía a la computadora
por el USB. Asegúrese de que su cápsula fonográfica
esté instalada cuando usa esta entrada, para lograr la
máxima calidad del sonido. Asegúrese también de que
sus jacks RCA estén enchufados a un dispositivo de
entrada o que no estén en contacto con partes
metálicas. Nota: La entrada de audio de 1/8" no se
encamina a los conectores de salida RCA del
giradiscos, sino sólo a su computadora mediante USB
Page 8

CARACTERÍSTICAS DEL PANEL DE CONTROL
PITCH
RPM
POWER
33
7845
INSTALACIÓN DE LAS PILAS
TONE
AUDIO
-10%
+10%
LOW HIGH
Este producto funciona con 6 pilas tipo «D». Deberían ser instaladas como se muestra en
el dibujo de arriba, con el extremo positivo apuntando hacia el asa.
OFF
Control del nivel de audio: Este control
1.
rotativo ajusta el nivel del volumen del altavoz
integrado, de los auriculares y de las salidas de
línea hacia el exterior. NOTA: Asegúrese de que
el control de nivel de audio está en posición OFF
cuando conecte algún dispositivo de salida de
audio alternativo.
2. Control del tono: Esta función le permite
ajustar la alta o baja frecuencia de los niveles de
audio.
3. Control del pitch: Este botón ajusta el pitch
de la música a +/-10%. En la posición central, el
pitch está al 0%.
NOTA: Para que el pitch pueda ser ajustado, el
tempo también debe cambiar según el ajuste del
pitch.
4. Interruptor de selección de rpm: Este
interruptor selecciona las revoluciones por
minuto (rpm) del plato: 33, 45 y 78 rpm.
5. LED de activación: Este LED indica que el
interruptor de alimentación está encendido.
Asegúrese de que la unidad está apagada
cuando la guarde o la transporte para evitar
malgastar la carga de las pilas.
Page 9

INHALT DER VERPACKUNG
• iPTUSB
• NETZTRAFO
• USB KABEL
EINFÜHRUNG
Der USB Turntable wird direkt mit dem Computer verbunden, um Ihre wertvollen Vinylaufnahmen in digitale Musik
umzuwandeln. Um Ihnen bei der Konvertierung zu helfen, liegen dem Gerät Software bei:
EZ Vinyl Converter ist der schnellste und einfachste Weg zur Digitalisierung Ihrer Schallplatten. EZ Vinyl Converter
speichert Ihre Aufnahmen direkt in Ihrer iTunes Bibliothek. Anwender, die zum ersten Mal Musik auf dem Computer
aufnehmen, werden dieses Programm als völlig ausreichend für ihre Zwecke empfinden. In einer übersichtlichen
Schritt-für-Schritt Kurzanleitung erfahren Sie alles über die Installation und die Verwendung des Programms.
Zur Softwareinstallation legen Sie einfach die mitgelieferte CD in das CD-ROM Laufwerk Ihres Computers und folgen den
Anweisungen im Bildschirm des Computers. Nach der Aufnahme Ihrer Schallplatten können Sie Ihre Titel auf CD brennen
oder sie auf portable Musik-Player laden.
(DEUTSCH) Schneller Start
• INSTALLATIONS-CD
• iPTUSB Kurzanleitung
• EZ VINYL CONVERTER KURZANLEITUNG
POWER
AUDIO RECORDER
MIXER
DJ HEADPHONE
1. Überprüfen Sie, dass sich alle auf der Vorderseite
dieser Anleitung aufgeführten Teile in der Verpackung
befinden.
2. LESEN SIE DIE BROSCHÜRE MIT DEN
SICHERHEITSHINWEISEN, BEVOR SIE DAS
PRODUKT BENUTZEN.
3. Sehen Sie sich dieses Aufbaudiagramm genau an.
Hinweis: Der Plattenspieler kann sowohl als
unabhängiges Gerät als auch in Verbindung mit den
im Aufbaudiagramm aufgeführten Geräten verwendet
werden.
4. Stellen Sie sicher, dass alle Geräte ausgeschaltet sind
und alle Fader und Verstärkungsregler auf “null”
stehen
5. Schließen Sie alle Stereoquellen wie im Diagramm
gezeigt an.
6. Schließen Sie an die Stereoausgänge den (die)
Verstärker, Kassettendecks und/oder andere
Tonquellen an.
NORMAL
FLANGER
AUTOCUT
LOPASS
RATE
LR
RATE
FILTERS
AUTOPAN
VARI-CUT
FILTERED
7. Schließen Sie alle Geräte an das Stromnetz an.
8. Schalten Sie alles in der folgenden Reihenfolge ein.
• Plattenspieler
• Mischpult (nicht beinhaltet)
• zuletzt vorhandene Verstärker oder
9. Beim Ausschalten drehen Sie diese Reihenfolge
10. Besuchen Sie die Webseite http://www.ion-audio.com
Weitere Informationen über dieses Produkt können auf
der Webseite http://www.ion-audio.com
werden.
Ausgabegeräte (nicht beinhaltet)
jeweils um, indem Sie,
• die Verstärker (nicht beinhaltet)
• das Mischpult (nicht beinhaltet)
• den Plattenspieler ausschalten
um das Produkt zu registrieren.
gefunden
Page 10

BESTANDTEILE DES GERÄTS UND DEREN FUNKTION
1. Plattenteller: Legen Sie Ihre Schallplatte auf den
Plattenteller.
2. Bedienleiste: Diese wird nachstehend separat
beschrieben.
3. Eingebauter Lautsprecher: Durch diesen kann
der Ton abgehört werden.
4. Tonarmklemme: Diese Klemme dient dazu, den
Tonarm während Ruhezeiten und beim Transport
des Geräts zu arretieren.
5. Tonarm: Dieses Gerät wird mit einem
gebrauchsfertigen, bereits ausbalancierten
Tonarm mit Tonabnehmergehäuse geliefert. Sie
können das Tonabnehmergehäuse selbst
auswechseln. Verwenden Sie hierzu Teile von
Händlern, welche in Ihrer Garantiebeschreibung
aufgeführt sind. Der Plattenteller beginnt sich
zu drehen, sobald der Tonarm über die
Schallplatte gehoben wird.
BEDIENELEMENTE RÜCKSEITE
1. Netzschalter: Dient zum Ein- und Ausschalten des
Geräts.
2. Wechselstrom-Ein: Dieser Plattenspieler kann
entweder durch Batterien betrieben werden oder durch
Anschluss des mitgelieferten Netzkabels. Schließen
Sie das Netzkabel an den Plattenspieler im
ausgeschalteten Zustand an, stecken Sie das Kabel
dann in die Steckdose und schalten Sie das Gerät ein.
HINWEIS: Das Gerät kann auch mit 6 “D”-ZellenBatterien betrieben werden (nicht enthalten).
3. Master-Ausgang (RCA): Dieser “Line-Pegel”-Ausgang
dient zum Anschluss an den Eingang eines externen
Tongeräts wie z. B. eines DJ-Mischpults,
Kassettendecks, CD-Brenners, PA-Systems, aktiven
Monitors oder einer Stereoanlage. Der Pegel des
Master-Stereoausgangssignals wird über den
Tonpegelregler gesteuert.
4. 3,2 mm Kopfhörerbuchse: Zur Verwendung eines 3,2
mm-Ministecker für Kopfhörer. HINWEIS: Stellen Sie
den Lautstärkenregler immer in die AUS-Stellung
bevor Sie einen Kopfhörer anschließen, um keinen
dauernden Hörschaden zu erleiden.
5. 6,3 mm Kopfhörerbuchse: Zur Verwendung von 6,3
mm- Kopfhörersteckern. HINWEIS: Stellen Sie den
6. 45-Mittelstück: Zur Verwendung mit 45-Rpm-Platten.
7. Abdeckhaube: Diese Abdeckung schützt den
Plattenspieler vor Verschmutzung und Missbrauch
während dieser nicht verwendet oder transportiert wird.
8. Schnallenverschluss für Abdeckhaube: Diese
Schließschnalle hält die Abdeckhaube an Ort und Stelle
und kann einfach geöffnet werden, indem man sie nach
links schiebt.
9. Tragegriff: Halten Sie das Gerät am Tragegriff, um es
aus Plattenkisten oder –taschen herauszunehmen und
es beim Transport zu tragen.
10. Batterieabdeckung: Sorgt dafür, dass die Batterien
während des Betriebs und beim Transport nicht
herausfallen können. Sie kann leicht geöffnet werden,
indem sie wie auf der Abdeckung angegeben
verschoben wird.
HINWEIS: Dieses Gerät verwendet 6 “D”-ZellenBatterien (nicht enthalten). Diese sollten
ordnungsgemäß in der angezeigten Richtung eingelegt
werden
Lautstärkenregler immer in die AUS-Stellung bevor Sie
einen Kopfhörer anschließen, um keinen dauernden
Hörschaden zu erleiden.
6. USB Audio Ausgang: Benutzen Sie das mitgelieferte
USB Kabel um den Plattenspieler mit ihrem Computer
zu verbinden. Der iPTUSB ist kompatibel zu USB 1
und USB 2 Anschlüssen. Weitere Informationen zur
Installation und zum Betrieb finden Sie in der auf der
CD enthaltenen Software-Anleitung, die Sie vor der
Verbindung des Turntables mit dem Computer lesen
sollten.
7. Gain: Dieser Regler kann zur Anpassung der
Lautstärke des Signals vom Turntable verwendet
werden. Falls das Audiosignal vom Turntable zu leise
oder zu laut ist, ändern Sie mit diesem Regler den
Pegel.
8. Line in Audio-Eingang: Über diesen Line In Eingang
(3,5 mm Stereo Miniklinke) können externe Geräte
(z.B. ein Kassettendeck) angeschlossen werden, und
deren Audiosignale ebenfalls über den USB
Audioausgang des iTTUSB10 an den Computer
geführt werden.
Page 11

FUNKTIONSELEMENTE DER BEDIENLEISTE
PITCH
RPM
POWER
33
7845
EINSETZEN DER BATTERIEN
TONE
AUDIO
-10%
+10%
LOW HIGH
OFF
Dieses Produkt kann auch von 6 “D”-Zellen-Batterien gespeist werden. Diese
sollten, wie oben gezeigt, mit dem Pluspol in Richtung des Tragegriffs zeigend,
eingelegt werden.
1. Tonpegelregler: Dieser Drehregler steuert die
Lautstärke des eingebauten Lautsprechers, des
Kopfhörers und der Line-Ausgänge. HINWEIS:
Stellen Sie den Tonpegelregler immer auf AUS,
wenn Sie andere Tonausgabegeräte anschließen.
2. Tonsteuerung: Dient zur Einstellung der tiefen und
hohen Tonfrequenzen.
3. Tonhöhensteuerung: Dieser Drehregler stellt die
Tonhöhe der Musik zwischen + und - 10% ein. In
der mittleren Stellung befindet sich die Tonhöhe auf
0%.
HINWEIS: Die Veränderung der Tonhöhe bedeutet
einen der gewählten Tonhöhe entsprechenden
Wechsel im Tempo.
4. RPM-Auswahlschalter: Hier wird die
Umdrehungsgeschwindigkeit des Plattentellers
eingestellt -- 33, 45 und 78 RPM.
5. Netz-Leuchtdiode: Diese Leuchtdiode zeigt an,
dass das Gerät eingeschaltet ist. Versichern Sie
sich, dass das Gerät bei Aufbewahrung oder beim
Transport ausgeschaltet ist, um die Batterien nicht
unnötig zu verschwenden.
Page 12

(FRANÇAIS) GUIDE D’INSTALLATION RAPIDE
CONTENU DE LA BOÎTE
• iPTUSB
• TRANSFORMATEUR DE PUISSANCE
• CÂBLE USB
INTRODUCTION
Le tourne-disque USB se branche directement à un ordinateur afin de transférer vos précieux vinyles au format
numérique. Nous avons inclus du logiciel afin de vous aider à convertir votre musique :
Le EZ Vinyl Converter est la façon la plus rapide et la plus simple de convertir vos enregistrements au média
numérique. Le EZ Vinyl Converter permet également de sauvegarder vos enregistrements dans votre
bibliothèque iTunes. L'utilisateur débutant préférera peut-être cette application pour sa simplicité d'utilisation.
Nous avons inclus un guide d'utilisation simplifié avec des instructions détaillées sur l'installation et le
fonctionnement du logiciel.
Installation du logiciel : Insérez simplement le CD dans le lecteur de votre ordinateur et suivez les instructions à
l'écran. Lorsque vous avez terminé la conversion du vinyle, vous le pouvez graver sur un CD ou le télécharger sur
des lecteurs multimédia portables.
DJ HEADPHONE
• CD D’INSTALLATION
• GUIDE POUR L’iPTUSB
• GUIDE POUR EZ VINYL CONVERTER
POWER
AUDIO RECORDER
MIXER
1. Assurez-vous que tous les articles énumérés sur la
page couverture de ce guide sont inclus dans la boîte.
2. LIRE LE LIVRET DES CONSIGNES DE SÉCURITÉ
AVANT D’UTILISER LE PRODUIT.
3. Examinez bien le schéma d’installation.
Note : Ce tourne-disque peut être utilisé de façon
autonome ou avec les appareils figurant sur la liste du
schéma d’installation.
4. Assurez-vous que tous les appareils sont hors tension
et que tous les atténuateurs et le gain sont réglés à
« zéro ».
5. Connectez toutes les sources d’entrées stéréo tel
qu’indiqué sur le schéma.
6. Brancher tous les appareils à sortie stéréo aux
amplificateurs de puissance, aux lecteurs de cassette
et aux sources audio.
7. Branchez tous les appareils à une prise de courant.
NORMAL
FLANGER
AUTOCUT
LOPASS
RATE
LR
RATE
FILTERS
AUTOPAN
FILTERED
VARI-CUT
8. Mettre tous les appareils sous tension dans l’ordre
suivant :
• Tourne-disque
• Console de mixage (non comprise)
• en dernier, tout amplificateurs ou appareils de
9. Pour mettre hors tension, toujours inverser l’opération,
10. Allez à http://www.ion-audio.com/
Plus d’information sur ce produit est disponible au site
Internet http://www.ion-audio.com
sortie (non compris)
• Éteindre les amplificateurs (non compris)
• Console de mixage (non comprise)
• Tourne-disque
produit.
pour enregistrer le
Page 13

CARACTÉRISTIQUES DU PRODUIT
1. Plateau : Placez un disque sur le plateau.
2. Panneau de commande : Veuillez vous référer
à la section détaillée sur les caractéristiques du
panneau de commande.
3. Enceinte intégrée : Utilisez cette enceinte pour
écouter le signal audio.
4. Serre-bras du bras de lecture : Utilisez le
serre-bras pour bien fixer le bras de lecture pour
le remisage ou le transport.
5. Bras de lecture : L’appareil est livré avec un
bras de lecture équilibré et une cartouche. La
cartouche est remplaçable par des pièces que
vous trouverez chez votre distributeur local dont
vous pouvez obtenir l’adresse dans le guide de
garantie. Le plateau se met à tourner dès que
le bras de lecture est déplacé au-dessus du
plateau.
CARACTÉRISTIQUES DU PANNEAU DE SORTIE
1.
Interrupteur d’alimentation : Permet de mettre
l’appareil sous et hors tension.
2. Entrée alimentation CA : Ce tourne-disque est conçu
pour fonctionner avec des piles ou le câble
d’alimentation fourni. Avec l’appareil hors tension,
branchez le câble d’alimentation dans le tournedisque, ensuite dans la prise de courant, puis mettez
sous tension. NOTE : Cet appareil peut être alimenté
par 6 piles de format « D »(non comprises).
3. Sortie Principale (RCA) : Cette sortie à niveau ligne
sert à relier l’appareil à un appareil audio externe tel
que console de mixage, enregistreur de cassettes,
graveur de disques compacts, système PA, enceinte
amplifiée ou stéréo maison. Le niveau du signal de
sortie stéréo principal est contrôlé par le bouton du
niveau audio.
4. Prise casque d’écoute 1/8 po : utilisez cette prise
avec mini-casques d’écoute à fiches 1/8 po. NOTE :
Veuillez à ce que le réglage du niveau soit à la position
OFF (éteint) avant de brancher un casque d’écoute
pour éviter d’endommager votre ouïe.
5. Prise casque d’écoute 1/4 po : utilisez cette prise
avec les casques d’écoute à fiches ¼ po. NOTE :
Veuillez à ce que le réglage du niveau soit à la position
OFF (éteint) avant de brancher un casque d’écoute
pour éviter d’endommager votre ouïe.
6. Adaptateur 45 rpm : Utilisez cet adaptateur avec les
7. Couvercle anti-poussière : Ce couvercle protège le
8. Verrou du couvercle anti-poussière : Ce verrou
9. Poignée : Utilisez cette poignée pour retirer facilement
10. Couvercle du boîtier des piles : Ce couvercle permet
6. Sortie audio USB : Branchez le tourne disque à votre
7. Gain: Ce bouton peut être utilisé pour régler le niveau
8. Entrée niveau ligne de • po : Il est possible de
disques 45 rpm.
tourne-disque de la poussière et les mauvais traitements
durant le remisage ou le transport.
permet de maintenir le couvercle en place et peut être
facilement ouvert en le glissant vers la gauche.
l’appareil des caisses de disques ou des sacs et
également pour le transporter.
de maintenir les piles en place durant l’utilisation de
l’appareil et également durant le transport. Il s’ouvre et
se referme facilement en glissant tel qu’il est indiqué sur
le dessus du couvercle. NOTE : Cet appareil
fonctionne également avec 6 piles de format « D » (non
comprises). Elles doivent être installées tel qu’il est indiqué.
ordinateur en utilisant le câble USB fourni. Veuillez
consulter le guide d’utilisation du logiciel, inclus sur le
CD, avant de brancher le tourne disque.
d’amplification du signal audio depuis la table
tournante. Si l’audio provenant de la table tournante
est trop discrète ou trop puissante, utilisez ce bouton
pour régler les paramètres du volume.
brancher un lecteur de cassettes, un magnétophone à
bobines ou tout autre source audio à cette prise. Le
signal est acheminé à l’ordinateur par le câble USB.
Pour une qualité sonore optimale, assurez vous que la
cartouche phono est bien installée. Assurez vous
également que les câbles RCA sont branchés dans un
appareil source, ou qu’ils ne sont pas en contact avec
du métal. Remarque : L'entrée audio de 1/8 po n’est
pas routée aux sorties RCA du tourne-disque, mais à
votre ordinateur par le biais du câble USB
Page 14

CARACTÉRISTIQUES DU PANNEAU DE COMMANDE
PITCH
POWER
RPM
33
7845
TONE
AUDIO
-10%
+10%
LOW HIGH
OFF
1. Réglage du niveau audio (AUDIO): Ce bouton
2. Bouton de réglage de tonalité (TONE) : Cette
3. Bouton de réglage de la vitesse (PITCH) : Ce
NOTE : Lorsque la vitesse est modifiée, le tempo est
4. Sélecteur RPM : Ce sélecteur permet de choisir le
5. Témoin d’alimentation : Ce témoin DEL indique
INSTALLATION DES PILES
Cet appareil fonctionne avec 6 piles de format « D ». Les piles doivent être placées
avec les pôles positifs dirigés vers la poignée comme l’indique le schéma.
rotatif ajuste le niveau du volume de l’enceinte
intégrée, de la sortie casque d’écoute et des sorties
ligne. NOTE : Veuillez à ce que le réglage du
niveau audio soit à la position OFF (éteint) avant de
brancher tout autre appareil de signal de sortie
audio.
caractéristique vous permet de régler les niveaux
des basses et hautes fréquences audio.
bouton modifie la vitesse de la musique de +/- 10 %.
Lorsque le bouton est réglé au centre la vitesse est
de 0 %.
automatiquement réglé pour s’ajuster au nouveau
réglage de la vitesse.
RPM du plateau du tourne-disque; 33,45 et 78 RPM.
que l’appareil est sous tension. Veuillez à ce que
l’appareil soit hors tension avant de le remiser ou de
le transporter afin d’éviter de gaspiller les piles.
Page 15

(ITALIANO) MONTAGGIO RAPIDO
CONTENUTO DELLA CONFEZIONE
• iPTUSB
• TRASFORMATORE
• CAVO USB
INTRODUZIONE
Il giradischi USB si collega direttamente al computer per trasformare i tuoi preziosi dischi in vinile in musica digitale.
Per aiutarvi nella conversione dei dischi in vinile, abbiamo incluso software EZ Vinyl Converter:
EZ Vinyl Converter è il modo più facile e veloce di trasformare i tuoi dischi in media digitali. EZ Vinyl
Converter salva comodamente le tue registrazioni nella libreria iTunes. Questa è probabilmente l’applicazione
preferibile per gli utenti alle prime armi. Abbiamo allegato una comoda Guida Rapida con istruzioni passo
passo circa l’installazione e l’uso del software.
Per installare il software: inserire nel computer il CD in dotazione e seguire le istruzioni da schermo. Una volta
terminato di convertire il vinile, lo si può masterizzare su un CD o caricare su dispositivi media portatili.
DJ HEADPHONE
• CD D’INSTALLAZIONE
• GUIDA RAPIDA iPTUSB
• GUIDE RAPIDE EZ VINYL CONVERTER
POWER
AUDIO RECORDER
MIXER
1. Verificate che tutti gli elementi elencati sul frontespizio
di questo manuale siano inclusi nella confezione.
2. PRIMA DI UTILIZZARE IL PRODOTTO LEGGETE IL
LIBRETTO DELLE ISTRUZIONI DI SICUREZZA.
3. Esaminate attentamente lo schema di montaggio.
Attenzione: questo giradischi può essere utilizzato
come apparecchio indipendente, così come gli
elementi elencati nello schema di montaggio rapido.
4. Assicuratevi che tutti i dispositivi siano spenti e che
tutti i fader e le manopole di guadagno siano a "zero”.
5. Collegate tutte le sorgenti d'ingresso stereo come
indicato nello schema.
6. Collegate i dispositivi con uscita stereo agli
amplificatori, piastre e/o altre sorgenti audio.
7. Collegate tutti gli apparecchi alla corrente.
8. Accendete tutto nel seguente ordine:
NORMAL
FLANGER
AUTOCUT
LOPASS
LR
RATE
RATE
FILTERS
AUTOPAN
FILTERED
VARI-CUT
• il giradischi
• il mixer (non incluso)
• per ultimi, eventuali amplificatori o dispositivi di
9. Al momento dello spegnimento, invertite sempre
10. Andate sul sito http://www.ion-audio.com
Troverete ulteriori informazioni riguardo a questo
prodotto sul sito http://www.ion-audio.com
uscita (non inclusi)
questa operazione:
• spegnendo gli amplificatori (non inclusi)
• il mixer (non incluso)
• il giradischi
registrazione del prodotto.
per la
Page 16

CARATTERISTICHE DEL PRODOTTO
1. Piatto: posizionate il disco sul piatto.
2. Pannello di controllo: vedi la sezione dettagliata
supplementare sulle caratteristiche del pannello di
controllo.
3. Altoparlante integrato: usate questo
altoparlante per ascoltare l'audio.
4. Fermabraccio: usate il fermabraccio per fissare il
braccio al momento di riporre e trasportare
l'apparecchio.
5. Braccio: questo apparecchio ha in dotazione un
braccio pre-bilanciato e una cartuccia pronti
all'uso. La cartuccia è sostituibile con ricambi
forniti dal vostro distributore, che potrete trovare
nella guida della garanzia. Quando il braccio
viene sollevato e portato sopra al disco, il
piatto inizia a girare.
6. Adattatore 45 giri: usare questo adattatore con
dischi a 45 giri.
CARATTERISTICHE PANNELLO USCITE
1.
Interruttore di alimentazione: usate questo
interruttore per accendere e spegnere l'alimentazione.
2. AC In: questo giradischi è progettato per funzionare a
batterie o per mezzo di un cavo di alimentazione
fornito in dotazione. Ad alimentazione spenta, inserire
la presa dell'alimentazione innanzitutto nel giradischi,
quindi inserire la spina nella presa a muro e
accendere. ATTENZIONE: questo apparecchio può
anche essere alimentato con 6 batterie di formato "D"
(Non Incluse).
3. Uscita Master (RCA): questa uscita a livello di linea è
per il collegamento all'ingresso di un dispositivo audio
esterno quale un mixer, un registratore, un
masterizzatore, un sistema di diffusione sonora, un
altoparlante o uno stereo. Il livello del segnale di uscita
stereo master è regolato dal comando del livello
dell'audio.
4. Jack cuffie da 1/8": usate questo jack con la presa
piccola da 1/8" delle cuffie. ATTENZIONE: prima di
inserire le cuffie, assicuratevi che il comando di
regolazione del volume sia su OFF per evitare danni
permanenti all'udito.
5. Jack cuffie da 1/4": usate questo jack con la presa da
1/4" delle cuffie. ATTENZIONE: prima di inserire le
cuffie, assicuratevi che il comando di regolazione del
volume sia su OFF per evitare danni permanenti
all'udito.
7. Coperchio antipolvere: questo coperchio protegge il
giradischi dalla polvere e dall'abuso quando
l'apparecchio non è in uso o viene trasportato.
8. Chiavistello del Coperchio Antipolvere: questo
chiavistello fissa saldamente in posizione il coperchio
antipolvere, e può essere facilmente aperto facendolo
scivolare verso sinistra.
9. Maniglia per il trasporto: servitevi di questa maniglia
per estrarre facilmente l'apparecchio dai cartoni dei
dischi o dalle borse, oltre che per trasportarlo.
10. Coperchio batterie: mantiene le batterie saldamente in
posizione durante l'uso e il trasporto. Si apre e si chiude
facilmente scorrendo come indicato sul coperchio
stesso. ATTENZIONE: l'apparecchio impiega 6 batterie
di formato "D" (non incluse). Devono essere installate
nella giusta direzione indicata
6. Uscita Audio USB: servirsi del cavo USB in dotazione
per collegare il giradischi al computer. Fare riferimento
al manuale d´istruzioni del software, incluso sul CD,
prima di procedere al collegamento del giradischi.
7. Gain: questa manopola può essere usata per regolare
il livello di guadagno del segnale audio proveniente dal
giradischi. Se l’audio proveniente dal giradischi è
troppo basso o troppo alto, servirsi di questa manopola
per regolare l’impostazione del volume.
8. Ingresso stereo di linea da 1/8”: collegare lettori di
nastri, dispositivi da bobina a bobina o qualsiasi altra
sorgente audio a questo livello. Questo segnale è
inviato al computer tramite la porta USB. Assicurarsi
che la cartuccia phono sia installata al momento di
utilizzare questo ingresso, per garantire la
massima qualità sonora. Assicurarsi inoltre che i jack
RCA siano inseriti in un dispositivo d´ingresso oppure
non in contatto con superfici metalliche. Nota:
l´ingresso audio da 1/8" non è convogliato ai jack di
uscita RCA del giradischi, bensí solo al computer
tramite USB
Page 17

CARATTERISTICHE PANNELLO DI CONTROLLO
PITCH
POWER
RPM
33
7845
TONE
AUDIO
-10%
+10%
LOW HIGH
OFF
1. Comando del Livello Audio: questa manopola regola
2. Comando del Tono: questa funzione vi permette di
3. Comando del Pitch: questa manopola regola il pitch
ATTENZIONE:affinché il pitch possa essere regolato,
4. Interruttore di selezione RPM (giri): questo
5. LED dell'alimentazione: questo LED indica che
INSTALLAZIONE BATTERIE
Questo prodotto può essere alimentato con 6 batterie di formato "D". Le batterie vanno
inserite come da illustrazione, con il polo positivo rivolto verso la maniglia.
il livello del volume dell'altoparlante integrato, delle
cuffie e delle uscite line out. ATTENZIONE: al
momento di collegare qualsiasi dispositivo di uscita
audio alternativo, assicurarsi che il Comando del Livello
Audio sia su OFF.
regolare i livelli di bassa e alta frequenza audio.
della musica di +/- 10%. In posizione centrale il pitch è
allo 0%.
anche il tempo deve cambiare in base all'impostazione
del pitch stesso.
interruttore seleziona la velocità in RPM (giri) del piatto
del giradischi - 33, 45, e 78 giri.
l'alimentazione è accesa. Al momento di trasportare o di
riporre l'apparecchio, assicuratevi che l'alimentazione
sia spenta, per evitare di sprecare le batterie.
Page 18

Page 19

Page 20

www.ion-audio.com
MANUAL VERSION 2.1
 Loading...