

Page 1

QUICKSTART GUIDE
ENGLISH ( 3 – 12 )
MANUAL DE INICIO RÁPIDO PARA EL USUARIO
ESPAÑOL ( 13 – 22 )
GUIDE D’UTILISATION RAPIDE
FRANÇAIS ( 23 – 32 )
KURZANLEITUNG
DEUTSCH ( 33 – 42 )
MANUALE RAPIDO DI UTILIZZAZIONE
ITALIANO ( 43 – 52 )
SNELSTARTGIDS
NEDERLANDS ( 53 – 62 )
ITALIANO
Page 2

Page 3
QUICK START GUIDE
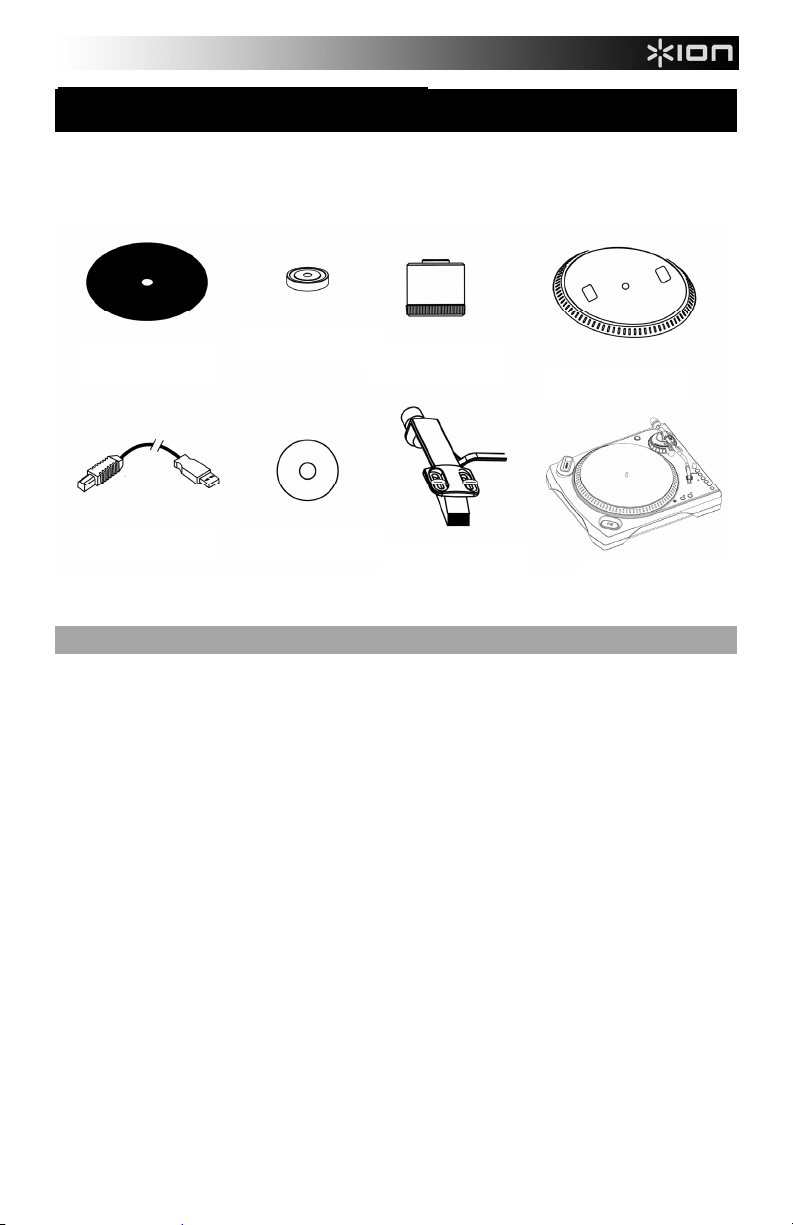
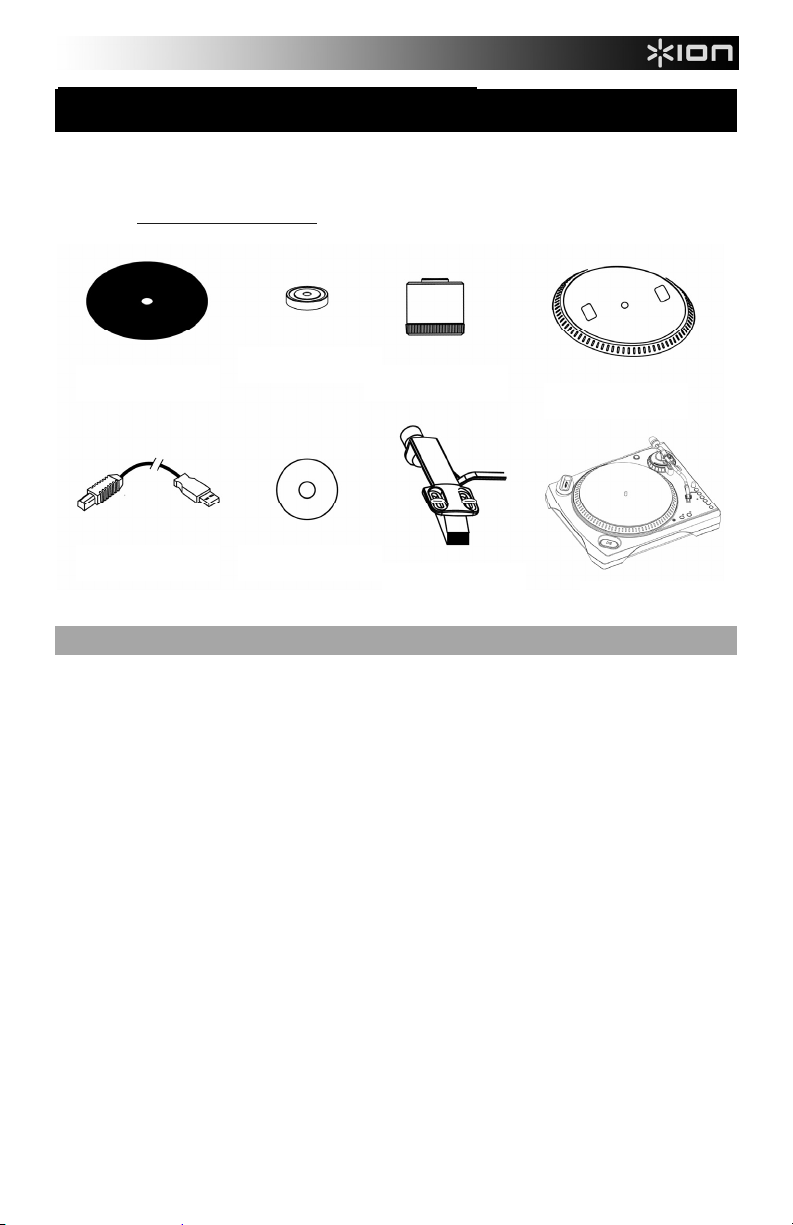
o Make sure that the items listed below are included in the box.
o READ SAFETY INSTRUCTION BOOKLET BEFORE USING THE PRODUCT
o Go to http://www.ion-audio.com for product registration.
45RPM
SLIPMAT
ADAPTER
COUNTERWEIGHT
PLATTER
USB
CABLE
CD
PRE-MOUNTED
CARTRIDGE
LP DOCK
TURNTABLE
INTRODUCTION
The LP Dock is a revolutionary product which allows you to record music from vinyl records and
external audio inputs directly to your iPod*. In addition, the USB turntable connects directly to your
computer to turn your treasured vinyl recordings into digital music. We have included several
software packages to aid you in converting your vinyl recordings: Please note that it is not required to
install any software in order to record directly to your iPod. However, you should install one of the
following applications to take advantage of computer recording:
EZ Vinyl/Tape Converter** (PC only) is the quickest and easiest way to turn your recordings
into digital media. EZ Vinyl/Tape Converter conveniently saves your recordings in your iTunes*
library. Novice users may find this application preferable. On the CD, we have included a
handy Software Quickstart Guide with step-by-step instructions on software installation and
operation.
EZ Audio Converter (Mac only) is a basic converter application for Mac OS X and is ideal for
novice users. Please refer to the included Software Quickstart Guide for step-by-step
instructions on software installation and operation.
Audacity (PC and Mac) is intended for the advanced user. This application allows for advanced
audio editing and processing, such as normalization, noise removal, 78 RPM speed conversion,
and automatic track separation. The Audacity Software Guide can be found on the included CD
– please refer to this guide as you are working with Audacity.
To install the software: simply insert the included CD into your computer and follow the on-screen
instructions.. After you finish converting your vinyl, you can then burn to CD or load onto portable
media devices.
* iTunes and iPod are trademarks of Apple, Inc., registered in the U.S.A. and other countries.
** A version of EZ Vinyl/Tape Converter with Gracenote MusicID is available for download at your product’s page at www.ion-audio.com.
3
Page 4
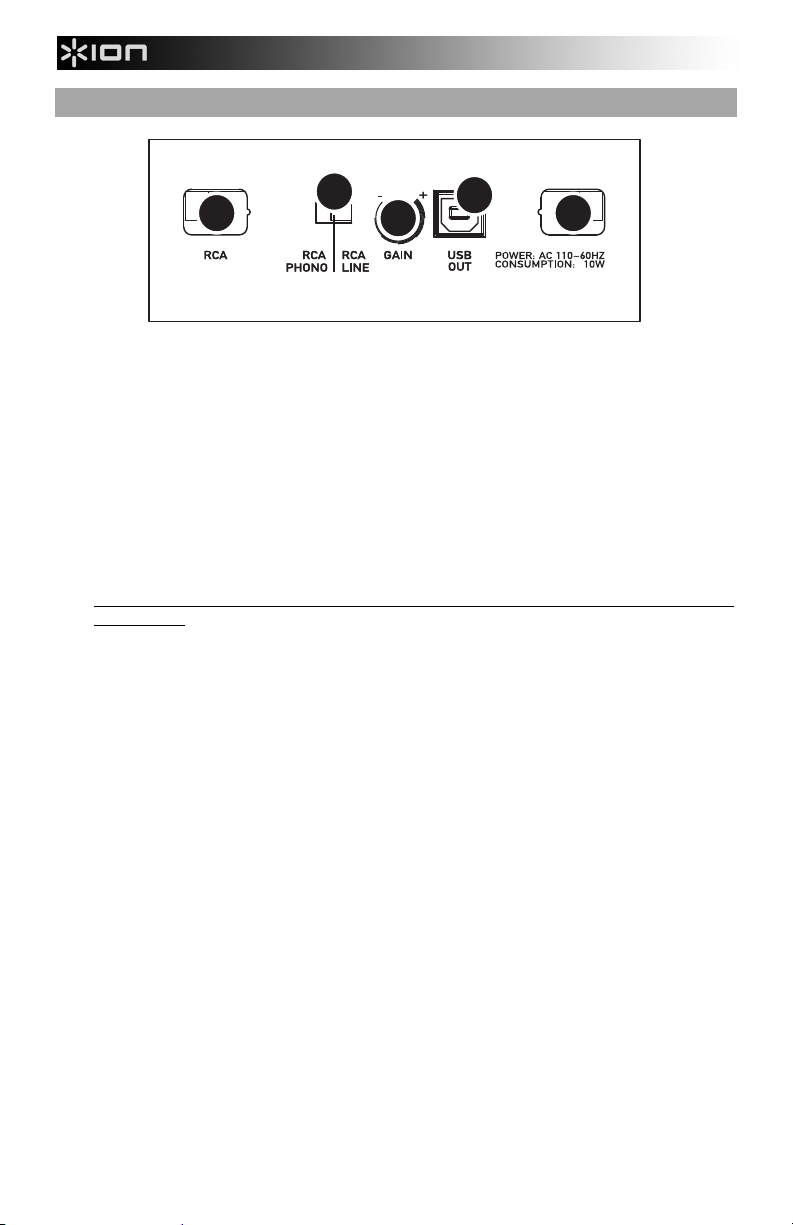
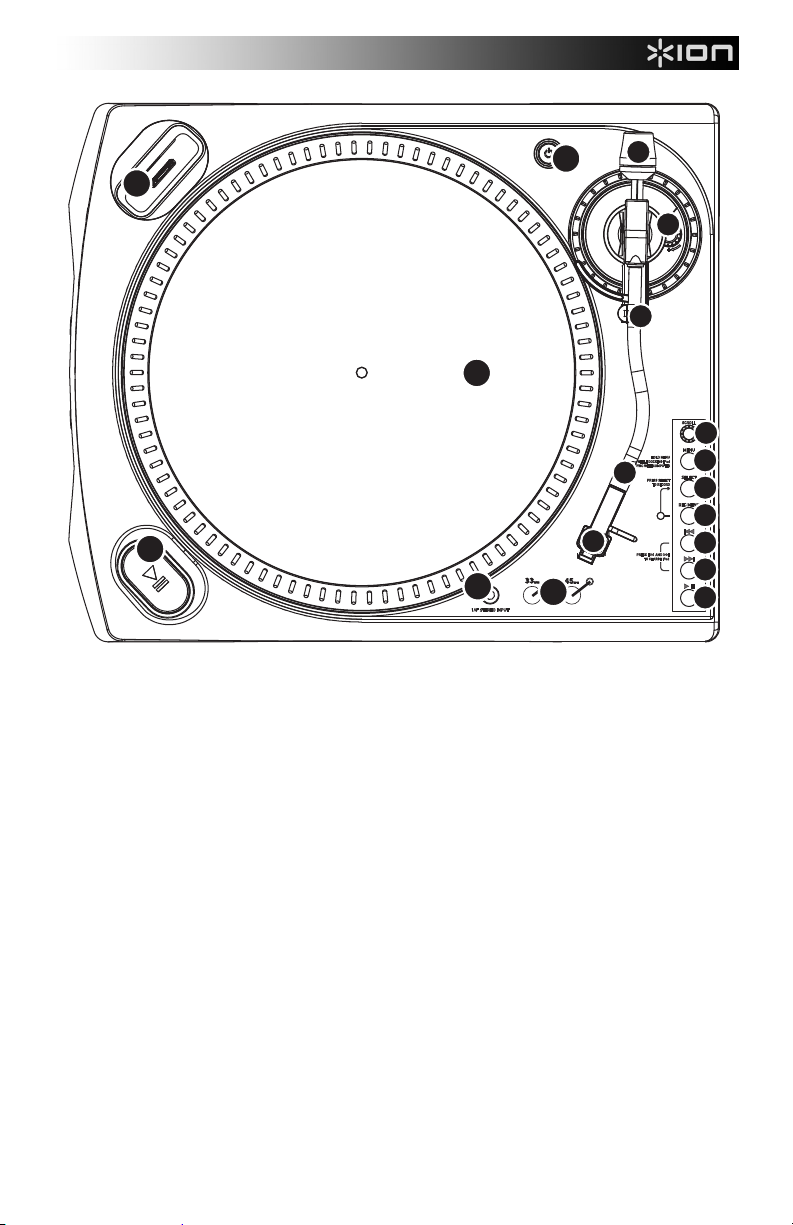
GENERAL CONTROLS
3
2
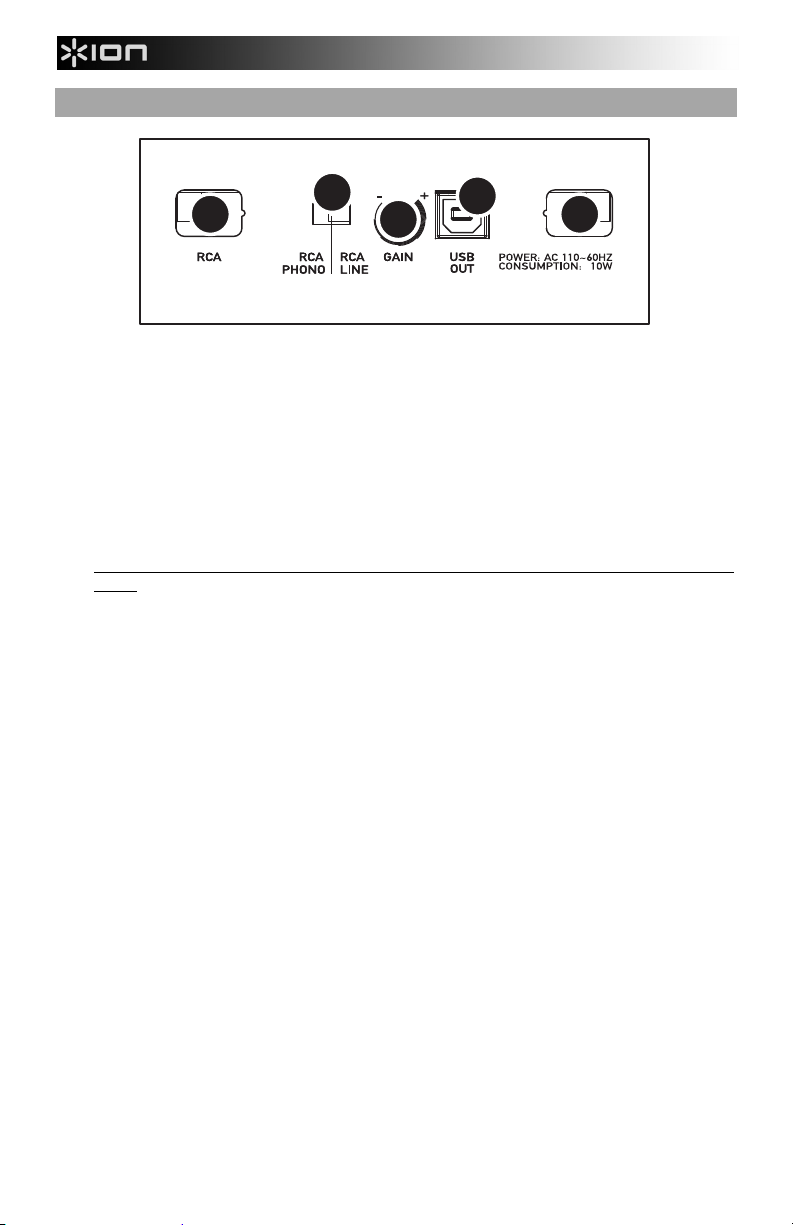
1. Power Cable: This power cable should be plugged into a wall receptacle AFTER all audio
connections are made.
2. RCA Audio Output Cables: These cables should be plugged into the audio inputs of your
home stereo system. (Please note: you can still copy records to your iPod or computer,
even if the audio outputs of the turntable are not connected to a stereo system).
3. RCA PHONO | RCA LINE Switch: There is a switch on the bottom panel, next to the RCA
cables, that selects between PHONO/LINE. Use PHONO level for plugging into a turntable
input on a home stereo. Use the LINE level for plugging into CD/AUX/TAPE inputs.
WARNING: You may damage your receiver if you plug in a LINE level into a PHONO
input.
4. Gain: This knob can be used to adjust the gain level of the audio signal from the turntable.
If the audio from the turntable is too quiet or too loud, use this knob to adjust the volume
setting.
5. USB Audio Output: Use the included USB Cable to connect your turntable to your
computer. The USB connection will provide audio from the turntable and stereo input to
your computer. The USB connection will also output audio from your computer through
the turntable’s RCA outputs. For transferring your vinyl records to your computer, we
have provided two different software packages on the included CD. EZ Vinyl/Tape
Converter (PC) and EZ Audio Converter (Mac) are the easiest and quickest ways to
transfer your vinyl records and should be used if you are a beginner. Alternatively, if you
are an advanced user you may wish to install and use the Audacity software (PC and
Mac), which allows you to take advantage of advanced audio editing features, such as
audio normalization, noise removal and automatic track separation.
4
5
1
(bottom panel connections)
4
Page 5

6
19
11
20
6
21
7
12
22
8
9
6. Power Button: Turns the unit on and off.
7. Platter: This platter must be securely fastened to the turntable prior to operation. The
Motor Drive Belt can be found on the drive ring underneath the platter. See SETUP
INSTRUCTIONS for detailed information on installing the Motor Drive Belt.
8. Start/Stop Buttons: This button starts and stops the turntable motor. If the button seems
to not be functioning, check to make sure that the Motor Drive Belt is properly installed in
the SETUP INSTRUCTIONS.
9. 1/8” Stereo Line Input: Connect Tape Players, Reel to Reel, or any other audio source
here. This signal is sent to the computer through the USB. Make sure that your phono
cartridge is installed while using this input for maximum sound quality. Also make
sure that your RCA jacks are either plugged into an input device or not in contact with
metal.
10. 33 and 45 RPM Buttons: These buttons control the RPM of the turntable platter. A red
LED indicates which RPM mode has been selected.
NOTE: If the turntable is powered down while in the 45 RPM setting, it will return to 33
RPM when it is powered up.
NOTE: You can record your 78RPM records by recording them at 33 or 45rpm, then
changing them to 78 in the Audacity software.
23
10
13
14
15
16
17
18
5
Page 6
12
13
14
15
16
17
18
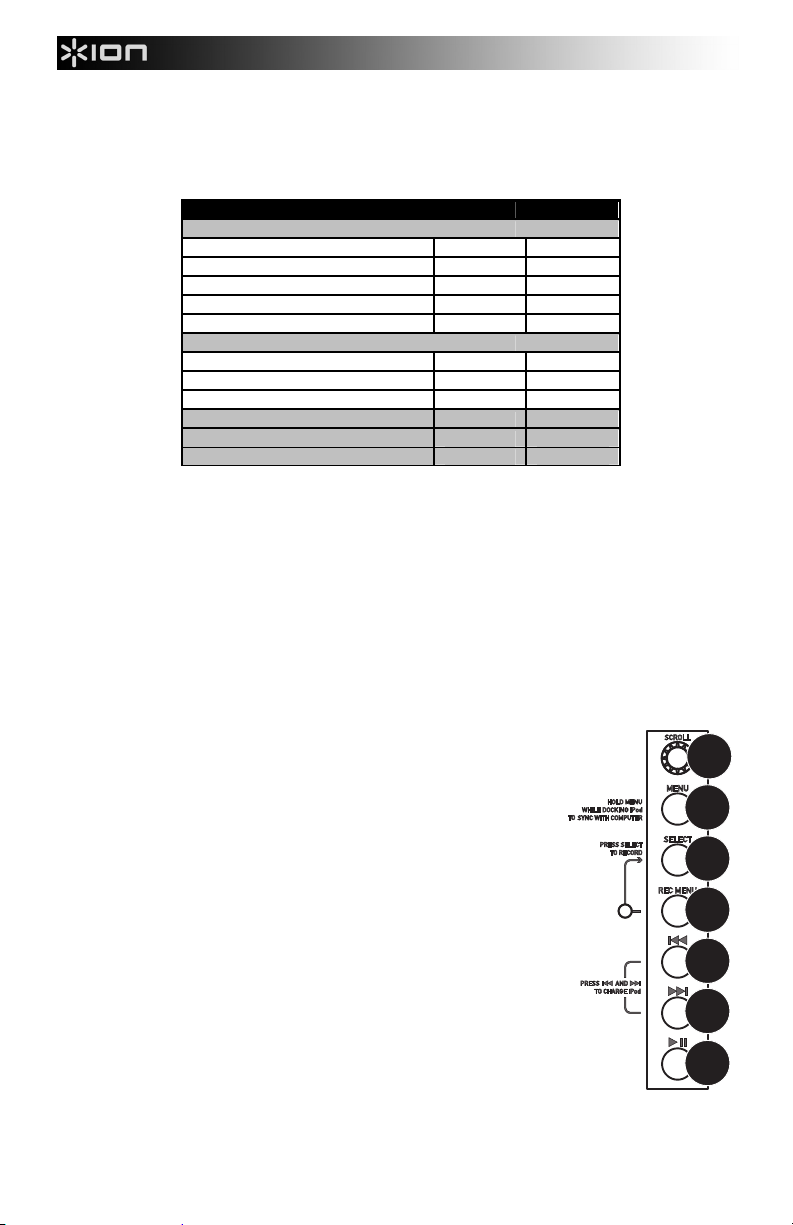
11. iPod Dock: Connect your iPod to this dock. Please make sure that your iPod fits snuggly
over the dock connector but do not force it! The dock allows you to record your vinyl
directly to your iPod or to play back music from your iPod through the turntable’s RCA
outputs. The LPDOCK is compatible with the following iPod models:
Note that your turntable can also charge your iPod while it is docked. When not recording,
the turntable will automatically charge your iPod. To ensure the best recording quality and
to prevent unwanted noise from entering your recordings, iPod charging will be disabled
as soon as you begin recording. We do understand, however, that you may be recording
long sessions which require your iPod to remain charged for longer periods of time. While
recording, you can turn on iPod charging by pressing |<< and >>| simultaneously. You
can turn it off at any time by pressing |<< and >>| again.
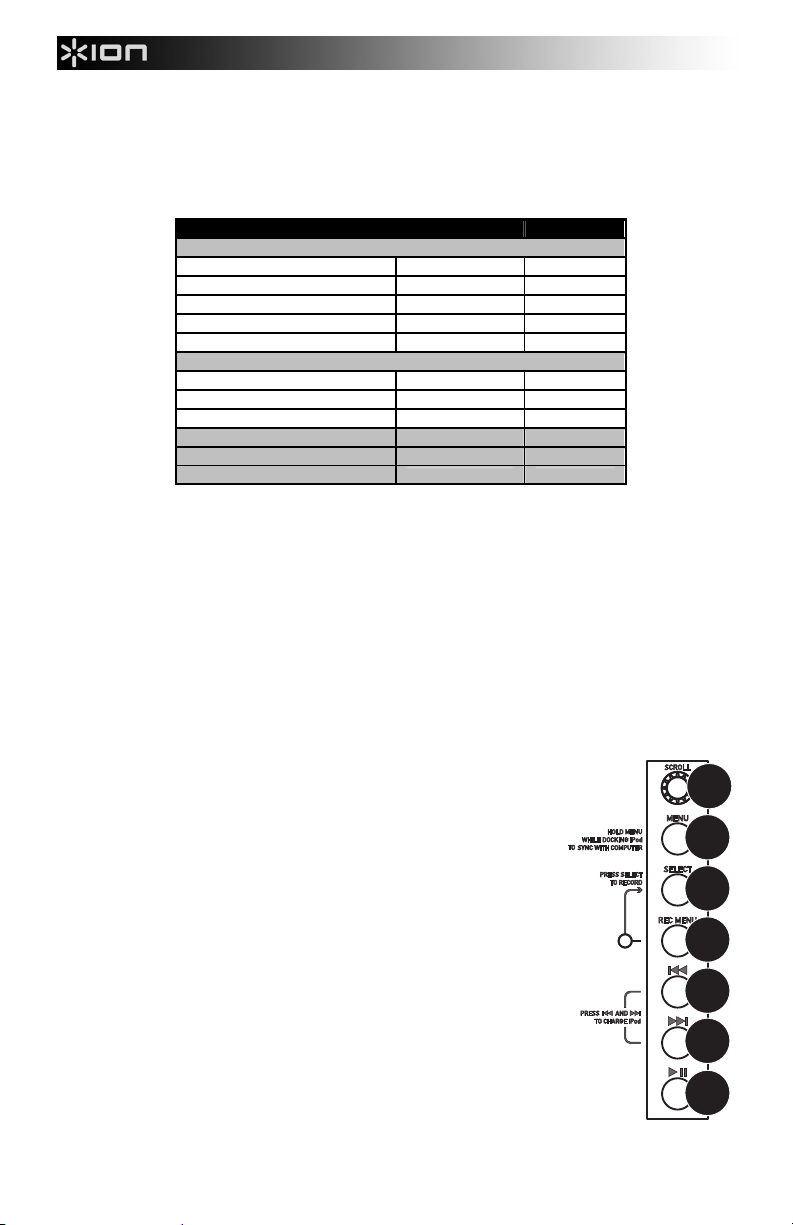
iPod CONTROLS: The following controls can be used to browse
and navigate menus and features of your iPod directly from the
turntable.
12. Scroll – This knob acts as Touchwheel controller on your
iPod.
13. Menu – This button acts as the ‘Menu’ button on your iPod.
14. Select – This button functions as the ‘Select’ command on
your iPod.
15. Rec Menu – Enters Record Mode (Voice Memo) on your iPod.
See ‘Recording to your iPod’ section for more details.
16. |<< - Functions as the ‘|<<’ button on your iPod.
17. >>| - Functions as the ‘>>|’ button on your iPod.
18. >|| - Functions as the ‘>||’ button on your iPod.
Please note that pressing |<< and >>| simultaneously while
recording will enable iPod charging. Press again to disable
iPod charging.
iPod Model Playback Record
iPod
Classic
5th generation
4th generation
3rd generation*
1st and 2nd generation
iPod Nano
3rd generation
2nd generation
1st generation
iPod Shuffle
iPod Mini
iPod Touch**
rd
* On 3
generation iPod, only the buttons “Play”, “Rewind”, and “Fast Forward”
are supported. Buttons “Select”, “Menu”, and “Rec Mode” are unsupported.
** On iPod Touch, only music player navigation is supported.
6
Page 7
21
19
20
22
23
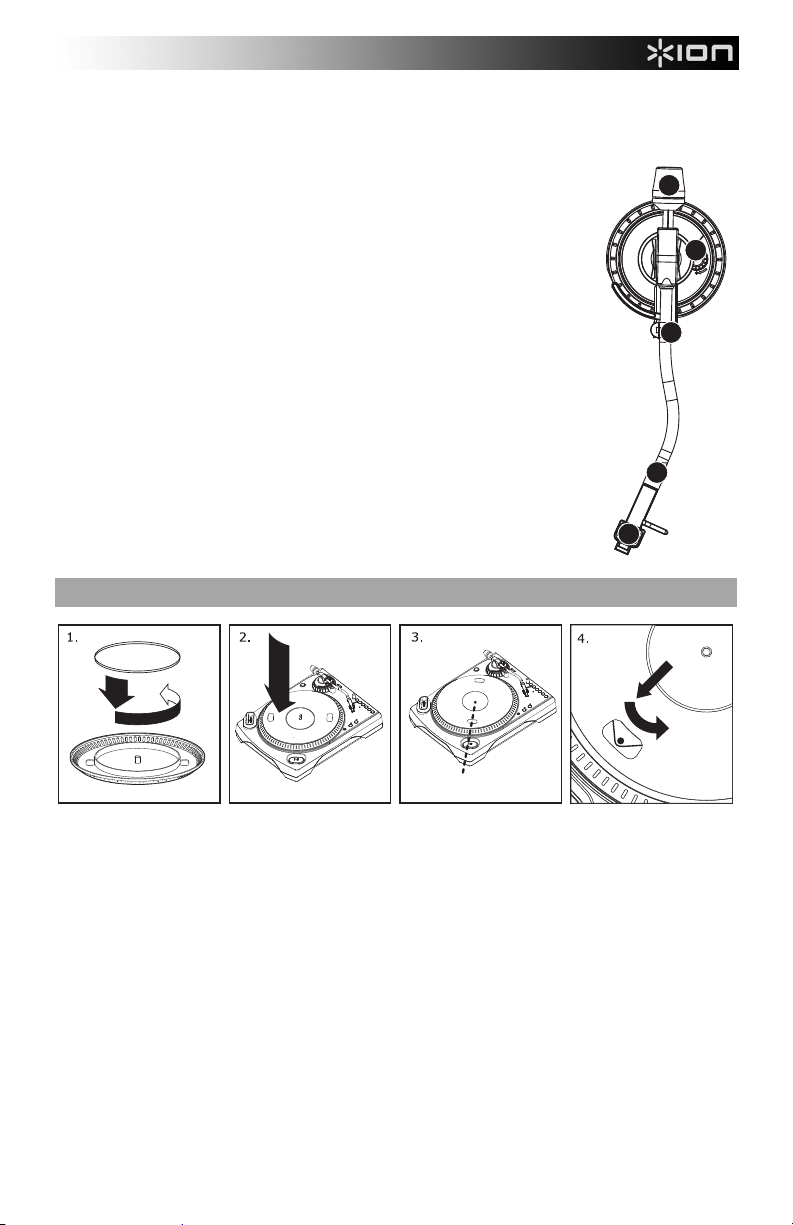
TONE ARM: Items 19 – 23 are all parts of the tonearm. Refer to the TONEARM SETUP
section for additional details on these controls.
19. Counter Weight and Scale Ring: The Counterweight is used to
balance the head shell and cartridge assembly so that the proper
amount of stylus pressure is applied to the record.
20. Anti-Skate Adjustment: This knob is used to compensate for
inward tracking forces. See TONEARM SETUP for more details.
21. Arm Clip: This specially designed arm clip secures the tone arm
while at rest or when not in use. The arm clip has been designed to
remain in the up position while unlocked.
NOTE: When transporting the turntable, it is always recommended
that the headshell be removed and the arm clip secured to prevent
tonearm or turntable damage.
22. Tone Arm Lock Nut: This Aluminum nut is used to secure the head
shell and cartridge assembly to the tone arm tube. See Cartridge
Setup for more details.
23. Cartridge and Headshell: The cartridge is pre-mounted on a
standard headshell. The cartridge is user replaceable and
compatible with a variety of standard cartridges. Be sure to remove
the clear plastic cover before operating the turntable from the
cartridge.
PLATTER SETUP
WARNING: Incorrect Platter setup can lead to poor turntable performance, platter
instability or permanent motor damage.
1. Start by placing the rubber drive belt around the inner bottom ring of the turntable platter.
This should come preinstalled, but check to make sure that it is not twisted or damaged.
2. Install the Platter on the center spindle and press it down firmly. Check to make sure that it
rotates uniformly and does not wobble excessively.
3. Rotate the platter so that the one of the holes is aligned with the Start Stop button on the
front corner of the turntable. The brass motor spindle should be visible through this hole.
4. Reach into the hole and pull the rubber drive belt off of the inner ring, and install it over the
motor spindle. Be careful not to twist the rubber drive belt during this step. Check to make
sure the platter rotates uniformly. If the drive belt is properly installed, there should be a
slight amount of tension that brings the platter to a stop after spinning it freely.
7
Page 8

TONEARM SETUP
1. Begin by rotating the
counterweight counterclockwise until it is in the
complete forward position
(NOTE: this is also the
maximum amount of
pressure that can be
applied to the cartridge.)
2. Now there should be a
feeling of weight and
resistance when the head
shell is raised and
lowered. Begin rotating
the counterweight
clockwise (away from the pivot point) until the weight and resistance feeling is gone. If
done properly, the tone arm will pivot with very little resistance back and forth indicating
that there is exactly 0 grams of stylus pressure.
3. With the counterweight in its new position further away from tone arm pivot point, grasp
the scale ring of the counter weight and rotate it until "0" is in the vertical position.
4. Finally, rotate the counterweight (and scale ring) counter-clockwise (towards the pivot
point) until the desired amount of weight is reached. If the scale rotates 360 degrees
beyond the zero point, the new scale ring reading should be added to 3.5.
*The included head shell and cartridge assembly requires a minimum of 3 grams and no
more than 5 grams for optimum performance.
Setting the Anti-Skate Adjustment
In most cases, the Anti-Skate should be set to its minimum setting. Anti-Skate compensates for
inward tracking forces that occur with certain cartridges when the stylus nears the center of the
record. If the turntable is experiencing excessive skipping while nearing the center spindle, try
increasing the Anti-Skate in the increments indicated on the dial. Start by adding an increment
of 1, test its performance, then increase it more, and so on.
IMPORTANT
Make sure that the felt slipmat is always placed on top of the platter while using the turntable.
Failure to use the slipmat may cause damage to your media as well as damage to the turntable.
Remove the plastic cartridge cover (needle cover) before operating the turntable.
8
Page 9

RECORDING TO YOUR iPod
Please follow the instructions below to record music directly to your iPod. Note that your iPod
will record audio from your turntable, as well as audio coming through the 1/8” Stereo Input.
Note that it is possible to record to your iPod without having any audio connections plugged in.
However, we highly recommend connecting the audio outputs (RCA or USB) to a speaker
system so you can monitor your recordings.
1. Place your iPod into the dock, making sure that it fits snuggly over the connector. Note
that depending on your iPod model, you may need to use the Universal Dock Adapter
included with your iPod.
2. Place a record on the platter and cue the music you would like to record.
3. Press the turntable’s REC MENU button – this will enter Record Mode on your iPod (Voice
Memo will be displayed on the screen of your iPod).
Note: With certain iPod models, pressing the Rec Menu button may not automatically
enter Voice Memo Mode. You may need to highlight the Voice Memo option and press
Select before proceeding.
Note: With certain iPod models, it may not be possible to enter Voice Memo Mode if your
iPod is currently in a music/video playback screen. If you experience difficulties accessing
Voice Memo Mode, exit to the Main Menu by pressing Menu and try again.
4. When you are ready to start recording, press the Select button to begin recording to your
iPod.
5. Now, press the turntable’s PLAY button to begin playing the music you wish to record.
6. When you wish to stop recording, simply pause the turntable.
7. Then, use the Scroll knob to select ‘Stop and Save’ and press Select. (Alternatively, you
can pause the recording and continue later by selecting ‘Pause’).
When you have finished, you can locate the recording by navigating to Extras X Voice
Memos. Your recordings will be identified by the date and time that the recording was
completed.
IMPORTANT: Renaming your recordings directly from your iPod is not recommended. If you
change the filename, your iPod may no longer be able to access the file. If you would like to
rename the recording, you should transfer the file to your computer, rename it and import it
back into your iTunes library as an AAC or MP3 file.
9
Page 10
SYNCING YOUR iPod THROUGH THE TURNTABLE
Your iPod can be synced to your iTunes right from the turntable. Follow the instructions below
to establish the connection.
1. Make sure that your turntable is connected to your computer, using the included USB
cable. (Windows users: If this is the first time that you are connecting the turntable, allow
your computer to automatically initialize the necessary hardware drivers. Proceed when
“Your New Hardware is Installed and Ready To Use” message appears on the bottom
corner of your computer screen screen.)
2. Press and hold the turntable’s Menu button while inserting the iPod into the dock. When
your iPod connects to your computer, you will see “Do Not Disconnect” displayed on the
screen of your iPod. DO NOT REMOVE YOUR iPod FROM THE DOCK WHILE “DO
NOT DISCONNECT” IS DISPLAYED AND BEFORE PROPERLY EJECTING THE iPod
FROM YOUR COMPUTER! OTHERWISE YOU MAY DAMAGE YOUR iPod AND
DESTROY ITS CONTENTS!
3. Once your iPod is properly connected to your computer, iTunes should start automatically.
(PC users: if you have not yet installed iTunes, you can insert the CD included with the
turntable. Follow the on-screen instructions to install the application.)
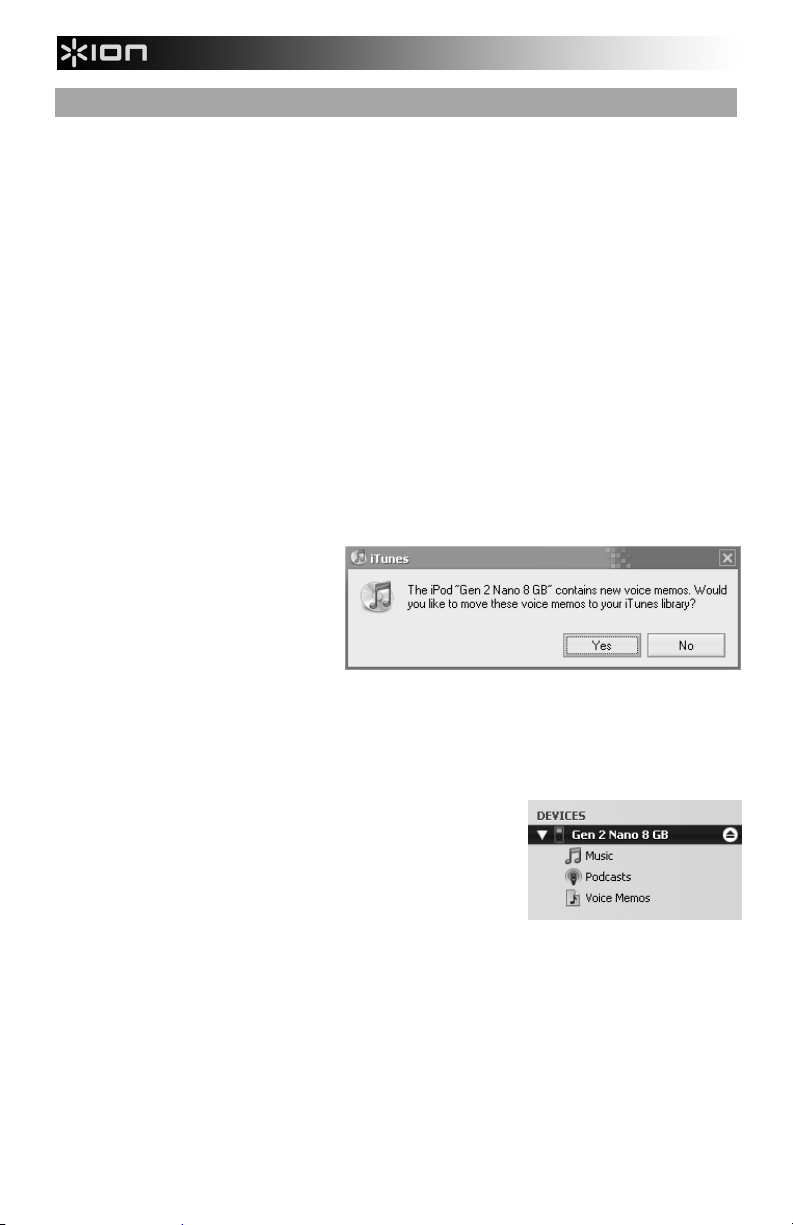
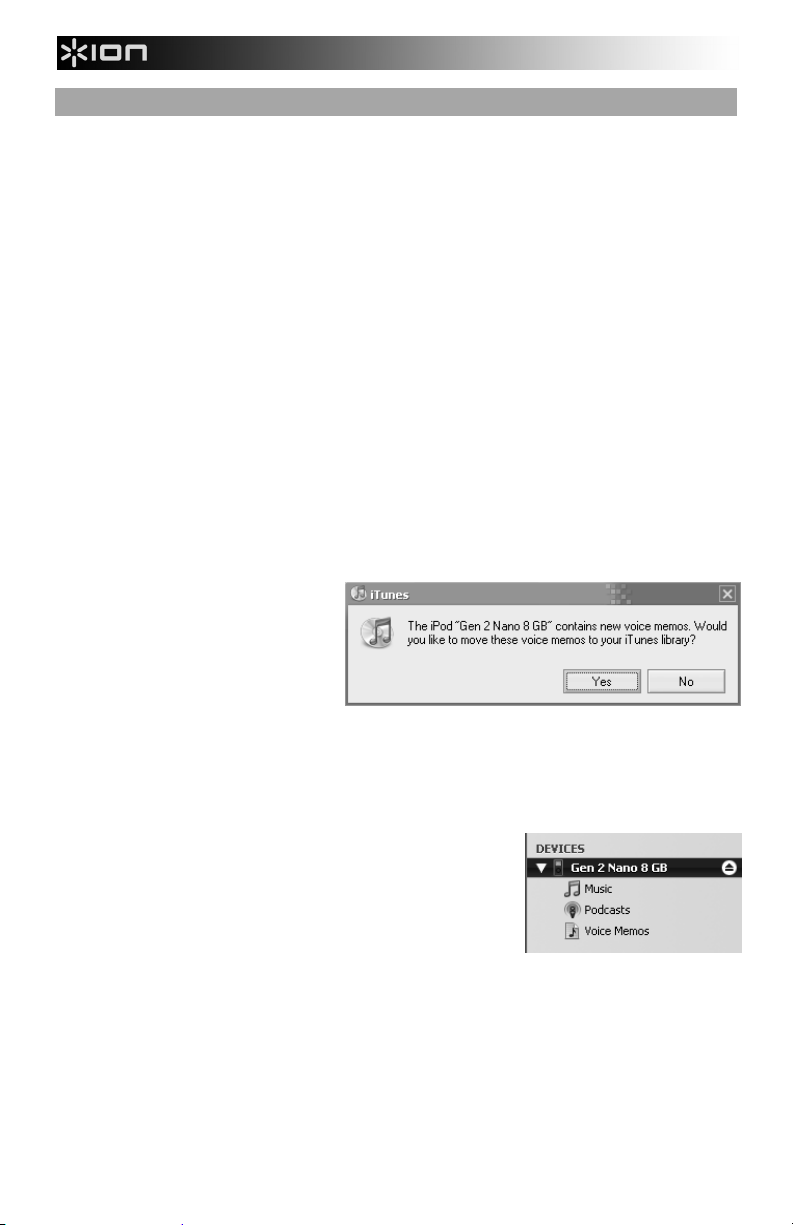
4. If you have made any new recordings since the last time your iPod was connected to the
computer, you will see the following screen:
Select ‘Yes’ if you would like to
move the recordings (referred to
as voice memos) to your iTunes
library.
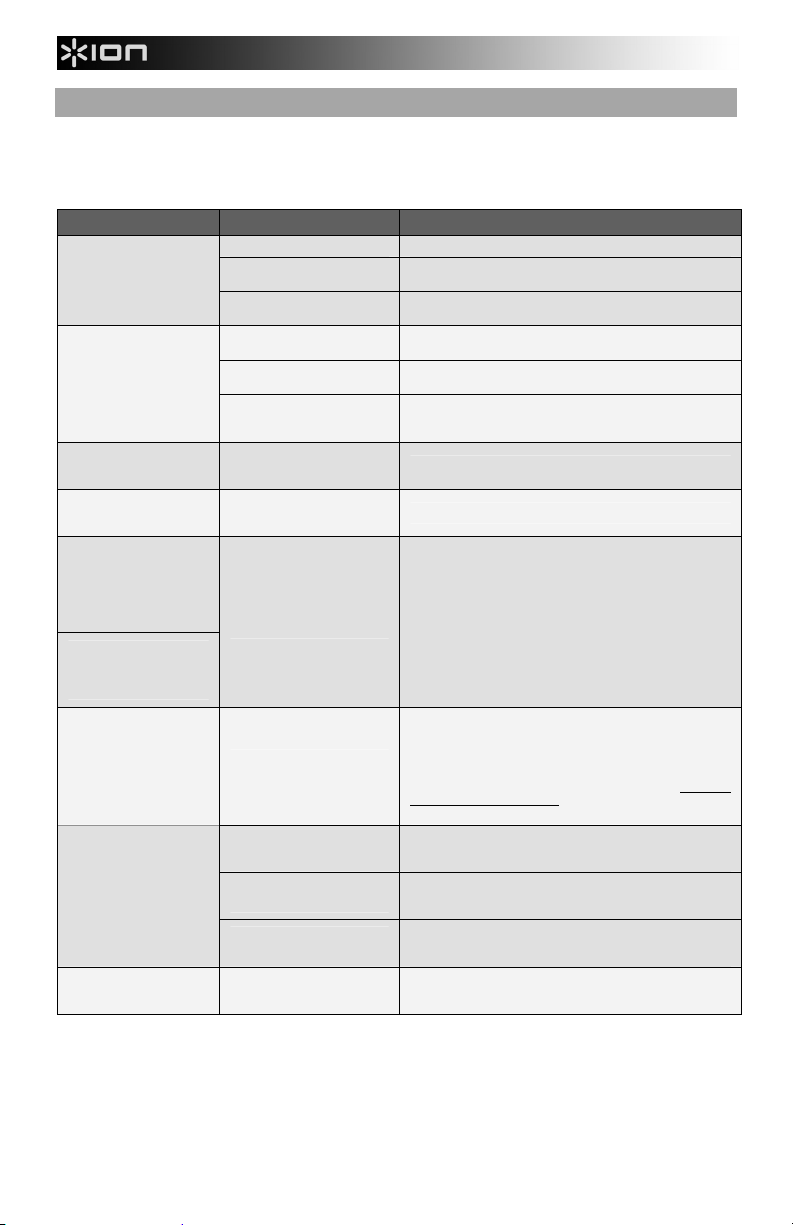
While your iPod is docked and synced to your computer, you can transfer music to and from it,
just as if it was connected directly to your computer.
Note that you can even listen to music from your computer through the turntable’s RCA audio
output!
IMPORTANT: TO SAFELY DISCONNECT YOUR iPod FROM
YOUR COMPUTER, EJECT YOUR iPod BY CLICKING ON
THE EJECT BUTTON.
NOTE: When you eject your iPod from your computer, you will
need to remove and replace it in the dock if you wish to keep
using it with the LPDOCK.
10
Page 11

CONVERTING YOUR 78RPM VINYL
If you wish to transfer your 78RPM records to your computer, you will need to install and use
the Audacity application. This application can be found on the CD included in the box. Please
install Audacity and follow the instructions below to record your 78RPMs. For Audacity
troubleshooting, refer to the Audacity Software Guide included on the CD.
1. Connect your turntable to your computer’s USB port.
2. Open Audacity.
3. In Audacity, go to EDIT -> PREFERENCES and set the Recording Device to ‘USB Audio
Codec’ – this is your USB turntable (select 2 channels to record in stereo).
4. Select your computer’s soundcard as the Playback Device. Note that the device name will
vary from computer to computer but should never be set to ‘Microsoft Sound Mapper’.
Alternatively, you can select “USB Audio Codec” if you would like to play the audio through
the turntable’s RCA outputs.
5. Lastly, check ‘Software Playthrough’ so you can hear the music through your audio device
while recording.
6. You are now ready to record. Press the RECORD button in Audacity to begin recording.
7. Play your 78RPM at 33 or 45RPM.
8. Once you have recorded the desired material, press STOP in Audacity.
9. Click on EDIT menu, then click on SELECT, then click on ALL (shortcut: “CTRL-A”).
10. Click on the EFFECT menu, click on CHANGE SPEED.
11. When the CHANGE SPEED box opens, you will see Standard Vinyl RPM selections. The
“from” should be set to 33 or 45 RPM (depending on the speed you selected on your
turntable), and the “to” should be set to 78 RPM.
12. Click on PREVIEW to hear your recording converted to the correct speed of 78 RPM.
Click on OK to finalize the conversion to 78 RPM.
13. Once you are finished, you can save your file by going to FILE -> EXPORT AS WAV.
This will save the recording as a .WAV audio file.
14. Pick a destination on your computer, a name for your recording, and click SAVE.
15. The recording can now be found in the location where you saved it in the previous step.
11
Page 12
TROUBLESHOOTING
Refer to the following troubleshooting scenarios if you experience difficulty recording your vinyl
to your iPod or computer.
PROBLEM CAUSE SOLUTION
Needle is not on the record. Place the needle on the record.
I am not hearing any audio
when I am recording.
I am experiencing poor
sound quality.
When recording vinyl to my
computer, the recording
sounds loud and distorted.
When recording vinyl to my
computer, the recording is
barely audible.
I cannot hear my recordings
when I try to play them from
my computer.
While the turntable is
connected, I cannot listen to
any music from my
computer.
When recording into my
computer on Windows Vista,
my recordings are mono
instead of stereo.
I am not able to record to my
iPod.
My music is playing at a
strange pitch.
Turntable not powered.
RCA outputs not connected to
speaker system.
Cartridge connection is not
secure.
Vinyl record is dirty or
scratched.
iPod is charging while recording.
The turntable Gain level is too
high.
The turntable Gain level is too
low.
Computer audio output not set
correctly.
Recording input properties in
Vista not set to “stereo”.
iPod not docked properly.
iPod is synced to your
computer.
iPod is not in Record Mode
(Voice Memo).
Incorrect speed selected on the
turntable.
BEFORE RETURNING THE PRODUCT, please contact ION Audio or your retailer for
technical support. Contact information can be found in the Safety Instruction Booklet
included with this product.
Make sure that the turntable is connected to a live power outlet
and that it is powered on.
Make sure you have connected the turntable’s RCA outputs to a
speaker system and that the speaker system is powered on.
Cartridge must be securely connected to the tonearm whenever
you are using the turntable.
Try dusting off and gently wiping the surface of the record before
playing it.
To ensure maximum audio quality, iPod charging should be
turned off while recording. If you have turned this feature on,
please disable it by pressing |<< and >>| simultaneously.
Turn down the Gain knob.
Turn up the Gain knob.
Make sure that your computer’s audio playback options are
configured in one of the following ways:
In Windows XP, go to Start X Control Panel X Sounds
and Audio Devices (on Windows XP) or Start X Control
Panel X Sound (on Windows Vista) and make sure that
your computer’s audio card is selected as the Sound
Playback device under the Audio tab.
Alternatively, you can play audio from your computer
through the turntable’s RCA audio outputs. Simply select
“USB Audio Codec” as the Sound Playback device and any
audio from your computer will play through the turntable’s
RCA outputs.
In Vista, you may need to manually specify “stereo” for the
recording input.
Go to Start X Control Panel X Sound (in Classic View). Then,
click on the Recording tab and highlight the Microphone input
(USB Audio Codec). Click on Properties to bring up the input
settings. Next, click on the Advanced tab and select “2 channel,
16 bit, 44100 Hz (CD quality)” in the Default Format pull-down
menu. Lastly, click Apply to accept the settings.
Make sure that the iPod is properly connected to the dock. If
necessary, you may need to use the Universal Dock Adapter,
included with your iPod.
You will not be able to record to your iPod while it is synced to
your computer through the USB connection. Eject the iPod from
your computer, remove it from the dock, then connect it again.
Ensure that your iPod is in Record Mode. Press the Rec Menu
button on the turntable to enter Record Mode. Then, press
Select on the turntable to begin recording.
Make sure that you are playing your records at the speed they
were intended to be played. Select between the two different
speeds by pressing 33RPM or 45RPM.
12
Page 13
GUÍA DE INICIO RÁPIDO
o Asegúrese de que todos los elementos abajo indicados estén incluidos en la caja.
o LEA EL FOLLETO DE INSTRUCCIONES DE SEGURIDAD ANTES DE UTILIZAR EL
PRODUCTO.
o Visite http://www.ion-audio.com
ALFOMBRILLA
ANTIDESLIZANTE
para registrar el producto.
ADAPTADOR PARA
45 RPM
CONTRAPESO
PLATO
CABLE USB CD
CÁPSULA PREINSTALADA
GIRADISCOS LP DOCK
INTRODUCCIÓN
LP Dock es un producto revolucionario que permite grabar música de discos de vinilo y entradas de
audio externas directamente en su iPod*. Además, el giradiscos USB se conecta directamente a su
computadora para convertir sus valiosos vinilos en música digital. Hemos incluido varios paquetes de
software para ayudarle a convertir sus grabaciones de vinilo: Tenga en cuenta que no se requiere
instalar ningún software a fin de grabar directamente en su iPod. No obstante, debe instalar una de
las siguientes aplicaciones para aprovechar la función de grabación de su computadora:
EZ Vinyl/Tape Converter** (sólo PC) es la forma más rápida y fácil de convertir las
grabaciones en medios digitales. Este software guarda convenientemente sus grabaciones en
la biblioteca de iTunes*. Es posible que los usuarios novicios prefieran esta aplicación. En el
CD, incluimos una práctica Guía de inicio rápido con instrucciones paso a paso sobre la
iinstalación y la operación del software.
EZ Audio Converter (Mac únicamente) es una aplicación de convertidor básica para Mac OS
X, ideal para usuarios novicios. Consulte en la Guía de inicio rápido del software incluida las
instrucciones detalladas sobre la instalación y la operación del software.
Audacity (PC y Mac) está previsto para el usuario avanzado. Esta aplicación permite la edición
y procesamiento avanzados de audio, tales como la normalización, la remoción de ruido, la
conversión de velocidad de discos de 78 RPM y la separación automática de pistas. La Guía
del software Audacity puede encontrarse en el CD incluido — consúltela cuando trabaje con
Audacity.
Para instalar el software: inserte simplemente el CD incluido en la computadora y siga las
instrucciones de la pantalla. Después de terminar de convertir su vinilo, puede quemarlo en CD o
cargarlo en dispositivos de medios portátiles.
* iTunes e iPod son marcas registradas de Apple, Inc., registradas en EE.UU. y otros países.
** Una versión de EZ Vinyl/Tape Converter con Gracenote MusicID está disponible para su descarga en la página de su producto en
www.ion-audio.com.
13
Page 14
CONTROLES GENERALES
3
2
1. Cable de alimentación: Este cable de alimentación se debe enchufar a un tomacorriente
en la pared DESPUÉS de que se hagan todas las conexiones de audio.
2. Cables RCA de salida de audio: Estos cables se deben enchufar en las entradas de
audio de su sistema estéreo hogareño. (Para tener en cuenta: igualmente se pueden
copiar discos en su iPod o computadora, incluso si las salidas de audio del giradiscos no
están conectadas a un sistema estéreo).
3. CONMUTADOR RCA FONOGRÁFICO | LÍNEA: Hay un conmutador en el panel inferior,
junto a los cables RCA, que selecciona entre PHONO y LINE (Fonográfico y Línea). Use
el nivel fonográfico para enchufar en la entrada de giradiscos de un estéreo hogareño.
Use el nivel de línea para enchufar a entradas CD/AUX/TAPE.
ADVERTENCIA: Puede dañar el receptor si enchufa un nivel de línea en una entrada
fonográfica.
4. Ganancia: Esta perilla se puede usar para ajustar el nivel de ganancia de la señal de
audio del giradiscos. Si el audio del giradiscos es demasiado bajo o fuerte, úsela para
ajustar el nivel de volumen.
5. Salida de audio USB: Use el cable USB incluido para conectar el giradiscos a su
computadora. La conexión USB proporciona audio proveniente del giradiscos y señal
estéreo a la computadora. La conexión USB también entrega audio desde la
computadora a través de las salidas RCA del giradiscos. Para transferir sus discos de
vinilo a la computadora, proporcionamos dos paquetes de software diferentes en el CD
incluido. EZ Vinyl/Tape Converter (PC) y EZ Audio Converter (Mac) representan la
manera más rápida y sencilla para transferir sus discos de vinilo y los principiantes deben
usarlos. En cambio, si usted es un usuario avanzado, es conveniente que instale y use el
software Audacity (PC y Mac), que le permite aprovechar las características avanzadas
de edición de audio, tales como normalización de audio, remoción de ruido y separación
automática de pistas.
4
5
1
(conexiones del panel inferior)
14
Page 15
6
19
11
20
6
21
7
12
22
8
9
6. Botón de encendido: Enciende y apaga la unidad.
7. Plato: Este plato se debe ajustar firmemente al giradiscos antes de hacerlo funcionar. La
correa de transmisión del motor se puede encontrar en el aro impulsor debajo del plato.
Vea las INSTRUCCIONES DE INSTALACIÓN para ver información más detallada sobre
la instalación de la correa de transmisión del motor.
8. Botones Start/Stop: Con este botón se arranca y para el motor del giradiscos. Si parece
que no funciona, lea las INSTRUCCIONES DE INSTALACIÓN para asegurarse de que la
correa de transmisión del motor esté bien instalada.
9. Entrada de línea estéreo de 1/8”: Puede conectar aquí reproductores de casetes y
cintas o cualquier otra fuente de audio. Esta señal se envía a la computadora por el USB.
Asegúrese de que su cápsula fonográfica esté instalada cuando usa esta entrada,
para lograr la máxima calidad de sonido. Asegúrese también de que sus jacks RCA
estén enchufados a un dispositivo de entrada o que no estén en contacto con partes
metálicas.
10. Botones de 33 y 45 RPM: Estos botones controlan las RPM del plato del giradiscos. Un
LED rojo indica cuál modo de RPM ha sido seleccionado.
NOTA: Si apaga el giradiscos mientras está ajustado a 45 RPM, volverá a los 33 RPM al
volver a encenderse.
NOTA: Puede grabar sus discos de 78 RPM grabándolos a 33 ó 45 rpm y cambiándolos a
78 en el software Audacity.
23
10
13
14
15
16
17
18
15
Page 16
12
13
14
15
16
17
18
11. Estación de acoplamiento de iPOD: Conecte su iPod a esta estación de acoplamiento.
Asegúrese de que el iPod se ajuste en forma ceñida en el conector de la estación, ¡pero
no lo fuerce! La estación de acoplamiento permite grabar su vinilo directamente en el
iPod o reproducir la música desde este último a través de las salidas RCA del giradiscos.
LPDOCK es compatible con los siguientes modelos de iPod:
Tenga en cuenta que el giradiscos puede cargar también su iPod cuando está en la
estación de acoplamiento. Cuando no está grabando, el giradiscos cargará
automáticamente su iPod. Para asegurar la mejor calidad de grabación y evitar que entre
ruido indeseable a las grabaciones, la carga del iPod se desactiva tan pronto usted
comienza a grabar. Entendemos, sin embargo, que usted puede grabar sesiones largas
que requieren que el iPod permanezca cargado durante períodos más prolongados.
Mientras graba, puede activar la carga del iPod pulsando |<< y >>| simultáneamente..
Puede desactivarla en cualquier momento pulsando |<< y >>| nuevamente.
CONTROLES DEL iPod: Se pueden usar los siguientes controles
para examinar y navegar los menús y las características del iPod
directamente desde el giradiscos.
12. Desplazamiento – Esta perilla actúa como controlador de
rueda táctil en el iPod.
13. Menú – Este botón actúa como botón de ‘Menú’ del iPod.
14. Seleccionar – Este botón funciona como el comando
‘Seleccionar’ del iPod.
15. Menú de grabación – Entra al Record Mode (Modo de
grabación) (Voice Memo) del iPod. Para conocer más
detalles, consulte la sección ‘Cómo grabar en el iPod’.
16. |<< - funciona como el botón ‘|<<’ del iPod.
17. >>| - funciona como el botón ‘>>|’ del iPod.
18. >|| - funciona como el botón ‘>||’ del iPod.
Tenga en cuenta que pulsando |<< y >>| simultáneamente
durante la grabación se activa la carga del iPod. Púlselos
nuevamente para desactivarla.
Modelo del iPod Reproducción Grabación
iPod
Classic
5ta generación
4ta generación
3ra generación*
1ra y 2da generación
iPod Nano
3ra generación
2da generación
1ra generación
iPod Shuffle
iPod Mini
iPod Touch
*En el iPod de 3ra generación, sólo se soportan los botones “Play”, “Rewind” y
“Fast Forward”. No se soportan los botones “Select”, “Menu” y “Rec Mode”.
** En iPod Touch, sólo se soporta la navegación de reproductores de música.
16
Page 17

21
19
20
22
23
BRAZO: Los elementos 19 a 23 son las partes del brazo. Consulte la sección INSTALACIÓN
DEL BRAZO para ver más detalles de estos controles.
19. Contrapeso y anillo de escala: El contrapeso se usa para
balancear el conjunto del portacápsula y la cápsula para que se le
aplique la cantidad adecuada de presión de la púa al disco.
20. Ajuste antideslizamiento: Esta perilla se usa para compensar las
fuerzas de tracción hacia adentro. Consulte INSTALACIÓN DEL
BRAZO para ver más detalles.
21. Clip del brazo: Este clip diseñado especialmente fija el brazo
mientras está en reposo o no se usa. El clip ha sido diseñado para
que permanezca hacia arriba mientras está desbloqueado.
NOTA: Al transportar el giradiscos, siempre se recomienda retirar el
portacápsula y sujetar bien el clip del brazo para evitar daños al
brazo o al giradiscos.
22. Tuerca de fijación del brazo: Esta tuerca de aluminio se usa para
fijar el conjunto del portacápsula y la cápsula al tubo del brazo.
Consulte Instalación de la cápsula para ver más detalles.
23. Cápsula y portacápsula: La cápsula está preinstalada en un
portacápsula estándar. La cápsula es reemplazable por el usuario y
compatible con una variedad de cápsulas estándar. Asegúrese de
retirar la cubierta plástica transparente antes de hacer funcionar el
giradiscos con la cápsula.
INSTALACIÓN DEL PLATO
ADVERTENCIA: La instalación incorrecta del plato puede causar el mal funcionamiento
del giradiscos, la inestabilidad del plato o un daño permanente al motor.
1. Comience la instalación colocando la correa de transmisión de goma alrededor del anillo
inferior del centro del plato del giradiscos. Éste debería venir preinstalado, pero revíselo
para asegurar que no esté doblado o dañado.
2. Instale el plato en el eje central y presiónelo firmemente. Revise para asegurarse que gira
de modo uniforme y que no se bambolea en exceso.
3. Gire el plato para que uno de los orificios esté alineado con el botón Start/Stop de la
esquina anterior del giradiscos. El eje de latón del motor debe ser visible a través de este
agujero.
4. Meta la mano en este agujero y tire de la correa de transmisión de goma del anillo interior,
e instálela sobre el eje del motor. Tenga cuidado de no doblar la correa de transmisión de
goma durante este paso. Verifique que el plato gire de modo uniforme. Si la correa de
transmisión está bien instalada, debe haber un poco de tensión que detiene el plato
después de girar libremente.
17
Page 18

INSTALACIÓN DEL BRAZO
1. Para empezar, gire el
contrapeso en sentido
antihorario hasta que esté
completamente en la
posición hacia adelante.
(NOTA: ésta es también la
máxima cantidad de
presión que se le puede
aplicar a la cápsula.)
2. Ahora debe sentir una
sensación de peso y
resistencia cuando levanta
o baja el portacápsula.
Comience a girar el
contrapeso en sentido horario (alejándolo del punto de pivote) hasta que la sensación de
peso y resistencia desaparezca. Si esto se hace correctamente, el brazo pivotará de un
lado al otro con muy poca resistencia indicando que hay exactamente 0 gramos de
presión sobre la aguja.
3. Con el contrapeso en su nueva posición más lejos del punto de pivote del brazo, tome el
anillo de escala del contrapeso y gírelo hasta que el “0” esté en la posición vertical.
4. Finalmente, gire el contrapeso (y el anillo de escala ) en sentido antihorario (hacia el
punto de pivote) hasta que se alcance el peso deseado. Si el anillo de escala gira 360
grados más del punto de cero, la nueva lectura del anillo debe agregarse a 3.5.
*El conjunto de portacápsula y cápsula que se incluye requiere un mínimo de 3 gramos y
no más de 5 gramos para un funcionamiento óptimo.
Ajuste del dispositivo antideslizamiento
En la mayoría de los casos, el dispositivo antideslizamiento debe ajustarse a su valor mínimo.
Este dispositivo compensa las fuerzas de tracción hacia adentro que ocurren con ciertas
cápsulas cuando la aguja se acerca al centro del disco. Si el giradiscos experimenta excesivos
saltos cuando se acerca al eje central, intente aumentar el valor del dispositivo
antideslizamiento en los incrementos indicados en el cuadrante. Comience agregando un
incremento de 1, pruebe el funcionamiento, auméntelo más si fuera necesario y así
sucesivamente.
IMPORTANTE
Asegúrese de que la alfombrilla de fieltro esté siempre colocada sobre el plato cuando se usa
el giradiscos. Si no se usa la alfombrilla, puede dañarse el medio, así como el giradiscos.
Retire la cubierta plástica de la cápsula (cubierta de la púa) antes de hacer funcionar el
giradiscos.
18
Page 19

CÓMO GRABAR EN EL iPod
Para grabar música directamente en el iPod, siga las instrucciones que se indican a
continuación. Tenga en cuenta que el iPod graba música de su giradiscos, así como el audio
proveniente de la entrada estéreo de 1/8”.
Observe también que es posible grabar en el iPod sin tener ninguna conexión de audio
enchufada. No obstante, recomendamos especialmente conectar las salidas de audio (RCA o
USB) a un sistema de altavoces para poder monitorear sus grabaciones.
1. Coloque el iPod en la estación de acoplamiento, asegurándose de que se ajuste en forma
ceñida en el conector. Tenga en cuenta que según el modelo de su iPod, puede ser
necesario usar el adaptador de acoplamiento universal incluido con el mismo.
2. Coloque un disco en el plato y busque la música que desea grabar.
3. Pulse el botón REC MENU del giradiscos —de esta forma entrará al modo de grabación
del iPod (aparece “Voice Memo” en la pantalla del mismo).
Nota: En ciertos modelos de iPod, al pulsar el botón Rec Menu es posible que no se
entre automáticamente al modo Voice Memo (Memo de voz). Tal vez tenga que resaltar
la opción Voice Memo y pulsar Select (Seleccionar) para continuar.
Nota: En ciertos modelos de iPod, es posible entrar al modo Voice Memo si su iPod está
en ese momento en una pantalla de reproducción de música/video. Si experimenta
dificultades para acceder al modo Voice Memo, salga al menú principal pulsando Menu
(Menú) e intente nuevamente.
4. Cuando esté listo para empezar a grabar, pulse el botón Select para comenzar la
grabación en el iPod.
5. A continuación, pulse el botón PLAY (Reproducir) para comenzar a reproducir la música
que desea grabar.
6. Cuando desee detener la grabación, simplemente ponga el giradiscos en pausa.
7. Luego use la perilla Scroll para seleccionar ‘Stop and Save’ (Parar y guardar) y pulse
Select. (Como alternativa, puede poner la grabación en pausa y continuar más tarde
seleccionando ‘Pause’).
Cuando termine, puede localizar la grabación navegando a Extras X Voice Memos. Sus
grabaciones se identifican por la fecha y hora en que se realizaron.
IMPORTANTE: No se recomienda cambiar de nombre sus grabaciones directamente desde el
iPod. Si cambia el nombre de archivo, es posible que el iPod no pueda acceder al mismo. Si
desea cambiar el nombre de la grabación, debe transferir el archivo a la computadora,
cambiarle el nombre e importarlo nuevamente a su biblioteca de iTunes como archivo AAC o
MP3.
19
Page 20
CÓMO SINCRONIZAR EL iPod A TRAVÉS DEL GIRADISCOS
Su iPod se puede sincronizar a iTunes directamente desde el giradiscos. Para establecer a
continuación, siga las instrucciones que se indican a continuación.
1. Asegúrese de que el giradiscos esté conectado a la computadora mediante el cable USB
incluido. (Usuarios de Windows: Si es la primera vez que conecta el giradiscos, deje que
la computadora inicialice automáticamente los drivers de hardware necesarios. Continúe
cuando aparezca el mensaje “Your New Hardware is Installed and Ready To Use” (Su
nuevo hardware está instalado y listo para usar) en la esquina inferior de la pantalla de la
computadora).
2. Pulse y mantenga oprimido el botón Menu del giradiscos mientras inserta el iPod en la
estación de acoplamiento. Cuando se conecte el iPod a la computadora, aparecerá “Do
Not Disconnect” (no desconectar) en la pantalla del iPod. ¡NO RETIRE EL iPod DE LA
ESTACIÓN DE ACOPLAMIENTO MIENTRAS APARECE “DO NOT DISCONNECT” NI
ANTES DE EXPULSAR CORRECTAMENTE EL iPod DE LA COMPUTADORA. DE LO
CONTRARIO, PUEDE DAÑAR EL iPOD Y DESTRUIR SU CONTENIDO!
3. Una vez que el iPod esté correctamente conectado a la computadora, iTunes debe
iniciarse automáticamente. (Usuarios de PC: si aún no instaló iTunes, puede insertar el
CD incluido con el giradiscos. Siga las instrucciones de la pantalla para instalar la
aplicación).
4. Si hizo alguna grabación nueva desde la última vez que conectó el iPod a la
computadora, verá la siguiente pantalla:
Seleccione ‘Yes’ (Sí) si desea
transferir sus grabaciones
(denominadas “voice memos”) a
su biblioteca de iTunes.
Mientras el iPod está acoplado y sincronizado con la computadora, puede transferir música
hacia y desde el mismo, tal como si estuviera conectado directamente a ella.
¡Tenga en cuenta que incluso puede escuchar música desde su computadora a través de la
salida de audio RCA del giradiscos!
IMPORTANTE: PARA DESCONECTAR EN FORMA
SEGURA EL iPod DE LA COMPUTADORA, EXPÚLSELO
HACIENDO CLIC EN EL BOTÓN EJECT (EXPULSAR)..
NOTA: Cuando expulse el iPod de la computadora, debe
retirarlo y volverlo a colocar en la estación de acoplamiento si
desea seguir usándolo con LPDOCK.
20
Page 21

CÓMO CONVERTIR SU VINILO DE 78 RPM
Para transferir sus discos de 78 RPM a la computadora, es necesario que instale la aplicación
Audacity. Esta aplicación se puede encontrar en el CD incluido en la caja. Instale Audacity y
siga las instrucciones de más abajo para grabar sus discos de 78 RPM. Para solucionar los
problemas de Audacity, consulte la Guía del software Audacity incluida en el CD.
1. Conecte su giradiscos al puerto USB de la computadora.
2. Abra Audacity.
3. En Audacity, vaya a EDIT -> PREFERENCES (Editar -> Preferencias) y configure
Recording Device (Dispositivo de grabación) como ‘USB Audio Codec’ (Códec de audio
USB) —éste es su giradiscos USB (seleccione 2 canales para grabar en estéreo).
4. Seleccione la tarjeta de sonido de la computadora como Playback Device (Dispositivo de
reproducción). Tenga en cuenta que el nombre del dispositivo varía según la
computadora pero nunca debe configurarse como ‘Microsoft Sound Mapper’.
Como alternativa, puede seleccionar “USB Audio Codec” si desea reproducir el audio a
través de las salidas RCA del giradiscos.
5. Por último, marque ‘Software Playthrough’ (Reproducción pasante por software), de modo
que pueda oír la música a través de su dispositivo de audio mientras la graba.
6. De esta forma, está listo para grabar. Pulse el botón RECORD (Grabar) en Audacity para
comenzar la grabación.
7. Reproduzca su disco de 78 RPM a 33 ó 45 RPM.
8. Una vez que haya grabado el material deseado, pulse STOP (Parar) en Audacity.
9. Haga clic en el menú EDIT, luego en SELECT (Seleccionar) y finalmente en ALL (Todos)
(acceso directo: “CTRL-A”).
10. Haga clic en el menú EFFECT (Efectos) y en CHANGE SPEED (Cambiar velocidad).
11. Cuando se abra el cuadro CHANGE SPEED, verá las selecciones de RPM para vinilos
estándar. El campo “from” (desde) debe configurarse como 33 ó 45 RPM (según la
velocidad que haya seleccionado en su giradiscos) y el “to” (hacia) como 78 RPM.
12. Haga clic en PREVIEW (Vista preliminar) para oír su grabación convertida a la velocidad
correcta de 78 RPM. Haga clic en OK (Aceptar) para finalizar la conversión a 78 RPM.
13. Una vez que termine, puede guardar su archivo yendo a FILE -> EXPORT AS WAV
(Archivo > Exportar como WAV). De esta forma, la grabación se guarda como archivo de
audio .WAV.
14. Seleccione un destino en la computadora, un nombre para la grabación y haga clic en
SAVE (Guardar).
La grabación puede encontrarse ahora en el lugar en que la guardó en el paso anterior.
15.
21
Page 22

SOLUCIÓN DE PROBLEMAS
Si experimenta dificultades al grabar sus vinilos en su iPod o computadora, consulte los
siguientes escenarios de solución de problemas.
PROBLEMA CAUSA SOLUCIÓN
La púa no está sobre el
disco.
No oigo ningún audio
mientras grabo.
Experimento un sonido de
baja calidad.
Cuando grabo el vinilo en la
computadora, la grabación
suena con alto volumen y
distorsionada.
Cuando grabo el vinilo en la
computadora, la grabación
es apenas audible.
No puedo oír mis
grabaciones cuando trato de
reproducirlas desde la
computadora.
Mientras el giradiscos está
conectado, no puedo
escuchar ninguna música
desde mi computadora.
Cuando grabo en la
computadora bajo Windows
Vista, mis grabaciones son
mono en lugar de estéreo.
No puedo grabar en el iPod
La música se reproduce con
un pitch extraño.
ANTES DE DEVOLVER EL PRODUCTO, comuníquese con Ion Audio o con su vendedor minorista para solicitar soporte técnico.
La información de contacto se encuentra en el folleto de instrucciones de seguridad incluido con este producto.
El giradiscos no está
encendido.
Las salidas RCA no
están conectadas al
sistema de altavoces.
La conexión de la
cápsula no es firme.
El disco de vinilo está
sucio o rayado.
El iPod se carga
mientras grabo.
El control de ganancia
del giradiscos está
demasiado alto.
El control de ganancia
del giradiscos está
demasiado bajo.
Salida de audio de la
computadora
configurada
incorrectamente.
Propiedades de entrada
de grabación en Vista no
configuradas a “stereo”
(estéreo).
El iPod no está acoplado
correctamente.
El iPod está
sincronizado a la
computadora.
El iPod no está en modo
de grabación (Voice
Memo).
Velocidad incorrecta
seleccionada en el
giradiscos.
Coloque la púa sobre el disco.
Asegúrese de que el giradiscos esté conectado a un tomacorriente
alimentado y que esté encendido.
Asegúrese de haber conectado las salidas RCA del giradiscos a un
sistema de altavoces y que dicho sistema esté encendido.
La cápsula debe estar conectada firmemente al brazo toda vez que use
el giradiscos.
Pruebe desempolvando y limpiando suavemente la superficie del disco
antes de reproducirlo.
Para asegurar máxima calidad de grabación, se debe desactivar la carga
del iPod mientras se graba. Si activó esta característica, desactívela
pulsando |<< y >>| simultáneamente.
Gire la perilla Gain para disminuir la ganancia.
Gire la perilla Gain para aumentar la ganancia.
Asegúrese de que las opciones de reproducción de audio de la
computadora estén configuradas en una de las siguientes maneras:
En Windows, vaya a Start X Control Panel X
Sounds and Audio Devices (Inicio > Panel de
Control > Dispositivos de sonido y audio) (en
Windows XP) o Start X Control Panel X Sound
(Inicio > Panel de control > Sonido) (en Windows
Vista) y asegúrese de que la tarjeta de sonido de la
computadora esté seleccionada como dispositivo de
reproducción bajo la pestaña Audio.
Como alternativa, puede reproducir el audio desde la computadora
a través de las salidas de audio RCA del giradiscos. Simplemente,
seleccione “USB Audio Codec” como dispositivo de Sound Playback
(Reproducción de audio) la salida de audio de la computadora se
reproducirá a través de las salidas RCA del giradiscos.
En Vista, es posible que sea necesario especificar manualmente “stereo”
para la entrada de grabación.
Vaya a Start X Control Panel X Sound (Inicio > Panel de Control >
Sonido) (en la vista clásica). Luego, haga clic en la pestaña Recording
(Grabación) y resalte la entrada Microphone (USB Audio Codec). Haga
clic en Properties (Propiedades) para activar la configuración de la
entrada. Luego, haga clic en la pestaña Advanced (Avanzadas) y
seleccione “2 channel, 16 bit, 44100 Hz (CD quality)” (2 canales, 16 bits,
44100 Hz (calidad de CD)) en el menú desplegable Default Format
(Formato por defecto). Finalmente, haga clic en Apply (Aplicar) para
aceptar los valores de configuración.
Asegúrese de que el iPod esté conectado correctamente a la estación de
acoplamiento. Si fuera necesario, puede usar el Universal Dock Adapter
(Adaptador de acoplamiento universal), incluido con el iPod.
No se puede grabar en el iPod mientras éste esté sincronizado a la
computadora a través de la conexión USB. Expulse el iPod de la
computadora, retírelo de la estación de acoplamiento y vuelva a
conectarlo.
Asegúrese de que el iPod esté en modo de grabación. Pulse el botón
Rec Menu del giradiscos para entrar a Record Mode (Modo de
grabación). Luego, pulse Select (Seleccionar) en el giradiscos para
comenzar a grabar.
Asegúrese de que esté reproduciendo sus discos a la velocidad a la que
están previstos. Seleccione entre las dos velocidades diferentes
pulsando 33RPM o 45RPM.
22
Page 23

GUIDE D’UTILISATION RAPIDE
o Veuillez vous assurer que les articles suivants sont dans la boîte.
o VEUILLEZ LIRE LE LIVRET DES CONSIGNES DE SÉCURITÉ AVANT D'UTILISER LE
PRODUIT.
o Allez à http://www.ion-audio.com pour enregistrer le produit.
TAPIS
CÂBLE USB CD
ADAPTATEUR 45 T/MIN
CONTREPOIDS
CARTOUCHE
PRÉINSTALLÉE
PLATEAU
TOURNE-DISQUE LP DOCK
INTRODUCTION
De plus, le tourne-disque USB se branche directement à un ordinateur afin de transférer vos précieux
vinyles au numérique. Plusieurs logiciels sont inclus afin de vous aider à faire la conversion des
enregistrements de vos disques de vinyle : veuillez noter qu'il n’est pas nécessaire d’installer aucun
logiciel pour enregistrer directement à votre iPod*. Cependant, vous devez installer une des
applications suivantes afin d’enregistrer sur ordinateur :
Le EZ Vinyl/Tape Converter** (pour PC seulement) est la façon la plus rapide et la plus simple
de convertir vos enregistrements au média numérique. Le EZ Vinyl/Tape Converter permet de
sauvegarder vos enregistrements dans votre bibliothèque iTunes*. L'utilisateur débutant
préférera peut-être cette application pour sa simplicité d'utilisation. Sur le CD, nous avons inclus
un guide d'utilisation simplifié avec des instructions détaillées sur l'installation et le
fonctionnement du logiciel.
Le EZ Audio Converter (pour Mac seulement) est un logiciel de conversion pour Mac OS X
idéal pour l’utilisateur débutant. Veuillez consulter le guide de démarrage rapide du logiciel pour
les instructions étape par étape sur l’installation et l’utilisation.
Audacity (PC et Mac) vise l'utilisateur plus expérimenté. Cette application permet d'utiliser des
fonctions d’édition évoluées, telles que la normalisation, la suppression du bruit, la conversion
78 tr/min et séparation automatique des pistes. Le guide d'utilisation du logiciel Audacity se
trouve sur le CD inclu, veuillez vous y référer.
Installation du logiciel : Insérez simplement le CD dans le lecteur de votre ordinateur et suivez les
instructions à l'écran. Lorsque vous avez terminé la conversion du vinyle, vous le pouvez graver sur
un CD ou le télécharger sur des lecteurs multimédia portables.
* ® iTunes et iPod sont des maques de commerce enregistrées de Apple, Inc., enregistrées aux États-Unis et dans d’autres
pays.
** Une version de EZ Vinyl/Tape Converter avec Gracenote MusicID est disponible en téléchargement sur la page web de votre produit à
www.ion-audio.com.
23
Page 24

COMMANDES PRINCIPALES
3
2
1. Câble d’alimentation : Ce câble d’alimentation doit être branché dans la prise murale
APRÈS avoir effectué tous les autres branchements.
2. Câbles stéréo RCA : Ces câbles doivent être branchés dans les entrées audio de votre
système stéréo. (Remarque : vous pouvez copier des albums sur votre ordinateur même
si les sorties audio du tourne-disque ne sont pas branchées à un système stéréo.
3. Commutateur RCA PHONO | RCA LINE : Il y a un commutateur sur le panneau inférieur,
à côté des câbles RCA qui permet de sélectionner entre une entrée phono ou ligne.
Utiliser l'entrée PHONO pour brancher un tourne-disque à une chaîne stéréo. Utiliser
l'entrée PHONO pour brancher à des entrées pour lecteur de disques compacts,
auxiliaires et cassette.
MISE EN GARDE : Vous pourriez endommager votre récepteur si vous branchiez un
câble niveau ligne dans une entrée phono.
4. Gain : Permet d'ajuster les niveaux du signal audio du tourne-disque. Si l’audio provenant
du tourne-disque est trop faible ou trop fort, utilisez ce bouton pour régler le volume.
5. Sortie audio USB : Branchez le tourne-disque à votre ordinateur en utilisant le câble
USB fourni. La connexion USB permet d'acheminer un signal audio de la table tournante
et du système stéréo à l’ordinateur. La connexion USB permet également la transmission
de l’audio depuis votre ordinateur aux sorties RCA du tourne-disque. Pour transférer vos
disques vinyle sur votre ordinateur, nous vous avons fourni deux progiciels différents sur
le CD. Les logiciels EZ Vinyl/Tape Converter (PC) et EZ Audio Converter (Mac) sont la
façon la plus simple et la plus rapide de transférer des disques de vinyle sur ordinateur et
nous vous recommandons de les utiliser si vous êtes un utilisateur débutant. Par contre, si
vous êtes un utilisateur d’expérience, nous vous recommandons d’installer le logiciel
Audacity (PC et Mac) qui vous permet d’utiliser des fonctions d'édition évoluées, telles que
la normalisation audio, la suppression du bruit et séparation automatique des pistes.
4
(Branchements du panneau inférieur)
5
1
24
Page 25

6
19
11
20
6
21
7
12
22
8
9
6. Interrupteur d'alimentation : Met l'appareil sous et hors tension.
7. Plateau : Le plateau doit être fixé fermement au tourne-disque avant de pouvoir l’utiliser.
La courroie d’entraînement se trouve sur l’anneau d’entraînement sous le plateau. Voir les
CONSIGNES D’INSTALLATION pour de plus amples informations sur l’installation de la
courroie d’entraînement.
8. Interrupteur Marche/Arrêt : Permet de démarrer et d’arrêter le moteur du tourne-disque.
Si la touche ne semble pas fonctionner, vérifiez que la courroie d’entraînement est
correctement installée à l’aide des CONSIGNES D’INSTALLATION.
9. Entrée stéréo niveau ligne de • po : Il est possible de brancher un lecteur de cassettes,
un magnétophone à bobines ou toute autre source audio à cette prise. Le signal est
acheminé à l’ordinateur par le câble USB. Pour une qualité sonore optimale,
assurez-vous que la cartouche phono est bien installée. Assurez-vous également que
les câbles RCA sont branchés dans un appareil source, ou qu’ils ne sont pas en contact
avec du métal.
10. Sélecteurs de vitesses de lecture 33/45 (t/min) : Ces touches modifient le nombre de
tours/minute du plateau du tourne-disque. Une DEL rouge indique quelle vitesse de
lecture est sélectionnée.
REMARQUE : Si le tourne-disque devient hors tension lorsque la vitesse de lecture 45
t/min est réglée, elle revient automatiquement à 33t/min lors de la remise sous tension.
REMARQUE : Il est possible d’enregistrer vos albums 78 t/min en les enregistrant d’abord
sur 33 t/min ou 45 t/min, puis en les modifiant à 78 t/min à l’aide du logiciel Audacity.
23
10
13
14
15
16
17
18
25
Page 26

12
13
14
15
16
17
18
11. Socle iPod : Ce socle permet de brancher un iPod. Assurez-vous que l'iPod est bien ajusté sur
le connecteur, mais ne le forcez surtout pas. Le socle permet d’enregistrer vos vinyles
directement sur l’iPod ou de retransmettre le signal audio provenant de l’iPod aux sorties RCA
du tourne-disque. Le LPDOCK est compatible avec les modèles iPod suivants :
De plus, le tourne-disque peut également recharger votre iPod lorsqu'il est sur le socle. Lorsque
le tourne-disque n’est pas en mode d’enregistrement, il recharge automatiquement votre iPod.
Afin d’assurer une meilleure qualité d’enregistrement et de prévenir l’infiltration de bruits
indésirables sur vos enregistrements, la fonction de rechargement de la pile est désactivée dès
que l’enregistrement débute. Nous comprenons qu’il puisse arriver que vos sessions
d’enregistrement soient longues et que votre iPod doit demeurer chargé plus longtemps. Durant
l’enregistrement il est possible d'activer la fonction de recharge en appuyant simultanément sur
les touches |<< et >>|. Il est possible de la désactiver en tout temps en appuyant de nouveau
sur les touches |<< et >>|.
Commandes iPod : Les commandes suivantes peuvent être utilisées
pour parcourir les menus et les fonctions de votre iPod directement à
partir du tourne-disque.
12. Scroll – Fonctionne de la même manière que la molette cliquable de
votre iPod.
13. Menu – Fonctionne de la même manière que la touche « Menu » de
votre iPod.
14. Select – Fonctionne de la même manière que la touche « Select » de
votre iPod.
15. Rec Menu – Permet d'activer le mode d’enregistrement (Voice Memo)
de votre iPod. Voir la section « Enregistrement sur iPod » pour plus
de détails.
16. |<< - Fonctionne de la même manière que la touche |<< de votre iPod.
17. >>| - Fonctionne de la même manière que la touche >>| de votre iPod.
18. >|| - Fonctionne de la même manière que la touche >|| de votre iPod.
Veuillez noter qu’appuyer simultanément sur les touches |<< et >>| permettent d’activer la fonction de
rechargement de la pile du iPod. Appuyez de nouveau pour désactiver la fonction de rechargement de
la pile du iPod.
Modèle d'iPod Lecture Enregistrement
iPod
Classic
5e génération
4e génération
3e génération*
1re et 2e génération
iPod Nano
3e génération
2e génération
re
1
iPod Shuffle
iPod Mini
iPod Touch**
génération
* Sur les iPods de 3e génération, uniquement les touches de lecture, de
retour et d’avance rapide sont prises en charge. Les touches de sélection,
menu et d’enregistrement ne sont pas prise en charge.
** Seule la navigation du lecteur de musique est prise en charge par l’iPod
Touch.
26
Page 27

21
19
20
22
23
BRAS DE LECTURE : Les items 19 à 23 font tous partie du bras de lecture. Veuillez consulter
la section « Installation du bras de lecture » pour plus de détail sur ces commandes.
19. Contrepoids et anneau de tension : Le contrepoids est utilisé pour
équilibrer l’ensemble de coquille et de cartouche afin que la force d’appui
de la pointe de lecture soit adéquate.
20. Réglage de la commande anti-dérapage : Ce réglage sert à
compenser pour la force d’appui. Voir la section « Installation du bras de
lecture » pour plus de détails.
21. Serre-bras : Le serre-bras est conçu spécialement pour maintenir le
bras de lecture en place. Le serre-bras est conçu pour demeurer en
position élevée lorsqu’il n’est pas verrouillé.
REMARQUE : Lors du transport du tourne-disque, il est recommandé de
retirer la coquille et de verrouiller le bras de lecture à l’aide du serre-bras
afin d’éviter de l’endommager.
22. Écrou de blocage du bras de lecture : Cette bague en aluminium est
utilisée pour fixer l'ensemble de coquille et de cartouche au bras de
lecture. Voir la section « Réglage de la cartouche » pour plus de détails.
23. Cartouche et coquille : La cartouche est préinstallée sur une coquille
standard. La cartouche peut être remplacée et est compatible avec les
différentes cartouches standards. Assurez-vous de bien retirer le
plastique transparent avant de faire fonctionner le tourne-disque à partir
de la cartouche.
INSTALLATION DU PLATEAU
MISE EN GARDE : Une mauvaise installation du plateau peut mener à une piètre performance
du tourne-disque, à une instabilité du plateau ou causer des dommages permanents à
l’entraînement.
1. Commencez par placer la courroie en caoutchouc autour de l'anneau intérieur inférieur du
plateau. Cette opération est habituellement faite en usine, mais veuillez vous assurer que la
courroie n'est pas torsadée ou endommagée.
2. Installez le plateau sur l’axe du centre et appuyez fermement. Assurez-vous qu’il tourne
uniformément et qu’il ne ballotte pas.
3. Faites tourner le plateau pour qu’un des trous soit aligné avec la touche Start Stop située sur le
coin avant du tourne-disque. L'axe du moteur devrait être visible à travers le trou du plateau.
4. Attrapez la courroie en caoutchouc à travers le trou et retirez-le de l'anneau intérieur inférieur et
installez-le sur l'axe du moteur. Faites attention de ne pas torsader la courroie lors de cette
étape. Assurez-vous que le plateau tourne uniformément. Si la courroie est correctement
installée, il devrait y avoir une légère tension qui arrête le plateau après l’avoir fait tourner
manuellement.
27
Page 28

RÉGLAGE DU BRAS DE LECTURE
1. Commencez par tourner le
contrepoids dans le sens
horaire jusqu’à ce qu’il soit
complètement penché vers
l’avant. (Note : C’est
également la quantité de
tension maximale qui peut
être appliquée sur la
cartouche.)
2. Il devrait y avoir
maintenant une sensation
de tension et de résistance
lorsque la coquille est
levée et abaissée. Tournez
le contrepoids dans le sens antihoraire (en vous éloignant du point de pivot) jusqu’à ce
que la sensation de tension et de résistance soit éliminée. Lorsque fait correctement, le
bras de lecture devrait pivoter avec très peu de résistance indiquant qu’il y a 0 gramme de
tension sur l'aiguille.
3. Avec le contrepoids en sa nouvelle position éloignée du point de pivot du bras de lecture,
saisissez l’anneau de tension du contrepoids et tournez-le jusqu’à ce que « 0 » soit en
position verticale.
4. Pour terminer, tournez le contrepoids (et l’anneau de tension) dans le sens horaire (vers le
point de pivot) jusqu’à ce que la quantité désirée de tension soit atteinte. Si le contrepoids
tourne 360 degrés au-delà du point zéro, 3,5 devra être ajoutée à la nouvelle lecture de
l’anneau de tension.
*L’ensemble de coquille et de cartouche inclus requiert un minimum de 3 grammes et un
maximum de 5 grammes pour un rendement optimal.
Réglage de la commande anti-dérapage
Dans la plupart des cas, la commande anti-dérapage doit être réglée au minimum. L'antidérapage compense pour la force d’appui qui se produit avec certaines cartouches lorsque la
pointe de lecture s’approche du centre du disque. Si le tourne-disque saute excessivement
pendant la lecture près de l’axe central, essayez d’augmenter l’anti-dérapage en utilisant les
incréments indiqués sur le cadran. Commencez par ajouter un incrément de 1, examinez le
résultat, ensuite augmentez-le un peu plus, et ainsi de suite.
IMPORTANT
Assurez-vous que le tapis de feutre est toujours placé sur le plateau lors de l’utilisation du
tourne-disque. À défaut de respecter cette condition, vous pourriez endommager le support
ainsi que le tourne-disque.
Assurez-vous de retirer le protège-cartouche en plastique (protège-aiguille) avant de faire
fonctionner le tourne-disque.
28
Page 29

ENREGISTREMENT SUR iPod
Veuillez suivre les consignes ci-dessus pour enregistrer votre musique directement sur votre
iPod. Veuillez noter que le iPod enregistre le signal audio du tourne-disque, ainsi que le signal
audio provenant de l’entrée stéréo de 1/8 po.
Notez qu’il est possible d’enregistrer sur l’iPod sans avoir aucune connexion audio branchée au
tourne-disque. Cependant, nous vous recommandons de brancher les sorties audio (RCA ou
USB) à un système de sonorisation afin que vous puissiez contrôler l'audio lors
d'enregistrements.
1. Placez l’iPod dans le socle en vous assurant qu’il est bien ajusté sur le connecteur. Selon
le modèle de iPod, il se peut que vous deviez utiliser l’adaptateur universel pour socle
fourni avec l’iPod.
2. Placez un disque sur le plateau et placez l’aiguille sur la musique que vous désirez
enregistrer.
3. Appuyez sur la touche REC MENU, ceci active le Record mode de votre iPod (Voice
Memo s’affiche sur l’écran du iPod).
Remarque : Avec certains modèles d’iPod, il se peut que le mode Mémo vocal ne soit pas
lancé automatiquement en appuyant sur la touche du menu d’enregistrement (Rec Menu).
Il se peut que vous deviez surligner l’option Mémo vocal et appuyer sur Sélection avant de
procéder.
Remarque : Avec certains modèles d’iPod, il n’est pas possible d’entrer en mode Mémo
vocal si l’iPod est en mode de lecture audio/vidéo. Si vous éprouvez des difficultés à
accéder au mode Mémo vocal, retournez au menu principal en appuyant sur la touche
Menu et réessayez.
4. Lorsque vous êtes prêt à enregistrer, appuyez sur la touche Select pour lancer
l’enregistrement sur votre iPod.
5. Appuyez maintenant sur la touche PLAY du tourne-disque afin de faire jouer la musique
que vous désirez enregistrer.
6. Lorsque vous désirez arrêter l’enregistrement, pausez simplement le tourne-disque.
7. Utilisez ensuite le bouton Scroll pour sélectionner « Stop and Save » et appuyez sur
Select. (Vous pouvez également sélectionner « Pause » pour arrêter et continuer plus
tard).
Lorsque vous avez terminé, vous pouvez trouver l’enregistrement en parcourant le menu
Extras X Voice Memos. Vos enregistrements seront identifiés par la date et l’heure
auxquelles l’enregistrement fut terminé.
IMPORTANT : Renommer les enregistrements à partir du iPod n’est pas recommandé. Si
vous modifiez le nom du fichier, il se peut que l’iPod ne puisse plus accéder au fichier. Si vous
désirez renommer le fichier de votre enregistrement, transférez-le sur votre ordinateur,
renommez-le, puis téléchargez-le dans votre bibliothèque iTunes comme fichier AAC ou MP3.
29
Page 30

SYNCHRONISATION DU IPOD PAR LE BIAIS DU TOURNE-DISQUE
Il est possible de synchroniser votre iPod à iTunes à partir du tourne-disque. Suivez les
consignes ci-dessous afin d’établir la connexion.
1. Assurez-vous que le tourne-disque est branché à votre ordinateur à l’aide du câble USB
inclus. (Utilisateurs Windows : Si c’est la première fois que vous brancher le tournedisque, veuillez permettre à votre ordinateur le temps nécessaire pour initialise
automatiquement les pilotes. Lorsque le message « Votre nouveau matériel est installé et
prêt à l'emploi » apparaît dans le coin gauche de l’écran de votre ordinateur, vous pouvez
procédé.
2. Maintenez la touche Menu du tourne-disque enfoncée tout en insérant l’iPod sur le socle.
Lorsque l’iPod se connexe à votre ordinateur, « Ne pas débrancher » s’affiche sur l’écran
du iPod. NE PAS DÉBRANCHEZ L’IPOD DU SOCLE LORSQUE « NE PAS
DÉBRANCHER » S’AFFICHE ET SANS AVOIR ÉJECTER CORRECTEMENT L’IPOD
DE L’ORDINATEUR. AUTREMENT VOUS POURRIEZ ENDOMMAGER L’IPOD ET SES
DONNÉES!
3. Lorsque l’iPod est correctement branché à l’ordinateur, iTunes s’ouvre automatiquement.
(Utilisateurs PC : si vous n’avez pas installé iTunes, vous pouvez insérer le CD inclus
avec le tourne-disque. Suivez les consignes à l’écran pour installer l’application.)
4. Si vous avez fait de nouveaux enregistrements depuis que vous avez branché votre iPod
à l’ordinateur, l’écran suivant devrait s’afficher :
Sélectionnez « Oui » si vous
désirez déplacer les
enregistrements (voice memos)
à votre bibliothèque iTunes.
Alors que l’iPod est sur le socle et synchronisé à votre ordinateur, vous pouvez transférer de la
musique depuis ou vers votre ordinateur comme si l’iPod y était directement branché.
Notez que vous pouvez également écouter de la musique depuis votre ordinateur par le biais
des sorties RCA du tourne-disque.
IMPORTANT : AFIN DE DÉBRANCHER VOTRE IPOD DE
L’ORDINATEUR DE MANIÈRE SÉCURITAIRE, ÉJECTEZ-LE
EN CLIQUANT SUR LA TOUCHE D’ÉJECTION.
REMARQUE : Lorsque vous éjectez votre iPod de l’ordinateur,
vous devrez le retirer de sur le socle puis le remettre ensuite si
vous désirez continuer à utiliser le LPDOCK.
30
Page 31

CONVERSION DU VINYLE 78 TR/MIN
Pour transférer les disques 78 tr/min sur votre ordinateur, vous devez installer et utiliser
l'application Audacity. Cette application se trouve sur le CD inclus dans la boîte. Veuillez
installer Audacity et suivre les indications ci-dessous pour l'enregistrement des 78 tr/min. Pour
toute question concernant Audacity, veuillez consulter son guide d'utilisation inclus sur le CD.
1. Branchez le tourne-disque au port USB de l’ordinateur.
2. Lancez Audacity.
3. Dans Audacity, allez à EDIT -> PREFERENCES et réglez Recording Device USB Audio
Codec « USB Audio Codec », ceci représente votre tourne-disque (sélectionnez 2 canaux
pour enregistrer en stéréo).
4. Sélectionnez la carte de son de votre ordinateur comme appareil de lecture par défaut.
Veuillez noter que le nom de l‘appareil peut varier d’un ordinateur à l'autre, mais ne
sélectionnez pas « Microsoft Sound Mapper ».
Vous pouvez également sélectionner « USB Audio Codec » afin d’utiliser la connexion
USB pour la transmission de l’audio depuis votre ordinateur aux sorties RCA du tournedisque.
5. Puis, cochez « Software Playthrough » afin de pouvoir écouter la musique à partir de
l‘appareil audio durant l’enregistrement.
6. Vous êtes maintenant prêt à enregistrer. Appuyez sur la touche RECORD dans Audacity
pour lancer l’enregistrement.
7. Faites jouer le 78 tr/min à 33 tr/min ou 45 tr/min.
8. Une fois l'enregistrement du matériel désiré terminé, appuyez sur la touche STOP dans
Audacity.
9. Cliquez sur le menu EDIT, puis sur SELECT, et ensuite sur ALL (raccourci : « CTRL-A »).
10. Cliquez sur le menu EFFECT et ensuite sur CHANGE SPEED.
11. Lorsque la fenêtre CHANGE SPEED s'ouvre, vous verrez les choix de vitesse pour les
vinyles standard. Le réglage « from » régler à 33 tr/min ou 45 tr/min, selon la vitesse que
vous avez sélectionnée, puis « to » à 78 tr/min.
12. Cliquez sur la touche PREVIEW pour entendre l'enregistrement reconverti à la bonne
vitesse de 78 tr/min. Cliquez sur OK pour finaliser la conversion à 78 tr/min.
13. Une fois terminé, vous pouvez sauvegarder le fichier en allant à FILE -> EXPORT AS
WAV. Ceci permet de sauvegarder l'enregistrement en fichier audio .WAV.
14. Sélectionnez un répertoire sur l'ordinateur, nommez le fichier et cliquez sur SAVE.
L'enregistrement se trouve dans le répertoire où vous l'avez sauvegardé dans l'étape
15.
précédente.
31
Page 32

DÉPANNAGE
Veuillez consulter les scénarios suivants si vous avez des problèmes lors de l’enregistrement
de vos vinyles.
PROBLÈME CAUSE SOLUTION
L’aiguille n’est pas déposée sur
le vinyle.
Je n’entends pas de signal
audio lors de
l’enregistrement.
Le son est de mauvaise
qualité.
Lors de l’enregistrement du
vinyle sur mon ordinateur,
l'audio est fort et déformé.
Lors de l’enregistrement du
vinyle sur mon ordinateur,
l'audio est à peine
perceptible.
Je n'entends pas mes
enregistrements lorsque je
les fais jouer sur mon
ordinateur.
Lorsque le tourne-disque est
branché, je n'entends son
provenant de mon
ordinateur.
Lorsque je fais
l’enregistrement sur mon
ordinateur avec Windows
Vista, mes enregistrements
sont en mono plutôt qu’en
stéréo.
Je ne parviens pas à
enregistrer sur mon iPod.
La musique joue à une
vitesse étrange.
AVANT DE RETOURNER CE PRODUIT, veuillez contacter Ion Audio ou votre détaillant pour du soutien technique.
Toutes les coordonnées se trouvent dans le livret des consignes de sécurité inclus avec de produit.
La table tournante n’est pas
branchée.
Les sorties RCA ne sont pas
branchées à un système de
sonorisation.
La cartouche n’est pas fixée
correctement.
Le vinyle est peut-être sale ou
égratigné.
La pile de l’iPod se recharge
durant l’enregistrement.
Le niveau de gain de la table
tournante est trop élevé.
Le niveau de gain de la table
tournante est trop faible.
La sortie audio n’est de
l'ordinateur n'est pas réglé
correctement.
Les paramètres d'entrée pour
l'enregistrement ne sont pas
réglés à « stéréo ».
L’iPod est mal branché.
L’iPod est synchronisé à
l’ordinateur.
L’iPod n’est pas en Record
Mode (Voice Memo).
La vitesse sélectionnée sur le
tourne-disque est incorrecte.
Déposez l’aiguille sur le vinyle.
Assurez-vous que le tourne-disque est branché à prise
d’alimentation et qu’il est sous tension.
Assurez-vous que les sorties RCA du tourne-disque sont
branchées à un système de sonorisation et que ce dernier est
sous tension.
La cartouche doit être fixée correctement au bras de lecture.
Essayez de retirer toute poussière ou marque de doigts en
l’essuyant avant de le remettre sur la table tournante.
Afin d’assurer une qualité audio optimale, la fonction de
rechargement de la pile doit être désactivée. Si vous aviez activé
la fonction de rechargement de la pile, veuillez la désactiver en
appuyant simultanément sur les touches |<< et >>|.
Diminuez le niveau de gain à l’aide du bouton de gain.
Augmentez le niveau de gain à l’aide du bouton de gain.
Assurez-vous que les options de lecture audio de votre ordinateur
sont configurées selon une des façons suivantes :
Dans Windows, allez à Démarrer X Panneau de
configuration X Sons et périphériques audio ( Windows XP)
ou Démarrer X Panneau de configuration X Sons (Windows
Vista) et assurez-vous que la carte de son de votre
ordinateur est sélectionnée comme appareil de lecture par
défaut sous l’onglet Audio.
Notez que vous pouvez également écouter de la musique
depuis votre ordinateur par le biais des sorties RCA du
tourne-disque. Sélectionnez simplement « USB Audio
Codec » comme appareil de lecture audio et l’audio depuis
votre ordinateur sera acheminé aux sorties RCA du tournedisque.
Dans Vista, il se peut que vous deviez régler manuellement
l'entrée d'enregistrement à « stéréo ».
Allez à Démarrer X Panneau de configuration X Son (mode
de visualisation classique). Cliquez ensuite sur l'onglet
Enregistrement et mettez l'entrée Microphone en surbrillance
(USB Audio Codec). Cliquez sur Propriétés pour voir les
paramètres d'entrée. Cliquez ensuite sur l'onglet Avancé et
sélectionnez « 2 canaux, 16 bits, 44100 Hz (qualité CD) » dans le
menu déroulant Format par défaut. Puis, cliquez sur Appliquez
pour confirmer les réglages.
Assurez-vous que l'iPod est bien ajusté sur le connecteur du
socle. Il se peut que vous deviez utiliser l’adaptateur universel
pour socle fourni avec votre iPod.
Vous ne pourrez enregistrer sur votre iPod lorsqu’il est
synchronisé à l’ordinateur via une connexion USB. Éjectez l’iPod
de votre ordinateur, retirez-le du socle, puis remettez-le de
nouveau sur le socle.
Assurez-vous que l’iPod est en Record Mode. Appuyez sur la
touche Rec Menu du tourne-disque afin d’activer le Record
Mode. Appuyez ensuite sur la touche Select du tourne-disque
pour lancer l’enregistrement.
Assurez-vous de faire jouer les disques à la vitesse appropriée.
Sélectionnez la vitesse appropriée, soit 33RPM ou 45RPM.
32
Page 33

KURZANLEITUNG
o Überprüfen SIe bitte, dass sich die in der unteren Abbildung aufgeführten Gegenstände in
der Produktverpackung befinden.
o LESEN SIE BITTE DIE SICHERHEITSHINWEISE, BEVOR SIE DAS PRODUKT
VERWENDEN
o Registrieren Sie Ihr Produkt online auf http://www.ion-audio.com.
SLIPMAT
CD
GEGENGEWICHT
VORMONTIERTES SYSTEM
PLATTENTELLER
LP DOCK
EINFÜHRUNG
Das LP DOCK ist ein völlig neuartiges Produkt, mit welchem Sie Musik von Schallplatten oder von externen
Audiogeräten direkt auf Ihren iPod* aufnehmen können. Zusätzlich dazu ist es möglich, Ihre Vinylschätze
über den USB Anschluss auf den Computer digital zu überspielen. Wir haben mehrere Softwarepakete
beigefügt, die Sie beim Konvertieren Ihrer Vinylaufnahmen unterstützen sollen. Beachten Sie bitte, dass für
direkte Aufnahmen auf Ihren iPod keine Software installiert werden muss. Sie sollten jedoch eine der
folgenden Anwendungen installieren, um die Vorteile von Computeraufnahmen zu nutzen:
1. EZ Vinyl/Tape Converter** (nur für PC) ist die schnellste und einfachste Lösung überhaupt, um Ihre
Schallplatten in das digitale Format umzuwandeln. EZ Vinyl/Tape Converter speichert Ihre Aufnahmen
für Sie direkt in Ihrer iTunes* Bibliothek. Gerade Anwender, die zum ersten Mal Schallplatten
digitalisieren lieben diese Software. Auf der CD, sie finden in einer handlichen Kurzanleitung
schrittweise Anleitungen zur Softwareinstallation und zur Bedienung des Programms.
2. EZ Audio Converter (nur für Mac) ist ein grundlegendes Converter-Programm für Mac OS X und ideal
für Neueinsteiger. Softwareinstallation und Betrieb sind Schritt für Schritt in der beigefügten SoftwareKurzanleitung erklärt.
3. Audacity (PC und Mac) wendet sich an erfahrene Anwender. Dieses Programm ermöglicht erweiterte
Audiobearbeitungen, wie Normalization, Rauschunterdrückung, 78 RPM Konvertierung sowie
automatische Titelunterteilungen. Der Audacity Software Guide mit weiteren Informationen zu diesem
Programm befindet sich auf der beiliegenden CD.
Um die Softwareprogramme zu installieren, legen Sie einfach die mitgelieferte CD in das Laufwerk Ihres
Computers ein und folgen den Bildschirmanweisungen. Nachdem Sie Ihre Schallplatten digitalisiert haben,
können Sie aus den Titeln eine CD brennen oder die Songs auf einen portablen MP3-Player laden.
* iTunes und iPod sind geschützte Warenzeichen von Apple, Inc., registriert in den U.S.A. und anderen Ländern.
** Eine Version der EZ Vinyl/Tape Converter mit Gracenote MusicID steht zum Download auf der Web-Seit für Ihr Produkt auf www.ionaudio.com.
33
Page 34

ANSCHLÜSSE UND BEDIENELEMENTE
3
2
1. NETZKABEL: Das Netzkabel verbinden Sie mit einer Steckdose, NACHDEM Sie alle
Audioverbindungen hergestellt haben.
2. RCA Audioausgang: Diese Kabel schließen Sie an die Audioeingänge Ihrer
Stereoanlage an. (Beachten Sie bitte: Sie können auch dann noch Musik auf Ihren iPod
oder Computer kopieren, wenn die Audioausgänge des Gerätes nicht mit Ihrer
Stereoanlage verbunden sind).
3. RCA PHONO | RCA LINE SCHALTER: Mit diesem Schalter auf der Unterseite des
Gerätes können Sie den Ausgangspegel von PHONO auf LINE stellen. Verwenden Sie
die PHONO Einstellung, wenn Sie den Plattenspieler an die Phonoeingänge Ihrer
Stereoanlage anschließen. Verwenden Sie den LINE Pegel, um das Gerät an die
CD/AUX/TAPE Eingänge anzuschließen.
ACHTUNG: Sie könnten Ihre Stereoanlage beschädigen, falls Sie das Gerät mit
LINE Pegel an den PHONO Eingängen der Anlage betreiben.
4. Gain: Mit diesem Regler justieren Sie die Lautstärke des Audiosignals des
Schallplattenspielers. Falls das Audiosignal Ihres Plattenspielers zu leise oder zu laut
sein sollte, passen Sie ihn mit diesen Reglern an.
5. USB Audio Ausgang: Mit dem beiliegenden USB Kabel können Sie diesen USB Port mit
Ihrem Computer verbinden. Die USB Verbindung transportiert das digitale Audiosignal
vom Plattenspieler und dem Stereoeingang zum Computer. Über USB kommt auch der
Audioausgang des Computers zurück und kann an den RCA Ausgängen des
Plattenspielers abgegriffen werden. Zur Übertragung Ihrer Schallplatten auf den
Computer haben wir zwei Programme beigelegt. EZ Vinyl/Tape Converter (PC) bzw. EZ
Audio Converter (Mac) sind die einfachste und schnellste Methode, um Ihre VinylAufnahmen zu übertragen. Wenn Sie Neueinsteiger sind, sollten Sie diese Programme
benutzen. Wenn Sie ein fortgeschrittener Nutzer sind, können Sie stattdessen auch die
Installation und Nutzung der Audacity-Software (PC und Mac) in Betracht ziehen, die es
Ihnen erlaubt, von entwickelteren Audioeditionskomponenten wie Audionormalisierung,
Löschen von Hintergrundgeräuschen und automatischer Tracktrennung zu profitieren.
4
5
1
(Anschlüsse auf der Unterseite)
34
Page 35

6
19
11
20
6
21
7
12
22
8
9
6. Power Taste: Schaltet das Gerät ein und aus.
7. Plattenteller: Der Plattenteller sollte sicher auf dem Plattenspieler montiert werden, bevor
Sie das Gerät verwenden. Der Motorantriebsriemen, der sich auf dem Ring unter dem
Plattenteller befindet, muss dafür vorher installiert werden. Weitere Informationen hierzu
finden Sie im Abschnitt AUFBAUANLEITUNG.
8. Start/Stop Taste: Diese Taste startet und stoppt den Motor des Schallplattenspielers.
Fall diese Taste nicht zu funktionieren scheint, überprüfen Sie bitte, ob der Antriebsriemen
richtig installiert ist. (Siehe AUFBAUABLEITUNG)
9. 3,5 mm Klinkeneingang: Schließen Sie Ihr Kassettendeck oder andere Audioquellen
hier an. Das hier eingehende Eingangssignal wird über USB an Ihren Computer
gesendet. Sie sollten in jedem Falle überprüfen, dass Ihr Tonabnehmersystem
installiert ist, um bei der Verwendung dieses Eingangs die maximale Audioqualität
zu erzielen. Passen Sie auch darauf auf, Ihre RCA Anschlüsse mit Ihrem Eingangsgerät
sind und keinen Kontakt zu metallischen Gegenständen haben.
10. 33 und 45 RPM Tasten: Diese Tasten steuern die Drehzahl des Plattentellers. Eine rote
LED zeigt jeweils an, welche Drehzahl gewählt ist.
HINWEIS: Wird der Plattenspieler mit der Einstellung 45 RPM ausgeschaltet, wechselt er
nach dem Einschalten zu 33 RPM.
HINWEIS: Schallplatten mit 78RPM können Sie mit 33 oder 45 RPM aufnehmen und sie
dann in Audacity auf 78 RPM konvertieren.
23
10
13
14
15
16
17
18
35
Page 36

11. iPod Dock: Schließen Sie hier Ihren iPod an. Achten Sie darauf, dass Ihr iPod gut in den
Dock Connector gleitet. Wenden Sie keine Kraft an! Das Dock ermöglicht es Ihnen, Ihre
Schallplatten direkt auf dem iPod aufzunehmen oder Musik von Ihrem iPod über die RCA
Audioausgänge wiederzugeben. Das LPDOCK ist mit den folgenden iPod Modellen
kompatibel:
iPod Modell Wiedergabe Aufnahme
iPod
Classic
5. Generation
4. Generation
3. Generation*
1. und 2. Generation
iPod Nano
3. Generation
2. Generation
2. Generation
iPod Shuffle
iPod Mini
iPod Touch
*Beim iPod der 3. Generation werden nur die Tasten “Play”, “Rewind”, und “Fast
Forward” unterstützt. Die Tasten “Select”, “Menu” und “Rec Mode” werden nicht
unterstützt.
** iPod Touch dient nur zur Steuerung des Musikplayers
Beachten Sie, dass Ihr Plattenspieler ihren angeschlossenen iPod gleichzeitig auflädt,
wenn Sie auf dem iPod nicht aufnehmen. Um eine optimale Aufnahmequalität zu erhalten
und um ungewünschten Nebengeräuschen vorzubeugen, wird das Aufladen iPod während
der Aufnahme deaktiviert. Wir wissen, dass es bei langen Aufnahmen notwendig sein
kann, den iPod aufzuladen. Sie können das Aufladen während der Aufnahme an Ihrem
iPod aktivieren, indem Sie gleichzeitig die Tasten |<< und >>| drücken. Sie schalten das
Aufladen aus, indem Sie die Tasten |<< und >>| noch einmal drücken.
iPod STEUERELEMENTE: Die folgenden Steuerelemente können
zum Durchsuchen und Navigieren in den Menüs und Funktionen
Ihres iPods direkt vom Plattenspieler aus verwendet werden.
12. Scroll – Dieser Regler funktioniert wie das Touchwheel Ihres
iPods.
13. Menu – Diese Taste arbeitet wie die ‘Menu’ Taste Ihres iPods.
14. Select – Diese Taste arbeitet wie die ‘Select’ Taste Ihres iPods.
15. Rec Menu – Wechselt in den Record Modus (Voice Memo)
Ihres IPods. Weitere Hinweise zu dieser Funktion finden Sie im
Abschnitt ‘Aufnahme auf dem iPod’.
16. |<< - Diese Taste arbeitet wie die ‘|<<’ Taste Ihres iPods.
17. >>| - Diese Taste arbeitet wie die ‘>>|’ Taste Ihres iPods.
18. >|| - Diese Taste arbeitet wie die ‘>||’ Taste Ihres iPods.
Beachten Sie, dass Sie durch gleichzeitiges Drücken der |<<
und >>| Tasten bei der Aufnahme den Ladevorgang des iPods
aktiviert. Drücken Sie diese Taste noch einmal, um diesen
Vorgang abzuschalten.
36
Page 37

21
19
20
22
23
TONARM: Die Punkte 19 – 23 beschreiben die Teile des Tonarms. Beachten Sie den Abschnitt
TONARM SETUP für weitere Informationen.
19. Gegengewicht und Skalenring: Das Gegengewicht dient dazu, die
Headshell (Systemträger) mit dem Tonabnehmersystem so
auszubalancieren, dass der korrekte Nadeldruck auf die Schallplatte
ausgeübt wird.
20. Anti-Skate Einstellung: Das Gegengewicht dient dazu,
dieHeadshell (Systemträger) mit dem Tonabnehmersystem so
auszubalancieren, dass der korrekte Nadeldruck auf die Schallplatte
ausgeübt wird.
21. Arm Clip: Dieser speziell entworfene Arm-Clip sichert den
Tonarmwährend Pausen und bei Nichtgebrauch. Der Arm-Clip
wurde so entworfen, dass er in der aufrechten Stellung verbleibt
solang er geöffnet ist.
HINWEIS: Beim Transport des Plattenspielers ist es immer
empfehlenswert, das Headshell mit dem Tonabnehmer System zu
entfernen und den Arm-Clip zu verschliessen, um den Tonarm oder
den Plattenspieler vor Beschädigung zu schützen.
22. Tonarm Verschluss: Diese Aluminiummutter dient zur festen
Verbindung von Headshell-Systems mit dem Tonarm. Für weitere
Einzelheiten, sehen Sie bitte unter Tonarm Aufbau nach.
23. Tonabnehmersystem und Headshell: Das Tonabnehmersystem
ist auf eine Standard-Headshell vormontiert. Sowohl das Tonabnehmersystem als auch
die Nadel kann selbst ausgetauscht werden und ist kompatibel mit den meisten Standard
DJ Systemen. Vor dem ersten Gebrauch entfernen Sie die Plastik Schutzkappe vom
System.
MONTAGE DES PLATTENTELLERS
WARNUNG: Unvorschriftsmäßiger Aufbau des Plattentellers kann zu schlechter Leistung des
Plattenspielers, Instabilität des Tellers oder zu permanentem Schaden des Motors führen.
1. Zuerst legen Sie den Gummi-Antriebsriemen um den inneren unteren Ring des
Plattentellers. Dies sollte bereits vorher installiert sein, aber überprüfen Sie, dass der
Riemen nicht verdreht oder beschädigt ist.
2. Setzen Sie den Teller auf die Zentralspindel und drücken Sie ihn herunter, bis er fest sitzt.
Stellen Sie sicher, dass er rund läuft und nicht eiert.
3. Drehen Sie den Teller so, dass eines der Löcher mit der Start/Stop-Taste an der vorderen
Ecke des Plattenspielers in einer Linie steht. Die Messingmotorspindel sollte durch das
Loch sichtbar sein.
4. Greifen Sie in das Loch und ziehen Sie den Gummiantriebsriemen vom inneren Ring über
die Motorspindel. Achten Sie darauf, den Gummiantriebsriemen dabei nicht zu verdrehen.
Stellen Sie sicher,dass der Plattenteller gleichmäßig läuft. Wenn der Antriebsriemen
korrekt installiert ist, sollte eine leichte Spannung bestehen, die den Drehteller zum Halt
bringt nachdem er frei gedreht wurde.
37
Page 38

AUFBAU DES TONARMS
1. Zuerst drehen Sie das
Gegengewicht im
Uhrzeigersinn, bis es sich
vollständig in der vordersten
Position befindet
(HINWEIS: dies ist zugleich
der größtmögliche Druck,
der auf das
Tonabnehmersystem
ausgeübt werden kann.)
2. Sie sollten nun Gewicht und
Widerstand fühlen können,
wenn der Tonarm
angehoben und abgesenkt
wird. Fangen Sie nun an, das Gegengewicht gegen den Uhrzeigersinn (weg vom
Schwenkpunkt) so lange zu drehen, bis das Gefühl von Gewicht und Widerstand nicht
mehr wahrzunehmen ist. Falls dies genau ausgeführt wird, schwenkt der Tonarm ohne
großen Widerstand auf und ab, was bedeutet, dass der Druck auf der Abtastnadel genau
0 Gramm beträgt.
3. Lassen Sie das Gegengewicht in der neuen Position und drehen sie nur den beweglichen
Skalenring des Gegengewichts solange, bis “0” in der vertikalen Position steht.
4. Zuletzt drehen Sie das Gegengewicht (samt Skalenring) in Richtung der Skala (von vorne:
gegen den Uhrzeigersinn) bis das gewünschte Gewicht erreicht ist. Falls die Skala sich
mehr als 360 Grad über den Nullpunkt hinaus dreht, sollte der angezeigte neue Wert des
Skalenrings zu 3.5 dazu addiert werden.
*Das mitgelieferte Tonabnehmersystem erfordert mindestens 3 Gramm, jedoch höchstens
5 Gramm für eine optimale Leistung.
Einstellung der Anti-Skate Einstellung
In den meisten Fällen sollte Anti-Skate auf seinen minimalsten Wert eingestellt werden. AntiSkate gleicht nach innen gerichtete Kräfte aus, welche bei manchen Systemen auftreten,
während sich die Abtastnadel auf die Plattenmitte zubewegt. Falls beim Plattenspieler während
Back-Cueing und Scratching außergewöhnlich starkes “Springen” in Richtung der mittleren
Spindel auftritt, versuchen Sie Anti-Skate in den auf der Anzeige gezeigten Schritten zu
erhöhen. Fangen Sie mit einer Steigerung von 1 an, testen Sie das Verhalten, dann steigern
Sie es weiter, und so fort.
WICHTIG
Achten Sie immer darauf, dass die Slipmat im auf dem Plattenteller liegt, wenn Sie den
Schallplattenspieler verwenden. Anderenfalls könnten Sie sowohl Ihre Schallplatten als auch
den Plattenspieler beschädigen.
Bitte entfernen Sie die Nadelabdeckung aus Plastik, bevor Sie den Plattenspieler verwenden.
38
Page 39

AUF IHREN iPod AUFNEHMEN
Folgen Sie bitte der folgenden Anleitung, um Schallplatten direkt auf dem iPod aufnehmen zu
können. Beachten Sie bitte, dass Ihr iPod Audiosignale des Schallplattenspielers und des 3,5
mm Miniklinkeneingang des Plattenspielers aufnehmen kann.
Wie Sie wissen, können Sie auf Ihrem iPod auch dann aufnehmen, wenn keine
Audioverbindungen am Plattenspieler hergestellt wurden. Jedoch empfehlen wir ausdrücklich,
die Audioausgänge (RCA oder USB) mit einem Lautsprecher zu verbinden, um die Aufnahmen
vorzuhören.
1. Stellen Sie den iPod in das Dock, so dass er leicht auf den Dock Anschluss zu schieben
ist. Beachten Sie, dass je nach verwendetem iPod Modell der universelle Dock Adapter,
der Ihrem iPod beiliegt, verwendet werden muss.
2. Legen Sie eine Schallplatte auf den Plattenteller und suchen gehen Sie direkt zu der
Position der Platte, an der sich das Lied, welches Sie aufnehmen möchten, befindet.
3. Drücken Sie die REC MENU Taste am Plattenspieler, um den Aufnahmemodus Ihres
iPods zu aktivieren (im Display des iPods erscheint Voice Memo).
Hinweis: Bei manchen Modellen wird durch Drücken der „Rec“-Taste nicht automatisch
auf den Aufnahmemodus zugegriffen. Unter Umständen muss die Aufnahmeoption zuerst
angewählt und dann bestätigt werden.
Hinweis: Bei manchen Modellen kann auf den Aufnahmemodus unter Umständen nicht
zugegriffen werden, wenn sich der iPod im gleichen Zeitpunkt im Musik- oder
Videowiedergabemodus befindet. Sollten sich beim Zugriff auf den Aufnahmemodus
Schwierigkeiten ergeben, einfach über die Menütaste zurück ins Hauptmenü gehen und
es erneut versuchen.
4. Wenn Sie für die Aufnahme bereit sind, drücken Sie die Select Taste, um den
Aufnahmevorgang zu beginnen.
5. Nun können Sie die PLAY Taste des Plattenspielers drücken, um die Musik, die
aufgenommen werden soll, wiederzugeben.
6. Sollten Sie die Aufnahme beenden wollen, beenden Sie die Wiedergabe des
Plattenspielers.
7. Verwenden Sie danach den Scroll Regler und wählen Sie ‘Stop and Save’ aus. Drücken
Sie Select. (Alternativ können Sie auch die Aufnahme unterbrechen (‘Pause‘), um sie
später ab diesem Punkt fortzusetzen).
Nach Abschluss des Aufnahmevorgangs finden Sie Ihre Aufnahme unter Extras X Voice
Memos. Sie können die Aufnahmen anhand der Datums- und Zeitangabe (zum Zeitpunkt der
Beendigung der Aufnahme) identifizieren.
WICHTIG: Wir empfehlen Ihnen, Ihre Aufnahmen nicht direkt auf dem iPod umzubenennen.
Falls Sie den Dateinamen Ihrer Aufnahme am iPod ändern, könnte es passieren, dass der iPod
auf die Musik nicht mehr zugreifen kann. Wenn Sie Ihre Aufnahmen umbenennen möchten,
sollten Sie die Daten erst auf den Computerübertragen, sie dann umbenennen und über Ihre
iTunes Bibliothek als AAC oder MP3 Datei zurück zum iPod senden.
39
Page 40

IHREN iPod ÜBER DEN SCHALLPLATTENSPIELER SYNCHRONISIEREN
Sie können Ihren iPod mit iTunes direkt über den Plattenspieler synchronisieren. Folgen Sie
dazu den nun beschriebenen Schritten:
1. Verbinden Sie Ihren Plattenspieler über das mitgelieferte USB Kabel mit Ihrem Computer,
(Windows Anwender aufgepasst! Falls Sie das erste Mal Ihren Plattenspieler an Ihren
Computer anschließen, warten Sie bitte, bis der Computer automatisch die benötigten
Hardware-Treiber geladen hat. Fahren Sie erst nach der Meldung “Ihre neue Hardware
wurde installiert und kann nun verwendet werden” fort.)
2. Halten Sie die Menu Taste am Plattenspieler gedrückt und stecken Sie dabei den iPod in
das Dock. Sobald sich Ihr iPod mit dem Computer verbindet, erscheint die Meldung “Bitte
nicht trennen” auf der iPod-Anzeige. ENTFERNEN SIE IHREN iPod NICHT VOM DOCK,
WÄHREND DIE “BITTE NICHT TRENNEN” MELDUNG BLINKT UND BEVOR SIE DAS
GERÄT NICHT AM COMPUTER ABGEMELDET HABEN! ANDERENFALLS KANN ES
ZU SCHÄDEN AM iPod ODER AN DEN DATEN DES GERÄTES KOMMEN!
3. Wenn Ihr iPod richtig an Ihren Computer angeschlossen wurde, sollte iTunes automatisch
starten. (PC Anwender sollten zur iTunes Installation die beiliegende CD verwenden.
Folgen Sie dabei einfach den Bildschirmanweisungen zur Installation des Programms.)
4. Wenn Sie nach der letzten Verbindung des iPods mit iTiunes neue Aufnahmen auf dem
iPod gemacht haben, erscheint nun folgende Anzeige:
Wählen Sie ‘Yes’, falls Sie die
Aufnahmen (hier als Voice
Memos bezeichnet) in die iTunes
Bibliothek übernehmen wollen.
Während Ihr iPod angeschlossen ist und sich mit Ihrem Computer synchronisiert, können Sie
auch Musik abgleichen, wie Sie es normalerweise gewohnt sind.
Beachten Sie bitte auch, dass Musik Ihres Computers auch über den RCA Ausgang Ihres
Plattenspielers wiedergeben können!
WICHTIG UM IGREN iPod SICHER VOM COMPUTER ZU TRENNEN, WERFEN SIE IHREN
iPod DURCH DEN ANKLICKEN DES EJECT TASTERS IN iTUNES AUS.
HINWEIS: Falls Sie Ihren iPod vom Computer abgemeldet
haben, müssen Sie ihn aus dem Dock entnehmen und wieder
einstecken, wenn SIe ihn weiterhin mit dem LPDOCK
verwenden wollen.
40
Page 41

UMWANDELN IHRER 78RPM SCHALLPLATTEN
Wenn Sie Ihre Schallplatten mit 78RPM auf Ihrem Computer aufnehmen möchten, müssen Sie
die Audacity Software installieren und verwenden. Dieses Programm finden Sie auf der
mitgelieferten CD. Installieren Sie Audacity und folgen Sie dann den nachstehend
beschriebenen Schritten. Eine Fehlerbeschreibung zu Audacity finden Sie in der Audacity
Softwareanleitung, die ebenfalls auf der CD enthalten ist.
1. Verbinden Sie Ihren Plattenspieler mit einem USB Port Ihres Computers.
2. Öffnen Sie Audacity.
3. Gehen Sie innerhalb Audacity‘s auf BEARBEITEN -> EINSTELLUNGEN und bestimmen
Sie den ‘USB Audio Codec’ – das ist Ihr USB Plattenspieler – als Aufnahmegerät. Stellen
Sie unter Kanäle 2-Stereo ein.
4. Definieren Sie die Soundkarte Ihres Computers als Wiedergabegerät. Die Bezeichnung
der Soundkarte unterscheidet sich von Computer zu Computer. Sie sollten aber nie
‘Microsoft Sound Mapper’ wählen.
Alternativ können Sie auch den “USB Audio Codec” verwenden, falls Sie das Audiosignal
über die RCA Ausgänge Ihres Plattenspielers ausgeben wollen.
5. Markieren Sie bitte die ‘Software Playthrough’ Option, damit Sie Ihre Musik während der
Aufnahme hören können.
6. Nun können Sie mit der Aufnahme beginnen. Drücken Sie die RECORD Taste in
Audacity, um den Vorgang zu starten.
7. Spielen Sie Ihre 78RPM Schallplatte mit 33 oder 45RPM ab.
8. Nachdem Sie die Aufnahme des gewünschten Titels abgeschlossen haben, drücken Sie
in Audacity die STOP Taste.
9. Klicken Sie dann auf EDIT und wählen Sie ALLES AUSWÄHLEN (Tastaturbefehl:
“STRG-A”).
10. Klicken Sie auf EFFEKT in der Menüleiste und wählen Sie CHANGE SPEED.
11. Wenn das Dialogfeld CHANGE SPEED geöffnet ist, sehen Sie die Standard Vinyl RPM
Auswahl. Im “from” Feld sollte (je nach Aufnahmegeschwindigkeit) 33 oder 45 RPM
stehen. Das “to” Feld sollte auf 78 RPM gesetzt werden.
12. Klicken Sie auf den VORHÖREN Taster, um zu überprüfen, dass Ihre Aufnahme in die
richtige Geschwindigkeit gewandelt wird. Zum Anwenden der Änderung klicken Sie auf
OK.
13. Nachdem Sie diese Bearbeitung vollzogen haben, speichern Sie ihren Titel über DATEI ->
EXPORTIEREN ALS WAV. Dadurch wird Ihre Musik als WAV Audiodatei gespeichert..
14. Wählen Sie ein Speicherziel auf Ihrem Computer aus, vergeben Sie einen Namen für
Ihren Titel und klicken Sie auf SPEICHERN.
15. Die Aufnahme finden Sie nun in dem Ordner auf Ihrer Festplatte, an dem Sie ihn im
vorhergehenden Schritt gespeichert haben.
41
Page 42

FEHLERHILFE
Sollten Sie bei der Verwendung Ihres USB Plattenspielers auf Probleme stoßen, können Sie
die folgende Fehlersuchtabelle verwenden, um eine Lösung zu finden.
PROBLEM URSACHE LÖSUNG
Nadel liegt nicht auf der
Schallplatte.
Ich höre bei der Aufnahme
kein Audiosignal.
Der Klang, den ich höre, ist
sehr schlecht.
Bei der Aufnahme der
Schallplatten auf den
Computer klingt es verzerrt
und sehr laut.
Bei der Aufnahme der
Schallplatten auf den
Computer klingen die
Aufnahmen zu leise.
Ich kann meine Aufnahmen
nicht hören, wenn ich sie vom
Computer abspiele.
Wenn der Plattenspieler
angeschlossen ist, kann ich
keine Audiosignale vom
Computer hören.
Unter Windows Vista sind
meine Aufnahmen nur in
Mono anstatt in Stereo.
Ich kann auf meinem iPod
nicht aufnehmen.
Meine Musik wird in der
falschen Tonhöhe abgespielt.
BEVOR SIE DIESES PROKT ZURÜCK SENDEN nehmen Sie bitte Kontakt mit ION Audio oder Ihrem Fachhändler zur
Behebung eines Problems auf. Die Kontaktinformationen finden Sie in der Broschüre mit den Sicherheitshinweisen,
Plattenspieler hat kein Strom.
RCA Ausgänge sind nicht mit
einem Lautsprechersystem
verbunden.
Das System sitzt nicht richtig.
Die Schallplatte ist schmutzig
oder verkratzt.
iPod wird während der Aufnahme
geladen.
Der Gain Pegel des
Plattenspielers ist zu hoch.
Der Gain Pegel des
Plattenspielers ist zu niedrig.
Der Audioausgang des
Computers ist nicht richtig
eingestellt.
Aufnahmeeinstellungen in Vista
stehen nicht auf “Stereo”.
iPod sitzt nicht richtig im Dock .
iPod wird gerade mit dem
Computer synchronisiert.
iPod befindet sich nicht im
Aufnahmemodus (Voice Memo).
Falsche Geschwindigkeit am
Plattenspieler ausgewählt.
die diesem Produkt beiliegt.
Legen Sie die Nadel auf die Schallplatte auf.
Vergewissern Sie sich, dass der Schallplattenspieler mit einer
funktionierenden Stromquelle verbunden und eingeschaltet ist.
Überprüfen Sie, dass die RCA Ausgänge des Plattenspielers mit
einem Lautsprechersystem verbunden sind und dieses eingeschaltet
ist.
Das Tonabnehmersystem muss fest am Tonarm sitzen, wenn Sie den
Plattenspieler verwenden.
Wischen Sie die Oberfläche der Schallplatte mit einem antistatischen
Tuch vorsichtig ab.
Um eine bestmögliche Aufnahmequalität zu erreichen, sollten Sie das
Aufladen des iPods während der Aufnahme ausgeschaltet lassen.
Wenn Sie diese Funktion trotzdem verwenden wollen, drücken Sie
gleichzeitig die Tasten |<< und >>|.
Drehen Sie den Gain Regler zu.
Drehen Sie den Gain Regler auf.
Konfigurieren Sie Ihre Audioeinstellungen am Computer wie folgt:
Gehen Sie in Windows auf Start X Systemsteuerung X
Sounds und Audiogeräte (Windows XP) oder Start X
Systemsteuerung X Sound (Windows Vista) und wählen Sie
die Soundkarte Ihres Computers als Wiedergabegerät im Audio
Tab.
Alternativ können Sie auch Audiosignale des Computers über
die RCA Ausgänge des Plattenspielers abhören. Wählen Sie
dazu einfach den “USB Audio Codec” Wiedergabegerät aus.
Dann wird das Audiosignal zu den RCA Ausgängen Ihres
Plattenspielers geführt.
In Vista müssen Sie möglicherweise für den Aufnahmeeingang den
Stereo-Mode manuell auswählen.
Gehen Sie auf Start X Systemsteuerung X Sound (in der
klassischen Ansicht). Klicken Sie dann auf den Aufnahme Tab und
wählen Sie den Mikrofon Eingang (USB Audio Codec) an. Klicken
Sie auf Eigenschaften.. Klicken Sie dann auf den Erweitert Tab und
wählen Sie “2 Kanal, 16 Bit, 44100 Hz (CD Qualität)” im
Standardformat Aufklappmenü aus. Drücken Sie dann auf
Übernehmen, um die Änderung zu bestätigen.
Achten Sie darauf, dass Ihr iPod richtig im Dock steckt. Bei einigen
Modellen benötigen Sie den universellen Dock Adapter, der Ihrem
iPod beiliegt.
Sie können nicht auf dem iPod aufnehmen, wenn er gerade mit dem
Computer über USB synchronisiert wird. Melden Sie den iPod am
Computer ab, ziehen Sie ihn aus dem Dock und stecken Sie ihn von
Neuem ein.
Überprüfen Sie, dass sich der iPod im Aufnahmemodus befindet.
Drücken Sie die Rec Menu Taste am Plattenspieler, um den
Aufnahmemodus zu aktivieren. Drücken Sie danach die Select Taste
am Plattenspieler, um die Aufnahme zu beginnen.
Achten Sie darauf, dass die Schallplatten in der vorgesehenen
Geschwindigkeit abgespielt werden. Sie können mit den Tasten
33RPM oder 45RPM zwischen zwei Geschwindigkeiten wählen.
42
Page 43

GUIDA RAPIDA
o Assicurarsi che gli elementi elencati di seguito siano contenuti nella confezione.
o LEGGERE ATTENTAMENTE IL LIBRETTO DI ISTRUZIONI PRIMA DI UTILIZZARE IL
PRODOTTO
o Recarsi alla pagina http://www.ion-audio.com per la registrazione del prodotto.
TAPPETINO
CAVO USB
ADATTATORE 45 GIRI
CD
CONTRAPPESO
CARTUCCIA PRE-MONTATA
PIATTO
GIRADISCHI LP DOCK
INTRODUZIONE
L’LP DOCK è un prodotto rivoluzionario che consente di registrare musica da dischi in vinile e da
ingressi audio esterni direttamente sul vostro iPod*. Inoltre, il giradischi USB si collega direttamente al
computer per trasformare i vostri preziosi dischi in vinile in musica digitale. Per aiutarvi nella
conversione dei dischi in vinile, abbiamo incluso diversi pacchetti software: va notato che per la
registrazione diretta su iPod non è richiesta l’installazione di alcun software. Tuttavia, sarà necessario
installare una delle seguenti applicazioni per sfruttare la registrazione su computer:
EZ Vinyl/Tape Converter** (unicamente per PC) è il modo più facile e veloce di trasformare le
vostre registrazioni in media digitali. EZ Vinyl/Tape Converter salva comodamente le vostre
registrazioni nella libreria iTunes*. Questa è probabilmente l’applicazione preferibile per gli utenti
alle prime armi. Sul CD, abbiamo allegato una comoda Guida Rapida con istruzioni passo passo
circa l’installazione e l’uso del software.
EZ Audio Converter (solo Mac) è un applicativo base di conversione per Mac OS X ed è
l’ideale per utenti principianti. Fate riferimento alla comoda Guida Rapida allegata, recante le
istruzioni passo passo circa l’installazione e l’uso del software.
Audacity (per PC e Mac) è il software destinato agli utenti esperti. Questa applicazione
permette modifiche e processo dell’audio avanzati quali normalizzazione, rimozione dei rumori,
conversione a 78 GIRI e separazione automatica delle tracce. La Guida per il software Audacity
si trova sul CD in dotazione: fare riferimento a quest’ultima quando si lavora con Audacity.
Per installare il software: inserire il CD in dotazione nel computer e seguire le istruzioni da schermo.
Una volta terminato di convertire il vinile, lo si può masterizzare su un CD o caricare su dispositivi
media portatili.
* iTunes e iPod sono marchi di fabbrica di Apple, Inc., registrati negli Stati Uniti e in altri paesi.
** Una versione di EZ Vinyl/Tape Converter con convertitore di Gracenote MusicID è disponibile per il download presso il sito web per il tuo
prodotto a www.ion-audio.com.
43
Page 44

COMANDI GENERALI
3
2
1. Cavo di alimentazione: questo cavo di alimentazione va inserito in una presa a muro
DOPO aver effettuato tutti i collegamenti audio.
2. Cavi di uscita RCA Audio: questi cavi vanno collegati a livello degli ingressi audio
dell’impianto home stereo (Nota bene: si possono copiare dischi sull’iPod o sul computer,
anche se le uscite audio del giradischi non sono collegate ad un impianto stereo).
3. Interruttore RCA PHONO | RCA LINEA: sul pannello inferiore, vicino ai cavi RCA, è
presente un interruttore che commuta tra PHONO e LINEA. Servirsi di un livello PHONO
per il collegamento in un ingresso giradischi su un home stereo. Servirsi del livello LINE
(linea) per il collegamento a ingressi CD/AUX/TAPE.
AVVERTENZA: si rischia di danneggiare il ricevitore collegando un livello di LINEA
in un ingresso PHONO.
4. Gain (guadagno): questa manopola serve a regolare il livello di guadagno del segnale
audio proveniente dal giradischi. Se l’audio proveniente dal giradischi è troppo basso o
troppo alto, servirsi di questa manopola per regolare il livello del volume.
5. Uscita audio USB: servirsi del cavo USB in dotazione per collegare il giradischi al
computer. Il collegamento USB fornirà l’audio dal giradischi e dall’ingresso stereo al
computer. Il collegamento USB convoglierà inoltre audio dal computer attraverso le uscite
RCA del giradischi. Per il trasferimento dei dischi in vinile al computer, abbiamo previsto
due diversi pacchetti software nel CD incluso. L’EZ Vinyl/Tape Converter e l‘EZ Audio
Converter (Mac) sono il modo più semplice e veloce di trasferire i vostri dischi in vinile ed
è preferibile che vengano utilizzati dai principianti. In alternativa, gli utenti avanzati
possono installare e utilizzare il software Audacity (per PC e Mac), che permette di
sfruttare funzioni avanzate di editing audio, quali la normalizzazione dell’audio, la
rimozione dei rumori e la separazione automatica delle tracce.
4
5
1
(Collegamenti pannello inferiore)
44
Page 45

6
19
11
20
6
21
7
12
22
8
9
6. Tasto di alimentazione: accende e spegne l’apparecchio.
7. Piatto: il piatto va fissato bene al giradischi prima dell’uso. La cinghia di trazione motore si
trova sull’apposito anello posto sotto al piatto. Per istruzioni dettagliate sull’installazione
della cinghia di trazione motore vedi le ISTRUZIONI DI SETUP.
8. Tasto Start/Stop: questo tasto avvia e ferma il motore del giradischi. Se il tasto sembra
non funzionare, assicurarsi che la cinghia di trazione motore sia ben installata nelle
ISTRUZIONI DI SETUP.
9. Ingresso di linea stereo da 1/8”: collegare lettori a nastro, Reel to Reel, o qualsiasi altra
sorgente audio a questo livello. Questo segnale viene inviato al computer tramite USB.
Quando si utilizza questo ingresso, assicurarsi che la cartuccia phono sia installata
per garantire il massimo della qualità sonora. Assicurarsi inoltre che i jack RCA siano
inseriti in un dispositivo di ingresso o non a contatto con metalli.
10. Tasti 33 e 45 giri: questi tasti controllano il numero di giri al minuto del piatto del
giradischi. Un LED rosso indica quale modalità di giri è stata selezionata.
NOTA BENE: se il giradischi viene spento quando si trova nella configurazione a 45 giri,
tornerà a 33 giri quando verrà nuovamente acceso.
NOTA BENE: si possono registrare i dischi a 78 giri registrandoli a 33 o a 45 giri e quindi
trasformandoli in 78 giri servendosi del software Audacity.
23
10
13
14
15
16
17
18
45
Page 46

12
13
14
15
16
17
18
11. Dock iPod: collegare l’iPod a questo dock. Assicurarsi che l’iPod si inserisca
agevolmente nel connettore, ma non forzarlo! Il dock permette di registrare il vinile
direttamente sull’iPod o di riprodurre musica proveniente dall’iPod attraverso le uscite
RCA del giradischi. L’LPDOCK è compatibile con i seguenti modelli di iPod:
COMANDI iPod: i seguenti comandi possono essere utilizzati per
scorrere e navigare tra i menu e le funzioni dell’iPod direttamente
dal giradischi.
12. Scroll – Questa manopola funziona come il controller
13. Menu – Questo tasto funziona come il tasto ‘Menu’ sull’iPod.
14. Select – Questo tasto funziona come il comando “Select”
15. Rec Menu – Entra in modalità di registrazione Record Mode
16. |<< – Funziona come il tasto “|<< ” dell’iPod.
17. >>| – Funziona come il tasto “>>| ” dell’iPod.
18. >|| – Funziona come il tasto “>||” dell’iPod.
Modello iPod Riproduzione Registrazione
iPod
Classic
5a generazione
4a generazione
3a generazione*
1a e 2a generazione
iPod Nano
3a generazione
2a generazione
1a generazione
iPod Shuffle
iPod Mini
iPod Touch
*Nell’iPod di 3a generazione, solo i tasti "Play”, “Rewind”, e “Fast Forward” sono supportati. I
tasti “Select”, “Menu” e “Rec Mode” non sono supportati.
** Su iPod Touch, è supportata unicamente la navigazione del lettore musicale.
Il giradischi è anche in grado di caricare l’iPod, quando questo è collegato al dock.
Quando non si registra, il giradischi caricherà automaticamente l’iPod. Per garantire la
migliore qualità di registrazione possibile e per evitare che rumori indesiderati vengano
introdotti nelle registrazioni; l’iPod in carica verrà disattivato non appena viene avviata la
registrazione. Tuttavia, è comprensibile che si possa desiderare di registrare lunghe
sessioni, cosa che richiede che l’iPod rimanga carico più a lungo. Durante la registrazione,
si può accendere la carica dell'iPod premendo |<< e >>| simultaneamente. Si può
spegnere in qualsiasi momento, premendo nuovamente |<< e >>|.
Touchwheel dell’iPod.
dell’iPod.
(Voice Memo) sull’iPod. Per maggiori dettagli, vedi il paragrafo
“Registrazione sull’iPod”.
La pressione simultanea di |<< e >>| durante la registrazione
attiverà la carica dell’iPod. Premere nuovamente i tasti per
disattivare la carica dell’iPod.
46
Page 47

21
19
20
22
23
BRACCIO: tutti gli elementi da 19 a 23 fanno parte del braccio. Fare riferimento al paragrafo
“CONFIGURAZIONE DEL BRACCIO” per ulteriori dettagli circa questi comandi.
19. Contrappeso e anello graduato: il contrappeso serve a bilanciare
il gruppo fonorivelatore e cartuccia in modo che venga applicato il
giusto livello di pressione della puntina sul disco.
20. Dispositivo anti-scivolamento: questa manopola serve a
compensare le forze di trazione centripete. Per maggiori dettagli,
vedi “CONFIGURAZIONE DEL BRACCIO”.
21. Ferma braccio: questo ferma braccio dal design speciale fissa il
braccio quando è a riposo o quando non è in uso. Il ferma braccio è
stato progettato in modo che resti sollevato quando sbloccato.
NOTA BENE: quando si trasporta il giradischi, si raccomanda di
rimuovere il fonorivelatore e di fissare il ferma braccio per evitare
danni al braccio o al giradischi.
22. Dado di fissaggio del braccio: questo dado in alluminio serve a
fissare il gruppo fonorivelatore e cartuccia al tubo del braccio. Per
maggiori dettagli, vedi “Configurazione cartuccia”.
23. Cartuccia e fonorivelatore: la cartuccia è pre-installata su un
fonorivelatore standard. La cartuccia è sostituibile dall’utente e
compatibile con numerose cartucce standard. Assicurarsi di
rimuovere la copertura in plastica trasparente prima di utilizzare il
giradischi dalla cartuccia.
CONFIGURAZIONE DEL PIATTO
AVVERTENZA: una configurazione scorretta del piatto può portare a scarse prestazioni del
giradischi, instabilità del piatto o danni permanenti al motore.
1. Iniziare posizionando la cinghia di trasmissione in gomma attorno all’anello inferiore
interno del piatto del giradischi. Questa dovrebbe essere pre-installata, ma verificare che
non sia torta o danneggiata.
2. Installare il piatto sull’asse centrale e premerlo verso il basso con decisione. Assicurarsi
che ruoti uniformemente e non oscilli eccessivamente.
3. Ruotare il piatto in modo che uno dei fori sia allineato con il pulsante Start Stop posto
sull’angolo anteriore del giradischi. L’albero del motore in ottone deve essere visibile
attraverso questo foro.
4. Tramite il foro, estrarre la cinghia di trasmissione in gomma dall’anello interno e installarla
sull’albero motore. Prestare attenzione a non torcere la cinghia di trasmissione in gomma
durante questa operazione. Assicurarsi che il piatto ruoti uniformemente. Se la cinghia di
trasmissione è installata correttamente, ci sarà una leggera quantità di tensione che farà
fermare il piatto dopo averlo lasciato girare liberamente.
47
Page 48

CONFIGURAZIONE DEL BRACCIO
1. Iniziare facendo ruotare il
contrappeso in senso
antiorario fino a che non si
trovi completamente dritto
(NOTA BENE: questa è
anche la quantità
massima di pressione che
è possibile applicare alla
cartuccia).
2. Ora, quando il
fonorivelatore viene alzato
e abbassato, si dovrebbe
avere una sensazione di
peso e di resistenza.
Iniziare ruotando il contrappeso in senso orario (lontano dal punto pivot) fino a quando la
sensazione di peso e resistenza non è scomparsa. Se fatto correttamente, il braccio
ruoterà con una resistenza minima avanti e indietro, indicando che vi sono esattamente 0
grammi di pressione sulla puntina.
3. Con il contrappeso nella sua nuova posizione lontana dal punto pivot del braccio, far
ruotare l’anello graduato del contrappeso fino a quando lo “0” non si trovi in posizione
verticale.
4. Infine, far ruotare il contrappeso (e l’anello graduato) in senso antiorario (verso il punto
pivot) fino a raggiungere la quantità di peso desiderata. Se la scala ruota di 360 gradi oltre
lo zero, la nuova lettura dell’anello graduato va aggiunta a 3,5.
*Per ottenere le prestazioni migliori, il gruppo fonorivelatore e cartuccia in dotazione
richiede un minimo di 3 grammi e non più di 5 grammi.
Regolazione del dispositivo antiscivolamento
Nella maggior parte dei casi, il dispositivo antiscivolamento va impostato al minimo. Questo
dispositivo compensa le forze centripete che si verificano con determinate cartucce quando la
puntina si avvicina al centro del disco. Se il giradischi salta eccessivamente al momento di
avvicinarsi all‘asse centrale, provare ad aumentare la configurazione dell’antiscivolamento degli
incrementi indicati sul quadrante. Iniziare aumentando di 1, testare le prestazioni, quindi
aumentarlo ulteriormente e così via.
IMPORTANTE
Quando si usa il giradischi, assicurarsi sempre che il tappetino sia posto sul piatto. Il mancato
utilizzo del tappetino può provocare danni al disco, oltre a danneggiare il giradischi stesso.
Rimuovere il cappuccio della cartuccia (copripuntina) prima di utilizzare il giradischi.
48
Page 49

REGISTRARE SULL’iPod
Seguire le istruzioni di cui sotto per registrare musica direttamente sull’iPod. Va notato che
l’iPod registrerà audio proveniente dal giradischi, oltre all’audio proveniente dall’ingresso stereo
da 1/8”.
Nota bene: è possibile registrare sull’iPod senza avere collegamenti audio inseriti. Tuttavia,
raccomandiamo di collegare le uscite audio (RCA o USB) ad un impianto di casse in modo da
poter monitorare le registrazioni.
1. Posizionare l’iPod nel dock, assicurandosi che sia inserito bene sul connettore. A seconda
2. Posizionare un disco sul piatto e selezionare la musica che si desidera registrare.
3. Premere il tasto REC MENU del giradischi: in questo modo si entra in modalità di
4. Una volta pronti a registrare, premere il tasto Select per avviare la registrazione sull’iPod.
5. Premere ora il tasto PLAY del giradischi per avviare la riproduzione del disco che si
6. Quando si desidera fermare la registrazione, porre semplicemente in pausa il giradischi.
7. Quindi, servirsi della manopola Scroll per selezionare ‘Stop and Save’ e premere Select
Una volta terminato, si può individuare la registrazione navigando in Extras X Voice Memos.
Le registrazioni verranno identificate dalla data e l’ora in cui la registrazione è stata effettuata.
IMPORTANTE: non è consigliabile rinominare le registrazioni direttamente sull’iPod.
Cambiando il nome del file, infatti, l’iPod potrebbe non essere più in grado di accedere al file.
Se si desidera rinominare la registrazione, trasferire il file sul computer, rinominarlo e importarlo
nuovamente nella libreria iTunes come file AAC o MP3.
del modello di iPod in vostro possesso, potrebbe essere necessario servirsi dell’adattatore
universale per dock in dotazione con l’iPod.
registrazione (Record Mode) sull’iPod (sullo schermo dell’iPod compare la scritta Voice
Memo).
Nota bene: in determinati modelli di iPod, la pressione del tasto Rec Menu potrebbe non
attivare automaticamente la modalità Voice Memo. Può rendersi necessario evidenziare
l’opzione Voice Memo e premere Select prima di procedere.
Nota bene: con determinati modelli di iPod potrebbe non essere possibile entrare in
modalità Voice Memo se l’iPod stesso si trova in una schermata di riproduzione
musicale/video. In caso di difficoltà nell’accedere alla modalità Voice Memo, tornare al
menu principale premendo Menu e riprovare.
desidera registrare.
(alternativamente, si può mettere in pausa la registrazione e continuare in seguito
selezionando “Pause”).
49
Page 50

SINCRONIZZAZIONE DELL’iPod ATTRAVERSO IL GIRADISCHI
L’iPod può essere sincronizzato all’iTunes direttamente dal giradischi. Seguire le istruzioni di
cui sotto per stabilire il collegamento.
1. Assicurarsi che il giradischi sia collegato al computer servendosi del cavo USB in
dotazione. (Utenti Windows: se questa è la prima volta che si collega il giradischi, lasciare
che il computer inizializzi automaticamente i driver hardware necessari. Procedere quando
il messaggio “Il nuovo hardware è stato installato ed è pronto all’uso” appare nell’angolo
inferiore dello schermo del computer.)
2. Premere e tenere premuto il tasto Menu del giradischi mentre si inserisce l’iPod nel dock.
Quando l’iPod si collega al computer, sullo schermo dell’iPod apparirà la scritta “Do Not
Disconnect” (non scollegare). NON SCOLLEGARE L’iPod DAL DOCK FINTANTO CHE
LA SCRITTA “DO NOT DISCONNECT” APPARE SULLO SCHERMO E PRIMA DI
AVER ESPULSO L’iPod DAL COMPUTER CON LA GIUSTA PROCEDURA! IN CASO
CONTRARIO, SI RISCHIA DI DANNEGGIARE L’iPod E DI DISTRUGGERNE IL
CONTENUTO!
3. Una volta collegato adeguatamente l’iPod al computer, iTunes si dovrebbe avviare
automaticamente. (Utenti PC: Nel caso in cui iTunes non sia ancora stato installato, si può
inserire il CD in dotazione con il giradischi. Seguire le istruzioni su schermo per installare
l’applicazione.)
4. Se sono state effettuate nuove registrazioni dall’ultima volta in cui l’iPod è stato collegato
al computer, apparirà la seguente schermata:
Selezionare “Yes” (Sì) se si
desidera trasferire le
registrazioni (indicate come
voice memo) alla libreria iTunes.
Mentre l’iPod è inserito nel dock e sincronizzato al computer, si può trasferire musica da e
verso di esso, proprio come se fosse collegato direttamente al computer.
È perfino possibile ascoltare musica dal computer attraverso le uscite audio RCA del giradischi!
IMPORTANTE: PER SCOLLEGARE L’iPod IN MANIERA
SICURA DAL COMPUTER, ESPELLERLO CLICCANDO SUL
TASTO EJECT.
NOTA BENE: quando si espelle l’iPod dal computer, sarà
necessario rimuoverlo e riposizionarlo nel dock se si desidera
continuare a utilizzarlo con l’LPDOCK.
50
Page 51

CONVERSIONE DEI VINILI A 78 GIRI
Per trasferire i vostri dischi a 78 giri sul computer, sarà necessario installare e utilizzare
l’applicazione Audacity. Questa si trova sul CD contenuto nella confezione. Installare Audacity
e seguire le istruzioni di cui sotto per registrare i vostri 78 giri. Per la risoluzione di eventuali
problemi con Audacity fare riferimento alla relativa Guida inclusa nel CD.
1. Collegare il giradischi alla porta USB del computer.
2. Lanciare Audacity.
3. In Audacity, recarsi su EDIT -> PREFERENCES (Modifica – Opzioni) e impostare il
dispositivo di registrazione su ‘USB Audio Codec’: questo è il vostro giradischi USB
(selezionare 2 canali per registrare in stereo).
4. Selezionare la scheda audio del computer come Playback Device (dispositivo di
riproduzione). Il nome del dispositivo varierà da computer a computer, ma non deve mai
essere impostato su ‘Microsoft Sound Mapper’.
Alternativamente, si può selezionare “USB Audio Codec” se si desidera riprodurre l’audio
attraverso le uscite RCA del giradischi.
5. Infine, spuntare “Software Playthrough” in modo da poter ascoltare la musica tramite il
dispositivo audio mentre si registra.
6. Si è ora pronti a registrare. Premere il pulsante RECORD in Audacity per avviare la
registrazione.
7. Riprodurre i dischi a 78 giri a 33 o 45 giri.
8. Una volta registrato il materiale desiderato, premere STOP in Audacity.
9. Cliccare sul menu EDIT, quindi su SELECT, e infine su ALL (scorciatoia: “CTRL-A”).
10. Cliccare sul menu EFFECT (effetti), quindi su CHANGE SPEED (modifica velocità).
11. Quando si apre la finestra CHANGE SPEED, si vedranno le opzioni del numero di giri dei
vinili standard. Il valore “from” (da) va impostato su 33 o 45 giri (a seconda della velocità
impostata sul giradischi), e il valore “to” (a) va impostato su 78 giri.
12. Cliccare su PREVIEW (anteprima) per ascoltare la registrazione convertita alla giusta
velocità di 78 giri. Cliccare su OK per finalizzare la conversione a 78 giri.
13. Una volta terminato, si può salvare il file recandosi su FILE -> EXPORT AS WAV. Questo
comando salverà la registrazione sotto forma di file audio in formato .WAV.
14. Scegliere una destinazione sul computer, un nome per la registrazione e cliccare su SAVE
(salva).
15. Le registrazioni possono ora essere trovate nella cartella in cui sono state registrate
durante il passaggio precedente.
51
Page 52

RISOLUZIONE DI PROBLEMI
Fare riferimento ai seguenti casi di risoluzione di problemi nel caso in cui si avessero difficoltà a
registrare i vinili sull’iPod o sul computer.
PROBLEMA CAUSA SOLUZIONE
La puntina non è sul disco. Appoggiare la puntina sul disco.
Non si sente l’audio mentre
registro.
Scarsa qualità sonora.
Quando registro un vinile sul
mio computer, la
registrazione suona forte e
distorta.
Quando registro un vinile sul
computer, la registrazione è
a malapena udibile.
Non riesco a sentire le mie
registrazioni quando provo a
riprodurle dal computer.
Quando il giradischi è
collegato non sento alcuna
musica dal mio computer.
Quando registro sul mio
computer con Windows
Vista, le mie registrazioni
risultano mono anziché
stereo.
Non mi è possibile registrare
sul mio iPod.
La mia musica suona in una
tonalità strana.
Il giradischi non è alimentato.
Le uscite RCA non sono
collegate all’impianto delle
casse.
Il collegamento della cartuccia
non è ben fisso.
Il vinile è sporco o graffiato.
L’iPod è in carica mentre si
registra.
Il livello Gain è troppo elevato. Abbassare la manopola Gain.
Il livello Gain è troppo basso. Alzare la manopola Gain.
Uscita audio del computer
impostata male.
Le proprietà di ingresso di
registrazione in Vista non sono
impostate su “stereo”.
L’iPod non è ben collegato al
dock.
L’iPod è sincronizzato al
computer.
L’iPod non si trova in modalità di
registrazione (Voice Memo)
Sul giradischi è stata
selezionata la velocità sbagliata.
PRIMA DI RESTITUIRE IL PRODOTTO, si prega di contattare ION Audio o il vostro
rivenditore per ottenere assistenza tecnica. Le informazioni di contatto sono reperibili
nel libretto di istruzioni di sicurezza in dotazione con questo prodotto.
Assicurarsi che il giradischi sia collegato ad una presa di
alimentazione funzionante e che sia acceso.
Assicurarsi di aver collegato le uscite RCA del giradischi ad un
impianto di casse e che questo sia acceso.
La cartuccia va fissata saldamente al braccio ogni volta che si
utilizza il giradischi.
Provare a spolverare delicatamente con un panno la superficie
del disco prima di riprodurlo.
Per garantire il massimo della qualità audio, l’iPod in carica va
spento mentre si registra. Se questa funzione è attiva, si prega di
disattivarla premendo |<< and >>| contemporaneamente.
Assicurarsi che le opzioni di riproduzione audio del computer
siano configurate in uno dei seguenti modi:
In Windows XP, recarsi su Start X Pannello di controllo X
Suoni e periferiche audio o Start X Pannello di controllo
X Suoni (su Windows Vista) e assicurarsi che la scheda
audio del computer sia selezionata quale periferica di
riproduzione audio sotto la linguetta Audio.
Alternativamente, si può riprodurre l’audio dal computer
attraverso le uscite audio RCA del giradischi. Selezionare
“USB Audio Codec” come periferica di riproduzione audio e
qualsiasi suono proveniente dal computer suonerà
attraverso le uscite RCA del giradischi.
In Vista, va specificato “stereo” per l’ingresso di registrazione.
Recarsi su Start X Pannello di controllo X Suono (in Visuale
Classica). Quindi, cliccare sulla linguetta Registrazione ed
evidenziare l’ingresso Microfono (USB Audio Codec). Cliccare
su Proprietà per richiamare le impostazioni di ingresso. Quindi,
cliccare sulla linguetta Avanzate e selezionare “2 canali, 16 bit,
44100 Hz (qualità CD)” nel menu a tendina Formato predefinito.
Infine, cliccare su Applica per accettare le impostazioni.
Assicurarsi che l’iPod sia ben collegato al dock. Se necessario,
utilizzare l’adattatore dock universale in dotazione con l’iPod.
Non è possibile registrare sull’iPod fintanto che è sincronizzato al
computer attraverso la porta USB. Espellere l’iPod dal computer,
rimuoverlo dal dock, quindi collegarlo nuovamente.
Assicurarsi che l’iPod si trovi in modalità di registrazione.
Premere il tasto Rec Menu sul giradischi per entrare in modalità
di registrazione. Quindi, premere Select sul giradischi per avviare
la registrazione.
Assicurarsi di riprodurre i dischi alla velocità per cui sono stati
creati. Scegliere tra le due diverse velocità premendo 33RPM o
45RPM (33 o 45 giri).
52
Page 53

SNELSTARTGIDS
o Controleer of onderstaande onderdelen in de doos zitten.
o LEES DE VEILIGHEIDSINSTRUCTIES VOOR HET PRODUCT GEBRUIKT WORDT
o Bezoek http://www.ion-audio.com voor productregistratie.
45 TPM
SLIPMAT
ADAPTER
TEGENGEWICHT
DRAAITAFEL
USB
KABEL
CD
VOORGEMONTEERD
ELEMENT
LP DOCK
DRAAITAFEL
INTRODUCTIE
De LPDock is een revolutionair product dat u in staat stelt muziek van vinyl platen en externe audioingangen direct op te nemen op uw iPod*. Daarbij kan de USB draaitafel rechtstreeks op de computer
worden aangesloten om uw kostbare vinyl platen om te zetten in digitale muziek. Er zijn diverse
softwarepakketten meegeleverd om u te helpen uw vinyl platen te converteren: Vergeet niet dat er
geen software geïnstalleerd hoeft te worden om direct naar uw iPod op te nemen. Wanneer u wilt
genieten van de voordelen van opname naar een PC zou u echter één van de volgende toepassingen
moeten installeren:
EZ Vinyl/Tape Converter** (alleen voor PC) is de snelste en makkelijkste manier om uw
opnamen om te zetten in digitale media. EZ Vinyl/Tape Converter bewaart uw opnamen voor uw
gemak in uw iTunes*-bibliotheek. Voor nieuwe gebruikers geniet deze toepassing de voorkeur.
Op de CD, we hebben een handige snelstartgids meegeleverd met stap voor stap instructies
voor installatie en werking van de software.
EZ Audio Converter (alleen Mac) is een basistoepassing voor conversie voor Max OS X en is
ideaal voor beginners. Raadpleeg de bijgesloten snelstartgids voor de software voor stap voor
stapinstructies over installatie en bediening van de software.
Audacity (PC en Mac) is bedoeld voor de gevorderde gebruiker. Deze toepassing stelt u in
staat tot geavanceerde audio-aanpassingen zoals normalisatie, verwijdering van ruis, conversie
naar 78 toeren en automatisch scheiden van nummers. De Audacity Softwaregids staat op de
bijgeleverde CD - raadpleeg deze gids bij het werken met Audacity.
Om de software te installeren kunt u eenvoudig de meegeleverde CD in de hiervoor geschikte drive
op uw computer invoeren waarna u de instructies op het scherm volgt. Na conversie van uw platen
kunt u de opnamen op CD branden of op draagbare media-apparatuur laden.
* iTunes en iPod zijn handelsmerken van Apple, Inc., geregistreerd in de V.S. en andere landen.
** Een versie van EZ Vinyl/Tape Converter met Gracenote MusicID is beschikbaar voor download op de pagina van uw product op
www.ion-audio.com.
53
Page 54

ALGEMENE BEDIENING
3
2
1. Netsnoer: Deze kabel dient in een stopcontact te worden gestoken NADAT alle audio-
aansluitingen zijn gemaakt.
2. RCA Audio uitgangskabels: Deze kabels worden in de audio-ingangen van uw
stereosysteem gestoken. (N.B.: u kunt platen naar uw iPod of computer blijven opnemen,
ook wanneer de audio-uitgangen van de draaitafel niet aangesloten zijn naar een
stereosysteem).
3. RCA PHONO | RCA LINE schakelaar: Er zit een schakelaar op het onderste paneel,
naast de RCA-kabels, waarmee geschakeld kan worden tussen PHONO- en LINE-niveau.
Gebruik PHONO voor aansluiting op een draaitafelingang op een thuisstereo. Gebruik
LINE voor aansluiting op CD/AUX/TAPE-ingangen.
WAARSCHUWING: U kunt uw ontvanger beschadigen wanneer u een LINE-niveau in
een PHONE-ingang plugt.
4. Gain: Deze knop kan gebruikt worden om het versterkingsniveau van het audiosignaal
van de draaitafel aan te passen. Wanneer het geluid van de draaitafel te zacht of te luid is
kan met deze knop de volume-instelling worden aangepast.
5. USB Audio Output: Gebruik de meegeleverde USB-kabel voor het aansluiten van de
draaitafel op uw computer. De USB-aansluiting zorgt voor geluid uit de draaitafel en stereo
input naar uw computer. De USB-aansluiting zal ook geluid van uw computer door de
RCA-uitgangen van de draaitafel leiden. Voor het overzetten van uw vinyl platen naar uw
computer worden twee verschillende softwarepakketten meegeleverd op de bijgeleverde
CD. EZ Vinyl/Tape Converter (PC) en EZ Audio Converter (Mac) zijn de meest
gemakkelijke en snelle manier voor het omzetten van vinyl platen voor beginners. Voor de
gevorderde gebruiker bestaat de mogelijkheid de Audacity-software te installeren en te
gebruiken (PC en Mac); hiermee kan gebruik gemaakt worden van geavanceerde audioaanpassing, zoals normalisatie, ruisverwijdering en automatische nummerscheiding.
4
5
1
(aansluitingen onderste paneel)
54
Page 55

6
19
11
20
6
21
7
12
22
8
9
6. Aan/Uit-knop: Schakelt de eenheid in of uit.
7. Plateau: Dit plateau dient vóór gebruik stevig bevestigd te zijn op de draaitafel. De
aandrijfriem voor de motor vindt u op de ring onder het plateau. Zie INSTALLATIEINSTRUCTIES voor gedetailleerde informatie over installatie van deze aandrijfriem.
8. Start/Stopknop: Deze knop start en stopt de motor van de draaitafel. Wanneer de knop
niet lijkt te functioneren, controleer dan m.b.v. de INSTALLATIE-INSTRUCTIES of de
aandrijfriem juist is geïnstalleerd.
9. 1/8” Stereo lijningang: Aansluiting voor alle geluidsbronnen, zoals cassettedecks. Dit
signaal wordt naar de computer verstuurd via USB. Zorg ervoor dat het phono-element
is geïnstalleerd bij gebruik van deze ingang, voor maximale geluidskwaliteit. Zorg er
ook voor dat de RCA-aansluitingen aangesloten zijn op een apparaat of niet in contact
staan met metaal.
10. 33 en 45 RPM knoppen: Deze knoppen controleren het toerental (RPM) van het plateau
van de draaitafel. Een rode LED geeft aan welk toerental geselecteerd is.
OPMERKING: Wanneer de draaitafel uitgeschakeld wordt met 45 toeren actief zal bij
opnieuw inschakelen 33 toeren geactiveerd zijn.
OPMERKING: 78 toerenplaten kunnen opgenomen worden door ze op 33 of 45 toeren op
te nemen en dan met de Audacity-software te wijzigen naar 78 toeren.
23
10
13
14
15
16
17
18
55
Page 56

12
13
14
15
16
17
18
11. iPod Dock: Sluit uw iPod aan op deze dock. Zorg ervoor dat uw iPod nauw aansluit op
de aansluiting maar oefen geen kracht uit. De dock stelt u in staat uw platen rechtstreeks
op te nemen naar uw iPod om zo muziek af te spelen via uw iPod door de RCA-uitgangen
van de draaitafel. De LPDOCK is compatibel met de volgende iPod-modellen:
Houd in gedachten dat de draaitafel ook de iPod kan opladen wanneer deze zich in de
dock bevindt. Wanneer er niet opgenomen wordt zal de draaitafel automatisch de iPod
opladen. Om de beste opnamekwaliteit te waarborgen en ongewenste geluiden in uw
opname te voorkomen wordt opladen van de iPod uitgeschakeld zodra u begint met
opnemen. Het is echter begrijpelijk dat u langere opnamesessies heeft waarbij het
noodzakelijk is dat de iPod voor langere tijd opgeladen blijft. Tijdens het opnemen kunt u
opladen van de iPod inschakelen door tegelijkertijd |<< and >>| in te drukken. U kunt het
opladen op elk moment uitschakelen door opnieuw op |<< and >>| te drukken.
iPod BEDIENING: De volgende knoppen kunnen gebruikt worden
om direct vanaf de draaitafel door menu's en kenmerken van uw
iPod te bladeren.
12. Scroll – Deze knop fungeert als regelaar voor het draaiwiel op
uw iPod.
13. Menu – Deze knop fungeert als de ‘Menu’- knop op uw iPod.
14. Select – Deze knop werkt als commando ‘Select’ op uw iPod.
15. Rec Menu – Schakelt over naar Opnamemodus (Voice
memo) op uw iPod. Zie de sectie ‘Opnemen naar uw iPod’
voor meer details.
16. |<< - Werkt als de knop ‘|<<’ op uw iPod.
17. >>| - Werkt als de knop ‘>>|’ op uw iPod.
18. >|| - Werkt als de knop ‘>||’ op uw iPod.
Houdt in gedachten dat het gelijktijdig indrukken van |<< en
>>| tijdens opname het opladen van de iPod zal inschakelen.
Druk deze toetsen opnieuw in om het opladen van de iPod uit
te schakelen.
iPod Model Afspelen Opnemen
iPod
Classic
5de generatie
4de generatie
3de generatie*
ste
1
iPod Nano
iPod Shuffle
iPod Mini
iPod Touch
en 2de generatie
3de generatie
2de generatie
ste
1
eneratie
*Op 3de generatie iPod worden alleen toetsen “Play” (afspelen), “Rewind”
(terugspoelen) en “Fast Forward” (doorspoelen) ondersteund. Knoppen “Select”
(selecteren), “Menu” en “Rec Mode” (opnamemodus) worden niet ondersteund.
** Voor iPod Touch wordt alleen navigatie van de muziekspeler ondersteund
56
Page 57

21
19
20
22
23
TOONARM: Items 19 – 23 zijn onderdelen van de toonarm. Raadpleeg de sectie
INSTALLATIE TOONARM voor aanvullende informatie over deze elementen.
19. Tegengewicht en schaalring: Het tegengewicht wordt gebruikt om
de naalddruk juist te kunnen instellen.
20. Anti-Skate aanpassing: deze knop wordt gebruikt om inwaartse
krachten op de arm te compenseren. Zie INSTALLATIE TOONARM
voor meer informatie.
21. Armklem: Deze speciaal ontworpen armklem zorgt ervoor dat de
toonarm in positie blijft wanneer deze niet wordt gebruikt. De klem is
ontworpen om in opwaartse positie te blijven staan wanneer
ontgrendeld.
OPMERKING: Bij transport van de draaitafel wordt het aanbevolen
de head shell te verwijderen en de armklem vast te zetten om
schade aan toonarm of draaitafel te voorkomen.
22. Borgmoer Toonarm: Deze aluminium moer wordt gebruikt om de
head shell en elementmontage vast te zetten op de toonarm.
Raadpleeg sectie Installatie Element voor meer informatie.
23. Element en Head shell: Het element is voorgemonteerd op een
standaard head shell. Het element kan door gebruiker vervangen
worden en is compatibel met veel standaardelementen. Zorg ervoor
dat het plastic beschermkapje verwijderd wordt vóór ingebruikname
van de draaitafel.
INSTALLATIE PLATEAU
WAARSCHUWING Onjuiste installatie van het plateau kan leiden tot slechte prestaties
en/of instabiliteit van de draaitafel of permanente schade aan de motor.
1. Begin met het plaatsen van de rubberen aandrijfriem rond de binnenste ring aan de
onderzijde van de draaischijf. Deze zou al geïnstalleerd moeten zijn maar controleer altijd
of deze niet gedraaid of beschadigd is.
2. Installeer de draaischijf op de centrale as en druk deze stevig aan. Controleer of de schijf
goed draait en geen vreemde bewegingen maakt.
3. Draai de draaischijf zo dat één van de gaten is uitgelijnd met de start/stopknop aan de
linker voorzijde van de draaitafel. De koperen motor-as dient zichtbaar te zijn door dit gat.
4. Trek via dit gat de rubberen aandrijfriem van de binnenste ring en leg deze over de motoras. Zorg ervoor dat de aandrijfriem bij deze stap niet gedraaid wordt. Controleer of de
schijf goed draait. Bij een juiste installatie van de aandrijfriem ondervindt de schijf een
lichte weerstand waardoor draaischijf na een aantal omwentelingen tot stilstand komt.
57
Page 58

INSTALLATIE TOONARM
1. Begin door het tegengewicht tegen de klok in te
draaien tot deze niet verder naar voren kan (N.B.:
dit is ook de maximale
druk die op het element
kan worden toegepast).
2. Bij het optillen en laten
zakken van de head shell
voelt de arm relatief zwaar
aan met weerstand. Draai
het tegengewicht met de
klok mee (weg van het
scharnierpunt) tot het
gevoel van gewicht/weerstand is verdwenen. Bij juiste toepassing zal de toonarm met
weinig weerstand heen en weer draaien, zo aangevend dat er 0 gram naalddruk is.
3. Met het tegengewicht in deze nieuwe positie, verder verwijder van het scharnierpunt van
de toonarm, draait u de schaalring van het tegengewicht tot de “0” verticaal staat.
4. Draai hierna het tegengewicht (en de schaalring) tegen de klok in (naar het scharnierpunt)
tot het gewenste gewicht bereikt wordt. Wanneer de schaal 360 graden draait vanaf het
nulpunt wordt de nieuwe aflezing van de schaalring opgeteld bij 3,5 gram.
*De bijgeleverde head shell en elementmontage vereisen minimaal 3 en maximaal 5 gram
voor optimale prestatie.
Instellen van de Anti-Skate-aanpassing
In de meeste gevallen wordt de Anti-Skate ingesteld op de minimale instelling. Anti-Skate
compenseert de inwaartse krachten die zich voordoen bij bepaalde elementen wanneer de
naald bij het midden van de plaat komt, te compenseren. Bij overmatig overslaan bij het
naderen van de as kunt u proberen de Anti-Skate te verhogen met de hoeveelheden die op de
schijf worden aangegeven. Begin met een verhoging van 1, test prestatie en verhoog indien
nodig verder.
BELANGRIJK
Zorg ervoor dat de vilten slipmat altijd op het plateau ligt bij gebruik van de draaitafel. Het niet
gebruiken van deze slipmak kan zowel uw media als de draaitafel beschadigen.
Verwijder het plastic elementkapje (naaldbescherming) voor gebruik van de draaitafel.
58
Page 59

OPNEMEN NAAR UW iPod
Volg onderstaande instructies voor het rechtstreeks opnemen van muziek naar uw iPod. Houd
in gedachten dat uw iPod zowel geluid van de draaitafel als geluid dat doorkomt via de 1/8”
stereo-ingang opneemt.
Het is mogelijk op te nemen naar uw iPod zonder aangesloten audio-aansluitingen. We raden u
echter aan de audio-uitgangen aan te sluiten (RCA of USB) op een speakersysteem zodat u de
opnamen kunt monitoren.
1. Plaats uw iPod in de dock, waarbij u ervoor zorgt dat het strak over de connector past.
Afhankelijk van het model iPod kan het nodig zijn de Universele Dock Adapter die bij de
iPod geleverd is te gebruiken.
2. Plaats een plaat op het plateau en ga naar the muziek die u wilt opnemen.
3. Druk op de knop REC MENU op de draaitafel –Record Mode op uw iPod wordt gestart (op
het scherm van de iPod wordt Voice Memo weergegeven).
4. Wanneer u klaar bent om op te nemen drukt u op de knop Select om te beginnen met het
opnemen naar uw iPod.
5. Druk op de knop PLAY van de draaitafel om de muziek aft e spleen die u wilt opnemen.
6. Wanneer u de opname wilt beëindigen zet u de draaitafel in ‘pauze’-stand..
7. Daarna gebruikt u knop Scroll om ‘Stop and Save’ te selecteren en drukt u op Select. (U
kunt de opname ook pauzeren om later door te gaan door ‘Pause’ te selecteren).
Wanneer u klaar bent kunt zien waar de staat door te navigeren naar Extras X Voice Memos.
Uw opnamen zijn te herkennen aan de datum en tijd waarop de opname afgerond werd.
BELANGRIJK: Het wordt niet aanbevolen de opnamen direct vanaf de iPod te hernoemen.
Wanneer u de bestandsnaam wijzigt kan het voorkomen dat het bestand niet meer door de
iPod te benaderen is. Wanneer u de opname wilt hernoemen kunt u deze het best overzetten
naar de computer, hernoemen en opnieuw importeren naar de iTunes-bibliotheek als AAC- of
MP3-bestand.
59
Page 60

SYNCHRONISATIE VAN UW iPod VIA DE DRAAITAFEL
Uw iPod kan rechtstreeks vanaf de draaitafel gesynchroniseerd worden met uw iTunes. Volg de
instructies hieronder om de verbinding te maken.
1. Zorg ervoor dat uw draaitafel aangesloten is op uw computer met de bijgeleverde USBkabel (voor Windows gebruikers: wanneer u de draaitafel voor het eerst aansluit, laat dan
de computer automatisch de benodigde stuurprogramma’s initialiseren. Ga door wanneer
het bericht “De nieuwe hardware is geïnstalleerd en klaar voor gebruik” aan de onderzijde
van het scherm zichtbaar wordt).
2. Druk de knop Menu in en houd deze ingedrukt tijdens het plaatsen van de iPod in de
dock, Wanneer de iPod verbinding maakt met de computer wordt “Do Not Disconnect”
weergegeven op het scherm van uw iPod. VERWIJDER UW iPod NIET UIT DE DOCK
ZO LANG “DO NOT DISCONNECT” WORDT WEERGEGEVEN EN VOORDAT U DE
iPod OP JUISTE WIJZE UIT DE COMPUTER VERWIJDERT! U KUNT ANDERS UW
iPod BESCHADIGEN EN DE INHOUD ERVAN VERNIETIGEN!
3. Nadat uw iPod juist aangesloten is op uw computer zou iTunes automatisch gestart
moeten worden (voor PC gebruikers: wanneer u iTunes nog niet geïnstalleerd heeft kunt u
de bij de draaitafel geleverde CD hiervoor gebruiken. Volg de instructies op het scherm
voor installatie van de applicatie).
4. Wanneer u nieuwe opnamen hebt gemaakt sinds de laatste keer dat uw iPod
aangesloten is geweest op de computer zult u het volgende scherm zien:
Selecteer ‘Yes’ wanneer u de
opnamen wilt verplaatsen (die Voice
memo’s worden genoemd) naar uw
iTunes-bibliotheek.
Zolang uw iPod in de dock zit en gesynchroniseerd is met de computer kunt u muziek van en
naar de iPod overzetten op dezelfde manier als wanneer deze direct op de computer is
aangesloten.
U kunt zelfs naar muziek luisteren die op de computer staat via de RCA audio-uitgang van de
draaitafel!
BELANGRIJK: OM UW iPod VEILIG LOS TE KOPPELEN
VAN UW COMPUTER GEBRUIKT U DAARVOOR DE KNOP
‘EJECT’ OP DE iPod.
OPMERKING: Wanneer u de iPod loskoppelt van uw computer
dient u deze uit de dock te halen en hier weer in te plaatsen
wanneer u de iPod wilt blijven gebruiken met de LPDOCK.
60
Page 61

CONVERSIE VAN UW 78 TOERENPLATEN
Wanneer u uw 78 toerenplaten wilt overzetten naar uw computer dient u de toepassing
Audacity te installeren en te gebruiken. Deze toepassing staat op de CD die meegeleverd
wordt. Installeer Audacity en volg de onderstaande instructies om uw 78 toerenplaten op te
nemen. Voor probleemoplossing in Audacity kunt u de softwaregids van Audacity raadplegen
die ook op de CD staat.
1. Sluit de draaitafel aan op de USB-poort van de computer.
2. Open Audacity.
3. In Audacity gaat u naar EDIT -> PREFERENCES (voorkeuren) en stelt het Recording
Device (opnameapparaat) in op ‘USB Audio Codec’ – dit is uw USB draaitafel (selecteer 2
kanalen om in stereo op te nemen).
4. Selecteer de geluidskaart van uw computer als Playback Device (afspeelapparaat). De
naam van het apparaat verschil van computer tot computer maar dient nooit ingesteld te
worden op ‘Microsoft Sound Mapper’.
U kunt ook “USB Audio Codec” selecteren wanneer u het geluid wilt afspelen door de
RCA-uitgangen van de draaitafel.
5. Als laatste vinkt u ‘Software Playthrough’ (afspelen via software) aan zodat u de muziek
via uw audioapparaat kunt beluisteren tijdens het opnemen.
6. U bent nu klaar voor het opnemen. Druk op de knop RECORD in Audacity om te beginnen
met opnemen.
7. Speel uw 78 toerenplaten af op 33 of 45 toeren.
8. Nadat u het gewenste materiaal hebt opgenomen drukt u in Audacity op STOP.
9. Klik op menu EDIT en daarna op SELECT, dan op ALL (snelkoppeling: “CTRL-A”).
10. Klik op menu EFFECT en klik op CHANGE SPEED (wijzig snelheid).
11. Na opening van het dialoogvenster CHANGE SPEED, zult u standaard toerentalselecties
voor platen zien. ‘From’(van) dient ingesteld te worden op 33 of 45 toeren (afhankelijk van
de opnamesnelheid die u gekozen hebt op de draaitafel) en de ‘To’ (naar) dient ingesteld
te worden op 78 toeren.
12. Klik op PREVIEW om uw opname geconverteerd naar de juiste snelheid van 78 toeren te
horen. Klik op OK om de conversie naar 78 toeren af te ronden.
13. Wanneer u klaar bent kunt u het bestand opslaan door te gaan naar FILE -> EXPORT AS
WAV (bestand, opslaan als .WAV). De opname zal bewaard worden als .WAV
geluidsbestand.
14. Kies een bestemming op uw computer, een naam voor de opname en klik op SAVE
(bewaren).
De opname is nu terug te vinden op de locatie waarnaar u deze in de voorgaande stap
15.
hebt opgeslagen.
61
Page 62

PROBLEEMOPLOSSING
Raadpleeg de volgende probleemoplossingen wanneer u moeilijkheden ondervindt bij het
opnemen van uw platen naar uw iPod of computer.
PROBLEEM OORZAAK OPLOSSING
Naald staat niet op de plaat. Plaats de naald op de plaat.
Ik hoor geen geluid wanneer
ik aan het opnemen ben.
De geluidskwaliteit is slecht.
Bij het opnemen van platen
naar de computer klinkt de
opname hard en vervormd.
Bij het opnemen van platen
naar de computer is deze
nauwelijks te horen.
Ik kan mijn opnamen niet
beluisteren wanneer ik ze
vanaf de computer afspeel.
Wanneer de draaitafel is
aangesloten kan ik niet naar
het geluid van de computer
luisteren.
Bij het opnemen van platen
naar mijn computer met
Windows Vista zijn de
opnamen mono in plaats
van stereo.
Ik kan niet opnemen naar
mijn iPod.
Mijn muziek speelt af op een
vreemde toonhoogte
Draaitafel heeft geen stroom.
RCA-uitgangen niet aangesloten op speakersysteem.
Aansluiting van het element is
niet in orde.
Vinyl plaat is vuil of beschadigd.
iPod wordt opgeladen tijdens
opname.
Het ‘Gain’ niveau is te hoog
ingesteld.
Het ‘Gain’ niveau is te laag
ingesteld.
Geluidsuitgang van de computer
is niet juist ingesteld.
Ingangseigenschappen voor
opname onder Vista zijn niet
ingesteld op “stereo”.
iPod zit niet goed in de dock.
iPod is gesynchroniseerd met
de computer.
De iPod staat niet in Opnamemodus (Voice Memo).
Onjuiste snelheid geselecteerd
op de draaitafel.
Zorg ervoor dat de draaitafel aangesloten is op een actief
stopcontact en dat deze is ingeschakeld.
Zorg ervoor dat de RCA-uitgangen van de draaitafel aangesloten
zijn op een speakersysteem en dat het speakersysteem is
ingeschakeld.
Element dient stevig bevestigd te zijn aan de toonarm wanneer
de draaitafel in gebruik is.
Stof de plaat af en veeg het oppervlak voorzichtig schoon voordat
de plaat afgespeeld wordt.
Om maximale geluidskwaliteit te waarborgen dient het opladen
van de iPod uitgeschakeld te worden tijdens opnamen. Wanneer
u deze optie ingeschakeld heeft kunt u deze uitschakelen door
tegelijk op |<< en >>| te drukken.
Draai de ‘Gain’ knop naar een lagere stand.
Draai de ‘Gain’ knop naar een hogere stand.
Zorg ervoor dat de afspeelopties voor geluid juist geconfigureerd
zijn op één van de volgende manieren:
In Windows gaat u naar Start X Configuratiescherm X
Geluiden en geluidsapparaten (in Windows XP) of Start X
Configuratiescherm X Geluid (in Windows Vista) en u
zorgt ervoor dat de geluidskaart van de computer is
geselecteerd als afspeelapparaat voor geluid onder tab
Geluid.
U kunt ook geluid van uw computer afspelen via de RCA
geluidsuitgangen van de draaitafel. Selecteer “USB Audio
Codec” als afspeelapparaat en geluid van de computer
wordt via de RCA-uitgangen van de draaitafel afgespeeld.
In Vista kan het nodig zijn handmatig “stereo” te selecteren voor
opnemen.
Ga naar Start X Configuratiescherm X Geluid (in Klassieke
weergave). Klik op tab Opnemen en kies Microfoon-ingang
(USB Audio Codec). Klik op Eigenschappen om de
ingangsinstellingen te laten zien. Klik hierna op tab Geavanceerd
en selecteer “2 kanalen, 16 bit, 44100 Hz (CD-kwaliteit)” in het
keuzemenu Standaard opmaak. Als laatste klikt u op
Toepassen om de instellingen te bevestigen.
Zorg ervoor dat de iPod juist aangesloten is op de dock. Het kan
nodig zijn de Universele Dock Adapter die bij de iPod geleverd is,
te gebruiken.
U zult niet in staat zijn op te nemen naar de iPod zolang deze
gesynchroniseerd is met de computer via de USB-aansluiting.
Koppel de iPod los van de computer, verwijder deze uit de dock
en sluit de iPod hierna opnieuw aan.
Zorg ervoor dat de iPod zich in Opnamemodus bevindt. Druk op
de knop Rec Menu op de draaitafel om deze modus te activeren.
Druk hierna op Select op de draaitafel om met opnemen te
beginnen.
Zorg ervoor dat u uw platen op dezelfde snelheid afspeelt als die
waarvoor deze bedoeld zijn. Selecteer één van de twee
snelheden door te drukken op 33RPM of 45RPM.
Voor technische ondersteuning wordt u verzocht VÓÓR RETOURNERING VAN HET PRODUCT
contact te zoeken met ION Audio of uw verkooppunt. Contactinformatie vindt u in de
Veiligheidsinstructies die bij het product geleverd worden.
62
Page 63

MANUAL VERSION 3.2
Page 64

 Loading...