

Page 1

QUICKSTART GUIDE
ENGLISH ( 2 – 4 )
GUÍA DE INICIO RÁPIDO
ESPAÑOL ( 5 – 7 )
GUIDE D'UTILISATION RAPIDE
FRANÇAIS ( 8 – 10 )
GUIDA RAPIDA
ITALIANO ( 11 – 13 )
KURZANLEITUNG
DEUTSCH ( 14 – 16 )
SNELSTARTGIDS
NEDERLANDS ( 17 – 19 )
1
Page 2
c
ON
OFF
33/45
USB
USB
BATT
7
8
9
10
11
6
QUICKSTART GUIDE
Make sure that the items listed below are included in the box:
• Quick Start Guide
• Safety Instructions and Warranty Information Booklet
• EZ Vinyl/Tape Converter Software CD
• Pre-Mounted Needle
• Pre-Mounted Slipmat
• 45 RPM Adapter
• USB Cable
• USB-to-AC Power Supply
READ SAFETY INSTRUCTION BOOKLET BEFORE USING THE PRODUCT
Go to http://www.ionaudio.com for product registration.
INTRODUCTION
You should install EZ Vinyl/Tape Converter to take advantage of computer
recording. EZ Vinyl/Tape Converter is the quickest and easiest way to turn your
recordings into digital media. EZ Vinyl/Tape Converter conveniently saves your
recordings in your iTunes* library. We have included a handy software Quickstart
Guide with step-by-step instructions on software installation and operation.
To install the software: simply insert the included CD into your computer and follow
the on-screen instructions. After you finish converting your vinyl, you can then burn to CD or load onto portable media devices.
Visit www.ionaudio.com/computer-optimization for more information on optimizing your computer for audio.
FEATURES
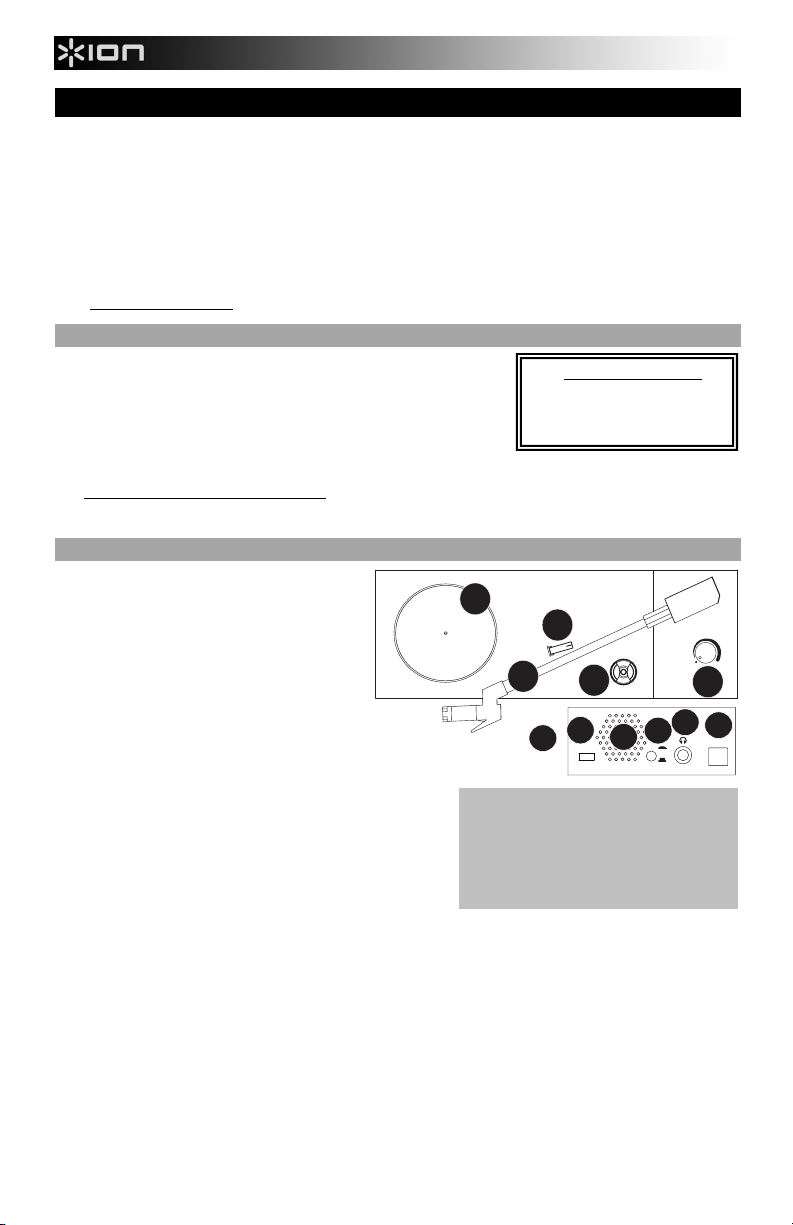
1. PLATTER – Place your record here.
2. TONEARM – LP2GO comes with a ready to use
pre-balanced tonearm and cartridge.
3. ARM CLIP – This specially designed arm clip
secures the tonearm while at rest or when not in
use. The arm clip has been designed to remain in
the up position while unlocked. When a record is
on the platter, place the arm clip down to avoid
scratching your vinyl.
4. 45 RPM ADAPTER HOLDER – Holds the
included 45 RPM adapter. When not using the
adapter, please place it in this holder.
5. VOLUME/POWER KNOB – To power on LP2GO, turn this knob clockwise
until it clicks. When powered on, use this knob to adjust the
volume. To turn off LP2GO, turn this knob counterclockwise until
it clicks.
6. 33 / 45 SWITCH – This switch controls the RPM of the turntable
platter.
7. SPEAKER – The record's audio will be played through this built-
in speaker.
8. USB/BATTERY SWITCH – When the switch is in the “down”
position, the turntable will be powered through a USB connection
– the USB AUDIO OUTPUT connected to either (A) your computer or (B) wall power, using the included USB-to-AC
power supply. When the switch is in the “up” position, the turntable will be powered by batteries (if batteries are installed).
9. HEADPHONE OUTPUT – Connect 1/8" stereo headphones here (not included). The speaker output stops playing audio
once headphones are connected.
10. USB PORT – Use the included USB cable to connect your turntable to your computer. The USB connection will provide
power to the turntable as well as the audio from the turntable to your computer. You can also power the turntable by
using the included USB cable and USB-to-AC power supply to connect your turntable to wall power.
Note: LP2GO may appear as “USB Microphone” or “USB Composite Device” in your computer’s sound control panel
(even though the included EZ Vinyl/Tape Converter manual says it appears as “USB Audio Codec”).
11. BATTERY COMPARTMENT – Remove the cover and place 4 AA batteries into this compartment. Be sure the positive
and negative poles of the batteries are facing the proper direction.
* iTunes is a trademark of Apple, Inc., r egistered in the U.S.A. and other countr ies.
1
IMPORTANT: Make sure that the slipmat is
always placed on top of the platter while using
the turntable. Failure to use the slipmat may
cause damage to your media as well as damage
to the turntable.
Remove the plastic cartridge cover (needle
cover) before operating the turntable.
Visit www.ionaudio.com/ezvc to
download the latest version of EZ
Vinyl/Tape Converter software or for
helpful troubleshooting guide and
additional support.
3
ON
2
4
OFF
5
2
Page 3
+
J
J
J
J
J
J
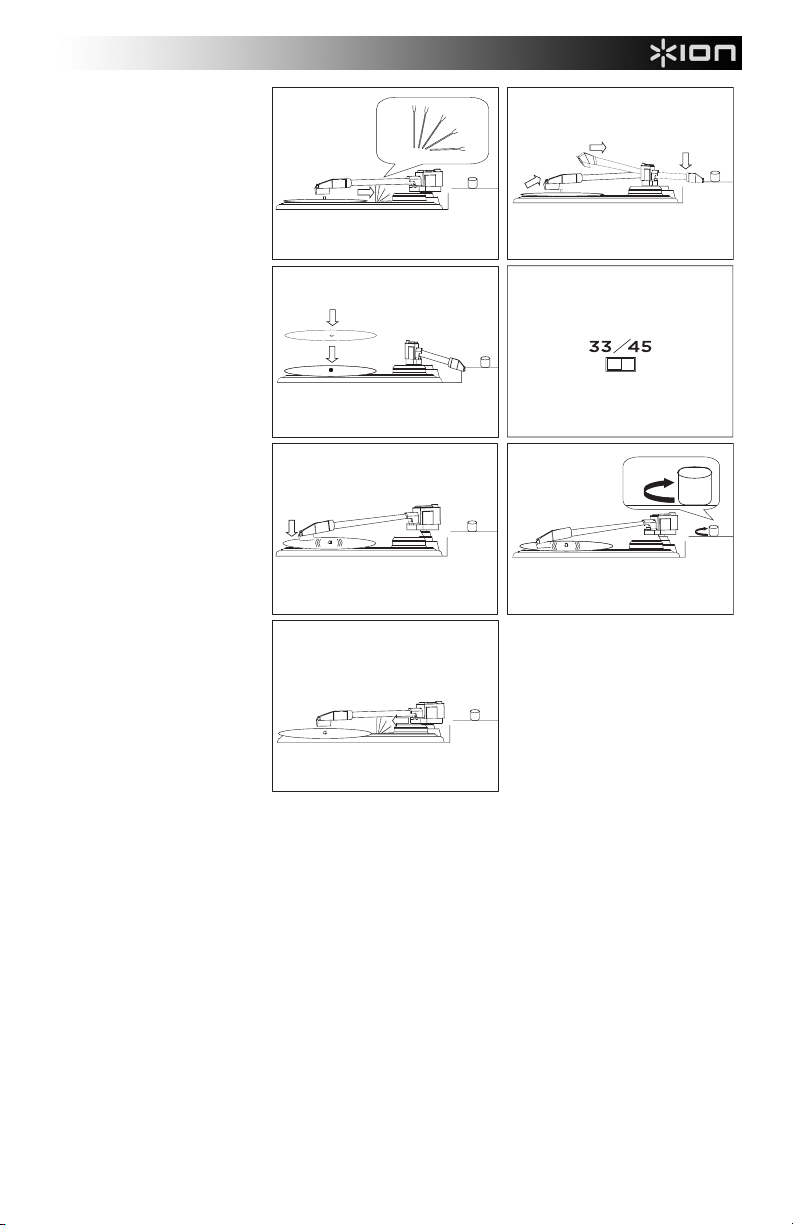
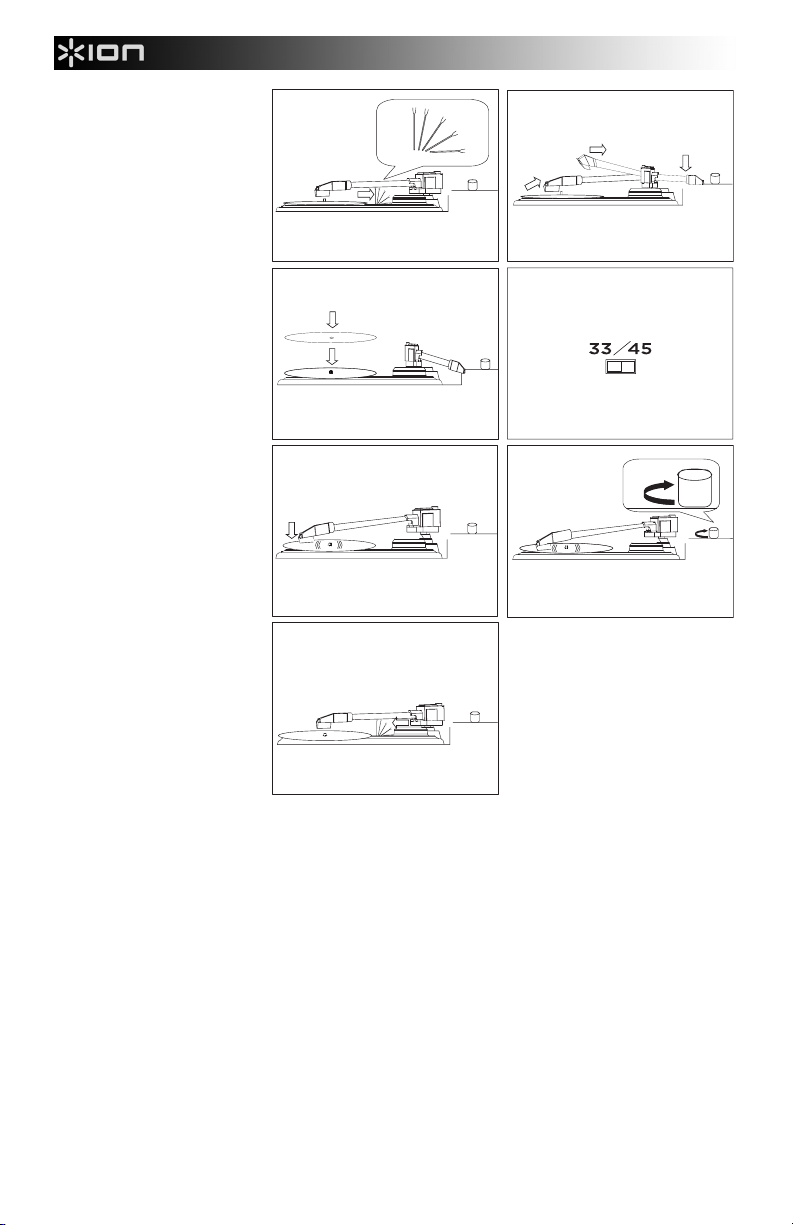
HOW TO PLAY YOUR
RECORDS
1. Undo and lower arm clip.
2. Raise the tonearm, then
move it to the side.
3. Place the record on the
platter.
4. Select speed (33/45 RPM);
use the included 45 RPM
adapter if needed.
5. Lower the tonearm onto
record; the record will begin
playing.
6. Adjust volume with
ON/OFF knob.
7. When finished, raise the
tonearm and return it to
rest on the arm clip.
1
3
5
2
4
6
VOLUME
7
3
Page 4
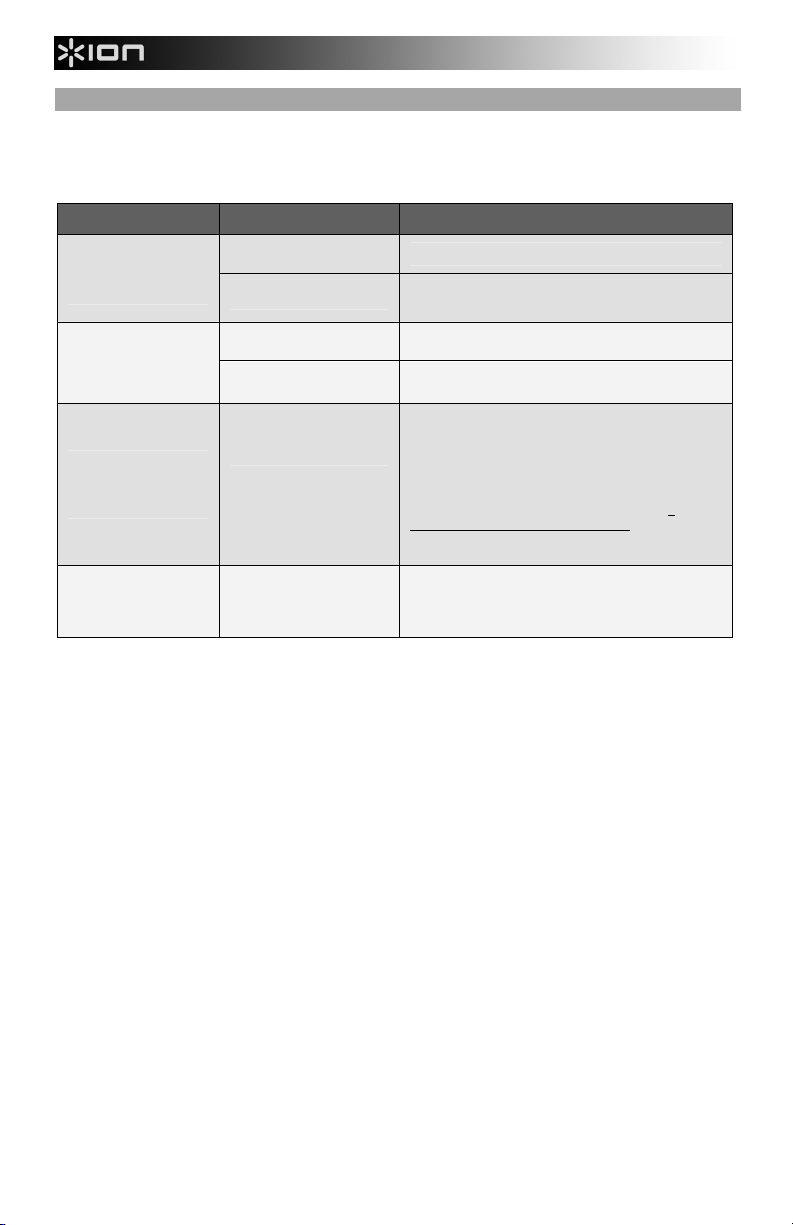
TROUBLESHOOTING
Refer to the following troubleshooting scenarios if you experience difficulty recording your vinyl
to your computer.
PROBLEM CAUSE SOLUTION
Needle is not on the
I am not hearing any
audio when I am
recording.
I am experiencing poor
sound quality.
When recording into my
computer on Windows
Vista, my recordings are
mono instead of stereo.
My music is playing at a
strange pitch.
record.
Turntable not powered.
Cartridge connection is not
secure.
Vinyl record is dirty or
scratched.
Recording input properties
in Vista not set to “stereo”.
Incorrect speed selected
on the turntable.
BEFORE RETURNING THE PRODUCT, please contact ION Audio or your retailer for
technical support. Contact information can be found in the Safety Instruction Booklet
included with this product.
Place the needle on the record.
Make sure that the turntable is connected to a
computer that is powered on.
Cartridge must be securely connected to the tonearm
whenever you are using the turntable.
Try dusting off and gently wiping the surface of the
record before playing it.
In Vista, you may need to manually specify “stereo”
for the recording input.
Go to Start X Control Panel X Sound (in Classic
View). Then, click on the Recording tab and
highlight the Microphone input (USB Audio Codec).
Click on Properties to bring up the input settings.
Next, click on the Advanced tab and select “2
channel, 16 bit, 44100 Hz (CD quality)” in the Default
Format pull-down menu. Lastly, click Apply to
accept the settings.
Make sure that you are playing your records at the
speed they were intended to be played. Select
between the different speeds (33 or 45 RPM).
4
Page 5
c
ON
OFF
33/45
USB
USB
BATT
7
8
9
10
11
6
GUÍA DE INICIO RÁPIDO
Asegúrese de que los elementos enumerados a continuación están incluidos en el cuadro:
• Guia de inicio rápido
• Instrucciones de seguridad y folleto de información de garantía
• EZ Vinyl / CD de software convertidor de cintas
• Pre-montado en la aguja
• Pre-montado Slipmat
• Adaptador de 45 RPM
• Cable USB
• USB de alimentación CA
LEA EL FOLLETO DE INSTRUCCIONES DE SEGURIDAD ANTES DE UTILIZAR EL PRODUCTO.
Visite http://www.ionaudio.com para registrar el producto.
INTRODUCCIÓN
Debe instalar EZ Vinyl/Tape Converter para aprovechar la función de grabación
de su computadora. EZ Vinyl/Tape Converter es la forma más rápida y fácil de
convertir las grabaciones en medios digitales. Este software guarda
convenientemente sus grabaciones en la biblioteca de iTunes. Incluimos una
práctica guía de inicio rápido con instrucciones paso a paso sobre la instalación
y la operación del software.
Para instalar el software: inserte simplemente el CD incluido en la computadora
y siga las instrucciones de la pantalla. Después de terminar de convertir su vinilo, puede quemarlo en CD o cargarlo en
dispositivos de medios portátiles.
Visite www.ionaudio.com/computer-optimization para más información sobre la optimización de su computadora para audio.
CARACTERÍSTICAS
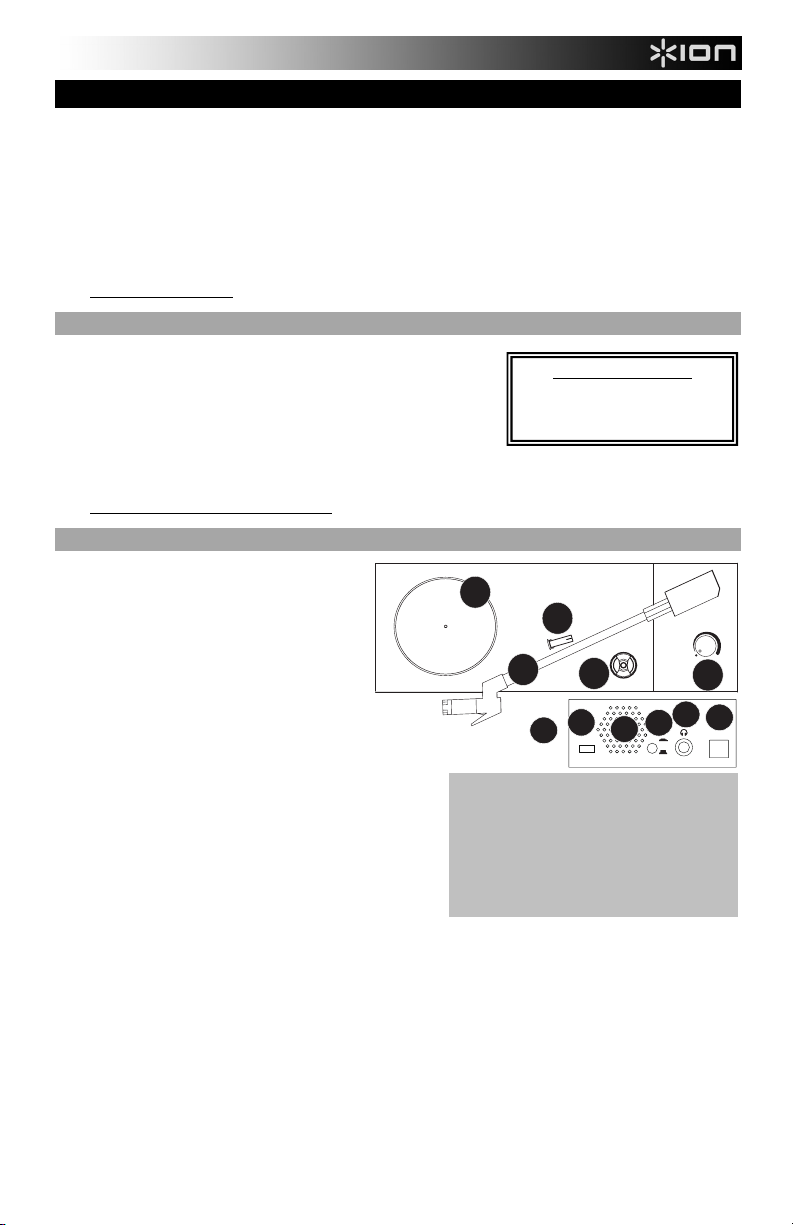
1. PLATO – Coloque aquí el disco.
2. BRAZO DE LECTURA – El LP2GO viene con un
brazo de lectura y una cápsula previamente
balanceados listos para usar.
3. CLIP DEL BRAZO – Este clip diseñado
especialmente fija el brazo mientras está en
reposo o no se usa. El clip ha sido diseñado para
que permanezca hacia arriba mientras está
desbloqueado. Cuando hay un disco en el plato,
coloque el clip del brazo hacia abajo para evitar
rayar su vinilo.
4. SOPORTE DEL ADAPTADOR DE 45 RPM – Sostiene el adaptador de 45
RPM incluido. Cuando no use el adaptador, póngalo en este soporte.
5. PERILLA DE VOLUMEN/ENCENDIDO – Para encender el
LP2GO, gire esta perilla en sentido horario hasta que se
escuche un clic. Cuando la unidad está encendida, use esta
perilla para ajustar el volumen. Para apagar el LP2GO, gire
esta perilla en sentido antihorario hasta que se escuche un
clic.
6. CONMUTADOR DE 33 / 45 RPM – Este conmutador controla
las RPM del plato del giradiscos.
7. ALTAVOZ – El audio del disco se reproduce por este altavoz
incorporado.
8. CONMUTADOR USB/BATERÍA – Cuando el conmutador está en la posición "hacia abajo", el giradiscos se alimenta por
la conexión USB – la SALIDA DE AUDIO USB conectada ya sea a (A) su computadora o (B) el tomacorriente de pared,
usando la fuente de alimentación USB a CA incluida. Cuando el conmutador está "hacia arriba", el giradiscos se
alimenta con las pilas (si están instaladas).
9. LOS TELÉFONOS – Unen (Conectan) 1/8 " auriculares estéreos aquí (no incluido). La salida de altavoz (orador) deja
de jugar de audio una vez que los auriculares son unidos(conectados).
10. PUERTO USB – Use el cable USB incluido para conectar el giradiscos a su computadora. Le conexión USB suministrará
alimentación al giradiscos, además del audio del mismo a su computadora. También puede alimentar el giradiscos
usando el cable USB incluido y la fuente de alimentación USB a CA para conectar su giradiscos al tomacorriente de
pared.
Nota: LP2GO puede aparecer como “USB Microphone” (Micrófono USB) o “USB Composite Device” (Dispositivo
compuesto USB) en el panel de control de sonido de su computadora (aunque el manual del EZ Vinyl/Tape Converter
incluido diga que aparece como “USB Audio Codec” [Códec de audio USB]).
11. COMPARTIMIENTO DE LAS PILAS – Retire la tapa y coloque 4 pilas AA en este compartimiento. Asegúrese de que los
polos positivos y negativos de las pilas queden colocados en el sentido correcto.
5
IMPORTANTE: Asegúrese de que la
alfombrilla esté siempre colocada sobre el plato
cuando se usa el giradiscos. Si no se usa la
alfombrilla, puede dañarse el medio, así como
el giradiscos.
Retire la cubierta plástica de la cápsula
(cubierta de la púa) antes de hacer funcionar el
giradiscos.
Visite www.ionaudio.com/ezvc para
descargar la versión más reciente de
EZ Vinyl/Tape Converter software o
para obtener una guía útil de solución
de problemas y soporte adicional.
1
3
2
4
ON
OFF
5
Page 6
+
J
J
J
J
J
J
CÓMO REPRODUCIR SUS
DISCOS
1. Desenganche y baje el clip
del brazo.
2. Levante el brazo y muévalo
al costado.
3. Coloque el disco sobre el
plato.
4. Seleccione la velocidad
(33/45 RPM); use el
adaptador para 45 RPM
incluido si es necesario.
5. Baje el brazo sobre el
disco. Éste comenzará a
reproducirse.
6. Ajuste el volumen con la
perilla de encendido.
7. Cuando termine, levante el
brazo y vuelva a apoyarlo
sobre el clip del mismo.
1
3
5
2
4
6
VOLUME
7
6
Page 7

SOLUCIÓN DE PROBLEMAS
Si experimenta dificultades al grabar sus vinilos en su computadora, consulte los siguientes
escenarios de solución de problemas.
PROBLEMA CAUSA SOLUCIÓN
La púa no está sobre
No oigo ningún audio
mientras grabo.
Experimento un sonido
de baja calidad.
Cuando grabo en la
computadora bajo
Windows Vista, mis
grabaciones son mono
en lugar de estéreo.
La música se
reproduce con un pitch
extraño.
el disco.
El giradiscos no está
encendido.
La conexión de la
cápsula no es firme.
El disco de vinilo
está sucio o rayado.
Propiedades de
entrada de
grabación en Vista
no configuradas a
“stereo” (estéreo).
Velocidad incorrecta
seleccionada en el
giradiscos.
ANTES DE DEVOLVER EL PRODUCTO, comuníquese con ION Audio o con su vendedor
minorista para solicitar soporte técnico. La información de contacto se encuentra en el
folleto de instrucciones de seguridad incluido con este producto.
Coloque la púa sobre el disco.
Asegúrese de que el giradiscos esté conectado a una
computadora que está encendido.
La cápsula debe estar conectada firmemente al brazo toda
vez que use el giradiscos.
Pruebe desempolvando y limpiando suavemente la
superficie del disco antes de reproducirlo.
En Vista, es posible que sea necesario especificar
manualmente “stereo” para la entrada de grabación.
Vaya a Start X Control Panel X Sound (Inicio > Panel de
Control > Sonido) (en la vista clásica). Luego, haga clic en
la pestaña Recording (Grabación) y resalte la entrada
Microphone (USB Audio Codec). Haga clic en Properties
(Propiedades) para activar la configuración de la entrada.
Luego, haga clic en la pestaña Advanced (Avanzadas) y
seleccione “2 channel, 16 bit, 44100 Hz (CD quality)” (2
canales, 16 bits, 44100 Hz (calidad de CD)) en el menú
desplegable Default Format (Formato por defecto).
Finalmente, haga clic en Apply (Aplicar) para aceptar los
valores de configuración.
Asegúrese de que esté reproduciendo sus discos a la
velocidad a la que están previstos. Seleccione entre las
velocidades diferentes (33/45 RPM).
7
Page 8

c
ON
OFF
33/45
USB
USB
BATT
7
8
9
10
11
6
GUIDE D’UTILISATION RAPIDE
Assurez-vous que les éléments énumérés ci-dessous sont inclus dans la boîte:
• Guide de démarrage rapide
• Instructions de sécurité et de garantie Livret d'information
• EZ Vinyl / CD du logiciel convertisseur bande
• pré-monté aiguille
• pré-monté Slipmat
• Adaptateur 45 RPM
• Câble USB
• Alimentation USB-AC
VEUILLEZ LIRE LE LIVRET DES CONSIGNES DE SÉCURITÉ AVANT D'UTILISER LE PRODUIT.
Allez à http://www.ionaudio.com pour enregistrer le produit.
INTRODUCTION
Vous devez installer EZ Vinyl/Tape Converter afin d’enregistrer sur ordinateur.
EZ Vinyl/Tape Converter est la façon la plus rapide et la plus simple de
convertir vos enregistrements au média numérique. EZ Vinyl/Tape Converter
permet de sauvegarder vos enregistrements dans votre bibliothèque iTunes.
Nous avons inclus un guide d'utilisation simplifié avec des instructions
détaillées sur l'installation et le fonctionnement du logiciel.
Installation du logiciel : Insérez simplement le CD dans le lecteur de votre
ordinateur et suivez les instructions à l'écran. Lorsque vous avez terminé la
conversion du vinyle, vous le pouvez graver sur un CD ou le télécharger sur des lecteurs multimédia portables.
Visitez le site www.ionaudio.com/computer-optimization afin d’obtenir plus d’information concernant l’optimisation de votre
ordinateur pour une meilleure qualité audio.
CARACTÉRISTIQUES
1. PLATEAU – Veuillez placer le disque sur ce
plateau.
2. BRAS DE LECTURE – Le LP2GO est doté d’un
bras de lecture équilibré et d’une cartouche.
3. SERRE-BRAS – Ce serre-bras est conçu
spécialement afin de maintenir en place le bras
de lecture lorsque la platine n’est pas utilisée. Le
serre-bras a été conçu pour rester en position
élevée lorsqu’il est déverrouillé. Lorsqu'un disque
est sur le plateau, placez le serre-bras vers le
bas pour éviter d'égratigner le vinyle.
4. EMPLACEMENT DE L’ADAPTATEUR 45
TR/MIN – Permet de ranger l’adaptateur pour disques 45 tr/min. Lorsqu’il n’est
pas utilisé, veuillez mettre l'adaptateur dans cet emplacement.
5. INTERRUPTEUR DE MISE EN MARCHE//VOLUME – Afin de mettre LP2GO
sous tension, tournez ce bouton dans le sens des aiguilles d’une
montre jusqu’à ce qu’un clic se fasse entendre. Lorsqu’il est
sous tension, utilisez ce bouton pour régler le volume. Afin de
mettre le LP2GO hors tension, veuillez tourner ce bouton dans le
sens antihoraire jusqu’à ce qu’un clic se fasse entendre.
6. SÉLECTEUR DE VITESSE (33/45) – Ce sélecteur régit la
vitesse de rotation du plateau.
7. HAUT-PARLEUR – Le signal audio provenant du disque se joué
par ce haut-parleur intégré.
8. SÉLECTEUR D’ALIMENTATION (USB/PILE) – Lorsque le commutateur est dans la position « bas », la platine tournedisque est alimentée via la connexion USB – la sortie AUDIO USB est branchée soit à (A) votre ordinateur soit (B) à une
prise secteur, à l’aide du câble d’alimentation USB à CC inclus. Lorsque le commutateur est dans la position « haut », la
platine tourne-disque est alimentée par des piles (si les piles sont installées).
9. LES TÉLÉPHONES – Connectent 1/8 "le casque à écouteurs stéréo ici (non inclus). L'orateur(le locuteur) que la
production arrête de jouer audio une fois le casque à écouteurs est connecté.
10. PORT USB – Utilisez le câble USB inclus pour brancher platine tourne-disque à un ordinateur. La connexion USB
permet d’alimenter la platine tourne-disque et d’acheminer le signal audio de la platine à votre ordinateur. Vous pouvez
également alimenter la platine tourne-disque à l’aide du câble USB inclus et le câble d'alimentation USB à CA inclus afin
de l'alimenter via une prise secteur
Remarque: Il se peut que le LP2GO apparaisse comme « Microphone USB » ou « Périphérique USB Composite » dans
le panneau de configuration audio de votre ordinateur (même si le guide d’utilisation du EZ Vinyl/Tape Converter inclus
dit qu'il apparaît comme « USB Audio Codec »).
11. COMPARTIMENT DES PILES – Retirez le couvercle et insérez 4 piles de type AA dans le compartiment. Assurez-vous
d'insérer les piles en respectant les polarités.
8
Visitez le site www.ionaudio.com/ezvc
afin de télécharger la toute dernière
version du logiciel EZ Vinyl/Tape
Converter, ou afin d’accéder au guide
de dépannage ou d’obtenir de l’aide
supplémentaire.
1
3
2
IMPORTANT: Assurez-vous que la feutrine est
toujours placé sur le dessus du plateau tout en
utilisant la platine. Ne pas utiliser la feutrine peut
causer des dommages à vos médias ainsi que
des dommages à la platine.
Retirez le couvercle de la cartouche en plastique
(capuchon de l'aiguille) avant d'utiliser la platine.
4
ON
OFF
5
Page 9

+
J
J
J
J
J
J
LECTURE DES DISQUES
VINYLES
1. Déverrouillez et abaissez le
serre-bras.
2. Levez le bras de lecture,
puis déplacez-le sur le
côté.
3. Placez le disque sur le
plateau.
4. Sélectionnez la vitesse de
lecture (33/45 tr/min);
utilisez l’adaptateur si
nécessaire.
5. Abaissez le bras de lecture
sur le disque. La lecture
devrait débuter.
6. Vous pouvez ajuster le
volume à l’aide du bouton
ON/OFF.
7. Lorsque vous avez terminé,
levez le bras de lecture et
placez-le sur le serre-bras.
1
3
5
2
4
6
VOLUME
7
9
Page 10

DÉPANNAGE
Veuillez consulter les scénarios suivants si vous avez des problèmes lors de l’enregistrement
de vos vinyles.
PROBLÈME CAUSE SOLUTION
Je n’entends pas de
signal audio lors de
l’enregistrement.
L’aiguille n’est pas
déposée sur le vinyle.
La table tournante n’est
pas branchée.
Déposez l’aiguille sur le vinyle.
Assurez-vous que le tourne-disque est branché à un
ordinateur qui est sous tension.
Le son est de mauvaise
qualité.
Lorsque je fais
l’enregistrement sur
mon ordinateur avec
Windows Vista, mes
enregistrements sont
en mono plutôt qu’en
stéréo.
La musique joue à une
vitesse étrange.
La cartouche n’est pas
fixée correctement.
Le vinyle est peut-être sale
ou égratigné.
Les paramètres d'entrée
pour l'enregistrement ne
sont pas réglés à
« stéréo ».
La vitesse sélectionnée sur
le tourne-disque est
incorrecte.
La cartouche doit être fixée correctement au bras de
lecture.
Essayez de retirer toute poussière ou marque de
doigts en l’essuyant avant de le remettre sur la table
tournante.
Dans Vista, il se peut que vous deviez régler
manuellement l'entrée d'enregistrement à « stéréo ».
Allez à Démarrer X Panneau de configuration X
Son (mode de visualisation classique). Cliquez
ensuite sur l'onglet Enregistrement et mettez l'entrée
Microphone en surbrillance (USB Audio Codec).
Cliquez sur Propriétés pour voir les paramètres
d'entrée. Cliquez ensuite sur l'onglet Avancé et
sélectionnez « 2 canaux, 16 bits, 44100 Hz (qualité
CD) » dans le menu déroulant Format par défaut.
Puis, cliquez sur Appliquez pour confirmer les
réglages.
Assurez-vous de faire jouer les disques à la vitesse
appropriée. Sélectionnez la vitesse appropriée (33, 45
ou RPM).
AVANT DE RETOURNER CE PRODUIT, veuillez contacter ION Audio ou votre détaillant
pour du soutien technique. Toutes les coordonnées se trouvent dans le livret des
consignes de sécurité inclus avec de produit.
10
Page 11

c
ON
OFF
33/45
USB
USB
BATT
7
8
9
10
11
6
GUIDA RAPIDA
Assicurarsi che gli elementi elencati di seguito sono inclusi nella confezione:
• Guida Rapida
• Istruzioni di sicurezza e informazioni Libretto di Garanzia
• EZ Vinyl/Tape Converter CD del software
• Pré-monté aiguille
• Pre-Mounted Slipmat
• Adaptateur 45 RPM
• Câble USB
• USB pour AC Power Supply
LEGGERE ATTENTAMENTE IL LIBRETTO DI ISTRUZIONI PRIMA DI UTILIZZARE IL PRODOTTO
Recarsi alla pagina http://www.ionaudio.com per la registrazione del prodotto.
INTRODUZIONE
Sarà necessario installare EZ Vinyl/Tape Converter per sfruttare la
registrazione su computer. EZ Vinyl/Tape Converter è il modo più facile
e veloce di trasformare le vostre registrazioni in media digitali. EZ
Vinyl/Tape Converter salva comodamente le vostre registrazioni nella
libreria iTunes. Abbiamo allegato una comoda Guida Rapida con
istruzioni passo passo circa l’installazione e l’uso del software.
Per installare il software: inserire il CD in dotazione nel computer e
seguire le istruzioni da schermo. Una volta terminato di convertire il vinile, lo si può masterizzare su un CD o caricare su
dispositivi media portatili.
Recarsi alla pagina www.ionaudio.com/computer-optimization per maggiori informazioni su come ottimizzare il computer per
l’audio.
CARATTERISTICHE
1. PIATTO – Il disco va collocato qui.
2. BRACCIO – Il LP2GO è dotato di un braccio e di
una cartuccia pre-bilanciati pronti per l’uso.
3. FERMABRACCIO – Questo fermabraccio dal
design speciale fissa il braccio quando è a riposo
o quando non è in uso. Il fermabraccio è stato
progettato in modo che resti sollevato quando
sbloccato. Quando un disco è sul piatto,
abbaddare il fermabraccio per evitare di rigare il
vinile.
4. ADATTATORE POSIZIONE 45 TR / MIN –
Contiene adattatore per disco 45 giri / min. Quando non in uso, si prega di
inserire l'adattatore in questo sito.
5. MANOPOLA VOLUME/POWER – Per accendere l'LP2GO, girare questa
manopola in senso orario fino allo scatto. Una volta acceso l'apparecchio,
servirsi di questa manopola per regolare il volume. Per spegnere
l'LP2GO, girare questa manopola in senso antiorario fino allo scatto.
6. INTERRUTTORE 33 / 45 GIRI – Questo interruttore regola i GIRI del
piatto del giradischi.
7. SPEAKER – L'audio dal disco è svolto dalla altoparlante incorporato.
8. INTERRUTTORE USB/BATTERIA – Quando l'interruttore è
abbassato, il giradischi sarà alimentato tramite il collegamento USB,
l'USCITA AUDIO USB collegata (A) al computer o (B)
all'alimentazione a parete, servendosi dell'alimentazione USB a CA in
dotazione. Quando l'interruttore è alzato, il giradischi sarà alimentato
a batterie (se inserite).
9. TELEFONI – Collega 1 / 8 "auricolare stereo qui (non incluso) Egli (il
relatore) che la produzione si arresta la riproduzione audio quando
l'auricolare è collegato.
10. PORTA USB – Servirsi del cavo USB in dotazione per collegare il giradischi al computer. Il collegamento USB fornisce
alimentazione al giradischi oltre all'audio dal giradischi al computer. Si può anche alimentare il giradischi servendosi del
cavo USB in dotazione e l'alimentazione da USB a CA per collegare il giradischi all'alimentazione a parete.
Nota bene: l'LP2GO può comparire come “microfpno USB” o “dispositivo USB composito” nel pannello di controllo audio
del computer (anche se il manuale dell'EZ Vinyl/Tape Converter in dotazione dice che compare come “USB Audio
Codec”).
11. VANO BATTERIA – Togliere il coperchio e inserire 4 batterie AA nel vano. Assicurarsi di inserire le batterie osservando
la corretta polarità.
11
Recarsi alla pagina www.ionaudio.com/ezvc
per scaricare l'ultima versione dei software EZ
Vinyl/Tape Converter oppure per ottenere
un'utile guida alla risoluzione dei problemi o
ulteriore assistenza.
1
3
2
IMPORTANTE: Quando si usa il
giradischi, assicurarsi sempre che il
tappetino sia posto sul piatto. Il mancato
utilizzo del tappetino può provocare danni
al disco, oltre a danneggiare il giradischi
stesso.
Rimuovere il cappuccio della cartuccia
(copripuntina) prima di utilizzare il
giradischi.
4
ON
OFF
5
Page 12

+
J
J
J
J
J
J
COME SUONARE I DISCHI
1. Sganciare e abbassare il
fermabraccio.
2. Alzare il braccio e muoverlo
di lato.
3. Collocare il disco sul piatto.
4. Selezionare la velocità
(33/45 giri); servirsi
dell'adattatore a 45 giri, se
necessario.
5. Abbassare il braccio
poggiandolo sul disco: il
disco inizierà a suonare.
6. Regolare il volume
servendosi della manopola
ON/OFF.
7. Una volta terminato,
sollevare il braccio e
riportarlo sul fermabraccio.
1
3
5
2
4
6
VOLUME
7
12
Page 13

RISOLUZIONE DI PROBLEMI
Fare riferimento ai seguenti casi di risoluzione di problemi nel caso in cui si avessero difficoltà a
registrare i vinili sul computer.
PROBLEMA CAUSA SOLUZIONE
La puntina non è sul disco. Appoggiare la puntina sul disco.
Non si sente l’audio
mentre registro.
Il giradischi non è
alimentato.
Assicurarsi che il giradischi sia collegato a un computer
che sia acceso.
Scarsa qualità sonora.
Quando registro sul
mio computer con
Windows Vista, le mie
registrazioni risultano
mono anziché stereo.
La mia musica suona
in una tonalità strana.
Il collegamento della
cartuccia non è ben fisso.
Il vinile è sporco o graffiato.
Le proprietà di ingresso di
registrazione in Vista non
sono impostate su “stereo”.
Sul giradischi è stata
selezionata la velocità
sbagliata.
La cartuccia va fissata saldamente al braccio ogni volta
che si utilizza il giradischi.
Provare a spolverare delicatamente con un panno la
superficie del disco prima di riprodurlo.
In Vista, va specificato “stereo” per l’ingresso di
registrazione.
Recarsi su Start X Pannello di controllo X Suono (in
Visuale Classica). Quindi, cliccare sulla linguetta
Registrazione ed evidenziare l’ingresso Microfono
(USB Audio Codec). Cliccare su Proprietà per
richiamare le impostazioni di ingresso. Quindi, cliccare
sulla linguetta Avanzate e selezionare “2 canali, 16 bit,
44100 Hz (qualità CD)” nel menu a tendina Formato
predefinito. Infine, cliccare su Applica per accettare
le impostazioni.
Assicurarsi di riprodurre i dischi alla velocità per cui
sono stati creati. Scegliere tra le diverse velocità 33, 45
o RPM (33, 45 giri).
PRIMA DI RESTITUIRE IL PRODOTTO, si prega di contattare ION Audio o il vostro
rivenditore per ottenere assistenza tecnica. Le informazioni di contatto sono reperibili nel
libretto di istruzioni di sicurezza in dotazione con questo prodotto.
13
Page 14

c
ON
OFF
33/45
USB
USB
BATT
7
8
9
10
11
6
KURZANLEITUNG
Stellen Sie sicher, dass die unten aufgeführten Teile in der Verpackung enthalten sind:
• Kurzanleitung
• Sicherheitshinweise und Garantie Booklet
• EZ Vinyl/Tape Converter Software CD
• Vormontierter Tonabnehmer
• Vormontierte Slipmat
• 45 RPM Adapter
• USB-Kabel
• USB Netzteil
LESEN SIE BITTE DIE SICHERHEITSHINWEISE, BEVOR SIE DAS PRODUKT VERWENDEN
Registrieren Sie Ihr Produkt online auf http://www.ionaudio.com.
EINFÜHRUNG
Sie sollten EZ Vinyl/Tape Converter installieren, um die Vorteile von
Computeraufnahmen zu nutzen. EZ Vinyl/Tape Converter ist die schnellste
und einfachste Lösung überhaupt, um Ihre Schallplatten in das digitale
Format umzuwandeln. EZ Vinyl/Tape Converter speichert Ihre Aufnahmen für
Sie direkt in Ihrer iTunes Bibliothek. Sie finden in einer handlichen
Kurzanleitung schrittweise Anleitungen zur Softwareinstallation und zur
Bedienung des Programms.
Um die Softwareprogramme zu installieren, legen Sie einfach die
mitgelieferte CD in das Laufwerk Ihres Computers ein und folgen den Bildschirmanweisungen. Nachdem Sie Ihre Schallplatten
digitalisiert haben, können Sie aus den Titeln eine CD brennen oder die Songs auf einen portablen MP3-Player laden.
Auf der Webseite www.ionaudio.com/computer-optimization befinden sich weitere Informationen zur Audio-Optimierung des
Computers.
EIGENSCHAFTEN
1. PLATTENTELLER – Hier Platte auflegen.
2. TONARM – Der LP2GO wird mit einem
3. ARM-CLIP – Dieser speziell entworfene Arm-Clip
4. 45 RPM ADAPTER ABLAGE – Ablage für den beiliegenden 45 RPM Adapter.
5. LAUTSTÄRKEREGLER/EIN-AUS-SCHALTER - Um LP2GO einzuschalten,
6. 33 / 45 RPM-SCHALTER – Regelt die Geschwindigkeit (RPM) des
7. LAUTSPRECHER – Die Platte wird über diese eingebauten
8. USB/BATTERIE-SCHALTER - Ist der Schalter in der unteren Position,
9. TELEFONE – Verbinden 1/8" Stereokopfhörer hier (nicht eingeschlossen). Die Sprecher-Produktion (Sprecher-Output)
10. USB PORT – Schließen Sie Ihren Plattenspieler mit dem mitgelieferten USB-Kabel an Ihren Computer an. Die USB-
11. BATTERIEFACH – Entfernen Sie den Deckel und legen Sie 4 AA-Batterien in das Fach. Stellen Sie sicher, dass die
Besuchen Sie www.ionaudio.com/ezvc,
um die neueste Version der EZ
Vinyl/Tape Converter Software herunter
zu laden oder um eine hilfreiche
Anleitung zur Fehlerbehebung und
zusätzliche Unterstützung zu erhalten.
betriebsfertigen, ausbalanciertem Tonarm mit System
ausgeliefert.
sichert den Tonarm, wenn er nicht verwendet wird.
Der Arm-Clip wurde so entwickelt, dass er in der
oberen Position bleibt, wenn er entsperrt ist. Befindet
sich eine Schallplatte am Plattenteller, legen Sie den
Arm-Clip ab, um Kratzer auf Ihrer Schallplatte zu
vermeiden.
Lagen Sie den Adapter hier ab, wenn Sie ihn nicht verwenden.
drehen Sie diesen Regler im Uhrzeigersinn bis er einrastet. Wenn das
Gerät eingeschaltet ist, verwenden Sie diesen Regler, um die Lautstärke
einzustellen. Um LP2GO abzuschalten, drehen Sie diesen Regler gegen
den Uhrzeigersinn bis er einrastet.
Plattentellers.
Lautsprecher zu hören sein.
wird der Plattenspieler über einen USB-Anschluss mit Strom versorgt der USB AUDIO-AUSGANG ist entweder (A) an Ihren Computer oder (B)
an eine Steckdose über das mitgelieferte USB-to-AC-Netzteil angeschlossen. Ist der Schalter in der oberen Position, wird
der Plattenspieler mit Batterien betrieben (wenn Batterien eingelegt sind).
hört auf, Audio- zu spielen, sobald Kopfhörer verbunden werden.
Verbindung versorgt den Plattenspieler mit Strom und Ihren Computer mit den Audiodaten vom Plattenspieler. Sie
können den Plattenspieler auch über das mitgelieferte USB-Kabel und über das USB-to-AC-Netzteil mit Strom versorgen,
um Ihren Plattenspieler an eine Steckdose anzuschließen.
Hinweis: LP2GO kann als "USB-Mikrofon" oder als "USB Composite-Gerät" in den Sound-Eigenschaften Ihres
Computers angezeigt werden (auch wenn das mitgelieferte EZ Vinyl/Tape Converter Handbuch angibt, es scheint als
"USB Audio Codec" auf).
positiven und negativen Pole der Batterien korrekt ausgerichtet sind.
14
1
3
2
WICHTIG: Achten Sie immer darauf,
dass die Slipmat auf dem Plattenteller
liegt, wenn Sie den
Schallplattenspieler verwenden.
Anderenfalls könnten Sie sowohl Ihre
Schallplatten, als auch den
Plattenspieler beschädigen. Bitte
entfernen Sie die Nadelabdeckung
aus Plastik, bevor Sie den
Plattenspieler verwenden.
4
ON
OFF
5
Page 15

+
J
J
J
J
J
J
SO SPIELEN SIE IHRE
SCHALLPLATTEN AB
1. Lösen und legen Sie den
Arm-Clip ab.
2. Heben Sie den Tonarm an
und bewegen ihn dann zur
Seite.
3. Legen Sie die Schallplatte auf
den Teller.
4. Wählen Sie die
Geschwindigkeit (33/45
RPM); Verwenden Sie den
beiliegenden 45 RPM
Adapter, wenn nötig.
5. Senken Sie den Tonarm auf
die Platte; Die Platte wird nun
abgespielt.
6. Stellen Sie die Lautstärke mit
der EIN/AUS-Taste ein.
7. Wenn Sie fertig sind, heben
Sie den Tonarm und bringen
ihn wieder in die
Ruheposition am Arm-Clip.
1
3
5
2
4
6
VOLUME
7
15
Page 16

FEHLERHILFE
Sollten Sie bei der Verwendung Ihres USB Plattenspielers auf Probleme stoßen, können Sie die folgende Fehlersuchtabelle
verwenden, um eine Lösung zu finden.
PROBLEM URSACHE LÖSUNG
Ich höre bei der
Aufnahme kein
Audiosignal.
Nadel liegt nicht auf der
Schallplatte.
Plattenspieler hat kein Strom.
Legen Sie die Nadel auf die Schallplatte auf.
Stellen Sie sicher, dass der Plattenspieler an einem Computer
angeschlossen ist.
Das Tonabnehmersystem muss fest am Tonarm sitzen, wenn
Sie den Plattenspieler verwenden.
Wischen Sie die Oberfläche der Schallplatte mit einem
antistatischen Tuch vorsichtig ab.
In Vista müssen Sie möglicherweise für die Aufnahme den
Stereo-Mode manuell auswählen.
Gehen Sie auf Start f Systemsteuerung f Sound (in der
klassischen Ansicht). Klicken Sie dann auf den Aufnahme Tab
und wählen Sie den Mikrofon Eingang (USB Audio Codec) an.
Klicken Sie auf Eigenschaften. Klicken Sie dann auf den
Erweitert Tab und wählen Sie “2 Kanal, 16 Bit, 44100 Hz (CD
Qualität)” im Standardformat Aufklappmenü aus. Drücken Sie
dann auf Übernehmen, um die Änderung zu bestätigen.
Achten Sie darauf, dass die Schallplatten in der vorgesehenen
Geschwindigkeit abgespielt werden. Sie können mit dem 33 / 45
Schalter zwischen zwei Geschwindigkeiten wählen.
Der Klang, den ich höre,
ist sehr schlecht.
Unter Windows Vista
sind meine Aufnahmen
nur in Mono anstatt in
Stereo.
Meine Musik wird in der
falschen Tonhöhe
abgespielt.
Das System sitzt nicht richtig.
Die Schallplatte ist schmutzig
oder verkratzt.
Aufnahmeeinstellungen in
Vista stehen nicht auf
“Stereo”.
Falsche Geschwindigkeit am
Plattenspieler ausgewählt.
BEVOR SIE DIESES PROKT ZURÜCK SENDEN nehmen Sie bitte Kontakt mit ION Audio
oder Ihrem Fachhändler zur Behebung eines Problems auf. Die Kontaktinformationen
finden Sie in der Broschüre mit den Sicherheitshinweisen, die diesem Produkt beiliegt.
16
Page 17

c
ON
OFF
33/45
USB
USB
BATT
7
8
9
10
11
6
SNELSTARTGIDS
Zorg ervoor dat de onderstaande punten zijn opgenomen in de doos:
• Snelstartgids
• Veiligheidsvoorschriften en garantie Boekje
• EZ Vinyl/Tape Converter Software CD
• Pre-Mounted Naald
• Pre-Mounted Slipmat
• 45 RPM Adapter
• USB-kabel
• USB naar AC Power Supply
LEES DE VEILIGHEIDSINSTRUCTIES VOOR HET PRODUCT GEBRUIKT WORDT
Bezoek http://www.ionaudio.com voor productregistratie.
INTRODUCTIE
Wanneer u wilt genieten van de voordelen van opname naar een PC, u moet
de EZ Vinyl/Tape Converter-Software installeren. EZ Vinyl/Tape Converter is
de snelste en makkelijkste manier om uw opnamen om te zetten in digitale
media. EZ Vinyl/Tape Converter bewaart uw opnamen voor uw gemak in uw
iTunes-bibliotheek. We hebben een handige snelstartgids meegeleverd met
stap voor stap instructies voor installatie en werking van de software.
Om de software te installeren kunt u eenvoudig de meegeleverde CD in de
hiervoor geschikte drive op uw computer invoeren waarna u de instructies op het scherm volgt. Na conversie van uw platen kunt
u de opnamen op CD branden of op draagbare media-apparatuur laden.
Bezoek www.ionaudio.com/computer-optimization voor meer informatie over het optimaliseren van uw computer voor
geluidsfunctionaliteit.
OVERZICHT
1. PLATEAU – Plaats uw plaat hier.
2. TOONARM – De LP2GO wordt geleverd met een
direct bruikbare, voorgebalanceerde toonarm met
patroon.
3. ARMSTEUN: deze speciaal ontworpen armsteun
beveiligt de toonarm in rustpositie of wanneer hij
niet wordt gebruikt. De armsteun werd ontworpen
om in de hoogste positie te blijven wanneer hij
ontgrendeld is. Plaats de armsteun in onderste
positie wanneer er een plaat op de platenspeler
ligt, om krassen op uw vinyl te vermijden.
4. 45 TPM ADAPTERHOUDER – Voor de meegeleverde 45 TPM-adapter.
Wanneer de adapter niet gebruikt wordt, kan deze in de houder worden
geplaatst.
5. VOLUMEKNOP, AAN/UITKNOP: draai deze knop naar rechts
tot de klik om de LP2GO aan te zetten. Draai deze knop om het
luidsprekervolume aan te passen wanneer het apparaat
aanstaat. Draai deze knop naar links tot hij klikt om de LP2GO uit
te zetten.
6. SCHAKELAAR 33 / 45 TOEREN: deze schakelaar controleert
het toerental van de draaitafel.
7. LUIDSPREKER – De muziek op de plaat wordt afgespeeld via deze ingebouwde luidspreker.
8. USB/BATTERIJSCHAKELAAR: met de schakelaar in de 'onderste' positie wordt de draaitafel gevoed door een USBverbinding. De USB AUDIO-uitgang is verbonden met ofwel (A) uw computer of (B) het stroomnet, met behulp van de
meegeleverde USB-netstroomadapter. Met de schakelaar in de 'bovenste' positie wordt de draaitafel gevoed door
batterijen (als er batterijen zijn geïnstalleerd).
9. TELEFOONS – Connect 1/8 "stereo koptelefoon hier (niet inbegrepen). De spreker output stopplaatsen spelen audio
eenmaal koptelefoon zijn aangesloten.
10. USB-POORT: gebruik de meegeleverde USB-kabel om uw draaitafel te verbinden met uw computer. De USB-verbinding
voorziet zowel in de voeding van de draaitafel als in het doorsturen van het audiosignaal van de draaitafel naar uw
computer. U kunt de draaitafel ook van stroom voorzien met behulp van de meegeleverde USB-kabel en de USBnetstroomadapter en uw draaitafel op het stopcontact aansluiten.
Opmerking: In het bedieningspaneel Geluid van uw computer kan de LP2GO verschijnen als "USB-microfoon" of
"Samengesteld USB-apparaat" (zelfs als de meegeleverde handleiding van EZ Vinyl/Tape Converter vermeldt dat het
verschijnt als "USB-audiocodec").
11. BATTERIJVAK – Verwijder het deksel en plaats 4 AA-batterijen in dit compartiment. Zorg ervoor dat de positieve en
negatieve polen van de batterijen in de juiste richting wijzen.
17
Surf naar www.ionaudio.com/ezvc om
de laatste versie te downloaden van EZ
Vinyl/Tape Converter en voor een
handige probleemoplossingsgids en
bijkomende ondersteuning.
1
3
2
BELANGRIJK: Zorg ervoor dat de slipmat altijd
wordt geplaatst op de top van de schaal, terwijl
het gebruik van de draaitafel. Als de slipmat
gebruik kan leiden tot schade aan uw media,
alsmede schade aan de draaitafel. Verwijder de
plastic klep van (naald) voordat u de draaitafel.
4
ON
OFF
5
Page 18

+
J
J
J
J
J
J
PLATEN AFSPELEN
1. Maak de armsteun los en
breng hem in onderste
positie.
2. Hef de toonarm op en
beweeg hem naar de
zijkant.
3. Leg de plaat op de
draaitafel.
4. Selecteer snelheid (33/45
tpm); gebruik indien nodig
de meegeleverde 45toerenadapter.
5. Laat de toonarm op de
plaat zakken; de plaat
begint te spelen.
6. Pas het volume aan met de
AAN-/UITKNOP.
7. Wanneer u geluisterd hebt,
heft u de toonarm op en
legt u hem terug op de
armsteun.
1
3
5
2
4
6
VOLUME
7
18
Page 19

PROBLEEM OPLOSSING
Raadpleeg de volgende probleemoplossingen wanneer u moeilijkheden ondervindt bij het
opnemen van uw platen naar uw iPod of computer.
PROBLEEM OORZAAK OPLOSSING
Ik hoor geen geluid
wanneer ik aan het
opnemen ben.
Naald staat niet op de
plaat.
Draaitafel heeft geen
stroom.
Plaats de naald op de plaat.
Zorg ervoor dat de draaitafel is aangesloten op een
computer die is ingeschakeld.
De geluidskwaliteit is
slecht.
Bij het opnemen van
platen naar mijn
computer met Windows
Vista zijn de opnamen
mono in plaats van
stereo.
Mijn muziek speelt af
op een vreemde
toonhoogte.
Aansluiting van het
element is niet in orde.
Vinyl plaat is vuil of
beschadigd.
Ingangseigenschappen
voor opname onder Vista
zijn niet ingesteld op
“stereo”.
Onjuiste snelheid
geselecteerd op de
draaitafel.
Element dient stevig bevestigd te zijn aan de toonarm
wanneer de draaitafel in gebruik is.
Stof de plaat af en veeg het oppervlak voorzichtig
schoon voordat de plaat afgespeeld wordt.
In Vista kan het nodig zijn handmatig “stereo” te
selecteren voor opnemen.
Ga naar Start X Configuratiescherm X Geluid (in
Klassieke weergave). Klik op tab Opnemen en kies
Microfoon-ingang (USB Audio Codec). Klik op
Eigenschappen om de ingangsinstellingen te laten
zien. Klik hierna op tab Geavanceerd en selecteer “2
kanalen, 16 bit, 44100 Hz (CD-kwaliteit)” in het
keuzemenu Standaard opmaak. Als laatste klikt u op
Toepassen om de instellingen te bevestigen.
Zorg ervoor dat u uw platen op dezelfde snelheid
afspeelt als die waarvoor deze bedoeld zijn. Selecteer
één van de snelheden door te drukken op 33, 45 of
RPM.
Voor technische ondersteuning wordt u verzocht VÓÓR RETOURNERING VAN HET
PRODUCT contact te zoeken met ION Audio of uw verkooppunt. Contactinformatie vindt
u in de Veiligheidsinstructies die bij het product geleverd worden.
19
Page 20

www.ionaudio.com
MANUAL VERSION 1.0
 Loading...