

Page 1

Karaoke Pro
QUICKSTART GUIDE
ENGLISH ( 3 – 4 )
GUÍA DE INICIO RÁPIDO
ESPAÑOL ( 5 – 6 )
GUIDE D'UTILISATION RAPIDE
FRANÇAIS ( 7 – 8 )
GUIDA RAPIDA
ITALIANO ( 9 – 10 )
KURZANLEITUNG
DEUTSCH ( 11 – 12 )
SNELSTARTGIDS
NEDERLANDS ( 13 – 14 )
Page 2

Page 3

QUICKSTART GUIDE (ENGLISH)
1
2
3
4
6
7
8
9
6
5
1. Make sure all items listed in the BOX CONTENTS section are
included in the box.
2. READ SAFETY INSTRUCTION BOOKLET BEFORE USING THE
PRODUCT.
3. Place product in an appropriate position for operation.
4. Make sure all input devices such as microphones, CD players, or
MP3 players are turned off and volume settings are set at "zero."
5. Optional: Connect additional audio input sources (e.g., CD player,
MP3 player, etc.) to the Aux inputs.
6. Switch everything on in the following order:
• audio input sources (i.e. microphones, instruments, CD/MP3
Players)
• Karaoke Pro
7. When finished, turn everything off in the following order:
• Karaoke Pro
• audio input sources
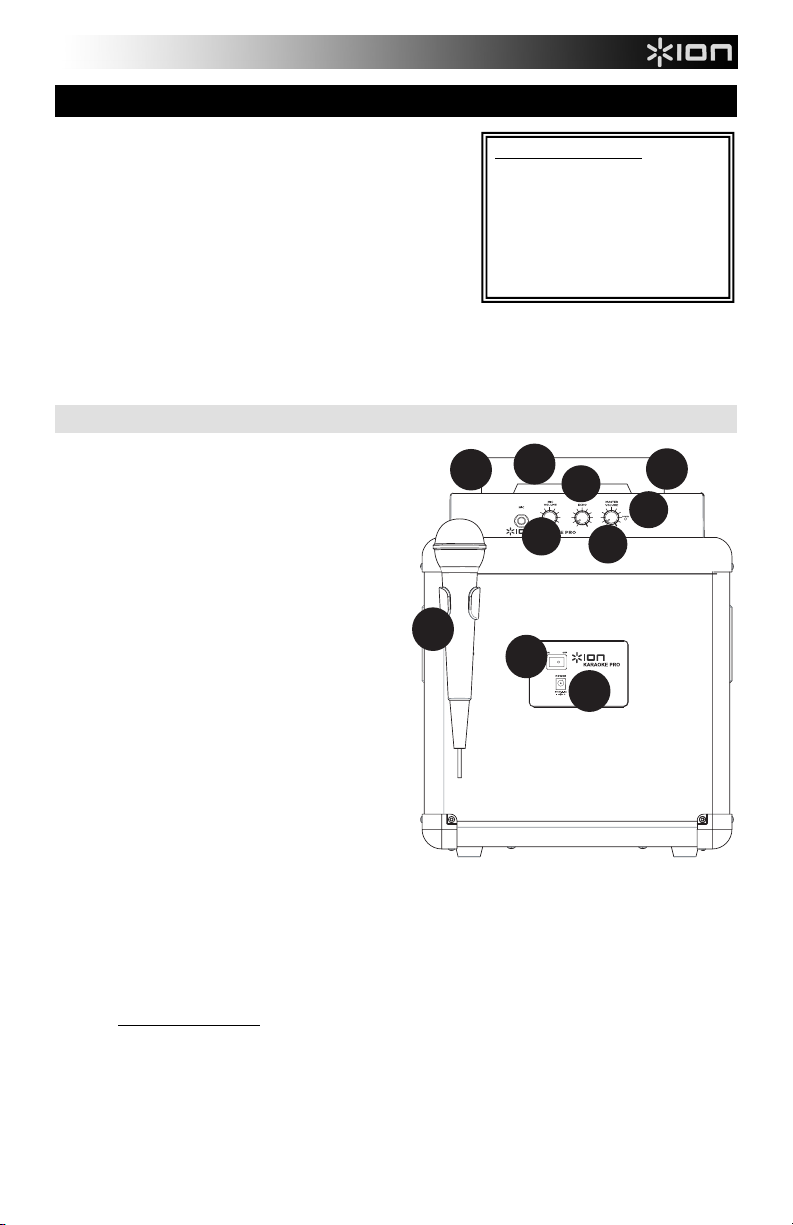
FRONT PANEL
1. Microphone Input with Volume Control (1/4"):
Connect an optional wired microphone (not included)
here, and use the volume knob to adjust the volume.
Note: You can use any dynamic microphone with a
1/4" cable with Karaoke Pro. You can purchase
microphones and cables from your local electronics
retailer or musical instrument store.
2. Echo: Use this knob to add or remove an echo effect
when using a microphone. Echo can give your mix a
bigger sound (simulating the reverb heard in a large
concert).
3. Master Volume Control: This knob controls Karaoke
Pro's master volume and the volumes of the Aux
inputs.
Note: if your mic is not loud enough compared to
your music, turn down the music on your source
(iPad, iPhone or other device)
4. Power LED: Indicates whether Karaoke Pro is on or
off.
5. Cradle: This cradle holds your iPad or other device.
6. Aux inputs: Connect your source to either of these
1/8” inputs.
Note: For the best performance with iOS apps, use a
1/8" TRRS cable.
Note: You can purchase 1/8" stereo audio cables at
your local electronics retailer or by contacting ION
Audio's parts department at
www.ionaudio.com/supporthome.
7. Mic Holder: Secure your mic here when it is not being used.
8. Power On/Off Switch: Use this to turn the unit on or off.
9. Power Cable Input: Insert the included power adapter here to power the unit.
iPad, iPhone, and iPod touch are trademarks of Apple, Inc., registered in the U.S.A. and other countries.
Go to http://www.ionaudio.com for product registration.
BOX CONTENTS
Karaoke Pro Speaker System
Wireless Microphone
1/8” (3.5mm) TRRS cable
Power adapter
Quickstart Guide
Safety & Warranty Manual
INPUT
3
Page 4
INSTALLING KARAOKE CLOUD SOFTWARE
IMPORTANT: To ensure the best possible experience with the Karaoke Cloud app, use the most
current iOS on your iPad, iPhone or iPod touch (not included).
Follow these steps below to download the app on your iPad, iPhone, or iPod touch:
Note: You can also download the app on your computer, but remember to connect and sync your iPad, iPhone, or
iPod touch to transfer the app to iPad, iPhone, or iPod touch.
1. Open the App Store on your iPad, iPhone or iPod touch.
2. Search for the Karaoke Cloud app and download it.
3. Tap 'Install App'.
4. Connect your iPad, iPhone, or iPod touch to Karaoke Pro.
5. Launch the Karaoke Cloud app.
You can also download other apps for Karaoke Pro, such as Karaoke Channel.
All users can visit www.karaokecloud.com or use your own favorite karaoke app. Karaoke Pro uses a standard 1/8"
input that can work with virtually any music source (CD players, MP3 players, computers, etc.).
IMPORTANT NOTES
Use this troubleshooting guide if you encounter any of the problems below:
• The sound is distorted: Try lowering the volume control of your sound source or music instrument. Also, try
to reduce the overall volume of Karaoke Pro.
• There is too much bass: Try adjusting the tone or EQ control on your sound source to lower the bass level.
• There is a high-pitched whistling noise when using a microphone: This is probably feedback. Point the
microphone away from the speaker.
• If you can’t hear the microphone over the music volume: Turn down the music volume from your source
(iPad, iPhone, or other device).
• There is a high-pitched whistling noise when using some apps on my iPhone/iPad/iPod touch/other
smartphone: This is probably feedback. You may be using an app that uses your device's internal mic. When
the Smartphone/device is close to Karaoke Pro's speaker, this may cause feedback. To avoid this,
TRRS cable, move the device away from Karaoke Pro's speaker, or use apps that do not use your device's
internal mic (e.g., Karaoke Cloud).
• The included cable doesn't reach my iPad or Tablet in Portrait mode: You can use a standard 1/8" stereo
cable with Karaoke Pro. Visit your local electronics retailer to purchase this cable.
Note: For the best performance with iOS apps, use a 1/8" TRRS cable.
use a
SPECIFICATIONS
Input Voltage: 9V DC, 1.5A Center Pin Positive
Input Wattage: 13.5W
Output Wattage: 7W (Peak)
Wireless Microphone Frequency: 174.8MHz
Included Cable Type: 1/8" TRRS stereo cable
Note: Any 1/8" TRS stereo cables will also work with Karaoke Pro.
Note: For the best performance with iOS apps, use a 1/8" TRRS cable.
Microphone Type (wired, 1/4" microphone input): Any dynamic microphone with 1/4" cable (available at your local
electronics or musical instruments retailer)
To purchase cables or microphones directly from ION Audio, please email parts@ionaudio.com.
4
Page 5
GUÍA DE INICIO RÁPIDO (ESPAÑOL)
1
2
3
4
6
7
8
9
6
5
1. Asegúrese de que todos los artículos indicados en CONTENIDO
DE LA CAJA estén incluidos en la misma.
2. LEA EL FOLLETO DE INSTRUCCIONES DE SEGURIDAD
ANTES DE UTILIZAR EL PRODUCTO.
3. Coloque el producto en una posición adecuada para su
funcionamiento.
4. Asegúrese de que todos los dispositivos de entrada tales como
micrófonos, reproductores de CD o reproductores MP3 estén
apagados y con el control de volumen en “cero”.
5. Opcional: Conecte fuentes de entrada de audio adicionales (por
ej., reproductor de CD, reproductor MP3, etc.) a las entradas Aux.
6. Encienda todo en el siguiente orden:
• fuentes de entrada de audio (por ejemplo, micrófonos, instrumentos, reproductores de CD/MP3)
• Karaoke Pro
7. Cuando termine, apague los equipos en el siguiente orden:
• Karaoke Pro
• fuentes de entrada de audio
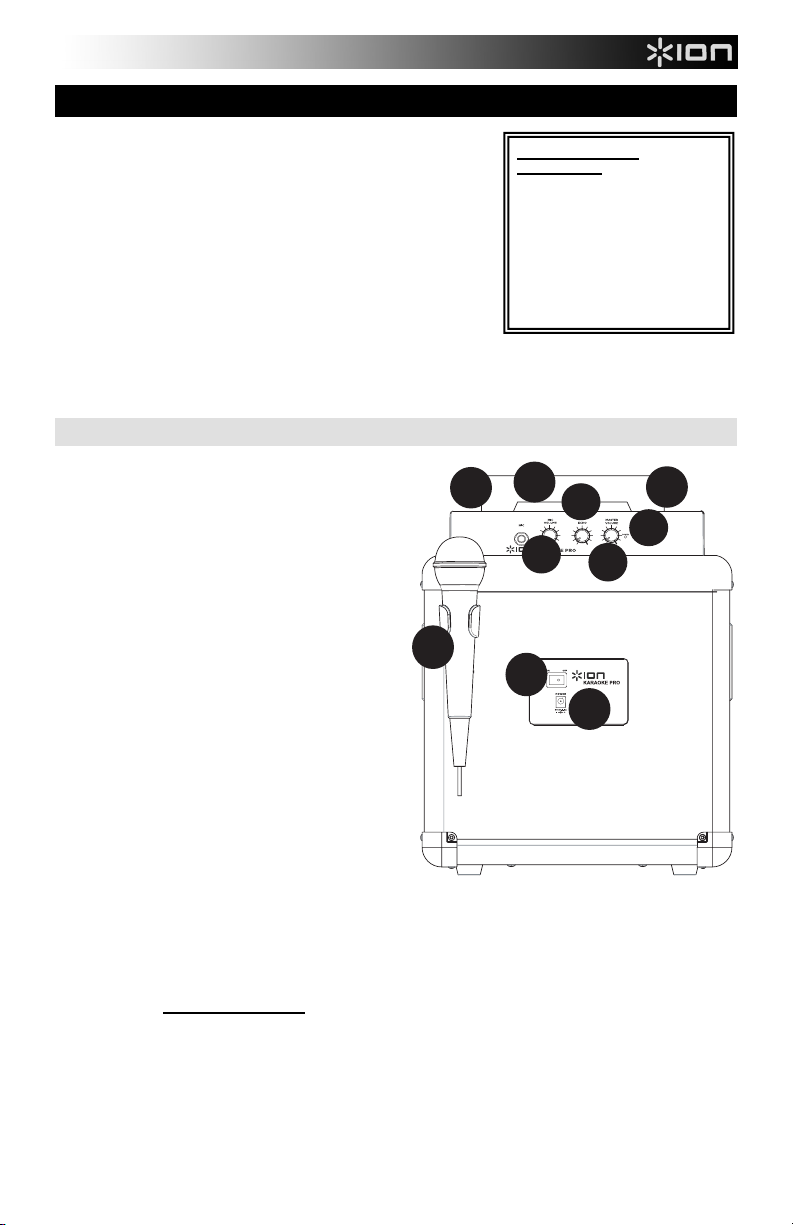
PANEL FRONTAL
1. Entrada para micrófono con control de volumen
(1/4 pulg.): Conecte aquí un micrófono cableado
opcional (no incluido) y utilice la perilla
correspondiente para ajustar el volumen.
Nota: Puede usar con Karaoke Pro cualquier
micrófono dinámico con cable de 1/4 pulg. Puede
adquirir los micrófonos y cables en las tiendas
minoristas de electrónica o de instrumentos
musicales locales.
2. Echo (Eco): Use esta perilla para agregar o quitar
un efecto de eco cuando utiliza un micrófono. El eco
puede darle a su mezcla un sonido más potente (que
simula la reverberación de una sala de conciertos).
3. Control de volumen maestro: Con esta perilla se
controla el volumen maestro del Karaoke Pro y los
volúmenes de las entradas Aux.
Nota: si su micrófono no tiene suficiente volumen
comparado con la música, baje el volumen de la
música en la fuente (iPad, iPhone u otro dispositivo)
4. LED de encendido: Indica si el Karaoke Pro está
encendido o apagado.
5. Base: Esta base contiene su iPad u otro dispositivo.
6. Entradas auxiliares: Conecte su fuente a una de
estas entradas de 1/8 pulg.
Nota: Para lograr el mejor rendimiento con
aplicaciones iOS, use un cable TRRS de 1/8 pulg.
Nota: Puede adquirir cables de audio estéreo de 1/8
pulg. en la tienda minorista de electrónica local o poniéndose en contacto con el departamento de repuestos de
ION Audio en www.ionaudio.com/supporthome.
7. Soporte para micrófono: Sujete aquí su micrófono cuando no lo usa.
8. Interruptor de encendido/apagado: Use este interruptor para encender y apagar la unidad.
9. Entrada del cable de alimentación: Inserte aquí el adaptador de alimentación incluido para alimentar la
unidad.
Visite http://www.ionaudio.com para registrar el producto.
5
CONTENIDO DE LA CAJA
Sistema de altavoz Karaoke Pro
Micrófono inalámbrico
Cable TRRS de 1/8 pulg. (3.5 mm)
Adaptador de alimentación
Guía de inicio rápido
Manual sobre la seguridad
garantía
INPUT
y
Page 6

INSTALACIÓN DEL SOFTWARE KARAOKE CLOUD
IMPORTANTE: Para asegurarse la mejor experiencia posible con la aplicación Karaoke Cloud, use el
IOS más actualizado en su iPad, iPhone o iPod touch (no incluidos).
Siga los pasos indicados a continuación para bajar la aplicación a su iPad, iPhone o iPod touch.
Nota: Puede también bajar la aplicación a su computadora, pero recuerde conectar y sincronizar su iPad, iPhone o
iPod touch para transferir la aplicación al iPad, iPhone o iPod touch.
1. Abra App Store (Tienda de aplicaciones) en su iPad, iPhone o iPod touch.
2. Busque la aplicación Karaoke Cloud y bájela.
3. Toque 'Install App' (Instalar aplicación).
4. Conecte su iPad, iPhone o iPod touch al Karaoke Pro.
5. Abra la aplicación Karaoke Cloud.
Puede también bajar otras aplicaciones para Karaoke Pro, tales como Karaoke Channel.
Todos los usuarios pueden visitar www.karaokecloud.com o usar su aplicación de karaoke favorita. Karaoke Pro
utiliza una entrada estándar de 1/8 pulg. que puede funcionar prácticamente con cualquier fuente de música
(reproductores de CD, reproductores de MP3, computadoras, etc.).
NOTAS IMPORTANTES
Use esta guía de solución de problemas si tiene alguno de los problemas que se mencionan a continuación:
• El sonido está distorsionado: Pruebe bajando el control de volumen de su fuente de sonido o instrumento
musical. Pruebe también reduciendo el volumen general del Karaoke Pro.
• Los graves son demasiados fuertes: Intente ajustando el control de tono o ecualización de su fuente de
sonido para reducir el nivel de graves.
• Si hay un silbido agudo cuando se usa un micrófono: Probablemente sea realimentación. Apunte el
micrófono apartándolo del altavoz.
• Si no puede oír el micrófono por arriba del volumen de la música: Baje el volumen de la música en la
fuente (iPad, iPhone u otro dispositivo).
• Se oye un silbido agudo cuando utilizo algunas aplicaciones en mi iPhone/iPad/iPod touch/otro
smartphone (teléfono inteligente): Probablemente sea realimentación. Es posible que esté usando una
aplicación que utiliza el micrófono interno de su dispositivo. Cuando el Smartphone o dispositivo está cerca del
altavoz del Karaoke Pro, puede producirse realimentación. Para evitarlo,
dispositivo del altavoz del Karaoke Pro, o use aplicaciones que no utilizan el micrófono interno de su
dispositivo (por ej. Karaoke Cloud).
• El cable incluido no llega a mi iPad o Tablet en modo Portrait (Vertical): Puede usar un cable estéreo
estándar de 1/8 pulg. con Karaoke Pro. Vaya a la tienda minorista de electrónica local para adquirir este
cable.
Nota: Para lograr el mejor rendimiento con aplicaciones iOS, use un cable TRRS de 1/8 pulg.
use un cable TRRS, aleje el
ESPECIFICACIONES
Voltaje de entrada: 9 V CC, 1.5 A, pin central positivo
Potencia de entrada: 13.5 W
Potencia de salida: 7 W (pico)
Frecuencia del micrófono inalámbrico: 174.8 MHz
Tipo de cable incluido: Cable estéreo TRRS de 1/8 pulg.
Nota: Todos los cables estéreo TRS de 1/8 pulg. funcionan también con Karaoke Pro.
Nota: Para lograr el mejor rendimiento con aplicaciones iOS, use un cable TRRS de 1/8 pulg.
Tipo de micrófono (cableado, entrada para micrófono de 1/4 pulg.): Cualquier micrófono dinámico con cable de
1/4 pulg. (disponible en su tienda minorista de electrónica o instrumentos musicales local)
Para adquirir cables o micrófonos directamente a ION Audio, envíe un correo electrónico a parts@ionaudio.com.
6
Page 7

GUIDE D’UTILISATION SIMPLIFIÉ (FRANÇAIS)
1
2
3
4
6
7
8
9
6
5
1. Assurez-vous que tous les articles énumérés dans le contenu de la
boîte de ce guide sont inclus dans la boîte.
2. VEUILLEZ LIRE LE LIVRET DES CONSIGNES DE SÉCURITÉ
AVANT D'UTILISER LE PRODUIT.
3. Placez l'appareil en position de fonctionnement.
4. Assurez-vous que tous les appareils d’entrée tels que microphones,
lecteurs CD ou lecteur MP3 raccordés sont éteints et que leur volume
est à « zéro ».
5. Facultatif : Branchez toutes sources audio supplémentaires (p. ex.,
lecteur CD, lecteur MP3, etc.) aux entrées auxiliaires.
6. Mettez tous les appareils sous tension dans l'ordre suivant :
• sources d'entrée audio (p. ex., microphones, instruments,
• Karaoke Pro
7. Et lorsque vous avez terminé, mettez tous les appareils hors tension dans l'ordre suivant :
• Karaoke Pro
• Source d'entrée audio
lecteurs de disques compacts, lecteurs MP3)
PANNEAU AVANT
1. Entrée microphone avec commande du volume
(¼ po) : Cette entrée permet de brancher un
microphone câblé (non inclus) et d’utiliser la
commande du volume pour le régler.
Remarque : N’importe quel microphone
électrodynamique avec câble ¼ po peut être utilisé
avec le Karaoke Pro. Vous pouvez vous procurer des
microphones et câbles chez un détaillant de produits
électroniques ou d’instruments de musique local.
2. Echo : Ce bouton permet d’ajouter ou de supprimer
un effet d’écho lorsqu’un microphone est utilisé. Un
effet d’écho permet d’ajouter de la profondeur au son
(simulant la réverbe d’une salle de concert).
3. Volume général : Ce bouton permet de régler le
volume général et le volume des entrées auxiliaires.
Remarque : Si votre microphone n’est pas assez fort
par rapport à la musique, diminuez le volume de la
source audio (iPad, iPhone ou autre appareil).
4. Témoin d'alimentation DEL : Indique si le Karaoke
Pro est sous ou hors tension.
5. Station d’accueil : Station d’accueil intégrée pour
iPad ou autres appareils.
6. Entrées auxiliaires : Ces entrées 1/8 po permettent
de brancher des sources audio externes.
Remarque : Afin d’obtenir la meilleure expérience
possible avec des applications iOS, utilisez un câble
TRRS 1/8 po.
Remarque : Vous pouvez vous procurer des câbles
1/8 po chez un détaillant de produits électroniques ou d’instruments de musique local ou en contactant le service
des pièces de rechange de ION Audio au www.ionaudio.com/supporthome.
7. Porte-microphone : Placez le microphone sur ce support lorsque vous ne l’utilisez pas.
8. Interrupteur Marche/Arrêt (ON/OFF) : Utilisez cet interrupteur pour mettre l'appareil sous et hors tension.
9. Entrée d’alimentation : Brancher le câble d'alimentation inclus ici afin d’alimenter l’appareil.
Veuillez visiter http://www.ionaudio.com pour enregistrer le produit.
7
CONTENU DE LA BOÎTE
Système de karaoké avec
haut-parleur
Microphone sans fil
Câble TRRS 1/8 po (3,5 mm)
Câble d’alimentation
Guide d’utilisation simplifié
Guide de sécurité et de la
garantie
INPUT
Page 8

INSTALLATION DU LOGICIEL KARAOKE CLOUD
IMPORTANT : Afin d’obtenir la meilleure expérience possible avec l’application Karaoke Cloud, nous
recommandons d’utiliser la dernière version de iOS sur votre iPad, iPhone ou iPod touch (non
inclus).
Suivez les étapes ci-dessous afin de télécharger l’application sur votre iPad, iPhone ou iPod touch :
Remarque : Vous pouvez également télécharger l’application sur votre ordinateur, mais n’oubliez pas de connecter
et de synchroniser votre iPad, iPhone ou iPod touch afin de transférer l’application sur votre iPad, iPhone ou iPod
touch.
1. Lancez l’application du App Store sur votre iPad, iPhone ou iPod touch.
2. Faites une recherche pour Karaoke Cloud et téléchargez l’application.
3. Cliquez sur « Installez ».
4. Branchez votre iPad, iPhone ou iPod touch au Karaoke Pro.
5. Lancez l’application Karaoke Cloud.
Vous pouvez également télécharger d’autres applications pour le Karaoke Pro comme Karaoke Channel.
Vous pouvez visiter le site www.karaokecloud.com ou utiliser votre application de karaoké préférée. L'entrée 1/8 po
standard du Karaoke Pro fonction avec pratiquement toutes les sources audio (lecteurs CD, MP3, ordinateur, etc.).
REMARQUES IMPORTANTES
Veuillez vous référer à ce guide de dépannage si vous éprouvez les troubles suivants :
• Il y a de la distorsion : Essayez de diminuer le volume sur l’appareil d’entrée audio ou l’instrument de
musique. Essayez également de réduire le volume général du Karaoke Pro.
• Il y a trop de basses fréquences : Essayez de régler le niveau de tonalité et d’égalisation sur l’appareil de
source d’entrée audio afin de diminuer le niveau des basses fréquences.
• Il y a un sifflement aigu lors de l’utilisation d’un microphone : Ceci est probablement causé par l’effet
Larsen (feedback). Dirigez le microphone loin du haut-parleur.
• Si vous ne pouvez entendre le microphone au-dessus de la musique : Diminuez le volume de la musique
de la source audio (iPad, iPhone ou autre appareil).
• Il y a un sifflement aigu lors de l’utilisation de certaines applications sur mon iPhone/iPad/iPod
touch/ou autre téléphone intelligent : Ceci est probablement causé par l’effet Larsen (feedback). Il se peut
que vous utilisiez une application qui se sert du microphone interne de l’appareil. Lorsque le téléphone
intelligent/appareil est près du haut-parleur du Karaoke Pro, il se peut que cela crée de la rétroaction. Afin
d’éviter la rétroaction, utilisez un câble TRRS, déplacez l’appareil loin du haut-parleur du Karaoke Pro, ou
utilisez une application qui n’utilise pas le microphone interne de l’appareil (p. ex., Karaoke Cloud).
• Le câble inclus n’est pas assez long pour atteindre mon iPad ou ma tablette en mode portrait : Vous
pouvez utiliser un câble stéréo standard de 1/8 po avec le Karaoke Pro. Veuillez visiter votre détaillant
électronique local pour vous en procurer un.
Remarque : Pour des résultats optimums avec des applications iOS, utilisez un câble TRRS de 1/8 po.
CARACTÉRISTIQUES
Tension d'entrée : 9 V CC, 1,5 A polarité positive au centre
Puissance d’entrée : 13,5 W
Puissance de sortie : 7 W (Point)
Fréquence du microphone : 174,8 MHz
Type de câble inclus : Câble TRRS stéréo de 1/8 po
Remarque : Vous pouvez également utiliser un câble TRS stéréo de 1/8 po avec le Karaoke Pro.
Remarque : Pour des résultats optimums avec des applications iOS, utilisez un câble TRRS de 1/8 po.
Type de microphone (câblé, entrée microphone de ¼ po) : N’importe quel microphone électrodynamique avec
câble de ¼ po (que vous pouvez vous procurer chez un détaillant de produits électroniques ou d’instruments local).
Pour acheter des câbles ou des microphones directement de ION Audio, veuillez envoyer un message à
parts@ionaudio.com.
8
Page 9
GUIDA RAPIDA (ITALIANO)
1
2
3
4
6
7
8
9
6
5
1. Assicurarsi che tutti gli elementi elencati nel paragrafo “CONTENUTI
DELLA CONFEZIONE” siano contenuti nella confezione stessa.
2. LEGGERE ATTENTAMENTE IL LIBRETTO DELLE ISTRUZIONI DI
SICUREZZA PRIMA DI UTILIZZARE IL PRODOTTO.
3. Collocare il prodotto in una posizione adeguata all’uso.
4. Asicurarsi che tutti i dispositivi di ingresso quali microfoni, lettori CD o
lettori MP3 collegati siano spenti e che i relativi volumi siano su
"zero".
5. Opzione: Collegare ulteriori fonti audio (lettori CD, lettori MP3, ecc.)
agli ingressi Aux.
6. Accendere tutto nel seguente ordine:
• sorgenti di ingresso audio (microfoni, strumenti, lettori CD/MP3,
ecc.)
• Karaoke Pro
7. Una volta finito, spegnere tutto nel seguente ordine:
• Karaoke Pro
• sorgenti di ingresso audio
PANNELLO ANTERIORE
1. Ingresso microfono con comando di regolazione
del volume (1/4"): collegare un microfono a filo
opzionale (non in dotazione) a questo livello e servirsi
della manopola del volume per regolare quest'ultimo.
Nota bene: Con il Karaoke Pro è possibile utilizzare
qualsiasi microfono dinamico dotato di un cavo da
1/4". Microfoni e cavi possono essere acquistati
presso il vostro negozio di elettronica locale o presso
un negozio di strumenti musicali.
2. Echo: servirsi di questa manopola per aggiungere o
rimuovere un effetto eco quando si utilizza un
microfono. L'eco può conferire al mix un suono
maggiore (simulando il riverbero che si sente in
occasione di un concerto).
3. Comando volume Master: questa manopola
controlla il volume master del Karaoke Pro e i volumi
degli ingressi Aux.
Nota bene: se il microfono non è abbastanza alto
rispetto alla musica, abbassare il volume della
musica a livello della sorgente (iPad, iPhone o altro
dispositivo)
4. LED di alimentazione: indica se il Karaoke Pro è
acceso o è spento.
5. Cradle: la cradle regge l'iPad o altri dispositivi.
6. Ingressi Aux: collegare la sorgente audio a uno di
questi ingressi da 1/8”.
Nota bene: per ottenere le migliori prestazioni con
app iOS, servirsi di un cavo TRRS da 1/8".
Nota bene: è possibile acquistare cavi audio stereo da 1/8" presso il proprio rivenditore di elettronica oppure
contattando il reparto parti di ricambio di ION Audio all'indirizzo www.ionaudio.com/supporthome.
7. Supporto Mic: fissare qui il microfono quando non è in uso.
8. Interruttore ON/OFF (accensione/spegnimento): servirsi di questo interruttore per accendere e spegnere
l'apparecchio.
9. Ingresso cavo di alimentazione: per alimentare l’apparecchio, inserire a questo livello il cavo di alimentazione
in dotazione.
Recarsi alla pagina http://www.ionaudio.com per la registrazione del prodotto.
9
CONTENUTI DELLA
CONFEZIONE
Sistema di altoparlanti Karaoke
Pro
Microfono wireless
Cavo TRSS da 1/8” (3,5mm)
Adattatore di alimentazione
Guida rapida
Istruzioni di sicurezza e
garanzia
INPUT
Page 10

INSTALLAZIONE DEL SOFTWARE KARAOKE CLOUD
IMPORTANTE: per trarre il massimo dall'app Karaoke Cloud, servirsi dell'iOS più recente su iPad,
iPhone o iPod touch (non in dotazione).
Procedere come indicato qui di seguito per scaricare l'app sull'iPad, sull'iPhone o sull'iPod touch.
Nota bene: si può anche scaricare l'app sul computer, ma non bisogna dimenticare di collegare e sincronizzare
l'iPad, l'iPhone, o l'iPod touch per trasferire l'app su iPad, iPhone o iPod touch.
1. Aprire l'App Store sull'iPad, sull'iPhone o sull'iPod touch.
2. Cercare l'app Karaoke Cloud e scaricarla
3. Selezionare 'Install App' (installa app).
4. Collegare iPad, iPhone o iPod touch al Karaoke Pro.
5. Lanciare l'app Karaoke Cloud.
È inoltre possibile scaricare altre app per il Karaoke Pro, quali Karaoke Channel.
Tutti gli utenti possono visitare la pagina www.karaokecloud.com o utilizzare la propria app per karaoke preferita. Il
Karaoke Pro impiega un ingresso standard da 1/8" in grado di funzionare praticamente con qualsiasi fonte musicale
(lettori CD, lettori MP3, computer, ecc.).
NOTE IMPORTANTI
Servirsi di questa guida per la risoluzione dei problemi qualora si incontri uno dei seguenti problemi:
• Il suono è distorto: provare ad abbassare il volume della propria fonte audio o dello strumento musicale.
Inoltre, provare a ridurre il volume complessivo del Karaoke Pro.
• Eccessivi bassi: provare a regolare la tonalità o il comando EQ a livello della fonte audio per abbasare il
livello dei bassi.
• Quando si utilizza il microfono si verifica un fischio ad alto pitch: si tratta probabilmente di ritorno. Puntare
il microfono lontano dalle casse.
• Se non si sente il microfono al di sopra della musica: abbassare il volume della musica a livello della
sorgente (iPad, iPhone o altro dispositivo).
• Quando utilizzo alcune app sul mio iPhone/iPad/iPod touch/altro smartphone si verifica un fischio ad
alto pitch: si tratta probabilmente di ritorno. Probabilmente state usando un'app che si serve del mic interno
del dispositivo. Quando lo Smartphone/dispositivo è vicino alla cassa del Karaoke Pro, ciò può causare ritorno.
Per evitarlo, servirsi di un cavo TRRS, allontanare il dispositivo dalla cassa del Karaoke Pro oppure servirsi di
app che non impiegano il microfono interno del dispositivo (ad es. il Karaoke Cloud).
• Il cavo in dotazione non raggiunge il mio iPad o Tablet in orientamento orizzontale: con il Karaoke Pro è
possibile servirsi di un cavo stereo standard da 1/8". Recarsi dal proprio rivenditore locale di elettronica per
acquistare tale cavo.
Nota bene: per ottenere le migliori prestazioni con app iOS, servirsi di un cavo TRRS da 1/8".
SPECIFICHE TECNICHE
Tensione di ingresso: 9V DC, 1,5A polo centrale positivo
Wattaggio di ingresso: 13,5W
Wattaggio di uscita: 7W (picco)
Frequenza del microfono wireless: 174,8MHz
Tipo di cavo incluso: cavo stereo TRRS da 1/8"
Nota bene: qualsiasi cavo stereo TRS da 1/8" funzionerà a sua volta con il Karaoke Pro.
Nota bene: per ottenere le migliori prestazioni con app iOS, servirsi di un cavo TRRS da 1/8".
Tipo di microfono (cablato, ingresso microfono da 1/4"): qualsiasi microfono dinamico dotato di cavo da 1/4"
(disponibile presso un qualsiasi negozio di elettronica locale o presso un negozio di strumenti musicali)
Per acquistare cavi o microfoni direttamente da ION Audio, inviare un'e-mail all'indirizzo parts@ionaudio.com.
10
Page 11

SCHNELLSTART-ANLEITUNG (DEUTSCH)
1
2
3
4
6
7
8
9
6
5
1. Stellen Sie sicher, dass alle im LIEFERUMFANG aufgelisteten Teile in
der Verpackung enthalten sind.
2. LESEN SIE DIE SICHERHEITSHINWEISE, BEVOR SIE DAS
PRODUKT VERWENDEN.
3. Für den Betrieb platzieren Sie das Produkt in einer geeigneten
Position.
4. Stellen Sie sicher, dass alle Eingabegeräte wie Mikrofone, CD-Player,
MP3-Player ausgeschaltet sind und deren Lautstärke auf "Null“ steht.
5. Optional: Verbinden Sie zusätzliche Audio-Eingangsquellen (z.B. CD-
Player, MP3-Player usw.) mit den AUX-Eingängen.
6. Schalten Sie alles in folgender Reihenfolge ein:
• Audio-Eingangsquellen (z.B. Mikrofone, Instrumente, CD/MP3Player)
• Karaoke Pro
7. Wenn Sie fertig sind, schalten Sie alles in dieser Reihenfolge aus:
• Karaoke Pro
• Audio-Eingangsquellen
VORDERSEITE
1. Mikrofoneingang mit Lautstärkeregler (1/4"):
Schließen Sie ein optionales, kabelgebundenes
Mikrofon hier an (nicht im Lieferumfang enthalten)
und verwenden Sie den Lautstärkeregler, um die
Lautstärke einzustellen.
Hinweis: Für Karaoke Pro können Sie ein beliebiges
dynamisches Mikrofon mit einem 1/4"-Kabel
verwenden. Sie können Mikrofone und Kabel von
Ihrem örtlichen Elektronik- oder Musikfachgeschäft
kaufen.
2. Echo: Mit diesem Regler können Sie den Echoanteil
des Mikrofons regulieren. Echo kann Ihrem Mix eine
größere Resonanz verleihen (indem es den ReverbEffekt einer großen Konzerthalle simuliert).
3. Gesamtlautstärkeregler: Dieser Regler bestimmt
die Gesamtlautstärke des Karaoke Pro und die
Lautstärken der AUX-Eingänge.
Hinweis: Wenn Ihr Mikrofon im Vergleich zu Ihrer
Musik nicht laut genug ist, reduzieren Sie die
Musiklautstärke an der Quelle (iPad, iPhone oder
anderes Gerät)
4. Power-LED: Zeigt an, ob Karaoke Pro ein- oder
ausgeschaltet ist.
5. Halterung: Diese Halterung hält Ihr iPad oder
anderes Gerät.
6. Aux-Eingänge: Verbinden Sie Ihre Quelle mit einem
dieser beiden 1/8"-Eingänge.
Hinweis: Für eine optimale Performance mit den iOS
Apps verwenden Sie ein 1/8" TRRS-Kabel.
Hinweis: Sie können 1/8"-Audiokabel (Stereo) bei Ihrem örtlichen Elektronikhändler oder bei ION Audio unter
www.ionaudio.com/supporthome kaufen.
7. Mikro-Halter: Sichern Sie hier Ihr Mikrofon, wenn Sie es nicht benutzen.
8. Ein-/Ausschalter: Verwenden Sie diesen Schalter, um das Gerät ein- oder auszuschalten.
9. Stromkabeleingang: Schließen Sie den mitgelieferten Netzadapter hier an, um das Gerät mit Strom zu
versorgen.
Besuchen Sie http://www.ionaudio.com, um Ihr Produkt zu registrieren.
11
LIEFERUMFANG
Karaoke Pro
Lautsprechersystem
Kabelloses Mikrofon
1/8" (3,5 mm) TRRS-Kabel
Netzteil
Schnellstart-Anleitung
Sicherheitshinweise und
Garantieinformationen
INPUT
Page 12

INSTALLIEREN DER KARAOKE CLOUD SOFTWARE
WICHTIG: Um die bestmögliche Erfahrung mit der Karaoke Cloud App zu gewährleisten, sollten Sie
das aktuellste iOS auf Ihrem iPad, iPhone oder iPod touch (nicht enthalten) verwenden.
Gehen Sie folgendermaßen vor, um die App auf Ihr iPad, iPhone oder iPod touch herunterzuladen.
Hinweis: Sie können die App auch auf Ihren Computer herunterladen, aber denken Sie daran, Ihr iPad, iPhone oder
iPod touch zu synchronisieren, um die App auf Ihr iPad, iPhone oder iPod touch zu übertragen.
1. Öffnen Sie den App Store auf Ihrem iPad, iPhone oder iPod touch.
2. Suchen Sie nach Karaoke Cloud App und laden Sie die App herunter.
3. Tippen Sie auf "App installieren".
4. Verbinden Sie Ihr iPad, iPhone oder iPod touch mit dem Karaoke Pro.
5. Starten Sie die Karaoke Cloud App.
Sie können auch andere Anwendungen für Karaoke-Pro herunterladen, wie z.B. Karaoke Channel.
Alle Benutzer können www.karaokecloud.com besuchen oder Ihre eigene Lieblingskaraoke-App verwenden. Karaoke
Pro verfügt über einen standardmäßigen 1/8"-Eingang, der mit praktisch jeder Musikquelle (CD-Player, MP3-Player,
Computer etc.) funktioniert.
WICHTIGE HINWEISE
Verwenden Sie diese Anleitung zur Fehlersuche, wenn Sie eines der folgenden Probleme haben:
• Der Sound klingt verzerrt: Drehen Sie den Lautstärkeregler an Ihrer Tonquelle oder dem Musikinstrument
zurück. Versuchen Sie auch, das Gesamtvolumen des Karaoke Pro zu reduzieren.
• Zu viel Bass: Versuchen Sie, den Ton- oder EQ-Regler Ihrer Tonquelle anzupassen, um den Bass zu
verringern.
• Bei der Verwendung von Mikrofonen tritt einer hoher Pfeifton auf: Hier handelt es sich wahrscheinlich um
einen Rückkopplungseffekt. Richten Sie es so ein, dass die Mikrofone vom Lautsprecher wegzeigen.
• Wenn das Mikrofon im Vergleich zur Musik zu leise eingestellt ist: Passen Sie die Lautstärke Ihrer
Musikquelle an (iPad, iPhone oder anderes Gerät).
• Ich höre einen schrillen Pfeifton, wenn ich einige Apps auf meinem iPhone/iPad/iPod touch/anderen
Smartphone verwende: Hier handelt es sich wahrscheinlich um einen Rückkopplungseffekt. Möglicherweise
verwenden Sie eine App, die das interne Mikrofon Ihres Geräts verwendet. Wenn sich das Smartphone/Gerät
in der Nähe des Lautsprechers Ihres Karaoke Pro befindet, kann dies zu Rückkopplungen führen. Um dies zu
vermeiden, verwenden Sie
nutzen Apps, die das interne Mikrofon in Ihrem Gerät nicht verwenden (z.B. Karaoke Cloud).
• Das im Lieferumfang enthaltene Kabel reicht nicht für mein iPad oder Tablet im Portrait-Modus: Sie
können ein standardmäßiges 1/8"-Stereokabel für Karaoke Pro verwenden. Besuchen Sie Ihr lokales
Elektronikfachgeschäft, um dieses Kabel zu kaufen.
Hinweis: Für die beste Leistung mit iOS Apps, verwenden Sie ein 1/8" TRRS-Kabel.
ein TRRS-Kabel und bewegen das Gerät vom Karaoke Pro Lautsprecher weg oder
TECHNISCHE DATEN
Eingangsspannung: 9V DC, 1.5A, mittlerer Pin mit positiver Polarität
Eingangsleistung: 13.5W
Ausgangsleistung: 7W (Peak)
Frequenz des kabellosen Mikrofons: 174.8MHz
Enthaltener Kabeltyp: 1/8" TRRS-Stereokabel
Hinweis: Alle 1/8" TRS-Stereokabel können ebenfalls mit Karaoke Pro verwendet werden.
Hinweis: Für die beste Leistung mit iOS Apps, verwenden Sie ein 1/8" TRRS-Kabel.
Mikrofontyp (Kabel, 1/4"-Mikrofoneingang): Jedes dynamische Mikrofon mit 1/4"-Kabel (erhältlich bei Ihrem
örtlichen Elektronik- oder Musikfachgeschäft)
Um Kabel oder Mikrofone direkt von ION Audio zu kaufen, emailen Sie parts@ionaudio.com.
12
Page 13

SNELSTARTGIDS (NEDERLANDS)
1
2
3
4
6
7
8
9
6
5
1. Zorg ervoor dat alle artikelen, opgesomd in INHOUD VAN DE DOOS,
zich in de doos bevinden.
2. LEES DE VEILIGHEIDSVOORSCHRIFTEN VOORALEER HET
PRODUCT TE GEBRUIKEN.
3. Plaats het product in een positie die geschikt is voor werking.
4. Zorg ervoor dat alle invoerapparaten, zoals microfoons, cd-spelers of
mp3-spelers uitgeschakeld zijn en dat het volume op "nul" staat.
5. Optioneel: Sluit bijkomende binnenkomende geluidsbronnen aan (bv.
cd-speler, mp3-speler, enz.) op de aux-ingangen.
6. Zet alles aan in deze volgorde:
• geluidsbronnen (bijv. microfoons, instrumenten, cd/mp3-spelers)
• Karaoke Pro
7. Zet bij het uitzetten alles uit in deze volgorde:
• Karaoke Pro
• binnenkomende geluidsbronnen
VOORPANEEL
1. Microfooningang met volumecontrole (1/4"): Sluit
hier een optionele draadmicrofoon (niet inbegrepen)
aan en gebruik de volumeknop om het volume aan te
passen.
Opmerking: Karaoke Pro werkt met alle dynamische
microfoons die beschikken over een 1/4"-kabel. U
kunt microfoons en kabels kopen bij uw plaatselijke
elektronicawinkel of muziekzaak.
2. Echo: Gebruik deze knop om wanneer u een
microfoon gebruikt een galmeffect toe te voegen of te
verwijderen. Echo bezorgt uw geluidsmix een ruimer
geluid (het bootst de galm van een groot concert na).
3. Hoofdvolumeregeling: Deze knop controleert het
hoofdvolume van Karaoke Pro en de volumes van de
Aux-ingangen.
Opmerking: als uw microfoon niet luid genoeg staat
in vergelijking met uw muziek, verlaag dan het
volumeniveau van uw geluidsbron (iPad, iPhone of
ander apparaat)
4. Stroom-LED: Geeft aan of Karaoke Pro aan- of
uitgeschakeld is.
5. Apparaathouder: Deze houder dient om uw iPad of
ander apparaat in te plaatsen.
6. Aux-ingangen: Verbind uw bron met één van deze
1/8"-ingangen.
Opmerking: Gebruik voor optimale prestaties met
iOS-apparaten een TRRS-kabel van 1/8".
Opmerking: U kunt stereokabels van 1/8"
aanschaffen bij uw plaatselijke elektronicahandel of
door contact op te nemen met de afdeling audio-onderdelen van ION Audio op www.ionaudio.com/supporthome.
7. Microfoonhouder: Berg hier uw microfoon op wanneer hij niet wordt gebruikt.
8. Aan/uit-schakelaar: Zet hiermee het apparaat aan of uit.
9. Ingang voor stroomkabel: Sluit om het apparaat van stroom te voorzien hier de meegeleverde stroomadapter
aan.
Ga naar http://www.ionaudio.com voor productregistratie.
INHOUD VAN DE DOOS
Luidsprekersysteem Karaoke
Pro
Draadloze microfoon
TRRS-kabel van 1/8" (3,5mm)
Stroomadapter
Snelstartgids
Handleiding veiligheid en
garantie
INPUT
13
Page 14

DE KARAOKE CLOUD SOFTWARE INSTALLEREN
BELANGRIJK: Om de best mogelijke ervaring met de Karaoke Cloud-app te garanderen, raden wij u
aan de meest recente iOS op uw iPad, iPhone of iPod touch (niet meegeleverd) te gebruiken.
Volg de stappen hieronder om de app op uw iPad, iPhone, of iPod touch te downloaden:
Opmerking: U kunt de app ook op uw computer downloaden, maar vergeet niet om uw iPad, iPhone of iPod touch
aan te sluiten en te synchroniseren als u de app naar uw iPad, iPhone of iPod touch over wilt zetten.
1. Open de App Store op uw iPad, iPhone of iPod touch.
2. Zoek naar de Karaoke Cloud-app en download de app.
3. Tik op 'App installeren'.
4. Sluit uw iPad, iPhone of iPod touch aan op Karaoke Pro.
5. Start de Karaoke Cloud-app.
U kunt voor Karaoke Pro ook andere apps downloaden, zoals Karaoke Channel.
Alle gebruikers kunnen www.karaokecloud.com bezoeken of uw eigen favoriete karaoke-app gebruiken. Karaoke Pro
maakt gebruik van een standaard 1/8"-ingang die werkt met vrijwel iedere muziekbron (cd-spelers, mp3-spelers,
computers, enz.).
BELANGRIJKE OPMERKINGEN
Gebruik deze gids voor probleemoplossing als u één van de hieronder vermelde problemen ondervindt:
• Het geluid is vervormd: Probeer het volumeniveau van de geluidsbron of het muziekinstrument lager te
zetten. Probeer ook om het hoofdvolume van Karaoke Pro te verminderen.
• Er zijn teveel bassen: Probeer op de toon- of EQ-bedieningsknoppen aan uw geluidsbron het niveau van de
lage tonen te verlagen.
• Er is een hoge fluitende pieptoon bij het gebruik van een microfoon: Dit is waarschijnlijk feedback. Richt
de microfoon weg van de luidspreker.
• Als u de microfoon niet kan horen boven het geluid van de muziek: Verlaag het muziekvolume van uw
geluidsbron (iPad, iPhone of ander apparaat).
• Er is een hoge fluitende pieptoon bij het gebruik van sommige apps op mijn iPhone/iPad/iPod
touch/andere smartphone: Dit is waarschijnlijk feedback. Mogelijk gebruikt u een app die de interne
microfoon van uw apparaat gebruikt. Wanneer de smartphone/het apparaat zich dicht bij de luidspreker van de
Karaoke Pro bevindt, kan dit feedback veroorzaken. Gebruik een TRRS-kabel
het apparaat van de luidspreker van de Karaoke Pro of gebruik apps die de interne microfoon van uw apparaat
niet gebruiken (bv. Karaoke Cloud).
• De meegeleverde kabel is niet lang genoeg voor mijn iPad of tablet-pc in portretmodus: Met Karaoke Pro
kunt u een standaard 1/8" stereokabel gebruiken. Bezoek uw plaatselijke elektronicawinkel om deze kabel aan
te schaffen.
Opmerking: Gebruik voor optimale prestaties met iOS-apparaten een TRRS-kabel van 1/8".
om dit te vermijden, verwijder
SPECIFICATIES
Ingangsvoltage: 9V DC, 1,5 A middelste pin positief
Inputwattage: 13,5 W
Outputwattage: 7 W (Piek)
Frequentie draadloze microfoon: 174,8 MHz
Meegeleverd kabeltype: TRRS-stereokabel van 1/8"
Opmerking: Alle TRS-stereokabels van 1/8" werken ook met Karaoke Pro.
Opmerking: Gebruik voor optimale prestaties met iOS-apparaten een TRRS-kabel van 1/8".
Microfoontype (met draad, microfooningang van 1/4"): Alle dynamische microfoons met 1/4"-kabel (verkrijgbaar
bij uw plaatselijke elektronica- of muziekwinkel)
Stuur een e-mailbericht naar parts@ionaudio.com om rechtstreeks bij ION Audio kabels of microfoons te kopen.
14
Page 15

Page 16

www.ionaudio.com
MANUAL VERSION 1.0
 Loading...