

Page 1

JUKEBOX BLUETOOTH
Quickstart Guide
English ( 3 – 5 )
Guía de inicio rápido
Español ( 6 – 8 )
Guide d'utilisation rapide
Français ( 9 – 11 )
Guida rapida
Italiano ( 12 – 14 )
Schnellstart-Anleitung
Deutsch ( 15 – 17 )
Snelstartgids
Nederlands ( 18 –20 )
Page 2

Page 3
Quickstart Guide (English)
1
2
+
3
+
Box Contents
• Jukebox Bluetooth
• Power Adapter
• Remote
• Quickstart Guide
• Safety and Warranty Information Booklet
Registration
Please go to ionaudio.com to register your Jukebox Bluetooth. Registering your product ensures that we can keep
you up-to-date with any new product developments and provide you with world-class technical support, should you
run into any problems.
Using Jukebox Bluetooth with your Device
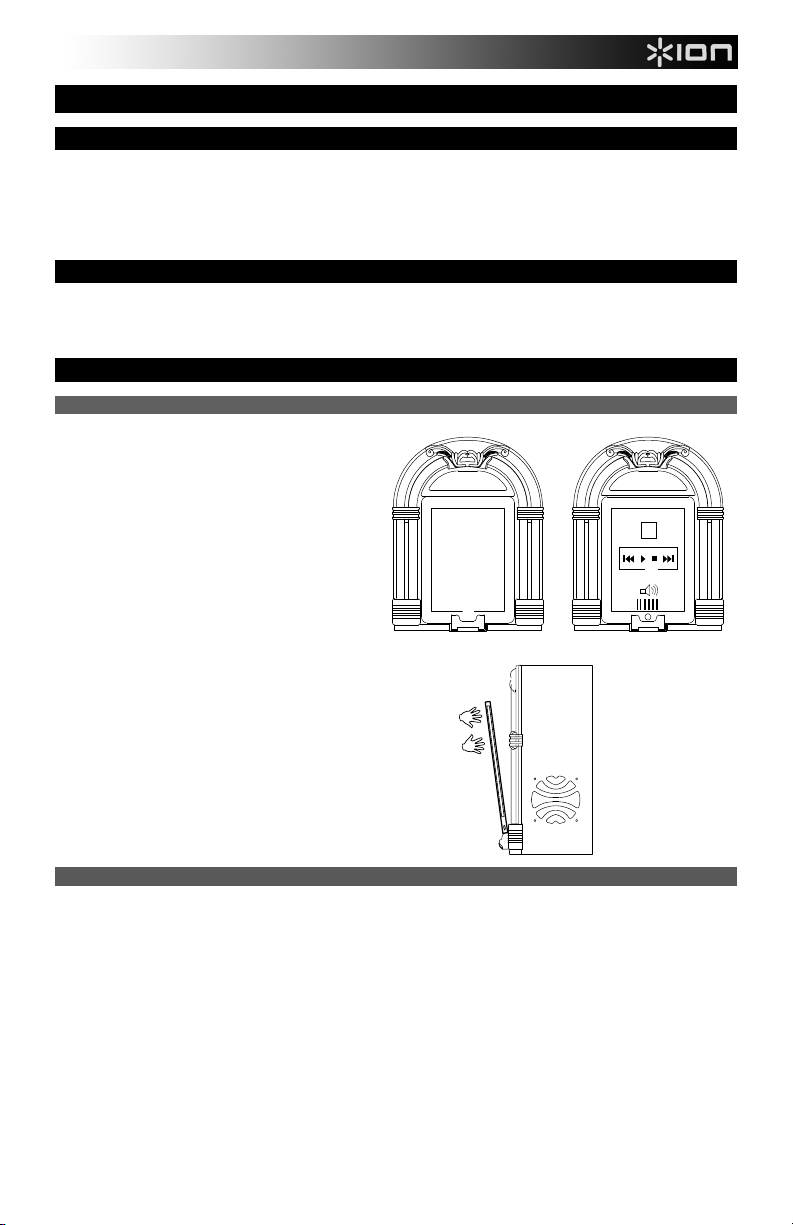
Setup Instructions
Get ready to travel back to the heyday and play
groovy tunes using your favorite music app on
your device with Jukebox Bluetooth.
1. Connect your Bluetooth device to Jukebox
Bluetooth (for pairing instructions see the
section Connecting a Bluetooth Device).
Alternatively, connect a media device such
as a CD player, smartphone, or MP3 player
to the 1/8” LINE IN of Jukebox Bluetooth.
The LINE IN jack can be found on the rear
panel.
Note: The LINE IN is recommended to be
used only if a Bluetooth device is not
connected.
2. On your device, launch your music library or
your favorite jukebox app to play a song.
Adjust the output volume from your device,
and by using the volume control on Jukebox
Bluetooth remote as needed.
3. To release the device from the cradle, hold
the device, press the CRADLE RELEASE,
and gently remove the device from the
cradle.
Connecting a Bluetooth Device
1. Turn on your Bluetooth device.
2. Power on Jukebox Bluetooth and it will automatically go into pairing mode to search for Bluetooth devices.
3. Navigate to your Bluetooth device’s setup screen, find “Jukebox BT” and connect.
Note: If your Bluetooth device prompts for a pairing code, enter ‘0000’.
Note: If you experience trouble pairing or playing music, update your device's OS.
4. To connect to another Bluetooth device, navigate to your currently connected Bluetooth device’s setup screen,
find “Jukebox BT” and unpair (process varies slightly by device - consult your Bluetooth device's manual for
details). Repeat step 3.
3
Page 4
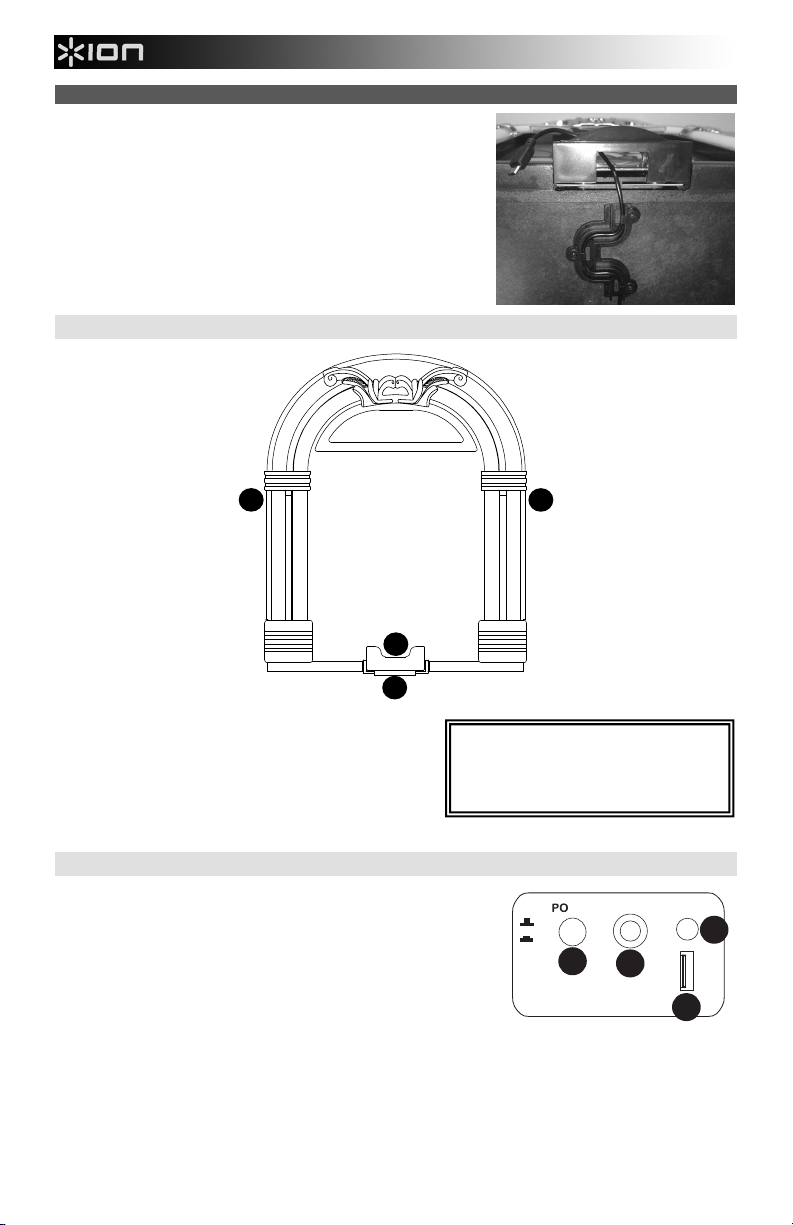
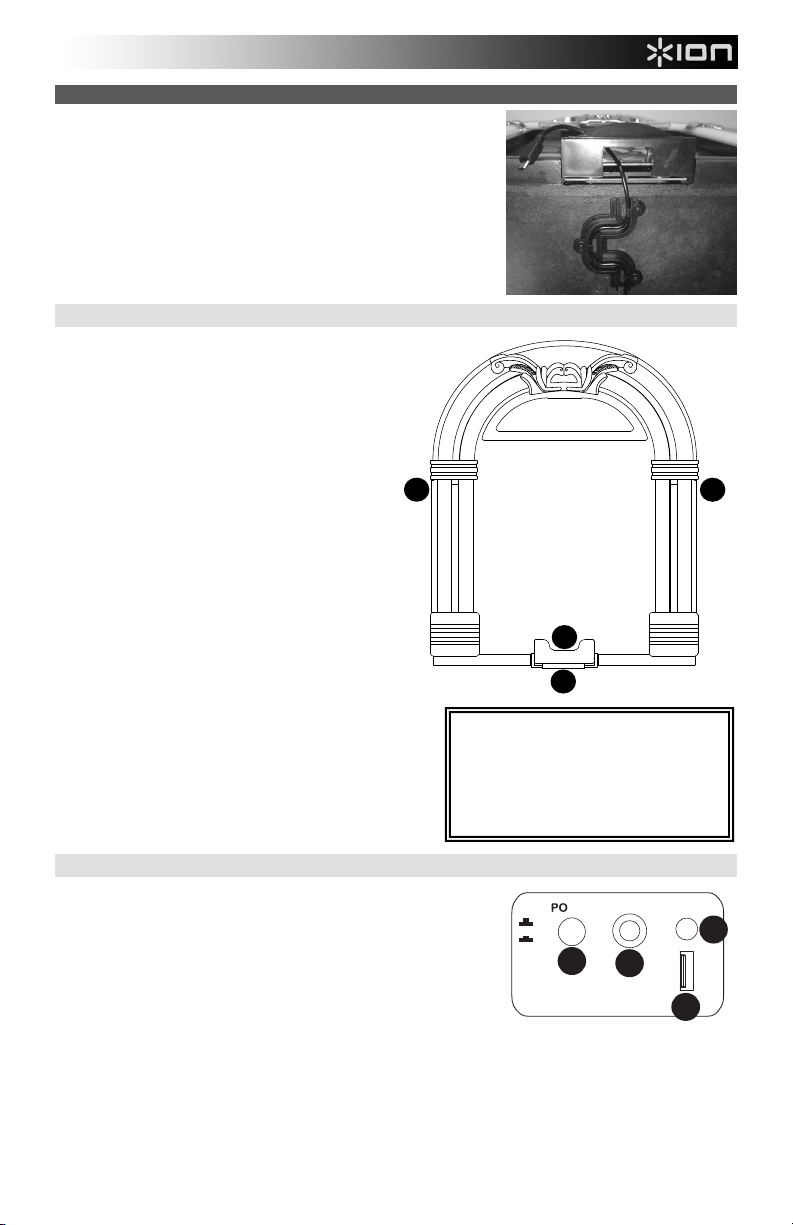
Routing Your Charging Cable
2
3
3
1
1
2
3
4
On the bottom of Jukebox Bluetooth, route your charge cable through
the cable channel clips to the pass-through slot.
Front Panel
1. CRADLE RELEASE* – When this lever is pressed down,
the music device will lean forward, allowing you to easily
grasp and pull up the music device, removing it from the
cradle.
2. CRADLE – To rest your music device on Jukebox
Bluetooth, place it into the device holder.
3. SPEAKERS – Plays back the audio from your music
device. Select from your music library or favorite jukebox app (works with most jukebox apps)
Rear Panel
1. POWER INPUT – Use the included power adapter (12V DC, 3A,
center pin-positive) to connect Jukebox Bluetooth to wall power.
2. LINE IN – This stereo 1/8” line-level input can be used to connect a
CD player, MP3 player, or other audio source. To adjust the volume of
the audio signal, adjust the output volume of your audio source.
3. POWER – Press this button to turn Jukebox Bluetooth on or off.
4. USB CHARGER – Connect a USB cable here to charge your USB
devices, such as MP3 players, smartphones, etc.
4
*Note: To ensure safe removal of your
music device, gently press the CRADLE
RELEASE down and securely grasp the
music device when it leans forward from
the cradle.
DC 12V
OFF
ON
WER
LINE IN
Page 5
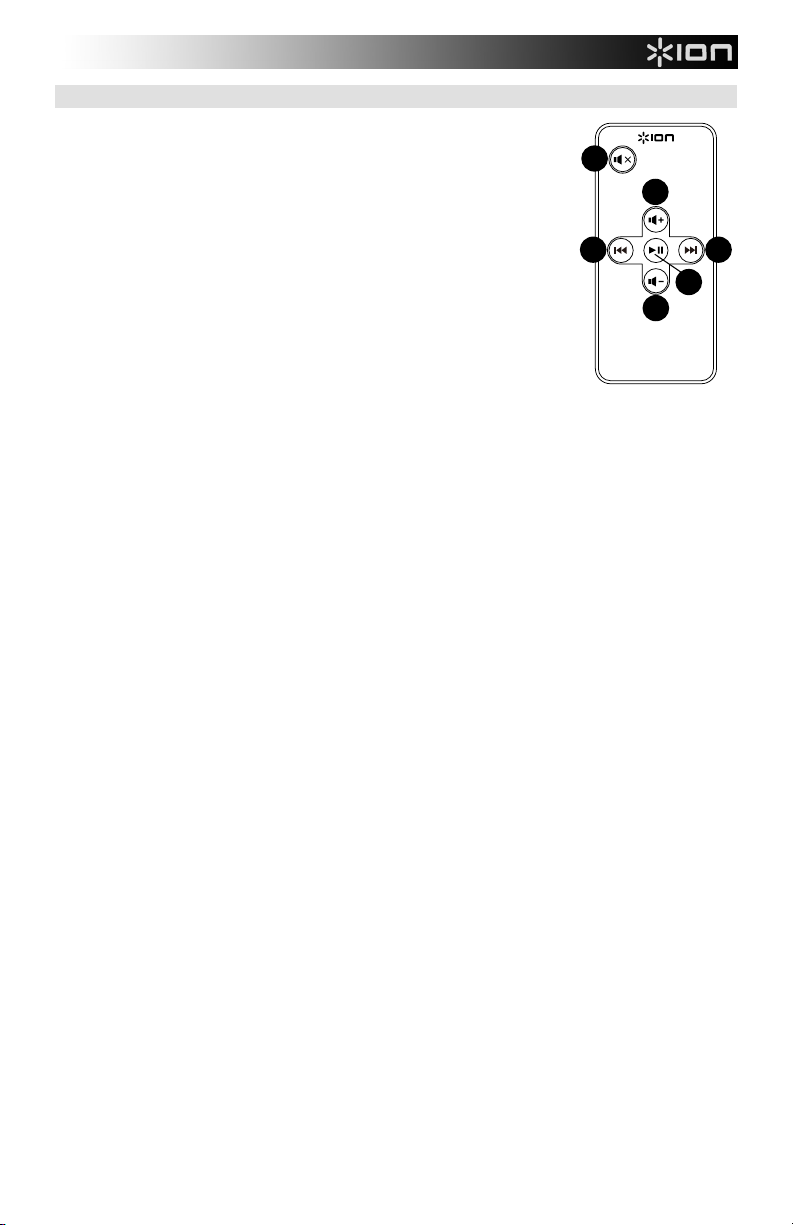
Remote
2
3
5
6
1
4
1.
Mute
2. Previous Track
3. Next Track
4. Play/Pause
5. Volume Up
6. Volume Down
Note: Room lighting and battery life can affect the operating range of the remote
control.
Note: In order to use the remote control for the first time, first pull out the tab attached
to the battery compartment.
To change the remote battery, follow the diagram located on the back of the remote.
Use a 3V DC CR2025 lithium button cell battery for replacement.
5
Page 6
Guía de Inicio Rápido (Español)
1
2
+
3
+
Contenido de la Caja
• Jukebox Bluetooth
• Adaptador de alimentación
• Remoto
• Guía de inicio rápido
• Folleto de información sobre la seguridad y la garantía
Registro
Visite ionaudio.com para registrar su Jukebox Bluetooth. El registro de su producto asegura que podamos
mantenerle actualizado con los nuevos desarrollos de productos y brindarle apoyo técnico de categoría mundial en
caso de que tenga algún problema.
Cómo Usar el Jukebox Bluetooth con su Dispositivo
Instrucciones de Instalación
Prepárese para volver a las épocas doradas y
reproduzca esos temas fantásticos usando su
aplicación musical favorita en su dispositivo
con el Jukebox Bluetooth.
1. Conecte su dispositivo a Bluetooth de
Jukebox Bluetooth. Como alternativa,
conecte un dispositivo de medios, como
un reproductor de CD, smartphone o
reproductor MP3 a la entrada de línea de
1/8” LINE IN del Jukebox Bluetooth. El
conector hembra LINE IN (Entrada de
línea) se encuentra en el panel trasero.
Nota: Se recomienda usar el conector
LINE IN sólo si no está conectado un
dispositivo Bluetooth.
2. En su dispositivo, abra su biblioteca
musical o su aplicación de rocola favorita
para reproducir un tema. Ajuste el
volumen de salida desde su dispositivo y
usando el control de volumen del control
remoto de Jukebox Bluetooth según sea
necesario.
3. Para liberar el dispositivo de la base,
sostenga el dispositivo, presione la
palanca Base (Liberación) y extráigalo
con cuidado.
CÓMO APAREAR UN DISPOSITIVO BLUETOOTH
1. Encienda su dispositivo Bluetooth.
2. Encienda el Jukebox Bluetooth, que pasará automáticamente al modo de apareamiento para buscar dispositivos
Bluetooth.
3. Navegue a la pantalla de configuración de su dispositivo Bluetooth, busque Jukebox BT” y conecte.
Nota: Si su dispositivo Bluetooth solicita un código de apareamiento, ingrese ‘0000’.
Nota: Si tiene problemas para aparear su dispositivo o reproducir música, actualice el programa operativo de su
dispositivo.
4. Para conectarse a otro dispositivo Bluetooth, navegue a la pantalla de configuración de su dispositivo Bluetooth
conectado en ese momento, busque “Jukebox BT” y deshaga el apareamiento (el proceso varía ligeramente
según el dispositivo —consulte los detalles en el manual de su dispositivo Bluetooth). Repita el paso 3.
6
Page 7
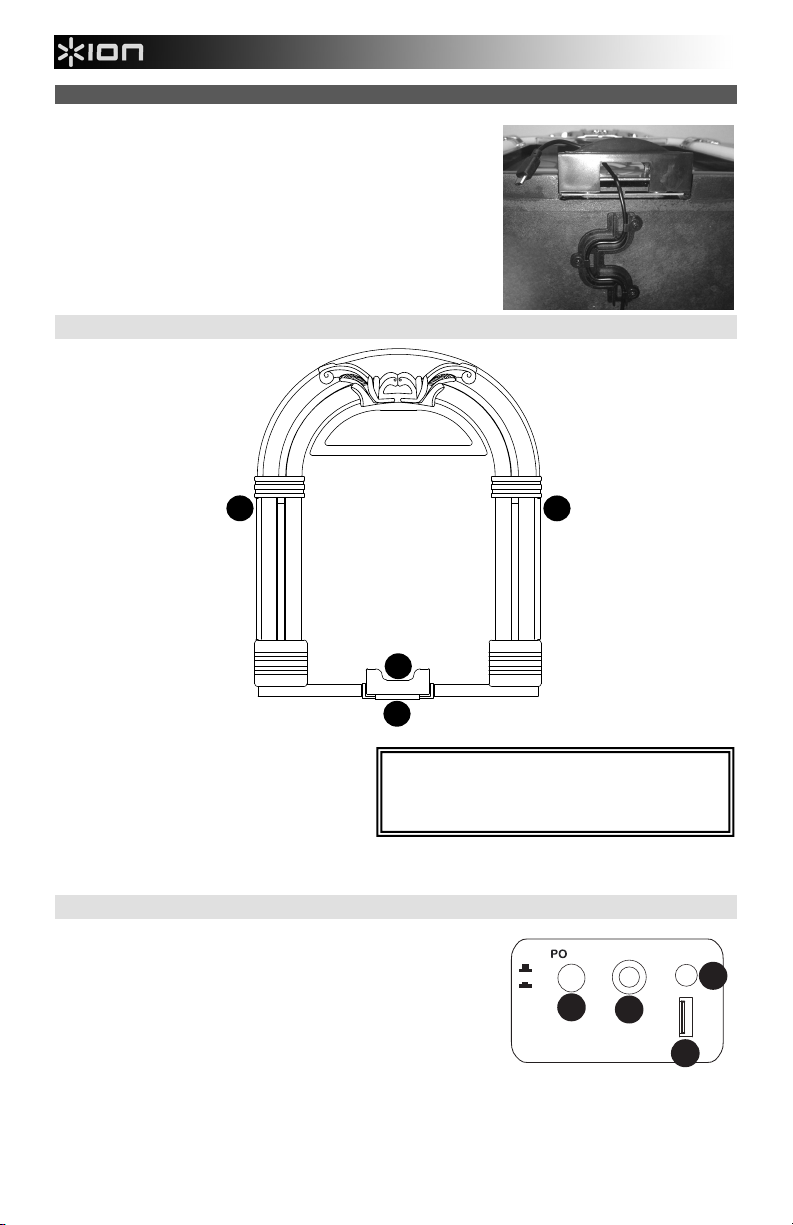
Cómo encaminar su cable de carga
2
3
3
1
1
2
3
4
En la parte inferior de Jukebox Bluetooth, encamine su cable de
carga a través de los clips del canal de cable hacia la ranura
pasante.
Panel Frontal
1. PALANCA DE LIBERACIÓN DE LA BASE DE
ACOPLAMIENTO* – Cuando se presiona esta
palanca hacia abajo, el dispositivo musical se
inclina hacia adelante, permitiéndole tomarlo
firmemente y tirar de él hacia arriba, para
extraerlo de la base.
2. BASE DE ACOPLAMIENTO – Para apoyar su
dispositivo musical en Jukebox Bluetooth,
colóquelo en el soporte para dispositivos.
3. ALTAVOCES – Reproducen el audio de su
dispositivo musical. Seleccione el tema en su
biblioteca musical o su aplicación de rocola
favorita (funciona con la mayoría de las
aplicaciones de rocola).
Panel Trasero
1. ALIMENTACIÓN ENTRADA – Use el adaptador de alimentación
incluido (12 V CC, 3 A, pin central positivo) para conectar el Jukebox
Bluetooth al tomacorriente de pared.
2. ENTRADA DE LÍNEA – Esta entrada de nivel de línea de 1/8" estéreo
se puede usar para conectar un reproductor de CD, MP3 u otra fuente
de audio. Para ajustar el volumen de la señal de audio, ajuste el
volumen de la salida de su fuente de audio.
3. ENCENDIDO – Pulse este botón para encender y apagar el Jukebox
Bluetooth.
4. USB CHARGER – Connect a USB cable here to charge your USB devices, such as MP3 players, smartphones,
etc.
7
*Nota: Para asegurar la extracción segura
de su dispositivo musical, presione
suavemente la palanca BASE RELEASE
hacia abajo y tome firmemente el
dispositivo musical cuando se incline
hacia adelante en la base de
acoplamiento.
OFF
ON
DC 12V
WER
LINE IN
Page 8

Control Remoto
2
3
5
6
1
4
1. Silencio
2. Pista anterior
3. Pista siguiente
4. Reproducir/Pausa
5. Subir volumen
6. Bajar volumen
Nota: La iluminación de la sala y la vida útil de la pila pueden afectar al alcance
operacional del control remoto.
Nota: A fin de usar el control remoto por primera vez, extraiga primero la
lengüeta fijada al compartimiento de las pilas.
8
Page 9

Guide d’utilisation Simplifié (Français)
1
2
+
3
+
Contenu de la Boîte
• Jukebox Bluetooth
• Câble d’alimentation
• Telecommande
• Guide d’utilisation simplifié
• Livret des consignes de sécurité et d’informations concernant la garantie
Enregistrement du Produit
Veuillez visiter le site internet ionaudio.com pour enregistrer votre Jukebox Bluetooth. L'enregistrement des produits
vous permet d'être informé sur les toutes dernières nouveautés concernant les produits et de vous offrir un soutien
technique de qualité, si vous en aviez besoin.
Utilisation du Jukebox Bluetooth Avec Votre Périphérique
Installation
Préparez-vous à voyager dans le temps et à
faire jouer votre musique à l'aide de votre
application préférée sur votre périphérique
avec le Bluetooth Jukebox.
1. Branchez votre Bluetooth périphérique à
Jukebox Bluetooth. Vous pourriez
également brancher un périphérique
multimédia tel qu'un lecteur de CD,
smartphone ou lecteur MP3 à l’entrée ⅛
po du Jukebox Bluetooth. L'entrée LINE
IN se trouve sur le panneau arrière.
Remarque : L’utilisation de l’entrée
LINE-IN est recommandée uniquement
lorsqu’aucun appareil Bluetooth n'est
connecté.
2. Sur votre appareil, ouvrez votre
bibliothèque de musique ou votre
application jukebox préférée afin de
lancer la lecture d’une chanson. Réglez
le volume de sortie de votre appareil, et
à l'aide de la commande de volume sur
la télécommande du Jukebox Bluetooth,
au besoin.
3. Pour éjecter le périphérique, tenir
l'appareil, appuyez sur station et retirez
délicatement le périphérique de la
station d’accueil.
Jumelage d'un Périphérique Bluetooth
1. Mettez votre périphérique Bluetooth sous tension.
2. Mettez le Jukebox Bluetooth sous tension et il passera automatiquement en mode jumelage afin de
rechercher les périphériques Bluetooth.
3. Accédez à l'écran de configuration de votre périphérique Bluetooth, recherchez «Jukebox BT» et
lancez le jumelage.
Remarque : Si votre périphérique Bluetooth vous demande d’entrer un code de jumelage, entrez «
0000 ».
Remarque : Si vous éprouvez de la difficulté à jumeler votre appareil ou à faire jouer de la musique,
faites une mise à jour du système d'exploitation de votre appareil.
4. Pour vous connecter à un autre appareil Bluetooth, accédez à l'écran de configuration de votre appareil
Bluetooth connecté, trouvez « Jukebox BT » et désactivez le jumelage (le processus varie légèrement
selon l’appareil utilisé, veuillez consulter le manuel de votre appareil Bluetooth pour plus de détails).
Répétez l'étape 3.
9
Page 10

Acheminement du câble de rechargement
2
3
3
1
1
2
3
4
Sur le dessous du Jukebox Bluetooth, guidez le câble de
rechargement dans les clips du passage de câble.
Panneau Avant
1. STATION RELEASE* – Lorsque ce levier est enfoncé
vers le bas, le périphérique musique se pencher vers
l'avant, ce qui vous permet de le saisir facilement et de le
retirer de la station.
2. STATION D’ACCUEIL – Pour déposer votre appareil sur
le Jukebox Bluetooth, placez-le dans le support.
3. HAUT-PARLEURS – Ils permettent de faire jouer le
signal audio provenant de votre périphérique musique.
Sélectionnez votre bibliothèque de musique musiqueou votre application de musique préférée (fonctionne avec
la plupart des applications jukebox).
Panneau Arrière
1. ENTRÉE D'ALIMENTATION – Utilisez le câble d’alimentation inclus
(12 V CC, 3 A, polarité positive au centre) pour brancher le Jukebox
Bluetooth dans une prise secteur.
2. ENTRÉES LIGNE – Cette entrée ⅛ po stéréo permet de brancher un
lecteur de disques compacts, un lecteur MP3 ou autres sources audio.
Pour régler le volume du signal audio, ajustez le niveau du volume de
la source audio (périphérique).
3. ALIMENTATION – Cette touche permet de mettre le Jukebox
Bluetooth en marche ou à l’arrêt.
4. USB RECHARGE: Branchez le câble de rechargement de votre périphérique à cette prise pour le recharger. Le
rechargement de la pile par la connexion USB fonctionne uniquement lorsque l’appareil est allumé.
10
*Remarque : Afin d'éjecter votre
périphérique musique de manière
sécuritaire, appuyez doucement sur le
levier STATION RELEASE et saisissez
fermement le périphérique lorsqu'il penche
vers l'avant sur la station.
DC 12V
WER
OFF
ON
LINE IN
Page 11

Telecommande
2
3
5
6
1
4
1. Sourdine
2. Piste précédente
3. Piste suivante
4. Lecture/Pause
5. Volume +
6. Volume -
Remarque : L’éclairage de la pièce et la charge de la pile peuvent affecter la
plage de fonctionnement de la télécommande.
Remarque : Avant d’utiliser la télécommande pour la première fois, retirez la
languette du compartiment à pile.
11
Page 12

Guida Rapida (Italiano)
1
2
+
3
+
Contenuti della Confezione
• Jukebox Bluetooth
• Adattatore di alimentazione
• Telecomande
• Guida rapida
• Libretto di istruzioni di sicurezza e garanzia
Registrazione
Recarsi alla pagina ionaudio.com per registrare il Jukebox Bluetooth. La registrazione del prodotto ci consente di
tenervi aggiornati con tutti gli ultimissimi sviluppi del prodotto e di offrirvi assistenza tecnica di livello mondiale, in caso
di eventuali problemi.
Utilizzo del Jukebox Bluetooth con un Dispositivo
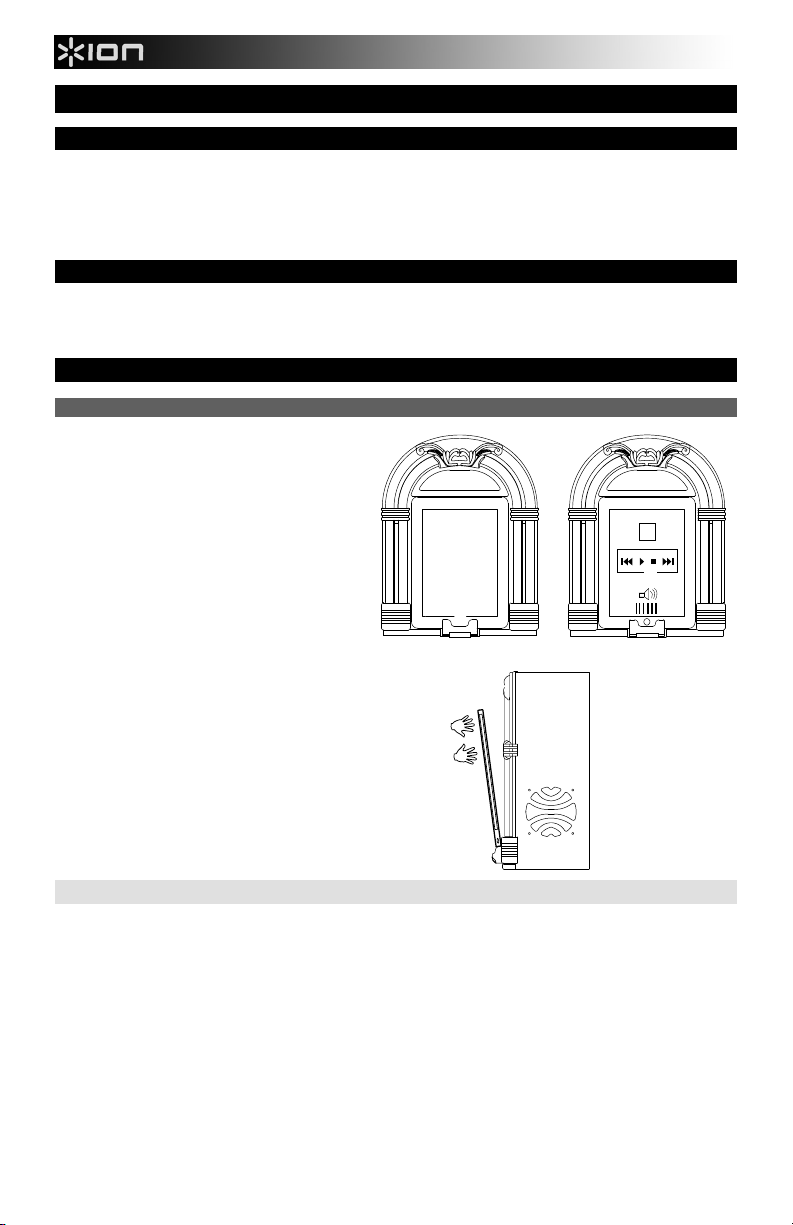
Istruzioni per la Configurazione
Preparatevi a tornare ai tempi d'oro e a
suonare fantastici motivi grazie al vostro app
musicale preferito sul vostro dispositivo con il
Jukebox Bluetooth.
1. Collegate il vostro dispositivo Bluetooth
al Jukebox Bluetooth. Alternativamente,
collegate un dispositivo multimediale
quale un lettore CD, smartphone o un
lettore MP3 all'INGRESSO DI LINEA da
1/8” del Jukebox Bluetooth. Il jack di
ingresso LINE IN si trova a livello del
pannello posteriore.
Nota bene: si consiglia l'utilizzo
dell'ingresso LINE IN unicamente
quando un dispositivo Bluetooth non è
collegato.
2. Sul dispositivo, lanciare la libreria
musicale o l'app da jukebox preferita per
riprodurre una canzone. Regolare il
volume di uscita del dispositivo
servendosi del comando di regolazione
del volume del telecomando del Jukebox
Bluetooth come desiderato.
3. Per scollegare il dispositivo dal cradle,
reggere il dispositivo, premere il cradle e
rimuovere delicatamente il dispositivo
dal cradle.
ACCOPPIAMENTO DI UN DISPOSITIVO BLUETOOTH
1. Accendere il dispositivo Bluetooth.
2. Accendere il Jukebox Bluetooth: entrerà automaticamente in modalità di accoppiamento per cercare
dispositivi Bluetooth.
3. Navigare nella schermata di configurazione del dispositivo Bluetooth, trovare “Jukebox BT” e
collegarlo.
Nota bene: se il dispositivo Bluetooth richiede un codice, inserire ‘0000’.
Nota bene: in caso di problemi nell'accoppiare gli apparecchi o nel riprodurre la musica, aggiornare il
sistema operativo del dispositivo.
4. Per collegare un altro dispositivo Bluetooth, navigare fino alla schermata di configurazione del
dispositivo Bluetooth attualmente collegato, trovare “Jukebox BT” e scollegarlo (il procedimento varia
leggermente da dispositivo a dispositivo; consultare il manuale per l'uso del proprio dispositivo
Bluetooth per maggiori dettagli). Ripetere la fase 3.
12
Page 13

Come convogliare il cavo di carica
2
3
3
1
1
2
3
4
Sul fondo del Jukebox Bluetooth, convogliare il cavo di ricarica
attraverso le clip del canale del cavo alla slot di passaggio.
Pannello Anteriore
1. CRADLE RELEASE* – Quando viene premuta questa
leva, il dispositivo musicale si inclina in avanti,
consentendo di afferrare e sollevare facilmente il
dispositivo musicale, rimuovendolo dal cradle.
2. CRADLE – Per collegare il dispositivo musicale sul
Jukebox Bluetooth, collocarlo nel porta dispositivo.
3. CASSE – Riproducono l'audio del dispositivo musicale.
Selezionatelo dalla vostra libreria musicale o dalla vostra app jukebox preferita (funziona con la maggior parte
delle app jukebox).
*Nota bene: per garantire la rimozione
sicura del dispositivo musicale, premere
delicatamente il CRADLE RELEASE e
afferrare saldamente il dispositivo
musicale quando pende dal cradle.
Pannello Posteriore
1. ALIMENTAZIONE – Servirsi dell'adattatore di alimentazione in dotazione
(12V DC, 3A, polo centrale positivo) per collegare il Jukebox Bluetooth
all'alimentazione a parete.
2. LINE IN – Questo ingresso stereo da 1/8" può essere utilizzato per collegare
un lettore CD, un lettore MP3 o altre sorgenti audio. Per regolare il volume
del segnale audio, regolare il volume di uscita della fonte audio.
3. ALIMENTAZIONE INGRESSO – Premere questo tasto per accendere o
spegnere il Jukebox Bluetooth.
4. USB CARICA – collegare a questo livello il cavo di ricarica del dispositivo per ricaricarlo. La carica tramite USB
funziona unicamente quando l'apparecchio è acceso.
13
OFF
ON
WER
DC 12V
LINE IN
Page 14

Telecomando
2
3
5
6
1
4
1. Muto
2. Traccia precedente
3. Traccia successiva
4. Play / Pausa
5. Volume su
6. Volume giù
Nota bene: l'illuminazione della stanza e la durata della batteria possono
influenzare la portata operativa del telecomando.
Nota bene: per utilizzare il telecomando la prima volta, estrarre la linguetta
fissata allo scomparto batterie.
14
Page 15

Schnellstart-Anleitung (Deutsch)
1
2
+
3
+
Lieferumfang
• Jukebox Bluetooth
• Netzteil
• Fernbedienung
• Schnellstart-Anleitung
• Sicherheitshinweise und Garantieinformationen
Registrierung
Bitte besuchen Sie ionaudio.com, um Ihr Jukebox Bluetooth zu registrieren. Wenn Sie Ihr Produkt registrieren,
sorgen wir dafür, dass Sie immer am neuesten Stand aller Produktentwicklungen sind. Außerdem bieten wir Ihnen
erstklassige technische Unterstützung an, sollten Sie auf Probleme stoßen.
So Verwenden sie das Jukebox Bluetooth mit Ihrem Gerät
Setup-Anweisungen
Machen Sie sich bereit, in die gute alte Zeit
zurückzureisen und mit dem Jukebox Bluetooth
groovige Songs mit Ihrer Lieblings-App auf
Ihrem Gerät zu spielen.
1. Verbinden Sie Ihr Bluetooth- mit Jukebox
Bluetooth. Wahlweise können auch
Medien-Geräte wie CD-Player,
smartphone oder MP3-Player mit dem
1/8"-LINE-Eingang des Jukebox
Bluetooth verbunden werden. Die LINE
IN-Buchse befindet sich auf der
Rückseite.
Hinweis: Wir empfehlen LINE IN nur
dann zu verwenden, wenn kein
Bluetooth-Gerät angeschlossen wurde.
2. Öffnen Sie Ihre Musik-Bibliothek oder
Ihre bevorzugte Jukebox App auf Ihrem
Gerät, um einen Song zu spielen. Bei
Bedarf stellen Sie die Lautstärke über Ihr
Gerät und über die Lautstärkeregler auf
der Jukebox Bluetooth Fernbedienung
ein.
3. Um das Gerät aus dem station zu
entfernen, halten Sie das Gerät, drücken
die ENTRIEGELUNGSTASTE und
nehmen das Gerät vorsichtig aus der
station.
Koppeln Eines Bluetooth-Geräts
1. Schalten Sie Ihr Bluetooth-Gerät ein.
2. Schalten Sie Jukebox Bluetooth ein und das Gerät wird automatisch in den Koppel-Modus schalten,
um nach Bluetooth-Geräten zu suchen.
3. Navigieren Sie zum Setup-Bildschirm Ihres Bluetooth-Geräts, suchen Sie "Jukebox BT" und verbinden
Sie die Geräte.
Hinweis: Wenn Ihr Bluetooth-Gerät die Eingabe eines Koppel-Codes anfordert, geben Sie '0000' ein.
Hinweis: Wenn Sie Probleme bei der Musikwiedergabe oder beim Koppeln Ihres Gerätes haben,
aktualisieren Sie das OS Ihres Gerätes.
4. Um eine Verbindung mit einem anderen Bluetooth-Gerät herzustellen, navigieren Sie auf Ihrem aktuell
angeschlossenen Bluetooth-Gerät zum Bildschirm Einstellungen, gehen auf "Jukebox BT" und
entkoppeln das Gerät (die einzelne Schritte variieren nach Gerät - lesen Sie das Handbuch Ihres
Bluetooth-Geräts für weitere Details). Wiederholen Sie Schritt 3.
15
Page 16
Verlegen Ihres Ladekabels
2
3
3
1
1
2
3
4
Führen Sie Ihr Ladekabel auf der Unterseite der Jukebox Bluetooth
durch den Kabelkanal zur Kabeldurchführung.
Vorderseite
1. ENTRIEGELUNGSTASTE* – Wenn diese
Taste gedrückt wird, wird das Musik-Gerät
nach vorne gekippt, so dass Sie es leicht aus
dem station herausnehmen können.
2. STATION – Wenn Sie Ihr Musikgerät auf der
Jukebox Bluetooth platzieren möchten, legen
Sie es in den Gerätehalter.
3. LAUTSPRECHER – Geben die Audiosignale Ihres Musik-Geräts wieder. Wählen Sie aus Ihrer Musik
Bibliothek oder bevorzugten Jukebox-App (funktioniert mit den meisten Jukebox-Apps).
*Hinweis: Drücken Sie die ENTRIEGELUNGSTASTE
vorsichtig herunter und achten Sie darauf, dass Sie
das Musik Gerät gut festhalten, wenn es nach vorne
aus dem station gekippt wird.
Rückseite
1. STROM INGANG – Verwenden Sie das mitgelieferte Netzteil (12V
DC, 3A, mittlerer Pin mit positiver Polarität), um das Jukebox
Bluetooth an eine Steckdose anzuschließen.
2. LINE-EINGANG – Dieser 1/8”-Line-Level-Eingang (Stereo) kann dazu
verwendet werden, einen CD-Player, MP3-Player oder eine andere
Audioquelle anzuschließen. Um die Lautstärke des Audiosignals
einzustellen, passen Sie die Lautstärke der Audioquelle an.
3. EIN-/AUS – Drücken dieses Schalters schaltet Jukebox Bluetooth ein
oder aus.
4. USB BUCHSE – Schließen Sie das Ladekabel Ihres Geräts hier an, um es aufzuladen. Das Laden via USB
funktioniert nur, wenn das Gerät eingeschaltet ist.
OFF
ON
16
WER
DC 12V
LINE IN
Page 17

Fernbedienung
2
3
5
6
1
4
1. Stumm
2. Vorheriger Titel
3. Nächster Titel
4. Wiedergabe/Pause
5. Lautstärke erhöhen
6. Lautstärke verringern
Hinweis: Die Zimmerbeleuchtung und die Lebensdauer der Batterie kann die
Reichweite der Fernbedienung beeinträchtigen.
Hinweis: Um die Fernbedienung zum ersten Mal zu verwenden, ziehen Sie den
Streifen aus dem Batteriefach heraus.
17
Page 18

Snelstartgids (Nederlands)
1
2
+
3
+
Inhoud van de Doos
• Jukebox Bluetooth
• Stroomadapter
• Afstandsbediening
• Snelstartgids
• Informatieboekje over Veiligheid en Garantie
Registratie
Surf naar ionaudio.com om uw Jukebox Bluetooth te registreren. Als u uw product registreert, wordt u op de hoogte
gehouden van alle nieuwe producten en kunt u rekenen op hoogstaande technische productondersteuning, indien u
ooit een probleem mocht ondervinden.
Jukebox Bluetooth Gebruiken met uw Apparaat
Installatie-Instructies
Keer terug naar de hoogtijdagen van de
muziek en gebruik de favoriete muziek-app van
je apparaat om hippe songs af te spelen op de
Jukebox Bluetooth.
1. Sluit je Bluetooth-apparaat aan op
Jukebox Bluetooth. Het is ook mogelijk
om een media-apparaat, zoals een cdspeler, smartphone of MP3-speler te
sluiten op de 1/8"-lijningang van Jukebox
Bluetooth. De lijningang bevindt zich aan
de achterkant.
Opmerking: Het is enkel aanbevolen de
LIJNINGANG te gebruiken als er geen
Bluetooth-apparaat is aangesloten.
2. Start uw muziekbibliotheek op uw
apparaat of start uw favoriete jukeboxapp om een nummer af te spelen. Regel
het uitgangsvolume vanaf uw apparaat
en indien nodig met behulp van de
volumeknop op de Jukebox Bluetoothafstandsbediening.
3. Om het apparaat uit het houder te halen:
houd het apparaat vast, druk op houder
en verwijder voorzichtig het apparaat uit
het houder.
EEN BLUETOOTH-APPARAAT KOPPELEN
1. Zet uw Bluetooth-apparaat aan.
2. Bij het aanzetten van Jukebox Bluetooth zet het zich automatisch in koppelmodus, om te zoeken naar
Bluetooth-apparaten.
3. Navigeer naar het instelscherm van uw Bluetooth-apparaat, zoek naar "Jukebox BT" en maak
verbinding.
Opmerking: Als uw Bluetooth-apparaat om een koppelingscode verzoekt, voer dan '0000' in.
Opmerking: Als u problemen ondervindt bij het koppelen van uw apparaat of het afspelen van muziek,
update dan het besturingssysteem van uw apparaat.
4. Om verbinding te maken met een ander Bluetooth-apparaat, navigeert u naar het instellingenscherm
van het Bluetooth-apparaat dat momenteel verbonden is, zoekt u naar 'Jukebox BT' en ontkoppelt u
(het proces varieert van apparaat tot apparaat: raadpleeg de handleiding van uw Bluetooth-apparaat
voor details). Herhaal stap 3.
Uw oplaadkabel geleiden
18
Page 19

Uw oplaadkabel geleiden
2
3
3
1
1
2
3
4
Geleid onderaan de Jukebox bluetooth uw oplaadkabel door de clips
van het kabelkanaal naar de doorsteekopening.
Voorpaneel
1. HOUDER VRIJGEVEN*: wanneer deze hendel wordt
ingedrukt, zal het muziek -apparaat overhellen, zodat u het
gemakkelijk kan vastnemen en naar boven trekken, om het
uit het houder te verwijderen.
2. HOUDER: Om uw muziekapparaat op de Jukebox
Bluetooth te laten rusten, plaatst u het in de
apparaathouder.
3. LUIDSPREKERS: speelt de audio van uw muziek -
apparaat af. Kies audio uit uw muziek -bibliotheek of uw favoriete jukebox-app (werkt met de meeste jukeboxapps).
*Opmerking: Voor een veilige verwijdering
van uw muziek -apparaat: druk voorzichtig
de knop HOUDER VRIJGEVEN naar
beneden en neem het muziek -apparaat
stevig vast wanneer het naar voren uit het
houder overhelt.
Achterpaneel
1. INGANG STROOM: gebruik de meegeleverde stroomadapter (12 V DC,
3 A, middelste pin is positief) om de Jukebox Bluetooth aan te sluiten op
het stroomnet.
2. LIJNINGANG: Deze stereo 1/8"-ingang kan worden gebruikt om een cd-
speler, mp3-speler of andere geluidsbron te verbinden. Om het volume
van het audiosignaal aan te passen, past u het uitgangsvolume van uw
audiobron aan.
3. AAN/UIT: druk op deze knop om Jukebox Bluetooth aan of uit te zetten.
4. OPLADEN USB: Sluit hier de oplaadkabel van uw apparaat aan om het op te laden. Opladen met USB werkt
alleen als het apparaat is ingeschakeld.
OFF
ON
19
WER
DC 12V
LINE IN
Page 20

Afstandsbediening
2
3
5
6
1
4
1. Dempen
2. Vorig nummer
3. Volgend nummer
4. Afspelen/pauzeren
5. Volume omhoog
6. Volume omlaag
Opmerking: De verlichting in de kamer en de levensduur van de batterij kunnen
het werkingsbereik van de afstandsbediening beïnvloeden.
Opmerking: Om de afstandsbediening voor de eerste keer te gebruiken, moet u
het lipje uit het batterijcompartiment trekken.
20
Page 21

Specifications
Speaker Output: 5W + 5W (1 KHz, 0 dB input signal)
Power: 12V DC, 3A, center pin-positive
Remote Control: 1x 3V DC CR2025 button cell battery
Note: Room lighting and battery life can affect the operating range of the remote control.
Trademarks and Licenses
iPad, iPhone, iPod touch, and iPod nano are trademarks or service marks of Apple Inc., registered in the
U.S. and other countries.
The Bluetooth word mark and logos are owned by the Bluetooth SIG, Inc. and any use of such marks by ION
Audio is under license.
All other product or company names are trademarks or registered trademarks of their respective owners.
21
Page 22

Page 23

Page 24

ionaudio.com
Manual Version 1.0
 Loading...