

Page 1

USB Tur ntable
(iTTUSB)
Quick Start Owner’s Manual
Kurzbedienungsanleitung(DEUTSCH)
Box Contents
Inhalt der Verpackung
Page 2
(ENGLISH) QUICK S TA RT GUIDE
o
Make sure all items listed on the front of this guide are included in the
box.
o
READ SA FETY IN STRUCTI ON BOOKL ET BEFOR E USING THE
PRODUCT
o
Go to http://www.ion-audio.com for product registration.
GENERAL C ONTROLS
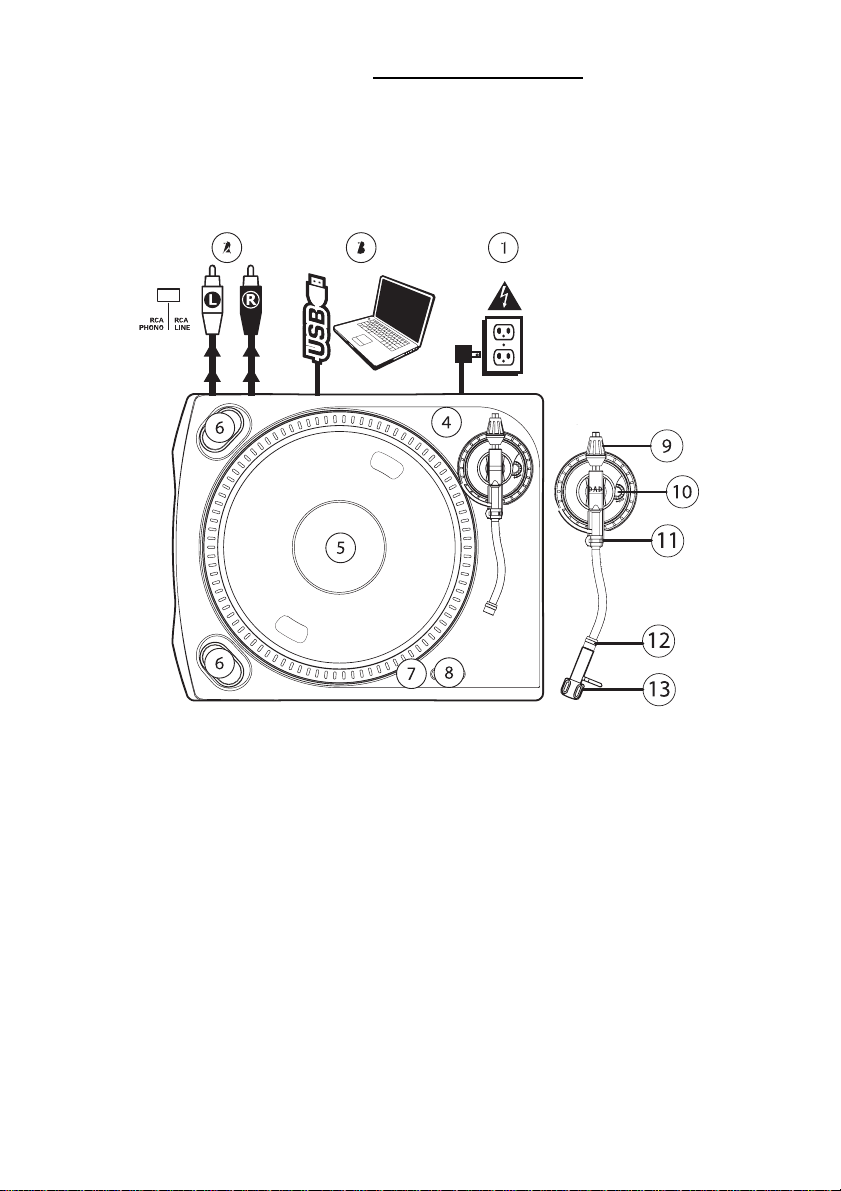
1.
Power Ca b le: This power cable should be plugged into a wall
receptac le AFT ER al l aud io co nnect i o ns are ma de .
2.
RCA Audio Output Cables: These cables should be plugged into a
CD or Auxiliary input on your computer.
IMPORTANT: There is a switch on the bottom panel, next to the RCA
cables that selects between PHONO/LINE. Use PHONO level for
plugging into a turntable input on a home stereo. Use the LINE level
for plugging into CD/AUX/TAPE inputs. WARNING: You may
damage your receiver if you plug in a LINE level into a PHONO
input.
3.
USB Audio Ou t put: Use the included USB Cable to connect your
turntable to your computer. Refer to the software instruction guide
before plugging in your turntable.
4.
Power Button: This ring around the power button illuminates red
when the turntable is switched on.
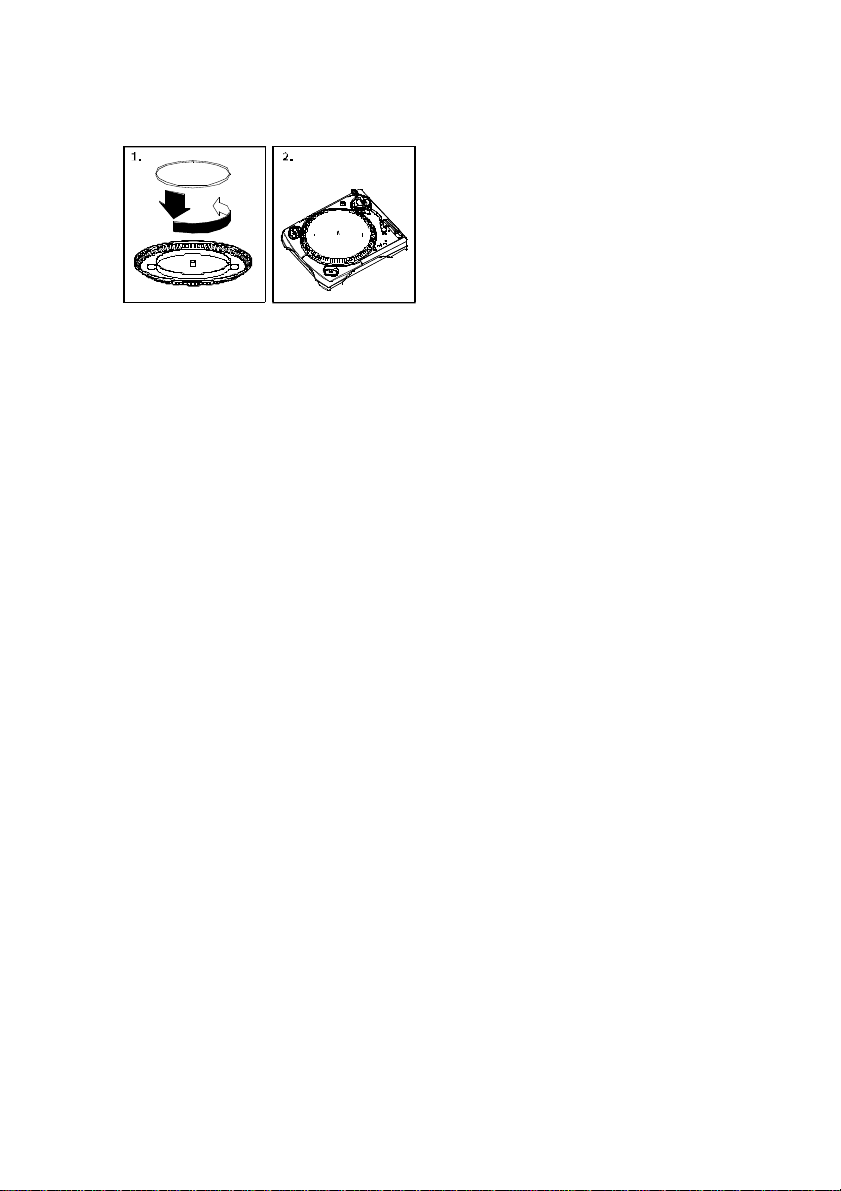
5.
Platter: This platter must be securely fastened to the turntable prior
to operation. The Motor Drive Belt can be found on the drive ring
Page 3

underneath the platter. See SETUP INSTRUCTIONS for detailed
information on installing the Motor Drive Belt.
6.
Start/Stop But tons: These buttons start and stop the turntable
motor. Both buttons have the same function. If they seem to not be
functioning, check to make sure that the Motor Drive Belt is properly
installed in the SETUP INSTRUCTIONS.
7.
1/8” St ereo Line Input: Conne ct Tape Pl ayer s, Reel to Ree l, or any
other audio source here. This signal is sent to the computer through
the USB. Make sure that your phono cartridge is installed while
using this input for maximum sound quality. Also make sure
that your RCA jacks are either plugged into an input device or not in
contact with metal.
Note: The 1/8" audio input is not routed to the turntable's RCA
output jacks, only to your computer via USB.
8.
33 and 45 RPM Buttons: These buttons control the RPM of the
turntable platter. A red LED indicates which RPM mode has been
selected.
NOTE: If the turntable is powered down while in the 45 RPM setting,
it will return to 33 RPM when it is powered up.
Note: You can record your 78RPM records by recording them at 33 or
45rpm, then changing them to 78 in the Audacity software.
9.
Pitch LED: This LED illuminates green when the pitch slider is set at
0%. When the pitch slider is moved away from zero, the LED
illuminates red.
10.
Pitch Slider: This slide co nt r ol all o ws t he pit c h t o be in cr ea se d or
decreased by 10%. In the center position the pitch is at 0%. When
moved away from the center and towards the tone arm decreases the
pitch (slows down the platter) and moving the pitch slider away from
the tone arm increase the pitch (speeds up the platter.)
TONE AR M: Items 11 – 15 are all parts of the tonearm. Refer to the
TONEARM SETUP section for additional details on these controls. Your
model will be equipp ed with straight arm or S-arm style depend ing
upon model purchased.
11.
Counter Weight and Sca le Ring: The Counterweight is used to
balance the head shell and cartridge assembly so that the proper
amount of stylus pressure is applied to the record.
12.
Anti-Skate Adjustment: This knob is used to compensate for inward
tracking forces. See TONEARM SETUP for more details.
13.
Arm Clip: This specially designed arm clip secures the tone arm while
at rest or when not in use. The arm clip has been designed to remain
in the up positio n while unlo cke d .
NOTE: When transporting the turntable, it is alw ays recommended
that the headshell be removed and the arm clip secured to prevent
tonearm or turntable damage.
14.
Tone Ar m Lock Nut: T h is Al uminum nut is used to secure the he ad
shell and cartridge assembly to the tone arm tube. See Cartridge
Setup for more details.
15.
Cartridge and Headshell: The cartridge is pre-mounted on a
standard headshell. The cartridge is user replaceable and compatible
Page 4
with a variety of standard cartridges. Be sure to remove the clear
plastic cover before operating the turntable from the cartridge.
PLATTER SETUP
Page 5

1.
Begin by rotating the counterweight clockwise until it is in the
complete forward position (NOTE: this is also the maximum amount
of pressure that can be applied to the cartridge.)
2.
Now there should be a feeling of weight and resistance when the head
shell is raised and lowered. Begin rotating the counterweight counterclockwise (away from the pivot point) until the weight and resistance
feeling is gone. If done properly, the tone arm will pivot with very
little resistance back and fo rth indicating that there is exactly 0 grams
of styl us pr e ss ur e .
3.
With the co u nte r weight in its new p o siti o n f urt h er aw ay fr om t o ne
arm pivot point, grasp the scale ring of the counter weight and rotate
it until "0" is in the vertical position.
4.
Finally, rotate the counterweight (and scale ring) clockwise (towards
the pivot point) until the desired amount of weight is reached. If the
scale rotates 360 degrees beyond the zero point, the new scale ring
reading should be added to 3.5.
*The incl uded head shell and cartrid ge asse m b ly re qu ir es a mi nim u m
of 3 grams and no more than 5 grams for optimum performance.
Page 6

Setting the Anti-Skate Adjustment
In most cases, the Anti-Skate should be set to its minimum setting. AntiSkate compensates for inward tracking forces that occur with certain
cartridges when the stylus nears the center of the record. If the turntable
is experiencing excessive skipping during back-cueing and scratching
while nearing the center spindle, try increasing the Anti-Skate in the
increments indicated on the dial. Start by adding an increment of 1, test
its performance, than increase it more, and so on.
IMPORTANT
Make sure that the felt slipmat is always placed on top of the platter while
using the turntable. Failure to use the slipmat may cause damage to your
media as well as dama ge to the tur nta ble .
Remove the plastic cartridge cover (needle cover) before operating the
turntable.
BEFORE RETUR NING THE PRODUC T, please contact Ion A udio or
your re tailer for tec hnical support. Contact inform ation c an be
found in the Safety Instruction Booklet included with this product.
Specifications (iTTUSB)
Manual Version: 1.1
Part List:
o
TTUSB Turntable
o
o
USB Cable Included
o
Product Weight (with Packaging): 12 lbs
Turntable Weight: 7.7 lbs
Master CTN dimensions: 20.27” x 17.16” x 6.85”
Motor: Belt Dr ive
Pitch: +/- 10%, 33 1/3 RPM or 45 RPM operation
Inputs: 1/8” stereo line level
Outputs: RCA (LINE/PHONO), USB Audio.
45 RPM Adapter Included
o
Software CD (MAC/PC)
o
Software User Manu al
o
Hardware Quick Start Guide
Counterweight for tonarm
o
Platter w/belt
o
Slipmat
o
Cartridge pre-mounted on Headshell
o
RCA Cable connected
Page 7

Vor de m Aufbau
1.
Versichern Sie sich, dass alle am Anfang dieser Anleitung
aufgeführten Teile in der Verpackung enthalten sind.
2.
LESEN SIE DI E SIC HER HE IT S BR OSC HÜ RE BE VO R SIE DA S
GERÄT BENUTZE N
3.
Um das Produkt zu registrieren, besuchen Sie bitte www.ion-audio.de
oder www.ion-audio.com
ALLGEMEINE BEDIENELEMENTE
1.
Stromkabel: Stecken Sie das Str omka bel in eine Steckd ose,
NACHDEM alle Tonanschlüsse erfolgt sind.
2.
RCA-Audioausgabekabel: Diese Kabel dienen zum Anschluß des
Plattenspi eler s an z.B. ei n DJ-M isch pult , ei nen Verst är k er oder
analoge Soundkartenanschlüsse eines PCs.
WICHTIGER HINWEIS:
Ein Ums c halter an der An sc hlusssei t e er mö gl i cht de n W e c hs el v o n
Phono zu Line Betrieb. Wählen Sie RCA-Phono zum Anschluss an
einen Phono-Eingang oder RCA-Line zum Anschluss an einen
Line/CD/AUX Eingang (eines Mischpultes, eines Verstärkers oder PCs)
WARNUNG: Sie könnten ihren Receiver/Ver s t ärker
beschäd igen, wenn Sie den iTTU SB im Line Betrieb an einen
Phono Eingang anschließen!
Page 8

3.
USB Audio Ausgang: Benutzen Sie das mitgelieferte USB Kabel um
den Plattenspieler mit ihrem Computer zu verbinden. Der iTTUSB ist
kompatibel zu USB 1 und USB 2 Anschlüssen. Weitere Hinweise zu
den System Einstellung der Software entnehmen Sie bitte der
Anleitung zur Software Installation (online auf www.ion-audio.de
„iTTUSB_Software_Audacity“)
4.
Ein/Ausschaltknopf: Der Ring um den Ein/A u s-S c h a lt kn o pf leu c ht e t
rot auf, wenn der Plattenspieler eingeschaltet ist.
5.
Plattenteller: Dieser Drehteller muss vor Inbetriebnahme mit dem
Plattenspi eler fest verb u nde n sein . Der Motor a ntrieb s rieme n bef indet
sich auf dem Antriebsring unterhalb des Drehtellers. Für Einzelheiten
zur Installation des Antriebsriemens lesen Sie bitte die
AUFBAUANLEITUNG (auf der folgenden Seite).
6.
Start/Stop-Tasten: Diese T asten starte n un d stoppen de n
Plattenspielermotor. Beide Tasten haben dieselbe Funktion. Falls diese
nicht zu funktionieren scheinen, stellen Sie mittels der
Aufbau an leitung sicher , da ss d er M ot or ant r i eb sriemen korre k t
installiert/montiert ist.
7.
Line in Audio-Eingang: Über diesen Line In Eingang (3,5 mm
Stereo Miniklinke) können externe Geräte (z.B. ein Kassettendeck)
angeschl osse n werd e n, und dere n Audi o signa le ebe nf all s über de n
USB Audioausgang des iTTUSB an den Computer geführt werden.
8.
33 und 45 RPM-Ta s t en: Diese Tasten steuern die
Umdrehungsgeschwindigkeit des Plattentellers. Eine rote Leuchtdiode
gibt an, welche Umdr ehu ng sges ch wind igk eit ge wäh lt wur de .
Hinweis: Bei m Ei ns ch a lt e n ist di e se U mdrehung s -E in st el l u ng
automatisch auf 33 RPM zurü ckgesetzt, auch wenn der
Plattenspieler bei einer Einstellung von 45 RPM ausgeschaltet
wurde.
9.
Tonhöhen-Leuchtdiode: Diese Leuchtdiode leuchtet grün auf, wenn
der Tonhöhenregler auf 0% steht. Wenn der Tonhöhenregler von 0
wegbewegt wird, leuchtet die Anzeige in rot auf.
10.
Tonhöhenregler: Mit diesem Sch ieb ereg ler läßt sich die To nhöhe
bzw. die Geschwindigkeit um 10% erhöhen oder vermindern. In der
mittleren Stell ung ist die T on h öhe bei 0% . Wen n der Regler v on der
Mitte in Richtung Tonarm bewegt wird, vermindert sich die Tonhöhe
(Plattenteller wird langsamer), wenn vom Tonarm weg bewegt wird,
erhöht sich die Tonhöhe (Plattenteller wird schneller.)
TONARM: Die Punkte 11 – 15 sind alle Teile des Tonarms. Für zusätzliche
Einzelheiten über diese lesen Sie bitte im Abschnitt TONARM-AUFBAU
nach. Abhängig vom gekauften Modell ist Ihres entweder mit einem
geraden oder S-förmigen Arm ausgerüstet.
11.
Gegeng ewicht und Ska lenring: Das Gegengewicht dient dazu, die
Headshell (Systemträger) mit dem Tonabnehmersystem so
auszubalancieren, dass der korrekte Nadeldruck auf die Schallplatte
ausgeübt wird.
Page 9

12. Anti-Skate-Einstellung: Dieser Drehknopf dient zum Ausgleich der
nach innen gerichteten Kräfte des Tonarms. Für weitere Einzelheiten,
lesen Sie bitte im Abschnitt TONARM-AUFBAU nach.
13.
Arm-Clip: Dieser speziell entworfene Arm-Clip sichert den Tonarm
während Pausen und bei Nichtgebrauch. Der Arm-Clip wurde so
entworfe n, dass er in der aufrec hte n Stell u ng verb lei b t solang er
geöffnet ist.
HINWEIS: Beim Transport des Plattenspielers ist es immer
empfehlenswert, das Headshell mit dem Tonabnehmer System zu
entfer nen und de n Arm -Clip zu ver sc h li e ss e n , um den Tonar m od er
den Plattenspieler vor Beschädigung zu schützen.
14.
Tonarm-Verschluss: Diese Aluminiummutter dient zur festen
Verbindung von Headshell-Systems mit dem Tonarm. Für weitere
Einzel he iten, se he n Sie bit t e u nt er Tonarm Aufbau nach .
15.
Headshell und Tonab nehmersyste m: Das Tonabnehmersystem ist
auf eine Standard-Headshell vormontiert. Sowohl das
Tonabnehmersystem als auch die Nadel kann selbst ausgetauscht
werden und ist kompatibel mit den meisten Standard DJ Systemen.
Vor dem ersten Gebrauch entfernen Sie die Plastik Schutzkappe vom
System.
Page 10
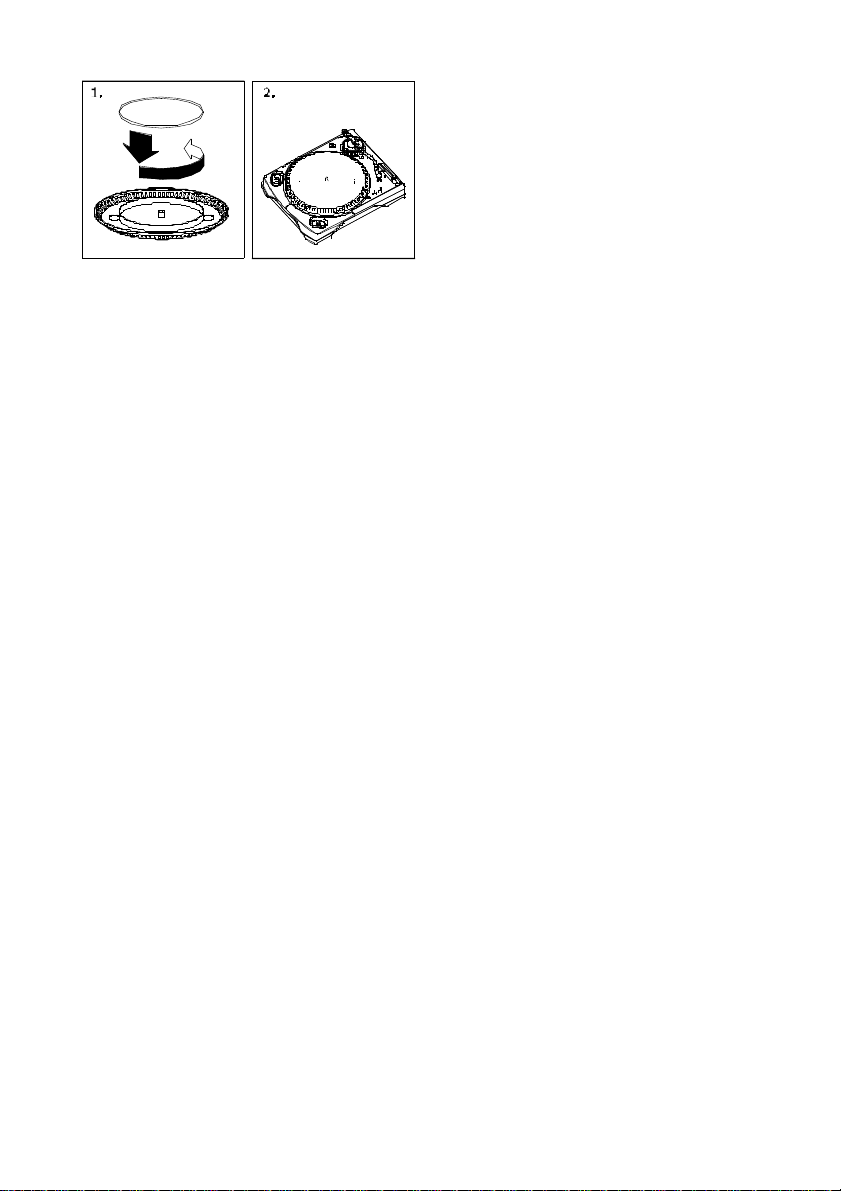
AUFBAU DES PLATTENTELLERS
Page 11

zugleich der größtmögliche Druck, der auf das Tonabnehmersystem
ausgeübt werden kann.)
2.
Sie sollten nun Gewicht und Widerstand fühlen können, wenn der
Tonarm angehoben und abgesenkt wird. Fangen Sie nun an, das
Gegengewicht gegen den Uhrzeigersinn (weg vom Schwenkpunkt) so
lange zu drehen, bis das Gefühl von Gewicht und Widerstand nicht
mehr wahrzunehmen ist. Falls dies genau ausgeführt wird, schwenkt
der Tonarm ohne großen Widerstand auf und ab, was bedeutet, dass
der Druck auf der Abtastnadel genau 0 Gramm beträgt.
3.
Lassen Sie das Gegengewicht in der neuen Position und drehen sie
nur den beweglichen Skalenring des Gegengewichts solange, bis “0”
in der vertikalen Position steht.
4.
Zuletzt drehen Sie das Gegengewicht (samt Skalenring) in Richtung
der Skala (von vorne: geg en den Uhr zeigersinn) bis das gewü nsc hte
Gewicht erreicht ist. Falls die Skala sich mehr als 360 Grad über den
Nullpunkt hin aus dr eht , sollte der ange zei gte ne ue Wer t des
Skalenrings zu 3.5 dazuaddi ert werden.
*Das mitgelieferte Tonabnehmersystem erfordert mindestens 3,
jedoch höchstens 5 Gramm für eine optimale Leistung.
Einstellung des Anti-Skate
In den meisten Fällen sollte Anti-Skate auf seinen minimalsten Wert
eingestellt werden. Anti-Skate gleicht nach innen gerichtete Kräfte aus,
welche b ei ma n ch en Systemen auft r et e n , wä hre nd si c h die Abt a st n ad el
auf die Plattenmitte zubewegt. Falls beim Plattenspieler während BackCueing und Scratching außergewöhnlich starkes “Springen” in Richtung
der mittleren Spindel auftritt, versuchen Sie Anti-Skate in den auf der
Anzeig e ge ze ig ten Schritt en zu erhöhen. Fangen Sie mit einer Steigerung
von 1 an, testen Sie das Verhalten, dann steigern Sie es weiter, und so
fort.
Page 12

Spezifikationen (iTTUSB)
Anleitungsversion: 1.1
Inhalt der Verpackung:
o
TTUSB Turntable
o
o
USB-Kabel
o
Gewicht (mit Verpackung): 5,44 kg
Gewicht des Turntables: 3,95 kg
Abmessungen: 460 x 370 x 135 mm
Motor: Riemenantrieb
Pitch: +/- 10%, 33 1/3 RPM oder 45 RPM Betrieb
Eingänge: 3,5mm Stereolinepegel
Ausgänge: RCA (LINE/PHONO), USB Audio.
45 RPM Adapter
o
Software CD (MAC/PC)
o
Software Bed ie n ungs an leit u ng
o
Hardware Kurzanleitung
Gegengewicht für Tonarm
o
Plattenteller mit Riemen
o
Slipmat
o
Tonabneh mer am Hea ds he ll vori nst al liert
o
RCA Kabel angeschlossen
 Loading...