

Page 1

iPICS2GO
QUICKSTART GUIDE
ENGLISH ( 2 – 4 )
GUÍA DE INICIO RÁPIDO
GUIDE D'UTILISATION SIMPLIFIÉ
ESPAÑOL ( 5 – 7 )
FRANÇAIS ( 8 – 10 )
GUIDA RAPIDA
ITALIANO ( 11 – 13 )
KURZANLEITUNG
SNELSTARTGIDS
NEDERLANDS ( 17 – 19 )
DEUTSCH ( 14 – 16 )
Page 2

BOX CONTENTS
iPICS2GO
Negative/Slide Tray
Photo Tray (3” x 5” / 4” x 6”)
4 AA Batteries
Quickstart Guide
Safety and Warranty Information Booklet
REGISTRATION
Please go to http://www.ionaudio.com to register your iPICS2GO. Registering your product ensures that we
can keep you up-to-date with any new product developments and provide you with world-class technical
support, should you run into any problems.
COMPATIBLE iOS DEVICES
iPICS2GO is compatible with the following iOS devices (not included):
iPhone 4*
iPhone 4S*
2
Page 3

USING iPICS2GO
Note: Before using iPICS2GO, download the iPICS2GO app from the App Store to your iPhone 4 or iPhone 4S.
To use the iPICS2GO app:
1. Open the App Store on your iPhone (not included) and download the iPICS2GO app.
2. Open the iPICS2GO app.
3. Turn on iPICS2GO scanner. When the power light illuminates, place iPhone in the iPhone cradle with the
screen facing up.
4. Place your slide, negative, or photo into the appropriate holder.
5. Insert the holder into the scanner. (Make sure the second, unused holder is removed from the scanner.)
6. In the app, touch the button for your film type: Slides, Negatives, 3 x 5, or 4 x 6.
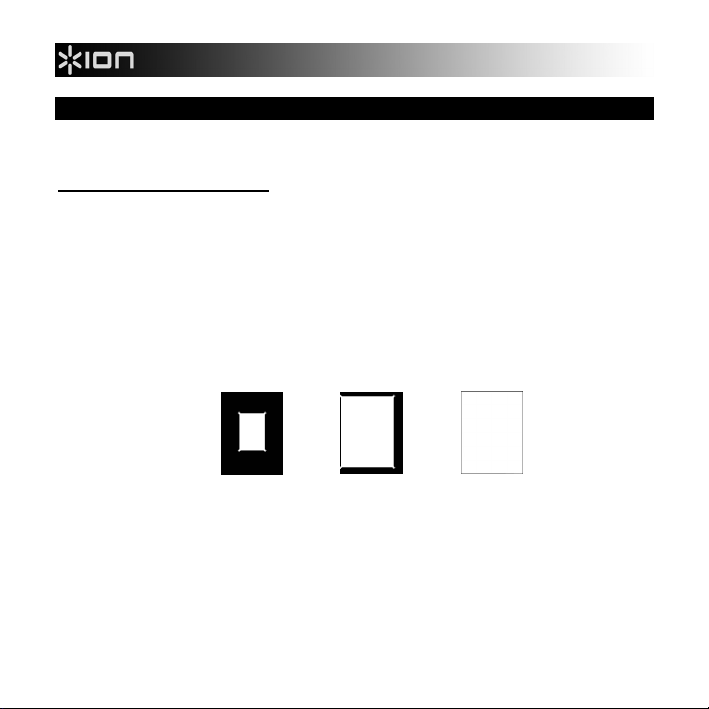
7. Adjust the holder so your image appears in the "crop box" on the camera screen. (4 x 6 uses the whole
screen.) The crop area will differ depending on the film type that is chosen.
See examples of the crop box areas below:
8. You may need to adjust the camera's "white balance." To do this, touch the screen in darker or lighter
areas of the image being scanned. Also, make sure your camera's flash is Off.
9. Touch the camera icon to take the picture. If you are satisfied with the resulting scan, touch Use or touch
Retake to try again.
10. When your scanned image appears in the app, you can then touch: Save (save it to your iPhone Photo
Album), Email (e-mail it to someone), or Facebook (upload it to Facebook). Please note that selecting
Email or Facebook won't save it to your iPhone Photo Album. For more information, visit
www.ionaudio.com/ipics2go.
Negatives and slides
* iPhone 4S and iPhone 4 are trademarks of Apple Inc., registered in the U.S. and other countries.
3 x 5
4 x 6
3
Page 4
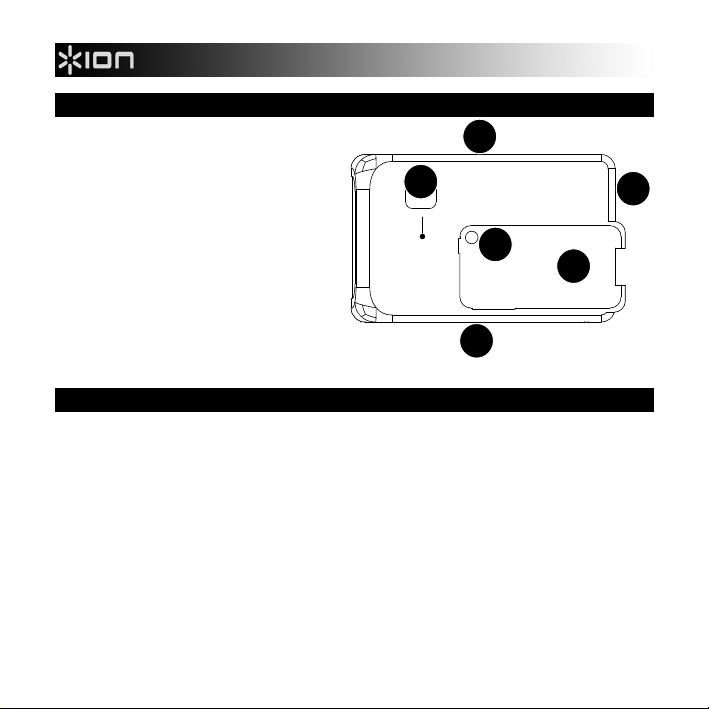
FEATURES
1. Power – This button turns iPICS2GO on/off.
2. iPhone Camera Aperture – Have the
iPhone camera facing this hole to capture
the image source.
3. iPhone Cradle – Place the iPhone here
when you are ready to scan.
4. Battery Compartment – Insert 4 AA
batteries here to power iPICS2GO.
5. Slide/Negative Tray – Insert the
slide/negative tray here.
6. Photo Holder Tray – Insert the included
photo holder here.
1
POWER
6
SPECIFICATIONS
DIMENSIONS: (W x D x H): 8.25” x 4.75” x 6.1” (210mm x 121mm x 155mm)
WEIGHT: 1 lb (.45 kg)
4
2
i
PICS 2 GO
3
5
4
Page 5

CONTENIDO DE LA CAJA
iPICS2GO
Bandeja para negativos y diapositivas
Bandeja para foto (8 x 13 cm / 10 x 15 cm) (3” x 5” / 4” x 6”)
4 pilas AA
Guía de inicio rápido
Folleto de información sobre la seguridad y la garantía
REGISTRO
Visite http://www.ionaudio.com para registrar su iPICS2GO. El registro de su producto asegura que podamos
mantenerle actualizado con los nuevos desarrollos de productos y brindarle apoyo técnico de categoría mundial
en caso de que tenga algún problema.
DISPOSITIVOS iOS COMPATIBLES
El iPICS2GO es compatible con los siguientes dispositivos iOS (no incluidos):
iPhone 4*
iPhone 4S*
5
Page 6
CÓMO USAR EL iPICS2GO
Nota: Antes de usar el iPICS2GO, baje la aplicación de iPICS2GO de la tienda de aplicaciones App Store a su
iPhone 4 o iPhone 4S.
Para usar la aplicación de iPICS2GO:
1. Abra App Store en su iPhone (no incluido) y baje la aplicación de iPICS2GO.
2. Abra la aplicación de iPICS2GO.
3. Encienda el escáner iPICS2GO. Cuando se ilumina la luz de encendido, coloque el iPhone en la base
para el mismo con la pantalla mirando hacia arriba.
4. Coloque la diapositiva, el negativo o la foto en el soporte apropiado.
5. Inserte el soporte en el escáner. (Asegúrese de retirar del escáner el segundo soporte, que no se usa.)
6. En la aplicación, toque el botón correspondiente al tipo de película: Slides (Diapositivas), Negatives
(Negativos), 3 x 5 ó 4 x 6.
7. Ajuste el soporte de modo que la imagen aparezca en el "recuadro de recorte" de la pantalla de la
cámara. (En 4 x 6 se usa la pantalla completa.) El área de recorte difiere según el tipo de película que
se elige. Vea a continuación ejemplos del área del recuadro de recorte:
8. Puede ser necesario ajustar el "balance de blanco" de la cámara. Para hacerlo, toque la pantalla en las
9. Toque el icono de la cámara para tomar la fotografía. Si está satisfecho con el escaneado resultante,
10. Cuando la imagen escaneada aparece en la aplicación, puede tocar: Save (guardarla en el álbum de
Negativos and diapositivas
áreas más oscuras o más luminosas de la imagen que se va a escanear. Además, asegúrese de que el
flash de su cámara esté apagado.
toque Use (Usar) o toque Retake (Repetir la toma) para realizar un nuevo intento.
fotos de su iPhone, Email (enviarla por correo electrónico a alguien) o Facebook (subirla a Facebook).
Tenga en cuenta que al seleccionar Email o Facebook, no se guarda en el álbum de fotos de su
iPhone. Para más información, visite www.ionaudio.com/ipics2go.
3x5
6
Page 7

CARACTERÍSTICAS
1. Encendido – Este botón se utiliza para
encender y apagar el iPICS2GO.
2. Apertura de la cámara del iPhone – Haga
que la cámara del iPhone enfrente a este
orificio para capturar la fuente de imagen.
3. Base para el iPhone – Coloque aquí el
iPhone cuando esté listo a escanear.
4. Compartimiento de las pilas – Inserte aquí
4 pilas AA para alimentar el iPICS2GO.
5. Bandeja para diapositivas y negativos –
Inserte aquí la bandeja para diapositivas y
negativos.
6. Bandeja para el soporte de fotos – Inserte
aquí el soporte de fotos incluido.
4
1
POWER
2
6
ESPECIFICACIONES
• DIMENSIONES: (Ancho x prof x alt): 210 x 121 x 155 (8.25” x 4.75” x 6.1”)
• PESO: 0.45 kg (1 lb)
i
PICS 2 GO
3
5
7
Page 8

CONTENU DE LA BOÎTE
iPICS2GO
Support pour négatif et diapositive
Support pour photo (3 po x 5 po/ 4 po x 6 po)
4 piles de format AA
Guide d’utilisation simplifié
Livret des consignes de sécurité et des informations concernant la garantie
ENREGISTREMENT DU PRODUIT
Veuillez visiter le site internet http://www.ionaudio.com pour enregistrer le iPICS2GO. L'enregistrement des
produits nous permet de vous informer sur les toutes dernières nouveautés concernant les produits et de vous
offrir un soutien technique de qualité lorsque vous en avez besoin.
APPAREILS iOS COMPATIBLES
Le iPICS2GO est compatible avec les dispositifs iOS suivants (non inclus) :
iPhone 4*
iPhone 4S*
8
Page 9

UTILISATION DU iPICS2GO
Remarque : Avant de pouvoir utiliser le iPICS2GO, vous devez télécharger l’application iDJ2GO du App Store
sur votre iPhone 4 ou iPhone 4S.
Pour utiliser l’application iPICS2GO:
1. Cliquez sur l'icône du App Store sur votre iPhone (non inclus) et téléchargez l’application iPICS2GO.
2. Lancez l’application iPICS2GO.
3. Mettez le numériseur iPICS2GO sous tension. Lorsque le voyant d'alimentation s'allume, placez votre
iPhone dans le socle avec l'écran vers le haut.
4. Placez votre diapositive, négatif ou photo dans le support approprié.
5. Insérez le support dans le numériseur. (Assurez-vous de retirer le deuxième support non utilisé du
numériseur.)
6. Dans l'application, sélectionnez le bouton correspondant à ce que vous désirez numériser : Slides
(diapositives), Negatives (négatifs), 3 x 5 ou 4 x 6 (photos).
7. Ajustez le support afin que votre image apparaisse dans la « fenêtre de rognage » du iPhone.
(Remarque : le type 4 x 6 requiert l'écran entier). La fenêtre de rognage est différente selon le type
sélectionné.
Voici des exemples de fenêtres de rognage :
8. Il se peut que vous ayez à ajuster l’équilibre des blancs de l’appareil photo. Pour ce faire, touchez l'écran
dans les zones plus sombres ou plus claires de l'image numérisée. Assurez-vous également que le flash
de l’appareil photo est désactivé (Off).
9. Touchez l'icône de l’appareil photo pour prendre la photo. Si vous êtes satisfait de la numérisation, tapez
Use, sinon, tapez Retake pour refaire la numérisation.
10. Lorsque l’image numérisée apparaît dans l'application, vous pouvez taper : Save (enregistrer dans
l’album photo de votre iPhone), Email (envoyer par courriel), ou Facebook (téléverser sur Facebook).
Veuillez noter qu’en sélectionnant Email ou Facebook, l’image ne sera pas enregistrée dans l’album
photo de votre iPhone. Pour plus d’information, visitez www.ionaudio.com/ipics2go.
Négatifs et diapositives
3 x 5
4 x 6
9
Page 10

CARACTÉRISTIQUES
1. Interrupteur d'alimentation – Ce bouton
permet de mettre le iPICS2GO sous et hors
tension.
2. Objectif de l’appareil photo du iPhone –
Alignez l’objectif du iPhone sur cet orifice
afin de capturer l’image.
3. Socle pour iPhone – Placez le iPhone sur
ce socle lorsque vous être prêt à numériser.
4. Compartiment des piles – Insérez 4 piles
de type AA afin d’alimenter le iPICS2GO.
5. Support pour diapositive/négatif – Insérez
le support pour diapositive/négatif ici.
6. Support pour photo – Insérez le support
pour photo ici.
SPÉCIFICATIONS
• DIMENSIONS : (L x P x H) : 8,25 po x 4,75 po x 6,1 po (210 mm x 121 mm x 155 mm)
• POIDS : 1 lb ( 0,45 kg)
1
POWER
6
4
2
i
PICS 2 GO
5
3
10
Page 11

CONTENUTI DELLA CONFEZIONE
iPICS2GO
Vassoio porta negativi/diapositive
Vassoio portafoto (3” x 5” / 4” x 6”)
4 batterie AA
Guida rapida
Libretto di istruzioni di sicurezza e garanzia
REGISTRAZIONE
Recarsi alla pagina http://www.ionaudio.com per registrare l’iPICS2GO. La registrazione del prodotto ci
consente di tenervi aggiornati con tutti gli ultimissimi sviluppi del prodotto e di offrirvi assistenza tecnica di livello
mondiale, in caso di eventuali problemi.
DISPOSITIVI iOS COMPATIBILI
L'iPICS2GO è compatibile con i seguenti dispositivi iOS (non in dotazione):
• iPhone 4*
• iPhone 4S*
11
Page 12

UTILIZZO DELL'iPICS2GO
Nota bene: prima di utilizzare l'iPICS2GO, scaricare l'app iPICS2GO dall'App Store sul proprio iPhone 4 o
iPhone 4S.
Per utilizzare l'app iPICS2GO:
1. Aprire l'App Store sull'iPhone (non in dotazione) e scaricare l'app iPICS2GO.
2. Aprire l'app iPICS2GO.
3. Accendere lo scanner iPICS2GO. Quando la spia di alimentazione si accende, collocare l'iPhone
nell'apposito cradle con lo schermo rivolto verso l'alto.
4. Collocare la diapositiva, il negativo o la foto nel supporto adeguato.
5. Inserire il supporto nello scanner. (Assicurarsi di rimuovere dallo scanner il secondo supporto,
inutilizzato.)
6. Nell'app, premere il pulsante relativo al proprio tipo di pellicola: Diapositive, Negativi, 3 x 5, o 4 x 6.
7. Regolare il supporto in modo che l'immagine compaia nella "casella di taglio" dello schermo della
macchina (4 x 6 impiega l'intero schermo). L'area di taglio cambia a seconda del tipo di pellicola
prescelto.
Si vedano esempi qui di seguito:
8. Può essere necessario regolare l'"equilibrio del bianco" della macchina fotografica. Per farlo, toccare lo
schermo nelle aree più scure o più chiare dell'immagine sottoposta a scansione. Assicurarsi inoltre che il
flash della macchina fotografica sia disattivato (Off).
9. Toccare l'icona della macchina fotografica per acquisire l'immagine. Se si è soddisfatti della scansione
realizzata, toccare Use (usa), in caso contrario, toccare Retake (acquisisci di nuovo) per riprovare.
10. Quando l'immagine scansionata compare nell'app, si può toccare: Save (salva nell'album fotografico
dell'iPhone), Email (invia a qualcuno tramite e-mail), o Facebook (carica su Facebook). Va notato che
selezionando Email o Facebook l'immagine non verrà salvata nell'album dell'iPhone. Per maggiori
informazioni recarsi alla pagina www.ionaudio.com/ipics2go.
Negativi e diapositive 3 x 5
12
4 x 6
Page 13

CARATTERISTICHE
1. Interruttore di alimentazione (power) – Accende
e spegne l'iPICS2GO.
2. Apertura per macchina fotografica iPhone –
Rivolgere la macchina fotografica dell'iPhone
verso questo foro per acquisire l'immagine
sorgente.
3. Cradle per iPhone – Collocare l'iPhone a questo
livello quando si è pronti a procedere alla
scansione.
4. Scomparto batterie – Inserire qui 4 batterie AA
per alimentare l'iPICS2GO.
5. Vassoio porta diapositive/negativi – Inserire qui
il vassoio porta diapositive/negativi.
6. Vassoio portafoto – Inserire il vassoio portafoto
in dotazione a questo livello.
1
POWER
SPECIFICHE TECNICHE
• DIMENSIONI: (L x P x H): 210 x 121 x 155mm (8.25” x 4.75” x 6.1”)
• PESO: 0,45 kg (1 lb)
6
4
2
i
PICS 2 GO
3
5
13
Page 14

LIEFERUMFANG
iPICS2GO
Negativ/Dia-Halter
Fotohalter (3 "x 5" / 4 "x 6")
4 AA-Batterien
Schnellstart-Anleitung
Sicherheitshinweise und Garantieinformationen
REGISTRIERUNG
Bitte besuchen Sie http://www.ionaudio.com, um iPICS2GO zu registrieren. Wenn Sie Ihr Produkt
registrieren, sorgen wir dafür, dass Sie immer am neuesten Stand aller Produktentwicklungen sind. Außerdem
bieten wir Ihnen erstklassige technische Unterstützung an, sollten Sie auf Probleme stoßen.
KOMPATIBLE iOS-GERÄTE
iPICS2GO ist mit folgenden iOS-Geräten kompatibel (nicht im Lieferumfang enthalten):
iPhone 4*
iPhone 4S*
14
Page 15

SO VERWENDEN SIE iPICS2GO
Hinweis: Laden Sie die iPICS2GO App vom App Store auf Ihr iPhone 4 oder iPhone 4S bevor Sie
iPICS2GO verwenden.
So verwenden Sie die iPICS2GO App:
1. Öffnen Sie den App Store auf Ihrem iPhone (nicht im Lieferumfang enthalten) und laden Sie die
iPICS2GO App.
2. Öffnen Sie die iPICS2GO App.
3. Schalten Sie den iPICS2GO-Scanner ein. Wenn die Power-LED leuchtet, setzen Sie das iPhone so in
die iPhone-Dockingstation ein, dass der Bildschirm nach oben zeigt.
4. Legen Sie Ihr Dia, Negativ oder Foto in den entsprechenden Halter ein.
5. Schieben Sie den Halter in den Scanner. (Vergewissern Sie sich, dass der zweite, ungenutzte Halter aus
dem Scanner entfernt wurde.)
6. Tippen Sie in der App auf die Schaltfläche für Ihren Filmtyp: Slides (Dias), Negatives (Negative), 3 x
5 oder 4 x 6.
7. Adjust the holder so your image appears in the "crop box" on the camera screen. (4 x 6 nutzt den
gesamten Bildschirm.) Die Crop-Box unterscheidet sich je nach gewähltem Filmtyp.
Hier sind einige Beispiele von verschiedenen Crop-Boxes:
8. Möglicherweise müssen Sie den "Weißabgleich" der Kamera anpassen. Um dies zu tun, berühren Sie
den Bildschirm in den dunkleren oder helleren Bildbereichen des gescannten Bildes. Stellen Sie
außerdem sicher, dass der Blitz der Kamera auf Off (Aus) steht.
9. Tippen Sie auf das Kamerasymbol, um das Bild aufzunehmen. Wenn Sie mit dem Resultat zufrieden
sind, tippen Sie auf Use (Verwenden) oder auf Retake (Erneute Aufnahme), um es noch einmal zu
versuchen.
10. Wenn das gescannte Bild in der App aufscheint, tippen Sie auf: Save (Speichern), um es in Ihrem
iPhone-Fotoalbum zu speichern, Email, um es jemandem zu e-mailen oder Facebook, um es
auf Facebook hochzuladen. Bitte beachten Sie, dass das Foto bei der Auswahl Email oder
Facebook nicht in Ihrem iPhone-Fotoalbum gespeichert wird. Für weitere Informationen besuchen Sie
www.ionaudio.com/ipics2go.
Negative und Dias
3 x 5
4 x 6
15
Page 16

FUNKTIONEN
1. Ein-/Ausschalter - Schaltet iPICS2GO ein/aus.
2. Blendenöffnung des iPhone - Richten Sie die iPhone-Kamera auf diese Öffnung, um das Bild
aufzunehmen.
3. iPhone-Dockingstation – Setzen Sie das iPhone in diese Halterung ein, wenn Sie zum Scannen
4. bereit sind.
5. Batteriefach- Legen Sie hier 4 AA-Batterien ein, um iPICS2GO mit Strom zu versorgen.
6. Negativ/Dia-Halter– Legen Sie hier den Negativ/Dia-Halter ein.
7. Fotohalter – Legen Sie den mitgelieferten Fotohalter hier ein.
TECHNISCHE DATEN
• ABMESSUNGEN: (B x T x H): 8,25 "x 4,75" x 6,1" (210mm x 121mm x 155mm)
• GEWICHT: 1 lb (0,45 kg)
16
Page 17

INHOUD VAN DE DOOS
iPICS2GO
Lade voor negatieven/dia's
Fotolade (9 x 13 cm / 10 x 15 cm)
4 AA-batterijen
Snelstartgids
Informatieboekje over Veiligheid en Garantie
REGISTRATIE
Surf naar http://www.ionaudio.com om uw iPICS2GO te registreren. Als u uw product registreert, wordt u op
de hoogte gehouden van alle nieuwe producten en kunt u rekenen op hoogstaande technische
productondersteuning, indien u ooit een probleem mocht hebben.
COMPATIBELE iOS-apparaten
iPICS2GO is compatibel met de volgende iOS-apparaten (niet meegeleverd):
iPhone 4*
iPhone 4S*
17
Page 18

iPICS2GO GEBRUIKEN
Opmerking: Voordat u iPICS2GO gebruikt dient u de iPICS2GO-app uit de App Store te downloaden op uw
iPhone 4 of iPhone 4S.
De iPICS2GO-app gebruiken:
1. Open de App Store op uw iPhone (niet meegeleverd) en download de iPICS2GO-app.
2. Open de iPICS2GO-app.
3. Zet de iPICS2GO-scanner aan. Wanneer het lampje begint te branden, plaatst u de iPhone met het
scherm naar boven in de iPhone-houder.
4. Plaats uw dia, negatief of foto in de gepaste houder.
5. Plaats de houder in de scanner. (Zorg ervoor dat de tweede, niet-gebruikte houder uit de scanner is
verwijderd.)
6. Druk in de app op de knop voor uw filmtype: Dia's, negatieven, 9 x 13 cm of 10 x 15 cm.
7. Stel de houder zodanig in, dat uw beeld verschijnt in het "bijsnijdscherm" op het camerascherm. (10 x 15
gebruikt heel het scherm.) Afhankelijk van het gekozen filmtype verschilt de grootte van de bijsnijdzone.
Zie hieronder voorbeelden van bijsnijdzones:
8. Mogelijk moet u de witbalans van uw camera aanpassen. Raak hiervoor het scherm aan in lichtere of
meer duistere zones van de in te scannen afbeelding. Zorg er ook voor dat de flitser van uw camera Uit
staat.
9. Raak het camerapictogram aan om een foto te nemen. Als u tevreden bent met het resultaat, raak dan
Gebruik aan of raak Opnieuw fotograferen aan om nog eens te proberen.
10. Als de ingescande afbeelding in de app verschijnt, kunt u het volgende aanraken: Opslaan (opslaan in
het fotoalbum van uw iPhone), E-mail (de afbeelding naar iemand e-mailen) of Facebook (de afbeelding
uploaden naar Facebook). Houd er rekening mee dat het selecteren van E-mail of Facebook de
afbeelding niet opslaat in uw iPhone-fotoalbum. Raadpleeg voor meer informatie
www.ionaudio.com/ipics2go.
Negatieven en dia's
3 x 5
4 x 6
18
Page 19

KENMERKEN
1. Power: Deze knop zet de iPICS2GO aan/uit.
2. Lensopening van de iPhone-camera: richt
de iPhone-camera naar deze opening om de
afbeelding vast te leggen.
3. iPhone-houder: plaats hier de iPhone
wanneer u gereed bent om te scannen.
4. Batterijvak: plaats hierin 4 AA-batterijen om
de iPICS2GO van stroom te voorzien.
5. Houder voor dia's/negatieven: plaats hierin
de houder voor dia's/negatieven.
6. Lade voor fotohouder: plaats hierin de
meegeleverde fotohouder.
SPECIFICATIES
• AFMETINGEN: Afmetingen (b x d x h): 210 mm x 121 mm x 155 mm (8.25” x 4.75” x 6.1”)
• GEWICHT: 0,45 kg (1 lb)
1
POWER
6
4
2
i
PICS 2 GO
3
19
5
Page 20

www.ionaudio.com
MANUAL VERSION 1.1
 Loading...