

Page 1
Quickstart Guide English ( 3 – 9 )
Guía de inicio rápido Español ( 10 – 17 )
Guide d’utilisation rapide Français ( 18 – 25 )
Guida rapida Italiano ( 26 – 33 )
Schnellstart-Anleitung Deutsch ( 34 – 41 )
Snelstartgids Nederlands ( 42 – 49 )
Appendix English ( 50 )
Page 2

2
Page 3

Quickstart Guide (English)
Introduction
Thank you for purchasing Game Day Lights. At ION, your entertainment is as important to us as it is
to you. That’s why we design our products with one thing in mind—to make your life more fun and
more convenient.
Note: Before you first use the product, please fully charge the battery. Your unit was purposely
shipped with a reduced battery charge to ensure safe transit.
Use the included power cable to connect the unit to a power outlet and let it charge for up to 5
hours. This helps ensure the longest life for your battery.
Box Contents
Game Day Lights
Microphone with mic cable
1/8” (3.5 mm) Stereo Aux Cable
Power Cable (2-pin IEC)
Quickstart Guide
Safety & Warranty Manual
Support
For the latest information about this product (documentation, technical specifications, system
requirements, compatibility information, etc.) and product registration, visit ionaudio.com.
For additional product support, visit ionaudio.com/support.
Rechargeable Batteries
Rechargeable lead-acid batteries are the same type used in automobiles. As with your car battery,
how you use this battery has a significant impact on its lifespan. With proper use and treatment, a
lead-acid battery can last for years. Here are some recommendations for getting the longest life from
the internal battery.
General Usage
Charge fully before use.
Charge fully before storing.
Storage
Repair
Disposal
For best product longevity, do not store at exceedingly hot (greater than 90°F /
32°C) or exceedingly cold (less than 32°F / 0°C) temperatures.
It is acceptable to leave your sound system plugged in. This will not overcharge
the battery.
If you leave the battery level low and do not charge it for 3 months, it may
permanently lose capacity.
If the battery fails to charge, check the fuse near the power cable input. If the fuse
is not intact, please replace it.
The battery can be replaced (details in the Technical Specifications).
For Warranty and Parts, visit ionaudio.com.
Bring the unit to a recycling center or dispose of in accordance with local
ordinances.
3
Page 4
Quick Setup
Getting Started
1. Make sure all items listed in the Box Contents are included in the box.
2. READ THE SAFETY & WARRANTY MANUAL BEFORE USING THE PRODUCT.
3. MAKE SURE THE BATTERY IS COMPLETELY CHARGED PRIOR TO FIRST USE FOR
MAXIMUM BATTERY LIFE.
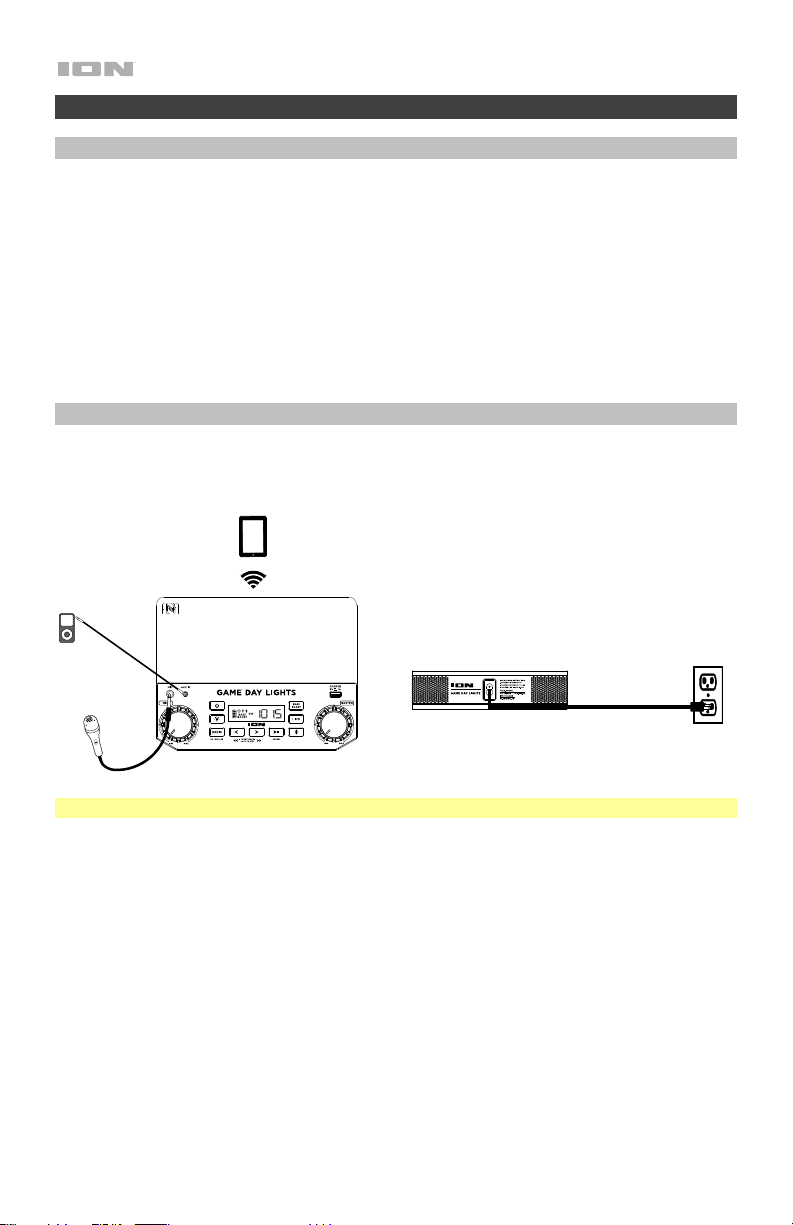
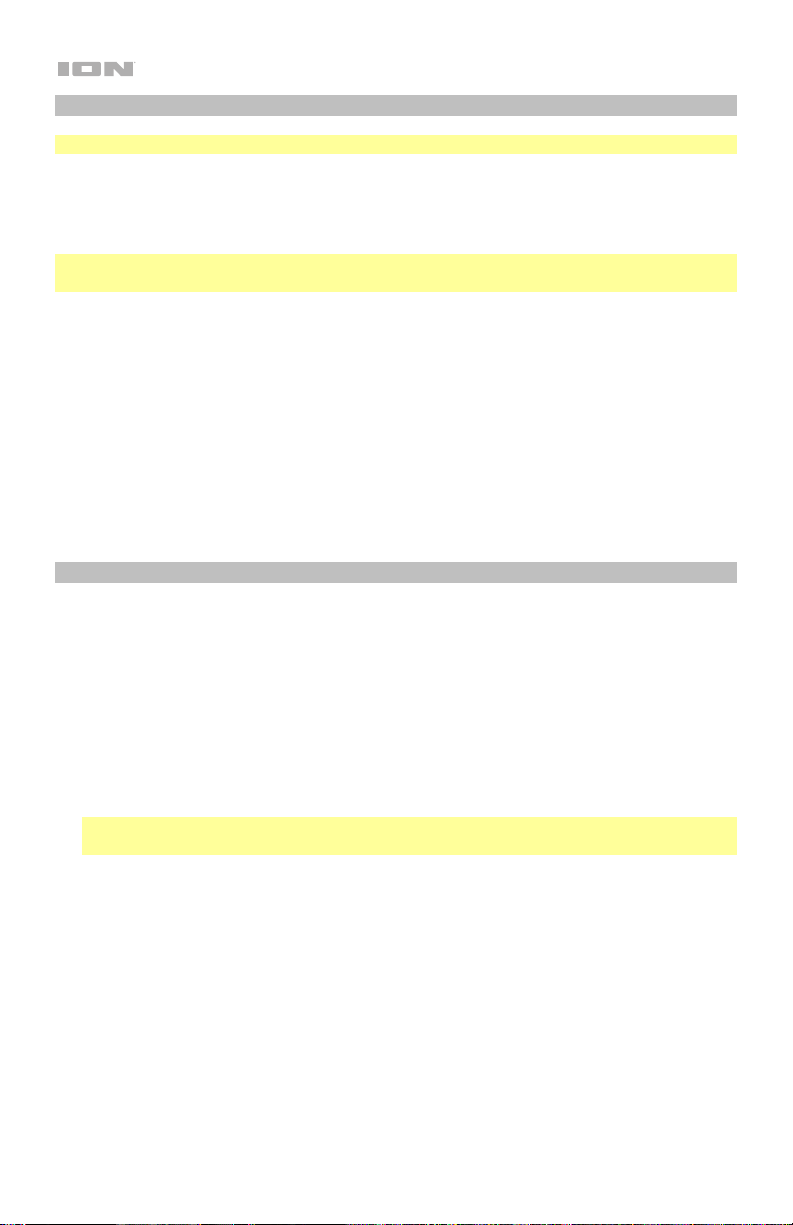
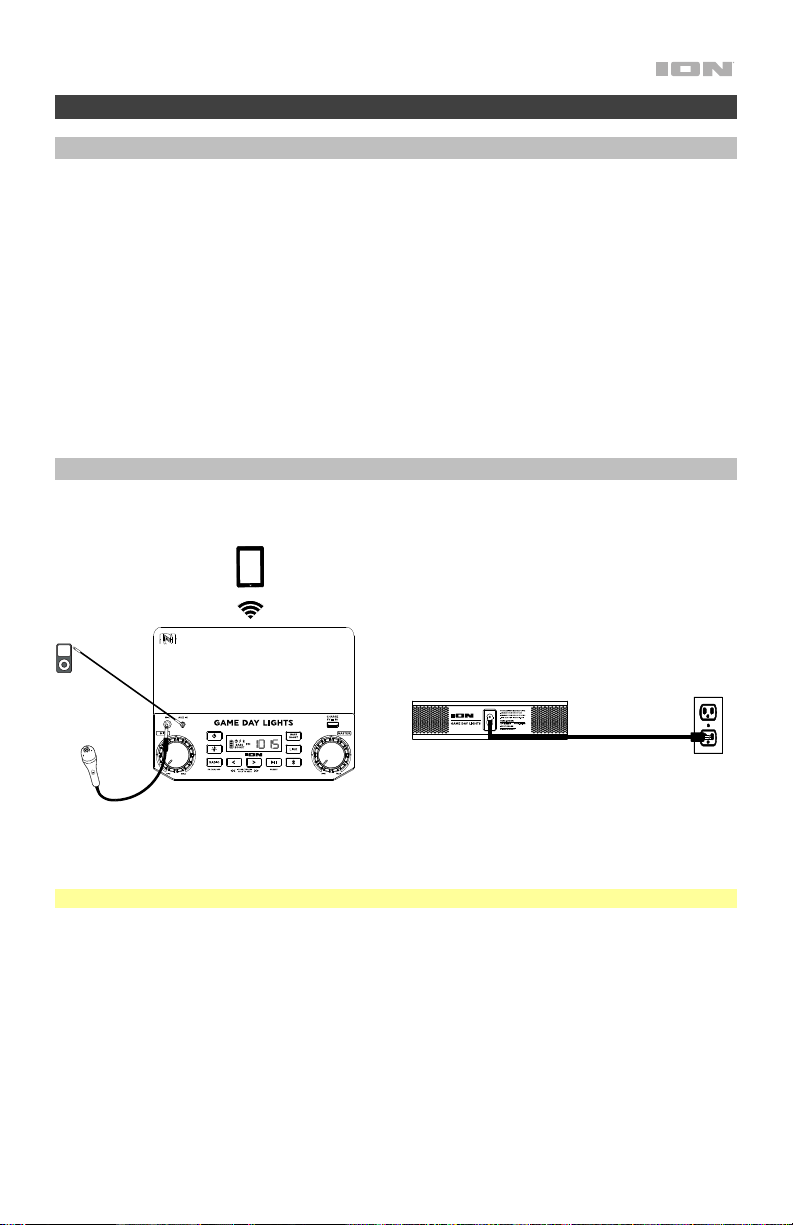
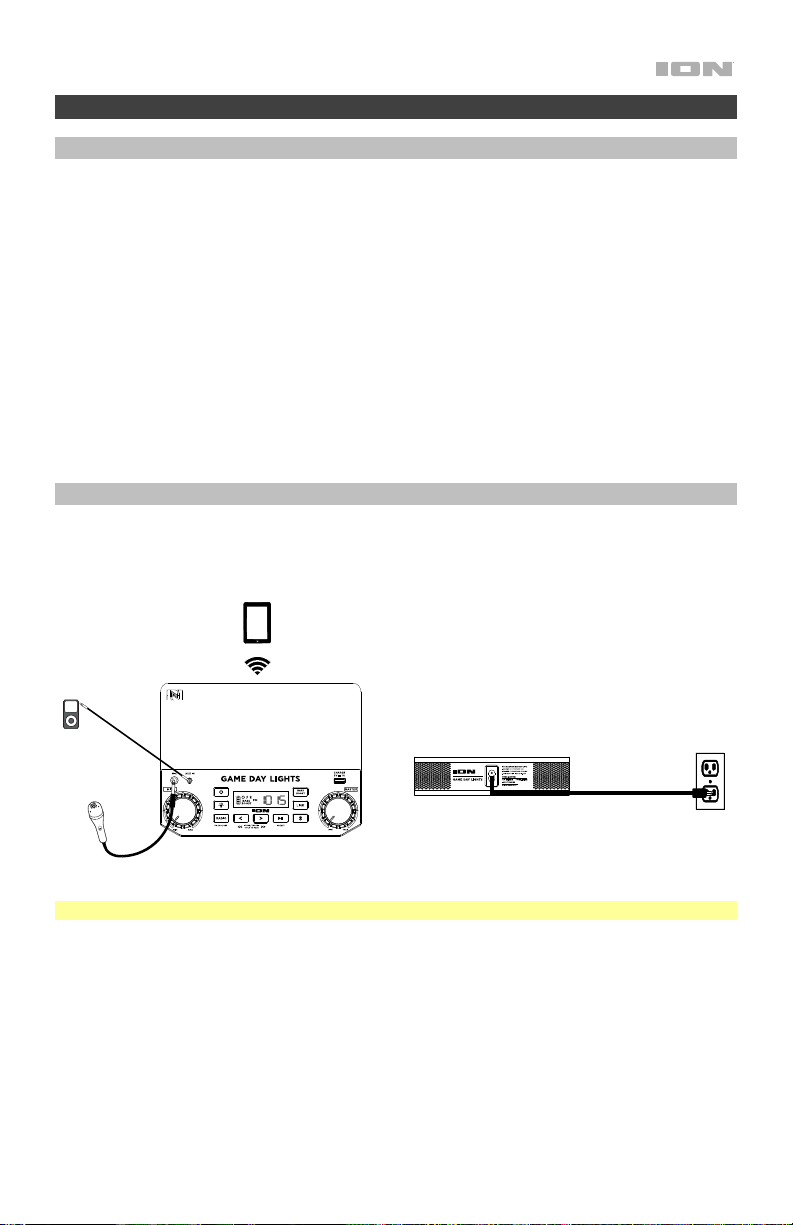
4. Study the connection diagram.
5. Ensure the Master Volume on Game Day Lights is at zero.
6. Connect your devices.
7. Raise the volume to a comfortable level.
8. Return the Master Volume to zero when you are finished using Game Day Lights.
Connection Diagram
Items not listed under the Box Contents are sold separately.
TOP PANEL
MP3
PLAYER
MICROPHONE
TABLET
Note: North America/Japan model shown here.
REAR PANEL
iPA80A
POWER
(for charging)
4
Page 5
1
2
3
4
7
8
9
10
5
6
11
12
1
13
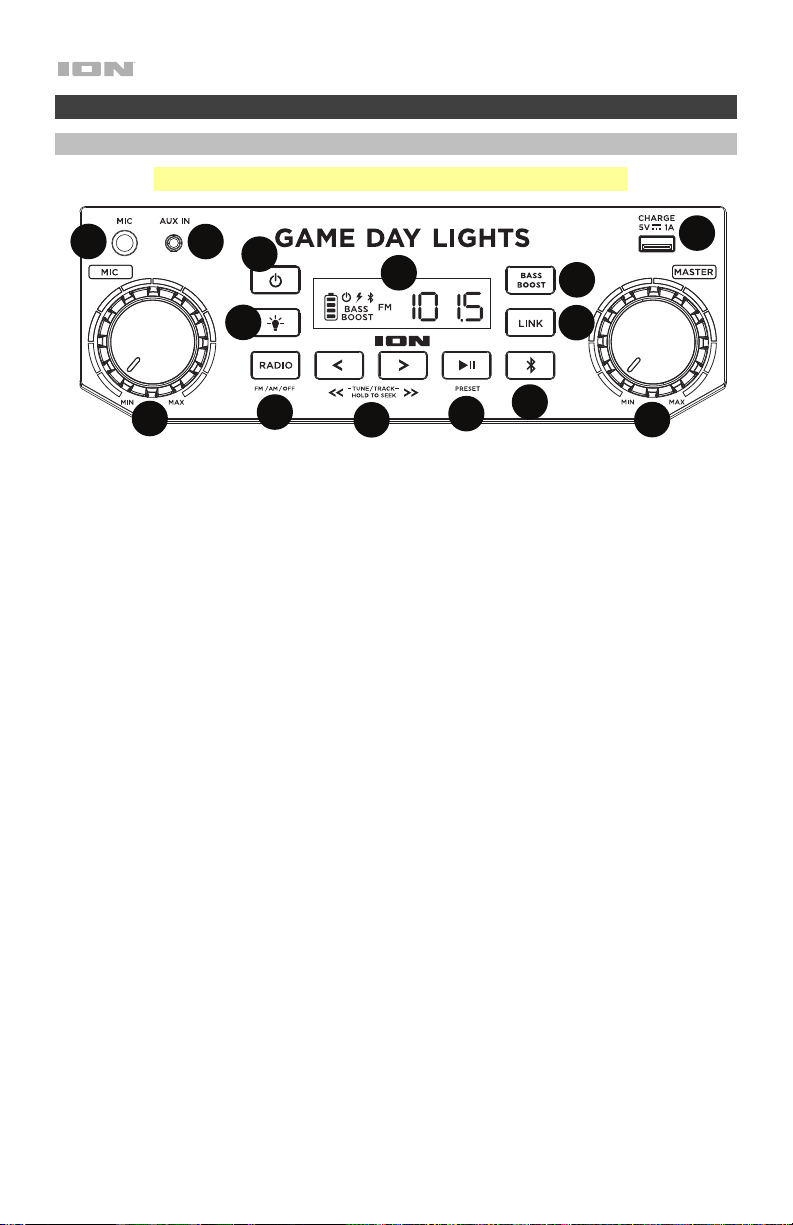
Features
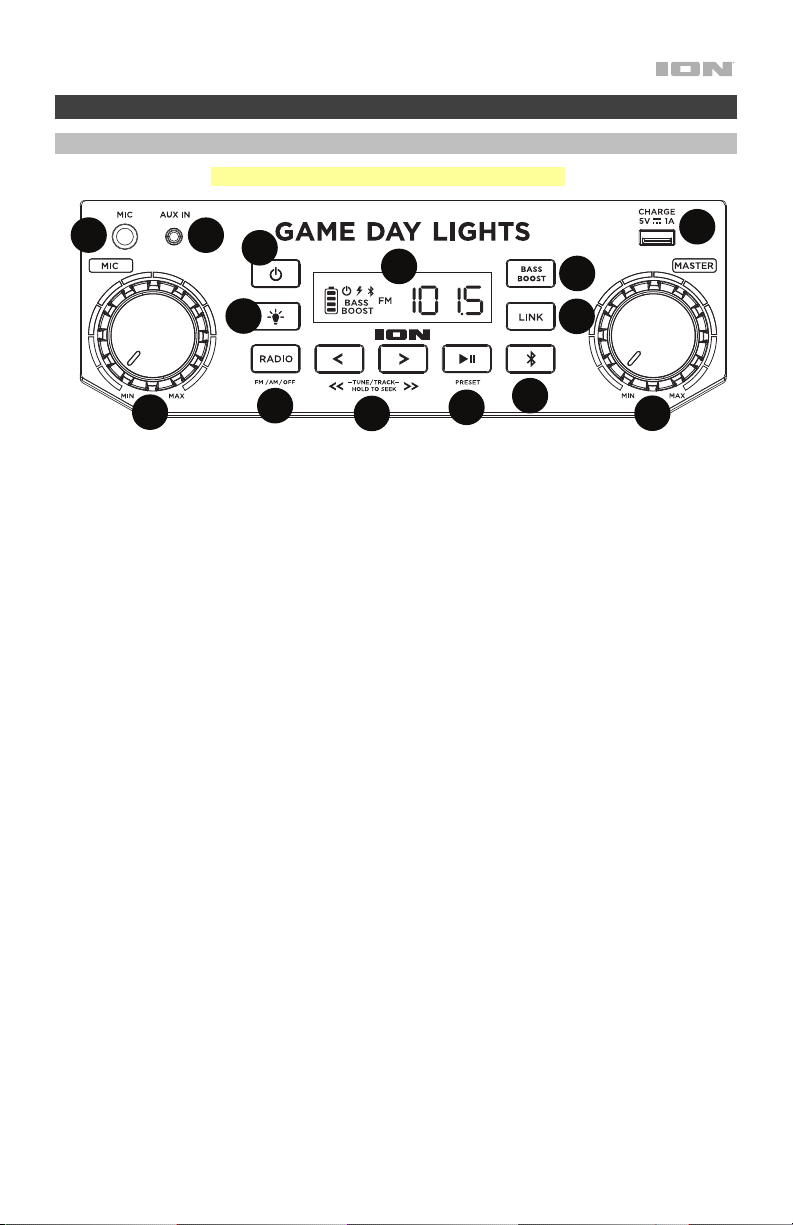
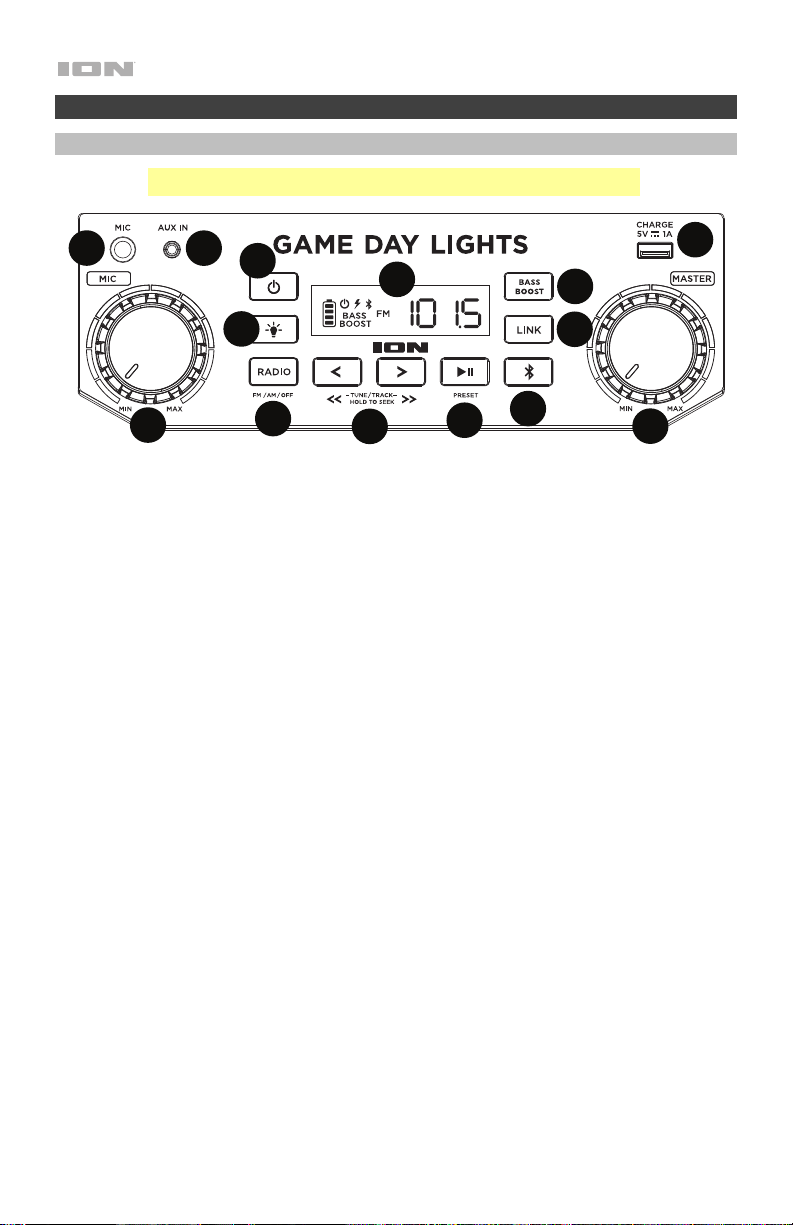
Front Panel
Note: North America/Japan model shown here.
13
12
10
1. Microphone Input with Volume Control (1/4"): This mono input accepts a 1/4" (6.35 mm)
audio source such as a microphone, guitar, or other musical instrument.
2. Auxiliary Input (1/8”): This stereo 3.5 mm (1/8”) input can be used to connect a CD player,
MP3 player, or other audio source.
3. Bluetooth Button: Press and release the Bluetooth button to pair to a Bluetooth device.
Tap this button to disconnect a paired Bluetooth device. Press and hold this button to
disable (or enable) the voice prompts.
4. Lights Button: Press this button to select how the lights function:
• Color Cycle: The lights slowly glow and cycle through colors. Press and hold the light
mode button to freeze the lights on one color.
• Beat Sync: The lights react to the beat of the music. If there is no music playing, the
lights will cycle through colors.
• Static Color: The lights are lit solidly white.
• Off: The lights turn off.
5. Bass Boost: Press this button to enhance the overall bass frequency response.
6. Master Volume Control: This adjusts the speaker’s main mix volume, which includes the
Microphone Input, Auxiliary Input, Radio, and the audio of a paired Bluetooth device.
7. Radio Selector (North America/Japan): This button sets the radio to AM, FM, or turns the
radio off.
8. Display: Displays the current radio station, battery status, and Bluetooth status.
• Charging Indicator:
o When the power cable is connected, movement of the battery segments shows
the battery is charging. When fully charged, all battery segments will be lit
without blinking.
o When the power cable is disconnected, the battery segment shows the level of
the battery.
o When the battery level is low, the bottom battery segment will blink.
11
5
Page 6
1
2
3
4
7
8
9
10
5
6
11
12
1
13
1
o If a front panel button is not pressed within 60 seconds, the battery level
indicator will turn off (to save energy). The battery level indicator will reappear
when any button is pressed. Also, when the battery gets to the lowest battery
icon segment, the battery level indicator will turn back on.
• Lightning Bolt Icon: The lightning bolt icon will illuminate when the power cable is
connected to wall power.
• Bluetooth Icon: The Bluetooth icon will be lit solid when a device is paired to Game
Day Lights.
• Power Icon: The power icon will be lit when Game Day Lights is powered on. The
power icon will not be lit when Game Day Lights is powered off.
• Bass Boost Icon: The Bass Boost icon will be on when the Bass Boost function is
activated. The icon will be off when the function is deactivated.
• Link Icon: The Link icon will be on when stereo-linked to another speaker. The Link
icon will be off when a single speaker is used.
9. Tune/Track Buttons: Tap these buttons to tune in a radio station (North America/Japan
only) or go to the previous/next track on a Bluetooth-connected device. To "seek" (jump to
the next available station), hold either button down for a few seconds until it starts to seek
a station. The unit will remember the last station it was on and start at that station when
powered off and on again.
Note: With some apps, pressing the Track – button or Track + button may go to another
playlist or music genre.
10. Play/Pause/Preset: Press to play or pause a track from a connected Bluetooth device. In
Radio Mode (North America/Japan only), press and release this button to select a
previously saved preset station. See the section Using the Radio for more details on
saving and recalling presets.
11. USB Charging Port: Connect your device’s charge cable here to charge it. USB charging
only functions when the unit’s power is turned on.
Note: To charge smartphones and tablets faster, put the device’s screen to sleep.
12. Link: Press and hold this button to start stereo-linking to another Game Day Lights
speaker. Double press this button to disconnect the link to another Game Day Lights
speaker.
13. Power ON/OFF Switch: Press and hold this button for 3 seconds to power Game Day
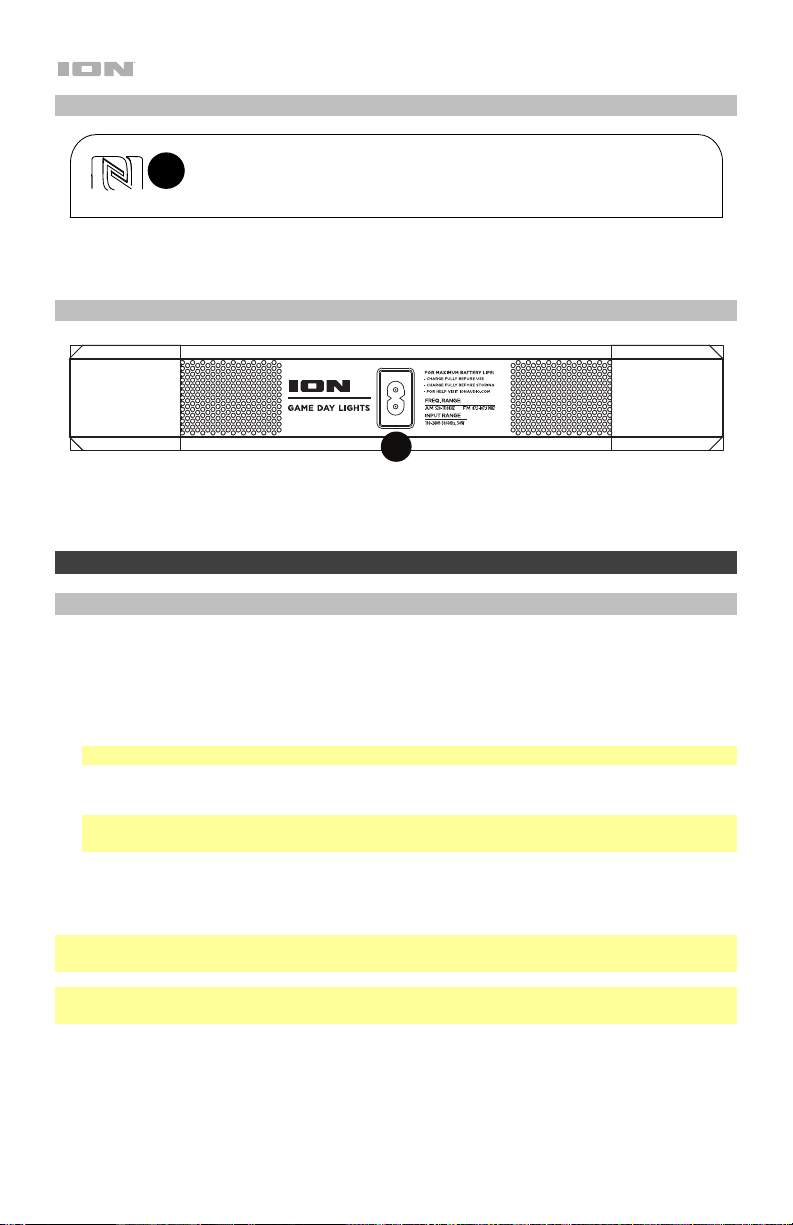
Top Panel
Lights on/off. Please note that while Game Day Lights is connected to a power source, it
does not need to be powered on to charge the battery. When the power is on, the display
will show the decimal icon or your current radio station.
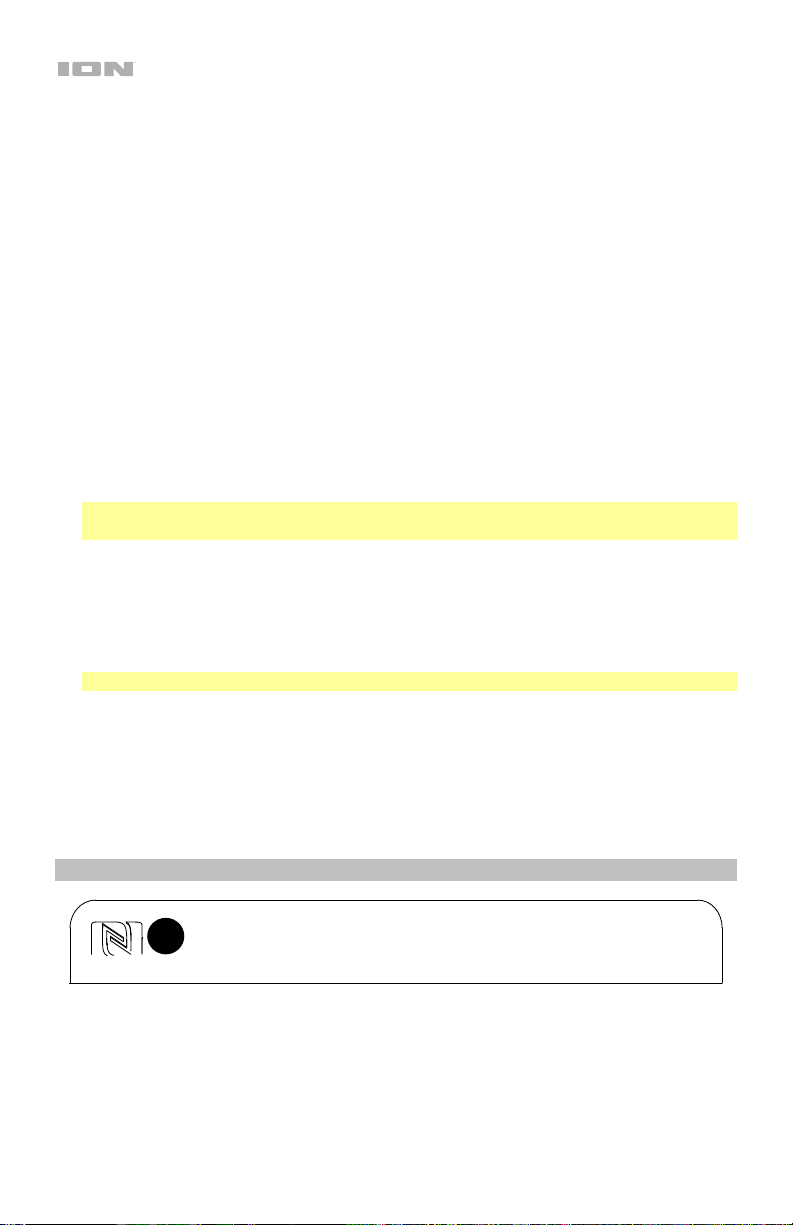
1. NFC: Tap your NFC (near-field communication) supported and enabled device here to pair
your phone by gently bumping on the ‘N’ logo.
6
Page 7
1
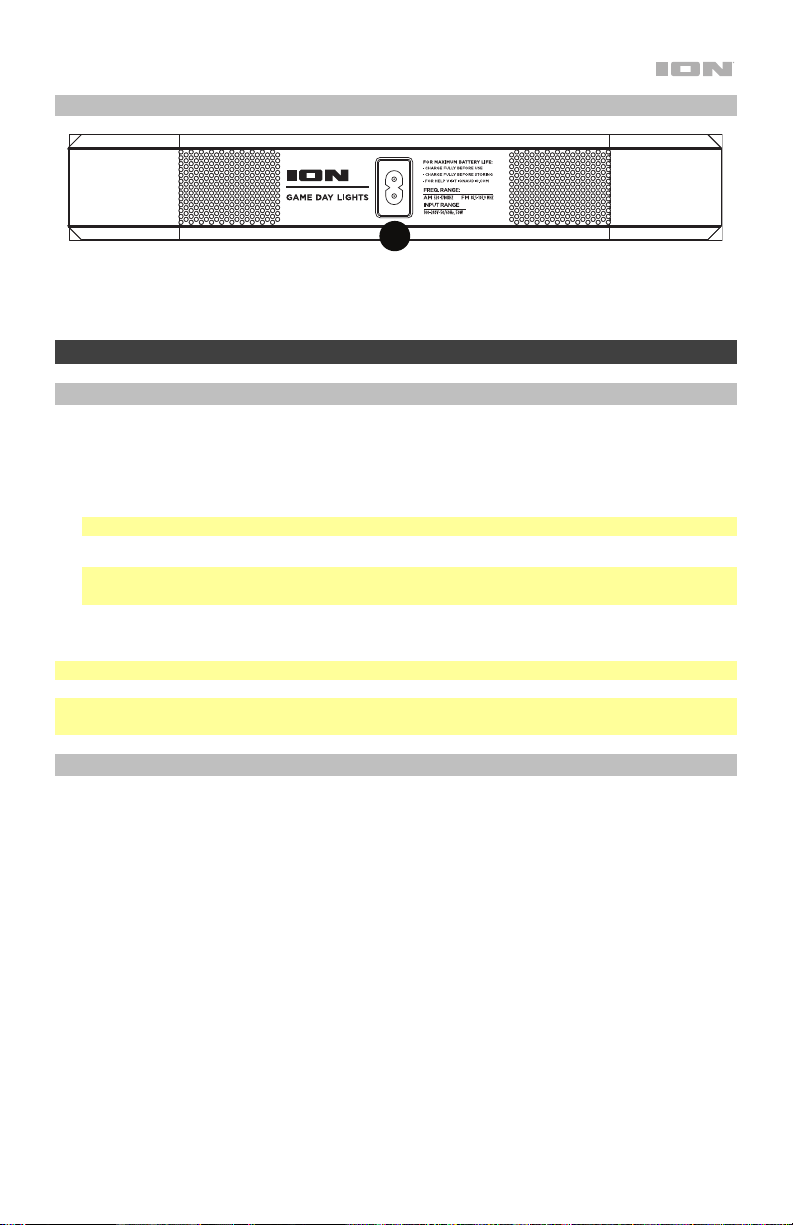
Rear Panel
iPA80A
1. Power Cable Input: Insert the included power cable here to charge the unit. Note that the
Game Day Lights can be used with the power cable while it simultaneously charges the
battery.
Operation
Pairing a Bluetooth Device
1. Turn on your Bluetooth device.
2. Power on Game Day Lights. Press and release the Bluetooth button to enter Bluetooth
pairing mode.*
3. Navigate to your Bluetooth device’s setup screen, find Game Day Lights and connect.
Note: If your Bluetooth device prompts for a pairing code, enter “0000”.
4. The Bluetooth icon will be lit solid when a device is “paired” to Game Day Lights. *
Note: Users should consider updating their OS if experiencing trouble with pairing or
playing music.
5. Tap the Bluetooth button to disconnect a paired Bluetooth device. *
6. To connect to another Bluetooth device, repeat steps 3-4.
Note: Maximum range will be achieved when using devices with Bluetooth 4.0.
* Tip: If you would like to disable (or enable) the voice prompts, double press the Bluetooth
button.
Pairing a Bluetooth Device Using NFC
NFC (near-field communication) allows data exchange from devices, such as pairing, by gently
bumping them together. Check in your device’s manual to see if this feature is supported.
To use NFC to pair with Game Day Lights:
1. In order to use NFC, your device must be turned on and unlocked.
2. Enter your device’s Settings menu and check that NFC is turned On (one time step).
3. Power on Game Day Lights.
4. Touch and briefly hold your device to the NFC logo.
5. Follow the pairing instructions that appear on your phone. If a passcode is required, enter
“0000”.
6. To unpair, gently bump your device against the NFC logo on Game Day Lights.
7
Page 8
Using the Radio
Note: This section for use with North America/Japan models only.
Selecting a Radio Station:
1. Press the Radio button to choose AM/FM.
2. Select a radio station using the –/+ buttons.
Note: If there is poor AM reception, disconnect AC power for optimal AM radio reception. To
further adjust AM reception, move the entire unit.
Saving a preset:
1. Press the Radio button to choose AM/FM and select a radio station that you want to save
to a preset location using the –/+ buttons.
2. Press and hold Play/Pause for 1 second. A preset number will appear on the screen.
3. Use the –/+ buttons to select which preset you want to save it to.
4. Press Play/Pause to confirm. SAV will appear on the screen.
Selecting a preset:
1. Press the Radio button to select AM/FM.
2. Press Play/Pause to cycle through the saved presets.
Stereo-Linking Two Game Day Lights Speakers*
To link two Game Day Lights speakers together for stereo sound:
1. Press and hold the Link button on both speakers to enter Stereo-Link mode. A tone will be
heard and the word LINK will blink when in the process of linking to the second speaker.
Once a link has been established, the word LINK will be lit solid.
Note: The linking process can take up to a minute to complete. The closer the two
speakers are to each other, the quicker the linking process occurs.
2. Press and release the Bluetooth button on either speaker to start the pairing process. The
Bluetooth icon will flash on the randomly assigned master speaker when in pairing mode.
The speaker assigned as master (with the Bluetooth icon illuminated) will play the Left
channel audio.
Note: The assigned left and right speaker channels can be switched by pressing and
holding the Bluetooth button.
3. Navigate to your Bluetooth device’s setup screen, find Game Day Lights and connect.
See Pairing a Bluetooth Device for Bluetooth setup details.
4. To disconnect/cancel linking between the two speakers, double press the Link button.
* This speaker may be able to link to different speakers in the ION Audio product line. For
more information, please visit ionaudio.com.
8
Page 9

Troubleshooting
If the unit is not charging: Make sure the power cable is properly connected to the power
input and the power outlet.
If the sound is distorted: Try lowering the volume control of your sound source, musical
instrument, or microphone. Also, try to reduce the overall volume of Game Day Lights using
the Master Volume knob.
If there is too much bass: Try adjusting the tone or EQ control on your sound source to lower
the bass level. This will allow you to play the music louder before clipping (distortion) occurs.
If there is poor AM reception: When you have a Bluetooth device that is connected,
disconnect your Bluetooth device in order to listen to AM radio. To adjust AM reception, move
the entire unit.
If there is a high-pitched whistling noise when using microphones: This is probably
feedback. Point the microphone away from the speaker.
If you can’t hear the microphone over the music volume: Turn down the music volume
from your source.
If you can’t play music from a flash drive: The USB port is only for charging USB devices.
If you cannot connect your audio device to Game Day Lights via Bluetooth:
• Have your audio device (e.g., smartphone or tablet) and Game Day Lights as close
together as possible while trying to connect. Make sure both the audio device and Game
Day Lights are unobstructed by walls, furniture, etc.
• Reset the Bluetooth connection on Game Day Lights to disconnect Game Day Lights
from any other audio device and restart the search process. If this does not work right
away, power off Game Day Lights and then power it back on. See Pairing a Bluetooth
Device for more information.
• Reset the Bluetooth connection on your audio device by turning Bluetooth off and back
on. You can find this under the Bluetooth menu in the Settings for your phone or other
audio device.
If this does not work, and you have connected to Game Day Lights before, find Game
Day Lights in the list of available or previously connected devices in your audio device's
Bluetooth menu, tap the "gear" or “i” icon located next to it and then select Unpair or
Forget. Turn Game Day Lights off and back on and try pairing again once it reappears in
your available devices list.
Note: If Game Day Lights has been paired to another audio device recently that is still
within range, you may need to repeat this process with that audio device to fully
disconnect.
9
Page 10

Guía de inicio rápido (Español)
Introducción
Gracias por comprar el Game Day Lights. En ION, su entretenimiento es tan importante para nosotros como
para usted. Por eso es que diseñamos nuestros productos con una sola cosa en mente—hacer que su vida
sea más divertida y cómoda.
Nota: Antes de utilizar por primera vez el producto, cargue completamente la batería. Su unidad se
despachó intencionalmente con una carga reducida de la batería por razones de seguridad en el tránsito.
Utilice el cable del suministro eléctrico incluido para conectar la unidad a una toma de corriente y permita
que la unidad se cargue durante hasta 5 horas. Esto contribuye a asegurar la vida útil más larga de su
batería.
Contenido de la caja
Game Day Lights
Micrófono con cable de micrófono
Cable auxiliar estéreo de 1/8" (3.5 mm)
Cable de alimentación (2-patillas IEC)
Guía de inicio rápido
Manual sobre la seguridad y garantía
Soporte
Para obtener la información más reciente acerca de este producto (documentación, especificaciones
técnicas, requisitos de sistema, información de compatibilidad, etc.) y registrarlo, visite ionaudio.com.
Para obtener soporte adicional del producto, visite ionaudio.com/support.
Baterías recargables
Las baterías de plomo-ácido recargables son del mismo tipo que se usa en los automóviles. Como sucede
con la batería del auto, la manera en que use esta batería tiene gran influencia sobre la duración de su vida
útil. Con un uso y tratamiento correctos, una batería de plomo-ácido puede durar varios años. He aquí
algunas recomendaciones para prolongar la vida útil de la batería interna.
Uso General
Almacenamiento
Reparación
Disposición final
Cargar completamente antes de utilizar.
Cargar completamente antes de almacenar.
Para lograr la mayor longevidad del producto, no lo almacene a temperaturas muy
altas (superiores 90 °F / 32 °C) o muy frías (inferiores a 32 °F / 0 °C).
Es aceptable dejar su sistema de sonido enchufado. No sobrecargará la batería.
Si deja que el nivel de la batería baje y no la carga durante 3 meses, puede perder
permanentemente su capacidad.
Si la batería no se carga, compruebe el fusible cerca de la entrada del cable de
alimentación. Si el fusible no está intacto, remplácelo.
La batería puede remplazarse (consulte los detalles en la sección Especificaciones
técnicas).
Por la garantía y las piezas de repuesto, visitando ionaudio.com.
Lleve la unidad a un centro de reciclaje o deséchela de acuerdo a las ordenanzas
locales.
10
Page 11
Instalación rápida
Para comenzar
1. Asegúrese de que todos los artículos indicados en Contenido de la caja estén incluidos
en ella.
2. LEA EL MANUAL SOBRE LA SEGURIDAD Y LA GARANTÍA ANTES DE UTILIZAR EL
PRODUCTO.
3. PARA ASEGURAR UNA MÁXIMA VIDA ÚTIL DE LA BATERÍA, ASEGÚRESE DE QUE
ESTÉ COMPLETAMENTE CARGADA ANTES DE UTILIZARLA POR PRIMERA VEZ.
4. Estudie el diagrama de conexión.
5. Asegúrese de que el volumen maestro del Game Day Lights esté en cero.
6. Conecte sus dispositivos.
7. Suba el volumen hasta un nivel confortable.
8. Regrese el volumen maestro a cero cuando termine de usar el Game Day Lights.
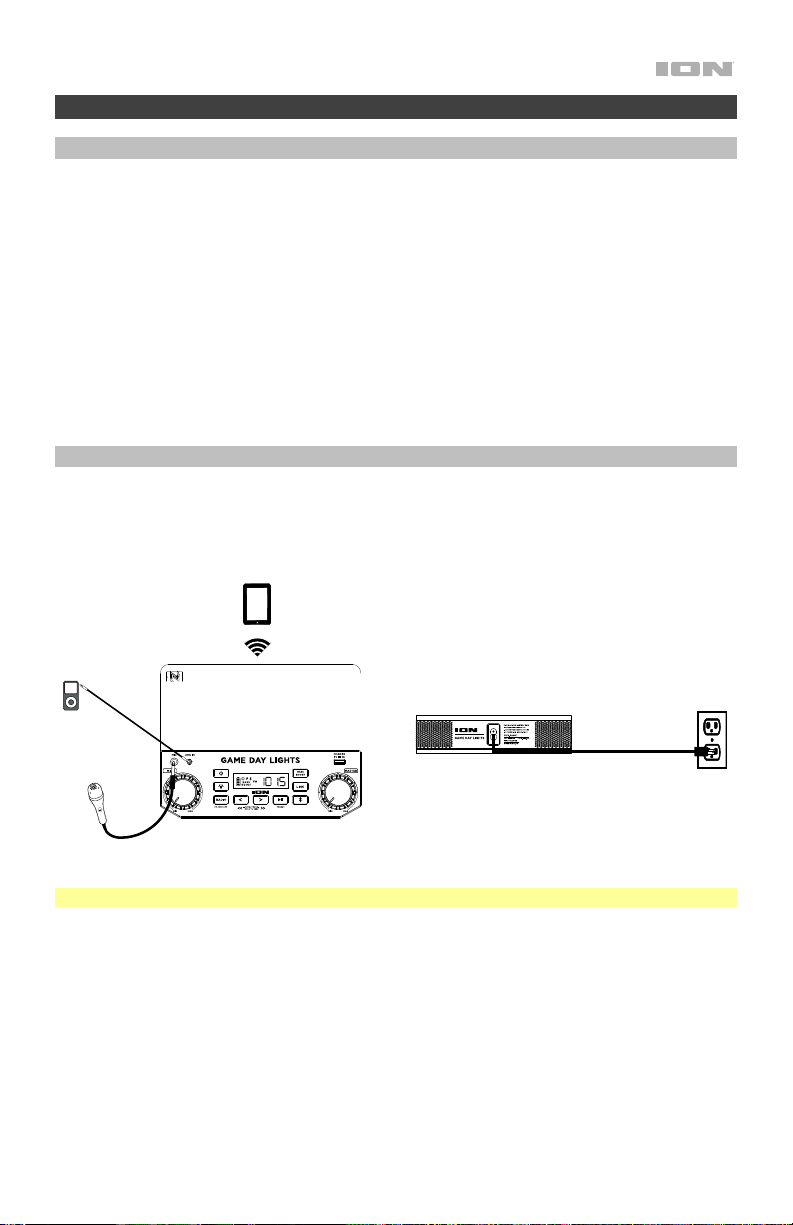
Diagrama de conexión
Los elementos que no se enumeran en Contenido de la caja se venden por separado.
PANEL SUPERIOR
MP3
REPRODUCTOR
MICRÓFONO
TABLETA
Nota: Aquí se muestra el modelo para Norteamérica/Japón.
PANEL TRASERO
iPA80A
SUMINISTRO
ELÉCTRICO
(para carga)
11
Page 12
1
2
3
4
7
8
9
10
5
6
11
12
1
13
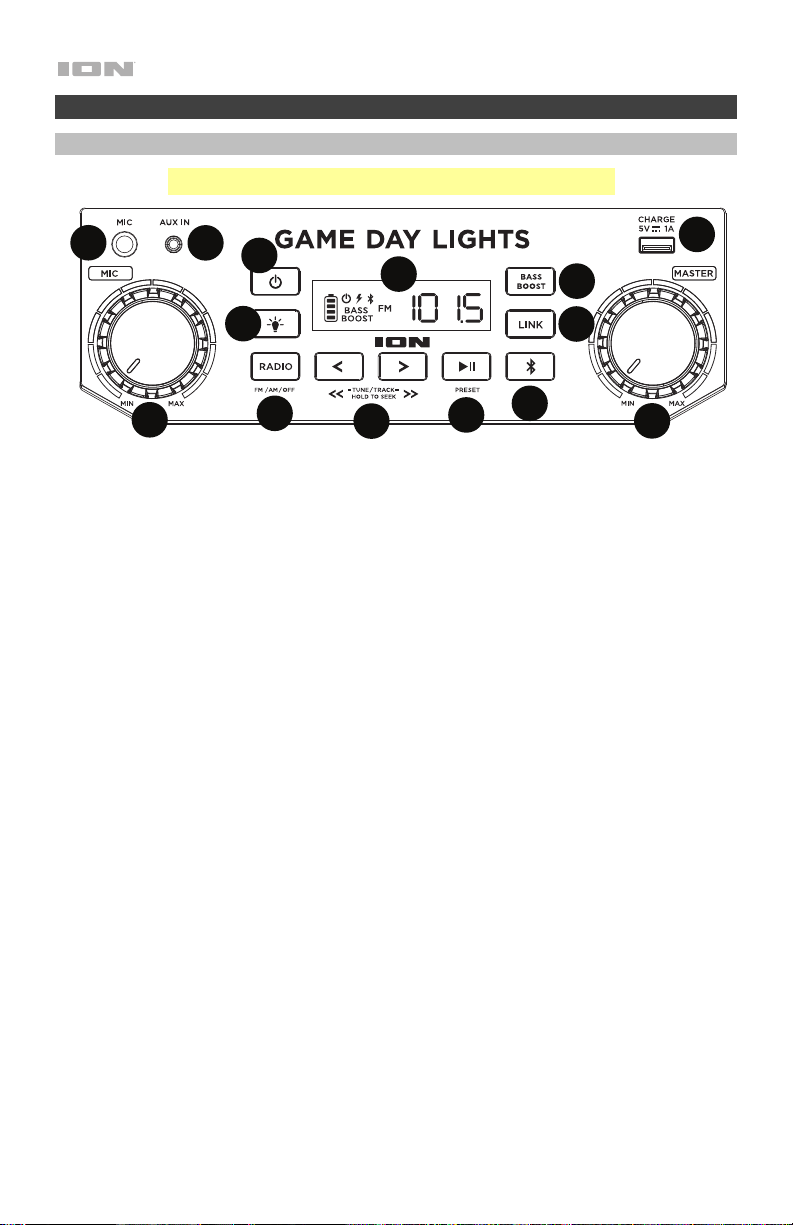
Características
Panel frontal
Nota: Aquí se muestra el modelo para Norteamérica/Japón.
13
12
10
1. Entrada para micrófono con control de volumen (1/4 pulg.): Esta entrada mono admite
una fuente de audio de 1/4" (6,35 mm) tal como un micrófono, una guitarra u otro
instrumento musical.
2. Entrada auxiliar (1/8 pulg.): Esta entrada de 3,5 mm (1/8 pulg.) estéreo se puede usar
para conectar un reproductor de CD, MP3 u otra fuente de audio.
3. Botón de Bluetooth: Presione y suelte el botón Bluetooth para vincular a un dispositivo
Bluetooth. Toque ligeramente el botón Bluetooth para desconectar un dispositivo
Bluetooth apareado. Mantenga pulsado este botón para desactivar (o activar) los avisos
de voz.
4. Botón de modo de luz: Pulse este botón para seleccionar el funcionamiento de las luces:
• Ciclo de color: Las luces brillan suavemente y cambian de un color a otro. Mantenga
pulsado el botón de modo para congelar las luces en un color.
• Sincronización con el ritmo: Las luces reaccionan al ritmo de la música.
• Color estático: Las luces se encienden de blanco permanentemente.
• Apagadas: Las luces se apagan.
5. Bass Boost: Pulse este botón para mejorar la respuesta en frecuencia general de los
graves.
6. Control de volumen maestro: Este control ajusta el volumen de la mezcla principal del
altavoz, que incluye la entrada de micrófono, la entrada auxiliar, el sintonizador y el audio
de un dispositivo Bluetooth apareado.
7. Selector de radio (Norteamérica/Japón): Este botón ajusta la radio a AM, FM, o la apaga.
8. Pantalla: Muestra la emisora de radio actual, el estado de la batería, el estado del
Bluetooth y el estado del enlace.
• Indicador de carga:
o Con el indicador de carga de la batería, cuando el cable de alimentación está
12
conectado, el movimiento de los segmentos de la batería muestra que se está
cargando. Una vez completamente cargada, todos los segmentos de la batería
estarán encendidos sin parpadear.
o Cuando se desconecta el cable de corriente, el segmento de la batería muestra en
nivel de la misma.
11
Page 13

o Cuando el nivel de la batería sea bajo, parpadeará el segmento inferior de la
batería.
o Si no se pulsa ningún botón del panel delantero en los siguientes 60 segundos, el
indicador de nivel de batería se apagará (para ahorrar energía). El indicador de
nivel de la batería volverá a aparecer cuando se pulse algún botón. Además, c
uando la batería llegue al segmento más bajo del icono de la batería, el indicador
de nivel de la batería volverá a encenderse.
• Icono del relámpago: El icono del relámpago se encenderá cuando el cable de
corriente esté conectado a una toma de corriente de pared.
• Icono de Bluetooth: El icono de Bluetooth se enciende con luz azul continua cuando
hay un dispositivo apareado al Game Day Lights.
• Icono de encendido: El icono de encendido se encenderá cuando el Game Day
Lights se encienda. Este icono de encendido no se encenderá cuando Game Day
Lights está apagado.
• Icono de Bass Boost: El icono de Bass Boost se iluminara cuando la función esté
activada. El icono estará apagado cuando la función esté desactivada.
• Icono de enlace: El icono de enlace estará encendido cuando se haya concretado el
enlace estéreo con otro altavoz. El icono de enlace estará apagado cuando se utilice
un solo altavoz.
9. Botones de sintonizador/pista: Toque ligeramente estos botones para sintonizar una
emisora de radio (Norteamérica y Japón solamente) o pasar a la pista anterior/siguiente de
un dispositivo Bluetooth conectado. Para "buscar" (saltar a la siguiente emisora
disponible), mantenga pulsado cualquier botón durante unos segundos hasta que empieza
a buscar la emisora. La unidad recuerda la última emisora que estaba sintonizada y
comienza en esa emisora cuando la apaga y enciende nuevamente.
Nota: En algunas aplicaciones, pulsar los botones Track – o Track + hará que vaya a otra
lista de reproducción o género musical.
10. Reproducir/Pausa/Preset: Pulse para reproducir o hacer pausa en una pista de un
dispositivo Bluetooth conectado. En modo de radio (Norteamérica y Japón solamente),
Pulse y suelte este botón para seleccionar una emisora preprogramada guardada
previamente. Consulte la sección Cómo usar la radio para obtener más detalles sobre
cómo guardar y recuperar presets.
11. Puerto de carga USB: Conecte aquí el cable de carga de su dispositivo para cargarlo. La
carga por USB funciona solamente cuando la unidad está encendida.
Nota: Para cargar teléfonos inteligentes (smartphones) y tabletas más rápido, ponga la
pantalla del dispositivo en estado de reposo.
12. Enlace: Mantenga pulsado este botón para comenzar el enlace estéreo con otro altavoz
Game Day Lights. Presione dos veces este botón para interrumpir el enlace estéreo con
otro altavoz Game Day Lights.
13. Interruptor de encendido/apagado: Mantenga pulsado este botón durante 3 segundos
para encender o apagar el Game Day Lights. Tenga en cuenta que mientras el Game Day
Lights está conectado a un suministro eléctrico, no es necesario encenderlo para que
cargue la batería. Cuando el altavoz está encendido, la pantalla mostrará el icono de
decimal o su emisora de radio actual.
13
Page 14
1
2
3
4
7
8
9
10
5
6
11
12
1
13
1
1
Panel superior
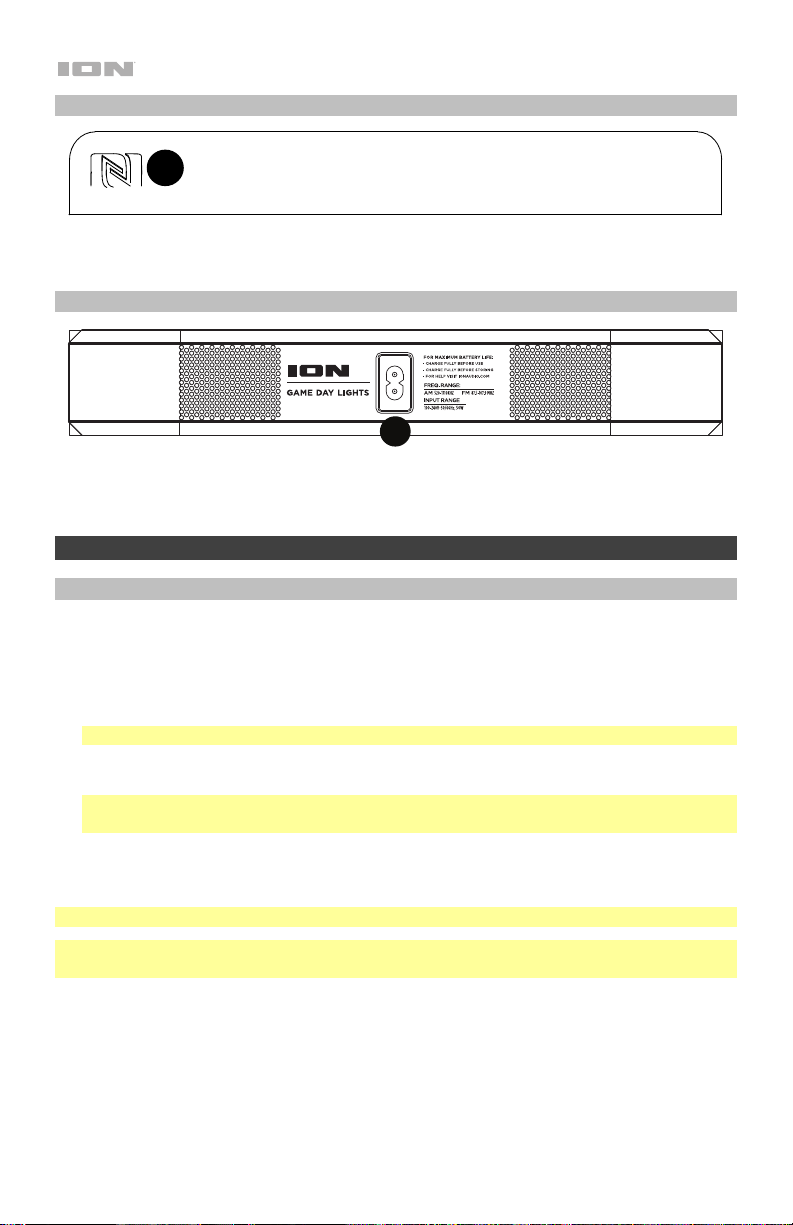
1. NFC: Toque ligeramente aquí su dispositivo NFC (comunicación de campo cercano)
Panel trasero
1. Entrada del cavo de alimentación: Inserte aquí el cable de alimentación incluido para
soportado y habilitado para aparear su teléfono tocando suavemente el logo de la ‘N’.
iPA80A
alimentación la unidad. Tenga en cuenta que el Game Day Lights puede funcionar con el
adaptador de potencia mientras se carga simultáneamente la batería.
Funcionamiento
Apareamiento de un dispositivo Bluetooth
1. Encienda su dispositivo Bluetooth.
2. Encienda el Game Day Lights. Presione y suelte el botón Bluetooth para vincular a un
dispositivo Bluetooth.*
3. Navegue a la pantalla de configuración de su dispositivo Bluetooth, busque Game Day
Lights y conecte.
Nota: Si su dispositivo Bluetooth solicita un código de apareamiento, ingrese “0000”.
4. El icono de Bluetooth se enciende con luz azul continua cuando hay un dispositivo
5. Toque ligeramente el botón Bluetooth para desconectar un dispositivo Bluetooth
6. Para conectarse a otro dispositivo Bluetooth, repita los pasos 3 y 4.
Nota: El alcance máximo se logra cuando se utilizan dispositivos con Bluetooth 4.0 o superior.
* Consejo: Si desea desactivar (o activar) los avisos de voz, pulse dos veces el botón
Bluetooth.
apareado al Game Day Lights. *
Nota: Los usuarios deben considerar la actualización de su sistema operativo (OS) si
experimentan problemas con el apareamiento o la reproducción de música.
apareado. *
14
Page 15

Cómo aparear un dispositivo Bluetooth usando NFC
La tecnología NFC (comunicación de campo cercano) permite el intercambio de datos entre
dispositivos, tal como el apareamiento, juntándolos suavemente. Compruebe en el manual de
su dispositivo si se soporta esta característica.
Cómo usar NFC para aparearse con el Game Day Lights:
1. A fin de usar NFC, su dispositivo debe estar encendido y desbloqueado.
2. Abra el menú Settings (Configuración) de su dispositivo y verifique que NFC esté On
(Activado) (este paso solo se realiza una vez).
3. Encienda el Game Day Lights.
4. Toque y acerque brevemente su dispositivo del logo de NFC ubicado en el panel superior
del Game Day Lights.
5. Siga las instrucciones de apareamiento que aparecen en su teléfono. Si se requiere una
contraseña, ingrese “0000”.
6. Para desaparear, toque suavemente con su dispositivo el logo de NFC.
Cómo usar la radio
Nota: Esta sección es solo para modelos de Norteamérica/Japón.
Selección de una estación de radio:
1. Pulse el botón Radio para elegir entre AM/FM.
2. Seleccione una estación de radio utilizando los botones
Nota: Si hay una mala recepción de AM, desconecte la corriente (CA) para una recepción
óptima de la radio AM. Para ajustar la recepción de AM aún más, mueva la unidad completa.
Guardado de presets:
1. Pulse el botón Radio para seleccionar AM/FM y seleccionar una estación de radio que
desee guardar en una ubicación de preset utilizando los botones
2. Mantenga pulsado reproducción/pausa durante 1 segundo. Aparecerá un número de
preset en la pantalla.
3. Utilice los botones
–/+ para seleccionar el preset en el cual desea grabarla.
4. Pulse reproducir/pausa para confirmar. Aparecerá SAV (guardar) en la pantalla.
Selección de presets:
1. Pulse el botón Radio para elegir entre AM/FM.
2. Pulse reproducir/pausa para recorrer los presets guardados.
–/+.
–/+.
15
Page 16

Cómo realizar el enlace estéreo entre dos altavoces Game Day Lights*
Cómo enlazar dos altavoces Game Day Lights entre sí para lograr un sonido estéreo:
1. Mantenga pulsado el botón Link (enlace) en ambos altavoces para ingresar al modo de
enlace estéreo. Se escuchará un tono y la palabra LINK parpadeará cuando esté en
proceso de apareamiento con el segundo altavoz. Una vez establecido el enlace, la
palabra LINK quedará encendida permanentemente.
Nota: El proceso de enlace puede demorar hasta un minuto en completarse. Mientras más
cerca se encuentre ambos altavoces entre sí, más rápido ocurrirá el proceso de enlace.
2. Pulse y suelte el botón Bluetooth en cualquiera de los altavoces para comenzar el
apareamiento. El icono de Bluetooth del altavoz maestro (asignado al azar) parpadeará
mientras está en el modo apareamiento. El altavoz maestro (con el icono de Bluetooth
iluminado) reproducirá el canal de audio izquierdo.
Nota: los canales de altavoz izquierdo y derecho asignados se pueden cambiar
presionando y manteniendo presionado el botón Bluetooth.
3. Navegue a la pantalla de configuración de su dispositivo Bluetooth, busque Game Day
Lights y establezca la conexión. Consulte en Apareamiento de un dispositivo Bluetooth
los detalles de la configuración Bluetooth.
4. Para desconectar/cancelar el enlace entre dos altavoces, pulsado dos veces el botón
Link.
*Es posible que este altavoz sea capaz de enlazarse con los diferentes altavoces de la línea de
productos de ION Audio. Para obtener más información, visite ionaudio.com.
16
Page 17

Solución de problemas
Si la unidad no se carga: Asegúrese de que el cable de alimentación esté conectado
correctamente a la entrada de corriente y a la toma de corriente.
Si el sonido está distorsionado: Pruebe bajando el control de volumen de su fuente de
sonido o instrumento musical. Pruebe también reduciendo el volumen general del Game Day
Lights.
Si los graves son demasiado fuertes: Intente ajustando el control de tono o ecualización de
su Game Day Lights o fuente de sonido para reducir el nivel de graves. De esta forma podrá
reproducir la música con más volumen antes de que se produzca el recorte (distorsión).
Si hay recepción pobre de AM: Cuando tiene un dispositivo Bluetooth que está conectado,
desconecte ese dispositivo Bluetooth a fin de escuchar la radio de AM. Para ajustar la
recepción de AM, mueva la unidad completa.
Si hay un silbido agudo cuando se usa un micrófono: Probablemente sea realimentación.
Apunte el micrófono apartándolo del altavoz.
Si no puede oír el micrófono por arriba del volumen de la música: Disminuya el volumen
de la música en su fuente.
Si no logra reproducir música desde una unidad flash: Los puerto USB sea solo para
cargar dispositivos USB.
Si no puede conectar su dispositivo de audio al Game Day Lights mediante Bluetooth:
• Mantenga su dispositivo de audio (por ej., teléfono inteligente [smartphone] o tableta) y el
Game Day Lights lo más cerca posible entre sí al realizar la conexión. Asegúrese que
tanto el dispositivo de audio como el Game Day Lights no estén obstruidos por paredes,
muebles, etc.
• Reinicie la conexión Bluetooth del Game Day Lights para desconectarlo Game Day Lights
de cualquier otro dispositivo de audio y reinicie el proceso de búsqueda. Si esto no
funciona en seguida, apague el Game Day Lights y luego vuelva a encenderlo. Para más
información, consulte Apareamiento de un dispositivo Bluetooth.
• Reinicie la conexión Bluetooth de su dispositivo de audio apagando el Bluetooth y luego
volviendo a encenderlo. Puede encontrar esta opción dentro del menú Bluetooth en los
ajustes de su teléfono o dispositivo de audio.
Si esto no funciona y ya se había conectado al Game Day Lights anteriormente, busque
Game Day Lights en la lista de dispositivos disponibles o previamente conectados en el
menú Bluetooth de su dispositivo de audio, toque el icono de engranaje o "i" ubicado
junto a él y luego seleccione Desaparear u Olvidar. Apague el Game Day Lights, luego
vuelva a encenderlo e intente aparearlo nuevamente una vez que vuelva a aparecer en su
lista de dispositivos disponibles.
Nota: Si Game Day Lights ya ha sido recientemente apareado con otro dispositivo de
audio que aún se encuentre dentro del alcance, es posible que tenga que repetir este
proceso con ese dispositivo de audio para desconectarlo completamente.
17
Page 18

Guide d'utilisation rapide (Français)
Présentation
Merci d’avoir fait l’acquisition de l'enceinte Game Day Lights. Chez ION, votre divertissement est aussi
important pour nous qu’il l’est pour vous. C’est pourquoi nous concevons nos produits avec une seule
chose en tête — rendre la vie plus amusante et plus pratique.
Remarque : Veuillez vous assurer d'avoir complètement chargé la batterie du produit avant sa première
utilisation. L’appareil a été expressément expédié avec une charge de batterie réduite afin d’assurer un
transport sécuritaire.
Veuillez utiliser le câble d’alimentation fourni pour relier l’appareil à une prise secteur et laisser la batterie se
recharger pendant 5 heures. Ceci permettra de maximiser la durée de vie de la batterie.
Contenu de la boîte
Game Day Lights
Microphone avec câble
Câble auxiliaire stéréo 3,5 mm (1/8 po)
Câble d'alimentation (CEI à 2 broches)
Guide d'utilisation rapide
Consignes de sécurité et informations concernant la garantie
Assistance technique
Pour les toutes dernières informations concernant la documentation, les spécifications techniques, la
configuration requise, la compatibilité et l'enregistrement du produit, veuillez visiter ionaudio.com.
Pour de l'assistance supplémentaire, veuillez visiter ionaudio.com/support.
Batteries rechargeables
Les batteries d'accumulateurs au plomb rechargeables sont du même type que les batteries utilisées dans
les automobiles. Comme pour la batterie de votre automobile, la manière dont vous l'utilisez a un impact
direct sur sa durée de vie. Cependant, avec une bonne utilisation, la batterie au plomb peut avoir une durée
de vie de plusieurs années. Voici quelques recommandations pour prolonger au maximum la durée de vie
de la batterie interne.
Utilisation générale
Entreposage
Réparation
Élimination
18
Chargez complètement la batterie avant utilisation.
Chargez complètement la batterie avant d'entreposer l'enceinte.
Pour optimiser la longévité du produit, ne pas entreposer dans des températures
extrêmement chaudes (supérieur à 32 °C / 90 °F) ou extrêmement froides (moins de
0 °C / 32 °F).
Il n'y a aucun problème à laisser l'enceinte branchée. Cela ne surchargera pas la
batterie.
Si vous laissez le niveau de charge de la batterie s'affaiblir sans la recharger pendant
3 mois, elle risque de perdre sa capacité de charge de façon permanente.
Si la batterie ne parvient plus à se recharger, vérifiez le fusible situé près de l'entrée
du câble d'alimentation. Si le fusible n'est pas intact, veuillez le remplacer.
La batterie peut être remplacée (veuillez consulter la section Spécifications
techniques).
Pour toutes questions concernant la garantie et les pièces de rechange, veuillez
communiquer avec le service de pièces de rechange en visitant ionaudio.com.
Apportez l'appareil dans un centre de recyclage ou disposez selon les règlements de
votre municipalité.
Page 19
Installation
Mise en route
1. Veuillez vous assurer que tous les articles énumérés dans le Contenu de la boîte de ce
guide sont inclus dans la boîte.
2. VEUILLEZ LIRE LE LIVRET DES CONSIGNES DE SÉCURITÉ ET DES INFORMATIONS
SUR LA GARANTIE AVANT D'UTILISER LE PRODUIT.
3. VEUILLEZ VOUS ASSURER D'AVOIR COMPLÈTEMENT CHARGÉ LA BATTERIE
AVANT LA PREMIÈRE UTILISATION AFIN D'AUGMENTER SA DURÉE DE VIE.
4. Veuillez examiner le schéma de connexion.
5. Veuillez vous assurer que le bouton Master Volume du Game Day Lights est à zéro.
6. Raccordez tous vos appareils.
7. Réglez le volume à un niveau confortable.
8. Lorsque vous avez terminé d'utiliser le Game Day Lights, remettez le bouton Master
Volume à zéro.
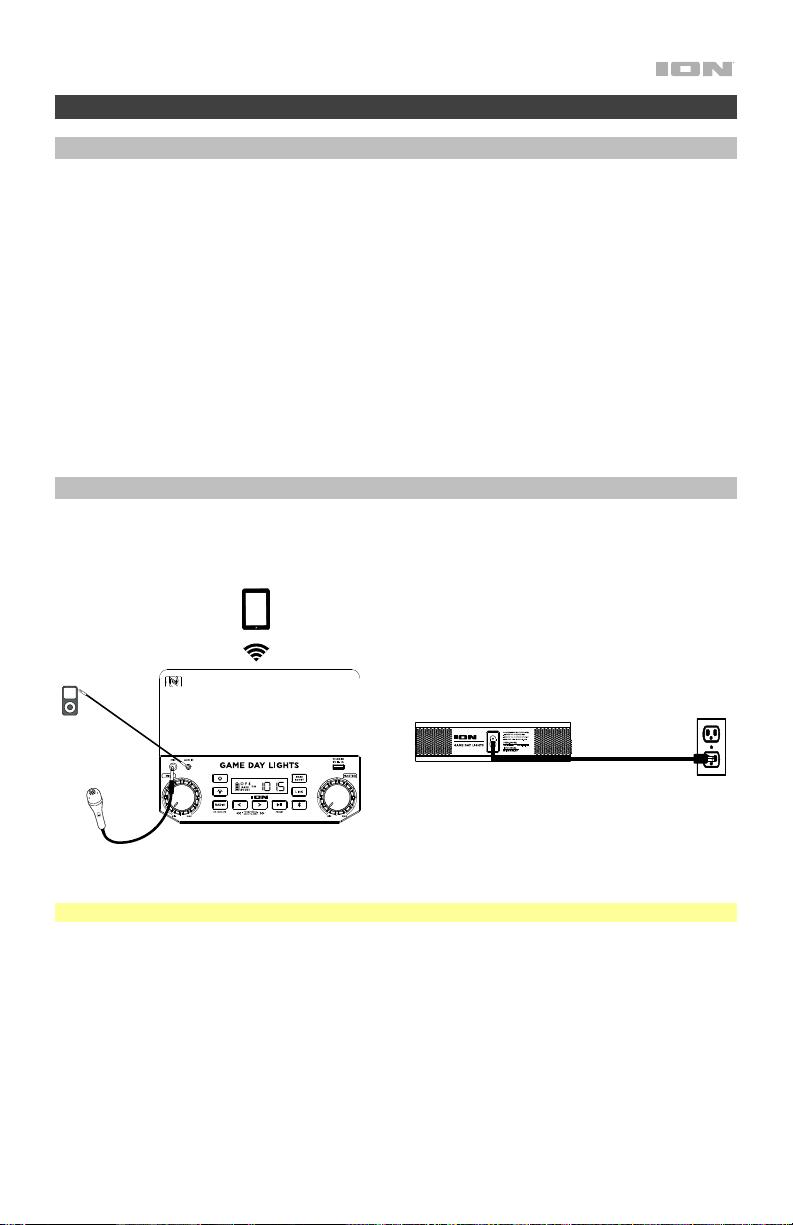
Schéma de connexion
Les articles qui ne figurent pas dans l’encadré Contenu de la boîte sont vendus séparément.
PANNEAU SUPÉRIEUR
LECTEUR
MP3
MICROPHONE
TABLETTE
PANNEAU ARRIÈRE
iPA80A
ALIMENTATION
(rechargement
de la batterie)
Remarque : Modèle nord-américain/japonais illustré.
19
Page 20
1
2
3
4
7
8
9
10
5
6
11
12
1
13
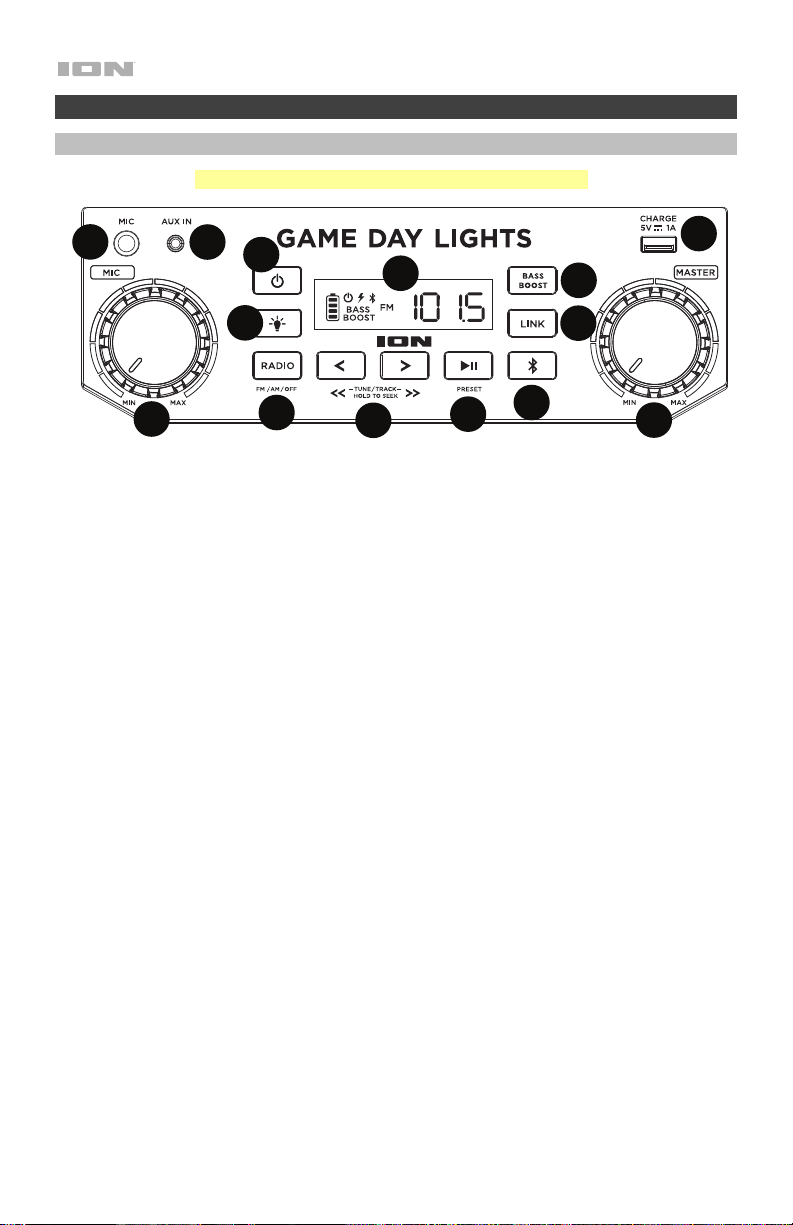
Caractéristiques
Panneau avant
Remarque : Modèle nord-américain/japonais illustré.
13
12
10
1. Entrée microphone 6,35 mm avec commande de volume : Cette entrée mono 6,35 mm
(1/4 po) permet de brancher un microphone, une guitare, ou autres instruments de
musique.
2. Entrée auxiliaire 3,5 mm : Cette entrée stéréo 3,5 mm (1/8 po) permet de brancher un
lecteur de disques compacts, lecteur MP3 ou autres sources audio.
3. Touche Bluetooth : Appuyez sur le bouton Bluetooth et relâchez-le pour le coupler à un
périphérique Bluetooth. Appuyez puis relâchez le bouton Bluetooth pour déconnecter le
périphérique Bluetooth branché. Maintenez la touche Bluetooth pour désactiver (ou
activer) les messages vocaux.
4. Touche de mode d'éclairage : Appuyez sur ce bouton pour sélectionner la façon dont les
lumières fonctionnent :
• Color Cycle : Les lumières brillent et défilent à travers toutes les couleurs. Maintenez
la touche du mode d'éclairage enfoncée afin que les lumières s'allument d'une seule
couleur.
• Beat Sync : Les lumières se synchronisent au rythme de la musique.
• Couleur Statique : Les lumières sont blanches.
• Off : Les lumières sont éteintes.
5. Bass Boost : Cette touche permet d'augmenter la réponse en basse fréquence.
6. Volume général (Master) : Ce bouton permet de régler le volume du mix général de
l'enceinte qui comprend l'entrée microphone, l'entrée auxiliaire, le syntoniseur et l'audio
provenant d'un périphérique Bluetooth jumelé.
7. Sélecteur de bande radio (modèle nord-américain/japonais) : Ce sélecteur permet de
syntoniser la bande AM, FM, et permet d'éteindre la radio.
8. Écran : Affiche la station radio en cours, l'état de charge de la batterie et l’état Bluetooth.
• Indicateur de charge :
o Lorsque le câble d'alimentation est connecté, le mouvement des segments de
batterie de l'indicateur de charge indique que la batterie est en charge. Lorsque
complètement chargée, tous les segments de la batterie s'allument sans clignoter.
o Lorsque le câble d'alimentation est débranché, le segment de l'indicateur de
charge indique le niveau de charge.
20
11
Page 21

o Lorsque la batterie est faible, le dernier segment de l'indicateur de niveau de
charge de la batterie clignote.
o Lorsqu'aucune des touches du panneau avant n'est enfoncée pendant plus de 60
secondes, l'indicateur de niveau de charge de la batterie s'éteint (pour économiser
de l'énergie). L'indicateur de niveau de charge de la batterie se rallume lorsqu'une
des touches du panneau avant est enfoncée. En outre, lorsque l'indicateur de
niveau de charge de la batterie est au plus faible l'indicateur se rallume.
• Icône éclair : L’icône éclair s'allume lorsque le câble d’alimentation est branché à
une prise secteur.
• Icône Bluetooth L’icône Bluetooth s’allume lorsqu'un périphérique est jumelé à
l’enceinte Game Day Lights.
• Icône d'alimentation : L’icône d'alimentation s’allume lorsque l’enceinte Game Day
Lights est sous tension. Cette icône d'alimentation ne sera pas allumé lorsque Game
Day Lights est éteint.
• Icône de Bass Boost : L’icône de Bass Boost s’allume lorsque la fonction est
activée. Cette icône sera éteinte lorsque la fonction est désactivée.
• Icône Link : L'icône Link demeure allumée lorsqu’une autre enceinte est raccordée
en série. L'icône Link est éteinte lorsqu’une seule enceinte est utilisée.
9. Touches de syntonisation/pistes : Ces touches permettent de syntoniser une station de
radio (modèle nord-américain/japonais seulement) ou de passer à la piste
précédente/suivante sur un périphérique Bluetooth connecté. Pour balayer la bande
(passer à la prochaine station), maintenez une de ces touches enfoncée quelques
secondes, jusqu'à ce qu'il commence à rechercher la prochaine station disponible.
L'appareil mémorise la dernière station syntonisée et s'ouvre sur cette station lorsqu'il est
remis sous tension.
Remarque : Dans certaines applications, les touches piste – et piste + permettent de
passer à la liste de lecture ou le genre de musique suivant ou précédent.
10. Lancer/interrompre la lecture/préréglages : Appuyez sur cette touche pour lancer la
lecture ou interrompre une piste sur un périphérique Bluetooth connecté. En mode radio
(modèle nord-américain/japonais seulement), appuyez et relâchez cette touche pour
sélectionner une station radio précédemment programmée comme préréglage. Veuillez
consulter la section Utilisation de la radio afin d'en savoir plus sur la programmation et le
rappel des préréglages.
11. Port de rechargement USB : Branchez le câble de rechargement de votre périphérique à
cette prise pour le recharger. Le rechargement de la batterie par la connexion USB
fonctionne uniquement lorsque l'appareil est allumé.
Remarque : Pour recharger plus rapidement vos smartphones et tablettes, mettez l'écran
de votre périphérique en veille.
12. Lien: Maintenir cette touche enfoncée permet de lancer le raccordement en série stéréo
d’une autre enceinte Game Day Lights. Appuyez deux fois sur enfoncée permet de
supprimer le raccordement en série stéréo d’une autre enceinte Game Day Lights.
13. Interrupteur d'alimentation : Maintenez cette touche enfoncée pendant 3 secondes afin
de mettre l'enceinte Game Day Lights sous et hors tension. Veuillez noter que lorsque
l'enceinte Game Day Lights est branchée à une source d'alimentation, la batterie se
recharge sans que l'enceinte ait besoin d'être mise sous tension. Lorsque l'appareil est
sous tension, l'écran affiche l'icône decimal ou la station de radio sélectionnée.
21
Page 22
1
2
3
4
7
8
9
10
5
6
11
12
1
13
1
1
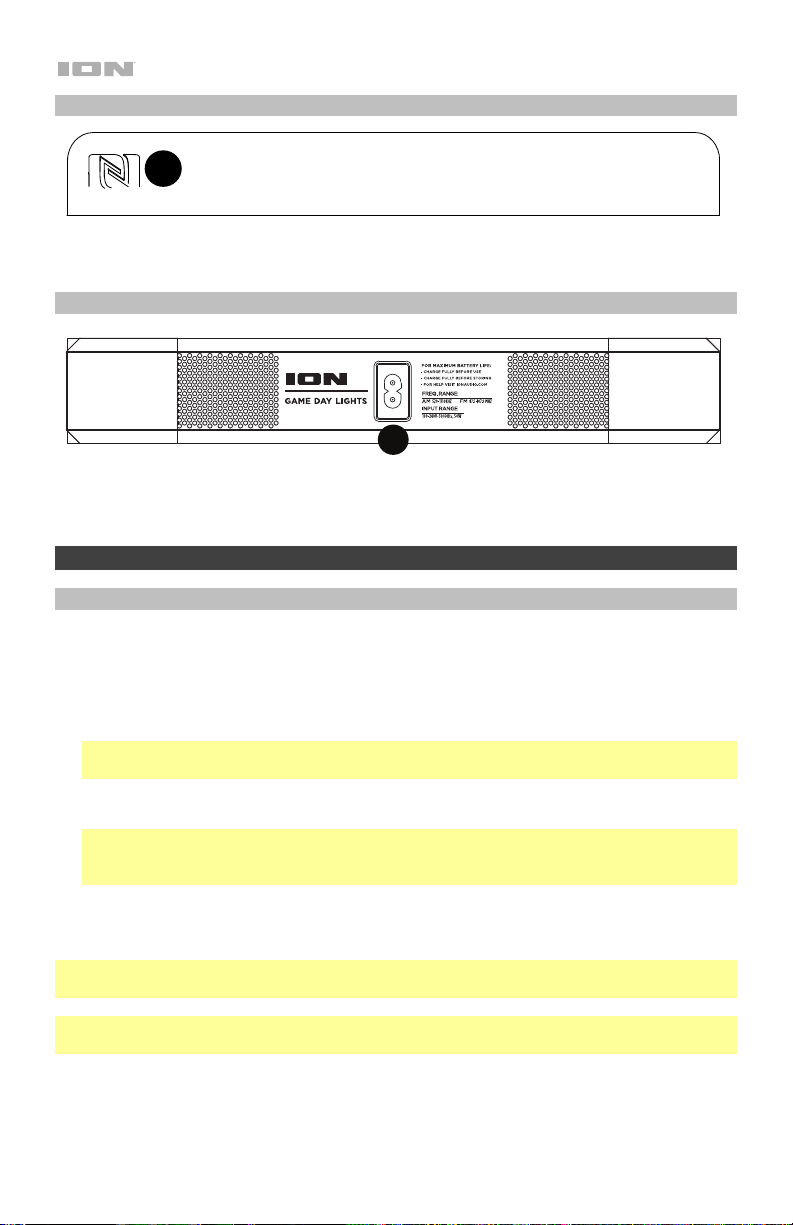
Panneau supérieur
1. NFC : Effleurez l’appareil doté de la fonctionnalité CCP (communication en champ proche)
Panneau arrière
1. Entrée du câble d'alimentation : Brancher le câble d'alimentation ci-inclus ici pour
sur le logo « N » afin de le jumeler.
iPA80A
d'alimentation l'appareil. Sachez qu'il est possible d'utiliser le Game Day Lights tout en le
rechargeant à l'aide de l'adaptateur d'alimentation.
Fonctionnement
Jumelage d'un périphérique Bluetooth
1. Mettez votre périphérique Bluetooth sous tension.
2. Mettez le Game Day Lights sous tension. Appuyez sur le bouton Bluetooth et relâchez-le
pour le coupler à un périphérique Bluetooth.*
3. Accédez à l'écran de configuration de votre périphérique Bluetooth, recherchez « Game
Day Lights » et lancez le jumelage.
Remarque : Si votre périphérique Bluetooth vous demande d'entrer un code de jumelage,
entrez « 0000 ».
4. L'icône Bluetooth s'allume lorsqu'un périphérique est jumelé à l'enceinte Game Day
Lights. *
Remarque : Les utilisateurs devraient envisager de mettre à jour leur système
d'exploitation si des ennuis surviennent durant le jumelage ou lors de la lecture de
musique.
5. Appuyez puis relâchez le bouton Bluetooth pour déconnecter le périphérique Bluetooth
branché. *
6. Pour jumeler un autre périphérique Bluetooth, répétez les étapes 3 et 4.
Remarque : La plage maximale peut être atteinte avec l'utilisation d'appareils dotés de
Bluetooth 4.0 ou de versions ultérieures.
* Astuce : Si vous souhaitez désactiver (ou activer) les messages vocaux, appuyez deux fois
sur Bluetooth.
22
Page 23

Jumelage Bluetooth à l'aide de la technologie CCP
La communication en champ proche (CCP) permet l'échange de données entre appareils, tel
que le jumelage, en effleurant les appareils l'un contre l'autre. Vérifiez le guide d'utilisation de
votre périphérique afin de déterminer si cette fonctionnalité est prise en charge.
Jumelage de l'enceinte Game Day Lights à l'aide de la technologie CCP :
1. Afin d'utiliser la fonctionnalité CCP, le périphérique doit être activé et son écran
déverrouillé.
2. Entrez dans le menu Réglages de votre périphérique et vérifiez que la fonction CCP est
activée (à faire uniquement lors du premier jumelage).
3. Mettez l'enceinte Game Day Lights sous tension.
4. Touchez brièvement le logo CCP, situé sur le panneau supérieur de l'enceinte Game Day
Lights, avec votre périphérique.
5. Suivez les instructions de jumelage qui s'affichent sur votre périphérique. Si votre appareil
vous demande d'entrer un mot de passe, entrez « 0000 ».
6. Pour supprimer la connexion, effleurez le périphérique contre le logo CCP.
Utilisation de la radio
Remarque : Cette section s’applique uniquement aux modèles nord-américains/japonais.
Sélectionner une station radio :
1. Appuyez sur la touche Radio afin de sélectionner la radio AM/FM.
2. Sélectionnez une station radio à l'aide des touches –/+.
Remarque : Si la réception AM est mauvaise, débranchez l'alimentation secteur afin d'obtenir
une réception optimale. Pour maximiser encore plus la réception des signaux AM, déplacez
l'appareil.
Programmer un préréglage :
1. Appuyez sur la touche Radio afin de choisir la radio AM/FM, puis sélectionner une station
radio que vous souhaitez programmer en utilisant les touches –/+.
2. Maintenez la touche pour lancer/interrompre la lecture pendant 1 seconde. Un numéro
de préréglage devrait s'afficher.
3. Utilisez les touches –/+ afin de sélectionner le préréglage.
4. Appuyez sur la touche pour lancer/interrompre la lecture afin de confirmer votre choix. «
SAV » devrait s'afficher.
Sélectionner un préréglage :
1. Appuyez sur la touche Radio afin de sélectionner la radio AM/FM.
2. Appuyez sur la touche pour lancer/interrompre la lecture afin de parcourir les
préréglages.
23
Page 24

Raccordement en série de deux enceintes Game Day Lights*
Raccorder deux enceintes Game Day Lights pour un son stéréo :
1. Maintenez la touche Link enfoncée pour accéder au mode de raccordement en série. Un
signal sonore retentit et le mot LINK clignote durant le processus de raccordement en
série. Lorsque le lien est établi, le mot LINK reste allumé.
Remarque : Le processus de raccordement en série peut prendre jusqu’à une minute.
Plus les enceintes sont proches l’une de l’autre, plus le raccordement en série se fait
rapidement.
2. Enfoncer puis relâcher la touche Bluetooth de l’une des deux enceintes permet de lancer
le jumelage. L'icône Bluetooth sur le haut-parleur maître (assigné au hasard) clignotera en
mode jumelage. Le haut-parleur maître (avec l'icône Bluetooth éclairée) jouera le canal
audio gauche.
Remarque : les canaux des enceintes gauche et droite attribués peuvent être changés en
maintenant enfoncé le bouton Bluetooth.
3. Accédez à l'écran de configuration de votre appareil Bluetooth, recherchez « Game Day
Lights » et appuyez sur Connecter. Voir la section Jumelage d'un périphérique
Bluetooth pour plus de détails.
4. Pour supprimer le raccordement en série, appuyez deux fois sur la touche Link.
* Cette enceinte pourrait éventuellement se raccorder à certaines autres enceintes de la
gamme ION Audio. Pour plus d’information, veuillez visiter ionaudio.com.
24
Page 25

Dépannage
Si l’appareil ne se recharge pas : Veuillez-vous assurer que le câble d’alimentation secteur
est correctement branché à l’entrée d’alimentation et à une prise secteur.
Lorsqu'il y a de la distorsion : Essayez de diminuer le volume sur l'appareil d'entrée audio ou
l'instrument de musique. Essayez également de diminuer le volume de la Game Day Lights.
Lorsqu'il y a trop de basses fréquences : Essayez de régler le niveau de tonalité et
d'égalisation de la Game Day Lights ou de la source d'entrée audio afin de diminuer le niveau
des basses fréquences. Cela vous permettra d'augmenter le volume de la musique avant que
l'écrêtage se produise.
Lorsqu'il y a une mauvaise réception AM : Lorsqu'un appareil Bluetooth est jumelé,
désactivez le jumelage de votre appareil Bluetooth afin d'écouter la radio AM. Pour ajuster la
réception AM, déplacer tout l'appareil.
Lorsqu'il y a un sifflement aigu lors de l'utilisation d'un microphone : Ceci est
probablement causé par la rétroaction (effet Larsen). Dirigez le microphone loin de l'enceinte.
Si vous ne pouvez entendre le microphone à cause du volume trop élevé de la musique :
Baissez le volume de la musique provenant de la source.
Si vous ne parvenez pas à lire le matériel sur la clé USB : Les port USB est uniquement à
recharger les périphériques USB.
Si vous ne pouvez connecter votre appareil audio à la Game Day Lights par connexion
Bluetooth :
• Veillez à ce que votre appareil audio (p. ex., smartphone ou tablette) et la Game Day
Lights soient le plus près possible l’un de l’autre lors du jumelage. Veillez également à ce
qu’aucun obstacle ne se trouve entre l’appareil audio et la Game Day Lights, comme des
murs, des meubles, etc.
• Réinitialisez la connexion Bluetooth sur la Game Day Lights afin de supprimer toute
connexion à la Game Day Lights et recommencer le processus de recherche d’appareil.
Si cela ne fonctionne pas immédiatement, mettez la Game Day Lights hors tension et de
nouveau sous tension. Veuillez consulter la section Jumelage d'un périphérique
Bluetooth afin d’en savoir plus.
• Réinitialisez la connexion Bluetooth sur l’appareil audio en désactivant et réactivant la
connexion Bluetooth. Vous pouvez effectuer ceci à partir du menu Bluetooth dans les
Réglages de votre smartphone ou autre appareil audio.
Si cela ne fonctionne pas et que vous avez déjà connecté votre appareil à la Game Day
Lights auparavant, veuillez rechercher la Game Day Lights dans la liste des appareils
disponibles ou précédemment connectés dans le menu Bluetooth de votre appareil
audio, puis appuyer sur l'icône engrenage ou « i » située à côté de « Oublier cet
appareil ». Mettez la Game Day Lights hors tension et de nouveau sous tension et
réessayez de la jumeler une fois qu’elle apparaît dans la liste des appareils disponibles.
Remarque : Si la Game Day Lights a été récemment jumelée à un autre appareil audio
qui est toujours dans son champ de portée, il se peut que vous deviez répéter ce
processus avec cet appareil audio afin de supprimer la connexion.
25
Page 26
Guida rapida (Italiano)
Introduzione
Grazie per aver acquistato il Game Day Lights. Per noi di ION, il tuo divertimento è importante quanto lo è
per te. Ecco perché progettiamo i nostri dispositivi con un unico obiettivo in mente: rendere la tua vita più
comoda e divertente.
Nota bene: prima di utilizzare per la prima volta il prodotto, ricaricare a fondo la batteria. L’apparecchio è
stato appositamente spedito con una carica ridotta della batteria per garantire un trasporto sicuro.
Servirsi del cavo di alimentazione in dotazione per collegare l’apparecchio a una presa di alimentazione e
lasciarlo in carica per 5 ore. Ciò aiuta a garantire la massima durata della batteria.
Contenuti della confezione
Game Day Lights
Microfono con cavo
Cavo aux stereo da 3,5 mm (1/8")
Cavo di alimentazione (2-pin IEC)
Guida rapida
Istruzioni di sicurezza e garanzia
Assistenza
Per le ultime informazioni in merito a questo prodotto (documentazione, specifiche tecniche, requisiti di
sistema, informazioni sulla compatibilità, ecc.) e per effettuarne la registrazione, recarsi alla pagina
ionaudio.com.
Per ulteriore assistenza sul prodotto, recarsi alla pagina ionaudio.com/support.
Batterie ricaricabili
Le batterie ricaricabili al piombo-acido sono dello stesso tipo di quelle utilizzate nelle automobili. Come nel
caso della batteria dell'automobile, il modo in cui si utilizza la batteria ha un notevole impatto sulla sua
durata. Con un utilizzo adeguato, una batteria al piombo-acido può durare per anni. Ecco alcune
raccomandazioni per garantire la massima durata dalla batteria interna:
Utilizzo generico
Come riporre
l'apparecchio
Riparazioni
Come eliminare
l'apparecchio
26
Caricare a fondo il prodotto prima dell'uso.
Caricare a fondo il prodotto prima di riporlo.
Per la massima longevità del prodotto, evitare di riporlo a temperature eccessivamente
elevate (superiori a 32 °C / 90 °F) o eccessivamente fredde (meno di 0 °C / 32 °F).
L'impianto audio può essere lasciato collegato. Così facendo la batteria non si
sovraccarica.
Se si lascia il livello della batteria basso e non la si ricarica per 3 mesi, potrebbe perdere
capacità in via permanente.
Se la batteria non si carica, verificare le condizioni del fusibile presso l'ingresso del
cavo di alimentazione. Se il fusibile non è intatto, sostituirlo.
La batteria può a sua volta essere sostituita (maggiori dettagli al paragrafo Specifiche
Tecniche).
Per informazioni in merito a Garanzia e parti di ricambio, contattare il dipartimento parti
di ricambio alla pagina ionaudio.com.
Recarsi con l'apparecchio presso un centro di riciclaggio oppure eliminarlo in
conformità con le normative locali.
Page 27
Configurazione rapida
Per iniziare
1. Assicurarsi che tutti gli elementi elencati nel paragrafo Contenuti della confezione siano
contenuti nella confezione stessa.
2. LEGGERE ATTENTAMENTE IL LIBRETTO DI SICUREZZA E GARANZIA PRIMA DI
UTILIZZARE IL PRODOTTO.
3. PER GARANTIRE LA MASSIMA DURATA DELLA BATTERIA, ASSICURARSI DI
AVERLA CARICATA COMPLETAMENTE PRIMA DEL PRIMO UTILIZZO.
4. Studiare lo schema dei collegamenti.
5. Assicurarsi che il Volume Master del Game Day Lights sia su zero.
6. Collegare i dispositivi.
7. Alzare il volume fino al livello desiderato.
8. Una volta finito di utilizzare il Game Day Lights, riportare il Volume Master a zero.
Schema dei collegamenti
Elementi non elencati sotto Contenuti della confezione sono venduti separatamente.
TABLET
PANNELLO SUPERIORE
Lettore
MP3
MICROFONO
Nota bene: modello per Nord America/Giappone nell’illustrazione.
PANNELLO POSTERIORE
iPA80A
ALIMENTAZIONE
(per la ricarica)
27
Page 28
1
2
3
4
7
8
9
10
5
6
11
12
1
13
Caratteristich
Pannello anteriore
Nota bene: modello per Nord America/Giappone nell’illustrazione.
13
12
10
1. Ingresso microfono con controllo del volume (1/4"): questo ingresso mono accetta fonti
audio da 6,35 mm (1/4") quali un microfono, una chitarra o un altro strumento musicale.
2. Ingresso ausiliario (1/8"): questo ingresso stereo da 3,5 mm (1/8”) può essere utilizzato
per collegare un lettore CD o altre fonti audio.
3. Tasto Bluetooth: Premere e rilasciare il pulsante Bluetooth per accoppiare un dispositivo
Bluetooth. Premere e rilasciare il pulsante Bluetooth per scollegare di un dispositivo
Bluetooth accoppiato. Tenere premuto questo pulsante per disattivare (o attivare) i
messaggi vocali.
4. Tasto di modalità luci: premere questo pulsante per selezionare il funzionamento delle
luci:
• Ciclo cromatico: le luci si accendono lentamente e passano ciclicamente da un colore
all’altro. Tenere premuto il tasto di modalità luminosa per congelare le luci su un colore
specifico.
• Beat Sync: le luci reagiscono al battito della musica.
• Colore statico: le luci sono accese stabilmente di colore bianco.
• Off: le luci si spengono.
5. Bass Boost: premere questo tasto per migliorare la risposta di frequenza complessiva dei
bassi.
6. Comando volume Master: questo comando regola il volume principale di mix
dell'altoparlante, che comprende l'ingresso microfono, l'ingresso ausiliario (aux), il
sintonizzatore e l'audio di un dispositivo Bluetooth collegato.
7. Selettore radio (Nord America/Giappon): questo interruttore imposta il sintonizzatore su
AM, FM, o spegne la radio.
11
28
Page 29

8. Display: mostra la stazione radio corrente, lo stato della batteria, e lo stato del Bluetooth.
• Indicatori di carica:
o Quando il cavo di alimentazione è collegato, il movimento dei segmenti della
batteria al livello dell'indicatore di carica indica che la batteria è in carica.
o Una volta completata la ricarica, tutti i segmenti della batteria saranno accesi
senza lampeggiare.
o Quando la batteria è scarica, il segmento inferiore dell’indicatore lampeggia.
o Quando il cavo di alimentazione è scollegato, i segmenti della batteria mostrano
il livello di carica. Se non viene premuto alcun pulsante sul pannello anteriore
entro 60 secondi, l'indicatore di livello della batteria si spegne (per risparmiare
energia). L'indicatore di livellodella batteria ricompare quando viene premuto un
pulsante qualsiasi. L'indicatore si accenderà nuovamente anche quando il livello
della batteria raggiunge il segmento più basso della relativa icona.
• Icona a fulmine: l'icona a fulmine si illumina quando il cavo di alimentazione è
collegato a una presa a parete.
• Icona Bluetooth: Quando un dispositivo è collegato al Game Day Lights, l'icona
Bluetooth è illuminata in maniera fissa.
• Icona di alimentazione: Quando il Game Day Lights è acceso, l’icona di alimentazione
sarà illuminato. Questa icona di alimentazione non si illumina quando Game Day Lights
è spento.
• Icona Bass Boost: L'icona Bass Boost verrà letta quando la funzione Bass Boost è
attivata. L'icona si spegne quando la funzione è disattivata.
• Icona Link: l’icona di collegamento “Link” sarà accesa quando il dispositivo è
collegato in stereo a un altro altoparlante. L’icona di collegamento “Link” sarà spenta
quando viene utilizzato un solo altoparlante.
9. Tasti Tune/Track (sintonia/traccia): toccare questi tasti per sintonizzare una stazione
radio (solo Nord America/Giappone) o per passare alla traccia precedente/successiva su
un dispositivo Bluetooth collegato. Per effettuare la "scansione" (passare alla stazione
disponibile successiva), tenere premuto uno di questi tasti per alcuni secondi fino a
quando non inizia a cercare una stazione. L'apparecchio ricorderà l'ultima stazione
selezionata e ripartirà da tale stazione in caso di spegnimento e riaccensione.
Nota bene: in alcune app, la pressione del tasto Track – o Track + può far passare a
un'altra playlist o a un altro genere musicale.
10. Play/Pause/Preset: premere questo tasto per riprodurre o mettere in pausa una traccia
da un dispositivo Bluetooth collegato. In modalità radio (solo Nord America/Giappone),
premere e rilasciare questo tasto per selezionare una stazione radio predefinita salvata in
precedenza. Si veda il paragrafo Utilizzo della radio per maggiori dettagli su come
salvare e richiamare i preset.
11. Porta di carica USB: collegare a questo livello il cavo di ricarica del dispositivo per
ricaricarlo. La carica tramite USB funziona unicamente quando l'apparecchio è acceso.
Nota bene: per caricare smartphone e tablet più in fretta, mettere lo schermo del
dispositivo in stand-by.
12. Collegamento: Tenere premuto questo tasto per avviare il collegamento stereo a un altro
altoparlante Game Day Lights. Premi due volte questo pulsante per disconnettere la
connessione ad un altro altoparlante Game Day Lights.
13. Interruttore ON/OFF (accensione/spegnimento): tenere premuto questo tasto per 3
secondi per accendere o spegnere l'Game Day Lights. Va notato che quando il Game
Day Lights è collegato ad una fonte di alimentazione, non deve essere necessariamente
acceso per caricare la batteria. Quando l'alimentazione è accesa, a display compare
l'icona decimale o la stazione radio corrente.
29
Page 30
1
2
3
4
7
8
9
10
5
6
11
12
1
13
1
1
Pannello superiore
1. NFC: siforare il dispositivo NFC (comunicazione in prossimità) supportato e abilitato a
Pannello posteriore
1. Ingresso cavo di alimentazione: inserire il cavo di alimentazione in dotazione per
questo livello per collegare il telefono premendo con delicatezza sul logo ‘N’.
iPA80A
alimentazione l'apparecchio. Il Game Day Lights può funzionare con il cavo di
alimentazione anche durante la ricarica della batteria.
Operazione
Allineamento di un dispositivo Bluetooth
1. Accendere il dispositivo Bluetooth.
2. Accendere il Game Day Lights. Premere e rilasciare il pulsante Bluetooth per accoppiare
un dispositivo Bluetooth. *
3. Navigare nella schermata di configurazione del dispositivo Bluetooth, trovare Game Day
Lights e collegarlo.
Nota bene: se il dispositivo Bluetooth richiede un codice, digitare “0000”.
4. Quando un dispositivo è collegato al Game Day Lights, l'icona Bluetooth è illuminata in
5. Premere e rilasciare il pulsante Bluetooth per scollegare di un dispositivo Bluetooth
6. Per collegarlo ad un altro dispositivo Bluetooth, ripetere i passaggi 3-4.
Nota bene: la portata massima si ottiene servendosi di dispositivi dotati di Bluetooth 4.0 o
superiore.
* Suggerimento: se si desidera disattivare (o attivare) i messaggi vocali, doppia pressione
Bluetooth.
maniera fissa. *
Nota bene: Gli utenti dovrebbero aggiornare il loro sistema operativo in caso di problemi
con l'accoppiamento o con la riproduzione di musica.
accoppiato. *
30
Page 31

Accoppiamento di un dispositivo Bluetooth servendosi dell'NFC
L'NFC (comunicazione in prossimità) consente lo scambio di dati tra dispositivi, come
nell'accoppiamento, mettendoli delicatamente insieme. Verificare nel manuale del proprio
dispositivo se questa funzione è supportata.
Per utilizzare l'NFC per l'accoppiamento con il Game Day Lights:
1. Per utilizzare l'NFC, il dispositivo deve essere acceso e sbloccato.
2. Entrare nel menu Settings del dispositivo e verificare che NFC sia acceso (On) (questo
passaggio andrà effettuato una sola volta).
3. Accendere il Game Day Lights.
4. Toccare e mantenere brevemente il dispositivo contro il logo NFC situato sul pannello
superiore del Game Day Lights.
5. Seguire le istruzioni di accoppiamento che compaiono sul telefono. Se viene richiesta una
password, digitare “0000”.
6. Spingere delicatamente il dispositivo contro il logo NFC.
Utilizzo della radio
Nota bene: questa sezione è dedicata unicamente per l’uso in Nord America/Giappone.
Scegliere una stazione radio:
1. Premere il tasto Radio per scegliere AM/FM.
2. Scegliere una stazione radio servendosi dei tasti –/+.
Nota bene: in caso di una cattiva ricezione AM, scollegare l'alimentazione CA per ottenere
una ricezione AM ottimale. Per regolare ulteriormente la ricezione AM, spostare l'intero
apparecchio.
Salvataggio di un preset:
1. Premere il tasto Radio per scegliere AM/FM e selezionare la stazione radio che si desidera
salvare su un preset servendosi dei tasti –/+.
2. Tenere premuto Play/Pause per 1 secondo. Un numero di preset apparirà sullo schermo.
3. Servirsi dei tasti –/+ per scegliere il preset che si desidera salvare su tale numero.
4. Premere il tasto Play/Pause per confermare. Sullo schermo appare la scritta SAV.
Scelta di un preset:
1. Premere il tasto Radio per selezionare AM/FM.
2. Premere Play/Pause per scorrere lungo i preset salvati.
31
Page 32

Collegamento stereo di due altoparlanti Game Day Lights*
Per collegare due altoparlanti Game Day Lights e ottenere un suono stereo:
1. Tenere premuto il tasto Link su entrambi gli altoparlanti per entrare in modalità Stereo
Link. Si sentirà un suono e la scritta LINK lampeggerà durante il collegamento al secondo
altoparlante. Una volta stabilito un collegamento, la scritta LINK sarà illuminata in maniera
fissa.
Nota bene: il processo di collegamento può richiedere fino a un massimo di un minuto.
Più i due altoparlanti sono vicini, più il processo di collegamento avverrà rapidamente.
2. Premere e rilasciare il tasto Bluetooth su uno dei due altoparlanti per avviare il
collegamento. L'icona Bluetooth sull’altoparlante principale (assegnato in modo casuale)
lampeggerà mentre si è in modalità di accoppiamento. L’altoparlante principale (con
l’icona Bluetooth illuminata) riprodurrà il canale audio sinistro.
Nota bene: i canali degli altoparlanti sinistro e destro assegnati possono essere
commutati tenendo premuto il pulsante Bluetooth.
3. Navigare fino alla schermata di configurazione del dispositivo Bluetooth, trovare Game
Day Lights e collegarlo. Si veda Accoppiamento di un dispositivo Bluetooth per
maggiori dettagli sulla configurazione del Bluetooth.
4. Per scollegare/annullare il collegamento tra i due altoparlanti, premere due volte il pulsante
Link.
* Questo altoparlante può essere in grado di collegarsi a diversi altoparlanti della linea di
prodotti ION Audio. Per maggiori informazioni, si veda la pagina ionaudio.com.
32
Page 33

Risoluzione di problemi
Se l’apparecchio non si ricarica: assicurarsi che il cavo di alimentazione sia collegato
adeguatamente all'ingresso di alimentazione e a una presa elettrica.
Il suono è distorto: provare ad abbassare il volume della propria fonte audio o dello
strumento musicale. Inoltre, provare a ridurre il volume complessivo del Game Day Lights.
Eccessivi bassi: provare a regolare la tonalità o il comando EQ sul Game Day Lights o a livello
della fonte audio per abbassare il livello dei bassi. Ciò permetterà di suonare la musica più
forte prima che salti (che si verifichi distorsione).
C'è una scarsa ricezione AM: se un dispositivo Bluetooth è accoppiato, scollegare il
dispositivo Bluetooth per ascoltare la radio AM. Per regolare la ricezione AM, spostare l'intero
apparecchio.
Se quando si utilizzano i microfoni si verifica un fischio ad alto pitch: si tratta
probabilmente di ritorno. Puntare il microfono lontano dall'altoparlante.
Se non si sente il microfono al di sopra della musica: abbassare il volume della musica dalla
fonte.
Impossibile riprodurre musica da un drive flash: le porta USB sono intese unicamente per
la ricarica di dispositivi USB.
Se non è possibile collegare il vostro dispositivo audio a Game Day Lights tramite
Bluetooth:
• Avvicinare il più possibile il vostro dispositivo audio (es. smartphone o tablet) e Game Day
Lights mentre provate a connetterli. Assicurarsi che il dispositivo audio e Game Day
Lights non siano ostacolati da pareti, mobili, ecc.
• Ripristinare la connessione Bluetooth di Game Day Lights per scollegare Game Day
Lights da qualsiasi altro dispositivo audio e riavviare il processo di ricerca. Se non
funziona subito, spegnere Game Day Lights e riavviarlo nuovamente. Consultare
Allineamento di un dispositivo Bluetooth per ulteriori informazioni.
• Ripristinare la connessione Bluetooth sul vostro dispositivo audio spegnendo e
riavviando il Bluetooth. Potete trovarlo nel menù Bluetooth delle Impostazioni del vostro
telefono o di un altro dispositivo audio.
Se ancora non funziona e avete già collegato Game Day Lights in passato, cercate Game
Day Lights nella lista dei dispositivi disponibili o collegati in precedenza al Bluetooth del
vostro dispositivo audio, cliccare sulla “ruota” o sull’icona a “i” situata accanto e
selezionare Scollega o Dimentica. Spegnere e riaccendere Game Day Lights, poi
provare ad allinearlo nuovamente una volta ricomparso nella lista dei dispositivi
disponibili.
Nota bene: se Game Day Lights è stato allineato da poco ad un altro dispositivo audio
che si trova nelle vicinanze, è possibile ripetere il procedimento con quel dispositivo
audio per scollegarlo completamente.
33
Page 34

Schnellstart-Anleitung (Deutsch)
Einführung
Vielen Dank für den Kauf von Game Day Lights. Ihre Unterhaltung ist uns bei ION genauso wichtig wie
Ihnen. Darum entwerfen wir unsere Produkte stets nur mit einem einzigen Ziel vor Augen: Ihr Leben
einfacher und unterhaltsamer zu machen.
Hinweis: Bevor Sie das Produkt zum ersten Mal verwenden, laden Sie bitte den Akku vollständig auf. Ihr
Produkt wurde absichtlich mit einer reduzierten Batterieladung ausgeliefert, um einen sicheren Transport zu
gewährleisten.
Verwenden Sie das mitgelieferte Netzkabel, um das Produkt an eine Steckdose anzuschließen, und lassen
Sie das Gerät bis zu 5 Stunden laden. Dies trägt dazu bei, die Lebensdauer Ihres Akkus zu verlängern.
Lieferumfang
Game Day Lights
Mikrofon mit Mikrofonkabel
3,5 mm (1/8") Stero Aux-Kabel
Netzkabel (2-pol. IEC)
Schnellstart-Anleitung
Sicherheitshinweise und Garantieinformationen
Kundendienst
Für die neuesten Informationen zu diesem Produkt (Dokumentation, technische Daten,
Systemanforderungen, Informationen zur Kompatibilität etc.) und zur Produktregistrierung besuchen Sie
bitte: ionaudio.com.
Für zusätzlichen Produkt-Support besuchen Sie ionaudio.com/support.
Aufladbare Akkus
Aufladbare Blei-Säure-Akkus des gleichen Typs werden auch in Automobilen eingesetzt. Ganz wie bei Ihrer
Autobatterie hat die Art und Weise wie Sie diesen Akku verwenden eine wesentliche Auswirkung auf seine
Lebensdauer. Bei sachgemäßer Verwendung und Behandlung kann ein Blei-Säure-Akku viele Jahre halten.
Hier sind einige Empfehlungen, um die maximale Lebensdauer für die interne Batterie zu erzielen.
Allgemeine
Verwendung
Lagerung
Reparatur
Entsorgung
34
Laden Sie das Gerät vor der Verwendung vollständig auf.
Laden Sie es vollständig auf, bevor Sie es verstauen.
Um eine optimale Langlebigkeit des Produkts zu garantieren, bewahren Sie es nicht in
extrem heißen (über 90 °F / 32 °C) oder extrem kalten (unter 32 °F / 0 °C) Temperaturen
auf.
Sie können Ihr Sound-System angesteckt lassen. Der Akku wird dabei nicht überladen.
Wenn Ihr Akku einen niedrigen Ladestand hat und Sie ihn 3 Monate lang nicht aufladen,
kann er dauerhaft an Kapazität verlieren.
Wenn sich der Akku nicht aufladen lässt, überprüfen Sie die Sicherung in der Nähe des
Netzkabelanschlusses. Ist die Sicherung nicht intakt, ersetzen Sie sie bitte.
Der Akku kann ersetzt werden (Details in den Technischen Daten).
Für Garantie und Ersatzteile besuchen Sie ionaudio.com.
Bringen Sie das Gerät in ein Recyclingzentrum oder entsorgen Sie es entsprechend
lokaler Verordnungen.
Page 35
Schnelles Einrichten
Erste Schritte
1. Stellen Sie sicher, dass alle im Lieferumfang aufgelisteten Teile in der Verpackung
enthalten sind.
2. LESEN SIE DIE SICHERHEITSHINWEISE & GARANTIEINFORMATIONEN BEVOR SIE
DAS PRODUKT VERWENDEN.
3. STELLEN SIE SICHER, DASS DER AKKU VOR DER ERSTEN VERWENDUNG
VOLLSTÄNDIG AUFGELADEN IST, UM EINE MAXIMALE AKKULEBENSDAUER ZU
ERZIELEN.
4. Werfen Sie einen Blick auf die Anschlussübersicht.
5. Stellen Sie sicher, dass die Gesamtlautstärke des Game Day Lights auf Null steht.
6. Anschluss Ihres Geräts.
7. Erhöhen Sie die Lautstärke auf ein angenehmes Niveau.
8. Bringen Sie die Gesamtlautstärke wieder auf Null, wenn Sie den Game Day Lights nicht
verwenden.
Anschlussdiagramm
Teile, die nicht im Lieferumfang angegeben sind, sind separat erhältlich.
OBERSEITE
MP3-
PLAYER
MIKROFON
TABLET
Hinweis: Hier wird das Modell für Nordamerika/Japan gezeigt.
RÜCKSEITE
STROM
(Zum Aufladen)
iPA80A
35
Page 36
1
2
3
4
7
8
9
10
5
6
11
12
1
13
Funktionen
Vorderseite
Hinweis: Hier wird das Modell für Nordamerika/Japan gezeigt.
13
12
10
1. Mikrofoneingang mit Lautstärkeregler (1/4"): Der Mono-Eingang nimmt einen 6,35 mm
(1/4")-Audioquelle anzuschließen an, wie zum Beispiel ein Mikrofon, eine Gitarre oder ein
anderes Musikinstrument.
2. Aux-Eingang (1/8"): Dieser 3,5 mm-Stereoeingang (1/8”) kann dazu verwendet werden,
einen CD-Player, MP3-Player oder eine andere Audioquelle anzuschließen.
3. Bluetooth-Taste: Drücken Sie die Bluetooth-Taste, und lassen Sie sie los, um sie mit
einem Bluetooth-Gerät zu koppeln. Drücken Sie kurz die Bluetooth-Taste, um ein
angeschlossenes Bluetooth-Gerät zu trennen. Halten Sie diese Taste gedrückt, um die
Sprachanweisungen zu deaktivieren (oder aktivieren).
4. Licht-Modus-Taste: Mit diesem Taste können Sie auswählen, wie sich die Lichter
verhalten:
• Farbwahl: Die Lichter glühen langsam und wechseln die Farben. Halten Sie die
Lichtmodustaste gedrückt, um die Lichter auf eine einzige Farbe einzustellen.
• Beat Sync: Das Licht regiert auf den Takt der Musik.
• Statische Farbe: Die Lichter leuchten durchgehend weiss.
• Off: Die Lichter erlöschen.
5. Bass Boost: Drücken Sie diese Taste, um den Bass-Frequenzgang insgesamt zu
verstärken.
6. Gesamtlautstärkeregler: Regelt die Gesamtlautstärke des Lautsprechers. Dies inkludiert
den Instrument-/ Mikrofon-Eingang, den AUX-Eingang, den Radio und das Audiosignal
eines gekoppelten Bluetooth-Geräts.
7. Radiowahlschalter (Nordamerika/Japan): Diese Taste stellt den Radio auf AM, FM, oder
schaltet das Radio aus.
8. Display: Zeigt den aktuellen Radiosender, Akkuladestatus und Bluetooth-Status.
• Ladeanzeigen:
36
o Wenn das Netzkabel eingesteckt ist, zeigt die Batterieladeanzeige eine
Bewegung auf den Batteriesegmenten an, um anzuzeigen, dass die Batterie
geladen wird.
o Wenn das Gerät voll aufgeladen ist, werden alle Akkusegmente durchgehend
leuchten (ohne zu blinken).
o Wenn der Batteriestand niedrig ist, blinkt das untere Batteriesegment.
11
Page 37

o Wenn das Netzkabel abgezogen wird, zeigt das Akkusegment den
Akkuladestand. Wenn nicht innerhalb von 60 Sekunden eine Taste auf der
Frontplatte gedrückt wird, schaltet sich die Batteriestandsanzeige aus (um
Energie zu sparen). Sobald eine Taste betätigt wird, erscheint die
Batteriestandsanzeige wieder. Die Batteriestandsanzeige schaltet sich auch
dann wieder ein, wenn die Batterie das niedrigste Segment des Batteriesymbols
erreicht.
• Blitzsymbol: Das Blitzsymbol leuchtet auf, wenn das Netzkabel an eine Steckdose
angesteckt ist.
• Bluetooth-Symbol: Das Bluetooth-Symbol leuchtet, wenn ein Gerät mit dem Game
Day Lights gekoppelt ist.
• Netz-Symbol: Das Symbol wird gelesen, wenn der Game Day Lights eingeschaltet
wird. Das Stromversorgungssymbol wird nicht gelesen, wenn der Game Day Lights
ausgeschaltet ist.
• Bass Boost-Symbol: Das Bass Boost-Symbol wird gelesen, wenn die Bass Boost-
Funktion aktiviert ist. Das Symbol wird ausgeschaltet, wenn die Funktion deaktiviert ist.
• Link-Symbol: Das Link-Symbol wird angezeigt, wenn es mit einem anderen
Lautsprecher verbunden ist. Das Link-Symbol ist nicht zu sehen, wenn ein einzelner
Lautsprecher verwendet wird.
9. Tune/Track-Tasten: Tippen Sie auf diese Tasten, um einen Radiosender einzustellen (Nur
Nordamerika/Japan) oder zum vorherigen/nächsten Track auf einem via Bluetooth
angeschlossenen Gerät zu springen. Um zu "suchen" (also zum nächsten verfügbaren
Sender zu springen), halten Sie eine dieser Tasten einige Sekunden lang gedrückt, bis die
Suche nach einem Sender beginnt. Das Gerät wird sich an den zuletzt gespielten Sender
erinnern und die Wiedergabe dieses Senders aufnehmen, wenn Sie das Gerät aus- und
wieder einschalten.
Hinweis: Bei einigen Apps kann durch Drücken der Taste Track – oder Track + zu einer
anderen Wiedergabeliste oder zu einem anderen Musikgenre gewechselt werden.
10. Wiedergabe/Pause/Presets: Drücken Sie diese Taste, um einen Track eines
angeschlossenen Bluetooth-Geräts zu spielen oder zu pausieren. Im Radio-Modus (Nur
Nordamerika/Japan), drücken Sie kurz diese Taste, um einen zuvor gespeicherten PresetSender auszuwählen. Siehe Abschnitt Verwendung des Radios für nähere Details zum
Speichern und Aufrufen von Presets.
11. USB-Anschluss: Schließen Sie das Ladekabel Ihres Geräts hier an, um es aufzuladen. Das
Laden via USB funktioniert nur, wenn das Gerät eingeschaltet ist.
Hinweis: Um Ihre Smartphones und Tablets schneller aufzuladen, bringen Sie den
Bildschirm des Geräts in den Ruhemodus.
12. Verknüpfung: Halten Sie diese Taste gedrückt, um die Stereoverbindung zu einem
anderen Game Day Lights-Lautsprecher zu starten. Drücken Sie diese Taste zweimal, um
die Verbindung zu einem anderen Game Day Lights-Lautsprecher zu trennen.
13. Ein-/Ausschalter: Halten Sie diese Taste 3 Sekunden lang gedrückt, um Game Day Lights
einzuschalten/ auszuschalten. Während der Game Day Lights an eine Stromquelle
angeschlossen ist, muss er nicht eingeschaltet sein, um den Akku aufzuladen. Wenn das
Gerät eingeschaltet ist, zeigt das Display das dezimal-Symbol oder den aktuellen
Radiosender an.
37
Page 38
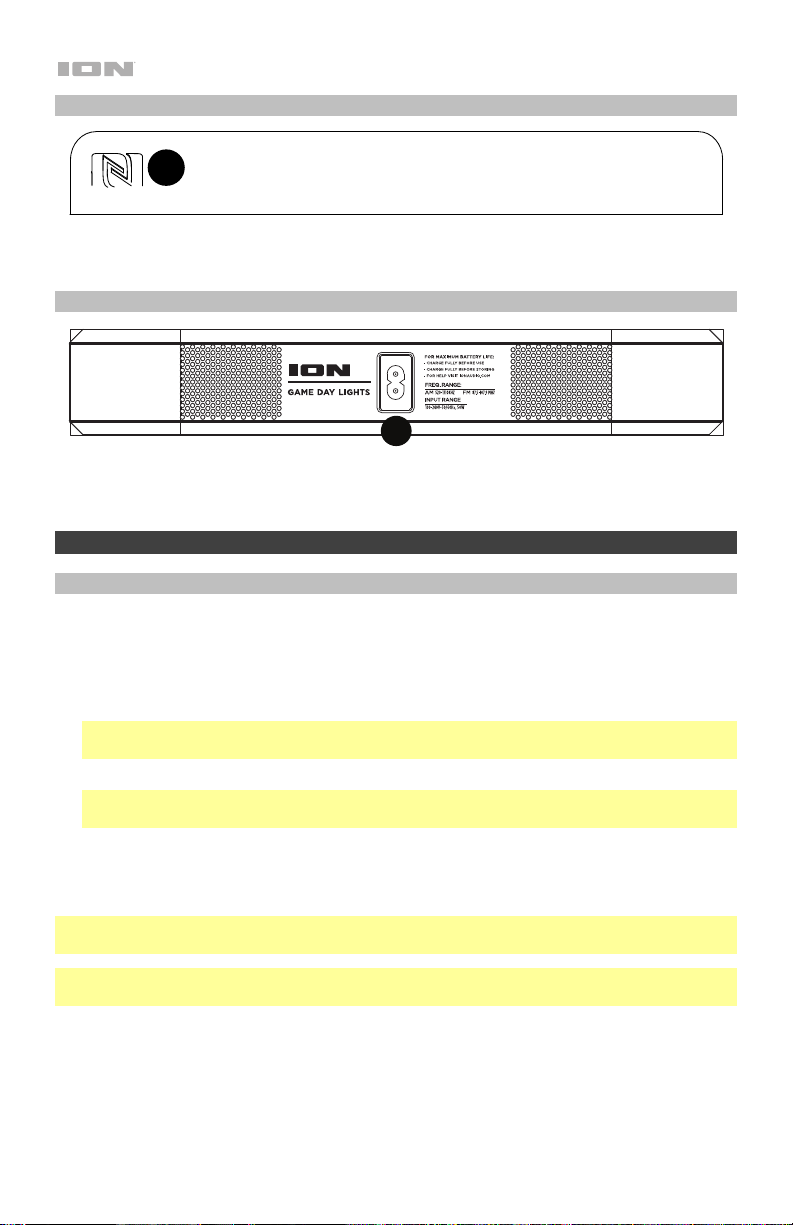
1
2
3
4
7
8
9
10
5
6
11
12
1
13
1
1
Oberseite
1. NFC: Tippen Sie auf Ihr NFC-unterstütztes Gerät (kabellose Nahbereichskommunikation),
Rückseite
1. Netzkabel-Eingang: Schließen Sie hier das mitgelieferte Netzkabel zum Netz der Batterie
um es mit Ihrem Telefon zu koppeln, indem Sie es vorsichtig gegen das "N"-Logo stoßen.
iPA80A
an. Der Game Day Lights kann mit dem Netzkabel betrieben werden und gleichzeitig die
Batterie laden.
Betrieb
Koppeln eines Bluetooth-Geräts
1. Schalten Sie Ihr Bluetooth-Gerät ein.
2. Schalten Sie Game Day Lights. Drücken Sie die Bluetooth-Taste, und lassen Sie sie los,
um sie mit einem Bluetooth-Gerät zu koppeln.*
3. Navigieren Sie zum Setup-Bildschirm Ihres Bluetooth-Geräts, wählen Sie Game Day
Lights und stellen Sie eine Verbindung her.
Hinweis: Wenn Ihr Bluetooth-Gerät die Eingabe eines Koppel-Codes anfordert, geben Sie
"0000" ein.
4. Das Bluetooth-Symbol leuchtet, wenn ein Gerät mit dem Game Day Lights gekoppelt ist. *
5. Drücken Sie kurz die Bluetooth-Taste, um ein angeschlossenes Bluetooth-Gerät zu
6. Um ein anderes Bluetooth-Gerät zu verbinden, wiederholen Sie die Schritte 3-4.
Hinweis: Die maximale Reichweite wird erreicht, wenn Sie Geräte mit Bluetooth 4.0 oder
höher verwenden.
* Tipp: Wenn Sie die Sprachanweisungen deaktivieren (oder aktivieren) möchten, doppelt
drücken die Bluetooth-Taste.
Hinweis: Benutzer sollten die Aktualisierung ihres OS in Betracht ziehen, falls sie
Probleme beim Koppeln oder bei der Musikwiedergabe haben.
trennen. *
38
Page 39

Koppeln eines Bluetooth-Geräts mit NFC
NFC (kabellose Nahbereichskommunikation) ermöglicht den Datenaustausch von Geräten, wie
z. B. die Kopplung durch leichtes Anstoßen. Lesen Sie in der Gebrauchsanleitung Ihres Geräts
nach, ob diese Funktion unterstützt wird.
So nutzen Sie NFC, um eine Verbindung mit dem Game Day Lights herzustellen:
1. Um NFC zu nutzen, muss das Gerät eingeschaltet und entsperrt werden.
2. Gehen Sie in das Einstellungen-Menü des Geräts und kontrollieren Sie, ob NFC
eingeschaltet ist (einmaliger Schritt).
3. Schalten Sie den Game Day Lights ein.
4. Berühren und halten Sie Ihr Gerät kurz zum NFC-Logo am oberen Teil des Game Day
Lights.
5. Folgen Sie den Anweisungen zum Koppeln, die auf Ihrem Telefon angezeigt werden. Wenn
ein Passcode erforderlich ist, geben Sie "0000" ein.
6. Stoßen Sie Ihr Gerät leicht gegen das "N"-Logo, um die Verbindung zu trennen.
Verwendung des Radios
Hinweis: Dieser Abschnitt betrifft nur die Modelle für Nordamerika/Japan.
Auswählen eines Radiosenders:
1. Drücken Sie die Taste Radio, um AM/FM Radio zu wählen.
2. Wählen Sie einen Radiosender mit den Tasten –/+ aus.
Hinweis: Bei schlechtem AM-Empfang ziehen Sie das Netzkabel ab, um den optimale AMRadioempfang zu erzielen. Um den AM-Empfang noch weiter anzupassen, bewegen Sie die
gesamte Einheit.
Presets speichern:
1. Drücken Sie die Taste Radio, um AM/FM auszuwählen und verwenden die Tasten –/+, um
einen Radiosender auszuwählen, den Sie auf ein Preset speichern möchten.
2. Halten Sie Wiedergabe/Pause 1 Sekunde lang gedrückt. Eine Preset-Nummer wird am
Bildschirm angezeigt.
3. Verwenden Sie die Tasten –/+, um auszuwählen, auf welches Preset Sie speichern
möchten.
4. Drücken Sie Wiedergabe/Pause, um zu bestätigen. SAV (speichern) wird am Bildschirm
angezeigt.
Auswählen von Presets:
1. Drücken Sie die Radio-Taste, um AM/FM zu wählen.
2. Drücken Sie Wiedergabe/Pause, um durch die gespeicherten Presets zu blättern.
39
Page 40

Stereo-Linking von zwei Game Day Lights-Lautsprechern*
So verbinden Sie zwei Game Day Lights lautsprechern für die Stereowiedergabe:
1. Halten Sie die Link-Taste auf beiden Lautsprechern gedrückt, um in den Stereo LinkModus zu gelangen. Ein Ton wird zu hören sein und das Wort LINK beginnt zu blinken,
wenn ein zweiter Lautsprecher verbunden wird. Sobald eine Verbindung hergestellt wurde,
leuchtet das Wort LINK.
Hinweis: Der Verknüpfungsvorgang kann bis zu einer Minute dauern. Je näher die zwei
Lautsprecher zueinander platziert sind, desto schneller kann eine Verbindung hergestellt
werden.
2. Drücken Sie die Taste Bluetooth an einem Lautsprecher und lassen Sie sie los, um die
Verbindung herzustellen. Das Bluetooth-Symbol auf dem zufällig zugewiesene MasterLautsprecher blinkt in den Koppel-Modus. Der Master-Lautsprecher (mit dem BluetoothSymbol beleuchtet) spielt den linken Audiokanal ab.
Hinweis: Die zugewiesenen linken und rechten Lautsprecherkanäle können durch Drücken
und Halten der Bluetooth-Taste umgeschaltet werden.
3. Navigieren Sie zum Setup-Bildschirm Ihres Bluetooth-Geräts, suchen Game Day Lights
und verbinden die Geräte. Siehe Koppeln eines Bluetooth-Geräts für Details zum
Bluetooth-Setup.
4. Um die Verbindung zwischen den beiden Lautsprechern zu trennen/abzubrechen, drücken
Sie zweimal die Link-Taste.
*Dieser Lautsprecher kann möglicherweise mit verschiedenen Lautsprechern der ION AudioProduktlinie verbunden werden. Für weitere Informationen besuchen Sie bitte ionaudio.com.
40
Page 41
Fehlerbehebung
Wenn das Gerät nicht aufgeladen wird: Stellen Sie sicher, dass das Netzkabel ordnungsgemäß mit
dem Netzeingang und einer Stromquelle verbunden ist.
Der Ton klingt verzerrt: Drehen Sie den Lautstärkeregler an Ihrer Tonquelle oder dem
Musikinstrument zurück. Versuchen Sie auch, das Gesamtvolumen des Game Day Lights zu
reduzieren.
Zu viel Bass: Versuchen Sie, den Ton- oder EQ-Regler des Game Day Lights oder Ihrer Tonquelle
anzupassen, um den Bass zu verringern. Dies ermöglicht Ihnen, die Musik lauter abzuspielen, bevor
der Klang verzerrt.
Schlechter AM-Empfang: Wenn Sie ein Bluetooth-Gerät angeschlossen haben, trennen Sie das
Bluetooth-Gerät, um AM-Radio zu hören. Um den AM-Empfang einzustellen, bewegen Sie die
gesamte Einheit.
Bei der Verwendung von Mikrofonen tritt einer hoher Pfeifton auf: Hier handelt es sich
wahrscheinlich um einen Rückkopplungseffekt. Richten Sie es so ein, dass die Mikrofone vom
Lautsprecher wegzeigen.
Wenn das Mikrofon im Vergleich zur Musik zu leise eingestellt ist: Verringern Sie die
Musiklautstärke Ihrer Quelle.
Wenn Sie keine Musik von einem USB-Stick spielen können: Die USB-Anschlüss ist nur dem
Aufladen von USB-Geräten.
Wenn Sie Ihr Audiogerät nicht über Bluetooth mit Game Day Lights verbinden können:
• Positionieren Sie Ihr Audiogerät (z. B. Smartphone oder Tablet) und Game Day Lights so nahe
wie möglich zueinander, um eine Verbindung herzustellen. Stellen Sie sicher, dass sowohl das
Audiogerät als auch Game Day Lights nicht von Wänden, Möbeln usw. blockiert werden.
• Setzen Sie die Bluetooth-Verbindung am Game Day Lights zurück, um Game Day Lights von
einem anderen Audiogerät zu trennen und starten den Suchvorgang neu. Wenn dies nicht sofort
funktioniert, schalten Sie Game Day Lights aus und dann wieder ein. Weitere Informationen
finden Sie unter Koppeln eines Bluetooth-Geräts.
• Setzen Sie die Bluetooth-Verbindung auf Ihrem Audiogerät zurück, indem Sie Bluetooth aus- und
wieder einschalten. Sie finden dies unter dem Bluetooth-Menü in den Einstellungen für Ihr
Telefon oder anderes Audiogerät.
Wenn dies nicht funktioniert und Sie bereits eine Verbindung zu Game Day Lights hergestellt
haben, suchen Sie in der Liste der verfügbaren oder zuvor verbundenen Geräte im BluetoothMenü Ihres Audiogerätes nach Game Day Lights, tippen neben dem Gerät auf das "Zahnrad"Symbol oder “i” und wählen dann Trennen oder Gerät ignorieren. Schalten Sie Game Day
Lights aus und wieder ein und versuchen Sie es erneut, sobald es wieder in der Liste der
verfügbaren Geräte angezeigt wird.
Hinweis: Wenn Game Day Lights kürzlich mit einem anderen Audiogerät gekoppelt wurde, das
sich noch in Reichweite befindet, müssen Sie diesen Vorgang möglicherweise mit diesem
Audiogerät wiederholen, um die Verbindung vollständig zu trennen.
Allgemeinhinweis zur Konformitätserklärung: Hiermit erklären wir, daß sich das Gerät Game Day
Lights in Übereinstimmung mit den grundlegenden Anforderungen der europäischen Richtlinie
1999/5/EG befindet. Die vollständige EG Konformitätserklärung kann unter folgender Adresse
angefordert werden:
inMusic GmbH
Harkortstrasse 12-32
40880 Ratingen
Germany
41
Page 42

V
V
Snelstartgids (Nederlands)
Inleiding
Bedankt voor uw aankoop van de Game Day Lights. Bij ION vinden wij entertainment even belangrijk
als u. Daarom ontwerpen wij onze producten met één doel voor ogen: u het leven leuker en
aangenamer maken.
Opmerking: De batterij volledig opladen voordat u het product voor het eerst gebruikt. Uw apparaat
wordt speciaal verzonden met een lagere batterijlading om een veilig transport te garanderen.
Gebruik de meegeleverde stroomkabel om het apparaat aan te sluiten op een stopcontact en laat
het gedurende max. 5 uren opladen. Dit helpt om je batterij een zo lang mogelijke levensduur te
bezorgen.
Inhoud van de doos
Game Day Lights
Microfoon met microfoonkabel
Stereo aux-kabel van 3,5 mm 1/8"
Stroomkabel (2-pin IEC)
Snelstartgids
Handleiding veiligheid en garantie
Ondersteuning
Voor de laatste informatie over dit product (documentatie, technische specificaties, systeem
vereisten, informatie over compatibiliteit, enz.) en productregistratie, bezoek ionaudio.com.
Voor aanvullende productondersteuning naar ionaudio.com/support.
Oplaadbare accu
Oplaadbare loodaccu van hetzelfde type als de accu's die in auto's worden gebruikt. Net als met uw
autoaccu heeft de manier waarop u met deze accu omgaat een grote invloed op de levensduur.
Wanneer een loodaccu naar behoren wordt gebruikt en behandeld, kan hij jarenlang meegaan.
Hierna volgen enkele aanbevelingen om de levensduur van uw accu maximaal te verlengen.
Algemeen
gebruik
Opslag
Herstellen
Verwijdering
olledig opladen voor gebruik.
Volledig opladen voordat u hem opbergt.
oor een optimale levensduur mag u de accu niet in een te warme (meer dan 32
ºC / 90 ºF) of te koude omgeving (minder dan 0 ºC / 32 ºF) bewaren.
Uw geluidssysteem mag aangesloten blijven op het stroomnet. Dat zal de accu
niet overladen.
Als het accuniveau laag blijft en u 3 maanden lang niet oplaadt, kan zich een
permanent capaciteitsverlies voordoen.
Als de accu niet wil opladen, controleer dan de zekering naast de stroomingang.
Vervang een doorgebrande zekering.
De accu kan worden vervangen (zie details in de Technische Specificaties).
Neem voor garantie en onderdelen surf naar ionaudio.com.
Breng de accu naar een afvaldepot of verwijder hem conform de plaatselijke
wetgeving.
42
Page 43
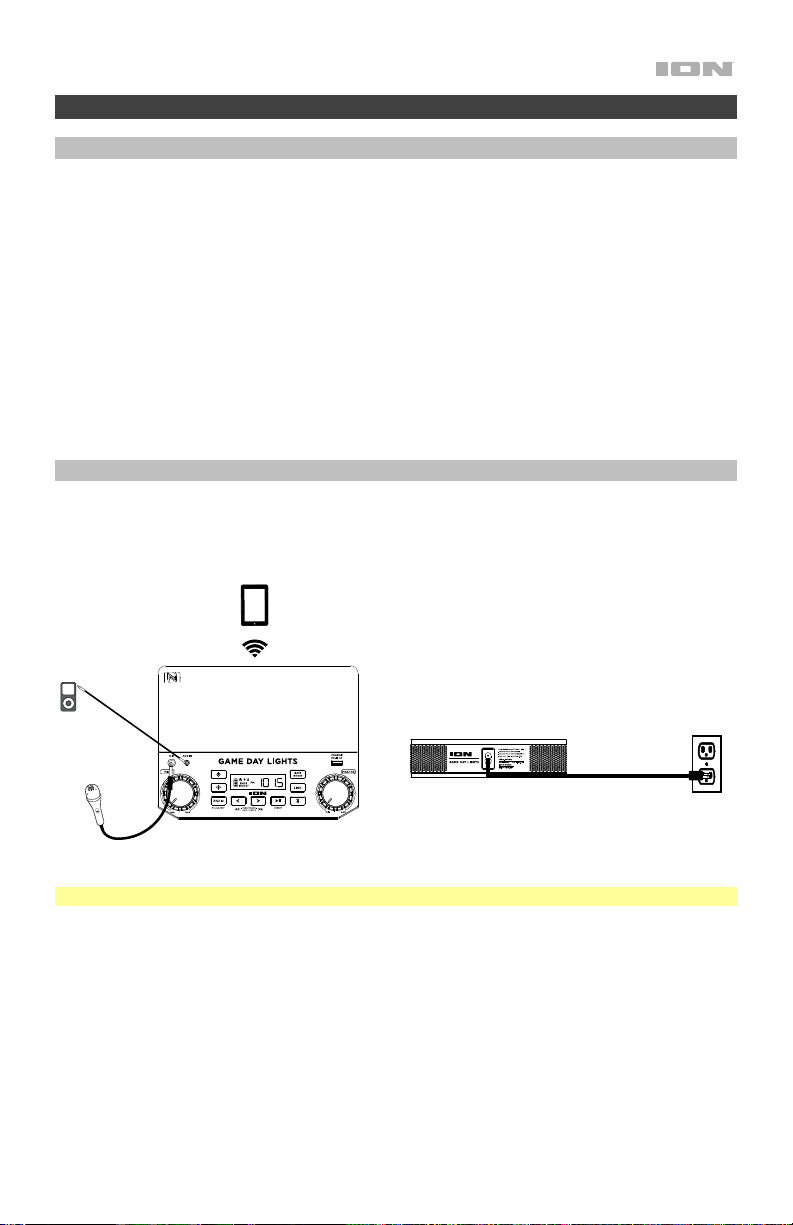
Snelle opstelling
Aan de slag
1. Zorg ervoor dat alle artikelen, opgesomd in Inhoud van de doos, zich in de doos
bevinden.
2. LEES DE HANDLEIDING VEILIGHEID EN GARANTIE VOORALEER HET PRODUCT TE
GEBRUIKEN.
3. ZORG ERVOOR DAT DE ACCU VOOR HET EERSTE GEBRUIK VOLLEDIG IS
OPGELADEN, VOOR EEN MAXIMALE LEVENSDUUR.
4. Bestudeer het aansluitschema.
5. Zorg ervoor dat het hoofdvolume op Game Day Lights op nul staat.
6. Sluit uw apparaten aan.
7. Verhoog het volume tot een aangenaam niveau.
8. Zet het hoofdvolume terug op nul wanneer u Game Day Lights stopt te gebruiken.
Aansluitschema
Artikelen die niet zijn opgesomd in Inhoud van de doos worden afzonderlijk verkocht.
BOVENPANEEL
TABLET
MP3-
SPELER
MICROFOON
Opmerking: Hier wordt het Noord-Amerikaanse/Japanse model getoond.
ACHTERPANEEL
iPA80A
STROOM
(voor het
opladen)
43
Page 44
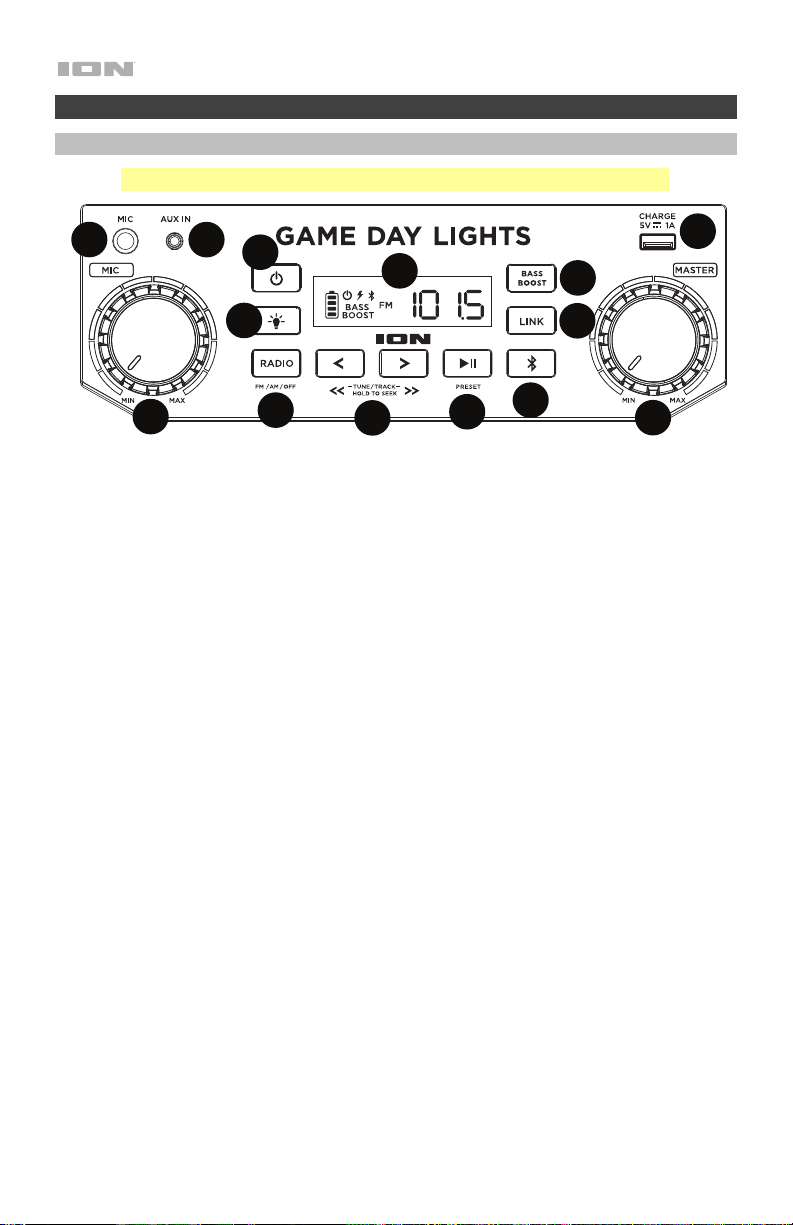
1
2
3
4
7
8
9
10
5
6
11
12
1
13
Kenmerken
Achterpaneel
Opmerking: Hier wordt het Noord-Amerikaanse/Japanse model getoond.
13
12
10
1. Microfooningang met volumeknop (1/4"): Deze mono-ingang accepteert een 6,35 mm
(1/4")-geluidsbron, zoals van een microfoon, gitaar of ander muziekinstrument.
2. Aux-ingang (1/8"): Deze stereo 3,5 mm (1/8")-ingang kan worden gebruikt om een cdspeler, mp3-speler of andere geluidsbron aan te sluiten.
3. Bluetooth-knop: Druk op de Bluetooth-knop en laat deze los om te koppelen met een
Bluetooth-apparaat. Tik op de knop Bluetooth om een gekoppeld Bluetooth-apparaat los
te koppelen. Houd ingedrukt deze knop om de gesproken aanwijzingen wilt uitschakelen
(of inschakelen).
4. Verlichtingsmodus-knop: Druk op de knop om te selecteren hoe de lichten werken:
• Kleuren doorlopen: De lichten gloeien traag en doorlopen de kleuren. Druk de
lichtmodustoets in om de lichten op één kleur vast te zetten.
• Beat Sync: De lichten reageren op het ritme van de muziek.
• Statische kleur: De lichten blijven wit branden.
• Uit: De lichten gaan uit.
5. Bass Boost: Druk op deze knop om de basfrequenties te benadrukken.
6. Hoofdvolumeregeling: Hiermee past u het maximale volume van de hoofdmix in de
luidspreker aan. Tot de hoofdmix behoren de microfooningang, de aux-ingang, de Radio
en het geluidssignaal van een gekoppeld Bluetooth-apparaat.
7. Keuzeschakelaar Radio (Noord-Amerika/Japan): Deze knop zet de Radio naar AM, FM of
schakelt de radio uit.
8. Scherm: Geeft het huidige radiostation, de accu-, en Bluetoothstatus.
• Oplaadindicator:
o Wanneer de voedingskabel is aangesloten, geven de bewegende
batterijonderdelen op de laadindicator aan dat de batterij wordt opgeladen. Van
44
zodra hij volledig is opgeladen, gaan alle batterijsegmenten branden, zonder te
knipperen.
o Wanneer de stroomkabel wordt losgekoppeld, geven de segmenten het
accuniveau weer.
o Wanneer het batterijniveau laag is, knippert het onderste batterijsegment.
11
Page 45
1
2
3
4
7
8
9
10
5
6
11
12
1
13
1
o Als u binnen de 60 seconden geen knop op het voorpaneel indrukt, dan gaat de
batterij-indicator uit (om energie te besparen). De batterij-indicator gaat opnieuw
aan wanneer een knop wordt ingedrukt. Wanneer de batterij-indicator het laatste
segment van het batterijpictogram bereikt, gaat de batterij-indicator opnieuw aan.
• Bliksempictogram: Wanneer de stroomkabel op het stopcontact is aangesloten,
begint het pictogram met de bliksem te branden.
• Bluetooth-pictogram: Het Bluetooth-pictogram blijft branden wanneer de Game Day
Lights is gekoppeld aan een apparaat.
• Stroom-pictogram: Het stroom-pictogram zal worden branden wanneer Game Day
Lights is ingeschakeld. Het stroom-pictogram wordt niet branden als Game Day Lights
is uitgeschakeld.
• Bass Boost-pictogram: Het Bass Boost-pictogram zal worden branden als de functie
Bass Boost is geactiveerd. Het pictogram is uitgeschakeld als de functie is
gedeactiveerd.
• Koppelingspictogram: Bij een stereoverbinding met een andere luidspreker brandt
het koppelingspictogram. Het koppelingspictogram staat uit wanneer maar een
luidspreker wordt gebruikt.
9. Zenderkeuze-/nummerknoppen: Tik op deze knoppen om af te stemmen op een
radiozender (alleen Noord-Amerika/Japan) of naar het vorige/volgende nummer te gaan op
een via Bluetooth aangesloten apparaat. Druk om een zender te zoeken (naar de volgende
beschikbare zender gaan) een van beide knoppen enkele seconden in, tot het apparaat op
zoek gaat naar een zender. Het apparaat onthoudt bij het uitschakelen de laatste zender
die speelde en start die zender weer op wanneer het apparaat opnieuw wordt aangezet.
Opmerking: In sommige apps kunnen de knoppen – of + nummer een andere afspeellijst
of muziekgenre oproepen.
10. Afspelen/pauzeren/voorkeuzezenders: Indrukken om een nummer vanaf een verbonden
Bluetooth-apparaat af te spelen of te pauzeren. In Radio-modus (alleen Noord-
Amerika/Japan), deze knop indrukken en loslaten om het vorige opgeslagen radiostation te
selecteren. Zie het hoofdstuk De radio gebruiken voor meer details over het opslaan en
oproepen van voorkeuzezenders.
11. USB-poort: Sluit de oplaadkabel van uw apparaat hierop aan om het op te laden. Opladen
met USB werkt alleen als het apparaat is ingeschakeld.
Opmerking: Zet het scherm van uw apparaat in slaapstand om uw smartphone en tablet
sneller op te laden.
12. Link: Houd deze knop ingedrukt om een stereoverbinding tot stand te brengen met een
andere Game Day Lights-luidspreker. Druk tweemaal op deze knop om de verbinding met
een andere Game Day Lights-luidspreker te verbreken.
13. Aan/uit-schakelaar: Druk en houd deze knop 3 seconden lang ingedrukt om Game Day
Lights aan/uit te zetten. Zolang de Game Day Lights is verbonden met een stroombron,
hoeft het apparaat niet aan te staan om de accu op te laden. Wanneer het apparaat is
ingeschakeld, verschijnt op het scherm het decimale-pictogram of uw huidige radiozender.
Bovenpaneel
1. NFC: Tik hier op uw gsm die NFC (near-field communication) ondersteunt en waarop deze
dienst is geactiveerd door zachtjes op het 'N'-logo te stoten.
45
Page 46
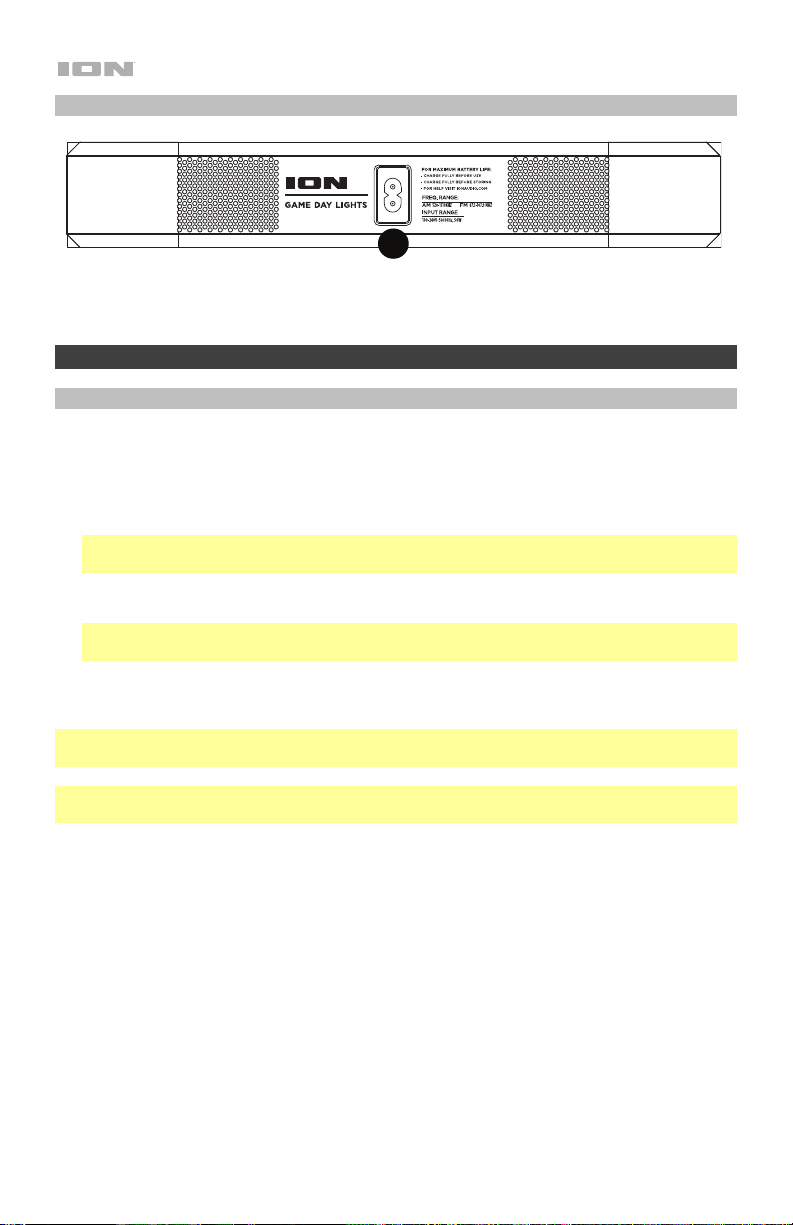
1
Achterpaneel
iPA80A
1. Stroomkabel-ingang: Steek de meegeleverde stroomkabel hierin om de unit op te
stroom. Merk op dat de Game Day Lights kan worden gebruikt met de stroomkabel terwijl
tegelijkertijd laadt de batterij.
Operatie
Een Bluetooth-apparaat koppelen
1. Zet uw Bluetooth-apparaat aan.
2. Aanzetten van Game Day Lights. Druk op de Bluetooth-knop en laat deze los om te
koppelen met een Bluetooth-apparaat.*
3. Navigeer naar het instelscherm van uw Bluetooth-apparaat, zoek naar Game Day Lights
en maak verbinding.
Opmerking: Als uw Bluetooth-apparaat om een koppelingscode verzoekt, voer dan
"0000" in.
4. Het Bluetooth-pictogram blijft branden wanneer de Game Day Lights is gekoppeld aan een
apparaat. *
Opmerking: gebruikers moeten het updaten van hun OS overwegen in geval van
problemen met het koppelen of afspelen van muziek.
5. Tik op de knop Bluetooth om een gekoppeld Bluetooth-apparaat los te koppelen. *
6. Om verbinding te maken met een ander Bluetooth-apparaat: herhaal stappen 3-4.
Opmerking: Voor een maximumbereik moeten apparaten met Bluetooth 4.0 of hoger worden
gebruikt.
* Tip: Als u de gesproken aanwijzingen wilt uitschakelen (of inschakelen), dubbelklikken de
knop Bluetooth.
46
Page 47

Een Bluetooth-apparaat koppelen met NFC
NFC (near-field communication) maakt gegevensuitwisseling, zoals koppeling, mogelijk tussen
apparaten door ze zachtjes tegen elkaar te stoten. Raadpleeg de handleiding van uw apparaat
om te zien of deze functie wordt ondersteund.
NFC gebruiken om te koppelen met de Game Day Lights:
1. Om NFC te gebruiken, moet uw apparaat zijn ingeschakeld en ontgrendeld.
2. Ga naar het menu Instellingen van uw apparaat en controleer of NFC Aanstaat
(eenmalige handeling).
3. Zet de Game Day Lights aan.
4. Met uw apparaat kort het NFC-logo, op het bovenpaneel van de Game Day Lights,
aanraken en het ertegen houden.
5. Volg de koppelingsinstructies die op uw telefoon verschijnen. Als een wachtwoord wordt
gevraagd, voer dan "0000" in.
6. Stoot zachtjes uw apparaat tegen het NFC-logo.
De radio gebruiken
Opmerking: Dit hoofdstuk is alleen voor gebruik met Noord-Amerikaanse/Japanse modellen.
Een radiozender selecteren:
1. Druk op de knop Radio om AM/FM te selecteren.
2. Selecteer een radiozender met de -/+-toetsen.
Opmerking: Bij slechte AM-ontvangst: haal het apparaat uit het stopcontact voor een
optimale AM-ontvangst. Verplaats heel het apparaat voor het verder aanpassen van de AMontvangst.
Een voorkeuzezender opslaan:
1. Druk op de knop Radio om AM/FM te selecteren en selecteer met de -/+-toetsen een
radiozender die u onder een voorkeuzenummer wilt opslaan.
2. De toets Afspelen/Onderbreken 1 seconde lang indrukken. Op het scherm verschijnt een
voorkeuzenummer.
3. Gebruik de -/+-toetsen om het nummer te selecteren waaronder u de zender wilt opslaan.
4. Druk op Afspelen/Onderbreken om te bevestigen. Op het scherm verschijnt SAV
(opslaan).
Een voorkeuzezender selecteren:
1. Druk op de Radio-toets om AM/FM te selecteren.
2. Druk op Afspelen/Onderbreken om door de opgeslagen voorkeuzezenders te bladeren.
47
Page 48

Stereokoppeling van twee Game Day Lights-luidsprekers*
Twee Game Day Lights-luidsprekers koppelen voor stereoklank:
1. Druk de Link-knop in op beide luidsprekers om de stereokoppelingsmodus te activeren. Er
is een toon hoorbaar en het woord LINK begint te knipperen wanneer de tweede
luidspreker wordt gekoppeld. Zodra de koppeling tot stand is gebracht, blijft het woord
LINK permanent branden.
Opmerking: Het koppelingsproces kan een minuut in beslag nemen. Hoed dichter de
luidsprekers zich bij elkaar bevindne, hoe sneller het koppelingsproces wordt voltooid.
2. Druk op de knop Bluetooth op een van beide luidsprekers en laat hem los om het
koppelen te starten. Het Bluetooth-pictogram op de willekeurig toegewezen
hoofdluidspreker knippert in de koppelmodus. De hoofdluidspreker (met het Bluetoothpictogram verlicht) speelt het linker audiokanaal.
Opmerking: de toegewezen linker en rechter luidsprekerkanalen kunnen worden
geschakeld door de Bluetooth-knop ingedrukt te houden.
3. Ga naar het instellingenscherm van uw Bluetooth-apparaat, zoek naar Game Day Lights
en maak verbinding. Zie Een Bluetooth-apparaat koppelen voor instellingsgegevens
voor Bluetooth.
4. Druk tweemaal op de Link-knop om de link tussen de twee luidsprekers te verbreken.
* Mogelijk zal deze luidspreker ook in staat zijn om verbinding te maken met andere
luidsprekers van het ION Audio productassortiment. Ga voor meer informatie naar
ionaudio.com.
48
Page 49

Probleemoplossing
Als het apparaat niet wordt opgeladen: Controleer of de stroomkabel naar behoren is
aangesloten op de stroomingang en het stopcontact.
Het geluid is vervormd: Probeer het volumeniveau van uw geluidsbron of muziekinstrument
te verlagen. Probeer ook het algemene volume van Game Day Lights te verlagen.
Er zijn teveel bassen: Probeer de toon- of EQ-bedieningsknop op Game Day Lights of uw
geluidsbron bij te regelen om het basniveau te verlagen. Dit stelt u in staat de muziek luider te
zetten vooraleer “afgeknipte” (vervormde) klanken optreden.
Bij slechte AM-ontvangst: Wanneer u over een gekoppeld Bluetooth-apparaat beschikt:
ontkoppel het Bluetooth-apparaat om naar AM-radio te luisteren. Verplaats heel het apparaat
voor het aanpassen van de AM-ontvangst.
Er is een hoge fluitende pieptoon bij het gebruik van een microfoon: Dit is waarschijnlijk
feedback. Richt de microfoon weg van de luidspreker.
Als het geluid van de microfoon niet boven de muziek uitkomt: Verlaag het volume van de
muziek van uw geluidsbron.
U kunt geen muziek afspelen van een USB-stick: De USB-poort is alleen geschikt om USBapparaten op te laden.
Als u uw audioapparaat niet kunt aansluiten op Game Day Lights via Bluetooth:
• Houd uw audioapparaat (bv. smartphone of tablet) en Game Day Lights zo dicht mogelijk
bij elkaar wanneer u verbinding probeert te maken. Zorg ervoor dat zowel het
audioapparaat als Game Day Lights geen hinder ondervinden van muren, meubels, enz.
• De Bluetooth-verbinding op Game Day Lights opnieuw instellen om Game Day Lights te
ontkoppelen van een ander audioapparaat en herstart het zoekproces. Als dit niet meteen
werkt, zet Game Day Lights dan eerst uit en vervolgens terug aan. Zie Een Bluetooth-
apparaat koppelen voor meer informatie.
• De Bluetooth-verbinding op uw audioapparaat opnieuw instellen door Bluetooth uit en dan
weer aan te zetten. Hiervoor kunt u terecht in het Bluetooth-menu van de Instellingen van
uw telefoon of ander audioapparaat.
Als dat niet werkt en u voorheen al verbinding hebt gemaakt met Game Day Lights, zoek
dan naar Game Day Lights in de lijst met beschikbare of voorheen aangesloten apparaten
in het Bluetooth-menu van uw audioapparaat, tik op het tandwielpictogram of het "i"pictogram naast de naam en kies vervolgens Ontkoppelen of Vergeten. Zet Game Day
Lights uit en opnieuw aan en probeer opnieuw te koppelen zodra het opnieuw verschijnt in
uw lijst met beschikbare apparaten.
Opmerking: Als Game Day Lights onlangs werd gekoppeld met een ander audioapparaat
dat zich nog steeds binnen het bereik bevindt, dan moet u dit proces mogelijk ook met dat
audioapparaat herhalen om volledig te kunnen ontkoppelen.
49
Page 50
Appendix (English)
Technical Specifications
Output Power
Drivers Low-Frequency: 6.5” / 165 mm woofer
Dimensions
(Depth x Width x Height)
Weight
Supported Bluetooth Profile
Bluetooth Range
Linked Range
Microphone Type
Aux Input
Frequency Response (+ 3dB)
Battery Battery life: Up to 50 hours
Power Input Voltage: 100–240 V 50/60 Hz
Charge Port
Radio Frequency Range
Specifications are subject to change without notice.
Bluetooth range is affected by walls, obstructions, and movement. For optimal performance, place the product in your room
at line of sight, so it is unaffected by walls, furniture, etc.
Battery life may vary based on temperature, age, and volume usage of product.
Trademarks & Licenses
ION Audio is a trademark of ION Audio, LLC, registered in the U.S. and other countries. The Bluetooth word
mark and logos are owned by the Bluetooth SIG, Inc. and any use of such marks by ION Audio is under
license. The N Mark is a trademark or registered trademark of NFC Forum, Inc. in the United States and in
other countries. All other product or company names are trademarks or registered trademarks of their
respective owners.
50 W (peak)
High-Frequency: 2.0” / 51 mm tweeter
9.9” x 13.1” x 13.3” / 252 x 333 x 338 mm
13.5 lbs. / 6.15 kg
A2DP, AVRCP
Up to 100' / 30.5 m
Up to 50’ / 15 m
Dynamic microphone
1/8” (3.5 mm) line-level
77 Hz – 20 kHz
Recharge time: 5 hours
Type: 12 V, 2.8 Ah, SLA
Dimensions:
mm
USB; +5 V, 1 A
US:
AM 520 – 1710 kHz
FM 87.5 – 107.9 MHz
(Depth x Width x Height) 3.1” x 2.2” x 3.9” / 79 x 56 x 99
JAPAN:
AM 522 – 1710 kHz
FM 75.5 – 108.0 MHz
50
Page 51

51
Page 52

ionaudio.com
Manual Version 1.3
 Loading...