

Page 1

Quickstart Guide English ( 3 – 8 )
Guía de inicio rápido Español ( 9 – 14 )
Appendix English ( 15 )
Page 2

2
Page 3
Quickstart Guide (English)
Introduction
Thank you for purchasing the Wave Rider. At ION, your entertainment is as important to us as
it is to you. That’s why we design our products with one thing in mind—to make your life more
fun and more convenient.
1. Make sure all items listed in the Box Contents are included in the box.
2. READ THE SAFETY & WARRANTY MANUAL BEFORE USING THE PRODUCT.
3. MAKE SURE THE BATTERY IS COMPLETELY CHARGED PRIOR TO FIRST USE FOR
MAXIMUM BATTERY LIFE.
Box Contents
Wave Rider
Micro-USB Cable
1/8" (3.5 mm) Stereo Aux Cable
Quickstart Guide
Safety & Warranty Manual
Support
For the latest information about this product (documentation, technical specifications, system
requirements, compatibility information, etc.) and product registration, visit ionaudio.com.
For additional product support, visit ionaudio.com/support.
3
Page 4
Features
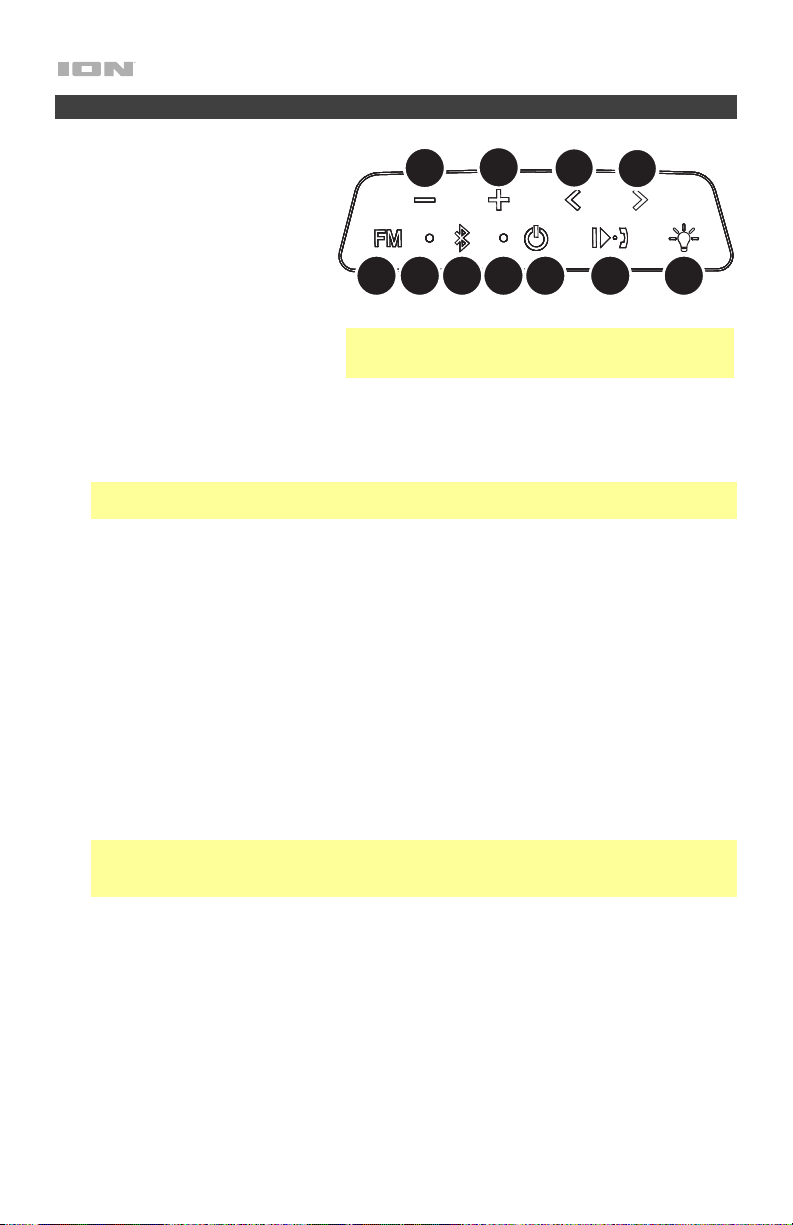
1. Volume Down (-): Press this to
decrease the speaker volume on
Wave Rider.
2. Volume Up (+): Press this to
increase the speaker volume on
Wave Rider.
3. Previous (<): Press and release
this button to go to the previous
FM radio station or to skip to the
previous Bluetooth track. Press
and hold this button to seek
backwards for a clear FM radio
station.
4. Next (>): Press and release this button to go to the next FM radio station or to skip to the
next Bluetooth track. Press and hold this button to seek forward for a clear FM radio
station.
Note: With some apps, pressing the Previous or Next button may go to another playlist
or music genre.
5. FM Mode: Press this button to enter FM mode. Hold the button for 3 seconds to enter
FM Preset Creation mode.
6. Bluetooth/FM LED: This blinks blue when Bluetooth pairing or illuminates solid blue
when connected to a Bluetooth device. When in FM mode, this LED is solid green and
blinks slowly when in FM Preset Creation mode.
7. Bluetooth Button: Press this button briefly to begin Bluetooth connecting. Press and
hold this button to disconnect a paired Bluetooth device.
Press the Bluetooth button twice to enable or disable voice prompts.
8. Charging Indicator: The LED will slowly blink when the battery needs to be charged. The
LED is solid red when the battery is charging. When the power is on and the battery is
fully charged, the red LED will turn off.
9. Power On/Off: Press and hold this button to turn Wave Rider on/off. While Wave Rider is
connected to a power source, it does not need to be powered on to charge the battery.
Note: Wave Rider will power off after 30 minutes if there is a Bluetooth connection with
no audio playing. It will never automatically power off when in FM mode unless the
battery has no charge.
10. Play/Pause / Call Receive/End: In Bluetooth mode, press this button to play or pause a
track from a connected Bluetooth device. In FM mode, press this button to select a
previously saved preset station.
When Bluetooth-paired, press and release this button to answer a phone call. The
phone’s ringtone will be heard through Wave Rider’s speaker until the call is answered.
When the call has been disconnected, Wave Rider will resume playing music. To reject an
incoming call, press and hold this button.
Press and hold this button for 2 seconds to enable your connected smartphone's voice
assistant (e.g. Siri®, Google®, etc), and then speak into the microphone.
Note: If the front speaker grill fills with water, the
sound will be muffled until the water has drained.
1
5
2
768 9
3
4
10 11
4
Page 5
11. Light Mode: Press this button to cycle through the available light modes:
• Color Cycle: The lights slowly glow and cycle through colors. Press and hold the
light mode button to freeze the lights on one color.
• Red/White/Blue: The lights all glow red for one second, followed by white then blue.
• Beat Sync: The lights react to the beat of the music.
• Off: The lights turn off. This is the default mode
when Wave Rider is first powered on.
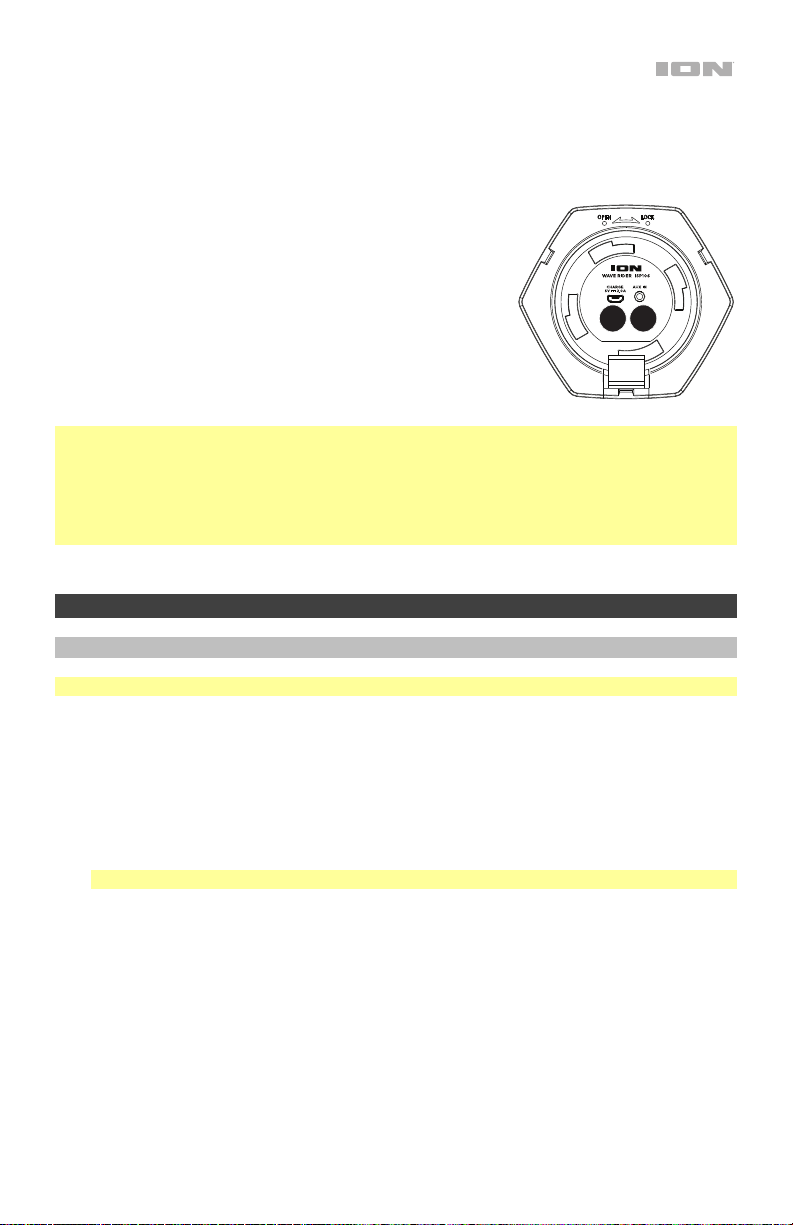
12. Micro USB Port*: Use the included micro-USB cable to
connect this port to a computer or power adapter (DC 5
V; sold separately) to charge Wave Rider.
12
13
13. Auxiliary Input*: This stereo 3.5 mm (1/8”) input can be
used to connect a CD player, MP3 player, or other audio
source.
*IMPORTANT:
• Cover the Aux In and the micro-USB port with the cap in the locked position when using
Wave Rider in water.
• Make sure Wave Rider and its connections are dry before charging. Never charge when
wet.
Operation
Pairing or Disconnecting a Bluetooth Device
Note: Maximum range will be achieved when using devices with Bluetooth 4.0.
To pair a Bluetooth device:
1. Turn on your Bluetooth device.
2. Power on Wave Rider and it will automatically go into pairing mode to search for
Bluetooth devices. You will know you are in pairing mode when the Bluetooth LED is
slowly flashing.
3. Navigate to your Bluetooth device’s setup screen, find Wave Rider and connect.
Note: If your Bluetooth device prompts for a pairing code, enter 0000.
To disconnect a Bluetooth device:
1. Press and release the Bluetooth button to disconnect a paired Bluetooth device.
2. To connect to another Bluetooth device, repeat step 3 above.
5
Page 6
Using the Phone
Note: You must power on and pair Wave Rider with your Bluetooth device before using it to
listen to music or as a speakerphone.
When you have an incoming call, Wave Rider’s speaker will play a ringtone.
1. To answer the call, press Wave Rider's Call Receive button.
Note: If you get an incoming call during music playback, the music will pause until you
end the call.
2. Speak into the microphone and adjust the call volume using the Volume buttons.
3. To end the call, press the Call End button.
4. To reject an incoming call, press and hold the Call Receive button.
Using the Radio
Selecting a Radio Station:
1. Press the FM button.
2. Select a radio station using the </> buttons.
Saving a Preset:
1. Press the FM button to choose FM Radio. The Bluetooth/FM LED will illuminate solid
green.
2. Press and release the </> buttons to select a FM radio station that you want to save as a
preset.
A voice prompt will be heard identifying the selected station.
3. Press and hold the FM button for 3 seconds to enter Preset Creation mode.
4. Press and release the </> buttons to select from one of the 6 preset locations. For each
button press of < or >, the unit will say the active preset number (for example, “two”).
Once the desired save location is reached, press and release the FM button to save the
station preset. The Bluetooth/FM LED will show 3 quick green flashes to confirm a
preset is saved and then exit Preset Save mode and return to FM mode.
Selecting a Preset:
To select from the 6 Preset stations, press and release Play/Pause in FM radio mode. The
tuner will jump to the next preset location and say the name of the preset location (for
example, “three”), and resume playing the FM station audio.
Note: When audio tones are playing, the FM signal will be temporarily muted.
6
Page 7
Stereo-Link™: Linking Two Speakers Together Wirelessly
1. Power on both Wave Rider speakers.
Note: In order to use Stereo-Link Mode, you cannot have a Bluetooth device connected.
If one speaker is connected to a Bluetooth device, break the connection by pressing and
holding the Bluetooth button.
2. With no Bluetooth device connected (blue LEDs on both speakers will blink), on one
Wave Rider press and hold – and + until you hear a short 3-tone melody; repeat this for
the second Wave Rider. The melody will indicate the Wave Riders are searching for each
other to link as their blue LEDs begin to blink fast.
3. Wait about 10-30 seconds for the Wave Riders to find each other. Once “linked”, one
Wave Rider will say “Paired” (if the voice prompts are enabled). Now that the two
speakers are “linked,” one speaker’s blue LED will be solid, while the other speaker’s
blue LED will blink slowly to indicate it’s ready to pair the stereo-linked speakers to your
Bluetooth device (e.g., your phone).
4. When the Wave Riders are wirelessly linked to play in stereo, navigate to your Bluetooth
device’s setup screen, find Wave Rider and connect.
5. Once your smartphone is paired, you will hear “Paired” (if the voice prompts are enabled)
and audio can now play out of both speakers in stereo.
• In Stereo-Link Mode: UI Controls on both speakers will be active.
• To exit Stereo-Link Mode, press and hold – and + until the speaker goes back into
pairing mode, saying “Ready to Pair”.
• In Stereo-Link Mode, press Power to turn off both speakers.
Note: If a Wave Rider is in Stereo-Link Mode when you power it off, it will be in Stereo-Link
the next time you power it on. That means if two Wave Riders are linked when you power them
off, they will automatically link when you power them on as long as they are in close range of
each other and powered on within 15 seconds of each other.
Note: If a Wave Rider is in Stereo-Link Mode when you power it off, when you power it back
on, it will revert back to single mode, and be ready to pair to a Bluetooth device if it does not
find another Wave Rider to link to within 15 seconds. To re-enter Stereo-Link Mode, follow
Steps 1–5 above.
7
Page 8
Troubleshooting
If the unit is not charging: Make sure the micro-USB cable is properly connected to the
Micro-USB port and your computer or power adapter.
If the sound is distorted: Try lowering the volume control of your sound source. Also, try to
reduce the overall volume of Wave Rider.
If there is too much bass: Try adjusting the tone or EQ control on your sound source to lower
the bass level. This will allow you to play the music louder before clipping (distortion) occurs.
If you cannot connect your audio device to Wave Rider via Bluetooth:
• Have your audio device (e.g., smartphone or tablet) and Wave Rider as close together as
possible while trying to connect. Make sure both the audio device and Wave Rider are
unobstructed by walls, furniture, etc.
• Reset the Bluetooth connection on Wave Rider to disconnect Wave Rider from any other
audio device and restart the search process. If this does not work right away, power off
Wave Rider and then power it back on. See Pairing or Disconnecting a Bluetooth
Device for more information.
• Reset the Bluetooth connection on your audio device by turning Bluetooth off and back
on. You can find this under the Bluetooth menu in the Settings for your phone or other
audio device.
If this does not work, and you have connected to Wave Rider before, find Wave Rider in
the list of available or previously connected devices in your audio device's Bluetooth
menu, tap the "gear" or “i” icon located next to it and then select Unpair or Forget. Turn
Wave Rider off and back on and try pairing again once it reappears in your available
devices list.
Note: If Wave Rider has been paired to another audio device recently that is still within
range, you may need to repeat this process with that audio device to fully disconnect.
8
Page 9
Guía de inicio rápido (Español)
Introducción
Gracias por comprar el Wave Rider. En ION, su entretenimiento es tan importante para nosotros
como para usted. Por eso es que diseñamos nuestros productos con una sola cosa en mente—
hacer que su vida sea más divertida y cómoda.
1. Asegúrese de que todos los artículos indicados en Contenido de la caja estén incluidos
en ella.
2. LEA EL MANUAL SOBRE LA SEGURIDAD Y LA GARANTÍA ANTES DE UTILIZAR EL
PRODUCTO.
3. PARA ASEGURAR UNA MÁXIMA VIDA ÚTIL DE LA BATERÍA, ASEGÚRESE DE QUE
ESTÉ COMPLETAMENTE CARGADA ANTES DE UTILIZARLA POR PRIMERA VEZ.
Contenido de la caja
Wave Rider
Cable micro-USB
Cable auxiliar estéreo de 3,5 mm (1/8 pulg.)
Guía de inicio rápido
Manual sobre la seguridad y garantía
Soporte
Para obtener la información más reciente acerca de este producto (documentación,
especificaciones técnicas, requisitos de sistema, información de compatibilidad, etc.) y
registrarlo, visite ionaudio.com.
Para obtener soporte adicional del producto, visite ionaudio.com/support.
9
Page 10
Características
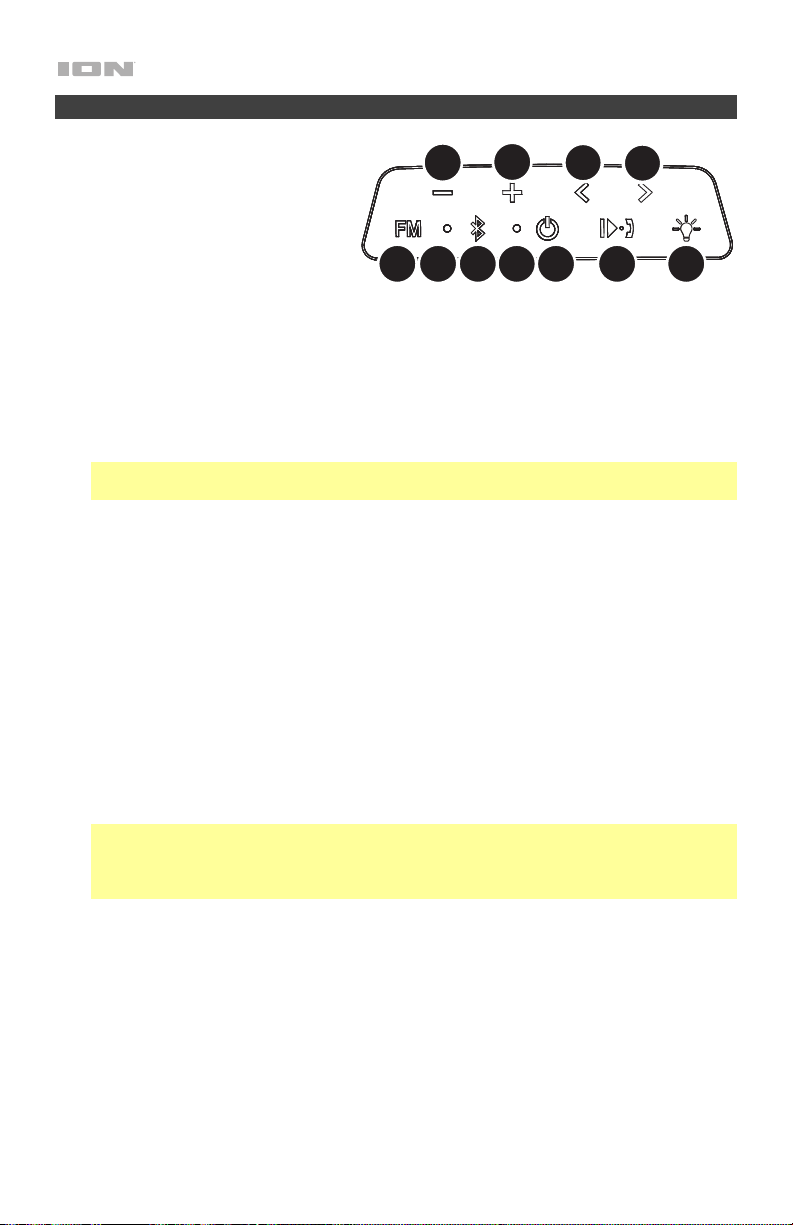
1. Bajar volumen (-): Pulse este
botón para disminuir el volumen
del altavoz del Wave Rider.
2. Subir volumen (+): Pulse este
botón para aumentar el volumen
del altavoz del Wave Rider.
3. Pista anterior (<): Pulse y suelte
este botón para ir a la siguiente
estación de FM o saltar a la
siguiente pista de Bluetooth.
Mantenga pulsado este botón para
buscar hacia atrás una estación de
FM con buena señal.
4. Pista siguiente (>): Pulse y suelte este botón para ir a la siguiente estación de FM o
saltar a la siguiente pista de Bluetooth. Mantenga pulsado este botón para buscar hacia
adelante una estación de FM con buena señal.
Nota: En algunas aplicaciones, pulsar los botones Previous Track (Pista anterior) o Next
Track (Pista siguiente) hará que vaya a otra lista de reproducción o género musical.
5. Modo FM: Pulse este botón para entrar al modo de FM. Mantenga pulsado el botón
durante 3 segundos para entrar al modo de creación de presets.
6. LED Bluetooth/FM: Parpadea durante el apareamiento de Bluetooth o se ilumina con luz
azul fija cuando está conectado a un dispositivo Bluetooth. En el modo FM, este LED
permanece iluminado con luz verde y parpadea lentamente cuando se encuentra en
modo de creación de presets de FM.
7. Botón Bluetooth: Pulse este botón brevemente para comenzar la conexión Bluetooth.
Mantenga pulsado este botón para desconectar un dispositivo Bluetooth apareado.
Pulse el botón Bluetooth dos veces para activar o desactivar los avisos de voz.
8. Indicador de carga: El LED parpadeará lentamente cuando se necesite cargar la batería.
El LED se iluminará con luz roja permanente cuando la batería se esté cargando. Cuando
esté encendido y la batería esté totalmente cargada, este LED rojo se apagará.
9. Encendido/apagado: Mantenga pulsado este botón para encender o apagar el Wave
Rider. Mientras el Wave Rider esté conectado a un suministro de energía eléctrica, no es
necesario encenderlo para que cargue la batería.
Nota: El Wave Rider se apagará tras 30 minutos si no se reproduce audio a través de la
conexión Bluetooth. Nunca se apagará automáticamente cuando esté en modo FM,
salvo que la batería se quede sin carga. El Wave Rider se apagará tras 30 minutos aun
cuando haya un dispositivo USB conectado al puerto de carga USB.
10. Reproducir/Pausa / Atender/Finalizar llamada: Púlselo para reproducir o hacer pausa
en una pista de un dispositivo Bluetooth conectado.
Con un dispositivo Bluetooth apareado, pulse y suelte este botón para atender una
llamada. Se escuchará el tono de llamada del teléfono a través del altavoz del Wave
Rider hasta que se atienda la llamada. Cuando la llamada haya finalizado, el Wave Rider
continuará reproduciendo música. Para rechazar una llamada entrante, mantenga
pulsado este botón.
Pulse y suelte este botón para seleccionar un preset de estación guardado previamente.
Mantenga pulsado este botón durante 2 segundos para activar el asistente de voz de su
teléfono inteligente (smartphone) conectado (por ej., Siri®, Google®, etc.) y luego háblele
al micrófono.
10
1
5
2
768 9
3
4
10 11
Page 11
11. Modo de iluminación: Pulse este botón para alternar por los modos de iluminación
disponibles.
• Ciclo de color: Las luces brillan suavemente y cambian de un color a otro. Mantenga
pulsado el botón de modo para congelar las luces en un color.
• Rojo/blanco/azul: Todas las luces se iluminarán de color rojo durante un segundo,
luego de color blanco y luego de color azul.
• Sincronizado con el ritmo: Las luces reaccionan al ritmo de la música.
• Off (Apagado): Las luces se apagan. Este es el
modo predeterminado la primera vez que se
enciende el Wave Rider.
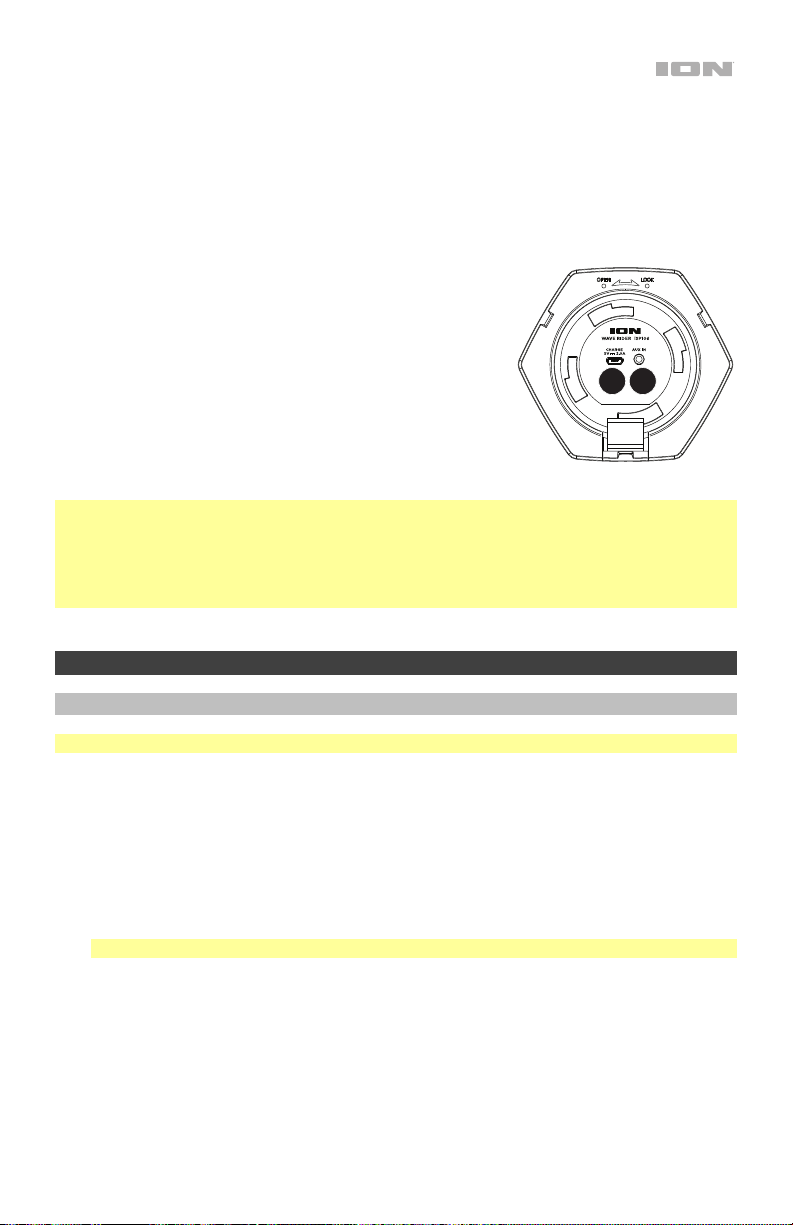
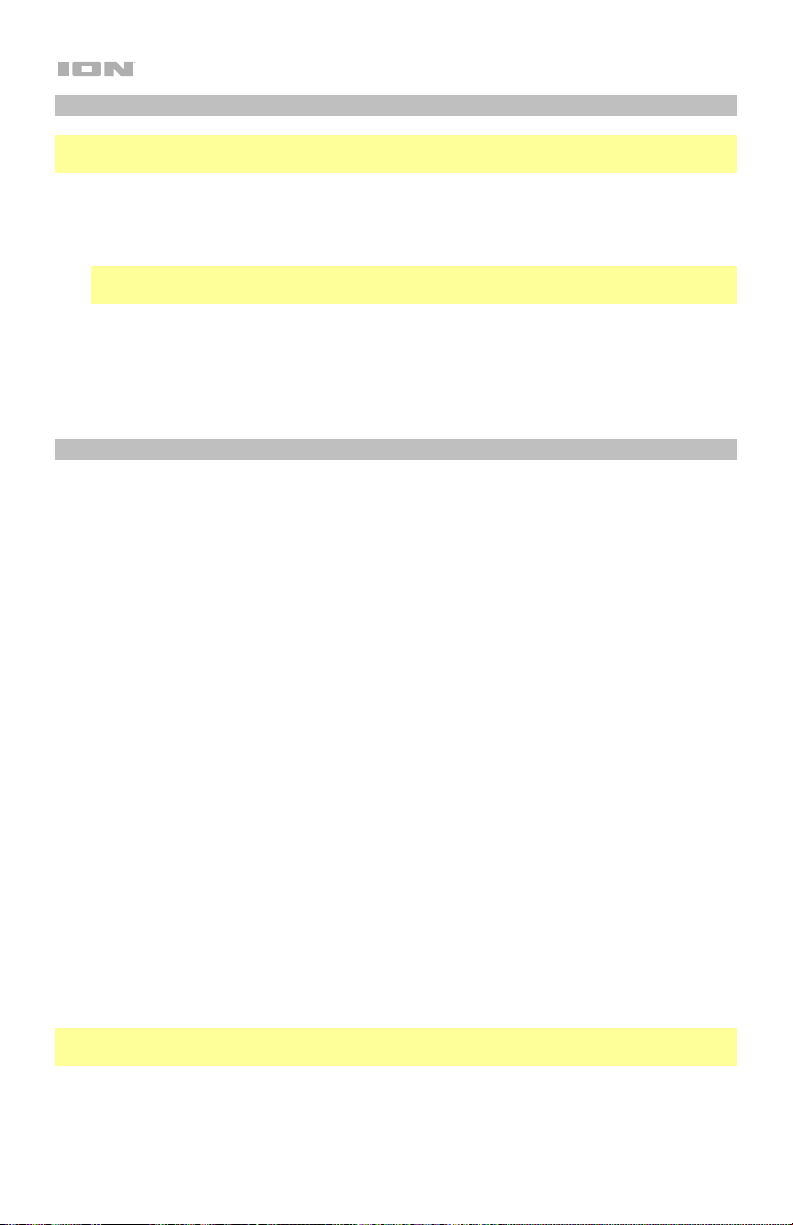
12. Puerto micro USB*: Utilice el cable micro USB incluido
para conectar este puerto a un ordenador o adaptador
de corriente (5 V de CC; se vende por separado) para
cargar el Wave Rider.
12
13
13. Entrada auxiliar*: Esta entrada estéreo de 3,5 mm (1/8
pulg.) se puede utilizar para conectar un reproductor de
CD, un reproductor de MP3 u otra fuente de audio.
*IMPORTANTE:
• Cubra la entrada auxiliar, el puerto micro-USB y el cable de alimentación con la tapa en
la posición cerrada antes de utilizar el Wave Rider en el agua.
• Asegúrese de que el Wave Rider y sus conexiones estén secas antes de cargarlo. Nunca
lo cargue si está húmedo.
Funcionamiento
Apareamiento o desconexión de un dispositivo Bluetooth
Nota: El alcance máximo se logra cuando se utilizan dispositivos con Bluetooth 4.0.
Cómo aparear un dispositivo Bluetooth
1. Encienda su dispositivo Bluetooth.
2. Encienda el Wave Rider, que pasará automáticamente al modo de apareamiento para
buscar dispositivos Bluetooth. Se dará cuenta de que está en modo de apareamiento
cuando el icono Bluetooth esté parpadeando.
3. Navegue a la pantalla de configuración Bluetooth de su dispositivo, busque Wave Rider
y establezca la conexión.
Nota: Si su dispositivo Bluetooth solicita un código de apareamiento, ingrese 0000.
Cómo desconectar un dispositivo Bluetooth:
1. Pulse y suelte el botón de Bluetooth para desconectar un dispositivo Bluetooth
apareado.
2. Para conectarse a otro dispositivo Bluetooth repita el paso 3 mencionado anteriormente.
11
Page 12
Cómo utilizar el teléfono
Nota: Debe encender y aparear el Wave Rider con su dispositivo Bluetooth antes de usarlo a
fin de poder utilizarlo para escuchar música o como teléfono manos libres.
Cuando tenga una llamada entrante, el altavoz del Wave Rider reproducirá un tono de
llamada.
1. Para contestar la llamada, pulse el botón Call Receive (Atender llamada) del Wave Rider.
Nota: Si recibe una llamada entrante durante la reproducción de música, ésta se pondrá
en pausa hasta que termine la llamada.
2. Háblele al micrófono y ajuste el volumen de la llamada utilizando los botones Volume
(volumen).
3. Para terminar la llamada, pulse el botón Call End (Terminar de llamada).
4. Para rechazar una llamada entrante, mantenga pulsado el botón Call Receive.
Cómo usar la radio
Selección de una estación de radio:
1. Pulse el botón FM.
2. Seleccione una estación de radio utilizando los botones </>.
Guardado de un preset:
1. Pulse el botón FM para elegir una radio de FM. El LED Bluetooth/FM se iluminará con
luz verde fija.
2. Pulse y suelte los botones </> para seleccionar una estación de FM que desee guardar
como un preset.
Se escuchará un indicativo de voz que identifica la estación seleccionada.
3. Mantenga pulsado el botón FM durante 3 segundos para activar el modo de creación de
presets.
4. Pulse y suelte los botones </> para seleccionar una de las 6 ubicaciones para presets.
Por cada pulsación del botón < o >, la unidad dice el número de preset activo (por
ejemplo, "dos"). Una vez alcanzada la ubicación de memorización deseada, pulse y
suelte el botón FM para guardar el preset de la estación. El LED Bluetooth/FM mostrará
3 destellos verdes rápidos para confirmar que se memorizó el preset y luego sale del
modo de guardado de presets y vuelve al modo FM.
Selección de presets:
Para seleccionar uno de los 6 presets de estaciones, pulse y suelte Play/Pause en modo de
radio de FM. El sintonizador saltará a la siguiente ubicación de preset, dirá el nombre de la
ubicación del preset (por ejemplo, "tres") y reanudará la reproducción del audio de la estación
de FM.
Nota: Cuando se están reproduciendo los tonos de audio, la señal de FM se silencia
temporalmente.
12
Page 13

Stereo-Link™: Enlace de dos altavoces entre sí de forma inalámbrica
1. Encienda ambos altavoces Wave Rider.
Nota: Para poder usar el modo Stereo-Link, no podrá tener un dispositivo Bluetooth
conectado. Si hay un altavoz conectado a un dispositivo Bluetooth, interrumpa la
conexión manteniendo pulsado el botón Bluetooth.
2. Si no hay ningún dispositivo Bluetooth conectado (los LED azules en ambos altavoces
parpadearán), mantenga pulsados – y + en uno de los Wave Rider hasta que escuche
una melodía corta de 3 tonos; repita este procedimiento para el segundo Wave Rider. La
melodía indicará que los Wave Rider se están buscando el uno al otro para enlazarse a la
vez que sus LED azules comienzan a parpadear rápidamente.
3. Espere de 10 a 30 segundos hasta que los Wave Rider se encuentren. Una vez
enlazados, uno de los Wave Rider dirá “Paired” (si los avisos de voz están activados).
Ahora que ambos altavoces están "enlazados", el LED azul de un altavoz estará
encendido, mientras que el LED azul del otro altavoz parpadeará lentamente para indicar
que está listo para aparear los altavoces estéreo enlazados a su dispositivo Bluetooth
(por ej., su teléfono).
4. Cuando los Wave Rider estén enlazados de forma inalámbrica para reproducir en
estéreo, navegue a la pantalla de configuración Bluetooth de su dispositivo, busque
Wave Rider y establezca la conexión.
5. Una vez apareado su teléfono inteligente (smartphone), escuchará “Paired” (si los avisos
de voz están activados) y podrá reproducir audio a través de ambos altavoces en
estéreo.
• En modo Stereo-Link: Los controles de la interfaz del usuario en ambos altavoces
estarán activados.
• Para salir del modo Stereo-Link, mantenga pulsados – y + hasta que el altavoz
regrese al modo de apareamiento diciendo “Ready to Pair”.
• Estando en el modo Stereo-Link, pulse Power (Encendido) para apagar ambos
altavoces.
Nota: Si un Wave Rider se encuentra en modo Stereo-Link cuando lo apaga, estará en modo
Stereo-Link la próxima vez que lo encienda. Eso implica que si dos Stereo-Link están
enlazados cuando los apaga, se enlazarán automáticamente cuando los encienda siempre
que estén dentro del alcance del otro y se enciendan con menos de 15 segundos de
diferencia entre sí.
Nota: Si un Wave Rider se encuentra en modo Stereo-Link cuando lo apaga, al encenderlo
nuevamente regresará al modo mono/individual, y estará listo para aparearse con un
dispositivo Bluetooth si no encuentra otro Wave Rider con el cual enlazarse en un período de
15 segundos. Para volver a entrar al modo Stereo-Link, repita los pasos 1 a 5 anteriores
13
Page 14

Solución de problemas
Si la unidad no se carga: Asegúrese de que el cable micro-USB esté conectado
correctamente al puerto micro-USB y a la toma de corriente o ordenador.
Si el sonido está distorsionado: Pruebe bajando el control de volumen de su fuente de
sonido o instrumento musical. Pruebe también reduciendo el volumen general del Wave Rider.
Si los graves son demasiado fuertes: Intente ajustando el control de tono o ecualización de
su Wave Rider o fuente de sonido para reducir el nivel de graves. De esta forma podrá
reproducir la música con más volumen antes de que se produzca el recorte (distorsión).
Si no logra reproducir música desde una unidad flash: El puerto USB sea solo para cargar
dispositivos USB.
Si no puede conectar su dispositivo de audio al Wave Rider mediante Bluetooth:
• Mantenga su dispositivo de audio (por ej., teléfono inteligente [smartphone] o tableta) y el
Wave Rider lo más cerca posible entre sí al realizar la conexión. Asegúrese que tanto el
dispositivo de audio como el Wave Rider no estén obstruidos por paredes, muebles, etc.
• Reinicie la conexión Bluetooth del Wave Rider para desconectarlo Wave Rider de
cualquier otro dispositivo de audio y reinicie el proceso de búsqueda. Si esto no funciona
en seguida, apague el Wave Rider y luego vuelva a encenderlo. Para más información,
consulte Apareamiento o desconexión de un dispositivo Bluetooth.
• Reinicie la conexión Bluetooth de su dispositivo de audio apagando el Bluetooth y luego
volviendo a encenderlo. Puede encontrar esta opción dentro del menú Bluetooth en los
ajustes de su teléfono o dispositivo de audio.
Si esto no funciona y ya se había conectado al Wave Rider anteriormente, busque Wave
Rider en la lista de dispositivos disponibles o previamente conectados en el menú
Bluetooth de su dispositivo de audio, toque el icono de engranaje o "i" ubicado junto a él
y luego seleccione Desaparear u Olvidar. Apague el Wave Rider, luego vuelva a
encenderlo e intente aparearlo nuevamente una vez que vuelva a aparecer en su lista de
dispositivos disponibles.
Nota: Si Wave Rider ya ha sido recientemente apareado con otro dispositivo de audio
que aún se encuentre dentro del alcance, es posible que tenga que repetir este proceso
con ese dispositivo de audio para desconectarlo completamente.
14
Page 15
Appendix (English)
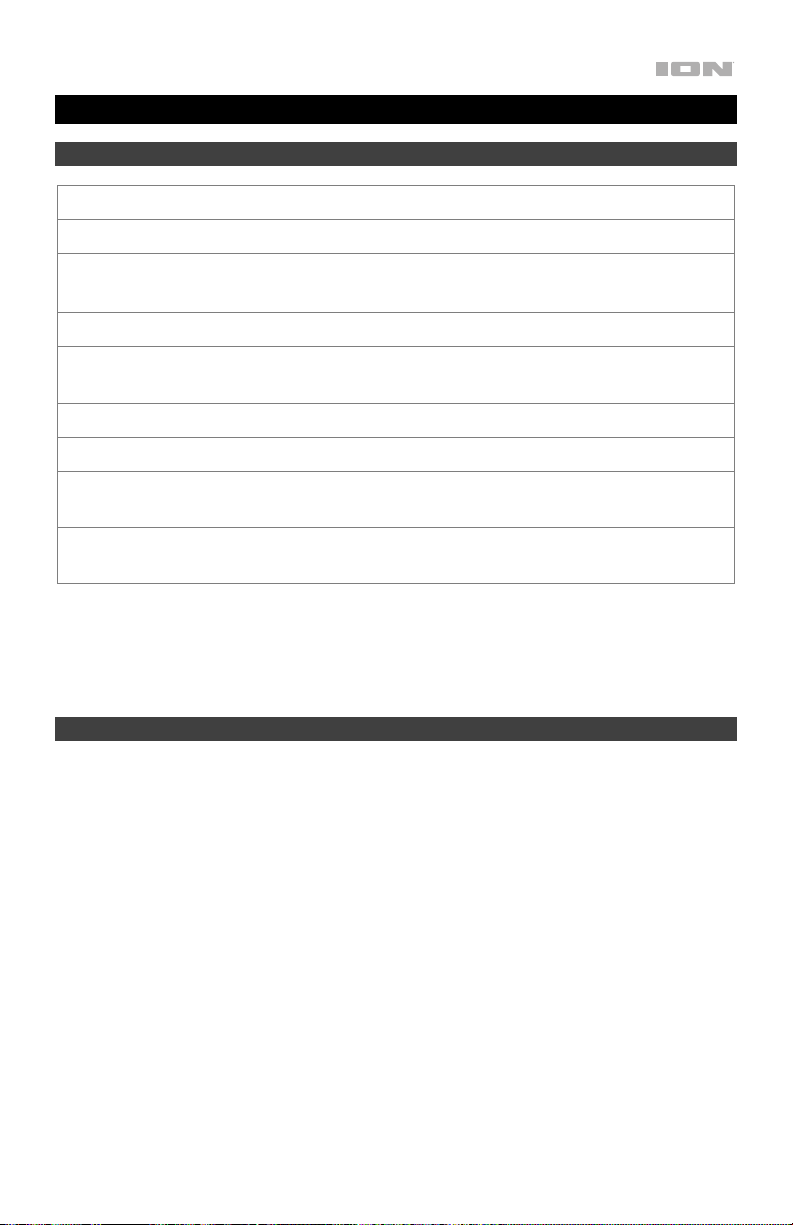
Technical Specifications
Output Power
Frequency Response
Bluetooth Specifications Profile: A2DP, HFP, AVRCP
Water Resistance Class
Battery Battery life: Up to 20 hours
Aux Input
Power
Dimensions
(depth x width x height)
Weight
Specifications are subject to change without notice.
Bluetooth and wireless reception and range are affected by walls, obstructions, and movement. For optimal
performance, place the product in the center of the room so it is unobstructed by walls, furniture, etc.
Battery life may vary based on temperature, age, and volume usage of product.
Trademarks & Licenses
ION Audio is a trademark of ION Audio, LLC, registered in the U.S. and other countries.
The Bluetooth word mark and logos are owned by the Bluetooth SIG, Inc. and any use of such marks by
ION Audio is under license.
All other product names, company names, trademarks, or trade names are those of their respective owners.
26 W (peak)
70 Hz – 18 KHz
Range: Up to 100 feet / 30.5 meters
IP67
Recharge time: Up to 4 hours
3.5 mm (1/8”) line-level
via Micro-USB (DC 5V)
3.0” x 9.5” x 8.85”
76.2 x 241 x 224 mm
2.75 lbs.
1.24 kg
15
Page 16

ionaudio.com
Manual Version 1.0
 Loading...