

Page 1

Portable
Hard Drive
USB 2.0
Quick Start Guide
Guide de démarrage rapide
Schnellstart-Handbuch
Guida di installazione rapida
Guía de instrucciones rápidas
Guia de uso rápido
Snel aan de slag
Snabbstartguide
Introduktion
Hurtigreferanse
Pikaopas
Gyors útmutató
Stručná příručka
Wprowadzenie
Краткое руководство по началу работы
Οδηγός γρήγορης εκκίνησης
Hızlı Başlama Kılavuzu
Page 2

Quick Install • Installation rapide
Schnellstart • Installazione rapida
Instalación rápida • Instalação rápida
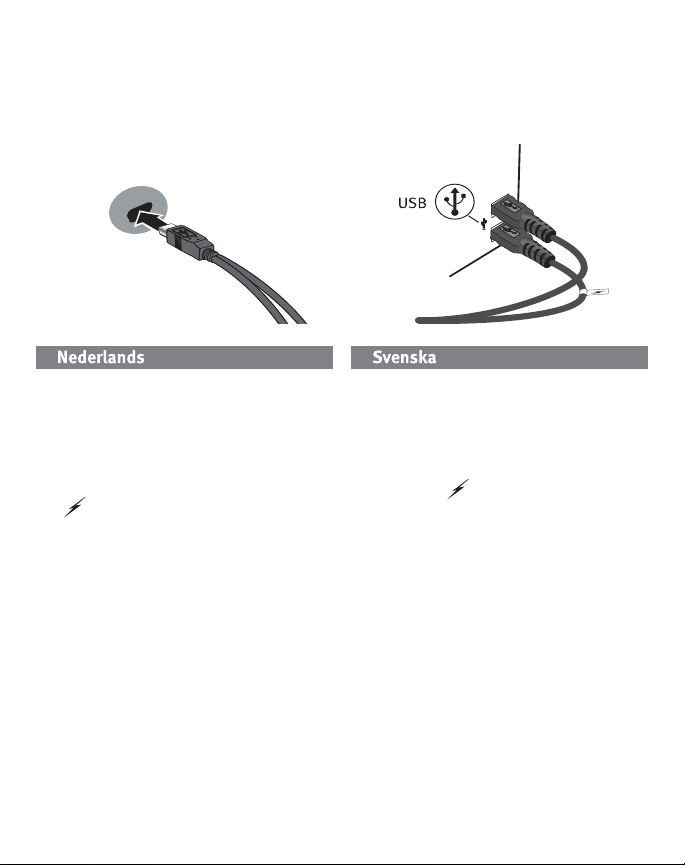
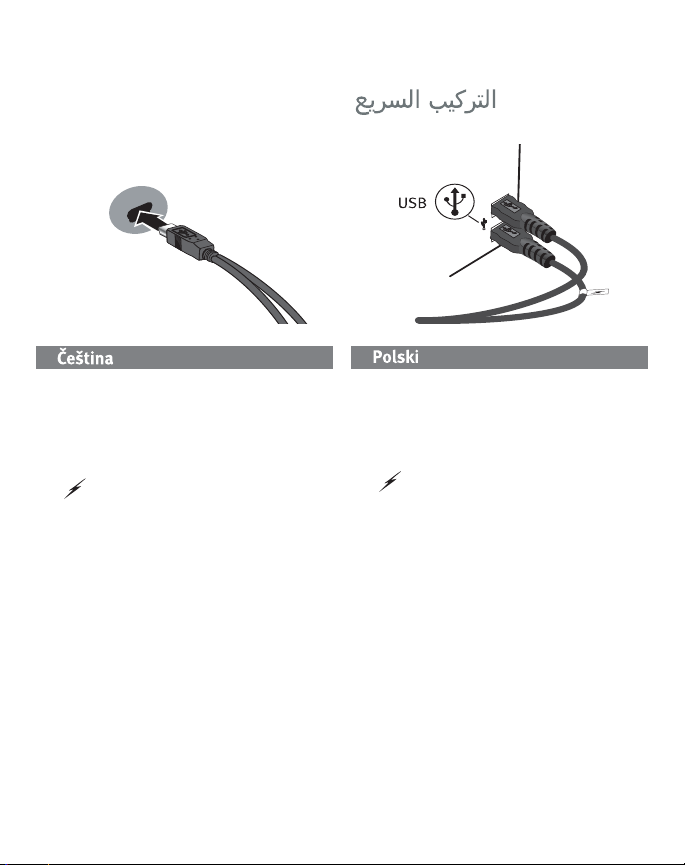
1. Connect the mini connector on the USB
cable to the back of the drive.
2. Connect the standard USB connectors on
the cable to USB ports on your computer.
NOTE: The line labeled with the
symbol provides auxiliary power and is
needed only if your computer does not
provide sufficient USB power through the
other line.
PC Users: The drive icon should appear in My
Computer or Windows Explorer.
Mac Users: You will need to reformat the drive.
See instructions on page 8.
2
1. Connectez le mini-connecteur du câble USB à
l’arrière du lecteur.
2. Connectez les connecteurs USB standard du
câble aux ports USB de l’ordinateur.
REMARQUE : La ligne portant le symbole
fournit une alimentation supplémentaire et
n’est nécessaire que si votre ordinateur ne
fournit pas une alimentation USB suffisante
via l’autre ligne.
Utilisateurs de PC : l’icône du disque dur doit
apparaître sur le Poste de travail ou dans
l’Explorateur Windows.
Utilisateurs de Mac : vous devez reformater
le disque dur. Consultez les instructions à la
page 10.
Page 3
1. Schließen Sie den Ministecker des USBKabels an der Rückseite des Laufwerks an.
2. Schließen Sie die Standardstecker des
USB-Kabels an den USB-Anschlüssen des
Computers an.
HINWEIS: Der Kabelstrang mit dem Symbol
liefert zusätzlichen Strom. Es wird nur
dann benötigt, wenn der Computer nicht
genügend Spannung über die andere USBLeitung liefert.
PC-Benutzer: Das Laufwerksymbol sollte
im Arbeitsplatz oder im Windows-Explorer
angezeigt werden.
Mac-Benutzer: Sie müssen das Laufwerk neu
formatieren. Lesen Sie hierzu die Anweisungen
auf Seite 11.
1. Collegare il connettore mini al cavo USB
situato sul retro dell’unità.
2. Collegare alle porte USB del computer i
connettori USB standard presenti sul cavo.
NOTA: l’estremità contrassegnata dal
simbolo
ausiliario, il cui impiego è necessario solo
se il computer non eroga alimentazione
USB sufficiente tramite l’altra estremità a
disposizione.
Utenti PC: l’icona dell’unità compare in Risorse
del computer o in Esplora risorse.
Utenti Mac: sarà necessario riformattare
l’unità. Fare riferimento alle istruzioni a
pagina 13.
fornisce un alimentatore
1. Conecte el mini conector al cable USB en la
parte posterior de la unidad.
2. Conecte los conectores USB estándar del
cable a los puertos USB del ordenador.
NOTA: La línea etiquetada con el símbolo
proporciona alimentación auxiliar y sólo
se requiere si el ordenador no proporciona
suficiente alimentación USB a través de la
otra línea.
Usuarios de PC: En Mi PC o en el Explorador de
Windows debe aparecer el icono de unidad.
Usuarios de Mac: Tendrá que volver a dar
formato a la unidad. Consulte las instrucciones
de la página 14.
1. Conecte o mini conector no cabo USB na
parte posterior da unidade.
2. Conecte os conectores USB padrão do cabo a
portas USB do computador.
NOTA: A linha rotulada com o símbolo
fornece alimentação auxiliar e é necessária
somente se o seu computador não fornecer
alimentação USB suficiente através da outra
linha.
Usuários de PC: O ícone da unidade deve
aparecer em Meu computador ou no Windows
Explorer.
Usuários de Mac: Será preciso reformatar a
unidade. Consulte as instruções na página 16.
3
Page 4
Snelle installatie • Snabbinstallation
Hurtig installation • Rask installering
Pika-asennus • Gyors telepítés
1. Sluit de miniconnector van de USB-kabel
aan op de achterkant van de drive.
2. Sluit de standaard USB-connectoren van
de kabel aan op USB-poorten van de
computer.
OPMERKING: De kabel met de symbool
levert hulpstroom en wordt alleen
gebruikt als uw computer onvoldoende
USB-stroom levert via de andere kabel.
Pc-gebruikers: het pictogram van de drive
verschijnt normaal in Deze computer of in
Windows Verkenner.
Mac-gebruikers: u dient de drive opnieuw te
formatteren. Zie instructies op pagina 18.
4
1. Anslut minikontakten till USB-kabeln på
baksidan av enheten.
2. Anslut kabelns USB-kontakter till USBportarna på datorn.
OBS! Den ledning som är märkt med
symbolen tillför extra elström,
och behövs bara om datorn inte kan
tillhandahålla tillräcklig energi genom
USB-ledningen.
PC-användare: Ikonen för enheten kommer att
visas i Den här datorn eller i Utforskaren.
Mac-användare: Använd Disk Utility när du
omformaterar enheten för Mac OS Extended
Journaled.
Page 5
1. Tilslut ministikket på USB-kablet på
drevets bagside.
2. Slut USB-standardstikkene på kablet til
USB-portene på computeren.
BEMÆRK! Linjen med symbolet
ekstra strøm og er kun nødvendigt, hvis
computeren ikke leverer tilstrækkelig USBstrøm gennem den anden linje.
Pc-brugere: Drevikonet bør vises i Denne
computer eller Windows Stifinder.
Mac-brugere: Du skal bruger Disk Utility til
at genformatere drevet Mac OS Extended
Journaled.
giver
1. Koble til minikontakten på USB-kabelen på
baksiden av stasjonen.
2. Koble USB-standardkontaktene på kabelen
til USB-porter på datamaskinen.
MERK: Ledningen som er merket med
symbolet
er bare nødvendig hvis datamaskinen ikke
gir tilstrekkelig USB-strøm via den andre
ledningen.
PC-brukere: Ikonet til stasjonen skal vises i Min
datamaskin eller Windows Utforsker.
Mac-brukere: Du må bruke Diskverktøy til å
omformatere stasjonen som Mac OS Extended
(journalført).
sørger for reservestrøm og
1. Kytke USB-kaapelin miniliitin
kiintolevyaseman takana olevaan
liitäntään.
2. Kytke kaapelin USB-liittimet tietokoneen
USB-portteihin.
HUOMAUTUS: Symbolilla merkityn
liitännän kautta laitteessa voi käyttää
lisävirtaa. Sitä tarvitaan vain, jos laite ei
saa tietokoneesta riittävästi USB-virtaa
muun liitännän kautta.
PC-tietokoneen käyttäjät: Aseman kuvakkeen
pitäisi tulla näkyviin Oma tietokone -ikkunaan
tai Windowsin Resurssienhallintaan.
Macintosh-käyttäjät: Asema tulee alustaa
uudelleen levytyökalulla Mac OS Extended
Journaled -tiedostojärjestelmäksi.
1. Csatlakoztassa az USB kábelen lévő mini
csatlakozót a meghajtó hátoldalához.
2. A kábel standard USB csatlakozóit illessze
számítógépe USB portjaiba.
MEGJEGYZÉS: A szimbólummal
jelölt csatlakozó segédenergiát (áramot)
biztosít, és csak akkor van rá szükség, ha
számítógépe nem ad elég USB energiát a
másik csatlakozón keresztül.
PC-felhasználók: A meghajtó ikonja nem
jelenik meg a Sajátgép vagy a Windows Intéző
ablakokban.
Mac-felhasználók: A Disk Utility segédprogram
segítségével formázza újra a meghajtót a Mac
OS Extended Journaled fájlrendszerrel.
5
Page 6
Rychlá instalace • Skrócona instrukcja insalacji
Быстрая установка •
Hızlı Kurulum
Γρήγορη εγκατάσταση
•
1. Připojte mini konektor kabelu USB do
zadní části jednotky.
2. Připojte konektory USB na kabelu k
libovolným portům USB v počítači.
POZNÁMKA: Vodič označený symbolem
poskytuje přídavné napájení a využívá
se jen tehdy, pokud počítač neposkytuje
dostatečné napájení USB prostřednictvím
jiného vodiče.
Uživatelé počítačů: Ve složce Tento počítač
nebo v programu Průzkumník Windows by se
měla objevit ikona jednotky.
Uživatelé počítačů Mac: Bude třeba použít
nástroj Disk Utility k opětovnému zformátování
disku na systém Mac OS Extended.
6
1. Podłącz mini złącze kabla USB do tylnej
części napędu.
2. Podłącz standardowe złącza kabla USB do
portów USB w komputerze.
UWAGA: Przewód oznaczony symbolem
dostarcza dodatkowe zasilanie i jest
wymagany tylko wtedy, gdy komputer nie
zapewnia odpowiedniego zasilania USB
poprzez inną linię.
Użytkownicy komputerów PC: Ikona dysku
zostanie wyświetlona w oknie Mój komputer
lub w oknie programu Eksplorator Windows.
Użytkownicy komputerów Macintosh: Do
ponownego sformatowania napędu Mac OS
Extended Journaled trzeba użyć narzędzia
dyskowego Disk Utility.
Page 7

1. Подключите мини-разъем кабеля USB к
задней стороне диска.
2. Подключите стандартные разъемы
кабеля USB к USB-портам компьютера.
ПРИМЕЧАНИЕ. Провод с символом
обеспечивает дополнительное питание
и необходим только в том случае, если
питание от компьютера через другой
провод USB является недостаточным.
Пользователи ПК. В окне «Мой компьютер»
или Проводнике Windows должен появиться
значок диска.
Пользователи Mac. Необходимо повторно
отформатировать диск. См. инструкции на
стр. 19.
1. USB kablo üzerindeki mini bağlayıcıyı
sürücünün arkasına takın.
2. Kablo üzerindeki standart USB
bağlayıcılarını bilgisayarınızdaki USB
bağlantı noktalarına takın.
NOT: simgesi olan hat, yardımcı güç
sağlar ve yalnızca bilgisayarınız diğer hat
üzerinden yeterli USB gücü sağlamazsa
gerekir.
PC Kullanıcıları: Sürücü simgesi Bilgisayarım
veya Windows Gezgininde görünmelidir.
Mac Kullanıcıları: Sürücüyü Mac OS Extended
Journaled olarak yeniden biçimlendirmek
için Disk İzlencesi uygulamasını kullanmanız
gerekecektir.
1. Συνδέστε το μίνι βύσμα του καλωδίου USB
στο πίσω μέρος της μονάδας δίσκου.
2. Συνδέστε τα τυπικά βύσματα USB
του καλωδίου σε υποδοχές USB στον
υπολογιστή.
ΣΗΜΕΙΩΣΗ: Η γραμμή που επισημαίνεται
με το σύμβολο παρέχει βοηθητική
τροφοδοσία και η σύνδεσή της είναι
απαραίτητη μόνο αν ο υπολογιστής σας
δεν παρέχει επαρκή τροφοδοσία USB
μέσω της άλλης γραμμής.
Χρήστες PC: Το εικονίδιο της συσκευής πρέπει
να εμφανιστεί στο φάκελο Ο Υπολογιστής μου
ή στην Εξερεύνηση των Windows.
Χρήστες Mac: Θα πρέπει να χρησιμοποιήσετε
το Disk Utility (Βοηθητικό πρόγραμμα δίσκων)
για να επαναλάβετε τη διαμόρφωση του
δίσκου Mac OS Extended Journaled.
ﺔﻴﺑﺮﻌﻟا
USB->S-(G-)H
C!A
USB
,=JH C!BDO=M%MHD
-#MQ!HBDL& M%MHD
.G-DKQE9M4MHD5*D-=MP"8'UG
L "I:$/TF$#+90G">6
T@ *D-#MQ!HBDL%A5?=
USB-)R5*D-!9"Q=A
">6-=MP
M/-#MQ!HBD.L%OG+*$0HD"!0JD
O=->S-(G.G-L8PMy
Computer-#MQ!HBDL%Windows
Explorer<1B$0GWindows
M$JAHD.L%OG+*$0HD"!0JD
->S-(G"QL#9ND$($/
O=M%MHD-Q;3DC2MHDCQ2M$ F>
U2MGCQ2M$ F>USB"P:D
7
Page 8

Using the Drive
Disconnecting the Drive
CAUTION! To prevent data loss, do not disconnect the drive during data transfer (activity light
flashing).
PC Users: Use the Safely Remove Hardware icon in the Windows taskbar before disconnecting.
Mac Users: Drag the disk icon to the Trash (Eject) icon on the Mac Desktop.
Backing Up with Your Drive
Iomega recommends periodic system backups and more frequent data backups to ensure that
your critical data is always protected. The frequency of your backup should depend on the
importance of your data. To protect your data, you can simply drag and drop copies of your critical
files onto the drive.
CAUTION! Any data storage device can fail. Always keep at least two copies on different disks for
all critical data files.
Formatting the Drive for Mac OS
The drive ships formatted NTFS. Use Disk Utility to reformat the drive Mac OS Extended Journaled.
NOTE: The following instructions work for Mac OS X, version 10.4 or above. For Mac OS X version
10.1 through 10.3.9, use Disk Utility, Erase to format the drive. See Mac Help if you need more
detailed instructions.
1. Select Applications → Utilities → Disk Utility
2. In the left hand column, click on the drive icon for the Iomega Hard Drive. Make sure you click
on the orange drive icon, not the volume icon.
3. Select the Partition tab.
4. Change Volume Scheme from Current to 1 Partition.
5. Select Mac OS Extended (Journaled) from the Format drop-down menu.
6. Click on the Options button.
7. Select the type of partition needed for your Mac:
GUID Partition Table for bootability on an Intel-based Macintosh computer.
Apple Partition Map for a PowerPC-based Mac.
8. Click OK.
9. Click the Partition button. The drive is ready to use when the format completes.
8
Page 9

Troubleshooting
Drive not detected
Try the following suggestions if the drive does not appear in My Computer, Windows® Explorer, or
on the Mac® Desktop.
• Try restarting your computer.
• Make sure you are using the USB cable that came with the drive. Make sure both lines of the
USB cable are connected to the computer.
• Try changing the connections to different USB ports.
See the support area on www.iomega.com for additional troubleshooting help.
PC will not start up
If your PC will not start up when the drive is connected, the BIOS on the computer probably has
a conflict with large capacity removable drives. To work around this problem, power off the drive
when starting the computer. Power on the drive after the computer finishes starting up.
Complete User’s Manual
A complete user’s manual in HTML format is available on the support area on www.iomega.com.
Utilisation du lecteur
Déconnexion du lecteur
ATTENTION ! Pour éviter toute perte de données, ne déconnectez pas le lecteur pendant un
transfert de données (voyant d’activité clignotant).
Utilisateurs de PC : Utilisez l’icône Retirer le périphérique en toute sécurité dans la barre des
tâches Windows avant la déconnexion.
Utilisateurs de Mac : Faites glisser l’icône du disque sur l’icône Corbeille (Ejecter) sur le bureau
Mac.
Sauvegarde sur le lecteur
Iomega conseille de procéder à des sauvegardes plus fréquentes de données afin de s’assurer
que vos données importantes soient toujours protégées. La fréquence des sauvegardes dépend
de l’importance des données. Pour protéger vos données, copiez vos fichiers les plus importants
sur le lecteur par simple glisser-déplacer.
ATTENTION ! Tout périphérique de stockage peut être défectueux. Conservez toujours deux copies
minimum sur des disques différents pour tous vos fichiers de données importants !
9
Page 10

Formatage du disque pour Mac OS
Le disque dur est livré formaté NTFS. Utilisez l’utilitaire de disque pour reformater le disque dur Mac OS
étendu (journalisé).
REMARQUE : les instructions suivantes fonctionnent pour Mac OS X, version 10.4 ou ultérieure. Pour
les versions Mac OS X versions 10.1 à 10.3.9, utilisez Utilitaire de disque, puis Effacer pour reformater
le disque. Consultez l’Aide Mac si vous souhaitez des instructions plus détaillées.
1. Sélectionnez Applications → Utilitaires → Utilitaire de disque
2. Dans la colonne de gauche, cliquez sur l’icône du disque dur Iomega. Assurez-vous de cliquer sur
l’icône orange du disque, pas sur l’icône de volume.
3. Sélectionnez l’onglet Partitionner.
4. Modifiez la configuration de volume de
5. Sélectionnez Mac OS étendu (journalisé) dans le menu déroulant Format.
6. Cliquez sur le bouton Options.
7. Sélectionnez le type de partition requise pour votre Mac :
Tableau de partition GUID pour l’amorçage sur un ordinateur Macintosh basé sur Intel.
Carte de partition Apple pour un Mac basé sur PowerPC.
8. Cliquez sur OK.
9. Cliquez sur le bouton Partitionner. Le disque peut être utilisé dès que le formatage est terminé.
Actuel
à
1 Partition
.
Dépannage
Le disque non détecté
Effectuez les opérations suivantes si le disque ne s’affiche pas dans le Poste de travail,
l’Explorateur Windows® ou le bureau Mac®.
• Redémarrez votre ordinateur.
• Assurez-vous que vous utilisez le câble USB fourni avec le lecteur. Assurez-vous que les deux
lignes du câble USB sont connectées à l’ordinateur.
• Essayez des modifier les connexions vers des ports USB différents.
Visitez la section Support sur le site www.iomega.com pour une aide supplémentaire au
dépannage.
L’ordinateur ne démarre pas
Si votre PC ne démarre pas lorsque le disque est connecté, il est possible que le BIOS de votre
ordinateur rencontre des problèmes avec les disques amovibles de grande capacité. Afin de
résoudre ce problème, éteignez le disque lorsque vous démarrez l’ordinateur. Allumez-le une fois
l’ordinateur démarré.
10
Page 11

Guide complet de l’utilisateur
Un guide de l’utilisateur complet est disponible au format HTML dans la section Support sur le site
www.iomega.com.
Das Laufwerk verwenden
Trennen des Laufwerks vom System
ACHTUNG! Um Datenverluste zu vermeiden, trennen Sie das Laufwerk während der
Datenübertragung (wenn Aktivitätsanzeige blinkt) nicht vom Computer.
PC-Benutzer: Klicken Sie vor dem Herausziehen der Stecker auf das Symbol Hardware sicher
entfernen in der Windows-Taskleiste.
Mac-Benutzer: Ziehen Sie das Datenträgersymbol zum Symbol Papierkorb (Auswerfen) auf dem
Mac-Schreibtisch.
Mit dem Iomega Laufwerk auf Nummer Sicher
Um einen kontinuierlichen Schutz Ihrer kritischen Daten sicherzustellen, empfiehlt es sich, das
System in regelmäßigen Abständen zu sichern. Bei den Daten sollten Sie dies noch häufiger tun.
Sie können die Daten auf einfache Weise sichern, indem Sie Kopien derselben mit der Maus auf
das Laufwerk ziehen.
VORSICHT! Bei jedem Datenspeichergerät können Defekte auftreten. Achten Sie bei allen
wichtigen Datendateien darauf, dass Sie stets über mindestens zwei Kopien auf verschiedenen
Datenträgern verfügen.
Formatieren des Laufwerks für Mac OS
Das Laufwerk ist mit NTFS vorformatiert. Verwenden Sie das Datenträgerdienstprogramm, um das
Laufwerk mit Mac OS Extended Journaled neu zu formatieren.
HINWEIS: Die folgenden Anweisungen gelten für Mac OS X, Version 10.4 oder höher. Verwenden
Sie den Befehl „Löschen“ des Datenträgerdienstprogramms für Mac OS X Version 10.1 bis 10.3.9.
In der Mac-Hilfe finden Sie weitere ausführliche Anweisungen.
1. Wählen Sie Anwendungen → Dienstprogramme → Datenträgerdienstprogramm
2. Klicken Sie in der linken Spalte auf das Laufwerksymbol für die Iomega-Festplatte. Stellen Sie
sicher, dass Sie auf das orangefarbene Laufwerksymbol und nicht auf das Volume-Symbol
klicken.
3. Wählen Sie die Registerkarte Partition.
4. Ändern Sie das Volume-Schema von Aktuell auf 1 Partition.
5. Wählen Sie Mac OS Extended (Journaled) aus dem Dropdown-Menü Format aus.
11
Page 12

6. Klicken Sie auf die Schaltfläche Optionen.
7. Wählen Sie den für Mac erforderlichen Partitionstyp aus:
GUID Partition Table für Bootfunktion auf einem Intel-basierten Macintosh-Computer.
Apple Partition Map für einen PowerPC-basierten Mac.
8. Klicken Sie auf OK.
9. Klicken Sie auf die Schaltfläche Partition. Sobald die Formatierung abgeschlossen ist, können
Sie das Laufwerk verwenden.
Fehlerbehebung
Laufwerk nicht gefunden
Falls das Laufwerk im Windows® Explorer unter Arbeitsplatz oder auf dem Mac®-Schreibtisch nicht
gefunden wird, versuchen Sie folgende Lösungsansätze:
• Führen Sie probeweise einen Neustart des Computers durch.
• Vergewissern Sie sich, dass Sie das mit dem Laufwerk gelieferte USB-Kabel verwenden.
Stellen Sie sicher, dass beide Leitungen des USB-Kabels am Computer angeschlossen sind.
• Verwenden Sie andere USB-Anschlüsse, sofern vorhanden.
Weitere Tipps zur Fehlerbehebung erhalten Sie im Supportbereich unter www.iomega.com.
Der PC lässt sich nicht starten
Wenn sich Ihr PC mit dem angeschlossenen Laufwerk nicht starten lässt, besteht möglicherweise
ein BIOS-Konflikt mit Wechseldatenträgern mit hoher Speicherkapazität. Sie können dieses
Problem umgehen, indem Sie das Laufwerk beim Starten des Computers ausschalten. Nach dem
Starten des Computers schalten Sie das Laufwerk ein.
Benutzerhandbuch (vollständig)
Im Bereich “Support” unter www.iomega.com steht Ihnen ein vollständiges Benutzerhandbuch im
HTML-Format zur Verfügung.
Uso dell’unità
Scollegamento dell’unità
ATTENZIONE! Per evitare che si verifichino perdite di dati, non scollegare l’unità durante il
trasferimento di informazioni (la spia verde di attività lampeggia).
Utenti PC: Prima di scollegare l’unità, usare l’icona Rimozione sicura dell’hardware nella barra
delle applicazioni di Windows.
Utenti Mac: Trascinare l’icona del disco nel Cestino (Espelli) sulla Scrivania Mac.
12
Page 13

Esecuzione di backup con l’unità
Iomega consiglia di eseguire backup di dati più frequenti per garantire la protezione dei dati
critici. La frequenza di esecuzione dei backup dovrebbe dipendere dall’importanza dei dati. Per
proteggere i dati, è sufficiente trascinare sull’unità le copie dei dati più importanti.
ATTENZIONE! Tutti i dispositivi per la memorizzazione di dati possono guastarsi. Conservare
sempre almeno due copie dei file contenenti informazioni di importanza critica su diversi dischi!
Formattazione dell’unità per Mac OS
L’unità viene fornita formattata in NTFS. Utilizzare utility Disco per riformattare l’unità Mac OS
Extended Journaled.
NOTA: le seguenti istruzioni sono valide per Mac OS X, versione 10.4 o successive. Per Mac OS X,
da 10.1 a 10.3.9, utilizzare l’Utility disco, Cancella per formattare l’unità. Per ulteriori informazioni
consultare il menu Aiuto del Mac.
1. Selezionare Applicazioni
2. Nella colonna a sinistra, fare clic sull’icona dell’unità corrispondente all’unità Iomega Hard
Drive. Assicurarsi di fare clic sull’icona arancione dell’unità e non sull’icona del volume.
3. Selezionare la scheda Partizione.
4. Modificare il volume dello schema da Attuale in Partizione 1.
5. Selezionare Mac OS Extended (Journaled) dal menu a discesa Formattazione.
6. Fare clic sul pulsante Opzioni.
7. Selezionare il tipo di partizione richiesta per il sistema Mac in uso:
Tabella di partizione GUID per avviabilità su computer Macintosh basato su Intel.
Mappa delle partizioni Apple per computer Mac basato su PowerPC.
8. Scegliere OK.
9. Fare clic sul pulsante Partizione. Sarà possibile utilizzare l’unità al termine della
formattazione.
→
Utility
→
Utility disco
Risoluzione dei problemi
Nessuna unità rilevata
Se l’icona dell’unità non compare in Risorse del computer, Esplora risorse di Windows® o sulla
Scrivania Mac®, procedere come descritto qui di seguito.
• Provare a riavviare il computer.
• Assicurarsi di utilizzare il cavo USB fornito in dotazione con l’unità. Accertarsi che le due
estremità del cavo USB siano collegate al computer.
• Provare a cambiare le connessioni utilizzando le diverse porte USB.
13
Page 14

Per ulteriore assistenza nella risoluzione dei problemi, visitare l’area del supporto tecnico
all’indirizzo www.iomega.com.
Il computer non si avvia
Se il PC non si avvia quando l’unità è collegata, è possibile che esista un conflitto tra il BIOS
del computer e i dischi rimovibili a elevata capacità. Per risolvere il problema, spegnere l’unità
quando si accende il computer. Accendere l’unità dopo l’avvio del computer.
Manuale completo dell’utente
Il manuale completo dell’utente è disponibile nell’area Assistenza all’indirizzo www.iomega.com.
Uso de la unidad
Desconexión de la unidad
PRECAUCIÓN: Para impedir la pérdida de datos, no desconecte la unidad durante el proceso de
transferencia de datos (la luz de actividad parpadea).
Usuarios de PC: Utilice el icono Quitar hardware con seguridad de la barra de tareas de Windows
antes de proceder a la desconexión.
Usuarios de Mac: Arrastre el icono del disco al icono Papelera (Expulsar) del escritorio de Mac.
Realizar copias de seguridad con su unidad
Iomega recomienda que se realicen copias copias de seguridad frecuentes de los datos para
garantizar que la información importante esté siempre protegida. La frecuencia con la que se
realicen dichas copias de seguridad dependerá de la importancia de los datos. Para proteger los
datos, no tiene más que arrastrar y soltar copias de los archivos importantes a la unidad.
PRECAUCIÓN:
dos copias en discos diferentes de todos los archivos de datos más importantes!
Cualquier dispositivo de almacenamiento de datos puede fallar. ¡Mantenga siempre al menos
Formateo de la unidad para Mac OS
La unidad se entrega con formato NTFS. Utilice la Utilidad de Discos para volver a dar formato a la
unidad en Mac OS Extended Journaled.
NOTA: Las siguientes instrucciones funcionan para Mac OS X, versión 10.4 o superior. Para Mac
OS X versiones 10.1 a 10.3.9, utilice Utilidad de Discos, Borrar, para dar formato a la unidad.
Consulte la Ayuda de Mac si necesita más instrucciones detalladas.
1. Seleccione Aplicaciones → Utilidades → Utilidad de Discos
2. En la columna de la izquierda, haga clic en el icono de unidad de disco duro Iomega.
Asegúrese de que hace clic en el icono de unidad de color naranja y no en el icono del
volumen.
14
Page 15

3. Seleccione la ficha Partición.
4. Cambie el esquema de volúmenes de Actual a 1 partición.
5. Seleccione Mac OS Extended (Journaled) del menú desplegable Formato.
6. Haga clic en el botón Opciones.
7. Seleccione el tipo de partición necesaria para su Mac:
Tabla de partición GUID para tener capacidad de arranque en un sistema Macintosh con base
Intel.
Mapa de partición de Apple para un sistema PowerPC con base Mac
8. Haga clic en Aceptar.
9. Haga clic en el botón Partición. Cuando la operación de formato finalice, la unidad estará lista
para utilizarse.
Solución de problemas
No se detecta la unidad
Siga las recomendaciones que se muestran a continuación si la unidad no aparece en Mi PC, en el
Explorador de Windows
• Pruebe a reiniciar el ordenador.
• Asegúrese de que está utilizando el cable USB incluido con la unidad y compruebe que las
dos líneas del cable USB están conectadas al ordenador.
• Pruebe a realizar las conexiones en puertos USB distintos.
Consulte el área de sorporte de www.iomega.com para obtener ayuda adicional sobre la solución
de problemas.
El PC no arranca
Si su PC no se inicia cuando la unidad está conectada, puede que la BIOS de su ordenador tenga
un conflicto con las unidades extraíbles de gran capacidad. Para solucionar este problema,
apague la unidad cuando arranque el equipo. Encienda la unidad después de que el equipo haya
terminado de arrancar.
®
o en el escritorio de Mac®.
Completo manual del usuario
El manual de usuario completo en formato HTML está disponible en el área de soporte del sitio
www.iomega.com.
15
Page 16

Utilização da unidade
Desconexão da unidade
CUIDADO! A fim de evitar a perda de dados, não desconecte a unidade durante a transferência de
dados (luz de atividade da unidade piscando).
Usuários de PC: Utilize o ícone Remover hardware com segurança na barra de tarefas do Windows
antes de desconectar.
Usuários de Mac: Arraste o ícone do disco até o ícone Lixeira (Ejetar) na mesa do Mac.
Execução de backup com a sua unidade
A Iomega recomenda que sejam feitos backups periódicos do sistema e backups mais freqüentes
de dados para garantir que seus dados mais importantes estejam sempre protegidos. A
freqüência da execução de backups deve basear-se na importância de seus dados. Para proteger
seus dados, você pode simplesmente arrastar e soltar cópias de seus arquivos importantes na
unidade ou pode usar um software de backup para programar backups regulares.
CUIDADO! Qualquer dispositivo de armazenamento de dados pode falhar. Sempre mantenha no
mínimo duas cópias em discos diferentes para todos os arquivos de dados importantes!
Formatação da unidade em Mac OS
A unidade é enviada com o formato NTFS. Use o Utilitário de disco para reformatar a unidade Mac
OS Extended Journaled.
OBS: as instruções a seguir funcionam para Mac OS X, versão 10.4 ou superior. Para Mac OS X
versão 10.1 a 10.3.9, use o Utilitário de disco, Apagar para formatar a unidade. Consulte a Ajuda
do Mac se precisar de instruções mais detalhadas.
1. Selecione Aplicativos → Utilitários → Utilitário de disco
2. Na coluna à esquerda, clique no ícone da unidade para o Disco rígido Iomega. Certifique-se
de clicar no ícone de unidade laranja, e não no ícone de volume.
3. Selecione a guia Partição.
4. Altere o Esquema de volume de Atual para Uma Partição.
5. Selecione Mac OS Extended (Journaled) no menu suspenso Formatar.
6. Clique no botão Opções.
7. Selecione o tipo de partição necessário para o seu Mac:
Tabela de partição GUID para boot em um computador Macintosh Intel-based
Mapa de partição Apple para um Mac PowerPC-based
8. Clique em OK.
16
Page 17

9. Clique no botão Partição. A unidade estará pronta para uso quando a formatação estiver
concluída.
Solução de problemas
A unidade não aparece em Meu computador, no Windows Explorer ou na mesa do Mac.
• Tente reiniciar seu computador.
• Certifique-se de estar usando o cabo USB fornecido com a sua unidade. Certifique-se de que
ambas as linhas do cabo USB estejam conectadas ao computador.
• Tente alterar as conexões para portas USB diferentes.
Visite a área de suporte do site www.iomega.com para obter ajuda adicional na solução de
problemas.
O computador não inicia
Se o computador não está iniciando quando a unidade está conectada, provavelmente existe
um conflito com o computador. Para resolver esse problema, desligue a unidade ao iniciar o
computador. Ligue a unidade quando o computador terminar de iniciar.
Manual completo do usuário
Está disponível na área de Suporte no site www.iomega.com a versão completa do manual do
usuário em formato HTML.
De drive gebruiken
De drive loskoppelen
WAARSCHUWING! Koppel de drive nooit los tijdens een gegevensoverdracht (wanneer het
statuslampje van de drive-activiteit knippert). Zo vermijdt u dat er gegevens verloren gaan.
PC-gebruikers: Gebruik het pictogram Hardware veilig verwijderen op de Taakbalk van Windows
voordat u de drive loskoppelt.
Mac-gebruikers: Sleep het diskpictogram naar het pictogram van de Prullenmand (Verwijder
schijf) op het Mac-bureaublad.
Back-ups maken met uw drive
Iomega raadt u aan regelmatig een back-up te maken van uw systeem en nog regelmatiger een backup van uw gegevens, zodat u er altijd op kunt vertrouwen dat uw kritieke gegevens zijn veiliggesteld.
De regelmaat waarmee u back-ups maakt, stemt u het beste af op het belang van uw gegevens.
U kunt uw gegevens eenvoudig beschermen door kopieën van uw bestanden naar de drive te
verslepen of door gebruik te maken van back-upsoftware om regelmatig back-ups te plannen.
17
Page 18

WAARSCHUWING! Elk apparaat voor gegevensopslag kan defect raken. Zorg daarom altijd voor
minstens twee kopieën van al uw belangrijke gegevensbestanden op verschillende schijven!
De drive formatteren voor Mac OS
Bij de levering is de drive geformatteerd als een NTFS-drive. Gebruik Disk Utility
(Schijfhulpprogramma) om de drive opnieuw te formatteren met de indeling Mac OS Extended
(Journaled).
OPMERKING: de volgende instructies werken voor Mac OS X, versie 10.4 of hoger. Voor Mac OS
X versie 10.1 tot en met 10.3.9 gebruikt u Disk Utility (Schijfhulpprogramma), Erase (Wis) om de
drive te formatteren. Raadpleeg de Help van Mac voor meer gedetailleerde instructies.
1. Selecteer Applications → Utilities → Disk Utility
(Programma’s → Hulpprogramma’s → Schijfhulpprogramma)
2. Klik in de linkerkolom op het drivepictogram van de Iomega Hard Drive. Let erop dat u op het
oranje drivepictogram klikt (niet op het volumepictogram).
3. Selecteer het tabblad Partition (Partitioneer).
4. Verander volumeschema van huidig naar 1 partitie.
5. Selecteer Mac OS Extended (Journaled) in het menu Format (Indeling).
6. Klik op de knop Options (Opties).
7. Selecteer het vereiste type partitie voor uw Mac:
GUID Partition Table (GUID-partitietabel (GPT) voor opstartbaarheid op een Intel-gebaseerde
Macintosh-computer.
Apple Partition Map (Apple-partitie-indeling) voor een PowerPC-gebaseerde Mac.
8. Klik op OK.
9. Klik op de knop Partition (Partitioneer). De drive is gebruiksklaar nadat de formattering is
voltooid.
Problemen oplossen
De drive wordt niet gedetecteerd
Probleem de volgende probleemoplossingen als de drive niet verschijnt in Deze computer,
Windows® Verkenner of op het Mac®-bureaublad.
• Start de computer opnieuw op.
• Controleer of u wel de USB-kabel gebruikt die bij de drive is meegeleverd. Controleer dat
beide kabels van de USB-kabel op de computer zijn aangesloten.
• Sluit de kabels op een andere USB-poort aan.
Bezoek het gedeelte Support op www.iomega.com voor aanvullende probleemoplossingen.
18
Page 19

PC wilt niet opstarten
Als u de computer niet kunt opstarten wanneer de drive is aangesloten, is er wellicht een conflict
opgetreden tussen de BIOS van de computer en de verwisselbare drive met grote capaciteit.
U kunt dit probleem oplossen door de drive uit te schakelen wanneer u de computer opstart.
Schakel de drive weer in wanneer de computer volledig is opgestart.
Gebruikershandleiding
Een volledige gebruikershandleiding in HTML-indeling is beschikbaar via het gedeelte Support op
www.iomega.com.
Использование диска
Отключение диска
ВНИМАНИЕ! Для предотвращения потери данных не отключайте диск во время передачи
данных (индикатор активности мигает).
Пользователи ПК. Для отключения необходимо использовать значок Безопасное извлечение
устройства на панели задач Windows.
Пользователи Mac. Перетащите значок диска в значок Trash (Eject) (Удаленные (Очистка)) на
рабочем столе Mac.
Резервное копирование на диск
Компания Iomega рекомендует периодически выполнять резервное копирование системы
и более частое резервное копирование данных для обеспечения постоянной защиты
важнейших данных. Частота резервного копирования зависит от важности информации.
Чтобы защитить данные, можно просто перетащить копии важных файлов на диск или
использовать программное обеспечение резервного копирования для планирования
регулярного создания резервных копий.
ВНИМАНИЕ! Любое устройство хранения данных может выйти из строя. Необходимо всегда
сохранять не менее двух копий файлов с важнейшими данными на различных дисках.
Форматирование диска для Mac OS
Диск поставляется отформатированным в формате NTFS. Чтобы отформатировать диск в
формате Mac OS Extended Journaled, используйте служебную программу Disk Utility.
ПРИМЕЧАНИЕ. Следующие инструкции необходимо использовать в ОС Mac OS X версии
10.4 или более поздней. В Mac OS X версий 10.1 – 10.3.9 для форматирования диска
используются служебные программы Disk Utility или Erase. См. справку по Mac OS для
получения более подробных инструкций.
19
Page 20

1. Выберите Приложения → Служебные программы → Disk Utility
2. В левом столбце выберите значок жесткого диска Iomega. Убедитесь в том, что выбран
оранжевый значок диска, а не значок тома.
3. Выберите вкладку Раздел.
4. Измените структуру томов со значения Теку щая на значение 1 раздел.
4. Выберите пункт Mac OS Extended (Journaled) в раскрывающемся меню Формат.
5. Нажмите кнопку Параметры.
6. Выберите тип разбиения на разделы, необходимый для ОС Mac:
GUID Partition Table для загрузки на компьютере Macintosh на базе процессора Intel;
Apple Partition Map для Mac на базе PowerPC.
7. Нажмите кнопку ОК.
8. Нажмите кнопку Разбиение на разделы. По завершении форматирования диск готов к
использованию.
Поиск и устранение неисправностей
Диск не определяется
Если диск не отображается в окне «Мой компьютер», Проводнике Windows® или на рабочем
столе Mac®, попробуйте выполнить следующие действия:
• Перезагрузите компьютер.
• Убедитесь в том, что используется USB-кабель, входящий в комплект поставки диска.
Убедитесь в том, что оба провода USB-кабеля подключены к компьютеру.
• Попробуйте подключить кабель к другим портам USB.
См. раздел поддержки на веб-сайте www.iomega.com/support для получения дополнительных
сведений об устранении неполадок.
ПК не включается
Если ПК не включается с подключенным диском, возможно, в BIOS возникает конфликт
подключения съемных дисков большой емкости. Для устранения этой проблемы выключите
диск при запуске компьютера. Включите диск по завершении загрузки компьютера.
Полное руководство пользователя
Полное руководство пользователя в формате HTML доступно в разделе поддержки на вебсайте www.iomega.com.
20
Page 21

Limited Warranty • Garantie Limitée
Eingeschränkte Garantie • Garanzia limitata
Garantía limitada • Garantia limitada • Beperkte garantie
Ограниченная гарантия
Iomega warrants this hardware product to be free from defects in materials and workmanship for the warranty period. This
non-transferable, limited warranty is only to you, the first end-user purchaser. The warranty begins on the date of purchase
and lasts for a period of one (1) year for product purchased in the Americas or the Asia-Pacific region; ninety (90) days for
Iomega reconditioned products purchased in these regions; or, two (2) years for product purchased by an end-user in Europe,
the Middle East, or Africa. Customers who register their new products at www.iomegareg.com within 90 days of purchase will
receive a warranty extension so that their total warranty shall be a period of three (3) years in all regions.
NOTE: Reconditioned products are not eligible for a warranty extension.
This warranty does not apply to: (a) Iomega software products; (b) expendable components such as fuses or bulbs;
or (c) third party products, hardware or software, supplied with the warranted product. Iomega makes no warranty of
any kind on such products which, if included, are provided “AS IS.” This warranty also excludes damage caused by
accident, misuse, abuse, use of non-Iomega approved media, exposure of media to excessive magnetic fields, or external
environmental causes.
Your sole and exclusive remedy for a covered defect is repair or replacement of the defective product, at Iomega’s sole
option and expense (shipping may be charged), and Iomega may use new or refurbished parts or products to do so. The
replaced part/product will be warranted for the remainder of the original warranty or three (3) months from the date of
shipment of such parts/products, whichever is longer. If Iomega is unable to repair or replace a defective product, your
alternate exclusive remedy shall be a refund of the original purchase price.
The above is Iomega’s entire obligation to you under this warranty. IN NO EVENT SHALL IOMEGA BE LIABLE FOR INDIRECT,
INCIDENTAL, CONSEQUENTIAL OR SPECIAL DAMAGES OR LOSSES, INCLUDING LOSS OF DATA, USE, OR PROFITS EVEN
IF IOMEGA HAS BEEN ADVISED OF THE POSSIBILITY OF SUCH DAMAGES. In no event shall Iomega’s liability exceed the
original purchase price of the drive or the media disk. Some jurisdictions do not allow the exclusion or limitation of
incidental or consequential damages, so the above limitation or exclusion may not apply to you.
Obtaining Warranty Service
You must notify Iomega within the warranty period to receive warranty service. Just as technology and market conditions
vary, Iomega’s specific customer support policies (including fees for services) and procedures change over time. To
obtain information about Iomega’s current policies or warranty service, please visit our website at www.iomega.com/
supportpolicy.html or write to: Iomega Customer Service, 4059 South 1900 West, Roy, UT 84067. Contact Information for
Iomega Customer Service in Europe can be obtained on our Support website at www.iomega.com/europe/support. If your
product is eligible for warranty service, you will be required to return it to Iomega, along with proper identification, a return
authorization number obtained from the Iomega website or provided by the Iomega representative, and proof of purchase.
Iomega will not protect, recover, or return data during warranty service so you should duplicate your data before shipment.
Limitations
THE ABOVE WARRANTY IS EXCLUSIVE AND IN LIEU OF ALL OTHER WARRANTIES, EXPRESS OR IMPLIED. To the extent permitted
by applicable law, IOMEGA SPECIFICALLY DISCLAIMS ANY IMPLIED WARRANTIES, INCLUDING ANY IMPLIED WARRANTY OF
MERCHANTABILITY OR FITNESS FOR A PARTICULAR PURPOSE. Any implied warranty required by applicable law shall be
limited in duration to the express warranty term. Some jurisdictions do not allow disclaimers of implied warranties or
limitations on how long an implied warranty lasts, so the above limitation may not apply to you. This warranty gives you
21
Page 22

specific legal rights and you may also have other rights that vary from jurisdiction to jurisdiction. Any suit for breach of any
warranty on your Product must be filed within one (1) year of the first date the suit could have been brought.
Iomega garantit que ce produit est exempt de tout vice de fabrication ou de malfaçon pendant toute la période de garantie.
Cette garantie limitée n’est pas transférable et ne s’applique qu’à l’utilisateur final. La garantie est effective à partir de
la date d’achat et reste ensuite valable pendant une période de un (1) an à compter de cette même date sur le continent
américain ou dans la région Asie-Pacifique, quatre-vingt dix (90) jours pour les produits remis en état achetés dans les
régions précédemment citées ou deux (2) ans dans le cadre d’un achat effectué par un utilisateur final en Europe, au
Moyen-Orient ou en Afrique. Les clients enregistrant leurs nouveaux produits sur www.iomegareg.com dans les 90 jours
suivant l’achat bénéficieront d’une extension de garantie. La durée totale de la garantie sera alors de trois (3) ans, dans
toutes les régions.
REMARQUE : les produits remis en état ne peuvent pas bénéficier d’une extension de garantie.
Cette garantie ne s’applique pas : (a) aux produits logiciels Iomega, (b) aux composants consommables comme les fusibles
ou les ampoules ou (c) aux produits tiers, matériel ou logiciel, fournis avec le produit sous garantie. Iomega ne garantit
en aucun cas ces produits qui, si inclus, sont fournis “EN L’ETAT”. Sont exclus les dommages causés par un accident, une
mauvaise utilisation, un usage abusif, l’utilisation de supports non fournis ou non approuvés par Iomega, une exposition
excessive des supports à un champ magnétique ou tout autre cause externe d’origine naturelle.
Votre seul et unique recours en cas de défaut reconnu est la réparation ou le remplacement du produit défectueux, aux
frais et à la discrétion de Iomega (l’expédition pourra vous être facturée). Iomega se réserve le droit d’utiliser des pièces
ou produits neufs ou remis en état pour procéder à la réparation. L’élément/produit remplacé sera garanti pendant le reste
de la garantie d’origine ou, au maximum, trois (3) mois à dater de l’expédition desdits éléments/produits. S’il s’avère que
Iomega est dans l’impossibilité de réparer ou remplacer un produit défectueux, votre seul recours sera le remboursement
du prix d’achat initial. L’obligation de garantie de Iomega envers vous se limite aux éléments cités précédemment. EN
AUCUN CAS IOMEGA NE POURRA ETRE TENUE POUR RESPONSABLE DES DOMMAGES OU PERTES INDIRECTS, ACCESSOIRES
OU SPECIAUX, Y COMPRIS LA PERTE DE DONNEES, DE L’IMPOSSIBILITE D’UTILISATION OU DE PROFIT ET CE MEME SI IOMEGA
A ETE AVERTIE DE L’EVENTUALITE DE TELS DOMMAGES. En aucun cas la responsabilité de Iomega ne pourra s’étendre
au-delà du prix d’achat initial de l’appareil ou du support. Certaines juridictions ne reconnaissent pas l’exclusion ou la
limitation des dommages accessoires ou indirects. De ce fait, les limitations ou les exclusions énoncées ci-dessus peuvent
ne pas être applicables dans votre cas.
Obtention d’un service de garantie
Pour bénéficier des services sous garantie, vous devez en avertir Iomega pendant la période de garantie. A l’image des
technologies et des conditions du marché, les procédures et les politiques d’Iomega en matière d’assistance clientèle
(notamment la tarification des services) sont susceptibles de varier dans le temps. Afin d’obtenir des informations
pertinentes sur les politiques actuelles ou sur le service de garantie d’Iomega, veuillez visiter notre site Web www.
iomega.com/supportpolicy.html ou nous écrire à l’adresse suivante : Iomega Customer Service, 4059 South 1900 West,
Roy, UT 84067. Les coordonnées des services d’assistance clientèle d’Iomega en Europe se trouvent sur notre site Web
d’assistance, www.iomega.com/europe/support. Si votre produit peut bénéficier du service sous garantie, vous devrez
le retourner à Iomega, avec son identification détaillée, un numéro d’autorisation de retour obtenu à partir de notre site
Web ou fourni par votre représentant Iomega et une preuve d’achat. Iomega ne protège, ne récupère ni ne retourne des
données pendant le service de garantie ; assurez-vous donc de copier vos données avant d’expédier le matériel.
Limites
LA PRESENTE GARANTIE EST EXCLUSIVE ET TIENT LIEU DE TOUTE AUTRE GARANTIE, EXPRESSE OU IMPLICITE. Dans les
limites de la législation en vigueur, IOMEGA DECLINE TOUTE GARANTIE IMPLICITE, Y COMPRIS TOUTE GARANTIE IMPLICITE
DE COMMERCIALISATION OU D’ADAPTATION A UN USAGE PARTICULIER. Toute garantie implicite requise par la législation
en vigueur sera limitée dans le temps à la durée de la garantie expresse. Certaines juridictions ne reconnaissent pas la
déclaration de non-responsabilité des dommages accessoires ou indirects. De ce fait, les limitations ou les exclusions
22
Page 23

énoncées ci-dessus peuvent ne pas être applicables dans votre cas. Cette garantie vous donne certains droits spécifiques,
mais vous pouvez également bénéficier de droits supplémentaires en fonction de la législation de votre état. Toute
poursuite pour défaut de garantie sur votre produit devra être déposée dans un délai d’un an à compter du premier jour à
partir duquel la poursuite peut être engagée.
Iomega garantiert, dass dieses Hardwareprodukt während des Garantiezeitraums keine Material- oder Herstellungsfehler
aufweist. Diese nicht übertragbare, eingeschränkte Garantie gilt ausschließlich für Sie als ersten Käufer sowie Endnutzer
dieses Produkts. Der Garantiezeitraum beginnt mit dem Erwerbsdatum und hat für folgenden Zeitraum Gültigkeit: ein (1)
Jahr für Produkte, die in Nord-, Mittel- und Südamerika oder im asiatisch-pazifischen Raum erworben wurden; neunzig
(90) Tage für alle bei Iomega überholten Produkte, die in diesen Regionen erworben wurden; zwei (2) Jahre für Produkte,
die von Endverbrauchern in Europa, im Nahen Osten oder in Afrika erworben wurden. Kunden, die ihre neuen Produkte
innerhalb von 90 Tagen nach dem Kauf unter www.iomegareg.com registrieren, erhalten eine Garantieverlängerung,
sodass die Gesamtgarantie eine Dauer von drei (3) Jahren für alle Regionen abdeckt.
HINWEIS: Überholte Produkte sind nicht zulässig für eine Garantieverlängerung.
Von dieser Garantie sind ausgenommen: (a) Iomega-Softwareprodukte; (b) Verschleißteile wie Sicherungen oder
Glühbirnen; bzw. (c) Drittanbieterprodukte, -Hardware oder -Software, die im Lieferumfang des Produkts enthalten waren,
auf das sich die Garantie bezieht. Iomega übernimmt hinsichtlich dieser Art von Produkten keinerlei Garantie. Falls diese
im Lieferumfang enthalten sind, werden sie mit Abbedingen der Haftung für einen bestimmten Zweck zur Verfügung
gestellt. Ausgenommen sind Schäden, die durch Unfall, Zweckentfremdung, unsachgemäße Verwendung, Verwendung von
Medien, die nicht von Iomega zur Verfügung gestellt oder anerkannt wurden, Kontakt der Medien mit übermäßig starken
Magnetfeldern oder Umwelteinflüssen verursacht wurden.
Ihr einziges und ausschließliches Rechtsmittel im Falle eines abgedeckten Defekts ist die Reparatur bzw. der Ersatz
des defekten Produkts; die diesbezügliche Entscheidung sowie die anfallenden Kosten liegen ausschließlich bei
Iomega (abgesehen von evtl. anfallenden Frachtkosten). Iomega kann hierzu neue oder gebrauchte Teile oder Produkte
verwenden. Für das ersetzte Teil/Produkt wird für den Rest der ursprünglichen Garantiefrist oder für drei (3) Monate ab
Versanddatum solcher Teile/Produkte Garantie geleistet, je nachdem, welcher Zeitraum länger ist. Falls die Reparatur
bzw. der Ersatz eines defekten Produkts durch Iomega nicht möglich ist, ist Ihr einziges alternatives Rechtsmittel die
Erstattung des ursprünglichen Kaufpreises. Die obigen Angaben stellen sämtliche Verpflichtungen dar, die Iomega Ihnen
gegenüber im Rahmen dieser Garantie hat. IOMEGA IST UNTER KEINEN UMSTÄNDEN HAFTBAR FÜR MITTELBARE SCHÄDEN,
SCHADENSERSATZ FÜR AUFWENDUNGEN BEI VERTRAGSERFÜLLUNG, FOLGESCHÄDEN ODER SPEZIELLE SCHÄDEN BZW.
VERLUSTE, EINSCHLIESSLICH DATENVERLUST, NUTZUNGSAUSFALL SOWIE BETRIEBSUNTERBRECHUNG, SELBST WENN
IOMEGA AUF DIE MÖGLICHKEIT SOLCHER SCHÄDEN HINGEWIESEN WURDE. Die Haftung von Iomega übersteigt keinesfalls
den ursprünglichen Kaufpreis des jeweiligen Laufwerks oder Datenträgers. Gemäß einiger Rechtsprechungen ist der
Ausschluss bzw. die Einschränkung von Schadensersatz für Aufwendungen bei Vertragserfüllung bzw. Folgeschäden nicht
zulässig, sodass die oben genannten Ausschluss- bzw. Einschränkungsklauseln für Sie möglicherweise nicht relevant sind.
Inanspruchnahme des Garantieservice
Um den Garantieservice in Anspruch nehmen zu können, müssen Sie Iomega innerhalb der Garantiefrist benachrichtigen.
Die spezifischen Kundendienstrichtlinien von Iomega (einschließlich der Servicegebühren) sowie die entsprechenden
Vorgehensweisen können sich aufgrund der veränderlichen Technologie und Marktbedingungen ändern. Wenn Sie gerne
mehr über die aktuellen Kundendienstangebote oder Garantieleistungen von Iomega erfahren möchten, besuchen Sie
unsere Website unter www.iomega.com/supportpolicy.html. Sie können sich auch unter folgender Adresse schriftlich
mit Iomega in Verbindung setzen: Iomega Customer Service, 4059 South 1900 West, Roy, UT 84067. Informationen zur
Kontaktaufnahme mit dem Kundendienst von Iomega finden Sie auf unserer Kundendienst-Website unter www.iomega.
com/europe/support. Wenn für Ihr Produkt Garantieanspruch besteht, müssen Sie es mit ordnungsgemäßer Identifikation,
der über die Iomega Website oder vom Vertreter zur Verfügung gestellten Nummer der Rückgabeberechtigung sowie dem
Kaufnachweis an Iomega zurück senden. Im Rahmen des Garantieservice werden Daten von Iomega weder geschützt noch
wiederhergestellt oder zurückgegeben, weshalb es sich empfiehlt, Ihre Daten vor dem Versand zu duplizieren.
23
Page 24

Einschränkungen
BEI DER OBIGEN GARANTIE HANDELT ES SICH UM EINE AUSSCHLIESSLICHE GARANTIE, DIE ANSTELLE ALLER WEITEREN
GARANTIEN, AUSDRÜCKLICHER ODER STILLSCHWEIGENDER NATUR, GÜLTIGKEIT HAT. Innerhalb des gesetzlich zulässigen
Rahmens SCHLIESST IOMEGA AUSDRÜCKLICH JEGLICHE STILLSCHWEIGENDEN GARANTIEN AUS, EINSCHLIESSLICH
JEGLICHER STILLSCHWEIGENDER GARANTIE HINSICHTLICH DER MARKTGÄNGIGKEIT BZW. DER EIGNUNG FÜR EINEN
BESTIMMTEN ZWECK. Sämtliche stillschweigenden Garantien, die laut geltendem Recht gewährt werden müssen, sind
auf die Laufzeit der ausdrücklichen Garantie beschränkt. Gemäß einiger Rechtsprechungen ist der Haftungsausschluss
stillschweigender Garantien oder die Einschränkung bezüglich der Laufzeit stillschweigender Garantien nicht zulässig,
sodass die obigen Einschränkungsklauseln für Sie möglicherweise nicht relevant sind. Durch diese Garantie werden Ihnen
gewisse subjektive Rechte verliehen, und Sie verfügen u. U. über weitere Rechte, die je nach Rechtsprechung variieren.
Sämtliche Klagen hinsichtlich Garantieverletzungen in Bezug auf Ihr Produkt müssen innerhalb 1 Jahres erhoben werden.
Ausschlaggebend hierfür ist das Datum, zu dem die Klageerhebung erstmalig möglich war.
Iomega garantisce che questo prodotto hardware è privo di difetti di fabbricazione e dei materiali durante l’intero periodo
di validità della garanzia. La presente garanzia limitata, non trasferibile, è da considerarsi valida per il solo utente finale e
non può quindi essere ceduta a terze parti. La garanzia decorre a partire dalla data di acquisto del prodotto e ha validità
di un (1) anno per i prodotti acquistati nelle Americhe o nella regione dell’Estremo Oriente e Oceania; la garanzia ha una
validità di novanta (90) giorni per i prodotti Iomega ricondizionati acquistati in tali regioni; oppure di due (2) anni per i
prodotti acquistati dall’utente finale in Europa, Medio Oriente o Africa. I clienti che registrano i loro nuovi prodotti entro 90
giorni dalla data di acquisto all’indirizzo www.iomegareg.com riceveranno un’estensione di garanzia per un totale di tre (3)
anni per tutte le zone.
NOTA: l’estensione della garanzia non può essere applicata ai prodotti ricondizionati.
La presente garanzia non è da ritenersi valida per: (a) i prodotti software Iomega; (b) i materiali di consumo, come ad
esempio i fusibili o le lampadine; o (c) i prodotti di terze parti, hardware o software, forniti in dotazione con il prodotto
coperto da garanzia. Iomega non fornisce alcun tipo di garanzia su tali prodotti che, se inclusi, vengono forniti “COSÌ COME
SONO”. Si considera escluso da garanzia il danno causato da incidente, l’uso improprio, l’abuso, l’utilizzo di supporti non
approvati da Iomega, l’esposizione dei supporti a campi magnetici particolarmente intensi o a cause ambientali esterne.
L’unico ed esclusivo diritto risarcitorio esercitabile in caso di difetto di un prodotto coperto da garanzia è la riparazione
o la sostituzione del prodotto difettoso, a sola discrezione e interamente a carico di Iomega; Iomega ha inoltre la
facoltà di utilizzare componenti o prodotti nuovi o rimessi a nuovo. È prevista la copertura del componente/prodotto
sostituito per tutto il periodo di validità della garanzia stipulata originariamente o per i tre (3) mesi successivi alla data di
spedizione di tale componente/prodotto, quale che sia la situazione temporale che risulti più conveniente per garantire
l’estendibilità della garanzia. Nell’eventualità in cui Iomega non sia in grado di riparare o sostituire il prodotto difettoso,
l’unico diritto risarcitorio alternativo esercitabile dall’acquirente consiste nella restituzione del prezzo di acquisto
del prodotto originale. Quanto sopra enunciato costituisce l’obbligo contrattuale cui attenersi ai sensi della presente
garanzia. IN NESSUN CASO IOMEGA DOVRÀ ESSERE RITENUTA RESPONSABILE DI EVENTUALI DANNI INDIRETTI, INCIDENTALI,
CONSEGUENZIALI O SPECIALI O DI ALTRI DANNI TRA CUI LE PERDITE DI DATI, UTILIZZO O DI PROFITTO, INDIPENDENTEMENTE
DAL FATTO CHE IOMEGA FOSSE AL CORRENTE DELLA POSSIBILITÀ CHE SI POTESSERO VERIFICARE TALI DANNI. In nessun
caso la responsabilità di Iomega potrà superare il prezzo di acquisto originale dell’unità o del supporto. Poiché alcune
giurisdizioni non prevedono l’esclusione o la limitazione di danni incidentali o conseguenziali, la limitazione o l’esclusione
di cui sopra potrebbe non avere alcuna validità giuridica.
Come ottenere servizi di assistenza durante il periodo di validità della garanzia
Per ricevere assistenza durante il periodo di validità della garanzia, è necessario inviare opportuna notifica a Iomega entro
detto periodo. Le politiche di assistenza clienti Iomega (compresi i servizi a pagamento) e le relative procedure variano
in base alle esigenze di mercato e alle tecnologie emergenti. Per ottenere informazioni sulle procedure Iomega in vigore,
visitare il sito Web all’indirizzo www.iomega.com/supportpolicy.html o scrivere a Iomega Customer Service, 4059 South
24
Page 25

1900 West, Roy, UT 84067. Le informazioni sui contatti dell’Assistenza clienti di Iomega in Europe sono disponibili sul sito
Web del Supporto tecnico all’indirizzo www.iomega.com/europe/support. Nel caso in cui il prodotto sia idoneo a ricevere
gli interventi manutentivi previsti dalla garanzia, sarà necessario restituire il prodotto a Iomega unitamente al relativo
codice, al numero di autorizzazione per la restituzione disponibile sul sito Web di Iomega o fornito dal rivenditore Iomega
e la prova di acquisto. Poiché Iomega non prevede la protezione, il ripristino o la restituzione dei dati durante l’esecuzione
degli interventi di manutenzione, si consiglia sempre di duplicarli prima di procedere alla spedizione del prodotto.
Limitazioni
LA PRESENTE GARANZIA HA NATURA ESCLUSIVA, PERTANTO SOSTITUISCE QUALUNQUE ALTRA GARANZIA ESPLICITA O
IMPLICITA. Nella misura in cui sia consentito dalle leggi in vigore, IOMEGA DISCONOSCE ESPRESSAMENTE EVENTUALI
GARANZIE IMPLICITE, COMPRESE QUELLE IMPLICITE DI COMMERCIABILITÀ O DI IDONEITÀ A FINI SPECIFICI. Eventuali
garanzie implicite previste dalla legislazione vigente devono essere limitate nel tempo in base a quanto sancito dai termini
della garanzia esplicita. Poiché alcune giurisdizioni non prevedono il ricorso a formule di diniego di garanzie implicite o
limitazioni sulla durata di validità di tale garanzia, è possibile che la limitazione di cui sopra non abbia alcuna validità nel
caso specifico. La presente garanzia concede particolari diritti legali, nonché eventuali altri diritti suscettibili di variazione
in base alla giurisdizione specifica. Eventuali risarcimenti per violazione dei termini contenuti nella garanzia devono essere
richiesti entro 1 anno dalla data in cui è possibile intraprendere un’azione legale.
Iomega garantiza que este producto de hardware está libre de defectos de materiales y mano de obra durante el período
de garantía. Esta garantía limitada e intransferible es sólo para usted, el primer comprador usuario final. El período de
garantía comienza en la fecha de compra y tiene una duración de un (1) año para productos adquiridos en el continente
americano, la región Asia-Pacífico; noventa (90) días para productos reacondicionados de Iomega adquiridos en estas
regiones; o dos (2) años para productos adquiridos por un usuario final en Europa, Oriente Medio o África. Los clientes
que registren sus nuevos productos en un plazo de 90 días desde su compra en www.iomegareg.com recibirán una
ampliación de la garantía, de forma que su garantía total será de un periodo de tres (3) años en todas las regiones.
NOTA: Los productos reacondicionados no pueden ampliar su garantía.
Esta garantía no se aplica a: (a) productos de software de Iomega, (b) consumibles como fusibles o lámparas, o (c)
productos, hardware o software, de terceros incluidos con el producto en garantía. Iomega no ofrece ningún tipo de
garantía para dichos productos que, si están incluidos, se proporcionan “TAL CUAL”. Se excluyen de esta garantía los
daños provocados por accidente, uso incorrecto, abuso, uso de discos no suministrados o no autorizados por Iomega,
exposición excesiva de los discos a campos magnéticos o por causas ambientales externas al producto.
Su única y exclusiva compensación por un defecto cubierto es la reparación o sustitución del producto defectuoso, a elección
y cargo de Iomega (el porte puede ser cobrado); Iomega puede utilizar piezas o productos nuevos o reparados para tal fin. La
garantía de la pieza o producto repuesto tendrá la validez del resto de la garantía original o tres (3) meses desde la fecha de
envío de dichas piezas o productos, sea cual sea su duración. Si Iomega no puede reparar o sustituir un producto defectuoso,
su única compensación alternativa será un reembolso del precio de compra original. Lo expuesto anteriormente es la única
obligación de Iomega con respecto a usted según esta garantía. EN NINGÚN CASO IOMEGA SERÁ RESPONSABLE DE CUALQUIER
DAÑO INDIRECTO, INCIDENTAL O RESULTANTE NI DE PÉRDIDAS, INCLUIDA LA PÉRDIDA DE DATOS, USO O BENEFICIOS INCLUSO
SI SE HA ADVERTIDO A IOMEGA DE LA POSIBILIDAD DE TALES DAÑOS. En ningún caso la responsabilidad de Iomega superará
el precio de compra original de la unidad o el disco. Algunas jurisdicciones no permiten la exclusión o limitación de los daños
incidentales o resultantes, por lo que es posible que la limitación o exclusión anterior no se aplique a
usted.
Obtención de servicio de garantía
Para recibir el servicio de garantía deberá notificar su caso al Iomega durante el período de garantía. La política y
procedimientos de asistencia al cliente de Iomega (incluidas las tarifas de los servicios) cambian al ritmo que lo hacen
la tecnología y las condiciones del mercado. Para obtener información acerca de las políticas actuales de Iomega o del
servicio de garantía, visite nuestra página Web en www.iomega.com/supportpolicy.html o escriba a: Iomega Customer
Service, 4059 South 1900 West, Roy, UT 84067, EE.UU. Para obtener información sobre el servicio de atención al cliente
25
Page 26

de Iomega en Europa, visite nuestra página Web de asistencia: www.iomega.com/europe/support. Si tiene derecho a
que su producto reciba servicio de garantía, se le pedirá que lo devuelva a Iomega, junto con la identificación adecuada,
un número de autorización de devolución obtenido del sitio Web de Iomega o proporcionado por el representante, y una
prueba de compra. Iomega no protegerá, recuperará o devolverá datos durante el servicio de garantía, por lo que debe
duplicarlos antes del envío.
Limitaciones
LA GARANTÍA ANTERIOR ES EXCLUSIVA Y SUSTITUYE LAS DEMÁS GARANTÍAS, EXPRESAS O IMPLÍCITAS. En la medida
permitida por la ley aplicable, IOMEGA RENUNCIA ESPECÍFICAMENTE A CUALQUIER TIPO DE GARANTÍA, INCLUIDAS LA
GARANTÍA IMPLÍCITA DE COMERCIABILIDAD O IDONEIDAD PARA UN FIN DETERMINADO. Cualquier garantía implícita
requerida por la ley aplicable estará limitada a la duración del plazo de la garantía expresa. Algunas jurisdicciones no
permiten la renuncia de las garantías implícitas ni limitación en la duración de una garantía limitada, con lo que es
posible que la limitación anterior no se aplique a usted. Esta garantía le otorga derechos legales específicos y es posible
que también tenga otros derechos que varían de una jurisdicción a otra. Cualquier demanda por violación de la garantía
del producto será presentada en un plazo de 1 año desde la primera fecha en la que la demanda pudiera haber sido
interpuesta.
A Iomega garante que este produto de hardware encontra-se isento de defeitos de material e de mão-de-obra durante
todo o período de garantia. Esta garantia limitada e intransferível destina-se unicamente ao consumidor, o primeiro
comprador usuário final. A garantia começa na data da compra e dura por um período de um (1) ano por produto
adquirido nas Américas ou na região da Ásia-Pacífico; noventa (90) dias por produtos Iomega recondicionados adquiridos
nestas regiões; ou, dois (2) anos por produto adquirido por um usuário final na Europa, no Oriente Médio ou na África. Os
clientes que registrarem seus novos produtos dentro de 90 dias após a compra em www.iomegareg.com irão receber uma
extensão da garantia para que sua garantia total seja um período de três (3) anos em todas as regiões.
OBS: Produtos recondicionados não são elegíveis para a extensão de garantia.
Esta garantia não se aplica a: (a) produtos de software da Iomega; (b) componentes perecíveis, como fusíveis ou
lâmpadas, ou (c) produtos de terceiros, hardware ou software, fornecidos com o produto garantido. A Iomega não oferece
garantias de qualquer espécie sobre tais produtos que, quando incluídos, são fornecidos “NO ESTADO”. Estão excluídos
os dados causados por acidente, uso impróprio, abuso, uso de mídia não fornecida ou aprovada pela Iomega, exposição
da mídia a campos magnéticos excessivos ou causas ambientais externas.
O único e exclusivo recurso do usuário com referência a defeitos cobertos pela garantia é o reparo ou substituição do
produto defeituoso, segundo escolha e determinação da Iomega (a remessa pode ser cobrada). Para tanto, a Iomega
poderá utilizar peças ou produtos novos ou recondicionados. A peça ou o produto substituído será coberto pelo tempo
restante da garantia original ou por 3 (três) meses a serem contados a partir da data de envio do mesmo, prevalecendo
o tempo mais longo. Se a Iomega não puder reparar ou substituir um produto defeituoso, o único recurso alternativo
exclusivo será a restituição da importância paga originalmente pela aquisição do produto. O exposto acima representa
todas as obrigações da Iomega para com o usuário sob esta garantia. EM NENHUMA EVENTUALIDADE A IOMEGA PODERÁ
SER RESPONSABILIZADA POR PERDAS OU DANOS INDIRETOS, INCIDENTAIS, EMERGENTES OU ESPECIAIS, INCLUINDO PERDA
DE DADOS, USO OU LUCROS, MESMO QUE A IOMEGA TENHA SIDO ADVERTIDA QUANTO À POSSIBILIDADE DE TAIS DANOS.
Em nenhuma eventualidade a responsabilidade da Iomega excederá o preço original de aquisição da unidade ou disco
de mídia. Algumas jurisdições não permitem a exclusão ou limitação de danos incidentais ou emergentes, portanto a
limitação ou exclusão acima poderá não se aplicar ao usuário.
Obtenção de serviço de garantia
É preciso notificar a Iomega dentro do período de garantia para receber o serviço de garantia. Os procedimentos da
Iomega, assim como suas políticas específicas de suporte ao cliente (incluindo taxas de serviços), mudam conforme as
condições tecnológicas e de mercado. Para obter informações sobre as políticas atuais da Iomega ou sobre o serviço de
garantia, visite nosso website em www.iomega.com/supportpolicy.html ou escreva para: Iomega Customer Service, 4059
26
Page 27

South 1900 West, Roy, UT 84067. Informações de contato para o atendimento ao cliente da Iomega na Europa podem
ser obtidas em nosso website de Suporte em www.iomega.com/europe/support. Caso o produto tenha direito ao serviço
de garantia, será necessário devolvê-lo à Iomega, acompanhado da identificação apropriada: o número da autorização
de retorno obtido no website da Iomega ou fornecido pelo representante da Iomega e uma comprovação de aquisição. A
Iomega não protege, recupera ou retorna dados durante o serviço de garantia, portanto o usuário deve fazer cópia dos
documentos antes da remessa.
Limitações
A GARANTIA ACIMA É EXCLUSIVA E SUBSTITUI TODAS AS OUTRAS GARANTIAS, EXPRESSAS OU IMPLÍCITAS. Na extensão
permitida pelas leis aplicáveis, A IOMEGA DESOBRIGA-SE ESPECIFICAMENTE DE QUAISQUER GARANTIAS IMPLÍCITAS,
INCLUINDO QUALQUER GARANTIA IMPLÍCITA DE COMERCIALIZAÇÃO OU ADEQUAÇÃO A UM DETERMINADO PROPÓSITO.
Quaisquer garantias implícitas exigidas pelas leis aplicáveis deverão ser limitadas, em duração, ao prazo da garantia
expressa. Algumas jurisdições não permitem a desobrigação de garantias implícitas ou limitações sobre a duração de
uma garantia implícita, portanto a limitação acima pode não se aplicar ao usuário. Esta garantia outorga direitos legais
específicos ao usuário, mas o usuário também poderá ter direitos que variam conforme sua jurisdição. Qualquer processo
judicial por violação de qualquer garantia sobre o Produto deverá ser aberto no prazo de 1 ano, a contar da primeira data
na qual a ação poderia ter sido movida.
Iomega garandeert voor de garantieperiode dat dit hardwareproduct vrij is van materiaal- en productiefouten. Deze
niet-overdraagbare beperkte garantie geldt alleen voor u, de eerste eindgebruiker die het product heeft aangeschaft. De
garantie gaat in op de dag van aankoop en loopt af na één (1) jaar voor producten die gekocht zijn op het Amerikaanse
continent of in Azië en het Stille-Oceaangebied; negentig (90) dagen voor vervangende Iomega-producten die in deze
regio’s zijn gekocht; of twee (2) jaar voor producten die door een eindgebruiker in Europa, het Midden-Oosten of Afrika
zijn gekocht. Klanten die hun producten binnen 90 dagen na aankoop registreren op www.iomegareg.com ontvangen een
verlenging van hun garantie zodat hun garantie in alle regio’s een periode van drie (3) jaar zal bedragen.
LET OP: vervangende producten komen niet in aanmerking voor een verlenging van de garantie.
Deze garantie geldt niet voor: (a) softwareproducten van Iomega; (b) verbruiksartikelen zoals zekeringen of lampjes; of (c)
producten, hard- of software, van derden die zijn meegeleverd met het product waarvoor de garantie geldt. Iomega biedt
geen enkele garantie voor dergelijke producten: indien meegeleverd, worden deze als zodanig meegeleverd. Uitgesloten
wordt schade veroorzaakt door een ongeluk, verkeerd gebruik, misbruik, gebruik van niet door Iomega geleverde of
goedgekeurde media, blootstelling van media aan extreme magnetische velden of externe oorzaken die met de omgeving
samenhangen.
Uw enige en exclusieve verhaalsrecht voor een gedekt defect is reparatie of vervanging van het defecte product, uitsluitend
door Iomega te bepalen en te betalen, en Iomega kan daarvoor nieuwe of gereviseerde onderdelen of producten
gebruiken. Het vervangen onderdeel/product wordt gegarandeerd voor de rest van de oorspronkelijke garantie of drie (3)
maanden vanaf de datum van verzending van deze onderdelen/producten, als dit langer is. Als Iomega een defect product
niet kan repareren of vervangen, is uw alternatieve exclusieve verhaalsrecht beperkt tot restitutie van de oorspronkelijke
aanschafprijs. Het hierboven beschrevene is de volledige verplichting van Iomega aan u op grond van deze garantie.
IOMEGA IS IN GEEN GEVAL AANSPRAKELIJK VOOR INDIRECTE SCHADE, INCIDENTELE SCHADE, GEVOLGSCHADE OF SPECIALE
SCHADE OF VERLIEZEN, INCLUSIEF VERLIES VAN GEGEVENS, GEBRUIK OF WINST, OOK ALS IOMEGA OP DE HOOGTE IS
GESTELD VAN DE MOGELIJKHEID VAN DERGELIJKE SCHADE. In ieder geval is de financiële aansprakelijkheid van Iomega
beperkt tot de oorspronkelijke aanschafprijs van de drive of de mediadisk. In sommige rechtsgebieden is de uitsluiting of
beperking van incidentele schade of gevolgschade niet toegestaan, waardoor het bovenstaande mogelijk niet voor u van
toepassing is.
Service onder de garantie krijgen
U moet Iomega binnen de garantieperiode laten weten dat u een beroep wilt doen op de garantieservice. Iomega’s
specifieke beleid voor klantenondersteuning (evenals vergoedingen voor services) en procedures worden regelmatig
27
Page 28

aangepast aan de veranderende technologie en marktsituatie. Bezoek Iomega op www.iomega.com/supportpolicy.html
voor meer informatie over het huidige beleid van Iomega of schrijf naar: Iomega Customer Service, 4059 South 1900
West, Roy, UT 84067, VS. U vindt de contactinformatie voor de klantenservice van Iomega in Europa via onze website
voor ondersteuning: www.iomega.com/europe/support. Als uw product in aanmerking komt voor de garantieservice,
moet u het artikel retourneren aan Iomega met de juiste identificatie, een retourbonnummer dat u via de Iomega-website
of een Iomega-vertegenwoordiger hebt gekregen en een bewijs van aankoop. Iomega kan tijdens de garantieservice
geen gegevens beveiligen, herstellen of terugsturen. U moet bijgevolg zelf uw gegevens kopiëren voordat u het product
verzendt.
Beperkingen
BOVENSTAANDE GARANTIE IS EXCLUSIEF EN VERVANGT ALLE ANDERE GARANTIES, EXPLICIET OF IMPLICIET. Voorzover
toegestaan door de toepasselijke wetgeving, WIJST IOMEGA SPECIFIEK ALLE IMPLICIETE GARANTIES AF, INCLUSIEF ALLE
IMPLICIETE GARANTIES VAN VERKOOPBAARHEID OF GESCHIKTHEID VOOR EEN BEPAALD DOEL. Elke impliciete garantie
die de geldende wetgeving vereist, wordt in duur beperkt tot de expliciete garantietermijn. In sommige rechtsgebieden
is afwijzing van impliciete garanties of beperkingen ten aanzien van de duur van impliciete garanties niet toegestaan.
Mogelijk geldt de bovenstaande beperking dan ook niet voor u. Deze garantie geeft u specifieke wettelijke rechten en
mogelijk hebt u ook andere rechten, die per rechtsgebied kunnen verschillen. Elk verzoek wegens schending van enige
garantie op uw product moet binnen één jaar na de eerste datum waarop het verzoek kon zijn ingebracht, worden
ingediend.
Компания Iomega гарантирует, что данное оборудование не содержит дефектов в материалах и способно исправно
проработать в течение всего гарантийного периода. Это ограниченная гарантия, не подлежащая передаче,
распространяется только на первого приобретателя. Гарантийный период отсчитывается с даты продажи и длится
в течение одного (1) года для продукции, приобретенной в Северной и Южной Америке или странах Азиатскотихоокеанского региона; девяноста (90) дней для отремонтированной продукции компании Iomega, приобретенной
в этих регионах; или двух (2) лет для продукции, приобретенной конечным пользователем в странах Европы,
Ближнего Востока или Африки. Пользователи, зарегистрировавшие новый продукт в течение 90 дней со дня
покупки на сайте www.iomegareg.com, могут воспользоваться возможностями расширенной гарантии; таким
образом, общая продолжительность гарантии будет составлять три (3) года во всех регионах.
ПРИМЕЧАНИЕ. На отремонтированные товары данная расширенная гарантия не распространяется.
Данная гарантия не распространяется на: (a) программные продукты компании Iomega; (б) расходные компоненты,
например предохранители или лампочки; или (в) продукты, оборудование или программное обеспечение сторонних
производителей, поставляемое вместе с гарантийным оборудованием. Компания Iomega не предоставляет гарантию
на такого рода продукцию, которая (при наличии) поставляется по принципу «КАК ЕСТЬ». Данная гарантия также
не распространяется на повреждения, вызванные несчастными случаями, неправильным или плохим обращением,
использованием носителей, не одобренных компанией Iomega, воздействием на носители данных сильных
магнитных полей или факторов окружающей среды.
Единственной и исключительной компенсацией возможных дефектов является ремонт или замена неисправного
оборудования по усмотрению компании Iomega (вопрос об оплате транспортных расходов решается отдельно),
при этом для устранения выявленных дефектов компания Iomega может использовать новые или восстановленные
детали или изделия. На замененную деталь/продукцию будет распространяться оставшееся время исходной
гарантия или период три (3) месяца с даты доставки такой детали/продукции, в зависимости от того, какой период
дольше. Если компания Iomega не может отремонтировать или заменить дефектную продукцию, может быть
рассмотрен вопрос о возврате денег, уплаченных за товар.
Вышеназванное охватывает все обязательства компании Iomega в рамках этой гарантии. НИ ПРИ КАКИХ
ОБСТОЯТЕЛЬСТВАХ КОМПАНИЯ IOMEGA НЕ БУДЕТ НЕСТИ ОТВЕТСТВЕННОСТИ ЗА ПРЯМЫЕ, СЛУЧАЙНЫЕ, КОСВЕННЫЕ
ИЛИ ПОСЛЕДОВАВШИЕ ПОВРЕЖДЕНИЯ И ПОТЕРИ, В ТОМ ЧИСЛЕ ЗА УТРАТУ ДАННЫХ ИЛИ ВОЗМОЖНОСТИ
ИСПОЛЬЗОВАНИЯ, УПУЩЕННУЮ ВЫГОДУ ИЛИ ДОХОД, ДАЖЕ ЕСЛИ КОМПАНИЯ IOMEGA СООБЩИЛА О
28
Page 29

ВОЗМОЖНОСТИ ТАКИХ ПОВРЕЖДЕНИЙ ИЛИ ПОТЕРЬ. Ни при каких обстоятельствах ответственность компании
Iomega не может превышать продажной стоимости проигрывателя или диска. Законодательство некоторых стран не
допускает исключения или ограничения на ответственность за случайные или последующие повреждения, поэтому
вышеназванные ограничения могут быть не применимы в вашей стране.
Получение гарантийного обслуживания
Компания Iomega должна быть уведомлена о необходимости гарантийного обслуживания в течение гарантийного
периода. Так как технологии и конъюнктура рынка меняются, процедуры и политика поддержки клиентов компании
Iomega (включая оплату за обслуживание) также могут измениться со временем. Для получения сведений о
текущей политике компании Iomega или о гарантийном обслуживании посетите веб-сайт компании www.iomega.
com/supportpolicy.html или напишите по адресу: Iomega Customer Service, 4059 South 1900 West, Roy, UT 84067.
Контактная информация для обслуживания клиентов компании Iomega может быть найдена в разделе поддержки на
веб-сайте www.iomega.com/europe/support. Если продукция подлежит гарантийному обслуживанию, то необходимо
возвратить ее компании Iomega вместе с документацией, учетным номером, полученным на официальном
веб-сайте Iomega или назначенным представителем Iomega, и документами, подтверждающими факт покупки.
Компания Iomega не несет ответственности за сохранность и восстановление данных во время гарантийного
обслуживания, поэтому необходимо сделать резервную копию данных перед отправкой оборудования на
гарантийное обслуживание или ремонт.
Ограничения
ВЫШЕУКАЗАННОЕ ГАРАНТИЙНОЕ ОБЯЗАТЕЛЬСТВО ЯВЛЯЕТСЯ ЕДИНСТВЕННЫМ И ЗАМЕНЯЕТ ВСЕ ПРОЧИЕ ГАРАНТИИ,
ЯВНЫЕ ИЛИ ПОДРАЗУМЕВАЕМЫЕ. В соответствии с действующим законодательством, КОМПАНИЯ IOMEGA НЕ БЕРЕТ
НА СЕБЯ ЛЮБЫЕ ПОДРАЗУМЕВАЕМЫЕ ГАРАНТИИ, В ТОМ ЧИСЛЕ ЛЮБЫЕ ПОДРАЗУМЕВАЕМЫЕ ГАРАНТИИ ТОВАРНОГО
СОСТОЯНИЯ ИЛИ ПРИГОДНОСТИ ИСПОЛЬЗОВАНИЯ ДЛЯ КОНКРЕТНЫХ ЦЕЛЕЙ. Любые подразумеваемые гарантии,
необходимые для соблюдения применимого законодательства, будут ограничиваться продолжительностью
заявленной гарантии. Законодательство некоторых стран не допускает исключения или ограничения в период
срока действия подразумеваемой гарантии, поэтому вышеуказанные ограничения могут не иметь юридической
силы в отдельных странах. Эта гарантия дает определенные законные права, кроме того, вы можете также обладать
другими правами, зависящими от юрисдикции. Любое судебное преследование за нарушение любой гарантии на
продукцию должно быть начато в течение одного (1) года с даты подачи иска.
Begränsad garanti • Begrænset garanti • Begrenset garanti
Rajoitettu takuu • Korlátozott garancia • Omezená záruka
Gwarancja ograniczona • Περιορισμένη εγγύηση
Sınırlı Garanti
•
Begränsad garanti
Kunder som har registrerat sina nya produkter inom 90 från inköpsdatum, på www.iomegareg.com, får en
garantiförlängning så att den totala garantiperioden blir tre (3) år i alla regioner.
OBS! Du måste registrera dig med något av de tillgängliga språken. Upprustade produkter får ingen
garantiförlängning.
På sidan www.iomega.com/support finns fullständiga garantivillkor.
29
Page 30

Begrænset garanti
Kunder, der registrerer deres nye produkter på www.iomegareg.com maks. 90 dage efter købet, vil få en
forlænget garanti, så den samlede garantiperiode bliver tre (3) år i alle regioner.
BEMÆRK: Du skal registrere med et tilgængeligt sprog. Forlængelse af garantiperioden gælder ikke for
istandsatte produkter.
Besøg www.iomega.com/support for at se en komplet beskrivelse af garantibetingelserne.
Begrenset garanti
Kunder som registrerer sine nye produkter på www.iomegareg.com innen 90 dager etter at de ble kjøpt, vil få en
garantiforlengelse, slik at garantien totalt vil gjelde for en periode på tre (3) år i alle regioner.
MERK: Du må registrere deg med et språk som er tilgjengelig. Overhalte produkter har ikke krav på
garantiforlengelse.
Se www.iomega.com/support for å få en fullstendig garantierklæring.
Rajoitettu takuu
Asiakkaat, jotka rekisteröivät uuden tuotteensa 90 päivän sisällä ostamisesta osoitteessa www.iomegareg.com,
saavat takuulaajennuksen niin, että takuun kokonaisajaksi muodostuu kaikilla alueilla kolme (3) vuotta.
HUOMAUTUS: Rekisteröinti tulee tehdä käytettävissä olevalla kielellä. Kunnostetut tuotteet eivät ole oikeutettuja
takuulaajennukseen.
Katso täydelliset takuuehdot osoitteesta www.iomega.com/support.
Korlátozott garancia
Azok a felhasználók, akik a vásárlás dátumától számítva 90 napon belül regisztrálják új termékeiket a www.
iomegareg.com webhelyen, garanciahosszabbítást kapnak, így minden térségben három (3) évre hosszabbítható
a garancia.
MEGJEGYZÉS: Regiszrálnia kell az egyik elérhető nyelven. A felújított termékek garanciája nem hosszabbítható meg.
A jótállás teljes szövege a www.iomega.com/support webhelyen található.
Omezená záruka
Zákazníci, kteří zaregistrují nové výrobky do 90 dnů od nákupu na webových stránkách www.iomegareg.com,
získají prodloužení záruční lhůty, takže jejich celková záruční lhůta bude trvat tři (3) roky, a to ve všech oblastech.
30
Page 31

POZNÁMKA: Registraci musíte provézt v jednom z dostupných jazyků. Repasované výrobky nemají nárok na
prodloužení záruky.
Úplné záruční podmínky naleznete na stránce www.iomega.com/support.
Gwarancja ograniczona
Klienci, którzy w ciągu 90 dni od nabycia dokonają rejestracji nowego produktu pod adresem
www.iomegareg.com otrzymają przedłużenie gwarancji; w związku z tym całkowity okres gwarancyjny dla tych
produktów we wszystkich powyższych regionach będzie obejmował trzy (3) lata.
UWAGA: Należy się zarejestrować, korzystając z dostępnego języka. Okres gwarancyjny produktów odnawianych
nie podlega przedłużeniu.
Pełna treść gwarancji znajduje się pod adresem: www.iomega.com/support.
Περιορισμένη εγγύηση
Οι πελάτες που θα δηλώσουν τα καινούρια τους προϊόντα σε διάστημα 90 ημερών από την ημέρα αγοράς στη
διεύθυνση www.iomegareg.com, θα λάβουν επέκταση εγγύησης έτσι ώστε η συνολική τους εγγύηση να φτάνει
το διάστημα των τριών (3) ετών σε όλες τις περιοχές.
ΣΗΜΕΙΩΣΗ: Για να εγγραφείτε, χρησιμοποιήστε μία διαθέσιμη γλώσσα. Δεν προβλέπεται επέκταση εγγύησης για
τα ανακατασκευασμένα προϊόντα.
Για πλήρη δήλωση εγγύησης, επισκεφτείτε την ιστοσελίδα www.iomega.com/support.
Sınırlı Garanti
Yeni ürünlerini satın alma işleminden sonraki 90 gün içerisinde www.iomegareg.com adresinde kaydeden
müşterilerin toplam garanti süreleri tüm bölgelerde üç (3) yıl olacak şekilde uzatılacaktır.
NOT: Mevcut olan bir dili kullanarak kayıt yapmalısınız. Yenilenmiş ürünler garanti uzatmasından yararlanamazlar.
Garanti bildiriminin tamamını okumak için www.iomega.com/support adresini ziyaret edin.
'$FBF1B
T%'O'"BDK"HEAP",LEL=OGO(BTF7BA/$P+5<LFBMC6)-BGEELO
'FBCJET.RB71%NB"HFB'7S)9LFB8CB'#'&+AP",B>PC6"O4#TE
wwwiomegacomsupport
5<LFBO*A1:AE?F0PMC6L/$CB
wwwiomegaregcomT MBF1CBPC@B'FBA/+NBBF1CBP90'EMC65PF!N9LH+
;2HFB
P90QF1B
31
Page 32

Regulatory Information
Informations relatives à la réglementation
Gesetzliche Bestimmungen • Informazioni sulle regolamentazioni
Información reglamentaria • Regulatieve informatie
Сведения о нормативных требованиях
Manufacturer/Responsible Party
Iomega Corporation
4059 South 1900 West
Roy, UT 84067 USA
This equipment complies with Part 15 of the FCC Rules. Operation
is subject to the following conditions: (1) This device may not cause
harmful interference, and (2) this device must accept any interference
received, including interference that may cause undesired operation.
NOTE: This equipment has been tested and found to comply with the
limits for a Class B digital device, pursuant to part 15 of the FCC Rules. These limits are designed to provide reasonable
protection against harmful interference in a residential installation. This equipment generates, uses and can radiate radio
frequency energy and, if not installed and used in accordance with the instructions, may cause harmful interference to
radio communications. However, there is no guarantee that interference will not occur in a particular installation. If this
equipment does cause harmful interference to radio or television reception, which can be determined by turning the
equipment off and on, the user is encouraged to try to correct the interference by one or more of the following measures:
• Reorient or relocate the receiving antenna.
• Increase the separation between the equipment and receiver.
• Connect the equipment into an outlet on a circuit different from that to which the receiver is connected.
• Consult the dealer or an experienced radio/TV technician for help.
CE (European Community)
This Iomega product conforms to the following European Directive(s)and Standard(s): Application of Council Directive:
2004/108/EC. Standards to which Conformity is declared: EN55022, EN55024, EN61000-3-2, EN61000-3-3. Importer’s
Name: Iomega International, S.A. Type of Equipment: Information Technology Equipment.
Waste Electrical and Electronic Equipment (WEEE)
In accordance with European Directive 2002/96/EC on Waste Electrical and Electronic Equipment (WEEE), the presence
of the above symbol on the product or on its packaging indicates that this item must not be disposed of in the normal
unsorted municipal waste stream. Instead, it is the user’s responsibility to dispose of this product by returning it to a
collection point designated for the recycling of electrical and electronic equipment waste. Separate collection of this waste
helps to optimize the recovery and recycling of any reclaimable materials and also reduces the impact on human health
and the environment.
For more information concerning the correct disposal of this product, please contact your local authority or the retailer
where this product was purchased.
32
Page 33

Canadian Verification
This Class B digital apparatus meets all requirements of the Canadian Interference-Causing Equipment Regulations (ICES003, Class B).
CE (Union européenne)
Ce produit Iomega est certifié conforme aux normes et directives européennes suivantes : Application de la directive du
Conseil : 2004/108/EC. Conformité déclarée pour les normes suivantes : EN55022, EN55024, EN61000-3-2, EN61000-3-3.
Nom de l’importateur : Iomega International, S.A. Type d’équipement : matériel informatique.
Déchets d’équipements électriques et électroniques (WEEE)
Conformément à la Directive européenne 2002/96/EC relative aux déchets d’équipements électriques et électroniques
(WEEE), la présence du symbole ci-dessus sur un produit ou sur son emballage indique que cet article ne doit pas être mis
au rebut avec les déchets municipaux normaux non-triés. La responsabilité incombe à l’utilisateur de ramener ce produit
à un endroit dédié au recyclage des déchets d’équipements électriques et électroniques. La collecte indépendante de
ces déchets permet d’optimiser la récupération et le recyclage des matériaux récupérables et de minimiser l’impact sur la
santé des personnes et l’environnement.
Pour de plus amples informations concernant la mise au rebut appropriée de ce produit, contactez les autorités locales ou
le revendeur auprès duquel le produit a été acheté.
Vérification pour le Canada
Cet appareil numérique de classe B est conforme aux normes définies dans les réglementations canadiennes sur les
appareils générant des interférences radio (Canadian Interference-Causing Equipment Regulations, ICES-003, Class B).
CE (Europäische Union)
Dieses Iomega-Produkt hält die Bestimmungen der folgenden EU-Richtlinie(n) und Norm(en) ein: Umsetzung der Richtlinie
des Rats: 2004/108/EC. Normen, deren Einhaltung festgestellt wurde: EN55022, EN55024, EN61000-3-2, EN61000-3-3.
Name des Importeurs: Iomega International, S.A. Gerätetyp: Einrichtungen der Informationstechnik.
WEEE-Abfallverordnung (Waste Electrical and Electronic Equipment)
In Übereinstimmung mit der europaweiten Vorschrift 2002/96/EC zu Elektrik- und Elektronikabfällen (WEEE) weist das
Vorhandensein des obigen Symbols auf dem Produkt oder der Verpackung desselben darauf hin, dass dieser Artikel nicht
mit dem gewöhnlichen Hausmüll entsorgt werden darf. Es liegt vielmehr in der Verantwortung des Verbrauchers, das
Produkt an einer für die Wiederverwertung von Elektrik- und Elektronikabfällen vorgesehenen Sammelstelle zu entsorgen.
Die getrennte Entsorgung dieser Abfälle trägt zur Optimierung der Wiederaufbereitung jeglichen recyclingfähigen Materials
sowie zur Verringerung von Gesundheits- und Umweltschäden bei.
Weitere Informationen zur korrekten Entsorgung dieses Produkt erhalten Sie beim Händler oder der Behörde, bei dem oder
bei der es erworben wurde.
CE (Unione Europea)
Questo prodotto Iomega è conforme alle direttive e agli standard europei: Applicazione della direttiva comunitarie:
2004/108/EC. Dichiarazione di conformità agli standard: EN55022, EN55024, EN61000-3-2, EN61000-3-3. Nome
importatore: Iomega International, S.A. Tipo di apparecchiatura: dispositivo informatico.
33
Page 34

Waste Electrical and Electronic Equipment (WEEE)
In conformità a quanto sancito dalla Direttiva europea 2002/96/EC, nota anche come WEEE (Waste Electrical and
Electronic Equipment), la presenza di questo simbolo sul prodotto o sulla confezione indica che il prodotto non deve in
alcun modo essere smaltito nei normali cassonetti di raccolta. Al contrario, è responsabilità dell’utente provvedere al
corretto smaltimento del prodotto in appositi punti di raccolta destinati al riciclaggio delle apparecchiature elettriche ed
elettroniche inutilizzate. La raccolta differenziata di tali rifiuti consente di ottimizzare il recupero e il riciclaggio di materiali
riutilizzabili, riducendo nel contempo i rischi legati alla salute dell’uomo e l’impatto ambientale.
Per maggiori informazioni sul corretto smaltimento del prodotto, contattare l’autorità locale o il rivenditore presso cui è
stato acquistato il prodotto.
CE (Comunidad Europea)
Este producto Iomega se ajusta a las siguientes directivas y estándares europeos: Aplicación de la Directiva del Consejo:
2004/108/EC. Estándares con los que se declara Conformidad: EN55022, EN55024, EN61000-3-2, EN61000-3-3. Nombre
del importador: Iomega International, S.A. Tipo de equipo: Equipo de tecnología de la información.
Residuos de aparatos eléctricos y electrónicos (WEEE)
Conforme a la Directiva europea 2002/96/EC sobre Residuos de aparatos eléctricos y electrónicos (RAEE), la presencia
del símbolo anterior sobre el producto o en el embalaje indica que este artículo no debe arrojarse al flujo de residuos
no clasificados municipal. Es responsabilidad del usuario desechar este producto llevándolo a un punto de recogida
designado para el reciclaje de residuos de aparatos eléctricos y electrónicos. La recogida por separado de este residuo
ayuda a optimizar la recuperación y reciclaje de cualquier material reciclable y también reduce el impacto en la salud y el
entorno.
Para obtener más información acerca del desecho correcto de este producto póngase en contacto con la autoridad local o
el distribuidor donde adquirió este producto.
CE (Comunidade Européia)
Este produto da Iomega está em conformidade com as Seguintes diretivas e padrões europeus: Aplicação da Directiva do
Conselho:
2004/108/EC. Padrões em relação aos quais a conformidade foi declarada: EN55022, EN55024, EN61000-3-2, EN610003-3. Nome do importador: Iomega International, S.A. Tipo de equipamento: Equipamento de tecnologia da informação.
CE (Europese Gemeenschap)
Dit Iomega-product voldoet aan de volgende Europese Richtlijn(en) en Norm(en): Toepassing van Richtlijn: 2004/108/EC
van de Europese Commissie. Normen waarmee de conformiteit wordt verklaard: EN55022, EN55024, EN61000-3-2,
EN61000-3-3 en EN60825-1. Naam van importeur: Iomega International, S.A. Type apparatuur: Informatietechnologieapparatuur.
Afgedankte elektrische en elektronische apparatuur (WEEE)
In overeenstemming met de Europese richtlijn 2002/96/EG betreffende afgedankte elektrische en elektronische
apparatuur (AEEA) geeft de vermelding van het hierboven vermelde symbool op het product of de verpakking aan dat
dit artikel niet in de normale, niet-gesorteerde stedelijke afvalstroom mag worden verwerkt. In plaats daarvan ligt de
verantwoordelijkheid van de afvoer van dit product bij de gebruiker, die het dient aan te bieden bij een inzamelpunt voor
34
Page 35

de recyclage van afgedankte elektrische en elektronische apparatuur. De gescheiden inzameling van dit afval helpt de
eventuele te recupereren materialen terug te winnen of te recycleren en vermindert de impact ervan op het milieu en de
gezondheid van de mens.
Voor meer informatie betreffende de juiste afvoermethode voor dit product, neemt u contact op met de plaatselijke
overheid of de winkelier bij wie dit product is gekocht.
CE (Европейский Союз)
Данная продукция компании Iomega соответствует следующим директивам и стандартам
Европейского Союза: Директивы ЕС: 2004/108/EC. Стандарты, требованиям которых отвечает
устройство: EN55022, EN55024, EN61000-3-2, EN61000-3-3. Название поставщика: Iomega
International, S.A. Тип оборудования: оборудование для информационных технологий.
Утилизация электронного и электротехнического оборудования (WEEE)
В соответствии с директивой 2002/96/EC в отношении утилизации электронного и
электротехнического оборудования (WEEE), наличие вышеупомянутого значка на
оборудовании или на его упаковке указывает на то, что устройство должно утилизироваться
специальных образом. Потребитель несет ответственность за утилизацию данного устройства
путем его доставки на сборный пункт, предназначенный для приемки электронного и
электротехнического оборудования на переработку. Отдельный сбор таких отходов помогает
оптимизировать их переработку и уменьшить вредное влияние на здоровье человека и
окружающую среду.
Дополнительные сведения в отношении правильной утилизации данного устройства могут
быть получены у продавца устройства или у уполномоченного представителя компаниипроизводителя.
Models may vary.
Les modèles peuvent varier.
Abweichungen je nach Modell möglich.
I modelli possono variare.
Los modelos pueden variar.
Os modelos podem variar.
Modellen kunnen verschillen.
Модели могут отличаться.
35
Page 36

English
For service and support for your Iomega product, visit us at www.iomega.com.
Français
Pour obtenir du service et de l’assistance pour votre produit Iomega,
visitez notre site à l’adresse suivante : www.iomega.com.
Deutsch
Servicedienstleistungen und Kundendienst für Ihr Iomega Produkt
fi nden Sie unter www.iomega.com.
Italiano
Per ottenere assistenza e supporto per il prodotto Iomega in uso,
visitare il sito Web all’indirizzo www.iomega.com.
Español
Para obtener información sobre servicio y asistencia técnica para su producto Iomega,
visítenos en www.iomega.com.
Русский
Для получения обслуживания и поддержки продукта Iomega посетите веб-сайт
www.iomega.com/support.
Copyright © 2009 Iomega Corporation. All rights reserved. Iomega and the stylized “i” logo are either registered
trademarks or trademarks of Iomega Corporation in the United States and/or other countries. Microsoft and Windows are
either registered trademarks or trademarks of Microsoft Corporation in the United States and/or other countries. Apple
and Mac are either registered trademarks or trademarks of Apple, Inc. in the United States and/or other countries. Certain
other product names, brand names, and company names may be trademarks or designations of their respective owners.
31827201 05/05/09 b
 Loading...