

Page 1
4
0
4
0
4
0
4
0
4
0
4
0
C
L
I
K
!
®
P
C
C
A
R
D
A
D
A
P
T
E
R
©
C
o
p
y
r
i
g
h
t
1
9
9
8
I
o
m
e
g
a
C
o
r
p
o
r
a
t
i
o
n
1
8
2
1
W
e
s
t
I
o
m
e
g
a
W
a
y
,
R
o
y
,
U
t
a
h
8
4
0
6
7
P
r
o
t
e
c
t
e
d
b
y
U
.
S
.
p
a
t
e
n
t
a
p
p
l
i
c
a
t
i
o
n
s
p
e
n
d
i
n
g
i
n
t
h
e
U
.
S
.
a
n
d
o
t
h
e
r
c
o
u
n
t
r
i
e
s
.
0
3
6
9
3
5
0
0
C
L
I
K
!
®
P
C
C
A
R
D
A
D
A
P
T
E
R
©
C
o
p
y
r
i
g
h
t
1
9
9
8
I
o
m
e
g
a
C
o
r
p
o
r
a
t
i
o
n
1
8
2
1
W
e
s
t
I
o
m
e
g
a
W
a
y
,
R
o
y
,
U
t
a
h
8
4
0
6
7
P
r
o
t
e
c
t
e
d
b
y
U
.
S
.
p
a
t
e
n
t
a
p
p
l
i
c
a
t
i
o
n
s
p
e
n
d
i
n
g
i
n
t
h
e
U
.
S
.
a
n
d
o
t
h
e
r
c
o
u
n
t
r
i
e
s
.
0
3
6
9
3
5
0
0
i
n
t
h
e
U
.
S
.
a
40
4
0
C
L
I
K
!
®
P
C
C
A
R
D
A
D
A
P
T
E
R
©
C
o
p
y
r
i
g
h
t
1
9
9
8
I
o
m
e
g
a
C
o
r
p
o
r
a
t
i
o
n
1
8
2
1
W
e
s
t
I
o
m
e
g
a
W
a
y
,
R
o
y
,
U
t
a
h
8
4
0
6
7
P
r
o
t
e
c
t
e
d
b
y
U
.
S
.
p
a
t
e
n
t
a
p
p
l
i
c
a
t
i
o
n
s
p
e
n
d
i
n
g
i
n
t
h
e
U
.
S
.
a
n
d
o
t
h
e
r
c
o
u
n
t
r
i
e
s
.
0
3
6
9
3
5
0
0
CLIK!
™
DRIVE
FOR MOBILE COMPUTERS
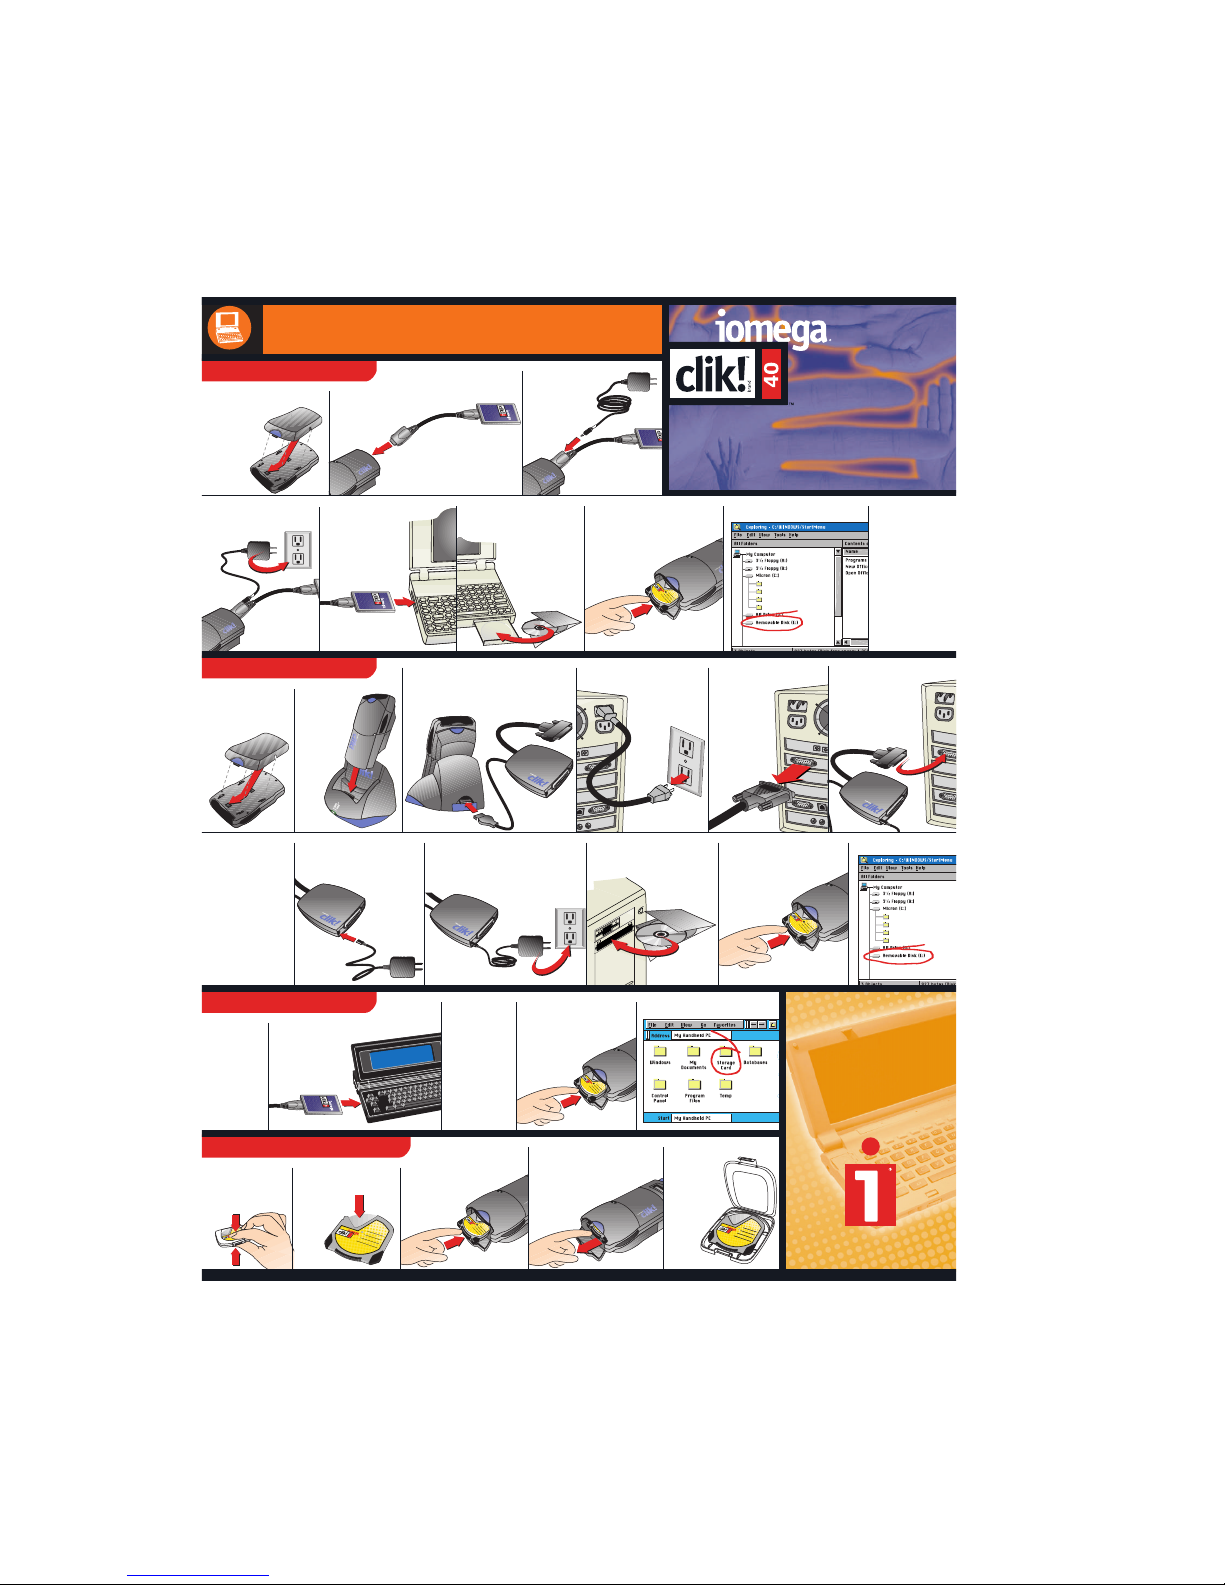
Window CE Device Setup
Desktop PC Computer Setup
Notebook Computer Setup
Quick Start Guide
Quick Start Guide
03466500
Clik! Media Usage
1. Follow
steps 1-4
as shown
above
in the
Notebook
Computer
Setup.
2. Slide the Clik! PC Card Adapter
into the PC card
slot on your
Windows CE®
device.
5. Locate files on the Clik! disk. 3. Attach your
Windows CE
®
device to your
desktop or
notebook
computer,
then install
the Clik!
Software.
1. Squeeze the top
and bottom of the
Clik! disk case
to open.
2. Never manually open
the shutter of the
Clik! disk.
3. Open the drive door on
the Clik! drive and gently
insert the disk (label
side up) until it
clicks.
4. To eject the Clik! disk, open
the drive door and gently
push in the Clik!
disk until
it clicks.
5. Always
store and
transport
the Clik!
disk in the
Clik! disk
case.
4. Insert a Clik! disk into the
Clik! drive (label side
up) until it clicks.
9. If you want to
use the Clik!
Battery, (with out the Clik!
Power Supply)
it must be
charged for
2-4 hours
before
initial use.
8. Verify drive letter assignment.
2. Connect the Clik! PC Card
Cable into Clik! drive.
5. Slide the Clik! PC Card
Adapter into the
PC card slot on
your notebook
computer.
6. Install Clik! Software.
(Attach Windows CE
®
device if necessary).
7. Insert a Clik! disk into the
Clik! drive (label side
up) until it clicks.
4. Plug the Clik! Power
Supply into an electrical
outlet.
1. Slide the Clik!
™
Battery onto
the back of
the Clik!
drive.
3. Plug the Clik!
Power Supply
into the Clik!
PC Card
Cable.
2. Set the
Clik! drive
into the
Clik!
Desktop
Dock.
3. Plug the Clik! Parallel Port Interface
cable into the back of the Clik!
Desktop Dock.
4. Disconnect power on your
computer.
5. Locate your
computer’s
parallel
port and
disconnect
any cable
already
attached.
8. Plug the Clik! Power Supply
into the Clik! Parallel Port
Interface.
12. Verify drive letter.
6. Connect the
Clik! Parallel
Port Interface
cable to your
computer’s
parallel port.
7. If you have a
printer, connect
the printer cable
to the Clik!
Parallel Port
Interface.
(See the
User’s Manual
for more
instructions.)
9. Plug the Clik! Power Supply into
an electrical outlet. Plug in the
power to your computer and
turn computer on.
11. Insert a Clik! disk into the
Clik! drive (label side
up) until it clicks.
10. Install Clik! Software.
(Attach Windows CE
®
device if necessary).
1. Slide the Clik!
Battery onto the
back of the
Clik! drive.
Page 2
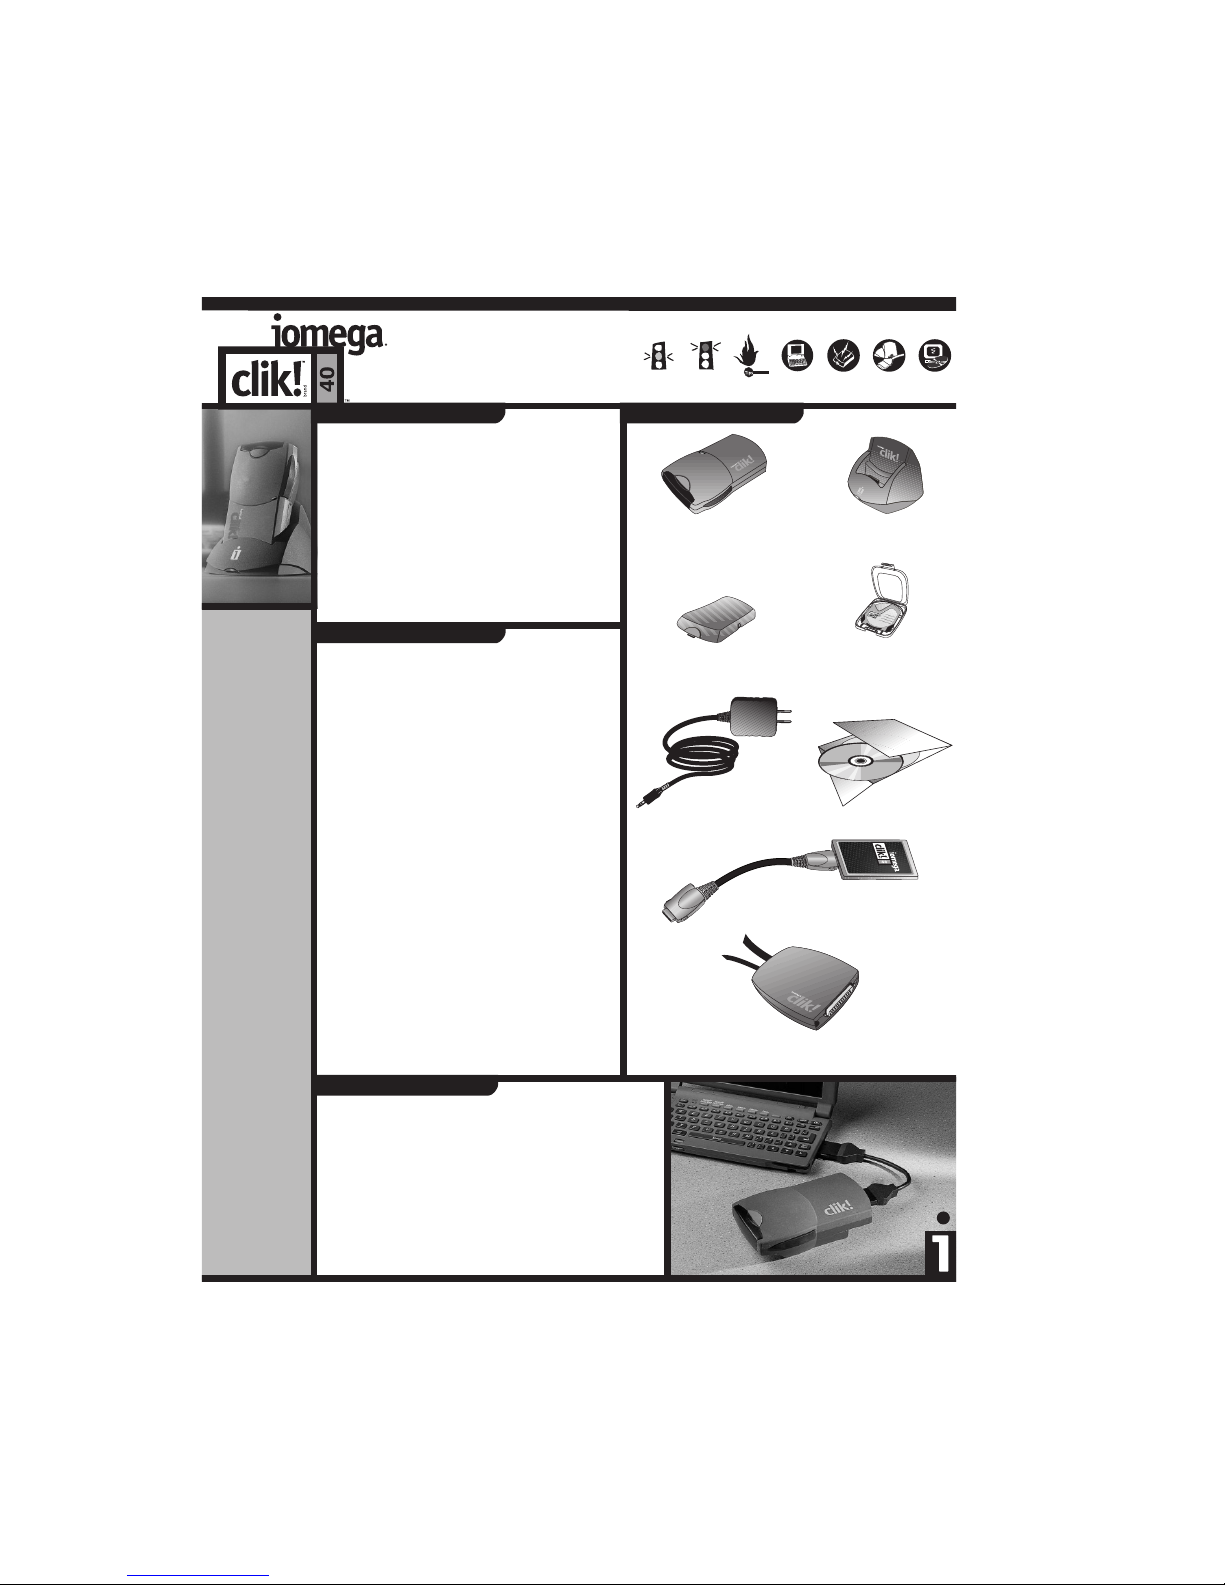
Clik!
PC Card Interface
C
L
IK
!
®
P
C
C
A
R
D
A
D
A
P
T
E
R
©
C
o
p
y
r
i
g
h
t
1
9
9
8
I
o
m
e
g
a
C
o
r
p
o
r
a
t
i
o
n
1
8
2
1
W
e
s
t
I
o
m
e
g
a
W
a
y
,
R
o
y
,
U
t
a
h
8
4
0
6
7
P
r
o
t
e
c
t
e
d
b
y
U
.
S
.
p
a
t
e
n
t
a
p
p
l
i
c
a
t
i
o
n
s
p
e
n
d
i
n
g
i
n
t
h
e
U
.
S
.
a
n
d
o
t
h
e
r
c
o
u
n
t
r
i
e
s
.
0
3
6
9
3
5
0
0
Clik!
Mobile Drive
Clik!
Desktop Dock
Clik!
Battery
Clik! Disk
and Disk Case
Clik! Parallel Port
Interface (PPI)
Clik!
Software
Clik!
Power Supply
a) To connect the Clik! Parallel Port Interface directly to the
parallel port on your computer?
b) To install the Clik! Software?
c) To charge the Clik! Battery for 2-4 hours before using it
for the first time?
d) To always store and transport the Clik! disk in the Clik!
disk case?
a) Use only Iomega Clik! power supplies and batteries
with your Clik! drive.
b) Always turn on power to your computer before or at the
same time as you supply power to your Clik! drive in the
Clik! Desktop Dock. Power must be applied to the Clik!
drive before the operating system begins to load.
c) Avoid exposing the Clik! drive or Clik! disks to dust,
direct sunlight, high temperature, moisture, or magnetic
fields (such as from monitors and some speakers).
d) If you have a printer connected to the Clik! drive, make
sure the Clik! Power Supply is connected to the Clik!
Parallel Port Interface and plugged into an electrical
outlet. Power to the drive is required for correct data
pass-through to the printer.
e) To use PC formatted files on your CE device, you must
convert files to CE format before copying them to your
Clik! disk.
f) The Clik! Mobile Drive never draws power from your
notebook or Windows CE® device. It only draws power
from the Clik! Battery or the Clik! Power Supply.
f) You can download software updates from Iomega at
http://www.iomega.com.
Clik! Drive:
The green activity light on the Clik! Mobile Drive indicates
the Clik! Mobile Drive is reading or writing data.
Clik! Battery:
The light on the Clik! Battery serves three purposes:
1) when the light is green, the battery is charging.
2) when the light is off, the battery has finished charging.
3) when the light is amber, the battery power is low.
Clik! Desktop Dock:
The green activity light appears when:
1) you have inserted the Clik! Mobile Drive properly and
2) the Clik! Desktop Dock is receiving electrical power.
SYSTEM
REQUIREMENTS:
· Windows® 98,
Windows
®
95, or
Windows NT
®
4.0
· CD-ROM drive to
install software
· 25MB free space
on hard drive
· 16MB RAM
(Pentium processor
recommended)
· Standard parallel
port for connection
to PC* and/or
Type II PC Card
slot for connection
to notebook
· Type II PC Card
Interface
· 600k free space
on CE device
· Windows CE
®
1.0
or higher
Windows CE®
Devices
Notebook and
Desktop PC
Computers
* EPP capable parallel port
recommended for maximum
data transfer date.
© Copyright 1998 Iomega Corporation, 1821 West Iomega Way, Roy, UT, 84067. Iomega, the stylized “i” logo, and
the swirl and hand graphics are registered trademarks of, and Clik! and the eye graphic are trademarks of, Iomega
Corporation. Microsoft, Windows, and Windows NT are registered trademarks of Microsoft Corporation registered in
the United States and other countries. All other product and brand names are the property of their respective owners.
Understanding Clik! LED Lights
Check the Clik! User’s Manual for more in-depth details about your Clik! Mobile Drive!
CLIK! DRIVE FOR
MOBILE COMPUTERS:
Clik Tips
Clik! Parts and Accessories
Warning Tips Clik!
Mobile
Charging
the Battery
Installing
Hardware
Installing
Software
Caution
Did You Remember?
 Loading...