

Page 1

BrightStor ® ARCserve ® Backup
for Windows
Administrator Guide
r11.1
C00652-1E
Page 2

This documentation and related computer software program (hereinafter referred to as the "Documentation") is for the
end user's informational purposes only and is subject to change or withdrawal by Computer Associates International,
Inc. ("CA") at any time.
This documentation may not be copied, transferred, reproduced, disclosed or duplicated, in whole or in part, without
the prior written consent of CA. This documentation is proprietary information of CA and protected by the copyright
laws of the United States and international treaties.
Notwithstanding the foregoing, licensed users may print a reasonable number of copies of this documentation for their
own internal use, provided that all CA copyright notices and legends are affixed to each reproduced copy. Only
authorized employees, consultants, or agents of the user who are bound by the confidentiality provisions of the license
for the software are permitted to have access to such copies.
This right to print copies is limited to the period during which the license for the product remains in full force and effect.
Should the license terminate for any reason, it shall be the user's responsibility to return to CA the reproduced copies
or to certify to CA that same have been destroyed.
To the extent permitted by applicable law, CA provides this documentation "as is" without warranty of any kind,
including without limitation, any implied warranties of merchantability, fitness for a particular purpose or
noninfringement. In no event will CA be liable to the end user or any third party for any loss or damage, direct or
indirect, from the use of this documentation, including without limitation, lost profits, business interruption, goodwill,
or lost data, even if CA is expressly advised of such loss or damage.
The use of any product referenced in this documentation and this documentation is governed by the end user's
applicable license agreement.
The manufacturer of this documentation is Computer Associates International, Inc.
Provided with "Restricted Rights" as set forth in 48 C.F.R. Section 12.212, 48 C.F.R. Sections 52.227-19(c)(1) and (2) or
DFARS Section 252.227-7013(c)(1)(ii) or applicable successor provisions.
© 2004 Computer Associates International, Inc.
All trademarks, trade names, service marks, and logos referenced herein belong to their respective companies.
Page 3

Contents
Chapter 1: Introducing BrightStor ARCserve Backup
Components. . . . . . . . . . . . . . . . . . . . . . . . . . . . . . . . . . . . . . . . . . . . . . . . . . . . . . . . . . . . . . . . . . . . . . . . . . . . . . . .1-1
BrightStor ARCserve Backup Manager. . . . . . . . . . . . . . . . . . . . . . . . . . . . . . . . . . . . . . . . . . . . . . . . . . . . . .1-1
BrightStor ARCserve Backup Server . . . . . . . . . . . . . . . . . . . . . . . . . . . . . . . . . . . . . . . . . . . . . . . . . . . . . . . .1-2
Functionality . . . . . . . . . . . . . . . . . . . . . . . . . . . . . . . . . . . . . . . . . . . . . . . . . . . . . . . . . . . . . . . . . . . . . . . . . . . . . . .1-2
Managers . . . . . . . . . . . . . . . . . . . . . . . . . . . . . . . . . . . . . . . . . . . . . . . . . . . . . . . . . . . . . . . . . . . . . . . . . . . . . . .1-3
Configuration . . . . . . . . . . . . . . . . . . . . . . . . . . . . . . . . . . . . . . . . . . . . . . . . . . . . . . . . . . . . . . . . . . . . . . . . . . .1-4
Wizards . . . . . . . . . . . . . . . . . . . . . . . . . . . . . . . . . . . . . . . . . . . . . . . . . . . . . . . . . . . . . . . . . . . . . . . . . . . . . . . .1-5
Utilities . . . . . . . . . . . . . . . . . . . . . . . . . . . . . . . . . . . . . . . . . . . . . . . . . . . . . . . . . . . . . . . . . . . . . . . . . . . . . . . . .1-5
Recover Database Utility . . . . . . . . . . . . . . . . . . . . . . . . . . . . . . . . . . . . . . . . . . . . . . . . . . . . . . . . . . . . . . .1-5
Merge Utility . . . . . . . . . . . . . . . . . . . . . . . . . . . . . . . . . . . . . . . . . . . . . . . . . . . . . . . . . . . . . . . . . . . . . . . . .1-6
Scan Utility . . . . . . . . . . . . . . . . . . . . . . . . . . . . . . . . . . . . . . . . . . . . . . . . . . . . . . . . . . . . . . . . . . . . . . . . . . .1-7
Compare Utility. . . . . . . . . . . . . . . . . . . . . . . . . . . . . . . . . . . . . . . . . . . . . . . . . . . . . . . . . . . . . . . . . . . . . . .1-7
Count Utility . . . . . . . . . . . . . . . . . . . . . . . . . . . . . . . . . . . . . . . . . . . . . . . . . . . . . . . . . . . . . . . . . . . . . . . . .1-8
Copy Utility . . . . . . . . . . . . . . . . . . . . . . . . . . . . . . . . . . . . . . . . . . . . . . . . . . . . . . . . . . . . . . . . . . . . . . . . . .1-8
Purge Utility. . . . . . . . . . . . . . . . . . . . . . . . . . . . . . . . . . . . . . . . . . . . . . . . . . . . . . . . . . . . . . . . . . . . . . . . . .1-8
Report Writer . . . . . . . . . . . . . . . . . . . . . . . . . . . . . . . . . . . . . . . . . . . . . . . . . . . . . . . . . . . . . . . . . . . . . . . . .1-9
Command Line . . . . . . . . . . . . . . . . . . . . . . . . . . . . . . . . . . . . . . . . . . . . . . . . . . . . . . . . . . . . . . . . . . . . . . . . . .1-9
BrightStor ARCserve Backup Security . . . . . . . . . . . . . . . . . . . . . . . . . . . . . . . . . . . . . . . . . . . . . . . . . . . . . .1-9
caroot User Profile. . . . . . . . . . . . . . . . . . . . . . . . . . . . . . . . . . . . . . . . . . . . . . . . . . . . . . . . . . . . . . . . . . . . .1-9
Equivalence . . . . . . . . . . . . . . . . . . . . . . . . . . . . . . . . . . . . . . . . . . . . . . . . . . . . . . . . . . . . . . . . . . . . . . . . .1-10
The System Account . . . . . . . . . . . . . . . . . . . . . . . . . . . . . . . . . . . . . . . . . . . . . . . . . . . . . . . . . . . . . . . . . .1-10
caroot, Equivalency, and the System Account . . . . . . . . . . . . . . . . . . . . . . . . . . . . . . . . . . . . . . . . . . . .1-11
Enterprise Level Password Management Utility . . . . . . . . . . . . . . . . . . . . . . . . . . . . . . . . . . . . . . . . . . . . .1-11
Centralized Cross-platform Management . . . . . . . . . . . . . . . . . . . . . . . . . . . . . . . . . . . . . . . . . . . . . . . . . .1-12
BrightStor ARCserve Backup Enterprise Module . . . . . . . . . . . . . . . . . . . . . . . . . . . . . . . . . . . . . . . . . . . . . . .1-12
Product Integration . . . . . . . . . . . . . . . . . . . . . . . . . . . . . . . . . . . . . . . . . . . . . . . . . . . . . . . . . . . . . . . . . . . . . . . .1-13
BrightStor ARCserve Backup for Laptops & Desktops. . . . . . . . . . . . . . . . . . . . . . . . . . . . . . . . . . . . . . . .1-13
BrightStor Portal Integration. . . . . . . . . . . . . . . . . . . . . . . . . . . . . . . . . . . . . . . . . . . . . . . . . . . . . . . . . . . . . .1-14
eTrust Antivirus . . . . . . . . . . . . . . . . . . . . . . . . . . . . . . . . . . . . . . . . . . . . . . . . . . . . . . . . . . . . . . . . . . . . . . . .1-14
Microsoft Management Console Integration . . . . . . . . . . . . . . . . . . . . . . . . . . . . . . . . . . . . . . . . . . . . . . . .1-14
Contents iii
Page 4

Preferences . . . . . . . . . . . . . . . . . . . . . . . . . . . . . . . . . . . . . . . . . . . . . . . . . . . . . . . . . . . . . . . . . . . . . . . . . . . . . . . 1-15
Global Settings . . . . . . . . . . . . . . . . . . . . . . . . . . . . . . . . . . . . . . . . . . . . . . . . . . . . . . . . . . . . . . . . . . . . . . . . 1-15
Library Filter. . . . . . . . . . . . . . . . . . . . . . . . . . . . . . . . . . . . . . . . . . . . . . . . . . . . . . . . . . . . . . . . . . . . . . . . . . . 1-16
Integrating with Unicenter NSM. . . . . . . . . . . . . . . . . . . . . . . . . . . . . . . . . . . . . . . . . . . . . . . . . . . . . . . . . . . . . 1-17
WorldView Integration. . . . . . . . . . . . . . . . . . . . . . . . . . . . . . . . . . . . . . . . . . . . . . . . . . . . . . . . . . . . . . . . . . 1-17
Requirements . . . . . . . . . . . . . . . . . . . . . . . . . . . . . . . . . . . . . . . . . . . . . . . . . . . . . . . . . . . . . . . . . . . . . . . 1-17
Creating Objects and View . . . . . . . . . . . . . . . . . . . . . . . . . . . . . . . . . . . . . . . . . . . . . . . . . . . . . . . . . . . . 1-17
Working with a Remote Repository . . . . . . . . . . . . . . . . . . . . . . . . . . . . . . . . . . . . . . . . . . . . . . . . . . . . 1-18
Unicenter Notification. . . . . . . . . . . . . . . . . . . . . . . . . . . . . . . . . . . . . . . . . . . . . . . . . . . . . . . . . . . . . . . . 1-19
Managing BrightStor ARCserve Backup with Unicenter . . . . . . . . . . . . . . . . . . . . . . . . . . . . . . . . . . 1-19
Workload Management Integration . . . . . . . . . . . . . . . . . . . . . . . . . . . . . . . . . . . . . . . . . . . . . . . . . . . . . . . 1-19
Backing up and Restoring Virtual Machine Environments . . . . . . . . . . . . . . . . . . . . . . . . . . . . . . . . . . . . . . 1-20
Configuration Requirements . . . . . . . . . . . . . . . . . . . . . . . . . . . . . . . . . . . . . . . . . . . . . . . . . . . . . . . . . . . . . 1-20
Backing Up a Guest Operating System . . . . . . . . . . . . . . . . . . . . . . . . . . . . . . . . . . . . . . . . . . . . . . . . . . . . 1-21
Backing Up the Host Operating System. . . . . . . . . . . . . . . . . . . . . . . . . . . . . . . . . . . . . . . . . . . . . . . . . . . . 1-21
Restoring the Guest Operating System . . . . . . . . . . . . . . . . . . . . . . . . . . . . . . . . . . . . . . . . . . . . . . . . . . . . 1-22
Recovering the Host Operating System From a Disaster . . . . . . . . . . . . . . . . . . . . . . . . . . . . . . . . . . . . . 1-22
The cabatch Utility. . . . . . . . . . . . . . . . . . . . . . . . . . . . . . . . . . . . . . . . . . . . . . . . . . . . . . . . . . . . . . . . . . . . . . . . . 1-22
Chapter 2: Planning
Assessing Basic Storage Requirements . . . . . . . . . . . . . . . . . . . . . . . . . . . . . . . . . . . . . . . . . . . . . . . . . . . . . . . . 2-2
How Big is Your Budget? . . . . . . . . . . . . . . . . . . . . . . . . . . . . . . . . . . . . . . . . . . . . . . . . . . . . . . . . . . . . . . . . . 2-2
How Much Data are You Backing Up? . . . . . . . . . . . . . . . . . . . . . . . . . . . . . . . . . . . . . . . . . . . . . . . . . . . . . 2-3
How Much Time Do You Have?. . . . . . . . . . . . . . . . . . . . . . . . . . . . . . . . . . . . . . . . . . . . . . . . . . . . . . . . . . . 2-3
What is Your Infrastructure Like?. . . . . . . . . . . . . . . . . . . . . . . . . . . . . . . . . . . . . . . . . . . . . . . . . . . . . . . . . . 2-3
Defining Data-transfer Requirements . . . . . . . . . . . . . . . . . . . . . . . . . . . . . . . . . . . . . . . . . . . . . . . . . . . . . . . . . 2-4
What is Your Basic Data-transfer Requirement? . . . . . . . . . . . . . . . . . . . . . . . . . . . . . . . . . . . . . . . . . . . . . 2-4
What is the Data-transfer Rate of Your Backup Hardware?. . . . . . . . . . . . . . . . . . . . . . . . . . . . . . . . . . . . 2-4
SCSI or Fibre Interfaces . . . . . . . . . . . . . . . . . . . . . . . . . . . . . . . . . . . . . . . . . . . . . . . . . . . . . . . . . . . . . . . . 2-4
Tape Drives . . . . . . . . . . . . . . . . . . . . . . . . . . . . . . . . . . . . . . . . . . . . . . . . . . . . . . . . . . . . . . . . . . . . . . . . . . 2-5
How Much Network Bandwidth Do You Have? . . . . . . . . . . . . . . . . . . . . . . . . . . . . . . . . . . . . . . . . . . . . . 2-6
Reconciling Data Transfer Requirements and Resources . . . . . . . . . . . . . . . . . . . . . . . . . . . . . . . . . . . . . . 2-7
Widening the Data Path . . . . . . . . . . . . . . . . . . . . . . . . . . . . . . . . . . . . . . . . . . . . . . . . . . . . . . . . . . . . . . . . . . 2-7
When You Cannot Widen the Data Path . . . . . . . . . . . . . . . . . . . . . . . . . . . . . . . . . . . . . . . . . . . . . . . . . . . . 2-8
Running Storage Operations in Parallel (Multiple Streaming). . . . . . . . . . . . . . . . . . . . . . . . . . . . . . . . . 2-11
iv Administrator Guide
Page 5

Defining Storage-capacity Requirements . . . . . . . . . . . . . . . . . . . . . . . . . . . . . . . . . . . . . . . . . . . . . . . . . . . . . .2-12
How Much Space Do You Need for Online Recovery Data?. . . . . . . . . . . . . . . . . . . . . . . . . . . . . . . . . . .2-12
How Much Space Do You Need for Backed-up Data? . . . . . . . . . . . . . . . . . . . . . . . . . . . . . . . . . . . . . . . .2-12
Matching Storage Capacity to Resources . . . . . . . . . . . . . . . . . . . . . . . . . . . . . . . . . . . . . . . . . . . . . . . . . . .2-13
Calculating Media Capacity . . . . . . . . . . . . . . . . . . . . . . . . . . . . . . . . . . . . . . . . . . . . . . . . . . . . . . . . . . .2-13
Other Factors Affecting Storage Capacity Calculations . . . . . . . . . . . . . . . . . . . . . . . . . . . . . . . . . . . .2-13
Testing Plans and Assumptions . . . . . . . . . . . . . . . . . . . . . . . . . . . . . . . . . . . . . . . . . . . . . . . . . . . . . . . . . . .2-14
Planning for Catastrophe. . . . . . . . . . . . . . . . . . . . . . . . . . . . . . . . . . . . . . . . . . . . . . . . . . . . . . . . . . . . . . . . . . . .2-14
Assessing the Risk . . . . . . . . . . . . . . . . . . . . . . . . . . . . . . . . . . . . . . . . . . . . . . . . . . . . . . . . . . . . . . . . . . . . . .2-15
Selecting an Off-site Repository . . . . . . . . . . . . . . . . . . . . . . . . . . . . . . . . . . . . . . . . . . . . . . . . . . . . . . . . . . .2-15
Security . . . . . . . . . . . . . . . . . . . . . . . . . . . . . . . . . . . . . . . . . . . . . . . . . . . . . . . . . . . . . . . . . . . . . . . . . . . . .2-15
Accessibility . . . . . . . . . . . . . . . . . . . . . . . . . . . . . . . . . . . . . . . . . . . . . . . . . . . . . . . . . . . . . . . . . . . . . . . . .2-15
Expense. . . . . . . . . . . . . . . . . . . . . . . . . . . . . . . . . . . . . . . . . . . . . . . . . . . . . . . . . . . . . . . . . . . . . . . . . . . . .2-16
Deciding What to Archive. . . . . . . . . . . . . . . . . . . . . . . . . . . . . . . . . . . . . . . . . . . . . . . . . . . . . . . . . . . . . . . .2-16
Testing Your Disaster Recovery Plan . . . . . . . . . . . . . . . . . . . . . . . . . . . . . . . . . . . . . . . . . . . . . . . . . . . . . .2-16
Sample Calculations . . . . . . . . . . . . . . . . . . . . . . . . . . . . . . . . . . . . . . . . . . . . . . . . . . . . . . . . . . . . . . . . . . . . . . . .2-17
Chapter 3: Backing Up Data
The Backup Wizard . . . . . . . . . . . . . . . . . . . . . . . . . . . . . . . . . . . . . . . . . . . . . . . . . . . . . . . . . . . . . . . . . . . . . . . . .3-2
Customizing Your Backup Jobs . . . . . . . . . . . . . . . . . . . . . . . . . . . . . . . . . . . . . . . . . . . . . . . . . . . . . . . . . . . . . . .3-2
Selecting the Source . . . . . . . . . . . . . . . . . . . . . . . . . . . . . . . . . . . . . . . . . . . . . . . . . . . . . . . . . . . . . . . . . . . . . .3-2
Backing Up an Entire Node. . . . . . . . . . . . . . . . . . . . . . . . . . . . . . . . . . . . . . . . . . . . . . . . . . . . . . . . . . . . . . . .3-3
Creating a Backup Job for an Entire Node . . . . . . . . . . . . . . . . . . . . . . . . . . . . . . . . . . . . . . . . . . . . . . . .3-4
Using the Security and Agent Information Dialog . . . . . . . . . . . . . . . . . . . . . . . . . . . . . . . . . . . . . . . . .3-4
Multiple Code Pages . . . . . . . . . . . . . . . . . . . . . . . . . . . . . . . . . . . . . . . . . . . . . . . . . . . . . . . . . . . . . . . . . . . . .3-5
Understanding How BrightStor ARCserve Backup Supports Multiple Code Pages . . . . . . . . . . . . .3-5
Specifying Code Pages . . . . . . . . . . . . . . . . . . . . . . . . . . . . . . . . . . . . . . . . . . . . . . . . . . . . . . . . . . . . . . . . .3-5
Selecting the Destination . . . . . . . . . . . . . . . . . . . . . . . . . . . . . . . . . . . . . . . . . . . . . . . . . . . . . . . . . . . . . . . . . .3-5
Wildcard Usage with Tape Library Groups . . . . . . . . . . . . . . . . . . . . . . . . . . . . . . . . . . . . . . . . . . . . . . . . . .3-6
Defining a Schedule . . . . . . . . . . . . . . . . . . . . . . . . . . . . . . . . . . . . . . . . . . . . . . . . . . . . . . . . . . . . . . . . . . . . . .3-6
Local Options. . . . . . . . . . . . . . . . . . . . . . . . . . . . . . . . . . . . . . . . . . . . . . . . . . . . . . . . . . . . . . . . . . . . . . . . . . . . . . .3-7
Global Options . . . . . . . . . . . . . . . . . . . . . . . . . . . . . . . . . . . . . . . . . . . . . . . . . . . . . . . . . . . . . . . . . . . . . . . . . . . . .3-9
Virus Options . . . . . . . . . . . . . . . . . . . . . . . . . . . . . . . . . . . . . . . . . . . . . . . . . . . . . . . . . . . . . . . . . . . . . . . . . . .3-9
Alert Options. . . . . . . . . . . . . . . . . . . . . . . . . . . . . . . . . . . . . . . . . . . . . . . . . . . . . . . . . . . . . . . . . . . . . . . . . . .3-10
Replication Options . . . . . . . . . . . . . . . . . . . . . . . . . . . . . . . . . . . . . . . . . . . . . . . . . . . . . . . . . . . . . . . . . . . . .3-11
Media Exporting Options . . . . . . . . . . . . . . . . . . . . . . . . . . . . . . . . . . . . . . . . . . . . . . . . . . . . . . . . . . . . . . . .3-11
Advanced Options . . . . . . . . . . . . . . . . . . . . . . . . . . . . . . . . . . . . . . . . . . . . . . . . . . . . . . . . . . . . . . . . . . . . . .3-12
Windows System Options . . . . . . . . . . . . . . . . . . . . . . . . . . . . . . . . . . . . . . . . . . . . . . . . . . . . . . . . . . . . .3-12
Multiplexing Options . . . . . . . . . . . . . . . . . . . . . . . . . . . . . . . . . . . . . . . . . . . . . . . . . . . . . . . . . . . . . . . . .3-12
Volume Shadow Copy Service . . . . . . . . . . . . . . . . . . . . . . . . . . . . . . . . . . . . . . . . . . . . . . . . . . . . . . . . . . . .3-13
Contents v
Page 6

Backup Media Options . . . . . . . . . . . . . . . . . . . . . . . . . . . . . . . . . . . . . . . . . . . . . . . . . . . . . . . . . . . . . . . . . . 3-14
Options for First Backup Media. . . . . . . . . . . . . . . . . . . . . . . . . . . . . . . . . . . . . . . . . . . . . . . . . . . . . . . . 3-14
Options for Additional Media . . . . . . . . . . . . . . . . . . . . . . . . . . . . . . . . . . . . . . . . . . . . . . . . . . . . . . . . . 3-15
Secure Your Backup Data . . . . . . . . . . . . . . . . . . . . . . . . . . . . . . . . . . . . . . . . . . . . . . . . . . . . . . . . . . . . . 3-15
Distinguish Media by Name Only. . . . . . . . . . . . . . . . . . . . . . . . . . . . . . . . . . . . . . . . . . . . . . . . . . . . . . 3-16
Verification Options . . . . . . . . . . . . . . . . . . . . . . . . . . . . . . . . . . . . . . . . . . . . . . . . . . . . . . . . . . . . . . . . . . . . 3-16
Retry Options . . . . . . . . . . . . . . . . . . . . . . . . . . . . . . . . . . . . . . . . . . . . . . . . . . . . . . . . . . . . . . . . . . . . . . . . . . 3-17
Operation Options. . . . . . . . . . . . . . . . . . . . . . . . . . . . . . . . . . . . . . . . . . . . . . . . . . . . . . . . . . . . . . . . . . . . . . 3-18
Pre/Post Options. . . . . . . . . . . . . . . . . . . . . . . . . . . . . . . . . . . . . . . . . . . . . . . . . . . . . . . . . . . . . . . . . . . . . . . 3-20
Run Command Before Job . . . . . . . . . . . . . . . . . . . . . . . . . . . . . . . . . . . . . . . . . . . . . . . . . . . . . . . . . . . . 3-20
Run Command After Job . . . . . . . . . . . . . . . . . . . . . . . . . . . . . . . . . . . . . . . . . . . . . . . . . . . . . . . . . . . . . 3-20
Do not run Command if . . . . . . . . . . . . . . . . . . . . . . . . . . . . . . . . . . . . . . . . . . . . . . . . . . . . . . . . . . . . . . 3-20
Run Before/After Command As . . . . . . . . . . . . . . . . . . . . . . . . . . . . . . . . . . . . . . . . . . . . . . . . . . . . . . . 3-21
Job Log Options . . . . . . . . . . . . . . . . . . . . . . . . . . . . . . . . . . . . . . . . . . . . . . . . . . . . . . . . . . . . . . . . . . . . . . . . 3-21
Backup Agent for Open Files. . . . . . . . . . . . . . . . . . . . . . . . . . . . . . . . . . . . . . . . . . . . . . . . . . . . . . . . . . . . . . . . 3-21
Redirecting Local Jobs. . . . . . . . . . . . . . . . . . . . . . . . . . . . . . . . . . . . . . . . . . . . . . . . . . . . . . . . . . . . . . . . . . . . . . 3-22
How Local Job Redirection Works . . . . . . . . . . . . . . . . . . . . . . . . . . . . . . . . . . . . . . . . . . . . . . . . . . . . . . . . 3-22
Options and Circumstances Affecting Local Job Redirection. . . . . . . . . . . . . . . . . . . . . . . . . . . . . . . . . . 3-23
Locating Redirected Jobs . . . . . . . . . . . . . . . . . . . . . . . . . . . . . . . . . . . . . . . . . . . . . . . . . . . . . . . . . . . . . . . . 3-23
Multistreaming. . . . . . . . . . . . . . . . . . . . . . . . . . . . . . . . . . . . . . . . . . . . . . . . . . . . . . . . . . . . . . . . . . . . . . . . . . . . 3-24
Multiplexing. . . . . . . . . . . . . . . . . . . . . . . . . . . . . . . . . . . . . . . . . . . . . . . . . . . . . . . . . . . . . . . . . . . . . . . . . . . . . . 3-25
Features Supported by Multiplexing . . . . . . . . . . . . . . . . . . . . . . . . . . . . . . . . . . . . . . . . . . . . . . . . . . . . . . 3-26
Submitting a Multiplexing Job. . . . . . . . . . . . . . . . . . . . . . . . . . . . . . . . . . . . . . . . . . . . . . . . . . . . . . . . . . . . 3-27
Multiplexing Global Options . . . . . . . . . . . . . . . . . . . . . . . . . . . . . . . . . . . . . . . . . . . . . . . . . . . . . . . . . . 3-27
Monitoring the Status of Your Multiplexing Job. . . . . . . . . . . . . . . . . . . . . . . . . . . . . . . . . . . . . . . . . . 3-28
Verifying the Integrity of Your Multiplexing Data. . . . . . . . . . . . . . . . . . . . . . . . . . . . . . . . . . . . . . . . 3-29
Submitting Jobs . . . . . . . . . . . . . . . . . . . . . . . . . . . . . . . . . . . . . . . . . . . . . . . . . . . . . . . . . . . . . . . . . . . . . . . . . . . 3-29
Preflight Checks for Your Backups. . . . . . . . . . . . . . . . . . . . . . . . . . . . . . . . . . . . . . . . . . . . . . . . . . . . . . . . . . . 3-29
Disaster Recovery . . . . . . . . . . . . . . . . . . . . . . . . . . . . . . . . . . . . . . . . . . . . . . . . . . . . . . . . . . . . . . . . . . . . . . . . . 3-30
Backing Up BrightStor ARCserve Backup for Laptops & Desktops Data . . . . . . . . . . . . . . . . . . . . . . . . . . 3-31
Managing Migrated Files . . . . . . . . . . . . . . . . . . . . . . . . . . . . . . . . . . . . . . . . . . . . . . . . . . . . . . . . . . . . . . . . 3-32
vi Administrator Guide
Page 7

Chapter 4: Restoring Data
The Restore Wizard . . . . . . . . . . . . . . . . . . . . . . . . . . . . . . . . . . . . . . . . . . . . . . . . . . . . . . . . . . . . . . . . . . . . . . . . .4-1
The Restore Manager . . . . . . . . . . . . . . . . . . . . . . . . . . . . . . . . . . . . . . . . . . . . . . . . . . . . . . . . . . . . . . . . . . . . . . . .4-1
Selecting the Source . . . . . . . . . . . . . . . . . . . . . . . . . . . . . . . . . . . . . . . . . . . . . . . . . . . . . . . . . . . . . . . . . . . . . .4-2
Multiple Code Pages . . . . . . . . . . . . . . . . . . . . . . . . . . . . . . . . . . . . . . . . . . . . . . . . . . . . . . . . . . . . . . . . . . . . .4-3
Specifying Code Pages . . . . . . . . . . . . . . . . . . . . . . . . . . . . . . . . . . . . . . . . . . . . . . . . . . . . . . . . . . . . . . . . .4-3
Selecting the Destination . . . . . . . . . . . . . . . . . . . . . . . . . . . . . . . . . . . . . . . . . . . . . . . . . . . . . . . . . . . . . . . . . .4-3
Defining a Schedule . . . . . . . . . . . . . . . . . . . . . . . . . . . . . . . . . . . . . . . . . . . . . . . . . . . . . . . . . . . . . . . . . . . . . .4-4
Restore Options. . . . . . . . . . . . . . . . . . . . . . . . . . . . . . . . . . . . . . . . . . . . . . . . . . . . . . . . . . . . . . . . . . . . . . . . . . . . .4-5
Backup Media Options. . . . . . . . . . . . . . . . . . . . . . . . . . . . . . . . . . . . . . . . . . . . . . . . . . . . . . . . . . . . . . . . . . . .4-5
Destination Options . . . . . . . . . . . . . . . . . . . . . . . . . . . . . . . . . . . . . . . . . . . . . . . . . . . . . . . . . . . . . . . . . . . . . .4-5
Operation Options . . . . . . . . . . . . . . . . . . . . . . . . . . . . . . . . . . . . . . . . . . . . . . . . . . . . . . . . . . . . . . . . . . . . . . .4-7
Pre/Post Options . . . . . . . . . . . . . . . . . . . . . . . . . . . . . . . . . . . . . . . . . . . . . . . . . . . . . . . . . . . . . . . . . . . . . . . .4-7
Job Log Options . . . . . . . . . . . . . . . . . . . . . . . . . . . . . . . . . . . . . . . . . . . . . . . . . . . . . . . . . . . . . . . . . . . . . . . . .4-8
Virus Options . . . . . . . . . . . . . . . . . . . . . . . . . . . . . . . . . . . . . . . . . . . . . . . . . . . . . . . . . . . . . . . . . . . . . . . . . . .4-8
Alert Options. . . . . . . . . . . . . . . . . . . . . . . . . . . . . . . . . . . . . . . . . . . . . . . . . . . . . . . . . . . . . . . . . . . . . . . . . . . .4-9
System State Restore Options . . . . . . . . . . . . . . . . . . . . . . . . . . . . . . . . . . . . . . . . . . . . . . . . . . . . . . . . . . . . .4-10
Restoring BrightStor ARCserve Backup for Laptops & Desktops Data. . . . . . . . . . . . . . . . . . . . . . . . . . . . .4-11
Restoring Migrated Files . . . . . . . . . . . . . . . . . . . . . . . . . . . . . . . . . . . . . . . . . . . . . . . . . . . . . . . . . . . . . . . . .4-11
Chapter 5: Customizing Your Jobs
Rotation Schemes . . . . . . . . . . . . . . . . . . . . . . . . . . . . . . . . . . . . . . . . . . . . . . . . . . . . . . . . . . . . . . . . . . . . . . . . . . .5-2
GFS Rotation Jobs on File System Devices . . . . . . . . . . . . . . . . . . . . . . . . . . . . . . . . . . . . . . . . . . . . . . . . . . .5-3
Media Pool Used. . . . . . . . . . . . . . . . . . . . . . . . . . . . . . . . . . . . . . . . . . . . . . . . . . . . . . . . . . . . . . . . . . . . . . . . .5-4
Backup Method . . . . . . . . . . . . . . . . . . . . . . . . . . . . . . . . . . . . . . . . . . . . . . . . . . . . . . . . . . . . . . . . . . . . . . . . . .5-4
Rotation Rules . . . . . . . . . . . . . . . . . . . . . . . . . . . . . . . . . . . . . . . . . . . . . . . . . . . . . . . . . . . . . . . . . . . . . . . . . . .5-4
Calendar View. . . . . . . . . . . . . . . . . . . . . . . . . . . . . . . . . . . . . . . . . . . . . . . . . . . . . . . . . . . . . . . . . . . . . . . . . . .5-5
Exceptions . . . . . . . . . . . . . . . . . . . . . . . . . . . . . . . . . . . . . . . . . . . . . . . . . . . . . . . . . . . . . . . . . . . . . . . . . . . . . .5-5
Media . . . . . . . . . . . . . . . . . . . . . . . . . . . . . . . . . . . . . . . . . . . . . . . . . . . . . . . . . . . . . . . . . . . . . . . . . . . . . . . . . .5-6
Filters . . . . . . . . . . . . . . . . . . . . . . . . . . . . . . . . . . . . . . . . . . . . . . . . . . . . . . . . . . . . . . . . . . . . . . . . . . . . . . . . . . . . .5-6
Specifying Filter Options . . . . . . . . . . . . . . . . . . . . . . . . . . . . . . . . . . . . . . . . . . . . . . . . . . . . . . . . . . . . . . . . . .5-7
Exclude . . . . . . . . . . . . . . . . . . . . . . . . . . . . . . . . . . . . . . . . . . . . . . . . . . . . . . . . . . . . . . . . . . . . . . . . . . . . . .5-7
Include . . . . . . . . . . . . . . . . . . . . . . . . . . . . . . . . . . . . . . . . . . . . . . . . . . . . . . . . . . . . . . . . . . . . . . . . . . . . . .5-7
Types of Filters . . . . . . . . . . . . . . . . . . . . . . . . . . . . . . . . . . . . . . . . . . . . . . . . . . . . . . . . . . . . . . . . . . . . . . . . . .5-7
File Pattern Filter . . . . . . . . . . . . . . . . . . . . . . . . . . . . . . . . . . . . . . . . . . . . . . . . . . . . . . . . . . . . . . . . . . . . . .5-7
Directory Filter. . . . . . . . . . . . . . . . . . . . . . . . . . . . . . . . . . . . . . . . . . . . . . . . . . . . . . . . . . . . . . . . . . . . . . . .5-7
File Attributes Filter . . . . . . . . . . . . . . . . . . . . . . . . . . . . . . . . . . . . . . . . . . . . . . . . . . . . . . . . . . . . . . . . . . .5-8
Contents vii
Page 8

File Modified Filters. . . . . . . . . . . . . . . . . . . . . . . . . . . . . . . . . . . . . . . . . . . . . . . . . . . . . . . . . . . . . . . . . . . 5-8
File Created Filters. . . . . . . . . . . . . . . . . . . . . . . . . . . . . . . . . . . . . . . . . . . . . . . . . . . . . . . . . . . . . . . . . . . . 5-8
File Accessed Filters. . . . . . . . . . . . . . . . . . . . . . . . . . . . . . . . . . . . . . . . . . . . . . . . . . . . . . . . . . . . . . . . . . . 5-9
File Size Filters . . . . . . . . . . . . . . . . . . . . . . . . . . . . . . . . . . . . . . . . . . . . . . . . . . . . . . . . . . . . . . . . . . . . . . . 5-9
Scheduling . . . . . . . . . . . . . . . . . . . . . . . . . . . . . . . . . . . . . . . . . . . . . . . . . . . . . . . . . . . . . . . . . . . . . . . . . . . . . . . 5-10
Custom Schedule. . . . . . . . . . . . . . . . . . . . . . . . . . . . . . . . . . . . . . . . . . . . . . . . . . . . . . . . . . . . . . . . . . . . . . . . . . 5-11
The Job Scheduler Wizard . . . . . . . . . . . . . . . . . . . . . . . . . . . . . . . . . . . . . . . . . . . . . . . . . . . . . . . . . . . . . . . . . . 5-12
The Job Status Manager . . . . . . . . . . . . . . . . . . . . . . . . . . . . . . . . . . . . . . . . . . . . . . . . . . . . . . . . . . . . . . . . . . . . 5-19
Managing Servers and Groups . . . . . . . . . . . . . . . . . . . . . . . . . . . . . . . . . . . . . . . . . . . . . . . . . . . . . . . . . . . 5-20
Job Queue . . . . . . . . . . . . . . . . . . . . . . . . . . . . . . . . . . . . . . . . . . . . . . . . . . . . . . . . . . . . . . . . . . . . . . . . . . . . . 5-20
Job Status. . . . . . . . . . . . . . . . . . . . . . . . . . . . . . . . . . . . . . . . . . . . . . . . . . . . . . . . . . . . . . . . . . . . . . . . . . . 5-22
The Last Result Field . . . . . . . . . . . . . . . . . . . . . . . . . . . . . . . . . . . . . . . . . . . . . . . . . . . . . . . . . . . . . . . . . 5-22
Backup Job Failure . . . . . . . . . . . . . . . . . . . . . . . . . . . . . . . . . . . . . . . . . . . . . . . . . . . . . . . . . . . . . . . . . . . 5-23
Activity Log . . . . . . . . . . . . . . . . . . . . . . . . . . . . . . . . . . . . . . . . . . . . . . . . . . . . . . . . . . . . . . . . . . . . . . . . . . . 5-24
Deleting Log Files . . . . . . . . . . . . . . . . . . . . . . . . . . . . . . . . . . . . . . . . . . . . . . . . . . . . . . . . . . . . . . . . . . . 5-25
Scheduling Activity Log Pruning . . . . . . . . . . . . . . . . . . . . . . . . . . . . . . . . . . . . . . . . . . . . . . . . . . . . . . 5-26
Displaying the Tape Log Tab. . . . . . . . . . . . . . . . . . . . . . . . . . . . . . . . . . . . . . . . . . . . . . . . . . . . . . . . . . . . . 5-27
Job Detail. . . . . . . . . . . . . . . . . . . . . . . . . . . . . . . . . . . . . . . . . . . . . . . . . . . . . . . . . . . . . . . . . . . . . . . . . . . . . . 5-27
Job Log. . . . . . . . . . . . . . . . . . . . . . . . . . . . . . . . . . . . . . . . . . . . . . . . . . . . . . . . . . . . . . . . . . . . . . . . . . . . . . . . 5-27
Job Scripts . . . . . . . . . . . . . . . . . . . . . . . . . . . . . . . . . . . . . . . . . . . . . . . . . . . . . . . . . . . . . . . . . . . . . . . . . . . . . . . . 5-28
Saving Scripts. . . . . . . . . . . . . . . . . . . . . . . . . . . . . . . . . . . . . . . . . . . . . . . . . . . . . . . . . . . . . . . . . . . . . . . . . . 5-28
Using an Existing Script . . . . . . . . . . . . . . . . . . . . . . . . . . . . . . . . . . . . . . . . . . . . . . . . . . . . . . . . . . . . . . . . . 5-28
Job Templates. . . . . . . . . . . . . . . . . . . . . . . . . . . . . . . . . . . . . . . . . . . . . . . . . . . . . . . . . . . . . . . . . . . . . . . . . . . . . 5-29
Creating Custom Job Templates . . . . . . . . . . . . . . . . . . . . . . . . . . . . . . . . . . . . . . . . . . . . . . . . . . . . . . . . . . 5-29
Chapter 6: Configuring Devices
Configuring a Tape or Optical Library. . . . . . . . . . . . . . . . . . . . . . . . . . . . . . . . . . . . . . . . . . . . . . . . . . . . . . . . . 6-2
Assigning Devices . . . . . . . . . . . . . . . . . . . . . . . . . . . . . . . . . . . . . . . . . . . . . . . . . . . . . . . . . . . . . . . . . . . . . . . 6-2
Assigning a Cleaning Tape and Changing Configuration Details. . . . . . . . . . . . . . . . . . . . . . . . . . . . . . . 6-3
Advanced Settings. . . . . . . . . . . . . . . . . . . . . . . . . . . . . . . . . . . . . . . . . . . . . . . . . . . . . . . . . . . . . . . . . . . . . . . 6-4
Configuring a RAID Device. . . . . . . . . . . . . . . . . . . . . . . . . . . . . . . . . . . . . . . . . . . . . . . . . . . . . . . . . . . . . . . . . . 6-5
Configuring a RAID Level . . . . . . . . . . . . . . . . . . . . . . . . . . . . . . . . . . . . . . . . . . . . . . . . . . . . . . . . . . . . . . . . 6-5
Configuring a RAID Group . . . . . . . . . . . . . . . . . . . . . . . . . . . . . . . . . . . . . . . . . . . . . . . . . . . . . . . . . . . . . . . 6-5
Configuring a Removable Drive . . . . . . . . . . . . . . . . . . . . . . . . . . . . . . . . . . . . . . . . . . . . . . . . . . . . . . . . . . . . . . 6-6
Configuring a Virtual Library . . . . . . . . . . . . . . . . . . . . . . . . . . . . . . . . . . . . . . . . . . . . . . . . . . . . . . . . . . . . . . . . 6-6
Configuring an IBM 3494 Library . . . . . . . . . . . . . . . . . . . . . . . . . . . . . . . . . . . . . . . . . . . . . . . . . . . . . . . . . . . . . 6-7
Configuring a StorageTek ACSLS Library. . . . . . . . . . . . . . . . . . . . . . . . . . . . . . . . . . . . . . . . . . . . . . . . . . . . . . 6-8
Configuring a File System Device. . . . . . . . . . . . . . . . . . . . . . . . . . . . . . . . . . . . . . . . . . . . . . . . . . . . . . . . . . . . . 6-9
Adding More than One File System Device in a Group . . . . . . . . . . . . . . . . . . . . . . . . . . . . . . . . . . . . . . 6-10
Device Commands that are Available for File System Devices . . . . . . . . . . . . . . . . . . . . . . . . . . . . . . . . 6-11
Enabling or Disabling Devices (for RSM) . . . . . . . . . . . . . . . . . . . . . . . . . . . . . . . . . . . . . . . . . . . . . . . . . . . . . 6-11
viii Administrator Guide
Page 9

Chapter 7: Managing Devices and Media
The Device Manager. . . . . . . . . . . . . . . . . . . . . . . . . . . . . . . . . . . . . . . . . . . . . . . . . . . . . . . . . . . . . . . . . . . . . . . . .7-1
Inserting and Removing Media . . . . . . . . . . . . . . . . . . . . . . . . . . . . . . . . . . . . . . . . . . . . . . . . . . . . . . . . . . . .7-2
Scheduling Jobs. . . . . . . . . . . . . . . . . . . . . . . . . . . . . . . . . . . . . . . . . . . . . . . . . . . . . . . . . . . . . . . . . . . . . . . . . .7-2
Maintenance Tasks . . . . . . . . . . . . . . . . . . . . . . . . . . . . . . . . . . . . . . . . . . . . . . . . . . . . . . . . . . . . . . . . . . . . . . .7-3
Formatting Media . . . . . . . . . . . . . . . . . . . . . . . . . . . . . . . . . . . . . . . . . . . . . . . . . . . . . . . . . . . . . . . . . . . . .7-3
Erasing Data. . . . . . . . . . . . . . . . . . . . . . . . . . . . . . . . . . . . . . . . . . . . . . . . . . . . . . . . . . . . . . . . . . . . . . . . . .7-4
Retensioning a Tape . . . . . . . . . . . . . . . . . . . . . . . . . . . . . . . . . . . . . . . . . . . . . . . . . . . . . . . . . . . . . . . . . . .7-5
Compressing Data . . . . . . . . . . . . . . . . . . . . . . . . . . . . . . . . . . . . . . . . . . . . . . . . . . . . . . . . . . . . . . . . . . . .7-5
Ejecting Media . . . . . . . . . . . . . . . . . . . . . . . . . . . . . . . . . . . . . . . . . . . . . . . . . . . . . . . . . . . . . . . . . . . . . . . .7-5
Rebuilding Media . . . . . . . . . . . . . . . . . . . . . . . . . . . . . . . . . . . . . . . . . . . . . . . . . . . . . . . . . . . . . . . . . . . . .7-5
Library Support. . . . . . . . . . . . . . . . . . . . . . . . . . . . . . . . . . . . . . . . . . . . . . . . . . . . . . . . . . . . . . . . . . . . . . . . . .7-6
Device Management Functions for Libraries . . . . . . . . . . . . . . . . . . . . . . . . . . . . . . . . . . . . . . . . . . . . . . . . .7-7
Checking Library Slots. . . . . . . . . . . . . . . . . . . . . . . . . . . . . . . . . . . . . . . . . . . . . . . . . . . . . . . . . . . . . . . . . . . .7-7
Loading or Removing Magazines . . . . . . . . . . . . . . . . . . . . . . . . . . . . . . . . . . . . . . . . . . . . . . . . . . . . . . . . . .7-7
Importing or Exporting Media . . . . . . . . . . . . . . . . . . . . . . . . . . . . . . . . . . . . . . . . . . . . . . . . . . . . . . . . . .7-8
Cleaning Tape Heads . . . . . . . . . . . . . . . . . . . . . . . . . . . . . . . . . . . . . . . . . . . . . . . . . . . . . . . . . . . . . . . . . .7-8
Marking Drives Offline and Online . . . . . . . . . . . . . . . . . . . . . . . . . . . . . . . . . . . . . . . . . . . . . . . . . . . . . .7-8
Removable Drive Support. . . . . . . . . . . . . . . . . . . . . . . . . . . . . . . . . . . . . . . . . . . . . . . . . . . . . . . . . . . . . . . . .7-9
Using Removable Media . . . . . . . . . . . . . . . . . . . . . . . . . . . . . . . . . . . . . . . . . . . . . . . . . . . . . . . . . . . . . . . . . .7-9
Enabling Removable Drives . . . . . . . . . . . . . . . . . . . . . . . . . . . . . . . . . . . . . . . . . . . . . . . . . . . . . . . . . . . .7-9
Formatting Removable Media. . . . . . . . . . . . . . . . . . . . . . . . . . . . . . . . . . . . . . . . . . . . . . . . . . . . . . . . . . .7-9
Configuring Removable Devices . . . . . . . . . . . . . . . . . . . . . . . . . . . . . . . . . . . . . . . . . . . . . . . . . . . . . . . .7-9
Managing Tape Drives Using DLTSage Error Handling . . . . . . . . . . . . . . . . . . . . . . . . . . . . . . . . . . . . . .7-10
Understanding How DLTSage Error Handling Works. . . . . . . . . . . . . . . . . . . . . . . . . . . . . . . . . . . . .7-10
Curing Tape Drive Errors . . . . . . . . . . . . . . . . . . . . . . . . . . . . . . . . . . . . . . . . . . . . . . . . . . . . . . . . . . . . . . . .7-11
Media Pools . . . . . . . . . . . . . . . . . . . . . . . . . . . . . . . . . . . . . . . . . . . . . . . . . . . . . . . . . . . . . . . . . . . . . . . . . . . . . . .7-11
Save Sets and Scratch Sets . . . . . . . . . . . . . . . . . . . . . . . . . . . . . . . . . . . . . . . . . . . . . . . . . . . . . . . . . . . . . . . .7-12
Serial Number Information . . . . . . . . . . . . . . . . . . . . . . . . . . . . . . . . . . . . . . . . . . . . . . . . . . . . . . . . . . . . . . .7-13
GFS Media Pools. . . . . . . . . . . . . . . . . . . . . . . . . . . . . . . . . . . . . . . . . . . . . . . . . . . . . . . . . . . . . . . . . . . . . . . .7-13
Maximizing Media in GFS Rotation Jobs . . . . . . . . . . . . . . . . . . . . . . . . . . . . . . . . . . . . . . . . . . . . . . . . . . .7-15
The Media Pool Manager. . . . . . . . . . . . . . . . . . . . . . . . . . . . . . . . . . . . . . . . . . . . . . . . . . . . . . . . . . . . . . . . . . . .7-20
The Media Management Administrator (MM Admin). . . . . . . . . . . . . . . . . . . . . . . . . . . . . . . . . . . . . . . . . . .7-21
Media Management and Tape Service . . . . . . . . . . . . . . . . . . . . . . . . . . . . . . . . . . . . . . . . . . . . . . . . . . . . .7-21
Terms . . . . . . . . . . . . . . . . . . . . . . . . . . . . . . . . . . . . . . . . . . . . . . . . . . . . . . . . . . . . . . . . . . . . . . . . . . . . . . . . .7-22
Contents ix
Page 10

The MM Admin Interface. . . . . . . . . . . . . . . . . . . . . . . . . . . . . . . . . . . . . . . . . . . . . . . . . . . . . . . . . . . . . . . . . . . 7-22
The MM Admin Toolbar . . . . . . . . . . . . . . . . . . . . . . . . . . . . . . . . . . . . . . . . . . . . . . . . . . . . . . . . . . . . . . . . 7-23
The MM Admin Window. . . . . . . . . . . . . . . . . . . . . . . . . . . . . . . . . . . . . . . . . . . . . . . . . . . . . . . . . . . . . . . . 7-23
The Vault Object . . . . . . . . . . . . . . . . . . . . . . . . . . . . . . . . . . . . . . . . . . . . . . . . . . . . . . . . . . . . . . . . . . . . . . . 7-24
The Schedule Object . . . . . . . . . . . . . . . . . . . . . . . . . . . . . . . . . . . . . . . . . . . . . . . . . . . . . . . . . . . . . . . . . . . . 7-25
The Vault Criteria Descriptor Object. . . . . . . . . . . . . . . . . . . . . . . . . . . . . . . . . . . . . . . . . . . . . . . . . . . . 7-25
The Rotation Object . . . . . . . . . . . . . . . . . . . . . . . . . . . . . . . . . . . . . . . . . . . . . . . . . . . . . . . . . . . . . . . . . . 7-26
The Report Object . . . . . . . . . . . . . . . . . . . . . . . . . . . . . . . . . . . . . . . . . . . . . . . . . . . . . . . . . . . . . . . . . . . . . . 7-27
The Find Media in Vault Object . . . . . . . . . . . . . . . . . . . . . . . . . . . . . . . . . . . . . . . . . . . . . . . . . . . . . . . . . . 7-28
The Status Object . . . . . . . . . . . . . . . . . . . . . . . . . . . . . . . . . . . . . . . . . . . . . . . . . . . . . . . . . . . . . . . . . . . . . . . 7-28
Reset the Status of Vault Processing. . . . . . . . . . . . . . . . . . . . . . . . . . . . . . . . . . . . . . . . . . . . . . . . . . . . . . . 7-28
The Media Management Process . . . . . . . . . . . . . . . . . . . . . . . . . . . . . . . . . . . . . . . . . . . . . . . . . . . . . . . . . . . . 7-29
Vaults. . . . . . . . . . . . . . . . . . . . . . . . . . . . . . . . . . . . . . . . . . . . . . . . . . . . . . . . . . . . . . . . . . . . . . . . . . . . . . . . . 7-30
Creating Vaults. . . . . . . . . . . . . . . . . . . . . . . . . . . . . . . . . . . . . . . . . . . . . . . . . . . . . . . . . . . . . . . . . . . . . . 7-30
Updating Vaults . . . . . . . . . . . . . . . . . . . . . . . . . . . . . . . . . . . . . . . . . . . . . . . . . . . . . . . . . . . . . . . . . . . . . 7-31
Deleting Vaults. . . . . . . . . . . . . . . . . . . . . . . . . . . . . . . . . . . . . . . . . . . . . . . . . . . . . . . . . . . . . . . . . . . . . . 7-31
Scheduling Tape Volume Movement . . . . . . . . . . . . . . . . . . . . . . . . . . . . . . . . . . . . . . . . . . . . . . . . . . . . . 7-31
Creating Schedules . . . . . . . . . . . . . . . . . . . . . . . . . . . . . . . . . . . . . . . . . . . . . . . . . . . . . . . . . . . . . . . . . . 7-31
Deleting Schedules. . . . . . . . . . . . . . . . . . . . . . . . . . . . . . . . . . . . . . . . . . . . . . . . . . . . . . . . . . . . . . . . . . . 7-32
Selecting Tape Volumes . . . . . . . . . . . . . . . . . . . . . . . . . . . . . . . . . . . . . . . . . . . . . . . . . . . . . . . . . . . . . . . . . 7-32
Creating a Vault Criteria Descriptor (VCD) . . . . . . . . . . . . . . . . . . . . . . . . . . . . . . . . . . . . . . . . . . . . . 7-32
Updating a Vault Criteria Descriptor (VCD) . . . . . . . . . . . . . . . . . . . . . . . . . . . . . . . . . . . . . . . . . . . . . 7-33
Deleting a Vault Criteria Descriptor (VCD). . . . . . . . . . . . . . . . . . . . . . . . . . . . . . . . . . . . . . . . . . . . . . 7-33
Defining Retention Policies . . . . . . . . . . . . . . . . . . . . . . . . . . . . . . . . . . . . . . . . . . . . . . . . . . . . . . . . . . . . . . 7-33
Creating a Rotation . . . . . . . . . . . . . . . . . . . . . . . . . . . . . . . . . . . . . . . . . . . . . . . . . . . . . . . . . . . . . . . . . . 7-33
Updating a Rotation . . . . . . . . . . . . . . . . . . . . . . . . . . . . . . . . . . . . . . . . . . . . . . . . . . . . . . . . . . . . . . . . . 7-34
Deleting a Rotation . . . . . . . . . . . . . . . . . . . . . . . . . . . . . . . . . . . . . . . . . . . . . . . . . . . . . . . . . . . . . . . . . . 7-34
Viewing Slot Information. . . . . . . . . . . . . . . . . . . . . . . . . . . . . . . . . . . . . . . . . . . . . . . . . . . . . . . . . . . . . . . . 7-35
Special Tape Volume Movement . . . . . . . . . . . . . . . . . . . . . . . . . . . . . . . . . . . . . . . . . . . . . . . . . . . . . . . . . 7-36
Finding Media in Vaults. . . . . . . . . . . . . . . . . . . . . . . . . . . . . . . . . . . . . . . . . . . . . . . . . . . . . . . . . . . . . . . . . 7-38
The ca_mmo Command . . . . . . . . . . . . . . . . . . . . . . . . . . . . . . . . . . . . . . . . . . . . . . . . . . . . . . . . . . . . . . . . . . . . 7-38
x Administrator Guide
Page 11

Chapter 8: Managing the Database and Reporting
The Database Manager. . . . . . . . . . . . . . . . . . . . . . . . . . . . . . . . . . . . . . . . . . . . . . . . . . . . . . . . . . . . . . . . . . . . . . .8-1
Selecting a Database View. . . . . . . . . . . . . . . . . . . . . . . . . . . . . . . . . . . . . . . . . . . . . . . . . . . . . . . . . . . . . . . . .8-2
Changing the Sort Order . . . . . . . . . . . . . . . . . . . . . . . . . . . . . . . . . . . . . . . . . . . . . . . . . . . . . . . . . . . . . . .8-3
Pruning Your Database . . . . . . . . . . . . . . . . . . . . . . . . . . . . . . . . . . . . . . . . . . . . . . . . . . . . . . . . . . . . . . . .8-3
Re-building the SQL Indexes. . . . . . . . . . . . . . . . . . . . . . . . . . . . . . . . . . . . . . . . . . . . . . . . . . . . . . . . . . . .8-3
Errors. . . . . . . . . . . . . . . . . . . . . . . . . . . . . . . . . . . . . . . . . . . . . . . . . . . . . . . . . . . . . . . . . . . . . . . . . . . . . . . .8-3
Device Records . . . . . . . . . . . . . . . . . . . . . . . . . . . . . . . . . . . . . . . . . . . . . . . . . . . . . . . . . . . . . . . . . . . . . . .8-4
Last Database Backup Information. . . . . . . . . . . . . . . . . . . . . . . . . . . . . . . . . . . . . . . . . . . . . . . . . . . . . . .8-4
The Catalog Database. . . . . . . . . . . . . . . . . . . . . . . . . . . . . . . . . . . . . . . . . . . . . . . . . . . . . . . . . . . . . . . . . . . . . . . .8-4
Enabling the Catalog Database. . . . . . . . . . . . . . . . . . . . . . . . . . . . . . . . . . . . . . . . . . . . . . . . . . . . . . . . . . . . .8-5
Enabling Media Pool Maintenance . . . . . . . . . . . . . . . . . . . . . . . . . . . . . . . . . . . . . . . . . . . . . . . . . . . . . . . . .8-5
Merge Options. . . . . . . . . . . . . . . . . . . . . . . . . . . . . . . . . . . . . . . . . . . . . . . . . . . . . . . . . . . . . . . . . . . . . . . . . . .8-6
Backing Up and Restoring with the Catalog Database . . . . . . . . . . . . . . . . . . . . . . . . . . . . . . . . . . . . . . . . .8-7
Submitting Backup Jobs . . . . . . . . . . . . . . . . . . . . . . . . . . . . . . . . . . . . . . . . . . . . . . . . . . . . . . . . . . . . . . . .8-7
Submitting a Restore Job . . . . . . . . . . . . . . . . . . . . . . . . . . . . . . . . . . . . . . . . . . . . . . . . . . . . . . . . . . . . . . .8-8
Using a Centralized Database. . . . . . . . . . . . . . . . . . . . . . . . . . . . . . . . . . . . . . . . . . . . . . . . . . . . . . . . . . . . . . . . .8-9
Setting up a Central Database. . . . . . . . . . . . . . . . . . . . . . . . . . . . . . . . . . . . . . . . . . . . . . . . . . . . . . . . . . . . .8-10
Adding Members to a BrightStor ARCserve Backup Central Database. . . . . . . . . . . . . . . . . . . . . . . . . .8-10
Configuring the Job Information Stored in Your Central Database . . . . . . . . . . . . . . . . . . . . . . . . . . . . .8-11
Using the Central Database. . . . . . . . . . . . . . . . . . . . . . . . . . . . . . . . . . . . . . . . . . . . . . . . . . . . . . . . . . . . . . .8-12
Using a Remote Database . . . . . . . . . . . . . . . . . . . . . . . . . . . . . . . . . . . . . . . . . . . . . . . . . . . . . . . . . . . . . . . . . . .8-12
Configuring BrightStor ARCserve Backup to Use MS SQL as Its Database . . . . . . . . . . . . . . . . . . . . . . . . .8-13
Configuring ODBC Data Source to Enable a Remote Database . . . . . . . . . . . . . . . . . . . . . . . . . . . . . . . . . . .8-14
Choosing a Database Configuration . . . . . . . . . . . . . . . . . . . . . . . . . . . . . . . . . . . . . . . . . . . . . . . . . . . . . . . . . .8-15
Advanced RAIMA Very Large Database Maintenance . . . . . . . . . . . . . . . . . . . . . . . . . . . . . . . . . . . . . . . . . .8-16
VLDB Architecture . . . . . . . . . . . . . . . . . . . . . . . . . . . . . . . . . . . . . . . . . . . . . . . . . . . . . . . . . . . . . . . . . . . . . .8-16
VLDB Utility Usage Considerations . . . . . . . . . . . . . . . . . . . . . . . . . . . . . . . . . . . . . . . . . . . . . . . . . . . . . . .8-16
VLDB Maintenance Utilities . . . . . . . . . . . . . . . . . . . . . . . . . . . . . . . . . . . . . . . . . . . . . . . . . . . . . . . . . . . . . .8-17
Using a Microsoft SQL Server Database . . . . . . . . . . . . . . . . . . . . . . . . . . . . . . . . . . . . . . . . . . . . . . . . . . . . . . .8-18
Installation Considerations . . . . . . . . . . . . . . . . . . . . . . . . . . . . . . . . . . . . . . . . . . . . . . . . . . . . . . . . . . . . . . .8-19
Transferring Data from a VLDB Database to a SQL Database. . . . . . . . . . . . . . . . . . . . . . . . . . . . . . . . . .8-20
SQL Connections. . . . . . . . . . . . . . . . . . . . . . . . . . . . . . . . . . . . . . . . . . . . . . . . . . . . . . . . . . . . . . . . . . . . . . . .8-20
Run a Database Consistency Check. . . . . . . . . . . . . . . . . . . . . . . . . . . . . . . . . . . . . . . . . . . . . . . . . . . . . . . .8-20
Contents xi
Page 12

Logs and Reports. . . . . . . . . . . . . . . . . . . . . . . . . . . . . . . . . . . . . . . . . . . . . . . . . . . . . . . . . . . . . . . . . . . . . . . . . . 8-21
The Activity Log . . . . . . . . . . . . . . . . . . . . . . . . . . . . . . . . . . . . . . . . . . . . . . . . . . . . . . . . . . . . . . . . . . . . . . . 8-21
The Tape Log . . . . . . . . . . . . . . . . . . . . . . . . . . . . . . . . . . . . . . . . . . . . . . . . . . . . . . . . . . . . . . . . . . . . . . . . . . 8-21
The Job Log. . . . . . . . . . . . . . . . . . . . . . . . . . . . . . . . . . . . . . . . . . . . . . . . . . . . . . . . . . . . . . . . . . . . . . . . . . . . 8-22
The Report Manager . . . . . . . . . . . . . . . . . . . . . . . . . . . . . . . . . . . . . . . . . . . . . . . . . . . . . . . . . . . . . . . . . . . . 8-22
Working with Reports and Report Manager. . . . . . . . . . . . . . . . . . . . . . . . . . . . . . . . . . . . . . . . . . . . . . . . 8-22
Standard Reports . . . . . . . . . . . . . . . . . . . . . . . . . . . . . . . . . . . . . . . . . . . . . . . . . . . . . . . . . . . . . . . . . . . . 8-23
Custom Reports . . . . . . . . . . . . . . . . . . . . . . . . . . . . . . . . . . . . . . . . . . . . . . . . . . . . . . . . . . . . . . . . . . . . . 8-23
Report Categories. . . . . . . . . . . . . . . . . . . . . . . . . . . . . . . . . . . . . . . . . . . . . . . . . . . . . . . . . . . . . . . . . . . . 8-23
Scheduling Custom Report Jobs . . . . . . . . . . . . . . . . . . . . . . . . . . . . . . . . . . . . . . . . . . . . . . . . . . . . . . . . . . 8-26
Scheduling a Custom Report from Report Manager . . . . . . . . . . . . . . . . . . . . . . . . . . . . . . . . . . . . . . 8-27
Scheduling a Custom Report from the Job Scheduler Wizard . . . . . . . . . . . . . . . . . . . . . . . . . . . . . . 8-27
Creating Custom Reports with Report Writer . . . . . . . . . . . . . . . . . . . . . . . . . . . . . . . . . . . . . . . . . . . . . . 8-27
Generating Reports for Multiple BrightStor ARCserve Backup Servers. . . . . . . . . . . . . . . . . . . . . . . . . 8-29
Running a BAB for Laptops & Desktops Session Details Report. . . . . . . . . . . . . . . . . . . . . . . . . . . . . . . 8-29
Using BrightStor Portal for Reporting . . . . . . . . . . . . . . . . . . . . . . . . . . . . . . . . . . . . . . . . . . . . . . . . . . . . . . . . 8-30
The Unicenter Monitoring Agent . . . . . . . . . . . . . . . . . . . . . . . . . . . . . . . . . . . . . . . . . . . . . . . . . . . . . . . . . . . . 8-31
The Diagnostic Utility. . . . . . . . . . . . . . . . . . . . . . . . . . . . . . . . . . . . . . . . . . . . . . . . . . . . . . . . . . . . . . . . . . . . . . 8-32
Diagnostic Utility Components . . . . . . . . . . . . . . . . . . . . . . . . . . . . . . . . . . . . . . . . . . . . . . . . . . . . . . . . 8-32
Creating the Express Mode Report . . . . . . . . . . . . . . . . . . . . . . . . . . . . . . . . . . . . . . . . . . . . . . . . . . . . . 8-33
Reviewing the Report . . . . . . . . . . . . . . . . . . . . . . . . . . . . . . . . . . . . . . . . . . . . . . . . . . . . . . . . . . . . . . . . 8-37
Chapter 9: Administering the Backup Server
BrightStor ARCserve Backup Engines . . . . . . . . . . . . . . . . . . . . . . . . . . . . . . . . . . . . . . . . . . . . . . . . . . . . . . . . . 9-1
Engine Status . . . . . . . . . . . . . . . . . . . . . . . . . . . . . . . . . . . . . . . . . . . . . . . . . . . . . . . . . . . . . . . . . . . . . . . . . . . 9-2
eTrust Antivirus. . . . . . . . . . . . . . . . . . . . . . . . . . . . . . . . . . . . . . . . . . . . . . . . . . . . . . . . . . . . . . . . . . . . . . . . . 9-3
INODIST Utility . . . . . . . . . . . . . . . . . . . . . . . . . . . . . . . . . . . . . . . . . . . . . . . . . . . . . . . . . . . . . . . . . . . . . . 9-3
Updating Virus Signatures . . . . . . . . . . . . . . . . . . . . . . . . . . . . . . . . . . . . . . . . . . . . . . . . . . . . . . . . . . . . . 9-8
Configuring the BrightStor ARCserve Backup Engines . . . . . . . . . . . . . . . . . . . . . . . . . . . . . . . . . . . . . . . . . 9-10
Configuring the Job Engine . . . . . . . . . . . . . . . . . . . . . . . . . . . . . . . . . . . . . . . . . . . . . . . . . . . . . . . . . . . . . . 9-10
Configuring the Tape Engine. . . . . . . . . . . . . . . . . . . . . . . . . . . . . . . . . . . . . . . . . . . . . . . . . . . . . . . . . . . . . 9-12
Message Log Options . . . . . . . . . . . . . . . . . . . . . . . . . . . . . . . . . . . . . . . . . . . . . . . . . . . . . . . . . . . . . . . . 9-12
General Options . . . . . . . . . . . . . . . . . . . . . . . . . . . . . . . . . . . . . . . . . . . . . . . . . . . . . . . . . . . . . . . . . . . . . 9-13
Setting an Alternate Log Path Entry . . . . . . . . . . . . . . . . . . . . . . . . . . . . . . . . . . . . . . . . . . . . . . . . . . . . 9-14
Configuring the Database Engine . . . . . . . . . . . . . . . . . . . . . . . . . . . . . . . . . . . . . . . . . . . . . . . . . . . . . . . . . 9-15
Configuring Alert . . . . . . . . . . . . . . . . . . . . . . . . . . . . . . . . . . . . . . . . . . . . . . . . . . . . . . . . . . . . . . . . . . . . . . 9-16
Log Configuration . . . . . . . . . . . . . . . . . . . . . . . . . . . . . . . . . . . . . . . . . . . . . . . . . . . . . . . . . . . . . . . . . . . . . . 9-17
Additional Server Admin Functions . . . . . . . . . . . . . . . . . . . . . . . . . . . . . . . . . . . . . . . . . . . . . . . . . . . . . . . . . 9-17
Changing the BrightStor ARCserve Backup System Account . . . . . . . . . . . . . . . . . . . . . . . . . . . . . . . . . 9-17
Supporting Multiple NIC Cards . . . . . . . . . . . . . . . . . . . . . . . . . . . . . . . . . . . . . . . . . . . . . . . . . . . . . . . . . . 9-18
BrightStor ARCserve Backup Domains . . . . . . . . . . . . . . . . . . . . . . . . . . . . . . . . . . . . . . . . . . . . . . . . . . . . . . . 9-19
xii Administrator Guide
Page 13

Domain Management. . . . . . . . . . . . . . . . . . . . . . . . . . . . . . . . . . . . . . . . . . . . . . . . . . . . . . . . . . . . . . . . . . . . . . .9-20
Configuring Windows-powered NAS and Storage Server 2003 Devices . . . . . . . . . . . . . . . . . . . . . . . . . . .9-20
Accessing BrightStor ARCserve Backup through the Windows-powered NAS Device . . . . . . . . . . . .9-21
BrightStor ARCserve Backup and Windows-powered NAS Device Configurations . . . . . . . . . . . . . .9-22
Backup Devices Connected Directly to Windows-powered NAS Devices . . . . . . . . . . . . . . . . . . . .9-22
Backup Devices Connected to BrightStor ARCserve Backup Server . . . . . . . . . . . . . . . . . . . . . . . . .9-23
Backup Devices Shared between BrightStor ARCserve Backup and Windows-powered NAS . . .9-23
Working with the Discovery Configuration. . . . . . . . . . . . . . . . . . . . . . . . . . . . . . . . . . . . . . . . . . . . . . . . . . . .9-24
Understanding Discovery Service . . . . . . . . . . . . . . . . . . . . . . . . . . . . . . . . . . . . . . . . . . . . . . . . . . . . . . . . . . . .9-25
IP Subnets/Windows Domains Discovery . . . . . . . . . . . . . . . . . . . . . . . . . . . . . . . . . . . . . . . . . . . . . . . . . .9-25
Configuration Options with the Discovery Configuration . . . . . . . . . . . . . . . . . . . . . . . . . . . . . . . . . . . .9-26
Enabling Discovery Using TCP/IP Subnet Sweep. . . . . . . . . . . . . . . . . . . . . . . . . . . . . . . . . . . . . . . . .9-26
Configuring Your Firewall to Optimize Communication . . . . . . . . . . . . . . . . . . . . . . . . . . . . . . . . . . . . . . . .9-29
Understanding the Ports Configuration File . . . . . . . . . . . . . . . . . . . . . . . . . . . . . . . . . . . . . . . . . . . . . . . .9-30
Modifying the Ports Configuration File . . . . . . . . . . . . . . . . . . . . . . . . . . . . . . . . . . . . . . . . . . . . . . . . . . . .9-31
Additional Resources . . . . . . . . . . . . . . . . . . . . . . . . . . . . . . . . . . . . . . . . . . . . . . . . . . . . . . . . . . . . . . . . . . . .9-32
Examples. . . . . . . . . . . . . . . . . . . . . . . . . . . . . . . . . . . . . . . . . . . . . . . . . . . . . . . . . . . . . . . . . . . . . . . . . . . .9-34
Considerations. . . . . . . . . . . . . . . . . . . . . . . . . . . . . . . . . . . . . . . . . . . . . . . . . . . . . . . . . . . . . . . . . . . . . . .9-36
Chapter 10: Using the Alert Manager
Components. . . . . . . . . . . . . . . . . . . . . . . . . . . . . . . . . . . . . . . . . . . . . . . . . . . . . . . . . . . . . . . . . . . . . . . . . . . . . . .10-2
The Alert Manager . . . . . . . . . . . . . . . . . . . . . . . . . . . . . . . . . . . . . . . . . . . . . . . . . . . . . . . . . . . . . . . . . . . . . . . . .10-2
Configuring the Alert Manager . . . . . . . . . . . . . . . . . . . . . . . . . . . . . . . . . . . . . . . . . . . . . . . . . . . . . . . . . . .10-3
Ports. . . . . . . . . . . . . . . . . . . . . . . . . . . . . . . . . . . . . . . . . . . . . . . . . . . . . . . . . . . . . . . . . . . . . . . . . . . . . . . .10-3
Broadcast . . . . . . . . . . . . . . . . . . . . . . . . . . . . . . . . . . . . . . . . . . . . . . . . . . . . . . . . . . . . . . . . . . . . . . . . . . .10-3
CA Unicenter TNG . . . . . . . . . . . . . . . . . . . . . . . . . . . . . . . . . . . . . . . . . . . . . . . . . . . . . . . . . . . . . . . . . . .10-4
Email . . . . . . . . . . . . . . . . . . . . . . . . . . . . . . . . . . . . . . . . . . . . . . . . . . . . . . . . . . . . . . . . . . . . . . . . . . . . . .10-5
NT Event Log . . . . . . . . . . . . . . . . . . . . . . . . . . . . . . . . . . . . . . . . . . . . . . . . . . . . . . . . . . . . . . . . . . . . . . .10-7
Pager . . . . . . . . . . . . . . . . . . . . . . . . . . . . . . . . . . . . . . . . . . . . . . . . . . . . . . . . . . . . . . . . . . . . . . . . . . . . . . .10-7
SMTP . . . . . . . . . . . . . . . . . . . . . . . . . . . . . . . . . . . . . . . . . . . . . . . . . . . . . . . . . . . . . . . . . . . . . . . . . . . . . .10-8
SNMP . . . . . . . . . . . . . . . . . . . . . . . . . . . . . . . . . . . . . . . . . . . . . . . . . . . . . . . . . . . . . . . . . . . . . . . . . . . . . .10-8
Trouble Ticket . . . . . . . . . . . . . . . . . . . . . . . . . . . . . . . . . . . . . . . . . . . . . . . . . . . . . . . . . . . . . . . . . . . . . . .10-9
Event Priority . . . . . . . . . . . . . . . . . . . . . . . . . . . . . . . . . . . . . . . . . . . . . . . . . . . . . . . . . . . . . . . . . . . . . . . . . .10-9
Testing the Messages . . . . . . . . . . . . . . . . . . . . . . . . . . . . . . . . . . . . . . . . . . . . . . . . . . . . . . . . . . . . . . . . . . . .10-9
Reviewing Alert Activity. . . . . . . . . . . . . . . . . . . . . . . . . . . . . . . . . . . . . . . . . . . . . . . . . . . . . . . . . . . . . . . .10-10
Contents xiii
Page 14

Appendix A: BrightStor ARCserve Backup Cluster Support
Backing Up and Restoring MSCS Nodes . . . . . . . . . . . . . . . . . . . . . . . . . . . . . . . . . . . . . . . . . . . . . . . . . . . . . . .A-2
Using BrightStor ARCserve Backup on MSCS . . . . . . . . . . . . . . . . . . . . . . . . . . . . . . . . . . . . . . . . . . . . . . . . . .A-3
BrightStor ARCserve Backup Job Failover Capability . . . . . . . . . . . . . . . . . . . . . . . . . . . . . . . . . . . . . . . .A-3
BrightStor ARCserve Backup High Availability Through Services Failover . . . . . . . . . . . . . . . . . . . . . .A-4
Manageability through Cluster Resource DLL . . . . . . . . . . . . . . . . . . . . . . . . . . . . . . . . . . . . . . . . . . . . . . .A-4
Installation Requirements for MSCS Cluster . . . . . . . . . . . . . . . . . . . . . . . . . . . . . . . . . . . . . . . . . . . . . . . . . . .A-4
Hardware Requirements . . . . . . . . . . . . . . . . . . . . . . . . . . . . . . . . . . . . . . . . . . . . . . . . . . . . . . . . . . . . . . . . .A-4
Software Requirements. . . . . . . . . . . . . . . . . . . . . . . . . . . . . . . . . . . . . . . . . . . . . . . . . . . . . . . . . . . . . . . . . . .A-5
Installing and Configuring BrightStor ARCserve Backup on a Cluster for Job Failover . . . . . . . . . . . . . . .A-5
Installing BrightStor ARCserve Backup. . . . . . . . . . . . . . . . . . . . . . . . . . . . . . . . . . . . . . . . . . . . . . . . . . . . .A-5
Installing on the Private Disks of Cluster Nodes . . . . . . . . . . . . . . . . . . . . . . . . . . . . . . . . . . . . . . . . . .A-5
Installing on Shared Disks of Cluster . . . . . . . . . . . . . . . . . . . . . . . . . . . . . . . . . . . . . . . . . . . . . . . . . . . .A-6
Configuring BrightStor ARCserve Backup for High Availability . . . . . . . . . . . . . . . . . . . . . . . . . . . . . . .A-8
Registering BrightStor ARCserve Backup with MSCS. . . . . . . . . . . . . . . . . . . . . . . . . . . . . . . . . . . . . .A-8
Registering BrightStor ARCserve Backup Registry Hive for Replication . . . . . . . . . . . . . . . . . . . . . .A-9
Sharing the BrightStor ARCserve Backup Installation Directory through MSCS . . . . . . . . . . . . . . .A-9
Moving Cluster IP Address, Cluster Name, and Shared Disk from the Temporary Group . . . . .A-10
Setting Up Dependencies Between BrightStor ARCserve Backup Groups. . . . . . . . . . . . . . . . . . . .A-10
Bring the BrightStor ARCserve Backup Cluster Group Online . . . . . . . . . . . . . . . . . . . . . . . . . . . . .A-11
Uninstalling BrightStor ARCserve Backup from a Cluster. . . . . . . . . . . . . . . . . . . . . . . . . . . . . . . . . . . .A-11
Disaster Protection for MSCS Nodes . . . . . . . . . . . . . . . . . . . . . . . . . . . . . . . . . . . . . . . . . . . . . . . . . . . . . . . . .A-12
Backing up and Restoring Applications on MSCS . . . . . . . . . . . . . . . . . . . . . . . . . . . . . . . . . . . . . . . . . . . . . .A-12
BrightStor ARCserve Backup Cluster Support FAQ . . . . . . . . . . . . . . . . . . . . . . . . . . . . . . . . . . . . . . . . . . . .A-13
Appendix B: Command Line Utilities
Available Command Line Utilities . . . . . . . . . . . . . . . . . . . . . . . . . . . . . . . . . . . . . . . . . . . . . . . . . . . . . . . . . . . . B-2
Basic Usage, Syntax, and Argument Information. . . . . . . . . . . . . . . . . . . . . . . . . . . . . . . . . . . . . . . . . . . . . . . . B-4
Authsetup . . . . . . . . . . . . . . . . . . . . . . . . . . . . . . . . . . . . . . . . . . . . . . . . . . . . . . . . . . . . . . . . . . . . . . . . . . . . . . . . . B-4
bab . . . . . . . . . . . . . . . . . . . . . . . . . . . . . . . . . . . . . . . . . . . . . . . . . . . . . . . . . . . . . . . . . . . . . . . . . . . . . . . . . . . . . . . B-5
ca_auth . . . . . . . . . . . . . . . . . . . . . . . . . . . . . . . . . . . . . . . . . . . . . . . . . . . . . . . . . . . . . . . . . . . . . . . . . . . . . . . . . . . B-5
ca_backup . . . . . . . . . . . . . . . . . . . . . . . . . . . . . . . . . . . . . . . . . . . . . . . . . . . . . . . . . . . . . . . . . . . . . . . . . . . . . . . . . B-9
ca_dbmgr . . . . . . . . . . . . . . . . . . . . . . . . . . . . . . . . . . . . . . . . . . . . . . . . . . . . . . . . . . . . . . . . . . . . . . . . . . . . . . . . B-23
ca_devmgr . . . . . . . . . . . . . . . . . . . . . . . . . . . . . . . . . . . . . . . . . . . . . . . . . . . . . . . . . . . . . . . . . . . . . . . . . . . . . . . B-27
ca_jobsecmgr . . . . . . . . . . . . . . . . . . . . . . . . . . . . . . . . . . . . . . . . . . . . . . . . . . . . . . . . . . . . . . . . . . . . . . . . . . . . . B-37
ca_log. . . . . . . . . . . . . . . . . . . . . . . . . . . . . . . . . . . . . . . . . . . . . . . . . . . . . . . . . . . . . . . . . . . . . . . . . . . . . . . . . . . . B-39
ca_merge . . . . . . . . . . . . . . . . . . . . . . . . . . . . . . . . . . . . . . . . . . . . . . . . . . . . . . . . . . . . . . . . . . . . . . . . . . . . . . . . . B-41
ca_mmo . . . . . . . . . . . . . . . . . . . . . . . . . . . . . . . . . . . . . . . . . . . . . . . . . . . . . . . . . . . . . . . . . . . . . . . . . . . . . . . . . . B-44
ca_restore . . . . . . . . . . . . . . . . . . . . . . . . . . . . . . . . . . . . . . . . . . . . . . . . . . . . . . . . . . . . . . . . . . . . . . . . . . . . . . . . B-47
ca_scan . . . . . . . . . . . . . . . . . . . . . . . . . . . . . . . . . . . . . . . . . . . . . . . . . . . . . . . . . . . . . . . . . . . . . . . . . . . . . . . . . . B-54
xiv Administrator Guide
Page 15

ca_qmgr . . . . . . . . . . . . . . . . . . . . . . . . . . . . . . . . . . . . . . . . . . . . . . . . . . . . . . . . . . . . . . . . . . . . . . . . . . . . . . . . . B-58
cabatch . . . . . . . . . . . . . . . . . . . . . . . . . . . . . . . . . . . . . . . . . . . . . . . . . . . . . . . . . . . . . . . . . . . . . . . . . . . . . . . . . . B-61
CAReports . . . . . . . . . . . . . . . . . . . . . . . . . . . . . . . . . . . . . . . . . . . . . . . . . . . . . . . . . . . . . . . . . . . . . . . . . . . . . . . B-64
pfc . . . . . . . . . . . . . . . . . . . . . . . . . . . . . . . . . . . . . . . . . . . . . . . . . . . . . . . . . . . . . . . . . . . . . . . . . . . . . . . . . . . . . . B-66
tapecopy . . . . . . . . . . . . . . . . . . . . . . . . . . . . . . . . . . . . . . . . . . . . . . . . . . . . . . . . . . . . . . . . . . . . . . . . . . . . . . . . . B-70
tapecomp . . . . . . . . . . . . . . . . . . . . . . . . . . . . . . . . . . . . . . . . . . . . . . . . . . . . . . . . . . . . . . . . . . . . . . . . . . . . . . . . B-82
Appendix C: Troubleshooting
Hardware . . . . . . . . . . . . . . . . . . . . . . . . . . . . . . . . . . . . . . . . . . . . . . . . . . . . . . . . . . . . . . . . . . . . . . . . . . . . . . . . . C-1
Possible Problems . . . . . . . . . . . . . . . . . . . . . . . . . . . . . . . . . . . . . . . . . . . . . . . . . . . . . . . . . . . . . . . . . . . . . . . C-1
Possible Resolutions . . . . . . . . . . . . . . . . . . . . . . . . . . . . . . . . . . . . . . . . . . . . . . . . . . . . . . . . . . . . . . . . . . . . . C-2
Security. . . . . . . . . . . . . . . . . . . . . . . . . . . . . . . . . . . . . . . . . . . . . . . . . . . . . . . . . . . . . . . . . . . . . . . . . . . . . . . . . . . C-3
Possible Resolutions . . . . . . . . . . . . . . . . . . . . . . . . . . . . . . . . . . . . . . . . . . . . . . . . . . . . . . . . . . . . . . . . . . . . . C-3
Open File . . . . . . . . . . . . . . . . . . . . . . . . . . . . . . . . . . . . . . . . . . . . . . . . . . . . . . . . . . . . . . . . . . . . . . . . . . . . . . . . . C-4
Possible Problems and Resolutions . . . . . . . . . . . . . . . . . . . . . . . . . . . . . . . . . . . . . . . . . . . . . . . . . . . . . . . . C-4
Tape Errors . . . . . . . . . . . . . . . . . . . . . . . . . . . . . . . . . . . . . . . . . . . . . . . . . . . . . . . . . . . . . . . . . . . . . . . . . . . . . . . C-6
Possible Problems . . . . . . . . . . . . . . . . . . . . . . . . . . . . . . . . . . . . . . . . . . . . . . . . . . . . . . . . . . . . . . . . . . . . . . . C-6
Possible Resolutions . . . . . . . . . . . . . . . . . . . . . . . . . . . . . . . . . . . . . . . . . . . . . . . . . . . . . . . . . . . . . . . . . . . . . C-7
Copying the Data to a New Tape . . . . . . . . . . . . . . . . . . . . . . . . . . . . . . . . . . . . . . . . . . . . . . . . . . . . . . . C-7
Creating a New Backup Tape . . . . . . . . . . . . . . . . . . . . . . . . . . . . . . . . . . . . . . . . . . . . . . . . . . . . . . . . . . C-7
Discovery Service . . . . . . . . . . . . . . . . . . . . . . . . . . . . . . . . . . . . . . . . . . . . . . . . . . . . . . . . . . . . . . . . . . . . . . . . . . C-7
Possible Problems . . . . . . . . . . . . . . . . . . . . . . . . . . . . . . . . . . . . . . . . . . . . . . . . . . . . . . . . . . . . . . . . . . . . . . . C-7
Possible Resolutions . . . . . . . . . . . . . . . . . . . . . . . . . . . . . . . . . . . . . . . . . . . . . . . . . . . . . . . . . . . . . . . . . . . . . C-8
Index
Contents xv
Page 16

Page 17

Chapter
Introducing BrightStor ARCserve
1
Backup
Components
BrightStor® ARCserve® Backup is a comprehensive, distributed storage
management solution for distributed and multiplatform environments. The
application can back up and restore data from all the machines on your network,
(including machines running Windows, UNIX, NetWare, and Linux) using
optional client agents. BrightStor ARCserve Backup also provides media and
device management utilities.
BrightStor ARCserve Backup offers control from one management console. It can
support small-scale and large-scale enterprise environments comprising of one
machine or many, across different platforms and organizations.
BrightStor ARCserve Backup comprises the following two main components that
work together to back up, copy, and restore your data:
■ BrightStor ARCserve Backup Manager
■ BrightStor ARCserve Backup Server
BrightStor ARCserve Backup Manager
Use the BrightStor ARCserve Backup Manager to perform tasks such as submitting
backup and restore jobs, managing your database, and searching reports. You can
install it on the same machine as the BrightStor ARCserve Backup Server or on a
different machine, such as a Windows 2000 workstation.
Note: The BrightStor ARCserve Backup Manager can display characters in other
languages. To change the language, use the Regional Options dialog (Windows
2000) or Regional and Language Options dialog (Windows XP) available on the
Control Panel. Consult your Microsoft Windows help for more information on
language settings.
Introducing BrightStor ARCserve Backup 1–1
Page 18

Functionality
BrightStor ARCserve Backup Server
The core components of BrightStor ARCserve Backup server are:
■ Job Engine—Processes your jobs at their designated date and time. It scans the
job queue for a job that is ready to run, then sends it to the appropriate handler.
■ Tape Engine—Communicates with and controls your storage devices. The
Tape Engine selects the device needed for a BrightStor ARCserve Backup job.
■ Database Engine—By default, all operations within BrightStor ARCserve
Backup are recorded by the Database Engine. This core service is responsible
for maintaining a history of:
– Files, directories, drives, and machines that BrightStor ARCserve Backup
has backed up or copied.
– Information about jobs that have been processed by BrightStor ARCserve
Backup, such as the job type, logs, the final result of a job, and the start and
end time.
– Media used by BrightStor ARCserve Backup, such as its type, its name, the
date it was first formatted, the date it expires, and the sessions on it.
Functionality
You can control BrightStor ARCserve Backup services through the Server Admin
tool.
BrightStor ARCserve Backup provides the components, functions, and utilities
required by network managers to obtain and actively manage network backups.
Start the BrightStor ARCserve Backup Manager by selecting the Manager icon
from the program group. The My First Backup tutorial opens the first time you
start the Manager. Subsequently, the Home Page appears, but you can still access
the tutorial from the Help menu. From the Home Page, you can start and access
any BrightStor ARCserve Backup function using the following navigational
features:
■ Home Page—Provides news and support that links you to tools you can use to
help solve problems with your computer. It also provides links to Quick Start,
Configuration, Wizards, and Utilities.
■ Navigation Bar—Quickly lets you independently access the Managers,
Wizards, Utilities, and the most recently used screens. You can easily show or
hide the Navigation Bar by selecting Navigation Bar from the View menu on
the BrightStor ARCserve Backup Home Page.
1–2 Administrator Guide
■ Quick Start—Provides quick links to BrightStor ARCserve Backup Manager
functions.
Page 19

Managers
Functionality
■ Configuration—Provides access to Device Configuration, which lets you
quickly configure the backup devices on your server and to SAN
configuration. You also can access the Central Database Configuration, which
lets you designate a central server to host database information from other
backup member servers.
■ Wizards—Simplifies the most common tasks of BrightStor ARCserve Backup.
You can access the Backup, Restore, Device, Create Boot Kit, Job Scheduler,
and Diagnostic Wizards.
■ Utilities—Offers several utilities that you can use to manage your database
and media. The utilities are Recover Database, Merge, Scan, Compare, Count,
Copy, Purge, and Report Writer.
The Home Page provides quick links to BrightStor ARCserve Backup functions.
You can access the BrightStor ARCserve Backup functions from the Quick Start
menu on the Home Page, or from the Quick Start link on the Navigation Bar. The
managers that you can access include the following:
■ Job Status Manager—Monitors all pending, completed, and active jobs from
the Job Status Manager window. You can schedule pending or completed jobs,
submit new jobs, delete jobs, and stop active jobs. Log information is provided
for each completed job.
■ Backup Manager—Backs up data to media. You can schedule and configure
backups of your machines and servers. Information about each backup job
(such as the path and name of each file, as well as the media used) is logged in
the BrightStor ARCserve Backup database. Using the Backup Manager you
can:
– Specify the source (data that you want to back up) and the destination
(media) for your backup job.
– Define your backup job to back up data on computers running other
operating systems such as NetWare, UNIX, Linux, and Windows.
– Use database agents running under Windows 2000 and 2003.
■ Restore Manager—Restores data that has already been backed up by
BrightStor ARCserve Backup. Using the Restore Manager you can:
– Find all the versions of the files that were backed up.
– Specify the source and destination of the restore job.
– Perform a complete or partial restore of you data.
■ Media Pool Manager—Manages, creates, and maintains logical groupings of
media for easy identification of backups, to allow efficient scheduling of the
maintenance and recycling of your media. You can design media rotation
schemes to suit your particular archive needs.
Introducing BrightStor ARCserve Backup 1–3
Page 20

Functionality
■ Device Manager—Displays information about your storage devices and
media. It also allows you to change a drive’s compression mode, and perform
media functions such as compression, formatting, erasing, ejecting, and
retensioning. BrightStor ARCserve Backup supports a wide variety of media
including 4mm, 8mm, DLT, QIC, Iomega’s Zip or Jazz media, PDs, MO, and
WORM formats.
■ Database Manager—Displays information from the BrightStor ARCserve
Backup database, such as the jobs processed by BrightStor ARCserve Backup,
the media used by BrightStor ARCserve Backup, and the devices you are using
with BrightStor ARCserve Backup.
■ Report Manager—Generates reports from data in the BrightStor ARCserve
Backup database. Various reports include information about backup
schedules, media errors, backup devices, media pools, and media status and
policies.
■ Server Admin—Allows you to modify the BrightStor ARCserve Backup
system account and manage the core BrightStor ARCserve Backup services:
Job Engine, Tape Engine, and Database Engine. The Configuration icon allows
you to configure tasks for these services including generating an alert and
defining message logging. The Database Engine tab allows you to configure
the database pruning job.
Configuration
■ MM Admin (available only with the Enterprise Module)—Provides the tools
you need to organize tape movement to off-site storage locations and protect,
control, and manage media resources.
■ Alert Manager—Sends messages to people in your organization, using various
methods of communication, regarding events that occur during the
functioning of BrightStor ARCserve Backup.
BrightStor ARCserve Backup provides configuration tools you can use to
configure devices and backup databases. The configuration tools include:
■ Device Configuration—A tool that allows you to easily configure backup
devices, such as tape and optical libraries, RAID devices, removable drives,
virtual libraries, and File System Devices (FSD). It also lets you enable or
disable devices for Removable Storage Management (RSM).
■ SAN Configuration—A tool that lets you configure the relationship between
the Primary and Distributed BrightStor ARCserve Backup servers.
■ Central Database Configuration—This easy-to-use console lets you configure
the various BrightStor ARCserve Backup host database systems.
1–4 Administrator Guide
Page 21

Wizards
Functionality
BrightStor ARCserve Backup provides you with wizards to simplify the most
common tasks of BrightStor ARCserve Backup. You can the BrightStor ARCserve
Backup wizards from the Wizards menu on the Home Page, or from the Wizards
link on the Navigation Bar. The wizards that you can access include the following:
■ Backup—Using the Backup Wizard you can easily select files that you want to
backup, the media to use, and then quickly complete the remaining steps
needed to start your backup job.
■ Restore—Provides a quick and efficient method for submitting restore jobs. It
lets you select one of two restore methods, the files you want to restore, a
destination, and restore options.
■ Device—Displays the devices you have installed on a local or remote system
and lets you easily format, erase, compress, and eject your storage media.
■ Create Boot Kit—Creates and updates precautionary and machine-specific
boot kits that will allow you to quickly recover your data if a disaster occurs.
Note: The Create Boot Kit wizard is available only if the BrightStor®
ARCserve
®
Backup Disaster Recovery Option is installed on your system. The
BrightStor ARCserve Backup Disaster Recovery Option is sold separately.
■ Job Scheduler—Provides an easy way to quickly package and submit jobs that
■ Diagnostic—Gathers and packages various BrightStor ARCserve Backup
Utilities
BrightStor ARCserve Backup offers several utilities that you can use to manage
files. You can access the Utilities from the Navigation Bar on the Home Page. These
utilities are described in the following section. For more information about the
options available for each utility, see the online help.
Recover Database Utility
Each time you run a backup job, BrightStor ARCserve Backup records information
in its databases about the machines, directori es, a nd fil es tha t hav e bee n back ed up,
and the media that was used. This allows you to locate files whenever you need to
restore them. This database information is backed up by default whenever you
back up your BrightStor ARCserve Backup home directory. Alternatively, you can
choose to backup the database files in every backup job regardless of whether the
BrightStor ARCserve Backup home directory is selected for backup.
you would typically submit from the Command Prompt window. In addition
to the commands associated with BrightStor ARCserve Backup, you can use
this wizard for virtually any executable.
system logs, which may be necessary for troubleshooting.
Note: The Diagnostic Wizard appears only if you install the Diagnostic Utility.
Introducing BrightStor ARCserve Backup 1–5
Page 22

Functionality
The Recover Database utility lets you restore this information to your BrightStor
ARCserve Backup database, overwriting existing database files. You can use this
utility at any time that you lose your BrightStor ARCserve Backup database files,
such as after a disaster like a fire, flood, or machine crash. The advanced database
recovery options are:
■ Backup Media—Specify media options for the job.
■ Operation—Specify a date to restore the database. The database backed up on
this date will be used. If no databases were backed up on that date, BrightStor
ARCserve Backup restores the most recent database before the specified date.
■ Pre/Post—Run commands or batch files before or after the job.
■ Job Log—Determine the level of detail you want recorded in the Job Queue
Log.
■ Alert—Send messages about events in your operation.
Note: You cannot use the Recover Database option to perform a restore database
operation for a BrightStor ARCserve Backup server using SQL as the database.
You must install the BrightStor
®
ARCserve® Backup Agent for Miscrosoft SQL
Server option on the server and backup and restore your BrightStor ARCserve
Backup database as you would any other SQL database.
Merge Utility
Use the Merge Utility option when you want to restore detailed session
information in your BrightStor ARCserve Backup database. For example, if a
backup was created using BrightStor ARCserve Backup on a different server, you
can use Merge to get the media information into the database in the BrightStor
ARCserve Backup home directory. This will allow you to restore media backed up
from another server at the file level. This can be useful if detailed information has
been pruned from the database. (By default, detailed job information is pruned 30
days after the backup to conserve database space. This can be configured in the
Server Admin Manager.)
Note: By default, all newly merged session details are preserved for one week (7
days) in the BrightStor ARCserve Backup database, even if the newly merged
session details are older than
database pruning, see the chapter “
the prune retention time. For more information on
Administering the Backup Server.”
BrightStor ARCserve Backup provides several types of advanced merge options:
■ Backup Media—Specify media options for the job.
■ Pre/Post—Run commands or batch files before or after the job.
■ Job Log—Determine the level of detail you want recorded in the Job Queue
Log.
■ Alert—Send messages about events in your operation.
1–6 Administrator Guide
Page 23

Scan Utility
Functionality
Use the Scan Utility option when you need information about your media backup
sessions. Each source that you choose to back up is saved on media as an
individual session. You can scan a single session or an entire media. Results of the
Scan job can be seen in the Job Queue. You would need to do this if you are trying
to recover a BrightStor ARCserve Backup machine and you need to find the most
recent backup of the BrightStor ARCserve Backup database so that you can restore
it.
If you would like a Scan job to produce a detailed listing of your media contents,
use the Log All activity feature on the scan options tab. You can also use the Scan
utility if you want a list of the files that were backed up.
BrightStor ARCserve Backup provides several types of advanced scan options:
■ Backup Media—Specify media options for the job.
■ Operation—Specify some general options for the job such as to scan files with
CRC verification or to enable database recording.
■ Pre/Post—Run commands or batch files before or after the job.
Compare Utility
■ Job Log—Determine the level of detail you want recorded in the Job Queue
Log.
■ Alert—Send messages about events in your operation.
Compare the contents of a media session to files on a machine. Results of the
Compare job can be seen in the Job Queue. You could use this option after a backup
to verify that the backup copied all of the files to media without error. BrightStor
ARCserve Backup provides several types of advanced compare options:
■ Backup Media—Specify media options for the job.
■ Operation—Specify whether to enable database recording.
■ Pre/Post—Run commands or batch files before or after the job.
■ Job Log—Determine the level of detail you want recorded in the Job Queue
Log.
■ Alert—Send messages about events in your operation.
Introducing BrightStor ARCserve Backup 1–7
Page 24

Functionality
Count Utility
Copy Utility
Count the number of files and directories on a machine. Results of the Count job
can be seen in the Job Queue. You could use this option after a Copy job to verify
that the Copy function copied all of the files from one disk to another without
error. BrightStor ARCserve Backup provides several types of advanced count
options:
■ Operation—Specify whether to enable database recording.
■ Pre/Post—Run commands or batch files before and after the job.
■ Job Log—Determine the level of detail you want recorded in the Job Queue
Log.
■ Virus—Scan files for viruses before they are counted.
■ Alert—Send messages about events in your operation.
Allows you to copy files from one location to another. For example, you can run a
copy job on your local machine to store files and directories on another machine
that is going to be backed up to media. Copy options determine related actions that
occur during or after the copy operation:
Purge Utility
■ Retry—Specify when to retry open files and file sharing options.
■ Operation—Specify operation options and whether or not to enable database
recording.
■ Destination—Specify options for the directory structure and file conflict
resolutions.
■ Pre/Post—Run commands or batch files before or after the job.
■ Job Log—Determine the detail you want recorded in the Job Queue Log.
■ Virus—Scans files for viruses before they are copied.
■ Alert—Send messages about events in your operation.
Allows you to delete files and directories from a machine. Results can be seen in
the Job Queue. BrightStor ARCserve Backup provides several types of advanced
purge options:
■ Operation—Specify some general options for the job such as to remove
directories or enable database recording.
■ Pre/Post—Run commands or batch files before or after the job.
■ Job Log—Determine the level of detail to record in the Job Queue Log.
1–8 Administrator Guide
■ Alert—Send messages about events in your operation.
Page 25

Report Writer
Create custom reports or generate predefined reports based on backup activity for
a defined period. You can specify a query or filter report data. Generated reports
can be previewed on screen, printed, and saved in either .csv or .xml format.
Command Line
BrightStor ARCserve Backup offers command line utilities that enable direct
control over almost all operations that can be performed by a BrightStor ARCserve
Backup server via the DOS prompt. It provides an alternative method of accessing
almost all of the operations available from the BrightStor ARCserve Backup
Manager.
A full description and use of these command line utilities can be found in the
appendix “
Command Line Utilities.”
BrightStor ARCserve Backup Security
Functionality
caroot User Profile
The following sections describe BrightStor ARCserve Backup security
functionality.
BrightStor ARCserve Backup is designed with a root-level, super user profile that
provides complete control of BrightStor ARCserve Backup. This profile, referred
to as “caroot,” is set up when you install BrightStor ARCserve Backup for the first
time. You can set the password for caroot during installation or later using the
ca_auth utility.
Note: You should not leave the password blank for caroot.
The caroot user profile controls access to only the BrightStor ARCserve Backup
Manager and backup-related functions, and should not be confused with the
security required to log in to your operating system.
Introducing BrightStor ARCserve Backup 1–9
Page 26

Functionality
Equivalence
BrightStor ARCserve Backup allows you to create equivalence to caroot for any
Windows account. A user who has been granted equivalence to caroot can run all
of the command line utilities but cannot log in to the BrightStor ARCserve Backup
Home Page. Creating equivalence has the following advantages:
■ Ease of command line usage—When you create equivalence for a Windows
user, the equivalence performs an implicit login on behalf of the logged-in user
whenever a command line function requires authentication. Therefore, the
command line utilities can be run without requiring the user to enter a user
name and password each time a command is submitted.
■ Access Restriction—Although a user that is equivalent to caroot can run all of
the command line utilities, the user does not have access to the BrightStor
ARCserve Backup Manager. Access to the interface is granted only through
the caroot account or through a BrightStor ARCserve Backup user account
with the proper privileges. You cannot use an account that has only been
granted equivalency to login to the interface. To give additional BrightStor
ARCserve Backup users access to the Home Page, use the ca_auth utility.
The System Account
The BrightStor ARCserve Backup services require a valid Windows system
account that has Administrator and Backup Operator privileges on the local
machine. The services use this account to access local resources, such as the hard
drive and the local network.
You are given the option of entering a Windows system account when you first
install BrightStor ARCserve Backup. If you enter a Windows account during
installation, BrightStor ARCserve Backup automatically grants this account
Administrator and Backup Operator privileges. If you select Skip during
installation, you must enter a valid Windows system account using the BrightStor
ARCserve Backup Server Administrator and grant it the required privileges
manually.
You can change the system account information at any time using the BrightStor
ARCserve Backup Server Administrator or the bconfig.exe utility.
1–10 Administrator Guide
Page 27

caroot, Equivalency, and the System Account
Do not confuse the caroot user profile with the BrightStor ARCserve Backup
System Account. The caroot user profile is used to control access to the BrightStor
ARCserve Backup Manager and its related backup functions; the system account
provides the security privileges needed by BrightStor ARCserve Backup services
to operate on the local machine.
Although the System Account and the caroot user profile perform different
functions, in order for BrightStor ARCserve Backup to run all of its jobs
successfully, you must grant the System Account equivalency to caroot. For
example, if the System Account is named BackupAdmin, and the local machine
name is BAB01, use the following ca_auth command to give the account
equivalency to caroot:
ca_auth -equiv add BackupAdmin BAB01 caroot caroot
For more information on security, see the chapter “Administering the Backup
Server, the appendix “Command Line Utilities,” or the online help.
Functionality
caroot_password
Enterprise Level Password Management Utility
When the user password changes, every job in the job queue must be modified to
reflect the change. A utility is provided to make the global user password changes
for all the jobs in the Job Queue for the local BrightStor ARCserve Backup Server
(default).
Syntax
ca_jobsecmgr [server arguments] <current security> <new security>
Options
The following server arguments are supported:
Argument Description
-s server Specifies the server to change the
-d Specifies to change the password on all
password on.
servers in the BrightStor ARCserve
Backup domain.
Introducing BrightStor ARCserve Backup 1–11
Page 28

BrightStor ARCserve Backup Enterprise Module
The following security options are supported:
Option Description
-u username Specifies the original BrightStor
-p password Specifies the original BrightStor
ARCserve Backup user name.
ARCserve Backup password.
-np newpassword
[-nu newusername]
Specifies the new password or new user
name (optional) in the BrightStor
ARCserve Backup domain.
Centralized Cross-platform Management
BrightStor ARCserve Backup offers Cross-platform Management, which simplifies
administration in cross-platform environments, including BrightStor ARCserve
Backup for NetWare Version 9.0 and r11.1, and BrightStor ARCserve Backup for
Linux Version 9.0, r11, and r11.1, backup servers, and remote environments. Its
advanced management functionality enables backup administrators to centrally
monitor and administer consistent backup policies throughout the environment.
From one centralized console, administrators can back up, copy, and restore any
machine in your network. They can also group preferred BrightStor ARCserve
Backup servers, view job status, monitor active jobs, view Activity Logs,
administer various BrightStor ARCserve Backup host database systems, and
customize reports.
BrightStor ARCserve Backup Enterprise Module
The BrightStor® ARCserve® Backup Enterprise Module is a separately-installed
component that enables the following advanced features:
■ Multiplexing up to 32 streams
■ Multistreaming
■ The Media Management Administrator
■ Dynamic Device Sharing between the BrightStor
■ Multistriping for the BrightStor
1–12 Administrator Guide
Area Network (SAN) Option and the BrightStor
NAS Option.
®
ARCserve® Backup Agent for Microsoft SQL
Server.
®
ARCserve® Backup Storage
®
ARCserve® Backup NDMP
Page 29

In addition, the BrightStor ARCserve Backup Enterprise Module is a prerequisite
for the following advanced agents and options:
■ BrightStor
■ BrightStor
■ BrightStor
HDS Snap-Shot
■ BrightStor
HP-XP Snap-shot
■ BrightStor
Note: For more information on advanced agents and options, see the
corresponding agent and option guides.
Product Integration
Product Integration
®
ARCserve® Backup Enterprise Option for IBM 3494
®
ARCserve® Backup Enterprise Option for StorageTek ACSLS
®
ARCserve® Backup Enterprise Option for Microsoft SQL Using
®
ARCserve® Backup Enterprise Option for Microsoft SQL Using
®
ARCserve® Backup Client for VSS Software Snap-Shot
The following sections include information on the products that BrightStor
ARCserve Backup offers integration with.
BrightStor ARCserve Backup for Laptops & Desktops
BrightStor ARCserve Backup offers integration with BrightStor® ARCserve
Backup for Laptops & Desktops (formerly BrightStor® Mobile Backup). The
product is a policy-based solution that provides continuous, intelligent backup of
data from both desktop and laptop computers. It can back up all the important
data on your company's laptops, remote workstations, and other computers that
are frequently disconnected from the network. However, even after this data has
been backed up, the BrightStor ARCserve Backup for Laptops & Desktops server
itself is still vulnerable to failure. By using BrightStor ARCserve Backup to back up
your BrightStor ARCserve Backup for Laptops & Desktops data to media, you can
protect yourself against the possibility of a disaster on your BrightStor ARCserve
Backup for Laptops & Desktops server. To back up your BrightStor ARCserve
Backup for Laptops & Desktops data, the BrightStor ARCserve Backup Agent for
Windows must be installed on the computer running the BrightStor ARCserve
Backup for Laptops & Desktops Server, even if the server is the local computer. For
information on how to back up and restore BrightStor ARCserve Backup for
Laptops & Desktops data using BrightStor ARCserve Backup, see
BrightStor ARCserve Backup for Laptops & Desktops Data in the chapter “Backing
Up Your Data” and Restoring BrightStor ARCserve Backup for Laptops &
Desktops Data in the chapter “Restoring Data.”
®
Backing Up
Introducing BrightStor ARCserve Backup 1–13
Page 30

Product Integration
BrightStor Portal Integration
BrightStor ARCserve Backup installs BrightStor® Portal iGateway and iSponsor by
default. This facilitates communication between BrightStor Portal and BrightStor
ARCserve Backup, allowing you to collect information from BrightStor ARCserve
Backup and manage it using BrightStor Portal. BrightStor Portal lets you view this
information from any web browser, which allows backup administrators to make
policy-based decisions without installing the BrightStor ARCserve Backup
Manager on their local machines. For more information on BrightStor Portal, see
the BrightStor Portal documentation.
eTrust Antivirus
BrightStor ARCserve Backup provides the scanning and curing components of
eTrust™ Antivirus, Computer Associates premier anti-virus engine to protect
your data.
Note: BrightStor ARCserve Backup provides only the scanning and curing
components. It does not provide a full install of eTrust Antivirus.
For more information about eTrust Antivirus integration, see eTrust Antivirus in
the chapter “Administering the Backup Server.”
Microsoft Management Console Integration
If you are using Windows XP, 2000, or 2003, BrightStor ARCserve Backup
seamlessly integrates with Microsoft Management Console. This allows you to
customize your access to BrightStor ARCserve Backup. Using Microsoft
Management Console, you can create shortcuts so that you can quickly open the
powerful BrightStor ARCserve Backup components you need rather than
accessing them via the program group. See the BrightStor ARCserve Backup Getting
Started for more information on how to integrate with Microsoft Management
Console.
1–14 Administrator Guide
Page 31

Preferences
Global Settings
Preferences
To access the BrightStor ARCserve Backup Preferences dialog, from the manager
windows select View and select Preferences from the menu bar.
You can set the following preferences:
■ Set Job Queue Refresh Rate to—Specify a time, in seconds, for periodic update
of the Job Status Manager.
■ Set Device Manager Refresh Rate to—Specify a time for periodic update of the
Device Manager.
■ Set Animated Speed to—Specify a speed at which the tape bitmap will rotate
if animation is selected for the Device or Backup Manager.
■ Show Removable Drives—This will display removable drives within the tree
view. For example, this will display a floppy drive under My Computer.
■ Show CDROM Drives—This will display CD ROM drives under My
Computer within the tree view.
■ Show Leaf Nodes—This will display all leaf nodes within the tree view. This
means that files will be displayed under directories and that media will be
displayed beneath drives.
■ Auto Start All Engines—The appropriate BrightStor ARCserve Backup
engines will start automatically when a manager is used.
■ Show Registry —This will display the registry file in order to select for a
backup.
■ Default Manager—The appropriate BrightStor ARCserve Backup Manager
will start automatically when BrightStor ARCserve Backup is loaded.
Introducing BrightStor ARCserve Backup 1–15
Page 32

Preferences
Library Filter
This feature applies only to library devices, and only affects those views in
BrightStor ARCserve Backup in which a device or a group hierarchy is displayed
(for example, in the Backup Manager under the Destination tab, or in the Device
Manager view.) By default, none of the options are selected, and there are no
default values for any of the choices.
Applying a filter can significantly reduce the amount of data that you have to deal
with at one time, and is recommended for use with large libraries.
The library filter allows the following options:
■ Show Write Protected Media in Format / Erase dialogs—Select this option to
view write-protected media in all Format and Erase dialogs.
■ Show Empty Slots—Select this to option to view the empty slots in the library.
■ Show Slots Between—Specify the range of slots to be displayed in the current
manager. To define the range, enter the minimum and maximum number of
slots allowed.
■ Show Blank Media—Select this option to view the blank media in the library.
■ Show Tapes Within Media Pool—Select this option to view the tapes within a
particular media pool. Wild cards (“*” and “?”) are accepted in the media pool.
■ Show Tapes Matching Serial #—Select this option to view the tapes that match
a certain serial number. Wild cards (“*” and “?”) are accepted in the serial
number.
1–16 Administrator Guide
Page 33

Integrating with Unicenter NSM
BrightStor ARCserve Backup integrates with the WorldView and Workload
Management components of Unicenter
(NSM) (formerly known as Unicenter
information on integration with each of these components.
WorldView Integration
The WorldView Integration component supports Unicenter® NSM and Unicenter
CA Common Services™ (CCS) (formerly known as Unicenter
Requirements
To integrate with WorldView, the following components are required:
■ Unicenter NSM or CCS
■ BrightStor ARCserve Backup
Integrating with Unicenter NSM
®
Network and Systems Management
®
TNG). The following sections include
®
TNG framework).
■ BrightStor ARCserve Backup Unicenter Integration Option
Note: You must install BrightStor ARCserve Backup Unicenter Integration on the
same computer that has the Unicenter WorldView components installed.
Creating Objects and View
To integrate with WorldView, you must run the Object Creation program. The
Object Creation program discovers BrightStor ARCserve Backup servers on the
network and creates BrightStor ARCserve Backup objects in the Unicenter NSM
repository. It creates these objects under each BrightStor ARCserve Backup
server's Unispace. The Object Creation program also creates a business process
view called BrightStor ARCserve Backup View, which represents a view of all
BrightStor ARCserve Backup objects.
Note: Run the Unicenter Auto Discovery program prior to running the Object
Creation program. If any new servers have been installed or the repository was
rebuilt, Unicenter Auto Discovery discovers machines and synchronizes
BrightStor ARCserve Backup servers on the network and objects in the repository.
However, the discovery program cannot discover BrightStor ARCserve Backup
UNIX on subnets not containing any Windows NT, Windows 2000, Windows
2003, and Windows XP machines. To discover these machines, you must specify
the subnet containing the BrightStor ARCserve Backup UNIX machines you want
to discover. To do this, use the DSCONFIG.EXE utility located in the BrightStor
ARCserve Backup home directory. After specified, click the Discover Now button
to discover the BrightStor ARCserve Backup Object Creation Utility.
Introducing BrightStor ARCserve Backup 1–17
Page 34

Integrating with Unicenter NSM
To use the Object Creation program:
Note: If you are working with a remote repository, see Working with a Remote
Repository.
1. From the BrightStor ARCserve Backup program group, select Object Creation.
2. If you want to delete all BrightStor ARCserve Backup objects in the repository
before creating new ones, select Delete existing objects. This allows you to
synchronize BrightStor ARCserve Backup servers on the network and
BrightStor ARCserve Backup objects in the repository. If you do not select this,
the program adds new BrightStor ARCserve Backup objects and updates
existing ones if necessary.
3. Click Start to proceed. When you are asked to sign on to the repository, enter
the repository user ID and password, and then click OK.
4. Either wait until the process completes or click Stop to abort the operation.
5. Click Start to re-start or Close to exit the program.
Note: The setup program also creates BrightStor ARCserve Backup class
definitions in the Unicenter object repository. If you rebuild the repository, all
BrightStor ARCserve Backup class definitions will be removed. To recreate
class definitions, re-install the program or run the CSTNGCLS.EXE utility. The
CSTNGCLS.EXE utility is located in TNGWV\BIN directory (TNGFW\BIN if
you are running CCS).
Working with a Remote Repository
By default, the Object Creation program creates BrightStor ARCserve Backup
objects in the local Unicenter repository. If the local WorldView is set up to work
with a repository on a remote machine, the Object Creation program requires an
additional parameter. To enter this parameter, run the Object Creation program
from a command prompt and, from the BrightStor ARCserve Backup home
directory, enter:
CSTNGX.EXE /R REPOSITORY_NAME
or
CSTNGX.EXE /R
If you do not specify the repository name with “/R” and click Start, a dialog
appears prompting you to enter an available repository.
Note: CCS does not support remote repository configuration.
1–18 Administrator Guide
Page 35

Unicenter Notification
BrightStor ARCserve Backup offers Alert Manager, which supports Unicenter
Notification. Using Alert Manager, you can send all events to the Unicenter Event
Manager Console and WorldView repository. For more information on using the
Alert Manager with Unicenter, see the chapter “
Note: The Alert Notification Service must be running to send events to the
Unicenter Event Management Console and WorldView repository.
Managing BrightStor ARCserve Backup with Unicenter
Using the Unicenter 2D or 3D Map, you can see the BrightStor ARCserve Backup
View and BrightStor ARCserve Backup Objects. When you right-click an object,
the context menu opens. From the context menu, you can launch the Job Status
Manager, BrightStor ARCserve Backup Wizard, Restore Wizard, Device Wizard,
and the BrightStor ARCserve Backup Manager.
Integrating with Unicenter NSM
Using the Alert Manager. ”
Workload Management Integration
BrightStor ARCserve Backup integrates with Workload Management when you
submit a backup job from the command line using the ca_backup.exe
-waitForJobStatus, ca_restore.exe -waitForJobStatus, ca_merge.exe
-waitForJobStatus, ca_scan.exe -waitForJobStatus, ca_qmgr.exe -waitForJobStatus,
and cabatch.exe utilities. These utilities provide automation by using the /J
(returns the job return code) and /W (wait for job completion) switches. When you
use these utilities, BrightStor ARCserve Backup will wait until the operation is
completed, and then exit with a return code that indicates the success or failure of
the job. For more information on ca_backup, ca_restore, ca_merge, ca_scan,
ca_qmgr, and cabatch, see the appendix “
cabatch Utility.
To integrate with Workload Management:
1. From the Command Prompt, enter caugui settings.
2. Click the Options tab on the right-hand side of the notebook.
3. Click the Workload Management tab on the bottom of the notebook.
4. Enter Y in the Submit jobs on behalf of another user field.
5. From the Control Panel, select Administrative Tools, Services. When the
Services dialog displays, highlight CA-Unicenter, right-click and select Stop.
Then, right-click CA-Unicenter again and select Start.
Command Line Utilities.” Also, see The
6. Enter a Job Set.
Introducing BrightStor ARCserve Backup 1–19
Page 36

Backing up and Restoring Virtual Machine Environments
7. Enter a Job with the following detail on the Submission Run-As tab:
■ Filename
■ User
■ Domain
■ Password
8. Demand Job.
Backing up and Restoring Virtual Machine Environments
BrightStor ARCserve Backup supports backup and restore operations in a virtual
environment where a Linux platform is the guest operating system, and a
Windows platform is the operating system hosting the virtual environment. With
this feature you can back up and restore VMware host partitions by using
BrightStor
®
ARCserve® Backup Client Agents.
If you install the Linux client agent on a Linux virtual machine, BrightStor
ARCserve Backup can back up and restore files, directories, and volumes on the
local Linux virtual machine.
If you need more information about using VMware Workstation, see the
application’s online help system.
Configuration Requirements
To use this functionality, your system must meet the following environmental
conditions:
■ The system hosting the virtual environment is an Intel-based processor
running a Windows operating system, such as Windows 2000 Server.
■ VMware Workstation 4.0 is installed on the system hosting the virtual
environment.
■ A Linux-based operating system is installed on the VMware environment.
1–20 Administrator Guide
Page 37

Backing Up a Guest Operating System
The process for backing up a guest operating system is similar to that of backing
up any other client agent. However, before you can back up a guest operating
system, you must perform the following preconfiguration tasks on the machine
hosting the VMware environment:
■ Install the BrightStor ARCserve Backup Client Agents (Windows or Linux) on
each guest operating system.
■ Install the BrightStor ARCserve Backup application agent corresponding to
the application that you want to protect on each guest operating system. For
example, if you want to protect Microsoft SQL Server data, you must install
the BrightStor
For more information about installing BrightStor ARCserve Backup Client Agents,
or any other BrightStor ARCserve Backup application agent, see the BrightStor
ARCserve Backup Getting Started.
For more information about backing up data, see the chapter Backing Up Data.
®
ARCserve® Backup Agent for Microsoft SQL Server.
Backing up and Restoring Virtual Machine Environments
Backing Up the Host Operating System
The process for backing up a host operating system is similar to that of backing up
any other client agent. However, before you can back up a host operating system,
you must install the appropriate BrightStor ARCserve Backup client agent
(Windows or Linux) on the host operating system.
To ensure the highest level of data protection in VMware environments, you
should perform the following tasks:
■ Backup the host operating system after installing the client agents and
application agents on the guest operating systems.
■ Suspend the virtual machine operating systems while you are backing up the
host operating system.
Note: Although you should back up the host operating system on a regular
basis, it is not necessary to back up the host operating system every time you
run a backup job on the guest operating systems.
For more information about backing up data, see the chapter Backing Up Data.
Introducing BrightStor ARCserve Backup 1–21
Page 38

The cabatch Utility
Restoring the Guest Operating System
The process required to restore a guest operating system is similar to that of
restoring any other client agent. For more information about restoring data, see the
chapter
Restoring Data.
Recovering the Host Operating System From a Disaster
The following list describes the guidelines that you should follow to recover a host
operating system from a disaster. These guidelines assume that you installed the
appropriate client and application agents on the host operating system.
To recover a guest operating system from a disaster, perform the following tasks:
■ Recover the guest operating system and install the client agent.
■ Restore the guest operating system’s data.
■ Start the host operating system.
■ Recover the data corresponding to each guest operating system by restoring
the client and application agent.
The cabatch Utility
The cabatch Utility is a job management tool that allows you to submit and delete
jobs in local or remote BrightStor ARCserve Backup job queues from the command
line. You can also use the cabatch utility to modify the execution times of jobs in
these queues. You can use job scripts created in the BrightStor ARCserve Backup
Manager or in a text file created using the cabatch Job Information Template in the
BrightStor ARCserve Backup home directory.
For more information on the cabatch utility, see the appendix “Command Line
Utilities.”
1–22 Administrator Guide
Page 39

Chapter
2
Planning
Protecting your data and managing your backup storage is fundamentally a policy
issue rather than a technical problem. Technology can implement policy, but it
cannot tell you what your policy should be.
Before you can use BrightStor ARCserve Backup software effectively, you need to
analyze your organization’s data storage requirements. You need to do the
following:
■ Understand how your organization’s data resources are used.
■ Understand how security and availability at any given time can affect your
corporation’s bottom line.
■ Develop a comprehensive, high-level storage plan before you purchase
additional hardware or configure BrightStor ARCserve Backup.
After you have a clear idea of your storage needs, this chapter can help you to
develop a comprehensive implementation plan that allows for:
■ Fast recovery of user-deleted files and directories.
■ Centralized, single-point backup administration for networked systems.
■ Backup operations that do not interfere significantly with normal business
operations.
■ Adequate quantities of media and adequate numbers of devices for your
needs.
■ Full recovery from catastrophic data loss.
Planning 2–1
Page 40

Assessing Basic Storage Requirements
Assessing Basic Storage Requirements
To determine your need for vault space, storage hardware, and storage media, you
have to translate your high-level plan into a set of concrete requirements. You need
to decide:
■ How much you have to spend on media, hardware, and network
improvements?
■ How much data you really need to protect?
■ When can you run backups without interfering with other work?
■ How much traffic your network can handle during backup periods?
■ How long you can wait for an average file or file system to be restored
following a data loss?
The following sections discuss these issues in more detail.
How Big is Your Budget?
Sometimes it pays to stress the obvious early on in the planning of a major project:
each of the parameters discussed in this chapter comes with a price tag attached. If
you need speed, you need a faster, higher-bandwidth network and more and faster
backup devices. Both command premium prices.
To meet your speed or data security requirements, you may need to buy more
media. Media elements are surprisingly expensive, particularly for newer and
faster backup devices.
You need to decide how much your organization can afford:
■ To spend on a backup and recovery solution
■ To lose in lost data and staff time
Then, do the following:
■ Decide what you are prepared to do in order to keep both kinds of costs in
bounds.
■ Decide whether performance or economy is your primary concern.
■ Evaluate the trade-offs discussed below in light of this initial decision.
2–2 Administrator Guide
Page 41

How Much Data are You Backing Up?
The more data you have, the more time, hardware, media, and network
bandwidth you require.
You need to decide:
■ Whether you need to back up user data only.
■ Whether you must also include system configurations and installed
applications.
■ Come up with a rough, total size for the data that you must back up, allowing
a reasonable margin for growth based on past experience in your organization.
How Much Time Do You Have?
As well as the amount of data that you have to back up, your infrastructure and
management requirements will depend on the time that is available for backup
operations in any given period. Ask yourself the following questions:
Assessing Basic Storage Requirements
■ Can you run backups during non-working hours, at night or on weekends?
■ Do you have to run backups concurrently with normal business operations
because your network is in use round the clock?
Identify the blocks of time that are available during the day and the week. If your
organization shuts down for any long periods during the month or year, you
might consider these times as well.
What is Your Infrastructure Like?
If you have not already done so, you should familiarize yourself with the
hardware, network, and site configuration that your backup and recovery plan
supports. You should know:
■ The numbers and types of computers and workstations you need to back up.
■ The identities of computers that have media libraries or devices attached
(these are the BrightStor ARCserve Backup servers).
■ The type of SCSI or fiber cabling connecting each library to its server and the
transfer rate of the cabling.
■ The type of library on each server.
■ The type of devices in each library and their transfer rate.
■ The degree of data compression that you plan to use, if any.
■ The types and capacities of your network, subnets, routers, and so on.
Planning 2–3
Page 42

Defining Data-transfer Requirements
Defining Data-transfer Requirements
The overall data transfer rate for your backup and recovery system sets the amount
of time required for storage operations. You have to balance your backup window,
backup data, and recovery speed requirements against the capabilities of your
existing infrastructure and the budgetary constraints of your organization.
What is Your Basic Data-transfer Requirement?
After you have quantified the amount of data that you have and the times when
you can back it up, you can roughly estimate the minimum data transfer rate that
you must achieve to fully back up the data in the allotted time. Use this
requirement as a starting point for the decisions you make later in this chapter.
To calculate a rough, minimum transfer rate, divide the amount of data by the
amount of time available to back up the data:
databackedup ÷ backup_window = required_rate
For example, if you have 1 Terabyte to back up and 5 hours available each night
and you intend to back up everything in one session, you need to achieve a rate of
200 GB per hour.
What is the Data-transfer Rate of Your Backup Hardware?
Your backup hardware is unlikely to be a limiting factor in reaching your target
data transfer rate. Most devices are very fast. However, you should evaluate
hardware speed at the planning stage. At a minimum, you must have enough
hardware, or fast enough hardware, to write your data to storage media within the
time allowed. Smaller numbers of fast devices or larger numbers of slower devices
can often achieve the same total throughput. Use the information that follows to
estimate the aggregate data transfer rate for your hardware.
SCSI or Fibre Interfaces
No device is faster than its connection to its data source. Current backup devices
connect using standard SCSI or fibre interfaces. The following table lists the
common varieties.
Version Bus Width Approximate Maximum Data-transfer
Rate
2–4 Administrator Guide
Wide Ultra SCSI 16 bits 40 MB/seconds=144 GB/hour
Ultra2 SCSI 8 bits 40 MB/seconds=144 GB/hour
Page 43

Defining Data-transfer Requirements
Version Bus Width Approximate Maximum Data-transfer
Rate
Wide Ultra2 SCSI 16 bits 80 MB/seconds=288 GB/hour
Ultra 160 SCSI 16 bits 160 MB/seconds=576 GB/hour
Fibre Channel 1 GB 100 MB/seconds=360 GB/hour
Fibre Channel 2 GB 200 MB/seconds=720 GB/hour
You can see that many of the SCSI interfaces and fibre interfaces will be able to
handle your requirement of 200 GB per hour. For example, if you are using a Wide
Ultra2 SCSI you can achieve 200 GB in less than an hour. Even if you are using a
slower SCSI controller you can use multiple SCSI controllers to achieve the
aggregate data transfer rate of 200 GB per hour.
Obviously, the SCSI bus or fibre interface should seldom limit your ability to
achieve your required data transfer rate. Any of these SCSI varieties could easily
meet the 40 GB per hour requirement in our example. Indeed, most could handle
the whole 200-GB job in under two hours. A Wide Ultra 160 SCSI could do it in
about 30 minutes.
Tape Drives
There are many kinds of devices. A few of the most common are listed in the
following table.
Device type Approximate Transfer rate
2:1 (compressed data)
DDS-4 6.0 MB/seconds=21.0
Maximum Capacity
(compressed data)
40 GB
GB/hour
AIT-2 12.0 MB/seconds=43.2
100 GB
GB/hour
AIT-3 31.2 MB/seconds=112.3
260 GB
GB/hour
DLT 7000 10.0 MB/seconds=36.0
70 GB
GB/hour
DLT 8000 12.0 MB/seconds=43.2
80 GB
GB/hour
Super DLT 24.0 MB/seconds=86.4
220 GB
GB/hour
Planning 2–5
Page 44

Defining Data-transfer Requirements
Device type Approximate Transfer rate
2:1 (compressed data)
Mammoth-2 24.0 MB/seconds=86.4
GB/hour
Ultrium (LTO) 30.0 MB/seconds=108.0
GB/hour
IBM 9890 20.0 MB/seconds=72.0
GB/hour
IBM 3590E 15.0 MB/seconds=54.0
GB/hour
Even though a single device may not be able to give the data transfer rate of 200
GB per hour set by our example, using multiple media devices should be able to
achieve this aggregate transfer rate. For example, if you are using Ultrium tape
drives, you need 2 tape drives to achieve 200 GB per hour, or 5 DLT 8000 drives to
achieve the same throughput.
How Much Network Bandwidth Do You Have?
Now you need to consider your network. More than any other factor, your
available network bandwidth determines the amount of data that you can
realistically transfer during a backup period. The following table compares the
performance of different types of networks. As you can see, network performance
can significantly impede large backup operations.
Maximum Capacity
(compressed data)
160 GB
200 GB
40 GB
60 GB
2–6 Administrator Guide
Network Type Theoretical
Transfer Rate
10Base-T
Ethernet
100Base-T
Ethernet
1 Gigabit
Ethernet
10 mbps =1.25
MB/seconds
100 mbps=12.5
MB/seconds
1000 mbps=125
MB/seconds
Realistic
Realistic Transfer Rate*
Throughput
40-50% 500 KB/seconds=1.8
GB/hour
80% 10 MB/seconds=36
GB/hour
70% 87.5 MB/seconds=315
GB/hour
*If you are backing up concurrently with other operations, remember that your
backup operations will not achieve the maximum, realistic transfer rate listed.
Page 45

Defining Data-transfer Requirements
Reconciling Data Transfer Requirements and Resources
If the preliminary calculations outlined in the preceding sections show that your
required data transfer rate is feasible given your existing infrastructure, you may
be able to stop here. However, preliminary calculations usually uncover conflicts
between stated requirements and available time and resources.
If minbandwidth is the amount of data that can be sent in a given time through the
narrowest, slowest bottleneck in the path from the backup source to the backup
media and if backupwindow is the time available, then the backup process is
governed by the following equation:
datatransferred = backupwindow × minbandwidth
In our example, we have a 5-hour window, fast storage devices, and 100Base-T
Ethernet. So the Ethernet LAN is our weakest link, and the following equation is
true:
datatransferred = 5 hrs × 36 GB/hour = 180 GB
Therefore, to back up 1 Terabyte of data, you have to do at least one of the
following tasks:
■ Increase the amount of time available to back up data.
■ Increase the bandwidth available at the narrowest part of the data path.
■ Reduce the size of datatransferred by backing up our 1 Terabyte in a series of
smaller, independent operations.
The following sections suggest several possible alternatives that will achieve one
or more of the above tasks.
Widening the Data Path
If you cannot decrease the amount of data that you need to move in the time
available, then a possible solution is to increase the available bandwidth. You can
do this either on the network that links data hosts to the BrightStor ARCserve
Backup server or in the hardware that stands between the server and the backup
media.
Planning 2–7
Page 46

Defining Data-transfer Requirements
Upgrading Your Network
As we have seen, the network is usually the most significant source of delays in the
enterprise-backup environment. If a faster technology is available or feasible, an
upgrade may be a good investment. For example, if we have a 100Base-T Ethernet
LAN and the same data transfer requirement as in the example we have been using
so far (200 GB per hour), we cannot get backups done in the time allowed (5 hours).
It would take approximately six times as long as we have to back everything up. A
Gigabit Ethernet network would back up everything with time to spare and would
benefit other business operations as well.
Storage Area Networks
A Storage Area Network (SAN) can improve backup performance significantly by
moving data over the high-speed fibre connections rather than the slower network
connections. In addition to the performance benefits derived from the high
bandwidth fibre connectivity and low host CPU utilization, a SAN also improves
the overall network performance by off loading the backup data transfer from the
enterprise network to a dedicated storage network. Though a SAN is expensive to
implement and maintain, benefits go beyond just backup. A careful analysis of
your requirements is necessary before a decision is made to implement a SAN. For
information on how BrightStor ARCserve Backup can help you take advantage of
a SAN, see the BrightStor ARCserve Backup SAN Option Guide.
Upgrading SCSI Buses and Devices
In cases where poor device throughput is the limiting factor or when you have
excess capacity on a fast network, you may need higher performance devices or
more of your existing devices. If you use an older, slower drive technology, it may
pay to upgrade to higher speed devices and faster SCSI buses. But in many cases,
it may be better to add devices and, where necessary, libraries. You can then run
storage operations in parallel using several devices at once.
When You Cannot Widen the Data Path
If you cannot upgrade the network or expand the time available for backups, you
can almost always reduce the size of the data set that has to be handled during any
particular instance of your backup. You achieve this by doing one of the following
tasks:
■ Segment your network.
■ Segment your data so that it is backed up during a series of successive
backups.
■ Reduce some of your backups so that they only store data that has changed
since the data set was last stored.
2–8 Administrator Guide
Page 47

Segmenting Your Network
In many cases, you can make better use of your existing network bandwidth by
placing BrightStor ARCserve Backup servers on different subnets. In the absence
of subnets, all backup data has to cross a single network to reach the BrightStor
ARCserve Backup servers. In effect, every piece of data travels sequentially to
every node on the network. When you subnet your network, in effect you create
two or more networks of equal speed, each of which handles a fraction of the
backup data. Data travels in parallel.
In our example, if we backed up 500 GB on two subnets instead of 1 Terabyte on
the entire network, we could back up twice as fast. Each subnet could transfer its
500 GB at 36 GB per hour for a total elapsed time of 14 hours (versus 28 hours). In
our 5-hour backup window, we could transfer 360 GB, which, though not enough,
is still far better than the 180 GB we could attain over a network that is not
subnetted.
Segmenting Your Data
Nothing forces you to treat all of your organization’s data as a single unit. It often
makes better sense to segment the data into logically related chunks before trying
to back it up. This reduces the time required for any single storage operation,
makes better use of short backup periods and works better on slow networks. You
still back up all of your data. You just do it in a series of shorter operations spread
over several days.
Defining Data-transfer Requirements
We might, for instance, back up 20% of the 1 Terabyte of data in our example each
night, Monday through Saturday. In the course of a week, this approach would
back up our entire 1 Terabyte across the 100Base-T network, without exceeding the
daily 5-hour backup period. As an added benefit, the compact backup elements
make locating and restoring our data faster and easier by reducing the scope of
searches.
The downside of this approach is that the entire data will not be backed up daily.
Most organizations cannot afford to not have daily backups of complete data;
therefore, this approach may not be suitable.
Planning 2–9
Page 48

Defining Data-transfer Requirements
You might segment your data for backup purposes in any of the following ways:
■ Business function (such as accounting, engineering, personnel management,
sales, and shipping)
■ Geographical location (such California development lab, St. Louis distribution
center, New York business office, Miami business office, Tokyo business
office, and Paris distribution center)
■ Network location (such as NA005, NA002, NA003, JP001, and EU001)
Your segmentation scheme should, however, group the data into reasonably
contiguous backup sources, so that the speed you gain is not lost in lengthy
searches and additional network traffic.
Reducing the Scope of Some Backups
After you have segmented your data, you can further reduce the required data
transfer rate by reducing the scope of some backups. Typically, a relatively small
percentage of your data changes from day to day. While these changes need to be
saved, a full backup is usually unnecessary. For example, if you try to back up
everything daily and only 10% of the data changes in the course of a day, you are
spending 95% of your limited backup time storing data that is already backed up.
When you include media consumption and wear and tear on your backup devices,
this can be an expensive proposition.
You should consider backing up everything weekly, after 50% or more of your
data has changed. You could then use the longer, weekend backup period for your
longest storage operation. On a daily basis, you could back up the changes only.
This would let you stay within the short, nightly back up window and would
economize on media.
BrightStor ARCserve Backup addresses this issue with the following types of
backups.
■ Full backups—stores everything, regardless of when the data last changed.
■ Differential backups—stores files that have changed since the last full backup.
■ Incremental backups—stores files that have changed since the last backup of
any type.
Getting the right mix of full and partial backup operations is something of a
balancing act. Ideally, you want each version of each piece of data backed up once.
You want to minimize unnecessary duplication that consumes media and time.
Therefore, you should keep the following considerations in mind:
2–10 Administrator Guide
Page 49

Defining Data-transfer Requirements
■ Full backups store all of your data at once. They produce a complete, coherent
image of the data as it was at the time of the backup. They also store the backed
up data together in a single, easily managed storage object. As a result, backup
strategies that rely exclusively on full backups are usually inefficient because
the relative percentage of new data in the overall data set is generally small.
Full backups save too many files that are already adequately backed up by a
previous storage operation.
In exceptional situations, however, where the bulk of an organization’s data
changes substantially over short periods, a plan that relies on full backups
exclusively may be the best choice. Because, in this case, most of the data is
fresh at any given time, the full backup may actually be less prone to needless
duplication than a mix of full and partial storage operations.
■ Incremental and differential backups let you avoid network congestion and
excessive media consumption. They better fit your existing hardware and
bandwidth constraints and mesh better with your users’ working hours.
Incremental and differential backups are faster than full backups. If you do
several of them between full backups, many files are still backed up more than
once, because the differential backup backs up all files that have changed since
the last full backup. This redundancy means that you can restore quickly,
because all the data you need for a full recovery is stored in, at most, two data
sets (the full and the last incremental).
Incremental and differential backups are only economical when the volume of
changes is small compared to the volume of the data set as a whole. When this
is the case, you can store changes on a small amount of media that is rewritten
frequently.
Running Storage Operations in Parallel (Multiple Streaming)
If device transfer rates limit your operations and if the necessary network
bandwidth is available, you may want to set up your operations to use all of the
available devices at once. By distributing the data across parallel streams, this
approach greatly reduces the time required for backup operations. It does,
however, consume more network bandwidth. Recovery after a catastrophic loss
may be faster, since all available devices collaborate to restore all or most of the
backup data at once. BrightStor ARCserve Backup has the ability to automatically
create multiple streams based on the availability of tape devices.
Planning 2–11
Page 50

Defining Storage-capacity Requirements
Defining Storage-capacity Requirements
So far, we have discussed factors that affect the speed with which backup and
restore operations can be performed. But you also need to consider the volume of
online data storage that you require.
How Much Space Do You Need for Online Recovery Data?
You need to figure out how much recovery data you need to store online, in your
robotic libraries. Data that is used primarily for archival purposes or for recovery
after a catastrophe can be stored offline in a repository or vault. It is unlikely to be
needed quickly. But recent backup data generally has to be available in a robotic
library so that users can easily locate and swiftly recover the most recent, intact
copies of the files they are most likely to lose.
To calculate the amount of recovery data you must store online, perform the
following steps:
1. Estimate the size of an average, full backup.
2. Add the estimated size of an average incremental backup.
3. Multiply by the number of backup sets that your organization wants to have
immediately available (“1” for the most recent, “2” for the two most recent,
and so on). This is the amount of recovery data you need to keep online:
recoverydata = (avgsizefull + avgsizeincrements) × numberbackupskept
How Much Space Do You Need for Backed-up Data?
You need to reserve online storage space for scheduled backup operations. To
calculate this space:
1. Estimate the size of an average, full backup.
2. Add the average, percent growth of the data set during a typical, full backup
cycle.
3. Add the estimated size of an average incremental backup.
4. Add the average percent growth of the data set during a typical, incremental
backup cycle.
2–12 Administrator Guide
Page 51

Matching Storage Capacity to Resources
Your ability to meet your storage-capacity requirements depends on the following
criteria:
■ The types of libraries you have
■ The number of each type you have
■ The types of media each library uses
After you have identified types and numbers of libraries that will be available, you
can calculate the capacity of each library using the following formula:
totalcapacity = numberslotsavailable × mediaelementcapacity
In this formula, the numberslotsavailable is the number of slots available in the
robotic library and mediaelementcapacity is the capacity of the media elements
used by the installed drives.
Calculating Media Capacity
Defining Storage-capacity Requirements
The raw capacity of the medi a varies with the type of drives , the type of media, and
the degree of data compression that you are using. You should deduct the
following from the raw capacity to arrive at the real data capacity:
Deduct ~10% for overhead.
This allows for the BrightStor ARCserve Backup media header and various
engine-specific overhead information. Note that the overhead may be more if you
are backing up a large number of very small files.
For example, if you try to back up 1 Terabyte on ten media elements that hold 100
GB each (after deducting overhead), media usage will require 100% efficient every
time you back up. Because this is unlikely, you need to use eleven media elements.
On the other hand, you can back up 1 Terabyte to six cartridges that hold 200 GB
each (after deducting overhead), because you have a healthy 200-GB (20%)
cushion.
The allowances specified above are important. If you do not set aside space for
overhead and variations in media usage, you may run out of media during a
backup operation and may, consequently, not have a timely and complete backup.
Other Factors Affecting Storage Capacity Calculations
Media elements have lifetimes that are usually specified in usage time or numbers
of uses or passes across the media. Make sure you take media aging into account
when calculating the number of media required. Consult the manufacturer’s
recommendations.
Planning 2–13
Page 52

Planning for Catastrophe
Restrictive media-selection criteria and extensive off-site storage can increase your
need for media well beyond the minimums calculated above.
Finally, the overall size of the data you need to back up usually increases over time.
Data piles up faster in some organizations than it does in others, but the pile almost
always grows. The preceding calculations assume a more-or-less constant amount
of data. So, when you estimate how much you need to back up (1 Terabyte in the
examples), always allow for growth. Then check periodically to be sure that you
always have enough extra storage to accommodate emerging needs.
Testing Plans and Assumptions
After you have made the required estimates, performed all the necessary
calculations, and formulated a plan that should work for your organization, you
should test it. Set up a pilot test configuration using a scaled down environment
and run tests.
Using the BrightStor ARCserve Backup logs, you can see how good your rough
estimates are. You can see if you estimated the amount of backup data correctly by
checking the size of a full backup generated by your plan. You can check your
estimate of the average percent change in your data by checking the size of the
incremental backups. You can mak e sure tha t all the data tha t should be backed up
is backed up, and you can see if your data and network segmentation tactics have
worked as intended.
Planning for Catastrophe
So far, we have focused on the major threat to your data—routine losses due to
equipment failure or operator error—and on the processes common to all backup
and recovery efforts. But there are some additional considerations when you are
planning your organization’s recovery from a major catastrophe.
For our purposes, a catastrophe is a natural or man-made disaster, such as a fire or
flood, that results in the loss of multiple hosts, a data center, or an entire network,
including locally stored backup media and hardware. To handle this sort of
extreme emergency, you must provide secure, off-site storage for some of your
backup media, and you must keep the off-site data current.
2–14 Administrator Guide
Page 53

Assessing the Risk
Planning for Catastrophe
Before going further, decide what sorts of disaster you can realistically prepare for,
given the importance of your data, the expense of protecting it, the magnitude of
the risk, and the corporate policies that apply to your sites. Consider the following
questions.
■ What is the likelihood that your organization will face a large-scale disaster
that affects the whole region or metropolitan area? Such catastrophes might
include earthquakes, large floods, or acts of war.
■ What is the likelihood of smaller disasters, such as building fires, localized
flooding, or vandalism?
■ How much data would you lose in a large disaster? In a small disaster?
■ How severely would the loss affect your organization in each case?
■ How much is your organization prepared to spend to defend against each of
the risks you identify?
Selecting an Off-site Repository
Like everything else in storage management, the selection of an off-site repository
or vault is the result of a series of trade-offs.
Security
The vault should be isolated enough from your main facility to protect the off-site
data from the kind of catastrophes you are prepared to guard against. If
earthquakes are the biggest threat you need to deal with, the vault should be in an
earthquake-resistant building at some distance from your main site or even in
another city or a different seismic zone. On the other hand, if fire or local flooding
is the danger, a storage room in an upper floor of the building across the street
might be enough.
Accessibility
Unfortunately, measures that isolate your data repository from your primary site
also make it harder (and more expensive) to keep the data in the remote repository
current. To be of use, off-site data has to be reasonably up-to-date, which means it
has to be reasonably accessible. A vault in a distant city might protect the data
against even the most extreme disasters, but it might be impractical to ship media
there on a daily basis.
Planning 2–15
Page 54

Planning for Catastrophe
Expense
In genera l, the more secure a vault is, the more expensive it is to use. You pay more
for more secure storage facilities. It often takes longer to get media to and from
these facilities. The more media you store off-site, the more you have to buy for
your main site.
Deciding What to Archive
Because catastrophes will, by definition, strike your infrastructure as well as your
backup media, you should assume that you will have to rebuild systems
completely before you can start the actual data recovery. For this reason, you
should always maintain the following off site:
■ Media elements that contain bootable operating systems for the BrightStor
ARCserve Backup servers.
■ A current, complete backup of the file systems, databases, and mail servers
supported by BrightStor ARCserve Backup.
You may want to include BrightStor ARCserve Backup distribution media and a
text file that lists your hardware configuration parameters.
Testing Your Disaster Recovery Plan
To be sure that your data is available after a disaster, you have to periodically test
the data that you are archiving. Routine file-backup routines get tested every time
a user cannot restore a deleted file. You soon hear about problems and, in general,
the results are not too costly. But disasters are, by definition, rare and expensive.
When your data center has just burned down, it is too late to find out that your
backup routine does not work. So be sure to test these infrequently used processes
on a regular basis.
Whenever you install new software or hardware, or change existing procedures,
complete the following tests:
■ Backup to media as you would for off-site storage and disaster recovery.
■ Verify that the backup operation stored all the specified data successfully.
■ Simulate a post-catastrophe recovery operation using the backup media from
the test.
You should also run brief, simulated, backup and restore operations whenever the
opportunity arises. Routine testing lets you exercise and assess your storage
processes on an ongoing basis.
2–16 Administrator Guide
Page 55

Sample Calculations
Sample Calculations
The examples below illustrate some representative situations that a backup and
recovery plan has to deal with.
Note: It is assumed that the backup server has enough CPU power and memory,
and the hard disk speed on the client or server is adequate.
Transfer Rate for Clients and Servers on a 100Base-T Ethernet LAN With No Subnets
In this configuration, data cannot move across the network faster than 36 GB per
hour, regardless of the number of servers and libraries available. To back up 1
Terabyte of data, the backup operation must run for 28 hrs.
Planning 2–17
Page 56

Sample Calculations
Transfer Rate for Clients and Servers on Two 100Base-T Ethernet Subnets
In this configuration, you can move twice as much data at the 36 GB per hour
100Base-T data rate. To back up 1 Terabyte of data, each subnet has to handle only
500 GB, so the operation takes 14 hours. Some performance is lost because the
network cannot keep the media drives in each library streaming along at their
combined 36 GB per hour optimum speed.
2–18 Administrator Guide
Page 57

Transfer Rate for Clients and Servers on a Gigabit Ethernet Network
In this configuration, you move data at 315 GB per hour data ratio. To back up 1
Terabyte of data, the backup operation must run for 3 hours.
Sample Calculations
Planning 2–19
Page 58

Sample Calculations
Transfer Rate For a Server With No Clients
In this case, the 216 GB per hour drives are the limiting factor, assuming that disk
system or server is not the bottleneck. The system would take 5 hours to back up 1
Terabyte.
2–20 Administrator Guide
Page 59

Transfer Rate For Server With SAN Option
In this configuration, local backups of each server on the SAN can achieve a data
transfer rate of 432 GB per hour.
Sample Calculations
Planning 2–21
Page 60

Sample Calculations
Storage Capacity For Two Sets of Recovery Data—One Full Backup, and One Incremental
Assume the following:
■ You have to do a full backup of 1 Terabyte of user data per week.
■ You have to do daily incremental backups.
■ About 10% of the data changes daily.
■ The data from the last two backup cycles are available, online, for fast
recovery.
■ You are using LTO tape drives with 2:1 compression in a library with 20 slots.
■ All media are used as efficiently as possible.
First, calculate the amount of capacity you need to store the output of the current
backup operations. LTO media elements have a raw capacity of 200 GB with 2:1
compression. After you deduct 10% for overhead, the real capacity is closer to 180
GB. The 1 Terabyte full backup thus requires:
1 Terabyte ÷ 180 GB / media element = 6 media elements
Using the above equation, you can also calculate the safety margin as follows:
(6 X 180 - 1000) / 1000 = 8%
Because six tapes (1 Terabyte) provides an 8% safety margin, you do not need to
add extra tapes. In this example, you need only 6 LTO tapes to store a full backup.
Based on the rate of change you estimated, the incremental backups amount to:
1 Terabyte × 10% changed / incremental × 5 incrementals = 500 GB changed
Therefore, at a minimum, you need the following:
500 GB ÷ 180 GB / media element = 3 media elements
Because three tapes (500 GB) provides a 9% safety margin, you do not need to add
extra tapes. You need only three tapes to store a single set of incremental backup
data.
2–22 Administrator Guide
Page 61

Sample Calculations
Next, calculate the amount of storage space you need for your online recovery
data. You need to retain the last two backup sets in the library, so you need 9 tapes
for the oldest set of recovery data and 9 tapes for the newest set. To store your
recovery data you need 18 tapes.
Therefore, your total storage requirement is as follows:
9 tapes for current backup + 18 tapes for recovery = 27 tapes
Next, you calculate the capacity of the library by deducting cleaning slots:
20 slots/library - 1 cleaning slot = 19 available slots
Therefore, you have a deficit of 27 - 19 = 8 slots and must do one of the following:
■ Add a library.
■ Compress the stored data.
■ Store only one set of recovery data online.
Planning 2–23
Page 62

Page 63

Chapter
3
Backing Up Data
BrightStor ARCserve Backup allows you to back up most machines attached to
your Windows network using one of the following sources:
■ Administrative shared drives
■ User-shared files, directories, and drives
Because BrightStor ARCserve Backup separates and lists Windows machines by
the domain or workgroup to which they belong, you can easily back up all the
machines belonging to a specific domain or workgroup, by selecting the name of
the domain or workgroup.
The optional BrightStor ARCserve Backup Client Agents allow you to
communicate with remote workstations in various environments. This provides
complete system backups, including system information from non-Windows
systems, such as NetWare or UNIX.
Similarly, the optional Backup Agents allow BrightStor ARCserve Backup to back
up and restore online databases such as MS Exchange, Lotus Domino, MS SQL
Server, Oracle, and IBM Informix.
If you have Unicenter NSM installed, you can use the monitoring agent to monitor
BrightStor ARCserve Backup. This agent can be used to start and stop services,
monitor the status of the BrightStor ARCserve Backup processes and media, and
report on the failure of backup jobs. For more information, see
Monitoring Agent in the chapter, “Managing the Database and Reporting.”
The Unicenter
Backing Up Data 3–1
Page 64

The Backup Wizard
The Backup Wizard
The Backup Wizard guides you through the process of creating and submitting a
backup job of a single machine without running the Backup Manager. For
procedural information on how to submit backup jobs using the Backup Wizard,
see the BrightStor ARCserve Backup Getting Started.
Customizing Your Backup Jobs
The Backup Manager lets you customize your backup jobs using filters, options,
and scheduling. For procedural information on how to submit backup jobs using
the Backup Manager, see the online help.
You can use the Backup Manager to:
■ Back up to various media or create a customized backup scheme.
■ Use filters to selectively exclude or include directories and files from backup
jobs.
■ Create an automated backup scheme using the Grandfather-Father-Son (GFS)
■ Apply filters to local source objects (such as volumes and nodes) or globally to
BrightStor ARCserve Backup allows you to back up the Windows registry as well
as the system state for Windows systems. Each backup job requires a source and a
destination (media). The Backup Manager screen provides three tabs to customize
your backup job:
■ Source
■ Destination
■ Schedule
Selecting the Source
The source is the path that you want to back up. You can easily find the files you
want to back up by browsing through the left panel to select the user-shared drives
and directories.
When selecting a source, you can either choose to back up an entire server or you
can select individual drives, directories, and files to back up. To select an entire
server, click the green box next to the server name. When you do this, all of the
drives, directories, and files on the server are automatically selected.
rotation scheme.
the entire backup job, or to both at the same time.
3–2 Administrator Guide
Page 65

Customizing Your Backup Jobs
To select individual drives, directories, and files to back up, expand a server name
and click the green boxes next to each drive, directory, and file.
Note: You can right-click individual drive, directory, and file names to customize
local backup options. If you have database agents installed, you can also right-click
them to customize local backup agent options. If you want to customize local
backup or local backup agent options, your job must be packaged explicitly, which
means you must select drives, directories, files, or database agents individually as
your source even if you want to back up an entire server. You cannot click the
green box next to the server name, and then customize local backup options for
individual drives, directories, files, or database agents. For more information on
using local options, see the Local Options section in this chapter. For more
information on dynamic and explicit job packaging, see the BrightStor ARCserve
Backup Getting Started.
Backing Up an Entire Node
If you want to back up an entire node, BrightStor ARCserve Backup provides the
capability to backup all file systems and databases on the specified node. This
feature supports
up an entire node are as follows:
■ You can direct BrightStor ARCserve Backup to back up a selected node and all
of its contents with a single click in the Backup Manger directory tree.
BrightStor ARCserve Backup will back up all file systems, databases, and
drives in the directory tree when you specify the node.
■ You can create a single backup job for the entire node. Tracking several to
many backup jobs on a single node can become a difficult and time consuming
maintenance task.
■ You can modify the node without having to modify preconfigured backup
jobs. For example, if you add a drive to the node, BrightStor ARCserve Backup
detects the new drive automatically and backs up the entire node when you
run the backup job.
Centralized Cross-platform Management. The benefits of backing
Backing Up Data 3–3
Page 66

Customizing Your Backup Jobs
Creating a Backup Job for an Entire Node
When backing up a node that includes database files, you must provide proper
authentication to access all databases when creating the backup job. Proper
authentication includes the User Name and Password for the corresponding
databases. You do not need to provide this authentication when the backup job
runs.
To facilitate database authentication, BrightStor ARCserve Backup presents the
Security and Agent Information dialog when you are creating a backup job on an
entire node. The Security and Agent Information dialog opens as you click the
Submit toolbar button, or if you select Save or Save As from the File menu on the
Backup Manager window.
Using the Security and Agent Information Dialog
The Security and Agent Information dialog serves two purposes:
■ Display a list of all database files on the node.
■ Set or change the User Name and Password for the database item selected in
the Security and Agent Information dialog.
To back up an entire node containing database files, perform the following
procedure:
1. From the Source tab of the Backup Manager, select the node that you want to
back up.
2. Click the Submit toolbar button.
If the node contains database files, the Security and Agent Information dialog
opens to display a list of all databases on the node, User Names, and
Passwords.
3. Optionally, to set or change a User Name or Password, click the Security
button. Enter the appropriate User Name and Password and click OK.
Note: In the Security dialog, you must specify User Name and Password with
backup rights on that machine. For example, Administrator or root.
4. Click OK.
The Submit dialog opens. For procedural information on how to submit
backup jobs using the Backup Manager, see the online help.
3–4 Administrator Guide
Page 67

Customizing Your Backup Jobs
Multiple Code Pages
The following sections describe how BrightStor ARCserve Backup supports the
use of multiple code pages.
Understanding How BrightStor ARCserve Backup Supports Multiple Code Pages
A code page is a map of characters as they relate to a particular language. If the
BrightStor ARCserve Backup server resides in an environment where different
languages and their character sets are running on other computers, the Backup
Manager and the Restore Manager may not be able to interpret and display
recognizable text in the source tree.
When you encounter this situation, you can specify any code page supported in
your environment. The code page lets BrightStor ARCserve Backup interpret the
information and display the text in a format that is recognizable to you.
When you specify a code page at the node or volume level, BrightStor ARCserve
Backup applies the characteristics of the code page to all child volumes,
directories, and so on. Code pages do not affect BrightStor ARCserve Backup
functionality.
Specifying Code Pages
You can change the code page on all tree items in the source tree. To specify a code
page, use the following steps:
1. From Source tab on the Backup Manager window, right-click the node,
volume, or directory for which you want to specify a code page.
2. From the Display Encoding right-click menu, select the desired code page.
BrightStor ARCserve Backup applies the new code page settings immediately.
Selecting the Destination
The destination is the backup media device or disk. Browse through the left panel
to select the groups and device. Place an asterisk in the Group or Media field to use
the first available drive and media in the group. If you want to use any available
group, enable the option Use Any Group. If you want to use a specific media pool,
select it in the Media Pool field.
Note: If you select a Media Pool, BrightStor ARCserve Backup automatically
checks the other destination and backup options you selected to verify that no
restrictions or conflicts occur when you run the job. If BrightStor ARCserve Backup
detects a conflict, a warning dialog opens.
Backing Up Data 3–5
Page 68

Customizing Your Backup Jobs
To back up to disk, use Device Configuration to configure an FSD.
Wildcard Usage with Tape Library Groups
The wildcard characters’ asterisk and question mark are supported in the Group
field. When wildcard characters are used to specify a job’s library group
destination, the job is sent to a group whose name matches the criteria and has at
least one available medium, as long as there is at least one available drive
associated with the library. A medium is available when it is not being used by
another job (NOTE: no special consideration is given to medium suitability as
determined by the job schema; for example, Media Pool). If more than one job uses
wildcards and more than one group matches the selection criteria, all jobs go to the
first group with an available medium.
Typing a name in the media field forces the job to be directed to a group that
matches the criteria and contains the specified medium, even if the medium is
bu sy. If ther e is no m edium w ith t he spe cified name in any of the matching groups,
but there is a blank medium in a matching group, it is used and renamed. If there
is no blank medium the user is prompted to insert one.
Note: The media field does not support wildcard characters.
When a media pool is specified, a medium from that pool is used if there is one
available in the first matching group. If there is no such medium in the group, but
there is a blank medium, it is renamed and added to the pool. If there is no blank
medium the user is prompted to insert one.
Defining a Schedule
You can configure your backup job to use a custom schedule or a rotation scheme
by using the BrightStor ARCserve Backup template schemes or by specifying your
own rotation parameters. You can also specify a repeat method and the following
backup methods for each backup:
■ Full (Keep Archive Bit)—Performed each time the job is repeated and keeps
■ Full (Clear Archive Bit)—Performed each time the job is repeated and clears
■ Incremental backup—Backs up only those files whose archive bits have been
the archive bit.
the archive bit.
set since the last full or incremental backup was performed. After each backup,
archive bits are reset so that they are not backed up during the next
incremental backup job.
3–6 Administrator Guide
Page 69

Local Options
Local Options
■ Differential backup—Backs up only those files whose archive bits have been
set since the last full backup was performed. Because differential backup jobs
do not clear a file’s archive bit, the files that were backed up in the last
differential job are backed up again. It takes longer to process backup jobs
using this method. However, this strategy requires only two sets of media to
restore a differential backup; the full media set, and the differential media set.
In the case of an incremental backup, you require the full media set and every
incremental set until the latest set.
Note: The above-described backup methods do not apply to the Linux Client
Agent.
For a description of detailed job scheduling features, see the chapter “Customizing
Your Jobs” or the online help.
BrightStor ARCserve Backup gives you the power and flexibility to customize
local options for specific drives that you want to back up. To do this, click the green
box next to the drive directory, and then right-click the drive and select Local
Options, as shown in the following examples:
Note: When setting local options, you must select drives individually as your
source even if you want to back up an entire server. You cannot click the green box
next to the server name, and then customize local backup options for individual
drives.
Backing Up Data 3–7
Page 70

Local Options
The Local Options dialog opens:
On the Local Options dialog, you can select the following options:
■ None—If you select this, no verification will be performed on the data backed
up.
■ Scan Backup Media Contents—If you select this, BrightStor ARCserve Backup
will scan the media and check that the header is readable for each file that is
backed up.
■ Compare Backup Media to Disk—Select this if you want BrightStor ARCserve
Backup to read blocks from the media and compare, byte for byte, the data on
the media against the files.
■ Session/Encryption Password—Enter a password for your backup job.
■ Compress Files Before Backup—Allows you to compress your files before
running your backup job.
■ Encrypt Files Before Backup—Allows you to encrypt your files before running
your backup job.
Note: If you have database agents installed, you can also right-click them to
customize local backup agent options. If you do this (similar to setting local
options on drives, directories, and files), you must select database agents
individually as your source even if you want to back up an entire server (You
cannot click the green box next to the server name, and then customize local
backup agent options).
3–8 Administrator Guide
Page 71

Global Options
This section describes the global backup options you can select when submitting
your backup job. For a description of additional backup job options and filtering
features, see the chapter “
dialog, click the Options button in the Backup Manager. The available option tabs
are:
■ Alert
■ Replication
■ Media Exporting
■ Advanced
■ Volume Shadow Copy Service
■ Backup Media
■ Verification
■ Retry
Global Options
Customizing Your Jobs.” To access the global options
Virus Options
■ Operation
■ Pre/Post
■ Job Log
■ Virus
Since eTrust Antivirus is bundled with BrightStor ARCserve Backup, you can
automatically scan for viruses during the backup operation using the virus
scanning options.
■ Enable Virus Scanning—Select this option to enable virus scanning and the
following options:
– Skip—Do not back up the infected file.
– Rename—Rename the infected files with the extension AVB. If a file with
the same name and the extension AVB exists, then the extension AV0 is
used, followed by AV1, AV2, and so on.
– Delete—Delete the infected file.
– Cure—Attempts to cure the infected file.
– Scan Compressed Files—Check each file in compressed archives
individually. Selecting this option might affect the performance of the
backup but provides increased virus protection.
Backing Up Data 3–9
Page 72

Global Options
Alert Options
You can use the alert notification system to send messages about events that are
displayed in the Activity Log during your backup operation. Choose one or more
of the following events for which you want to be notified:
■ Job Completed Successfully—All of the nodes, drives, and shares were
processed.
■ Job Incomplete—Some nodes, drives, or shares were missed.
■ Job Canceled by User—The user canceled the job.
■ Job Failed—The job was started but could not be completed.
■ Virus Detected—A virus was detected in one of the files to be backed up. For
information about the options you can select for handling infected files, see
Virus Options.
■ Customized Event—A customized event occurred. To specify this type of
event, enter an error, warning, or notification code in the space below the
Event drop-box.
Choose one or more of the defined alert configurations. The default configuration
means that you will use whatever is configured in Alert Manager. Click Configure
to define further configurations. BrightStor ARCserve Backup provides the
following defined alert configurations:
■ Broadcast
■ Pager
■ SMTP
■ SNMP
■ Event
■ Printer
■ Email
■ Lotus Notes
■ Unicenter NSM
Select Attach Job Log to include the job log information in the alert message. (This
option applies for trouble tickets and email only.)
Note: The list you create using Alert Options is saved with the job script and the
configuration defined using the Configuration button.
3–10 Administrator Guide
Page 73

Replication Options
If you have either the Replication Option or BrightStor® High Availability installed
on your server, BrightStor ARCserve Backup can back up replicated data on your
server. BrightStor ARCserve Backup provides the following replication options:
■ Backup Replicated Data—BrightStor ARCserve Backup backs up the data on
your server including all replicated data, which will appear to have been
copied from the primary servers. Each instance of replicated data is a separate
session on the backup media. If you restore your data to the original location,
the data goes to that primary machine, not to the server.
■ Skip Replicated Data—BrightStor ARCserve Backup backs up only the data on
your server and skips any replicated data.
■ Ignore Replication—BrightStor ARCserve Backup backs up all data normally.
It will not check to see if the data is replicated.
Media Exporting Options
Global Options
At the end of a backup job, you can move media out of the library or to an off-site
location for safe storage. If the job includes verification, the export is done at the
end of the verification. This feature is available for regular and rotation jobs and
supported on media libraries and RAID. BrightStor ARCserve Backup provides
the following media exporting options:
■ None—No media exporting will take place at the end of a backup job.
■ Export RAID1 Duplicate Tape After Job—If the job spanned to multiple media,
all the duplicate media used in this job is exported.
Note: This option is for RAID 1 support with libraries and mail slots only.
■ Export All Tapes After Job—BrightStor ARCserve Backup exports all the
media for the related backup. If the job spanned to multiple media, all the
media used in this job is exported. If there are not enough mail slots to export
all the media, the media that could not be exported is moved back to the
original home slot. In single mail slot libraries, BrightStor ARCserve Backup
retries a few times to check if the mail slot is empty to move the next media to
the mail slot. If the operator does not move the media, BrightStor ARCserve
Backup writes this information in the activity log.
Note: This option is for RAID 1 support with libraries and mail slots only.
Backing Up Data 3–11
Page 74

Global Options
Advanced Options
The Advanced options determine how BrightStor ARCserve Backup handles the
file system extensions during a backup.
Windows System Options
Note: These options are only supported on the Windows 2000, XP, and 2003
operating systems.
The options available are:
■ Traverse Directory Junctions and Volume Mount Points—Selecting this option
causes the backup job to traverse the volume or the directory being specified
to and take a backup of it. At the time of restore of this session, you can restore
files and directories contained in the referred to volume or directory. When
this option is not selected, the backup job does not back up the volume or the
directory being referred to by the volume mount point or the directory
junction respectively. Therefore, at the time of restore, you cannot restore a file
or directory contained in the referred to volume or directory.
Multiplexing Options
– Backup Mount Points as Part of the volume that they are mounted on—If
you select this, the volumes referred to by the Volume Mount Points will
be backed up as part of the same session as the Volume Mount Points.
When this option is not selected, the volumes referred to by the Volume
Mount Points are backed up as separate sessions
Note: This option is available only when the previous option, Traverse
Directory Junctions and Volume Mount Points, is selected.
■ Preserve File Hard Links—If you enable this, BrightStor ARCserve Backup
preserves hard links during a restore.
The following options regulate how BrightStor ARCserve Backup handles
multiplexing.
■ Chunk Size—Sets the performance of restore operations and memory usage.
The chunk size value determines the amount of contiguous data written for
one session before data from another session is multiplexed. The higher the
value, the faster the restore on some drives, but at the cost of memory size
during backup. For most drives, the default value of 1 MB is recommended.
■ Maximum Number of Streams—Sets the maximum number of streams that
can write to a tape at the same time. The default number of streams is 4 and the
supported range is between 2 and 32.
3–12 Administrator Guide
Page 75

Volume Shadow Copy Service
You can specify global options for using the Volume Shadow Copy Service (VSS)
These options affect all Writers for VSS backups, but they do not apply to
transportable VSS backups.
Note: For more information on VSS, see the BrightStor ARCserve Backup Microsoft
Volume Shadow Copy Service Guide.
On the Volume Shadow Copy Service tab, the File System Backup group box lets
you specify how you want BrightStor ARCserve Backup to handle open files
during file system backups. These options do not affect Writers and Components.
■ Use VSS--Directs BrightStor ARCserve Backup to use VSS to handle the
backup of open files.
If this check box is not selected, VSS support is not used and the BrightStor
ARCserve Backup Agent for Open Files (if available) is used to handle open
files. If the BrightStor ARCserve Backup Agent for Open Files is not available
and Use VSS is not selected, a traditional backup is performed. However, the
backup will be incomplete if there are any open files that cannot be backed up.
Global Options
■ Revert to traditional backup if VSS fails--Directs BrightStor ARCserve Backup
to execute a traditional backup if an attempt to create a VSS backup fails. If the
BrightStor ARCserve Backup Agent for Open Files is available, it is used to
handle open files if this option is selected and the VSS backup fails.
If this check box is not selected and the VSS backup fails, the backup job fails.
The Writers and Components group box lets you specify how you want BrightStor
ARCserve Backup to treat Writers and Components. These are global options
affect all Writers, except for those with Writer-specific options in place. For more
information about setting Writer-specific options, see the BrightStor ARCserve
Backup Microsoft Volume Shadow Copy Service Guide.
■ Files included by a writer will be excluded from file system backups—
Prevents files that belong to a Component from being backed up by a
traditional file system backup. This option offers the following advantages:
– Avoids backing up files that have already been backed up by VSS.
– By excluding files from traditional backups, fewer files are processed, and
traditional backups take less time to complete.
– Helps achieve successful backups by eliminating certain problems
associated with files that must be processed as a group; for example, files
associated with a Writer or database application. In a traditional backup,
there is no mechanism to ensure that the files are processed together.
■ Files excluded by a writer will be excluded from file system backups—
Prevents files that have been excluded from being backed up by a Component
from being backed up by a traditional file system backup.
Backing Up Data 3–13
Page 76

Global Options
■ If a component file fails to backup the writer, the backup will
Backup Media Options
You can specify the overwrite/append rules for the media used in your backup job
while you are configuring the job. This section describes the rules so that you can
determine which method is best for your purposes.
There may be files associated with an application that should never be backed
up (for example, the Windows page file). Each Writer is aware of whether its
associated application maintains any such files. Selecting this option allows
BrightStor ARCserve Backup to use this information when performing
traditional backups.
terminate--Cancels the backup of a Writer if the backup of any of the
Components fail. The backup of a Component fails if one or more of its files
cannot be successfully backed up.
Selecting this option ensures that and backup is consistent and that all of the
files associated with a Writer are backed up before the backup is considered
successful, regardless of how many Components are associated with the
Writer.
Options for First Backup Media
The First Backup Media is the media you use when the backup job begins. The
options for the first media are:
■ Append to Media—Adds job sessions to the selected media.
■ Overwrite Same Media Name, or Blank Media—Overwrites the media in the
drive only if it is the name you specified for the job or if the media is blank. If
neither of these conditions is met, BrightStor ARCserve Backup prompts you
to supply the specific media name or a blank tape.
■ Overwrite Same Media Name or Blank Media First, then Any Media—
Overwrites the media in the drive only if it is the name you specified for the
job or if the media is blank. If neither of these conditions is met, BrightStor
ARCserve Backup reformats whatever media it finds in the drive (if there is no
media in the drive and you are using a tape library, BrightStor ARCserve
Backup picks the oldest free tape) and starts backing up files at the beginning
of the media.
■ Timeout for First Media—Specifies the number of minutes BrightStor
ARCserve Backup will wait for a media to be inserted into a drive before it
cancels the job.
3–14 Administrator Guide
Page 77

Options for Additional Media
The additional backup media rules apply to jobs that require more than one media.
You need to specify which media BrightStor ARCserve Backup can use when the
job spans media. The additional backup media rules are:
■ Overwrite Same Media Name, or Blank Media—Writes to the media in the
device only if it has the same media name (but a different media ID) or if it is
blank. When the job requires an additional media, BrightStor ARCserve
Backup checks if the new media has the same name (but different media ID)
or if it is a blank media. As long as the ID is different, BrightStor ARCserve
Backup reformats the media, giving it the same name and ID as the first media.
Only the sequence number is different.
■ Overwrite Same Media Name or Blank Media First, then Any Media—
Overwrite any media found in the device (as long as it has a different ID from
the first media’s ID). All subsequent media are reformatted with the same
name and ID as the first media. Only the sequence number is different.
■ Timeout for Additional Media—Specifies the number of minutes BrightStor
ARCserve Backup will wait for a media to be inserted into a drive before it
cancels the job.
Global Options
Secure Your Backup Data
To ensure security throughout your network, you can choose from the following
methods:
■ Session/Encryption Password—To enhance network security, specify a
■ Compress Files Before Backup—Specify whether files will be compressed
■ Encrypt Files Before Backup—Specify whether BrightStor ARCserve Backup
session/encryption password that will be required in order to restore this data
from media.
Note: Make sure that you remember your password so that it is available
when you want to restore your data. If you do not know your password, you
will not be able to access the data!
before backup. You can increase the effectiveness of your media and increase
data speed by setting this option on. If the media drive does not support
compression, or if the hardware compression is disabled, BrightStor ARCserve
Backup will compress the data. On a compressed, NTFS volume, the data
being archived will be stored compressed.
should encrypt files before backup. Encryption encodes your data so that it is
non intelligible until recovered using BrightStor ARCserve Backup.
Backing Up Data 3–15
Page 78

Global Options
Distinguish Media by Name Only
BrightStor ARCserve Backup writes to any media that has the name specified in
the Media text box on the Destination tab, regardless of the media's ID or sequence
number. This option is useful if you are running a repeating Overwrite job with a
specific media and you want to ensure that the same media is used for the job each
time.
■ When you enable this BrightStor ARCserve Backup looks for a media that has
the name specified in the Media text box and uses it, regardless of the media's
other identifying features.
■ When you do not enable this option, the second time the backup job is run,
BrightStor ARCserve Backup cannot always locate the original tape because
some of its identifying features will have changed.
Note: If two or more media in the tape library have the same name, BrightStor
ARCserve Backup uses the first media in the device group that matches the
specified name. Therefore, we do not recommend that you use this option to
perform a single occurrence overwrite.
Verification Options
BrightStor ARCserve Backup allows you to verify that your data was correctly
backed up to media. You can verify data for the entire backup job or for a selected
drive in your backup job. The global verification options (applied to the entire job)
will be overridden by the options selected for a drive. BrightStor ARCserve Backup
provides the following options for verification:
■ None—The back up will not be verified.
■ Scan Backup Media Contents—Check the proprietary BrightStor ARCserve
Backup data area (the header) of each file on the backup media. If it is readable,
BrightStor ARCserve Backup assumes the data is reliable. If it is not readable,
the Activity Log is updated with this information. This is the fastest
verification method.
If you selected Calculate and Store CRC Value on Backup Media on the
Operation tab, BrightStor ARCserve Backup automatically performs CRC
verification. This method assigns a value to the data that you copied to media
and compares it to the value assigned to the data that you backed up. This
enables you to identify the individual data packets that were backed up.
■ Compare Backup Media to Disk—Data from the backup media is read and
compared byte for byte against the source files. This option takes time, but
ensures that all data on the backup media are exactly as on the disk. If
BrightStor ARCserve Backup finds a mismatch, the errors are recorded in the
Activity Log.
3–16 Administrator Guide
Page 79

Retry Options
Global Options
When BrightStor ARCserve Backup encounters an open file, the following options
are provided:
■ Open File Retry—determines how frequently BrightStor ARCserve Backup
will attempt to back up or copy open files.
– Retry Immediately—Back up or copy the file again, immediately after the
first attempt failed. If the file is still unavailable, BrightStor ARCserve
Backup writes information to the Activity Log, and the job is labeled
“Incomplete.”
– Retry After Job—Back up or copy the file again after all the other source
files have been backed up. If the file is still unavailable, BrightStor
ARCserve Backup writes information to the Activity Log, and the job is
labeled “Incomplete.”
– Number of Retries—Number of times you want to try to back up or copy
the file.
– Retry Interval (sec)—Period of time you want to wait between attempts.
■ File Sharing—determines how BrightStor ARCserve Backup shares the files
with other applications when backing up or copying a file.
– Use Deny None if Deny Write Fails—[default] Attempt to place the file in
“Deny Write” mode. If this is not possible (because the file is already
open), then place the file into “Deny None” mode.
– Use Lock Mode if Deny Write Fails—Attempt to place the file in “Deny
Write” mode. If this is not possible (because the file is already open), then
lock the file completely (prohibiting any user from opening or writing to
the file). This option ensures the most recent version of the file is backed
up or copied.
– Deny Write—Prevent another process from writing to the file while
BrightStor ARCserve Backup has it open. If another process has the file
open before BrightStor ARCserve Backup can open it, BrightStor
ARCserve Backup will not back up the file (unless you specified an Open
File Retry option).
– Deny None—Allow another process to read or write to the file, regardless
of whether BrightStor ARCserve Backup opens it first. This option ensures
that your files are up-to-date, although the file that was backed up or
copied may not be the most recent version.
Note: If you use applications (such as email) that are in operation 24 hours a day,
you may want to choose one of the Deny None methods. As long as no other
process is writing to these files during the job, the backup or copy will be
consistent. If you want to ensure that only the most current version of every file is
backed up or copied, you should select a Deny Write or Lock Mode option.
Backing Up Data 3–17
Page 80

Global Options
Operation Options
The operation options for backup determine related actions that occur during or
after the backup, and the level of information that is recorded in the database.
BrightStor ARCserve Backup provides the following options:
■ Delete Files After Backup—Removes the files from the hard disk after the file
backup is completed. This option deletes only the files from unprotected
directories. By default, the following system directories are protected for
UNIX, Linux, and Mac OS X:
–/
–/bin
–/etc
–/lib
–/sbin
–/usr/bin
–/usr/sbin
You can protect other directories by modifying the applicable file system agent
configuration file, groom.cntl, located on the client agent machine. The agent
configuration file, groom.cntl, is specific to UNIX and Linux client agents.
By default, the following system directories are protected for NetWare:
– SYSTEM
–PUBLIC
–LOGIN
–ETC
–MAIL
On Windows, System State and system protected files are not deleted.
■ Disable File Estimate—By default, before any file is backed up to media,
BrightStor ARCserve Backup performs an estimate of how long the job will
take. Select this option if you want BrightStor ARCserve Backup to skip this
function.
■ Calculate and Store CRC Value on Backup Media—Calculating and storing
the CRC value on the backup media will enable BrightStor ARCserve Backup
to perform CRC verification during the backup job. To instruct BrightStor
ARCserve Backup to use the CRC value stored on media, see the Backup
Options, Verification tab.
3–18 Administrator Guide
Page 81

Global Options
■ Eject Backup Media upon Completion—Select one of the following:
– Use Default Device Setting—Select this if you want to use the setting you
selected during library configuration.
– Eject Media—Select this if you want to eject media from the drive after the
job finishes. This helps prevent any other job from overwriting
information on this media. If you select this, it overrides the setting you
selected during library configuration.
– Do not Eject Media—Select this if you do not want to eject media from the
drive after the job finishes. If you select this, it overrides the setting you
selected during library configuration.
Note: For more information on library configuration, see Assigning a
Cleaning Tape and Changing Configuration Details in the chapter
“Configuring Devices.”
■ Backup BrightStor ARCserve Backup Database files—Select this option to
back up the BrightStor ARCserve Backup database files with your backup job.
You must also select whether to backup the database on every backup job or
only when the BrightStor ARCserve Backup home directory is backed up, by
clicking the appropriate option button.
■ Database Options are:
– Record Detail Information—Select this to log detail information and all
information pertaining to the source and destination in the database.
If you enabled the catalog database and select this, catalog files are stored
in the CATALOG.DB folder after all detail information contained in the
catalog files are merged into the database. If you did not enable the catalog
database, the catalog files are deleted after the merge.
Note: For more information on the catalog database, including
information on backing up and restoring when using this feature, see the
chapter, “Managing the Database and Reporting
.”
– Record Job and Session Information Only—This is the recommended
method. Select this to log only job and session information in the database.
If you select this, no detail information will be merged into the database.
If you enabled the catalog database and select this, catalog files are stored
in the CATALOG.DB folder. If you did not enable the catalog database,
catalog files are deleted afterwards.
– Disable Database Recording—Select this if you do not want to log any
information about this job in the database. Select this option if you are
backing up the BrightStor ARCserve Backup database or if you have
limited disk space.
Note: You must submit a Merge Media operation before you can use any
of the database views to restore this data. Or, you can restore data from
this job using the Restore by Media source view.
Backing Up Data 3–19
Page 82

Global Options
Pre/Post Options
These options allow you to run a command on your machine before or after the job
is executed.
For example, you may want to use the Pre option to stop the application that owns
the data you are about to back up, and then use the Post option to start it again.
Note: Commands with executables on remote systems are not supported.
BrightStor ARCserve Backup provides the pre and post options described in the
next few sections.
Run Command Before Job
Enter the path to and name of the file to be executed on the machine before the job
takes off.
■ On Exit Code— BrightStor ARCserve Backup detects exit codes of other
programs. You can specify the following options for a particular exit code:
■ Delay in Minutes—Specify the delay in which BrightStor ARCserve Backup
Run Command After Job
Enter the path and name of the file to be executed on the machine after the job is
completed.
Do not run Command if
Specify for a command not to run if BrightStor ARCserve Backup detects that a job
fails, a job is incomplete, or a job is complete.
Note: This option is not available when you are using BrightStor ARCserve
Backup to manage a UNIX or Linux based server.
– Run Job Immediately—The job runs immediately if the appropriate code
is selected.
– Skip Job—The job does not run if the appropriate exit code is detected.
– Skip Post Application—Skip any commands specified to run after the job
if the appropriate code is detected.
waits before running a job when the appropriate exit code is detected.
3–20 Administrator Guide
Page 83

Run Before/After Command As
The User Name and Password corresponds to the UNIX system of the host server
selected, and is required to check the system privileges on that server. The user
name and password entered into these fields should not be confused with the
BrightStor ARCserve Backup User Name and Password.
Job Log Options
The log options determine the level of detail that is included in the log report for
the operation. The log options can be set in the following windows: Backup,
Restore, Compare, Scan, Copy, Count, and Purge. BrightStor ARCserve Backup
provides the following log options:
■ Log All Activity—Record all of the activity that occurs while the job is running
in the Job Log.
■ Log Summary Only—Record summary information on the job (including
source, destination, session number, and totals) and errors.
■ Log Disabled—Do not record any information about this job in the Job Log.
Backup Agent for Open Files
Backup Agent for Open Files
If the BrightStor® ARCserve® Backup Agent for Open Files is installed on any of
your computers, you can manage the BAOF Engine directly from the Backup
Manager.
1. In the Backup Manager, go to the Source tab and select a server from the
browser in the left pane.
2. If this server has the BAOF Engine installed, right-click the computer and
select the following menu items or simply click these items in the Additional
Information pane, on the bottom-right of the screen:
■ Configure Open File Agent—This displays the BAOF Configuration
screen. From here, you can set various global settings for BAOF on the
selected computer.
■ View Open File Agent Status—This displays the BAOF Status screen. This
shows which files and groups BAOF is currently processing on the
selected computer.
■ View Open File Agent Log File—This displays the Log File Viewer screen.
This shows the log file for the selected computer.
For more information, see the BrightStor ARCserve Backup Agent for Open Files
Guide.
Backing Up Data 3–21
Page 84

Redirecting Local Jobs
Redirecting Local Jobs
Typically, if a backup job fails because of a device error, a media error, or because
no media is available, the remaining source nodes in the job cannot be backed up.
BrightStor ARCserve Backup offers protection against this problem through its
Local Job Redirection functionality. Using Local Job Redirection, if a job fails
because of a device error, media error, or because no media is available, BrightStor
ARCserve Backup automatically redirects the job to another device group. This
provides an added layer of protection and gives you an additional opportunity to
run your job successfully.
Note: Local Job Redirection only supports backup jobs that use local tape devices.
NAS server backup jobs are not supported. Also, Local Job Redirection does not
support redirecting to NAS device groups. For example, if you submit a backup
job and it fails because of a media error, it cannot be redirected to a NAS device
group.
Backup jobs typically fail when a hardware error occurs. If you use Local Job
Redirection, your job does not automatically fail. Instead, it attempts to redirect.
How Local Job Redirection Works
BrightStor ARCserve Backup automatically submits a Local Redirection Job to a
different group if there is a device error, media error, or if the backup job cannot
find a tape to use. The job can be redirected many times until all device groups
have been tried.
BrightStor ARCserve Backup changes the structure of a redirected job as follows:
■ Device Group—Changes the Device group of the job to any Device group
other than the current group.
■ Execution Time—Changes to the current time.
■ GFS/Rotation Job—Changes to a Custom Backup job.
■ Custom Repeating Job—Set to Run Once.
■ Options for First Backup Media—Changes Overwrite Media to Append to
Media.
3–22 Administrator Guide
Page 85

Options and Circumstances Affecting Local Job Redirection
The Local Job Redirection feature responds as described to the following
situations:
■ Multistreaming—Sub-jobs are redirected. The Local Job Redirection feature
does not apply to Master jobs.
Note: To use multistreaming, you must install the BrightStor ARCserve
Backup Enterprise Module.
■ Some Nodes Backed Up—If some of the source nodes in the job were backed
up successfully before the media or device failure, the Local Job Redirection
feature excludes them from the new job to eliminate date duplication.
■ Retry Missed Target—If this option is selected for a GFS and Rotation backup
when a device or media error occurs, all missed targets are retried in the local
redirection backup jobs. A makeup job is not submitted.
Locating Redirected Jobs
Redirecting Local Jobs
If you configure your server for Local Job Redirection, you can check the Activity
Log at any time to determine if a job was redirected and, if so, which device group
the job was sent to.
The local redirection job uses the same Job ID as the original job. In the Activity
Log, you can group messages by job to see the status of both the original job and
redirected job under the same ID.
You can also check the job queue to determine if a job was redirected from another
job. In the Job Queue, the description field indicates if the job was redirected.
Backing Up Data 3–23
Page 86

Multistreaming
Multistreaming
Note: To use multistreaming, you must install the BrightStor ARCserve Backup
Enterprise Module.
Multiple streaming offers you the advantage of using all the available tape devices
on the system by splitting a single backup job into multiple jobs using all the tape
devices. As a result, it will increase the overall backup throughput compared with
the sequential method.
You can use all of the devices or you can specify a single group of devices. If the
BrightStor
®
ARCserve® Backup Tape and Optical Library Option is installed and
the group with the library is selected, multiple streaming uses all library devices.
If the BrightStor ARCserve Backup Tape and Optical Library Option is not
installed, you can put devices into separate groups. For a changer, the total number
of streams (slave jobs) that are created depends on the number of tape devices. For
a single tape drive device, the total number of streams depends on the number of
device groups.
Multistreaming is performed at the volume level for regular files (two volumes can
run simultaneously on two separate devices), and at the database level for local
database servers. Multiple streaming is performed at node level for Preferred
Shared Folder, remote database servers, and Windows Client Agents.
You can have only as many jobs running simultaneously as the number of devices
or groups that are on the system. With the Multi Stream option, one master job is
created that will trigger slaves jobs for as many volumes as you have. When a job
is finished on one device, another job is executed until there are no more jobs to
run.
Some characteristics and requirements of multiple streaming are:
■ Multistreaming always requires a media pool selection to prevent the tapes
from being overwritten (for Windows only).
■ Separate tape devices should be configured in separate groups for regular
drives, however for changers, they can be configured to be in the same group.
For UNIX, separate groups are required for the multistreaming option.
■ Multistreaming works with Rotation and GFS jobs.
■ Canceling the master job cancels all of the slave jobs. For Windows, canceling
and monitoring is checked between jobs for performance considerations.
■ Pre and post operation and comments is supported at the master job level.
Pre/post operations are not performed for slave jobs.
3–24 Administrator Guide
Page 87

Multiplexing
Multiplexing
■ Each slave job has a default job description with this pattern:
MULTISTREAM[JOB[MID]]SUBJOB[SID]
where MID is the master job ID and SID is the sub job (slave job) ID.
■ The multistreaming option is ignored if the groups you choose have only one
device, or if only one object (volume, database, or remote node) backup is
submitted.
Note: You should use the same types of tape devices for multistreaming jobs. In
order to achieve the optimum performance with your multistreaming jobs, you
should use a high-end server machine with multiple processors and at least 256
MB memory per processor.
Multiplexing is a process in which data from multiple sources is written to the
same media simultaneously. When a job that has multiple sources is submitted
with the multiplexing option enabled, it is broken into child jobs—one for each
source. These child jobs write data to the same media simultaneously.
Note: When using multiplexing, you can select the maximum number of streams
that can write a tape at the same time. For more information on this setting, see the
section
Multiplexing Global Options in this chapter.
Multiplexing is useful when your tape drive throughput is faster than the rate at
which data can be extracted from the source. Factors that can affect backup
throughput are as follows:
■ The kind of data being backed up. For example, backing up large number of
small files reduces backup throughput because of the larger number of
necessary file system operations (file open and close).
■ Some databases may be inherently slow in providing data.
■ The network throughput of the server being backed up.
■ The disk performance on which the data resides.
■ The server resources like CPU speed, memory size, page file size, network
card, and amount of other activities on the server.
■ Network backups that involve hundreds of servers.
Backing Up Data 3–25
Page 88

Multiplexing
When data is backed up over the network from multiple sources, most of the
previous factors are involved, which reduces the throughput and increases the
amount of time it takes to perform a backup. In addition, if the tape drive is not
consistently streamed, the life of the tape drive is reduced drastically because of
the SHOE-SHINE effect—when data is written intermittently, the drive has to
stop, and then go back and forth on the media to adjust to the new position from
where it has to write again. With multiplexing, data is continuously available and
tape drives are constantly streaming. This decreases the amount of time it takes to
perform a backup while increasing the life of the hardware.
Features Supported by Multiplexing
The following table includes the features that are supported and not supported
with multiplexing:
Supported Not Supported
Multiple jobs can write to the same tape
drive.
Single session restore from
multiplexing tapes.
Multiple restores simultaneously from
a single multiplexing tape.
Multiple session consolidation
simultaneously from a single
multiplexing tape to multiple
non-multiplexing tapes.
QFA restore from multiplexing tapes. The Verify after Backup option.
Merge from multiplexing tapes. Disk staging during multiplexing.
Disaster recovery Multiplexing jobs cannot be submitted
to NAS devices, File System Devices,
RAID devices, and WORM media.
Session consolidation from a
multiplexing tape to a
non-multiplexing tape.
Multiplexing is not available if you are
using the BrightStor ARCserve Backup
Enterprise Option for Microsoft SQL
Using HDS Snap-Shot, BrightStor
ARCserve Backup Image Option, or
BrightStor ARCserve Backup Serverless
Backup Option.
Scan and compare on multiplexing
tapes.
Multiplexing jobs cannot be submitted
to a non-multiplexing media.
3–26 Administrator Guide
Multiplexing is not supported on
Optical Changers and DVD drives.
Page 89

Submitting a Multiplexing Job
To submit a multiplexing job, you must enable the Multiplexing feature on the
Destination tab in the Backup Manager. In addition, you can select any of the
following:
■ Multiplexing media (multiplexing media appear with a blue circle with an M
next to them)
■ Blank media
■ Media pool
Note: You cannot submit a multiplexing job to a tape library that has WORM
media unless you use the Virtual Library option to split the tape library into
groups so that one has WORM media and the other does not. If you do this, you
can submit a multiplexing job to the group that does not have WORM media. For
more information about the Virtual Library option, see
Library in the chapter “Configuring Devices.”
Multiplexing
Configuring a Virtual
Multiplexing Global Options
BrightStor ARCserve Backup offers the following multiplexing global options:
■ Chunk Size—Sets the performance of restore operations and memory usage.
The chunk size value determines the amount of contiguous data written for
one session before data from another session is multiplexed. The higher the
value, the faster the restore on some drives, but at the cost of memory size
during backup. For most drives, the default value of 1 MB is recommended.
■ Maximum Number of Streams—Sets the maximum number of streams that
can write to a tape at the same time. The default number of streams is 4 and the
supported range is between 2 and 4. If you have the Enterprise Module
installed, the supported range is between 2 and 32.
Backing Up Data 3–27
Page 90
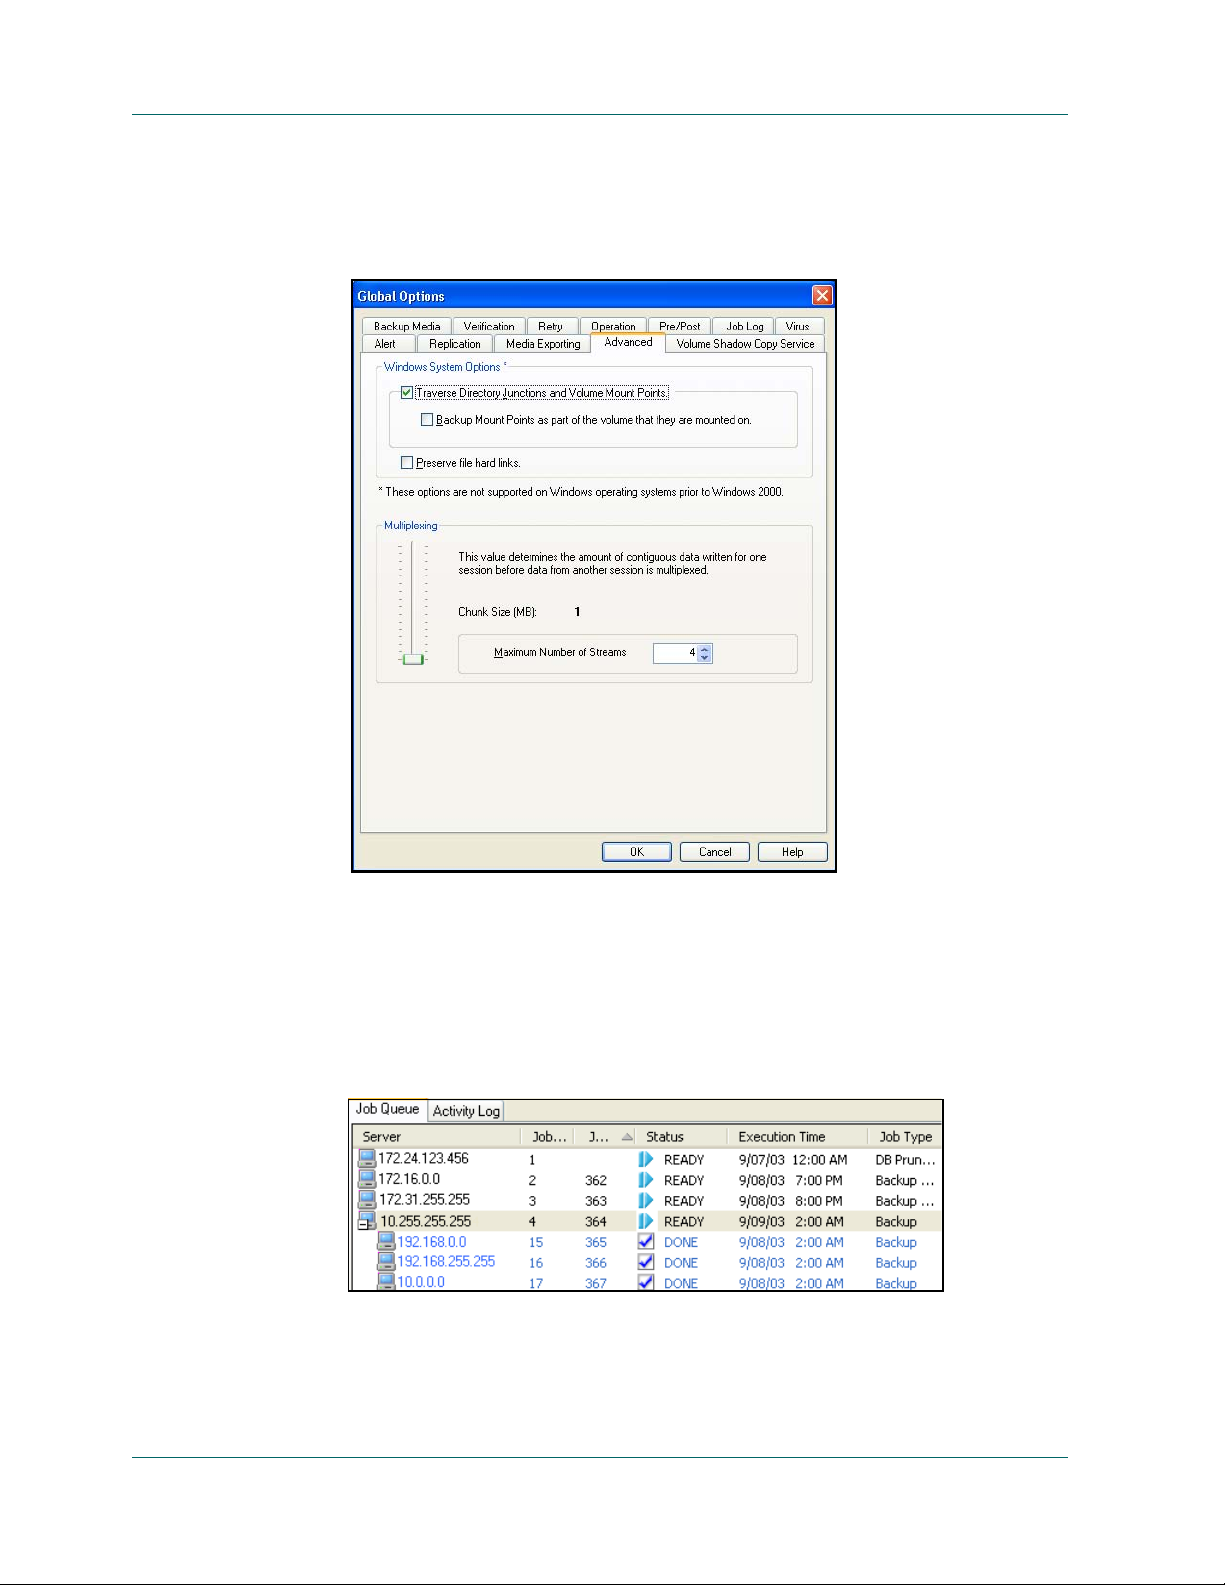
Multiplexing
To set the multiplexing global options, in the Backup Manager, click the Options
button. From the Advanced tab, move the slider to the desired chunk size value,
select the maximum number of streams value, and then click OK.
Monitoring the Status of Your Multiplexing Job
After you submit a multiplexing job, you can monitor its status from the job queue
in the Job Status Manager. In the Job Queue, multiplexing jobs appear in levels so
that you can view the parent and child job relationship—children jobs appear as
subjobs underneath the parent job:
3–28 Administrator Guide
Page 91

In addition, the status of the parent job is the highest severity status of a child. For
example, if Child 1 is successful, Child 2 is incomplete, and Child 3 has failed, the
parent job will have a FAILED status.
Verifying the Integrity of Your Multiplexing Data
If you want to verify the integrity of your data after your multiplexing job
completes, use the Scan Utility to enable the Scan files global option with CRC
verification and perform a scan media job. For more information about the Scan
Utility, see
and the online help.
Scan Utility in the chapter “Introducing BrightStor ARCserve Backup”
Submitting Jobs
From the Backup Manager, select Source, Destination, Schedule, specify the
options you require, and click Start to submit your job.
Submitting Jobs
1. When the Security and Agent Information page opens, edit or confirm the
security and agent information for your job, and click OK.
2. When the Submit Job page opens, select Run Now to run the job immediately,
or select Run On and select a future date and time when you want the job to
run.
3. Enter a description for your job.
4. If you selected multiple sources to back up and want to set the priority in
which the job sessions initiate, click Source Priority. Use the Top, Up, Down,
and Bottom buttons to change the order in which the jobs are processed. When
you finish setting priorities, click OK.
5. On the Submit Job page, click OK to submit your job.
For more information on submitting jobs using the Backup Wizard, see the
BrightStor ARCserve Backup Getting Started.
Preflight Checks for Your Backups
The preflight check (PFC) utility enables you to run vital checks on the BrightStor
ARCserve Backup server and agents to detect conditions that may cause backup
jobs to fail. The checks performed by PFC fall into four categories: system checks,
BrightStor checks, agent checks, and media checks:
■ System Checks—These include checking system requirements for the server,
available disk space for the database, and RPC service registration.
Backing Up Data 3–29
Page 92

Disaster Recovery
■ BrightStor Checks—These include checking the BrightStor ARCserve Backup
system account and its privileges, the status of the BrightStor engines, SAN
server connectivity (if the BrightStor ARCserve Backup SAN Option is
installed), and the health of the tape devices attached to the server.
■ Agent Checks—These include checking the connection and credentials for any
client and database agents needed for the job.
■ Media Checks—These include checking the availability of media in the scratch
set (if a media pool is specified for the job), checking the media expiration
dates, and checking for source and destination conflicts for File System
Devices.
The optimum time to run this command is a couple of hours before your jobs are
scheduled to run so that you can have ample time to correct any problems that may
appear in the PFC report. For more information on the PFC utility and its
associated options, see the appendix “
Disaster Recovery
Command Line Utilities.”
To ensure against data loss, maintain current backups of all your servers and
workstations. If you do not have these backups, BrightStor ARCserve Backup is
limited in its ability to recover data. Be sure to create a media rotation scheme and
a schedule to maintain current backups.
By default, the BrightStor ARCserve Backup server always generates or updates
disaster recovery information for all full backup systems, even when the
BrightStor ARCserve Backup Disaster Recovery Option is not installed. This
ensures that the latest backup information is always available if the BrightStor
ARCserve Backup Disaster Recovery Option is installed a later time.
Note: To disable the BrightStor ARCserve Backup server from generating or
updating the disaster recovery information, create and set the following registry
key value to 1 on the BrightStor ARCserve Backup server machine:
HKEY_LOCAL_MACHINE\SOFTWARE\Computer Associates\ BrightStor ARCserve
Backup
\Base\Task\backup\SkipDRSession
See the BrightStor ARCserve Backup Disaster Recovery Option Guide for more
information.
3–30 Administrator Guide
Page 93

Backing Up BrightStor ARCserve Backup for Laptops & Desktops Data
Backing Up BrightStor ARCserve Backup for Laptops &
Desktops Data
If you use BrightStor® ARCserve® Backup for Laptops & Desktops, you can use
BrightStor ARCserve Backup to back up your BrightStor ARCserve Backup for
Laptops & Desktops data to media to protect yourself against the possibility of a
disaster on your BrightStor ARCserve Backup for Laptops & Desktops server.
Follow these steps to back up a BrightStor ARCserve Backup for Laptops &
Desktops server.
Note: All BrightStor ARCserve Backup for Laptops & Desktops data on the
BrightStor ARCserve Backup for Laptops & Desktops server is backed up.
1. Add the computer running the BrightStor ARCserve Backup for Laptops &
Desktops server as a Client Agent. Perform the following steps:
a. Right-click the Windows NT/2000/XP/2003 Systems item in the Source
tree.
b. Select Add Machine/Object from the pop-up menu.
c. Enter the required information in the Add Agent dialog. For help with the
Add Agent dialog, click the Help button.
2. Expand the BrightStor ARCserve Backup for Laptops & Desktops server
computer's node in the Source tree and select the BrightStor ARCserve Backup
for Laptops & Desktops server box (it will turn green).
3. Submit the backup job as you would any other.
Tip: After you have added the computer running the BrightStor ARCserve
Backup for Laptops & Desktops server as a Client Agent, you can use the Backup
Wizard to submit your backup job.
Backing Up Data 3–31
Page 94

Backing Up BrightStor ARCserve Backup for Laptops & Desktops Data
Managing Migrated Files
To help manage the space on backup servers, BrightStor ARCserve Backup for
Laptops & Desktops administrators have the option of migrating old backup data
to a BrightStor ARCserve Backup server. The administrator defines criteria for old
backup data—such as size and the date the file was last modified—on the
BrightStor ARCserve Backup for Laptops & Desktops server. Migrating old
backup data helps conserve space on the BrightStor ARCserve Backup for Laptops
& Desktops server and provides a safe way to archive these files.
Over time, however, some of these file can become obsolete or expired. This can
happen when:
■ The BrightStor ARCserve Backup for Laptops & Desktops server restores the
file to its local storage area, returning the file to the BrightStor ARCserve
Backup for Laptops & Desktops server.
■ The BrightStor ARCserve Backup for Laptops & Desktops server submits a
newer version of a file; older versions of the file with the same name on the
tape become obsolete and can no longer be used.
■ The BrightStor ARCserve Backup for Laptops & Desktops client to whom the
files belong is completely deleted from the server storage area.
In all cases, these files are marked as “expired” in the BrightStor ARCserve Backup
database.
This expiration of files results in a situation in which parts of the data stored on the
BrightStor ARCserve Backup for Laptops & Desktops-dedicated tape are no longer
needed, and the tape can be reused and placed in the BrightStor ARCserve Backup
scratch set. The following are guidelines for reusing such BrightStor ARCserve
Backup media:
■ If all files on a tape are no longer being used, the tape can be reused.
■ If there are only a few files on the tape, the BrightStor ARCserve Backup
administrator can query the files, submit a restore, and free up the tape.
Note: Data Growth Restores cannot be performed on the session level.
3–32 Administrator Guide
Page 95

Chapter
Restoring Data
4
This chapter includes information on the various tools and options BrightStor
ARCserve Backup offers to let you safely and efficiently restore your data.
The Restore Wizard
The BrightStor ARCserve Backup Restore Wizard guides you through the process
of restoring your data. Using this wizard, you can submit a restore job to the
BrightStor ARCserve Backup job queue without using the Restore Manager. The
Restore Manager is provided to allow you to perform more customized restores
using filters, options, and scheduling. The wizard offers two restore methods:
■ Restore By Session (the default method)
■ Restore By Query
For more information on how to use the Restore Wizard, see the online help or the
BrightStor ARCserve Backup Getting Started.
The Restore Manager
The aim of running a successful restore job is to quickly identify the data you need
and to retrieve it from the appropriate backup media.
BrightStor ARCserve Backup allows you to restore data to most machines attached
to your Windows network. Each restore job requires a source and destination. The
files selected as your source must originate from a BrightStor ARCserve Backup
backup media, and the destination must be a hard drive. The Restore Manager
dialog provides three tabs to customize your restore job:
■ Source
■ Destination
■ Schedule
Restoring Data 4–1
Page 96

The Restore Manager
The optional BrightStor ARCserve Backup Client Agents allow you to
communicate with remote workstations in various environments to restore data to
non-Windows systems, such as NetWare or UNIX.
Similarly, the optional Backup Agents allow BrightStor ARCserve Backup to
restore online databases and applications such as MS Exchange, Lotus Domino,
MS SQL Server, Oracle, and IBM Informix.
For procedural information on how to submit a basic restore job, see the online
help.
If Unicenter NSM is already installed, you can use the monitoring agent to monitor
BrightStor ARCserve Backup. This agent can be used to start and stop services,
monitor the status of the BrightStor ARCserve Backup processes and media, and
report on the failure of backup jobs. For more information, see
Monitoring Agent in the chapter “Managing the Database and Reporting.”
Selecting the Source
The Unicenter
BrightStor ARCserve Backup makes it easy to find the files you want to restore.
Because your requirements and circumstances can vary, BrightStor ARCserve
Backup provides you with the following methods for selecting the data (the
source) you want to restore:
■ Restore by Tree—Restores a specific directory or drive from a display of files
and directories that were backed up with BrightStor ARCserve Backup. Use
this method when you do not know which media contains the data you need,
but you know which machine it came from. This view uses the BrightStor
ARCserve Backup database; if the database is stopped, this method of restore
will not work.
■ Restore by Session—Allows you to select the session, and the files and
directories you want to restore. Use this method when you know the media
name, but are not certain about the session you want to restore. This view uses
the BrightStor ARCserve Backup database; if the database is stopped, this
method of restore will not work.
■ Restore by Query—Restores files based on the search pattern used to locate the
names of the files or directories. Use this method when you know the name of
the file or directory you want to restore, but do not know the machine it was
backe d up f rom o r the m edia it wa s bac ked u p to. T his v iew u ses t he Br ightS tor
ARCserve Backup database; if the database is stopped, this method of restore
will not work.
■ Restore by Backup Media—Restores a complete backup session from a
specified media in a storage device. All files in the session are restored to the
destination, unless filters are added to the restore job. Use this method when
media was created by a different version of BrightStor ARCserve Backup or if
the database does not recognize it.
4–2 Administrator Guide
Page 97

Important! If you cannot see the items that you would like to restore, the corresponding
records may have been pruned from your database. You can repopulate your restore source
selection by running the Merge utility. For more information about the Merge utility, see
the section
Note: If you have installed the BrightStor® ARCserve® Backup Image Option, you
will also have Restore by Image/Serverless available. Use this method when you
need to read and restore blocks of data quickly by bypassing the file system.
For more information on how to submit a restore job using each of these methods,
see the online help.
Multiple Code Pages
For more information about code pages, see the section Understanding How
BrightStor ARCserve Backup Supports Multiple Code Pages in the chapter
“Backing Up Data.”
The Restore Manager
Merge Utility, in the chapter “Introducing BrightStor ARCserve Backup.”
Specifying Code Pages
You can change the code page on all tree items in the source tree. To specify a code
page, use the following steps:
1. From Source tab on the Restore Manager window, right-click the node,
volume, or directory for which you want to specify a code page.
2. From the Display Encoding right-click menu, select desired code page.
BrightStor ARCserve Backup applies the new code page settings immediately.
Selecting the Destination
BrightStor ARCserve Backup provides you with two methods for selecting the
destination you want to restore the data to:
■ Restore files to their original location
■ Restore to user-shared directories and drives
Note: The default method is to restore files to their original location. If you
deselect this check box, you are presented with a list of machines, directories and
files. You can select your specific destination from this list.
Restoring Data 4–3
Page 98

The Restore Manager
For information on how to select a destination, see the online help.
Defining a Schedule
Jobs can be submitted so that they repeat as follows:
■ Once—Do not repeat this job.
■ Every n frequency—Repeat this job every specified number of Minutes,
■ Day(s) of the Week—Repeat this job on the days that are checked off.
Hours, Days, Weeks, or Months.
■ Week(s) of the Month—Repeat this job on the weeks that are checked off.
■ Day of the Month—Repeat this job on the specified day.
■ Custom—Repeat this job on the month, day, hour, or minute specified.
Note: If you select the Run Job Now option when your storage device is busy,
BrightStor ARCserve Backup reports that the storage device is busy and the job is
not submitted to the job queue. You should schedule your job, keeping the current
date and time. This way, when BrightStor ARCserve Backup discovers that the
storage device is busy, it automatically retries the job until the drive becomes free.
For a description of detailed job scheduling features, see the chapter “Customizing
Your Jobs” or the online help.
4–4 Administrator Guide
Page 99

Restore Options
This section describes the global restore options you can select when submitting
your restore job. To access the global options dialog, click the Options button in the
Restore Manager. The available option tabs are:
■ Backup Media
■ Destination
■ Operation
■ Pre/Post
■ Job Log
■ Virus
■ Alert
Backup Media Options
Restore Options
Destination Options
You can specify a time out period that BrightStor ARCserve Backup will wait to
provide the media you need to restore your data. Available media options are:
■ Time-out for First Backup Media—Period of time that BrightStor ARCserve
Backup waits for the first media required for your restore job. If the time
expires, the job fails.
■ Timeout for Additional Backup Media—Period of time that BrightStor
ARCserve Backup waits for any additional media to become available.
Using this option, you can determine how the directory structure is created on the
destination when files are restored and which files (if any) can be overwritten.
■ Directory Structure Options—select the method that BrightStor ARCserve
Backup should use to create directories:
– Do Not Create the Base Directories—(default) Do not create the base
directory on the destination path, but create all subdirectories below the
source base directory.
– Create Directories from the Base—Create the destination path beginning
from the base directory.
– Create Entire Path from the Root—Create the entire source path on the
destination. No files from any parent directories are restored. Only the
directory path to the base directory is created on the destination.
Restoring Data 4–5
Page 100

Restore Options
■ File Conflict Resolution Options—select the method that BrightStor ARCserve
Backup should use when there are files on the destination disk that have the
same name as files being copied from the source:
– Overwrite All Files—Restore all source files to the destination regardless
of conflicting file names. The files from the source will overwrite existing
files on the destination.
– Rename Files—Copy the source file to the destination with the same file
name but a different extension. The extension maintains the first two
characters of the original, but the last character will be 1, 2, 3..., depending
on how many files BrightStor ARCserve Backup has encountered with the
same name.
– Skip Existing Files—Do not restore a source file if a file with the same
name already exists on the destination.
– Overwrite with Newer Files Only—Only restore source files whose
modification date is later than the modification date of the file with the
same name on the destination.
– Confirm Overwrites (for Run Now only)—Before BrightStor ARCserve
Backup tries to restore the source file, you will be prompted to confirm
that you want the file on the destination to be overwritten when
submitting a Run Now job.
■ VMS File Version Options—Select one of the following options to determine
how BrightStor ARCserve Backup should act when restoring VMS files that
have the same names and version numbers as the files in the target restore
directory:
– Create New File Version—BrightStor ARCserve Backup will restore all
files as new versions of the original. The files in the target directory will
not be affected.
– Restore File Version (Overwrite)—If a file in the target directory has the
same name and version number as a file in the restore data, BrightStor
ARCserve Backup will overwrite the file.
– Restore File Version (No Overwrite)—If a file in the target directory has
the same name and version number as a file in the restore data, BrightStor
ARCserve Backup will not restore the file. All other files will be restored
with their original names and version numbers.
4–6 Administrator Guide
 Loading...