

Page 1
Welcome to the TrackEASE Smart System
®
Blood Glucose Monitoring System
Congratulations on your purchase of the TrackEASE
Smart System
®
Blood Glucose Monitoring System. You
now have a very simple and accurate way to test your
blood glucose (sugar) level, anytime, anywhere.
Our Commitment to You
Our goal is to provide you with quality healthcare
products and dedicated customer service. If you have
questions about using TrackEASE Smart System
®
products, visit our web site at:
www.homediagnostics.com.
Caution! Please read complete Owner’s
Booklet and all product Instructions for Use.
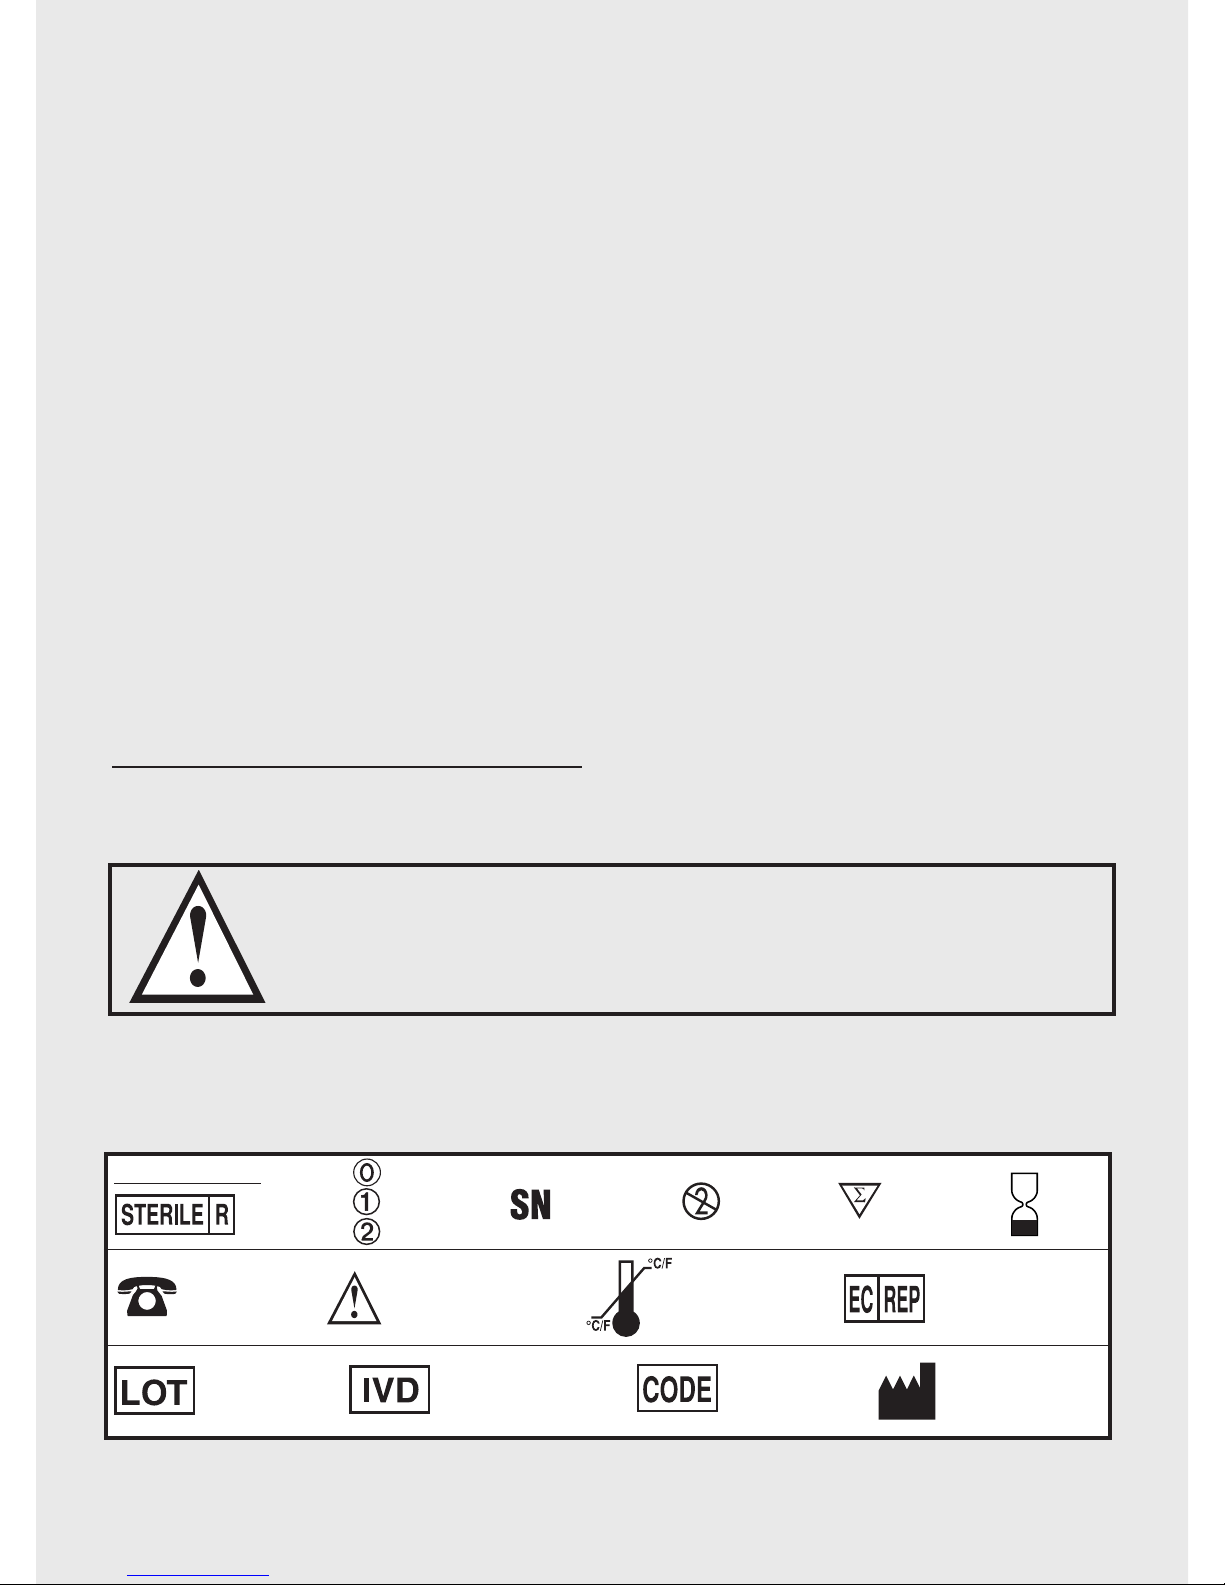
i
For
Assistance
Call
Use
By
Date
Lot
Number
For in vitro
Diagnostic
Testing Only
Authorized
Representative
Sterile
Number
of Tests
Control
Level
SYMBOLS:
Code
Number
Single
Use
Only
Attention! Read
Instructions
for Use.
Storage
Temperature
Range
Manufactured
By
Serial
Number
Page 2

ii
Importance of Blood Glucose Monitoring
The more you know about diabetes, the better you are
able to take care of yourself. As you meet with your
Doctor or Diabetes Healthcare Professional, you will
work together to determine the target range for your
blood glucose results and how often you should test.
Having the majority of your results within your target
range helps delay or prevent complications of diabetes.
Using the TrackEASE Smart System
®
Blood Glucose
Monitoring System for self-testing shows you and your
Doctor or Diabetes Healthcare Professional how well
your daily treatment plan is working to control your
blood glucose. Do not make changes to your treatment
plan without discussing with your Doctor or Diabetes
Healthcare Professional.
The TrackEASE Smart System
®
is intended for in vitro
(outside the body) testing only, and is not for the
diagnosis of diabetes or for testing blood glucose in
newborns.
Use of the TrackEASE Smart System
®
Blood Glucose
Monitoring System in a manner not specified in this
Owner’s Booklet is not recommended and may affect
your ability to determine your blood glucose.
Page 3
iii
Important Information
Important: For the best possible performance from
TrackEASE Smart System
®
we recommend you:
• Read all instructions before you begin to test.
• Perform Check Strip and Glucose Control Tests
before testing your blood.
Note:
Glucose Control may not always be
included. Check Contents List on outside
packaging. If Glucose Control is not listed,
contact place of purchase.
• Check Codes. Code in Meter Display must match
Code on vial of TrackEASE Smart System
®
Test
Strips being used and Code Number printed on Code
Chip.
•
Use only TrackEASE Smart System®Test Strips
and TrackEASE Smart System
®
Glucose Control
with TrackEASE Smart System
®
Meter.
• Use only fresh capillary whole blood samples for
testing. TrackEASE Smart System
®
is not
recommended for use with venous samples. Meter
displays results in
Plasma values.
• The TrackEASE Smart System®is recommended
for testing of human whole blood only.
Page 4

iv
Health Related Information
• Severe dehydration and/or excessive water loss
may cause false low results.2If you believe you
are suffering from severe dehydration, contact
your Doctor or Diabetes Healthcare Professional
immediately.
• Test results equal or below 80 mg/dL (4.4
mmol/L) indicate low blood glucose
(hypoglycemia).3Test results greater than 250
mg/dL (13.9 mmol/L), indicate high blood
glucose (hyperglycemia).4Perform another
blood test to assure that your results are correct.
If you continue to get similar results and you are
having symptoms that suggest glucose is too low
or too high, follow the treatment advice given by
your Doctor or Diabetes Healthcare
Professional.
Page 5

Table of Contents
Fast Test Guide ...........................................inside front cover
Your Target Blood Glucose Range .............inside back cover
Introductory Information ...................................................i-v
Know Your System
Meter .............................................................................1-3
Test Strip ..........................................................................4
Test Strip Vial Label .........................................................5
Getting Started
Turning Meter On and Off................................................6
Meter Set Up (Time, Date, Units of Measure) .............7-8
Coding .........................................................................9-10
Quality Control Tests ......................................................11
Check Strip Test ..........................................................11
Glucose Control Test..............................................12-15
Testing your Blood
Obtain a Blood Sample.................................................16-17
Testing Blood Glucose..................................................18-19
Result Warning Messages ..................................................20
Meter Memory
Viewing Results in Memory ..............................................21
Care and Troubleshooting
Caring for TrackEASE Smart System®.........................22-23
Battery Installation .............................................................24
Troubleshooting..................................................................25
Display Messages ......................................................26-28
Meter Specifications ..........................................................29
Chemical Composition.......................................................30
Meter Warranty ......................................................................31
References..............................................................................32
v
Page 6
KKNNOOWW YYOOUURR SSYYSSTTEEMM
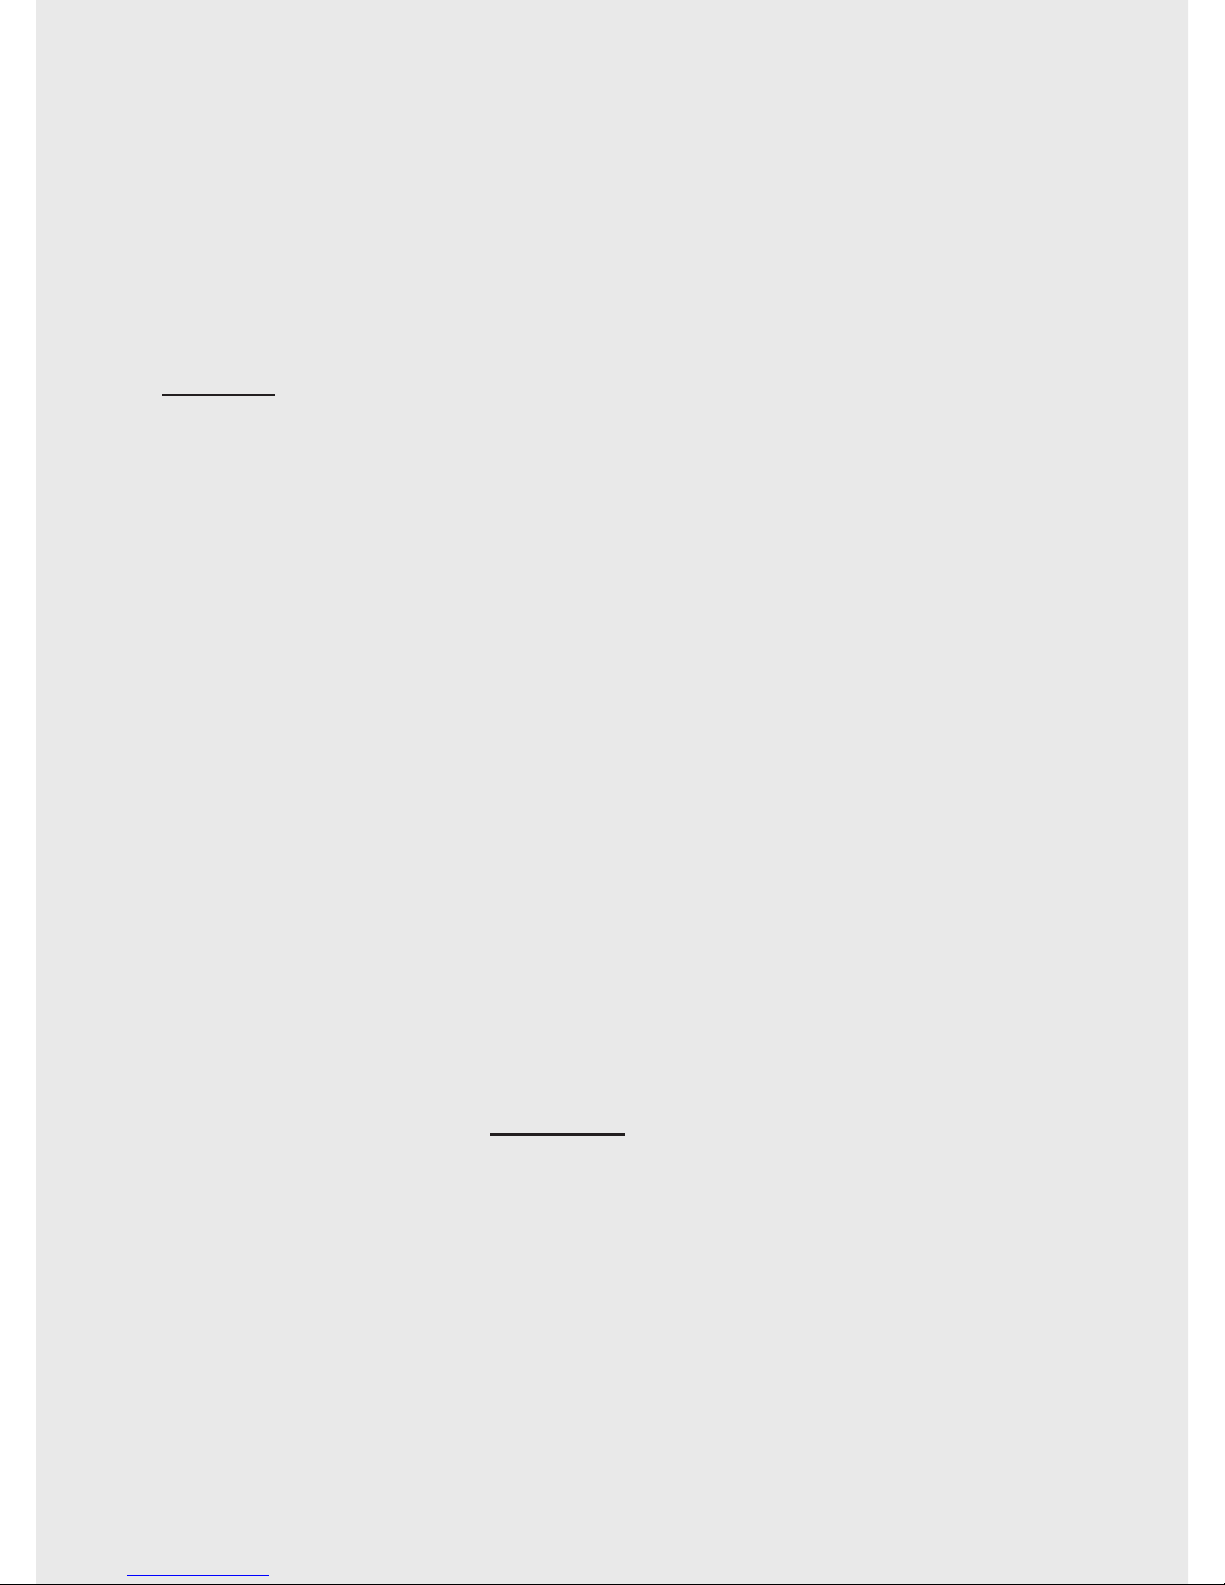
Know Your System
Meter
➀ Button - Decrease numbers in Set Up;
remove Control Symbol; move backward by date
when viewing results in Memory.
➁ Button - Select settings; view results in
Memory.
➂ Button - Increase numbers in Set Up; add
Control Symbol; move forward by date when
viewing results in Memory.
➃ Display - Shows test results, messages and other
information.
➄ Test Port - Insert TrackEASE Smart System
®
Test Strip or Check Strip here.
1
Top of Meter
1 32
5
4
Front of Meter
Page 7
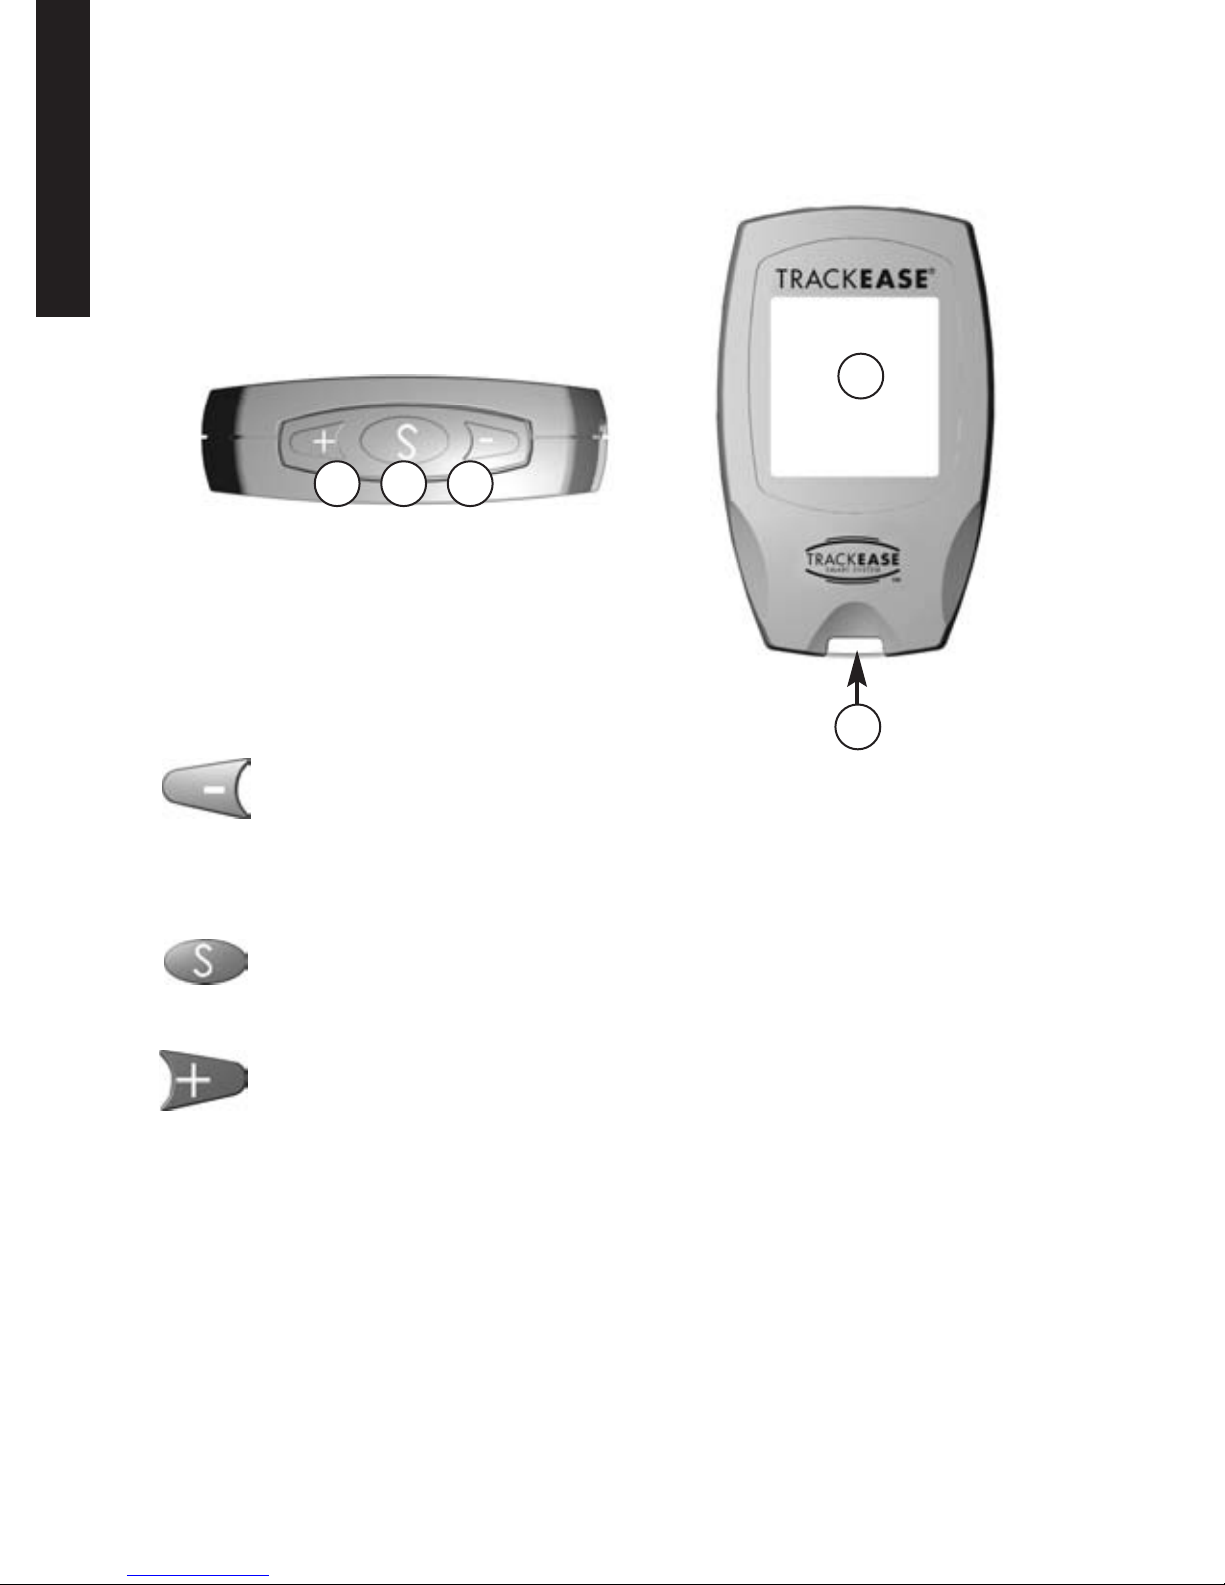
KKNNOOWW YYOOUURR SSYYSSTTEEMM
➅ Code Chip Port - Insert the Code Chip here.
➆ Battery Compartment - Use one
non-rechargeable 3V Lithium Battery
(#CR2032), positive (“+”) side up.
Note:
See Pg. 24 for details on discarding old
battery.
➇ Meter Label - Contains telephone number for
assistance.
➈ Serial Number Label - Identifies Meter when
calling for assistance.
2
7
6
8
9
C1027
6
Back of Meter
Left Side of Meter
Page 8
4
3
2
1
765
8
9
10
3
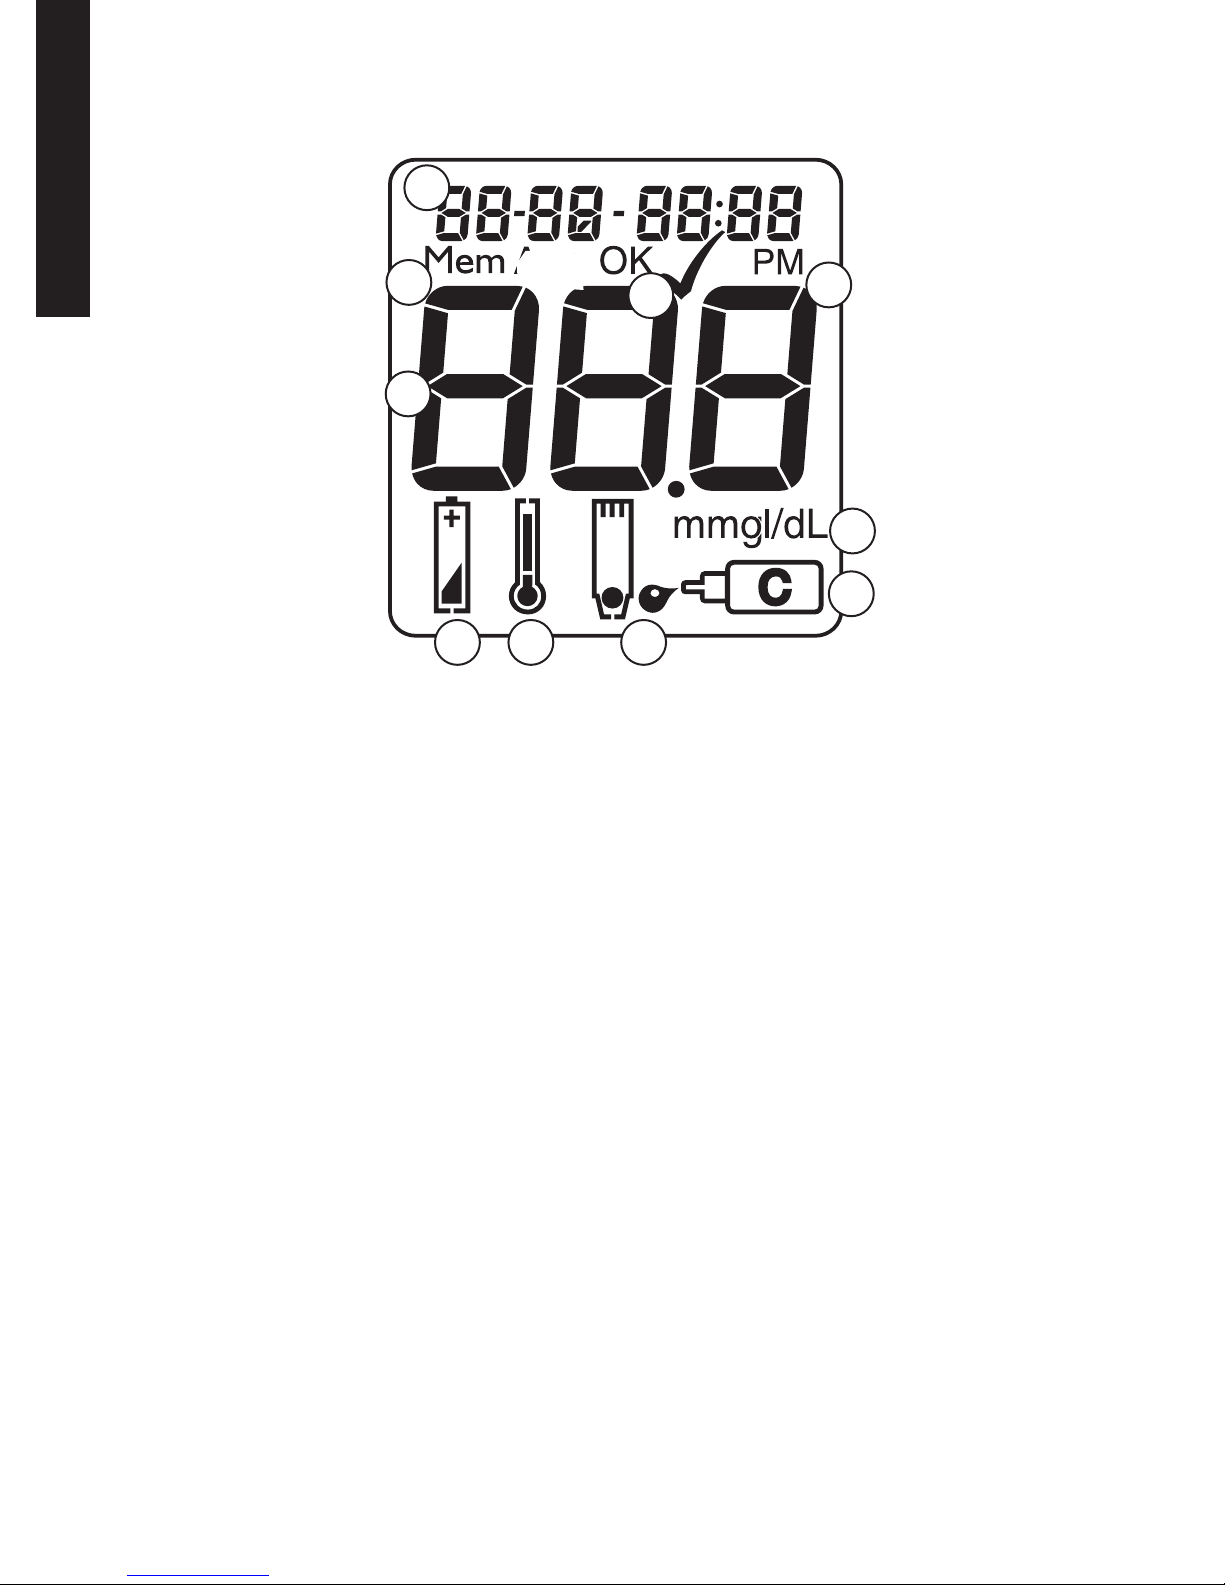
Display
1. Time, Date, Code.
2. Test Result in Memory.
3. Check Strip Test correct.
4. Test results.
Note:
A decimal point appears when results
are in mmol/L.
5. Battery Symbol (see
Display Messages).
6. Temperature Symbol (see
Display Messages).
7. Apply Sample Symbol.
8. Control Symbol (see
Glucose Control Test).
9. Glucose Units of Measure.
10. Time is P.M.
Note:
AM does not appear.
KKNNOOWW YYOOUURR SSYYSSTTEEMM
Page 9
KKNNOOWW YYOOUURR SSYYSSTTEEMM
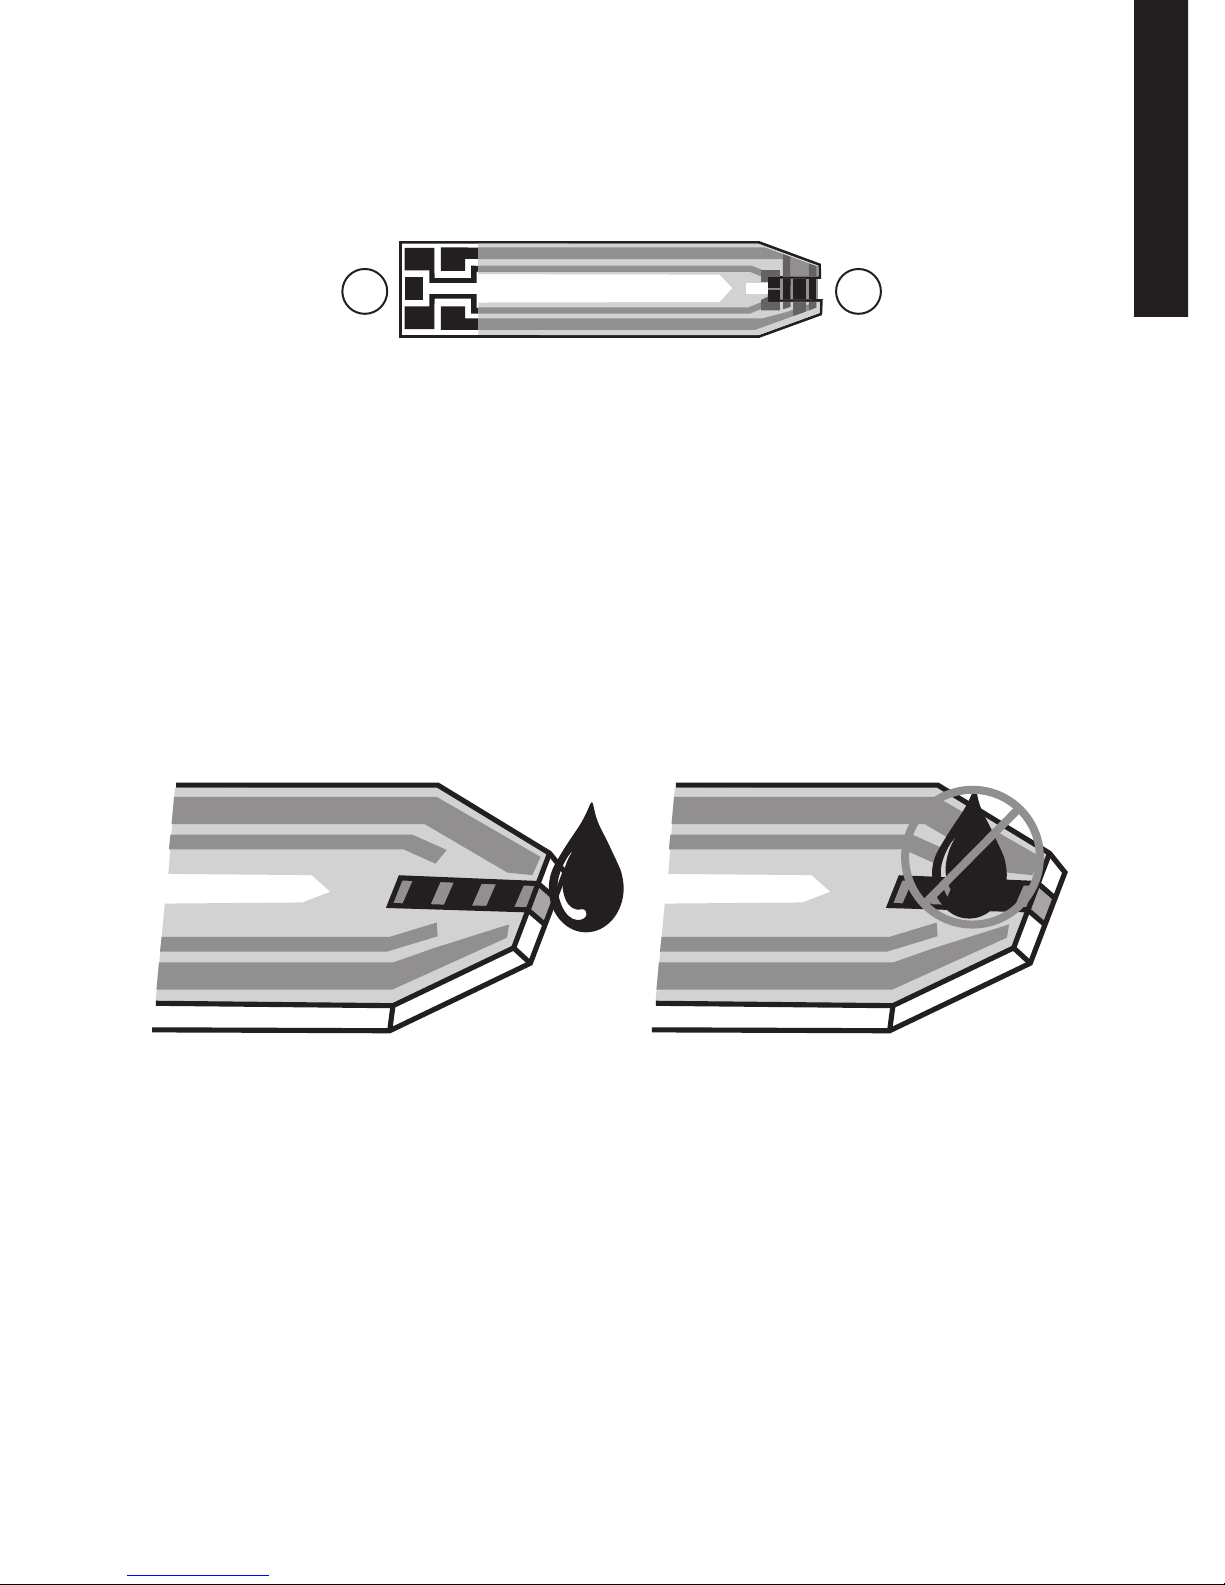
4
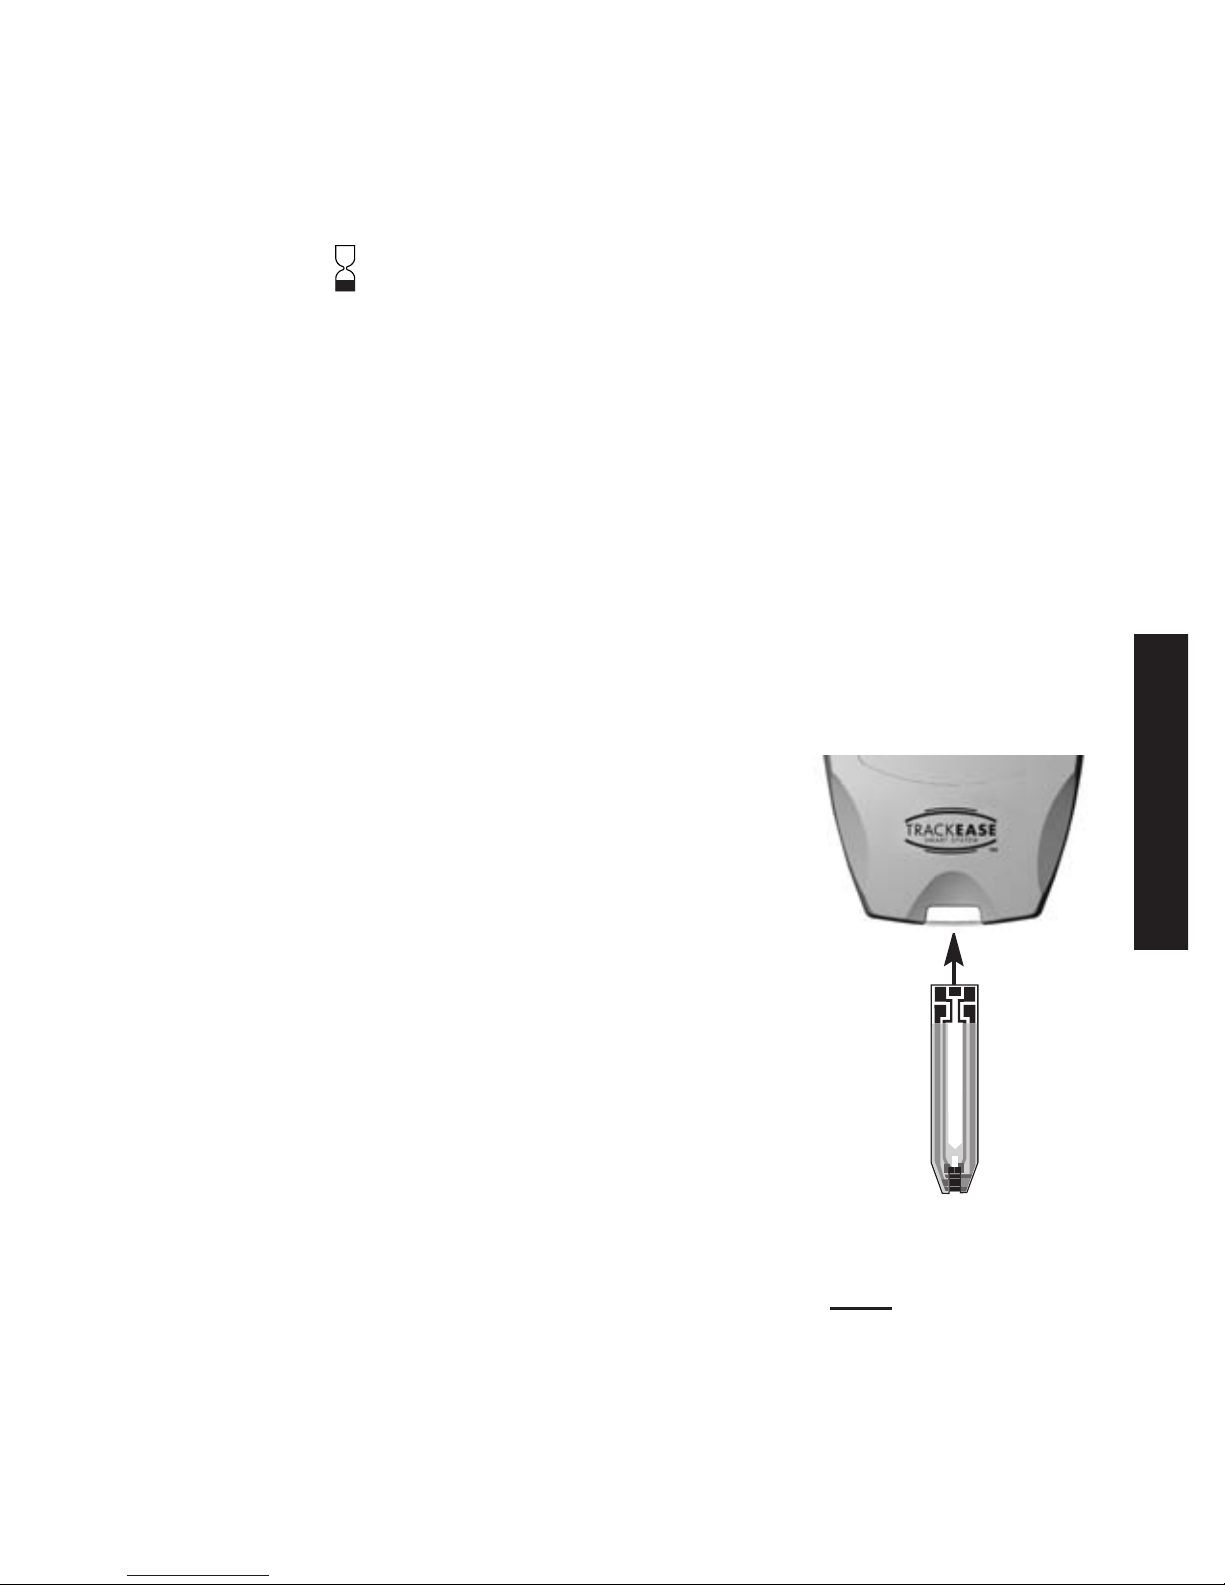
➀ Contact End -
Insert into Meter with Contacts
(metallic blocks) facing up
.
➁ Sample Tip - Place sample (blood or Glucose
Control) to edge of Tip.
Placement of Sample to Test Strip
Correct Incorrect
Note:
Do not apply blood or Glucose Control to
top of Test Strip!
Use Strip quickly after removal from vial.
Strips that have been left out of vial too
long will give error message when used.
Test Strip
1 2
Front of Test Strip
Page 10
1
2
3
2
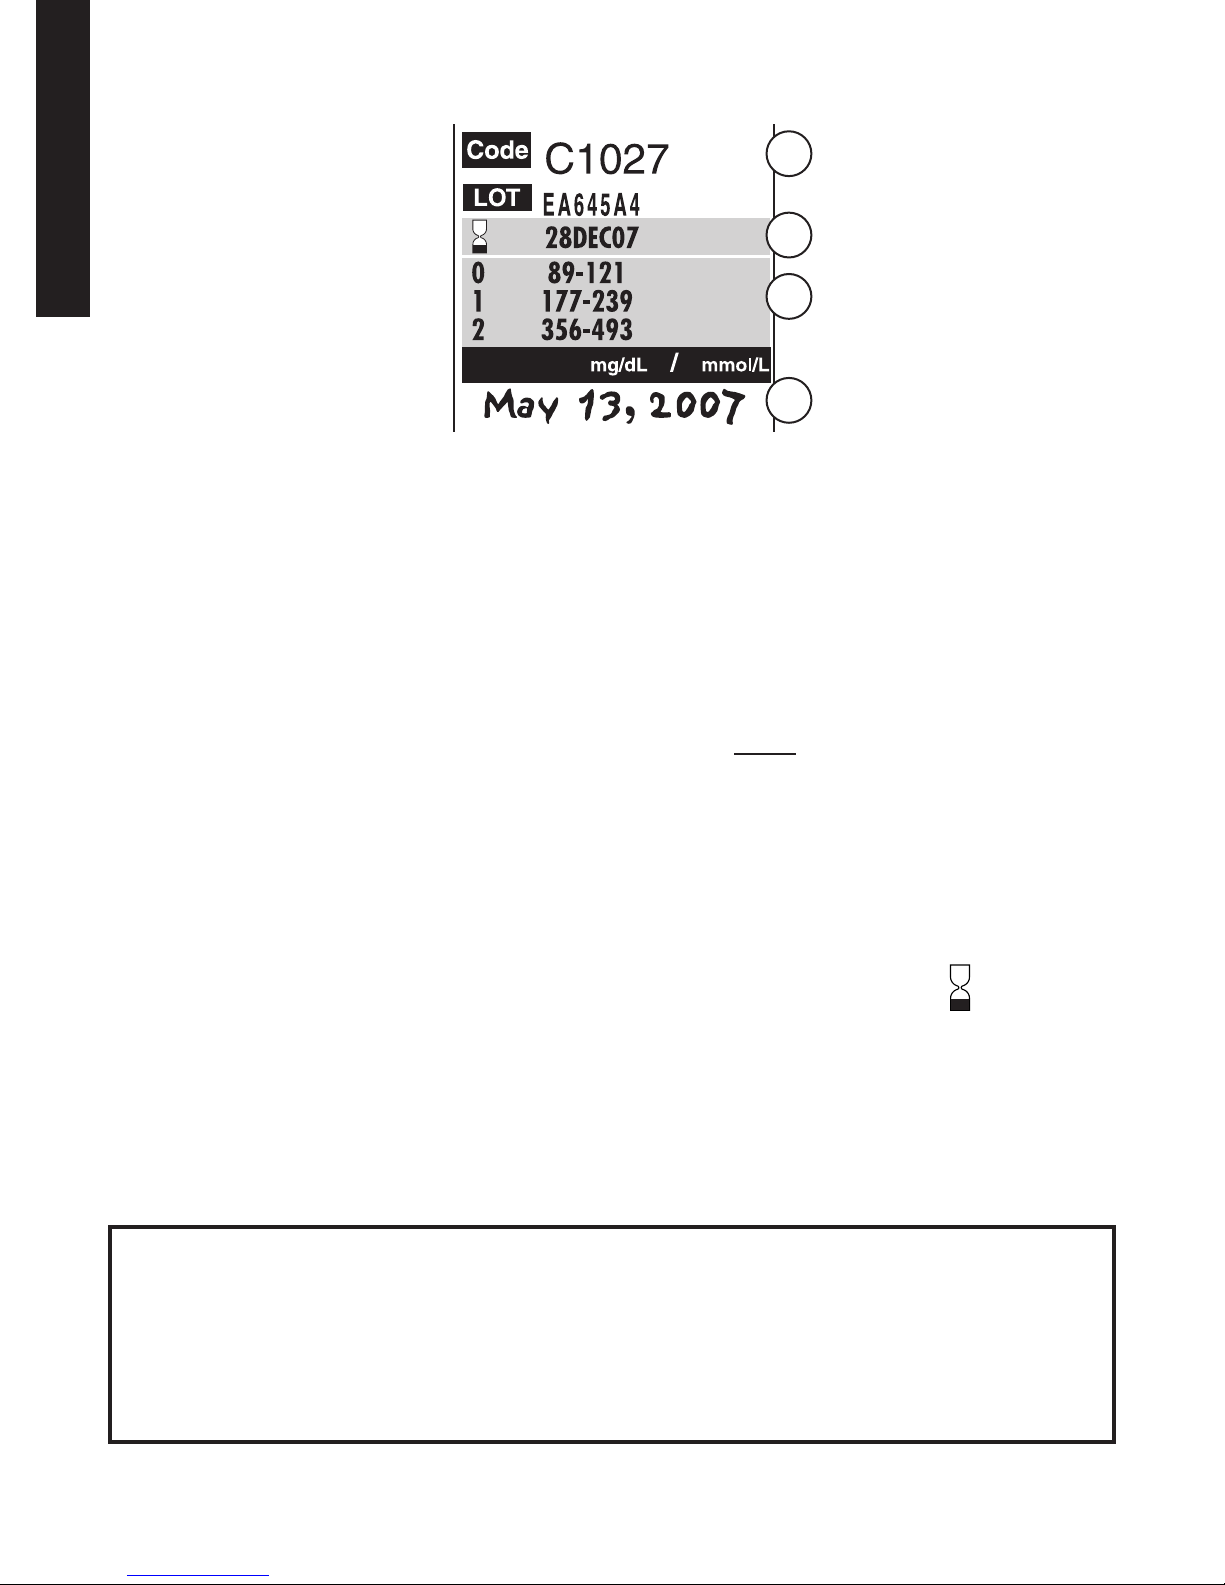
Test Strip Vial Label
➀ Code - Match Code in Meter Display with Code
on Code Chip
and Code on Test Strip vial label
before testing. All Codes MUST match for
accurate results.
Note: Letter printed before number on Code Chip
and vial label Code will not
appear in
Meter Display. See
Coding for further
details.
➁ Use by Dates - Write date first opened on vial
label. Discard vial and unused Strips 120 days
after written date or date printed next to
symbol, whichever comes first.
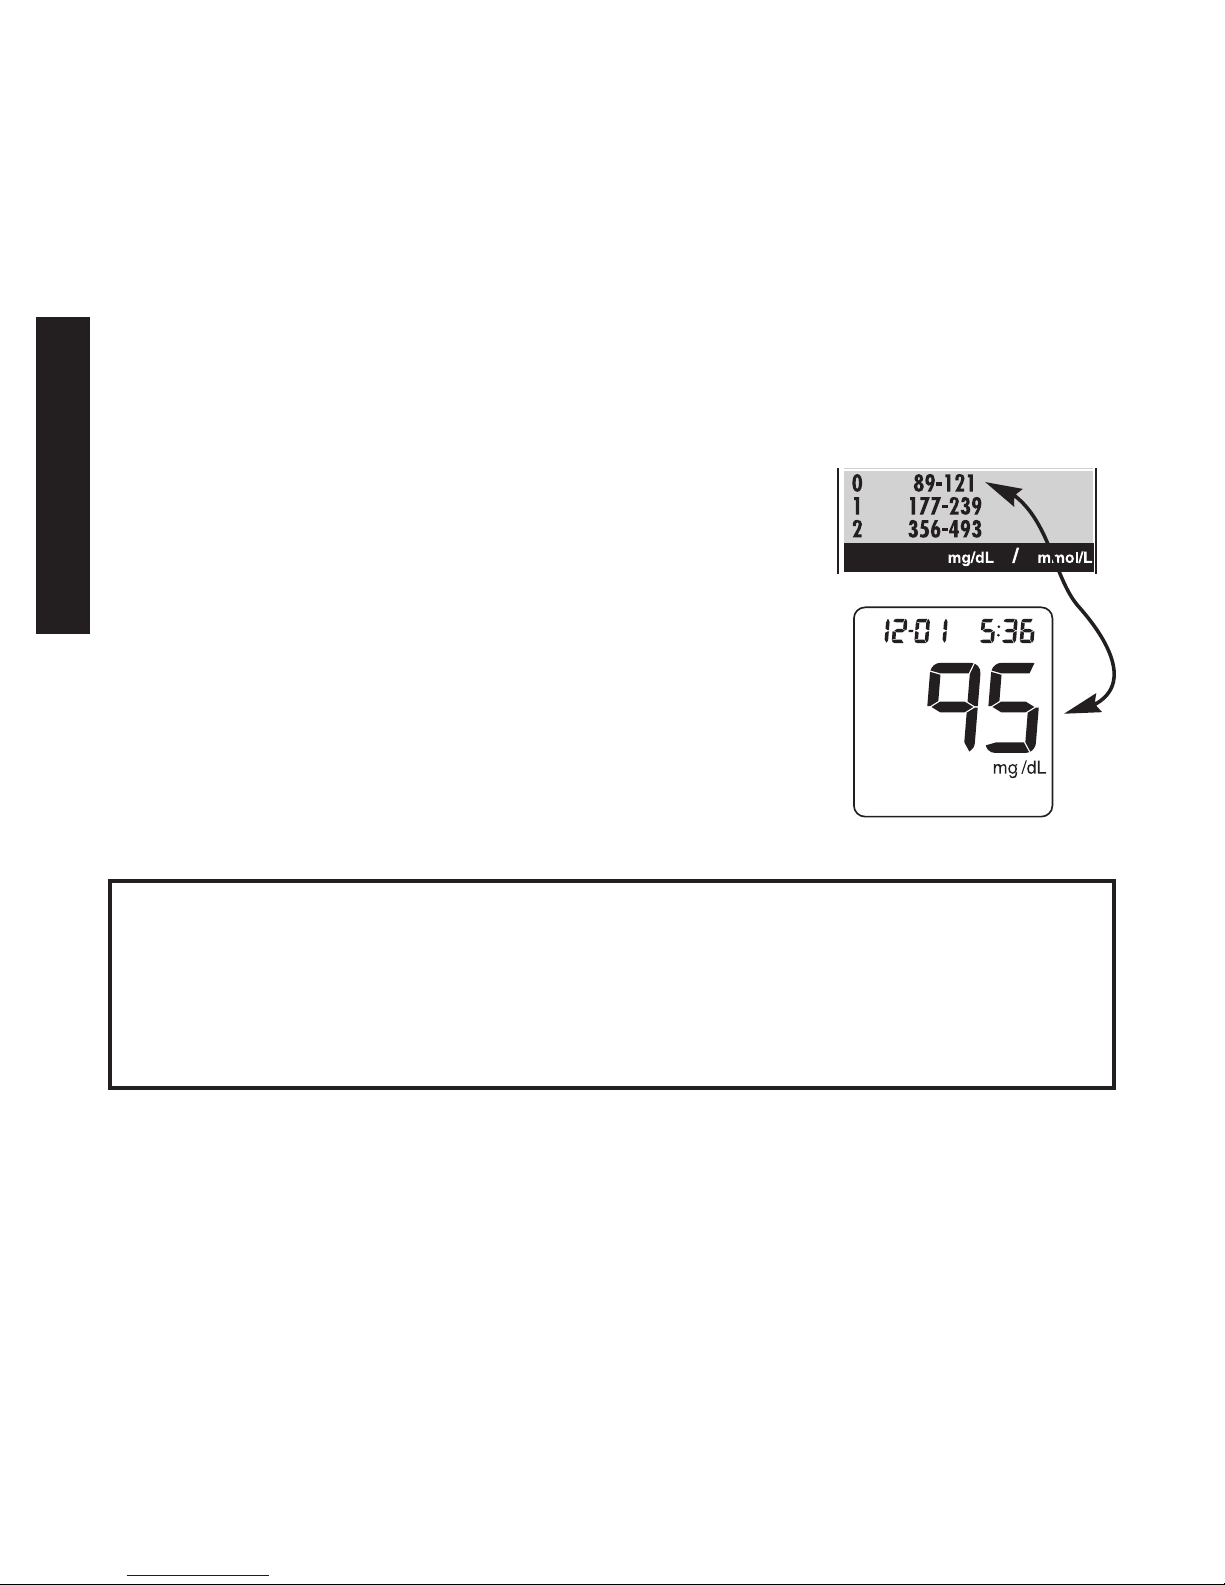
➂ Glucose Control Level Range - Range of
numbers in which Glucose Control Test result
must fall to assure System is working properly.
Caution!
Use of Test Strips or Glucose Control past
the Use by Dates may give inaccurate or
incorrect test results. Discard out-of-date
products and test with new products.
5
KKNNOOWW YYOOUURR SSYYSSTTEEMM
Page 11
GGEETTTTIINNGG SSTTAARRTTEEDD
Getting Started
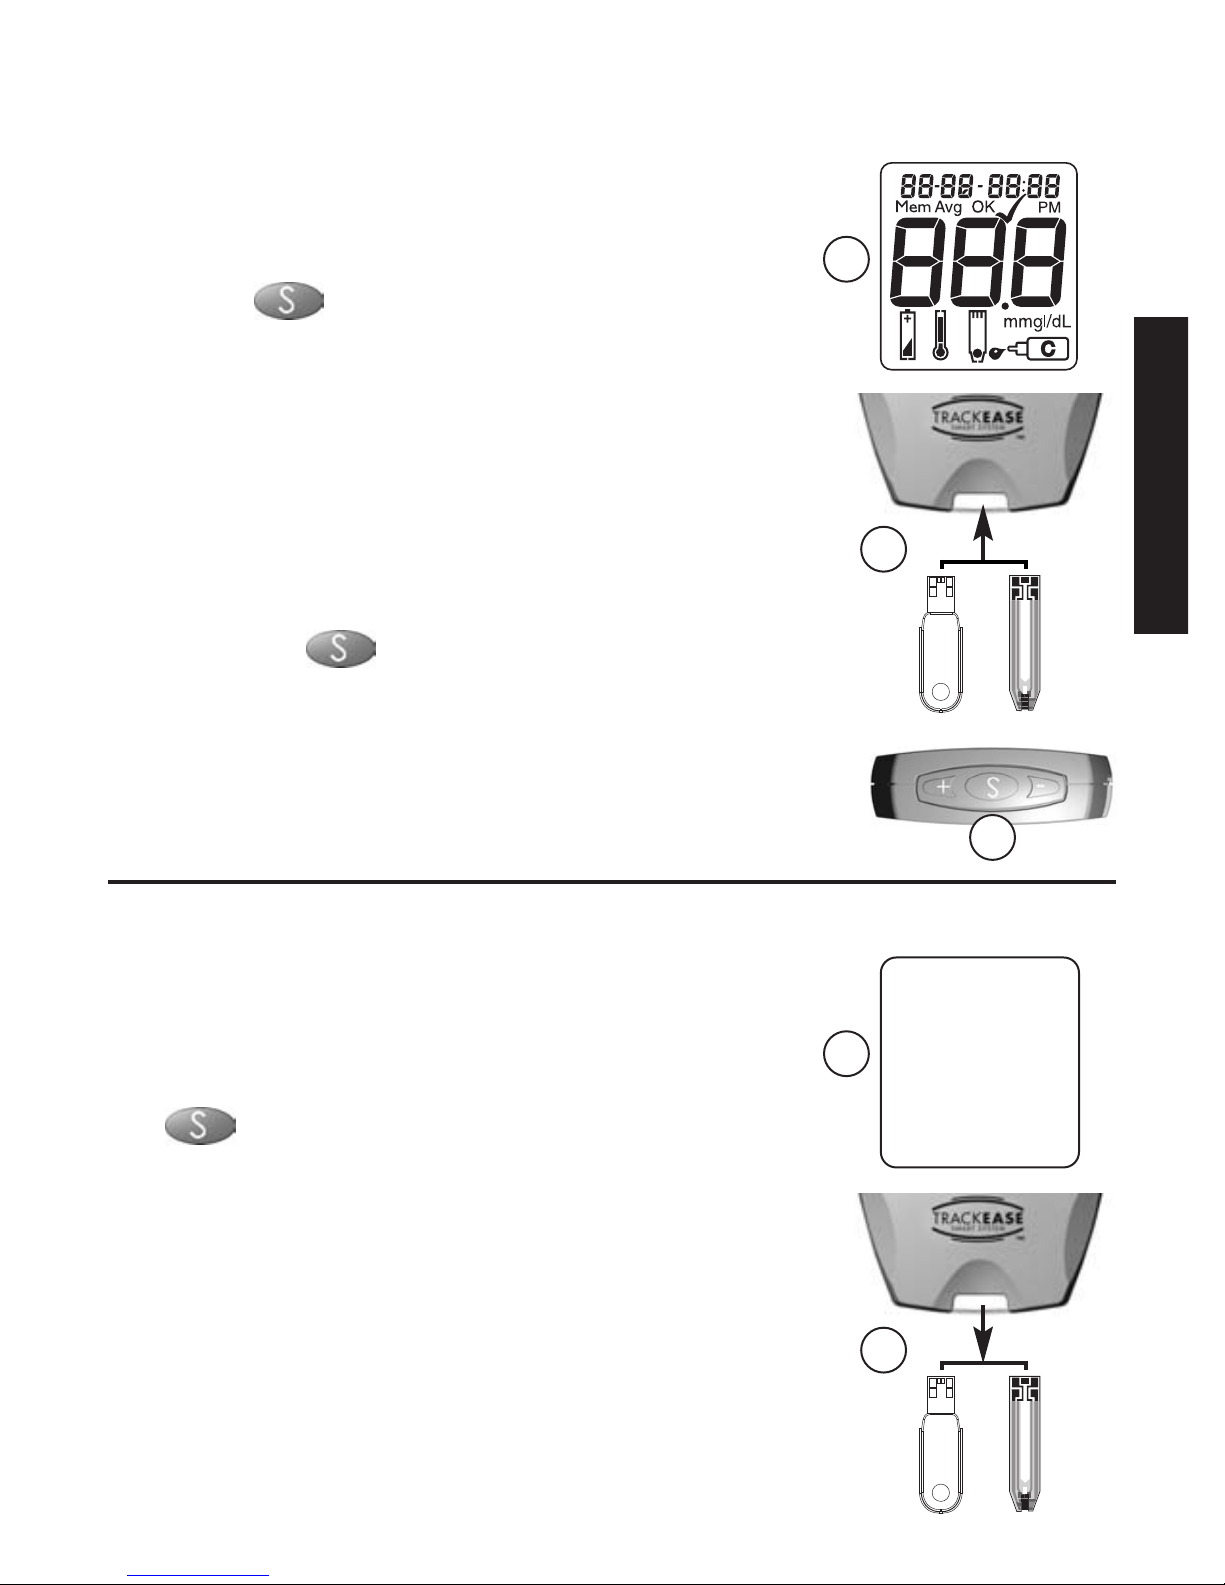
To Turn Meter On…
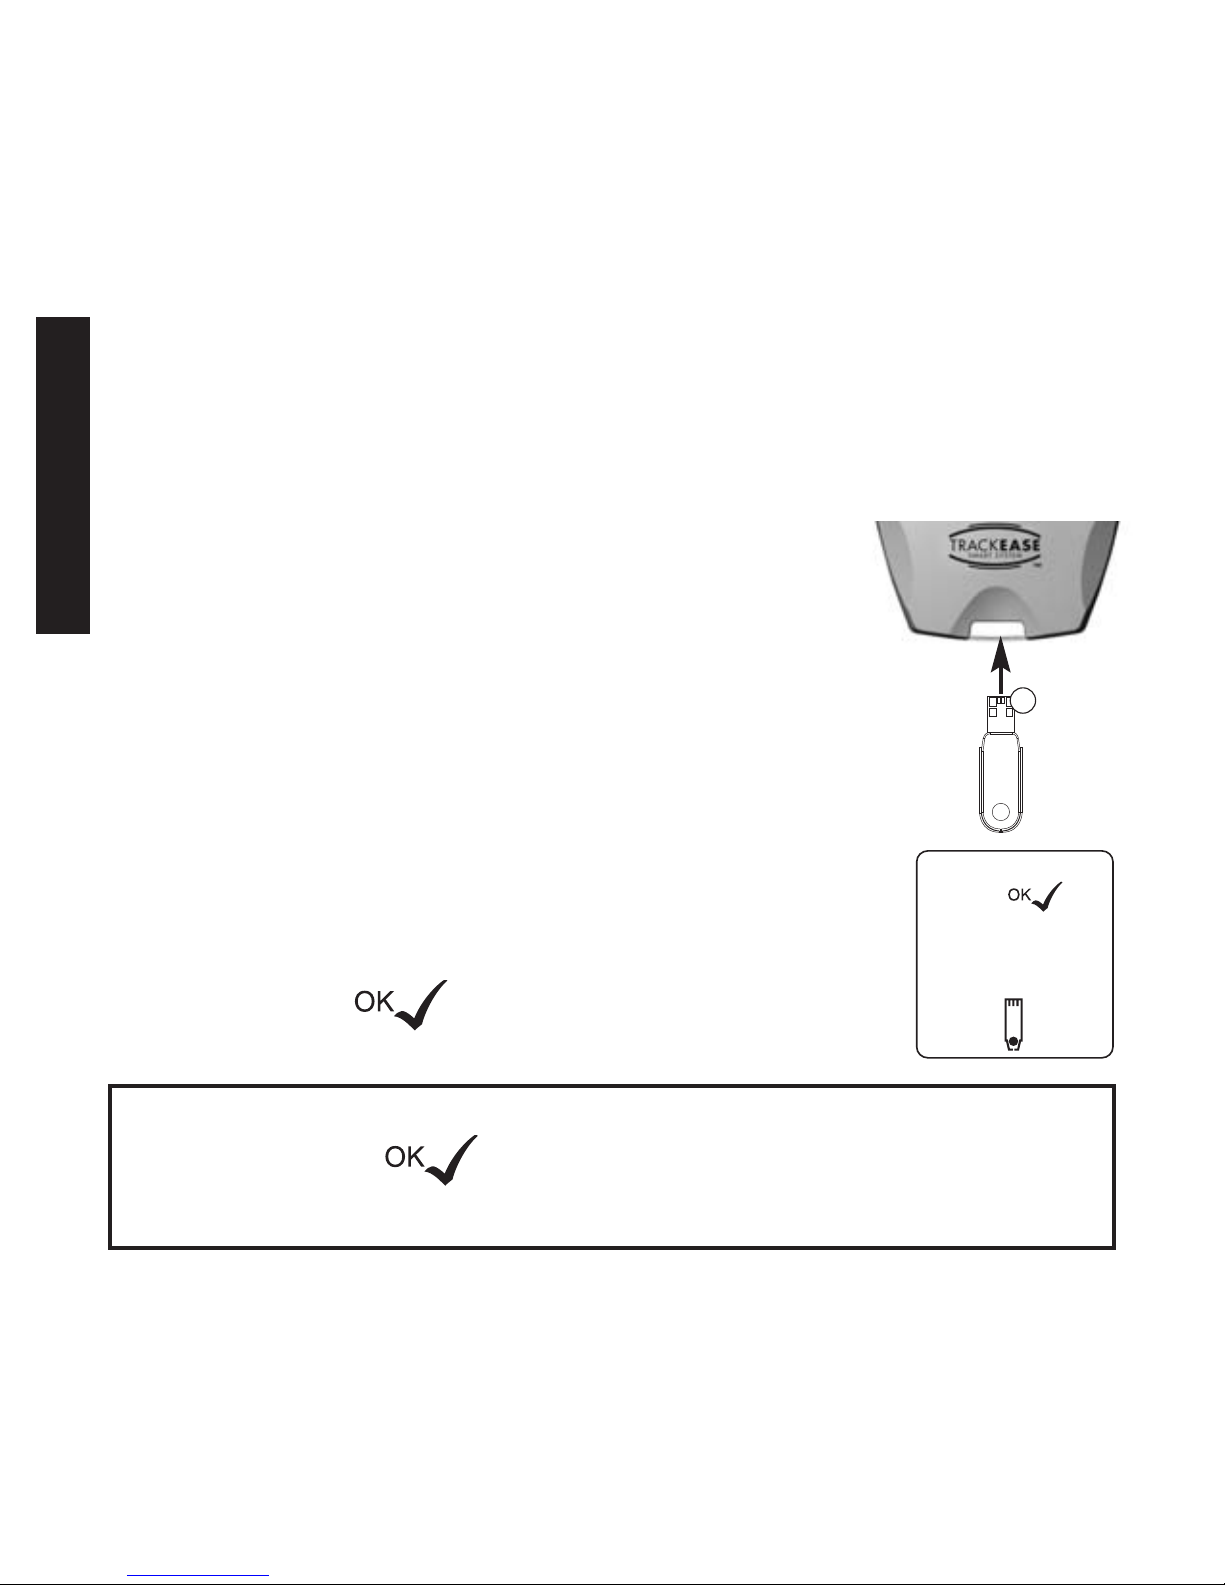
➀ For Set Up options, press and
hold until full display appears.
➁ For Check Strip Test, insert
Check Strip into Test Port.
For Blood or Control Test,
insert Test Strip into Test Port.
➂ For Memory, press and
release .
To Turn Meter Off…
➀ After viewing Set Up or
Memory, press and hold
until Display is blank.
➁ After Testing, remove Test Strip
or Check Strip from Test Port.
➂ Meter turns off after two minutes
of non-use.
6
or
1
1
2
or
2
3
Page 12
Meter Set Up
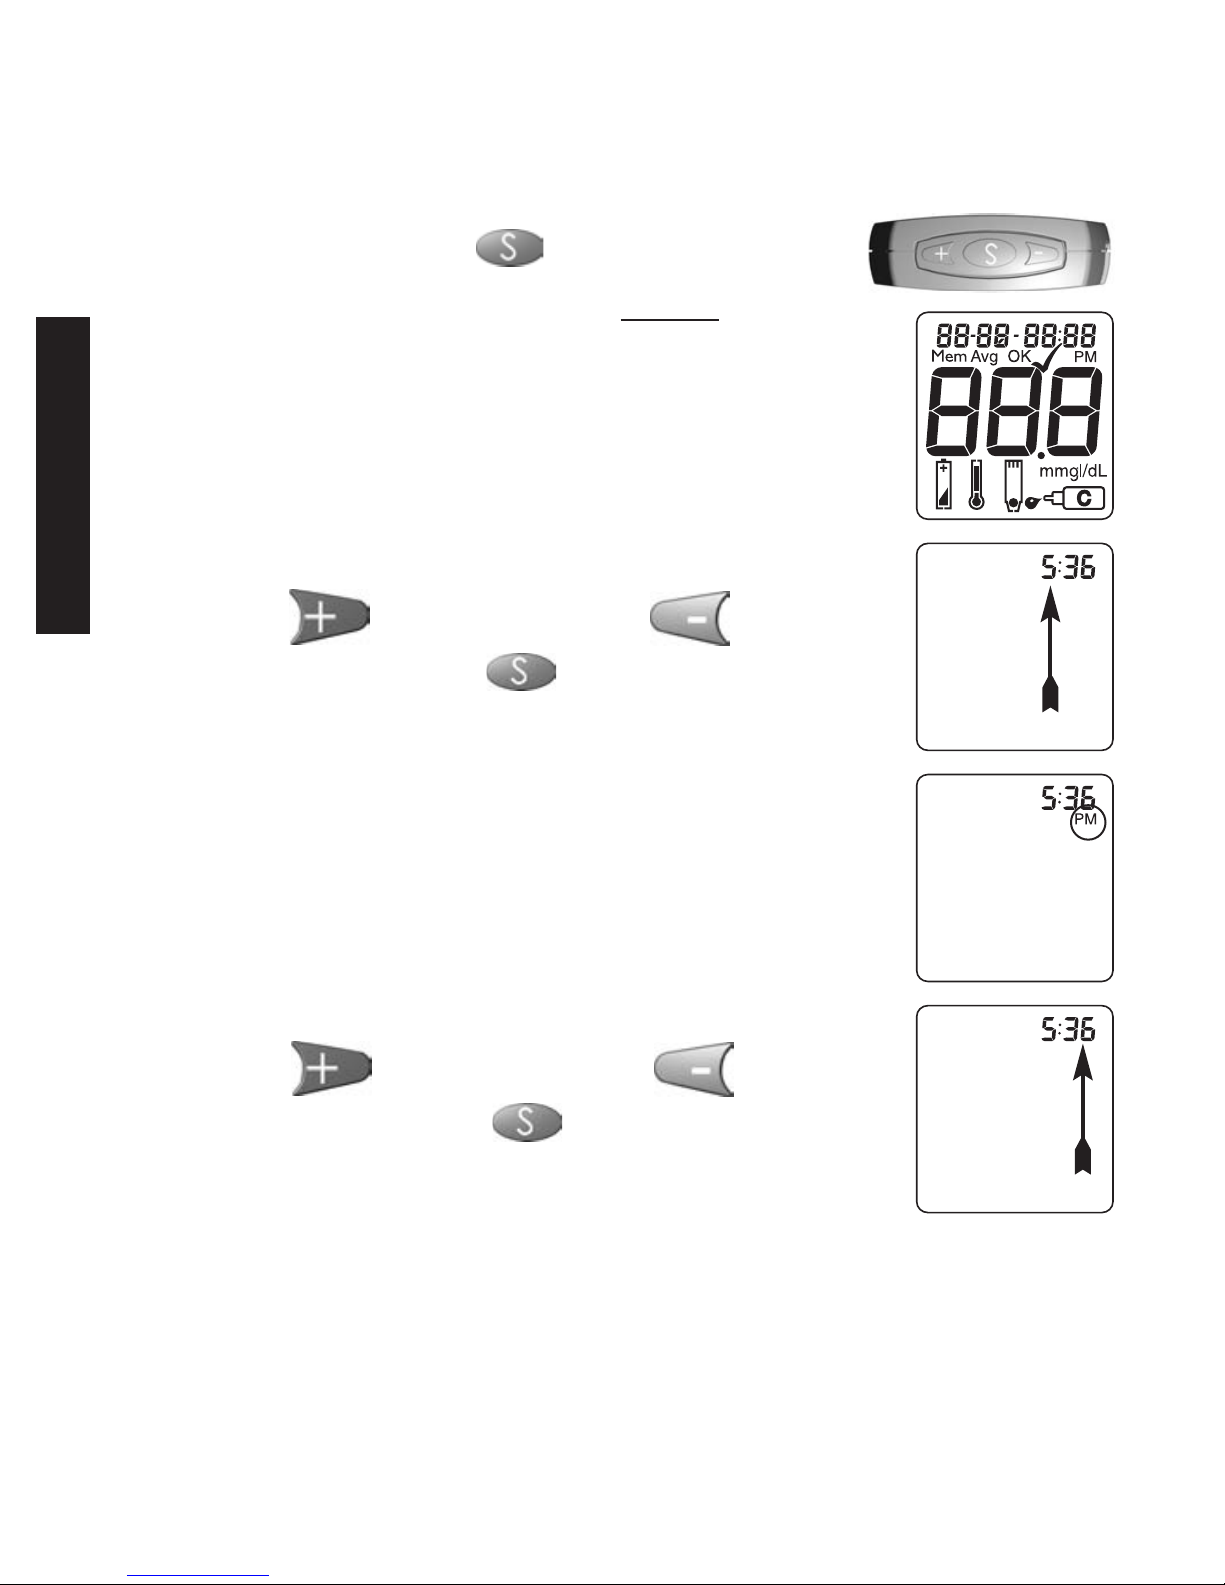
1. Start with Meter off. Do not insert Test Strip.
Press and hold . Date/Time
displays first. Release after full
display appears (shown at right) and
Meter beeps.
Set Hour / Minutes
2.
The hour flashes.
Press to increase or to
decrease. Press when correct.
Note: To set “PM”, scroll until “PM”
is below correct time. “PM” is
not an option if factory setting is
for a 24-hour clock.
3. The minutes flashes.
Press to increase or to
decrease. Press when correct.
7
GGEETTTTIINNGG SSTTAARRTTEEDD
Page 13
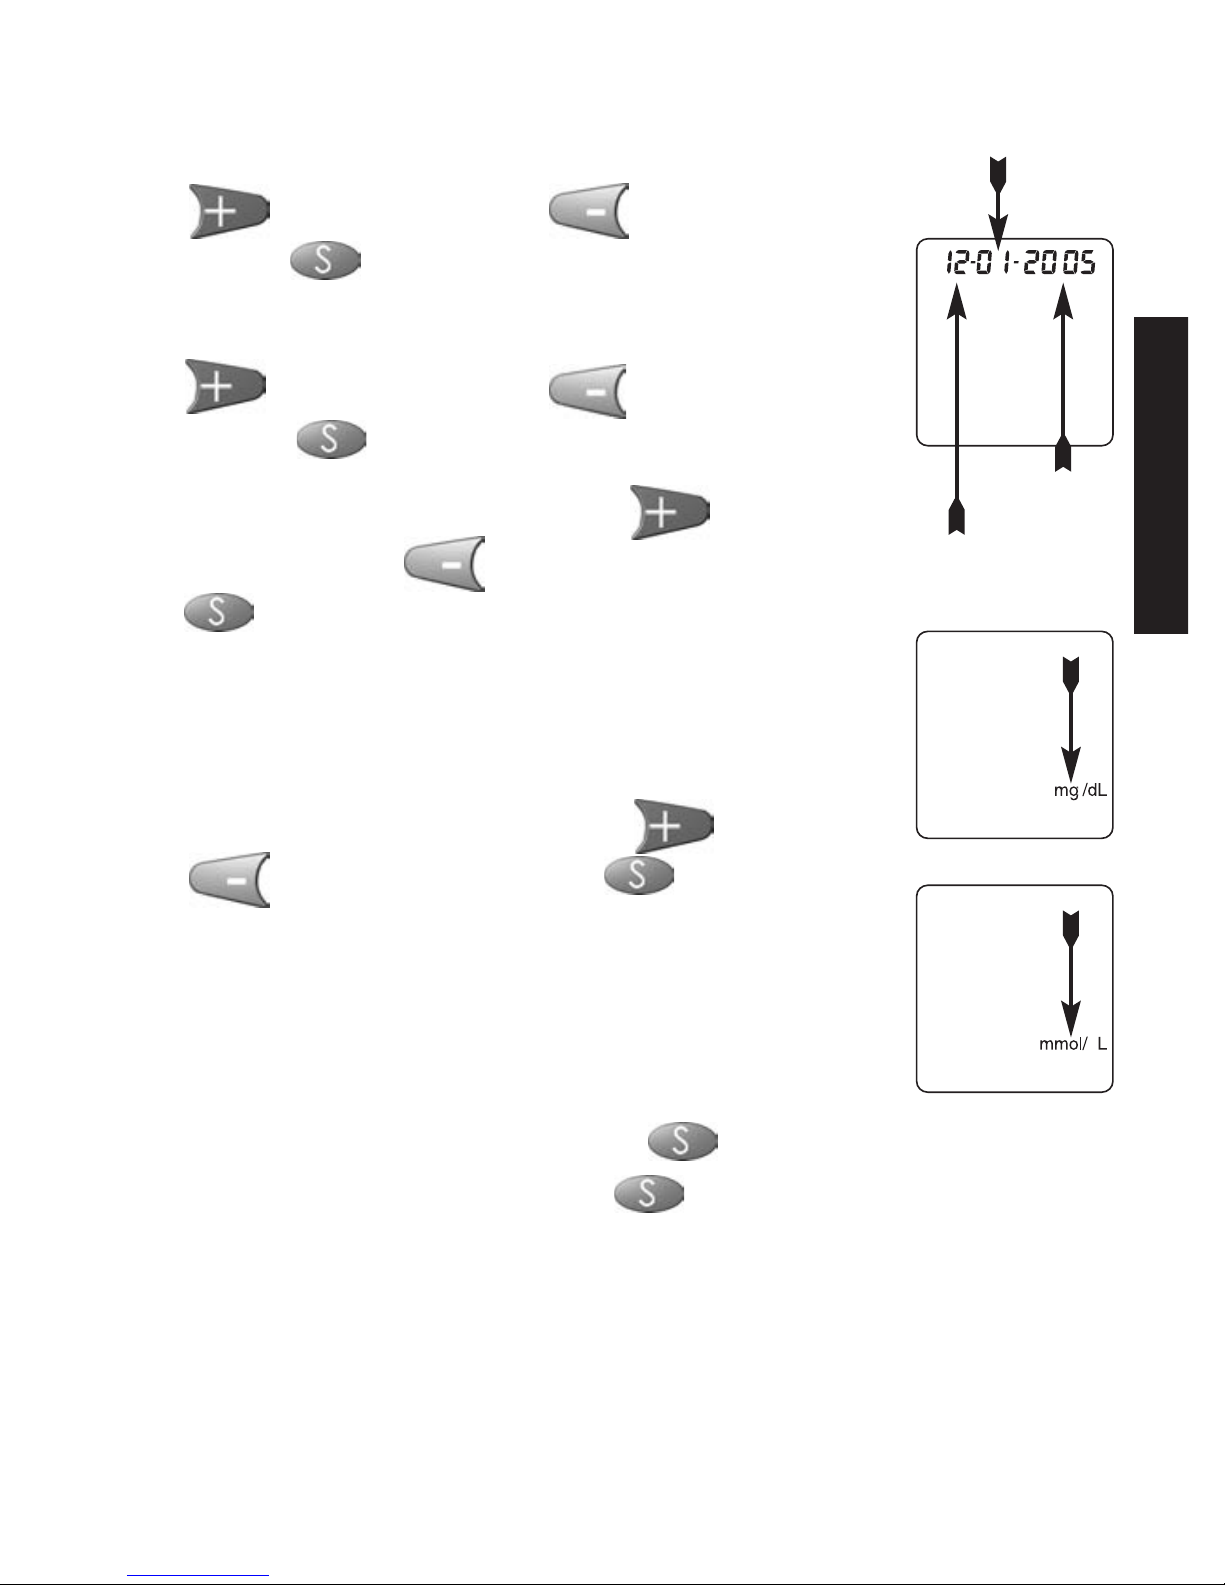
Set Month/Day/Year
4. The month (number) flashes. Press
to increase or to decrease.
Press when correct.
5. The day (number) flashes. Press
to increase or to decrease.
Press when correct.
6. The year flashes. Press to
increase or to decrease. Press
when correct.
Set Unit of Measure
7. The unit of measure (mg/dL or
mmol/L) flashes. Press or
to change. Press to select.
Note: mg/dL is default setting for
Meters sold in United States.
Exit Set-up Mode
To review settings, press . Make changes as
needed. Press and hold until Display goes
blank. Options are saved. Meter turns off.
8
GGEETTTTIINNGG SSTTAARRTTEEDD
or
Month
Day
Year
Page 14
9
Coding
Code Chip is packaged with each box of Test Strips.
Note: After all Test Strips are used from box,
remove Code Chip from Meter and discard.
Open new box of Test Strips and insert new
Code Chip into Meter before testing.
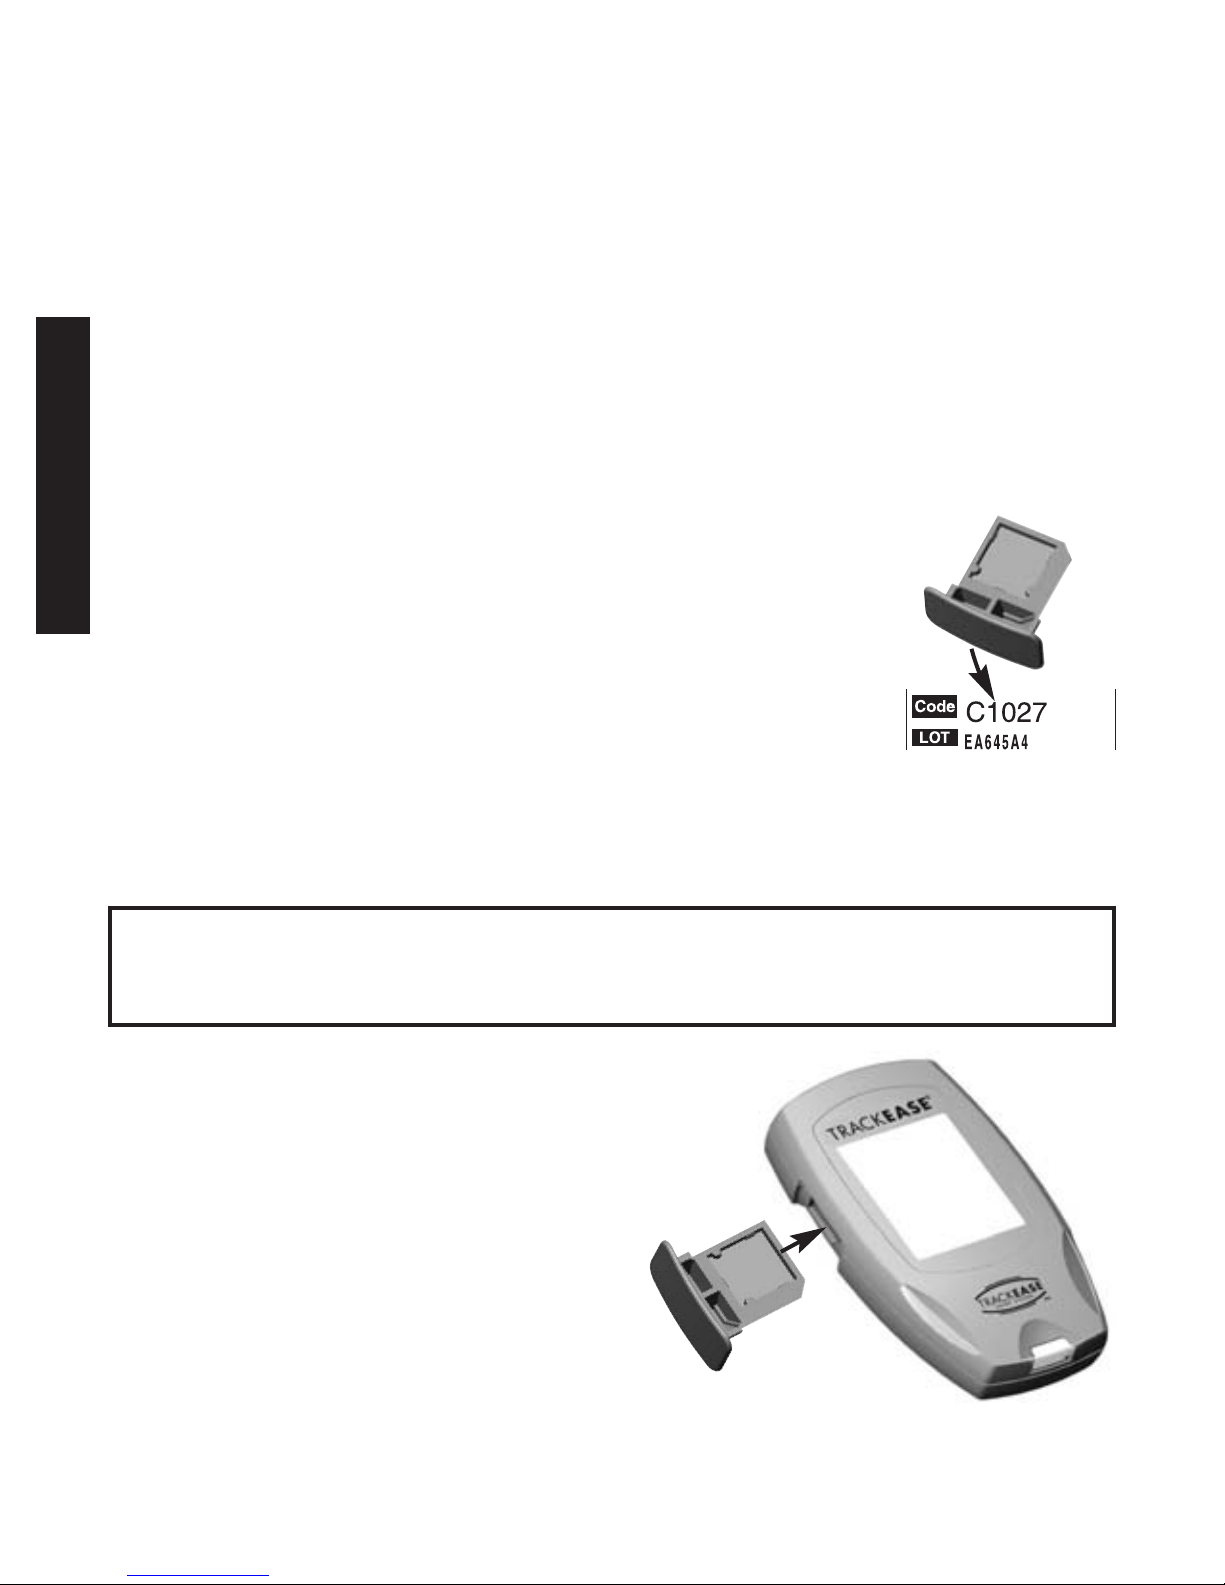
1. Start with Meter off. Remove and
open Code Chip package from box
of Test Strips to be used. Match
Code printed on Code Chip to Code
printed on vial label.
Caution! If Codes do not match, do not use
Test Strips. Call for assistance.
2. If Codes match, insert
Code Chip into Code
Chip Port as shown,
locking in place.
C
1
0
2
7
C
1
0
2
7
GGEETTTTIINNGG SSTTAARRTTEEDD
Page 15
GGEETTTTIINNGG SSTTAARRTTEEDD
10
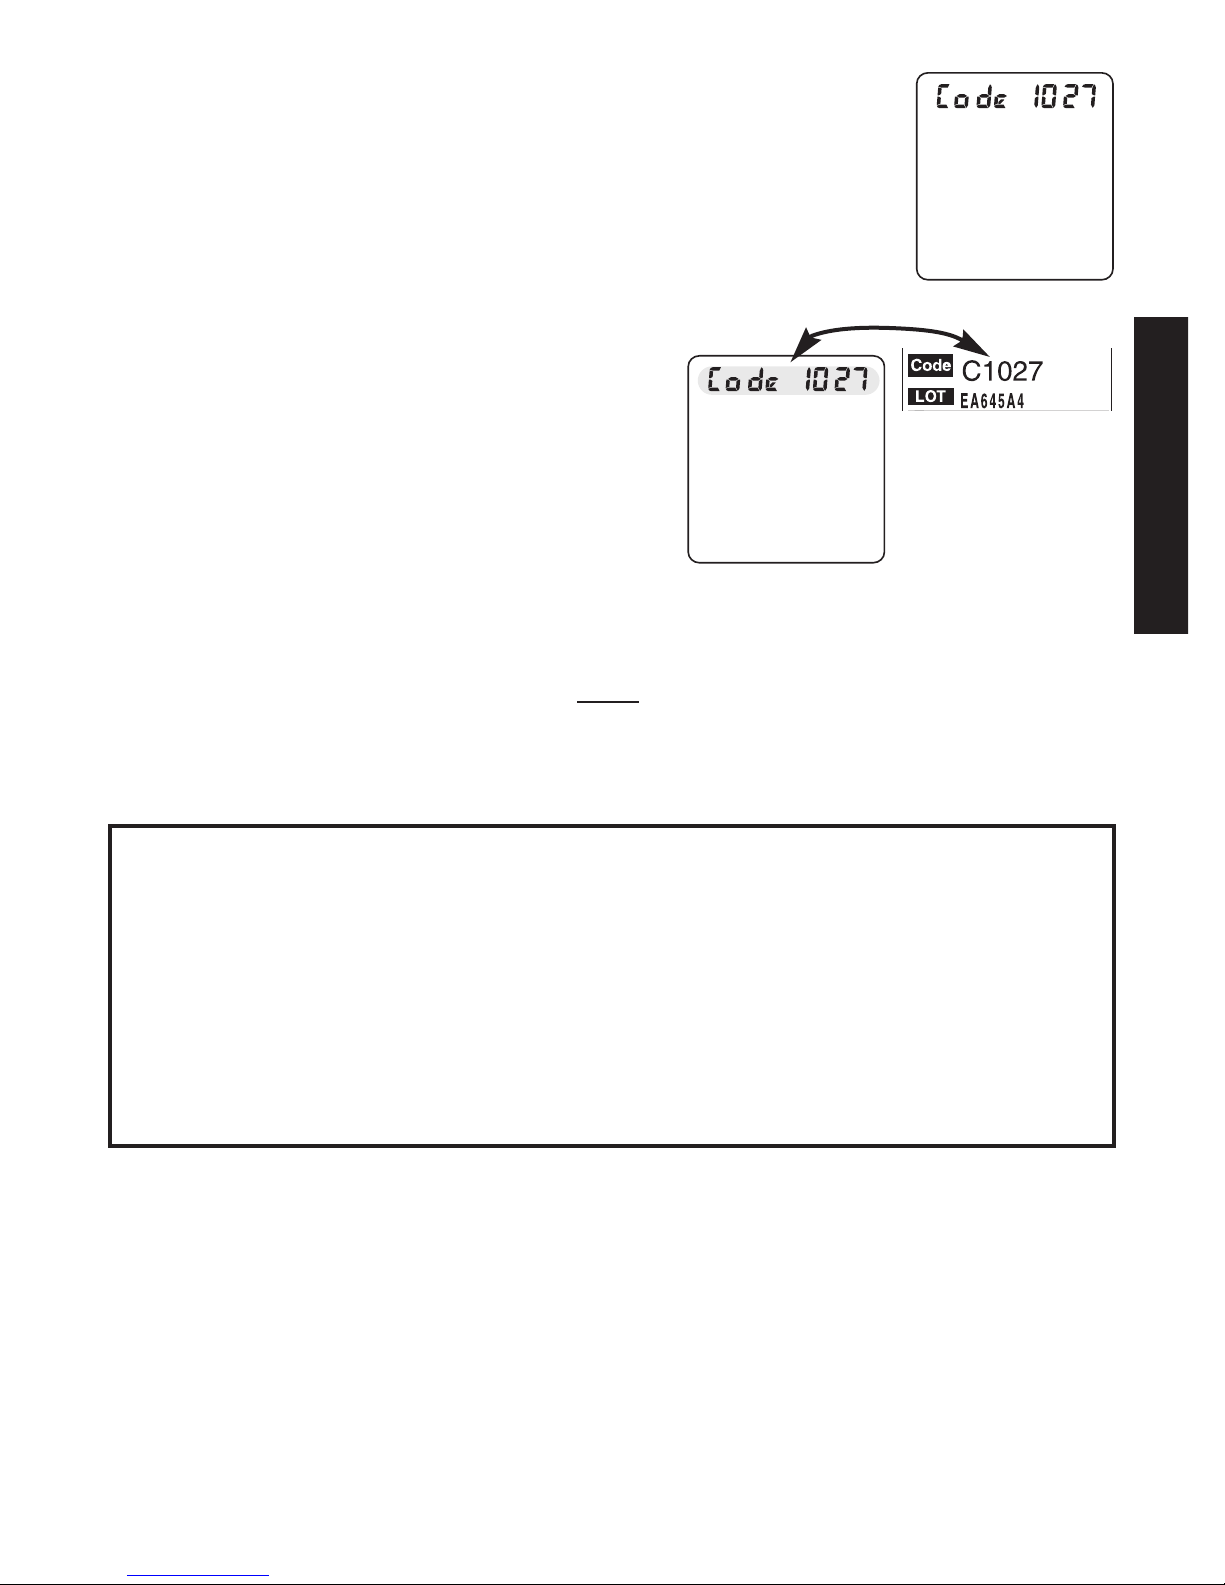
3. Insert Test Strip into Test Port.
Meter turns on. “Code” and number
appear in Display.
4. Match to Code number
on vial label. If Codes
match, begin testing.
Note: Letter printed before number on the Vial
Label Code will not
appear in Meter
Display.
Caution! If “Code ----” shows in Display,
reinsert Code Chip and then reinsert
Test Strip. If “Code ----” still shows in
Display or if Codes do not match,
DO
NOT
use Test Strips. Test results could
be incorrect. Call for assistance.
Page 16
11
Quality Control Tests
Check Strip Test
Check Strip is stored in Carrying Case. Check
Strip Test is used to check that Meter is working
properly. Perform a Check Strip Test when:
• Using Meter for first time.
• Results do not match how you feel.
• Meter was dropped or banged.
1. Start with Meter off. Remove
Check Strip from Carrying Case.
Insert Check Strip Contact End ➀
into Test Port with dimple facing
up. Meter turns on.
2. Check Display to make sure that
all segments are showing. (See
Pg. 3.)
3. After a few seconds, Meter
displays if test is correct.
Caution! If segments are missing from Display
or does not appear, do not use
Meter for testing. Call for assistance.
4. Remove Check Strip. Return to Carrying Case.
Meter turns off.
1
GGEETTTTIINNGG SSTTAARRTTEEDD
Page 17
GGEETTTTIINNGG SSTTAARRTTEEDD
12
Glucose Control Test
Glucose Control Test uses TrackEASE Smart System
®
Glucose Control to check performance of System.
Note:
Glucose Control may not always be
included. Check Contents List on outside
packaging. If Glucose Control is not listed,
contact place of purchase or Technical
Service at the number located on back
cover.
Perform Control Tests when…
• Using Meter for first time. We recommend you
perform several Control Tests for practice before
testing with blood.
• Opening a new vial of Test Strips.
• Meter results seem unusually low or high.
• Meter was dropped.
Caution! Result ranges are printed on Test
Strip vial label. These ranges are for
Control Test results only and
are not
recommended result range for your
blood glucose.
Do not ingest Glucose Control.
Most current Control Test result is stored in Memory.
Page 18
13
How to Test Glucose Control
1. Wash hands with soap and water, dry
thoroughly. Allow Control, vial of Test Strips
and Meter to adjust to room temperature
(68-77ºF/20-25ºC). Write date first opened
on Control Label.
2. Check dates on Control label and Test Strip vial
label. Do not use Control if 3 months past
written opened date or past date printed next to
symbol. Do not use Test Strips if 120 days
past written opened date or past date printed
next to symbol. Discard out-of-date
products and use new products if either
date has passed.
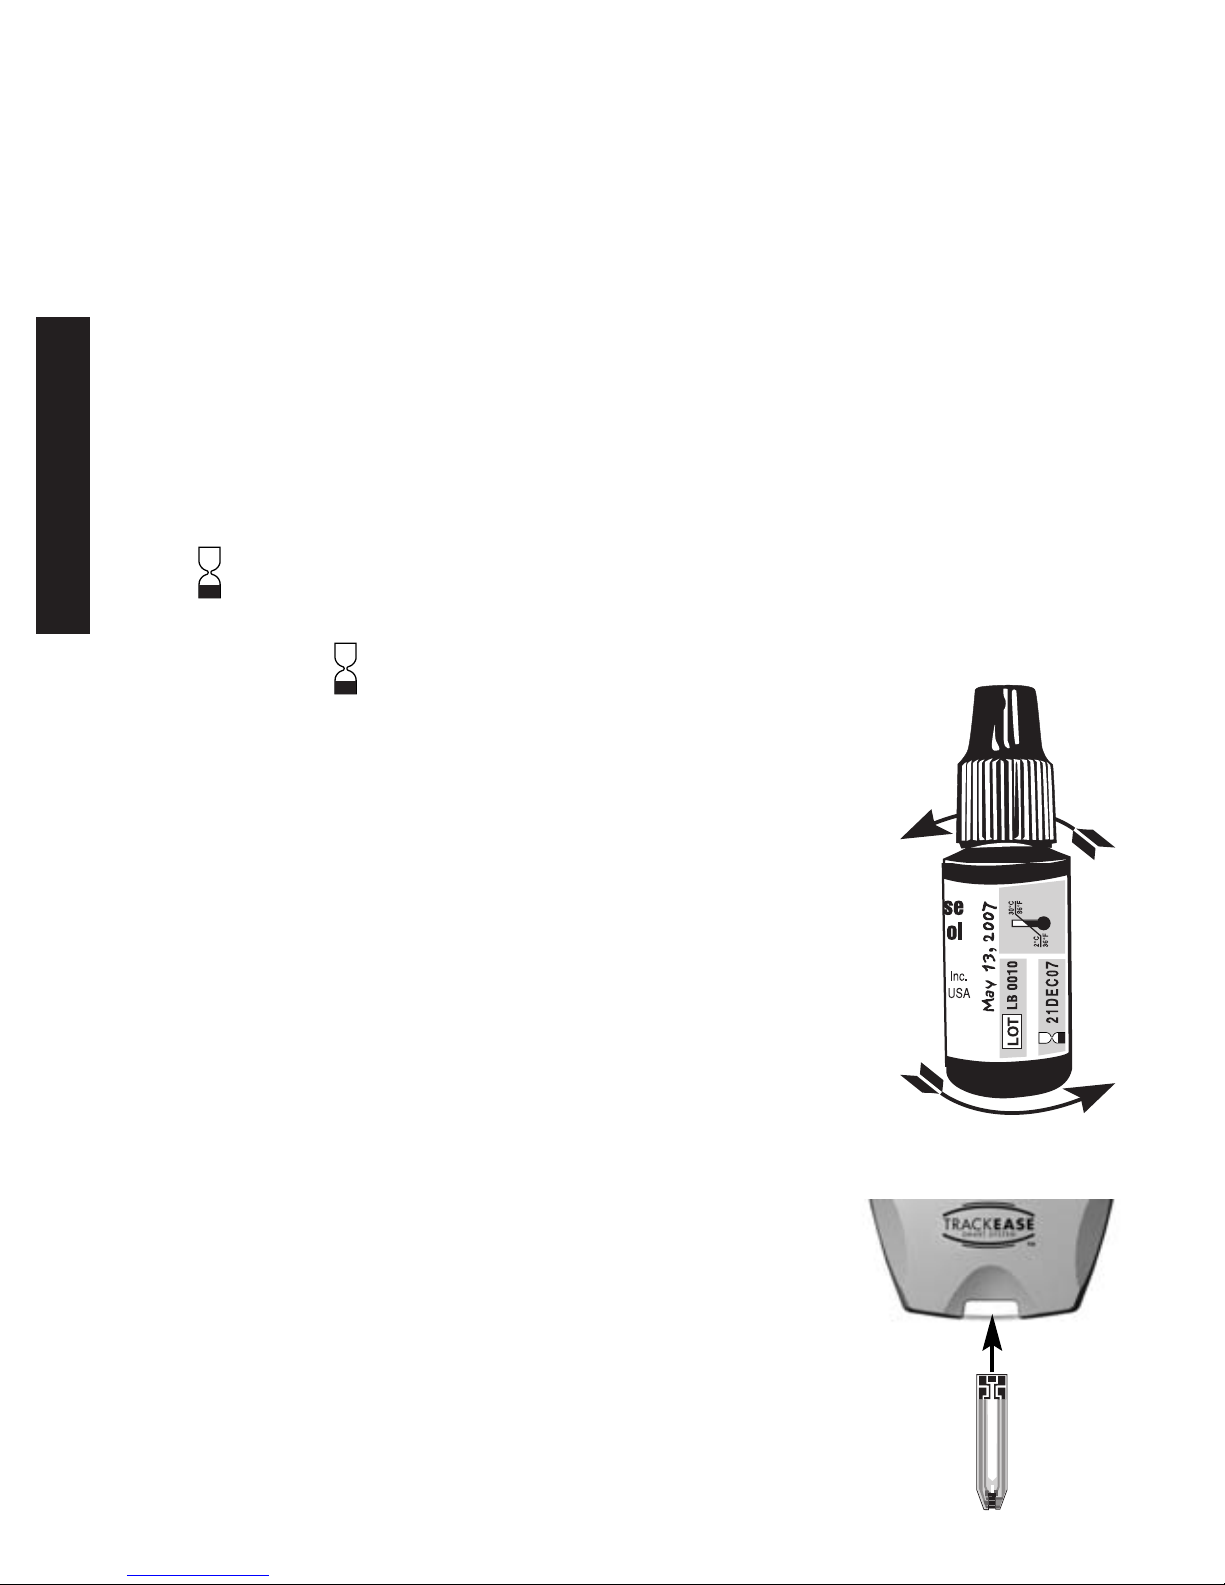
3. Swirl or invert bottle gently to mix
Control. DO NOT SHAKE!
4. Remove Test Strip from vial. Recap
vial immediately. Wipe top of vial
cap with a wet tissue, dry thoroughly.
Note: Use Strip quickly after removal
from vial. Strips that have been
left out of vial too long will
give error message when used.
Discard old Strip and use new
Strip for testing.
5. Insert Test Strip into Test Port.
Meter turns on.
GGEETTTTIINNGG SSTTAARRTTEEDD
Page 19
GGEETTTTIINNGG SSTTAARRTTEEDD
14
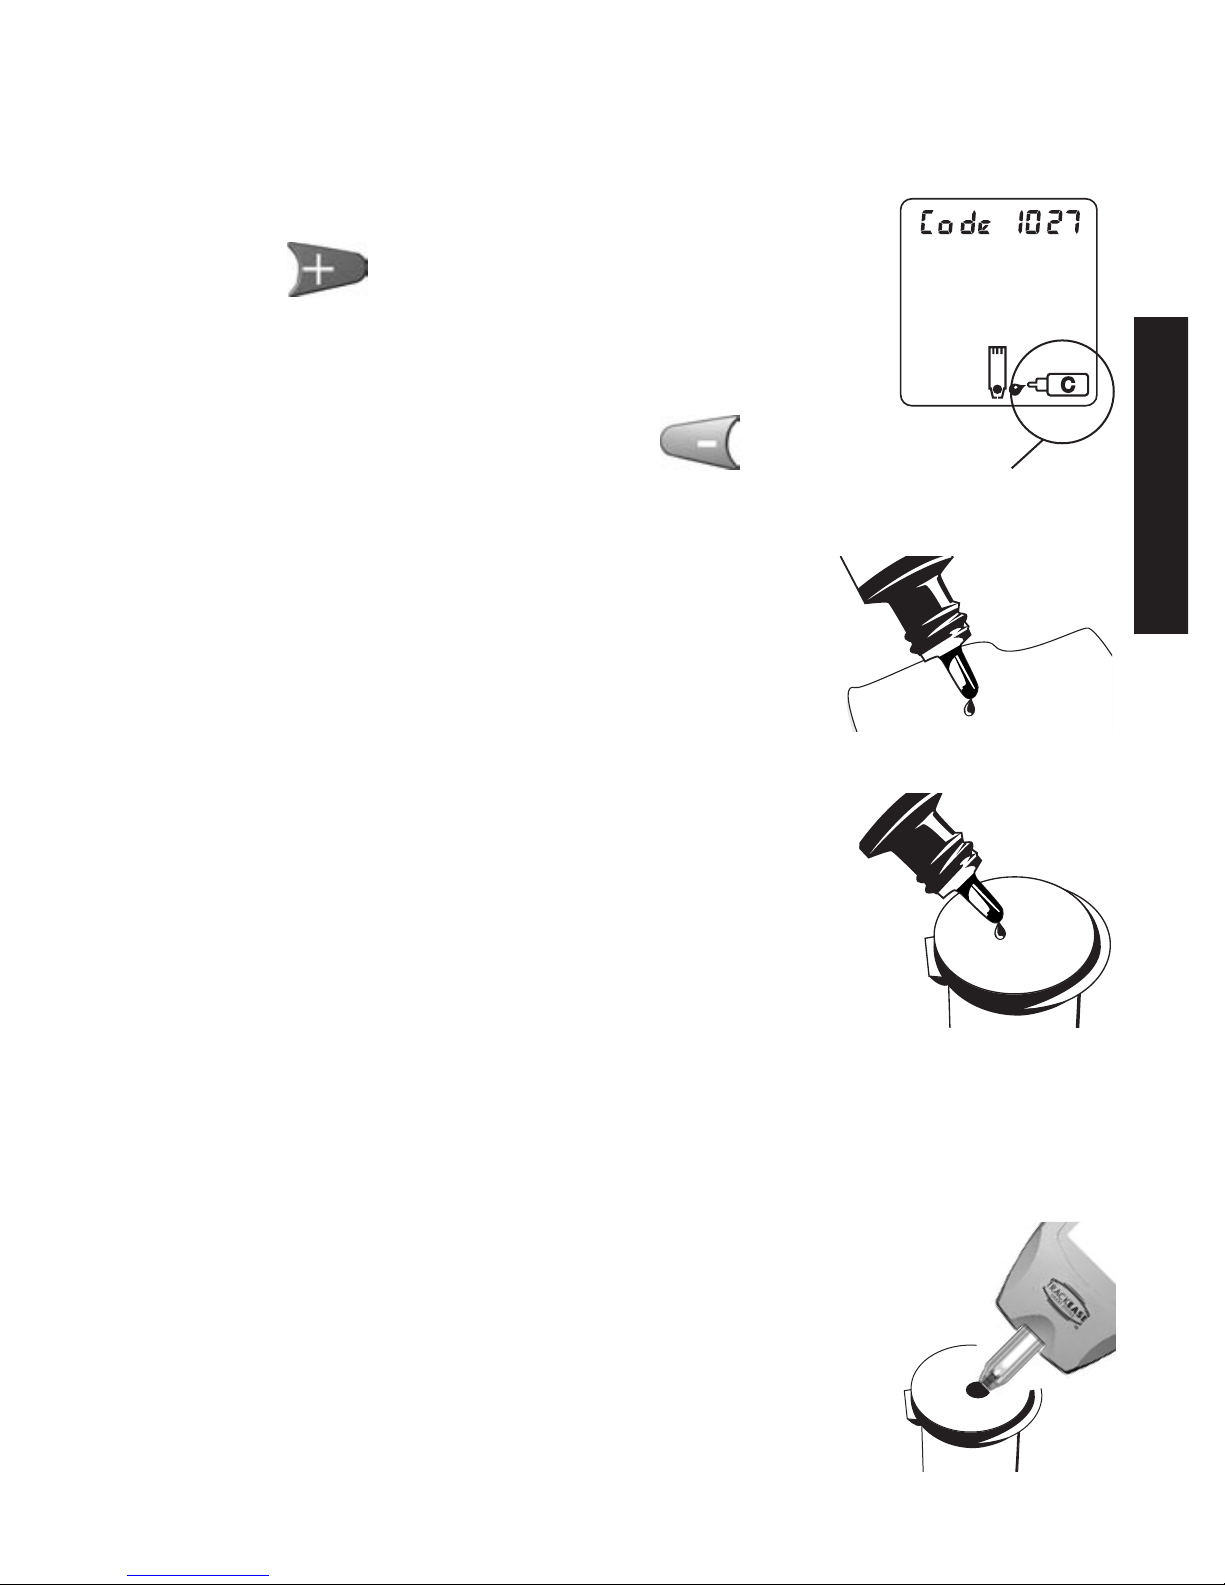
6. Match Code in Display with Code on Test Strip
vial label being used. If Codes do not match,
see Coding (pg. 9).
7. Press . Control Symbol
appears in Meter Display.
Note: If you decide not to perform
a Control Test, press to
remove Control Symbol.
8. Turn Control bottle upside
down. Squeeze one drop of
Control onto a clean tissue.
Wipe off bottle tip.
9.
Gently squeeze a drop onto top
of closed vial cap. Touch edge of
Test Strip Sample Tip to drop of
Control (See pg. 5).
Note: A small piece of unused aluminum foil or
clear plastic wrap may be used instead of
vial cap. Dispose after use.
10.
Allow drop to be drawn into Strip.
Remove Strip from drop when
Meter beeps.
Control
Symbol
Page 20
15
Note: If Meter does not beep or begin countdown
soon after placing Sample Tip to Control
drop, discard Strip. Repeat test with new
Test Strip. If problem persists, see
Troubleshooting.
11. Compare result to Control Level
Range printed on Test Strip vial
label:
If result is in range, System
can be used for testing blood.
If result does not fall within
range, repeat test using a new
Strip.
Caution! If Control Test result continues to be
outside range, System should not be
used for testing blood. Call for
assistance.
12. Remove Test Strip from Meter and discard.
Meter turns off.
13. Wipe Control drop off of vial cap with a clean,
wet tissue and dry thoroughly.
GGEETTTTIINNGG SSTTAARRTTEEDD
Page 21
TTEESSTTIINNGG YYOOUURR BBLLOOOODD
16
How to Obtain a Blood Sample
Refer to Lancing Device “Instructions for Use” for
detailed instructions.
From Fingertip
1. Prepare fingertip by washing hands in warm,
soapy water. Rinse well. Dry thoroughly.
2. Place end of Lancing Device
against tip of finger. Lance
fingertip.
3. Set Lancing Device aside. To help blood drop
form, lower hand to waist level, gently
massaging finger from palm to fingertip. Allow
blood drop to form before attempting to apply
to Test Strip.
Always remove and discard used Lancet in
appropriate container when testing is complete.
Page 22

TTEESSTTIINNGG YYOOUURR BBLLOOOODD
17
For Forearm Testing
1. Select area to be lanced. Wash with soap and
warm water, rinse and dry thoroughly.
2. Rub area vigorously or apply a warm compress
to stimulate blood flow.
3. Place tip firmly against forearm.
Press trigger button. Apply firm
pressure on lancing device until
an adequate blood drop is
formed.
Important Notes Regarding Forearm Samples Used in
Testing Blood Glucose:
• Check with your Doctor or Diabetes Healthcare
Professional to see if forearm testing is right for you.
• Blood glucose results from forearm are not always the
same as results from fingertip. Do not use forearm for
testing when blood sugar is rapidly rising or falling,
e.g., within 2 hours of eating, after taking insulin,
immediately after exercise, or when you are ill or
under stress. Use fingertip sample for testing.
• Do not use forearm samples for testing if you think
your blood sugar is low, if you don’t regularly
experience symptoms when your blood glucose is low,
or if your results from forearm samples do not match
the way you feel. Use fingertip sample for testing.
5
Page 23
TTEESSTTIINNGG YYOOUURR BBLLOOOODD
18
How to Test Blood Glucose
1. Check dates on Test Strip vial being used. Do
not use if 120 days past written date or date
next to symbol, whichever comes first
2. Wash area. Rinse well and dry thoroughly.
3. Remove Test Strip from vial. Recap vial
immediately.
Note: Use Test Strips quickly after removal from
vial. Strips that have been left out of vial
too long will give error message when used.
Discard old Strip and use new Strip for
testing.
4. With Meter off, insert Test
Strip Contact End (Contacts
facing up) into Test Port.
Meter turns on.
5. Match Code in Display to
Code on Test Strip vial being
used. If Codes do not match,
see Coding.
Note: Letter printed before the number on Code
Chip and vial label code will not
appear in
Meter Display
6. Lance fingertip or forearm. Allow drop to
form.
Contacts
Face
Up
Page 24

19
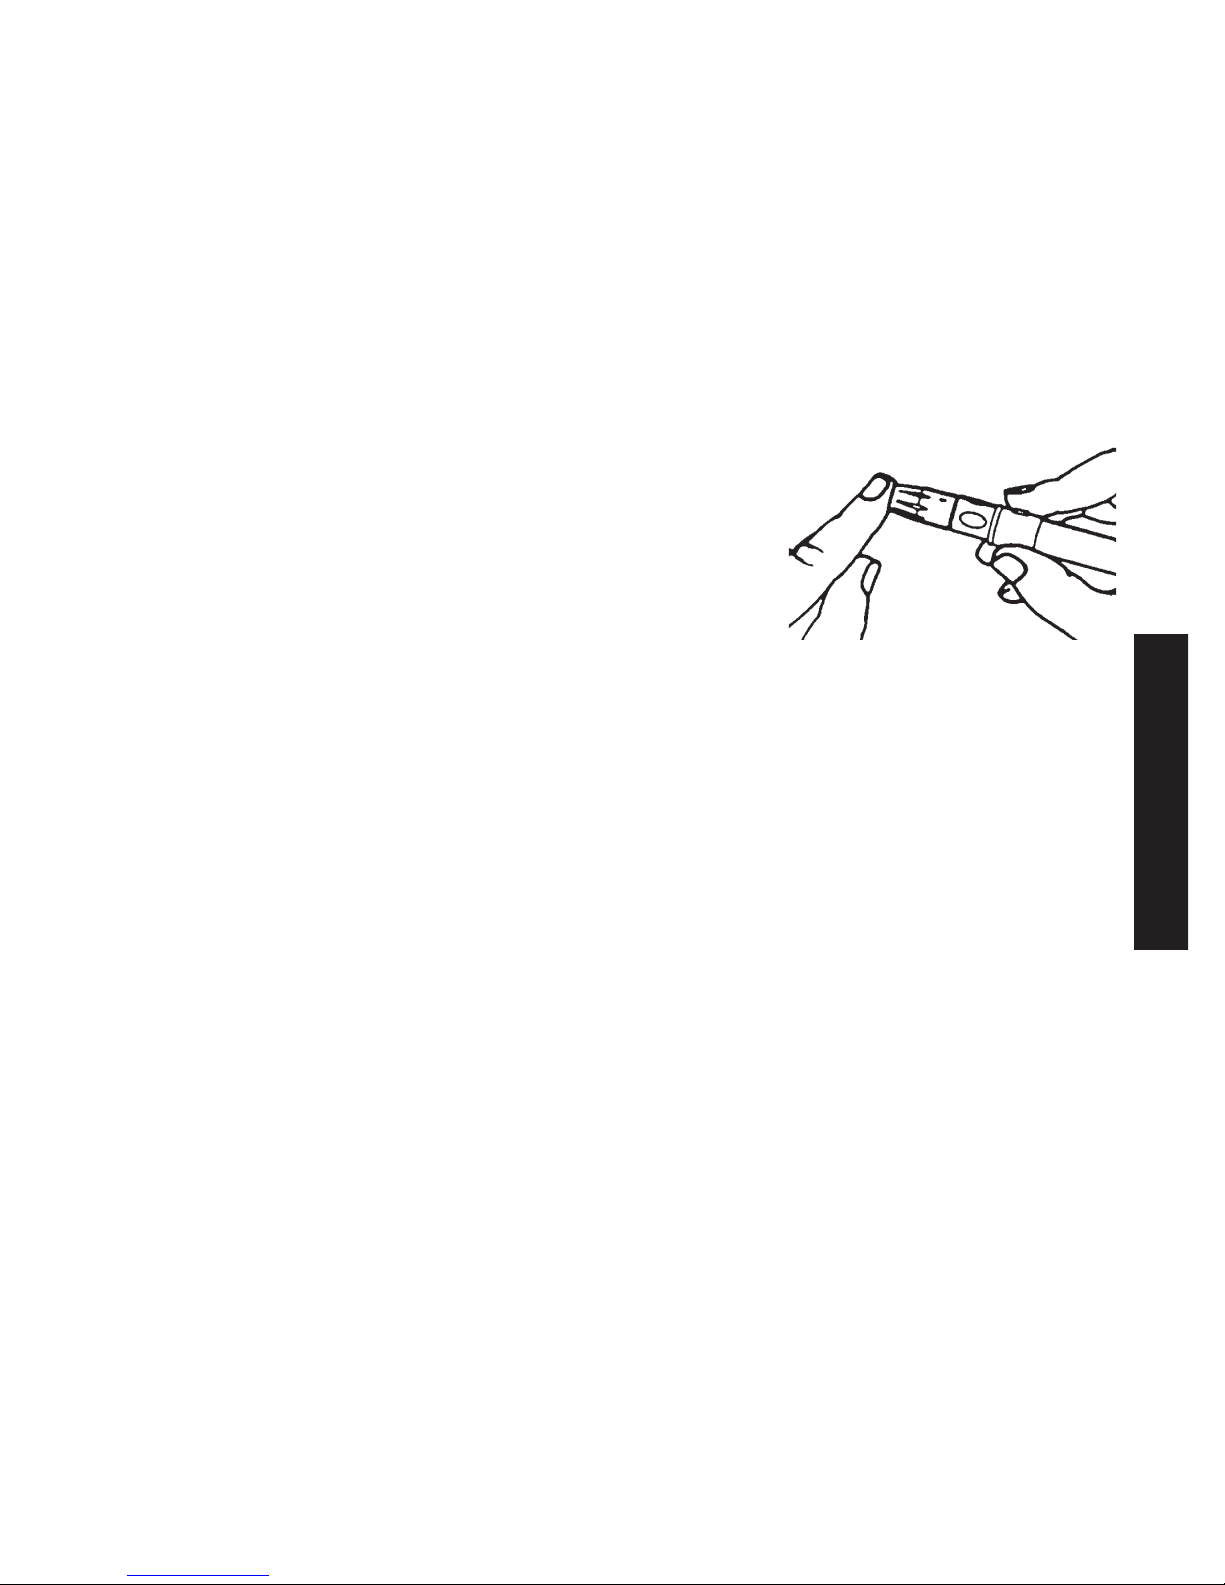
7. Touch edge of Test Strip
Sample Tip to blood drop
and hold.
(See
pg. 4.) Allow
blood to be drawn into Test
Strip until Meter beeps.
Note: If Meter did not beep or begin countdown
soon after touching blood drop to Test Strip
Sample Tip, discard Strip. Repeat test with
new Test Strip and new blood drop. If
problem persists, see
Troubleshooting.
8. After countdown, result is
displayed with date and time.
Remove Test Strip and discard.
Meter turns off.
Result is stored in Meter’s Memory.
Record result with date in log book.
TTEESSTTIINNGG YYOOUURR BBLLOOOODD
Page 25

TTEESSTTIINNGG YYOOUURR BBLLOOOODD
20
Results Warning Messages
WARNING!
If blood glucose test result is less
than 20 mg/dL (1.1 mmol/L), “LO”
appears in Meter Display.
If blood glucose test result is
greater than 600 mg/dL (33.3
mmol/L), “HI” appears in Meter
Display.
Always repeat test to confirm Low (“LO”) and
High (“HI”) results. If results still display “LO” or
“HI”, call your Doctor or Diabetes Healthcare
Professional immediately.
Page 26

MMEETTEERR MMEEMMOORRYY
21
Viewing Results in Memory
Memory stores 200 results, which are displayed
from most recent to oldest.
Start with Meter off. Press and release
. Meter displays most recent result
in memory.
To scroll results forward, press .
To scroll results backward, press .
Latest Glucose Control Test result
appears after earliest blood test result
and shows Control Symbol in Display.
Only one Glucose Control Test result is
stored in Memory.
Control
Symbol
Page 27

CCAARREE//TTRROOUUBBLLEESSHHOOOOTTIINNGG
22
Caring for TrackEASE Smart System
®
• Store System (Meter, Check Strip, Glucose
Control, Test Strips, Code Chip) in Carrying
Case to protect from liquids, dust and dirt.
• Store System in a dry place at room temperature
(36°-86°F / 2°-30°C). DO NOT FREEZE.
Meter Care
• Wipe Meter with clean, lint-free cloth dampened
with one of the following:
– Mild detergent or mild soap and water
– 10% household bleach and water
• Never immerse Meter in liquids or allow any
liquids into Test and Data Ports.
Check Strip Care
• Do not bend Check Strip.
• Do not apply blood, Glucose Control or any other
liquid to Check Strip.
• To clean, wipe with damp cloth, dry thoroughly.
• Do not write on Check Strip.
Glucose Control Care
• Write date opened on Control label. Discard 3
months after opening or after date printed next to
symbol, whichever comes first.
• After use, wipe bottle tip clean and recap tightly.
• Store at room temperature (36°-86°F / 2°-30°C).
• Swirl bottle to mix. Do not shake.
Page 28

CCAARREE//TTRROOUUBBLLEESSHHOOOOTTIINNGG
23
Test Strip Care
• Store Strips in original vial only.
• Write date opened on Strip vial. Discard unused
Strips from vial 120 days after opening or after
date printed next to symbol, whichever comes
first. Use of Strips past either date may give
incorrect results.
• Close vial immediately after removing Strip. Use
Strip quickly after removal from vial. Never store
Strips outside of vial. Store in a dry place at
room temperature below 86°F/30°C. DO NOT
FREEZE.
• Do not reuse Strip.
• Apply only fresh capillary blood or TrackEASE
®
Glucose Control to Strips.
• Do not bend, cut or alter Strips in any way.
Code Chip Care
• Code Chip must remain in Meter until all Strips
from box are used, then discard old Code Chip.
• Insert new Code Chip from new box of Strips
immediately before using Test Strips.
Page 29

CCAARREE//TTRROOUUBBLLEESSHHOOOOTTIINNGG
24
Battery Installation
Replace Battery when Low or Dead
Battery Symbols appear in Display
or Meter does not turn on.
1. Lift tab on Battery Cover.
2. Turn Meter over, tap gently
to loosen and remove Battery.
3. Insert new Battery, positive
(“+”) side up. Close cover.
Note: Use non-rechargeable
3V Lithium Battery
(#CR2032).
4. Discard old battery in appropriate container.
5. Turn Meter on. If Meter will not turn on, check
that Battery was installed properly. If not,
reinsert Battery and try again. Call for
assistance if problem persists.
Note: Replacing battery may affect date and time
settings. Check date and time by pressing
and releasing. To reset, see Set Up.
Low Dead
Caution!
Batteries might explode if mishandled or
incorrectly replaced. Do not dispose of battery
in fire. Do not disassemble or attempt to
recharge Battery. Dispose according to
local/country specific regulations.
Page 30

25
Action
Remove Strip. Re-insert
correctly.
Remove Strip. Re-insert
Strip fully into Meter.
Repeat with new Strip.
Replace battery.
Battery positive (“
+”)
side must face up.
Call for assistance.
Action
Repeat test with new
Strip and larger drop.
Repeat test with new
Strip and apply drop
after Meter beeps.
Repeat with new Strip.
Call for assistance.
Reason
Strip inserted upside
down or backwards
Strip not fully inserted
Strip Error
Dead or no battery
Battery in backwards
Meter Error
Reason
Sample drop too small
Sample applied after
two minute shut-off
Problem with Strip
Problem with Meter
Troubleshooting
1) After inserting Test Strip, Meter does not turn on.
2) After applying sample, test does not start/
Meter does not beep or begin countdown.
CCAARREE//TTRROOUUBBLLEESSHHOOOOTTIINNGG
Page 31

CCAARREE//TTRROOUUBBLLEESSHHOOOOTTIINNGG
26
Messages
Displa
y
Reason
Temperature
Error
Temperature
change too quick
Temperature
Too Cold
Meter temperature
less than 50ºF
(10ºC)
Temperature
Too Hot
Meter temperature
greater than
104ºF (40ºC)
Sample Not
Detected
Used Test Strip
or Test Strip
outside of vial
too long.
Action
Wait 10 minutes
for Meter and
Strips to reach
room temperature
before testing.
Move Meter and
Test Strips to area
between 50º-104º
(10º- 40ºC)
before testing.
Move Meter and
Test Strips to area
between 50º-104º
(10º- 40ºC)
before testing.
Retest with new
Test Strip and
larger sample.
Repeat with new
Test Strip. If error
persists, call for
assistance.
Page 32

27
Messages (continued)
Display
Reason
Meter Error
Test Strip Error
Strip Removed
During Test
Check Strip
Error
Code Chip
Error
Action
Call for
assistance.
Retest with new
Test Strip. If error
persists, call for
assistance.
Retest with new
Strip. If error
persists, call for
assistance.
Repeat test. If
error persists DO
NOT use Meter
for testing. Call
for assistance.
Remove Code
Chip and reinsert.
If error persists,
call for
assistance.
CCAARREE//TTRROOUUBBLLEESSHHOOOOTTIINNGG
Page 33

CCAARREE//TTRROOUUBBLLEESSHHOOOOTTIINNGG
28
Messages (continued)
Display
Reason
Low Battery
Dead Battery
Code Chip
Error
•
WARNING!!
HI - High Results
Result more than 600
mg/dL (33.3 mmol/L)
LO - Low Results
Result less than
20
mg/dL
(1.11 mmol/L)
Action
About 50 tests
can be done
before Battery
must be replaced.
Replace Battery.
Remove Code
Chip and re-
insert. If error
persists, call for
assistance.
• WARNING!!
Retest with
new Strip. If
result is still
“HI” or “LO”
contact Doctor
immediately.
Page 34

29
Meter Specifications
Result Range: 1.1 - 33.3 mmol/L (20 - 600 mg/dL)
Sample Size: Minimum 1 microliter (1 µl)
Sample:
Fresh capillary whole blood or Glucose Control
Test Time: 10 seconds
Result Value: Plasma values
Assay Method: Electrochemical
Power Supply: One 3V Lithium Battery
#CR2032 (non-rechargable)
Total power when active
at full battery = 8.6mW
Battery Life: Approximately 1,100 tests or 1 year
Automatic shut-off: After two minutes of non-use
Weight: 47 grams (1.66 ounces)
Size: 89 x 55 x 17mm (3.52" x 2.15" x 0.67")
Memory Size: 200 blood glucose results,
1 Control Test result
System Operating Range (Meter & Test Strips):
Relative Humidity: 10-90% (Non-condensing)
Temperature: 10º- 40ºC (50º-104ºF)
Hematocrit: 30-55%
Note: Use within specified environmental
conditions only.
CCAARREE//TTRROOUUBBLLEESSHHOOOOTTIINNGG
Page 35

30
Chemical Composition
Test Strips: Glucose Oxidase (Aspergillis niger)
2.5 Units, Mediators, Buffers and Stabilizers.
Glucose Control: Contents: Volume: 3 mL. Water
- 73%, D-glucose - 0.09 - 0.20%, Viscosity
Enhancing Agent - 25%, Inorganic Salts - 1.8%,
Amaranth - 0.08%, and Preservatives - 0.03%.
CCAARREE//TTRROOUUBBLLEESSHHOOOOTTIINNGG
Page 36

31
Limited Warranty
Home Diagnostics, Inc. provides the following Warranty to the
original retail purchaser of the TrackEASE Smart System®Meter:
1) Home Diagnostics Inc. warrants this Meter to be free of defects
in materials and workmanship at the time of purchase. If the
meter is inoperative prior to five (5) years from the date of the
original retail purchase, Home Diagnostics, Inc will replace the
Meter with an equivalent Meter, at its option, at no cost to the
purchaser. Failure of the meter due to abuse or use not in
accordance with the instructions for use is not covered by this
Warranty.
2) This Warranty does not include the battery supplied with the
Meter.
3) Do not take the Meter apart. This action will void the Warranty
and cause the Meter to display false results.
4) The duration of any implied Warranty, including any implied
Warranty of merchantability or fitness for a particular purpose
shall be limited to five (5) years from the date of original retail
purchase. Some states do not allow limitations on how long an
implied Warranty last, so the above limitation may not apply.
5) Home Diagnostics, Inc. disclaims liability for incidental or
consequential damages for breach of any expressed or implied
Warranty, including any implied Warranty of merchantability or
fitness for a particular use with respect to the Meter. Some
states do not allow the exclusion or limitation of incidental or
consequential damages, so the above limitations or exclusion
may not apply.
6) This Warranty gives the user specific legal rights, and the user
may also have other rights which vary state to state.
Your TrackEASE Smart System
®
Technical Service Representative will be
able to provide detailed information regarding procedures for
returning your Meter, if necessary.
Page 37

32
References
1. Joslin Diabetes Center & Joslin Clinic, Inc., (Sept. 2001).
Guidelines for Pharmacological Management of Type 2 Diabetes.
[Electronic Version]. Retrieved August 22, 2002 from
www.joslin.harvard.edu/education/library/wbggoal.shtml.
2. Hackett, J., Aziz, K.,
Review Criteria Assessment of Portable
Blood Glucose Monitoring in vitro Diagnostic Devices Using
Glucose Oxidase, Dehydrogenase or Hexokinase Methodology
; FDA
Draft Document, p. 6 (1997).
3. Joslin Diabetes Center, (2002).
What Can I Do to Prevent Serious
Hypoglycemic Episodes When I Am Hypoglycemic Unaware?
[Electronic Version]. Retrieved August 22, 2002 from
www.joslin.org/education/library/hypoglycemic_unaware.shtml.
4. Joslin Diabetes Center & Beth Israel Deaconess Medical Center,
(2002).
Guidelines for Management of Hypoglycemic Emergencies
[Electronic Version]. Retrieved August 22, 2002 from
www.diabetesmanagement.joslin.org/-guidelines/hyperglycemicguide.pdf.
5. Food and Drug Administration 2003.
Diabetes Information - Glucose
Meters and Diabetes Management.
[Electronic Version]. Retrieved
August 11, 2003 from www.fda.gov/diabetes/glucose.html.
Page 38

33
Notes:
Page 39

34
Notes:
Page 40

35
C4HDI04 Rev. 4 • 10MAY06
Notes:
Page 41

Bienvenido al sistema de control de la
glucemia TrackEASE Smart System
®
Felicitaciones por su compra del sistema de control de la
glucemia TrackEASE Smart System
®
. Ahora dispone de
una manera muy sencilla y precisa para analizar su nivel
de glucemia (azúcar en sangre), en cualquier momento y
dondequiera que esté.
Nuestro compromiso con usted
Nuestra meta es ofrecerle productos de alta calidad para
el cuidado de la salud y dedicación al cliente. Si tiene
preguntas acerca del uso de los productos TrackEASE
Smart System
®
, visite nuestro sitio web en:
www.homediagnostics.com.
¡Precaución! Lea completamente el folleto del
usuario y las instrucciones de uso de todos los
productos.
i
Para obtener
ayuda, llame
al
Fecha
de
vencimiento
Número
de lote
Únicamente para
pr
uebas de diagnóstico
in vitr
o
Representante
autorizado
Estéril
Número
de
pruebas
Nivel de
la prueba
de control
SÍMBOLOS:
Número
de
código
Para
un solo
uso
¡Atención! Lea
las instrucciones
de uso
Valores de
temperatura de
almacenamiento
Fabricado por
Número
de serie
Page 42

ii
Importancia del control de la glucemia
Mientras más sepa usted sobre la diabetes, más
preparado(a) estará para cuidarse. Usted y su médico o
el profesional de atención de la diabetes estudiarán su
caso para determinar el objetivo para los resultados de
su nivel de glucemia y la frecuencia con la que usted
debe realizar la prueba. El tener la mayoría de sus
resultados dentro de la serie de resultados objetivos
ayudará a retardar o prevenir cualquier complicación de
la diabetes.
Al usar el sistema de control de la glucemia TrackEASE
Smart System
®
para pruebas individuales, su médico o el
profesional de atención de la diabetes podrá saber qué
tan bien se está llevando a cabo su plan de tratamiento
diario del control de la glucemia. No cambie su plan de
tratamiento sin antes discutirlo con su médico o el
profesional de atención de la diabetes.
TrackEASE Smart System
®
está diseñado para pruebas
in vitro (fuera del cuer po) solamente, y no para
diagnosticar la diabetes ni para las pruebas de glucemia
en recién nacidos.
No se recomienda usar el sistema de control de la
glucemia TrackEASE Smar t System
®
de una manera
distinta a la especificada en este folleto del usuario ya
que ello puede afectar su capacidad para determinar su
nivel de glucemia.
Page 43

iii
Información importante
Importante: P ara obtener el mejor resultado posible con
TrackEASE Smart System
®
, le recomendamos que:
• Lea todas las instrucciones antes de comenzar la
prueba.
•
Haga las pruebas de la tira de verificación y del
control de la glucosa antes de hacer la prueba en
sangre.
Nota: El contr ol de la glucosa puede no estar inc luido . Re vise la
lista de contenido que apar ece en la en voltura. Si el control
de la glucosa no está incluido en la lista, comuníquese con
la tienda donde compró el pr oducto .
• Compruebe los códigos. El código que aparece en la
pantalla del medidor debe coincidir con el código
impreso en el envase de las tiras reactivas TrackEASE
Smart System
®
que está usando y con el número de
código impreso en el chip de codificación.
•
Use únicamente las tiras reactivas TrackEASE
Smart System
®
y el control de la glucosa TrackEASE
Smart System
®
con su medidor TrackEASE Smart
System
®
.
•
Use únicamente muestras de sangre capilar total
fresca para hacer la prueba. No se recomienda usar
muestras de sangre venosa con TrackEASE Smart
System
®
. El medidor presenta los resultados como
valores en plasma.
• TrackEASE Smart System®está recomendado para
hacer pruebas en sangre humana total únicamente.
Page 44

iv
Información relacionada con la salud
• La deshidratación grave y la pérdida excesiva de
agua son factores que pueden ocasionar
resultados falsos negativos.2Si usted cree que
tiene una deshidratación grave, comuníquese con
su médico o el profesional de atención de la
diabetes inmediatamente.
• Los resultados que muestran valores iguales o
menores de 80 mg/dl (4.4 mmol/l) indican un
bajo nivel de glucemia (hipoglucemia).3Los
resultados que muestran valores mayores de 250
mg/dl (13.9 mmol/l), indican un alto nivel de
glucemia (hiperglucemia).4Haga otra prueba en
sangre para asegurar que sus resultados sean
cor rectos. Si vuelve a obtener un resultado
similar y tiene síntomas que indican que el nivel
de glucemia está demasiado bajo o demasiado
alto, siga el tratamiento aconsejado por su
médico o el profesional de atención de la
diabetes.
Page 45

Índice
Guía rápida para realizar pruebas .........................interior de la portada
Serie de resultadosobjetiv os de glucemia .......interior de la contraportada
Información introductoria .....................................................................i-v
Conozca su sistema
Medidor ...................................................................................1-3
Tira reactiva ...............................................................................4
Etiqueta del envase de tiras reactivas ........................................5
Preparación
Para prender y apagar el medidor...............................................6
Configuración del medidor (hora, fecha, unidades de medida) ...7-8
Codificación ..........................................................................9-10
Pruebas de control de calidad ..................................................11
Prueba de la tira de verificación ..........................................11
Prueba de control de la glucosa .......................................12-15
Procedimiento para hacerse la prueba de sangre
Procedimiento para tomar la muestra de sangre .....................16-17
Procedimiento para hacer la prueba de glucemia ..................18-19
Mensajes de advertencia del resultado ........................................20
Memoria del medidor
Visualización de los resultados guardados en la memoria ..........21
Cuidados y resolución de problemas
Cuidados del TrackEASE Smart System®..............................22-23
Instalación de la pila ....................................................................24
Resolución de problemas..............................................................25
Mensajes en pantalla ..........................................................26-28
Especif icaciones del medidor ......................................................29
Composición Química .................................................................31
Garantía del medidor .......................................................................32
Referencias........................................................................................33
v
Page 46

CCOONNOOZZCCAA SSUU SSIISSTTEEMMAA
Conozca su sistema
Medidor
➀ Botón - Para reducir la numeración en la
configuración; quitar el símbolo del control; ir hacia
atrás por fecha al ver los resultados en la memoria.
➁ Botón - Para seleccionar los ajustes; ver los
valores promedio matutinos; ver los resultados
guardados en la memoria.
➂ Botón - Para aumentar la numeración en la
configuración; agregar el símbolo del control; ir
hacia delante por fecha al ver los resultados
guardados en la memoria.
➃ Pantalla - Muestra los resultados de la prueba, los
mensajes y otra información.
➄ Puerto de prueba - Inserte aquí la tira reactiva
TrackEASE Smart System
®
o la tira de verificación.
1
Vista superior del medidor
1 32
5
4
Vista frontal del medidor
Page 47

CCOONNOOZZCCAA SSUU SSIISSTTEEMMAA
➅ Puerto del chip de codificación - Inserte aquí el
chip de codificación.
➆ Compartimiento para pila - Introduzca una pila de
litio de 3 voltios no recargable (#CR2032) con
el polo positivo (“+”) hacia arriba.
Nota:
Consulte en la página 24 los detalles sobre cómo
desechar una pila gastada.
➇ Etiqueta del medidor - Indica el número de
teléfono al cual se puede solicitar asistencia.
➈ Etiqueta del número de serie - Número de
identificación del medidor que se debe dar al llamar
para solicitar asistencia.
2
7
6
8
9
C1027
6
Vista trasera del medidor
Vista lateral del medidor
Page 48

Pantalla
1. Hora, fecha, código.
2. Resultado de la pr ueba guardado en memoria.
3. Pr ueba de la tira de verificación (cor recta).
4. Resultados de la pr ueba.
Nota:
Aparece un punto decimal cuando los resultados se
expresan en mmol/l.
5. Símbolo de la pila (ver Mensajes en pantalla).
6. Símbolo de la temperatura (ver Mensajes en
pantalla).
7. Símbolo para aplicar la muestra.
8. Símbolo del control (véase
Prueba de control de
la glucosa).
9. Unidades de medida de la glucosa.
10. La hora mostrada es p.m.
Nota:
Si la hora es a.m., aquí no aparecerá nada.
4
3
2
1
765
8
9
10
3
CCOONNOOZZCCAA SSUU SSIISSTTEEMMAA
Page 49

CCOONNOOZZCCAA SSUU SSIISSTTEEMMAA
4
➀ Extremo de contactos -
Inserte este extremo de la
tira en el medidor con los contactos (la sección
metálica) hacia arriba.
➁Punta para la muestra - Coloque la muestra (la
sangre o el control de la glucosa) en el borde de la
punta.
Colocación de la muestra en la tira reactiva
Correcta Incorrecta
Nota:
¡No aplique la muestra de sangre o el control de la
glucosa en la parte superior de la tira reactiva!
Use la tira reactiva inmediatamente después de que
la saque del envase. Las tiras reactivas que se han
dejado afuera del envase por mucho tiempo
ocasionarán un mensaje de error cuando se usen.
Tira reactiva
1 2
Vista frontal de la tira reactiva
Page 50

Etiqueta del envase de tiras reactivas
➀ Códig o - Antes de realizar la prueba, compare el código que
aparece en la pantalla del medidor con el código impreso en el
chip de codificación y con el código impreso en la etiqueta del
en v ase de tiras reacti v as. Todos los códigos DEBEN coincidir para
poder obtener resultados precisos.
Nota: La letra que antecede al número impreso en el c hip de
codificación y al código impr eso en la etiqueta del en vase
no
apar ecerá en la pantalla del medidor. Véase
Codificación par a más detalles.
➁ Fechas de vencimiento - Escriba en la etiqueta la fecha en que
abra por primera vez el en v ase. Deseche el en v ase y las tiras no
usadas cuando ha yan transcurrido 120 días a partir de la fecha
escrita en la etiqueta o en la fecha impresa junto al símbolo , lo
que ocurra primero.
➂ Serie de r esultados de la prueba de control - Serie dentro de la
cual debe estar el resultado de la prueba de control para asegurar
que el sistema está funcionando correctamente.
¡Precaución!
El uso de las tir as r eactivas o del contr ol de la glucosa después de
las fechas de vencimiento puede arrojar resultados impr ecisos o
incorrectos. Desec he los pr oductos vencidos, y ha ga la prueba con
pr oductos nuevos.
5
CCOONNOOZZCCAA SSUU SSIISSTTEEMMAA
1
2
3
2
Page 51

PPAARRAA EEMMPPEEZZAARR
Preparación
Para prender el medidor...
➀ Para las opciones de configuración,
mantenga presionado el botón
hasta que aparezcan todas las opciones
en pantalla.
➁ Para la prueba de la tira de
verificación, insértela en el puerto de
prueba. Para la prueba en sangre o de
control, inserte la tira reactiv a en el
puerto de prueba.
➂ Para ver los resultados guardados en la
memoria, presione y suelte el botón .
Para apagar el medidor...
➀ Después de visualizar la configuración
o la memoria, mantenga presionado el
botón hasta que la pantalla quede
en blanco.
➁ Después de la prueba, saque la tira
reactiv a o la tira de v erificación del
puerto de prueba.
➂ El medidor se apagará después de que
transcurran dos minutos sin usarlo.
6
o
1
2
o
2
3
1
Page 52

7
PPAARRAA EEMMPPEEZZAARR
Conf iguración del medidor
1. Comience con el medidor apagado. No inserte la
tira reactiva.
Mantenga presionado el botón .
La fecha y la hora aparecerán primero.
Suelte el botón
después de que hayan
aparecido todas las opciones en pantalla
(como se muestra a la derecha) y el
medidor haya emitido un sonido.
Configurar la hora y los minutos
2.
El número correspondiente a la hora
aparece de manera intermitente.
Presione el botón para aumentar la
numeración o el botón para
disminuirla. Presione el botón para
seleccionar la hora correcta cuando
aparezca en pantalla.
Nota: Para ajustar la hora como“PM”,
continúe presionando hasta que vea la
opción “PM” debajo de la hora
correcta. “PM”no es una opción si la
configuración de fábrica del medidor
es para 24 horas.
3. El número cor respondiente a los minutos aparece
de manera intermitente. Presione el botón para
aumentar la numeración o el botón para
disminuirla. Presione el botón para
seleccionar los minutos correctos cuando aparezcan
en pantalla.
Page 53

Conf igurar el mes, el día y el año
4. El número correspondiente al mes aparece de
manera intermitente. Presione el botón para
aumentar la numeración o el botón para
disminuirla. Presione el botón para se le c c io n a r
el mes correcto cuando aparezca en pantalla.
5. El número correspondiente al día aparece de
manera intermitente. Presione el botón para
aumentar la numeración o el botón para
disminuirla. Presione el botón para seleccionar
el día correcto cuando aparezca en pantalla.
6. El número correspondiente al año aparece de
manera intermitente. Presione el botón para
aumentar la numeración o el botón para
disminuirla. Presione el botón para seleccionar
el año correcto cuando aparezca en pantalla.
Conf igurar la unidad de medida
7. La unidad de medida (mg/dl o mmol/l) aparece de
manera intermitente. Presione o para
cambiarla. Presione el botón para seleccionar
la unidad de medida deseada cuando aparezca en
pantalla.
Nota: mg/dl es la unidad predeterminada
de los medidores que se venden en
los Estados Unidos.
Modo de conf iguración de salida
Para re visar la configuración, presione el botón . Haga los
cambios necesarios. Mantenga presionado el botón hasta que
la pantalla quede en blanco. Las opciones se habrán guardado. El
medidor se apagará.
8
PPAARRAA EEMMPPEEZZAARR
o
Mes
Día
Año
Page 54

Codificación
El chip de codificación se incluye en cada caja de tiras reactiv as.
Nota: Una vez que haya usado todas las tiras reactivas de
la caja, retire del medidor el chip de codif icación y
deséchelo.
Abra una nueva caja de tiras reactivas e inserte en
el medidor el nuevo chip de codificación antes de
realizar la prueba.
1. Comience con el medidor
apagado. Saque y abra el paquete
del chip de codificación que se
encuentra dentro de la caja de las
tiras reactivas que se van a
utilizar. Compare el código
impreso en el chip de codificación con el
código impreso en la etiqueta
del envase.
¡Precaución! Si los códigos no coinciden, no use las
tiras reactivas. Comuníquese con nosotros.
2. Si los códigos coinciden,
inserte el chip de
codificación dentro del
puerto del chip como
se ve en la f igura, y
encájelo en su sitio.
C
1
0
2
7
9
C
1
0
2
7
PPAARRAA EEMMPPEEZZAARR
Page 55

3. Inser te la tira reactiva en el puerto de
prueba. El medidor se prenderá. En la
pantalla aparecerá “Code” (código) y
un número.
4. Compare este número con
el número del código
impreso en la etiqueta del
envase. Si los códigos
coinciden, comience la
prueba.
Nota: La letra que antecede al número del código de la
etiqueta delenvase no aparecerá en la pantalla del
medidor.
¡Precaución! Si en la pantalla aparece “Code ---”,
vuelva a insertar el chip de
codificación y luego, vuelva a
insertar la tira reactiva. Si aparece
de nuevo en la pantalla “Code ----”
o si los códigos no coinciden, NO
use las tiras reactivas. Los
resultados de la prueba podrían ser
incorrectos. Comuníquese con nosotros.
PPAARRAA EEMMPPEEZZAARR
10
Page 56

1
11
Pruebas de control de calidad
Prueba de la tira de verif icación
La tira de verif icación se guarda en el estuche. La
prueba de la tira de verificación sirve para verif icar que
el medidor esté funcionando correctamente. Haga la
prueba de la tira de verificación cuando:
• Use el medidor por primera vez.
• Los resultados no reflejen la forma como se siente.
• El medidor se haya caído o golpeado.
1. Comience con el medidor apagado.
Saque la tira de verif icación del
estuche. Inserte el extremo de
contactos
➀ de la tira de verificación
dentro del puerto de pr ueba. La
hendidura debe quedar hacia arriba.
El medidor se prenderá.
2. Revise la pantalla para asegurarse de
que se visualicen todos los campos.
(Véase la página 3.)
3. Al cabo de algunos segundos,
aparecerá en pantalla el mensaje
si la prueba fue cor recta.
¡Precaución! Si faltan campos en pantalla o no
aparece el mensaje ,no haga la
prueba con el medidor. Comuníquese con
nosotros.
4. Saque la tira de verificación. Guárdela de nuevo
en el estuche. El medidor se apagará.
PPAARRAA EEMMPPEEZZAARR
Page 57

Prueba de control de la glucosa
La prueba de control de la glucosa usa el control de la
glucosa de TrackEASE Smart System®para verif icar el
funcionamiento del sistema.
Nota: El control de la glucosa puede no estar incluido.
Revise la lista de contenido que aparece en la
envoltura. Si el control de la glucosa no está
incluido en la lista, comuníquese con la tienda
donde compró el producto.
Haga la prueba de control cuando...
• Use el medidor por primera vez. Le recomendamos que
haga varias pruebas de control para practicar antes de
hacer la prueba en sangre.
• Abra un nuevo envase de tiras reactivas.
• Los resultados sean más bajos o más altos que lo usual.
• El medidor se haya caído.
¡Precaución! Las series de r esultados que están
impr esas en la etiqueta del en vase de las tiras
r eactivas son los r esultados de la prueba de
contr ol únicamente, no es una serie de
r esultados r ecomendada para la prueba de su
nivel de glucemia.
No ingiera la solución de control de la glucosa.
El resultado de la última prueba de control se guardará en
la memoria.
PPAARRAA EEMMPPEEZZAARR
12
Page 58

13
Procedimiento para la prueba de control de la glucosa
1. Lávese las manos con agua y jabón, y lue go séqueselas
completamente. Deje que el control, el en v ase de las tiras
reactiv as y el medidor se ajusten a la temperatura ambiente
(68 a 77º F/20 a 25º C). Escriba en la etiqueta del en v ase
del control la fecha en que se abra por primera vez.
2. Verifique las fechas escritas en las etiquetas de los en v ases
del control y de las tiras reactiv as. No use el producto si ya
han transcurrido 3 meses desde la fecha de apertura del
producto o si ya ha pasado la fecha que aparece junto al
símbolo . No use las tiras reactiv as si ya han transcurrido
120 días desde la fecha de apetura del producto o si ya ha
pasado la fecha que aparece junta al símbolo . Si ya h a
pasado alguna de las fechas mencionadas, deseche los
productos vencidos y haga la prueba con
productos nuevos .
3. Gire la botella o in viértala para mezclar la
solución de control. ¡NO AGITAR!
4. Saque la tira reacti v a del en v ase. Vuelva a
tapar el en vase inmediatamente. Limpie la
tapa del en v ase con una toallita desechab le
húmeda y séquela completamente.
Nota: Use la tir a reactiva inmediatamente
después de que la saque del en vase. Si
usa una tir a que se haya dejado afuera
del en vase por mucho tiempo,
apar ecerá un mensaje de error.
Deseche la tira vieja y use tiras nue vas
par a las pruebas.
5. Inserte la tira reactiv a en el puerto de prueba.
El medidor se prenderá..
PPAARRAA EEMMPPEEZZAARR
Page 59

PPAARRAA EEMMPPEEZZAARR
14
6. Compare el código que aparece en pantalla con el
código impreso en la etiqueta del envase de tiras
reactivas que va a usar. Si los códigos no
coinciden, véase el capítulo de
Codificación (página 9).
7. Presione el botón . El símbolo del
control aparecerá en la pantalla del
medidor .
Nota: Si decide no hacer la prueba de control,
presione para quitar el símbolo
del control.
8. In vierta la botella del control. Aplique
una gota de la solución de control en
una toallita desechable limpia. Limpie
el pico de la botella.
9.
Aplique suavemente una gota sobre la
tapa del envase cerrado. Toque la gota
de la solución de control con el borde
de la tira reactiva por el lado de la
punta para la muestra.
(Véase la
página 5).
Nota: En vez de la tapa del envase, se puede usar un
pequeño trozo de papel de aluminio o
envoltorio plástico transparente.
Deséchelo después de usarlo.
10.
Permita que la gota impregne la tira.
Separe la tira de la gota cuando escuche el
sonido emitido por el medidor.
Símbolo
del
control
Page 60

Nota: Si después de tocar la gota de control con la punta
para la muestra el medidor no emite un sonido ni
comienza la cuenta regresiva, deseche la tira.
Repita la prueba con una nueva tira reactiva. Si el
problema persiste, véase el capítulo de Resolución
de problemas.
11. Compare el resultado de su prueba
con la serie de resultados para la
prueba de control impresa en la
etiqueta del en
vase de tiras reactivas:
Si el resultado está dentro de la serie,
el sistema puede usarse para las
pruebas con muestras de sangre. Si el
resultado no está dentro de la serie,
repita la prueba con una nueva tira.
¡Precaución! Si el resultado de la prueba de control
vuelve a estar fuera de la serie, el sistema
no debe usarse para las pruebas con
muestras de sangre. Comuníquese con
nosotr os.
12. Quite la tira del glucómetro y deséchela. El medidor se
apagará.
13. Limpie la tapa del envase eliminando la gota de la
solución de control con una toallita desechable limpia y
húmeda, y séquela.
15
PPAARRAA EEMMPPEEZZAARR
Page 61

PPRRUUEEBBAA PPOORR SSAANNGGRREE
16
Procedimiento para la toma de la
muestra de sangre
Consulte las “Instrucciones de uso” del
instrumento de punción para ver instrucciones
detalladas.
Del dedo
1. Lávese las manos con agua
tibia y jabón para que el dedo
esté limpio. Enjuáguelas bien.
Séquelas completamente.
2. Coloque el extremo del instrumento de punción
en contacto con la punta del dedo. Puncione la
punta del dedo.
3. Coloque el instr umento de punción a un lado.
Para facilitar que se forme la gota de sang re,
baje la mano a la altura de la cintura y masajee
ligeramente la palma de la mano hacia la punta
del dedo. Deje que se forme una gota de sang re
antes de aplicársela a la tira reactiva.
No olvide retirar y desechar la lanceta usada en un
recipiente apropiado cuando termine de hacer la
prueba.
Page 62

PPRRUUEEBBAA PPOORR SSAANNGGRREE
17
P ar a la prueba con sangre tomada del antebrazo
1. Seleccione el área de punción. Lave con agua tibia y
jabón, enjuague y seque bien.
2. Frote bien el área o coloque compresas tibias para
estimular el flujo sanguíneo.
3. Coloque con f irmeza la punta en el
antebrazo. Presione el botón de
activación. Ejerza presión firme sobre
el instrumento de punción hasta
obtener una gota de sangre adecuada.
Notas importantes relacionadas con las muestras tomadas
del antebrazo para la prueba de glucemia:
• Confirme con su médico o el profesional de atención de la diabetes
que la prueba en el antebrazo es adecuada para su caso.
• Los resultados de la prueba de glucemia obtenidos con la sangre
tomada del antebrazo no siempre son iguales a los obtenidos con la
sangre tomada del dedo. No haga la prueba con una muestra de
sangre tomada del antebrazo en momentos en los cuales la glucemia
aumenta o disminuye rápidamente (es decir, durante las 2 horas
posteriores a las comidas, luego de aplicarse insulina,
inmediatamente después de hacer ejercicio, o en caso de enfermedad
o estrés). En su lugar , utilice una muestra de sangre tomada del dedo.
5
Page 63

PPRRUUEEBBAA PPOORR SSAANNGGRREE
18
Procedimiento para hacer la prueba de glucemia
1. Verifique las fechas del env ase de tiras reacti v as que v a a usar.
No use las tiras después de que ha yan transcurrido 120 días a
partir de la fecha de apertura del en v ase o cuando ha ya
pasado la fecha impresa al lado del símbolo , lo que ocurra
primero.
2. Lave el área de punción. Enjuague y seque bien el área de
punción.
3. Saque la tira reactiva del envase. Vuelva a taparlo
inmediatamente.
Nota: Use la tira reactiva inmediatamente después de que la
saque del en vase. Si se usa una tira que se haya dejado
afuer a del en vase por mucho tiempo, aparecerá un mensaje
de err or. Deseche la tir a vieja, y use
tir as nuevas par a las pruebas.
4. Con el medidor apagado, inserte el
extremo de contactos de la tira reactiva
(con los contactos hacia arriba) dentro
del puerto de prueba. El medidor se prenderá.
5. Compare el código que aparece en pantalla con
el código impreso en la etiqueta del en vase de
tiras reactiv as que se v a a usar. Si los códigos no
coinciden, véase el capítulo de Codificación.
Nota: La letra que antecede al número del chip de
codificación y al código de la etiqueta del envase no
aparecerá en la pantalla del medidor.
6. Puncione la punta del dedo o el antebrazo. Deje que se
forme una gota de sangre.
Contactos
hacia
arriba
Page 64

7. Toque la gota de sang re con el
borde de la tira reactiva por el
lado de la punta para la muestra
y manténgalos en contacto.
(Véase la página 4.) Deje que la
gota de sangre impregne la tira
reactiva hasta que escuche el
sonido que emite el medidor.
Nota: Si después de tocar la gota de sangre con la tira
reactiva por el lado de la punta para la muestra, el
medidor no emite un sonido ni comienza la cuenta
regresiva, deseche la tira. Repita la prueba con una
nueva tira reactiva y una nueva gota de sangre. Si el
problema persiste, véase el capítulo de
Resolución de problemas.
7. Después de la cuenta regresiva,
aparecerá el resultado junto con la fecha
y la hora. Retire la tira reactiva y
deséchela. El medidor se apagará.
El resultado se guardará en la memoria del
medidor.
Anote el resultado y la fecha en el diario de
control.
19
PPRRUUEEBBAA PPOORR SSAANNGGRREE
Page 65

PPRRUUEEBBAA PPOORR SSAANNGGRREE
20
Mensajes de advertencia del
resultado
¡ADVERTENCIA!
Si el resultado de la prueba de glucemia es
menor que 20 mg/dl (1.1 mmol/l), aparecerá
en pantalla el mensaje
“LO” (bajo).
Si el resultado de la prueba de glucemia es
mayor que 600 mg/dl (33.3 mmol/l),
aparecerá en pantalla el mensaje
“HI” (alto).
Repita la prueba para confirmar el resultado, cuando
salga bajo (
“LO”) o alto (“HI”). Si el resultado vuelve
a salir bajo (
“LO”) o alto (“HI”), llame a su médico o
al profesional de atención de la diabetes
inmediatamente.
Nota: Los resultados son considerados bajos (“LO”)
cuando el valor del promedio matutino es de 20
mg/dl (1.1 mmol/l). Los resultados son considerados
altos (“HI”) cuando el valor es de 600 mg/dl (33.3
mmol/l).
Page 66

MMEEMMOORRIIAA DDEELL MMEEDDIIDDOORR
21
Visualización de los resultados guardados
en la memoria
La memoria guarda 200 resultados que se pueden ver
en la pantalla por orden de fecha más reciente a más
antigua.
Comience con el medidor apagado.
Presione y suelte el botón . La pantalla
del medidor muestra el resultado más
reciente guardado en la memoria.
Para avanzar cronológicamente hacia delante,
presione .
Para avanzar cronológicamente hacia
atrás, presione .
El resultado de la prueba de control más
reciente aparecerá después del primer
resultado de la prueba de sang re y se verá en
pantalla el símbolo de control. La memoria
conserva un solo resultado de la prueba de control de
la glucosa.
Símbolo
del
control
Page 67

CCUUIIDDAADDOOSS//RREESSOOLLUUCCIIOONN DDEE PPRROOBBLLEEMMAASS
22
Cuidados del TrackEASE Smart System
®
• Conserve el sistema (el medidor, la tira de verificación, el
control de la glucosa, las tiras reactivas y el chip de
codificación) en su estuche para protegerlo del polvo, la
suciedad y los líquidos.
• Conserve el sistema en un lugar seco a temperatura ambiente
(36° a 86° F / 2° a 30° C).
NO CONGELAR.
Cuidados de su medidor
• Limpie el medidor con un paño sin pelusas humedecido con
alguno de los siguientes líquidos:
– Un detergente suave o agua con jabón suave
– Agua con un 10 % de lejía de uso doméstico
• Nunca sumerja el medidor en líquidos ni permita que entre
ningún líquido en los puertos de prueba y de datos.
Cuidados de la tira de v erificación
• No doble la tira de v erificación.
• No aplique sangre, solución de control de la glucosa ni
ningún otro líquido en la tira de verificación.
• Para limpiarla, hágalo con un paño húmedo y seque bien.
• No escriba sobre la tira de verificación.
Cuidados del control de la glucosa
• Escriba en la etiqueta del envase del control la fecha en que lo
abra por primera vez. Deseche el producto a los 3 meses de la
fecha en que lo abrió por primera vez o después de la fecha
impresa junto al símbolo , lo que ocurra primero.
• Después de usar el producto, limpie el pico de la botella y
vuelva a poner la tapa con firmeza.
• Conserv ar a temperatura ambiente (36° a 86° F / 2° a 30° C).
• Gire la botella para mezclar el producto. No agitar.
Page 68

23
Cuidados de la tira reactiva
• Conserve las tiras únicamente dentro de su envase
original.
• Escriba en el envase de las tiras la fecha en que lo
abra por primera vez. Deseche las tiras no usadas
cuando hayan transcur rido 120 días a par tir de la
fecha en que abrió el envase por primera vez, o
cuando haya pasado la fecha impresa junto al
símbolo , lo que ocurra primero. Si usa las tiras
después de alguna de las las fechas mencionadas,
puede obtener resultados incorrectos.
• Cier re el envase inmediatamente después de sacar la
tira. Use la tira reactiva inmediatamente después de
que la saque del envase. Nunca guarde las tiras fuera
del envase. Conserve en un lugar seco a temperatura
ambiente menor de 86 °F/30° C.
NO CONGELAR.
• No use la tira más de una vez.
• Aplique en las tiras únicamente muestras de sang re
capilar fresca o de la solución de control de la glucosa
TrackEASE
®
.
• No doble, corte ni altere las tiras de ningún modo.
Cuidados del chip de codif icación
• El chip de codif icación debe per manecer dentro del
medidor hasta que se hayan usado todas las tiras de la
caja. Una vez que se hayan usado todas las tiras, debe
desechar el chip de codificación viejo.
• Justo antes de usar una nueva caja de tiras reactivas,
debe insertar el nuevo chip de codif icación que viene
en la caja de tiras.
CCUUIIDDAADDOOSS//RREESSOOLLUUCCIIOONN DDEE PPRROOBBLLEEMMAASS
Page 69

Instalación de la pila
Cambie la pila cuando aparezcan en
pantalla los símbolos de pila con poca
carga o de pila descargada, o cuando el
medidor no se prenda.
1.
Use la pestaña para levantar la tapa
del compartimiento de las pilas.
2. Voltee el medidor, déle un
golpecito para soltar la pila y
sáquela.
3. Inserte un pila nueva colocando el
polo positivo (“+”) hacia arriba.
Ponga de nuevo la tapa.
Nota: Use una pila de litio de 3 voltios no recar gable
(#CR2032).
4. Deseche la pila gastada en un recipiente apropiado.
5. Prenda el medidor. Si el medidor no se prende,
compruebe que la pila se haya instalado correctamente. Si
no, vuelva a insertar la pila e intente otra vez. Llámenos
para solicitar asistencia si el problema persiste.
Nota: El cambio de la pila puede afectar la configuración
de la fecha y la hora. Revise la fecha y la hora
presionando el botón y soltándolo. Para volver
a configurar, véase el capítulo de
Configuración.
24
Poca
carga
Descar-
gada
¡Precaución!
Las pilas podrían explotar si se maltratan o se
cambian de manera incorrecta.No deseche la pila
en el fuego.No desarme la pila ni intente recargarla.
Deseche la pila en conf ormidad con los reglamentos
locales y nacionales específicos.
CCUUIIDDAADDOOSS//RREESSOOLLUUCCIIOONN DDEE PPRROOBBLLEEMMAASS
Page 70

25
Acción
Saque la tira. Vuelva a insertarla
correctamente.
Saque la tira. V uelv a a insertarla
completamente dentro del medidor .
Repita con una nuev a tira.
Cambie la pila.
Coloque la pila con el polo
positiv o (“+”) hacia arriba.
Comuníquese con nosotros.
Acción
Repita la prueba con una nueva tira
y una gota de muestra más grande.
Repita la prueba con una nueva tira
y aplique la gota de muestra después
de que el medidor emita el sonido.
Repita con una nuev a tira.
Comuníquese con nosotros.
Razón
La tira se ha insertado con el lado
incorrecto hacia arriba o al revés
La tira no se ha insertado
completamente.
Error de tira.
Pila con poca carga o descar gada.
La pila se ha colocado al revés.
Error del medidor.
Razón
La gota de la muestra es
demasiado pequeña
La muestra se aplicó después de
los dos minutos de espera y se
apagó el medidor .
Ha y un problema con la tira.
Ha y un problema con el medidor .
Resolución de problemas
1) El medidor no prende cuando se inserta la tira reactiv a .
2) La prueba no se inicia cuando se aplica la muestra.El medidor
no emite ningún sonido ni comienza la cuenta regresiv a.
CCUUIIDDAADDOOSS//RREESSOOLLUUCCIIOONN DDEE PPRROOBBLLEEMMAASS
Page 71

26
Mensajes
P
antalla
Razón
Error de
temperatura
La temperatura
cambia demasiado
rápido.
La temperatura
está m
uy baja
La temperatura es
menor de 10º C
(50º F)
La temperatura está
demasiado alta
La temperatura del
medidor es mayor
de 40º C (104º F)
No se detectó la
muestra
La tira reactiva ya
se ha usado o ha
estado fuera del
envase por mucho
tiempo.
Acción
Espere 10 minutos
antes de comenzar la
prueba para que el
medidor y las tiras
alcancen la temperatura
ambiente.
Antes de hacer la prueba,
muev a el medidor y las
tiras reactiv as a un lugar
en donde la temperatura
esté entre 10º y 40º C
(50º y 104º F).
Antes de hacer la
prueba, mueva el
medidor y las tiras
reactiv as a un lugar en
donde la temperatura
esté entre 10º y 40º C
(50º y 104º F).
Vuelva a hacer la
prueba con una nueva
tira reactiva y una
muestra más grande.
Repita con una nueva
tira reactiva. Si el
error persiste,
comuníquese con
nosotros.
CCUUIIDDAADDOOSS//RREESSOOLLUUCCIIOONN DDEE PPRROOBBLLEEMMAASS
Page 72

27
Mensajes (continuación)
Pantalla
Razón
Error del
medidor.
Error de la tira
reactiva
La tira se retiró
antes de que
terminara la
prueba
Error de la tira de
verificación
Error del chip de
codificación
Acción
Comuníquese con
nosotros.
Repita la prueba con
una nueva tira
reactiva. Si el error
persiste,
comuníquese con
nosotros.
Repita la prueba
con una nueva tira.
Si el error persiste,
comuníquese con
nosotros.
Repita la prueba. Si
el error persiste,
NO vuelva a usar
el medidor.
Comuníquese con
nosotros.
Saque el chip de
codificación y
vuelva a insertarlo.
Si el error persiste,
comuníquese con
nosotros.
CCUUIIDDAADDOOSS//RREESSOOLLUUCCIIOONN DDEE PPRROOBBLLEEMMAASS
Page 73

28
Mensajes (continuación)
Pantalla
Razón
Pila con poca
carga
Pila descargada
Error del chip de
codificación
• ¡ADVERTENCIA!
HI – Resultado alto.
El resultado fue ma yor de
600 mg/dl (33.3 mmol/l)
LO – Resultado bajo.
El resultado fue menor de
20 mg/dl (1.11 mmol/l)
Acción
Se pueden hacer 50
pruebas más antes
de que se deba
cambiar la pila.
Cambie la pila.
Saque el chip de
codificación y vuelva
a insertarlo. Si el error
persiste, comuníquese
con nosotros.
• ¡ADVERTENCIA!
Repita la prueba con una
nuev a tira. Si el resultado
sigue saliendo alto (“HI”)
o bajo (“LO”),
comuníquese con su
médico
inmediatamente.
CCUUIIDDAADDOOSS//RREESSOOLLUUCCIIOONN DDEE PPRROOBBLLEEMMAASS
Page 74

29
Especificaciones del medidor
Serie de resultados: 1.1 a 33.3 mmol/l (20 a 600 mg/dl)
Tamaño de la muestra: 1 microlitro (1 µl) como mínimo
Muestra: Sangre capilar total fresca o la solución de control de la glucosa
Tiempo de la prueba: 10 segundos
Valor del resultado: Valores en plasma
Método del ensayo: ElectroquímicoPower
Fuente de alimentación: Una pila de litio de 3 voltios
#CR2032 (no recargab le)
P otencia total cuando funciona
con la pila completamente cargada
= 8.6 mW
Vida útil de la pila: Aproximadamente 1100 pruebas ó 1 año
Apagado automático: A los dos minutos que permanezca sin uso
Peso: 47 g ramos (1.66 onzas)
Tamaño: 89 x 55 x 17mm (3.52" x 2.15" x 0.67")
Capacidad de la memoria: 200 resultados de pruebas
de glucemia, 1 resultado
de la prueba de control
Valores del funcionamiento del sistema
(Medidor y tiras reactivas):
Humedad relativa: 10 a 90 % (sin condensación)
Temperatura: 10º a 40º C (50º a 104º F)
Hematocrito: 30 a 55 %
Nota: Use el sistema sólo dentro de las condiciones
ambientales especificadas.
CCUUIIDDAADDOOSS//RREESSOOLLUUCCIIOONN DDEE PPRROOBBLLEEMMAASS
Page 75

30
Composición Química
Tiras Reactivas: Glucosa Oxidasa (Aspergillis
niger)
2.5 Unidades, Mediadores, Soluciones
Tampón y Estabilizadores.
Glucose Control: Contenido: Volumen: 3 mL.
Composición Química: Agua - 73%, D-glucosa -
0.09 - 0-20%, Agente para Mejorar la Viscosidad 25%, Sales Inorgánicas - 1.8%, Amaranto - 0.08%,
y Preservativo - 0.03%.
CCUUIIDDAADDOOSS//RREESSOOLLUUCCIIOONN DDEE PPRROOBBLLEEMMAASS
Page 76

31
Garantía limitada
Home Diagnostics, Inc. le ofrece la siguiente garantía al comprador
original al por menor del medidor TrackEASE Smart System
®
:
1) Home Diagnostics Inc. garantiza que este medidor está libre de
defectos de materiales y de mano de obra en el momento de la
compra. Si el medidor deja de funcionar antes de que se cumplan
cinco (5) años a partir de la fecha de la compra original al por menor,
Home Diagnostics, Inc cambiará a criterio propio el medidor por un
medidor equivalente, sin ningún costo para el comprador. Esta
garantía no cubre las fallas del medidor que hayan sido causadas por
algún abuso o un uso no conforme con las instr ucciones de uso.
2) Esta garantía no incluye la pila suministrada con el medidor.
3) No desarme el medidor. Esto anulará la garantía y hará que el
medidor muestre resultados erróneos.
4) La duración de cualquier garantía implícita, incluida cualquier
garantía implícita de comerciabilidad o idoneidad para un fin
particular debe limitarse a cinco (5) años contados a partir de la fecha
de la compra original al por menor. Algunos estados no permiten
limitaciones sobre la duración de una garantía implícita, por lo tanto
la limitación antes mencionada puede no ser válida en su caso.
5) Home Diagnostics, Inc. no se hará responsable por daños y perjuicios
contingentes o emergentes debidos al incumplimiento de cualquier
garantía expresa o implícita, incluida cualquier garantía implícita de
comerciabilidad o idoneidad para un uso particular con respecto al
medidor. Algunos estados no per miten la exclusión ni la limitación
de los daños y perjuicios contingentes o emergentes, por lo tanto, las
limitaciones y exclusiones antes mencionadas pueden no ser válidas
en su caso.
6) Esta garantía otorga al usuario derechos legales específicos. El
usuario puede tener también otros derechos, los cuales varían de
estado a estado.
Su representante de servicios técnicos de TrackEASE Smart System
®
podrá darle más información con relación a los procedimientos a seguir
para devolver su medidor, si esto fuera necesario.
Page 77

32
Referencias:
1. Joslin Diabetes Center & Joslin Clinic, Inc., (Sept. 2001).
Guidelines for Pharmacological Management of Type 2 Diabetes.
[Versión en formato electrónico]. Obtenida el 22 de agosto de 2002
a través de www.joslin.har vard.edu/education/library/wbggoal.shtml
2. Hackett, J., Aziz, K.,
Review Criteria Assessment of Portable
Blood Glucose Monitoring in vitro Diagnostic Devices Using
Glucose Oxidase, Dehydrogenase or Hexokinase Methodology
; FDA
Draft Document, p. 6 (1997).
3. Joslin Diabetes Center, (2002).
What Can I Do to Prevent
SeriousHypoglycemic Episodes When I Am Hypoglycemic Unaware?
[Versión en formato electrónico]. Obtenida el 22 de agosto de 2002
a través de www.joslin.org/education/library/hypoglycemic_unaware.
shtml.
4. Joslin Diabetes Center & Beth Israel Deaconess Medical Center,
(2002).
Guidelines for Management of Hypoglycemic Emergencies
[Versión en formato electrónico]. Obtenida el 22 de agosto de 2002
a través de www.diabetesmanagement.joslin.org/guidelines/
hyperglycemicguide.pdf.
5. Food and Drug Administration 2003.
Diabetes Inf ormation - Glucose
Meters and Diabetes Management
. [Versión en formato electrónico].
Obtenida el 11 de agosto de 2003 a través de www.fda.gov/diabetes/
glucose.html.
Page 78

33
Notas:
Page 79

34
Notas:
Page 80

35
C4HDI04 Rev. 4 • 10MAY06
Notas:
 Loading...