


Owner's Operator And Maintenance Manual
Manuel de l'utilisateur et d'entretien
REHAB SHOWER COMMODE CHAIR
CHAISE DE DOUCHE AVEC SIÈGE D'AISANCE
DEALER: THIS MANUAL MUST BE GIVEN TO THE USER OF THE
REHAB SHOWER COMMODE CHAIR.
USER: BEFORE USING THIS REHAB SHOWER
COMMODE CHAIR, READ THIS MANUAL AND SAVE FOR FUTURE
REFERENCE.
FOURNISSEUR: CE MANUEL DOIT ÊTRE REMIS À LUTILISATEUR DE
LA CHAISE DE DOUCHE.
UTILISATEUR: AVANT DUTILISER CETTE CHAISE DE DOUCHE, LIRE
CE MANUEL ET LE CONSERVER POUR RÉFÉRENCE ULTÉRIEURE.
For more information regarding
Invacare products, parts, and services,
please visit: www.invacare.com
Pour de plus amples renseignements sur
les produits, les pièces et le service Invacare
visitez le: www.invacare.com

WARNING/SPECIAL NOTES
WARNING
THIS REHAB SHOWER COMMODE CHAIR IS NOT
DESIGNED OR INTENDED FOR OUTDOOR TRANSPORTATION OR EXTENDED MOBILITY USAGE.
DO NOT OPERATE THIS EQUIPMENT WITHOUT
FIRST READING AND UNDERSTANDING THIS
MANUAL. IF YOU ARE UNABLE TO UNDERSTAND
THE WARNINGS, CAUTIONS, AND
INSTRUCTIONS, CONTACT A HEALTHCARE
PROFESSIONAL, DEALER OR TECHNICAL
WARNING/SPECIAL NOTES
PERSONNEL IF APPLICABLE BEFORE
ATTEMPTING TO USE THIS EQUIPMENT OTHERWISE INJURY OR DAMAGE MAY RESULT.
SPECIAL NOTES
WARNING/CAUTION notices as used in this manual apply to hazards or
unsafe practices which could result in personal injury or property damage.
NOTICE
THE INFORMATION CONTAINED IN THIS DOCUMENT IS SUBJECT
TO CHANGE WITHOUT NOTICE.
REHAB SHOWER COMMODE CHAIR USER
As a manufacturer of Rehab Shower Commode chairs, Invacare endeavors
to supply a wide variety of Rehab Shower Commode chairs to meet many
needs of the end user. However, final selection of the type of Rehab Shower
Commode chair to be used by an individual rests solely with the user and
his/her healthcare professional capable of making such a selection.
REHAB SHOWER COMMODE CHAIR TIE-DOWN RESTRAINTS AND
SEAT POSITIONING STRAPS
Invacare recommends that rehab shower commode chair users NOT be
transported in vehicles of any kind while in rehab shower commode
chairs. As of this date, the Department of Transportation has not
approved any tie-down systems for transportation of a user while in a
Rehab Shower Commode chair, in a moving vehicle of any type.
It is Invacares position that users of Rehab Shower Commode chairs
should be transferred into appropriate seating in vehicles for transportation and use be made of the restraints made available by the auto
industry. Invacare cannot and does not recommend any Rehab Shower
Commode chair transportation systems.
WITH REGARDS TO RESTRAINTS - SEAT POSITIONING STRAPS - IT
IS THE OBLIGATION OF THE DME DEALER, THERAPISTS AND OTHER
HEALTHCARE PROFESSIONALS TO DETERMINE IF A SEAT POSITIONING STRAP IS REQUIRED TO ENSURE THE SAFE OPERATION OF
THIS EQUIPMENT BY THE USER. SERIOUS INJURY CAN OCCUR IN
THE EVENT OF A FALL FROM A REHAB SHOWER COMMODE CHAIR.
Rehab Shower Commode Chair 2 Part No. 1118394

TABLE OF CONTENTS
TABLE OF CONTENTS
SPECIAL NOTES................................................................................ 2
LABEL LOCATIONS........................................................................... 7
SPECIFICATIONS .............................................................................. 8
SECTION 1 - GENERAL GUIDELINES .................................................. 9
OPERATING INFORMATION ................................................................................................................ 9
WEIGHT TRAINING ................................................................................................................................ 10
WEIGHT LIMITATION ............................................................................................................................ 10
SAFETY/HANDLING OF REHAB SHOWER COMMODE CHAIRS ........................................... 10
SECTION 2 - SAFETY INSPECTION .................................................. 15
SAFETY INSPECTION CHECKLIST .....................................................................................................15
TROUBLESHOOTING............................................................................................................................. 16
SECTION 3 - CARE AND MAINTENANCE ........................................ 17
MAINTENANCE SAFETY PRECAUTIONS ........................................................................................ 17
SUGGESTED MAINTENANCE PROCEDURES ................................................................................ 17
SECTION 4 - UNFOLDING/FOLDING ................................................. 18
UNFOLDING/FOLDING THE SHOWER COMMODE CHAIR .................................................. 18
TABLE OF CONTENTS
SECTION 5 - SEAT AND BACK ........................................................ 19
REPLACING THE SLIP ON BACK UPHOLSTERY .......................................................................... 19
REMOVING/INSTALLING PADDED SEAT ....................................................................................... 19
USING SEAT COVER ............................................................................................................................... 20
REMOVING/INSTALLING SEAT POSITIONING STRAP .............................................................. 20
SECTION 6 - PAIL ........................................................................... 21
REMOVING/INSTALLING THE PAIL .................................................................................................. 21
REMOVING/INSTALLING THE PAIL HOLDER ............................................................................... 22
SECTION 7 - FRONT RIGGINGS ....................................................... 23
REMOVING/INSTALLING/ADJUSTING SWINGAWAY FOOTREST ASSEMBLY ................. 23
FOOTPLATE HEIGHT ADJUSTMENT ................................................................................................ 23
REPLACING HEEL LOOPS ..................................................................................................................... 24
SECTION 8 - ARMS ......................................................................... 25
REMOVING/INSTALLING SWING-BACK ARMS............................................................................ 25
POSITIONING SWING-BACK ARMS ................................................................................................. 26
REPLACING ARMREST PAD ................................................................................................................. 26
SECTION 9 - CASTERS .................................................................... 27
REMOVING/INSTALLING FRONT CASTERS
- ON MODEL NOS. 6795 AND 6895 ................................................................................................. 27
REMOVING/INSTALLING CASTERS WITH BRAKE
- ON MODEL NO. 6891 ......................................................................................................................... 27
SECTION 10 - REAR WHEELS AND HANDRIMS ................................ 28
REMOVING/INSTALLING WHEELS - ON MODEL NOS. 6795 AND 6895............................ 28
REPLACING/REPAIRING WHEEL TIRE.............................................................................................. 29
REPLACING WHEEL HANDRIM.......................................................................................................... 29
SECTION 11 - WHEEL LOCKS ........................................................... 30
USING/ADJUSTING THE WHEEL LOCKS ........................................................................................ 30
LIMITED WARRANTY ..................................................................... 32
MANUEL DE L'UTILISATEUR ET D'ENTRETIEN ................................. 33
Part No. 1118394 3 Rehab Shower Commode Chair

PRODUCT REGISTRATION FORM
REGISTER YOUR PRODUCT!
The benefits of registering:
1. Safeguard your investment.
2. Ensure long term maintenance and servicing of your purchase.
3. Receive updates with product information, maintenance tips, and industry news.
4. Invacare can contact you or your provider, if servicing is needed on your product.
5. It will enable Invacare to improve product designs based on your input and needs.
FORM
PRODUCT REGISTRATION
Any registration information you submit will be used by Invacare Corporation only, and
Register ONLINE at www.invacare.com
Complete and mail the form on the next page
protected as required by applicable laws and regulations.
- or -
Rehab Shower Commode Chair 4 Part No. 1118394

PRODUCT REGISTRATION FORM
Register ONLINE at www.invacare.com - or -
Complete and mail this form
Name _______________________________________________________________
Address _____________________________________________________________
City ___________________State/Province __________
Zip/Postal Code ________
Email ___________________________________ Phone No. _________________
Invacare Model No. ______________________ Serial No. __________________
Purchased From _________________________Date of Purchase: ___________
1. Method of purchase: (check all that apply)
❏ Medicare ❏ Insurance ❏ Medicaid ❏ Other __________________________
2. This product was purchased for use by: (check one)
❏ Self ❏ Parent ❏ Spouse ❏ Other
3. Product was purchased for use at:
❏ Home ❏ Facility ❏ Other
4. I purchased an Invacare product because:
Cut Along Line
❏ Price ❏ Features (list features) _________________________________________
5. Who referred you to Invacare products? (check all that apply)
❏ Doctor ❏ Therapist ❏ Friend ❏ Relative ❏ Other ___________________
❏ No referral ❏ Advertisement (circle one): TV, Radio, Magazine, Newspaper
6. What additional features, if any, would you like to see on this product?
7. Would you like information sent to you about Invacare products that may be available for a
__________________________________________________________________________
particular medical condition? ❏ Yes ❏ No
If yes, please list any condition(s) here and we will send you information by email and/or mail about
any available Invacare products that may help treat, care for or manage such condition(s):
__________________________________________________________________________
Fold
here
Fold
here
8. Would you like to receive updated information via email or regular mail about the Invacare
home medical products sold by Invacare's dealers? ❏ Yes ❏ No
9. What would you like to see on the Invacare website?
__________________________________________________________________________
10. Would you like to be part of future online surveys for Invacare products? ❏ Yes ❏ No
11. User's Year of birth: ______________________________________________________
If at any time you wish not to receive future mailings from us, please contact us at Invacare Corporation,
CRM Department, 39400 Taylor Parkway, Elyria, OH 44035, or fax to 877-619-7996 and we will remove
you from our mailing list.
To find more information about our products, visit www.invacare.com.

Fold
here
Fold
here
Cut Along Line
Invacare Product Registration Form
Please Seal with
Tape Before Mailing
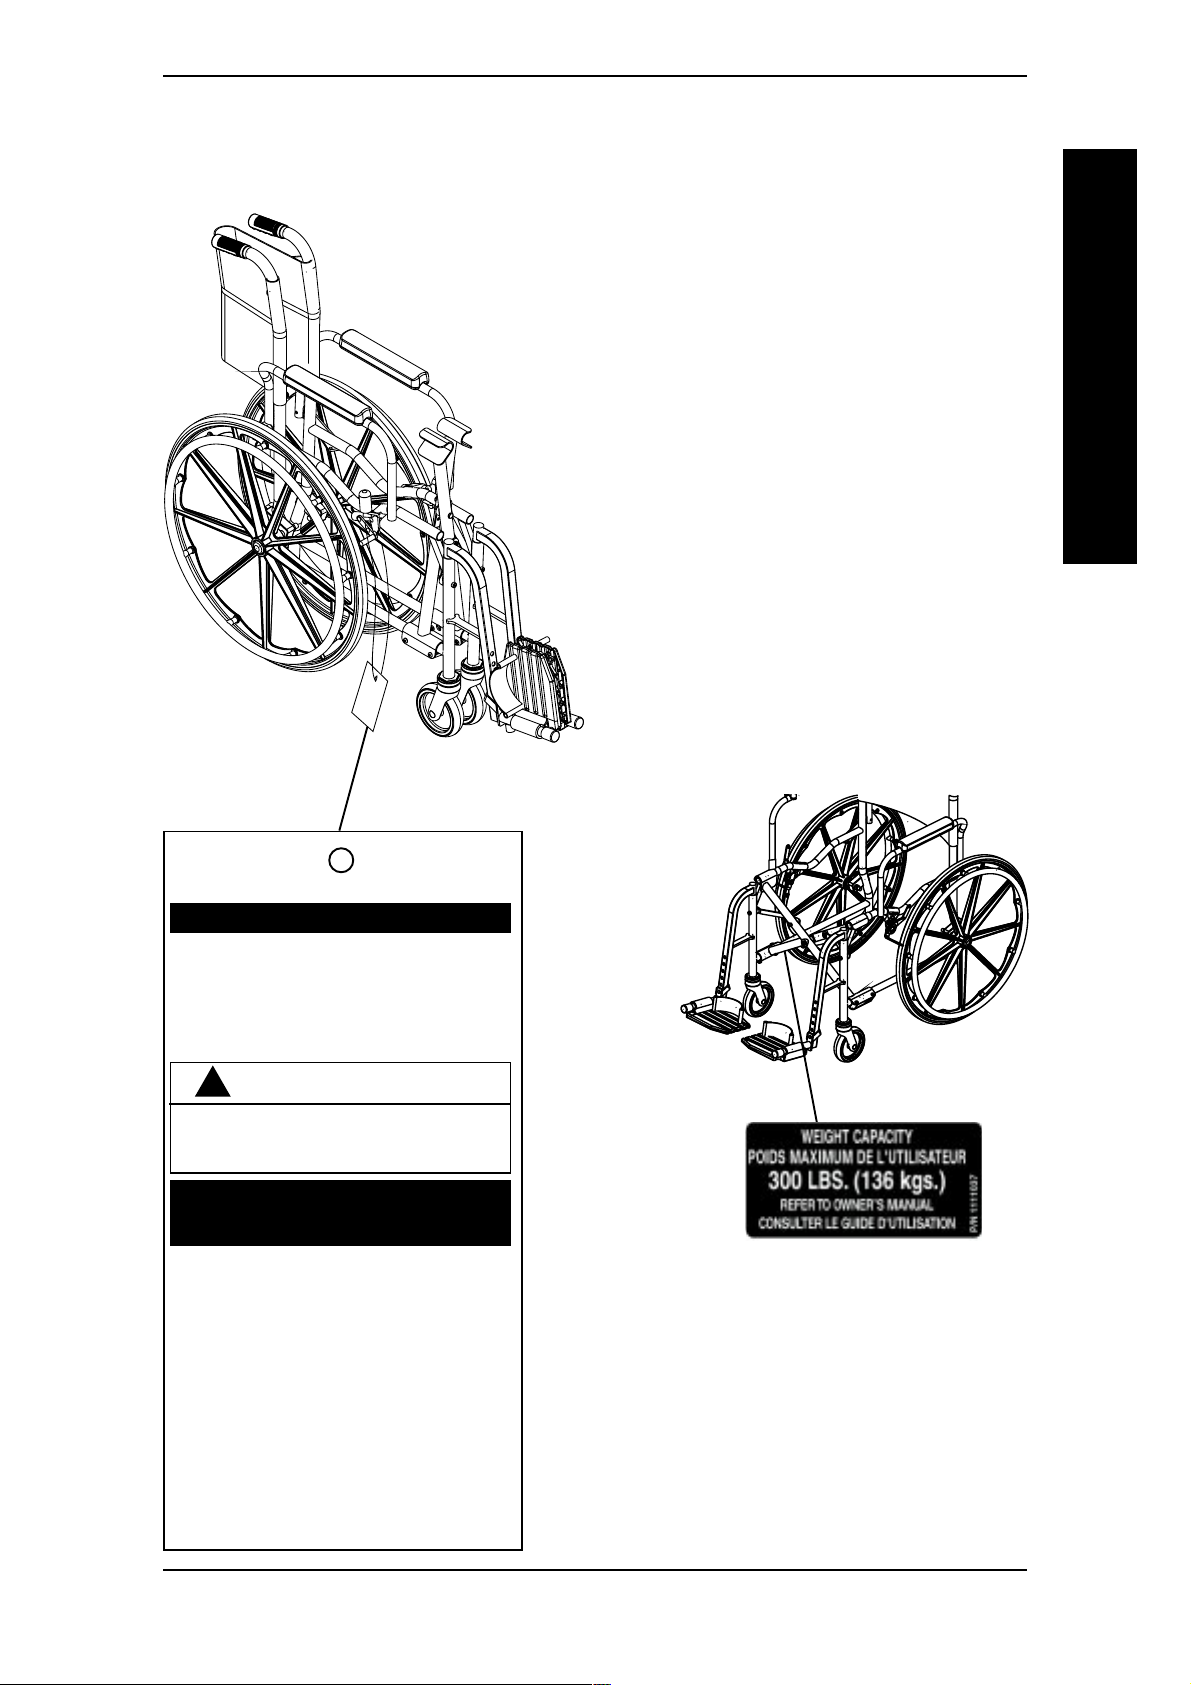
LABEL LOCATIONS
LABEL LOCATIONS
LABEL LOCATIONS
IMPORTANT NOTICE
The wheel locks on this wheelchair have been
pre-set at the factory to comply with the
Veterans Administration functional Standard
8320.01 of the Federal Register, paragraph
3.2.4.5.3. If these wheel locks do not meet
your needs, follow instructions below.
!
CAUTION
Any wheel lock adjustments should embed
wheel lock shoe at least 1/8" into tire when
locked (3/16" on pneumatic tires).
INSTRUCTIONS FOR WHEEL
LOCK ADJUSTMENTS
1. Loosen wheel lock mounting fastener,
which runs through mounting bracket and
frame.
2. Slide clamp toward rear wheel until wheel
lock shoe is embedded into tire material at
least 1/8" when handle is engaged to the
lock position (3/16" for pneumatic tires).
3. Tighten mounting fastener to secure
mounting bracket in desired location and
recheck lock shoe embedding.
4. Inspect for correct locking action BEFORE
actual use.
NOTE: The weight capacity
label is located on the back
of the cross-member.
P/N 1114837 REV A
Part No. 1118394 7 Rehab Shower Commode Chair

SPECIFICATIONS
SPECIFICATIONS
REHAB SHOWER COMMODE CHAIR
18.50" Seat 18.50" Seat 16.00" Seat
Model Number (5" Casters) (24" Wheels) (24" Wheels)
Overall Rehab Shower Commode Height
(Floor to Top of Push Handle) 38½" 38½" 38½"
Seat-to-Floor Height 23" 23" 23"
Seat-to-Armrest Height 7¾" 7¾" 7¾"
SPECIFICATIONS
Back Height
(Top of Seat to Top of Upholstery) 15½" 15½" 15½"
Footrest Extension Max
(From Top of Seat) 20¾" 20¾" 20¾"
Footrest Extension Min
(From Top of Seat) 16¾" 16¾" 16¾"
Overall Rehab Shower Commode Chair 22" 26½" 24½"
Width (Handrim to Handrim) No Handrim
Overall Back Width 18" 18" 16"
Seat Width 18½" 18½" 16"
Width Between Arms 18" 18" 16"
Folded Width 8" 12" 12"
Overall Depth
(Without Front Riggings) 30" 33" 33"
Seat Depth 18¼" 18¼" 16"
Weight 30 lbs 41 lbs 40 lbs
Weight Capacity 300 lbs 300 lbs 300 lbs
Clearance for Over-the-Toilet Use
Depth
(Front X-Brace to Edge of Rear Tire) 19" 28" 28"
No Tire
Depth
(Rear-Wheel Axle Bolt to Edge of Tire) N/A 11½" 11½"
Height
(Floor to Seat Base) 20¼" 20¼" 20¼"
Inside Width
(Between Side Frames) 16" 16" 14"
Rehab Shower Commode Chair 8 Part No. 1118394

GENERAL GUIDELINES
Section 1 - General Guidelines - includes the following:
Operating Information Weight Limitation
SECTION 1
Weight Training Safety/Handling of Rehab Shower Commode Chairs
OPERATING INFORMATION
GENERAL WARNINGS
THIS REHAB SHOWER COMMODE CHAIR IS NOT
DESIGNED OR INTENDED FOR OUTDOOR
TRANSPORTATION OR EXTENDED MOBILITY USAGE.
KEEP HANDS AND FINGERS CLEAR OF MOVING PARTS TO AVOID INJURY.
Unless otherwise noted, all service and adjustment should be performed
while the Rehab Shower Commode chair is unoccupied.
To determine and establish your particular safety limits, practice bending,
reaching and transferring activities in several combinations in the presence of a qualified health professional BEFORE attempting active use of
the Rehab Shower Commode chair.
ALWAYS wear the SEAT POSITIONING STRAP.
ALWAYS verify that hand grips on the rear cane are secure PRIOR to
use when an assistant is used to propel the Rehab Shower Commode
chair. Check for any signs of looseness or deterioration and if found,
contact a qualified technician. DO NOT attempt to move the Rehab
Shower Commode chair by using the hand grips if they are found to be
unsecure or have deteriorated.
GENERAL GUIDELINES
DO NOT attempt to reach objects if you have to move forward in the seat.
DO NOT attempt to reach objects if you have to pick them up from the
floor by reaching down between your knees.
DO NOT lean over the top of the back upholstery. This will change your
center of gravity and may cause you to tip over.
DO NOT shift your weight or sitting position toward the direction you
are reaching as the Rehab Shower Commode chair may tip over.
DO NOT use an escalator to move a Rehab Shower Commode chair
between floors. Serious bodily injury may occur.
WHEEL LOCKS ARE NOT BRAKES. DO NOT attempt to stop a moving
Rehab Shower Commode chair with the wheel locks.
Before attempting to transfer in or out of the Rehab Shower Commode
chair, every precaution should be taken to reduce the gap distance. Turn
ALL casters parallel to the object you are transferring onto. When transferring to and from the Rehab Shower Commode chair, ALWAYS ENGAGE BOTH WHEEL LOCKS (on model nos. 6795 and 6895) or
BRAKES ON ALL FOUR (4) CASTERS (on model no. 6891).
DO NOT sit or transfer into the Rehab Shower Commode chair unless it
is fully open.
DO NOT climb, go up or down ramps or traverse slopes greater than 9°.
DO NOT attempt to move up or down an incline with a water, ice or oil film.
Part No. 1118394 9 Rehab Shower Commode Chair

SECTION 1 GENERAL GUIDELINES
DO NOT use parts, accessories, or adapters other than those authorized
by Invacare. Otherwise, the warranty is void.
DO NOT attempt to ride over obstacles. Doing so may cause your Rehab
Shower Commode chair to tip over and cause bodily harm or damage to
the Rehab Shower Commode chair.
DO NOT overtighten hardware attaching to the frame. This could cause
damage to the frame tubing.
DO NOT use the footplate as a platform when getting in or out of the
Rehab Shower Commode chair.
DO NOT attempt to lift the Rehab Shower Commode chair by any removable (detachable) parts. Lifting by means of any removable (detach-
GENERAL GUIDELINES
able) parts of a Rehab Shower Commode chair may result in injury to the
user or damage to the Rehab Shower Commode chair.
DO NOT stand on the frame of the Rehab Shower Commode chair.
When cleaning rear cane or hand grip areas use only a clean towel lightly
dampened with cool water. Verify that grips are dry prior to use. Use of
soap or ammonia based cleaning solutions will result in the hand grips
sliding off the cane assembly. Failure to observe this warning may result
in injury to the user or bystanders.
GENERAL WARNINGS (CONTINUED)
GENERAL GUIDELINES
DO NOT tip the Rehab Shower Commode chair without assistance.
ALWAYS use the handrims for self-propulsion.
WEIGHT TRAINING
WARNING
Invacare DOES NOT recommend the use of its Rehab Shower Commode
chairs as a weight training apparatus. Invacare Rehab Shower Commode
chairs have NOT been designed or tested as a seat for any kind of weight
training. If occupant uses said Rehab Shower Commode chair as a weight
training apparatus, INVACARE SHALL NOT BE LIABLE FOR BODILY
INJURY AND THE WARRANTY WILL BE VOID.
WEIGHT LIMITATION
WARNING
The Rehab Shower Commode chair has a weight limitation of 300 lbs
(136kg).
SAFETY/HANDLING OF REHAB SHOWER COMMODE CHAIRS
Safety and Handling of the Rehab Shower Commode chair requires the close attention of the Rehab Shower Commode chair user as well as the assistant. This manual
points out the most common procedures and techniques involved in the safe operation
and maintenance of the Rehab Shower Commode chair. It is important to practice and
master these safe techniques until you are comfortable in maneuvering around the
frequently encountered architectural barriers.
Rehab Shower Commode Chair 10 Part No. 1118394

Use this information only as a basic guide. The techniques that are discussed on the
following pages have been used successfully by many.
Individual Rehab Shower Commode chair users often develop skills to deal with daily
living activities that may differ from those described in this manual. Invacare recognizes
and encourages each individual to try what works best for him/her in overcoming
architectural obstacles that they may encounter, however ALL WARNINGS and
CAUTIONS given in this manual MUST be followed. Techniques in this manual are a
starting point for the new Rehab Shower Commode chair user and assistant with
safety as the most important consideration for all.
STABILITY AND BALANCE
ALWAYS wear the SEAT POSITIONING STRAP.
To assure stability and proper operation of your Rehab Shower Commode chair, you
GENERAL GUIDELINES
must maintain proper balance at all times. Your Rehab Shower Commode chair has
been designed to remain upright and stable during normal daily activities as long as you
do not move beyond the center of gravity.
Virtually all activities which involve movement in the Rehab Shower Commode chair
have an effect on the center of gravity. Invacare recommends using seat/chest positioning straps for additional safety while involved in activities that shift your weight.
SECTION 1GENERAL GUIDELINES
GENERAL GUIDELINES
WARNING
DO NOT lean forward out of the Rehab Shower Commode chair any further than the
length of the armrests. Make sure the casters are pointing in the forward position
whenever you lean forward. This can be achieved by advancing the Rehab Shower
Commode chair and then reversing it in a straight line.
COPING WITH EVERYDAY OBSTACLES
Coping with the irritation of everyday obstacles can be alleviated somewhat by learning
how to manage your Rehab Shower Commode chair. Keep in mind your center of
gravity to maintain stability and balance.
A NOTE TO REHAB SHOWER COMMODE CHAIR ASSISTANTS
When assistance to the Rehab Shower Commode chair user is required, remember to
use good body mechanics.
WARNING
DO NOT attempt to lift the Rehab Shower Commode chair by any
removable (detachable) parts. Lifting by means of any removable (detachable) parts of a Rehab Shower Commode chair may result in injury to the
user or damage to the Rehab Shower Commode chair.
Always verify that hand grips on the rear cane are secure PRIOR to use
when an assistant is used to propel or lift the chair. Check for any signs of
looseness or deterioration and if found, contact a qualified technician. DO
NOT attempt to move the Rehab Shower Commode chair by pulling on
the hand grips if they are found to be unsecure or have deteriorated.
Also, be aware of detachable parts such as armrests or legrests. These must NEVER be
used to move the Rehab Shower Commode chair or as lifting supports, as they may be
inadvertently released, resulting in possible injury to the user and/or assistant(s).
When learning a new assistance technique, have an experienced assistant help you
before attempting it alone.
Part No. 1118394 11 Rehab Shower Commode Chair
SECTION 1 GENERAL GUIDELINES
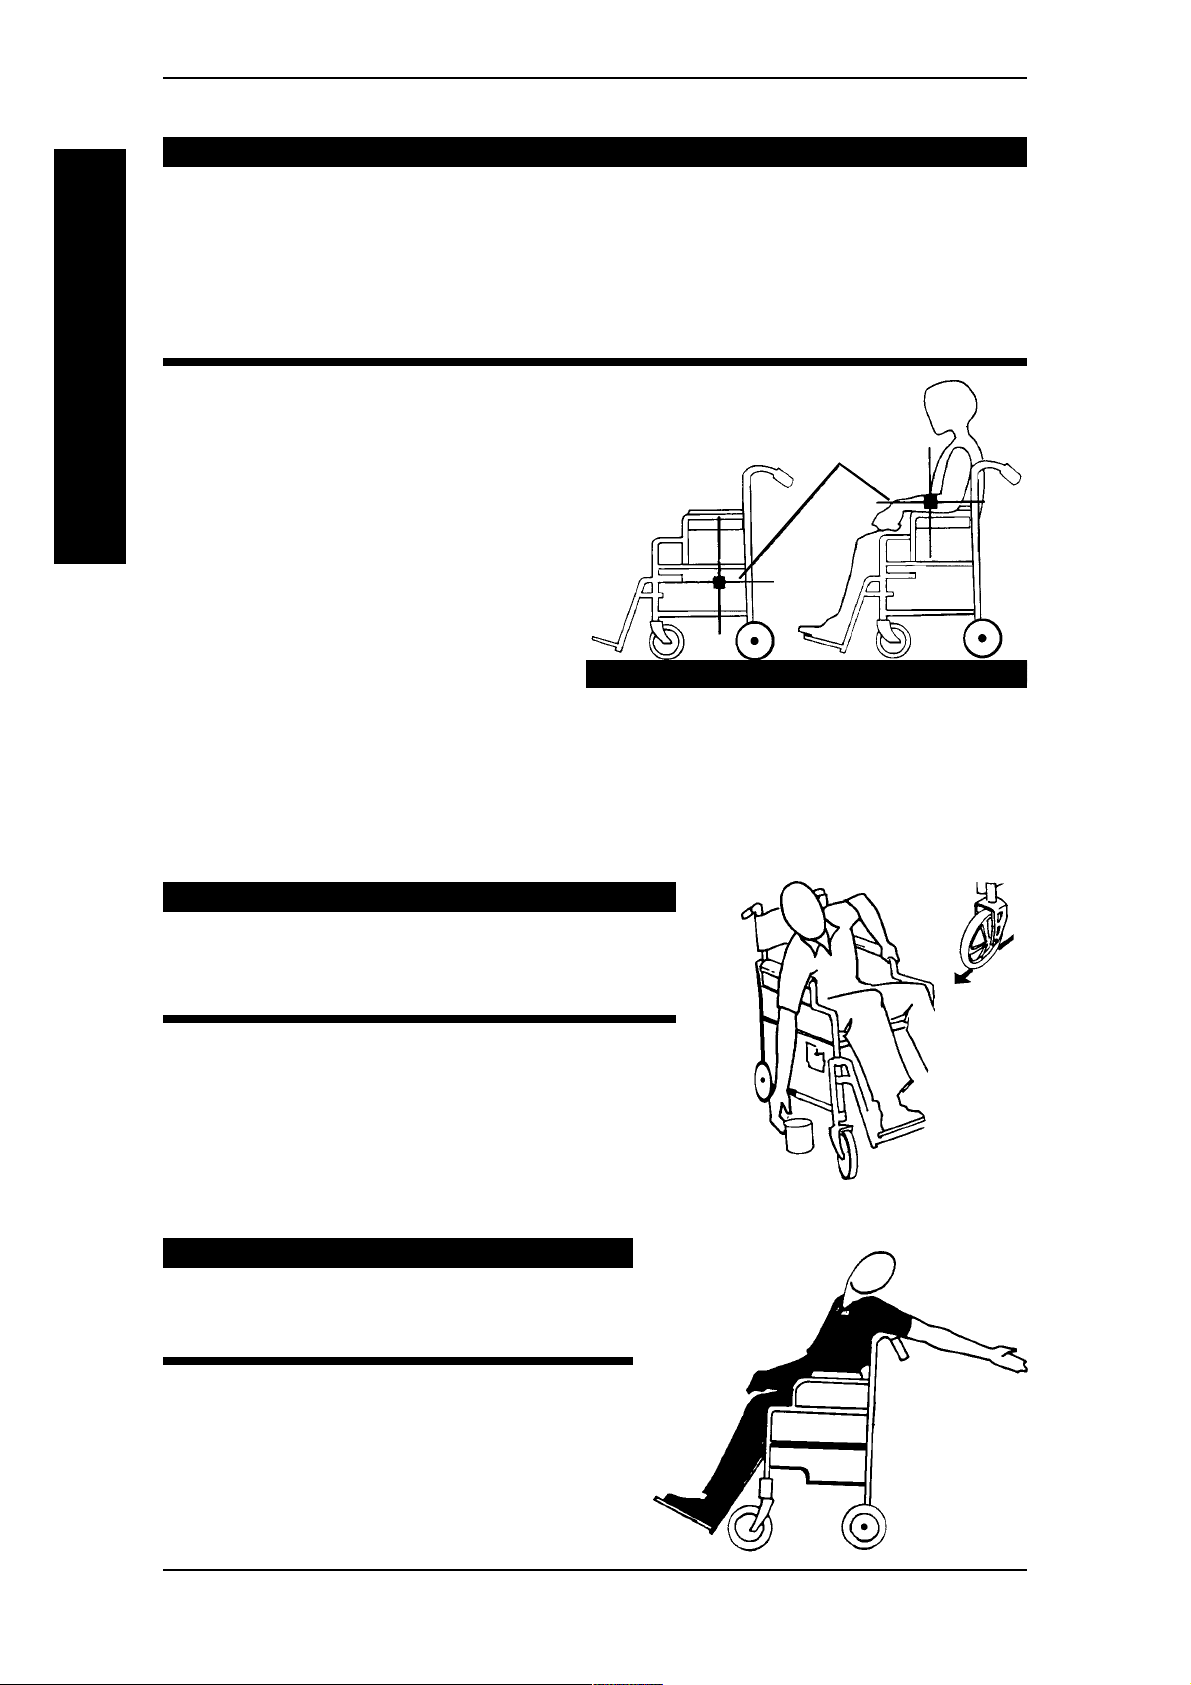
PERCENTAGE OF WEIGHT DISTRIBUTION
DO NOT attempt to reach objects if you have to move forward in the seat
or pick them up from the floor by reaching down between your knees.
The seat depth/width, back height, position of the casters, size/position of
the rear wheels as well as the user condition directly relate to the stability of
the Rehab Shower Commode chair. Any change to one (1) or any combination of the above may cause the shower commode chair to decrease in
stability. These adjustments MUST be performed by a qualified technician.
Many activities may require the Rehab
Shower Commode chair owner to
reach, bend and transfer in and out of
GENERAL GUIDELINES
the chair. These movements cause a
change in the normal balance, the center
of gravity and the weight distribution of
the chair. To determine and establish
your particular safety limits, practice
bending, reaching and transferring
activities in several combinations in the
presence of a qualified healthcare
professional BEFORE attempting active
use of the Shower Commode chair.
WARNING
CENTER OF
GRAVITY
UNOCCUPIED OCCUPIED
Proper positioning is essential for your safety. When reaching, leaning or bending forward, it is important to use the front casters as a tool to maintain stability and balance.
REACHING, LEANING AND BENDING - FORWARD
WARNING
DO NOT attempt to reach objects if you
have to move forward in the seat or pick
them up from the floor by reaching down
between your knees.
Position the front casters so that they are extended
as far forward as possible and engage wheel locks.
REACHING AND LEANING - BACKWARDS
WARNING
DO NOT lean over the top of the back
upholstery. This will change your center
of gravity and may cause you to tip over.
Position Rehab Shower Commode chair as
close as possible to the desired object. Point
front casters forward to create the longest
possible wheelbase. Reach back only as far as
your arm will extend without changing your
sitting position.
Rehab Shower Commode Chair 12 Part No. 1118394

TIPPING
SECTION 1GENERAL GUIDELINES
WARNING
DO NOT tip the Rehab Shower Commode chair without assistance.
When tipping the Rehab Shower Commode chair, an assistant should grasp the back of
the chair on a non-removable (non-detachable) part. Inform the occupant of the shower
commode chair before tipping it and remind him/her to lean back. Be sure the
occupants feet and hands are clear of all wheels and/or pinch points.
WARNING
When lowering the front casters of the Rehab Shower Commode chair,
DO NOT let the Rehab Shower Commode chair drop the last few inches
to the floor. This could result in injury to the occupant and/or damage to
the Rehab Shower Commode chair.
STAIRWAYS
WARNING
ALWAYS wear the seat positioning strap.
DO NOT attempt to lift a Rehab Shower Commode chair by lifting on
any removable (detachable) parts. Lifting by means of any removable
(detachable) parts of a Rehab Shower Commode chair may result in
injury to the user or damage to the Rehab Shower Commode chair.
GENERAL GUIDELINES
Always verify that hand grips on the rear cane are secure PRIOR to use
when an assistant is used to propel or lift the chair. Check for any signs of
looseness or deterioration and if found, contact a qualified technician. DO
NOT attempt to move the Rehab Shower Commode chair by pulling on
the hand grips if they are found to be unsecure or have deteriorated.
EXTREME CAUTION is advised when it is necessary to move an occupied Rehab Shower Commode chair up or down the stairs. Invacare
recommends that, if possible, the user be removed from the Rehab
Shower Commode chair prior to moving. Invacare recommends using
two (2) assistants and making thorough preparations. Make sure to use
ONLY secure, non-detachable parts for hand-held supports.
Follow this procedure for moving the Rehab Shower Commode chair between floors when an elevator is NOT available:
1. After the Rehab Shower Commode chair has been tilted back to the balance point,
one assistant (in the rear) backs the chair up against the first step, while securely
grasping a non-removable (non-detachable) part of the Rehab Shower Commode
chair for leverage.
2. The second assistant, with a firm hold on a non-detachable part of the framework,
lifts the Rehab Shower Commode chair up and over the stair and steadies it as the
first assistant places one (1) foot on the next stair and repeats STEP 1.
3. The Rehab Shower Commode chair should not be lowered until the last stair has
been negotiated and the chair has been rolled away from the stairway.
Part No. 1118394 13 Rehab Shower Commode Chair

GENERAL GUIDELINESSECTION 1
WARNING
When lowering the front casters of the Rehab Shower Commode chair,
DO NOT let the Rehab Shower Commode chair drop the last few inches
to the ground. This could result in injury to the occupant and/or damage
to the Rehab Shower Commode chair.
ESCALATORS
WARNING
DO NOT use an escalator to move a Rehab Shower Commode chair
between floors. Serious bodily injury may occur.
GENERAL GUIDELINES
TRANSFERRING TO AND FROM OTHER SEATS
BEFORE attempting to transfer in or out of the Rehab Shower Commode
chair, every precaution should be taken to reduce the gap distance. Turn
both casters parallel to the object you are transferring onto. Also be
certain the wheel locks are engaged to help prevent the wheels from
moving.
When transferring, position yourself as far back as possible in the seat.
This will help prevent damaged upholstery and the possibility of the
Rehab Shower Commode chair tipping forward.
NOTE: This activity may be performed independently provided you have adequate mobility and
upper body strength.
Position the Rehab Shower Commode chair as close as possible along side the seat to
which you are transferring onto, with the all casters parallel to it. Flip up the armrest.
Engage wheel locks on Model Nos. 6795 and 6895 OR brakes on casters on Model No.
6891. Shift body weight into seat with transfer.
WARNING
CAUTION
During independent transfer, little or no seat platform will be beneath you. Use a transfer board if at all possible.
Rehab Shower Commode Chair 14 Part No. 1118394

Section 2 - Safety Inspection - includes the following:
Safety Inspection Checklist
SECTION 2SAFETY INSPECTION
Troubleshooting
SAFETY INSPECTION
SAFETY INSPECTION CHECKLIST
NOTE: Every six (6) months, take your Rehab Shower Commode chair to a qualified technician for a
thorough inspection and servicing. Regular cleaning will reveal loose or worn parts and enhance the
smooth operation of your shower commode chair. To operate properly and safely, your Rehab Shower
Commode chair must be cared for just like any other vehicle. Routine maintenance will extend the life
and efficiency of your shower commode chair.
Initial adjustments should be made to suit personal body structure/preference. Thereafter follow these maintenance procedures:
Inspect/Adjust
ITEM
Initially
Weekly
GENERAL
Rehab Shower Commode chair rolls straight
(no excessive drag or pull to one side). XX
FRAME AND CROSSBRACES
(SECTION 4)
Inspect for loose or missing hardware. XX
Inspect for bent frame or crossbrace. XX
Monthly
Periodically
SEAT AND BACK (SECTION 5)
Inspect for rips or sagging. XX
Inspect for loose or broken hardware. XX
Inspect cane hand grips for wear/looseness/
deterioration. XX
FRONT CASTERS (SECTION 9)
Inspect wheel/axle assembly for proper
tension by spinning caster; caster should
come to a gradual stop. XX
Loosen/tighten locknut if wheel wobbles
noticeably or binds to a stop. XX
Ensure wheel bearings are clean and free of
moisture. XXX
Inspect casters for cracks and wear. XX
CAUTION: As with any vehicle, the
wheels and tires should be checked
periodically for cracks and wear, and
should be replaced.
CLEANING
Clean upholstery and armrests. XX
Part No. 1118394 15 Rehab Shower Commode Chair

SECTION 2 SAFETY INSPECTION
SAFETY INSPECTION CHECKLIST (CONTINUED)
Inspect/ Inspect/ Inspect/
Inspect/Adjust
ITEM
SPOKES
Inspect for broken spokes. XX
REAR WHEELS (SECTION 10)
No excessive side movement or binding
when lifted and spun. X X
Inspect for cracked, bent or broken spokes. XX
Initially
Weekly
Monthly Periodically
SAFETY INSPECTION
TIRES (SECTION 10)
Inspect for flat spots and wear. X
CAUTION: As with any vehicle, the
wheels and tires should be checked
periodically for cracks and wear, and
should be replaced.
HANDRIMS (SECTION 10)
Inspect for signs of rough edges. X
WHEEL LOCKS (SECTION 11)
Do not interfere with tires when rolling. XX
Pivot points free of wear and looseness. XX
Wheel locks easy to engage. X X
Wheel locks prevent chair from moving
when engaged. XX
TROUBLESHOOTING
Chair
Veers
Left/Right
Sluggish
Turn/
Performance
Casters
Flutter
Squeaks
and
Rattles
Looseness in
Chair
Chair
3
Wheels
Solutions
Check for loose
X
X
X
Rehab Shower Commode Chair 16 Part No. 1118394
X
X
X
X
X
X
X
X
X
stem nuts/bolts.
Check that all
casters contact
ground at the
same time.
Check for loose
nuts and bolts.
Check that rear
wheels are equally
spaced away from
X
seat frame.

Section 3 - Care and Maintenance - includes the following:
SECTION 3CARE AND MAINTENANCE
Maintenance Safety Precautions
Suggested Maintenance Procedures
Cleaning
MAINTENANCE SAFETY PRECAUTIONS
WARNING
After ANY adjustments, repair or service and BEFORE use, make sure all
attaching hardware is tightened securely - otherwise injury or damage
may result.
CAUTION
DO NOT overtighten hardware attaching to the frame. This could cause
damage to the frame tubing.
Your Rehab Shower Commode chair has been carefully assembled and is ready for
immediate use. In order to assure maximum service from this quality chair, it is suggested that you follow a regular maintenance schedule.
Periodically check to make certain that ALL parts are snug and bolts tightened. Also at
this time, clean the entire chair using a mild soap and water.
CARE AND MAINTENANCE
SUGGESTED MAINTENANCE PROCEDURES
1. Before using your Invacare Rehab Shower Commode chair, make sure all nuts and
bolts are tight. Check all parts for damage or wear and replace. Check all parts for
proper adjustment.
2. Periodically adjust wheel locks as tires wear. Refer to ADJUSTING WHEEL LOCKS
in SECTION 11 of this manual.
3. Periodically check front caster and rear wheel hubs to make sure they are clean.
CAUTION
As with any vehicle, the rear wheels, casters and tires should be checked
periodically for cracks and wear, and should be replaced if damaged.
4. The rear wheels, casters and tires should be checked periodically for cracks and
wear, and should be replaced by a qualified technician if damaged.
NOTE: Tire wear is excessive if there are cuts, surface defects or the tires are loose on the rims.
NOTE: Invacare recommends that tires and casters are replaced every five (5) years.
5. Periodically check caster wheel bearings to make sure they are clean and free from
moisture. Use a Teflon® lubricant if necessary.
6. Periodically check handrims to ensure they are secured to the rear wheels. If loose,
have them tightened by a qualified technician.
CLEANING
After every use, clean Rehab Shower Commode chair with mild soap and water.
Part No. 1118394 17 Rehab Shower Commode Chair
SECTION 4 UNFOLDING/FOLDING
Section 4 - Unfolding/Folding - includes the following:
Unfolding/Folding the Rehab Shower Commode Chair
UNFOLDING/FOLDING THE SHOWER COMMODE CHAIR
Keep hands and fingers clear of moving parts to avoid injury.
When unfolding the Rehab Shower Commode chair, DO NOT position
fingers or hands between the pivot links. Ensure ONLY open palms (and
not fingers) are used to press down on the crossbrace ends. Otherwise
injury or damage may occur.
DO NOT sit or transfer into the Rehab Shower Commode chair unless it is
fully open and the crossbrace saddles are fully seated into the side frame.
UNFOLDING/FOLDING
UNFOLDING
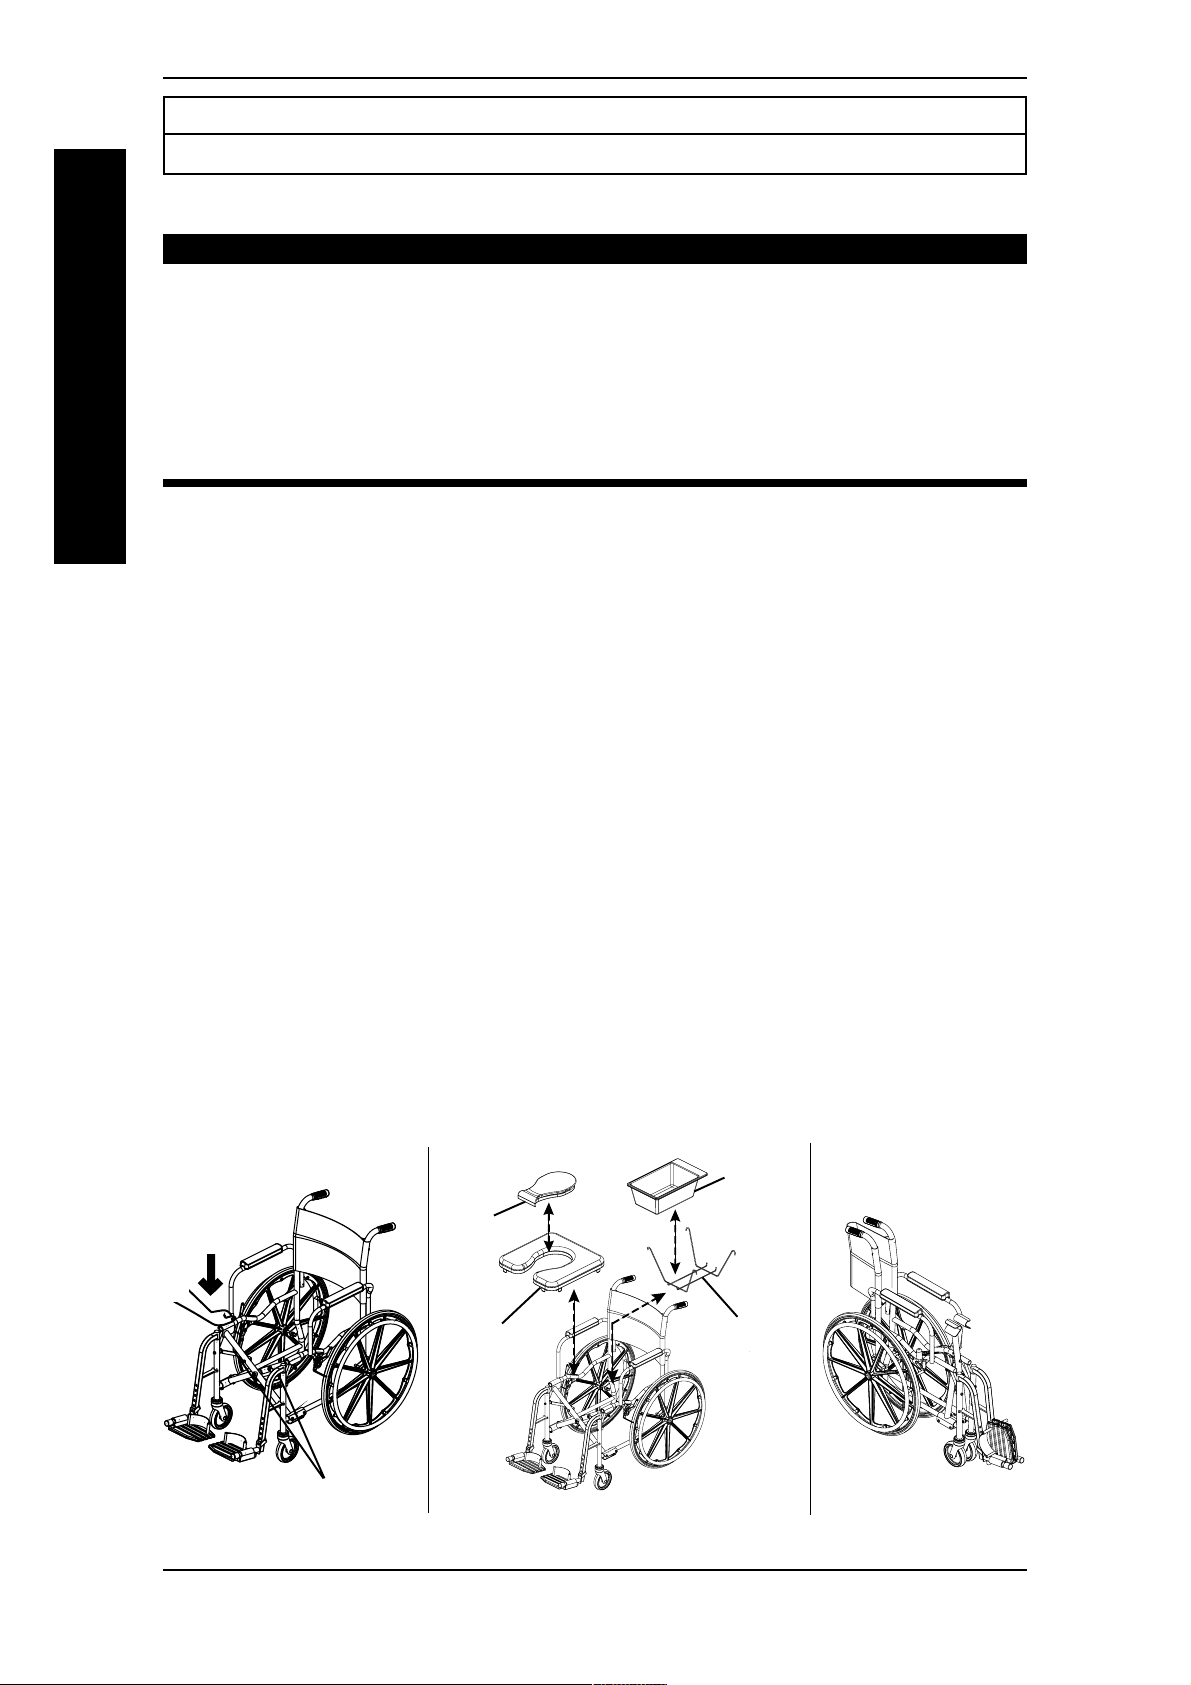
1. Open the Rehab Shower Commode chair by pushing down on crossbraces (DETAIL
"A" of FIGURE 1).
2. Raise armrests for easier access to frame by squeezing the armrest release lever
toward arm tubing and lift.
WARNING
3. Place pail holder onto frame by inserting the four (4) pail holder hooks into the four
(4) holes on the frame tubing (DETAIL "B" of FIGURE 1).
4. Position seat on frame and push down to lock seat onto frame (DETAIL "B" of
FIGURE 1).
FOLDING
1. Raise armrests for easier access to frame by squeezing the armrest release lever
toward arm tubing and lift.
2. Remove seat (and seat cover, if available) from frame by pulling up on the seat.
3. Remove the pail from pail holder.
4. Remove pail holder from frame by lifting the four (4) pail holder hooks out of the
four (4) holes on the frame tubing (DETAIL "B" of FIGURE 1).
5. Fold the Rehab Shower Commode chair by lifting up on crossbraces (DETAIL "C" of
FIGURE 1).
DETAIL A DETAIL C
PUSH
DOWN
DETAIL B
Pail
Seat
Cover
Seat
Crossbraces
Pail
Holder
FIGURE 1 - UNFOLDING/FOLDING THE SHOWER COMMODE CHAIR
Rehab Shower Commode Chair 18 Part No. 1118394

SEAT AND BACK SECTION 5
Section 5 - Seat and Back - includes the following:
Replacing the Slip On Back Upholstery Using Seat Cover
Removing/Installing Padded Seat Removing/Installing Seat
Positioning Strap
WARNING
After ANY adjustments, repair or service and BEFORE use, make sure all attaching hardware is tightened securely - otherwise injury or damage may occur.
When installing the seat, ensure ONLY open palms (and not fingers) are
used to press down on the seat to lock on frame. Otherwise injury or
damage may occur.
REPLACING THE SLIP ON BACK UPHOLSTERY (FIGURE 1)
SEAT AND BACK
1. Remove the two (2) mounting screws
and washers that secure the existing
Washer
Back Upholstery
back upholstery to two (2) back canes.
2. Pull existing back upholstery up and
over the two (2) back canes.
3. Install the NEW back upholstery
over the two (2) back canes.
Mounting
Screws
Back Cane
4. Secure the NEW back upholstery to
the back canes with the existing
mounting screws and washers.
FIGURE 1 - REPLACING THE SLIP
ON BACK UPHOLSTERY
REMOVING/INSTALLING PADDED SEAT
REMOVING (FIGURE 2)
The padded seat may be positioned in one (1) of four (4) directions (DETAIL "A" of
FIGURE 2).
1. Move armrests out of the way by squeezing the armrest release lever and lifting.
2. Remove seat by pulling up on seat.
DETAIL "A"
1
4
2
3
FIGURE 2 - REMOVING/INSTALLING PADDED SEAT
Part No. 1118394 19 Rehab Shower Commode Chair

SEAT AND BACK
SEAT AND BACKSECTION 5
INSTALLING (FIGURE 2)
1. Move armrests out of the way by squeezing the armrest release lever and lifting.
2. Place seat in desired direction (DETAIL "A" of FIGURE 2).
3. Push seat down until it locks onto Rehab Shower Commode chair frame.
USING SEAT COVER (FIGURE 3)
Invacare provides a cover for the seat hole opening to be used if desired during shower
use. Refer to FIGURE 3.
Seat Cover
Seat
FIGURE 3 - USING THE SEAT COVER
REMOVING/INSTALLING SEAT POSITIONING STRAP
(FIGURE 4)
REMOVING
1. Remove the seat. Refer to REMOVING/INSTALLING PADDED SEAT
in section of this manual.
2. Move the swing back arm out of
the way. Refer to POSITIONING
SWING-BACK ARMS in SECTION
8 of this manual.
3. Remove the respective mounting
screw and washer that secures each
half of the seat positioning strap to
the seat frame.
INSTALLING
1. Position the two (2) NEW seat
positioning strap halves on the seat
frame.
2. Reinstall the two (2) mounting
screws and locknuts to secure the two (2) halves of the seat positioning straps to
the seat frame.
Seat Positioning
Strap
Washer
Mounting Screw
Frame
FIGURE 4 - REMOVING/INSTALLING
SEAT POSITIONING STRAP
3. Reinstall the seat. Refer to REMOVING/INSTALLING PADDED SEAT in section of
this manual.
Rehab Shower Commode Chair 20 Part No. 1118394

PAIL SECTION 6
Section 6 - Pail - includes the following:
Removing/Installing the Pail
Removing/Installing Pail Holder
WARNING
Remove pail before using Rehab Shower Commode chair in shower.
REMOVING/INSTALLING THE PAIL (FIGURE 1)
1. TO REMOVE: From rear of Rehab Shower Commode chair, slide pail out of pail
holder.
NOTE: Ensure pail does not tip/tilt while removing.
2. TO INSTALL: From rear of Rehab Shower Commode chair, slide pail into pail holder
front first.
CLEANING
PAIL
Clean the pail holder using a mild soap and water.
Seat
Front of Pail
Frame
Crossbraces
Pail
Handle
Back
of Pail
Pail Holder
Hooks (4)
Pail holder
Frame
FIGURE 1 - REMOVING/INSTALLING PAIL AND PAIL HOLDER
Part No. 1118394 21 Rehab Shower Commode Chair

PAIL
SECTION 6
PAIL
REMOVING/INSTALLING THE PAIL HOLDER
REMOVING
1. Swing back the arms for easier access to seat. Refer to USING SWING-BACK
ARMS in SECTION 8 of this manual.
2. Remove seat. Refer to REMOVING/INSTALLING PADDED SEAT in SECTION 5 of
this manual.
3. Remove pail from pail holder. Refer to REMOVING/INSTALLING THE PAIL in this
section of the manual.
4. Remove pail holder from frame tubing by lifting the four pail holder hooks out of the
four holes on the tabs of the frame tubing (FIGURE 1).
INSTALLING
1. Install pail holder into frame tubing by inserting the four pail holder hooks into the
four holes on the tabs of the frame tubing (FIGURE 1).
2. Install pail into pail holder. Refer to REMOVING/INSTALLING THE PAIL in this
section of the manual.
3. Replace seat. Refer to REMOVING/INSTALLING PADDED SEAT in SECTION 5 of
this manual.
4. Lower armrests into position until they lock into frame tubing. Refer to
POSITIONING SWING-BACK ARMS in SECTION 8 of this manual.
Rehab Shower Commode Chair 22 Part No. 1118394

SECTION 7FRONT RIGGINGS
Section 7 - Front Riggings - includes the following:
Removing/Installing/Adjusting Swingaway Footrest Assembly
Footplate Height Adjustment
Replacing Heel Loops
WARNING
After ANY adjustments, repair or service and BEFORE use, make sure all
attaching hardware is tightened securely - otherwise injury or damage
may result.
REMOVING/INSTALLING/ADJUSTING SWINGAWAY
FOOTREST ASSEMBLY (FIGURE 1)
REMOVING
1. Lift footrest assembly to disengage
from shower commode chair
frame.
2. Remove footrest assembly from
chair frame.
INSTALLING
1. Place the top of the footrest assembly into Rehab Shower Commode
chair frame.
Rehab
Shower
Commode
Chair Frame
Footplate
Adjustment Pin
Footrest
Footplate
Assembly
FRONT RIGGINGS
Footrest
2. Slide and push down to lock in
place.
FIGURE 1 - REMOVING/INSTALLING/
ADJUSTING SWINGAWAY
FOOTREST ASSEMBLY
ADJUSTING
1. Lift footrest assembly enough to disengage from inner pin, but not enough to totally
remove from Rehab Shower Commode chair frame.
2. Swing the footrest to the outside of the Rehab Shower Commode chair.
3. Repeat the procedure for the other footrest assembly.
FOOTPLATE HEIGHT ADJUSTMENT
NOTE: Footplates adjust up and down by lifting up on the footplate until footplate adjustment pin
disengages from hole.
1. Lift front of footplate up until footplate adjustment pin disengages from hole.
2. Slide footplate to alternate footplate adjustment height.
3. Push down on front of footplate until footplate adjustment pin engages into desired
pin hole.
Part No. 1118394 23 Rehab Shower Commode Chair

FRONT RIGGINGSSECTION 7
REPLACING HEEL LOOPS (FIGURE 3)
1. Note the position of hex bolt, coved washers and locknut for reinstallation.
2. Remove the hex bolt, coved washers and locknut that secure the lower footrest to
the footrest support.
3. Remove the lower footrest.
4. Remove the phillips bolt, spacer and locknut that secure the existing heel loop to
the lower footrest.
5. Slide the existing heel loop off the lower footrest.
6. Replace heel loop.
FRONT RIGGINGS
7. Reverse STEPS 1-6 to reassemble.
NOTE: When securing heel loop to lower footrest, tighten the phillips screw and locknut until the
spacer is secure.
Phillips Bolts
Heel Loop
Lower Footrest
Locknuts
FIGURE 3 - REPLACING HEEL LOOPS
Rehab Shower Commode Chair 24 Part No. 1118394

ARMS SECTION 8
Section 8 - Arms - includes the following:
Removing/Installing Swing-Back Arms
Positioning Swing-Back Arms
Replacing Armrest Pad
WARNING
After ANY adjustments, repair or service and BEFORE use, make sure all attaching hardware is tightened securely - otherwise injury or damage may occur.
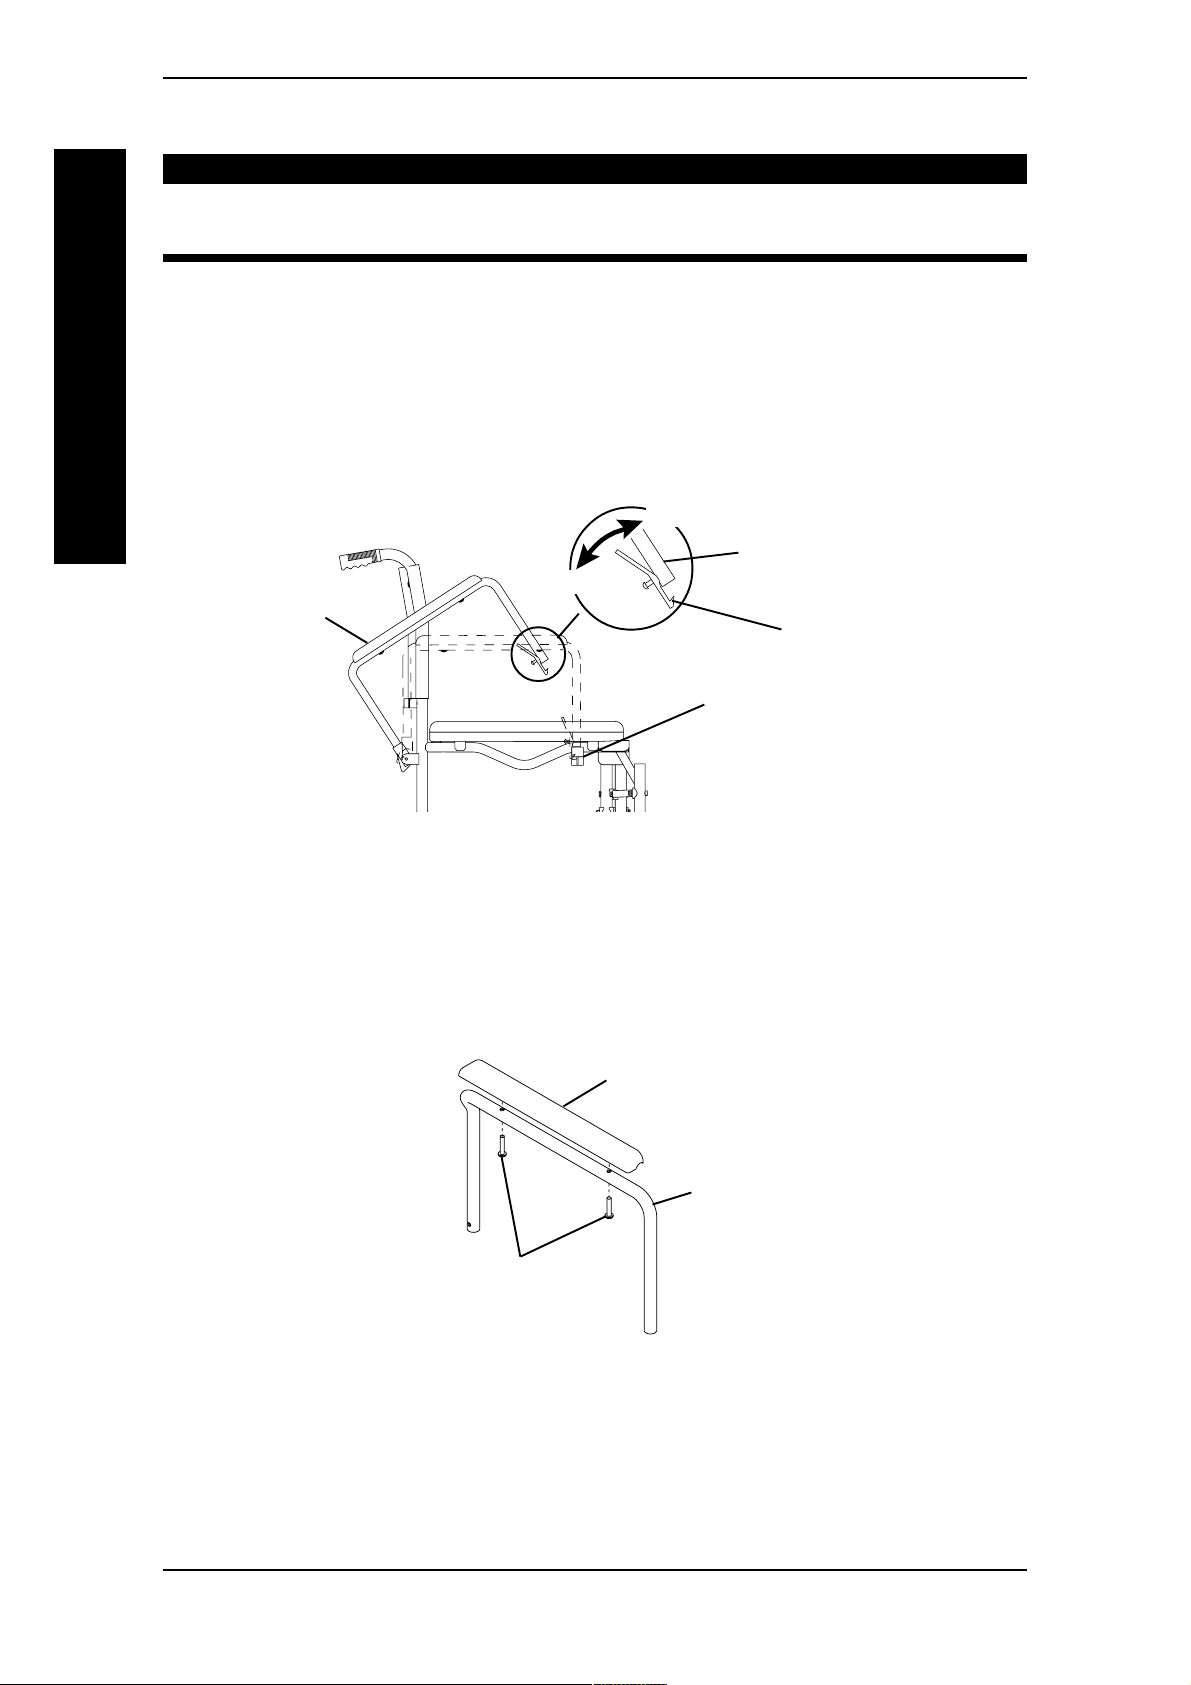
REMOVING/INSTALLING SWING-BACK ARMS (FIGURE 1)
REMOVING
1. Swing arm back. Refer to POSITIONING SWING-BACK ARMS in this section of
the manual.
2. Remove the mounting screw and locknut that secure the swing-back arm to the arm
mounting bracket on the frame.
3. Remove the arm and arm pivot.
4. If necessary, repeat STEPS 1-3 for the other arm.
INSTALLING
1. Install swing-back arm and arm pivot on the arm mounting bracket with mounting
screw and locknut. Securely tighten.
2. Lock the swing-back arm by pushing the arm down into the socket until and audible
"click" is heard.
ARMS
3. If necessary, repeat STEPS 1-2 for the other swing back arm.
Arm Pivot
Locknut
Arm Mounting
Bracket
Frame
Mounting Screw
FIGURE 1 - REMOVING/INSTALLING SWING-BACK ARMS
Swing Back Arm
Part No. 1118394 25 Rehab Shower Commode Chair
ARMS
SECTION 8 ARMS
POSITIONING SWING-BACK ARMS (FIGURE 2)
WARNING
Make sure the armrest release lever is in the locked position before using
the Rehab Shower Commode chair.
1. Unlock the swing-back arm by pressing the arm release lever towards the arm
frame.
2. Pull the front of the swing-back arm straight up/out of the arm socket and push back
towards the rear of the Shower Commode chair.
3. To lock the swing-back arm, pull the swing-back arm forward and then push downward into the arm socket until an audible "click" is heard.
UNLOCK
Arm Frame
Swing- Back Arm
LOCK
Arm Release
Lever
Arm Socket
FIGURE 2 - SWING-BACK ARMS
REPLACING ARMREST PAD (FIGURE 3)
1. Remove the mounting screws that secure the armrest pad to the arm.
2. Replace armrest pad and securely tighten with the existing mounting screws.
Armrest Pad
Arm
Mounting
Screws
FIGURE 3 - REPLACING ARMREST PADS
Rehab Shower Commode Chair 26 Part No. 1118394
CASTERS SECTION 9
Section 9 - Casters - includes the following:
Removing/Installing Front Casters
Removing/Installing Casters with Brake
WARNING
After ANY adjustments, repair or service and BEFORE use, make sure all
attaching hardware is tightened securely - otherwise injury or damage
may result.
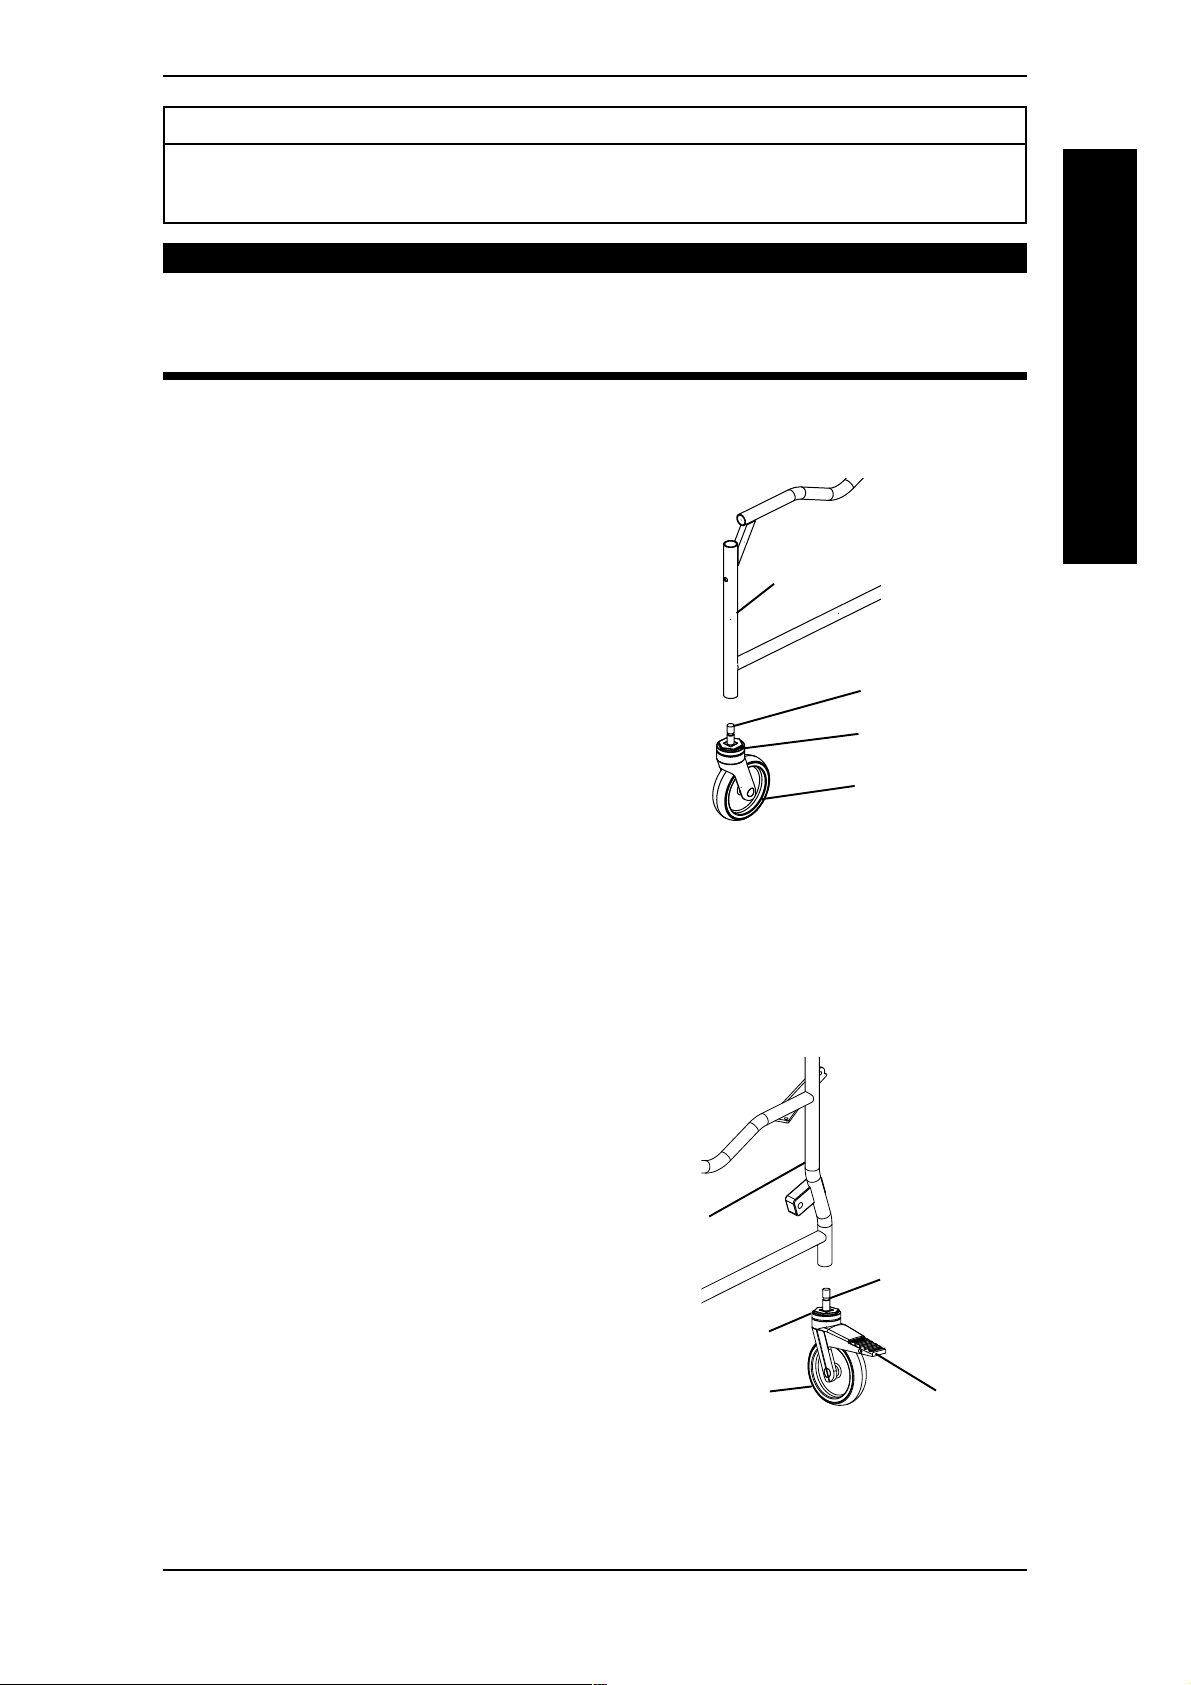
REMOVING/INSTALLING FRONT CASTERS - ON MODEL
NOS. 6795 AND 6895 (FIGURE 1)
REMOVINGREMOVING
REMOVING
REMOVINGREMOVING
1. Loosen nut on caster assembly.
2. Unscrew the caster stem from the
chair frame.
Frame
CASTERS
INSTALLING
1. Screw the caster stem to the chair
Front Caster
Stem
frame.
2. Tighten nut on caster assembly.
Nut
NOTE: Overtightening will impair freedom of
Front Caster
caster swing.
FIGURE 1 - REMOVING/
INSTALLING FRONT CASTERS
REMOVING/INSTALLING CASTERS WITH BRAKE - ON
MODEL NO. 6891 (FIGURE 2)
REMOVINGREMOVING
REMOVING
REMOVINGREMOVING
1. Loosen nut on caster assembly.
2. Unscrew the caster stem from the
chair frame.
INSTALLING
1. Screw the caster stem to the chair
frame.
2. Tighten nut on caster assembly.
Frame
Caster Stem
NOTE: Overtightening will impair freedom
Nut
of caster swing.
Rear Caster
Brake
FIGURE 2 - REMOVING/INSTALLING
CASTERS WITH BRAKE
Part No. 1118394 27 Rehab Shower Commode Chair

REAR WHEELS AND HANDRIMSSECTION 10
Section 10 - Rear Wheels and Handrims - includes the following:
Removing/Installing Wheels
Replacing/Repairing Wheel Tire/Tube
Replacing Wheel Handrim
WARNING
After adjustments and before use make sure all attaching hardware is
securely tightened.
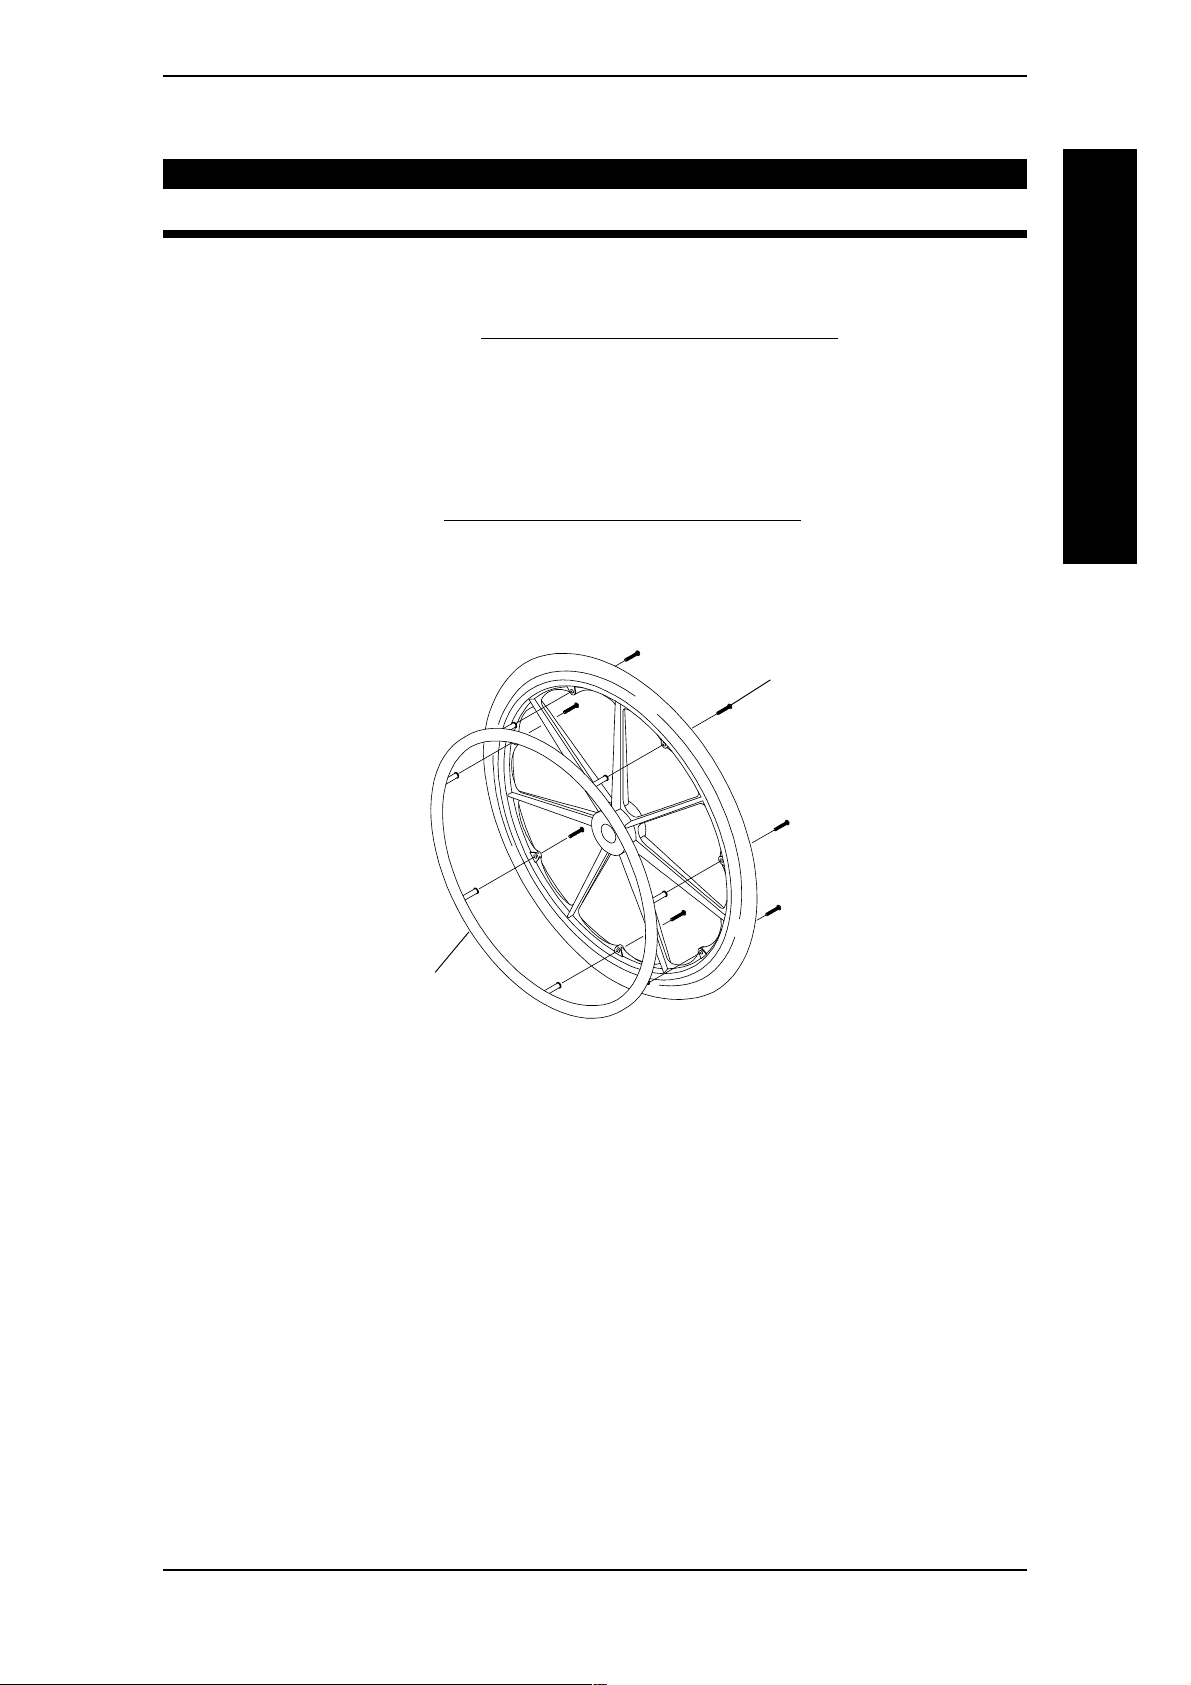
REMOVING/INSTALLING WHEELS - ON MODEL NOS. 6795
AND 6895 (FIGURE 1)
REMOVING
REAR WHEELS AND HANDRIMS
1. Remove the cap.
2. Note the order of the hardware that secures the wheel to the frame.
3. Remove the mounting screw, washer, spacer and locknut that secure the wheel to
the frame.
4. If necessary, repeat STEPS 1-3 for the other wheel.
INSTALLING
1. Install the wheel on the frame with the mounting screw, washer, spacer and locknut.
Securely tighten.
NOTE: Ensure that the hardware is replaced in the order noted in STEP 2.
2. If necessary, repeat for the other wheel.
Wheel
Shower
Commode
Frame
Spacer
Wheel
Mounting
Bracket
Mounting
Screw
Cap
Washer
Locknut
FIGURE 1 - INSTALLING REAR WHEELS
Rehab Shower Commode Chair 28 Part No. 1118394
REAR WHEELS AND HANDRIMS
SECTION 10
REPLACING/REPAIRING WHEEL TIRE
WARNINGWARNING
WARNING
WARNINGWARNING
Replacement of wheel tire MUST be performed by a qualified technician.
REPLACING WHEEL HANDRIM (FIGURE 2)
1. Remove the wheel. Refer to REMOVING/INSTALLING WHEELS in this section of
the manual.
2. Remove the button screws that secure the existing handrim to the wheel.
3. Remove the existing handrim.
4. Install the new handrim by reversing STEPS 1 and 3.
5. Reinstall wheel. Refer to REMOVING/INSTALLING WHEELS in this section of the
manual.
6. If necessary, repeat this procedure for the opposite wheel.
REAR WHEELS AND HANDRIMS
Button Screw
Handrim
FIGURE 2 - REPLACING WHEEL HANDRIM
Part No. 1118394 29 Rehab Shower Commode Chair
SECTION 11 WHEEL LOCKS
Section 11 - Wheel Locks - includes the following:
Using/Adjusting the Wheel Locks
After ANY adjustments, repair or service and BEFORE use, make sure all
attaching hardware is tightened securely - otherwise injury or damage
may result.
If wheel locks do not hold the occupied Rehab Shower Commode chair in
place contact a qualified technician - otherwise injury or damage may
occur.
WHEEL LOCKS
USING/ADJUSTING THE WHEEL LOCKS
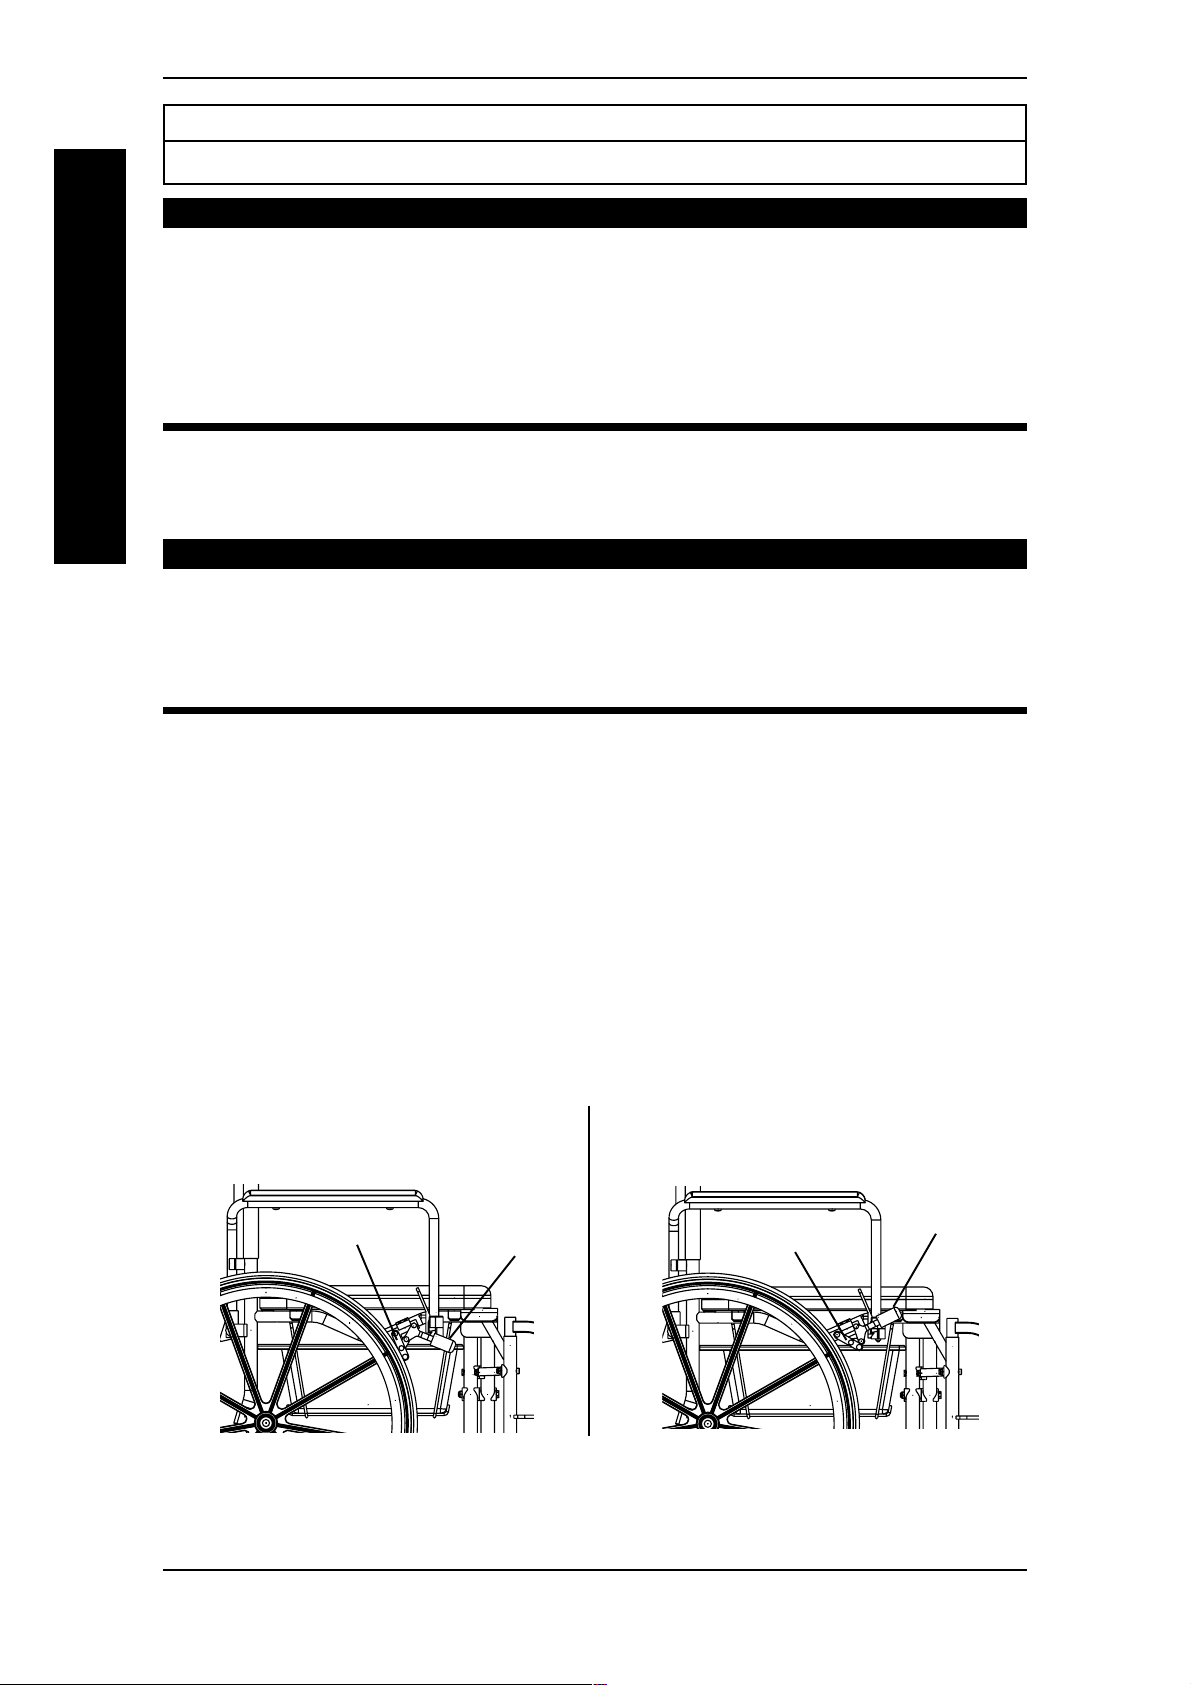
USING THE WHEEL LOCKS (FIGURE 1)
DO NOT attempt to stop a moving Rehab Shower Commode chair with
the wheel locks. WHEEL LOCKS ARE NOT BRAKES - otherwise injury
or damage may occur.
WARNING
WARNING
Keep hands and fingers clear of moving parts to avoid injury.
Wheel locks are standard on ALL Rehab Shower Commodes chairs with 24-inch rear
wheels and 5-inch casters (on model nos. 6795 and 6895). These locks are provided to
prevent the rear wheels from turning.
NOTE: Position Rehab Shower Commode chair on a flat, level surface to perform this procedure.
1. Ensure the Rehab Shower Commode chair is not moving before engaging the wheel
locks.
2. To engage wheel locks, push the wheel lock handle forward to the LOCKED
position (DETAIL "A" of FIGURE 1).
3. Disengage the wheel locks by reversing STEP 2 (DETAIL "B" of FIGURE 1).
DETAIL "A" - ENGAGED
Wheel Lock
Wheel Lock
Handle
DETAIL "B" - DISENGAGED
Wheel Lock
Handle
Wheel Lock
FIGURE 1 - USING WHEEL LOCKS
Rehab Shower Commode Chair 30 Part No. 1118394
SECTION 11WHEEL LOCKS
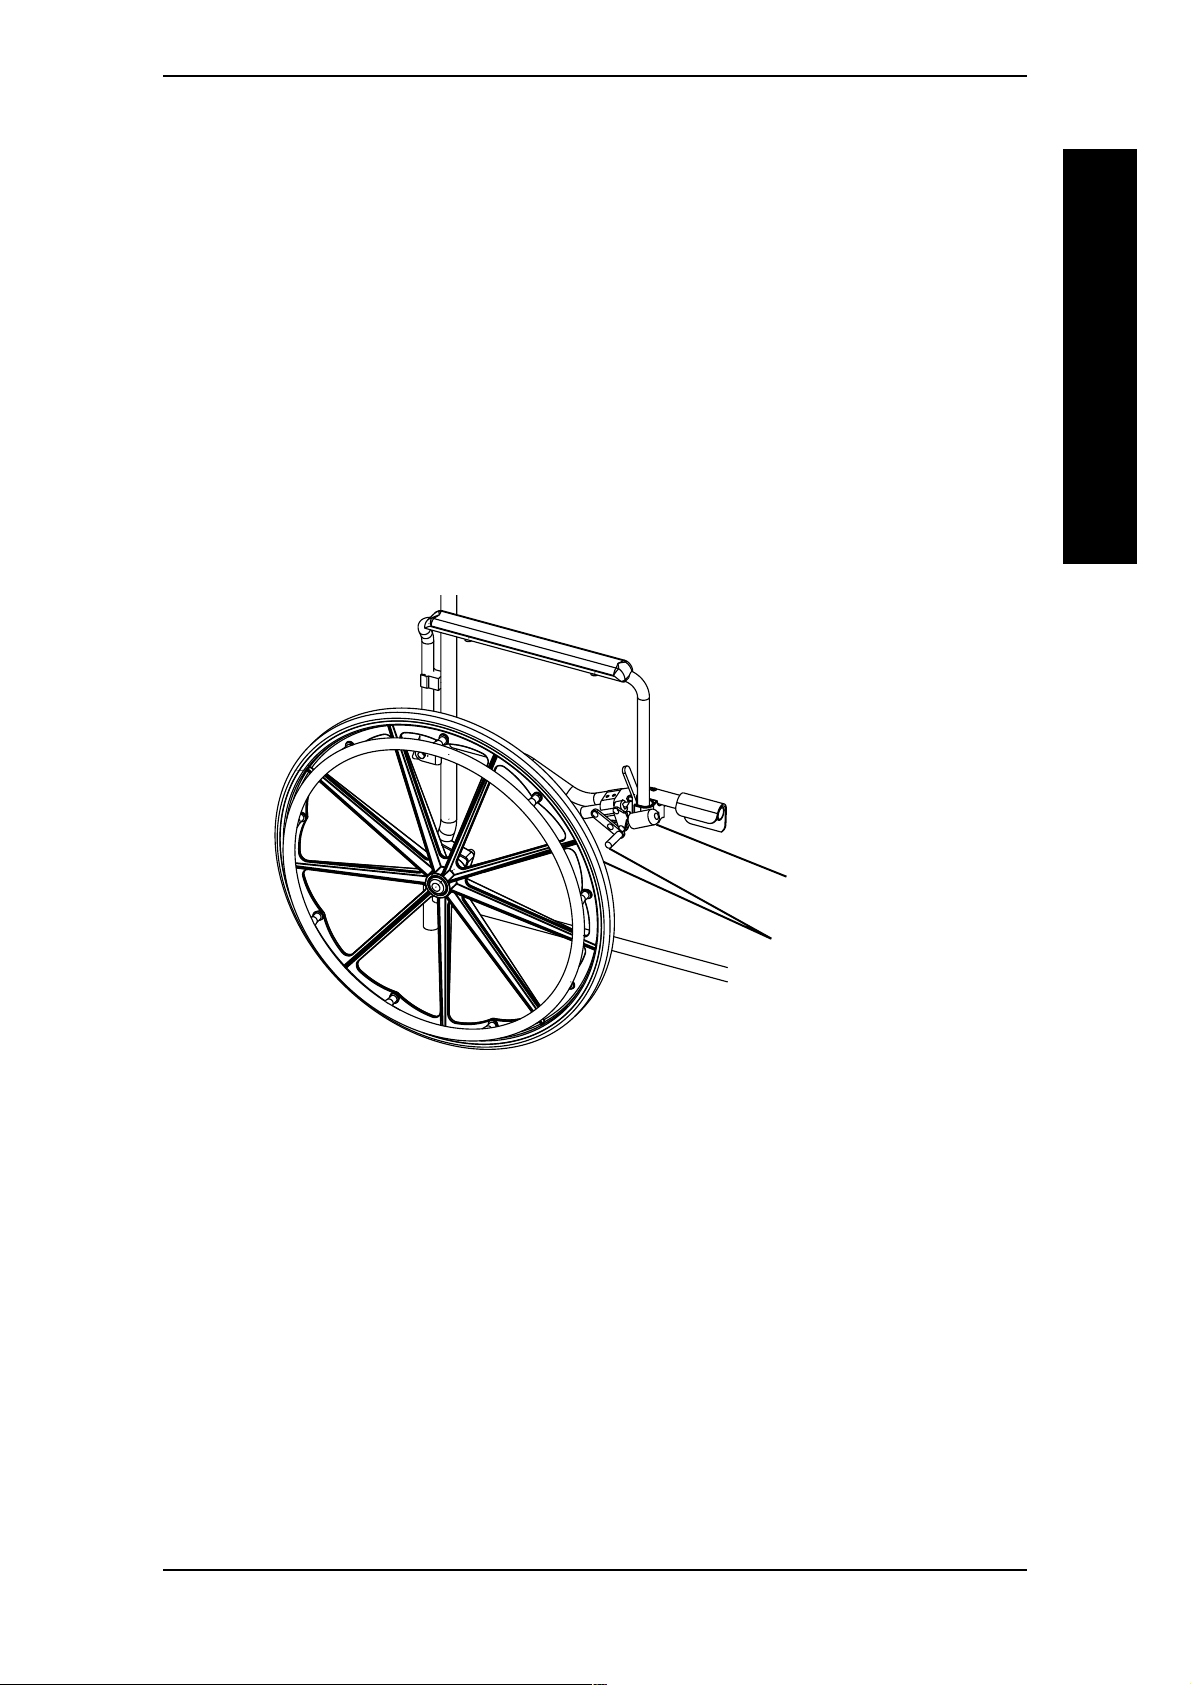
ADJUSTING THE WHEEL LOCKS (FIGURE 2)
1. Loosen the two (2) socket screws that secure the wheel lock assembly to the Rehab
Shower Commode chair frame.
NOTE: Any wheel lock adjustment should embed the wheel lock shoe at least 3/16-inch into the
tire when engaged.
2. Adjust the position of wheel lock until the 3/16-inch measurement is obtained for
correct wheel lock adjustment (FIGURE 2).
3. Securely tighten the two (2) socket screws.
4. Engage the wheel lock and push against the Rehab Shower Commode chair and
determine if the wheel lock engages the wheel lock shoe enough to hold the Rehab
Shower Commode chair.
5. Repeat the above sections until the wheel lock holds the Rehab Shower Commode chair.
6. Repeat section for opposite wheel lock
WHEEL LOCKS
Wheel Lock Handle
Wheel lock shoe
embedded into rear
wheel tire at least
FIGURE 2 - ADJUSTING WHEEL LOCK
3/16-inch
Part No. 1118394 31 Rehab Shower Commode Chair

LIMITED WARRANTY
PLEASE NOTE: THE WARRANTY BELOW HAS BEEN DRAFTED TO COMPLY WITH
FEDERAL LAW APPLICABLE TO PRODUCTS MANUFACTURED AFTER JULY 4, 1975.
This warranty is extended only to the original purchaser/user of our products.
This warranty gives you specific legal rights and you may also have other legal rights which
vary from state to state.
With regard to the original purchaser/user only, Invacare warrants its product to be free
from defects in materials and workmanship for a period of three (3) years from date of
purchase. If within such warranty period any such product shall be proven to be defective,
such product shall be repaired or replaced, at Invacares option. This warranty does not
include any labor or shipping charges incurred in replacement part installation or repair of
LIMITED WARRANTY
any such product. Invacares sole obligation and your exclusive remedy under this warranty
shall be limited to such repair and/or replacement.
For warranty service, please contact the dealer from whom you purchased your Invacare
product. In the event you do not receive satisfactory warranty service, please write directly
to Invacare at the address at the bottom of this page. Provide dealers name, address, the
product model number, date of purchase, indicate nature of the defect and, if the product
is serialized, indicate the serial number. Do not return products to our factory without our
prior consent.
LIMITED WARRANTY
LIMITATIONS AND EXCLUSIONS: THE FOREGOING WARRANTY SHALL NOT
APPLY TO SERIAL NUMBERED PRODUCTS IF THE SERIAL NUMBER HAS BEEN
REMOVED OR DEFACED, PRODUCTS SUBJECTED TO NEGLIGENCE, ACCIDENT,
IMPROPER OPERATION, MAINTENANCE OR STORAGE, PRODUCTS MODIFIED
WITHOUT INVACARES EXPRESS WRITTEN CONSENT INCLUDING, BUT NOT
LIMITED TO, MODIFICATION THROUGH THE USE OF UNAUTHORIZED PARTS OR
ATTACHMENTS; PRODUCTS DAMAGED BY REASON OF REPAIRS MADE TO ANY
COMPONENT WITHOUT THE SPECIFIC CONSENT OF INVACARE, OR TO A PRODUCT DAMAGED BY CIRCUMSTANCES BEYOND INVACARES CONTROL, AND
SUCH EVALUATION WILL BE SOLELY DETERMINED BY INVACARE. THE WARRANTY SHALL NOT APPLY TO PROBLEMS ARISING FROM NORMAL WEAR OR
FAILURE TO ADHERE TO THESE INSTRUCTIONS.
THE FOREGOING EXPRESS WARRANTY IS EXCLUSIVE AND IN LIEU OF ANY
OTHER WARRANTIES WHATSOEVER, WHETHER EXPRESS OR IMPLIED, INCLUDING THE IMPLIED WARRANTIES OF MERCHANTABILITY AND FITNESS FOR A
PARTICULAR PURPOSE, AND THE SOLE REMEDY FOR VIOLATIONS OF ANY
WARRANTY WHATSOEVER, SHALL BE LIMITED TO REPAIR OR REPLACEMENT OF
THE DEFECTIVE PRODUCT PURSUANT TO THE TERMS CONTAINED HEREIN. THE
APPLICATION OF ANY IMPLIED WARRANTY WHATSOEVER SHALL NOT EXTEND
BEYOND THE DURATION OF THE
EXPRESS WARRANTY PROVIDED HEREIN. INVACARE SHALL NOT BE LIABLE FOR
ANY CONSEQUENTIAL OR INCIDENTAL DAMAGES WHATSOEVER.
THIS WARRANTY SHALL BE EXTENDED TO COMPLY WITH STATE/PROVINCIAL
LAWS AND REQUIREMENTS.
Rehab Shower Commode Chair 32 Part No. 1118394

AVERTISSEMENTS/ IMPORTANT
AVERTISSEMENT
CETTE CHAISE DE DOUCHE AVEC SIÈGE D'AISANCE N'EST
PAS CONÇUE OU PRÉVUE POUR LE TRANSPORT À
L'EXTÉRIEUR OU POUR LA MOBILITÉ.
NE PAS UTILISER CET ÉQUIPEMENT SANS DABORD AVOIR
LU ET COMPRIS CE MANUEL. SI VOUS NE COMPRENEZ PAS
LES AVERTISSEMENTS, LES NOTES ATTENTION OU LES
INSTRUCTIONS, CONTACTEZ UN PROFESSIONNEL DES
SOINS DE SANTÉ, UN FOURNISSEUR OU UN TECHNICIEN
AVANT DE TENTER DUTILISER CET ÉQUIPEMENT, SANS
QUOI DES BLESSURES OU DES DOMMAGES PEUVENT
SURVENIR.
AVERTISSEMENT/ IMPORTANT
IMPORTANT
Les AVERTISSEMENTS/NOTES ATTENTION utilisés dans ce manuel sappliquent aux dangers et aux pratiques dangereuses qui peuvent causer des
blessures ou des dommages à la propriété.
NOTE
LINFORMATION CONTENUE DANS CE DOCUMENT PEUT ÊTRE
MODIFIÉE SANS PRÉAVIS.
UTILISATEUR DE LA CHAISE DE DOUCHE AVEC SIÈGE D'AISANCE
En tant que fabricant de chaise de douche avec siège d'aisance, Invacare s'efforce
d'en offrir une grande variété afin de répondre aux nombreux besoins de l'utilisateur. Cependant, le choix final du type de chaise de douche avec siège d'aisance
demeure la responsabilité de l'utilisateur et de son professionnel des soins de
santé en mesure de faire ce choix.
CEINTURES DE CHAISE DE DOUCHE AVEC SIÉGE D'AISANCE
Invacare recommande de NE PAS transporter les utilisateurs de chaise de
douche avec siège d'aisance à bord d'un véhicule lorsqu'ils sont assis dans leur
chaise. À ce jour, le ministère des Transports n'a approuvé aucun système
d'attaches pour le transport des personnes assises dans leur chaise de douche
avec siège d'aisance et ce, pour tous les types de véhicules.
Invacare recommande de transférer les utilisateurs de chaise de douche avec
siège d'aisance sur les sièges du véhicule et de les attacher avec les ceintures
de sécurité du véhicule. Invacare ne peut ni ne veut recommander de
système de transport de chaise de douche avec siège d'aisance.
AU SUJET DES CEINTURES - LE FOURNISSEUR DME, LE
THÉRAPEUTE ET LES AUTRES PROFESSIONNELS DES SOINS DE
SANTÉ SONT RESPONSABLES DE DÉTERMINER SI LA CEINTURE
EST NÉCESSAIRE POUR ASSURER LA SÉCURITÉ DE L'UTILISATEUR.
DES BLESSURES GRAVES PEUVENT SURVENIR SI L'UTILISATEUR
TOMBE DE LA CHAISE DE DOUCHE AVEC SIÈGE D'AISANCE.
Part No. 1118394 33 Rehab Shower Commode Chair

TABLE DES MATIÈRES
IMPORTANT .................................................................................. 33
EMPLACEMENT DES ÉTIQUETTES .................................................... 35
SPÉCIFICATIONS ............................................................................ 36
SECTION 1 - CONSIGNES GÉNÉRALES ............................................. 37
INFORMATION DE FONCTIONNEMENT ...................................................................................... 37
MUSCULATION ........................................................................................................................................ 38
LIMITE DE POIDS ...................................................................................................................................... 38
SÉCURITÉ/MANIPULATION DE LA CHAISE DE DOUCHE AVEC SIÈGE D'AISANCE ...... 38
SECTION 2 - INSPECTION DE SÉCURITÉ .......................................... 42
LISTE D'INSPECTION DE SÉCURITÉ ..................................................................................................42
TABLE DES MATIÈRES
DÉPANNAGE ............................................................................................................................................. 43
SECTION 3 - SOIN ET ENTRETIEN ................................................... 45
PRÉCAUTIONS DE SÉCURITÉ POUR L'ENTRETIEN .................................................................... 45
PROCÉDURES SUGGÉRÉES POUR L'ENTRETIEN ......................................................................... 45
SECTION 4 - DÉPLIER/PLIER ............................................................ 46
DÉPLIER/PLIER LA CHAISE DE DOUCHE AVEC SIÈGE D'AISANCE ....................................... 46
TABLE DES MATIÈRES
SECTION 5 - SIÈGE ET DOSSIER ....................................................... 47
REMPLACER LA GARNITURE DE DOSSIER..................................................................................... 47
ENLEVER/INSTALLER LE SIÈGE REMBOURRÉ................................................................................. 47
UTILISER LE REVÊTEMENT DE SIÈGE ................................................................................................ 48
ENLEVER/INSTALLER LA CEINTURE ................................................................................................. 48
SECTION 6 - SEAU .......................................................................... 49
ENLEVER/INSTALLER LE SEAU............................................................................................................. 49
ENLEVER/INSTALLER LE PORTE-SEAU ............................................................................................. 50
SECTION 7 - APPUIE-JAMBES/PIEDS ................................................ 51
ENLEVER/INSTALLER/RÉGLER LES APPUIE-JAMBES PIVOTANTS............................................ 51
RÉGLER LA HAUTEUR DE LA PALETTE ........................................................................................... 51
REMPLACER LES TALONNIÈRES......................................................................................................... 52
SECTION 8 - APPUIE-BRAS ............................................................. 53
ENLEVER/INSTALLER LES APPUIE-BRAS PIVOTANTS ................................................................. 53
POSITIONNER LES APPUIE-BRAS PIVOTANTS.............................................................................. 54
REMPLACER LE COUSSINET DE L'APPUIE-BRAS .......................................................................... 54
SECTION 9 - ROUES AVANT ........................................................... 55
ENLEVER/INSTALLER LES ROUES AVANT
- MODÈLE # 6795 ET # 6895................................................................................................................. 55
ENLEVER/INSTALLER LES ROUES AVANT AVEC FREIN
- MODÈLE # 6891 ..................................................................................................................................... 55
SECTION 10 - ROUES ARRIÈRE ET CERCEAUX DE CONDUITE .......... 56
ENLEVER/INSTALLER LES ROUES - MODÈLE # 6795 ET # 6895 .............................................. 56
REMPLACER/RÉPARER LE PNEU ......................................................................................................... 57
REMPLACER LE CERCEAU DE CONDUITE .................................................................................... 57
SECTION 11 - FREINS DE BLOCAGE ................................................. 58
UTILISER/RÉGLER LES FREINS DE BLOCAGE ................................................................................. 58
GARANTIE LIMITÉE....................................................... BACK COVER
Rehab Shower Commode Chair 34 Part No. 1118394

EMPLACEMENT DES ÉTIQUETTES
EMPLACEMENT DES ÉTIQUETTES
EMPLACEMENT DES
ÉTIQUETTES
NOTE IMPORTANTE
Les freins de blocage sur ce fauteuil ont été
réglés à l'usine afin de satisfaire les standards
de fonctionnement administratif des anciens
combattants 8320.01 du registre fédéral,
paragraphe 3.2.4.5.3. Si ces freins de blocage
ne satisfont pas vos besoins, suivre les
instructions suivantes.
!
A TTENTION
Tous les réglages des freins de blocage doivent
permettre au sabot de s'enfoncer de 1/8" dans
le pneu (3/16"sur les pneumatiques).
INSTRUCTIONS POUR RÉGLER
LES FREINS DE BLOCAGE
1. Desserrer l'attache du frein de blocage
qui passe dans le support de montage et
le châssis.
2. Déplacer la pince vers l'arrière de la roue
jusqu'à ce que le sabot s'enfonce dans le
pneu d'au moins 1/8 po. lorsque la
poignée est enclenchée en position
bloquée (3/16 po. pour les pneus
pneumatiques).
3. Serrer l'attache du frein de blocage pour
fixer le support de montage à l'endroit
voulu et vérifier l'enfoncement du sabot.
4. Vérifier le blocage AVANT l'utilisation.
NOTE: L'étiquette indiquant
la limite de poids est situé
à l'arrière du croisillon.
P/N 1114837 REV A
Part No. 1118394 35 Rehab Shower Commode Chair

SPÉCIFICATIONS
SPÉCIFICATIONS
CHAISE DE DOUCHE AVEC SIÈGE D'AISANCE
Siège 18,50 po. Siège 18,50 po. Siège 16 po.
Numéro de modèle (Roues avant 5 po.) (Roues 24 po. ) (Roues 24 po.)
Hauteur totale de la chaise
(Du plancher jusqu'au-dessus des poignées) 38½" 38½" 38½"
Distance siège/sol 23" 23" 23"
Distance siège/appuie-bras 7¾" 7¾" 7¾"
SPÉCIFICATIONS
Hauteur du dossier
(Du dessus du siège au dessus de la garniture) 15½ po. 15½ po. 15½ po.
Extension max des appuie-pieds
(À partir du dessus du siège) 20¾ 20¾ 20¾
Extension min des appuie-pieds
(À partir du dessus du siège) 16¾" 16¾" 16¾"
Largeur totale de la chaise 22" 26½" 24½"
(D'un cerceau de conduite à l'autre) pas de cerceaux
Largeur totale du dossier 18" 18" 16"
Largeur du siège 18½" 18½" 16"
Largeur entre les appuie-bras 18" 18" 16"
Largeur de la chaise pliée 8" 12" 12"
Profondeur totale
(Sans les appuie-bras/pieds ) 30" 33" 33"
de conduite
Profondeur du siège 18¼" 18¼" 16"
Poids 30 lbs 41 lbs 40 lbs
Limite de poids 300 lbs 300 lbs 300 lbs
Dégagement au-dessus de la toilette
Profondeur
(Croisillon avant au rebord du pneu arrière) 19" 28" 28"
Pas de pneu
Profondeur
(Boulon de l'essieu de la roue arrière au rebord du pneu) N/D 11½" 11½"
Hauteur
(Plancher à la base du siège ) 20¼" 20¼" 20¼"
Largeur intérieure
(Entre les châssis latéraux) 16" 16" 14"
Rehab Shower Commode Chair 36 Part No. 1118394

CONSIGNES GÉNÉRALES
Section 1 - Consignes générales:
Information de fonctionnement Limite de poids
SECTION 1
Musculation Sécurité/manipulation de la chaise de
douche avec siège d'aisance
INFORMATION DE FONCTIONNEMENT
AVERTISSEMENTS GÉNÉRAUX
CETTE CHAISE DE DOUCHE AVEC SIÈGE D'AISANCE N'EST PAS CONÇUE
OU PRÉVUE POUR LE TRANSPORT À L'EXTÉRIEUR OU LA MOBILITÉ.
GARDER LES MAINS ET LES DOIGTS ÉLOIGNÉS DES PIÈCES MOBILES
POUR ÉVITER LES BLESSURES.
À moins d'avis contraire, tout entretien ou réglage doit être exécuté
lorsque la chaise de douche avec siège d'aisance est inoccupée.
Pour déterminer et établir vos limites personnelles de sécurité,
pratiquez-vous à vous pencher, à atteindre des objets et à transférer en
présence d'un professionnel des soins de santé AVANT de tenter
d'utiliser activement la chaise de douche avec siège d'aisance.
TOUJOURS porter les ceintures.
TOUJOURS vérifier si les gaines des poignées sont sécuritaires AVANT
que l'assistant ne pousse la chaise de douche avec siège d'aisance. Si les
gaines sont lâches ou abîmées, contacter un technicien qualifié. NE PAS
tenter de déplacer la chaise de douche avec siège d'aisance si les gaines
ne sont pas sécuritaires ou si elles sont abîmées.
CONSIGNES GÉNÉRALES
NE PAS tenter d'atteindre des objets si vous devez vous déplacer vers
lavant du siège.
NE PAS tenter d'atteindre des objets si vous devez vous pencher entre vos genoux.
NE PAS vous pencher par-dessus la garniture du dossier. Cela changera
votre centre de gravité et vous pourriez basculer.
NE PAS déplacer son poids ou sa position dans la direction de l'objet que vous
tentez de rejoindre; la chaise de douche avec siège d'aisance pourrait basculer.
NE PAS utiliser d'escalier roulant pour déplacer une chaise de douche avec
siège d'aisance entre des étages. Des blessures graves peuvent survenir.
LES FREINS DE BLOCAGE NE SONT PAS DES FREINS. NE PAS tenter
d'immobiliser une chaise de douche avec siège d'aisance en mouvement
avec les freins de blocage.
Avant de tenter de transférer dans ou hors de la chaise de douche avec siège
d'aisance, toutes les précautions doivent être prises pour réduire la distance
à franchir. Placer toutes les roues avant parallèles à l'objet où vous
transférez. Au moment du transfert, dans ou hors de la chaise de douche
avec siège d'aisance, TOUJOURS ENCLENCHER LES DEUX (2) FREINS DE
BLOCAGE (pour les modèles 6795 et 6895) ou LES FREINS SUR LES
QUATRE ROUES (modèle 6891).
NE PAS s'asseoir ou transférer dans la chaise de douche avec siège
d'aisance si la chaise n'est pas complètement ouverte.
NE PAS franchir, descendre ou monter de rampes ou de pentes de plus
de 9° d'inclinaison.
NE PAS tenter de monter ou descendre des plans inclinés recouverts
d'eau, de glace ou d'un film d'huile.
Part No. 1118394 37 Rehab Shower Commode Chair

SECTION 1 CONSIGNES GÉNÉRALES
NE PAS utiliser de pièces, d'accessoires ou d'adaptateurs autres que
ceux autorisés par Invacare, sans quoi la garantie sera annulée.
NE PAS tenter de de franchir des obstacles, sans quoi la chaise de douche
avec siège d'aisance pourrait basculer et causer des blessures ou
endommager la chaise.
NE PAS trop serrer la quincaillerie de fixation sur le châssis. Ceci
pourrait endommager les tubes du châssis.
NE PAS utiliser les palettes comme plate-forme pour s'asseoir ou se
relever de la chaise de douche avec siège d'aisance,
NE PAS tenter de soulever la chaise de douche avec siège d'aisance par des
pièces amovibles (détachables), sans quoi des blessures à l'utilisateur ou des
CONSIGNES GÉNÉRALES
dommages à la chaise de douche avec siège d'aisance peuvent survenir.
NE PAS se tenir sur le châssis de la chaise de douche avec siège d'aisance.
Pour nettoyer les montants et les poignées, utiliser seulement un linge
propre humidifié avec de l'eau froide. Vérifier si les gaines sont sèches avant
de les utiliser. L'utilisation de savon ou d'une solution à base d'ammoniaque
fera glisser les gaines des montants. Le non respect de cet avertissement
pourrait causer des blessures à l'utilisateur ou aux personnes à proximité.
CONSIGNES GÉNÉRALES (SUITE)
NE PAS basculer la chaise de douche avec siège d'aisance sans aide.
TOUJOURS utiliser les cerceaux de conduite pour s'auto-propulser.
MUSCULATION
AVERTISSEMENT
Invacare recommande de NE PAS utiliser ses chaises de douche avec
siège d'aisance comme appareil de musculation. Les chaises de douche
avec siège d'aisance Invacare NE sont PAS conçues ou testées pour servir
de siège pour faire de la musculation. Si l'occupant utilise la chaise de
douche avec siège d'aisance comme appareil de musculation, Invacare NE
pourra être tenu responsable des blessures et la garantie sera annulée.
LIMITE DE POIDS
AVERTISSEMENT
La limite de poids de la chaise de douche avec siège d'aisance est de
300 livres (136 kg).
SÉCURITÉ/MANIPULATION DES CHAISES DE DOUCHE
AVEC SIÈGE D'AISANCE
La sécurité et la manipulation de la chaise de douche avec siège d'aisance nécessitent toute
l'attention de l'utilisateur et de l'assistant. Ce manuel présente les techniques et les procédures
couramment utilisées pour l'utilisation sécuritaire et l'entretien de la chaise de douche avec siège
d'aisance. Il est important de pratiquer et de maîtriser ces techniques de sécurité jusqu'à ce que
vous soyez à l'aise pour manoeuvrer autours des obstacles fréquemment rencontrés.
Utiliser cette information comme guide de base seulement. Les techniques présentées dans
les pages suivantes se sont avérées efficaces pour plusieurs personnes.
Rehab Shower Commode Chair 38 Part No. 1118394

SECTION 1CONSIGNES GÉNÉRALES
Les utilisateurs de chaise de douche avec siège d'aisance développent souvent des habiletés,
différentes de celles décrites dans ce manuel, qui leur permettent de pratiquer les activités
quotidiennes. Invacare reconnaît et encourage chaque personne à découvrir ce qui lui convient le
mieux, afin d'arriver à surmonter les obstacles architecturaux qu'elle peut rencontrer. Toutefois,
TOUS LES AVERTISSEMENTS ET LES NOTES ATTENTION donnés dans ce manuel DOIVENT
être respectés. Les techniques présentées dans ce manuel sont un point de départ pour le nouvel
utilisateur et son assistant, et misent avant tout sur la sécurité.
STABILITÉ ET ÉQUILIBRE
AVERTISSEMENT
TOUJOURS porter LA CEINTURE.
Pour assurer la stabilité et le bon fonctionnement de votre chaise de douche avec siège d'aisance,
vous devez maintenir un bon équilibre en tout temps. Votre chaise de douche avec siège d'aisance
a été conçue pour demeurer droite et stable tout au long de vos activités quotidiennes, en autant
que vous n'excédiez pas les limites de votre centre de gravité.
Pratiquement toutes les activités qui impliquent un mouvement dans la chaise de douche
avec siège d'aisance ont un effet sur le centre de gravité. Invacare recommande d'utiliser
les ceintures (de siège, thoraciques) pour plus de sécurité lors des activités qui
impliquent un déplacement de votre de poids.
CONSIGNES GÉNÉRALES
NE PAS se pencher vers l'avant de la chaise de douche avec siège d'aisance, au-delà de la
longueur des appuie-bras. S'assurer que les roues avant pointent vers l'avant lorsque
vous vous penchez vers l'avant. En avançant la chaise de douche avec siège d'aisance puis
en la reculant, les roues avant pointeront vers l'avant.
FAIRE FACE AUX OBSTACLES QUOTIDIENS
Apprendre à utiliser sa chaise de douche avec siège d'aisance peut diminuer les frustrations ressenties face aux obstacles de la vie quotidienne. Garder en tête votre centre de
gravité pour maintenir votre stabilité et votre équilibre.
NOTE AUX ASSISTANTS
Lorsque l'utilisateur de la chaise de douche avec siège d'aisance nécessite de l'aide,
rappelez-vous de bien forcer.
AVERTISSEMENT
NE PAS tenter de soulever la chaise de douche avec siège d'aisance par
des pièces amovibles (détachables), sans quoi des blessures ou des
dommages peuvent survenir.
TOUJOURS vérifier si les gaines des poignées sont sécuritaires AVANT
qu'un assistant ne pousse ou ne soulève la chaise de douche avec siège
d'aisance. Si les gaines sont lâches ou abîmées, contacter un technicien
qualifié. NE PAS tenter de déplacer la chaise de douche avec siège
d'aisance si les gaines ne sont pas sécuritaires ou si elles sont abîmées.
Méfiez-vous également des pièces amovibles (détachables) telles que les appuie-bras ou
les appuie-jambes. Ces pièces ne doivent JAMAIS servir de support pour déplacer la
chaise de douche avec siège d'aisance puisqu'elles risquent de se détacher et causer des
blessures à l'utilisateur et/ou à l'assistant.
Lorsque vous apprenez une nouvelle technique d'aide, demandez l'aide d'un assistant
expérimenté avant de la tenter seule.
Part No. 1118394 39 Rehab Shower Commode Chair

SECTION 1 CONSIGNES GÉNÉRALES
POURCENTAGE DE DISTRIBUTION DE POIDS
NE PAS tenter d'atteindre d'objets si vous devez vous avancer sur le siège
ou si vous devez les ramasser au sol en vous penchant entre vos genoux.
La profondeur/largeur du siège, la hauteur du dossier, la position des roues
avant, la taille/position des roues arrière ainsi que la condition de l'utilisateur
sont directement reliés à la stabilité de la chaise de douche avec siège
d'aisance. Tout changement à une (1) ou plusieurs des combinaisons
précédentes diminuera la stabilité de la chaise de douche avec siège
d'aisance. Ces réglages DOIVENT être exécutés par un technicien qualifié.
Plusieurs activités obligent l'utilisateur de
la chaise de douche avec siège d'aisance à
sétirer, à se pencher et à effectuer un
CONSINGES GÉNÉRALES
transfert de la chaise. Ces mouvements
entraîneront un changement de léquilibre,
du centre de gravité et de la distribution
du poids de la chaise. Pour déterminer et
fixer ses limites sécuritaires personnelles,
sexercer à se pencher, à sétirer et à
effectuer des transferts, de diverses
manières, en présence dun professionnel
des soins de santé, AVANT de
commencer à se servir activement de la
chaise de douche avec siège d'aisance.
AVERTISSEMENT
CENTRE DE
GRAVITÉ
INOCCUPÉ OCCUPÉ
Une bonne position est essentielle à votre sécurité. Pour sétirer, se pencher ou atteindre un
objet, il est important dutiliser les roues avant pour maintenir la stabilité et léquilibre.
S'ÉTIRER, SE PENCHER ET SE PLIER - VERS L'AVANT
AVERTISSEMENT
NE PAS tenter de joindre des objets si vous
devez vous déplacer vers l'avant du siège ou si
vous devez les ramasser du plancher en vous
penchant entre vos genoux.
Placer les roues avant de façon à ce qu'elles soient le plus vers
l'avant possible et enclencher les freins de blocage.
ATTEINDRE, SE PENCHER - VERS L'ARRIÈRE
AVERTISSEMENT
NE PAS se pencher par-dessus la garniture
du dossier. Ceci modifiera votre centre de
gravité et pourrait vous faire basculer.
Placer la chaise de douche avec siège d'aisance le
plus près possible de lobjet voulu. Orienter les
roues avant vers lavant pour créer un
empattement le plus grand possible. Étendre le
bras au maximum vers l'arrière sans toutefois
changer votre position assise.
Rehab Shower Commode Chair 40 Part No. 1118394

SECTION 1CONSINGES GÉNÉRALES
BASCULER
AVERTISSEMENT
NE PAS basculer la chaise de douche avec siège d'aisance sans aide.
Pour basculer la chaise de douche avec siège d'aisance, lassistant devrait saisir une pièce non
amovible (non-détachable) du dossier. Aviser loccupant de la chaise de douche avec siège
d'aisance avant de basculer la chaise et lui rappeler de se pencher vers larrière. Sassurer
que ses pieds et ses mains sont loin des roues et/ou des points de pincement.
AVERTISSEMENT
Lorsque vous abaissez les roues avant de la chaise de douche avec siège
d'aisance, NE PAS laisser retomber la chaise au sol. L'occupant pourrait
être blessé et/ou la chaise endommagée.
ESCALIERS
AVERTISSEMENT
TOUJOURS porter sa ceinture.
CONSIGNES GÉNÉRALES
Ne pas tenter de soulever la chaise de douche avec siège d'aisance par des
pièces amovibles (détachables); lutilisateur pourrait être blessé ou la
chaise endommagée.
TOUJOURS vérifier si les gaines des poignées sont sécuritaires AVANT
qu'un assistant ne pousse ou ne soulève la chaise douche avec siège
d'aisance. Si les gaines sont lâches ou abîmées, contacter un technicien
qualifié. NE PAS tenter de déplacer la chaise de douche avec siège
d'aisance si les gaines ne sont pas sécuritaires ou si elles sont abîmées.
Faire preuve d'une très grande prudence lorsque vous déplacez une
chaise de douche avec siège d'aisance occupée dans les escaliers. Invacare
recommande de sortir l'occupant de la chaise, si possible. Invacare
recommande la présence de deux (2) assistants et une préparation
rigoureuse. Sassurer dutiliser SEULEMENT des pièces sécuritaires, non
détachables pour soutenir la chaise.
Suivre cette procédure pour déplacer la chaise de douche avec siège d'aisance dun
étage à un autre lorsquun ascenseur nest PAS disponible:
1. Après avoir incliné la chaise jusquà son point déquilibre, un assistant (placé à
larrière) recule la chaise contre la première marche, tout en tenant fermement une
pièce non amovible (non-détachable) de la chaise pour la soulever.
2. Le deuxième assistant, avec une bonne prise sur une pièce non-détachable du
châssis, soulève la chaise par-dessus la marche et stabilise la chaise pendant que le
deuxième assistant place un pied sur la marche suivante et répète LÉTAPE 1.
3. La chaise ne doit pas être rabaissée avant davoir franchi la dernière marche et avant
d'être éloigné de l'escalier.
Part No. 1118394 41 Rehab Shower Commode Chair
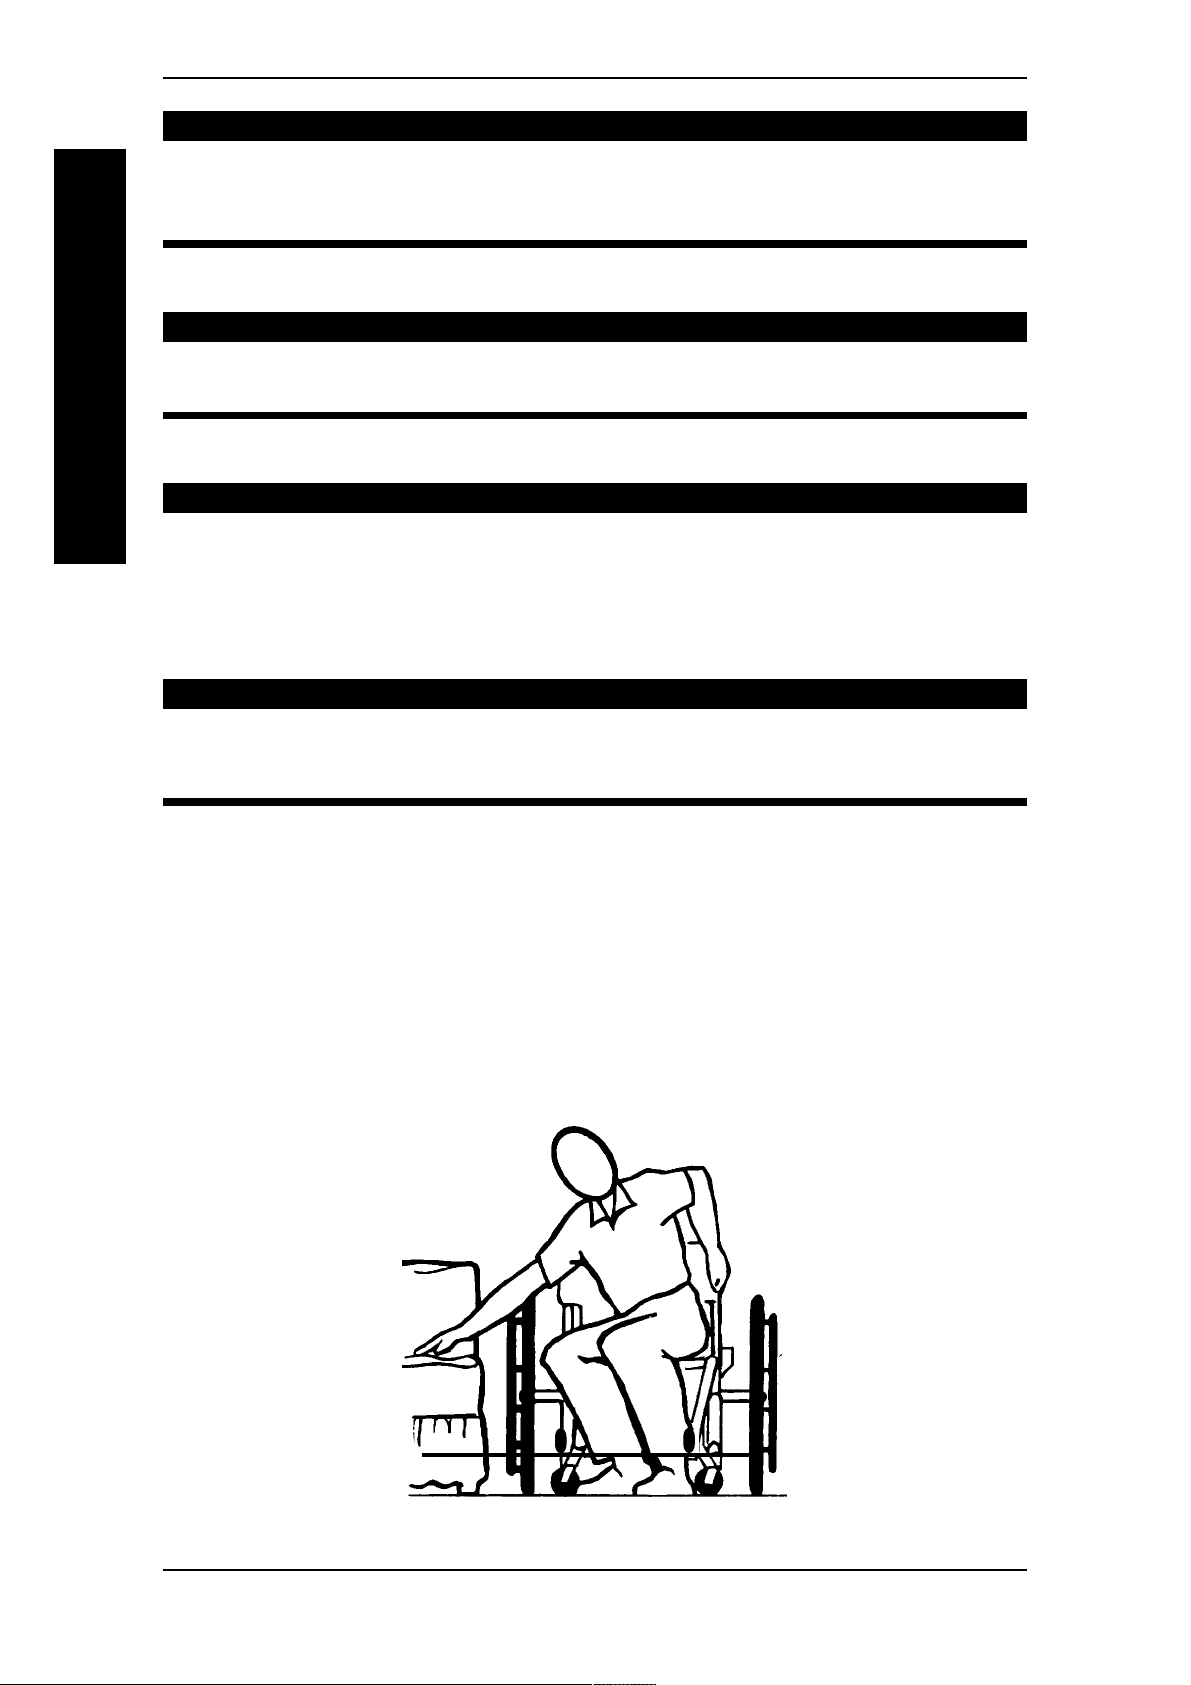
CONSIGNES GÉNÉRALESSECTION 1
AVERTISSEMENT
Lorsque vous abaissez les roues avant de la chaise de douche avec siège
d'aisance, NE PAS laisser la chaise retomber au sol. Ceci pourrait causer
des blessures à l'occupant et /ou des dommages à la chaise.
ESCALIERS ROULANTS
AVERTISSEMENT
NE PAS utiliser descalier roulant pour déplacer une chaise de douche avec
siège d'aisance dun étage à un autre. Des blessures graves peuvent survenir.
TRANSFÉRER DUN SIÈGE À UN AUTRE
CONSIGNES GÉNÉRALES
AVANT de tenter de transférer de ou dans sa chaise de douche avec
siège d'aisance, toutes les précautions doivent être prises pour réduire la
distance à franchir. Placer les deux roues avant parallèle au lieu de
transfert. S'assurer que les freins de blocage sont enclenchés pour
prévenir le déplacement de la chaise.
Lors d'un transfert, se placer bien au fond du siège. Cette pratique
empêchera la garniture de s'endommager et la chaise de douche avec
siège d'aisance de basculer.
NOTE: Cette activité peut être pratiquée seul à condition d'être suffisamment mobile et fort
physiquement.
Placer la chaise de douche avec siège d'aisance le plus près possible du siège dans lequel
vous transférez et les roues avant parallèle au siège. Relever l'appuie-bras. Enclencher
les freins de blocage sur les modèles de chaise 6795 et 6895 OU les freins sur le modèle
6891. Transférer le poids vers lautre siège.
Lors dun transfert effectué seul, vous aurez peu ou n'aurez pas de siège sous vous. Si
possible, utiliser une planche de transfert.
AVERTISSEMENT
ATTENTION
Rehab Shower Commode Chair 42 Part No. 1118394

Section 2 - Inspection de sécurité:
SECTION 2INSPECTION DE SÉCURITÉ
Liste d'inspection de sécurité
INSPECTION DE SÉCURITÉ
Dépannage
LISTE D'INSPECTION DE SÉCURITÉ
NOTE: Tous les six (6) mois, apportez votre chaise de douche avec siège d'aisance chez un
technicien qualifié pour un entretien et une inspection en profondeur. Un nettoyage régulier
permettra de détecter les pièces usées ou lâches, et améliorera le rendement de votre chaise. Pour
fonctionner adéquatement et sécuritairement, votre chaise doit être entretenue comme tout autre
véhicule. Un entretien régulier augmentera la durée de vie et l'efficacité de votre chaise.
Les réglages initiaux devraient être faits en fonction du physique et des préférences de
l'utilisateur. Suivre ensuite les procédures d'entretien suivantes:
Inspecter/Régler
ITEM Initial 1/sem. 1/mois Périodiquement
GÉNÉRAL
Chaise de douche avec siège d'aisance
roule droit (ne dévie pas). XX
CHÂSSIS ET ENTRETOISES
(SECTION 4)
Vérifier si la quincaillerie est lâche ou
manquante. XX
Vérifier si le châssis ou les entretoises
sont pliés. XX
SIÈGE ET DOSSIER (SECTION 5)
Vérifier s'il y a des déchirures ou si c'est
lâche. XX
Vérifier si la quincaillerie est brisée ou
desserrée. XX
Vérifier si les gaines des montants sont
lâches, déchirées ou abîmées. XX
ROUES AVANT (SECTION 9)
Vérifier la tension fourche/roue en
tournant la roue avant; celle-ci devrait
s'arrêter graduellement. XX
Serrer/desserrer l'écrou de blocage si
la roue vibre ou s'arrête d'un coup. XX
S'assurer que les roulements sont secs
et propres. XXX
Vérifier si les roues sont usées ou fendillées. XX
ATTENTION: Comme pour tout autre
véhicule, vérifier périodiquement
si les roues et les pneus sont fendus ou
usés, et les remplacer si nécessaire.
NETTOYAGE
Nettoyer les garnitures et les appuie-bras. XX
Part No. 1118394 43 Rehab Shower Commode Chair

SECTION 2 INSPECTION DE SÉCURITÉ
LISTE D'INSPECTION DE SÉCURITÉ (SUITE)
ITEM Initial 1/sem. 1/mois Périodiquement
RAYONS
Vérifier s'il y a des rayons brisés. XX
ROUES ARRIÈRE (SECTION 10)
Aucun mouvement latéral ou pliage
lorsque soulevé/tourné. XX
Vérifier s'il y a des rayons fendus, pliés
ou brisés. XX
PNEUS (SECTION 10)
INSPECTION DE SÉCURITÉ
Vérifier s'il y a des points plats ou de l'usure. X
ATTENTION: Comme pour tout autre
véhicule, vérifier périodiquement si
les roues et les pneus sont fendus ou
usés, et les remplacer si nécessaire.
Inspecter/Régler
CERCEAUX DE CONDUITE
(SECTION 10)
Vérifier si les rebords sont rugueux. X
FREINS DE BLOCAGE (SECTION 11)
Ne nuit pas au roulement. XX
Points pivots propres et secs. XX
Freins de blocage facile à enclencher. XX
Freins de blocage enclenchés empêchent
la chaise de rouler. XX
DÉPANNAGE
Fauteuil
Dévie à
Droite/
Gauche
X
X
Virage/
Rendement
Lent
X
Roues
Avant
Vibrent
X
X
Grince
et Vibre
X
Chaise
Lâche
X
Roule
Sur 3
Roues
Solutions
Vérifier s'il y a des
écrous/boulons lâches.
Vérifier si les roues
avant touchent le sol
en même temps.
Vérifier s'il y a des
boulons ou des écrous
X
X
Rehab Shower Commode Chair 44 Part No. 1118394
X
X
X
lâches.
Vérifier si les roues
arrière sont à égale
distance du chassis du
siège.
X

Section 3 - Soins et entretien:
Précautions de sécurité pour l'entretien
SECTION 3SOIN ET ENTRETIEN
Procédures d'entretien suggérées
Nettoyage
PRÉCAUTIONS DE SÉCURITÉ POUR L'ENTRETIEN
AVERTISSEMENT
Après TOUT réglage, réparation ou entretien, et AVANT utilisation,
s'assurer que toute la quincaillerie de fixation est bien serrée, sans quoi
des blessures ou des dommages peuvent survenir.
ATTENTION
NE PAS trop serrer la quincaillerie fixée au châssis, sans quoi les tubes du
châssis pourraient être endommagés.
Votre chaise de douche avec siège d'aisance a été assemblée avec soin et est prête pour
utilisation immédiate. Afin d'obtenir le meilleur rendement de votre chaise, il est
suggéré de suivre un horaire d'entretien régulier.
Vérifier périodiquement votre chaise pour vous assurer que TOUTES les pièces et les
boulons sont bien serrés. À ce moment, nettoyer toute la chaise avec un savon doux et de
l'eau.
SOINS ET ENTRETIEN
PROCÉDURES D'ENTRETIEN SUGGÉRÉES
1. Avant d'utiliser votre chaise de douche avec siège d'aisance, s'assurer que tous les écrous
et les boulons sont bien serrés. S'assurer que les pièces ne sont pas usées ou
endommagées et, le cas échéant, les remplacer. Vérifier si les pièces sont bien réglées.
2. Régler périodiquement les freins de blocage puisque les pneus s'usent. Se référer à
RÉGLER LES FREINS DE BLOCAGE de la SECTION 11 de ce manuel.
3. Vérifier périodiquement si les roues avant et les moyeux des roues arrière sont propres.
ATTENTION
Comme pour tout autre véhicule, vérifier périodiquement si les roues arrière, les
roues avant et les pneus sont fendus ou usés, et les remplacer si nécessaire.
4. Vérifier périodiquement si les roues arrière, les roues avant et les pneus sont usés
ou fendus et, le cas échéant, les faire remplacer par un technicien qualifié.
NOTE: L'usure des pneus est excessive s'il y a des coupures ou des défauts ou si les pneus sont
lâches sur la jante.
NOTE: Invacare recommande que les pneus et les roues avant soient remplacés tous les cinq (5) ans.
5. Vérifier périodiquement les roulements à billes des roues avant pour s'assurer qu'ils
sont propres et secs. Utiliser un lubrifiant au Téflon®si nécessaire.
6. Vérifier périodiquement les cerceaux de conduite pour s'assurer qu'ils sont bien
fixés aux roues arrière. S'ils sont lâches, les faire serrer par un technicien.
NETTOYAGE
Nettoyer après chaque utilisation la chaise de douche avec siège d'aisance avec de l'eau
et un savon doux.
Part No. 1118394 45 Rehab Shower Commode Chair

SECTION 4 DÉPLIER/PLIER
Section 4 - Déplier/plier:
Déplier/plier la chaise de douche avec siège d'aisance
DÉPLIER/PLIER LA CHAISE DE DOUCHE AVEC SIÈGE D'AISANCE
Garder les mains et les doigts loin des pièces mobiles pour éviter les blessures.
Au moment de déplier la chaise de douche avec siège d'aisance, NE PAS laisser
les doigts ou les mains entre les liens pivots. S'assurer d'utiliser SEULEMENT la
paume des mains (pas les doigts) pour appuyer sur les extrémités des croisillons,
sans quoi des blessures ou des dommages peuvent survenir.
DÉPLIER/PLIER
NE PAS s'asseoir ou transférer dans la chaise de douche avec siège d'aisance
si elle n'est pas complètement ouverte et si les étriers des entretoises ne
sont pas complètement assis sur le châssis latéral.
DÉPLIER
1. Ouvrir la chaise de douche avec siège d'aisance en appuyant sur les entretoises
(SCHÉMA "A", FIGURE 1).
AVERTISSEMENT
2. Pour faciliter l'accès au châssis, relever les appuie-bras en serrant le levier de
dégagement de l'appuie-bras vers le tube de l'appuie-bras et soulever.
3. Placer le seau sur le châssis en insérant les quatre (4) crochets dans les quatre (4)
orifices sur le châssis en tube (SCHÉMA "B", FIGURE 1).
4. Placer le siège sur le châssis et appuyer pour bloquer le siège sur le châssis
(SCHÉMA "B", FIGURE 1).
PLIER
1. Pour faciliter l'accès au châssis, relever les appuie-bras en serrant le levier de
dégagement de l'appuie-bras vers le tube de l'appuie-bras et soulever.
2. Enlever le siège (et le couvercle du siège, s'il y a lieu) du châssis en tirant sur le siège.
3. Enlever le seau du porte-seau.
4. Enlever le porte-seau du châssis en enlevant les quatre (4) crochets des quatre (4)
orifices situés sur le châssis en tube (SCHÉMA "B" de la FIGURE 1).
5. Plier la chaise de douche avec siège d'aisance en soulevant les entretoises (SCHÉMA
"C" de la FIGURE 1).
SCHÉMA A SCHÉMA C
APPUYER
SCHÉMA B
Seau
Couvercle
de siège
Siège
Entretoises
Porte-seau
FIGURE 1 - DÉPLIER/PLIER LA CHAISE DE DOUCHE AVEC SIÈGE D'AISANCE
Rehab Shower Commode Chair 46 Part No. 1118394

SIÈGE ET DOSSIER SECTION 5
Section 5 - Siège et dossier:
Remplacer la garniture de dossier Utiliser le couvercle du siège
Enlever/Installer le siège rembourré Enlever/Installer la ceinture de siège
AVERTISSEMENT
Après TOUT réglage, réparation ou entretien, et AVANT utilisation,
s'assurer que toute la quincaillerie de fixation est bien serrée, sans quoi
des blessures ou des dommages peuvent survenir.
Au moment d'installer le siège s'assurer d'utiliser SEULEMENT la paume
des mains (pas les doigts) pour bloquer le siège sur le châssis, sans quoi
des blessures ou des dommages peuvent survenir.
REMPLACER LA GARNITURE DE DOSSIER (FIGURE 1)
1. Enlever les deux (2) vis de montage et
les rondelles qui fixent la garniture de
dossier existante aux deux (2)
montants du dossier.
Rondelle
Garniture de dossier
SIÈGE ET DOSSIER
2. Enlever la garniture existante des deux
(2) montants de dossier.
3. Installer la NOUVELLE garniture de
dossier sur les deux (2) montants de
Vis de
montage
Montant de
dossier
dossier.
4. Fixer la NOUVELLE garniture sur les
montants du dossier avec les vis de
FIGURE 1 - REMPLACER LA
GARNITURE DE DOSSIER
montage et les rondelles existantes.
ENLEVER/INSTALLER LE SIÈGE REMBOURRÉ
ENLEVER (FIGURE 2)
Le siège rembourré peut être placé dans l'une (1) des quatre (4) directions (SCHÉMA
"A"de la FIGURE 2).
1. Déplacer les appuie-bras en serrant le levier de dégagement des appuie-bras et en
les soulevant.
2. Enlever le siège en le tirant.
SCHÉMA "A"
1
4
2
3
FIGURE 2 - ENLEVER/INSTALLER LE SIÈGE REMBOURRÉ
Part No. 1118394 47 Rehab Shower Commode Chair
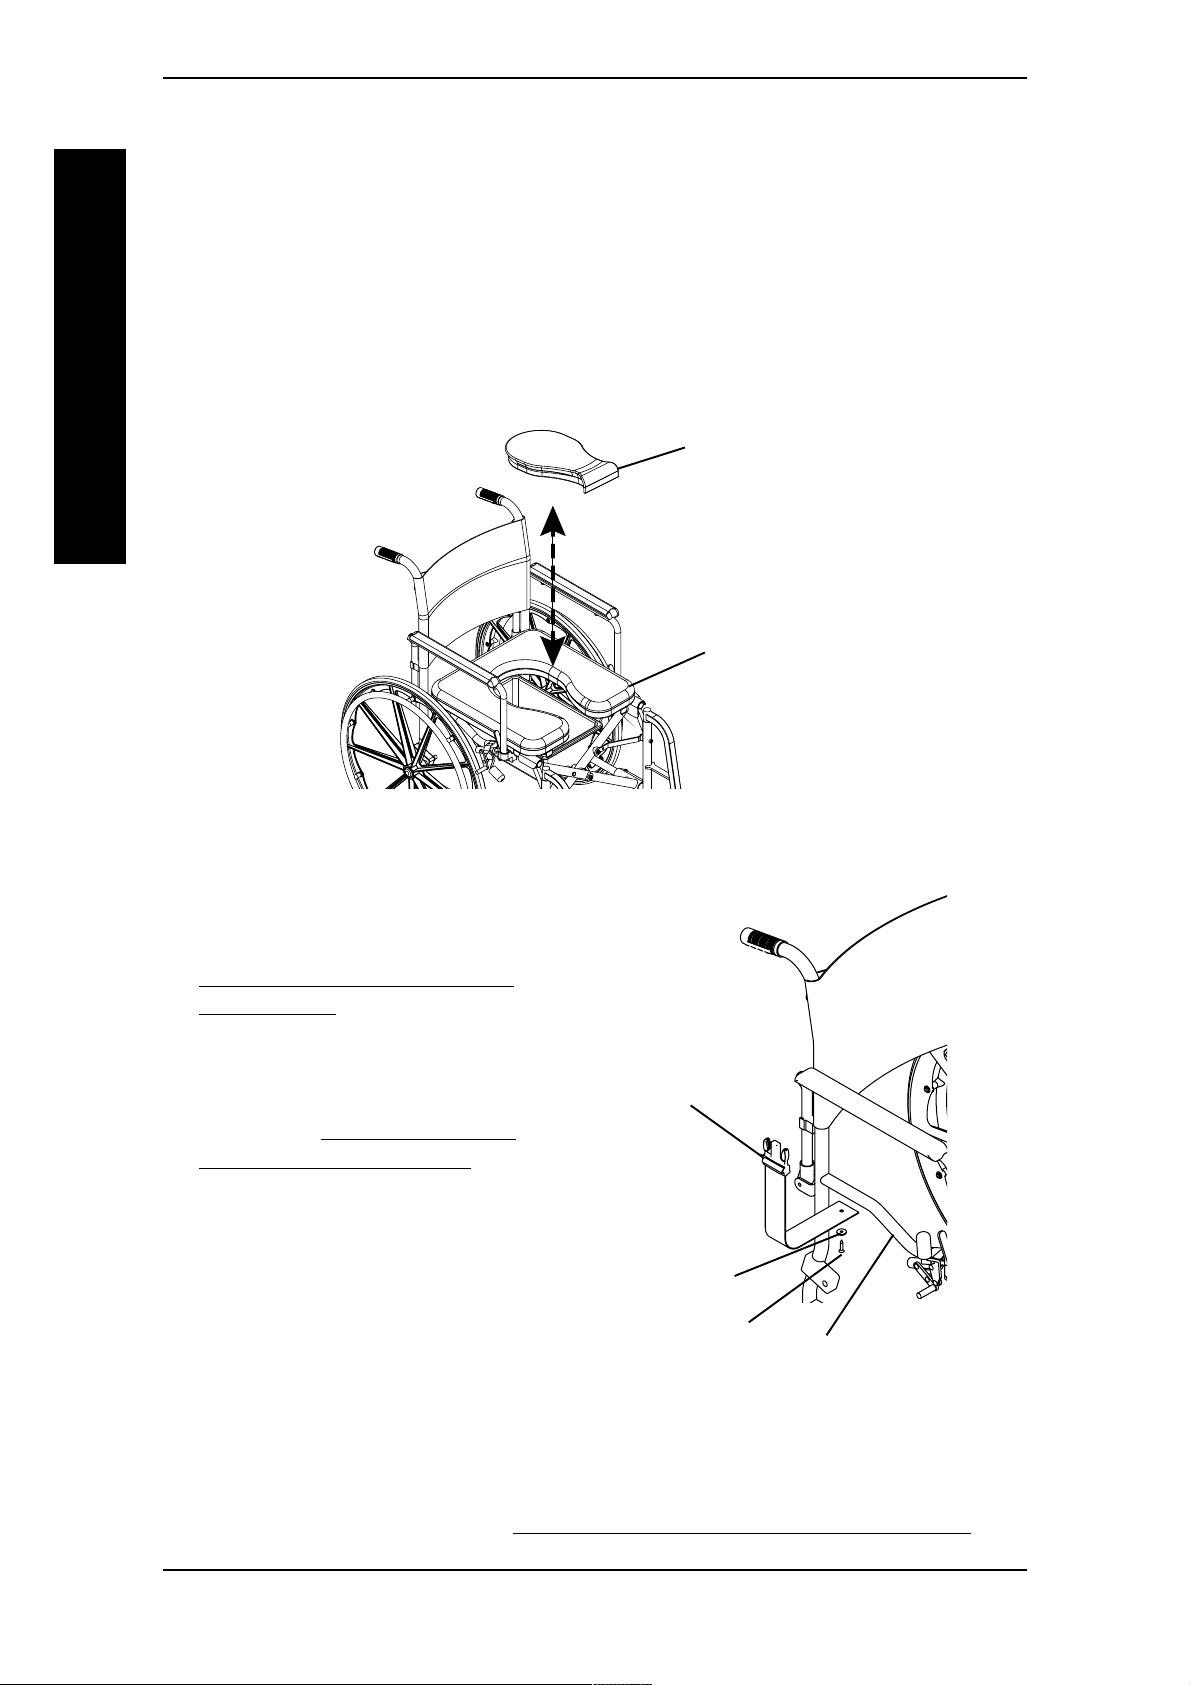
SECTION 5
SIÈGE ET DOSSIER
INSTALLER (FIGURE 2)
1. Enlever les appuie-bras en serrant le levier de dégagement de l'appuie-bras et en le
soulevant.
2. Placer le siège dans la direction choisie (SCHÉMA "A" de la FIGURE 2).
3. Appuyer sur le siège jusqu'à ce qu'il bloque sur le châssis de la chaise de douche
avec siège d'aisance.
UTILISER LE COUVERCLE DU SIÈGE (FIGURE 3)
Invacare fournit un couvercle pour l'ouverture du siège que vous pouvez utiliser
pendant la douche, au besoin. Se référer à la FIGURE 3.
SIÈGE ET DOSSIER
ENLEVER/INSTALLER LA CEINTURE DU SIÈGE (FIGURE 4)
ENLEVER
1. Enlever le siège. Se référer à
Couvercle du siège
Siège
FIGURE 3 - UTILISER LE COUVERCLE DU SIÈGE
ENLEVER/INSTALLER LE SIÈGE
REMBOURRÉ dans cette section
du manuel.
2. Mettre les appuie-bras dans une
position hors de portée de nuire.
Ceinture
de siège
Se référer à POSITIONNER LES
APPUIE-BRAS PIVOTANTS de la
SECTION 8 de ce manuel.
3. Enlever la vis de montage et la
rondelle qui fixent chaque partie
de la ceinture au châssis du siège.
INSTALLER
Rondelle
Vis de montage
Châssis
1. Placer les deux (2) nouvelles
parties de ceinture sur le châssis
du fauteuil.
FIGURE 4 - ENLEVER/INSTALLER LA
CEINTURE DU SIÈGE
2. Réinstaller les deux (2) vis de montage et les écrous de blocage qui fixent les deux
(2) parties de la ceinture au châssis du siège.
3. Réinstaller le siège. Se référer à ENLEVER/INSTALLER LE SIÈGE REMBOURRÉ
dans cette section du manuel.
Rehab Shower Commode Chair 48 Part No. 1118394

SEAU SECTION 6
Section 6 - Seau:
Enlever/Installer le seau
Enlever/Installer le porte-seau
AVERTISSEMENT
Enlever le seau avant d'utiliser la chaise de douche avec siège d'aisance
sous la douche.
ENLEVER/INSTALLER LE SEAU (FIGURE 1)
1. POUR ENLEVER: De l'arrière de la chaise de douche avec siège d'aisance, sortir le
seau du porte-seau.
NOTE: S'assurer de ne pas basculer ou renverser le seau en l'enlevant.
2. POUR INSTALLER: De l'arrière de la chaise de douche avec siège d'aisance, insérer
le seau, partie avant devant, dans le porte-seau.
NETTOYAGE
Nettoyer le porte-seau avec de l'eau et du savon doux.
Poignée
Siège
Seau
Arrière du
seau
SEAU
Entretoises de
la chaise
Avant du seau
Châssis
Crochets (4) du
porte-seau
Porte-seau
FIGURE 1 - ENLEVER/INSTALLER LE SEAU ET LE PORTE-SEAU
Part No. 1118394 49 Rehab Shower Commode Chair

SEAU
SEAUSECTION 6
ENLEVER/INSTALLER LE PORTE-SEAU
ENLEVER
1. Relever les appuie-bras pour faciliter l'accès au siège. Se référer à POSITIONNER
LES APPUIE-BRAS PIVOTANTS de la SECTION 8 de ce manuel.
2. Enlever le siège. Se référer à ENLEVER/INSTALLER LE SIÈGE REMBOURRÉ de la
SECTION 5 de ce manuel
3. Enlever le seau du porte-seau. Se référer à ENLEVER/INSTALLER LE SEAU dans
cette section du manuel.
4. Enlever le porte-seau du tube du châssis en sortant les quatre (4) crochets du porteseau des quatre (4) orifices sur les languetttes du tube du châssis (FIGURE 1).
INSTALLER
1. Installer le porte-seau sur le tube du châssis en insérant les quatre (4) crochets du porteseau dans les quatre (4) orifices sur les languettes du tube du châssis (FIGURE 1).
2. Installer le seau sur le porte-seau. Se référer à ENLEVER/INSTALLER LE SEAU dans
cette section du manuel.
3. Replacer le siège. Se référer à ENLEVER/INSTALLER LE SIÈGE REMBOURRÉ de la
SECTION 5 de ce manuel
4. Abaisser les appuie-bras en position jusqu'à ce qu'ils bloquent dans les tubes du
châssis. Se référer à POSITIONNER LES APPUIE-BRAS PIVOTANTS de la
SECTION 8 de ce manuel.
Rehab Shower Commode Chair 50 Part No. 1118394

Section 7 - Appuie-pieds/jambes
Enlever/installer/régler les appuie-pieds pivotants
SECTION 7APPUIE PIEDS/JAMBES
Régler la hauteur de la palette
Remplacer les talonnières
AVERTISSEMENT
Après TOUT réglage, réparation ou entretien, et AVANT utilisation,
s'assurer que toute la quincaillerie de fixation est bien serrée, sans quoi
des blessures ou des dommages peuvent survenir.
ENLEVER/INSTALLER/RÉGLER LES APPUIE-PIEDS
PIVOTANTS (FIGURE 1)
ENLEVER
1. Soulever l'appuie-pied pour le
désenclencher du châssis de la
chaise de douche avec siège
d'aisance.
2. Enlever l'appuie-pied du châssis
de la chaise.
INSTALLER
1. Placer le dessus de l'appuie-pied
dans le châssis de la chaise de
douche avec siège d'aisance.
Châssis de
la chaise
de douche
avec siège
d'aisance
Tige de réglage
de la palette
Appuie-pied
Palette
Ensemble de
l'appuie-pied
APPUIE-JAMBES/PIEDS
2. Insérer et appuyer pour
bloquer en place.
FIGURE 1 - ENLEVER/INSTALLER/
RÉGLER LES APPUIE-PIEDS PIVOTANTS
RÉGLER
1. Soulever l'ensemble de l'appuie-pied pour le désenclencher de la tige intérieure, sans
toutefois l'enlever de la chaise.
2. Pivoter l'appuie-pied vers l'extérieur de la chaise de douche avec siège d'aisance.
3. Répéter la procédure pour l'autre côté.
RÉGLER LA HAUTEUR DE LA PALETTE
NOTE: Les palettes se règlent vers le haut ou vers le bas en soulevant la palette jusqu'à ce que la
tige de réglage de la palette se désenclenche de l'orifice.
1. Soulever l'avant de la palette jusqu'à ce que la tige de réglage se désenclenche de l'orifice.
2. Déplacer la palette pour changer la hauteur de réglage.
3. Appuyer à l'avant de la palette jusqu'à ce que la tige de réglage s'enclenche dans
l'orifice choisi.
Part No. 1118394 51 Rehab Shower Commode Chair

APPUIE-PIEDS/JAMBESSECTION 7
REMPLACER LES TALONNIÈRES (FIGURE 3)
1. Noter la position du boulon hexagonal, des rondelles bombées et de l'écrou de
blocage pour la réinstallation.
2. Enlever le boulon hexagonal, les rondelles bombées et l'écrou de blocage qui fixent
la partie inférieure de l'appuie-pied au support de l'appuie-pied.
3. Enlever la partie inférieure de l'appuie-pied.
4. Enlever le boulon Phillips, l'intercalaire et l'écrou de blocage qui fixent la talonnière
existante de la partie inférieure de l'appuie-pied.
5. Enlever la talonnière existante.
6. Remplacer la talonnière.
APPUIE-PIEDS/JAMBES
7. Inverser les ÉTAPES 1-6 pour remonter.
NOTE: Au moment de fixer la talonnière sur la partie inférieure de l'appuie-pied, serrer la vis
Phillips et l'écrou de blocage jusqu'à ce que l'intercalaire soit fixe.
Partie inférieure
de l'appuie-pied
FIGURE 3 - REMPLACER LES TALONNIÈRES
Boulons Phillips
Talonnière
Écrous de blocage
Rehab Shower Commode Chair 52 Part No. 1118394

APPUIE-BRAS
Section 8 - Appuie-bras:
Enlever/installer les appuie-bras pivotants
Positionner les appuie-bras pivotants
SECTION 8
Remplacer les coussinets d'appuie-bras
AVERTISSEMENT
Après TOUT réglage, réparation ou entretien, et AVANT utilisation,
s'assurer que toute la quincaillerie de fixation est bien serrée, sans quoi
des blessures ou des dommages peuvent survenir.
ENLEVER/INSTALLER LES APPUIE-BRAS PIVOTANTS
(FIGURE 1)
ENLEVER
1. Pivoter l'appuie-bras. Se référer à POSITIONNER LES APPUIE-BRAS PIVOTANTS
dans cette section du manuel.
2. Enlever la vis de montage et l'écrou de blocage qui fixe l'appuie-bras pivotant au
support de montage de l'appuie-bras situé sur le châssis.
3. Enlever l'appuie-bras et le pivot de l'appuie-bras.
4. Si nécessaire, répéter les ÉTAPES 1-3 pour l'autre appuie-bras.
INSTALLER
APPUIE-BRAS
1. Installer l'appuie-bras pivotant et le pivot de l'appuie-bras dans le support de
montage de l'appuie-bras avec la vis de montage et l'écrou de blocage. Bien serrer.
2. Bloquer l'appuie-bras pivotant en appuyant dessus jusqu'à ce que l'appuie-bras fasse
un déclic dans l'encastrement.
3. Si nécessaire, répéter les ÉTAPES 1-2 pour l'autre appuie-bras pivotant.
Appuie-bras pivotant
Appuie-bras pivotant
Écrou de blocage
Support de montage
de l'appuie-bras
Châssis
Vis de montage
FIGURE 1 - ENLEVER/INSTALLER LES APPUIE-BRAS PIVOTANTS
Part No. 1118394 53 Rehab Shower Commode Chair

SECTION 8 APPUIE-BRAS
POSITIONNER LES APPUIE-BRAS PIVOTANTS (FIGURE 2)
AVERTISSEMENT
S'assurer que le levier de dégagement de l'appuie-bras est bloqué en position
avant d'utiliser la chaise de douche avec siège d'aisance.
1. Débloquer l'appuie-bras pivotant en appuyant, vers le châsssis, sur le levier de
dégagement.
2. Sortir la partie avant de l'appuie-bras pivotant de l'encastrement et pousser vers
l'arrière de la chaise de douche avec siège d'aisance.
APPUIE-BRAS
3. Pour bloquer l'appuie-bras pivotant, le ramener vers l'avant et appuyer jusqu'à ce
qu'il fasse un déclic dans l'encastrement.
Appuie-bras pivotant
REMPLACER LE COUSSINET DE L'APPUIE-BRAS (FIGURE 3)
1. Enlever les vis de montage qui fixent le coussinet de l'appuie-bras à l'appuie-bras.
2. Remplacer le coussinet de l'appuie-bras et bien serrer les vis de montage existantes.
DÉBLOQUER
Châssis de l'appuie-bras
BLOQUER
Levier de dégagement
de l'appuie-bras
Encastrement de
l'appuie-bras
FIGURE 2 - APPUIE-BRAS PIVOTANTS
Coussinet de
l'appuie-bras
Appuie-bras
Vis de montage
FIGURE 3 - REMPLACER LES COUSSINETS DE L'APPUIE-BRAS
Rehab Shower Commode Chair 54 Part No. 1118394
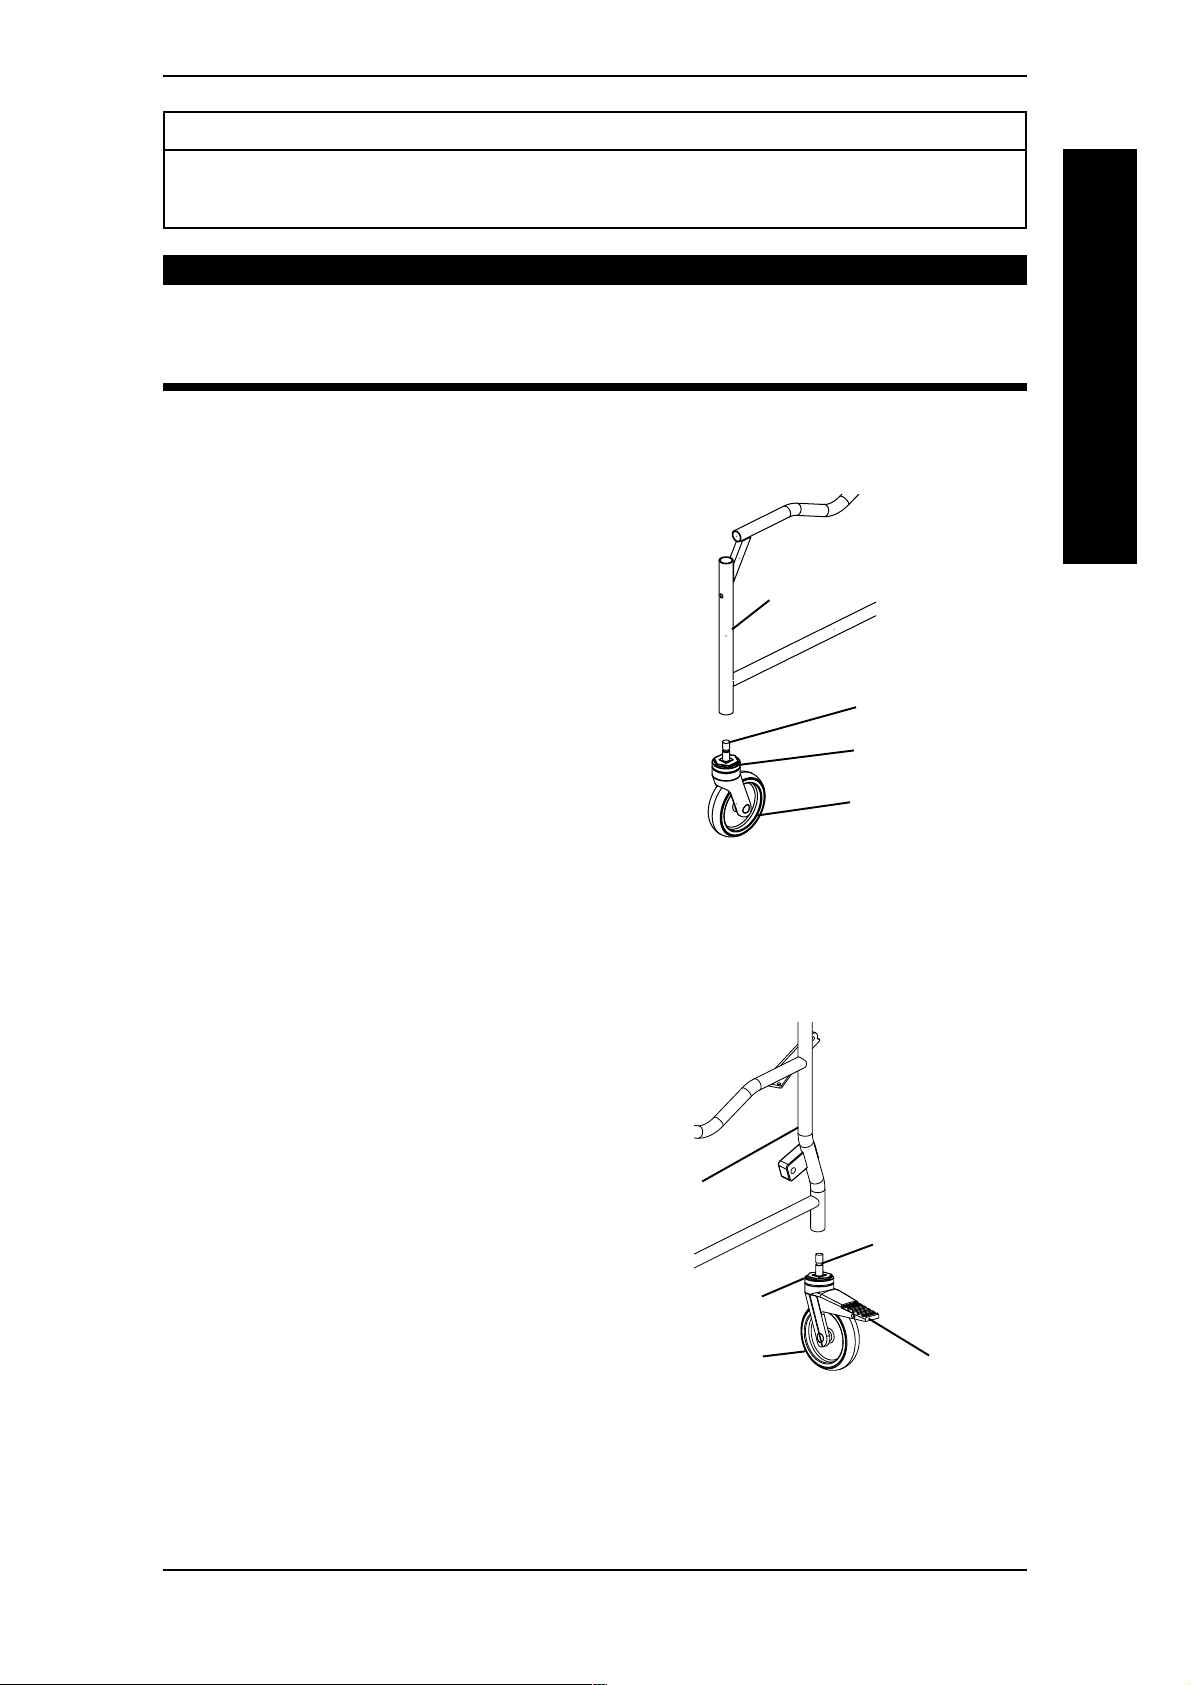
ROUES AVANT SECTION 9
Section 9 - Roues avant:
Enlever/Installer les roues avant
Enlever/Installer les roues avant avec frein
AVERTISSEMENT
Après TOUT réglage, réparation ou entretien, et AVANT utilisation,
s'assurer que toute la quincaillerie de fixation est bien serrée, sans quoi
des blessures ou des dommages peuvent survenir.
ENLEVER/INSTALLER LES ROUES AVANT - MODÈLES
6795 ET 6895 (FIGURE 1)
ENLEVERENLEVER
ENLEVER
ENLEVERENLEVER
1. Desserrer l'écrou de l'ensemble de
la roue avant.
2. Desserrer la tige de la roue avant du
châssis de la chaise.
INSTALLER
1. Visser la tige de la roue avant sur le
châssis de la chaise.
2. Serrer l'écrou sur l'ensemble de la
roue avant.
Châssis
Tige de la roue
avant
Écrou
Roue avant
ROUES AVANT
NOTE: Trop serrer nuira au mouvement de
la roue avant.
FIGURE 1 - ENLEVER/INSTALLER
LES ROUES AVANT
ENLEVER/INSTALLER LES ROUES AVANT AVEC FREIN MODÈLE 6891 (FIGURE 2)
ENLEVERENLEVER
ENLEVER
ENLEVERENLEVER
1. Desserrer l'écrou de l'ensemble de
la roue avant.
2. Desserrer la tige de la roue avant du
châssis de la chaise.
INSTALLER
1. Serrer la tige de la roue avant sur le
châssis de la chaise
2. Serrer l'écrou sur l'ensemble de la
roue avant.
NOTE: Trop serrer nuira au mouvement de
la roue avant.
Châssis
Tige de la
roue avant
Écrou
Roue arrière
Frein
FIGURE 2 - ENLEVER/INSTALLER
LES ROUES AVANT AVEC FREINS
Part No. 1118394 55 Rehab Shower Commode Chair

ROUES ARRIÈRE ET CERCEAUX DE CONDUITESECTION 10
Section 10 - Roues arrière et cerceaux de conduite:
Enlever/Installer les roues
Remplacer/Réparer les pneus/chambres à air
Remplacer les cerceaux de conduite
AVERTISSEMENT
Après tout réglage et avant utilisation, s'assurer que toute la quincaillerie
de montage est bien serrée.
DE CONDUITE
ENLEVER/INSTALLER LES ROUES - MODÈLES 6795 ET 6895
(FIGURE 1)
ROUES ARRIÈRE ET CERCEAUX
ENLEVER
1. Enlever le capuchon.
2. Noter l'ordre de la quincaillerie qui fixe la roue au châssis.
3. Enlever la vis de montage, la rondelle, l'intercalaire et l'écrou de blocage qui fixent la
roue au châssis.
4. Si nécessaire, répéter les ÉTAPES 1-3 pour l'autre roue.
INSTALLER
1. Installer la roue sur le châssis avec la vis de montage, la rondelle, l'intercalaire et
l'écrou de blocage. Bien serrer.
NOTE: S'assurer que la quincaillerie est replacée dans l'ordre noté à L'ÉTAPE 2.
2. Si nécessaire, répéter pour l'autre roue.
Roue
Châssis de la chaise
de douche avec siège
d'aisance
Intercalaire
Support de
montage de
la roue
Vis de
montage
Capuchon
Rondelle
Écrou de
blocage
FIGURE 1 - INSTALLER LES ROUES ARRIÈRE
Rehab Shower Commode Chair 56 Part No. 1118394

ROUES ARRIÈRE ET CERCEAUX DE CONDUITE SECTION 10
REMPLACER/RÉPARER LE PNEU
AVERTISSEMENTAVERTISSEMENT
AVERTISSEMENT
AVERTISSEMENTAVERTISSEMENT
Le remplacement du pneu DOIT être exécuté par un technicien qualifié.
REMPLACER LE CERCEAU DE CONDUITE (FIGURE 2)
1. Enlever la roue. Se référer à ENLEVER/INSTALLER ROUES de cette section du
manuel.
2. Enlever les vis boutons qui fixent le cerceau de conduite existant à la roue.
3. Enlever le cerceau de conduite.
4. Installer le nouveau cerceau de conduite en inversant les ÉTAPES 1 et 3.
5. Réinstaller la roue. Se référer à ENLEVER/INSTALLER LES ROUES dans cette
section du manuel.
6. Si nécessaire, répéter cette procédure pour l'autre côté.
ROUES ARRIÈRE ET CERCEAUX
DE CONDUITE
Vis bouton
Cerceau de
conduite
FIGURE 2 - REMPLACER LE CERCEAU DE CONDUITE
Part No. 1118394 57 Rehab Shower Commode Chair
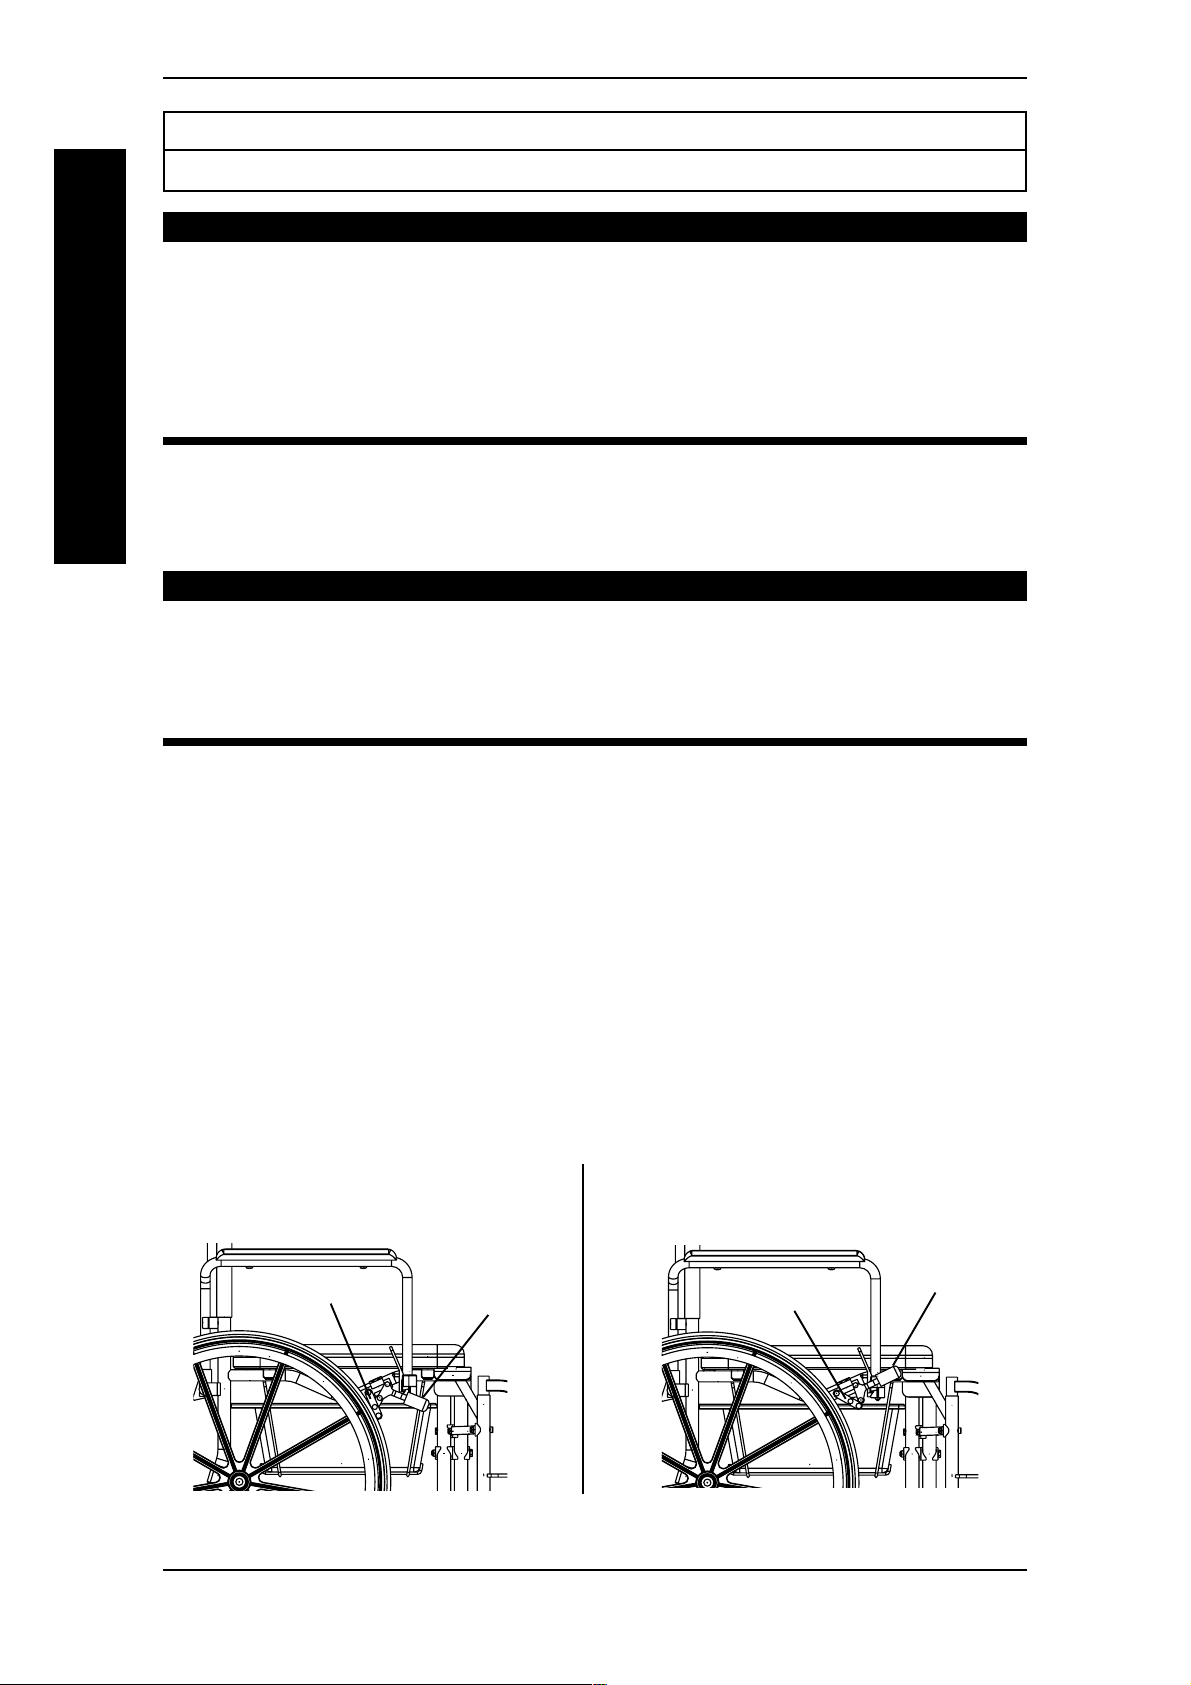
SECTION 11 FREINS DE BLOCAGE
Section 11 - Freins de blocage:
Utiliser/régler les freins de blocage
AVERTISSEMENT
Après TOUT réglage, réparation ou entretien, et AVANT utilisation,
s'assurer que toute la quincaillerie de fixation est bien serrée, sans quoi des
blessures ou des dommages peuvent survenir.
Si les freins de blocage ne retiennent pas la chaise de douche avec siège
d'aisance occupée, contacter un technicien qualifié, sans quoi des dommages
ou des blessures peuvent survenir.
FREINS DE BLOCAGE
UTILISER/RÉGLER LES FREINS DE BLOCAGE
UTILISER LES FREINS DE BLOCAGE (FIGURE 1)
NE PAS tenter d'immobiliser une chaise de douche avec siège d'aisance avec
les freins de blocage. Les FREINS DE BLOCAGE NE SONT PAS DES
FREINS. Des blessures ou des dommages peuvent survenir.
Garder les mains et les doigts loin des pièces mobiles pour éviter les blessures.
Les freins de blocage sont standard sur TOUTES les chaises de douche avec siège
d'aisance munies de roues arrière de 24 pouces et de roues avant de 5 pouces (modèles
6795 et 6895). Ces freins de blocage servent à empêcher les roues arrière de tourner.
NOTE: Placer la chaise de douche avec siège d'aisance sur une surface plate et de niveau pour
exécuter cette procédure.
1. S'assurer que la chaise de douche avec siège d'aisance ne bouge pas avant
d'enclencher les freins de blocage.
2. Pour enclencher les freins de blocage, pousser vers l'avant la poignée du frein de
blocage en position LOCKED (bloqué) (SCHÉMA "A" de la FIGURE 1).
AVERTISSEMENT
3. Désenclencher les freins de blocage en inversant L'ÉTAPE 2 (SCHÉMA "B" de la
FIGURE 1).
SCHÉMA "A" - ENCLENCHÉ SCHÉMA "B" - DÉSENCLENCHÉ
Poignée du frein
Frein de blocage
Poignée du frein
de blocage
Frein de blocage
de blocage
FIGURE 1 - UTILISER LES FREINS DE BLOCAGE
Rehab Shower Commode Chair 58 Part No. 1118394
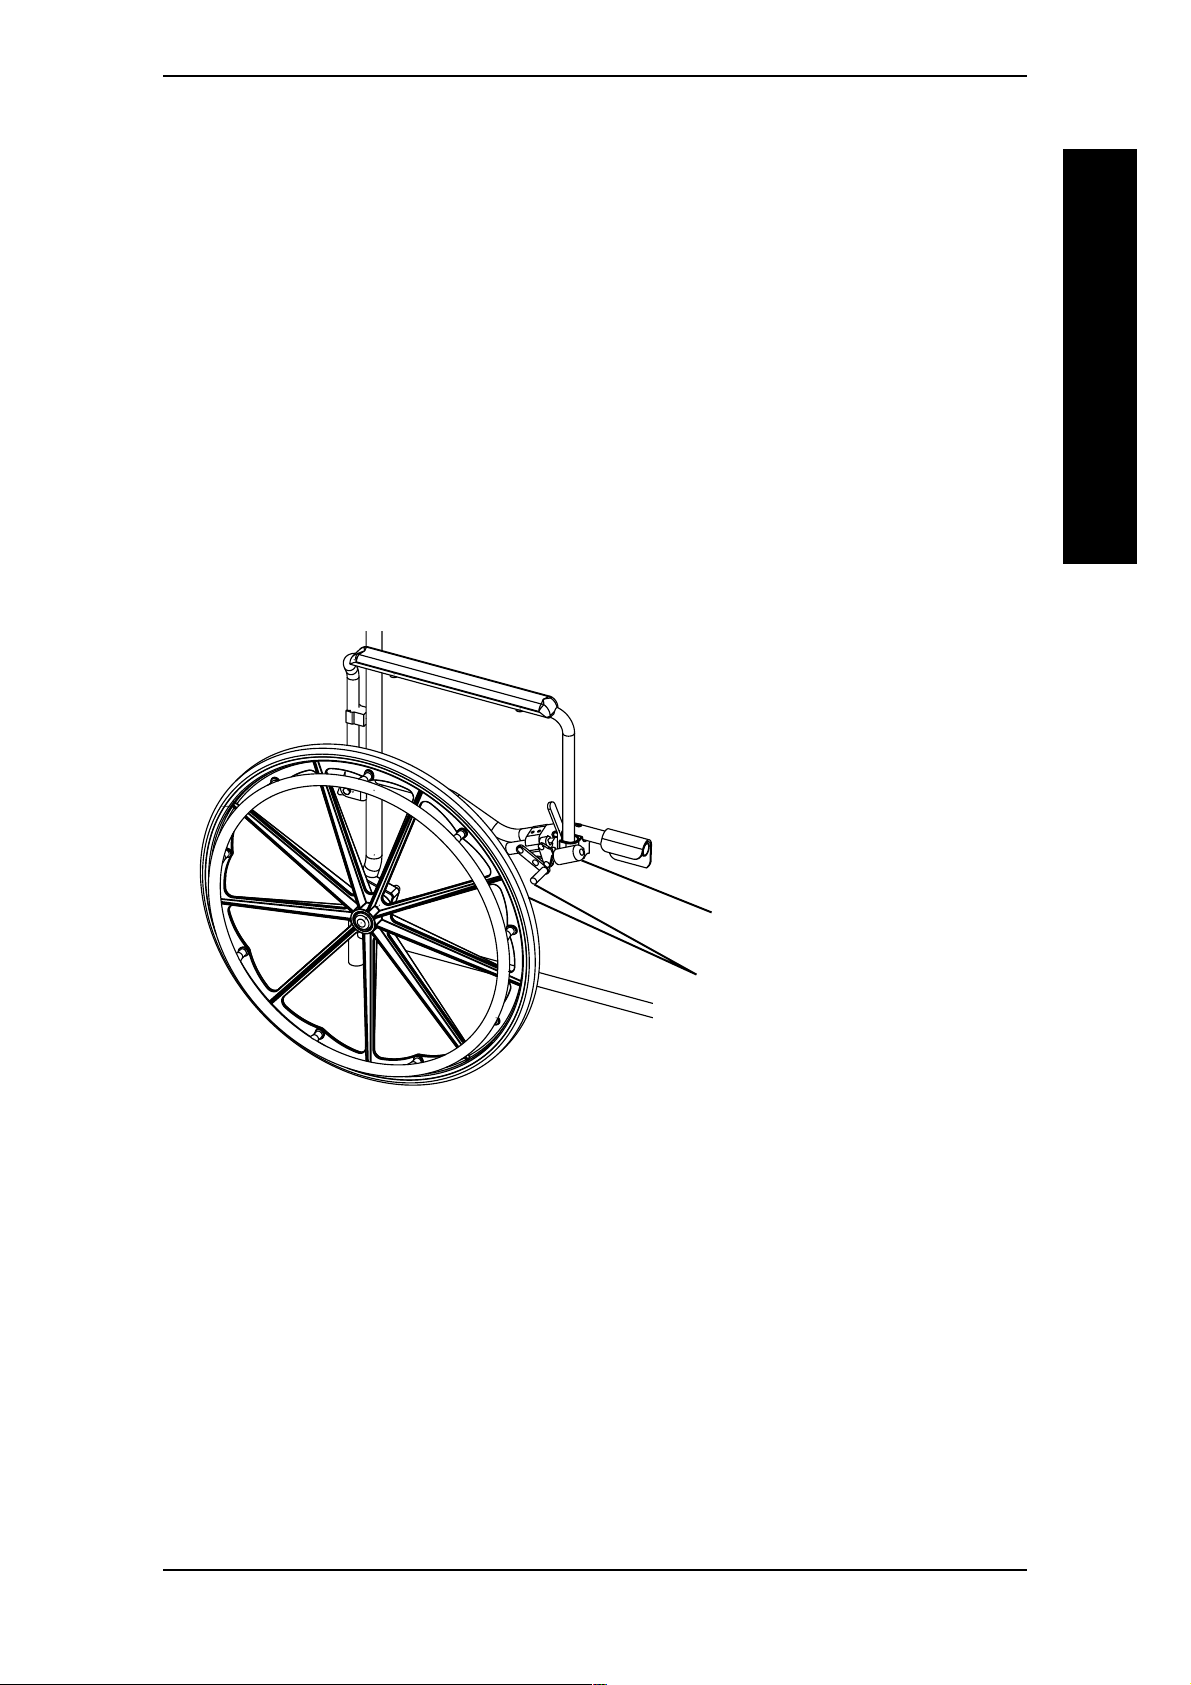
SECTION 11FREINS DE BLOCAGE
RÉGLER LES FREINS DE BLOCAGE (FIGURE 2)
1. Desserrer les deux (2) vis à tête creuse qui fixent le frein de blocage à l'ensemble de
la chaise de douche avec siège d'aisance.
NOTE: Le frein de blocage enclenché devrait pouvoir permettre d' enfoncer le sabot du frein d'au
moins 3/16 dans le pneu.
2. Régler la position du frein de blocage jusqu'à ce que la mesure de 3/16 pouce soit
obtenue (FIGURE 2).
3. Bien serrer les deux (2) vis à tête creuse.
4. Enclencher le frein de blocage et pousser la chaise de douche avec siège d'aisance et
vérifier si les freins de blocage enfoncent les sabots de frein suffisamment pour
retenir la chaise.
5. Répéter les sections précédentes jusqu'à ce que les freins de blocage retiennent la
chaise de douche avec siège d'aisance.
6. Répéter la section pour l'autre frein de blocage.
FREINS DE BLOCAGE
Poignée du frein de blocage
Sabot du frein de blocage enfoncé
d'au moins 3/16 po dans le pneu.
FIGURE 2 - RÉGLER LE FREIN DE BLOCAGE
Part No. 1118394 59 Rehab Shower Commode Chair

GARANTIE LIMITÉE
REMARQUE: LA GARANTIE CI-DESSOUS A ÉTÉ RÉDIGÉE EN ACCORD AVEC LA LOI
FÉDÉRALE APPLICABLE SUR LES PRODUITS FABRIQUÉS APRÈS LE 4 JUILLET 1975.
Cette garantie est valable pour l'acheteur/utilisateur initial de nos produits seulement.
Cette garantie vous donne des droits légaux spécifiques. D'autres droits variant d'un État
(provinces) à l'autre peuvent se rajouter.
Pour l'acheteur/utilisateur initial seulement, INVACARE garantit son produit contre tout
défaut de fabrication ou défaut dans le matériel pour une période de trois (3) ans à partir
de la date d'achat. Si, durant cette période, ce produit devait être reconnu défectueux, il
sera réparé ou remplacé, suivant le choix d'INVACARE. Cette garantie ne s'applique pas à
la main-d'oeuvre ou aux frais de livraison encourus pour le remplacement de pièces ou la
réparation dudit produit. La seule et unique obligation d'INVACARE et votre seul recours
selon cette garantie se limite au remplacement et/ou à la réparation du produit.
Pour le service, contactez le fournisseur ou vous avez acheté votre produit Invacare. Si
vous nêtes pas satisfait du service, écrire directement à Invacare à ladresse inscrite à la
dernière page. Fournir le nom du fournisseur, ladresse, la date dachat, la nature du défaut
et le numéro de série si le produit en a un. Ne pas retourner les produits à lusine avant
davoir obtenu notre autorisation
RESTRICTIONS: LA PRÉSENTE GARANTIE NE S'APPLIQUE PAS AUX PRODUITS
MAL ENTRETENUS, ACCIDENTÉS, INADÉQUATEMENT UTILISÉS, ENTRETENUS
OU ENTREPOSÉS, ENVIRONNEMENTS ENFUMÉS OU AVEC DE LA SUIE, DUSAGE
AUTRE QUE LUSAGE, LENTRETIEN OU LAPPLICATION NORMAL OU AUX
PRODUITS MODIFIÉS SANS LE CONSENTEMENT ÉCRIT DINVACARE, (INCLUANT,
MAIS NE SE LIMITANT PAS À, LA MODIFICATION AVEC DES PIÈCES OU
ACCESSOIRES NON AUTORISÉS), AUX PRODUITS ENDOMMAGÉS PAR DES
RÉPARATIONS FAITES SANS L'APPROBATION D'INVACARE, OU AUX PRODUITS
ENDOMMAGÉS DANS DES CIRCONSTANCES AU-DELÀ DU CONTRÔLE
D'INVACARE.
WARRANTY
LA PRÉSENTE GARANTIE EST EXCLUSIVE ET REMPLACE TOUTES LES AUTRES
GARANTIES. LES GARANTIES IMPLICITES, S'IL Y A LIEU, INCLUANT LA GARANTIE
DE COMMERCIALISATION ET D'AJUSTEMENT DANS UN BUT PARTICULIER, NE
DOIVENT SE PROLONGER AU-DELA DE LA DURÉE DE LA PRÉSENTE GARANTIE,
ET LE RECOURS POUR VIOLATION DE QUELCONQUE GARANTIE IMPLICITE DOIT
SE LIMITER À LA RÉPARATION OU AU REMPLACEMENT DU PRODUIT
DÉFECTUEUX CONFORMÉMENT AUX PRÉSENTS TERMES. INVACARE NE SERA
PAS TENU RESPONSABLE POUR TOUT DOMMAGE-INTÉRÊT ACCESSOIRE OU
INDIRECT.
CETTE GARANTIE DEVRA ÊTRE ÉLARGIE POUR RÉPONDRE AUX LOIS ET AUX
RÈGLEMENTS DES ÉTATS (PROVINCES).
Invacare Corporation www.invacare.com
USA Canada Teflon is a registered trademark of
One Invacare Way 570 Matheson Blvd E Unit 8 Teflon Corporation.
Elyria, Ohio USA Mississauga Ontario Invacare is a registered trademark of
44036-2125 L4Z4G4 Canada Invacare Corporation.
800-333-6900 800-668-5324 Yes, you can. is a trademark of Invacare
Corporation.
© 2004 Invacare Corporation
Part No. 1118394 Rev B - 02/04
PRODUCT MADE IN CHINA
 Loading...