

Page 1
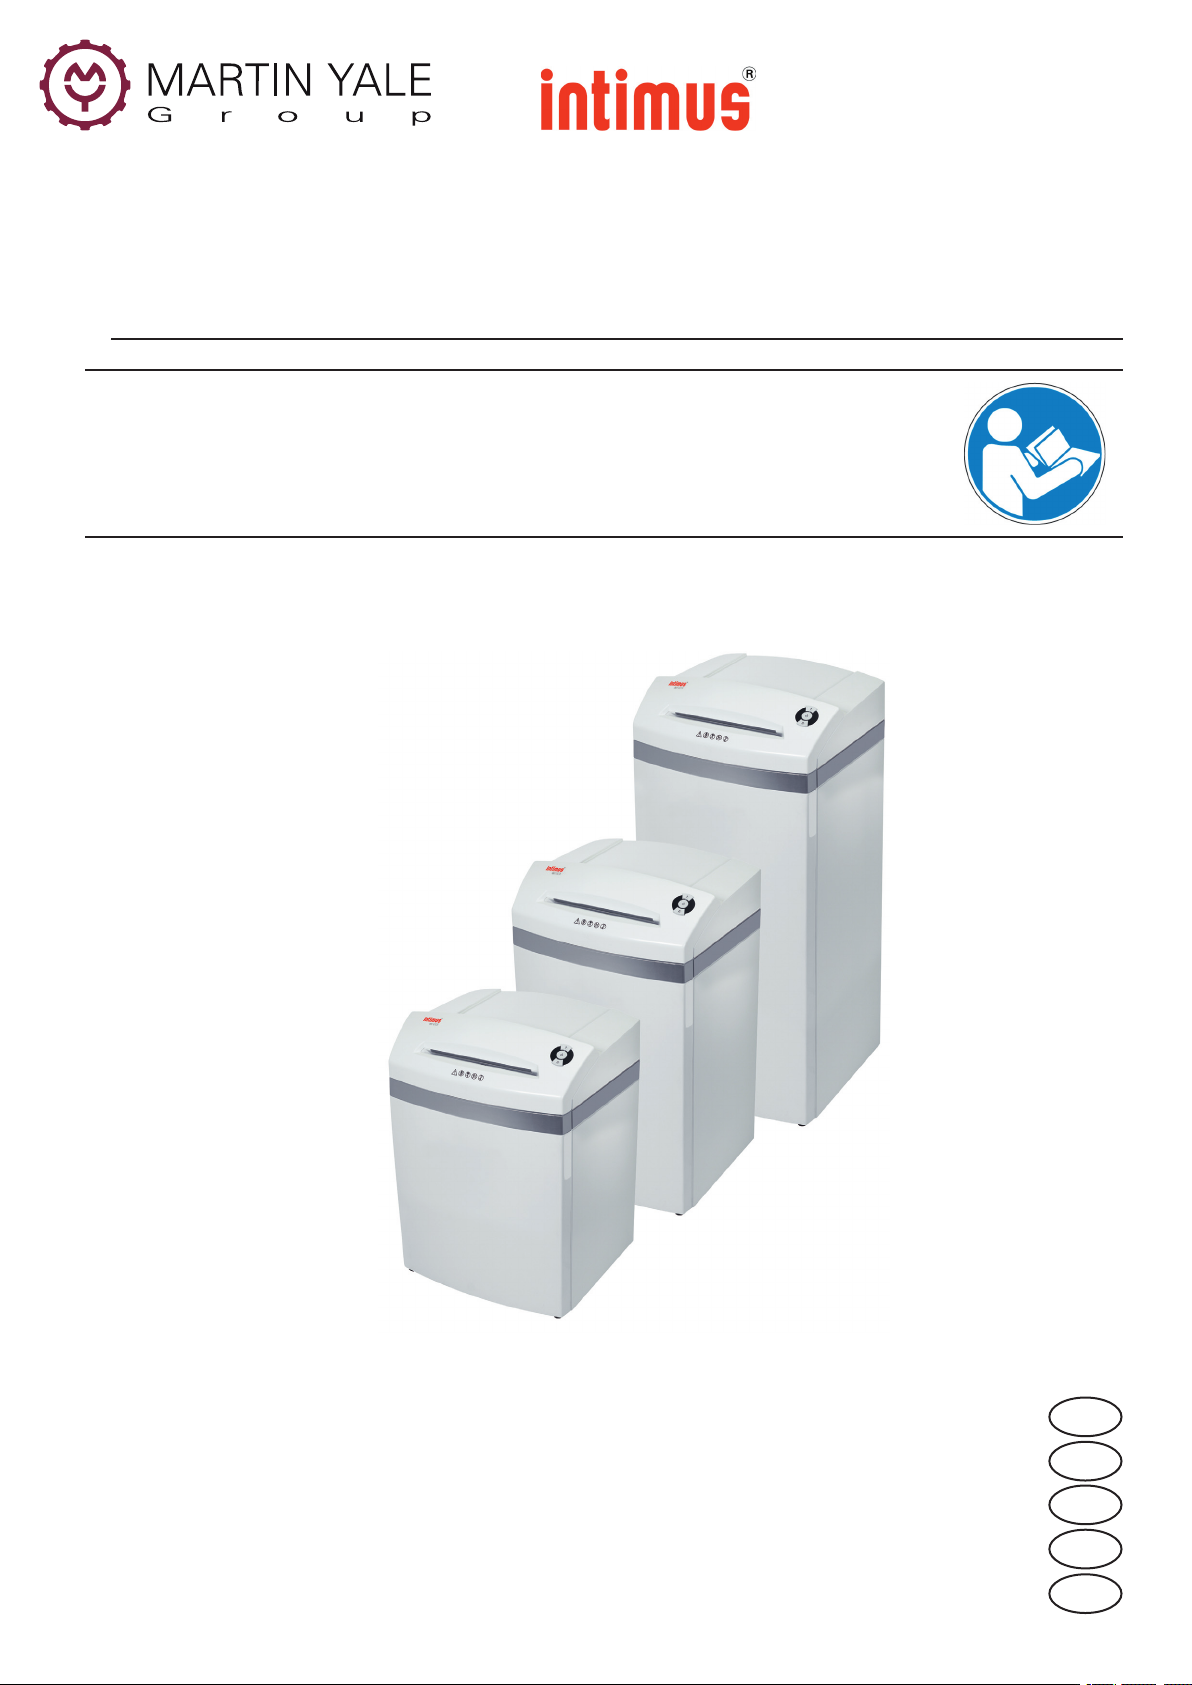
45SC2
45CC3
45CC4
45CC5
45CC6
60SC2
60CC3
60CC4
90SC2
90CC3
90CC4
Type/Tipo:
278/279/295-4S + 278/279/295-4C + 278/279/295-2C + 278/279/295-1C + 278/279/295-1CF
Before operating, please read the Operating Manual!
Before operating, please read the Operating Instructions!
Veuillez lire le mode d’emploi avant la mise en service!
Leer las instrucciones de uso antes de la puesta en servicio!
Antes de pôr a máquina em funcionamento leia as instruções de operação!
60CC5
60CC6
90CC5
90CC6
Operating Manual
Operating Instructions
Instructions d’opération
Instrucciones de uso
91402 2 05/11
Instruções de Operação
(page 2-4)
(page 5-7)
(page 8-10)
(página 11-13)
(página 14-16)
USA
GB
F
E
P
Page 2
USA
45SC2
45CC3
45CC4
45CC5
45CC6
60SC2
60CC3
60CC4
60CC5
60CC6
90SC2
90CC3
90CC4
90CC5
90CC6
IMPORTANT SAFETY NOTES
<< The machine may not be operated by more
than one person at any given time!
The machine was designed for safe operation
by “one person only”.
<< During the shredding process no other
work may be performed on the machine
(for example cleaning, etc.)!
<< The machine is not a toy, and is not suitable
for use by children!
The overall technical safety concept of
this machine (dimensions, feed openings,
emergency shutdown devices etc.) does not
provide for any guarantee regarding hazardfree operation by children.
<< Danger of injury! Keep all
loose articles of clothing, ties,
jewelery, long hair or other loose
objects away from opening!
Warning:
Moving parts can crush and cut!
<< Danger of injury! Never insert fingers into
opening!
<< In case of danger switch the machine
off with the mains switch, or unplug the
machine!
<< Always unplug the machine from the
mains power supply before opening the
machine!
Repairs may only be performed by trained
personnel!
Special materials
Symbol
Model
45/60/90SC2 X
45/60/90CC3 X
45/60/90CC4 X
45/60/90CC5 X X X
45/60/90CC6 X X X X
X = not applicable for shredding
Warning:
Electrical Hazard!
INITIATION
AREA OF APPLICATION:
The intimus 45/60/90SC2/CC3/CC4/CC5/CC6
data shredder is a machine used for shredding
general documents.
Generally the machine may only be
used to shred paper (deviations see
table below “special materials”)!
Shredding of other types of data carriers
may lead to injuries (for example due to
splintering of hard materials etc.) and
damage to the machine (for example
destruction of the cutter etc.).
INSTALLATION:
- Unpack the machine and put it together.
- Fit the plastic bag onto the bag frame.
- Attach the Power Cord to the Power Connection
on the machine and plug into an AC outlet (1)
(Fig. 2) (For information on the right fuse for
the plug see “TECHNICAL DATA”).
The socket outlet shall be installed
near the equipment and shall be easily
accessible!
Only operate the machine in enclosed
rooms at temperatures between 10°C
and 25°C!
Keep enough distance to the surroun
dings when installing the machine.
-
CONTROLS:
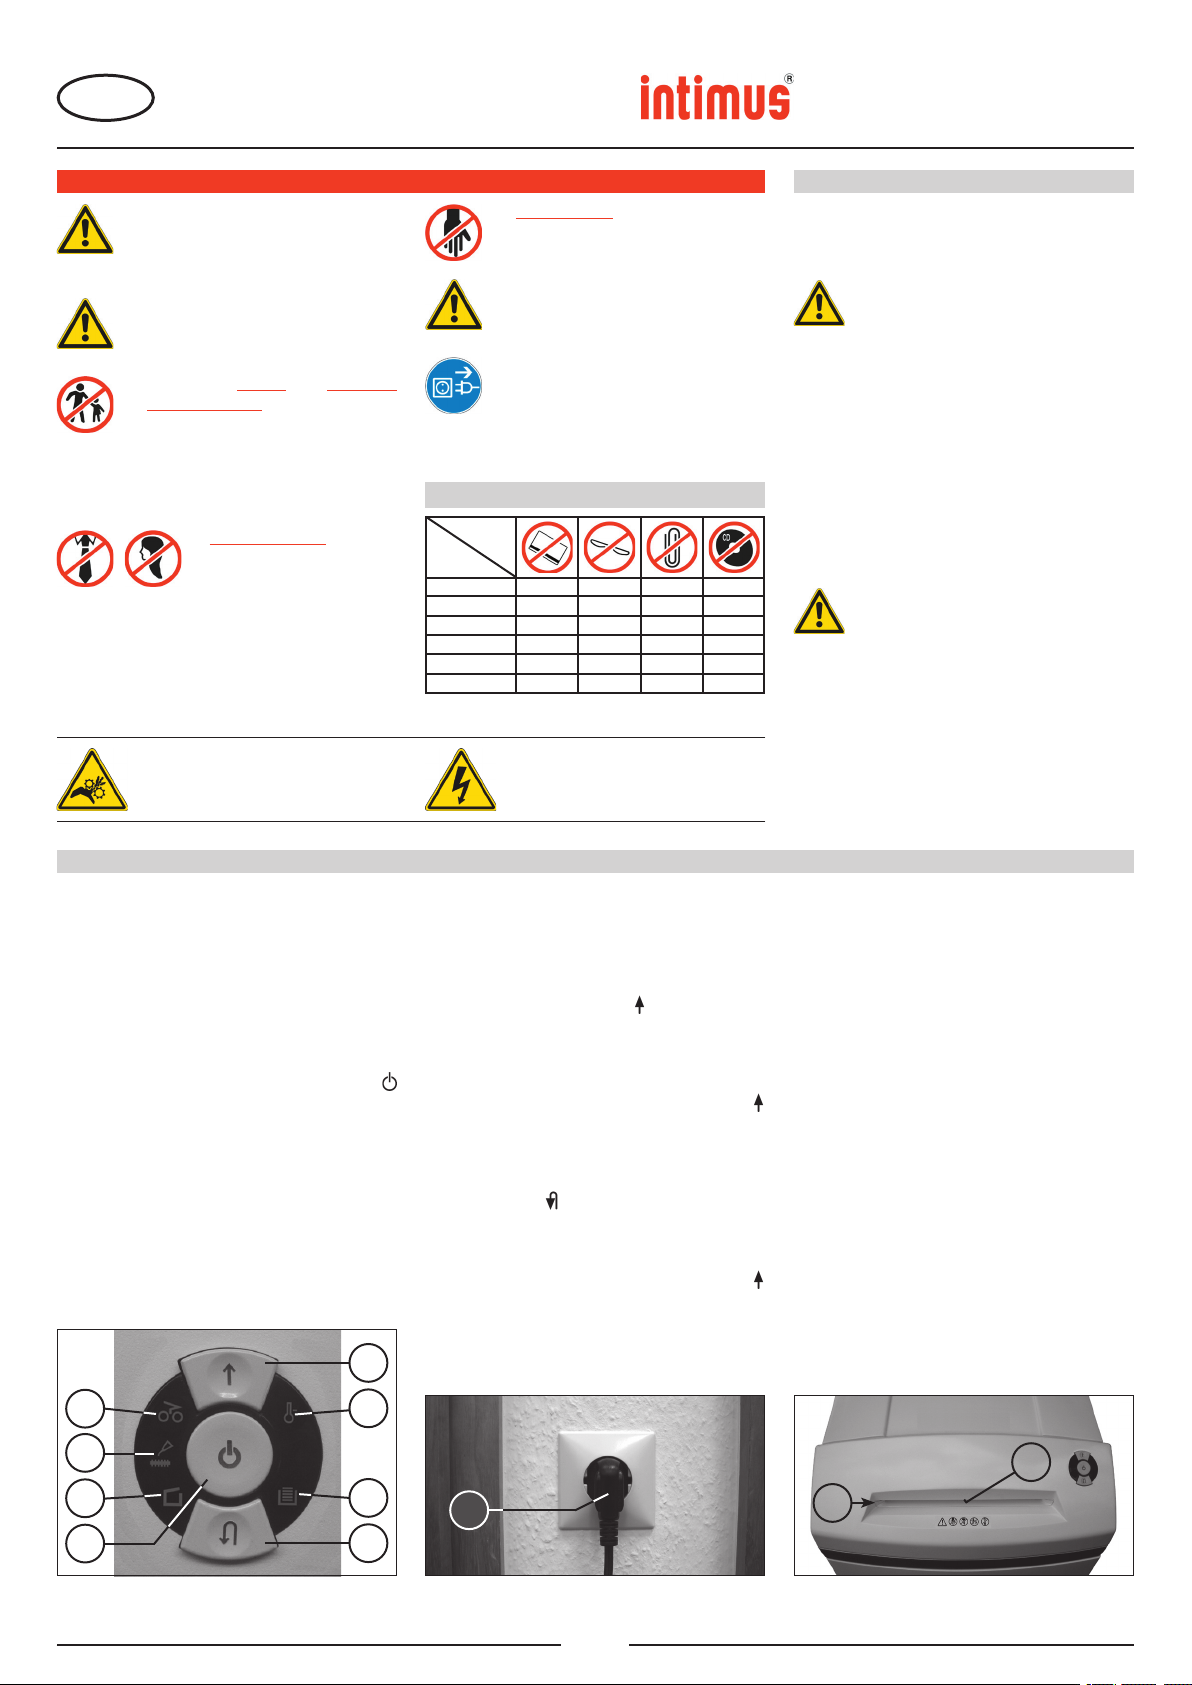
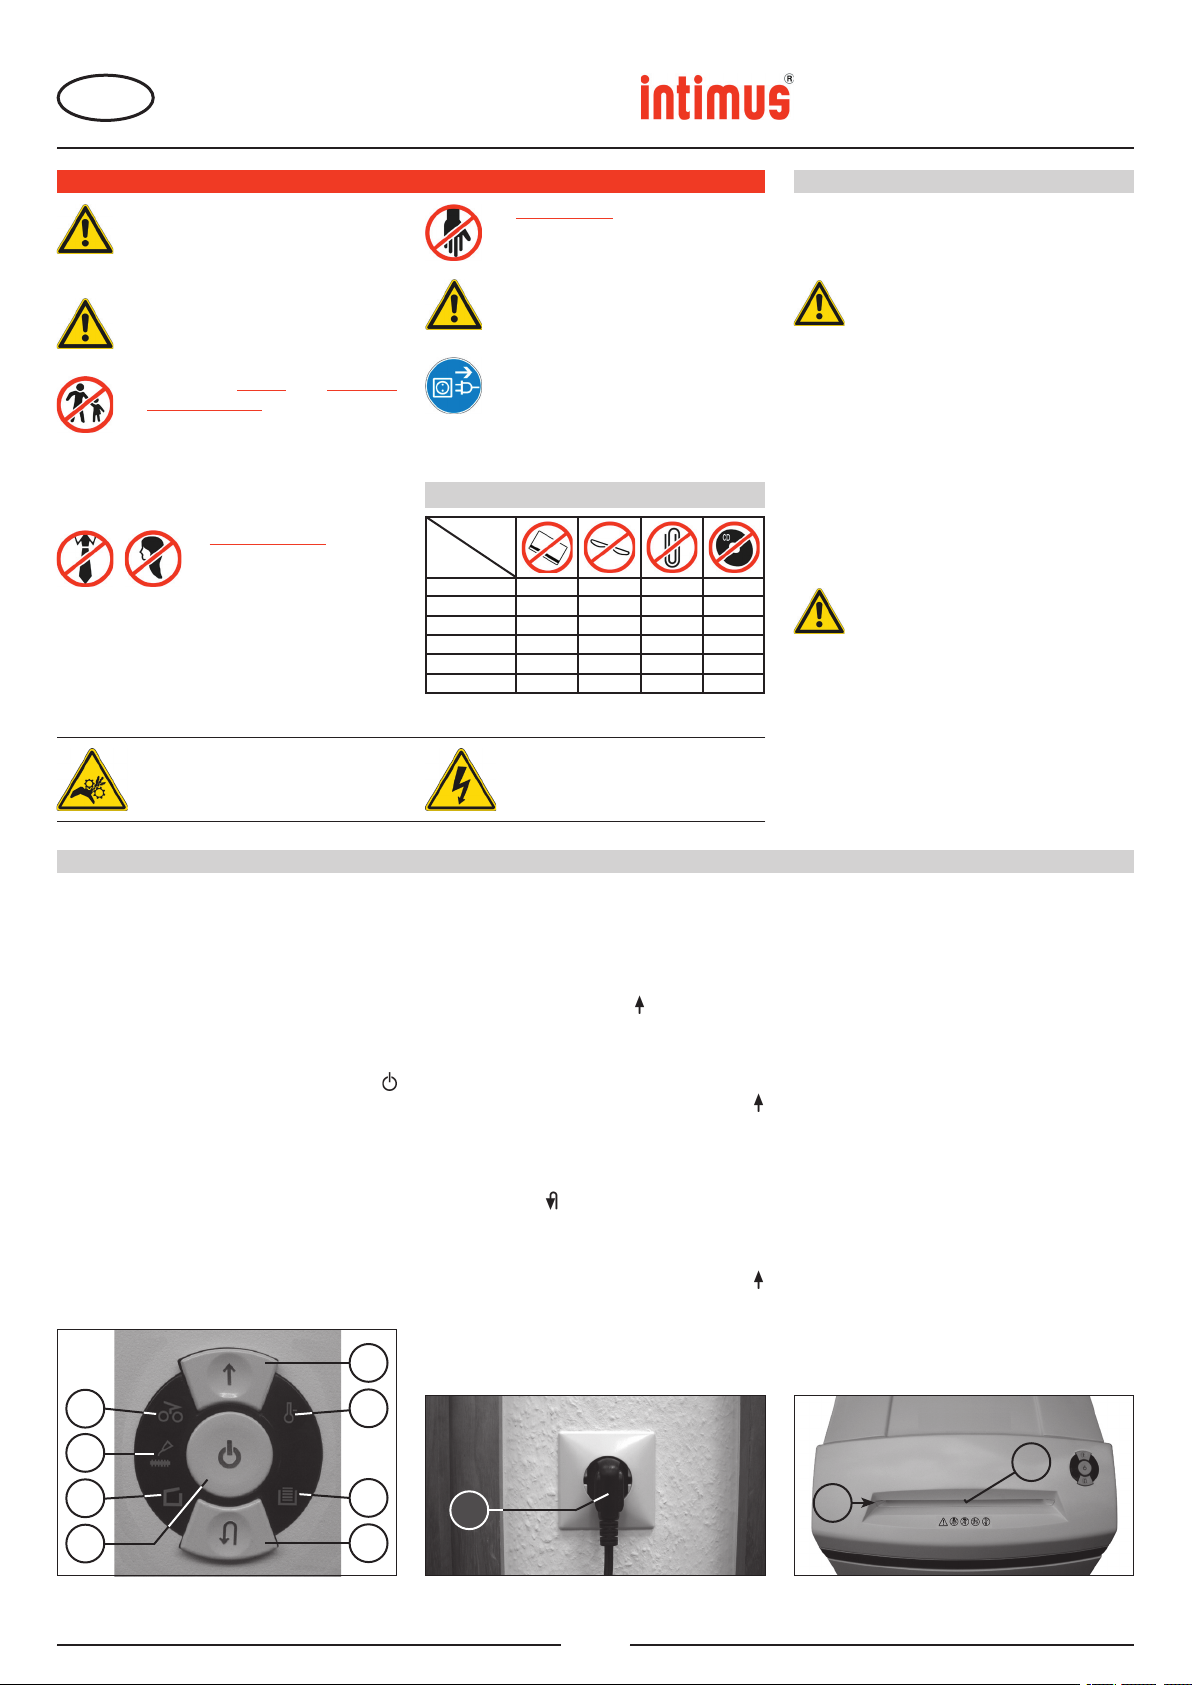
1 = Mains plug (fig. 2)
When the machine is first plugged in it is not
on.
2 = Function buttons (fig. 1)
“Ready”/ “Off” / “Stop“
This button has three functions:
a) “Ready”
The machine changes to “Ready” if you
press this button briefly.
At the same time the integral LED display
comes on.
b) “Off”
The machine switches off if it is in the “Ready”
mode and the button is held down for about 3
seconds.
Note: The machine switches off automatically
if it is not used for about 5 minutes.
c) “Stop”
If you press this button briefly when the
cutters are running they switch off and stop.
3
6
9
OPERATION
3 = Forwards button (fig. 1)
This button has two functions:
a) If this button is pressed briefly, the cutting
mechanism runs forwards for a few seconds,
e.g. to remove remaining material from the
cutting mechanism. At the same time the
integrated LED display lights up.
b) If this button is pressed and held for approx.
two secs., the cutting mechanism runs
forwards continually and materials to be
shredded can be fed into the machine. At
the same time the integrated LED display
lights up.
4 = Reverse button (fig. 1)
If you press this button the cutters run backwards
for a short time. At the same time the integral
LED display comes on.
5 = Light barrier (Forward motion) (fig. 3)
The shredding procedure starts as soon as
material is fed into the feed slot. At the same
time the integral forward button LED display
comes on.
6 = Control display (fig. 1)
“Material jam in machine”/ “Light barrier
covered when door opens or when machine
turned on”
For the procedures see the relevant description
under the “MALFUNCTION” section.
a) “Material jam in machine”
Comes on when too much material has been
fed into the cutters. The cutters jam, then
run in reverse for a short time and stop. The
motor switches off.
b) “Light barrier covered
when door open”
Comes on when there is still material in
the feed slot when the door is opened. The
cutters stop. The motor switches off.
c) “Light barrier covered
when machine turned on”
Comes on when there is still material in the
feed slot when the machine is switched on.
7
8
2
fig. 1
10
4
1
fig. 2
11
fig. 3
2
5
91402 2 05/11
Page 3
USA
CONTROLS:
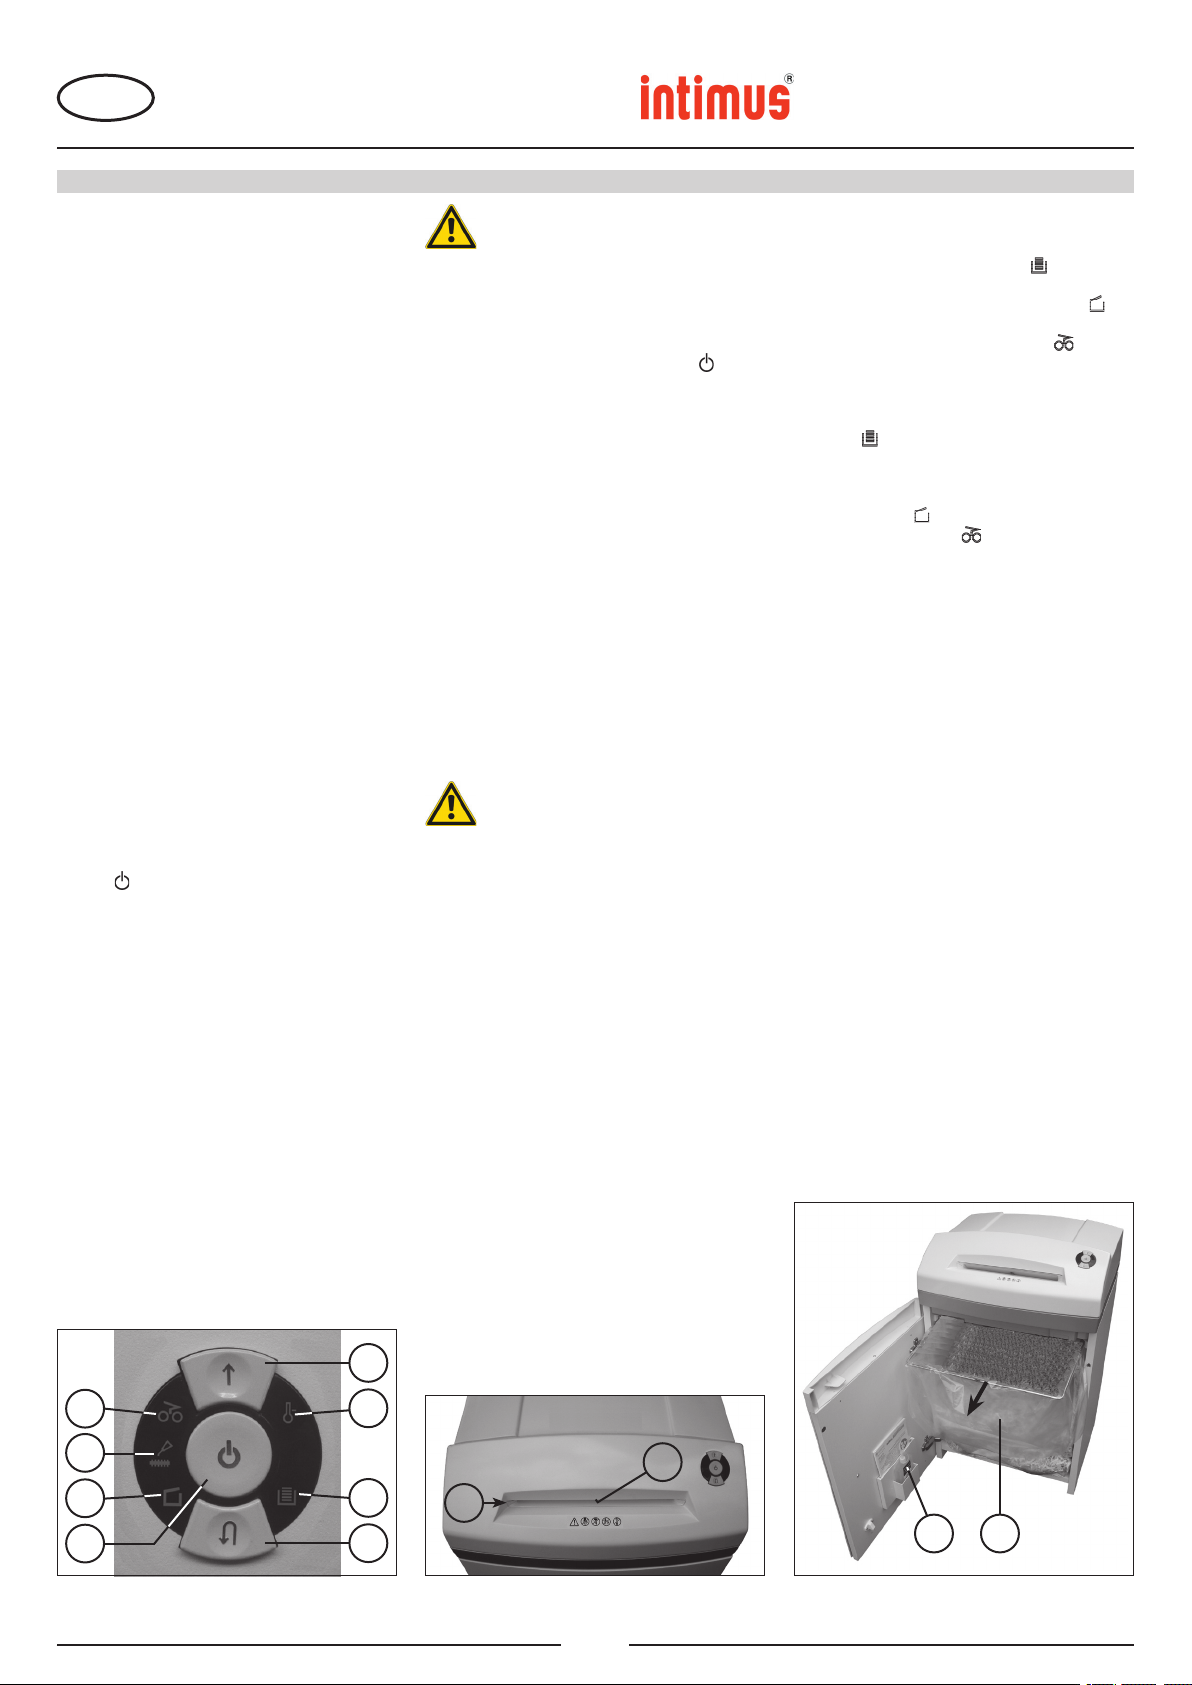
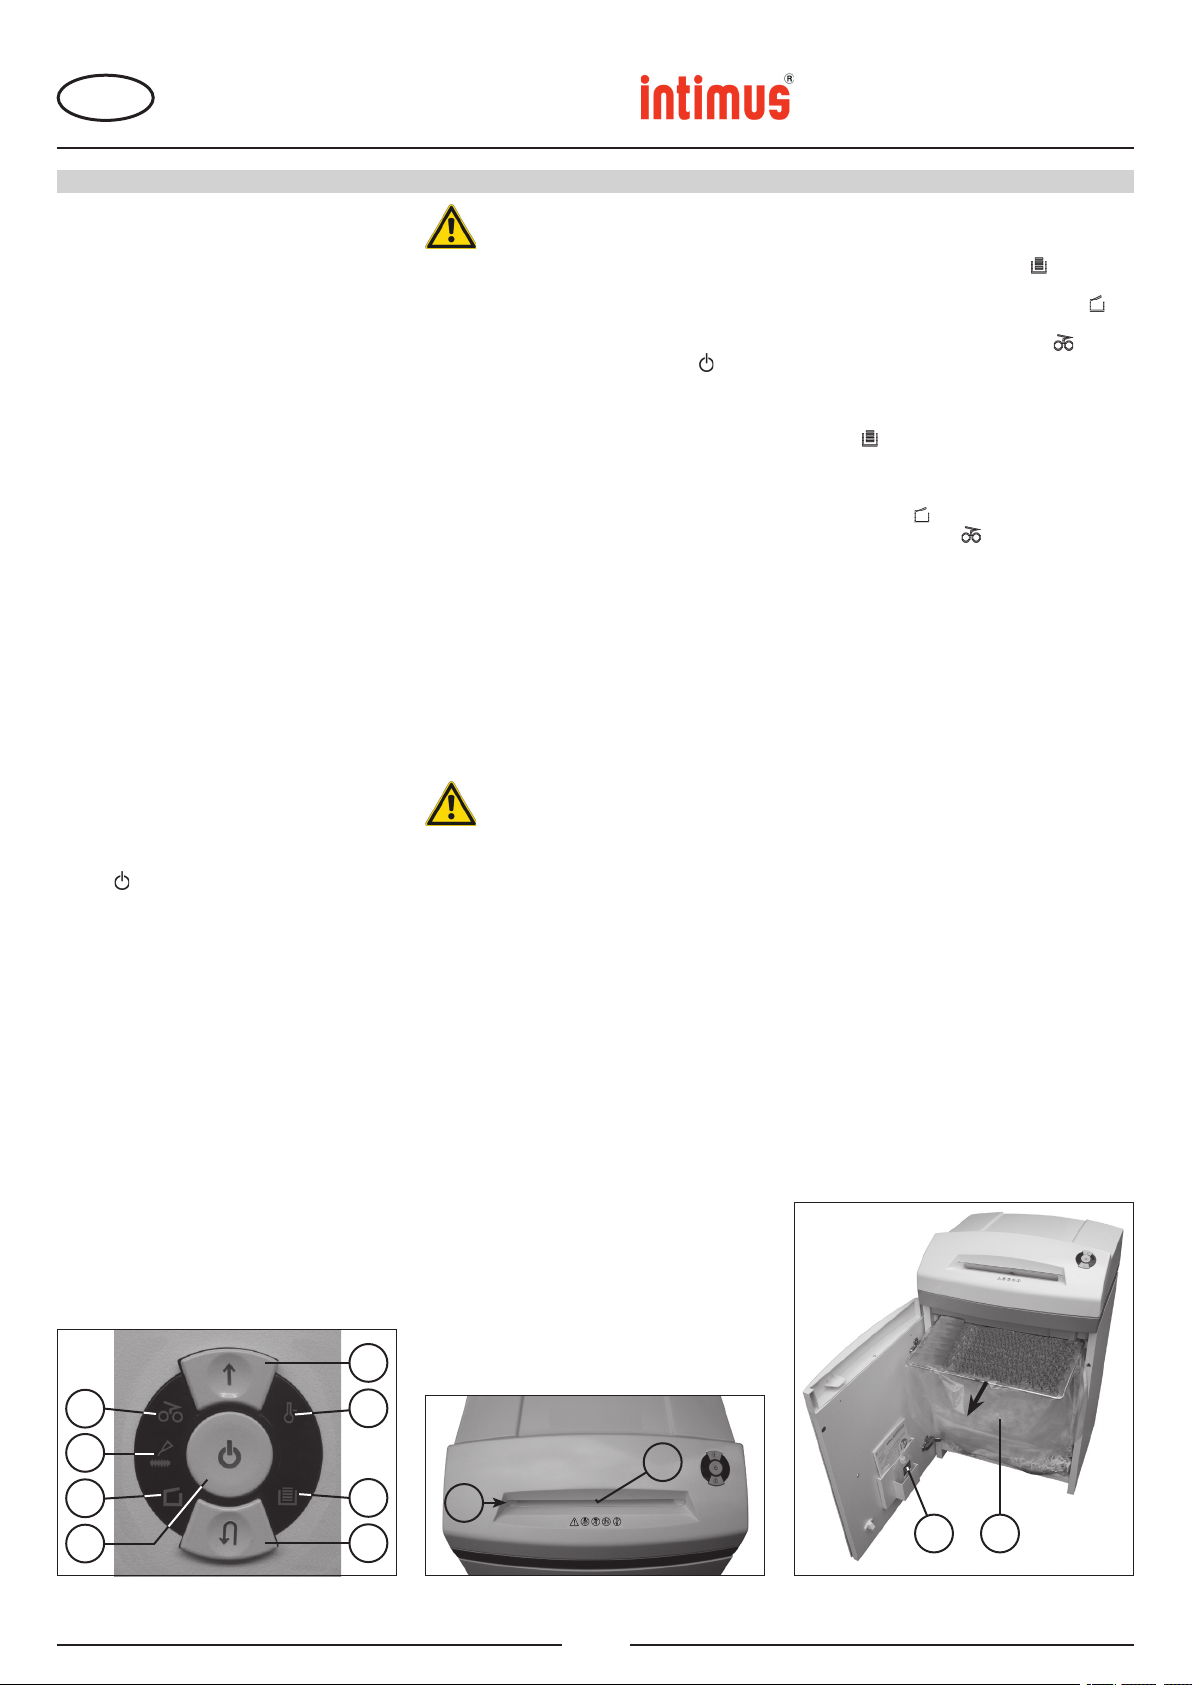
7 = Control display (Fig. 1)
“Oil cutters”
Comes on when the cutters in the cross
cut version must be oiled. The lubrication
procedure must be acknowledged on
the reverse button (4) (see description in
“CUTTER MAINTENANCE”).
8 = Control display (Fig. 1)
“Door open”/ “Door malfunction”
a) “Door open”
Comes on if the door on the lower part
of the machine is opened. The machine
switches off automatically and cannot
be started as long as the door remains
open.
b) “Electrical fault”
Flashes when there is an electrical fault
in the door sensor. The machine switches
off. Please contact your dealer.
9 = Control display (Fig. 1)
“Motor overload” /
“Electrical fault”
To find out what to do see the relevant
description under the “MALFUNCTION”
section.
a) “Motor protection”
Comes on when the motor has been
overloaded and has switched off. The
machine cannot be started while the
motor is cooling down.
b) “Electrical fault”
Flashes when there is an electrical fault
inside the control board. At the same
time the function button (2) LED display
flashes. The machine switches off.
Please contact your dealer.
10 = Control display
“Paper collection bag full” (Fig. 1)
Comes on when the paper collection bag is
full and must be emptied. The cutting unit
for reducing paper switches off.
OPERATION
The shredder may not be used as a
step ladder or as a seat. Danger of
falling due to breakage!
SWITCHING THE MACHINE ON:
Proceed as follows to switch the machine to
“Ready”:
- Press the function button (2) briefly.
- The function button (2) LED display
on for “Ready”.
- The machine can be loaded.
MATERIAL FEED:
Feed paper into the cutting mechanism through
the paper feed slot (11) (fig. 3).
The machine automatically switches to forwards
running, draws the material in and automatically
switches off after shredding.
Note: For shredding transparent films, the
machine must be manually switched to forwards
running (press and hold the forwards button (3)
for approx. 2 secs.).
By briefly pressing the function button (2) (Stop
function), the shredding process can be stopped
at any time. To continue, press and hold the
forwards button (3) for approx. 2 secs.
If the machine is not used for a period of approx.
5 mins., it automatically switches off.
Never feed the shredder with a
quantity of material exceeding the
maximum indicated. Refer to the
TECHNICAL DATA section!
Should the machine become
overloaded, follow the instructions under
“MATERIAL JAM IN MACHINE” under
“MALFUNCTIONS”.
comes
45SC2
45CC3
45CC4
45CC5
45CC6
60SC2
60CC3
60CC4
60CC5
60CC6
90SC2
90CC3
90CC4
90CC5
EMPTYING THE
PAPER COLLECTION BAG (Fig. 4):
If the paper collection bag is full the machine
switches off. The control display (10) comes
on. Proceed as follows:
- Open the door. The control display
comes on. If there is still material in one of
the feed slots, the control display
comes on.
- Take the collection bag (12) and the frame out
of the bottom part of the housing. Remove the
bag and dispose of the contents. The control
display (10) goes out.
- Fit the emptied bag onto the bag frame and
insert the bag and the frame into the bottom
part of the housing again. Close the door. The
control display (8) goes out.
- If the control display (6) comes on, press
the forward button (3) briefly. The remaining
material in the feed slot is shredded and the
display go out.
Note: The machine will only run if the door is
closed.
DYNAMIC LOAD DISPLAY:
To prevent a material jam and thus ensure a
continual, effective destruction of the data
carriers, the current load level of the motor is
displayed during the shredding process by a
coloured, diffuse light in the feed slot as follows:
Green light: load < 50%
Yellow light: load 50 - 75%
Red light: load 75 - 100%
(8)
(6) also
90CC6
11 = Paper feed slot (Fig. 3)
12 = Paper collection bag (Fig. 4)
13 = Oil reservoir (Fig. 4)
6
7
8
2
fig. 1 fig. 3 fig. 4
3
9
10
4
5
11
1213
3
91402 2 05/11
Page 4
USA
MATERIAL JAM IN THE MACHINE:
(Auto reverse function)
If a jam is caused by too much material being fed
in the following happens:
- The cutters jam, then run in reverse for a short
time (material is released) and stop. The motor
switches off. The control display
on.
Proceed as follows:
Paper jam in paper feed slot (11)
- Remove the paper that has been fed back.
- The cutters now run forwards automatically
and shred the remaining paper in the cutters.
During the forward run the forward button (3)
LED display
(6) goes out.
- Continue shredding with less paper.
- If necessary, switch the cutters manually
alternately from forward to reverse until the
material has gone through completely and
been shredded.
comes on. The control display
(6) comes
MALFUNCTIONS
LIGHT BARRIER COVERED
WHEN DOOR OPENED:
Should there still be material in the feed slot
when the door is opened, the motor switches off
and the cutters stop. The control display
comes on.
Close the door and acknowledge the status
by pressing the forward button (3) briefly.
The existing material is fed to the cutters and
shredded.
LIGHT BARRIER COVERED
WHEN MACHINE TURNED ON:
Should there still be material in the feed slot
when the machine is switched on the control
display (6) comes on.
Remove the material and acknowledge the
status by pressing the forward button (3) briefly.
MOTOR PROTECTION:
Should the motor be overloaded it switches off.
The control display (9) comes on.
The machine can be started again after a cooling
down period of about 25 – 40 minutes.
(6)
45SC2
45CC3
45CC4
45CC5
45CC6
60SC2
60CC3
60CC4
60CC5
60CC6
90SC2
90CC3
90CC4
90CC5
ELECTRICAL FAULT:
If the control display
the function button (2) LED display
the control display (8)
electrical fault. The machine cannot be started.
In this case please contact your dealer.
FAULT CHECK LIST:
Should the machine not work, check the following
points:
plug connected to the power supply?
- is the
door closed?
- is the
paper collection bag full?
- is the
Follow the instructions for “EMPTYING THE
PAPER COLLECTION BAG“.
- Is there a
Follow the instructions in “MATERIAL JAM IN
THE MACHINE”.
- Is the
See “MOTOR PROTECTION”.
If none of these test points apply, please
contact your dealer.
material jam in the machine?
motor overloaded?
(9) flashes together with
or only
flashes there is an
90CC6
MAINTENANCE / DISPOSING
Before starting any repair work and
also before cleaning/maintenance
which is not described in the follo
wing section always disconnect the
mains power supply!
CLEANING THE PHOTOCELLS:
If paper particles should come to rest in the inlet
guide (for example after a paper jam) it is possible
that the machine will not turn off, due to the broken
light barrier.
To remove these paper strips and also to clean
the photocell, pass another sheet of paper through
the feed slot, or switch the machine to reverse and
wipe both “eyes” of the photocell with a brush.
CUTTER MAINTENANCE (CROSS CUT):
Cross cut cutters must be oiled after a
-
specific operating time. If the control display
Open the door. The control display
and the reverse button (4) LED display
as the control display
oil reservoir (13) (Fig. 4) from the holder in the door
and close the door again.
Pour a little oil onto a sheet of paper and then
feed this through the paper feed slot (12) onto the
cutters.
The paper is drawn in and in this way the oil is
distributed to the cutters.
Note: This procedure is acknowledged as
follows to turn off the display after the cutters
have been oiled:
- Open the door until the control display (8) lights
(7) comes on proceed as follows:
(7) flashes. Remove the
up. The control displays
(7) and (4) flash.
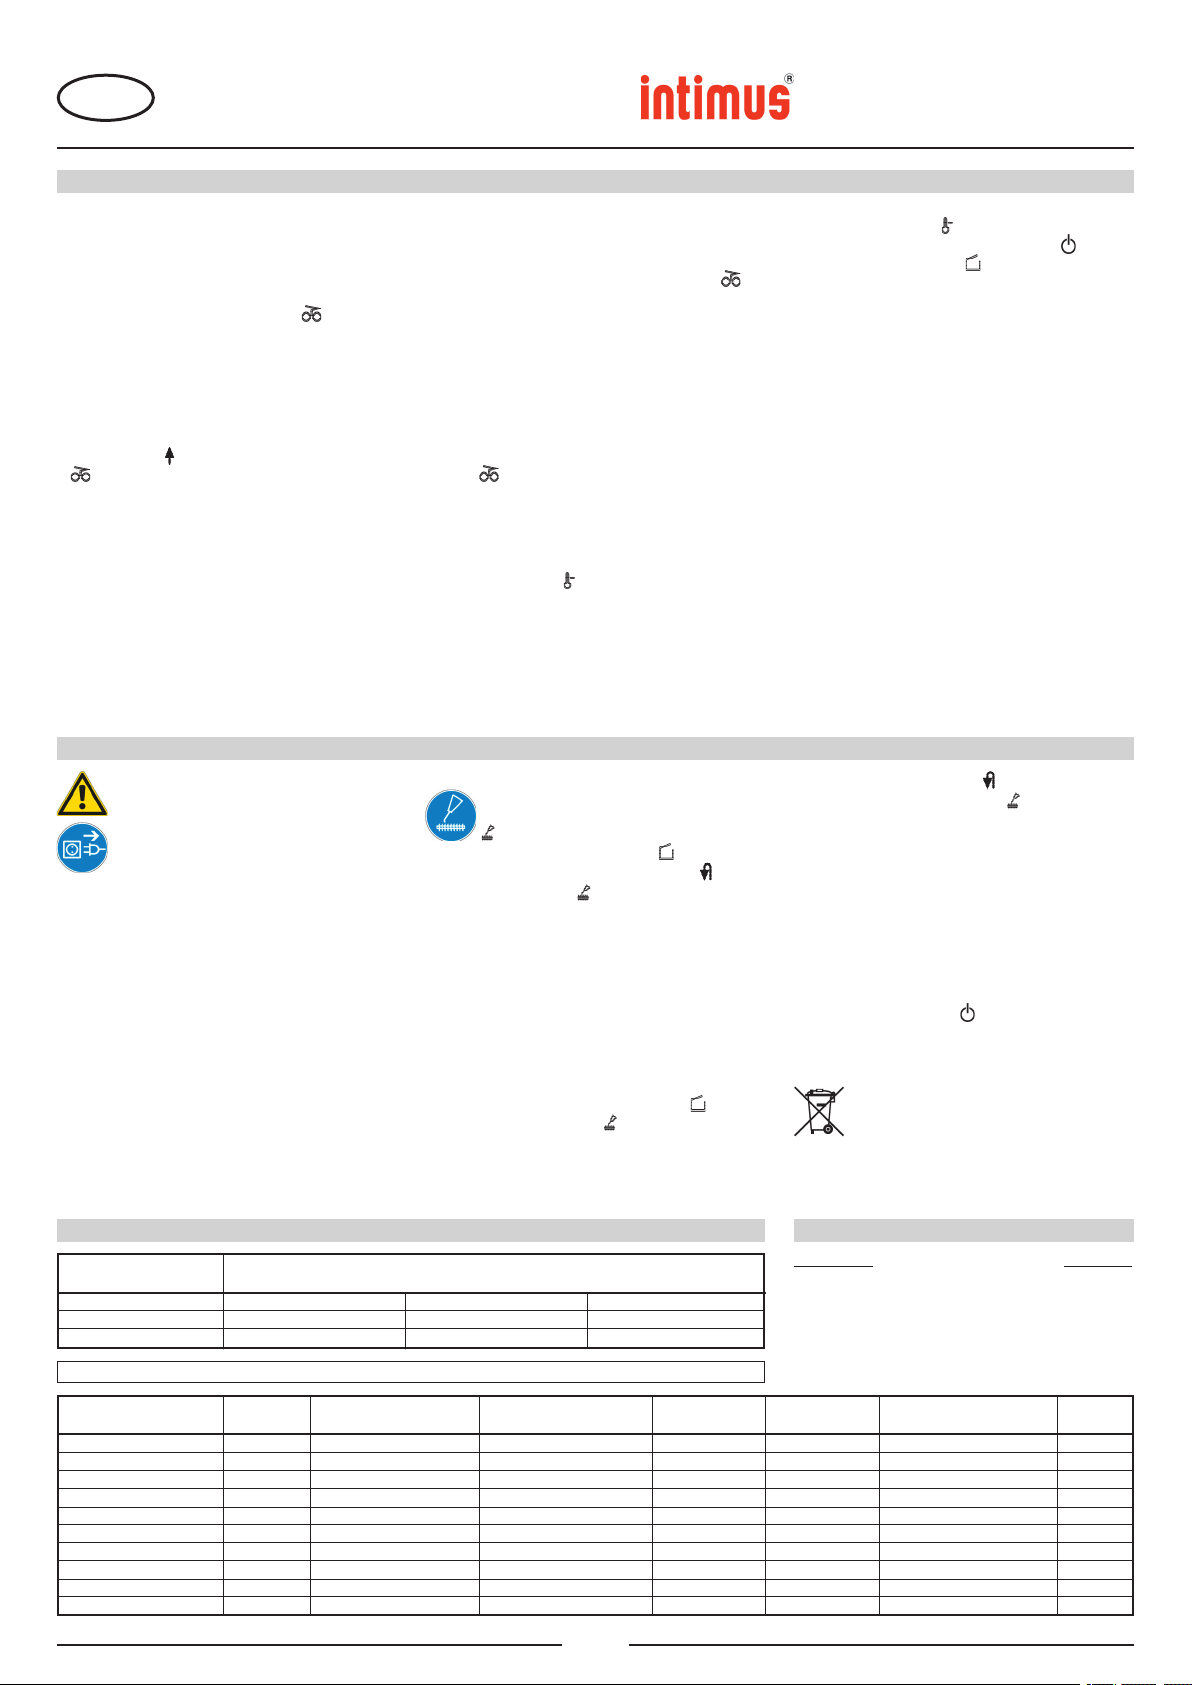
TECHNICAL DATA SPECIAL ACCESSORIES
Model Power supply data
supply voltage/frequency · current consumption · power
intimus 45SC2/45CC3-CC6
intimus 60SC2/60CC3-CC6
intimus 90SC2/90CC3-CC6
Listed Circuit Breaker: 220-230V = 10 amps / 120V = 15 amps / 100V = 15 amps
220-230V/50Hz · 3.0 amps · 0.7 kW 120V/60Hz · 5.6 amps · 0.7 kW 100V/50/60Hz · 7.0 amps · 0.7 kW
220-230V/50Hz · 3.0 amps · 0.7 kW 120V/60Hz · 5.6 amps · 0.7 kW 100V/50/60Hz · 7.0 amps · 0.7 kW
220-230V/50Hz · 3.0 amps · 0.7 kW 120V/60Hz · 5.6 amps · 0.7 kW 100V/50/60Hz · 7.0 amps · 0.7 kW
(8) comes on
as well
- Press the reverse button
down until the control display (7) goes out.
- Close the door again.
The cutters now start a cleaning cycle automatically
(forward and reverse run) and then switch off.
The machine is ready for use again. Should you
need to re-order the special oil see “SPECIAL
ACCESSORIES”.
AUTOMATIC ENERGY SAVING:
If the machine is not used for a while it automatically
switches off after about 5 minutes. The function
button (2) LED display
Press the function button briefly to turn it on again.
DISPOSING OF THE MACHINE:
Dispose of the machine in an
environmentally friendly fashion at the end
of its useful service life. Do not dispose of
any of the parts included in the machine or
its packaging with household waste.
Description Order-No.
Plastic bag, 17.32x13.00x23.62x0.002 in. (45)
Plastic bag, 17.32x13.00x38.58x0.002 in. (60/90)
Lubricant, 110 ml bottle 88035
Note: For orders of special accessories and spare parts,
please contact your dealer.
(4) and keep it held
for “Ready” goes out.
83079
99977
Model Type Cutting width Cutting capacity Working width Noise level Dimensions Weight
paper paper W x D x H
intimus 45SC2 278-4S 0.15 in. 22-24 sheets* 10.24 in. app. 55 dB(A)
intimus 45CC3 278-4C 0.15x1.18 in. 16-18 sheets* 10.24 in. app. 55 dB(A)
intimus 45CC4 278-2C 0.07x0.59 in. 11-13 sheets* 10.24 in. app. 55 dB(A)
intimus 45CC5 278-1C 0.03x0.47 in. 7-8 sheets* 10.24 in. app. 55 dB(A)
intimus 45CC6 278-1CF 0.03x0.18 in. 5-6 sheets* 10.24 in. app. 55 dB(A)
intimus 60/90SC2 279/295-4S 0.15 in. 22-24 sheets* 10.24 in. app. 55 dB(A)
intimus 60/90CC3 279/295-4C 0.15x1.18 in. 16-18 sheets* 10.24 in. app. 55 dB(A)
intimus 60/90CC4 279/295-2C 0.07x0.59 in. 11-13 sheets* 10.24 in. app. 55 dB(A)
intimus 60/90CC5 279/295-1C 0.03x0.47 in. 7-8 sheets* 10.24 in. app. 55 dB(A)
intimus 60/90CC6 279/295-1CF 0.03x0.18 in. 5-6 sheets* 10.24 in. app. 55 dB(A)
17.72 x 15.35 x 25.59 in. 68.43 lb.
17.72 x 15.35 x 25.59 in. 70.64 lb.
17.72 x 15.35 x 25.59 in. 70.64 lb.
17.72 x 15.35 x 25.59 in. 70.64 lb.
17.72 x 15.35 x 25.59 in. 70.64 lb.
17.72 x 15.35 x 30.31/38.98 in. 72.85/81.68 lb.
17.72 x 15.35 x 30.31/38.98 in. 75.06/83.88 lb.
17.72 x 15.35 x 30.31/38.98 in. 75.06/83.88 lb.
17.72 x 15.35 x 30.31/38.98 in. 75.06/83.88 lb.
17.72 x 15.35 x 30.31/38.98 in. 75.06/83.88 lb.
* based on A4-paper 70g/m² at 230V/50Hz
4
91402 2 05/11
Page 5
GB
45SC2
45CC3
45CC4
45CC5
45CC6
60SC2
60CC3
60CC4
60CC5
60CC6
90SC2
90CC3
90CC4
90CC5
90CC6
IMPORTANT SAFETY NOTES
<< The machine may not be operated by more
than one person at any given time!
The machine was designed for safe operation
by “one person only”.
<< During the shredding process no other
work may be performed on the machine
(for example cleaning, etc.)!
<< The machine is not a toy, and is not suitable
for use by children!
The overall technical safety concept of
this machine (dimensions, feed openings,
emergency shutdown devices etc.) does not
provide for any guarantee regarding hazardfree operation by children.
<< Danger of injury! Keep all
loose articles of clothing, ties,
jewelery, long hair or other loose
objects away from opening!
Warning:
Moving parts can crush and cut!
<< Danger of injury! Never insert fingers into
opening!
<< In case of danger switch the machine
off with the mains switch, or unplug the
machine!
<< Always unplug the machine from the
mains power supply before opening the
machine!
Repairs may only be performed by trained
personnel!
Special materials
Symbol
Model
45/60/90SC2 X
45/60/90CC3 X
45/60/90CC4 X
45/60/90CC5 X X X
45/60/90CC6 X X X X
X = not applicable for shredding
Warning:
Electrical Hazard!
INITIATION
AREA OF APPLICATION:
The intimus 45/60/90SC2/CC3/CC4/CC5/CC6
data shredder is a machine used for shredding
general documents.
Generally the machine may only be
used to shred paper (deviations see
table below “special materials”)!
Shredding of other types of data carriers
may lead to injuries (for example due to
splintering of hard materials etc.) and
damage to the machine (for example
destruction of the cutter etc.).
INSTALLATION:
- Unpack the machine and put it together.
- Fit the plastic bag onto the bag frame.
- Attach the Power Cord to the Power Connection
on the machine and plug into an AC outlet (1)
(Fig. 2) (For information on the right fuse for
the plug see “TECHNICAL DATA”).
The socket outlet shall be installed
near the equipment and shall be easily
accessible!
Only operate the machine in enclosed
rooms at temperatures between 10°C
and 25°C!
Keep enough distance to the surroun
dings when installing the machine.
-
CONTROLS:
1 = Mains plug (fig. 2)
When the machine is first plugged in it is not
on.
2 = Function buttons (fig. 1)
“Ready”/ “Off” / “Stop“
This button has three functions:
a) “Ready”
The machine changes to “Ready” if you
press this button briefly.
At the same time the integral LED display
comes on.
b) “Off”
The machine switches off if it is in the “Ready”
mode and the button is held down for about 3
seconds.
Note: The machine switches off automatically
if it is not used for about 5 minutes.
c) “Stop”
If you press this button briefly when the
cutters are running they switch off and stop.
3
6
9
OPERATION
3 = Forwards button (fig. 1)
This button has two functions:
a) If this button is pressed briefly, the cutting
mechanism runs forwards for a few seconds,
e.g. to remove remaining material from the
cutting mechanism. At the same time the
integrated LED display lights up.
b) If this button is pressed and held for approx.
two secs., the cutting mechanism runs
forwards continually and materials to be
shredded can be fed into the machine. At
the same time the integrated LED display
lights up.
4 = Reverse button (fig. 1)
If you press this button the cutters run backwards
for a short time. At the same time the integral
LED display comes on.
5 = Light barrier (Forward motion) (fig. 3)
The shredding procedure starts as soon as
material is fed into the feed slot. At the same
time the integral forward button LED display
comes on.
6 = Control display (fig. 1)
“Material jam in machine”/ “Light barrier
covered when door opens or when machine
turned on”
For the procedures see the relevant description
under the “MALFUNCTION” section.
a) “Material jam in machine”
Comes on when too much material has been
fed into the cutters. The cutters jam, then
run in reverse for a short time and stop. The
motor switches off.
b) “Light barrier covered
when door open”
Comes on when there is still material in
the feed slot when the door is opened. The
cutters stop. The motor switches off.
c) “Light barrier covered
when machine turned on”
Comes on when there is still material in the
feed slot when the machine is switched on.
7
8
2
fig. 1
10
4
1
fig. 2
11
fig. 3
5
5
91402 2 05/11
Page 6
GB
CONTROLS:
7 = Control display (Fig. 1)
“Oil cutters”
Comes on when the cutters in the cross
cut version must be oiled. The lubrication
procedure must be acknowledged on
the reverse button (4) (see description in
“CUTTER MAINTENANCE”).
8 = Control display (Fig. 1)
“Door open”/ “Door malfunction”
a) “Door open”
Comes on if the door on the lower part
of the machine is opened. The machine
switches off automatically and cannot
be started as long as the door remains
open.
b) “Electrical fault”
Flashes when there is an electrical fault
in the door sensor. The machine switches
off. Please contact your dealer.
9 = Control display (Fig. 1)
“Motor overload” /
“Electrical fault”
To find out what to do see the relevant
description under the “MALFUNCTION”
section.
a) “Motor protection”
Comes on when the motor has been
overloaded and has switched off. The
machine cannot be started while the
motor is cooling down.
b) “Electrical fault”
Flashes when there is an electrical fault
inside the control board. At the same
time the function button (2) LED display
flashes. The machine switches off.
Please contact your dealer.
10 = Control display
“Paper collection bag full” (Fig. 1)
Comes on when the paper collection bag is
full and must be emptied. The cutting unit
for reducing paper switches off.
OPERATION
The shredder may not be used as a
step ladder or as a seat. Danger of
falling due to breakage!
SWITCHING THE MACHINE ON:
Proceed as follows to switch the machine to
“Ready”:
- Press the function button (2) briefly.
- The function button (2) LED display
on for “Ready”.
- The machine can be loaded.
MATERIAL FEED:
Feed paper into the cutting mechanism through
the paper feed slot (11) (fig. 3).
The machine automatically switches to forwards
running, draws the material in and automatically
switches off after shredding.
Note: For shredding transparent films, the
machine must be manually switched to forwards
running (press and hold the forwards button (3)
for approx. 2 secs.).
By briefly pressing the function button (2) (Stop
function), the shredding process can be stopped
at any time. To continue, press and hold the
forwards button (3) for approx. 2 secs.
If the machine is not used for a period of approx.
5 mins., it automatically switches off.
Never feed the shredder with a
quantity of material exceeding the
maximum indicated. Refer to the
TECHNICAL DATA section!
Should the machine become
overloaded, follow the instructions under
“MATERIAL JAM IN MACHINE” under
“MALFUNCTIONS”.
comes
45SC2
45CC3
45CC4
45CC5
45CC6
60SC2
60CC3
60CC4
60CC5
60CC6
90SC2
90CC3
90CC4
90CC5
EMPTYING THE
PAPER COLLECTION BAG (Fig. 4):
If the paper collection bag is full the machine
switches off. The control display
on. Proceed as follows:
- Open the door. The control display (8)
comes on. If there is still material in one of
the feed slots, the control display (6) also
comes on.
- Take the collection bag (12) and the frame out
of the bottom part of the housing. Remove the
bag and dispose of the contents. The control
display (10) goes out.
- Fit the emptied bag onto the bag frame and
insert the bag and the frame into the bottom
part of the housing again. Close the door. The
control display (8) goes out.
- If the control display (6) comes on, press
the forward button (3) briefly. The remaining
material in the feed slot is shredded and the
display go out.
Note: The machine will only run if the door is
closed.
DYNAMIC LOAD DISPLAY:
To prevent a material jam and thus ensure a
continual, effective destruction of the data
carriers, the current load level of the motor is
displayed during the shredding process by a
coloured, diffuse light in the feed slot as follows:
Green light: load < 50%
Yellow light: load 50 - 75%
Red light: load 75 - 100%
(10) comes
90CC6
11 = Paper feed slot (Fig. 3)
12 = Paper collection bag (Fig. 4)
13 = Oil reservoir (Fig. 4)
6
7
8
2
fig. 1 fig. 3 fig. 4
3
9
10
4
5
11
1213
6
91402 2 05/11
Page 7
GB
MATERIAL JAM IN THE MACHINE:
(Auto reverse function)
If a jam is caused by too much material being fed
in the following happens:
- The cutters jam, then run in reverse for a short
time (material is released) and stop. The motor
switches off. The control display
on.
Proceed as follows:
Paper jam in paper feed slot (11)
- Remove the paper that has been fed back.
- The cutters now run forwards automatically
and shred the remaining paper in the cutters.
During the forward run the forward button (3)
LED display
(6) goes out.
- Continue shredding with less paper.
- If necessary, switch the cutters manually
alternately from forward to reverse until the
material has gone through completely and
been shredded.
comes on. The control display
(6) comes
MALFUNCTIONS
LIGHT BARRIER COVERED
WHEN DOOR OPENED:
Should there still be material in the feed slot
when the door is opened, the motor switches off
and the cutters stop. The control display
comes on.
Close the door and acknowledge the status
by pressing the forward button (3) briefly.
The existing material is fed to the cutters and
shredded.
LIGHT BARRIER COVERED
WHEN MACHINE TURNED ON:
Should there still be material in the feed slot
when the machine is switched on the control
display (6) comes on.
Remove the material and acknowledge the
status by pressing the forward button (3) briefly.
MOTOR PROTECTION:
Should the motor be overloaded it switches off.
The control display (9) comes on.
The machine can be started again after a cooling
down period of about 25 – 40 minutes.
(6)
45SC2
45CC3
45CC4
45CC5
45CC6
60SC2
60CC3
60CC4
60CC5
60CC6
90SC2
90CC3
90CC4
90CC5
ELECTRICAL FAULT:
If the control display
the function button (2) LED display or only
the control display (8)
electrical fault. The machine cannot be started.
In this case please contact your dealer.
FAULT CHECK LIST:
Should the machine not work, check the following
points:
plug connected to the power supply?
- is the
door closed?
- is the
paper collection bag full?
- is the
Follow the instructions for “EMPTYING THE
PAPER COLLECTION BAG“.
- Is there a
Follow the instructions in “MATERIAL JAM IN
THE MACHINE”.
- Is the
See “MOTOR PROTECTION”.
If none of these test points apply, please
contact your dealer.
material jam in the machine?
motor overloaded?
(9) flashes together with
flashes there is an
90CC6
MAINTENANCE / DISPOSING
Before starting any repair work and
also before cleaning/maintenance
which is not described in the following section always disconnect the
mains power supply!
CLEANING THE PHOTOCELLS:
If paper particles should come to rest in the inlet
guide (for example after a paper jam) it is possible
that the machine will not turn off, due to the broken
light barrier.
To remove these paper strips and also to clean
the photocell, pass another sheet of paper through
the feed slot, or switch the machine to reverse and
wipe both “eyes” of the photocell with a brush.
CUTTER MAINTENANCE (CROSS CUT):
Cross cut cutters must be oiled after a
specific operating time. If the control display
Open the door. The control display
and the reverse button (4) LED display
as the control display
oil reservoir (13) (Fig. 4) from the holder in the door
and close the door again.
Pour a little oil onto a sheet of paper and then
feed this through the paper feed slot (12) onto the
cutters.
The paper is drawn in and in this way the oil is
distributed to the cutters.
Note: This procedure is acknowledged as
follows to turn off the display after the cutters
have been oiled:
- Open the door until the control display (8) lights
(7) comes on proceed as follows:
(7) flashes. Remove the
up. The control displays
(7) and (4) flash.
TECHNICAL DATA SPECIAL ACCESSORIES
Model Power supply data
supply voltage/frequency · current consumption · power
intimus 45SC2/45CC3-CC6
intimus 60SC2/60CC3-CC6
intimus 90SC2/90CC3-CC6
Pre-fusing (slow-blow): 220-230V = 10 amps / 120V = 15 amps / 100V = 15 amps
220-230V/50Hz · 3.0 amps · 0.7 kW 120V/60Hz · 5.6 amps · 0.7 kW 100V/50/60Hz · 7.0 amps · 0.7 kW
220-230V/50Hz · 3.0 amps · 0.7 kW 120V/60Hz · 5.6 amps · 0.7 kW 100V/50/60Hz · 7.0 amps · 0.7 kW
220-230V/50Hz · 3.0 amps · 0.7 kW 120V/60Hz · 5.6 amps · 0.7 kW 100V/50/60Hz · 7.0 amps · 0.7 kW
(8) comes on
as well
- Press the reverse button
down until the control display (7) goes out.
- Close the door again.
The cutters now start a cleaning cycle automatically
(forward and reverse run) and then switch off.
The machine is ready for use again. Should you
need to re-order the special oil see “SPECIAL
ACCESSORIES”.
AUTOMATIC ENERGY SAVING:
If the machine is not used for a while it automatically
switches off after about 5 minutes. The function
button (2) LED display
Press the function button briefly to turn it on again.
DISPOSING OF THE MACHINE:
Dispose of the machine in an
environmentally friendly fashion at the end
of its useful service life. Do not dispose of
any of the parts included in the machine or
its packaging with household waste.
Description Order-No.
Plastic bag, 440x330x600x0.05 mm (45) 83079
Plastic bag, 440x330x950x0.05 mm (60/90) 99977
Lubricant, 110 ml bottle
Note: For orders of special accessories and spare
parts, please contact your dealer.
(4) and keep it held
for “Ready” goes out.
88035
Model Type Cutting width Cutting capacity Working width Noise level Dimensions Weight
paper paper W x D x H
intimus 45SC2 278-4S 3.8 mm 22-24 sheets* 260 mm app. 55 dB(A) 450 x 390 x 650 mm 31 kg
intimus 45CC3 278-4C 3.8x30 mm 16-18 sheets* 260 mm app. 55 dB(A) 450 x 390 x 650 mm 32 kg
intimus 45CC4 278-2C 1.9x15 mm 11-13 sheets* 260 mm app. 55 dB(A) 450 x 390 x 650 mm 32 kg
intimus 45CC5 278-1C 0.8x12 mm 7-8 sheets* 260 mm app. 55 dB(A) 450 x 390 x 650 mm 32 kg
intimus 45CC6 278-1CF 0.8x4.5 mm 5-6 sheets* 260 mm app. 55 dB(A) 450 x 390 x 650 mm 32 kg
intimus 60/90SC2 279/295-4S 3.8 mm 22-24 sheets* 260 mm app. 55 dB(A) 450 x 390 x 770/990 mm 33/37 kg
intimus 60/90CC3 279/295-4C 3.8x30 mm 16-18 sheets* 260 mm app. 55 dB(A) 450 x 390 x 770/990 mm 34/38 kg
intimus 60/90CC4 279/295-2C 1.9x15 mm 11-13 sheets* 260 mm app. 55 dB(A) 450 x 390 x 770/990 mm 34/38 kg
intimus 60/90CC5 279/295-1C 0.8x12 mm 7-8 sheets* 260 mm app. 55 dB(A) 450 x 390 x 770/990 mm 34/38 kg
intimus 60/90CC6 279/295-1CF 0.8x4.5 mm 5-6 sheets* 260 mm app. 55 dB(A) 450 x 390 x 770/990 mm 34/38 kg
* based on A4-paper 70g/m² at 230V/50Hz
7
91402 2 05/11
Page 8
F
45SC2
45CC3
45CC4
45CC5
45CC6
60SC2
60CC3
60CC4
60CC5
60CC6
90SC2
90CC3
90CC4
90CC5
90CC6
RECOMMANDATIONS IMPORTANTES DE SÉCURITÉ
<< La machine ne doit pas être utilisée par
plusieurs personnes en même temps!
La conception des éléments de sécurité
repose sur une mise en service sans danger
pour “L’utilisation de la machine par une seule
personne”.
<< Ne pas effectuer d’autres activités sur la
machine (par ex. nettoyage...) durant le
procédé de destruction!
<< La machine n’est pas un jouet et ne convient
pas pour être utilisée par des enfants!
Le concept global de sécurité (dimensions,
orifices d‘alimentation, mises hors circuit de
sécurité, etc.) de cette machine ne fournit
aucune garantie pour une manipulation sans
danger par les enfants.
<< Risque de blessure! N’approchez
jamais du bloc de coupe les vête
ments amples, colliers, cheveux
longs, cravates etc!
Attention:
Danger de contusion et de coupure
à cause des pièces mobiles !
-
45/60/90SC2 X
45/60/90CC3 X
45/60/90CC4 X
45/60/90CC5 X X X
45/60/90CC6 X X X X
<< Risque de blessure! N’introduisez jamais
les doigts dans l’ouverture!
<< En cas de danger, arrêter la machine par
l’interrupteur principal, ou débranchez la
machine!
<< Débrancher le raccordement réseau avant
d’ouvrir l’installation!
Les travaux de réparation doivent être
effectués uniquement par un spécialiste!
Matériaux spéciaux
Symbole
Modèle
X = ne convient pas pour le broyage
Attention:
Risque de blessure à cause de la
tension électrique !
MISE EN MARCHE
DOMAINES D’UTILISATION:
Le destructeur de documents
CC3/CC4/CC5/CC6 est un appareil destiné à détruire
des documents courants.
En principe, l’appareil peut uniquement
être utilisé pour broyer du papier
(exceptions, voir tableau sous « Matériaux
spéciaux ») !
Le broyage d’autres supports de données
peut se traduire par des blessures de
personnes (éclatement de matériaux solides
par ex., etc.) et de dégâts à l’appareil
(destruction du mécanisme de coupe par
ex.).
INSTALLATION :
- Déballer l’appareil et l’installer.
- Accrocher le sac de plastique dans le cadre pour
sac.
- Relier le cordon d‘alimentation à la fiche
d‘alimentation électrique de la machine et branchez
sur la prise secteur (1) (fig. 2) (voir les indications
concernant le fusible auxiliaire requis pour la
prise secteur dans les « CARACTERISTIQUES
TECHNIQUES »).
Le raccordement au secteur de la machine
doit être librement accessible et doit se
trouver à proximité de la machine !
Utiliser la machine uniquement dans des
locaux fermés et tempérés (10 – 25 °C) !
Placer toujours la machine à une distance
suffisante du mur !
intimus 45/60/90SC2/
ELEMENTS DE COMMANDE:
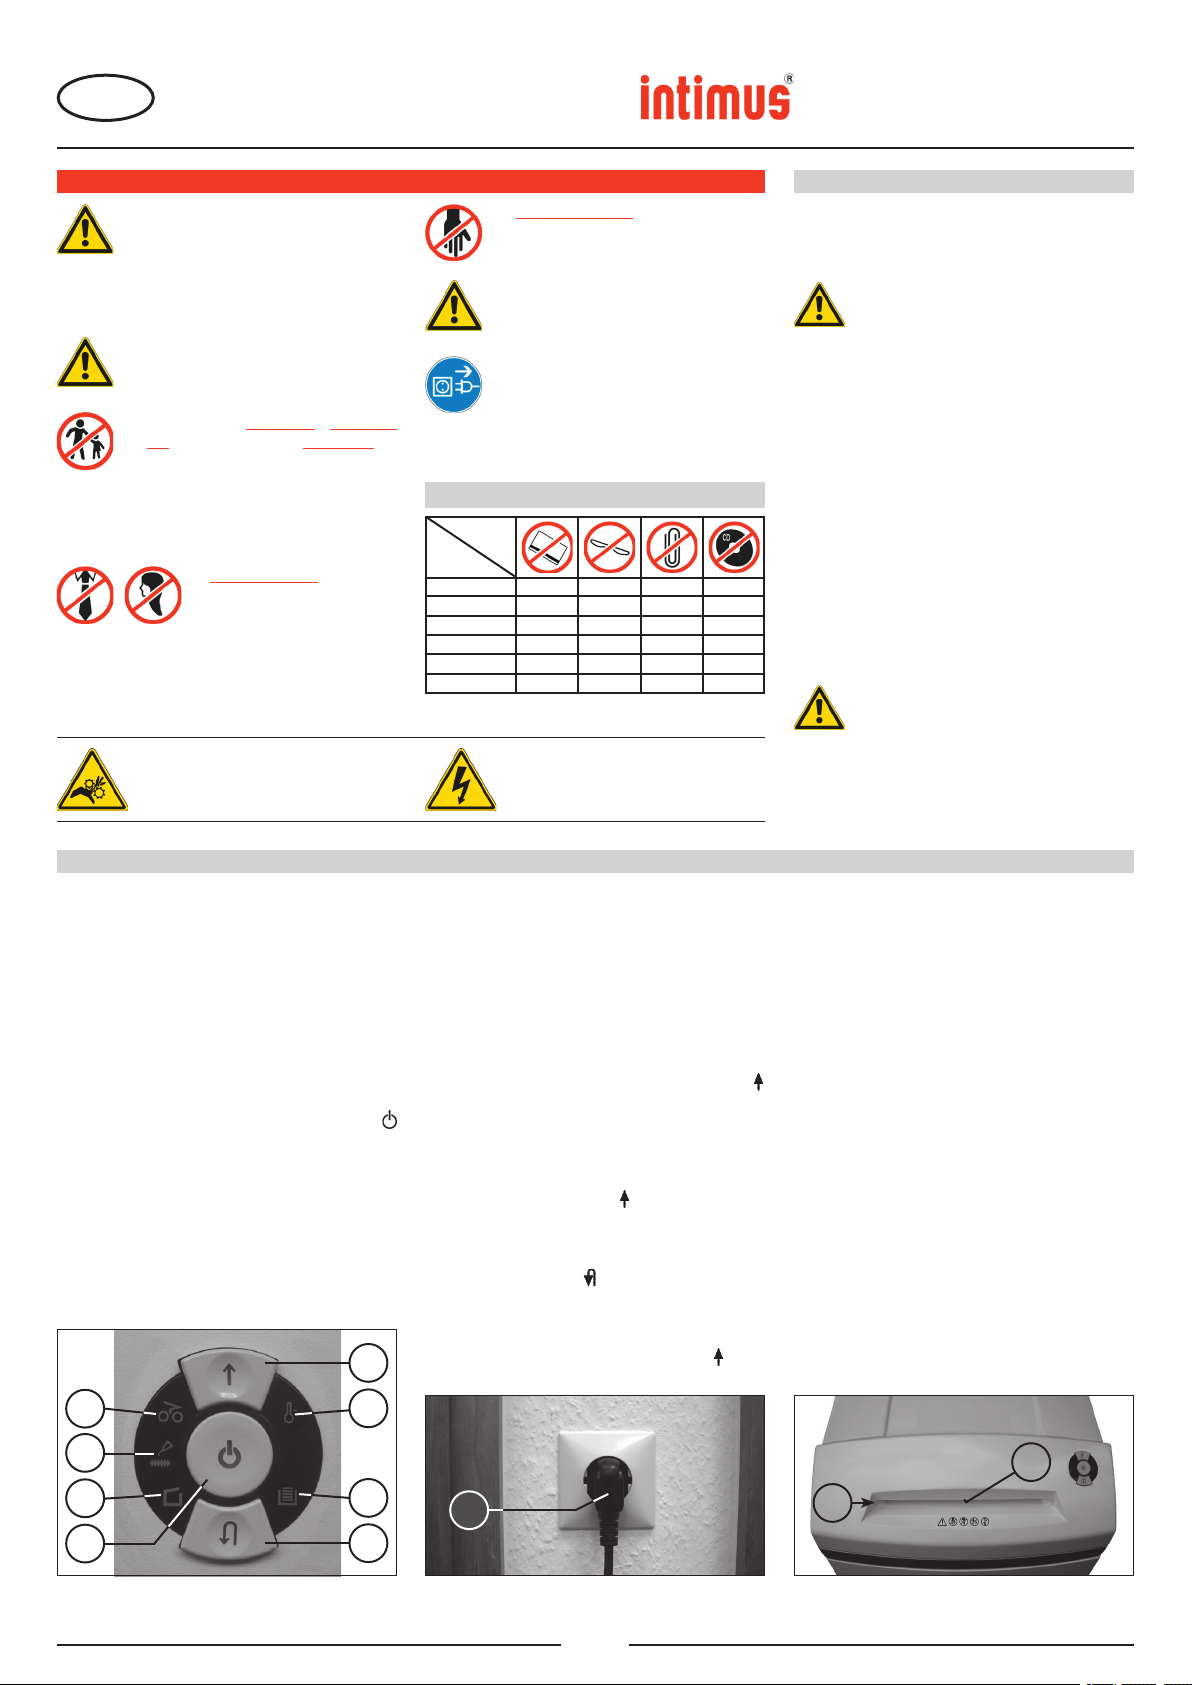
1 = Fiche secteur (fig. 2)
Lorsqu’elle est raccordée au secteur électrique
par le biais de la fiche secteur, la machine est tout
d’abord éteinte.
2 = Touche de fonction (fig. 1)
« Prêt à fonctionner » / « Arrêt « / « Stop »
Cette touche comprend trois fonctions:
a) « Prêt à fonctionner »
Frapper brièvement sur cette touche
pour commuter la machine sur « prêt à
fonctionner ».
Simultanément, le voyant LED intégré
s’allume.
b) « Arrêt »
Maintenir enfoncée cette touche dans l’état
« prêt à fonctionner » pendant env. 3 secondes
pour éteindre la machine.
Remarque: La machine s’éteint
automatiquement en cas de non utilisation
pendant un laps de temps d’environ 5 minutes.
3
6
9
UTILISATION
c) « Stop »
Frapper brièvement sur cette touche pendant
que le bloc de coupe fonctionne pour éteindre
et arrêter celui.ci.
3 = Touche de marche avant (fig. 1)
Cette touche comprend deux fonctions :
a) Une frappe brève sur cette touche a pour effet
de faire avancer le bloc de coupe pendant
quelques secondes, par ex. pour faire sortir
un document resté dans le bloc de coupe.
Simultanément, le voyant LED intégré
s’allume.
b) Si cette touche est maintenue enfoncée
pendant env. deux secondes, le bloc de coupe
fonctionne en permanence en avant et la
machine peut être alimentée. Simultanément,
le voyant LED intégré s’allume.
4 = Touche de marche arrière (fig. 1)
Un actionnement de cette touche fait reculer
brièvement le bloc de coupe. Simultanément, le
voyant LED intégré s’allume.
5 = Barrière lumineuse (marche avant) (fig. 3)
Démarre l’opération de broyage dès que du
matériau est introduit dans la fente d’alimentation.
Simultanément, le voyant LED intégré
touche marche avant s’allume.
de la
6 = Voyant de contrôle (fig. 1)
« Bourrage de matériau dans l’appareil »
/ « Barrière lumineuse occupée lors de
l’ouverture de porte ou lors de la mise en
marche »
Lire la description des manières de procéder sous
la rubrique « PANNE ».
a) « Bourrage de matériau dans l’appareil »
S’allume lorsque la quantité de matériau
chargée dans le bloc de coupe est trop
importante. Le bloc de coupe se bloque, se
déplace ensuite un peu vers l’arrière et s’arrête.
Le moteur s’éteint.
b) « Barrière lumineuse occupée
lors de l’ouverture de porte »
S’allume lorsque du matériau se trouve encore
dans la fente d’alimentation lors de l’ouverture
de la porte. Le bloc de coupe s’arrête. Le
moteur s’éteint.
c) « Barrière lumineuse occupée
lors de la mise en marche »
S’allume lorsque du matériau se trouve dans la
fente d’alimentation lors de la mise en marche
de la machine.
7
8
2
fig. 1
10
4
1
11
fig. 2 fig. 3
8
5
91402 2 05/11
Page 9
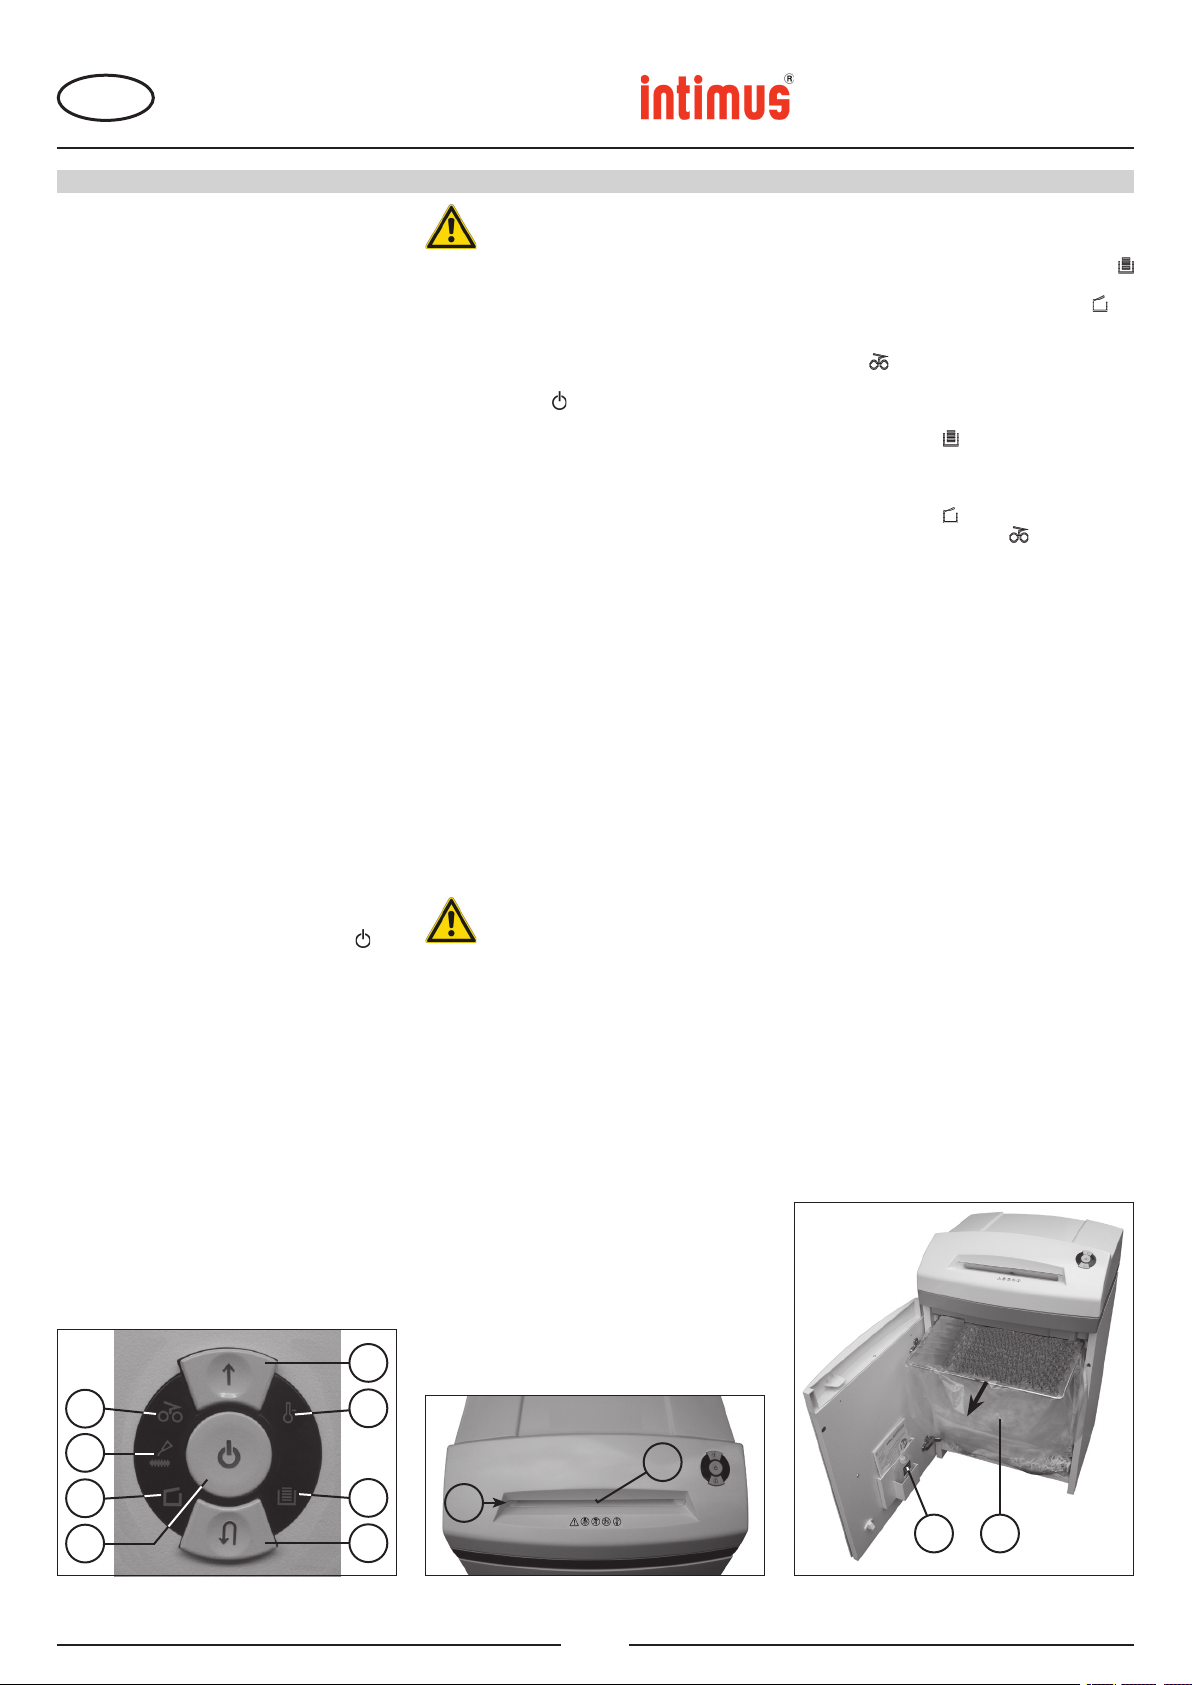
F
ELEMENTS DE COMMANDE :
7 = Voyant de contrôle (fig. 1)
« Lubrifier bloc de coupe »
S’allume lorsque le bloc de coupe de
la version Cross-Cut doit être lubrifié.
L’opération de lubrification doit être validée
sur la touche de marche arrière (voir
description « MAINTENANCE BLOC DE
COUPE »)
8 = Voyant de contrôle (fig. 1)
« Port e ouve r te »/ « P ertur b a tion
porte »
a) « Porte ouverte »
S’allume lorsque la porte de l’armoire
inférieure est ouverte. La machine
s’éteint automatiquement et ne peut
être démarrée tant que la porte reste
ouverte.
b) « Dysfonctionnement électrique »
Clignote, lorsque le capteur de porte
prés e n t e un dy s f onctio n n e ment
éle ctri q ue. La ma chine s ’ étei nt.
Veuillez en informer votre distributeur
spécialisé.
9 = Voyant de contrôle (fig. 1)
« Surcharge du moteur » /
« Dysfonctionnement électrique »
Lire la description des manières de
procéder sous la rubrique « PANNE ».
a) « Protection du moteur »
S’allume lorsque le moteur a subi
une surcharge et qu’il s’est éteint. La
machine ne peut être démarrée pendant
la phase de refroidissement du moteur.
b) /« Dysfonctionnement électrique »
C li g n ot e e n pr é sen c e d’ u n
dy sfo nct ion nem ent électrique s ur
le circ uit imprimé d e comman de.
Simultanément, le voyant LED
la touche de fonction (2) s’allume. La
machine s’éteint. Veuillez en informer
votre distributeur spécialisé.
10 = Voyant de contrôle (fig. 1)
« Sac collecteur de papier plein «
S’allume lorsque le sac collecteur pour
papier est rempli et qu’il doit être vidé. Le
bloc de coupe pour le broyage de papier
s’éteint.
de
UTILISATION
N’utiliser en aucun cas le destructeur
en tant que siège ou surface de
marche. Risque de chute suite à la
rupture de matériel !
MISE EN MARCHE DE LA MACHINE :
Pour mettre la machine sur « prêt à fonctionner »,
procéder comme suit:
- Actionner brièvement la touche de fonction
(2)
- Le voyant LED
s’allume et affiche « prêt à fonctionner ».
- La machine peut être alimentée.
ALIMENTATION DE MATERIAU :
Alimenter le bloc de coupe en
d’alimentation de papier (11) (fig. 3).
La machine passe automatiquement en marche
avant, aspire le matériau et s’éteint de nouveau
automa tiquement l orsque le broyage est
terminé.
Re marq ues: Pou r le b roya ge d e fil ms
transparents, il convient de commuter la
machine manuellement sur la marche avant
(maintenir la touche marche avant (3) enfoncée
pendant environ 2 secondes).
Il est possible de stopper à tout moment le
broyage en actionnant brièvement la touche de
fonction (2) (fonction « stop »). Pour poursuivre,
maintenir la touche de marche avant (3)
enfoncée pendant environ 2 secondes.
La machine s’éteint automatiquement en cas
de non utilisation pendant un laps de temps
d’environ 5 minutes.
Ne ja mais al imen t er l’ap pare il
av ec une qua ntité d e ma tér iau
supérieure au maximum indiqué
( v oir « C A RAC T ER I STI Q UE S
TECHNIQUES »).
Si m algré tout, une quantité trop
importante de matériau parvient dans
le bloc de coupe, voir la rubrique
« PANNE » sous « BOURRAGE DE
MATERIAU DANS L’APPAREIL ».
de la touche de fonction (2)
papier par la fente
45SC2
45CC3
45CC4
45CC5
45CC6
60SC2
60CC3
60CC4
60CC5
60CC6
90SC2
90CC3
90CC4
90CC5
VIDER LE SAC COLLECTEUR
POUR PAPIER (fig. 4)
La machine s’éteint lorsque le sac collecteur
pour papier est rempli. Le voyant de contrôle
(10) s’allume. Procéder comme suit :
- Ouvrir la porte. Le voyant de contrôle
s’allume. Si du matériau se trouve encore
dans la fente d’alimentation, le voyant de
contrôle (6) s’allume également.
- Extraire le sac collecteur (12) avec le cadre
pour sac hors de la partie inférieure du boîtier,
retirer le sac et en éliminer son contenu. Le
voyant de contrôle (10) s’éteint.
- Accrocher le sac vidé dans le cadre pour sac
et replacer le sac et le cadre dans la partie
inférieure du boîtier. Fermer la porte. Le
voyant de contrôle (8) s’éteint.
- Si le voyant de contrôle (6) s’allume,
actionner brièvement la touche de marche
avant (3). Le matériau resté dans la fente
d’alimentation est broyé et le voyant s’éteint.
Remarque: La machine fonctionne uniquement
lorsque la porte est fermée !
AFFICHAGE
DYNAMIQUE DE SOLLICITATION :
Afin d’éviter un bourrage de matériau et donc
pour obtenir la destruction continue et efficace
des supports de données, le degré momentané
de sollicitation du moteur est affiché comme suit
en cours de broyage par une lumière colorée et
diffuse dans la fente d’alimentation :
Lumière verte : Sollicitation < 50%
Lumière jaune : Sollicitation 50 - 75%
Lumière rouge : Sollicitation 75 - 100%
(8)
90CC6
11 = Fente d’alimentation de papier (fig. 3)
12 = Sac collecteur pour papier (fig. 4)
13 = Récipient d’huile (fig. 4)
3
6
9
7
8
2
fig. 1 fig. 3 fig. 4
10
4
11
5
1213
9
91402 2 05/11
Page 10
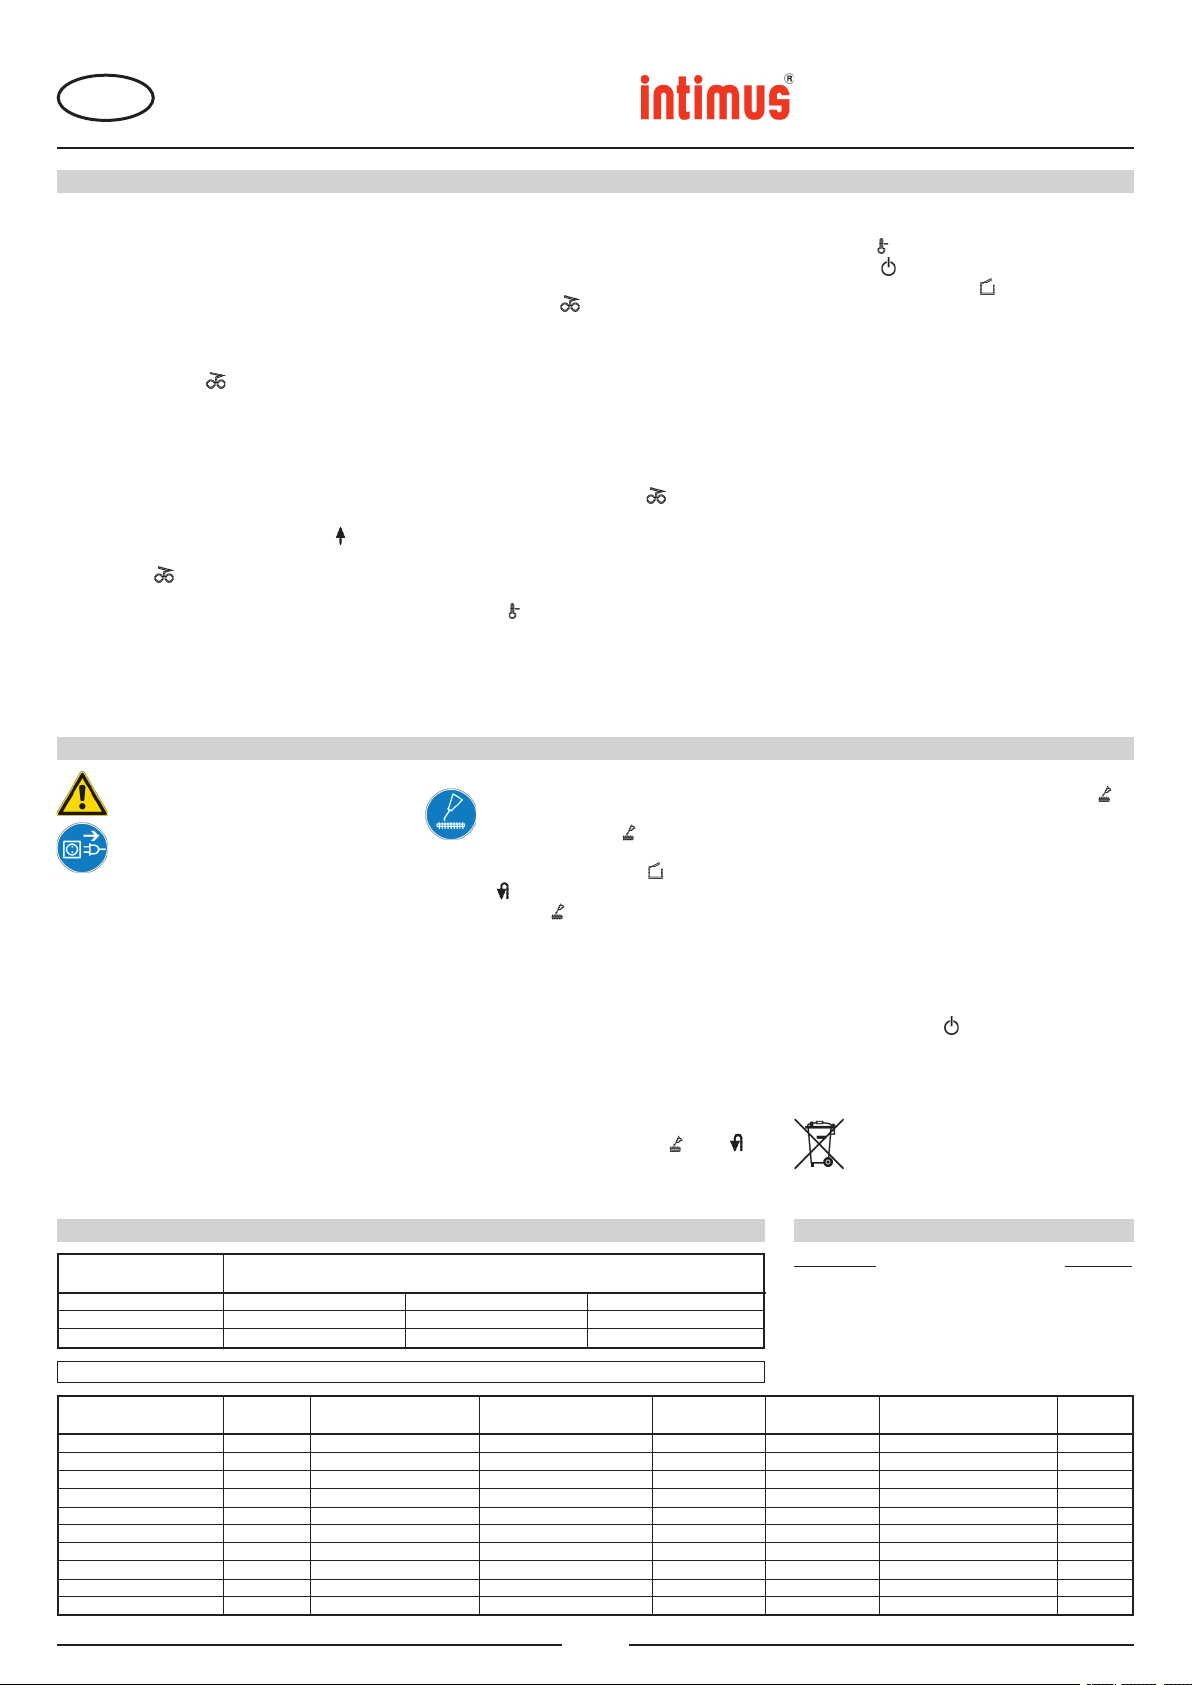
F
COMMENT REMEDIER AUX PETITES PANNES
BOURRAGE DE
MATERIAU DANS L’APPAREIL:
[Fonction Auto-Reverse]
Si une quantité trop importante de matériau
provoque un bourrage, la machine réagit comme
suit:
- Le bloc de coupe se bloque, se déplace
ensuite un peu vers l’arrière (ce qui libère le
matériau) et s’arrête. Le moteur s’éteint. Le
voyant de contrôle (6) s’allume.
Procéder comme suit:
Bourrage de papier dans la fente
d’alimentation pour papier (11)
- Enlever le papier introduit.
- Le coupe de bloc avance maintenant
automatiquement et broie les résidus de
papier restés dans le bloc de coupe. En cours
de marche avant, le voyant LED de la
touche marche avant (3) s’allume. Le voyant
de contrôle (6) s’éteint.
- Poursuivre le broyage avec une quantité de
papier plus faible.
- Si nécessaire, commuter manuellement le bloc
de coupe en alternance en marche avant et en
marche arrière, jusqu’à ce que le matériau soit
entièrement passé et broyé.
BARRIERE LUMINEUSE OCCUPEE
LORS DE L’OUVERTURE DE PORTE:
Si du matériau se trouve encore dans la fente
d’alimentation lors de l’ouverture de la porte, le
moteur s’éteint et le bloc de coupe s’arrête. Le
voyant de contrôle (6) s’allume.
Fermer la porte et valider l’état en actionnant
brièvement la touche de marche avant (3). Le
matériau présent passe dans le bloc de coupe
et est broyé.
BARRIERE LUMINEUSE OCCUPEE
LORS DE LA MISE EN MARCHE:
Si du matériau se trouve dans la fente
d’alimentation lors de la mise en marche de la
machine, le voyant de contrôle (6) s’allume.
Retirer le matériau et valider l’état en actionnant
brièvement la touche de marche avant (3).
PROTECTION DU MOTEUR:
Le moteur s’éteint s’il est surchargé. Le voyant
de contrôle (9) s’allume.
Après une période de refroidissement d’environ
25 à 40 minutes, il est possible de redémarrer
l’appareil.
45SC2
45CC3
45CC4
45CC5
45CC6
60SC2
60CC3
60CC4
60CC5
60CC6
90SC2
90CC3
90CC4
90CC5
DYSFONCTIONNEMENT ELECTRIQUE:
Il y a dysfonctionnement électrique si le voyant
de contrôle
voyant LED
seul le voyant de contrôle
pas possible de démarrer la machine.
Dans ce cas, veuillez informer votre distributeur
spécialisé.
LISTE DE CONTROLE EN CAS DE PANNES:
Si l’appareil ne fonctionne pas, vérifier les points
ci-après:
- La fiche secteur est-elle raccordée au
secteur ?
- La
- Le
Suivre les instructions « VIDER LE SAC
COLLECTEUR POUR PAPIER ».
- Y a-t-il un bourrage de matériau dans
l’appareil ?
Suivre les instructions « BOURRAGE DE
MATERIAU DANS L’APPAREIL ».
- Le
Voir sous « PROTECTION DU MOTEUR ».
Si aucun des points de contrôle n’est
pertinent, veuillez en informer votre
distributeur spécialisé.
(9) clignote parallèlement avec le
de la touche de fonction (2) ou si
(8) clignote. Il n’est
porte est-elle fermée ?
sac collecteur pour papier est-il plein ?
moteur a-t-il été surchargé ?
90CC6
ENTRETIEN / ELIMINATION
Veuillez enlever la prise de courant
avant tous travaux de réparation, de
nettoyage et d‘entretien qui ne sont
pas mentionnés spécialement dans
le texte suivant !
NETTOYAGE DES
CELLULES PHOTOELECTRIQUES:
Il est possible que des morceaux de papier restent dans la
rainure d’admission (par ex. après un bourrage de papier)
et empêchent la barrière lumineuse « occupée » d’arrêter
l’appareil.
Il est possible d’enlever ces morceaux de papier ou de
nettoyer les cellules photoélectriques, soit en introduisant
une nouvelle feuille de papier dans le bloc de coupe, soit en
déclenchant la marche arrière et en passant brièvement un
pinceau sur les « yeux » des cellules photoélectriques.
MAINTENANCE DU BLOC DE COUPE (CROSS-CUT):
Les blocs de coupe Cross-Cut doivent être
lubrifiés après avoir fonctionné un certain temps.
Si le voyant de contrôle (7) s’allume, procéder
comme suit:
Ouvrir la porte. Le voyant de contrôle
voyant LED
le voyant de contrôle (7) clignotent. Retirer le récipient
d’huile (13) (fig. 4) de son support dans la porte et refermer
la porte.
Répandre un peu d’huile sur une feuille de papier et faire
passer la feuille dans le bloc de coupe au travers de la fente
d’alimentation de papier (12).
Le papier est aspiré et l’huile parvient ainsi dans le bloc de
coupe.
Remarque: Afin de faire disparaître les voyants de
contrôle, il convient de valider la fin de l’opération de
lubrification du bloc de coupe comme suit:
- Ouvrir la porte jusqu’à ce que le voyant de contrôle
(8) s’allume. Les voyants de contrôle
clignotent.
de la touche de marche arrière (4) ainsi que
(8) s’allume et le
(7) et (4)
CARACTÉRISTIQUES TECHNIQUES ACCESSOIRES SEPARES
Modèle Caractéristiques branchement sur le secteur
tension de raccordement/fréquence · courant absorbé · puissance
intimus 45SC2/45CC3-CC6 220-230V/50Hz · 3,0 A · 0,7 kW 120V/60Hz · 5,6 A · 0,7 kW 100V/50/60Hz · 7,0 A · 0,7 kW
intimus 60SC2/60CC3-CC6 220-230V/50Hz · 3,0 A · 0,7 kW 120V/60Hz · 5,6 A · 0,7 kW 100V/50/60Hz · 7,0 A · 0,7 kW
intimus 90SC2/90CC3-CC6 220-230V/50Hz · 3,0 A · 0,7 kW 120V/60Hz · 5,6 A · 0,7 kW 100V/50/60Hz · 7,0 A · 0,7 kW
Fusible (à action retardée): 220-230V = 10 A / 120V = 15 A / 100V = 15 A
- Actionner la touche de marche arrière (4) et la maintenir
enfoncée jusqu’à ce que le voyant de contrôle (7)
s’éteigne.
- Refermer la porte.
Le bloc de coupe commence maintenant automatiquement
un cycle de nettoyage (course marche avant/course marche
arrière) et ensuite il s’éteint. La machine est à nouveau prête
à fonctionner. Pour recommander ultérieurement de l’huile
spéciale, voir « ACCESSOIRES SPECIAUX ».
MODE AUTOMATIQUE ECONOMIE D’ENERGIE:
Lorsque la machine n’est pas utilisée pendant un certain
temps, elle s’éteint automatiquement après environ 5
minutes. Le voyant LED
indiquant « prêt à fonctionner » s’éteint. Actionner brièvement
la touche de fonction pour remettre la machine en marche.
ELIMINATION DE LA MACHINE:
Lorsqu’elle est en fin de durée de vie, toujours
éliminer la machine de façon conforme à
l’environnement. Ne jamais jeter aucune pièce
de la machine ou de l’emballage avec les ordures
ménagères.
Désignation Ordre-No.
Sac en plastique, 440x330x600x0,05 mm (45)
Sac en plastique, 440x330x950x0,05 mm (60/90)
Flacon d’huile special, 110 ml 88035
Notez: Pour les accessoires et pièces détachées,
veuillez contacter votre agent.
de la touche de fonction (2)
83079
99977
Modèle Type Largeur de coupe Capacité de coupe
papier papier L x P x H
intimus 45SC2 278-4S 3,8 mm 22-24 feuilles* 260 mm ca. 55 dB(A) 450 x 390 x 650 mm 31 kg
intimus 45CC3 278-4C 3,8x30 mm 16-18 feuilles* 260 mm ca. 55 dB(A) 450 x 390 x 650 mm 32 kg
intimus 45CC4 278-2C 1,9x15 mm 11-13 feuilles* 260 mm ca. 55 dB(A) 450 x 390 x 650 mm 32 kg
intimus 45CC5 278-1C 0,8x12 mm 7-8 feuilles* 260 mm ca. 55 dB(A) 450 x 390 x 650 mm 32 kg
intimus 45CC6 278-1CF 0,8x4,5 mm 5-6 feuilles* 260 mm ca. 55 dB(A) 450 x 390 x 650 mm 32 kg
intimus 60/90SC2 279/295-4S 3,8 mm 22-24 feuilles* 260 mm ca. 55 dB(A) 450 x 390 x 770/990 mm 33/37 kg
intimus 60/90CC3 279/295-4C 3,8x30 mm 16-18 feuilles* 260 mm ca. 55 dB(A) 450 x 390 x 770/990 mm 34/38 kg
intimus 60/90CC4 279/295-2C 1,9x15 mm 11-13 feuilles* 260 mm ca. 55 dB(A) 450 x 390 x 770/990 mm 34/38 kg
intimus 60/90CC5 279/295-1C 0,8x12 mm 7-8 feuilles* 260 mm ca. 55 dB(A) 450 x 390 x 770/990 mm 34/38 kg
intimus 60/90CC6 279/295-1CF 0,8x4,5 mm 5-6 feuilles* 260 mm ca. 55 dB(A) 450 x 390 x 770/990 mm 34/38 kg
Largeur de travail
Niveau de bruit Dimensions Poids
* se réfère à du papier A4 70g/m2 pour 230 V/50 Hz
10
91402 2 05/11
Page 11
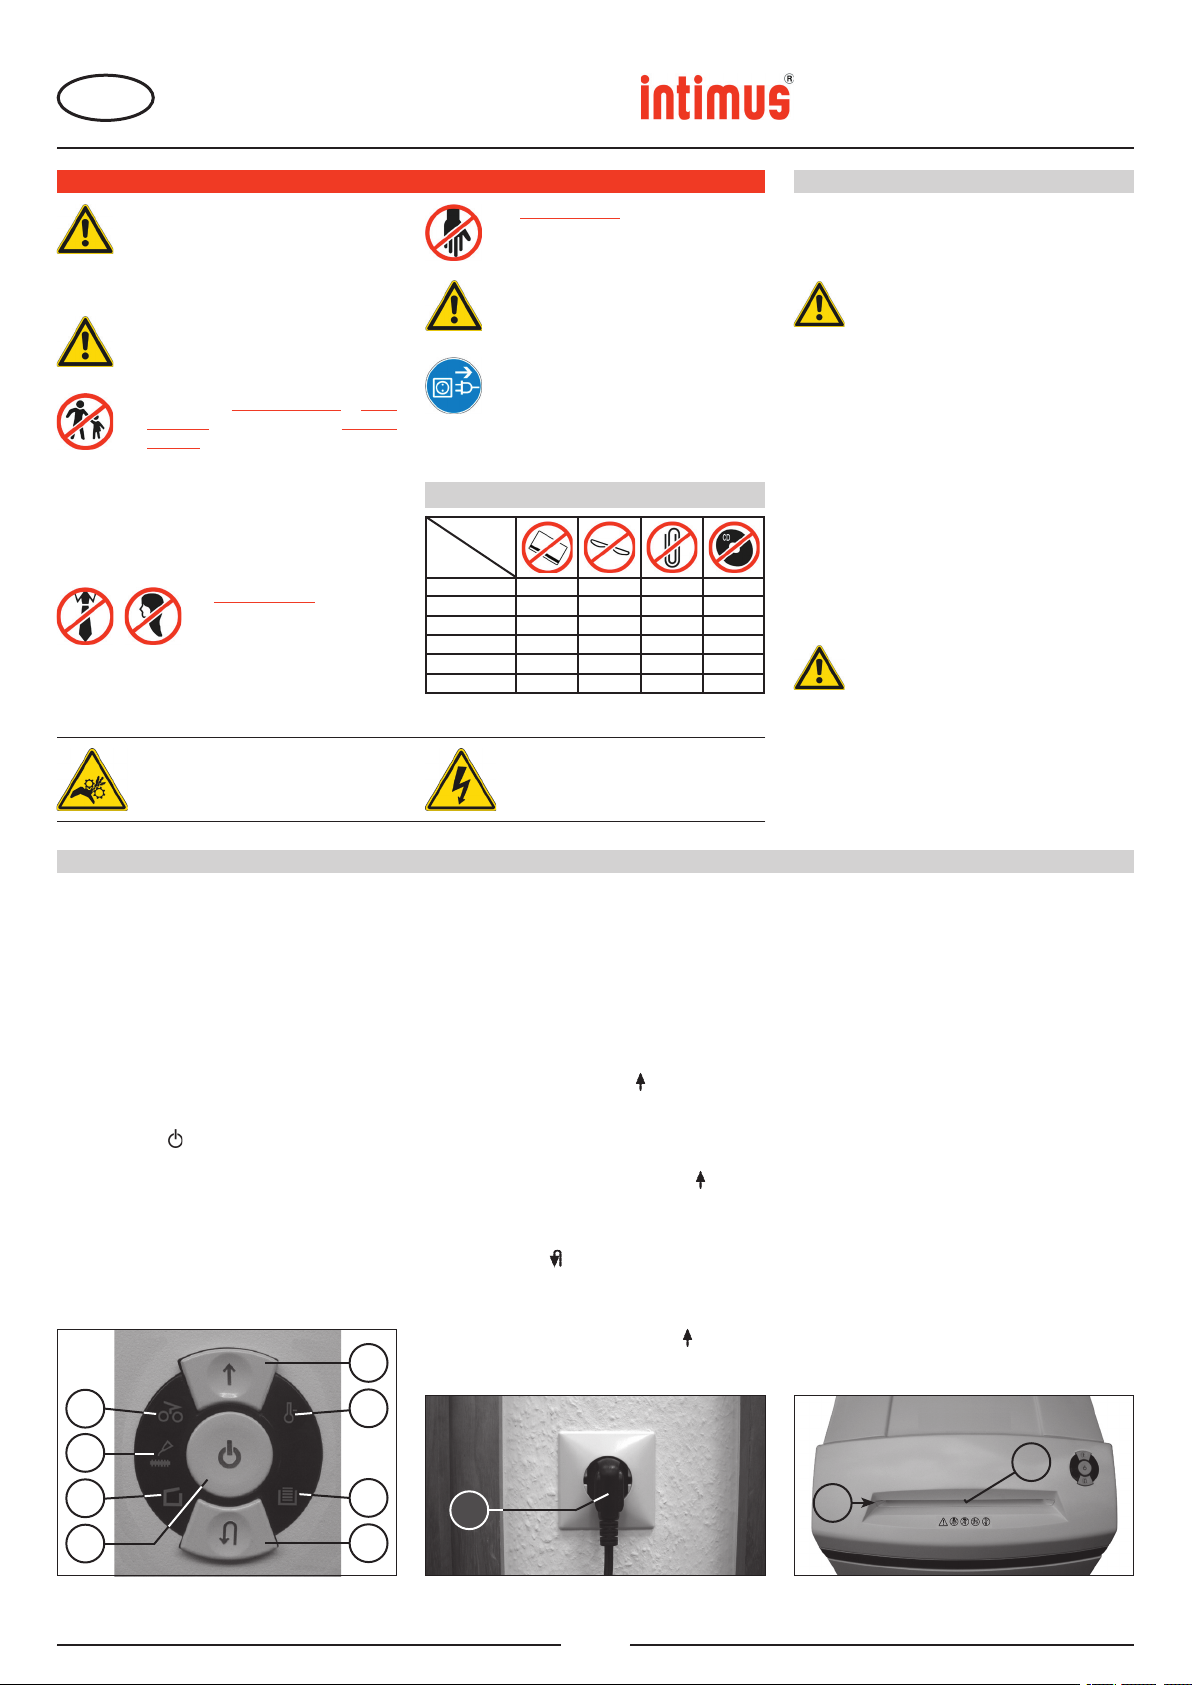
E
45SC2
45CC3
45CC4
45CC5
45CC6
60SC2
60CC3
60CC4
60CC5
60CC6
90SC2
90CC3
90CC4
90CC5
90CC6
INDICACIONES DE SEGURIDAD IMPORTANTES
<< ¡El aparato no debe ser operado por varias
personas al mismo tiempo!
La concepción de los elementos de seguri-
dad se basa en un manejo sin peligro en un
„servicio por una sola persona“.
<< ¡Durante el proceso de trituración no
se deben efectuar otros trabajos en la
máquina (p. ej. limpieza etc.)!
<< ¡La máquina no es un juguete y no es
apropiada para el empleo y uso por parte
de niños!
El concepto global en razón de la seguridad
(dimensiones, orificios de alimentación,
desconexiones de seguridad, etc.) de esta
máquina no incluye ningún tipo de garantía
en cuanto a un manejo inofensivo por parte
de niños.
<< ¡Peligro de lesión! No acercar a
la apertura de alimentación piezas sueltas de ropa, corbatas,
bisutería, cabello largo u otros
objetos sueltos!
Atención:
Peligro de magulladura o heridas
de corte por partes en movimiento!
45/60/90SC2 X
45/60/90CC3 X
45/60/90CC4 X
45/60/90CC5 X X X
45/60/90CC6 X X X X
<< ¡Peligro de lesión! No introducir los dedos
en la apertura de alimentación!
<< ¡En caso de emergencia desconectar el
aparato usando el interruptor principal o
extraer la clavija de red!
<< Antes de abrir el aparato hay que extraer
la clavija de red!
¡Las reparaciones solamente debe efec
tuarlas un técnico especialista!
Materiales especiales
Símbolo
Modelo
X = no apropiado para el desmenuzamiento
Atención:
Peligro de lesiones por tensión
eléctrica!
PUESTA EN SERVICIO
CAMPO DE APLICACIÓN:
El shredder de datos intimus 45/60/90SC2/CC3/
CC4/CC5/CC6 es un aparato para la trituración de
información escrita.
¡La máquina solamente debe ser utilizada
para el desmenuzamiento de papel (puede
consultar las excepciones en la tabla en
„Materiales especiales“)!
El desmenuzamiento de soportes de datos
de otro tipo puede tener como consecuencia
-
lesiones en personas (p. ej. debido a
fragmentos de materiales compactos,
etc.), así como daños en la máquina (p. ej.
destrucción del mecanismo de corte, etc.).
COLOCACIÓN:
- Desembale y coloque el aparato.
- Cuelgue el saco de plástico en el marco del saco.
- Conecte, utilizando el cable suministrado, el
terminal de corriente del aparato a una toma de
corriente alterna (1) (Fig. 2) (ver las indicaciones
sobre el fusible previo necesario del tomacorriente
en “CARACTERÍSTICAS TÉCNICAS”).
¡La toma de conexión a la red de la
máquina tiene que encontrarse en un
lugar fácilmente accesible y en las
inmediaciones de la máquina!
¡La máquina sólo se deberá usar en
recintos cerrados y con temperaturas
comprendidas entre 10 – 25ºC.
Instale la máquina con una separación
suficiente de la pared.
ELEMENTOS DE MANDO:
1 = Clavija de enchufe a la red (Fig. 2)
Al enchufar la máquina a través de la clavija de enchufe a
la red eléctrica, la máquina se encuentra en primer lugar
desconectada.
2 = Pulsador funcional (Fig. 1)
“Listo para el uso” / “Apagado” / “Parada”
Este pulsador comprende tres funciones:
a) “Listo para el uso”
Accionando brevemente este pulsador se conecta el
equipo en el modo de funcionamiento “listo para el
uso”.
Al mismo tiempo se encenderá el indicador piloto
integrado .
b) “Apagado”
Si se acciona este pulsador en el modo de
funcionamiento “Listo para el uso” aprox. por 3 seg.,
la máquina se desconectará.
Nota: Si la máquina no se utiliza durante un
periodo de tiempo de aprox. 5 min., se apagará
automáticamente.
3
6
9
MANEJO
c) “Parada”
Al accionar brevemente este pulsador mientras el
mecanismo de corte está en marcha, se desconectará
éste y se quedará parado.
3 = Pulsador de avance (Fig. 1)
Este pulsador comprende dos funciones:
a) Accionando brevemente este pulsador, el mecanismo
de corte avanzará unos pocos segundos, por ejemplo,
para sacar el material que aún se encuentra en el
mecanismo de corte. Al mismo tiempo se encenderá
el indicador piloto integrado .
b) Si este pulsador se mantiene oprimido durante unos
dos segundos, el mecanismo de corte avanzará
de modo continuo, por lo que el máquina se podrá
suministrar con material. Al mismo tiempo se
encenderá el indicador piloto integrado .
4 = Pulsador de retroceso (Fig. 1)
El mecanismo de corte retrocede brevemente al accionar
este pulsador. Al mismo tiempo se encenderá el indicador
piloto integrado .
5 = Barrera fotoeléctrica (avance) (Fig. 3)
Inicia el proceso de desmenuzamiento en el momento de
introducir material en la ranura de alimentación. Al mismo
tiempo se encenderá el indicador piloto
de avance.
del pulsador
6 = Indicador de control (Fig. 1)
“Material atascado en el aparato” / “Barrera
fotoeléctrica tapada por apertura de puerta o por
conexión”
Para el modo de proceder consulte la descripción
correspondiente en el apartado “AVERÍA”.
a) “Material atascado en el aparato”
Se encenderá al introducir demasiado material en
el mecanismo de corte. El mecanismo de corte se
bloquea, retrocede a continuación un poco y se para.
El motor se desconecta.
b) “Barrera fotoeléctrica tapada
por apertura de puerta”
Se enciende si al abrir la puerta sigue habiendo
material en la ranura de alimentación. El mecanismo
de corte se para. El motor se desconecta.
c) “Barrera fotoeléctrica tapada
por conexión”
Se enciende si al conectar la máquina sigue habiendo
material en la ranura de alimentación.
7
8
2
Fig. 1
10
4
1
Fig. 2
11
Fig. 3
11
5
91402 2 05/11
Page 12
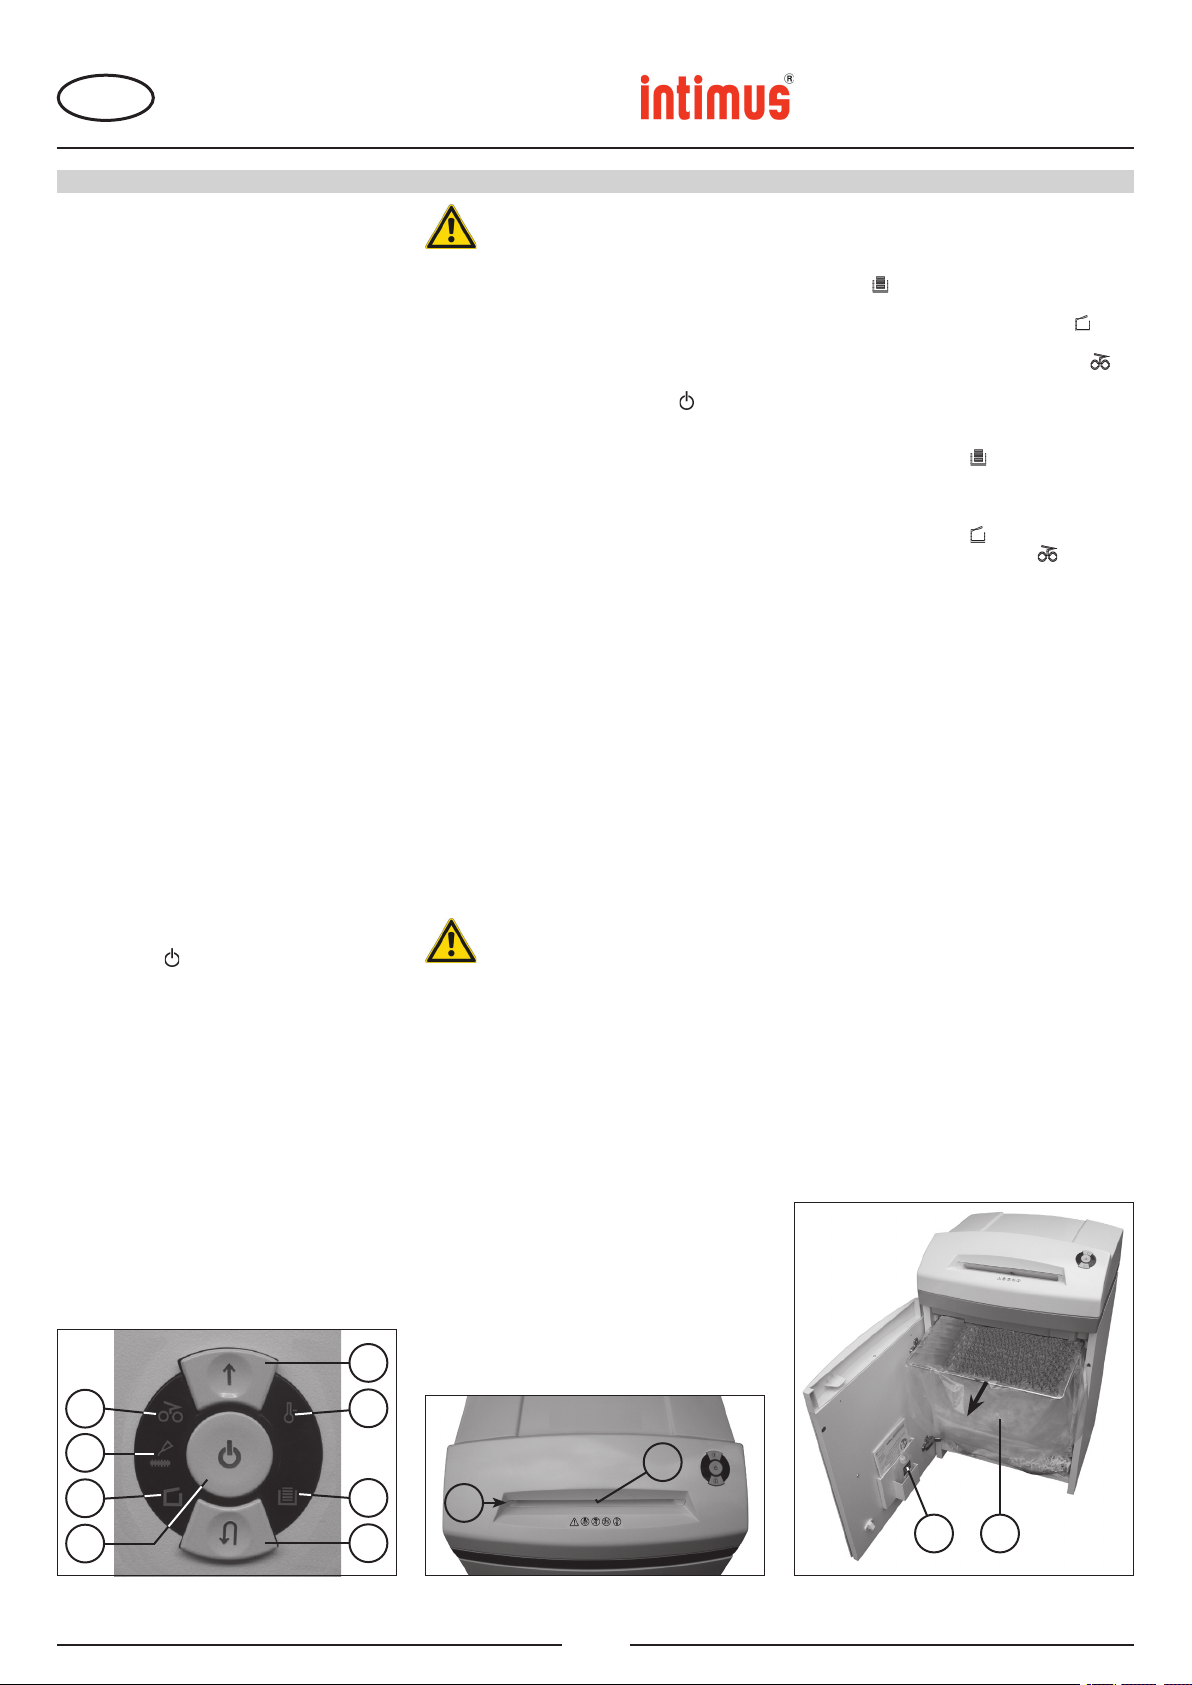
E
ELEMENTOS DE MANDO:
7 = Indicador de control (Fig. 1)
“Engrasar mecanismo de corte”
Se enciende cuando el mecanismo de
corte de la versión Cross-Cut (cruzado)
se tiene que engrasar. El proceso de
engrase se tiene que confirmar con el
pulsador de retroceso (4) (ver descripción
en “MANTENIMIENTO DEL MECANISMO
DE CORTE”).
8 = Indicador de control (Fig. 1)
“Puerta abierta” / “Avería eléctrica”
a) “Puerta abierta”
Se enciende si la puerta del armario
inferior está abierta. El aparato se
desconecta automáticamente y no se
puede conectar mientras la puerta siga
estando abierta.
b) “Avería eléctrica”
parpadea, si ha surgido una avería
eléctrica en los sensores de la puerta.
El aparato se desconecta. Avise al
comercio especializado más cercano.
9 = Indicador de control (Fig. 1)
“Sobreca rga de mo tor ” / “Ave ría
eléctrica”
Para el modo de proceder consulte la
descripción correspondiente en el apartado
“AVERÍA”.
a) “Guardamotor”
Se enciende cuando el motor se ha
sobrecargado y desconectad o. La
máquina no se puede activar durante la
fase de enfriamiento del motor.
b) “Avería eléctrica”
parpadea, si ha surgido una avería
eléctrica dentro de la placa de circuitos
impresos del sistema de mando. Al
mismo tiempo se encenderá el indicador
piloto
La máquina se desconecta. Avise al
comercio especializado más cercano.
10 = Indicador de control (Fig. 1)
“Saco recolector de papel lleno”
Se enciende cuando el saco recolector
para papel está lleno y se tiene que
vaciar. El mecanismo de corte para
el desm e nuza m iento de pap e l se
desconecta.
del pulsador funcional (2).
MANEJO
La destructora no se debe utilizar
nun c a co m o as i ento ni c o mo
taburete. ¡Peligro de caída por rotura
de material!
CÓMO CONECTAR EL APARATO:
Para conectar el aparato en “listo para el uso”
proceda como sigue:
- Accione brevemente el pulsador funcional
(2).
- El indicador piloto del pulsador
(2) se encenderá para la función “Listo para el
uso”.
- A continuación se puede empezar a alimentar
el aparato con papel.
ALIMENTACIÓN DE MATERIAL:
Introduzca papel por la ranura de alimentación
de papel (11) (Fig. 3) al mecanismo de corte.
El aparato se conecta automáticamente a
la marcha de avance, mete el material y se
desconecta automáticamente después de haber
finalizado la etapa de desmenuzamiento.
Notas: Para el desmenuzamiento de láminas
transparentes se tiene que conectar la máquina
a mano en el modo de funcionamiento de
avance (mantenga accionado el pulsador de
avance (3) durante unos 2 segundos).
Accionando brevemente el pulsador funcional
(2) (función de “Parada”) se puede detener en
todo momento la etapa de desmenuzamiento.
Para continuar, mantenga accionado el pulsador
de avance (3) durante 2 segundos.
Si la máquina no se utiliza durante un periodo de
tiempo de aprox. 5 min. se desconecta.
¡No introduzca nunca en el aparato
más material del indicado como
máx i mo (cons ulte el apa r tado
“DATOS TÉCNICOS”)!
En el caso de que se haya introducido
de todos modos demasiado material
en el mecanismo de corte, consulte en
“AVERÍAS” en el apartado “MATERIAL
ATASCADO EN EL APARATO”.
funcional
45SC2
45CC3
45CC4
45CC5
45CC6
60SC2
60CC3
60CC4
60CC5
60CC6
90SC2
90CC3
90CC4
90CC5
CÓMO VACIAR EL SACO RECOLECTOR
PARA PAPEL (Fig. 4):
En cuanto el saco recolector se haya llenado de
papel, el aparato se desconectará. El indicador
de control
sigue:
- Abra la puerta. El indicador de control (8) se
enciende. Si aún queda material en la ranura
de alimentación, el indicador de control
se encenderá también ahora.
- Saque el saco recolector (12) junto con el
marco contenido en la unidad inferior de la
carcasa, retire el saco y elimine el contenido.
El indicador de control (10) se apaga.
- Cuelgue el saco vaciado en el marco del saco
y vuelva a introducir el saco con marco en la
unidad inferior de la carcasa. Cierre la puerta.
El indicador de control (8) se apaga.
- Si el indicador de c ontrol
encendido, confirme brevemente con el
pulsador de avance (3). El material que se
había quedado en la ranura de alimentación
es desmenuzado y el indicador se apaga.
Nota: ¡La máquina sólo funciona con la puerta
cerrada!
INDICADOR DINÁMICO DE CARGA:
A fin de evitar el atasco de material y, por lo
tanto, lograr una destrucción continuada y
efectiva de los soportes de datos, se indica durante la etapa de desmenuzamiento - el grado
momentáneo de carga del motor mediante una
luz difusa, determinada por el color, en la ranura
de alimentación, como sigue:
Luz verde: Carga < 50%
Luz amarilla: Carga 50 -75%
Luz roja: Carga 75 -100%
(10) se enciende. Proceda como
(6)
(6) está
90CC6
11 = Ranura de
alimentación de papel (Fig. 3)
12 = Saco recolector para papel (Fig. 4)
13 = Botellita de aceite (Fig. 4)
6
7
8
2
Fig. 1 Fig. 3 Fig. 4
3
9
10
4
11
12
5
1213
91402 2 05/11
Page 13
E
MATERIAL ATASCADO EN EL APARATO:
(Función de auto-retroceso)
Si se produce un atasco debido a un exceso de
material introducido, el aparato reacciona como
sigue:
- El mecanismo de corte se bloquea, retrocede
a continuación un poco (material se libera) y se
para. El motor se desconecta. El indicador de
control (6) se enciende.
Proceda como sigue:
Papel atascado en la ranura de alimentación
de papel (11)
- Retire el papel retrocedido.
- Una vez hecho esto, el mecanismo de corte
avanzará automáticamente y desmenuzará el
resto de papel contenido en el mecanismo de
corte. El indicador piloto integrado
de avance (3) está encendido durante el avance.
El indicador de control (6) se apaga.
- Continúe con el desmenuzamiento introduciendo
una cantidad menor de papel.
- Si fuera necesario, conecte el mecanismo
de corte a mano, alternando entre avance y
retroceso, hasta que el material haya pasado por
el mecanismo de corte y se haya desmenuzado.
del pulsador
AVERIA
BARRERA FOTOELÉCTRICA TAPADA
POR APERTURA DE PUERTA:
Si al abrir la puerta se encontrara aún material en la
ranura de alimentación, el motor se desconectará
y el mecanismo de corte se parará. El indicador de
control (6) se enciende.
Cierre la puerta y confirme la situación accionando
brevemente el pulsador de avance (3). El material
restante se introducirá en el mecanismo de corte
para ser desmenuzado.
BARRERA FOTOELÉCTRICA TAPADA POR
CONEXIÓN:
Si al conectar la máquina hubiera material en la
ranura de alimentación, el indicador de control se
enciende (6).
Retire el material y confirme la situación accionando
brevemente el pulsador de avance (3).
GUARDAMOTOR:
Si el motor se sobrecarga, se desconectará. El
indicador de control (9) se enciende.
Deje enfriar el aparato unos 25-40 minutos y vuelva
a activar entonces el aparato.
45SC2
45CC3
45CC4
45CC5
45CC6
60SC2
60CC3
60CC4
60CC5
60CC6
90SC2
90CC3
90CC4
90CC5
AVERÍA ELÉCTRICA:
Si el indicador de control
combinación con el indicador piloto
funcional (2) o sólo el indicador de control (8),
significa que ha surgido una avería eléctrica. Con
lo que el aparato no se puede activar.
Avise en este caso al comercio especializado más
cercano.
LISTA DE VERIFICACIÓN EN LAS AVERÍAS:
Si el aparato no funciona, compruebe los siguientes
puntos:
- ¿Se ha conectado la clavija de enchufe a la red
de corriente eléctrica?
- ¿Está la
- ¿Esta el
Siga las instrucciones en el apartado “CÓMO
- ¿Hay material atascado en el aparato?
Siga las instrucciones en el apartado “MATERIAL
- ¿Se ha sobrecargado el
Consulte el apartado “GUARDAMOTOR”.
Si su aparato presenta otro problema distinto
a los alistados anteriormente, notifíquelo al
comercio especializado más cercano.
puerta cerrada?
saco recolector de papel lleno?
VACIAR EL SACO RECOLECTOR”.
ATASCADO EN EL APARATO”.
(9) parpadea en
del interruptor
motor?
90CC6
MANTENIMIENTO / ELIMINACIÓN
¡Antes de efectuar reparaciones así
como la limpieza y el mantenimiento,
que no estén descritos explícitamen
te en el texto siguiente, desenchufe
la clavija!
LIMPIEZA DE LAS FOTOCÉLULAS:
En el caso de que se hayan quedado papeles adheridos
en la ranura de entrada (p. ej. tras un atasco de papel)
es posible que el aparato no se desconecte a causa de la
fotocélula “tapada”.
Puede retirar los trozos de papel o bien limpiar la fotocélula,
alimentando el mecanismo de corte con una hoja de papel
adicional, o activar la marcha de retroceso del aparato
pasando, a continuación, brevemente un pincel sobre ambas
“ópticas” de la fotocélula.
-
MANTENIMIENTO DEL MECANISMO DE CORTE
(CORTE CRUZADO/CROSS-CUT):
Después de haber transcurrido un determinado
tiempo de servicio, se deberá aplicar aceite en
los mecanismos de corte cruzado. Si el indicador
de control está encendido (7), proceda como
sigue:
Abra la puerta. El indicador de control (8) se enciende y el
indicador piloto del pulsador de retroceso (4) así como el
indicador de control
aceite (13) (Fig. 4) situada en el soporte de la puerta y vuelva
a cerrar la puerta.
Distribuya un poco de aceite sobre una hoja de papel y, a
continuación, introdúzcala por la ranura de alimentación de
papel (12) al mecanismo de corte.
El papel se mete y el aceite penetrará así en el mecanismo
de corte.
Nota: Para borrar el indicador, habrá que confirmar este
proceso, después de haber engrasado el mecanismo de
corte, como sigue:
- Abra la puerta hasta que el indicador de control
se encienda. Los indicadores de control
parpadean.
(7) parpadean. Tome la botellita de
(7) y ( 4)
- Accione el pulsador de retroceso (4) y no lo suelte hasta
que el indicador de control (7) se apague.
- Cierre la puerta de nuevo.
Una vez hecho esto, el mecanismo de corte comenzará
automáticamente un ciclo de limpieza (avance/retroceso) y,
a continuación, se desconecta. La máquina vuelve a estar
lista para el uso. Si desea pedir el aceite especial, consulte
el apartado “ACCESORIOS ESPECIALES”.
FUNCIÓN AUTOMÁTICA DE AHORRO ENERGÉTICO:
Si el aparato no se utiliza durante algún tiempo, se
desconectará automáticamente tras unos 5 min. El indicador
piloto del pulsador funcional (2) para “Listo para el uso”
se apaga. Accione brevemente el pulsador funcional para
reconectar.
ELIMINACIÓN DEL APARATO USADO:
Elimine el aparato usado al final de su vida útil
respetando siempre las normas medioambientales.
No tire las partes de la máquina ni el embalaje con
(8)
la basura doméstica.
DATOS TÉCNICOS ACCESSORIO ESPECIAL
Modelo Datos de conexión a la red
tensión de conexión/frecuencia · consumo de corriente · potencia
intimus 45SC2/45CC3-CC6 220-230V/50Hz · 3,0 A · 0,7 kW 120V/60Hz · 5,6 A · 0,7 kW 100V/50/60Hz · 7,0 A · 0,7 kW
intimus 60SC2/60CC3-CC6 220-230V/50Hz · 3,0 A · 0,7 kW 120V/60Hz · 5,6 A · 0,7 kW 100V/50/60Hz · 7,0 A · 0,7 kW
intimus 90SC2/90CC3-CC6 220-230V/50Hz · 3,0 A · 0,7 kW 120V/60Hz · 5,6 A · 0,7 kW 100V/50/60Hz · 7,0 A · 0,7 kW
Fusible previo (lento): 220-230V = 10 A / 120V = 15 A / 100V = 15 A
Modelo Tipo Ancho de corte Rendimiento de corte Ancho de Nivel de ruídos Dimensiones Peso
papel papel
intimus 45SC2 278-4S 3,8 mm 22-24 hojas* 260 mm aprox. 55 dB(A) 450 x 390 x 650 mm 31 kg
intimus 45CC3 278-4C 3,8x30 mm 16-18 hojas* 260 mm aprox. 55 dB(A) 450 x 390 x 650 mm 32 kg
intimus 45CC4 278-2C 1,9x15 mm 11-13 hojas* 260 mm aprox. 55 dB(A) 450 x 390 x 650 mm 32 kg
intimus 45CC5 278-1C 0,8x12 mm 7-8 hojas* 260 mm aprox. 55 dB(A) 450 x 390 x 650 mm 32 kg
intimus 45CC6 278-1CF 0,8x4,5 mm 5-6 hojas* 260 mm aprox. 55 dB(A) 450 x 390 x 650 mm 32 kg
intimus 60/90SC2 279/295-4S 3,8 mm 22-24 hojas* 260 mm aprox. 55 dB(A) 450 x 390 x 770/990 mm 33/37 kg
intimus 60/90CC3 279/295-4C 3,8x30 mm 16-18 hojas* 260 mm aprox. 55 dB(A) 450 x 390 x 770/990 mm 34/38 kg
intimus 60/90CC4 279/295-2C 1,9x15 mm 11-13 hojas* 260 mm aprox. 55 dB(A) 450 x 390 x 770/990 mm 34/38 kg
intimus 60/90CC5 279/295-1C 0,8x12 mm 7-8 hojas* 260 mm aprox. 55 dB(A) 450 x 390 x 770/990 mm 34/38 kg
intimus 60/90CC6 279/295-1CF 0,8x4,5 mm 5-6 hojas* 260 mm aprox. 55 dB(A) 450 x 390 x 770/990 mm 34/38 kg
trabajo
A x F x A
Denominación N° de pedido
Saco de plástico, 440x330x600x0,05 mm (45) 83079
Saco de plástico, 440x330x950x0,05 mm (60/90) 99977
Botellita de aceite, 110 ml 88035
Inicación: En el caso de pedidos ulteriores de accesorios
especiales y de piezas de repuesto, rogamos se dirija a
nuestro representante oficial.
* referido a papel formato A4 70g/m2 a 230V/50Hz
13
91402 2 05/11
Page 14
P
45SC2
45CC3
45CC4
45CC5
45CC6
60SC2
60CC3
60CC4
60CC5
60CC6
90SC2
90CC3
90CC4
90CC5
90CC6
INSTRUÇÕES DE SEGURANÇA IMPORTANTES
<< O aparelho não deve ser manejado por
várias pessoas ao mesmo tempo!
Os elementos de segurança servem para
um manejo sem perigo no „servigo por um
só operador“.
<< Durante a operação de corte de papel não
devem ser realizados outros trabalhos na
máquina (por exemplo limpezas, etc.)!
<< A máquina
priada para a utilização por crianças!
Os aspectos de técnica de segurança
(dimensões, aberturas de alimentação,
dispositivos de desligamento de segurança,
etc.) desta máquina não implicam qualquer
garantia de manuseio seguro por crianças.
Atenção:
Perigo de contusões e golpes
devido a peças móveis!
não é brinquedo e não é apro-
<< Risco de ferimento! Manter
peças de vestuários penden
tes, gravatas, jóias, cabelos
compridos ou outros abjectos
pendentes afastados da abertura para alimentação!
-
45/60/90SC2 X
45/60/90CC3 X
45/60/90CC4 X
45/60/90CC5 X X X
45/60/90CC6 X X X X
<< Risco de ferimento! Não colocar as mãos
na abertura para alimentação!
<< Em caso de perigo, desligar a máquina no
interruptor principal, ou desligar a ficha
da tomada!
<< Antes de abrir a máquina deve desligar a
ficha da tomada!
Todas as reparações devem ser executa
das por especialistas!
Materiais especiais
Símbolo
Modelo
Atenção:
Risco de ferimento devido a tensão
eléctrica!
X = inapropriado para trituração
ENTRADA EM FUNCIONAMENTO
ÁREA DE APLICAÇÃO:
A trituradora intimus 45/60/90SC2/CC3/CC4/CC5/CC6
é uma máquina para cortar todo o tipo de material
próprio para escrita.
A máquina só deve ser empregada para
a trituração de papel (divergências: veja
tabela sob „Materiais especiais“)!
A trituração de outros suportes de dados
pode provocar ferimentos em pessoas (por
ex. devido ao estilhaçamento de produtos,
-
etc.), assim como, danos na máquina (por
ex. distruição das lâminas, etc.).
INSTALAÇÃO:
- Desembale a máquina e instale-a.
- Pendure o saco de plástico na respectiva
armação.
- Utilizando o cabo de corrente fornecido, ligue a
fonte de alimentação do aparelho à tomada de
corrente alternada (para indicações sobre o fusível
de entrada necessário da tomada de rede, veja
“DADOS TÉCNICOS”).
A ligação à rede eléctrica da máquina tem
de estar acessível, desimpedida e perto
da máquina!
A máquina só deve ser usada em espaços
fechados e com uma temperatura amena
(10 - 25 °C)!
Instalar a máquina sempre com uma
distância suficiente em relação à parede
do local.
ELEMENTOS DE COMANDO:
1 = Ficha de ligação à rede (Fig. 2)
Quando se liga a máquina com a respectiva ficha
à rede eléctrica, ela fica em estado de desligado.
2 = Botão das funções (Fig. 1)
“Operacional”/”Desligar”/”Parar”
Este botão inclui três funções:
a) “Operacional”
Com um breve toque neste botão, a máquina
fica em estado “Operacional”.
Ao mesmo tempo, acende-se o indicador LED
integrado .
b) “Desligar”
Mantendo este botão premido no estado
“Operacional” durante aprox. 3 segundos, a
máquina desliga-se.
Nota: Se a máquina não for usada durante
aprox. 5 minutos, desliga-se automaticamente.
c) “Parar”
Com um breve toque neste botão, estando o
mecanismo de corte a funcionar, este desligase e pára.
3
6
9
UTILIZAÇÃO
3 = Botão de avanço (Fig. 1)
Este botão inclui duas funções:
a) Com um breve toque neste botão, o mecanismo
de corte avança durante alguns segundos,
por ex. para fazer sair o material cortado que
tenha aí ficado. Ao mesmo tempo, acende-se o
indicador LED integrado .
b) Se este botão for mantido premido durante
aprox. dois segundos, o mecanismo de corte
gira continuamente para a frente e a máquina
pode ser alimentada. Ao mesmo tempo,
acende-se o indicador LED integrado .
4 = Botão de retrocesso (Fig. 1)
Premindo este botão, o mecanismo de corte
gira, por instantes, para trás. Ao mesmo tempo,
acende-se o indicador LED integrado .
5 = Dispositivo fotoeléctrico (avanço) (Fig. 3)
Inicia o processo de trituração assim que é
introduzido material na ranhura de alimentação.
Ao mesmo tempo, acende-se o indicador LED
do botão de avanço.
6 = Indicador de controlo (Fig. 1)
“Congestionamento de material no aparelho”/
”Dispositivo fotoeléctrico ocupado ao se abrir
a porta ou ao ligar”
Para a descrição do procedimento, ver na rubrica
“FALHA”.
a) “Congestionamento de
material no aparelho”
Acende-se quando é fornecido demasiado
material ao mecanismo de corte. O mecanismo
de corte bloqueia, gira um pouco para trás e
pára. O motor desliga-se.
b) “Dispositivo fotoeléctrico ocupado
ao se abrir a porta”
Acende-se quando, ao abrir a porta, ainda
há material na ranhura de alimentação
mecanismo de corte pára. O motor desliga-se.
c) “Dispositivo fotoeléctrico ocupado ao
ligar”
Acende-se quando, ao ligar a máquina, há
material na ranhura de alimentação.
. O
7
8
2
Fig. 1
10
4
1
Fig. 2
11
Fig. 3
14
5
91402 2 05/11
Page 15
P
ELEMENTOS DE COMANDO:
7 = Indicador de controlo (Fig. 1)
“Olear o mecanismo de corte”
Acende-se quando o mecanismo de corte
da versão de corte cruzado (“cross-cut“)
precisa de ser oleado. A lubrificação tem de
ser confirmada com o botão de retrocesso
(4) (veja a descrição em “MANUTENÇÃO
DO MECANISMO DE CORTE”).
8 = Indicador de controlo (Fig. 1)
“Porta aberta”/”Falha na porta”
a) “Porta aberta”
Acende-se quando a porta do armário
inferior está aberta. A máquina desligase automaticamente e não se pode
voltar a ligar enquanto a porta estiver
aberta.
b) “Falha eléctrica”
Pisca se houver alguma falha eléctrica
nos sensores da porta. A máquina
desliga-se. Informe o vendedor
autorizado.
9 = Indicador de controlo (Fig. 1)
“Sobrecarga do motor”/
“Falha eléctrica”
Para a descrição do procedimento, ver na
rubrica “FALHA”.
a) “Protecção do motor”
Acende-se quando o motor é
sobrecarregado e se desliga por esse
motivo. Durante a fase de arrefecimento
do motor, a máquina não pode ser
colocada em funcionamento.
b) “Falha eléctrica”
Pisca se houver alguma falha eléctrica
na placa de circuitos impressos. Ao
mesmo tempo, o indicador LED
interruptor de funcionamento (2) pisca. A
máquina desliga-se. Informe o vendedor
autorizado.
10 = Indicador de controlo
“Saco colector de papel cheio” (Fig. 1)
Acende-se quando o saco colector de papel
está cheio e precisa de ser esvaziado. O
mecanismo de corte para destruição de
papel desliga-se.
do
UTILIZAÇÃO
A desfibradora nunca pode ser usada
para alguém se sentar ou subir para
cima dela. Perigo de queda devido à
ruptura de material!
LIGAR A MÁQUINA:
Para ligar a máquina no modo “Operacional”,
proceda da seguinte forma:
- Prima por instantes o botão das funções (2).
- O indicador LED
(2) acende-se para indicar o modo
“Operacional”.
- A máquina pode ser alimentada.
ALIMENTAÇÃO DE MATERIAL:
Alimentar o mecanismo de corte com
através da ranhura de alimentação de papel (11)
(Fig. 3).
A máquina activa automaticamente a rotação
para a frente e puxa o material, desligandose automaticamente depois do processo de
destruição.
Nota: Para a destruição de películas
transparentes, a máquina tem de ser mudada
manualmente para a rotação para a frente
(mantenha premido o botão de avanço (3)
durante, aprox., 2 segundos).
Com um breve toque no botão das funções (2)
(função “Parar”), o processo de destruição pode
ser parado em qualquer altura. Para continuar,
mantenha premido o botão de avanço (3)
durante, aprox., 2 segundos.
Se a máquina não for usada durante aprox. 5
minutos, desliga-se automaticamente.
Nunca alimente o aparelho com uma
quantidade de material superior
à máxima indicada (veja “DADOS
TÉCNICOS”)!
Se, mesmo assim, alguma vez
entrar demasiado material no
mecanismo de corte, veja “FALHA”,
em “CONGESTIONAMENTO DE
MATERIAL NO APARELHO”.
do botão das funções
papel
45SC2
45CC3
45CC4
45CC5
45CC6
60SC2
60CC3
60CC4
60CC5
60CC6
90SC2
90CC3
90CC4
90CC5
ESVAZIAR O SACO COLECTOR
PARA PAPEL (Fig. 4):
Quando o saco colector para papel estiver cheio,
a máquina desliga-se. O indicador de controlo
(10) acende-se. Proceda da seguinte forma:
- Abra a porta. O indicador de controlo
(8) acende-se. Se ainda houver material
na ranhura de alimentação, o indicador de
controlo (6) também se acende.
- Puxe o saco colector (12) com a respectiva
armação da parte inferior da caixa, retire-o e
elimine o conteúdo. O indicador de controlo
(10) apaga-se.
- Pendure o saco vazio na armação e volte a
introduzir ambos na parte inferior da caixa.
Feche a porta. O indicador de controlo
apaga-se.
- Se o indicador de controlo (6) estiver aceso,
prima o botão de avanço (3) por instantes. O
material restante na ranhura de alimentação é
destruído e o indicador apaga-se.
Nota: A máquina só funciona com a porta
fechada!
INDICAÇÃO DINÂMICA DA CARGA:
Para evitar um congestionamento de material
e conseguir, assim, uma inutilização contínua
e eficaz dos suportes de dados, durante o
processo de destruição, é indicado o grau de
carga do motor nesse momento através de uma
luz difusa com a cor apropriada na ranhura de
alimentação:
Luz verde: Carga < 50 %
Luz amarela: Carga 50 % - 75 %
Luz vermelha: Carga 75 % - 100%
(8)
90CC6
11 = Ranhura de alimentação de papel
(Fig. 3)
12 = Saco colector de papel (Fig. 4)
13 = Recipiente de óleo (Fig. 4)
6
7
8
2
Fig. 1 Fig. 4Fig. 3
3
9
10
4
11
15
5
1213
91402 2 05/11
Page 16
P
CONGESTIONAMENTO
DE MATERIAL NO APARELHO:
(Função Auto-Reverse)
Em caso de congestionamento devido a
fornecimento de demasiado material, a máquina
reage da seguinte forma:
- O mecanismo de corte bloqueia, retrocede um
pouco (o material é desbloqueado) e pára. O
motor desliga-se. O indicador de controlo
(6) acende-se.
Proceda da seguinte forma:
Congestionamento de papel na respectiva
ranhura de alimentação (11)
- Retire o papel reconduzido.
- O mecanismo de corte gira agora
automaticamente para a frente e destrói
o papel que resta no mecanismo de corte.
Durante a rotação para a frente, o indicador
LED do botão de avanço (3) acende-se. O
indicador de controlo (6) apaga-se.
- Continue a destruição com menos quantidade
de papel.
- Se necessário, vá alternando manualmente
entre rotação para a frente e para trás do
mecanismo de corte até todo o material estar
completamente inserido e destruído.
AVARIAS
DISPOSITIVO FOTOELÉCTRICO
OCUPADO AO SE ABRIR A PORTA:
Se, ao abrir a porta, ainda houver material na
ranhura de alimentação, o motor desliga-se
e o mecanismo de corte pára. O indicador de
controlo (6) acende-se.
Feche a porta e confirme o estado premindo o
botão de avanço (3) por instantes. O material de
corte existente é conduzido ao mecanismo de
corte e destruído.
DISPOSITIVO
FOTOELÉCTRICO OCUPADO AO LIGAR:
Se, ao ligar a máquina, houver material na
ranhura de alimentação, o indicador de controlo
(6) acende-se.
Retire o material e confirme o estado premindo o
botão de avanço (3) por instantes.
PROTECÇÃO DO MOTOR:
Se estiver sobrecarregado, o motor desliga-se.
O indicador de controlo (9) acende-se.
Após um período de arrefecimento de aprox. 25
a 40 minutos, pode voltar a ligar o aparelho.
45SC2
45CC3
45CC4
45CC5
45CC6
60SC2
60CC3
60CC4
60CC5
60CC6
90SC2
90CC3
90CC4
90CC5
FALHA ELÉCTRICA:
Se o indicador de controlo
juntamente com o indicador LED
funções (2) ou apenas o indicador de controlo
(8), é porque há uma falha eléctrica. Não é
possível colocar a máquina em funcionamento.
Neste caso, informe o seu revendedor
autorizado.
LISTA DE CONTROLO EM CASO DE FALHA:
Se o aparelho não funcionar, verifique os
seguintes pontos:
- A ficha
- A
- O
Siga as instruções em “ESVAZIAR O SACO
- Há congestionamento de material no
Siga as instruções em
- O
Veja em “PROTECÇÃO DO MOTOR”.
Se nenhum destes pontos de verificação
se aplicar, informe o seu revendedor
autorizado.
está ligada à rede?
porta está fechada?
saco colector de papel está cheio?
COLECTOR PARA PAPEL”.
aparelho?
“CONGESTIONAMENTO DE MATERIAL NO
APARELHO”.
motor ficou sobrecarregado?
(9) piscar
do botão das
90CC6
MANUTENÇAO / DISPOSIÇÃO
Antes da realização de todos
os trabalhos de reparação, bem
como dos trabalhos de limpeza e
manutenção, que não se encontrem
descritos em particular no texto
que se segue, desligar o cabo de
alimentação!
LIMPEZA DAS CÉLULAS FOTOELÉCTRICAS:
Se ficarem pedaços de papel na ranhura de alimentação
(por ex. depois de um congestionamento de papel) é
possível que o aparelho já não se desligue porque o
dispositivo fotoeléctrico detecta o estado “ocupado”.
Pode retirar os pedaços de papel ou limpar a célula
fotoeléctrica introduzindo mais uma folha de papel no
mecanismo de corte ou activando a rotação inversa da
máquina e, com um pincel, limpar por instantes o dois
“olhos” da célula fotoeléctrica.
MANUTENÇÃO DO MECANISMO
DE CORTE CRUZADO (“CROSS-CUT”):
Os mecanismos de corte cruzado (“crosscut“) têm de ser lubrificados depois de um
determinado tempo de operação. Se o indicador
de controlo (7) se acender, proceda da
seguinte forma:
Abra a porta. O indicador de controlo
e o indicador LED
como o indicador de controlo
recipiente de óleo (13) (Fig. 4) do suporte da porta e
volte a fechá-la.
Distribua um pouco de óleo numa folha de papel e
introduza-a no mecanismo de corte pela ranhura de
alimentação de papel (12).
O papel é puxado e o óleo entra no mecanismo de
corte.
Nota: Para apagar a indicação, depois de lubrificar o
mecanismo de corte, confirme o procedimento desta
forma:
- Abra a porta até o indicador de controlo (8) se acender.
Os indicadores de controlo (7) e (4) piscam.
do botão de retrocesso (4), bem
(8) acende-se
(7) piscam. Retire o
- Mantenha premido o botão de retrocesso (4) até o
indicador de controlo (7) se apagar.
- Volte a fechar a porta.
O mecanismo de corte inicia automaticamente um
ciclo de limpeza (rotação para a frente e para trás) e
desliga-se. A máquina volta ao estado operacional. Para
encomendar o óleo especial, consulte “ACESSÓRIOS
ESPECIAIS”.
ECONOMIZAÇÃO AUTOMÁTICA DE ENERGIA:
Se a máquina não for usada durante algum tempo,
desliga-se automaticamente depois de aprox. 5 min. O
indicador LED
“Operacional” apaga-se. Para a voltar a ligar, prima por
instantes o botão das funções.
ELIMINAR A MÁQUINA:
do botão das funções (2) do modo
No fim da sua vida útil, elimine a máquina da
forma menos prejudicial para o ambiente.
Não deite nenhuma peça da máquina nem da
embalagem no lixo doméstico.
DADOS TECNICOS ACESSORIOS ESPECIAIS
Modelo Dados de conexão à rede
Tensão de conexão/Frequência · Consumo de corrente · potência
intimus 45SC2/45CC3-CC6 220-230V/50Hz · 3,0 A · 0,7 kW 120V/60Hz · 5,6 A · 0,7 kW 100V/50/60Hz · 7,0 A · 0,7 kW
intimus 60SC2/60CC3-CC6 220-230V/50Hz · 3,0 A · 0,7 kW 120V/60Hz · 5,6 A · 0,7 kW 100V/50/60Hz · 7,0 A · 0,7 kW
intimus 90SC2/90CC3-CC6 220-230V/50Hz · 3,0 A · 0,7 kW 120V/60Hz · 5,6 A · 0,7 kW 100V/50/60Hz · 7,0 A · 0,7 kW
Segurança (ociosa): 220-230V = 10 A / 120V = 15 A / 100V = 15 A
Modelo Tipo Largura do corte Produtividade do corte Lagura de Nivel de ruido Dimensões Peso
papel papel
intimus 45SC2 278-4S 3,8 mm 22-24 folhas* 260 mm 55 dB(A) (aprox) 450 x 390 x 650 mm 31 kg
intimus 45CC3 278-4C 3,8x30 mm 16-18 folhas* 260 mm 55 dB(A) (aprox) 450 x 390 x 650 mm 32 kg
intimus 45CC4 278-2C 1,9x15 mm 11-13 folhas* 260 mm 55 dB(A) (aprox) 450 x 390 x 650 mm 32 kg
intimus 45CC5 278-1C 0,8x12 mm 7-8 folhas* 260 mm 55 dB(A) (aprox) 450 x 390 x 650 mm 32 kg
intimus 45CC6 278-1CF 0,8x4,5 mm 5-6 folhas* 260 mm 55 dB(A) (aprox) 450 x 390 x 650 mm 32 kg
intimus 60/90SC2 279/295-4S 3,8 mm 22-24 folhas* 260 mm 55 dB(A) (aprox) 450 x 390 x 770/990 mm 33/37 kg
intimus 60/90CC3 279/295-4C 3,8x30 mm 16-18 folhas* 260 mm 55 dB(A) (aprox) 450 x 390 x 770/990 mm 34/38 kg
intimus 60/90CC4 279/295-2C 1,9x15 mm 11-13 folhas* 260 mm 55 dB(A) (aprox) 450 x 390 x 770/990 mm 34/38 kg
intimus 60/90CC5 279/295-1C 0,8x12 mm 7-8 folhas* 260 mm 55 dB(A) (aprox) 450 x 390 x 770/990 mm 34/38 kg
intimus 60/90CC6 279/295-1CF 0,8x4,5 mm 5-6 folhas* 260 mm 55 dB(A) (aprox) 450 x 390 x 770/990 mm 34/38 kg
trabalho
Designação N° de encomenda
Saco de plástico, 440x330x600x0,05 mm (45) 83079
Saco de plástico, 440x330x950x0,05 mm (60/90) 99977
Frasco de óleo, 110 ml 88035
Indicação: No caso de encomendar mais tarde peças dos
acessórios especiais e no caso de necessitar peças de
reposição, dirija-se ao seu revendedor especializado.
L x P x A
* Referente a papel A4 70g/m2 com 230V/50Hz
16
91402 2 05/11
Page 17

45SC2
45CC3
45CC4
45CC5
45CC6
60SC2
60CC3
60CC4
60CC5
60CC6
90SC2
90CC3
90CC4
90CC5
90CC6
17
91402 2 05/11
Page 18

45SC2
45CC3
45CC4
45CC5
45CC6
60SC2
60CC3
60CC4
60CC5
60CC6
90SC2
90CC3
90CC4
90CC5
90CC6
18
91402 2 05/11
Page 19

45SC2
45CC3
45CC4
45CC5
45CC6
60SC2
60CC3
60CC4
60CC5
60CC6
90SC2
90CC3
90CC4
90CC5
90CC6
19
91402 2 05/11
Page 20

International Network
Headquarters
USA MARTIN YALE Industries
Germany MARTIN YALE INTERNATIONAL GmbH
Bergheimer Straße 6-12 fax +49 / (0) 7544 60-248
88677 Markdorf / Bodensee [email protected]
www.martinyale.de, www.intimus.com
Branch Offices
South Africa MARTIN YALE Africa
S & B House, 7 Loveday Street fax +27 / (0) 11 838 73 22
Marshall Town, Johannesburg [email protected]
P. O. BOX 1291, Houghton 2041
www.martinyale.co.za
United Kingdom MARTIN YALE International
Unit C 2 The Fleming Centre, Fleming Way fax +44 / (0) 1293 61 11 55
Crawley, West Sussex, RH10 9NN [email protected]
www.intimus.co.uk
France MARTIN YALE International S.A.R.L.
☏
+1 / 260 563-0641
☏
+49 / (0) 7544 60-0
☏
+27 / (0) 11 838 72 81
☏
+44 / (0) 1293 44 1900
☏
+33 / (1) 70 00 69 00
Spain MARTIN YALE Ibérica S.L.
C/Maestrat, n° 26 fax +34 / 9 02 22 31 32
Pol. Indus. Les Salines [email protected]
08880 Cubelles (Barcelona)
www.martinyale.es
Italy Martin Yale Italia srl
Sweden MARTIN YALE Nordic
P.R. China MARTIN YALE Beijing
Room 2003 D Building fax +86 / (0) 10 84 47 10 75
Guojiang No 2 Dong Sanhuan Bei Lu [email protected]
Chaoyang District, Beijing 100027
www.martinyale.com.cn
Dieses Papier ist aus 100 % Altpapier ohne optische Aufheller hergestellt
This paper made from 100 % unbleached recycled paper
Papier recyclable à 100 %
☏
+34 / 9 02 22 31 31
☏
+39 / 335 618 4924
☏
+46 / 8 556 165 20
☏
+86 / (0) 10 84 47 10 70
91402 2 05/11
 Loading...