

Page 1
93PO
(93PO) "NMMA" BOAT W/O MOTOR MOUNTING (TYPE I) ENGLISH 7.5” X 10.3” 08/04/2010
SAVE THESE INSTRUCTIONS
Page 1
INTEX® OWNER’S MANUAL
INFLATABLE BOAT
IMPORTANT
THIS BOOKLET CONTAINS IMPORTANT SAFETY INFORMATION.
READ IT THOROUGHLY BEFORE USING THIS PRODUCT AND
KEEP IT FOR FUTURE REFERENCE.
©2010 Intex Marketing Ltd. - Intex Development Co. Ltd. - Intex Trading Ltd. - Intex Recreation Corp.
All rights reserved/Tous droits réservés/Todos los derechos reservados/Alle Rechte vorbehalten.
Printed in China/Imprimé en Chine/Impreso en China/Gedruckt in China.
®™ Trademarks used in some countries of the world under license from/®™ Marques utilisées dans certains pays sous
licence de/Marcas registradas utilizadas en algunos países del mundo bajo licencia de/Warenzeichen verwendet in einigen
Ländern der Welt in Lizenz von/Intex Marketing Ltd. to/à/a/an Intex Trading Ltd., Intex Development Co. Ltd., G.P.O
Box 28829, Hong Kong & Intex Recreation Corp., P.O. Box 1440, Long Beach, CA 90801 • Distributed in the European
Union by/Distribué dans l’Union Européenne par/Distribuido en la unión Europea por/Vertrieb in der Europäischen Union
durch/Intex Trading B.V., P.O. Box nr. 1075 – 4700 BB Roosendaal – The Netherlands
IMPORTANT!
DO NOT RETURN PRODUCT TO STORE
To purchase parts and accessories or to obtain non-technical assistance,
Visit www.intexcorp.com
For technical assistance and missing parts call us toll-free (for U.S. and Canadian Residents):
1-800-234-6839
Monday through Friday, 8:30am to 5:00pm Pacific Time
093PO-R0-1108
Page 2

93PO
(93PO) "NMMA" BOAT W/O MOTOR MOUNTING (TYPE I) ENGLISH 7.5” X 10.3” 08/04/2010
SAVE THESE INSTRUCTIONS
Page 2
TABLE OF CONTENTS
INTRODUCTION......................................................................................................................................3
MANUFACTURE’S CERTIFICATION.......................................................................................................3
WARNING.................................................................................................................................................3
MANUFACTURER’S RECOMMENDATION.............................................................................................4
DESCRIPTION.........................................................................................................................................5
INFLATING INSTRUCTIONS....................................................................................................................6
HOW TO USE BOSTON VALVE...............................................................................................................6
FISHING ROD HOLDER USE.................................................................................................................6
OAR ASSEMBLY......................................................................................................................................7
GRAB LINE INSTALLATION.....................................................................................................................8
ACCESSORY LINE INSTALLATION.........................................................................................................8
SAFETY AND OPERATION INSTRUCTIONS......................................................................................8-9
CARE AND MAINTENANCE....................................................................................................................9
DISASSEMBLY AND STORAGE............................................................................................................10
TROUBLESHOOTING............................................................................................................................10
REPAIRS................................................................................................................................................10
INTEX SERVICE CENTER LOCATIONS...............................................................................................11
Page 3
93PO
(93PO) "NMMA" BOAT W/O MOTOR MOUNTING (TYPE I) ENGLISH 7.5” X 10.3” 08/04/2010
SAVE THESE INSTRUCTIONS
Page 3
Introduction
This manual has been compiled to help you to operate your craft with safety and pleasure. It contains
details of the craft, the equipment supplied or fitted, its systems, and information on its operation and
maintenance. Please read it carefully, and familiarize yourself with the craft before using it.
If this is your first craft, or you are changing to a type of craft you are not familiar with, for your own
comfort and safety, please ensure that you obtain handling and operating experience before
assuming command of the craft. Your dealer or national sailing federation or yacht club will be pleased
to advise you of local sea school, or competent instructors.
PLEASE KEEP THIS MANUAL IN A SECURE PLACE, AND HAND IT OVER TO THE NEW OWNER
WHEN YOU SELL THE CRAFT. RECORD THE "HULL IDENTIFICATION NUMBER" (HIN) WHICH IS
PRINTED ON THE BOAT'S HULL IN THE FOLLOWING BOX:
HIN: ________________________
Manufacture’s Certification
Our boats comply with ISO 6185 standard established by the International Organization for
Standardization.
NMMA (FOR USA ONLY) certification means that the boat, sold in the United States, has been
judged by the National Marine Manufacture’s Association to be in compliance with the U.S. Coast
Guard Regulations and American Boat and Yacht Council (ABYC) standards and recommended
practices.
• This is not a life saving device. Use only under competent supervision. Never allow diving into
this product. Never leave in or near the water when not in use. Never tow from any vehicle.
• Read the complete Owner’s Manual before use and store this Manual in a safe place for future
reference.
• Follow all the Safety and Operating Instructions on this Manual.
• Boats propelled exclusively by manual means.
• Never navigate alone. Beware of offshore winds and currents.
• Do not exceed the maximum recommended capacities. Overloading violates regulations.
• Everyone on board must wear a Personal Floatation Device (PFD).
• Use caution when stepping or climbing aboard the boat. Step into the center of the boat for
maximum stability.
• Distribute the weight of passengers, gear, tackle box, and accessories so that the boat sits level
fore (front) to aft (back) and side-to-side.
• Do not use your boat if you suspect a puncture or leak.
• Adults should inflate the chambers in numbered sequence.
• Not for white water rafting or any other extreme sports activities.
• Follow these rules to avoid drowning, paralysis or other serious injuries.
WARNING
Page 4
93PO
(93PO) "NMMA" BOAT W/O MOTOR MOUNTING (TYPE I) ENGLISH 7.5” X 10.3” 08/04/2010
SAVE THESE INSTRUCTIONS
Page 4
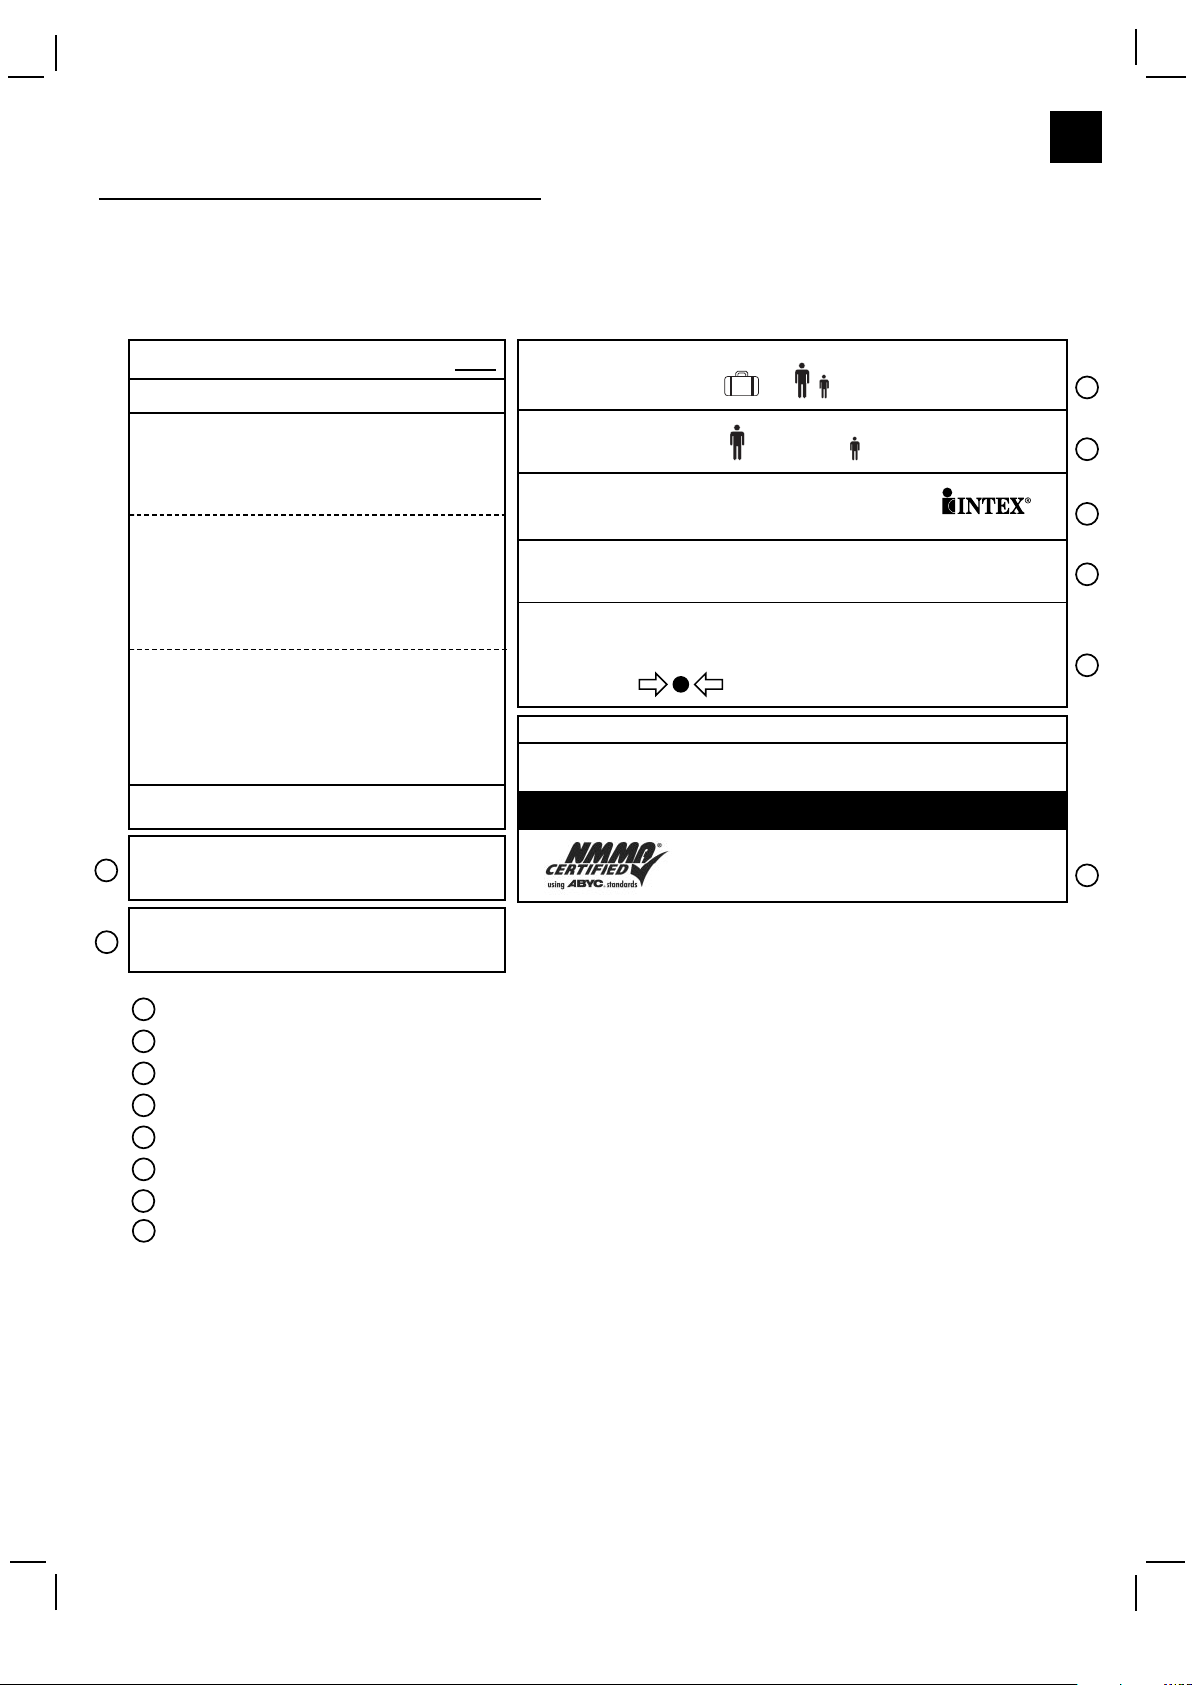
Europe hull identification number (HIN).
USA hull identification number (HIN).
Manufacturer’s recommended maximum load capacity.
Maximum person’s capacity.
Manufacturer’s name and country of origin.
Model name and number.
Manufacturer’s recommended working pressure.
NMMA (for USA only) certification means that the boat, sold in the United States, has been
judged by the National Marine Manufacture’s Association to be in compliance with the U.S.
Coast Guard Regulations and American Boat and Yacht Council (ABYC) standards and
recommended practices.
6
5
4
3
2
1
Manufacturer’s Recommendation
The total number of persons and total weight shall not exceed the limits printed on the boat. Please refer to
the boat's hull label for the actual values of your boat.
BOAT LABEL FORMAT
7
ISO 6185 PART 1 TYPE
Do not overinflate or use high pressure air
compressor to inflate.
Adults should inflate the chambers with cold air in
numbered sequence.
This boat not rated for propulsion by a motor.
Use the enclosed ruler to check while inflating.
Nicht zu stark aufblasen und keinen Kompressor
zum Aufblasen verwenden.
Erwachsene sollten die kammern in der
angegebenen Reihenfolge mit kalter luft aufblasen.
Das Boot kann nicht durch einem Motor betrieben
werden.
Verwenden Sie das belgefügte Meßgerät um die
korrekte Füllung zu überprüfen.
Ne pas surgonfler. Ne pas utiliser de compresseur
pour le gonflage.
Le gonflage doit être effectué par un adulte avec de
l'air froid en suivant les étapes suivantes.
Ce bateau n'est pas adapté pour être équipé d'un
moteur.
Utiliser la règle jointe pour ajuster le gonglage de la
chambre à air principale.
MAXIMUM CAPACITIES
MAXIMUM-KAPAZITÃT
CAPACITÉS MAXIMUM
PERSONS
PERSONEN
PERSONNES
MANUFACTURER
HERSTELLER
FABRICANT
MODEL
MODELL
MODÈLE
RECOMMENDED WORKING PRESSURE FOR EACH CHAMBER
EMPFOHLENE ARBEITENDE DRUCK FÜR JEDE LUFTKAMMER
RECOMMANDÉ FONCTIONNEL PRESSION POUR CHAQUE CHAMBRE À AIR
CN-XEE ________
BY INTEX
®
LOAD CAPACITY
BASIC FLOTATION
___Kg ( ___ Lbs) MAX.
National Marine Manufacturers Association
+ = ___ Kg ( ___ Lbs)
____________________
= ___ bar ( ___ psi)
CHINA
1
3
4
5
6
7
8
MAXIMUM CAPACITIES
PERSONS OR ____kg (___Lbs)
____
____ POUNDS, PERSONS, GEAR
= ___ = ___
DESIGN COMPLIANCE WITH NMMA REQUIREMENTS BELOW IS VERIFIED.
MFGR. RESPONSIBLE FOR PRODUCTION CONTROL
XEE ________
2
8
Page 5

93PO
(93PO) "NMMA" BOAT W/O MOTOR MOUNTING (TYPE I) ENGLISH 7.5” X 10.3” 08/04/2010
SAVE THESE INSTRUCTIONS
Page 5
NOTE: Drawings for illustration purpose only. Actual product may vary. Not to scale.
Description
Challenger Series
Seahawk Series
" " - Recommended seating arrangement of the occupants.
Challenger 1
134
6
8
2
17
6
234 8
Seahawk 1
5
" " - Recommended seating arrangement of the occupants.
1
2
3
4
5
6
7
8
9
Grab handle
All around grab line
Inflatable floor or removable slats floor
Oar lock
Gear pouch or accessory bag
Inflation valve
Fishing rod holder
Boston valve
Oar holder
Descriptions
Challenger 2
12
34
6
8
9
Page 6

93PO
(93PO) "NMMA" BOAT W/O MOTOR MOUNTING (TYPE I) ENGLISH 7.5” X 10.3” 08/04/2010
SAVE THESE INSTRUCTIONS
Page 6
Inflating Instructions
Before starting, locate a clean area free of stones or other sharp objects. Unroll the boat so it is laid
out flat, and locate your pump.
Use a hand or foot operated air pump to inflate the boat. Do not use high-pressure air compressors.
Adults should inflate the chambers following the numerical sequence marked on the valves. It is very
important to follow the numerical sequence; failure to do so will result in an improperly inflated boat.
Fill each chamber until it is stiff to the touch but NOT hard. Use the enclosed ruler to check the main
chamber for proper inflation. DO NOT OVER INFLATE. Fill with cold air only.
IMPORTANT: Air temperature and weather condition do affect the internal air pressure of inflatable
products. In cold weather the product will lose some pressure due to the fact that the air will contract.
If this occurs, you may want to add a little air to the product. However, in hot weather, the air will
expand. You must let some air out to prevent the product from failing due to overpressure.
How to Use Boston Valve:
1. Double valve cap (valve lets air in, not out).
2. Quick deflation cap.
3. Unscrew Double valve cap.
4. Insert output end of air pump into valve and fill. Do not over inflate or use high pressure
compressor.
5. To deflate: unscrew quick-deflation cap. CAUTION: Double valve does not operate when this cap is
off. Do not unscrew this cap while boat or inflatable is in water.
Fishing Rod Holder Use (Certain Models):
1. Slide the end cap over the end of the fishing rod.
2. Insert the fishing pole into the holder.
1
2
3
4
5
Fishing Rod Holder
Fishing Rod
Holder
End Cap
Fishing
Rod
Page 7

93PO
(93PO) "NMMA" BOAT W/O MOTOR MOUNTING (TYPE I) ENGLISH 7.5” X 10.3” 08/04/2010
SAVE THESE INSTRUCTIONS
Page 7
1. Insert “Shaft A” with the pin end first into the blade. Make sure the pin is securely fastened to the
blade.
2. Insert the assembled “Shaft A” through the oar-lock with the blade towards outboard (water).
3. Place the retainer ring onto the other end of the assembled “Shaft A”, from inside of the boat.
4. Join “Shaft A” with “Shaft B” together by inserting them together into the coupler and tighten the
coupler covers securely.
5. When the oars are not in use secure the oars onto the oar holders located on each side of the
boat.
Oar Assembly:
Pin
Coupler Cover
Shaft B
Coupler
Shaft A
Blade
Retainer Ring
FRENCH OARS:
Page 8
93PO
(93PO) "NMMA" BOAT W/O MOTOR MOUNTING (TYPE I) ENGLISH 7.5” X 10.3” 08/04/2010
SAVE THESE INSTRUCTIONS
Page 8
Safety and Operating Instructions
Before Departing from the Shore or Dock
Know all required information and inform your passengers:
• Take a boating safety course and get hands-on training from your boat dealer or local boating
authorities.
• Know all local regulations and hazards related to water activities and boat operation.
• Check weather forecast, local currents, tides and wind conditions.
• Advise someone on land of the time you plan to be back at your starting point.
• Explain basic boat operation to all passengers.
• Children and non-swimmers need special instructions in the use of life jacket or personal floatation
devices (PFD).
• Be sure that one of your passengers can operate the boat in case of emergency.
• Learn how to determine the distance you can cover, and remember that bad weather conditions
can alter this.
• Review all safety requirements regularly.
Check the working condition of the boat and equipments:
• Check inflation pressure.
• Inspect the valves caps.
• Check the load is evenly distributed, fore (front) to aft (back) and side-to-side.
Make sure that all required safety equipment is on board (check the laws and regulations of the
country or locality in which you are boating to see if additional equipment may be needed):
• One personal flotation device (PFD) per person.
• Air pump, oars, repair kit and tool kit.
• Any other mandatory equipment.
• The boat papers and your boating license (if applicable).
• Lights are required if operating after dark.
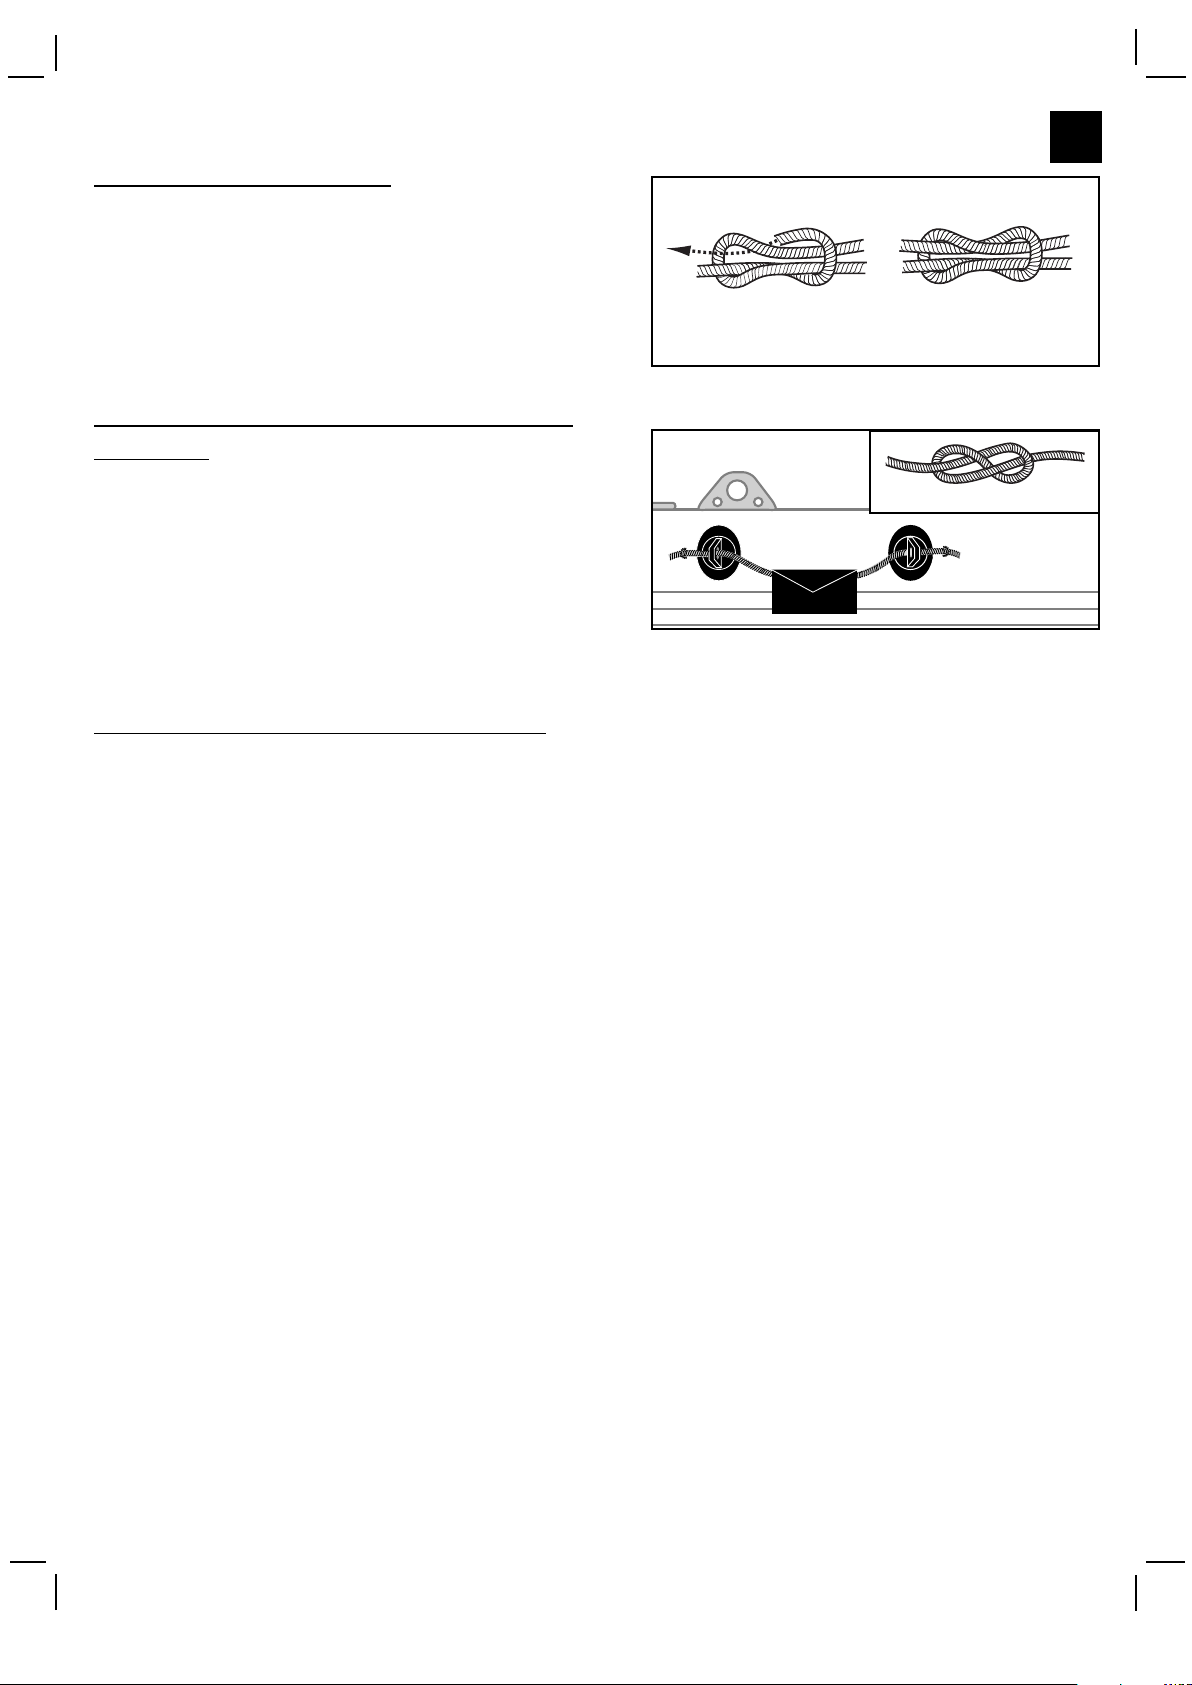
Grab Line Installation:
IMPORTANT: To properly install the inflatable boat’s
grab line and/or accessory lines, first inflate the boat.
If is necessary, begin the grab line installation at the
rear of the boat by threading it through the rope
holders completely around the outside of the boat.
Tie the two loose ends in a square knot at the rear
end of the boat.
Square knot
Figure eight knot
Accessory Line Installation (Certain
Models):
Your boat may have accessory lines to install. Tie a
figure eight knot into one end of the accessory line
and slide it through the rope holders. Tie a figure
eight knot in the remaining end of the rope.
The accessory bags may or may not be attached to
the accessory lines. Slide the rope through the
accessory bags while installing the accessory lines,
if desired.
Page 9

93PO
(93PO) "NMMA" BOAT W/O MOTOR MOUNTING (TYPE I) ENGLISH 7.5” X 10.3” 08/04/2010
SAVE THESE INSTRUCTIONS
Page 9
Rules to Observe During Navigation
• Be responsible, do not neglect the safety rules, this could jeopardize your life and the lives of
others.
• Always keep control of your boat.
• Respect local regulations and practices.
• Near the shore, navigate in the designated boating area.
• Remember that weather conditions can rapidly deteriorate. Always be sure that you can reach a
shelter rapidly.
• Everyone on board must always wear a personal flotation device (PFD).
• Always use the Stop Switch Lanyard.
• Do not drink alcohol or take drugs before or while operating your boat. Maintain passenger
sobriety.
• Do not exceed the authorized number of persons or weight.
• Make sure your passengers remain seated at all times. At planning speeds, in rough water or
during sharp turns, all passengers should position themselves in seats or on the floor.
• No bow riding. Bow riding is illegal in most areas and is extremely dangerous. In case of falling,
the man overboard is in the way of the propeller.
• Be especially careful when docking. Arms and legs may be injured if they are outside the boat.
• Keep clear of swimmers and divers. Always avoid areas where divers/swimmers are in the water.
• Keep a sharp lookout especially when operating near beaches and launch sites. The Alpha flag
indicates proximity of divers. You MUST maintain a safe distance as required by your local boating
laws, which may range from 50 meters (164 feet) to 91 meters (300 feet).
• Avoid sharp turns at high speeds. You could get ejected from the boat.
• Do not make changes in direction without advising passengers.
• Avoid all contact between the buoyancy tubes and sharp objects or aggressive liquids (such as
acid).
• Do not smoke on board.
Care and Maintenance
The boat is made of the highest quality materials and complies with ISO 6185 standards. Altering the
construction of the boat will endanger your own safety, safety of the occupants and void the limited
warranty!
There is very little that you have to do to keep your boat in good condition for many years. You may
store it inflated or deflated. If you leave it outside, raise it up off the ground and do not place any
heavy or sharp objects on it. If it is going to be in direct sunlight or exposed to leaves or rain, cover it
with a tarp. We do not recommend hanging the boat. If you store it in a closet, basement or garage,
we suggest you pick a cool, dry place, making sure the boat is clean and dry before you store it - or
mold can accumulate.
Use as few cleaning agents as possible, do not discharge waste agents into water, and clean your
boat preferably on land.
Clean your boat after a trip to prevent damage from sand, salt water or sun exposure.
Most dirt can be removed with a garden hose, a sponge and mild soap. Make sure the boat is
completely dry before storing. Store the product and accessories in a dry, temperature controlled,
between 32 degrees Fahrenheit (0 degrees Celsius) and 104 degrees Fahrenheit (40 degrees Celsius)
storage location.
Page 10

93PO
(93PO) "NMMA" BOAT W/O MOTOR MOUNTING (TYPE I) ENGLISH 7.5” X 10.3” 08/04/2010
SAVE THESE INSTRUCTIONS
Page 10
Disassembly and Storage
First clean your boat thoroughly following the Care and Maintenance instructions. Open all air valves
and deflate boat completely. Remove all the accessories from the boat; seats, fishing rod holders,
oars, gear pouch and battery pouch.
Flip the boat over. Fold the left side of the boat over and then fold the right side over the left. Fold the
bow end twice to the middle of the boat tightly while forcing out any remaining air; repeat this
procedure for the stern. With two opposing folded sides, fold one end over the other like closing a
book. Your boat is ready for storage. Fold the boat loosely and avoid sharp bends, corners and
creases which can damage the boat.
Troubleshooting
If your boat appears a bit soft, it might not be because of a leak. If the boat was inflated late in the day
with 32 °C (90 °F) air, that air might cool down to 25 °C (77 °F) overnight. The cooler air exerts less
pressure on the hull, so it could appear soft the next morning.
If there has been no temperature variation, you need to start looking for a leak:
• Take a good look at your boat from just a few feet away. Flip it over and closely check over the
outside. Any large leaks should be clearly visible.
• If you have an idea where your leak is, use a mix of dishwashing liquid and water in a spray
bottle, and spray over the suspicious areas. Any leak will produce bubbles that will pinpoint the
location of the leak.
• Check valves for leak, if necessary, spray soapy water around the valve and the valve base.
Repairs
Through constant use you may occasionally puncture your boat. Most leaks only take a few minutes to
repair. Your boat comes with a repair kit, and additional repair supplies can be ordered from Intex
Consumer Service or from our website.
First locate the leak; soapy water will bubble out from the source of the leak. Thoroughly clean the
area surrounding the leak to remove any dirt or grime.
Cut a piece of repair material large enough to overlap the damaged area by approximately 1.5 cm
(1/2”). Round off the edges, and place over the damaged area. Using a pencil, trace the outline of the
patch lightly. Apply adhesive to the underneath side of the patch and around the area to be repaired.
Coat the affected area lightly but completely with glue.
Place the patch on the damaged area and press down firmly. You may want to use a weight on top to
keep it in place. Allow 12 hours for repair to dry. After patch has dried, apply glue around the edges for
a complete seal (dry 4 hours).
Page 11

93PO
(93PO) "NMMA" BOAT W/O MOTOR MOUNTING (TYPE I) ENGLISH 7.5” X 10.3” 08/04/2010
SAVE THESE INSTRUCTIONS
Page 11
AREAS LOCATION
• UNITED STATES INTEX RECREATION CORP.
• CANADA 14779 Bar Harbor Road
Fontana, CA 92336
Tel: 1-800-234-6839
Fax: 310-549-2900
Website: www.intexcorp.com (U.S./Canada only)
Consumer Service Hours: 8:30 am to 5:00 pm
Pacific Time, Mon. thru FRI. only.
• MEXICO KAY INTERNACIONAL, S.A. DE C.V.
SAN JERONIMO # 550- INT.501 Y 502. COL.
JARDINES DEL PEDREGAL. C.P. 01900
MÉXICO D.F.
Tel: 01-800-347-4020 (Collect Call)
Tel: 55-9172-8035
Fax: 55-9172-8047
E-mail: servicenter@kayinternacional.com
Website: www.intexmexico.com.mx
• PANAMA SUPRO MUNDIAL S.A./
• PARAGUAY PRODUCTOS SUPERIORES S.A.
• ECUADOR Boulevard Andrews, Albrook,
• HONDURAS Panama, Rep. of Panama
• EL SALVADOR Tel: 507-300-3800
• NICARAGUA Fax: 507-300-3813
E-mail: suproadmin@supropanama.com
• COSTA RICA CENTURY USA, LLC
• DOMINICAN REPUBLIC 4731 W. Atlantic Ave., Suite B-3
• GUATEMALA Delray Beach, FL 33445, USA
• COLOMBIA Tel: 561-495-0648
• VENEZUELA Fax: 561-495-4782
E-mail: sales@centuryusa.com
• MIDDLE EAST REGION FIRST GROUP INTERNATIONAL
Al Moosa Group Building, 1st Floor,
Office 102 & 103, UMM Hurair Road,
Karama, Dubai, UAE
TEL: 00971-4-800INTEX(46839) / +971-4-3373322
FAX: 00971-4-3375115
E-mail: intex@firstgroupinternational.com.
Website: www.firstgroupinternational.com
• ASIA INTEX DEVELOPMENT CO. LTD.
9th Floor,
Dah Sing Financial Centre
108 Gloucester Road,
Wanchai, Hong Kong
Tel: 852-28270000
Fax: 852-23118200
E-mail: xmservicesupport@intexcorp.com.cn
Website: www.intexdevelopment.com
For answers to most frequently asked questions, please visit
www.intexcorp.com. Non U.S. Residents, please visit www.intexdevelopment.com.
 Loading...