


USER GUIDE
Digital trimmer-controlled Behind-the-Ear hearing instrument
STAGE 73 BTE
STAGE 83 PBTE
Thank you for selecting an Interton® BTE (Behind-the-Ear) /Power BTE hearing system!
Please familiarize yourself with the information in this guide. It contains important instructions for proper use and care, technical performance information and other general information about your hearing system. Your hearing instruments have been adjusted to your particular hearing loss.
Your hearing healthcare professional will explain these adjustments and the special features of your particular model.
Becoming Accustomed to Amplification
While purchasing a hearing system is a major step, it is only one step in a process towards more comfortable hearing. A hearing loss is usually acquired gradually over many years. Successfully adapting to the amplification your hearing system provides takes time and consistent use. You will enjoy more benefits from your Interton® hearing system by wearing the system regularly in order to get comfortable with using it.
This booklet & your instrument
In this booklet you will find instructions for inserting and controlling your new hearing instrument. You will find explanations on controlling your instrument, on daily handling and on its use. Furthermore, you can read what to do if things do not live up to your expectations. We will give a few practical steps towards better hearing.
Contents |
|
|
|
On/Off function |
6 |
Removing/Inserting the Battery |
17 |
Volume control |
7 |
Warnings |
18 |
Changing memory programs |
7 |
Maintenance and cleaning |
19 |
Proper placement in the ear |
10 |
General warnings |
21 |
Removal |
11 |
Solving small problems |
22 |
Recognizing left and right instrument |
12 |
Eight steps towards better hearing |
26 |
Using the telephone |
14 |
Hearing Instrument identification |
30 |
The telecoil feature |
14 |
Repairs |
31 |
Cellular phone |
15 |
General Precautions |
31 |
Using Assistive Listening (Tele-Loop) |
|
Warning to hearing care practitioner |
32 |
Systems |
16 |
Technical Specifications |
32 |
Changing batteries |
17 |
|
|
2 |
3 |

microphone |
volume wheel |
earhook |
plastic |
tube |
trimmer |
program button |
battery door and on/off switch |
earmould |
STAGE ISG173-V |
(1-trimmer hearing instrument) |
4
microphone |
volume wheel |
earhook |
plastic |
tube |
trimmers |
program button |
battery door and on/off switch |
earmould |
STAGE ISG273-V / STAGE ISG283-V |
(2-trimmer hearing instruments) |
microphone |
volume wheel |
earhook |
plastic |
tube |
trimmers |
program button |
battery door and on/off switch |
earmould |
STAGE ISG373-V / STAGE ISG383-V |
(3-trimmer hearing instruments) |
5
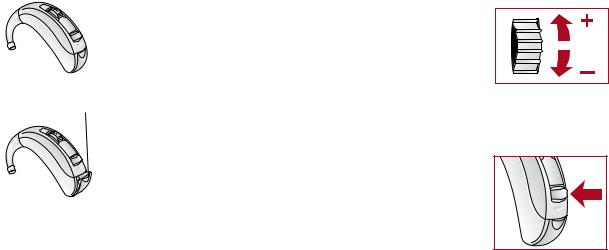
On/Off Function |
|
|
Volume control |
Switch your hearing instrument on by closing the battery door. |
|
|
Your instrument has a volume control which allows you to set and |
Switch your instrument off by a small movement of the battery |
|
|
control the volume manually. |
door till you feel a click. After switching on, your hearing |
|
|
During the fitting of the hearing instrument, your hearing care |
instrument will always start in program 1. |
|
|
|
|
|
practitioner will have chosen an optimal volume setting for you. |
|
Read more on this subject on page 7. |
|
|
|
|
|
Please note the setting of that particular level. |
|
|
|
|
|
• Switch your instrument off if you are not using it. |
|
off |
Your volume control has numbers on it to indicate the sound level. |
This will increase the battery life. |
|
|
|
• At night, switch off your instrument and open the battery door |
|
|
|
completely. It allows moisture in your instrument to evaporate |
|
|
Changing Memory Programs |
and will increase the instrument’s life span. |
|
|
|
|
|
Your hearing instrument has a push button allowing you to use |
|
|
|
|
|
|
|
|
up to three different listening programs, each of them suitable |
|
|
|
|
|
|
|
for certain situations. |
|
|
|
6 |
7 |

After pressing the program button, the instrument will switch program. If it was in program 1 it will switch to program 2, if it was in program 2 it will switch to program 3, if it was in program 3 it will switch back to program 1.
Note: Models ISG173-V, ISG273-V and ISG283-V have only 2 programs (Basic and Noise). Models ISG373-V and ISG383-V have 3 programs (Basic, Noise and Telecoil).
Your instrument will give an audible signal after pressing the program button. A little later, the instrument will give:
•one single beep if set in program 1
•two beeps if set in program 2
•three beeps if set in program 3
When you close the battery door and switch the instrument on it will start in program 1, confirmed by one single beep.
Press the program button if you want to move to a different listening program.
Program |
Type of program |
Intended for |
|
number |
listening situations |
||
|
|||
|
|
|
|
1 |
Basic |
Most situations |
|
|
|
|
|
2 |
Noise |
Background noise |
|
|
|
|
|
3 |
Telecoil |
Assistive Listening System |
|
|
|
|
8 |
9 |

Proper Placement in the Ear
Inserting the instrument
• With the battery door opened in the off position take the earmould between thumb and index finger and position its
‘point’ in your ear canal. Now, slide the earmould all the way  into your ear with a gentle, twisting movement. Insertion can
be easier if you gently pull your auricle backwards with your other hand.
• Turn the top-part of the earmould gently backwards and forwards so that it fits behind the fold of skin above your ear canal.
•Place the hearing instrument behind your ear. Move the ear- 

 mould up and down and press gently to ensure it is positio-
 ned correctly in the ear. Opening and closing your mouth can
 ease insertion. You will feel when the earmould is positioned correctly.
• When correctly positioned switch on your instrument by closing the battery door.
• You can also insert the hearing instrument while in the on position. However you might experience some feedback (whistling) during the operation.
Removal
•Switch off the instrument by pressing the battery door in the ‘off’ position.
•Lift the hearing instrument from behind the ear. For a moment, let it hang beside your ear.
•Using your thumb and index finger, gently pull the earmould (not the instrument or the tubing) loose from the ear.
•Remove the earmould completely by gently twisting it.
10 |
11 |
 Loading...