


User Guide
Digital Receiver-in-the-Ear instrument (RIE)
A560-D
A560-D Open
A560-D HPG
1
Thank you for selecting an Interton hearing system. We are proud of our hearing products and are confident you have chosen one of the best products available. Please familiarize yourself with the information in this guide. It contains important instructions for proper use and care, technical performance information, and other general information about your hearing system. Your hearing system has been adjusted to your particular hearing loss. Your hearing healthcare professional will explain these adjustments and the special features of your particular model.
Becoming Accustomed to Amplification
While purchasing a hearing system is a major step, it is only one step in a process toward more comfortable hearing. Successfully adapting to the amplification your hearing system provides takes time and consistent use.
You will enjoy more benefits from your Interton hearing system by taking the following actions:
•Wear the system regularly in order to get comfortable with using it.
•Begin by wearing your system for short periods of time in quiet environments.
•As you get more comfortable with the system, increase the wearing time and wear your hearing system in multiple types of listening environments.
It may take as long as several months for your brain to get used to all the “new” sounds around you. Following these suggestions will give your brain time to learn how to interpret amplification and increase the benefits you get from using an Interton hearing system.
Contents |
|
Cleaning the Receiver Dome and Tube |
21 |
|
|
Cleaning the Earmould |
22 |
Your Hearing System |
4 |
Changing the Dome |
23 |
On/Off Function |
6 |
Earwax Management |
25 |
Power-on Delay |
6 |
When the Hearing System Is Not in Use |
25 |
Stand-By Mode |
7 |
Things that Can Damage |
|
Volume Control |
7 |
Your Hearing System |
26 |
Changing Memory Programs |
8 |
Moisture |
26 |
Dual Microphone System |
9 |
Temperature Extremes |
26 |
Proper Placement in the Ear |
10 |
Rough Treatment |
27 |
Using the Telephone |
14 |
Corrosive Substances |
27 |
Telecoil |
14 |
General Warnings |
28 |
Cellular Phone and |
|
Solving Small Problems |
30 |
Hearing Instrument Compatibility |
15 |
General Precautions |
34 |
Using Assistive Listening Systems |
16 |
Hearing Instrument Identification |
35 |
Removing/Inserting the Battery |
17 |
Repairs |
36 |
Low Battery Warning |
18 |
Technical Specifications |
36 |
Battery Safety |
19 |
Notes |
37 |
Cleaning the Instrument |
20 |
|
|
Cleaning the Microphone Sound Inlets |
20 |
|
|
2 |
3 |

Receiver Tube
(Tube)
Dome |
Receiver |
|
(Sound Outlet)) |
Microphone 1
(Sound Inlet)
Volume Control
Microphone 2
 (Sound Inlet)
Memory
Selector
Earmould |
Battery Compartment and On/Off switch |
|
|
AVIO 5 Receiver In-the-Ear (RIE) |
|
Manufacturer
Model
A560-D
INTERTON
XXXXXXXX
Serial Number
Battery Door and On/Off switch
4 |
5 |
On/Off Function
The door to the battery compartment serves as the On/Off switch for your hearing instrument. When the door is fully closed, the instrument is on. To turn the instrument off, press the tab on the base of the instrument with your fingertip until the battery door snaps partly open, then put your fingernail under the nail grip and pull gently to open it completely.
Tip: To reduce battery consumption,
turn the instrument off when it is not in use.
Power-on delay
Power-on delay allows you to insert the instrument in your ear without the hearing instrument squealing.
It delays the switch-on time by 10 seconds after closing the battery compartment. A beep each second is presented during this time.
Stand-By Mode
Stand-by mode reduces battery consumption since only a small amount of power is used. When in stand-by mode, the hearing instrument will not deliver sound to the ear.
You can put the instrument into stand-by mode by holding down the Memory Selector for five seconds. You will hear a series of beeps, indicating that the instrument is now in stand-by mode.
To return to functional mode, simply press the Memory Selector once.
Volume Control |
|
Your hearing system is equipped with a toggle volume control. |
|
volume control |
|
Simply press the toggle up to increase the volume, or down to |
|
decrease the volume. |
|
For each volume step, you will hear a beep signal indicating the |
|
change. The loudness of the beeps will increase as you turn |
|
the volume up and decrease as you turn it down. If you reach |
|
the upper or lower limit of the volume control range, there will |
|
be a different type of beep signal with a lower pitch. |
|
|
|
6 |
7 |

Changing Memory Programs
Hearing instrument memories are used to store settings optimal memory selector in different listening situations. Your hearing healthcare professio- 
nal may have programmed multiple memories into your hearing instruments to accommodate your lifestyle needs.
For future reference, ask your hearing health professional to fill in your memory program information on the notes page at the back
of this guide.
Whenever the hearing instrument is turned on, Memory 1 is automatically activated. Memories can then be selected by pushing the Memory Selector button on the instrument.
Your hearing instrument may have up to 4 programs.
Special tones will indicate which memory has been activated. One tone will sound when
Memory 1 is activated, two tones will sound when Memory 2 is activated, etc. Memories are always activated in sequence, for example, with three memories: 1 to 2, 2 to 3, 3 to 4,
4 to 1.
Consult your hearing healthcare professional if the memory programs in your hearing instruments need to be reconfigured.
Dual microphone system
If you want to listen to a person in a noisy environment, the microphones in your hearing instrument can help you to concentrate on the speech. If the microphones are in the directional mode the background noise will be attenuated. In this mode the sounds in front of you will be enhanced, so you can hear better the speech of the person you look at.
Your hearing care practitioner can program the device in the required modes.
Depending on your hearing instrument and the setting chosen by you and your hearing care practitioner switching to and from directional mode can be done automatically.
8 |
9 |
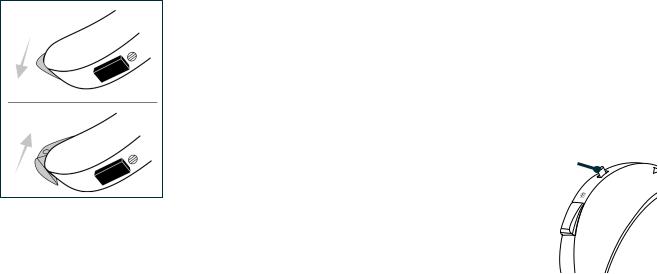
Proper Placement in the Ear
Inserting the Receiver Dome and RIE Instrument:
•With the battery door open (the off position), hold your hearing instrument by the tube, right where it bends.
•Hang the instrument over the top of your ear so that the housing portion is behind your ear and the dome is in front.
•Push the receiver dome into your ear until it sits comfortably and the tube lies flat against the side of your head. Note: When the receiver dome is placed correctly, you should not see the tube sticking out when looking directly into a mirror.
•If you have not already turned on your hearing instrument, switch it on by closing the battery door.
If you need further help, your hearing healthcare professional will be glad to show you how to insert your hearing instrument correctly.
Note: If your hearing instrument irritates your ear in any way and prevents you from wearing your hearing instrument, please contact your hearing healthcare professional. Never attempt to modify the shape of your hearing instrument yourself.
10 |
11 |

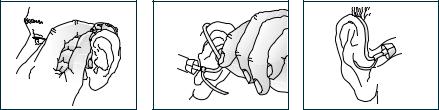
Inserting the Standard Earmould and RIE Instrument:
•With the battery door half open (Off position), put your earmould between your thumb and index finger and position its “point” in your ear canal. Now, slide the earmould all the way into your ear with a gentle, twisting movement.
•Place the hearing instrument behind your ear. Move the earmould up and down and press gently to ensure it is positioned correctly in the ear. You will feel when the earmould is positioned correctly.
•Switch on your hearing aid.
Tip: Insertion of the earmould can be easier if you gently pull your ear backward with your other hand. Opening and closing your mouth while inserting may also be helpful.
Removal
To remove the hearing instrument from your ear, simply pull the tube outward with your thumb and forefinger. Consult your hearing healthcare professional if you have difficulty removing the hearing instrument.
12 |
13 |
 Loading...