

Intermetro MBQ TOP MOUNT Service Manual
®
Metro
Heated
Banquet
Cabinets
TOP-MOUNTED MODULE
USER MANUAL
®
®
InterMetro Industries Corporation
Wilkes-Barre, PA 18705
570-825-2741

TABLE OF CONTENTS
SECTION PAGE
I. Introduction
A. Identifying Your Cabinet ................................ 2
B. Features ........................................................ 3
II. Operating Instructions
A. Electric Heating System ................................ 3
B. Canned Fuel System ..................................... 3
C. Count-up/Count-down Timer/Clock .............. 3
III. Cleaning Instructions
A. Shelf Removal/Installation ............................ 4
B. Electric Heating Module
Removal/Installation ...................................... 4
C. Quad-Heat Dual Fuel
Removal/Installation ...................................... 4
D. Specific Cleaning Instructions ....................... 5
E. General Cleaning Instructions ....................... 5
IV. Maintenance
A. Cabinet Maintenance .................................... 5
B. Electric Heating Module ................................ 5
C. Blower Motor Maintenance............................ 5
V. Replacement Parts and Procedures
A. Cabinet .......................................................... 6
B. Electric Heating Module ................................ 8
C. Battery Replacement —
Count-up/Count-down Timer/Clock ............... 8
D. Swivel-Lock Operation .................................. 8
E. Swivel-Lock Caster System ......................... 11
F. Quad-Heat System ...................................... 12
VI. Wiring Schematic ............................................. 13
Warranty ........................................................... 14
1
I. INTRODUCTION
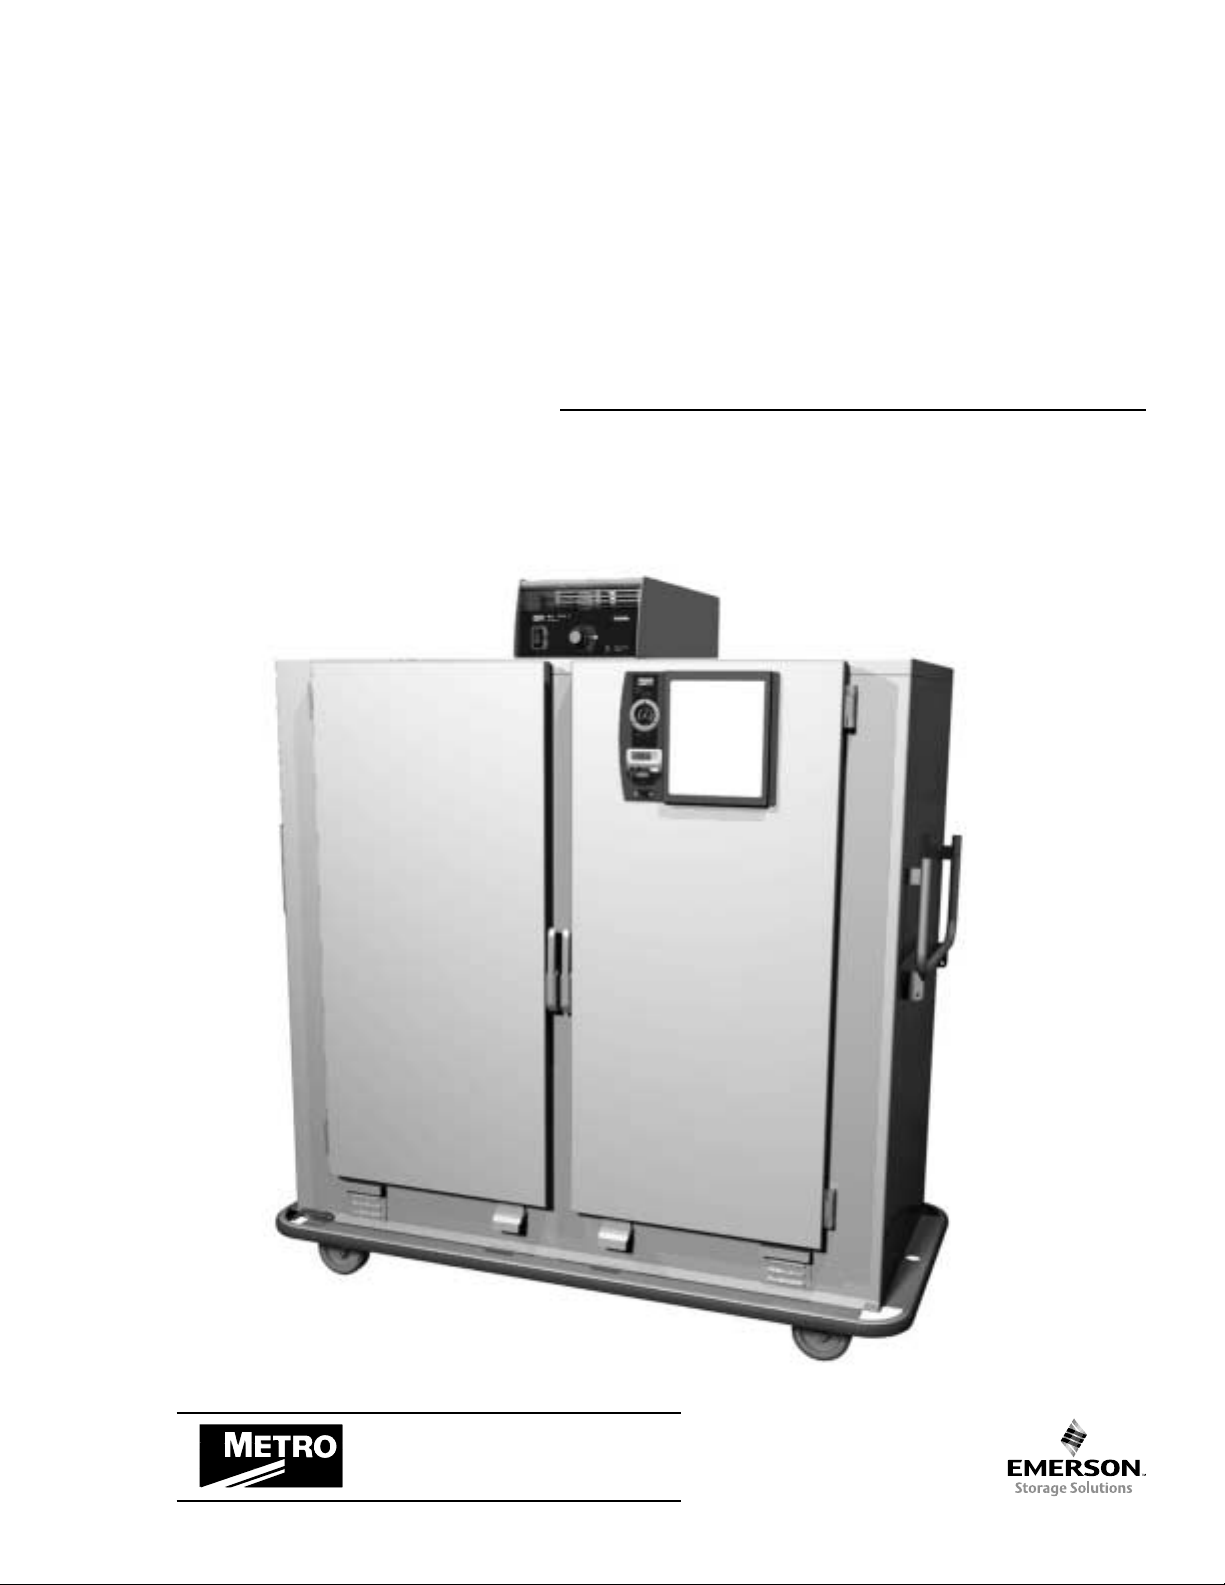
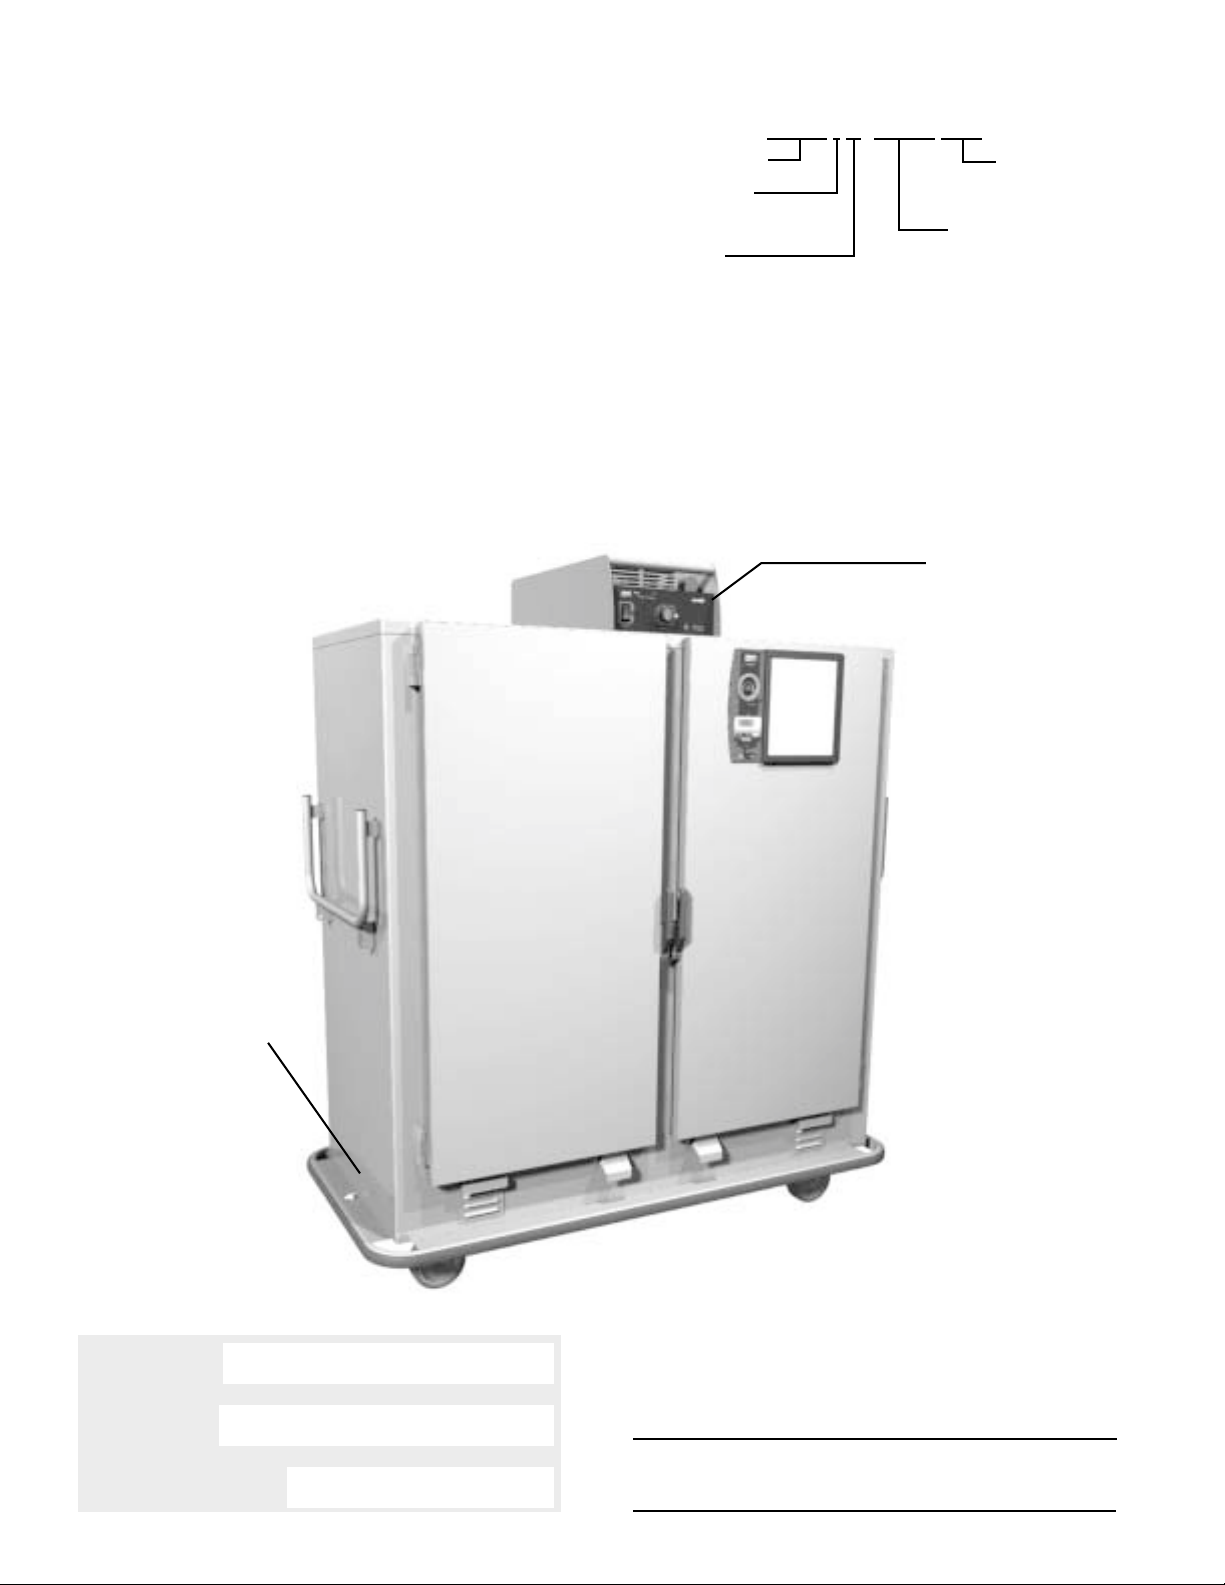
A. IDENTIFYING YOUR CABINET
There are two numbers, which you may want
to record for future reference: the cabinet
model number, serial number, and the module
serial number. Refer to the photo below to
locate these numbers. It is recommended that
all numbers be recorded in an appropriate
place, such as on this page (see below). Also,
please record the cabinet model number and
module serial number on the Warranty Card
found at the back of this manual. Be sure to
complete the remainder of the Warranty Card
and return it to Metro within fifteen (15) days
of delivery of the cabinet. Once you have
located and recorded these numbers, refer to
the sample numbers given to the right to
identify the components of your cabinet.
SAMPLE OF CABINET LABELING
MBQTL-180D-QH
Cabinet Series
Top-Mounted
Module
Footprint:
Blank = Standard
L = Large
LOCATION OF MODULE
SERIAL NUMBER
▼
Quad-Heat
(Dual Fuel)
Double Door
Cabinet Size
LOCATION OF CABINET
MODEL NUMBER AND
SERIAL NUMBER
(Silver Label on Side of Cabinet)
▼
Model Number ________________________________
Serial Number ________________________________
Module Serial Number __________________________
NOTE: Please read this manual thoroughly before using your
cabinet. If you should have questions, please contact
Metro customer service department.
2

B. FEATURES — ALL MODELS
In order to utilize your new cabinet to its full potential;
take a minute to identify the following features that have
been provided for your convenience.
• The module has been placed at the top of the cabinet
for easy accessibility and efficient operation.
• Clearly marked control panel for easy viewing and
allowing temperature adjustments without opening
the door.
• Handles on each end of the cabinet.
• Optional swing-up handle.
• Thermometer, timer and dual function white board/
clipboard on the door.
• Easy pull magnetic door latch.
• Kick latch on all doors.
• All components — door, module and shelves are
removable to permit thorough, obstruction-free
cleaning.
• Optional swivel-lock caster system.
• Optional canned fuel system. Includes chimney,
baffles and canned fuel drawers. All are removable to
permit thorough, obstruction-free cleaning.
• Optional travel latch.
II. OPERATING INSTRUCTIONS
A. ELECTRIC HEATING SYSTEM
Your cabinet is designed to MAINTAIN the
temperature of HOT prepared foods. The
module is equipped with a thermostatically
controlled heater and a blower for air circulation.
A POWER switch is provided along with a red
light to indicate when the unit is switched ON.
Next to the POWER switch is the
TEMPERATURE control.
A three-wire grounded lead power cord is
supplied fixed to the module. The cord cannot
be separated from the module. When the
cabinet is not in use, the cord can be either
wrapped around the module or looped over the
push handles.
1. With the POWER switch OFF, plug the power
supply cord into a standard grounded 15
amp, 125VAC receptacle.
2. Snap POWER switch to ON. The red POWER
light will now glow and the blower will begin
circulating air.
3. Turn the TEMPERATURE thermostat to a setting
of 10. The holding unit is now in operation.
4. After allowing the cabinet to PREHEAT FOR
APPROXIMATELY 45/60 MINUTES, reduce the
thermostat setting to 6/8. In a room of average
temperature (72°F) this should provide 150° to
170°F. Adjustments to the temperature may be
made as necessary.
THIS IS A HOT FOOD HOLDING
CABINET AND IS NOT INTENDED TO
RETHERMALIZE COLD FOOD. MAKE
SURE FOOD AND CABINETS ARE AT
PROPER TEMPERATURES BEFORE
PLACING FOOD IN THE CABINET.
NOTE: The POWER (red) light will glow as
soon as the POWER switch is switched ON
and will continue to glow until switched OFF.
The blower will operate as long as the
POWER switch is ON.
It is not necessary at the end of the operating
day to disrupt the TEMPERATURE setting in
order to turn the unit OFF. By switching the
POWER switch to OFF, the unit is no longer
operating. By switching the POWER switch to
ON when resuming operations, the cabinet
will attain the preset level (or it can be
preheated at a setting of 10 before adjusting
to the desired temperature).
B. CANNED FUEL SYSTEM (Optional)
The Canned Fuel system does not require
the electric heating module to be turned on
for operation. Each bottom-mounted drawer
holds 2 cans of fuel. Lift slightly and pull the
drawer out until it stops or lift the drawer front
and remove it from the cabinet. Place a fuel
can into each round cutout and light the fuel.
Close the drawer.
NOTE: Filling each canned fuel drawer with
2 cans of fuel will heat the unit to 200°F in
approximately 45 minutes. In order to maintain
a desired temperature, some of the canned
fuel cans may need to be extinguished.
Follow manufacturer’s guidelines for canned
fuel usage.
C. COUNT-UP/COUNT-DOWN TIMER/CLOCK
CLOCK MODE
1. Press the Mode button until the clock icon
appears on screen next to the printed
“CLOCK” icon.
2. Press and hold (SET) for two seconds.
3. “HOURS” will flash.
4. Press ( ▲ ) or ( ▼ ) to set.
5. Repeat process to set minutes or seconds.
6. To complete the process press (SET).
NOTE: The two-second delay is to prevent
accidental changing of time. There is no delay
in Timer mode.
COUNT-DOWN TIMER MODE
Can be used to countdown the minutes until the
canned fuel needs to be replenished.
1. Press the Mode button until the timer icon
appears on the screen next to the printed
“TIMER” icon.
2. Press (SET).
3. “HOURS” will flash.
3

4. Press (▲) or (▼) to set up or down to
desired interval (23:59:59 max.).
5. Repeat process to set minutes or seconds.
6. Press (START) to start. Press (STOP) to stop.
HELPFUL HINTS:
• If you want to set only hours, it is not
necessary to press (SET) through minutes and
seconds. Simply set desired interval and
press (START).
• As a reminder, your timer will “beep” for 3
seconds when it reaches 5 minutes before set
interval expires.
• When timer reaches 00:00:00 the alarm will
sound and “TIME’S UP!” will appear on the
screen. Your timer will now begin to count up.
The alarm will stop after 60 seconds and your
timer will continue to count up until you press
(STOP).
• (CLEAR) button can be used at any time to
clear the display. (CLEAR) button also
functions for recall of last setting.
• (RECALL) feature: after you press (STOP),
pressing the (RECALL) button will
automatically display the last timer setting.
• Each time you press ( ▲ ) or ( ▼ ) the digits
will change once. If you hold the button down
digits will change rapidly.
COUNT-UP TIMER MODE
Can be used to track how long food has been in
the cabinet.
1. Press the Mode button until the stop watch
icon appears on screen next to the printed
“STOP WATCH” icon.
2. Press (START) to start. Press (STOP) to stop.
III. CLEANING INSTRUCTIONS
CAUTION
AT NO TIME SHOULD THE MODULE OR
CABINET BE WASHED OR FLOODED WITH
WATER OR LIQUID SOLUTION. NEVER
STEAM CLEAN. SEVERE DAMAGE OR
ELECTRICAL HAZARD COULD RESULT.
1. Turn off power switch.
2. Unplug the unit from its power source.
WARNING
ALLOW THE UNIT TO COOL BEFORE
CLEANING, AS THE INTERIOR OF THE
CABINET MAY BE HOT ENOUGH TO BURN.
A. SHELF REMOVAL/INSTALLATION
To remove the shelves, all shelves must first
be lowered onto the bottom shelf, lift the
uppermost shelf off of the stack so that you are
holding onto the long edge of the shelf and the
shelf is hanging vertically. Position the shelf so
one vertical edge is in one of the rear cabinet
corners. Swing the other vertical edge out the
door and remove the shelf. Repeat until all the
shelves are removed.
To install the shelves, reverse the above
procedure. Before installing shelves, install
the Quad-Heat Fuel System baffle(s) and
chimney(s) (Section C below).
NOTE: The shelf wires that run from left to right
in the cabinet should be on the top side of the
installed shelves. Make sure the shelves are
seated in the hangers correctly.
B.ELECTRIC HEATING MODULE
REMOVAL/INSTALLATION
Due to module location, 2 people are required
to remove it from the unit.
Coil power cord and place on module top.
No hardware secures the module to the
cabinet top. Grasp the front and rear horizontal
module handles and lift upward until bottom
duct clears cabinet top. Walk the module to
one end and lower.
Do not use abrasive cleaners. For every
cleaning method, best results are always
obtained when the cleaner and technique are
matched to the soil conditions involved.
Contact your detergent representative to ensure
the cleaning product being used is
recommended for use on stainless steel. Follow
the manufacturer’s directions on cleaners.
Never mix cleaners.
CAUTION
DO NOT ALLOW THE CABINET POWER
SUPPLY CORD RECEPTACLE TO COME IN
CONTACT WITH WATER OR CLEANSERS.
IT MUST BE DRY BEFORE PLUGGING THE
MODULE POWER SUPPLY CORD INTO IT.
C. QUAD-HEAT DUAL FUEL SYSTEM
REMOVAL/INSTALLATION
1. The heat conductive baffles spread the heat
from the canned fuel drawers to the corner
chimneys. The heat baffles are next to the
standard electric module. First, remove the
Electric Heating System module. To remove a
baffle, lift up on the recessed handle to
disengage the edge of the baffle from the
locator pin in the bottom of the cabinet. Then
slide the baffle away from the nearest end of
the cabinet until it clears the shelf hangers
and lift it out of the cabinet.
2. To remove the corner chimneys (after
removing the heat conduction baffles) put
your thumb and finger into the two holes near
the upper end of the chimney and lift the
chimney off its hanger and remove it from
the cabinet.
To install the Quad-Heat dual fuel system,
reverse the above instructions. When
installing the chimneys, make sure they are
securely seated on the hangers. When
sliding the baffles to the end of the cabinet,
make sure the slots in the bottom of the
4

chimney engage the baffle and that the baffle
is locked into the locator pins by pushing
down on the recessed handle.
D. SPECIFIC CLEANING INSTRUCTIONS
CAUTION
DO NOT IMMERSE THE ELECTRIC HEATING
MODULE WHEN CLEANING.
1. Use a damp cloth and dry with a towel.
Special attention should be paid to keeping
the air-inlet area and the controls area free of
dirt build-up.
BE SURE TO THOROUGHLY DRY THE
MODULE BEFORE RETURNING IT TO USE.
2. Do not neglect to clean the under-chassis
area, especially the area above each caster.
3. The cabinet or component(s) must be
thoroughly rinsed to remove any residue that
may stain the materials.
E. GENERAL CLEANING INSTRUCTIONS
1. LIGHT SOIL
If routine (daily) cleaning is practiced, a mild
soap and warm water should be sufficient to
keep the unit clean.
2. HEAVIER SOIL
If cleaning has been postponed, solvent or
emulsion type cleaners that can be applied
with bare hands will give excellent results.
Such cleaners are available under various
brand names. Detergent suppliers can
recommend materials appropriate for use on
stainless steel.
NOTE: For every cleaning method, best
results are always obtained when the cleaner
and techniques are matched to the soil
conditions involved. To ensure using the
proper cleaner for stainless steel, contact
your detergent representative.
IV. MAINTENANCE
A. CABINET MAINTENANCE
Your cabinet has been designed to require
very little maintenance. With normal use,
cleaning is the only form of maintenance that
needs to be done on a regular basis.
Keeping the casters free of dirt build-up will
go a long way in prolonging their life.
If your cabinet is rolled over rough surfaces
or transported over the road, the various
threaded fasteners, i.e., screws and nuts,
should be periodically inspected and
tightened if necessary, particularly the
handles, door hinges and caster fasteners.
B. ELECTRIC HEATING MODULE
MAINTENANCE
The module, on the top of your cabinet, has
also been designed to require very little
maintenance. With normal use, cleaning is
the only form of maintenance that needs to
be done on a regular basis. When cleaning,
do not spray water up into the module and
do not immerse the module in water. Wipe
with a damp cloth and dry with a towel.
Keeping vital areas such as the air-inlet area
and the controls area free of dirt build-up will
go a long way in prolonging the life of the
electrical components. No maintenance is
required on the electrical components.
C. BLOWER MOTOR MAINTENANCE
The blower motor requires no maintenance
other than keeping the unit clear of dirt, dust
and food particles.
5
 Loading...