

Page 1

680x Series Portable Printers
TECHNICAL REFERENCE
MANUAL
""""""""""""""""""""""""""""
PN: 978-018-001
Revision B
March, 2002
Page 2

NOTICE
"
The information contained herein is proprietary and is provided solely for the
purpose of allowing customers to operate and service Intermec manufactured
equipment and is not to be released, reproduced, or used for any other purpose
without written permission of Intermec.
Disclaimer of Warranties. The sample source code included in this document is
presented for reference only. The code does not necessarily represent complete,
tested programs. The code is provided “AS IS WITH ALL FAULTS.” ALL
WARRANTIES ARE EXPRESSLY DISCLAIMED, INCLUDING THE
IMPLIED WARRANTIES OF MERCHANTABILITY AND FITNESS FOR A
PARTICULAR PURPOSE.
We welcome your comments concerning this publication. Although every effort has
been made to keep it free of errors, some may occur. When reporting a specific
problem, please describe it briefly and include the book title and part number, as
well as the paragraph or figure number and the page number.
Send your comments to:
Intermec Technologies Corporation
Publications Department
550 Second Street SE
Cedar Rapids, IA 52401
ANTARES, INTERMEC, NORAND, NOR*WARE, PEN*KEY, ROUTEPOWER,
TRAKKER, and TRAKKER ANTARES are registered trademarks and
ENTERPRISE WIRELESS LAN, INCA, TE 2000, UAP, and UNIVERSAL ACCESS
POINT are trademarks of Intermec Technologies Corporation.
2000 Intermec Technologies Corporation. All rights reserved.
This publication printed on recycled paper.
Acknowledgments
O’Neil is a registered trademark of O’Neil Development, Inc
Page 3

CONTENTS
""""""""""""""""""""""""""""
SECTION 1
General Information
Introduction 1-1.........................................
680x Portable Printer Descriptions 1-1....................
The 6805a Portable Printer 1-2...........................
The 6805a Portable Printer Parts List 1-3.............
The 6806 Portable Printer 1-4............................
The 6806 Portable Printer Parts List 1-5...............
The 6804T Portable Printer 1-6...........................
The 6804T Portable Printer Parts List 1-7.............
The 6804T CR Portable Printer 1-8.......................
The 6804T CR Portable Printer Parts List 1-9..........
The 6804DM Portable Printer 1-10........................
The 6804DM Portable Printer Parts List 1-11...........
The 6804DM CR Portable Printer 1-12.....................
The 6804DM CR Portable Printer Parts List 1-13........
The 6808 Portable Printer 1-14............................
The 6808 Portable Printer Parts List 1-15...............
The 6808 CR Portable Printer 1-16........................
The 6808 CR Portable Printer Parts List 1-17...........
The 681 Portable Printer 1-18.............................
The 681 Portable Printer Parts List 1-19................
The 682 Portable Printer 1-20.............................
The 682 Portable Printer Parts List 1-21................
The 781 Portable Printer 1-22.............................
The 781 Portable Printer Parts List 1-23................
The 782 Portable Printer 1-24.............................
The 782 Portable Printer Parts List 1-25................
Features and Benefits 1-26................................
Intermec Portable Printers Technical Reference Manual
i
Page 4

CONTENTS
SECTION 2
Self Test
Introduction 2-1.........................................
Self Test 2-1............................................
SECTION 3
781T Printer using Wireless Printing
IrDA/Wireless Mode 3-1.................................
Newest Features 3-1.................................
Tri --mode Printing 3- 1............................
Wireless Printing Parameters 3-2.................
Automatic Ticket Voiding 3-5......................
781T Preparation 3-5................................
Printer Self-Test 3-6..............................
700 Mobile Computer Preparation 3-6.................
781T Questions 3-7..................................
Development Suggestions 3-8.........................
Intermec Portable Printers Technical Reference Manual
ii
Page 5

CONTENTS
SECTION 4
Operation
Paper Loading 4-1.......................................
Out of Paper 4-1.....................................
Removing Paper Core 4-1............................
6805a and 6806 Printers 4-1......................
6804 and 6808 Series of Printers 4-2...............
Paper Loading 4-2...................................
Standard Paper 4-2..............................
Linerless Labels 4-3..............................
Automatic Paper Loading 4-3.........................
6805a and 6806 Printers 4-3......................
6804 and 6808 Series of Printers 4-3...............
Manual Paper Loading 4-4...........................
6805a, 6806, and 6804 Series of Printers 4-4........
6804 and 6808 Series of Printers 4-5...............
Batteries 4-6............................................
Determining Current Battery Power 4-6...............
6805a Printer 4-6................................
6806 Printer 4-7.................................
6804 Series 4-7..................................
6808 Series of Printer 4-8.........................
Charging your Printer with the AC Adapter 4-8...........
6806 Printers 4-8....................................
6804 and 6808 Series of Printers 4-8..................
Charging your Printer with the Cigarette Lighter
Adapter 4-9.........................................
6806 Printers 4-9....................................
6804 and 6808 Series of Printers 4-9..................
Replacing the Fuse 4-9..................................
Replacement Fuse Rating 4-10.....................
When to Replace the Battery 4-10.........................
Replacing the Battery 4-10................................
6805a Printer 4-10....................................
6806 Printer 4-11.....................................
6804 Series of Printers 4-11...........................
6808 Series of Printers 4-11...........................
Battery Charging Indicator 4-12.......................
Customer Receipts and Labels 4-12........................
Line Printer (Default) 4-13............................
Intermec Portable Printers Technical Reference Manual
iii
Page 6

CONTENTS
Easy Print 4-13.......................................
Line Printer Mode 4-13...............................
Sample Receipt in Line Printer Mode 4-14...........
Command Strings for Text 4-15.....................
Explanation of Command Strings 4-15..............
Escape Sequences 4-15............................
Easy Print Mode 4-22.....................................
Easy Print Command General Format 4-22.............
Print Command Format 4-24..............................
Easy Print Example 1 4-25................................
Explanation of Command Strings 4-26..............
Easy Print Example 2 4-26............................
Explanation of Command Strings 4-26..............
Easy Print Command Section 4-27.........................
Ahead Command Format {AHEAD: nnn} 4-28...............
Back Command Format {BACK: nnn} 4-28.................
Line Printer Mode {LP} 4-28..............................
Self Test Printout {TP} 4-28...............................
Print Command Format 4-29..............................
Global Options 4-30......................................
Font Names 4-32.........................................
Font Field Options 4-33...................................
Bar Code Names 4-33.....................................
Bar Code Field Options 4-34...........................
Notes on the use of PDF-417 4-34......................
Graphic Names 4-36......................................
Graphic Field Options 4-37................................
Line Names 4-37.........................................
Card Reader Commands 4-38..............................
Operational Commands 4-38...........................
General Reader Operational Commands 4-39...........
General Reader Configuration Commands 4-40..........
Magnetic Card Operational Commands 4-40............
Magnetic Card Configuration Commands 4-41..........
Smart Card Operational Commands 4-42...................
Smart Card Configuration Commands 4-44.............
Operational Scenarios 4-44................................
General 4-44......................................
Magnetic Card Reader 4-45........................
Smart Card Reader 4-46...........................
Intermec Portable Printers Technical Reference Manual
iv
Page 7

CONTENTS
SECTION 5
Maintenance and Troubleshooting
Cleaning Yo ur Printer 5-1................................
Cleaning the Interior 5-1.............................
Cleaning the Exterior 5-2............................
Troubleshooting 5-2.....................................
Paper Loading Problems 5-2..........................
Not Printing 5-3.....................................
Print Quality Problems 5-3...........................
Print Roller Appears Dirty 5-3....................
Linerless Labels 5-3..............................
Print is Too Light 5-3.............................
Charging Problems 5-4...............................
Using an AC Adapter 5-4.........................
Using a Cigarette Lighter Adapter 5-4.............
Programming Problems 5-4...........................
Easy Print Command Format 5-5.....................
Downloading Problems 5-6...........................
APPENDIX A
Specifications
Battery Specifications A-7................................
Cable Specifications A-8..................................
Thermal Paper Specifications A-9.........................
Guidelines for Using a “Q” Mark to Align Forms (6805a,
6806, 6804, and 6808) A-10............................
Wake-Up Characters A-15.................................
APPENDIX B
Query
Introduction B-1.........................................
Query Format B-1.......................................
Query Format B-1...................................
Interpreting the Reply to a Query B-2..............
Status ESC{ST?} B-3.................................
Configuration ESC{CF?} B-4..........................
Intermec Portable Printers Technical Reference Manual
v
Page 8

CONTENTS
Battery ESC{BT?} B-5................................
Ve rsion ESC{VR?} B-6................................
Memory ESC{MY?} B-7...............................
Print Head ESC{PH?} B-8............................
Infrared ESC{IR?} B-9................................
Fonts ESC{FN?} B-10.................................
Graphics ESC{GR?} B-11..............................
Formats ESC {FM?} B-12..............................
Demand Quantity ESC{DQ?} B-13......................
Cancel ESC{CN!} B-13.................................
Reset ESC{RE!} B-14..................................
Status Card Reader ESC{RS?} B-14.....................
Read Magnetic Card ESC{MR?} B-14...................
APPENDIX C
Available Fonts
FIGURES
Figure 1-1 6805a Portable Printer 1-2.....................
Figure 1-2 6806 Portable Printer 1-4......................
Figure 1-3 6804T Portable Printer 1-6.....................
Figure 1-4 6804T CR Portable Printer 1-8.................
Figure 1-5 6804DM Portable Printer 1-10..................
Figure 1-6 6804DM CR Portable Printer 1-12...............
Figure 1-7 6808 Portable Printer 1-14......................
Figure 1-8 6808 CR Portable Printer 1-16..................
Figure 4-1 Paper Loading 4-2............................
Figure 4-2 Paper Fold 4-4................................
Figure 4-3 Paper Fold 4-5................................
Figure 4-4 Line Printer Mode Sample Receipt 4-14..........
Figure 4-5 Print Command Format 4-24....................
Figure A-1 Modular and DB9F Connector Pin-outs A-8.....
Figure A-2 Thermal Paper Specifications A-9..............
Figure A-3 Parking Ticket Q Mark for 6805a Portable
Printer A-11..........................................
Figure A-4 Parking Ticket Q Mark for 6806 Portable
Printer A-12..........................................
Figure A-5 Parking Ticket Q Mark for 6804 and 6804TCR
Portable Printers A-13.................................
Intermec Portable Printers Technical Reference Manual
vi
Page 9

CONTENTS
Figure A-6 Parking Ticket Q Mark for 6808 Series Portable
Printers A-14.........................................
TABLES
Table 2-1 Query Quick Reference 2-1......................
Table 4-1 Battery Charging Descriptions 4-12...............
Table 4-2 Line Printer Mode Descriptions 4-13..............
Table 4-3 Bit--Mapped Graphics Mode Descriptions 4-17.....
Table 4-4 Line Printer Mode Font Descriptions 4-19.........
Table 4-5 Quick Reference for Easy Print Commands 4-25...
Table 4-6 Printing Text Font Name Descriptions 4-32........
Table 4-7 Font Field Option Descriptions 4-33..............
Table 4-8 Bar Code Description and Data Requirements 4-33.
Table 4-9 Bar Code Field Option Descriptions 4-34..........
Table 4-10 Graphic Field Option Descriptions 4-37..........
Table 4-11 Line Names Option Descriptions 4-37............
Table A-1 Printer Specifications A-1.......................
Table A-2 Printer Specifications A-2.......................
Table A-3 Printer Specifications A-3.......................
Table A-4 Printer Specifications A-4.......................
Table A-5 Printer Specifications A-5.......................
Table A-6 Printer Specifications A-6.......................
Table A-7 Battery Specifications A-7.......................
Table A-8 Thermal Paper Specifications A-9................
Table A-9 ASCII Character Codes A-15.....................
Table B-1 Query Q uick Reference B-2.....................
Table B-2 Status Reference B-4...........................
Table B-3 Configuration Reference B-5....................
Table B-4 Battery Reference B-6..........................
Table B-5 Ve rsion Reference B-7..........................
Table B-6 Memory Reference B-8.........................
Table B-7 Print Head Reference B-9.......................
Table B-8 Infrared Reference B-10.........................
Table B-9 Fonts Reference B-11............................
Table B-10 Graphics Reference B-12........................
Table B-11 Formats Reference B-13........................
Intermec Portable Printers Technical Reference Manual
vii
Page 10

CONTENTS
GLOSSARY
INDEX
Intermec Portable Printers Technical Reference Manual
viii
Page 11

Section 1
General Information
""""""""""""""""""""""""""""
Introduction
The 680x series of portable printers was designed to be run
on internal software that you can modify with the Portable
Printer Configuration Program. This program offers complete user control of the printer. It also allows you to add
enhancements as they are developed. Every time we develop a faster print speed, or other new capabilities, you can
get these new features just by installing new software.
680x Portable Printer Descriptions
The following pages show the location of the key components for each of the printers in this series.
Intermec Portable Printers Technical Reference Manual
1-1
Page 12

General Information
The 6805a Portable Printer
Charge Indicator
SECTION 1
Battery Casing End Boot
RJ-11 Port
DC Power Jack
Paper Knob
Paper Release Lever
IR Window
Self Test Button
Paper Casing End Boot
Figure 1-1
6805a Portable Printer
Intermec Portable Printers Technical Reference Manual
1-2
Page 13

SECTION 1
General Information
The 6805a Portable Printer Parts
List
Printer Part Number
6805a 320-066-004
6805a Linerless 320-066-006
Cables Part Number
4000 Series and 6210 hand-held computer 226-044-001
6300 hand-held computer 216-996-001
RT1700 hand-held computer 216-994-001
Laptop download cable 320-066-032
60x to 680x serial cable (RJ-11) 226-437-001
Power Adapters Part Number
AC Power Adapter (110 Volt) 320-066-042
U.K. Power Supply 320-066-043
Europe Power Supply 320-066-044
Australian Power Supply 320-066-045
Cigarette Lighter Adapter, 5 Amp. 6 in. coiled 320-066-031
Supplies Part Number
Replacement NiCd Battery 320-066-041
Paper Ro d 290-152-300
Thermal Cleaning Paper (25) 320-066-013
Paper 320-066-021
Linerless Paper 320-066-022
Intermec Portable Printers Technical Reference Manual
1-3
Page 14
General Information
The 6806 Portable Printer
Paper Knob
SECTION 1
Battery Casing End Boot
Charging Indicator
(Under Boot)
DC Power Jack
Self Test Button
RJ-11 Port
Paper Release Lever
Figure 1-2
6806 Portable Printer
Intermec Portable Printers Technical Reference Manual
1-4
Paper Casing End Boot
Page 15

SECTION 1
General Information
The 6806 Portable Printer Parts List
Printer Part Number
6806 320-070-004
6806 Linerless 320-070-006
Cables Part Number
4000 Series and 6210 hand-held computer 226-044-001
6300 hand-held computer 216-996-001
RT1700 hand-held computer 216-994-001
Laptop download cable 320-066-032
60x to 680x serial cable (RJ-11) 226-437-001
Power Adapters Part Number
AC Power Adapter 320-066-042
U.K. Power Supply 320-066-043
Europe Power Supply 320-066-044
Australian Power Supply 320-066-045
Cigarette Lighter Adapter, 5 Amp. 6 in. coiled 320-066-031
Supplies Part Number
Replacement DR-30Battery 320-070-041
Paper Ro d 320-070-901
Thermal Cleaning Paper (25) 320-066-013
Paper 320-070-021
Linerless Paper 320-070-022
Intermec Portable Printers Technical Reference Manual
1-5
Page 16

General Information
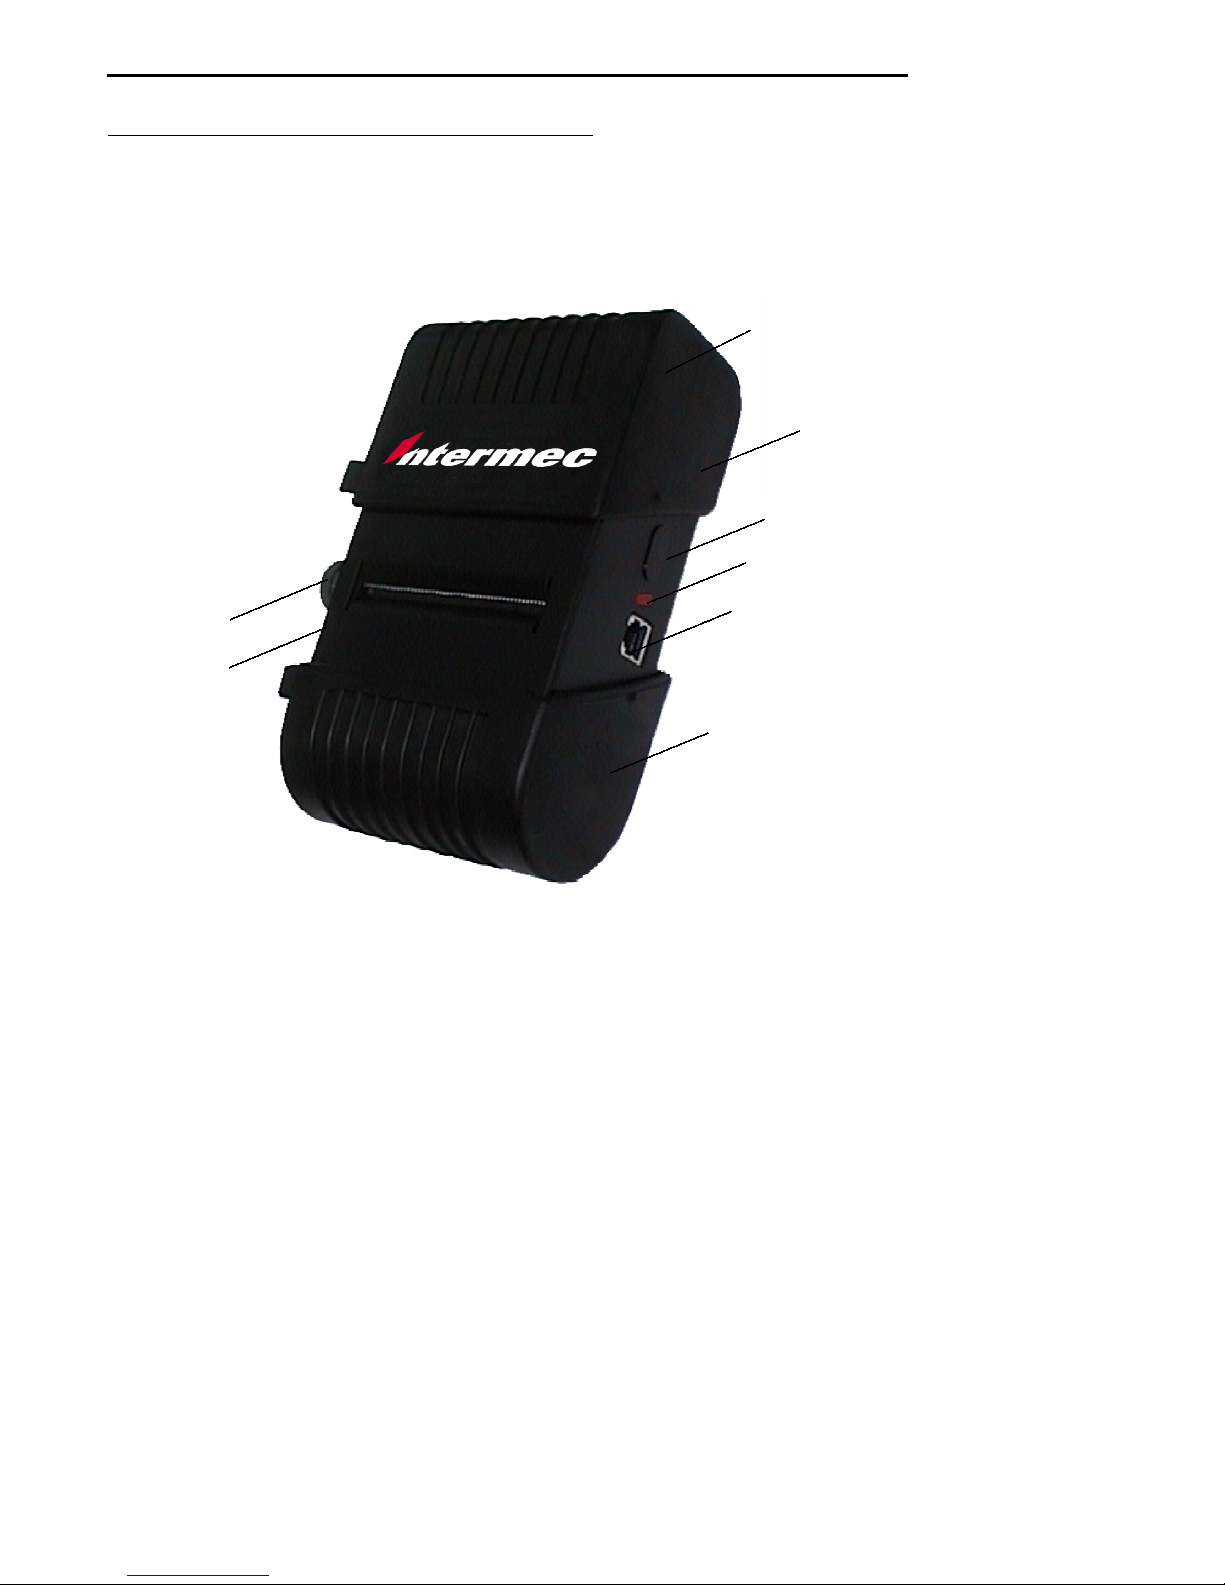
The 6804T Portable Printer
SECTION 1
Latch
Tear Bar
Charge Indicator
Paper Release Lever
DC Power Jack
Paper Roll
Figure 1-3
6804T Portable Printer
Intermec Portable Printers Technical Reference Manual
1-6
Battery
Self Test Button
IR Window
RJ-11 Port
Page 17

SECTION 1
General Information
The 6804T Portable Printer Parts
List
Printer Part Number
6804T 320-080-001
Cables Part Number
Data Cable -- RJ-11F--(RF-11 R/A, coiled) 320-080-043
RJ-11F Adapter Cable -- Right Angle 320-080-023
4000 Series and 6210 hand-held computer 226-044-001
6300 hand-held computer 216-996-001
RT1700 hand-held computer 216-994-001
Laptop download cable 320-066-032
60x to 680x serial cable (RJ-11) 226-437-001
Power Adapters Part Number
AC Power Adapter (110 volt) 320-066-042
U.K. Power Supply 320-066-043
Europe Power Supply 320-066-044
Australian Power Supply 320-066-045
Cigarette Lighter Adapter, 5 Amp. 6 in. coiled 320-066-031
Supplies Part Number
Replacement NiMH 1800mAhr Battery 320-080-022
Thermal Cleaning Paper (25) 320-066-013
Thermal Paper (50 rolls) 320-080-011
Intermec Portable Printers Technical Reference Manual
1-7
Page 18

General Information
The 6804T CR Portable Printer
SECTION 1
Latch
Tear Bar
Card Reader
Charge Indicator
Paper Release Lever
DC Power Jack
Paper
Figure 1-4
6804T CR Portable Printer
Intermec Portable Printers Technical Reference Manual
1-8
Battery
Self Test Button
IR Window
RJ-11 Port
Page 19

SECTION 1
General Information
The 6804T CR Portable Printer
Parts List
Printer Part Number
6804T with Smart Card & Magswipe Reader 320-080-003
Cables Part Number
Data Cable -- RJ-11F--(RF-11 R/A, coiled) 320-080-043
RJ-11F Adapter Cable -- Right Angle 320-080-023
4000 Series and 6210 hand-held computer 226-044-001
6300 hand-held computer 216-996-001
RT1700 hand-held computer 216-994-001
Laptop download cable 320-066-032
60x to 680x serial cable (RJ-11) 226-437-001
Power Adapters Part Number
AC Power Adapter (110 volt) 320-066-042
U.K. Power Supply 320-066-043
Europe Power Supply 320-066-044
Australian Power Supply 320-066-045
Cigarette Lighter Adapter, 5 Amp. 6 in. coiled 320-066-031
Supplies Part Number
Replacement NiMH 1800mAhr Battery 320-080-022
Thermal Cleaning Paper 320-066-013
Thermal Paper (50 rolls) 320-080-011
Intermec Portable Printers Technical Reference Manual
1-9
Page 20

General Information
The 6804DM Portable Printer
SECTION 1
Latch
Tear Bar
Charge Indicator
DC Power Jack
Paper Roll
Figure 1-5
6804DM Portable Printer
Intermec Portable Printers Technical Reference Manual
1-10
Battery
Self Test Button
IR Window
RJ-11 Port
Page 21

SECTION 1
General Information
The 6804DM Portable Printer Parts
List
Printer Part Number
6804DM 320-080-002
Cables Part Number
Data Cable --RJ11F-- (RJ--11 R/A, coiled) 320-080-043
RJ--11F Adapter Cable – Right Angle 320-080-023
4000 Series and 6210 hand-held computer 226-044-001
6300 hand-held computer 216-996-001
RT1700 hand-held computer 216-994-001
Laptop download cable 320-066-032
60x to 680x serial cable (RJ-11) 226-437-001
Power Adapters Part Number
AC Power Adapter (110 Volt) 320-066-042
U.K. Power Supply 320-066-043
Europe Power Supply 320-066-044
Australian Power Supply 320-066-045
Cigarette Lighter Adapter, 5 Amp. 6 in. coiled 320-066-031
Supplies Part Number
Replacement NiMH 1800mAhr Battery 320-080-022
Paper (2ply impact) 50 rolls 320-080-012
Ink Ribbon, Black 805-066-001
Ink Ribbon, Purple 805-066-002
Intermec Portable Printers Technical Reference Manual
1-11
Page 22

General Information
The 6804DM CR Portable Printer
Battery
SECTION 1
Latch
Tear Bar
Card Reader
Charge Indicator
DC Power Jack
Paper Roll
Figure 1-6
6804DM CR Portable Printer
Intermec Portable Printers Technical Reference Manual
1-12
Self Test Button
IR Window
RJ-11 Port
Page 23

SECTION 1
General Information
The 6804DM CR Portable Printer
Parts List
Printer Part Number
6804DM CR Mag Stripe Reader Stainless Belt Clip 320-080-004
Cables Part Number
Data Cable --RJ11F-- (RJ--11 R/A, coiled) 320-080-043
RJ--11F Adapter Cable – Right Angle 320-080-023
4000 Series and 6210 hand-held computer 226-044-001
6300 hand-held computer 216-996-001
RT1700 hand-held computer 216-994-001
Laptop download cable 320-066-032
60x to 680x serial cable (RJ-11) 226-437-001
Power Adapters Part Number
AC Power Adapter (110 Volt) 320-066-042
U.K. Power Supply 320-066-043
Europe Power Supply 320-066-044
Australian Power Supply 320-066-045
Cigarette Lighter Adapter, 5 Amp. 6 in. coiled 320-066-031
Supplies Part Number
Replacement NiMH 1800mAhr Battery 320-080-022
Paper (2ply impact) 320-080-012
Ink Ribbon, Black 805-066-001
Ink Ribbon, Purple 805-066-002
Intermec Portable Printers Technical Reference Manual
1-13
Page 24

General Information
The 6808 Portable Printer
Battery Pack
Self Test Button
SECTION 1
Latch
Tear Bar
Charge Indicator
RJ-11 Port
Paper Roll
Figure 1-7
6808 Portable Printer
Intermec Portable Printers Technical Reference Manual
1-14
Battery Pack
IR Window
DC Power Jack
Page 25

SECTION 1
General Information
The 6808 Portable Printer Parts List
Printer Part Number
6808 & Swivel Belt Clip 320-081-002
6808 Linerless & Swivel Belt Clip 320-081-006
Swivel Belt Connector 320-081-022
Swivel Belt Connector Lock Male 320-081-023
Swivel Belt Connector Lock Female 320-081-024
Cables Part Number
Data Cable --RJ11F-- (RJ--11 R/A, coiled) 320-080-043
RJ--11F Adapter Cable – Right Angle 320-080-023
4000 Series and 6210 hand-held computer 226-044-001
6300 hand-held computer 216-996-001
RT1700 hand-held computer 216-994-001
Laptop download cable 320-066-032
60x to 680x serial cable (RJ-11) 226-437-001
Power Adapters Part Number
AC Power Adapter (110 volt) 320-066-042
U.K. Power Supply 320-066-043
Europe Power Supply 320-066-044
Australian Power Supply 320-066-045
Cigarette Lighter Adapter, 5 Amp. 6 in. coiled 320-066-031
6808 Single Charger 852-051-001
Supplies Part Number
Replacement Li--Ion 1350mAhr Battery 320-081-021
Thermal Paper 130’/roll, 50/case 320-081-011
Paper Linerless 70’/roll, 50/case 320-081-012
Intermec Portable Printers Technical Reference Manual
1-15
Page 26

General Information
The 6808 CR Portable Printer
Card Reader
SECTION 1
Latch
Tear Bar
Battery Pack
Self Test Button
Charge Indicator
RJ-11 Port
Paper Roll
Figure 1-8
6808 CR Portable Printer
Intermec Portable Printers Technical Reference Manual
1-16
Battery Pack
IR Window
DC Power Jack
Page 27

SECTION 1
General Information
The 6808 CR Portable Printer Parts
List
Printer Part Number
6808 CR with Swivel Belt Clip 320-081-004
Swivel Belt Connector 320-081-022
Swivel Belt Connector Lock Male 320-081-023
Swivel Belt Connector Lock Female 320-081-024
Cables Part Number
Data Cable --RJ11F-- (RJ--11 R/A, coiled) 320-080-043
RJ--11F Adapter Cable – Right Angle 320-080-023
4000 Series and 6210 hand-held computer 226-044-001
6300 hand-held computer 216-996-001
RT1700 hand-held computer 216-994-001
Laptop download cable 320-066-032
60x to 680x serial cable (RJ-11) 226-437-001
Power Adapters Part Number
AC Power Adapter (110 volt) 320-066-042
U.K. Power Supply 320-066-043
Europe Power Supply 320-066-044
Australian Power Supply 320-066-045
Cigarette Lighter Adapter, 5 Amp. 6 in. coiled 320-066-031
6808 Single Charger 852-051-001
Supplies Part Number
Replacement Li--Ion 1350mAhr Battery 320-081-021
Thermal Paper 130’/roll, 50/case 320-081-011
Intermec Portable Printers Technical Reference Manual
1-17
Page 28

General Information
The 681 Portable Printer
SECTION 1
Cover Latch
Charger Jack
Intermec Portable Printers Technical Reference Manual
1-18
Charge LED:
Red charging
Green done
Paper Advance
Computer to
Printer Jack
Page 29

SECTION 1
General Information
The 681 Portable Printer Parts List
Printer Part Number
681T 320-082-003
681DM 320-082-004
Cables Part Number
Data Cable --RJ11F-- (RJ--11 R/A, coiled) 320-080-043
4000 Series and 6210 hand-held computer 226-044-001
6300 hand-held computer 216-996-001
RT1700 hand-held computer 216-994-001
Laptop download cable 320-066-032
Mobile Computer to Printer cable (RJ-11 connector) 226-437-001
Mobile Computer to Printer cable (RJ-45 connector) 226-469-001
Power Adapters Part Number
AC Power Adapter International 851-060-002
Cigarette Lighter Adapter, 5 Amp. 6 in. coiled 852-052-001
Supplies Part Number
Replacement Li--Ion 1350mAhr Battery 320-081-021
Intermec Portable Printers Technical Reference Manual
1-19
Page 30

General Information
The 682 Portable Printer
SECTION 1
Terminal Holder
Terminal Securing Tab
Ribbon Cartridge
(Dot Matrix)
Paper Advance
Charge LED:
Red charging
Green done
Intermec Portable Printers Technical Reference Manual
1-20
Charge Jack
Page 31

SECTION 1
General Information
The 682 Portable Printer Parts List
Printer Part Number
681T 320-083-003
682DM 320-083-004
Cables Part Number
Data Cable --RJ11F-- (RJ--11 R/A, coiled) 320-080-043
Power Adapters Part Number
AC Power Adapter International 851-060-002
Cigarette Lighter Adapter, 5 Amp. 6 in. coiled 851-052-001
Supplies Part Number
Replacement Li--Ion 1350mAhr Battery 320-081-021
Intermec Portable Printers Technical Reference Manual
1-21
Page 32

General Information
The 781 Portable Printer
SECTION 1
Cover Latch
Charger Jack
Intermec Portable Printers Technical Reference Manual
1-22
Charge LED:
Red charging
Green done
Paper Advance
Computer to
Printer Jack
Page 33

SECTION 1
General Information
The 781 Portable Printer Parts List
Printer Part Number
781T 320-085-001
Cables Part Number
Data Cable --RJ11F-- (RJ--11 R/A, coiled) 320-080-043
Mobile Computer to Printer cable (RJ-11 connector) 226-437-001
Mobile Computer to Printer cable (RJ-45 connector) 226-469-001
Power Adapters Part Number
AC Power Adapter International 851-060-002
Cigarette Lighter Adapter, 5 Amp. 6 in. coiled 320-066-031
Supplies Part Number
Replacement Li--Ion 1350mAhr Battery 320-081-021
Intermec Portable Printers Technical Reference Manual
1-23
Page 34

General Information
The 782 Portable Printer
SECTION 1
Terminal Holder
Ribbon Cartridge
(Dot Matrix)
Paper Advance
Charge LED:
Red charging
Green done
Intermec Portable Printers Technical Reference Manual
1-24
Charger Jack
Page 35

SECTION 1
General Information
The 782 Portable Printer Parts List
Printer Part Number
782T 320-084-001
782DM 320-084-002
Cables Part Number
Data Cable --RJ11F-- (RJ--11 R/A, coiled) 320-080-043
Power Adapters Part Number
AC Power Adapter International 851-060-002
Cigarette Lighter Adapter, 5 Amp. 6 in. coiled 852-052-001
Supplies Part Number
Replacement Li--Ion 1350mAhr Battery 320-081-021
Intermec Portable Printers Technical Reference Manual
1-25
Page 36

General Information
Features and Benefits
Compact Design: These portable printers are rugged
"
and light enough to be worn all day on a worker’s belt.
Infrared Technology: Wireless capabilities allow data
"
to be sent to the printer without cables.
Power Efficiency: Easily outlasts a typical 8--hour shift
"
on a single charge.
The 6805a recharges in three hour.
"
The 6806 recharges in four hours.
"
The 6804 series recharges in about 6--9 hours.
"
The 6808, 681, 682, 781, and 782 series re-
"
charges in about 3 hours.
Extremely ruggedized:
"
The 6805a and 6806 series provide an aluminum
"
“roll cage” to protect the print head and other
delicate electronic components from crushing,
twisting and torsional types of damage. Synthetic rubber boots provide protection from impact
and shock types of damage, and variable weather
conditions.
The 6804 and 6808 series of printers are entirely
"
encased in a protective shell of blow molded high
density polyethylene.
The entire line of 680x series of portable printers
"
can withstand multiple, drops to concrete on every face without damage.
Flash Memory: Provide the capability to easily “per-
"
sonalize” features. Using the exclusive Portable Printer Configuration Program, the printer can be upgraded using a personal computer:
To cha nge fon ts
"
Operating system
"
Graphics
"
SECTION 1
Intermec Portable Printers Technical Reference Manual
1-26
Page 37

SECTION 1
General Information
Configurations.
"
The user never has to send the printer back to the
manufacturer for updates. Flash memory also means that
the print speed is fast. The printer never has to wait for a
computer to send graphics.
Linerless Labels: The entire 680x series of portable
"
printers offer “linerless” label capabilities. Linerless
labels are labels without peel--off backing. They save
labor costs, because workers can apply them as they
come out of the printer.
Intermec Portable Printers Technical Reference Manual
1-27
Page 38

General Information
SECTION 1
Intermec Portable Printers Technical Reference Manual
1-28
Page 39

Section 2
Self Test
""""""""""""""""""""""""""""
Introduction
This chapter gives you self--test instructions to check out
your printer.
Self Test
Push the red button and hold four seconds to print a self
test. Below is an explanation of the print--out.
Tab le 2 -1
Query Quick Reference
Self Test
F/W Ver
Timeout
Baud Rate
Parity
Data Bits
Handshake
Burn Adj
Paper
Beeper
Description
The internal software version
The seconds between printing and sleep mode.
The speed at which the printer receives data.
Odd, Even, or None
Matches with computer sending data to printer.
The way the printer handles flow control from host.
Amount of heat used to print on the thermal paper.
1or2ply
May be turned On or Off.
Intermec Portable Printers Technical Reference Manual
2-1
Page 40

Self Test
Table 2-1 (continued)
Query Quick Reference
Self Test Description
Batt Volt
Batt T emp
Flash/RAM
Boot Version
Prnhd Tmp
Infrared
Device Name
Device Nickname
IrDA Ver
Available
Fonts
Available
Graphics
Available Bar
Codes
Card Reader
Option
Current voltage of the batter y pack.
Temperature of the battery.
1 Meg or 4 Meg Flash/ 1 Meg or 4 Meg RAM
Boot sector firmware.
Temperature of print head (between 0 and 50 degrees).
Set by the user to “Off”, “IrDA”, “ASK”, “ASK/CRC”, “Direct”, “Direct CRC”, “PULSE”, or “PULSE--CRC”
Shows type of device (i.e. 680x)
Shows user name for printer.
The 1.0 refers to the IrDA standard in use. The next two
digits refer to any IR modifications made to the configuration.
“LOC” shows whether a font is Resident (R) or Downloaded
(D). “CPI” s hows characters per inch. “DESCRIPTION”
describes the font. “NAMES” give the “Easy Print” name,
the Line Printer name, and the hexadecimal equivalent of
that name.
“LOC” shows whether a font is Resident (R) or Downloaded
(D). “CPI” s hows characters per inch. “DESCRIPTION”
describes the graphic. “NAMES” give the “Easy Print”
name, the Line Printer name, and the hexadecimal equivalent of that name.
All supported barcodes supported are displayed. “DESCRIPTION” describes the graphic. “NAMES” give the
“Easy Print” name, the Line Printer name, and the hexadecimal equivalent of that name.
Shows the current Card Reader configuration.
SECTION 2
Intermec Portable Printers Technical Reference Manual
2-2
Page 41

Section 3
781T Printer using Wireless
Printing
""""""""""""""""""""""""""""
IrDA/Wireless Mode
Your printer comes to you as an IrDA mode printer. To
switch the mode to Wireless Printing it is necessary to
toggle the mode via the self-test function of the printer.
Performing the self-test indicates the current mode of the
printer. The mode displays on the ticket and an audible in dication sounds. Each time the self-test function is performed the mode will toggle between wireless printing and
IrDA modes.
Newest Features
Tri- mode Printing
Version 4.25 of the 781T printer firmware now supports
printing via three different technologies.
Serial Cable
Serial printing uses a 700 to 781T cable (p/n: 226-437-001).
IrDA Wireless
IrDA works with two different wireless printing technologies. The printer needs to know which one it should use.
Intermec Portable Printers Technical Reference Manual
3-1
Page 42

781T Printer using Wireless Printing
The printer toggles between Bluetooth On/IrDA Off and
Bluetooth Off/IrDA On each time you perform a self--test on
the printer.
The current mode of the printer is indicated on the self-test
ticket. Look under the RF Personal Network section to determine if Bluetooth Power is On or Off, and look under the
Infrared Config section to determine if Infrared mode is On
or Off. Keep in mind, that only one wireless technology is
active at a time. Also, remember to self-test the printer
back int the mode if was in if you self-test to look at the
battery voltage or similar attribute.
Bluetooth Wireless
Bluetooth operation on the printer side of things is rather
simple. Self-test the printer into Bluetooth mode and forget
about it. The printer handles everything for you. Do note
that if you are in Bluetooth mode and you hook up a serial
cable, the printer drops out of Bluetooth mode and proceeds
to take input from the serial cable.
SECTION 3
Wireless Printing Parameters
The 781T contains some new parameters relevant to Bluetooth usage. Most of these parameters are embedded in the
printer and are only visible when queried by a Bluetooth
enabled 700 mobile computer. If the parameters documented here are unfamiliar to you, refer to the Bluetooth
Terminology.
Bluetooth Terminology
"
Device Address
Ethernet card, this is a globally unique identifier for
each Bluetooth radio. The device address will normally be seen written in the form AA.BB.CC.DD.00.11 or
AA:BB:CC:DD:00:11.
"
Device Name
tain 248 bytes. The device name is sometimes referred
to as the ”friendly” name because it usually contains
human readable names such as ”Ryan’s 781T Printer”.
Intermec Portable Printers Technical Reference Manual
3-2
--A UTF--8 encoded string that can con-
--Similar to a MAC address on an
Page 43

SECTION 3
781T Printer using Wireless Printing
"
Device Inquiry
--The process of broadcasting a request
that all devices in range announce themselves. The
inquiry process will gather device addresses, Class of
Device, and valuable clock information from all devices that respond to the inquiry. By default, a Device
Inquiry will last 10.24 seconds. This interval is specified by the Bluetooth specification and provides the
best opportunity to find all of the devices in range that
are set to discoverable.
"
Device Discovery
-- Is a Device Inquiry with the added
step of a Device Name Discovery.
"
Class of Device
--Is information gathered during the
Device Discovery procedure and indicates a device’s
typeandwhatservicesitoffers.
"
Bluetooth Device Class-
Helps distinguish a particular
Bluetooth device from other devices that may be near.
Some
Device Classes
are Computer, Phone, and Audio.
The 781T has a Device Class of Peripheral.
"
Bluetooth Service Type
--Helps distinguish a particular
Bluetooth service from other services that may be
near. Some
Service Types
are Networking, Capturing,
and Information. The 781T has a Service Type of Rendering.
"
Discoverable
--If your device is
Discoverable
,itresponds to Device Inquiries from other devices. If you
have no need to gather information on a particular device, it is best to leave it as undiscoverable. A good example is the 700. The 700 doesn’t currently support
any services. If you make i t discoverable, it will only
slow down the process of gathering information from
the printers that are in range.
"
Connectable
--If your device is
Connectable
, it can accept requests for connection from other devices. If you
have no need to connect to a particular device, it is
best to leave it as unconnectable.
Intermec Portable Printers Technical Reference Manual
3-3
Page 44

781T Printer using Wireless Printing
SECTION 3
"
Bondable
--If your device is
Bondable
, it can participate
in Bluetooth security requests. There are currently no
services available on the 700, therefore there is no
need to make it Bondable.
Build Information
In addition to Bluetooth Power status, the RF personal Network section of the self-test ticket also contains
mation
. This information is useful if you ever need to know
Build Infor-
what particular version of Bluetooth firmware is in your
printer, whether that be for support or upgrade purposes.
Default Device Name
Your 781T printer comes from the factory with a “friendly”
name that reflects the serial number. if you have a 781T
with a serial number of 4321012, the Device Name will be
781T--4321012. this parameter is currently only configurable in the factory. If you would like the Device Name to fit
your particular naming convention, please discuss that with
your Intermec representative.
Default Device Class
Your 781T printer comes f r om the factory with a device
class of ’Peripheral’. This parameter is currently only configurable at the factory. If you would like the Device Class to
be something different, please discuss that with your Intermec representative.
Default Service Class
Your 781T printer comes fr om the factory with a service
class of ’Rendering’. This parameter is currently only configurable at the factory. If you w ould like the Service Class to
be something different, please discuss that with your Intermec representative.
Services Offered
Your 781T printer comes from the factory with one available service, Wireless Printer, Bluetooth “Serial Port” ser-
Intermec Portable Printers Technical Reference Manual
3-4
Page 45

SECTION 3
781T Printer using Wireless Printing
vice. This parameter is currently only configurable in the
factory. If you would like the Service Offered to be something different, please discuss that with your Intermec representative.
Automatic Ticket Voiding
This feature is enabled by adding a couple of esc sequences
to the beginning and ending of your session data. Once enabled, if a link loss is detected in the middle of your print
job, the printer considers the print job incomplete and will
automatically print a VOID marker on the output in progress.
To enable ticket voiding you must send an ESC followed by
bt1 (0x1b, 0x62, 0x74, x031) to mark the beginning of the
print job, and ESC followed by bt0 (0x1b, 0x62, 0x74, x030)
to mark the end. If the printer sees a Bluetooth disconnect
after the ESC+bt1 but before the ESC+bt0 is received, it
VOIDs the ticket.
781T Preparation
1. Prepare the 781T by holding down the red button for
about two seconds until you hear a short beep. This
means the printer is ready to go and will be discoverable.
Any time you press and hold the button until it beeps,
you will dump any active wireless printing sessions.
2. You are ready to print wireless transactions.
Intermec Portable Printers Technical Reference Manual
3-5
Page 46

781T Printer using Wireless Printing
Printer Self-Test
1. Press the Paper Advance (red) button for at least five
seconds to run a Self-Test. This means you will be
holding it long enough to hear the
paper advance
state of your printer. Verify the current mode by reading the Power status line from the printout. When
your printer is turned off, the radio is undiscoverable
and unconnectable.
2. When shipping your printer via air freight, turn the
wireless printing mode off and set to IrDA so that the
radio is not powered
700 Mobile Computer Preparation
SECTION 3
and complete a
beep
. The self-test indicates the current
1. On your mobile computer, tap the
located in the System tray on the
2. Select
3. From the
Advanced Features>Bluetooth Devices
Tools
menu, select
Bluetooth
Toda y
tttt
screen.
Device Discovery
icon
.
.You
are presented with a couple of screens detailing the
device discovery process.
4. You are now presented with a screen allowing you to
modify the selection parameters. The default should
work for your needs.
5. Click
Next
to proceed. A search for Bluetooth devices
is performed followed by a look-up of discovered device
names. The progress bars indicate the inquiry status.
6. A list of discovered devices displays.
If your remote wireless printer is discovered and presented
in the list, select the
Next
.
appropriate check box
and click
If your remote device is not displayed, ensure that the device and its radio are switched ON. Click
Finish
.
Next
, then select
7. A progress bar appears indicating Service Directory is
being p erformed.
Intermec Portable Printers Technical Reference Manual
3-6
Page 47

SECTION 3
781T Printer using Wireless Printing
If the discovery is successful a screen with
covery
displays. Click
Finish
. The remote device icon ap-
Successful dis-
pears in the Bluetooth Devices Folder. Verify that this device was discovered by looking at the properties
Device>Properties
(
If the Services tab lists
).
Portable Printer
,theservicewas
discovered correctly.
If it doesn’t, select the
Update
button on the
Services
tab to
try to rediscover the services available (sometimes it will
take a couple tries to correctly discover the services).
8. Click
Next
twice, all Wireless Printing devices within
range will be discovered and displayed. You may have
to repeat this step from time-to-time.
9. The
Bluetooth Serial Port
service is necessary for
the virtual COM port to work. Choose COM6 in your
application to use the Wireless Printing device you selected. Verify that this service was discovered by looking at the properties for this printer (
ties
).
Device>Proper-
10. Verify that your Wireless Printing device is set as your
“favorite” device. In the
select
Tools>My Favorite
ensure your printer shows as
Bluetooth Devices Folder
.Inthe
Favorites
screen,
My Favorite Device
,
.
781T Questions
Why does my printer beep every five minutes when it sits
unconnected?
As part of the implementation of the Serial Port Service in
the printer, the service “refreshes” itself every five minutes.
That refresh sends a message to the printer, which then
wakes up (causing the beep) and resynchronizes with the
Serial Port Service. The printer will then go back to sleep
based on it’s timeout.
How long should a connection to the 781T take?
Intermec Portable Printers Technical Reference Manual
3-7
Page 48

781T Printer using Wireless Printing
The average time needed to connect to the printer is about
three seconds. There are times when it can take up to seven
seconds. Keep in mind, that if a connection fails, you could
attempt a retry.
Development Suggestions
Connection Retries--Just like cell phones and garage
"
door openers, Bluetooth is a radio frequency technology. Because of that, there will be times when a connection attempt will fail. This failure can occur for many
reasons (out of range, interference, etc.). To cope with
this, applications should build in a retry mechanism.
Our testing shows that three retries is the optimum
number to code into your program. The majority of the
time, the first retry will succeed if the previous connection failed d ue to interference or timing windows.
If a connection fails on a 3rd retry, there is most likely
a condition preventing the connection would should be
investigated further.
Persistent storage of printer address. Some customers
"
will choose to use equipment that is ”tied” together. In
this scenario a particular mobile computer will always
be used with the same printer. If you choose to use
this scenario, you can store the printer’s Device Address to the mobile computer ’s storage card. That way,
if you need to cold boot the unit for an application upgrade, the mobile computer can associate itself with
the printer automatically without going through the
Device Discovery process.
*Bluetooth is a trademark of Bluetooth SIG, Inc., U.S.A.
SECTION 3
Intermec Portable Printers Technical Reference Manual
3-8
Page 49

Section 4
Operation
""""""""""""""""""""""""""""
Paper Loading
The 680x series of printers are thermal direct printers requiring thermal paper.
Out of Paper
The 6804 DM portable printer has no paper out indication
and w ill continue to print with no paper providing the
printer does not time out.
The remainder 680x series of portable printers will sound
two quick beeps when they run out of paper. If the printer
is out of paper, (or the paper release lever is up), the printer
will suspend operation until the paper is present and the
lever is down. The printer will continue to communicate
with the hand held as long as it does not “time out.” Once
the printer restarts, it will finish the rest of the print job
where it left off.
The next sections will explain how to manually or automatically load paper.
See the parts lists in Chapter 1 to order paper supplies.
Removing Paper Core
6805a and 6806 Printers
1. Remove the round end boot of the printer by tucking
the tips of your fingers under the edge of the boot and
pulling it off with a peeling motion.
Intermec Portable Printers Technical Reference Manual 4-1
Page 50

Plugging in the Chips SECTION 4
2. Wrap your index finger around the wider end of the
paper rod and pull up. The paper rod will snap out.
Remove the empty paper core and discard. (Save t he
plastic rod)
6804 and 6808 Series of Printers
1. Unsnap the latch and lift up the cover.
2. Wrap your index finger around the empty paper core
and pull up. The paper rod will snap out.
3. Remove the empty paper core and discard.
Paper Loading
Figure 4-1
Paper Loading
Standard Paper
If you are using standard paper, you can load the paper automatically or manually. Experiment to find out which
method is best for you.
4-2 Intermec Portable Printers Technical Reference Manual
Page 51

SECTION 4 Operation
Linerless Labels
If you are using linerless paper, it is recommend that you
use the manual paper loading method.
Automatic Paper Loading
6805a and 6806 Printers
1. Press the red self test button to wake the printer.
2. With the loose, clean edge of the paper coming from
the bottom of the roll, insert the edge of the paper between the roller and the platen.
3. If the printer is on, it w ill feed the paper automatically. If you have allowed the printer to fall into sleep
mode, press the red self test button.
4. Insert the plastic paper rod through the center of the
paper roll.
5. Place the narrow end of the rod into the small hole on
the side of the paper cavity.
6. Snap the wider end into the cutout on the opposite
side of the paper cavity.
7. Turn the paper knob clockwise to tighten the paper
slack in the cavity.
8. Replace the end boot and tear off extra paper.
6804 and 6808 Series of Printers
1. With the loose, clean edge of the paper coming from
the bottom of the roll, insert the edge of the paper between the roller and the platen.
2. Press the red self test button to wake the printer.
3. Push the button again while the printer is awake
causes the mechanism to feed about 1” of paper.
4. Insert the paper into the paper well with it resting on
the paper rod clips.
Intermec Portable Printers Technical Reference Manual 4-3
Page 52

Operation SECTION 4
5. Press the red button while the printer is on and it will
feed paper. You will need about 2 inches of paper coming out of the mechanism.
6. Lower the cover while placing the extra paper though
the tearbar.
7. Latch cover closed and tear off extra paper.
Manual Paper Loading
6805a, 6806, and 6804 Series of Printers
1. Lift up the paper release lever. This takes the pressure off the platen. Make sure you have a clean edge
on the new paper roll.
2. Take the edge of the paper and fold it 45 degrees. Insert the tip of the p aper between the roller and the
platen.
Fold
Figure 4-2
Paper Fold
3. Push on the paper until the tip is peeking out the other side. (If it seems too tight to insert the tip, disengage the paper release lever and turn the feed knob.)
4-4 Intermec Portable Printers Technical Reference Manual
Page 53

SECTION 4 Operation
4. Grab the tip and pull it through until the paper is
straight.
5. Push down the paper lever and insert the plastic paper rod through the center of the paper roll.
6. Place the narrow end of the rod into the small hole on
the side of the paper cavity.
7. Snap the wider end into the cutout on the opposite
side of the paper cavity.
8. Turn the paper knob clockwise to tighten the paper
slack in the cavity.
9. Replace the end boot and tear off extra paper.
6804 and 6808 Series of Printers
1. Lift up the paper release lever. This takes the pressure off the platen. Make sure you have a clean edge
on the new paper roll.
2. Take the edge of the paper and fold it 45 degrees.
Fold
Figure 4-3
Paper Fold
Intermec Portable Printers Technical Reference Manual 4-5
Page 54

Operation SECTION 4
3. Insert the tip of the paper between the roller and the
platen.
4. Push on the paper until the tip is peeking out the other side. (If it seems too tight to insert the tip, disengage the paper release lever and turn the gear to advance the paper).
5. Grab the tip and pull it through until the paper is
straight.
6. Push down the paper lever and insert the paper into
the paper well with it resting in the paper rod clips.
7. Press the red button while the printer is on and it will
feed paper. You will need about 2 inches of paper coming out of the mechanism.
8. Lower the cover while placing the extra paper though
the tear bar.
9. Latch Cover closed and tear off extra paper.
Batteries
"
The 6805a printer uses an internal NiCd battery pack.
"
The 6806 printer uses an internal Nickel Metal Hydride battery (DR30).
"
The 6804 series of printers uses an internal Nickel
Metal Hydride (DR10).
"
The 6808 series of printer uses 1 or 2 Lithium--ion
battery packs.
"
The entire 680x series of portable printers can be
charged on the road, with a cigarette lighter adapter
or at home or the office with an AC adapter.
Determining Current Battery Power
6805a Printer
To determine the current charge on the battery pack, print
out a self test by pressing and holding the red self--test but-
4-6 Intermec Portable Printers Technical Reference Manual
Page 55

SECTION 4 Operation
ton for four seconds. If the battery is good, you will see the
abbreviation for the word “GOOD” next to the Battery voltage print out.
This printer has a built in low battery detector. When the
printer’s battery voltage is low, the printer will beep three
times, indicating a Low Battery Warning. This will only
happen however, if the printer is awake.
This printer recharges in approximately one hour.
WARNING: WARNING: Use only the batteries specified for the printer.
Using non - approved batteries will void your warranty.
French Canadian: Utiliser uniquement les batteries spécifiées
pour l’imprimante. L’utilisation de batteries non approuvées
annulera votre garantie.
6806 Printer
To determine the current charge on the battery pack, you
can print out a self test by pressing and holding the red
self--test button on the side of the printer for four seconds.
If the battery is good, you will see the word “GOOD” next to
the battery voltage print out.
This printer has a built in low battery detector. When your
printer’s battery voltage is low, the printer will beep three
times, indicating a Low Battery Warning.
The 6806 Printer recharges in approximately f our hours.
6804 Series
To determine the current charge on the battery pack, print
out a self test by pressing and holding the red self--test button for four seconds. If the battery is good, you will see the
abbreviation for the word “GOOD” next to the Battery voltage print out.
This series of printers has a built in low battery detector.
When the printer’s battery voltage is low, the printer will
beep three times, indicating a Low Battery Warning. This
will only happen however, if the printer is awake.
Intermec Portable Printers Technical Reference Manual 4-7
Page 56

Operation SECTION 4
This 6804 series of printers recharges in approximately six
to nine hours.
6808 Series of Printer
To determine the current charge on the battery pack, print
out a self test by pressing and holding the red self--test button for four seconds. If the battery is good, you will see the
abbreviation for the word “GOOD” next to the Battery voltage print out. The 6808 series can use two batteries
(VBATT1 and VBATT2).
This series of printers has a built in low battery detector.
When the printer’s battery voltage is low, the printer will
beep three times, indicating a Low Battery Warning. This
will only happen however, if the printer is awake.
This series of printers recharges in approximately t hree
hours.
Charging your Printer with the AC
Adapter
1. Plug the AC adapter into a standard wall outlet.
2. Plug the other end into the DC jack on the side of the
printer. The battery charge light will glow red while
the battery is charging. When it is fully charged, the
light will glow green.
6806 Printers
To connect the ac adapter, slide back the round rubber boot
to access the DC jack and charge LED.
6804 and 6808 Series of Printers
To access the charge jack, open the cover then insert the
plug.
4-8 Intermec Portable Printers Technical Reference Manual
Page 57

SECTION 4 Operation
The entire 680x series of printers can be used while the batteries are being recharged.
Charging your Printer with the Cigarette
Lighter Adapter
1. Plug the cigarette lighter cord into a standard cigarette lighter in your vehicle.
2. Plug the other end of the cord into the DC jack on the
side of the printer. The battery light will glow red
while the battery is charging. When it is fully charged,
the light will glow green.
6806 Printers
To connect the lighter adapter, slide back the round rubber
boot to access the DC jack and charge LED.
6804 and 6808 Series of Printers
To access the charge jack, open the cover then insert the
plug.
The entire 680x series of printers can be used while the batteries are being recharged.
Replacing the Fuse
If the printer does not respond when it is connected to the
cigarette lighter adapter, it is possible that the fuse in the
adaptor may be blown.
1. To check, remove the cigarette lighter adapter from all
power supplies and unscrew the cover over the pin.
Intermec Portable Printers Technical Reference Manual 4-9
Page 58

Operation SECTION 4
2. Pull out the fuse. If the elements in the fuse appear
broken, replace the fuse.
Replacement Fuse Rating
"
1/4” diameter
"
1 1/4” length
"
5A 250V
"
UL and CSA approved
"
McMaster Carr part #7085K75, specify 5 Amp
"
2.5 mm DC jack
"
Center pin positive
"
NOTE: Make sure that the cigarette lighter is receiving power during the
charging cycle. Many vehicles do not allow the cigarette lighter to
operate when the engine is not running.
When to Replace the Battery
A battery’s life span can be referred to as its ”Cycle Life.”
The cycle life is the number of times the battery can be depleted and recharged.
Once the battery reaches the end of its cycle life, the battery’s ability to hold a charge diminishes. If you notice diminished results in printing time, it is time to replace the
battery.
Replacing the Battery
6805a Printer
1. Remove the square end boot of the printer (the side
with the logo on it) by tucking the tips of your fingers
under the edge of the boot and pulling it off with a
peeling motion.
4-10 Intermec Portable Printers Technical Reference Manual
Page 59

SECTION 4 Operation
2. Press down on the clip to detach the battery connector
from the printer.
3. Push on the opposite side of the old battery to slide it
through the opening.
4. Push the new battery through the opening.
5. Insert the plug back into the battery.
6. Charge the new battery.
6806 Printer
1. Remove the square end boot of the printer (the side
with the logo on it) by tucking the tips of your fingers
under the edge of the boot and pulling it off with a
peeling motion.
2. Tap the edge of the printer (where you see its bar code
label) against the heel of your hand.
3. Lift out plug and slide battery out.
4. Slide the new battery in.
5. Insert the plug back into the battery.
6. Charge the new battery.
6804 Series of Printers
1. Open the cover and slide the battery away from the
print head towards the hinge.
2. Lift out the battery from the tray.
3. Slide the new battery in.
4. Charge the new battery.
6808 Series of Printers
1. Open the cover and gently push the battery lock tabs
away while lifting the battery up.
Intermec Portable Printers Technical Reference Manual 4-11
Page 60

Operation SECTION 4
2. Insert the new battery in by putting the non contact
area of the battery in first towards the center.
3. Push down on the battery near the battery lock tabs.
4. Charge the new battery.
Battery Charging Indicator
Tab le 4 -1
Battery Charging Descriptions
Battery LED
Solid Red Charging in Progress
Green Charge Completed
Red Flash Slow Low Temperature or Battery is disconnected
Red Flash Fast High Temperature
Red/Orange Slow Low Voltage
Red/Orange Fast High Voltage
Orange Flash Slow Time out
Orange Flash Fast Internal Error
State of Charge
Customer Receipts and Labels
This chapter is designed to be used by programmers, software engineers, and technicians. It assumes a basic knowledge of computer programming.
The 680x series of printers can operate in Line Printer
Mode or Easy Print Mode. Both modes are used to print
receipts, labels, tickets and reports. The mode you choose
will depend on the sophistication of your receipt and label
requirements, and on a variety of other factors discussed
below.
4-12 Intermec Portable Printers Technical Reference Manual
Page 61

SECTION 4 Operation
Line Printer (Default)
Line Printer Mode is for receipts and labels with text and
simple (bit- mapped) graphics such as a signature
that do not need to be stored.
Easy Print
Easy Print is for receipts and labels with complex graphics or any graphics stored in a PCX format. It allows
you to design a custom receipt, ticket or report with borders, lines, logos, bar codes, text and stored graphics in any
arrangement or rotation to suit your needs.
Line Printer Mode
Line Printer Mode allows you t o create simple receipts and
labels which may include signatures and graphics. The
table below details the host commands available when the
printer is in this mode.
Tab le 4 -2
Line Printer Mode Descriptions
Command
ESC C n Set form length. Range for “n” is 1--255 4-15
ESC A n Set interline spacing; n = 0 (default) 4-16
CAN Cancel line buffer 4-16
ESC V n1 n2 Bit-- mapped graphics mode select 4-16
ESC B Begin acceptance of compressed graphics 4-17
ESC E End acceptance of compressed graphics 4-17
SO Set double wide print 4-18
SI Condensed print 4-18
FF Form feed 4-18
LF Line feed 4-18
Description Page
Intermec Portable Printers Technical Reference Manual 4-13
Page 62

Operation SECTION 4
Table 4-2 (continued)
Line Printer Mode Descriptions
Command PageDescription
CR Carriage return 4-19
ESC w n Font select. Range for “n” is 21--26 hex 4-19
ESC @ Reset the printer 4-20
ESC Hn Multiply height “n” times 4-20
ESC Q n1 n2 Advance n1 n2 from “Q” mark 4-21
ESC R n International Font selection 4-21
ESC ! n Set double wide and double hi gh 4-21
ESC EZ Go to Easy Print Mode 4-22
"
NOTE: All Line Printer Mode commands are case sensitive. Where you see
lower case letters, use lower case. Where you see upper case letters, use upper case. The “n”s are binary numbers, not ASCII (see
individual commands).
Sample Receipt in Line Printer Mode
Figure 4-4
Line Printer Mode Sample Receipt
4-14 Intermec Portable Printers Technical Reference Manual
Page 63

SECTION 4 Operation
Command Strings for Text
1. w”
2. RECEIPT
w!
3.
4. Item #1 -- yellow version $1.00
5. Item #2 -- blue version $1.00
6. Item #3 -- red version $1.00
w”
7.
8. TOTAL: $3.00
EZ
9.
Explanation of Command Strings
"
Line 1--2: The “ ” character is what the ESC character
looks like on your screen. Lines 1--2 print “RECEIPT”
in 7.2 cpi font using
"
Line 3--6: Print Item #1 -- #3 information i n a 20.4 cpi
font using
"
Line 7--8: Prints the “Total” in a 7.2 cpi font using w
w! sequence.
sequence.
"
Line 9: Go to Easy Print Mode. (The left arrow w r epresents the escape character as it appears on your
screen).
w sequence.
Escape Sequences
ESC C n Set Form Length
"
Format: ESC C n
"
Dec: 27 6 n
"
Hex: 1B 43 n
"
Function:Sets the page length in character lines. In
the command format, “n” represents the number of
lines in the form and “n” is a single byte. The default
for “n” is 20 decimal, 14 hexadecimal. The range for
“n” is 1--255.
Intermec Portable Printers Technical Reference Manual 4-15
Page 64

Operation SECTION 4
ESC A n Set Interline Spacing
" Format: ESC A n
"
Dec: 27 65 n
"
Hex: 1B 41 n
"
Function: Sets the number of blank dot lines that are
fed between character lines. It will add “n “ (eight bit
binary number) blank lines after completion of the
current line and before the next line begins printing.
The default for “n” is 0, where n = number of inter
character blank dot lines in a single character. The
range for “n” is 1--155.
CAN Cancel Line Buffer
"
Format: CAN
"
Dec: 24
"
Hex: 18
"
Function: Cancels characters received on the currently
forming line (but not yet printed) to be discarded.
ESC V n1 n2 Bit - Mapped Graphics
"
Format: ESC V n1n2
"
Dec: 27 86 n1n2
"
Hex: 1B 56 n1n2
"
Function: Prints the next (n1*256 + n2) dot lines as
bit--mapped graphics. “n1n2
number set, most significant byte first.
Used to print user--generated bit map graphics across the
width of the print head. After r eceipt of this command, the
printer will dump the binary data supplied directly to the
print head. As customary with bit map data, a “1” bit indicates a dot is on, “0” bit indicates the dot is off.
Graphics printed in this manner must be the exact width of
the head in bits. Bit 7 of the first byte of data received will
print at the left--most dot on the head as you view the head
with the paper feeding away from you.
4-16 Intermec Portable Printers Technical Reference Manual
” form a 16--bit binary
Page 65

SECTION 4 Operation
The printer will remain in bit map graphics mode until the
total amount of bytes necessary to fill “n1 n2” lines of print
have been received by the printer.
Tab le 4 -3
Bit- Mapped Graphics Mode Descriptions
Printer Type
Dots
Across
6805a 384 48 203
6804 & 6804TCR 384 48 203
6804DM & 68804DMCR 240 30 127 Horizontal,
6806 576 72 203
6808 Series 832 104 203
Bytes
Across
Dots Per Inch
69 Vertical
ESC B, ESC E Accept Compressed Graphics
"
Format: ESC B
"
Dec: 27 66
"
Hex: 1B 42
"
Format: ESC E
"
Dec: 27 69
"
Hex: 1B 45
"
Function:Accepts compressed graphics data. Then it
will uncompress and print.
Each compressed d ot line (using a run-- length encoding
scheme) is preceded by an uppercase “G.” Each uncompressed dot line is preceded by an upper case “U.”
Vertical white space (where several consecutive dot lines
have not been printing) can be efficiently handled using an
upper case “A” followed by a single byte count of the number of dot lines to advance.
Compressed dot lines use a single graphics byte, followed by
the number of times that byte is to be repeated. Once the
Intermec Portable Printers Technical Reference Manual 4-17
Page 66

Operation SECTION 4
compressed graphics data command (ESC B) is received,
each dot line must be preceded by the “G” or “U,” or an “A”
may be sent followed by the number of lines to advance.
When all data has been sent, the final bytes must be ESC E
to exit compressed graphics data.
Compressed graphics mode requires a graphic image the
same width as the print head in use: The 6806 has 576 bits
across a single line; the 6805a and 6804 have 384 bits; the
6804DM has 240 bits; and the 6808 has 832 bits across a
single line.
SO Set Double Wide Print
"
Format: SO
"
Dec: 14
"
Hex: OE
"
Function: Will print the current font in double width
until an SI is received (single wide printing) or a carriage return is received.
SI Set Single Wide Print
"
Format: SI
"
Dec: 15
"
Hex: OF
"
Function: Will print the current font in single width.
FF Form Feed
"
Format: FF
"
Hex: 0C
"
Dec: 12
"
Function: Will print the current line being formed,
then advance the paper to top of form.
LF Line Feed
"
Format: LF
4-18 Intermec Portable Printers Technical Reference Manual
Page 67

SECTION 4 Operation
"
Dec: 10
"
Hex: 0A
" Function: Line feed will cause the line to print and the
paper to advance.
CR Carriage Return
"
Format: CR
"
Dec: 13
"
Hex: 0D
"
Function: Like a line feed (see above), the carriage return command will cause the line to print and the paper to advance.
Both Line Feed and Carriage Return commands are provided for your programming convenience.
"
NOTE: To print and advance “n” lines, use that number of CR commands (or
LF commands, or CR/LF or LF/CR combinations).
ESC w n Select Font
"
Format: ESC w n
"
Dec: 27 119 n
"
Hex: 1B 77 n
"
Function: Selects a font from the following list, given
“n,” a binary eight--bit number. The first three fonts in
the table below are permanent fonts. The next four
have been added for you but can be removed. The default font style is a 20.4 cpi font (n= 33 decimal, 21
hexadecimal.)
Table 4 -4
Line Printer Mode Font Descriptions
Name Font ASCII Hex Dec Dots
Wide
MF055 5.5 # 23 35 37 39 96 chars large block
MF072 7.2 ” 22 34 28 31 96 chars large block
Intermec Portable Printers Technical Reference Manual 4-19
Dots
High
Description
Page 68

Operation SECTION 4
Table 4-4 (continued)
Line Printer Mode Font Descriptions
Name DescriptionDots
MF102 10.2 (space) 20 32 20 26 223 chars medium block
MF107 10.7 & 26 38 19 26 96 chars block bold
MF185 18.5 $ 24 36 11 24 96 chars block normal
MF204 20.4 ! 21 33 10 24 224 chars block normal
MF226 22.6 % 25 37 9 24 97 chars small block
Dots
DecHexASCIIFont
Wide
High
bold
6804DM Printer Only
IM5X7 22.1 ? 3F 63 5 7 96 chars impact 5 x 7
IM5X8 22.1 @ 40 64 5 8 96 chars impact 5 x 8
"
NOTE: The “(space)” in the chart above represents the space character.
This is the basic list of fonts. For the entire list, See Appendix C.
"
NOTE: To compare the fonts, run the demo program and print the sample
files. See Chapter 2, Quick Demo.
ESC @ Reset Printer
"
Format: ESC @
"
Dec: 27 64
"
Hex: 1B 40
"
Function: Resets the printer to defaults.
"
NOTE: Here’s an important Easy Print command to remember when you
wish to return to Line Printer Mode from Easy Print Mode:
Format: {LP} Function: “{LP}” is not a Line Printer Mode command.
Use it from within Easy Print Mode when you need to return to Line
Printer Mode . If you do use it from within Line Printer mode by mistake, it will simply print “[LP}” on your receipt or label.
ESC Hn Heighten Font “n” Times
"
Format: ESC H n
4-20 Intermec Portable Printers Technical Reference Manual
Page 69

SECTION 4 Operation
"
Dec: 27 72 n
"
Hex: 1B 48 n
"
Function: Multiply height of font by “n.” Must apply to
entire line.
ESC Q n1n2 Advance “n1n2” From “Q” Mark
"
Format: ESC Q n1 n2
"
Dec: 27 81 n
"
Hex: 1B 51 n
"
Function: Advance the paper “n1n2” dot lines from
“Q” Mark. For more on the “Q” mark, see Appendix A.
ESC R n Select International Character Set
"
Format: ESC R n
"
Dec: 27 82 n
"
Hex: 1B 52 n
"
Function: Selects international
0=USA 4=Denmark
1=France 5=Sweden
2=Germany 6=Italy
3=UK 7=Spain
ESC Hn Set Double Wide and Double High
"
Format: ESC ! n
"
Dec: 27 33 n
"
Hex: 1B 21 n
"
Function: Selects font height and width for one line.
Must apply to entire line.
n = 10h 16d Double High
n = 20h 32d Double Wide
n = 30h 48d Double High and Double wide
Intermec Portable Printers Technical Reference Manual 4-21
Page 70

Operation SECTION 4
ESC EZ Go to Easy Print Mode
"
Format:ESCEZ
"
Dec: 27 69 90
"
Hex: 1B 45 5A
"
Function: Puts the printer in Easy Print Mode. You
must use the capital letters ‘EZ.”
Easy Print Mode
Easy Print is the easiest of all possible modes of printing. It
uses “English--like” commands. You can go to Easy Print
from Line Printer Mode by entering an ESC EZ.
Easy Print Mode allows you to design a custom receipt,
ticket or report with borders, lines, stored graphics, logos,
bar codes and text in any arrangement or rotation to suit
your needs. Unlike Line Printer Mode, Easy Print allows
you to use stored graphics. Thus, anything you print will be
printed lightning fast. You can create images that are miss ing only variable data, which will be supplied when the
image is printed.
The 680x series of printers can store from one to 100 different formats in internal memory, depending on the size of
the format and the amount of memory available in your
printer (1M or 4M).
The printed receipt might contain your company logo at the
top, a signature line at the bottom and an identifying bar
code in the middle.
Easy Print Command General
Format
There are four things to remember about all Easy Print
Commands.
4-22 Intermec Portable Printers Technical Reference Manual
Page 71

SECTION 4 Operation
1. They all look like this: {Command:Information}
where “information” is the set of instructions (if any)
the printer needs to carry out a command.
2. For some commands, no “information” is necessary in
the sense used above.
3. For some commands, the information the printer
needs is somewhat more complex, e.g. the Print Command.
4. For some commands, there are “global options” which
modify the entire command.
"
NOTE: Always use Easy Print for graphics you will use multiple times, such
as a company logo. By storing a graphic in flash memory, you minimize communications between the host computer, thus increasing
your print speed. Your hand --held computer sends only the variable
data to the printer in order to print receipts
"
NOTE: If the printer is asleep, null characters must precede any Easy Print
or Line Printer commands. If the printer is awake, it does not need
null characters in either mode.
Intermec Portable Printers Technical Reference Manual 4-23
Page 72

Operation SECTION 4
e
e
a
Print Command Format
Command
After the left bracket, command, global options and colon, the command string consists
of a series of identically formed lines all of which have this format:
@row, column, Name, Field Options|print data|}
Vertical bars surround the data. Colons surround the row and column information.
Information
{Print, Global Options:
Right Bracket ends Print Request
@ row, column: Name, Field Options|Data|
@ row, column: Name, Field Options|Data|
@ row, column: Name, Field Options|Data|
Data:
will be the text printed out on a receipt or label that is
human readable, or the characters that are machine
readable with a scanner.
Field Options: The user can multiply the height or width of text,
graphics and bar codes.
Depending on what is printed, the data
}
Name: The Name of what you are printing is the style of font or bar code
or line, or the file name of the graphic. An example of the name of a font is
“MF102.” Do not put spaces in the “Name” or the printer will reject your print
request.
Row, Column: Where to print text, graphics, bar codes and lines. A typical print
request will consist of the word “Print” and a number of items to be printed, each at a diff
ent row and possibly at a different column. In order for text to line up properly, keep the
column number the same, (e.g. @10, 30 (information)| @ 60,30 (information)|). Note:
can be no spaces before or after a colon.
Global Options: An action that refers to entire receipt or label. A global option can be used to stop
the paper after a specified number of dot lines or at a specified mark, to rotate an image, or to print
specified number or copies all at once or on demand. A colon follows global options, if any.
Figure 4-5
Print Command Format
4-24 Intermec Portable Printers Technical Reference Manual
Th
Page 73

SECTION 4 Operation
Tab le 4 -5
Quick Reference for Easy Print Commands
Command Reference Page
Ahead 4-28
Back 4-28
LP 4-28
Self Test Printout 4-28
Print 4-28
Print Command Format 4-29
Print Global Options 4-30
Font Names 4-32
Font Field Options 4-33
Bar Code Names 4-33
Bar Code Field Options 4-34
Graphic Names 4-36
Graphic Field Options 4-37
Line Names 4-37
Easy Print Example 1
EXAMPLE 1:
Text with Field Options
1)
EZ
2)
{PRINT:
@10,30:MF226,HMULT2,VMULT2|Total:$13.15|
3)
4)
@60,30:MF226,HMULT2,VMULT2|01-01-97|
}
5)
Intermec Portable Printers Technical Reference Manual 4-25
Page 74

Operation SECTION 4
Explanation of Command Strings
Line 1: Set to Easy Print Mode. The “ “ishowtheESC
character looks on the screen.
Line 2: Left bracket and “PRINT” begins print request.
Line 3: Print “Total $13.15” in a 22.6 cpi font that has been
vertically and horizontally multiplied to twice its normal
size. Note that there are no spaces in the row and column
information, nor any spaces in the font name.
Line 4: Print the date 01--01--97 in a 22.6 cpi font that is
widened and heightened to twice normal size.
Line 5: Right bracket closes Print Command set.
Easy Print Example 2
EXAMPLE 2: Text and Bar Code with Field Options
1)
EZ
{PRINT:
2)
@10,30:MF226,|Item#1 yellow $10.00|
3)
4)
@40,30:MF226|Item#2 blue $3.15
5)
@100,30:BC39N,HIGH 20,WIDE 2|@13.15
@150,30:MF107|TOTAL $13.15|remarks
6)
}
7)
{AHEAD:200}
8)
Explanation of Command Strings
Line 1: Set to Easy Print Mode. The “ “ishowtheESC
character looks on your screen.
4-26 Intermec Portable Printers Technical Reference Manual
Page 75

SECTION 4 Operation
Line 2: Left bracket and “PRINT” begins print request.
Line 3--4: Starting at row 10, column 30, print Item #1 and
Item #2 information in a 22.6 cpi font.
Line 5: Print a Code 39 bar code that has been heightened
and w idened. The embedded Total doesn’t have t he word
“Total” because this bar code wasn’t wide enough to embed
the whole word.
Line 6: Print the human--readable total underneath the
bar code. You can put remarks or comments after the vertical
bar.
Line 7: A right bracket closes the Print command set.
Line 8: The AHEAD command advances the paper 200 dot
lines.
Easy Print Command Section
The rest of this chapter gives you the specifics of each Easy
Print command.
Each Easy Print command has a unique format and function. All but t he “Query” class of commands can be explained in 1--7 pages. Detailed information on the “Query”
class can be found in Appendix B. The “n”s are ASCII numbers, not binary (see individual commands).
Intermec Portable Printers Technical Reference Manual 4-27
Page 76

Operation SECTION 4
Ahead Command Format {AHEAD: nnn}
{ A left bracket begins the command set.
AHEAD:nnn “AHEAD:nnn” or “Ahead:nnn” or “A:nnn”
advances the paper by “nnn” dot lines. Ahead is an alternative to using the paper knob and manually advancing the
paper. The range for “nnn” is 1 to 65,000. The command is
enclosed in left and right brackets.
} A right bracket ends the command set.
Back Command Format {BACK: nnn}
} A left bracket begins the command set.
BACK:nnn “BACK:nnn” or “Back:nnn” or “B:nnn” backs
the paper by “nnn” dot lines. Use the BACK command to
reposition the edge of the paper for minimum paper waste.
The command is enclosed in left and right brackets.
} A right bracket ends the command set.
Line Printer Mode {LP}
{ A left bracket begins the command set.
LP “LP” puts printer in Line Printer Mode. The command
is enclosed in left and right brackets.
} A right bracket ends the command set.
Self Test Printout {TP}
{ A left bracket begins the command set.
TP “TP” commands a self test print out.
4-28 Intermec Portable Printers Technical Reference Manual
Page 77

SECTION 4 Operation
} A right bracket ends the command set.
Print Command Format
The general format for the Print Command (shown below)
includes all possible printer actions to stop the paper or rotate the image, all possible print images, and all possible
options used to alter those images.
{Print, Global Options:@row,column:Name,Field Options|data|}
{
PRINT, A comma follows the PRINT command only if there are one
Global Options:“Global options” include DEMAND, QUANTITY, QSTOP,
@row,column: “@row,column:” specify the row and column where each line
Name “Name” is the name of the text, bar code, line or graphic to
Field Options
A left bracket begins each command set.
or more “global options.”
STOP, and ROT270. If more than one global option is used,
each is separated from the next by a comma. Following the
last global option or following “Print” if there are none is
the “:”
of text or graphics will be placed. The row and column numbers are separated by a comma with no spaces anywhere.
The range for each row is 1 -- 65,000. The column range for
the 6805a is 1 -- 384. The column range for the 6806 is 1 --
576. In a typical print request , there may be five or more
“@row,col” for the single word “Print.”
be printed. The name is always five characters, even for the
graphics which you name yourself.
“
Field options” are used to increase the size of fonts, bar
codes, graphics or lines. Each one is separated from the
next by a comma.
|Data | “Data” refers to the text to be printed or embodied in a bar
code. Data is surrounded by vertical bars.
Intermec Portable Printers Technical Reference Manual 4-29
Page 78

Operation SECTION 4
}
"
NOTE: A single print command can be used for multiple print lines called a
Right bracket ends the PRINT command set.
print request. Thus, you don’t have to repeat the word “PRINT” every
time you want to print another line of text.
Global Options
BACKnnn Back Global Option
Format: BACKnnn (1 <
Function: Functions the same way as the BACK com-
mand. Backs the paper up “nnn” dot lines before beginning
to print.
Example:
{PRINT,BACK50:@10,30:MF107|Hi world| }
QUANTITYnnn Quantity Global Option
Format: QUANTITYnnn (1 <
Function: Quantity allows you to specify how many cop-
ies of a label or receipt you w ish to print.
nnn < 200)
nnn < 999 )
Example:
{PRINT,QUANTITY 5:@10,30: MF107|Hi|}
DEMAND Demand Global Option
Format: DEMAND (6805a and 6806 only)
Function: Used with the “QUANTITY” command, or
alone, DEMAND allows you to print a given number of copies, stopping between each copy. Just press the red button
on the printer to print each copy. You can print less than
the Quantity specified. If no Quantity is specified, you can
print one copy when you’re ready. The remaining demands
will clear when the printer falls a sleep. You can cancel the
remaining demands by sending ESC{CN!}
Example:
4-30 Intermec Portable Printers Technical Reference Manual
{PRINT, QUANTITY 5, DEMAND:@10,30:MF107|Hi world|}
Page 79

SECTION 4 Operation
QSTOPnnn Qstop Global Option
Format: QSTOPnnn (1 <
nnn < 65000) (6805a, 6806, and
6804)
Function: Stop nnn dot lines after sensing “Q” mark. Af-
ter the mark has been found, the paper advances for “nnn”
dot lines and stops (even if the image is not yet complete.)
If, however, there is no “Q” mark on the paper, the printer
continues its search. See also the “STOP” option for use as
a safeguard.
Example:
"
NOTE: The “Q” must be positioned so that it does not sit under the sensor
when the paper is properly aligned. See Appendix A, for more on the
Qmark.
{PRINT,QSTOP500:@10,30:MF107|Hi world| }
ROT270 ROT270 Global Option
Format: ROT270
Function: Will rotate image so that the left--hand edge of
the landscape image prints first.
Example:
{PRINT,ROT270:@10,30:MF107|Hi world| }
STOP nnn Stop Global Option
Format: STOP nnn ( 1 <
nnn < 65000)
Function: UsetheSTOPoptiontoadvancethepaperto
the proper point for tearing. This options stops the paper
“nnn” dot lines after the beginning of the label or receipt.
The data “nnn” sent after the STOP option specifies the total number of dot lines high for this print image. For example, for the 680x series, which have a 203 DPI mechanism,
specifying “STOP 500” will give a 2.5” total height image
from the top of the paper to where it has stopped under the
print head.
The STOP option can be used with the QSTOP option. Set
the STOP to stop the printing just after the stop using the
QSTOP option. This way, the paper will always stop ad-
Intermec Portable Printers Technical Reference Manual 4-31
Page 80

Operation SECTION 4
vancing whether paper with “Q” marks is loaded, or regular
paper is loaded.
Example:{PRINT,STOP500,QSTOP125:
@10,30:MF107|Hi world|
}
In this example, the paper will stop advancing when it has
advanced 500 dot lines, or 125 dot lines after the “Q” mark
has been detected, whichever occurs first.
{Print, Global options:@row,column:Name,Field Options|data|}
Font Names
To print text, you must specify the name of the font for the
text to be printed. Each font has a five--character name.
This is only a partial list. For the entire list of available
fonts, see Appendix C.
Tab le 4 -6
Printing Text Font Name Descriptions
Name CPI Description
MF055 5.5 96 chars large block (26 chars for lower case, 26
chars for upper case, plus symbols, etc.)
MF072 7.2 95 chars large block
MF102 10.2 223 chars medium block bold
MF107 10.7 96 chars block bold
MF185 18.5 96 chars block normal
MF204 20.4 224 chars block normal (default font for 6805a, 6806,
and 6804 printers).
6804DM Printer Only
IM5X7
(default)
4-32 Intermec Portable Printers Technical Reference Manual
22.1 96 characters for impact 5 x 7
Page 81

SECTION 4 Operation
Table 4-6 (continued)
Printing Text Font Name Descriptions
Name DescriptionCPI
IM5X8 22.1 96 characters for impact 5 x 8
MF226 22.6 96 chars small block
Font Field Options
These options are used to heighten or widen the font.
Tab le 4 -7
Font Field Option Descriptions
Field Option Abbr. Description
HMULTn HMn Widens text; 1 < n<255.
VMULTn Vn Heightens text; 1 < n<255.
"
NOTE: To compare the fonts, run the demo program and print the samples.
See Chapter 2, Quick Demo.
Bar Code Names
Tab le 4 -8
Bar Code Description and Data Requirements
Name Description Requirements for Data
BC39N Code 39 2:1 ratio Can use these characters in the data field: Space $ % + . /
0--9 A -- Z. Auto inserts leading and trailing “*”
BC39W Code 39 3:1 ratio Can use same characters as above.
COBAR Codabar 0--9--$:/.+abcd,usermustsendleadingandtrailing
guard bar a-- d
I2of5 Int. 2 of 5
2.5:1 ratio
0--9 (digits only, must be even. Controller will insert leading zero to assure an even number of digits).
Intermec Portable Printers Technical Reference Manual 4-33
Page 82

Operation SECTION 4
Table 4-8 (continued)
Bar Code Description and Data Requirements
Name Requirements for DataDescription
BCI25 Int. 2 of 5
2:1 ratio
BC128 Code 128 Automatically selects Codes A -- C, for the shortest bar
EN128 EAN-- 128 Uses Codes C, for the shortest bar code. Allows all ASCII
UPC--A UPC--A 0--9 (must have 11 digits or error, controller calculates
EAN08 EAN--8 0--9 (must have 7 digits or error, controller calculates
EAN13 EAN--13 0--9 (must have 12 digits or error, controller calculates
PD417 PDF--417 See Notes on the use of PDF--417.
0--9 (digits only, must be even. Controller will insert leading zero to assure an even number of digits).
code. Allows all ASCII characters.
characters.
check digit).
check digit).
check digit).
Bar Code Field Options
Tab le 4 -9
Bar Code Field Option Descriptions
Field Option Abbr. Description
HIGHn Hn Changes height of bar code in 5 dot inch intervals;
default is 5 dots; 1 < n<255.
WIDEn Wn Width multiplier of bar code; default is 1; W = 2 is
twice as wide (1/2 density) as W = 1; 1 < n<255.
Notes on the use of PDF-417
Use PDF--417 the same as any other bar code:
1. After entering Easy Print using ESC+EZ, select the
barcode using the name “PD417”.
4-34 Intermec Portable Printers Technical Reference Manual
Page 83

SECTION 4 Operation
2. Enter data between two ‘|’. If the data is long, DO
NOT put CR/LF in data unless you want the CR/LF to
be in the bar code.
PDF--417 has several field parameters that may be specified:
1. COLUMNS will specify the number of columns of
DATA printed in each row of the bar code. If not specified, the default value of 2 DATA columns is used. The
actual COLUMNS used is 4 greater then DATA COLUMNS. (2 for GARD COLUMNS and 2 for ROW indicator COLUMNS).
2. SECURITY specifies the level of error detection and
correction codes, from 1 through 8. If not specified,
the default value for the number of data characters to
be printed is used:
"
1--40 characters level 2
"
40--160 characters level 3
"
161--320 characters level 4
"
321--863 characters level 5
3. YDIM specifies the height of each element, in units of
.005 inches. Default is 1
4. WDIM specifies the width of each element, in units of
.005 inches. Default is 1
PDF--417 symbols contains:
1. A maximum of 1848 text characters (fewer if mixed
with arbitrary bytes)
2. A minimum of 3 rows and a maximum of 30 rows
3. A minimum of 1 column and a maximum of 30 columns
4. Error d etection and correction characters vary with
different security levels:
"
Level 1 adds 4 codewords
"
Level 2 adds 8 code words
Intermec Portable Printers Technical Reference Manual 4-35
Page 84

Operation SECTION 4
"
Level 3 adds 16 code words
"
Level 4 adds 32 code words
"
Level 5 adds 64 code words
"
Level 6 adds 128 code words
"
Level 7 adds 256 code words
"
Level 8 adds 512 code words
EXAMPLE:
{PRINT:@75,10:PD417,YDIM 6,XDIM 2,COLUMNS 2, SECURITY 3|ABCDEFGHIJKL|}
Will print a PDF--417 bar code containing ABCDEFGHIJKL with each element .010” wide and .030” high,
with each row containing 2 data bytes and using a error
detection and correction level of 3, which adds 16 error
correction code words to the bar code.
You can print any characters using the PDF--417. It is optimized for the most common printing of a mixture of numbers, text, and control characters.
Graphic N ames
Function: Print a stored graphic, e.g. stored under the
name “alogo.”
EXAMPLE 1: {PRINT: @10,30:ALOGO|}
EXAMPLE 2:
{PRINT:@10,30:ALOGO,HMULT2, VMULT2|}
Explanation: Example 1 prints whatever logo has been
stored under the five--character name, “ALOGO.” (See
Chapter 3 on how to use the “Graphics” button in the Configuration Program to store a graphic automatically.
Example 2 above makes the logo twice as big as it would
be otherwise.
4-36 Intermec Portable Printers Technical Reference Manual
Page 85

SECTION 4 Operation
Graphic Field Options
These options are used to widen or heighten the graphic.
Table 4 -10
Graphic Field Option Descriptions
Field Option Abbr. Description
HMULTn HMn Multiplies width of graphic by “n”
VMULTn VMn Multiplies height of graphic by “n”
"
NOTE: See Chapter 3, Graphics section, for storing graphics automatically
before you print.
Line Names
Format 1: Hline, length nnn, thick n
Format 2: Vline, length nnn, thick n
Function: Horizontal and vertical lines can be drawn
around text or graphics.
EXAMPLE 1: {PRINT: @60,30:HLINE, length 200, thick 2|}
EXAMPLE 2:
{PRINT:@60,30:VLINE, length 50, thick2|}
Explanation: Example 1 prints a horizontal line 200 dot
lines long, and two dot lines thick. Example 2 prints a vertical line 50 dot lines long, and 2 dot lines thick. There is only
a single vertical bar “|” because there is no data to enclose.
Tab le 4 -11
Line Names Option Descriptions
Abbr Name Description
THLINEHorizontal line
VVLINEVertical line
Intermec Portable Printers Technical Reference Manual 4-37
Page 86

Operation SECTION 4
Table 4-11 (continued)
Line Names Option Descriptions
Abbr DescriptionName
L Lengthnnn Set line length
T Thicknnn Set line thickness
Card Reader Commands
Operational Commands
All operational commands for the magnetic/smart card
reader peripheral are IMMEDIATE commands, taking the
form of Easy Print commands (bracketed by “{“ and “}”) and
preceded by the ESC (1Bh) character. Responses vary by
command. All operational commands are two characters,
followed by:
! command complete, no data is expected in response
? command complete, response with data expected
: data for peripheral follows
In addition, the reader has configuration options which can
be semi--“permanently” set in Flash for LED usage, Magnetic Stripe and Smart Card reader. Format for these configuration commands follows the self--writing three character configuration commands (similar to IR related
configuration commands).
In all cases, the printer will respond with either a NAK
(N<crc>}, or a WACK (W<crc>) indicating the printer is
busy writing to flash followed by an ACK (A<crc>). The
CRC is the common CRC--16.
4-38 Intermec Portable Printers Technical Reference Manual
Page 87

SECTION 4 Operation
General Reader Operational
Commands
The card reader has two LEDs, red and green that may be
used to give a visual status to the user for either magnetic
cards or smart cards. In addition, the printer can be polled
for general card reader status as well as the current state of
the LEDs. Semicolons separate elements of the returned
status:
Command: {RS?} Status – returns power, card inserted,
and LED status as follows:
"
P:0/1 for smart card (ICC) power off or on
"
S:0/1 for card not s eated or seated
"
B:0/1 for button currently connected to reader
"
G:0/1/F for Green Led off or on or flashing
"
R:0/1/F for Red Led off or on or flashing
"
Example Response – no button reader
{RS!P:0;S:1;G:F;R:0}indicating ICC power off, card is
seated and green led is flashing
"
Example Response – with button reader
{RS!P:0;S:0;B:1;G:0;R:0} indicating ICC and LEDs off,
no card seated, button in contact
Command: {RG:data} Controls Green Led – requires 1
data byte.
Response: {RG!} if the command was received (for any data
sent).
Command: {RR:data} Controls Red Led -- requires 1 Data
byte.
Response: {RR!} if the command was received (for any data
sent).
RG/RR data: 0 (zero) – Turn LED off
1 (one) – Turn LED on
F (flash) – Begin flashing LED
Intermec Portable Printers Technical Reference Manual 4-39
Page 88

Operation SECTION 4
General Reader Configuration
Commands
The red and green LEDs and buzzer can be configured to be
under host control, or the printer’s control. The printer can
control the LEDs only if EITHER the MAG card read is enabled, OR the Smart Card is enabled, but not both. If the
LEDs are configured to be under host control, the MG and
MR commands will override the printer ’s current use of the
LED:
Command: {CCR:data} Reader LED and BEEPER configuration – requires data
CCR data: HOST – LEDs and BEEPER are under host control
AUTO – LEDs and BEEPER are under reader’s control:
If MAG card enabled and ICC Smart Card disabled:
"
Flashing Green – card inserted
"
Solid Green (timed) + 2 short beeps – good read
"
Solid Red (timed) + 1 long beep – bad read
If ICC Smart Card enabled and MAG card disabled
"
Flashing Green – card inserted
"
Solid Red – card inserted and ICC power ON
"
Solid Green (timed) – card inserted and ICC power
turned OFF
Magnetic Card Operational
Commands
The magnetic card reader is always operating in the background if it is enabled. Magnetic card data is read when
the card is inserted, removed, or both (default is read on
removal only). That data read is stored in the printer until
the data is zeroed or the printer falls asleep. Temporary
4-40 Intermec Portable Printers Technical Reference Manual
Page 89

SECTION 4 Operation
flash configuration override commands are valid only until
changed by another command or the printer falls asleep.
Command: {ME!} Enable Magnetic card reader (temporarily overrides Flash setting)
Response: {ME!}
Command: {MD!} Disable Magnetic card reader (Temporarily overrides Flash setting)
Response: {MD!}
Command: {MZ!} Zero Magnetic card data (use to assure
data is from CURRENT read)
Response: {MZ!}
Command: {MR?} Read Magnetic card data – all data read
from card is returned,
Including start/stop characters (%?;) and delimiters (^=)
Returns data delimited as follows:
"
{N} – no card data read OR:
"
T1: -- delimits Track 1 data (sent if track 1 is enabled)
"
T2: -- delimits Track 2 data (sent if track 2 is enabled)
"
T3: -- delimits Track 3 data (sent if track 3 is enabled)
"
| -- delimits data from one track to another
If there is NO data recorded on an enabled track, then an
‘N’ is returned in place of that data.
If the data read was bad (parity or LRC), then a ‘B’ is returned in place of that data.
Response example (all three tracks enabled – all good read)
{T1:<data>|T2:<data>|T3:<data>}
Response example (Track 1 data bad and Track 3 not recorded) {T1:B|T2:<data>|T3:B}.
Magnetic Card Configuration
Commands
The magnetic card reader is capable of reading Tracks I, II,
and III. Not all applications use all tracks, so to avoid bad
Intermec Portable Printers Technical Reference Manual 4-41
Page 90

Operation SECTION 4
reads being reported you should enable only the tracks you
expect data to read for data. In addition, the reader can
read data when the card is inserted, removed or in both directions. Finally, the card reader can be globally enabled or
disabled. Parameters to be set should be set in a single
command, with options separated by semicolons:
Command: {CMR:data} Configure Magnetic Card Reader
– requires data.
CMR data:
"
T1:ON or OFF to enable or disable reading Track I
"
T2:ON or OFF to enable or disable reading Track II
"
T3:ON or OFF to enable or disable reading Track III
"
E:ON or OFF to enable or disable the magnetic card
read
"
D:IN or OUT or BOTH for card read direction
"
S:ON or OFF to enable or disable auto RS--232 send of
data on reading
"
A:ON or OFF to enable the auto print stand--alone
demo
EXAMPLE: Turn T1&2 ON, T3 OFF, and the auto print ON:
"
1 – put the printer into Easy Print by sending 3 characters ESC+EZ
"
2–configurebysending
{CMR:T1:ON;T2:ON;T3:OFF;A:ON}
Smart Card Operational Commands
Since Smart Card applications and card types can vary
widely, the printer acts only as a conduit to the card, relaying commands to the card and accepting data back from the
card.
Most cards require special commands of their own. The
commands shown here are commands to the reader, not to
the card.
4-42 Intermec Portable Printers Technical Reference Manual
Page 91

SECTION 4 Operation
The card specific data sent to the printer as data along with
these reader commands is sent to the card and any response(dataand/orstatusword–a2bytesequence)from
the card is returned to the host. Consult ISO--7816 part 4
for T=0 commands to the smart card, which are included as
the data for the SR and SW commands to the card reader
and meaning of responses.
Command: {SP:data} Controls Power to the Smart card –
requires data.
Response for power ON: {SP:<ATR data>}
Where ATR data is Answer To Reset data returned by card
Response for power OFF: {SP!}
SP data: 0 (zero) – Turn power off
1 (one) – Turn power on (printer returns ATR for
async card)
Command: {SW:data} ICC card write – requires command
to be written to card (ISO--7816)
Uses Sync or if Async, protocol selected at configuration
Returns status response from card preceded by {SW!
Command: {SR:data} ICC card read – requires command/
data to be written to card (ISO--7816)
Uses Sync or of Async, protocol selected at configuration
Returns data and status response with data from card preceded by {SR!
Implemented as required (future):
Command: {SM:data} Smart Memory Card – requires
command/data to be written to card
Uses I
2
C or SPI communications to card
Subcommands for read and write control the reader as well
as the card
Intermec Portable Printers Technical Reference Manual 4-43
Page 92

Operation SECTION 4
Smart Card Configuration
Commands
The smart card reader can be enabled and disabled. The
reader can support smart Asynchronous (T=0 and T=1/future) and Synchronous (future) smart cards, microprocessor
based cards as w ell as memory cards (future). But it must
be configured for the type of card that is to be used. Parameters to be set should be set in a single command, with options separated by semicolons:
Command: {CSR:data}Configures the smart card reader –
requires data
CSR data: T:MEM or ASYNC or SYNC for memory or async
or sync µP based card types
P:T0 or T1 for ASYNC card protocol to be used (T1 is future)
M:I2C or SPI for I
ture)
E:ON or OFF to enable or disable the smart card reader
C:BIN or HEX to send commands to the card in binary or
ASCII Hex
R:BIN or HEX to receive status&data responses from card
in binary or ASCII Hex
A:ON or OFF to enable the auto print stand--alone demo
2
C or SPI type memory card interface (fu-
EXAMPLE: To turn the auto print demo ON:
"
1 – put the printer into Easy Print by sending three
characters: ESC+EZ
"
2 – configure the printer by sending {CSR:A:ON}
Operational Scenarios
General
The magnetic card and button data are read automatically
by the 6804TCR and 6808 printers, and buffered internally
4-44 Intermec Portable Printers Technical Reference Manual
Page 93

SECTION 4 Operation
until the host requests the data. Data is flushed either
when the host explicitly requests that the buffer is zeroed
or when the printer falls asleep.
Smart cards, however, vary widely and many have specific
security issues (such as passwords, cryptographic keys, and
application knowledge of file structure) that must be presented to gain access to data stored on the card. For smart
card applications, the 6804 and 6808TCR printers acts as a
conduit for commands and data from the host, and returns
data sent from the card.
In normal operation, the printer will probably be asleep
when any card or button transaction begins.
1. The printer will wake up whenever a magnetic card or
smart card is inserted, or the probe is touched to a
button.
2. The button is r ead automatically whenever the printer
is awake and the button is sensed by touching with
the probe.
3. The magnetic card is read when the printer is awake
and the card is moving.
4. This data is stored in an internal buffer in the printer
and available to the host via RS--232 or IrDA.
5. Data directly from the smart card can be read by command from via RS--232 or IrDA
Magnetic Card Reader
Although insertion type card readers such as the one used
on the reader can read cards either upon insertion or withdrawal, the read rate is much higher upon withdrawal with
virtually all readers of this type (e.g. the gas pump readers). This is because the card is unstable and the rate of
movement can change drastically when the card is first inserted.
If the reader is already awake, and more than one card
could be inserted, the application may choose to zero the
Intermec Portable Printers Technical Reference Manual 4-45
Page 94

Operation SECTION 4
buffer before prompting the insertion of the card to assure
the data is from the card about to be inserted, and not a
previously read card.
An application, then, may choose the following sequence if
the operator of the equipment is trained (i.e. not a “consumer” end user); this uses the automatically generated LED/
Buzzer status indicators
"
Handheld prompts the user to insert, then remove
card
"
Operator inserts card (waking up the reader) and
waits for green LED, then removes card
"
Handheld polls the 6804 and 6808 TCR printers waiting for data to be available
Or, if the operator is an “untrained consumer”, the application may choose a more step--by--step approach and handle
handheld screen prompts and LED/Buzzer as required:
1. Handheld prompts the user to insert their card
2. User inserts the magnetic card into the card reader
slot waking up the reader
3. Handheld polls the reader looking for the card to be
inserted
4. When the handheld sees the card is inserted, it
prompts user to remove card
5. 6804 TCR automatically reads and buffers card data
from any or all of Tracks I, II, and III
6. Handheld polls the reader looking for the card to be
removed
7. Handheld requests card data from reader
Smart Card Reader
Smart cards vary widely (some are microprocessor based,
some are memory only; all may have security). In addition,
memory cards have data organization and microprocessor-based cards have a file structure that is defined by the application.
4-46 Intermec Portable Printers Technical Reference Manual
Page 95

SECTION 4 Operation
Most smart card operating systems (inside the smart card)
do not provide a method of “reading the directory (file structure)”. The file structure and security features are unique
to the application. So although the r eader gives access to
“standard card types” (as defined in ISO--7816), it is not
possible to “automatically” read and buffer the smart card
data.
Each application should have a predefined card type as well
as use of that card; the handheld should then have that
knowledge. The application, then, might choose to handle a
microprocessor--based smart card as follows :
"
Handheld prompts the user to insert their card.
"
User inserts the smart card into the card reader slot
waking up the reader>
"
Handheld polls the reader looking for the card to be
inserted.
"
Handheld commands reader to power up the card;
reader returns the card’s answer to reset (unique to
each card type).
"
Handheld commands reader to pass commands and
data to the card, selecting files and providing passwords and cryptographic keys as required.
"
Reader returns smart card’s response to each command and data sent from the handheld, allowing the
handheld to determine if proper access has been attained.
"
Handheld requests data from the card, and reader returns that data.
"
Handheld provides command with data to be written
to the card, and the reader passes that command and
data to the card and returns the card’s response.
"
When the transaction is complete, the handheld
prompts the reader to power down the card, then
prompts the user to remove the card.
Intermec Portable Printers Technical Reference Manual 4-47
Page 96

Operation SECTION 4
4-48 Intermec Portable Printers Technical Reference Manual
Page 97

Section 5
Maintenance and Troubleshooting
""""""""""""""""""""""""""""
Cleaning Your Printer
The 680x series of portable printers require little maintenance. They were designed to be rugged and attractive
without constant attention. However, with continued use,
the printer will collect dirt and residue and require some
cleaning.
Cleaning the Interior
Dirt, adhesive and residue will collect on the print head of
the printer and need to be removed. Clean your printer once
a month if you use it frequently, or once every three months
if used infrequently.
We offers a printer cleaning card that is used to clean the
6804, 6805a, and 6806 printers. It is a paper--sized card
that has been saturated with a cleaning solution.
1. Tear open the pouch containing the cleaning card and
remove the card.
2. Remove the receipt paper from the printer and insert
the cleaning card into the paper feed.
3. Press the red self--test button on the side of the printer for 4 seconds. Conduct self tests until the card feeds
all the way through the printer.
4. Allow a few seconds for the print head to dry and insert it through the printer again.
Intermec Portable Printers Technical Reference Manual 5-1
Page 98

Plugging in the Chips SECTION 5
5. Remove the Cleaning Card and throw it away.
WARNING: Do not attempt to clean the internal areas of the printer in any
other way than that described above! This could result in
damage to the print head and void your warranty
French Canadian: Vous devez suivre cette procédure pour
nettoyer les parties internes de l’imprimante. Si vous ne suivez
pas cette procédure, vous pouvez endommager la tête
d’impression et annuler ainsi votre garantie.
Cleaning the Exterior
When the outside of your portable printer needs cleaning,
use a soft cloth and mild cleanser if necessary. Do not use
abrasive cleanser, chemicals or scrubbing pads, as your
printer’s finish could become marked.
Troubleshooting
Paper Loading Problems
If the paper feed mechanism does not feed correctly on the
first part of a new paper roll, remove two to three feet of
paper from the outside of the roll. The length of paper rolls
can vary by as m uch as five feet, making the roll too thick
in diameter for the printer to accommodate.
If the printer is out of paper (or the paper release lever is
disengaged) this condition will interrupt a batch of receipts,
and the printer will suspend operation until the condition is
cleared. The printer will continue to communicate with the
hand held as long as it does not “time out.”
Once the printer is operational, the suspended print batch
(if any) will continue to print, insuring that all receipts are
properly printed.
5-2 Intermec Portable Printers Technical Reference Manual
Page 99

SECTION 5 Maintenance and Troubleshooting
Not Printing
1. Print a self test. If the self test will not print, check
battery voltage by plugging the printer into a wall
outlet using the AC adapter. Repeat the self test, and
check the Battery Voltage print out. Charge battery if
necessary or replace.
2. Check cable connections. Make sure the modular connector is inserted and clipped in.
3. Check to see if your cable has been damaged by excessive pulling. A cable may also be damaged if it is bent
at sharp angles.
4. Make sure the paper is properly installed (with lever
closed).
5. Turn the print head knob to ensure that paper is not
jammed.
6. Use only the recommended battery pack for the printer.
7. Printer will not print on wrong side of paper. Re--load
if necessary.
Print Quality Problems
Print Roller Appears Dirty
Clean Your Printer.
Linerless Labels
Linerless label printing can cause the print head to become
sticky. Use the cleaning method described in the Preventative Maintenance portion of this section. Attempts to clean
the printer by other methods could result in costly damage
to the print head.
Print is Too Light
If you are not getting satisfactory darkness, connect your
printer to the personal computer containing your Configu-
Intermec Portable Printers Technical Reference Manual 5-3
Page 100

Maintenance and Troubleshooting SECTION 5
ration Program and click on the Paper Options button. Adjust the Darkness setting to a higher percentage until the
print is dark and crisp. See
tails.
Chapter 3, page 18
, for de-
Charging Problems
Using an AC Adapter
If the printer does not respond when it is connected to an
AC adapter, there could be a problem with the adapter or
with the wall outlet.
Using a Cigarette Lighter Adapter
If the printer does not respond when it is connected to a cigarette lighter adapter, it is possible that the fuse may be
blown. To check, remove the cigarette lighter adapter from
all power supplies and unscrew the cover over the pin. Pull
out the fuse. If the elements in the fuse appear broken, replace the fuse.
Programming Problems
1. Check to see that you have installed all of the correct
settings as required by your particular hand--held
computer. Using the information in Chapter 3, you
should have chosen the communications settings
(baud rate, handshaking, etc.) (However, if you are
using IrDA, the infrared standard set by the Infrared
Data Association, you will not have to worry about
baud rate or parity or data bit settings as they are set
automatically).
2. Updating your firmware will delete any data stored in
the printer ’s internal memory. Thus, you may need to
add your old format files to your new setup program
before updating your configuration.
5-4 Intermec Portable Printers Technical Reference Manual
 Loading...