

Page 1

6651 Pen Computer
USER’S GUIDE
""""""""""""""""""""""""""""
PN: 961-054-022
Revision A
June 2000
Page 2

"
NOTICE This publication contains information proprietary to Intermec Technologies Corporation. It is being supplied
to you with the express understanding that the information contained herein is for the benefit of the conĆ
tracting party only, and may not be copied, distributed, or displayed to third parties without the express
written consent of Intermec Technologies Corporation, and shall be returned to Intermec Technologies CorĆ
poration upon written request. If a purchase, license, or nondisclosure agreement has been executed, the
terms of that agreement shall govern this document.
This publication is furnished for information only, and the information in it is subject to change without
notice. Although every effort has been made to provide complete and accurate information, Intermec
Technologies Corporation assumes no responsibility or liability for any errors or inaccuracies that may
appear in this document.
Disclaimer of Warranties. The sample source code included in this document is presented for reference only.
The code does not necessarily represent complete, tested programs. The code is provided AS IS WITH
ALL FAULTS." ALL WARRANTIES ARE EXPRESSLY DISCLAIMED, INCLUDING THE IMPLIED
WARRANTIES OF MERCHANTABILITY AND FITNESS FOR A PARTICULAR PURPOSE.
We welcome your comments concerning this publication. Although every effort has been made to keep it
free of errors, some may occur. When reporting a specific problem, please describe it briefly and include the
book title and part number, as well as the paragraph or figure number and the page number.
Send your comments to:
Intermec Technologies Corporation
Publications Department
550 Second Street SE
Cedar Rapids, IA 52401
INTERMEC, NORAND, PEN*KEY, PEN*VIEW, ROUTEĆCOMMANDER, and BEVERAGE ROUTEBOOK
are registered trademarks and NOR*WARE and RAPIDREP are trademarks of Intermec Technologies
Corporation.
2000 Intermec Technologies Corporation. All rights reserved.
This publication printed on recycled paper.
Acknowledgments
Alexander is a registered trademark of Alexander Manufacturing Co.
Ethernet is a trademark of Xerox Corporation.
Microclean II is a registered trademark of Foresight International.
Microsoft, MS, and MSĆDOS, and Windows, are registered trademarks and Visual Basic for Windows, and
Windows for Pen are trademarks of Microsoft Corporation.
SanDisk is a trademark of SanDisk Corporation
FCC Computer Compliance
"
NOTICE This equipment meets Class B digital device limits per Part 15 of FCC Rules. These limits protect against
interference in a residential area. It emits, uses, and can radiate radio frequency energy. If you do not
install and use the equipment according to its instructions, it may interfere with radio signals. However,
there is no guarantee that interference will not occur in a particular installation.
If this equipment does cause harmful interference to radio or television reception, which can be determined
by turning our equipment off and on, the user is encouraged to try to correct the interference by one or
more of the following measures:
" Reorient or relocate the radio or television receiving antenna.
" Increase the separation between the computer equipment and receiver.
" Connect the equipment into an outlet on a circuit different from that to which the radio or televiĆ
sion receiver is connected.
" Consult the dealer or an experienced radio or television technician for help.
Antenna Requirements
"
NOTICE FCC rules section 15.203 and Canada's RSSĆ210 require that this device be operated using an antenna furĆ
nished by Intermec Technologies Corporation. The antenna coupling on this product has been designed to
accept only antennas manufactured by us. Use of an antenna other than that furnished with the equipment
is prohibited by FCC and Industry Canada rules.
Canadian Computer Compliance
This Class B digital apparatus meets all requirements of the Canadian InterferenceĆCausing Equipment
Regulations.
Page 3

Cet appareil numérique de la classe B respecte toutes les exigences du Reglèment sur le material boilleur
du Canada.
Telephone Installation Warning Notices
The following notices apply to equipment that may be connected to telephone lines or systems. For your
personal safety, and to protect this equipment from potential electrical or physical damage, do NOT connect
equipment to telephone lines or data communication equipment unless the following warnings have been
read, understood, and complied with.
" Never install telephone wiring during a lightning storm.
" Never install telephone jacks in wet locations unless the jack is specifically designed for wet locaĆ
tions.
" Never touch uninsulated telephone wires or terminals unless the telephone line has been disconĆ
nected at the network interface.
" Use caution when installing or modifying telephone lines.
" Avoid using a telephone (other than cordless type) during an electrical storm. There may be a
remote risk of electric shock from lightning.
" Do not use the telephone to report a gas leak in the vicinity of the leak.
Installation du téléphone : avertissements
Les avertissements qui suivent s'appliquent à tout équipement qui peut être branché aux lignes ou systèmes
téléphoniques. Pour votre sécurité personnelle et pour protéger l'équipement de tout dommage électrique
ou physique potentiel, NE PAS brancher un ordinateur tablette électronique ou ses périphériques aux lignes
téléphoniques ou équipements avant que les avertissements suivants aient été lus, compris et observés :
" Ne jamais installer de câblage téléphonique pendant un orage électrique.
" Ne jamais installer de prise téléphonique dans un endroit humide à moins que la prise ait été spéĆ
cifiquement conçue pour être utilisée dans les endroits humides.
" Ne jamais toucher les fils de téléphone ou de l'équipement terminal non isolés à moins que la ligne
téléphonique n'ait été débranchée de l'interface réseau.
" User de prudence lors de l'installation ou de la modification de lignes téléphoniques.
" Éviter d'utiliser un téléphone (autre qu'un appareil téléphonique sans fil) pendant un orage élecĆ
trique. Il pourrait y avoir un faible risque d'électrocution par la foudre.
" Ne pas utiliser le téléphone afin de signaler une fuite de gaz à proximité de la fuite.
B
CAUTION: Intermec Technologies Corporation suggests you buy cables from us to connect with other
devices. Our cables are safe, meet FCC rules, and suit our products. Other cables may not
be tested. They may cause problems from electrostatic discharge or induced energy. Our
warranties do not cover loss, injury, or damage from other cables.
B
CAUTION: Intermec Technologies Corporation recommends that you only purchase Norand Mobile
Systems Division certified modems. Intermec does not certify all modems available in the
marketplace. Intermec does not warrant noncertified modems; furthermore, these modems
may cause problems from electrostatic discharge and may not conform to FCC regulations.
For a list of Norand Mobile Systems Division certified modems call Customer Support at
1-800-221-9236 in United States or (country code) 800-633-6149 in Canada.
WARNING: The lithium ion battery may explode if replaced incorrectly. Replace only with the same or
equivalent type.
ADVERTISSEMENT: La batterie au lithium peut exploser si elle est replacée de manière incorrecte. Elle ne
doit être remplacée que par une batterie identique ou similaire.
WARNING: Lithium ion batteries may explode or catch fire if overcharged due to improper dock
installation.
ADVERTISSEMENT: Les batteries au lithium peuvent exploser ou prendre feu si elles sont trop changées à
cause d’une mauvaise installation de la station d’accueil.
Page 4

Page 5

Table of Contents
Chapter 1: Getting Started .........................................................1-1
Welcome .........................................................................................................1-1
What the Intermec 6651 can do......................................................................1-2
Checking the contents..................................................................................... 1-2
About this manual ...........................................................................................1-3
Conventions used ...........................................................................................1-3
Caring for your device .....................................................................................1-4
Part names and functions ...............................................................................1-6
Setting Up the Device......................................................................................1-9
Chapter 2: Hardware ...................................................................2-1
Attaching the Keyboard Hard Cover................................................................2-1
Using as Tablet ...............................................................................................2-2
Using the Built-in Camera ...............................................................................2-3
Replacing the Battery Pack............................................................................. 2-5
Replacing the Backup Battery......................................................................... 2-6
About Power Source .......................................................................................2-9
Resetting the device......................................................................................2-10
Connecting the device to your desktop computer .........................................2-12
Using the infrared port for file transfer ..........................................................2-13
Using the Built-in Modem ..............................................................................2-14
Using a PC Card ...........................................................................................2-15
Using the Compact Flash (CF) Card.............................................................2-17
Connecting to USB Devices..........................................................................2-18
Using the Printer ...........................................................................................2-19
Connecting an External CRT ........................................................................2-21
Security Features ..........................................................................................2-22
i
Page 6

Chapter 3: Basics........................................................................3-1
Entering Information and Selecting Objects....................................................3-1
Programs.........................................................................................................3-1
Using the Start Menu and Taskbar .................................................................3-4
Using the Command Bar.................................................................................3-4
Finding Files and Exploring the Web ..............................................................3-5
Customizing Your Device................................................................................3-5
Chapter 4: Microsoft ActiveSync ...............................................4-1
Chapter 5: Microsoft Office Companion Programs.................. 5-1
Pocket Word: Creating Documents ................................................................5-1
Pocket Excel: Creating Workbooks ................................................................5-3
Pocket Access: Viewing and Creating Data....................................................5-4
Pocket PowerPoint: Showing Presentations ...................................................5-6
Chapter 6: Voice Recorder and InkWriter ................................ 6-1
Voice Recorder: Capturing Ideas and Thoughts...............................................6-1
InkWriter: Creating Notes and Drawings......................................................... 6-3
Chapter 7: Microsoft Pocket Outlook.......................................7-1
Calendar: Scheduling Meetings and Appointments ........................................7-2
Contacts: Tracking Business Colleagues .......................................................7-5
Tasks: Keeping a To Do List...........................................................................7-6
Inbox: Sending and Receiving E-mail Messages..................................................7-8
ii
Page 7

Chapter 8: Getting Connected Remotely ................................. 8-1
Connecting to an ISP ......................................................................................8-1
Connecting to Your Network ...........................................................................8-2
Getting Help on Connecting Remotely............................................................8-4
Chapter 9: Bundled Software .....................................................9-1
Simple Internet Connection .............................................................................9-1
Mail................................................................................................................9-11
Web Surfing ..................................................................................................9-23
MPEG-4 Camera...........................................................................................9-28
Movie Gallery ................................................................................................9-31
Movie Player..................................................................................................9-33
PC File Viewer...............................................................................................9-35
Image Editor.................................................................................................. 9-39
Backup Tool ..................................................................................................9-44
Launcher .......................................................................................................9-48
Appendices................................................................................. A-1
A. Troubleshooting ......................................................................................... A-1
B. Hardware specifications............................................................................. B-1
iii
Page 8

Where to Find Information
This manual describes your device hardware, provides an overview of the programs
included, and describes how to set up communications between your device and
desktop computer and the Internet. The following table is a guide to the different
types of information available to help you use your device. Note that although this
manual introduces the programs on your device, it does not describe them
completely. For more information, see the comprehensive online Help for each
program.
Information Source
Device programs This User Guide
-or-
Synchronizing and
exchanging files with a
Online Help on your device. Select
and then
Help
.
The booklet accompanying the Microsoft®
ActiveSync CD.
Start
desktop computer
-or-
ActiveSync online Help on your desktop
computer. In the ActiveSync window, click
Help
, then
Microsoft ActiveSync Help
.
ActiveSync Help also includes
troubleshooting information on connections.
-or-
Online Help on your device. Tap
then
Help
.
Start
and
Toolbar buttons Tap or click and hold on a toolbar button to
see its name. Drag off the toolbar button
before lifting to avoid activating the button.
Up-to-date information on
Windows
® CE-based
http://www.microsoft.com/windowsce/
devices
Information on this
release of Windows CE
Read Me files (located in the ActiveSync
folder on your desktop computer).
and ActiveSync
iv
Page 9

Chapter 1: Getting Started
a)1
What the INTERMEC 6651 can do
The INTERMEC 6651 uses the Microsoft Windows CE operating system, which is
similar to the Microsoft Windows® 95/98 and Windows NT® 4.0 operating systems.
You can us e t h e d ev i ce t o pe rf or m m an y of the PC operations you are already familiar
with, such as accessing e-mail, surfing web pages, w riting letters, managing
expenses, and keeping track of appointments and contacts.
The Microsoft Windows CE operating system comes standard with the following
programs:
• Microsoft Pocket W ord
• Microsoft Pocket Excel
• Microsoft Pocket PowerPoint®
• Pocket Internet Explorer
• Pocket Outlook
• Microsoft Pocket Access
• ActiveSync
• Microsoft InkWriter®
etc.
Additional programs from SHARP in this device make your mobile life even more
comfortable.
® (Contacts/Calendar/Tasks/Inbox)
®
Checking the contents
Please check the contents carefully. The package should include the following:
• Serial cable (PN: 871-012-030)
• AC adapter (PN:871-012-020)
• AC power cord (PN:851-036-010)
• CR2032 lithium backup battery ×2
• Battery pack (PN:871-012-010)
• Keyboard hard cover (packed inside the device)
• Stylus (packed inside the device)(PN:871-012-040)
• Quick Start Guide
• Declaration of Conformity
If there are problems with any of these contents, please contact your INTERMEC
TECHNOLOGIES CORPORATION dealer.
1-1
Page 10

About this user guide
This user guide helps you get started using the device as soon as possible. It
consists of the following chapters:
Chapter 1 : Getting Started
Introduces the device and explains how to use this user guide. Quickly walks you
through the device setup procedure.
Chapter 2 : Hardware
Explains the hardware features of the device and its general operation.
Chapter 3 : Basics
Explains the operation of the keyboad and stylus, and basic operation of Windows
CE.
Chapter 4 : Microsoft ActiveSync
Describes ActiveSync.
Chapter 5 : Microsoft Office Companion Programs
Describes Pocket Word, Pocket Excel, Pocket Access and Pocket PowerPoint.
Chapter 6 : Voice Recorder and InkWriter
Describes Voice Recorder and InkWriter.
Chapter 7 : Microsoft Pocket Outlook
Describes Calendar, Contacts, Tasks and Inbox
Chapter 8 : Getting Connected Remotely
Explains how to connect the device to a desktop computer, network or the Internet
Chapter 9 : Bundled Software
Describes the bundled programs from SHARP.
Appendices
Troubleshooting procedures, Specifications and other information about the device.
This user guide assumes that you are already familiar with Microsoft Windows
95/98 or Windows NT 4.0. If necessary, refer to the appropriate Microsoft
documentation.
Conventions used
The following keyboard and symbol conventions are used in this user guide:
BOLD capitalized notations indicate menu names, commands, toolbar buttons,
tabs in dialog boxes, dialog box titles, and items within display boxes.
1-2
Page 11

Caring for your device
This device contains sophisticated circuitry and a glass display panel which can be
damaged if not cared for properly. The following precautions should ensure your
device gives you many years of reliable use.
• Keep your device away from extreme heat. Do not leave it on the
dashboard of a car or near a heater. Do not leave it in any place that is
extremely damp or dusty.
• Do not drop your device or subject it to severe impact. Bending the
body can damage the circuitry. Do not use extreme force when
pressing the display or keys.
• Do not use sharp objects or your fingernails to touch the display screen.
We recommend you use only the supplied stylus to tap or write on the
screen.
1-3
Page 12

• Hard, sharp objects can scratch your device, so ensure it is closed
and/or protected when carried with other objects.
• Do not use solvents to clean your device. Use only a soft dry cloth.
• Since this product is not waterproof, do not use it or store it where
fluids, for example water, can splash onto it. Raindrops, water spray,
juice, coffee, steam, perspiration, etc. may also cause malfunction.
• Care should be exercised when using this device on heat sensitive
surfaces or your lap as the base will get hot.
• If you force the built-in camera to rotate, you may damage it.
• When opening the display more than 180°, be careful of the following:
• Do not forcibly rotate the display.
• Do not rotate the display while cables are connected to the AC
adapter jack, serial port, or modem jack.
Further, make sure that the modem jack is closed.
• Do not leave the device with the PC card or CF card eject buttons
protruding. They might break off.
1-4
Page 13

Part names and functions
1
Display
2
Shutter button
15
Cover latch
Microphone
Built-in camera
Keyboard
16
Keyboard hard cover
14
13
12
Display
Hard icon
Speaker
Security slot
Cover latch
Stylus
Stylus
Hard icon
Speaker
Security slot
RESET button
USB port
PC Card slot
10
PC Card eject button
11
Infrared port
7
8
9
3
4
5
6
I R
RESET
RESET button
Use this button when computer operation freezes.
USB port
PC Card slot
PC Card eject button
Infrared port
Keyboard
Built-in camera
Microphone
Shutter button
Keyboard hard cover
It is to be attached when the device is used as a tablet.
1-5
Page 14
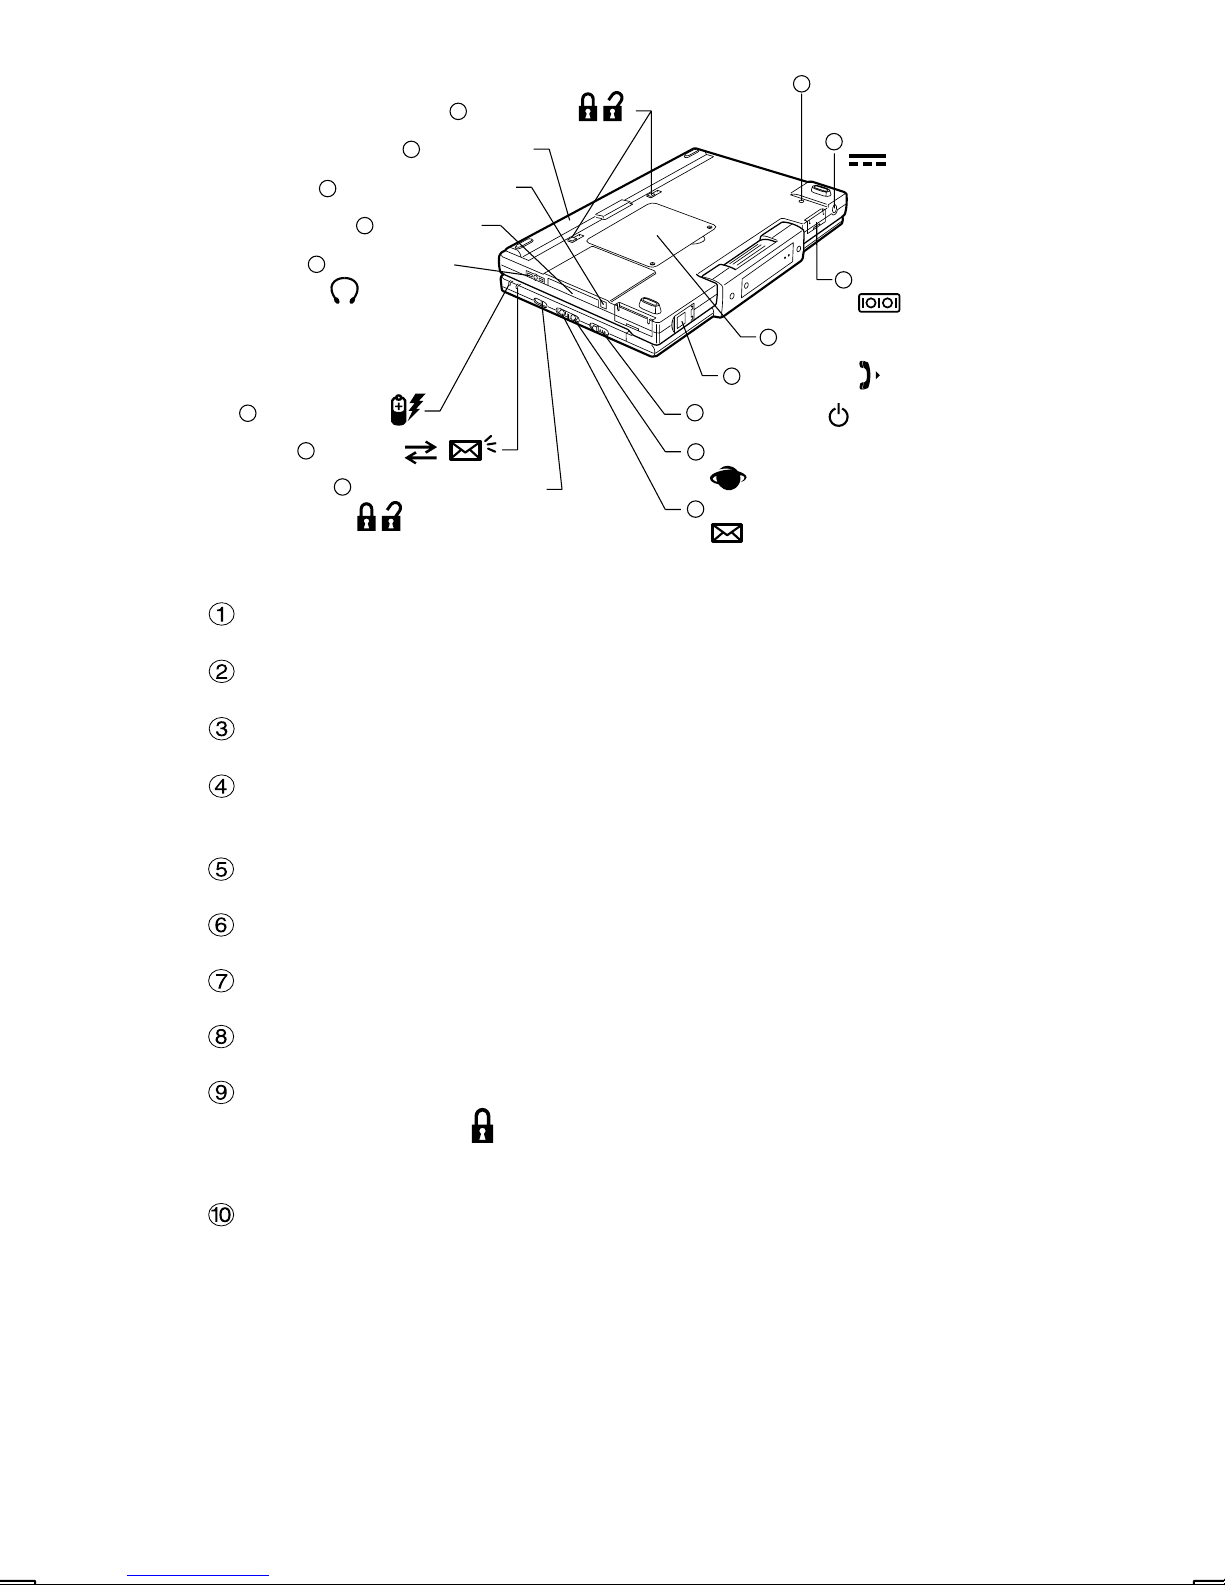
Lock switch
Battery pack
16
15
1
FULL RESET button
FULL RESET
2
AC adapter jack
CF card eject button
CF card slot
Earphone jack
11
Charging lamp
Mail lamp
One-touch lock switch
14
13
12
10
9
FULL RESET button
AC adapter jack
Serial port
Serial/VGA port
Backup battery cover
Modem jack
Power switch
One-touch web surfing switch
One-touch mail receipt switch
6
7
8
4
5
3
Backup battery cover
The backup lithium battery (CR2032) is installed here.
Modem jack
Power switch
One-touch web surfing switch
One-touch mail receipt switch
One-touch lock switch
If this switch is in the
position, the one-touch web surfing switch and one-
touch mail receipt switch will not work.
Mail LED
1-6
Page 15

Charging LED
During charging, this LED flashes orange. Once charging is finished, the LED
stops flashing and remains illuminated.
Earphone jack
CF card slot
Battery pack
Lock switch
CF card eject button
1-7
Page 16
Setting Up the Device
Important
Before using the device for the first time, please perform all of the procedures
explained in this section.
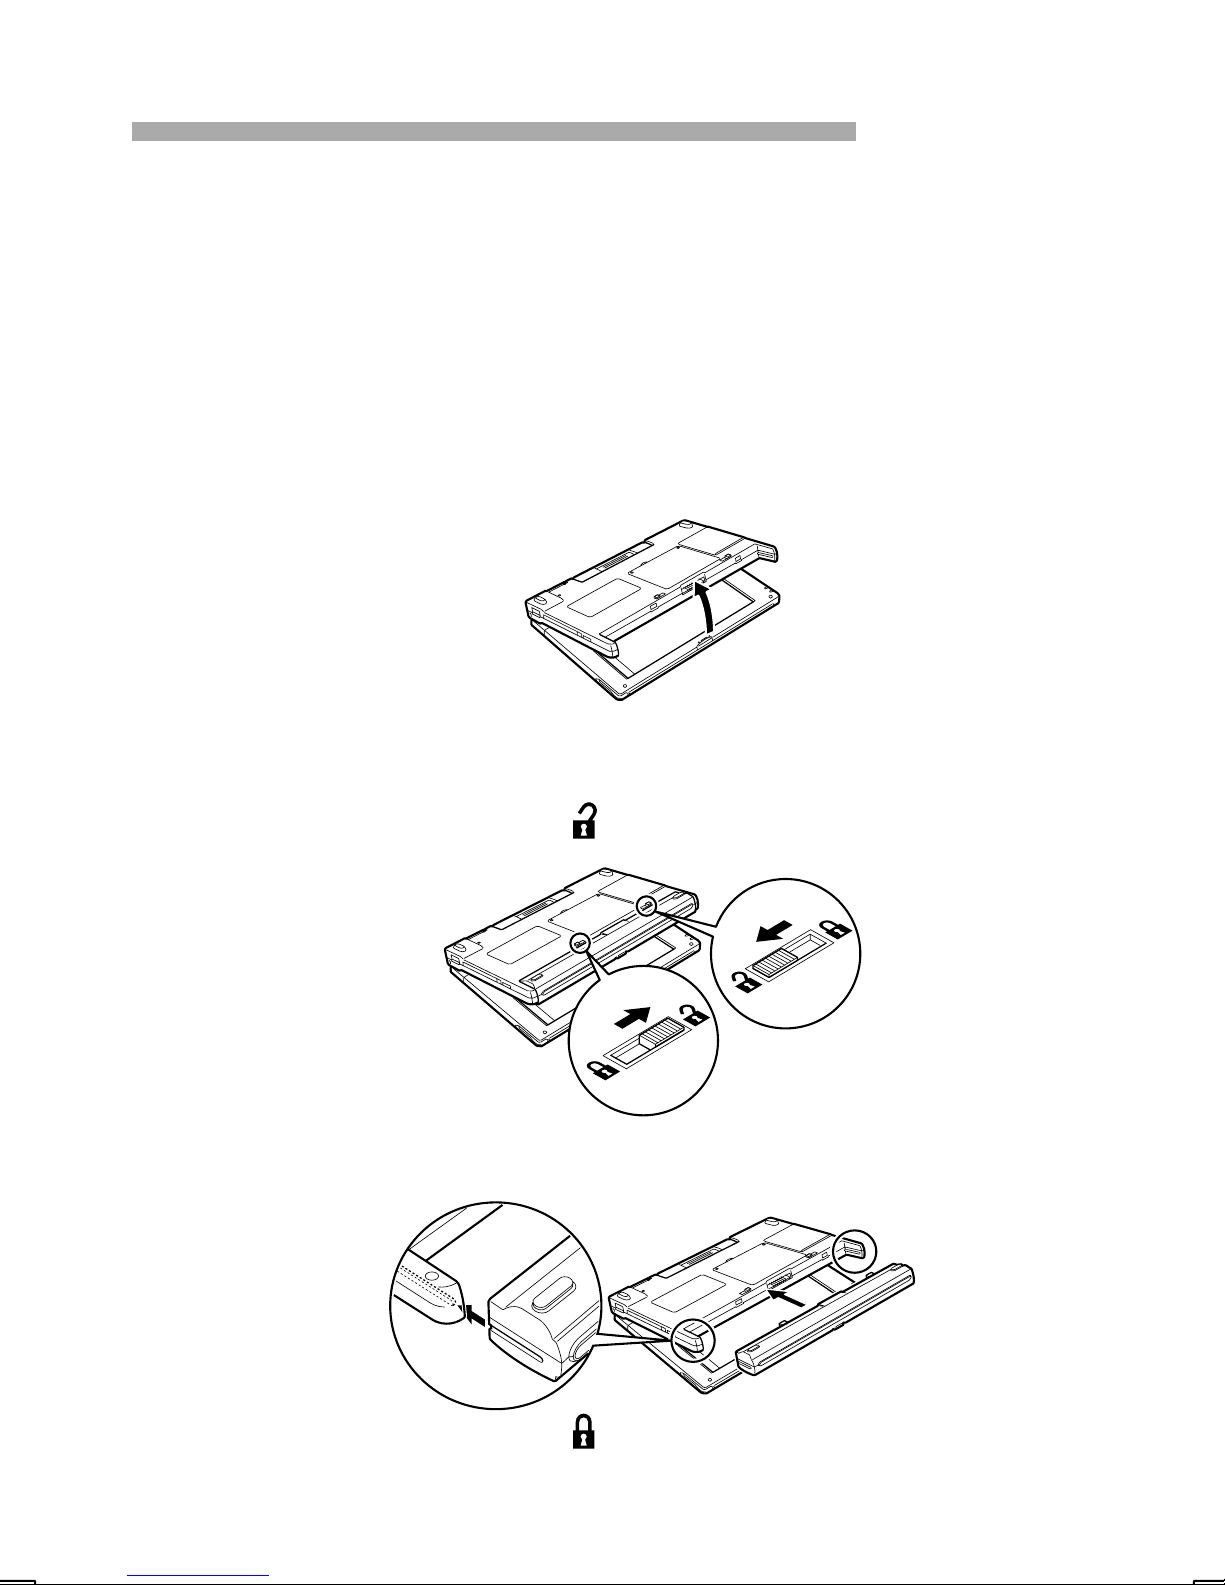
Installing the Batteries
After the battery pack is installed, the lithium battery for data backup should be
installed.
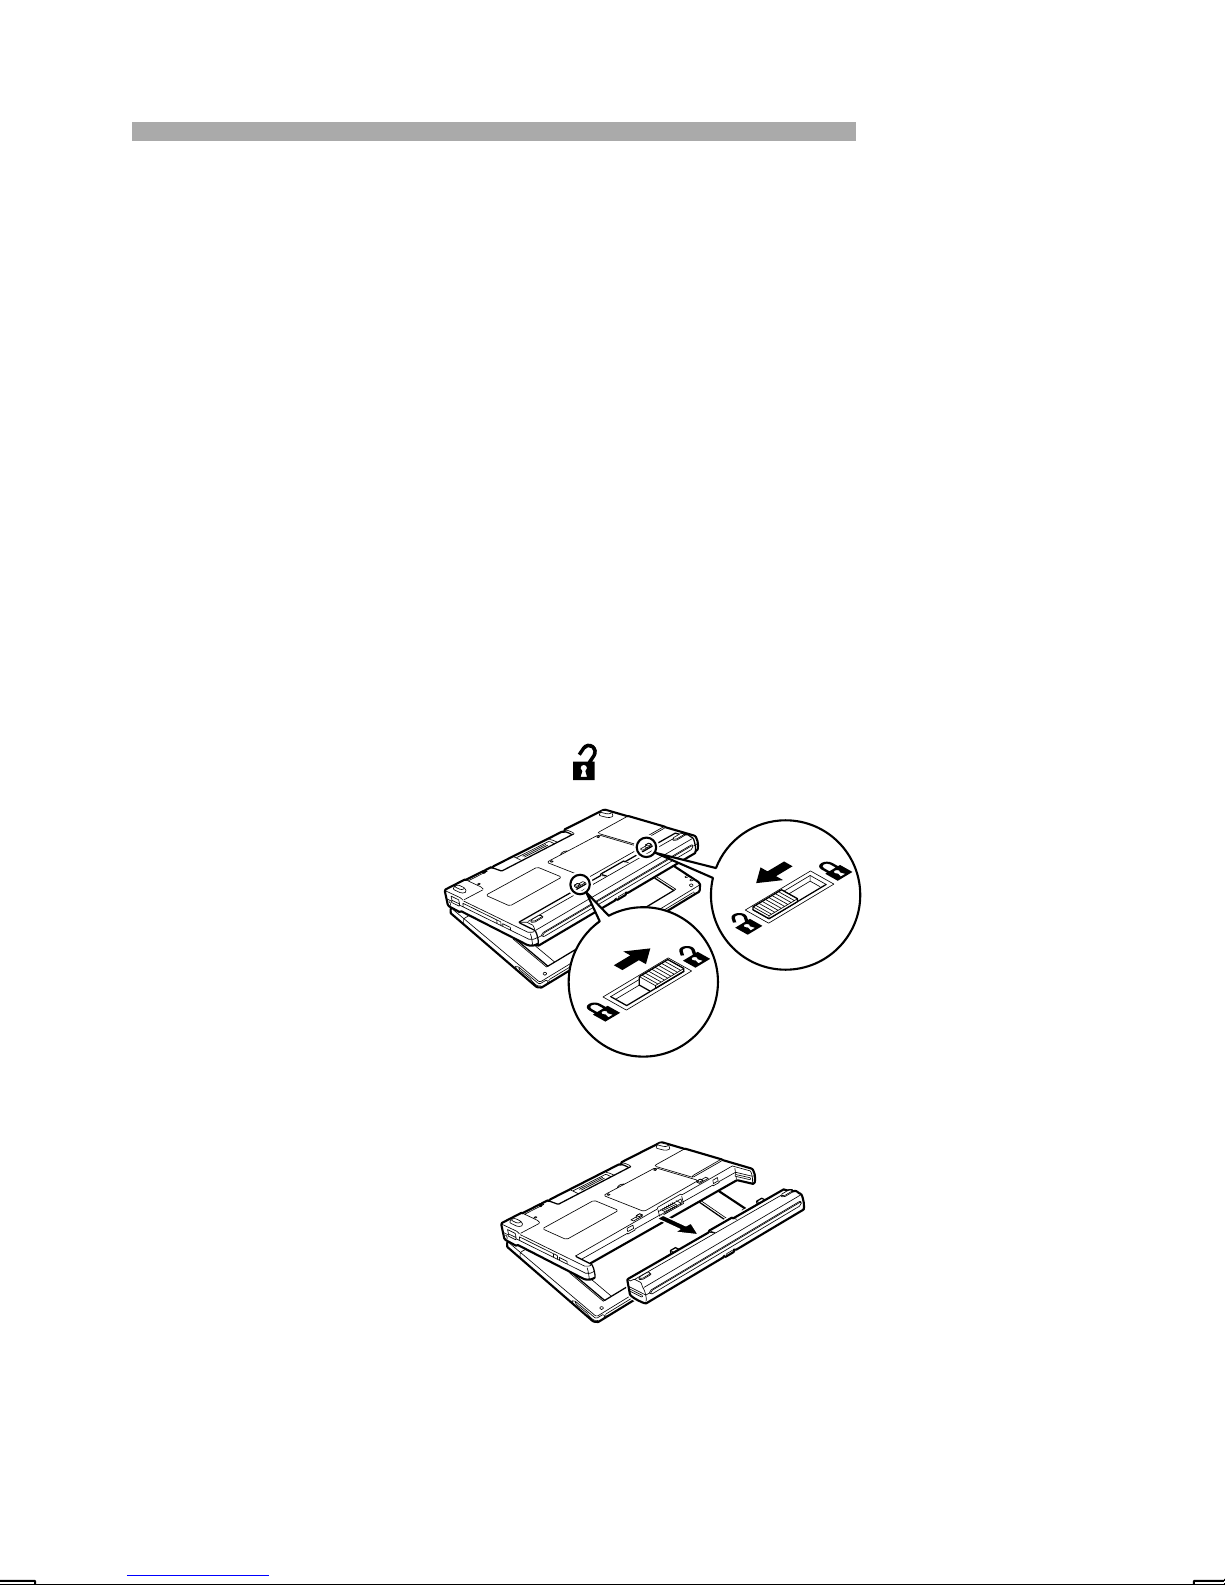
Installing the battery pack
1. Place the device with the bottom up, and then open the display.
Note:
The battery pack cannot be installed with the display in the closed condition.
2. Slide the lock switches to the
position.
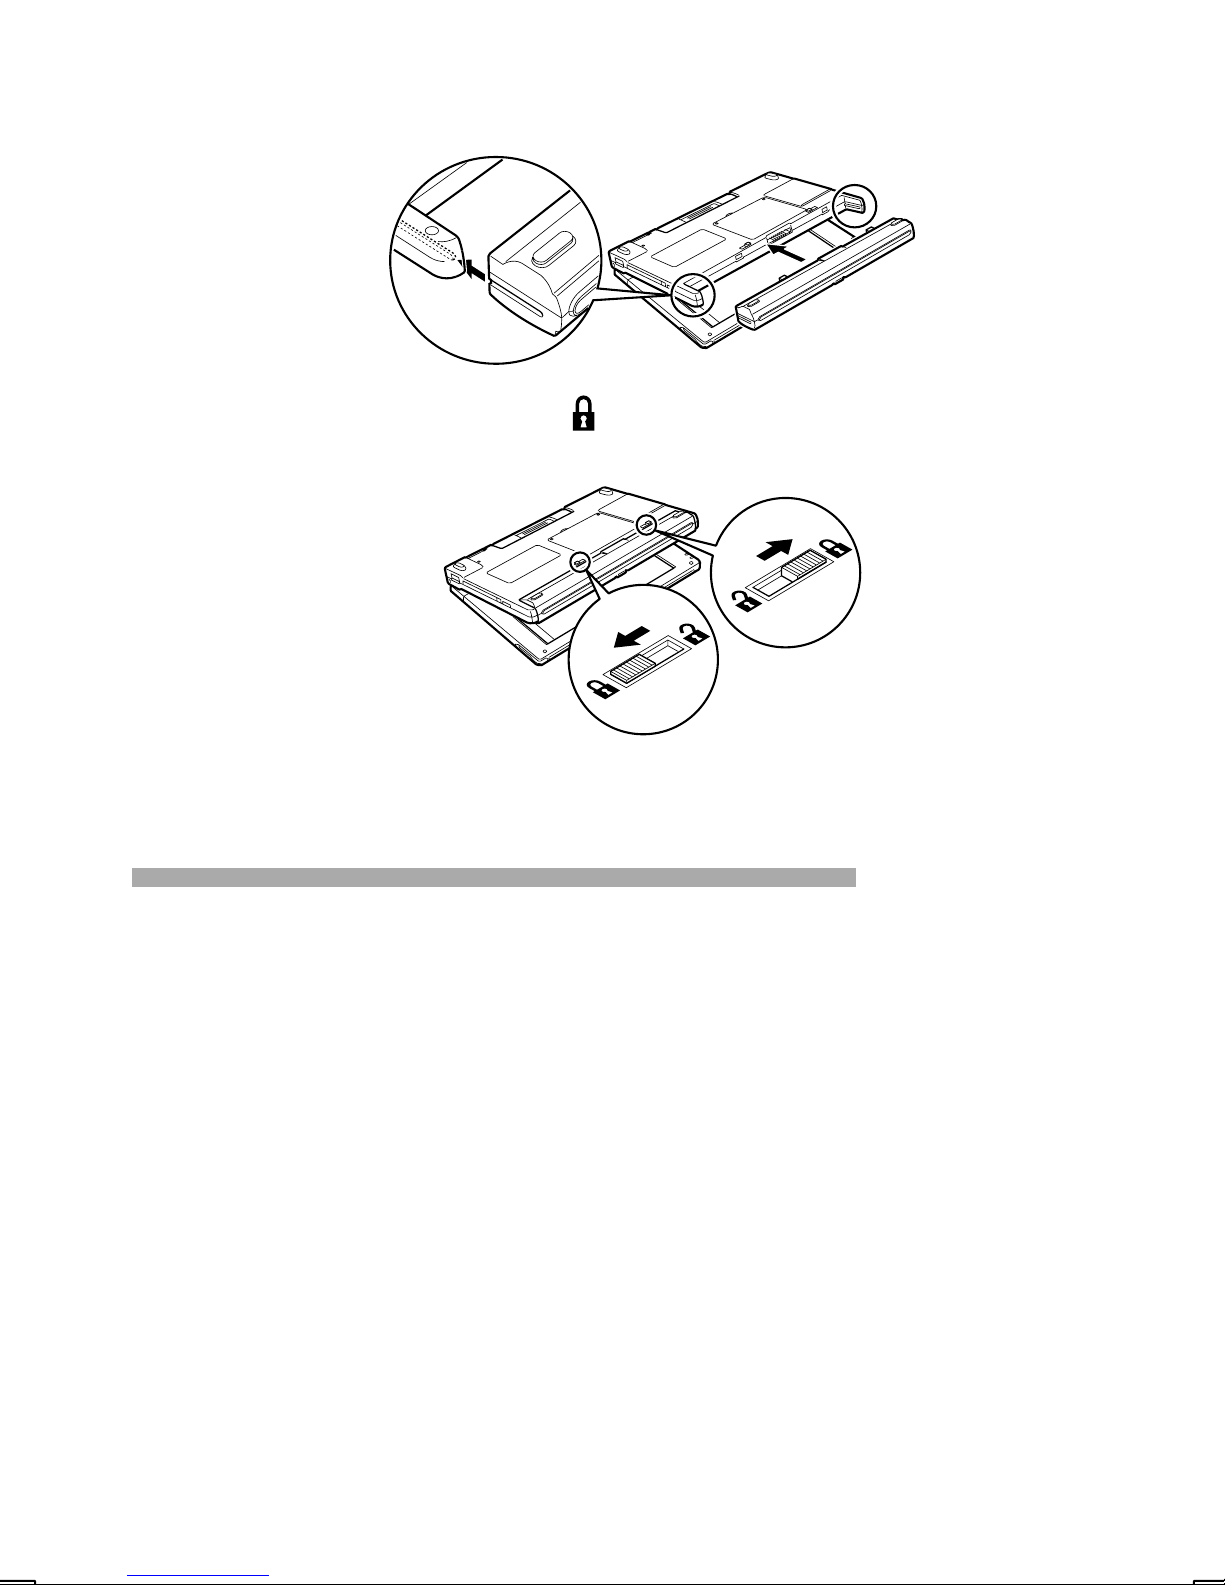
3. Align the battery pack with the rails of the main device and push it straight in.
4. Slide the lock switches to the position.
1-8
Page 17
If the lock switches cannot be moved, pull out the battery pack and then insert
it again.
5. Close the display.
Installing the Backup Battery
Caution:
Be sure that you are discharged of static electricity by briefly touching a grounded
metal object before beginning these procedures.
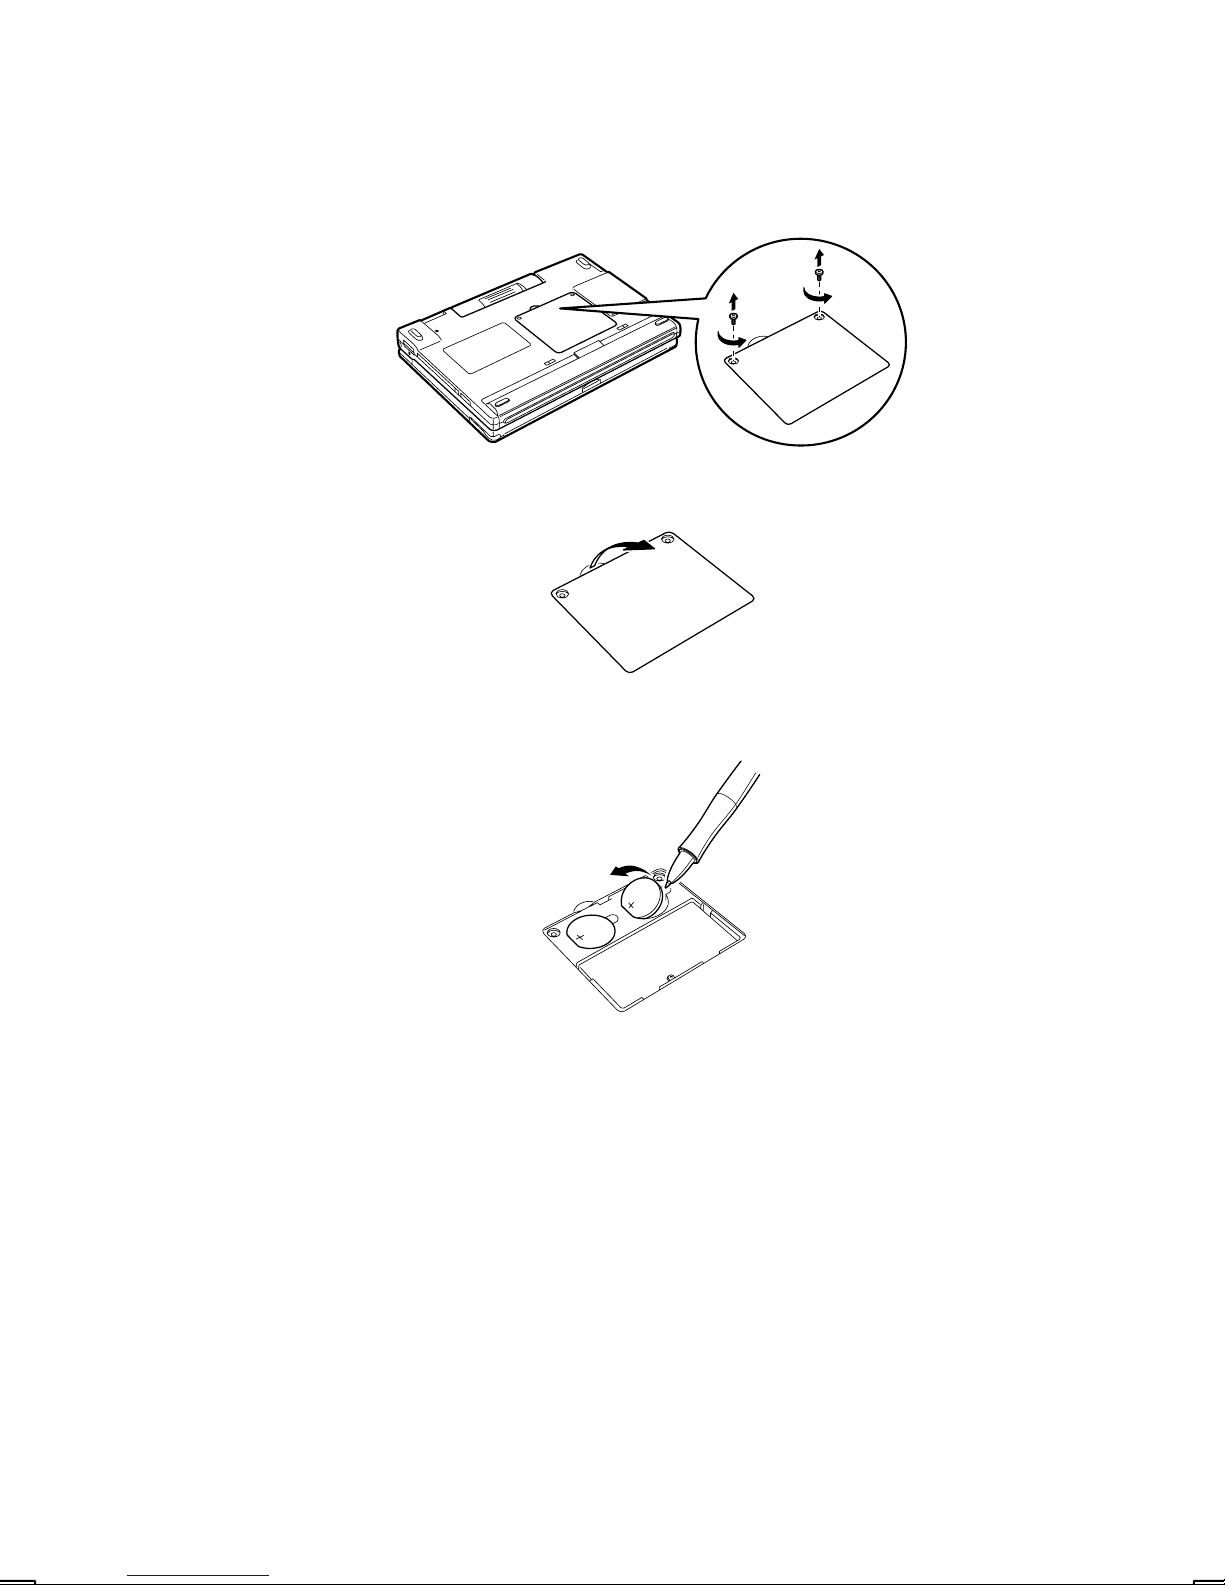
1. Confirm that the battery pack has been installed.
2. Remove the screws from the backup battery cover.
3. Insert a finger into the recess and lift up to remove the backup battery
compartment cover.
1-9
Page 18

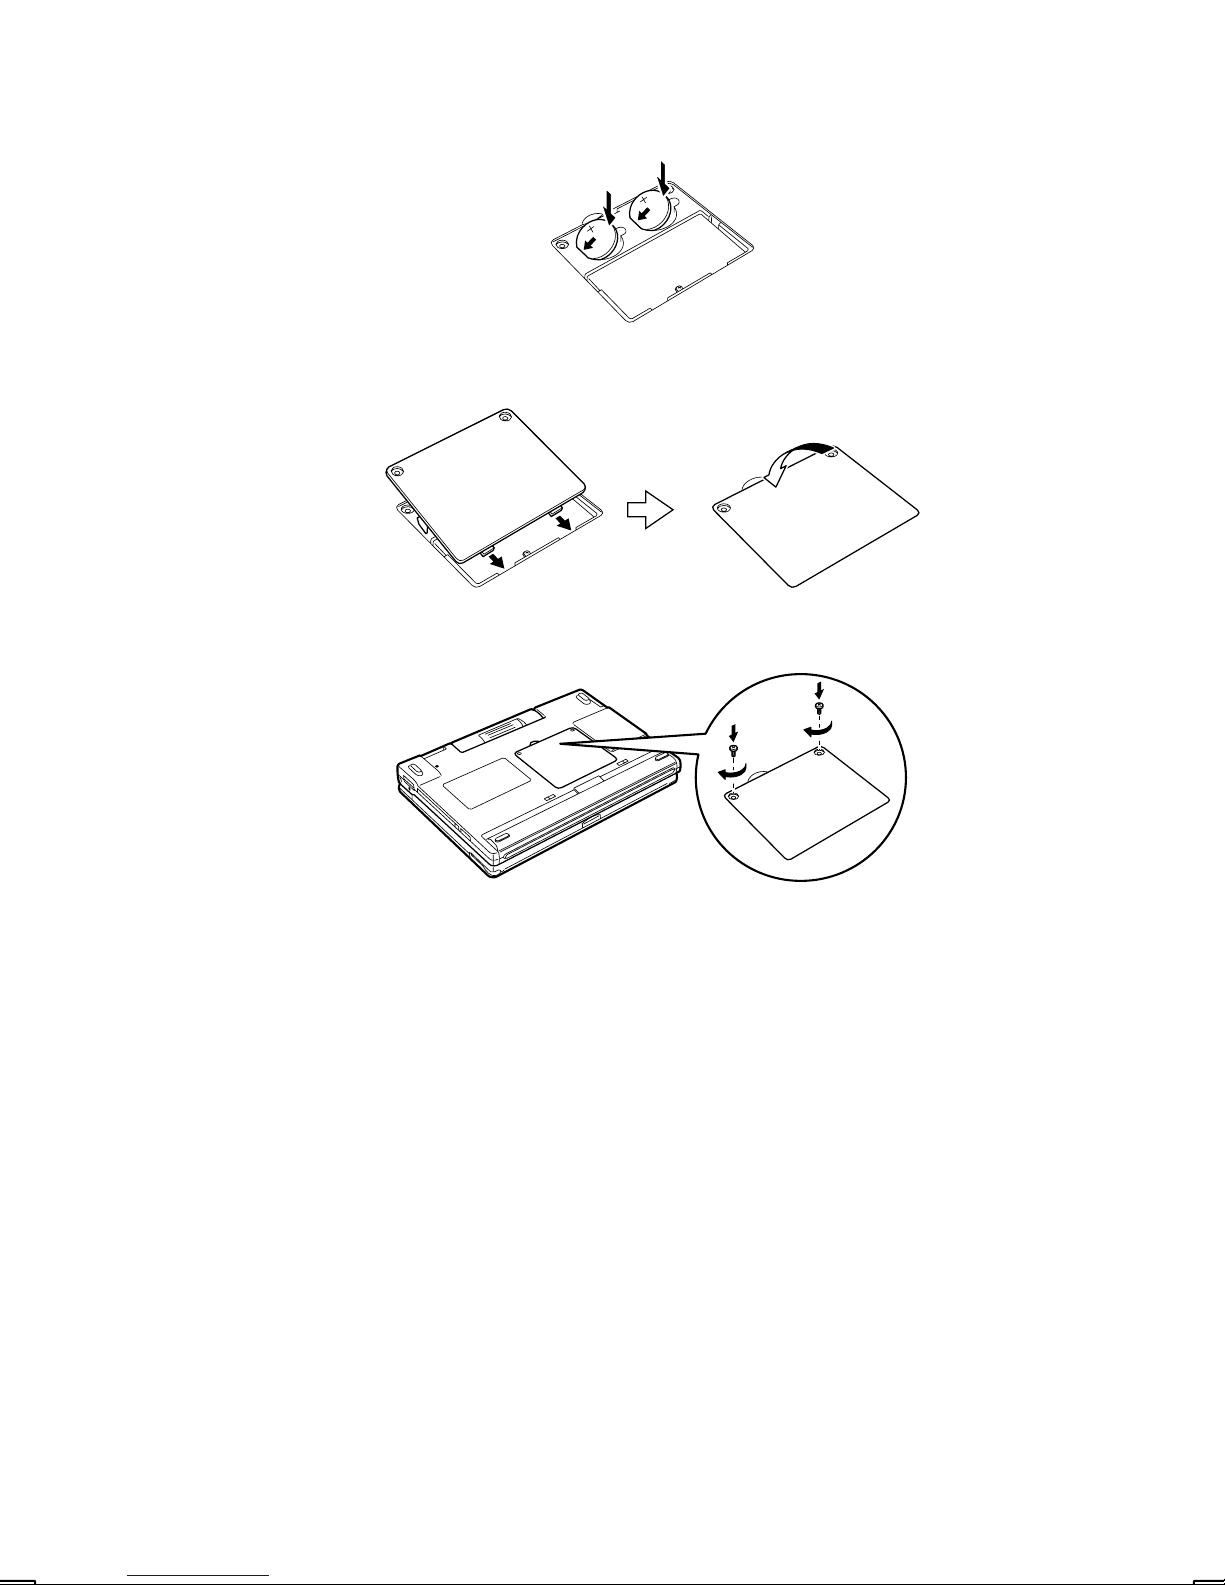
4. Install two CR2032 lithium batteries with the plus (+) side up. Press the battery
to the left and press down.
Caution:
Do not touch other parts in the battery compartment.
5. Return the backup battery cover to its original position.
6. Attach the screws.
Charging
1. Confirm that the power to main device is turned OFF (nothing is displayed on
the screen).
2. Close the display.
3. Connect the AC adapter and the power cord to the main device in the order of
➀, ➁ and ➂.
➂
➁
➃
➀
1-10
Page 19

4. After a few seconds, charging starts and the orange LED ➃ starts blinking.
Charging time is approximately 2.5 hours. When charging is completed, the
LED stops blinking but continues to light steadily.
5. When charging is completed, disconnect the AC adapter and the power cord.
Note:
• Charging can be performed while the device is in use.
• When charging is completed, disconnect the AC adapter and the power
cord.
Caution:
Be sure to disconnect the DC power plug from the 6651 before opening the
display fully, or you could damage the DC power plug or the DC input jack.
Using AC Power Supply
Use the AC adapter to plug your device into external power whenever possible,
especially when:
• Using a modem card, Ethernet card, or other peripheral.
• Using the backlight feature of your device display.
• Connecting to a desktop computer.
• Letting the LED indicator flash for extended time periods.
1. Confirm that the power to main device is turned OFF (nothing is displayed on
the screen).
2. Close the display.
3. Connect the AC adapter and the power cord to the main device in the order of
➀, ➁ and ➂.
➂
➁
➃
➀
4. Open the display and turn ON the power.
When you have finished using the unit, disconnect the AC adapter and the
power cord.
Note:
Keep the battery pack attached when AC power supply is used.
1-11
Page 20

About power sources
• Caution: When the main battery is depleted, recharge it promptly. If the depleted
main battery is not recharged, the backup battery will be drained more quickly
than normal. (See Battery life in “Hardware specifications”)
• The device will turn off if you ignore the low battery warning and continue to work.
If this happens, the data being edited and other information may be lost, and the
alarm may not function correctly.
• When you use the AC adapter, a slight humming noise may be heard. This is
normal.
• After charging or prolonged use of the main battery, it may become warm. This is
normal, and does not indicate any problem.
Caution:
• The socket outlet must be located near the equipment and be easily accessible.
• When the AC adapter is not in use, keep it disconnected from a AC outlet.
• Do not use the AC adapter to operate other equipment, as the equipment may be
damaged.
• Avoid using the AC adapter during an electrical storm. Electric shock and
damage to the device from lightning is possible.
• If any fluid which has leaked from the battery enters your eyes rinse them
thoroughly with water and seek medical attention immediately, or serious injury
could results.
WARNING:
THE VOLTAGE APPLIED MUST BE THE SAME AS SPECIFIED ON
THE ADAPTER. USING THE ADAPTER AT A HIGHER THAN
SPECIFIED VOLTAGE IS DANGEROUS AND MAY RESULT IN A
FIRE OR OTHER TYPE OF ACCIDENT, THUS DAMAGING THE
ADAPTER. INTERMEC TECHNOLOGIES CORPORATION TAKES
NO RESPONSIBILITY FOR ANY DAMAGE RESULTING FROM USE
OF THE ADAPTER AT VOLTAGES OTHER THAN THAT
SPECIFIED.
1-12
Page 21
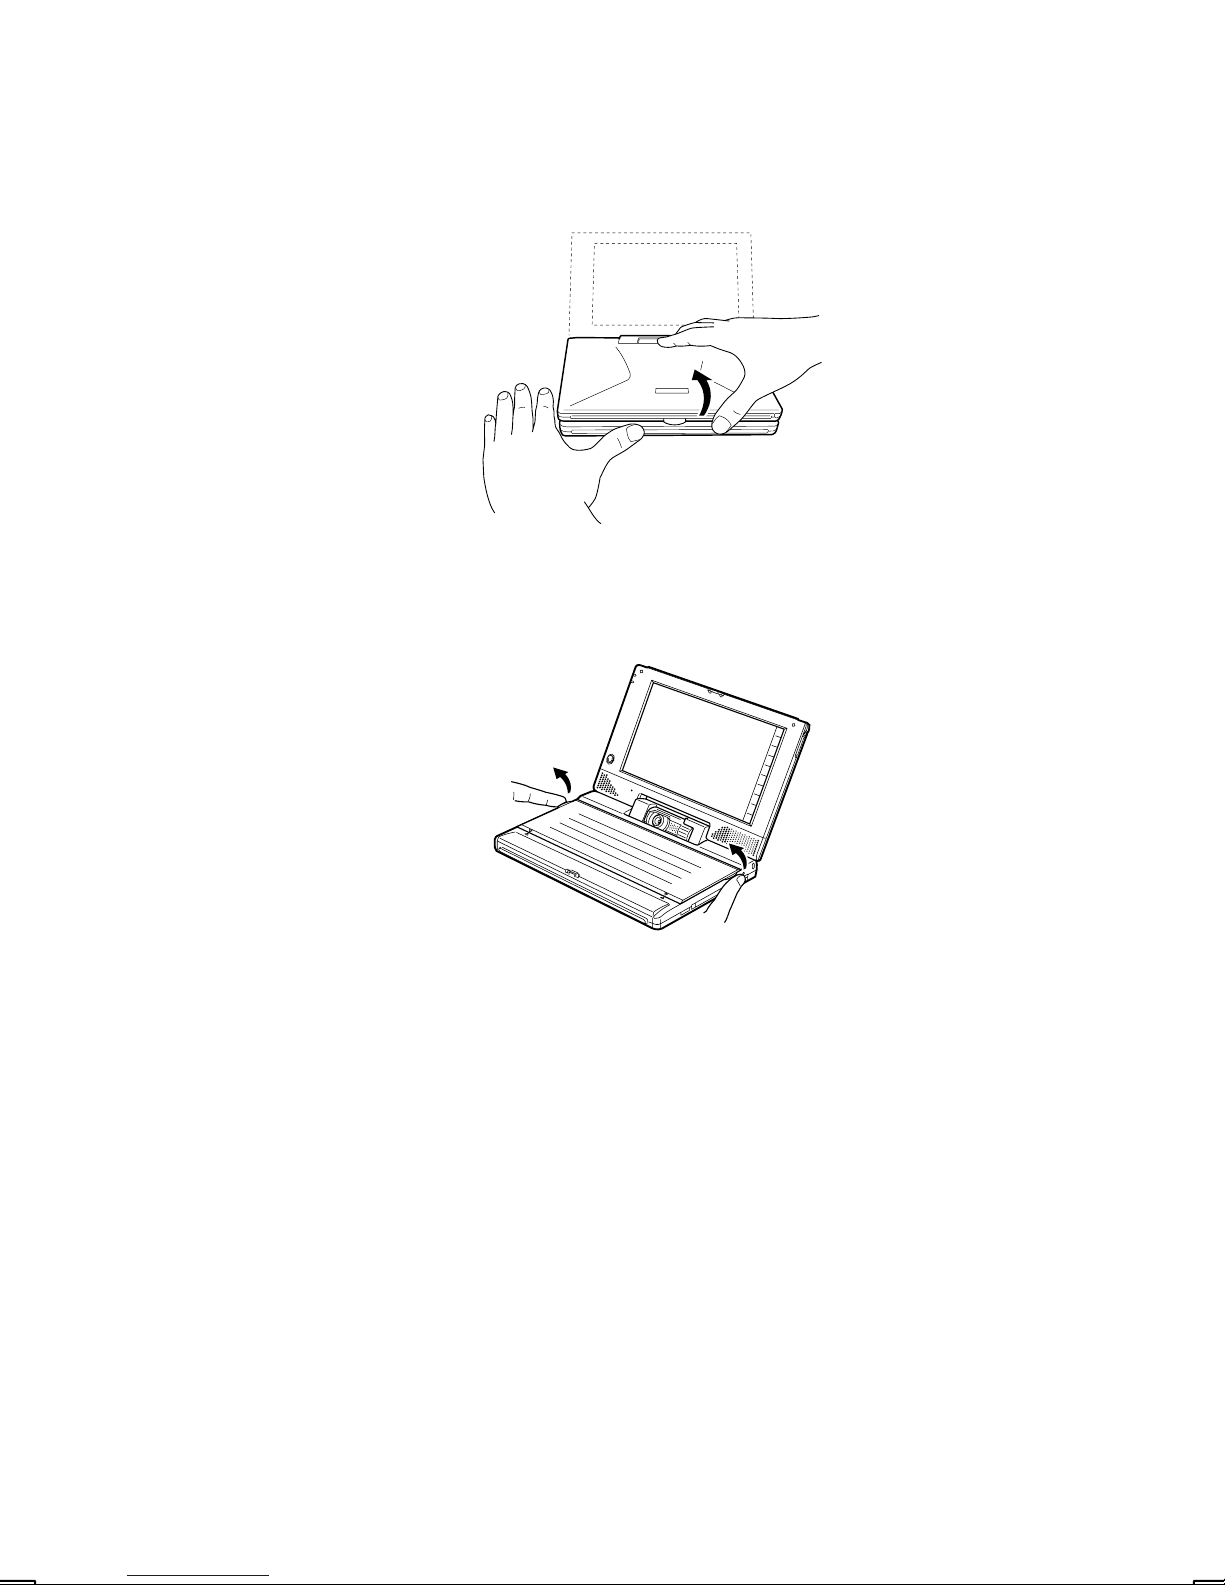
Removing the Keyboard Hard Cover
1. Open the display.
• Place your fingers on the tabs to the left and right of the device's central
cover latch, and open the display.
2. Remove the keyboard hard cover.
• Place your fingers on the left and right tabs (slightly jutting out), then gently
lift up the keyboard hard cover and remove.
Note:
• Keep the keyboard hard cover. It is reusable. Attach it when the device is
used as a tablet.
• Replace the cover the same way you removed it.
1-13
Page 22

Turning ON the Power
Press the power key (On/Off) to turn on the power.
Keep pressing the power key for about 1 second to turn OFF the power.
Note:
The power switch can also be used to turn ON the power.
1-14
Page 23

Chapter 2: Hardw are
a)2
This chapter describes how to use the various hardware features of the device.
Attaching the Keyboard Hard Cover
When using the device as a tablet, attach the keyboard hard cover to avoid
accidentally pressing the keys. Attaching the keyboard hard cover also makes the
device easier to carry.
1. Being careful to place the cover right-side up, align the ▲ marks on the device
with the ▼ marks on the keyboard hard cover.
Caution:
Make sure the ▲ and ▼ marks are aligned, and that the tabs on the left and
right of the keyboard hard cover are flush with the keyboard. If you install the
hard cover with the tabs sticking up, you may damage them.
2. Confirm that the marks are aligned properly and gently press the keyboard
hard cover as illustrated in the diagram.
2-1
Page 24

Using as a Tablet
The display can be flipped over and the device used as a tablet. It is also possible
to reverse the image displayed on the screen.
1. Turn OFF the power.
2. Turn the display carefully to transform the device into a tablet.
3. Slide the power switch to turn ON the power.
Keep pressing the power switch to the side for about 1 second to turn OFF the
power.
2-2
Caution:
• Before the display is turned, disconnect the AC adapter, modem cable or
serial cable from the rear side of the main device, and leave the cover
closed. Turning the display while the cover is open will result in damage.
• Be careful not to pinch your fingers when turning the display.
Reversing the Image
Tap the
The screen image is reversed and the keyboard is locked. (The power key is not
locked.)
hard icon.
Page 25

Using the Built-in Camera
You can use the built-in camera to capture movies and still images. Since the lens
mount rotates, you can point the lens outward to capture images while holding the
device like a tablet, or point the lens inward to capture images of yourself.
The basic features of the built-in camera are explained here.
Part Names
LensRotating lens mount
Shutter button
Note:
If you tap the
locked. (The power key is not locked.) Further, you can change keyboard Lock
settings with Keyboard lock on the control panel.
hard icon, the screen image is reversed and the keyboard is
Basic Features
The method for adjusting the direction of the lens is explained here.
To adjust the direction of the lens
Rotate the lens mount until it points towards the subject, then adjust the direction of
the lens.
2-3
Page 26

Cautions When Using the Built-in Camera
• About handling the built-in camera
• The amount of time it takes for brightness to stabilize differs depending on
the temperature of the surrounding area. Please wait until the brightness
stabilizes.
• Do not point the lens towards the sun. Color may be lost and an image of
the sun may be burnt into the screen.
• Important points when recording
• When using the device in dark places, the display screen will appear grainy,
but this is not a malfunction.
• When recording moving subjects, the shapes may appear distorted, but this
is not a malfunction.
• You may see a single frame at a time, but this is not a malfunction.
• If you point the lens toward a TV picture tube or PC display, you will see
horizontal bands on the screen. Further, you will see horizontal bands on
the recorded image, but this is not a malfunction.
• The filament of an incandescent light bulb may appear black, especially in
bright areas, but this is not a malfunction.
• When the scene suddenly moves from a dark subject to a bright subject (or
vice versa), it takes a few seconds for the screen to return to normal.
• When recording movies, hold the device as steady as possible. If you shake
the device, noise may enter the recording.
• Condensation
• When this device is suddenly moved from a cold place to a hot one, water
drops (condensation) form on the inside and outside of the device due to the
difference in temperature. Each situation is different, but leave the device for
approximately 1 hour before using to let it adjust to the surrounding
temperature.
• Blurring
• If your hand moves while pressing the shutter during recording, you will
cause the image to blur and the captured photograph may become
disrupted. Make sure you hold the device so that the subject appearing on
the device’s screen does not move during recording.
• Focusing
• You do not need to adjust the focus. As long as you are more than 26 cm
(approx. 8.8 in) from the subject, it will be in focus.
• Subjects that produce infrared rays
• When recording subjects that produce infrared rays, such as stoves, the
color may not record properly. In this case, recorded images are saved in
the colors they appear on the device’s screen.
2-4
Page 27
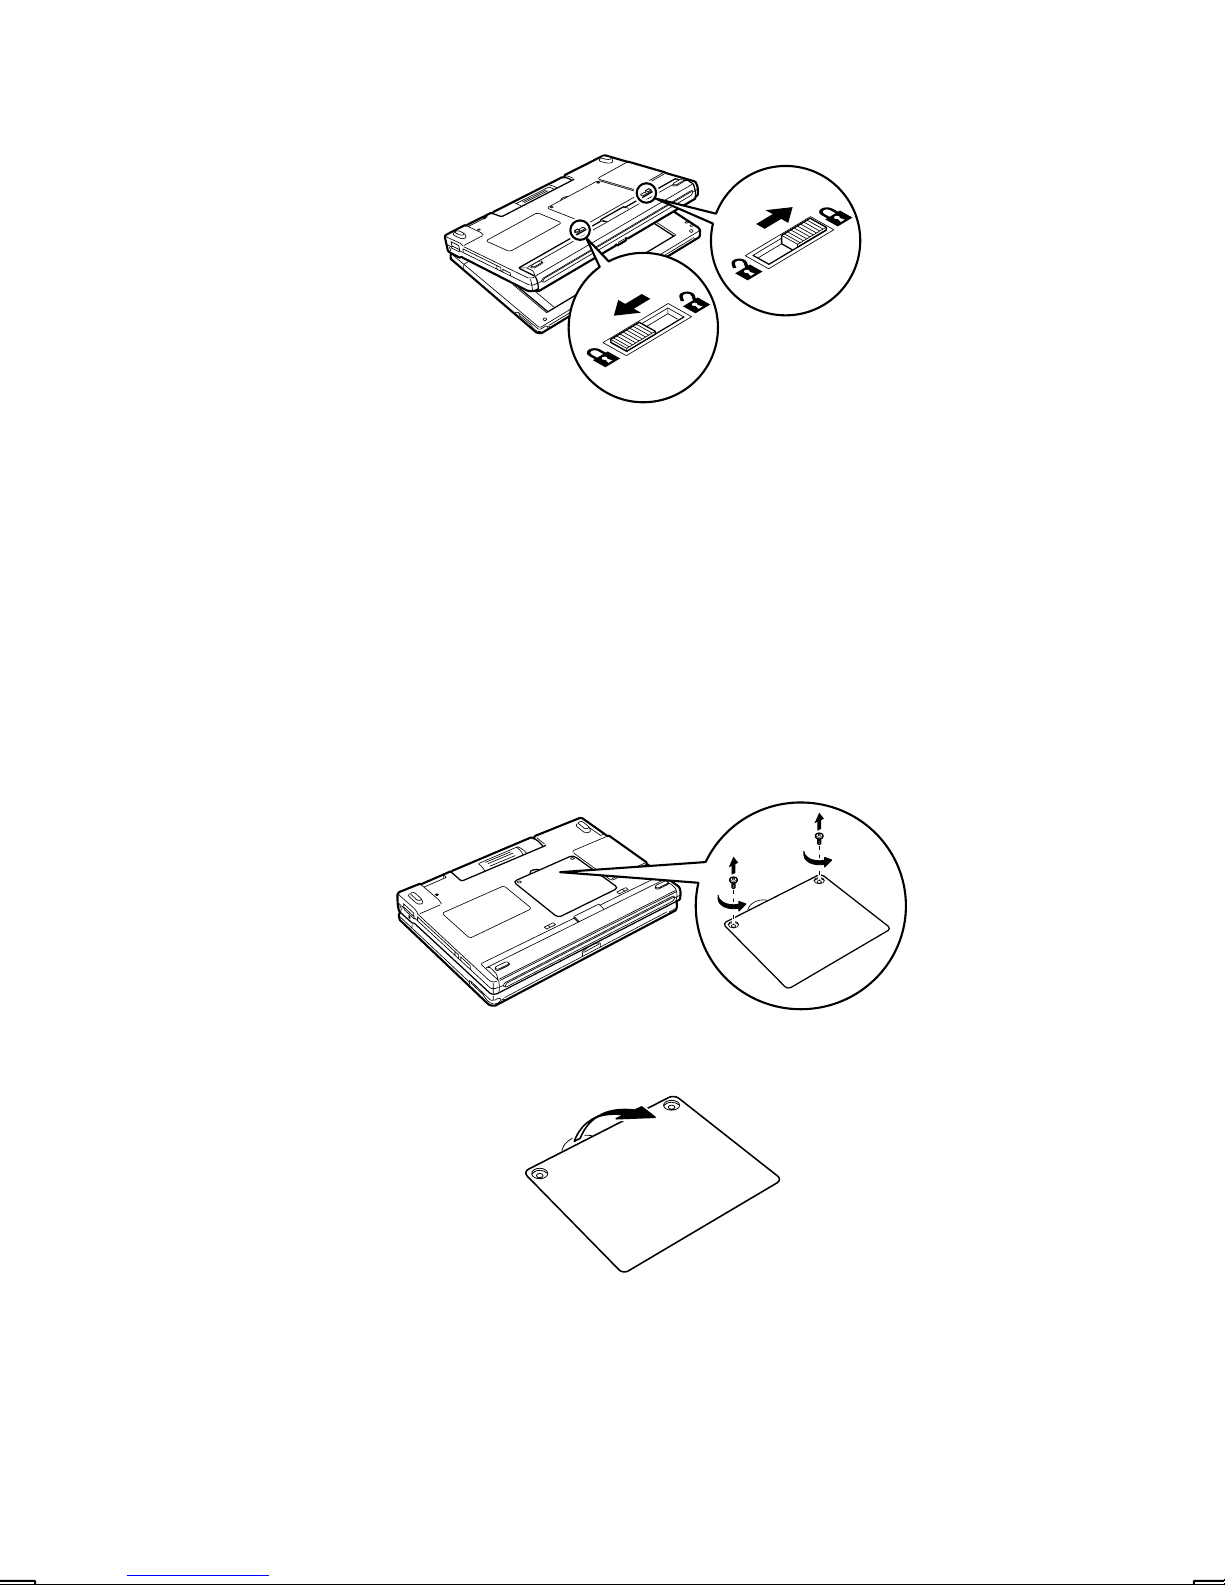
Replacing the Battery Pack
The battery pack is a consumable. When it discharges quickly after charging, the
battery pack is exhausted. Replace it with a new battery pack (PN:871-012-010).
Caution:
• Make sure you use a battery pack (PN:871-012-010) that is designed for use
with this device. Other battery packs may cause fire or result in data loss.
• When replacing the battery pack, make sure two backup batteries (for data
backup) are installed. If you remove both the battery pack and the backup
batteries, you will lose all of your data and settings.
1. Confirm that backup batteries are installed and that they are working.
You can confirm the remaining life of the lithium battery (backup batteries) in
Power management on the control panel.
2. Turn off the power and wait approximately 3 seconds.
3. Open the display slightly, then turn the device upside down.
Note:
You cannot replace the battery pack if the display is closed (locked).
4. Slide the lock switches to the
position.
5. Remove the battery pack from the device.
2-5
Page 28
6. Align the new battery pack with the rails on the device and insert it, making
sure you keep it straight.
7. Slide the lock switches to the position. If the lock switches will not move,
reinsert the battery pack.
8. Turn on the power to the device and confirm that it is operating normally.
Replacing the Backup Battery
When the backup batteries for data backup are exhausted and the message
prompting you to replace them is displayed, replace them with two new type
CR2032 lithium batteries. If the low battery warnings for the backup batteries and
the main battery are both displayed at the same time, replace the backup batteries
after you have recharged the battery pack (main battery).
Caution:
• Make sure you use two type CR2032 lithium batteries. Other types of lithium
batteries may cause fire or harm data.
• Replace both backup batteries with new ones at the same time.
• When replacing backup batteries, make sure the battery pack is installed. If you
remove both the battery pack and the backup battery, you will lose all of your
data.
• Before replacing backup batteries, back up all data to a PC or memory card.
• In order to discharge static electricity stored in your body, touch a metal object
with your hands before you start to replace the batteries.
1. Confirm that the battery pack is installed and that it is working.
Confirm battery pack (main battery) life in Power management on the control
2-6
Page 29
panel.
2. Turn off the power.
3. Remove the screws from the backup battery cover.
4. Place a finger in the groove and remove the backup battery cover.
5. Remove the backup batteries with the tip of a ball pen.
Caution:
• Do not touch any other parts.
• Do not use any sharp-pointed object to remove the backup batteries.
2-7
Page 30
6. Place the two new backup batteries (CR2032) with the plus (+) mark in the top
position and insert by pressing on the left side.
7. Replace the backup battery cover.
8. Insert the screws.
9. Turn on the power to the device and confirm that no warnings appear.
Caution:
• Keep batteries out of the reach of children.
• Danger of explosion if battery is incorrectly replaced. Replace only with the same
or equivalent type recommended by the manufacturer. Discard used batteries
according to the manufacturer's instructions.
• Backup battery: Replace battery with Panasonic type CR2032 only. Use of
another battery may present a risk of fire or explosion. See operation manual for
safety instructions.
• Backup battery: Battery may explode if mistreated. Do not recharge,
disassemble or dispose of in fire.
• Leaving depleted batteries in the device may result in battery leakage and
damage from corrosion.
2-8
Page 31

About the Power Source
The device’s power has the following features:
• When you turn on the power, the screen appears immediately.
• The power key (On/Off) and power switch perform the same operation.
• When the power is turned off, it is the same as if the device were in the suspend
mode.
• If you turn on the power, the last screen displayed before the device was turned
off appears again.
• If no operations are done for a fixed period of time, the device will automatically
shuts off (goes into the suspend mode).
When turning on the power:
• Press the power key (On/Off).
• Press the power switch sideways.
When turning the power back on:
After waiting about 3 seconds, press the power key or press the power switch
sideways.
• When using the one-touch mail receipt and one-touch web surfing switches, wait
3 seconds after turning off the power, then press the button and turn the power
back on.
• When replacing the battery pack, wait 3 seconds after the power has been
turned off, then slide the lock switch across.
When turning off the power:
• Press the power key for approximately 1 second.
• Press the power switch sideways and hold it there for approximately 1 second.
• Select the Start menu, then select Suspend.
Caution:
Do not turn the power on and off quickly. When a PC card is installed, it takes
approximately 5 seconds for the card to be confirmed.
Automatic power-off (suspend mode)
2-9
Page 32

Power goes off automatically when:
• You do not use the keyboard within 1 minute after turning on the power with the
one-touch mail receipt or one-touch web surfing switches, or the remote control.
• During battery-powered operation, when you do not do any operations within the
time specified in Power management on the control panel (default is 3 minutes).
Setting the device to enter suspend mode
Double click on Power management in the control panel. Set the time interval in the
Power off sheet of the Power management properties dialog box.
Resetting the device
Reset
If the device stops responding while you are using it, you can reset the device.
Make sure the device is turned on, and then press the RESET button with the
stylus.
Note:
The reset function will not work if the device is turned off when you press the
RESET button.
If the problem still persists after you have reset the device, try the following (full
reset) remedy.
Full Reset
Caution:
2-10
Page 33

The following procedure will cause all data on the device to be lost. Please perform
a full back-up prior to this procedure.
1. Press the RESET button on the side of the device with the tip of the stylus or a
ballpoint pen, and at the same time, press the FULL RESET button on the
bottom of the device in a similar manner.
2. Turn on and re-setup the device using the H/PC Setup Wizard.
3. Restore your data from a backup.
Note:
• If you forget your password after restoring a backup, you must set up your device
again, using the above steps, then re-enter your password.
• We recommend that you back up data to a memory card or PC. If data is backed
up, you can restore the device to its previous state even if you press the FULL
RESET button. For details on backing up data, see Chapter 9, “Backup Tool”
and Chapter 4, “ActiveSync.”
2-11
Page 34

Connecting the device to your desktop
computer
You can connect the device to your desktop computer to backup data, synchronize
activities, transfer files, etc. by using Microsoft ActiveSync.
Connecting the device to the desktop computer with the
provided serial cable
1. Turn on the device.
2. Flip open the serial port cover as shown.
3. Insert the 18-pin end of the supplied serial cable into the serial port on the
device.
4. Insert the other end of the cable into the serial port on the desktop computer
that you plan to specify when you install ActiveSync.
2-12
Page 35

Using the infrared port for file transfer
You can use the built-in infrared port to transfer files (using Windows Explorer) and
communicate with other handheld notebook and desktop PCs compliant with the
IrDA (115.2 kbps) standards.
Make sure both devices are turned on, then take the following steps:
1. Align the two devices so that their infrared ports are facing each other.
2. From the sending device, tap to select the data of Contacts or the file.
3. On the receiving device, tap Receive from the File menu.
4. On the sending device, tap Send from the File menu, or tap Infrared
Recipient from Send To of the File menu. Start sending the data.
2-13
Page 36

Using the Built-in Modem
(Model with built-in modem may not available in some countries)
You can use the built-in modem to perform fax and data transmission.
Connect the built-in modem to an analog telephone line as follows:
1. Using your finger, gently open the modem port.
2. Insert one end of the modular phone cable into the modem jack.
3. Insert the other end of the modular phone cable into a telephone outlet.
Note:
• Before using the built-in modem for communication, check that it is set up in
Windows CE.
• When opening the display more than 180°, be sure to close the modem jack.
Leaving it open may damage it.
2-14
Page 37

Safety Warning on Built-in Modem
• Never install telephone wiring during a lightning storm.
• Never install a modular jack in a wet location unless the jack is specifically
designed for wet locations.
• Never touch uninsulated telephone wires or terminals unless the telephone line
has been disconnected at the network interface.
• Use caution when installing or modifying telephone cables.
• Avoid using the modem over a telephone line during an electrical storm.
Electronic shock and main device damage from lightning is possible.
• This Modem is designed for use with analog telephone systems only. Use with
digital telephone systems, often found in offices and hotels, may cause
permanent damage. You need to be sure the line you are connecting to is an
analog line. Please check with the facilities manager before communicating.
• Do not use the Modem to report a gas leak in the vicinity of the leak.
Using a PC Card
Caution:
• Not all PC Cards will work with the device. Be sure to use only recommended PC
Cards. Using non-recommended PC Cards may cause problems such as
damage to the device or the PC Card.
Contact your local dealer for more information on recommended PC Cards.
• Some PC Cards, such as the Memory Card, consume a great deal of power.
When using such PC Cards, we recommend you use the AC adapter whenever
possible.
• Depending on the battery level, the display may turn off without displaying any
warning message (such as a low battery warning) when it is used with certain PC
Cards that use a great deal of power, such as the Memory Card.
Inserting a PC Card
Insert the PC Card into the slot as far as it will go. Make sure the PC Card is facing
up. If the card will not go in, check the orientation. Never force the card as it may
cause damage to the device or the card itself.
1. Turn off the device.
2-15
Page 38

2. Insert the PC Card.
3. Swing closed in the PC Card eject button.
Caution:
When using the device as a tablet, the orientation for PC card insertion is the
reverse of that when using the device as a keyboard.
Removing a PC Card
1. Close all applications accessing or otherwise utilizing data on the inserted PC
Card.
2. Turn off the device.
3. Press the EJECT button so that it pops out of the device (➀), then push the
button in again (➁) to eject the PC card.
➀
➁
Note:
Push the EJECT button until you hear it click. If you do not, the EJECT button will
be left protruding from the device.
2-16
Page 39

Using the Compact Flash (CF) Card
Caution:
• Not all CF Cards will work with the device. Be sure to use only recommended CF
Cards. Using non-recommended CF Cards may cause problems such as
damage to the device or the CF Card.
Contact your local dealer for more information on recommended CF Cards.
• Some CF Cards, such as the Memory Card, consume a great deal of power.
When using such CF Cards, we recommend you use the AC adapter whenever
possible.
Depending on the battery level, the display may turn off without displaying any
warning message (such as a low battery warning) when it is used with certain CF
Cards that use a great deal of power, such as the Memory Card.
Inserting a CF Card
1. Turn off the device.
2. Insert the CF Card.
Caution:
When using the device as a tablet, the orientation for CF card insertion is the
reverse of that when using the device as a keyboard.
2-17
Page 40

Removing a CF Card
1. Close all applications accessing or otherwise utilizing data on the inserted CF
Card.
2. Turn off the device.
3. Press the Eject button so that it pops out of the computer (➀), then push the
button in again (➁) to eject the CF card.
➀
➁
Note:
Push the EJECT button until you hear it click. If you do not, the EJECT button will
be left protruding from the device.
Connecting to USB Devices
You can connect to USB (Universal Serial Bus) peripheral devices, such as a
mouse, floppy disk drives, printers, and so on.
Note:
• You can install or remove USB peripheral devices while the device’s power is
turned on.
• When using USB devices, you must use driver software that is compatible with
the device.
Connecting to USB Devices
1. Open the USB connector cover.
2-18
Page 41

2. Connect the USB device cable to the USB connector.
Caution:
Make sure you align the pins on the cable with the pin-holes on the connector.
If you force the cable to connect when it is not aligned properly, you may
damage the cable or the connector.
Note:
• If a warning appears while you are using a USB device, follow the directions on
the screen.
• Some devices do not require driver software, such as the mouse.
Removing USB Devices
Remove the USB device cable from the device and close the cover.
Using the Printer
You can communicate with the printer through a USB port, serial port, or built-in
infrared port.
You can print from the following software:
• Pocket Word
• Pocket Excel
• Pocket Access
• Pocket Outlook (Inbox, Calendar, Contacts, and Tasks)
Note:
• For details on how to connect the printer to the device, refer to the printer’s
instruction manual.
• Because print functions for software other than those listed above do not exist,
you cannot print directly from other software.
• You can use the built-in infrared port to send Image Editor files to printers that
support IrTran-P.
2-19
Page 42

Printing
As an example, this section explains the procedure for printing Pocket Word data
on a printer connected to a serial port.
1. Start up Pocket Word.
2. Select Print from the File menu.
The Print dialog box appears.
3. Make Printer, Port, and Paper size settings, then tap the OK button.
• When using the serial port, select Port, COM1:9600.
• When using the built-in infrared port, select Port, IRDA.
• When using a USB port, select Port, USB.
Printing starts.
2-20
Page 43

Connecting an External CRT
You can use an optional monitor cable (PN: 871-012-030) to connect the device to
the external CRT (hereafter referred to as CRT) and display the device screen on
the CRT.
Note:
• CRTs that can be connected with a monitor cable include LCDs (analog interface
connection), projectors and so forth that meet the following conditions.
Mode Horizontal scanning
frequency
800 × 600 dots
800 × 480 dots
640 × 480 dots
• Input interface: analog RGB, 15-pin (mini D-sub, 15-pin)
• The CRT displays the same screen as that which appears on the device. If you
connect the cable and turn on the power, it will be displayed at 800 × 600 dots
on the CRT.
• With Microsoft Pocket PowerPoint, you can display a slide show on the CRT
while operating from the device. Select External display (800 × 600) or External
display (640 × 480) from the Tool menu’s Slide show settings. However, when
the screen is reversed, you cannot display this.
1. Turn off the power to the device and CRT.
37.4KHz 60Hz
37.4KHz 60Hz
30.0KHz 60Hz
Vertical scanning
frequency
2. Open the connector cover
.
Caution:
Do not open the cover from the bottom. If you force the cover open, you may
damage it.
2-21
Page 44

3. Insert and fix the cable connected to the CRT firmly into the monitor cable ➀
then connect it to the device ➁.
➁
➀
4. Turn on the power to the CRT and the device. The screen displayed on the
device is displayed on the CRT.
Note:
If nothing is displayed on the CRT, turn the device off and back on again.
Security Features
To prevent theft, you can connect a retail Kensington Notebook MicroSaver
Security Cable to the security slot
on the device.
Caution:
Do not connect the Kensington Notebook MicroSaver Security Cable while any
USB device is connected, as this will damage the USB connector.
2-22
Page 45

Chapter 3: Basics
a)3
Entering Information and Selecting Objects
Your device comes with a keyboard, touch screen, and stylus. You use the
keyboard just as you do on your desktop computer. The stylus and touch screen
replace the pointing device (such as a mouse); you select and move objects on the
screen by tapping and dragging them with the stylus. The stylus also allows you to
write on the screen just as you do with a pen and paper.
Tip: If you have difficulty accurately selecting objects with your stylus,
press CTRL+ALT+ + (PLUS key) to calibrate the screen.
Programs
The Windows CE programs that come with your device are stored in ROM (readonly memory) and cannot be removed or lost. You can install additional programs
that will be placed in RAM (random access memory). The following software is
provided as standard with the Microsoft Windows CE operating system.
Program Description
Calendar Keep track of your appointments and create meeting
requests.
Contacts Keep track of your friends and colleagues.
Inbox Send and receive e-mail.
Tasks Keep track of your tasks.
Microsoft Pocket
Access
Microsoft Pocket Excel View and create Excel documents.
Microsoft Pocket
PowerPoint
Microsoft Pocket Word View and create Word documents.
ActiveSync Initiate synchronization with your desktop computer
PC Link Initiate a connection with your desktop computer.
Remote Networking Set up connections with other computers or the
Terminal View and download files from a bulletin board or send
View ODBC databases and create Access
information.
Present PowerPoint presentations.
from your device.
Internet.
and receive e-mail.
3-1
Page 46

Program Description
Microsoft Voice
Record your spoken ideas.
Recorder
Microsoft InkWriter
World Clock Set the date, time, and alarm for your home city and
Calculator Perform calculations.
Solitaire Entertain yourself while on the road.
Note:
For details on additional software provided by SHARP, see Chapter 9, “Bundled
Software.”
Press the program keys, located along the top of the keyboard, to quickly open or
switch to programs. Holding down the CTRL or SHIFT key while pressing a
program key offers additional functionality.
Create handwritten or typed notes and drawings.
the city you are visiting.
Program
Key
Inbox
Internet
Explorer
Calendar
Contacts
Program Key
(un-chorded)
Launch/switch to
Inbox.
Switch to next
Explorer window (or
launch if not already
open).
Launch/switch to
Calendar.
Launch/switch to
Contacts.
Launch/switch to
Tasks.
SHIFT+Program
Key
Starts Inbox and
opens a new
message.
Switch to last
Explorer window (or
launch if not already
open).
Launch/switch to
Calendar.
Launch/switch to
Contacts.
Launch/switch to
Tasks.
CTRL+ Program
Key
Starts Inbox and
opens a new
message.
Launch new
Explorer window.
Launch/switch to
Calendar.
Launch/switch to
Contacts.
Launch/switch to
Tasks.
Tasks
Switch to next
Pocket Word
Pocket
Word
Program
Key
3-2
window (or launch if
not already open).
Program Key
(un-chorded)
Switches to the next
Pocket Word
window (or starts
Pocket Word if it is
not open).
SHIFT+Program
Key
Switches to the next
Pocket Word
window (or starts
Pocket Word if it is
not open).
CTRL+ Program
Key
Page 47

Pocket
Excel
Switch to next
Pocket Excel
window (or launch if
not already open).
Switch to last
Pocket Excel
window (or launch if
not already open).
Launch new Pocket
Excel window.
Pocket
PowerPoint
Pocket
Access
Calculator
World
Clock
PC Link
Switch to next
Pocket PowerPoint
window (or launch if
not already open).
Switch to next
Pocket Access
window (or launch if
not already open).
Switch to last
Pocket PowerPoint
window (or launch if
not already open).
Switch to last
Pocket Access
window (or launch if
not already open).
Launch new Pocket
PowerPoint window.
Launch new Pocket
Access window.
Start Calculator. Start Calculator. Start Calculator.
Start World Clock. Start World Clock. Start World Clock.
Launch PC Link. Launch ActiveSync. Launch Remote
Networking.
Tip: There are many Windows CE programs available, including
freeware and shareware. Visit http://www.microsoft.com/windowsce/
or try searching the Web on the keyword “Windows CE” to find
additional programs for your device.
Other special key functions
• £ Enters the pound symbol,
•
Enters the Euro symbol,
User 1, User 2 Can be set with the control panel user keys.
Although “User 1” and “User 2” keys appear on the keyboard, by default they do not
input anything. You can set them using User keys in the control panel.
+
+
.
.
3-3
Page 48

Using the Start Menu and Taskbar
Use the Start menu to open programs, settings, Help, and recently used
documents. Just select Start, and then select the program or item you want to
open. In addition to the Start menu, the taskbar contains buttons for the programs
you have running, a status area, and a desktop icon.
Tip: You can change the color of the windows and menus. On the Start
menu, select Settings, then Control Panel. Double-tap or double-click
the Display icon, and then select the Appearance tab. Select a preset
scheme or create your own.
Using the Command Bar
Each program has a command bar located at the top of the program window. The
command bar displays both menu names and toolbar buttons. Select the slider to
switch between displaying toolbar buttons only or menu names and toolbar buttons.
You can drag the slider to display the buttons and menu names you want. You can
also drag the slider down to move the toolbar buttons under the menus.
3-4
Page 49

Finding Files and Exploring the Web
To find files on your device, select Start, Programs, and then Windows Explorer.
When you create and save a file on your device, it is stored in a folder called My
Documents unless you select another location. You can copy or move a file from
one location to another by selecting the file and then using the Copy or Cut and
Paste commands on the Edit menu.
Tip: While using Windows Explorer, you can type a URL in the Address
box to access a Web site if you are connected to the Internet or an
intranet.
To view Web pages, select Start, Programs, and then Internet Explorer. To view
Web pages that are stored on your device, select File, Open, and then the Browse
button and locate the file. To view Web pages on the Internet or an intranet, type a
URL in the Address box. To access Internet or intranet Web pages, you must first
set up a connection between your device and the Internet or an intranet.
Tip: To view the HTML source code of a Web page on your device, first
select Save As on the File menu and save the page on your device.
Then, select Open on the Pocket Word File menu, select All
Documents in the Type list, and select the page you saved.
Customizing Your Device
You can adjust device settings to suit the way you work. Select Start, Settings,
and then Control Panel to see the settings available on your device.
You might want to adjust the following:
• Owner, to enter contact information in case your device is misplaced.
• Power, to maximize battery life.
• System, to adjust memory allocation between storage memory and program
memory.
• Passw ord, to limit access to your device.
• Volume & Sounds, to customize or turn off sounds.
• World Clock, to set the date and time for your location and a second location.
3-5
Page 50

3-6
Page 51

Chapter 4: Microsoft ActiveSync
a)4
Microsoft ActiveSync enables you to synchronize the information on your desktop
computer with the information on your device. Synchronization is the process of
comparing the data on your device with your desktop computer and updating both
computers with the most recent information. For example:
• Keep Pocket Outlook data up-to-date by synchronizing your mobile device with
your choice of Microsoft Outlook, Microsoft Schedule+, or Microsoft Exchange on
your desktop computer.
• Synchronize Word and Excel documents, Access and other ODBC databases
and tables, and InkWriter documents between your device and desktop
computer. Your files are automatically converted to the correct format.
With ActiveSync, you can also:
• Back up and restore your device data
• Add and remove programs on your device.
• Copy (rather than synchronize) files between your device and your desktop
computer.
For further information, please refer to the Microsoft ActiveSync Help.
http://www.microsoft.com/pocketpc/downloads/activesync.asp
4-1
Page 52

4-2
Page 53

Chapter 5:
Microsoft Office Companion Programs
a)5
The Microsoft Office companion programs consist of Microsoft Pocket Word,
Microsoft Pocket Excel, Microsoft Pocket Access, and Microsoft Pocket
PowerPoint. These programs work with the Windows versions of the same
programs on your desktop computer to give you easy access to up-to-date copies
of your documents. You can create or edit Excel and Word files, PowerPoint
presentation notes, and Access databases and tables on your device. Word and
Excel templates are available to help you quickly create documents. Once you
have created or edited a document, synchronize it with your desktop computer to
copy the new document, or changes you’ve made to the existing document, to your
desktop computer. For more information on synchronization, see ActiveSync Help
on the desktop computer.
You can access the Office companion programs by selecting Start, Programs,
Office, and then the program you want to open.
Tip: More information on the procedures described in this chapter, as
well as information on additional procedures, can be found in online
Help on the device. Select Start, Help, and then the program you want
information on. Because programs work in similar ways to their
counterparts on the desktop computer, online Help covers basic
procedures and the differences between the companion programs and
desktop programs. If you need more information on using an Office
program, see the documentation that came with the desktop version of
the program.
Pocket Word: Creating Documents
You can use Pocket Word to create documents, such as letters, meeting minutes,
and trip reports. You can also use Pocket Word to open and edit documents
created in the desktop version of Word. When you are ready to save a document
you created or edited, you can save it in a variety of formats, including Pocket
Word (.pwd) and Word (.doc). If you plan to send the document through e-mail to
someone who will be using Word, not Pocket Word, be sure to save it in the Word
(.doc) format.
To type text in Pocket Word, tap or click the screen to place the insertion point and
start typing. Use the spelling checker to verify accuracy. You can quickly format the
text, using buttons and menu commands. You can format as you go or apply
formatting later.
5-1
Page 54

You can type text in either Outline view or Normal view, and you can easily switch
from one view to the other, using the View menu. Work in Outline view when taking
notes in meetings; use headings to highlight the main points and body text to add
details.
5-2
To take meeting minutes using Pocket Word:
1. Select File, New, and then Document from Template.
2. Select Meeting Notes and then OK.
3. Select File and then Save.
4. Enter a name, choose a storage location, and then select OK.
5. Replace the text in the template.
Tip: To see more of your document, select Full Screen on the View
menu.
Page 55

Pocket Excel: Creating Workbooks
You can use Pocket Excel to create workbooks, such as expense reports and
mileage logs. You can also use Pocket Excel to open and edit workbooks created
in the desktop version of Excel. When you are ready to save a workbook you
created or edited, you can save it in a variety of formats, including Pocket Excel
(.pxl) and Excel (.xls). If you plan to send the document through e-mail to someone
who will be using Excel, not Pocket Excel, be sure to save it in the Excel (.xls)
format.
Pocket Excel provides fundamental spreadsheet tools, such as formulas, functions,
sorting, and filtering. You can split panes to easily view different areas of a large
worksheet. You can also “freeze” the top and leftmost panes in a worksheet to
keep row and column labels or other data visible as you scroll through a sheet.
5-3
Page 56

To log travel expenses using Pocket Excel:
1. Select File, New, and then Workbook from Template.
2. Select Expense Report and then OK.
3. Select File and then Save.
4. Enter a name, choose a storage location, and then select OK.
5. Replace the text in the template.
Tip: If your workbook contains sensitive information, you can protect it
with a password. To do so, open the workbook, select File, and then
Password. Every time you open the workbook, you will need to enter
the password, so pick one that is easy for you to remember but hard for
others to guess. Workbooks with password protection cannot be
synchronized.
Pocket Access: Viewing and Creating Data
Use Pocket Access to view and update data derived from Microsoft Access,
Microsoft SQL Server, and other ODBC databases you have created on the
desktop computer. Simply create the database on your desktop computer and then
transfer the data to your device. For example, a sales organization might use
Access on the desktop computer to create a master database of products and
order forms. The sales force can synchronize their devices with the master
database to get up-to-date product information and to upload completed client
order information. For more information on synchronizing, see ActiveSync Help on
the desktop computer.
You can also use Pocket Access to create new databases, tables, and SQL
procedures directly on your device.
Tip: Programmers can use Microsoft ActiveX® Data Objects for
Windows CE (ADOCE) and Microsoft Visual Basic® or Microsoft Visual
C++® to develop custom database solutions. For more information, see
http://www.microsoft.com/windowsce/.
5-4
Page 57

To create a new database and table on the device:
1. Select Start, Programs, Office, and then Microsoft Pocket Access. If
Access is already running, select File and then Open/New Database. If you
do not see this command on the menu, select View and then Database View.
2. Enter a name for the database and select OK.
3. Double-tap or double-click the Create a new table icon.
4. In the Field Name box, enter a name.
5. From the Data Type list, select a data type. A field's data type cannot be
changed after the table is saved.
• Text boxes have a size limit of 255 characters. To enter longer notes, select
the Memo data type.
• To enter numbers with decimal points, select the Float data type.
• To enter numbers between -32,768 and +32,767, select the Integer data
type.
• To enter smaller numbers, select the Small Integer data type.
5-5
Page 58

6. To set the size limit of a field, enter an amount in the Field Size box. A field's
size cannot be changed after the table is saved.
7. To index the field, select Yes from the Indexed list. Indexing a field allows
Pocket Access to find and sort information faster for that field.
8. Repeat these steps until you have created all the fields you want for y our table.
9. Select File and then Save Table.
Tip: If you have tables that you don’t want to keep updated on the
device (such as product catalogs), mark them as read-only when
transferring them from the desktop to the device to save time during
future synchronization sessions. ActiveSync will not check for updates
the next time you synchronize.
Pocket PowerPoint: Showing Presentations
Use Pocket PowerPoint to quickly and easily deliver a professional presentation on
your device (for one-on-one presentations) or connect your device to a VGA
monitor and show the presentation to a larger group (this require an optional
monitor cable). Simply create the presentation in Microsoft PowerPoint on your
desktop computer and then transfer the presentation to your device. Your Pocket
PowerPoint file will include the text, pictures, notes, and layout position of the
original Microsoft PowerPoint presentation, but will not include animations or slide
transitions.
To show a presentation:
5-6
Page 59

1. Using ActiveSync, copy the presentation from your desktop computer to your
device. For more information, see ActiveSync Help on the desktop computer.
2. Select Start, Programs, Office, and then Micosoft Pocket PowerPoint.
3. In the Open Presentation dialog box, select the presentation you want to
show, and then OK.
4. To change the presentation display and slide advance options, select Tools
and then Set Up Show.
5. To start the show, select View and then View Show. If you chose Manual in
step 4, use the Previous and Next buttons to control the slides.
Tip: You can tailor a presentation while on the road by adding a new
title slide to your presentation. To do so, select Tools and then Title
Slide.
5-7
Page 60

5-8
Page 61

Chapter 6:
Voice Recorder and InkWriter
a)6
Voice Recorder and InkWriter are programs for quickly capturing your ideas, notes,
and thoughts. With Voice Recorder, you can record reminders and ideas. With
InkWriter, you can take handwritten and typed notes and create drawings.
More information on the procedures described in this chapter, as well
as information on additional procedures, can be found in online Help on
the device. Select Start, Help, and then the program you want
information on.
Voice Recorder: Capturing Ideas and Thoughts
Quickly capture thought, reminders, ideas, and phone numbers with Voice
Recorder.
6-1
Page 62

To record and play a recording:
1. Select Start, Programs, Accessories, and then Microsoft Voice Recorder.
2. Hold your mobile device’s microphone near your mouth or other source of
sound.
3. Select the Record button. You’ll hear a beep when recording begins.
4. To stop recording, select the Stop button. The new recording appears in the
recording list.
5. To play a recording, double-tap or double-click it in the recording list. To pause
playback, select the Play/Pause button. Select Play/Pause again to resume
playback.
Tip: You can play all of your recordings, one after another. Select the
recording you want to play first, select Control and then Play
Sequential. The selected recording and following recordings will be
played. A short beep will sound between recordings.
6-2
Page 63

InkWriter: Creating Notes and Drawings
InkWriter, a text, graphics, and ink processor with Rich Ink technology, makes it
easy to write and draw the way you do on paper, but with the benefit of being able
to edit and format what you've written and drawn. With InkWriter, you can enter
information in the way that's easiest for you. You can type using the keyboard, or
you can write and draw directly on the screen using your stylus or pointing device.
6-3
Page 64

To create an InkWriter document:
1. Select Start, Programs, Accessories, and then InkWriter.
2. Create your document:
• To write, select
are using a pointing device, click and drag to write on the screen.
• To type, select View and then Typimg and use the keyboard.
• To draw, select View and then Drawing and use the stylus like a pen. If you
are using a pointing device, click and drag to draw on the screen. You can
also create a drawing in Writing view by crossing three of the ruled lines on
the first stroke of the drawing.
View and then Writing and use the stylus like a pen. If you
3. When you are finished, select File and then Save.
Tip: InkWriter can help you draw perfect circles, rectangles, triangles,
and lines. In Drawing view, draw the shape you want and use the
Select tool to select it. Then, select Format, Shapes, and select the
shape you want.
6-4
Page 65

Chapter 7:
Microsoft Pocket Outlook
a)7
The Microsoft Pocket Outlook program includes Calendar, Contacts, Tasks, and
Inbox. Using ActiveSync, you can synchronize information in Microsoft Outlook
Microsoft Schedule+, or Microsoft Exchange on your desktop computer with your
device. Each time you synchronize, ActiveSync compares the changes you made
on your device and desktop computer and updates both computers. For more
information, see ActiveSync Help on the desktop computer.
Calendar, Contacts, and Tasks each consists of a card view and list view. The card
view is where you enter or view the details for each entry. The list view is where
you view all entries. With Inbox, you can send and receive e-mail messages, either
through synchronization with Outlook or Exchange on your desktop computer or by
connecting directly to your mail server through an Internet or network account.
You can access Pocket Outlook by selecting Start, Programs, Pocket Outlook,
and then the tool you are interested in.
More information on the procedures described in this chapter, as well
as information on additional procedures, can be found in online Help on
the device. Select Start, Help, and then the program you want
information on.
,
7-1
Page 66

Calendar: Scheduling Meetings and
Appointments
Use Calendar to schedule appointments, meetings, and other events. You can
check your appointments in one of several views (Day, Week, Month, Year, and
Agenda) and easily switch among the views by selecting the corresponding toolbar
button.
7-2
Page 67

To create a new appointment:
1. From any view, select the New Appointment button.
2. Enter a description and a location.
3. Select the time and date.
4. To add notes, select the Notes button, and then select the notes area. Enter
your notes.
5. To assign the appointment to a category, select the Categories button and
select a category from the list.
6. Select other desired options and then OK when finished.
Tip: To quickly add an appointment in Day or Week view, select the
time and type the description and location. Enter the location in
parentheses if you want Calendar to recognize it as the location. For
example, “Lunch (Cafeteria).”
7-3
Page 68

If you need to schedule a meeting with people who use Outlook, Pocket Outlook, or
Schedule+, you can use Calendar to schedule the meeting. When attendees
receive a meeting request, they can choose to accept or decline the meeting. If
they accept, the meeting is automatically added to their schedule. In addition, their
response is automatically sent back to you, and your calendar is updated.
Before you can send a meeting request, you will need to enter e-mail addresses in
Contacts and set up Inbox to send and receive messages. For information on using
Contacts and Inbox, see “Contacts: Tracking Friends and Colleagues” and “Inbox:
Sending and Receiving E-mail Messages.”
To create a meeting request:
1. Select Tools, Options, and then choose a mail transport. If you send and
receive messages using synchronization, select ActiveSync. If you connect to
an ISP or network, select the service you set up in Inbox.
2. Select File and then Make Meeting.
3. Enter the meeting information.
4. Select the contacts you want to invite.
5. Select other desired options and then OK.
Inbox automatically creates a meeting request and sends it to the attendees the
next time you connect to your mail server or synchronize with your desktop
computer.
Tip: Your device will remind you about your appointments and
meetings by sounding an alarm, flashing the notification light, or
displaying a message on the screen. To change how your are notified,
select Tools and then Options. Select the Alarm button and then
Reminder Options.
7-4
Page 69

Contacts: Tracking Business Colleagues
Contacts maintains a list of your business colleagues so that you can easily find
the information you’re looking for, whether you’re at home or on the road. Using the
device IR port, you can also quickly share Contacts information with other Windows
CE-based mobile device users.
To create a new contact:
1. Select the New Contact button.
2. Enter a name.
7-5
Page 70

3. Select the Business or Personal button and enter information in the
appropriate fields. Supply an e-mail address if you want to send meeting
requests and e-mail messages to this contact.
4. To add a note or assign the contact to a category, select the
Notes/Categories button. Then select the notes area and enter your notes, or
select a category from the list.
Tip: You can send up to 25 contact cards at a time to another Windows
CE-based device. In the Contacts list, select the item(s) you want to
send, then File, and then Send. If you are receiving items(s), select
File and then Receive.
Tasks: Keeping a To Do List
Use Tasks to keep track of what you have to do. Overdue tasks are displayed in
bold and in red.
7-6
Page 71

To create a new task:
1. Select the New Task button.
2. Enter a description.
3. Select the start date, due date, and other information.
4. To add notes, select the Notes button and then the notes area. Enter your
notes.
5. To assign the task to a category, select the Categories button and select a
category from the list.
6. Select other desired options and then OK.
Tip: To mark a task as complete, in the task list, select the check box in
the Status column. To delete all completed tasks, select Edit and then
Delete Completed Tasks.
7-7
Page 72

Inbox: Sending and Receiving E-mail Messages
Use Inbox to send and receive e-mail messages. You can access your e-mail by
connecting to a mail server through an Internet or network account or by
synchronizing with your desktop computer.
7-8
Page 73

Connecting to a mail server
You can send and receive messages by connecting directly to your mail server.
Use a modem to connect to your Internet service provider (ISP), or use a modem
or Ethernet card to connect to the local area network that your mail server is
connected to. In addition to creating a connection to your ISP or network, you must
give Inbox the information it needs to communicate with your mail server.
Tip: Inbox does not currently support connecting with proprietary mail
protocols such as AOL and MSN. However, you can still gain access
to the Internet through these services. There may be third-party
programs available that would enable you to send and receive mail
through proprietary protocols. Try searching the Web on the keyword
“Windows CE” to find third-party programs for your device.
Setting up Inbox for connecting to a mail se rver
1. Get the following information from your ISP or network administrator: POP3 or
IMAP4 server name, SMTP host name, user name, password, and domain
name (for network connections only).
2. Select Start, Programs, Pocket Outlook, and then Inbox.
3. Select Services and then Options.
4. On the Services tab, select Add.
5. Choose IMAP4 Mail or POP3 Mail, enter a name for the connection, and then
select OK.
6. In the Mail Service Definition dialog box, enter the information from step 1. In
Connection, choose the remote connection you want to use. (If you are
receiving e-mail through a network connection, Select Network Connection.)
If you have not created a connection, select Create new connection, doubletap or double-click the Make New Connection icon, and follow the instructions
in the wizard. When finished, select Inbox in the Taskbar and continue setting
up Inbox. For more information, see “Chapter 7: Getting Connected Remotely.”
7. In the Mail General Preferences dialog box, select desired options.
7-9
Page 74

8. In the Mail Inbox Preferences dialog box, select desired options.
When Getting Messages, choose how you want messages downloaded
• In
by default. Choosing Get full copy of messages will take up more storage
space on your device. Choosing Only synchronize Inbox folder hierarchy
(IMAP4 only) will speed up the time it takes to download your messages.
• In When Getting Full Copy, choose whether you want to download file
attachments and meeting requests when you get full copies of messages.
This setting applies whether you have chosen to download full copies of
messages by default, or if you selectively download full copies of messages
by opening the message and selecting the Get Full Copy button. In
addition, if you want to receive meeting requests, your Exchange Server
administrator must enable support for Rich Text Format for your account.
Ask your administrator if this feature is enabled for you.
Downloading messages
To send and receive e-mail, select the Services menu and make sure that the
service you want to use is selected (the selected service has a bullet next to it.)
Then, select the Connect button. When you connect to the mail server, the
messages on your device and mail server are synchronized: new messages are
downloaded to the device Inbox folder, messages in the device Outbox folder are
sent, and messages that have been deleted on the server are removed from the
device Inbox. These folders are stored under the service you created when setting
up Inbox. Double-tap or double-click a message in the message list to open it. If
you read a message and decide that you need the full copy, select the Get Full
Copy button.
7-10
Page 75

Disconnecting from the server
To disconnect Inbox from your mail server, select the Connect button again. You
also need to disconnect your dial-up connection by double-tapping or doubleclicking the icon in the status bar and selecting Disconnect.
Managing messages and folders
By default, messages are displayed in one of four folders in the service you
created: Inbox, Deleted (local), Outbox, and Sent. The Deleted (local) folder
contains messages that have been deleted on the device. If you are using IMAP4,
you may see a Deleted Items folder. This folder is for deleted messages on the
server. The behavior of the Deleted and Sent folders depends on the Inbox options
you have chosen.
7-11
Page 76

If you want to organize messages into additional folders, select File, Folder, and
then New Folder. Then, drag messages into the folder you created. The behavior
of the folders you create depends on whether you are using POP3 or IMAP4.
If you are using POP3, when you drag messages to a folder you created, the link is
broken between the messages and their copies on the mail server. The next time
you connect, the mail server will see that the messages are missing from the
device Inbox and delete them from the server. This prevents you from having
duplicate copies of a message, but it also means that you will no longer have
access to the messages you move to the folders you create from anywhere except
the device.
If you are using IMAP4, the folders you create and the messages you move are
mirrored on the server. For example, if you move two messages from the Inbox
folder to a folder called Family, the server will create a copy of the Family folder
and copy the messages into that folder. Therefore, messages are available to you
anytime you connect to your mail server, whether it is from your device, laptop
computer, or desktop computer. This synchronization of folders occurs when you
create a new folder, move messages into a folder, exit the Inbox program, or select
Synchronize Folders on the Services menu. If you want to view the messages in
a folder while disconnected from your mail server, select the folder and then
Offline Folder on the Services menu.
Synchronizing E-mail Using ActiveSync
Another way to access your e-mail is by synchronizing your device and desktop
computer. Using ActiveSync on your desktop computer, you can send and receive
e-mail messages by exchanging information between Inbox on your device and
Inbox in either Outlook or Exchange on your desktop computer. When you
synchronize, any changes made on either computer are transferred to the other. If
you have received new messages in Inbox on your desktop computer, the
messages are copied to your device. If you delete a message on the device, it is
deleted from the desktop the next time you synchronize. If you compose and send
new e-mail messages on your device, the messages are moved to the desktop
computer and sent the next time you synchronize. In addition, changes you’ve
made to Calendar, Contacts, and Tasks are updated.
If you are receiving e-mail by synchronizing with your desktop computer, the device
Inbox is set up by default. However, because e-mail messages are not
synchronized by default, you will need to set up ActiveSync on your desktop
computer to include e-mail messages when synchronizing.
For specific instructions on setting up and using synchronization, see ActiveSync
Help on the desktop computer.
7-12
Page 77

Downloading messages
To send and receive e-mail, connect to your desktop computer and initiate
synchronization. The way you initiate synchronization depends on how you are
connected to your desktop computer and the settings you have chosen in
ActiveSync. For more information, see ActiveSync Help on the desktop computer.
When you synchronize, new messages in Inbox on the desktop computer are
copied to the Inbox folder on your device, and messages in the device Outbox
folder are sent. These folders are stored under the ActiveSync service in Inbox.
Double-tap or double-click a message in the message list to open it.
Managing messages and folders
Messages are stored in one of four folders in the ActiveSync service: Inbox,
Deleted (local), Outbox, and Sent. The behavior of the Deleted and Sent folders
depends on the Inbox options you have chosen.
If you want to store messages in a folder other than Inbox, select File, Folder, and
then New Folder. Create the folder and then drag messages into it. Doing so
breaks the link between these messages and their copies on the desktop
computer. When you synchronize next, the messages in the folder you created will
not be synchronized. In addition, the desktop computer will see that the messages
are missing from the device Inbox folder and delete them from the Inbox folder on
the desktop so that both Inbox folders match. This prevents you from getting
duplicate copies of a message, but it also means that you will no longer have
access to the messages you move out of Inbox except from the device.
7-13
Page 78

Sending a message
To send a message:
1. Select Compose and then New Message.
2. Select the To field and enter the address of one or more recipients, or select
the Address Book button to select addresses from the Contacts list or an
address service.
3. Select the Subject field and enter a title for the message.
4. Select the message body and type your message.
5. To attach a file, select the Add Attachment button.
6. Select the Send button.
If you are not connected to your mail server, the message is moved to the Outbox
folder and will be sent the next time you connect or synchronize.
7-14
Page 79

Chapter 8:
Getting Connected Remotely
a)8
If you want to use your device to connect to your desktop computer, a network, or
the Internet while away from your office, you must create a dial-up connection. This
is called remote networking. You have the following remote networking options:
• Connect to your Internet service provider (ISP). Once connected, you can send
and receive e-mail messages and view Web pages. If this is the method you
want to use, see “Connecting to an ISP.”
• Connect to the network at your company or organization. Once connected, you
can send and receive e-mail messages, view intranet Web pages, and access
files on the network. If this is the method you want to use, see “Connecting to
Your Network.”
• Connect to your desktop computer to synchronize remotely. Once connected,
you can synchronize information such as your Pocket Outlook data. If this is the
method you want to use, see “Connecting to Your Desktop Computer to
Synchronize Remotely.” For more information on synchronization, see
ActiveSync Help on the desktop computer.
Note:
• Chapter 9, “Simple Internet Connection,” provides an easy alternative to the
procedures explained in “Connecting to an ISP” and “Connecting to Your
Network.”
• Settings must be made using the Simple Internet Connection procedure before
using the Mail, Web surfing, and FTP Internet applications provided by SHARP,
or the one-touch mail receipt and web surfing switches.
Connecting to an ISP
You can connect to your ISP by creating a dial-up connection. Once connected,
you can send and receive e-mail messages and view Web pages.
To create a dial-up connection to an ISP:
1. If your device does not have a built-in modem, install a modem card.
2. Get the following information from your ISP: ISP dial-up access telephone
number, user name, and password.
3. Select Start, Programs, Communications, and then Remote Networking.
4. Double-tap or double-click the Make New Connection icon.
5. Enter a name for the connection, such as “ISP Dial-Up,” select Dial-Up
8-1
Page 80

Connection, and then select Next.
6. Select your modem type.
7. You should not need to change any settings in the Configure or TCP/IP
Settings dialog boxes. Most ISPs now use server-assigned addresses. If the
ISP you are connecting to does not use server-assigned addresses, enter the
addresses in the TCP/IP Settings dialog box. When finished, select Next.
8. Enter the access phone number and select Finish.
Once you have created the dial-up connection, you simply double-tap or double-
click the connection, enter your user name and password, and select Connect any
time you want to connect. Once connected, you can use Pocket Internet Explorer to
visit Web pages or Inbox to send and receive e-mail. Before you can use Inbox,
you need to provide the information it needs to communicate with the mail server.
For specific instructions, see “Inbox: Sending and Receiving E-mail Messages”.
Connecting to Your Net work
If you have access to a network, you can send e-mail, access file servers, view
intranet pages, and possibly access the Internet. You can connect to your network
in one of two ways:
• Create a dial-up connection using a RAS account. Before you can create this
dial-up connection, your network administrator will need to set up a RAS account
for you. If this is the method you want to use, see “To create a dial-up connection
to a network.”
• Use an Ethernet card and a net tap to connect to the network. If this is the
method you want to use, see “To create a network (Ethernet) connection.”
To create a dial-up connection to a network:
1. If your device does not have a built-in modem, install a modem card.
2. Get the following information from your network administrator: corporate dial-
up access telephone number, user name, password, and domain name.
3. Select Start, Programs, Communications, and then Remote Networking.
4. Double-tap or double-click the Make New Connection icon.
8-2
Page 81

5. Enter a name for the connection, such as “Corporate Dial-Up,” select Dial-Up
Connection, and then select Next.
6. Select your modem type. You should not need to change settings in the
Configure or TCP/IP Settings dialog boxes. When finished, select Next.
7. Enter the access phone number and select Finish.
Once you have created the dial-up connection, you simply double-tap or double-
click the connection, enter your user name, password, and domain, and select
Connect any time you want to connect. Once connected, you can use Pocket
Internet Explorer to visit intranet Web pages and Inbox to send and receive e-mail.
Before you can use Inbox, you need to provide the information it needs to
communicate with the mail server. For specific instructions, see “Inbox: Sending
and Receiving E-mail Messages”.
To create a network (Ethernet) connection:
You do not need to create a new connection in Remote Networking on your device
for a network connection. Instead, you must install and configure an Ethernet card.
The drivers for the card already exist on your device.
1. Insert the Ethernet card into your device and connect it to your network cable.
You must have an NE2000-compatible Ethernet card.
2. You may see a message warning about battery power. If you have an A/C
Adaptor, plug it into your device.
3. In the Settings dialog box, enter the information for your server. See your
network administrator if you need assistance. Most networks use DHCP, so
you should not have to change these settings. If the Settings dialog box is not
displayed automatically, go to Start, Settings, Control Panel, and double-tap
or double-click Network. Select your Ethernet driver and select Properties.
4. Select Start, Settings, Control Panel, and double-tap or double-click
Network. In the Identification tab, enter your name, password, and domain.
Once connected, you can use Pocket Internet Explorer to visit intranet Web pages
and Inbox to send and receive e-mail. Before you can use Inbox, you need to
provide the information it needs to communicate with the mail server. For specific
instructions, see “Inbox: Sending and Receiving E-mail Messages”.
8-3
Page 82

Getting Help on Connec ting Remotely
More information on the procedures described here, as well as information on
additional procedures, can be found in the following locations:
• “Inbox: Sending and Receiving E-mail Messages”.
• ActiveSync Help on your desktop computer.
• Online Help on the device. Select Start, Help, and then Inbox, Remote
Connections, or Synchronization.
8-4
Page 83

Chapter 9: Bundled Software
a)9
Your device comes with preinstalled software applications from SHARP.
Simple Internet Connection
Simple Internet Connection is software for making connections necessary for
Internet connection and e-mail, or switching the connection to the Internet. You can
register multiple Internet connections and mail addresses, allowing you to use the
software both at work and at home.
This section explains how to connect to your Internet service provider and how to
connect to the Internet via a LAN network.
Settings must be made using the Simple Internet Connection procedure before
using the Internet applications provided by SHARP (Mail, Web surfing, and FTP),
or the mail receipt and web surfing switches.
Connecting to your Provider
Make sure that you have instructions and materials supplied by your Internet
service provider available, and refer to these while making the settings.
Note:
Setting required by some providers may not be possible with the device using
Simple Internet Connection or Remote Network. Also, no software is provided for
special protocols such as those used by MSN or AOL.
Register your provider into connection
This section describes how to register a new connection. You do not have to be
connected to a phone line to make this setting, so you please take your time.
1. Double tap the Simple Internet Connection icon.
The Simple Internet Connection Dialog box appears.
9-1
Page 84

2. Tap the New button.
3. Select Telephone line, and tap the Next button.
9-2
Page 85

4. Select the connection method, and tap the Next button.
• Select Regular Phone Line (Tone) or Regular Phone Line (Pulse) for
connection to a regular phone line.
• When connecting via an extension that requires a 0 to be dialed first, check
Add prefix and enter 0 to the edit box.
5. Set each of the items and tap the Next button.
In this dialog box, settings are made for connecting to your provider.
The items displayed vary according to your provider. Refer to the instructions
supplied by your provider when making the settings.
9-3
Page 86

6. Set each of the items and tap the Next button.
In this dialog box, settings are made for e-mail.
The items displayed vary according to your provider. Refer to the instructions
supplied by your provider when making the settings.
7. Check the contents of the settings, then tap the Register button.
The provider is registered into Select Connection in initial dialog shown at
step 2.
9-4
Page 87

Editing connection settings
You can make changes to connection settings, or create a new connection from an
existing connection setting.
1. Select the connection to be edited, and tap the Copy button or the Edit button.
• When you want to create a new connection using the edited contents of an
existing connection, tap the Copy button. This is useful when the same
connection uses more than one connection method.
• When you want to change only the connection settings, tap the Edit button.
2. Tap the Next Button.
9-5
Page 88

3. Select the connection method, then tap the Next button.
4. Edit items as necessary in the Internet Settings or Mail Settings dialog boxes
that follow, then tap the Next button.
5. When the Verify Settings dialog box appears, check the contents of the
edited settings and tap the Register button.
If you selected Copy in step 1, a new connection is registered into the Select
Connection list.
Switching connections
1. Select a registered provider, and tap the Switch Connection button.
9-6
Page 89

2. Tap the OK button.
Connection will be made to this connection until you switch to a different
connection.
Connection via a LAN
Before making settings, you will need to get information such as IP addresses from
your network administrator. Make the settings as instructed by your network
administrator.
Note:
To connect to the Internet via a LAN, you will need a LAN (network) card.
Important:
• Please use a LAN card whose operation has been confirmed by SHARP. Using
other LAN cards may damage the device or the card.
• To make a connection to the Internet via a LAN, some knowledge of networks is
required. If a mistake is made when making a setting, not only will connection
not be possible but damage to the entire LAN network could result. Make
settings as instructed by your network administrator.
Registering a LAN Connection
1. Install a LAN card into the device, and make LAN card settings.
2. Double tap the Simple Internet Connection icon.
The Simple Internet Connection dialog box is displayed.
9-7
Page 90

3. Tap the New button.
4. Tap LAN and then tap the Next button.
5. Set each of the items as necessary and tap the Next button.
9-8
Page 91

6. Set each of the items as necessary and tap the Next button.
7. Set each of the items as necessary and tap the Next button.
8. Check the contents of the settings and then tap the Register button.
The new connection is registered into Select Connection.
Switching the connection to LAN
9-9
Page 92

1. Select a registered connection, and tap the Switch Connection button.
The Simple Internet Connection dialog box appears.
2. Tap the OK button.
3. Remove the LAN card from the device once, and then re-install it.
9-10
Page 93

9
Mail
Sending Message
First, perform a test by sending a message to yourself. This is useful for checking
to see how an addressee will view your mail.
1. Double tap the Mail icon.
If the E-mail: Inquiry dialog box appears, tap Yes.
Mail starts.
2. Tap the
button.
A screen for composing a message appears.
9-11
Page 94

3. Input your e-mail addresses.
Tap the New button, input the e-mail address into the address dialog box that
appears, and then tap the OK button.
The e-mail address is input into Address.
4. Write the message.
Input a title for the message into Subject.
9-12
Page 95

5. Tap the
button.
6. The message that you create is stored in the Outbox folder.
7. Select Send Message from the Tool menu.
The connection is opened.
9-13
Page 96

A message is displayed informing you that the message has been sent, then
the connection is cut.
Viewing Received Mail
Let’s see if the message you sent to yourself has arrived.
1. Select Receive Message from the Tool menu.
Note:
With the
can send and receive message with one operation.
The connection is opened.
or by selecting Send/Receive Message from the Tool menu, you
9-14
Page 97

A message is displayed informing you that the e-mail has been received, then
the connection is cut.
2. Tap the in tray, then tap the button to display the contents of the message.
Is the message displayed as you expected?
Before sending a message to your friends, send some to yourself for practice.
9-15
Page 98

Note:
• When you want to reply to a message, tap the
button to enable you to
add text to the original message. This is the same as selecting Reply to
Sender from the Compose menu.
• To delete a message, tap on the message you wish to delete and then
select delete from the Edit menu. The message is moved to the Delete
Items. Selecting Empty Deleted Items from the File menu erases all
messages in the Delete Items.
9-16
Page 99

Sending a message with a file attached
Let’s send an e-mail with an attachment consisting of an image recorded using an
MPEG-4 camera.
You can also write a message after choosing the file to be attached with the Movie
Gallery or PC File Viewer.
1. Create a message, and tap Attachment sheet.
The Attachment sheet is displayed.
2. Tap the Attach button.
9-17
Page 100

3. Specify the location of the file to be attached, then tap the OK button.
The file is attached to the message.
4. Send the message in the normal way.
9-18
 Loading...