

Page 1

User’s Guide
EasyLAN 100e
Ethernet Adapter
Page 2

User’s Guide
EasyLAN 100e
Ethernet Adapter
Page 3

Intermec Technologies Corporation
Worldwide Headquarters
6001 36th Ave.W.
Everett, WA 98203
U.S.A.
www.intermec.com
The information contained herein is provided solely for the purpose of allowing customers to
operate and service Intermec-manufactured equipment and is not to be released, reproduced, or
used for any other purpose without written permission of Intermec Technologies Corporation.
Information and specifications contained in this document are subject to change without prior
noticed and do not represent a commitment on the part of Intermec Technologies Corporation.
© 2007 by Intermec Technologies Corporation. All rights reserved.
The word Intermec, the Intermec logo, Norand, ArciTech, Beverage Routebook, CrossBar,
dcBrowser, Duratherm, EasyADC, EasyCoder, EasySet, Fingerprint, i-gistics, INCA (under
license), Intellitag, Intellitag Gen2, JANUS, LabelShop, MobileLAN, Picolink, Ready-to-Work,
RoutePower, Sabre, ScanPlus, ShopScan, Smart Mobile Computing, SmartSystems, TE 2000,
Trakker Antares, and Vista Powered are either trademarks or registered trademarks of Intermec
Technologies Corporation.
There are U.S. and foreign patents as well as U.S. and foreign patents pending.
ii EasyLAN 100e Ethernet Adapter User’s Guide
Page 4

Document Change Record
This page records changes to this document. The document was
originally released as Revision 001.
Version
Number
002 9/2007 Revised guide to include information on after
Date Description of Change
service locations for South Korea.
EasyLAN 100e Ethernet Adapter User’s Guide iii
Page 5

iv EasyLAN 100e Ethernet Adapter User’s Guide
Page 6

Contents
Document Change Record. . . . . . . . . . . . . . . . . . . . . . . . . . . . . . iii
Before You Begin. . . . . . . . . . . . . . . . . . . . . . . . . . . . . . . . . . . . . . . . . . . . . . . . . . . . vii
Safety Information . . . . . . . . . . . . . . . . . . . . . . . . . . . . . . . . . . . . . . . . . . . vii
Global Services and Support. . . . . . . . . . . . . . . . . . . . . . . . . . . . . . . . . . . . vii
Warranty Information . . . . . . . . . . . . . . . . . . . . . . . . . . . . . . . . . vii
Web Support . . . . . . . . . . . . . . . . . . . . . . . . . . . . . . . . . . . . . . . viii
Telephone Support . . . . . . . . . . . . . . . . . . . . . . . . . . . . . . . . . . viii
Service Location Support . . . . . . . . . . . . . . . . . . . . . . . . . . . . . . . ix
Who Should Read This Manual . . . . . . . . . . . . . . . . . . . . . . . . . . . . . . . . . ix
Patent Information. . . . . . . . . . . . . . . . . . . . . . . . . . . . . . . . . . . . . . . . . . . . x
Installing the Adapter . . . . . . . . . . . . . . . . . . . . . . . . . . . . . . . . . . . . . . . . . 1
1
Introducing the EasyLAN 100e Ethernet Adapter. . . . . . . . . . . . . . . . . . . . . . . . . . . . 2
Supported Operating Systems and Network Protocols . . . . . . . . . . . . . . . . . . . . . . . . 3
Installing the Adapter . . . . . . . . . . . . . . . . . . . . . . . . . . . . . . . . . . . . . . . . . . . . . . . . . 4
Connecting the Adapter to Your Network . . . . . . . . . . . . . . . . . . . . . . . . . . 4
Printing a Test Label. . . . . . . . . . . . . . . . . . . . . . . . . . . . . . . . . . . . . . . . . . . 5
Assigning the IP Address. . . . . . . . . . . . . . . . . . . . . . . . . . . . . . . . . . . . . . . .5
Contents
Setting Up to Print . . . . . . . . . . . . . . . . . . . . . . . . . . . . . . . . . . . . . . . . . . . . . . . . . . .7
Print Using FTP . . . . . . . . . . . . . . . . . . . . . . . . . . . . . . . . . . . . . . . . . . . . . . 8
Printing From a Windows NT 4 PC or Windows 2000/XP PC . . . . . . . . . . 8
Setting Up for a Windows NT 4 PC . . . . . . . . . . . . . . . . . . . . . . . 8
Setting Up for a Windows 2000/XP PC. . . . . . . . . . . . . . . . . . . . 10
Setting up for Windows Vista . . . . . . . . . . . . . . . . . . . . . . . . . . . 10
Setting Up for a Windows 95/98 System . . . . . . . . . . . . . . . . . . . 10
Printer Installation . . . . . . . . . . . . . . . . . . . . . . . . . . . . . . . . . . . . . . . . . . . . . . . . . . 12
Configuring the Adapter . . . . . . . . . . . . . . . . . . . . . . . . . . . . . . . . . . . . . 15
2
Opening the Web Browser Interface . . . . . . . . . . . . . . . . . . . . . . . . . . . . . . . . . . . . .16
Configuring the TCP/IP Parameters. . . . . . . . . . . . . . . . . . . . . . . . . . . . . . 17
Configuring the Access and Update Passwords . . . . . . . . . . . . . . . . . . . . . . 20
Configuring the Server Settings . . . . . . . . . . . . . . . . . . . . . . . . . . . . . . . . . 21
Configuring the Parallel Port . . . . . . . . . . . . . . . . . . . . . . . . . . . . . . . . . . . 22
Configuring Port Services . . . . . . . . . . . . . . . . . . . . . . . . . . . . . . . . . . . . . . 24
EasyLAN100e Ethernet Adapter User’s Guide v
Page 7

Contents
Configuring for NetWare. . . . . . . . . . . . . . . . . . . . . . . . . . . . . . . . . . . . . . . . . . . . . 28
Configuring the NetWare Parameters . . . . . . . . . . . . . . . . . . . . . . . . . . . . 28
Configuring Additional Queues . . . . . . . . . . . . . . . . . . . . . . . . . . . . . . . . 31
Configuring for NetBIOS . . . . . . . . . . . . . . . . . . . . . . . . . . . . . . . . . . . . . . . . . . . . 31
Configuring the DLC Parameters . . . . . . . . . . . . . . . . . . . . . . . . . . . . . . . . . . . . . . 33
Configuring for UNIX. . . . . . . . . . . . . . . . . . . . . . . . . . . . . . . . . . . . . . . . . . . . . . . 34
Configuring for Berkeley UNIX . . . . . . . . . . . . . . . . . . . . . . . . . . . . . . . . 35
Configuring for Sun Solaris . . . . . . . . . . . . . . . . . . . . . . . . . . . . . . . . . . . 36
Configuring for HP-UX . . . . . . . . . . . . . . . . . . . . . . . . . . . . . . . . . . . . . . 38
Configuring for IBM AIX . . . . . . . . . . . . . . . . . . . . . . . . . . . . . . . . . . . . 39
Configuring for Other Systems . . . . . . . . . . . . . . . . . . . . . . . . . . . . . . . . . 40
Troubleshooting and Managing the Adapter . . . . . . . . . . . . 41
3
Troubleshooting Printing Problems . . . . . . . . . . . . . . . . . . . . . . . . . . . . . . . . . . . . . 42
Troubleshooting Network Configuration Problems . . . . . . . . . . . . . . . . . . . . . . . . . 42
Managing the Adapter . . . . . . . . . . . . . . . . . . . . . . . . . . . . . . . . . . . . . . . . . . . . . . . 42
Rebooting the Adapter . . . . . . . . . . . . . . . . . . . . . . . . . . . . . . . . . . . . . . . 43
Resetting the Adapter to Factory Defaults . . . . . . . . . . . . . . . . . . . . . . . . . 43
Printing a Test Label . . . . . . . . . . . . . . . . . . . . . . . . . . . . . . . . . . . . . . . . . . . . . . . . 44
Reloading Firmware . . . . . . . . . . . . . . . . . . . . . . . . . . . . . . . . . . . . . . . . . . . . . . . . 45
Using the Web Browser Interface. . . . . . . . . . . . . . . . . . . . . . . . . . . . . . . . . . . . . . . 45
Console Commands . . . . . . . . . . . . . . . . . . . . . . . . . . . . . . . . . . . . . . . . . . 49
A
Sending the Console Commands. . . . . . . . . . . . . . . . . . . . . . . . . . . . . . . . . . . . . . . 50
General Commands . . . . . . . . . . . . . . . . . . . . . . . . . . . . . . . . . . . . . . . . . 51
TCP/IP Commands . . . . . . . . . . . . . . . . . . . . . . . . . . . . . . . . . . . . . . . . . 55
NetWare Commands. . . . . . . . . . . . . . . . . . . . . . . . . . . . . . . . . . . . . . . . . 57
Index . . . . . . . . . . . . . . . . . . . . . . . . . . . . . . . . . . . . . . . . . . . . . . . . . . . . . . . . . . . . . . . 59
vi EasyLAN100e Ethernet Adapter User’s Guide
Page 8

Before You Begin
This section provides you with safety information, technical
support information, sources for additional product information,
and explains how to identify and understand warnings, cautions,
and notes included in this document.
Safety Information
Your safety is extremely important. Read and follow all warnings
and cautions in this document before handling and operating
Intermec equipment.
A warning alerts you of an operating procedure, practice,
condition, or statement that must be strictly observed to avoid
death or serious injury to the persons working on the
equipment.
A caution alerts you to an operating procedure, practice,
condition, or statement that must be strictly observed to
prevent equipment damage or destruction, or corruption or
loss of data.
Before You Begin
Note: Notes either provide extra information about a topic or
contain special instructions for handling a particular condition or
set of circumstances.
Global Services and Support
Warranty Information
To understand the warranty for your Intermec product, visit the
Intermec web site at www.intermec.com and click Service &
Support > Warranty.
Disclaimer of warranties: The sample code included in this
document is presented for reference only. The code does not
necessarily represent complete, tested programs. The code is
provided “as is with all faults.” All warranties are expressly
disclaimed, including the implied warranties of merchantability
and fitness for a particular purpose.
EasyLAN100e Ethernet Adapter User’s Guide vii
Page 9

Before You Begin
Web Support
Visit the Intermec web site at www.intermec.com to download
our current manuals (in PDF). To order printed versions of the
Intermec manuals, contact your local Intermec representative or
distributor.
The Intermec technical knowledge base (Knowledge Central) at
intermec.custhelp.com provides technical information and links
to request technical support for your Intermec product.
Telephone Support
These services are available from Intermec.
In the USA and
Canada call 1-800755-5505 and
Services Description
Order Intermec
products
Order Intermec
media
Order spare
parts
Te c h n i ca l
Support
Service • Get a return authorization
Service contracts • Ask about an existing
• Place an order.
• Ask about an existing
order.
Order printer labels and
ribbons.
Order spare parts. 1 or 2 and then
Talk to technical support
about your Intermec
product.
number for authorized
service center repair.
• Request an on-site repair
technician.
contract.
•Renew a contract.
• Inquire about repair
billing or other service
invoicing questions.
choose this option
1 and then choose 2
1 and then choose 1
choose 4
2 and then choose 2
2 and then choose 1
1 or 2 and then
choose 3
viii EasyLAN100e Ethernet Adapter User’s Guide
Page 10

Before You Begin
Outside the U.S.A. and Canada, contact your local Intermec
representative. For technical support in South Korea, see the next
section. To search for your local representative, from the
Intermec web site, click Contact.
Service Location Support
For technical support in South Korea, use the after service
locations listed below:
AWOO Systems
102-1304 SK Ventium
522 Dangjung-dong
Gunpo-si, Gyeonggi-do Korea, South 435-776
Contact: Mr. Sinbum Kang
Telephone: +82-31-436-1191
Email: sbkang@awoo.co.kr
Sammi Information Systems Co Ltd
7-9FL, Seo Jo Building
103-15, Galwor-Dong
Seoul, Yong San-ku Korea, South 140-807
Contact: Kyung-Hee Koo
Telephone: +82-2-790-5508
Email: jlovekoo@sammicomputer.co.kr
Who Should Read This Manual
The EasyLAN 100 Ethermet Adapter User’s Guide is for the person
responsible for installing, configuring, and maintaining the
EasyLAN 100e Ethernet Adapter (referred to throughout as the
“Ad ap te r” ).
This EasyLAN 100 Ethermet Adapter User’s Guide provides
information about the features of the Adapter, including how to
install, configure, operate, maintain, and troubleshoot your
Adapter.
Note: Before you work with the Adapter, you should be familiar
with your network and general networking terms, such as IP
address.
The Intermec web site at www.intermec.com contains our
documents (as PDF files) available for download.
EasyLAN100e Ethernet Adapter User’s Guide ix
Page 11

Before You Begin
Patent Information
To d ownloa d docume nts
1 Visit the Intermec web site at www.intermec.com.
2 Click Service & Support > Manuals.
3 In the Select a Product field, choose the product whose
documentation you want to download.
To order printed versions of the Intermec manuals, contact your
local Intermec representative or distributor.
This product is covered by one or more patents.
There may be other U.S. and foreign patents pending.
x EasyLAN100e Ethernet Adapter User’s Guide
Page 12

1
This chapter provides an overview of the EasyLANTM 100e
Ethernet Adapter and explains in detail how to install the
Adapter in your network. The chapter covers these topics:
• Introducing the EasyLAN 100e Ethernet Adapter
• Supported Operating Systems and Network Protocols
• Installing the Adapter
• Setting Up to Print
•Printer Installation
Installing the Adapter
EasyLAN 100e Ethernet Adapter User’s Guide 1
Page 13

Chapter 1 — Installing the Adapter
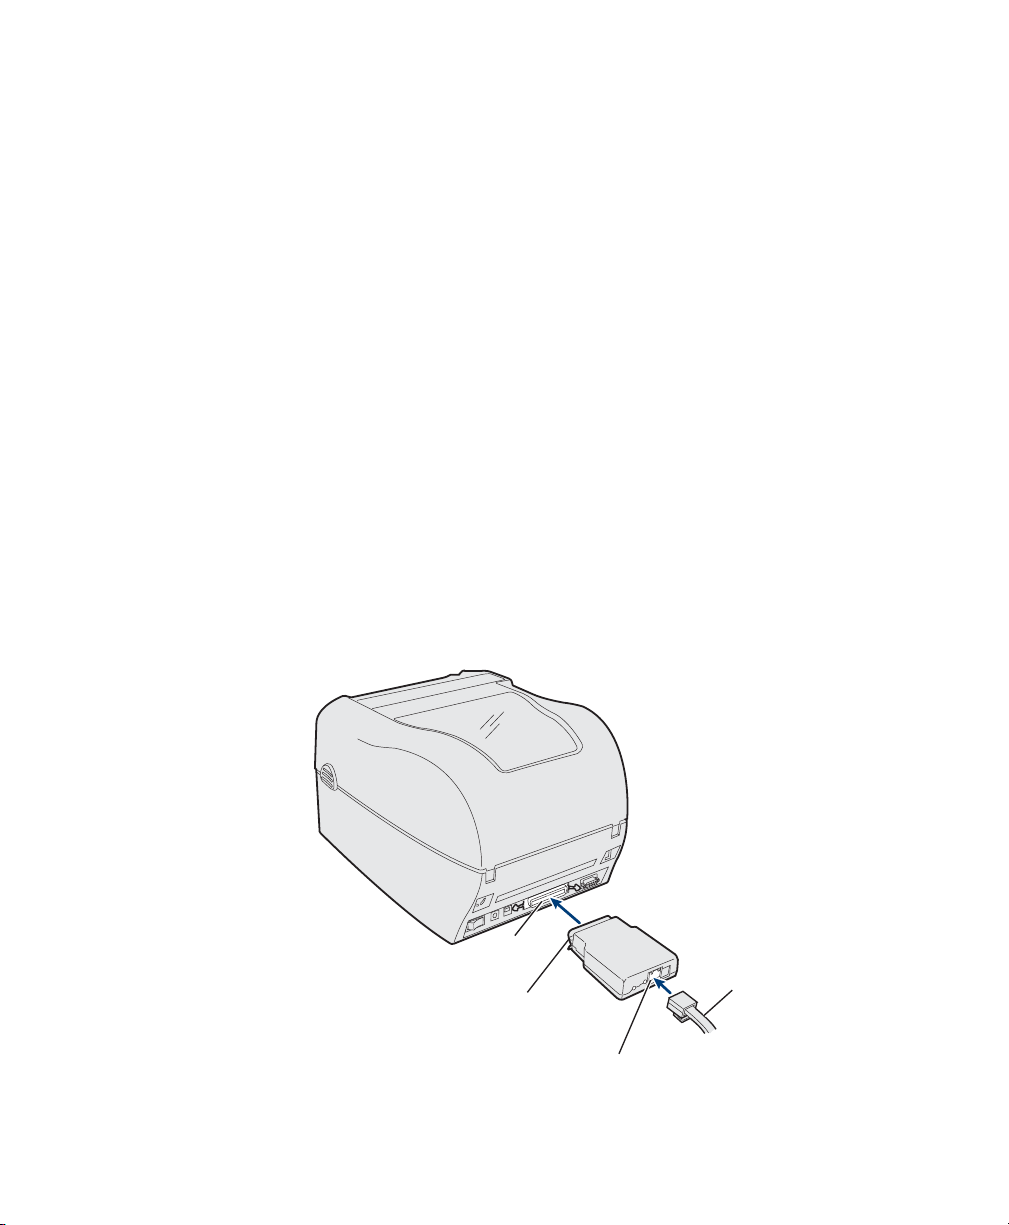
Introducing the EasyLAN 100e Ethernet Adapter
The external EasyLAN 100e Ethernet adapter
(P/N 225-746-001) acts as a print server, letting you share
printers across your Ethernet network.
You can connect the Adapter to these printers:
•EasyCoder C4
• EasyCoder PC4
• EasyCoder PC41
•PF8d
•PF8t
The Adapter uses a 10BaseT/100BaseTx connector. This
connector supports the 10BaseT network speed of 10 Mbps
(Standard Ethernet), while the 100Base Tx supports a network
speed of 100 Mbps (Fast Ethernet).
Parallel port
connector
10BaseT/100BaseTx
Ethernet port
Tes t
button
EasyLAN 100e Ethernet Adapter
LED
Connector, LED, and Button Descriptions
Part Description
10BaseT/
100BaseTx
connector
Parallel port
connector
2 EasyLAN 100e Ethernet Adapter User’s Guide
Connects the Adapter to a standard Ethernet (10
Mbps) or Fast Ethernet (100 Mbps) network via an
Ethernet cable.
Provides the Adapter with a single high-speed parallel
port that can connect directly, without additional
cabling, to an Intermec printer’s parallel port.
Page 14

Chapter 1 — Installing the Adapter
Connector, LED, and Button Descriptions (continued)
Part Description
LED Provides information on power-up diagnostics and
network activity.
Te s t button Prints a test label that shows some of the Adapter’s
settings. Printers that do not use the Intermec Printer
Language (IPL), Direct Protocol (DP), or ESim
cannot print a test label.
Reset the Adapter’s to the factory default settings.
For more help, see “Printing a Test Label” on page 5.
Supported Operating Systems and Network Protocols
•Windows® 95, 98, ME, NT 4, 2000, XP, and Vista
•TCP/IP
•LPD/LPR
• Raw TCP/IP (port 9100)
®
•NetBIOS
over IP (with SMB)
• Multiple configurable TCP port numbers
•Telnet
•WINS
•DHCP
•IPX/SPX
™
•NetWare
RPrinter Bindery mode
• NetWare PServer Bindery mode
• NetWare NPrinter NDS mode with NDPS support
• NetWare PServer NDS mode
• Ethernet II, 802.3, 802.2, 802.2 SNAP Frame types
• Compatible with PCONSOLE, NWADMIN,
PRINTCON, and other Novell utilities
•NetBEUI
•UNIX
EasyLAN 100e Ethernet Adapter User’s Guide 3
®
Page 15
Chapter 1 — Installing the Adapter
Installing the Adapter
Before you install the Adapter, make sure that you have the
appropriate Ethernet cable. Make sure that you have loaded
media and ribbon into the printer and connected the power cord.
For help, see the printer’s quick start guide for your printer.
Connecting the Adapter to Your Network
This section explains how to connect the Adapter first to your
printer, and then to your network.
To connect the Adapter to your printer
1 Take note of the MAC address printed on the Adapter’s
underside. You will need this address to configure the printer.
2 Turn off the printer.
3 Plug the Adapter parallel port connector into the parallel port
on the printer.
4 Connect one end of an Ethernet cable to the 10BaseT/
100BaseTx connector on the Adapter.
5 Connect the other end of the cable to an active Ethernet
(data) port for your network.
Parallel
port
Parallel
port
connector
10BaseT/100BaseTx
port
4 EasyLAN 100e Ethernet Adapter User’s Guide
Ethernet
cable
Page 16

To connect to your network
You are now ready to start using your printer. If you want to print
a test label or set a static IP address for the Adapter, see the next
two sections.
Printing a Test Label
Test that the Adapter works properly by printing a test label. The
test label shows the Adapter’s current status, network settings,
and network statistics.
To print a test label
Chapter 1 — Installing the Adapter
1 Turn on the printer.
When you turn on the printer, the Adapter runs through a set
of power-up diagnostics for a few seconds.
2 If the Adapter is operating properly, the LED flashes
momentarily and then turns off. After this, the LED flashes
whenever there is network activity.
3 The Adapter obtains its TCP/IP settings automatically,
including an IP address, if you have a DHCP (Dynamic Host
Configuration Protocol) server on your network.
1 Wait until the power-up cycle finishes and the LED turns off.
2 Insert a small, straightened paper clip into the recessed Te s t /
Factory button.
3 Gently press the button once and then remove the paper clip.
If you cannot print a test label, see Chapter 3, “Troubleshooting
and Managing the Adapter.”
You c an a lso use the Te s t button to reset the Adapter to its factory
default settings. For help, see “Resetting the Adapter to Factory
Defaults” on page 43.
Assigning the IP Address
The Adapter connects to the network automatically and obtains
its TCP/IP settings, including an IP address, if your network
assigns IP addresses from a DHCP server.
EasyLAN 100e Ethernet Adapter User’s Guide 5
Page 17

Chapter 1 — Installing the Adapter
If your network does not use DHCP or if you want to configure a
static IP address, use ARP (Address Resolution Protocol) to
assign a fixed IP address to the Adapter. Configure a static IP
address using the web browser interface (see Chapter 2,
“Configuring the Adapter”).
Note: The IP address you assign to the Adapter must be on the
same logical network as your host computer. For example, if your
computer has an IP address of 192.189.207.3, the Adapter should
have an IP address of 192.189.207.n (where n is an integer
between 1 and 254).
To get the IP address using a Windows-based PC
1 On your PC, choose: Start > Program > Accessories >
Command Prompt. The command prompt appears.
2 Type the following command (and then press Enter):
arp -a
3 Verify that there are ARP entries in the table. Go to Step 5 if
there are no entries.
4 Ping a device in your network by typing:
ping nnn.nnn.nnn.nnn
where nnn.nnn.nnn.nnn is the IP address of any network
device (your own PC, for example). This command puts an
ARP entry in the table.
5 Type the following command:
arp -s nnn.nnn.nnn.nnn nn-nn-nn-nn-nn-nn
ping nnn.nnn.nnn.nnn
arp -d nnn.nnn.nnn.nnn
where nnn.nnn.nnn.nnn is the IP address of the Adapter, and
nn-nn-nn-nn-nn-nn
is the MAC address of the Adapter.
Example:
arp -s 192.168.3.191 00-40-8c-10-00-86
ping 192.168.3.191
arp -d 192.168.3.191
6 EasyLAN 100e Ethernet Adapter User’s Guide
Page 18

Chapter 1 — Installing the Adapter
The host returns either Reply from 192.168.3.191... or
a similar message. This reply indicates that the address has been
set and communications established.
To get the IP address from a UNIX host machine
These steps also work with Microsoft Windows.
• Type the following command:
arp -s host_name nn:nn:nn:nn:nn:nn temp
ping host_name
where:
host_name is the name mapped to the Adapter’s IP address.
The default name is
INTERMEC_
nnnnnn
, where nnnnnn is
the last six digits of the MAC address.
nn:nn:nn:nn:nn:nn is the MAC address for the Adapter.
Example:
arp -s INTERMEC_0B766F 00:40:8c:10:00:86 temp
ping INTERMEC_0B766F
The host returns either INTERMEC_0B766F is alive or a similar
message. This message indicates that the address has been set and
communications established.
When you execute the PING command for the first time, you
may experience a longer than usual response time.
The ARP command can vary between different UNIX systems.
Berkeley System Distribution (BSD) type systems expect the host
name and node address in reverse order. Furthermore, IBM AIX
systems require the additional argument
ether. For example:
arp -s ether host_name 00:40:8c:10:00:86 temp
Setting Up to Print
After you have connected the Adapter to your network and
established an IP address, you are ready to set up your printer for
printing. This section explains:
• how to print using file transfer protocol (FTP).
• how to set up printing on a Windows NT 4 PC or Windows
2000/XP PC.
EasyLAN 100e Ethernet Adapter User’s Guide 7
Page 19

Chapter 1 — Installing the Adapter
• how to install and use the Intermec print monitor on a
Windows 95/98 PC.
To set up your printer to print from a UNIX system, see
“Configuring for UNIX” on page 34.
Print Using FTP
After installing and connecting the Adapter in your network, you
have several options for sending print requests. This section
explains how to print using FTP.
To print using an FTP session
1 From an MS DOS prompt, log in to the Adapter using the
command
address or name assigned to the adapter. The default name is
INTERMEC_
the MAC address.
2 Press Enter. You do not need to enter a specific user id and
password.
3 Enter the following command to print the test label:
put c:\path\file_name p1
ftp
ipaddress
nnnnnn
, where ipaddress is the IP
, where nnnnnn is the last six digits of
where:
c: the drive with the file you want to print.
path is file directory.
file_name is name of the file you want to print.
p1 is name of the port you want to print to.
4 Log out using the command
quit, bye, or exit,
depending on your FTP version.
Printing From a Windows NT 4 PC or Windows 2000/XP PC
This section explains how to set up printing from a Windows NT
4 PC or Windows 2000/XP PC.
Setting Up for a Windows NT 4 PC
To print from a Windows NT 4 PC, prepare the Windows NT 4
PC for LPR/LPD printing over the TCP/IP network, and then
install the printer.
8 EasyLAN 100e Ethernet Adapter User’s Guide
Page 20

Chapter 1 — Installing the Adapter
To prepare for LPR/LPD printing
1 From the Start menu, select Settings > Control Panel. The
Control Panel dialog box opens.
2 Double-click the Network icon. The Network dialog box
opens.
3 Select Protocols.
4 Add TCP/IP Protocol, select Services, and add MS TCP/IP
Printing.
To install a printer
1 Install the InterDriver for your printer. For help, see the
Software page for your printer on the PrinterCompanion CD.
2 From the Start menu, select Settings > Control Panel. The
Control Panel dialog box opens.
3 Double-click the Printers folder.
4 Click Add Printer.
5 Select My Computer and click Next.
6 Select Add Port.
7 In Printer Ports, select LPR Port and click New Port.
8 When asked to Add LPR compatible printer, enter the IP
address or name of the Adapter as the server providing LPD.
The default name is INTERMEC_nnnnnn, where
nnnnnn is
the last six digits of the MAC address.
9 Enter
prn as the name of the printer or print queue on the
server, where n
is a number from 1 to 8.
10 Choose the printer driver for your printer and click Next.
11 Enter a printer name and click Next.
12 Select Shared to share the printer across your network
(optional).
13 Enter a share name, click Next, and then click Finish.
You can now print from your Windows NT PC to your printer.
EasyLAN 100e Ethernet Adapter User’s Guide 9
Page 21

Chapter 1 — Installing the Adapter
Setting Up for a Windows 2000/XP PC
Before you install the printer on a Windows 2000/XP PC, you
need to install the printer driver, InterDriver. See your printer’s
Software page on the PrinterCompanion CD for help.
To install the printer, use the Add Printer wizard to add your
printer using the following settings when prompted:
• Choose Local Printer.
• Choose Create a new port and then Standard TCP/IP Port.
• Choose the InterDriver for your printer.
You can print after you install the printer as a TCP/IP port.
Setting up for Windows Vista
Windows Vista uses the installation wizard to manage the
InterDriver set up. Use the Add Printer wizard to add your
printer using the following settings when prompted:
• Choose Local Printer.
• Choose Create a new port and then Standard TCP/IP Port.
• Choose the InterDriver for your printer.
You can print after you install the printer as a TCP/IP port.
Setting Up for a Windows 95/98 System
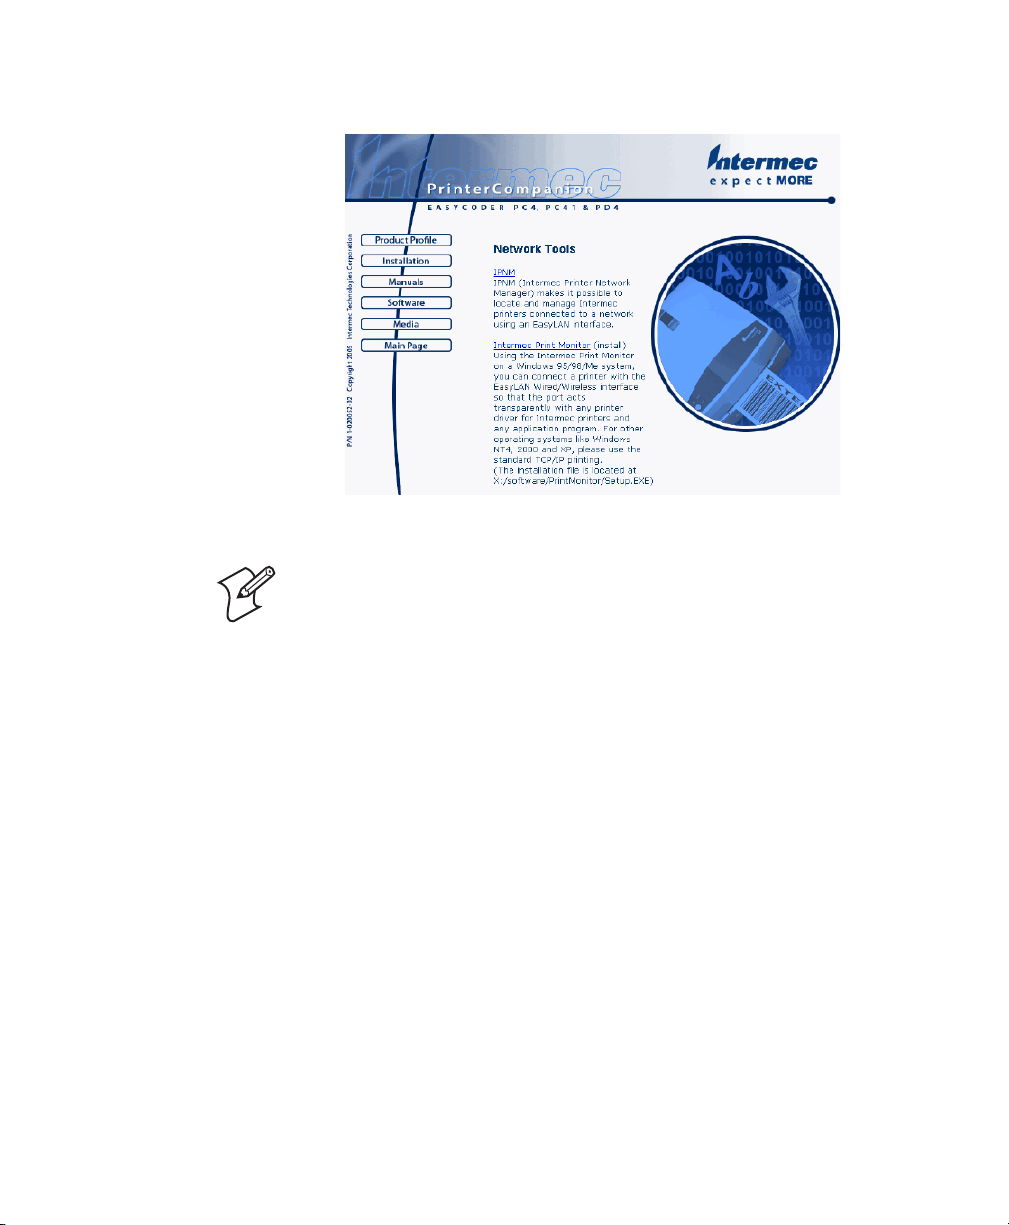
If you use a Windows 95/98 system, you must install the
Intermec Print Monitor to print over an Ethernet network.
The Intermec Print Monitor is available on the
PrinterCompanion CD that ships with your printer. Print
Monitor creates a network port for the Ethernet link on a
Windows 95/98 system. Consequently, the port acts
transparently with any printer driver for Intermec printers and
any application program. Because it uses TCP/IP, Print Monitor
can be used with IP routers and other IP-based equipment.
10 EasyLAN 100e Ethernet Adapter User’s Guide
Page 22

Chapter 1 — Installing the Adapter
To install Intermec Print Monitor
1 Place the PrinterCompanion CD in your PC’s CD drive. The
PrinterCompanion page appears.
2 In the left frame, click the button for your printer, such as the
PC4. The welcome page for that printer appears.
3 In the left menu, click Software. The Software Page appears.
4 Scroll down the middle of the window and then click the link
Network Software Tools. The Network Software Tools page
appears.
EasyLAN 100e Ethernet Adapter User’s Guide 11
Page 23
Chapter 1 — Installing the Adapter
5 Click the link Install Intermec Print Monitor.
6 Follow the instructions for installing Intermec Print Monitor.
Note: Print Monitor returns a message and aborts installation
if you have anything other than Windows 95/98 as your
operating system. More recent versions of Windows do not
require this software.
7 When the installation is complete, close the
PrinterCompanion screen.
You are now ready to install the printer to TCP/IP ports.
Printer Installation
Once you have successfully installed the PrinterCompanion
software from the CD, install the printer using Windows 95/98.
To install the printer
1 From the Start menu, select Settings > Printers. The Printers
dialog box appears.
2 Double-click Add Printer to open the Add Printer Wizard.
3 Add the printer that uses the Adapter by selecting the Local
printer radio button and the printer driver that came with
your printer. After you click Finish in the last dialog box, the
printer appears in the Printers dialog box.
12 EasyLAN 100e Ethernet Adapter User’s Guide
Page 24

Chapter 1 — Installing the Adapter
4 Right-click the printer in the Printers dialog box, and select
Properties from the menu. The Properties dialog box
appears.
5 Click the Details tab.
6 Click Add Port. The Add Port dialog box appears.
7 Select the Other radio button, select Intermec Print
Monitor, and then click OK. The Port Name dialog box
appears.
8 In the Printer Name or IP Address field, enter the Adapter’s
IP address.
9 In the Port Name field, enter the TCP printer port for the
Adapter.
10 In the Port Number field, enter the port number that you
want to use. The default is 9100.
11 Click OK. The new TCP/IP port appears in the Print to the
following port drop-down list.
12 Select the new port and click Apply. The new TCP/IP port is
ready.
You are now ready to print to your printer as a TCP/IP port from
your Windows 95/98 system.
EasyLAN 100e Ethernet Adapter User’s Guide 13
Page 25

Chapter 1 — Installing the Adapter
14 EasyLAN 100e Ethernet Adapter User’s Guide
Page 26

2
This chapter explains how to configure the EasyLAN 100e
Ethernet Adapter for advanced and network-specific settings, and
includes these topics:
• Opening the Web browser interface
• Configuring for NetWare
• Configuring for NetBIOS
• Configuring the DLC parameters
• Configuring for UNIX
For information on using console commands to configure the
Adapter, see Appendix A, “Console Commands.”
Configuring the Adapter
EasyLAN 100e Ethernet Adapter User’s Guide 15
Page 27

Chapter 2 — Configuring the Adapter
Opening the Web Browser Interface
You can use a standard web browser interface to configure the
Adapter.
To configure the Adapter
1 Start your web browser.
2 In the browser’s address line, enter the IP address for the
Adapter and press Enter. Refer to the Test label for the
current IP address; if you have not printed a Test label, see
“Printing a Test Label” on page 5.
The Printer Status window appears, displaying the main
menu selections and the printer’s current status information,
including:
• System Name
•System Description
•Adapter’s Serial Number
• Adapter’s Ethernet (MAC) Address
• Firmware Version
• Status of your previously named port
3 Click Login. The Network Configuration Login screen
appears.
16 EasyLAN 100e Ethernet Adapter User’s Guide
Page 28

Chapter 2 — Configuring the Adapter
4 In the Network Card Access Password field, enter your
password.
The default password is
Note: The Network Card Access Password protects the Adapter
from unauthorized changes, limiting access to the main menu
page in the web browser interface.
5 Click Submit. The Printer Status page appears.
You are now ready to configure the Adapter.
Configuring the TCP/IP Parameters
Use the web browser interface to configure advanced parameters
or update the Adapter’s configuration.
Note: If you are using a DHCP server to assign TCP/IP settings,
the Adapter may not need any further configuration.
If your DHCP server allows the adapter to keep its IP address
permanently, using DHCP may work well.
In most cases, however, use a static IP address so that you will not
have to search for the new IP address when you configure the
Adapter and printer port via a web browser interface.
To manually configure TCP/IP parameters
intermec.
1 Open the Adapter’s web browser interface. For help, see thee
earlier section“Opening the Web Browser Interface” on
page 16.
2 Click TCP/IP in the left pane. The Configure TCP/IP page
appears.
EasyLAN 100e Ethernet Adapter User’s Guide 17
Page 29

Chapter 2 — Configuring the Adapter
3 Configure the TCP/IP parameters, entering at least the IP
address or verifying the IP address assigned by the DHCP
server. For help, see the next table.
Note: If the page shows the Network Card Update Password
field, enter the current Update password. The default is
intermec.
4 Click Submit (scroll to the bottom of the page if not visible).
The message returned, “Data updated successfully,” indicates
the changes were accepted.
Note: If you have entered incorrect or improperly formatted
information, the message returned is specific to the task.
5 Click another link on the left to make additional changes, or
click Logout to close the web browser window.
18 EasyLAN 100e Ethernet Adapter User’s Guide
Page 30

Chapter 2 — Configuring the Adapter
TCP/IP Parameters Defined
Parameter Definition
TCP/IP Enable or disable TCP/IP communications. Default =
enabled.
Enabled
services
IP address Enter the IP address for the Adapter,n.n.n.n where n is
IP address Enter the IP address for the Adapter, n.n.n.n where n is
Subnet mask Enter the subnet mask (if setting a static IP address),
Gateway Enter the IP address (n.n.n.n where n is from 0 to 255)
Boot
method
Configure the services for the port you are using. For
help, see “Configuring Port Services” on page 24.
from 0 to 255. Default = 0.0.0.0
If you have changed the IP address, after you click
Submit, you will have to enter the new IP address in the
Address/Go to line to return to web browser control of
the print server.
from 0 to 255. Default = 192.0.0.192
If you have changed the IP address, after you click
Submit, you will have to enter the new IP address in the
Address/Go to line to return to web browser control of
the print server.
n.n.n.n where n is from 0 to 255.Default = 0.0.0.0
for the gateway or router if setting a static IP) address.
Default = 0.0.0.0
Select the method for finding the Adapter IP address,
subnet mask, and gateway address when the printer
turns on or the Adapter is reset.
Auto sets the Adapter to request an IP address using
DHCP, BOOTP, and RARP. If unable to get an IP
address using these methods, Auto changes to Static.
Default = Auto.
DHCP sets the Adapter to obtain an IP address from a
DHCP server.
BOOTP sets the Adapter to use the boot protocol to get
an IP address.
RARP sets the Adapter to use the reverse address
resolution protocol to get an IP address.
Static sets the Adapter to use the IP address set in the IP
Address field whenever it boots.
EasyLAN 100e Ethernet Adapter User’s Guide 19
Page 31

Chapter 2 — Configuring the Adapter
TCP/IP Parameters Defined (continued)
Parameter Definition
Boot tries Enter the number of times the boot method tries to set
RARP boot
settings
TCP
window
TCP
timeout
LPD banner Set the Adapter, using a check mark, to print the banner
LPD retry Set the Adapter, using a check mark, to wait for an LPD
Keepalive
timer
the IP address, subnet mask, and gateway address before
using the available values. The default is 3; enter any
value from 0 to 255.The boot method must be set to
Auto, DHCP, BOOTP, or RARP.
Select with check mark whether RARP sets the subnet
mask based on the Adapter’s IP address and sets the
gateway IP address. Default = not checked.
To use these settings, set the boot method to RARP or
Auto.
Enter the maximum TCP window for TCP
communications. This value is normally set
automatically by the network (1,500 to 65,535), but
you may want to change it to optimize network
performance.
Enter the maximum TCP window for TCP
communications. This value (10240) is normally set
automatically by the network (1,500 to 65,535), but
you may want to change it to optimize network
performance.
page in an LPD control file. Default = not checked.
job that has been terminated before it was completed to
be resent. Default = not checked.
If the LPD job is resent, the Adapter continues printing
the job where it had stopped.
Enter how often in minutes (0 to 255) the Adapter
sends an IP ping packet to the router to keep the router
aware of the Adapter. Default = 5 minutes; enter 0 to
disable this feature.
Configuring the Access and Update Passwords
Use the web browser interface to configure the access and update
passwords. For help, see “Opening the Web Browser Interface”
on page 16.
20 EasyLAN 100e Ethernet Adapter User’s Guide
Page 32

Chapter 2 — Configuring the Adapter
• The access password protects the Adapter from unauthorized
changes, limiting access to the main menu page in the web
browser interface.
• The update password allows you to reload the firmware.
• The default password is
To configure the access and update passwords
1 Log in to the Adapter’s web page.
2 Select Admin from the menu on the left.
3 Click Configure Network Card Access Password, and the
Configure Network Card Access Password page appears.
4 Enter the access password in both fields.
5 Click Submit, which returns the message “Data updated
successfully” to indicate the changes were accepted.
6 Update your password when necessary by repeating Steps 1
through 4.
7 Click any other command on the left to continue working, or
click Logout to return to the main access window and then
close your browser.
Configuring the Server Settings
intermec.
The Adapter acts as a print server to control access to the
configuration parameters and manage printer resources.
To configure the server settings
1 Log in to the Adapter’s Admin page if you are not already
there.
2 From the main menu page, click Server Settings.
3 In the Server Settings pane, enter a unique name for the
Adapter print server. You may additionally:
• enter a system name and description.
EasyLAN 100e Ethernet Adapter User’s Guide 21
Page 33

Chapter 2 — Configuring the Adapter
• enter a contact name and location.
• reset the server.
• restore the factory defaults.
4 Once you have completed any changes, click Submit, which
returns the message “Data updated successfully” to indicate
the changes were accepted.
5 Click another command on the left to continue working, or
click Logout to close the web browser window.
Configuring the Parallel Port
The Adapter communicates with the printer through its parallel
port. You can use the web browser interface to change the default
settings for the parallel port (also called the printer port).
Note: Change the parallel port settings only if you are directed to
do so by Intermec Technical Support.
Configure the parallel port using the web browser interface if you
do not want to use the default settings.
To configure the parallel port
1 Log in to the Adapter’s web page. For help, see “Opening the
Web Brow se r Inte r face” o n page 16.
22 EasyLAN 100e Ethernet Adapter User’s Guide
Page 34

Chapter 2 — Configuring the Adapter
2 From the main menu page, click Printer Port. The Print Port
Settings page appears.
The first four rows display information about the parallel port
including:
• any existing jobs in the port.
•port status.
•port name.
• the port type.
3 Configure the necessary parameters. For help, see the next
table.
From this window, you may also:
• click the Cancel Print Job link to cancel existing print
jobs.
• click the Job Log link to view the job log.
EasyLAN 100e Ethernet Adapter User’s Guide 23
Page 35

Chapter 2 — Configuring the Adapter
4 Click Submit, which returns the message “Data updated
successfully” to indicate the changes were accepted.
5 Click another command on the left to continue working, or
click Logout to close the web browser window.
Parallel Port Parameters Defined
Parameter Definition Values
Output mode Select the mode for data output. Auto, High
Bi-directional
communication
ECP Enable or disable the Enhanced
Software I/O Enable or disable input/output
Output buffering Enable or disable setting aside a
PJL status Enable or disable printer job
Select whether the port supports
two-way communications.
Capabilities Port (ECP).
communication.
portion of memory for buffering
output data.
language (PJL) status.
Speed,
Compatible
Default = Auto
Checked, not
checked
Default =
checked
Checked, not
checked
Default = not
checked
Checked, not
checked
Default = not
checked
Checked, not
checked
Default = not
checked
Checked, not
checked
Default = not
checked
Configuring Port Services
Port services are programs or routines that provide virtual
hardware-level support to other programs. Use the web browser
interface to change the default settings for the port services.
If you selected a service name, such as NetWare, in a network
parameter page, begin with Step 3 in the next procedure.
24 EasyLAN 100e Ethernet Adapter User’s Guide
Page 36

Chapter 2 — Configuring the Adapter
To configure the port services
1 Log in to the Adapter’s web page with your browser. For help,
see “Opening the Web Browser Interface” on page 16.
2 Click Print Services to view the Configure Service page.
3 Click the service name for the service you want to configure.
For example, click PR1 to open the following Configure
Service window.
EasyLAN 100e Ethernet Adapter User’s Guide 25
Page 37

Chapter 2 — Configuring the Adapter
4 Make any needed changes to the configurable parameters. For
help, see the next table.
5 Click Submit, which returns the message “Data updated
successfully” to let you know that the changes were accepted.
These changes take effect the next time you reset the Adapter.
6 Click another command on the left to continue working, or
click Logout and close your browser window.
Port Service Parameters
Parameter Definition
Service name Enter the name of the service, using any ASCII
Service Port Select the port (P1) that the service runs on.
Protocols Choose the protocols the service uses to
Filter Select the data filter the service uses (default = 0):
Priority Enter the priority (0 to 255): a small number equals
Control strings Select the data strings (predefined) for the beginning
characters and the MAC address. Default =
INTERMECnnnnnn_P1, where nnnnnn is the last
six digits of the MAC address.
communicate.
TCP\IP, NetWare, DLC, NetBIOs,
Default = TCP\IP, Netware, DLC.
• 0, no filter: data passes unmodified
• 1, text substitution: default is CRLF for line feed
(LF)
•2, not used
• 3, converts normal text to PostScript
• 4, converts output data to PostScript Tagged
Binary
a high priority. Default = 10
of a job and end of a job. Default = No string
26 EasyLAN 100e Ethernet Adapter User’s Guide
Page 38

Chapter 2 — Configuring the Adapter
Port Service Parameters (continued)
Parameter Definition
Queue server Use check mark to configure the Adapter to fetch
print jobs directly from the NetWare print queues.
Default = No string.
NDS tree Enter the name of the organizational tree (with any
ASCII character) and enter the context for your
NetWare network. Default = blank.
To configure the Adapter for NetWare Directory
Services, choose the Queue Server radio button and
enter an NDS tree name and context for the Adapter.
To disable NDS support, leave the NDS Tree field
and the NDS Context field blank.
NDS context Enter the organizational unit(s) that you configured
for the Adapter using NWAdmin or PCONSOLE
using any ASCII character. Default = blank.
To disable NDS support, leave the NDS Tree field
and the NDS Context field blank.
Bindery File
Servers or
Service Bindery
File Server
Remote printer Check this button if you have a NetWare print server
Printer number Enter the NPrinter number (from 0 to 255) on your
Print server Enter the name of the NetWare print server using
Raw TCP port Enter a number (from 1024 to 65,535) for the TCP
Bi-directional
communication
Queued (TCP)
communication
Click either Configure Bindery File Servers or
Configure Service Bindery File Servers. For help,
see “To configure bindery and service bindery file
servers” on page 30.
loaded on the file server or workstation. Default =
not checked.
NetWare server. Default = 0.
any ASCII character. Default = blank
port to be used with this service. Default = 9100.
Configure the service to send data back from the
printer to the network (checked, not checked).
Default = checked. Normally you should not need to
change this.
Configure the Adapter to queue jobs sent to the raw
TCP port (checked, not checked). Default =
checked.
If not configured, the Adapter rejects jobs if the
Adapter is currently busy with another job.
EasyLAN 100e Ethernet Adapter User’s Guide 27
Page 39

Chapter 2 — Configuring the Adapter
Configuring for NetWare
The Adapter automatically makes itself known on a NetWare
network. The default NetWare Print Server name is PR1.Use this
NetWare Print Server name for either NDS or bindery mode
configuration.
Use your web browser to configure NetWare parameters.
Configure additional queues using the Novell NWAdmin utility.
Note: Intermec recommends you use the Novell 32-bit client on
your Windows PC instead of the Microsoft NetWare client. The
Novell client allows direct configuration of print queues without
the need for a Novell utility like NWAdmin or PCONSOLE.
If you are configuring the first port using the web browser
interface, the NDS Printer Name for this port is automatically
assigned as INTERMECnnnnnn_P1, where nnnnnn is the last six
digits of the MAC address.
You may assign any unique name for the printer if you are using
an alternate configuration method like NWAdmin. For help
configuring the first printer port, see “Configuring the Parallel
Por t” on page 22.
You use the Print Server and Printer names extensively while
configuring NetWare services. These names are actually the
names of the Adapter’s NetWare services. You can change the
default names using the web browser interface. For help, see
“Configuring Port Services” on page 24.
Configuring the NetWare Parameters
While the Adapter makes itself known automatically on a
NetWare network, you can optionally configure the NetWare
parameters using the web browser interface.
To configure the NetWare parameters
1 Log in to the Adapter using the web browser interface. For
help opening this page, see “Opening the Web Browser
Interface” on page 16.
2 Click NetWare. The Configure Netware page appears.
28 EasyLAN 100e Ethernet Adapter User’s Guide
Page 40

Chapter 2 — Configuring the Adapter
3 Select Enable to activate NetWare communications. Read the
information in the Active Servers and Queues to determine
the enabled servers and queues.
4 Configure the parameters. For help, see the next table.
5 To configure services for the port shown in the Enabled
Services row, click the link for that port. For help, see
“Configuring Port Services” on page 24.
Read the information in the Active Servers and Queues row to
find out what servers and queues are enabled.
6 To configure bindery file servers, click Configure Bindery
File Servers. For help, see “To configure bindery and service
bindery file servers” on page 30.
7 Configure other NetWare parameters (for help, see “NetWare
Parameters Defined” in the table that follows).
8 If the page displays the Network Card Update Password
field, enter the current Update password (the default is
intermec).
9 Click Submit, which returns the message “Data updated
successfully” to indicate that your changes were accepted.
10 Click another command on the left to continue working, or
click Logout and close the web browser window.
EasyLAN 100e Ethernet Adapter User’s Guide 29
Page 41

Chapter 2 — Configuring the Adapter
Netware Parameters Defined
Parameter Definition
NetWare Enable or disable NetWare communications.
Enabled services Configure the services on the port you are using
Bindery file servers Click either Configure Bindery File Servers or
Frame type Select the frame type: Auto, 802.3, Ethernet II,
NetWare password Enter the password the Adapter uses to
To configure bindery and service bindery file servers
Default = Enable.
(enable, disable). For help, “Configuring Port
Services” on page 24.
Configure Service Bindery File Servers. For
help, see the next procedure “To configure
bindery and service bindery file servers.’
802.2, SNAP. Default = Auto.
communicate with the file server (any ASCII
characters) in the Enter new password field and
Confirm new password field. Default = blank.
To disable the password, enter a single space.
1 In the Active Servers and Queues row of the Configure
NetWare page or the NetWare row of the Configure Service
page, click Configure Bindery File Servers or click
Configure Service Bindery File Servers.
Based on your selection, either the Configure Bindery File
Servers page or Configure Service Bindery File Servers page
appears.
2 To add a server, enter a server number in the box and click
Add.
To remove a server, select a server from the drop-down list and
click Remove.
30 EasyLAN 100e Ethernet Adapter User’s Guide
Page 42

3 Click Submit, and the status pane displays the message,
“Configuration has been modified. The unit must be reset for
new values to take effect. Data updated successfully.”
4 Click another command on the left to continue working, or
click Logout to return to the main browser login window.
Configuring Additional Queues
Additional queues must be configured using the Novell
NWAdmin utility. This program is usually found in the Public
directory on the NetWare file server.
To configure additional queues and ports
1 Start the NWAdmin utility.
2 Make sure you are in the right context (that is, login profile).
If not, select To o l s > NDS Browser then browse for the
needed context.
3 Select the container where you want the print queue to reside.
4 From the Tools menu, select Print Services Quick Setup.
5 Browse for the NetWare Print Server by clicking on the
button next to the Print Server Name window.
Chapter 2 — Configuring the Adapter
6 Enter the name of the NDS Printer for the preferred port in
the Name box (for example, INTERMEC04ECBA_P1).
7 Leave the Ty pe box at the default Parallel setting.
8 Select the preferred banner type.
9 Enter any name for the print queue. If necessary, browse for
the volume.
10 Click Create to create the print queue. You are now ready to
use the queue from a NetWare workstation.
Configuring for NetBIOS
NetBIOS provides application programs with a uniform set of
commands for requesting lower-level network services. Nodes on
a network require those services to conduct sessions and transmit
and receive information. Use your web browser to configure the
NetBIOS parameters if you do not want to use the default
settings.
EasyLAN 100e Ethernet Adapter User’s Guide 31
Page 43

Chapter 2 — Configuring the Adapter
To configure for NetBIOS
1 Log in to the Adapter using the web browser interface. For
help opening this page, see “Opening the Web Browser
Interface” on page 16.
2 Click NetBIOS/NetBEUI/DLC. The Configure NetBIOS/
NetBEUI/DLC page appears.
3 Click Configure NetBIOS/NetBEUI to display the
Configure NetBIOS/NetBEUI page.
4 Configure the parameters. For help, see the next table.
5 In the Enabled Services row, click the displayed port to
configure the services for that port. For help, see “Configuring
Port Services” on page 24.
6 Verify that the Computer Name row displays the name you
assigned to the Adapter.
7 If the page displays the Network Card Update Password
field, enter the current Update password (the default is
intermec).
8 Click Submit, which returns the message “Data updated
successfully.” The changes take effect following the next
Adapter reset
9 Click another command on the left to continue working, or
click Logout and close the web browser window.
NetBIOS Parameters
Parameter Definition
NetBEUI protocol Enable or disable communication over the
NetBEUI protocol. Default = enable.
NetBIOS/IP Enable or disable communication over the
Internet protocol. Default = enable.
32 EasyLAN 100e Ethernet Adapter User’s Guide
Page 44

Chapter 2 — Configuring the Adapter
NetBIOS Parameters (continued)
Parameter Definition
Enabled services Configure the services on the port you are
using. For help, see “Configuring Port
Services” on page 24.
Domain name Enter the name of the domain that contains
the PCs that will print to this printer. Any
ASCII characters. Default = INTERMEC.
WINS server method Select the server method:
•Set to Auto to use DHCP to set primary
and secondary WINS server IP addresses.
To use DHCP, you must set the boot
method in the Configure TCP/IP page to
either Auto or DHCP.
•Set to Static (n.n.n.n where n is from 0 to
255) to fix the values in the Primary and
Secondary WINS Server IP Address rows.
This disables WINS registration. Default =
0.0.0.0
Primary WINS server
IP address
Secondary WINS
server IP address
Enter the IP address for the primary WINS
server (n.n.n.n where n is from 0 to 255).
Default = 0.0.0.0
Enter the IP address for the optional secondary
WINS server n.n.n.n where n is from 0 to
255). Default = 0.0.0.0
Configuring the DLC Parameters
Data link control (DLC) error-correction protocol in the Systems
Network Architecture (SNA) manages data transmission between
two nodes over a physical link.
Use the web browser interface to configure the DLC parameters
if you do not want to use the default settings.
To configure the DLC parameters
1 Log in to the Adapter using the web browser interface. For
help opening this page, see “Opening the Web Browser
Interface” on page 16.
EasyLAN 100e Ethernet Adapter User’s Guide 33
Page 45

Chapter 2 — Configuring the Adapter
2 Click NetBIOS/NetBEUI/DLC. The Configure NetBIOS/
NetBEUI/DLC page appears.
3 Click Configure DLC to display the Configure DLC page.
4 In the DLC row, select Enable or Disable.
5 In the Enabled Services row, click the port for which you are
configuring services. For help, see “Configuring Port Services”
on page 24.
6 Click Submit, which returns the message “Data updated
successfully” to let you know that the changes were accepted.
Your changes take effect following the next Adapter reset.
7 Click another command on the left to continue working, or
click Logout and close the web browser window.
Configuring for UNIX
The Adapter appears to the network as a UNIX host computer
with a unique IP address running the line printer daemon (lpd)
protocol. As a result, any host computer that supports the
Berkeley remote-LPR command can spool jobs to the Adapter
without the need for any special software on the host computer.
Note: Before you configure a UNIX print queue, the Adapter
must have a valid IP address. See “Configuring the TCP/IP
Parameters” on page 17 for help.
34 EasyLAN 100e Ethernet Adapter User’s Guide
Page 46

Configuring for Berkeley UNIX
Berkeley UNIX host computers include Linux, Digital
Equipment Corporation Digital UNIX, OSF/1, and ULTRIX;
Compaq Tru64 UNIX; SunOS (not Solaris), SCO UNIX; and
many others. Sun Solaris, HP-UX, and IBM AIX users should
skip to the appropriate sections later in this chapter.
Note: Do not use the Linux X-Windows graphical user interface
printer configuration utility, which does not work with the
Adapter. Instead, Linux users should follow the configuration
steps listed in this section.
Note: SCO UNIX users should use the ripconf command to
create a printer and automatically configure the /etc/printcap file
(you still need to edit the /etc/hosts file).
Enter the Adapter’s service name (INTERMEC_nnnnnn_P1
where nnnnnn is the last six digits of the MAC address) as the
name of the printer (refer to the Adapter’s test label for the exact
name of this service), and enter the name of the Adapter that you
assigned in the etc/hosts file as the remote host name. Because
this name must be unique for each printer, we recommend using
the INTERMEC_nnnnnn_P1 service instead of the generic
BINARY_P1 service.
Chapter 2 — Configuring the Adapter
To configure as a Berkeley UNIX host
1 Edit the /etc/hosts file (or equivalent local host table). For
example:
192.189.207.33 imcprinter
2 Edit the printcap file. For example:
LabelPrinter:\
:lp=:\
:rm=IMCD:\
:rp=BINARY_P1:\
:sd=/usr/spool/LabelPrinter:
where:
LabelPrinter is the queue name.
IMC matches the name in the hosts file.
EasyLAN 100e Ethernet Adapter User’s Guide 35
Page 47

Chapter 2 — Configuring the Adapter
BINARY_P1 is the Adapter’s service name. Use TEXT_P1
instead of BINARY_P1 for text files.
sd
is the spool directory.
3 Create the spool directory. The lpd spool directory is usually
located in the /usr/spool directory. To create a new spool
directory, use the mkdir command. For example:
mkdir /usr/spool/lpd/LabelPrinter
4 Print using the standard lpr command:
lpr –PLabelPrinter filename
For AT&T based UNIX systems, such as SCO, use the
standard lp command:
lp –dLabelPrinter filename
Configuring for Sun Solaris
To use the Adapter with Sun Solaris, first add both the Adapter’s
IP address and name to the /etc/hosts file using the Admintool
utility Host Manager.
To use Host Manager to add the IP address
1 Open Host Manager in the Admintool utility. For help, see
the documentation for your Sun Solaris system.
2 Click None – Use /etc files on host.
3 Click Apply.
4 Click Edit and then click Add Host.
5 Enter the Adapter’s name as the Host Name (this name is
anything you want it to be, although the underscore [_]
character is not permitted).
6 Enter the IP address and MAC address of the Adapter (the
MAC address uses the format aa:bb:cc:dd:ee:ff).
7 Click Add.
8 Close the Host Manager windows. You are now ready to use
the Printer Manager in the Admintool utility.
36 EasyLAN 100e Ethernet Adapter User’s Guide
Page 48

Chapter 2 — Configuring the Adapter
To use the Printer Manager
1 Open the Printer Manager under Open Windows in the
Admintool utility. For help, see the documentation for your
Sun Solaris system.
2 Select Edit.
3 Select Add.
4 Select Add Access to Remote Printer.
5 At the Printer Name prompt, type a name for the print
queue.
6 At the Printer Server prompt, type:
name\!servicename
where:
name matches the Adapter’s name as entered in the hosts
table.
servicename is the print service name. For binary graphics files,
use the service BINARY_P1; for text files, use the service
TEXT P1.
7 Make sure that the printer server OS is set to BSD (this is the
default setting).
8 Select Add.
9 To print, use the standard lp command.
lp –dLabelPrinter filename.
Note: We recommend using the /etc/hosts file for the printer
name rather than NIS or other name services.
Due to a bug in the Sun lpd implementation on Solaris 2.4 and
earlier releases, you may encounter printing problems on very
long print jobs. Configure the Adapter as an HP JetDirect card
using the HP JetAdmin for UNIX software for a bug workaround.
Solaris print queues can also be configured from the UNIX shell
using the lpadmin command.
EasyLAN 100e Ethernet Adapter User’s Guide 37
Page 49

Chapter 2 — Configuring the Adapter
Configuring for HP-UX
Use the Adapter with an HP-UX host with the following
configuration changes.
To configure as an HP-UX host:
1 Open the sam program in GUI mode.
2 Double-click Printers and Plotters.
3 Double-click HP Distributed Printer Services.
4 Double-click Physical Printer.
5 Select Actions, and then select Add Physical Printer with
Network Interface.
6 Enter any name in the Supervisor field (for example,
print).
7 If you have not already created the printer name, which is the
name of the print queue, you must perform these steps:
a Open a different terminal or console.
b Open the HOSTS file (found in /etc/hosts).
c Type the IP address for the Adapter, followed by a space
and the printer name.
d Save the HOSTS file.
e Close the terminal or console.
8 Enter the IP address of the Adapter as the Remote System
Name.
9 Enter the preferred Adapter’s service name (BINARY_P1 for
binary files or TEXT_P1 for text files) as the Remote Printer
Name.
Check that the box next to Remote Printer is on BSD
System.
You may also choose to accept the default values for the
remaining items.
10 Click OK to configure the printer.
Print using the lp –d command with the Adapter’s name.
38 EasyLAN 100e Ethernet Adapter User’s Guide
Page 50

Note: The configuration for HP Distributed Print Services and
for earlier version of HP-US is slightly different.
You can also configure the Adapter as a JetDirect card using HPUX. To do this, you need the UP UNIX Host Printing Software
(part of HP’s JetAdmin for UNIX).
Configuring for IBM AIX
Use the AIX (System Management Interface Tool) SMIT
program, following these steps.
To configure as an IBM AIX host
Chapter 2 — Configuring the Adapter
1 Enter
smit and select Devices.
2 Select Printer/Plotter.
3 Select Manage remote printer subsystem.
4 Select Client services.
5 Select Remote printer queues.
6 Select Add a remote queue.
7 Enter the following remote queue settings:
a Name of queue to add (user selectable)
b Activate the queue (Yes)
c Destination host (Adapter’s IP address; or if you have
configured the /etc/hosts file, use the Adapter name you
specified in that file)
d Remote printer queue name (BINARY_P1 for binary files
or TEXT_P1 for text files)
e Name of device to add (user selectable; for example, lp0)
8 Print using the
lp –d command.
Note: The configuration for earlier versions of AIX is slightly
different.
You can also configure the Adapter as a JetDirect card using AIX.
To do this, refer to your AIX documentation.
EasyLAN 100e Ethernet Adapter User’s Guide 39
Page 51

Chapter 2 — Configuring the Adapter
Configuring for Other Systems
You can use the Adapter with any computer system that supports
either the lpr/lpd protocol or the HP JetDirect card. The
Adapter’s parallel port uses port 9100 by default. Refer to your
system’s documentation for information on configuring lpr/lpd
or JetDirect print queues.
40 EasyLAN 100e Ethernet Adapter User’s Guide
Page 52

3
Troubleshooting and Managing the Adapter
This chapter explains troubleshooting and managing the
EasyLAN 100e Ethernet adapter and covers these topics:
• Troubleshooting Printing Problems
• Troubleshooting Network Configuration Problems
• Managing the Adapter
•Printing Test Label
• Reloading Firmware
• Using the Web Browser Interface
EasyLAN 100e Ethernet Adapter User’s Guide 41
Page 53

Chapter 3 — Troubleshooting and Managing the Adapter
Troubleshooting Printing Problems
First, make sure the printer has power. Check the printer
connection to your computer. Verify the printer has both media
and ribbon.
If the printer appears to be functioning, test the connection
between the printer and the Adapter by pushing the Te s t button
on the back of the printer for no more than 5 seconds.
Note: If a test label does not print, the printer may still be able to
print through the Adapter. Set up the printer as you normally
would and try printing from an application.
If the test label does not print, try resetting the Adapter to factory
defaults by pressing and holding the recessed Te s t button for
more than 5 seconds.
Troubleshooting Network Configuration Problems
If you are using TCP/IP, make sure that your computer and the
Adapter are on the same IP segment or can reach each other with
a PING command from the host.
The IP address you assign to the Adapter must be on the same
logical network as your host computers (for example, if your
computer has an IP address of 192.189.207.3, the Adapter
should have an IP address of 192.189.207.n where n is an integer
between 1 and 254), or you must properly configure your router
address to work with the Adapter.
As long as your Adapter is set to Auto or DHCP for obtaining an
IP address, the Adapter’s IP address can change. Either configure
your DHCP server to give the Adapter a permanent address lease
or configure the Adapter to be on a static address outside the
scope of DHCP addresses. For more help configuring static IP
addresses, consult your network administrator.
Managing the Adapter
This section explains how to:
• reboot the Adapter.
• set the Adapter to factory defaults.
• print a test label.
42 EasyLAN 100e Ethernet Adapter User’s Guide
Page 54

•reload firmware.
Rebooting the Adapter
You can reboot (restart) the Adapter using your web browser. For
help opening the Adapter’s Admin page, see “Opening the Web
Browser Interface” on page 16.
Note: Only the Adapter reboots, not the entire printer. For
troubleshooting printer issues, refer to the instruction manual for
your printer.
To reboot the Adapter
1 Click Server Settings from the left menu.In the Server
2 Click Submit. A page appears confirming that the Adapter
Chapter 3 — Troubleshooting and Managing the Adapter
Settings page, click Reset Server. The ResetServer page
displays the following warning.
has been reset.
3 Click another command on the left to continue working, or
click Logout and close the web browser window.
Resetting the Adapter to Factory Defaults
Use the Te s t button or the web browser interface to set the
Adapter to factory defaults.
Note: This guide covers only the Adapter factory defaults, and
resetting affects only the Adapter, not the printer itself.
If your network uses DHCP, the Adapter may receive a new IP
address after being set to factory defaults. Print a test label to view
the assigned IP address. For help, see “Printing a Test Label” on
page 44. If you do not have a DHCP server, you need to set a
static IP address after setting the Adapter to defaults.
To reset using the Test button
•Press and hold the Te s t button for more than 5 seconds.
EasyLAN 100e Ethernet Adapter User’s Guide 43
Page 55

Chapter 3 — Troubleshooting and Managing the Adapter
To reset using the web browser interface
1 From the Server Settings page, click Restore Defaults. For
help opening the Server Settings page, see“Opening the Web
Browser Interface” on page 16.
2 Click Submit. The Restore Defaults page and warning
appears.
3 Click Submit. A page appears telling you that the Adapter is
set to factory defaults.
Note: The access and update passwords are set to the factory
default intermec. For more information on what the passwords
control, see “Configuring the Access and Update Passwords” on
page 20.
4 Click another command on the left to continue working, or
click Logout and close the web browser window.
Printing a Test Label
Use the web browser interface or the Te s t button to print a test
label. This section explains how to use the web browser interface.
For help using the Te s t button, see “Printing a Test Label” on
page 5.
To print a test label using the browser
1 From the main menu, while viewing any page, click Print
Tes t La bel . For help using the web browser, see“Opening the
Web Brow se r Inte r face” o n page 16.
A page appears telling you that the test label has been sent to
the printer.
2 Click another command on the left to continue working, or
click Logout and close the web browser window.
44 EasyLAN 100e Ethernet Adapter User’s Guide
Page 56

Chapter 3 — Troubleshooting and Managing the Adapter
Reloading Firmware
You can load firmware on the Adapter using trivial file transfer
protocol (TFTP) on Windows NT/2000/XP or the web browser
interface.
To use TFTP to reload firmware
• Use the TFTP PUT command:
tftp –i ipaddress put pathname password
where:
ipaddress is the IP address of the Adapter
pathname is the path and file name for the firmware
password
intermec)
Example:
tftp -i 10.20.111.35 put c:\ppimc104.bin Intermec
is the password for the Adapter (default password is
Using the Web Browser Interface
Note: Before you can load the firmware onto the Adapter, you
need to load the firmware into the /TFTP directory on your
TFTP server or into the /LOGIN directory on your NetWare
server.
1 From the Admin Configuration page, click Update
Firmware. The Reload Firmware page appears. For help
opening the Admin Configuration page, see “Opening the
Web Brow se r Inte r face” o n page 16.
EasyLAN 100e Ethernet Adapter User’s Guide 45
Page 57

Chapter 3 — Troubleshooting and Managing the Adapter
2 In the Firmware file name field, enter the file name for the
firmware. If the new firmware is not in the /TFTP directory
(TFTP server) or the /LOGIN directory (NetWare server),
enter the path for the firmware before the file name.
Note: If you are using the SolarWinds TFTP server on a
Windows 95/98 PC, you need to enter ./ before the file name for
the firmware.
3 If the new firmware is on your TFTP server, enter the IP
address for the TFTP server in the form n.n.n.n, where n is a
number from 0 to 255.
If the new firmware is on your NetWare server, enter the
name of the Netware server.
46 EasyLAN 100e Ethernet Adapter User’s Guide
Page 58

Chapter 3 — Troubleshooting and Managing the Adapter
4 Click Submit. If you enabled reload on submit, the firmware
is sent to the Adapter, and a message page appears letting you
know the reload was successful.
5 Click any other command from the menu on the left to
continue, or select Logout to leave the Adapter configuration.
Latest Firmware
To obtain the most current firmware, visit the Intermec website,
www.intermec.com.
To download latest firmware
1 Visit the Intermec web site at www.intermec.com.
2 Click Service & Support > Downloads.
3 In the Select a Product field, choose the product whose
firmware you want to download.
EasyLAN 100e Ethernet Adapter User’s Guide 47
Page 59

Chapter 3 — Troubleshooting and Managing the Adapter
48 EasyLAN 100e Ethernet Adapter User’s Guide
Page 60

A
This appendix explains how to send the console commands and
provides a list of the commands.
Console Commands
EasyLAN 100e Ethernet Adapter User’s Guide 49
Page 61

Appendix A — Console Commands
Sending the Console Commands
You can send console commands to the Adapter by using either
Telnet or the web browser interface.
Note: Using console commands to configure the Adapter can
interfere with your connection through the web browser. You can
minimize the disruption to your printer connection by
configuring with the web browser.
The following procedure explains how to use the web browser
interface. For help using Telnet, see your Telnet documentation.
When using the web browser interface console mode to send
commands, you should only use commands that show
information, such as
or commands that do not have an equivalent web page.
Most of the parameters that you can configure using console
commands can also be configured through the web browser
interface.
To send the console commands
1 From the menu, select Admin to open the Admin
Configuration page. For help opening the main web page, see
“Opening the Web Browser Interface” on page 16.
sh port, which shows the port parameters,
50 EasyLAN 100e Ethernet Adapter User’s Guide
Page 62

General Commands
Appendix A — Console Commands
2 Click Console. The Console page appears.
3 Enter the commands you want to send and click Enter. For a
list of commands, see the next section.
4 Click any of the menu items on the left side to return to
Admin or to select other functions.
The following table lists general console commands for
configuring and managing the Adapter.
General Console Commands
Command Description
cl serve st stringnumber
cl fa Deletes the fatal error log.
cl po p1 job
exit/^d
he
in
set default
set load dis
EasyLAN 100e Ethernet Adapter User’s Guide 51
Removes the specified string
number.
Clears the current entry in the
Adapter’s internal queue for the
parallel port.
Exits console.
Provides information on available
commands.
Resets the Adapter.
Sets the Adapter’s parameters to
factory default settings.
Disables the firmware reload after
exit.
Page 63

Appendix A — Console Commands
General Console Commands (continued)
Command Description
set load en
set load ho name
set load ip n.n.n.n
set load so filename
set pa password
set port p1 ackh status
set port p1 bid status
set port p1 dvid status
set port p1 ecp status
set port p1 fstb status
Enables the firmware reload after
exit.
Sets the node name of the boot host
for NetWare firmware load. Load
the firmware into the /LOGIN
directory.
Sets the IP address of the load host
(TCP/IP firmware load). Load the
firmware into the /TFTP directory.
Sets the host filename of the
firmware to load.
Sets the console password. The
default password is intermec.
Enables or disables pACKH on
parallel port (for older printers),
where status equals
or
dis for disabled.
en for enabled
Enables or disables Bi-directional
mode on the parallel port, where
status equals en for enabled or dis
for disabled.
Enables or disables 1284 device ID
queries on the parallel port, where
status equals
en for enabled or dis
for disabled.
Enables or disables 1284 ECP
mode on the parallel port, where
status equals
en for enabled or dis
for disabled.
Enables or disables Fast Strobe
mode on the parallel port., where
status equals
en for enabled or dis
for disabled.
52 EasyLAN 100e Ethernet Adapter User’s Guide
Page 64

Appendix A — Console Commands
General Console Commands (continued)
Command Description
set port p1 nbuf status
set pro password
set serve de
set serve str n “…”
set servi servicename
protocol status
set servi servicename
bot nn
set servi servicename
eot nn
set servi servicename fi
nn
set servi servicename
fms matchnumber
Enables or disables no buffering on
parallel port, where status equals
for enabled or
Sets the console protection
password to prevent access to set
commands. (Use the
command to access set commands.)
Sets the node description string
displayed with the show server
command.
Defines the Adapter’s BOT/EOT
string.
Enables or disables specified
protocol on the specified service.
Where servicename is the name of
the service you are modifying,
protocol is the protocol to enable or
disable, and status equals
enabled or
dis for disabled.
Sets the service BOT string, where
servicename is the name of the
service you are modifying and nn is
the BOT string.
Sets the service EOT string to nn,
here servicename is the name of the
service you are modifying and nn is
the EOT string.
Sets the service filter to nn, where
servicename is the name of the
service you are modifying and nn is
the service filter.
Sets the service with the specified
match string number, where
servicename is the name of the
service you are modifying and
matchnumber is the match string
number.
en
dis for disabled.
unprotect
en for
EasyLAN 100e Ethernet Adapter User’s Guide 53
Page 65

Appendix A — Console Commands
General Console Commands (continued)
Command Description
set servi servicename
frs replacenumber
set servi ip servicename
status
set servi servicename na
newname
set servi servicename
rec status
sh fat
sh free
sh loa
sh port
sh snmp argument
sh port p1 sta
sh serve co
sh servi
sh te
sh ve
Sets the service with the specified
replacement string number, where
servicename is the name of the
service you are modifying and
replacenumber is the replacement
string number.
Enables or disables IP service jobs,
where servicename equals the name
of the service and status equals
for enabled or
dis for disabled.
en
Changes the service name, where
servicename is the name of the
service you are modifying and
newname is the new name for the
service.
Enables or disables Receive Only
mode on the specified service,
where servicename equals the name
of the service and status equals
for enabled or
dis for disabled.
en
Displays the fatal error log.
Displays the memory available.
Displays the firmware update
parameters.
Displays the port parameters.
Displays the SNMP variables for
the indicated SNMP item, where
argument is the SNMP item.
Displays the current port status.
Displays the Adapter’s statistics.
Displays the service parameters.
Prints the test label.
Displays the Adapter’s firmware
version.
54 EasyLAN 100e Ethernet Adapter User’s Guide
Page 66

TCP/IP Commands
Appendix A — Console Commands
General Console Commands (continued)
Command Description
unpro
Allows the system manager to
temporarily access set commands
when the remote console is in
protected mode. The set default
command can be used to
permanently disable the protected
mode.
ze
Zeroes statistical counts.
Use these console commands to configure and manage TCP/IP
parameters.
TCP/IP Console Commands
Command Description
set ip ac status
n.n.n.n
set ip ad n.n.n.n
set ip bo n
set ip status
set ip meth stat
Enables or disables a specified IP address
from accessing the Adapter, where status
equals
en for enabled, dis for disabled, or
all for enabling all IP addresses, and
n.n.n.n equals the specific IP address.
Sets the IP address of the Adapter, where
n.n.n.n equals the IP address.
Sets the number of BOOTP/RARP tries,
where n is the number of BOOTP/RARP
tries.
Enables or disables IP processing, where
status equals
en for enabled or dis for
disabled.
Sets the IP address to a static address so
that the Adapter will not look for a DHCP
address.
EasyLAN 100e Ethernet Adapter User’s Guide 55
Page 67

Appendix A — Console Commands
TCP/IP Console Commands (continued)
Command Description
set ip ra nn
set ip ro n.n.n.n
set ip su n.n.n.n
set ip ti n
set servi
servicename ip
status
set servi
servicename tcp nn
sh ip
sh ip ac
Sets the procedure used by the Adapter
when obtaining its IP address. By default,
this sets the IP address along with a default
subnet mask and a router address that is
the same as the address of the load host. By
setting nn to 1, the subnet mask is not set.
If nn is set to 2, the router address is not
set. If nn is set to 3, neither the subnet
mask nor the router address is set.
Sets the default router address, where
n.n.n.n equals the router (gateway) IP
address.
Sets the subnet mask, where n.n.n.n equals
the subnet mask.
Sets the inactivity time-out in minutes.
Where n is the number of minutes.
Enables or disables TCP/IP jobs on the
specified Adapter, where servicename
equals the name of the service and status
equals en for enabled or dis for disabled.
Sets the TCP port number (>1023) on the
specified service, where servicename is the
service you are modifying and nn is the
TCP port number.
Shows LPD/TCP/Telnet parameters.
Shows IP addresses that are allowed to
access the Adapter.
56 EasyLAN 100e Ethernet Adapter User’s Guide
Page 68

NetWare Commands
Appendix A — Console Commands
Use these console commands to configure and manage NetWare
parameters.
NetWare Console Commands
Command Description
cl netw se server
set netw ad n
set netw status
set netw fr type
set netw ne n
set netw np pserver
n on service
set netw pa
password
set netw po n
set netw qs
fileserver on
service
set netw re
set netw name se
status
Removes the specified NetWare file server
from the Adapter’s access list, where server
is the NetWare file server.
Sets the advertising frequency of the
Adapter, where n is the advertising
frequency.
Enables or disables the NetWare protocol
on the Adapter, where status equals
enabled or
dis for disabled.
en for
Sets the NetWare frame type, where type
equals
eth for Ethernet II, al for all, au
for auto, or
sna for SNAP.
Sets the NetWare internal network
number, where n is the NetWare internal
network number.
Sets NPrinter mode on the specified
service, where pserver is the NetWare print
server, n is the NPrinter mode, and service
is the service you are modifying.
Sets the Adapter’s login password for the
file server, where password is the login
password.
Sets the queue polling time in seconds,
where n is the number of seconds.
Sets Queue Server mode on the specified
service, where fileserver is the NetWare file
server and service is the service you are
modifying.
Rescans the file servers for new queues.
Enables or disables the file server, where
name equals the name of the file server
and status equals
en for enabled or dis
for disabled.
EasyLAN 100e Ethernet Adapter User’s Guide 57
Page 69

Appendix A — Console Commands
NetWare Console Commands (continued)
Command Description
set servi
servicename net
status
sh netw
set servi
servicename con
string
set servi
servicename tree
string
Enables or disables NetWare jobs on the
specified service, where servicename is the
service you are modifying and status
equals
en for enabled or dis for disabled.
Shows the NetWare parameters.
Sets NDS context. Where servicename is
the service you are modifying and string is
the NDS context.
Sets NDS tree. Where servicename is the
service you are modifying and string is the
NDS tree.
58 EasyLAN 100e Ethernet Adapter User’s Guide
Page 70

I
Index
EasyLAN 100e Ethernet Adapter User’s Guide 59
Page 71

Index
Numerics
10BaseT/100BaseTx connector, 2
1284 device
ECP mode, 52
ID queries, 52
A
active servers and queues row, 29
Adapter – See EasyLAN 100e Adapter.
Admintool utility for Sun Solaris, 36
advertising frequency, 57
ARP/PING command
UNIX host, 7
B
Berkeley UNIX host
configuring Adapter as, 35
downloading IP address from, 7
bi-directional communication
check box, 27
default, 24
mode, 52
booting
boot method field, 19
boot tries field, 20
configuring boot host node name, 52
select method, 19
BOOTP
configuring Adapter for, 19
configuring tries, 55
BOT/EOT string, 53
buffering parallel port, 53
C
configuring
access password, 21
Adapter as Berkeley UNIX host, 35
DLC, 34
DLC parameters, 33
DLC radio buttons, 33
frame type field in NetWare, 30
HP JetDirect card, 40
HP-UX Host, 38
IBM AIX host, 39
IP address, 5, 19
NetBIOS
WINS server IP address, 33
NetBIOS page, 33
NetBIOS WINS server method, 33
NetWare
active Servers and Queues row, 29
port services, 24
service, service name field, 26
TCP/IP
IP address field, 19
configuring inactivity timeout, 56
configuring load host, 52
configuring Netware
remote printer, 27
configuring NetWare page
NetWare password, 30
NetWare radio buttons, 30
opening, 28
configuring parallel port, 22
configuring port services, 24
bi-directional communication, 24
enabled services row, 30
filter settings, 26
NDS, 27
NDS tree, 27
priority, 26
protocols, 26
queue server, 27
configuring TCP/IP
boot method, 19
boot tries, 20
enabled services row, 19
gateway, 19
IP address, 19
IP address, entering or changing, 19
keepalive timer, 20
radio buttons, 19
RARP boot settings, 20
TCP timeout, 20
connecting to network, 4
console commands, 51–58
exiting, 51
NetWare, 57
password, setting, 52
protected mode, disabling, 55
protection password, setting, 53
TCP/IP parameters, 55
console page
general commands, 51
sending commands, 50
60 EasyLAN 100e Ethernet Adapter User’s Guide
Page 72

Index
control strings, 26
D
defaults
password, 17
setting Adapter to, 51
device ID queries, 1284, 52
DHCP
configuring Adapter for, 19
disable DHCP, 55
domain name field, 33
downloading IP address, 5
UNIX host, 7
E
EasyCoder printer – See printers.
EasyLAN 100e Adapter
firmware, loading, 45
installing, 4
IP address, configuring, 5
LED activity, 5
managing, 42
overview, 2
rebooting, 43, 51
resetting to factory default settings, 43
setting up to print, 7
statistics, displaying, 54
ECP
check box, 24
mode, 1284, 52
enabled services row
configure NetWare page, 30
NetBIOS, 33
enhanced capabilities port - See ECP
etc/hosts file, adding adapter
information, 36
F
factory settings
resetting to defaults, 43–44
setting Adapter to defaults, 51
fast strobe mode, 52
fatal error log
deleting, 51
showing, 54
file server
enabling or disabling, 57
rescanning for queues, 57
filter field, 26
firmware
loading, 45
showing update parameters, 54
showing version, 54
frame type, NetWare, 57
FTP session, printing, 8
G
gateway field, 19
H
host manager for Sun Solaris,
HP JetAdmin for UNIX, using, 40
HP JetDirect card, configuring as, 40
HP-UX Host, configuring as, 38
I
IBM AIX host
configuring as, 39
downloading IP address from, 7
ID queries, 1284 device, 52
inactivity timeout, configuring, 56
installing
Adapter, 4
Intermec Print Monitor, 11
printer, 9
InterDriver, using, 9–10
Intermec Print Monitor, installing, 10
internal network number, 57
IP address
configuring
automatically, 5
static IP, 55
using Console mode, 55
using DHCP, 5
configuring Windows PC, 6
show, 56
WINS primary, secondary, 33
IP processing, configuring, 55
IP service jobs, 54
J
jobs
NetWare, enabling or disabling, 58
TCP/IP, enabling or disabling, 56
K
keepalive timer field, 20
36
EasyLAN 100e Ethernet Adapter User’s Guide 61
Page 73

Index
L
LED
activity when printer is turned on, 5
functions, 3
Linux X-Windows users, note, 35
load host, configuring, 52
LPD banner check box, 20
LPD retry check box, 20
LPR/LPD printing, Windows NT 4, 8
M
match string number, 53
memory available, showing, 54
N
NDS
context field, 27
context, configuring, 58
tree field, 27
NDS tree, configuring, 58
NetBIOS, 31
NetWare
configure boot host node name, 52
configuring using Console
commands, 57
enabling or disabling, 30
file server, removing from ACL, 57
frame type, configuring, 57
internal network number, 57
jobs, enabling or disabling, 58
NDS context, configuring, 58
NDS tree, configuring, 58
NetWare commands, 57–58
NPrinter, configuring, 57
parameters, showing, 58
password, configuring, 57
queue polling time, 57
queue server mode, 57
queues, configuring, 31
radio buttons, 30
rescanning file servers for queues, 57
Network Card Access Password, 17
network mask – See subnet mask field.
network protocols, supported, 3
node description string, 53
Novell NWAdmin utility, using, 31
NPrinter mode, 57
O
operating systems, supported, 3
output buffering check box, 24
output mode, 24
overview – See EasyLAN 100e Adapter.
P
pACKH, 52
parallel port, 22, 53
1284 device status, 52
bi-directional mode, 52
configuring, 22
Fast Strobe mode, 52
internal queue, 51
pACKH, 52
parameters, defined, 24
web browser, configuring with, 22
parallel port connector, 2
password
console, 52
NetWare, configuring, 30, 57
PING/ARP command
using with a UNIX host, 7
PJL status check box, 24
polling time, queue, 57
port services
protocols, 53
showing parameters, 54
ports
showing parameters, 54
showing status, 54
print queues, configuring for NetWare, 31
printer
installing with Windows 95/98, 12–13
number field, 27
setting up to print, 7
status page, 17
turning on with Adapter, 5
PrinterCompanion CD
using to install InterDriver, 9, 10
using to install the Intermec Print
Monitor, 10
printing
setting up, 7
test label, 5, 44, 54
using a Windows 2000/XP PC, 8
using an FTP session, 8
62 EasyLAN 100e Ethernet Adapter User’s Guide
Page 74

Index
using Windows 2000/XP, 10
using Windows 95/98 PC, 10
using Windows NT 4 PC, 8
using Windows Vista, 10
priority field, 26
protocols check box, 26
protocols for port services, 53
Q
queries, 1284 device ID, 52
queue polling time, 57
queue server mode - See NetWare
queued (TCP) communication, 27
queues, configuring for NetWare, 31
R
RARP
boot settings check box, 20
configuring Adapter for, 19
tries, configuring, 55
raw TCP port, 27
rebooting the Adapter, 43
receive only mode, 54
reloading firmware, 45
disabling, enabling, 51
replacement string number, 54
rescanning file servers for queues, 57
ripconf, 35
router IP address, 56
entering - See Gateway field, 19
show, 56
S
SCO UNIX users, ripconf, 35
sending Console commands, 50
server settings, configuring, 21
service
filter, configuring, 53
name field, 26
name, configure using console
command, 54
parameters, showing, 54
port field, 26
service BOT string, 53
service EOT string, 53
service strings, configuring
BOT, 53
EOT, 53
servicename
filter, 53
set, 53
setting up to print – See printing.
SNMP variables, showing, 54
software – See firmware.
software I/O, 24
SolarWinds TFTP server, note, 46
statistical counts, zeroing, 55
statistics, showing, 54
string number, removing, 51
subnet mask
configuring, 56
field, 19
Sun Solaris host, configuring, 36
support
telephone, viii
web site, viii
T
TCP
configuring port, 27
port number, 56
timeout field, 20
window field, 20
TCP/IP
jobs, configuring, 56
parameters
configure using console
commands, 55
configuring method for setting, 56
radio buttons, 19
Test button
using to print a test label, 5
using to restore default settings, 43
test label
printing, 5, 44
showing information, 5
TFTP, using to reload firmware, 45
timeout, inactivity configuring, 56
troubleshooting
network configuration, 42
printing problems, 42
two-way communications, 24
U
UNIX, 37
EasyLAN 100e Ethernet Adapter User’s Guide 63
Page 75

Index
acquiring IP address from host, 7
ARP/PING command, using, 7
configuring
Berkeley UNIX, 35
HP-UX, 38
IBM AIX, 39
Sun Solaris, 36
W
web browser interface
opening the browser, 16
using to reload firmware, 45
using to set to default settings, 44
Windows 95/98, 10
Windows-based PC
Windows 2000/XP
printing, 10
setting up, 10
Windows 95/98
printing, 10
setting up, 10
Windows NT 4
printing, 9
setting up, 8
Z
zeroing statistical counts, 55
64 EasyLAN 100e Ethernet Adapter User’s Guide
Page 76

Index
EasyLAN 100e Ethernet Adapter User’s Guide 65
Page 77

Worldwide Headquarters
6001 36th Avenue West
Everett, Washington 98203
U.S.A.
tel 425.348.2600
fax 425.355.9551
www.intermec.com
EasyLAN 100e Ethernet Adapter User’s Guide
*934-010-002*
P/N 934-010-002
 Loading...