

Page 1

GE
Security
TruVision Mini PTZ 12X Camera
User Manual
P/N 1069515_EN • REV A • ISS 26NOV09
Page 2
Copyright © 2009 GE Security, Inc.
Disclaimer
Trademarks and patents
Intended use
FCC compliance
Certification and compliance
European Union directives
This document may not be copied in whole or in part or otherwise reproduced without prior
written consent from GE Security, Inc., except where specifically permitted under US and
international copyright law.
The information in this document is subject to change without notice. GE Security, Inc.
(“GE Security”) assumes no responsibility for inaccuracies or omissions and specifically disclaims
any liabilities, losses, or risks, personal or otherwise, incurred as a consequence, directly or
indirectly, of the use or application of any of the contents of this document. For the latest
documentation, contact your local supplier or visit us online at www.gesecurity.com.
This publication may contain examples of screen captures and reports used in daily operations.
Examples may include fictitious names of individuals and companies. Any similarity to names
and addresses of actual businesses or persons is entirely coincidental.
GE and the GE monogram are trademarks of General Electric Company. TruVision is a trademark
of GE Security.
Other trade names used in this document may be trademarks or registered trademarks of the
manufacturers or vendors of the respective products.
Use this product only for the purpose it was designed for; refer to the data sheet and user
documentation for details. For the latest product information, contact your local supplier or visit
us online at www.gesecurity.com.
This equipment has been tested and found to comply with the limits for a Class A digital device,
pursuant to part 15 of the FCC Rules. These limits are designed to provide reasonable protection
against harmful interference when the equipment is operated in a commercial environment.
This equipment generates, uses, and can radiate radio frequency energy and, if not installed
and used in accordance with the instruction manual, may cause harmful interference to radio
communications.
You are cautioned that any changes or modifications not expressly approved by the party
responsible for compliance could void the user's authority to operate the equipment.
2004/108/EC (EMC directive): Non-European manufacturers must designate an authorized
representative in the Community. Our authorized manufacturing representative is:
GE Security B.V., Kelvinstraat 7,
6003 DH Weert, The Netherlands.
2002/96/EC (WEEE directive): Products marked with this symbol cannot be disposed of as
unsorted municipal waste in the European Union. For proper recycling, return this product to
your local supplier upon the purchase of equivalent new equipment, or dispose of it at
designated collection points. For more information see: www.recyclethis.info.
2006/66/EC (battery directive): This product contains a battery that cannot be disposed of as
unsorted municipal waste in the European Union. See the product documentation for specific
battery information. The battery is marked with this symbol, which may include lettering to
indicate cadmium (Cd), lead (Pb), or mercury (Hg). For proper recycling, return the battery to your
supplier or to a designated collection point. For more information see: www.recyclethis.info.
Contact information For contact information see our Web site: www.gesecurity.com.
For EMEA contact information see our Web site: www.gesecurity.eu.
Page 3

Content
Chapter 1 Product introduction 1
Product overview 1
Features 1
System requirements 3
Chapter 2 Installation 5
Installation environment 5
Unpacking the dome camera 6
Removing the protective cover from the outdoor dome camera 7
Dome camera DIP switches 8
Setting up the dome camera 9
Setting the dome camera communication protocol 10
Setting the RS-485 communication 12
Setting the dome camera site ID 12
22-pin connector description 14
Wiring the dome camera 15
Mounting the dome camera on a ceiling 16
Mounting the dome camera on a wall 18
Chapter 3 Menu overview 21
On-screen information 21
Main menu overview 22
Using a keypad to program menus 24
Chapter 4 Basic setup 27
Language selection 27
Camera site
ID displayed on a monitor 27
Area title displayed on a monitor 28
Area title settings 28
Preset points settings 29
Preset tour settings 30
Autopan se
ttings 31
Shadow tour settings 32
Auto return settings 34
Chapter 5 Advanced setup 35
Default 35
Backlight compensation 35
Focus adjustment 36
Exposure control settings 36
White balance 37
Camera settings 38
Pan/tilt settings 40
TruVision Mini PTZ 12X Camera User Manual i
Page 4

Day/night (Day/night models only) 42
Alarm settings 43
Privacy mask settings 45
Time and date settings 46
Schedule settings 47
Appendix A Specifications 49
Appendix B Camera settings checklist 51
Appendix C Warranty and contact information 57
Warranty information 57
Contacting support 57
Index 59
ii TruVision Mini PTZ 12X Camera User Manual
Page 5

Chapter 1
Product introduction
Product overview
The TruVision Mini PTZ 12X Camera is an innovative camera designed for middle and
small surveillance applications. It possesses true PTZ camera features and has a
graphical programming interface for easier customization of camera settings.
Installation of the TruVision Mini PTZ 12X Camera is simplified because it has a single
cable to connect it to power, data, alarms, and video outputs. It can be integrated
with various digital surveillance products, such as DVRs, control keyboards and
various accessories for a total surveillance solution. The dome camera incorporates
several protocols to enhance control and connectivity.
The dome camera is ideal for all surveillance requirements in a wide variety of
buildings such as hotels, department stores, intelligent buildings, amusement parks,
parking lots, factories, hospitals, schools, and stations.
Features
This section describes the TruVision Mini PTZ 12X Camera features.
Precise and accurate dome camera performance
• High resolution 540 TV lines
• Preset speed up to 300°/sec
• 360° endless pan
• Proportional pan and tilt speed
• Preset positions / Autopan / Preset Tour / Shadow Tour
• Auto-calibration
• Digital/mechanical image flip (180°)
TruVision Mini PTZ 12X Camera User Manual 1
Page 6

0BChapter 1: Product introduction
Dynamic Dome applications
• Schedule function
• Multiple built-in protocols
• Lightweight design for easy installation
• Flexible indoor mountings
• 16 privacy masks
• 8 alarms and 1 relay
Superior dome camera image quality
• 12X optical zoom
• 12X digital zoom
• Digital auto slow shut
• Backlight compensation
• Auto focus
• Auto white balance
• Auto gain control
• Auto iris control
• Removable IR cut filter
• Minimum illumination: 1 Lux, 0.2 Lux (B/W)
• 2D / 3D video noise reduction
2 TruVision Mini PTZ 12X Camera User Manual
Page 7
0BChapter 1: Product introduction
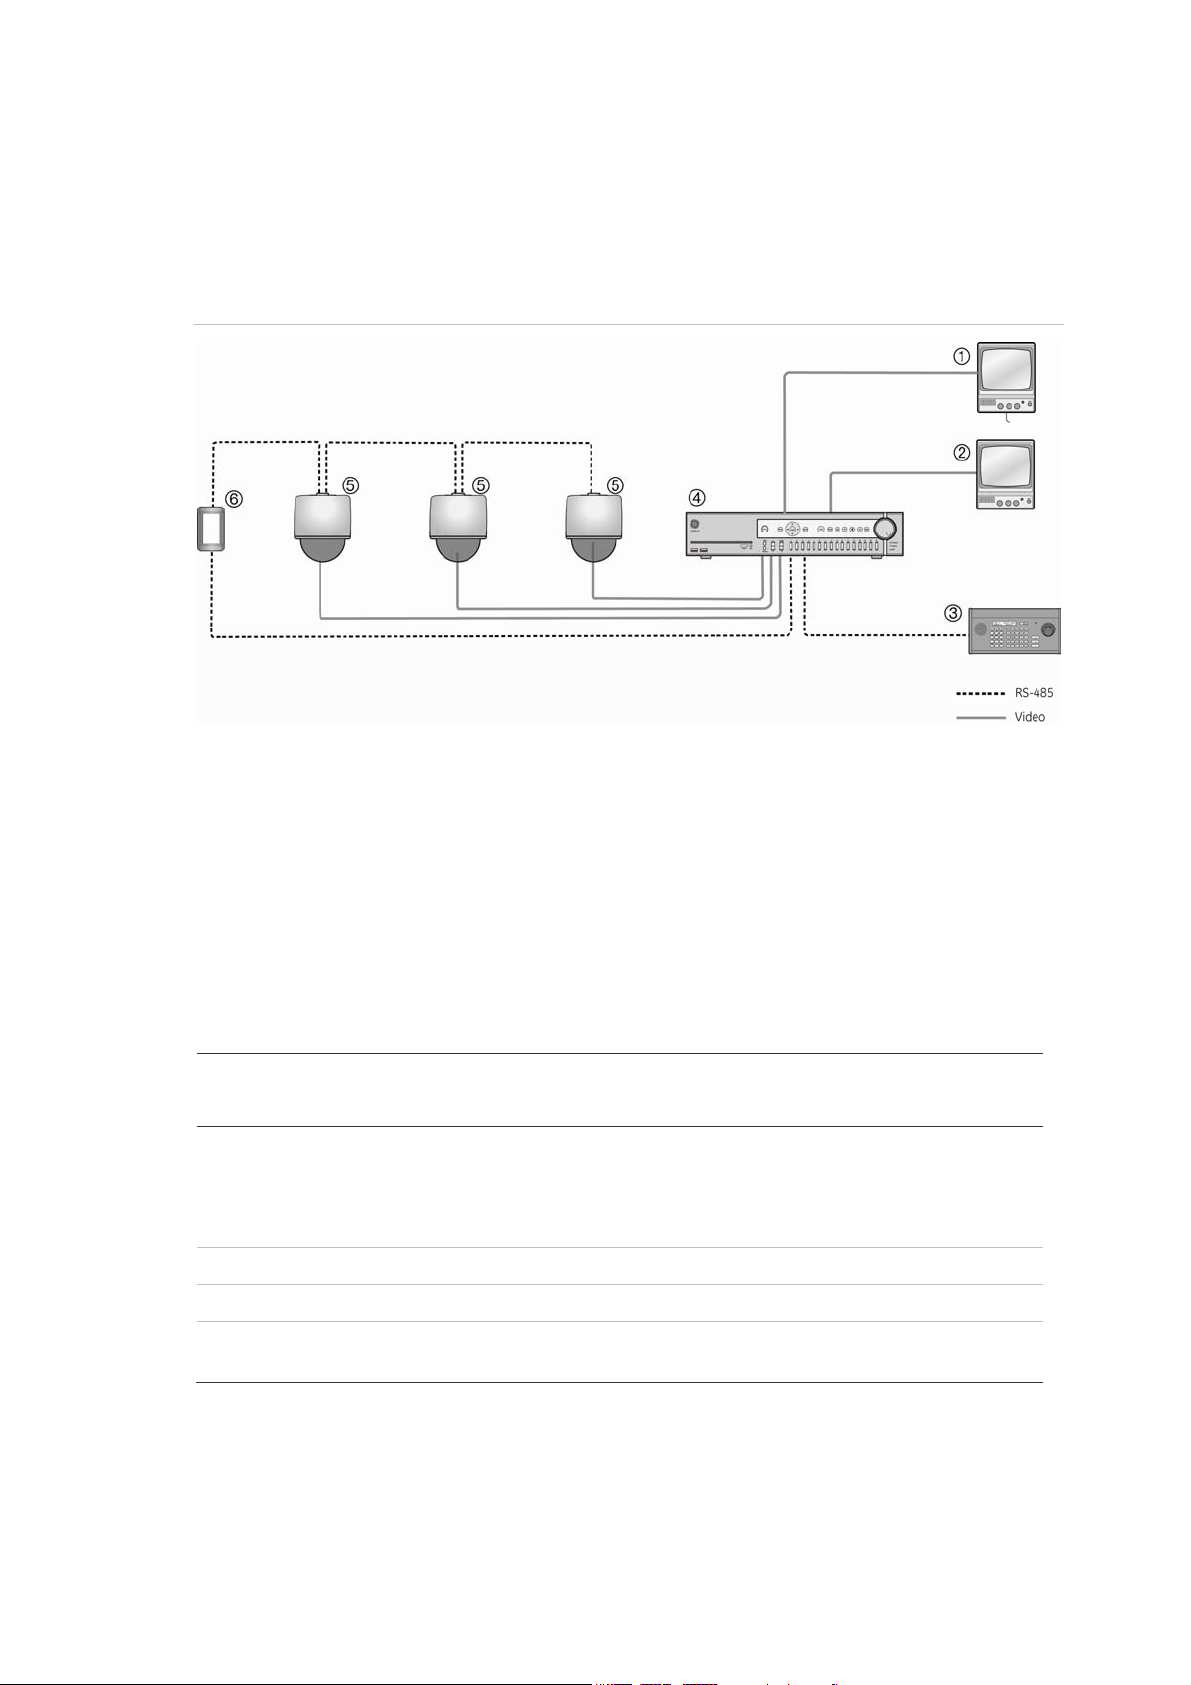
System requirements
For proper operation, adhere to the following operational, cable, and power
requirements for TruVision PTZ Mini 12X cameras.
Figure 1: Example of a system
1. Monitor A
2. Monitor B
3. Control keypad
4. DVR /Multiplxer/ Quad/ Switcher
5. Dome camera
6. Repeater
Cable requirements
Table 1 below lists the requirements for the cables that connect to the dome camera.
Table 1: Recommended cable requirements
Operation Cable requirement Max. length
feet meters
Data (RS-485) STP (shielded twisted-pair) cable
Cat-5 cable recommended. If the total cable length
exceeds 1219 m (4000 feet), using a repeater to
maintain the signal is recommended.
Video 75 ohm coaxial cable with BNC ends 1600 486
4000 1219
Alarm Cat-5 cable recommended. 1250 381
Power 24 VAC cable. To determine the size of cable needed for individual applications, see
“Power cable size and length requirements” on page 4.
TruVision Mini PTZ 12X Camera User Manual 3
Page 8

0BChapter 1: Product introduction
Power cable size and length requirements
Using the proper gauge of power cable will ensure proper operation and avoid
voltage drops. See Table 2 below for the recommended cable gauge for varying
maximum cable lengths and power draws.
Table 2: Recommended power cable gauges based on maximum lengths for an operating voltage
of 24 VAC (±10%)
Wire gauge Indoor dome cameras (14 W) Outdoor dome cameras (54 W)
AWG mm
(diameter)
10 2.59 2061 628 534 163
12 2.05 1294 394 335 102
14 1.63 813 247 211 64
16 1.29 512 156 133 41
18 1.02 322 98 83 25
20 0.81 203 62 53 16
22 0.64 127 39 33 10
feet meters feet meters
4 TruVision Mini PTZ 12X Camera User Manual
Page 9

Chapter 2
Installation
Complete all the necessary programming before you install the dome camera. This
chapter provides information on how to install the dome camera.
Use a control keyboard, such as the GE KTD-405/KTD-405-2D keypad or other control
device, to control the dome camera.
Installation environment
When installing your product, consider these factors:
• Handling: Handle the camera carefully. Avoid striking, shaking, etc. Improper
handing or storage could damage the camera.
• Electrical: Install electrical wiring carefully. It should be done by qualified service
personnel. The input electricity to the unit has a tolerance of 24 VAC ± 10%. Do
not overload the power cord or adapter.
• Ventilation: Ensure that the location planned for the installation of the camera is
well ventilated.
• Temperature: Do not operate the camera beyond the specified temperature,
humidity or power source ratings. The operating temperature of the indoor
camera is between 0°C to 50°C (32°F to 122°F) and that of the outdoor camera is
between -30°C to 50°C (-22°F to 122°F),. Humidity is below 90%.
• Moisture: Do not expose the indoor camera to rain or moisture, or try to operate it
in wet areas. The indoor camera is designed for indoor use or locations only
where it is protected from rain and moisture. Turn the power off immediately if
the camera is wet and ask a qualified service person for servicing. Moisture can
damage the camera and also create the danger of electric shock.
• Cleaning: Clean only with a dry cloth. If the dirt is difficult to remove, use a mild
liquid non-abrasive detergent and wipe gently.
• Protect from strong light: Never face the camera towards the sun. Do not aim
the camera at bright objects. Whether the camera is in use or not, never aim it at
TruVision Mini PTZ 12X Camera User Manual 5
Page 10

1BChapter 2: Installation
the sun or other extremely bright objects. Otherwise, the camera may be smeared
or damaged.
• Servicing: Do not attempt to service this camera yourself. Any attempt to
dismantle or remove the covers from this product will invalidate the warranty and
may also result in serious injury. Refer all servicing to qualified service personnel.
Unpacking the dome camera
When you receive the product, check the package and contents for damage, and
verify that all items are included. If any of the items are damaged or missing, please
contact your local supplier.
Items shipped with the dome camera include:
Figure 2: Dome camera package
(Indoor dome shown)
Dome camera and 4.7” bubble Hard ceiling mount Plastic fixing plate
I/O interface cable for power, video,
alarms, and serial data
Self-tapping screws (X4) Black M3 screw, silver-finish M3
screw
Security torx CD with User Manual Pocket guide
6 TruVision Mini PTZ 12X Camera User Manual
Page 11
1BChapter 2: Installation
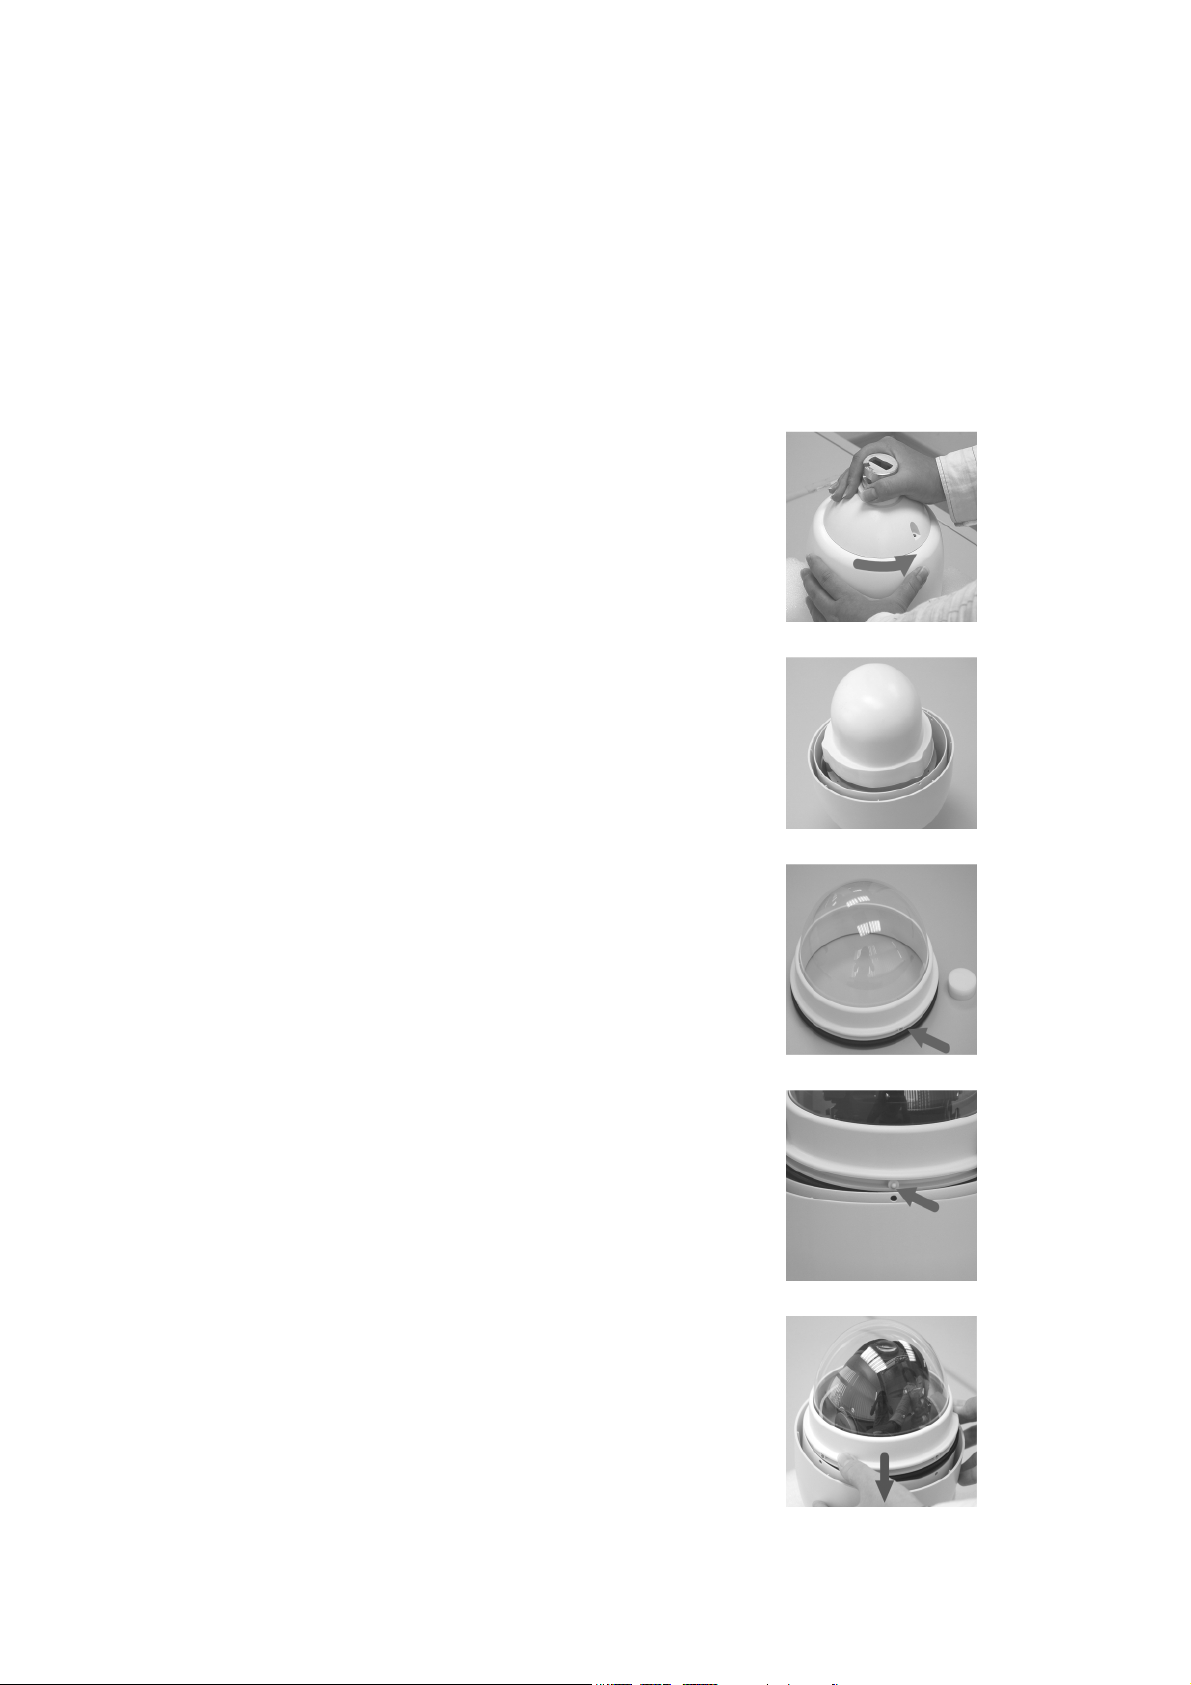
Removing the protective cover from the outdoor dome camera
The outdoor dome camera is shipped with a protective cover and PE sheet on the
dome camera for protection. These must be removed before installation.
To remove the protective cover and PE sheet
1. Unpack the dome camera.
2. Turn the dome camera upside down and
place it on the cushion. Then rotate the
outdoor top mount bracket counterclockwise
and detach it from the main dome camera
housing.
3. Remove the protective cover and PE sheet
from the dome camera.
4. Use an applicator brush and smear some
lubricant on the surface of the bubble
waterproof rubber gasket.
Then attach the bubble to the dome camera
body by first aligning the center point on the
cover with one of the four holes on the dome
camera housing, as shown.
5. Using both hands on either side of the
bubble, gently press down the bubble. Make
sure the two slotted screws and the screw
hole on the bubble align with the three holes
on the dome camera housing.
TruVision Mini PTZ 12X Camera User Manual 7
Page 12

1BChapter 2: Installation
Caution: DO NOT press on the top of the bubble
as shown in the figure as it might damage the
unit.
6. Screw the bubble and dome camera body
together with the supplied M3
standard/security screw. Use the supplied
security torx to fasten the security screws.
7. Further secure the bubble by turning the two
slotted screws counterclockwise so that they
touch the dome camera housing.
8. Set the DIP switches.
Dome camera DIP switches
Configure the dome camera’s ID and communication protocol before connecting the
analog dome camera to other devices. The DIP switches used for configuring these
settings are located on the top of the dome camera housing. See Figure 3 on page 9
for the location of the DIP switches on both the indoor and outdoor dome cameras.
The 22-pin connector for I/O interface cable connection is located on the back plate.
8 TruVision Mini PTZ 12X Camera User Manual
Page 13
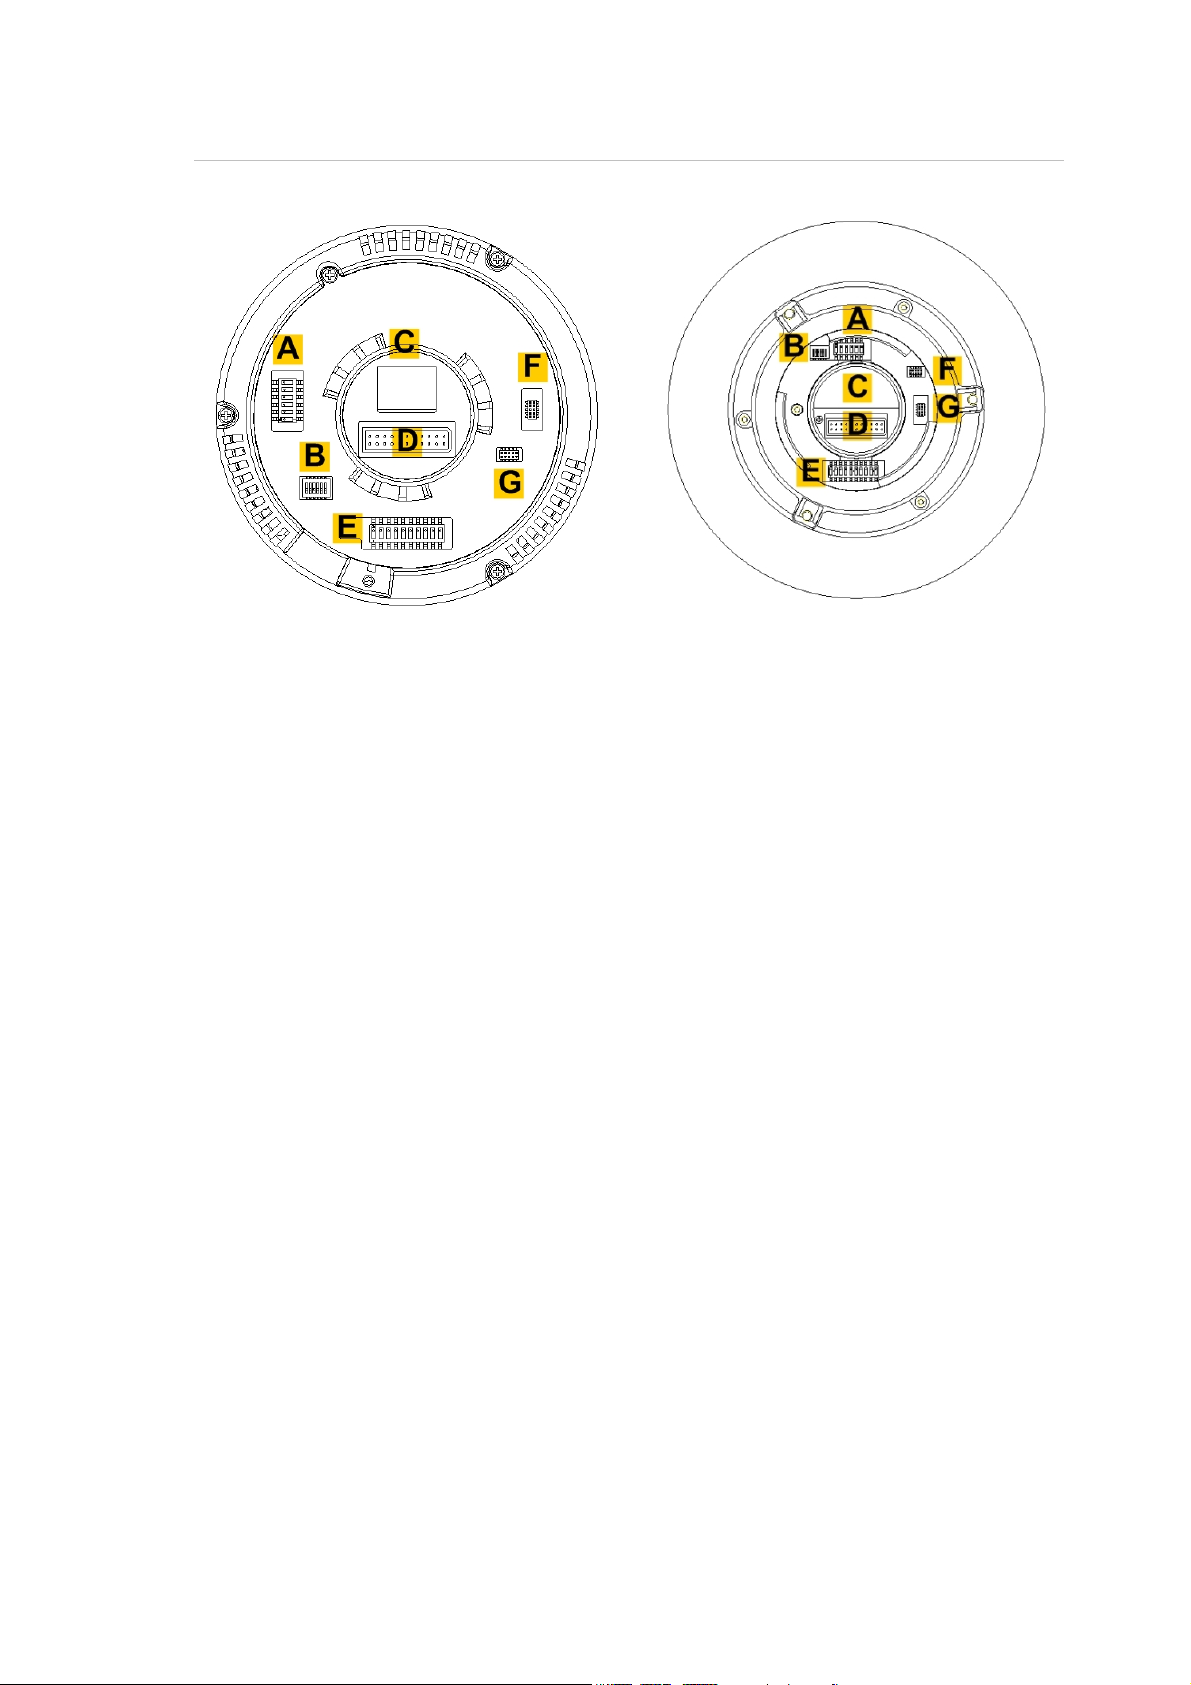
1BChapter 2: Installation
Figure 3: Dome camera DIP switches
Indoor dome camera Outdoor dome camera
A. Dome camera protocol DIP switches
B. RS-485 communication DIP switches
C. None
D. 22-pin connector
E. Dome camera site ID DIP switches
F. Reserved
G. Reserved
See the following sections on how to setup the ID and control protocol of the dome
camera.
Setting up the dome camera
To quickly put the Mini PTZ 12X dome camera into operation:
1. Configure the dome camera’s DIP switches, which are located on the top of the
dome camera.
2. Set the dome camera communication protocol.
3. Set the RS-485 communication DIP switch.
4. Verify and set the communication termination, if required.
5. Set the dome camera ID.
6. Mount the dome camera to the wall/ceiling.
7. Wire the dome camera.
8. Connect the dome camera to a monitor.
9. Program the dome camera.
TruVision Mini PTZ 12X Camera User Manual 9
Page 14
1BChapter 2: Installation
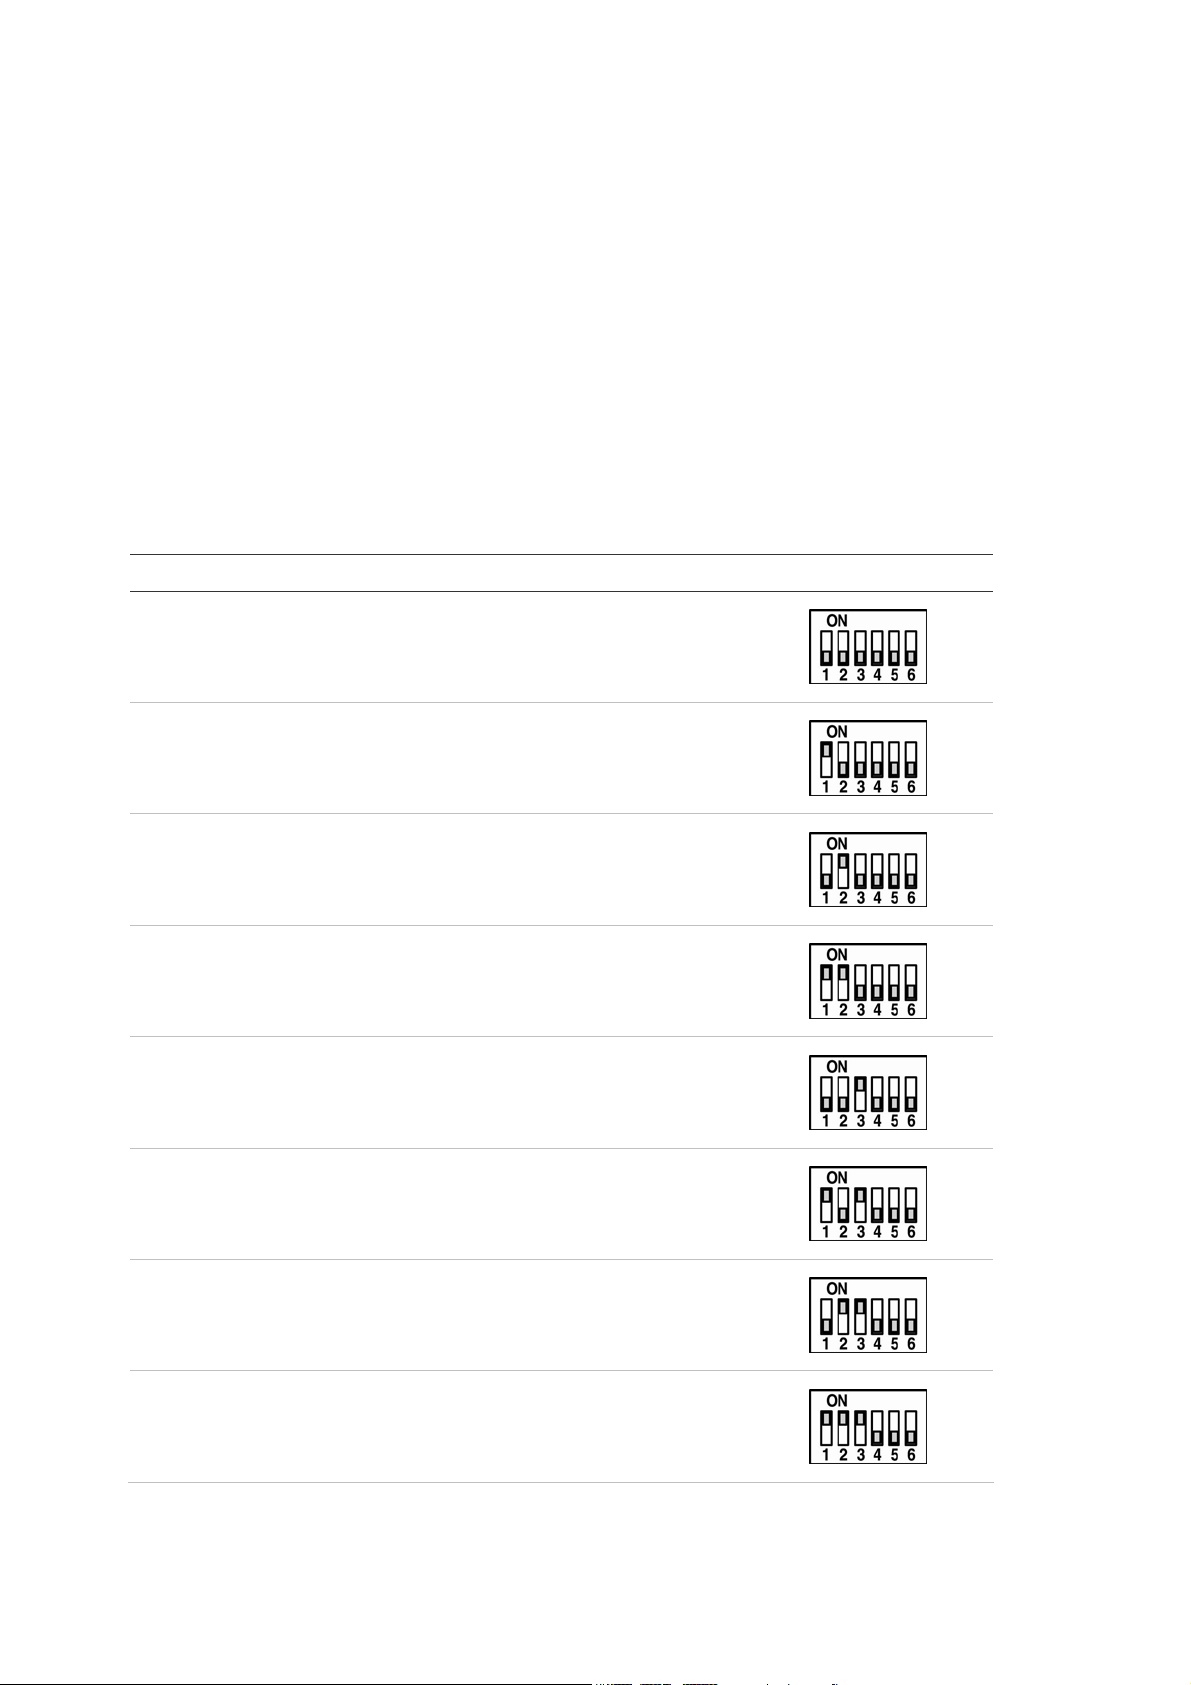
Setting the dome camera communication protocol
The TruVision Mini PTZ 12X Camera can use several different protocols for
communication. To select a protocol, you must set the protocol DIP switches to the
correct sequence of 1s (on) and 0s (off).
To set a dome camera protocol using the DIP switches
1. Locate the protocol DIP switch block (A, Figure 3 on page 9).
2. Using Table 3 below, find the DIP switch sequence for the desired protocol and set
the switches accordingly.
Table 3: Protocols supported
Protocol Baud rate Switch position
GE Impac RS-485 9600 000000
GE Digiplex RS-422 4800 100000
Pelco D 2400 010000
Pelco D 4800 110000
Pelco D 9600 001000
Pelco P 2400 101000
Pelco P 4800 011000
Pelco P 9600 111000
10 TruVision Mini PTZ 12X Camera User Manual
Page 15
1BChapter 2: Installation
Protocol Baud rate Switch position
Philips 9600 000100
VCL 9600 001100
JVC 9600 010100
DSCP 9600 101100
Chiper 9600 111100
Functions supported by third party protocols
Table 4: Functions supported
Function Key commands
Pelco AD 422 VCL Philips
Enter menus Preset 95 Preset 94
(alternate Preset
77)
Exit menus Preset 95 Preset 95 Preset 97 Preset 77
Select/enter in
menus
Set auto pan limits Preset 92 and 93 Preset 62 and 63
Start auto pan Preset 99 Preset 79 Preset 79 On – 2 - Enter
Play Shadow Tour
1
Iris+ Iris+ Iris+ Iris+
Pattern 1 Preset 65 1 + Autopan Preset 70 – 76 = S
Wipe or Preset 77 Preset 77
Tours 1-7,
Preset 78 = S Tours
8
Play Preset Tour 1 Preset 98 Preset 70 Preset 70 On – 8 - Enter
Turn 180 degrees
on pan
Show splash
screen
TruVision Mini PTZ 12X Camera User Manual 11
Preset 33 N/A N/A On – 1 - Enter
N/A N/A N/A On – 997 - Enter
Page 16
1BChapter 2: Installation
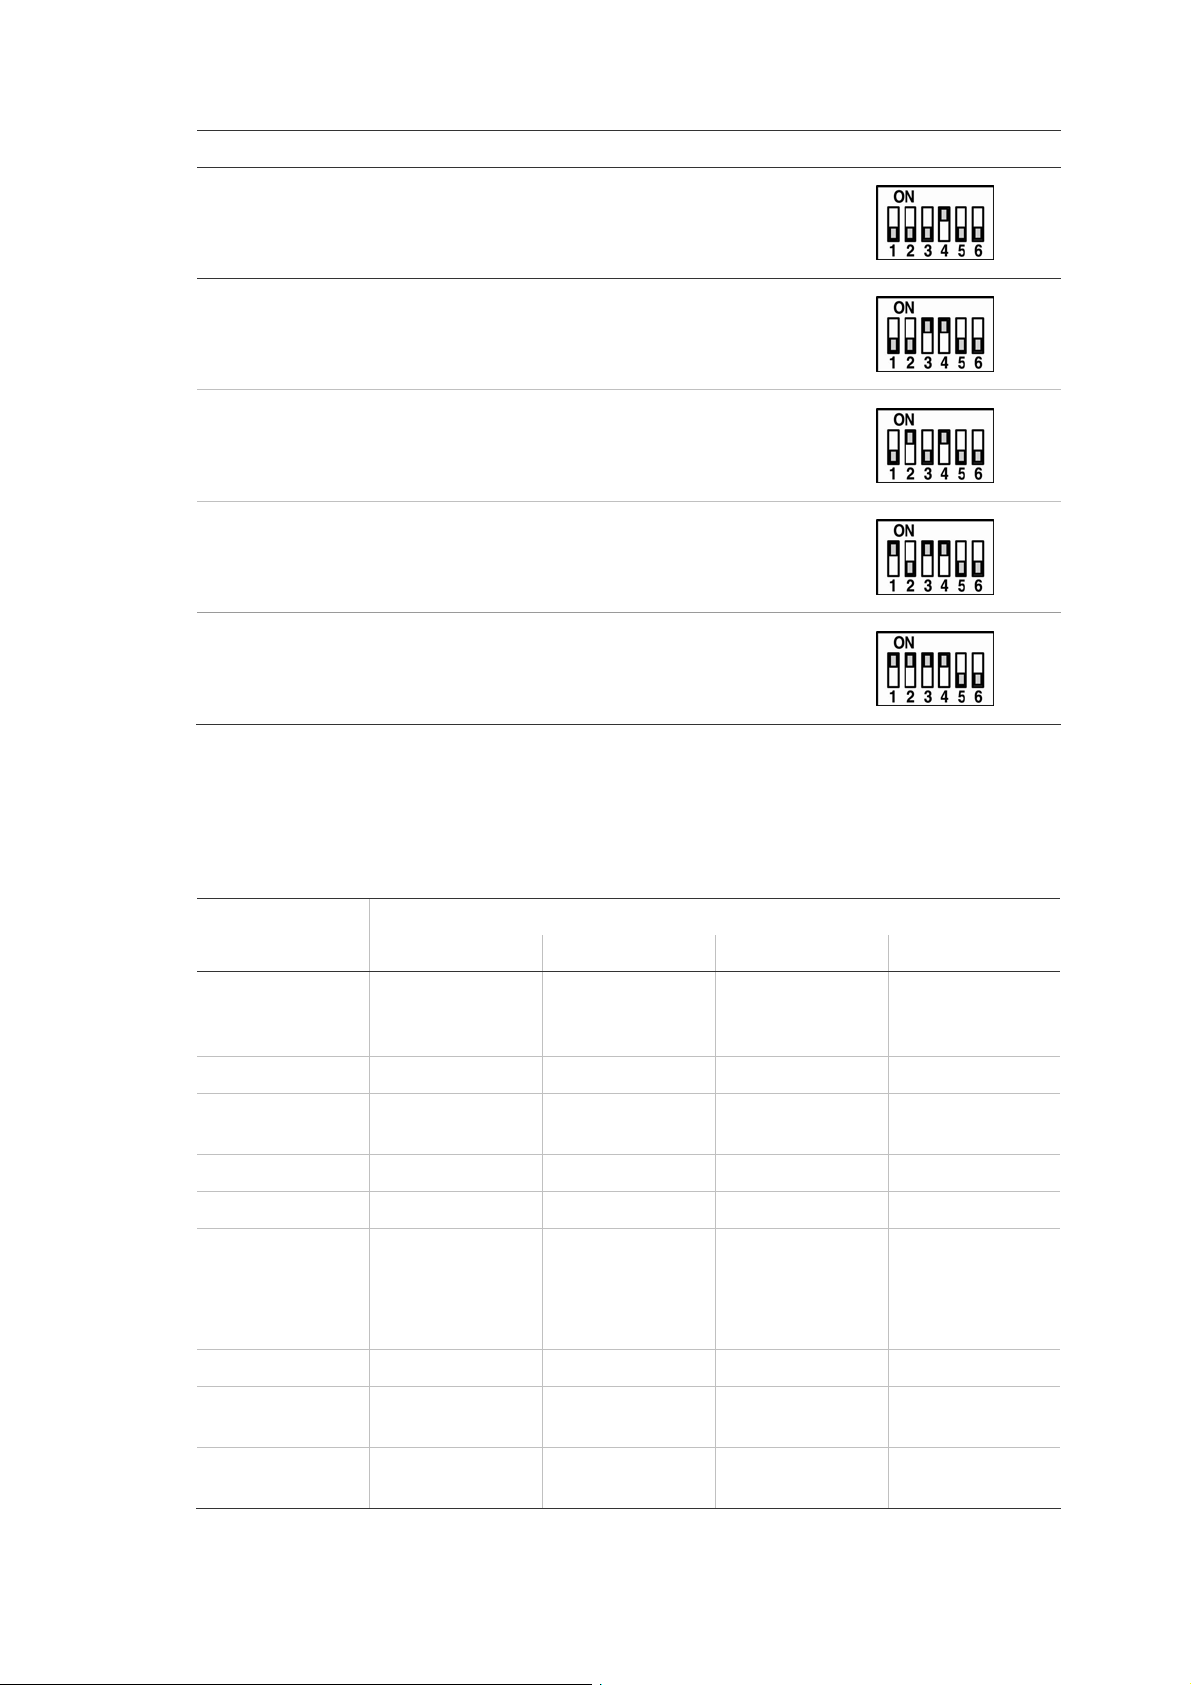
Setting the RS-485 communication
RS-485 is the interface that connects the dome camera to the control device.
Consequently the RS-485 setup of the dome camera and the control device must be
identical.
Locate the communication DIP switch block (see B, Figure 3 on page 9). See Figure 4
below for an explanation of the communication DIP switches of the dome camera.
Figure 4: Communication DIP switch
1. RS-485 setting
2. RS-485 setting
3. Termination
4. Line lock
5. System initialization
6. Not used
The RS-485 default setting is half-duplex (see Figure 4 above). This setting should only
be changed by a qualified CCTV specialist. DIP switches SW3 and SW4 are used for
termination and Line Lock adjustment respectively. The SW5 DIP switch is used to
restore the dome camera to the factory default status.
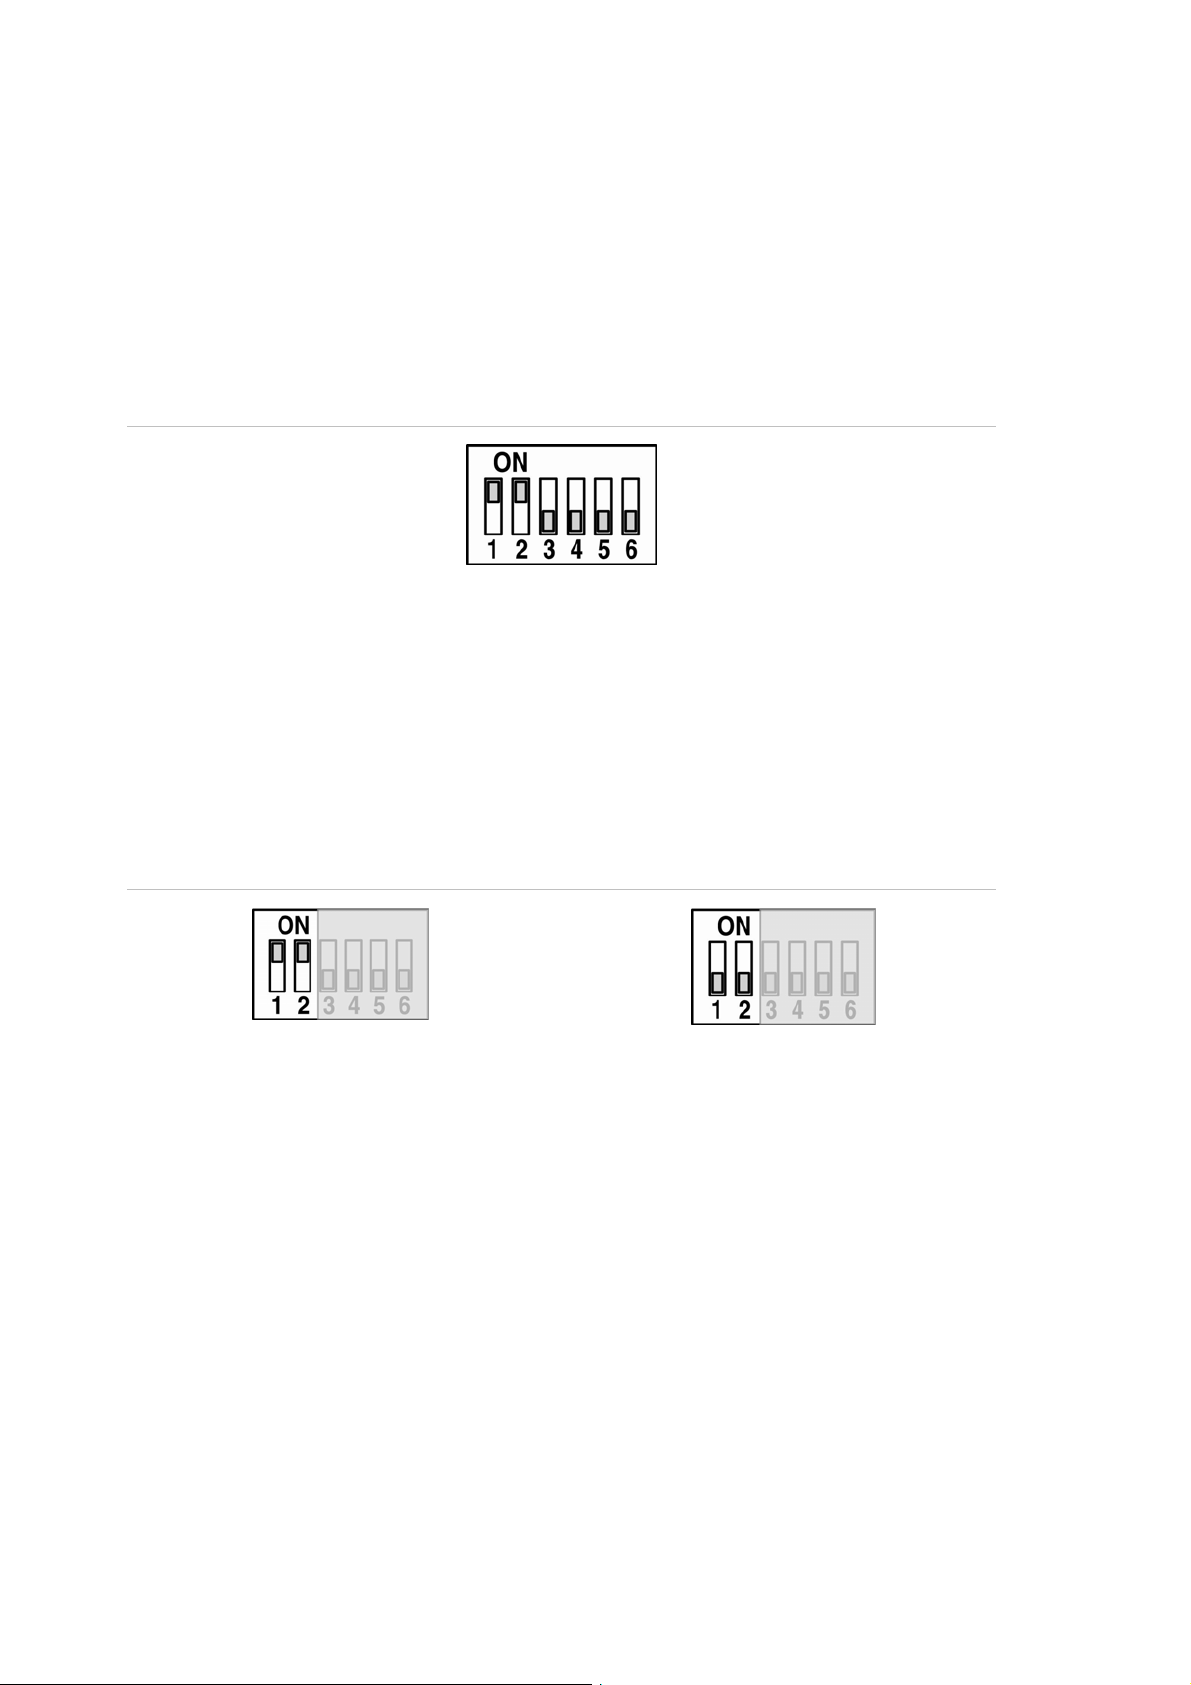
Figure 5: RS-485 setting
Half-duplex (Default)
Full-duplex
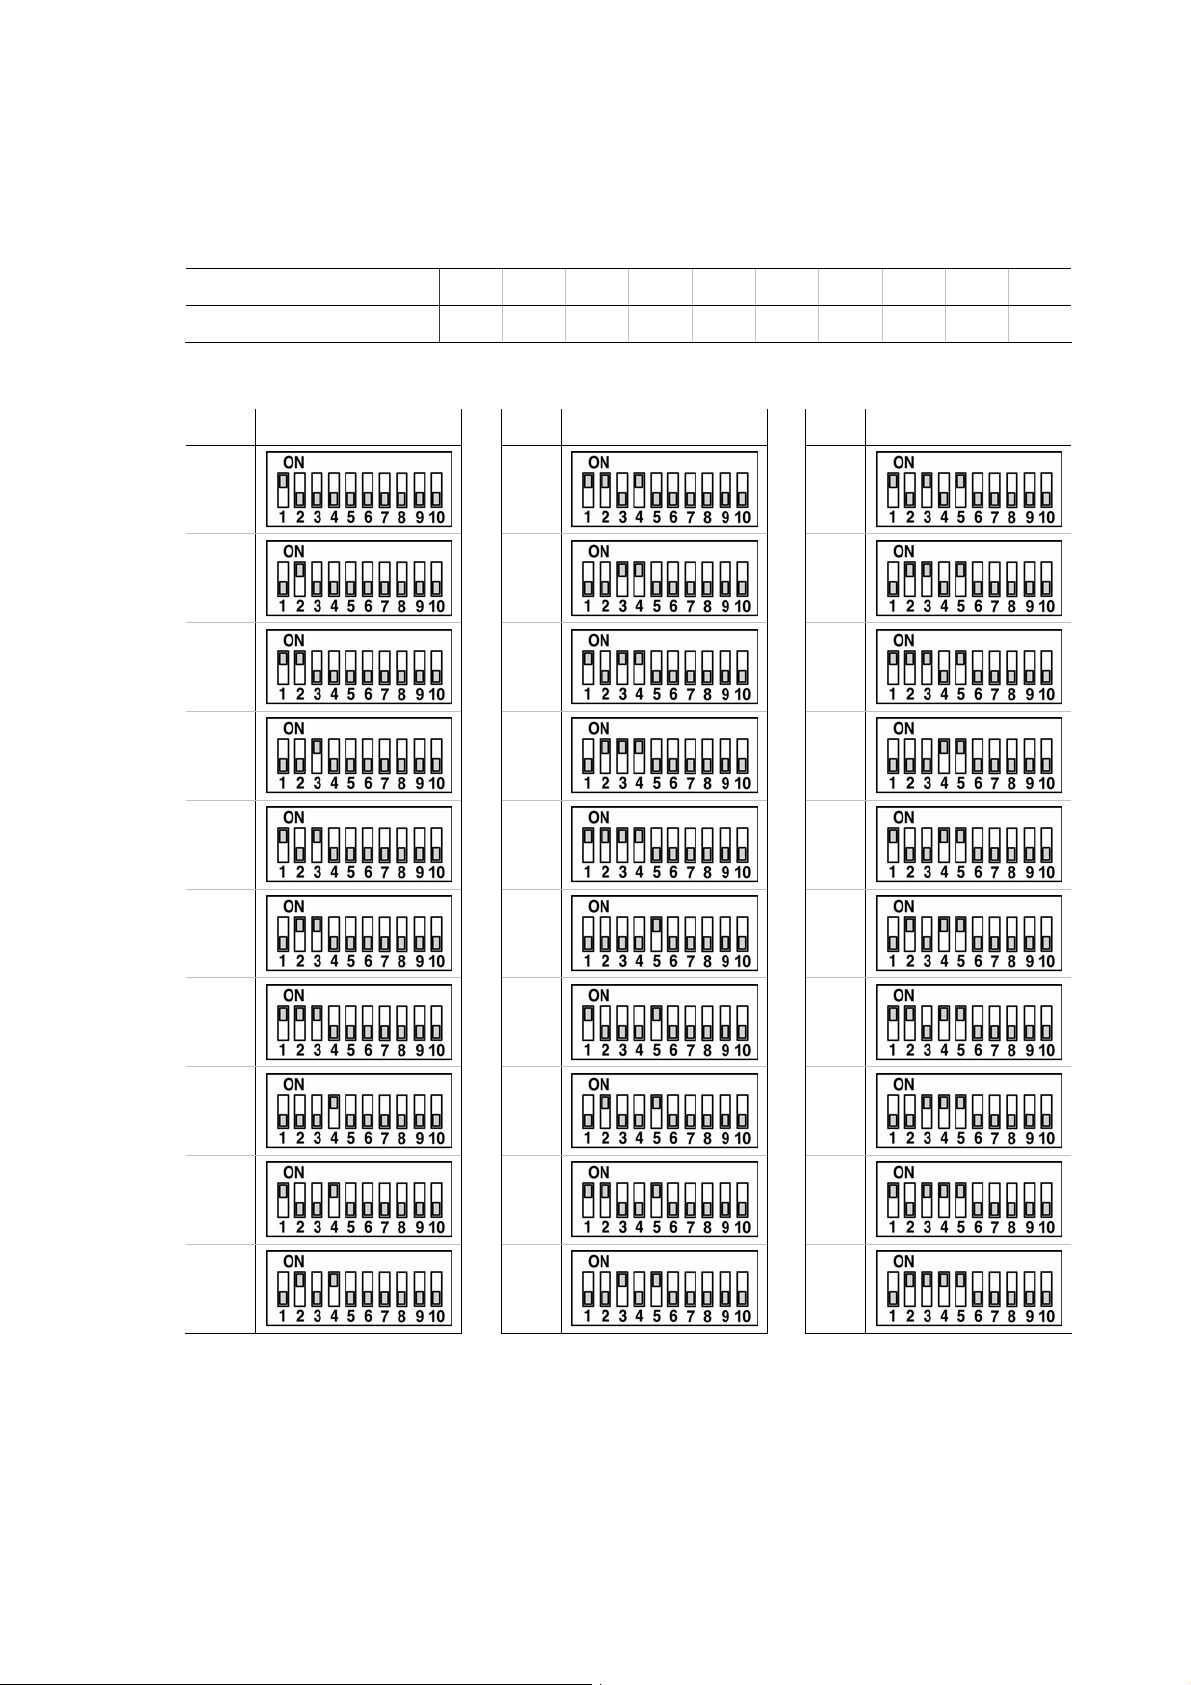
Setting the dome camera site ID
Before turning on the dome camera, you must set the dome camera site ID. Each
dome camera connected to the same network must have a unique ID. Use the 10-bit
DIP switch to set the dome camera’s site ID setting.
To set a dome camera site’s ID
1. Locate the dome camera site ID DIP switch block (E, Figure 3 on page 9).
2. Using Table 5 on page 13, determine which DIP switches when turned on will add
up to the site ID number for that dome camera. See Figure 6 on page 14 for an
example.
12 TruVision Mini PTZ 12X Camera User Manual
Page 17
1BChapter 2: Installation
3. Place the switches that correspond to those values in the On position.
4. Carefully record the site ID of each dome camera installed.
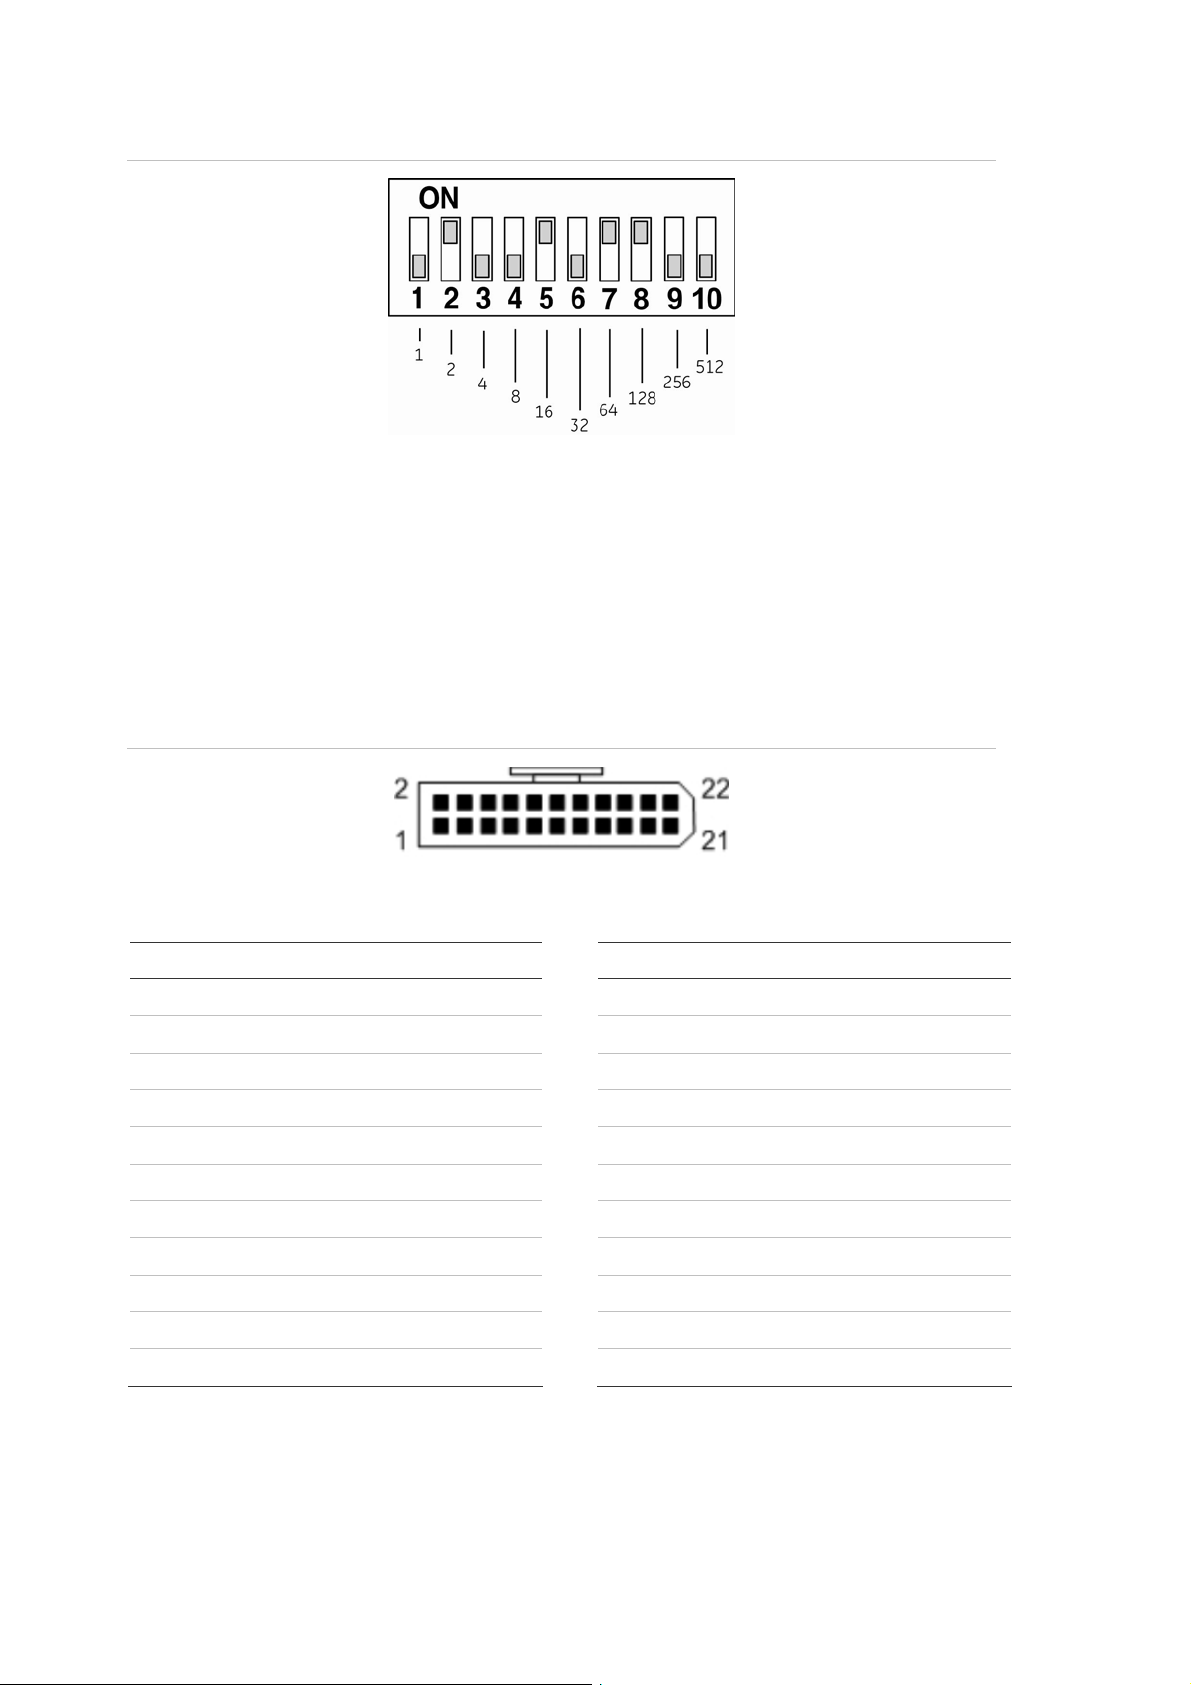
Table 5: DIP switch positions and equivalent values
DIP switch position number 1 2 3 4 5 6 7 8 9 10
Equivalent value 1 2 4 8 16 32 64 128 256 512
Table 6: Dome camera site ID DIP switch settings for dome cameras 1 to 30
Unit DIP switch Unit DIP switch Unit DIP switch
1
2
3
4
5
6
7
11
12
13
14
15
16
17
21
22
23
24
25
26
27
8
9
10
18
19
20
28
29
30
TruVision Mini PTZ 12X Camera User Manual 13
Page 18
1BChapter 2: Installation
Figure 6: Example of setting DIP switches for the dome camera site ID 210 (128 + 64 + 16 + 2)
22-pin connector description
The 22-pin connector for I/O interface cable connection is located on the back plate
of the dome camera. See Table 7 below for the pin locations if you need to attach, for
example, alarm input and output devices.
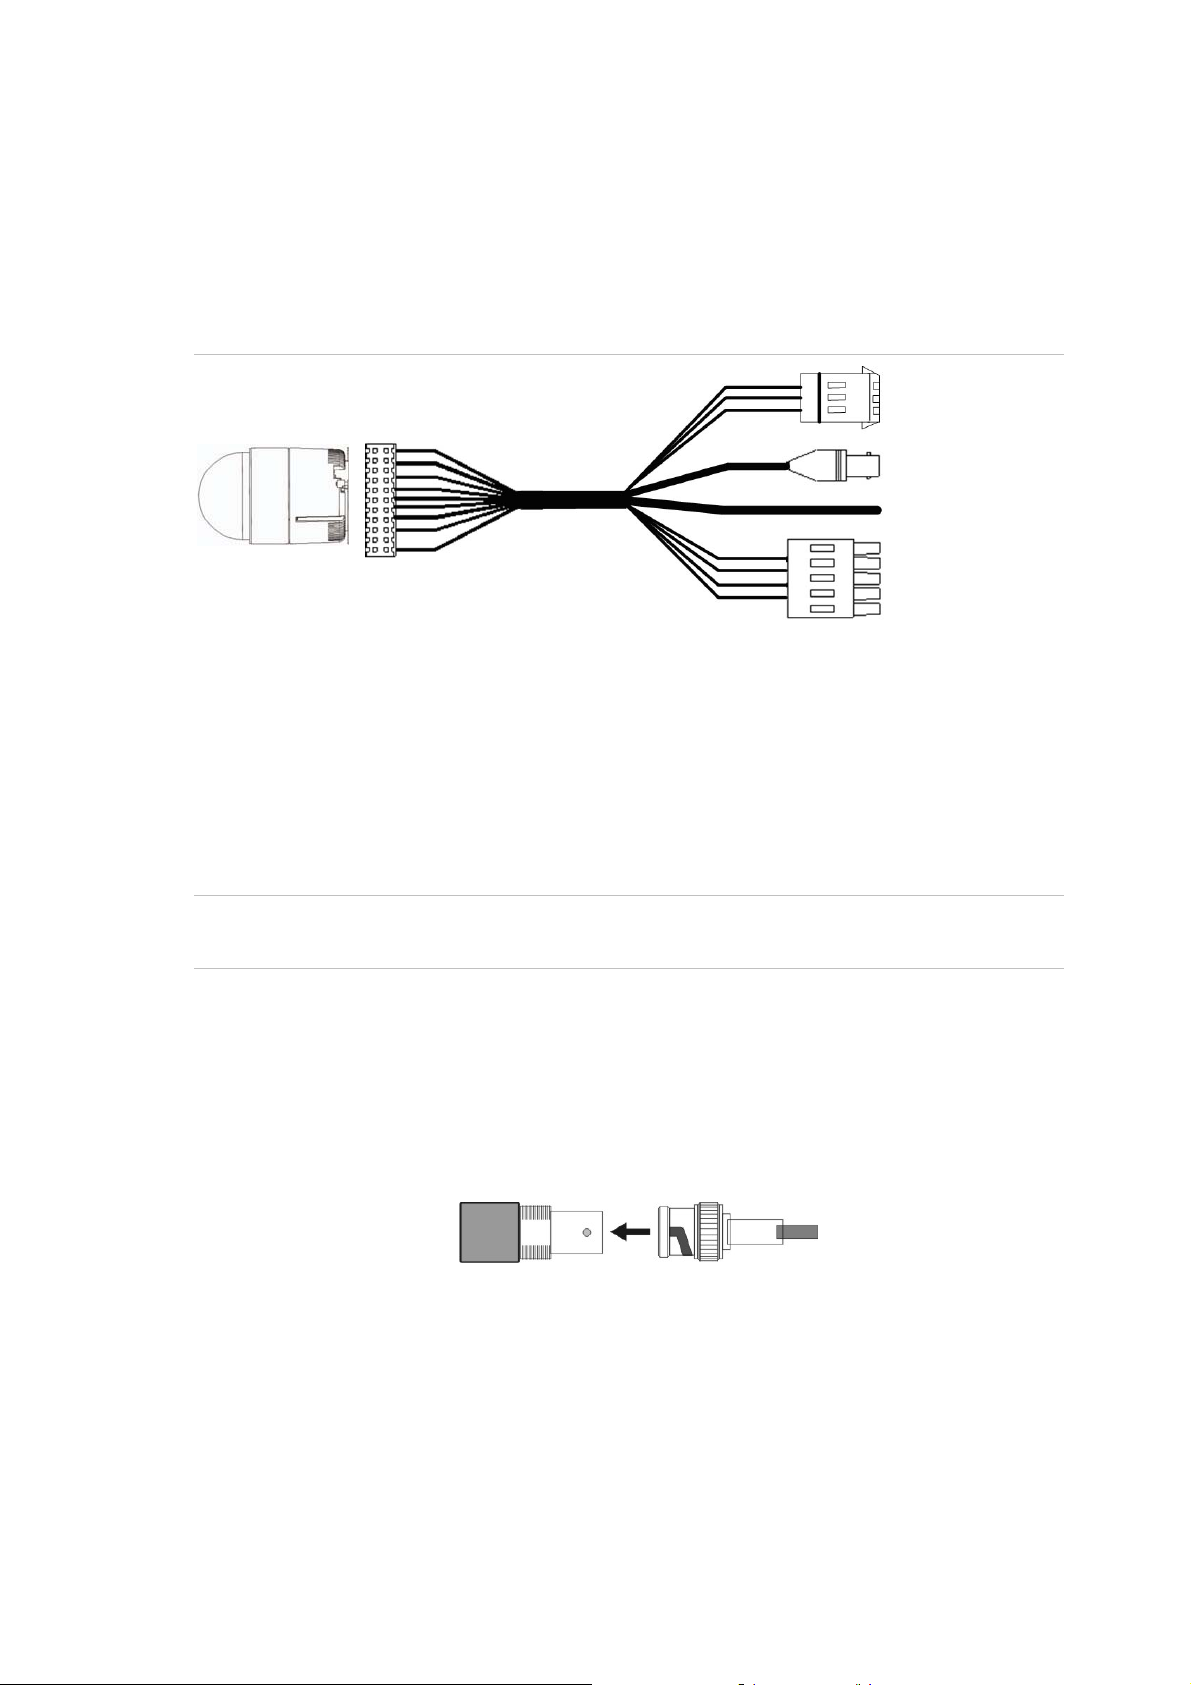
Figure 7: 22-pin connector
Table 7: Dome camera’s 22-pin connector description
Pin Description Pin Description
1 Power In AC 24 – 1 12 Alarm Contact 1
2 Alarm Relay NC 13 Alarm Contact 2
3 Power In AC 24 – 2 14 Alarm Contact 3
4 Alarm Relay NO 15 Alarm Contact 4
5 Power Earth Ground 16 Alarm Contact 5
6 Relay Com 17 Alarm Contact 6
7 Control T+ 18 Alarm Contact 7
8 Control R- 19 Alarm Contact 8
9 Control T- 20 Alarm Contact GND
10 Control R+ 21 Video GND
11 ISOG 22 Video POS
14 TruVision Mini PTZ 12X Camera User Manual
Page 19
1BChapter 2: Installation
Wiring the dome camera
The TruVision Mini PTZ 12X Camera is shipped with a 24 VAC I/O interface cable (see
Figure 8 below). This cable facilitates installation as there is only one cable to
connect to the dome camera.
Figure 8: 24 VAC I/O interface cable
Dome camera 22-pin connector
1. Power input cable: Provides 24 VAC power supply to the dome camera.
When wiring the power cable, ensure that the ground wire is terminated into the middle pin of the power terminal
block.
2. Video output cable: Sends video signals to a remote viewing site. A coaxial cable is recommended.
3. Alarm cable.
4. RS-485 serial data connector: This twisted pair cable carries serial commands from a control device to the dome
camera. A CAT 5, 24 gauge cable is recommended. (See “Cable requirements” on page 3 for more information.)
Caution: During installation carefully pull the cables so as not to damage them. It is
recommended to fasten the cables once they are connected.
To wire the dome camera
1. Connect the 22-pin connector of the I/O interface cable to its connector in the
base of the dome camera. See Figure 3 on page 9 for its location.
2. Connect the crimp-on BNC connector of the video output to the coaxial video
cable of a monitor or DVR.
BNC connector
Coaxial video cable
3. Connect the control keyboard to the dome camera through the serial terminal
block.
4. Connect the alarm cable to a dry contact, for example, a PIR detector or an
access control system.
5. Connect the RS-485 serial data connector to the DVR/keypad, as shown below.
TruVision Mini PTZ 12X Camera User Manual 15
Page 20
1BChapter 2: Installation
2-wire connection from a DVR/control keypad/PC to the dome camera
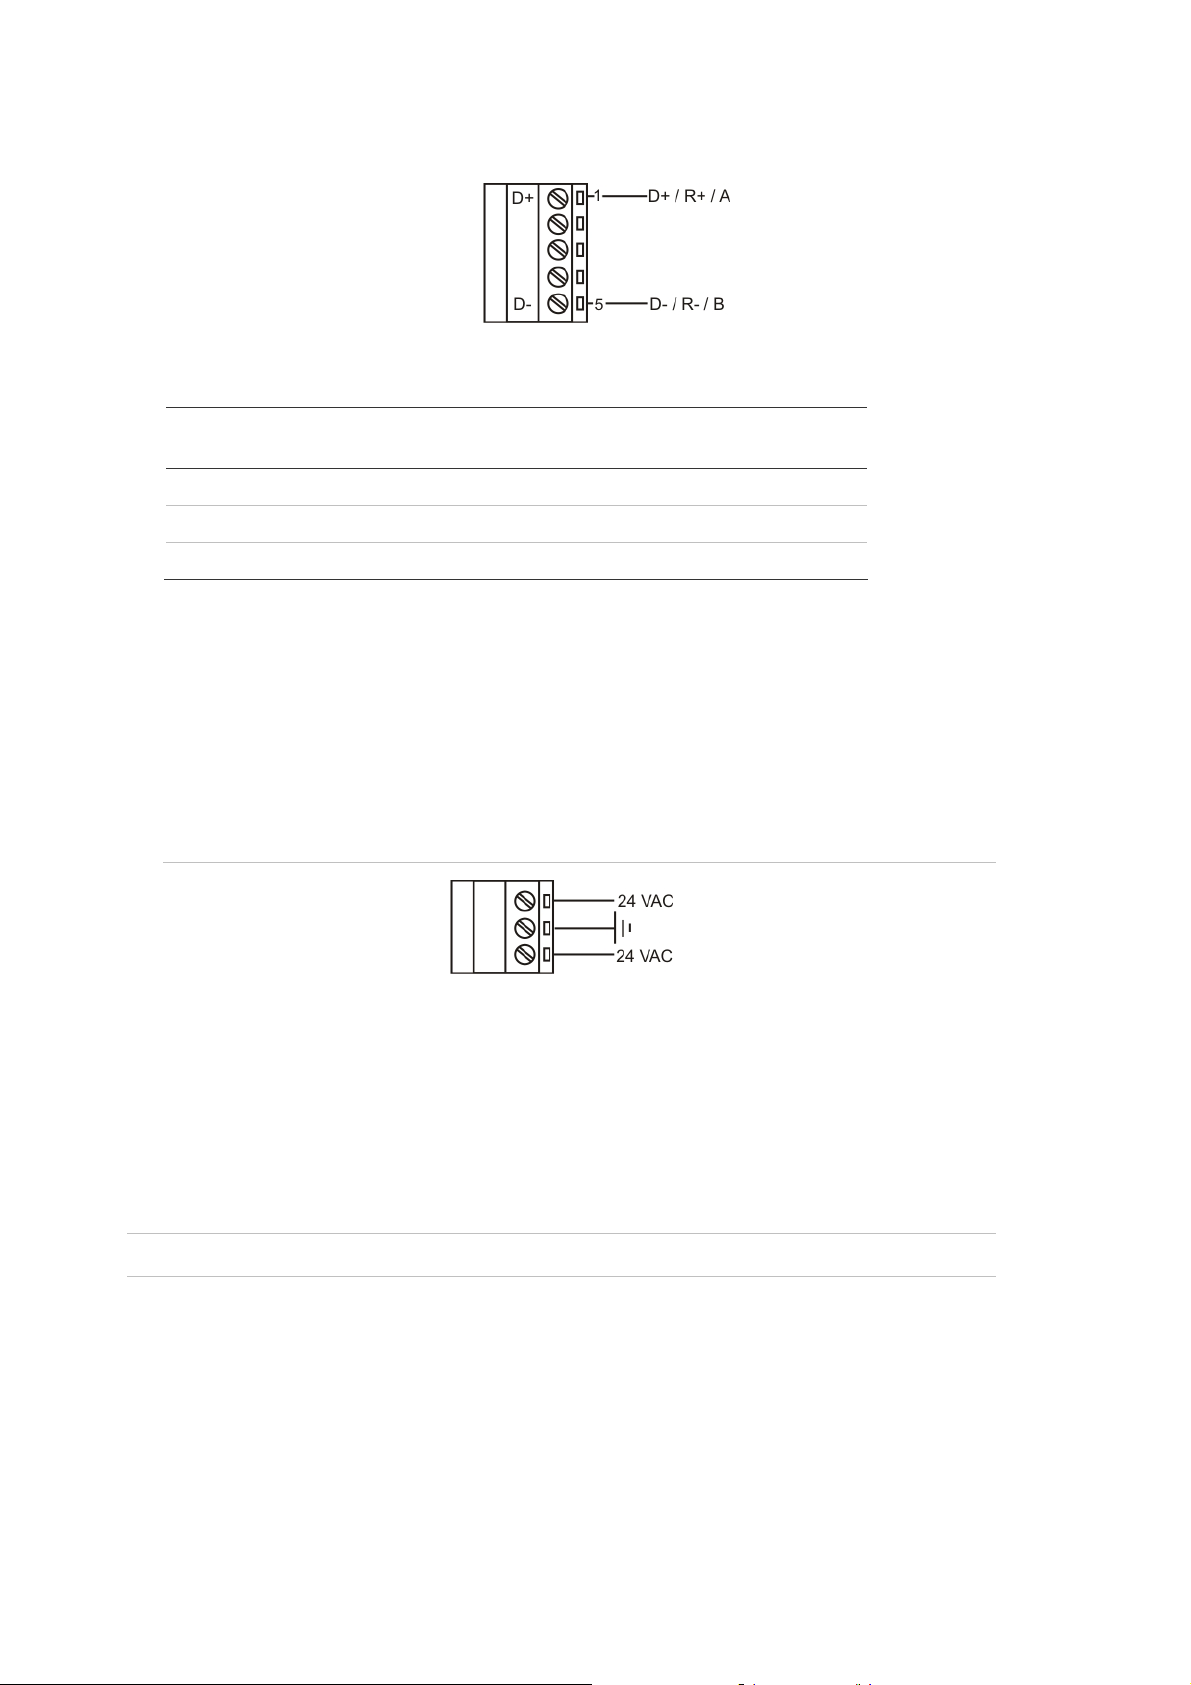
Table 8: Pin definition of the serial data connector
Pin Corresponding pins
(22-pin connector)
1 7, 10 T+, R+ (D+ or A)
2 - 4 Reserved
5 8, 9 T-, R- (D- or B)
Definition
Note: See “Cable requirements” on page 3 for information using a RS-485 cable
for the dome camera.
5. Connect the power cable to the power source. As soon as the dome camera is
connected, it is operational.
Note: The ground wire must be inserted into the center pin of the power input
terminal block. See Figure 9 below.
Figure 9: Ground wire for power input
Mounting the dome camera on a ceiling
The dome camera can be mounted on a solid ceiling using the hard ceiling mount
that is shipped with the dome camera.
Caution: Complete all installation steps before supplying power to the camera.
Items needed for mounting
A. Dome camera, which is shipped with:
I/O interface cable
Hard ceiling mount
Plastic fixing plate
16 TruVision Mini PTZ 12X Camera User Manual
Page 21

1BChapter 2: Installation
B. Screws and screw anchors for fixing the standard ceiling mount to a hard ceiling
(not supplied.)
Tools needed
Tool for drilling
Tool for screwing
To mount the dome camera on a ceiling
1. Screw the plastic fixing plate to the matching
screw hole on the edge of the dome camera,
as shown.
2. Place the hard ceiling mount in the desired position on the ceiling and mark the
position of the four screw holes.
3. Drill a hole in each marked position.
4. Fix the hard ceiling mount to the ceiling
using the self-tapping screws, as shown.
5. Thread the I/O interface cable and/or
Ethernet cable through the center hole of the
mount and connect the cable to the 22-pin
connector on the base of dome camera.
6. Attach the dome camera to the hard ceiling
mount. Ensure that the central part of dome
camera base is locked into the central hole
of the mount.
TruVision Mini PTZ 12X Camera User Manual 17
Page 22

1BChapter 2: Installation
Note: The dome camera’s plastic fixing plate
must align with the mate screw hole on the
mount, as shown.
7. Tighten the fixing screw to securely fix the
dome camera.
8. If the dome camera bubble had been
removed earlier, reattach it now.
The installation is complete.
Mounting the dome camera on a wall
The dome camera can be mounted on a wall using a pendant mount. It is used for
indoor and outdoor use. This mount is ordered separately from the dome camera.
There are two mounting kits available:
Standard pendant mount (TVP-WM)
Extended pendant mount (TVP-LWM)
Caution: Complete all installation steps before supplying power to the camera.
Items needed for mounting
A. Dome camera, which is shipped with:
Outdoor mounting kit (cover and waterproof rubber boot)
I/O interface cable
M5 standard/security screws
B. Pendant mount (standard or extended), which is shipped with:
Sponges
18 TruVision Mini PTZ 12X Camera User Manual
Page 23

1BChapter 2: Installation
M5 standard/security screws
C. Screws and screw anchors for fixing the standard pendent mount onto the wall
(not included)
Tools needed
Tool for drilling
Tool for screwing
To pendant mount the dome camera
1. Drill a cable-access hole in the wall where you want to install the pendant mount.
2. Using the correct screws and screw anchors, fix the pendant mount to the wall.
Figure 10: Pendant-mount
Standard pendant mount
1. Pendant-mount
2. Waterproof rubber boot
3. Cover of the outdoor mounting kit
4. 22-pin connector is at the end of the I/O interface
cable
Extended pendant mount
5. Screws and screw anchors to attach pendant mount
to wall
6. Screws and washers to attach pendant mount to the
outdoor mounting kit
3. Attach the waterproof rubber boot to the pendant mount.
4. Run the cable through the pendant mount. The 22-pin connector of the I/O
interface cable should exit from the pendant mount.
Note: Block the cable-entry hole in the wall with the supplied sponges to prevent
insects from entering the pendant mount.
5. Thread the cables through outdoor mount kit.
TruVision Mini PTZ 12X Camera User Manual 19
Page 24

1BChapter 2: Installation
6. Attach the outdoor mount kit to the pendant mount arm using the supplied
screws and washers. Adjust the rubber boot to the joint.
7. Connect the 22-pin connector of the I/O interface cable to the dome camera.
8. Attach the dome camera to the outdoor mount kit with the supplied screws and
washers.
20 TruVision Mini PTZ 12X Camera User Manual
Page 25

Chapter 3
Menu overview
On-screen information
When the unit is powered up, a splash screen appears that displays important
system information (see Figure 11 below.) Items marked in italic in the figure can
change depending on the settings.
Figure 11: Splash screen that appears when the dome camera is powered up
Information on the status of several dome camera functions can be displayed on the
monitor screen. The on-screen display (OSD) shows the current zoom focus, alarm
number, time and date, as well as the dome camera area title and site ID. See
Figure 12 on page 22 and Table 9 on page 22.
TruVision Mini PTZ 12X Camera User Manual 21
Page 26

2BChapter 3: Menu overview
Figure 12: Position of on-screen information
Table 9: Dome camera information displayed on-screen
Position Function OSD display Description
1 Alarm number Alarm # Alarm Message
2 Current zoom ratio 1X Present Zoom Ratio
(Optical Zoom/Digital Zoom)
3 Camera site ID Camera site ID displayed.
4 Date and time Date and time displayed.
5 Area title Area title displayed.
Main menu overview
The dome camera is programmed through the on-screen (OSD) menus. To access the
OSD menus, you must open the main menu. The main menu, which appears over
three screens, lets you set up the dome camera or change the default settings to suit
your installation.
Note: The OSD menu can be pre-programmed to time-out after certain number of
minutes of inactivity. The default value is two minutes.
22 TruVision Mini PTZ 12X Camera User Manual
Page 27

2BChapter 3: Menu overview
Figure 13: Main menus
Main menu commands options
Table 10 below provides a list of controls and options available on each screen that
you can access from the main menu. Access to the menu screens can depend
whether the system has been set up to require a password.
Table 10: Main menu descriptions
Command Function
Language Configures the language of the on-screen display.
Default Configures the remote system reset, or is used to default all the settings
of the system or of a dome camera.
Backlight Configures the backlight setting.
Focus The dome camera always operates in auto focus mode.
Exposure control Configures exposure compensation, shutter speed, iris control,
White balance Configures white balance.
TruVision Mini PTZ 12X Camera User Manual 23
Page 28

2BChapter 3: Menu overview
Command Function
Camera setup Configures digital zoom, automatic slow shutter, digital noise reduction,
video invert, image freeze, and aperture.
Pan/Tilt setup Configures image flip, tilt limits, proportional speed, auto calibration,
password, OSD menu duration.
ID display Configures camera site ID.
Title display Configures camera title display.
Title setting Configures wording of camera title.
Preset Configures preset points.
Preset tour Configures preset tour, preset tour step, preset position, preset tour
speed, dwell time, and manual preset tour.
Autopan Configures autopan, start point, end point, direction, speed, and
execution.
Shadow tour Configures shadow tour number, record start, and record end.
Auto return Configures auto return, return action selection, preset point selection,
preset tour selection, autopan selection, shadow tour selection, return
time, and manual auto return.
Day/Night
(D/N cameras only)
Alarm setting Configures alarm setting.
Alarm detection Configures alarm detection.
Privacy mask Configures privacy mask.
Time and date Configures time and date of the dome camera. The camera can time sync
Schedule Configures schedules for preset tours/autopans/shadow tours.
Configures IR cut filter threshold, and manual control.
to Digiplex or Impac master time signals, or can be manually set.
Using a keypad to program menus
Use a control device such as a control keypad to configure the camera menu options.
We use the KTD-405 keypad controller (Figure 2) in this manual to explain the
features of the TruVision Mini PTZ 12X Camera because of the KTD-405’s ability to
control all of the camera’s features. (For detailed keypad instructions, refer to the
KTD-405/KTD-405-2D Controller Keypad User Manual.)
You can record the settings for the dome cameras using the checklist in Appendix B
“Camera settings checklist” on page 51. This checklist also lists the default values of
the settings, where applicable.
24 TruVision Mini PTZ 12X Camera User Manual
Page 29

2BChapter 3: Menu overview
Accessing the programming menus
To access the programming menus using a KTD-405/KTD-405-2D keypad
1. Switch the keypad to the camera site you want to program.
2. Press and hold the set key until Enter programming code displays.
3. At the code entry display, enter the programming code 9, 5, 1. Then press the seq
button.
4. At the first menu display, press 3 to select the option Camera.
5. At the Enter camera site number screen, enter the site number of the dome
camera you wish to program. Camera default value is 1. The Main Page 1 menu
appears.
Caution: If the camera times out while you are in a menu and exits the menu system,
all changes are automatically saved.
Navigating the menus
You can use the keypad joystick and keys to navigate through the menu system. See
Figure 14 below and Figure 15 on page 26 for further information on their use.
Figure 14: Menu keys of the KTD-405/405-2D keypad
Shaded keys appear on the KTD-405A/ KTD-405-2DA only
TruVision Mini PTZ 12X Camera User Manual 25
Page 30

2BChapter 3: Menu overview
Table 11: Navigating the programming menus using the KTD-405/405-2D keypad
Key Function
Scrolls up the menus.
Scrolls down the menus.
Scrolls left or right when indicated by in the menu.
Enters or exits a menu or submenu when indicated by in a menu option.
When a menu has , scroll left and right to select a menu function and then
press the set key to enter the submenu.
Iris +: Enters or selects a menu option
Iris -: Esc. Exits a menu option. There is no need to select the menu option Exit to
quit a menu.
Figure 15: Joystick motion
Scroll up
Previous
Next
Scroll down Edit (turn joystick clockwise)
26 TruVision Mini PTZ 12X Camera User Manual
Page 31

Chapter 4
Basic setup
This chapter describes how to configure the basic options for the TruVision Mini PTZ
12X Camera.
The default values (where applicable) of the settings are listed in the checklist in
Appendix B “Camera settings checklist” on page 51.
Language selection
The dome camera is shipped with on-screen display (OSD) menus available in several
languages. They include English, French, German, Italian, Portuguese, and Spanish.
The default language is English.
To change the language of the OSD menus
1. Display the Main Page 1 OSD screen.
2. Select Language. The OSD menu will automatically change to the selected
language.
Camera site ID displayed on a monitor
You can display the camera site ID on the monitor to identify each dome camera. The
ID is a number. See Figure 12 on page 22 for the on-screen position of the camera ID.
See section “Setting the dome camera site ID” on page 12 for information on setting
up a camera site ID.
To display the site ID on the monitor
1. Display the Main Page 2 OSD screen.
2. Select ID Display and then select one of the options:
TruVision Mini PTZ 12X Camera User Manual 27
Page 32

3BChapter 4: Basic setup
On Display camera ID on the monitor screen.
Off Hide the camera ID on the monitor screen. Default setting.
Area title displayed on a monitor
You can display the area title of the dome camera on the monitor so that it is easy to
identify which area is being shown is on-screen.
To display an area title
1. Display the Main Page 2 OSD screen.
2. Select Area Title and then select one of the options:
On Display the title of the selected area on the monitor screen.
Off Hide the title of the selected area on the monitor screen.
Area title settings
You can configure up to 16 area titles. Each title can have up to 20 characters.
To create an area title
1. Using the keypad, select the SET POS menu selection and point the dome camera
in the direction for which you want to set a title. Press the set key.
2 Display the Main Page 2 OSD screen.
3. Select Area Title Num.
4. Enter a number for the view area; 01, for example.
5. On the keypad press the set key to enter the editing page. The Title Setting screen
appears as shown below.
28 TruVision Mini PTZ 12X Camera User Manual
Page 33

3BChapter 4: Basic setup
5: Using the direction keys of the keypad select a character and press the set key to
input.
For example: A set B set C set
TITLE: ABC
6: To delete characters, select a character by moving the cursor to LEFT or RIGHT
and press set on the keypad. Then move the cursor to DELETE and press set to
delete the selected character.
7: When the title is completed, move the cursor to SAVE and press set to save it and
to return to Main Menu 2.
Preset points settings
The dome camera can be programmed to execute preset positions that can then be
recalled, for example, when an alarm is triggered or when the user requests it. See
“Schedule settings” on page 47 for more information on programming when a preset
position or tour can be triggered.
You can program up to 256 preset points depending on the protocol used.
Table 12: Preset menu description
Function Description
Preset Set Set the preset points. You need to set up at least two points in order to be
able to then set up a preset tour.
Show Preset Select the preset point that you want to execute. After pressing the set
key, the camera will turn to the appointed point.
Exit Select Yes to save any changes and return to Main Page 2.
To set a preset point
1. Display the Main Page 2 OSD screen.
2. Select Preset to enter the Preset OSD menu.
3. Select a number by either pressing the right/left keys on the keypad to select a
number (001 represents preset point 1, 002 represents preset point 2, etc.), or by
using the iris+ key to increase or decrease the number by 10.
4. Press the set key on the keypad, and then rotate the dome camera to a targeted
pan, tilt, and zoom position.
5. Press the set key again to save the defined preset point.
Once the preset point is saved, move the cursor to the next menu item to execute the
preset point and confirm it is correct.
Note: To freeze the image as the dome camera moves between preset points, see the
option “Image Freeze” under “Camera settings” on page 38.
TruVision Mini PTZ 12X Camera User Manual 29
Page 34

3BChapter 4: Basic setup
Preset tour settings
The function executes pre-positioning of the pan, tilt, zoom, and focus features in a
certain sequence for a dome camera. Before setting this function, you must have set
up at least two preset points.
This function is located on Main Page 2.
Preset Tours are saved as follows:
Preset Tour #1 = PTZ Tour 3
Preset Tour #2 = PTZ Tour 4
Preset Tour #3 = PTZ Tour 7
Preset Tour #4 = PTZ Tour 8
Preset Tour #5 = PTZ Tour 11
Preset Tour #6 = PTZ Tour 12
Preset Tour #7 = PTZ Tour 15
Preset Tour #8 = PTZ Tour 16
Figure 16: Preset Tour menu
Table 13: Preset Tour menu description
Function Description
Preset Tour Set up to eight preset tours.
Using the left/right direction keys, select a preset tour number and then
set its preset tour steps. This option is also called P Tour.
P Tour Step Set up to 64 points for each preset tour. The preset tour steps are order in
which the preset points are carried out by the camera. Preset position,
speed, and dwell time will also influence how the camera Show P Tours
through each preset tour step.
Preset Pos. Set a specific preset position to the selected preset tour step. You can
specify one of up to 255 preprogrammed positions. The unit will
automatically make the step after the last programmed step, which is an
End step. The Preset Tour will then loop and keep running.
Speed Set each preset tour step to a different speed, ranging from 01 to 15.
Within this range, pan, and tilt speed varies from 5 to 300 (degrees/sec.)
30 TruVision Mini PTZ 12X Camera User Manual
Page 35

3BChapter 4: Basic setup
Function Description
Dwell Time Set the period of time that the camera will stay at a preset tour step. The
range is from 0 to 127 seconds. The camera will move to the next preset
tour step when the dwell time expires. If the setting is 0, the dome will stay
at this preset your step until the camera is manually moved.
Run P Tour Manually select which P Tour to view after programming.
Exit Select Yes to save any changes and return to Main Page 2.
Autopan settings
The autopan feature allows the dome camera to pan continuously between right and
left limit settings. An autopan movement requires the start and end points to be
defined as well as specifying whether the movement is clockwise or
counterclockwise.
This function is located on Main Page 2.
Figure 17: Autopan menu
Table 14: Autopan menu description
Function Description
Autopan You can set up to four autopan functions. Use the LEFT/RIGHT direction
keys on the keypad to choose a line to execute.
You can also have the camera to do endless panning by setting the
start point the same as the end point.
Start point To set the start position of the autopan path, proceed as follows:
1. While the menu option To Find is flashing, move the cursor to Start
Point and press set. The option will then become To Save.
2. Move the dome to the desired position and press set to save the
position as the start point. The cursor will move to End Point
automatically. Set the end point to complete the autopan setting.
Note: The tilt and zoom values of the start point are recorded and fixed
for the selected autopan.
End Point Set the end position of the P Tour. See “Start Point” above for further
information.
TruVision Mini PTZ 12X Camera User Manual 31
Page 36

3BChapter 4: Basic setup
Function Description
Direction You need to specify whether the camera moves clockwise or
counterclockwise from the start point to the end point before then
returning to the start point.
Select Right for the camera to pan clockwise from the start point to the
end point, and then return to the start point.
Select Left for the camera to pan counterclockwise e from the start
point to the end point, and then return to the start point. See the picture
below.
Speed Select the speed at which the camera automatically pans. Choose from
Run Autopan Once the autopan setup is completed, you can run the autopan
Exit Select Yes to save any changes and return to Main Page 2.
Start point
Left
Counterclockwise Clockwise
End point
four speed settings (10 to 45°/sec.) where 1 is the slowest.
function.
Right
Shadow tour settings
A Shadow Tour is a route formed with manual operation, through adjusting pan and
tilt position, which can be stored and recalled to execute repeatedly.
This function is located on Main Page 2. See Figure 18 on page 33.
Shadow Tours are saved as follows:
Shadow Tour #1 = PTZ Tour 1
Shadow Tour #2 = PTZ Tour 2
Shadow Tour #3 = PTZ Tour 5
Shadow Tour #4 = PTZ Tour 6
Shadow Tour #5 = PTZ Tour 9
Shadow Tour #6 = PTZ Tour 10
Shadow Tour #7 = PTZ Tour 13
Shadow Tour #8 = PTZ Tour 14
32 TruVision Mini PTZ 12X Camera User Manual
Page 37

3BChapter 4: Basic setup
Figure 18: Shadow Tour menu
Table 15: Shadow Tour menu description
Function Description
Shadow Tour Up to eight shadow tours can be defined. Using LEFT/RIGHT direction
keys to select a shadow tour number first and then follow the steps
below to start recording the Shadow Tour path.
Record Start You need to define where the shadow tour starts.
Record End You need to define where the shadow tour ends.
Run Shadow Tour When the shadow tour is recorded, select this option to playback the
Shadow Tour.
Exit Select Yes to save any changes and return to Main Page 2.
To record a “quick” shadow tour (shadow tour #1)
1. Rotate the dome camera to the desired view and setup the tilt and zoom start
position. Using a KTD-405 keypad, hold the esc key and press tour. Then press
zoom +.
Note: You must be in normal operation mode when carrying out this function. It
cannot be done from programming mode.
2. Press esc to exit and save Shadow Tour #1.
To record a shadow tour
1. In the Shadow Tour menu, select the number of the shadow tour being recorded.
2. Select Record Start and press set (ENTER). Move to the desired start position.
3. Press set (ENTER) to start recording the shadow tour using the joystick or keypad
to create the shadow tour path.
4. Press set (ENTER) once to save the shadow tour. The cursor moves automatically
to Record End.
Note: When the Record Start is saved, a message will automatically appear onscreen to show how much of the buffer memory remains. Once the buffer
percentage reaches 100%, the path will not be recorded.
5. Select Run S. Tour to replay the saved tour.
6. When you are happy with the shadow tour recorded, exit the menu and return to
the main menu.
TruVision Mini PTZ 12X Camera User Manual 33
Page 38

3BChapter 4: Basic setup
Auto return settings
Set the dome camera to automatically return after a period of inactivity to a specific
preprogrammed preset, preset tour, autopan, or shadow tour position. This feature is
disabled by default.
This function is located on Main Page 2.
Figure 19: Auto Return screen (screen for Preset mode shown)
Table 16: Auto Return menu description
Function Description
Auto Return Enable or disable the function.
Return Action This function tells the camera which mode to execute when auto return
is enabled and the set return time is reached.
Select one of the four following modes: Autopan, Preset Tour, Shadow
Tour, and Preset. Depending on which mode is selected, the menu item
below changes.
Preset This is listed if Preset was selected as the return action mode (see
Figure 19 above.)
Select a
return when the return time is activated. See “Preset ” on page 29 for
m
Preset Tour This is listed if Preset Tour was selected as the return action mode.
Select a preset tour that the camera should execute after a period of
inactivity. See “To set a preset point” on page 29” for more information.
Autopan This is listed if Autopan was selected as the return action mode.
Select a preprogrammed autopan that the camera should execute after
a period of inactivity. See “Autopan ” on page 31 for more information.
Shadow Tour This is listed if Shadow Tour was selected as the return action mode.
preprogrammed preset point to where the camera should
ore information.
Select a preprogrammed shadow tour that the camera should execute
after a period of inactivity. See “Shadow tour ” on page 32 for more
informa
Return time Select the period of inactivity (return time) after which the auto return is
activated. The time period ranges between 1 and 128 minutes.
Go If Auto Return has been enabled, you can execute an auto return
manually.
Exit Select Yes to save any changes and return to Main Page 2.
tion.
34 TruVision Mini PTZ 12X Camera User Manual
Page 39

Chapter 5
Advanced setup
This chapter describes how to configure the advanced options for the TruVision Mini
PTZ 12X Camera.
The default values (where applicable) of the settings are listed in the checklist in
Appendix B “Camera settings checklist” on page 51.
Default
Use this menu to reset the unit.
Function Description
System Reset Select to reboot the camera.
Default System Select to restore all camera settings and functions back to factory default. The
camera will reboot.
Default Camera Select to restore back to factory default the camera settings under AE, White
Balance, and Camera Setup menus.
Exit Select Yes to save any changes and return to Main Page 1.
Backlight compensation
The backlight compensation function improves image quality when the background
illumination is high. It prevents the object in the center from appearing too dark.
One practical application of backlight compensation enables you to see detail inside
a room with a window on a bright day. The auto exposure will average all the light in
the scene, so bright areas, such as windows, get greater weight, and the dome
camera will adjust so you can see the bright area (outside). Backlight correction
forces the dome camera to ignore areas of high brightness, so the rest of the scene
(the inside of the building) will be properly exposed. You can see detail inside, but in
TruVision Mini PTZ 12X Camera User Manual 35
Page 40

4BChapter 5: Advanced setup
the process the lighting at the window will be adjusted so seeing outside is not
possible.
The default setting is Off.
Note: Leaving backlight compensation on all the time on an unattended PTZ dome
camera will produce a picture that is washed out or too bright under normal daylight
or bright room conditions.
This menu is located on Main Page 1.
Focus adjustment
The camera’s focus works in Auto Focus mode by default. You can control the focus
manually using the keypad control. However, the focus returns to Auto as soon as the
Pan or Tilt is moved. The focus control behavior cannot be controlled from the menus.
This menu is located on Main Page 1.
Table 17: Focus menu description
Function Description
Auto The lens continuously adjusts to the correct focus automatically for the
sharpest picture. This is the default setting.
Focus is adjusted manually by pressing the Focus + / - button on the
controller keypad or by using the joystick. Once the manual adjustments have
been made, the camera returns to the default setting, Auto focus.
Exposure control settings
Auto exposure (AE) allows you to automatically set the proper exposure according to
the existing light conditions. You can select the AE mode to have an aperture (iris) –
priority, shutter-priority, or set the options manually.
Exposure is the amount of light received by the camera’s image sensor and is
determined by how wide you open the lens diaphragm (iris adjustment), by how long
you keep the sensor exposed (shutter speed), and by other exposure parameters.
This menu is located on Main Page 1.
Figure 20: Example of the AE mode menu with the Shutter option selected
36 TruVision Mini PTZ 12X Camera User Manual
Page 41

4BChapter 5: Advanced setup
Table 18: AE mode menu description
Function Description
Exposure
Compensation
AE mode Set the method the camera uses to adjust to different light levels:
Iris: The iris value is fixed at F1.6.
Manual: Manually select a shutter speed (1/10000 to 1/50 for PAL; 1/10000 to
Auto: Select for the camera’s brightness, shutter speed, iris and AGC (Auto
Shutter: The shutter speed takes main control of exposure, and both iris and
Select the exposure value, which ranges from -10.5 dB to+10.5 dB. The
default setting is Off.
1/60 for NTSC) and gain value (-3 dB to 28 dB) to optimize the video output.
Select a higher value to see movement and a lower value to see clearer
images.
Gain Control) control circuits work together automatically to get consistent
video output level.
AGC will function automatically in cooperation with the shutter speed to
achieve consistent exposure output.
Select a shutter speed by format:
NTSC: 1/60, 1/90, 1/100, 1/250, 1/500, 1/180, 1/250, 1/350, 1/500, 1/725,
1/1000, 1/1500, 1/2,000, 1/3000, 1/4000, 1/6000, or 1/10000 sec.
PAL: 1/50, 1/100, 1/250, 1/500, 1/1000, 1/2,000, 1/5000, or 1/10000 sec.
Select a higher value to see movement and a lower value to see clearer
images
Exit + Save Select Yes to save any changes and return to Main Page 1.
To change the AE mode values
1. Display the Main Page 1 screen.
2. Select AE Mode. It will start flashing. Press set.
3. Select one of the AE Mode options (Auto, Iris, Manual, or Shutter) using the set
button. The option’s sub menu appears.
5. Select the desired value. The other AE mode options cannot be changed.
6. Exit the menu and return to Main Page 1.
White balance
White balance (WB) tells the dome camera what the color white looks like. Based on
this information, the dome camera will then continue to display all colors correctly
even when the color temperature of the scene changes such as from daylight to
fluorescent lighting, for example.
The unit for measuring this ratio is in degree Kelvin (K). You can select one of the
White Balance control modes according to the installation condition. The following
table shows the color temperature of some light sources.
TruVision Mini PTZ 12X Camera User Manual 37
Page 42

4BChapter 5: Advanced setup
Table 19: Examples of the color temperatures of different light sources
Light sources Color temperature in °K
Cloudy sky 6,000 to 8,000
Noon sun and clear sky 6,500
Household lighting 2,500 to 3,000
75-watt bulb 2,820
Candle flame 1,200 to 1,500
See Table 20 below for a description of the functions available.
This menu is located on Main Page 1.
Table 20: White balance menu description
Function Description
Auto Select to enable or disable automatic white balance. Its color
temperature range is 3000 to 7500°K. The white balance value is
calculated using color information from the entire screen. This is the
default setting.
Indoor Select for a static indoor setting. Optimizes the WB for typical indoor
conditions. It is set at 3200°K base mode.
Outdoor Select for a static outdoor setting. Optimizes the WB for typical
outdoor conditions. It is set at 5800°K base mode.
ATW Auto Tracing White Balance.
Select to enable or disable auto tracing white balance. Its color
temperature range is 2000 to 10,000°K. The white balance is
calculated, or “traced”, more quickly than by the Auto function.
Manual Select to make manual adjustments to the white balance. R (red level)
and B (blue level) gains are adjustable and range from 0 to 127.
Exit Select Yes to save any changes and return to Main Page 1.
Camera settings
You can select whether to activate several dome camera functions including Digital
Zoom, Auto Slow Shutter, Noise Reduction, Video Invert, and Image Freeze. See
Figure 21 on page 39 and Table 21 on page 39 for information on these functions.
This menu is located on Main Page 1.
38 TruVision Mini PTZ 12X Camera User Manual
Page 43

4BChapter 5: Advanced setup
Note: The Image Flip and the Image Invert functions are automatically disabled when
the Privacy Mask function is enabled.
Figure 21: Camera setup menu
Table 21: Camera setup menu description
Function Description
Max. Digital Zoom Set the digital zoom on the camera. Digital zoom (also known as electronic
zoom) indicates how much zoom the camera’s software can add to the optical
limit. The maximum optical zoom limit will be multiplied by the electronic
zoom setting to increase total zoom. Digital zoom is activated when the full
optical zoom level is reached. It can be set up to a maximum of 12X. The zoom
speed of the camera is fixed (8).
The default setting is 4X.
Note: Digital zoom may degrade image quality.
Slow Shutter Automatic Slow Shutter.
Select to delay the switch to night mode. This feature only works when the
camera is in day (color) mode. It extends the useful range of the color mode in
dark situations and keeps the camera in color mode longer before having to
switch to night mode. However, motion can become blurry when the shutter is
set to auto slow. The default setting is On.
Note: This feature is only available on cameras with day/night capability.
“Day/night (Day/night models only)” on page 42 for more information.
D.N.R. Digital Noise Reduction.
Select to improve image quality in low light levels. The default setting is Off.
With 2D / 3D noise reduction, the processor analyzes the camera images
by pixel and frame by frame to eliminate environmental noise signal so that
the highest quality image can be produced even in low light levels. 3D DNR
generates better noise reduction than 2D DNR.
See
pixel
TruVision Mini PTZ 12X Camera User Manual 39
Page 44

4BChapter 5: Advanced setup
Function Description
Video Invert Sets whether images will be inverted. See the photos below.
Video Invert Off Video Invert On
By default images appearing on-screen are upside down as cameras are
usually installed on ceilings, for example. However, by enabling this option the
image can be inverted. This may be required during testing or demonstrations,
for example.
When this function is enabled, the preset mask(s) will be set to off
automatically. See “Privacy mask” on page 45 for more information. The
defaul
t setting is Off.
Image Freeze Sets whether the most recent camera image will freeze on the screen while
the camera is traveling to a preset position.
Enable this function to freeze the camera image while the camera moves
between preset positions. The camera freezes the last image while it is
moving and displays a static image until it stops moving. Disabling this
function causes the camera to display live video as the camera moves to the
preset position.
The default setting is Off.
See “Preset points settings” on page 29 for further information on setting
preset poi
Aperture Use this to set the definition of objects. When this function is enabled the
edges of objects in an image are more sharply defined. There are 16 levels of
adjustment from 01 to 16, where 01 is no enhancement.
This function could be used, for example, when there is text in a camera
image. Enabling the function would make the text appear sharper.
Exit Select Yes to save any changes and return to Main Page 1.
nts and tours.
Pan/tilt settings
This menu provides access to pan/tilt, password, and speed settings that can be
changed or customized. See Figure 22 on page 41 for the screen.
This menu is located on Main Page 1.
Note: The Image Flip and the Video Invert functions are automatically disabled when
the Privacy Mask function is enabled.
40 TruVision Mini PTZ 12X Camera User Manual
Page 45

4BChapter 5: Advanced setup
Figure 22: Pan/Tilt setup screen
Table 22: Pan/Tilt setup menu description
Function Description
Image Flip Image flip automatically rotates the camera 180 degrees when the
bottom tilt limit is reached. This feature enables tracking of a target
passing directly under the camera.
E-Flip: Select this option to seamlessly track objects. Almost no delay
occurs compared to the spin mode.
The privacy mask function is automatically disabled if the E-flip function
is enabled, and the screen will show “Mask will be set off.”
Spin: This is a standard mechanical operation. As the dome tilts to the
maximum angle, it will pan 180°, and then continue tilting to keep
tracking objects.
Off: Select this option to disable the image flip function. This is the default
setting.
Note: To make the camera tilt within a specific range, such as between
-10° to +100°, set the range of tilt angle in the Tilt Limits menu (see next
section). The default tilt setting is 90°.
Tilt Limits Use this setting to adjust the minimum and maximum camera viewing
angles.
The minimum angle can be adjusted between -10° and +10°. Default
value is 0°.
The maximum angle can be adjusted between 80° and 100°. Default
value is 90°.
Prop. Speed Proportional speed.
Proportional speed decreases the pan/tilt speed of the camera to
provide better tracking when the camera is zoomed in. This helps reduce
pan/tilt overshoot when zooming in on objects far from the camera.
Auto Cal. Auto calibration.
There are one horizontal and one vertical infrared ray check points in
each dome. When the camera’s position is moved during installation or
maintenance, the relative distance between the original set point and the
check point could be changed. Enable the Auto Calibration function, the
dome will automatically detect the distance change and reset the point
TruVision Mini PTZ 12X Camera User Manual 41
Page 46

4BChapter 5: Advanced setup
Function Description
back to the original position.
Password The camera is shipped without password protection. When this function
is enabled, you will be prompted to enter the password to proceed
whenever the OSD menus are accessed.
To set or change a password
1: For the password function, select On and press the set key. The New
Password screen appears.
2. Using the arrow keys on the keypad or the jogging stick, select a
number from the list and press the set key to input. For example, for
password 0134, select:
For example: 0, set, 1, set
Passwords must have four digits. The default password is 0000.
3: In the Confirm Password line enter the same password again to
confirm the setting.
4. Select Save and return to Main Page 1.
WARNING: Record your password in a safe place. If you should forget
your password, you will not be able to access the camera menus. Please
contact technical support for assistance.
OSD Timeout Set the period of time that menus will stay on-screen.
Select one of the time options, which is up to 5 minutes. Default value is 2
minutes. If Off is enabled, the menus remain on-screen.
Exit Select Yes to save any changes and return to Main Pag1.
, 3, set , 4, set
Day/night (Day/night models only)
This function controls when the dome camera switches to day or night mode. The
dome camera produces high-quality color video during the day or when light levels
are high. It then switches monochrome and removes the infrared filter to improve IR
sensitivity at night or when light levels are low.
Note: This menu will only be present if the dome camera supports day/night
switching.
42 TruVision Mini PTZ 12X Camera User Manual
Page 47

4BChapter 5: Advanced setup
Table 23: Day/night menu description
Function Description
Auto Select this option for day/night mode to be automatically activated. The
internal circuit will automatically decide the threshold to remove the IR
cut filter according to the value of light condition calculated by internal
light algorithms. The options include Low, Mid, and Hi.
Low indicates a higher sensitivity and can improve reliability of lens so
that it is fast to switch to Day mode and relatively difficult to change into
Night mode; Hi indicates that it is fast to switch to Night mode and
difficult to change into Day mode.
This is the default setting.
Manual Select manually whether day or night mode is activated.
Select On to deactivate the IR cut filter and put the camera in B/W (Night)
mode. Select Off to activate the IR cut filter and put the camera in color
(Day) mode.
Exit Select Yes to save any changes and return to Main Page 3.
Alarm settings
You can program actions for alarms. The camera has eight alarm inputs and one
alarm output (NO and NC) to which to connect alarm devices.
Figure 23: Alarm setting menu
Table 24: Alarm setting menu description
Function Description
Alarm Enable or disable this option. The default setting is Off.
Alarm Contact Select a number for the alarm contact being setup. For alarm
contact definitions, please refer to “22-pin connector description”
on page 14. Up to eight alarm contacts can be set.
Note: If tw
time, the lower alarm contact number will have priority. For
example, if Alarm 1 and Alarm 3 are triggered simultaneously,
only Alarm 1 will be handled.
Contact Type Select the contact type (NO, NC).
TruVision Mini PTZ 12X Camera User Manual 43
o or more alarm contacts are triggered at the same
Page 48

4BChapter 5: Advanced setup
Function Description
Normally Open (NO):
Alarm In
Normally Closed (NC):
Alarm In
Alarm Action Select one of the pre-programmed modes to be executed when
the alarm is triggered (Preset, Preset Tour, Autopan, or Shadow
Tour.) The option listed below will depend on which mode has
been selected.
When an alarm is triggered, there will also be a warning flashed
on-screen. See Figure 12 on page 22.
Preset Select a pre-programmed preset number that the camera should
execute when an alarm contact is triggered.
Preset Tour Select a pre-programmed preset tour number that the camera
should execute when an alarm contact is triggered.
Autopan Select a pre-programmed autopan number that the camera
should execute when an alarm contact is triggered.
Shadow Tour Select a pre-programmed shadow tour number that the camera
should execute when an alarm contact is triggered.
Relay Action (Dwell Time) Set the duration during which the camera will keep the relay
energized when an alarm is triggered. This relay timer starts
counting from the second the alarm is triggered.
Time options are 1 to 127 seconds, OFF, or Always (on) when
alarm occurs.
44 TruVision Mini PTZ 12X Camera User Manual
Page 49

4BChapter 5: Advanced setup
Function Description
Exit Select Yes to save any changes and return to Main Page 3.
Privacy mask settings
Privacy masks let you conceal sensitive areas (such as neighboring windows) to
protect them from view on the monitor screen and in the recorded video. You can
create 16 privacy masks (numbered 1 to 16) per camera. A maximum of eight privacy
masks can be displayed at one time.
When creating your masks, it is a common practice to make them 50% larger than
the areas you wish to cover so that the masked areas remain concealed at all times.
Also, be aware that masks cannot be created in the area directly below the dome
camera.
The dome camera takes the center of the selected view as the starting point when
setting a mask. The joystick is locked during setup.
Figure 24: Mask information
Area to be masked Mask
0° (+90°) 180° (-90°)
Positive (+)
hemisphere
90° (0°)
Mask 50% larger than the area to be covered No mask allowed 20° either side of the 90° (0°) tilt
Negative (-)
hemisphere
Note: The Image Flip function is automatically disabled when the Privacy Mask
function is enabled.
Figure 25: Privacy mask menu
TruVision Mini PTZ 12X Camera User Manual 45
Page 50

4BChapter 5: Advanced setup
Table 25: Privacy mask menu description
Function Description
Privacy Mask Enable or disable this option. The default setting is Off.
Set Mask Up to 16 privacy masks can be set.
To set a privacy mask
1. Turn on the Privacy Mask feature, and select ON.
2. Select a mask number. Then select Set Mask and press the set key
to enter the Set Mask menu.
3. Select each of the following options to position and size the mask
on-screen:
Center: Using the joystick or the left/right keys, adjust the mask’s
horizontal position. The camera will move according to the joystick
movements.
Size (H size range 00 to 80): Adjust Horizontal (Width) by moving
the joystick Left and Right.
Size (V Size range 00 to 60): Adjust the Vertical (height) by moving
the joystick Up and Down.
Note: Set the H and V size to 0 to delete the selected mask.
Clear Mask Delete a saved mark zone.
To delete a privacy mask
1. Select the mask zone to be deleted (e.g. 01).
2. Press the set key to confirm the selection.
Transparency Select Set whether the color of privacy mask is transparent. Select On
to display transparent masks The default setting is Off.
Color Select the color of the privacy mask. The available colors are black,
white, red, green, blue, cyan, yellow and magenta
Exit Select Yes to save any changes and return to Main Page 3.
Time and date settings
Set the time and date related parameters of the dome camera.
Note: Time and Date can be synchronized automatically using an Impac or Digiplex
Protocol Time/date master signal on the serial line.
46 TruVision Mini PTZ 12X Camera User Manual
Page 51

: Advanced setup
Table 26: Time/date menu description
Function Description
Time Display Select whether time is displayed on-screen. The default setting is Off.
Set Year Select the year number.
Set Month Select the month number.
Set Day Select the day number.
Set Hour Select the hour number.
Set Minute Select the minute number.
Exit + Save Select Yes to save changes and return to MainPage3.
Schedule settings
You can program the dome camera to activate a preset point or function (Preset
Tour, Autopan, or Shadow Tour) automatically at a specific time of day.
Table 27: Schedule menu
Function Description
Schedule Enable or disable this option globally for all events. The default setting
is Off.
Event Number Select the event number to be programmed. Up to 32 schedule points
can be programmed.
Hour Select the hour during which the schedule point is executed every
day.
Minute Select the minute during which the schedule point is executed.
Event Action Select the mode that is activated for the schedule point:
None: No action is executed.
Preset: This mode is executed for the selected scheduled point.
Preset Tour: This mode is executed for the selected scheduled point.
Autopan: This mode is executed for the selected scheduled point.
Shadow Tour: This mode is executed for the selected scheduled
point.
IR Func: Applies to Day/Night models only.
Note: If the Day/Night mode is enabled, the Auto Day/Night will be
activated for a schedule point.
Schedule reset Users can reset the whole schedule with the item
Exit Select Yes to save any changes and return to Main Page 3.
TruVision Mini PTZ 12X Camera User Manual 47
Page 52

: Advanced setup
48 TruVision Mini PTZ 12X Camera User Manual
Page 53

Appendix A
Specifications
Environment Indoor/Outdoor (model specific)
Controller interface RS-485
Operating temperature (indoor) 0 to 50°C (32 to 122°F)
Operating temperature (outdoor) -30 to +50°C (-22 to +122°F)
Dimensions (Height x Width) 131 × 200 mm (5.2 × 7.9 inches)
Weight 1.2 kg (2.6 lbs)
Power supply 24 VAC ±10%
Power consumption 14 W (Indoor), 52 W (Outdoor with heater on)
Battery removal
The TruVision Mini PTZ 12X Camera contains one 3 V Lithium battery.
To remove the battery
1. Unscrew the single screw located on the base of the dome camera.
2. Unscrew each of the three screws on the side of the dome camera.
3. Locate the battery and carefully remove it.
TruVision Mini PTZ 12X Camera User Manual 49
Page 54

5BAppendix A: Advanced setup
Battery
4. Dispose of the battery as required by local ordinances or regulations.
5. Reassemble the dome camera.
50 TruVision Mini PTZ 12X Camera User Manual
Page 55

Appendix B
Camera settings checklist
Use this checklist to record the menu settings of each dome camera.
Default values are highlighted in bold, where applicable.
TruVision Mini PTZ 12X Camera User Manual 51
Page 56

6BAppendix B: Camera settings checklist
Camera ID: Camera title:
Main
Menu
No.
Menu Sub menus and options
1 Language English, French, German, Italian, Portuguese, Spanish
Option
configured
1 Default
Camera
System Reset, Default System, Default Camera
1 Backlight On, Off
1 Focus Auto (manual return to Auto)
1 Exposure
Control
Exposure Comp.
Exposure Control
Off, Exposure Value -10.5 dB to
+10.5dB
Auto
Shutter Shutter Speed
PAL: 1/50 to
1/10000 sec.
NTSC: 1/60 to
1/10000 sec.
Iris Iris Value F1.6
Manual
Bright Value:
Auto
Shutter Speed
PAL: 1/50 to
1/10000 sec.
NTSC: 1/60 to
1/10000 sec.
Iris Value F1.6
Gain Value: 3 dB to +28 dB
1 White Balance
Auto (Auto White Balance)
Indoor
Outdoor
ATW
Manual
R Gain : 000 to 127
B Gain: 000 to 127
1 Zoom Speed 8
Camera Setup
Digital Zoom On, 1x, 2x, 3x, 4x, 5x, 6x, 7x, 8x, 9x,
10x, 11x, 12x
Auto Slow Shut On, Off
2D N.R. On, Off D.N.R.
3D N.R. On, Off
Video Invert On, Off
52 TruVision Mini PTZ 12X Camera User Manual
Page 57

6BAppendix B: Camera settings checklist
Main
Menu
No.
Menu Sub menus and options
Option
configured
Image Freeze On, Off
Aperture 01 to 16 (7)
1 Pan Tilt Setup
Image Flip Off, Spin, E-flip
Adjust Min. Angle -10 to +10 deg. Tilt Limits
Adjust Max. Angle 80 to 100 deg.
Proportional Speed On, Off
Auto Cal. On, Off
Password On, Off
OSD Auto Close Off, 1 min, 2 min, 3 min, 4 min, 5 min.
2 Site ID On, Off
2 Area Title On, Off
2 Title Setting 01 to 16
Preset Set 001 to 256 2 Preset
Show Preset 001 to 256
2 Preset Tour
Preset Tour 1 to 8
P Tour Step 01 to 64
Preset Pos. 001 to 255, End
Speed 01 to 15
Dwell Time 000 to 127 sec.
Show P Tour Sequence ENTER
2 Autopan
Autopan 1 to 4
Start Point To Find, To Save
End Point To Find, To Save
Direction Right, Left
Speed 01 to 04
Show P Tour Autopan
2 Shadow Tour
Shadow Tour 1 to 8
Record Start
Record End
Show P Tour Autopan
TruVision Mini PTZ 12X Camera User Manual 53
Page 58

6BAppendix B: Camera settings checklist
Main
Menu
No.
Menu Sub menus and options
2 Auto Return Enter
Auto Threshold Mid, Hi, Low 3 Day/Night
(Optional)
3 Alarm Setting
Manual IR Manual: On, Off
Alarm Contact 1 to 8
Option
configured
Auto Return On, Off
Return Action
Preset
Preset Tour
Autopan
Shadow Tour
Preset Point
Preset Tour
001 to 256
001 to 008
Autopan
Shadow Tour
001 to 004
001 to 008
Return Time 001 to 128 min.
Go
Alarm On, Off
Contact Type NO, NC
Alarm Action
Preset
Preset Tour
Autopan
Shadow Tour
Preset Point
Preset Tour
001 to 256
001 to 008
Autopan
Shadow Tour
001 to 004
001 to 008
Relay Action 001 to 127 sec., Always, Off
3 Alarm Detect None
3 Privacy Mask
Privacy Switch On, Off
Transparency On, Off
Color Black, White, Red, Green, Blue, Cyan,
Yellow, Magenta
H Center: L/R
Set Mask 01 to 16
V Center: D/U
H Size 00 to 80,
54 TruVision Mini PTZ 12X Camera User Manual
10
V Size 00 to 60,
10
Page 59

6BAppendix B: Camera settings checklist
Main
Menu
No.
3
Menu Sub menus and options
Time/Date
Time Display
On, Off
Option
configured
Set Year 00 to 99
Set Month 01 to 12
Set Day 01 to 31
Set Hour 00 to 23
3 Schedule On, Off
Schedule
Set Minute 00 to 59
Day 01 to 31 01
Hour 00 to 23 00
Minute 00 to 59 00
None No Action
Preset Preset Point 001
Preset Tour Preset Tour 001
Event Action
to 256
to 008
Autopan Autopan 001 to
004
Shadow Tour Shadow Tour
001 to 008
IR Func. Day/Night Auto,
On, Off
3
Exit OSD
TruVision Mini PTZ 12X Camera User Manual 55
Page 60

6BAppendix B: Camera settings checklist
56 TruVision Mini PTZ 12X Camera User Manual
Page 61

Appendix C
Warranty and contact
information
Warranty information
The warranty period for the TruVision Mini PTZ 12X Camera is three years from the
date of delivery.
Contacting support
For help installing, operating, maintaining, and troubleshooting this product, refer to
this document and any other documentation provided. If you still have questions,
contact us during business hours (Monday through Friday, excluding holidays).
Table 28: Technical support
North America
T 888 GE Security (888.437.3287) Toll-free in the US, Puerto Rico, and Canada.
503.885.5700 outside of the toll-free area.
F 888.329.0332 (Tualatin tech support)
561.998.6232 (Boca Raton tech support)
E nstechsrv@ge.com
gesecurity.customerservice@ge.com
Europe, Middle East, and Africa
W Select Customer Support at www.gesecurity.eu
Australia
E techsupport@gesecurity.com.au
TruVision Mini PTZ 12X Camera User Manual 57
Page 62

7BAppendix C: Warranty and contact information
Latin America
F 1 305.593.4300
E InfraSec.TechnicalServicesLatinAmerica@ge.com
InfraSecCustomerService.LatinAmerica@ge.com
China, India, Singapore, Taiwan, Southeast Asia
E ges.asiatechservice@ge.com
58 TruVision Mini PTZ 12X Camera User Manual
Page 63

Index
A
AE mode, 36
Alarms
settings, 43
Aperture, 38
Area title
display, 28
settings, 28
Auto calibration, 40
Auto exposure
settings, 36
Auto focus, 36
Auto return
settings, 34
Autopan
settings, 31
B
Backlight compensation
image quality, 35
Battery removal, 49
C
Cabling, 3
recommended cable gauge, 4
Camera communication protocols
set, 10
Camera defaults
reset, 35
Camera site ID
display, 27
set, 12
Checklist
menu settings, 51
Communication protocols
protocols supported, 10
Digital zoom, 38
DIP switches
location, 8
RS-485 communication block, 12
set camera communication protocol, 10
E
Exposure compensation, 36
I
I/O interface cable, 15
Image flip, 40
Image freeze, 38
Installation environment, 5
K
Keypad
navigate OSD menus, 25
use, 24
KTD-405 keypad, 24
L
Language
change, 27
M
Masking sensitive areas, 45
Mount camera
on concrete ceiling, 16
on wall, 18
N
Noise reduction, 38
O
D
Day/night
settings, 42
Default settings OSD menus, 51
Defaults
reset remotely, 35
TruVision Mini PTZ 12X Camera User Manual 59
On-screen information, 21
OSD menus
access programming menus, 25
description, 23
language selection, 27
navigate programming menus, 25
overview, 22
Page 64

Index
OSD menusdefault settings, 51
OSD timeout, 40
P
Pan/tilt
settings, 40
Passwords, 40
Preset points
settings, 29
Preset tour
speed, 30
steps, 30
Preset tour
dwell time, 30
settings, 30
Presets
show, 29
Privacy mask, 45
Product overview, 1
Proportional speed, 40
Protocols supported, 10
functions supported by third parties, 11
R
RS-485 communication
set, 12
S
Schedule preset point or functin
settings, 47
Shadow tour
settings, 32
Slow shutter, 38
System defaults
reset, 35
System requirements, 3
T
Tilt limits, 40
Time/date
settings, 46
V
Video invert, 38
W
White balance
settings, 37
Wire the camera, 15
60 TruVision Mini PTZ 12X Camera User Manual
Page 65

 Loading...