

Page 1

Guide
Intel® Centrino® with vPro™ Technology
Intel® Core™2 Processor with vPro™ Technology
Intel® vPro™ and Intel®
Centrino® Pro
Processor
Technology Quick
Start Guide
Based on Intel® Active Management Technology and LANDesk®
Management Suite 8.8
Version 1.8
October 2008
Page 2

Intel® vPro™ and Intel® Centrino® Pro Processor Technology Quick Start Guide
Contents
Preface.................................................................................................................................3
Intended Audience....................................................................................................................................................................................3
What This Document Contains...........................................................................................................................................................3
Process Overview..............................................................................................................4
Section 1: Deciding Which Provisioning Mode to Use .............................................5
Where do I go from here?.....................................................................................................................................................................5
Section 2 – Deploying Intel® vPro Using SMB (Basic) Mode Provisioning ............6
Process Flowchart....................................................................................................................................................................................6
Step 1: Configure Existing IT Infrastructure..............................................................................................................................7
Step 2: Verify Intel vPro Client Windows Drivers....................................................................................................................7
Step 3: Ensure Management Console Has the Correct Intel AMT Support.................................................................8
Step 4: Configure Intel vPro Client BIOS ......................................................................................................................................9
Step 5: Discover Intel vPro Clients Through the Management Console ...................................................................11
Step 6: Test Intel vPro Client Functionality.............................................................................................................................11
Step 7: Post Configuration...............................................................................................................................................................13
Section 3 – Deploying Intel vPro Using Enterprise (Standard and Advanced) Mode
Provisioning..................................................................................................................... 16
Process Flowchart.................................................................................................................................................................................16
Intel vPro Enterprise Setup and Configuration Flow...........................................................................................................17
Step 1: Configure Existing IT Infrastructure...........................................................................................................................18
Step 2: Verify Intel vPro Client Windows Drivers.................................................................................................................20
Step 3: Set Intel vPro Password and TLS mode in Management Console...............................................................20
Step 4: Configure Intel vPro Client Authentication Settings..........................................................................................21
Step 5: Discover Intel vPro Clients through the Management Console ....................................................................27
Step 6: Test Intel vPro Client Functionality.............................................................................................................................28
Step 7: Post Configuration...............................................................................................................................................................29
Appendix A: Troubleshooting...................................................................................... 32
An example of Successful Provisioning......................................................................................................................................34
An example of an unsuccessful Provisioning ..........................................................................................................................36
Appendix B: Glossary of Terms used in this guide................................................. 39
2
Page 3

Intel® vPro™ and Intel® Centrino® Pro Processor Technology Quick Start Guide
Preface
This document provides the high level steps required to deploy desktop and notebook PCs with Intel®
vPro™ technology. It does not provide step-by-step procedures for completing those high level steps,
but instead provides links to more detailed information where such step-by-step procedures may be
found.
Intended Audience
This Quick Start Guide is intended for Information Technology (IT) prof essionals, system integrators,
and other technical specialists with experience deploying computer systems and networking
technologies in an Information Technology environment. It is not intended for general audiences.
What This Document Contains
Section Description
Process Overview Provides a brief overview of the overall deployment process; lists high
level steps, including decisions to be made, which are explained in
more detail in subsequent sections.
Deciding Which Provisioning Mode To
Use
Deploying Intel vPro Using SMB (Basic)
Mode Provisioning
Deploying Intel vPro Using Enterprise
(Standard and Advanced) Mode
Provisioning
Appendix A: Troubleshooting Provides information on correcting problems that may arise during
Appendix B: Glossary Provides a list of terms used in this document and their definitions.
Provides the necessary information to make the decision as to which
provisioning mode will best suit your deployment needs based on the
size and complexity of your IT environment.
Provides the overall steps to deploy Intel vPro based systems into your
IT environment using SMB (also known as Basic) mode provisioning.
Provides the overall steps to deploy Intel vPro based systems into your
IT environment using Enterprise (composed of both Standard and
Advanced) mode provisioning.
deployment.
3
Page 4

Intel® vPro™ and Intel® Centrino® Pro Processor Technology Quick Start Guide
Process Overview
Intel® Active Management Technology1 (Intel® AMT) provides significant flexibility in order to meet the
needs of various customer environments. This flexibility requires that customers make a number of
decisions when planning and implementing their deployment of Intel AMT-enabled systems.
The overall deployment process is shown below:
• Install the LANDesk Management System (LDMS) agent on each clien t system. Since you will
ultimately be utilizing the LA NDesk Management Suite to manage your vPro clients the LANDesk
Client Agent should be installed prior to provisioning Int el vPro. You can either push the client
agent from the LANDesk Management Console or in the case of the One-Touch provisioning you
can pull the client agent from the LANDesk Management Console. By having the client agent
installed prior to provisioning the Intel vPro client you are not subject to your DNS resolving the
host name and therefore provisioning should be fairly quick and easy.
• Decide which provisioning mode to use (SMB or Enterprise). This decision determines which of
the subsequent sections of this guide you will use to accomplish the remaining steps (below).
See Section 1 for information on deciding which provisioning mode to use.
• Install or validate infrastructure component s (D NS, DHCP, SQL Server, etc.).
• Ensure required Windows* drivers (for SOL and IDE-R) are installed on vPro clients.
• Configure your management console to manage Intel vPro clients.
• Configure Intel vPro components (Intel M E and Intel AMT) in Intel® Management Engine BIOS
Extension (Intel® MEBx) on Intel vPro clients.
• Discover Intel vPro clients in your management console.
• Test Intel vPro client management functionality in your management console.
• Perform post configuration steps (IT support process changes, maintenance procedures, etc.).
For Additional Information: Most sections will hav e a reference to additional information. Below is the
URL where you can locate the documents referenced throughout the paper.
LANDesk® - http://download.intel.com/business/vpro/pdfs/landesk_whitepaper.pdf
Note: If you decide to use Enterprise mode provisioning, the process described above can vary
significantly depending on whether or not you plan to use Remote Configuration, which uses Public Key
Infrastructure (PKI) to authenticate communication between the provisioning server and the Intel vPro
clients, and automates some of the steps above. See the flow chart in the next section below for a
visual representation of the overall provisioning process, and the various “paths” through it depending
on which provisioning mode and method you choose.
1. Intel® Active Management Technology (Intel® AMT) is a hardware-based technology that facilitates remote out-o f-band
management of computers by use of a small secondary processor located on the motherboard.
This out of band (OOB) controller has embedded firmware that runs on the Intel® Management Engine (Intel® ME), a separate
small ARC architecture processor built into either the North Bridge or NIC of the motherboard. The Intel AMT firmware is stored in
the same SPI flash memory component used to store the BIOS and is generally updated along with the BIOS.
4
Page 5

Intel® vPro™ and Intel® Centrino® Pro Processor Technology Quick Start Guide
Section 1: Deciding Which Provisioning Mode to Use
Before starting the deployment, you must decide which provisioning mode to use: SMB or Enterprise.
Note: SMB mode, which stands for “Small-Medium Business,” is also known as “Basic” mode, and
Enterprise mode can be divided into “Standard” and “Advanced” modes, based on whether you require
Transport Layer Security (TLS) certificate-based encryption for you management traffic.
Several factors should be considered in deciding which provisioning mode to use, such as security
requirements, size of organization, and existing IT infrastructure.
The primary difference between SMB and Enterprise modes is the ability to encrypt management traffic.
In the Advanced Enterprise mode, all management traffic may be encrypted with Transport Layer
Security (TLS). In SMB mode and the Standard Enterprise mode the traffic is not encrypted.
The other major difference in provisioning modes is how the client system receives its configuration
information. In Enterprise mode, you can use manual, one-touch, or remote configuration options, or
have your OEM pre-provision the client systems before shipment. In SMB mode, you must manually
provision each client system.
The following questions can help you decide which mode to use.
Question Yes No
Do your security needs require that
all traffic from a management
console to the Intel vPro machine be
encrypted?
Is your IT infrastructure set up to
support either Static IP or Windows
Workgroups?
Is your organization small enough to
provision each system manually?
You must choose Enterprise
Advanced mode.
You should choose SMB (Basic)
mode; manual management of the
client host list is required.
You may choose either SMB or
Enterprise
You may choose either SMB or
Enterprise
You may choose either SMB or
Enterprise
You should choose Enterprise
Where do I go from here?
Selected provisioning mode: Go to:
SMB Section 2 – Deploying Intel® vPro Using SMB (Basic) Mode Provisioning on
page 6
Enterprise Section 3 – Deploying Intel vPro Using Enterprise (Standard and Advanced)
Mode Provisioning on page 16
5
Page 6
Intel® vPro™ and Intel® Centrino® Pro Processor Technology Quick Start Guide
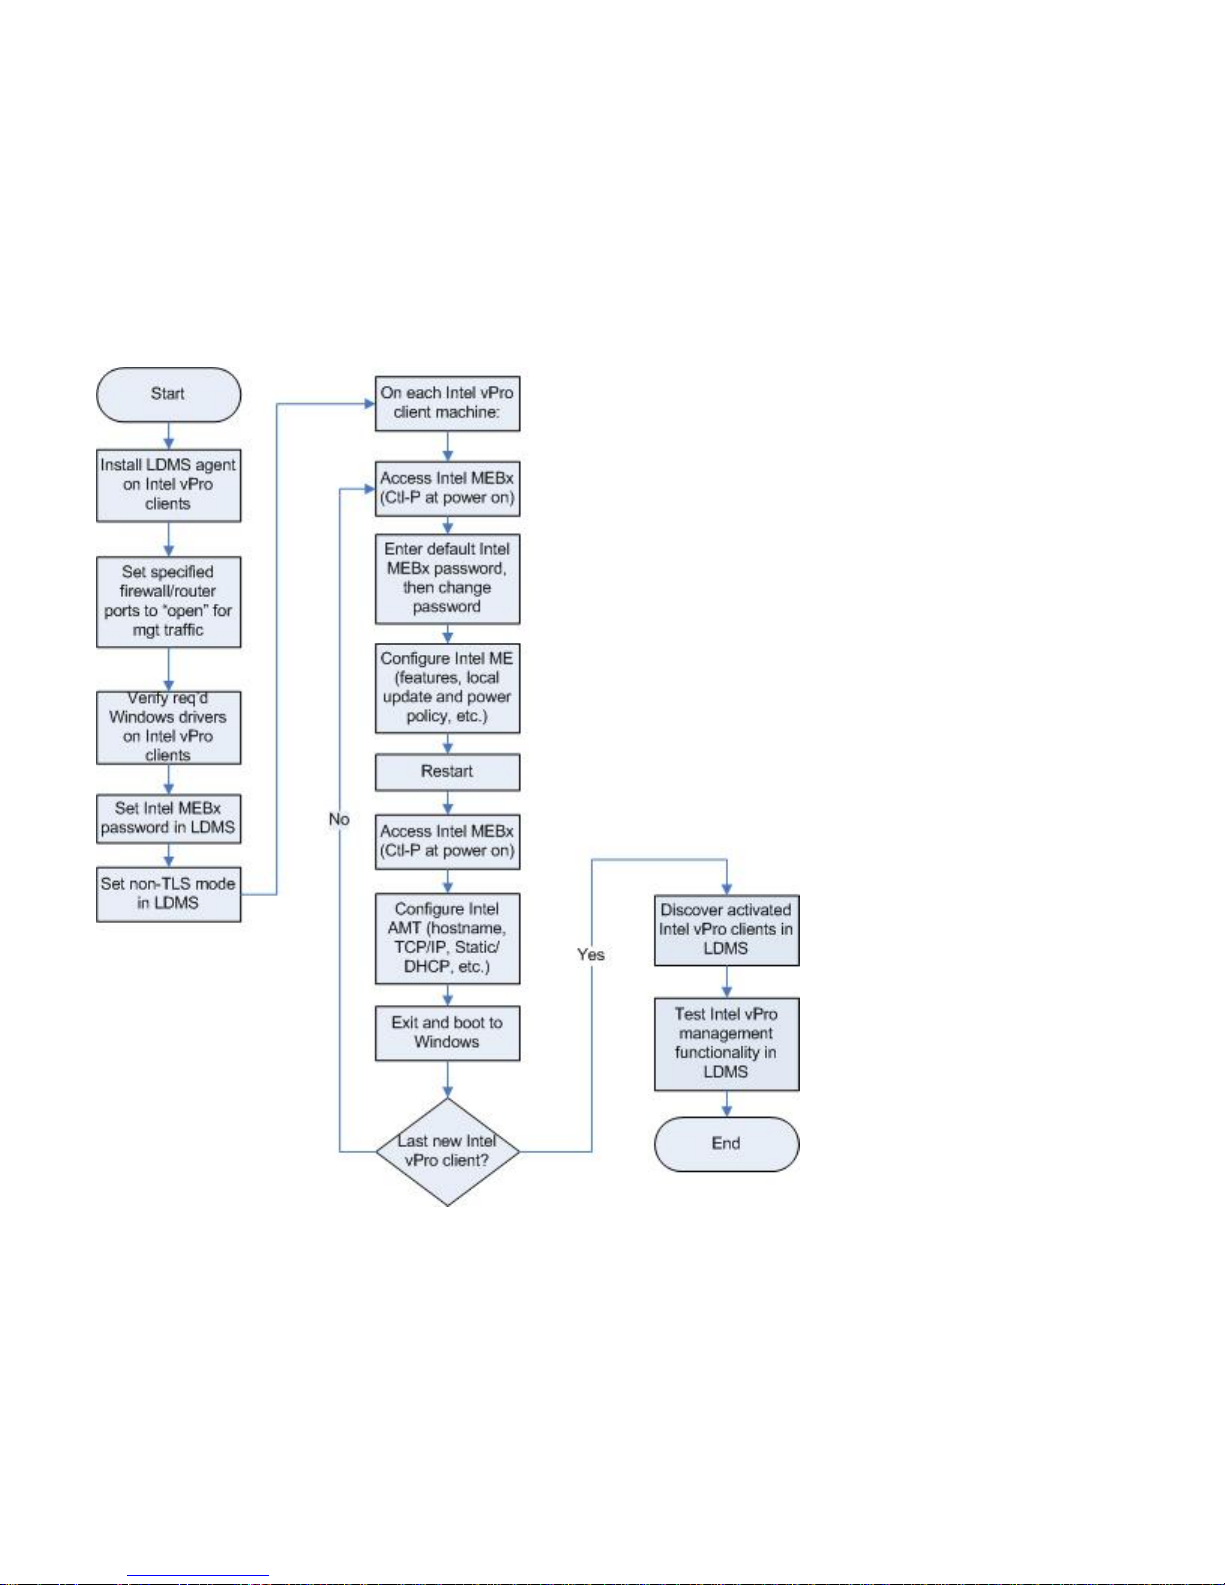
Section 2 – Deploying Intel® vPro Using SMB (Basic)
Mode Provisioning
Process Flowchart
The following picture shows the overall process flow f or provisioning Intel vPro client systems in SMB
mode. The steps are described in further detail in this section.
6
Page 7

Intel® vPro™ and Intel® Centrino® Pro Processor Technology Quick Start Guide
Step 1: Configure Existing IT Infrastructure
Step 1a: Choose DHCP or Static IP Addressing for Client Systems.
If your IT environment requires the use of static IP addresses, be aware that the Intel AMT client must
then have two IP addresses: one for the host OS and one for the Intel Management Engine (Intel ME).
Use of static IP addresses also requires that the host OS and Intel ME on the client system have
separate host (computer) names.
DHCP is recommended if it is supported in your IT environment. This allows the Intel AMT client to
share a single IP address and hostname with the client OS. If static IP addressing is required for some
applications, use reserved addresses for those clients that require a static IP address. This allows the
application that requires a static IP address to meet its requirements, but allow s Intel AMT to use one IP
address and hostname instead of two.
If using DHCP, configure DHCP to support Option 81 so that the client provides its fully qualified domain
name (FQDN) to the DHCP server, as well as instructions on how the DHCP server should process DNS
updates for the client. Option 15 should also be enabled in the DHCP Scope Options to allow the DNS to
resolve host queries after IP address changes.
Step 1b: Set Firewall/Router Ports
Set Firewall/Router Ports 16992 and 16994 to “open” for Intel AMT management traffic.
Step 2: Verify Intel vPro Client Windows Drivers
The following Intel AMT drivers, which are digitally signed by Intel and compatible w ith Microsoft
Windows* operating systems (including Windows 2000, Windows XP, and Windows Vista*), are required
on the Intel AMT client platform. Obtain these drivers from your client system manufacturer’s driver and
download support pages (most client drivers and Intel MEBx updates are contained on the same support
web page by the OEM).
• Intel® Management Engine Interface (Intel MEI) driver -- Provides a secure local
communications interface between the host operating system and the Intel ME via the Intel MEI.
• Serial-over-LAN (SoL) driver -- Enables a COM port for VT100 or ANSI remote sessions prior to
graphic interface when the operating system loads. You can view and send commands to a
remote client prior to the operating system loading, including en tering into the BIOS, viewing
POST, etc.
• Local Management Service (LMS) driver –Provides an interface enabling local management
software agents to communicate with the Intel Management Engine using the same high-level
protocols as those used for remote management (e.g. XML, SOAP). When first loaded, the driver
will cause a pop-up to occur to confirm that Intel AMT is running. The pop-up can be disabled. As
the Intel AMT firmware is updated, this driver is most likely to require a coordinated update as
new features are enabled. The driver also checks for consistency of the Intel AMT hostname and
the operating system host name.
7
Page 8

Intel® vPro™ and Intel® Centrino® Pro Processor Technology Quick Start Guide
It is recommended that the LANDesk client agent also be installed, although it is not required.
Discovery of the Intel vPro machine will differ depending on whether the client agent is installed. See
Step 5: Discover Intel vPro Clients Through the Management Console on page 11 for further
in
formation.
Step 3: Ensure Management Console Has the Correct Intel AMT
Support
The Intel vPro features included in LANDesk Syst em Manager (LSM) are now built into LANDesk
Management Suite (LDMS) 8.8. This is a change from LDMS 8.7 where both LDMS and LMS were
required for full Intel vPro functionality. L DMS 8.8 supports all Intel AMT features including System
Defense and Agent Presence. LDMS 8.8 also supports both the wired and wireless functionality of
systems based on Intel® Centrino® 2 with vPro™ technology.
Step 3a: Set Password:
1. In the LANDesk Configure Services tool, enter a strong password on the Intel vPro
Configuration tab.
2. In the Current Intel vPro Credentials area, enter the current name and password for the
Intel MEBx. This name and password will be used to enter the Intel M EBx after the original
provisioning process has finished.
The Intel Management Engine BIOS Extension (Intel MEBx) is an option ROM module extension
to the system BIOS. It.is provided to the OEM by Intel. The Intel MEBx allows you to
configure settings that control the operation of the Management Engine which runs on the Intel
AMT client. For more information on Intel MEBx, see the Intel Management Engine BIOS
Extension User’s Guide.
Note: Use the same password in step 4c below when you change the Intel MEBx password on
the Intel vPro client.
3. Leave the bottom half of the screen, Provision with new Intel vPro Credentials, blank at
this time.
8
Page 9

Intel® vPro™ and Intel® Centrino® Pro Processor Technology Quick Start Guide
Step 3b: Select TLS or non-TLS mode.
Under the Discovery & Provisioning portion of the dialog box you’ll find two options:
• Provision in TLS mode for secure communication
• Provision in non-TLS mode
Since you have made the choice to use SMB mode, select “Provision in non-TLS mode,” then click
Apply.
Step 4: Configure Intel vPro Client BIOS
Step 4a: Confirm You Have the Latest BIOS and Firmware Version
Visit your Original Equipment Manufacturer (OEM) website to determine if you have the latest versions
of BIOS and firmware. If an update is needed, follow the instructions provided by the OEM to
implement the update.
Examples of OEM BIOS updates include:
• HP:
http://h20000.www2.hp.com/bizsupport/TechSupport/So
ameId=3232116&prodTypeId=12454&prodSeriesId=3232030&swLang=13&taskId=135&swEnv
OID=1093
• Lenovo: http://www-307.ibm.com/pc/support/site.wss/MIGR-67881.html
• Dell:
http://support.dell.com/support/downloads/driverslist.aspx?c=us&l=en&s=gen&ServiceTag=&Sy
stemID=PLX_PNT_P4_745C&os=WW1&osl=en&catid=&impid=
ftwareIndex.jsp?lang=en&cc=us&prodN
Step 4b: Enter the Intel MEBx
There are two methods to enter the Intel MEBx.
• Ctrl-P: Start the Intel AMT enabled system. After the BIOS settings screen has passed, another
screen is displayed prompting you to enter Ctrl-P. Type Ctrl-P to enter the Intel MEBx.
• BIOS: Some local OEMs have chosen to have the Intel MEBx be a portion of their regular BIOS
menu system. In this case enter the keystrokes to launch their BIOS settings screen (usually F2
or Del).
Step 4c: Change the Intel MEBx Password
Upon entering the Intel MEBx for the first time, you will be required to enter the default password,
which is “admin.” When you enter the Intel ME Bx for the first time, you will be prompted to change the
password. The Intel MEBx password must meet “strong” password criteria which include:
• Be between 8- and 32-characters long
9
Page 10

Intel® vPro™ and Intel® Centrino® Pro Processor Technology Quick Start Guide
• Contain both upper and lower case Latin characters
• Have at least one numeric character
• Have at least one ASCII non-alphanumeric character (!, @, #, $, %, ^, &, *)
Step 4d: Select an IP Addressing Scheme
SMB mode supports both Static IP and Dynamic Host Protocol Configuration (DHCP). DHCP is the most
commonly used scheme today and provides the easiest integration with Intel AMT. If DHCP is your
choice, simply ensure that the DHCP value is set properly in the MEBx (“DHCP Disabled? No”).
If you choose static IP addressing, the Intel AMT client must have two IP addresses, one for the host OS
and one for the Intel Management Engine (Intel ME). Static IP addressing also requires a separate host
(computer) name for the host OS and the Intel ME. To select static IP addressing, select “DHCP
Disabled? Yes.” You’ll then be prompted to enter the IP information including IP address, subnet
mask, default gateway, and primary and secondary DNS server.
A host name must be entered into the Intel MEBx whether you choose static IP or DHCP within SMB
mode. It is not necessary to enter the Domain name into the Intel MEBx for SMB mode.
Step 4e: Set Additional Intel MEBx Parameters
There are a number of parameters that you can change in the Intel MEBx. All fields have a default
setting that may vary slightly depending on the sy stem’s manufacturer. However, you’ll need to pay
particular attention to the following settings for SMB mode.
Setting Description or value
Intel AMT Configuration Mode Set to SMB
Configuration Server Options Not needed because these apply only to enterprise mode
Intel AMT Hostname In SMB mode this is required. If you use DHCP, this must match
computer name in the host OS. If you use static IP addressing, this
name must be unique from the computer name in the host OS.
Intel AMT Domain Name This will match the Domain Name in the Host OS
DHCP Enabled DHCP is recommended, but in SMB, both DHCP and Static IP addressing
are supported
Refer to documentation provided by your hardware manufacturer to determine which settings you need
to change.
For an example of an OEM configuration document:
• HP dc7700 Business PC - http://www.icare.hp.com.cn/TechCe
nter_StaticArticle/37022/44474.pdf
10
Page 11

Intel® vPro™ and Intel® Centrino® Pro Processor Technology Quick Start Guide
Step 5: Discover Intel vPro Clients Through the Management Console
Discovery of the Intel vPro devices varies depending on whether the latest LANDesk client agent is
loaded.
Discovery Without the LANDesk Agent Installed on the Client:
1. In LANDesk, navigate to the Unmanaged Device Discovery (UDD) tab. The bottom half of the
UUD tab displays the undiscovered devices,
2. On the UUD tab, click the Intel AMT category to display the discovered Intel vPro machines.
Allow a few minutes for the Intel AMT client to display as the LANDesk Core Database must
complete a refresh before the Intel AMT client appears. If the client still does not display after
a few minutes, click on the refresh icon in the UDD tool bar (second icon from left).
3. Move the Intel vPro machines to your management database by right-clicking one of the
devices and selecting Move to Inventory Database. Repeat for each Intel vPro machine.
4. Click the All Devices list to see the Intel vPro machines. You may need to click Refresh if the
All Devices list was already displayed when you moved the Intel vPro machines.
5. Right click an Intel vPro machine to see all the Intel AMT selections available.
Discovery With the LANDesk Agent Installed on the Client:
No explicit action is required to discover Intel vPro client systems if the LANDesk Agen t is installed on
them. If the LANDesk Agent is installed on the client system, then that client system will already be
listed in the All Devices list in LANDesk.
However, when you activate the Intel Management Engine (Intel ME) on the client using the process
described in Steps 3 and 4 on the preceding pages, you will then see the Intel vPro selections available
for that client when you righ t click on it in the All Devices list.
Step 6: Test Intel vPro Client Functionality
After the device has been discovered and added to the management database, it is a good idea to test
the functionality of the Intel vPro machine. Perform the following steps to test the Intel AMT client
functionality.
Step 6a: Test Intel AMT Client Functionality From LANDesk
1. In the All Devices list, right-click an Intel AMT device to display the menu of Intel AMT Options.
2. At a minimum, look at the following Intel AMT Options to test that the Intel AMT configuration
has been successfully completed:
o Intel AMT Summary
11
Page 12

Intel® vPro™ and Intel® Centrino® Pro Processor Technology Quick Start Guide
o Remote Boot Manager – Power On/Off
o Remote Boot Manager using Console Redirection (Serial over LAN /SOL) and IDE
Redirection
For further information on testing these features, refer to the following whitepaper:
• Integrating Intel® vPro™ Technology with LANDesk® Management Products
http://download.intel.com/business/vpro/pdfs/landesk_whitepaper.pdf
Step 6b: Test Intel AMT Client Functionality Using Intel AMT Web Console
1. On the management console system, login as an administrator with user rights.
2. Open a web browser and enter the IP address and assigned port number (16992) in the
browser address bar (example, http://192.168.0.1:16992).
The following web browsers are supported:
o Internet Explorer* 6.0 SP1
o Netscape* 7.2 for Windows and Linux
o Mozilla Firefox* 1.0 for Windows and Linux
o Mozilla 1.7 for Windows and Linux
3. Once the Intel AMT Configuration Web Page is displayed, login using ”admin” as the username
and the Intel MEBx “strong” password you created in Step 4c on page 12. You can then view
the following client management information:
o System Status
o Hardware Information
o Event Log
o Remote Control
o Network Settings
o User Accounts
12
Page 13

Intel® vPro™ and Intel® Centrino® Pro Processor Technology Quick Start Guide
Step 7: Post Configuration
Once you’ve deployed and configured your Intel vPro client machines, there are still some additional
actions you should consider.
Adding New Devices:
As new Intel vPro clients are added to the network you will need to perform the deployment process
described above to activate Intel AMT on the new devices, discover the new devices, and then add them
to your management database. This procedure should be added to your standard maintenance
procedures.
Updating Procedures to Include Intel AMT Features:
Work with your management console to determine how best to ut ilize the new capabilities available to
you through your Intel vPro devices. Further, it is a good idea to update your procedures to utilize Intel
vPro features, such as those procedures your help desk staff follow when helping users. For example,
you will want to update the process to re-image a PC that has blue screened at a remote site using the
new Intel AMT features (i.e., SOL and IDE – Redirection) now available in your management console.
Using Agent Presence (AP):
Agent Presence (AP) monitors for the existence of agents. The LANDesk client agents must be installed
on the client PC in order to use AP. AP is automatically configured when the LANDesk client agents are
installed. However, you can perform additional configuration in the Configure | Intel vPro Options |
Agent Presence | Configuration page of the LDMS console.
Agent Presence is either enabled for all managed Intel AMT 2.x machines or disabled for all machines. It
cannot be enabled or disabled for specific machines. AP enabling is controlled by the Enable Agent
Presence Monitoring check-box in the configuration page mentioned above.
By default, AP monitors the following two processes on the client machine:
Agent Reason for AP Monitoring
LANDesk Management Agent (RESIDENTAGENT.EXE) The LANDesk Management Agent is monitored because
most of the Client\Server communication between
LANDesk agents and the LANDesk Core is done through
this agent.
LANDesk Monitoring Service (COLLECTOR.EXE) The LANDesk Monitoring Service is monitored because
it is the heart of the LANDesk monitoring system.
While these agents are running you can monitor any other service on the client machine using the LSM
service monitoring tool. These agents and their descriptions are defined in AGENTPRESENCE.XML which
is sent down to the Intel AMT non-volatile memory (NVM) storage area on the client Intel AMT machine
and subsequently read by the LANDesk agent to determine what it should monitor.
13
Page 14

Intel® vPro™ and Intel® Centrino® Pro Processor Technology Quick Start Guide
Once AP starts on the client (default startup time is 6 minutes after the client is powered on), if the
COLLECTOR.EXE process is killed or the LANDesk Management Agent service is stopped, an AP alert is
generated. AP start and stop alerts are displayed in the LSM log, not the Intel AMT Event Log.
Note: If the COLLECTOR.EXE process is killed, restart it by running RESTARTMON.EXE, which is located
in the LDCLIENT folder on the client system.
LANDesk Management Suite 8.8 has the ability to have Agent Presence trigger a System Defense policy
to isolate the client system from the network. This can be done by creating an Intel AMT Agent
Presence alert in the LSM console (under the Core Ruleset) with the action of “Place in the Intel AMT
Remediation Queue.” With this alert rule in place, if a monitored process on the client is stopped, an
Agent Presence alert is generated by Intel AMT and sent to the LANDesk core server. The core server
will then issue a System Defense policy to the client that will stop all network traffic except for LANDesk
management traffic, Intel AMT traffic, DNS traffic, and DHCP traffic, thus isolating the client system
from the network except for system management functions.
Using LANDesk* Out-of-Band Monitor (AMTMON) Features:
LANDesk 8.8 has the ability to disable the network on the client at the OS level. This is not done
through the System Defense feature, but rather through LANDesk agents and communication via the
Intel AMT non-volatile memory (NVM) area. When you select to disable or enable the network on that
client, a flag is set in NVM on the client, which is monitored by the service LANDesk* Out-of-Band
Monitor (AMTMON.EXE). The AMTMON service disables or enables the network on the client based on
the value of the flag in NVM. AMTMON can also run a vuln erability scan on the client at the next
restart, if that flag is set. A message dialog is displayed on the client system whenever these three
operations are performed.
Note: Do not ping the Intel AMT client to test if the network is disabled. Intel AMT will still respond to
pings.
System Defense (SD):
System Defense (SD) does not require any agents to be inst alled on the Intel AMT client machine.
System Defense policies may be configured on a per-machine basis.
There are four pre-defined SD policies:
• An FTP access policy which will trigger SD if an FTP access is made either to or from the Intel
AMT client machine.
• A UDP flood policy which will trigger SD if Intel AMT sees at least 20,000 UDP packets per second
and will monitor for a Denial-of-service attack.
• An SYN flood policy which will trigger SD if Intel AMT sees at least 20,000 IP packets per second
and will monitor for a Denial-of-service attack.
14
Page 15

Intel® vPro™ and Intel® Centrino® Pro Processor Technology Quick Start Guide
• A Kill All NICs policy which will stop all network tr affic except for LANDesk management, Intel
AMT, DNS, and DHCP traffic, thus isolating the client system from the network except for system
management functions.
Note: In LANDesk 8.8 there is no GUI to create or modify System Defense filters or policies. Currently
all modifications have to be made to the XML pages used for System Defense.
Once SD triggers an alert, the alert is displayed in the LSM log. LANDesk and Intel AMT limit network
access by replacing the current client policy with the K ill All NICs policy when SD is triggered. The client
machine is also placed in the Remediation queue, which can be fou nd in Configure | System Defense
| Remediation. Once the machine is remediated, the Kill All NICs policy is removed and the prev ious
policy is re-applied. The administrator must manually perform the actual remediation of removing the
virus or spyware, or fixing whatever caused the SD to be triggered.
15
Page 16

Intel® vPro™ and Intel® Centrino® Pro Processor Technology Quick Start Guide
Section 3 – Deploying Intel vPro Using Enterprise
(Standard and Advanced) Mode Provisioning
Process Flowchart
The following picture shows the overall process flow fo r provisioning Intel vPro client systems in
Enterprise (Standard and Advanced) mode. The steps are described in further detail in this section.
16
Page 17

Intel® vPro™ and Intel® Centrino® Pro Processor Technology Quick Start Guide
Intel vPro Enterprise Setup and Configuration Flow
Prior to executing the steps for configuring the Intel v Pro components (Intel AMT and Intel ME) in
Enterprise mode (either Standard or Advanced), it is first important to understand the overall flow of
the Enterprise mode configuration process (recall that the main difference between Standard and
Advanced is that if you provision your clients in Advanced mode, all management traffic between the
management console and the managed clients will be encrypted using cert- based encryption).
In Enterprise mode, an Intel vPro machine receives its configuration settings over the network, once it
has been prepared with some initial setup information. The f o llowing diagram shows the modes or
states that an Intel vPro device passes through before it becomes operational.
Intel vPro Configuration States:
1. Factory State
– AMT disabled
– No network configuration
– No security credentials
2. Setup State
– AMT enabled
– Basic network configured
– Admin credentials loaded
3. Configured State
– AMT fully configured (e.g power policies)
– Security credentials fully loaded
– Ready for remote management
SETUP
SETUP
(Pre--
Provisioning))
(Pre
Provisioning
CONFIGURATION
CONFIGURATION
(Provisioning)
(Provisioning)
Factory State: An Intel vPro machine comes from the OEM in Factory State. In this state Intel AMT is
un-configured and not available for use by management applications. When an operator enters
information via the Intel Management Engine BIOS extension (Intel MEBx) manually or with the aid of a
USB storage device, the Intel vPro machine makes the transition into the setup state. See Step 3 –
Configure AMT Client BIOS for instructions on how to prepare an Intel vPro machine to receive its
configuration settings from a Setup and Configuration Application (SCA) which is inherent in LDMS.
Setup State: When an Intel vPro machine enters Setup State it waits for delivery of its configuration
settings from the LDMS core server. After it enters setup mode, the Intel vPro machine periodically
sends messages to the LDMS core server. When the LDMS core server receives messages from the Intel
vPro machine, it responds by delivering the configuration settings and placing the device in Operational
State.
Operational State: The Intel vPro machine enters Operational State once its configuration settings
have been supplied and committed. At this point the Intel vPro machine is ready to interact with
management applications.
17
Page 18

Intel® vPro™ and Intel® Centrino® Pro Processor Technology Quick Start Guide
Step 1: Configure Existing IT Infrastructure
In order for an Intel vPro machine to be manageable, it must become known to the management
console. The process by which this occurs is called “provisioning”. Enterprise setup (pre-provisioning)
requires a series of steps that are performed on both the Intel vPro clients and the LANDesk core server
in order to prepare the client for provisioning over the network by the LANDesk core server (which acts
as the provisioning server for the Intel vPro clients).
Intel vPro Integration Points with IT Infrastructure Components
The following diagram shows the interaction w ith the different network elements. Each will be
discussed briefly in order to understand the integration requirement.
Manages
Management
Console
Intel®vPro™
Clients
Registers
DHCP
Updates
Manages
Core Server
Configuration Server
CA Server
Requests
SQL DB
DNS
DHCP Server: When an Intel vPro machine enters setup state, the default IP addressing scheme is
DHCP (that is, use DHCP to obtain an IP address). The Intel® Management Engine (Intel® ME) also
uses the DHCP server to help dynamically update the DNS server with its network address information.
The DHCP server must support Option 81 to register network address information into the DNS server
on behalf of the Intel ME. Option 15 should also be enabled in the DHCP Scope Options to allow the
DNS to resolve host queries after IP address changes.
DNS Server: The DNS Server is used by network devices such as Management Consoles to locate
address information for Intel vPro clients in order to contact them and manage them. The Intel vPro
clients may also use the DNS server during the provisioning configuration phase to locate the provision
server and request their configuration information, as explained below.
Once configured to the setup state, Intel AMT makes a DNS request for the name "ProvisionServer"
(unless you choose to configure the client’s BIOS manually). If the requested name cannot be resolved
by the DNS server, then a second request is made for "ProvisionServer.DomainName." Intel AMT
expects to either find the IP address of the provision server in this way, or by havin g it set explicitly in
the Intel MEBx configuration process (Step 4: Configure Intel vPro Client A
21). The Intel Management Engine BIOS Extension (Int
uthentication Settings, page
el MEBx) is an option ROM module extension to
18
Page 19

Intel® vPro™ and Intel® Centrino® Pro Processor Technology Quick Start Guide
the system BIOS.. It.is provided to the OEM by Intel. The Intel MEBx allows you to configure settings
that control the operation of the Management Engine which runs on the Intel AMT client. For more
information on Intel MEBx, see the Intel Management Engine BIOS Extension User’s Guide.
Step 1a: Manually register the “provision server” entry into the DNS server.
Manually resister the “provision server” entry into the DNS server.
Step 1b: Set Firewall/Router Ports Open for Management Traffic
Intel AMT requires certain ports to be “open” in order to allow management traffic through them. The
Intel AMT ports are 16992 (non-TLS), 16993 (TLS), 16994 (non-TLS redirection), 16995 (TLS
redirection) – these are IANA-assigned ports which Intel purchased. They cannot be changed. Port
9971 is used in Enterprise mode to listen for “Hello” packets. This port is configurable in the LDMS
console.
To change the port number on the LANDesk core server, do the following:
1. Go to the following registry key: SOFTWARE\LANDesk\Management Suite and create a key
named AMTDiscovery.
2. Create a DWORD with a name of Port and enter the value you would like to assign as the new
listening port for the discovery of the Intel AMT Hello packets. You will then need to restart
the LANDesk® Agentless Discovery Service or reboot the server.
NOTE: Please refer to your LANDesk documentation or contact LANDesk Professional Services for
details on performing LANDesk operations that affect the computer’s registry.
Step 1c: Database Server Integration:
Intel vPro machines will have information about them (inventory) stored in a repository used by the
management console. With LANDesk management products, Microsoft SQL and Oracle database
integration is available. Please refer to your LANDesk documentation on how to successfully integrate
into the database of choice.
19
Page 20

Intel® vPro™ and Intel® Centrino® Pro Processor Technology Quick Start Guide
Step 2: Verify Intel vPro Client Windows Drivers
The following Intel AMT drivers, which are digitally signed by Intel and compatible w ith Microsoft
Windows* operating systems (including Windows 2000, Windows XP, and Windows Vista*), are required
on the Intel vPro client platform. Obtain these drivers from your client system manufacturer’s driver
and download support pages (most client drivers and Intel MEBx updates are contained on the same
support web page by the OEM).
• Intel Management Engine Interface (Intel MEI) driver -- Provides a secure local
communications interface between the host operating system and the Intel ME via the Intel MEI.
• Serial-over-LAN (SoL) driver -- Enables a COM port for VT100 or ANSI remote sessions prior
to graphic interface when the operating system loads. You can view and send commands to a
remote client prior to the operating system loading, including en tering into the BIOS, viewing
POST, etc.
• Local Management Service (LMS) driver –Provides an interface enabling local management
software agents to communicate with the Intel Management Engine using the same high-level
protocols as those used for remote management (e.g. XML, SOAP). When first loaded, the driver
will cause a pop-up to occur to confirm that Intel AMT is running. The pop-up can be disabled. As
the Intel AMT firmware is updated, this driver is most likely to require a coordinated update as
new features are enabled. The driver also checks for consistency of the Intel AMT hostname and
the operating system host name.
It is recommended that the LANDesk client agent also be installed, although it is not required.
Discovery of the Intel vPro machine will differ depending on whether the client agent is installed. See
Step 5: Discover Intel vPro Clients through the Management Console on page 27 for further
in
formation.
Step 3: Set Intel vPro Password and TLS mode in Management
Console
The Intel vPro features included in LANDesk Syst em Manager (LSM) are now built into LANDesk
Management Suite (LDMS) 8.8. This is a change from LDMS 8.7 where both LDMS and LMS were
required for full Intel vPro functionality. L DMS 8.8 supports all Intel vPro features including System
Defense and Agent Presence. LDMS 8.8 also supports both the wired and wireless functionality of
systems based on Intel® Centrino® 2 with vPro™ technology.
Two pieces of information are required for Intel vPro in LANDesk: a password to access the Intel MEBx,
where Intel vPro configuration information is set; and the management network traffic security setting,
either TLS (secured) or non-TLS (unsecured).
To ensure Intel vPro support in your management console, do the following:
20
Page 21

Intel® vPro™ and Intel® Centrino® Pro Processor Technology Quick Start Guide
Step 3a: Set Intel MEBx Password
In the LANDesk Configuration Services tool, click the Intel vPro Configuration tab and enter a
strong password in the Current Intel vPro Credentials (top) portion of the screen. This is the
password you will use in the future if you need to access the In tel MEBx on any individual client system
after the initial provisioning process is complete. See the Intel MEBx User Guide for information on
accessing and using the Intel MEBx on an Intel vPro machine.
Leave the bottom half of the screen, Provision with new Intel vPro Credentials, blank.
Step 3b: Select TLS (Advanced mode) or non-TLS (Standard mode)
In Advanced mode, Transport Layer Security (TLS) is used to provide privacy and data integrity
between communicating applications. It allows for Client/Server applications to communicate in a way
to prevent eavesdropping, tampering, or message forgery. With LDMS, TLS is only available in
Enterprise Advanced mode provisioning with an Intel vPro machine. The LANDesk core server is used
to issue the certificates to the proper trusted devices within the network.
Under the Discovery & Provisioning portion of the dialog box you’ll find two options related to
encryption:
• Provision in TLS mode for secure communication
• Provision in non-TLS mode
If you are provisioning in Standard mode, select non-TLS mode. F or Advanced mode, select TLS mode
for secure communication. After making this selection, click Apply.
Step 4: Configure Intel vPro Client Authentication Settings
In Enterprise mode, configuring the authentication settings on the Intel vPro clients can be performed in
either of the following three ways:
• Remote Configuration (Intel AMT 3.0 or higher) – Step 4A below
• OEM pre-configuration – Step 4B below
• One-touch configuration (using a USB thumb drive or manual entry) – Step 4C below
Step 4A: Remote Configuration (Intel AMT 3.0 or higher) – Factory State to Configured
State
Remote Configuration uses matching certificate hashes on the Intel vPro clients and the provisioning
server to authenticate interaction between the clients and the server. Once the client and server
authenticate each other (i.e., the certificate hashes match), the provisioning server automatically
begins provisioning the client.
With Remote Configuration, you have two choices:
21
Page 22

Intel® vPro™ and Intel® Centrino® Pro Processor Technology Quick Start Guide
• Use your own root certificate, if you already have one
• Use one of the certificate hashes provided with Intel vPro (i.e., already on the client systems)
Using your own root certificate: If you already have a root certificate on your LANDesk core server
(the provisioning server), then you need to do one of the following:
• instruct your Intel vPro client manufacturer (OEM) to place a matching certificate hash on each
Intel vPro client during manufacture
• manually enter the matching certificate hash using t he Intel MEBx on each Intel vPro client
before deployment
If you instruct your OEM to load the certificate hashes onto y o ur Intel vPro clients, the clients will
already have a certificate hash that matches the existin g root certificate on your provisioning server
when they arrive. All you need to do is connect them to the network and power them on and they’ll
automatically provision themselves (assuming you’ve completed Steps 1-3 above). Then they will be in
a Configured state.
Skip to Step 5: Discover Intel vPro Clients through
the Management Console, on page 27.
Using one of the certificates provided with Intel vPro: If you want to use one of the certificates
provided with Intel vPro, you will need to purchase a matching root certificate, and load it onto your
LANDesk core server (the provisioning server). Once a matching root certificate is present on the
provisioning server, the Intel vPro clients will automatically authenticate themselves with the
provisioning server at power on, and will then automatically be provisioned by t he provisioning server.
The certificates are purchased from one of the approved Certificate Authority (CA) vendors, such as
VeriSign, Comodo, Go Daddy, and Starfield. Check with your OEM to see which of these CA vendors
they support. The certificates are placed in C:\Program
Files\LANDesk\ManagementSuite\amtprov\certStore.
1. Create a new folder named cert_1.
2. Copy the three files that were received from the CA vendor (trusted_cert.pem, corecacert.pem,
corecakey.pem) into the cert_1 directory. You can create up to eight cert folders to hold eight
different certs from different CAs.
3. Some CA vendors may name the certificates differently. To be consistent, renamed the files to:
o trusted_cert.pem (root cert)
o corecacert.pem (the cert user buys from the CA)
o corecakey.pem (the private key the administrator generated when they bought the cert).
o Trusted_cert_intermediate.pem (The certificate that CA’s use to issue the cert you buy.
This is issued by the root cert from each CA.)
When your Intel vPro clients arrive, they will already hav e a certif icate hash that matches the new root
certificate you just installed on your provisioning server. All you need to do is connect them to the
network and power them on and they’ll automatically provision t hemselves (assuming you’ve completed
Steps 1-3 above). Then they will be in a Configured stat e.
22
Page 23

Intel® vPro™ and Intel® Centrino® Pro Processor Technology Quick Start Guide
Skip to Step 5: Discover Intel vPro Clients through
the Management Console, on page 27.
Note: You can also test Remote Configuration using a LANDesk generated certificate. The appropriate
server certificates are already in place. However, the client hash needs to be placed into the Intel ME
BIOS on the Intel AMT 3.0 client. The client hash is automatically generated and stored at the
beginning of the AMTDiscService.log file. It will look something like this:
Fri, 30 Nov 2007 11:30:37 InitInstance()
Fri, 30 Nov 2007 11:30:37 LANDesk(R) Intel AMT Provisioning Service
Fri, 30 Nov 2007 11:30:45 sha1 hash: (32A1-F117-AB25-0E1B-482B-7EFE-C0BE-92A7-B090-
D416)
Fri, 30 Nov 2007 11:30:45 md5 hash: (D29A-E72B-1029-846C-CE50-4C52-82EC-8F24)
Fri, 30 Nov 2007 11:31:01 Hash added to DB
Fri, 30 Nov 2007 11:31:01 Server listens for incoming connections.
The administrator will need to place the sha1 hash in the ME BIOS on the client.
For further detailed information on obtaining and configuring certificates see file Installing VeriSign
Certificate for Landesk 8.8.pdf at web site http://communities.intel.com/docs/DOC-1639.
You can set several Intel ME and Intel AMT parameters in the LANDesk Management Suite (LDSM), just
as you would manually in the Intel MEBx directly on the individual client. Intel vPro parameters set in
the management console are applied to all Intel vPro machines being provisioned.
Step 4B: OEM Pre-configuration – Factory State to Configured State
Most OEMs are willing to provide the service of changing the Intel vPro client from factory state to setup
state by entering the password and client authentication information into the Intel ME Bx on each client
system for you. This often requires an additional fee to the OEM. This method is most useful when an
Intel vPro client machines are to be delivered directly to the end user from the manufacturer.
The authentication information (securit y keys) can be provided to the OEM for loading into the client
system’s BIOS (via the Intel MEBx), or the OEM could provide yo u with a list of keys they generated.
The keys must match between the Intel vPro machines and the management console. The
management consoles have an option to import and export keys to facilitate this transaction.
If you ordered your Intel vPro client systems pre-con figured with Intel MEBx password and client
authentication information already loaded by the OEM, then they are already in a Setup state. When
you connect the client systems to the network and power th em on they will automatically authenticate
themselves with the provisioning server and provisioning will occur (assuming you performed Steps 1-3
above). Then they will be in a Configured state, ready to be discovered and managed by the
23
Page 24

management console.
Intel® vPro™ and Intel® Centrino® Pro Processor Technology Quick Start Guide
Skip to Step 5: Discover Intel vPro Clients through
the Management Console, on page 27.
Step 4C: One-Touch Configuration of Intel vPro Client - Factory State to Setup State
The Intel vPro clients need authentication information configured on them so that they can authenticate
themselves to the provisioning server; otherwise the server won’t provision them. This authentication
information is made up of a Provisioning ID (PID) and a Provisioning Pass-phrase (PPS). Together they
are referred to as a PID-PPS pair. The server maintains a list of valid PID-PPS pairs, which is matched
against any incoming PID-PPS pair from a client requesting provisioning. If the client’s PID-PPS
matches one of the entries in the server’s list, th at client is provisioned.
Note. Do not confuse the TLS security keys that are part of management console interaction with the
Intel vPro machine and the TLS-PSK keys that are used during setup and configuration. These are
separate keys. Once the TLS-PSK keys are used during the setup and configuration stage, they are not
used again unless an Intel vPro machine is re-provisioned. Whereas, the other TLS keys are used for all
communications from the management console to the Intel vPro machine.
Step 4C-1: Confirm Latest BIOS Version: It is important that you use the latest BIOS and firmware
version from the Original Equipment Manufacturer (OEM). Please visit their website to determine the
latest versions. If an update is needed, follow the instructions provided by the OEM to implement the
update.
Examples of OEM BIOS updates
• HP:
http://h20000.www2.hp.com/bizsupport/TechSupport/So
ftwareIndex.jsp?lang=en&cc=us&prodN
ameId=3232116&prodTypeId=12454&prodSeriesId=3232030&swLang=13&taskId=135&swEnv
OID=1093
• Lenovo: http://www-307.ibm.com/pc/support/site.wss/MIGR-67881.html
• Dell:
http://support.dell.com/support/downloads/driverslist.aspx?c=us&l=en&s=gen&ServiceTag=&Sy
stemID=PLX_PNT_P4_745C&os=WW1&osl=en&catid=&impid=
Step 4C-2: Create PID-PPS security keys in LANDesk. Before you can configure the PID-PPS
information on the Intel vPro clients, you need to gen erate that information in the LANDesk
management console.
1. Open the LDMS console.
2. Open the “Configure” > “Intel vPro options” > “”ID Generation” option. An option to generate
Intel AMT IDs is displayed.
3. Generate the IDs. These IDs contain the PID-PPS pairs that you will then load onto your Intel
vPro client machines.
24
Page 25

Intel® vPro™ and Intel® Centrino® Pro Processor Technology Quick Start Guide
4. The console will display the values for manual entry into the Intel vPro machine, or there is an
option to export/import (at the bottom of the dialogue box) the security keys to a USB thumb
drive (filename setup.bin) for one-touch configuration.
If you want to use a USB thumb drive to easily transfer the Intel MEBx password and PID-PPS
security key information to the Intel vPro clients, continue to Step 4C-3, Configure Intel
vPro Clients Using a USB Thumb Drive. To manually configure the clients, go to Step 4C-
3a, Manually Configuring the Intel vPro Clients.
Step 4C-3: Configure Intel vPro Clients Using a USB Thumb Drive: In this method, the new
password and the PID/PPS keys are exported from the management console onto a USB thumb drive.
1. In LANDesk, select the option to export the PID-PPS security keys to a setup.bin file, then copy
the setup.bin file to a USB thumb drive.
2. Once you have exported the setup.bin file to a USB thumb drive, insert the USB drive into each
Intel vPro client system during boot up and the information is automatically transferred to the
Intel ME.
3. Once the authentication information is transferred, restart the system and let it boot to
Windows. The Intel vPro client will automatically aut henticate itself with the provisioning
server and provisioning will occur.
4. Repeat for each Intel vPro client system.
Note: You can only use the USB key to transfer the PID/PPS information to the Intel MEBx one time
per client system. A bit is set on the client once the transfer has been made and the client will not
allow an additional transfer to occur unless th e bit is reset. To reset this bit, you would need to clear
the client Intel Management Engine by performing a Full Un-Provision in the Intel MEBx (reset to factory
defaults).
USB Thumb Drive Notes: You should use a USB 2.0 thumb drive and 2 GB or less. Format the USB
drive in FAT 16 through any Windows client. This must be in FAT 16, not FAT 32. The file (setup.bin )
that is created by the export function noted above MUST be the first file on the drive, to function
properly. Once this file is on the drive, other files can then be added as needed.
You may need to try several USB drives to find one that works, and you may need to try both the front
and back USB ports on the client system. Refer to the USB Provisioning Matr ix for a list of tested
drives: http://communities.intel.com/docs/DO
C-1247#USB2
Once you have configured your clients using the USB thumb drive, skip to Step 5: Discover Intel vPro
Clients through the Management Console, on page 24.
25
Page 26

Intel® vPro™ and Intel® Centrino® Pro Processor Technology Quick Start Guide
Step 4C-3a: Manual Configuration of the Intel vPro Clients (alternative to USB drive
method): Use this method to manually enter the password and PID-PPS credentials for each Intel vPro
client machine.
A minimal amount of information is required to change the Intel vPro client from Factory Mode to Setup
Mode. The information required includes:
• Change Intel MEBx password (change from factory default). The default password is “admin.”
The new ME password must meet “strong” password criteria which include:
• Be between 8 and 32 characters long
• Contain both upper and lower case Latin characters
• Have at least one numeric character
• Have at least one ASCII non-alphanumeric character (!, @, #, $, %, ^, &, *)
• Provisioning ID (PID) and Provisioning Pass-Phrase (PPS). These are used to perform the
necessary steps of authenticating a new client and initiating the provisioning process. This uses
Transport Layer Security (TLS) Pre-shared Key (PSK) for authentication.
To manually update the Intel vPro clients with new Intel MEBx passwords and valid PID-PPS security
keys, do the following on each client system:
1. Start the client system, then press Ctrl-P during startup to enter the Intel MEBx.
2. Change the Intel MEBx password to a “strong” password (use the same password for each
client system).
3. Select Intel AMT Configuration, then Setup and Configuration, then TLS-PSK, then Set
PID and PPS.
4. Enter one of the PID-PPS combinations from the list of PID-PPS pairs you generated in
LANDesk (Step 4C-2 above).
5. Exit the Intel MEBx and reboot the client system to the Windows OS.
6. Repeat for each Intel vPro client.
Note: Once the client boots to Windows, it will automatically authenticate itself with the provisioning
server and provisioning will occur.
See the Intel Management Engine BIOS Extension (Intel MEBx) User’s Guide for detailed information
about configuring the Intel ME and Int e l AMT using the Intel MEBx.
Skip to Step 5: Discover Intel vPro Clients through
the Management Console, on page 27.
26
Page 27

Intel® vPro™ and Intel® Centrino® Pro Processor Technology Quick Start Guide
Step 5: Discover Intel vPro Clients through the Management Console
Discovery of the Intel vPro devices varies depending on whether the latest LANDesk client agent is
loaded.
Discovery Without the LANDesk Agent Installed on the Client:
1. In LANDesk, navigate to the Unmanaged Device Discovery (UDD) tab. The bottom half of the
UUD tab displays the undiscovered devices,
2. On the UUD tab, click the Intel AMT category to display the discovered Intel vPro machines.
Allow a few minutes for the Intel AMT client to display as the LANDesk Core Database must
complete a refresh before the Intel AMT client appears. If the client still does not display after
a few minutes, click on the refresh icon in the UDD tool bar (second icon from left).
3. Move the Intel vPro machines to your management database by right-clicking one of the
devices and selecting Move to Inventory Database. Repeat for each Intel vPro machine.
4. Click the All Devices list to see the Intel vPro machines. You may need to click Refresh if the
All Devices list was already displayed when you moved the Intel vPro machines.
5. Right click an Intel vPro machine to see all the Intel AMT selections available.
Discovery With the LANDesk Agent Installed on the Client:
No explicit action is required to discover Intel vPro client systems if the LANDesk Agen t is installed on
them. If the LANDesk Agent is installed on the client system, then that client system will already be
listed in the All Devices list in LANDesk.
However, when you activate the Intel Management Engine (Intel ME) on the client using the process
described in Steps 3 and 4 on the preceding pages, you will then see the Intel vPro selections available
for that client when you righ t click on it in the All Devices list.
27
Page 28

Intel® vPro™ and Intel® Centrino® Pro Processor Technology Quick Start Guide
Step 6: Test Intel vPro Client Functionality
After the device has been discovered and added to the management database, it is a good idea to test
the functionality of the Intel vPro machine. Perform the following steps to test the Intel AMT client
functionality.
Step 6a: Test Intel vPro Client Functionality From LANDesk
1. In the All Devices list, right-click an Intel vPro device to display the menu of Intel AMT Options.
2. At a minimum, look at the following Intel vPro Options to test that the Intel AMT configuration
has been successfully completed:
o Intel vPro Summary
o Remote Boot Manager – Power On/Off
o Remote Boot Manager using Console Redirection (Serial over LAN /SOL) and IDE
Redirection
For further information on testing these features, refer to the following whitepaper:
• Integrating Intel® vPro™ Technology with LANDesk® Management Products
http://download.intel.com/business/vpro/pdfs/landesk_whitepaper.pdf
Step 6b: Test Intel AMT Client Functionality Using Intel AMT Web Console
1. On the management console system, login as an administrator with user rights.
2. Open a web browser and enter the IP address and assigned port number (16992 for non-TLS,
16993 for TLS) in the browser address bar (example, http://192.168.0.1:16992 or
http://192.168.0.1:16993 ).
The following web browsers are supported:
o Internet Explorer* 6.0 SP1 or later
o Netscape* 7.2 for Windows and Linux
o Mozilla Firefox* 1.0 for Windows and Linux
o Mozilla 1.7 for Windows and Linux
3. Once the Intel AMT Configuration Web Page is displayed, login usin g the Intel MEBx username
and password. You can then view the following client management information:
o System Status
o Hardware Information
o Event Log
o Remote Control
28
Page 29

Intel® vPro™ and Intel® Centrino® Pro Processor Technology Quick Start Guide
o Network Settings
o User Accounts
Step 7: Post Configuration
Once you’ve deployed and configured your Intel vPro client machines, there are still some additional
actions you should consider.
Adding New Devices:
As new Intel vPro clients are added to the network you will need to perform the deployment process
described above to activate Intel AMT on the new devices, discover the new devices, and then add them
to your management database. This procedure should be added to your standard maintenance
procedures.
Updating Procedures to Include Intel AMT Features:
Work with your management console to determine how best to ut ilize the new capabilities available to
you through your Intel vPro devices. Further, it is a good idea to update your procedures to utilize Intel
vPro features, such as those procedures your help desk staff follow when helping users. For example,
you will want to update the process to re-image a PC that has blue screened at a remote site using the
new Intel AMT features now available in your management console.
Using Agent Presence (AP):
Agent Presence (AP) monitors for the existence of agents. The LANDesk client agents must be installed
on the client PC in order to use AP. AP is automatically configured when the LANDesk client agents are
installed. However, you can perform additional configuration in the Configure | Intel Vpro Options |
Agent Presence | Configuration page of the LDMS console.
Agent Presence is either enabled for all managed Intel AMT 2.x machines or disabled for all machines. It
cannot be enabled or disabled for specific machines. AP enabling is controlled by the Enable Agent
Presence Monitoring check-box in the configuration page mentioned above.
By default, AP monitors the following two processes on the client machine:
Agent Reason for AP Monitoring
LANDesk Management Agent (RESIDENTAGENT.EXE) The LANDesk Management Agent is monitored because
LANDesk Monitoring Service (COLLECTOR.EXE) The LANDesk Monitoring Service is monitored because
most of the Client\Server communication between
LANDesk agents and the LANDesk Core is done through
this agent.
it is the heart of the LANDesk monitoring system.
29
Page 30

Intel® vPro™ and Intel® Centrino® Pro Processor Technology Quick Start Guide
While these agents are running you can monitor any other service on the client machine using the LSM
service monitoring tool. These agents and their descriptions are defined in AGENTPRESENCE.XML which
is sent down to the Intel AMT non-volatile memory (NVM) storage area on the client Intel AMT machine
and subsequently read by the LANDesk agent to determine what it should monitor.
Once AP starts on the client (default startup time is 6 minutes after the client is powered on), if the
COLLECTOR.EXE process is killed or the LANDesk Management Agent service is stopped, an AP alert is
generated. AP start and stop alerts are displayed in the LSM log, not the Intel AMT Event Log.
Note: If the COLLECTOR.EXE process is killed, restart it by running RESTARTMON.EXE, which is located
in the LDCLIENT folder on the client system.
LANDesk Management Suite 8.8 has the ability to have Agent Presence trigger a System Defense policy
to isolate the client system from the network. This can be done by creating an Intel AMT Agent
Presence alert in the LSM console (under the Core Ruleset) with the action of “Place in the Intel AMT
Remediation Queue.” With this alert rule in place, if a monitored process on the client is stopped, an
Agent Presence alert is generated by Intel AMT and sent to the LANDesk core server. The core server
will then issue a System Defense policy to the client that will stop all network traffic except for LANDesk
management traffic, Intel AMT traffic, DNS traffic, and DHCP traffic, thus isolating the client system
from the network except for system management functions.
Using LANDesk* Out-of-Band Monitor (AMTMON) Features:
LANDesk 8.8 has the ability to disable the network on the client at the OS level. This is not done
through the System Defense feature, but rather through LANDesk agents and communication via the
Intel AMT non-volatile memory (NVM) area. When you select to disable or enable the network on that
client, a flag is set in NVM on the client, which is monitored by the service LANDesk* Out-of-Band
Monitor (AMTMON.EXE). The AMTMON service disables or enables the network on the client based on
the value of the flag in NVM. AMTMON can also run a vuln erability scan on the client at the next
restart, if that flag is set. A message dialog is displayed on the client system whenever these three
operations are performed.
Note: Do not ping the Intel AMT client to test if the network is disabled,; Intel AMT will still respond to
pings.
System Defense (SD):
System Defense (SD) does not require any agents to be inst alled on the Intel AMT client machine.
System Defense policies may be configured on a per-machine basis.
There are four pre-defined SD policies:
• An FTP access policy which will trigger SD if an FTP access is made either to or from the Intel
AMT client machine.
30
Page 31

Intel® vPro™ and Intel® Centrino® Pro Processor Technology Quick Start Guide
• A UDP flood policy which will trigger SD if Intel AMT sees at least 20,000 UDP packets per second
and will monitor for a Denial-of-service attack.
• An SYN flood policy which will trigger SD if Intel AMT sees at least 20,000 IP packets per second
and will monitor for a Denial-of-service attack.
• A Kill All NICs policy which will stop all network tr affic except for LANDesk management, Intel
AMT, DNS, and DHCP traffic, thus isolating the client system from the network except for system
management functions.
Note: In LANDesk 8.8 there is no GUI to create or modify System Defense filters or policies. Currently
all modifications have to be made to the XML pages used for System Defense.
Once SD triggers an alert, the alert is displayed in the LSM log. LANDesk and Intel AMT limit network
access by replacing the current client policy with the K ill All NICs policy when SD is triggered. The client
machine is also placed in the Remediation queue, which can be fou nd in Configure | Intel vPro
Options | System Defense | Remediation. Once the machine is remediated, the Kill All NICs policy
is removed and the previous policy is re-applied. The administrator must manually perform the actual
remediation of removing the virus or spyware, or fixing whatever caused the SD to be triggered.
Congratulations! You are now on your way to more productively managing a powerful computer
system. This can improve your productivity and provide a valuable return on your investment.
31
Page 32

Intel® vPro™ and Intel® Centrino® Pro Processor Technology Quick Start Guide
Appendix A: Troubleshooting
Additional troubleshooting information can be found at the Known Issues, Best Practices, and
Workarounds wiki: http://communities.intel.com/docs/DO
Intel vPro machine not discovered:
The Intel vPro machine may not have completed the “provisioning cycle” with the LANDesk core server.
One way to tell this would be to look into the AMTDiscService.Log (AMT discovery service log) which is
located in the “Program Files / LANDesk / Management Suite” subdirectory. Note: This log file will not
refresh dynamically when you have it opened. It must be closed and reopened to refresh. If the client
has properly provisioned, there will be an entry similar to the following:
Wed, 27 Jun 2007 15:53:42 Incoming Connection from 192.168.0.101:16994
Wed, 27 Jun 2007 15:53:42 Hostname: client20
Wed, 27 Jun 2007 15:53:42 Incoming data (32) is:
Wed, 27 Jun 2007 15:53:42 Version: 2
Wed, 27 Jun 2007 15:53:42 Count : 0
C-1247.
Wed, 27 Jun 2007 15:53:42 UUID : F228CDC0-84FB-11DB-915E-0013D4D07748
Wed, 27 Jun 2007 15:53:42 PID : PID0009Q
Wed, 27 Jun 2007 15:53:45 Added to UDD list
There are a couple of interesting things to point out in this example. First, note that the incoming
connection is coming from the device’s DHCP address. Next, the hostname will likely be the hostname
that is registered in DNS for this client. If the hostname is blank in the Management Engine or a
different hostname exists (in this example the hostname in the ME was iDBO), the hostname passed to
the LANDesk core server will likely come from the DNS entry.
The next thing to note is that the PID entry is shown. This helps you to see that the initial
authentication has been accepted. Note then that the device was added to the UDD (Unmanaged
Device Discovery). Another entry you could see instead would be:
Wed, 27 Jun 2007 15:35:19 already in managed list (nodename), info updated
If you do not see these entries the most likely causes are:
You have not matched the PID / PPS pre-shared keys between the Intel AMT client and the LANDesk
core server. The keys generated through the LANDesk System Manager Configure | Intel vPro Options
| ID Generation must match those you entered into the Intel MEBx.
You have a mismatched Management Engine password. The password that you entered into the LDMS
Configure | Services | Intel vPro Configuration tab must match the strong password entered into the
Intel MEBx. If you entered this manually, make sure you have mat ched all capitalization, numerals,
and special characters. If you have used “one-touch” provisioning via the USB key, make sure when
you generate the keys to be exported (LANDesk Management Suite | Configure | Intel vPro Options |
32
Page 33

Intel® vPro™ and Intel® Centrino® Pro Processor Technology Quick Start Guide
Export or Import Intel AMT IDs) that you enter the same password in the field that says “Specify Intel
vPro ME password (for Intel AMT 2.5 or greater only)”. This needs to be filled in for any Intel vPro
machine of 2.1 or greater.
Intel vPro machine was discovered through UDD (Unmanaged Device Discovery) when a network scan
was run, but the Intel AMT option and Move to Management Database option are grayed out.
This error will occur if you run a network scan on the segment the Intel vPro machine resides on and it
has not completed the provisioning process and does not have a LANDesk client agent installed. Use
the same troubleshooting techniques as listed in troubleshooting item #1
Intel vPro machine shows up in my managed device inventory, but none of the Intel AMT options are
available.
This is another symptom of the Intel vPro machine not completing the provisioning process. Please
refer to troubleshooting item #1 to resolve
A second log file is also available to help understand the link between the Intel AMT client, backend
services (provision server, DNS, DHCP, LDAP and AD) and also LANDesk Management Suite 8.8. The
second log file shows the actual process between the Intel AMT client, your Domain services, provision
server and LDMS. In the examples below you can see exactly what is happening between the Client (in
the provisioning process with RCT) and the backend infrastructure, the first example shows a successful
provisioning using the RCT process where the Cert and hash were utilized to do the actual provisioning.
Note the third and fourth entries where the Domain responded with the FQDN and the actual host name
of the client being provisioned. The rest of the log shows each action and the response from the client.
The second log file shows a failed provision process and if you look at the third an d fourth entries you
can see that the Domain did not offer the FQDN in the third entry and the fourth line presents with the
clients IP address instead of the client name. This is a fairly common situation where the Domain does
not resolve to the client for some reason. Some of the problems her e are multiple client names with
the same IP address in the DNS forward or reverse lookup zones, other problems can be if the DNS and
DHCP service do not cleanup or resolve released IP addresses. Poor infrastructure (whether
maintenance or implementation) is the lions share of why provisioning fails, the log files helps point you
to where the problems are.
1. From the LDMS VM open Windows Explorer
2. Select Program Files>LANDesk>Management Suite>AMTPROV
3. Open the AMTProvMgr2.log
33
Page 34

Intel® vPro™ and Intel® Centrino® Pro Processor Technology Quick Start Guide
An example of Successful Provisioning
Thu, 28 Feb 2008 113500 LANDesk Intel AMT Provisioning Manager
Thu, 28 Feb 2008 113500 IP 192.168.0.100 UUID 44454C4C-FF00-10FF-80FF-FFC04FFF0000
Thu, 28 Feb 2008 113500 FQDN name for ZTC client1.vprodemo.com
Thu, 28 Feb 2008 113501 Host Name client1
Thu, 28 Feb 2008 113501 UUID 44454C4C-FF00-10FF-80FF-FFC04FFF0000
Thu, 28 Feb 2008 113501 PID no
Thu, 28 Feb 2008 113501 IP Address 192.168.0.100
Thu, 28 Feb 2008 113501 user cert 1 exists
Thu, 28 Feb 2008 113503 soap_ssl_client_context() return 0
Thu, 28 Feb 2008 113503 Action getCoreVersion
Thu, 28 Feb 2008 113506 GetCoreVersion passed
Thu, 28 Feb 2008 113506 Action getHostname
Thu, 28 Feb 2008 113506 GetHostName passed
Thu, 28 Feb 2008 113506 AMT hostname in bios [CLIENT1]
Thu, 28 Feb 2008 113506 Action getDomainname
Thu, 28 Feb 2008 113506 GetDomainName passed
Thu, 28 Feb 2008 113506 Action GetPkiCapabilities
Thu, 28 Feb 2008 113507 GetPkiCapabilities passed
Thu, 28 Feb 2008 113507 DHCP mode
Thu, 28 Feb 2008 113507 SetInterfaceSettings passed
Thu, 28 Feb 2008 113507 LAN SetInterfaceSettings succeeds
34
Page 35

Intel® vPro™ and Intel® Centrino® Pro Processor Technology Quick Start Guide
Thu, 28 Feb 2008 113507 Action SetRngKey
Thu, 28 Feb 2008 113507 SetRngKey passed
Thu, 28 Feb 2008 113507 Action SetTLSKeyAndCertificate
Thu, 28 Feb 2008 113507 To generate keys and certificate
Thu, 28 Feb 2008 113509 Success to generate keys and certificate
Thu, 28 Feb 2008 113509 SetTLSKeyAndCertificate passed
Thu, 28 Feb 2008 113509 Action EnumerateTrustedRootCertificates
Thu, 28 Feb 2008 113509 EnumerateTrustedRootCertificates passed
Thu, 28 Feb 2008 113509 No trusted root certificates exist
Thu, 28 Feb 2008 113509 Action SetTlsOptions
Thu, 28 Feb 2008 113509 SetTlsOptions passed
Thu, 28 Feb 2008 113509 Action CommitChanges
Thu, 28 Feb 2008 113510 CommitChanges passed
Thu, 28 Feb 2008 113510 ProvisioningUnprovisioning process completed successfuly
35
Page 36

Intel® vPro™ and Intel® Centrino® Pro Processor Technology Quick Start Guide
An example of an unsuccessful Provisioning
Thu, 06 Mar 2008 11:26:23 LANDesk Intel AMT Provisioning Manager
Thu, 06 Mar 2008 11:26:23 IP: 192.168.0.100 UUID: 44454C4C-4A00-1032-8038-C6C04F514431
Thu, 06 Mar 2008 11:26:28 Hostname from DNS:
Thu, 06 Mar 2008 11:26:29 Host Name: 192.168.0.100
Thu, 06 Mar 2008 11:26:29 UUID: 44454C4C-4A00-1032-8038-C6C04F514431
Thu, 06 Mar 2008 11:26:29 PID: no
Thu, 06 Mar 2008 11:26:29 IP Address: 192.168.0.100
Thu, 06 Mar 2008 11:26:29 user cert 1 exists
Thu, 06 Mar 2008 11:26:31 soap_ssl_client_context() return: 0
Thu, 06 Mar 2008 11:26:31 Action: getCoreVersion
Thu, 06 Mar 2008 11:26:34 GetCoreVersion passed
Thu, 06 Mar 2008 11:26:34 Action: GetAdminAclEntryStatus
Thu, 06 Mar 2008 11:26:34 GetAdminAclEntryStatus passed
Thu, 06 Mar 2008 11:26:34 MEBx password has already been changed, skipping SetMEBxPassword
Thu, 06 Mar 2008 11:26:34 Action: GetDigestRealm
Thu, 06 Mar 2008 11:26:34 GetDigestRealm passed
Thu, 06 Mar 2008 11:26:35 SetAdminAclEntryEx passed
Thu, 06 Mar 2008 11:26:35 Action: getHostname
Thu, 06 Mar 2008 11:26:35 GetHostName passed
Thu, 06 Mar 2008 11:26:35 AMT hostname is not set in bios. Invalid hostname (192.168.0.100) by
DNS. Hostname is not set
36
Page 37

Intel® vPro™ and Intel® Centrino® Pro Processor Technology Quick Start Guide
Thu, 06 Mar 2008 11:26:35 Action: getDomainname
Thu, 06 Mar 2008 11:26:35 GetDomainName passed
Thu, 06 Mar 2008 11:26:35 Action: GetPkiCapabilities
Thu, 06 Mar 2008 11:26:35 GetPkiCapabilities passed
Thu, 06 Mar 2008 11:26:35 Action: SetEnabledInterfaces
Thu, 06 Mar 2008 11:26:35 SetEnabledInterfaces passed
Thu, 06 Mar 2008 11:26:35 Action: SetRedirectionListenerState
Thu, 06 Mar 2008 11:26:35 GetRedirectionListenerState passed
Thu, 06 Mar 2008 11:26:35 Current RedirectionListenerState: Disabled. Enable it now
Thu, 06 Mar 2008 11:26:35 SetRedirectionListenerState passed
Thu, 06 Mar 2008 11:26:35 Action: setActivePowerPackage
Thu, 06 Mar 2008 11:26:35 EnumeratePowerPackages passed
Thu, 06 Mar 2008 11:26:35 SetActivePowerPackage passed
Thu, 06 Mar 2008 11:26:35 Action: enumerateInterfaces
Thu, 06 Mar 2008 11:26:35 EnumerateInterfaces passed
Thu, 06 Mar 2008 11:26:35 Action: setInterfaceSettings
Thu, 06 Mar 2008 11:26:35 DHCP mode
Thu, 06 Mar 2008 11:26:35 SetInterfaceSettings passed
Thu, 06 Mar 2008 11:26:35 LAN: SetInterfaceSettings succeeds
Thu, 06 Mar 2008 11:26:35 Action: SetRngKey
Thu, 06 Mar 2008 11:26:35 SetRngKey passed
Thu, 06 Mar 2008 11:26:35 Action: SetTLSKeyAndCertificate
Thu, 06 Mar 2008 11:26:35 To generate keys and certificate
37
Page 38

Intel® vPro™ and Intel® Centrino® Pro Processor Technology Quick Start Guide
Thu, 06 Mar 2008 11:26:37 Success to generate keys and certificate
Thu, 06 Mar 2008 11:26:37 SetTLSKeyAndCertificate passed
Thu, 06 Mar 2008 11:26:37 Action: setNetworkTime
Thu, 06 Mar 2008 11:26:37 GetLowAccuracyTimeSynch passed
Thu, 06 Mar 2008 11:26:37 SetHighAccuracyTimeSynch passed
Thu, 06 Mar 2008 11:26:37 Action: EnumerateTrustedRootCertificates
Thu, 06 Mar 2008 11:26:37 EnumerateTrustedRootCertificates passed
Thu, 06 Mar 2008 11:26:37 No trusted root certificates exist
Thu, 06 Mar 2008 11:26:37 Action: SetTlsOptions
Thu, 06 Mar 2008 11:26:37 SetTlsOptions passed
Thu, 06 Mar 2008 11:26:37 Action: CommitChanges
Thu, 06 Mar 2008 11:26:37 Error: CommitChanges failed (status: 0x0809 res: 0x0000)
Thu, 06 Mar 2008 11:26:37 Error: SetProvisioningParameters() failed
38
Page 39

Intel® vPro™ and Intel® Centrino® Pro Processor Technology Quick Start Guide
Appendix B: Glossary of Terms used in this guide
PPS: Provisioning Pass phrase. Pre-shared
key used in provisioning Intel vPro machines.
BIOS: Basic Input Output System
DHCP: Dynamic Host Configuration Protocol
DNS: Domain Name Service.
Enterprise Mode: Provisioning model used
for larger organizations
Intel® AMT: Intel® Active Management
Technology allows Web Service calls to Intel
desktops and notebook clients for out-of-band
management and services.
Intel® Centrino® Pro processor
technology: Intel processor technology that
provides a higher level of security and
management to mobile computers.
Intel® ME: Intel® Management Engine
Intel® MEBx: Intel® Management Engine
BIOS Extension
Intel® vPro™ Processor Technology: Intel
processor technology that provides a higher
level of security and management to desktop
computers.
PSK: Pre-shared key
SMB Mode: Small (and Medium) Business
model used for provisioning an Intel vPro
machine
TLS: Transport Layer Security
ISV: Independent Software Vendor
LMS: Local Management Service driver.
Provides an interface enabling local
management software agents to communicate
with the Intel Management Engine using the
same high-level protocols as those used for
remote management (e.g. XML, SOAP).
OEM: Original Equipment Manufacturer.
Notation used to designate the PC
manufacturer.
PID: Provisioning ID. First portion of security
key used in provisioning Intel vPro machines.
PKI: Public Key Infrastructure
PKI CH: Public Key Infrastructure –
Certification Hash
39
Page 40

Intel® vPro™ and Intel® Centrino® Pro Processor Technology Quick Start Guide
Page 41

Intel® vPro™ and Intel® Centrino® Pro Processor Technology Quick Start Guide
*Other names and brands may be claimed as the property of
others.
Copyright © 2008 Intel Corporation. All rights reserved.
Intel®, the Intel logo, Intel. Leap ahead™, the Intel Leap ahead™
Logo, Centrino®, the Centrino® logo, Intel® Core™, vPro™, the
vPro™ logo, Intel SpeedStep™, Pentium®, and Celeron® are
registered trademarks of Intel Corporation in the United States
and other countries.
.
INFORMATION IN THIS DOCUMENT IS PROVIDED IN
CONNECTION WITH INTEL® PRODUCTS. NO LICENSE, EXPRESS
OR IMPLIED, BY ESTOPPEL OR OTHERWISE, TO ANY
INTELLECTUAL PROPERTY RIGHTS IS GRANTED BY THIS
DOCUMENT. EXCEPT AS PROVIDED IN INTEL’S TERMS AND
CONDITIONS OF SALE FOR SUCH PRODUCTS, INTEL ASSUMES
NO LIABILITY WHATSOEVER, AND INTEL DISCLAIMS ANY
EXPRESS OR IMPLIED WARRANTY, RELATING TO SALE AND/OR
USE OF INTEL PRODUCTS INCLUDING LIABILITY OR
WARRANTIES RELATING TO FITNESS FOR A PARTICULAR
PURPOSE, MERCHANTABILITY, OR INFRINGEMENT OF ANY
PATENT, COPYRIGHT OR OTHER INTELLECTUAL PROPERTY
RIGHT. UNLESS OTHERWISE AGREED IN WRITING BY INTEL,
THE INTEL PRODUCTS ARE NOT DESIGNED NOR INTENDED
FOR ANY APPLICATION IN WHICH THE FAILURE OF THE INTEL
PRODUCT COULD CREATE A SITUATION WHERE PERSONAL
INJURY OR DEATH MAY OCCUR.
Intel® Active Management Technology requires the computer
system to have an Intel® AMT-enabled chipset, network
hardware and software, as well as connection with a power
source and a corporate network connection. Setup requires
configuration by the purchaser and may require scripting with
the management console or further integration into existing
security frameworks to enable certain functionality. It may
also require modifications of implementation of new business
processes. With regard to notebooks, Intel AMT may not be
available or certain capabilities may be limited over a host OS-
based VPN or when connecting wirelessly, on battery power,
sleeping, hibernating or powered off. For more information,
see http://www.intel.com/technolog
Intel Corporation may have patents or pending patent
applications, trademarks, copyrights, or other intellectual
property rights that relate to the presented subject matter.
The furnishing of documents and other materials and
information does not provide any license, express or implied,
by estoppel or otherwise, to any such patents, trademarks,
copyrights, or other intellectual property rights.
Intel may make changes to specifications and product
descriptions at any time, without notice.
Intel® Active Management Technology requires the platform to
have an Intel® AMT-enabled chipset, network hardware and
software, connection with a power source, and a network
connection.
y/manage/iamt/
 Loading...