

Page 1
VMware vSphere* 4.1
Installation Guide for
ESX*/ESXi* 4.1
Intel® Server Board S5520HC
Intel® Server Board S5520UR
Intel® Enabled Solutions Acceleration Alliance (Intel® ESAA)
Copyright© 2011 Intel Corporation. All rights reserved. Intel, the Intel logo, and Xeon are registered trademarks of Intel Corporation or its
subsidiaries in the United States and other countries. *Other names and brands may be claimed as the property of others.
Recipe ID: 40VMWR860000000000-02
41VMWR860000000000-02
18 February 2011
Page 2

VMware vSphere* 4.1 Installation Guide for ESX/ESXi* 4.1
www.intel.com/go/esaa
The information contained in this document is provided for informational purposes only and represents the current view of Intel Corporation (“Intel”) and its
contributors ("Contributors") on, as of the date of publication. Intel and the Contributors make no commitment to update the information contained in this
document, and Intel reserves the right to make changes at any time, without notice.
DISCLAIMER. THIS DOCUMENT IS PROVIDED “AS IS.” NEITHER INTEL, NOR THE CONTRIBUTORS MAKE ANY REPRESENTATIONS OF ANY KIND WITH RESPECT
TO PRODUCTS REFERENCED HEREIN, WHETHER SUCH PRODUCTS ARE THOSE OF INTEL, THE CONTRIBUTORS, OR THIRD PARTIES. INTEL, AND ITS
CONTRIBUTORS EXPRESSLY DISCLAIM ANY AND ALL WARRANTIES, IMPLIED OR EXPRESS, INCLUDING WITHOUT LIMITATION, ANY WARRANTIES OF
MERCHANTABILITY, FITNESS FOR ANY PARTICULAR PURPOSE, NON-INFRINGEMENT, AND ANY WARRANTY ARISING OUT OF THE INFORMATION CONTAINED
HEREIN, INCLUDING WITHOUT LIMITATION, ANY PRODUCTS, SPECIFICATIONS, OR OTHER MATERIALS REFERENCED HEREIN. INTEL, AND ITS CONTRIBUTORS
DO NOT WARRANT THAT THIS DOCUMENT IS FREE FROM ERRORS, OR THAT ANY PRODUCTS OR OTHER TECHNOLOGY DEVELOPED IN CONFORMANCE WITH
THIS DOCUMENT WILL PERFORM IN THE INTENDED MANNER, OR WILL BE FREE FROM INFRINGEMENT OF THIRD PARTY PROPRIETARY RIGHTS, AND INTEL,
AND ITS CONTRIBUTORS DISCLAIM ALL LIABILITY THEREFOR.
INTEL, AND ITS CONTRIBUTORS DO NOT WARRANT THAT ANY PRODUCT REFERENCED HEREIN OR ANY PRODUCT OR TECHNOLOGY DEVELOPED IN RELIANCE
UPON THIS DOCUMENT, IN WHOLE OR IN PART, WILL BE SUFFICIENT, ACCURATE, RELIABLE, COMPLETE, FREE FROM DEFECTS OR SAFE FOR ITS INTENDED
PURPOSE, AND HEREBY DISCLAIM ALL LIABILITIES THEREFOR. ANY PERSON MAKING, USING OR SELLING SUCH PRODUCT OR TECHNOLOGY DOES SO AT HIS
OR HER OWN RISK.
Licenses may be required. Intel, its contributors and others may have patents or pending patent applications, trademarks, copyrights or other intellectual
proprietary rights covering subject matter contained or described in this document. No license, express, implied, by estoppel or otherwise, to any intellectual
property rights of Intel or any other party is granted herein. It is your responsibility to seek licenses for such intellectual property rights from Intel and others
where appropriate.
Limited License Grant. Intel hereby grants you a limited copyright license to copy this document for your use and internal distribution only. You may not
distribute this document externally, in whole or in part, to any other person or entity.
LIMITED LIABILITY. IN NO EVENT SHALL INTEL, OR ITS CONTRIBUTORS HAVE ANY LIABILITY TO YOU OR TO ANY OTHER THIRD PARTY, FOR ANY LOST
PROFITS, LOST DATA, LOSS OF USE OR COSTS OF PROCUREMENT OF SUBSTITUTE GOODS OR SERVICES, OR FOR ANY DIRECT, INDIRECT, SPECIAL OR
CONSEQUENTIAL DAMAGES ARISING OUT OF YOUR USE OF THIS DOCUMENT OR RELIANCE UPON THE INFORMATION CONTAINED HEREIN, UNDER ANY CAUSE
OF ACTION OR THEORY OF LIABILITY, AND IRRESPECTIVE OF WHETHER INTEL, OR ANY CONTRIBUTOR HAS ADVANCE NOTICE OF THE POSSIBILITY OF SUCH
DAMAGES. THESE LIMITATIONS SHALL APPLY NOTWITHSTANDING THE FAILURE OF THE ESSENTIAL PURPOSE OF ANY LIMITED REMEDY.
Intel, the Intel logo, and Intel Xeon are trademarks or registered trademarks of Intel Corporation or its subsidiaries in the United States and other countries.
VMware is a registered trademark of VMware Corporation and/or its affiliates.
*Other names and brands may be claimed as the property of others.
Copyright © 2011, Intel Corporation. All Rights Reserved.
2
Page 3

VMware vSphere* 4.1 Installation Guide for ESX*
Contents
Executive Summary ............................................................................................................................................................. 5
VMware vSphere Essentials* Editions ...................................................................................................................... 5
Maximize Virtualization Benefits .............................................................................................................................................................................................. 6
Server Configuration Options and Selection Criteria ........................................................................................ 8
Hardware Components ...................................................................................................................................................... 9
Intel® I/O Expansion Module Support Matrix ....................................................................................................... 11
Software Components .................................................................................................................................................... 11
Related Intel® ESAA Solutions ..................................................................................................................................... 12
Recipe Overview ................................................................................................................................................................ 12
Server Configuration Recommendations ............................................................................................................. 14
Basic Network Configurations .................................................................................................................................... 14
Volume Setup and Storage Layout .......................................................................................................................... 16
Configure Access to Storage .................................................................................................................................................................................................... 16
Hardware RAID BIOS Configuration ................................................................................................................................................................................... 17
Hardware Trusted Execution Technology Configuration (Optional) .................................................................................................. 17
Hardware RAID Configuration .................................................................................................................................... 21
Intel® Server Boards RAID Options and Accessories ...................................................................................... 22
Hardware RAID Controller Options and Setup ......................................................................................................................................................... 22
Get Started with ESX* 4.1 ............................................................................................................................................ 24
Initial Tasks ................................................................................................................................................................................................................................................. 24
VMware ESX* 4.1 Installation ..................................................................................................................................... 25
Install ESX* 4.1........................................................................................................................................................................................................................................ 25
Standard Setup ....................................................................................................................................................................................................................................... 26
Install ESXi 4.1 Installable Using the Interactive Mode ................................................................................ 27
Prerequisites .............................................................................................................................................................................................................................................. 27
Installation Procedure ...................................................................................................................................................................................................................... 28
Set Up VMware ESXi Installable* .............................................................................................................................. 28
Set the Password for the Administrator Account ................................................................................................................................................ 29
Configure IP Settings for ESXi*.................................................................................................................................. 29
Configure IP Settings from the Direct Console ....................................................................................................................................................... 29
Configure DNS Settings from the Direct Console ................................................................................................................................................ 29
Managing ESX* Hosts ...................................................................................................................................................................................................................... 30
vSphere* Client Hardware Requirements ............................................................................................................ 30
vSphere* Client Software Requirements ............................................................................................................. 30
Download the vSphere* Client ................................................................................................................................................................................................ 30
Install the vSphere* Client ............................................................................................................................................ 31
Manage Multiple Hosts with vCenter Server* ................................................................................................... 31
vSphere* and vCenter Server* .................................................................................................................................. 32
vCenter Server* Installation ........................................................................................................................................ 33
vCenter Server* and the vSphere* Client Hardware Requirements ................................................................................................... 33
Minimum Requirements for vCenter Server* ............................................................................................................................................................ 33
vCenter Server* Software Requirements .................................................................................................................................................................... 33
vCenter Server* Prerequisites .................................................................................................................................................................................................. 34
Install vCenter Server* ................................................................................................................................................... 35
3
Page 4

VMware vSphere* 4.1 Installation Guide for ESX/ESXi* 4.1
Running the Software ..................................................................................................................................................... 39
Setup a Basic Inventory with the Getting Started Tabs ................................................................................................................................ 39
Start the vSphere* Client and Log into vCenter Server* ............................................................................................................................... 40
Create a Datacenter .......................................................................................................................................................................................................................... 41
Adding Hosts ............................................................................................................................................................................................................................................ 41
Set Up VMkernal Port for VMotion* (Optional) ........................................................................................................................................................ 42
Configure Datastores ....................................................................................................................................................... 43
Create Local VMFS Datastores ............................................................................................................................................................................................... 43
Create an External Datastore (Optional) ....................................................................................................................................................................... 44
Create a Virtual Machine ............................................................................................................................................................................................................... 56
Loading an OS on a Virtual Machine ................................................................................................................................................................................... 58
Create a Cluster and Setup Flex Migration (Optional) ................................................................................... 58
Appendix A: ESXi* Support Configuration for Intel® TXT (Optional) ..................................................... 60
Confirm the PCR Values Import to vCenter* Server ........................................................................................................................................... 62
through the VMware MOB. ......................................................................................................................................................................................................... 62
Where to Go Next .............................................................................................................................................................. 67
Technical and Marketing Reference Documentation..................................................................................... 67
The vSphere* Tutorial ...................................................................................................................................................................................................................... 67
VMware vSphere* Documentation ..................................................................................................................................................................................... 67
VMware vSphere* 4.1 Online Training ............................................................................................................................................................................. 67
VMware* Knowledge Base ......................................................................................................................................................................................................... 67
Support Information ......................................................................................................................................................... 68
Intel® ESAA – Your Recipe for Success ................................................................................................................... 69
4
Page 5
VMware vSphere* 4.1 Installation Guide for ESX*
Executive Summary
Intel® Server Platforms and VMware* virtualization solutions together help reduce the cost
and complexity of virtualization deployments. The Intel® Xeon® processor 5600 series yield
higher performance than the Intel® Xeon® processor 5500 series and cut costs by requiring
less servers to perform the same tasks. They also enable secure platforms through new
security technologies such as Intel® Trusted Execution Technology (Intel® TXT) and Intel®
Advanced Encryption Standard (AES). VMware virtualization improves server utilization and
reduces power and server management costs. The Intel® Server Board platforms have the
flexibility to support VMware capabilities such as High Availability, DRS, DPM and VMware
VMotion* with external storage. A variety of server platforms provides flexibility in
delivering virtualization solutions to meet computing needs. Affordable platforms are
available to deploy small business solutions or higher-performance servers can be deployed
for meeting highly-scalable virtualization solutions for the data center and cloud computing.
With VMware vSphere Essential* editions, customers can deploy easily managed servers
while providing an affordable business continuity solution. Customers can take advantage of
data center capabilities with vSphere* standard, advanced and enterprise plus editions to
provide high availability, automated resource management and simplified operations.
VMware virtualization software certified on Intel® Server platforms makes it easier to bring
fully-tested products to market faster and at a lower cost.
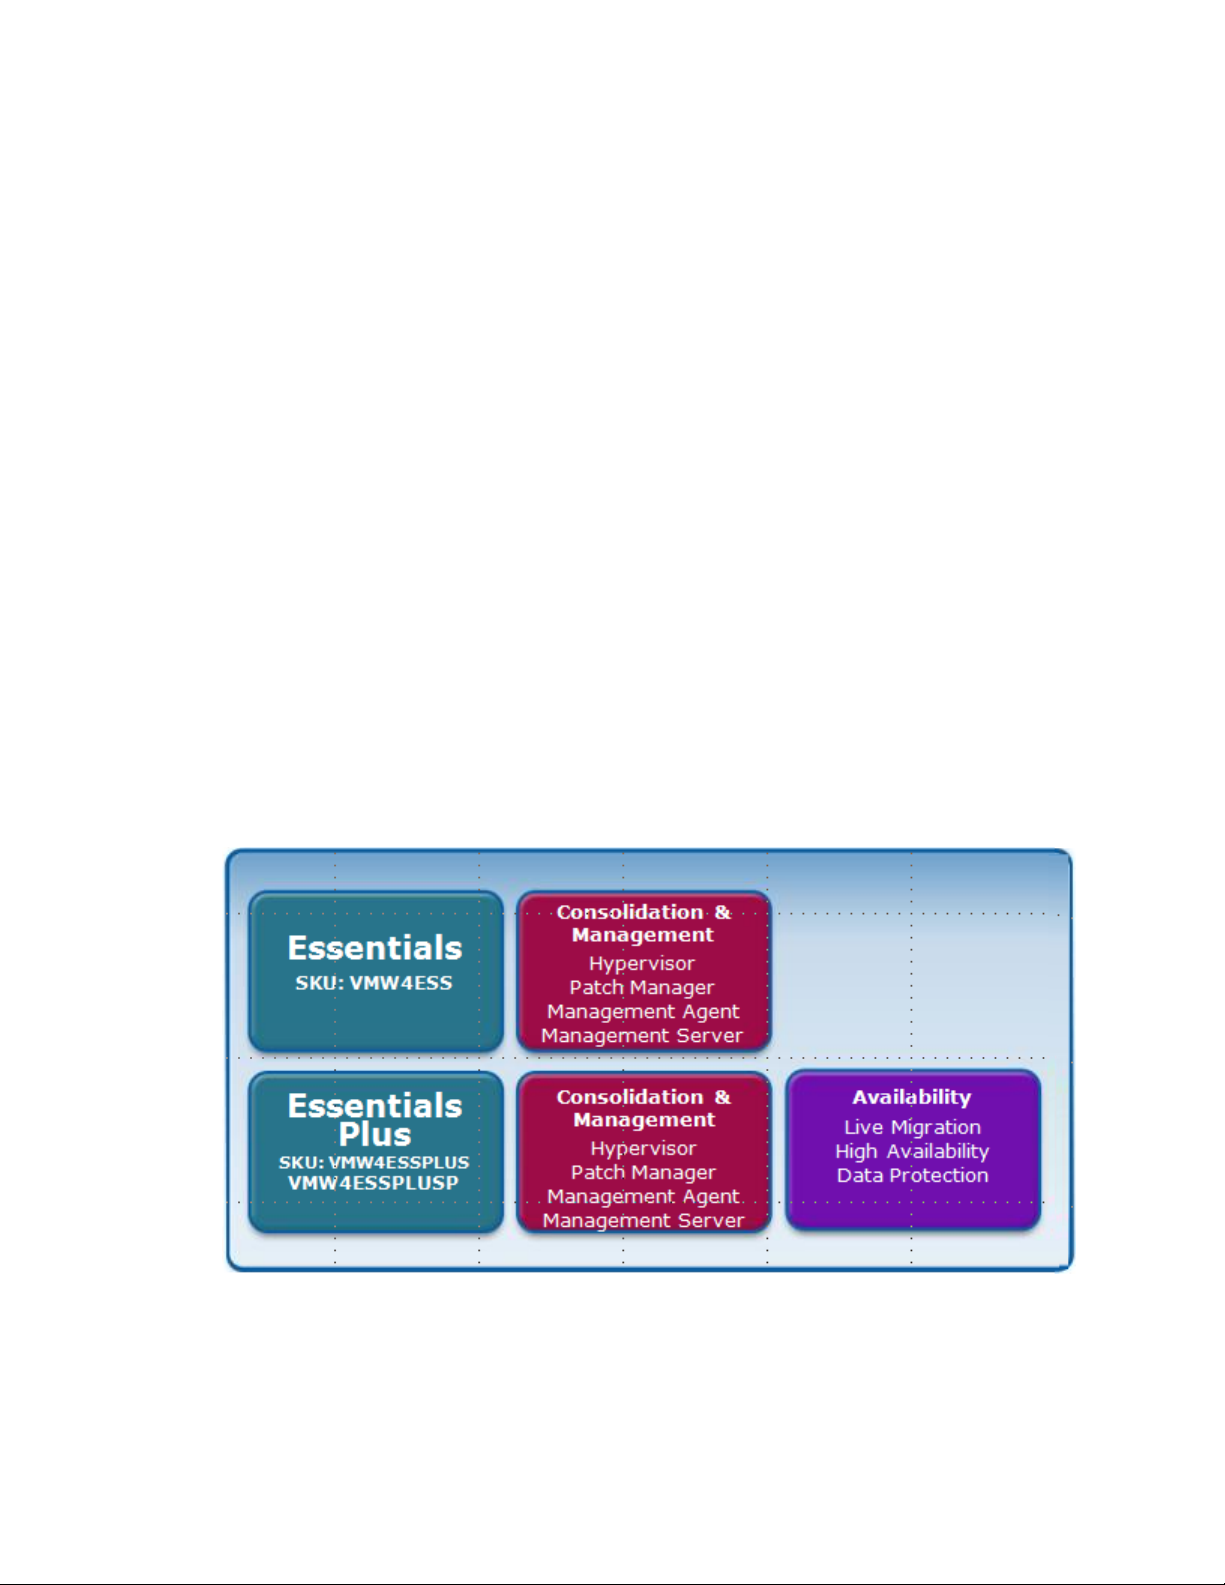
VMware vSphere Essentials* Editions
Figure 1 - VMware vSphere Essentials* Editions
Designed especially for small IT environments with fewer than 20 physical servers, the VMware vSphere
Essentials* Editions deliver enterprise-class capabilities in a cost-effective solution package for
organizations wanting to optimize and protect their IT assets with minimal up-front investment. It is an allin-one solution for small offices that want to consolidate and manage many application workloads while
reducing hardware and operating costs with a low up-front investment.
5
Page 6
VMware vSphere* 4.1 Installation Guide for ESX/ESXi* 4.1
VMware vSphere Essentials Plus* adds live migration high application availability and data protection for a
complete server consolidation and business continuity solution for the small office IT environment. Both
editions are all-inclusive packages that enable many application workloads to be virtualized and consolidated
onto three physical servers running vSphere and to be centrally managed. VMware vSphere also comes in
Standard, Enterprise and Enterprise plus editions that are appropriate for larger data center or cloud
deployments:
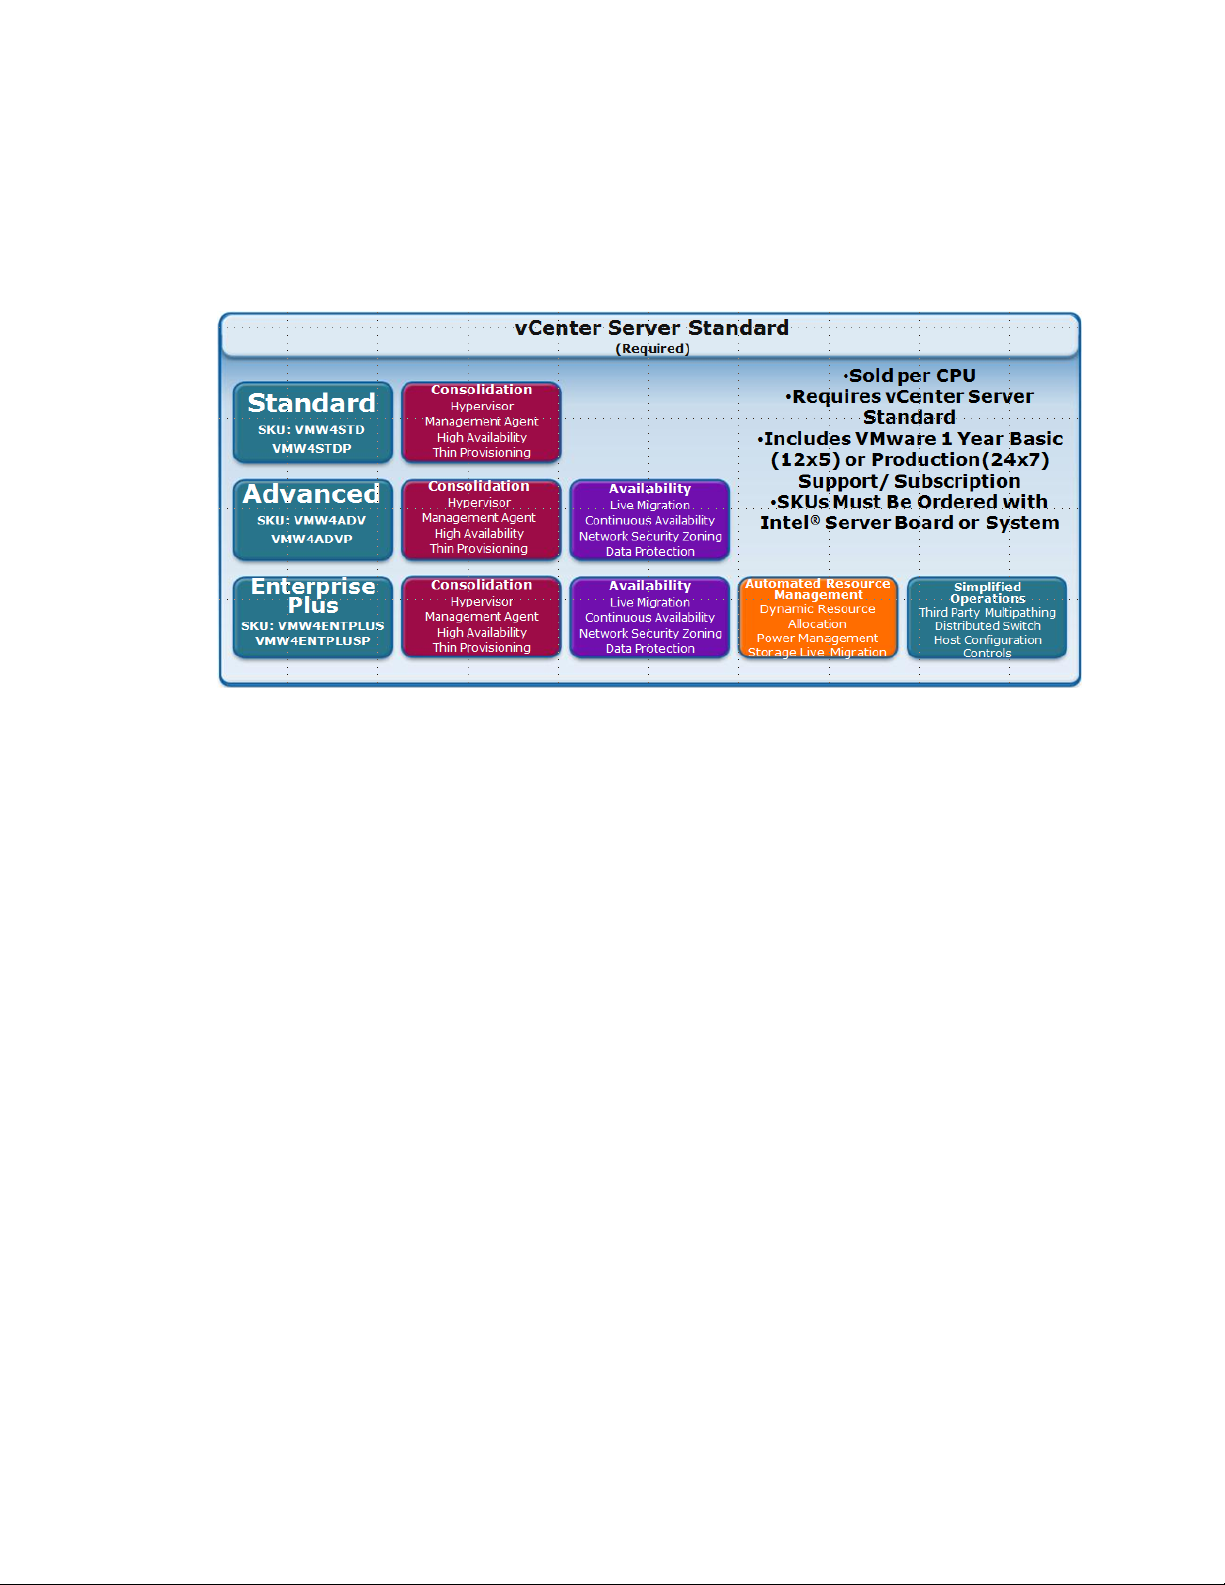
Figure 2 - VMware vSphere* Versions
Standard: Provides an entry solution for basic consolidation of applications to greatly reduce hardware
costs while accelerating application deployment.
Advanced: Provides a strategic consolidation solution that protects all applications against planned and
unplanned downtime to provide superior application availability and data protection.
Enterprise Plus: Includes the full range of vSphere* features for transforming datacenters into
dramatically simplified cloud computing environments that can provide the next generation of flexible,
reliable IT services to their businesses.
vCenter Server* Foundation: Provides users the benefits of vCenter Server*, but is designed to serve
the needs of a smaller IT environment with the ability to manage three or fewer physical server hosts
running vSphere*.
Maximize Virtualization Benefits
Intel is also building a better physical platform with unique hardware assist features to enhance the virtual
datacenter and help tame server sprawl. The Intel® Xeon® processor 5600 series, built on Intel®
microarchitecture, codenamed Westmere, expands the benefits of virtualization with innovations that boost
performance, increase consolidation ratios, and enable servers of different generations to be combined in
the same virtualized server pool, improving virtual machine failover, load balancing, and disaster recovery
capabilities.
Intel® Virtualization Technology (Intel® VT) continues to offer investment protection and infrastructure
flexibility with multigeneration VM migration across the full range of 32-bit and 64-bit configurations,
enabling bigger VM pools.
Intel® Virtualization Technology for Connectivity (Intel® VT-c) provides hardware-assisted I/O that
accelerates network performance and simplifies VM migration.
6
Page 7

VMware vSphere* 4.1 Installation Guide for ESX*
Intel® Virtualization Technology for Directed I/O (Intel® VT-d) helps speed data movement and
eliminates much of the performance overhead by giving designated VMs their own dedicated I/O
devices, reducing the overhead of the VM migration in managing I/O traffic.
Application performance is critical for day-to-day business operations, as well as creating new products and
reaching new customers. But many data centers are now at capacity, and new data centers are expensive
to build. By refreshing data center infrastructure with more efficient servers, additional performance and
scalability can be delivered within the same energy and space footprint. The Intel® Xeon® processor 5600
series brings intelligent performance to the most trusted server architecture. The Intel® Xeon® processor
5600 series is the world’s most adaptable server platform, adjusting performance and power usage in real
time to meet the exact requirements of computing workloads, while allowing manual adjustment for IT
control. The Intel® Xeon® processor 5600 series brings together a number of innovative technologies to
deliver intelligent performance:
Intel® Turbo Boost Technology, together with Intel® Intelligent Power Technology, delivers
performance on demand, letting processors operate above the rated frequency to speed specific
workloads and reduce power consumption during low utilization periods.
Intel® Hyper-Threading Technology benefits from larger caches and massive memory bandwidth,
delivering greater throughput and responsiveness for multi-threaded applications.
Intel® QuickPath Technology and an integrated memory controller speed traffic between processors
and I/O controllers for bandwidth-intensive applications, delivering up to 3.5 times the bandwidth for
technical computing.
Intel® Trusted Execution Technology (TXT) for safer computing is a versatile set of hardware
extensions to enhance the platform security capabilities. The Intel® Trusted Execution Technology
requires a TPM module on the server platform. Refer to the Intel® Server Boards Product Page at
http://www.intel.com/products/server/motherboard/index.htm#s1=all&s2=S5520HC&s3=all to see
which Intel® Server Boards support Intel® TXT.
Trusted Platform Module (TPM) is a hardware-based security device that addresses the growing
concern on boot process integrity and offers better data protection. TPM protects the system start-up
process by ensuring it is tamper-free before releasing system control to the operating system. A TPM
device provides secured storage to store data, such as security keys and passwords. In addition, a TPM
device has encryption and hash functions. A pre-boot environment, such as the BIOS and operating
system loader, uses the TPM to collect and store unique measurements from multiple factors within the
boot process to create a system fingerprint. This unique fingerprint remains the same unless the preboot environment is tampered with. Therefore, it is used to compare to future measurements to verify
the integrity of the boot process. Refer to the Intel® Server Boards Product Page at
http://www.intel.com/products/server/motherboard/index.htm#s1=all&s2=S5520HC&s3=all to see
which Intel® Server Boards support Intel® TXT.
Intel® Advanced Encryption Standard (AES) - These instructions enable fast and secure data
encryption and decryption, using the Advanced Encryption Standard (AES)
The breakthrough performance, energy efficiency and reliability of the new Intel® Xeon® processor-based
systems make them the best choice for virtualization and business critical applications, enabling IT to
become more efficient and responsive. For information on virtualization performance, refer to the Intel®
website for more information.
The Intel® Xeon® processor 3400 Series provides a lower-cost solution for virtualization solutions. The
processor provides an entry-level cost point for customers deploying small business virtualization solutions.
7
Page 8

VMware vSphere* 4.1 Installation Guide for ESX/ESXi* 4.1
Customers deploying simple server solutions can consolidate 5-10 servers on a single platform to lower
operating costs while delivering good performance.
Server Configuration Options and Selection Criteria
The Intel® Xeon® processor 5600 Series performance benefits provide improved performance on
virtualization solutions compared to the previous generation Intel® Xeon® processor 5500 Series.
Intel® Server Boards provide sufficient memory for running virtual machines. Maximizing the amount of
memory on the board will provide more memory for each virtual machine. To enhance performance, VMware*
recommends installinig ESX* on a robust system with more RAM than the minimum required and with
multiple physical disks. Consider the following recommendations for enhanced performance:
RAM: ESX* 4.1 hosts require more RAM than typical servers. An ESX 4.1 host must be equipped with
sufficient RAM to run concurrent virtual machines. Running these four virtual machines with 512 MB
RAM requires that the ESX 4.1 host be equipped with approximately 4 GB RAM, which includes 2,048
MB for the virtual machines.
Dedicated Fast Ethernet Adapters for Virtual Machines: Place the management network and virtual
machine networks on different physical network cards. Dedicated Gigabit Ethernet cards for virtual
machines improve throughput to virtual machines with high network traffic.
It is also recommended to purchase a quad-port Network Internet Card for improved networking and I/O
performance while providing redundancy in case of failure. With virtualization applications, it is important to
provide redundancy when consolidating server applications on a single system because multiple applications
will fail with a single point-of-failure. With the addition of a quad-port NIC for the server, there are four
additional ports available to each VMware* host for either additional networking bandwidth for virtual
machines as well as redundant paths.
Typical deployments would dedicate two ports for the management interface, two ports for the storage
interface and two ports for the VM network. Additional ports may be needed for the vm network depending
on the network load. Customers with high network bandwidth requirements for their application would want
to consider InfiniBand* or 10GE interfaces for even more network capacity. The server board and platform
options depend on the number of Virtual Machines that will run on an ESX* server:
Intel® Server Board S5520UR and Intel® Server Board S5520HC are ideal for scalable high-
performance virtualization. The increased memory supported on each server board allows for more
virtualization machines to be deployed because more memory can be allocated for each Virtual Machine.
Intel® Server Board S5520UR is rack-mounted for data centers and Enterprise IT. Intel® Server Board
S5520HC is ideal for customers wanting a pedestal chassis virtualization solution for office
environments. Intel® Server Board S5520UR and Intel® Server Board S5520HC each has up-to 96
GB of memory and expansion for I/O cards, making them ideal for virtualization. For maximizing the
number of Virtual Machines and supporting more I/O, these server options provide the best possible
performance and scalability for virtualization. Intel® Server Board S5520URT and Intel® Server Board
S5520HCT are required for support of Intel® TXT. Refer to the Intel® Server Boards Product Page at
http://www.intel.com/products/server/motherboard/index.htm#s1=all&s2=S5520HC&s3=all to see
which Intel® Server Boards support Intel® TXT.
8
Page 9

Hardware Components
Quantity
Item
Intel® Server Board
S5520HC
S5520HCT
S5520UR
S5520URT
1
Intel® Server Chassis
SC5600
SC5650
SR1600 (1U) 3.5” disk drive
SR1625 (1U) 2.5” disk drive
SR2600 (2U) 3.5” disk drives
SR2625 (2U) 2.5” disk drives
Memory
4 GB or more
Memory modules
Refer to the tested memory list at
http://www.intel.com/support/mo
therboards/server/s5520hc/sb/C
S-030221.htm
http://www.intel.com/support/moth
erboards/server/s5520ur/sb/CS-
030026.htm
Processors
2
Intel® Xeon® Processors
Refer to the tested processor list at
http://www.intel.com/support/mo
therboards/server/s5520hc/sb/C
S-030221.htm
http://www.intel.com/support/moth
erboards/server/sb/CS-
030213.htm
Storage
3 minimum
hardware RAID
SATA/SAS hard drives or
SSD
Refer to the tested hardware list at
http://www.intel.com/support/mo
therboards/server/s5520hc/sb/C
S-030220.htm
http://www.intel.com/support/moth
erboards/server/s5520ur/sb/CS-
030027.htm
2 Minimum Non
RAID SAS or
SATA
SAS/SATA hard drives or
SSD
Refer to the tested hardware list at
http://www.intel.com/support/mo
therboards/server/s5520hc/sb/C
S-030220.htm
http://www.intel.com/support/moth
erboards/server/s5520ur/sb/CS-
030027.htm
VMware vSphere* 4.1 Installation Guide for ESX*
Table 1 – Hardware Bill of Materials
9
Page 10

VMware vSphere* 4.1 Installation Guide for ESX/ESXi* 4.1
Quantity
Item/Model #
Intel® Server Board
S5520HC
S5520UR
Internal RAID Options – Intel® RAID Controllers
1 Optional
AXXROMBSASMR Internal 4 Port SAS RAID ROC
Module (lsi1064E)
1 Optional
AXX4SASMOD Internal 4 Port SAS Module (lsi1078)
1 Optional
AXX4SASIOMOD External 4 Port SAS Module
(lsi1064e)
1 Optional
AXXRMS2MH080
8-port 6Gb Integrated RAID (LSI2108)
1 Optional
AXXRMS2LL040 / AXXRMS2LL080
4-port/8-port 6Gb RAID (LSI21008)
1 Optional
AXXRMS2AF040 / AXXRMS2AF080 4-port/8-port 6Gb
RAID (LSI2008)
1 Optional
SAS RAID ROC Midplane in the chassis
Refer to RAID and Storage Options Available
on Intel® Server Boards and Systems based on
Intel® 5500/5520 Chipset at
http://download.intel.com/support/motherboards
/server/sb/raid_options_on_s5500_s5520_serv
er_products_v1_0.pdf
Networking
1 Optional
Dual Port GbE I/O Module AXXGBIOMOD
1 Optional
Quad Port GbE I/O Module AXX4GBIOMOD2
1 Optional
Dual Port 10GbE I/O Module AXX10GBIOMOD
1 Optional
InfiniBand* (QDR) I/O Module AXXIBQDRIOMOD
1 Optional
Single-port InfiniBand* (QDR) AXXIBQDRSR169X
10
Table 1 Continued – Hardware Bill of Materials
Page 11
VMware vSphere* 4.1 Installation Guide for ESX*
Intel® I/O Expansion Module
Product Code
S5520UR
S5520HC
Single Connector
Dual-port Intel 82571EB GbE
AXXGBIOMOD
External 4-port SAS (LSI1064e)
AXXSASIOMOD
Single-port InfiniBand* (SDR)
AXXIBIOMOD
Double Connector
Dual-port Intel 82598EB 10GbE*
AXX10GBIOMOD
4-port Intel 82576EB GbE*
AXX4GBIOMOD2
Single-port InfiniBand (QDR)
AXXIBQDRIOMOD
Single-port InfiniBand (QDR)
AXXIBQDRSR169X
SAS Controllers
4-port Internal SAS (LSI1064e)*
AXX4SASMOD
4-port Internal SAS HW RAID (LSI1078)*
AXXROMBSASMR
8-port 6Gb Integrated RAID (LSI2108)
AXXRMS2MH080
4-port/8-port 6Gb RAID (LSI2008)
AXXRMS2LL040 /
AXXRMS2LL080
4-port/8-port 6Gb RAID (LSI2008)
AXXRMS2AF040 /
AXXRMS2AF080
Item
Version
Manufacturer
Comment
VMware ESX* 4.1
VMware ESX 4.1
http://downloads.VMware.com/
d/info/datacenter_downloads/V
Mware_vsphere_4/4
VMware*
vCenter Server* 4.1
VMware vCenter Server 4.1
http://downloads.VMware.com/
d/info/datacenter_downloads/V
Mware_vsphere_4/4
VMware*
VMware ESXi* 4.1
Installable
VMware ESXi 4.1 Installable
http://downloads.VMware.com/
d/info/datacenter_downloads/V
Mware_vsphere_4/4
VMware*
Intel® I/O Expansion Module Support Matrix
Table 2 - Intel® I/O Expansion Module Support Matrix
Software Components
Table 3 – Installation Software BOM
VMware vSphere* is available as an accessory to Intel® Server Boards and Intel® Server Systems. An Intel®
Authorized Distributor can provide VMware vSphere as an add-on to eligible Intel® Server Product purchases.
Most Intel® Server Products are certified to run with VMware vSphere* and are listed on the VMware
Hardware Compatibility List. For more information, including ordering information and sales tools, please click
this link: http://www3.intel.com/cd/channel/reseller/asmo-na/eng/products/server/436106.htm
11
Page 12

VMware vSphere* 4.1 Installation Guide for ESX/ESXi* 4.1
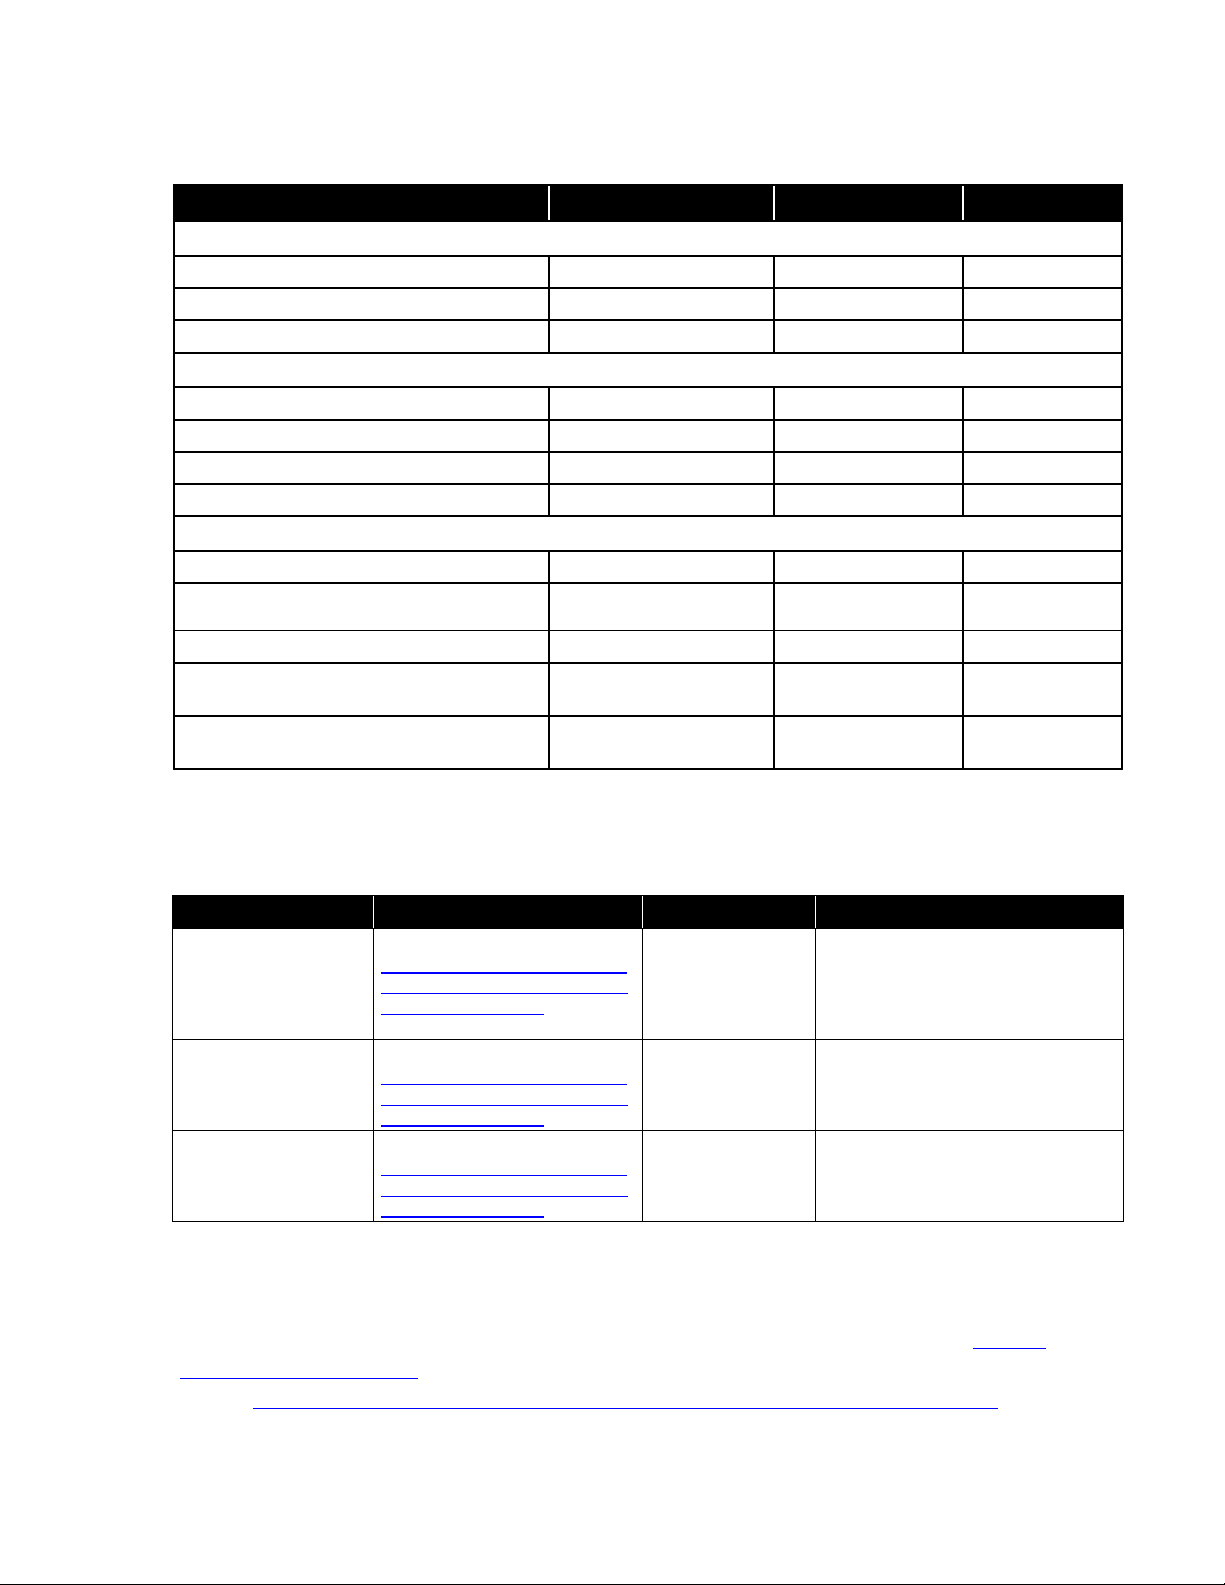
Related Intel® ESAA Solutions
There are several solutions available to provide disaster recovery or iSCSI/NAS storage. The following recipes
may provide an alternative storage solution for a vSphere 4.1 host depending on storage needs. If deploying
a large number of VMs, the disk I/O capability or IOPS provided by local drives may be exceeded. External
storage is a viable option when deploying disk-intensive applications or when the number of virtual
machines deployed need more disk I/O. This can also be loaded onto the SAS/SAN to provide higher-end
storage functions such as backup and high availability.
DataCore SANmelody* (High Availability) on Microsoft Windows Server* 2008 :
This storage virtualization SAN solution for iSCSI combines Intel® Modular Server Compute Module
MFS5000SI with DataCore* SANmelody* software (in a two disk server configuration for auto failover,
high availability configuration) and is the perfect companion to server and desktop virtualization.
SANmelody* software virtualizes, manages, and thin provisions storage, and provides disaster recovery,
while optimizing storage utilization, manageability, and performance. This solution provides enterpriseclass performance and functionality at an SMB-affordable price.
http://www.esaa-members.com/index.php/recipes/recipeSummary/1160
Open-E* Data Storage Server* : This recipe uses Open-E* Data Storage Server* to create a storage
system for applications that is fast, flexible and reliable. Open-E DSS is already pre-installed on a USB
flash module (disk on module) and with the unique Web interface, no special knowledge is required even
for the configuration of the most eccentric storage strategy.
http://www.esaa-members.com/index.php/recipes/recipeSummary/617
Hytrust Appliance* Installation and Configuration: This recipe explains how to install and configure
the Hytrust Appliance*. HyTrust Appliance delivers enterprise-class controls for access, accountability,
and visibility for VMware virtualization infrastructure.
http://www.esaa-members.com/recipes/recipeSummary/1589
Recipe Overview
This Intel® ESAA recipe covers the installation steps required to setup a basic virtualization infrastructure
environment. An outline of the recipe is shown in Figure 3. The steps are outlined below. The primary focus
of this recipe is to guide the user in storage setup and networking to support installation of both vSphere
ESX* 4.1 hosts and vCenter*. The first part configures RAID and virtual disks to support the install of both
the vSphere ESX 4.1 and vCenter. Setup of the vSphere client software, connecting to the vCenter Server,
and managing the datacenter is also covered. The recipe also covers:
Setting up an external data store and networking requirements to provide shared external storage to
support VMotion*
Setting up a cluster, adding hosts and enabling enhanced VMotion compatibility or Intel® VT
FlexMigration.
Once complete, a basic virtualization infrastructure that can be expanded by adding more hosts or enabling
higher-end features is created. Refer to vSphere* documentation for more detailed information, including
12
Page 13

VMware vSphere* 4.1 Installation Guide for ESX*
Setup RAID
And Configure
BIOS Settings
Create
Virtual Disks
Create
Virtual Disks
Install VMware
ESX 4
Install
vSphere Client
Install vCenter
Server
Create a
DataCenter
Configure
Local and External
Data Stores
Setup VmKernel
Ports
Setup
Networking for
VM Traffic
Create a VM
And Load an OS
Create a Cluster
And Enable Flex
Migration
information about how to set up more advanced features or capabilities, additional requirements and Best
Known Methods, such as:
Configure RAID and setup virtual disks for vSphere ESX* 4.1 and vCenter* – Sets up the storage
needed for VMware* vSphere*.
Install VMware ESX* 4.1 – Installs VMware ESX* 4.1 on each of the servers.
Install the vSphere* client – Loads the client software that enables access to the vCenter* Server and
ESX* hosts.
Install vCenter Server* – Installs the vCenter Server* to manage the datacenter.
Create a datacenter and add hosts – Creates a datacenter and adds the hosts.
Setup VMkernel ports to support VMotion* – Sets up the networking to enable VMotion*.
Configure datastores – Covers the steps required to setup a datastore for virtual machine storage
using the external iSCSI storage.
Setup networking to support VM traffic – Configures a network port separate from the management
and storage network port to support virtual machine traffic.
Create a VM and load an OS – Guides the user to set up a virtual machine and to load a sample
operating system from a USB CD.
Create a cluster and enable Intel® VT FlexMigration – Covers creating a cluster in the datacenter and
adding hosts to the cluster. Intel® VT FlexMigration is enabled but Distributed Resource Scheduling,
Distributed Power Management and High Availability is disabled. These features can be enabled in the
setup if needed. A license is required to enable DRS, DPM and HA.
Figure 3 - Recipe Steps Outline (from left to right)
13
Page 14

VMware vSphere* 4.1 Installation Guide for ESX/ESXi* 4.1
Server Configuration Recommendations
Recommended for enhanced performance:
RAM: ESX* 4.1 hosts require more RAM than typical servers. An ESX* 4.1 host must be equipped with
sufficient RAM to run concurrent virtual machines. For example, running four virtual machines with 512
MB RAM requires that the ESX 4.1 host be equipped with approximately 4 GB RAM, which includes
2,048 MB for the virtual machines. Typical server deployments require at least 2-4 GB of memory per
virtual machine. This depends on the application needs for each server. These calculations do not take
into account possible memory savings from using variable overhead memory for each virtual machine.
See links in the appendix of the VMware Resource Management Guide for more information.
BIOS Settings: For Intel® Xeon® Processor systems, the processors must include support for Intel® VT.
Consult individual BIOS settings to ensure that Intel® VT is enabled. Many servers that include CPUs with
Intel® VT support might ship with Intel® VT disabled by default, so it must be enabled. Also enable
“Execute Disable Bit” in the BIOS to allow vSphere* to run. Please check both settings before installing
vSphere ESX* 4.1.
Processor Selection: When creating virtual machines it is recommended each virtual machine be
assigned a single virtual CPU or core. Multiple cores may be needed if an application requires more
performance or if running multi-threaded applications. However, there is overhead associated with
setting up to run with multiple vCPUs per VM. Performance is impacted when a virtual machine has to
wait until the cores are available. There is also more memory overhead required with multiple vCPUs.
Given these considerations, a single virtual CPU or core may be used and assigned to each VM. The
quantity of VMs running on each server depends on the CPU, disk I/O or networking loads for the
applications. Take into account the application workloads to determine not only the number of virtual
CPUs needed but also the networking and disk I/O requirements.
Hard Disk Sizing: The size of the hard disks for virtual machines depends on loading requirements and
the disk sizes required by the application. For the vSphere ESX* 4.1 installation, allocate at least 50 GB
of storage space. In the installation setup instructions for this recipe, 50 GB of storage space is setup.
Calculate or determine if the virtual machines running on a LUN are sufficient to meet the demands for
the applications. In addition, reduce the number of VMs residing on a single LUN or virtual disk to avoid
SCSI reservation issues. SCSI reservations are made by the host when changes are made to the VMFS
metadata. When a host holds a reservation, the other hosts will report a SCSI reservation conflict when
I/O is requested from the LUN.
For more BIOS, CPU, memory and hard disk recommendations refer to the Performance Best Practices for
VMware vSphere® 4.1 available online at:
http://www.VMware.com/pdf/Perf_Best_Practices_vSphere4.1.pdf
Basic Network Configurations
For VMware* vSphere ESX* 4.1, adding the additional network cards provides extra bandwidth and
redundancy for service console and virtual machine network ports. It is recommended to use static IP
addresses for the ESX servers.
14
Page 15

VMware vSphere* 4.1 Installation Guide for ESX*
Server
IP address
Netmask
VCenter Server*
192.168.1.30
255.255.255.0
ESX* 4.1 Srv 1
192.168.1.10
255.255.255.0
ESX* 4.1 Srv 1 Vmkernel port
192.168.1.11`
255.255.255.0
ESX* 4.1 Srv 1
192.168.1.20
255.255.255.0
ESX* 4.1 Srv 1 Vmkernel port
192.168.1.21
255.255.255.0
In this recipe the two network ports on the server module are used on each of the servers with the
following network setup for ESX Server:
Figure 4 - VMware* vSphere* 2 Servers Network Configuration
For VMware* vSphere*, there are three network connections or ports that need to be configured:
VMkernel, to handle storage traffic.
Service Console, to handle host management traffic.
Virtual Machine, to handle VM network traffic.
Table 4 shows a summary of the IP addresses that will be assigned to each server for this example.
Table 4 – IP Addresses Assigned to Each Server
The first NIC on the server is used for the management and storage traffic. The second NIC is used
specifically for virtual machine traffic. Additional ports can be added to handle more network traffic or
provide redundancy by adding a mezzanine card. Depending on the network I/O requirements for the
application, it is recommended to purchase the additional card.
VMware* uses designated ports for communication. Additionally, the managed hosts are listening for data
from the vCenter Server* system on designated ports. If a firewall exists between any of these elements
and Windows* firewall service is in use, the installer opens the ports during the installation. For custom
firewalls, the required ports must be manually opened. If a firewall is between two managed hosts and to
perform source or target activities, such as migration or cloning, the managed hosts must be configured to
receive data. Refer to the ESX and vCenter Server Installation Guide for more detailed information on
15
Page 16

VMware vSphere* 4.1 Installation Guide for ESX/ESXi* 4.1
setting up firewall ports and installing ESX* Server:
http://www.vmware.com/pdf/vsphere4/r41/vsp_41_esx_vc_installation_guide.pdf
Volume Setup and Storage Layout
Configure Access to Storage
An ESX Server* virtual machine uses a virtual hard disk to store its operating system, program files, and
other data associated with its activities. A virtual disk is a large physical file, or a set of files, that can be
copied, moved, archived, and backed up as easily as any other file. To store virtual disk files and be able to
manipulate the files, ESX Server 4.1 requires specialized dedicated storage space. ESX Server uses storage
space on a variety of physical storage devices, including the host’s internal and external storage devices, or
networked storage devices. The storage device is a physical disk or disk array dedicated to the specific tasks
of storing and protecting data. ESX Server can discover storage devices it has access to, and use them as
datastores. The datastore is a special logical container, analogous to a file system on a logical volume, where
ESX Server places virtual disk files and other files that encapsulate essential components of a virtual
machine. Deployed on different devices, the datastores hide specifics of each storage product and provide a
uniform model for storing virtual machine files. Using the VI Client, datastores can be set-up in advance on
any storage device that the ESX Server 4.1 discovers.
It is recommended to create separate virtual disks and datastores for each virtual machine. This improves
performance by storing multiple VMs on different LUNs or virtual disks as opposed to a single LUN and
avoids SCSI reservation issues. After creating the datastores, they can be used to store virtual machine files.
The next sections provide steps to install ESX* Server and to setup ESX Server hosts to store and run virtual
machines from internal and external storage. The recipe will show how to setup hardware RAID to install
the ESX server and how to connect to an external iSCSI storage solution.
16
Page 17
VMware vSphere* 4.1 Installation Guide for ESX*
Hardware RAID BIOS Configuration
The following steps show how to setup for the Intel® RAID Controller AXX4SASMOD.
1) Power-on the server and enter the BIOS by pressing the F2 key.
2) Select the “Advanced” option on the top menu.
3) Select “Processor or CPU Configuration”.
4) Ensure “Intel® Virtualization Technology” and “Execute Disable Bit” are set to “Enable”.
5) Select “Mass Storage Configuration”.
6) Disable the Onboard SATA Controller.
7) Enable the Intel® SAS Entry Raid Module.
8) Save the changes by pressing the F10 key, then select “Yes”.
Hardware Trusted Execution Technology Configuration (Optional)
Intel® Server Board S5520URT and Intel® Server Board S5520HCT are required to support Intel® Trust
Execution Technology (Intel® TXT). Execute the following steps to enable Intel® TXT to work with VMware
on these motherboards.
1) Ensure that steps 1-4 have been executed in the previous section before proceeding with these steps.
2) Power-on the system and press the F2 key to enter the BIOS.
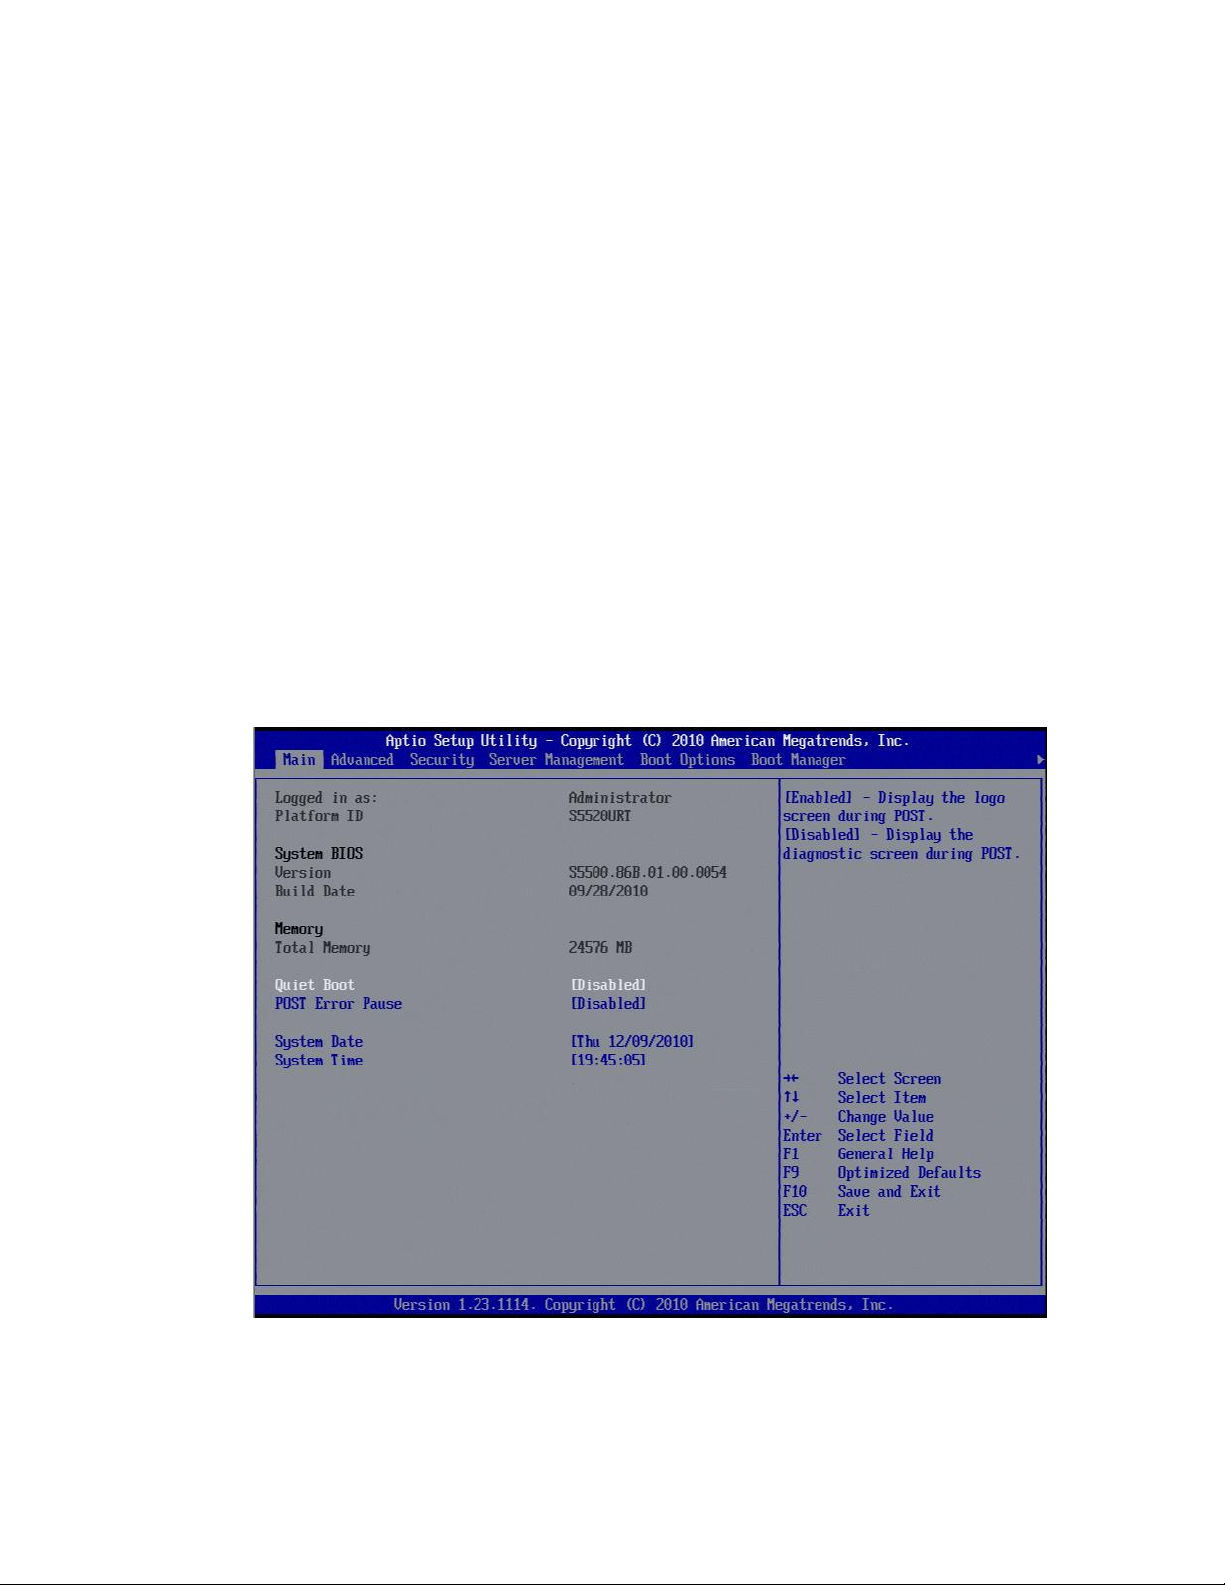
3) Move to the “Main” tab, then disable “Quiet Boot”.
Figure 5 – Disable Quiet Boot in BIOS
17
Page 18
VMware vSphere* 4.1 Installation Guide for ESX/ESXi* 4.1
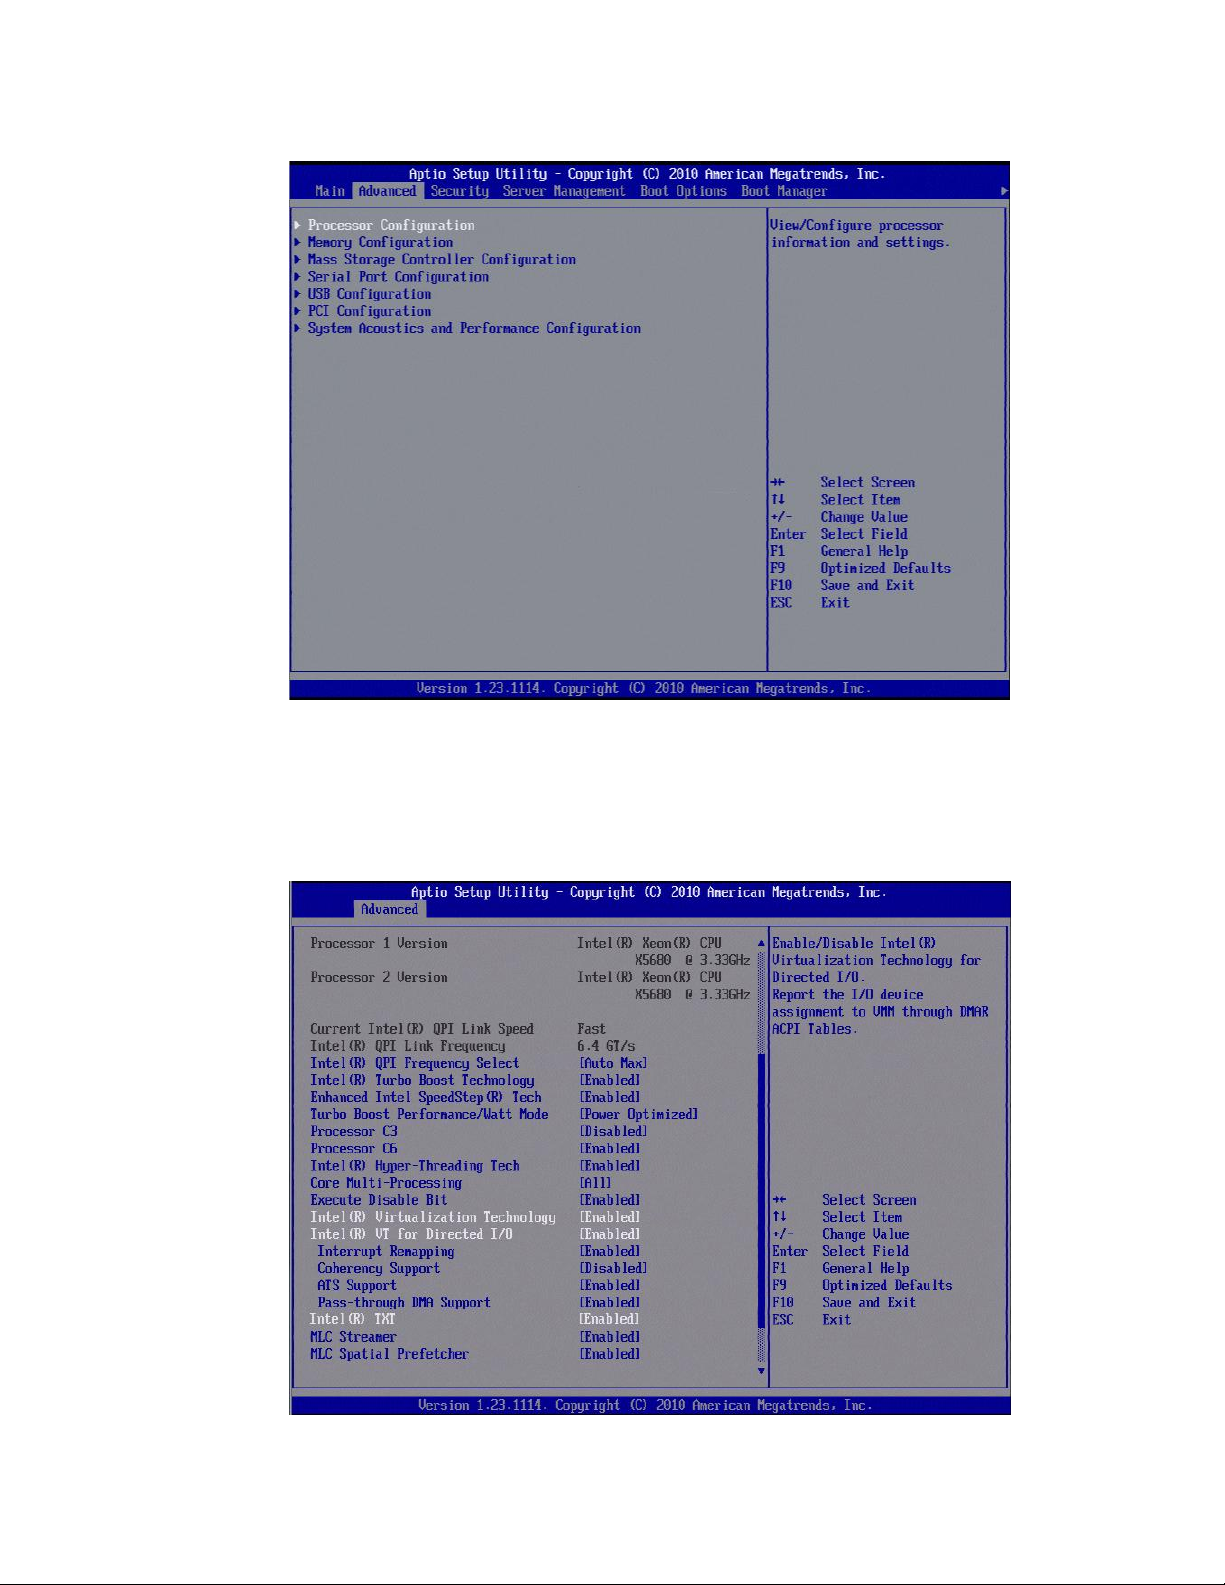
4) Move to the “Advanced” tab and select “Processor Configuration”.
Figure 6 – Processor Configuration in BIOS
5) Ensure the following are enabled:
– Intel® Virtualization Technology
– Intel® VT for Directed I/O (leave sub-categories at their defaults)
– Intel® TXT
Figure 7 – Intel Features Enabled in BIOS
18
Page 19
VMware vSphere* 4.1 Installation Guide for ESX*
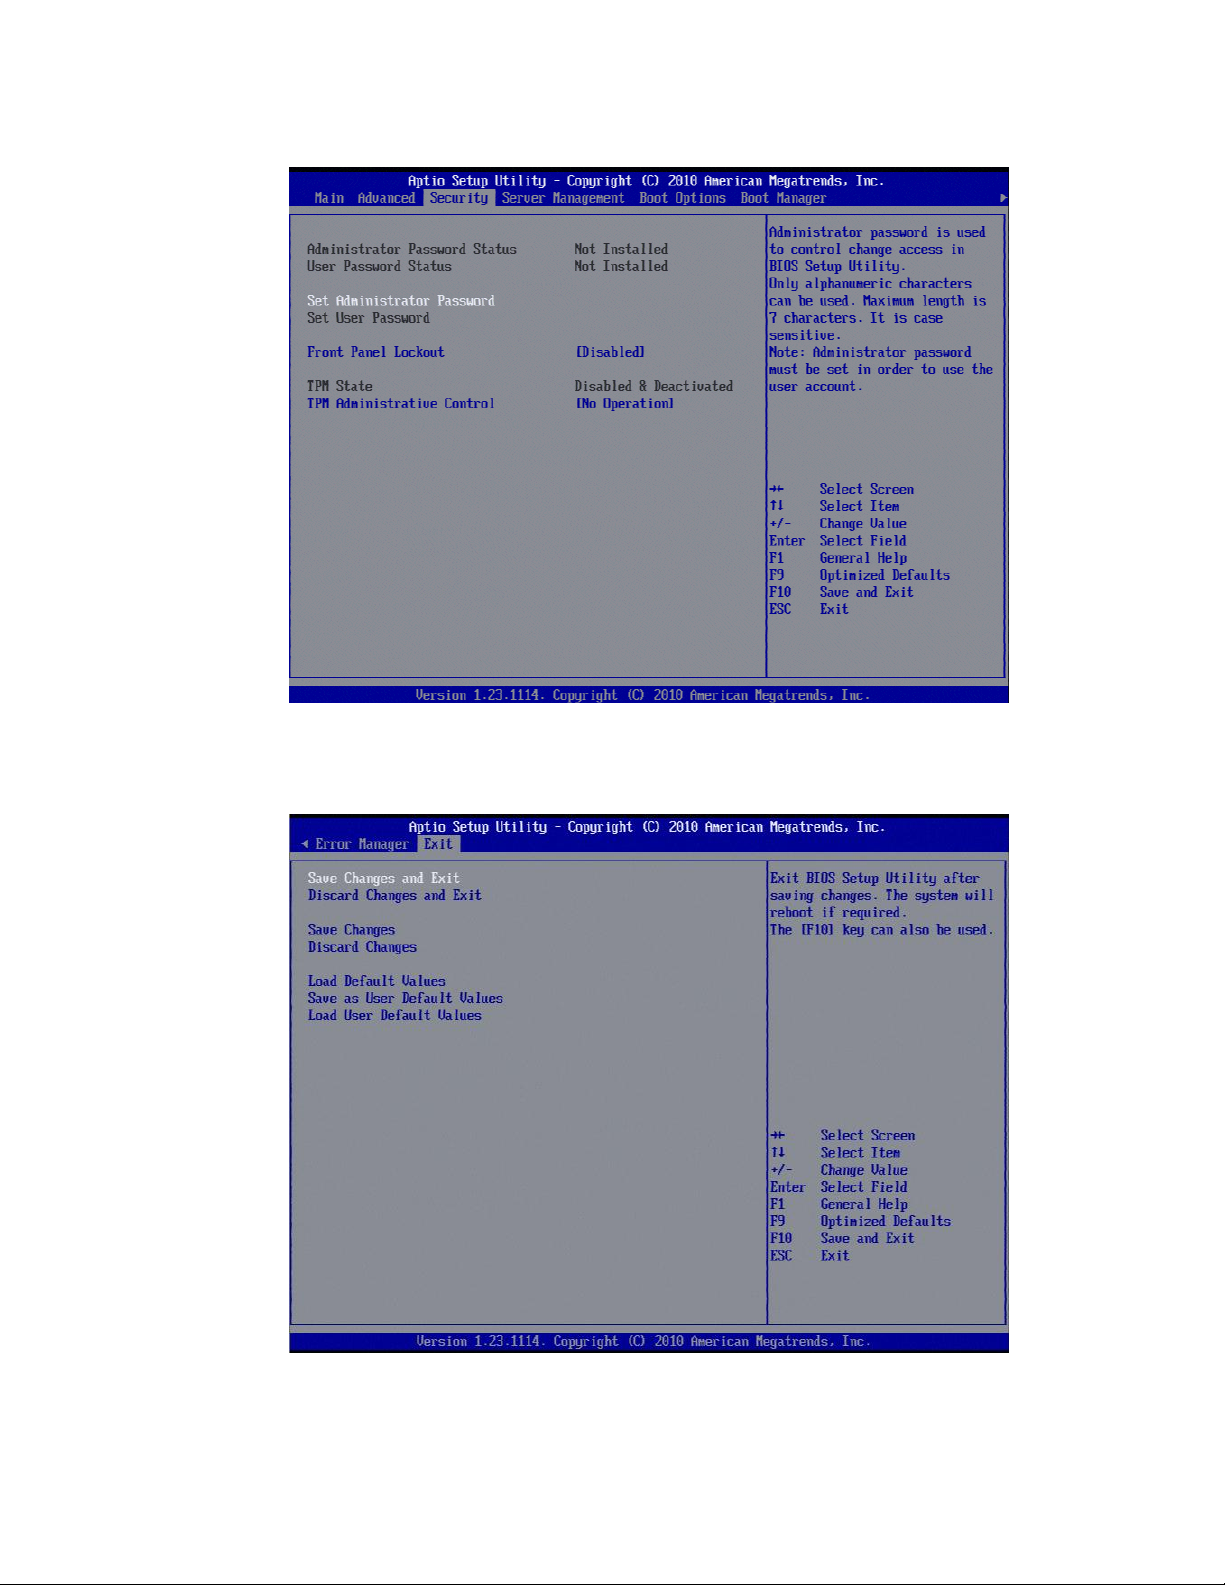
6) Move to the “Security” tab and select “Set Administrator Password”.
Figure 8 – Set Administrator Password in BIOS
7) Scroll to the “Exit” tab and select “Save Changes and Exit”. It is important to save the changes and
reboot to ensure the TPM is activated properly.
Figure 9 – Save Changes and Exit BIOS
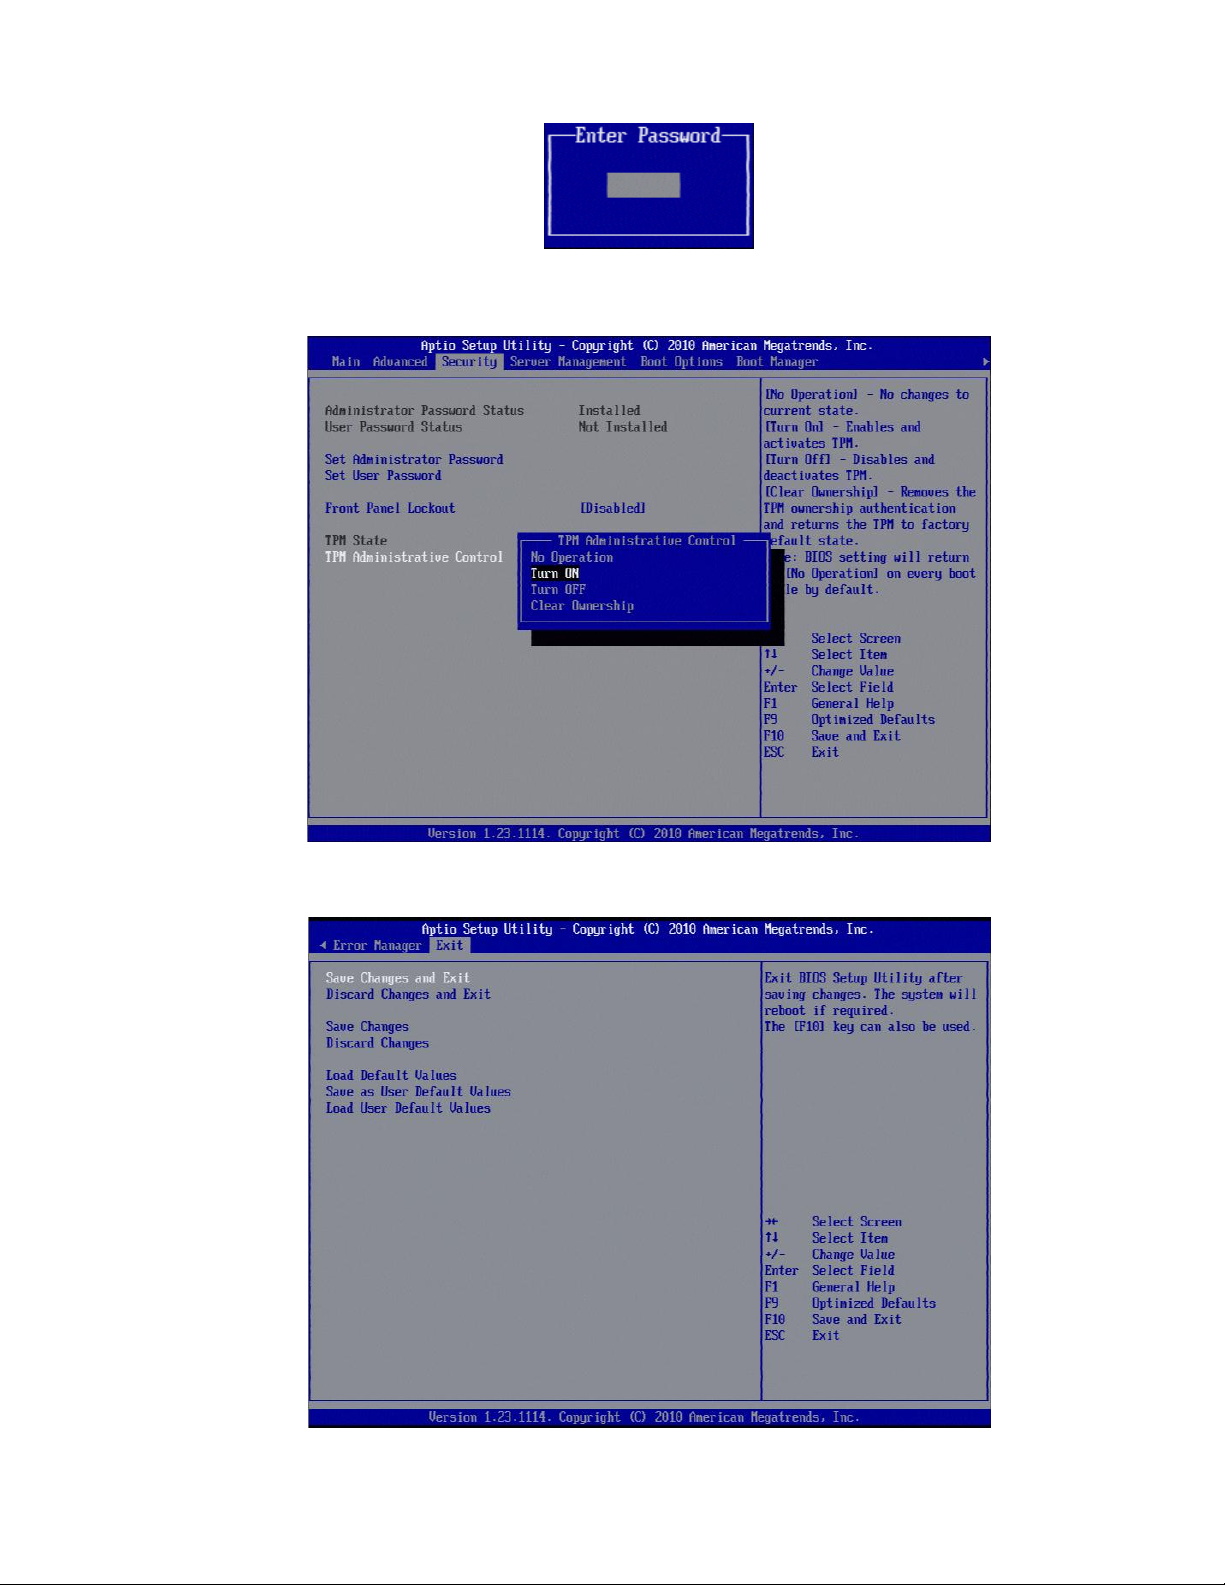
8) Return to BIOS when the reboots using the Administrative password to access BIOS.
19
Page 20
VMware vSphere* 4.1 Installation Guide for ESX/ESXi* 4.1
Figure 10 – Enter Administrator Password
9) Move to the “Security” tab, then select “TPM Administrative Control”. Change the setting to “Turn On”.
Figure 11 – Turn On TPM Administrative Control in BIOS
10) Scroll to the “Exit” tab and select “Save Changes and Exit”.
Figure 12 – Save Changes and Exit BIOS
20
Page 21

VMware vSphere* 4.1 Installation Guide for ESX*
Storage
Controller
RAID Types and Levels
VMware* vSphere
ESX* 4.1 Installation
RAID
VMware vSphere ESX*
4.1 Installation
Single SATA/SAS Drive
On-board Intel®
82801JR I/O
Controller Hub
(ICH10R)
Software RAID 0/1/10 standard
Software RAID 5 with Intel® RAID
Activation Key AXXRAKSW5
No Support for
Software RAID
Supported
Optional Intel® SAS
Entry RAID Module
AXX4SASMOD
Entry Hardware RAID 0/1/1E/10E
Hardware RAID Levels
Supported
Supported
Software RAID 0/1/10 standard
Software RAID 5 with Intel® RAID
Activation Key AXXRAKSW5
No Support for
Software RAID
Supported
Optional Intel®
Integrated RAID
Controller
SROMBSASMR
(AXXROMBSASMR)
Intelligent Hardware RAID
0/1/10/5/50/6/60
Hardware RAID Levels
Supported
Hardware RAID
Recommended
SAS/SATA
Active midplane 2
(FALSASMP2)
Entry Hardware RAID 0/1/1E/10E
standard
Intelligent Hardware RAID
0/1/10/5/50/6/60 with Intel® RAID
Activation Key
Hardware RAID Levels
Supported
Hardware RAID
Recommended
Intel® TXT and the Trusted Platform Module on the system should now be properly configured for use with
VMware TXT environments. Refer to Appendix A: ESXi* Support Configuration for Intel® TXT (Optional) on
page 60 for information regarding Trusted Execution setup for VMware ESXi*.
Hardware RAID Configuration
There are two options when setting up VSphere 4.1 on Intel® Server Boards and Systems based on Intel®
5500/5520/5600 Chipset: The ESX* 4.1 image can be loaded onto either a single SATA or SAS drive or use
a hardware RAID solution. The optional hardware RAID module cards or RAID controllers for the server can
be used to provide data protection on the ESX 4.1 installation or for your virtual machines if running VMs off
local storage. This type of configuration is ideal for small businesses running single server virtualization
solutions. Separate LUNS are set-up to run the ESX Software and Virtual Machines. To provide multiple
server virtualization deployments in enterprise or data center scenarios, a single-drive installation can be
used with external storage solutions. Host profiles would be used to save ESX 4.1 configuration settings in
case of host failure. Host profiles can be used in the data center environment to rapidly deploy new hosts or
recover failed ones. Virtual machines are then stored on external storage. Table 5 summarizes the options
available for Intel® Server Boards and Systems based on Intel® 5500/5520/5600 Chipset. Not all options are
available for different server boards and systems. For additional information regarding RAID support see
RAID and Storage Options Available on Intel® Server Boards and Systems based on Intel® 5500/5520
Chipset at http://download.intel.com/support/motherboards/server/sb/raid_
options_on_s5500_s5520_server_products_v1_0.pdf
Table 5 – RAID options available for Intel® Server Boards and Systems based on Intel® 5500/5520/5600 Chipset
21
Page 22

VMware vSphere* 4.1 Installation Guide for ESX/ESXi* 4.1
Intel® Server Boards RAID Options and Accessories
This Intel® ESAA recipe covers the setup of hardware RAID configuration for ESX* that would be used in
small business environments. Virtual Disks are setup for both the loading of the ESX Software and for
running virtual machines. Consider adding additional virtual disks for the virtual machine to run on depending
on disk I/O requirements for applications.
Hardware RAID Controller Options and Setup
Refer to the Intel® Server Configurator Tool for a specific Intel® Server Board to identify supported RAID
Controllers. The Intel® RAID Controller RS2BL080, a first-generation 6G SAS adapter incorporating LSI*
MegaRAID* technology, offers unprecedented performance with exceptional data protection and design
flexibility. Features including LSI SAS2108 6Gb/s RAID on Chip (ROC*) silicon and a native PCI Express*
Generation 2 architecture allow for significant performance gains for both 3Gb/s and 6Gb/s drive-based
solutions. Data protection and availability are enhanced by new features including Decision Feedback
Equalization for greater signal integrity, enhanced diagnostics, and more robust error reporting. Not all
servers support 6G SAS. However, there is a performance benefit when running at 3G as well. The card is
recommended for providing the best performance for virtualization platforms. The steps to configure
hardware RAID are listed below. The steps apply for both hardware RAID controllers and intelligent hardware
RAID:
1) Reboot the server and enter the RAID controller BIOS.
2) Press the <CTRL> + G keys as the server boots up.
3) Click the “Start” button.
4) Select the “Configuration Wizard” option in the left hand menu.
5) Select “New Configuration”, then click “Next”.
6) Select “Yes” when asked about destructive operation.
7) Select “Manual Configuration”, then click “Next”.
22
Page 23
VMware vSphere* 4.1 Installation Guide for ESX*
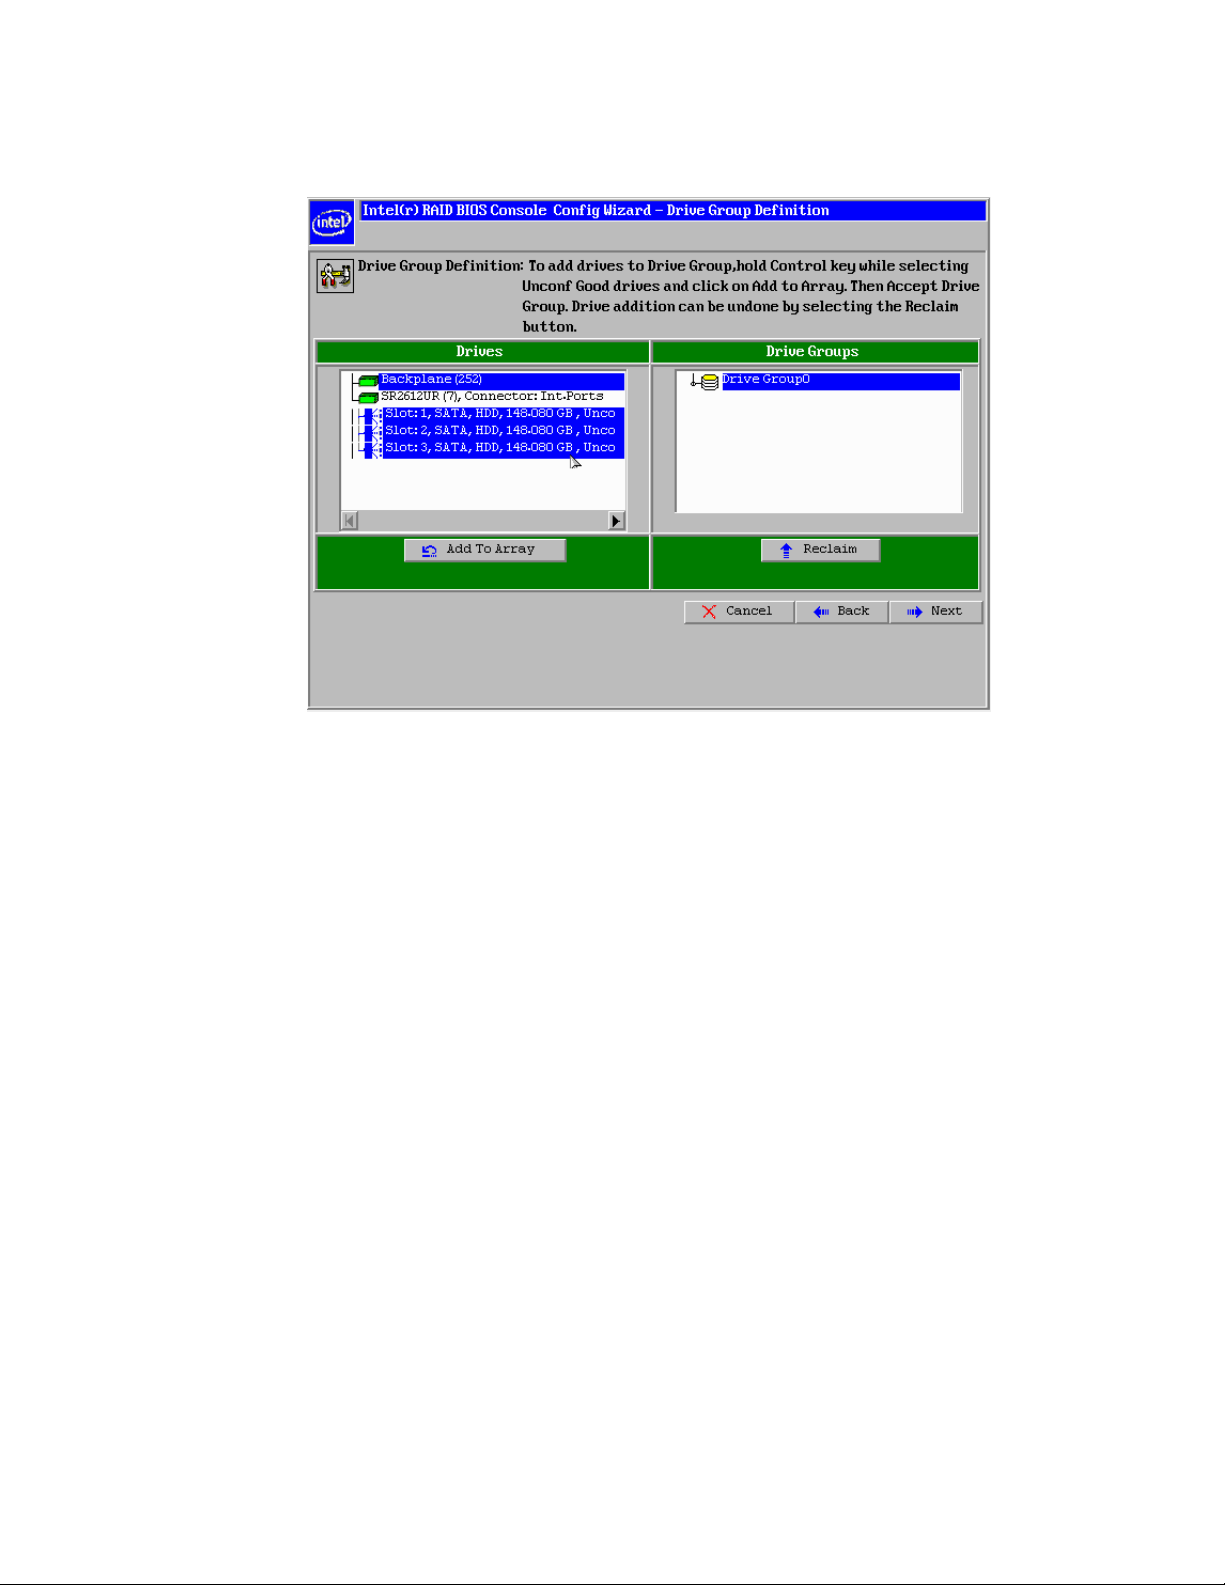
8) Select the drives to be used in the RAID array by holding down the <CTRL> key and selecting each drive
with the mouse as shown in Figure 5.
Figure 13 – RAID BIOS Console Config Wizard / Drive Group Definition
9) Click “Add to Array”.
10) Click “Accept DG” to create the drive array, then click “Next”.
11) Select “ADD SPAN”, then click “Next”.
12) Select RAID 5 as the RAID level and set the size to at least 50 G. Set the RAID policies that would be
best for the application. This Virtual Drive or LUN will be used to load the ESX* image. Click “Accept”.
13) Click “Back” to create another Virtual Drive or LUN.
14) Select “ADD SPAN”, then click “Next”.
15) Select RAID 5 as the RAID level. Keep the default drive size and set the RAID policies that are
appropriate for the application.
16) Click “Accept”. Optionally, multiple LUNS can be created to be used as DataStores for the virtual machine.
Using more than one LUN can help prevent bottlenecks in the application when multiple virtual
machines are accessing the same LUN. In this case, a single LUN is created. Click “Next.”
17) Click “Accept” at the configuration Preview.
18) Select “Yes” to save the configuration.
19) Select “Yes” when asked to initialize.
20) Select the first Virtual Drive (VD0), then select “Set Boot Drive”.
21) Click “Go”. The boot drive should indicate current = 0.
22) Click “Home”.
23) Click “Exit”, then “Yes” when asked to exit the application.
24) Reboot the server by pressing the <CTRL>+<ALT>+<DEL> keys.
23
Page 24
VMware vSphere* 4.1 Installation Guide for ESX/ESXi* 4.1
Get Started with ESX* 4.1
Follow the procedures included here to install and setup a basic inventory for a single-host virtualization
environment. After the host is setup with a working virtual machine, vCenter Server* can be installed and a
multiple-host virtualization environment can be utilized. This information is for experienced Windows* or
Linux* system administrators installing VMware ESX* 4.1 to deploy virtualization for the first time.
Specifically, it is for users who meet the following requirements:
ESX* 4.1 software is not installed.
VMware vSphere* Client or vCenter Server* is not installed.
Initial Tasks
The getting started tasks range from initial setup of a new virtualization host to a working virtual machine.
After a host and functional virtual machine is ready, a managed host environment can be setup with vCenter
Server*. Getting started with ESX* 4.1 includes the following tasks:
Installing ESX* 4.1 and adding the host to the network.
Installing the vSphere* Client and connecting to the ESX*4.1 host.
Deploying and running a virtual machine.
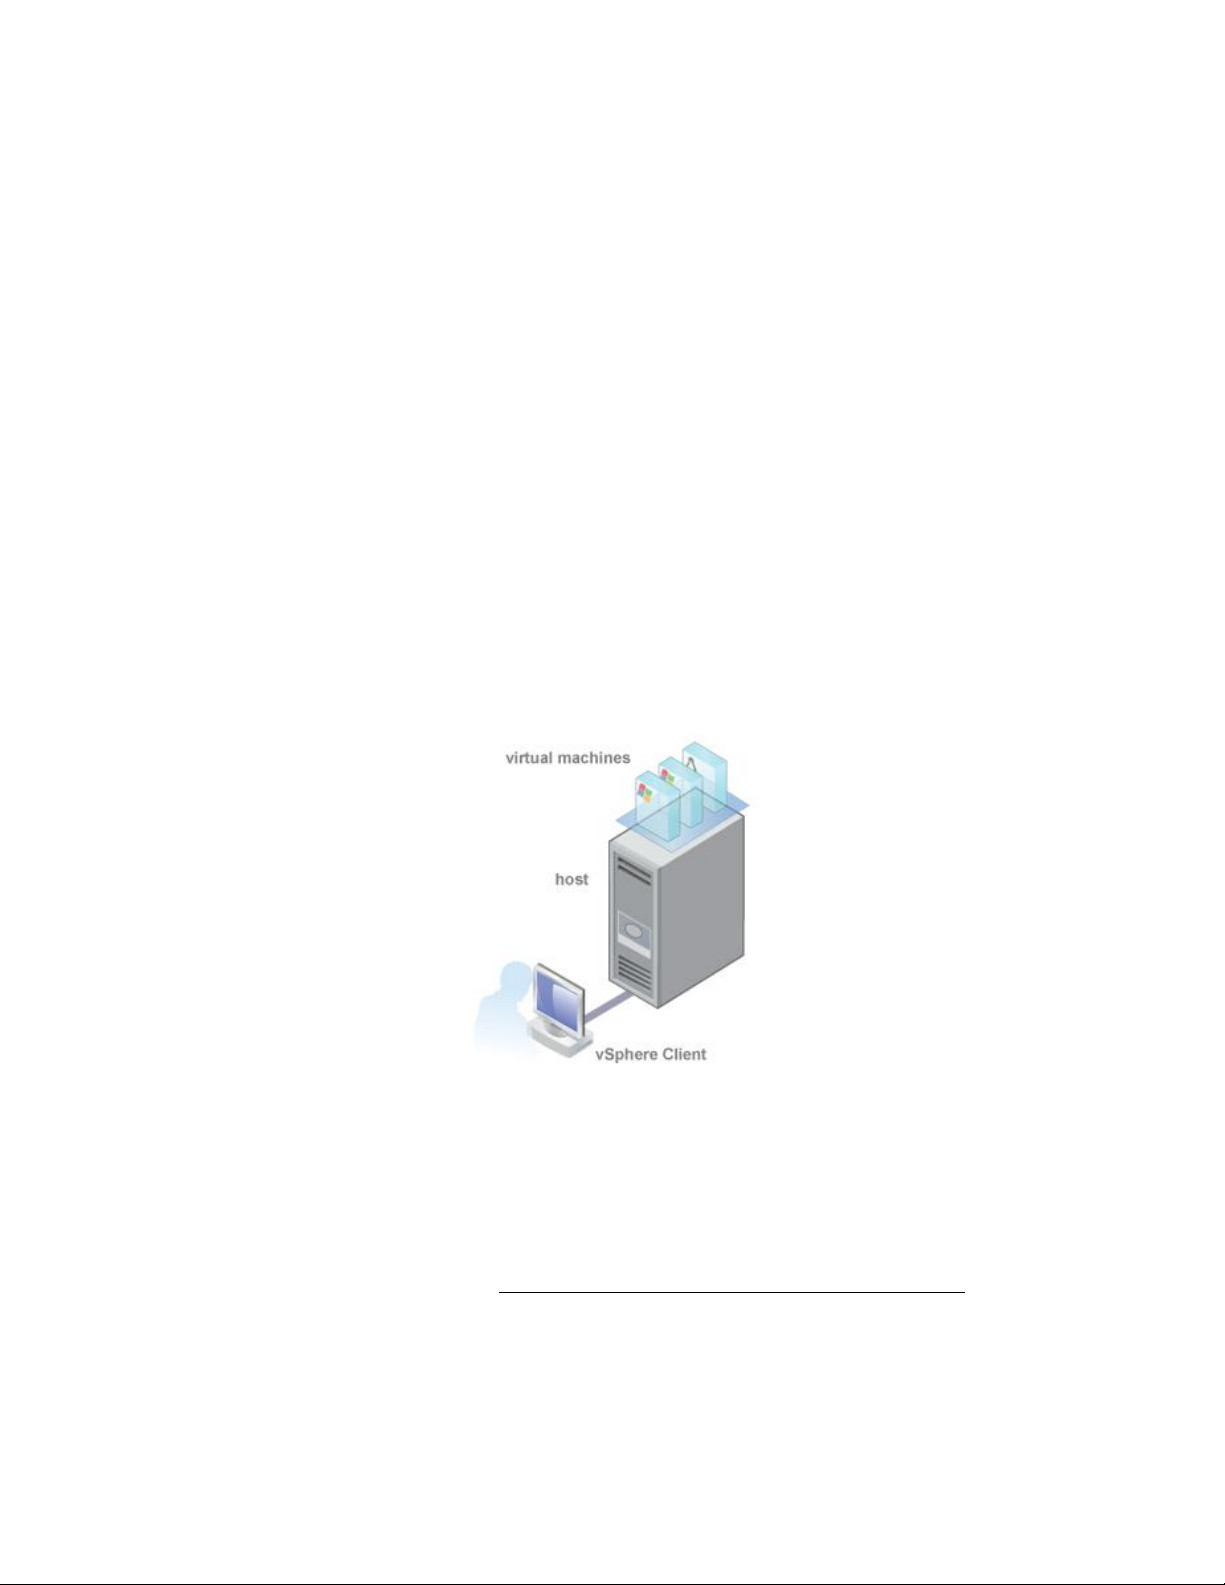
Completing the getting started tasks sets up the single-host management system for virtualization as
shown in Figure 6.
Figure 14 – Basic Single-Host Management System
After the initial setup of ESX* 4.1, vSphere* 4.1 with vCenter Server* can be deployed to manage multiple
hosts. There are two options for installing ESX* 4.1:
VMware ESX* 4.1 Installation (No TXT support)
VMware ESXi* 4.1 Update 1 (Supports TXT)
Choose the one that is most appropriate for the intended environment. The next few sections cover the
steps to install ESX 4.1. Refer to the Install ESXi* 4.1 Installable Using the Interactive Mode section on page
27 to install ESX 4.1.
24
Page 25

VMware vSphere* 4.1 Installation Guide for ESX*
VMware ESX* 4.1 Installation
Install ESX* 4.1 to get started with running virtual machines. The machine running ESX virtualization
software will act as a host in the virtual infrastructure. Hosts provide CPU and memory resources, access to
storage, and network connectivity for virtual machines that reside on them.
Install ESX* 4.1
Use the ESX* 4.1 CD to install the ESX 4.1 software onto a SAS, SATA, or SCSI hard drive. Installing on a
Fibre Channel SAN is supported experimentally. Verify the server hardware clock is set to UTC. This setting is
in the system BIOS.
Verify a keyboard and monitor are attached to the server the ESX* software will be installed on.
A USB or installed CD is needed to load the software.
To install ESX* 4.1, perform these steps:
1) Ensure that the DVD is plugged into Server1 with the latest ESX* 4.1 software.
2) Power-on Server 1.
3) Enter the BIOS by pressing the F2 key.
4) Select the Boot Manager tab.
5) Select the USB DVD or DVD drive to boot off the DVD and Install ESX* 4.1.
6) After the ESX* 4.1 screen displays, select “Install ESX in graphical mode”.
7) A series of installation messages display until the Welcome page appears. Click “Next” to continue.
8) Select “I accept the terms of the license agreement”, then click “Next”. Installation cannot complete
unless the license agreement is accepted.
9) Select the keyboard type from the list, then click “Next”.
10) Select whether to install custom drivers with the ESX* installation. Select “Yes” to load system drivers;
custom drivers do not have to be installed. Custom drivers can be installed after the ESX installation is
complete, using other command-line and GUI tools, such as the vSphere* CLI and vCenter Update
Manager*. Click “Next” to continue.
11) A pop up message appears. Click “Yes” to load the required ESX* drivers.
12) Click “Next” when the drivers finish loading.
13) Configure ESX* licensing:
a) Select “Enter a serial number now”, enter the vSphere* license key, then click “Next”.
b) If a license key is not available during the installation, select “Enter a license key later”, click “Next”.
This choice allows ESX* evaluation (or enter a vSphere* license key later using the vSphere Client).
14) Select the network adapter for the ESX* service console. Virtual machine network traffic shares this
network adapter until a virtual switch is configured for another network adapter. Other network
adapters can be configured at a later time from the vSphere* Client.
15) If the adapter is connected to a VLAN, select “This adapter requires a VLAN ID”, enter a VLAN ID number
between 0 and 4095, then click “Next”. VLAN ID for VMs is described later in the recipe.
16) Configure the network settings:
a) VMware* recommends using a static IP address to simplify client access. To use static settings but
the required information is not available, use DHCP for the installation and configure static settings
after consulting with a network administrator.
25
Page 26

VMware vSphere* 4.1 Installation Guide for ESX/ESXi* 4.1
b) For the host name, type the complete host name including the domain. This option is available only
if using a static IP address.
17) For demo purposes, enter “ESXServer 1.labs.com”.
Figure 15 – Configure ESX* Network Settings
18) (Optional) Click “Test these settings” to test the network interface.
19) Select the standard setup option
Standard Setup
The installer configures the default partitions on a single hard drive or LUN where ESX* is installed. The
default partitions are sized based on the capacity of the hard drive or LUN.
1) Select the first LUN 0 to install ESX*.
CAUTION: The installer erases all content on the selected storage device. Installing ESX* on a USB
device is not supported.
2) Click “Next”, then click “OK” at the Data Loss Warning screen to confirm the selection.
3) Configure the time zone:
a) Configure the date and time settings. Select “Automatically”, then enter the IP address or host name
of an NTP server.
b) Select “Manually” to use the machine date and time detected by the installer or to set the date and
time manually. If selecting “Manually” and a functioning mouse is not available, the calendar month
and year can be changed by using the “Ctrl” and left-arrow keys and the “Ctrl” and right-arrow keys
for the month, and the “Ctrl” and up-arrow keys and the “Ctrl” down-arrow keys for the year.
4) Enter a root password. It must contain between 6 and 64 characters.
5) (Optional) Create additional users by clicking “Add”.
6) Confirm the installation configuration, then click “Next”.
26
Page 27

VMware vSphere* 4.1 Installation Guide for ESX*
7) If an installation error occurs at this point, the ISO image might be invalid or there might be something
wrong with the DVD media. To troubleshoot, try the ISO download process again. Ensure the DVD is in
working order, and make sure the DVD drive and DVD media type are compatible. When retrying the
installation, perform the media check operation. Alternatively, use another media access option, such as
HTTP.
8) Click “Next”, then click “Finish” to exit the installer and reboot the host.
9) During reboot, press the “F2” key to enter the machine’s BIOS setup or boot menu.
10) Set the first boot device to be the drive on which ESX* was installed.
11) Create a second host by installing the software on a second server (optional). If running with only one
server, the cluster setup instructions later in the recipe can be skipped.
Note: In previous releases of ESX*, if the system did not boot up after installation, one troubleshooting
approach was to mount the partitions for debugging. For ESX 4.1, mounting the partitions would not be
helpful in resolving the issue. If after installation the system does not boot up, the most likely cause is
that the BIOS is configured to boot from the wrong disk.
Servers that do not support Trusted Platform Module (TPM) may get an “initalization for tpm_tis failed with 19”. This error message can be ignored.
Install ESXi 4.1 Installable Using the Interactive Mode
Use the ESXi 4.1 CD/DVD to install the ESXi 4.1 software onto a SAS, SATA, or SCSI hard drive.
Prerequisites
Obtain the ESXi* 4.1 Installable ISO file on CD or DVD media. If the installation CD/DVD is not available,
the ISO file can be created.
Verify that the server hardware clock is set to UTC. This setting is in the system BIOS.
Verify that a keyboard and monitor are attached to the machine on which the ESXi* software will be
installed.
Consider disconnecting network storage. This action decreases the time it takes the installer to search
for available disk drives.
ESXi Embedded* must not be on the host. ESXi Installable* and ESXi Embedded cannot exist on the same
host.
27
Page 28

VMware vSphere* 4.1 Installation Guide for ESX/ESXi* 4.1
Installation Procedure
1) Insert the ESXi 4.1 Installable* CD/DVD into the CD/DVD-ROM drive.
2) Restart the machine.
3) In the Welcome screen, press the “Enter” key to continue with the installation.
4) Read the VMware* end-user license agreement and accept it by pressing the F11 key.
5) In the Select a Disk screen, select the disk drive on which to install ESXi* 4.1 and press the “Enter” key.
Note: Do not rely on the disk order in the list to select a disk. The disk order is determined by the BIOS
and might be out of order. This might occur on systems where drives are continuously being added and
removed.
6) If the selected disk contains data, the Confirm Disk Selection screen displays.
7) Press the “F11” key to start the installation.
8) When the installation is complete, remove the installation CD/DVD.
9) Press the “Enter” key to reboot the host.
10) During the reboot operation, VFAT scratch and VMFS partitions are created on the disk.
11) Enter the BIOS by pressing the “F2” key.
12) Select “Boot options” and set “Boot Option #1” to the boot device for the drive on which ESXi was
installed (in Step 6).
13) Select “Exit”, save changes, then exit.
14) Answer “yes” to save the configuration, then exit.
Set Up VMware ESXi Installable*
Setting up ESXi* involves configuring the Administrative (root) password for the ESXi host and configuring
the default networking behavior. Before beginning these tasks, the following set up is required:
An ESXi* system that is powered on, and connected to a monitor and a keyboard.
(Optional) At least one other computer to act as a management station. This computer must be running
Windows* and have network access to the ESXi* host.
Consider using a network with a DHCP server.
After installing and booting ESXi* for the first time, the system network and storage devices are configured
with defaults. After the host completes the auto configuration phase, the direct console appears on the
attached monitor. Using a keyboard attached to the host, press the “F2” key to examine the default
configuration. As the system administrator, make changes to the default configuration, such as creating the
administrator password or setting the static IP address. VMware* recommends configuring the
administrative access settings and server network.
28
Page 29

VMware vSphere* 4.1 Installation Guide for ESX*
Set the Password for the Administrator Account
Use the direct console to set the password for the administrator account (root). The administrative user
name for the ESXi* host is root. By default, the administrative password is not set. Perform the following
steps:
1) From the direct console, select “Configure Password”.
2) (Optional) If a password is already set up, type the password in the “Old Password” line, then press the
“Enter” key. Press the “Enter” key if this is the first time setting the password.
3) In the “New Password” line, type a new password, then press the “Enter” key.
4) Retype the new password, then press the “Enter” key.
5) The status next to “configure password” should change to “Set”.
Configure IP Settings for ESXi*
By default, DHCP sets the IP address, subnet mask, and default gateway. For future reference, write down
the IP address. For DHCP to work, the network environment must have a DHCP server. If DHCP is not
available, the host assigns the link local IP address, which is in the subnet 169.254.x.x/16. No outbound
traffic is allowed through the assigned IP address. The assigned IP address appears on the direct console. If
the physical monitor access to the host is not available, access the direct console using a remote
management application. The default subnet mask is 255.255.0.0. If the network does not have a DHCP
server, configure the IP settings for ESXi* manually from the direct console.
Configure IP Settings from the Direct Console
If the physical access to the host or remote access to the direct console is available, use the direct console
to configure the IP address, subnet mask, and default gateway by performing these steps:
1) Select “Configure Management Network”, then press the “Enter” key.
2) Select “IP Configuration”, then press the “Enter” key.
3) Select “Set static IP address and network configuration”.
4) Enter the IP address, subnet mask, and default gateway, then press the “Enter” key.
Configure DNS Settings from the Direct Console
If the physical access to the host or remote access to the direct console is available, use the direct console
to configure DNS information by performing these steps:
1) Select “Configure Management Network”, then press the “Enter” key.
2) Select “DNS Configuration”, then press the “Enter” key.
3) Select “Use the following DNS server addresses and hostname”.
4) Enter the primary server, an alternate server (optional), and the host name.
5) Press the “<ESC>” key to exit.
6) Answer “yes” to apply changes and restart the management network.
7) Press the “<ESC>” key to logout.
29
Page 30

VMware vSphere* 4.1 Installation Guide for ESX/ESXi* 4.1
Managing ESX* Hosts
Hosts are managed using the vSphere* Client. After finishing the initial setup of the host, download and
install the vSphere Client. Connect to the host and add the first virtual machine by importing a virtual
appliance.
vSphere* Client Hardware Requirements
Make sure the vSphere* Client hardware meets the following requirements.
CPU: 1 CPU
Processor: 500 MHz or faster Intel® Xeon® processor
Memory: 1GB RAM
Disk Storage: 1 GB free disk space for a complete installation, which includes the following
components:
− Microsoft .NET* 2.0
− Microsoft .NET* 3.0 SP1
− Microsoft Visual* J#
− vSphere* Client 4.1
− vSphere* Host Update Utility 4.1
400 MB must be available on the drive that has the %temp% directory. If all of the prerequisites are
already installed, 300 MB of free space is required on the drive that has the %temp% directory, and 450
MB is required for the vSphere* Client 4.1.
Networking: Gigabit connection recommended.
vSphere* Client Software Requirements
Make sure the operating system supports the vSphere* Client. The vSphere Client requires the Microsoft
.NET* 3.0 SP1 Framework. If the system does not have it installed, the vSphere Client installer installs it. For
a list of supported operating systems, see the Compatibility Matrixes on the VMware* vSphere*
documentation website.
Download the vSphere* Client
The vSphere* Client is a Windows* program that can be used to configure the host and to operate its virtual
machines. The vSphere Client can be downloaded from any host. The host URL (the IP address or host name)
is necessary. To download the vSphere Client, perform these steps:
1) From a Windows* machine, open a Web browser.
2) Enter the URL for the host. For example, “http://exampleserver.example.com” or “http://xxx.xxx.xxx.xxx”.
The Welcome page appears.
3) Click “Download the vSphere Client” under Getting Started.
4) Click “Yes” in the security warning dialog box that appears.
5) Click “Save” to download the vSphere* Client installer.
30
Page 31

VMware vSphere* 4.1 Installation Guide for ESX*
Feature
vCenter Server*
ESX*
Scale of Deployment
Multiple Hosts
Single Host
Capacity planning
Built in
Available separately
Server consolidation wizard
Built in
Available separately
Instant server provisioning
Available with templates and cloning
Not available
No downtime maintenance
Possible with VMotion*
Not available
Load balancing
Possible with VMware* DRS
Not available
Failover
Possible with VMware* HA
Not available
Power savings
Possible with VMware* Distributed Power Management (DPM)
Not available
Centralized access control
Available with Active Directory Integration
Not available
Install the vSphere* Client
The vSphere* Client enables connection to an ESX* host and to a vCenter Server* system. The vSphere
Client must be installed on a Windows* machine that has network access to the ESX host and Internet
access. To install the vSphere* Client, perform these steps:
1) Run the vSphere* Client installer.
2) Double-click the VMware-viclientbuild number.exe file to run the vSphere Client installer.
3) Choose a language for the installer, then click “OK”.
4) When the Welcome screen appears, click “Next”.
5) Select “I agree to the terms in the license agreement”, then click “Next”.
6) Type the user name and organization name, then click “Next”.
7) Select the installation location.
8) Accept the default installation location, then click “Next” or click “Change” to select a different location,
then click “Next”.
9) Click “Install” to begin the installation.
10) Click “Finish” to complete the installation.
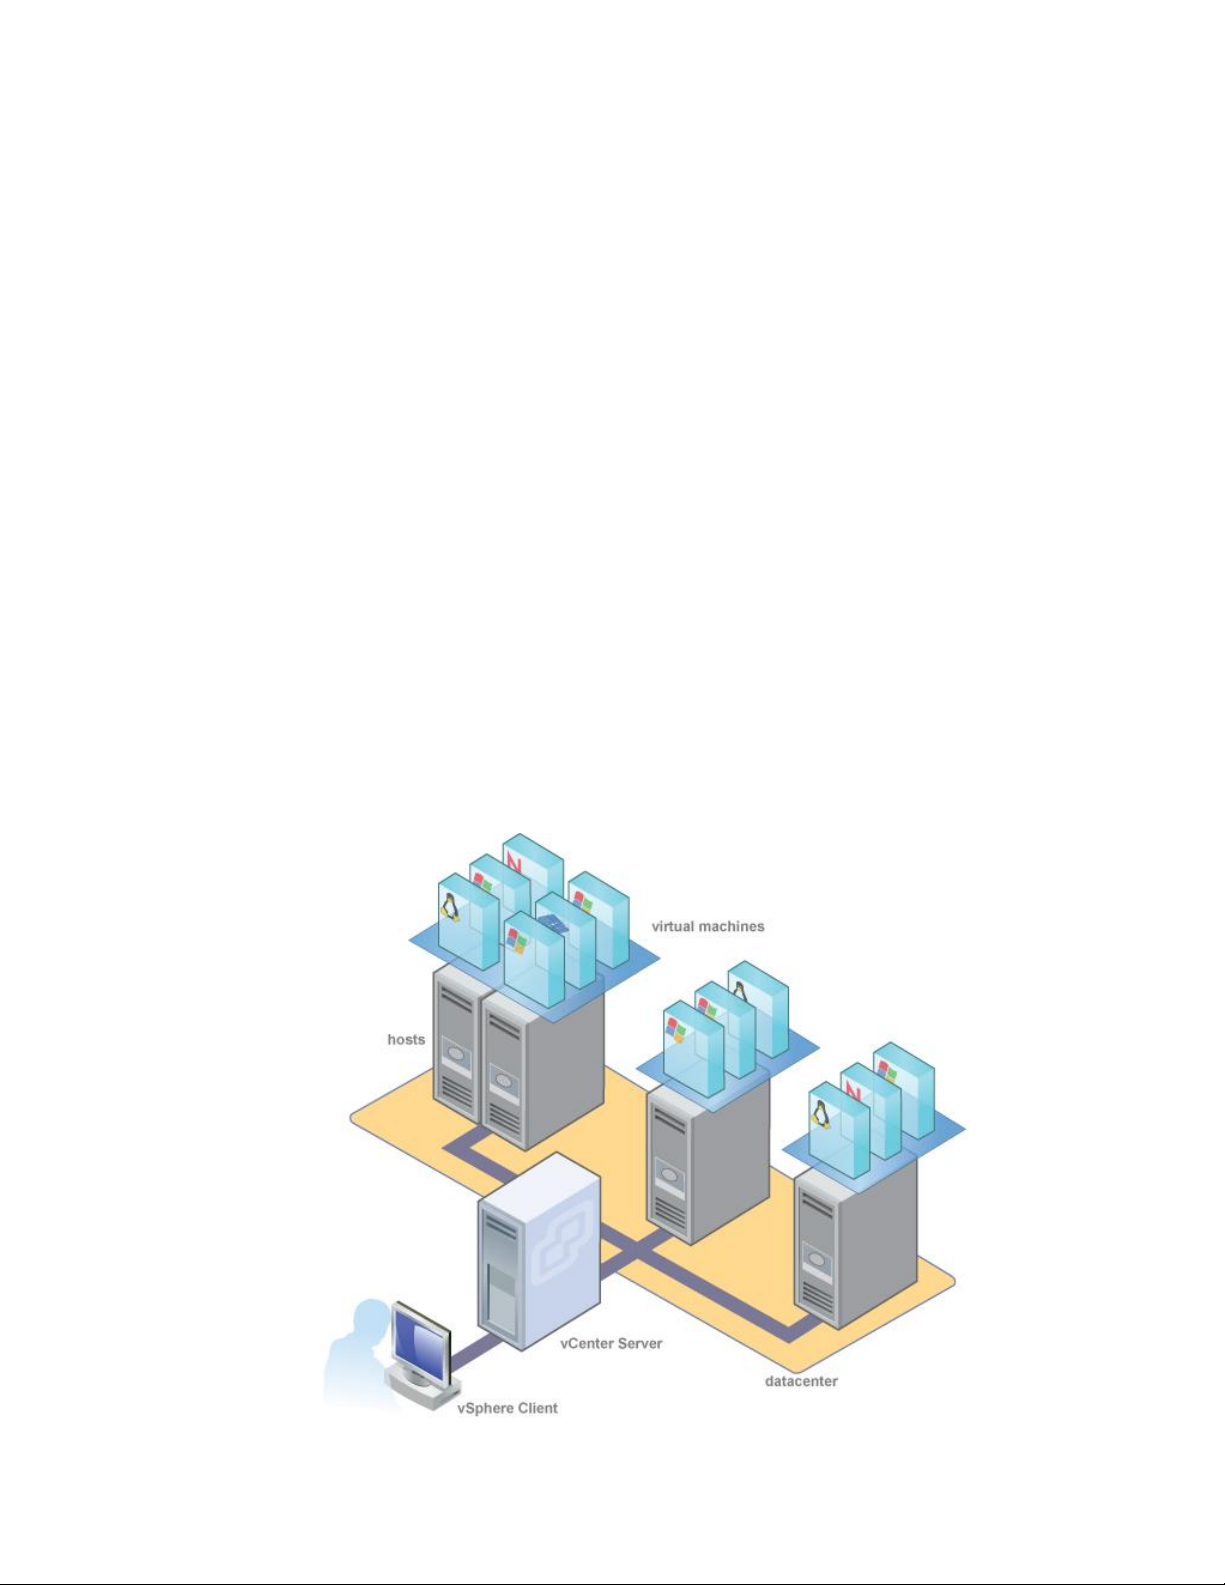
Manage Multiple Hosts with vCenter Server*
VMware vSphere* with vCenter Server* can be deployed to manage multiple hosts at the same time. Using
vCenter Server to manage multiple hosts allows experimentation with advanced management options, such
as resource sharing, and all of the other options available within the vSphere environment. Deploying
vCenter Server provides many advantages over deploying a single, standalone ESX host. Table 6 illustrates
some of the advantages and compares multiple-host management with vCenter Server as opposed to
single-host management.
Table 6 – vCenter* Multiple Hosts Management Compared to Single Host ESX* Management
31
Page 32
VMware vSphere* 4.1 Installation Guide for ESX/ESXi* 4.1
vSphere* and vCenter Server*
VMware vSphere* is a suite of virtualization applications that includes ESX* and vCenter Server*. vSphere
uses virtualization to do the following tasks:
Run multiple operating systems on a single physical machine simultaneously.
Reclaim idle resources and balance workloads across multiple physical machines.
Work around hardware failures and scheduled maintenance.
vSphere includes the following components in addition to the ESX* host and vSphere Client previously
setup:
VMware vCenter Server*: vCenter Server unifies resources from individual hosts so these resources
can be shared among virtual machines in the entire datacenter. It accomplishes this by managing the
assignment of virtual machines to the hosts and the assignment of resources to the virtual machines
within a given host based on the policies that the system administrator sets. vCenter Server allows the
use of advanced vSphere features such as VMware Distributed Resource Scheduler* (DRS), VMware
High Availability* (HA), and VMware VMotion*.
Datacenter: A datacenter is a structure under which hosts and their associated virtual machines are
added to the inventory.
Virtual Machine: A virtual machine is a software computer that, like a physical computer, runs an
operating system and applications. Multiple virtual machines can run on the same host at the same time.
Virtual machines that vCenter Server* manages can also run on a cluster of hosts.
Figure 8 shows the relationships among the basic components of vSphere and how vCenter Server can be
used to manage hosts and run virtual machines.
Figure 16 – vSphere* Components
32
Page 33

VMware vSphere* 4.1 Installation Guide for ESX*
vCenter Server* Installation
Install vCenter Server* to manage multiple hosts. To get started with vCenter Server quickly and to manage
the host, install vCenter Server on a desktop or laptop. vCenter Server must be installed on a Windows*
machine that has network access to the ESX* host. For production use, VMware* recommends installing
vCenter Server on a dedicated server system.
Before installing vCenter Server, make sure the system meets the minimum hardware and software
requirements. vCenter Server requires a database. vCenter Server uses Microsoft SQL Server* 2005 Express
for small deployments with up to 5 hosts and 50 virtual machines. For larger deployments, VMware supports
several Oracle* and Microsoft SQL Server databases. Refer to the vSphere Compatibility Matrixes for the list
of supported databases.
vCenter Server* and the vSphere* Client Hardware Requirements
The vCenter* Server system is a physical machine or virtual machine with access to a supported database.
The vCenter Server system must meet specific requirements. Also ensure the vSphere* Client machines
meet the hardware requirements.
Minimum Requirements for vCenter Server*
If loading vCenter Server*, the following requirements are required to install the software:
CPU: Two 64-bit CPUs or one 64-bit dual core processor.
Processor: Intel® Xeon® processor, 2.0Ghz or faster. Processor requirements might be greater if the
database runs on the same machine.
Memory: 3 GB RAM. Memory requirements may be greater if the database runs on the same machine.
vCenter Server* includes a service named VMware VirtualCenter Management Webservices. This service
requires 512 MB to 4.4 GB of additional memory. The maximum WebServices JVM memory can be
specified during the installation depending on the inventory size.
Disk storage: 3 GB. Disk requirements might be higher if the database runs on the same machine.
Microsoft* SQL Server* 2005 Express disk requirements: Up to 2 GB free disk space to decompress
the installation archive. Approximately 1.5 GB of these files is deleted after the installation is complete.
Networking: Gigabit connection recommended.
See database documentation for the hardware requirements of the database. The database requirements
are in addition to the vCenter Server requirements if the database and vCenter Server run on the same
machine.
vCenter Server* Software Requirements
Ensure the operating system supports vCenter Server*. A 64-bit operating system and 64-bit system DSN is
required for vCenter to connect to its database. See the Compatibility Matrixes on the VMware vSphere*
documentation website.
33
Page 34

VMware vSphere* 4.1 Installation Guide for ESX/ESXi* 4.1
vCenter Server* Prerequisites
Before installing vCenter Server*, review the prerequisites:
Obtain the installation DVD or download the installation ISO image.
Hardware must meet the vCenter Server* hardware requirements.
If the machine vCenter Server* is being installed or has VirtualCenter* installed, upgrading instead of
performing a fresh installation of vCenter Server is an option.
Note: To keep the existing VirtualCenter configuration, see the Upgrade Guide.
There must be no Network Address Translation (NAT) between the vCenter Server* system and the
hosts it will manage.
For the installation of vCenter Server*, VMware* recommends installing the bundled Windows SQL
Server* 2005 Express database on one of the supported operating systems. If the SQL Native Client is
already installed, uninstall the SQL Native Client before beginning the vCenter Server installation.
The system used for the vCenter Server* installation must belong to a domain rather than a workgroup.
If assigned to a workgroup, the vCenter Server system is not able to discover all domains and systems
available on the network when using such features as vCenter Guided Consolidation Service*. To
determine whether the system belongs to a workgroup or a domain, right-click “My Computer”, click
“Properties”, then click the Computer Name tab. The Computer Name tab displays either a Workgroup
label or a Domain label.
During the installation, the connection between the machine and the domain controller must be working.
The computer name cannot be more than 15 characters.
The DNS name of the machine must match the actual computer name.
Ensure the system vCenter Server* is being installed on is not an Active Directory domain controller.
On each system running vCenter Server*, ensure the domain user account has the following
permissions:
− Member of the Administrators group.
− Act as part of the operating system.
− Log on as a service.
Assign a static IP address and host name to the Windows* server that will host the vCenter Server*
system. This IP address must have a valid (internal) domain name system (DNS) registration that
resolves properly from all managed ESX* hosts.
If installing vCenter Server* on Windows Server* 2003 SP1, the disk for the installation directory must
have the NTFS format, not the FAT32 format.
vCenter Server*, like any other network server, should be installed on a machine with a fixed IP address
and well-known DNS name, so clients can reliably access the service. If using DHCP instead of a static IP
address for vCenter Server, ensure the vCenter Server computer name is updated in the domain name
service (DNS). One way to test this is by “pinging” the computer name. For example, if the computer
name is “host-1.company.com”, run the following command in the Windows* command prompt:
ping host-1.company.com
If the computer name can be “pinged”, the name is updated in DNS.
34
Page 35
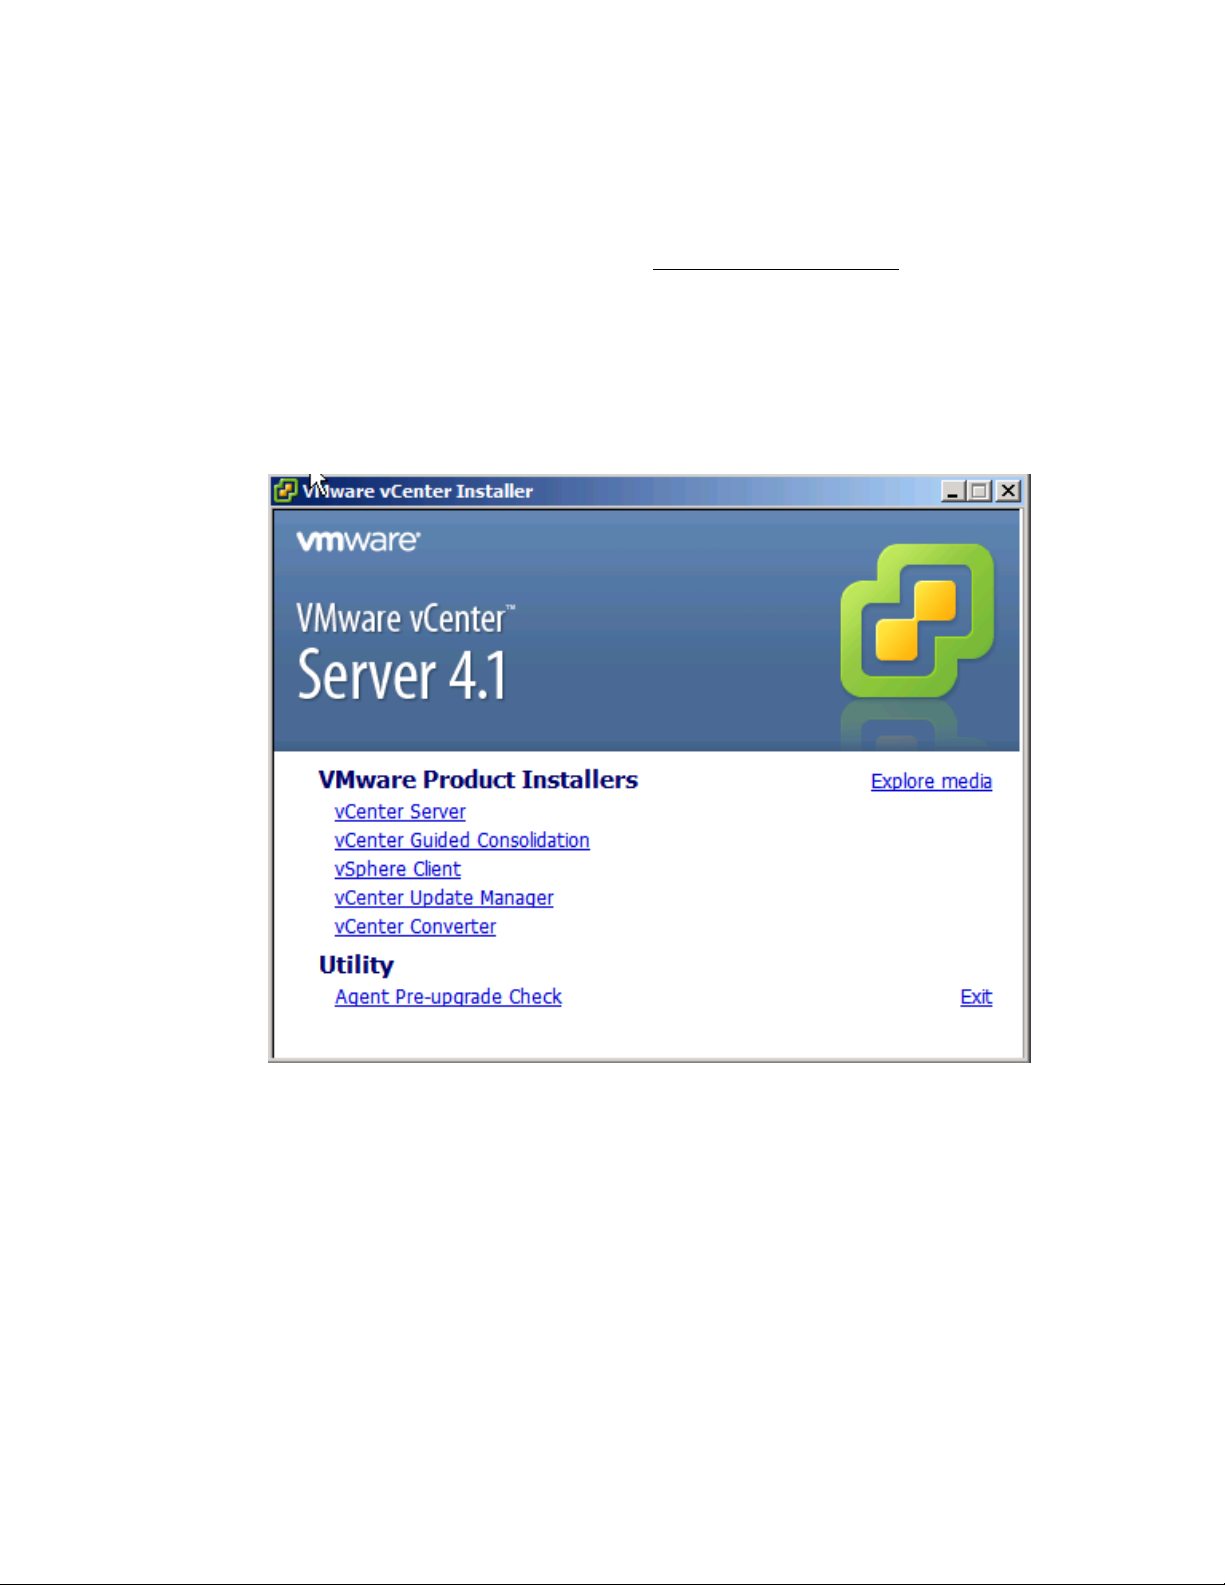
VMware vSphere* 4.1 Installation Guide for ESX*
Install vCenter Server*
vCenter Server* allows central management of hosts from either a physical or virtual Windows* machine,
and enables the use of advanced features such as VMware Distributed Resource Scheduler* (DRS), VMware
High Availability* (HA), and VMware VMotion*. See the vCenter Server Prerequisites section on page 34. To
install vCenter Server, perform these steps:
1) Install Windows Server* 2008 on a server. After installing Windows Server 2008 and setting up the
networking, proceed with installing vCenter*.
2) Go to the DVD ROM installation disk and select the autorun.exe. Ignore any errors.
3) Select the vCenter Server* link, then select “English” for the language.
4) The software will start installing. This may take a few minutes
Figure 17 – vCenter Server* 4.1 Installer
5) Click “Next” at the installation wizard screen.
6) Click “Next” at the End User Patent Agreement screen.
7) Select “I agree to the license agreement”, then click “Next”.
8) Enter the appropriate user name, organization, and license key, then click ”Next”. If a license key is not
available, the software will load in evaluation mode.
35
Page 36
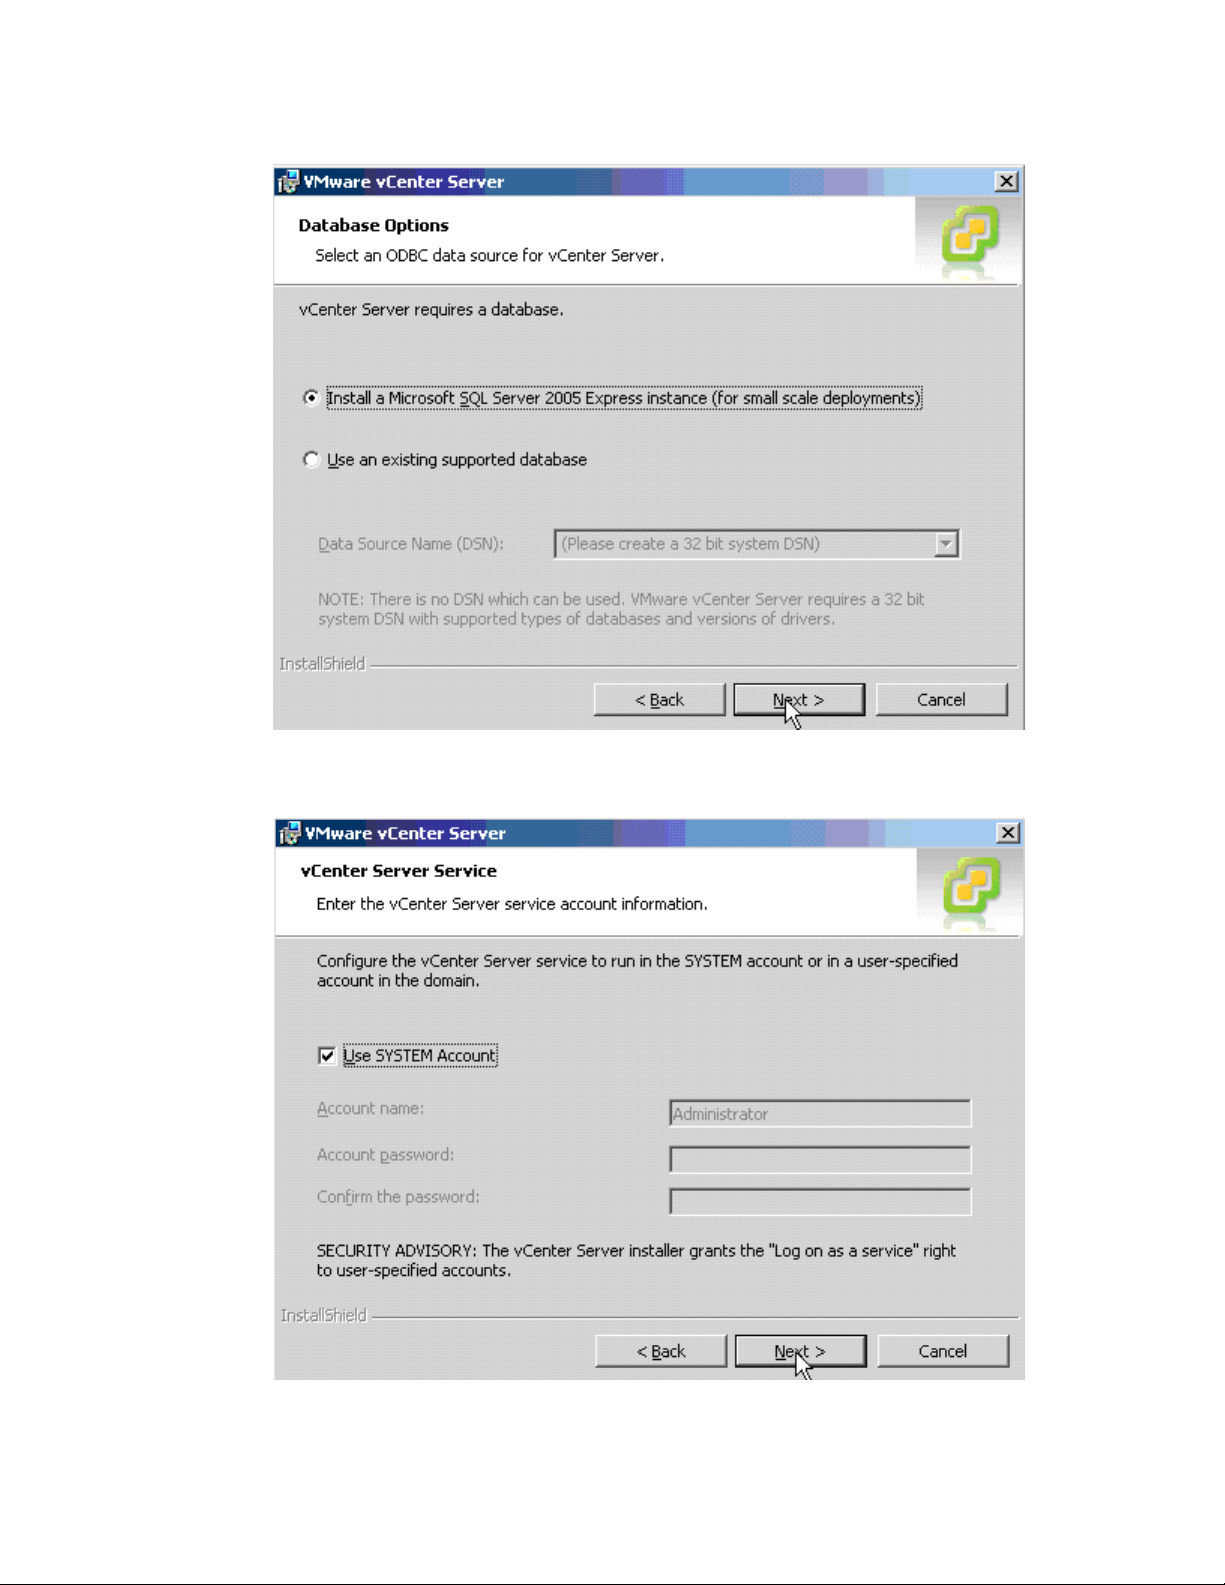
VMware vSphere* 4.1 Installation Guide for ESX/ESXi* 4.1
9) Select the “Install a Microsoft SQL Server 2005…” radio button, then click “Next”.
Figure 18 – vCenter Server* 4.1 Installer Database Options Window
10) Select the “Use SYSTEM Account” box for the vCenter* account.
Figure 19 – vCenter Server* 4.1 Installer vCenter Server Service Window
11) Keep the default Destination folder, then select “Next”.
36
Page 37
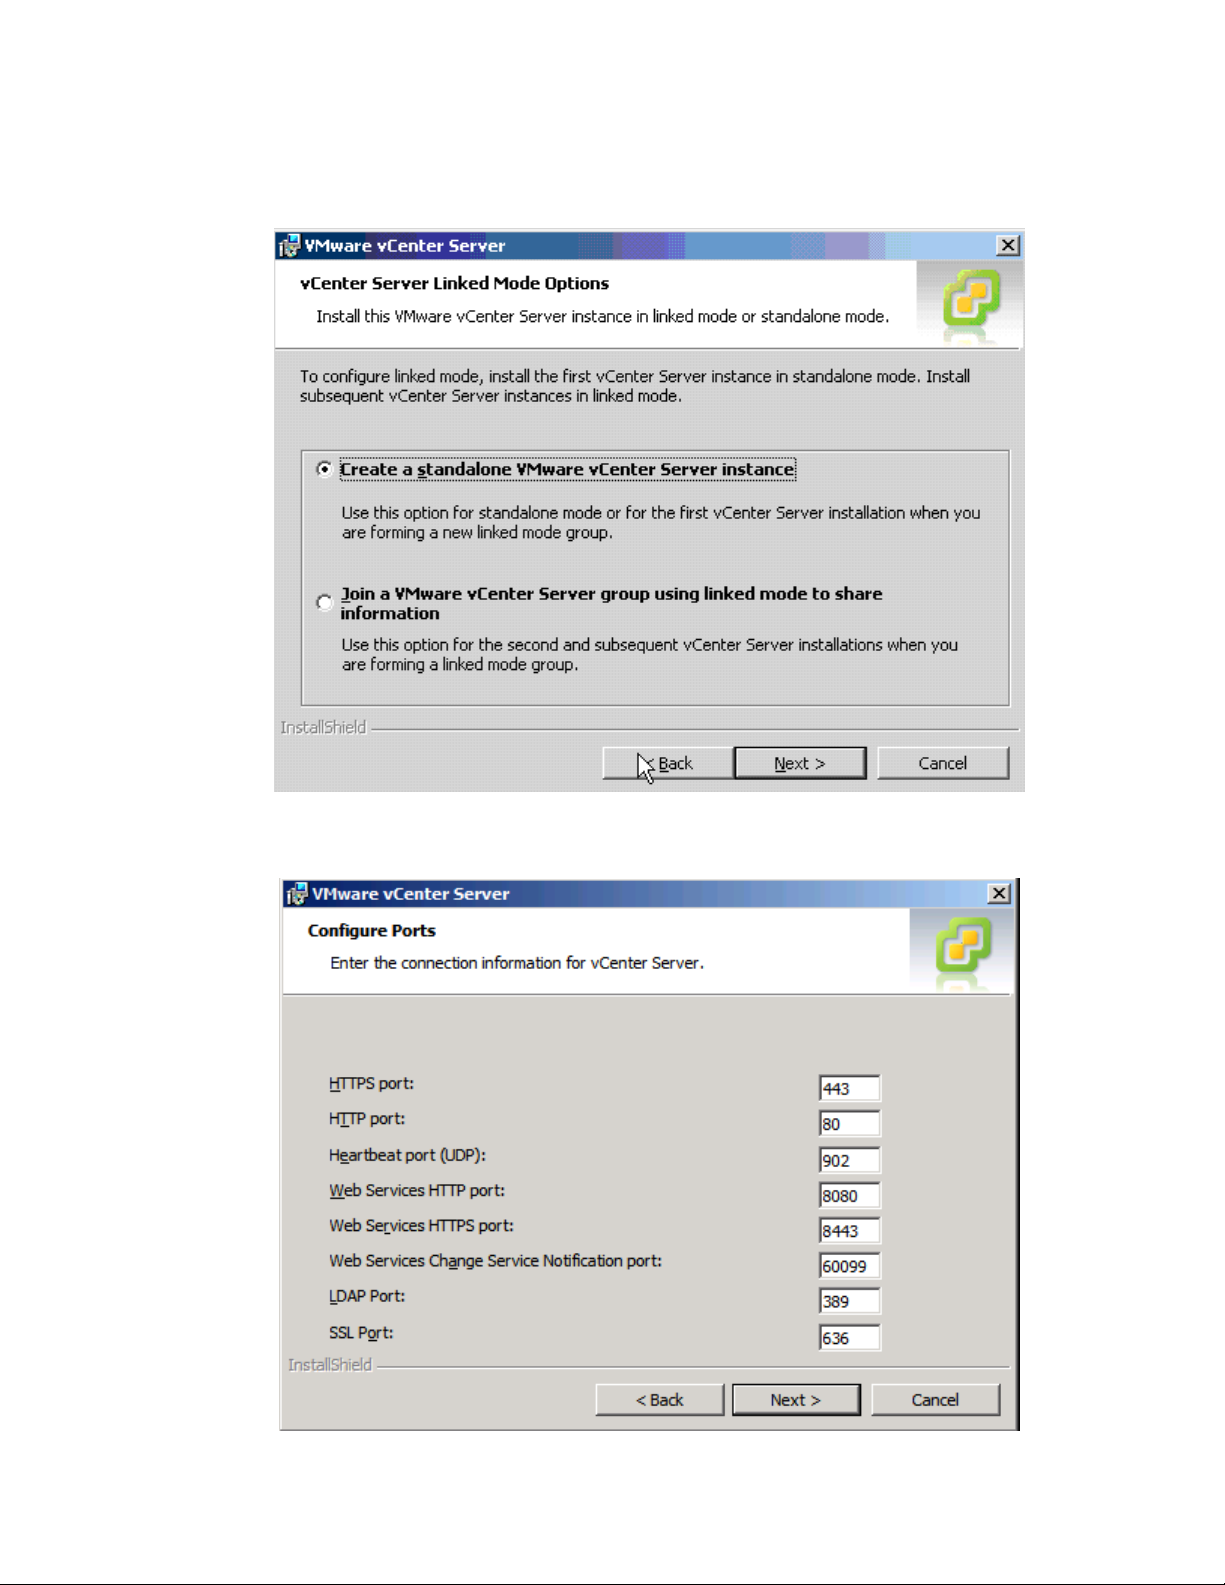
VMware vSphere* 4.1 Installation Guide for ESX*
12) Select the “Create standalone VMware vCenter Server instance” radio button, then click “Next”.
vSphere* now has the ability to link vCenters* within a datacenter to share information between the
vCenter Servers.
Figure 20 – vCenter Server* 4.1 Installer vCenter Server Linked Mode Options Window
13) Configure the various ports used by the VMware vCenter Server*, then click “Next”.
Figure 21 – vCenter Server* 4.1 Installer vCenter Server Configure Ports Window
37
Page 38
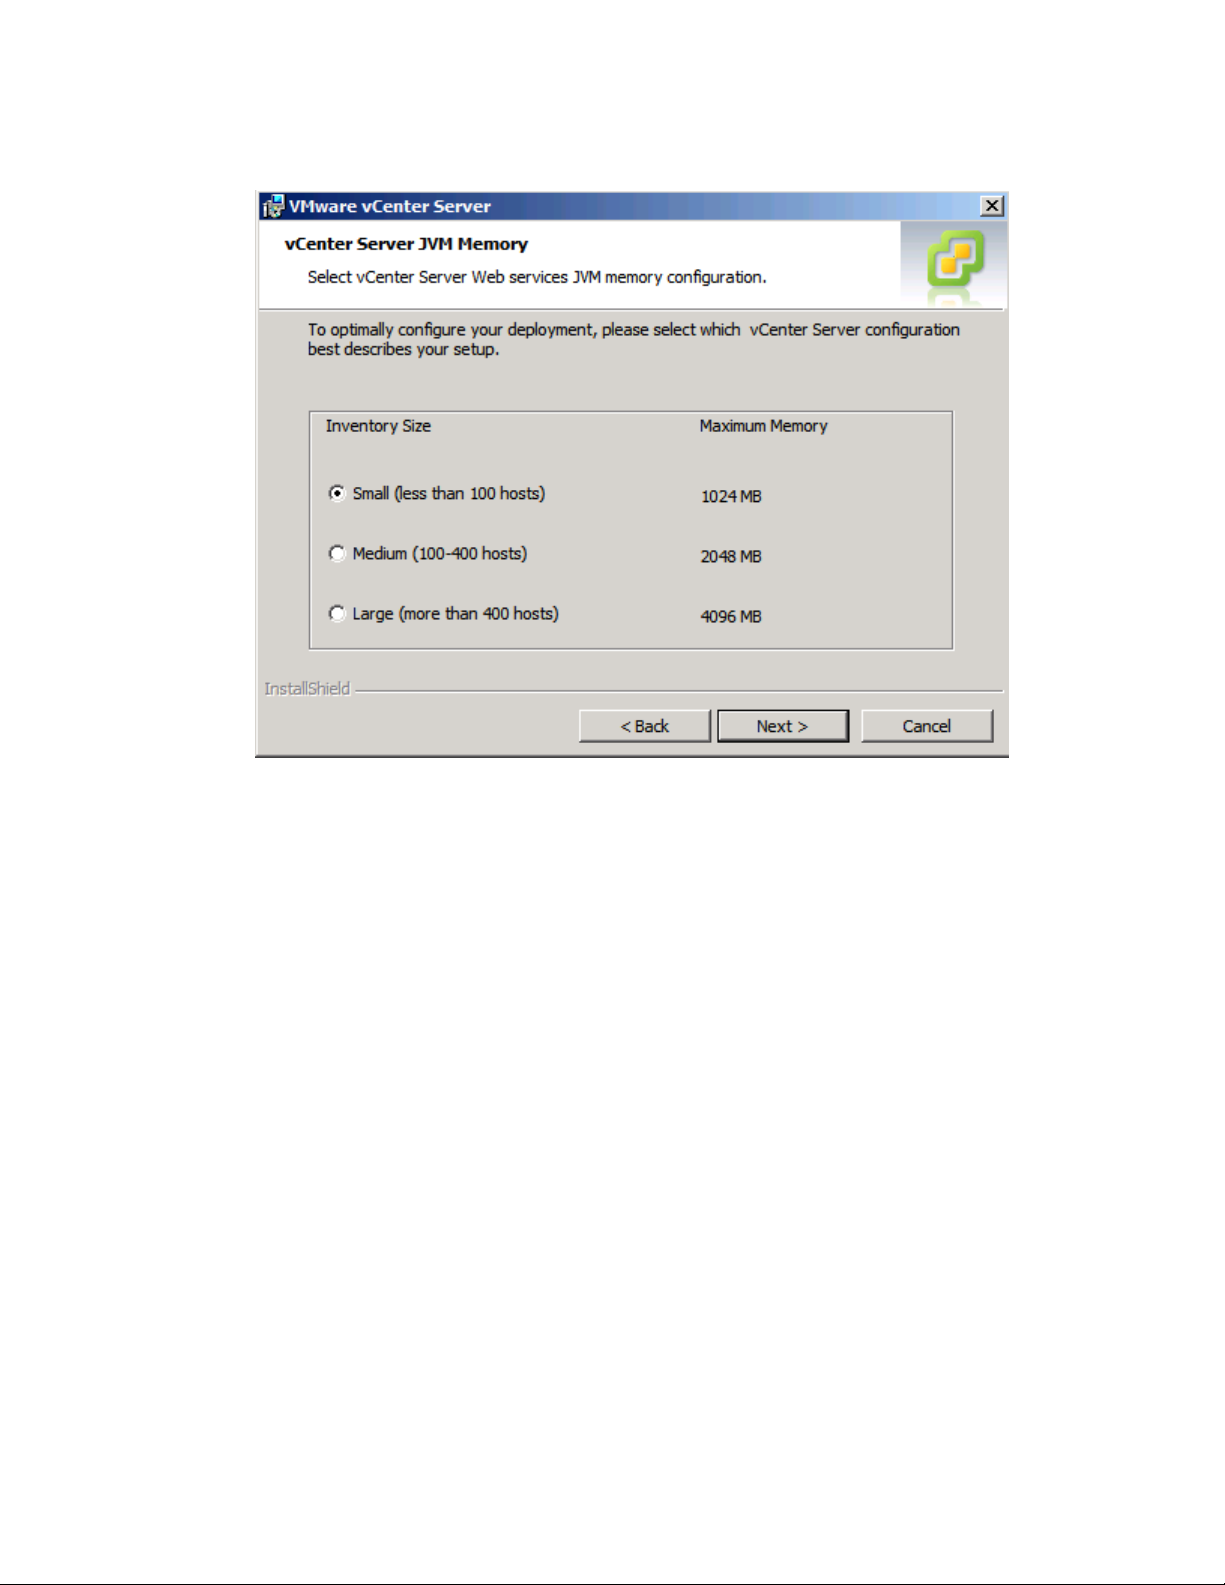
VMware vSphere* 4.1 Installation Guide for ESX/ESXi* 4.1
14) Select the vCenter Server* JVM memory based on the number of hosts to be supported, then select
“Next”.
Figure 22 – vCenter Server* 4.1 Installer vCenter Server JVM Memory Window
15) Click “Install” to start the installation process. This will take several minutes to complete.
16) Microsoft SQL* installs.
17) Click “Finish” when the final screen appears.
18) After the software loads, determine the IP address for the machine.
19) Run the VMware vSphere* client and login to the vCenter* with the user name “administrator” and the
password “password”..
38
Page 39
VMware vSphere* 4.1 Installation Guide for ESX*
Running the Software
Setup a Basic Inventory with the Getting Started Tabs
The Getting Started tabs in the vSphere* Client connected to vCenter* Server provide a wizard to setup a
basic inventory quickly.
Figure 23 – vSphere* Client Getting Started Tab
Setting up a basic inventory with the Getting Started tabs after installing vCenter* Server includes the
following tasks:
Creating a datacenter.
Adding the host to the datacenter.
Creating a virtual machine.
An empty vCenter* Server inventory is necessary to view the Getting Started tabs wizard. After setting-up
the basic inventory, the Getting Started tabs continue to provide information about inventory objects but no
longer provide inventory setup wizard help.
39
Page 40
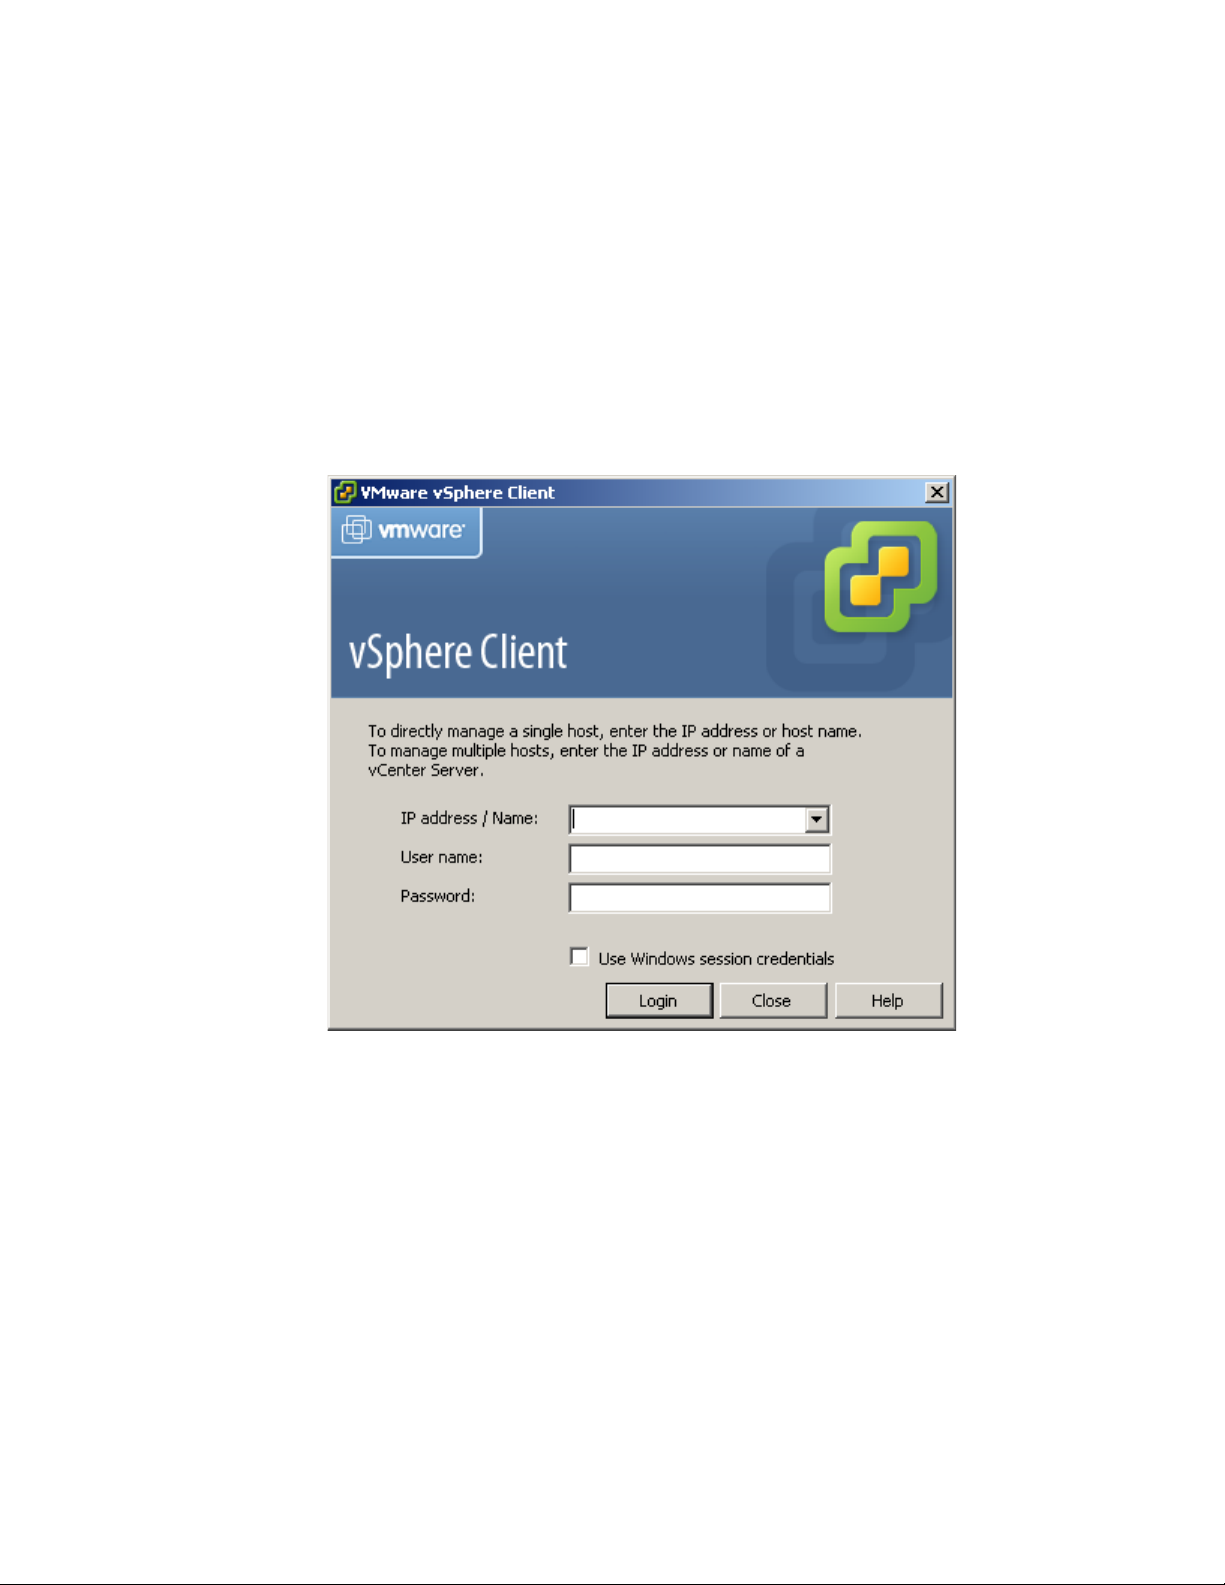
VMware vSphere* 4.1 Installation Guide for ESX/ESXi* 4.1
Start the vSphere* Client and Log into vCenter Server*
When connecting to vCenter Server* with the vSphere* Client, vCenter Server can be managed, in addition
to the hosts and virtual machines that it manages. To start the vSphere Client and to log into the vCenter
Server, perform these steps:
1) Start the vSphere* Client. Double-click the shortcut or select “Start” > “Programs” > “VMware” >
“VMware vSphere Client”.
2) Log into vCenter Server* as the administrator.
a) Enter the IP address or vCenter Server* name.
b) Enter the Windows* administrator user name.
c) Enter the Windows* administrator password.
Figure 24 – vShpere* Client Administrator Login Screen
3) Click “Login”.
40
Page 41
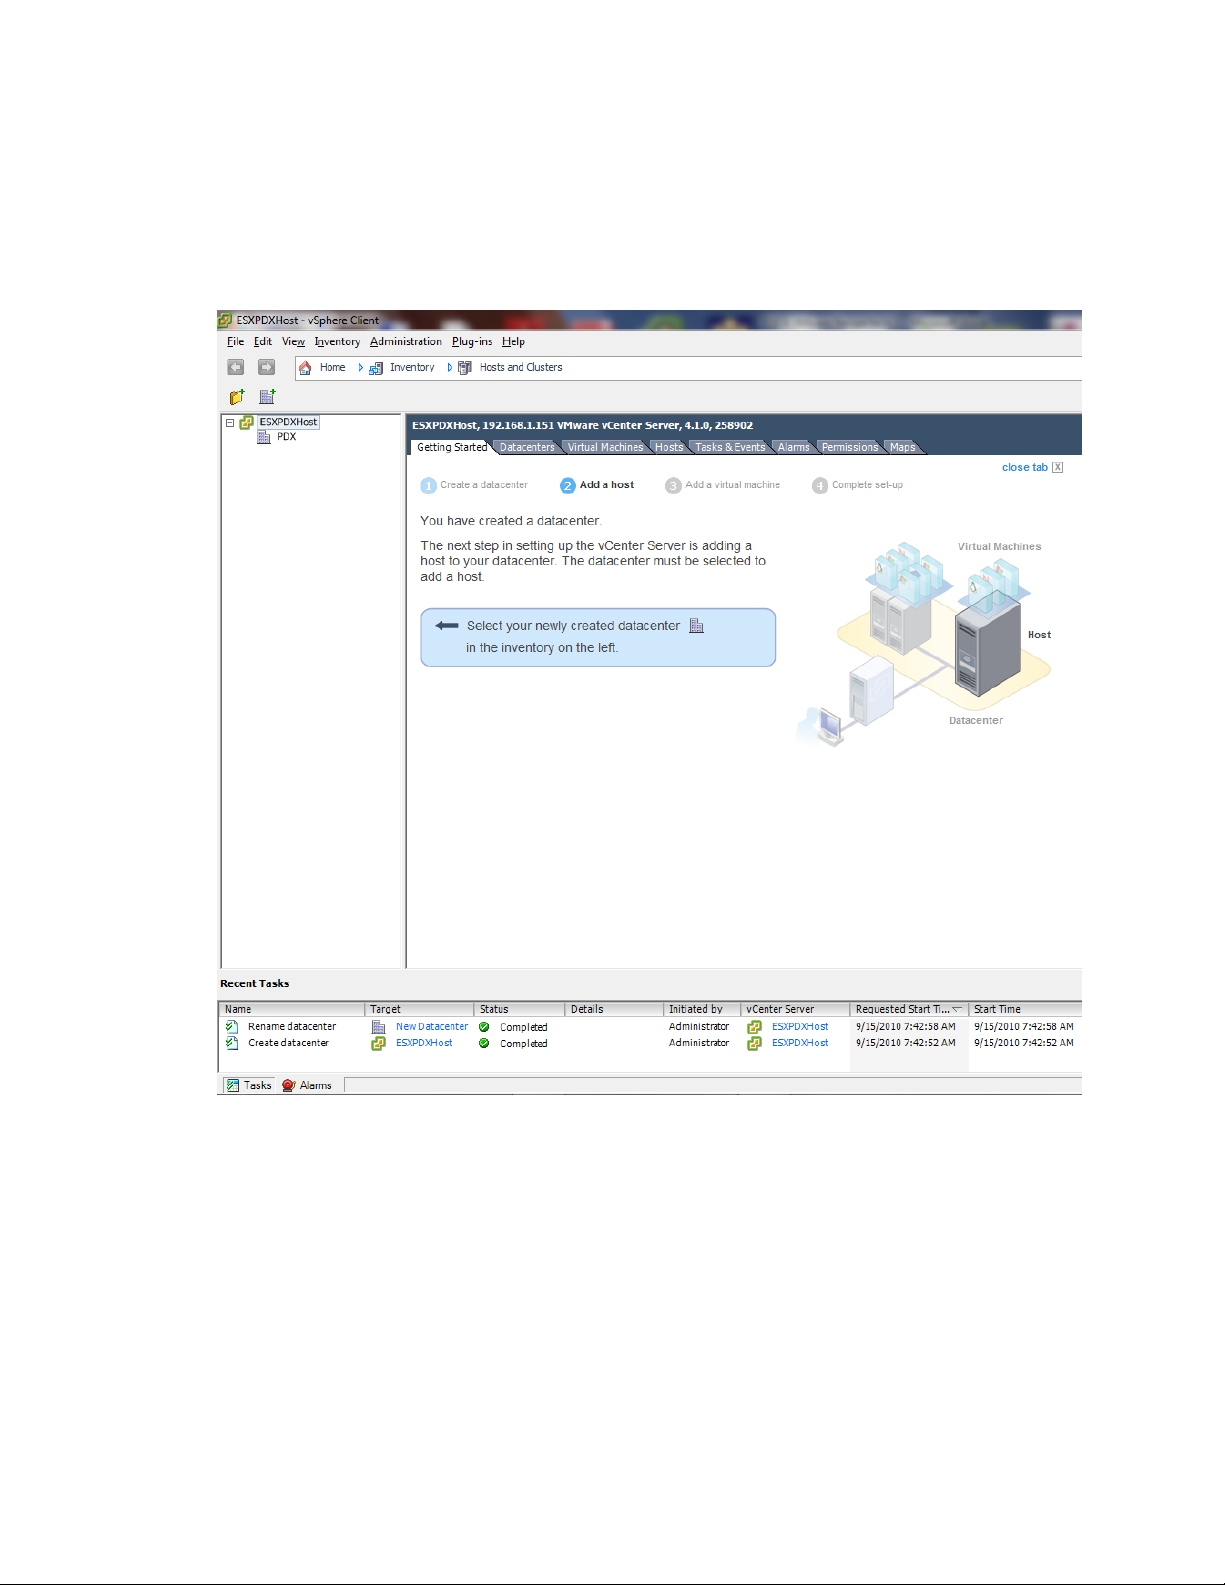
VMware vSphere* 4.1 Installation Guide for ESX*
Create a Datacenter
The first step in setting up the vSphere* environment is to create a datacenter. If logging-in for the first
time, there should be no inventory items in the Inventory panel. To create a datacenter, perform these steps:
1) In the Getting Started tab in the Information panel, follow the on-screen instructions, then click “Create
a datacenter”. This creates a datacenter.
Figure 25 – vCenter* Server Getting Started Tab Wizard
2) Name the datacenter by selecting it and entering a name. In this example, “Portland” is the name.
Adding Hosts
When adding the host to a datacenter, vCenter Server* manages it. To add a host, perform these steps:
1) In the Inventory panel, select the datacenter created if it is not selected.
2) In the Getting Started tab, follow the on-screen instructions, then click “Add a host”.
3) Type the IP address or name of the ESX* host in the Host name field. Enter 192.168.1.10 for this
example. Enter the User name root and the Password “password’’ for a user account that has
administrative privileges on the selected managed host.
41
Page 42

VMware vSphere* 4.1 Installation Guide for ESX/ESXi* 4.1
Figure 26 – Specify Connection Settings in the Add a Host Wizard
4) Click “Next”. Answer “yes” to trust the host if a security alert pops-up.
5) To confirm the Host Summary information, click “Next”.
6) Assign an existing or new license key to the host, then click “Next”.
7) Select the “Lockdown mode” checkbox to prevent remote users from logging into the host. Leave it
unchecked if desired. It can be enabled later by modifying the security settings in the configuration tab,
Click “Next”.
8) Select a location from the list of inventory objects, then click “Next”.
9) Click “Finish” to complete adding a host. The vSphere* Client displays a progress bar in the Recent Tasks
pane while the host is added. Adding a new host can take a few minutes and the Status percentage
might appear to pause at different increments during the process. When a new host is added, the host
might appear as “disconnected” until vCenter Server* completes the task. After the host is added, the
status changes to “connected”, indicating that the host connection is complete. The host installed and
setup earlier and the virtual appliance imported are added to the inventory managed by vCenter Server.
10) Repeat steps 1-9 to add the second host, using IP address 192.168.1.20.
Set Up VMkernal Port for VMotion* (Optional)
1) In the inventory panel, select the first host (192.168.1.10).
2) Select the Configuration tab.
3) Select “Networking” under the hardware pane.
4) Select the “Add networking” link in the right upper tab.
5) Select “VMKernel” to setup a network connection for supporting VMotion*.
6) Click “Next”.
7) Click “Use Vswitch 0” to create the VMkernal port on the first NIC.
42
Page 43

VMware vSphere* 4.1 Installation Guide for ESX*
8) Enter “VMKernel” in the Network Label field, then check the “Use this port group for VMotion” checkbox.
9)
10) Click “Next”.
Figure 27 – VMkernal Connection Settings
11) Enter the IP address and Subnet Mask for the VMkernel Port. In this example, 192.168.1.11is used with
a netmask of 255.255.255.0.
12) Click “Next”.
13) Select “Finish” at the Summary window.
14) Repeat steps 1 through 12 for the second host (192.168.1.20).
Configure Datastores
Create Local VMFS Datastores
VMFS datastores serve as repositories for virtual machines. VMFS datastores can be set up on any SCSIbased storage devices that the host discovers.
Click the Configuration tab, then click “Storage” in the Hardware panel.
1) Click “Datastores”, then click “Add Storage”.
2) Select the Disk/LUN storage type, then click “Next”. Select the first LUN listed for the first host and the
second LUN for the second host.
3) Select a device to use for the datastore, then click “Next”.
4) Click “Next” at the current disk layout screen.
43
Page 44

VMware vSphere* 4.1 Installation Guide for ESX/ESXi* 4.1
5) In the Properties screen, enter “VmStore1” as a datastore name for the first datastore, then click
“Next”.
6) Click “Next” at the Disk LUN Formatting screen.
7) In the Ready to Complete screen, review the datastore configuration information, then click “Finish”.
8) A datastore using the local Virtual Disk is created.
9) When completed, a datastore should be listed.
Create an External Datastore (Optional)
Access to shared storage in a VMware* virtual datacenter environment is made possible by VMware
vStorage Virtual Machine File System* (VMFS*), a high‐performance cluster file system designed specifically
for virtual machines.
VMware has built a robust storage interface into the vSphere* software that provides a wide range of
storage virtualization connectivity options while providing a consistent presentation of storage to virtual
machines. Connectivity options include Fibre Channel (FC) and iSCSI SAN, NFS, and internal storage disk.
vStorage vMotion* technology enables live migration of virtual machine disk files across storage arrays with
no disruption in service.
In the next section, the steps to set up a datastore to be used by vSphere for VMotion, and running
Distributed Resource Scheduling (DRS) and Distributed Power Management (DPM) are provided. In the
example, an Open-E* storage server is used as the iSCSI target. A 100 G iSCSI volume set up on an Open-E
server will be used. An iSCSI target on a storage solution will need to be set up. Whatever storage solution is
used will need an IQN assigned that identifies the iSCSI target. Refer to storage vendor documentation for
setting up a iSCSI volume or LUN and for obtaining the IQN information.
44
Page 45

VMware vSphere* 4.1 Installation Guide for ESX*
The following steps set up two hosts to connect to an external storage box:
1) Select the first Host (192.168.1.10), click the Configuration tab, then select “Storage Adapters” in the
Hardware pane.
2) Scroll down the list of storage adapters, then select iSCSI Software Adapter.
Figure 28 – Storage Adapter Configuration
3) Click “Properties”; the iSCSI initator properties dialog box will appear.
4) Click “Configure”, click the “Enabled” checkbox for the Status.
5) Change the IQN for the external iSCSI target (iqn.1998-01.com.vmware:esx11 for station 1), then click
“OK”.
Figure 29 – iSCSI Initiator General Properties
45
Page 46

VMware vSphere* 4.1 Installation Guide for ESX/ESXi* 4.1
6) The properties should change to the settings similar to those in Figure 22:
Figure 30 – iSCSI Initiator Properties
46
Page 47

7) Select the Static Discovery TAB.
Figure 31 – Add Static Target Server Dialog Window
VMware vSphere* 4.1 Installation Guide for ESX*
8) Click “Add”.
9) Write the IQN (iSCSI Target Name) for the storage solution:__________________________
10) In the Add Static Target Server dialog, enter the IP address, 192.168.1.220 in this example, and the
IQN target name for the storage server (iqn.2009-04:dss.station1) for example. Verify that it is typed or
pasted in correctly, then click “OK”.
Figure 32 – Add Static Target Server Properties
11) The iSCSI target should appear in the dialog.
47
Page 48
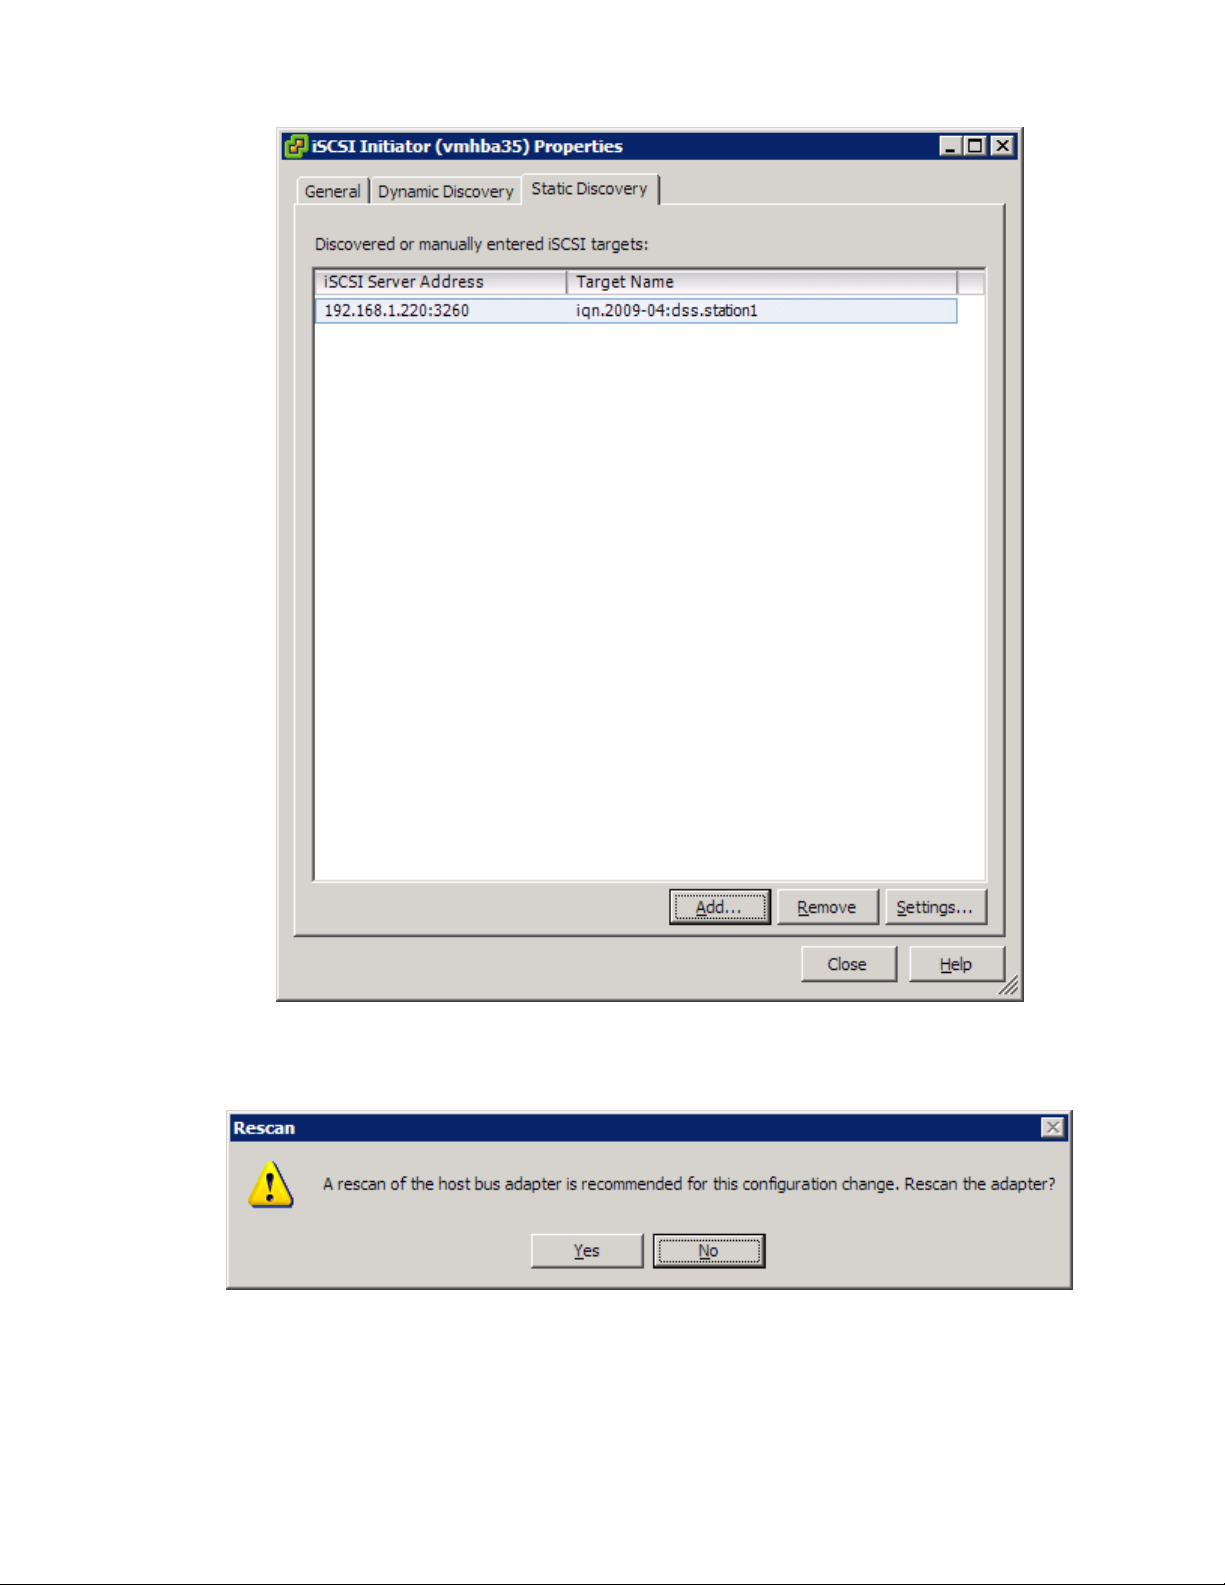
VMware vSphere* 4.1 Installation Guide for ESX/ESXi* 4.1
Figure 33 – iSCSI Initiator Properties Window
12) Click “Close”; the scan dialog should pop up. Click “Yes” to rescan the adapter. This may take a few
minutes.
Figure 34 – Rescan Dialog Window
13) The iSCSI target for the volume should be displayed.
14) Select “Storage” in the Hardware pane.
15) Click “Add Storage”.
48
Page 49
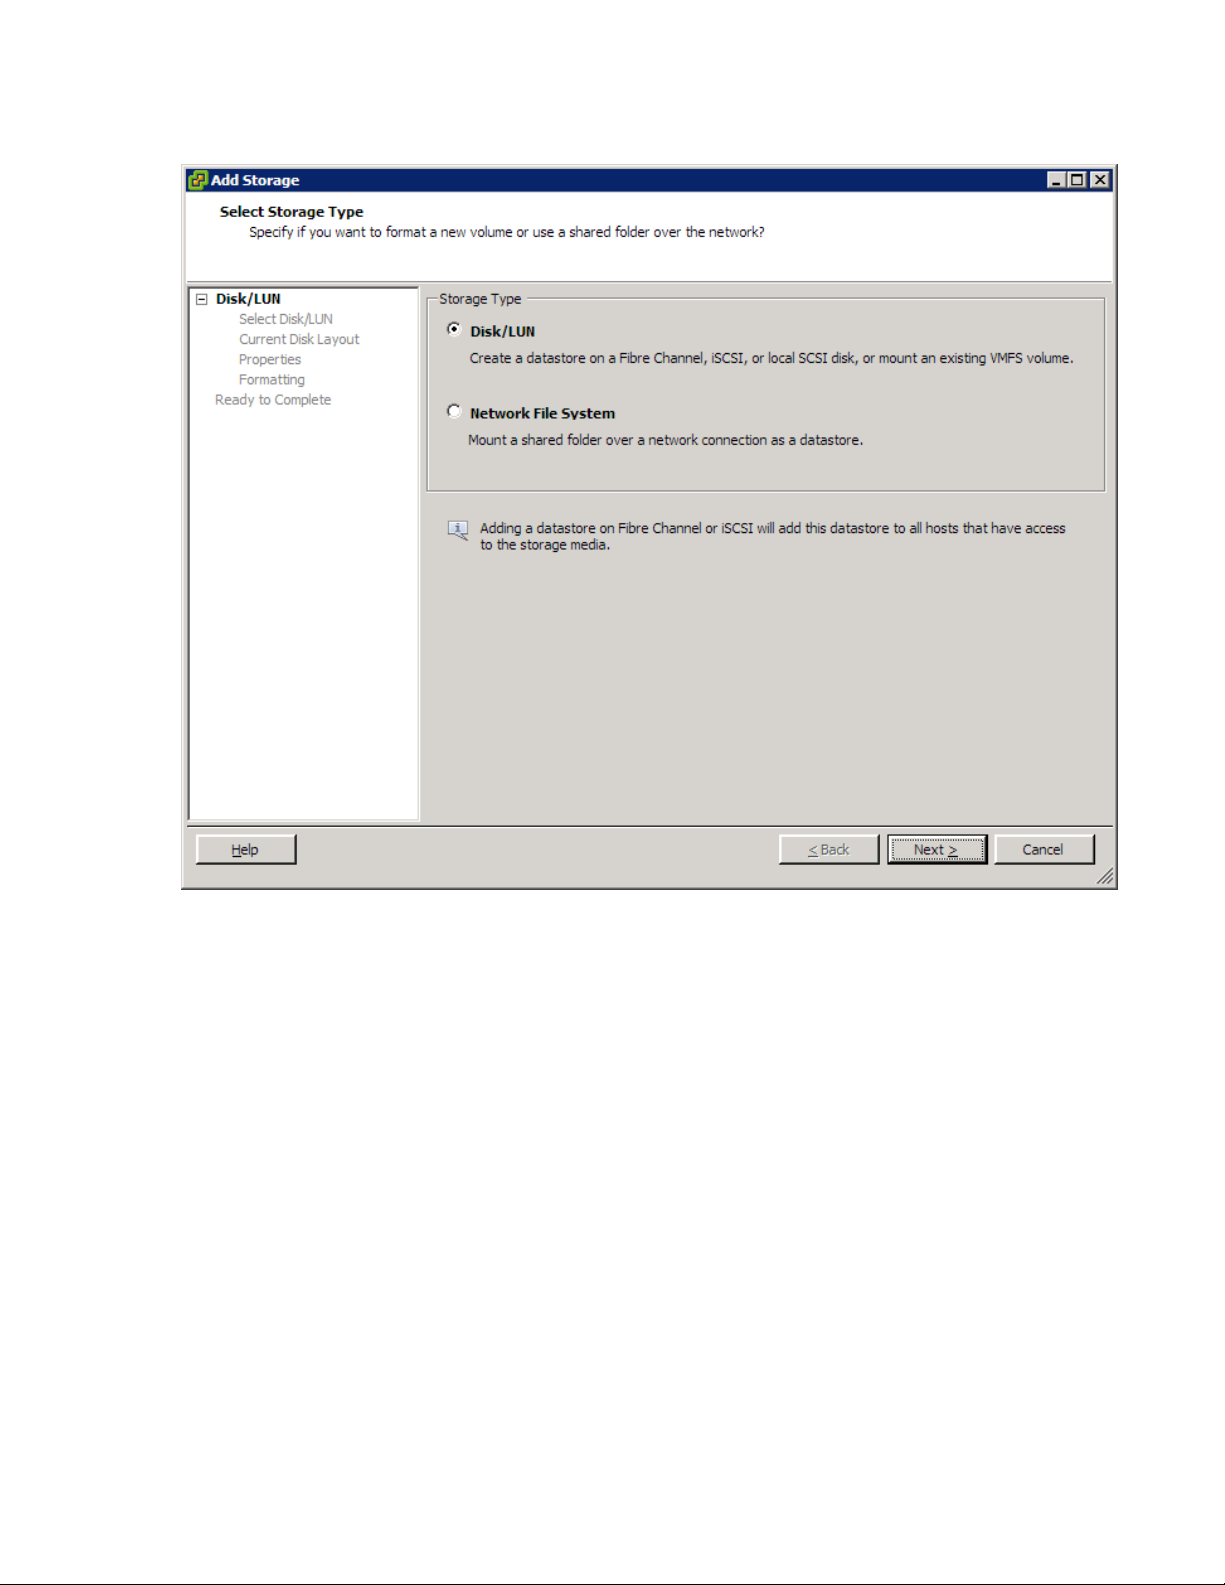
16) Select the Disk/LUN radio button.
VMware vSphere* 4.1 Installation Guide for ESX*
Figure 35 – Select Storage Type Window
49
Page 50
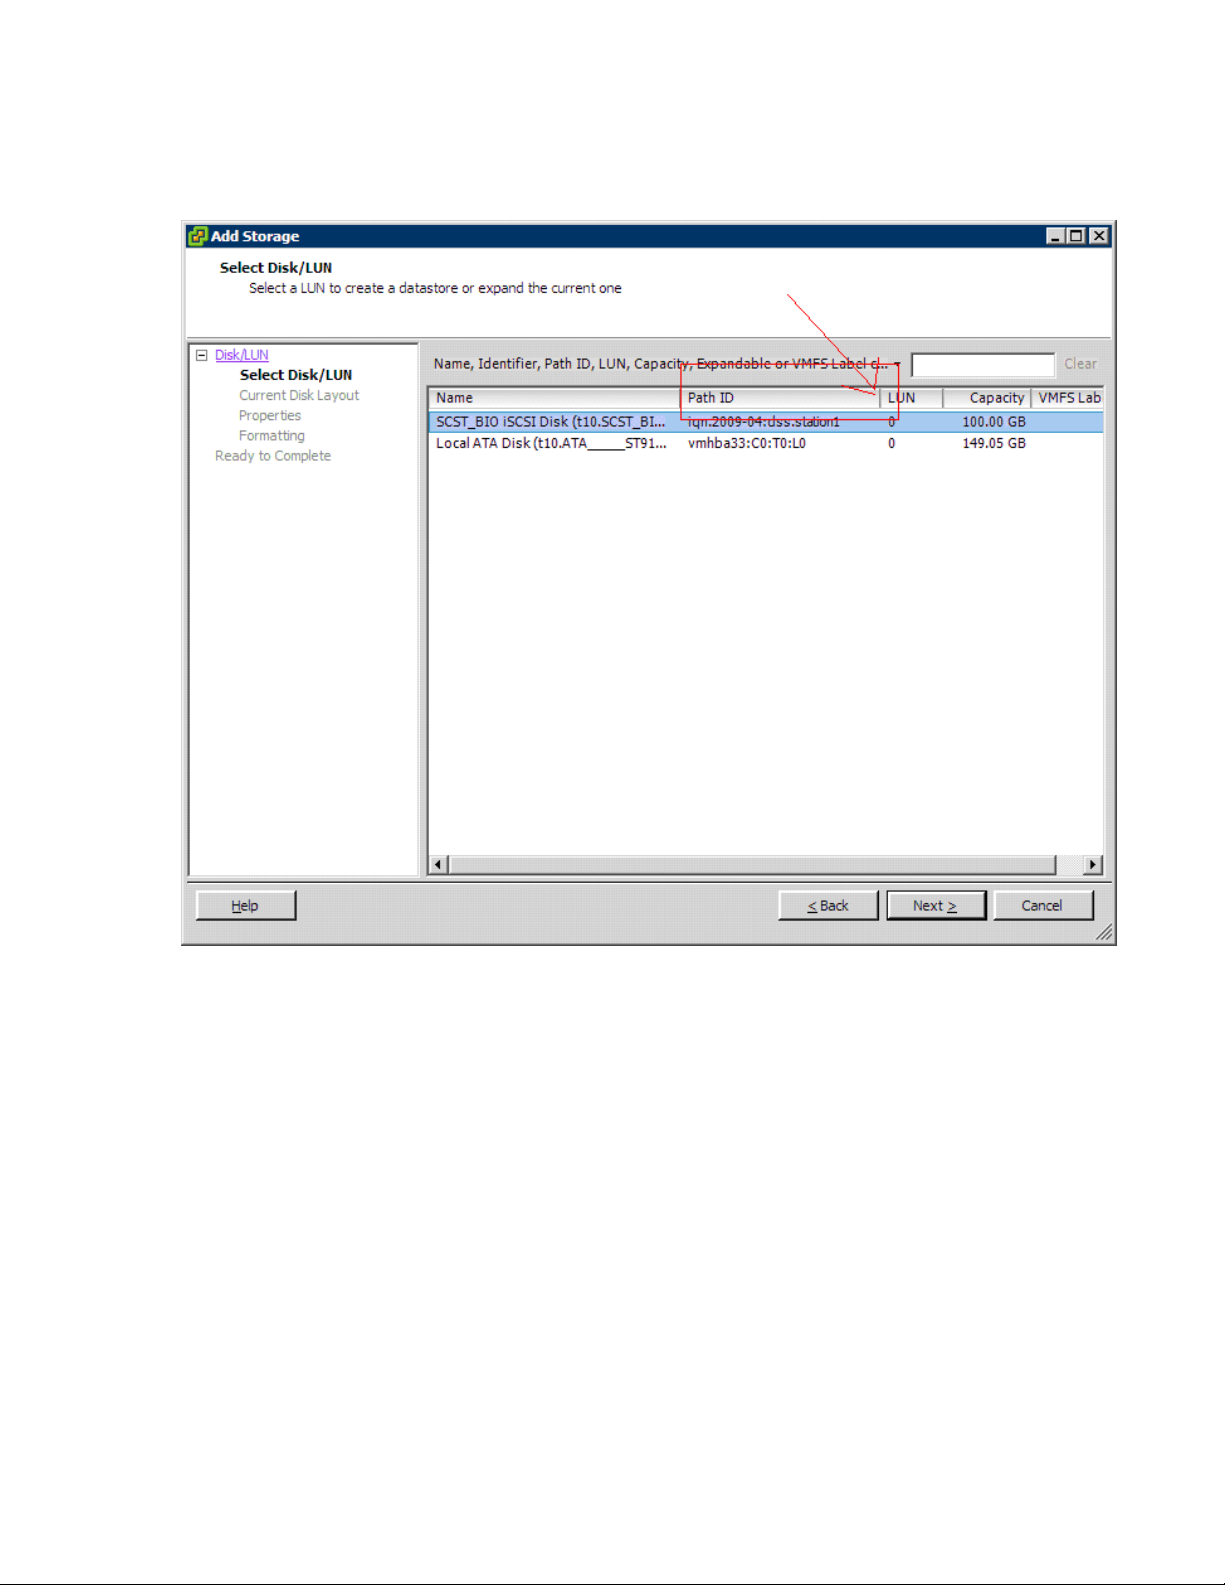
VMware vSphere* 4.1 Installation Guide for ESX/ESXi* 4.1
17) Select the LUN assigned to a station according to the path ID (the Path ID in the table may have to be
expanded; select the bar between it and the LUN entry) with the appropriate IQN (iqn.200904:dss.station<station #>, for example). Do not assign it to the local disk.
50
Figure 36 – Select Disk/LUN Window
Page 51
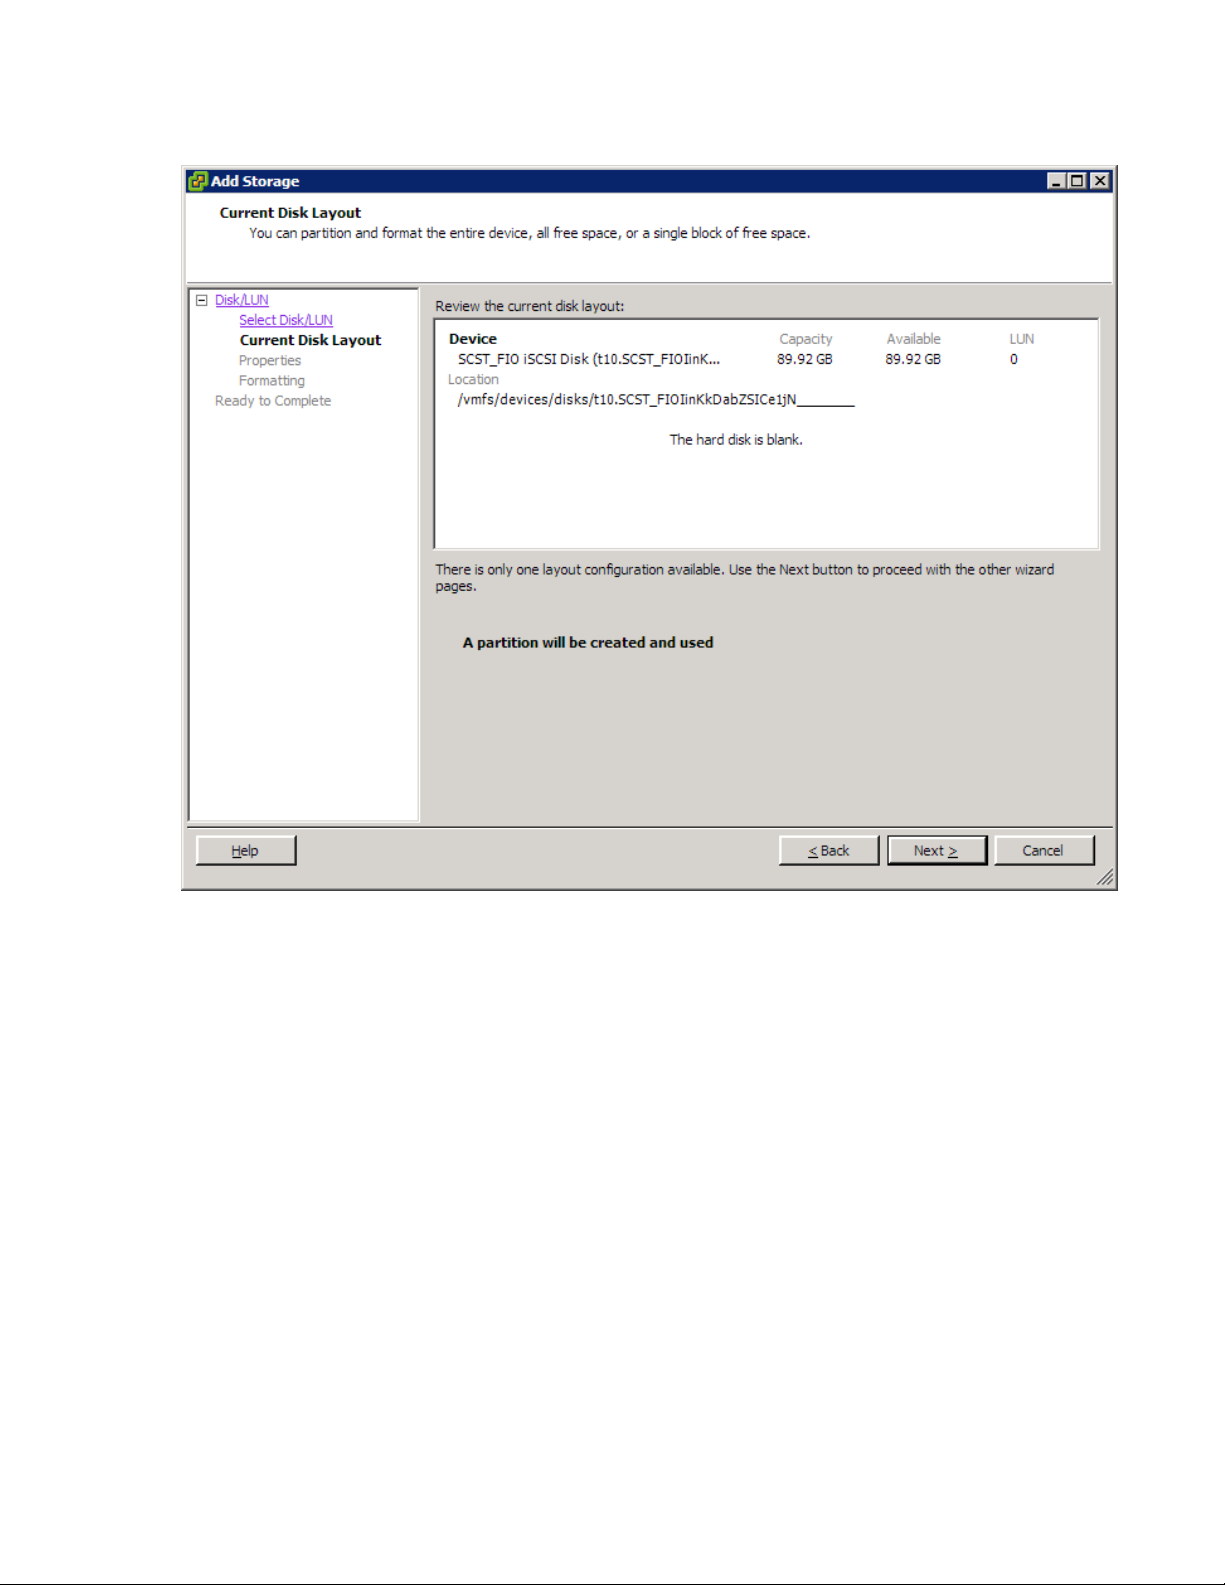
18) Click “Next” in the Current Disk Layout window.
VMware vSphere* 4.1 Installation Guide for ESX*
Figure 37 – Current Disk Layout Window
51
Page 52
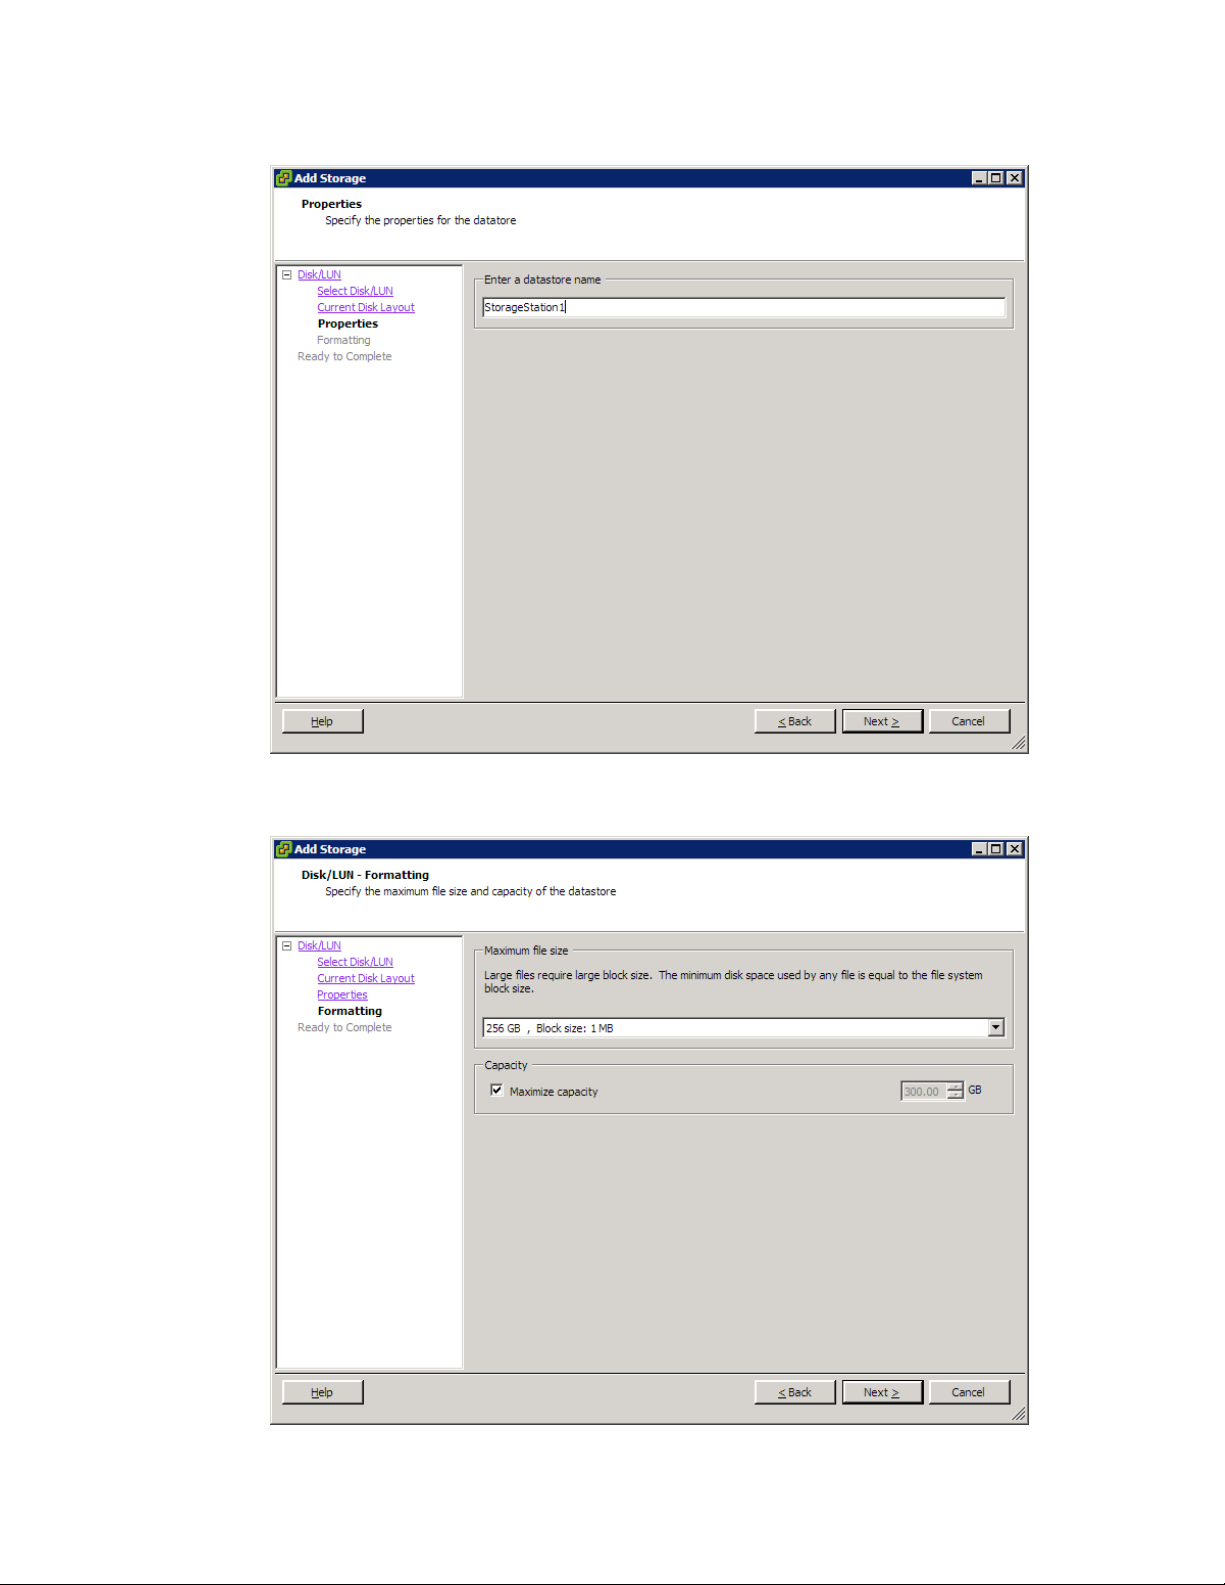
VMware vSphere* 4.1 Installation Guide for ESX/ESXi* 4.1
19) Enter “StorageStation1” in the “Enter a datastore name” field, then click “Next”.
Figure 38 – Add Storage Properties Window
20) Click “Next” in the Disk/LUN - Formatting window.
Figure 39 – Disk/LUN - Formatting Window
52
Page 53

21) Click “Next” in the Ready to Complete window.
VMware vSphere* 4.1 Installation Guide for ESX*
Figure 40 – Ready to Complete Window
22) Select the second Host (192.168.1.12 for station 1), click the Configuration tab, then select “Storage
Adapters” in the Hardware pane.
23) Scroll down the list of storage adapters, then select iSCSI Software Adapter.
24) Click ”Properties” and the iSCSI initator properties dialog box appears.
25) Click “Configure”, click the “Enabled” checkbox for the Status, then click “OK”.
26) Click ”Configure”, change the station iqn (iqn.1998-01.com.VMware:esx21 )”, then “OK”.
27) Click the Static Discovery tab.
28) Click “Add”.
53
Page 54
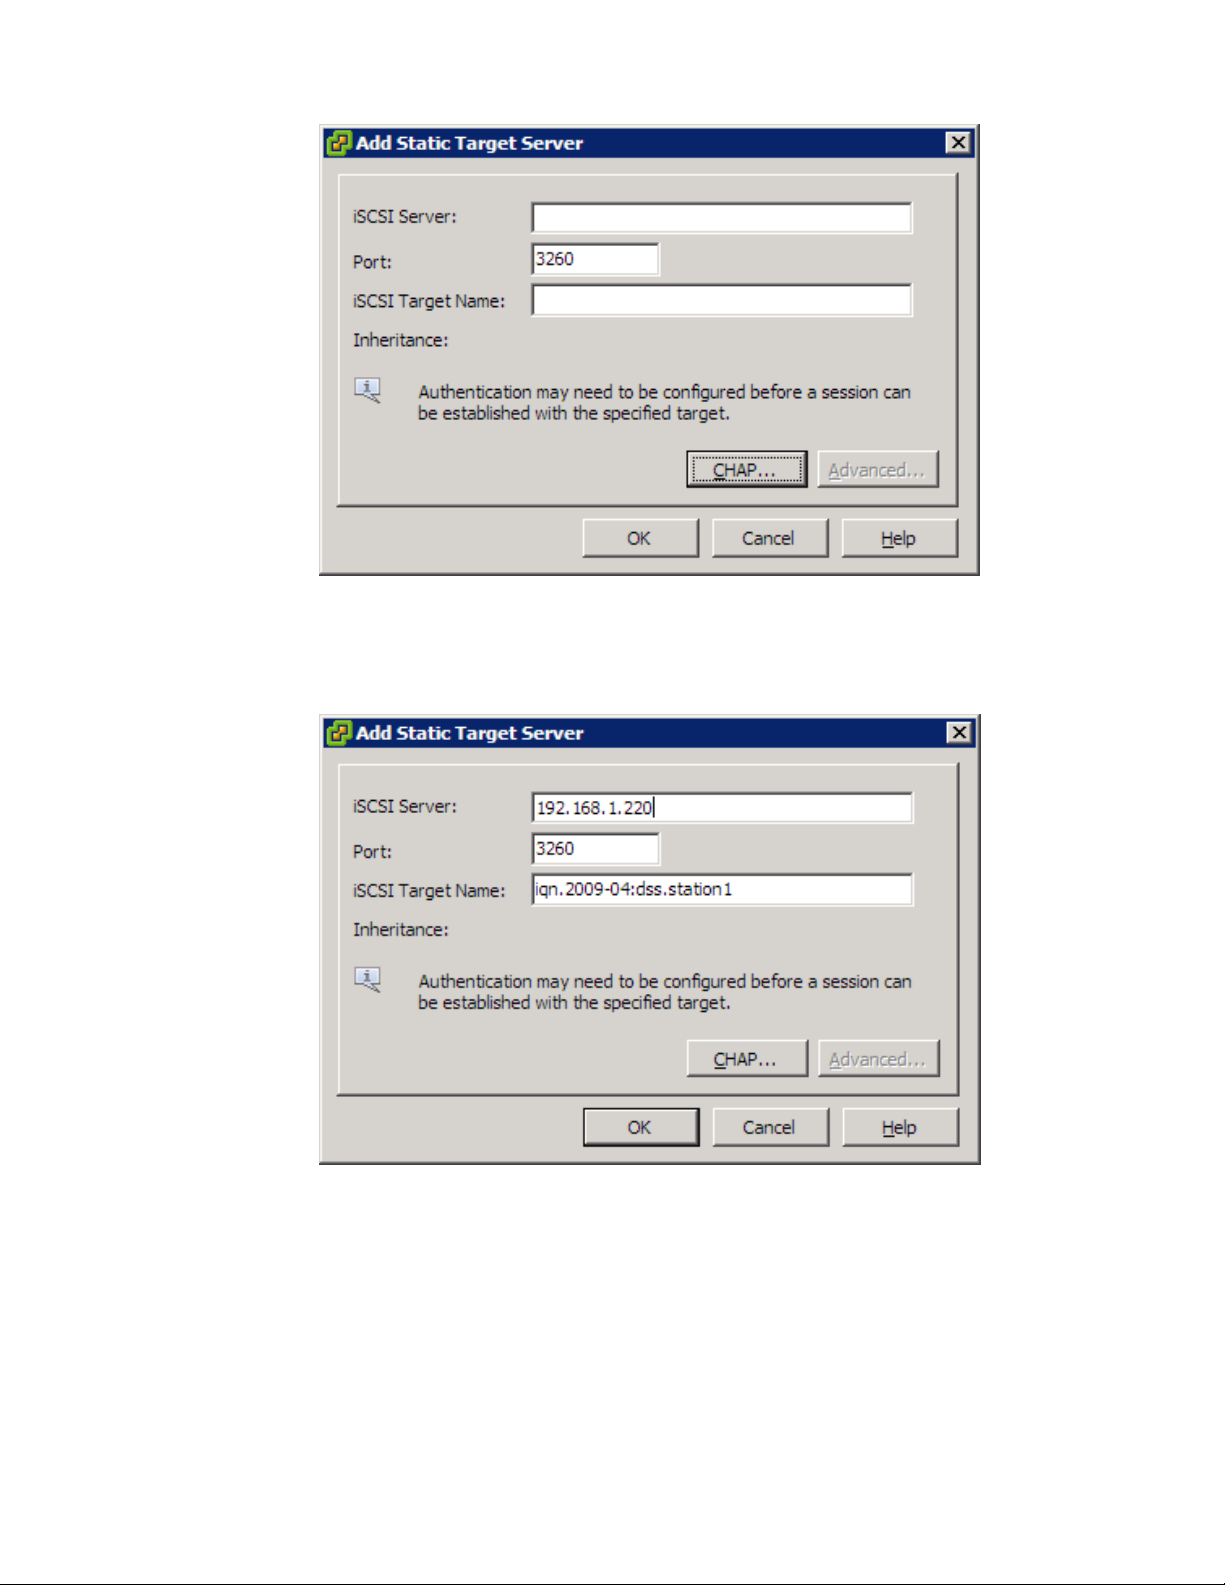
VMware vSphere* 4.1 Installation Guide for ESX/ESXi* 4.1
Figure 41 – Add Static Target Server Dialog Window
29) In the Add Static Target dialog, enter the IP address 192.168.1.220 for the Open-E* server and the
target name used previously for host 1. Verify that it is typed or pasted in correctly, then click “OK”.
30) The iSCSI target should appear in the dialog.
Figure 42 – Add Static Target Server Properties
54
Page 55
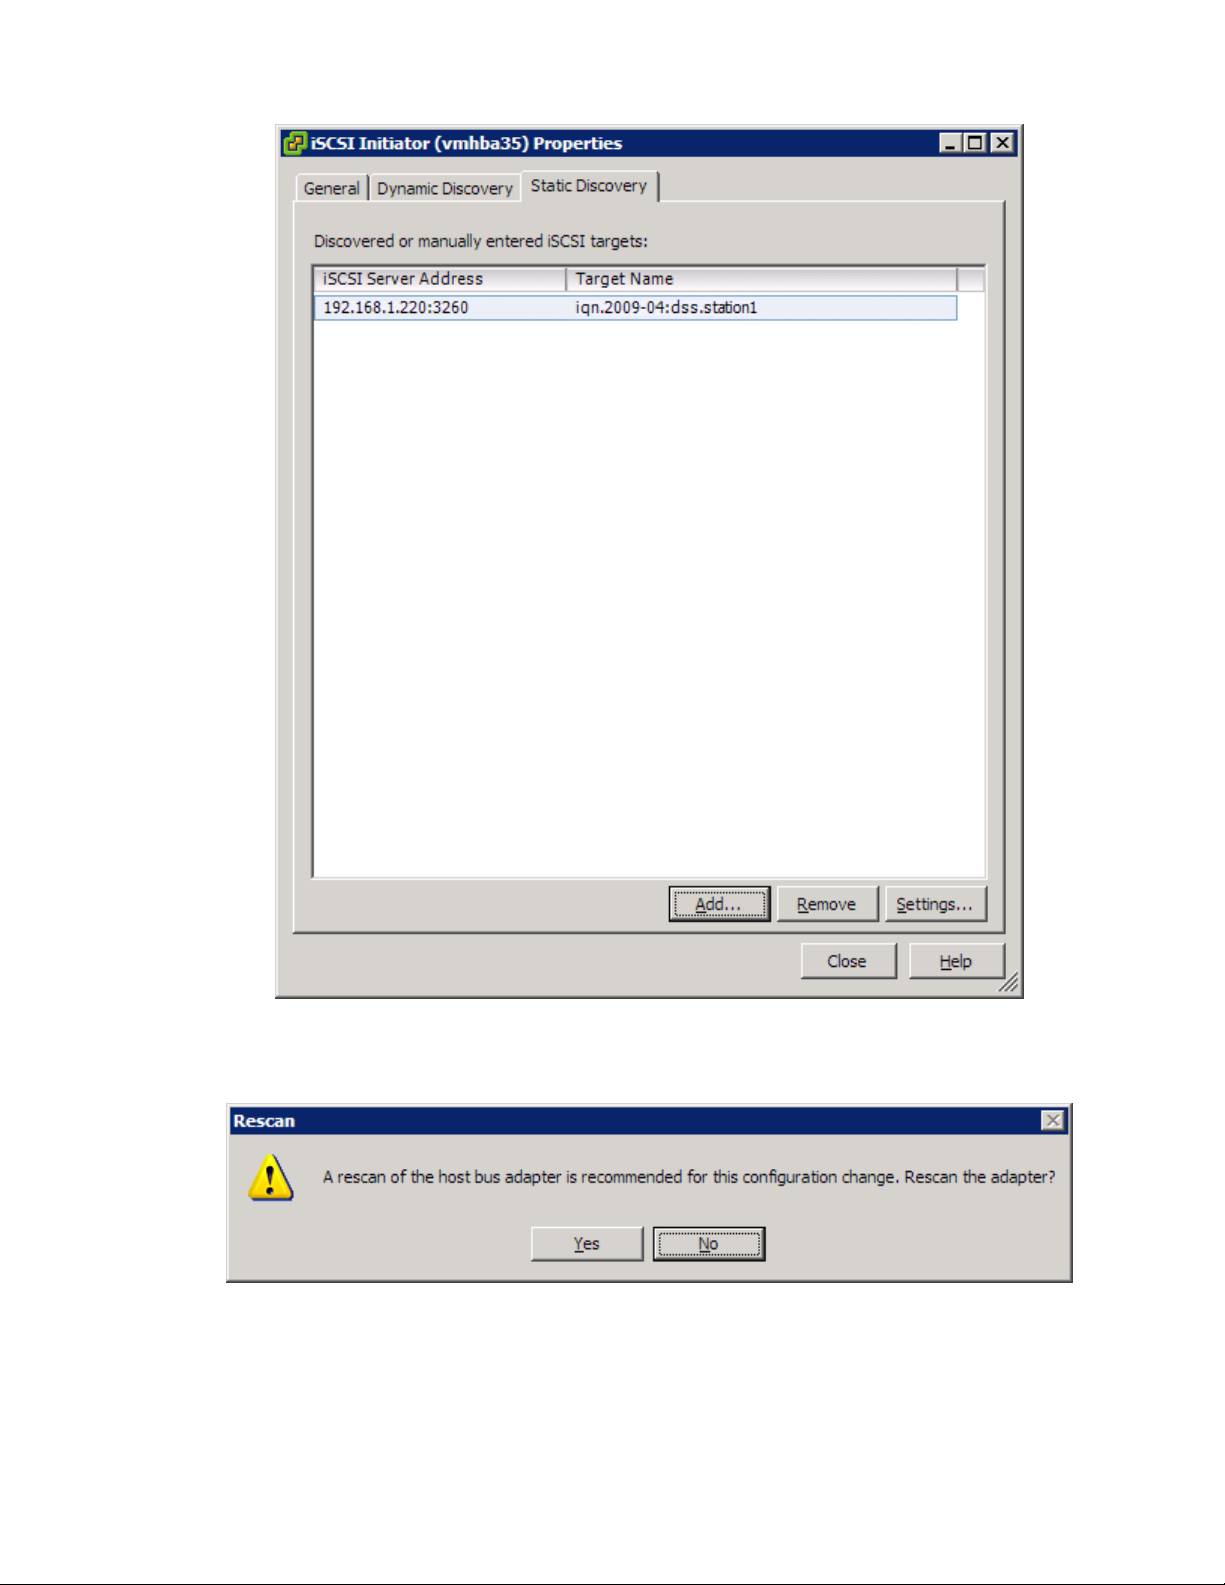
VMware vSphere* 4.1 Installation Guide for ESX*
Figure 43 – iSCSI Initiator Properties
31) Click “Close”; the scan dialog should pop up. Click “Yes” to rescan the adapter. This may take a few
minutes.
Figure 44 – Adapter Rescan Dialog Window
32) The iSCSI target for the volume should be displayed in the main screen.
33) Select the second host> the Configuration tab > “Storage” in the Hardware pane, then click “Refresh”.
The storage available to the second host should appear.
55
Page 56
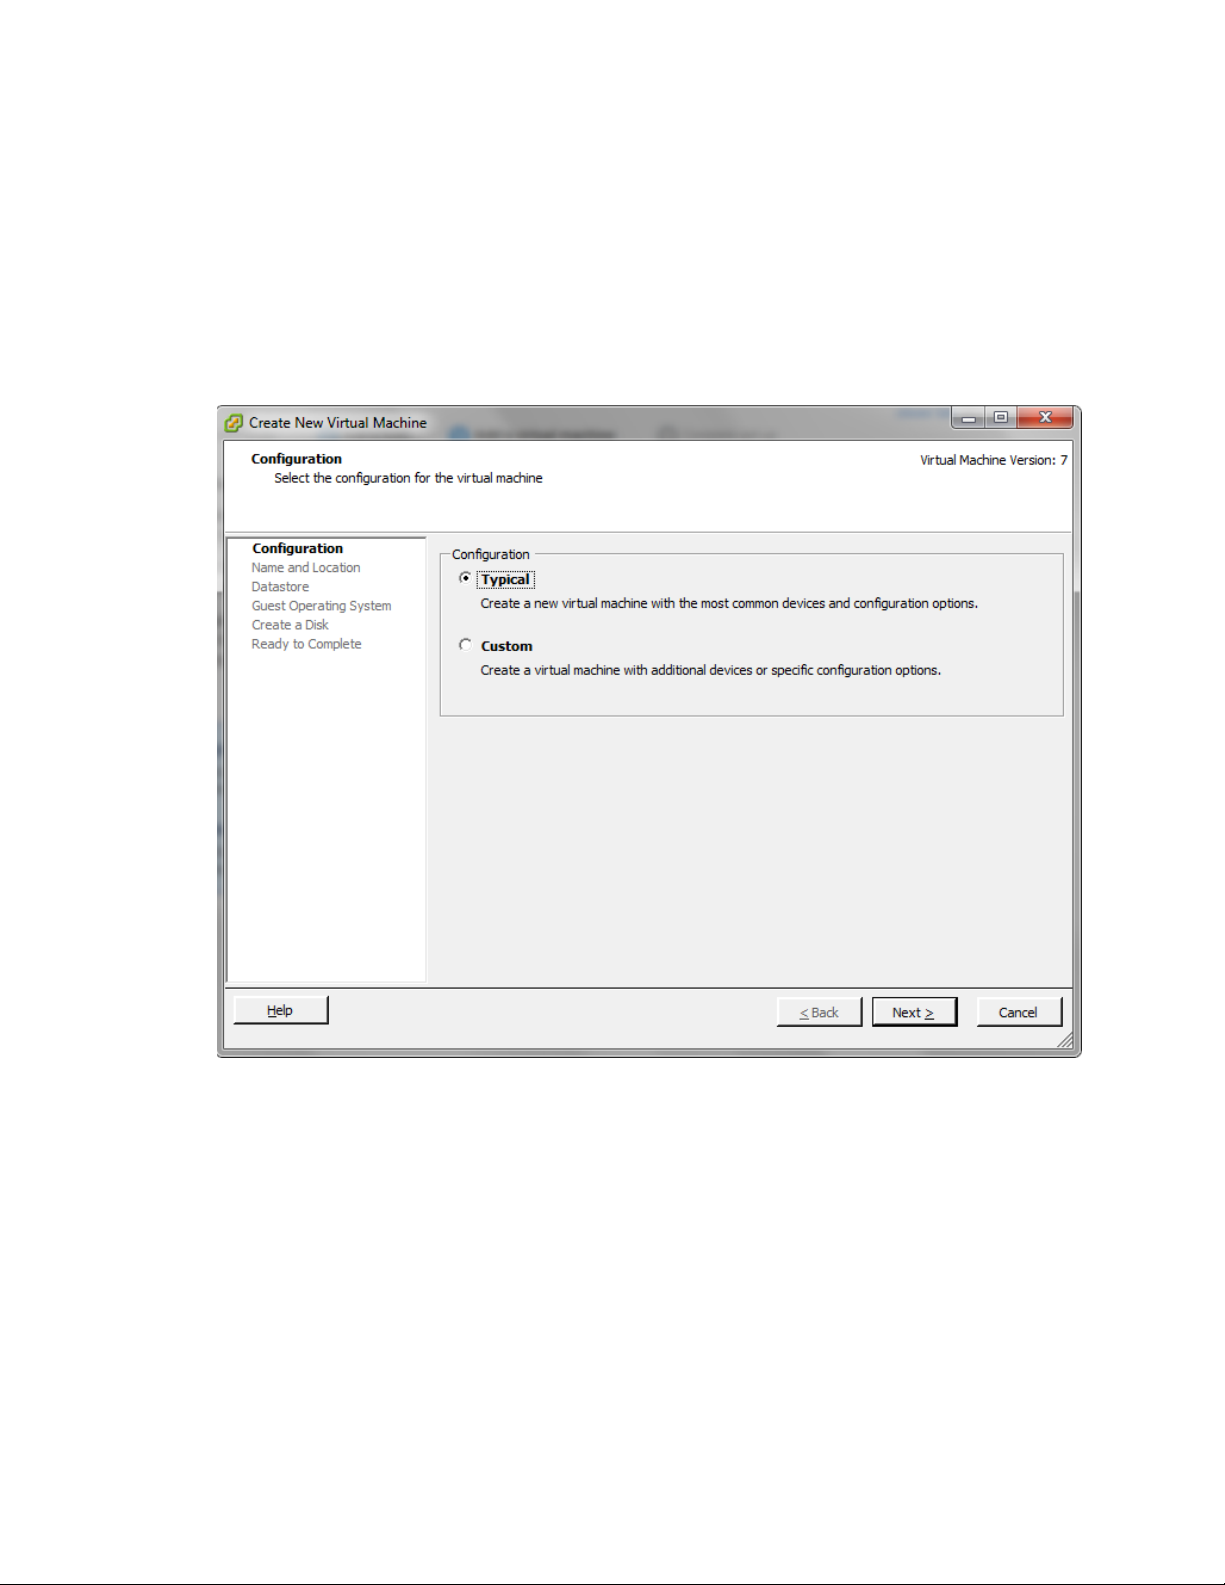
VMware vSphere* 4.1 Installation Guide for ESX/ESXi* 4.1
Create a Virtual Machine
Creating a virtual machine is similar to building a computer. After creating a virtual machine, a guest
operating system must be installed with applications and VMware* Tools* on it. Ensure an ISO image and a
license for the operating system to install on the virtual machine are available. To create a virtual machine,
perform these steps:
1) In the Inventory panel, select the host machine.
2) Click “Create a new virtual machine” in the Getting Started tab.
3) Select “Typical”, then click “Next”.
Figure 45 – Create New Virtual Machine Configuration Window
4) Type a virtual machine name, then click “Next”.
5) Select a datastore to store the virtual machine files in, then click “Next”. The datastore must be large
enough to hold the virtual machine and its virtual disk files. In this example, VMStore1 is used.
6) Under Guest Operating System, select the operating system family (Microsoft Windows*, Linux*, Novell
NetWare*, Solaris*, or other) and select the version from the drop-down list. This is the virtual machine’s
operating system. Base the choice on the planned use of the virtual machine. In this example, Windows
Server* 2003 Enterprise Edition is used because it is the OS version used for the demo.
Note: The wizard does not install the guest operating system. The New Virtual Machine wizard uses
this information to select appropriate default values, such as the amount of memory needed.
7) Specify the size of the virtual disk, then click “Next”. Enter the disk size in megabytes (MB) or gigabytes
(GB). The default is 8 GB. The virtual disk must be large enough to hold the guest operating system and
56
Page 57
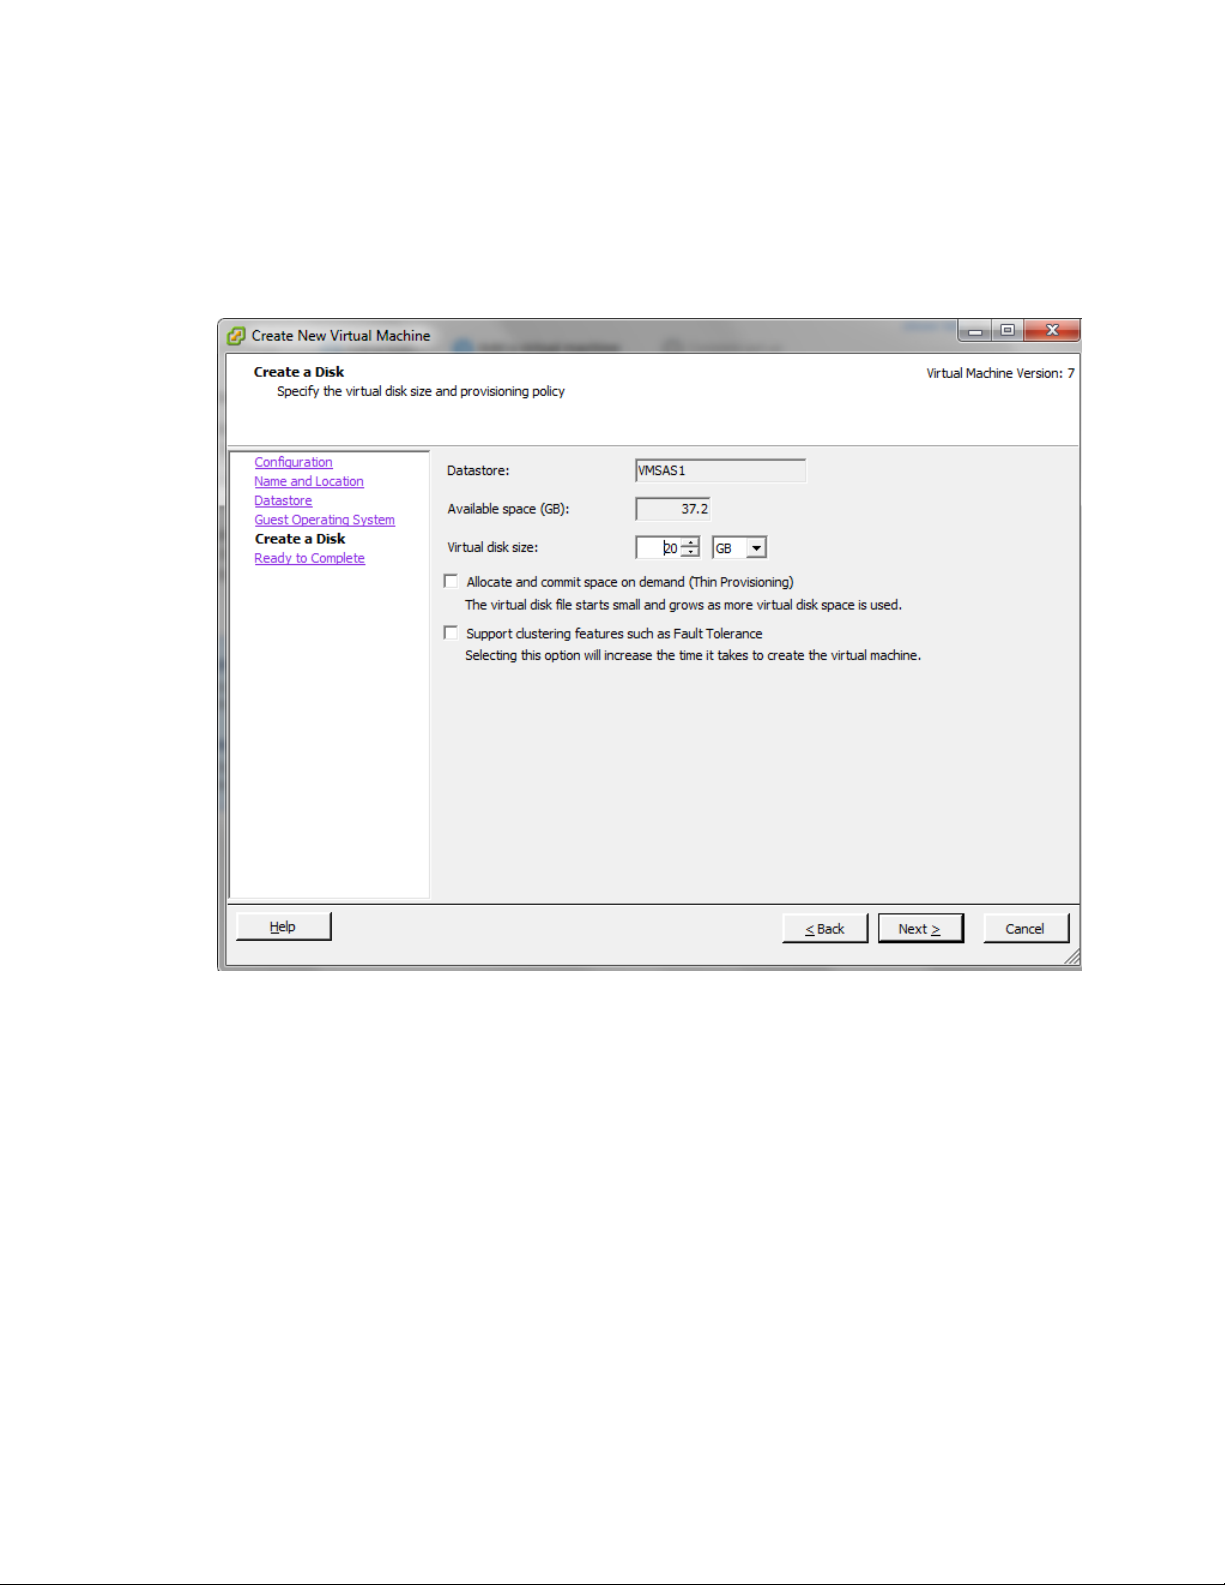
VMware vSphere* 4.1 Installation Guide for ESX*
all of the software to be installed, with room for data and growth. In this example, 30 G is selected for
the operating system.
8) Select the Thin Provisioning option to allocate only disk space that is used. Thin Provisioning is a new
feature in vSphere* that makes efficient use of disk resources. Click “Next”.
9) Select the Thin Provisioning option if you want to allocate only disk space that is used. Thin Provisioning
is a new feature in vSphere* that makes efficient use of disk resources. Click “Next” to continue.
Figure 46 – Create New Virtual Machine Create a Disk Window
10) In the Ready to Complete New Virtual Machine window, review the selections, then click “Finish” to
create the new virtual machine. After creating the virtual machine, install a guest operating system and
VMware Tools* on it. Instructions for how to install a guest operating system and VMware Tools are
located in the vSphere* Tutorial, accessible from the vSphere Client*. Select the virtual machine and
follow the links in the Getting Started tab to learn how to install an operating system.
57
Page 58
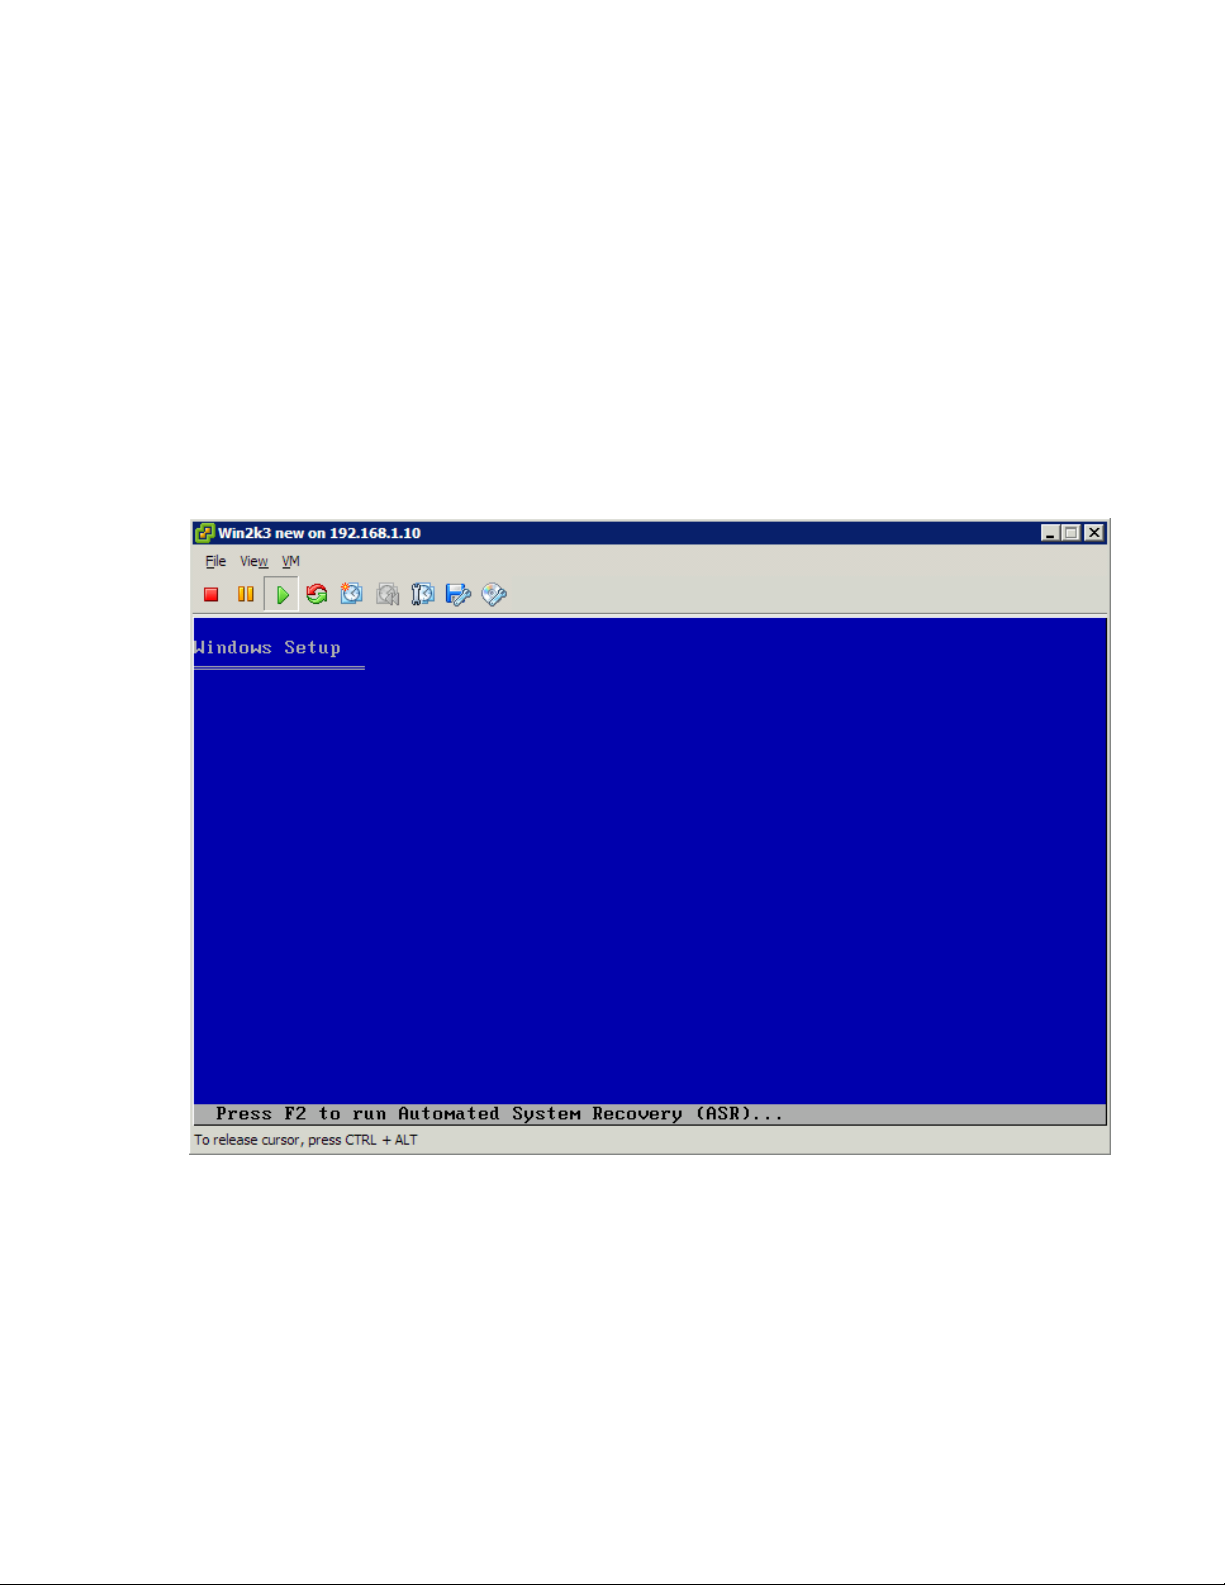
VMware vSphere* 4.1 Installation Guide for ESX/ESXi* 4.1
Loading an OS on a Virtual Machine
1) Ensure a local CD is installed or USB CD-ROM is plugged into the server.
2) Click on the newly created virtual machine, the click “Edit Settings”.
3) In the Hardware pane, select the “CD/DVD Drive 1” item.
4) Select the “Host Device” radio button, then select “/dev/scd1” for the Host Device.
5) Click “OK”.
6) Ensure the OS installation disk is plugged into DVD/CDROM Drive.
7) Right-click the VM, then select “Power On”.
8) Select the Console tab to view the VM booting up.
9) The operating System will start to load. Complete the operating system installation by going through
the setup screen. When completed, remove the CD and reboot the system. The USB CDROM can be
removed if desired.
Figure 47 – Loading the OS
Create a Cluster and Setup Flex Migration (Optional)
Live migration using VMotion* is the first step towards an automated and much more flexible IT
environment because it truly frees up the OS and application workloads from the hardware. Virtual machines
run on and consume resources from the ESX* host. VMotion enables the migration of live virtual machines
from one physical server to another without service interruption. The notion of planned downtime goes
away. This live migration capability allows virtual machines to move from a heavily loaded server to a lightly
loaded one. The result is a more efficient assignment of resources. With VMotion, resources can be
58
Page 59
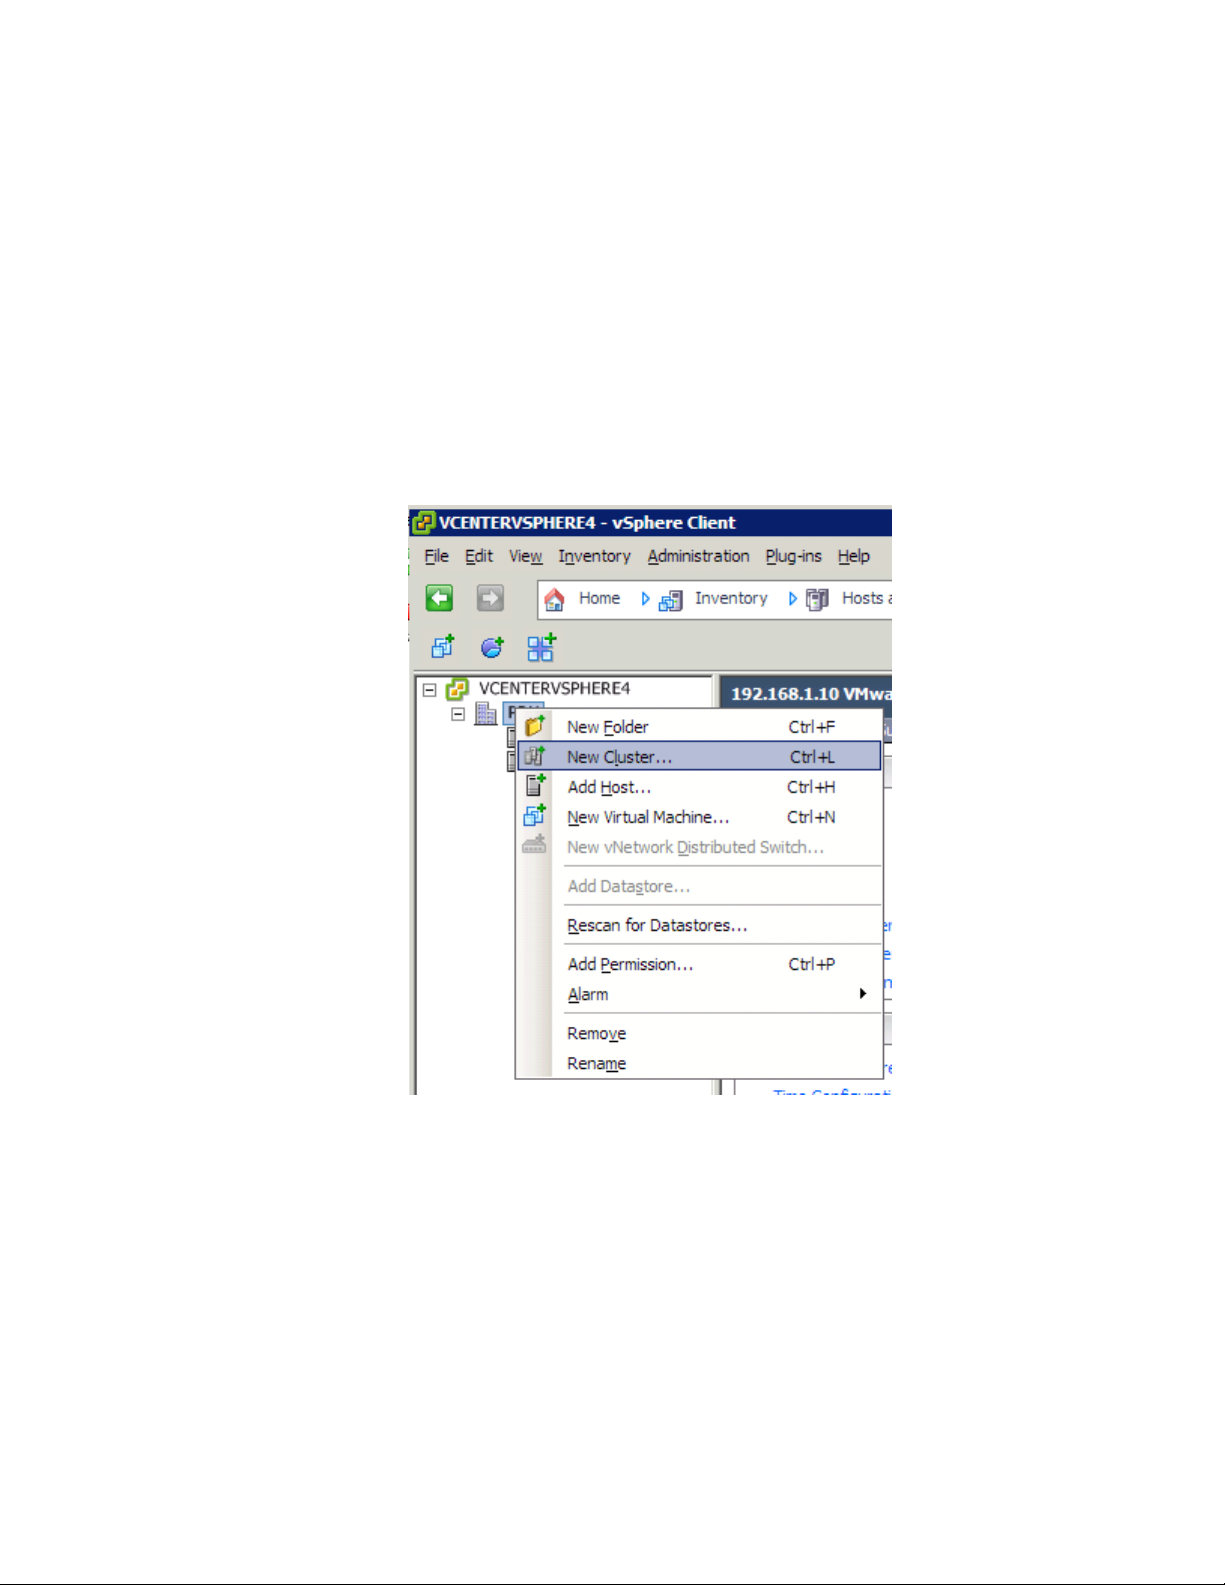
VMware vSphere* 4.1 Installation Guide for ESX*
dynamically reallocated to virtual machines across physical servers. VMware Distributed Resource Scheduler*
(DRS*) aids in resource control and management capability in the virtual datacenter. A cluster can be viewed
as an aggregation of the computing and memory resources of the underlying physical hosts put together in
a single pool. Virtual machines can be assigned to that pool. DRS monitors the workload of the running
virtual machines and the resource utilization of the hosts to assign resources.
Using VMotion* and an intelligent resource scheduler, VMware DRS automates the task of assigning virtual
machines to servers within the cluster to use the computing and memory resources of that server. DRS does
the calculation and automates the pairing. If a new physical server is made available, DRS automatically
redistributes the virtual machines using VMotion to balance the workloads. If a physical server must be taken
down for any reason, DRS automatically reassigns its virtual machines to other servers. The next steps
explain how to setup two servers to enable VMotion and Distributed Resource Scheduling.
1) Right-click on the Data Center, then select ”New Cluster”.
Figure 48 – Set up a New Cluster
2) Name the cluster and leave the HA unchecked. Select DRS, then click “Next”.
3) Select the automation level for the DRS.
4) Select the power management option for the cluster.
5) Select the “Enable EVC for Intel Hosts” checkbox. This enables the ability to migrate back-and-forth
between servers with different CPUs.
6) Select “Store the swapfile in the same directory” option, then click “Next”.
7) Click “Next” at the Summary screen.
8) The task bar should show the cluster being created.
9) Click the left mouse button, hold on the first host and drag and drop it into the cluster.
10) Select “Put all the host resources in the root resource pool”, then click “Next”.
11) Click “Finish” in the Ready to Complete window.
59
Page 60

VMware vSphere* 4.1 Installation Guide for ESX/ESXi* 4.1
12) Repeat the process for the second host. A cluster containing the two hosts is created.
13) Power-on one of the VMs created in a previous step.
14) Select one of the VMs and drag it to one of the hosts. Migrating back-and-forth the between the hosts
is possible.
A cluster is now set up and VMotion* is enabled. This provides a failover mechanism for the virtual machines
in case one of the hosts fails. The DRS option provides for balancing the virtual machine loads across
multiple servers. More than one server can be added to the cluster for large enterprise environments running
a large number of virtual machines. For small businesses, VMotion provides protection against host failures
to provide continuous up-time for applications.
Appendix A: ESXi* Support Configuration for Intel® TXT
(Optional)
In order for Intel ® Trusted Execution Technology to work completely with vCenter* Server, a function
named “tboot” must be enabled for each host. Please note this function is only available for ESXi* hosts and
not for ESX* hosts. To enable “tboot” for a host, follow these steps.
1) Open the vSphere* Client console for vCenter* Server
Figure 49 – vSphere* Client
3) Select a host to enable “tboot” for, then select the Configuration tab.
60
Page 61

VMware vSphere* 4.1 Installation Guide for ESX*
4) In the “Software” category of the Configuration tab, select “Advanced Settings”. This will open the
Advanced Settings window.
Figure 50 – vSphere* Client Configuration Tab
5) In the left column of the Advanced Settings window, select the “Misc” option to show its options. In
the right column, find the function “Misc.enableTboot” and change its option from “0” to “1”. Select “OK”,
then reboot the ESXi* host. Repeat this process for each host.
Figure 51 – vSphere* Client Advanced Settings Window
61
Page 62

VMware vSphere* 4.1 Installation Guide for ESX/ESXi* 4.1
Confirm the PCR Values Import to vCenter* Server
through the VMware MOB.
1) From the VMware vCenter* Server, open Internet Explorer* or a compatible Web browser, then enter the
name of the VMware vCenter Server, for example, “https://vcs.test.com:444/mob”
Note: Go to the MOB Web on the vCenter* Server, not one of the ESXi* servers. Select “Continue to this
website (not recommended)”, then login with the vCenter Server Administrative account.
Figure 52 – Log into the VMware vCenter* Server Managed Object Browser
2) Click on "Content".
Figure 53 – Managed Object Browser
62
Page 63
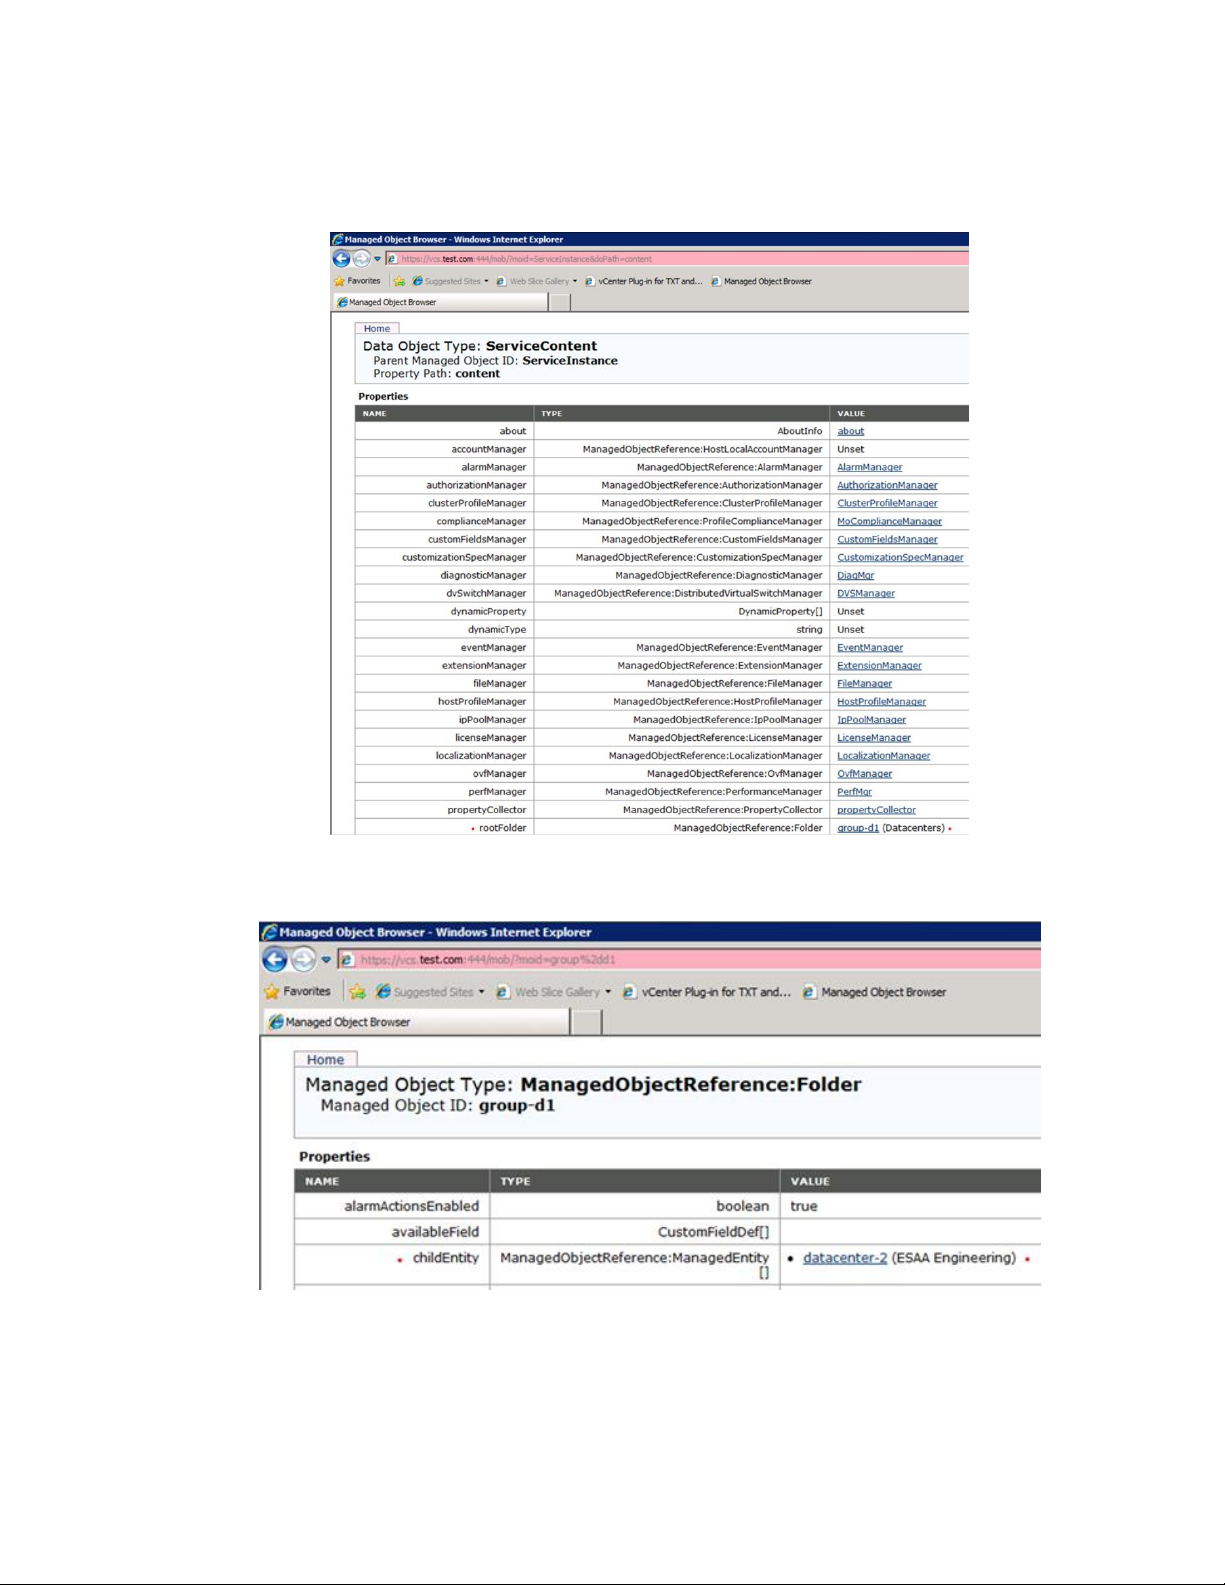
VMware vSphere* 4.1 Installation Guide for ESX*
3) Find the "rootfolder" row, then click on its value "group-d1 (Datacenters)".
Note: “group-d1 (Datacenters)” could be named something else in different environments.
Figure 54 – rootFolder > group-d1 (Datacenters)
4) Find the "childEntity" row, then click its value "datacenter-2”.
Figure 55 – childEntity > datacenter-2
63
Page 64
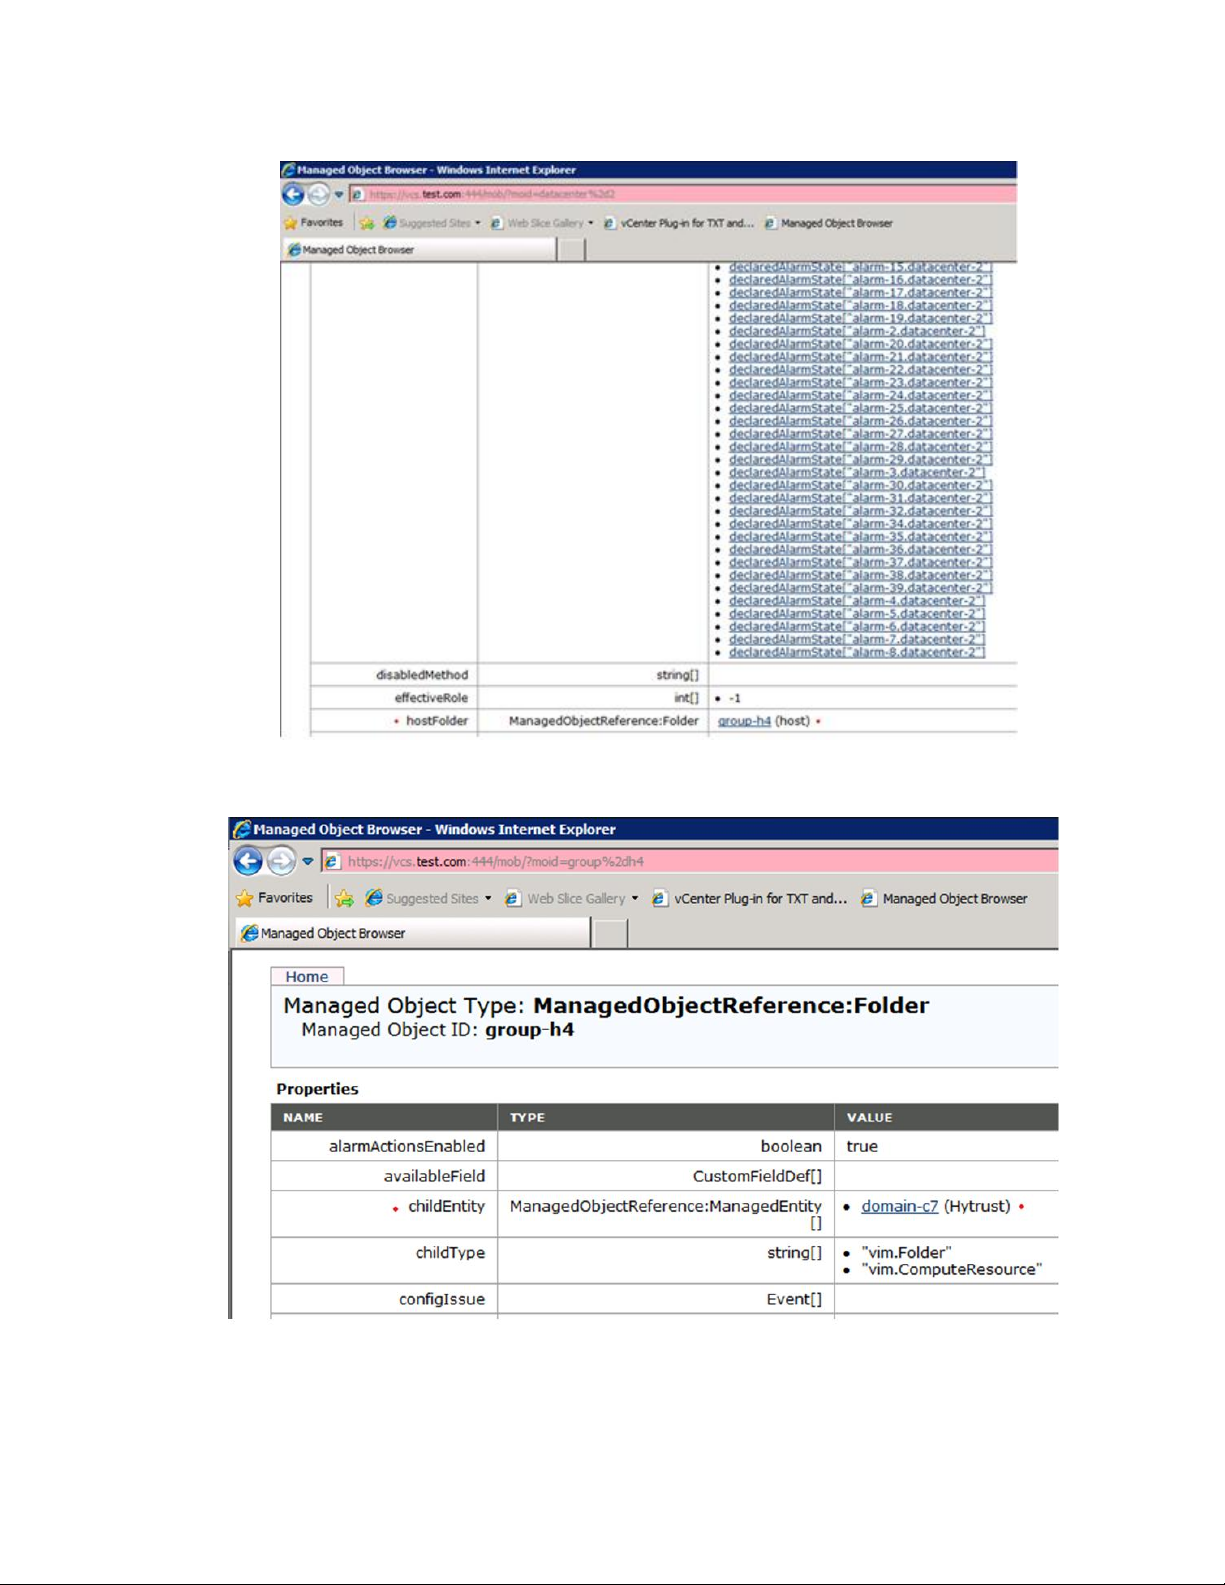
VMware vSphere* 4.1 Installation Guide for ESX/ESXi* 4.1
5) Scroll down to find the "hostFolder" row, then click its value "group-h4 (host)".
Figure 56 – hostFolder > group-h4 (host)
6) Find the "childEntity" row, then click its value, for example, “domain-c7 (Hytrust)”
64
Figure 57 – childEntity > domain-c7 (Hytrust)
Page 65
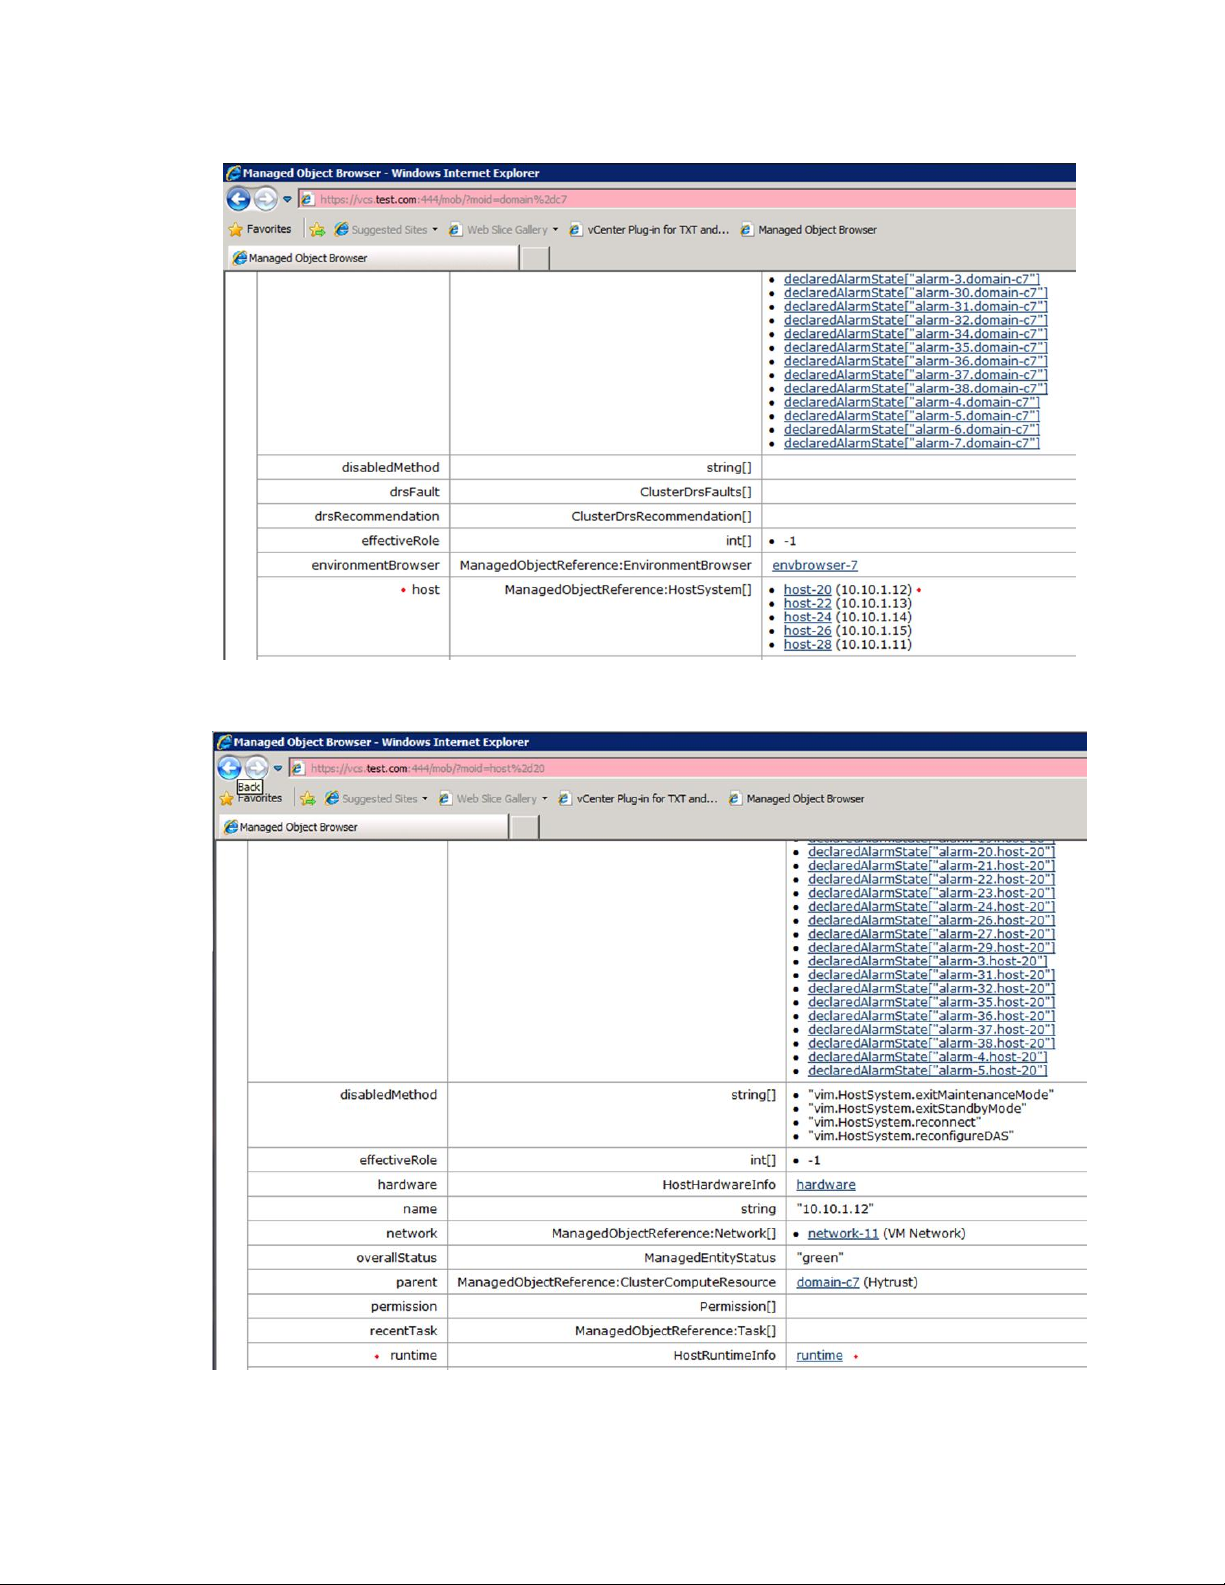
VMware vSphere* 4.1 Installation Guide for ESX*
7) Find the "host" row, then select an Intel® TXT-enabled host in the value column.
Figure 58 – host > (Intel® TXT-enabled hosts)
8) Find the “runtime” row, then click "runtime" in its value column.
Figure 59 – runtime > runtime
65
Page 66
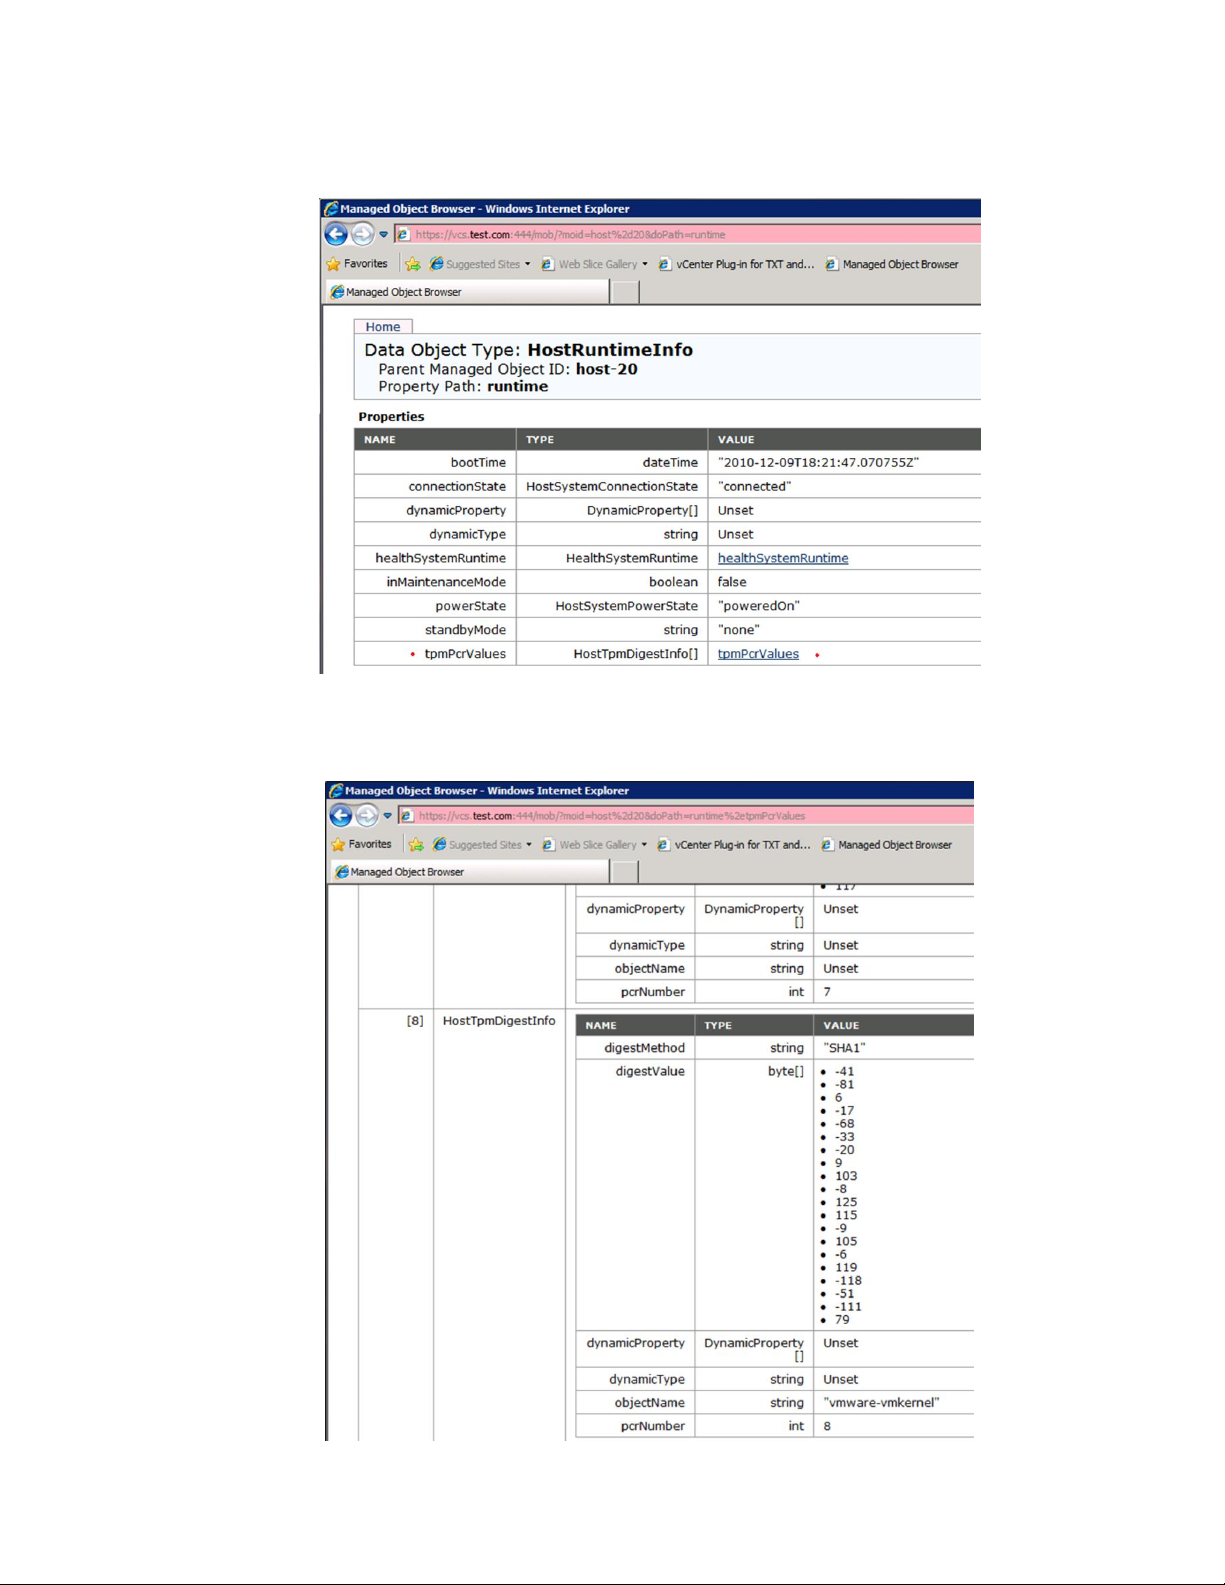
VMware vSphere* 4.1 Installation Guide for ESX/ESXi* 4.1
9) Find the “tmpPcrValues” row, then click "tmpPcrValues " in its value column to see the digest values.
Note: If the server is not Intel® TXT-enabled, it will say "unset" under the tpmPcrValues.
Figure 60 – tmpPcrValues > tmpPcrValues
For example, display the host digest value for (8) “vmware-vmkernel”. Digest value is read
-41-816-17-68-33-209103-8125115-9105-6119-118-51-11179
Figure 61 – TMP Digest Read for “vmware-vmkernal”
66
Page 67

VMware vSphere* 4.1 Installation Guide for ESX*
Where to Go Next
After the vSphere* environment is setup, the following can be done:
Expand the capacity by adding more hosts and storage.
Expand the virtual datacenter by creating and importing new virtual machines.
Perform a consolidation of the physical servers using the Consolidation wizard.
For more information about how to evaluate the features and benefits of vSphere*, go to
http://www.VMware.com/go/vi_evalresources.
Technical and Marketing Reference Documentation
The vSphere* Tutorial
The vSphere* tutorial contains information about many of the basic vSphere components and tasks. The
tutorial can be accessed through the Explore Further links in the Getting Started tabs in the vSphere Client,
for instance, to learn more about an object selected in the inventory. The tutorial can also be accessed from
the Help menu in the vSphere Client.
VMware vSphere* Documentation
Refer to the VMware vSphere* 4.1 documentation for information on advanced host and vCenter* Server
configuration, setup for larger deployments for production environments, as well as information on
advanced vSphere features. The vSphere documentation consists of the combined vCenter Server and ESX*
documentation set. To access the current versions of this manual and other books, go to:
http://www.vmware.com/support/pubs/vs_pages/vsp_pubs_esx41_vc41.html
VMware vSphere* 4.1 Online Training
Register now for a focused webinar session. Hosted by VMware* experts, these webinars cover many topics
from sales to technical topics, and how VMware vSphere* can address the business and IT challenges that
face every organization today and how they can be solved with the new VMware vSphere products:
http://www.vmware.com/partners/programs/training-centers/
VMware* Knowledge Base
VMware* has an online knowledgebase to search for Vmware VSphere* and related products.issues:
http://kb.vmware.com/selfservice/microsites/microsite.do;jsessionid=B19F30D2BBDA0EA4D256F79BE1E4
1833
In addition, VMware has a community webpage were customers discuss issues with VMmare experts online.
Access the VMware Communities webpage at: http://communities.vmware.com/home.jspa
67
Page 68

VMware vSphere* 4.1 Installation Guide for ESX/ESXi* 4.1
Support Information
Support can be obtained on the VMware* support website. Please contact VMware regarding any issues
with VMware VSphere* 4.1 software: http://www.vmware.com/support
Refer to the VMware* website for support phone numbers:
http://www.vmware.com/support/phone_support.html
Support for the Intel® Server Boards:
− Intel® Server Board S5520HC
− Intel® Server Board S5520UR
− Intel® Server Board S5500WB
− Intel® Server Board S5500BC
− Intel® Server Board S3420GP
Please contact the appropriate vendor for any support issues with third party hardware or software used in
recipe configurations. Intel customer support does not provide support for third-party software- or
hardware-related issues. Calls received by the Intel support site will be referred to the appropriate vendor.
Vendor support information
Intel hardware support information
VMware vSphere* is available as an accessory to Intel® Server Boards and Intel® Server Systems. An Intel®
Authorized Distributor can provide VMware vSphere as an add-on to eligible Intel® Server Product purchases.
Most Intel® Server Products are certified to run with VMware vSphere* and are listed on the VMware
Hardware Compatibility List.
For more information, including ordering information and sales tools, please click this link:
http://www3.intel.com/cd/channel/reseller/asmo-na/eng/products/server/436106.htm
68
Page 69
VMware vSphere* 4.1 Installation Guide for ESX*
Intel® ESAA – Your Recipe for Success
Collaborative Validation. Reliable Solutions. Complete Confidence.
When you choose a validated server solution available through
the Intel® Enabled Solutions Acceleration Alliance (Intel® ESAA),
you choose a solution that delivers the highest standards for
quality and interoperability. Through this collaborative alliance,
Intel Corporation has teamed with other industry leaders to
provide you with server solutions that meet a range of business
needs. Intel® ESAA provides a process to streamline deployment
and implementation so you can focus on growing your business.
For more information about the Intel® ESAA program, visit
www.intel.com/go/esaa.
69
 Loading...