

Page 1

Intel® Server System SR870BH2 Quick
Start Guide
Order Number: C43207-001
This guide contains basic instructions for setting up the system and accessing
the Product Guide from the Resource CD.
Page 2

Important Safety Instructions
Read all caution and safety statements in this document before performing any of the instructions.
®
See Intel
http:\\support.intel.com
Server Boards and Server Chassis Safety Information on the Resource CD and/or at
.
Wichtige Sicherheitshinweise
Lesen Sie zunächst sämtliche Warn- und Sicherheitshinweise in diesem Dokument, bevor Sie eine
der Anweisungen ausführen. Beachten Sie hierzu auch die Sicherheitshinweise zu IntelServerplatinen und -Servergehäusen auf der Ressourcen-CD oder unter http:\\support.intel.com
.
Consignes de sécurité
Lisez attention toutes les consignes de sécurité et les mises en garde indiquées dans ce document
avant de suivre toute instruction. Consultez Intel Server Boards and Server Chassis Safety
Information sur le CD Resource CD ou bien rendez-vous sur le site http:\\support.intel.com
.
Instrucciones de seguridad importantes
Lea todas las declaraciones de seguridad y precaución de este documento antes de realizar
cualquiera de las instrucciones. Vea Intel Server Boards and Server Chassis Safety Information en
el CD Resource y/o en http:\\support.intel.com
.
重要安全指导
在执行任何指令之前,请阅读本文档中的所有注意事项及安全声明。参见 Resource
CD(资源光盘) 和/或 http:\\support.intel.com
Server Chassis Safety Information
(《Intel 服务器主板与服务器机箱安全信息》)。
上的
Intel Server Boards and
Copyright © 2000 - 2003 Intel Corporation. All rights reserved. No part of this document may be copied, or reproduced in
any form, or by any means without prior written consent of Intel.
Intel Corporation (Intel) makes no warranty of any kind with regard to this material, including, but not limited to, the implied
warranties of merchantability and fitness for a particular purpose. Intel assumes no responsibility for any errors that may
appear in this document. Intel makes no commitment to update nor to keep current the information contained in this
document.
This equipment has been tested and found to comply with the limits for a Class A digital device, pursuant to part 15 of the
FCC Rules. These limits are designed to provide reasonable protection against harmful interference when the equipment is
operated in a commercial environment. This equipment generates, uses, and can radiate radio frequency energy and, if not
installed and used in accordance with the instruction manual, may cause harmful interference to radio communications.
Operation of this equipment in a residential area is likely to cause harmful interference in which case the user will be required
to correct the interference at his/her own expense.
Intel is a registered trademark of Intel Corporation or its subsidiaries in the United States and other countries.
* Other names and brands may be claimed as the property of others.
ii
Page 3

Contents
Intel® Server System SR870BH2 Specifications.................................................................... 5
Regulatory Specifications and Disclaimers............................................................................. 6
FCC Electromagnetic Compatibility Notice (USA).......................................................... 6
Electromagnetic Compatibility Notices (International).................................................... 7
Removing the Server from the Box ......................................................................................... 8
Selecting a Site ....................................................................................................................... 8
Checking Power Cords ...........................................................................................................9
Connections and Controls..................................................................................................... 10
Connecting the Monitor, Keyboard, and Mouse....................................................................14
Powering On the Server for the First Time............................................................................ 14
Mounting the DVD/CD-RW Device .......................................................................................15
The Intel® Server System SR870BH2 Resource CD ...........................................................15
The Intel® Server System SR870BH2 Product Guide .......................................................... 16
iii
Page 4

<This page intentionally left blank.>
iv Intel® Server System SR870BH2
Quick Start Guide
Page 5
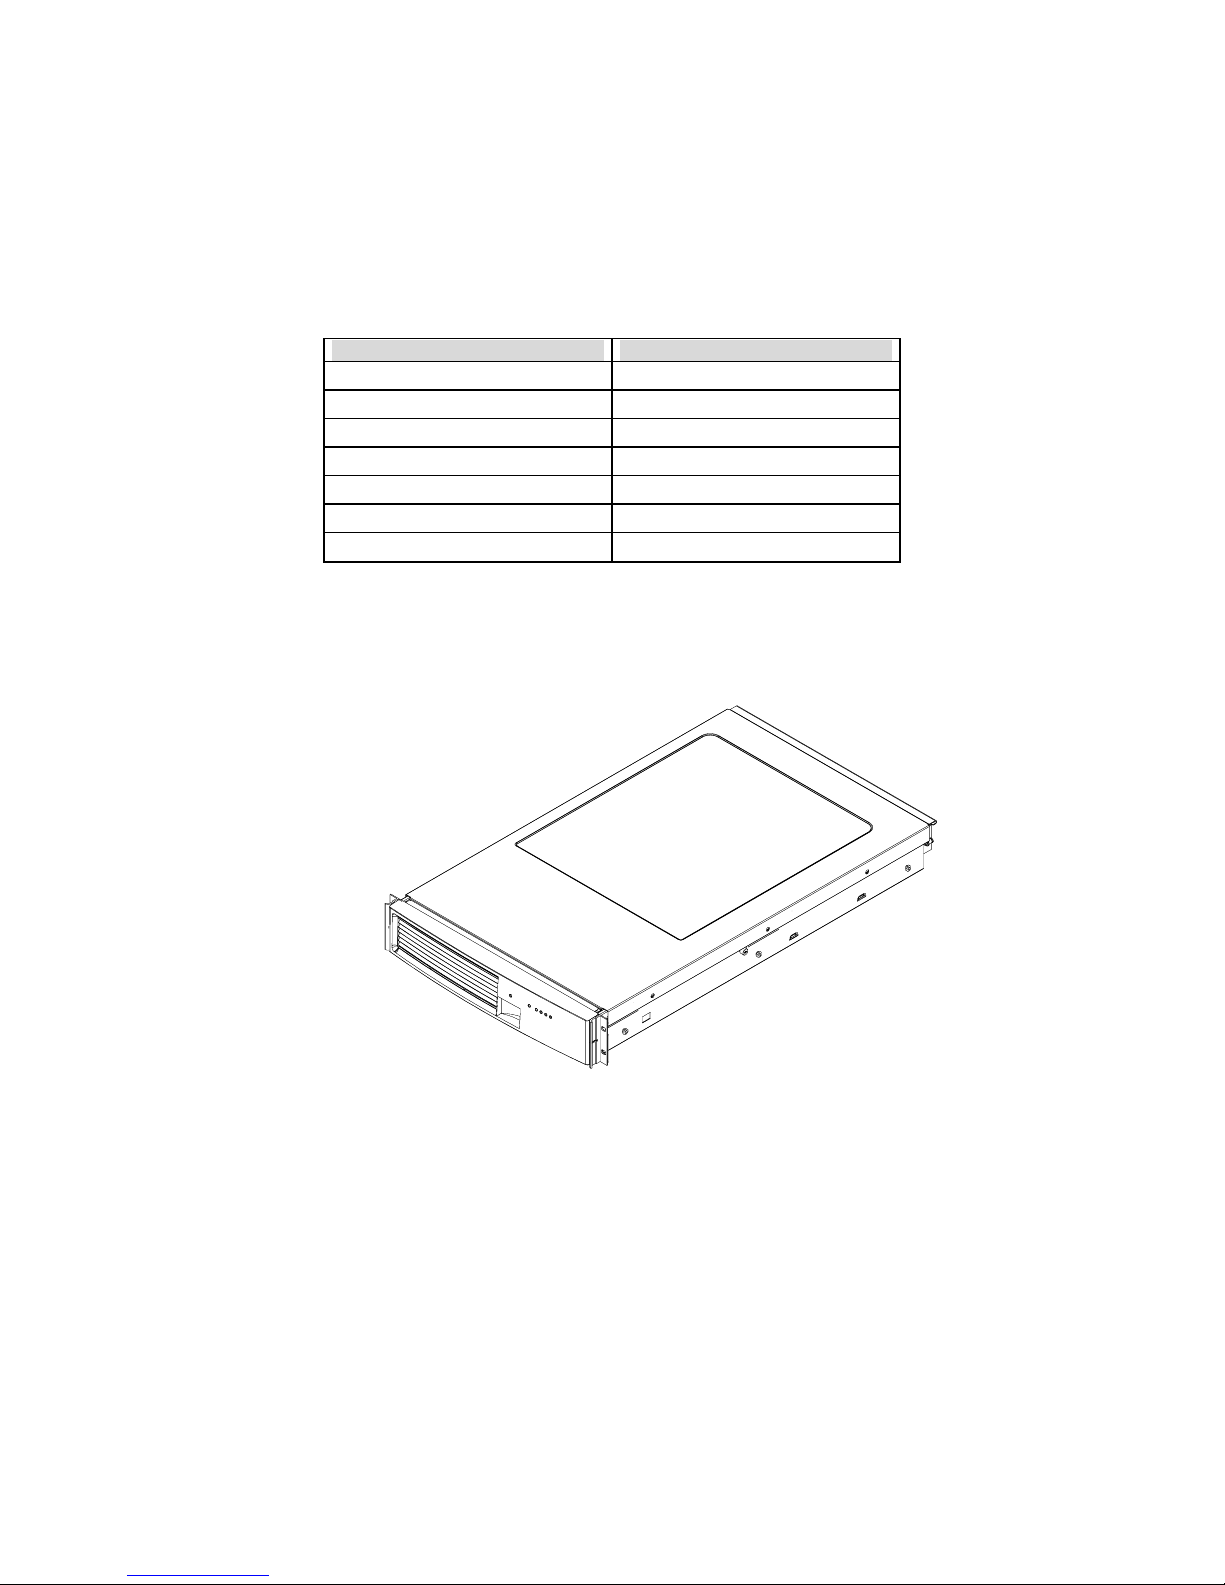
Intel® Server System SR870BH2 Specifications
Table 1. Intel® Server System SR870BH2 Physical Specifications
Specification Value
Height 3.4 inches (87 mm)
Width 17.7 inches (449 mm)
Depth 29.4 inches (747 mm)
Front clearance 3 inches (76 mm)
Side clearance 1 inch (25 mm)
Rear clearance 6 inches (152 mm)
Weight1
Note: 1. The system weight listed above is an estimate for a fully configured system and will vary depending on number
of peripheral devices and add-in cards, as well as the number of processors and DIMMs installed in the system.
65 lbs (30 kg)
Intel® Server System SR870BH2 5
Quick Start Guide
Figure 1. Intel® Server System SR870BH2
Page 6

Regulatory Specifications and Disclaimers
FCC Electromagnetic Compatibility Notice (USA)
This equipment has been tested and found to comply with the limits for a Class A digital device,
pursuant to Part 15 of the FCC Rules. These limits are designed to provide reasonable protection
against harmful interference when the equipment is operating in a commercial environment. This
equipment generates, uses, and can radiate radio frequency energy and, if not installed and used in
accordance with the instructions, may cause harmful interference to radio communications.
Operation of this equipment in a residential area is likely to cause harmful interference. In this
case, the user is required to correct the interference at his/her own expense. If this equipment does
cause harmful interference to radio or television reception, which can be determined by turning the
equipment off and on; the user is encouraged to try to correct the interference by one or more of the
following measures:
• Reorient or relocate the receiving antenna.
• Increase the separation between the equipment and the receiver.
• Connect the equipment into an outlet on a circuit different from that to which the receiver is
connected.
• Consult the dealer or an experienced radio/TV technician for help.
Any changes or modifications not expressly approved by the grantee of this device could void the
user’s authority to operate the equipment. The customer is responsible for ensuring compliance of
the modified product.
FCC Declaration of Conformity
Product Type: SR870BH2
This device complies with Part 15 of the FCC Rules. Operation is subject to the following two
conditions: (1) This device may not cause harmful interference, and (2) this device must accept any
interference received, including interference that may cause undesired operation.
For questions related to the EMC performance of this product, contact:
Intel Corporation
2800 Center Drive
DuPont, WA 98327 USA
Laser Compliance Notice
Intel products that use laser technology comply with Class 1 laser requirements.
Class 1 Laser Product
Luokan 1 Laserlaite
Klasse 1 Laser Apparat
6 Intel® Server System SR870BH2
Quick Start Guide
Page 7

Laser Klasse 1
NOTE
Class A device definition: If a Class A device is installed within this system,
then the system is to be considered a Class A system. In this configuration,
operation of this equipment in a residential area is likely to cause harmful
interference.
Electromagnetic Compatibility Notices (International)
Europe (CE Declaration of Conformity)
This product has been tested in accordance too, and complies with the Low Voltage Directive
(73/23/EEC) and EMC Directive (89/336/EEC). The product has been marked with the CE Mark to
illustrate its compliance.
Japan EMC Compatibility
English translation of the notice above:
This is a Class A product based on the standard of the Voluntary Control Council for Interference
by Information Technology Equipment (VCCI). If this equipment is used in a domestic
environment, radio disturbance may arise. When such trouble occurs, the user may be required to
take corrective actions.
ICES-003 (Canada)
Cet appareil numérique respecte les limites bruits radioélectriques applicables aux
appareils numériques de Classe A prescrites dans la norme sur le matériel brouilleur:
“Appareils Numériques”, NMB-003 édictée par le Ministre Canadian des
Communications.
English translation of the notice above:
This digital apparatus does not exceed the Class A limits for radio noise emissions from digital
apparatus set out in the interference-causing equipment standard entitled “Digital Apparatus,”
ICES-003 of the Canadian Department of Communications.
Intel® Server System SR870BH2 7
Quick Start Guide
Page 8

BSMI (Taiwan)
The BSMI Certification number and the following warning is located on the product safety label
which is located visibly on the external chassis.
Removing the Server from the Box
Carefully unpack the server. Be sure to use two people to lift the server. Do not attempt to lift or
move the server by the handles on the power supplies. If you need to move the server from one
location to another, use a hand-truck or other mechanical assist unit.
WARNINGS
AVOID INJURY: To avoid personal injury when unpacking the server,
use only a mechanical assist unit to lift it off the shipping pallet. The
maximum server configuration weighs 65 lbs (30 kg).
Selecting a Site
The server operates reliably within normal office environmental limits. Select a site that meets
these criteria:
• Near a properly earthed, grounded three-pronged power outlet
⎯ In the United States and Canada: a NEMA-compliant, 110-208 V∼ outlet rated for 15 amps
⎯ In other geographic areas: a properly grounded, earthed outlet in accordance with the local
electrical authorities and electrical code of the region
• Clean and relatively free of excess dust
• Well ventilated and away from sources of heat, with the ventilating openings on the server kept
free of obstructions
• Away from sources of vibration or physical shock
• Isolated from strong electromagnetic fields and noise caused by electrical devices such as
elevators, copy machines, air conditioners, large fans, large electric motors, radio and TV
transmitters, and high-frequency security devices
CAUTION, ESD Precautions
Electrostatic discharge (ESD) can damage disk drives, add-in boards, and other
parts. This server can withstand normal levels of environmental ESD.
However, we recommend doing all procedures in this guide only at an
ESD-protected workstation. If one is not available, you can provide some ESD
8 Intel® Server System SR870BH2
Quick Start Guide
Page 9

protection by wearing an anti-static wrist strap attached to chassis ground of the
server when handling components (e.g., any unpainted metal surface).
CAUTION
Grounded outlet: Make sure that the power service connection is through a
properly grounded outlet.
Temperature: The range of temperatures in which the server operates when
installed in an equipment rack, must not go below 5 °C (41 °F) or rise above
35 °C (95 °F). Extreme fluctuations in temperature can cause a variety of
problems in your server.
Ventilation: The equipment rack must provide sufficient airflow to the front
of the server to maintain proper cooling. The rack must also include
ventilation sufficient to exhaust a maximum of 650 Watts (or 2300 BTUs)
for each server. The rack selected and the ventilation provided must be
suitable to the environment in which the server will be used.
Checking Power Cords
WARNING
The Power button on the front control panel of the server does not
completely remove AC power. To completely remove AC power from
the server, you must unplug both AC power cords from the system or
from the wall outlet. Unplugging the cords removes the +12 Volt
standby power that is present when the server is powered down.
WARNING
Do not attempt to modify or use an AC power cord that is not the exact
type required. You must use a power cord that meets the following
criteria:
1. Rating: For U.S./Canada cords must be UL Listed/CSA Certified,
16/3, 75C type, VW-1, SJT/SVT, with NEMA 5-15P or
NEMA 6-15P attachment plug and IEC 320 C13 input power
connector rated 15 amps. For outside U.S./Canada cords must be
flexible harmonized (<HAR>) rated 250V, 1.0 mm minimum
conductor size with IEC 320 C13 input power connector and rated
for no less than 10 amps.
2. AC Attachment Connector, wall outlet end for outside U.S./Canada:
The AC wall attachment plug should be a three conductor grounding
type, rated at 125 V, 15 amps and must be for the configuration of
the specific region or country. The AC wall attachment plug must
bear at least an accepted safety agency certification mark for the
specific region or country.
Intel® Server System SR870BH2 9
Quick Start Guide
Page 10

3. Input Power Connector, server end: The connectors that plug into
the AC receptacles on the server must be an IEC 320, sheet C13, type
female connector and are rated for 125 V/250 V, 15 A.
NOTES
Surge Suppressor Recommendations: In geographic regions that are
susceptible to electrical storms, we highly recommend that you plug the
server into a surge suppressor.
EMI Information: For information about complying with electromagnetic
interference regulations, see “Electromagnetic Compatibility” in the
®
Server System SR870BH2 Product Guide.
Intel
Connections and Controls
Figure 2 and Figure 3 show the chassis front view and the peripheral bay module.
Figure 2. Chassis Front View
10 Intel® Server System SR870BH2
Quick Start Guide
Page 11

Hard Drives DVD/CD Drive Front Panel
Hard Drives DVD/CD Drive Front Panel
Hard Drives DVD/CD Drive Front Panel
Power Bay Power Supply Modules
Power Bay Power Supply Modules
Power Bay Power Supply Modules
Figure 3. Front View of Intel® Server System SR870BH2 (Shown with Bezel Removed)
Figure 4 shows the front control panel of the Server System SR870BH2. The front control panel of
the server displays status lights for system status, hard drives, and power supplies.
B C
B C
D
A
A
D
EFGH
EFGH
I JK
I JK
View with Front Bezel Removed
View with Front Bezel Removed
View with Front Bezel Installed
View with Front Bezel Installed
Figure 4. Front Panel View
Table 3. Front Panel Control and Indicator Description
Item Feature Description
Front Panel Switches and LED Indicators
A System Power switch and LED
B System Reset switch Resets the system.
Toggles system power.
LED State ACPI
Off Power off No
On Power on No
Off S4 / S5 Yes
On S0 Yes
Intel® Server System SR870BH2 11
Quick Start Guide
Page 12

Item Feature Description
C SDINT (System Diagnostic
Interrupt) switch
D System ID switch and LED (Blue) System identification switch and light
E System Status/Fault LED
(Green/Amber)
F Hard Drive Fault LED (Amber)
G, H LAN1, LAN2 Status LEDs (Green)
Front Panel Connectors
I Video connector Video port, standard VGA compatible, 15-pin connector
J USB3 connector USB port 3, 4-pin connector
K USB4 connector USB port 4, 4-pin connector
Asserts SDINT.
Indicates system status.
LED State Description
Off Not ready Post err/NMI Ev/CPU missing
Green,
On
Green,
Blinking
Amber,
On
Amber,
Blinking
Indicates Hard drive subsystem fault status.
LED State Description
Off Drive Missing Slot Empty, Online, Prepare for
On Inactive Drive Failed
Blinking Drive Identity, Rebuild,
Indicates LAN activity status.
LED State Description
Off Inactive No Connection or Link
On Idle Link and No Activity
Blinking Active Access / Activity
Ready No Alarms
Ready – Degraded CPU Fault, DIMM killed
Critical Alarm Critical of Pwr Flt, Fan, Voltage,
and Temperature failures.
Non-Critical Alarm Non-Critical of redundant Pwr
Flt, redundant Fan, Voltage,
and Temperature failures.
removal.
Predictive Fail, Rebuild
Interrupt or Rebuild on empty
slot.
12 Intel® Server System SR870BH2
Quick Start Guide
Page 13

Figure 5 shows the features found on the chassis back panel.
A
A
1 2 3
1 2 3
CFG
CFG
Figure 5. Chassis Back Features
Table 4. Back Panel Features
Item Description
A
B Two AC input power connectors
C External SCSI connector1
D System ID switch
E System ID LED (blue)
F
G Serial port2, RJ45 connector
H Two USB 1.1 ports, 4-pin connectors (USB0 on bottom, USB1 on top)
I Video port, standard VGA compatible, 15-pin connector
PCI Slots
Slot 1 100 MHz, 64-bit PCI-X slot, full length
Slot 2 100 MHz, 64-bit PCI-X slot, full length
Slot 3 133 MHz, 64-bit PCI-X slot, full length
Two LAN ports, RJ45 connector (LAN1 on bottom, LAN2 on top)
LAN port LEDs:
Green LED On – ethernet link is detected
Off – no ethernet connection
Blinking – ethernet link is active
Green/Amber
dual color LED
Ethernet speed indicator
Green On – 100 Mbps
Amber On – 1000 Mbps
Notes: 1. External SCSI bus supports both LVDS and SE signals via the external SCSI
connector.
B
B
1 2
1 2
HIDE
HIDE
2. EMP access is provided via shared serial port.
Intel® Server System SR870BH2 13
Quick Start Guide
Page 14

Connecting the Monitor, Keyboard, and Mouse
CAUTION
Unplug server before connecting external devices, make sure the server is not
plugged in or equipment could be damaged.
Before powering on the server, you must connect these devices to the front or back of the Server
System SR870BH2.
1. Video monitor to the video port (I in Figure 4)
2. Keyboard to a USB port (J in Figure 4)
3. Mouse to a USB port (K in Figure 4)
Powering On the Server for the First Time
The first time you power on the server you need to enter the BIOS Setup Utility and set the correct
date and time values. After setting these values, the server executes its Power-On Self Test (POST)
sequence and passes control to the Boot Manager. From the Boot Manager, you can mount the
DVD/CD-RW device to block zero and then load the operating system.
For information on the Boot Manager and the EFI Shell, refer to the Intel® Server System
SR870BNH2 Product Guide.
Follow these steps to power up the Server System SR870BH2 for the first time:
1. Make sure all external devices, such as a monitor, keyboard, and mouse, have been connected.
2. Plug the female ends of both AC power cords into the back of the chassis (B 1 and 2 in Figure
5)
3. Plug the male ends of the server AC power cords into wall outlets (grounded, three-pronged
AC power outlets).
4. Power on the video monitor.
5. Press the Power button on the front control panel (A in Figure 4). Pressing this button causes
the server fans to start up and POST to begin.
6. When POST displays the message: “Hit <F2> if you want to run SETUP,” enter <F2> and the
system will enter the BIOS Setup Utility. (If you see a prompt asking for a system password,
pressing the <ENTER> key will get you directly to the BIOS Setup Utility.)
NOTE
For information on how to use the BIOS Setup Utility, see the Intel® Server
System SR870BH2 Product Guide.
7. From the Main menu of the BIOS Setup Utility, use the arrow keys to move the cursor down to
the system date and time selections. Position the cursor over the date and time values and enter
appropriate values. Use the <tab> key to move within the date and time fields.
8. Use the arrow key to access the Exit menu and select the item to save changes and exit the
BIOS Setup Utility. After you exit the utility, the boot procedure resumes. You can monitor
the remainder of the boot progress on the video display.
14 Intel® Server System SR870BH2
Quick Start Guide
Page 15

NOTE
POST checks the processors, memory, keyboard and most installed
peripheral devices. During the memory test, POST displays the amount of
memory it is able to access and test. The length of time needed to test
memory depends on the amount of memory installed. POST is stored in
flash memory.
9. The AMI* BIOS banner displays the loaded versions of the BIOS, PAL, SAL, and EFI.
10. The LSI* banner appears and indicates the recognized drives. Note that a Platform
Configuration EFI based configuration utility is required to enter the LSI SCSI utility. The
LSI* SCSI utility enables you to manage and configure the server’s SCSI devices. For
information on the Platform Configuration Tool EFI utility and the screens available in this
utility, see the Intel® Server System SR870BH2 Product Guide.
11. POST concludes and passes control to the Boot Manager.
12. From the Boot Manager, you can use arrow keys to highlight the option that invokes the EFI
Shell, or you can highlight and select the Boot Maintenance Menu. Booting to the EFI Shell
causes the following prompt to appear:
Shell>
13. Mount the DVD/CD-RW device as block zero. For information on how to mount this device,
see “Mounting the DVD/CD-RW Device” below.
14. Boot the operating system that you want to run on the server.
Mounting the DVD/CD-RW Device
Before you can use the DVD/CD-RW device to read media, you must mount the device. Follow
these steps to mount the DVD/CD-RW device:
1. Be sure that you are in the EFI Shell. You should see the following prompt:
Shell>
2. Insert media into the DVD/CD-RW drive. The media does not need to contain files. In order
for the mount command in the next step to work, the drive must be loaded with media.
3. At the shell prompt, enter the following command:
mount -r
The media in the DVD/CD-RW should get remapped to one of the file systems, i.e., FS0:, FS1:,
FS2. Change to the appropriate file system and enter the following command:
ls
The Intel® Server System SR870BH2 Resource CD
The Intel® Server System SR870BNH2 Resource CD has the following contents: documentation for
adding drivers during Microsoft* Windows* 2003 installation on floppy-less systems,
Advanced Server* 2.1 and SuSE* Enterprise Server 8.0 SCSI and Ethernet* drivers, System
Maintenance Utility (SMU), EFI* Platform Diagnostics, FRUSDR Loader*, Quick Start Guide
(this guide), Product Guide and Adobe* Acrobat* Reader.
RedHat*
Intel® Server System SR870BH2 15
Quick Start Guide
Page 16

The Resource CD comes with a menu driven program that can be used for the following:
1. Create a CD containing drivers for various operating systems.
2. Create a CD containing utilities, service partition and diagnostics.
3. Install EFI* Service Partition. The EFI service partition supports remote access to the Server
System SR870BH2 via modem or LAN for the purpose of executing configuration/setup
utilities and diagnostics.
4. Run Server System SR870BH2 EFI-based utilities.
How to invoke the Resource CD menu.
1. Insert the Resource CD into the server’s DVD/CD-RW drive before booting to EFI Shell.
2. Boot the system into EFI Shell; the EFI CD Menu program will launch automatically. If the
EFI CD Menu program does not launch in the EFI Shell, mount and map to the CD drive and
type ‘startup’ and press <Enter> to launch the EFI CD Menu.
3. Arrow key over to the Utilities and select the utility you want to run.
The Intel® Server System SR870BH2 Product Guide
The Intel® Server System SR870BH2 Product Guide comes as a single .PDF file shipped on the
Resource CD. You can use the Adobe* Acrobat* Reader to view the product guide.
16 Intel® Server System SR870BH2
Quick Start Guide
 Loading...