

Page 1

Intel® NetStructure™
1520 Cache Appliance
Administrator’s Guide
Page 2

Copyright © 2000, Intel Corporation. All rights reserved.
Intel Corporation
5200 N. E. Elam Young Parkway
Hillsboro, Oregon 97124-6497
No part of this publication may be reproduced, transmitted, transcribed, stored in
a retrieval system, or translated into any language or computer language, in any
form or by any means, electronic, mechanical, magnetic, optical, chemical,
manual, or otherwise, without the prior written permission of Intel Corporation.
INFORMATION IN THIS DOCUMENT IS PROVIDED “AS IS” WITH NO
WARRANTIES WHATSOEVER, INCLUDING ANY WARRANTY OF
MERCHANTABILITY, NONINFRINGEMENT OF INTELLECTUAL
PROPERTY RIGHTS OR ANY OTHER RIGHTS OF THIRD PARTIES OR OF
INTEL, FITNESS FOR ANY PARTICULAR PURPOSE, OR ANY
WARRANTY OTHERWISE ARISING OUT OF ANY SPECIFICATION,
DOCUMENTATION, SOFTWARE OR OTHER MATERIALS REFERENCED
HEREIN. Nothing in this document constitutes a guarantee, warranty or license
to any intellectual property right, express or implied, by estoppel or otherwise.
Intel makes no representations or warranties and specifically disclaims all
liability as to this document or the information contained herein with respect to:
(i) liability for infringement of any proprietary rights, including without
limitation, intellectual property rights; (ii) sufficiency, reliability, accuracy,
completeness or usefulness of same; and (iii) ability or sufficiency of same to
function accurately as a representation of any standard. Furthermore, Intel makes
no commitment to update the information contained in this document, and Intel
reserves the right to make changes at any time, without notice, the information
contained in this document. LIMITATION OF LIABILITY. IN NO EVENT
SHALL INTEL BE LIABLE TO ANY PARTY FOR ANY DAMAGES
WHATSOEVER (INCLUDING, WITHOUT LIMITATION, DIRECT,
INDIRECT, SPECIAL, CONSEQUENTIAL, LOST PROFITS, BUSINESS
INTERRUPTION, COMPUTER FAILURE OR MALFUNCTION, OR LOST
INFORMATION) SUFFERED AS A RESULT OF USE OF THE PRODUCT.
Intel® cache products may contain design defects or errors known as errata
which may cause the product to deviate from published specifications. Current
characterized errata are available on request.
*Other product and corporate names may be trademarks of other companies and
are used only for explanation and to the owners’ benefit, without the intent to
infringe.
July 2000 A29914-001
Page 3

Contents
Preface ix
Who should read this manual ................................................................... x
Conventions used in this manual.............................................................. x
Chapter 1 Introduction 1
What is an Intel® NetStructure™ Cache Appliance? ............................... 2
Why use this caching appliance?....................................................... 2
Flexible cache architecture ................................................................2
Intel NetStructure Cache Appliance features ..................................... 3
How to use this guide ............................................................................... 5
Chapter 2 Getting Started 7
Starting the system for the first time ......................................................... 8
Accessing the Manager UI .....................................................................12
Using Monitor and Configure mode .................................................13
Using online help.............................................................................. 15
Accessing the command-line interface................................................... 15
Verifying that caching works................................................................... 15
Changing passwords .............................................................................. 15
Chapter 3 Monitoring Appliance Performance 17
Accessing monitor pages .......................................................................18
Using the Dashboard page..................................................................... 18
Dashboard alert lights ...................................................................... 19
Changing the selected node ............................................................20
Using the Node page.............................................................................. 20
Using the Graphs page........................................................................... 21
Using the Protocols page .......................................................................21
Using the Cache page ............................................................................ 21
iii
Page 4

Using the ARM page .............................................................................. 21
Using the Other page ............................................................................. 22
Using the MRTG page ........................................................................... 22
Chapter 4 Configuring the Appliance 23
Accessing configure pages .................................................................... 24
Using the Server Basics page................................................................ 24
Setting general options.................................................................... 25
Setting Web management options .................................................. 26
Setting virtual IP addressing options ............................................... 26
Setting browser auto configuration options ..................................... 28
Setting throttling of network connections......................................... 28
Configuring load-shedding............................................................... 28
Enabling SNMP agents ................................................................... 29
Using the Protocols page ....................................................................... 30
Configuring HTTP............................................................................ 30
Configuring NNTP ........................................................................... 31
Configuring FTP .............................................................................. 34
Using the Cache page............................................................................ 35
Cache activation .............................................................................. 35
Storage ............................................................................................ 36
Freshness........................................................................................ 36
Variable content............................................................................... 38
Using the Security page ......................................................................... 39
Using the Routing page.......................................................................... 39
Setting HTTP parent caching options.............................................. 40
Setting ICP options.......................................................................... 41
Setting server accelerator options ................................................... 43
Checking transparency.................................................................... 44
Checking WCCP.............................................................................. 44
Using the Host Database page .............................................................. 44
Configuring the host database......................................................... 45
Configuring DNS.............................................................................. 47
Using the Snapshots page ..................................................................... 47
iv Intel NetStructure Cache Appliance Administrator’s Guide
iv
Intel NetStructure Cache Appliance Administrator’s Guide
Page 5

Chapter 5 Using the Command-Line Interface 49
Starting the command-line interface....................................................... 50
Starting the appliance the first time.................................................. 50
Using the appliance after initial start-up ........................................... 50
Navigating the command-line interface .................................................. 51
Using the setup menu............................................................................. 52
Changing network addresses configuration ..................................... 52
Changing the controller speed and transmission mode ................... 53
Changing the DNS address and domain name................................ 53
Changing the gateway address........................................................ 53
Configuring time zone settings......................................................... 54
Configuring date and time settings................................................... 54
Viewing current network address settings........................................ 54
Using the main menu.............................................................................. 54
Checking the status of the Server and Manager.............................. 55
Starting the appliance ......................................................................55
Stopping the appliance..................................................................... 55
Viewing and maintaining versions of the software ........................... 56
Clearing statistics ............................................................................. 59
Rebooting the System...................................................................... 60
Halting the System ........................................................................... 60
Changing the administrator password for telnet or serial access..... 60
Resetting to factory settings............................................................. 61
Preparing a cache disk..................................................................... 61
Using the config menu............................................................................ 61
Setting general controls ...................................................................62
Configuring protocol options ............................................................63
Configuring the cache ...................................................................... 76
Configuring security options............................................................. 82
Configuring routing options .............................................................. 84
Configuring the Adaptive Redirection Module (ARM) ......................93
Configuring the host database options............................................. 96
Configuring logging options.............................................................. 98
Contents v
Page 6

Using the monitor menu ......................................................................... 99
Viewing Node statistics.................................................................... 99
Viewing Protocol statistics ............................................................. 100
Viewing Cache statistics................................................................ 104
Viewing Other statistics ................................................................. 105
Using the expert menu ......................................................................... 107
Using the save menu ........................................................................... 108
Using the load menu ............................................................................ 108
Using the logoff menu .......................................................................... 108
Chapter 6 Troubleshooting Problems 109
Rebooting your system ........................................................................ 110
Rebooting your system from the CLI ............................................. 110
Upgrading software .............................................................................. 111
Appendix A Caching Solutions and Performance 113
Web proxy caching............................................................................... 114
A day in the life of a cache request ............................................... 114
Ensuring cached object freshness................................................. 115
Revalidating objects ...................................................................... 116
HTTP object freshness tests ......................................................... 116
Deciding whether to serve HTTP objects ...................................... 117
Configuring HTTP freshness options............................................. 118
Caching HTTP alternates .............................................................. 119
To cache or not to cache? ............................................................. 119
Transparent proxy caching................................................................... 120
Serving requests transparently...................................................... 121
Interception strategies ................................................................... 121
ARM redirection............................................................................. 125
Adaptive interception bypass......................................................... 126
Server acceleration .............................................................................. 128
Advantages of server acceleration ................................................ 129
How server acceleration works...................................................... 129
Retrieving requested documents................................................... 129
Web server redirects ..................................................................... 131
Understanding server acceleration mapping rules ........................ 132
Examples of rules and translations................................................ 133
vi Intel NetStructure Cache Appliance Administrator’s Guide
vi
Intel NetStructure Cache Appliance Administrator’s Guide
Page 7

Understanding cache hierarchies ......................................................... 135
HTTP cache hierarchies................................................................. 135
ICP cache hierarchies .................................................................... 136
NNTP cache hierarchies ................................................................ 137
News article caching............................................................................. 138
The appliance as a news server ....................................................139
The appliance as a caching proxy news server ............................. 139
Supporting several parent news servers........................................ 139
Blocking particular groups.............................................................. 140
Clustering ....................................................................................... 140
Transparency ................................................................................. 141
Posting ........................................................................................... 141
Maintaining the cache: updates and feeds..................................... 141
Configuring Access control ............................................................142
Obeying NNTP control messages.................................................. 143
Client bandwidth throttling.............................................................. 143
Carrier-class architecture .....................................................................143
Performance................................................................................... 143
High-availability .............................................................................. 145
Node fault tolerance ....................................................................... 147
Expansion capabilities.................................................................... 147
Centralized administration.............................................................. 148
Appendix B Error Messages 151
HTML messages sent to clients ...........................................................152
Standard HTTP response messages ...................................................154
Glossary 157
Index 163
List of
Procedures
Initially configuring and starting your system............................................ 8
Accessing the Manager UI .....................................................................12
Reaching Monitor pages......................................................................... 18
Reaching the Dashboard page............................................................... 18
Changing the selected node................................................................... 20
Reaching the Node Page .......................................................................20
Reaching the Graphs page..................................................................... 21
Reaching the Protocols page .................................................................21
Contents vii
Page 8

Reaching the Cache page...................................................................... 21
Reaching the ARM page ........................................................................ 22
Reaching the Other page ....................................................................... 22
Reaching the MRTG page ..................................................................... 22
Reaching the configure pages ............................................................... 24
Reaching the Server Basics page.......................................................... 24
Modifying the Virtual IP address list ....................................................... 27
Adding a Virtual IP address.................................................................... 27
Reaching the Protocols page ................................................................. 30
Reaching the Cache page...................................................................... 35
Reaching the Security page ................................................................... 39
Reaching the Routing page.................................................................... 40
Adding an ICP Peer ............................................................................... 42
Creating a document route rewriting rule ............................................... 43
Reaching the Host Database page ........................................................ 44
Reaching the Snapshots page ............................................................... 48
Changing network address configuration on the NIC............................. 52
Changing speed and transmission mode............................................... 53
Changing the DNS address ................................................................... 53
Changing the gateway address.............................................................. 53
Configuring the time zone setting........................................................... 54
Configuring the date and time settings................................................... 54
Checking Server and Manager status.................................................... 55
Starting the appliance ............................................................................ 55
Stopping the appliance........................................................................... 55
Identifying which versions of the appliance software are installed......... 56
Setting up the FTP server ...................................................................... 56
Starting the upgrade from the appliance side ........................................ 57
Running a different version of the appliance software ........................... 58
Deleting a version of the appliance software ......................................... 59
Viewing the current version of the appliance ......................................... 59
Clearing statistics for the appliance ....................................................... 59
Rebooting the system ............................................................................ 60
Halting the system.................................................................................. 60
Changing the password ......................................................................... 60
Resetting the appliance to default factory settings................................. 61
viii Intel NetStructure Cache Appliance Administrator’s Guide
viii
Intel NetStructure Cache Appliance Administrator’s Guide
Page 9

Preparing a cache disk ........................................................................... 61
Setting general controls.......................................................................... 62
Configuring HHTP options...................................................................... 63
Configuring NNTP options...................................................................... 64
Adding NNTP server rules...................................................................... 65
Configuring the FTP options................................................................... 71
Adding filter rules.................................................................................... 72
Deleting filter rules.................................................................................. 74
Viewing filter rules ..................................................................................74
Adding remap rules ................................................................................74
Deleting remap rules ..............................................................................75
Viewing remap rules ............................................................................... 75
Enabling caching for different protocols .................................................76
Setting disk storage options ...................................................................77
Setting freshness properties................................................................... 77
Adding caching rules .............................................................................. 79
Deleting cache rules ............................................................................... 81
Viewing cache rules................................................................................ 82
Adding IP Allow rules.............................................................................. 82
Deleting IP Allow rules............................................................................ 82
Viewing IP Allow rules ............................................................................83
Adding Manager Allow rules................................................................... 83
Deleting Manager Allow rules................................................................. 84
Viewing Manager Allow rules .................................................................84
Enabling parent proxy caching rules ......................................................89
Disabling parent proxy caching rules...................................................... 89
Adding parent proxy caching rules ......................................................... 89
Deleting parent proxy caching rules ....................................................... 91
Viewing parent proxy caching rules........................................................ 92
Enabling WCCP...................................................................................... 92
Disabling WCCP..................................................................................... 92
Configuring WCCP options..................................................................... 92
Viewing current WCCP options ..............................................................93
Enabling transparent redirection............................................................. 93
Disabling transparent redirection............................................................ 93
Adding ARM bypass rules ...................................................................... 94
Contents ix
Page 10

Deleting ARM bypass rules.................................................................... 95
Viewing ARM bypass rules .................................................................... 95
Configuring load-shedding options......................................................... 96
Configuring host database options......................................................... 96
Viewing host database options .............................................................. 98
Enabling logging options ........................................................................ 98
Disabling logging options ....................................................................... 98
Configuring logging options.................................................................... 98
Viewing logging options ......................................................................... 99
Viewing node statistics........................................................................... 99
Viewing protocol statistics .................................................................... 100
Viewing Cache statistics ...................................................................... 104
Viewing host database statistics .......................................................... 105
Viewing DNS statistics ......................................................................... 106
Viewing cluster statistics ...................................................................... 106
Viewing logging statistics ..................................................................... 107
Entering expert mode........................................................................... 107
Saving the current configuration to a floppy disk ................................. 108
Loading a previously saved configuration from a floppy ...................... 108
Logging off the system ......................................................................... 108
Rebooting the appliance from the CLI.................................................. 110
Rebooting the appliance from the front panel ...................................... 110
x Intel NetStructure Cache Appliance Administrator’s Guide
x
Intel NetStructure Cache Appliance Administrator’s Guide
Page 11

Preface
This manual describes how to use and configure an Intel® NetStructure™ Cache Appliance
system (referred to as “appliance” in this manual) either as a single node or as a cluster of
nodes.
The manual covers the following topics:
◆
Chapter 1
◆
Chapter 2
monitoring, and configuring the appliance.
◆
Chapter 6
with the appliance.
◆
Appendix A
and features of the appliance.
◆
Appendix B
contains an overview of the appliance and an overview of this guide.
through
contains information to help you troubleshoot problems you might have
contains background information about the appliance’s main components
provides error information.
Chapter 1
contain procedural information about starting,
xi
Page 12

Who should read this manual
This manual is intended for system administrators who configure, run, and
administer Intel NetStructure Cache Appliance systems. Consequently, the
information in the manual was written with the assumption that the reader has
experience in Web server administration and configuring TCP/IP networking.
Conventions used in this manual
This manual uses the following conventions.
Convention Purpose
italics Represent emphasis and introduce terms, for example,
“the management cluster.”
bold
monospaced
font
monospaced
bold
monospaced
italic
brackets [ ] Represent optional command arguments in command
Represents graphical user interface options and menu
names, for example, “
Represents commands, file names, file content, computer
input, and output, for example, “use the
command.”
Represents commands that you should enter literally, for
example, type
Represents variables for which you should substitute a
value, for example, “enter a
syntax, for example,
Reset
reboot
add pathname
.
”
filename
reconfigure
.”
[size]
xii
Intel NetStructure Cache Appliance Administrator’s Guide
Page 13

Chapter 1
Introduction
The Intel® NetStructure™ Cache Appliance is a carrier -class caching appliance that offers
high performance, high availability, and simple centralized management. The appliance
automatically and efficiently copies network documents and images, bringing them closer
and serving them faster to your users.
When placed strategically in a network, the appliance can serve user requests for objects
from its cache or the caches of neighboring appliances rather than have requests served
from an origin server. This relief results in improved network performance, and a
perceived higher quality of service. At the same time, the appliances reduce Internet
bandwidth usage by eliminating redundant requests for popular documents.
This chapter provides the following overviews:
◆
What is an Intel® NetStructure™ Cache Appliance?‚ on page 2
◆
Intel NetStructure Cache Appliance features‚ on page 3
◆
How to use this guide‚ on page 5
1
Page 14

What is an Intel® NetStructure™ Cache Appliance?
Internet users request billions of documents each day all over the world.
Unfortunately, global data networking has become difficult for professionals as
they struggle with overloaded servers trying to keep pace with society’s growing
data demands.
The Intel NetStructure Cache Appliance family provides you with a turnkey,
scalable solution you can place in your network to deliver industry-leading
caching capabilities. Your system is designed for fast and reliable caching for
Internet Service Providers (ISPs), backbone providers, and large intranets.
Why use this caching appliance?
Caching can significantly reduce pressure on busy networks and servers by
storing copies of popular documents near their users. Instead of making multiple
requests for the same document across congested networks to overloaded servers,
users access copies from the caching appliance’s large, fast local cache. This
reduces backbone congestion, provides faster response, and improves the quality
of service.
The following design features make the Intel NetStructure Cache Appliance a
carrier-class caching product:
✔
Speed (the ability to handle thousands of simultaneous user connections)
✔
Scalability (you can easily add nodes to a management cluster as needed)
✔
Fault tolerance (redundant boot images)
✔
Secure single-point administration (you can configure many nodes at once)
See
Intel NetStructure Cache Appliance featur es‚ on page 3
about these features.
for more information
Flexible cache architecture
You can use the appliance alone or with other enterprise software, including other
caching products. Here are some examples of ways to use the appliance.
Web proxy cache
User requests go to the appliance on the way to the destined web server . If the
cache contains the requested document, the appliance serves the requested
document directly. If the cache does not have the desired document, the
appliance acts as a proxy, fetching the document from the web server on the
user’s behalf, and keeps a copy to satisfy future requests.
2
Intel NetStructure Cache Appliance Administrator’s Guide
Page 15

Server accelerator
The appliance can be configured as a web server to accelerate slower
traditional web servers. Documents stored in cache are served at high speed,
while documents not in cache are requested on demand from slower,
traditional web servers. This
proxy
.
Part of an HTTP cache hierarchy
The appliance can participate in flexible cache hierarchies, where Internet
requests not fulfilled in one cache can be routed to other regional caches,
taking advantage of the of nearby caches.
ICP sibling
The appliance supports the standard Internet Cache Protocol (ICP) to
interoperate with existing ICP cache hierarchies. The appliance can send ICP
queries to neighboring caches as part of an ICP cache hierarchy.
NNTP news cache
The appliance caches and serves NNTP news articles and can accept news
feeds for designated news groups.
server accelerator
feature is also called
reverse
Intel NetStructure Cache Appliance features
The appliance provides a rich set of features to ensure high performance and
superior stability and to offer broad flexibility. The following list provides a brief
overview of the appliance’s primary features. For a more exhaustive list and
description of features, refer to
Scalability
The appliance scales from a single node into multiple-node
you to improve system performance and reliability simply by adding more
nodes to your cluster. Support exists for two types of clusters:
and
management-only clustering
Clustering‚ on page 140
Boot Image Redundancy
The appliance features both a primary and secondary boot image on separate
hard drives. When a drive with a boot image fails, a system administrator can
detect and replace the faulty hard drive. This feature helps maximize the time
your system is up and running uninterrupted.
Carrier-class architecture‚ on page 143
. For more information on clustering, see
.
.
clusters
, allowing
soft clustering
Chapter 1
Introduction
3
Page 16

Multithreading process support
The appliance is the first commercial caching proxy server to aggressively
implement multithreading, breaking down large transactions into small,
efficient tasks. The appliance processes multiple outstanding requests
simultaneously and efficiently, even under peak loads.
High-speed caching
The cache consists of a high speed object database stored on raw disk.
Objects are stored and indexed according to their URL and associated
headers. This enables the appliance to store, retrieve, and serve not only web
pages, but parts of web pages, providing optimum bandwidth savings.
Broad protocol support
The Intel NetStructure Cache Appliance supports the following protocols:
✔
HTTP versions 0.9 through 1.1
✔
FTP
✔
NNTP
✔
ICP
✔
SSL encryption
✔
WCCP 2.0
HTTP cache hierarchy support
In a hierarchy of proxy servers, the appliance can act either as a parent or
child cache, either to other Intel NetStructure Cache Appliances, or to other
caching products.
Web server acceleration
Through reverse proxy, the appliance can act as a web server accelerator,
handling requests for and relieving stress from web servers.
Transparency option
With transparent interception of user traffic, user requests are automatically
injected into the cache on their way to the eventual destination. Users request
Internet data as usual without any browser configuration, and the appliance
automatically serves their requests.
Secure, single-point administration
The appliance offers two administration alternatives to suit the needs of
different environments:
✔
Browser-based interface
: The Manager User Interface (UI) offers
password-protected, single-point administration for an entire cluster.
✔
Command-line interface
: The command-line interface lets you
configure the system’s network addresses and lets you control,
configure, and monitor the appliance.
4
Intel NetStructure Cache Appliance Administrator’s Guide
Page 17

SNMP Network Management
The appliance can be monitored and managed through SNMP network
management facilities. The appliance supports two management information
bases (MIBs). The first, MIB-2 is a well known standard MIB. The second,
the proprietary Intel NetStructure Cache Appliance MIB provides more
specific node and cluster information.
Performance reporting
You can get performance statistics at a glance from the Manager UI or from
the command-line interface.
How to use this guide
The rest of this guide contains three parts: background information, procedural
chapters, and reference appendixes.
To find out about … See …
Procedures how to get started Starting the system for the first time‚ on
page 8
how to use the Manager UI Accessing the Manager UI‚ on page 12
how to monitor and configure the
appliance using the Manager UI
how to use the command line
interface
how to upgrade software Installing a new version of the appliance
how to troubleshoot system
problems
Appendices background information including
web proxy caching, transparent
proxy caching, server acceleration,
cache hierarchies, news article
caching, and carrier-class
architecture
error messages Appendix B‚ Error Messages
Using Monitor and Configure mode‚ on
page 13
Accessing the command-line interface‚
on page 15
software‚ on page 56
Chapter 6‚ Troubleshooting Problems
Appendix A‚ Caching Solutions and
Performance
Chapter 1
Introduction
5
Page 18

Page 19

Getting Started
This chapter contains the following sections:
◆ Starting the system for the first time‚ on page 8
◆ Accessing the Manager UI‚ on page 12
◆ Accessing the command-line interface‚ on page 15
◆ Verifying that caching works‚ on page 15
◆ Changing passwords‚ on page 15
Chapter 2
7
Page 20

Starting the system for the first time
Before you can start the Intel NetStructure Cache Appliance, make sure it is
physically connected properly. Connections include:
✔ Connecting to the network through the primary network interface.
✔ Connecting a Terminal Emulator or Concentrator to the appliance’s COM1
port using the serial cable that came packaged with the appliance.
✔ Attaching the supplied power cord to the appliance and plugging the cord into
an approved receptacle.
You can find instructions on how to physically set up your system in the Intel
NetStructure Cache Appliance Quick Start.
Note Safety regulations and warranty require that the front bezel mounts and panel
must be in place during operation of the appliance.
Once you have made the physical connections, you can initially configure your
appliance and start it up.
▼ Initially configuring and starting your system
1 From the Terminal Emulator or Serial Concentrator, make sure you are
emulating a VT100 terminal. Use these port specifications for the connection:
✔ 9600 baud
✔ 8 data bits
✔ No parity
✔ 1 stop bit
✔ Hardware flow control
2 From the window emulating the VT100 terminal, open the connection to the
appliance.
3 Power on the appliance by pressing the power button, located behind the front
bezel. Supplying power to the appliance starts the initial boot process. The
initial boot process takes approximately three to four minutes. During this
time random characters might appear on the screen of your VT100 terminal
emulator.
Note See the Intel NetStructure Cache Appliance Quick Start for locations of
controls and physical features on your system.
8 Intel NetStructure Cache Appliance Administrator’s Guide
Page 21

4
After your system completes the boot procedure, a console login prompt
appears with fields for both a login and password. At the prompt, supply
admin for both the login and password, and press Enter.
5 After you login, the VT100 terminal emulator screen displays this initial set
of menu selections.
—setup Initial Intel Cache Setup
install Install Intel Cache
commit Commit Setup Changes
6
Use the arrow keys to select setup and press the Enter key.
Note For information on how to navigate within the CLI, refer to Navigating the
command-line interface‚ on page 51.
7 The setup menu appears. This menu allows you to configure network and
time parameters as well as view settings you have entered.
—network Configure Network
timezone Configure Time Zone
time Configure Date and Time
view View Settings
8
Use the arrow keys to select network and press the Enter key. The following
network setup fields appear:
Enter IP Address 192.168.1.10______________
Enter Hostname Intel-NetStructure-Cache__
Enter Netmask 255.255.255.0_____________
Enter Nameserver IP __________________________
Enter Gateway IP 192.168.1.1_______________
Enter Domain _________________________
9
In each field supply an appropriate value and press the Enter key. Pressing the
Enter key moves the cursor to the next field. After you have supplied values
for all six fields, press CTRL+X to save your changes and return to the
previous menu.
10 The bottom of the screen displays a message that indicates the setup has
completed. When the message appears, entries to the screen have been
successfully changed and stored. The menu on this screen should appear as
follows:
network Configure Network
–timezone Configure Time Zone
time Configure Date and Time
view View Settings
Chapter 2 Getting Started 9
Page 22

Note
11
Use the arrow keys to highlight timezone and press the Enter key. Pressing
the Enter key causes a scrollable list of av ailable timzones to appear . Here is a
partial list:
–United States Eastern
United States Central
United States Mountain
United States Pacific
12
Use the arrow keys to scroll through the available zones and highlight the
appropriate zone for your area. After highlighting the applicable zone, press
the Enter key. Next, press any key to save your selection and return to the
previous screen as follows:
network Configure Network
timezone Configure Time Zone
–time Configure Date and Time
view View Settings
In order for the timezone change to become effective, the appliance must be
rebooted. A reboot operation occurs later during the initial setup.
13 Use the arrow keys to highlight time and press the Enter key. Pressing the
Enter key causes the following fields to appear:
Enable(1)/Disable(0) Daylight Savings Time__
Currently Inside (1)/Outside(0) Daylight Savings Time__
Enter Time [HH:MM:SS] __:__:__
Enter Date [MM/DD/YYYY] __/__/__
14
Set your Daylight Savings T ime options. Then enter the time using a 24-hour
format (e.g., for 2:14:56 PM enter 14:14:56). For each part of the format, you
must press Enter to accept the value and to move to the next part of the field.
For example, after entering the two-digit hour value, pressing Enter causes
the value to be accepted and positions the cursor over the minutes part of the
time field. Supply the date using the MM/DD/YYYY format. After supplying
the date, press the CTRL-X key combination to save your changes and return
to the previous menu as follows:
network Configure Network
timezone Configure Time Zone
time Configure Date and Time
–view View Settings
15
From this menu you can select view to verify the network and time
information you have entered. After you are sure all the information you ha v e
entered is correct, press the CTRL-X key combination twice to move back to
the main menu as follows:
setup Initial Intel Cache Setup
–install Install Intel Cache
commit Commit Setup Changes
16
From the main screen, highlight install and press the Enter key. Selecting
install causes the settings to be written to the boot image. During the
10 Intel NetStructure Cache Appliance Administrator’s Guide
Page 23

Note
installation, the bottom of the screen keeps you apprised of the installation’s
progress.
17 After the installation is complete, use the arro w ke ys to position the cursor on
commit as follows:
setup Initial Intel Cache Setup
install Install Intel Cache
–commit Commit Setup Changes
18
Pressing the Enter key starts the final phase of the initialization process as
well as the cache application. The bottom of the screen indicates that the
cache application has started and prompts you to press the Enter key a second
time.
19 When the Initialization Complete! prompt appears, press the Enter
key to reboot the appliance. Rebooting the appliance takes several minutes.
During the reboot process, random characters might appear in the window of
the VT100 terminal emulator screen.
20 After your system completes the boot procedure, a console login prompt
appears with fields for both a login and password. At the prompt, supply
admin for both the login and password, and press Enter.
21 After the login completes, the initial menu appears with additional selections:
setup Initial Intel Cache Setup
–main Main Intel Cache Controls
config Intel Cache Configuration
monitor View Statistics
expert Enter Expert Mode
save Save Config to Floppy
load Load Config from Floppy
logoff Logoff
The system starts with factory settings. You can further configure or customize
the appliance by following the guidelines in Chapter 4‚ Configuring the
Appliance.
Once the software is running, you can access the system through a web browser
by using the system’s IP Address with an appended :8081 as the URL. For
information on accessing the manager UI, refer to Accessing the Manager UI‚ on
page 12.
Chapter 2 Getting Started 11
Page 24

Accessing the Manager UI
The Manager UI is a browser-based interface, consisting of a series of web pages.
Use the Manager UI to monitor performance and configure and fine-tune selected
nodes in your cluster. You can access any node in the cluster through the same
Manager UI.
▼ Accessing the Manager UI
1 Open your web browser.
The Manager UI requires Java and JavaScript; be sure to enable Java and
JavaScript.
2 Point your browser at this location, where nodename is the IP address you
have assigned to the appliance or the qualified DNS name. If the appliance is
part of a cluster, you will be logging into that specific node:
http://nodename:8081/
3 Provide your appliance administrator’s ID and password. By default, the
administrator ID is
that you change the default administrator ID and password. You can change
these values by using the Security page. For information on how to use the
Security page, see Using the Security page‚ on page 39.
Note Should you forget your password, contact Customer Service at Intel
Corporation for assistance. For information on how to contact Intel Customer
Service, see the Intel NetStructure Cache Appliance Product Support booklet
that came with your system.
Note Changing ID and password values by using the Manager UI changes those
values for the node you are logging into only. Furthermore, changing the ID
and password for the Manager UI does not change the ID and password for
telnet access. You must use the command-line interface (CLI) to change the
telnet ID and password for the node.
The Manager UI appears in your browser in the default monitor mode. The
Dashboard page, as shown Figure 1, is the default page. From the
MONITOR and CONFIGURE tabs to the left of the Dashboard page, you
can reach all other Manager UI pages.
admin and the password is admin. It is recommended
12 Intel NetStructure Cache Appliance Administrator’s Guide
Page 25
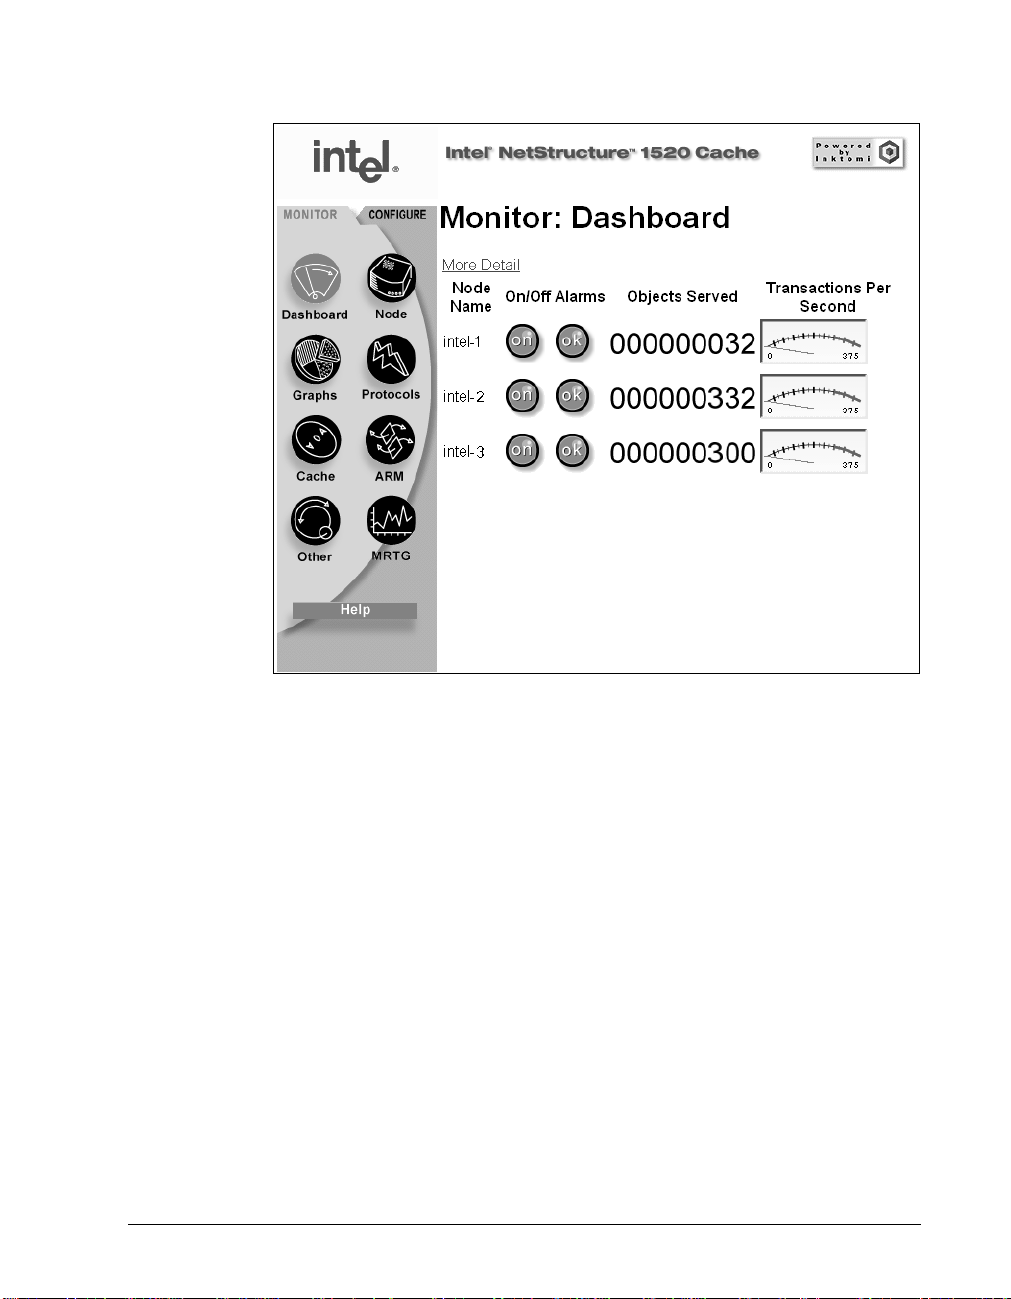
Figure 1 The Dashboard page
Using Monitor and Configure mode
The Manager UI has two modes, Monitor and Configure:
✔ In Monitor mode, view performance statistics and graphs. To access Monitor
mode, click the top of the MONITOR tab.
✔ In Configure mode, view and modify the appliance’s configuration options.
To access Configure mode, click the top of the CONFIGURE tab.
Chapter 2 Getting Started 13
Page 26

Figure 2 shows the control frame buttons for both the Monitor and Configure
modes.
Monitor mode frame
Figure 2 The Monitor and Configure Control Frames
Configure mode frame
When you are in Monitor mode, you can access all the pages that report
information about the appliance’s performance. With the exception of the
information on the Dashboard page, information on the Monitor pages pertain
to the selected node. You can change nodes at any time by returning to the
Dashboard and clicking the node of your choice. For information about how to
use each of the performance screens, see Accessing monitor pages‚ on page 18.
When you are in Configure mode, you can access pages that change system
configuration values for the selected node. Each time you click the Make These
Changes button the selected node’s configuration is updated.
Note It is recommended that you save current configuration values before making any
changes.
To save and restore an entire set of configuration files, refer to Using the
Snapshots page‚ on page 47. For information about all the values you can set in
Configuration mode, see Chapter 4‚ Configuring the Appliance.
14 Intel NetStructure Cache Appliance Administrator’s Guide
Page 27

Using online help
Both the MONITOR and CONFIGURE tabs have a Help page button. When
you click the Help page button, the online help opens in another browser
window. Each of the Manager UI pages has online help available.
Accessing the command-line interface
You can access the command-line interface using one of two methods:
✔ Provide a serial connection to the Intel NetStructure Cache Appliance
machine. Refer to the Intel NetStructure Cache Appliance Quick Start Guide
for detailed information.
✔ Access the machine through a telnet connection. This method requires you to
enter a telnet Administrator ID and password. Refer to Changing the
administrator password for telnet or serial access‚ on page 60 for
information on this ID and password.
For information on using the command-line interface, refer to Chapter 1‚ Using
the Command-Line Interface.
Verifying that caching works
After starting the appliance, you should verify that it is up and running. To see if
the appliance is processing HTTP requests, do the following:
1 From the Monitor tab in the Manager UI, click the Protocols button.
2 Make a note of the current HTTP User Agent Total Document Bytes
statistic.
3 Set your browser to the Intel NetStructure Cache Appliance proxy port.
4 Browse the Internet.
5 Check the HTTP User Agent Total Document Bytes value.
This value should have increased if caching is working.
Changing passwords
Two IDs and passwords exist for each appliance: one to access the Manager UI
and one to access the CLI when you are connected to the appliance through a
telnet or serial connection. By default, the appliance uses admin for both the
Administrator’s ID and password in each case.
For a given Manager UI session, an ID and password are required the first time
you access an appliance or the cluster, or when you attempt to connect to a node
through a telnet connection. The Administrator’s ID and password are unique for
each node in the cluster. It is recommended that you change the default
Chapter 2 Getting Started 15
Page 28

Administrator’s ID and password for both telnet and Manager UI access as soon
as possible after installing each node.
To change the password for the Manager UI, see Using the Security page‚ on
page 39. To change the password for the telnet or serial connection, see
Changing the administrator password for telnet or serial access‚ on page 60.
16 Intel NetStructure Cache Appliance Administrator’s Guide
Page 29

Chapter 3
Monitoring Appliance Performance
This chapter describes how to use the Manager UI to collect and interpret performance
statistics on the Intel NetStructure Cache Appliance.
This chapter contains the following sections:
◆ Accessing monitor pages‚ on page 18
◆ Using the Dashboard page‚ on page 18
◆ Using the Node page‚ on page 20
◆ Using the Graphs page‚ on page 21
◆ Using the Protocols page‚ on page 21
◆ Using the Cache page‚ on page 21
◆ Using the ARM page‚ on page 21
◆ Using the Other page‚ on page 22
◆ Using the MRTG page‚ on page 22
17
Page 30

Accessing monitor pages
The Manager UI uses monitor pages to present performance information on the
selected appliance and the cluster as a whole. A monitor page is a browser page
displayed as a result of “clicking” on a page button in the Manager UI. By
default, the Manager UI starts in monitor mode (as opposed to configure mode),
which displays Monitor page buttons.
▼ Reaching Monitor pages
1 Open your browser to the Manager UI.
2 Enter the Administrator ID and password. By default, the Administrator ID is
admin and the password is also admin. Intel recommends that the
administrator change these values when the appliance is initially installed.
Note Should you forget your password, contact Customer Service at Intel
Corporation for assistance. For information on how to contact Intel Customer
Service, see the Intel
that came with your system.
3 Click on a MONITOR tab.
Note Some performance displays rely on Java. To use the Monitor pages or any
other pages in the UI, make sure your browser is set to enable Java and
JavaScript.
Information displayed on the monitor mode pages fall into two categories:
information for the selected node in the cluster, and information for the cluster as
a whole. To view information on a given node, you need to access that node as
described in Changing the selected node‚ on page 20.
NetStructure Cache Appliance Product Support booklet
Using the Dashboard page
The Dashboard page provides a concise vie w of the appliance and of the cluster.
The page displays all nodes in the cluster by name and tracks essential statistics
for each node. In the list of nodes, a single node is currently selected. Its name
appears in black text without underlining, while the rest of the node names appear
appear as hypertext links.
▼ Reaching the Dashboard page
1 Be sure you are in monitor mode. If not, click the MONITOR tab.
2 Click the Dashboard page button.
Note By default, the Dashboard page appears after you log onto Manager UI with
your Administrator ID and password.
Node-
specific
information
18 Intel NetStructure Cache Appliance Administrator’s Guide
With the exception of the information on the Dashboard page and the cluster
information on the Node page, performance information pertains to a single
node.
Page 31

Use the Dashboard page to:
✔ Select a node
✔ See which nodes are on and which are off
✔ See if an alarm condition exists on any node
If an alarm condition exists, you can click the alarm light to view a
description of the alarm and resolve it.
✔ See the number (cumulative to date) of objects served to users from each
node
✔ See the traffic load (as current transactions per second)
The meter dial shows you how hard a node is working. When the needle is to
the left on the dial, the work load is light. When the needle is to the far right
(red), the node is overloaded.
Dashboard alert lights
The Dashboard contains two alert lights: an on/off light and an alarm light. Alert
lights indicate the following about a node:
Alert light Condition Description
on/off light Green Caching is active.
on/off light Dark Caching is not active.
alarm light Green No alarms.
alarm light Red with link to alarms Alarms exist for that node. Click the
red alarm light for more information.
alarm light Yellow A cluster problem exists.
Resolving alarms
Alarms alert you to problems or warn you of potential problems. Alarm
conditions themselves are built into the appliance—you cannot change them.
If an alarm light is on, you can click it to view a description of the alarm
conditions. Click the Resolve button to acknowledge that you have been
informed of the condition.
Important Clicking the Resolve button only dismisses alarm messages; it does not actually
resolve the cause of the alarms.
Exposing node detail
Click the More Detail link to expose the following information for the listed
nodes in the cluster:
✔ Cache hit rate
✔ Cache hit rate, fresh
Chapter 3 Monitoring Appliance Performance 19
Page 32

✔ Cache hit rate, refresh
✔ Errors
✔ Aborts
✔ Active clients/servers
✔ Average fresh hit
Note Online help provides descriptions for each of these statistics.
Changing the selected node
As mentioned earlier, information on pages accessed in monitor mode exists for
the selected node and for the cluster as a whole. You start the process to change
the selected node from the Dashboard page by clicking on a node name.
▼ Changing the selected node
1 Click on the node name.
2 Provide the Administrator ID and password, if necessary. It is only necessary
to log on to a node once during a given Manager UI session.
Note Should you forget your password, contact Customer Service at Intel
Corporation for assistance. For information on how to contact Intel Customer
Service, see the Intel NetStructure Cache Appliance Product Support booklet
that came with your system.
After changing the selected node, that name appears as black text without
underlining, while the remaining node names appear as hypertext links.
If you need more information about the selected node, click the Node page
button (described in Using the Node page‚ on page 20).
Note The online help provides descriptions of each of the statistics in the Dashboard
page.
Using the Node page
The Node page provides performance statistics for the currently selected node in
your cluster and the cluster as a whole. These statistics include document hit
rates, DNS lookups, and client and server transactions.
▼ Reaching the Node Page
1 Be sure you are in monitor mode. If not, click the MONITOR tab.
2 Click the Node page button.
Note Online help provides descriptions for each of the statistics on the Node page.
20 Intel NetStructure Cache Appliance Administrator’s Guide
Page 33

Using the Graphs page
The Graphs page provides a list of options for generating performance graphs
for cache results, garbage collection, transfer rates, and object size for the
currently selected node.
▼ Reaching the Graphs page
1 Be sure you are in monitor mode. If not, click the MONITOR tab.
2 Click the Graphs page button.
Once you reach the Graphs page, click a link to generate a graph for viewing.
Using the Protocols page
The Protocols page provides cluster-wide statistics for use of the HTTP, FTP,
NNTP, ICP, and WCCP protocols for the selected node.
▼ Reaching the Protocols page
1 Be sure you are in monitor mode. If not, click the MONITOR tab.
2 Click the Protocols page button.
Note Online help provides descriptions for each of the statistics in the Protocols page.
Using the Cache page
The Cache page provides cache statistics for the selected node. Cache statistics
report cumulative and current information about connections, transactions, object
reads and writes, and document hits and misses.
▼ Reaching the Cache page
1 Be sure you are in monitor mode. If not, click the MONITOR tab.
2 Click the Cache page button.
Note Online help provides descriptions of each of the statistics in the Cache page.
Using the ARM page
The ARM page provides statistics about the Adaptive Redirection Module used
for transparent proxy caching for the selected node. The statistics include
information about ARM configuration, WCCP fragments (if you are using a
WCCP-enabled router), the Network Address Table (NAT), and security (for
example, the number of dropped TCP connections).
Chapter 3 Monitoring Appliance Performance 21
Page 34

▼ Reaching the ARM page
1 Be sure you are in monitor mode. If not, click the MONITOR tab.
2 Click the Arm page button.
Note Online help provides descriptions of each of the statistics in the ARM page.
Using the Other page
The Other page reports statistics for the various appliance functions, including
host database and DNS lookups for the selected node.
▼ Reaching the Other page
1 Be sure you are in monitor mode. If not, click the MONITOR tab.
2 Click the Other page button.
Host
database and
DNS statistics
If you see more lookups on the DNS server than in the host database, you might
need to increase the size of your database or adjust database time-out settings. Or,
you might need to adjust the time-out and retry settings for DNS look-ups. To
make adjustments, see Using the Host Database page‚ on page 44.
Note Online help provides descriptions of each of the statistics in the Other page.
Using the MRTG page
Multi Router Traffic Grapher (MRTG) is a graphing tool that enables you to
monitor the appliance’s performance. The MRTG page shows information about
virtual memory usage, client connections, document hit rates, hit and miss rates,
and so on. MRTG uses five-minute intervals to formulate the statistics and
provides useful historical information about your appliance’s performance.
▼ Reaching the MRTG page
1 Be sure you are in monitor mode. If not, click the MONITOR tab.
2 Click the MRTG page button.
Once the page is displayed, click on a graph to see daily, weekly, monthly, and
yearly statistics for that particular graph.
You can also click on the daily view link at the bottom of the MRTG page to see
daily statistics and on the weekly view link to see weekly statistics. Clicking on
these links provides a more extensive selection of related graphs.
Note Online help provides descriptions of the graphs.
22 Intel NetStructure Cache Appliance Administrator’s Guide
Page 35

Chapter 4
Configuring the Appliance
This chapter describes the configuration options that control the Intel NetStructure Cache
Appliance behavior and performance, and instructs you on how to set these values in the
Manager UI.
This chapter contains the following sections:
◆ Accessing configure pages‚ on page 24
◆ Using the Server Basics page‚ on page 24
◆ Using the Protocols page‚ on page 30
◆ Using the Cache page‚ on page 35
◆ Using the Security page‚ on page 39
◆ Using the Routing page‚ on page 39
◆ Using the Host Database page‚ on page 44
◆ Using the Snapshots page‚ on page 47
23
Page 36

Accessing configure pages
The Manager UI uses configure pages to display and allo w configuration changes
to the selected appliance. A configure page is a bro wser page displayed as a result
of “clicking” on a configure page button in the Manager UI.
Note Some performance displays rely on Java. To use the configure pages or any other
pages in the UI, make sure your browser is set to enable Java and JavaScript.
▼ Reaching the configure pages
1 Open your browser to the Manager UI.
2 Enter the Administrator ID and password. By default, the Administrator ID is
admin and the password is also admin. It is recommended that you change
these default values as soon as possible after the appliance is installed.
Note Should you forget your password, contact Customer Service at Intel
Corporation for assistance. For information on how to contact Intel Customer
Service, see the Intel NetStructure Cache Appliance Product Support booklet
that came with your system.
3 Click the CONFIGURE tab.
After you click the CONFIGURE tab, the Server Basics page appears.
Each configure page allows you to control certain configuration settings for the
selected node in a cluster. To update a setting you must provide relevant data or
choices and then click the accompanying Make These Changes button on the
configure page.
The following sections describe each configure page in detail.
Using the Server Basics page
The Server Basics page lets you:
✔ Turn cache and proxy services on or off
✔ Identify the appliance name
✔ Restart or reconfigure the caching software
✔ Configure the use of virtual IP addresses
✔ Auto configure browsers to connect to the appliance
✔ Throttle appliance connections
✔ Enable SNMP agents
▼ Reaching the Server Basics page
✔ If you are in monitor mode, click the CONFIGURE tab.
✔ If you are in configure mode, click Server page button.
24 Intel NetStructure Cache Appliance Administrator’s Guide
Page 37

Setting general options
The following table describes the general configuration settings in the Intel
NetStructure Cache section.
Option Description
on/off Enables or disables caching. When you disable
caching, you shut down all cache and proxy
services on a node-by-node basis. That is, you
can turn caching on or off only one node at a time.
You must disable cache services before
performing certain maintenance tasks.
Intel NetStructure Cache
Cluster name
Local Domain Expansion
on/off
.com Domain Expansion
on/off
Displays the hostname for the appliance. By
default, the name assumes a standalone node
and displays the hostname for the appliance as
the cluster name. If you are configuring an
appliance to be part of an existing management
cluster, you must enter the cache cluster name.
Enables or disables local domain expansion.
If you want the appliance to attempt to resolve
unqualified hostnames by expanding to the local
domain, enable expansion. For example, if a user
makes a request to an unqualified host named
host_x, and if the appliance’s local domain is
y.com, the appliance will expand the hostname to
host_x.y.com.
Enables or disables .com domain expansion.
If you want the appliance to attempt to resolve
unqualified hostnames by redirecting them to the
expanded address prepended with www. and
appended with .com, enable expansion. For
example, if a user makes a request to inktomi,
the appliance redirects the request to
www.inktomi.com.
If local domain expansion is enabled, the
appliance attempts local domain expansion
before .com domain expansion; the appliance
tries .com domain expansion only if local domain
expansion fails.
Chapter 4 Configuring the Appliance 25
Page 38

Setting Web management options
The Web Management section lets you restart the cluster and specify refresh rates
as observed in monitor mode. The following table describes these configuration
settings.
Option Description
Restart Restarts the entire cluster.
You must restart the cluster to effect changes you have
made to port numbers and virtual IP addresses on the
selected node. Restarting the cluster takes about 15
seconds, during which time cache and proxy services
are disabled.
Refresh rate in
Monitor mode
Specifies the refresh rate for the display of the graphs
and statistics with which you can monitor the appliance’s
performance.
Setting virtual IP addressing options
The Virtual IP Addressing section lets you define and maintain the appliance’s
pool of virtual IP addresses.
The appliance keeps a pool of IP addresses as virtual IP addresses from which to
draw and assign IP addresses to nodes as necessary . This practice assures that if a
node in the cluster fails, other nodes can assume the failed node’ s responsibilities.
What are virtual IP addresses?
Virtual IP addresses are really just IP addresses. The y are called virtual addresses
because they are not tethered to particular machines and can rotate among nodes
in a cluster.
It is common for a single machine to represent multiple IP addresses on the same
subnet. This machine would have a primary or real IP address bound to its
interface card and would also serve many more virtual addresses.
Using virtual IP addressing for node failover
You can set up your user base to use a DNS round-robin pointing at virtual IP
addresses, as opposed to using the real IP addresses of the appliance machines in
the cluster.
Because virtual IP addresses are not bound to machines, a cluster can steal
addresses from inactive nodes and distribute those addresses among the
remaining live nodes.
Using a proprietary management protocol, appliance nodes communicate their
status with their peers. If a node fails, its peers notice the failure and quickly
negotiate which of the remaining nodes will mask the fault by taking over the
failed node’s virtual interface.
26 Intel NetStructure Cache Appliance Administrator’s Guide
Page 39

The following table describes the Virtual IP Addressing configuration settings.
Option Description
Virtual IP on/off Enables or disables virtual IP addressing.
If virtual IP addressing is disabled, appliance nodes cannot
cover each other’s failures.
Edit virtual IP
addresses
Allows you to edit your list of virtual IP addresses. Changes
will not be effective until you click the Restart button on the
same page.
Incorrect IP addressing can effectively disable your system.
Make sure you understand how virtual IP addresses work
before you change them. If you do not assign a range of
valid virtual IP addresses to the appliance’s manager
process, nodes cannot cover each other’s failures.
Adding entries to the Virtual IP address list
You can add or change entries in the Virtual IP address pool by modifying the
appliance’s Virtual IP address list.
▼ Modifying the Virtual IP address list
1 On the Server Basics page, scroll to the Virtual IP Addressing section.
2 Click the Edit virtual IP addresses link.
The Virtual IP page appears. You can add, remove, or modify Virtual IP
addresses by clicking the Add Entry, Delete, or Modify buttons.
▼ Adding a Virtual IP address
1 Click the Add Entry button in the Virtual IP page.
2 In the IP Address field, enter the virtual IP address.
3 In the Device field, enter the network interface name (for example, iprb0).
4 In the Subinterface field, enter the subinterface-ID.
This is the number between 1-255 that the interface uses for the address.
5 Click the Add button.
Note To reset the fields, click the Reset button.
Handling
multiple
interfaces
If you have multiple network interfaces, the appliance monitors the state of the
interfaces and detects failure. It does this by sending ICMP echo requests, much
like the ping command.
Chapter 4 Configuring the Appliance 27
Page 40

Setting browser auto configuration options
The Autoconfiguration of Browsers section lets you specify an auto
configuration file for the selected node. Web browsers use the appliance by
specifying a preference to use a proxy server, usually through an auto
configuration file.
Note Users must set their browsers to connect to the appliance’s auto configuration
file. For information on setting your browser to use a proxy, such as the
appliance, see your browser documentation. If you are using the transparency
option, you do not need auto configuration files.
The following table describes the section’s options.
Option Description
Autoconfiguration
file
Allows you to create or edit an auto configuration file.
Setting throttling of network connections
The Throttling of Network Connections section lets you set a limit on the
number of connections the appliance can have. Setting limits on the connections
helps to prevent system overload when traffic bottlenecks develop. When
network connections reach the limit, new connections are queued until existing
connections close.
Note This section is available only if transparency is disabled. If you enable
transparency, you do not see this option. See Configuring load-shedding‚ on
page 28 for information about the transparency load shedding option.
The following table describes the section’s options.
Option Description
Maximum Number
of Connections
Specifies the maximum number of connections that the
appliance can have.
Configuring load-shedding
The Load Shedding section lets you configure how the appliance handles
overloaded conditions.
When transparency is enabled, the appliance handles overload conditions by
forwarding a percentage of new requests to origin servers. You can configure the
appliance to automatically shed load if the HTTP-hit transaction times become
too long. For example, suppose that the lower limit for HTTP hit-transaction time
is 500 milliseconds and the upper limit is 1000 milliseconds. Given these limits,
the following is true:
✔ If it takes the appliance more than 500 milliseconds to serve a fresh hit, it
begins to shed load.
28 Intel NetStructure Cache Appliance Administrator’s Guide
Page 41

✔ If it takes the appliance more than 750 milliseconds, it begins to shed 50% of
its load.
✔ If the fresh-hit transaction time exceeds 1000 milliseconds, the appliance
begins to shed 100% of its load.
Load shedding is temporary; when hit-transaction times return to acceptable
levels, the appliance reverts to handling all incoming requests.
The following table describes the options.
Option Description
HTTP hit transaction time - low
watermark
HTTP hit transaction time - high
watermark
The lower limit for HTTP transaction
time in milliseconds.
When the average hit transaction time
reaches this value, the appliance
forwards a percentage of incoming
client requests directly to the origin
server.
The upper limit for HTTP transaction
time in milliseconds.
When the average hit transaction time
reaches this value, the appliance
forwards all incoming client requests
directly to the origin server.
Enabling SNMP agents
The SNMP section lets you enable an SNMP agent to monitor information about
the appliance and send warning messages, called SNMP traps, to SNMP
monitoring stations.
The following table describes the options.
Option Description
SNMP Agent on/off Enables or disables an SNMP agent.
The appliance SNMP agent supports
access to two management
information bases (MIBs): MIB-2 (a
standard MIB) and the Intel
NetStructure Cache Appliance MIB.
Enabling the SNMP agent on allows
access to both.
Chapter 4 Configuring the Appliance 29
Page 42

Using the Protocols page
The Protocols page lets you view and change the selected appliance’s protocol
configuration. You can tune HTTP, NNTP, and FTP timeout intervals; and
configure the appliance to remove HTTP headers from documents to protect site
and user privacy.
▼ Reaching the Protocols page
1 Be sure you are in configure mode. If not, click the CONFIGURE tab.
2 Click the Protocols page button.
The Protocols page is divided into four sections for configuring HTTP, NNTP,
HTTPS, and FTP.
Configuring HTTP
The HTTP section lets you configure the appliance’s handling of HTTP. The
following table describes the section’s options.
Option Definition
Keep-Alive
Timeout
Inbound
Keep-Alive
Timeout
Outbound
Inactivity
Timeout
Inbound
Inactivity
Timeout
Outbound
Specifies how long the appliance should keep connections to
users open for a subsequent request after a transaction ends.
If the user does not make another request before the timeout
expires, the appliance closes the connection. If the user does
make another request, the timeout period starts over.
The user can close the connection at any time.
Specifies how long the appliance should keep open the
connections to Web servers (content servers) for a
subsequent transfer of data after a transaction ends.
If the appliance does not need to make a subsequent request
for data before the timeout expires, it closes the connection.
Once the connection is closed, the timeout period starts over.
The Web server can close the connection at any time.
Specifies how long the appliance should keep connections to
users open if a transaction stalls. If the appliance stops
receiving data from a user or the user stops reading the data,
the appliance closes the connection when this timeout
expires.
The user can close the connection at any time.
Specifies how long the appliance should keep open
connections to Web servers if the transaction stalls. If the
appliance stops receiving data from a Web server, the
appliance will not close the connection until this timeout has
expired.
The Web server can close the connection at any time.
30 Intel NetStructure Cache Appliance Administrator’s Guide
Page 43

Option Definition (Continued)
Activity
timeout
Inbound
Activity
Timeout
Outbound
Remove the
following
common
headers
Specifies the maximum time the appliance should remain
connected to a user. If the user does not finish making a
request (reading and writing data) before this timeout expires,
the appliance closes the connection.
The user can close the connection at any time.
Specifies the maximum time the appliance should wait for
fulfillment of a connection request to a Web server. If the
appliance does not establish a connection to a Web server
before this timeout expires, the appliance terminates the
connection request.
The Web server can close the connection at any time.
Specifies headers for removal. Removing headers can protect
the privacy of your site:
❚ The From header. This header identifies the user’s e-mail
address
❚ The Referer header. This header identifies the Web link
followed by the user.
❚ The User-Agent header. This header identifies the
agent—usually a browser—making the request.
❚ The Cookie header. This header is often used to identify
the user making a request.
Insert Client-ip Insert Client-ip headers to retain client IP addresses.
Remove
Client-ip
User
Language
Remove Client-ip headers for more privacy.
Selects the language in which messages to the user from the
appliance are displayed. The default language is English.
Configuring NNTP
The NNTP section lets you configure basic NNTP options. While this section
lets you configure basic options, you must use the command-line interface to
configure the appliance to cache articles from particular NNTP servers and news
groups as well as to set access restrictions and authentication requirements for
news readers. See Configuring NNTP servers‚ on page 65 for more information.
Chapter 4 Configuring the Appliance 31
Page 44

The following table describes the options.
Option Definition
NNTP Server
on/off
NNTP Server
Port
Connect
Message
(posting
allowed)
Connect
Message
(posting not
allowed)
NNTP options
Enables or disables the appliance to cache and serve news
articles.
After turning NNTP on or off for the selected node, you must
restart the cluster to effect the change. Click the Restart
button on the Server Basics page.
Specifies the port that the appliance uses for serving NNTP
requests. The default port is 119.
Defines the message displayed to news readers when they
connect to the appliance with posting allowed.
Defines the message displayed to news readers when they
connect to the appliance with posting not allowed.
❚ Posting: Allows users to post NNTP articles to parent
NNTP servers.
❚ Access Control: Turns access control on or off. To refine
access control, use the command-line interface. See
Configuring NNTP access‚ on page 69 for more
information.
If you are using an authentication server, you must enter its
name and port (see page 33).
❚ NNTP V2 Authentication Server: Supports NNTP version 2
authentication. Use this option only if all of your client
authentication supports version 2.
❚ Run Local Authentication Server: Runs an authentication
program on the selected node. Use the command-line
interface to configure which clients must be authenticated.
See Configuring NNTP access‚ on page 69 for more
information.
❚ Allow Feeds: Allows the appliance to accept feeds of news
articles from feed or push groups.
Use the command-line interface to designate feed and
push groups. The appliance does not cache news articles
from feed groups; instead, it receives feeds of news articles
as the parent NNTP server receives feeds. Push groups
are groups for which the appliance can both retrieve
articles on demand and receive news feeds.
See Configuring NNTP servers‚ on page 65 for information
about designating news groups as push or feed.
32 Intel NetStructure Cache Appliance Administrator’s Guide
Page 45

Option Definition (Continued)
NNTP options
(continued)
❚ Background Posting: Causes the appliance to post NNTP
articles to parent NNTP servers in the background.
❚ Obey Cancel Control Messages: Sets the appliance to
obey cancel control messages.
When the appliance gets a cancel control message, it
deletes the corresponding article from the cache. You do
not need to enable this option if the appliance is caching
articles on demand (i.e. no feed groups exist). For all
nonfeed news groups, the appliance actively polls parent
NNTP servers for cancelled articles. See the Check for
Cancelled Articles option, below.
❚ Obey Newgroups Control Messages: Causes the appliance
to obey newgroup control messages.
The appliance actively polls parent NNTP servers for new
groups; see the Check for New Groups option, below.
❚ Obey Rmgroups Control Messages: Sets the appliance to
obey rmgroup (remove group) control messages.
Inactivity
Timeout
Check for New
Groups Every
Check for
Cancelled
Articles Every
Check Parent
NNTP Server
Every
Check Cluster
Every
Check Pull
Groups Every
Authentication
Server Host
Defines the number of seconds that idle connections can
remain open. This timeout should be at least three minutes.
Defines the number of seconds that pass before the
appliance polls parent NNTP servers for new news groups.
The parent group lists change slowly. Consequently, you do
not need to check them frequently.
Use the command-line interface to list the hosts you want the
appliance to poll. See Configuring NNTP servers‚ on page 65
for more information.
Defines the number of seconds that pass before the
appliance polls all nonfeed news groups on the parent NNTP
servers for cancelled articles. Checking for new articles
should not be done too frequently as it involves
communication with the parent NNTP server.
Defines the number of seconds that pass before the
appliance polls the parent NNTP server for new articles.
Defines the number of seconds that pass before the
appliance checks the nodes on the cluster.
Defines the number of seconds that pass before the
appliance pulls (or caches) news articles from defined pull
groups. Use the command-line interface to designate pull
groups. See Configuring NNTP servers‚ on page 65 for more
information.
The name of the host machine running the authentication
server. If the host machine is the appliance, enter “local host”.
Chapter 4 Configuring the Appliance 33
Page 46

Option Definition (Continued)
Authentication
Server Port
Local
Authentication
Server Timeout
Client Speed
Throttle
The port on which the locally run authentication server
accepts connections. If the authentication server is remote,
the appliance connects to it on this port.
The number of milliseconds after which the authentication
server aborts an incomplete authorization operation. The
client can retry the operation.
Refer to Configuring NNTP access‚ on page 69 for
information about configuring authentication servers.
The number of bytes per second that clients are limited to
during downloading operations. Use a 0 (zero) for unlimited
downloading.
Configuring FTP
The FTP section lets you configure FTP protocols. The follo wing table describes
the options.
Option Definition
FTP
connection
mode
FTP inactivity
timeout
(seconds)
Anonymous
FTP password
❚ PASV/PORT: Specifies the appliance use PASV connection
mode. PASV/PORT is the default FTP connection mode. If
PASV mode fails, the appliance uses PORT mode to initiate
the data connection, and then the appliance accepts it.
❚ PASV only: Specifies that the appliance initiates the data
connection to the FTP server, and the FTP server accepts
it. This mode is firewall-friendly, however, some FTP servers
do not support it.
❚ PORT only: Specifies that the FTP server initiates the data
connection, and the appliance accepts it.
FTP transfers require two connections: a control connection to
inform the FTP server of a request for data and a data
connection to send the data. The appliance always initiates
the control connection. FTP mode determines whether the
appliance or the FTP server initiates the data connection.
Defines the number of seconds before the appliance waits for
a response from the FTP server. If the FTP server does not
respond in time, the appliance abandons the user’s request.
Specifies an anonymous password for FTP servers that
require a password for access.
34 Intel NetStructure Cache Appliance Administrator’s Guide
Page 47

Using the Cache page
The Cache page allows you to configure the following:
✔ Cache activation
✔ Object freshness
✔ Variable object content
▼ Reaching the Cache page
1 Be sure you are in configure mode. If not, click the CONFIGURE tab.
2 Click the Cache page button.
The following sections describe the sections in the Cache page.
Cache activation
The following table describes the cache activation configuration options.
Option Description
Enable HTTP
caching
Enable FTP
caching
Enable NNTP
caching
Ignore user
requests to
bypass cache
Enables caching of objects retrieved through HTTP.
Enables caching of objects retrieved through FTP.
Enables caching of objects retrieved through NNTP.
Instructs the appliance to ignore no-cache headers. This
means the appliance ignores a user’s stipulation to ignore
their requests served from the cache.
Chapter 4 Configuring the Appliance 35
Page 48

Storage
The following table describes the storage options.
Option Description
Maximum
HTTP/FTP
object size in
bytes
Maximum
number of
alternate
versions
(HTTP)
Specifies the maximum size of HTTP or FTP objects the
appliance can cache.
Use a 0 (zero) to indicate no limit.
Specifies the maximum number of HTTP alternates that the
appliance can cache.
Use a 0 (zero) to indicate no limit. If a popular URL has
thousands of alternates, you might observe increased cache
hit latencies (transaction times) as the appliance searches
through the alternates for each request. In particular, some
URL addresses can have large numbers of alternates due to
cookies. If the appliance is set to vary on cookies, you might
encounter this problem. See Variable content‚ on page 38 for
more information.
Freshness
The following table describes the freshness options.
Option Description
Verify
freshness
by checking
Minimum
freshness
information for
a document to
be cached
If an object
has no
expiration
date
Configures the appliance to ask the original content server to
verify the freshness of objects according to the following list
before serving them.
❚ when the object has expired
❚ when the object has expired or if the object has no
expiration date
❚ always
❚ never
Specifies the minimum freshness information required to
consider a document able to be cached:
❚ an explicit lifetime
❚ a last-modified time
❚ nothing
Specifies the time limits the appliance will keep an object in
the cache:
❚ minimum time in the cache. You can specify from
15 minutes to two weeks.
❚ maximum time in the cache. You can specify from
15 minutes to two weeks.
36 Intel NetStructure Cache Appliance Administrator’s Guide
Page 49

Option Description (Continued)
FTP cached
objects expire
Internet
Explorer
requests force
a check with
the origin
server
Specifies how long the appliance will keep FTP objects in the
cache. You can specify from 15 minutes to two weeks.
Configures the appliance to treat Microsoft Internet Explorer
requests more conservatively, providing fresher content at the
cost of serving fewer objects from the cache according to the
following options:
❚ never: never force a freshness check with the origin server
❚ for IMS revalidation requests: only force a freshness check
for IMS (If Modified Since) revalidation requests
❚ always: always force a freshness check with the origin
server
Certain versions of Microsoft Internet Explorer do not request
cache reloads from reverse proxies and transparent caches
when the user presses the browser Refresh button. This can
prevent content from being loaded directly from the origin
servers.
Chapter 4 Configuring the Appliance 37
Page 50

Variable content
The following table describes the variable configuration options.
Option Description
Do not cache Instructs the appliance to refuse to cache objects served in
response to URL addresses that contain:
❚ ?
❚ ;
❚ cgi
❚ end in .asp
Enable
Alternates
Vary on these
HTTP header
fields:
Cache
responses to
requests
containing
Cookies for:
Instructs the appliance to cache alternate versions of HTTP
documents.
Enables the appliance to serve alternate documents.
Selecting the Enable Alternates option allows you to specify
values to match for the following fields:
❚ If the request is for text: The default value is user-
agent and cookie. Some documents can have
thousands of alternate cookie versions. If you choose to
vary on cookies, it is recommended that you limit the
number of alternates cached. See Storage‚ on page 36.
❚ If the request is for images: Images are rarely
personalized.
❚ If the request is for anything other than text or images
Using document header information, the appliance can
compare cached document specifications against
requested specifications to determine if the correct
alternate version of the document is in the cache. For
example, a document header can specify that the
document targets a specific browser, but any browser can
request the document from the appliance. If a requested
document’s fields do not match a cached document’s fields,
the appliance does not serve the document from its cache,
but instead retrieves a fresh copy from the origin server.
Configures the appliance to cache responses to requests
that contain cookies for:
❚ no content-types
❚ all content-types
❚ only image-content types
❚ content-types that are not text
38 Intel NetStructure Cache Appliance Administrator’s Guide
Page 51

Using the Security page
The Security page lets you configure access to the Manager UI. You can set
administrator and guest IDs and passwords (guests have read-only access) for the
selected node.
▼ Reaching the Security page
1 Be sure you are in configure mode. If not, click the CONFIGURE tab.
2 Click the Security page button.
The following table describes the Manager access options.
Option Description
Authentication
(basic) on/off
Administrator’s ID Specifies the administrator login ID. (The ID is not checked
Change
administrator’s
password
Guest ID Specifies the guest login ID. Guests can access only the
Change guest
password
Enables or disables authentication. Leave authentication
on to check the administrator ID and password whenever a
user logs on to the Manager UI.
if you turn authentication off.) The administrator has access
to both configure and monitor pages in the Manager UI.
Allows you to change the administrator password. Clicking
the link displays the Change Administrator’s Password
page where you can enter and validate a new password.
(The password is not checked if you turn authentication
off).
monitor pages of the Manager UI. The guest login ID is
static for all guests.
Allows you to change the guest password. Clicking the link
displays the Change Guest’s Password page where you
can enter and validate a new password.
Using the Routing page
The Routing page lets you configure the following:
✔ HTTP parent caching
✔ Internet Caching Protocol (ICP) support
✔ Server acceleration (reverse proxy service)
From the Routing page, you can also check if transparency and WCCP are
enabled.
Chapter 4 Configuring the Appliance 39
Page 52

parent
failover
▼ Reaching the Routing page
1 Be sure you are in configure mode. If not, click the CONFIGURE tab.
2 Click the Routing page button.
Setting HTTP parent caching options
The appliance can participate as a member of an HTTP cache hierarchy . You can
point your appliance at a parent network cache—either another Intel NetStructure
Cache Appliance or a different caching product—to form a cache hierarchy,
wherein a child cache relies upon a parent cache in fulfilling user requests.
You can specify more than one parent cache to be queried. If the first parent
cache does not respond to the request, the appliance tries the next parent cache.
The appliance supports multiple parent caches and parent failover. Use the
command-line interface to configure multiple parent caches and parent failover
(which gives appliance a sequence of parent caches to query if the first parent
cache misses). See Controlling parent proxy caching‚ on page 89.
The following table describes the options.
Option Description
Parent Caching
on/off
Parent Cache Identifies the parent cache and port. Using the following
Enables or disables parent caching. To set parent caching
on, you must also name a parent cache.
format: parent_name:port_number. The port must be
dedicated. If the appliance cannot find a requested object in
its own cache, it searches the parent cache before
searching the Internet. If you want parent failover, you can
specify more than one parent cache; for example,
parent1:port1; parent2:port2
40 Intel NetStructure Cache Appliance Administrator’s Guide
Page 53

Setting ICP options
In the ICP section you can establish ICP peers.
The following table describes the ICP options.
Option Description
ICP Mode Enables or disables ICP mode:
❚ Only Receive Queries
❚ Send/Receive Queries
❚ Disabled
ICP Port Specifies the port to use for ICP messages. The default
port is 3130.
ICP Multicast
enabled on/off
ICP query
timeout
ICP Peers View or modify the appliance’s ICP hierarchy.
Establishing ICP peers
For ICP to work, the appliance must recognize its ICP neighbors (siblings and
parents).
Enables or disables multicast. If your appliance has a
multicast channel connection to its ICP peers, it can send
ICP messages through multicast.
Specifies the timeout for ICP queries in seconds.
Chapter 4 Configuring the Appliance 41
Page 54

▼ Adding an ICP Peer
1 Click the ICP Peers link.
2 Click the Add Entry button.
3 Enter the information for the ICP peer host. If you want to clear the entire
form of information, you can press the Reset button.
Field Description
Hostname The hostname for the ICP host. You do not have to enter
a hostname if you know the host IP address.
If you enter a hostname but leave the IP address as
0.0.0.0, the ICP configuration obtains the host IP
address via a DNS lookup on the entered hostname.
Therefore, if you do not know the IP address, simply
leave it as 0.0.0.0.
Host IP The host IP address.
If you enter an IP address other than 0.0.0.0, the ICP
configuration uses the IP address to identify the host.
Otherwise, the ICP configuration requires a hostname.
Type ICP host type. Use one of the following options:
❚ 1 specifies a parent cache
❚ 2 specifies a sibling cache
❚ 3 specifies the local host
Option 3 is reserved for the appliance. In option 3, the
hostname must be localhost and the host IP address
must be 0.0.0.0. The ICP configuration enforces this
convention.
Proxy Port The appliance’s proxy port (usually 8080).
ICP Port The UDP port used for ICP (usually 3130).
Multicast Member Indicates whether the host is on a multicast network with
the appliance. Use one of the following options:
❚ No
❚ Ye s
Multicast IP The multicast IP address.
Multicast TTL The multicast datagram time to live. Use one of the
following options:
❚ 1: specifies that IP multicast datagrams will not be
forwarded beyond a single subnetwork.
❚ 2: allows delivery of IP multicast datagrams to more
than one subnet if there are one or more multicast
routers attached to the first hop subnet.
4 Click the Add button to save your changes.
42 Intel NetStructure Cache Appliance Administrator’s Guide
Page 55

Setting server accelerator options
The Server Accelerator section allows you to configure the appliance as a
Server Accelerator (also known as a re v erse or server -side proxy). Y ou can enable
or disable this function as well as control how the appliance routes document
requests to the slower traditional Web servers. For more information about setting
up the appliance as a Server Accelerator, see Setting general controls‚ on
page 62.
The following table describes Server Accelerator options.
Option Description
Server
Acceleration
Reverse proxy
only
Document Route
Rewriting Rules
URL to redirect
requests without
Host header
Enables or disables server acceleration.
If you select on, the appliance is a server accelerator for the
Web servers specified in document route rewrite rules
defined through the command-line interface.
Sets the appliance to operate solely as a server
accelerator. If you select Yes, the appliance does not serve
requests to unspecified Web servers from the cache. See
Understanding server acceleration mapping rules‚ on
page 132 for information on creating document route
rewriting rules.
If you select No, the appliance serves requests from
unspecified Web servers as a normal proxy cache.
Allows you to view, modify, or add document route rewrite
rules. See Understanding server acceleration mapping
rules‚ on page 132 for information on document route
rewrite rules.
Specifies an alternate URL that incoming requests from
older clients that do not provide a Host: header can be
directed.
It is recommended that you set this option to a page that
explains the situation to the user and advises a browser
upgrade or provides a link directly to the origin server,
bypassing the appliance. Alternatively, you can specify a
map rule that maps requests without Host: headers to a
particular server.
▼ Creating a document route rewriting rule
1 In the Server Accelerator section, click the Document Route Rewriting
Rules link.
The Configure: Routing: URL Rewriting page appears. This page displays
the set of current rules as well as a Add Entry b utton that lets you create ne w
rules.
Chapter 4 Configuring the Appliance 43
Page 56

2
Click the Add Entry button.
3 From the Type field, select the type of rule you want to set (map or
reverse_map).
4 In the Target field, enter the origin or from URL for the rule. You can enter up
to four components; for example, <scheme>://<host>:<port>/
<path_prefix>
5
In the Replacement field, enter the destination or to URL for the rule. You
can enter up to four components; for example, <scheme>://
<host>:<port>/<path_prefix>
6
Click the Add button to add the rule.
Note You can abandon the new rule by clicking Reset.
Checking transparency
The Transparency section indicates whether the appliance is running
transparently. If transparency is enabled, you will see the following message:
The transparency option is installed. Redirected users will
be served transparently.
If transparency is not enabled, you will see the following message:
The Transparency option is not currently installed.
For more information about Transparency, see Transparent proxy caching‚ on
page 120.
Checking WCCP
The WCCP section indicates whether WCCP is enabled. If WCCP is enabled,
you will see the following message:
The WCCP option is currently installed.
If WCCP is not enabled, you will see the following message:
The WCCP option is not currently installed.
Using the Host Database page
The Host Database page lets you view and change the following:
✔ Host database options
✔ Domain Name Service lookups
▼ Reaching the Host Database page
1 Be sure you are in configure mode. If not, click the CONFIGURE tab.
2 Click the Host DB page button.
44 Intel NetStructure Cache Appliance Administrator’s Guide
Page 57

Configuring the host database
The appliance host database stores the domain name server (DNS) entries of
servers that the appliance contacts to fulfill user requests. You configure the
appliance host database by setting options in the Host Database Management
section. The following table describes the options.
Option Description
Lookup timeout Specifies the DNS lookup timeout in seconds. You can
choose from the following:
❚ 5 seconds
❚ 10 seconds
❚ 15 seconds
❚ 20 seconds
❚ 30 seconds
Foreground
timeout
Specifies how long DNS entries can remain in the database
before they are flagged as stale. You can choose from the
following:
❚ 12 hours
❚ 24 hours
❚ 48 hours
For example, if this timeout is 24 hours, and a user requests
an entry that has been in the database for 24 hours or longer,
the appliance will refresh the entry before serving it.
You can set the background timeout (see next item) to refresh
entries in the background, before objects become stale.
Be careful not to set the foreground timeout too low. Doing so
might slow response time. Additionally, setting the timeout
value too high risks accumulation of incorrect information.
Setting the foreground timeout to greater than or equal to the
background timeout disables background refresh.
Chapter 4 Configuring the Appliance 45
Page 58

Option Description (Continued)
Background
timeout
Specifies how long DNS entries can remain in the database
before they are flagged as entries to refresh in the
background. These entries are still fresh, so they can be
refreshed after they are served, rather than before. You can
choose from the following:
❚ 3 hours
❚ 6 hours
❚ 12 hours
❚ 24 hours
❚ 48 hours
For example, the foreground refresh timeout interval is
24 hours and the background timeout is 12 hours. In this
situation a user requests an object from my.com and
16 hours later a user makes a second request for an object
from my.com. The DNS entry for my.com has not been
refreshed in the foreground because the entry is not yet
24 hours old. But since the background timeout has expired,
the appliance will first serve the user’s request and then
refresh the entry in the background.
Invalid host
timeout
Specifies how long the proxy software should remember that
a hostname is invalid. This is often called negative DNS
caching. You can choose from the following:
❚ Immediate
❚ 15 minutes
❚ 30 minutes
❚ 1 hour
❚ 1.5 hours
❚ 2 hours
For example, if a user specifies an invalid hostname, the
appliance informs the user that it could not resolve the
hostname and the appliance gets another request for the
same hostname. If the appliance still remembers the bad
hostname, it will not try to look it up again but will simply send
another invalid hostname message to the user.
Re-DNS on
Reload
Enables or disables the appliance’s ability to re-resolve
hostnames whenever clients reload pages.
46 Intel NetStructure Cache Appliance Administrator’s Guide
Page 59

Configuring DNS
The DNS Configuration section lets you configure DNS services. The follo wing
table describes the options.
Option Description
Resolve
attempt
timeout
Number of
retries
Specifies how long the appliance must wait for the DNS server
to respond with an IP address, even if the client request has
been cancelled. You can choose from the following:
❚ 5 seconds
❚ 10 seconds
❚ 15 seconds
❚ 20 seconds
❚ 30 seconds
If the user abandons the request before this timeout expires,
the appliance can still obtain the host’s IP address in order to
cache it. The next time a user makes the same request, the
address will be in the cache.
Specifies how many times the appliance should allow a lookup
to fail before it abandons the lookup and sends an invalid
hostname message to the user. You can choose from the
following:
❚ 1
❚ 2
❚ 3
❚ 4
❚ 5
Using the Snapshots page
The Snapshots page lets you take snapshots of the selected appliance’s
configurations or lets you restore previously saved configurations. A
configuration snapshot consists of a complete set of appliance configuration files.
Note It is a good idea to take a snapshot before doing system maintenance or
attempting to tune system performance. Taking a snapshot only takes a few
seconds and it can save you hours of correcting configuration mistakes.
Chapter 4 Configuring the Appliance 47
Page 60

▼ Reaching the Snapshots page
1 Be sure you are in configure mode. If not, click the CONFIGURE tab.
2 Click the Snapshots page button.
The following table describes the options.
Option Description
Name New
Snapshot
Take Snapshot Takes a snapshot. Taking a snapshop saves a copy of all
Restore
Snapshot
Delete
Snapshot
Note Once you create a snapshot for the appliance, you should remove the floppy
Specifies a name for the snapshot. Do not include the
forward slash “/” character in the name.
appliance configuration files. The snapshot is saved under
the name specified in the Name New Snapshot field.
Restores a snapshot. Clicking the Restore button returns the
appliance to the configuration previously saved in the
snapshot selected from the list.
Deletes an existing snapshot. Clicking the Delete Snapshot
button deletes the previously saved configuration that is
selected from the list.
diskette from the drive. If you do not remove the diskette from the drive and the
system needs to be rebooted remotely, the system will attempt to reboot from the
diskette, which does not have a bootable image.
48 Intel NetStructure Cache Appliance Administrator’s Guide
Page 61

Chapter 5
Using the Command-Line Interface
This chapter describes the command-line utility that you can use to configure the system’s
network addresses and to control, configure, and monitor the Intel NetStructure Cache
Appliance.
This chapter contains the following sections:
◆ Starting the command-line interface‚ on page 50
◆ Navigating the command-line interface‚ on page 51
◆ Using the setup menu‚ on page 52
◆ Using the main menu‚ on page 54
◆ Using the config menu‚ on page 61
◆ Using the monitor menu‚ on page 99
◆ Using the expert menu‚ on page 107
◆ Using the save menu‚ on page 108
◆ Using the load menu‚ on page 108
49
Page 62

Starting the command-line interface
The command-line interface displays automatically on screen when you provide
a serial interface connection to the appliance. For information on how to make a
serial connection to the appliance, see the Intel NetStructure Cache Appliance
Quick Start Guide.
Note Make sure your terminal is set to emulate a VT100 terminal when you are
communicating with the appliance through a serial interface.
Starting the appliance the first time
The first time you connect to the appliance, the Initial Setup menus display as
follows:
setup Initial Intel Cache Setup
install Install Intel Cache
commit Commit Setup Changes
These menu selections let you do the following:
✔ setup—Provide the appliance machine with a hostname, IP address, subnet
mask address, DNS address, gateway address, domain name, time zone, and
date and time.
✔ install—Install or update the appliance software. This task takes several
minutes.
✔ commit—Save the appliance network configuration after installing the
software.
For instructions on how to start the appliance for the first time, see either the Intel
NetStructure Cache Appliance Quick Start Guide or Starting the system for the
first time‚ on page 8.
Note For security reasons, you should change your Administrator ID and password for
telnet access as soon as possible after installing and initially configuring your
appliance. See Changing the administrator password for telnet or serial access‚
on page 60.
Using the appliance after initial start-up
After initial configuration and when you connect to the appliance through a serial
interface, this main selection menu displays on the screen:
setup Initial Intel Cache Setup
main Main Intel Cache Controls
config Intel Cache Configuration
monitor View Statistics
expert Enter Expert Mode
save Save Config to Floppy
load Load Config From Floppy
logoff Logoff
50 Intel NetStructure Cache Appliance Administrator’s Guide
Page 63

These menu selections let you do the following:
✔ setup—Change the system’s network address configuration and time
settings. See Using the setup menu‚ on page 52 for more information.
✔ main—Start or stop the cache and proxy services, check version information,
clear statistics, and install and delete software. See Using the main menu‚ on
page 54 for more information.
✔ config—Configure the appliance, including server, protocols, security, and
routing. See Using the config menu‚ on page 61 for more information.
✔ monitor—Monitor performance by viewing statistics. See Using the monitor
menu‚ on page 99 for more information.
✔ expert—Use the appliance’s expert feature. See Using the expert menu‚ on
page 107 for more information.
✔ save—Save the current configuration to a floppy disk. See Using the save
menu‚ on page 108 for more information.
✔ load—Load a saved configuration from a floppy disk. See Using the load
menu‚ on page 108 for more information.
✔ logoff—Logoff from the current login.
Navigating the command-line interface
The command-line interface consists of a series of menus that you can access to
adjust the system’s network configuration and control, and to configure and
monitor the appliance.
The following table explains how to navigate the interface:
To do this... Do this
Move from one menu item to another Use the up and down arrow
keys
Select a menu or menu item Move to the item and press
Enter
Return to the previous form or menu screen Press CTRL-X
Accept an action confirmation box Press CTRL-X
Accept changes to the form and exit it by
returning to the previous form or menu screen
Save information you have entered in a form’s
field and position the cursor at the next field.
You must press Enter for each field in the form
Cancel all changes to a form and exit it by
returning to the previous form or menu screen
Chapter 5 Using the Command-Line Interface 51
Press CTRL-X
Press Enter
Press ESC
Page 64

As you navigate through windows, you see the path of the window displayed in
the top menu border, starting with the root menu.
The following steps provide an example of how to view cache performance
statistics from the monitor menu.
1 From the initial menu, use the down arrow key on your keyboard to navigate
to the monitor menu item. Doing so highlights that item to show that you
have selected it.
2 Press Enter. After pressing Enter, the monitor menu appears and the menu
border displays root->monitor.
3 Press the down arrow key to navigate to the cache menu item and press Enter.
Doing so displays the cache performance statistics on the screen and the
menu border displays
root->monitor->cache.
Using the setup menu
The setup menu lets you do the following:
✔ Change the IP address, hostname, and netmask address on the primary
network interface controller in the appliance.
✔ Change the speed and transmission mode of the primary network interface
controller.
✔ Change the DNS address and domain name.
✔ Change the gateway address.
✔ Configure time zone settings.
✔ Configure date and time settings.
✔ View current network address settings on the primary network interface
controller.
Changing network addresses configuration
You can change the network settings of the primary network interface controller
(host name, IP address, and netmask address) any time after the initial setup.
Note You must configure the network interface controller the first time you connect to
the appliance from a terminal. (See Starting the command-line interface‚ on
page 50 for more information.)
▼ Changing network address configuration on the NIC
1 Select the setup menu and press Enter.
2 Select ip and press Enter. Doing so displays the current IP address, hostname,
and netmask.
3 In the New IP Address field, enter the IP address that you want to assign to
the appliance, and press Enter.
52 Intel NetStructure Cache Appliance Administrator’s Guide
Page 65

4
In the New Hostname field, enter the hostname that you want to assign to the
appliance, and press Enter.
5 In the New Netmask field, enter the netmask address that you want to assign
to the appliance system, and press Enter.
6 Press CTRL-X to save your changes and return to the previous menu.
Changing the controller speed and transmission mode
You can change the speed and transmission mode of the primary network
interface controller any time after the initial setup.
▼ Changing speed and transmission mode
1 Select the setup menu and press Enter.
2 Select nic and press Enter.
3 From the list, choose a speed and mode and press Enter. Doing so causes a
message to appear indicating the change has been made but will not take
effect until the system is rebooted.
Changing the DNS address and domain name
You can change the DNS address and domain name used by the appliance.
▼ Changing the DNS address
1 Select the setup menu, and press Enter.
2 Select dns and, press Enter. Doing so displays the current DNS address and
domain name.
3 In the New DNS Address field, enter the DNS address that you want to
assign to the appliance, and press Enter.
4 In the New Domainname field, enter the domain name that you want to
assign to the appliance, and press Enter.
5 Press CTRL-X to save your changes and return to the previous screen.
Changing the gateway address
You can change the gateway address used by the appliance.
▼ Changing the gateway address
1 Select the setup menu, and press Enter.
2 Select gateway, and press Enter. Doing so displays the current gateway
address and a field in which you can enter the new gateway address.
3 In the New Gateway field, enter the gateway address that you want to assign
to the appliance, and press Enter.
4 Press CTRL-X to save your changes and return to the previous screen.
Chapter 5 Using the Command-Line Interface 53
Page 66

Configuring time zone settings
You can configure the appliance for the appropriate time zone.
▼ Configuring the time zone setting
1 Select the setup menu, and press Enter.
2 Select timezone, and press Enter. Doing so displays a list of available time
zone settings.
3 Use the up and down arrow keys to scroll through the list and select the
appropriate time zone.
4 Once you have selected the item, press Enter.
5 Press any key to continue.
6 Press CTRL-X to return to the previous screen. When you exit the screen, a
message appears indicating that the new time zone setting does not take effect
until the system is rebooted.
Configuring date and time settings
You can configure the appliance’s date and time.
▼ Configuring the date and time settings
1 Select the setup menu, and press Enter.
2 Select time, and press Enter. Doing so displays time and date fields, each
having various fields in which you can enter data.
3 Provide data in each sub-field and use the Enter key to move between sub-
fields.
✔ Enable or disable Daylight Savings Time
✔ Indicate whether you’re inside or outside Daylight Savings Time
✔ Enter time in the format HH:MM:SS
✔ Enter the date in the format MM/DD/YYYY
4 When you have finished, press CTRL-X to confirm your settings and exit the
window.
Viewing current network address settings
You can view the current hostname, IP, DNS, and Gateway address settings by
selecting view from the setup menu.
Using the main menu
The main menu lets you do the following:
✔ Check the status of the Server and Manager resident on the appliance.
54 Intel NetStructure Cache Appliance Administrator’s Guide
Page 67

✔ Start the appliance cache and proxy services.
✔ Stop the appliance cache and proxy services.
✔ View and maintain the version of software installed on the appliance.
✔ Clear persistent statistics.
✔ Reboot the system.
✔ Halt the system.
✔ Change Administrator password for telnet and serial access.
✔ Reset the appliance to the factory settings.
✔ Prepare cache disk.
Checking the status of the Server and Manager
You can check the status of the appliance’s Server and Manager applications
using the main menu.
▼ Checking Server and Manager status
1 Select the main menu, and press Enter.
2 Select status, and press Enter. Doing so displays a window that indicates
whether the Server and Manager are UP or DOWN.
Starting the appliance
Starting the caching and proxy services “starts” the appliance.
▼ Starting the appliance
1 Select the main menu, and press Enter.
2 Select start, and press Enter. Doing so displays a message indicating that the
appliance has started successfully.
Stopping the appliance
Shutting down all caching and proxy services “stops” the appliance.
Note You must stop the appliance before doing certain maintenance tasks.
▼ Stopping the appliance
1 Select the main menu, and press Enter.
2 Select stop, and press Enter. Doing so displays a message indicating the
cache has been stopped.
Chapter 5 Using the Command-Line Interface 55
Page 68

Viewing and maintaining versions of the software
You can have up to two versions of the appliance software installed on the system
at the same time. From these versions, you can choose which one is current and
executes in the appliance. Installing a new version of the software automatically
makes it the current version.
You can use the versions menu, which is a submenu of the main menu, to do the
following:
✔ Identify the installed versions.
✔ Install new versions.
✔ Switch versions.
✔ Delete a version.
✔ View which version is running.
Identifying which versions of the software are currently installed
▼ Identifying which versions of the appliance software are installed.
1 Select the main menu and press Enter.
2 Select versions and press Enter.
3 Select view and press Enter. Doing so displays a list of version numbers.
Installing a new version of the appliance software
You can update the software on your cache appliance using FTP to download the
updated files. When you install a new version of the software, it becomes the
current, running version. In addition, the appliance copies the new version to
your secondary drive.
▼ Setting up the FTP server
1 Set up the FTP server to provide upgrade files to the appliance. You can use a
single FTP server to upgrade multiple appliances.
2 Place the files on an FTP server that’s accessible by the appliance, and on a
network with sufficient performance for fast transfer of files.
3 Each upgrade must exist in a separate directory. We recommend that the
names you choose for your directories indicate the release. This example
shows separate directories for application, patch, and OS/application
upgrades:
<ftp_dir>/app_3.0.9.0
<ftp_dir>/app_3.1.0.0
<ftp_dir>/patch_1
<ftp_dir>/patch_2
<ftp_dir>/os_1
<ftp_dir>/os_2
56 Intel NetStructure Cache Appliance Administrator’s Guide
Page 69

4
Regardless of the type of upgrade, that is, application, patch, or OS/
application, each upgrade requires two files, which you must copy into the
correct directory on the FTP server:
upgrade_info
<upgrade_name>.tar.gz
▼ Starting the upgrade from the appliance side
1 Start the command line interface.
2 Go to root > main > version > install
3 Enter the following information in the fields provided:
✔ IP address or hostname of FTP server
✔ Path to upgrade files
✔ Username on FTP server
✔ User password on FTP server
4 Press Ctrl-X to begin upgrading. A message will appear, Checking FTP
Site... as the appliance connects to the FTP server and retrieves the
upgrade_info file. Next, the CLI displays the type of upgrade (APP,
PATCH, or OS), and a message describing the upgrade. You will see a
warning that an OS upgrade later requires you to swap the primary and
secondary drives.
5 Press Ctrl-X to proceed or Escape to abort. If you select Proceed, the
upgrade continues, following the procedure for that upgrade type as
explained in the corresponding section below.
Application upgrade
After you press Ctrl-X to proceed, the CLI displays this message:
Ftp’ing Application Upgrade. Please Wait...
The server transfers the application upgrade file tar.gz (approximately 26
MB). When the transfer is complete, the CLI displays this message:
Upgrade Will Take 4-6 Minutes. Please Wait...
Once the upgrade is complete, the system automatically reboots. The CLI
displays this message:
Final Message: Upgrade Complete.
Intel (r) NetStructure (tm) 1520 Cache is rebooting.
Please wait 2-3 minutes for an active console login.
After the system has finished rebooting, follow the procedures in Starting the
system for the first time in chapter 2.
Chapter 5 Using the Command-Line Interface 57
Page 70

Patch upgrade
After you press Ctrl-X to proceed, the CLI displays this message:
Installing The Patch. Please Wait...
The server transfers the application upgrade tar.gz (typically less than 10
MB). When the transfer is complete, the CLI displays this message:
Ftp Fetching Successful
The appliance starts to install the upgrade. The CLI displays this message:
Patch Installation In Progress. Please Wait...
Once the upgrade is installed, the CLI displays this message:
Patch Installation Successful
Once the upgrade is complete, the system automatically reboots, then the CLI
displays this message:
Final Message: Upgrade Complete.
Intel (r) NetStructure (tm) 1520 Cache is rebooting.
Please wait 2-3 minutes for an active console login.
Continue to use the appliance as before. If the upgrade requires you to reset the
application, you are warned in an upgrade message.
OS/Application upgrade
After you press Ctrl-X to proceed, the CLI displays the message:
Upgrading To The New OS. Please Wait...
The server transfers the application image upgrade file tar .gz (typically 310 MB).
When the transfer is complete, the CLI displays this message:
Ftp Fetching Successful
The appliance begins preparing the secondary disk, and the CLI displays this
message:
Disk Preparation in Progress. Please Wait...
Once the disk is prepared, the CLI displays this message:
Disk Preparation Successful
Next, reboot the system. After the system has finished rebooting, follow the
procedures in Starting the system for the first time in chapter 2.
Running a different version of the appliance software
You can switch between the two different versions of the software.
▼ Running a different version of the appliance software
1 Select the main menu, and press Enter.
2 Select versions, and press Enter.
3 Select switch, and press Enter . Doing so displays a list of v ersions. If no other
versions exist, a message displays indicating such.
4 Select the version you want to run, and press Enter.
58 Intel NetStructure Cache Appliance Administrator’s Guide
Page 71

Deleting a version of the appliance software
You can delete a version of the appliance software when you need to add a newer
version but you already have two versions installed.
Note You cannot delete the currently running version of the appliance software. To
delete that software, you must first switch to the second version and then delete
the other version. Also, if you have only one software version installed, you
cannot delete it.
▼ Deleting a version of the appliance software
1 Select the main menu, and press Enter.
2 Select versions, and press Enter.
3 Select delete, and press Enter.
4 Select the version you want to delete, and press Enter. Doing so displays a
confirmation prompt asking you whether you want to really delete the
version.
5 When prompted, press y to confirm or n to cancel.
Viewing which version of the appliance software is currently running
You can check which version of the appliance software is running on your
machine.
▼ Viewing the current version of the appliance
1 Select the main menu, and press Enter.
2 Select versions, and press Enter.
3 Select current, and press Enter. Doing so displays a message that indicates
the current version number.
Clearing statistics
You can clear statistics that remain through reboot operations (persistent
statistics). Clearing statistics from the appliance initializes them to a preinstallation state.
Note Clearing statistics involves stopping and restarting the appliance.
▼ Clearing statistics for the appliance
1 Select the main menu, and press Enter.
2 Select stop, and press Enter. Doing so stops all caching functions in the
appliance and displays a status message indicating such.
3 Select clear, and press Enter . Doing so displays a confirmation prompt asking
you whether you want to really clear statistics.
4 Be sure that y appears after the confirmation prompt and then press Enter.
Chapter 5 Using the Command-Line Interface 59
Page 72

5
Press CTRL-X to clear the statistics and return to the previous screen.
Choosing to clear the statistics causes a confirmation message to appear.
6 Select start, and press Enter. Doing so resumes the caching functions in the
appliance.
Rebooting the System
You can reboot the system. Rebooting the system is different than starting or
stopping the caching software. A system reboot performs an orderly shutdown of
the appliance and restarts the operating system.
▼ Rebooting the system
1 Select the main menu, and press Enter.
2 Select reboot, and press Enter. Doing so causes the system to reboot. The
caching software retains its status (on or off) after the reboot operation.
Halting the System
You can halt the system. Halting the system is different than starting or stopping
the caching software or rebooting the system. Halting the system gives little or no
warning to users connected to the machine before logging them off. You should
halt the appliance only as a last resort to problems.
▼ Halting the system
1 Select the main menu, and press Enter.
2 Select halt, and press Enter. Doing so causes a message to display that
indicates the appliance is halting. Shortly after this message the CLI halts.
Changing the administrator password for telnet or serial access
Connecting to the appliance through telnet or a serial port requires you to enter
an administrator ID and password. When you install the appliance, the default ID
is admin and the password is admin. This procedure allows you to change the
password. The username remains the same.
Note Should you forget your password, contact Customer Service at Intel Corporation
for assistance. For information on how to contact Intel Customer Service, see the
Intel NetStructure Cache Appliance Pr oduct Support booklet that came with your
system.
Important For security, it is highly recommended that you change the password.
▼ Changing the password
1 Select the main menu, and press Enter.
60 Intel NetStructure Cache Appliance Administrator’s Guide
Page 73

2
Select passwd, and press Enter. Doing so causes a prompt to appear
requesting you to type and confirm the new administrator password.
3 Enter and confirm the new password.
4 Press CTRL-X to save your changes and return to the previous screen.
Note Changing the password value using CLI changes only the password for telnet or
serial access. It does not change the password for Manager UI access.
Resetting to factory settings
You can reset settings in the appliance to their factory defaults.
Warning Using this command deletes your installation and requires you to reinstall and
reconfigure the appliance completely.
▼ Resetting the appliance to default factory settings
1 Select the main menu, and press Enter.
2 Select reset, and press Enter . Doing so displays a confirmation prompt asking
you whether you want to really reset settings.
3 Be sure that y appear after the confirmation prompt and then press Enter.
4 Press CTRL-X to reset the settings and return to the previous screen.
Choosing to reset the settings causes the appliance to stop and delete the
installation, then returns you to the setup menu so you can reinstall the
appliance again. See Using the setup menu‚ on page 52 for more information.
Preparing a cache disk
You can prepare a cache disk for use in the system. You must prepare a new drive
in the system before the caching software can use it. Preparing the drive allows
the caching software to recognize the drive as a cache disk.
▼ Preparing a cache disk
1 Select the main menu, and press Enter.
2 Select prep, and press Enter. Doing so causes the system to examine the
cache drives for uninitialized drives and prepare them for use.
Using the config menu
The config menu lets you do the following:
✔ Set general controls, such as shut down, bounce, start up, or restart the local
appliance, and restart or bounce the cluster.
✔ Configure protocol options.
✔ Configure the cache.
✔ Configure security options.
Chapter 5 Using the Command-Line Interface 61
Page 74

✔ Configure routing options.
✔ Configure the Adaptive Redirection Module (ARM) for transparent proxy
caching.
✔ Configure the host database options.
✔ Configure logging options.
Setting general controls
You can stop, start, or restart caching on the local appliance or cluster. You can
also bounce the local appliance or the cluster. When you bounce the local
appliance, caching is stopped and then quickly restarted on the local appliance.
The same is true when you bounce the cluster, caching is stopped and then
quickly restarted on each node in the cluster.
▼ Setting general controls
1 Select the config menu, and press Enter.
2 Select server, and press Enter.
3 Select the configuration option you want to use, and press Enter:
✔ To specify the name of your cluster, select cache rename, and press
Enter. Doing so displays the current cache name and a field in which
you can enter a new name. After entering the new name, press CTRL-X
to save your changes and return to the previous screen.
✔ To enter a multicast group address, select multicast address, and press
Enter. Doing so displays the current multicast address and a field in
which you can enter the new multicast address. After entering the new
address, press CTRL-X to save your changes and return to the previous
screen.
✔ T o restart caching on the cluster, select cluster restart, and press Enter.
See step four for further information.
✔ To restart caching on the local appliance, select local restart, and press
Enter. See step four for further information.
✔ To shut down caching on the local appliance, select local shutdown,
and press Enter. See step four for further information.
✔ To start up caching on the local appliance, select local startup, and
press Enter. See step four for further information.
✔ To bounce the cluster, select cluster bounce, and press Enter. See step
four for further information.
✔ T o bounce the local appliance, select local bounce, and press Enter. See
step four for further information.
✔ To set up an alarm email address, select email, and press Enter. Doing
so displays the current alarm email address. You can enter the email
62 Intel NetStructure Cache Appliance Administrator’s Guide
Page 75

address you want to use in this field and press CTRL-X to save your
changes and return to the previous screen.
✔ T o see whether the appliance is in rev erse or forward proxy mode, select
view-mode, and press Enter. A message displays at the bottom of the
screen that indicates reverse or forward proxy enabled.
✔ To set the appliance for reverse proxy, select rev-proxy, and press
Enter.
✔ To set the appliance for forward proxy, select forw-proxy, and press
Enter.
Note To use both forward and reverse proxy, set the appliance to reverse. If
you are running in non-transparent mode, the proxy port is 80.
4 In some cases, you are prompted to confirm the action before it is performed.
T o continue with the action, be sure that y appears after the prompt when you
press Enter. After pressing Enter, press CTRL-X to return to the previous
screen. To cancel the operation, be sure n appears after the prompt and press
Enter. Or you can press ESC to exit the screen.
Configuring protocol options
You can set HTTP, NNTP, and FTP configuration options. You can also set filter
rules and remap rules. Filter rules let you deny or allow particular URL requests
and keep or strip header information. Remap rules let you create a set of
document routing rewrite rules for reverse proxy caching so that the appliance
can handle relative path requests.
Configuring HTTP options
You can view the current configuration settings and remove HTTP headers.
▼ Configuring HHTP options
1 Select the config menu, and press Enter.
2 Select protocols, and press Enter.
3 Select http, and press Enter.
4 Select the configuration option you want to use, and press Enter:
✔ To view the current HTTP configuration settings, select view, and press
Enter.
✔ To remove HTTP headers, select remove, and press Enter. You can
remove the following headers:
From: identifies the user’s email address
Referer: identifies the Web link followed by the user
Chapter 5 Using the Command-Line Interface 63
Page 76

User-Agent: identifies the agent making the request, usually a
browser
Cookie: identifies the user that made the request
✔ To add HTTP headers, select add, and press Enter. You can add the
following headers:
From: identifies the user’s email address
Referer: identifies the Web link followed by the user
User-Agent: identifies the agent making the request, usually a
browser
Cookie: identifies the user that made the request
✔ T o remove a client IP header or undo the removal, select remove/undo,
and press Enter. See insert/undo below.
✔ To insert a client IP header or undo the insertion, select insert/undo,
and press Enter. When a client IP header is inserted, it allows the traffic
server to track its IP as opposed to other means that common http
protocol permits.
✔ Language: Messages from the traffic server to users are displayed by
default in English.
✔ Auth: This is the proxy authorization. Because the proxy authorization
header field applies only to the next outbound proxy that demanded
authentication using the proxy-authenticate field, this feature is added
so that you can force the traffic server to forward the header to the next
proxy in the chain. By default, this is disabled. If you are running the
traffic server through another proxy (for example, a firewall), you
should enable this feature to make http authentication work.
Configuring NNTP options
You can configure enable and disable NNTP caching, view the current NNTP
settings, enable and disable NNTP server feeds, enable and disable NNTP access
control, configure NNTP servers, configure NNTP access, configure the NNTP
port, set timeout values, and remove HTTP headers.
▼ Configuring NNTP options
1 Select the config menu, and press Enter.
2 Select protocols, and press Enter.
3 Select nntp, and press Enter.
4 Select the configuration option you want to use, and press Enter:
✔ T o vie w the current NNTP configuration settings, select view, and press
Enter. The configuration settings display on screen.
✔ To enable the appliance to cache and serve news articles select enable,
and press Enter.
64 Intel NetStructure Cache Appliance Administrator’s Guide
Page 77

✔ To Disable the appliance from caching and serving news articles select
disable, and press Enter.
✔ T o allo w NNTP server feeds, select the first feeds in the menu and press
Enter.
✔ To inhibit NNTP server feeds select the second feeds in the menu and
press Enter.
✔ To allow NNTP access control, select the first access in the menu and
press Enter.
✔ To inhibit NNTP access control select the second access in the menu
and press Enter.
✔ To configure NNTP servers, select servers, and press Enter. Refer to
Configuring NNTP servers for more information.
✔ To configure NNTP access, select access and press Enter. Refer to
Configuring NNTP access‚ on page 69 for more information.
Configuring NNTP servers
You can add, delete, and view NNTP server rules. The appliance uses NNTP
server rules to let you specify:
❚ The parent NNTP servers from which you want the appliance to cache
articles.
❚ The news groups you want the appliance to observe.
❚ The type of NNTP activity you want the appliance to perform; for
example, caching news articles on demand, posting news articles, and
receiving news feeds.
❚ The network interface the appliance uses to contact the parent NNTP
server.
▼ Adding NNTP server rules
1 Select the config menu, and press Enter.
2 Select protocols, and press Enter.
3 Select nntp, and press Enter.
4 Select servers, and press Enter.
5 Select add rules, and press Enter.
6 Enter an NNTP server rule, and press Enter.
7 Press CTRL-X to save your changes and return to the previous screen.
Each rule must have the following format:
hostname group-wildmat priority interface
The
hostname and group-wildmat tags are required; priority and
interface are optional.
Chapter 5 Using the Command-Line Interface 65
Page 78

The following table describes the tags you can use in a rule:
Tag Description
hostname Choose one of the following:
❚ host name
❚ host name:port
❚ IP address
❚ IP address:port
❚ .block—Use .block to block access to specific
news groups.
group-wildmat This tag must be a comma-separated list of group
names and
wildcard). The list file options are: subscriptions,
distributions, and distrib.pats.
Do not use spaces in the list. Use the prefix “!” to
indicate groups not included in the list. The list is
processed in reverse order, so more specific
restrictions should be placed later in the list.
Examples:
list files in wildmat format (use * as a
❚ *,!distrib.pats
The previous example does not include any
distrib.pats files, but does include all others.
❚ *,!alt.*
The previous example does not include any
groups of the form alt.*, but does include all
others.
❚ talk.religion.*,!talk.religion.barney
,subscriptions
The previous example includes only subscriptions
from all talk.religion.* groups but excludes
talk.religion.barney.
priority This tag tells the appliance how to treat the specified
host and news groups. Use one of the following
options:
❚ <no priority tag>
If you do not use a priority tag, the appliance
caches articles from the specified news groups on
demand. If you specify multiple groups (such as
alt.*), the appliance maintains a group list and
will poll the parent NNTP server regularly to check
for changes in the group list.
66 Intel NetStructure Cache Appliance Administrator’s Guide
Page 79

Tag (Continued) Description (Continued)
priority
(continued)
❚ feed
The appliance will receive news feeds for the
specified groups as the parent NNTP server
receives news feeds. The appliance will not cache
articles on demand, since it will have them.
❚ push
The appliance can both receive news feeds and
cache articles on demand.
❚ pull
The appliance actively pulls (caches) all articles
from these news groups at a frequency you
specify in the appliance Manager UI. The
appliance does not wait for user requests.
A “pull” line must be preceded by a “cache on
demand” line. The appliance needs to be aware of
the news server and its groups before it can pull
articles from a specific group. See the examples
following this table.
❚ pullover
The appliance actively pulls the overview
database for the news groups but retrieves news
articles on demand.
A “pullover” line must be preceded by a “cache on
demand” line. The appliance needs to be aware of
the news server and its groups before it can pull
overviews from a specific group. See the
examples following this table.
❚ dynamic
The appliance automatically decides, based on
usage patterns, whether a group should be “pull,”
“pullover,” or demand retrieval-based.
❚ Enter a positive integer
The appliance retrieves articles on demand from
the specified server according to the assigned
priority. The default priority is 0. Multiple servers
assigned the same priority are accessed in a
round-robin fashion.
❚ post
Articles to be posted to the specified news groups
are sent to the specified server.
interface Enter the network interface the appliance uses to
contact the parent NNTP server.
Chapter 5 Using the Command-Line Interface 67
Page 80

Examples
The following rule tells the appliance to block all requests from rec.*
groups with the exception of rec.soccer:
.block !rec.soccer,rec.*
The following rule is an example of setting the port associated with the
hostname:
news.webhost.com:999 *
The following rule is an example of associating an interface and priority with
an IP address:
news.webhost.com * 0 10.3.3.2
The following rules are examples of establishing priorities for the hostnames:
news.webhost.com * 0
news.backup.com * 1
The following rules are examples of defining pull and pullover groups.
comp.webhost.com *
comp.webhost.com comp.* feed
Note Every line designating a pull or pullover group must be preceded by a “cache
on demand” line as follows:
comp.webhost.com alt.*
comp.webhost.com alt.bicycles pull
▼ Deleting NNTP server rules
1 Select the config menu, and press Enter.
2 Select protocols, and press Enter.
3 Select nntp, and press Enter.
4 Select servers, and press Enter.
5 Select delete, and press Enter. Doing so displays a list of rules. If no rules
exist, a message displays at the bottom of the screen indicating such.
6 Use the arrow keys to select the rule you want to delete and press Enter.
7 Press CTRL-X to save your change and return to the previous screen.
68 Intel NetStructure Cache Appliance Administrator’s Guide
Page 81

▼ Viewing NNTP server rules
1 Select the config menu, and press Enter.
2 Select protocols, and press Enter.
3 Select nntp, and press Enter.
4 Select servers, and press Enter.
5 Select view, and press Enter. Doing so displays the file containing the
NNTP server rules.
Configuring NNTP access
The appliance uses NNTP access rules to let you control user access to news
articles that are cached. Each rule describes the access privileges for a
particular group of clients. You can add, delete, and view access rules.
▼ Adding NNTP access rules
1 Select the config menu, and press Enter.
2 Select protocols, and press Enter.
3 Select nntp, and press Enter.
4 Select access, and press Enter.
5 Select add rules, and press Enter.
6 Enter an NNTP access rule, and press Enter.
7 Press CTRL-X to save the rule and return to the previous screen.
Each rule must begin with a specific client group. You can use three ways
to specify groups of clients: by IP range, domain, or host name. For
example:
ip=0.0.0.0-255.255.255.255
ip=127.0.0.1
domain=intel.com
hostname=myhost.mydomain.com
Following the client group is an access directive. The access directive is
of the form access=value. The allowed access values are ip_allow,
ip_deny, basic, generic, and custom. Depending on the access
directive, you can further specify an authenticator program, users, and
passwords, as in the following examples:
ip=127.0.0.1 access=”generic” authenticator=”homebrew”
user=”joe”
hostname=myhost.com access=”basic” user=”joe” pass=”bob”
Chapter 5 Using the Command-Line Interface 69
Page 82

The following table lists the access directive options:
If access is... authenticator is... user is... pass is...
ip_allow not required not required not required
ip_deny not required not required not required
basic not required required optional
generic optional not required not required
custom required optional; but
the only
allowed entry
is the string
“required”.
(See the
following
example.)
optional; but the
only allowed
entry is the
string “required”.
(See the
following
example.)
The following is an example of custom access:
ip=127.0.0.1 access=”custom” authenticator=”hb” user=required pass=required
▼ Deleting NNTP access rules
1 Select the config menu, and press Enter.
2 Select protocols, and press Enter.
3 Select nntp, and press Enter.
4 Select access, and press Enter.
5 Select delete, and press Enter. Doing so displays a list of rules. If no rules
exist, a message displays at the bottom of the screen indicating such.
6 Use the arrow keys to select the rule you want to delete and press Enter.
7 Press CTRL-X to save your change and return to the previous screen.
▼ Viewing NNTP access rules
1 Select the config menu, and press Enter.
2 Select protocols, and press Enter.
3 Select nntp, and press Enter.
4 Select access, and press Enter.
5 Select view, and press Enter. Doing so displays file containing the NNTP
access rules.
70 Intel NetStructure Cache Appliance Administrator’s Guide
Page 83

Configuring Secure Socket Layer (SSL) port
You can view and specify the ports to which SSL is restricted.
▼ Viewing SSL ports
1 Select the config menu, and press Enter.
2 Select protocols, and press Enter.
3 Select ssl, and press Enter.
4 Select view, and press Enter. Doing so displays the ports to which SSL is
restricted.
▼ Restricting SSL to specific ports
1 Select the config menu, and press Enter.
2 Select protocols, and press Enter.
3 Select ssl, and press Enter.
4 Select port, and press Enter. Doing so displays the current ports to which
SSL is restricted and a field in which you can specify additional ports.
5 Supply the ports to which SSL will be restricted, and press Enter. You can
enter a maximum of two ports. When entering more than one port,
separate them with blank space. Also, you must enter the complete list of
ports even if one is already specified in the existing list.
6 Press CTRL-X to save your changes and return to the previous screen.
Configuring FTP options
You can view the current FTP configuration settings, set the connection mode,
the inactivity timeout value, and the anonymous password.
▼ Configuring the FTP options
1 Select the config menu, and press Enter.
2 Select protocols, and press Enter.
3 Select ftp, and press Enter.
4 Select the configuration option you want to use, and press Enter:
✔ To view the current FTP configuration settings, select view, and press
Enter. The configuration settings display on screen.
✔ To set the connection mode, select mode, and press Enter. You can
select from three modes: PASV/PORT, PASV only, and PORT only.
Pressing Enter makes the selection.
Chapter 5 Using the Command-Line Interface 71
Page 84

✔ T o set the inacti vity timeout (the length of time the appliance waits for a
response from the FTP server before abandoning the user’s request for
data), select inactivity, and press Enter. Doing so causes a field to
appear with the current setting displayed. Supply the new value and
press Enter. Press CTRL-X to save your changes and return to the
previous screen.
✔ T o set the anon ymous password for FTP serv ers that require a password
for access, select password, and press Enter. Doing so causes a field to
appear with the current password displayed. Supply the new value and
press Enter. Press CTRL-X to save your changes and return to the
previous screen.
Setting filter rules
The appliance uses filter rules to deny or allow particular URL requests and keep
or strip header information. When a URL request is allowed, the appliance will
cache and serve the requested document. When a request is denied, the client
receives an access denied message.
You can add, delete, and view filter rules.
▼ Adding filter rules
1 Select the config menu, and press Enter.
2 Select protocols, and press Enter.
3 Select filter, and press Enter.
4 Select add rules, and press Enter.
5 Enter a filter rule, and press Enter.
6 Press CTRL-X to save the rule and return to the previous screen.
Each rule must have the following format:
primary destination=value secondary specifier=value action=value
Note You can use more than one secondary specifier in a rule. However, you
cannot repeat a secondary specifier.
The following table lists the primary destination tags and their allowed
values:
Primary Destination Allowed Value
dest_domain Requested domain name
dest_host Requested host name
dest_ip Requested IP address
url_regex Regular expression to be found in a URL
72 Intel NetStructure Cache Appliance Administrator’s Guide
Page 85

The secondary specifiers are optional. The following table lists the possible
tags and their allowed values:
Secondary Specifier Allowed Value
time A time range, such as 08:00-14:00
src_ip The IP address of the client
prefix A prefix in the path part of a URL
suffix A file suffix in the URL
port A requested URL port
method A request URL method; one of the following:
❚ get
❚ post
❚ put
❚ trace
scheme A request URL protocol; one of the following:
❚ HTTP
❚ FTP
The following table lists the possible action tags and their allowed values:
Action Value
action
❚ ip_allow
❚ ip_deny
keep_hdr Enter the client request header information that
you want to keep:
❚ date
❚ host
❚ cookie
❚ client_ip
strip_hdr Enter the client request header information that
you want to strip. You have the same options as
keep_hdr.
Examples
The following rule tells the appliance to deny FTP document requests to the
IP address 112.12.12.12.
dest_ip=112.12.12.12 scheme=ftp action=ip_deny
Chapter 5 Using the Command-Line Interface 73
Page 86

The following rule tells the appliance to keep the client IP address header for
URL addresses that contain the regular expression politics and whose path
prefix is /viewpoint.
url_regex=politics prefix=/viewpoint keep_hdr=client_ip
The following rule tells the appliance to strip all cookies to the requested host
www.intel.com.
dest_host=www.intel.com strip_hdr=cookie
The following rule tells the appliance not to allow puts to the requested host
www.intel.com.
dest_host=www.intel.com method=put action=ip_deny
▼ Deleting filter rules
1 Select the config menu, and press Enter.
2 Select protocols, and press Enter.
3 Select filter, and press Enter.
4 Select delete, and press Enter. Doing so causes a list of the rules to appear. If
no rules exist, a message appears at the bottom of the screen indicating such.
5 Use the arrow keys and move to the rule you want to delete, and press Enter.
6 Press CTRL-X to save your changes and return to the previous screen.
▼ Viewing filter rules
1 Select the config menu, and press Enter.
2 Select protocols, and press Enter.
3 Select filter, and press Enter.
4 Select view, and press Enter. Doing so displays the file containing the filter
rules.
Setting remap rules
For reverse proxy caching, the appliance uses remap rules to map an origin serv er
to the appropriate location on the appliance.
Remap rules are also used to modify location headers. Origin servers might
respond to a request with a location header that redirects the client to another
location. Origin server location headers must be reverse mapped so that clients
do not bypass the appliance when they make redirected requests.
You can add, delete, and view remap rules.
▼ Adding remap rules
1 Select the config menu, and press Enter.
2 Select protocols, and press Enter.
74 Intel NetStructure Cache Appliance Administrator’s Guide
Page 87

3
Select remap, and press Enter.
4 Select add rules, and press Enter.
5 Enter a remap rule, and press Enter.
6 Press CTRL-X to save your changes and return to the previous screen.
Each rule must consist of three fields: type target replacement.
The following table describes the proper format for each field.
Field Description
type Enter either one of the following:
❚ map—maps an incoming request URL to the
appropriate origin server URL.
❚ reverse_map—use for location header modifying
rules.
target
replacement
Enter the from URL. You can enter up to four
components:
<scheme>://<host>:<port>/<path_prefix>
Enter the
components:
<scheme>://<host>:<port>/<path_prefix>
to URL. You can enter up to four
For more detailed information about remapping rules, refer to Understanding
server acceleration mapping rules‚ on page 132.
▼ Deleting remap rules
1 Select the config menu, and press Enter.
2 Select protocols, and press Enter.
3 Select remap, and press Enter.
4 Select delete, and press Enter. Doing so displays a list of the current remap
rules. If no rules exist, a message appears at the bottom of the screen
indicating such.
5 Use the arrow keys and position the cursor over the rule you want to delete,
and press Enter.
6 Press CTRL-X to save your changes and return to the previous screen.
▼ Viewing remap rules
1 Select the config menu, and press Enter.
2 Select protocols, and press Enter.
3 Select remap, and press Enter.
4 Select view, and press Enter. Doing so displays the file containing the remap
rules.
Chapter 5 Using the Command-Line Interface 75
Page 88

Configuring the cache
You can configure cache storage options to do the following:
✔ Enable caching of objects for different protocols.
✔ Set disk storage options.
✔ Set freshness properties.
✔ Set caching rules.
Enabling caching for different protocols
You can configure the appliance to cache objects retrieved via the HTTP, NNTP,
and FTP protocols. You can also choose to ignore or obey user requests to bypass
the cache.
▼ Enabling caching for different protocols
1 Select the config menu, and press Enter.
2 Select cache, and press Enter.
3 Select activation, and press Enter.
4 Select the configuration option you want to change.
Note: You are not prompted for confirmation. Make sure you want to complete the
action before you select one of the following options, and press Enter.
✔ To enable HTTP caching, select the first HTTP, and press Enter.
✔ To disable HTTP caching, select the second HTTP, and press Enter.
✔ To enable NNTP caching, select the first NNTP, and press Enter.
✔ To disable NNTP caching, select the second NNTP, and press Enter.
✔ To enable FTP caching, select the first FTP, and press Enter.
✔ To disable FTP caching, select the second FTP, and press Enter.
✔ To ignore user requests to bypass the cache (ignore client Cache
Control: no-cache headers), select the first Bypass, and press Enter.
✔ To obey user requests to bypass the cache (obey client Cache Control:
no-cache headers), select the second Bypass, and press Enter.
After you press Enter, your selection displays at the bottom of the screen.
76 Intel NetStructure Cache Appliance Administrator’s Guide
Page 89

Setting disk storage options
You can configure the cache to store only objects below a certain size and to store
a limited number of alternates.
▼ Setting disk storage options
1 Select the config menu, and press Enter.
2 Select cache, and press Enter.
3 Select storage, and press Enter. Doing so causes the Configure Cache
Storage box to appear. This box shows the current settings for maximum
object size and maximum number of alternates allowed in the cache.
4 In the New HTTP/FTP Object Size field, type the maximum size of the
HTTP or FTP objects that you want the appliance to cache, and press Enter.
5 In the New Maximum number of alternates field, type the maximum
number of alternates that you want the appliance to cache, and press Enter.
6 Press CTRL-X to save your changes and return to the previous screen.
Setting object freshness options
You can configure how fresh you want the appliance to keep your documents in
the cache.
▼ Setting freshness properties
1 Select the config menu, and press Enter.
2 Select cache, and press Enter.
3 Select freshness, and press Enter . Doing so displays a list of options. Each of
these options has several selections you can choose from. Use the arrow k e ys
to position the cursor over the option you want and press Enter.
Chapter 5 Using the Command-Line Interface 77
Page 90

The following table shows the options:
Option Description
Options to Verify freshness Choosing this option lets you configure how
the appliance asks the original content server
to verify the freshness of objects (revalidate
them) before serving them.
Select from one of the following options and
press Enter. After pressing Enter press
CTRL-X to save your changes and return to
the previous screen.
❚ When The Object Has Expired—The
appliance revalidates objects with explicit
expiration dates after they expire.
Otherwise, it uses heuristic methods to
evaluate freshness and revalidates the
object should it be stale.
❚ When The Object Has Expired Or Has No
Expiry Date—The appliance revalidates
objects with explicit expiration dates after
they expire. All other documents are
revalidated before serving.
❚ Always—The appliance always revalidates
objects before serving them.
❚ Never—The appliance never checks object
freshness.
Freshness information Specifies the minimum freshness information
required when considering to cache a
document.
Select from one of the following options and
press Enter. After pressing Enter press
CTRL-X to save your changes and return to
the previous screen.
❚ An Explicit Lifetime—The appliance only
caches objects with Expires headers or
Cache-Control: max-age headers.
❚ A Last Modified Time—The appliance only
caches objects with Expires headers, or
Cache-Control: max-age headers,
or Last-Modified headers.
❚ Nothing—The appliance caches
documents regardless of freshness
headers.
78 Intel NetStructure Cache Appliance Administrator’s Guide
Page 91

Option (Continued) Description (Continued)
Set FTP objects expiry FTP objects carry no time stamp or date
information. The appliance considers them
fresh for the amount of time specified here.
This "freshness" time is counted from the
time the object arrives in the cache.
Enter the time in seconds and press Enter.
After pressing Enter, press CTRL-X to save
your changes and return to the previous
screen.
Internet Explorer options Versions of Microsoft Internet Explorer do not
request cache reloads from reverse proxies
and transparent caches when the user
presses the browser Refresh button. This
behavior can prevent users from manually
reloading content directly from the origin
servers. You can configure the appliance to
treat Microsoft Internet Explorer requests
more conservatively. Doing so provides
fresher content at the cost of serving fewer
documents from cache.
Internet Explorer requests force a check with
the origin server.
Select from one of the following options and
press Enter. After pressing Enter press
CTRL-X to save your changes and return to
the previous screen.
❚ Never
❚ For IMS Revalidation Requests
❚ Always
Configuring caching rules
The appliance uses caching rules to determine how a particular group of URL
addresses should be cached. You can add, delete, and view caching rules.
Caching rules can specify:
✔ Whether to cache objects
✔ How long to keep (pin) particular objects in the cache
✔ How long to consider cached objects as fresh
✔ Whether to ignore no-cache directories from the server
▼ Adding caching rules
1 Select the config menu, and press Enter.
2 Select cache, and press Enter.
Chapter 5 Using the Command-Line Interface 79
Page 92

3
Select rules, and press Enter.
4 Select add rules, and press Enter.
5 Enter a caching rule, and press Enter.
6 Press CTRL-X to save your rule and return to the previous screen.
Each rule must have the following format:
primary destination=value secondary specifier=value action=<value
The following table lists the supported primary destinations and their allowed
values:
Primary Destination Allowed Value
dest_domain Requested domain name
dest_host Requested host name
dest_ip Requested IP address
url_regex Regular expression to be found in a URL
The secondary specifiers are optional. The following table lists the possible
tags and their allowed values.
Note You can use more than one secondary specifier in a rule. However, you
cannot repeat a secondary specifier.
Secondary Specifier Allowed Value
time A time range, such as 08:00-14:00
src_ip The IP address of the client
prefix A prefix in the path part of a URL
suffix A file suffix in the URL
port A requested URL port
method A request URL method; use one of the following:
❚ get
❚ post
❚ put
❚ trace
scheme A request URL protocol; use one of the following:
❚ HTTP
❚ FTP
80 Intel NetStructure Cache Appliance Administrator’s Guide
Page 93

The following table lists the possible action tags and their allowed values:
Action Value
action
❚ never-cache
❚ ignore-no-cache
pin-in-cache Enter the amount of time you want to keep the
object(s) in the cache. Use the following time
formats:
❚ h for hours, e.g. 10h
❚ m for minutes, e.g. 5m
❚ s for seconds, e.g. 20s
❚ mixed units, e.g. 1h15m20s
revalidate Enter the amount of time you want to consider
the object(s) fresh. Use the same time formats
that are shown in pin-in-cache.
Examples
The following rule tells the appliance to never cache FTP documents
requested from the IP address 112.12.12.12.
dest_ip=112.12.12.12 scheme=ftp action=never-cache
The following rule tells the appliance to keep in the cache for 12 hours
documents whose URL addresses contain the regular expression
politics and whose the paths contain the prefix /viewpoint.
url_regex=politics prefix=/viewpoint pin-in-cache=12h
▼ Deleting cache rules
1 Select the config menu, and press Enter.
2 Select cache, and press Enter.
3 Select rules, and press Enter.
4 Select delete rules, and press Enter. Doing so displays a list of the current
rules. If no rules exits, a message appears at the bottom of the screen
indicating such.
5 Use the arrow keys to position the cursor over the rule you want to delete and
press Enter.
6 Press CTRL-X to save your changes and return to the previous screen.
Chapter 5 Using the Command-Line Interface 81
Page 94

▼ Viewing cache rules
1 Select the config menu, and press Enter.
2 Select cache, and press Enter.
3 Select rules, and press Enter.
4 Select view rules, and press Enter. Doing so displays the file containing the
cache rules.
Configuring security options
You can control client access to the appliance and access to the Manager UI.
Controlling client access to the appliance
The appliance uses IP Allow rules to specify ranges of IP addresses that are
allowed to use the appliance as a web proxy. If you want to deny access to
specific IP addresses, do not include them in an IP Allow rule. You can add,
delete, and view IP Allow rules.
▼ Adding IP Allow rules
1 Select the config menu, and press Enter.
2 Select security, and press Enter.
3 Select server, and press Enter.
4 Select add rules, and press Enter.
5 Enter an IP allow rule, and press Enter.
6 Press CTRL-X to save your rule and return to the previous screen.
Each rule must have the following format:
src_ip=IPaddress or IPaddress_range action=ip_allow
The IP address or range of IP addresses specified in the src_ip field are
allowed to use the appliance as a web proxy.
Examples
The following rule allows all clients to use the appliance as a web proxy:
src_ip=0.0.0.0-255.255.255.255 action=ip_allow
The following rule allows a specific subnet to use the appliance as a web
proxy:
src_ip=123.12.3.000-123.12.3.123 action=ip_allow
▼ Deleting IP Allow rules
1 Select the config menu, and press Enter.
2 Select security, and press Enter.
82 Intel NetStructure Cache Appliance Administrator’s Guide
Page 95

3
Select server, and press Enter.
4 Select delete rules, and press Enter. Doing so displays a list of current rules.
If no rules exist, a message displays at the bottom of the screen indicating
such.
5 Use the arrow keys to position the cursor over the rule you want to delete, and
press Enter.
6 Press CTRL-X to save your changes and return to the previous screen.
▼ Viewing IP Allow rules
1 Select the config menu, and press Enter.
2 Select security, and press Enter.
3 Select server, and press Enter.
4 Select view rules, and press Enter. Doing so displays the file containing the
IP Allow rules.
Controlling access to the Manager UI
The appliance uses Manager Allow rules to specify ranges of IP addresses that
are allowed to access the Manager UI. If you want to deny Manager UI access to
specific IP addresses, do not include them in a Manager Allow rule. You can add,
delete, and view Manager Allow rules.
▼ Adding Manager Allow rules
1 Select the config menu, and press Enter.
2 Select security, and press Enter.
3 Select mgmt, and press Enter.
4 Select add rules, and press Enter.
5 Enter a rule, and press Enter.
6 Press CTRL-X to save your rule and return to the previous screen.
Each rule must have the following format:
src_ip=IPaddress or IPaddress_range action=ip_allow
The IP address or range of IP addresses specified in the src_ip field are
allowed to access the Manager UI.
Examples
The following rule allows one user to access the Manager UI:
src_ip=123.12.3.123 action=ip_allow
The following rule allows a range of IP addresses to access the Manager
UI:
src_ip=123.12.3.000-123.12.3.123 action=ip_allow
Chapter 5 Using the Command-Line Interface 83
Page 96

▼ Deleting Manager Allow rules
1 Select the config menu, and press Enter.
2 Select security, and press Enter.
3 Select mgmt, and press Enter.
4 Select delete rules, and press Enter. Doing so displays a list of the current
rules. If no rules exist, a message displays at the bottom of the screen
indicating such.
5 Use the arrow keys to position the cursor over the rule you want to delete, and
press Enter.
6 Press CTRL-X to save your changes and return to the previous screen.
▼ Viewing Manager Allow rules
1 Select the config menu, and press Enter.
2 Select security, and press Enter.
3 Select mgmt, and press Enter.
4 Select view rules, and press Enter. Doing so displays the file containing the
Manager Allow rules.
Configuring routing options
You can configure ICP peers (parent and sibling caches), control HTTP parent
proxy services, and configure Web cache control protocol.
Configuring and maintaining ICP peers
You can do the following when configuring and maintain ICP peers:
✔ View and modify ICP rules
✔ View current ICP settings
✔ Enable ICP
✔ Disable ICP
✔ Enable multicast
✔ Disable multicast
✔ Set ICP port numbers
✔ Set ICP query timeout
Viewing and modifying ICP rules
The appliance uses ICP rules to define parent and sibling caches. You can
add, delete, and view ICP rules.
84 Intel NetStructure Cache Appliance Administrator’s Guide
Page 97

▼ Adding ICP rules
1 Select the config menu, and press Enter.
2 Select routing, and press Enter.
3 Select icp, and press Enter.
4 Select rules, and press Enter.
5 Select add rules, and press Enter.
6 Add an ICP rule, and press Enter.
7 Press CTRL-X to save your rule and return to the previous screen.
Each rule must contain the name and configuration information for a
single ICP peer in the following format:
host:hostIP:cache_type:proxy_port:icp_port:MC_on:MC_IP:MC_TTL:
The following table describes each field:
Field Description
host The host name of the ICP peer. The name
localhost is reserved for the appliance.
host IP The IP address of the ICP peer.
cache_type The cache type. Use the following options:
❚ 1 to indicate an ICP parent cache
❚ 2 to indicate an ICP sibling cache
Option 3 is reserved for the local host (the
appliance itself).
proxy_port The port number of the TCP port used by the
ICP peer for proxy communication.
icp_port The port number of the UDP port used by the
ICP peer for ICP communication.
MC_on Multicast on/off. Use the following options:
❚ 0 if multicast is not enabled
❚ 1 if multicast is enabled
Chapter 5 Using the Command-Line Interface 85
Page 98

Field (Continued) Description (Continued)
MC_IP The multicast IP address.
MC_TTL The multicast time to live. Use the following
Example
The following example configuration is for three nodes: the local host,
one parent, and one sibling:
localhost:0.0.0.0:3:8080:3130:0:0.0.0.0:0:
host1:123.12.1.23:1:8080:3131:0:0.0.0.0:0:
host2:123.12.1.24:2:8080:3131:0:0.0.0.0:0:
▼ Deleting ICP rules
1 Select the config menu, and press Enter.
2 Select routing, and press Enter.
3 Select icp, and press Enter.
4 Select rules, and press Enter.
5 Select delete rules, and press Enter. Doing so displays a list of current
rules. If no rules exist, a message displays at the bottom of the screen
indicating such.
6 Use the arrow keys to position the cursor over the rule you want to delete,
and press Enter.
7 Press CTRL-X to save your changes and return to the previous screen.
If MC_on is disabled, appliance ignores this
field.
options:
❚ 1 if IP multicast datagrams will not be
forwarded beyond a single subnetwork
❚ 2 to allow delivery of IP multicast datagrams
to more than one subnet (if there are one or
more multicast routers attached to the first
hop subnet)
If MC_on is disabled, appliance ignores this
field.
86 Intel NetStructure Cache Appliance Administrator’s Guide
Page 99

▼ Viewing ICP rules
1 Select the config menu, and press Enter.
2 Select routing, and press Enter.
3 Select icp, and press Enter.
4 Select rules, and press Enter.
5 Select view rules, and press Enter. Doing so causes the file containing the
ICP rules to appear.
Viewing current ICP settings
You can find out if the ICP protocol is enabled or disabled, what the ICP port
number is, whether ICP multicast is enabled or disabled, and the ICP query
timeout by viewing the settings.
▼ Viewing ICP settings
1 Select the config menu, and press Enter.
2 Select routing, and press Enter.
3 Select icp, and press Enter.
4 Select view, and press Enter.
Enabling and disabling ICP
You can enable or disable ICP.
▼ Enabling ICP
1 Select the config menu, and press Enter.
2 Select routing, and press Enter.
3 Select icp, and press Enter.
4 Select enable-icp, and press Enter.
▼ Disabling ICP
1 Select the config menu, and press Enter.
2 Select routing, and press Enter.
3 Select icp, and press Enter.
4 Select disable-icp, and press Enter.
Chapter 5 Using the Command-Line Interface 87
Page 100

Enabling and disabling multicast in ICP
You can enable or disable multicast in ICP.
▼ Enabling multicast in ICP
1 Select the config menu, and press Enter.
2 Select routing, and press Enter.
3 Select icp, and press Enter.
4 Select enable-multicast, and press Enter.
▼ Disabling multicast in ICP
1 Select the config menu, and press Enter.
2 Select routing, and press Enter.
3 Select icp, and press Enter.
4 Select disable-multicast, and press Enter.
Setting the ICP port number
You can set the ICP port number.
▼ Setting the ICP port number
1 Select the config menu, and press Enter.
2 Select routing, and press Enter.
3 Select icp, and press Enter.
4 Select port, and press Enter. Doing so causes a field to appear that has the
current port number displayed.
5 Supply the port number in the data field, and press Enter.
6 Press CTRL-X to save your changes and return to the previous screen.
Setting the ICP query timeout
You can set the ICP query timeout number.
88 Intel NetStructure Cache Appliance Administrator’s Guide
 Loading...