

Page 1

EtherExpress™ PRO/100 CardBus
Mobile Adapter
User’s Guide
How to Use This Manual
This User’s Guide contains the latest and most complete information
available at press time on the installation and operation of the PRO/100
CardBus adapter. It is designed to help both new and experienced network
users install and configure the Intel product in the shortest time possible.
Overview of the Installation Process
For an overview of the installation process, see the Late Breaking News card
and Chapters 1 and 2 in this User’s Guide. For technical details on configuration issues see Chapter 3, Configuration Reference.
How to Find More Information
Use the Table of Contents, Index, and page and text headings in this User’s
Guide to help you find what you need. Check the README file on the
Network Drivers diskette. To check for updated drivers, access the Intel
website at:
http://support.intel.com
See Appendix A for additional support information.
i
Page 2

Copyright © 1997 Intel Corporation. All rights reserved.
Intel Corporation
5200 N.E. Elam Young Parkway
Hillsboro, OR 97124-6497
Intel Corporation assumes no responsibility for errors or omissions in this
guide. Nor does Intel make any commitment to update the information
contained herein.
*
Other product and corporate names may be trademarks of other companies
and are used only for explanation and to the owners’ benefit, without intent to
infringe.
Second edition June 1997 668559-002
ii
Page 3

Contents
Hardware Installation .............................................. 1
Before Installing Hardware................................................................... 1
Installing the Hardware ......................................................................... 3
What to Do Next ................................................................................... 5
Software Installation ............................................... 7
CardBus Installation Guidelines ........................................................... 7
Installing with Windows 95 .................................................................. 8
Determining Y our V ersion of Windo ws 95 ........................................... 8
Installing with Windows 95 .................................................................. 9
Version 4.00.950 or 4.00.950a .............................................................. 9
Installing with Windows 95 ................................................................ 15
Version 4.00.950b (OSR2) or Later .................................................... 15
Installing NetWare Client 32 ODI Drivers under Windows 95.......... 16
Installing with Windows NT 3.51 and 4.0 .......................................... 18
Installing with Windows 3.x and Windows for Workgroups .............. 21
Installing under IBM OS/2 (Warp 3.0 and 4.0) Using the NDIS
or ODI Driver.............................................................................. 22
Installing Network Software ............................................................... 25
Artisoft LANtastic version 6.0............................................................ 26
AT&T StarGROUP LAN Manager version 2.1a ................................ 26
Banyan VINES version 5.5 & 6.0 ....................................................... 26
DEC PATHWORKS versions 5.x or 6.x............................................. 28
FTP Software LANWatch ................................................................... 31
FTP Software PC/TCP ........................................................................ 33
Generic Installation ............................................................................. 37
HP LAN Manager ............................................................................... 37
iii
Page 4

CONTENTS
IBM Local Area Network Support Program....................................... 38
IBM Local Area Network Support Program (version 1.2) ................. 39
IBM PC LAN and IBM DOS LAN Requester ................................... 40
Manual Installation ............................................................................. 41
Microsoft LAN Manager .................................................................... 41
Windows for Workgroups ................................................................... 43
Novell NetWare ................................................................................... 47
SunSoft PC-NFS (version 3.5)............................................................ 48
Novell NetWare 32-bit ODI Drivers................................................... 49
Ungermann-Bass Net/One for DOS ................................................... 51
Wollongong PathWay Access for DOS............................................... 52
Configuration Reference....................................... 55
Who Should Consult This Chapter? ................................................... 55
Special Features .................................................................................. 56
Sample Configuration Files for Selected Network Operating
Systems ....................................................................................... 60
Artisoft LANtastic/AI 6.0 ................................................................... 60
Banyan VINES .................................................................................... 63
DEC PATHWORKS 5.0 and 5.1......................................................... 64
Windows for Workgroups 3.11 ........................................................... 65
Windows for Workgroups Using the ODI Driver with NetWare as
Secondary Network...................................................................... 67
Driver Parameters Reference .............................................................. 71
ODI Settings (for driver M32AODI.COM and M32AODI.OS2) ...... 71
NDIS 2.0.1 Settings (for drivers M32ANDIS.EXE and
M32ANDIS.OS2) ........................................................................ 73
M32A.SYS (NDIS 3) Settings for Microsoft Windows NT and
Windows 95.................................................................................. 76
Novell Client 32 Driver Settings (for driver M32A.LAN)................. 79
Novell Client32 Driver Keywords ...................................................... 79
Packet Driver Settings (for driver ....................................................... 80
M32APD.COM) .................................................................................. 80
Diagnostic Test Utility Settings (M32ATEST.EXE) .......................... 82
Keyword Alphabetical Reference ....................................................... 82
T r oubleshooting..................................................... 89
LED Indicators .................................................................................... 90
Diagnostic Self Test (MS-DOS only) ................................................. 91
Error Messages.................................................................................... 94
General Troubleshooting..................................................................... 98
iv
Page 5

C O N T E N T S
Network Operating System Troubleshooting ................................... 104
Troubleshooting Checklist ................................................................ 116
Intel Automated Customer Support................... 119
Specifications ...................................................... 121
General Specifications ...................................................................... 121
General Specifications (continued)................................................... 122
Compatibility..................................................................................... 122
Technical Specifications.................................................................... 123
Limited Lifetime Warranty................................. 125
Network Software License Agreement .............. 129
Regulatory Agency Notices................................ 133
Index..................................................................... 135
v
Page 6

CONTENTS
vi
Page 7

Chapter 1
Hard ware Installation
Follow the instructions in this chapter to install the PRO/100 CardBus
adapter hardware and network cabling. See Chapter 2, Software
Installation for instructions on how to install network software.
The PRO/100 CardBus adapter provides access to both 10 Mbps and 100
Mbps networks with a single adapter cable, and auto-senses 10 Mbps or
100 Mbps network speed. The Adapter requires Category 5 (data
grade) unshielded twisted pair (UTP) cabling for 100 Mbps or
Category 3 or 5 for 10 Mbps.
Before Installing Hardware
Check Package Contents:
• PRO/100 CardBus adapter
• A LAN adapter cable with 15-pin PC Card connector at one end
and a RJ-45 connector at the other (for 100Base-TX or 10Base-T
Ethernet connectivity)
• Software on two 3.5-inch diskettes
• Late Breaking News card
• User’s Guide
• Product registration card
• Protective adapter case
NOTE:
Please fill out the Product Registration Card and mail it immediately.
1
Page 8

CHAPTER 1
Verify Other Required Equipment
To install the PRO/100 CardBus adapter, you need the following:
1 A portable PC with a CardBus slot. Note that CardBus slots are
different from 16-bit PCMCIA slots. If your CardBus adapter does not
fit in your slot, it may be a 16-bit slot. Contact your computer dealer for
more information.
2 A local area network supporting 10 or 100 Mbps Ethernet, as required,
and a network operating system supported by the PRO/100 CardBus
adapter. See Chapter 2, Software Installation for a list of the
network operating systems supported.
NOTE:
Since the PRO/100 CardBus adapter automatically detects the speed of the network
to which it is connected, it may be safely connected to either a 100Base-TX or
10Base-T network, as specified in items 3 and 4 below.
3 For connection to a 100Base-TX 100 Mbps Ethernet network, a
Category 5 (data grade) unshielded twisted pair (UTP) network cable
terminating in a male RJ-45 connector.
4 For connection to a 10Base-T twisted pair Ethernet network, a network
cable terminating in a male RJ-45 connector and connected to a 10
Mbps hub or switch.
Determine System Requirements
During installation of the PRO/100 CardBus adapter hardware, power to
the computer should be ON and your operating system should be running.
If configured to do so, your system will detect the PRO/100 CardBus
adapter. For details on how to install driver software for your particular
environment, see Chapter 2, Software Installation.
The PRO/100 CardBus adapter hardware is compatible with Types II and
III PC Card slots that support CardBus technology. Installation and
removal procedures may vary on different computers.
2
Page 9
Hardware Installation
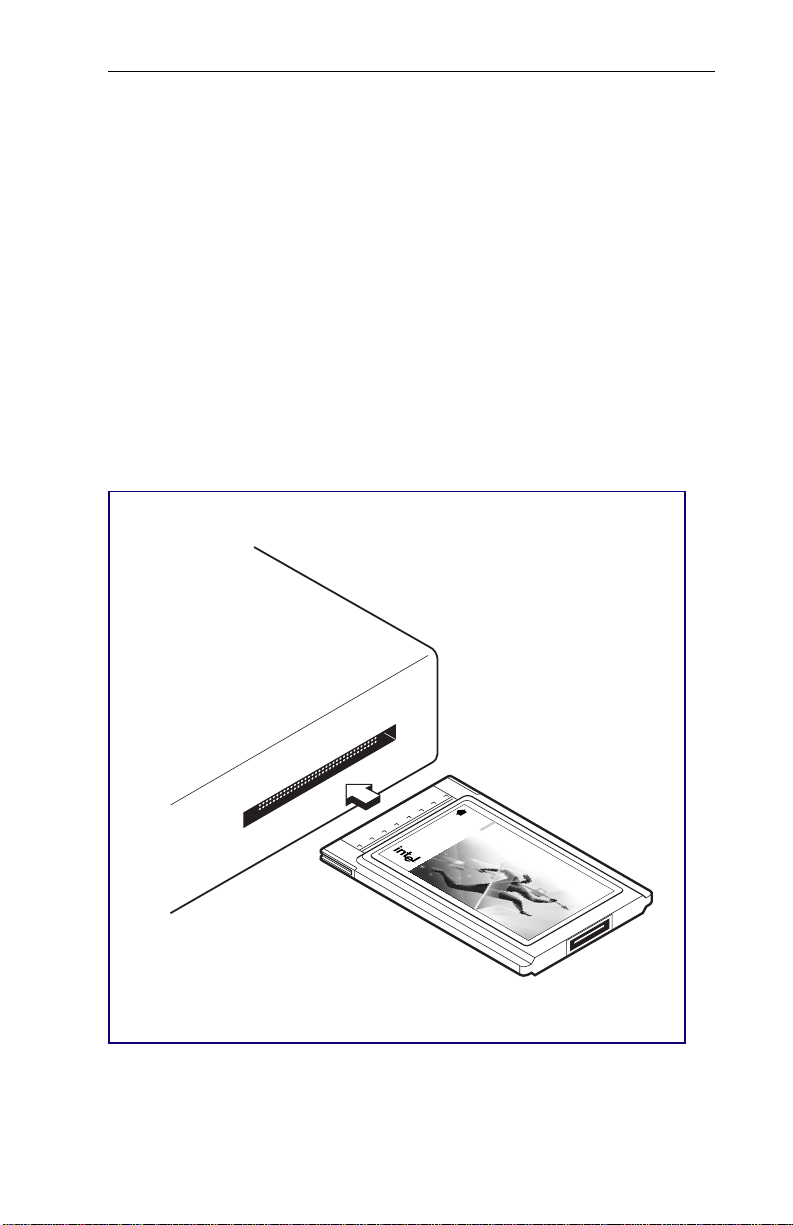
Installing the Hardware
Insert the PRO/100 CardBus adapter
1 Grasp the PRO/100 CardBus adapter by the edges with the Intel
label facing upward and the wide PC Card connector next to the insert
slot.
2 Insert the card into a CardBus slot and push it in until it is firmly
seated.
NOTE:
The PRO/100 CardBus adapter will not fit in a slot that does not support CardBus
technology.
32 bit
CardBus
Intel EtherExpress
PRO/100 Mobile Adapter
™
Inserting the PRO/100 CardBus adapter into the Computer
3
Page 10
CHAPTER 1
Removing the PRO/100 CardBus adapter
Follow the PC card removal instructions specified in the documentation for
your computer.
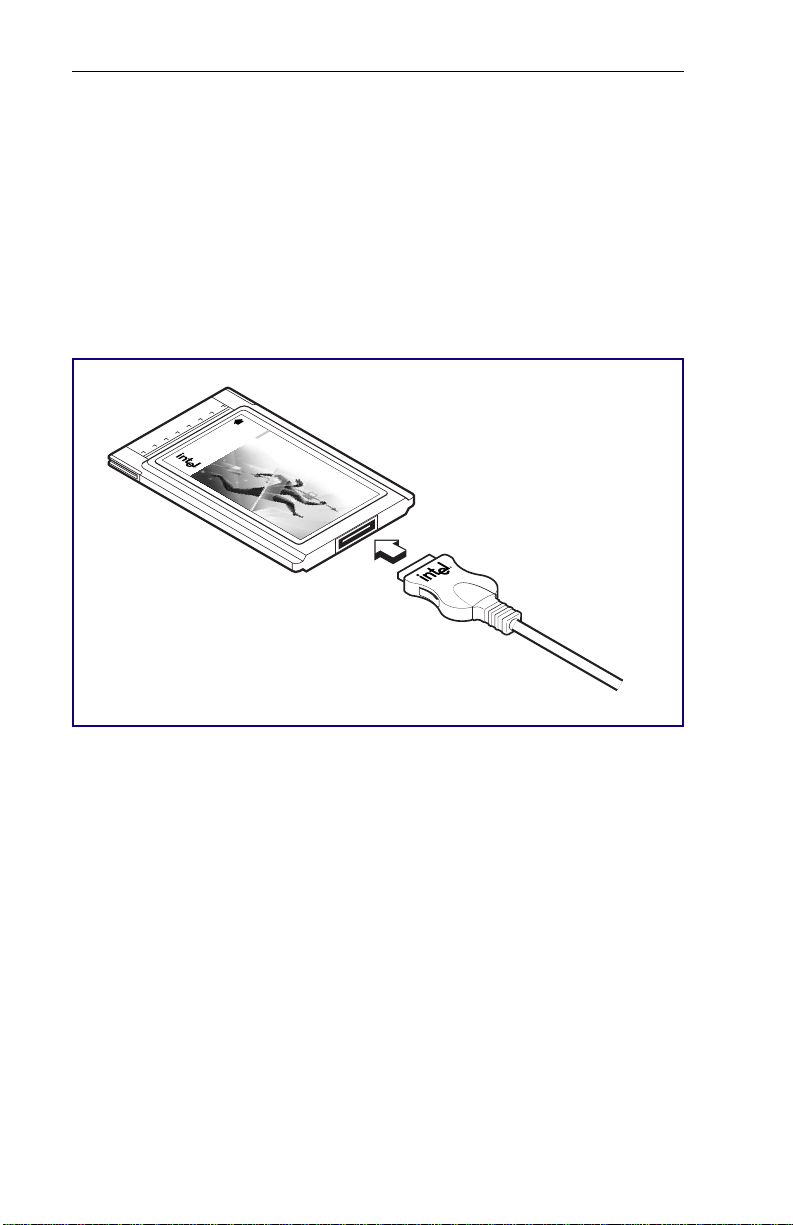
Connecting the LAN Adapter Cable to the Card
• Attach the 15-pin connector at the end of the Intel adapter cable to the
mating connector on the end of the adapter (see illustration below).
Press the cable connector gently into the connector on the card until it
clicks into place. Do not force the connection.
32 bit
CardBus
Intel EtherExpress
PRO/100 Mobile Adapter
™
Connecting the LAN Adapter Cable to the PRO/100 CardBus adapter
4
Page 11
Hardware Installation
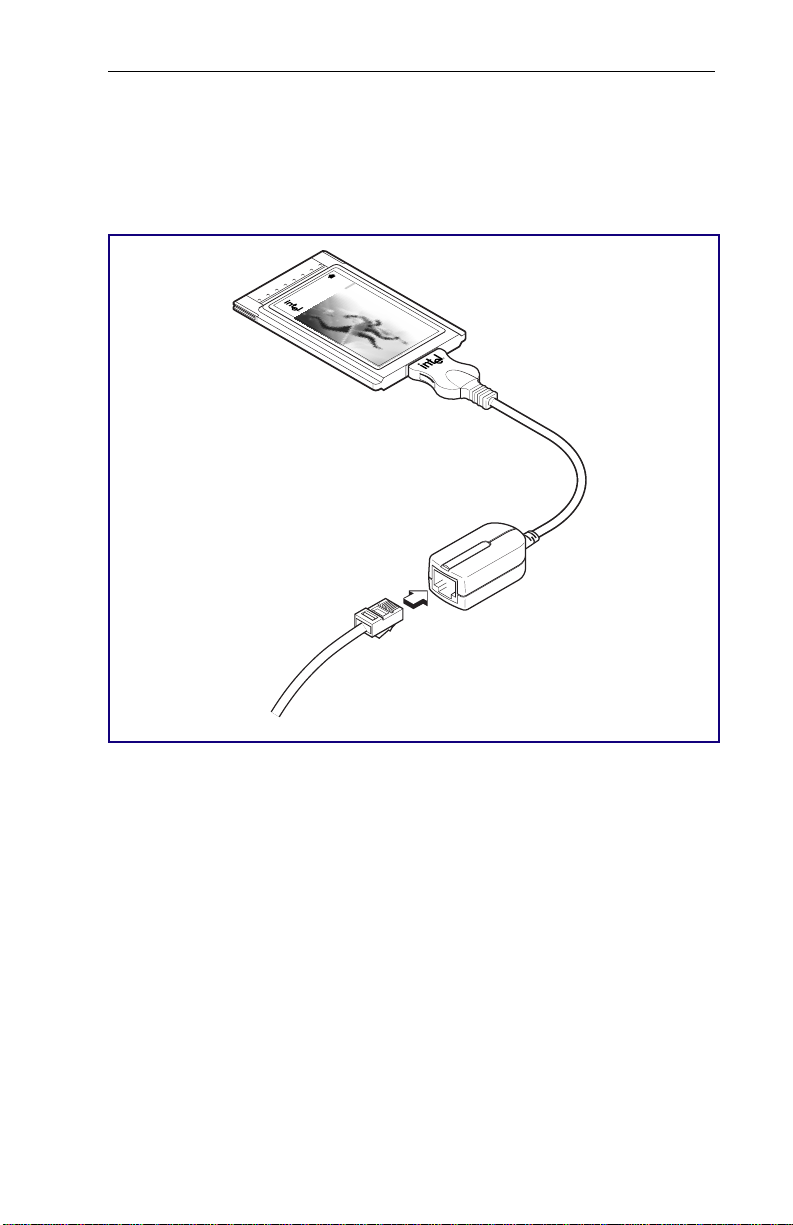
Connecting the Network Cable to the LAN Adapter Cable
• Plug the network cable into the female RJ-45 connector, as shown in
the figure.
32 bit
CardBus
Intel EtherExpress
PRO/100 Mobile Adapter
™
Connecting to the Network Cable to LAN Adapter Cable
What to Do Next
After installing the hardware and connecting cables, proceed to Chapter 2.
Software Installation. You will need the Intel Installation Disk and
Network Drivers Disk.
5
Page 12

CHAPTER 1
6
Page 13

Chapter 2
Software Installation
CardBus Installation Guidelines
The PRO/100 CardBus adapter can be used in Windows 3.x, Windows 95,
Windows NT, and MS-DOS environments, and with most common
network operating systems. However, some current operating systems or
Card and Socket Services versions do not yet support CardBus technology.
In these cases you will be able to use the PRO/100 CardBus adapter, but
you will not be able to use or swap PC Cards or other CardBus adapters
while using the adapter.
Installation instructions and guidelines are provided in this chapter for the
fully supported and unsupported CardBus environments known at the time
of publication.
The installation topics covered are:
• Windows* 95
• Windows 95 using Novell Client 32
• Windows NT*
• Windows 3.x, Windows for Workgroups
• IBM OS/2* Warp
• Others, listed in alphabetical order
7
Page 14

CHAPTER2
Installing with Windows 95
The first release of Windows 95 (4.00.950 or 950a) included built-in
support for 16-bit PC Cards but not for 32-bit CardBus. However, your
PRO/100 CardBus adapter can still be installed under Windows 95. See
the procedure on the next page.
Cardbus built-in support is included in Windows 95 OEM Service Release
#2 (also known as Windows 95 OSR2 or version 4.00.950b).
Please review the README.TXT file on the Installation Disk and visit the
Intel website for the latest information on CardBus support in Windows
95.
Determining Your Version of Windows 95
Follow the steps below to determine which version of Windows 95 you are
running:
1 Click on the Start button.
2 Select Settings.
3 Select the Control Panel.
4 Double-click on the System icon.
The System Properties dialog box opens.
5 Select the General tab.
Information about your system is displayed, including the version of
Windows 95 you are running, under “System.”
• Versions 4.00.950 or 4.00.950a. For installation procedures
(including special instructions for Toshiba computers), see the
section titled “Installing with Windows 95 Version 4.00.950 or
4.00.950a.”
• Version 4.00.950b (also known as OSR2). For installation
procedures, see the section titled “Installing with Windows 95
Version 4.00.950b (OSR2) or Later.”
8
Page 15

Software Installation
Installing with Windows 95
V er sion 4.00.950 or 4.00.950a
Windows 95 does not include ‘Hot Swap’ support for CardBus adapters.
The PRO/100 CardBus adapter includes a driver that will let you use the
device within Windows 95. To use this driver, however, you must first
disable support for PC Cards in Windows 95. This means you cannot
simultaneously use another CardBus adapter or PC Card with the PRO/100
CardBus adapter.
To install with Windows 95 Version 4.00.950 or
4.00.950a:
NOTE:
For Toshiba portable computers with CardBus support, see the separate installa-
tion instructions under the heading “Installing Toshiba Computers with Windows
95 version 4.00.950 or 4.00.950a” later in this section.
1 Insert the PRO/100 CardBus adapter.
2 Click Start.
3 Choose Settings.
4 Choose Control Panel.
The Control Panel opens.
5 Double-click the Network icon.
The Network window opens.
6 Click Add.
The Select Network Component Type window opens.
7 Double-click Adapter.
The Select Network Adapter window opens.
8 Click Have Disk.
The Install From Disk window opens.
9 Insert the Intel Drivers Disk.
10 With A:\ in input box, click OK (or type in the correct path).
The Select Network Adapter window reopens.
9
Page 16

CHAPTER2
11 Under “Manufacturers,” click “Intel.”
12 Select the “Intel EtherExpress PRO/100 Mobile CardBus 32 manual
load." Note that this is the second driver listed. You may need to
scroll the text to see the entire driver name.
13 Click OK.
14 The Network window reopens.
15 Click OK.
The Intel dialog box appears displaying various settings. An asterisk
in any field indicates that the current setting is incorrect. Use the Up
or Down arrow to adjust the setting until the asterisk disappears.
16 Click OK.
The Copying Files window opens.
17 Insert your original Windows 95 CD or disk (identify the drive that
holds the CD or disk) and click OK.
The System Settings window opens.
NOTE:
If Windows 95 was pre-installed on your computer, the necessary files are lo-
cated in the following directory:
C:\WINDOWS\OPTIONS\CABS
18 Click No when prompted to restart the computer. (But click Yes for
Toshiba computers with CardBus support, as described in step 12
under the heading “Installing Toshiba Computers with Windows 95
version 4.00.950 or 4.00.950A” later in this section.)
DO NOT RESTART the computer at this time (unless you are using
a Toshiba CardBus computer). First, complete the following steps to
disable PC Card support:
NOTE:
Some portable computers require that PCMCIA support be disabled through the
computer's BIOS in addition to the steps below. Before completing the following
steps, please review the README.TXT file on the Network Drivers Disk for computer-specific information.
10
Page 17

Software Installation
1 In the Control Panel, double-Click the System icon.
The System Properties window opens.
2 Click the Device Manager tab.
3 Double-click PCMCIA Socket.
4 Click PCIC or compatible PCMCIA controller.
5 Click Remove.
A removal confirmation window opens.
6 Click OK.
The System Settings Change window opens.
7 Remove the Network Drivers Disk from the floppy drive.
8 Click Yes to restart the computer.
When you restart the computer the first time after removing the PCIC
device, you will be prompted to select a driver. Choose Do not install a
driver. This prompt is not displayed again.
11
Page 18

CHAPTER2
Re-enabling PC Card support with Windows 95
Version 4.00.950 or 4.00.950a
If you have disabled PC Card and Socket support in order to use the
PRO/100 CardBus adapter, and now want to use another PC Card, such as
a PC Card modem in your computer, you will first need to re-enable the
PC Card support as described in the following steps:
1 Click Start.
2 Choose Settings.
3 Choose Control Panel.
The Control Panel window opens.
4 Double-click the Network icon.
The Network window opens.
5 Click the Configuration tab.
6 Select the “Intel EtherExpress PRO/100 Mobile CardBus 32 Manual
Load.”
7 Click Remove.
8 Click OK.
9 Click No when prompted to restart the computer.
DO NOT RESTART the computer at this time. First, complete the
following steps to re-enable PC Card support:
1 In the Control Panel, double-click the System icon.
The System Properties window opens.
2 Click the Device Manager tab.
3 Double-click PCMCIA Socket.
4 Double-click PCIC or Compatible Controller.
The PCIC or Compatible Controller Properties window opens.
5 Click the Drivers tab.
6 Click the Change Driver button.
The Select Device window opens.
7 Select “PCIC or compatible PCMCIA controller,” and click OK.
The PCIC or Compatible Controller Properties window reopens.
12
Page 19

Software Installation
8 Click OK.
The System Properties window reopens.
9 Click Close.
10 Click Start.
11 Select Shut Down.
12 Select Restart the Computer and click Yes.
Your computer is now set to use other PC Card devices.
Installing Toshiba Computers with Windows 95
Version 4.00.950 or 4.00.950A
If you are installing the PRO/100 CardBus adapter on Toshiba portables
with CardBus support, including the Tecra 700 series, Tecra 500 series
and Protégé 650, please follow use the following installation procedures:
1 Determine which version of Windows 95 you have, using the
guidelines under the heading “Determining Your Version of Windows
95” earlier in this chapter.
2 If your version of Windows 95 is version 4.00.950 or 4.00.950a,
complete the following steps. If your version of Windows 95 is
version 4.00.950b (OSR2) or later, follow the instructions later in this
chapter for those versions.
3 Before installing the PRO/100 CardBus adapter, it is necessary to
modify PC Card support on the computer via Toshiba’s BIOS setup
program.
4 Press Start, and select Shutdown. Select Restart in MS-DOS mode to
reboot your machine.
5 At the DOS prompt, run the Toshiba setup program by typing
TSETUP and press Enter.
6 On the setup program menu, look for an item titled “PC Card
Controller Mode”. If the mode is set to PCIC Compatible, proceed to
step 7. If the mode is set to CardBus/16-bit, press the End button on
your keyboard and then Y for Yes. Proceed to step 11.
7 Use the down arrow key to navigate through the Toshiba setup menu
to the “PC Card Controller Mode” field.
13
Page 20

CHAPTER2
8 Press the space bar until the PC Card Controller Mode is set to
CardBus/16-bit.
9 Press the End button on your keyboard and press Y when prompted.
10 Reboot your computer.
11 Perform steps 1 through 17 under the heading “Installing with
Windows 95 version 4.00.950 or 950a” at the beginning of the
Installing with Windows 95 section earlier in this chapter.
12 After completing steps 1 through 17, select Yes when prompted to
reboot the machine. At this point installation is complete.
Re-enabling PC Card support on Toshiba Computers
If you have disabled PC Card support in order to use the PRO/100
CardBus adapter under Windows 95 version 4.00.950 or 950a, and now
want to use a PC Card, such as a PC Card modem in your computer, you
will need to re-enable PC Card support by following these steps:
1 Click Start.
2 Choose Settings.
3 Choose Control Panel.
The Control Panel window opens.
4 Double-click the Network icon.
The Network window opens.
5 Click the Configuration tab.
6 Select the “Intel EtherExpress PRO/100 Mobile CardBus 32 Manual
Load.”
7 Click Remove.
8 Click OK.
9 Click No when prompted to restart the computer.
10 Press Start, and select Shutdown. Select Restart in MS-DOS mode to
reboot your machine.
11 At the DOS prompt, run the Toshiba setup program by typing
TSETUP.
12 Use the down arrow key to navigate through the Toshiba setup menu
to the “PC Card Controller Mode” field.
13 Press the space bar until the PC Card Controller Mode equals PCIC
Compatible.
14
Page 21

Software Installation
14 Press the End button on your keyboard and press Y when prompted.
15 Reboot your computer.
16 After your system has rebooted it is ready to support PC Cards under
Windows 95.
Installing with Windows 95
V ersion 4.00.950b (OSR2) or Later
Windows 95 OSR2 and later versions support CardBus. This means you
can use the built-in PC Card support in Windows 95 to install, remove,
and hotswap CardBus cards and PC Cards.
To install the CardBus with Windows 95 Version
4.00.950b (OSR2) or later:
1 Insert the PRO/100 CardBus adapter.
2 Allow the Plug and Play facility to install the PRO/100 CardBus
adapter.
3 When prompted for a disk, insert the Intel Network Drivers Disk.
Enabling another PCMCIA or CardBus card in
Windows 95 Version 4.00.950b (OSR2) or Later
The PRO/100 CardBus adapter can be used simultaneously with another
PCMCIA or CardBus card by using the Plug and Play feature to remove
the PRO/100 CardBus adapter and install the new card.
15
Page 22

CHAPTER2
Installing NetWare Client 32 ODI Drivers under
Windows 95
When installing the PRO/100 CardBus adapter under Windows 95 you
have the option of installing either an NDIS3 driver (also known as
Miniport) or a 32-bit ODI client driver (Client 32).
Windows 95 installation instructions vary slightly for different versions of
Windows 95. See the instructions earlier in this manual on how to
determine your version of Windows 95, then follow the instructions below
for your version.
Installing under Windows 95 Version 4.00.950 or
4.00.950a
1 Follow the instructions earlier in this chapter on how to disable PC
Card support in Windows 95, under the heading Installing with
Microsoft Windows 95 Version 4.00.950 or 4.00.950a.
2 Follow the steps below for Client 32 installation under Windows 95
Version 4.00.950b. However, you may use any version of the Client
32 Install Software.
Installing under Windows 95 Version 4.00.950b or
later (OSR2)
NOTE
Windows 95 version 4.00.950b requires Client 32 for Windows 95 version 2.12 or
greater (ask your Network Administrator if you do not know which version of
NetWare Client 32 you have).
1 Follow the instructions earlier in this chapter for installing the Intel
PRO/100 CardBus adapter under Windows 95 version 4.00.950b. This
procedure will install the adapter with the NDIS3 (Miniport) driver.
2 Click the Start button in the left bottom corner of your Windows 95
Desktop and select Run. Then type the path to SETUP.EXE or
Browse to the Client 32 install directory. Possible paths are:
A:\
if installing from Disk 1 of the diskette version
C:\DIRECTORY_NAME\
if installing from a directory on your hard disk
\\NOVELL_SRV_NAME\SYS\PUBLIC\CLIENT\WIN95\IBM_ENU\
16
Page 23

Software Installation
if installing from a Novell NetWare Server you are connected to.
3 Once you have selected the proper path, run SETUP.EXE and follow
the Novell instructions. At the last screen, DO NOT select REBOOT.
Instead, click CUSTOMIZE.
NOTE
If prompted to insert the Windows 95 CD-ROM, click OK and type the path to the
CABS directory on your hard drive (usually C:\WINDOWS\OPTIONS\CABS).
4 The CUSTOMIZE option will take you to the Network dialog box
where you may or may not have an adapter installed. DO NOT
REMOVE any of the existing drivers. First ADD the 32 Bit ODI
driver by selecting Add. Then in the Select Network Adapter Type
box select Adapter. Next, in the Select Network Adapters box click
Have disk and insert the Intel Network Drivers Disk (Disk 2). Select
OK at the Install from Disk box. In the next window highlight Intel in
the manufacturers column and Intel EtherExpress PRO/100 CardBus
Adapter for NetWare Client 32 V1.0.
5 This will take you back to the Network window where you may now
remove the existing driver if there was one. You should be left with a
Novell ODINSUP and an Intel PRO/100 CardBus adapter for
NetWare Client 32 V1.0 adapter.
6 If your laptop requires any special resources, you may select the
adapter and Properties window to change them. Otherwise click OK .
NOTE
If asked to insert the NetWare Client 32 for Windows 95 Disk x click OK and enter
the path to the Client 32 Install from Step 2 above.
7 After rebooting, the driver will load but you may receive a New
Hardware Found PCI Card message which will take you to the Update
Device Driver Wizard window. At this window make sure you DO
NOT have the drivers disk in drive A:. Then click Next >. The next
window should display “Windows was unable to locate a driver for
this device.” Now click Finish. You should not see this message in
subsequent reboots. This step will leave a “?!PCI Card” indication in
the Control Panel\System Properties\Device Manager\Other Devices
section, but will not hinder operation of the driver. However, if you
wish to reinstall the Miniport driver at a later time be sure, to remove
the “?!PCI Card” line from the above named window.
17
Page 24

CHAPTER2
Installing with Windows NT 3.51 and 4.0
Windows NT 3.51 and 4.0 include full support for PC Cards and partial
support for CardBus. The PRO/100 CardBus adapter includes a driver that
will let you use the device within Windows NT. When loaded, this driver
disables support for PC Cards in Windows NT. This means you cannot
simultaneously use another CardBus or PC Card with the PRO/100
CardBus adapter.
Please review the README.TXT file on the Installation Disk and visit the
Intel website for the latest information on CardBus support in Windows
NT.
The installation steps for Windows NT 3.51 and Windows NT 4.0 are
slightly different, so they are addressed separately here.
To install with Windows NT 3.51:
1 Insert the PRO/100 CardBus adapter.
2 Double-click the Control Panel.
The Control Panel opens.
3 Double-click the Network icon.
The Network Settings window opens.
4 Click Add Adapter.
The Add Network Adapters window opens.
5 Scroll to select “Other (requires disk from manufacturer).”
6 Click Continue.
The Insert Disk windows opens.
7 Insert the Intel Network Drivers Disk .
8 Click OK.
The Select OEM Option window opens.
9 Click OK.
10 Intel EtherExpress PRO/100 CardBus Mobile Adapter Setup window
opens, displaying the default settings.
NOTE:
In most circumstances, the default settings will properly operate the PRO/100
CardBus adapter. However, consult the README.TXT file for specific settings (if
necessary).
18
Page 25

Software Installation
11 Click OK.
The Network Settings window reopens.
12 Click OK.
The Network Settings Change window opens.
13 Click Restart Now to restart your computer.
Re-enabling PC Card Support in Windows NT 3.51
The PRO/100 CardBus adapter cannot be used simultaneously with a PC
Card in Windows NT 3.51.
To remove the PRO/100 32-bit Mobile Adapter from Windows
NT 3.51:
1 Double-click the Control Panel.
The Control Panel opens.
2 Double-click the Network icon.
The Network Settings window opens.
3 Choose the “Intel EtherExpress PRO/100 Mobile CardBus 32.”
4 Click Remove.
5 Click Yes to confirm.
To install with Windows NT 4.0:
1 Insert the PRO/100 CardBus adapter.
2 Click Start.
3 Choose Settings.
4 Choose the Control Panel.
The Control Panel opens.
5 Double-click the Network icon.
The Network Settings window opens.
6 Click the Adapters tab.
The Network Adapters window opens.
7 Click Add.
The Select Network Adapter window opens.
8 Click Have Disk.
19
Page 26

CHAPTER2
9 Insert the Intel Network Drivers Disk .
10 Click OK.
The Select OEM Option window opens.
11 Click OK.
Windows NT Setup window briefly displays.
12 PRO/100 CardBus adapter Settings window opens, displaying the
default settings.
NOTE:
In most circumstances, the default settings will properly operate the PRO/100
CardBus adapter. However, consult the README.TXT file for specific settings (if
necessary).
13 Click OK.
The Network Settings window redisplays.
14 Click Close.
If any dialog boxes appear related to setting up network protocols,
click Cancel, and contact your Network Administrator.
15 When the Network Settings Change window opens, click Yes to
restart your computer.
Re-enabling PC Card Support in Windows NT 4.0
The PRO/100 CardBus adapter cannot be used simultaneously with a PC
Card in Windows NT 4.0.
To remove the PRO/100 CardBus adapter from Windows NT 4.0:
1 Double-click the Control Panel.
The Control Panel opens.
2 Double-click the Network icon.
The Network Settings window opens.
3 Choose the “Intel EtherExpress PRO/100 Mobile CardBus 32.”
4 Click Remove.
20
Page 27

Software Installation
Installing with Windows 3.x and Windo ws for
W orkgroups
To install under Windows 3.x or Windows for Workgroups, use the Intel
Installation Program. Insert the Installation Disk, into your disk drive, and
proceed as follows (substitute the correct drive letter for your system):
1 From the Program Manager, choose File, then Run. In the Command
Line box, type the following:
A:SETUP
2 Press Enter or click OK.
3 Select your network operating system from the list displayed and click
OK.
4 Follow the on-screen instructions. Note the following variations for
NetWare and other network operating systems:
Novell NetWare Installation
With Novell NetWare highlighted, click the OK button. Intel
provides all software necessary to configure your NetWare client
workstation. Upon completion, the Installation Program will reboot
your system. When your system comes back up, log in to the network.
NOTE:
The NetWare VLM shell is used to connect to your NetWare server. The Intel
Installation Program will decompress and configure the necessary files. If you
do not plan to use the Installation Program, see “Manual Installation” in the
alphabetical section of this chapter for instructions on how to decompress and
load the NetWare VLM files.
If you need NETX shell support, contact your System Administrator.
Installation of Other Network Operating Systems
For listed network operating systems other than Novell NetWare, highlight
your network operating system and click the OK button. The Intel
installation software will analyze your system and create a custom Intel
Network Drivers Disk. Make sure your diskette is not write-protected
when executing this step.
5 Once you have completed the steps prompted by the Intel Installation
Program, exit the program and find your network operating system in
this chapter of the User’s Guide, using the alphabetical listing under
the heading “Installing Network Software.” Follow the procedures
indicated there to complete the installation.
21
Page 28

CHAPTER2
NOTE:
Even though older Card and Socket Services software for MS-DOS and Windows
3.X may not support CardBus, it may be possible to use another PC Card simultaneously with the PRO/100 CardBus adapter. Please refer to the README.TXT file
or the Intel website for the latest information and tips regarding Card and Socket
Services.
The Installation Program will modify your AUTOEXEC.BAT,
CONFIG.SYS, and network configuration files to match the optimum
configuration for your system.
For detailed technical information on configuration files and settings, see
Chapter 3, Configuration Reference and Chapter 4, Troubleshooting.
Installing under IBM OS/2 (Warp 3.0 and 4.0)
Using the NDIS or ODI Driver
NOTE
The PRO/100 CardBus adapter includes NDIS 2.0 and ODI drivers for OS/2. Cur-
rently, the Card and Socket Services software in OS/2 does not support CardBus.
Therefore, in order to install the CardBus driver in OS/2, OS/2’s Card and Socket
Services must be disabled. Follow IBM’s instructions for disabling Card and
Socket Services.
Installation Steps for Warp 3.0 and 4.0 (NDIS driver)
1 Remove OS/2’s Card and Socket Services according to IBM’s
instructions.
By default, the CardBus NDIS driver will be installed. If you wish
to install the ODI client, the Novell Client installation program
should be used. See the OS/2 ODI Client install section for instructions.
2 Run MPTS (Multi-Protocol Transport Services). For Warp 3.0,
MPTS is on the desktop. For Warp 4.0, MPTS is in System Setup.
3 In the MPTS window, click on Configure
4 In the Configure window, select the LAN adapter and protocols
radio button, then click on Configure.
5 In the LAPS Configuration window, in the Network Adapter
section, click on Other Adapter.
22
Page 29

Software Installation
6 Set the path as A:\NDIS and click OK.
7 Back at the LAPS Configuration window, in the Network Adapter
section, select the PRO/100 CardBus adapter by clicking on it and
then clicking Add.
8 In the Protocols section, select the protocols you wish to use by
clicking on the protocols and then clicking Add.
9 In the Current Configuration section, click on PRO/100 CardBus
adapter and click edit to edit the driver settings. The default
settings for the product will be displayed. Generally, the default
settings should be used. The most important to check are INT and
SOCKET. If there is a conflict, these should be adjusted using trial
and error.
10 After reviewing the settings, click OK.
11 Click OK again
12 Click close
13 Follow the onscreen instructions to complete installation.
NOTE
In Warp 4.0, a free interrupt can be found by running Hardware Manager (under
System Setup). Under IRQ, look for a free one (the program shows what’s used).
Installation Steps for Warp 3.0 and 4.0 (ODI driver)
The PRO/100 CardBus adapter includes NDIS2 and ODI drivers for
OS/2. Currently, the Card and Socket Services software in OS/2 does not
support CardBus. Therefore, in order to install the CardBus driver in
OS/2, OS/2’s Card and Socket Services must be disabled. Follow IBM’s
instructions for disabling Card and Socket Services.
1 Remove OS/2’s Card and Socket Services according to IBM’s
instructions.
2 In order to install Intel’s OS/2 ODI driver, the Novell Netware
Client for OS/2 installation disks are needed. Insert disk 1 of the
OS/2 client installation disks (the WSOS2_1 disk) in the floppy
drive and run INSTALL.
3 In the NetWare Workstation for OS/2 Installation Utility window,
click the Installation menu item and select the Requester on
Workstation option.
4 In the ‘Set Target Directory’ Windows, set the destination directory
(default is c:\netware) and click OK.
23
Page 30

CHAPTER2
5 In the ‘Requester Installation’ window, select the the option ‘Edit
CONFIG.SYS and copy all files’ and click OK.
6 In the ‘Step 1- choose the ODI LAN Driver’ window, click on the
list box to display the list of LAN drivers. An Installation Message
window will appear. Put the Intel Network Drivers Disk in the
floppy drive and click OK.
7 In the list box, enter M32AODI.OS2 as the LAN driver to install,
and click Continue.
8 The Installation Message window will reappear. Re-insert the
NetWare Client disk in the floppy drive (disk WSOS2_1) and click
OK.
9 Follow the onscreen instructions to complete the installation of the
Netware Client for OS/2 software.
24
Page 31

Software Installation
Installing Network Software
Use the instructions under this heading in the following circumstances:
• To complete the installation of network software after you have run
the Intel Installation Program: Find your network operating system in
the alphabetical listing that follows.
• To install software for network operating systems not supported by
the Intel Installation Program (for example, on systems running MSDOS without Windows): Find your network operating system in the
alphabetical listing that follows, or see the headings “Generic
Installation” and “Manual Installation” in the same listing.
• To install and configure manually, without running the Intel
Installation Program: See the heading “Manual Installation” in the
alphabetical listing that follows.
Use the Modified Intel Network Drivers Disk
When prompted for a device driver or manufacturer’s disk by your
network operating system install procedure, use Intel Network Drivers
Disk.
Alphabetical Reference
The section is organized in alphabetical order by network operating
system vendor. Unless otherwise indicated, these instructions are designed
to be used with the Intel Installation Program. They assume a first-time
installation of client software on a workstation, using the configuration
values set by the Intel Installation Program or, when the Installation
Program is not used, using the default values listed in Chapter 3,
Configuration Reference.
The PRO/100 CardBus adapter supports ODI, NDIS 2.01, NDIS 3 and
packet drivers. To determine which of these drivers you need for your
networking environment, consult your network administrator or network
documentation.
25
Page 32

CHAPTER2
Artisoft LANtastic version 6.0
NDIS 2.0 Driver
1 Run the Intel Installation Program from the Installation Disk.
2 Choose Artisoft LANtastic from the Select Network Operating System
screen.
3 Follow the prompts to complete the Intel segment of the installation.
4 Run the Artisoft LANtastic 6.0 “install” program. Specify
C:\LANTASTI as the destination directory (or the directory set with
the Intel Installation Program).
5 At the “Select network adapter” screen, choose “NDIS Support for
Network Adapters.”
6 When prompted for the “manufacturer’s driver disk” on the “Enter
NDIS driver directory” screen, insert the Intel Network Drivers Disk.
7 Complete the Artisoft installation.
8 Reboot the computer and start LANtastic.
AT&T StarGR OUP LAN Mana ger version 2.1a
NDIS 2.0 Driver
See Microsoft LAN Manager.
Banyan VINES version 5.5 & 6.0
NDIS 2.0 Driver
Prior to installing the Banyan Vines client software, it is necessary to
determine the Interrupt Number for the PRO/100 CardBus adapter. After
you have installed the Adapter, follow these steps to determine the
Interrupt Number:
1 Insert the Intel Network Drivers Disk in the floppy drive.
2 At the DOS prompt, enter
M32ATEST
3 Press Enter.
4 When the Main Menu opens, run Test.
The IRQ number will be displayed when the Test is complete.
26
Page 33

Software Installation
5 Write down the IRQ number to use when you proceed with the
installation.
For example, if the IRQ=6, write down the number 6.
Now continue with the Banyan Vines installation as follows:
1 Run the Intel Installation Program from the Installation Disk.
2 Choose Banyan VINES from the Select Network Operating System
screen.
3 Follow the prompts to complete the Intel segment of the installation.
The Installation Program also creates a \VINES directory on your hard
disk.
4 Copy the files from the VINES Master disk into the VINES directory.
5 Copy the NDIS driver file and the PROTOCOL.INI file from \NDIS
directory on the Network Drivers Disk into the VINES directory.
6 Change to the VINES directory.
7 Type PCCONFIG and select Network Card Settings, followed by
NDIS Ethernet.
8 Enter the IRQ value you wrote down in Step 5 of the M32ATEST
procedure above.
9 At the PROTOCOL.INI bindings prompt, type INTELNET.
10 Press F10 to save and Esc to return to the main menu.
11 Select Login Environment Settings, followed by Default
Communications Driver, followed by NDIS Ethernet.
12 Press Esc to return to the Main Menu and press F10 to save.
13 Manually add these lines to your AUTOEXEC.BAT file:
CD\VINES
BAN
14 Manually add these lines to your CONFIG.SYS file:
DEVICE=C:\VINES\PROTMAN.DOS /I:C\VINES
DEVICE=C:\VINES\M32ANDIS.EXE
27
Page 34

CHAPTER2
DEC PATHWORKS versions 5.x or 6.x
NDIS 2.0 Driver
These instructions are based on PATHWORKS documentation for
configuration of a PC as a client workstation, using a system service
already installed on a LAN Manager server and the LAN Manager SETUP
diskette.
Prior to installing the DEC PATHWORKS client software, it is necessary
to determine the Interrupt Number for the PRO/100 CardBus adapter.
After you have installed the PRO/100 CardBus adapter, follow these steps
to determine the Interrupt Number:
1 Insert the Intel Network Drivers Disk in the floppy drive.
2 At the DOS prompt, enter
M32ATEST
3 Press Enter.
4 When the Main Menu opens, run Test.
The IRQ number will be displayed when the Test is complete.
5 Write down the IRQ number to use when you proceed with the
installation.
For example, if the IRQ=6, write down the number 6.
Now continue with the DEC PATHWORKS installation as
follows:
1 Run the Intel Installation Program from the Installation Disk.
2 Choose DEC PATHWORKS from the Select Network Operating
System screen.
3 Follow the prompts to complete the Intel segment of the installation.
4 Check the README file on your PATHWORKS SETUP disk for
requirements such as lastdrive, setver, etc. You will need 500 K of
free conventional memory and about 1 MB of extended memory to
run PATHWORKS SETUP. Be sure you have a lastdrive statement in
your CONFIG.SYS file (lastdrive=g will work in most cases).
5 Use a text editor to modify the file A:\NDIS\PI.TPL on the
PATHWORKS SETUP disk, as follows (A:\NDIS is a hidden
directory. You can access it by typing CD A:\NDIS):
Change the line (remove the semicolon)
28
Page 35

Software Installation
;NI_IRQ = [IRQ VALUE FROM STEP 5 OF THE FIRST PROCEDURE ABOVE]
to read
NI_IRQ = [IRQ VALUE FROM STEP 5 OF THE FIRST PROCEDURE ABOVE]
The NI_IRQ value must be the same as the interrupt value you will
use for the Intel adapter.
6 Run the SETUP program from the PATHWORKS SETUP disk for
LAN Manager.
7a For Pathworks 5.0, choose Configure PC.
7b For Pathworks 6.0, select Yes for the “Has the Pathworks software
been installed to a LAN Manager file Service.”
8 In the Select Drive Window, choose “Network.”
9 Select DECnet as transport.
10 When prompted to choose a network adapter, choose “Other.”
11 When prompted for driver information, in the “Other Adapter”
window use the following:
a. for PATHWORKS 5.0:
NDIS DRIVER PATH: A:\
NDIS DRIVER FILE: M32ANDIS.EXE
NDIS DRIVER NAME: INTEL$
b. for PATHWORKS 5.1:
DRIVER FILE: A:\M32ANDIS.EXE
PROTOCOL.INI STUB: A:\DEC\PROTOCOL.INI
c. for PATHWORKS 6.0:
DRIVER FILE: A:\M32ANDIS.EXE
PROTOCOL.INI STUB: A:\DEC\PROTOCOL.INI
Skip the Additional Files section.
12 Insert the Intel Network Drivers Disk when prompted.
13 Enter your node information when prompted.
14 Save the PROTOCOL.INI file with the default settings.
At this point, the SETUP program will try to connect to the DECnet
server. Once connected, the SETUP program will map a logical drive
to your system service.
29
Page 36

CHAPTER2
15 Highlight the logical drive mapped by the SETUP program, and press
Enter to run PWSETUP.
16 Press Enter to confirm the Software Destination C:\PW.
17 Choose Express (or Custom if you have a lot of prior installation
experience).
18 Select an appropriate Workstation Template, or create one.
19 Under Network Adapter Information, choose other network adapter,
with NDIS enabled, and enter the following information:
IN THE NON-SUPPORTED NETWORK ADAPTER WINDOW
DRIVER FILE: A:\M32ANDIS.EXE
PROTOCOL.INI STUB: A:\DEC\PROTOCOL.INI
Skip the Additional Files section and ensure Ethernet box is enabled.
20 Insert the Intel Network Drivers Disk when prompted.
21 In the Network Adapter Information window, select M32ANDIS
Unsupported Network Adapter with NDIS Box enabled
22 In LAN Manager System Service Connection Information window,
enter username and press Enter.
23 Enter the Windows directory path.
24 Press Enter to add the STARTNET.BAT file to your
AUTOEXEC.BAT file.
25 A PROTOCOL.INI file created by SETUP will display in edit mode.
a Remove the semicolon at the beginning of the ni_irq line, as
follows:
Change the line
;NI_IRQ = [IRQ VALUE FROM STEP 5 OF THE FIRST PROCEDURE ABOVE]
to read
NI_IRQ = [IRQ VALUE FROM STEP 5 OF THE FIRST PROCEDURE ABOVE]
The ni_irq value must be the same as the interrupt value used for the Intel
adapter.
b Verify that the [m32andis] section has the following lines and
settings:
[M32ANDIS]
DRIVERNAME=INTEL$
30
Page 37

Software Installation
26 Exit SETUP and reboot to start the network. (Some machines may
require a cold boot at this point—power the computer down and back
up again.)
FTP Software LANWatch
Packet and NDIS 2.0 Drivers
FTP Software’s LANWatch network monitor software can be installed
using Intel’s packet or NDIS 2.0 drivers. For information on which driver
is appropriate for your network environment, refer to the FTP LANWatch
documentation.
FTP Software LANWatch Packet Driver Installation
1 Run the Intel Installation Program from the Installation Disk.
2 Choose FTP LANWatch from the Select Network Operating System
screen.
3 Follow the prompts to complete the Intel segment of the installation.
4 Install LANWatch according to the instructions in your FTP
LANWatch manual.
5 Copy the file M32APD.COM from the C:INTEL\M32A diretory to
the directory where your LANWatch files are stored.
6 (This step is not required for LANWatch versions 3.0 and later.)
Using a text editor, add the following line to your CONFIG.SYS file:
DEVICE = [
PATH
]IFCUST.SYS
where [path] is the drive and directory where your LANWatch files
are stored.
7 Reboot the PC.
8 Change to the directory of where your LANWatch files are stored and
run M32APD.COM.
9 Run LW.EXE.
31
Page 38

CHAPTER2
FTP Software LANWatch NDIS 2.0 Driver Installation
1 Run the Intel Installation Program from the Installation Disk.
2 Choose FTP LANWatch from the Select Network Operating System
screen.
3 Follow the prompts to complete the Intel segment of the installation.
4 Install LANWatch according to the instructions in your FTP
LANWatch manual.
5 Using a text editor, add the following lines to your CONFIG.SYS file:
DEVICE = C:\NDIS\PROTMAN.SYS /I:C:\NDIS
DEVICE = C:\NDIS\M32ANDIS.EXE
DEVICE = C:\NDIS\DIS_PKT.GUP
(Include the following line for LANWatch versions earlier than 3.0
only)DEVICE = C:\LW\IFCUST.SYS
6 Create a directory called NDIS on your hard disk, by typing:
MD NDIS
7 At the DOS prompt, copy M32ANDIS.EXE from the
C:\INTEL\M32A directory on your hard disk and the file
PROTOCOL.FTP from the \NDIS directory on the Intel Network
Drivers Disk to the \NDIS directory you created in Step 6.
8 Use a text editor to modify the PROTOCOL.FTP file to match the
keywords and values in the sample PROTOCOL.INI file in the
\INTEL\M32A directory.
9 Copy all the files from the \NDIS directory on the FTP Unsupported
Software Disk A to the \NDIS directory created in Step 6.
10 Reboot the PC.
11 Change to the \NDIS directory and run NETBIND.EXE.
12 Run LW.EXE.
32
Page 39

Software Installation
FTP Software PC/TCP
Packet, NDIS 2.0, and ODI Drivers
FTP Software’s PC/TCP Generic Ethernet Kernel ETHDRV.EXE can be
installed using Intel’s Packet, ODI, or NDIS drivers. PC/TCP can also be
used concurrently with NetWare. For information on which driver is
appropriate for your network environment, see the FTP PC/TCP
documentation. For environments using values other than those set by the
Intel Installation Program, see Chapter 3, Configuration Reference in
this manual.
FTP PC/TCP 3.X with OnNet 1.1 and Windows for
Workgroups 3.11
1 Run the Intel Installation Program from the Installation Disk.
2 From the Select Network Operating System screen, choose Windows
for Workgroups then FTP PC/TCP 3.x.
3 Follow the prompts to complete the Intel segment of the installation.
4 Run the PC/TCP installation program OnNet 1.1.
5 Follow the prompts to the Network Card Screen, then select “Other
NDIS Driver or Updated Packet Driver.”
6 Insert the Intel Network Drivers Disk when prompted.
7 Choose the appropriate driver then follow prompts to complete the
installation.
8a For NDIS installation, reboot the PC.
8b For ODI installation, do not reboot. Continue with step 9.
Additional Steps for ODI Installation
If you are using an ODI driver, continue with the following steps:
9 Change to the directory into which PC/TCP was installed.
10 Use a text editor to change the file PCTCP.INI as follows:
• In the section PCTCP ifcust 0 change the line
INTERFACE-TYPE=NDIS
to read
INTERFACE-TYPE=PKTDRV.
11 Save the file and exit the text editor.
12 Change to the C:\ (root) directory.
33
Page 40

CHAPTER2
13 Use a text editor to modify the AUTOEXEC.BAT file as follows
(\PCTCP is the default installation directory):
• Move the line containing the STARTNET.BAT command or the
lines containing the network driver files to immediately above the
line
SET PCTCP=C:\PCTCP\PCTCP.INI
• Add the line
C:\PCTCP\ODIPKT
after the line
PCTCP=C:\PCTCP\PCTCP.INI
14 Save the file and exit the text editor.
15 Copy the file ODIPKT from disk 5 of the FTP PC/TCP installation
disks to the directory into which PC/TCP was installed.
16 Reboot the PC.FTP PC/TCP 3.X with OnNet 1.1 with Windows 3.1
FTP PC/TCP 3.X with OnNet 1.1 with Windows 3.1
1 Run the Intel Installation Program from the Installation Disk.
2 From the Select Network Operating System screen, choose FTP PC/
TCP.
3 Follow the prompts to complete the Intel installation.
4 Run the PC/TCP installation program OnNet 1.1.
5 When prompted, insert the Intel Network Drivers Disk.
6 Follow prompts to complete the PC/TCP installation.
7a For an NDIS installation, reboot the PC.
7b For ODI installation, do not reboot. Continue with step 8.
Additional Steps for ODI Installation
If you are using an ODI driver, continue with the following steps:
8 Change to the directory into which PC/TCP was installed.
9 Use a text editor to change the file PCTCP.INI as follows:
34
Page 41

Software Installation
• In the section PCTCP ifcust 0 change the line
INTERFACE-TYPE=NDIS
to read
INTERFACE-TYPE=PKTDRV.
10 Save the file and exit the text editor.
11 Change to the C:\ (root) directory.
12 Use a text editor to modify the AUTOEXEC.BAT file as follows
(\PCTCP is the default installation directory):
• Move the line containing the STARTNET.BAT command or the
lines containing the network driver files to immediately above the
line
SET PCTCP=C:\PCTCP\PCTCP.INI
• Add the line
C:\PCTCP\ODIPKT
after the line
PCTCP=C:\PCTCP\PCTCP.INI
13 Save the file and exit the text editor.
14 Copy the file ODIPKT from disk 5 of the FTP PC/TCP installation
disks to the directory into which PC/TCP was installed.
15 Reboot the PC.
FTP Software PC/TCP Packet Driver Installation with
OnNet 1.1
1 Run the Intel Installation Program from the Installation Disk.
2 Choose FTP PC/TCP from the Select Network Operating System
screen.
3 Follow the prompts to complete the Intel segment of the installation.
4 Exit to DOS, switch to the C:\INTEL\M32A directory and run
M32APD.COM.
5 Install PC/TCP software according to the directions given in the PC/
TCP documentation.
6 Copy the file M32APD.COM from the C:\INTEL\M32A directory to
the PC/TCP directory specified in the PC/TCP install procedure.
35
Page 42

CHAPTER2
7 Edit the AUTOEXEC.BAT file and add the following lines:
C:\PCTCP\M32APD.COM
C:\PCTCP\ETHDRV.EXE
8 (This step is not required for PC/TCP versions 2.10 and later.) Using a
text editor, add the following lines to your CONFIG.SYS file:
DEVICE=[
DEVICE=[
where [path] is the drive and directory specified at the PC/TCP
installation.
9 Reboot the PC.
10 Change to the directory where your PC/TCP files are stored and run
M32APD.COM by typing: M32APD and pressing Enter.
11 Run the ETHDRV.EXE kernel program supplied with PC/TCP. This
loads the PC/TCP kernel into memory. The packet driver must always
load before the kernel.
12 Continue your server or workstation startup as instructed in the PC/
TCP documentation.
PATH
]IPCUST.SYS
PATH
]IFCUST.SYS
ODI with FTP Software PC/TCP and NetWare
If you need to run Novell NetWare concurrently with FTP PC/TCP,
proceed as follows:
1 Run the Intel Installation Program from the Installation Disk.
2 Choose FTP PC/TCP from the Select Network Operating System
screen.
3 Follow the prompts to complete the Intel segment of the installation.
4 Install PC/TCP according to the instructions in your FTP PC/TCP
manual.
5 (This step is not required for PC/TCP versions 2.10 and later.) Using a
text editor, add the following lines to your CONFIG.SYS file:
DEVICE=[
DEVICE=[
36
PATH
]IPCUST.SYS
PATH
]IFCUST.SYS
Page 43

Software Installation
where [path] is the drive and directory specified in the PC/TCP
installation.
6 Copy NET.CFG from the C:\INTEL\M32A directory and the files
LSL.COM and M32AODI.COM from the root directory of the Intel
Network Drivers Disk to the PC/TCP directory created in the PC/TCP
install procedure.
7 To start the workstation, load the software as follows:
LSL
M32AODI
IPXODI
ODIPKT (USE THE VERSION SUPPLIED WITH PC/TCP)
ETHDRV
VLM
8 Change to the network drive (usually F:\LOGIN).
9 Log in to the network.
Generic Installation
If your NOS is not listed in the Intel Installation Program, you can try
selecting “Generic NDIS Driver” or “Generic ODI Driver” in the Intel
Installation Program and clicking the Install button. A sample
configuration file containing parameters optimized for your system will be
created in the \INTEL\M32A directory on your hard disk. For NDIS, this
will be a custom PROTOCOL.INI file. For ODI, it will be a custom
NET.CFG file. Use this sample file to assist you in configuring the actual
configuration file for your system (or use the sample file itself if
appropriate).
HP LAN Manager
NDIS 2.0 Driver
See Microsoft LAN Manager.
37
Page 44

CHAPTER2
IBM Local Area Network Support Program
IBM Local Area Network Support Program (version
1.36)
NDIS 2.0 Driver
1 Run the Intel Installation Program from the Installation Disk.
2 Choose IBM LAN Support Program from the Select Network
Operating System screen.
3 Follow the prompts to complete the Intel segment of the installation.
4 Install the IBM Local Area Network Support Program according to
the instructions in the IBM Local Area Network Support Program
User’s Guide.
5 Under Environment Information, respond “no” to the question “Do
you have adapter option disks?”
6 Choose the Intel CardBus adapter from the list provided.
7 If prompted to do so, insert the Intel Network Drivers Disk when
prompted and type the path
A:\NDIS
8 Press Esc twice to bypass error messages.
9 Continue with the installation until finished.
10 Use a text editor to add the following two lines in your CONFIG.SYS
file at the location indicated by the “rem” statement concerning
insertion of the driver name:
DEVICE=\LSP\M32ANDIS.EXE
11 Copy M32ANDIS.EXE from the directory C:\INTEL\M32A to the
C:\LSP directory on your hard disk.
12 Use a text editor to edit the PROTOCOL.INI keyword settings in the
C:\LSP directory to match the keywords contained in the sample
PROTOCOL.INI file located at C:\INTEL\M32A as required (unless
you are using PRO/100 CardBus adapter default settings).
13 Save the files and reboot the PC.
38
Page 45

Software Installation
IBM Local Area Network Support Program
(version 1.2)
NDIS 2.0 Driver
1 Run the Intel Installation Program from the Installation Disk.
2 Choose IBM LAN Support Program from the Select Network
Operating System screen.
3 Follow the prompts to complete the Intel segment of the installation.
4 Install the IBM Local Area Network Support Program according to
the instructions in the IBM Local Area Network Support Program
User’s Guide. The following instructions refer to the prompts and
messages displayed with the Configuration Aid automated install
software provided with the LAN Support Program.
5 If a message appears during the LAN Support Program installation
indicating there are no IBM LAN adapters installed in the
workstation, bypass the message by pressing Enter.
6 Answer [N]o to program support for the PC Network Adapter.
7 Answer [Y]es to use of programs needing the NETBIOS interface.
8 When prompted, select the Etherand Network family of network
cards.
9 Continue with the installation until finished.
10 Use a text editor to replace the line in your CONFIG.SYS file that
reads:
DEVICE=\XX.DOS
with the line
DEVICE=\M32ANDIS.EXE
11 Still in the CONFIG.SYS file, add the parameter O=N (where O is a
letter, not zero) to the line
DEVICE=\DXMT0MOD.SYS
as follows
DEVICE=\DXMT0MOD.SYS O=N
12 Copy M32ANDIS.EXE from the directory C:\INTEL\M32A to the
root directory of your hard disk or boot disk.
39
Page 46

CHAPTER2
13 Change to the LANMAN directory on your hard disk or boot disk.
14 Use a text editor to modify the PROTOCOL.INI file in the C:\LSP
directory as follows:
• Under the ETHERAND section, change the line that reads
BINDINGS = TCMAC2
to read:
BINDINGS = INTELNET
• Underneath that section insert a new section that reads:
[INTELNET]
DRIVERNAME = INTEL$
15 Use a text editor to edit the keyword settings in the PROTOCOL.INI
file in the C:\LSP directory to match the keywords contained in the
sample PROTOCOL.INI file located at C:\INTEL\M32A as required
(unless you are using PRO/100 CardBus adapter default settings).
16 Save the file and reboot the PC.
IBM PC LAN and IBM DOS LAN Requester
1 Install the IBM LAN Support Program according to the instructions
under the heading “IBM Local Area Network Support Program,”
which immediately precedes this one.
2 Reboot the PC.
3 Install IBM PC LAN or IBM DOS LAN Requester according to the
instructions in the IBM documentation.
4 Reboot the PC.
40
Page 47

Software Installation
Manual Installation
All network drivers provided on the Intel Network Drivers Disk can be
installed manually, without the Intel Installation Program. You must copy
the correct driver files to your hard disk and make appropriate changes to
CONFIG.SYS, AUTOEXEC.BAT, and configuration files such as
NET.CFG (for ODI) or PROTOCOL.INI (for NDIS). Manual installation
should only be performed by a system administrator or someone with
equivalent knowledge of the installation process for your network
operating system.
NOTE:
For manual installation of Novell NetWare with VLM (available only under MS-
DOS or Windows 3.x) you must first decompress the VLM files by running the
MS-DOS batch file DCOMPVLM.BAT from the Network Drivers Disk, as follows:
DCOMPVLM [
where [
path
] is the directory for NetWare files (usually C:NWCLIENT).
DCOMPVLM will decompress and copy all required files to the designated directory.
For an overview of the installation process, see the instructions provided
for your network operating system i the alphabetical section of this
chapter. Consult Chapter 3, Configuration Reference, for detailed
information on configuration files and settings. For additional information,
consult your network operating system documentation.
PATH
]
Microsoft LAN Manager
Microsoft LAN Manager (version 2.1)
NDIS 2.0 Driver
1 Run the Intel Installation Program fromt he Installation Disk.
2 Choose Microsoft LAN Manager from the Select Network Operating
System screen.
3 Follow the prompts to complete the Intel segment of the installation.
4 Begin installation of LAN Manager using “setup.”
5 When prompted to select the available network adapter driver, choose
“Other Driver.”
41
Page 48

CHAPTER2
6 When prompted, insert the Intel Network Drivers Disk.
7 Select “Intel EtherExpress PRO/100 Mobile CardBus 32” from the
menu.
8 Continue with the installation until it is completed.
9 If installing Microsoft LAN Manager to run under Windows proceed
to step 10. Otherwise, skip to step 15.
10 Run Windows.
11 Choose setup from “Main” group.
12 Select Startup, and under the “Options” screen select Change System
Settings.
13 Select Network then scroll to LAN Manager version 2.1.
14 Follow the prompts to complete the installation.
15 Reboot the PC.
Microsoft LAN Manager (version 2.1) with Windows
for Workgroups 3.11
1 Run the Intel Installation Program from the Installation Disk.
2 Choose Windows for Workgroups from the Select Network Operating
System screen.
3 Select “Yes” on the Attached to Network File Server screen.
4 Select Microsoft LAN Manager.
5 Follow the prompts to complete the Intel segment of the installation.
6 Start Windows and, in the Network program group, double-click on
the Network Setup icon.
7 If you have not installed network support, choose Networks in the
Network Setup dialog box, select Install Windows Network, and click
OK. Otherwise proceed with step 8.
8 In the Network Setup dialog box, choose Drivers.
9 In the Network Drivers dialog box, choose Add Adapter.
10 In the Add Network Adapter box, choose Unlisted or Updated
Network Adapter and click OK.
11 When prompted for an “unlisted, updated, or vendor-provided
network driver disk,” insert the Intel Network Drivers Disk.
12 Select “Intel M32A NDIS 2.01 Real Mode,” and click OK.
42
Page 49

Software Installation
13 Close the Network Drivers dialog box and click OK in the Network
Setup box.
14 Complete the installation process, inserting the Intel Network Drivers
Disk if required.
15 Continue with the installation until it is completed.
16 Click on the Control Panel in the “Main” group.
17 Select Startup from the Control Panel.
18 In the Options for Enterprise Networking window click “Log on to
Windows NT or LAN Manager Domain.”
19 Save, exit, and reboot the PC.
Windows for W orkgr oups
NDIS 2.01 and ODI Drivers
Instructions are provided for installing Intel network drivers for the first
time on a system using Windows for Workgroups version 3.11 alone or
with NetWare. These instructions assume that Windows for Workgroups
has already been installed. Remove any earlier version of the Intel drivers
before installing the new version. No NDIS 3 driver is supplied for
Windows for Workgroups.
The following topics are covered for Windows for Workgroups:
• How to install for Windows for Workgroups version 3.11 and
NetWare using the ODI driver
• How to install for Windows for Workgroups 3.11 using the NDIS 2.0
driver
• How to Disable Windows for Workgroups Networking
For troubleshooting tips for Windows for Workgroups, see Chapter 4,
Troubleshooting.
43
Page 50

CHAPTER2
Windows for Workgroups Version 3.11 and NetWare
(Using the ODI driver)
1 To configure Windows for Workgroups with NetWare, run the Intel
Installation Program and choose Windows for Workgroups.
2 Choose YES to “Connect to Network Server.”
3 Choose “Novell NetWare” as your network server.
4 When the installation is complete, reboot the computer.
5 At the Intel menu, choose “Load EtherExpress PRO/100 Mobile
CardBus 32 for Network Access.”
6 From the DOS prompt, run the NetWare Client install. Be sure to
install support for Windows.
7 When the Novell Client install program asks for an ODI driver, insert
the Intel Network Drivers Disk.
8 Complete the installation process and reboot the computer.
9 Log in to NetWare.
10 Start Windows for Workgroups and, in the Network program group,
double-click on the Network Setup icon.
Windows for Workgroups Network Setup will detect the NetWare
configuration and automatically select Novell NetWare as an
additional network. It will also prompt for Novell support files (from
Novell Client diskettes) if required during the installation. (If
necessary, use the Novell decompression utility to decompress the
required files.)
Windows for Workgroups Setup will also attempt to determine what
NetWare driver model you are using. If for some reason Windows for
Workgroups was unable to detect the driver model, you should select
IPXODI and LSL as the driver type.
Note that you can install NetWare as an additional network under
Windows for Workgroups, as follows:
11 In the Network Setup dialog box, choose Networks.
12 To install both Windows for Workgroups and NetWare, choose
Install Windows Network.
13 Choose Other under Additional Network Support, then select the
NetWare configuration appropriate for your network.
14 If you want to share your files or printers with others, select
“Sharing.”
44
Page 51

Software Installation
15 In the Network Setup dialog box, choose Drivers.
16 In the Network Drivers dialog box, choose Add Adapter.
17 In the Add Network Adapter box, choose Unlisted or Updated
Network Adapter and click OK.
18 When prompted for an “unlisted, updated, or vendor-provided
network driver disk,” insert the Intel Network Drivers Disk and click
OK.
19 Select “Intel EtherExpress PRO/100 Mobile CardBus 32” and click
OK.
20 Close the Network Drivers dialog box and click OK in the Network
Setup box.
21 Complete the installation process, inserting the Intel Network Drivers
Disk if required.
22 Reboot the computer.
NOTE:
Verify that the following lines have been added to your AUTOEXEC.BAT and
STARTNET.BAT files. If they are not there, add them manually using a text editor.
Add the following command to the AUTOEXEC.BAT file, where \WINDOWS is the
directory into which Windows was installed:
C:\WINDOWS\NET START
Add the following command to the STARTNET.BAT file in your NWCLIENT directory, where \WINDOWS is the directory into which Windows was installed:
C:\WINDOWS\ODIHLP.EXE
Windows for Workgroups 3.11 Using the NDIS 2.0
Driver
1 Run the Intel Installation Program from Disk 1, Installation Disk.
2 Choose Windows for Workgroups installation from the Select
Network Operating System screen.
3 Choose “No” on the Attached to Network File Server screen.
4 Follow the prompts to complete the Intel segment of the installation.
5 Start Windows for Workgroups and double-click on the Network
Setup icon in the Network Group.
45
Page 52

CHAPTER2
6 If you have not installed network support, choose Networks in the
Network Setup dialog box, select Install Windows Network, and click
OK. Otherwise proceed to Step 7. Click the Sharing button to share
files and printers.
7 In the Network Setup dialog box, choose Drivers.
8 In the Network Drivers dialog box, choose Add Adapter.
9 In the Add Network Adapter box, choose Unlisted or Updated
Network Adapter and click OK.
10 When prompted for an “unlisted, updated, or vendor-provided
network driver disk,” insert the Intel Network Drivers Disk.
11 Select “Intel M32A NDIS 2.01 Real Mode” and click OK.
12 Close the Network Drivers dialog box and click OK in the Network
Setup box.
13 Complete the installation process, inserting the Intel Network Drivers
Disk if required.
How to Remove an Existing Windows for
Workgroups Installation
1 Start Windows and select Network Setup in the Network program
group.
2 In the Network Setup dialog box, choose Drivers.
3 In the Network Drivers dialog box, choose Remove to discard any
existing network adapter drivers.
4 Choose Close and return to the Network Setup dialog box.
5 Exit the Network Setup program and exit Windows.
6 At the DOS prompt, change to the Windows system directory, as
follows
CD \WINDOWS\SYSTEM
7 Make a directory called OEM, as follows
MKDIR OEM
8 Type
DIR OEM?.INF
to see a list of driver configuration files.
9 Use the DOS EDIT program to view each OEM file to determine
which ones reference Intel.
10 Copy the old Intel configuration files to the OEM directory.
46
Page 53

Software Installation
11 Delete the old Intel configuration files from the Windows system
directory.
12 Restart Windows.
13 Follow the instructions for installing drivers for Windows for
Workgroups alone or Windows for Workgroups and NetWare.
Novell NetW are
ODI Driver
The Intel ODI driver allows for the concurrent use of Novell NetWare and
other protocols that support Novell’s Open Data-Link Interface (ODI)
specification.
NetWare
1 Run the Intel Installation Program from the Installation Disk.
2 Choose Novell NetWare from the Select Network Operating System
screen.
3 Follow the prompts to complete the installation.
4 The Intel Installation Program will reboot the computer and verify the
NetWare connection.
5 Log in to the network.
NOTE:
The Intel Installation Program uses the NetWare VLM shell to connect to your
NetWare server. The Installation Program decompresses and copies all the
required files.
If you are installing manually, without the Intel Installation Program (under MSDOS or Windows 3.x) you must first decompress the VLM files by running the
MS-DOS batch file DCOMPVLM.BAT from the Network Drivers Disk, as follows:
DCOMPVLM [
where [
path
] is the directory for NetWare files (usually C:\NWCLIENT).
DCOMPVLM will decompress and copy all required files to the designated directory.
If you need NETX shell support, contact your System Administrator.
PATH
]
47
Page 54

CHAPTER2
SunSoft PC-NFS (version 3.5)
NDIS 2.0 Driver
1 Run the Intel Installation Program from the Installation Disk.
2 Choose SunSoft PC-NFS from the Select Network Operating System
screen.
3 Follow the prompts to complete the Intel segment of the installation.
4 Install PC-NFS for Ethernet according to instructions in the PC-NFS
documentation. Choose NDIS setup, and follow the instructions to
complete the setup. Note the prompt that tells you that further manual
modifications will have to be made.
5 Reboot the computer. You will see some error messages. Disregard
them and continue with these instructions.
6 Rename the file PROTOCOL.NFS in the C:\LANMAN directory to
PROTOCOL.INI. Use a text editor to edit the PROTOCOL.INI file as
follows:
Replace the items
[YOUR-MAC-MODULE]
DRIVERNAME = YOURMAC$
OPTION1 = VALUE1 ETC.
[NFS-NDIS]
DRIVERNAME = NFSLINK1
BINDINGS = YOUR-MAC-MODULE
with
[INTELNET]
DRIVERNAME = INTEL$
[NFS-NDIS]
DRIVERNAME = NFSLINK$
BINDINGS = INTELNET
7 Copy M32ANDIS.EXE from the C:\INTEL\M32A directory to the
C:\LANMAN directory.
8 Use a text editor to insert the following lines in your CONFIG.SYS
file:
DEVICE=C:\LANMAN\M32ANDIS.EXE
between the two lines
DEVICE=C:\LANMAN\PROTMAN.SYS
48
Page 55

Software Installation
DEVICE=C:\LANMAN\NFS-NDIS.SYS
as follows:
DEVICE=C:\LANMAN\PROTMAN.SYS
DEVICE=C:\LANMAN\M32ANDIS.EXE
DEVICE=C:\LANMAN\NFS-NDIS.SYS
9 Verify that your AUTOEXEC.BAT file contains a line that reads
C:\LANMAN\NETBIND
before the line that reads
NET INIT
10 Configure PC-NFS options according to your PC-NFS documentation,
and reboot the computer.
Novell NetW are 32-bit ODI Drivers
Installing the Client 32 Driver under Windows 3.x and
DOS
In order to install the Client 32 driver under Windows 3.x or DOS, the
following software is needed:
· PRO/100 CardBus adapter Network Drivers Disk
· NetWare Client 32 for DOS/Win 3.1x disks from Novell
Installing under DOS
1 Put the NetWare Client 32 install disk in drive A.
2 Type a:\install and press enter.
3 Select the products you want to install.
4 Follow the onscreen instructions
5 At the Select a LAN Driver screen, select User Specified LAN
Driver
6 Insert the Intel Network Drivers Disk in drive A
7 Type A: and press enter.
8 Select Intel EtherExpress PRO/100 CardBus Adapter
49
Page 56

CHAPTER2
9 A screen will display the default settings for the driver. Most of the
time, these settings do not need to be changed. Check the
README.TXT for machine specific settings.
10 To complete installation, follow the onscreen instructions.
Installing under Windows 3.x
1 Select File, Run, and type a:\setup
2 Follow the onscreen instructions
3 When the ODI Driver Selection Dialog box appears, select User
Specified Driver and click Next.
4 When prompted, insert the Intel Network Drivers Disk in drive A:
5 Select the driver a:\m32a.lan
6 To complete installation, follow the onscreen instructions.
Installing under Windows 95
Refer to the instructions on page 16.
50
Page 57

Software Installation
Ungermann-Bass Net/One for DOS
NDIS 2.0 Driver
The PRO/100 CardBus adapter is supported on Ungermann-Bass Net/One
LAN Manager and MS-NET networks. There are two NDIS driver
packages available from UB: XNS BNS/NDIS and TCP BNS/NDIS. These
packages, used with a Intel NDIS driver, provide files that support DOS
workstations. They are available from UB and authorized UB
representatives.
Ungermann-Bass Net/One LAN Manager version 2.1
Installation
1 Begin installation of LAN Manager 2.1 using “setup.”
2 When prompted to select the available network adapter driver, choose
“Other Driver.”
3 When prompted, insert the Intel Network Drivers Disk.
4 Select “Intel EtherExpress PRO/100 Mobile CardBus 32” from the
menu.
5 Continue with the installation until it is completed.
6 Following the UB instructions, modify your CONFIG.SYS file by
adding the following lines:
For DOS:
DEVICE = [
PATH
]M32ANDIS.EXE
where [path] is the drive and directory in which you installed your
network operating system.
7 Use a text editor to modify your PROTOCOL.INI file as follows:
• For each protocol that you want to bind, set the protocol
definition area of the PROTOCOL.INI file to:
BINDINGS = UBLOOP
51
Page 58

CHAPTER2
• At the end of the file, add the following fragments:
[UBLOOP]
DRIVERNAME = UBLOOP$
BINDINGS = INTELNET
;INTEL ADAPTER
[INTELNET]
DRIVERNAME = INTEL$
8 Reboot the PC.
W ollongong PathWay Access for DOS
NDIS and ODI Drivers
Wollongong PathWay Access for DOS can be installed using Intel NDIS
or ODI drivers. Installation instructions for both types of driver are
provided below. For information on which driver is appropriate for your
network environment, refer to the Wollongong PathWay Access for DOS
documentation.
Wollongong PathWay NDIS Installation
1 Run the Intel Installation Program from the Installation Disk.
2 Choose Wollongong PathWay Access from the Select Network
Operating System screen.
3 Follow the prompts to complete the Intel segment of the installation.
4 Install PathWay Access for DOS Kernel and Drivers programs
according to the instructions in the PathWay Access for DOS manual.
Before rebooting the PC, continue with the following steps.
5 Use a text editor to modify the CONFIG.SYS file. After the statement
that reads
DEVICE=C:\PATHWAY\PWTCP.SYS
add the lines
DEVICE=\PATHWAY\[PROTMAN FILE] /I:C:\PATHWAY
DEVICE=\PATHWAY\M32ANDIS.EXE
where [PROTMAN FILE] is equal to the PROTMAN2.EXE or
PROTMAN.EXE file that is located in your PATHWAY directory.
(Refer to the Wollongong PathWay Access for DOS manual for
information regarding the differences between these two files.)
52
Page 59

Software Installation
6 Copy the file M32ANDIS.EXE from C:\INTEL\M32A directory to
the PATHWAY directory on your hard disk or boot disk.
7 Continue with the “custom” instructions in the PathWay Access for
DOS manual.
8 Reboot the PC.
Wollongong PathWay ODI Installation
1 Run the Intel Installation Program from the Installation Disk.
2 Choose Wollongong PathWay Access from the Select Network
Operating System screen.
3 Follow the prompts to complete the Intel segment of the installation.
4 Install PathWay Access for DOS Kernel and Drivers programs
according to the instructions in the PathWay Access for DOS manual.
Before rebooting the PC, perform the following steps.
5 Run the MS-DOS batch file DCOMPVLM.BAT from the Network
Drivers Disk, as follows:
DCOMPVLM PATHWAY
DCOMPVLM.BAT will decompress and copy all required files from
the Intel Network Drivers Disk to the PATHWAY directory on your
hard disk or boot disk. (The files are LSL.COM, M32AODI.COM,
IPXODI.COM, VLM.EXE, and NET.CFG.)
6 Change to the PATHWAY directory and load the software in the
following order:
LSL
M32AODI
IPXODI (ONLY IF USING NOVELL NETWARE)
VLM (ONLY IF USING NOVELL NETWARE)
7 Load the Wollongong file ODI.EXE.
8 Continue with the instructions in the PathWay Access for DOS
manual.
9 Reboot the PC.
53
Page 60

CHAPTER2
54
Page 61

Chapter 3
Configuration Reference
Who Should Consult This Chapter?
This chapter contains additional information on PRO/100 CardBus adapter
features and technical information on configuration requirements, including
sample configuration files. You can use this information to modify an
existing installation or perform a new installation manually without the
assistance of the Intel Installation Program.
If You Installed with the Intel Installation Program
The file modifications made by the Intel Installation Program should allow
most PC users to log on to their network after performing the steps outlined
in Chapter 1, Hardware Installation and Chapter 2, Software
Installation.
If you followed those instructions and still have not been able to
successfully log on to your the network, you may need to modify the
configuration parameters set by the Intel Installation Program. You can
modify configuration settings by re-running the Intel Installation Program
or by running IEDIT, the Intel System File Editor installed in the Intel
Mobile Windows program group.
55
Page 62

CHAPTER3
For Installation without the Intel Installation Program
The information in this chapter can be used to manually configure the
PRO/100 CardBus adapter. For manual installation, it is assumed that you
have some experience with manual setup of network adapters, and know
how to access and modify configuration files, using an ASCII text editor.
Intel recommends that manual installation be performed by a system
administrator or equivalent.
Special Features
Card and Socket Services
The Personal Computer Memory Card International Association (PCMCIA)
has developed specifications governing the use of PC Cards (formerly
PCMCIA cards) in personal computer systems. The software components
that implement these specifications are called Card and Socket Services.
This software supports the ability of PC Card-aware device drivers (known
as clients) to share cards, sockets, and system resources.
The PCMCIA has recently developed specifications for a new generation of
32-bit PC Cards, called CardBus. Since CardBus is new, support for
CardBus has not yet been implemented in Card and Socket Services,
although development is underway. To use Card and Socket Services with
the PRO/100 CardBus adapter, the Card and Socket Services must support
CardBus.
At press time, Intel had tested the following Card and Socket Services with
the PRO/100 adapter:
Product/Operating System Manufacturer
CardWizard v. 5.3/DOS/Windows 3.x SystemSoft Corp.
Phoenix Card Manager 95 v. 4.0 Phoenix Technologies Ltd.
Intel is also working with the following vendors and products to ensure
compatibility as they become available:
CardWare v. 5.0/Windows NT Award Software
International Inc.
CardWorks v. 5.3/Windows 95 (OSR2) SystemSoft Corp.
CardWizard v. 3.0/Windows NT SystemSoft Corp.
Card Executive/Windows NT Phoenix Technologies Ltd.
56
Page 63

Configuration Reference
As additional vendors add CardBus support to Card and Socket Services,
new driver software from Intel may be required to use the Intel CardBus
Adapter with Card and Socket Services. Review the README.TXT file
and check the Intel website for the latest information.
Check with the vendor who supplied your Card and Socket Services to
determine if it supports CardBus. If your Card and Socket Services do not
support CardBus, the remainder of this section does not apply.
NOTE:
Microsoft Windows 95 and Windows NT have card handling functionality built-in
and do not require separate Card and Socket Services software.
However, the first two releases of Windows 95 (versions 4.00.950 and 4.00.950a)
did not include support for CardBus in Card and Socket Services. Windows 95
Release OSR2 (also referred to as version 4.00.950b) includes CardBus support.
See the Windows 95 Installation section at the beginning of Chapter 2 for additional details.
If you are using the OSR2 version of Windows 95, the information in this section is
applicable. Windows NT 3.51 and 4.0 do not implement native CardBus support.
Please refer to the Windows NT Installation section at the beginning of Chapter 2
for additional information.
Finally, review the README.TXT file or the Intel website for the latest information
on support for CardBus under various operating systems and Card and Socket
Services.
If you are using the version of Windows 95 that supports CardBus, you can
take advantage of the full range and benefits of PC Card capability. If you
are not using that version of Windows 95, the features following the note
may not be supported.
NOTE:
For DOS and Windows 3.1 systems, the Intel PRO/100 CardBus driver may be able
to co-exist with older Card and Socket Services, even though the Card and Socket
Services do not directly support CardBus. Consult the installation instructions in
Chapter 2 and README.TXT file for more details.
57
Page 64

CHAPTER3
HotSwap
The PRO/100 CardBus adapter currently supports HotSwap during
connection to a network or host computer from a CardBus computer only if
you are running versions of Windows 95 or Windows NT that fully support
CardBus. This feature allows the CardBus to be removed from the
computer, temporarily replaced with another type of card such as a modem
or memory card, then reinserted without loss of network connection.
For example, a user could replace a PRO/100 CardBus adapter connected to
a network with a PC Card flash or SRAM memory card. The network drives
become temporarily inaccessible. Any access from DOS or Windows will
return an “Invalid drive specification” message. Meanwhile, the drive
associated with the flash or SRAM card is available for copying and data
retrieval.
If the PRO/100 CardBus is returned to the PC Card slot within the timeout
period specified by the network operating system, then network drives,
path, and mappings will be reinstated exactly as they were before the swap.
The default timeout value varies for different network operating systems.
On NetWare 3.11, for example, the default setting is 15 minutes and is
modifiable only by the network administrator. If the 15 minute limit is
exceeded, the network connection can usually be restored by simply
logging back in without rebooting.
NOTE:
The HotSwap feature is not supported unless Card and Socket Services software (or
its equivalent under Windows 95 or Windows NT) supports CardBus and is running
on the PC Card computer. Upgrading to new drivers from Intel may also be required, as new Card and Socket software is released.
Power Management Suspend/Resume
Power management features such as suspend/resume are supported by the
PRO/100 CardBus adapter on PC Card systems running both Card and
Socket Services (or the equivalent functionality of Windows 95 or
Windows NT) that support CardBus. This means that when the computer
enters a reduced power or power saving mode, an ongoing network
connection will remain active for the period of time allowed by the network
operating system. Even if the time period is exceeded, the network
connection can usually be restored by simply logging back in without
rebooting.
58
Page 65

Configuration Reference
NOTE:
The suspend/resume feature is not supported unless Card and Socket Services
software (or its equivalent under Windows 95 or Windows NT) supports CardBus
and is running on the PC Card computer.
Power Management Guidelines
HotSwap and suspend/resume operations are subject to limitations dictated
by the network operating system. See the documentation for your network
operating system to determine how long the network will wait for activity
before dropping a connection, and whether this time period is user
configurable.
Full-Duplex Transmission
The PRO/100 CardBus adapter hardware and network drivers are designed
to support full-duplex operation, or the ability to transmit and receive on the
network at the same time. This feature is only available when the Adapter is
connected to full-duplex switches.
If your network supports full-duplex operation, activate the CardBus feature
by including the keyword LINEMODE=FULL in the configuration file or
on the command line for your network driver.
NOTE:
To use full-duplex capabilities, your network must have full-duplex hardware in
place and enabled. If you use the LINEMODE=FULL keyword without full-duplex
hardware, the network will become unusable due to excessive collisions.
Advanced Look-Ahead Pipelining
The PRO/100 CardBus adapter also uses pipelining technology to improve
performance. Advanced Look-Ahead Pipelining allows for processing and
transmission of packets before the entire packet has been loaded into
memory, resulting in significant gains in performance. This feature is
enabled automatically, without user intervention.
59
Page 66

CHAPTER3
Memory Exclusion
When using a memory manager (under DOS and Windows 3.X), you must
exclude a 4K memory range between C000 and EF00 for the use of the
PRO/100 CardBus adapter. For example:
DEVICE=C:\DOS\HIMEM.SYS
DEVICE=C:\DOS\EMM386.EXE NOEMS X=D200-D2FF
This example excludes 4K of the D200 segment for use by the PRO/100
CardBus adapter. If the CardBus software is not configured for a specific
address, it will automatically detect a free memory range. Otherwise, be
sure the CardBus software is set to the same memory window that is
excluded.
Sample Configuration Files for Selected Network
Operating Systems
The following sample configuration files show default parameters for some
network operating systems. This information is designed to supplement the
information provided in Chapter 2, Software Installation.
Artisoft LANtastic/AI 6.0
NOTE:
If you are using DOS multi-menu CONFIG.SYS, the three LANtastic-related lines in
the CONFIG.SYS will be located in a COMMON section at the end of your
CONFIG.SYS. You will have to manually move those lines into the proper
menuitem section of your CONFIG.SYS. The same is true for the line call
c:\lantasti\startnet.bat in your AUTOEXEC.BAT file.
Sample CONFIG.SYS
device=c:\dos\himem.sys
REM INTEL PRO/100 CB — DO NOT CHANGE LINES BELOW
DEVICE=C:\DOS\EMM386.EXE NOEMS X=D200-D2FF
REM DEVICE=C:\DOS\EMM386.EXE NOEMS
REM INTEL PRO/100 CB — DO NOT CHANGE LINES ABOVE
60
Page 67

Configuration Reference
FILES=50
BUFFERS=30
REM INTEL PRO/100 CB — DO NOT CHANGE LINES BELOW
DEVICE=C:\LANTASTI\PROTMAN.DOS /I:C:\LANTASTI
DEVICE=C:\LANTASTI\M32ANDIS.EXE
REM INTEL PRO/100 CB — DO NOT CHANGE LINES ABOVE
Sample AUTOEXEC.BAT
PATH=C:\UTIL;C:\DOS;
PROMPT $P$G
CALL C:\LANTASTI\STARTNET.BAT
Sample PROTOCOL.INI
;PROTOCOL.INI FOR LANTASTIC VERSION 6.00
;—————— USING INTEL ETHEREXPRESS PRO/100 32-BIT
;MOBILE ADAPTER
;
[PROTMAN]
DRIVERNAME = PROTMAN$
DYNAMIC = YES
; PROTOCOL.INI SECTION FOR THE INTEL ETHEREXPRESS
;PRO/100 32-BIT MOBILE ADAPTER.
[M32ANDIS_NIF]
DRIVERNAME = INTEL$
NOEARLYRX
Sample STARTNET.BAT
@ECHO OFF
REM LANTASTIC VERSION 6.00 INSTALLED 95/01/26
11:31:28
REM (FOR DOS)
C:
CD C:\LANTASTI
SET LAN_CFG=C:\LANTASTI
61
Page 68

CHAPTER3
REM IF LANTASTIC IS DISABLED, SKIP EVERYTHING.
IF EXIST DISABLED GOTO :STARTNET_DONE
@ECHO ===== BEGIN LANTASTIC CONFIGURATION =====
PATH C:\LANTASTI;%PATH%
SET LAN_DIR=C:\LANTASTI.NET
LOADHIGH AI-NDIS BIND_TO=M32ANDIS_NIF
AILANBIO @STARTNET.CFG
REDIR T4700 @STARTNET.CFG
IF EXIST NOSHARE GOTO :NOSHARE
SERVER C:\LANTASTI.NET @STARTNET.CFG
NET LOGIN \\T4700
GOTO :CONTINUE
:NOSHARE
@ECHO LANTASTIC SERVER WAS INSTALLED BUT TURNED
OFF.
:CONTINUE
REM IF CONNECT.BAT EXISTS, RUN IT TO SET UP
CONNECTIONS.
IF EXIST CONNECT.BAT GOTO :CONNECT
REM OTHERWISE SET UP CONNECTIONS SPECIFIED DURING
INSTALL.
NET USE LPT1: \\T4700\@PRINTER
NET LPT TIMEOUT 10
GOTO :CONNECT_DONE
:CONNECT
@ECHO SETTING UP LANTASTIC CONNECTIONS FROM
CONNECT.BAT
REM BUILD CONNECT.BAT LIKE THIS: “NET SHOW/BATCH
>C:\LANTASTI\CONNECT.BAT”
REM (OR RUN THE BATCH FILE SETNET.BAT)
CALL CONNECT.BAT
:CONNECT_DONE
NET POSTBOX
62
Page 69

Configuration Reference
@ECHO ===== END LANTASTIC CONFIGURATION =====
:STARTNET_DONE
CD \
Banyan VINES
NOTE:
If you are using DOS Multi-menu CONFIG.SYS, the three VINES related lines in the
CONFIG.SYS will be located at the end of your CONFIG.SYS. You will have to
manually move those lines into the proper menuitem section of your CONFIG.SYS.
If you are getting Banyan VINES Error codes 10xx, check your
C:\VINES\NDISBAN.DOC for explanations of error codes.
Sample CONFIG.SYS
DEVICE=C:\DOS\HIMEM.SYS
REM INTEL PRO/100 CB — DO NOT CHANGE LINES BELOW (EMM)
DEVICE=C:\DOS\EMM386.EXE NOEMS X=D200-D2FF
REM DEVICE=C:\DOS\EMM386.EXE NOEMS
REM INTEL PRO/100 CB — DO NOT CHANGE LINES ABOVE
FILES=40
BUFFERS=30
REM INTEL PRO/100 CB — DO NOT CHANGE LINES BELOW (NDIS)
DEVICE=C:\VINES\PROTMAN.DOS /I:C:\VINES
DEVICE=C:\VINES\M32ANDIS.EXE
REM INTEL PRO/100 CB — DO NOT CHANGE LINES ABOVE
Sample AUTOEXEC.BAT
PATH=C:\UTIL;C:\DOS;
PROMPT $P$G
CD\VINES
BAN
Sample PROTOCOL.INI
; PROTOCOL.INI SECTION FOR THE INTEL ETHEREXPRESS
;PRO/100 32-BIT MOBILE ADAPTER.
63
Page 70

CHAPTER3
[INTELNET]
DRIVERNAME = INTEL$
DEC PATHWORKS 5.0 and 5.1
Sample CONFIG.SYS
DEVICE=C:\DOS\HIMEM.SYS
DEVICE=C:\DOS\EMM386.EXE NOEMS X=D200-D2FF
FILES=40
BUFFERS=30
SHELL=C:\DOS\COMMAND.COM /P /E:1024
LASTDRIVE=G
Sample AUTOEXEC.BAT
CD\PW
STARTNET.BAT
Sample PROTOCOL.INI (after completion of install
process)
[PROTOCOL MANAGER]
DRIVERNAME = PROTMAN$
[IPX4MAC]
DRIVER = IPX$MAC
BINDINGS = M32ANDIS
[IPX_XIF]
DRIVERNAME = IPX$
BINDINGS = M32ANDIS
[NETBEUI]
DRIVERNAME = NETBEUI$
SESSIONS = 6
NCBS = 12
BINDINGS = M32ANDIS
64
Page 71

Configuration Reference
LANABASE = 0
[DATALINK]
DRIVERNAME = DLL$MAC
LG_BUFFERS = 14
SM_BUFFERS = 6
OUTSTANDING = 32
BINDINGS = M32ANDIS
DECPARM = C:\PW\
IRQ = 5
;; YOUR DECNET ADDRESS IS AA0004008407
;;
[M32ANDIS]
DRIVERNAME=INTEL$
Windows for Workgroups 3.11
Sample CONFIG.SYS
DEVICE=C:\DOS\HIMEM.SYS
REM INTEL PRO/100 CB — DO NOT CHANGE LINES BELOW
(EMM)
DEVICE=C:\DOS\EMM386.EXE NOEMS X=D200-D2FF
REM DEVICE=C:\DOS\EMM386.EXE NOEMS
REM INTEL PRO/100 CB — DO NOT CHANGE LINES ABOVE
FILES=40
BUFFERS=30
DEVICE=C:\WINDOWS\IFSHLP.SYS
LASTDRIVE=Z
65
Page 72

CHAPTER3
Sample AUTOEXEC.BAT
C:\WINDOWS\NET START
Sample PROTOCOL.INI
[NETWORK.SETUP]
VERSION=0X3110
NETCARD=M32AMAC,1,M32AMAC,1
TRANSPORT=MS$NETBEUI,NETBEUI
TRANSPORT=MS$NDISHLP,MS$NDISHLP
LANA0=M32AMAC,1,MS$NETBEUI
LANA1=M32AMAC,1,MS$NDISHLP
[NETBEUI]
BINDINGS=M32AMAC,ASYMAC
LANABASE=0
DRIVERNAME=NETBEUI$
SESSIONS=10
NCBS=12
[PROTMAN]
DRIVERNAME=PROTMAN$
PRIORITY=MS$NDISHLP
[M32AMAC]
DRIVERNAME=INTEL$
[MS$NDISHLP]
DRIVERNAME=NDISHLP$
BINDINGS=M32AMAC
Sample [NETWORK DRIVERS] SECTION IN SYSTEM.INI
[NETWORK DRIVERS]
DEVDIR=C:\WINDOWS
LOADRMDRIVERS=YES
66
Page 73

Configuration Reference
NETCARD=M32ANDIS.EXE
TRANSPORT=*NETBEUI,NDISHLP.SYS
Windows for Workgroups Using the ODI Driver
with NetWare as Secondary Network
Sample STARTNET.BAT
REM INTEL PRO/100 CB — DO NOT CHANGE LINES BELOW
:M32A_MENU
@ECHO OFF
CLS
GOTO %CONFIG%
:M32A_E_INTEL
C:
CD C:\NWCLIENT
IF NOT EXIST M32AODI.COM GOTO M32A_ERROR
LSL
M32AODI.COM
IPXODI
C:\WINDOWS\ODIHLP.EXE
VLM
IF NOT EXIST ICHECK.EXE GOTO S_M32A_INTEL
CLS
ICHECK.EXE -E -1 F:
:S_M32A_INTEL
F:
LOGIN
GOTO M32A_END
:M32A_ERROR
ECHO ERROR: UNABLE TO LOCATE DRIVER FILE.
:M32A_END
C:
67
Page 74

CHAPTER3
CD \
REM INTEL PRO/100 CB — DO NOT CHANGE LINES ABOVE
Sample CONFIG.SYS
REM INTEL PRO/100 CB — DO NOT CHANGE LINES
BELOW (MENU)
[MENU]
MENUITEM=M32A_E_INTEL,LOAD INTEL
ETHEREXPRESS PRO/100 32-BIT MOBILE ADAPTER
FOR NETWORK ACCESS
MENUITEM=M32A_END,DO NOT LOAD ANY INTEL
DRIVERS
MENUCOLOR=15,0
[M32A_E_INTEL]
[M32A_END]
[COMMON]
REM INTEL PRO/100 CB — DO NOT CHANGE LINES
ABOVE
DEVICE=C:\WINDOWS\HIMEM.SYS /TESTMEM:OFF
DEVICE=C:\DOS\EMM386.EXE X=D000-DFFF
DOS=HIGH
DOS=UMB
BUFFERS=20
FILES=40
LASTDRIVE=Z
DEVICE=C:\WINDOWS\IFSHLP.SYS
STACKS=9,256
Sample AUTOEXEC.BAT
@ECHO OFF
PROMPT $P$G
PATH C:\WINDOWS;C:\DOS
68
Page 75

Configuration Reference
SET TEMP=C:\DOS
C:\DOS\SMARTDRV.EXE /X C+
REM INTEL PRO/100 CB — DO NOT CHANGE LINES
BELOW
:M32A_MENU
@ECHO OFF
CLS
GOTO %CONFIG%
:M32A_E_INTEL
C:\WINDOWS\NET START
C:
CD C:\NWCLIENT
IF NOT EXIST C:\NWCLIENT\STARTNET.BAT GOTO
M32A_ERROR
CALL C:\NWCLIENT\STARTNET.BAT
GOTO M32A_END
:M32A_ERROR
ECHO ERROR: UNABLE TO LOCATE DRIVER FILE.
:M32A_END
C:
CD \
REM INTEL PRO/100 CB — DO NOT CHANGE LINES
ABOVE
REM INTEL PRO/100 CB — DO NOT CHANGE LINES
BELOW (PATH)
PATH=%PATH%;C:\NWCLIENT
REM INTEL PRO/100 CB — DO NOT CHANGE LINES
ABOVE
Sample PROTOCOL.INI
[NETWORK.SETUP]
VERSION=0X3110
69
Page 76

CHAPTER3
NETCARD=M32A$ODI,1,M32A$ODI,4
TRANSPORT=MS$NWLINKNB,NWLINK
TRANSPORT=MS$NETBEUI,NETBEUI
LANA0=M32A$ODI,1,MS$NETBEUI
LANA1=M32A$ODI,1,MS$NWLINKNB
[NET.CFG]
PATH=C:\NWCLIENT\NET.CFG
[M32A$ODI]
[LINK DRIVER M32AODI]
DATA=FRAME ETHERNET_802.2
[NWLINK]
BINDINGS=M32AODI
[NETBEUI]
BINDINGS=M32AODI
LANABASE=0
SESSIONS=10
NCBS=12
Sample [network drivers] section in SYSTEM.INI
[NETWORK DRIVERS]
DEVDIR=C:\WINDOWS
LOADRMDRIVERS=NO
Sample NET.CFG file (located C:\NWCLIENT)
LINK DRIVER M32AODI
FRAME ETHERNET_802.3
FRAME ETHERNET_802.2
FRAME ETHERNET_II
FRAME ETHERNET_SNAP
70
Page 77

Configuration Reference
Driver Parameters Reference
The following paragraphs present configuration guidelines for each of the
driver types: NDIS2 and NDIS3, ODI, and packet. These guidelines are
followed by a comprehensive “keyword” reference section.
All of the drivers described here automatically detect the speed of the
network to which the adapter is attached (10 Mbps or 100 Mbps), unless
otherwise noted. Speed can also be specified with the LINESPEED
keyword.
Full-duplex operation must be explicitly configured with the LINEMODE
keyword, unless the adapter is being connected to a hub which supports
Nway* auto-negotiation. In this case the adapter will auto-detect fullduplex operation.
All of the DOS drivers have enhanced resource detection capability built in.
The drivers will detect free system memory, IRQ, and I/O resources for use
by the drivers. To use this feature, do not force a particular resource by
placing a keyword in the network configuration file. This will override the
automatic resource detection for that parameter.
ODI Settings (for driver M32AODI.COM and
M32AODI.OS2)
Custom parameters for networks using the ODI driver can be entered
manually, using an ASCII editor, in the NET.CFG file.
DOS ODI Driver Configuration Notes (M32AODI.COM)
The ODI driver M32AODI.COM conforms to the “Novell ODI
Specification: 16-bit DOS Client HSMs.” It is a DOS-based terminate-andstay-resident (TSR) program. The driver will configure itself according to
the options specified in the NET.CFG file. This file is supplied on the
Network Drivers Disk and must be present in the same directory as the ODI
driver. Files required for using M32AODI.COM are
M32AODI.INS Intel installation information file
NET.CFG Network configuration file
M32AODI.COM Intel ODI driver
71
Page 78

CHAPTER3
Most installations will be able to use the settings implemented in the
NET.CFG file by the Intel Installation Program. If any parameters need to
be changed, use an ASCII text editor to open and modify the NET.CFG file
and insert the appropriate keywords and values after the line
LINK DRIVER M32AODI
Parameters can also be implemented on the command line. Command line
parameters override parameters placed in the NET.CFG file.
NET.CFG Example
LINK DRIVER M32AODI
FRAME ETHERNET_802.2
M32AODI.COM Keywords
KEYWORD DEFAULT VALID VALUES
MEMORY AUTO C000 - EF00
IOADDRESS AUTO 100 - FF80
IRQ AUTO 3-15
SOCKET AUTO 1-4
MODE MEM IO OR MEM
72
NOCHECK NOT PRESENT
NOLED NOT PRESENT
TXBUFFERSIZE 2 1 - 10
RXBUFFERSIZE 15 1 - 30
ERT HIGH LOW, MED, OR HIGH
NOEARLYRX NOT PRESENT
NOEARLYTX NOT PRESENT
LINESPEED AUTO 10 OR 100
LINEMODE AUTO HALF OR FULL
LINKDISABLE NOT PRESENT
NOBURST NOT PRESENT
LATENCY 32 0 - 255
CACHE 8 0, 4, 8, 16, 32
NOWRITEPOST NOT PRESENT
Page 79

Configuration Reference
NOPREFETCH NOT PRESENT
S (COMMAND LINE ONLY: SHOW
RESIDENT LAN DRIVERS)
U (COMMAND LINE ONLY: UNLOAD)
OS/2 ODI Driver Configuration Notes (CBEODI.OS2)
The OS/2 ODI driver M32AODI.OS2 conforms to the Novell "ODI
Developer's Guide for OS/2 Client Driver Hardware Specific Modules"
version 2.1. It is an IBM OS/2-based device driver for use with OS/2
versions 2.0 and later. The Novell OS/2 workstation ODI stack including
M32AODI.OS2 supports Novell's NetWare Requester for OS/2 networking
client environment.
Files required for using M32AODI.OS2 include Novell OS/2 Requester
files and the following files:
NET.CFG Network configuration file
M32AODI.OS2 Intel ODI driver for OS/2
Most installations will be able to use the settings implemented in the
NET.CFG file by the Intel Installation Program. If any parameters need to
be changed, use an ASCII text editor to open and modify the NET.CFG file
and insert the appropriate keywords and values after the line
LINK DRIVER M32AODI
NDIS 2.0.1 Settings (for drivers M32ANDIS.EXE
and M32ANDIS.OS2)
Custom parameters for the NDIS driver can be entered manually, using an
ASCII editor, in the PROTOCOL.INI file.
73
Page 80

CHAPTER3
NDIS 2.0.1 DOS Driver Configuration Notes
The DOS NDIS driver M32ANDIS.EXE conforms to the 3Com/Microsoft
LAN Manager Network Driver Interface Specification (NDIS) version
2.0.1. It is a DOS-based executable terminate-and-stay-resident (TSR)
program that will configure itself according to the options specified in the
PROTOCOL.INI file, which is supplied on the Network Drivers Disk.
The files required for using M32ANDIS.EXE are:
PROTOCOL.INI Configuration and binding information file
M32ADOS.NIF Intel installation file for Microsoft LAN
Manager
M32ANDIS.EXE Intel DOS NDIS 2.0.1 driver
NDIS 2.0.1 OS/2 Driver Configuration Notes
The OS/2 NDIS driver M32ANDIS.OS2 conforms to the 3Com/Microsoft
LAN Manager Network Driver Interface Specification (NDIS) version
2.0.1. It is an IBM OS/2-based device driver for use with OS/2 versions 2.0
and later.
The files required for using M32ANDIS.OS2 are:
PROTOCOL.INI Configuration and binding information file
M32AOS2.NIF Intel installation file for Microsoft LAN
Manager
M32ANDIS.OS2 Intel OS/2 NDIS 2.0.1 driver
If any parameters need to be changed, use an ASCII text editor to modify
the PROTOCOL.INI file with the appropriate keywords and values.
Keyword syntax for PROTOCOL.INI can be found below. Keywords are
not case sensitive, and can be abbreviated to a unique sequence of initial
characters (for example, IN for INTERRUPT, IO for IOADDRESS). A
Keyword Alphabetical Reference follows the keyword listings.
Most installations will be able to use the settings implemented in the
PROTOCOL.INI file by the Intel Installation Program. If any parameters
need to be changed, use an ASCII text editor to modify the
PROTOCOL.INI file with the appropriate keywords and values.
74
Page 81

Configuration Reference
NDIS 2.0.1 Keywords (M32ANDIS.EXE and
M32ANDIS.OS2)
KEYWORD DEFAULT VALID VALUES
DRIVERNAME=INTEL$ (REQUIRED FIRST ITEM IN
PROTOCOL.INI)
MEMORY AUTO C000 - EF00
IOADDRESS AUTO 100 - FF80
IRQ AUTO 3 - 15
SOCKET AUTO 1 - 4
MODE MEM IO OR MEM
NOCHECK NOT PRESENT
NOLED NOT PRESENT
TXBUFFERSIZE 2 1 - 10
RXBUFFERSIZE 15 1 - 30
ERT HIGH LOW, MEDIUM,
HIGH
NOEARLYRX NOT PRESENT
NOEARLYTX NOT PRESENT
LINESPEED AUTO 10 OR 100
LINEMODE AUTO HALF OR FULL
LINKDISABLE NOT PRESENT
NOBURST NOT PRESENT
LATENCY 32 0 - 255
CACHE 32 0, 4, 8, 16,
OR 32
NOWRITEPOST NOT PRESENT
NOPREFETCH NOT PRESENT
VERBOSE NOT PRESENT
75
Page 82

CHAPTER3
M32A.SYS (NDIS 3) Settings for Microsoft
Windows NT and Windows 95
M32A.SYS is an NDIS 3 Miniport driver. It conforms to the Microsoft
Network Driver Interface Specification (NDIS). It supports both Windows
NT and Windows 95.
Windows NT Support
The M32A.SYS driver supports the networking environment in Microsoft
Windows NT versions 3.51 and greater.
The files necessary for using M32A.SYS include:
M32A.DLL Intel M32A installation DLL
OEMSETNT.INF Intel installation file for Microsoft
Windows NT
M32A.SYS Intel NDIS 3 driver for Microsoft
Windows NT
There are user-configurable parameters to the M32A.SYS driver which can
be modified using the Network Control Panel built into Windows NT. This
applet uses the OEMSETNT.INF file to set the corresponding parameters in
the registry.
The user-configurable parameters are as follows:
76
Page 83

Configuration Reference
Parameter Default Valid Values Registry
Value
I/O PORT 0XF800 0X1000-0XF800 SAME
MEMORY ADDRESS 0XD4000 0XC0000-0XDF000 SAME
INTERRUPT 5 3, 4, 5, 7, SAME
10, 11, 15
INTERRUPT STYLE 0 AUTO DETECT 0
PCI IRQS 1
ISA IRQS 2
LINE SPEED 0 AUTODETECT 0
10 MB 1
100 MB 2
LINE MODE 1 AUTODETECT 0
HALF-DUPLEX 1
FULL-DUPLEX 2
PC CARD SOCKET 0 AUTODETECT 0
1 1
2 2
3 3
DIRECT ENABLE 0 AUTODETECT O
OFF 1
ON 2
EARLYTRANSMIT 1 OFF 0
ON 1
EARLYRECEIVE 1 OFF O
ON 1
77
Page 84

CHAPTER3
The network node address can be modified by manually editing the registry
and adding the parameter ‘NetworkAddress’ with a hexadecimal string
value, such as ‘00A0C9112233’. If the user does NOT specify a
‘NetworkAddress’ then the M32A.SYS driver uses the network node
address contained in the PRO/100 CardBus adapter Card Information
Structure.
Windows 95 Support
The M32A.SYS driver also supports the networking environment in
Microsoft Windows 95.
The files necessary for using M32A.SYS with Windows 95 include:
NETM32A.INF Intel installation file for Windows 95
M32A.SYS Intel NDIS 3 driver for Windows 95
There are user-configurable parameters to the M32A.SYS driver which can
be modified using the Network Control Panel built into Windows 95. This
applet queries the user for parameter selections and then sets the
corresponding parameters in the registry. The user-configurable parameters
are as follows:
Parameter Default Valid Values Registry
Value
DIRECTENABLE AUTODETECT OFF, ON,
AUTODETCT 0
EARLYTRANSMIT ON OFF 0
ON 1
LINESPEED AUTO AUTO DETECT 0
10 MBPS 1
100 MBPS 2
LINEMODE 0 AUTODETCT 0
HALF-DUPLEX 1
FULL-DUPLEX 2
INTERRUPTSYTLE 0 AUTODETECT 0
PCI-IRQ 1
ISA-IRQ 2
78
Page 85

Configuration Reference
SOCKET 0 AUTODETECT 0
11
22
33
44
The network node address can be modified by specifying a value for
‘NetworkAddress’ such as ‘00A0C9112233’. If the user does NOT specify
a ‘NetworkAddress’ then the M32A.SYS driver uses the network node
address contained in the PRO/100 CardBus adapter Card Information
Structure.
Novell Client 32 Driver Settings (for driver M32A.LAN)
The driver M32A.LAN conforms to the Novell “ODI NetWare Server
Driver Development Tool Kit Driver Specification” version 3.3. It is a 32bit driver. This driver can be used as a server driver in NetWare versions
3.12, 4.10, and 4.11. For NetWare 3.12 and 4.10, server NLMs must be
updated to the 3.3 specification. The new NLMs can be obtained from
Novell.
Novell Client32 Driver Keywords
Parameters for configuring the Novell server driver must be specified
on the command line.
Keyword Default Valid Values
MEMORY AUTO C000 - FFFFE000
IOADDRESS AUTO 100 - FF80
IRQ AUTO 3 - 15
SOCKET AUTO 1 - 4
MODE MEM IO or MEM
NOLED NOT PRESENT
TXBUFFERSIZE 10 1 - 100
RXBUFFERSIZE 30 1 - 100
79
Page 86

CHAPTER3
ERT HIGH LOW, MEDIUM, or
HIGH
NOEARLYRX NOT PRESENT
NOEARLYTX NOT PRESENT
LINESPEED AUTO 10 or 100
LINEMODE HALF HALF or FULL
LINKDISABLE NOT PRESENT
NOBURST NOT PRESENT
LATENCY 32 0 - 255
CACHE 32 0, 4, 8, 16, or 32
NOWRITEPOST NOT PRESENT
NOPREFETCH NOT PRESENT
80
Page 87

Configuration Reference
Packet Driver Settings (for driver
M32APD.COM)
Packet driver parameters must be stated on the M32APD.COM command
line when running the packet driver.
Packet Driver Configuration Notes
The Intel packet driver M32APD.COM conforms to FTP Software’s public
domain packet-driver specification. It is a DOS-based terminate-and-stayresident (TSR) program. The driver file M32APD.COM is located in the
\PKTDRV directory on the Network Drivers Disk.
Refer to your network documentation for instructions on how to install the
packet driver with your network. Most installations should be able to use
the default settings listed below.
Keywords are not case sensitive, and can be abbreviated to a unique
sequence of initial characters (for example, IN for INTERRUPT).
Packet Driver Keywords
Keyword Default Valid Values
MEMORY AUTO C000 - EF00
IOADDRESS AUTO 100 - FF80
IRQ AUTO 3 - 15
SOCKET AUTO 1 - 4
MODE MEM IO OR MEM
NOCHECK NOT PRESENT
NOLED NOT PRESENT
TXBUFFERSIZE 2 1 - 10
RXBUFFERSIZE 15 1 - 30
ERT HIGH LOW, MEDIUM, OR HIGH
NOEARLYRX NOT PRESENT
NOEARLYTX NOT PRESENT
LINESPEED AUTO 10 OR 100
LINEMODE HALF HALF OR FULL
81
Page 88

CHAPTER3
LINKDISABLE NOT PRESENT
NOBURST NOT PRESENT
LATENCY 32 0 - 255
CACHE 32 0, 4, 8, 16, OR 32
NOWRITEPOST NOT PRESENT
NOPREFETCH NOT PRESENT
SINT 60 (60 - 80)
VERBOSE NOT PRESENT
Packet Driver Example
A typical sequence for loading the packet driver M32APD.COM and
default configuration settings is as follows:
M32APD
ETHDRV
If no default configuration settings are used, these must be stated on the
M32APD.COM command line. For example,
M32APD IOADDRESS=320 INT=7
ETHDRV
Diagnostic Test Utility Settings (M32ATEST.EXE)
The M32ATEST.EXE utility is a Intel utility for testing Intel adapter
hardware. It is an MS-DOS executable file.
M32ATEST.EXE tests the adapter hardware functionality, including the PC
Card interface, the serial EEPROM, the Ethernet controller, and the PHY
interface (adapter modules). It displays manufacturing information
including serial number and date and time of manufacture. It also displays
configuration information including interrupt, I/O address, and starting
memory location used.
M32ATEST.EXE is an interactive program. It does not take command line
parameters. Parameters can be modified and tested through the user
interface in the program. See the Troubleshooting section for more
information about this utility.
82
Page 89

Configuration Reference
Keyword Alphabetical Reference
? displays command summary for driver
CACHE sets the system cache line size on the CardBus
Bridge. Valid arguments are system dependent
and may include only 0 (cache disabled), 4, 8,
16, or 32. Changing this parameter may affect
network performance.
DIRECTENABLE For 32-bit NDIS3 Driver (M32A.SYS) only:
DIRECTENABLE forces the method used by the
driver to determine if a PRO/100 CardBus
adapter is present. Valid parameters are
AutoDetect, Off, and On. Using AutoDetect
allows the driver to determine if the CardBus
bridge has already been setup by another enabler
such as a Socket and Card Services. If so, the
driver will use the current configuration. Using
On, forces the driver to enable the CardBus
bridge without checking its current state.
DRIVERNAME=INTEL$ required as first item in the INTEL section of the
PROTOCOL.INI file for the M32ANDIS driver.
ERT specifies the Advanced Look-ahead Pipelining
threshold. Valid settings are LOW, MEDIUM,
and HIGH. Changing this value will affect
network performance, depending on the
computer system.
INT See IRQ.
INTERRUPT See IRQ.
INTERRUPTSTYLE For 32-bit NDIS3 Driver (M32A.SYS) only:
INTERRUPTSTYLE forces the driver to use
ISA IRQ routing or PCI IRQ routing. Some
CardBus bridges have the capability of
supporting both PCI and ISA style IRQ routing.
Valid parameters are AutoDetect, PCI-IRQ,
and ISA-IRQ. The default keyword is
AutoDetect.
IOADDRESS and
IOBASEADDRESS specifies the base I/O address of the Intel adapter
I/O ports, in hexadecimal notation. The PRO/100
CardBus adapter requires 128 contiguous I/O
addresses if run in I/O mode. If using memorymapped I/O mode, no I/O ports are necessary. If
this parameter is not specified the driver will
detect an I/O port automatically.
83
Page 90

CHAPTER3
I/O PORT see IOADDRESS
IRQ specifies a hardware interrupt for use by the
adapter. If the computer system uses PCI
interrupts on the CardBus Bridge, this parameter
is ignored (unless the ISAIRQ keyword is used
as an override). If this parameter is not specified
the driver will detect an IRQ automatically.
ISAIRQ use this keyword to force the driver to use ISA
IRQ routing. Some CardBus bridges have the
capability of supporting both PCI and ISA style
IRQ routing. The driver automatically
determines the best choice for this option unless
this keyword is used as an override.
LATENCY specifies the latency timer for the CardBus
Bridge. This parameter affects the bus mastering
capabilities of the PRO/100 CardBus adapter.
Changing this parameter may affect system
performance. The range is a decimal number
between 1 and 255. The default is 32. The
default is 32. The latency should be lowered if
more than one peripheral device, such as a
modem, is being used. If the PRO/100 CardBus
adapter is the only peripheral being used, use a
higher latency, such as 255.
LINEMODE For 16-bit DOS Drivers: LINEMODE selects
either half-duplex or full-duplex mode for the
network. Valid parameters are AUTO, HALF or
FULL. Selecting full-duplex enables the
PRO/100 CardBus adapter to send and receive
data simultaneously when connected to a fullduplex hub. Default is AUTO.
For 32-bit NDIS3 Driver (M32A.SYS):
LINEMODE selects either half-duplex or fullduplex mode for the network. Valid parameters
are AutoDetect, Half Duplex, and Full-Duplex.
Selecting full-duplex enables the PRO/100
CardBus adapter to send and receive data
simultaneously when connected to a full-duplex
switch. Default is keyword is AutoDetect.
LINESPEED For 16-bit DOS Drivers: LINESPEED forces
operation to 10 or 100 Mbps. If the keyword is
not present the line speed will be automatically
detected (default).
84
Page 91

Configuration Reference
For 32-bit NDIS3 Driver (M32A.SYS):
LINESPEED forces operation to 10 or 100
Mbps. Valid parameters are AutoDetect, 10
Mbps, and 100 Mbps. Default keyword is
AutoDetect.
LINKDISABLE disables link integrity for non-IEEE 10BASE-T
networks such as StarLAN 10. Without this
keyword in the driver command line, the driver
defaults to link integrity ENABLED.
MEM see MEMORY.
MEMORY specifies the host PC memory location for the
Intel adapter in hexadecimal notation, when
MODE MEMORY (memory-mapped I/O) is
being used (see MODE). The memory block
occupies 4 Kbytes of host memory.
MODE set this keyword to IO to disable requests for
memory-mapped mode on systems that only
support an I/O-driven card. The MEMORY
setting provides increased performance on
computers that allow simultaneous availability of
memory and I/O resources.
NETWORKADDRESS allows user to override adapter’s unique network
node address by specifying a different node
address.
NOBURST disables burst mode reads on the PRO/100
CardBus adapter. Using this keyword will force
the adapter to initiate a bus-master request for
each read, negatively impacting performance.
NOCHECK disables verification of adapter resources. If the
driver detection and verification code is causing
problems when loading, this keyword can be
used to turn the feature off.
NODEADDRESS see NETWORKADDRESS.
NOEARLYRX disables Advanced Look-ahead Pipelining
features of the adapter. This keyword may be
used to troubleshoot systems that have
inexplicable network problems. Using this
keyword may negatively impact performance.
NOEARLYTX disables early transmit capability of the Adapter.
This keyword may be used to troubleshoot
systems that have inexplicable network
problems. Using this keyword may negatively
impact performance.
85
Page 92

CHAPTER3
NOLED turns off LED indicators on LAN adapter
module to conserve power.
NOPREFETCH disables prefetching in memory-mapped I/O
mode by turning off this capability on the
CardBus bridge. Using this keyword may
negatively impact performance.
PCIIRQ use this keyword to force the driver to use PCI
IRQ routing. Some CardBus bridges have the
capability of supporting both PCI and ISA style
IRQ routing. The driver automatically
determines the best choice for this option unless
this keyword is used as an override.
PORT (ODI) see IOADDRESS.
RXBUFFERSIZE sets the size of the adapter receive packet buffer.
This is a number in decimal in the range 1 - 30
for 16-bit drivers and 1 - 100 for the 32-bit ODI
driver. Each packet adds approximately 1520
bytes to the resident size of the driver. The
default is 15 packets.
S (ODI)(MS-DOS command line only) displays
LAN drivers resident in memory.
SINT (Packet Driver) is a number from hexadecimal
60 to 80 designating a software interrupt. Default
is 60.
SOCKET For 16-bit DOS Drivers: identifies the number
of the host computer’s PC Card slot or socket
into which the PRO/100 CardBus adapter is
inserted. If a socket number is specified, only the
specified socket is checked for the Intel adapter.
If no socket is specified, all sockets are searched
until the Intel adapter is found.
For 32-bit NDIS3 Driver (M32A.SYS):
identifies the number of the host computer's PC
slot or socket into which the PRO/100 CardBus
adapter is inserted. Valid parameters are
AutoDetect, 1, 2, 3, and 4. If a socket number is
specified, only the specified socket is checked
for the Intel adapter. The default keyword is
AutoDetect, and the driver will then
automatically check all slots for the PRO/100
CardBus adapter.
86
Page 93

Configuration Reference
TXBUFFERSIZE sets the size of the adapter transmit packet
buffer. This is the number of transmit packets in
decimal in the range 1 - 10 for 16-bit drivers and
1 - 100 for the 32-bit ODI driver. Each packet
adds approximately 1520 bytes to the resident
size of the driver. The default is 2 packets.
U (ODI)(MS-DOS command line only) unloads
driver from memory.
87
Page 94

CHAPTER3
88
Page 95

Chapter 4
Troubleshooting
This chapter contains troubleshooting information covering the most
common issues encountered when installing the PRO/100 CardBus adapter,
based on information developed by Intel Customer Support. This
information is intended for users or network administrators who are already
familiar with the PRO/100 CardBus adapter and its user documentation, and
who have run into difficulties after having completed the installation
procedures for the adapter, as described in the preceding chapters of this
User’s Guide.
This chapter contains the following headings:
• LED Indicators
• Diagnostic Test
• Error Messages
• General Troubleshooting
• Network Operating System Troubleshooting (Artisoft LANtastic,
DEC PATHWORKS, Microsoft Windows 95, Microsoft
Windows for Workgroups, Novell NetWare)
• Troubleshooting Checklist
89
Page 96
CHAPTER 4
Additional Sources of Information
In addition to this User’s Guide, your computer and network documentation
should also be consulted as needed. For the latest information on the PRO/
100 CardBus adapter, see the README file on the Intel Network Drivers
Disk, call the Intel BBS (see attached Support Page File), or visit the Intel
World Wide Web site at http://support.intel.com. See Appendix A in this
User’s Guide for Intel support services access information.
LED Indicators
The LED indicators on the PRO/100 CardBus adapter TPE connector
operate under the following conditions: (1) the card is inserted into a PC
Card slot and (2) connected to the network, (3) computer is powered on,
and (4) network driver has been loaded.
Transmission
Activity - Yellow
Link Integrity
Orange - 100 Mbps
Green - 10 Mbps
PRO/100 CardBus adapter TPE connector and LEDs
90
Page 97

Troubleshooting
Diagnostic Self Test (MS-DOS only)
Intel provides a DOS-based self test diagnostics program. This program,
located on the PRO/100 CardBus adapter Network Drivers Disk, tests
several PRO/100 CardBus adapter functions. It also reports test results, the
serial number of the unit, and the node address. M32ATEST can only be
run from an MS-DOS command line.
This utility is intended to be a diagnostic tool in troubleshooting PRO/100
CardBus adapter configuration errors. It is designed to be simple to use and
understand, yet provide valuable technical information. The program can
run without a PRO/100 CardBus adapter, or even a CardBus machine, and
still provide some functionality. The program is dynamic. This means cards
can be inserted and removed at any time. Multiple cards can be tested and
different configurations can be tested. M32ATEST.EXE can run in a DOS
box in Windows, or Windows 95.
Executing the Self Test
Use the following steps to execute the self test.
1 Install the PRO/100 CardBus adapter according to the instructions
contained in Chapter 1, Hardware Installation in this User’s
Guide.
2 Start your computer from DOS. DO NOT load a network driver.
NOTE:
Do not run M32ATEST with a network driver loaded. Loading a network driver
before running M32ATEST may cause unpredictable results when exiting the test
utility.
3 Run the diagnostic test by typing M32ATEST at the MS-DOS
prompt, then press Enter. For example,
M32ATEST
NOTE:
If an error message displays when you execute the self test, see “Error Messages”
later in this chapter.
91
Page 98

CHAPTER 4
Main Screen
The program consists of several function “buttons” and a view pane.
Pressing or invoking a function will bring up the corresponding screen in
the view pane. This view remains until another is selected. To exit
M32ATEST type 'x' or push the 'Exit' button.
When a function is active, the button appears to remain down or pushed.
Once the button pops up, the function is completed and the screen is a
passive results display.
There are nine functions which can be invoked by pushing the associated
button on the main screen. A button can be pushed by pressing the
highlighted letter indicated on the button, or by using the left mouse button.
Each function is explained below.
TEST
This function uses the current configuration to initialize the adapter and
verify it is powered on and properly seated in its slot. It displays the current
setting and test result for each parameter. Parameters are configured
through the CONFIGURE function described below. If a card is detected
and initialized successfully, the CIS information is displayed.
A failure may indicate that service is required for the PRO/100 CardBus
adapter. Contact Intel Customer Support.
The CIS section displays the model and serial numbers of the unit, its
manufacturing date and time, and its network node address. This data has
been preprogrammed at the factory and cannot be altered.
Important
Write down the PRO/100 CardBus adapter model and serial numbers for reference
Customer Support will ask you to supply the model and serial numbers when
requesting technical assistance or warranty service from Intel.
CONFIGURE
This function allows the user to set the parameters used for testing. The
address mode can be set to Auto, Memory, or I/O. For Memory and I/O a
hexadecimal address can be specified. The IRQ can be set to Auto, or IRQ.
The IRQ selection can be used to force a particular interrupt, and a specific
type of interrupt (PCI or ISA). The network line speed and line mode can
also be set from this function.
92
Page 99

Troubleshooting
SOFTWARE
This function attempts to determine what software is currently loaded
which will affect the operation of the card. It displays the current version of
DOS and Windows, and any Card and Socket Services available.
HARDWARE
This function attempts to determine if a CardBus Controller exists on the
machine. It first checks for PCI BIOS extensions, and then it searches for
any CardBus Controllers. If found it displays the vendor information and
the PCI interrupt (if enabled by the BIOS)
NETWORK
This function enables the card on the Ethernet network and performs some
diagnostics. It reports the operating mode and speed detected and monitors
the network for traffic. Network traffic is shown on a graph. This graph
provides a visual representation of the volume of traffic on the local area
network (LAN). The Receive Statistics window displays the cumulative
totals for received packets, KBytes, and Errors.
RESOURCES
This function attempts to determine free resources which can be utilized by
the driver. It searches for memory, I/O, and IRQ.
ADVANCED
This function allows the user to setup advanced diagnostics.
ABOUT
This function displays the current version of the program.
HELP
This function displays the help screen.
EXIT
This function exits the application.
93
Page 100

CHAPTER 4
Error Messages
Except as noted, these messages are specific to the Intel PRO/100 CardBus
adapter. They are listed in strict numerical/alphabetical order, i.e., numbers
appear before letters and messages starting with “The” are under the letter
T, initial “A” or “An” under the letter A.
For an explanation of other messages that may appear on the screen, see the
network-specific or computer-specific troubleshooting later in this chapter,
as well as your computer and network operating system documentation.
A card was not detected in the selected slot.
The SOCKET keyword was used to force a particular slot, but no PRO/100
CardBus adapter was detected there.
A CardBus interface could not be found.
The driver was unable to detect a CardBus bridge. Some machines require
that the CardBus Bridge be enabled through the system BIOS. Check with
the laptop manufacturer to find out how to enable the CardBus Bridge.
A PCI IRQ could not be set, and none exists for this slot
If the PCIIRQ keyword has been used to force PCI IRQ routing, but the
IRQ keyword has not been set, this message may occur if the driver cannot
set or verify an interrupt through the PCI BIOS. This keyword effectively
disables the ISA IRQ routing capability of the driver.
A working IRQ could not be found
The resource detection could not find a usable IRQ. Either the system has
no available IRQ resources, or the available IRQ resources could not be
configured for the CardBus Bridge.
A PRO/100 CardBus adapter could not be found
The driver was able to detect a CardBus Bridge, but there was no Intel
PRO/100 CardBus adapter inserted into a slot.
94
 Loading...