

Page 1

Intel® Gateway Solutions for the
Internet of Things – Development
Kit – DK50
Getting Started Guide
October 2014
Document Number: 330496-005
Page 2

Contents
By using this document, in addition to any agreements you have with Intel, you accept the terms set forth below.
You may not use or facilitate the use of this document in connection with any infringement or other legal analysis concerning
Intel products described herein. You agree to grant Intel a non-exc lusiv e, royalty-free license to any patent claim thereafter
drafted which includes subject matter disclosed herein.
INFORMATION IN THIS DOCUMENT IS PROVIDED IN CONNECTION WITH INTEL PRODUCTS. NO LICENSE, EXPRESS OR IMPLIED,
BY ESTOPPEL OR OTHERWISE, TO ANY INTELLECTUAL PROPERTY RIGHTS IS GRANTED BY THIS DOCUMENT.
Intel may make changes to specifications and product descriptions at any time, without notice. Designers must not rely on the
absence or characteristics of any features or instructions marked "reserved" or "undefined". Do not finalize a design with this
information.
The products described in this document may contain design defects or errors known as errata which may cause the product to
deviate from published specifications. Current characterized errata are available on request.
Contact your local Intel sales office or your distributor to obtain th e latest specifications and before placing your product order.
Code Names are only for use by Intel to identify products, platform s, programs, serv ices, etc. (“products”) in deve lopment by
Intel that have not been made commercially available to the public , i.e., announced, launched or shipped. They are never to be
used as “commercial” names for products. Also, they are not intended to function as trademarks.
Copies of documents which have an order number and are referenced in this document, or other Intel literature, may be obtained
by calling 1-800-548-4725, or go to: http://www.intel.com/design/literature.htm
Intel, Intel Atom, Intel Core, Intel
Corporation or its subsidiaries in the United States and other countries.
Wind River is a trademark of Wind River Systems, Inc.
*Other names and brands may be claimed as the property of others.
Copyright © 2014, Intel Corporation. All rights reserved.
®
Hyper-Threading Technology, Intel logo are trademarks or registered trademarks of Intel
Intel® Gateway Solutions for the IoT – Development Kit – DK50
Getting Started Guide October 2014
2 Document Number: 330496-005
Page 3

Contents
Contents
1 Introduction .....................................................................................................7
Development Kit Contents .......................................................................7 1.1
Reference Documents .............................................................................8 1.2
Technical Support ...................................................................................9 1.3
Documentation Conventions ................................................................... 10 1.4
Target Device Photos ............................................................................ 10 1.5
2 Register Your Product ...................................................................................... 12
3 Host System Setup ......................................................................................... 16
Host System Hardware Recommendations ............................................... 16 3.1
Host System Software Requirements ....................................................... 16 3.2
4 Target Device Setup ........................................................................................ 17
Target Device Hardware ........................................................................ 17 4.1
Connecting Power ................................................................................. 18 4.2
Confirming Serial Port ........................................................................... 18 4.3
Target Device Software ......................................................................... 21 4.4
Wired Ethernet Connection .................................................................... 21 4.5
Wireless Ethernet Connection ................................................................. 21 4.6
4.6.1
Connecting to the Target Device’s Local Wireless Network ............. 22
Wind River Web Interface Tool (WebIF) ................................................... 22 4.7
4.7.1
Configuring a Static IP Address Using WebIF ............................... 23
4.7.2 Finding the Target Device IP Address in WebIF ............................ 24
Using Secure Shell Session (SSH) to Login to the Target Device .................. 24 4.8
5
Installing Intelligent Device Platform Tools on the Host System ............................. 26
Host System OS Requirements ............................................................... 26 5.1
Host System Hardware Recommendations ............................................... 26 5.2
Wind River Software Installation Prerequisites .......................................... 27 5.3
5.3.1
Disk Space and Installation Folders ............................................ 27
5.3.2 Wind River Host Tools License ................................................... 27
5.3.3 Internet Connection ................................................................. 27
5.3.4 Download the Installer ............................................................. 28
Installing the Host Tools Base Packages ................................................... 28 5.4
6
Building the Intelligent Device Platform XT Runtime Software ................................ 30
Build Requirements .............................................................................. 30 6.1
Wind River Linux Configure Command ..................................................... 30 6.2
Build the Target Device Runtime Software................................................ 31 6.3
7
Installing Software on the Target Device ............................................................ 32
Obtain the Target Device Software Image ................................................ 32 7.1
Writing the Micro-SD Flash Card ............................................................. 32 7.2
Changing Default Boot .......................................................................... 33 7.3
8 Programming the SPI Flash Firmware ................................................................. 36
DediProg Programmer Information .......................................................... 36 8.1
Programming the Firmware .................................................................... 37 8.2
Backing Up the Firmware ....................................................................... 41 8.3
October 2014 Getting Started Guide
Document Number: 330496-005 3
Intel® Gateway Solutions for the IoT – Development Kit – DK50
Page 4

Tables
Appendix A Errata ........................................................................................................... 46
A.1 Modifying the MAC Address of Wired Ethernet Interface (eth0) .............................. 47
Appendix B Intel® Gateway Solutions for the Internet of Things – Knowledge Forum ................. 49
B.1 Accessing the Forum ....................................................................................... 49
B.2 Using the Forum ............................................................................................. 50
B.3 Submitting Questions ...................................................................................... 50
B.4 Subscribing to Tags ......................................................................................... 53
Appendix C Building an Intelligent Device Platform Project Using Wind River Workbench ............ 55
C.1 Create the Project ........................................................................................... 55
C.2 Build Project................................................................................................... 70
Tables
Table 1. Reference Documents ........................................................................................8
Table 2. Development Kit Errata .................................................................................... 46
Figures
Figure 1. Target Device - Top View ................................................................................. 10
Figure 2. Target Device - Bottom View ............................................................................ 11
Figure 3. Register Product ............................................................................................. 12
Figure 4. Create Support User Account ............................................................................ 13
Figure 5. Wind River License Key Request Confirmation ..................................................... 14
Figure 6. Logged in to Intel Registration Center ................................................................ 14
Figure 7. Email Message: Intel® Premier Support Registration Successfully Completed ........... 15
Figure 8. Email Message: Thank you for registering Intel® Gateway Solutions for the Internet of
Things (IoT) Development Kit DK50 ................................................................... 15
Figure 9. Target Device Set Up ....................................................................................... 17
Figure 10. Confirm USB-Serial Device is Recognized in Linux ................................................ 18
Figure 11. PuTTY Configuration Snapshot 1 ........................................................................ 19
Figure 12. PuTTY Configuration Snapshot 2 ........................................................................ 20
Figure 13. Confirm USB-Serial Device is Recognized in Linux ................................................ 20
Figure 14. Configuri ng a Stati c IP Address on the Wireless Ethernet Port ................................ 23
Figure 15. WebIF List of Network Connections (Status Interfaces) ..................................... 24
Figure 16. SSH Terminal Configuration Using PuTTY ............................................................ 25
Figure 17. SSH Terminal Configuration using PuTTY ............................................................ 33
Figure 18. Target Device Boot Device Menu Default ............................................................ 33
Figure 19. Target Device Boot Device Option C hanged to MMC ............................................. 34
Figure 20. GRUB Configuration Original (grub.conf) ............................................................ 34
Figure 21. GRUB Configuration Updated (grub.conf) ............................................................ 35
Intel® Gateway Solutions for the IoT – Development Kit – DK50
Getting Started Guide October 2014
4 Document Number: 330496-005
Page 5

Figures
Figure 22. DediProg SF100 Flash Programmer .................................................................... 36
Figure 23. DediProg Header on the Target Device ............................................................... 37
Figure 24. Connection from DediProg to Target Device ........................................................ 38
Figure 25. Flash Memory Selection ................................................................................... 38
Figure 26. DediProg Programming Software - Graphical User Interface (GUI) .......................... 39
Figure 27. Load File Dialog Box ........................................................................................ 40
Figure 28. Progr a m ming Complete ................................................................................... 41
Figure 29. DediProg Header on the Target Device ............................................................... 42
Figure 30. Connection from DediProg to Target Device ........................................................ 42
Figure 31. Flash Memory S election ................................................................................... 43
Figure 32. DediProg Programming Software - Graphical User Interface (GUI) .......................... 44
Figure 33. DediProg Edit Screen – with SPI Flash Contents Displayed .................................... 45
Figure 34. Location of MA C Address on Target Device Ethernet Port ...................................... 47
Figure 35. Display: Knowledge Forum Introductory Screen ................................................... 50
Figure 36. Display: Ask Question ...................................................................................... 51
Figure 37. Display: Title Question ..................................................................................... 51
Figure 38. Display: Categorize Question ............................................................................ 52
Figure 39. Display: Tag Question...................................................................................... 52
Figure 40. Display: Submit Question ................................................................................. 53
Figure 41. Display: Subscribe to Forum Tags ..................................................................... 54
Figure 42. Workspace Location Selection ........................................................................... 56
Figure 43. Create a New Workbench Project ....................................................................... 57
Figure 44. Selecting Target Operating System .................................................................... 58
Figure 45. Select Build Type ............................................................................................ 59
Figure 46. Specify Project Name ...................................................................................... 60
Figure 47. Enable Addons ................................................................................................ 61
Figure 48. Reload Configurations ...................................................................................... 62
Figure 49. glibc_idp Option Available ................................................................................ 63
Figure 50. Add Layers ..................................................................................................... 64
Figure 51. Add wr-intel-support ....................................................................................... 65
Figure 52. Add wr-mcafee Layer ...................................................................................... 66
Figure 53. Finalize Configuration ...................................................................................... 67
Figure 54. Configuration Script Progress ............................................................................ 68
Figure 55. Build Configuration Completed .......................................................................... 69
Figure 56. Build Project................................................................................................... 70
Figure 57. Build Project in Progress .................................................................................. 71
Figure 58. Workbench Config Log ..................................................................................... 72
Figure 59. Build Console Displaying Project Completion ....................................................... 72
October 2014 Getting Started Guide
Document Number: 330496-005 5
Intel® Gateway Solutions for the IoT – Development Kit – DK50
Page 6

Revision History
Date Revision Description
Revision History
October 2014 005 Added Appendix to build an Intelligent Device Platform Project with
September 2014 004 Added Loaner kit information. Corrected reference documents / added
August 2014 003 Corrected licensing information.
July 2014 002 Added Knowledge Forum appendix and made minor edits, mostly in
May 2014 001 First public version
Wind River Workbench
links
correcting inconsistent forma tting.
§
Intel® Gateway Solutions for the IoT – Development Kit – DK50
Getting Started Guide October 2014
6 Document Number: 330496-005
Page 7

Introduction
1 Introduction
This guide describes how to set up and begin running the Intel® Gateway Solutions for
the Internet of Things (IoT) – Development Kit – DK50. In this document:
• Development Kit refers to the Intel
Things (IoT) – Development Kit – DK50, including the Target Device
hardware, board firmware, and Wind River software.
• Target Device refers to the Intel
kit.
• Host System refers to a stand-alone computer system onto which the Wind
River Development Tools software is installed. A Host System and the Wind
River Development Tools are not included in the kit.
Development Kit Contents 1.1
®
Gateway Solutions for the Internet of
®
Galileo Development Board included in the
The Development Kit includes the following:
®
• Intel
Galileo Development Board
• Power adapter, power cord, and power plugs
• Documentation packet
• Micro-SD flash memory card (installed), includes Wind River Linux OS with
Wind River Intelligent Device Platform software
• USB to flash memory card adapter
• USB flash memory drive, includes a backup image for the Target Device OS
and Development Kit documentation.
In addition, some versions of the Development Kit may include the following:
• Four nylon standoffs and screws
®
• Intel
7260 dual-band wireless network adapter (PCIe* Mini Card)
• 2x internal Wi-Fi* antenna with U.FL connector
• Metal chassis for the Intel® Galileo Development Board
• 2x external Wi-Fi* antenna with RP-SMA male connector
October 2014 Getting Started Guide
Document Number: 330496-005 7
Intel® Gateway Solutions for the IoT – Development Kit – DK50
Page 8

Reference Documents 1.2
The following documents provide additional details and related information for
developing Intel® gateway solutions.
Table 1. Reference Documents
Title Link Description
Introduction
Intel® Galileo Board Getting
Started Guide Website
Wind River® Linux 5.0 / 5.1
Recommended Development
Host Distributions
Wind River® Linux 5.0.1 –
Users Guide
Wind River® Intelligent
Device Platform 2.0 –
Product Brief
http://www.intel.com/content/
www/us/en/embedded/products
/galileo/galileo-getting-startedguide.html
Wind River Online Support:
http://www.windriver.com/supp
ort/
https://wwwssl.intel.com/content/www/us/e
n/embedded/designtools/evaluationplatforms/gatewaysolutions/wind-river-linux-userguide.html
https://wwwssl.intel.com/content/www/us/e
n/embedded/designtools/evaluationplatforms/gatewaysolutions/wind-river-idp-xt2productbrief.html?wapkw=wind+river
Website with step- by-step
tools, FAQs, and examples
Key content:
• Recommended Development
Host Distributions
• Required Host Packages by
Host Distribution
Key content:
• Wind River Linux Overview
• Development & Build
Environment
• Configuration and Build
• Layers & Recipes
• Userspace & Kernel
Development
• Debugging
Key content:
• Product Overview
• Wind River Intelligent Device
Platform Architecture
• Technical Specifications
Wind River® Intelligent
Device Platform 2.0 –
Release Notes
Intel® Gateway Solutions for the IoT – Development Kit – DK50
Getting Started Guide October 2014
8 Document Number: 330496-005
http://www.intel.com/content/
www/us/en/embedded/designtools/evaluationplatforms/gatewaysolutions/wind-river-idprelease-notes.html
Key content:
• Changes in this release
• Requirements
• Issues & Customer Service
Page 9

Introduction
Title Link Description
Wind River® Intelligent
Device Platform 2.0 –
Programmer’s Guide
Wind River® Intelligent
Device Platform 2.0 –
Security Guide
https://wwwssl.intel.com/content/www/us/e
n/embedded/designtools/evaluationplatforms/gatewaysolutions/wind-river-idp-xt2programmersguide.html?wapkw=wind+river
https://wwwssl.intel.com/content/www/us/e
n/embedded/designtools/evaluationplatforms/gatewaysolutions/wind-river-idpsecurityguide.html?wapkw=wind+river
Key content:
• Wind River Intelligent Device
Platform Overview
• Architecture
• Wind River IDP Security,
Connectivity & Management
• Validation
• System Owner, Device &
Application Develop men t
Vendor Tasks
Key content:
• Wind River IDP Security
Overview
• Security Planning
• Risks, Threats & IDP Security
Mechanisms
• BKMs, Keys & Certificates
• Secure Repository
• Encrypted Data Storage
Technical Support 1.3
For users with a registered product, Intel provides technical support for this
Development Kit through Intel® Premier Support. To submit a support reque st using
Intel Premier Support, go to
https://businessportal.intel.com. See the Dear Customer
Letter included with your Development Kit for details.
In addition to Intel® Premier Support, registered users can use the Intel® Gateway
Solutions for the IoT - Knowledge Forum to ask “how-to” questions. Follow the
instructions in Appendix B to register, login, and submit questions in this online
support forum.
October 2014 Getting Started Guide
Document Number: 330496-005 9
Intel® Gateway Solutions for the IoT – Development Kit – DK50
Page 10
Documentation Conventions 1.4
The following conventions are used in this manual:
Courier font - code examples, command line entries, API names,
•
parameters, filenames, directory paths, and executables
• Bold text - graphical user interface entries and buttons
Target Device Photos 1.5
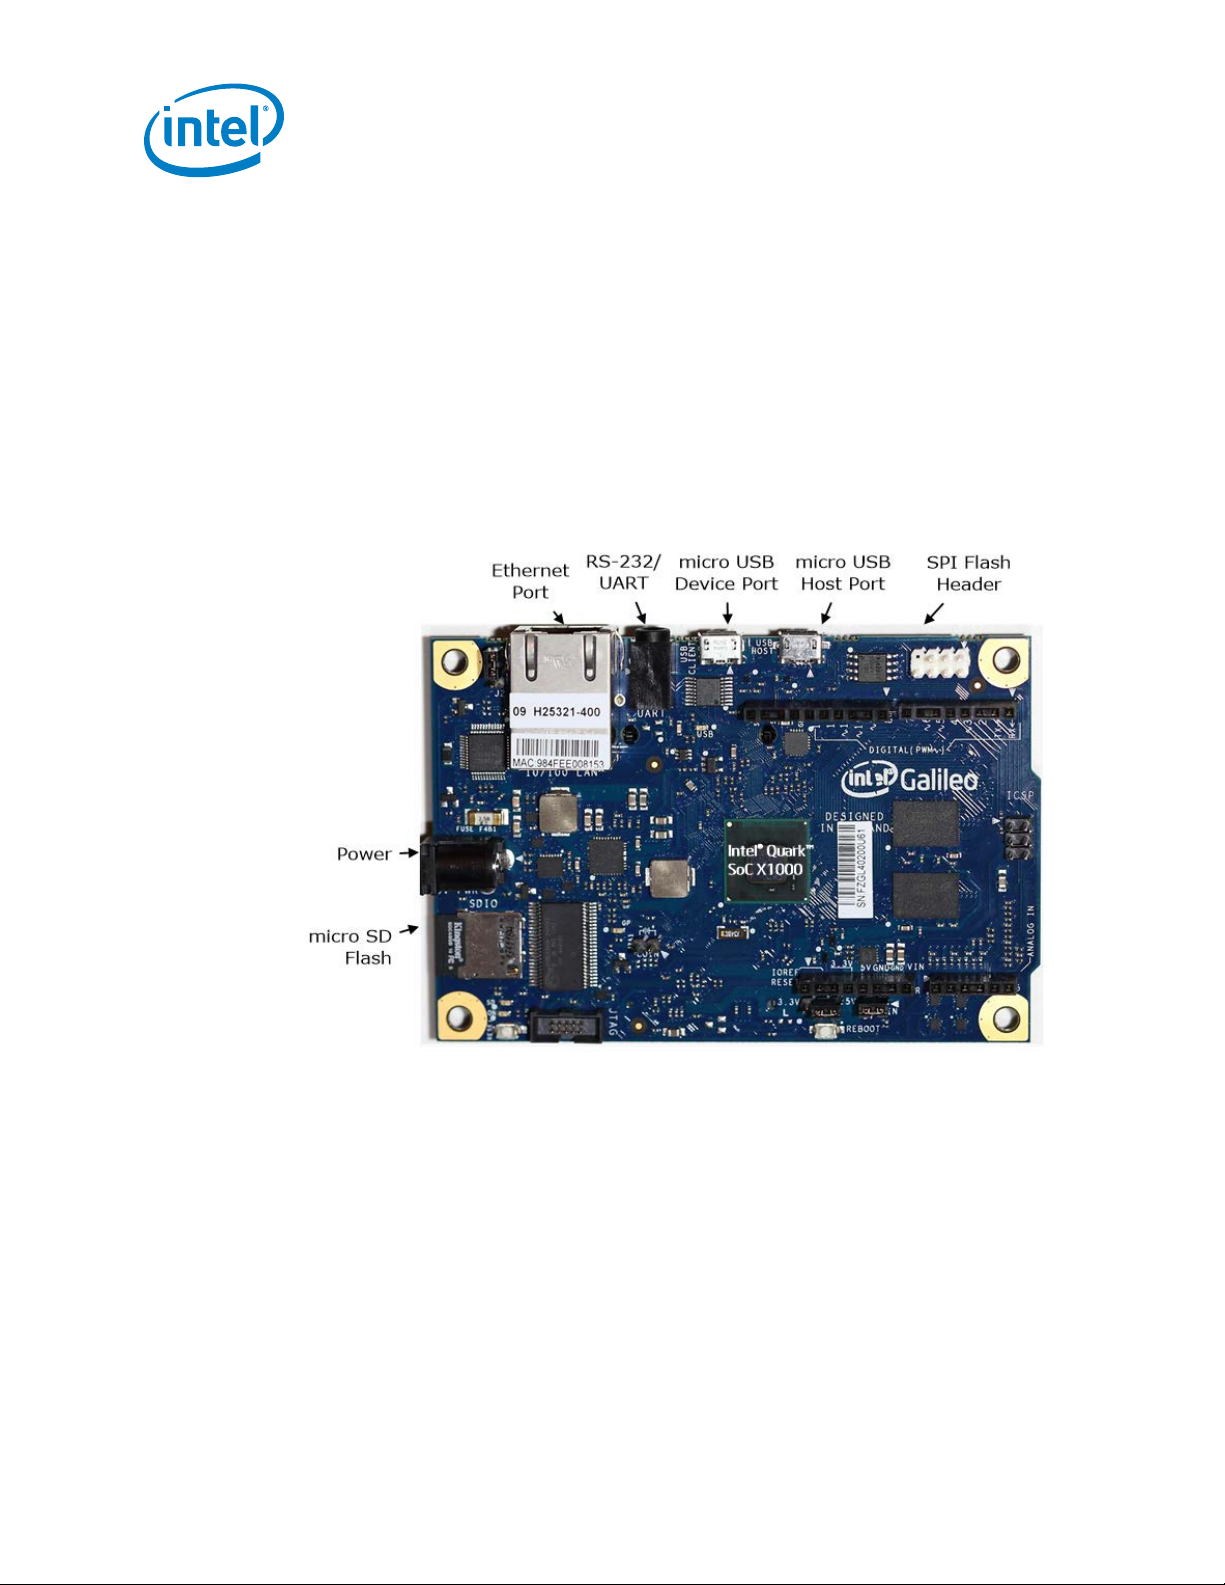
Photos of the Target Device are included below for your reference.
Figure 1. Target Device - Top View
Introduction
Intel® Gateway Solutions for the IoT – Development Kit – DK50
Getting Started Guide October 2014
10 Document Number: 330496-005
Page 11
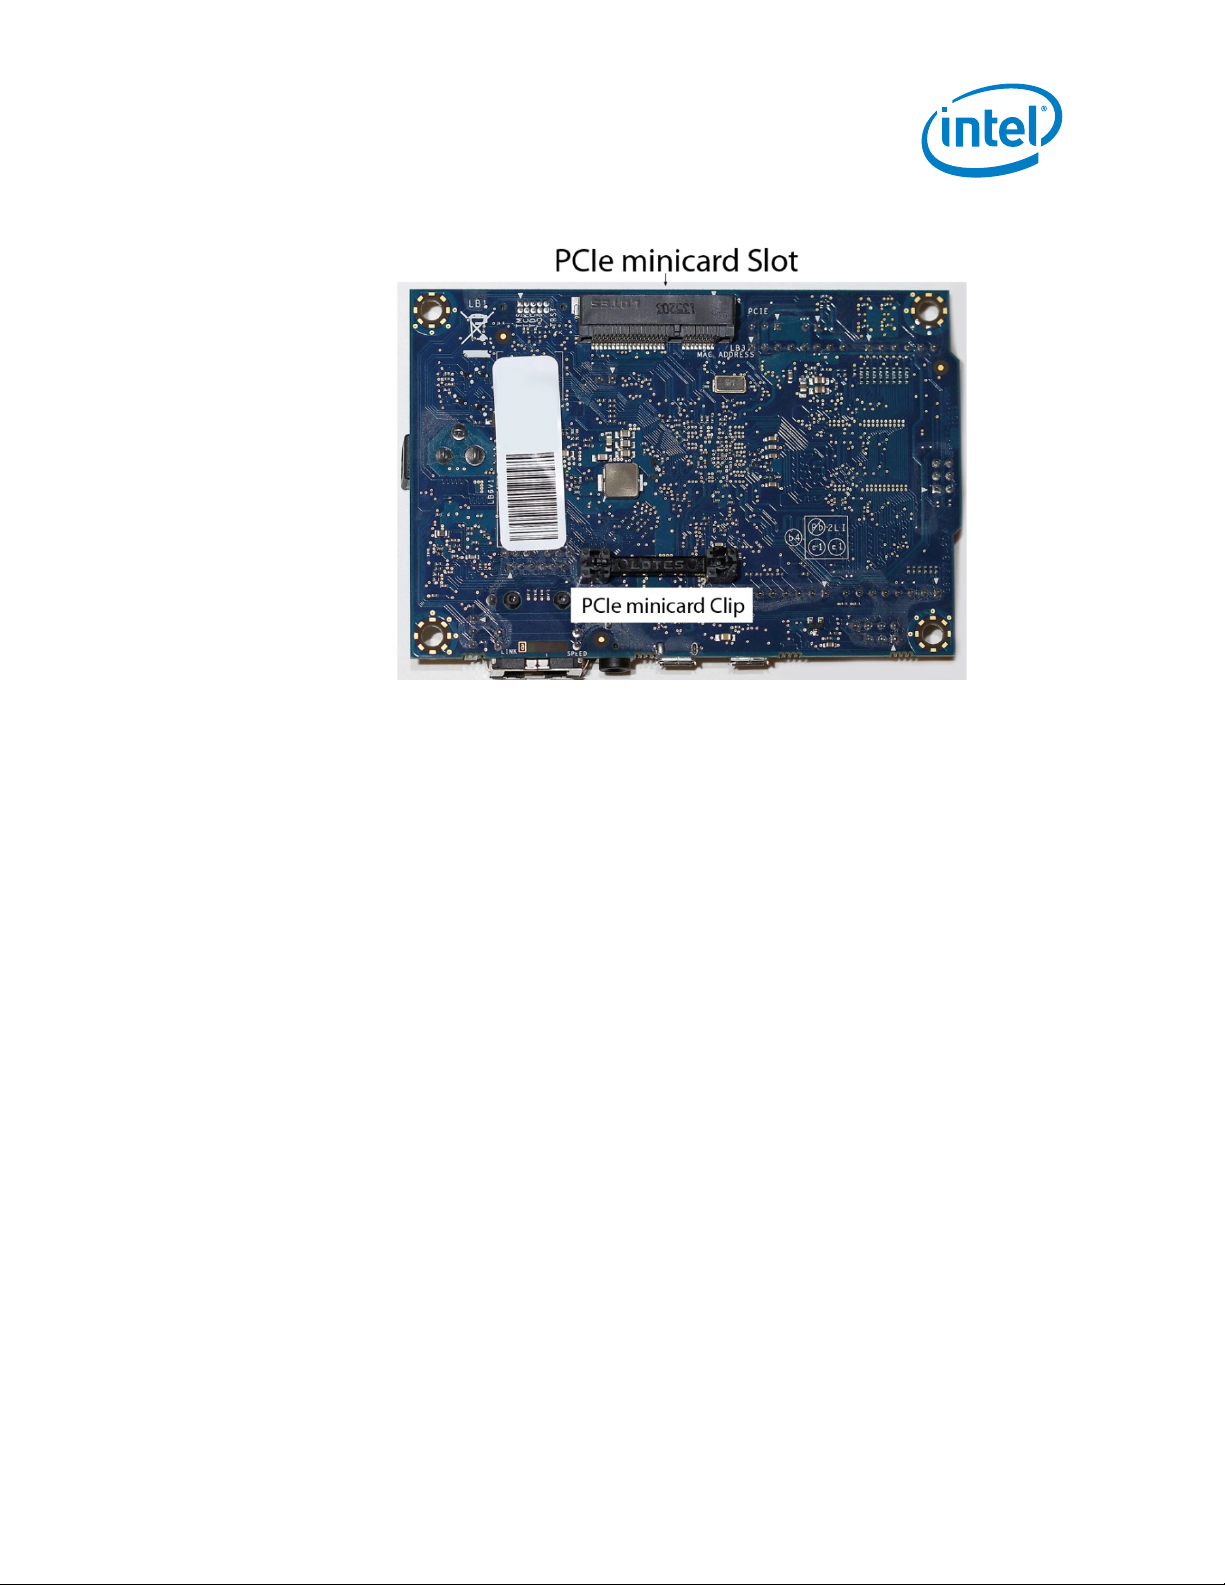
Introduction
Figure 2. Target Device - Bottom View
October 2014 Getting Started Guide
Document Number: 330496-005 11
Intel® Gateway Solutions for the IoT – Development Kit – DK50
Page 12

2 Register Your Product
Before you begin, you must register your Intel® Gateway Solutions for the Internet of
Things – Development Kit – DK50 Series. The registration process submi ts a license
key request to Wind River to permit you to download Wind River software. You cannot
use the Wind River installer to download the Wind River com po n en ts without this
license.
You will use the login ID and password that you create or use in these steps to access
the Intel Registration Center. On the Intel Registration Center you can see a list of
licensed products and download software for them.
1. In your Web browser, go to https://registrationcenter.intel.com
The following screen is displayed:
Register Your Product
Figure 3. Register Product
Intel® Gateway Solutions for the IoT – Development Kit – DK50
Getting Started Guide October 2014
12 Document Number: 330496-005
Page 13

Register Your Product
2. In the box for your email address, select the appropriate option for your email
address:
• IMPORTANT: If you have an Intel Premier Support account, use the email
address that is associated with this account. Using your existing email address
will automatically add this product to your list of supported products.
• Otherwise, use your preferred email address.
3. Type in the serial number that is located at the top of the “Dear Customer Letter”
included in your product box.
4. A screen displays on which you must fill out your contact information. Click
Submit after filling in your information.
5. Follow the correct path:
• If your email address was not recognized, you will be prompted to create a
user account. See Figure 5. Create Support User Account. Type in your
preferred Login ID and password and then click Submit..
• If your email address is recognized, you will not see Figure 5. Create Support
User Account. Continue to the next step.
Figure 4. Create Support User Accoun t
October 2014 Getting Started Guide
Document Number: 330496-005 13
Intel® Gateway Solutions for the IoT – Development Kit – DK50
Page 14

6. A confirmation screen displays as follows. Your screen includes your contact
information in the bottom part of the screen. Click Continue.
Figure 5. Wind River License Key Request Confirmation
7. You are prompted to sign into the Intel Registration Center with your user name
and password. Your list of subscribed products is displayed and you can download
the necessary software. See the following illustration:
Figure 6. Logged in to Intel Registration Center
Register Your Product
Intel® Gateway Solutions for the IoT – Development Kit – DK50
Getting Started Guide October 2014
14 Document Number: 330496-005
Page 15
Register Your Product
You will receive two messages in email from “Intel Registration Center.” Save these
messages for future reference.
• One message is titled, “Intel
®
Premier Support Registration Successfully
Completed”. See the sample message below.
Figure 7. Email Message: Intel
®
Premier Support Registration Successfully Completed
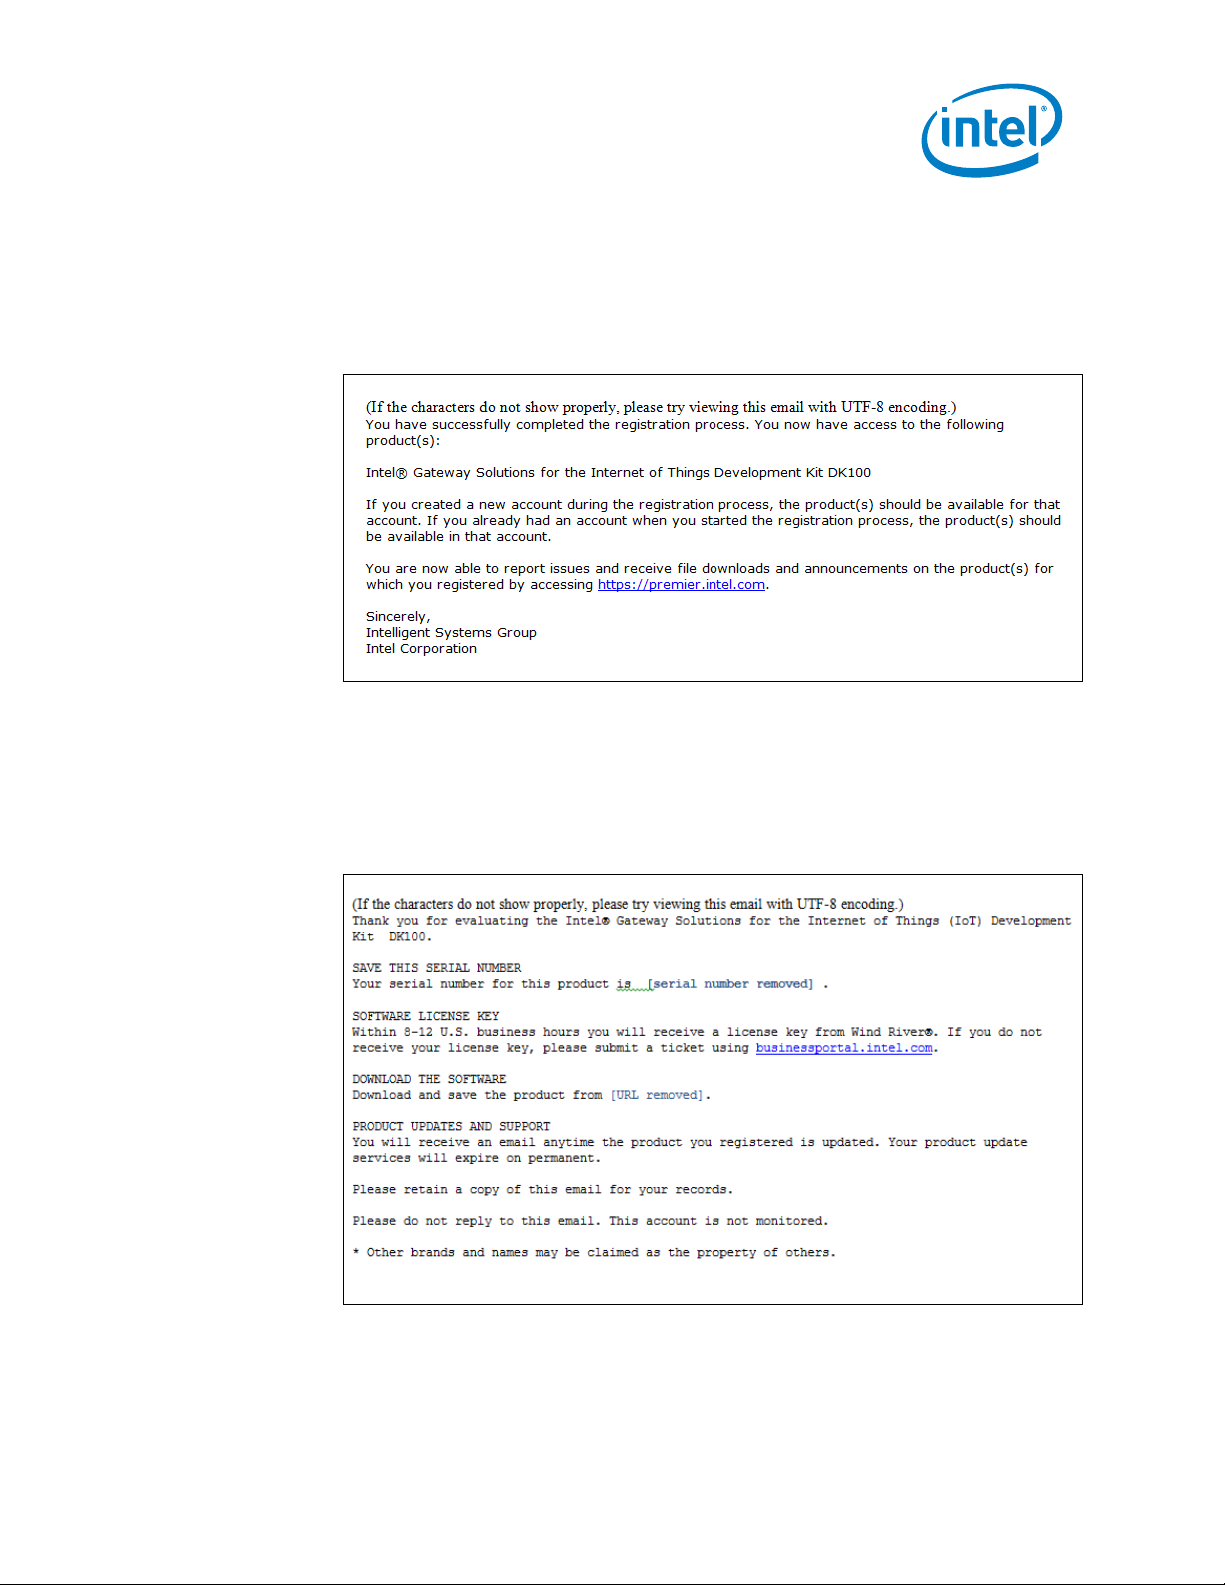
• The other message is titled, “Thank you for registering Intel® Gateway
Solutions for the Internet of Things (IoT) Development Kit DK50”. See the
sample message below:
Figure 8. Email Message: Thank you for registering Intel
Internet of Things (IoT) Development Kit DK50
®
Gateway Solutions for the
§
October 2014 Getting Started Guide
Document Number: 330496-005 15
Intel® Gateway Solutions for the IoT – Development Kit – DK50
Page 16

3 Host System Setup
The Development Kit requires a Host System to interface with the Target Device and
for Target Device software development.
Host System Hardware Recommendations 3.1
The following Host System hardware is recommended, especially if the Host System
will be used for Target Device software development.
rd
• 3
• CPU with four or more cores and with Intel
• 150 GB or more of free disk space
• 4 GB or more RAM
• Wired Ethernet port or Wireless Ethernet (Wi-Fi)
• At least one USB 2.0 port
• Micro SDHC flash memory card reader or adapter
Generation Intel® Core™ i5 processor or better
®
®
(Intel
HT Technology)
Host System Setup
Hyper-Threading Technology
Host System Software Requirements 3.2
Recommended Host System OS
Intel recommends Linux for the Host System operating system. The instructions in this
guide were developed on a system running Ubuntu 12.04 (64-bit).
Serial Port Communication Software
The Host System must have serial port interface software installed, such as PuTTY*,
to communicate with the Target Device over the serial RS-232/UART interface.
Intel® Gateway Solutions for the IoT – Development Kit – DK50
Getting Started Guide October 2014
16 Document Number: 330496-005
Page 17

Target Device Setup
4 Target Device Setup
Follow the steps below to set up the Target Device. When finished, the setup should
look like the following picture.
Figure 9. Target Device Set Up
Target Device Hardware 4.1
The following hardware is needed to set up the Target Device. This hardware is
included with the Development Kit:
®
• Intel
• Power adapter, power cord, and power plug
• Micro-SD Flash Card (capacity of 4 to 16 GB)
The following additional hardware is included with some versions of the Development
Kit for wireless connectivity:
October 2014 Getting Started Guide
Document Number: 330496-005 17
Galileo Development Board
Intel® Gateway Solutions for the IoT – Development Kit – DK50
Page 18
Target Device Setup
• Intel® 7260 dual-band wireless network adapter (PCIe* Mini Card)
• 2x internal Wi-Fi* antenna with U.FL connector (if the Target Device does not
have a metal chassis)
• 2x external Wi-Fi antenna with RP-SMA male connector (if the Target Device
has a metal chassis)
The following hardware is recommended, but not included in the Development Kit:
• 1/8 inch stereo to Male DB9 Serial cable
• Female DB9 Serial to USB cable
• Micro USB 2.0 to USB Female adapter (an On-The-Go adapter will work)
• Micro USB 2.0 to USB Male adapter (an On-The-Go adapter will work)
Connecting Power 4.2
Plug in the 12 Volt DC jack of the included power adapter to the DC Input of the
Target Device. Connect the appropriate plug to the power adapter. Plug in the power
adapter to wall power.
Confirming Serial Port 4.3
The serial port provides Linux command line interface to the Target Device.
Note: A 1/8 inch stereo to Male DB9 Serial cable is needed for Serial Port I/ O . This is not
included in the kit.
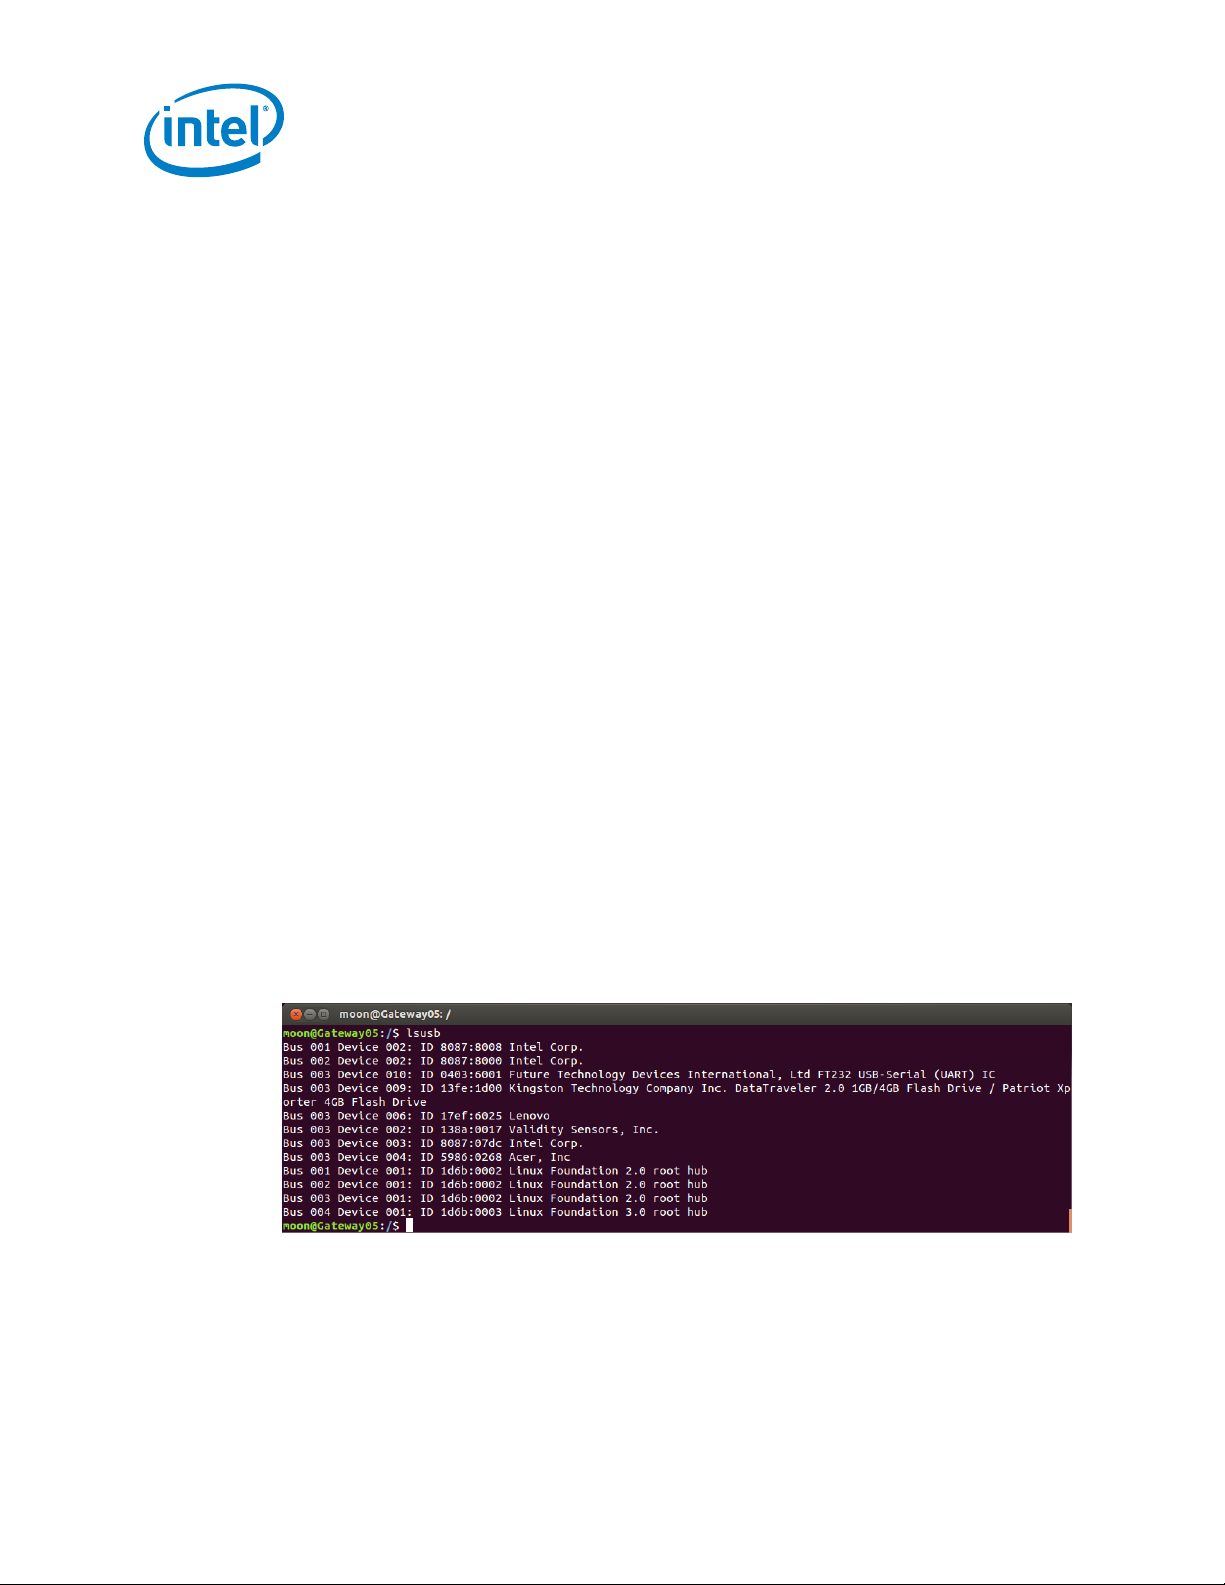
Use the lsusb command in a Linux command line to confirm that the USB-Serial
(UART) interface was recognized correctly by the operating system. The following
figure shows the FT232 USB-Serial (UART) USB device as an example.
Figure 10. Confirm USB-Serial Device is Recognized in Linux
Intel® Gateway Solutions for the IoT – Development Kit – DK50
Getting Started Guide October 2014
18 Document Number: 330496-005
Page 19
Target Device Setup
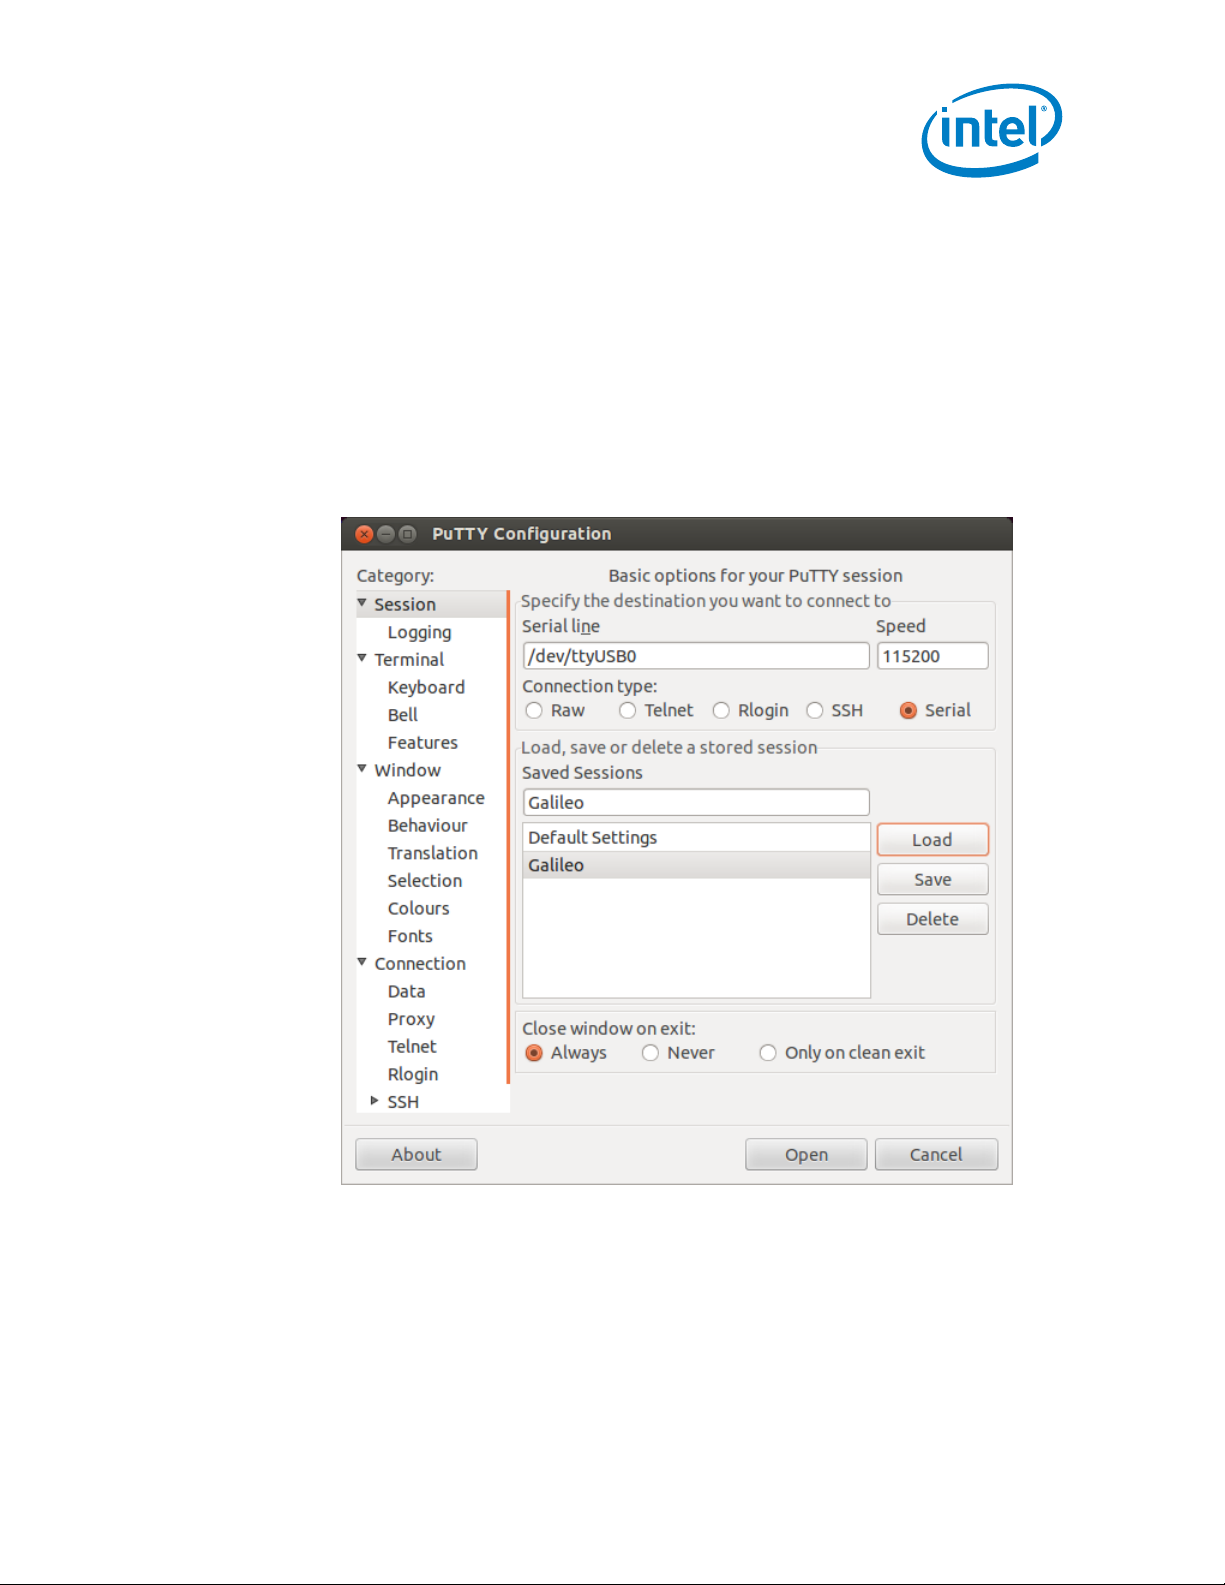
Use the following settings to connect to the Target Device via a serial port interface,
such as PuTTY*:
• BAUD Rate: 115200
• Data Bits: 8
• Stop Bits: 1
• Parity: None
• Flow Control: None
Figure 5 and Figure 6 show PuTTY application snapshots as an example.
Figure 11. PuTTY Configuration Snapshot 1
October 2014 Getting Started Guide
Document Number: 330496-005 19
Intel® Gateway Solutions for the IoT – Development Kit – DK50
Page 20

Figure 12. PuTTY Configuration Snapshot 2
Target Device Setup
If the PuTTY connection fails using the above settings, check for incorrect rd/wr/exe
permissions for the file handle /dev/ttyUSBn (where n is the device number that the
OS assigns. It is typically 0 through 9). Update the permission settings using the
chmod linux command. See the following figure.
Figure 13. Confirm USB-Serial Device is Recognized in Linux
Detailed instructions for connecting the serial port from the Target to the Host System
are in the Intel
®
Galileo Board Getting Started Guide.
Intel® Gateway Solutions for the IoT – Development Kit – DK50
Getting Started Guide October 2014
20 Document Number: 330496-005
Page 21

Target Device Setup
Target Device Software 4.4
The included micro-SD flash memory card is bootable and is pre-loaded with the Wind
River Linux and Wind River Intelligent Device Platform XT software.
After establishing connectivity via Serial Port or SSH, use the following login and
password to access the Linux command line interface:
login: root
Password: root
Wired Ethernet Connection 4.5
The best way to connect the Target Device to the internet or to another network is
through an Ethernet router with integrated DHCP server. Use an Ethernet cable to
connect the 10/100 LAN port of the Target Device to one of the I/O ports of the
router.
The Wind River Intelligent Device Platform XT runtime software implements a network
gateway function that assumes the Ethernet eth0 interface (10/100 LAN port) has a
WAN connection. The Target Device will attempt to obtain an IP address from a DHCP
server on this interface.
As an alternative to connecting the Target Device to an Ethernet router with an
integrated DHCP server, the Target Device may be configured with a static IP address
after the system has booted. (See Section 3.7.1 Configuring a Static IP Address Using
WebIF
Wireless Ethernet Connection 4.6
A wireless connection requires installing a wireless network adapter (PCIe* Mini Card).
The Intel® 7260 dual-band wireless network adapter supported by the default Target
Device runtime software is used in this section for illustration.
Note: The following instructions assume a wireless network adapter is installed.
After the Target Device has booted, the Inteligent Device Platform gateway advertises
a wireless LAN network with Service Set Identifier (SSID) of:
xxxx are alphanumeric characters.
Connect to this local wireless network using the password: windriveridp.
IDPDK-xxxx, where
October 2014 Getting Started Guide
Document Number: 330496-005 21
Intel® Gateway Solutions for the IoT – Development Kit – DK50
Page 22

Target Device Setup
4.6.1 Connecting to the Target Device’s Local Wireless Network
This section provides instructions to connect the Host System or another wireless
device to the Target Device’s local wireless network.
The following steps were performed on a Host System running Ubuntu 12 operating
system. The procedure should be similar for other Linux operating systems.
1. Select the Network Icon at the top of the screen, or go to System Settings ->
Network Connections.
2. Find the Target Device’s local wireless network with an SSID of IDPDK-xxxx.
3. Select the Target Device’s local wireless network to connect to it.
4. When prompted, enter the password:
You should now be connected to the Target Device’s local wireless network.
Note: The onboard wireless LAN is statically defined to use subnet 192.168.1.0
windriveridp.
Wind River Web Interface Tool (WebIF) 4.7
Wind River provides a Web Interface tool (WebIF) that allows the user to control and
change many Target Device settings.
Note: The following instructions assume a wireless network adapter is installed.
Use the following steps to access the Web Interface (WebIF) tool.
1. Connect from a Host System to the Target Device on the wired or wireless
Ethernet interface as explained in Section 3.5 or Section 3.6.
2. On the Host System, open an internet browser.
3. In the address window of the browser, enter internet address
https://192.168.1.1
4. If the connection to the Web Interface is successful, a popup box will ask for a
user name and password. Use
User Name:
Password: admin
See the Wind River Systems Intelligent Device Platform Programmer’s Guide at
https://www-ssl.intel.com/content/www/us/en/embedded/design-tools/evaluationplatforms/gateway-solutions/wind-river-idp-xt2-programmersguide.html?wapkw=wind+river and Release Notes at
http://www.intel.com/content/www/us/en/embedded/design-tools/evaluationplatforms/gateway-solutions/wind-river-idp-release-notes.html for details regarding
the Web Interface tool and its Target Device customization options.
admin
Intel® Gateway Solutions for the IoT – Development Kit – DK50
Getting Started Guide October 2014
22 Document Number: 330496-005
Page 23

Target Device Setup
4.7.1 Configuring a Static IP Address Using WebIF
To configure a static IP address for the wired and wireless network interfaces go to the
Network Networks tab, and setup the Network Configuration.
Note the following:
• WAN Configuration applies to the wired Ethernet port.
• LAN Configuration applies to the wireless Ethernet (Wi-Fi) interface.
An example of setting the Wireless Ethernet port to a static IP Address is shown in the
following screen capture.
Figure 14. Configuring a Static IP Address on the Wireless Ethernet Port
After making your changes, scroll to the bottom of the screen and click Save
Changes, and then click Apply Changes.
Intel® Gateway Solutions for the IoT – Development Kit – DK50
October 2014 Getting Started Guide
Document Number: 330496-005 23
Page 24

Target Device Setup
4.7.2 Finding the Target Device IP Address in WebIF
The Status Interfaces tab of WebIF has information about the Target Device
network connections. See the figure below for an example. Note the foll o wi n g:
• WAN is the wired Ethernet port information.
• LAN is the wireless Ethernet port information.
Figure 15. WebIF List of Network Connections (Status Interfaces)
Using Secure Shell Session (SSH) to Login to the 4.8
Target Device
Use the following steps to use a Secure Shell Session (SSH) to login from the Host
System to the Target Device, use these steps:
1. Connect from the Host System to the Target Device on the wired or wireless
Ethernet interface as explained in Section 3.5 or Section 3.6.
2. Find the IP Address of the Target Device.
Intel® Gateway Solutions for the IoT – Development Kit – DK50
Getting Started Guide October 2014
24 Document Number: 330496-005
Page 25

Target Device Setup
• Wireless Ethernet Connection: If connected to the Target Device through the
• Wired Ethernet Connection: If connected to the Target Device through the
3. Start the SSH session between the Host and Target Devices:
Wireless Ethernet interface, you can find the IP Address of the Target Device
in the WebIF tool’s Status Interfaces tab. See Section 3.7.2
Wired Ethernet Interface, you can find the IP address of the Target Device in
the DHCP Client Table of the router to which the Target and Host systems are
connected.
• On a Linux Host System, issue the command:
<IP Address> is the IP Address of the Target Device. You may need to add
sudo to your ssh command for admin access.
• On a Windows or Linux Host System, use terminal software, such as PuTTY, to
connect to the Target Device using the Target Device’s IP Address. See the
following figure.
Figure 16. SSH Terminal Configuration Using PuTTY
ssh <ip address> where
§
October 2014 Getting Started Guide
Document Number: 330496-005 25
Intel® Gateway Solutions for the IoT – Development Kit – DK50
Page 26

Installing Intelligent Device Platform Tools on the Host System
5 Installing Intelligent Device
Platform Tools on the Host
System
The Intel® Gateway Solutions for the Internet of Things (IoT) – Development Kit –
DK50 includes access to an installer for the Wind River tools for software
development. The host software tools are Wind River Linux 5.0.1, Wind River
Intelligent Device Platform XT 2.0, and Wind River Workbench 3.3.5.
See the Dear Customer Letter included in the Development Kit for instructions to
obtain the installer and necessary licenses.
Host System OS Requirements 5.1
The Wind River Systems development tools may be installed on many different
Linux*-based Host Systems. Before proceeding, review Wind River Linux 5.0/5.0.1
Recommended Development Host Distributions to ensure that you have installed the
appropriate packages and that your system meets the minimum operating system
requirements. The document is included on the USB flash drive in the
folder and is called Recommended-Hosts-List_5.0.1.pdf.
Note: These instructions were validated on an Ubuntu 12.04 LTS 64-bit Host System.
documents
Host System Hardware Recommendations 5.2
The following Host System hardware is recommended.
rd
• 3
• CPU with four or more cores and with Intel
• 150 GB or more of free disk space
• 4 GB or more RAM
• Ethernet connection to the internet
With the minimum hardware above, a typical initial compile will take about 3 hours.
Improving the specifications of the Host System can reduce this to about 2 hours.
Generation Intel® Core™ i5 processor or better
®
(Intel® HT Technology)
Hyper-Threading Technology
Intel® Gateway Solutions for the IoT – Development Kit – DK50
Getting Started Guide October 2014
26 Document Number: 330496-005
Page 27

Installing Intelligent Device Platform Tools on the Host System
Wind River Software Installation Prerequisites 5.3
Before starting the host tools installation, check the following:
5.3.1 Disk Space and Installation Folders
About 42 gigabytes of disk space is needed during the host tools installation. About 12
GB of that will be permanently used after the installation is complete.
The installation process creates three folders in the home directory of your Host
System:
• WindRiver - The folder to install the host tools. The installation requires
approximately 12 GB of free space in this folder.
Installer - A temporary folder that can be deleted later. The installation
•
requires approximately 15 GB of free space in this folder.
• tmp – A temporary folder used by the installation process. The installation
requires approximately 15 GB of free disk space.
5.3.2 Wind River Host Tools License
You must have a temporary License Authentication Code or a permanent License
Authentication File to install the Intelligent Device Platform host tools.
• For Early Access kits, instructions to obtain a temporary License
Authentication Code are included in the Dear Customer Letter that
accompanied the kit.
• If you purchased a kit, instructions to obtain a permanent License
Authentication File are provided at the time of purchase.
5.3.3 Internet Connection
The time required to install the host tools is primarily dependent on the download
speed of the Host System’s internet connection. The installer downloads
approximately 15 gigabytes of data from Wind River’s servers. This may take several
hours.
October 2014 Getting Started Guide
Document Number: 330496-005 27
Intel® Gateway Solutions for the IoT – Development Kit – DK50
Page 28

Installing Intelligent Device Platform Tools on the Host System
5.3.4 Download the Installer
The Wind River Host Tools are installed on the Host System using an installer.
• If you have an Early Access Development Kit, then the Installer folder is on
the USB flash drive that was shipped with the Development Kit.
• If you purchased the Development Kit, then see the Dear Customer Letter
included in the kit or sent to you at the time of purchase for instructions to
download the Installer.
Installing the Host Tools Base Packages 5.4
Follow the steps below to install Wind River Linux 5.0.1, Wind River Intelligent Device
Platform XT 2.0.1, and Wind River Workbench 3.3.5 on the Host System.
1. Plug in the provided USB key into the Host System.
2. Using the GUI or command line, copy the Installer files that you downloaded
to the
Installer folder on the Host System. The Installer file is named
DVD-R181165.1-1-00.zip or similar. Use command:
cp /media/AtomGatewaySW/install/DVD-R181165.1-1-00.zip \
$HOME/Installer/
3. Using the GUI or command line, unzip the Installer zip file. Use commands:
cd $HOME/Installer
unzip DVD*.zip -d ./
4. Go to the unzipped DVD-R181165.1-1-00 folder and run the setup_linux
executable. An Installer window opens. Use commands:
cd DVD-R181165.1-1-00
./setup_linux
5. On the Installer pop-up window, select the Wind River Host Tools install
location. Use the Browse button select the WindRiver folder you created in
Section 4.3.1, or enter the complete path to that folder.
6. On Online Update Settings page, keep the default boxes checked.
7. On this same page, if your network requires a proxy server for access to the
internet, do the following:
a) Mark the box titled Connect to the internet using a proxy server.
b) Provide the proxy server information for your network.
8. On the Install Now or Create a Local Download screen, keep the default
Install box checked. Local download is for administrators planning multiple
installations of this product.
9. On the Choose Activation Type screen, do one of the following:
• If you received a License Activation File with the purchase of the
Development Kit:
a) Make a directory called license in $HOME/WindRiver
b) Copy the license activation file into directory
$HOME/WindRiver/license
c) Select Permanent activation and en ter the full path and filename of
the license file, or use the Browse button to find it using the GUI.
Intel® Gateway Solutions for the IoT – Development Kit – DK50
Getting Started Guide October 2014
28 Document Number: 330496-005
Page 29

Installing Intelligent Device Platform Tools on the Host System
• For temporary activation, select Temporary activation. A License Activation
Code will be required later. Use the license obtained in Section 4.3.2.
10. On the Host Information page, select the Ethernet adapter that will be used
to download the Host tools from the internet.
11. On the User Information screen, do the following:
• For Loaner kits, use the LAC and the 90-day Wind River Host Tools
License provided in the Dear Customer Letter included with your
Development Kit.
• If you selected Temporary activation, enter the temporary License
Authentication Code provided in the Dear Customer Letter.
• Enter the required user information.
12. On the Choose Installation Filters screen, select only Intel.
13. On the Select Products screen, keep the default selections.
14. When the License Agreement window pops up, click I ACCEPT to accept
the standard license agreement and the product evaluation license
agreement for Wind River Linux and Intelligent Device Platform.
15. On the Confirm and Install page, click Install.
Note: The download and install can take several hours depending on the speed of your
Internet connection.
16. Successful installation will end with a message that says:
Installation Completed
. Click Finish to exit the Installer window.
17. If you encounter installation issues, provide the files
$HOME/WindRiver/setup.log and setup_install_failure.log to
your Intel support contact.
Media
§
October 2014 Getting Started Guide
Document Number: 330496-005 29
Intel® Gateway Solutions for the IoT – Development Kit – DK50
Page 30

Building the Intelligent Device Platform XT Runtime Software
6 Building the Intelligent Device
Platform XT Runtime Software
This section describes how to use the Host System to build an Intelligent Device
Platform XT runtime file system and operating system that can be installed onto the
Target Device.
If you use Eclipse* or if you prefer a GUI-based development environment to build
your Board Support Package, then see Appendix C for instructions on using Wind River
Workbench to create an Intelligent Device Platform Project.
Build Requirements 6.1
The build process requires two folders on your Host System at the same level as the
WindRiver and Install folders:
Project - The project folder in which you will develop your Intelligent Device
•
Platform XT-based solution. The build requires approximately 40 GB of free
space in this folder.
• Project/build-cache - The folder where the build cache is stored. Using a
build cache can significantly reduce the time required to build the project after
incremental changes are made. The build requires approximately 10 GB of
free space in this folder.
Create these folders before proceeding. You can substitute different names for these
folders if desired. Use these commands to create the folders:
cd $HOME
mkdir Project
mkdir Project/build-cache
Wind River Linux Configure Command 6.2
Go to the Project folder. Use command:
cd $HOME/Project.
Configure the Wind River software build using the
configure command for creating software for the Target Device in this kit looks like
this:
configure command. A typical
Note: The ‘\’ symbols in the command tell the Linux command line interpreter to ignore the
following return or newline. The configure command above does not need the ‘\’
symbols if the full command is on one line.
Intel® Gateway Solutions for the IoT – Development Kit – DK50
Getting Started Guide October 2014
30 Document Number: 330496-005
Page 31

Building the Intelligent Device Platform XT Runtime Software
Note: In the option for -- enable-parallel-pkgbuilds=4, use the number of process
threads available in the CPU of your Host System. For example, when using a CPU
with two cores and hyperthreading, there 4 process threads are available, so specify
“4” for optimal performance.
Note: Specifying
using this number of jobs will result in shorter compile times. You may ignore the
warning.
../WindRiver/wrlinux-5/wrlinux/configure \
--enable-board=intel-quark \
--enable-kernel=standard \
--enable-rootfs=glibc-idp \
--enable-addons=wr-idp \
--enable-bootimage=ext3,hdd \
--enable-jobs=50 \
--enable-parallel-pkgbuilds=4 \
--with-layer=wr-mcafee,wr-wks-oneagent-oma-dm-ia,wr-intel-
support \
--with-template=feature/mqtt,feature/webif,feature/intel-
wilkinpeak2,feature/idp_devkit_full,feature/intelwilkinpeak2,feature/recovery \
--without-layer=wr-srm \
--with-sstate-dir=./buildcache
The configure command may take a few minutes to complete.
Build the Target Device Runtime Software 6.3
When the Configure command is finished, build the Target Device runtime OS by
issuing the following commands from the Project folder:
cd $HOME/Project
make fs
--enable-jobs=50 will generate a warning, but trials have shown that
This builds the Linux runtime system and generates the runtime components that can
be installed on your Target Device.
The software images and a script to deploy the images to a USB flash drive or SD
Flash Card are created in the $HOME/Project/export directory. For the Target
Device in this Development Kit, use the image titled intel-quark-glibc-idp-
standard-dist.tar.bz2
The first time a target runtime system is built, it can take several hours depending on
your Host System’s specifications. Subsequent builds will be shorter if the option
--with-sstate-dir./build-cache was included in the configure command.
The only supported method to organize the Target Device root file system and boot
procedure is based on the above configuration line with the default Wind Ri ver
Intelligent Device Platform XT platform settings.
§
October 2014 Getting Started Guide
Document Number: 330496-005 31
Intel® Gateway Solutions for the IoT – Development Kit – DK50
Page 32

Installing Software on the Target Device
7 Installing Software on the
Target Device
Wind River Linux 5 and Intelligent Device Platform XT 2.0 runtime software is preloaded on the micro-SD flash card that is installed in the Target Device. This section
describes how to install a new image of the Wind River runtime software onto the
micro-SD flash card.
Note: Before proceeding, ensure the Target Device is set up as described in Section 3.
Obtain the Target Device Software Image 7.1
Begin by obtaining a new image, or the provided backup image, of the Wind River
runtime software for the Target Device. The backup image for the Target Device is on
the USB Flash Memory Drive in the backup directory. The software on the backup
image is the same as, or similar to, the software that came pre-loaded on the microSD flash card.
A new Wind River runtime software image can be created using the Wind River Host
Tools, as described in Section 5. The new image is created in the directory
HOME/Project/export
Note: Before using the backup image, copy the entire
drive to the Host System.
Writing the Micro-SD Flash Card 7.2
Use these steps to program a Target Device runtime image onto a micro-SD card or to
a USB Flash Drive:
1. In a Linux terminal window on the Host System navigate to either the
directory, or the $HOME/Project/export directory.
1. Insert the micro-SD Flash Card into a USB Flash Card reader.
2. Insert the USB Flash Card reader into the USB Port of the Host System
3. Determine the /dev/sd# device the micro-SD flash card was assigned to.
4. Run this command:
sudo ./deploy.sh -f wrlinux-image-glibc-idp-intel-quarksdcard.tar.bz2 -d /dev/sd# -y
(Where /dev/sd# is the drive assignment of the micro-SD card.)
This will take a few minutes to run. The figure below shows the terminal
window after the script completed successfully.
backup directory from the USB flash
backup
Intel® Gateway Solutions for the IoT – Development Kit – DK50
Getting Started Guide October 2014
32 Document Number: 330496-005
Page 33

Installing Software on the Target Device
Figure 17. SSH Terminal Configuration using PuTTY
The micro-SD flash card should now have a viable Target Device runtime
software image.
5. With the power off on the Target Device, insert the micro-SD flash card.
6. Plug in the power adapter to boot the Target Device.
Changing Default Boot 7.3
After the Target Device boots with the new image, the default boot is set to USB, not
the MMC card. See the following figure.
Figure 18. Target Device Boot Device Menu De fault
October 2014 Getting Started Guide
Intel® Gateway Solutions for the IoT – Development Kit – DK50
Document Number: 330496-005 33
Page 34

Installing Software on the Target Device
Use the serial terminal described in Section 3.3 to control the Target Device. From
this, use the down arrow key to change the boot menu option to MMC. See the figure
below.
Figure 19. Target Device Boot Device Option Changed to M M C
Once booted, on the Target Device edit /boot/grub/grub.conf. Put MMC before USB.
See the following two figures. This changes the boot order so that MMC is the primary
boot option in grub. After power cycling the Target Device the default boot device will
now be MMC.
Figure 20. GRUB Configuration Original (grub.conf)
Intel® Gateway Solutions for the IoT – Development Kit – DK50
Getting Started Guide October 2014
34 Document Number: 330496-005
Page 35

Installing Software on the Target Device
Figure 21. GRUB Configuration Updated (grub.conf)
§
October 2014 Getting Started Guide
Document Number: 330496-005 35
Intel® Gateway Solutions for the IoT – Development Kit – DK50
Page 36

Programming the SPI Flash Firmware
8 Programming the SPI Flash
Firmware
During application development, it may be necessary to modify or reprogram the
firmware contained in the SPI Flash of the Target Device. The recommended method
is to program the SPI Flash is by using a DediProg programmer.
A backup copy of the firmware for the Development Kit is on the USB flash drive in the
backup directory.
DediProg Programmer Information 8.1
See www.DediProg.com to purchase a DediProg SPI Flash programmer. The SF100,
SF600, and SF600Plus models are compatible with the Target Device. The Target
Device uses a 2X4 2.54mm ISP pin header on the board. Obtain the cables necessary
to plug into this header.
Figure 22. DediProg SF100 Flash Progra mmer
Intel® Gateway Solutions for the IoT – Development Kit – DK50
Getting Started Guide October 2014
36 Document Number: 330496-005
Page 37

Programming the SPI Flash Firmware
Programming the Firmware 8.2
The following items are required to program the firmware:
• DediProg SF100.
• DediProg software. Download from www.DediProg.com
• Flash image file in .bin format.
• Target Device board.
Warning: Before updating the firmware, save a backup copy of the existing firmware. See
Section 7.3 for instructions.
1. Disconnect the power supply from the Target Device.
2. Identify the 7-pin SPI header on the Target Device. See the red arrow in the
figure below.
Figure 23. DediProg Header on the Target Device
October 2014 Getting Started Guide
Document Number: 330496-005 37
Intel® Gateway Solutions for the IoT – Development Kit – DK50
Page 38

3. Connect the DediProg to the Target Device as shown in the figure below.
Figure 24. Connection from DediProg to Target Device
4. Plug in the USB connection of the DediProg Flash Programmer to the Host PC.
The DediProg software must already be installed on the Host System. You will
see a pop-up message similar to the one shown below. Select W25Q64FV
and click OK.
Programming the SPI Flash Firmware
Figure 25. Flash Memory Selection
Intel® Gateway Solutions for the IoT – Development Kit – DK50
Getting Started Guide October 2014
38 Document Number: 330496-005
Page 39
Programming the SPI Flash Firmware
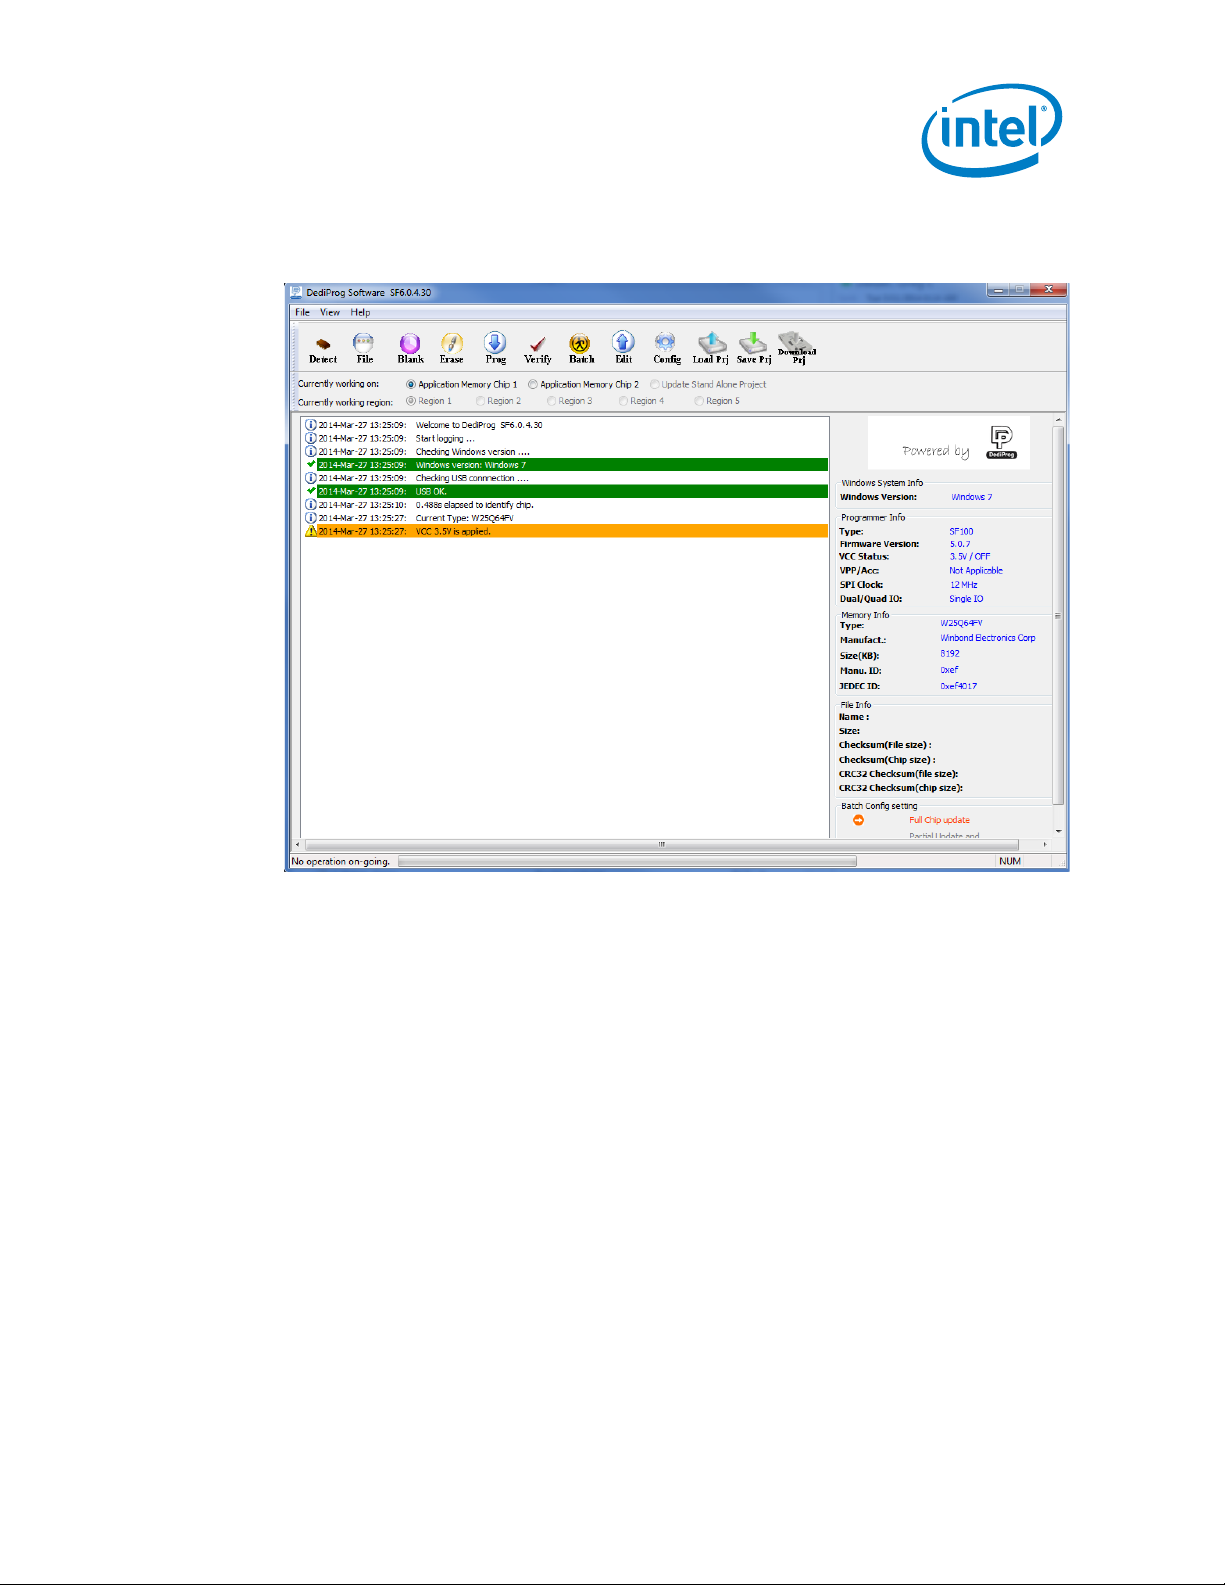
5. The DediProg GUI starts as shown in the figure below.
Figure 26. DediProg Programming Softw are - Graph ical User Interface (GUI)
6. Save a backup copy of the existing firmware. See Section 7.3 for instructions.
October 2014 Getting Started Guide
Document Number: 330496-005 39
Intel® Gateway Solutions for the IoT – Development Kit – DK50
Page 40

7. Click File and select the binary image that you want to flash. The figure below
shows the file galileo.bin is selected. Click OK.
Figure 27. Load File Dialog Box
Programming the SPI Flash Firmware
Intel® Gateway Solutions for the IoT – Development Kit – DK50
Getting Started Guide October 2014
40 Document Number: 330496-005
Page 41
Programming the SPI Flash Firmware
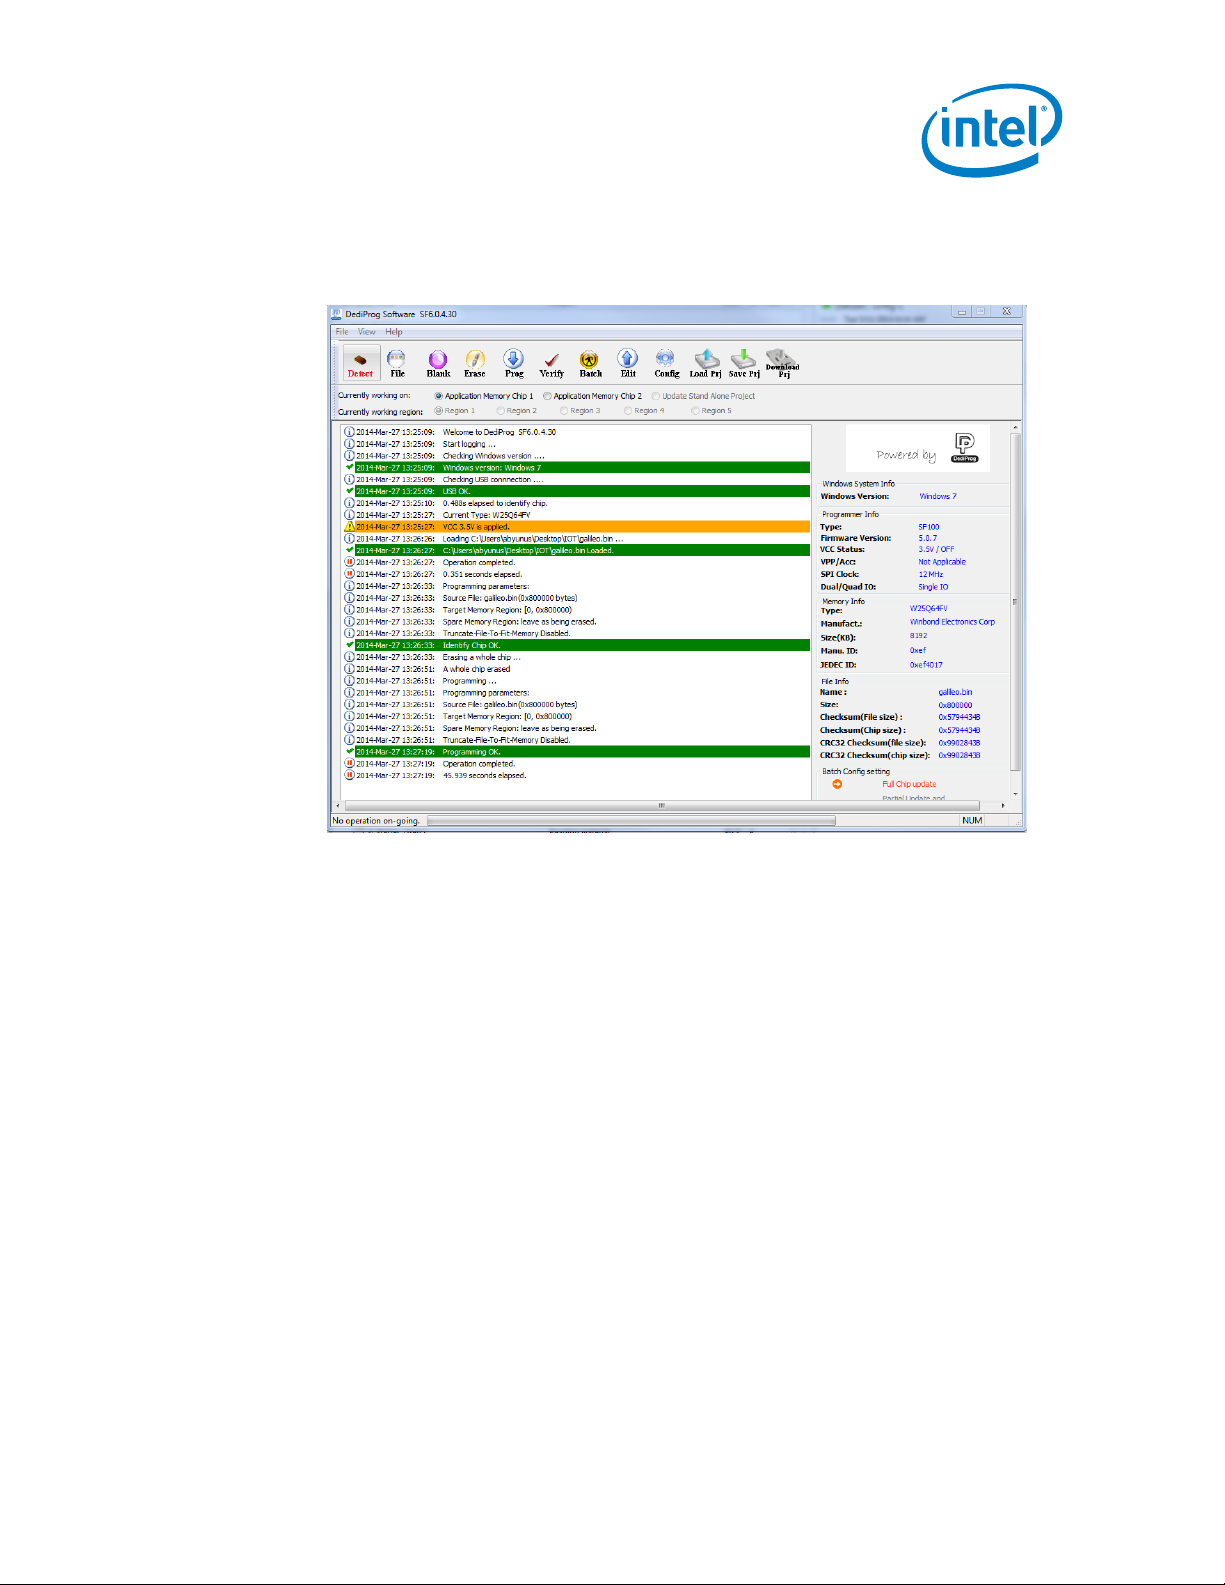
8. Click Batch to start the programming. An 8 MB file will take about 45 seconds
to complete. See the figure below.
Figure 28. Programming Complete
9. Disconnect the USB cable from the Host System.
10. Disconnect the DediProg cable from the header on the Target Device.
Backing Up the Firmware 8.3
Use the following steps to make a backup copy of the firmware that is on the microSD card.
1. Disconnect the power supply from the Target Device.
2. Identify the 7-pin SPI header on the Target Device. See the red arro w in the
figure below.
October 2014 Getting Started Guide
Document Number: 330496-005 41
Intel® Gateway Solutions for the IoT – Development Kit – DK50
Page 42

Figure 29. DediProg Header on the Ta rg et Device
Programming the SPI Flash Firmware
3. Connect the DediProg to the Target Device as shown in the figure below.
Figure 30. Connection from DediProg to Target Device
Intel® Gateway Solutions for the IoT – Development Kit – DK50
Getting Started Guide October 2014
42 Document Number: 330496-005
Page 43

Programming the SPI Flash Firmware
4. Plug in the USB connection of the DediProg Flash Programmer to the Host
System. The DediProg software must already be installed on the Host PC. You
will see a pop-up message similar to the one shown below. Select W25Q64FV
and click OK.
Figure 31. Flash Memory Selection
October 2014 Getting Started Guide
Document Number: 330496-005 43
Intel® Gateway Solutions for the IoT – Development Kit – DK50
Page 44
Programming the SPI Flash Firmware
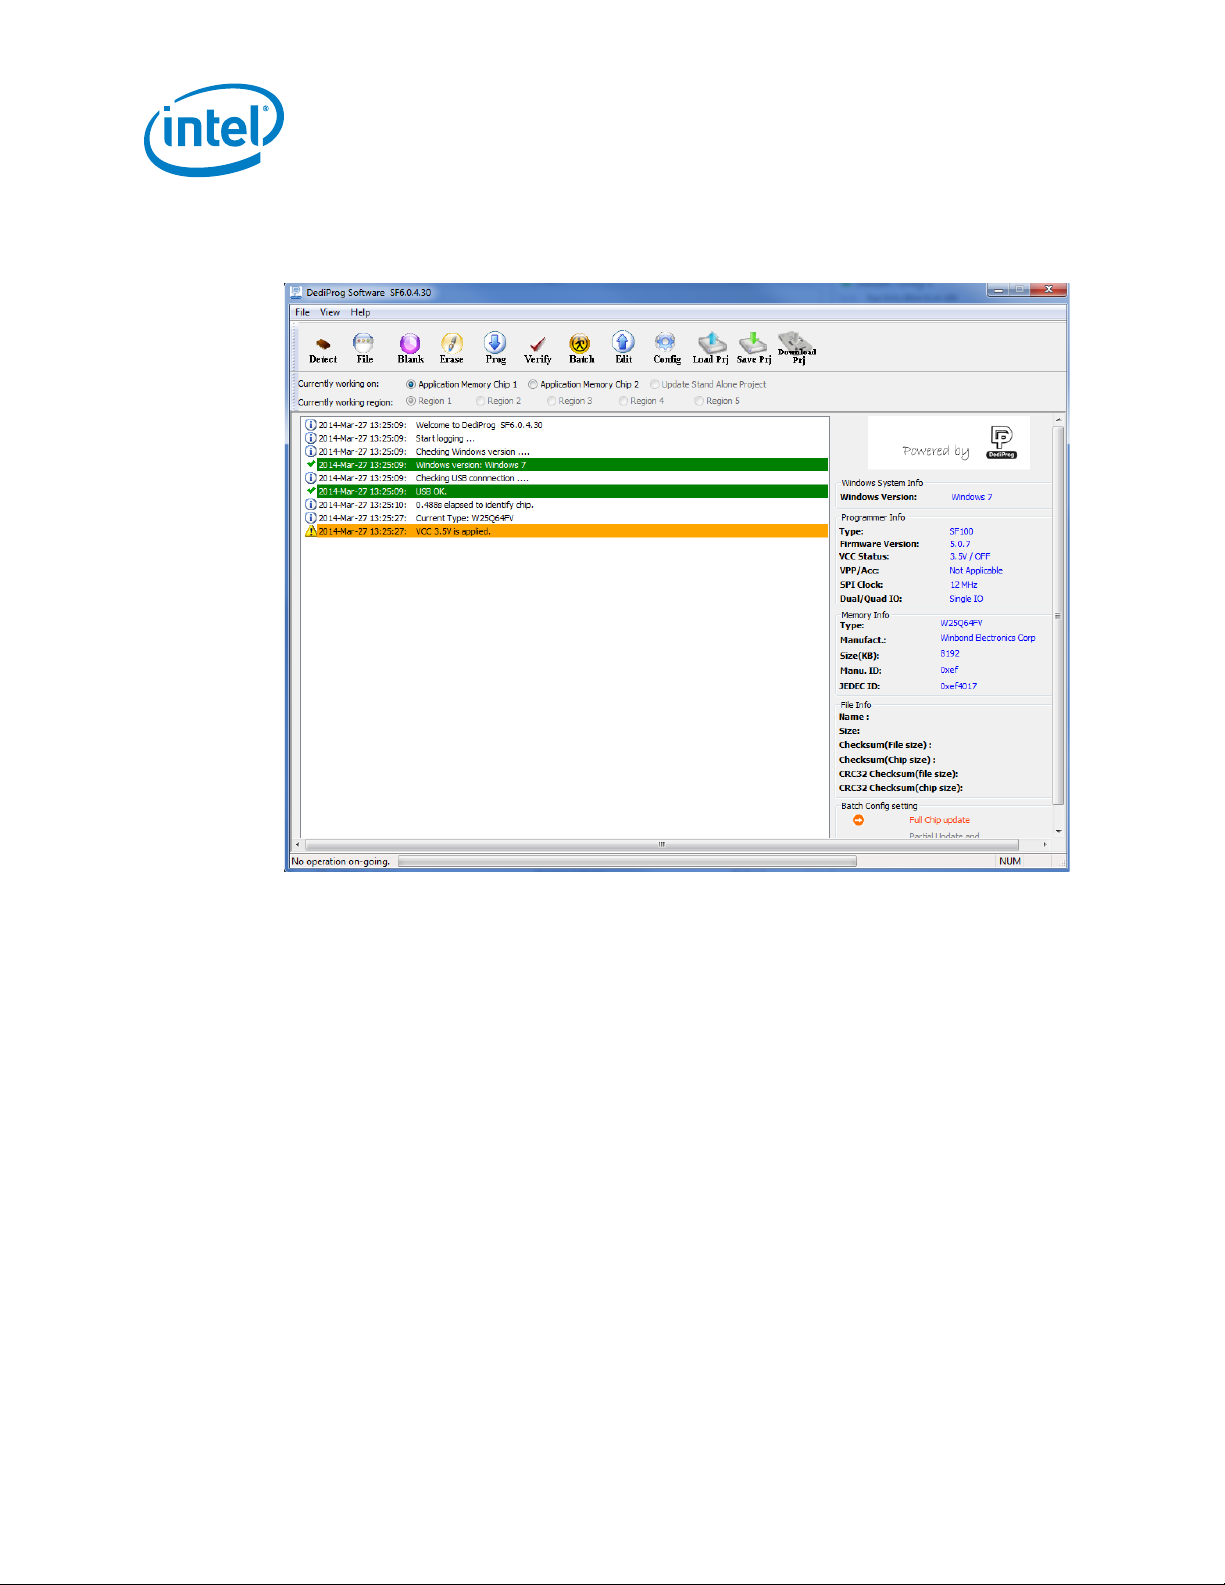
5. The DediProg GUI should start as shown in the figure below.
Figure 32. DediProg Programming Softw are - Graph ical User Interface (GUI)
Intel® Gateway Solutions for the IoT – Development Kit – DK50
Getting Started Guide October 2014
44 Document Number: 330496-005
Page 45

Programming the SPI Flash Firmware
6. Click the Edit button. The View Contents in the Memory Chip window pop-
up is shown in the figure below.
Figure 33. DediProg Edit Screen – with SPI Flash Contents Displayed
7. Click Read. The DediProg software reads the contents of the SPI flash
memory and displays them in the window.
8. Click Chip Buffer to File.
9. Enter a file name when prompted. The chip image is saved to the file.
§
October 2014 Getting Started Guide
Document Number: 330496-005 45
Intel® Gateway Solutions for the IoT – Development Kit – DK50
Page 46

Appendix A Errata
Errata pertaining to this version of the Development Kit are shown in Table 2.
Table 2. Development Kit Errata
Programming the SPI Flash Firmware
Errata
Number
1 On the Target Device, the micro-USB
2 On the Target Device, the MAC
3 Continuous messages including error
port labeled “Client USB” does not
work.
address of the wired Ethernet inter f a ce
(eth0) is AA:BB:CC:DD:EE:FF by
default.
messages requesting hardwar e r eset
are displayed on command line
interface after powering on the Target
Device if Intel
wireless network adapter is installed.
Errata Description Workaround/Future Fix
®
7260 dual-band
A fix for this erratum is planned in a
future release of Target Device
firmware.
A fix for this erratum is planned in a
future release of Target Device
firmware. See Section A.1 for a
workaround.
Login with username as root and
password as root while the messages
are being displayed. Type reboot.
These messages will not be displayed
after the reboot.
Intel® Gateway Solutions for the IoT – Development Kit – DK50
Getting Started Guide October 2014
46 Document Number: 330496-005
Page 47

Programming the SPI Flash Firmware
A.1 Modifying the MAC Address of Wired Ethernet
Interface (eth0)
The procedure to modify the MAC addres s o f the wired Ethernet interface requires
changes to the Target Device’s firmware. Follow the steps below to change and then
rebuild the firmware.
1. Complete the steps in Section 5.1 and Section 5.2.
2. Find the MAC address of the Target Device. It is labelled on the Ethernet port.
See the following figure.
Figure 34. Location of MAC Address on Target Device Ethernet Port
3. On the Host System, edit galileo-platform-data.ini. This file is typically
$HOME/Project/layers/wr-bsps/intel-quark/recipes-
under
support/spi-layout-tools/files/platform-data.
4.
Change the string AABBCCDDEEFF to match the MAC address of the Target
Device. See the figure below.
5. Save and close the file.
October 2014 Getting Started Guide
Document Number: 330496-005 47
Intel® Gateway Solutions for the IoT – Development Kit – DK50
Page 48

Programming the SPI Flash Firmware
6. Execute make fs as described in Section 5.3 to rebuild the firmware. The
firmware file
$HOME/Project/export/images.
7. Update the Target Device as described in Section 7.
Flash-galileo-8M-secured.bin is created in
§
Intel® Gateway Solutions for the IoT – Development Kit – DK50
Getting Started Guide October 2014
48 Document Number: 330496-005
Page 49

Programming the SPI Flash Firmware
Appendix B Intel
Internet of Things – Knowledge Forum
In addition to the technical support through Intel® Premier Support, an online
community knowledge forum is available for the Intel® Gateway Solutions for the IoT.
The forum is located at https://ask.intel.windriver.com
how-to questions and search for answers related to Wind River® Linux and the
development tool.
Intel will continue to offer hardware and software technical support through Intel®
Premier Support; you can use this knowledge forum as an additional support option.
Questions on this forum are typically related to installation and usage of Wind River
Linux, the Intelligent Device Platform XT, and compilers and development tools, such
as the Wind River Workbench.
This appendix guides you through accessing and using the Intel
for the IoT Knowledge Forum. In using the forum, be aware that this is an open
support model and the following bullets apply:
• Wind River hosted Knowledge Forums (Wind River Knowledge Forum and the
• Questions posted on the forums are visible to all users. All users can
• Refrain from posting proprietary, confidential, or controlled information on the
®
Intel
Gateway Solutions for the IoT Knowledge Forum) are open support
repositories that are accessible to Intel, Wind River employees, and customers
who have active Support Maintenance Agreements.
contribute answers. Both questions and answers can be edited by any user on
the Knowledge Forums.
Knowledge Forums. Intel Corporation and Wind River Systems are not
responsible for ensuring the privacy of data on the Knowledge Forums.
®
Gateway Solutions for the
. On this forum, you can ask
®
Gateway Solutions
B.1 Accessing the Forum
Use the following steps to create a Wind River account and log in to the forum.
NOTE: You might already have a Wind River support account. If so, disregard Step 1 and
continue with Step 2.
1. To create a Wind River support account you must fill out a short form at
https://support.windriver.com/selfservicewebapp/register.action. This form
requires you to enter your License and License Activation Code keys. You
received this information after you registered your Development Kit.
2. Login at https://ask.intel.windriver.com. Use your Wind River Online Support
account user name and password.
3. If you have not yet done so, then when prompted, set up a screen name. This
is the identity you will use in the online community. Other users will see you
by this identity. Do not use your email address for your screen name.
October 2014 Getting Started Guide
Document Number: 330496-005 49
Intel® Gateway Solutions for the IoT – Development Kit – DK50
Page 50

Programming the SPI Flash Firmware
B.2 Using the Forum
After you are registered and logged in, you can post questions and search for topics of
interest. Submitted questions are accessible to all knowledge forum users. Forum
moderators and Wind River product experts regularly monitor the forum to answer
questions. If necessary, your question will be escalated.
NOTE: If your issue is urgent or related to BSP development on a specific project, create an
issue ticket through Intel® Premier Support instead of relying on this forum for
answers.
The screen looks like this after you register and log in:
Figure 35. Display: Knowledge Forum Int roductory Screen
B.3 Submitting Questions
Use the following steps to ask a question on the forum.
1. Click ASK YOUR QUESTION. See the red box in the following figure.
Intel® Gateway Solutions for the IoT – Development Kit – DK50
Getting Started Guide October 2014
50 Document Number: 330496-005
Page 51

Programming the SPI Flash Firmware
Figure 36. Display: Ask Question
4. Title your question:
Figure 37. Display: Title Question
October 2014 Getting Started Guide
Document Number: 330496-005 51
Intel® Gateway Solutions for the IoT – Development Kit – DK50
Page 52

5. Provide details about your question. To help the support staff to provide
accurate and timely guidance, include details about your test / development
environment, including:
• Detailed information about your question.
• Software, such as Intelligent Device Platform XT release, Wind River Linux
version, BIOS, FW etc.
• Hardware, such as board, processor SKU, memory, I/O etc.
6. Categorize your question. Add IOT-Gateway as a tag in addition to specific
product tags. This will allow the support team to track issues related Intel®
Gateway Solutions for the Internet of Things. See the following figure.
Figure 38. Display: Categorize Question
Programming the SPI Flash Firmware
Your selected tags display in a list. You can add or remove tags as necessary.
See the following figure.
Figure 39. Display: Tag Question
Intel® Gateway Solutions for the IoT – Development Kit – DK50
Getting Started Guide October 2014
52 Document Number: 330496-005
Page 53

Programming the SPI Flash Firmware
7. Click Ask Your Question to submit the question. See the red box in the
following figure.
Figure 40. Display: Submit Question
B.4 Subscribing to Tags
You can choose to subscribe to specific tags to receive email alerts for issues and
updates to questions related to that tag/category. Use the following steps.
Click on your preferred email setting. See the red box i n the f ol l o wing figure.
October 2014 Getting Started Guide
Document Number: 330496-005 53
Intel® Gateway Solutions for the IoT – Development Kit – DK50
Page 54

Figure 41. Display: Subscribe to Forum Tags
Programming the SPI Flash Firmware
8. Click Change frequency of emails to set up how often you receive email
messages.
§
Intel® Gateway Solutions for the IoT – Development Kit – DK50
Getting Started Guide October 2014
54 Document Number: 330496-005
Page 55

Programming the SPI Flash Firmware
Appendix C Building an Intelligent Device
Platform Project Using Wind River
Workbench
This appendix provides step-by-step instructions to build a Wind River Intelligent
Device Platform project using Wind River Workbench. The st eps below guide you
through tasks such as selecting configuration options and adding different layers to
your project.
This appendix assumes the following:
• Your Host System is running Ubuntu 12.04, 64-bit.
• You used the directory names indicated in Section 5.3.1, Disk Space and
Installation Folders and Section 6.1, Build Requirements. If you used different
directory names, replace the directory names in the steps below with the
directories that you created.
• You followed the instructions in Section 6, Building the Intelligent Device
Platform XT Runtime Software to install Intelligent Device Platform on your
Host System.
• You know how to deploy a runtime image on your Target Device. See Section
7, Installing Software on the Target Device.
C.1 Create the Project
1. Use the following commands to launch Workbench:
cd $HOME/WindRiver
./ startWorkbench.sh
October 2014 Getting Started Guide
Document Number: 330496-005 55
Intel® Gateway Solutions for the IoT – Development Kit – DK50
Page 56

2. Upon launching, Workbench asks for a workspace folder. Type the path or browse
to your workspace folder. Suggestion: Use your home folder. See the following
figure:
Figure 42. Workspace Location Selection
Programming the SPI Flash Firmware
The application launches.
Intel® Gateway Solutions for the IoT – Development Kit – DK50
Getting Started Guide October 2014
56 Document Number: 330496-005
Page 57

Programming the SPI Flash Firmware
3. From the main menu, click File > New > Wind River Workbench Project, as
shown:
Figure 43. Create a New Workbench Project
October 2014 Getting Started Guide
Document Number: 330496-005 57
Intel® Gateway Solutions for the IoT – Development Kit – DK50
Page 58

4. Select the target operating system. Choose Wind River Linux Platform Base
5.0.1, as shown:
Figure 44. Selecting Target Operating System
Programming the SPI Flash Firmware
Intel® Gateway Solutions for the IoT – Development Kit – DK50
Getting Started Guide October 2014
58 Document Number: 330496-005
Page 59

Programming the SPI Flash Firmware
5. Since your goal is to create a runtime image, select Platform as the build type as
shown:
Figure 45. Select Build Type
Intel® Gateway Solutions for the IoT – Development Kit – DK50
October 2014 Getting Started Guide
Document Number: 330496-005 59
Page 60

6. Type a name for your project:
Figure 46. Specify Project Name
Programming the SPI Flash Firmware
Note: Important! You must enable wr-idp as an addon before selecting the RootFS type.
Make sure you correctly complete steps 7 - 8.
Intel® Gateway Solutions for the IoT – Development Kit – DK50
Getting Started Guide October 2014
60 Document Number: 330496-005
Page 61

Programming the SPI Flash Firmware
7. Click Add and select –enable-addons=[yes|no|addon[…] as shown below.
Figure 47. Enable Addons
October 2014 Getting Started Guide
Document Number: 330496-005 61
Intel® Gateway Solutions for the IoT – Development Kit – DK50
Page 62

8. Edit the Value field near the bottom of the screen to add wr-idp, and then click
the Reload button. See the following figure.
Note: If you do not click Reload, you cannot use glibc-idp as the RoofFS type.
Figure 48. Reload Configurations
Programming the SPI Flash Firmware
Intel® Gateway Solutions for the IoT – Development Kit – DK50
Getting Started Guide October 2014
62 Document Number: 330496-005
Page 63
Programming the SPI Flash Firmware
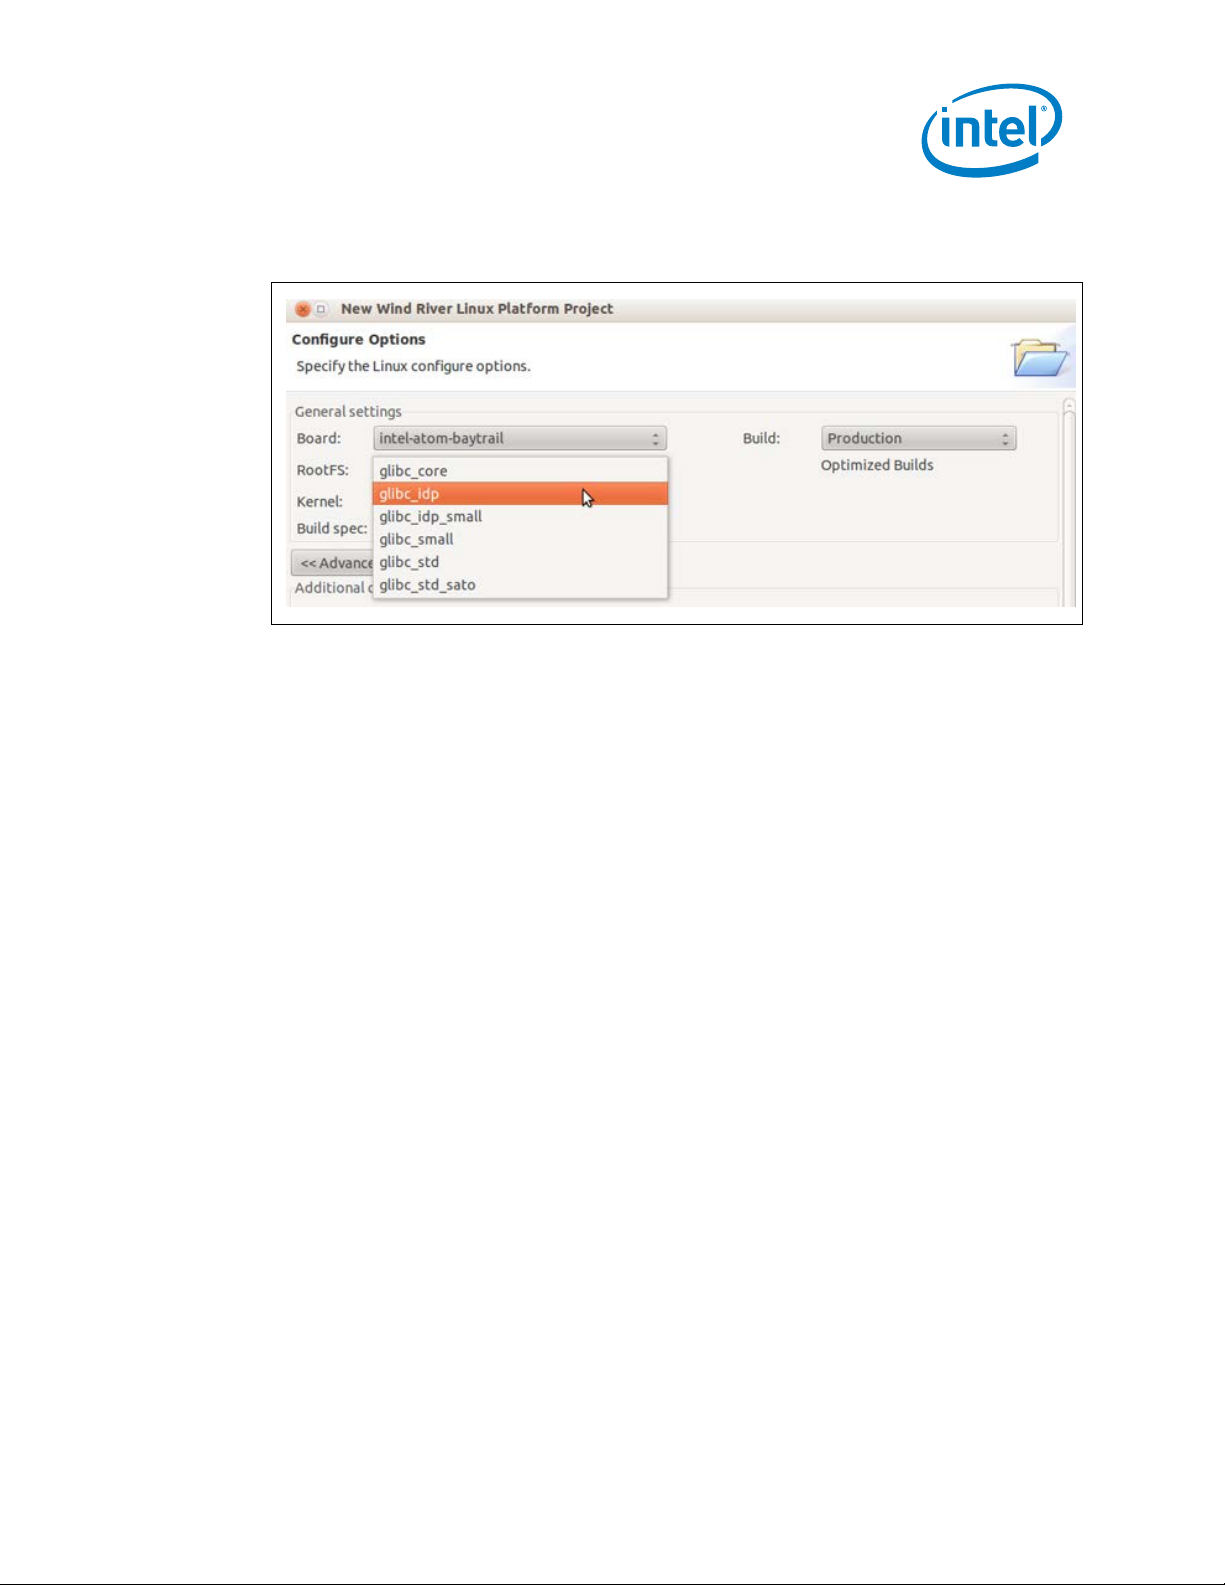
9. For RootFS, select glibc_idp as shown:
Figure 49. glibc_idp Option Available
10. For Board, select the board type appropriate for your Target Device. If you are
unsure of your selection, see the configure command you used in Section 6.2,
Wind River Linux Configure Command. Look for the parameter
board= xxx
where xxx is the Board that you need to select.
11. For Kernel, select standard.
--enable-
October 2014 Getting Started Guide
Document Number: 330496-005 63
Intel® Gateway Solutions for the IoT – Development Kit – DK50
Page 64

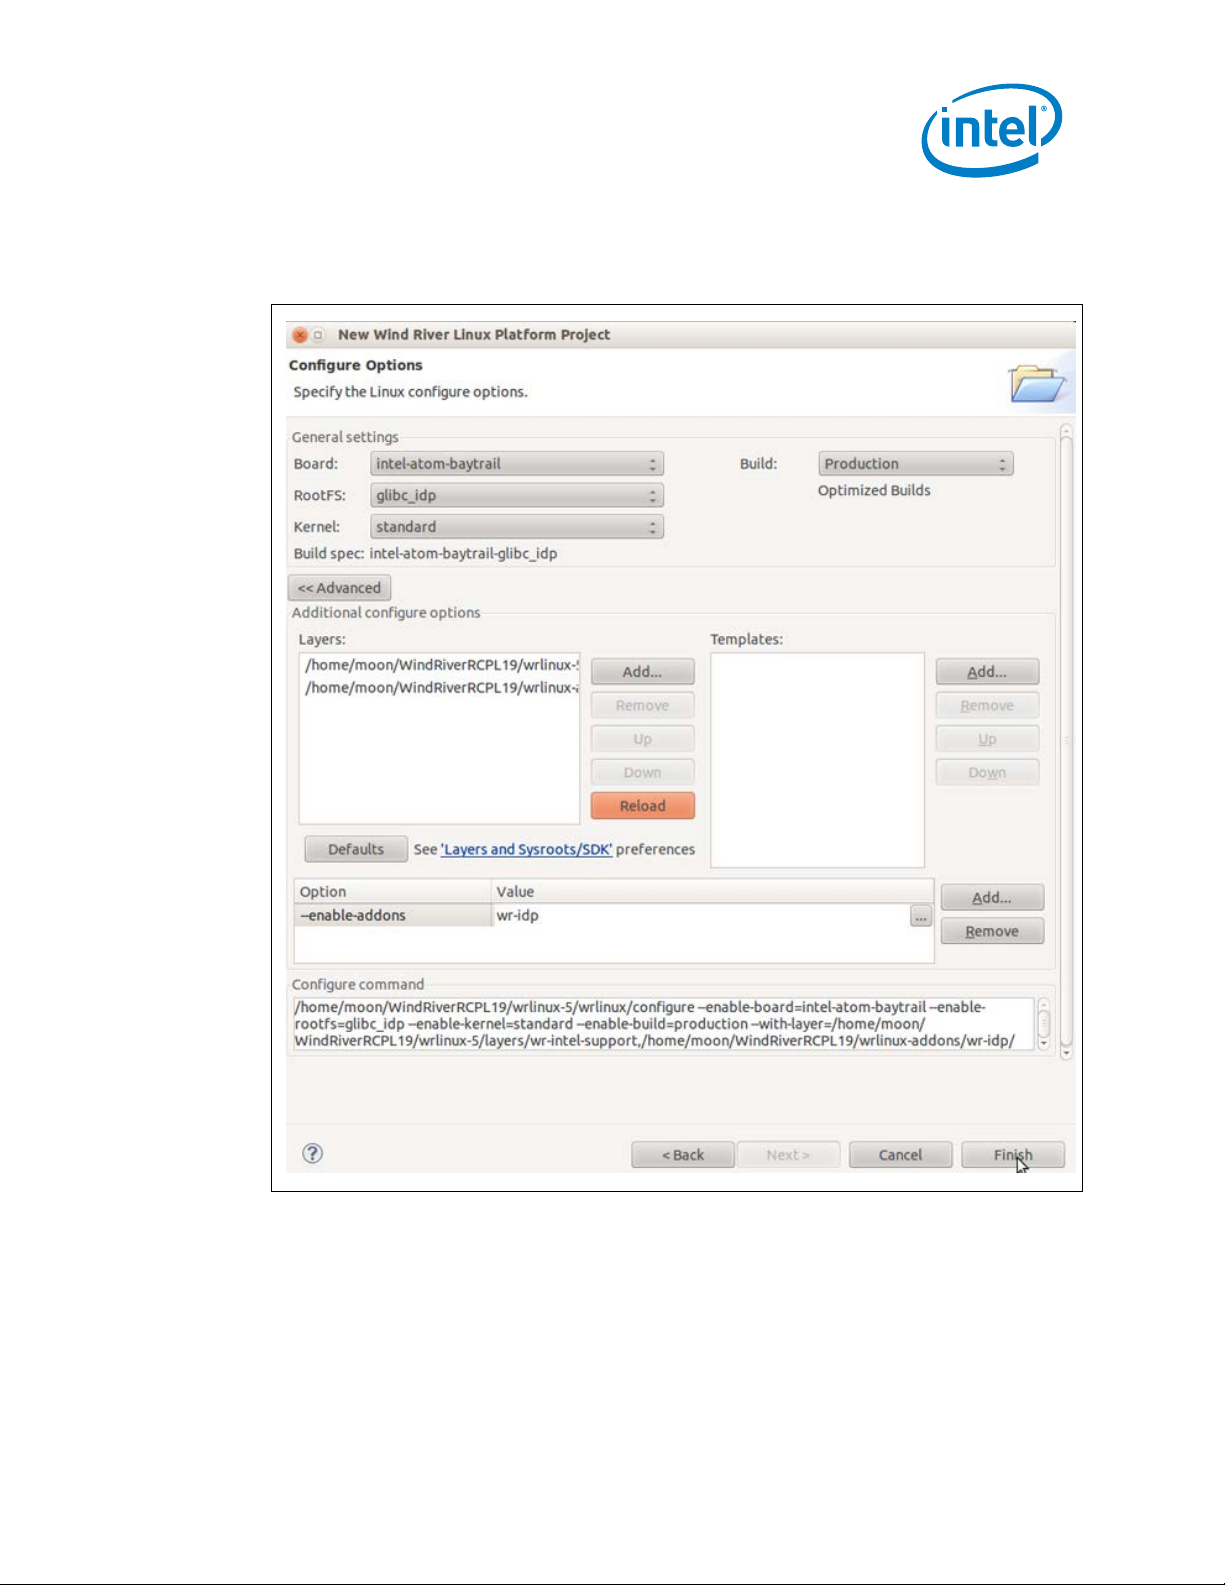
12. You are ready to add layers. Click Add… as shown below.
Figure 50. Add Layers
Programming the SPI Flash Firmware
Intel® Gateway Solutions for the IoT – Development Kit – DK50
Getting Started Guide October 2014
64 Document Number: 330496-005
Page 65

Programming the SPI Flash Firmware
13. Select wr-intel-support as shown in below, and then click Reload.
Figure 51. Add wr-intel-support
Intel® Gateway Solutions for the IoT – Development Kit – DK50
October 2014 Getting Started Guide
Document Number: 330496-005 65
Page 66

14. Select to add the wr-mcafee layer as shown:
Figure 52. Add wr-mcafee Layer
Programming the SPI Flash Firmware
Intel® Gateway Solutions for the IoT – Development Kit – DK50
Getting Started Guide October 2014
66 Document Number: 330496-005
Page 67
Programming the SPI Flash Firmware
15. Add additional layers as needed. When you are done, click Finish to finalize your
configuration.
Figure 53. Finalize Configuration
October 2014 Getting Started Guide
Document Number: 330496-005 67
Intel® Gateway Solutions for the IoT – Development Kit – DK50
Page 68

The configuration script will show a progress screen similar to the following while
it executes. Execution will take a few minutes.
Figure 54. Configuration Script Progress
Programming the SPI Flash Firmware
Intel® Gateway Solutions for the IoT – Development Kit – DK50
Getting Started Guide October 2014
68 Document Number: 330496-005
Page 69

Programming the SPI Flash Firmware
Upon completion you will see a summary similar to the following:
Figure 55. Build Configuration Completed
You are ready to build your project. Follow the steps in the next section.
October 2014 Getting Started Guide
Document Number: 330496-005 69
Intel® Gateway Solutions for the IoT – Development Kit – DK50
Page 70

C.2 Build Project
Depending on you configuration items, your selected layers and the processing power
of your development system it will take 2 to 4 hours to build your project. The build
took approximately 4 hours on a test system that was running an Intel
4900 processor at 2.8GHz with Intel® Hyper-Threading technology, and 8 GB RAM.
1. From the main menu, select Project > Build Project.
Figure 56. Build Project
Programming the SPI Flash Firmware
®
quad-core i7-
Intel® Gateway Solutions for the IoT – Development Kit – DK50
Getting Started Guide October 2014
70 Document Number: 330496-005
Page 71

Programming the SPI Flash Firmware
The project build begins and displays a progress window:
Figure 57. Build Project in Progress
October 2014 Getting Started Guide
Intel® Gateway Solutions for the IoT – Development Kit – DK50
Document Number: 330496-005 71
Page 72

2. Optional: Open a terminal window to examine the config file generated by
Workbench. The config file looks similar to the following:
Figure 58. Workbench Config Log
Programming the SPI Flash Firmware
The following figure shows the output of the Build Console.
Figure 59. Build Console Displaying Project Completion
3. Deploy your project to your Target Device.
Intel® Gateway Solutions for the IoT – Development Kit – DK50
Getting Started Guide October 2014
72 Document Number: 330496-005
 Loading...