

Page 1

Intel® IoT Gateway Development Kit
DK100 Series
Getting Started Guide
April 2015
Order No.: 330307-007
Page 2

By using this document, in addition to any agreements you have with Intel, you accept the terms set forth below.
You may not use or facilitate the use of this document in connection with any infringement or other legal analysis concerning Intel products described
herein. You agree to grant Intel a non-exclusive, royalty-free license to any patent claim thereafter drafted which includes subject matter disclosed
herein.
No license, express or implied, by estoppel or otherwise, to any intellectual property rights is granted by this document.
All information provided here is subject to change without notice. Contact your Intel representative to obtain the latest product specifications and
roadmaps.
Intel may make changes to specifications and product descriptions at any time, without notice. Designers must not rely on the absence or
characteristics of any features or instructions marked "reserved" or "undefined". Intel reserves these for future definition and shall have no
responsibility whatsoever for conflicts or incompatibilities arising from future changes to them. The information here is subject to change without
notice. Do not finalize a design with this information.
The products described in this document may contain design defects or errors known as errata which may cause the product to deviate from published
specifications. Current characterized errata are available on request.
Copies of documents which have an order number and are referenced in this document, or other Intel literature, may be obtained by calling
1-800-548-4725, or go to: http://www.intel.com/design/literature.htm
Intel processor numbers are not a proxy for performance. Processor numbers differentiate features within a processor family, not across different
processor families. Learn more at: http://www.intel.com/products/processor_number/
Intel, the Intel logo, Intel Atom, Intel Core and Intel Quark, are trademarks of Intel Corporation in the U.S. and/or other countries.
Wind River is a trademark of Wind River Systems, Inc.
*Other names and brands may be claimed as the property of others.
Copyright © 2014–2015, Intel Corporation. All rights reserved.
®
IoT Gateway Development Kit DK100 Series
Intel
Getting Started Guide April 2015
2 Order No.: 330307-007
Page 3
Quick Power-On—Intel IoT Gateway Development Kit DK100 Series
Quick Power-On
The following terms are used in these steps:
• Target Device refers to the Intel® IoT Gateway - DK100 Series.
• Host System refers to a Linux system that you provide.
1. Connect the Serial Interface to a Host System running PuTTY.
2. Connect the Power Supply.
3.
At the login prompt, use root for both the login ID and password.
The Target Device is now booted with the sample runtime image. This sample runtime
image is for evaluation purposes only. After you have explored its features, use the
rest of this document to build a production-ready runtime image.
April 2015 Getting Started Guide
Order No.: 330307-007 3
Intel® IoT Gateway Development Kit DK100 Series
Page 4

Revision History
Date Revision Description
April 2015 007 Changed information related to recommended development
February 2015 006 First Intel® IoT Gateway 2.1 release
September 2014 005 Corrected document references / added links
September 2014 004 Minor updates
August 2014 003 Corrected licensing instructions
July 2014 002 Minor updates and corrections
July 2014 001 Initial public release
Intel IoT Gateway Development Kit DK100 Series —Revision History
hosts
Updated errata
Document restructured
Added appendix to build an Intelligent Device Platform
Project with Wind River Workbench
Added appendix for Triage Tool
Command and other modifications throughout for Release
2.1
Corrected firmware update command to add modprobe
efi_capsule_update
Intel® IoT Gateway Development Kit DK100 Series
Getting Started Guide April 2015
4 Order No.: 330307-007
Page 5

Contents—Intel IoT Gateway Development Kit DK100 Series
Contents
Quick Power-On.................................................................................................................. 3
Revision History..................................................................................................................4
1.0 Introduction................................................................................................................. 9
1.1 About the Intel® IoT Gateway Development Kit DK100 Series.......................................9
1.2 Intel® IoT Gateway Development Kit DK100 Series Kit Contents................................. 10
1.3 About this Guide...................................................................................................13
1.4 Reference Documents............................................................................................15
1.5 Before you Begin.................................................................................................. 16
2.0 Connect the Hardware................................................................................................ 19
3.0 Connect the Target Device to a Host System............................................................... 20
3.1 Connecting with a Wireless Network Connection........................................................21
3.2 Connecting with a Wired Ethernet Connection........................................................... 22
3.3 Remotely Logging in to the Target Device with ssh.................................................... 22
4.0 Prepare to Build Your Runtime Image.........................................................................24
4.1 Task Checklist and Completion Times...................................................................... 24
4.2 Prepare Host System for Wind River Software Installation.......................................... 25
5.0 Register Your Development Kit................................................................................... 27
6.0 Install Linux Packages and Wind River Linux Host Tools on the Host System............. 32
7.0 Build Intelligent Device Platform XT Runtime Software.............................................. 40
8.0 Update SPI Firmware.................................................................................................. 42
9.0 Put Intelligent Device Platform XT Runtime Image onto USB Flash Drive................... 44
10.0 Install Intelligent Device Platform XT Runtime on Target Device..............................47
Appendix A Intel® IoT Gateway Knowledge Forum........................................................... 48
Appendix B Use Wind River WebIF to Configure the Target Device (Optional).................. 53
Appendix C Building an Intelligent Device Platform Project Using Wind River
®
Workbench.............................................................................................................. 55
Appendix D Triage Tool..................................................................................................... 72
Appendix E Installing and Configuring PuTTY................................................................... 73
Appendix F Troubleshooting............................................................................................. 79
April 2015 Getting Started Guide
Order No.: 330307-007 5
Intel® IoT Gateway Development Kit DK100 Series
Page 6

Intel IoT Gateway Development Kit DK100 Series —Figures
Figures
1 Software Stack........................................................................................................10
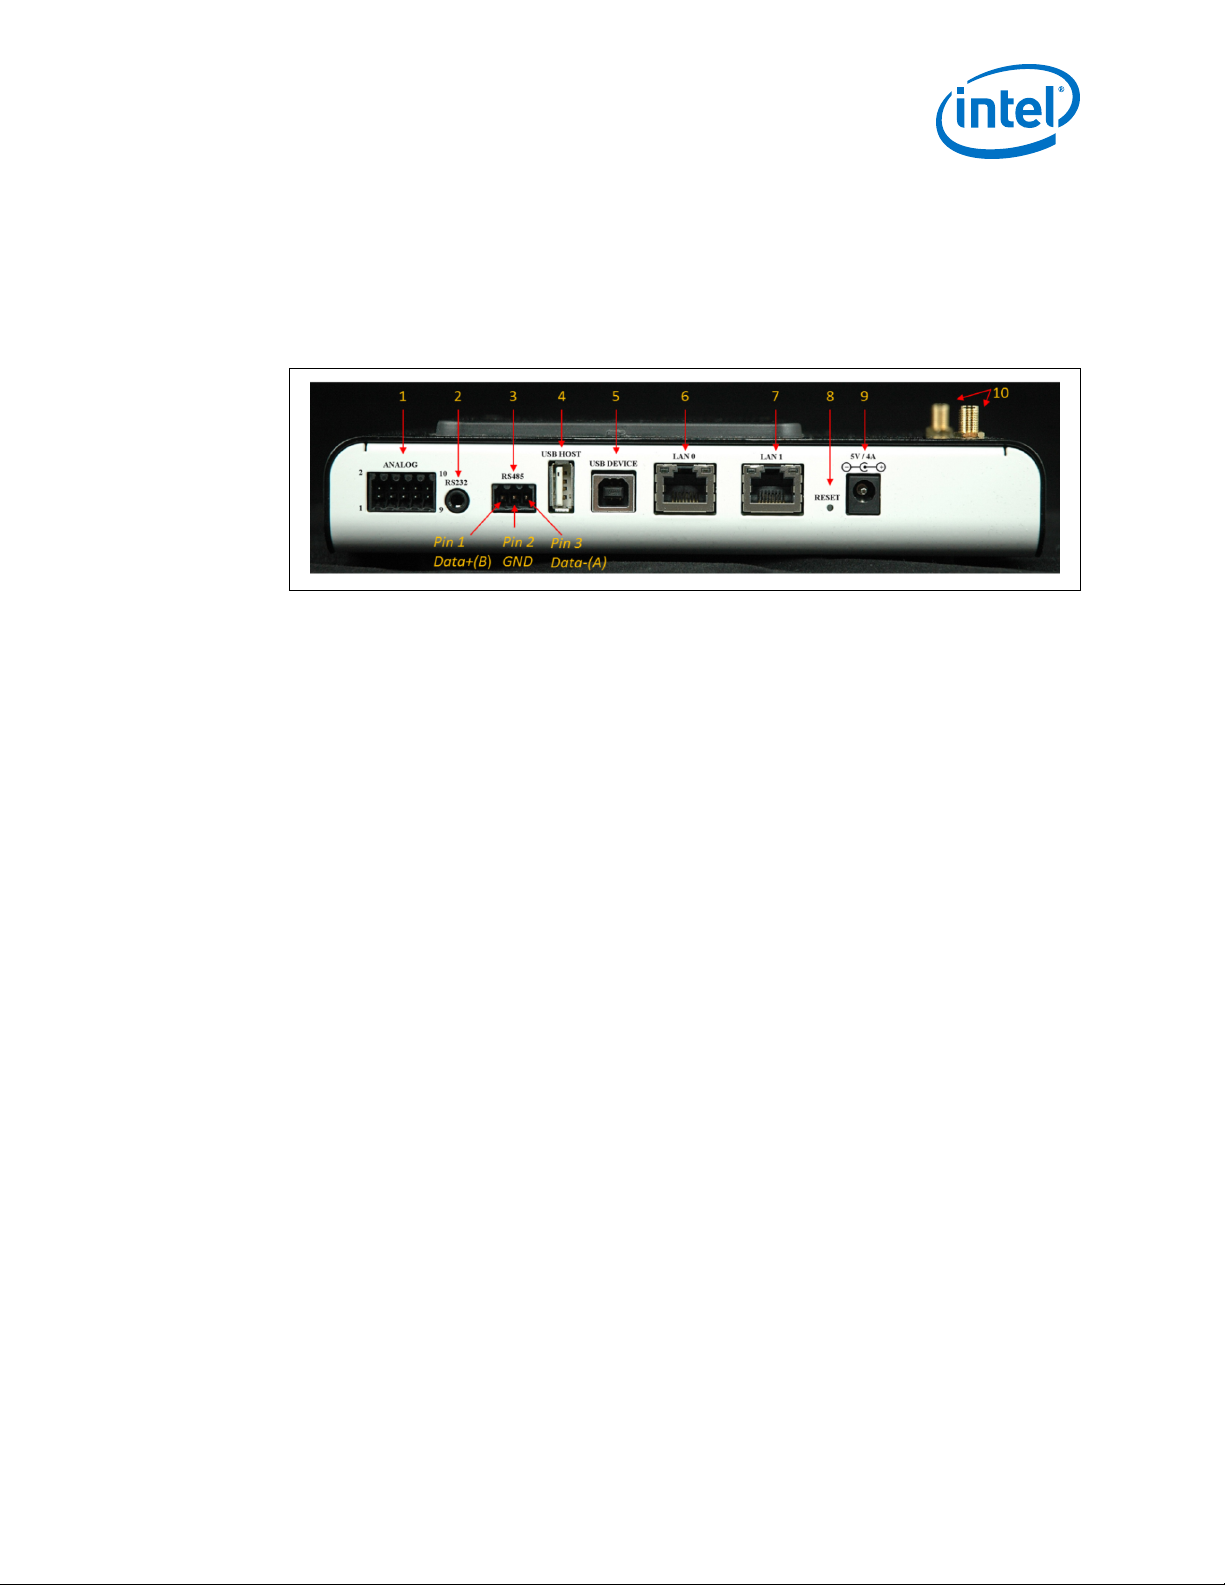
2 Intel® IoT Gateway DK100 Series - Back.................................................................... 11
3 RS-232 Cable for Serial Communication Transmission...................................................12
4 Power Cord.............................................................................................................13
5 Sample "You Are Here".............................................................................................14
6 Register a Product................................................................................................... 27
7 Create Support User Account.................................................................................... 28
8 Wind River License Key Request Confirmation............................................................. 28
9 Logged Into Intel Registration Center......................................................................... 29
10 Intel Registration Center Product Page....................................................................... 29
11 Email Message: Intel® Premier Support Registration Successfully Completed...................30
12 Message: Thank you for registering Intel® IoT Gateway Development Kit DK100 Series.... 30
13 Wind River Installer Package Updates.........................................................................33
14 Online Update Settings, Part 1.................................................................................. 34
15 Online Update Settings, Part 2.................................................................................. 34
16 Activation Type....................................................................................................... 35
17 License Authorization Code Location...........................................................................36
18 Choose Installation Filters.........................................................................................37
19 Select Products....................................................................................................... 37
20 Confirm and Install.................................................................................................. 38
21 PuTTY Virtual Terminal Screen, Request to Boot from MMC............................................42
22 USB Flash Drive File System Name............................................................................ 44
23 Folder Error for wr_usb_boot.....................................................................................45
24 Knowledge Forum Opening Screen.............................................................................49
25 Ask Question.......................................................................................................... 50
26 Title Question......................................................................................................... 50
27 Categorize Question.................................................................................................50
28 Tagged Question..................................................................................................... 51
29 Submit Question......................................................................................................51
30 Subscribe to Forum Tags.......................................................................................... 52
31 Untrusted Certificate................................................................................................53
32 WebIF Application....................................................................................................54
33 Workspace Location Selection................................................................................... 55
34 Create a New Workbench Project...............................................................................56
35 Selecting Target Operating System............................................................................ 56
36 Select Build Type.....................................................................................................57
37 Specify Project Name...............................................................................................57
38 Enable Addons........................................................................................................ 58
39 Reload Configurations.............................................................................................. 59
40 glib_idp Option Available.......................................................................................... 60
41 Add Layers............................................................................................................. 61
42 Add wr-intel-support................................................................................................62
43 Add wr-mcafee Layer...............................................................................................63
44 Adding Options........................................................................................................63
45 enable jobs=50.......................................................................................................64
46 -enable-parallel-pkgbuilds=<number of CPUs>........................................................... 65
47 Finalize Configuration...............................................................................................66
48 Configuration Script Progress.................................................................................... 67
49 Build Configuration Completed.................................................................................. 68
50 Build Project........................................................................................................... 69
51 Build Project Progress Window...................................................................................70
52 Config File.............................................................................................................. 70
53 Build Console Displaying Project Completion................................................................71
54 PuTTY Configuration Screen...................................................................................... 73
Intel® IoT Gateway Development Kit DK100 Series
Getting Started Guide April 2015
6 Order No.: 330307-007
Page 7

Figures—Intel IoT Gateway Development Kit DK100 Series
55 Change to Serial with Speed of 115200...................................................................... 74
56 Change Flow Control................................................................................................75
57 Change to SCO Function Keys................................................................................... 76
58 Save Settings..........................................................................................................77
59 Update Session with Correct tty Port.......................................................................... 78
April 2015 Getting Started Guide
Order No.: 330307-007 7
Intel® IoT Gateway Development Kit DK100 Series
Page 8

Intel IoT Gateway Development Kit DK100 Series —Tables
Tables
1 Reference Documents.............................................................................................. 15
2 Items to Obtain.......................................................................................................16
3 Recommended Development Hosts............................................................................ 17
4 Login IDs and Passwords.......................................................................................... 18
5 Target Device Errata................................................................................................ 79
Intel® IoT Gateway Development Kit DK100 Series
Getting Started Guide April 2015
8 Order No.: 330307-007
Page 9

Introduction—Intel IoT Gateway Development Kit DK100 Series
1.0 Introduction
1.1
About the Intel® IoT Gateway Development Kit DK100 Series
The Intel® IoT Gateways provide pre-integrated hardware and software building
blocks. The gateways connect legacy and new systems, and enable seamless and
secure data flows between edge devices and the cloud. Using a single, integrated
solution allows you to focus your resources on innovating for new services, bug data
solutions, and other IoT-focused applications.
Intel® IoT Gateway Development Kit DK100 Series includes the following:
• Processor: Intel® Quark™ SoC X1020D
• Software: Wind River® Linux (Host), Wind River® Intelligent Device Platform XT,
Wind River Workbench, McAfee* Embedded Control
• Security: Open SSL* Library, McAfee* Embedded Control, SRM Signing Tool,
Certificate Management, Secure Boot, Application Integrity Monitor, Application
Resource Control, Secure Package Management, Encrypted Storage
• Manageability and provisioning: OMA DM, TR-069, Web-based configuration
interfaces
• Communications and connectivity: Serial, USB, VPN, WI-Fi* Access Point,
Bluetooth*, MQTT, ZigBee* (ZigBee is enabled by third-party hardware)
• Runtime environments: Java*, OSGi*, Lua*
• I/O: 2x Ethernet* 10/100, USB 2.0 host & device, RS-232, RS-485, 2x internal
mini PCIe (for Wi-Fi* / Bluetooth* / 3G modules), SPI (internal), 12-bit 8 channel
ADC
• Memory and storage: 512 KB SRAM, 1 GB ECC DDR3, onboard microSD card
The Intel® IoT Gateway - Development Kit DK100 Series provides a key ingredient for
enabling the connectivity of legacy industrial, energy, and transportation devices to
the IoT. It integrates technologies and protocols for networking, embedded control,
enterprise-grade security, and easy manageability on which application-specific
software can run. This product offers:
• Speed: By integrating hardware and software building blocks.
• Protection of legacy investments by connecting new and legacy systems with
intelligent compute platforms for communication to the cloud.
• Secure data with standards-based interfaces.
Blank line. Do not delete.
Blank line. Do not delete.
Blank line. Do not delete.
April 2015 Getting Started Guide
Order No.: 330307-007 9
Intel® IoT Gateway Development Kit DK100 Series
Page 10

The following diagram illustrates the software components that are included in the
Ecosystem /
Application
Development
and end-user enabled
cloud connector,
applications, and
services
Manageability
OMA DM
TR-069
Web-Base d
Configuration Interfaces
Security
Open SSL Library
SRM Signing Tool
Certification
Management
Secure Boot
Application Integrity
Monitor
Application Resource
Control
Secure Package
Management
Encrypte d Storage
Connectivity
Bluetooth*
Serial
USB
VPN
Wi-Fi* Access P oint
MQTT
ZigBee* (enabled by
third-party hardware)
McAfee Embedded
Control
Wind River Development Environment
Wind River Linux 5.0.1
Intel Processor-Based Solution
(Intel® Quark™ SoC X1020D Processor)
Runtime Environment
Lua*
Java*
OSG
SQlite3
Intel® IoT Gateway Development Kit DK100 Series Software Stack.
Figure 1. Software Stack
Intel IoT Gateway Development Kit DK100 Series —Introduction
1.2
Intel® IoT Gateway Development Kit DK100 Series Kit Contents
Your kit contains the following items:
• One Intel® IoT Gateway DK100 Series with pre-loaded Wind River® Intelligent
Device Platform XT image
• Documentation
• One power supply
• Serial-to-USB cable set
• Two Wi-Fi antennas
• RS485 and ADC terminal connectors
Blank line. Do not delete.
Blank line. Do not delete.
Blank line. Do not delete.
Blank line. Do not delete.
Blank line. Do not delete.
Blank line. Do not delete.
Blank line. Do not delete.
Blank line. Do not delete.
Blank line. Do not delete.
Intel® IoT Gateway Development Kit DK100 Series
Getting Started Guide April 2015
10 Order No.: 330307-007
Page 11
Introduction—Intel IoT Gateway Development Kit DK100 Series
Blank line. Do not delete.
Blank line. Do not delete.
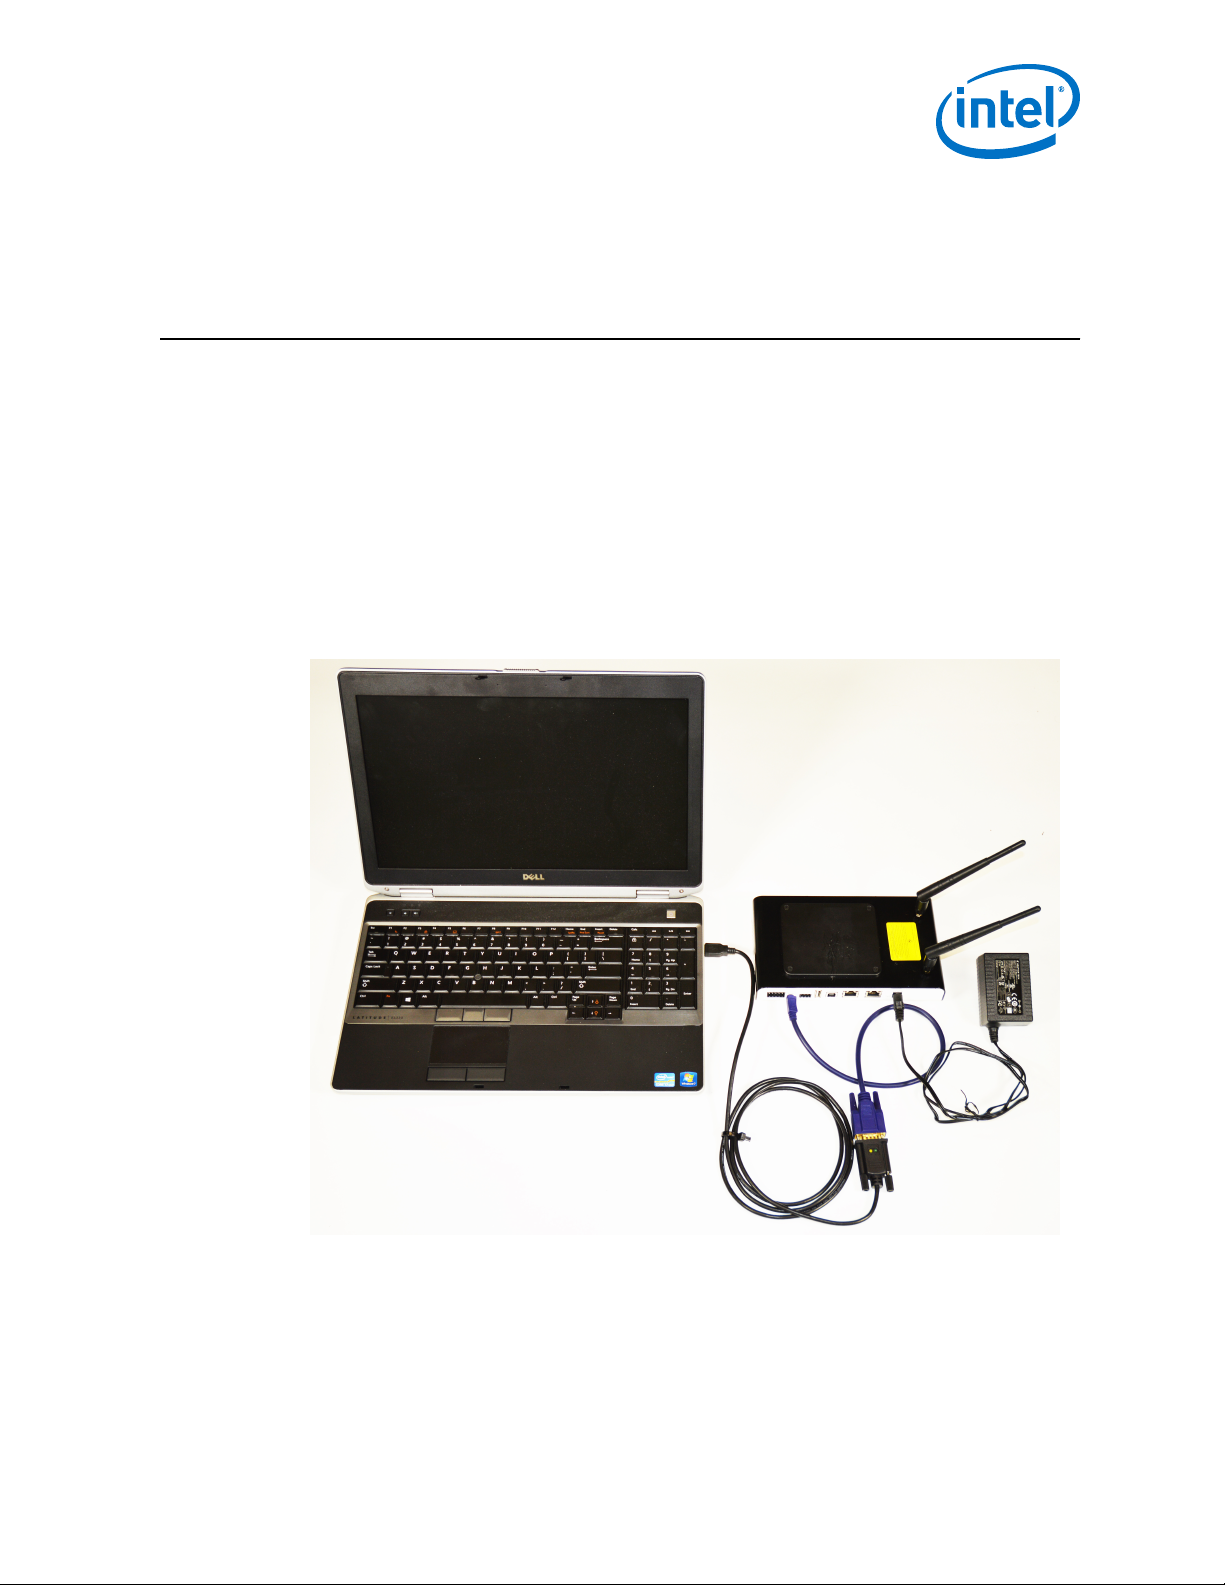
The following photos provide details and descriptions for the hardware interfaces/
components of the Intel® IoT Gateway DK100 Series.
Figure 2. Intel® IoT Gateway DK100 Series - Back
1. Analog to Digital Converter inputs. 0-5V dynamic range. Use 10-pin connector
insert supplied.
Pinout is as follows: Pin 1: Channel 1, Pin 2: Channel 0, Pin 3: Channel 3, Pin 4:
Channel 2, Pin 5: +5V (25mA max), Pin 6: GND, Pin 7: Channel 5, Pin 8: Channel
4, Pin 9: Channel 7, Pin 10: Channel 6.
2. RS-232 serial console and debug port. 3.5mm stereo audio jack. Use the 3.5mm > DB-9 adapter supplied. The Audio Stereo Jack adapter plugs into this connector.
3. RS-485 half duplex, non-isolated serial port. Use 3-pin connector insert supplied.
The pin-out is as follows: Pin 1: Data+(B), Pin 2: GND, Pin 3: Data-(A).
4. USB Host Port - type A.
5. USB Device port - type B.
6. RJ-45 10/100 Ethernet Port 0.
7. RJ-45 10/100 Ethernet Port 1.
8. Reset button. Use a paper clip to access the button if a reset is needed.
9. 5V DC - 4A main power input. Use the power adapter supplied.
10. Wi-Fi antenna bulkhead connectors.
April 2015 Getting Started Guide
Order No.: 330307-007 11
Intel® IoT Gateway Development Kit DK100 Series
Page 12
Intel IoT Gateway Development Kit DK100 Series —Introduction
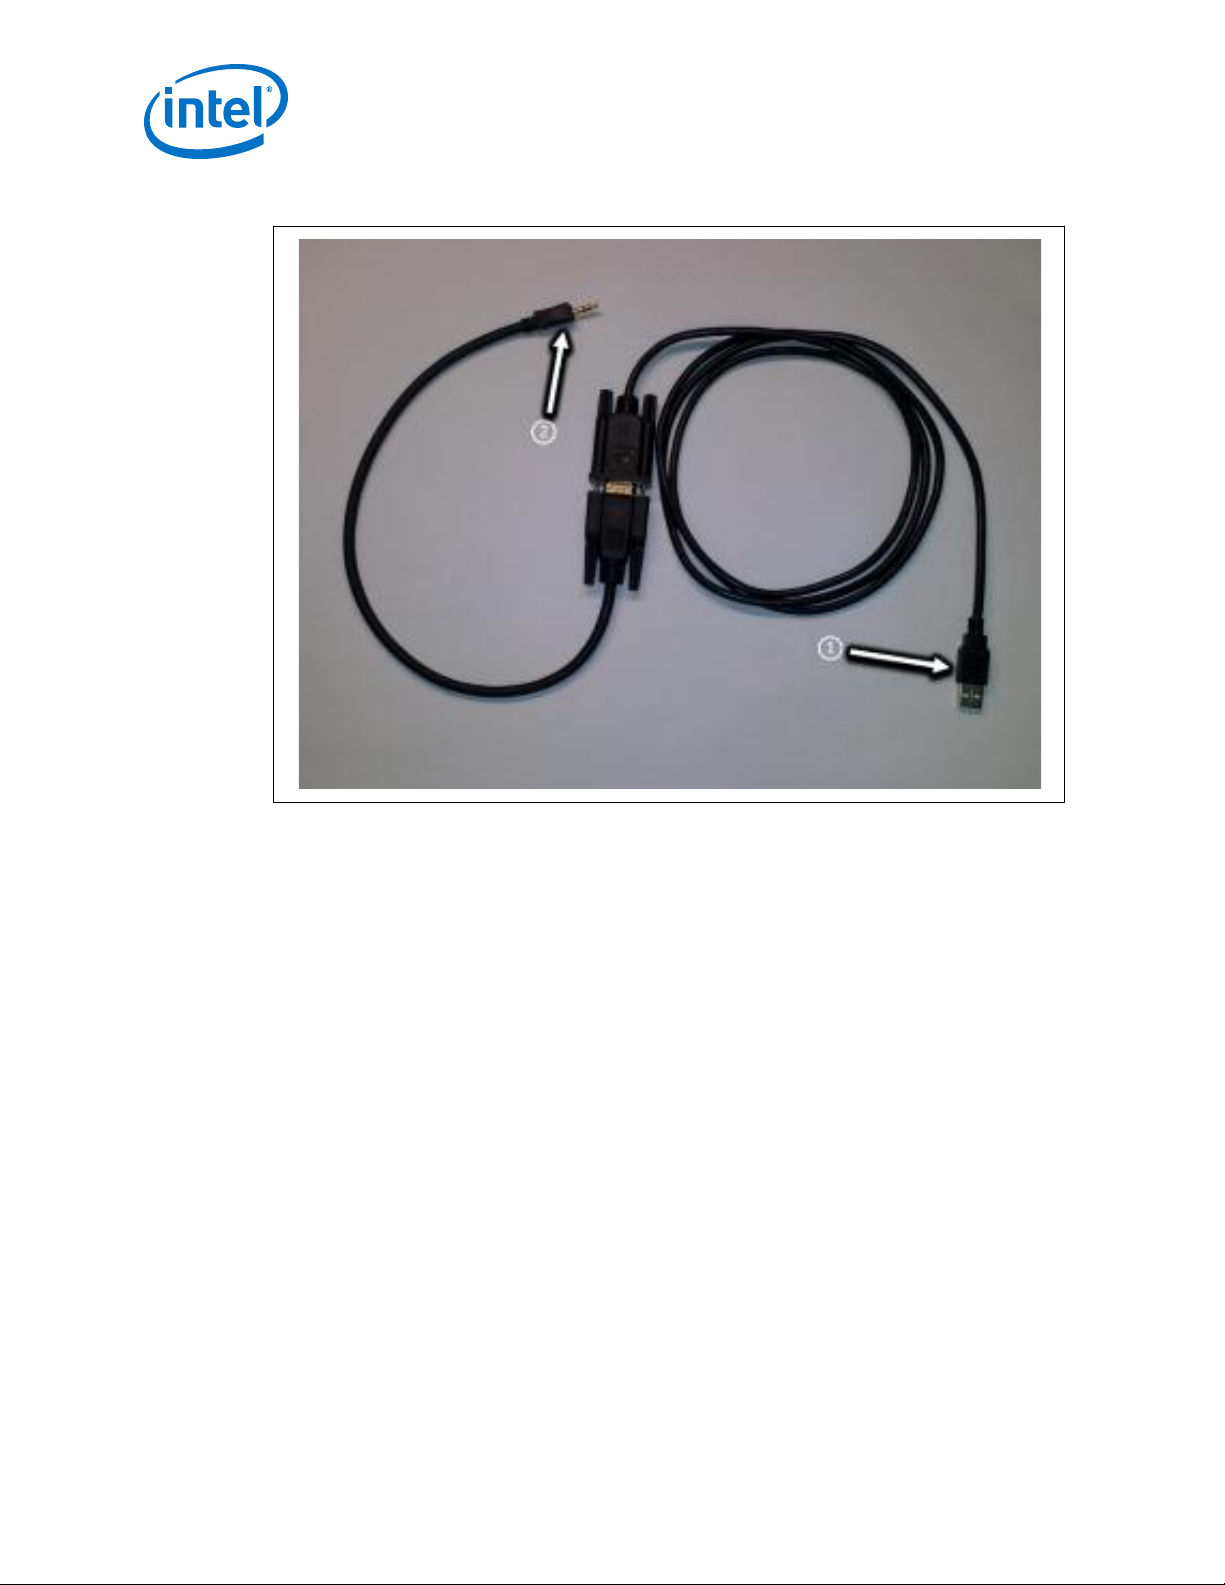
Figure 3. RS-232 Cable for Serial Communication Transmission
You will use this between your Host System and the Target Device.
The USB connection, noted by number 1 in the figure, attaches to the USB port on
your Host System.
The audio stereo jack adapter, noted by number 2, attaches to the back of the Target
Device. See Figure 2 on page 11, number 2.
Note: Do not attach the RS-232 USB connection to the Host System until instructed to do
so.
Intel® IoT Gateway Development Kit DK100 Series
Getting Started Guide April 2015
12 Order No.: 330307-007
Page 13
Introduction—Intel IoT Gateway Development Kit DK100 Series
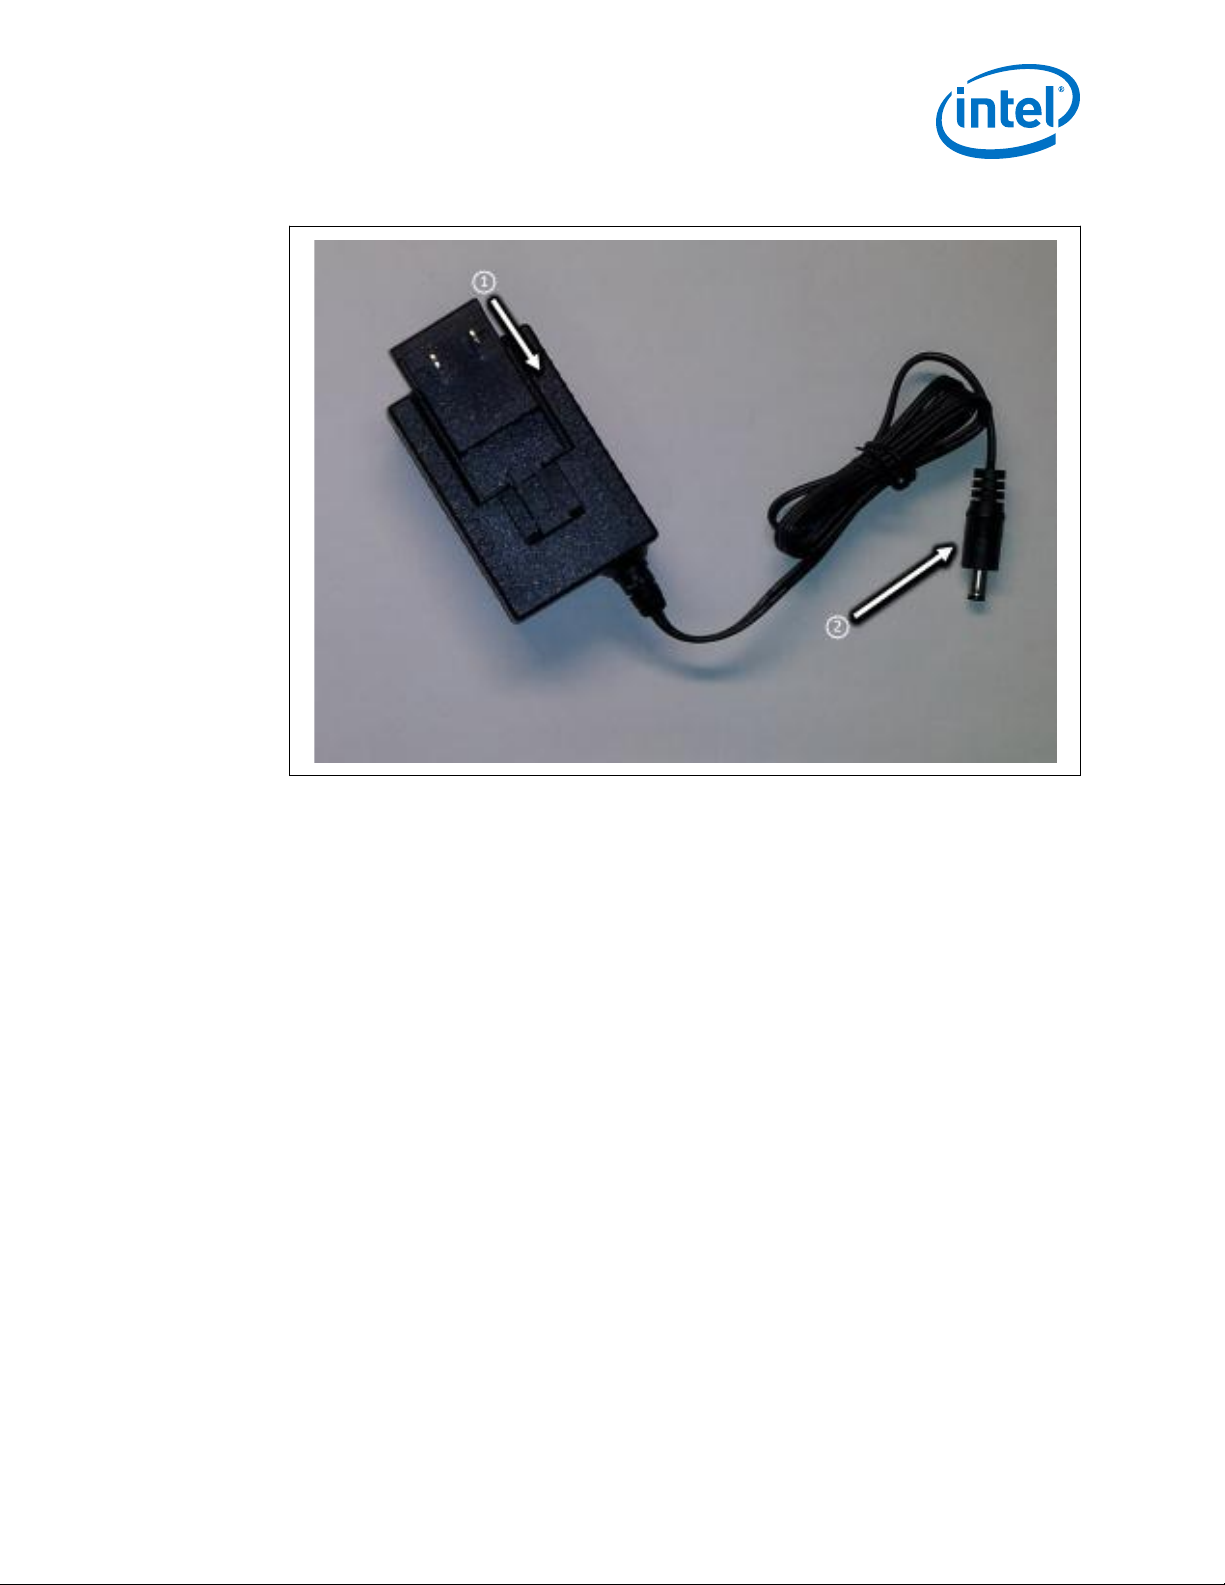
Figure 4. Power Cord
1.3
Number 1 in the figure slides into the power holder and then can be plugged into a
power outlet.
The DC barrel connector, number 2 in the figure, connects to the back of the Target
Device. See Figure 2 on page 11, number 9.
If you need to detach the power plug from the power cradle, pinch the latch together
at the bottom of the power cradle and push the power plug up.
About this Guide
This guide is organized as follows:
• Chapters 1 - 4: How to set up your Target Device, including connecting it to your
Host System.
• Chapters 5 - 7: How to build your own runtime software and install it on your
Target Device.
• The appendices provide information about:
— Using the Intel® IoT Gateway Knowledge Forum.
— Building an Intelligent Device Platform Project using Wind River Workbench.
— Using the Wind River Workbench to perform a Project Export / Import.
— Using the Triage Tool to aid in debugging.
— Installing and configuring PuTTY.
April 2015 Getting Started Guide
Order No.: 330307-007 13
Intel® IoT Gateway Development Kit DK100 Series
Page 14
Put Runtime
Software on
Flash Drive
Install Linux
and Wind River
Packages on
Host System
Build Runtime
on Host
System
Update SPI
Firmware on
Target Device
Install Runtime
on Target
Device
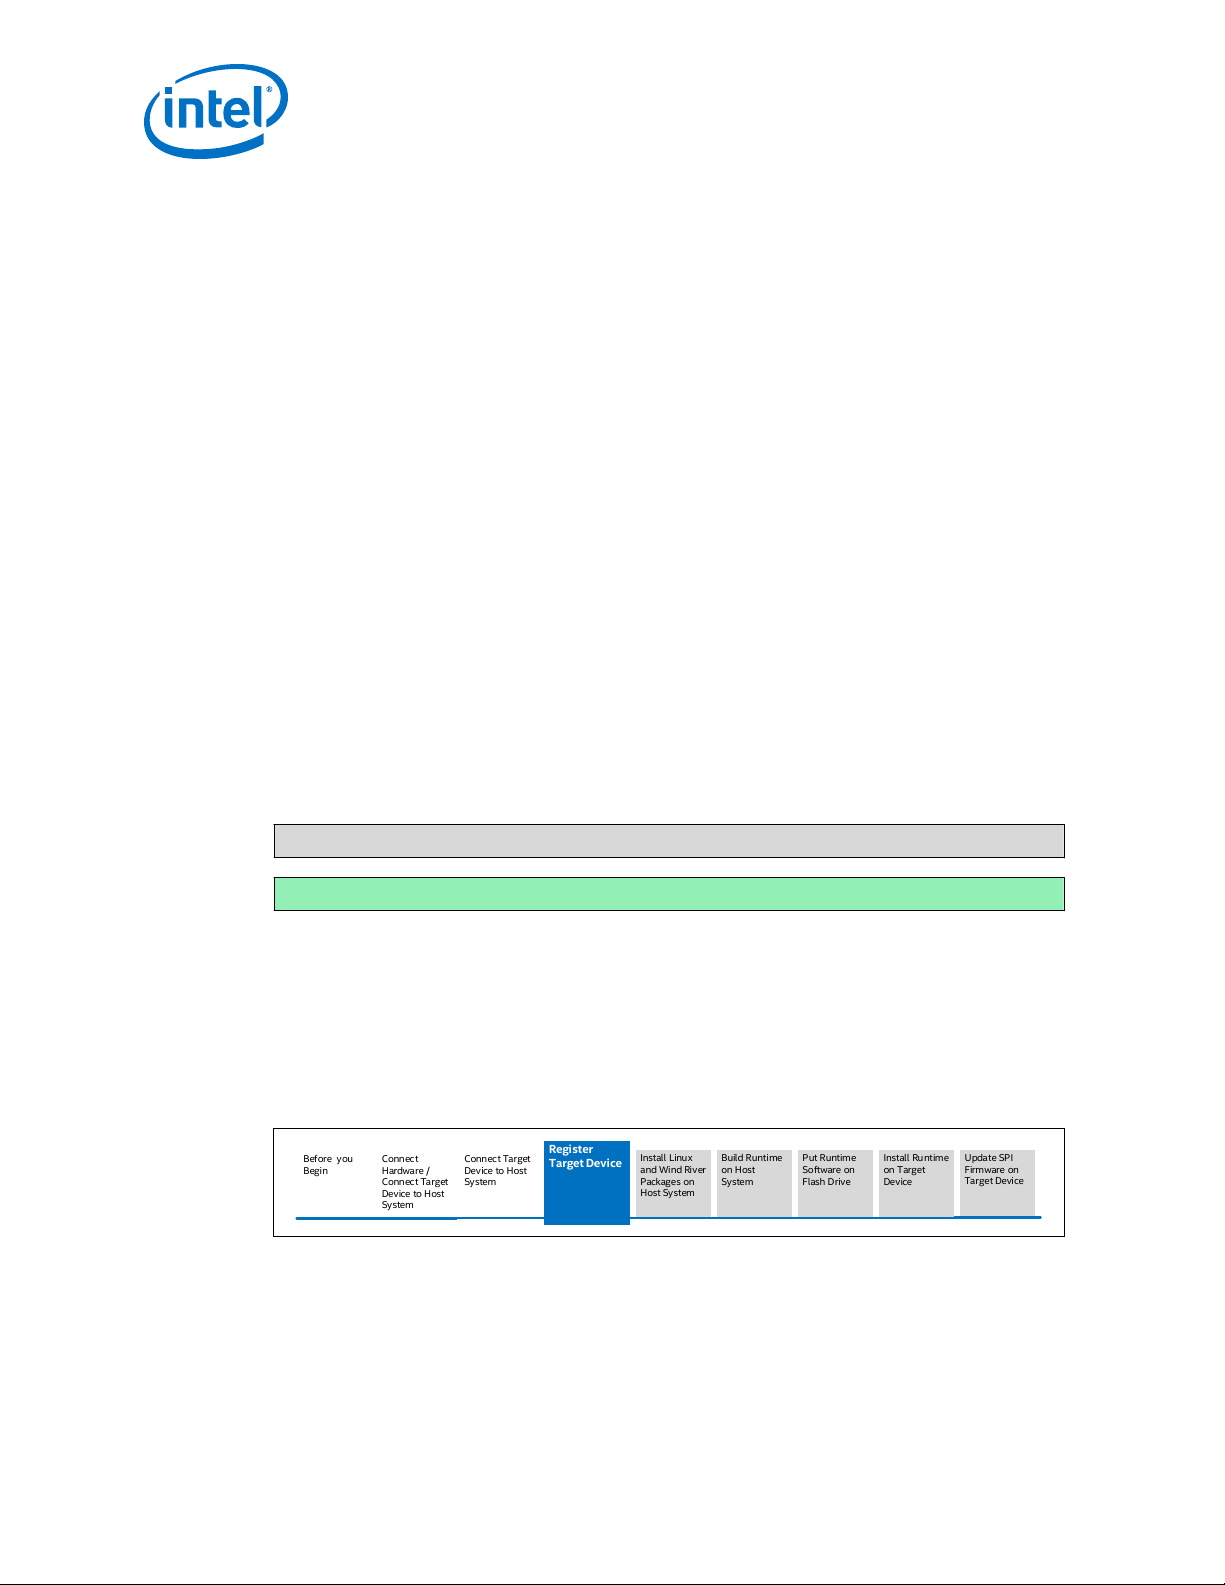
Before you
Begin
Connect
Hardware /
Connect Target
Device to Host
System
Connect Target
Device to Host
System
Register
Target Device
Intel IoT Gateway Development Kit DK100 Series —Introduction
For help with typing commands to your Linux terminal, use Intel® IoT Gateway
Development Kit DK100 Series - Getting Started Guide Commands at https://
downloadcenter.intel.com/Detail_Desc.aspx?
agr=Y&DwnldID=24331&lang=eng&wapkw=dk100. This text file includes all of the
commands in this Getting Started Guide. The purpose is to provide you with an easy
way to copy and paste commands to your Linux terminal.
Document Conventions
This document uses the following conventions:
• "Development Kit" refers to the Intel® IoT Gateway Development Kit DK100
Series. This term includes the gateway hardware, the board firmware, and the
software from Wind River Systems, Inc.
• "Target Device" refers to the gateway device onto which you will install Wind
River® Intelligent Device Platform XT runtime software.
• "Host System" refers to a Linux system that you will use to configure your Target
Device. You will install development tools from Wind River Systems, Inc. on this
system. The Host System is not included in this kit.
The examples in this publication use a Host System that has an Intel® Core™ i5
second generation processor and Ubuntu* Desktop 14.04 distribution software. If
you are using a different operating system, substitute the instructions in this
publication with instructions that are appropriate for your system.
•
This font is used for commands, API names, parameters,
filenames, directory paths, and executables.
• Bold text is used for graphical user interface entries, buttons, and keyboard keys.
This font in a gray box is used for commands or scripts that you must type.
This font in a green box displays responses to your commands.
• To help you keep track of your progress, illustrations are used at the beginning of
each key task. The following is an example of these illustrations.
— A white background indicates steps you have completed.
— A blue background indicates the step you are about to work on.
— A gray background indicates future steps.
Figure 5. Sample "You Are Here"
Blank line. Do not remove.
Blank line. Do not remove.
Blank line. Do not remove.
Intel® IoT Gateway Development Kit DK100 Series
Getting Started Guide April 2015
14 Order No.: 330307-007
Page 15

Introduction—Intel IoT Gateway Development Kit DK100 Series
Blank line. Do not remove.
1.4
Reference Documents
The following documents will help you complete your installation.
Table 1. Reference Documents
Title Link Description
Intel® IoT Gateway
Development Kit DK100
Series - Getting Started
Guide Commands
Wind River® Linux 5.0 / 5.1
Recommended Development
Host Distributions
Wind River® Linux 5.0.1 Users Guide
Wind River® Intelligent
Device Platform XT 2.0 Product Brief
Wind River® Intelligent
Device Platform XT 2.0 Programmer's Guide
Wind River® Intelligent
Device Platform XT 2.0 Release Notes
Wind River® Intelligent
Device Platform XT 2.0
Security Guide
https://downloadcenter.intel.com/
Detail_Desc.aspx?
agr=Y&DwnldID=24331&lang=eng&wapk
w=dk100
Wind River Online Support:
https://knowledge.windriver.com/@api/
deki/files/153500/041441.pdf
https://www-ssl.intel.com/
content/www/us/en/embedded/designtools/evaluation-platforms/gatewaysolutions/wind-river-linux-user-guide.html
https://www-ssl.intel.com/
content/www/us/en/embedded/designtools/evaluation-platforms/gatewaysolutions/wind-river-idp-xt2-productbrief.html?wapkw=wind+river
https://www-ssl.intel.com/
content/www/us/en/embedded/designtools/evaluation-platforms/gatewaysolutions/wind-river-idp-xt2programmers-guide.html?wapkw=wind
+river
http://www.intel.com/
content/www/us/en/embedded/designtools/evaluation-platforms/gatewaysolutions/wind-river-idp-releasenotes.html
https://www-ssl.intel.com/
content/www/us/en/embedded/designtools/evaluation-platforms/gatewaysolutions/wind-river-idp-securityguide.html?wapkw=wind+river
Text file of the commands used
in this document
• Recommended Development
Host Distributions
• Required Host Packages by
Host Distribution
• Wind River Linux Overview
• Development & Build
Environment
• Configuration and Build
• Layers & Recipes
• Userspace & Kernel
Development
• Debugging
• Product Overview
• Wind River Intelligent Device
Platform Architecture
• Technical Specifications
• Wind River Intelligent Device
Platform Overview
• Architecture
• Security, Connectivity &
Management
• Validation
• System Owner, Device &
Application Development
Vendor Tasks
• Changes in this release
• Requirements
• Issues & Customer Service
• Platform Security Overview
• Security Planning
• Risks, Threats & Intelligent
Device Platform Security
Mechanisms
• BKMs, Keys & Certificates
• Secure Repository
• Encrypted Data Storage
continued...
April 2015 Getting Started Guide
Order No.: 330307-007 15
Intel® IoT Gateway Development Kit DK100 Series
Page 16

Title Link Description
Before you
Begin
Connect
Hardware /
Connect Target
Device to Host
System
Put Runtime
Software on
Flash Drive
Prepare Host
System for
Wind River
Software
Register Target
Device
Install Linux
and Wind River
Packages on
Host System
Build Runtime
on Host
System
Update SPI
Firmware on
Target Device
Install Runtime
on Target
Device
Wind River® Intelligent
Device Platform XT EMS
Profile - User's Guide
Wind River® EMS Device
Management - User's Guide
Wind River® Intelligent
Device Platform XT EMS
Profile - Release Notes
Intel IoT Gateway Development Kit DK100 Series —Introduction
http://www.intel.com/
content/www/us/en/embedded/designtools/evaluation-platforms/gatewaysolutions/wind-river-intelligent-deviceplatform-xt-ems-profile-user-guide.html
http://www.intel.com/
content/www/us/en/embedded/designtools/evaluation-platforms/gatewaysolutions/wind-river-ems-devicemanagement-user-guide.html
• Device Management
Overview
• Mashery API Reference and
Examples
• Wind River Intelligent Device
Platform Edge Management
System Overview
• Device side and Cloud side
components Device
Onboarding, Application
Development and Target
component updates
• Alarm workflow and error
recovery
http://www.intel.com/
content/www/us/en/embedded/designtools/evaluation-platforms/gatewaysolutions/wind-river-intelligent-deviceplatform-xt-ems-profile-releasenotes.html
• Product Overview
• Host and Target
Requirements
• Usage Caveats and Known
Issues
1.5
Before you Begin
Review the following information to make sure you have everything you need.
Required Experience Level
You need basic experience using the Linux command line interface.
Items and Software You Need to Provide
You will need to provide the following items to complete your installation:
Table 2. Items to Obtain
What you need First Needed in Notes
Host System hardware
(recommended):
• 3rdGeneration Intel® Core™ i5
processor or better
• CPU with four or more cores
and with Intel® HyperThreading Technology
• 150 GB or more of free disk
space
• 4 GB or more RAM
Connect the Target Device to a
Host System on page 20
The minimum hardware
requirements are:
• Intel® Pentium® 2 processor
• 80 GB free disk space
• 768 MB RAM
With these minimum
requirements, your performance
may not be adequate.
continued...
Intel® IoT Gateway Development Kit DK100 Series
Getting Started Guide April 2015
16 Order No.: 330307-007
Page 17

Introduction—Intel IoT Gateway Development Kit DK100 Series
What you need First Needed in Notes
• One USB 2.0 port
Host Operating System Connect the Target Device to a
Communications:
• PuTTY utility or equivalent
• Serial to USB cable
USB flash drive with at least 4 GB
capacity
Host System on page
Connect the Target Device to a
Host System on page 20
Use Wind River WebIF to
Configure the Target Device
(Optional) on page 53
Recommended Development Hosts
The following recommended development host distributions have been tested by Wind
River to run Wind River Linux 5.0 / 5.0.1. Intel recommends the Ubuntu Desktop
14.04 (base version) 64-bit OS for your Host System.
20
The Wind River Systems, Inc.
development tools may be
installed on many different Linux*
based host systems. See
Recommended Development Hosts
on page 17
These instructions have been
validated on an Ubuntu 14 64-bit
host system.
The contents of this flash drive will
be overwritten.
Table 3. Recommended Development Hosts
Distribution Architecture
Ubuntu* Desktop 14.04 (base version) or 12.04 x86 32-bit, x86 64-bit
Red Hat Enterprise Linux Workstation 6.5 x86 32-bit, x86 64-bit
Red Hat Enterprise Linux Workstation 7 x86 64-bit
OpenSUSE* 12.2 x86 32-bit, x86 64-bit
Novell* SUSE Linux Enterprise Desktop 11 SP2 x86 32-bit, x86 64-bit
Fedora* 18 x86 32-bit, x86 64-bit
These instructions in this guide were validated on an Ubuntu 14.04 (base version) 64bit host system, which is available at http://old-releases.ubuntu.com/releases/trusty/
as ubuntu-14.04-desktop-amd64.iso
Caution: To maintain Wind River® Intelligent Device Platform XT compatability, do not perform
sudo apt-get upgrade
For detailed information on supported Linux development hosts, and for additional
Linux host requirements, see the Wind River® Intelligent Device Platform XT 2.0 Release Notes at http://www.intel.com/content/www/us/en/embedded/design-tools/
evaluation-platforms/gateway-solutions/wind-river-idp-release-notes.html
Login IDs and Passwords
You will be prompted for several login IDs and passwords throughout these installation
procedures. The following is a quick reference to them.
April 2015 Getting Started Guide
Intel® IoT Gateway
Order No.: 330307-007 17
Development Kit DK100 Series
Page 18

Table 4. Login IDs and Passwords
Logging into... ID and Password
Target Device
Target Device local wireless network
Wind River Intelligent Device Platform Administration
Console (WebIF)
Technical Support
For users with a registered product, Intel provides technical support for this
Development Kit through Intel® Premier Support. If you do not already have an Intel
Premier Support account, you may apply for one when you register this Development
Kit in Register Your Development Kit on page 27.
To submit a support request using Intel Premier Support, go to https://
businessportal.intel.com. Click the Product Support Tab -> Intel Premier Support
Home. Submit your issue using one of these product names:
• Intel® IoT Gateway Development Kit DK100 Series
• Intel® Development Toolkit for Data Gateways
Intel IoT Gateway Development Kit DK100 Series —Introduction
ID: root
Password: root
Password: windriveridp
ID: admin
Password: admin
In addition to Intel® Premier Support, registered users can use the Intel® IoT
Gateway - Knowledge Forum to ask "how-to" questions. Follow the instructions in Intel
IoT Gateway Knowledge Forum on page 48 to register, login, and submit questions
in this online support forum.
Intel® IoT Gateway Development Kit DK100 Series
Getting Started Guide April 2015
18 Order No.: 330307-007
Page 19

Connect
Hardware /
Connect
Target Device
to Host
System
Put Runtime
Software on
Flash Drive
Prepare Host
System for
Wind River
Software
Register Target
Device
Install Linux
and Wind River
Packages on
Host System
Build Runtime
on Host
System
Update SPI
Firmware on
Target Device
Install Runtime
on Target
Device
Before you
Begin
Connect the Hardware—Intel IoT Gateway Development Kit DK100 Series
2.0 Connect the Hardware
You will begin your installation by connecting the Target Device hardware. This
chapter guides you through making the connections and plugging in your Target
Device. Refer to Figure 2 on page 11 through Figure 4 on page 13 in making your
connections.
Remember: Target Device refers to the gateway device that is included in the Development Kit.
Host System refers to the Ubuntu 14.04 system that you will use to build the runtime
software.
1. Connect the RS-232 audio stereo jack to the back of the Target Device. Do not
connect the USB cable to the Host System yet.
2. Plug in the power adapter connector to the DC In connector on the Target Device.
3. Plug the power cord into a 120V or 240V power outlet to ensure it powers on.
4. Unplug the device. You will plug it in again during the next steps.
April 2015 Getting Started Guide
Order No.: 330307-007 19
Intel® IoT Gateway Development Kit DK100 Series
Page 20

Connect
Hardware /
Connect
Target Device
to Host
System
Put Runtime
Software on
Flash Drive
Prepare Host
System for
Wind River
Software
Register Target
Device
Install Linux
and Wind River
Packages on
Host System
Build Runtime
on Host
System
Update SPI
Firmware on
Target Device
Install Runtime
on Target
Device
Before you
Begin
Intel IoT Gateway Development Kit DK100 Series —Connect the Target Device to a Host System
3.0 Connect the Target Device to a Host System
This section shows you how to make a connection between your Host System and
Target Device using the PuTTY utility for a serial console connection. The instructions
in this section are specific to PuTTY, but you can use a different utility to make your
connection if you prefer. See your instructions for your utility if you use another
utility. If you need help configuring PuTTY on your Host System, see Installing and
Configuring PuTTY on page 73.
What you need to do
1. Save a session in your PuTTY configuration named Intel IoT Gateway. Under
Serial line type /dev/ttyUSB0
2.
From your Host System $HOME command prompt, display the available TTY ports.
Use the following command:
ls /dev/tty*
Write down the resulting TTY port information. You will use this in the next step.
3. The RS-232 cable is already connected to your Target Device. Connect the other
end to your Host System USB port.
4. Plug in your Target Device.
5.
While still at the $HOME prompt, change the ownership and permissions for using
PuTTY. This example uses ttyUSB0 for the port. Your port may be different; see
the port you wrote down in the previous step. Use the following command,
replacing ttyUSB0 with the port that you wrote down.
sudo chmod 666 /dev/ttyUSB0
6. Start the PuTTY utility.
7. Load the IoT Gateway session that you saved in step 1.
8. Click Open to launch a PuTTY Virtual Terminal session. You are now connected to
the Target Device. The Virtual Terminal opens to a blank screen.
9. Leave the screen at this point. You will return to it later.
Intel® IoT Gateway Development Kit DK100 Series
Getting Started Guide April 2015
20 Order No.: 330307-007
Page 21

Connect the Target Device to a Host System—Intel IoT Gateway Development Kit DK100 Series
3.1
Connecting with a Wireless Network Connection
The Target Device advertises a wireless network with a service set identifier (SSID) of
IDPDK-xxxx, where xxxx is the last four digits of the wireless network card MAC
address. This section guides you through using this information to connect a Host
System to the Target Device's wireless network to access the features on the Target
Device.
1. From the PuTTY Virtual Terminal, issue the following command to determine the
wireless SSID of the Target Device:
grep ssid /etc/config/wireless
The output displays the SSID:
option ssid IDPDK-xxxx
2. Write down your SSID.
3. Issue the following command from the Target Device command line to determine
the IP address used for the wireless Access Point:
ifconfig br-lan
The output includes the IP address, denoted by inet addr
inet
addr:<TARGET_DEVICE_IP_ADDRESS>
The Target Device ID address is likely set to the default 192.168.1.1
4. Write down your Target Device IP address.
5. On the Host System (not in the PuTTY Virtual Terminal), select the System
Settings icon.
6. Click the Network icon.
7. Click Wireless.
8. Click the dropdown arrow next to Network Name and then click the SSID that
you wrote down.
9.
When prompted, enter the password: windriveridp.
The Target Device and Host System are now connected through a wireless network.
You can use ssh to log in to the Target Device from the Host System. See Remotely
Logging in to the Target Device with ssh on page 22.
Blank line. Do not delete.
Blank line. Do not delete.
Blank line. Do not delete.
Blank line. Do not delete.
Blank line. Do not delete.
Blank line. Do not delete.
April 2015 Getting Started Guide
Order No.: 330307-007 21
Intel® IoT Gateway Development Kit DK100 Series
Page 22

Intel IoT Gateway Development Kit DK100 Series —Connect the Target Device to a Host System
3.2
Connecting with a Wired Ethernet Connection
Refer to Connect the Hardware on page 19 to make the following connections.
1. Use an Ethernet cable to connect the Target Device LAN1 port to an I/O port on a
router that has an integrated DHCP server. It is important to use the port, labeled
Ethernet LAN 1 on your Target Device. This port connects as eth1.
2. Confirm on the PuTTY video display for the Target Device that the Target Device is
connected at eth1. Your screen should display:
eth1 NIC Link is Up
3. Issue the following command from the PuTTY Virtual Terminal command line to
determine the IP address used for the network Access Point:
ifconfig br-lan
The output includes the IP address, denoted by inet addr as shown:
inet addr:<TARGET_DEVICE_IP_ADDRESS>
The Target Device IP address is probably set to the default of 192.168.1.1
4. Write down your Target Device IP address.
The Target Device and Host System are now connected to a wired network. You can
use ssh to log in to the Target Device from the Host System. See Remotely Logging in
to the Target Device with ssh on page 22.
3.3
Remotely Logging in to the Target Device with ssh
Once the Target Device and Host System are connected through a wired or wireless
network, you can use ssh to remotely log in to the Target Device from the Host
System.
1. Validate that both the Target Device and the Host System have a valid IP address
and are on same subnet. Use the following command on both the Target Device
and the Host System to see the IP address on each.
ifconfig
2. Be sure both Host System and the Target Device return an IP address and the
subnet addresses match. For example, the following addresses are valid and they
are on the same subnet:
Target Device IP address
192.168.1.1
Host System IP address
192.168.1.9
3. On the Target Device execute the following command to start the sshd deamon:
service sshd start
Intel® IoT Gateway Development Kit DK100 Series
Getting Started Guide April 2015
22 Order No.: 330307-007
Page 23

Connect the Target Device to a Host System—Intel IoT Gateway Development Kit DK100 Series
You should see the following output:
Starting OpenBSD Secure Shell server: sshd
done.
4. (Optional): To automatically start sshd for all future reboots, execute the following
command on the Target Device:
update-rc.d sshd defaults
5. To remotely login to the Target Device from the Host System, at the Host System
execute the following command, substituting <TARGET_DEVICE_IP_ADDRESS>
with the Target Device IP address that you wrote down earlier.
ssh root@<TARGET_DEVICE_IP_ADDRESS>
Your screen displays:
root@<TARGET_DEVICE_IP_ADDRESS>'s password:
6. Type the Target Device password:
root
When you successfully log in to the Target Device, the command prompt is displayed:
root@WR-IntelligentDevice:~#
April 2015 Getting Started Guide
Order No.: 330307-007 23
Intel® IoT Gateway Development Kit DK100 Series
Page 24

Intel IoT Gateway Development Kit DK100 Series —Prepare to Build Your Runtime Image
4.0 Prepare to Build Your Runtime Image
The first part of this publication got you up and running with a sample runtime image
that you used to explore some of the Target Device features. This part of the
document guides you through creating your own runtime image. Although you will not
be using your Target Device again for a while, the steps in the remainder of this
publication assume that you have completed the setup steps.
4.1
Task Checklist and Completion Times
Below are the key tasks you will complete in the remainder of the chapters. You must
complete each of these tasks in order. Upon completing one chapter, continue to the
next until you reach the optional information in the appendices.
The full installation process, including the steps to build your own runtime image takes
several hours. The time required will vary, depending on your skills and experience,
the processor speed of the system that you use to perform the configuration steps,
and the speed of your internet connection.
The estimated completion times in the table below are based on Ubuntu* Desktop
14.04 running on an Intel® Core™ i5 second generation processor and with an internet
connection running at approximately 3 MB per second.
You will prepare the Host System before working more with the Target Device.
Note: Host System refers to a computer system onto which the development tools from
Wind River Systems, Inc. will be installed. Target Device refers to the hardware that is
included in your Development Kit.
Done Task Section Estimated Completion
Preliminary Steps 30 - 90 minutes
✔ Gather necessary components Items and Software You
✔ Connect the Target Device and a Host
System
Update Host System Linux Install Ubuntu Linux
Create Host System directories, and
confirm Host System free space.
Need to Provide on page
16
Connect the Target
Device to a Host System
on page 20
Updates on page 25
Create Directories and
Confirm Disk Space on
page 26
10 minutes
10 minutes
10 minutes to 1 hour,
depending on the
number of updates to
install
10 minutes
Time
continued...
Intel® IoT Gateway Development Kit DK100 Series
Getting Started Guide April 2015
24 Order No.: 330307-007
Page 25

Prepare Host
System for
Wind River
Software
Put Runtime
Software on
Flash Drive
Register Target
Device
Install Linux
and Wind River
Packages on
Host System
Build Runtime
on Host
System
Update SPI
Firmware on
Target Device
Install Runtime
on Target
Device
Before you
Begin
Connect
Hardware
Prepare to Build Your Runtime Image—Intel IoT Gateway Development Kit DK100 Series
4.2
Done Task Section Estimated Completion
Time
Register your Development Kit to obtain a
Wind River SW license. A license is
required to complete the remaining steps
Register Your
Development Kit on page
27
10 minutes to register.
Up to 1 day to receive
license
in this publication.
Install and Build Runtime on Host System
5 - 10 hours
The completion time is highly dependent on the Host System and the
Internet connection speed.
Install base packages for Wind River Linux
5.0.1, Wind River Intelligent Device
Installing the Wind River
Host Tools on page 32
2 - 4 hours
Platform XT 2.0, Wind River Workbench
3.3.5
Build the runtime software image on the
Host System and copy the image to a USB
flash drive.
Build Intelligent Device
Platform XT Runtime
Software on page 40
3 - 5 hours
Install Runtime Image to Target Device 45 minutes
Install the runtime image on the Target
Device.
Deploy Image to MicroSD Flash Card
45 minutes
Total Estimated Time to Complete Installation 6 - 12 hours
Prepare Host System for Wind River Software Installation
Install Ubuntu Linux Updates
The Linux software on your Host System must be current before you install the Wind
River Host Tools software. This section provides instructions to perform this update.
From your Host System command line interface, use the following command to apply
the Ubuntu updates:
sudo apt-get update
Blank line. Do not remove.
Blank line. Do not remove.
Blank line. Do not remove.
Blank line. Do not remove.
Blank line. Do not remove.
Blank line. Do not remove.
April 2015 Getting Started Guide
Order No.: 330307-007 25
Intel® IoT Gateway Development Kit DK100 Series
Page 26

Intel IoT Gateway Development Kit DK100 Series —Prepare to Build Your Runtime Image
Create Directories and Confirm Disk Space
Create the following directories on your Host System:
•
$HOME/WindRiver - This directory is used to install the Wind River Host Tools.
The installation requires approximately 30 GB of free space in this directory.
•
$HOME/Installer - This is a temporary directory that you can delete after
completing your installation. The installation requires approximately 15 GB of free
space in this directory.
•
$HOME/Project - The project directory in which you will develop your Intelligent
Device Platform XT-based solution. The build requires approximately 20 GB of free
space in this directory.
•
$HOME/Project/build-cache - The build cache directory. Using a build cache
can significantly reduce the time required to build the project after incremental
changes are made. The build requires approximately 10 GB of free space in this
directory.
Use these commands to create the directories:
cd $HOME
mkdir WindRiver
mkdir Installer
mkdir Project
mkdir Project/build-cache
You must also have approximately 15 GB of temporary disk space in the /tmp
directory
In total, a minimum of approximately 100 GB is required to complete the full runtime
build process.
Intel® IoT Gateway Development Kit DK100 Series
Getting Started Guide April 2015
26 Order No.: 330307-007
Page 27

Put Runtime
Software on
Flash Drive
Install Linux
and Wind River
Packages on
Host System
Build Runtime
on Host
System
Update SPI
Firmware on
Target Device
Install Runtime
on Target
Device
Before you
Begin
Connect
Hardware /
Connect Target
Device to Host
System
Connect Target
Device to Host
System
Register
Target Device
Register Your Development Kit—Intel IoT Gateway Development Kit DK100 Series
5.0 Register Your Development Kit
Important: If you are using an Early Access Development Kit or a Loaner Development Kit from
the Intel Demo Depot, use the 90-day License Authorization Code provided in the
Dear Customer Letter that came with your kit. in this case, you do not need to register
your Target Device. Instead, skip ahead to Install Linux Packages and Wind River
Linux Host Tools on the Host System on page 32.
Before you begin the installation process, you must register your Development Kit.
The registration process submits a license key request to Wind River to permit you to
download Wind River Development software. You cannot use the Wind River installer
to download the Wind River software without this license.
You will use the login ID and password that you create or use in these steps to access
the Intel Registration Center. On the Intel Registration Center you can see a list of
licensed products and download the installers for those software products.
1. In your Web browser on any computer, go to https://registrationcenter.intel.com
The following screen is displayed:
Figure 6. Register a Product
April 2015 Getting Started Guide
Order No.: 330307-007 27
Intel® IoT Gateway Development Kit DK100 Series
Page 28

Intel® IoT Gateway Development Kit DK100
Support Account Request
Intel IoT Gateway Development Kit DK100 Series —Register Your Development Kit
2. In the box for your email address, select the appropriate option for your email
address:
• IMPORTANT: If you have an Intel® Premier Support account, use the email
address that is associated with that Intel® Premier Support account. Doing so
will automatically add this product to your list of supported products.
• Otherwise, use your preferred email address. Use an address that you can use
when registering any future Intel products.
3. Type in the serial number that is located at the top of the Dear Customer Letter
included in your product box.
4. A screen displays on which you must fill out your contact information. Click
Submit after filling in your information.
5. Follow the correct path:
• If your email address was not recognized, you will be prompted to create a
user account. See Figure 7 on page 28. Type in your preferred Login ID and
password, and then click Submit.
• If your email address is recognized, you will not see Figure 7 on page 28.
Continue to the next step.
Figure 7. Create Support User Account
6. A confirmation screen displays with the following displayed at the top of the
screen. Click Continue.
Figure 8. Wind River License Key Request Confirmation
Intel® IoT Gateway Development Kit DK100 Series
Getting Started Guide April 2015
28 Order No.: 330307-007
Page 29

Intel® IoT Gateway Development Kit DK100
Intel® IoT Gateway Development Kit DK200
Intel® IoT Gateway Development Kit DK50
Version 2.0 (2.0.2)
Version 2.0 (2.0.2)
Version 2.0 (2.0.2)
08 Jul 2014
08 Jul 2014
Intel® IoT Gateway Development Kit
DK100
Intel® IoT Gateway Development Kit DK100
The following registrations grant access to the Intel® IoT Gateway Development Kit DK100 downloads.
Register Your Development Kit—Intel IoT Gateway Development Kit DK100 Series
7. Type your user name and password to sign into the Intel Registration Center.
8. Once you have signed in, your list of subscribed products is displayed. See the
example below.
Figure 9. Logged Into Intel Registration Center
9. Click the version link for your product in the table of products to go to the product
page. See the circled information in the figure above.
The following screen displays:
Figure 10. Intel Registration Center Product Page
April 2015 Getting Started Guide
Order No.: 330307-007 29
Intel® IoT Gateway Development Kit DK100 Series
Page 30

Intel IoT Gateway Development Kit DK100 Series —Register Your Development Kit
10. Click the Download: [file] link to download the Installer for the Wind River Host
Tools. You will use this file to install the Wind River Host Tools in the next chapter.
See the circled information in the above figure.
Upon completion, you will receive two email messages from "Intel Registration
Center." Save these messages for future reference.
• One message is titled, "Intel® Premier Support Registration Successfully
Completed". You can use Intel Premier Support for technical support of this
Development Kit". See the sample message below.
Figure 11. Email Message: Intel® Premier Support Registration Successfully Completed
• The other message is titled, "Thank you for registering Intel® IoT Gateway
Development Kit DK100 Series". See the sample message below.
Figure 12. Message: Thank you for registering Intel® IoT Gateway Development Kit
DK100 Series
Intel® IoT Gateway Development Kit DK100 Series
Getting Started Guide April 2015
30 Order No.: 330307-007
Page 31

Register Your Development Kit—Intel IoT Gateway Development Kit DK100 Series
Under SOFTWARE LICENSE KEY the text indicates that you will receive a license
key from Wind River. You will need this license key when you install the Wind
River Components on the Host System in Installing the Wind River Host Tools on
page 32
April 2015 Getting Started Guide
Order No.: 330307-007 31
Intel® IoT Gateway Development Kit DK100 Series
Page 32

Put Runtime
Software on
Flash Drive
Build Runtime
on Host
System
Update SPI
Firmware on
Target Device
Install Runtime
on Target
Device
Before you
Begin
Connect
Hardware /
Connect Target
Device to Host
System
Connect Target
Device to Host
System
Register Target
Device
Install Linux
and Wind
River
Packages on
Host System
Intel IoT Gateway Development Kit DK100 Series —Install Linux Packages and Wind River Linux
Host Tools on the Host System
6.0 Install Linux Packages and Wind River Linux Host Tools on the Host System
This chapter will guide you through installing the Wind River Host Tools software on
your Host System, and then verifying that all necessary Linux operating system
packages are installed on the Host System.
You must have internet access and a Wind River license to complete these steps. You
applied for the license in Register Your Development Kit on page 27. Check your email
for the license information.
Installing the Wind River Host Tools
In this section, you will install the following:
• Wind River Linux 5.0.1
• Wind River Intelligent Device Platform XT 2.0
• Wind River Workbench 3.3.5
If possible, begin these steps at the end of the day and in a location that can be
unattended, so you can allow the installation to run overnight.
To complete this section, you need the following:
• The Installer file that you downloaded from the Intel Registration Center in
Register Your Development Kit on page 27, step 10.
• The license information included in the License email message from Wind River.
See Figure 17 on page 36.
• An internet connection for your Host System.
Note: The download and install process can take several hours to complete depending on the
speed of your Internet connection. On an Intel® Core™ i5 second generation processor
with a 3 MB per second download speed, these steps will take approximately 2 hours.
At a 1 MB per second download speed, these steps will take approximately 4 hours.
Intel® IoT Gateway Development Kit DK100 Series
Getting Started Guide April 2015
32 Order No.: 330307-007
Page 33

Install Linux Packages and Wind River Linux Host Tools on the Host System—Intel IoT Gateway
Development Kit DK100 Series
Note: You may have used different directory names when you created directories in Create
Directories and Confirm Disk Space on page 26. If you used different names, replace
the directory names in the following steps with the names of the directories that you
created.
1. Copy the Installer file that you downloaded in Register Your Development Kit on
page 27, step 10 into the $HOME/Installer directory.
2.
Change to the Installer directory and unzip the installer file. Use the following
commands:
cd $HOME/Installer
unzip DVD*.zip
3. Start the Wind River Host Tools Installer with the following command:
./setup_linux
The Wind River Installer screen opens.
If instead you see the following screen indicating new Linux packages are
required, complete the steps below the figure.
Figure 13. Wind River Installer Package Updates
a. To perform the updates, using the following command:
sudo apt-get install libstdc++6:i386 libgtk2.0-0:i386 libxtst6:i386
b.
After the update command completes, repeat the ./setup_linux command.
4. In the Installer window, select the Wind River Host Tools installation location.
The WindRiver directory displays by default. If not, use the Browse button to
select the $HOME/WindRiver directory. Then click OK.
5. On the page Online Update Settings, perform the following actions:
• If you are not using a proxy server to connect to the internet, go to step 7.
• If your network requires a proxy server, check the box Connect to the
internet using a proxy server and provide your proxy information.
If you receive error messages, double-check your proxy settings and work with
your IT department for the appropriate settings.
April 2015 Getting Started Guide
Order No.: 330307-007 33
Intel® IoT Gateway Development Kit DK100 Series
Page 34

Intel IoT Gateway Development Kit DK100 Series —Install Linux Packages and Wind River Linux
Figure 14. Online Update Settings, Part 1
Host Tools on the Host System
6. On the next Online Updates Settings page, leave the defaults selected, as
shown:
Figure 15. Online Update Settings, Part 2
Intel® IoT Gateway Development Kit DK100 Series
Getting Started Guide April 2015
34 Order No.: 330307-007
Page 35

Install Linux Packages and Wind River Linux Host Tools on the Host System—Intel IoT Gateway
Development Kit DK100 Series
The Wind River Installer checks for updates. This takes about 2 minutes.
7. On the page Install or Download, choose between installing right away from the
internet, or to copy the product files to the Host System and perform the
installation later.
8. On the page Choose Activation Type, select Temporary activation (requires
License Authorization Code and internet connection).
Note: Although your Wind River Host Tools license is a permanent license, you
must select Temporary Activation to use the license number and License
Authorization Code that you received from Wind River.
Figure 16. Activation Type
9. On the page Host Information, choose the Ethernet adapter that will be used for
downloading the Host System tools from the internet. This is used to link your
Wind River software license with your Host System. Click Next.
10. On the page User Information, type in the following information:
• The Wind River Software License Authorization Code (LAC) that you received
via email when you registered your product. See the highlighted area in
example email message below.
• Enter your user information.
April 2015 Getting Started Guide
Order No.: 330307-007 35
Intel® IoT Gateway Development Kit DK100 Series
Page 36

Intel IoT Gateway Development Kit DK100 Series —Install Linux Packages and Wind River Linux
Figure 17. License Authorization Code Location
Host Tools on the Host System
11. Click Next. A progress bar displays while the installer contacts Wind River to
verify your Wind River License Authorization Code and register your Host System.
This will take about 1 minute.
Note: The MAC address of eth0 for your Host System is the only address allowed
to use this license.
12. On the page Choose Installation Filters, click Deselect all, and then select
only Intel. Click Next.
Intel® IoT Gateway Development Kit DK100 Series
Getting Started Guide April 2015
36 Order No.: 330307-007
Page 37

Install Linux Packages and Wind River Linux Host Tools on the Host System—Intel IoT Gateway
Development Kit DK100 Series
Figure 18. Choose Installation Filters
13. On the Select Products page, keep the default selections. Your screen will look
similar to the following.
Figure 19. Select Products
April 2015 Getting Started Guide
Order No.: 330307-007 37
Intel® IoT Gateway Development Kit DK100 Series
Page 38

Intel IoT Gateway Development Kit DK100 Series —Install Linux Packages and Wind River Linux
14. Click Next. The License Agreement displays. Review it, and then click I
ACCEPT if you agree to the terms of the agreement.
15. On the page Confirm and Install, click Install.
Figure 20. Confirm and Install
Host Tools on the Host System
Note: The download and install might take several hours depending on the speed
of your Internet connection.
When the installation is complete, the top of the screen displays Installed
Content and the Next button is again available.
16. Click Next. A thank you message displays with a link to a readme file.
Recommended: Leave the default check next to the readme file.
17. Click Finish to exit the Installer window. The readme file opens in a browser and
the installation application closes.
If you encounter installation issues, provide your Intel support contact with the
following files from the directory: $HOME/WindRiver/
•
setup.log
•
setup_install_failure.log
Intel® IoT Gateway Development Kit DK100 Series
Getting Started Guide April 2015
38 Order No.: 330307-007
Page 39

Install Linux Packages and Wind River Linux Host Tools on the Host System—Intel IoT Gateway
Development Kit DK100 Series
Verify All Required Linux Packages Are Installed
These steps verify that all Linux operating system packages required for using the
Wind River Host Tools are present. If any are not present, this section guides you
through installing them.
1.
Change to the directory $HOME/WindRiver/wrlinux-5/scripts. Use the
following command:
cd $HOME/WindRiver/wrlinux-5/scripts
2. Use the following command to verify all packages have been installed:
./host_package_install.sh
3. Choose the correct path:
• Continue to Build Intelligent Device Platform XT Runtime Software on page
40 if you receive the response: All required host packages are
installed.
• Continue with the steps below if you receive a response similar to the
following: Following packages need to be installed: [package
#1] [package #2].
4.
You should already be in the $HOME/WindRiver/wrlinux-5/scripts
directory. If not, go to this directory.
5. Use the following command to install the additional package(s), replacing the
package number with the information in the response you received in step 3:
sudo apt-get install [package #1] [package #2] [etc]
where you replace [package #1] with the first item listed in step 3, [package
#1] with the second item, and so on.
You may need to type your password at the prompt: [sudo] password for
[username]
Blank line. Do not delete.
April 2015 Getting Started Guide
Order No.: 330307-007 39
Intel® IoT Gateway Development Kit DK100 Series
Page 40

Put Runtime
Software on
Flash Drive
Update SPI
Firmware on
Target Device
Install Runtime
on Target
Device
Before you
Begin
Connect
Hardware /
Connect Target
Device to Host
System
v
Connect Target
Device to Host
System
Register Target
Device
Install Linux and
Wind River
Packages on
Host System
Build Runtime
on Host
System
Intel IoT Gateway Development Kit DK100 Series —Build Intelligent Device Platform XT Runtime
7.0 Build Intelligent Device Platform XT Runtime Software
Install Linux Packages and Wind River Linux Host Tools on the Host System on page
32 guided you through installing the Wind River Host Tools and Intelligent Device
Platform XT software on your Host System. With the software installed, you are now
ready to develop the applications and runtime operating system that will run on your
Target Device. This guide does not cover application development. For guidance, see
the documents listed in Reference Documents on page 15.
Software
This section explains how to build an Intelligent Device Platform XT runtime file
system and operating system. This runtime file system and operating system are built
on the Host System and then installed on the Target Device.
If you use Eclipse* or if you prefer a GUI-based development environment to build
your Target Device runtime file system and operating system, then see Building an
Intelligent Device Platform Project Using Wind River Workbench on page 55.
The steps in this section will take several hours to complete. If possible, begin these
steps at the end of the day and in a location that can be unattended so you can allow
the build process to run overnight.
What you need to do
Note: You may have used different directory names when you created directories in Create
Directories and Confirm Disk Space on page 26. If you used different names, replace
the directory names in the following steps with the names of the directories you
created.
1.
Begin this procedure in your Project directory. Use the following command:
cd $HOME/Project
2.
Use the Wind River Linux configure command to configure the build. See the
command below for a typical configure command. Use configure --help to
explore supported configuration options, and see the Wind River® Intelligent
Device Platform XT 2.0 – Programmer’s Guide, Part II (Key Related Tasks) for help
with generating your own keys and for additional configuration options and details.
Intel® IoT Gateway Development Kit DK100 Series
Getting Started Guide April 2015
40 Order No.: 330307-007
Page 41

Build Intelligent Device Platform XT Runtime Software—Intel IoT Gateway Development Kit
DK100 Series
Note: By default the runtime operating system is built with the latest version of
the Wind River Host Tools that you installed on your Host System. To use an
earlier version, specify the desired "RCPL" version like this:
--with-rcpl-version=XXXX
where XXXX is the 4-digit RCPL version number.
Note:
In the option for --enable-parallel-pkgbuilds=4 use the number of
process threads available in the CPU of your Host System. For example,
when using a CPU with two cores and hyperthreading, four process threads
are available, so specify "4" for optimal performance.
../WindRiver/wrlinux-5/wrlinux/configure \
--enable-board=intel-quark \
--enable-kernel=standard \
--enable-rootfs=glibc-idp \
--enable-addons=wr-idp \
--enable-bootimage=ext3,hdd \
--enable-jobs=6 \
--enable-parallel-pkgbuilds=4 \
--enable-patchresolve=noop \
--enable-rm-work=yes \
--enable-checkout-all-layers=yes \
--with-layer=wr-prosyst-mbs-smarthome-sdk-ia,wr-exegin-zigbee-ia,\
wr-digi-idigiconnector,wr-wks-oneagent-oma-dm-ia,\
wr-wks-oneagent-tr069,wr-ieee11073,wr-intel-support \
--with-template=feature/vlan,feature/opc,feature/recovery,\
feature/opc_demo,feature/ipsec_vpn,feature/l2tp,\
feature/openjdk-bin,feature/online_updates,feature/bluetooth,\
feature/boot_delay_network,feature/pptp_vpn,\
feature/intel-wilkinpeak2,feature/webif
The configure command will take several minutes to complete. You will see
progress hash-marks at the bottom of the screen through most of the process.
Upon completion, your terminal prompt will return.
3. Build the runtime operating system using the command below. This builds the
Linux runtime system and generates the runtime components that can be installed
on your Target Device.
make fs
Note: This command will take 3 - 5 hours to complete. The completion time is
highly dependent on the processing speed of your Host System.
At the end of the make process the Target Device runtime operating system is
compressed into a single file that is a USB flash drive image. The flash drive image
is created in the directory $HOME/Project/export. The file has a .bz2
extension.
April 2015 Getting Started Guide
Order No.: 330307-007 41
Intel® IoT Gateway Development Kit DK100 Series
Page 42

Build Runtime
on Host System
Before you
Begin
Connect
Hardware /
Connect Target
Device to Host
System
Connect Target
Device to Host
System
Register Target
Device
Install Linux and
Wind River
Packages on
Host System
Put Runtime
Software on
Flash Drive
Update SPI
Firmware on
Target Device
Install Runtime
on Target
Device
Intel IoT Gateway Development Kit DK100 Series —Update SPI Firmware
8.0 Update SPI Firmware
Before installing the runtime image on the Target Device, you must update the SPI
firmware. The steps in this section walk you through the firmware update. You will use
the PuTTY Virtual Terminal to complete these steps.
1. In the PuTTY Virtual Terminal, boot your Target Device to MMC.
Figure 21. PuTTY Virtual Terminal Screen, Request to Boot from MMC
It will take about 2 minutes for the Target Device to boot.
2.
At the login prompt, use root for both the login ID and password.
3. Insert the USB flash drive into the Target Device.
4.
While still in the PuTTY Virtual Terminal session, copy the .cap file from the USB
flash drive to the firmware directory on the Target Device and enable the Target
Device to update the firmware on next boot. Use these commands to do so:
mkdir -p /lib/firmware
modprobe efi_capsule_update
cp /media/sda1/CapsuleUpdate/Flash-crosshill-8M-secure.cap /lib/firmware
echo -n Flash-crosshill-8M-secure.cap > /sys/firmware/efi_capsule/capsule_path
echo 1 > /sys/firmware/efi_capsule/capsule_update
reboot
Intel® IoT Gateway Development Kit DK100 Series
Getting Started Guide April 2015
42 Order No.: 330307-007
Page 43

Update SPI Firmware—Intel IoT Gateway Development Kit DK100 Series
5. After the firmware has updated, power down the Target Device by issuing the
following command:
poweroff
April 2015 Getting Started Guide
Order No.: 330307-007 43
Intel® IoT Gateway Development Kit DK100 Series
Page 44

Build Runtime
on Host System
Update SPI
Firmware on
Target Device
Install Runtime
on Target
Device
Before you
Begin
Connect
Hardware /
Connect Target
Device to Host
System
Connect Target
Device to Host
System
Register Target
Device
Install Linux and
Wind River
Packages on
Host System
Put Runtime
Software on
Flash Drive
Intel IoT Gateway Development Kit DK100 Series —Put Intelligent Device Platform XT Runtime
Image onto USB Flash Drive
9.0 Put Intelligent Device Platform XT Runtime Image onto USB Flash Drive
Build Intelligent Device Platform XT Runtime Software on page 40 guided you through
building your runtime image and deploying it to a bootable USB flash drive.
You will now put the Intelligent Device Platform XT image onto a USB flash drive and
then install it onto the Target System from the USB flash drive. You will begin these
steps on your Host System terminal.
Note: The runtime software can be booted from the USB flash drive, but Intel recommends
installing the runtime components on the Target Device's hard drive.
1.
From the Host System $HOME directory, use the following command to display the
mounted devices:
df
Your output will look similar to the following. Look for the USB file system name in
the location on your screen where the file system name is circled in the example.
In the example below, the USB flash drive file system name is /dev/sdb1. To
identify it on your system, look at the right heading column that says Mounted
on. In this column, look for the row that begins with /media. The file system
name is in the left column of this row.
Figure 22. USB Flash Drive File System Name
The example screen displays /dev/sdb1. The 1 at the end of sdb1 indicates the
partition. In the step below, do not include the partition. In the example,
only /dev/sdb is used for the file system name. Write down the file system name
that is displayed on your screen. You will use it in the next step. If you
Intel® IoT Gateway Development Kit DK100 Series
Getting Started Guide April 2015
44 Order No.: 330307-007
Page 45

Put Intelligent Device Platform XT Runtime Image onto USB Flash Drive—Intel IoT Gateway
Development Kit DK100 Series
accidentally include the partition in the command, you will receive an error
message: ERROR: Device mode should be set to -d option.
e.g.: /dev/sdb
Warning: The following command will overwrite all contents on your USB flash
drive. The USB flash drive must have a capacity of at least 4 GB.
2.
In the $HOME/projects directory, type the following command to format the
USB flash drive with two partitions and deploy the tar file to the USB flash drive.
This command also changes the media name on the USB flash drive. Choose the
appropriate command for your circumstances, replacing the ? in sd? with the
information you wrote down in the previous step:
sudo ./deploy.sh \
-u -f export/intel-quark-glibc-idp-standard-dist-srm.tar.bz2 \
-d /dev/sd? -y -b cross-hill
3.
Type your password at the prompt: [sudo] password for <username>.
You may see an error screen stating it is not possible to open the folder
wr_usb_boot, as shown below. This is not a concern. If you receive this message,
click OK.
Figure 23. Folder Error for wr_usb_boot
April 2015 Getting Started Guide
Order No.: 330307-007 45
Intel® IoT Gateway Development Kit DK100 Series
Page 46

Intel IoT Gateway Development Kit DK100 Series —Put Intelligent Device Platform XT Runtime
Image onto USB Flash Drive
4. When the process completes, remove the USB flash drive and re-insert it into the
Host System. The USB flash drive mounts as /media/<username>/
wr_usb_boot .
5. Copy and rename the new configuration tar file from your Host System to your
USB flash drive, using the following command.
sudo cp export/intel-quark-glibc-idp-standard-dist-srm.tar.bz2 \
/media/<username>/wr_usb_boot/opt/rootfs-dist.tar.bz2
6. Use the following command to verify the build image has been copied to the USB
flash drive by listing the directory contents as follows:
ls /media/<username>/wr_usb_boot/opt
7. Your output should include:
rootfs-dist.tar.bz2
If you do not see this file:
• Verify your configure command was correct in Build Intelligent Device Platform
XT Runtime Software on page 40, step 2.
• Verify that your copy command was correct in step 8, above.
8.
Use the following command to unmount the USB flash drive, replacing the ? in
sd?1 and sd?2 with the information you wrote down in step 1:
umount /dev/sd?1 /dev/sd?2
9. Remove the USB flash drive from the Host System.
Intel® IoT Gateway Development Kit DK100 Series
Getting Started Guide April 2015
46 Order No.: 330307-007
Page 47

Before you
Begin
Prepare Host
System for Wind
River Software
Register Target
Device
Install Linux and
Wind River
Packages on
Host System
Install
Runtime on
Target Device
Build Runtime
on Host System
Put Runtime
Software on
Flash Drive
Connect
Hardware /
Connect Target
Device to Host
System
Update SPI
Firmware on
Target Device
Install Intelligent Device Platform XT Runtime on Target Device—Intel IoT Gateway
Development Kit DK100 Series
10.0 Install Intelligent Device Platform XT Runtime on Target Device
Build Intelligent Device Platform XT Runtime Software on page 40 guided you through
building your runtime image and deploying it to a bootable USB flash drive. Update
SPI Firmware on Target Device - Conref Source walked you through updating the SPI
firmware on your Target Device. You will now install the runtime software on your
Target Device's SD drive. Complete these steps from the PuTTY Virtual Terminal
$HOME screen on your Host System.
Note: The runtime software can be booted from the USB flash drive, but Intel recommends
installing the runtime components on the Target Device's hard drive.
What you need to do
1. To install the Intelligent Device Platform XT from the USB flash drive to the Target
Device SD drive, use the following command:
tgt=/dev/mmcblk0 /sbin/reset_media
2.
Respond yes when prompted to Restore the boot media to its factory
defaults. This process could take as long as 25 minutes. Do not remove the USB
flash drive during this process. Upon completion, you will be prompted to log in.
Use root for both the login ID and password.
3. After the command completes, shut down the Target Device. Use the command:
poweroff
4. Wait for the Target Device power button light to turn off.
5. Remove the USB flash drive from the Target Device.
The Target Device is now loaded with the new runtime image and is ready to use.
Now that you know how to use the Development Kit, it is time to develop your own
gateway solution. See Table 1 on page 15 for a list of helpful technical documents.
April 2015 Getting Started Guide
Order No.: 330307-007 47
Intel® IoT Gateway Development Kit DK100 Series
Page 48

®
Intel IoT Gateway Development Kit DK100 Series —Intel
IoT Gateway Knowledge Forum
Appendix A Intel® IoT Gateway Knowledge Forum
In addition to the technical support through Intel® Premier Support, an online
community knowledge forum is available for the Intel® IoT Gateway Development Kit.
The forum is located at https://ask.intel.windriver.com. On this forum, you can ask
how-to questions and search for answers related to Wind River® Linux and the Wind
River development tools.
Intel will continue to offer hardware and software technical support through Intel
Premier Support; you can use this knowledge forum as an additional support option.
Questions on this forum are typically related to installation and usage of Wind River
Linux, the Intelligent Device Platform XT, and compilers and development tools, such
as the Wind River Workbench.
In using the forum, be aware that this is an open support model and the following
bullets apply:
• Wind River hosted Knowledge Forums (Wind River Knowledge Forum and the
Intel® IoT Gateway Knowledge Forum) are open support repositories that are
accessible to Intel, Wind River employees, and customers who have active
Support Maintenance Agreements.
• Questions posted on the forums are visible to all users. All users can contribute
answers. Both questions and answers can be edited by any user on the Knowledge
Forums.
• Refrain from posting proprietary, confidential, or controlled information on the
Knowledge Forums. Intel Corporation and Wind River Systems are not responsible
for ensuring the privacy of data on the Knowledge Forums.
®
This section guides you through accessing and using the Intel® IoT Gateway
Knowledge Forum.
Accessing the Forum
Use the following steps to create a Wind River account and log in to the forum.
Note: You might already have a Wind River support account. If you have an account,
disregard Step 1 and begin with Step 2.
1. To create a Wind River support account you must fill out a short form at https://
support.windriver.com/selfservicewebapp/register.action. This form requires you
to enter your license and LAC keys. You received this information after you
registered your Development Kit.
2. Login at https://ask.intel.windriver.com. Use your Wind River Online Support
account user name and password.
3. If you have not yet done so, then when prompted, set up a screen name. This is
the identity you will use in the online community. Other users will see you by this
identity. Do not use your email address for your screen name.
Intel® IoT Gateway Development Kit DK100 Series
Getting Started Guide April 2015
48 Order No.: 330307-007
Page 49

Intel® IoT Gateway – Knowledge Forum
Intel® IoT Gateway – Knowledge Forum
®
IoT Gateway Knowledge Forum—Intel IoT Gateway Development Kit DK100 Series
Intel
Using the Forum
After you are registered and logged in, you can use the forum to ask questions and
search for topics of interest. Submitted questions are posted on the forum and are
accessible to all forum users. Forum moderators and Wind River product experts
regularly monitor the forum to answer questions. If necessary, your question will be
escalated.
Note: If your issue is urgent or related to BSP development on a specific project, create an
issue ticket through Intel® Premier Support instead of relying on this forum for
answers.
The screen looks like this after you register and log in:
Figure 24. Knowledge Forum Opening Screen
April 2015 Getting Started Guide
Order No.: 330307-007 49
Intel® IoT Gateway Development Kit DK100 Series
Page 50

Intel® IoT Gateway – Knowledge Forum
Intel® IoT Gateway – Knowledge Forum
Intel IoT Gateway Development Kit DK100 Series —Intel
Submitting Questions
Use the following steps to ask a question on the forum.
1. Click ASK YOUR QUESTION. See the red box in the following figure.
Figure 25. Ask Question
®
IoT Gateway Knowledge Forum
2. Title your question in the field provided, as shown:
Figure 26. Title Question
3. Provide details about your question. To help the support staff to provide accurate
and timely guidance, include details about your test / development environment,
including:
• Detailed information about your question.
• Software, such as Intelligent Device Platform XT release, Wind River Linux
• Hardware, such as board, processor SKU, memory, I/O etc.
4. Categorize your question. Add IOT-Gateway as a tag in addition to specific
product tags. This will allow the support team to track issues related to Intel® IoT
Gateway See the following figure.
Figure 27. Categorize Question
version, BIOS, FW, etc.
Intel® IoT Gateway Development Kit DK100 Series
Getting Started Guide April 2015
50 Order No.: 330307-007
Page 51

®
IoT Gateway Knowledge Forum—Intel IoT Gateway Development Kit DK100 Series
Intel
Your selected tags display in a list. You can add or remove tags as necessary. See
the following figure.
Figure 28. Tagged Question
5. Click Ask Your Question to submit the question. See the red box in the following
figure.
Figure 29. Submit Question
April 2015 Getting Started Guide
Order No.: 330307-007 51
Intel® IoT Gateway Development Kit DK100 Series
Page 52

In
Intel® IoT Gateway – Knowledge Forum
Intel® IoT Gateway – Knowledge Forum
Intel IoT Gateway Development Kit DK100 Series —Intel® IoT Gateway Knowledge Forum
Subscribing to Tags
You can choose to subscribe to specific tags to receive email alerts for issues and
updates to questions related to that tag/category. Use the following steps.
1. Select your preferred email setting. See the red box in the following figure.
Figure 30. Subscribe to Forum Tags
2. Click Change frequency of emails to set up how often you receive email
messages.
Intel® IoT Gateway Development Kit DK100 Series
Getting Started Guide April 2015
52 Order No.: 330307-007
Page 53

Use Wind River WebIF to Configure the Target Device (Optional)—Intel IoT Gateway
Development Kit DK100 Series
Appendix B Use Wind River WebIF to Configure the Target Device (Optional)
This appendix guides you through using the Wind River WebIF application. WebIF is a
web-based interface used to manage wired, wireless, and 3G connectivity on
Intelligent Device Platform XT Target Devices.
How to use WebIF
1. On the Host System, open an internet browser.
2. Choose the correct path:
Note:
Be sure to use https (not http) for either path.
• If you used a wireless network connection from your Host System to your
Target Device, type the following URL into the internet browser on your Host
System: https://192.168.1.1
• If you used a wired network connection from your Host System to your
Target Device, type the following URL into the internet browser on your Host
System: https://<TARGET_DEVICE_IP_ADDRESS>, where
<TARGET_DEVICE_IP_ADDRESS> is the IP address of your target device.
Note: The Host System and the Target Device must be on the same subnet.
3. Most browsers present a pop-up warning box stating that the security certificate is
not recognized. Select the option to tell the browser to disregard the certificate
and connect to the Web site. In the following example, you would click I
Understand the Risks, and then Add Exception:
Figure 31. Untrusted Certificate
April 2015 Getting Started Guide
Order No.: 330307-007 53
Intel® IoT Gateway Development Kit DK100 Series
Page 54

Intel IoT Gateway Development Kit DK100 Series —Use Wind River WebIF to Configure the
4.
Login with user name: admin and password: admin. The Wind River® Intelligent
Device Platform XT 2.0 Web Interface (WebIF) console opens. See the figure
below.
Figure 32. WebIF Application
Target Device (Optional)
The WebIF menus provide a simple interface to allow you to configure the hardware
and I/O features of the Target Device. If you are interested in things you can do
through this interface, see the Wind River® Intelligent Device Platform XT 2.0 –
Programmer’s Guide at https://www-ssl.intel.com/content/www/us/en/embedded/
design-tools/evaluation-platforms/gateway-solutions/wind-river-idp-xt2programmers-guide.html?wapkw=wind+river
See also the Wind River® Intelligent Device Platform XT 2.0 – Release Notes at http://
www.intel.com/content/www/us/en/embedded/design-tools/evaluation-platforms/
gateway-solutions/wind-river-idp-release-notes.html.
Intel® IoT Gateway Development Kit DK100 Series
Getting Started Guide April 2015
54 Order No.: 330307-007
Page 55

®
Building an Intelligent Device Platform Project Using Wind River
Gateway Development Kit DK100 Series
Workbench—Intel IoT
Appendix C Building an Intelligent Device Platform Project Using Wind River® Workbench
This appendix provides step-by-step instructions to build a Wind River Intelligent
Device Platform project using Wind River Workbench. The steps below guide you
through tasks such as selecting configuration options and adding different layers to
your project.
This appendix assumes the following:
• Your Host System is running Ubuntu 14.04, 64-bit.
• You used the directory names indicated in Create Directories and Confirm Disk
Space on page 26. If you used different directory names, replace the directory
names in the steps below with the directories that you created.
• You followed the instructions in Installing the Wind River Host Tools on page 32.
• You know how to deploy a runtime image on your Target Device. See Install
Intelligent Device Platform XT Runtime on Target Device on page 47.
Note: These steps will take 2 - 4 hours to complete.
Create the Project
1. Use the following commands to launch Workbench:
cd $HOME/WindRiver
./ startWorkbench.sh
2. Upon launching, Workbench asks for a workspace folder. Type the path or browse
to your workspace folder. Suggestion: Use your home folder. See the following
figure:
Figure 33. Workspace Location Selection
April 2015 Getting Started Guide
Order No.: 330307-007 55
Intel® IoT Gateway Development Kit DK100 Series
Page 56

Intel IoT Gateway Development Kit DK100 Series —Building an Intelligent Device Platform
The application launches.
3. From the main menu, click File > New > Wind River Workbench Project, as
shown:
Figure 34. Create a New Workbench Project
Project Using Wind River® Workbench
4. Select the target operating system. Choose Wind River Linux Platform Base
5.0.1, as shown, and then click Next.
Figure 35. Selecting Target Operating System
Intel® IoT Gateway Development Kit DK100 Series
Getting Started Guide April 2015
56 Order No.: 330307-007
Page 57

Building an Intelligent Device Platform Project Using Wind River® Workbench—Intel IoT
Gateway Development Kit DK100 Series
5. Select Platform as the build type as shown, and then click Next.
Figure 36. Select Build Type
6. Type a name for your project, and then click Next.
Figure 37. Specify Project Name
Important:
You must enable wr-idp as an addon before selecting the RootFS
type. Make sure you correctly complete steps 7 - 8.
April 2015 Getting Started Guide
Order No.: 330307-007 57
Intel® IoT Gateway Development Kit DK100 Series
Page 58

Intel IoT Gateway Development Kit DK100 Series —Building an Intelligent Device Platform
7.
Click Add and select -enable-addons=[yes|no|addon[…] as shown below.
Figure 38. Enable Addons
Project Using Wind River® Workbench
Intel® IoT Gateway Development Kit DK100 Series
Getting Started Guide April 2015
58 Order No.: 330307-007
Page 59

Building an Intelligent Device Platform Project Using Wind River
Gateway Development Kit DK100 Series
8. Edit the Value field near the bottom of the screen to add wr-idp, and then click
the Reload button. See the following figure.
Note:
If you do not click Reload, you cannot use glibc-idp as the RoofFS type.
Figure 39. Reload Configurations
®
Workbench—Intel IoT
April 2015 Getting Started Guide
Order No.: 330307-007 59
Intel® IoT Gateway Development Kit DK100 Series
Page 60

Intel IoT Gateway Development Kit DK100 Series —Building an Intelligent Device Platform
9. For RootFS, select glibc_idp as shown:
Figure 40. glib_idp Option Available
Project Using Wind River® Workbench
10. For Board, select the board type appropriate for your Target Device. if your
Target Device has an Intel® Atom™ processor, select intel-atom-baytrail. If your
Target Device has an Intel® Quark™ processor, select intel-quark.
11. For Kernel, select standard.
Intel® IoT Gateway Development Kit DK100 Series
Getting Started Guide April 2015
60 Order No.: 330307-007
Page 61

Building an Intelligent Device Platform Project Using Wind River
Gateway Development Kit DK100 Series
12. You are ready to add layers. Click Add… as shown below.
Figure 41. Add Layers
®
Workbench—Intel IoT
April 2015 Getting Started Guide
Order No.: 330307-007 61
Intel® IoT Gateway Development Kit DK100 Series
Page 62

Intel IoT Gateway Development Kit DK100 Series —Building an Intelligent Device Platform
13. Select wr-intel-support as shown below, and then click Reload.
Figure 42. Add wr-intel-support
Project Using Wind River® Workbench
Intel® IoT Gateway Development Kit DK100 Series
Getting Started Guide April 2015
62 Order No.: 330307-007
Page 63

Building an Intelligent Device Platform Project Using Wind River
Gateway Development Kit DK100 Series
14. Select to add the wr-mcafee layer as shown:
Figure 43. Add wr-mcafee Layer
®
Workbench—Intel IoT
15. Add additional layers as needed.
16. Click the Add button in the Option group as shown in figure below:
Figure 44. Adding Options
April 2015 Getting Started Guide
Order No.: 330307-007 63
Intel® IoT Gateway Development Kit DK100 Series
Page 64

Intel IoT Gateway Development Kit DK100 Series —Building an Intelligent Device Platform
17.
Add an option to -enable-jobs=50, as shown below. Then click OK.
Figure 45. enable jobs=50
Project Using Wind River® Workbench
Intel® IoT Gateway Development Kit DK100 Series
Getting Started Guide April 2015
64 Order No.: 330307-007
Page 65

®
Building an Intelligent Device Platform Project Using Wind River
Gateway Development Kit DK100 Series
Workbench—Intel IoT
18. Click Add in the Option group again.
19.
Add an option to -enable-parallel-pkgbuilds=<number of CPUs>, where
<number of CPUs> is the number of CPUs in your system. See the following
figure. Then click OK.
Figure 46. -enable-parallel-pkgbuilds=<number of CPUs>
April 2015 Getting Started Guide
Order No.: 330307-007 65
Intel® IoT Gateway Development Kit DK100 Series
Page 66

Intel IoT Gateway Development Kit DK100 Series —Building an Intelligent Device Platform
20. Click Finish to finalize your configuration.
Figure 47. Finalize Configuration
Project Using Wind River® Workbench
Intel® IoT Gateway Development Kit DK100 Series
Getting Started Guide April 2015
66 Order No.: 330307-007
Page 67

Building an Intelligent Device Platform Project Using Wind River
Gateway Development Kit DK100 Series
The configuration script will show a progress screen similar to the following while
it executes. Execution will take a few minutes.
Figure 48. Configuration Script Progress
®
Workbench—Intel IoT
April 2015 Getting Started Guide
Order No.: 330307-007 67
Intel® IoT Gateway Development Kit DK100 Series
Page 68

Intel IoT Gateway Development Kit DK100 Series —Building an Intelligent Device Platform
Upon completion you will see a summary screen similar to the following:
Figure 49. Build Configuration Completed
Project Using Wind River® Workbench
You are ready to build your project. Follow the steps in the next section.
Intel® IoT Gateway Development Kit DK100 Series
Getting Started Guide April 2015
68 Order No.: 330307-007
Page 69

Building an Intelligent Device Platform Project Using Wind River
Gateway Development Kit DK100 Series
Build Project
Depending on you configuration items, your selected layers and the processing power
of your development system it will take 2 to 4 hours to build your project. The build
took approximately 4 hours on a test system that was running an Intel® Core
i7-4900 processor at 2.8 GHz with Intel® Hyper-Threading technology, and 8 GB RAM.
1. From the main menu, select Project > Build Project.
Figure 50. Build Project
®
Workbench—Intel IoT
™
April 2015 Getting Started Guide
Order No.: 330307-007 69
Intel® IoT Gateway Development Kit DK100 Series
Page 70

Intel IoT Gateway Development Kit DK100 Series —Building an Intelligent Device Platform
The project build begins and the progress displays as follows:
Figure 51. Build Project Progress Window
Project Using Wind River® Workbench
2. Optional: Open a terminal window to examine the config file generated by
Workbench. The config file looks similar to the following:
Figure 52. Config File
Intel® IoT Gateway Development Kit DK100 Series
Getting Started Guide April 2015
70 Order No.: 330307-007
Page 71

Building an Intelligent Device Platform Project Using Wind River® Workbench—Intel IoT
Gateway Development Kit DK100 Series
Upon completion, the Build Console displays as follows:
Figure 53. Build Console Displaying Project Completion
3. Deploy your project to your Target Device.
April 2015 Getting Started Guide
Order No.: 330307-007 71
Intel® IoT Gateway Development Kit DK100 Series
Page 72

Appendix D Triage Tool
The Triage Tool is a set of shell scripts designed to collect customer's hardware and
software information for efficient issue debugging. One set of scripts is for the host
development environment and second set of scripts is for the Target Device. The
scripts know the location of information, such as log files, and they know the
commands to run to gather the details. The output is a compressed tar file that can be
provided to Intel's support team for quick issue resolution. Attach your Triage Tool
outputs to Intel® Premier Support issues for faster resolution.
Host System Location and Usage
On your Host System, the script is in the project directory. The example below shows
the usage. In the example:
•
-i <install dir> is the path to Wind River Intelligent Device Platform
installation directory
•
-b <Project> is the path to where you build your project, such as $HOME/
Project
Intel IoT Gateway Development Kit DK100 Series —Triage Tool
$HOME/Project$ sudo sh ./triage_tool_host.sh -i <install dir> -b <Project>
The output is a tar file in your current working directory.
Target Device Location and Usage
On the Target Device the script is in the /root/examples directory. The example
below shows the usage:
root@WR-IntelligentDevice:~/examples# ./triage_tool_target.sh
The output is a tar file in your current working directory.
Intel® IoT Gateway Development Kit DK100 Series
Getting Started Guide April 2015
72 Order No.: 330307-007
Page 73

Installing and Configuring PuTTY—Intel IoT Gateway Development Kit DK100 Series
Appendix E Installing and Configuring PuTTY
This section guides you through installing and configuring a Secured Shell (SSH) /
Telnet network protocol utility, named PuTTY. PuTTY is an open source virtual terminal
that is available in the Ubuntu 14.04 release.
1.
From your Host System $HOME command prompt type the following command to
install PuTTY.
Note: PuTTY is also available from http://ubuntu.com
sudo apt-get install putty
2.
Type your password at the prompt: [sudo] password for [username]
3.
Type y at the prompt: Do you want to continue [Y/n]?
Starting and Configuring PuTTY
1.
From your Host System $HOME command prompt, start PuTTY:
putty
The PuTTY Configuration screen is displayed, as shown below:
Figure 54. PuTTY Configuration Screen
April 2015 Getting Started Guide
Order No.: 330307-007 73
Intel® IoT Gateway Development Kit DK100 Series
Page 74

Intel IoT Gateway Development Kit DK100 Series —Installing and Configuring PuTTY
2. Make the following changes on this screen:
• Change Connection type to Serial. See number 1 in the following figure.
• Change Speed to 115200. This option will be available after you change the
Connection type to Serial. See number 2 in the following figure.
Figure 55. Change to Serial with Speed of 115200
Intel® IoT Gateway Development Kit DK100 Series
Getting Started Guide April 2015
74 Order No.: 330307-007
Page 75

Installing and Configuring PuTTY—Intel IoT Gateway Development Kit DK100 Series
3. Under the Category menu on the left side of your screen, select Serial and
change the Flow control to None. See number 1 and 2 in the following figure:
Figure 56. Change Flow Control
April 2015 Getting Started Guide
Order No.: 330307-007 75
Intel® IoT Gateway Development Kit DK100 Series
Page 76

Intel IoT Gateway Development Kit DK100 Series —Installing and Configuring PuTTY
4. Under the Category menu on the left side of your screen, select Keyboard and
change the Function keys and keypad to SCO. See number 1 and 2 in the
following figure:
Figure 57. Change to SCO Function Keys
Intel® IoT Gateway Development Kit DK100 Series
Getting Started Guide April 2015
76 Order No.: 330307-007
Page 77

Installing and Configuring PuTTY—Intel IoT Gateway Development Kit DK100 Series
Saving a Session
1. Under the Category menu on the left side of your screen, select Session. Name
your session as Intel IoT Gateway, and then click Save. Your session name will
be displayed in the Saved Sessions list. See the numbered items in the following
figure.
Figure 58. Save Settings
2. Click Cancel to return to your Host Development System command prompt.
April 2015 Getting Started Guide
Order No.: 330307-007 77
Intel® IoT Gateway Development Kit DK100 Series
Page 78

Intel IoT Gateway Development Kit DK100 Series —Installing and Configuring PuTTY
Loading Saved Session
This section guides you through loading the Intel IoT Gateway session.
1. Click Intel IoT Gateway under Saved Sessions. See number 1 in the following
figure.
2. Click Load to display the Intel IoT Gateway settings. See number 2 in the figure.
3. Change the Serial line to /dev/ttyUSB0 and then click Save. See numbers 3
and 4 in the figure.
4. Click Open to open a PuTTY Virtual Terminal session. See number 5 in the figure.
Figure 59. Update Session with Correct tty Port
A PuTTY Virtual Terminal session displays as a black screen with a cursor in the
upper left corner.
Intel® IoT Gateway Development Kit DK100 Series
Getting Started Guide April 2015
78 Order No.: 330307-007
Page 79

Troubleshooting—Intel IoT Gateway Development Kit DK100 Series
Appendix F Troubleshooting
The errata for this version of the platform are shown in the following table.
Table 5. Target Device Errata
Errata Description Workaround
The Wi-Fi Access Point or Ethernet WAN interface
may exhibit functional instability when loaded with
concurrent traffic from multiple Wi-Fi and/or
Ethernet clients.
Fixed in Wind River® Intelligent Device Platform XT
2.0.4 (March 2015)
April 2015 Getting Started Guide
Order No.: 330307-007 79
Intel® IoT Gateway Development Kit DK100 Series
 Loading...