

Page 1
Intel® Per sonal Audio Play er 3000
Q
UICK START GUIDE
INSTALLING THE SOFTWARE
Note: Install the included software before connecting y our Player to your computer.
T o install the software pro vided with y our Pla y er:
1. Insert the included CD-ROM into your CD-ROM drive.
If the installation doesn’t start automatically: click the Start menu and then click Run.
In the Run dialog box, type: “[x]:\setup.exe” where [x] is the letter of your computer’s CD-ROM drive.
2. Follow the on-screen prompts.
When requested, enter the
MusicMatch Jukebox Upgrade Key
exactly as it is
printed on the back of this guide.
USING THE INTEL AUDIO MANAGER
Use the Intel Audio Manager to:
• search your computer and create your own digital music library.
• automatically generate playlists by artist, album, or genre.
• preview digital music on your computer bef ore y ou tr ansfer it to your Player.
• transfer your digital music to your Player’s internal and external memory.
Note: To rip and encode digital music from your CD collection, refer to the included MusicMatch Jukebox online help.
WHAT’S ON THE CD ROM
The installation CD-ROM provided with your Intel® Personal Audio Play er 3000 includes softw are f or creating,
organizing, previewing, and transferring your personal digital m usic library to your Pla y er.
Intel® Audio Manager
Use the Intel® Audio Manager to create a digital music library , previe w your music bef ore you transf er it, and quickly tr ansfer
custom playlists to your Player .
Intel® Faceplate Designer
Use the Intel® Faceplate Designer to personalize your Pla y er with y our o wn custom faceplates.
MusicMatch Jukebox* (plus version)
Use MusicMatch Jukebox* to create a digital music library from your own CD collection.
Intel® Audio Sampler Volume 2
The Intel® Audio Sampler, Volume 2 is a brief collection of digital music that you can transfer to your Pla y er to
immediately enjoy the Intel digital music experience. To read more about the music and artists, go to:
Start > Programs > Intel Personal Audio Play er 3000 > Support and Documentation > About the Intel Audio Sampler Vol. 2
Go to
www.intel.com/home/audio/info/download.htm
for free downloads and information on upcoming events for selected artists.
Setting up Your Computer for Your Player
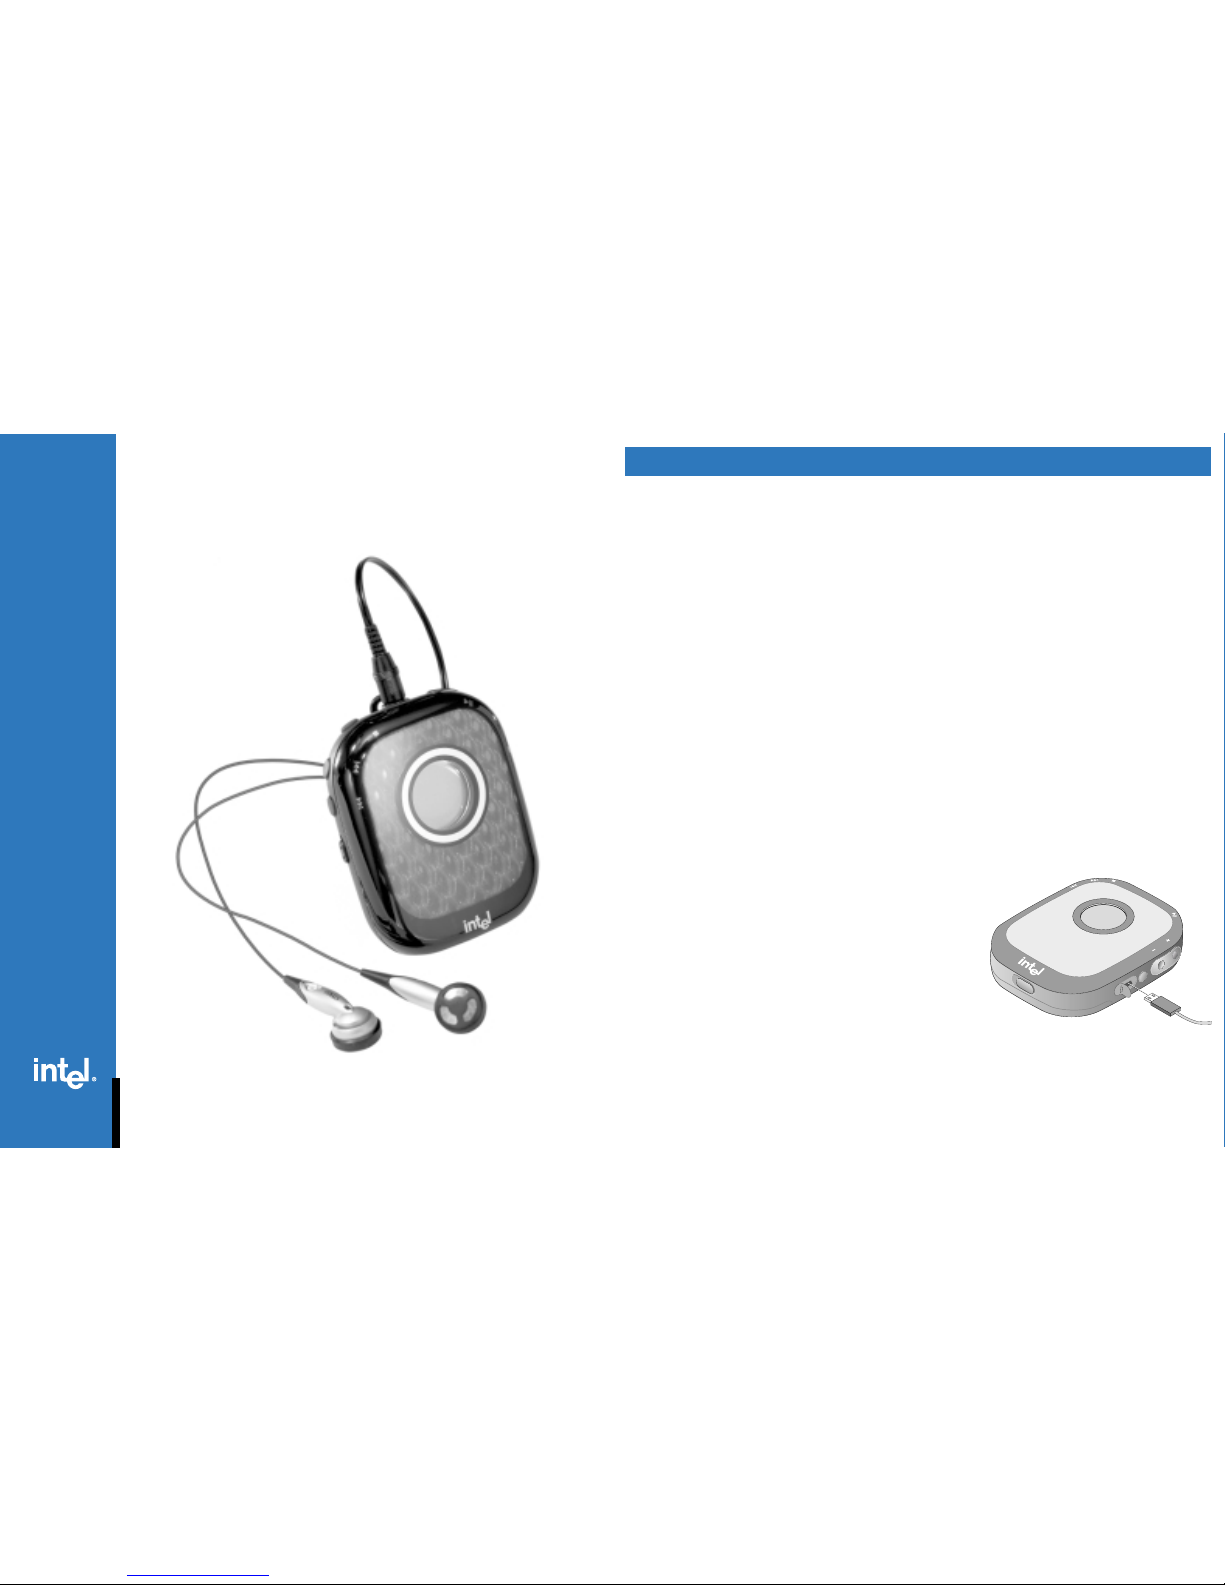
CONNECTING TO YOUR COMPUTER
Peel back the protective cov er to your Player’s USB port to connect the
small end of the included USB cable.
Note: While your Player is connected to a USB port, all of your
Player’s controls are disab led.
Do not remove the battery while your Player is connected to USB.
Page 2

When you turn on your Player...
• The total memory on your Player (internal and external) appears briefly.
Note: External memory is part of the total memory only after it has been formatted by the Intel Audio Manager software.
• Then the total # of tracks and total play time appear briefly.
• Then the current track # and its total play time appear .
Note: When you turn off your Pla yer in the middle of a song, it returns to your stopping point when you turn it on.
Player Display
Tra ck paused
Tra ck stopped
Player controls loc ked
Repeat all selected
Shuffle selected
Battery indicator (appears at
less than 10% battery life)
USB connection
All Player controls disabled
Tra ck playing
Repeat 1 selected
My Player’s controls don’t work
Ensure that the control lock switch is off. When the control lock s witch is on, the lock icon appears in y our Play er’s display .
Slide the control lock switch down toward the battery door to access your Player’s controls.
My Player does not turn on or my Player’s display is frozen
Verify that your battery has enough power or remove and replace y our battery to reset your Play er.
My Player is turned on, my batteries are fresh, but the display is blank
Your Player enters sleep mode after sitting idle for two minutes. T o revive your Player, press the pla y b utton.
I can’t find my Player in the Intel Audio Manager
Click Refresh in the Intel Audio Manager or disconnect and reconnect your Player’s USB cable to verify the USB connection.
T o troubleshoot using your Pla yer with the Intel A udio Manager, go to
T roubleshooting
in the Intel Audio Manager online help.
I installed a MultiMediaCard (MMC) in my Player and I can’t play the songs on it
Y our Intel Personal Audio Player 3000 plays only MMCs f ormatted by the Intel A udio Manager.
With the MMC in your Player, connect y our Player to your computer and launch the Intel Audio Manager to automati-
cally format your MMC to work with your Player.
Troubleshooting
INTEL AUDIO PLAYERS AND PROTECTED CONTENT
The Intel Personal Audio Play er 3000 supports Windo ws Media* Digital Rights Management (DRM). DRM protected
music content includes usage rules that may limit a song from being copied to or used on multiple audio players as
well as the number of times that it can be copied to a single audio player or play ed on y our computer. For more
information on DRM content, refer to the Intel Audio Manager online help or your content provider
Doing More with Your Player
INST ALL A MUL TIMEDIACARD (MMC) TO UPGRADE YOUR PLAYER
1. Remove the battery as directed in
Installing and Changing the Battery
.
Note: Always disconnect y our Player from its USB cable before you insert or
remove an MMC.
2. If an MMC is installed, use your fingernail or a small coin to carefully pull the
MMC away from the bottom of your Play er.
3. With the MMC oriented as shown, insert it into the memory slot and push it
into place until it stops flush with the battery compartment.
4. Insert a battery oriented as shown in
Installing and Changing the Battery
.
Note: For best results, refer to the list of recommended MMC vendors at
support.intel.com/support/peripherals/audioplayer/mmclist.htm
CHANGE THE FACEPLATE INSERT TO CUSTOMIZE YOUR PLAYER
1. Slide the faceplate release tab toward the control lock switch and lift the faceplate
away from your Play er .
2. If a faceplate insert is installed, remove it.
3. Align the new faceplate insert so that your Player’s display is fully visible.
To attach the Faceplate
1. Insert the top tab of the faceplate into the notch at the top of your Player.
2. Rotate the faceplate down.
3. Insert the tab at the bottom of the faceplate into the notch at the bottom of your
Player until it clicks.
Note: To create your own faceplate inserts, go to:
Start > Programs > Intel Personal Audio Pla y er 3000 > Intel FacePlate Designer
.
Note: Several sample f aceplate inserts are installed into the folder,
Intel Faceplate
Designer Samples
in your computer’s
..\My Documents
folder.
Page 3

SYSTEM REQUIREMENTS
The Intel Personal Audio Play er 3000 and Intel A udio Manager require:
• Microsoft Windows* 98, Windows 98SE, Windows Me, Windows 2000, or Windows XP
Note: Windows 2000 and Windows XP require Administrator Privileges for hardware installation.
• 200MHz Intel
®
Pentium® processor or faster
• Available powered USB port
• 4x or faster CD-ROM drive
• 800x600 screen resolution or better w/16-bit color
• 32MB of RAM (64MB recommended)
• 53MB minimum free hard disk space
- 11MB - Intel Audio Manager; 22MB - Intel Audio Sampler Vol. 2 (optional); 20MB - MusicMatch J uk ebo x (optional)
PRODUCT SPECIFICATIONS
Dimensions 83 mm x 64 mm x 38 mm (with belt clip)
Weight 83.4 g (with belt clip and without battery)
Battery type / life 1 AA - alkaline or NiMH (alkaline recommended for maximum play time of up to 10 hours)
When your Player is going to sit idle for an e xtended period of time, remo v e the battery.
Memory (internal) 64MB Intel
®
Strataflash™
Memory (external) MultiMediaCard (MMC) expansion slot
See MMC vendors at
www.support.intel.com/support/peripherals/audioplayer/mmclist.htm.
Audio Codec support MP3* and WMA* (including Windows Media* DRM protected music content)
Frequency response 20 Hz to 20 kHz
Maximum output 6.5 mW @ < 0.1% total harmonic distortion + noise
Signal-to-Noise Ratio > 90 dB
Bass and Treble Boost 12 step controls
CUSTOMER SUPPORT
For assistance with MusicMatch Jukebox ref er to the MusicMatch Jukebox online help.
For assistance with the Player or the Intel Audio Manager softw are:
•
click Start > Programs > Intel Personal Audio Play er 3000 > Support and Documentation > Customer Support
or
• call Intel Customer Support at
North America (916) 377-7000
United Kingdom +44 (0) 870 607 2439
Note: Your Pla y er’s serial number is on your Player, under the battery cover, just below the battery.
ONLINE HELP
For further details on the features and capabilities of the Intel Audio Manager software, consult the online Help at:
Start > Programs > Intel Personal Audio Play er 3000 > Support and Documentation > Audio Manager Help
Technical Information
Stop / off button
Press to stop track
Press and hold to turn off
Player
Fast forward button
Press to jump to next track
Press and hold to scan
forward in current track
Up button
Press to increase volume,
bass, or treble
Down button
Press to decrease volume,
bass, or treble
Mode button
Press to change repeat and
shuffle modes
Press and hold to access bass
adjust (then press to change
between bass and treble)
Control lock switch
Slide up toward rewind
button to lock all controls
Battery door
Holds one AA battery
Holds one MultiMediaCard
USB cable port
Peel open to connect the
small end of the included
USB cable
Headphone jack
Connects earbuds to Player
Belt clip mounting guides
Insert belt clip tab and
included mounting screw
Play / pause button
Press to turn on Player
Press to start or pause track
Rewind button
Press to jump to previous track
Press and hold to scan
backward in current track
Faceplate release tab
Slide toward the control lock
switch to release Faceplate
Player Controls
Page 4

NOTICES AND WARRANTY INFORMATION
For information about warranties, copyrights and trademarks, disclaimers , FCC compliance, liability, and battery
disposal, consult the
Intel Personal Audio Pla yer 3000 Information
document at:
Start > Programs > Intel Personal Audio Play er 3000 > Support and Documentation > Audio Pla y er Inf ormation
VOLUME LEVEL
T o establish a saf e listening v olume, first set the volume control on your Intel Personal Audio Play er 3000 to the low est
audible level (indicated by “01” in the volume indicator). Then slowly increase the volume until you can hear it comfort-
ably, clearly, and without distortion. Once you have set the v olume le v el, lea v e it there f or comf ortable listening.
WARNING: Using the Player at a volume higher than a comfortable sound level may lead to temporary or permanent
hearing loss. Follow the volume level recommendations above to avoid e xposure to excessive sound levels. Note
that your comfortable sound level may be higher than normal due to surrounding noise le v els . To avoid risk of hearing
loss, use the Player at the comfortable sound lev el that y ou estab lished in quiet surroundings at all times .
BATTERIES
Replace batteries only with the same or equivalent type. Dispose of batteries according to manuf acturer’s instructions.
ELECTRICAL SAFETY
Use caution when using your Player in any damp or wet environments as w ater leakage into the Player ma y cause f ailure.
WARNING: To pre vent fire or shock hazard, do not expose this equipment to rain or moisture.
OPERATING VEHICLES
Do not use your Player and ear buds while operating a motorized v ehicle or riding a bicycle.
Using Y our Player Safely
© 2001 Intel Corporation All rights reserved.
Intel is a registered trademark of Intel Corporation or its subsidiaries in the
United States and other countries.
*Other names and brands may be claimed as property of others.
*A63834-001*
A63834-001
MUSICMATCH JUKEBOX UPGRADE KEY
GETTING STARTED WITH YOUR PLAYER
Note: Install the included software before connecting y our Player to a powered USB port on your computer.
Y our Player has a pre-loaded Welcome Track to introduce you to the Pla yer and a song sampler for you to immediately
enjoy the Intel digital music experience.
With a battery installed and your ear buds connected:
1. Turn on your Player by pressing the play / pause button.
2. Press the play / pause button to start the Welcome Track, track 1.
Refer to the
Player Controls
and
Player Display
pages in this guide to familiarize yourself with your Play er’s
functionality.
QUICK TIPS FOR YOUR PLAYER
• Y our Player enters sleep mode when left idle, a song not playing and no buttons pressed, for two minutes.
• After you access the bass and treble settings with the Mode button, use the “+” and “-” buttons to adjust them.
Your Player exits EQ mode automatically after a few seconds.
• You can transfer a single song to the internal memory or the external memory, but not across both.
Using Y our Player
INSTALLING AND CHANGING THE BATTERY
A single AA alkaline battery powers your Player for up to 10 hours of high quality digital
sound. For best results, replace the battery only with the same or equivalent type.
Note: Do not remove the battery while your Pla yer is connected to USB.
Note: Always remov e the battery when inserting or removing a MultiMediaCard.
1. Press the indentation on the battery cover and slide it away from your Player.
2. If a battery is installed, remove it and dispose of it as instructed by the
battery manufacturer.
3. Insert a new battery oriented as shown.
4. Replace the battery cover.
+
-
REMOVING AND ATTACHING THE BELT CLIP
Use the included belt clip to easily take your Player with you.
Removing the Belt Clip
1. Loosen the mounting screw until the belt clip releases from your Player .
2. Keep the mounting screw attached to the belt clip for future use.
Attaching the Belt Clip
1. Attach the belt clip to the back of your Player with the clip running down the
back of your Player as shown.
Use the guide tab for proper alignment.
2. Tighten the included screw to secure the belt clip to your Player.
 Loading...