

Page 1
RP-600
DUAL BAND PMR 446 / LPD 433 UHF FM VOICE PAGER
OPERATING MANUAL
INTRODUCTION
This product has been specifically designed for the following purposes :
- as a Voice Pager in Tourists Guided Tours
- as a Voice Pager in Conferences, Meetings, etc.
- as a Voice Pager in traditional Paging Systems (in stores, hotels, restaurants, resorts, factories, warehouses, offices, shops,
etc.) and wherever a same message from a main transmitter must be received by either one or more groups of persons or by
a single person.
The pager operates in the PMR-446 (8 channels) and LPD-433 (69 channels) UHF FM bands. 38 CTCSS codes, call vibration
alert, earset or built-in speaker and more features are included. Band, channel and all other functions are fully programmable by
the system manager in the PROGRAM mode. Please read the following operating instructions before using the radio.
\
BATTERY CHARGING / 230VAC WALL ADAPTOR CHARGER (Mod. AC-600)
When the battery capacity is low, the Battery Level Indicator (G) blinks. Recharge batteries at this time. When the battery capacity
is low, switch OFF the pager and connect the wall charger to the CHARGE jack (1), then plug it to a 230VAC outlet ; the Battery
Level Indicator bars (G) will blink indicating that the wall charger is connected to the pager and that the charging process is
running. To obtain the maximum performance from the batteries, recharge them only when they are fully discharged. The
approximate charging time with 2 x 1500 mAh Ni-MH batteries is 8-12 hours, depending on the batteries condition. When the
charging time has expired, unplug the wall charger from the AC outlet and then disconnect it from the pager.
BATTERY CHARGING / MULTIPLE DESK CHARGER (Mod. MDC-600)
Please refer to the instruction manual supplied with the Multiple Desk Charger.
WARNING !
1. If the product will not be used for a long period of time, please take out the batteries.
2. Please dispose of old or defective batteries in a safe and environmentally friendly manner.
3. Do not dispose of batteries in fire.
4. Do not recharge batteries for more than 12 hours, to avoid overcharge or overheating, which could damage the radio.
5. Do never try to recharge alkaline batteries, as this might cause damage to the radio or explosion of the batteries.
6. Do not use chargers or accessories others than the original ones, otherwise damage to the radio may occur.
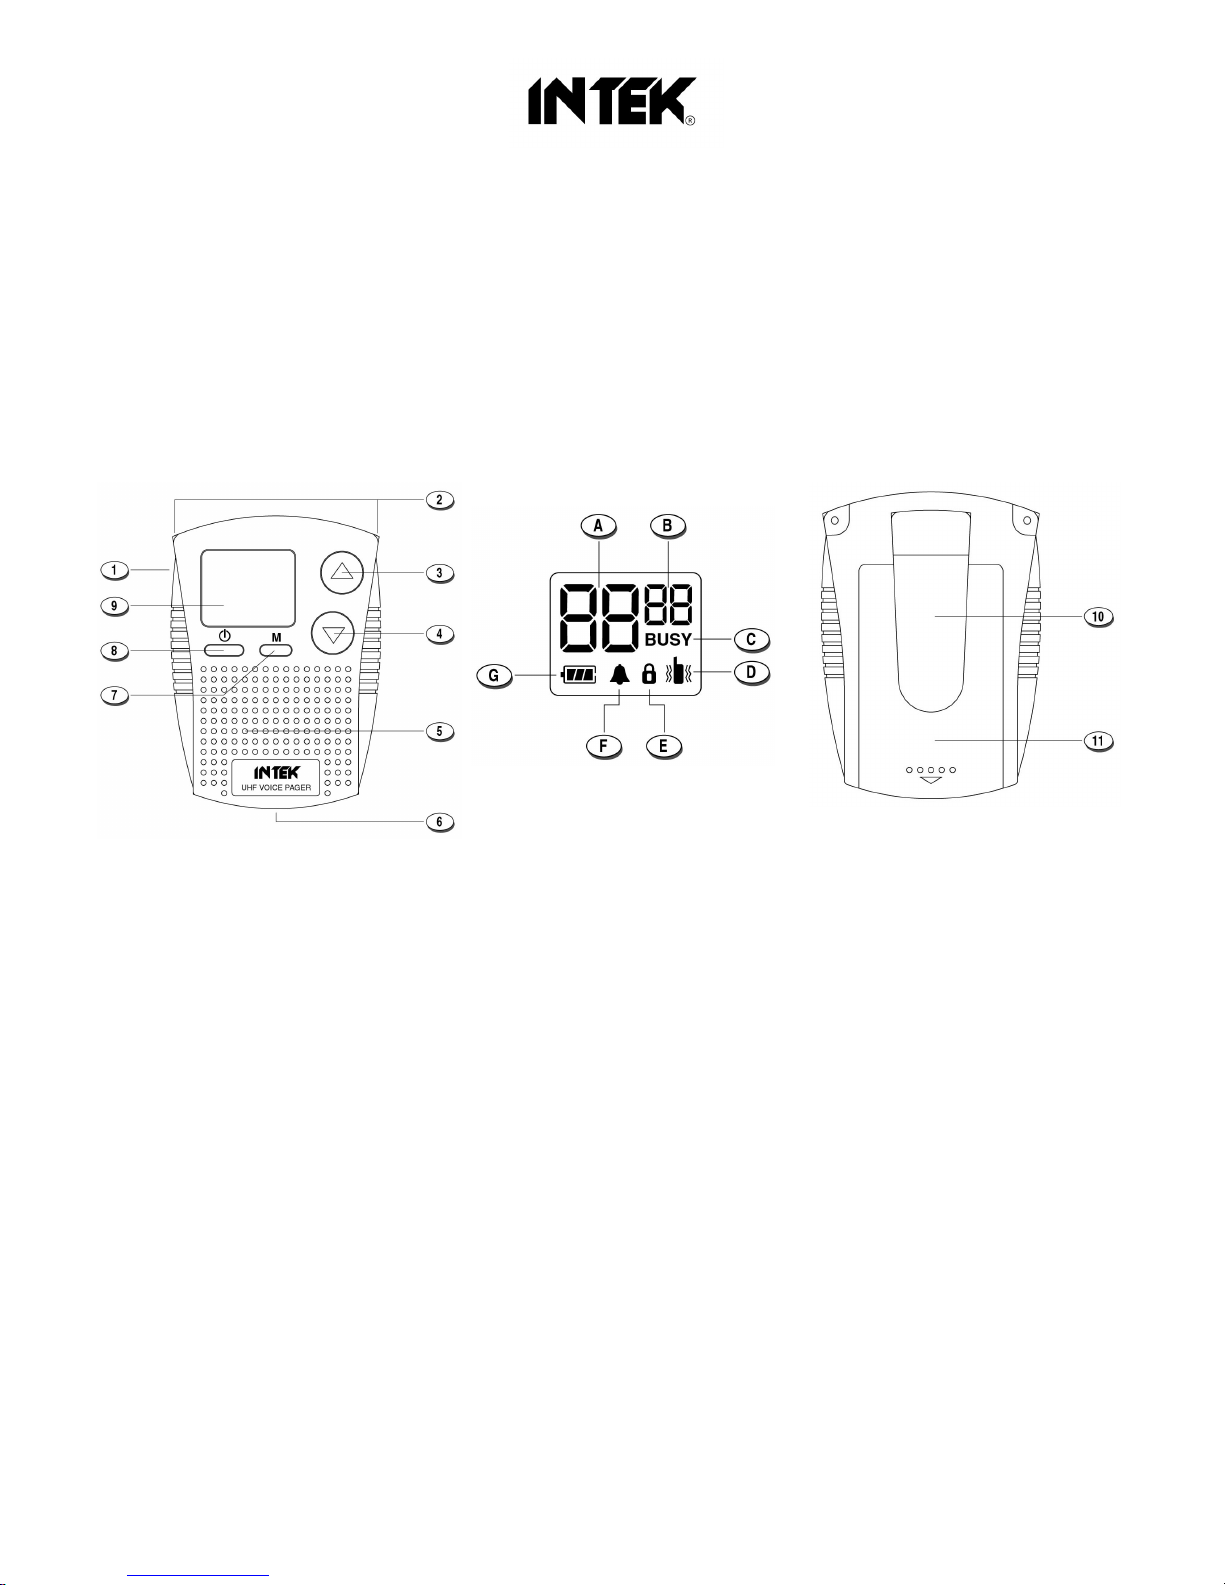
KEYS AND CONTROLS
1. Earset / Charge Jack
2. Holes for Necklace
3. UP Key
4. DOWN Key
5. Built-in Speaker
6. Desk Charger Contacts
7. MENU / Monitor Key
8. ON-OFF Key
9. Backlighted LCD
LCD DISPLAY
A. Channel Number or
Volume Level
B. CTCSS Code Number
C. BUSY Icon
D. Vibrator Alert Icon
E. Keypad Lock Icon
F. CALL Alarm Icon
G. Battery Level Indicator
BATTERY INSTALLATION
1. Remove the locking screw (12).
2. Remove the Belt Clip (10)
3. Slide down and remove the
battery door (11).
4. Install 2 x AA size batteries.
Please respect correct polarity.
5. Re-install the battery door (11).
6. Re-install the Belt Clip (10)
7. Re-install the locking screw (12).
Page 2
BASIC OPERATION - USER MODE
When radio is turned ON, it always sets in the USER MODE. In this mode, user can only operate the following basic functions, in
order to avoid entering any wrong command or change the radio settings and programming.
Power ON/OFF
1. Switch ON the radio by pressing and holding the ON-OFF (8) key for about 2 seconds.
2. The LCD Display (9) will shortly show the Channel Number (A) and the CTCSS Code Number (B).
3. Then the LCD Display (9) will show the selected Volume Level (A) (from level 01 to 08), the Battery Level (G) and the Keypad
Lock icon (E).
4. To switch OFF the radio, press and hold the ON-OFF (8) key for about 2 seconds.
Volume Level Setting
Adjust the Volume to the desired level, pressing the UP (3) or DOWN (4) keys while listening to an incoming communication.
The desired Volume Level (A) will appear on the LCD Display (9).
Monitor Function
Press and hold the MENU/MONITOR key (7) for about 2 seconds to activate the Monitor function. This function opens temporarily
the Squelch in order to listen to the background noise and to any weak signal. This function is convenient to monitor any incoming
communication on the operating channel. If the Monitor function is enabled, the BUSY Icon (C) appears on the LCD Display (9). To
disable the Monitor function, release the MENU/MONITOR key (7).
Earset Operation
1. Connect the external earset to the earset jack (1).
2. Adjust the Volume to the desired level.
3. The built-in speaker (5) is disabled when the earset is connected.
Always set the volume to the minimum level before connecting an external earset, in order to avoid damaging the earset or the
user’s ear. Gradually increase the volume level while wearing the earset and listening to an incoming signal.
CALL Function / CALL Memory
The Pager can receive and store in memory an incoming CALL signal, if this CALL signal was transmitted by a
transmitter/transceiver type DRS-5070 (desk type station) or SL-02 (handheld station).
When a CALL signal is received, a CALL tone is heard and the CALL icon (F) blinks on the LCD (9). The CALL icon (F) will
continue to blink in order to inform the user that a CALL signal was received by its pager and it will stop blinking when the
MENU/Monitor key (7) will be pressed.
ADVANCED FUNCTIONS - PROGRAM MODE
Pager may be programmed by the system manager in the PROGRAM MODE. The following functions are programmable only in
the PROGRAM MODE. In the normal USER MODE, the user cannot access, program or modify any of these functions, in order to
avoid entering any wrong command or change the settings programmed by the system manager.
1. Channel selection (PMR channels P1-P8) (LPD channels 01-69)
2. CTCSS Code selection (from 0 to 38)
3. VIBRATION Alert
To enter thePROGRAM MODE, proceed as follows :
1. Switch OFF the radio.
2. Switch ON the radio by pressing simultaneously the ON-OFF (8) andtheMENU/MONITOR (7) keys, until radio is ON.
3. The Keypad LOCK icon (E) will disappear from the LCD (9).
4. Press the MENU/Monitor (7) key several times to scroll the various programmable functions.
Switch OFF the radio to exit the PROGRAM MODE.
Channel Selection
1. In the PROGRAM MODE press the MENU/Monitor Key (7) until the Channel Number (A) blinks on the LCD (9).
2. Press the UP (3) or DOWN (4) keys to select the desired channel number (PMR channels P1-P8) (LPD channels 01-69).
Press and hold the UP (3) or DOWN (4) key, to advance the channel selection quicker.
3. To confirm and store the selection, press the ON-OFF (8) key or press the MENU/Monitor (7) key to move to the next function.
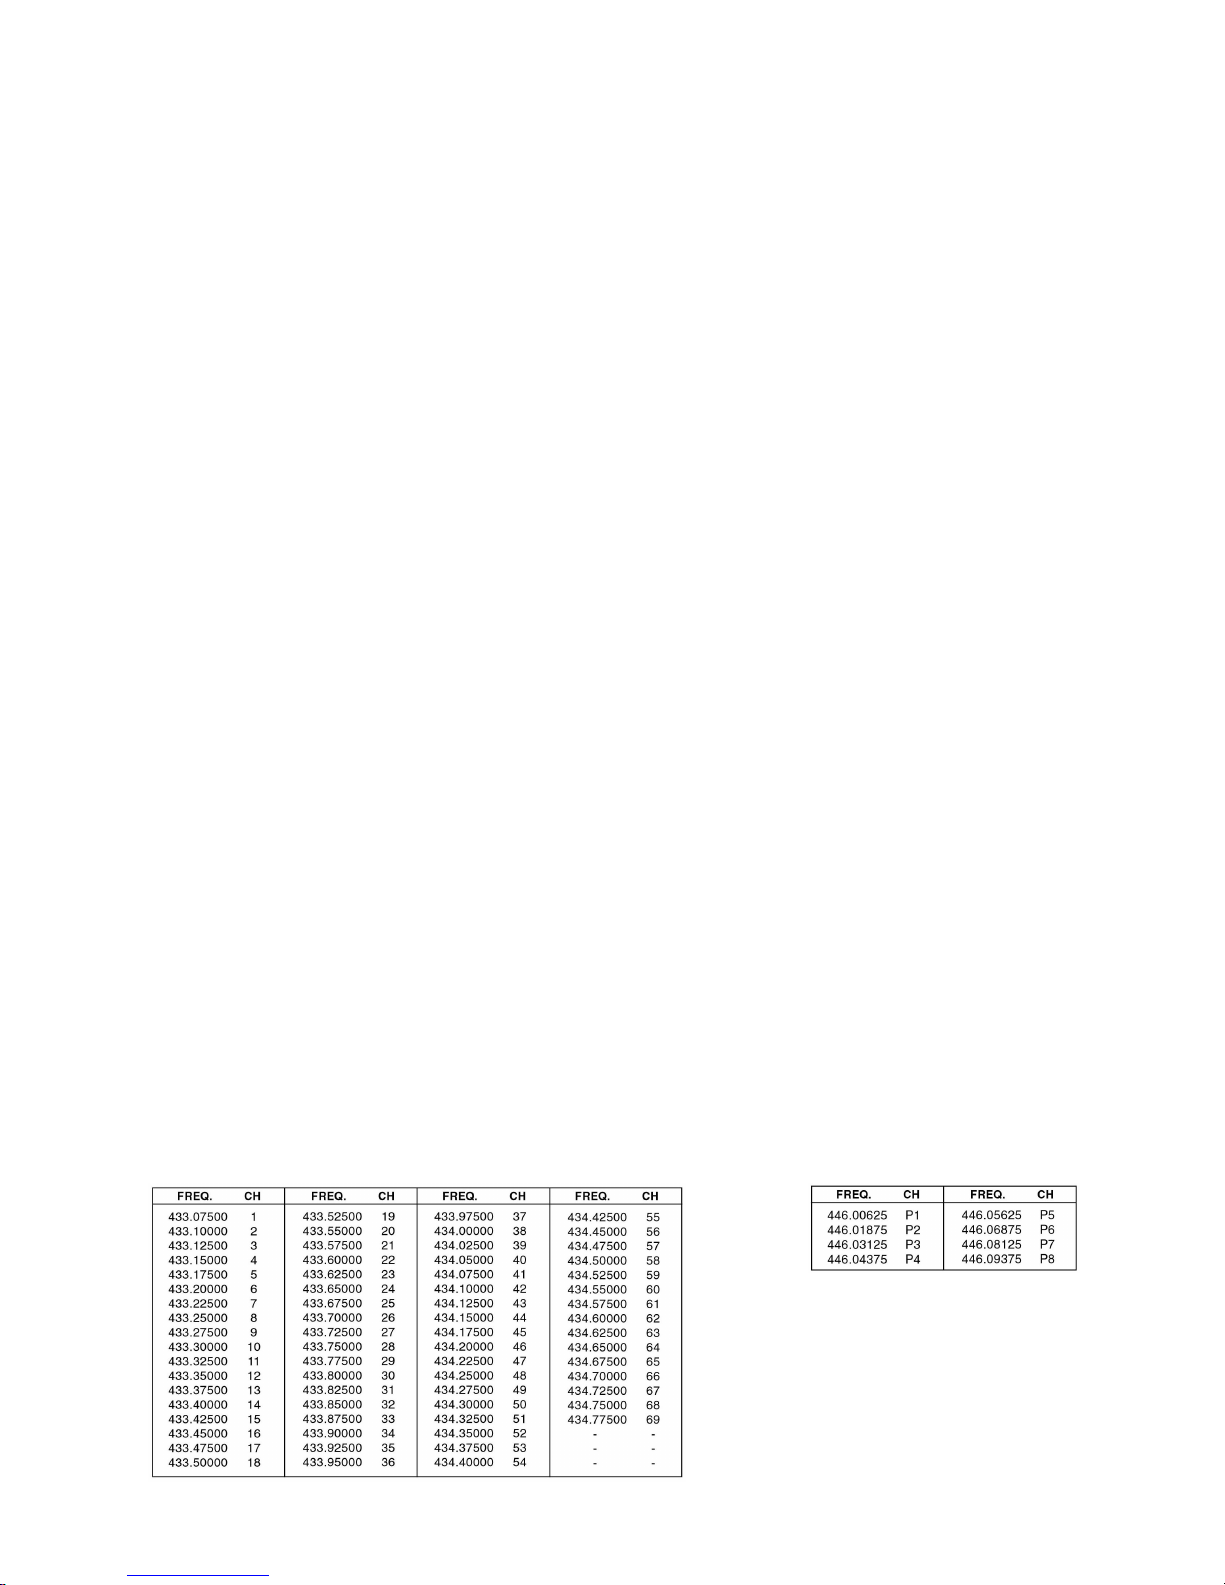
LPD Channels Table PMR Channels Table
Page 3

CTCSS Tone Selection
1. In the PROGRAM MODE press the MENU/Monitor Key (7) until the Channel Number (A) blinks on the LCD (9).
2. Press again the MENU/Monitor Key (7) until the CTCSS Code Number (B) blinks on the LCD Display (9).
3. Press the UP (3) or DOWN (4) keys to select the desired CTCSS Code Number. Press and hold the UP (3) or DOWN (4) keys
to move the selection quicker.
4. Select the CTCSS Code 0 to disable the CTCSS function.
5. To confirm and store the selection, shortly press the ON-OFF (8) key or press the MENU/Monitor (7) key to move to the next
function.
Notice : To receive messages from other radios, transmitters and receivers (pagers) must use the same channel number and the
same CTCSS code number. Please refer to the channel and CTCSS frequency tables included in this manual.
VIBRATION Alert
This function may be operated only if the Call signal is transmitted by a transmitter/transceiver type DRS-5070 (desk type station)
or SL-02 (handheld station). If this function is enabled, when a CALL signal is received, in addition to the CALL tone the pager will
also vibrates for several seconds. This is specially useful in noisy locations, as a CALL tone alert may be missed.
1. In the PROGRAM MODE press the MENU/Monitor Key (7) until the Channel Number (A) blinks on the LCD Display (9).
2. Press again the MENU/MONITOR Key (7) a few times until the Vibration icon (D) blinks and the oF icon (A) (function disabled)
or the on icon (A) (function enabled) will appear on the LCD (9).
4. Press the UP (3) or DOWN (4) keys to enable (on) or disable (oF) the Vibration Alert function.
3. To confirm and store the selection, shortly press the ON-OFF Key (8) or press the MENU/Monitor Key (7) to keep scrolling the
other menu functions.
SPECIFICATIONS
Channels 8 PMR 446 Channels / 69 LPD 433 Channels
CTCSS Tones 38 CTCSS Codes
Operating Frequency Range 446.00625 - 446.09375 MHz (PMR Band)
433.07500 - 434.77500 MHz (LPD Band)
Power Source 2.4V (2 x AA 1,2V 1500mAh Ni-MH Rechargeable Battery)
3.0V (2 x AA 1,5V Alkaline Battery)
Audio Output 860 mV (16 ohm)
Dimensions H85 x L60 X D36 mm
Weight gr. 110 (battery included)
IMPORTANT INFORMATION
Important !
Changes or modifications to this product could void your authority to operate this unit. Any adjustment to your radio must be made by a qualified authorized
technician or service station.Never open the cabinet of your radio. Never change or replace anything in your radio (except batteries).
Hazardous Environments
Do not operate the radio in hazardous environments. Do not keep radio under direct rain.
Care and Safety
To clean the radio, use a soft cloth dampened with water. Do not use cleaners or solvents because they can harm the body of the unit and leak inside, causing
permanent damage. Use a dry, lint-free cloth to clean the battery contacts. Do not submerge the unit in water or use it on a wet environment. If the unit gets
wet, turn it off and remove the battery immediately. Dry the battery and the battery compartment with a soft cloth to minimize potential water damage. Leave the
battery compartment cover off overnight to ensure complete drying. Do not use the radio until it is completely dry.
Battery Operation / Wasting
Dispose of battery in the proper manner, according to federal, state and local regulations that apply in your area. A battery may leak electrolyte if it is mixed in a
set with different battery types, if inserted incorrectly, if disposed of in fire, or if an attempt is made to charge a battery not intended to be charged. Discard leaky
batteries immediately. Leaking batteries can cause skin burns or other personal injury.
Warning !
The use of this device may be subject to national restrictions or regulations. Check your local authority or dealer before purchasing and using this product.
User Information
In accordance with art. 13 of the Legislative Decree of 25th July 2005, no. 15 ”Implementation of Directives 2002/95/EC, 2002/96/EC and
2003/108/EC, relative to reduction of the use of hazardous substances in electrical and electronic equipment, in addition to waste disposal”. The
crossed bin symbol shown on the equipment indicates that at the end of its working life the product must be collected separately from other
waste. The user must therefore take the above equipment to the appropriate differentiated collection centres for electronic and electro technical
waste, or return it to the dealer when purchasing a new appliance of equivalent type, in a ratio of one to one. Appropriate differentiated waste
collection for subsequent recycling, treatment and environment-friendly disposal of the discarded equipment helps to prevent possible negative
environmental and health effects and encourages recycling of the component materials of the equipment. Illegal disposal of the product by the user will be
punished by application of the administrative fines provided for by the legislative decree no. 22/1997 (article 50 and following of the legislative decree no.
22/1997).
Page 4

DECLARATION OF CONFORMITY
Produced, imported and distributed by :
INTEK S.R.L.
Europe Head Office
16 via Guglielmo Marconi, 20090 Segrate, Italy
Tel. +3902 2695 0451 - Fax. +3902 2695 2185
www.intek-radios.com
e-mail : intek.com@intek-com.it
 Loading...