

Page 1

get started
INSTANT POT® DUO
MULTI-COOKER
™
Page 2

Table of contents
IMPORTANT SAFEGUARDS..................................................................................4
Special cord set instructions .......................................................................................9
Product specifications ..................................................................................................9
Find your model name and serial number ...............................................................9
Product, parts and accessories ...........................................................................10
Get started .............................................................................................................12
Initial set up ....................................................................................................................12
Initial test run (water test) ..........................................................................................13
Pressure cooking 101 ............................................................................................14
Releasing pressure ................................................................................................ 15
Venting methods ...........................................................................................................15
Control panel .........................................................................................................17
Settings ..................................................................................................................18
Status messages ..................................................................................................20
Pressure control features ....................................................................................21
Multicooker lid ..............................................................................................................22
Steam release handle .................................................................................................22
Sealing ring ...................................................................................................................23
Float valve .....................................................................................................................23
Anti-block shield ...........................................................................................................24
Pressure cooking ..................................................................................................24
Jump start magic! ........................................................................................................25
Smart programme breakdown ..................................................................................26
Pressure cooking tips ..................................................................................................28
Pressure cooking grains ............................................................................................ 30
2 | [email protected] | 1800 251 643
Page 3

Table of contents
Other cooking styles .............................................................................................31
Slow Cook ......................................................................................................................32
Sauté ...............................................................................................................................33
Deglazing the inner pot (pressure cooking after sauté) ................................... 34
Yogurt .............................................................................................................................35
Using yogurt cups ........................................................................................................36
Care, cleaning and storage .................................................................................. 37
Removing and installing parts ................................................................................. 38
Troubleshooting .....................................................................................................41
Warranty ...............................................................................................................44
Contact ..................................................................................................................46
instantpot.com.au | 3
Page 4

IMPORTANT SAFEGUARDS
At Instant Brands™ your safety always comes rst. The Instant Pot® Duo™
was designed with your safety in mind. As always, be careful when using
electrical appliances and follow basic safety precautions.
01 READ ALL INSTRUCTIONS, SAFEGUARDS AND W ARNINGS
BEFORE USE. FAILURE TO FOLLOW THESE SAFEGUARDS
AND INSTRUCTIONS MAY RESULT IN INJURY AND/OR
PROPERTY DAMAGE.
02 Use only the Instant Pot Duo lid with the Instant Pot Duo multicooker
base. Using any other multicooker lids may cause injury and/or
damage.
03 For household use only. Not for commercial use. DO NOT use the
appliance for anything other than its intended use.
04 For countertop use only. Always operate the appliance on a stable,
non-combustible, level surface.
• DO NOT place on anything that may block the vents on the bottom
of the appliance.
• DO NOT place on a hot stove.
05 Heat from an external source will damage the appliance.
• DO NOT place the appliance on or close to a hot gas or electric
burner, or a heated oven.
• DO NOT use the appliance near water or ame.
• DO NOT use outdoors. Keep out of direct sunlight.
06 DO NOT touch the appliance’s hot surfaces. Only use the side handles
for carrying or moving.
• DO NOT move the appliance when it is under pressure.
• DO NOT touch accessories during or immediately after cooking.
• DO NOT touch the metal portion of the lid when the appliance is in
operation; this could result in injury.
• Always use hand protection when removing accessories, and to
handle the inner pot.
• Always place hot accessories on a heat-resistant surface or cooking
plate.
WARNING
Read this manual carefully and completely and retain for future reference.
Failure to adhere to safety instructions may result in serious injury or damage.
4 | [email protected] | 1800 251 643
Page 5

IMPORTANT SAFEGUARDS
07 The removable inner pot can be extremely heavy when full of
ingredients. Care should be taken when lifting the inner pot from
the multicooker base to avoid burn injury.
• Extreme caution must be used when the inner pot contains hot food,
hot oil or other hot liquids.
• DO NOT move the appliance while it is in use and use extreme
caution when disposing of hot grease.
08 Overlling may cause a risk of clogging the steam release
pipe and developing excess pressure, which may result in burns, injury,
and/or property damage.
• DO NOT ll over PC MAX — 2/3 as indicated on the inner pot.
• DO NOT ll the inner pot over — 1/2 line when cooking foods that
expand during cooking such as rice or dried vegetables.
09 This appliance cooks under pressure. Any pressure in the
appliance can be hazardous. Allow the appliance to depressurise naturally
or release all excess pressure before opening. Inappropriate use may
result in burns, injury and/or property damage.
• Make sure the appliance is properly closed before operating.
Refer to Pressure control features: multicooker lid.
• DO NOT cover or obstruct the steam release handle and/or oat valve
with cloth or other objects.
• DO NOT attempt to open the appliance until it has depressurised,
and all internal pressure has been released. Attempting to open the
appliance while it is still pressurised may lead to sudden release of
hot contents and may cause burns or other injuries.
• DO NOT place your face, hands or exposed skin over the steam
release handle or oat valve when the appliance is in operation or has
residual pressure, and do not lean over the appliance when removing
the lid.
• Turn the appliance off if steam escapes from the steam release
handle and/or oat valve in a steady stream for longer than 3 minutes.
• If steam escapes from the sides of the lid, turn the appliance off and
make sure the sealing ring is properly installed. Refer to Pressure
WARNING
Read this manual carefully and completely and retain for future reference.
Failure to adhere to safety instructions may result in serious injury or damage.
instantpot.com.au | 5
Page 6

IMPORTANT SAFEGUARDS
10 When cooking meat with skin (e.g. sausage with casing), the skin can
11 When pressure cooking food with a doughy or thick texture, or a high
12 Oversized foods and/or metal utensils must not be inserted into the
13 Proper maintenance is recommended before and after each use:
14 DO NOT use this appliance for deep frying or pressure frying with oil.
15 If the power cord is detachable, always attach the plug to the appliance
16 Regularly inspect the appliance and power cord. Do not operate the
17 Spilled food can cause serious burns. A short power-supply cord is
control features: sealing ring.
• DO NOT attempt to force the lid off the Instant Pot multicooker base.
Refer to Releasing pressure.
swell when heated. Do not pierce the skin while it is swollen; this could
result in scalding injury.
fat/oil content, contents may splatter when opening the lid. Follow recipe
instructions for pressure release method. Refer to Releasing pressure.
inner pot as they may cause risk of re and/or personal injury.
• Check the steam release handle, steam release pipe, anti-block
shield and oat valve for clogging.
• Before inserting the inner pot into the multicooker base, make sure
both parts are dry and free of food debris.
• Let the appliance cool to room temperature before cleaning or
storage.
rst, then plug the cord into the wall outlet. To turn off, press Cancel,
then remove the plug from power source. Always unplug when not in
use, as well as before adding or removing parts or accessories, and
before cleaning. To unplug, grasp the plug and pull from the outlet.
Never pull from the power cord.
appliance if the power cord or plug is damaged, or after the appliance
malfunctions or is dropped or damaged in any manner. For assistance,
contact Customer Care by email at [email protected] or by
phone at 1800 251 643 or (02) 9317 1000.
provided to reduce the hazards resulting from grabbing, entanglement
and tripping.
WARNING
Read this manual carefully and completely and retain for future reference.
Failure to adhere to safety instructions may result in serious injury or damage.
6 | [email protected] | 1800 251 643
Page 7

IMPORTANT SAFEGUARDS
• DO NOT let the power cord hang over edges of tables or counters,
or touch hot surfaces or open ame, including the stovetop.
• DO NOT use below-counter power outlets, and never use with an
extension cord.
• Keep the appliance and cord away from children.
18 DO NOT use any accessories or attachments not authorised by
Instant Brands LLC. The use of parts, accessories or attachments not
recommended by the manufacturer may cause a risk of injury, re or
electric shock.
• To reduce the risk of pressure leakage, cook only in an authorised
stainless-steel Instant Pot inner pot.
• DO NOT use the appliance without the removable inner pot installed.
• To prevent personal injury and damage to the appliance, only replace
the sealing ring with an authorised Instant Pot sealing ring.
19 DO NOT attempt to repair, replace or modify components of the
appliance, as this may cause electric shock, re or injury, and will void
the warranty.
20 DO NOT tamper with any of the safety mechanisms, as this may result
in injury or property damage.
21 The multicooker base contains electrical components. To avoid
electrical shock:
• DO NOT put liquid of any kind into multicooker base.
• DO NOT immerse power cord, plug or the appliance in water or
other liquid.
• DO NOT rinse the appliance under tap.
22 DO NOT use the appliance in electrical systems other than 220-240V~
50/60Hz. Do not use with power converters or adapters.
23 This appliance is NOT to be used by children or by persons with
reduced physical, sensory or mental capabilities. Close supervision
is necessary when any appliance is used near children and these
individuals. Children should not play with this appliance.
WARNING
Read this manual carefully and completely and retain for future reference.
Failure to adhere to safety instructions may result in serious injury or damage.
instantpot.com.au | 7
Page 8

IMPORTANT SAFEGUARDS
24 DO NOT leave the appliance unattended while in use. Never
connect this appliance to an external timer switch or separate
remote-control system.
25 DO NOT store any materials in the multicooker base or inner pot
when not in use.
26 DO NOT place any combustible materials in the multicooker base
or inner pot, such as paper, cardboard, plastic, Styrofoam or wood.
27 DO NOT use the included accessories in a microwave, toaster oven,
convection or conventional oven, or on a ceramic cooktop, electric coil,
gas range or outdoor grill.
SAVE THESE INSTRUCTIONS.
WARNING
To avoid injury, read and understand the instructions in this user manual before
attempting to use this appliance.
WARNING
Electrical shock hazard. Use grounded outlet only.
• DO NOT remove ground.
• DO NOT use an adapter.
• DO NOT use an extension cord.
Failure to follow these instructions may result in electric shock and/or serious injury.
WARNING
THE FAILURE TO FOLLOW ANY OF THE IMPORTANT SAFEGUARDS AND/OR
THE INSTRUCTIONS FOR SAFE USE IS A MISUSE OF YOUR APPLIANCE THAT
CAN VOID YOUR WARRANTY AND CREATE THE RISK OF SERIOUS INJURY.
WARNING
Read this manual carefully and completely and retain for future reference.
Failure to adhere to safety instructions may result in serious injury or damage.
8 | [email protected] | 1800 251 643
Page 9

IMPORTANT SAFEGUARDS
Special cord set instructions
Per safety requirement, a short power supply cord is provided to reduce the hazards
resulting from entanglement and tripping.
This appliance has a 3-prong grounding plug. To reduce the risk of electric shock, plug the
power cord into a grounded electrical outlet that is easily accessible.
Product specifications
Duo Mini 700W 220-240V~ 50/60Hz 3 Litres 3.9 kg cm: 29L x 25.5W x 28.5H
Duo 60 1000W 220-240V~ 50/60Hz 5.7 Litres 5.44 kg cm: 33.5L x 31W x 31.7H
Duo 80 1200W 220-240V~ 50/60Hz 8 Litres 7.16 kg cm: 37.6L x 33.8W x 36.1H
Find your model name and serial number
Model name: Find it on the label on the back of the multicooker base, near the power cord.
Serial number: Turn the multicooker base over — you’ll find this info on a sticker on
the bottom.
WARNING
Read this manual carefully and completely and retain for future reference.
Failure to adhere to safety instructions may result in serious injury or damage.
instantpot.com.au | 9
Page 10

Product, parts and accessories
See Care, cleaning and storage: Removing and installing parts to find out how
everything fits together.
Top of lid
Steam release handle
Float valve
Handle
Lid fins
Lid position marker
Bottom of lid
Locking pin
Silicone cap
(bottom of float valve)
Stand the lid up in the multicooker base to keep it off your
countertop! Insert the left or right lid fin into corresponding
slot in the multicooker base handles to stand it up and
save some space.
Illustrations in this document are for reference only and may
differ from the actual product. Always refer to the actual product.
10 | [email protected] | 1800 251 643
Anti-block shield
Steam release pipe
(beneath anti-block shield)
Sealing ring rack
Sealing ring
Page 11

Product, parts and accessories
Inner pot
Multicooker base
Fill lines
Stainless-steel inner pot
Outer pot
Condensation rim
Condensation collector (rear)
Heating element
(interior)
Base handles
Control panel
Base power socket
(rear, 8L is hardwired)
Detachable power cord
(3L and 5.7L only)
Stainless-steel exterior
Illustrations in this document are for reference only and may differ from the actual product.
Always refer to the actual product.
instantpot.com.au | 11
Page 12

Get started
Initial set up
01 Pull that Duo out of the box!
02 Remove the packaging material and accessories from in and around the multicooker.
Make sure to check under the inner pot!
03 Wash the inner pot in a dishwasher or with hot water and dish soap. Rinse it well with
warm, clear water and use a soft cloth to thoroughly dry the outside of the inner pot.
04 Wipe the heating element with a soft, dry cloth to make sure there are no stray
packaging particles left in the multicooker base.
Don’t remove the safety warning stickers from the lid or the rating label from the
back of the multicooker base.
05 You may be tempted to put the Duo on your stovetop — but don’t do it!
Place the multicooker base on a stable, level surface, away from combustible material
and external heat sources.
Is something missing or damaged?
Get in touch with Customer Care by email at [email protected] or by phone at
1800 251 643 or (02) 9317 1000.
Feeling keen?
• Check out Product, parts and accessories to get to know your Instant Pot’s
components, then read over Pressure control features for an in-depth look.
• While you’re doing the Initial test run (water test), read over Pressure cooking 101
to find out how the magic happens!
WARNING
Read the Important
safeguards before using the
appliance. Failure to read and
follow those instructions for
safe use may result in damage
to the appliance, property
damage or personal injury.
12 | [email protected] | 1800 251 643
Do not place the
appliance on a
stovetop or upon
another appliance.
Heat from an external
source will damage
the appliance.
Do not place anything on
top of the appliance, and
do not cover or block the
steam release handle or
anti-block shield, located
on the appliance lid.
Page 13

Get started
Initial test run (water test)
Do you have to do the water test? No — but getting to know the ins and outs of your Duo
prepares you for success in the kitchen! Take a few minutes to get to know how this baby works.
Stage 1: Setting up the Duo for pressure
cooking
01 Remove the inner pot from the
multicooker base. Add 750 mL of water
to the inner pot, then insert it back
into the multicooker base.
02 3L & 5.7L models: Secure the power
cord to the base power socket on the
back of the multicooker base. Make
sure the connection is tight.
All models: Connect the power cord to
a 220-240V power source.
The display shows OFF.
03 Place and close the lid as described
in Pressure control features:
Multicooker lid.
04 Turn the steam release handle to the
Sealing position.
Stage 2: "Cooking" (...hot water à la
king, anyone?)
01 Select Pressure Cook.
02 Use the - / + buttons to adjust the
cooking time to 5 minutes (00:05).
Adjustments are saved when a Smart
Programme starts, so the next time
you use Pressure Cook, it will default to
5 minutes.
03 Press Keep Warm to turn the
automatic Keep Warm setting off.
04 The multicooker beeps after 10 seconds
and the display shows On.
While the multicooker does its thing,
read Pressure cooking 101 on
the next page to find out how
the magic happens.
05 When the Smart Programme finishes,
the display shows End.
Stage 3: Releasing pressure
01 Follow instructions for a Quick Release in
Releasing pressure: Venting methods.
02 Wait for the float valve to drop,
then carefully open and remove the
lid as described in Pressure control
features: Multicooker lid.
03 Using proper hand protection, remove
the inner pot from the multicooker
base, discard the water and thoroughly
dry the inner pot.
That's it! You're good to go :)
CAUTION
Pressurised steam releases through the top of the steam release handle. Keep
exposed skin away from the steam release handle.
DANGER
DO NOT attempt to remove the lid while the oat valve is up and NEVER
attempt to force the lid open. Contents are under extreme pressure. Float
valve must be down before attempting to remove the lid. Failure to follow these
instructions may result in serious personal injury and/or property damage.
CAUTION
The inner pot will be hot after cooking. Always use appropriate heat protection when
handling a hot inner pot.
instantpot.com.au | 13
Page 14

Pressure cooking 101
Pressure cooking uses steam to raise the boiling point of water above 100ºC. These high
temperatures allow you to cook food way faster than normal.
When pressure cooking, the Instant Pot goes through 3 stages.
Pre-heating
What you see What you don’t see Tips
The time it takes the multicooker to
While the multicooker preheats,
it vaporises liquid to create
The display shows
On.
steam.
Once enough steam has built up,
the float valve pops up and locks
the lid in place.
Cooking
What you see What you don’t see Tips
The float valve bobs
up and down from all
the steam, then pops
up and stays flush
with the lid. The
display switches
to the cooking
countdown timer.
When it reaches the required
pressure level, cooking begins.
The Instant Pot automatically
maintains the cooking pressure
at High or Low pressure.
pressurise depends on things like
food and liquid temperature and
volume.
Frozen foods have the longest preheating time. For the fastest results,
thaw your food before cooking it.
No need to hang around during this
stage — trust that IP magic!
A higher pressure means a higher
temperature.
Smart Programme settings (e.g.,
cooking time, pressure level, etc.)
can be adjusted at any time during
cooking.
Releasing pressure
What you see What you don’t see Tips
If Keep Warm is on
after cooking, the
timer counts up from
00:00.
If not, the multicooker
goes back to standby
and the display shows
End.
The float valve is still
popped up.
14 | [email protected] | 1800 251 643
Although food has finished
cooking, the multicooker is still
pressurised and hot, which is why
the float valve is up.
Releasing pressure lowers
the temperature inside the
multicooker, which allows you to
safely remove the lid once the
float valve drops.
See Releasing pressure for
information on safe venting
techniques and what they’re used for.
Follow your recipe instructions to
choose the best venting method for
your meal.
The Instant Pot cools faster
if Keep Warm is turned off.
Page 15
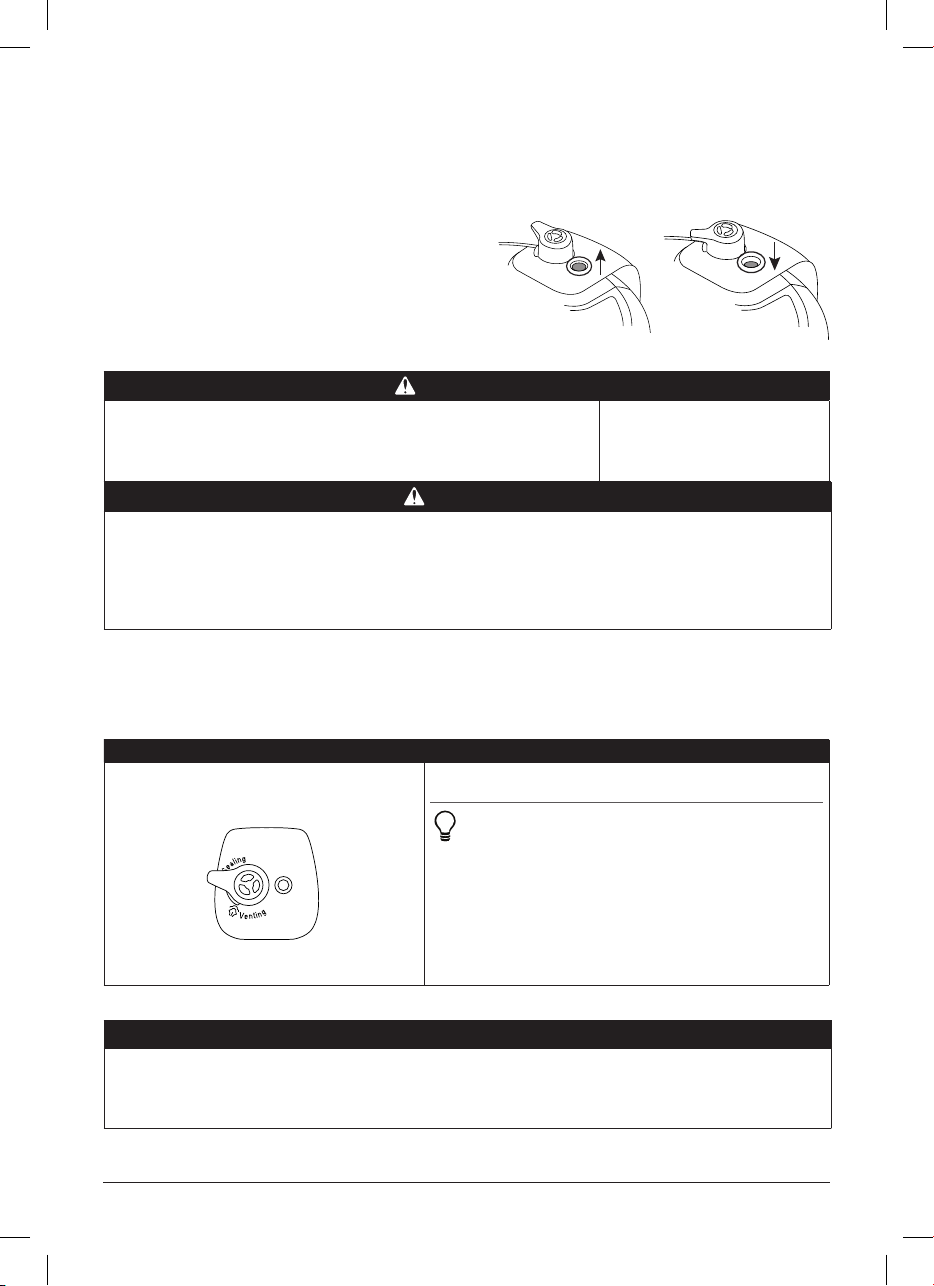
Releasing pressure
You must release pressure after pressure cooking before attempting to open the lid.
Follow your recipe’s instructions to choose a venting method, and always wait until the
float valve drops into the lid before opening.
Venting methods
• Natural Release (NR or NPR)
• Quick Release (QR or QPR)
• Timed Natural Release
WARNING
Steam ejected from the steam release handle is hot.
DO NOT place hands, face, or any exposed skin over
the steam release handle when releasing pressure.
DANGER
DO NOT attempt to remove the lid while the oat valve is up and NEVER
attempt to force the lid open. Contents are under extreme pressure. Float
valve must be down before attempting to remove the lid. Failure to follow
these instructions may result in serious personal injury and/or property damage.
Natural Release (NR or NPR)
Cooking stops gradually. As the temperature within the multicooker drops, the Instant Pot
depressurises naturally over time.
Pressurised Depressurised
DO NOT cover the
steam release handle.
What to do What to expect
After cooking finishes, leave the steam release
handle in the Sealing position until all pressure
is released.
Sealing position
Your meal continues to cook even after the Smart Programme ends.
This is called “carryover cooking” or “resting”, and it’s
great for large cuts of meat.
The depressurisation time may vary based upon the volume,
type and temperature of food and liquid. It can take up to
40 minutes with some dishes, so plan ahead — it’s well worth
the wait!
When pressure has been fully released, the float valve drops
into the lid.
NOTICE
Use NR to depressurise the multicooker after cooking high-starch foods
(e.g., soups, stews, chilis, pasta, oatmeal and congee) or after cooking
foods that expand when cooked (e.g., beans and grains).
instantpot.com.au | 15
Page 16
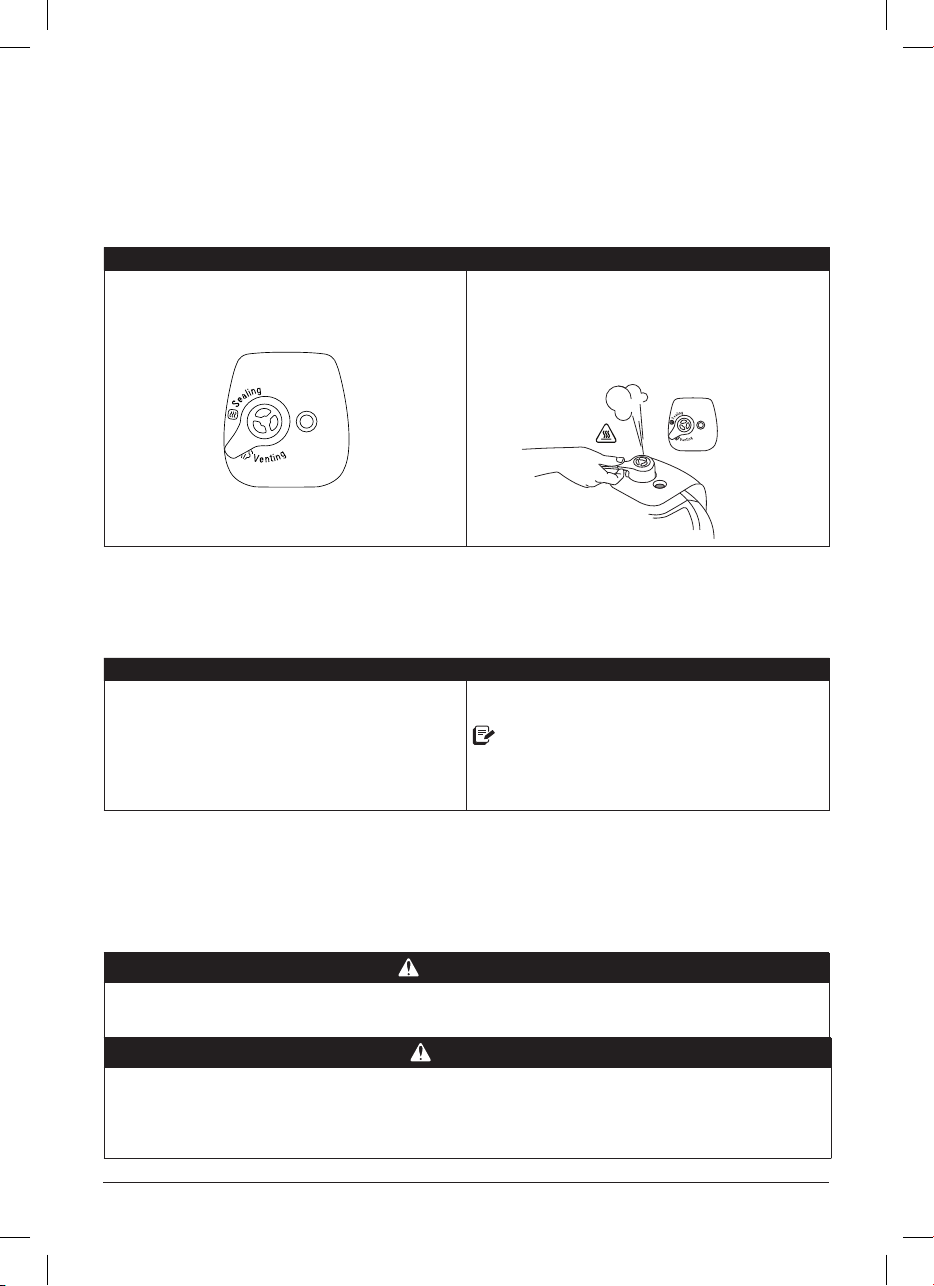
Releasing pressure
Quick Release (QR or QPR)
Stops cooking quickly and prevents overcooking. Perfect for quick-cooking vegetables and
delicate seafood!
What to do What to expect
Carefully, quickly and confidently, turn the steam
release handle to Venting and wait for all pressure
inside the multicooker to release.
Venting position
Timed natural release
The carryover cooking continues for a specific amount of time, then stops quickly when
you release the remaining pressure. Perfect for finishing rice and grains.
What to do What to expect
Leave the steam release handle in the Sealing position
for a while (according to your recipe) then turn it to
Venting and wait for all pressure inside the multicooker
to release.
A jet of steam ejects through the top of the steam
release handle.
This is normal!
When pressure has been fully released, the float valve
drops into the lid.
A jet of steam ejects through the top of the steam
release handle.
The temperature within the multicooker drops, so the
steam release may not be as powerful as a normal QR.
When pressure has been fully released, the float valve
drops into the lid.
If there is substantial spatter while venting, turn the steam release handle back to
Sealing. Wait a few minutes before trying to release pressure again. If spatter continues,
use NR to safely release the remaining pressure.
Illustrations in this document are for reference only and may differ from the actual product.
Always refer to the actual product.
CAUTION
Steam ejected from the steam release handle is hot. DO NOT place hands, face,
or any exposed skin over the steam release handle when releasing pressure.
NOTICE
Do not use QR when cooking fatty, oily, thick or high-starch foods (e.g., stews,
chilis, pasta and congee) or when cooking foods that expand when cooked
(e.g., beans and grains).
16 | [email protected] | 1800 251 643
Page 17
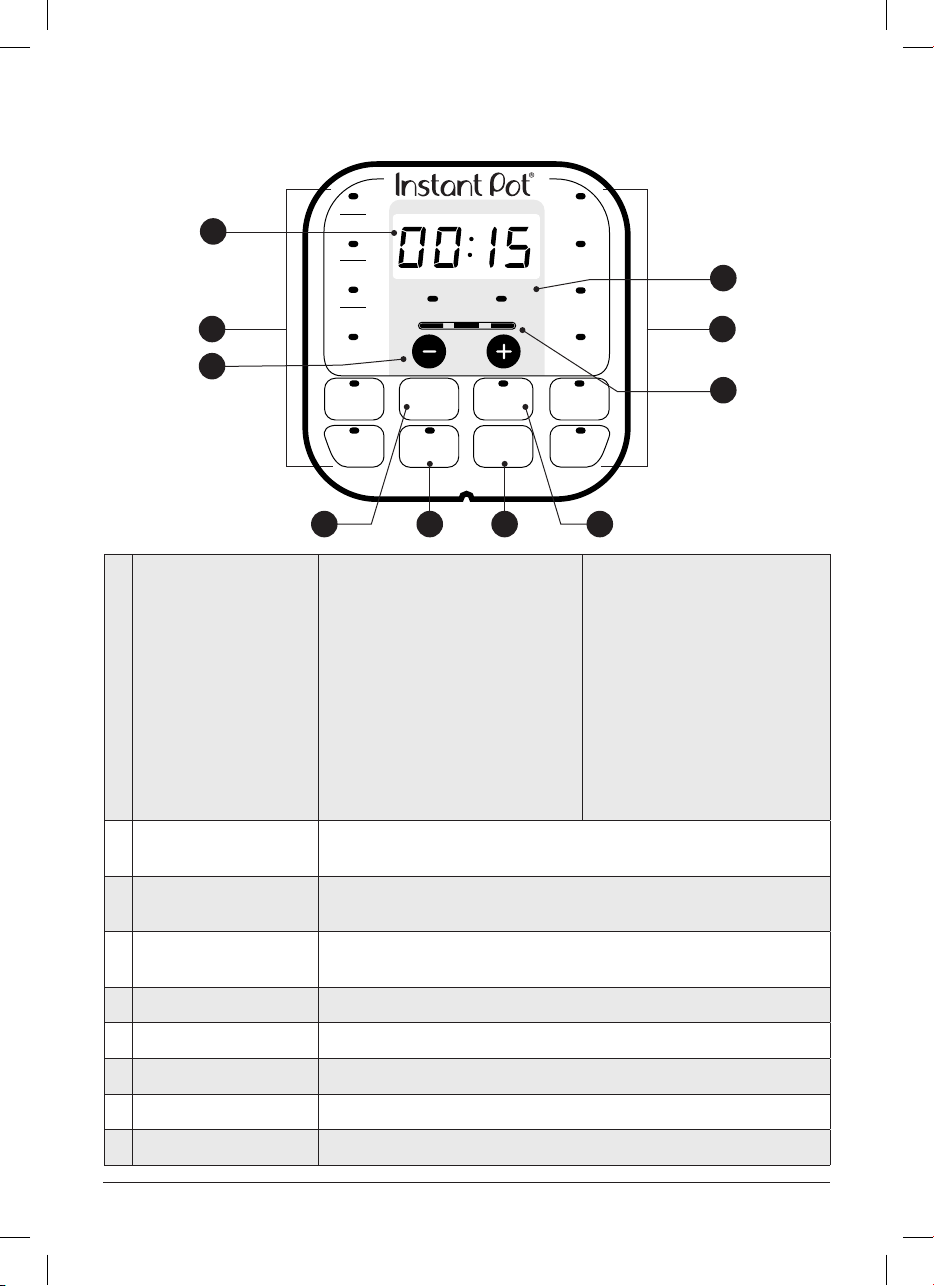
Control panel
2
1
5
1 Smart Programmes
Soup
Broth
Meat
Stew
Bean
Chili
Poultry
Slow
Cook
Sauté
Low Pressure High Pressure
Less
Normal More
Pressure
Level
Delay
Start
Keep
Warm
Cancel
6 78 9
Pressure cooking
• Soup/Broth
• Meat/Stew
• Bean/Chili
• Poultry
• Rice
• Multigrain
• Porridge
• Steam
• Pressure Cook
Duo
Rice
Multigrain
Porridge
Steam
Yogurt
Pressure
Cook
Non-pressure cooking
• Slow Cook
• Sauté
• Yogurt
• Keep Warm
3
1
4
2 Time display
3 Pressure fields
4 Less / Normal / More
Shows the time in HH:MM format. Counts up or down, depending
on the Smart Programme.
LEDs show if the multicooker is using Low or High pressure during
pressure cooking.
Preset cooking time or temperature levels, depending on the Smart
Programme.
5 - / + buttons Adjust time for cooking, Delay Start and Keep Warm.
6 Pressure level Toggle between Low Pressure and High Pressure.
7 Keep Warm Turns the Keep Warm setting on or off.
8 Delay Start Delay the start of cooking.
9 Cancel Stop a Smart Programme at any time.
instantpot.com.au | 17
Page 18
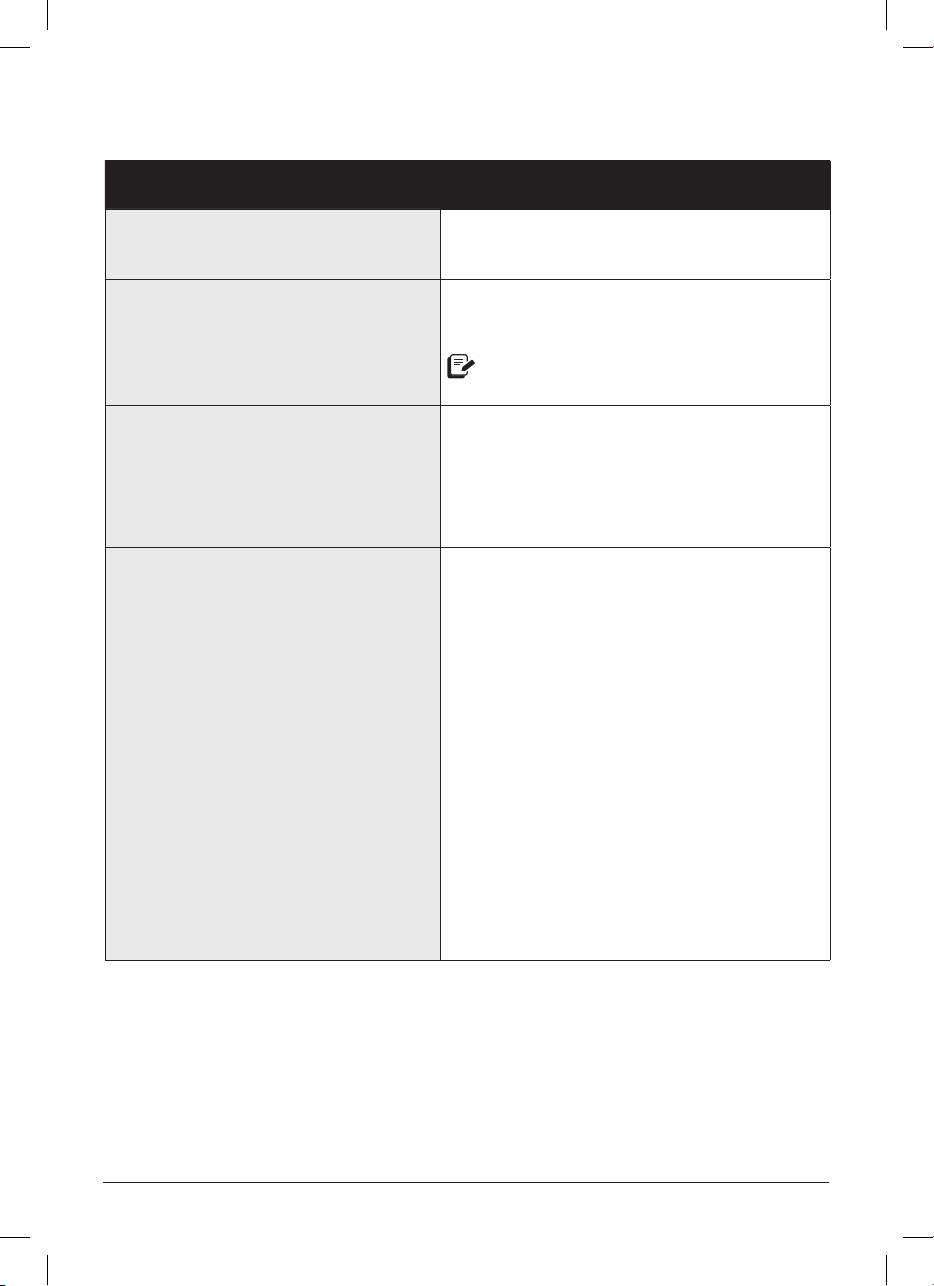
Settings
Setting Description
Turn sound on
Turn sound off.
Adjust and save custom cooking
times and temperatures.
Reheat or warm for long periods.
When in standby, press and hold the + button
until the display shows S On.
When in standby, press and hold the - button
until the display shows SOFF.
Audible safety and error message alerts
cannot be turned off.
Once a Smart Programme is selected, changes
to the cooking time, temperature and pressure
level are saved once the Smart Programme
begins.
See Cooking for details.
Keep Warm can be used for up to a maximum
of 10 hours (10:00).
01 When in standby, press Keep Warm.
02 Press Keep Warm again to cycle through
Less, Normal and More warming
temperature levels.
03 Use the - / + buttons to set a warming
timer.
04 Keep Warm begins automatically after
10 seconds.
When cooking thick or starchy foods, heat may
not dissipate evenly. To ensure food safety,
stir the contents of thicker dishes every 40
to 60 minutes.
When Keep Warm completes, the display
shows End.
18 | [email protected] | 1800 251 643
Page 19

Settings
Setting Description
Delay Start can be set from between
10 minutes (00:10) and 24 hours (24:00).
01 Select a Smart Programme and tweak it as
needed, then press Delay Start.
Once pressed, there is no way to go back
to the Smart Programme settings. You’ll
have to press Cancel and start again.
02 When the hours field flashes, use the
Set a Delay Start timer.
Reset an individual smart programme.
- / + buttons to adjust the hours.
03 Press Delay Start again to toggle to the
minutes field and use the - / + buttons
to adjust the minutes.
04 The Delay Start timer starts automatically
after 10 seconds.
When Delay Start ends, the Smart Programme
begins and the display shows On.
Delay Start is not available with the Sauté
or Yogurt Smart Programmes.
When in standby, press and hold one Smart
Programme button until the multicooker
returns to Standby and displays OFF.
The Smart Programme’s pressure level,
cooking time and temperature are restored to
the factory default setting.
Reset all smart programmes.
When in standby, press and hold Cancel until
the multicooker beeps.
All Smart Programme pressure levels, cooking
times and temperatures are restored to the
factory default setting.
instantpot.com.au | 19
Page 20
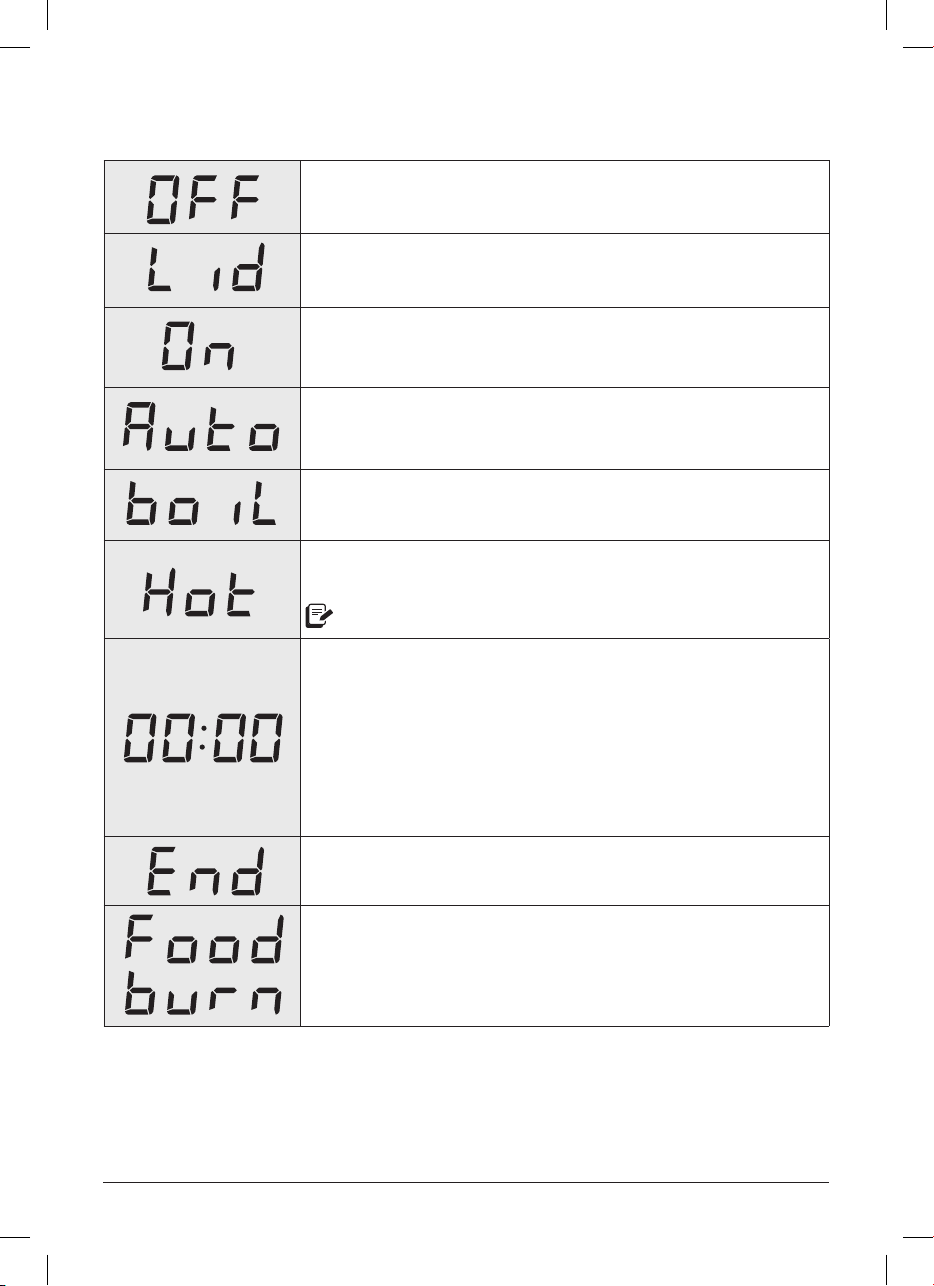
Status messages
The Instant Pot is in standby mode, ready for action!
May indicate that the lid is missing or is not properly secured.
The multicooker is pre-heating.
The Rice Smart Programme is running.
The Yogurt Smart Programme is in the process of pasteurising
milk (i.e., the Yogurt Smart Programme is set to More).
The inner pot has reached the perfect temperature and is ready
to start cooking your food.
Only applies to Sauté.
Display shows one of the following:
• When Delay Start is running, the multicooker counts down
until the Smart Programme begins;
• When a Smart Programme is running, the multicooker
counts down the remaining cooking time;
• When Keep Warm is running, the multicooker counts the
length of time that food has been warming.
The Smart Programme has finished and Keep Warm is off.
The multicooker is overheating due to insufficient liquid.
See Troubleshooting for more information.
Do you see something else? See Troubleshooting for more information.
20 | [email protected] | 1800 251 643
Page 21
Pressure control features
See Care, cleaning and storage for installation and removal of parts.
Multicooker lid
What we love about it What you should know about it
The lid was designed with lid fins that fit
perfectly inside the handles on the left and
right sides of the multicooker base to help
keep your countertop dry!
When the Instant Pot is plugged in it plays a
little jingle when you open and close the lid.
The lid is removable during non-pressure
cooking so you can taste-test as you go.
When you’re pressure cooking, the lid
only locks into place once the multicooker
has pressurised. Try not to remove the lid
unnecessarily!
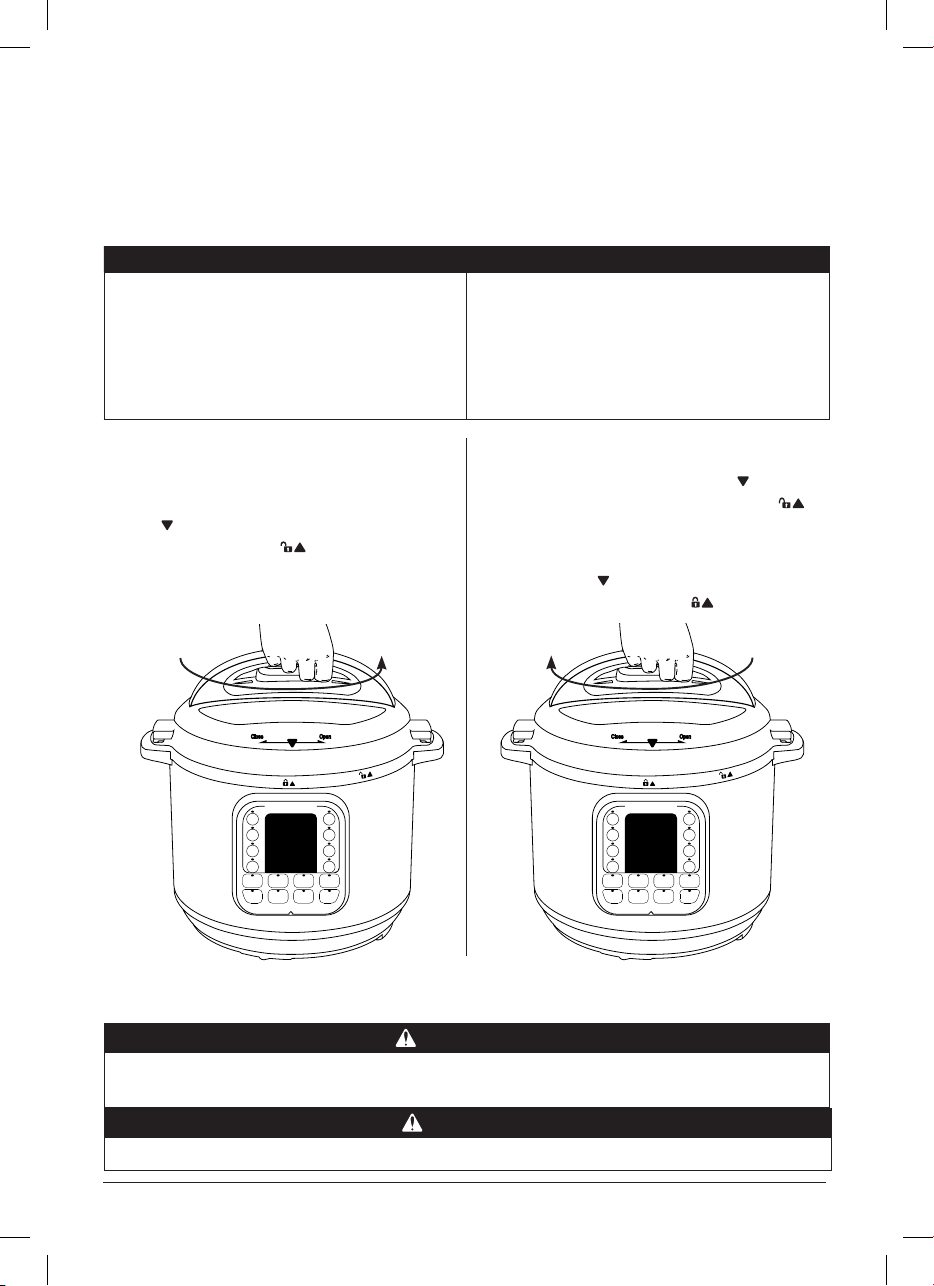
Removing the lid
01 Grip the lid handle and turn it counter-
clockwise to align the symbol on the
lid with the symbol on the rim of the
multicooker base .
02 Lift the lid up and off the multicooker
base towards your body.
Illustrations in this document are for reference only and may differ from the actual product.
Always refer to the actual product.
Closing the lid
01 Align the symbol on the lid with the
symbol on the multicooker base ,
then lower the lid onto the track.
02 Turn the lid clockwise until the symbol
on the lid aligns with the symbol on
the multicooker base .
WARNING
Only use a compatible Instant Pot Duo lid with the Instant Pot Duo multicooker
base. Using any other multicooker lids may cause injury and/or damage.
CAUTION
Always check the lid for damage and excessive wear prior to cooking.
instantpot.com.au| 21
Page 22
Pressure control features
Steam release handle
The steam release handle controls the steam, venting it from the top of the steam release
handle, or sealing it inside the Instant Pot.
What we love about it What you should know about it
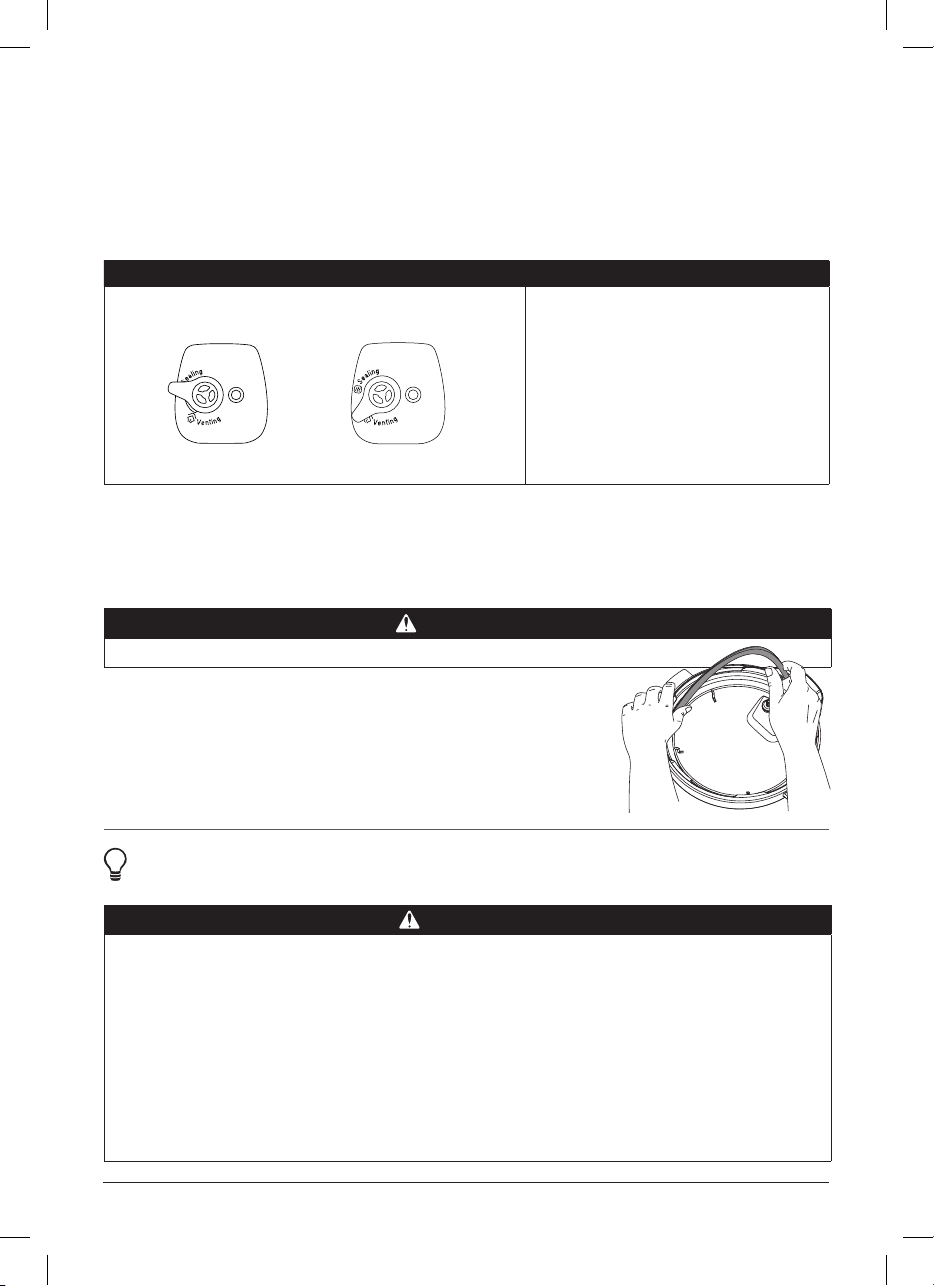
It’s easy to tell when the handle is in the Sealing
or Venting position.
Sealing position Venting position
The steam release handle is integral to product safety and necessary for pressure
cooking. It should be installed before use and cleaned regularly.
See Releasing pressure for safe venting methods and information on pressurisation
and depressurisation.
WARNING
Do not cover or block the steam release handle in any way.
Sealing ring
When the multicooker lid is closed, the sealing ring creates an
airtight seal between the lid and the inner pot.
The sealing ring must be installed before using the multicooker.
Only one sealing ring should be installed in the lid at a time.
The steam release handle sits
loosely on the steam release pipe to
pivot easily while under pressure, so
it may feel a bit wobbly.
This is normal!
Silicone is porous, so it absorbs strong aromas and certain flavours. Keep extra
sealing rings on hand to limit the transfer of aromas and flavours between dishes.
CAUTION
Only use authorised Instant Pot sealing rings. DO NOT use a stretched or
damaged sealing ring.
• Always check for cuts, deformation and correct installation of the sealing ring
before cooking.
• Sealing rings stretch over time with normal use. The sealing ring should be
replaced every 12–18 months or sooner if you notice stretching, deformation,
or damage.
Failure to follow these instructions may cause food to discharge, which may lead
to personal injury or property damage.
22 | [email protected] | 1800 251 643
Page 23
Pressure control features
Float valve
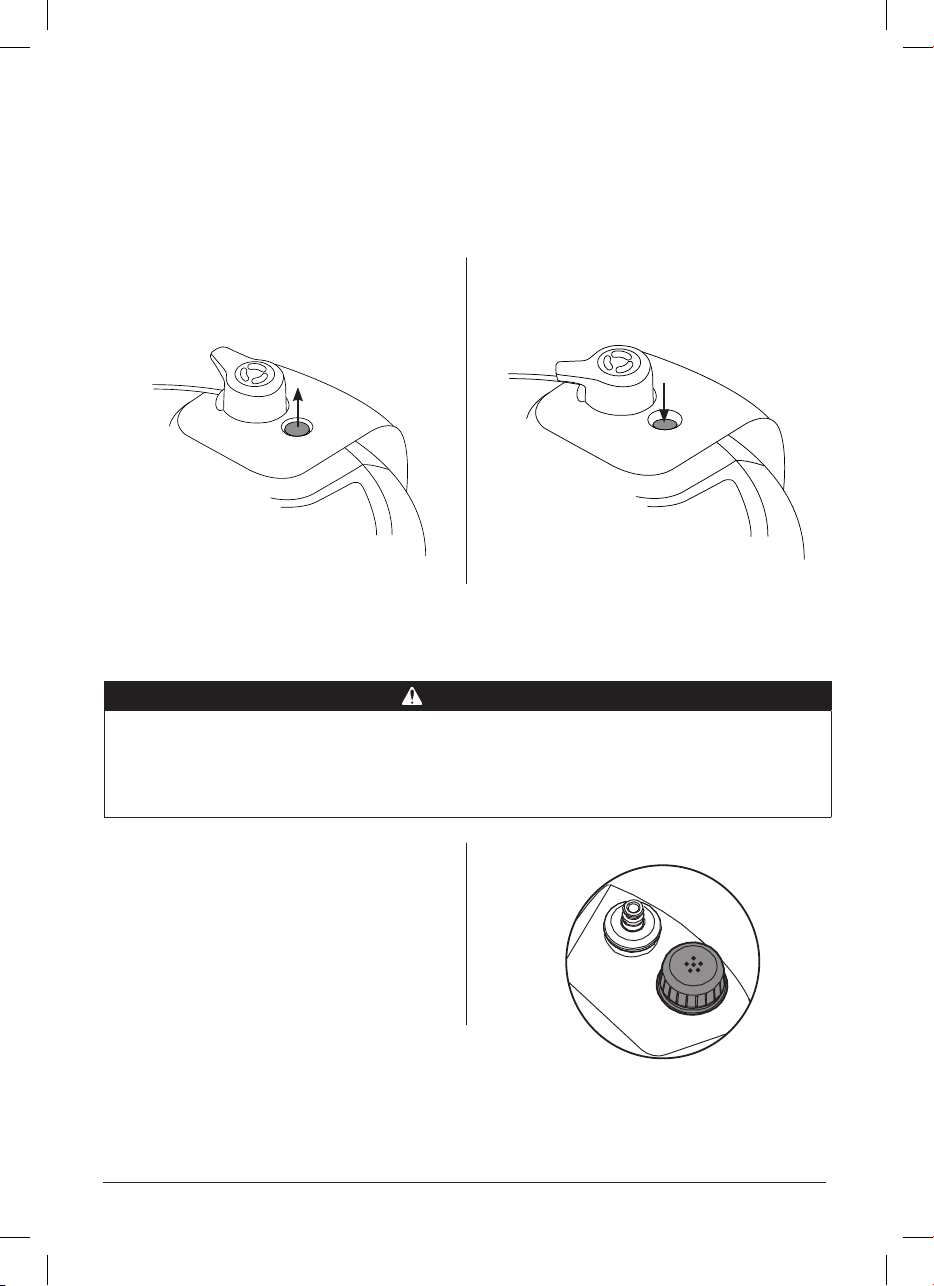
The float valve is a visual indication of whether there is pressure in the multicooker
(pressurised) or not (depressurised). It appears in two positions:
Pressurised
The float valve has visibly popped
up and is flush with the lid.
The float valve and silicone cap work together to seal in pressurised steam. These parts
must be installed before use. Do not attempt to operate the Instant Pot without the float
valve properly installed. Do not touch the float valve during use.
DANGER
DO NOT attempt to remove the lid while the oat valve is up and NEVER
attempt to force the lid open. Contents are under extreme pressure. Float
valve must be down before attempting to remove the lid. Failure to follow these
instructions may result in serious personal injury and/or property damage.
Depressurised
The float valve has
descended into the lid.
Anti-block shield
The anti-block shield prevents food
particles from coming up through the
steam release pipe, assisting with pressure
regulation.
The anti-block shield is integral to product
safety and necessary for pressure cooking.
Illustrations in this document are for reference only and may differ from the actual product.
Always refer to the actual product.
instantpot.com.au| 23
Page 24
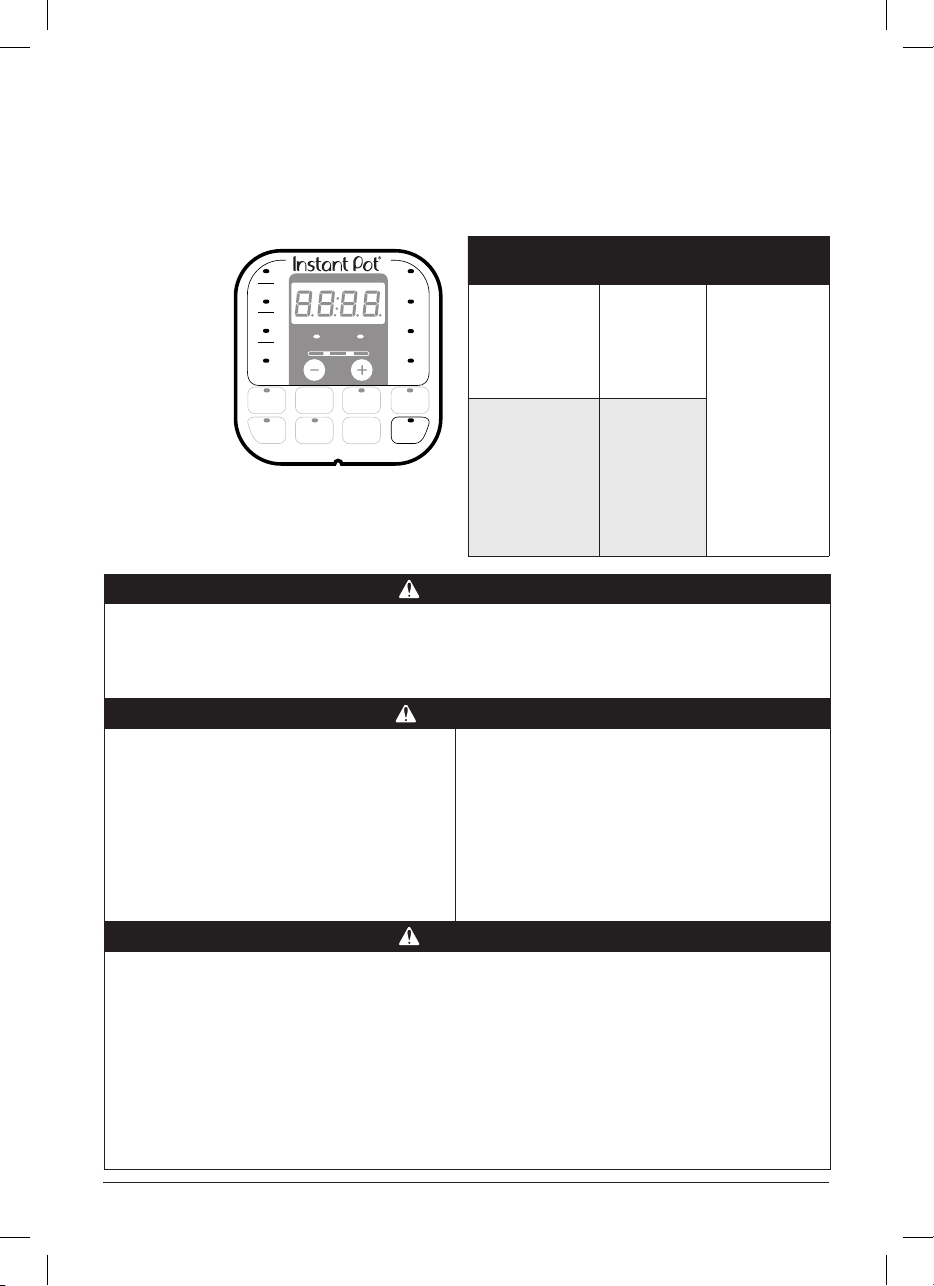
Pressure cooking
Whether you’re a whiz in the kitchen
or a complete newbie, these Smart
Programmes help get you cooking with
the touch of a button.
• Soup/Broth
• Meat/Stew
• Bean/Chili
• Poultry*
• Rice
• Multigrain*
• Porridge
Soup
Broth
Meat
Stew
Bean
Chili
Poultry
Slow
Cook
Sauté
Low Pressure High Pressure
Less
Pressure
Level
Delay
Start
Normal More
Keep
Warm
Cancel
Duo
Rice
Multigrain
Porridge
Steam
Yogurt
Pressure
Cook
• Steam
• Pressure Cook
*Not available on 3L model.
Use Pressure Cook instead.
Using pressurised steam guarantees your
dish is cooked evenly and deeply, for the
delicious results you expect every time.
Pressure level
Suggested
use
Notes
Fish and
Low Pressure
5.8 – 7.2 psi
(35–55 kPa)
High Pressure
10.2 – 11.6 psi
(65–85 kPa)
seafood,
soft
vegetables
and rice.
Eggs, meat,
poultry, root
vegetables,
oats, beans,
grains, bone
broth, stew,
The pressure
level
controls the
temperature,
so a higher
pressure
results in
a higher
cooking
temperature.
chili.
CAUTION
To avoid scorching or scalding injury, be cautious when cooking with more than
1/4 cup (60 mL) oil, oil-based sauces, condensed cream-based soups, and thick
sauces. Add suitable liquid to thin sauces. Avoid recipes that call for more than 1/4
cup (60 mL) of oil or fat content.
WARNING
Always cook with the inner pot in
place. Food must be placed in the
inner pot. DO NOT pour food or
liquid into the multicooker base.
To avoid risk of personal injury and/or
property damage, place food and liquid
ingredients in the inner pot, then insert
the inner pot into the multicooker base.
Do not ll inner pot higher than the PC MAX
— 2/3 (Pressure Cooking Maximum) line as
indicated on the inner pot.
When cooking foods that foam or froth
(e.g., applesauce, cranberries or split
peas) or expand (e.g., oats, rice, beans,
pasta) do not ll the inner pot higher than
the — 1/2 line as indicated on the inner pot.
CAUTION
Always inspect the lid and inner pot carefully to make sure they are clean and in
good working condition before use.
• To avoid personal injury or damage to the appliance, replace the inner pot if it is
dented, deformed or damaged.
• Use only authorised Instant Pot inner pots made for this model when cooking.
Always make sure the inner pot and heating element are clean and dry before
inserting the inner pot into the multicooker base.
Failure to follow these instructions may damage the multicooker. Replace
damaged parts to make sure safe function.
24 | [email protected] | 1800 251 643
Page 25
Pressure cooking
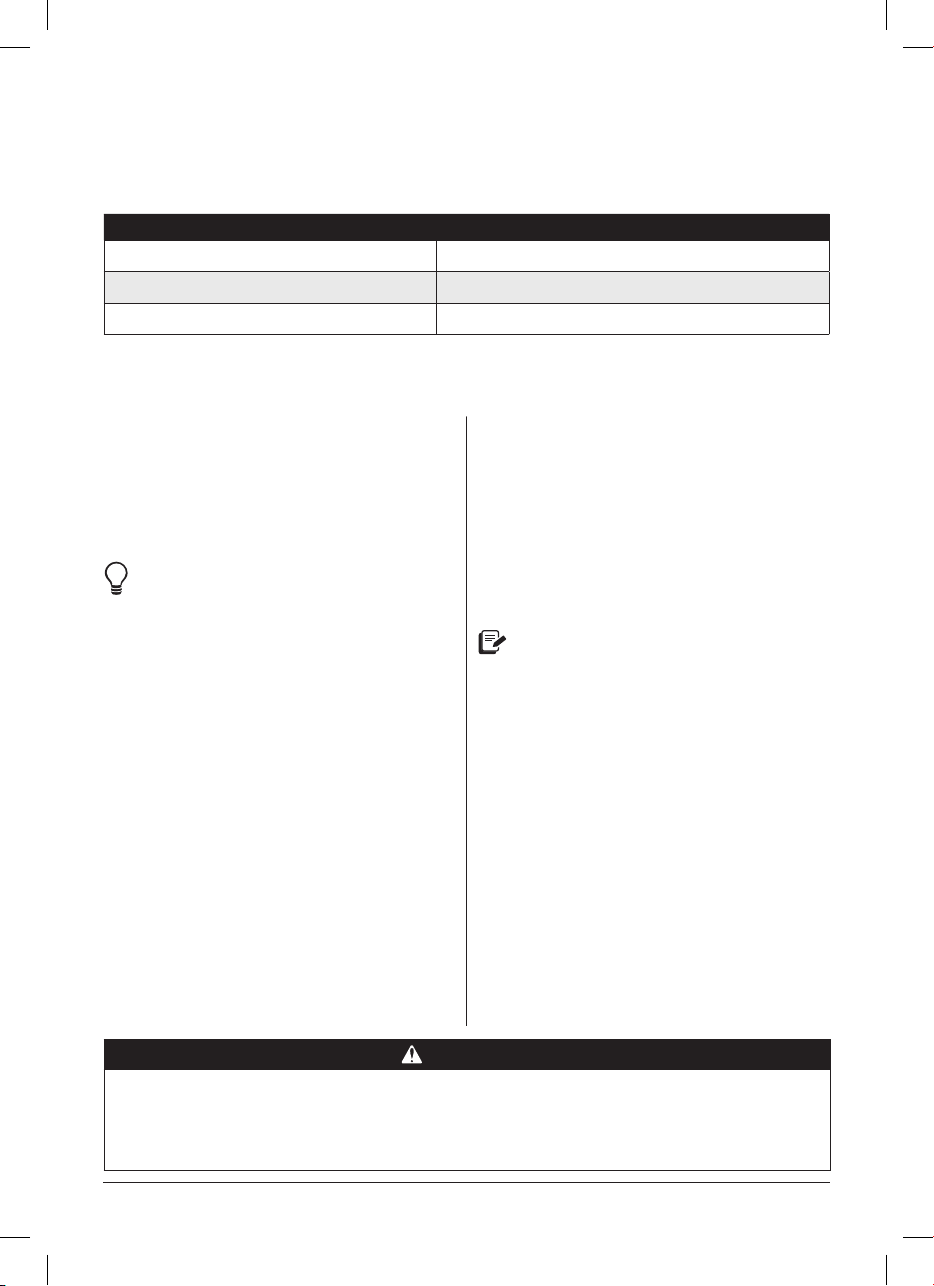
To create steam, pressure cooking liquids should be water-based, such as broth, stock, soup
or juice. If using canned, condensed or cream-based soup, add water as directed below.
Instant pot size Minimum liquid for pressure cooking
3 Litres 1 cup (250 mL)
5.7 Litres 1½ cup (375 mL)
8 Litres 2 cups (500 mL)
*Unless otherwise specified by your recipe.
Jump start magic!
Stage 1: Setting up the Duo for pressure
cooking
01 Remove the inner pot from the
multicooker base.
Add food and liquid ingredients to the
inner pot, as directed by your recipe.
Use the steam rack to keep foods out
of the cooking liquid. This helps to
distribute heat, prevents nutrients
from leeching into the cooking liquid,
and, stops food items from sticking to
the bottom of the inner pot.
Insert the inner pot back into the
multicooker base.
02 3L & 5.7L models: Secure the power
cord to the base power socket on the
back of the multicooker base. Make
sure the connection is tight.
All models: Connect the power cord to
a 220-240V power source.
The display shows OFF.
03 Place and close the lid as described
in Pressure control features:
multicooker lid.
04 Turn the steam release handle to the
Sealing position.
Stage 2: Pressure cooking
01 Select the Smart Programme you want
to use.
02 Press the same Smart Programme
button again to cycle through the preset
time options in Less, Normal and More.
03 Use the - / + buttons to adjust the
cooking time.
Adjustments are saved to the Smart
Programme when cooking begins.
04 Press Pressure Level to toggle
between Low Pressure and High
Pressure.
05 Leave the automatic Keep Warm
setting on, or press Keep Warm to turn
it off.
06 The multicooker beeps after 10 seconds,
and the display shows On as the
multicooker preheats.
07 When the Smart Programme finishes,
follow your recipe’s directions to select
the appropriate venting method. See
Releasing pressure: Venting methods
for safe venting techniques.
DANGER
DO NOT attempt to remove the lid while the oat valve is up and NEVER
attempt to force the lid open. Contents are under extreme pressure. Float
valve must be down before attempting to remove the lid. Failure to follow these
instructions may result in serious personal injury and/or property damage.
instantpot.com.au | 25
Page 26
Pressure cooking
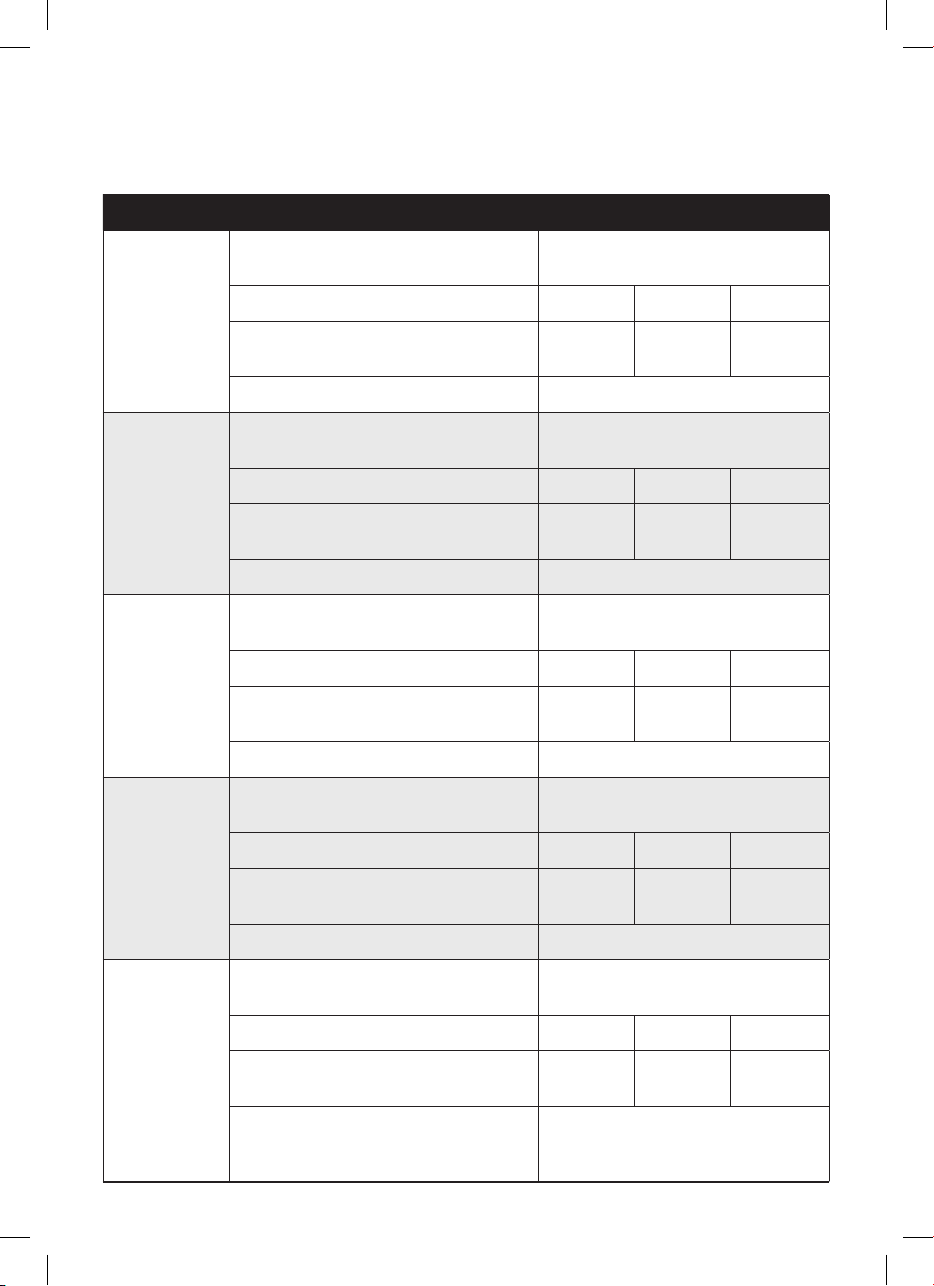
Smart programme breakdown
Smart Programmes Settings and defaults
Soup/Broth
Meat/Stew
Bean/Chili
Pressure
Setting Less Normal More
Default cooking time (adjustable)
Cooking time range 1 minute to 4 hours (00:01–04:00)
Pressure
Setting Less Normal More
Default cooking time (adjustable)
Cooking time range 1 minute to 4 hours (00:01–04:00)
Pressure
Setting Less Normal More
Default cooking time (adjustable)
Cooking time range 1 minute to 4 hours (00:01–04:00)
Pressure
Low (35–55 kPa / 5–8 psi)
High (65–85 kPa / 9.4–12.3 psi)
20 minutes
(00:20)
High (65–85 kPa / 9.4–12.3 psi)
20 minutes
(00:20)
High (65–85 kPa / 9.4–12.3 psi)
25 minutes
(00:25)
High (65–85 kPa / 9.4–12.3 psi)
30 minutes
(00:30)
Low (35–55 kPa / 5–8 psi)
35 minutes
(00:35)
Low (35–55 kPa / 5–8 psi)
30 minutes
(00:30)
Low (35–55 kPa / 5–8 psi)
4 hours
(04:00)
45 minutes
(00:45)
40 minutes
(00:40)
Poultry*
Default cooking time (adjustable)
Rice
26 | [email protected] | 1800 251 643
Default cooking time (adjustable)
Setting Less Normal More
Cooking time range 1 minute to 4 hours (00:01–04:00)
Pressure
Setting Less Normal More
Cooking time range
5 minutes
(00:05)
High (65–85 kPa / 9.4–12.3 psi)
8 minutes
(00:08)
The cook time adjusts automatically
depending on the volume of rice:
8 to 15 minutes. Display shows Auto.
15 minutes
(00:15)
Low (35–55 kPa / 5–8 psi)
12 minutes
(00:12)
30 minutes
(00:30)
15 minutes
(00:15)
Page 27
Pressure cooking
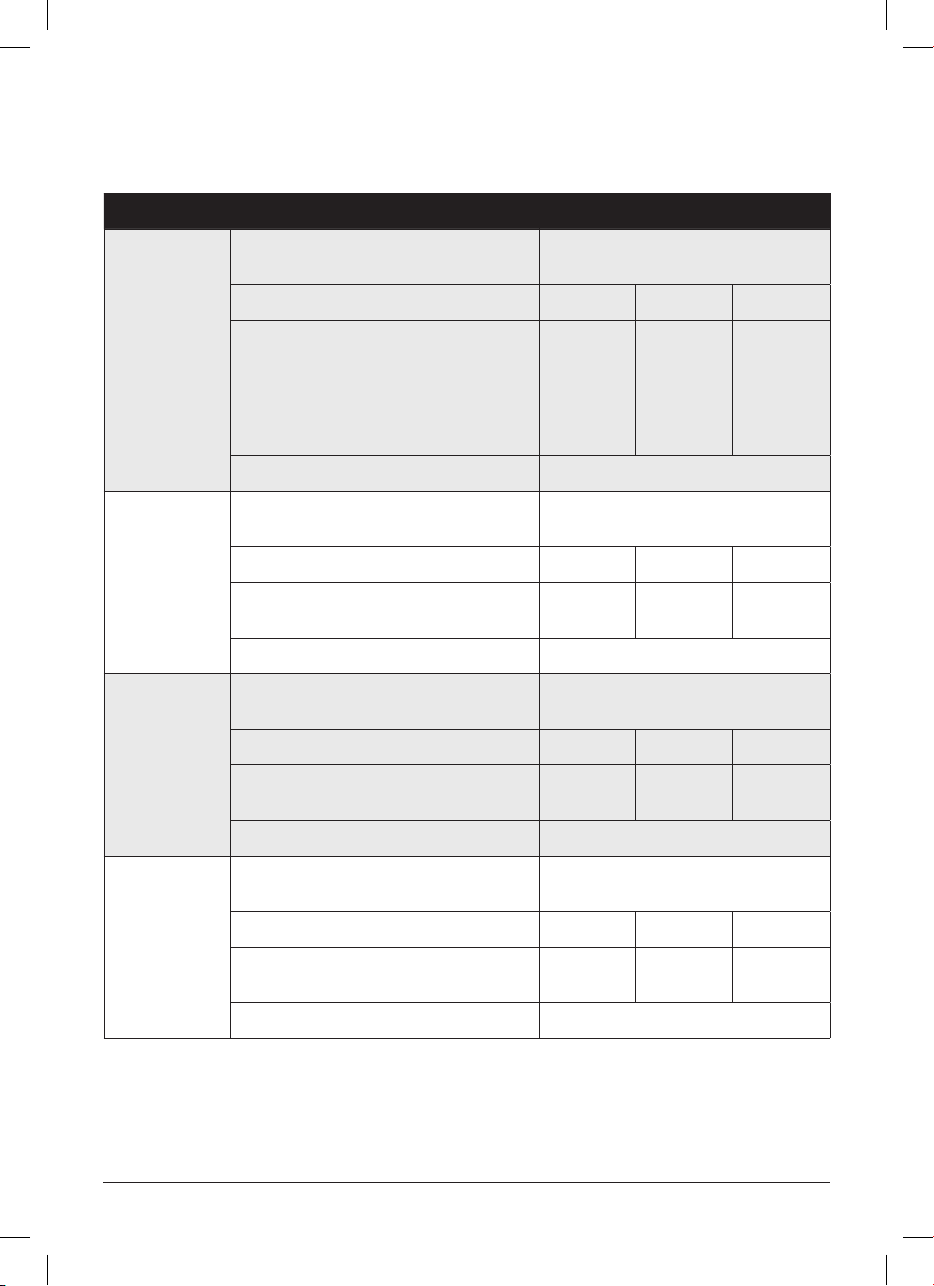
Smart programme breakdown
Smart Programmes Settings and defaults
Multigrain*
Porridge
Steam
Pressure
Setting Less Normal More
Default cooking time (adjustable)
Cooking time range 1 minute to 4 hours (00:01–04:00)
Pressure
Setting Less Normal More
Default cooking time (adjustable)
Cooking time range 1 minute to 4 hours (00:01–04:00)
Pressure
Setting Less Normal More
Default cooking time (adjustable)
Low (35–55 kPa / 5–8 psi)
High (65–85 kPa / 9.4–12.3 psi)
20 minutes
(00:20)
High (65–85 kPa / 9.4–12.3 psi)
5 minutes
(00:05)
High (65–85 kPa / 9.4–12.3 psi)
3 minutes
(00:03)
40 minutes
(00:40)
Low (35–55 kPa / 5–8 psi)
20 minutes
(00:20)
Low (35–55 kPa / 5–8 psi)
10 minutes
(00:10)
1 hour
(01:00)
+ 45
minutes
soaking
time
30 minutes
(00:30)
15 minutes
(00:15)
Cooking time range 1 minute to 4 hours (00:01–04:00)
Pressure
Setting Less Normal More
Pressure Cook
Default cooking time (adjustable)
Cooking time range 1 minute to 4 hours (00:01–04:00)
*Not available on Duo 3L models. Use Pressure Cook instead.
Low (35–55 kPa / 5–8 psi)
High (65–85 kPa / 9.4–12.3 psi)
20 minutes
(00:20)
35 minutes
(00:35)
instantpot.com.au | 27
45 minutes
(00:45)
Page 28

Pressure cooking
Pressure cooking tips
Smart
Programme
Soup/Broth
Meat/Stew
Bean/Chili
Poultry*
Setting What it's for Tips
Less Soup without meat.
Normal Soup with meat.
More Rich bone broth.
Less Soft texture. Choose setting based on meat texture
Normal Very soft texture.
More Fall-off-the-bone texture.
Less Firmer texture. Choose setting based on bean texture
Normal Soft texture.
More Very soft texture.
Less Soft texture. Choose setting based on poultry texture
Normal Very soft texture.
More Fall-off-the-bone texture.
Liquid remains clear due to lack of
boiling motion.
Always use NR to release pressure when
cooking soup with a high starch content.
desired, or adjust cook time manually.
Allow meat to “rest” for 5–30 minutes,
depending on size. It will retain cooking
juices for tender, succulent meat.
desired, or adjust cook time manually.
When cooking beans or legumes, always
use NR to release pressure.
Make sure dry beans are completely
submerged in water.
desired or adjust cook time manually.
Allow poultry to “rest” for 5–30
minutes, depending on size. It will retain
cooking juices for tender, succulent
meat.
Less Tender but firm to bite. For cooking medium and long-grain
Rice
28 | [email protected] | 1800 251 643
Normal
More Softer texture white rice.
Normal texture
white rice.
white rice.
Depending on the volume of rice, cook
time may range from 8–15 minutes.
Use a 10-minute Natural Release after
cooking for perfect results.
Page 29

Pressure cooking
Pressure cooking tips
Smart
Programme
Multigrain*
Porridge
Steam
Pressure Cook NA Manual programmeming.
Setting What it's for Tips
Brown rice, wild rice,
Less
Normal
More
Less
Normal
More
Less Vegetables.
Normal Fish and Seafood.
More Meat.
black beans, chickpeas,
etc.
Brown rice, wild rice,
mung beans, etc.
Tough grains or
a mixture of grains
and beans.
Oatmeal—steel cut
or rolled.
White rice,
porridge or congee.
Rice, porridge or
congee with a mixture
of various grains.
Select Less or Normal based on type
of grain and desired texture.
More begins with 45 minutes of warm
water soaking time prior to 60 minutes
of pressure cooking.
Adjust time as directed in recipe.
Always use NR to release pressure when
cooking foods that expand.
Use steam rack provided to elevate food
from cooking liquid.
Use QR to release pressure to prevent
food from overcooking.
Press Pressure Level to toggle between
High and Low pressure.
Use - / + buttons to adjust cook time
Adjust according to recipe or desired
results.
* Not available on 3L model. Use Pressure Cook instead.
instantpot.com.au| 29
Page 30
Pressure cooking
Pressure cooking grains
Download the free Instant Brands Connect app to search recipes, save favourites, make
notes and more!
Rice and grain Grain to water ratio
White or brown rice 1 cup : 1 cup
Quinoa 1 cup : 3/4 cup
Oatmeal 1 cup : 3 cups
Risotto
Porridge 1 cup : 10 cups
1 cup : 2 cups
Add additional wine to taste
CAUTION
When cooking meat, always use a meat thermometer to ensure the internal
temperature reaches a safe minimum temperature.
30 | [email protected] | 1800 251 643
Page 31
Other cooking styles
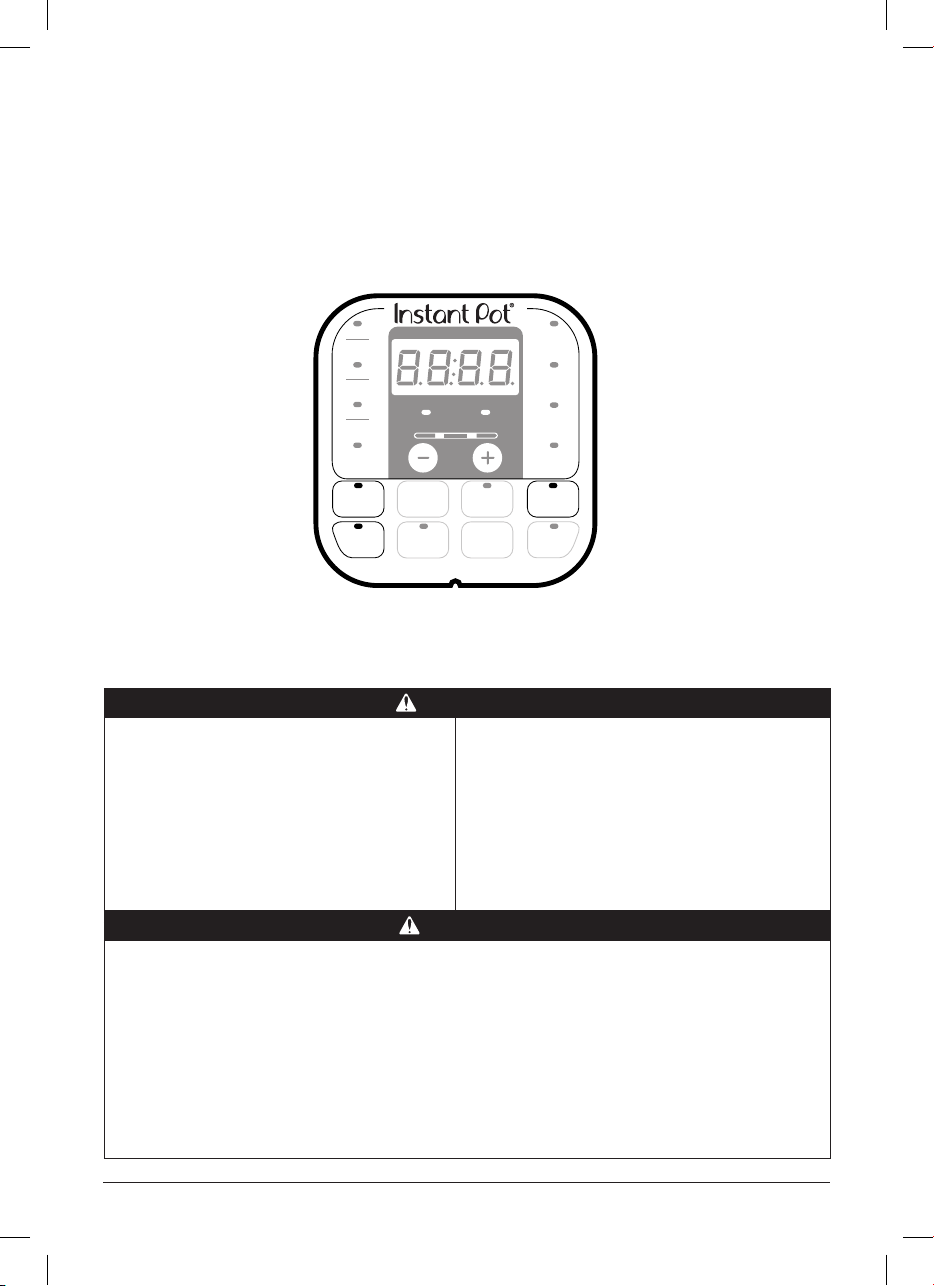
The Duo is much more than a multicooker. These Smart Programmes don’t cook with
pressure, but are just as easy to use.
• Slow Cook
• Sauté
• Yogurt
Keep
Warm
Cancel
Duo
Rice
Multigrain
Porridge
Steam
Yogurt
Pressure
Cook
Soup
Broth
Meat
Stew
Bean
Chili
Poultry
Slow
Cook
Sauté
Low Pressure High Pressure
Less
Normal More
Pressure
Level
Delay
Start
Always inspect your Instant Pot multicooker lid, inner pot and multicooker base carefully
to make sure they are clean and in good working condition before use.
WARNING
Always cook with the inner pot in
place. Food must be placed in the
inner pot. DO NOT pour food or
liquid into the multicooker base.
To avoid risk of personal injury and/or
property damage, place food and liquid
ingredients in the inner pot, then insert
the inner pot into the multicooker base.
Do not ll inner pot higher than the PC MAX
— 2/3 (Pressure Cooking Maximum) line as
indicated on the inner pot.
When cooking foods that foam or froth
(e.g., applesauce, cranberries or split
peas) or expand (e.g., oats, rice, beans,
pasta) do not ll the inner pot higher than
the — 1/2 line as indicated on the inner pot.
CAUTION
Always inspect the lid and inner pot carefully to make sure they are clean and in
good working condition before use.
• To avoid personal injury or damage to the appliance, replace the inner pot if it is
dented, deformed or damaged.
• Use only authorised Instant Pot inner pots made for this model when cooking.
Always make sure the inner pot and heating element are clean and dry before
inserting the inner pot into the multicooker base.
Failure to follow these instructions may damage the multicooker. Replace
damaged parts to make sure safe function.
instantpot.com.au | 31
Page 32

Other cooking styles
Slow Cook
Slow Cook is compatible for use with any common slow cooker recipe, so you can keep
cooking your classics!
The float valve should not rise during Slow Cook. The lid is removable throughout the
cooking process for easy access. If the float valve rises, make sure the steam release
handle is set to the Venting position. See to Pressure control features: Steam
release handle.
Setting Suggested Use Notes
Less
Normal
More
Low setting on common
slow cookers.
Medium setting on common
slow cookers.
High setting on common
slow cookers.
Less is commonly used for low and slow,
all-day cooking, and should be set for a
minimum of 10 hours (10:00) for best
results.
You can use a glass lid for slow cooking
if it has a venting hole.
Stage 1: Setting up the Duo for slow
cooking
01 Remove the inner pot from the
multicooker base.
Add food and liquid ingredients
to the inner pot.
Insert the inner pot into the
multicooker base.
02 3L & 5.7L models: Secure the power
cord to the base power socket on the
back of the multicooker base. Make
sure the connection is tight.
All models: Connect the power cord to
a 220-240V power source.
The display shows OFF.
03 Place and close the lid as described
in Pressure control features:
multicooker lid, or use a glass lid with
a venting hole.
04 Turn the steam release handle to the
Venting position.
Stage 2: Slow cooking
01 Press Slow Cook.
02 Press Slow Cook again to cycle
through the preset temperature
options in Less, Normal and More.
03 Use the - / + buttons to adjust the
cooking time.
Cooking time and temperature level
adjustments are saved to the Smart
Programme when cooking begins.
04 Leave the automatic Keep Warm
setting on, or press Keep Warm
to turn it off.
05 After 10 seconds, cooking begins
and the display timer counts down.
When cooking completes, the display
shows End if Keep Warm is turned off.
If not, the timer begins counting from
00:00 up to 10 hours (10:00).
32 | [email protected] | 1800 251 643
Page 33

Other cooking styles
Sauté
Sauté can be used in place of a frying pan, griddle or flat-top grill.
Setting Suggested Use Notes
Less
Normal Pan searing or sautéing.
More Stir-frying or browning meat.
Simmering, thickening and
reducing liquids.
The display switching from Hot to On indicates
the multicooker is maintaining the cooking
temperature.
As a safety precaution, 30 minutes is the
maximum cooking time.
Stage 1: Setting up the Duo for sautéing
01 Insert the inner pot into the
multicooker base. Do not use a lid.
02 3L & 5.7L models: Secure the power
cord to the base power socket on the
back of the multicooker base. Make
sure the connection is tight.
All models: Connect the power cord to
a 220-240V power source.
The display shows OFF.
03 Press Sauté.
04 Press Sauté again to cycle through the
preset temperature options in Less,
Normal and More.
05 Use the - / + buttons to adjust the
cooking time.
Cooking time and temperature level
adjustments are saved to the Smart
Programme when cooking begins.
06 After 10 seconds, the multicooker
displays On to indicate that it has
begun heating.
Stage 2: Sautéing
07 When the display switches from On
to Hot, add ingredients as directed
by your recipe.
If recipe ingredients are added before
the Hot message appears, it may not
appear at all. This is normal!
08 If you finish sautéing before the timer
runs out, press Cancel. Otherwise,
when cooking finishes the display
shows End.
Delay Start and Automatic Keep Warm are not available on the Sauté Smart Programme.
instantpot.com.au | 33
Page 34
Other cooking styles
Deglazing the inner pot (pressure cooking after sauté)
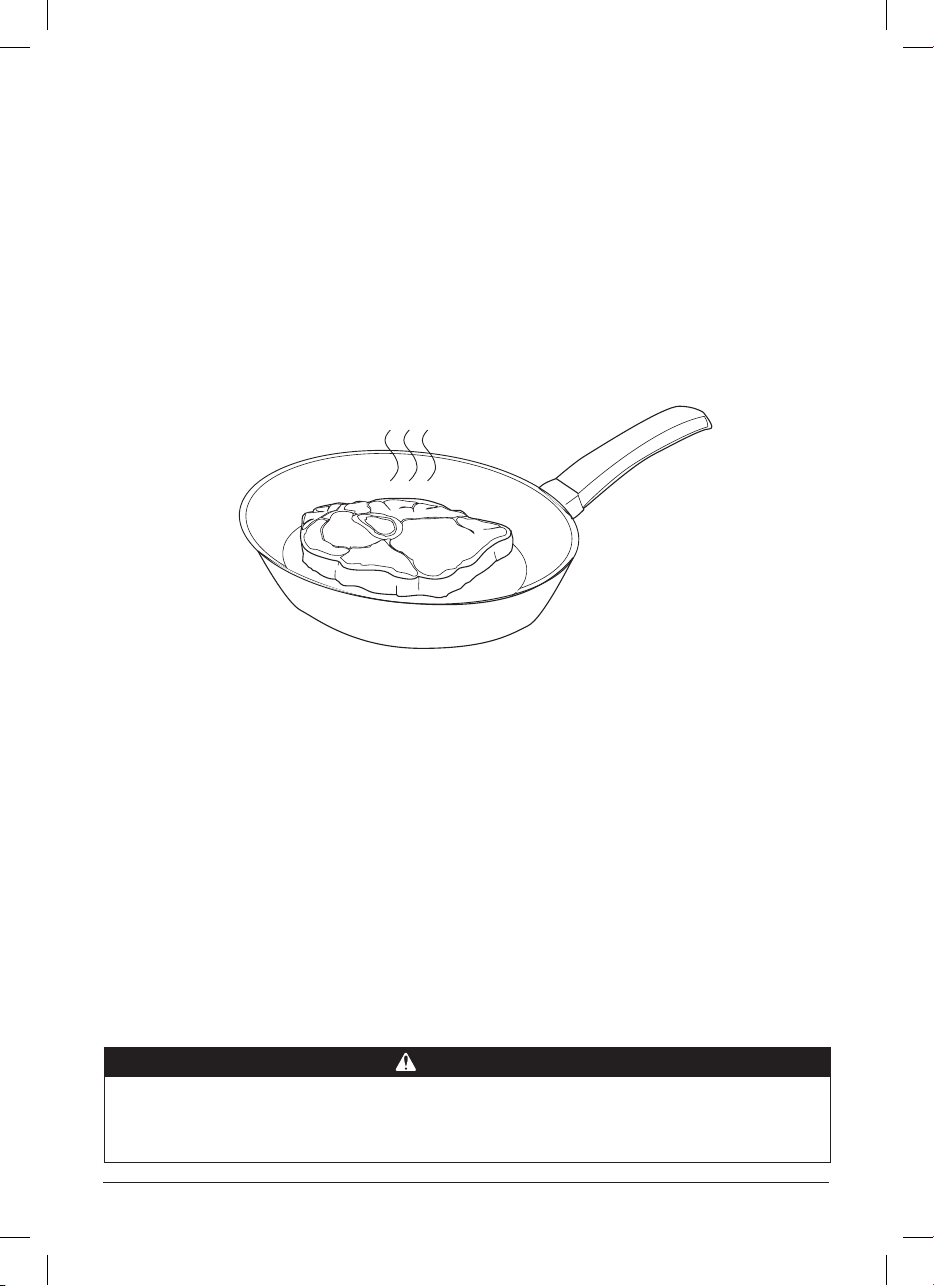
Sautéing meat and vegetables before pressure cooking is the perfect way to boost
flavours, as sugars caramelise from the high heat of the Sauté Smart Programme.
When pressure cooking after using Sauté, deglaze the inner pot to make sure food
items do not scorch.
To deglaze: Remove food items from the inner pot and add a thin liquid (e.g., water, broth,
wine) to the hot surface. Use a wooden or silicone scraper to loosen anything
that may be stuck to the bottom of the inner pot.
WARNING
The Sauté Smart Programme reaches high temperatures. If unmonitored, food
may burn on this setting. Do not use the lid and do not leave your multicooker
unattended while using Sauté.
34 | [email protected] | 1800 251 643
Page 35
Other cooking styles
Yogurt
Yogurt is designed to effortlessly produce delicious fermented dairy and non-dairy recipes.
Instant Pot Size Minimum Milk Volume Maximum Milk Volume
3 Litres 2 cups (500 mL) 1.9 Litres
5.7 Litres 4 cups (1 L) 3.8 Litres
8 Litres 6 cups (1.5 L) 5.8 Litres
Setting Suggested Use Notes
For lower temperature
Less
Normal
More Pasteurising milk.
fermentation (e.g., Jiu Niang,
a sweet fermented glutinous
rice dessert).
Fermenting milk after culture
has been added.
Default fermentation time is 24 hours (24:00).
Adjust fermentation time based on recipe.
A longer fermentation will result in tangier
yogurt. Adjust as desired up to 99 hours
and 30 minutes (99:30).
Pasteurisation time is preset and cannot be
adjusted.
Display shows boiL while pasteurisation is
running.
For extra thick yogurt, pasteurise milk twice!
Stage 1: Pasteurise milk
01 Remove the inner pot from the
multicooker base.
02 Add unpasteurised milk to the inner
pot then insert the inner pot into the
multicooker base.
03 3L & 5.7L models: Secure the power
cord to the base power socket on the
back of the multicooker base. Make
sure the connection is tight.
All models: Connect the power cord to
a 220-240V power source.
The display shows OFF.
04 Place and close the lid as described
in Pressure control features:
multicooker lid.
05 Turn the steam release handle to the
Venting position.
06 Press Yogurt.
07 Press Yogurt again and cycle to More.
The display shows boiL.
08 After 10 seconds the multicooker
begins heating.
09 When pasteurisation finishes, the
display shows End.
Remove the lid and use a thermometer
to check the temperature.
Milk must reach a minimum of 72°C for
pasteurisation to occur.
instantpot.com.au | 35
Page 36

Other cooking styles
Stage 2: Add starter culture
01 Allow pasteurised milk to cool to just
below 43°C.
02 Add a starter culture to the milk
according to package instructions.
If using plain yogurt as a starter, make
sure that it contains an active culture.
Mix in 30 mL (2 tbsp) of yogurt per
3.7 L of milk, or follow a trusted recipe.
03 Place and close the lid as described
in Pressure control features:
multicooker lid.
Allow the yogurt to cool, then place in in your fridge for 12 to 24 hours to allow the
flavours to develop!
Stage 3: Ferment yogurt
01 Press Yogurt.
02 Press Yogurt again and cycle to
Normal. The display shows 8 hours
(08:00).
03 Use the - / + buttons to adjust
the fermentation time if desired.
A longer fermentation period
will give you tangier yogurt.
04 After 10 seconds the multicooker
begins heating. The display timer
counts up to the set time from 00:00.
05 When fermentation completes, the
multicooker beeps and displays End.
Using yogurt cups
Yogurt cups are a convenient way to portion out yogurt servings.
01 After adding the starter culture to your pasteurised milk, carefully pour the milk
into your yogurt cups and seal them tightly.
02 Clean the inner pot thoroughly and place the steam rack on the bottom of the
inner pot.
03 Place the sealed yogurt cups on the steam rack and add water to the inner pot
until the cups are submerged halfway.
04 Follow the steps in Stage 3: Ferment Yogurt.
36 | [email protected] | 1800 251 643
Page 37

Care, cleaning and storage
Clean your Duo and its parts after each use. Failure to follow these cleaning instructions
may result in catastrophic failure, which may lead to property damage and/or severe
personal injury.
Always unplug your multicooker and let it cool to room temperature before cleaning.
Never use metal scouring pads, abrasive powders or harsh chemical detergents on
any of the Instant Pot’s parts or accessories.
Let all surfaces dry thoroughly before use, and before storage.
Parts Cleaning methods and instruction
Accessories
• Steam rack
Lid and parts
• Condensation collector
• Anti-block shield
• Sealing ring
• Steam release handle
• Float valve
• Silicone cap
Inner pot
Power cord (8L only)
Detachable power cord
(3L & 5.7L only)
Multicooker base
Dishwasher safe if placed on the top rack.
Dishwasher safe if placed on the top rack.
Remove all the parts from the lid before cleaning. See Care, cleaning and storage:
Removing and installing parts.
• Check the condensation collector after each use and empty as needed.
Do not allow food or moisture to stagnate in the condensation collector.
• With steam release handle and anti-block shield removed, clean the interior
of the steam release pipe to prevent clogging.
• To drain water from the lid after dishwashing, grasp the lid handle and hold the
lid vertically over a sink, then turn it 360°— such as turning a steering wheel.
• After cleaning, store the lid upside down on the multicooker base.
• Store sealing rings in a well-ventilated area to decrease residual odour of
flavourful meals. To eliminate odours, add 1 cup (250 mL) water and 1 cup
(250 mL) white vinegar to inner pot, and run Pressure Cook for 5–10 minutes, then
QR pressure.
Dishwasher safe.
• More acute hard water staining may require a vinegar-dampened sponge
and some scrubbing to remove.
• If there is tough or burned food residue at the bottom, soak in hot water
for a few hours for easy cleaning.
• Make sure all exterior surfaces are dry before placing in multicooker base.
Hand wash only. Do not machine wash.
• Use a barely damp cloth to wipe any particles off the cord.
Hand wash only. Do not dishwash.
• Wipe the inside of the outer pot as well as the condensation rim with a
barely damp cloth. Allow them to dry completely before inserting inner pot.
• Clean multicooker base and control panel with a soft, barely damp cloth
or sponge.
Some discolouration may occur after machine washing, but this will not affect the cooker’s safety or performance.
instantpot.com.au | 37
Page 38
Care, cleaning and storage
WARNING
The Instant Pot multicooker base contains electrical components. To avoid re,
electric leakage or personal injury, make sure the multicooker base stays dry.
• DO NOT immerse the multicooker base in water or other liquid, or attempt
to cycle it through the dishwasher.
• DO NOT rinse the heating element.
• DO NOT submerge or rinse the power cord or the plug.
Removing and installing parts
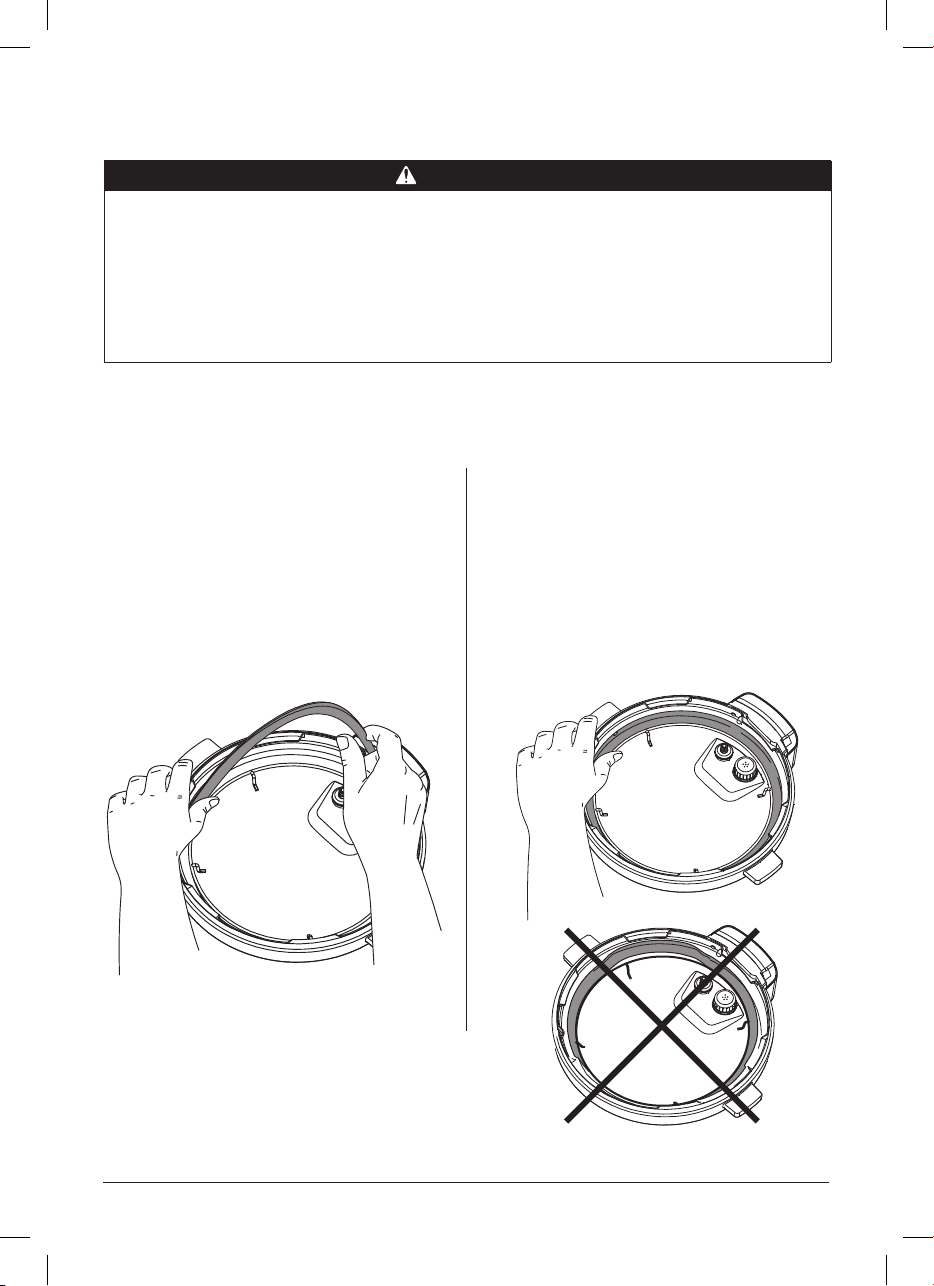
Silicone sealing ring
Remove the sealing ring
Grip the edge of the silicone and pull the
sealing ring out from behind the circular
stainless steel-sealing ring rack.
With the sealing ring removed, inspect
the steel rack to make sure it is secured,
centered, and an even height all the way
around the lid. Do not attempt to repair a
deformed sealing ring rack.
Install the sealing ring
Place the sealing ring over the sealing ring
rack and press it into place. Press down
firmly to prevent puckering.
When installed properly, the sealing ring is
snug behind sealing ring rack and should
not fall out when the lid is turned over.
Illustrations in this document are for reference
only and may differ from the actual product.
Always refer to the actual product.
38 | [email protected] | 1800 251 643
Incorrect
Page 39
Care, cleaning and storage
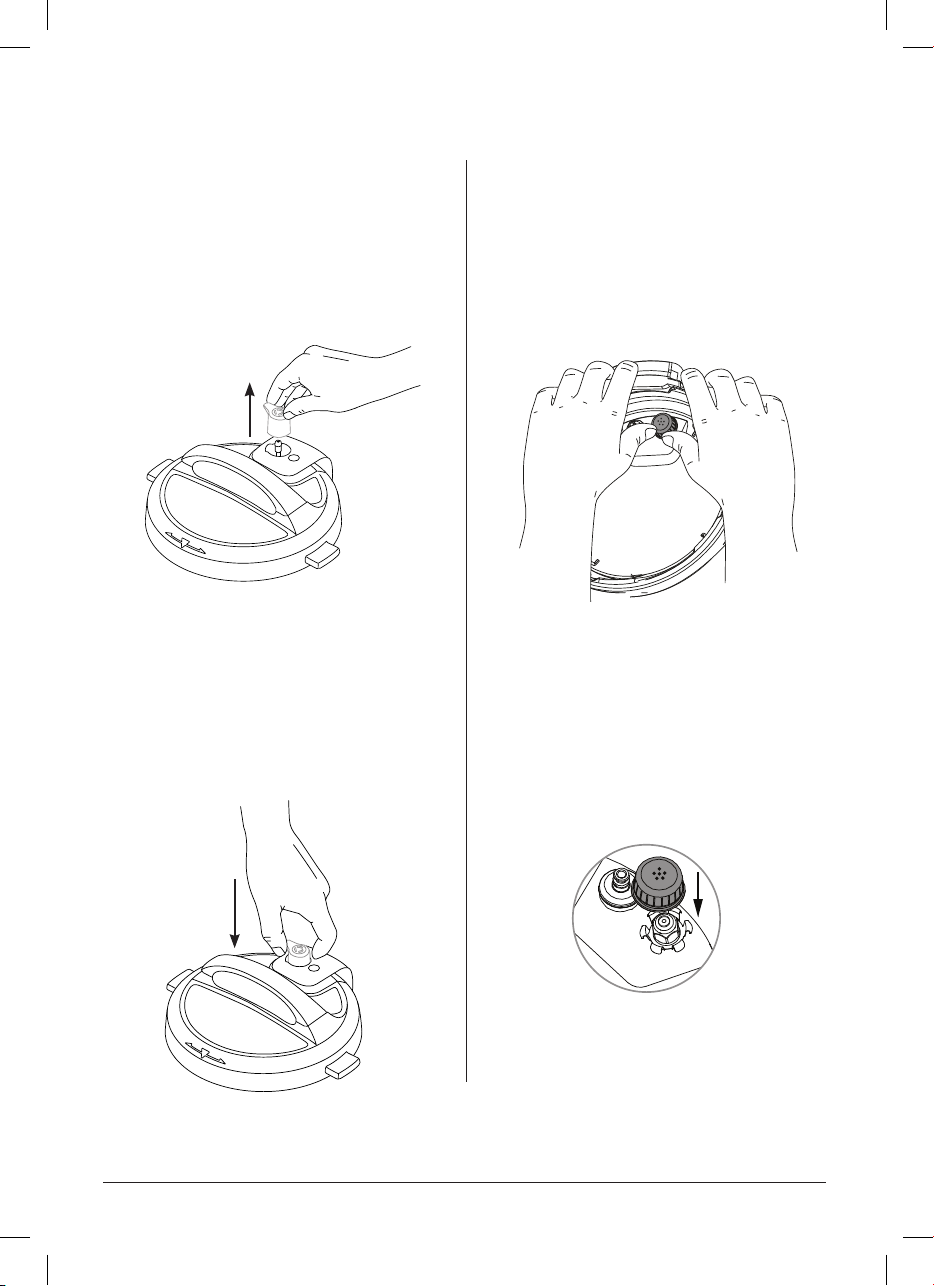
Steam release handle
Remove the steam release handle
Pull the steam release handle up and off
the steam release pipe.
The steam release handle must be
installed before using the multicooker.
Install the steam release handle
Place the steam release handle on the
steam release pipe and press down firmly.
The steam release handle sits loosely on
the steam release pipe when installed
properly but should remain in place
when the lid is turned over.
Anti-block shield
Remove the anti-block shield
Grip the lid like a steering wheel and use
your thumbs to press firmly against the
side of the anti-block shield (pressing
towards the side of the lid and up) until
it pops off the prongs underneath.
Remove
Install the anti-block shield
Place the anti-block shield over the prongs
and press down until it snaps into position.
Do not attempt to operate the multicooker
without the anti-block shield installed.
Install
Illustrations in this document are for reference only and may differ from the actual product.
Always refer to the actual product.
instantpot.com.au| 39
Page 40
Care, cleaning and storage
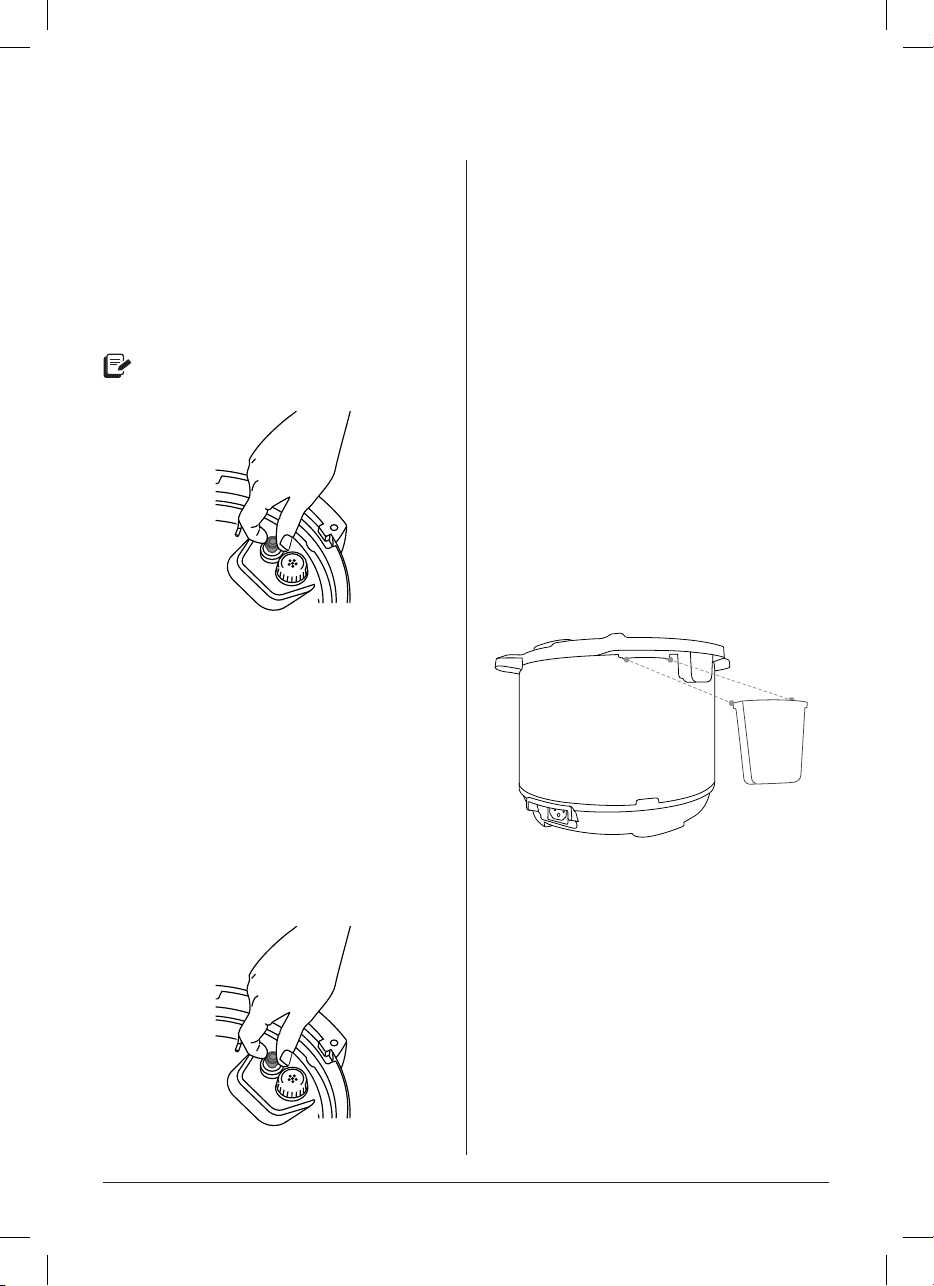
Float valve and silicone cap
Remove the float valve
Place one finger on the flat top of float
valve, then turn the lid over. Detach the
silicone cap from the bottom side of the
float valve. Remove the float valve from
the top of the lid.
Do not discard the float valve or
silicone cap.
Top of lid
Install the float valve
Drop the narrow end of the float valve into
the float valve hole on the top of the lid.
Place one finger on the flat top of the float
valve, then turn the lid over. Firmly attach
the silicone cap to the bottom of the
float valve.
Do not attempt to operate the multicooker
without the float valve and/or silicone cap
properly installed in the multicooker lid.
Condensation collector
The condensation collector sits at the back
of the multicooker base and catches any
overflow from the condensation rim.
It should be installed before cooking, then
emptied and rinsed out after each use.
Remove the condensation collector
Pull the condensation collector away from
the multicooker base; do not pull down.
Note the tabs on the multicooker base and
the grooves on the condensation collector.
Install the condensation collector
Align the grooves on the condensation
collector over the tabs on the back
of the multicooker base and slide the
condensation collector into place.
Bottom of lid
40 | [email protected] | 1800 251 643
Illustrations in this document are for
reference only and may differ from the actual
product.
Always refer to the actual product.
Page 41
Troubleshooting
Register your Instant Pot Duo today at instantpot.com.au/support/register.
Get in touch with Customer Care by email at [email protected] or by phone at
1800 251 643 or (02) 9317 1000.
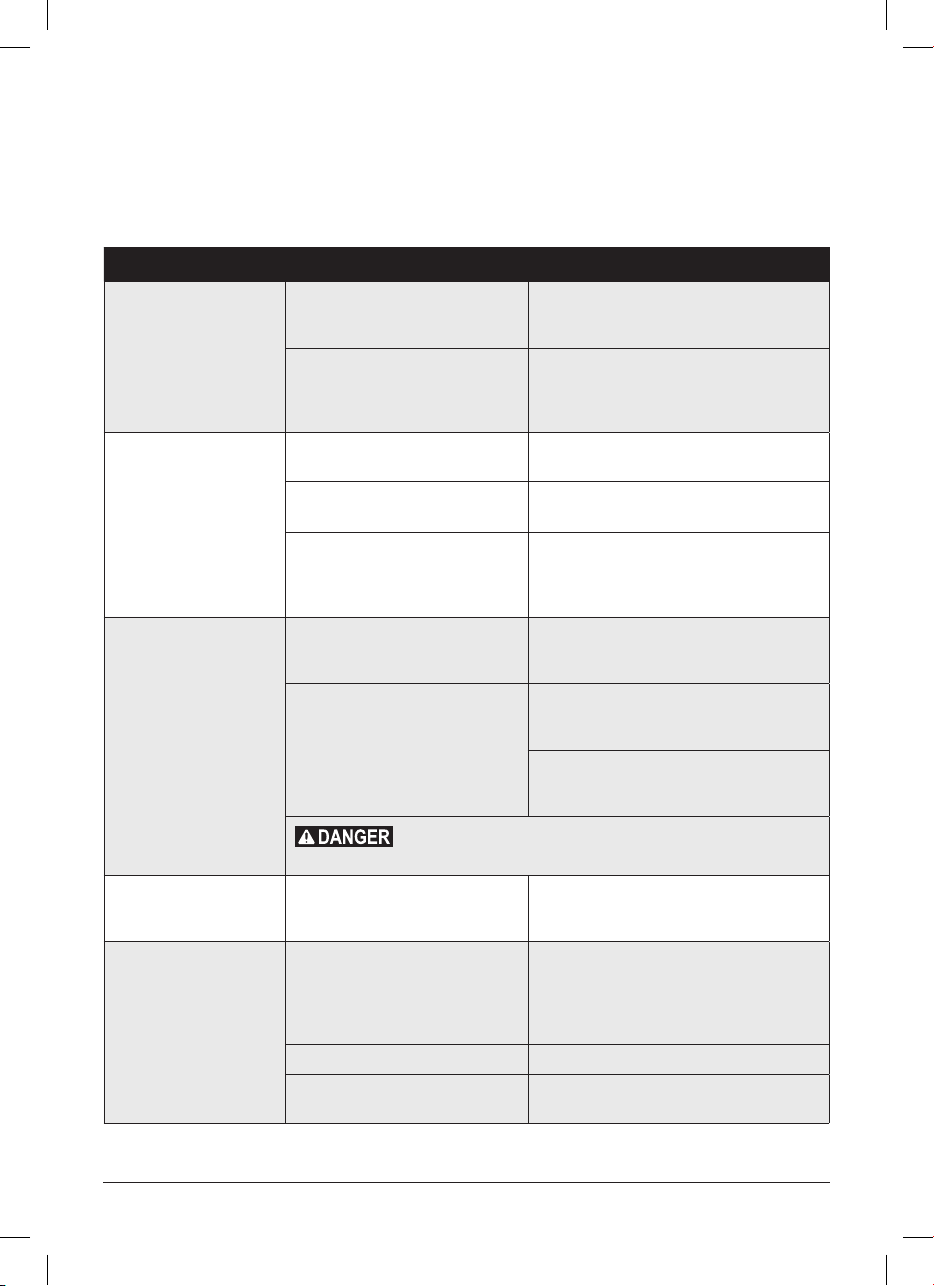
Problem Possible reason Try this
The sound of power switching and
Occasional clicking or
light cracking sound.
Difficulty closing the lid.
Difficulty opening the lid.
the pressure board expanding when
changing temperatures.
Bottom of the inner pot is wet.
Sealing ring is not properly installed.
Float valve is in the popped-up
position.
Contents in multicooker are still hot.
Pressure inside the multicooker.
Float valve stuck in the popped-up
position due to food debris
or residue.
This is normal; no action needed.
Wipe exterior surfaces of the inner pot.
Make sure the heating element is dry
before inserting the inner pot back into
the multicooker base.
Reposition the sealing ring. Make sure it is
snug behind the sealing ring rack.
Gently press the float valve downward with
a long utensil.
Turn the steam release handle to the
Venting position, then lower the lid onto
the multicooker base slowly, allowing heat
to dissipate.
Release pressure according to recipe.
Only open the lid after the float valve
has dropped down.
Make sure steam is completely released by
quick releasing pressure, then press the float
valve gently with a long utensil.
Open the lid cautiously, then thoroughly clean
the float valve, surrounding area, and lid
before next use.
The inner pot is stuck
to the lid when the
mulicooker is opened.
Steam gushes from the
steam release handle
when it is in the Sealing
position.
Contents may be under pressure. To avoid scalding injury, DO NOT
attempt to force the lid open.
Cooling of the inner pot may create
suction, causing the inner pot to
adhere to the lid.
Not enough liquid in the inner pot.
Pressure sensor control failure. Contact Customer Care.
Steam release handle is not seated
properly.
To release the vacuum, turn the steam release
handle to the Venting position.
Add thin, water-based liquid to the inner pot
according to its size.
3L: 1 cup (250 mL)
5.7L: 1 ½ cups (375 mL)
8L: 2 cups (500 mL)
Turn the steam release handle to the Sealing
position.
instantpot.com.au | 41
Page 42
Troubleshooting
Problem Possible reason Try this
No sealing ring in the lid. Install a sealing ring.
The sealing ring is damaged or not
installed properly.
Food debris attached to the sealing
Steam leaks from side
of lid.
The float valve does not
rise.
Minor steam leaking or
hissing from the steam
release handle during the
cook cycle.
ring.
The lid is not closed properly. Open, then close the lid.
The sealing ring rack is warped or
off-centre.
The inner pot rim may be
misshapen.
Food debris on the float valve or
float valve silicone cap.
Too little liquid in the inner pot.
Float valve silicone cap damaged or
missing.
Float valve obstructed by lid-locking
mechanism.
No heat in the inner pot.
Inner pot base may be damaged.
Steam release handle is not in the
Sealing position.
Multicooker is regulating excess
pressure.
Replace the sealing ring.
Remove the sealing ring and clean it
thoroughly.
Remove the sealing ring from the lid, then
check the sealing ring rack for bends or
warps. Contact Customer Care.
Check for deformation and contact Customer
Care.
Remove the float valve from the lid and clean
it thoroughly. Perform the Initial test run to
check for function and record your findings.
Contact Customer Care.
Check for scorching on the bottom of the
inner pot. Add thin, water-based liquid to the
inner pot according to its size.
3L: 1 cup (250 mL)
5.7L: 1 ½ cups (375 mL)
8L: 2 cups (500 mL)
Install or replace the float valve and/or
silicone cap.
Tap the float valve with a long utensil. If
the float valve does not drop, turn the
multicooker off. Contact Customer Care.
Perform the Initial test run to check for
function and record your findings. Contact
Customer Care.
Perform the Initial test run to check for
function and record your findings. Contact
Customer Care.
Turn the steam release handle to the Sealing
position.
This is normal; no action required.
42 | [email protected] | 1800 251 643
Page 43

Troubleshooting
Problem Possible reason Try this
The display remains
blank after connecting
the power cord.
Error code appears on
the display and the
multicooker beeps
continuously.
Bad power connection or no power.
Cooker’s electrical fuse has blown. Contact Customer Care.
C1
C2
C6
C6H
C6L
C5
C7 or
NoPr
Inspect power cord for damage. If damage is
noticed, contact Customer Care.
Check outlet to make sure it is powered.
Faulty sensor. Contact Customer Care.
Temperature is too high
because the inner pot is not
placed in the multicooker
base.
Temperature is too high.
Heat element has failed. Contact Customer Care.
Not enough liquid.
Steam release handle is in
the Venting position.
Press Cancel and wait for heating element to
cool; make sure there are no foreign objects
in multicooker base; insert or reposition
inner pot in multicooker base and re-enter
commands.
Check for scorching on bottom of inner pot.
Add thin, water-based liquid to the inner pot
according to its size.
3L: 1 cup (250 mL)
5.7L: 1 ½ cups (375 mL)
8L: 2 cups (500 mL)
Add thin, water-based liquid to the inner pot
according to its size.
3L: 1 cup (250 mL)
5.7L: 1 ½ cups (375 mL)
8L: 2 cups (500 mL)
Turn the steam release handle to the Sealing
position.
Lid is not in the correct
Lid
position for the selected
programme.
High temperature detected
at bottom of inner pot;
Food
Error code appears on
the display and the
multicooker beeps
continuously.
Any other servicing must be performed by an authorised representative.
multicooker automatically
burn
reduces the temperature
to avoid overheating.
Pressure has accumulated
PrSE
during a non-pressure
cooking programme.
Open and close the lid.
Do not use a lid when using Sauté.
Starch deposits at the bottom of the inner
pot may have blocked heat dissipation.
Turn the multicooker off, release pressure
according to the recipe, and inspect the
bottom of the inner pot.
Turn the steam release handle to the Venting
position.
instantpot.com.au | 43
Page 44

Warranty
Limited Warranty
This Limited Warranty is issued by Corelle Brands (Australia) Pty Ltd (Corelle Brands Australia) and
is effective for one year from the date of original consumer purchase. Proof of original purchase
date and return of your appliance is required to obtain service under this Limited. Return of your
appliance to us will be done in accordance with our instructions only. Provided that this appliance
is operated and maintained in accordance with written operating instructions attached to or
furnished with the appliance or published operating instructions on www.instantpot.com.au, Corelle
Brands Australia will, in its sole and exclusive discretion, either: (i) repair defects in materials or
workmanship; or (ii) replace the appliance. In the event that your appliance is replaced, the Limited
Warranty on the replacement appliance will expire 12 months from the date of original consumer
purchase.
We remind you the appliance you purchased is for personal use only (not commercial use).
Any modification/alteration or attempted modification/alteration to your appliance will void this
Limited Warranty, unless such modification/alteration or attempted modification/alteration was
expressly authorised by a Corelle Brands Australia Representative in writing.
This Limited Warranty only covers Corelle Brands Australia’s appliances/products and is not extended
to any other appliances, products, equipment, components, or devices that you use or may use in
conjunction with the Corelle Brands Australia’s appliances.
To claim under this Limited Warranty:
1. Contact Corelle Brands Australia at:
Sydney Corporate Park
Level 1, 184 Bourke Road, Alexandria, NSW 2015
Email: [email protected]
2. Provide a description of the appliance you believe has malfunctioned due to defective
parts or workmanship.
3. If it is necessary for the appliance to be sent to Corelle Brands Australia for repair or
replacement, Corelle Brands Australia will send you a pre-paid shipping label and you
must send the appliance and your dated sales receipt to Corelle Brands Australia along
with the appliance. If you do not have your dated sales receipt, please advise Corelle
Brands Australia in advance, and Corelle Brands Australia will attempt to verify your
purchase.
4. If Corelle Brands Australia determines that the appliance has malfunctioned due to
defective parts or workmanship, and is covered under this Limited Warranty, Corelle
Brands Australia will repair and return the appliance, or send you a replacement
appliance, at Corelle Brands Australia’s cost.
5. Any repaired or replaced appliance will be covered by this Limited Warranty for the
remainder of the original warranty period or ninety (90) days following your receipt of
the replacement or repaired appliance, whichever is greater.
44 | [email protected] | 1800 251 643
Page 45

Warranty
6. If Corelle Brands Australia confirms the appliance has not malfunctioned due to
defective parts or workmanship, and/or is in working order, or if proof of purchase is
not verified, Corelle Brands Australia reserves the right to return the appliance to you
at your pre-paid cost. If this cost is not met, Corelle Brands Australia reserves the right
to dispose of the appliance after 45 days’ notice to you.
Limitation and Exclusions
To the maximum extent permitted by law, the maximum liability of Corelle Brands Australia, if any,
for any allegedly defective appliance or part shall in no circumstances exceed the purchase price of a
comparable replacement appliance or part of the same age.
This Limited Warranty does not cover:
Damage resulting from accident, modification/alteration (unless expressly authorised by a Corelle
Brands Australia Representative in writing), misuse, abuse, neglect, unreasonable use, use contrary
to the written operating instructions attached to or furnished with the appliance or published
operating instructions on www.instantpot.com.au, normal wear and tear, commercial use, improper
assembly by you or anyone, disassembly by you or anyone, repair by you or anyone, failure to provide
reasonable and necessary maintenance, force majeure event including but not limited to fire, flood,
acts of God;
Repairs where your appliance is used for other than normal, personal use or when it is used in a
manner that is contrary to the written operating instructions attached to or furnished with the
appliance or published operating instructions on www.instantpot.com.au ; or
Use of unauthorised parts and accessories, or repairs to parts and systems resulting from
unauthorised repairs or modifications/alterations made to your appliance.
The cost of repair or replacement under these excluded circumstances shall be borne by you. Our
goods come with guarantees that cannot be excluded under the Australian Consumer Law. You are
entitled to a replacement or refund for a major failure and compensation for any other reasonably
foreseeable loss or damage. You are also entitled to have the goods repaired or replaced if the goods
fail to be of acceptable quality and the failure does not amount to a major failure.
Distri buted by Co relle Brands (Aus tralia) P ty Ltd.
Sydney Cor porate Park
Level 1, 1 84 Bour ke Road, Alexandr ia, NSW 20 15.
1800 2 51 643 or (02) 9317 1000.
Email: [email protected]
instantpot.com.au | 45
Page 46

©2022 Corelle Brands (Australia) Pty Ltd.
Distributed by Corelle Brands (Australia) Pty Ltd.
An Instant Brands Company.
Sydney Corporate Park
Level 1, 184 Bourke Road, Alexandria, NSW 2015, Australia.
instantpot.com.au
©2022 Instant Brands LLC.
801-0110-91
 Loading...