

Page 1
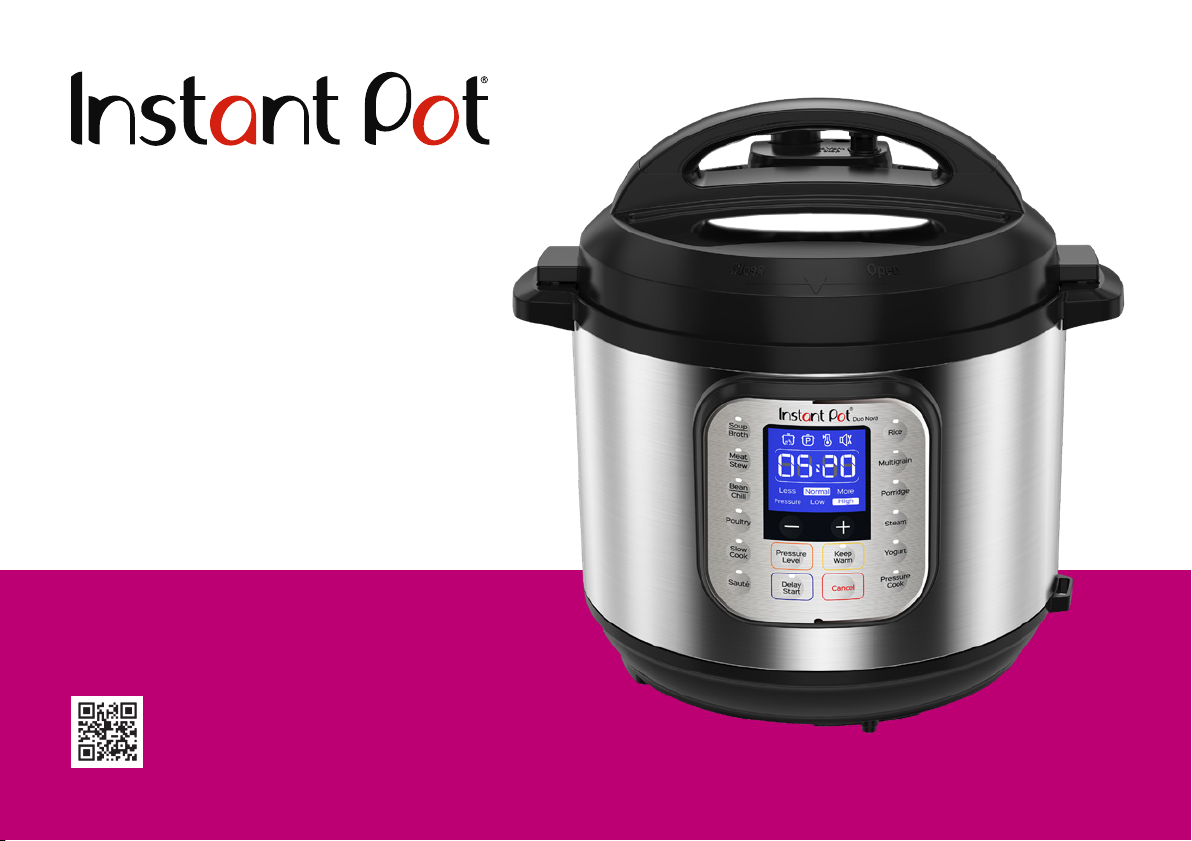
DUOTM NOVA
Multi-Use Pressure Cooker
Welcome
Initial Setup
Getting Started
Venting Methods
Initial Test Run (Water Test)
More Controls & Smart Programs
Support & Contact Information
Getting Started Guide
Full manual and instruction videos available at instantpot.com.au
Register your product today at instantpot.com.au/support/register
Page 2
2
Page 3

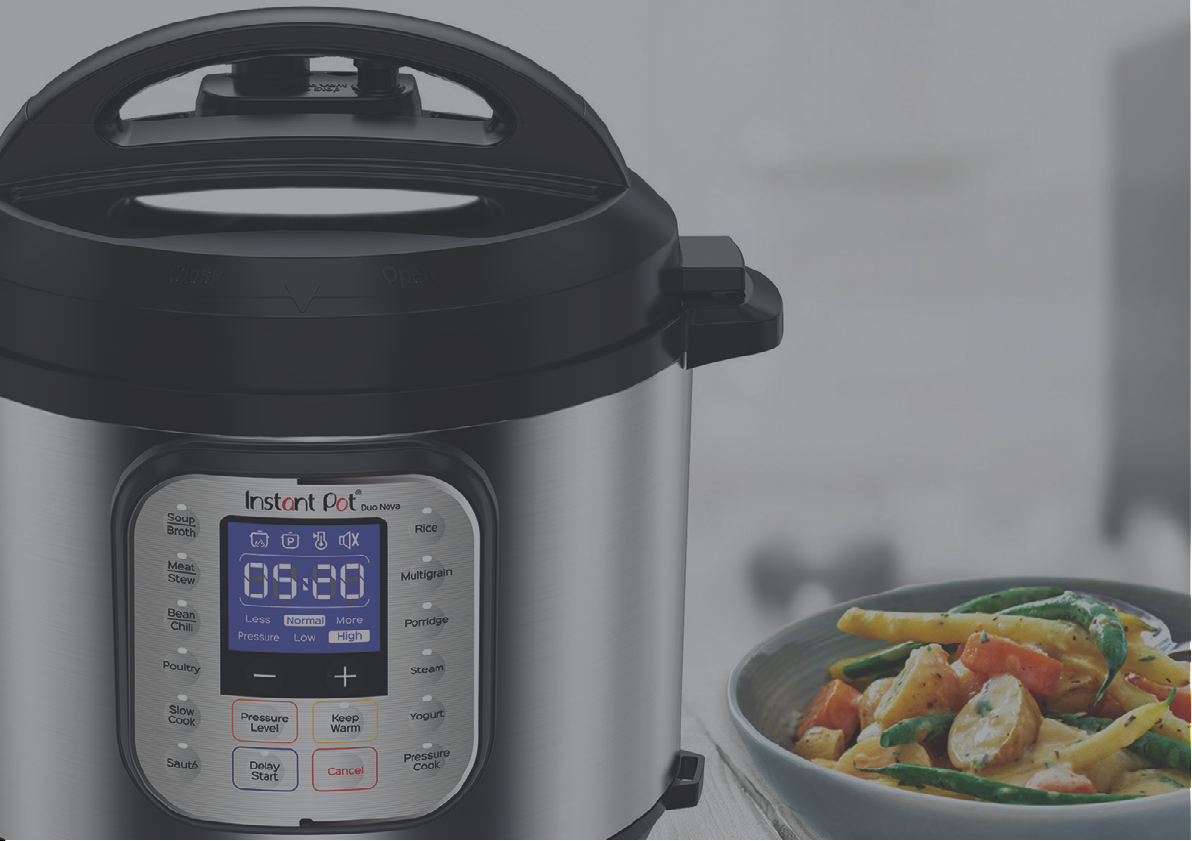
Welcome to the world of Instant cooking.
Hello! Thank you for welcoming us into your kitchen.
Having families ourselves, we developed the Instant Pot® Duo
to allow busy families and professionals alike to cook healthy,
delicious meals more easily and in less time.
We have partnered with chefs, authors and bloggers
to compile a collection of recipes that we hope you enjoy!
Robert J. Wang
Founder & Chief Innovation Ofcer
TM
Nova
Download the Instant Pot App
• 1000+ Recipes
• New User Tips
• Getting Started Videos
3
Page 4

Initial Setup
Page 5

Initial Setup
• Read all Important Safeguards in the included Safety, Maintenance & Warranty booklet before use. Failure to do so
may result in property damage and/or personal injury.
• Remove all packaging material from in and around the cooker, and verify that all parts are accounted for.
• Use only the Instant Pot® DuoTM Nova lid with the Instant Pot® DuoTM Nova pressure cooker. Using any other
pressure cooker lids may cause injury and/or damage.
• Place the cooker on a stable, level surface, away from external heat sources.
• Follow Care & Cleaning instructions in the included Safety, Maintenance & Warranty booklet to wash the cooker
before first use.
• Do not remove safety warning stickers from lid, serial number from bottom, or rating label from back of cooker base.
CAUTION
Never use the cooker on a stovetop. Do not place appliance on or in close proximity to a hot gas or electric burner, or a heated oven. Heat from an external source will
damage appliance.
Initial Setup |
5
Page 6
Stainless Steel Inner Pot
Cooker Parts Overview
Page 7
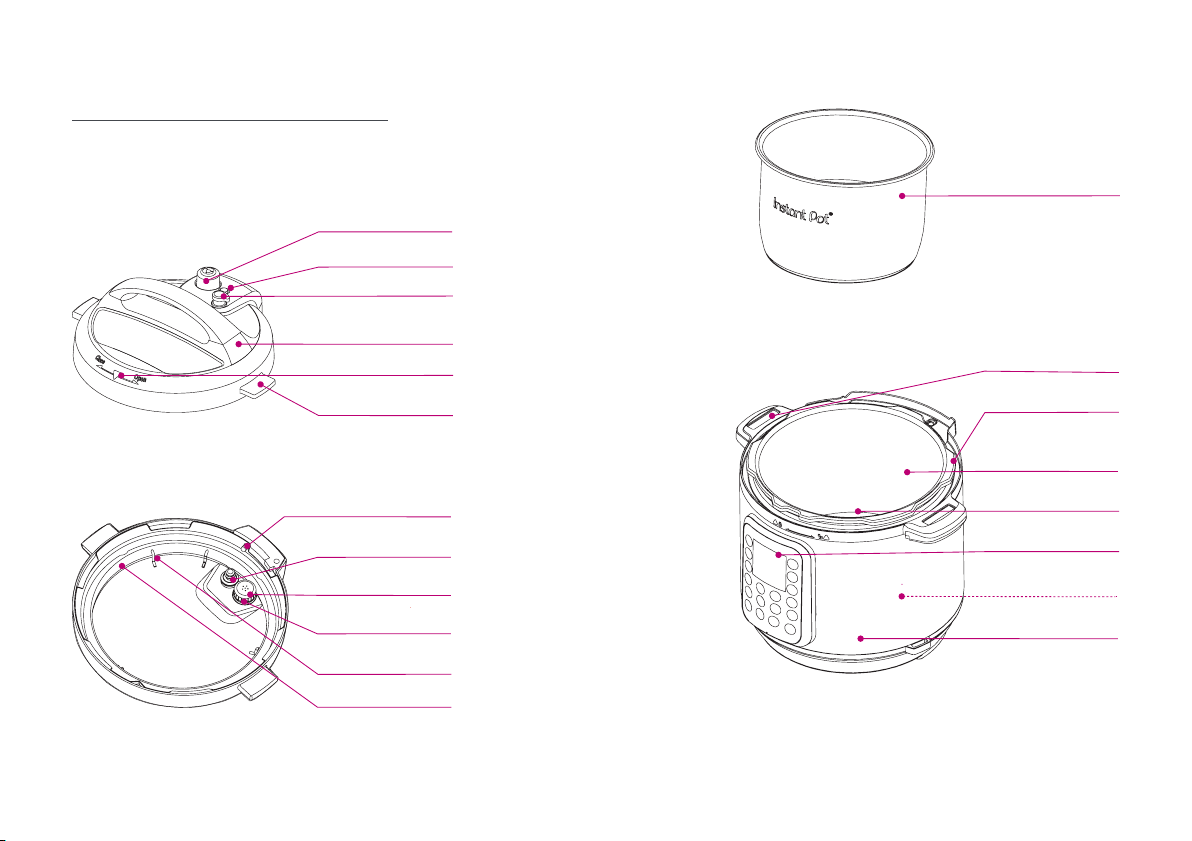
Cooker Parts Overview
Inner Pot
Top of Lid
Bottom of Lid
Steam Release Valve
Float Valve
Quick Release Button
Handle
Lid Position Marker
Lid Fins
Locking Pin
Float Valve Silicone Cap
Anti-Block Shield
Steam Release Pipe
beneath Anti-Block Shield
Sealing Ring Rack
Sealing Ring
Stainless Steel Inner Pot
Cooker Base
Cooker Handles
Condensation Rim
Outer Pot
Heating Element
Control Panel
Base Power Socket
(Rear)
Cooker Base
Images are for reference only. Refer to actual product.
Cooker Parts Overview |
7
Page 8

Getting Started
Page 9
1
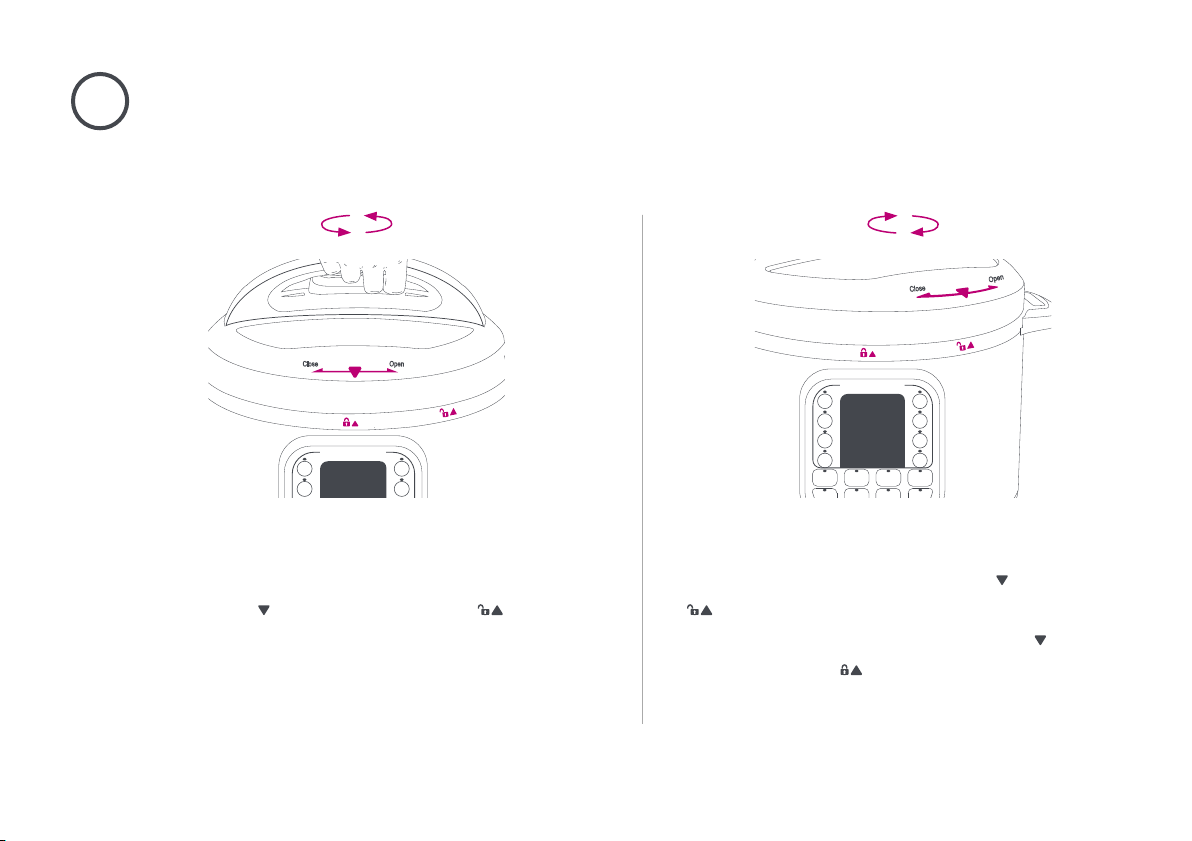
Open & Close Lid
When cooker is plugged in, it will play a jingle when lid is opened and closed.
Open Close
Open: Grip handle and turn lid counter-clock-
wise until on lid is aligned with indicator
on the rim of cooker base. Lift lid up and off of
cooker base.
Note: Always check lid for damage prior to cooking.
Close: Grip handle and align the on lid with
indicator on rim of cooker base. Lower lid
into track then turn lid clockwise until on the
lid lines up with indicator on base.
Getting Started |
9
Page 10
2
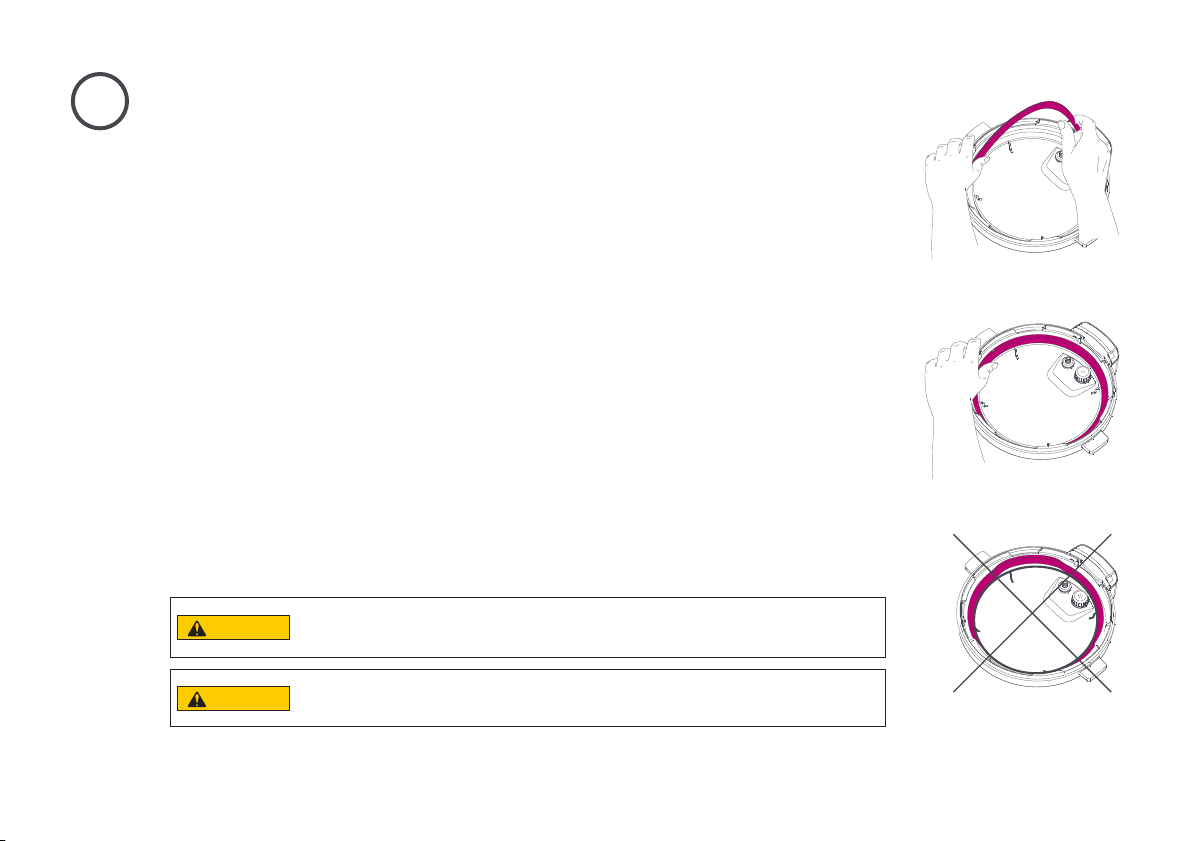
Check Sealing Ring & Sealing Ring Rack
Remove: Pull sealing ring out from behind sealing ring rack.
Inspect sealing ring rack. It should be centered in the lid and an even
height all the way around.
Sealing ring must be installed before use and cleaned after each use.
Install: Place sealing ring over sealing ring rack and press into place.
Ensure entire sealing ring is snug behind sealing ring rack.
After closing the lid, the sealing ring creates an airtight seal between lid
and cooker base. The sealing ring is an integral part of product safety.
Note: An extra sealing ring is included with your cooker. Use one for sweet dishes and one for savory.
Only one sealing ring should be installed when using your cooker.Replace your sealing ring every
12-18 months or when deformation or damage is noticed.
10
| Getting Started
CAUTION
CAUTION
Remove
Install
Always check for cuts or deformations in sealing ring prior to cooking. Only use authorized
Instant Pot® sealing rings. Failure to follow these instructions may cause food to discharge,
which may lead to personal injury or property damage.
Sealing rings may stretch over time. Do not use a stretched or damaged sealing ring. If
puckering occurs, replace sealing ring.
Page 11
3
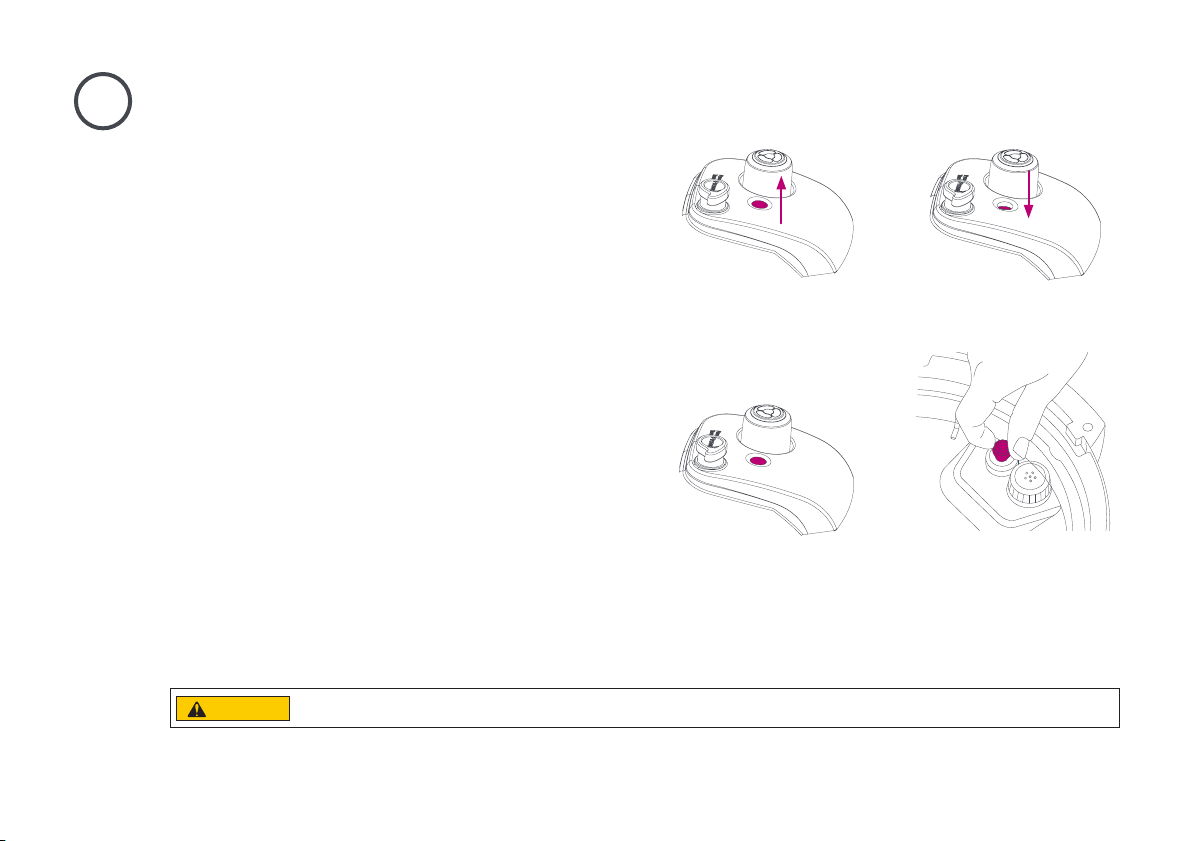
Remove & Install Float Valve
The oat valve has 2 positions. It pops up
to indicate when the cooker is pressurized,
and lowers into the lid when the cooker
is depressurized.
Remove: Place one nger on the at top of oat
valve. Turn lid over. Detach silicone cap from
bottom side of oat valve. Remove oat valve
from top of lid. Do not discard oat valve or
silicone cap.
The oat valve and silicone cap must be
installed before use to seal in pressurized steam.
Clean after each use.
DepressurizedPressurized
Install: Drop oat valve into oat valve hole on
top of lid. Place one nger on the at top of oat
valve. Turn lid over. Attach silicone cap to bottom
of oat valve.
CAUTION
While oat valve is up, contents of cooker are pressurized. Do not attempt to remove lid. Refer to “Venting Methods” section in this Guide for
information on releasing pressure.
Top Bottom
Getting Started |
11
Page 12
4
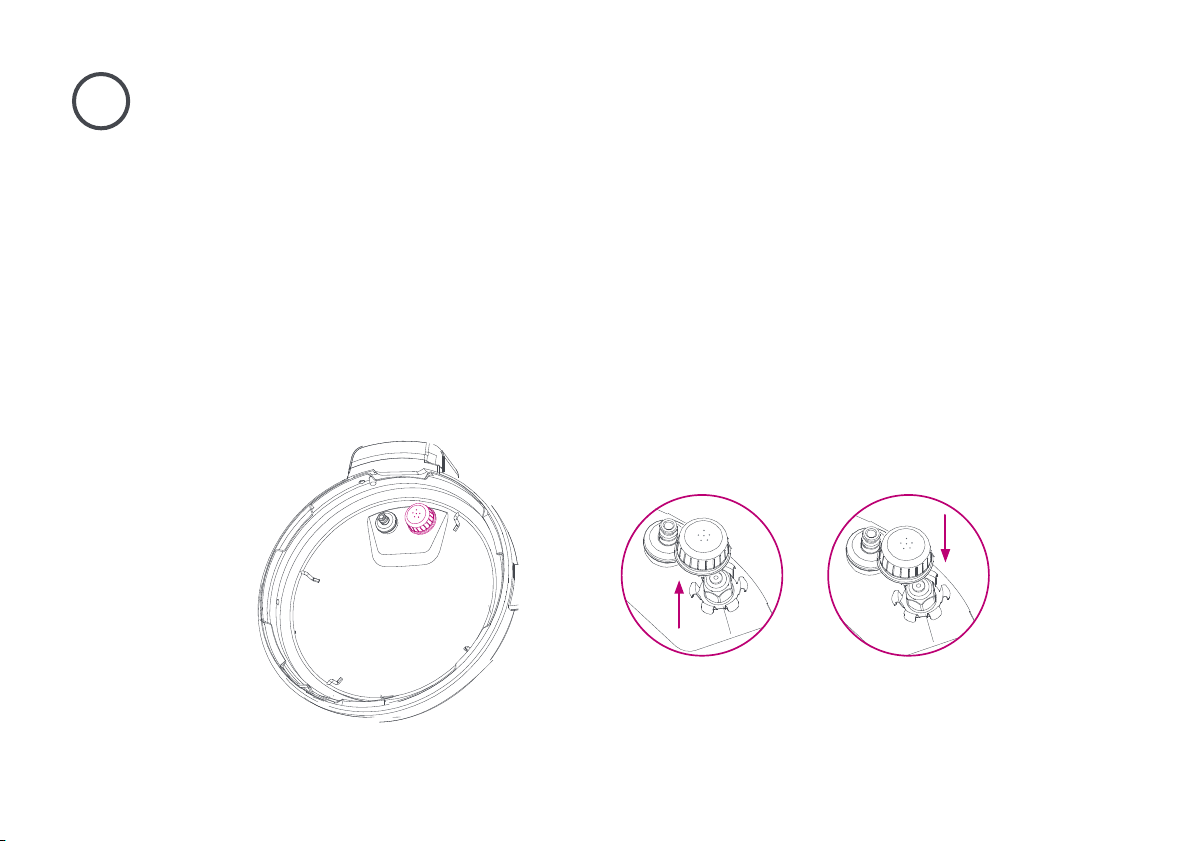
Remove & Install Anti-Block Shield
Remove: Grip lid and press rmly against side of anti-block shield (pressing towards side of lid and
up) until it pops off the prongs underneath.
Anti-block shield must be installed before use and cleaned after each use.
Install: Place anti-block shield over prongs and press down until it snaps into position.
Anti-block shield prevents food particles from coming up through the steam release pipe, assisting
with pressure regulation.
Remove Install
12
| Getting Started
Page 13
5
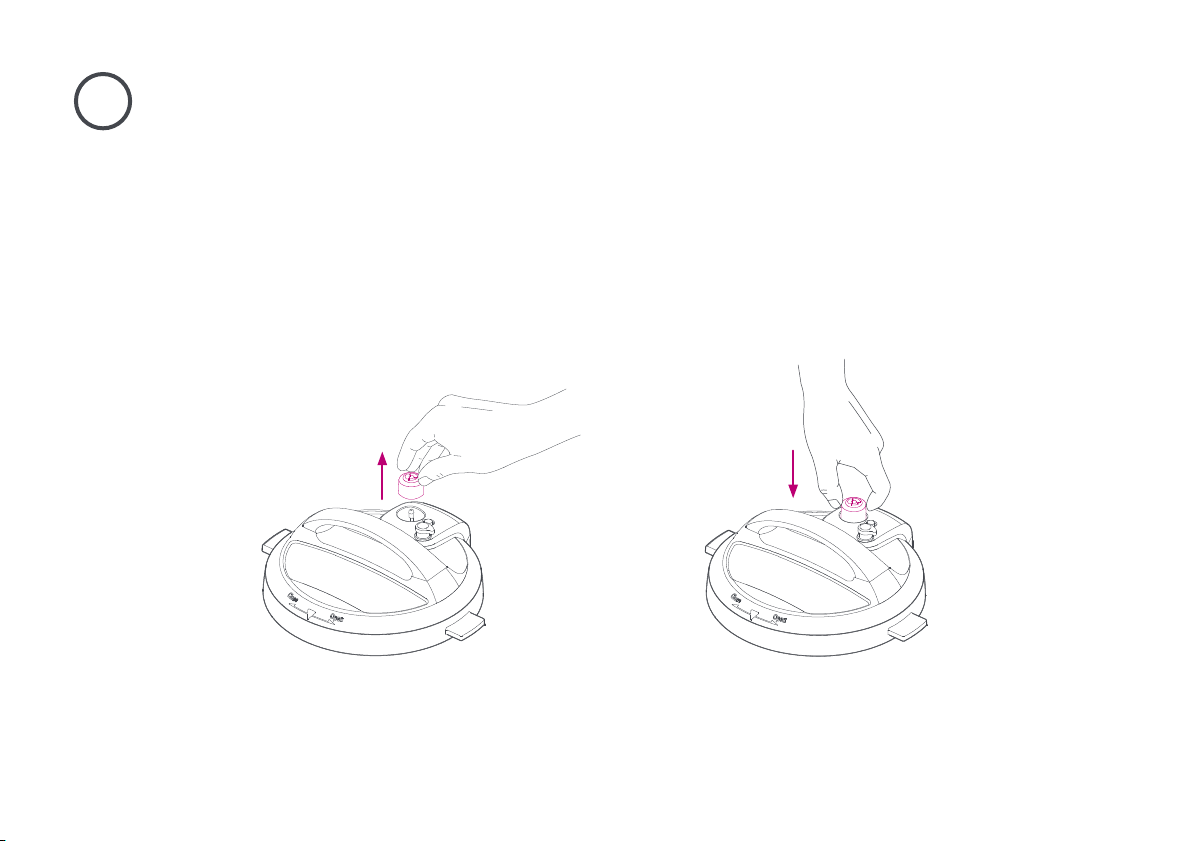
Remove & Install Steam Release Assembly
Remove: Pull steam release valve up and off steam release pipe.
Steam release valve must be installed before use and cleaned after each use.
Install: Place steam release valve on steam release pipe and press down.
Fits loosely when installed properly, but will remain in place when the lid is turned over.
Remove
Install
Getting Started |
13
Page 14
6
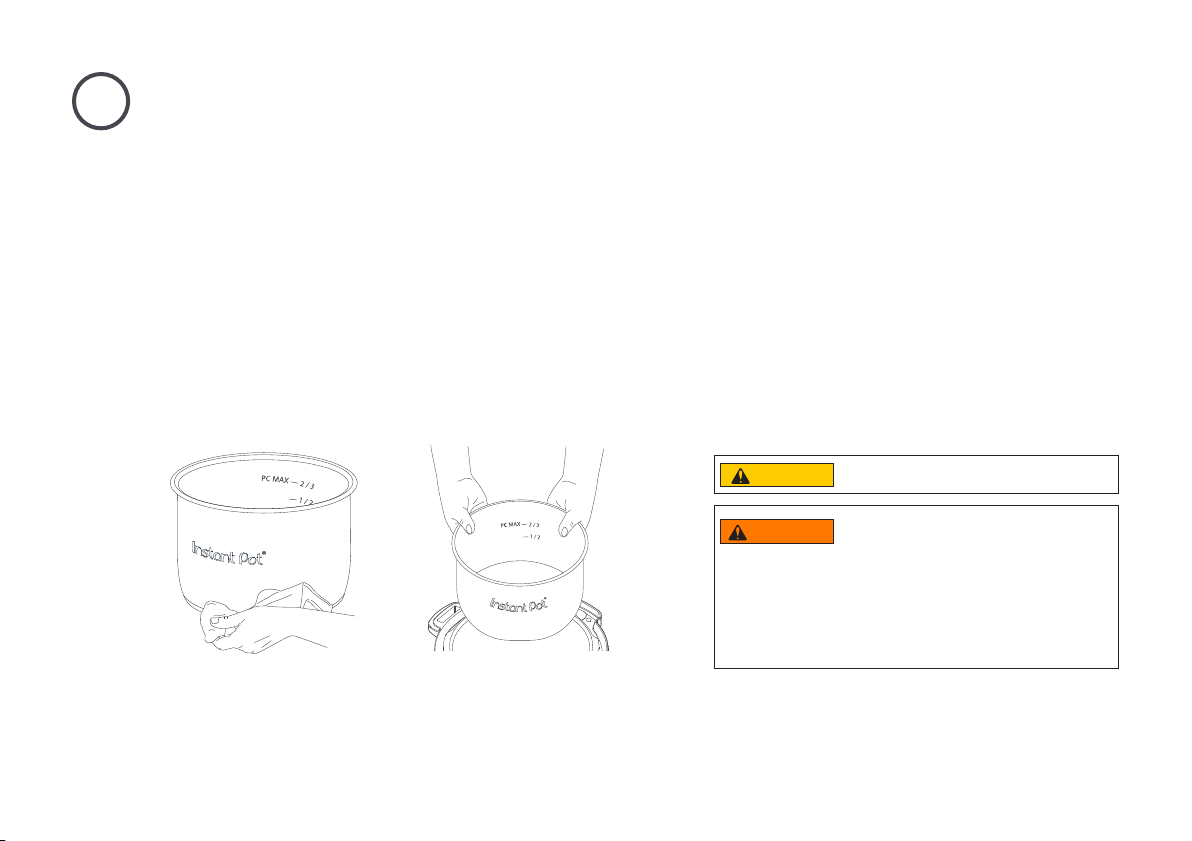
Remove & Clean Inner Pot
Remove inner pot from cooker base and wash with hot water and dish soap before rst use.
Wipe outer surfaces of inner pot and heating element to ensure they are dry and free of food debris.
Failure to do so may damage the cooker.
Place inner pot into cooker base before cooking. Food must be placed only in the inner pot,
not cooker base.
The inner pot is an integral part of product safety. Always use an authorized Instant Pot® inner pot
made for this model when cooking. Failure to do so may cause personal injury or property damage.
*
14
| Getting Started
Note: Always check inner pot for dents or deformations prior to cooking.
CAUTION
WARNING
indicated on the inner pot.
Exercise extreme caution when cooking and venting food such as
applesauce, cranberries, pearl barley, oatmeal, split peas, noodles, etc.,
as these foods may foam, froth, or spatter, and may clog the steam
release pipe and/or steam release valve. Do not ll the inner pot higher
than the — 1/2 line when cooking these foods.
To avoid risk of personal injury and/or property
damage, do not pour food or liquid into cooker base.
Do not ll the inner pot higher than the PC MAX
— 2/3 line (Pressure Cooking Maximum), as
Page 15
7
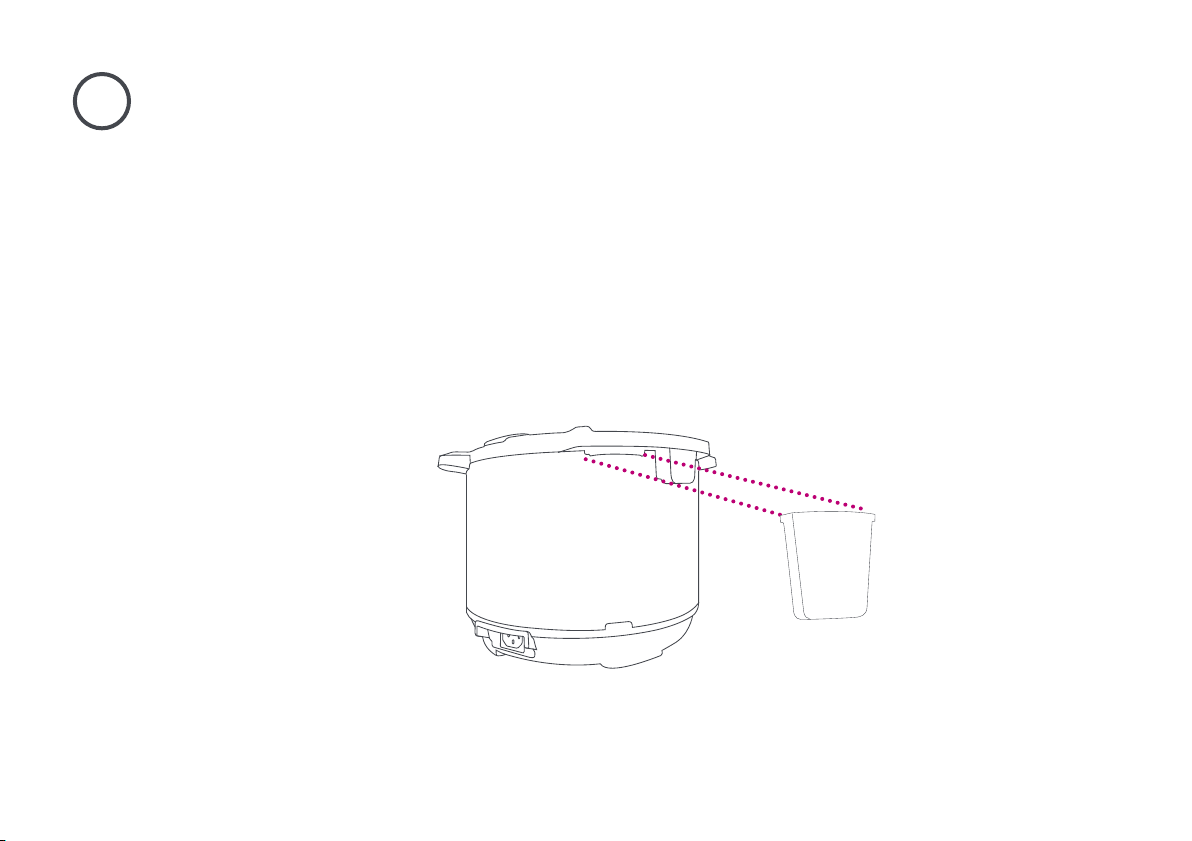
Install Condensation Collector
Install: On back of cooker base, align grooves on condensation collector over tabs and push
condensation collector into place.
The condensation collector accumulates excess water and should be installed before cooking.
Clean after use.
Remove: Pull condensation collector away from cooker base. Do not pull down on
condensation collector.
Getting Started |
15
Page 16
Let’s get cooking!
Venting Methods
Venting Methods
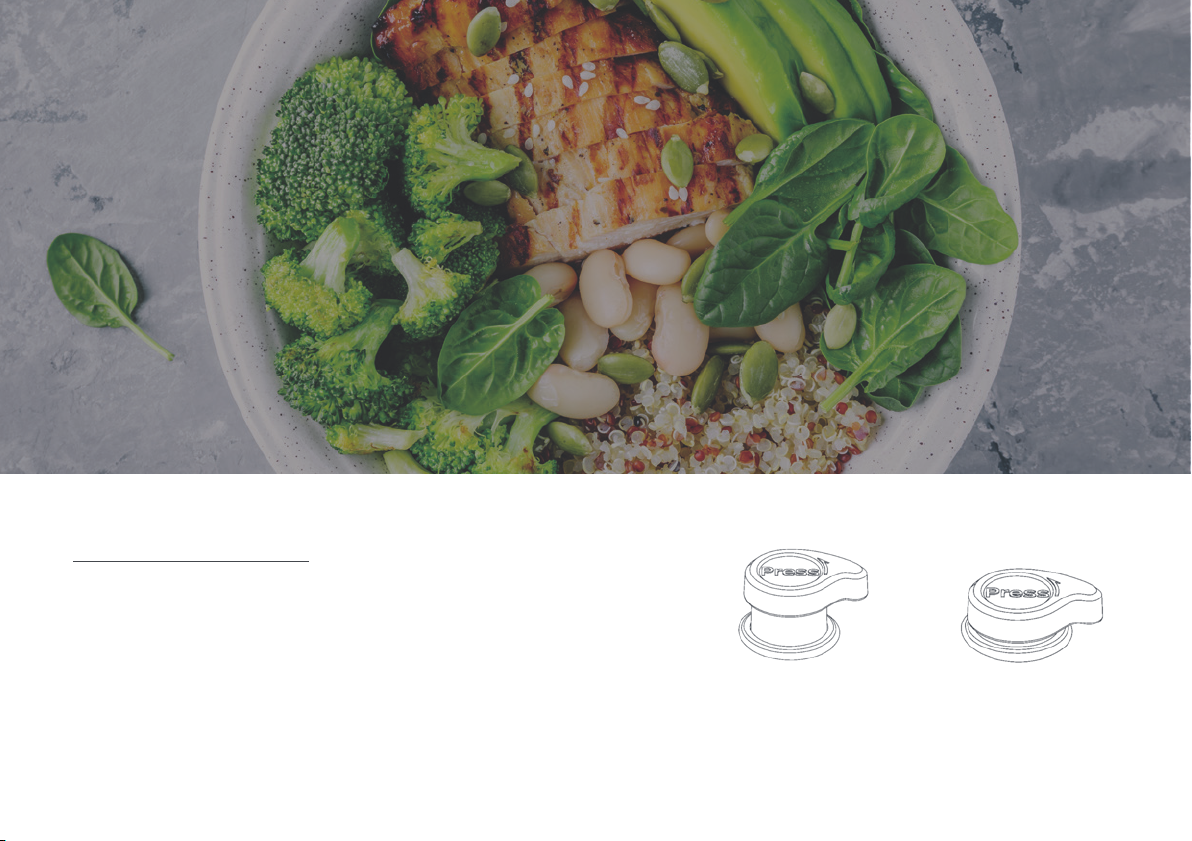
When closing the lid, the quick release button will automatically
reset to the popped up “Seal” position.
VentSeal
16
| Venting Methods
Page 17
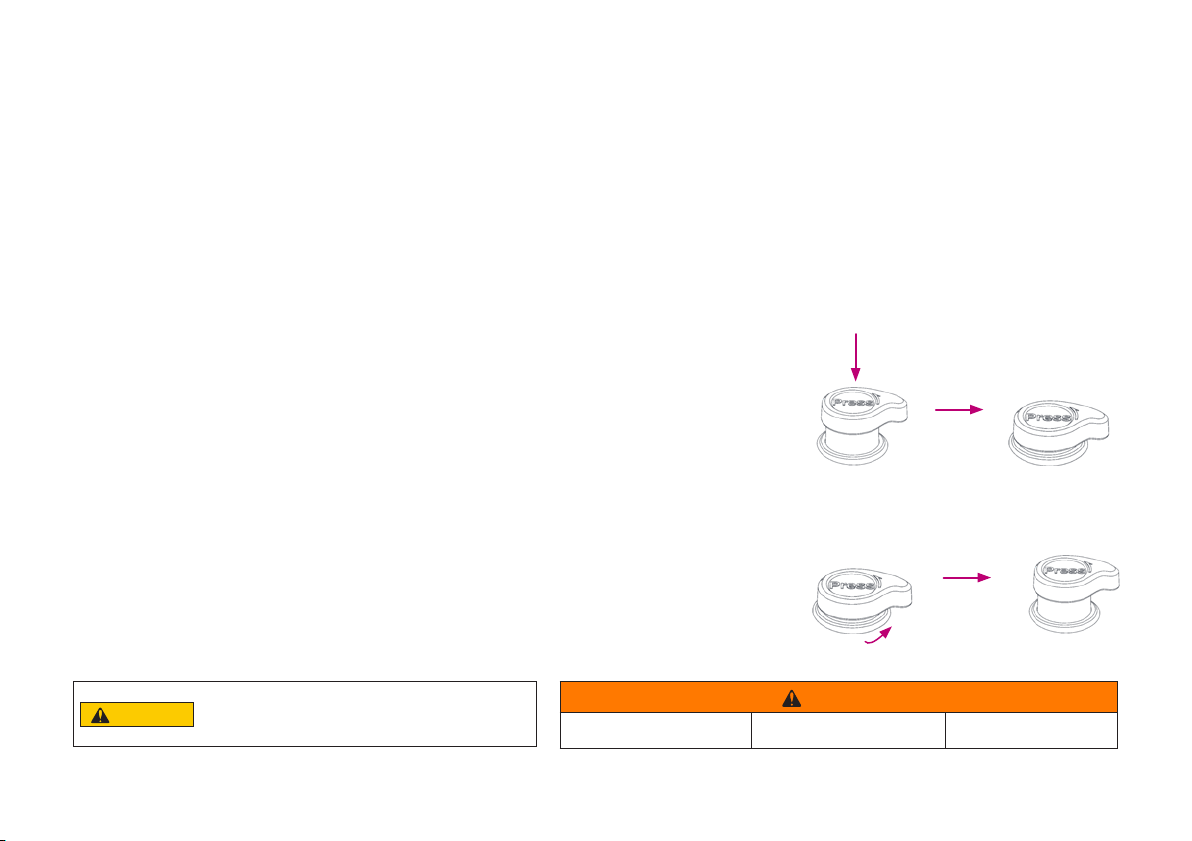
Natural Release (NR)
Leave the steam release in the “Seal” position (up). The cooker dissipates heat so pressure releases naturally over time.
This method must be used when cooking food such as soups, stews or chilis, as well as food that expands, such as
beans and grains.
Note: Depressurization time will vary based upon volume of food and liquid. May take 10-40 minutes, or longer.
Quick Release (QR)
Vent: Press quick release button down until it clicks.
When depressed, a continuous stream of steam will be released through
the steam release valve until the float valve drops into the lid.
Note: It will be loud!
If spatter occurs, flick quick release button to reset it to the “Seal” position,
and try again after a few minutes. If spatter continues, use NR to vent
remaining pressure.
Seal: Flick quick release button to reset it to the popped up “Seal” position.
CAUTION
Float valve will drop when cooker has depressurized.
Do not attempt to open the lid while the oat valve is
still popped up.
Do not lean over the steam
release valve.
WARNING
Do not place unprotected skin
over the steam release valve.
Do not cover the steam
release valve.
Venting Methods |
17
Page 18

18
Initial Test Run
(Water Test)
Page 19

Initial Test Run (Water Test)
1. Add 3 cups (24 oz / 750 mL) water to inner pot.
2. Insert inner pot into cooker base.
3. 3L & 5.7L : Secure power cord to base connection socket.
Ensure connection is tight.
Connect power cord to a 220-240V~ power source.
Display indicates “OFF”.
4. Align on lid with on cooker base.
Lower lid into track, then turn lid clockwise until jingle sounds.
Steam release automatically resets to “Seal” position when the
lid is closed.
5. Select Smart Program: Pressure Cook.
6. Use + / – keys to adjust cook time to “00:05” minutes.
Note: The Instant Pot will save any customization made to cook time.
After 10 seconds, display indicates “On” and cooker begins
Pre-heating.
7. Float valve rises when cooker has pressurized.
Once pressurized, Cooking begins and display changes from
“On” to cook time countdown.
8. When the Smart Program completes, cooker begins
Keep Warm or display indicates “End”.
9. Press quick release button down until it clicks into
“Vent” position.
Pressurized steam will release through top of steam
release valve.
Float valve will drop when pressure has been fully released.
10. To open, turn the lid counter-clockwise until a jingle sounds.
11. Discard water and dry inner pot.
12. Start cooking!
For details on Smart Programs and operation instructions, view the
full manual at instantpot.com.au
Initial Test Run (Water Test) |
19
Page 20

More Controls & Smart Programs
Page 21

More Controls
Cancel Press to stop a Smart Program at any time. Cooker returns to Standby and displays “OFF”.
Delay Start Postpone cooking up to 24 hours. Select a Smart Program and if desired, adjust the cook time, then press
Delay Start to turn the setting on. Use the + / - keys to adjust the number of hours before cooking will begin.
Keep Warm Setting is on by default on all Smart Programs except Sauté and Yogurt.. Once Smart Program is selected, press
Keep Warm to turn the setting off.
Sound On/Off When in Standby, press and hold “+” key until display indicates “S On”.
When in Standby, press and hold “–” key until display indicates “SOFF”.
Note: Error code alerts cannot be silenced.
More Controls |
21
Page 22

Smart Programs
Smart
Program
Soup/Broth
Meat/Stew
Bean/Chili
Poultry
Rice
Multigrain
Setting Suggested Use Note
Less Soup without meat
Normal Soup with meat
More Rich bone broth
Less Soft texture
Normal Very soft texture
More Fall-off-the-bone texture
Less Firmer texture
Normal Soft texture
More Very soft texture
*
Less Soft texture
Normal Very soft texture
More Fall-off-the-bone texture
Less Tender but rm to bite
Normal Normal texture white rice
More Softer texture white rice
Less
*
Normal Brown rice, wild rice, mung beans, etc.
More
Brown rice, wild rice, black beans,
chickpeas, etc.
Tough grains or a
mixture of grains and beans
*Not available on 3L size. Use Pressure Cook instead.
Liquid remains clear due to lack of boiling motion.
Always use NR to release pressure when cooking soup with a high starch content.
Choose setting based on meat texture desired, or adjust cook time manually.
Allow meat to “rest” for 5-30 minutes (depending on size), either in the cooker or covered.
Choose setting based on bean texture desired, or adjust cook time manually.
When cooking beans or legumes, always use NR to release pressure.
Ensure dry beans are completely submerged in water.
Choose setting based on meat texture desired, or adjust cook time manually.
Allow poultry to “rest” for 5-10 minutes (depending on size), either in the cooker or covered.
Depending on the volume of rice, cook time may range from 8-15 minutes.
After cooking, wait 10 minutes then use QR to vent.
Select “Less” or “Normal” based on type of grain and desired texture.
“More” begins with 45 minutes of warm water soaking time prior to 60 minutes of pressure cooking.
22
| Smart Programs
Page 23

Smart
Program
Porridge
Steam
Pressure
Cook
Slow Cook
Sauté
Yogurt
Setting Suggested Use Note
Less Oatmeal—steel cut or rolled
Normal White rice, porridge/congee
More
Less Vegetables
Normal Fish and Seafood
More Meat
Less
Normal
More
Less
Normal
More
Less Simmering & reducing
Normal Pan searing or sautéing
More Stir-frying or browning meat
Less
Normal Fermenting yogurt
More Pasteurizing milk
Rice porridge/congee with a mixture
of various grains
Manual programming
Corresponds to Low on common
slow cookers
Corresponds to Medium on
common slow cookers
Corresponds to High on common
slow cookers
Low-temperature fermentation
(Jiu Niang)
Adjust time as directed in recipe.
Always use NR to release pressure when cooking foods that expand.
Use steam rack provided to elevate food from cooking liquid.
Use QR to prevent food from overcooking.
Press Pressure Level to toggle between High and Low pressure.
Use + / - keys to adjust cook time.
Adjust according to recipe for desired results.
Ensure quick release button is set to “Vent” position.
Optionally, use a glass lid for slow cooking.
Do not use the lid on Sauté.
Maximum 30 minutes to prevent overheating.
When display switches from “On” to “Hot”, add recipe ingredients. If ingredients are added before
“Hot” message appears, it may not appear at all.
Milk must reach a minimum of 72°C (161°F) for pasteurization to occur.
Allow pasteurized milk to cool to below 43°C (110°F).
8 hours is standard for fermentation, but a longer period will result in tangier yogurt.
Smart Programs |
23
Page 24

Let’s get cooking!
628-0310-02
Enjoy time well spent with
the Instant family of small appliances.
Register your product today at:
instantpot.com.au/support/register
©2019 Corelle Brands (Australia) Pty Ltd.
©2019 Corelle Brands (Australia) Pty Ltd.
Distributed by Corelle Brands (Australia) Pty Ltd.
9c Commercial Road, Kingsgrove, NSW, 2208, Australia
Ph 1800 251 643 or 02 9317 1000
instantpot.com.au
 Loading...