

Page 1
TM
VORTEX
PLUS
10 Quart Air Fryer Oven
User Manual
Welcome
Important Safeguards
Initial Setup
Product Overview
Control Panel
Initial Test Run
Smart Programs
Rotisserie
Cooking Timetable
Care & Cleaning
Troubleshooting
Warranty
Support & Contact
Information
Page 2

Welcome to the world of Instant cooking.
Hello! Thank you for welcoming us into your kitchen.
Having families ourselves, we developed the Instant
TM
Vor texTM Air Fryer
Oven to allow busy families and professionals alike to cook healthy,
delicious meals more easily and in less time.
We have partnered with chefs, authors and bloggers to compile a
collection of recipes that we hope you enjoy!
Download the FREE Instant Pot App
• Original Recipes
Robert J. Wang
Founder & Chief Innovation Ofcer
Find dozens of easy to follow recipes at https://recipes.instantpot.com/ or download
the Instant Pot app at https://instantpot.com/instant-pot-recipe-app-free-recipes/
• New User Tips
• Getting Star ted Videos
2
Page 3

IMPORTANT SAFEGUARDS
When using, to avoid the risk of serious injury when using your appliance,
basic safety precautions should be followed, including the following:
1. READ ALL INSTRUCTIONS, SAFEGUARDS, AND WARNINGS BEFORE
OPERATING THE APPLIANCE.
2. Always operate the appliance on a stable, non-combustible, level surface.
3. The appliance’s outer surfaces may become hot during use. Do not touch
hot surfaces. Wear Instant Pot® mini mitts or oven mitts when opening the
oven door and handling hot components. Extreme caution must be used
when moving the appliance. Let the appliance cool to room temperature
before handling or moving.
4.
CAUTION
immerse power cord, plug, or the appliance in water or other liquid.
5. Do not rinse the appliance under tap.
6. The cooking chamber contains electrical components. To avoid electrical
shock, do not put liquid of any kind into the cooking chamber.
7. This appliance is NOT to be used by children or by persons with reduced
physical, sensory, or mental capabilities. Close supervision is necessary
when this appliance is used near children and these individuals. Children
should not use or play with this appliance.
8. Unplug from the outlet when not in use, as well as before adding or
removing parts or accessories, and before cleaning. To unplug, grasp the
plug and pull from the outlet. Never pull from the power cord.
9. Avoid contact with moving parts.
10. Regularly inspect the appliance and power cord. Do not operate
any appliance with a damaged cord or plug or after the appliance
malfunctions, or is dropped or damaged in any manner. Contact
Customer Care at support@instantappliances.com or 1-800-828-7280.
11. Do not use any accessories or attachments not authorized by Instant
Brands
manufacturer, such as fry baskets, may cause a risk of injury, re or electric
shock.
TM
To protect against the risk of electrical shock, do not
Inc. The use of attachments not recommended by the
12. For household countertop use only. Do not use outdoors. Not for
commercial use.
WARNING
Read this manual carefully and completely, and retain for future reference.
Failure to adhere to safety instructions may result in serious injury.
3
Page 4

IMPORTANT SAFEGUARDS
13. Do not place the appliance on any kind of stovetop, or in a heated oven;
heat from an external source will damage the appliance.
14. Do not let power cord contact hot surfaces or open ame, including a
stovetop.
15. Do not use appliance for anything other than intended use.
16. Proper maintenance is recommended after each use. Refer to “Care &
Cleaning”. Let the appliance cool to room temperature before cleaning or
storage.
17.
CAUTION
supply cord is provided to reduce the hazards resulting from grabbing,
entanglement and tripping. Keep appliance and cord away from children.
Never drape cord over edge of table or counter, never use power outlet
below counter, and never use with an extension cord.
18. Do not attempt to repair, replace, alter, or modify components of the
appliance. This may cause electric shock, re and/or injury, and will void
the warranty.
19. Do not tamper with any of the safety mechanisms.
20. Do not use the appliance in electrical systems other than 120V~60Hz for
Canada and the USA. Do not use with power converters or adapters.
21. Do not overll the air fryer basket. Overlling may cause food to contact
the heating element, which may result in re and/or personal injury.
22. Do not cover the air vents while the appliance is in operation. Doing so
will prevent even cooking and may cause damage to the appliance.
23. Never pour oil into the cooking chamber. Fire and personal injury could
result.
24. While cooking, the internal temperature of the appliance reaches several
hundred degrees. To avoid personal injury, never place unprotected
hands inside the appliance until it has cooled to room temperature.
Spilled food can cause serious burns. A short power-
25. When cooking, do not place the appliance against a wall or against other
appliances. Leave at least 5” of free space on the back, sides, and above
the appliance. Do not operate the appliance on or near combustible
materials such as tablecloths and curtains. Do not place anything on top
of the appliance.
4
WARNING
Read this manual carefully and completely, and retain for future reference.
Failure to adhere to safety instructions may result in serious injury.
Page 5

IMPORTANT SAFEGUARDS
26. When in operation, hot air is released through the air vents. Keep your
hands and face at a safe distance from the air vents and take extreme
caution when removing the accessories from the appliance.
27. Should the unit emit black smoke, press Cancel and unplug the appliance
immediately. Wait for smoking to stop before opening the door, then
clean the appliance thoroughly.
28. Do not leave the appliance unattended while in use.
29. Never connect this appliance to an external timer switch or separate
remote-control system.
30. Use extreme caution when removing hot accessories from the cooking
chamber or disposing of hot grease.
31. Oversized foods and/or metal utensils must not be inserted into the
cooking chamber as they may cause risk of re and/or personal injury.
32. Do not store any materials, other than the included accessories, in the
cooking chamber when not in use.
33. Do not place any combustible materials in the cooking chamber, such as
paper, cardboard, plastic, Styrofoam or wood.
34. The included accessories are not to be used in a microwave, toaster oven,
convection or conventional oven, nor on a ceramic, electric, induction or
gas cooktop, or an outdoor grill.
SAVE THESE INSTRUCTIONS
WARNING
Read this manual carefully and completely, and retain for future reference.
Failure to adhere to safety instructions may result in serious injury.
5
Page 6

IMPORTANT SAFEGUARDS
WARNING
To avoid injury, read and understand instruction manual before using this machine.
WARNING
Electrical shock hazard. Use grounded outlet only. DO NOT remove ground. DO NOT use an adapter. DO
NOT use an extension cord. Failure to follow instructions can cause electrical shock and/or death.
NOTI CE
THE FAILURE TO FOLLOW ANY OF THE IMPORTANT SAFEGUARDS AND THE IMPORTANT
INSTRUCTIONS FOR SAFE USE IS A MISUSE OF YOUR APPLIANCE THAT CAN VOID YOUR
WARRANTY AND CREATE THE RISK OF SERIOUS INJURY.
Special Cord Set Instructions
As per UL safety requirements, a short power supply cord (0.6 m to 0.9 m /
24 in – 35 in) is provided to reduce the hazards resulting from grabbing,
entanglement and tripping
This appliance has a 3-prong grounding plug. To reduce the risk of electric
shock, plug the power cord into a grounded (earthed) electrical outlet that is
easily accessible.
Product Specications
Vortex Plus 10 10 Quart 1500W 120V~60 Hz
6
WARNING
Read this manual carefully and completely, and retain for future reference.
Failure to adhere to safety instructions may result in serious injury.
16.94 lb
7.7 kg
in: 13.23L × 13.23W × 14.37H
cm: 33.6L × 33.6W × 36.5H
Page 7

Initial Setup
• Remove all packaging material from, in and around the oven, as well as all
accessories from inside the oven chamber.
• Follow Care & Cleaning instructions in this manual to clean the oven
before rst use.
• Place the oven on a stable, level surface, away from combustible material
and external heat sources. Leave at least 5” of space around the oven.
• Do not place the oven on a stovetop.
• Do not place anything on top of the oven.
• Do not block the air vents.
• Read the Important Safeguards in this User Manual before using the oven.
Failure to read and follow Important Safeguards may result in damage to
the oven, damage to property or personal injury.
7
Page 8
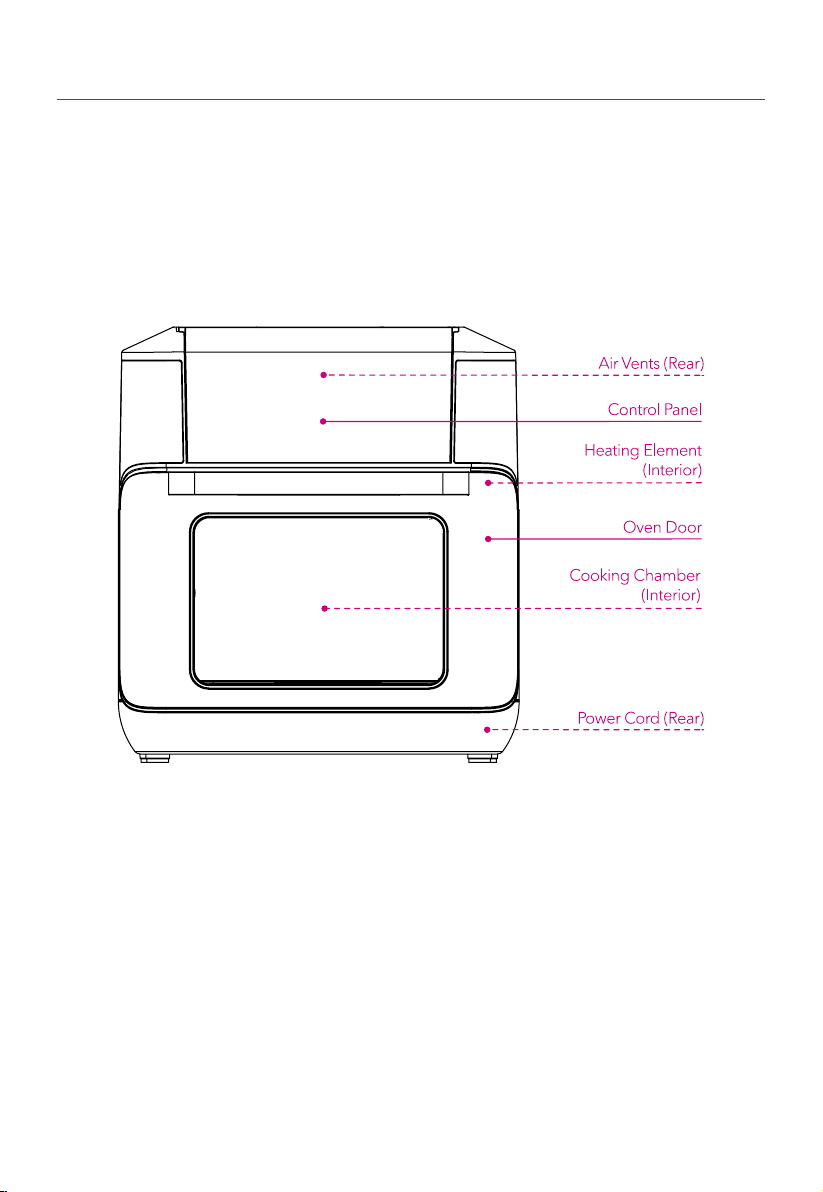
Product Overview
The Vortex Plus Air Fryer Oven uses rapid air circulation to cook food, giving
your meals all the crispy rich avor of deep frying with little or no oil.
Air Fryer Oven
Images are for reference only. Refer to actual product.
8
Page 9

Product Overview
Air Fryer Oven Accessories
Drip Pan
Cooking Tray (x2)
Rotisserie Basket
Images are for reference only. Refer to actual product.
Rotisserie Fork
Rotisserie Spit
Rotisserie Lift
9
Page 10

Control Panel
The Vortex Plus Air Fryer Oven Control Panel features intuitive touch screen
controls and an LED Display.
1 2
3
1 Display
Shows cooking time, cooking
temperature, reminders and error
messages.
2 Smart Programs
Smart Programs control cooking
times and temperatures
automatically. Select a Smart
Program by touching the label on
the Control Panel. Display reads
“Off” to indicate that the Smart
Program has been initiated and the
oven is in Standby mode.
Vortex Plus 10 Smart Programs:
• Air Fry
• Roast
• Broil
• Bake
• Reheat
• Dehydrate
Note: Each Smart Program includes a
default cooking time and temperature.
3 Adjust Temperature
Touch the Temp [+] or [-] signs to
adjust the cooking temperature.
Touch and hold to adjust quickly.
4
6
7
8 5
4 Adjust Time
Touch the Time [+] or [-] signs to
adjust the cooking time. Touch and
hold to adjust quickly.
Note: The Smart Program saves your
time and temperature adjustments when
you touch Start.
5 Start
Touch the Start key to begin
cooking.
6 Rotate
Once cooking has begun, touch the
Rotate key to turn rotisserie rotation
on and off.
Note: Applicable to Air Fry & Roast
only. The key turns blue when the Rotate
function is available.
7 Light
Touch the Light key to turn the oven
light on or off. The oven light turns
off automatically after 5 minutes.
8 Cancel
Touch the Cancel key to stop
cooking. The oven goes into to
Standby mode and the Display
reads “OFF”.
10
Page 11

More Controls
Smart Program Reset When in Standby, touch and hold the Smart Program
you wish to reset for 3 seconds. The Smart Program
cooking time and temperature is restored to the
default setting.
Full Reset When in Standby, touch and hold both the Tem p
and Time plus [+] signs at the same time for 3
seconds. All Smart Programs cooking times and
temperatures are restored to the default settings.
Sound On/Off When in Standby (Display reads “Off ”), touch and
hold both the Temp and Time minus [−] signs for 3
seconds to toggle sound on or off.
Note: Error alerts cannot be silenced.
11
Page 12

Display Messages
OFF indicates that the Air Fryer is in Standby mode.
On indicates that the Air Fryer is in Preheating mode.
Add food indicates that the oven has reached desired temperature and food
can be added
00:00 indicates that the Smart Program is running. The time indicator will
count down while your food is cooking.
turn Food is a reminder to turn, ip or shake food items as recommended by
your recipe.
End indicates that the Smart Program has ended.
12
Page 13

Test Run
Follow these steps to ensure your oven is operating properly.
1. Open the oven door.
Place the drip pan on the bottom of the cooking chamber.
Close door.
2. Plug the power cord into a 120V power source.
Display reads “OFF” indicating that oven is in Standby mode.
3. Touch the Air Fry Smart Program control on the Control Panel.
vvvThe default Air Fry Smart Program cooking temperature is 400ºF.
4. Touch the [+] or [−] Time controls to adjust the cooking time to 20
minutes.
Note: Smart Programs automatically save your last temperature and time settings.
5. Touch Start to begin cooking.
The display reads “On” while the oven is in Preheat mode.
Use the Temp [+] or [−] and Time [+] or [−] controls to adjust the cooking
temperature or time.
6. When the oven reaches the Smart Program cooking temperature, the
display reads “Add Food”.
For this test run, do not add food to the cooking chamber.
7. Open oven door.
Use Instant Pot® mini-mitts or oven mitts and carefully insert both cooking
trays into the heated cooking chamber.
Close door.
The cooking time and temperature will be displayed
8. Part way through the Smart Program cooking time, the oven beeps and
displays “turn Food” to remind you to turn your food.
Open the door to automatically pause the Smart Program, then close the
door to resume.
Note: The “turn Food” reminder only appears when using Air Fry or Roast Smart
Programs and only if Rotate is not turned on.
Note: Cooking will recommence after 10 seconds whether food has been turned
or not.
13
Page 14

Test Run
9. Display will count down the last minute of cooking time in seconds
When the Smart Program is complete, display reads “End” and the fan
blows to cool the oven.
Note: The Air Fryer Oven will remind you that food is ready 5, 30 and 60 minutes
after the Smart Program ends.
CAUTI ON
room temperature, then clean the accessories and cooking chamber. Refer to “Care & Cleaning” in the
included Safety, Maintenance & Warranty booklet.
The oven will be hot during and after cooking. Do not touch hot surfaces. Always use
Instant Pot® Mini Mitts or oven mitts to remove cooking trays. Allow the oven to cool to
14
Page 15

Smart Program Settings
Default Vortex Plus 10 Smart Program Time and Temperature settings are as
shown in the table below.
Smart
Program
Air Fry
Roast
Broil
Bake
Reheat
Dehydrate
Default
Cooking Time
18 minutes 1 – 60 minutes 400°F / 205°C 180 – 400°F / 82 – 205°C
For all your favorite deep-fried meals, including fries, cauliower wings, chicken
nuggets and more.
40 minutes 1 – 60 minutes 380°F / 193°C 180 – 400°F / 82 – 205°C
Ideal for beef, lamb, pork, poultry, vegetable dishes and more.
8 minutes 1 – 20 minutes 400°F / 205°C 400°F / 205°C
Direct top-down heating. Perfect for melting cheese on French onion soup,
nachos and more.
30 minutes 1 – 60 minutes 365°F / 185°C 180 – 400°F / 82 – 205°C
Light and uffy cakes and pastries, scalloped potatoes and more.
10 minutes 1 – 60 minutes 280°F / 138°C 120 – 360°F / 49 – 182°C
Reheat leftovers without overcooking or drying out.
7 hours 1 – 15 hours 120°F / 49°C 105 – 160°F / 41 – 71°C
Perfect for homemade fruit leather, jerky, dried vegetables and more.
Available Time
Range
Default Cooking
Temperature
Available Temperature
Range*
15
Page 16

Using the Rotisserie Accessory
Always insert rotisserie accessories and food before preheating the oven.
To use the Rotisserie Basket
Read these instructions and/or watch the video to ensure you are using the
rotisserie properly. Failure to follow these steps could result in damage to
the rotisserie catch. youtube.com/watch?time_continue=1&v=VmHa7qf6Ai0
Place food items in the rotisserie basket.
1
Align the tab on the rotisserie
2 3
basket with the notch in the lid
then place the lid.
CAUTI ON
16
Do not overll the rotisserie basket.
Turn the lid clockwise to secure it.
Page 17

Using the Rotisserie Accessory
Always insert rotisserie accessories and food before preheating the oven.
To use the Rotisserie Spit & Forks
Unscrew the 2 set screws.
1
Remove the forks from the spit.
2
CAUTI ON
Ensure the food item is able to rotate freely. Do not allow food items to make contact
with the heating coil.
17
Page 18

Using the Rotisserie Accessory
Push the food item onto the spit.
3
Slide the forks onto both ends of the spit, ensuring the prongs are
4
inserted into the food item.
Tighten the set
5
screw to secure
the forks.
CAUTI ON
18
Ensure the food item is able to rotate freely. Do not allow food items to make contact
with the heating coil.
Page 19

Using the Rotisserie Accessory
Always insert rotisserie accessories and food before preheating the oven.
Rotisserie Cooking
With the oven door open, slide the basket accessory or rotisserie spit
1
into the guides into the cooking chamber. Both the basket and rotisserie
spit install and remove the same way.
Move the rotisserie
2
catch lever to the
right and hold it
in position.
Release the rotisserie catch lever
4
and rotate the rotisserie basket
into place to ensure that the arm is
held securely in place.
Align the rotisserie arm
3
with the hole in the center
of the rotisserie catch on
both sides of the cooking
chamber.
19
Page 20

Using the Rotisserie Accessory
Close the oven door.
5
6 7 8 9
Select Air Fry
or Roast.
20
and Time [+ / −]
controls to
adjust cooking
temperature and
time as desired.
Touch Start. Touch Rotate.Use the Temp
Page 21

Using the Rotisserie Accessory
Removing the Accessory
Use caution when opening oven door.
1
Door and accessories will be hot.
Position the rotisserie lift hooks beneath
the left and right arms of the accessory.
Move the rotisserie catch
2
lever to the right to release
the accessory.
Pull the accessory towards
3
you, then release the
rotisserie catch lever.
Carefully remove the accessory
4
from the cooking chamber.
WARN ING
removing hot accessories from the cooking chamber. Always use Instant Pot® Mini Mitts or oven mitts when
disassembling hot rotisserie accessories.
Rotisserie spit, forks, and basket will be hot during and after cooking. Always use the
rotisserie lift to remove rotisserie accessories, and exercise extreme caution when
21
Page 22

Cooking Timetable
Food Setting Cooking Time*
Thin-cut fries
(Frozen)
Thin-cut fries
(Fresh)
Thick-cut fries
(Frozen)
Thick-cut fries
(Fresh)
Chicken wings Air Fry / Roast 20 – 30 minutes 360°F / 182°C
Whole chicken
(up to 4 lbs)
Chicken nuggets
(Frozen)
Shrimp (Frozen) Air Fry 8 minutes 400°F / 205°C
Shrimp (Fresh) Air Fry 8 – 10 minutes 350°F / 177°C
Fish sticks
(Frozen)
Asparagus Broil / Bake 7 – 9 minutes 370°F / 188°C
Cauliower Broil / Bake 6 – 10 minutes 370°F / 188°C
Cake Bake 25 – 35 minutes 360°F / 182°C
Air Fry / Roast 14 – 18 minutes 400°F / 205°C Rotisserie Basket
Air Fry / Roast 18 – 20 minutes 400°F / 205°C Rotisserie Basket
Air Fry / Roast 16 – 20 minutes 400°F / 205°C Rotisserie Basket
Air Fry / Roast 20 – 25 minutes 400°F / 205°C Rotisserie Basket
Roast 50 – 70 minutes 380°F / 193°C Rotisserie Spit
Broil 10 – 15 minutes 400°F / 205°C
Broil 8 – 12 minutes 400°F / 205°C Cooking Tray, Middle
Cooking
Temperature*
Accessory & Placement
Cooking Tray, Bottom /
Rotisserie Basket
Cooking Tray, Middle /
Rotisserie Basket
Cooking Tray, Middle /
Rotisserie Basket
Cooking Tray, Middle /
Rotisserie Basket
Cooking Tray, Middle /
Rotisserie Basket
Cooking Tray, Middle /
Rotisserie Basket
Drip Pan, Bottom
(Springform Pan)
*Note: Cooking times and temperatures are recommendations only. Always follow a trusted
recipe.
CAUTI ON
22
Always use a meat thermometer to ensure the internal temperature of poultry reaches
at least 165°F / 75°C.
Page 23

Cooking Tips
Instant Air Fryer Ovens can cook all your favorite fresh and frozen oven-baked,
and deep-fried snacks—fast!
• Use the Smart Programs as a starting point and experiment with cooking
times, and temperatures to get the results your prefer.
• Rotisserie-cooked foods and rotisserie accessories, and foods must be
placed in the oven before touching Start
• With the exception of rotisserie-cooked foods, most foods will benet
greatly from a preheated oven. Wait for the display to read “Add Food”
before inserting food into the cooking chamber.
• When cooking coated food items, choose breadcrumb batters over
liquid-based batters to ensure that the batter will stick to the food.
• Flip or rotate food items when the display indicates “turn Food” to ensure
they are evenly cooked on both sides.
• For crispy, golden fries, soak fresh potato sticks in ice water for 15
minutes, pat dry and spray lightly with cooking oil before inserting them
to the oven.
• When baking cake, pie, quiche, or any food with lling or batter, use
an oven-safe baking dish and cover food with foil or an oven-safe lid to
prevent the top from overcooking.
• The drip pan doubles as a at cooking tray. Use the drip pan when
cooking fragile or lled foods.
• When cooking pizza, insert both cooking trays into the oven and place the
pizza on the bottom cooking tray.
• Pat moist food items dry before cooking to prevent steam, splatter and
excess steam.
• Air frying can cause oil and fat to drip from foods. To prevent excess
smoke, carefully remove and empty the drip pan periodically throughout
cooking.
• To ensure seasoning adheres to food items, spray food items with cooking
oil before adding seasoning.
• Feel free to use any oven-safe cookware in your Air Fryer Oven.
23
Page 24

Cooking Tips
• Find dozens of easy to follow recipes at:
recipes.instantpot.com
Download the Instant Pot app at:
instantpot.com/instant-pot-recipe-app-free-recipes/
CAUTI ON
Do not spray cooking oil into the cooking chamber.
24
Page 25

Care & Cleaning
Always unplug your Vortex Plus Air Fryer Oven and let it cool to room
temperature before cleaning.
Never use harsh chemical detergents, scouring pads, or powders on any of
the parts or components.
Part / Accessory Instruction Cleaning Method
Clean after each use. For best results, use a
Rotisserie Basket
Rotisserie Spit &
Forks
Cooking Trays
Rotisserie Lift Clean as needed.
Drip Pan
Cooking Chamber
Removable Door Allow to air-dry completely before reinstalling.
Outer Body &
Stainless Steel
bristled brush rather than a sponge or cloth.
Optionally, spray with non-stick cooking spray
before adding food.
Disassemble and clean after each use.
Do not cover cooking trays when cooking. Air
must be able to circulate freely.
Clean after each use.
Cooking trays have a non-stick coating. Do not
use metal utensils when cleaning.
Remove and clean after each use. Ensure that all
grease and food debris removed.
Optionally, line the pan with aluminum foil or
parchment paper for easier cleaning.
Clean the cooking chamber walls as needed.
Always check the heating coil for food debris and
clean the heating coil as needed.
Ensure the heating coil is dry before next use.
Clean with a soft, damp cloth or sponge, and wipe
dry to prevent streaking.
Dishwasher or
Hand Wash
Damp Cloth Only
Note: To remove baked-on grease and food residue from accessories, and the cooking
chamber, spray with a mixture of baking soda and vinegar and wipe clean with damp cloth.
For stubborn stains, allow the mixture to sit on the affected area for several minutes before
scrubbing clean.
25
Page 26

Care & Cleaning
Remove the Oven Door
1. Place one hand on top of the Air Fryer Oven to hold it rmly in place.
2. Open the door to a 45º angle from the oven.
3. Pull the door up from the right side until it pops out of its track
Reinstall the Oven Door
1. Hold the door at a 45º angle from the oven
2. Align the teeth at the bottom of the oven door with the grooves in the Air
Fryer Oven.
3. Press down on the right side of the oven door until it pops into place, then
press the left side down.
Do not immerse the appliance
in water. Do not rinse the
appliance under a tap. Do not
wet prongs of power cord.
26
WARNING
Without proper cleaning, food
and grease splatter may build
up around the heating element,
causing the risk of smoke, re,
and personal injury.
If you smell smoke, touch Cancel and
unplug the appliance. Once cool, remove
food splatter or grease with a soft cloth
and mild detergent.
Page 27

Troubleshooting
Register your product today at instantappliances.com/support/register.
Problem Possible Reason Try This
Cancel the Smart Program, unplug the oven and
allow it to cool to room temperature. Choose
a neutral oil with a high smoke point, such as
Virgin or Extra Virgin Olive Oil, Avocado, Canola,
Soybean, Safower, or Rice Bran.
Cancel the Smart Program, unplug the oven and
allow it to cool to room temperature. Remove all
accessories from the cooking chamber and clean
the area as well as all accessories thoroughly.
Cancel the Smart Program, unplug the oven and
allow it to cool. Contact Customer Care Team.
Note: Do not attempt to repair the appliance.
Avoid air frying foods with a high fat content.
Check drip pan/crumb tray for excess oil or fat
and carefully remove as needed after cooking.
Pat dry moist food ingredients before air frying.
Do not add water or other liquid to cooking
chamber when air frying.
Be mindful when seasoning food.
Spray vegetables and meats before adding
seasoning so they adhere to the ingredients.
Ensure the power cord is plugged into the outlet
rmly.
Plug in another appliance to the same plug to test
the circuit.
Move the Air Fryer to another plug.
Contact Customer Care Team.
Contact Customer Care Team.
Black smoke
coming from Air
Fryer
White smoke
coming from Air
Fryer
Air Fryer is
plugged in but
will not turn on
All lights
ash and
a code
appears on
the display
E1
E2
Using an oil with a low
smoke point
Food residue on the
bottom of the cooking
chamber, or accessories
Faulty circuit or heating
element
Cooking foods with
high fat content, such
as bacon, sausage, and
hamburger
Water is vaporizing
producing thick steam
Seasoning on food has
blown into element
The appliance is not
properly plugged in
Outlet is not powered
Door is open Ensure the oven door is closed.
Broken circuit of the
thermal sensor
Short circuit of the
thermal sensor
If the problems persist or for any service issue, contact an authorized service
representative at support@instantappliances.com or by creating a support
ticket instantappliances.com/support.
27
Page 28

Warranty
Limited Warranty
This Limited Warranty is effec tive for one year from the date of original consumer purchase. Proof of original
purchase date and, if reques ted by an authorized representative of Ins tant Brands Inc. (“Instant Brands”), return of
your appliance, is required to obtain ser vice under this Limited Warrant y. Provided that this appliance is operated
and maintained in accordance with written instructions attached to or furnished with the appliance, Instant Brands
will, in its sole and exclusive discretion, either: (i) repair defects in materials or workmanship; or (ii) replace the
appliance. In the event that your appliance is replaced, the Limited Warranty on the replacement appliance will
expire 12 months from the date of original consumer purchase.
This Limited Warranty extends only to the original purchaser and use of the appliance
in the United States of America and Canada. This warranty does not cover units that are
used outside of the United States of America and Canada.
Any modication or attempted modication to your appliance may interfere with the safe operation of the
appliance and will void this Limited Warranty. This Limited Warrant y does not apply in respect of any appliance
or any part thereof that has been altered or modied unless such alterations or modications were expressly
authorized by an Instant Brands representative.
Limitation and Exclusions
The liability of Instant Brands, if any, for any allegedly defective appliance or par t shall in no circumstances exceed
the purchase price of a comparable replacement appliance.
This Limited Warranty does not cover:
1. Damage resulting from accident, alteration, misuse, abuse, neglect, unreasonable use, use contrar y to the
operating instructions, normal wear and tear, commercial use, improper assembly, disassembly, failure to
provide reasonable and necessary maintenance, re, ood, acts of God or repair by anyone unless direc ted by
an Instant Brands Representative;
2. Repairs where your appliance is used for other than normal, personal use or when it is used in a manner that is
contrary to published user or oper ator instructions; or
3. Use of unauthorized parts and accessories, or repairs to part s and systems resulting from unauthorized repair s
or modications made to this appliance.
The cos t of repair or replacement under these excluded circumstances shall be paid by you.
28
Page 29

Warranty
Disclaimer of Implied Warranties
EXCEPT AS EXPR ESSLY PROVIDED HEREIN AND TO T HE EXTENT PERMIT TED BY LAW, INSTANT BRANDS MAKE S
NO WARR ANTIES, CO NDITIONS OR REPRESENTATIONS, E XPRESS OR IMPLIED, BY STATUTE, USAGE, CUSTOM OF
TRA DE OR OTHERWISE WITH RE SPECT TO THE APPLIANCES OR PARTS COVERED BY THIS WARRANTY, INCLU DING
BUT NOT LIMITED TO, WARRANTIES, CONDITIONS, OR REPRESENTATIONS OF WORKMANSHIP, MERCHANTABILITY,
MERCHANTABLE QUALITY, FITNESS FOR A PARTICULAR PURPOSE OR DURABILITY.
Some states or provinces do not allow for the exclusion of implied warranties of merchantability or tness, so
this limitation may not apply to you. In these states and provinces, you have only the implied warranties that are
expressly required to be provided in accordance with applicable law.
Limitation of Remedies; Exclusion of Incidental and Consequential Damage
YOUR SOL E AND EXCLUSIVE REMEDY UNDER THIS LIMITED WARRANTY SHALL BE APPLIANCE REPAIR OR
REPLACEMENT AS PROVIDED HEREIN. INSTANT BRANDS SHALL NOT BE LIABLE FOR INDIRECT, INCIDENTAL OR
CONSEQUENTIA L DAMAGES ARISING OUT O F OR IN CONNECTION WITH THE USE OR PERFORMANCE OF T HE
APPLI ANCE OR DAMAGES WITH RESPECT TO AN Y ECONOMIC LOSS, PERSONAL INJURY, LOSS OF PROPERTY,
LOSS OF RE VENUES OR PROFITS, LOSS OF ENJOYMENT OR USE, COSTS OF REMOVAL, INS TALL ATIO N OR OTHER
INDIRECT, INCIDENTAL OR CONSEQUENTIAL DAMAGES OF ANY NATURE OR KIND.
Warranty Registration
Please visit www.instantappliances.com/support/register to register your new Instant Brands™ appliance
and validate your warrant y within thir ty (30) days of purchase. You will be asked to provide the store name, date
of purchase, model number (found on the back of your appliance) and serial number (found on the bottom of
your appliance) along with your name and email address. The registration will enable us to keep you up to date
with product development s, recipes and contac t you in the unlikely event of a product safety notication. By
registering, you acknowledge that you have read and under stand the instruc tions for use, and warnings set for th in
the accompanying instructions.
Warranty Service
To obtain service under this warranty, please contact our Customer Service Department
by phone at 1-800-828-7280 or by email to support@instantappliances.com. You can
also create a support ticket online at www.instantappliances.com/support. If we are
unable to resolve the problem, you may be asked to send your appliance to the Service
Department for quality inspection. Instant Brands is not responsible for shipping costs
related to warranty service, save and except for shipping costs associated with the return
of your appliance from Canada or within the 48 contiguous states and the District of
Columbia of the United States of America, as provided herein. When returning your
appliance, please include your name, mailing address, email address, phone number,
and proof of the original purchase date as well as a description of the problem you are
encountering with the appliance.
29
Page 30

686-0101-51
Instant Brands Inc.
11 - 300 Earl Grey Dr., Suite 383
Ottawa, Ontario
K2T 1C1
Canada
Register your product today at:
instantappliances.com/support/register
Contact Customer Care:
1-800-828-7280
support@instantappliances.com
instantappliances.com/#Chat
instantappliances.com
store.instantappliances.com
Copyright © 2019 Instant Brands™ Inc
 Loading...