


TM
VORTEX
VORTEX
6 Quart Air Fryer
,
TM
PLUS
User Manual
Welcome
Important Safeguards
Getting Started
Product, Parts and
Accessories
Control Panel
Smart Programs
Cooking Tips
Care and Cleaning
Troubleshooting
Warranty
Contact Information

Thank you for welcoming us into your kitchen.
™
Having families ourselves, we developed the Instant
Vor tex™ air fryers to allow
busy families and professionals alike to cook healthy, delicious meals more easily
and in less time.
Table of ContentsWelcome to the world of Instant cooking.
IMPORTANT SAFEGUARDS .............................................................................. 5 –7
Special Cord Set Instructions ............................................................................... 7
We have partnered with chefs, authors and bloggers to compile a collection of
recipes that we hope you enjoy!
Happy cooking,
Robert J. Wang
Founder and Chief Innovation Ofcer
Download the Instant Pot App
• Original Recipes
• New User Tips
• Getting Started Videos
Find helpful how-to-videos, download the app, or visit our recipes site.
Product Specications .......................................................................................... 7
Initial Set Up .............................................................................................................8
Product, Parts and Accessories ....................................................................... 9-10
Control Panel ..........................................................................................................11
Smart Programs Settings ...................................................................................12
Status Messages ..................................................................................................14
Getting Started ................................................................................................. 16 -21
Initial Test Run ...................................................................................................... 16
Smart Programs ........................................................................................................ 22
Cooking Tips ........................................................................................................22
Cooking Timetable ...................................................................................................23
Care and Cleaning ................................................................................................ 24
Troubleshooting ...............................................................................................25-26
Warranty ................................................................................................................. 27
Contact Information ............................................................................................. 29
3

IMPORTANT SAFEGUARDSIMPORTANT SAFEGUARDS
When using electrical appliances, basic safety precautions should always
be followed:
1. READ THE GETTING STARTED GUIDE AND ALL INSTRUCTIONS,
SAFEGUARDS, AND WARNINGS BEFORE OPERATING THE APPLIANCE.
FAILURE TO FOLLOW THESE SAFEGUARDS AND INSTRUCTIONS MAY
RESULT IN INJURY AND/OR PROPERTY DAMAGE.
2. The appliance’s outer surfaces may become hot during use. Do not touch hot
surfaces. Wear oven mitts when handling hot components. Extreme caution
must be used when moving the appliance. Let the appliance cool to room
temperature before handling or moving.
CAUTION
3.
power cord, plug, or the appliance in water or other liquid.
4. Do not rinse the appliance under tap.
5. The cooking chamber contains electrical components. To avoid electrical
shock, do not put liquid of any kind into the cooking chamber.
6. This appliance is NOT to be used by children or by persons with reduced
physical, sensory, or mental capabilities. Close supervision is necessary when
this appliance is used near children and these individuals. Children should not
use or play with this appliance.
7. Unplug from the outlet when not in use, as well as before adding or removing
parts or accessories, and before cleaning. To unplug, grasp the plug and pull
from the outlet. Never pull on the power cord.
8. Avoid making contact with moving parts.
9. Inspect the appliance and power cord regularly. Do not operate any appliance
with a damaged cord or plug or after the appliance malfunctions, or is
dropped or damaged in any manner. For assistance, contact the Customer
Care Team at support@instantappliances.com or 1-800-828-7280.
10. Do not use any accessories or attachments not authorized by Instant Brands
Inc. The use of attachments not recommended by the manufacturer, may
cause a risk of injury, re or electric shock.
11. For household countertop use only. Do not use outdoors.
Not for commercial use.
12. Do not place the appliance on any kind of stovetop, or in a heated
oven; heat from an external source will damage the appliance.
To protect against the risk of electrical shock, do not immerse
13. Do not let power cord contact hot surfaces or open ame,
including a stovetop.
14. Do not use appliance for anything other than intended use.
15. Proper maintenance is recommended after each use. Refer to
Care and Cleaning. Let the appliance cool to room temperature
before cleaning or storage.
CAUTION
16.
cord is provided to reduce the hazards resulting from grabbing,
entanglement and tripping. Keep appliance and cord away from children.
Never drape cord over edge of table or counter, never use power outlet
below counter, and never use with an extension cord.
17. Do not attempt to repair, replace, alter, or modify components of the
appliance. This may cause electric shock, re and/or injury, and will void the
warranty.
18. Do not tamper with any of the safety mechanisms.
19. Do not use the appliance in electrical systems other than 120 V / 60 Hz.
Do not use with power converters or adapters.
20. Do not overll the appliance or accessories. Overlling may cause food to
contact the heating element, which may result in re and/or personal injury.
21. Do not cover the cooling vents while the appliance is in operation. Doing so
will prevent even cooking and may cause damage to the appliance.
22. Never pour oil into the cooking chamber. Fire and personal injury
could result.
23. While cooking, the internal temperature of the appliance reaches several
hundred degrees. To avoid personal injury, never place unprotected hands
inside the appliance until it has cooled to room temperature.
24. When cooking, do not place the appliance against a wall or against other
appliances. Leave at least 5" / 13 cm of free space on the back, sides, and
above the appliance. Do not operate the appliance on or near combustible
materials such as tablecloths and curtains. Do not place anything on top of
the appliance.
25. When in operation, hot air is released through the cooling vents. Keep your
hands and face at a safe distance from the cooling vents and take extreme
caution when removing the accessories from the appliance.
Spilled food can cause serious burns. A short power-supply
WARNING
Read this manual carefully and completely, and retain for future reference.
Failure to adhere to safety instructions may result in serious injury.
WARNING
Read this manual carefully and completely, and retain for future reference.
Failure to adhere to safety instructions may result in serious injury.
54

IMPORTANT SAFEGUARDS
IMPORTANT SAFEGUARDS
26. Should the unit emit black smoke, press Cancel and unplug the appliance
immediately. Wait for smoking to stop before opening the door, then clean
the appliance thoroughly.
27. Do not leave the appliance unattended while in use.
28. Never connect this appliance to an external timer switch or separate remotecontrol system.
29. Use extreme caution when removing hot accessories from the cooking
chamber or disposing of hot grease.
30. Oversized foods and/or metal utensils must not be inserted into the cooking
chamber as they may cause risk of re and/or personal injury.
31. Do not store any materials, other than the included accessories, in the cooking
chamber when not in use.
32. Do not place any combustible materials in the cooking chamber, such as
paper, cardboard, plastic, Styrofoam or wood.
33. Clean the appliance after each use. Let the appliance cool to room
temperature before cleaning or storing the appliance. Refer to
Care and Cleaning.
34. Do not use appliance accessories in any other appliance including microwave
ovens, toaster ovens, convection or conventional ovens, ceramic, electric,
induction or gas cooktops, or outdoor grills.
WARN ING
Electrical shock hazard. Use grounded outlet only. DO NOT remove ground. DO NOT use an adapter. DO NOT use
an extension cord. Failure to follow instructions can cause electrical shock and/or death.
WARN ING
THE FAILURE TO FOLLOW ANY OF THE IMPORTANT SAFEGUARDS AND THE IMPORTANT
INSTRUCTIONS FOR SAFE USE IS A MISUSE OF YOUR APPLIANCE THAT CAN VOID YOUR WARRANTY
AND CREATE THE RISK OF SERIOUS INJURY.
WARN ING
To avoid injury, read and understand instruction manual before using this machine.
Special Cord Set Instructions
As per safety requirements, a short power supply cord (0.6 m to 0.9 m /
24” to 35”) is provided to reduce the hazards resulting from grabbing,
entanglement and tripping.
This appliance has a 3-prong grounding plug. To reduce the risk of electric shock,
plug the power cord into a grounded (earthed) electrical outlet that
is easily accessible.
Product Specications
SAVE THESE INSTRUCTIONS
WARNING
Read this manual carefully and completely, and retain for future reference.
Failure to adhere to safety instructions may result in serious injury.
Model: Vor tex 6 170 0 W 120 V ~ 60 Hz 6 Quart
Model: Vortex
Plus 6
170 0 W 120 V ~ 60 Hz 6 Quart
12.08 lbs
5.48 kg
12.46 lbs
5.65 kg
12.36" x 14.92" x 12.83"
31.4 cm x 37.9 cm x 32.6 cm
12.36" x 14.92" x 12.83"
1.4 cm x 37.9 cm x 32.6 cm
The models listed may not represent all models in the Vortex, Vortex Plus, or
Vortex Pro series. Visit instantappliances.com for details.
WARNING
Read this manual carefully and completely, and retain for future reference.
Failure to adhere to safety instructions may result in serious injury.
76

Initial Set Up Product, Parts and Accessories
• Read the Important Safeguards in this User Manual before using the appliance.
Failure to read and follow Important Safeguards may result in damage to the
appliance, property damage or personal injury.
• Remove all packaging material and accessories from within and around the
appliance.
• Place the appliance on a stable, level surface, away from combustible material
and external heat sources.
• Leave at least 5” / 13 cm of space above and around all sides of the appliance.
• Do not place anything on top of the oven and do not block the air vents.
• Remove the air fryer basket and check the cooking chamber for loose packing
material before rst use.
• Follow Care and Cleaning instructions in this manual to clean the appliance
before rst use.
Before using the air fryer, verify that all parts and accessories are accounted for.
Air Fryer
CAUTION
Do not place the appliance on a stove top. Heat from an external source will damage
the appliance. Do not place anything on top of the appliance, and do not block the
air vents.
Illustrations are for reference only and may differ from the actual product.
98
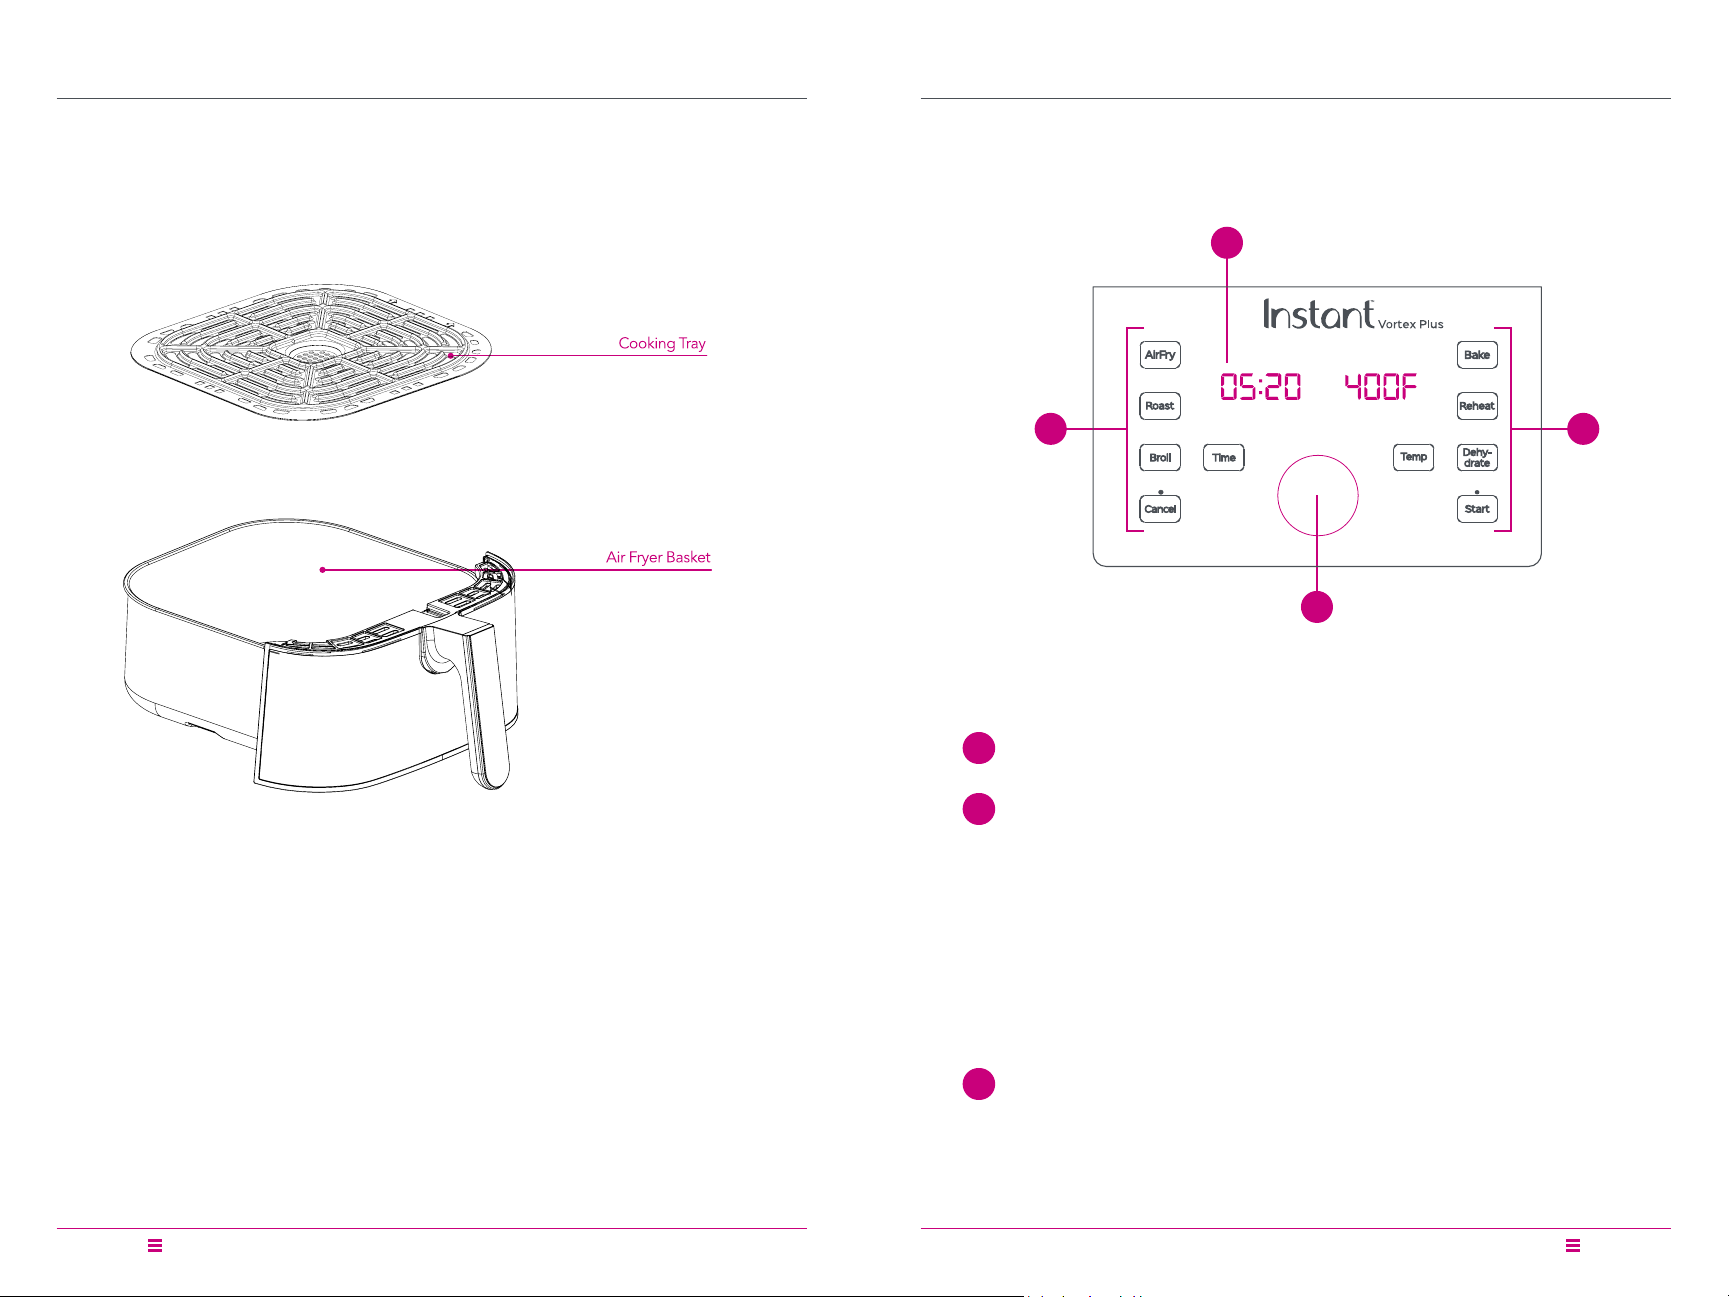
Product, Parts and Accessories Control Panel
Air Fryer Accessories
Instant air fryers feature an intuitive control panel with touch screen controls
and an LED display to make cooking fast and easy.
1
Note: Broil & Dehydrate only availa ble on Vor tex Plus.
2 2
3
Illustrations are for reference only and may differ from the actual product.
1 Display
Shows cooking time, cooking temperature, reminders and error messages.
2 Smart Programs
Smart Programs have pre-set cooking times and temperatures but can be
customized to your own settings.
• Air Fry for fries, cauliower wings, chicken nuggets and more.
• Bake Light and uffy cakes and pastries, scalloped potatoes and more.
• Roast for beef, lamb, pork, poultry, vegetable dishes and more.
• Reheat to prepare leftovers without overcooking or drying out.
• Broil (Vortex Plus 6 only) for direct top-down cooking, melting cheese
on French onion soup and nachos, and more.
• Dehydrate (Vortex Plus 6 only) for homemade fruit leather, jerky,
dried vegetables and more.
3 Dial
Rotate to adjust cooking times and temperatures. Press to wake the display.
1110

Smart Program Settings Smart Program Settings
Setting Description
Standby Mode When the air fryer is in Standby mode, the display reads OFF.
Cancel Key
Turn Sounds
On or Off
Change Temperature
Scale (°F or °C)
Adjust Cooking Time
Touch Cancel at any time to end a Smart Program and return to Standby
mode.
When in Standby mode, touch and hold both the Time and Temp keys for
5 seconds.
Note: Error alerts cannot be silenced.
Start any Smart Program, then touch and hold the Temp key for 5 seconds
to toggle between °F or °C.
• When in Standby mode, touch the Smart Program key you wish to select.
• Touch the Time key and turn the dial to adjust the cooking time.
• Press the dial to conrm the change.
• Touch Start to save the change in the air fryer’s memory.
To adjust the cooking time after cooking has started, simply follow steps 2
and 3 listed above. Cooking will continue with the adjusted time, however,
adjustments made after cooking has started are not saved to memory.
Setting Description
Reset Individual
Smart Program
Reset All
Smart Programs
When in Standby mode, touch and hold the Smart Program key you wish
to reset for 5 seconds. The cooking time and temperature for that Smart
Program are restored to the factory default settings.
When in Standby mode, press and hold the dial for 5 seconds. The
cooking times and temperatures for all Smart Programs are restored to the
factory default settings.
Adjust Cooking
Temperature
• When in Standby mode, touch the Smart Program key you wish to select.
• Touch the Temp key and turn the dial to adjust the cooking temperature.
• Press the dial to conrm the change.
• Touch Start to save the change in the air fryer’s memory.
To adjust the cooking temperature after cooking has started, simply follow
steps 2 and 3 listed above. Cooking will continue with the adjusted time,
however, adjustments made after cooking has started are not saved to
memory.
1312

Status Messages Status Messages
Indicates that the air fryer is
in Standby mode.
Indicates that the air fryer is in Preheat
mode.
Note: Not applicable to Reheat and Dehydrate.
Indicates that the air fryer has reached
cooking temperature and food can be
added.
Note: Applicable only to Air Fry, Roast, Bake and Broil.
Indicates that Smart Program is running.
Cooking time remaining counts down
in hours and minutes until 1 minute
remains, then counts down in seconds
to Smart Program end.
Indicates that the Smart Program
has ended.
Status Indicators
21 3
1 Preheat
Indicates that the air fryer is preheating. The display
reads On during preheating.
2 Cook
Indicates that cooking is in progress. The display shows
the remaining cooking time and temperature during
cooking.
3 Turn
Indicates that food may be turned or shaken as
required by your recipe. The air fryer will beep for ten
seconds, then resume cooking.
Note: Applicable only to Air Fry and Roast.
1514
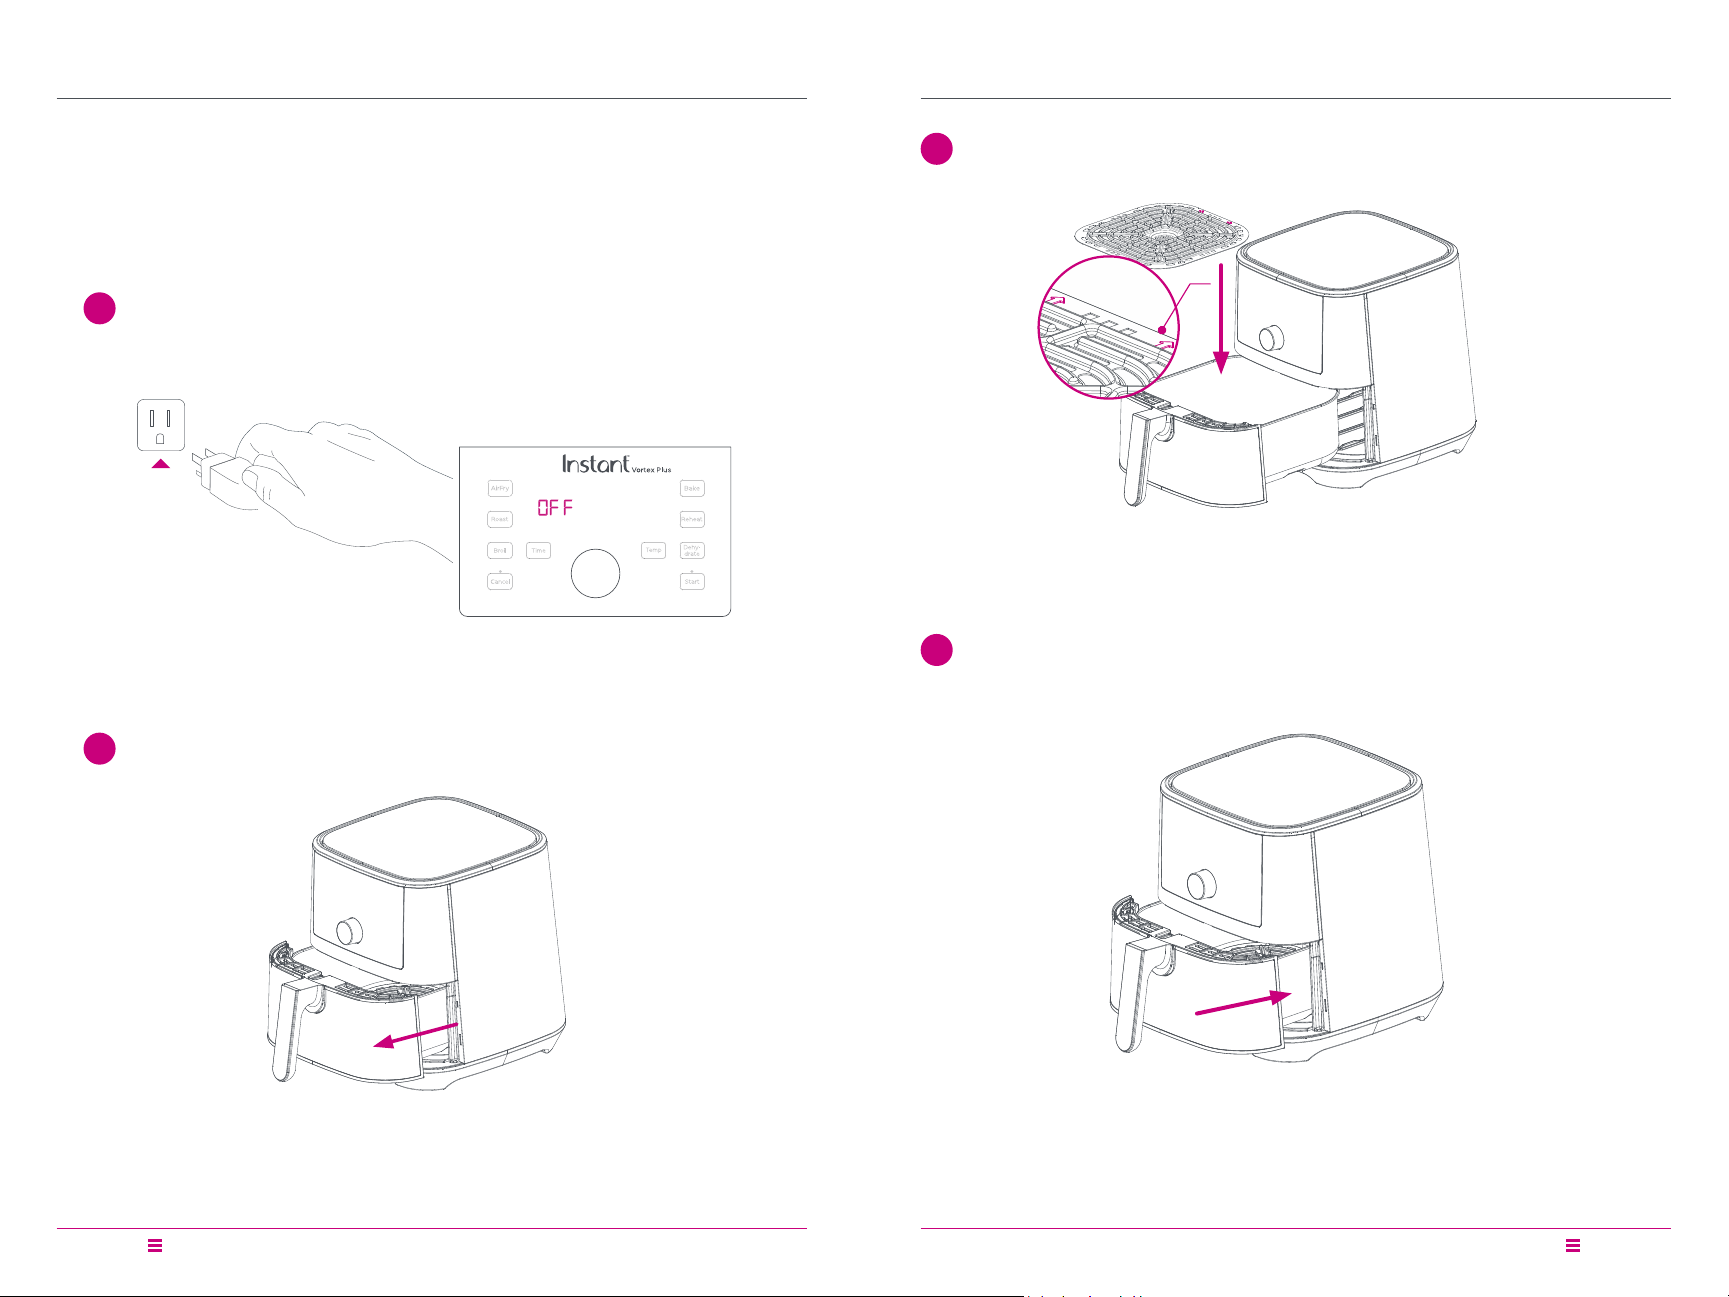
Getting Started
Getting Started
Initial Test Run
Follow these steps to familiarize yourself with your air fryer and to ensure it is
operating properly.
Approximate time: 25 minutes
Connect the power cord to a 120 V power source.
1
The air fryer is in Standby mode and the display indicates OFF.
Note: To wake the air fryer, press the dial button or touch the screen.
Place the cooking tray on the bottom of the air fryer basket.
3
Note: Ensure the indicator arrows point towards the back or the front of the air fryer.
Insert the air fryer basket back into the cooking chamber.
4
Remove the air fryer basket from the cooking chamber.
2
Illustrations are for reference only and may differ from the actual product.
Illustrations are for reference only and may differ from the actual product.
1716

Getting Started
Getting Started
Select Smart Program: Air Fry.
5
6
Touch Temp, then use the dial to adjust the cooking temperature
to 205ºC/400ºF.
Touch Time, then use the dial to adjust the cook time to 20 minutes.
7
Touch Start to begin cooking.
The display indicates On while the air fryer Preheats.
To adjust the cooking time or temperature at any time during
cooking, touch the Time or Temp key and rotate the dial. Press
the dial to conrm the adjustment.
8
When the air fryer reaches the target temperature, the display
reads Add Food.
*Note: Smar t Programs automatically save your last temperature and time settings when you touch Start.
Illustrations are for reference only and may differ from the actual product.
For this initial test, do not add food to the air fryer basket.
Illustrations are for reference only and may differ from the actual product.
1918

Getting Started
Getting Started
Carefully remove and re-insert the air fryer basket.
9
The display indicates the cooking time and temperature, and the status
indicator shows Cook.
Part way through the Smart Program, the display changes to
10
turn Food to remind you to ip or shake your food items.
When 1 minute remains, the display counts down the remaining
11
cooking time in seconds.
When the Smart Program completes, the display indicates End and
the fan continues to blow to cool the air fryer.
Note: If the air fryer basket is not removed, the air fryer will remind you that food is ready after
5, 30, and 60 minutes.
Remove the air fryer basket to pause the Smart Program. Turn or shake
food as desired, then insert the air fryer basket back into the cooking
chamber. Once fully inserted, cooking will resume automatically.
Note: Turn notice only appears on Air Fry and Roast Smart Programs. Some food items do not
need turning. If the basket is not removed, cooking will resume after 10 seconds.
CAUTI ON
The air fryer and air fryer basket will be hot during and after cooking. Do not touch hot surfaces.
Allow the air fryer to cool to room temperature, then clean the air fry basket according to Care
and Cleaning instructions.
2120

Smart Programs
Cooking Timetable
Instant air fryers use rapid air circulation to cook food, giving your meals all the
crispy rich avor of deep frying with little to no oil.
Smart Program Default Time
AirFry 15 minutes 1–60 minutes 385°F / 196°C 180–400°F / 82–205°C
Roast 18 minutes 1–60 minutes 380°F / 193°C 180–400°F / 82–205°C
Bake 30 minutes 1–60 minutes 365°F / 185°C 180–400°F / 82–205°C
Reheat 10 minutes 1–60 minutes 280°F / 138°C 120–360°F / 49–183°C
Broil
Vortex Plus
Dehydrate
Vortex Plus
6 minutes 1–40 minutes 400°F / 205°C NA
8 hours 1–72 hours 130°F / 54°C 95–175°F / 41–71°C
Adjustment
Range
Default
Temperature
Adjustment Range
Cooking Tips
• Preheating the air fryer is an important step. Wait for the display to read Add
Food before inserting food into the cooking chamber.
• When baking cake, pie, quiche and other similar foods, use an oven-safe
baking dish covered with foil or an oven-safe lid to prevent the top of foods
from overcooking.
Use the Smart Programs as a starting point and experiment with cooking times
and temperatures to get the results you prefer.
Food Smart Program Cooking Time*
Thin-cut fries
(Frozen)
Thin-cut fries
(Fresh)
Thick-cut fries
(Frozen)
Thick-cut fries
(Fresh)
Chicken wings Air Fry or Roast 20–30 minutes 400°F / 205°C Turn food partway
Half chicken (up to
2lbs)
Chicken nuggets
(Frozen)
Shrimp (Frozen) Air Fry 8–10 minutes 400°F / 205°C Turn food partway
Shrimp (Fresh) Air Fry 8–10 minutes 350°F / 177°C Turn food partway
Fish sticks (Frozen) Broil / Bake 8–12 minutes 400°F / 205°C Turn food partway
Air Fry or Roast 14–18 minutes 385°F / 196°C Shake food partway
Air Fry or Roast 18–20 minutes 385°F / 196°C Shake food partway
Air Fry or Roast 16–20 minutes 385°F / 196°C Shake food partway
Air Fry or Roast 20–25 minutes 385°F / 196°C Shake food partway
Roast 30–40 minutes 380°F / 193°C Optionally, baste partway
Broil / Air Fry 10–15 minutes 400°F / 205°C Turn food partway
Cooking
Temperature*
Instruction
• When cooking coated food, use an egg wash with breadcrumbs rather than
liquid-based batters to ensure that batter sticks to the food.
• Spray food items with cooking oil before seasoning to ensure seasoning sticks.
• Soak fresh potato sticks in ice water for 15 minutes, then pat dry and spray
lightly with cooking oil before inserting them to the oven.
• Pat dry moist food items before cooking to prevent excess steam and splatter.
• Air frying can cause oil and fat to drip from foods. To prevent excess smoke,
carefully remove and drain the air fryer basket.
CAUTI ON
Do not spray cooking oil into the cooking chamber.
Asparagus Broil / Bake 7–9 minutes 380°F / 193°C Turn food partway
Cauliower Broil / Bake 6–10 minutes 380°F / 193°C Turn food partway
Cake Bake 25–35 minutes 365°F / 185°C
Use a springform cake
*Cook times and temperatures are recommendations only.
Always follow a trusted recipe.
Find dozens of easy-to-follow recipes or download the Instant Pot App.
CAUTI ON
Chart for more information.
Always use a meat thermometer to ensure the internal temperature reaches a safe
minimum temperature. Refer to the USDA’s Safe Minimum Internal Temperature
pan
2322

Care and Cleaning Troubleshooting
Clean your air fryer and accessories after each use.
Always unplug the air fryer and let it cool to room temperature before
cleaning. Never use harsh chemical detergents, scouring pads, or powders
on any of the parts or components.
Let all surfaces dry thoroughly before use, and before storage.
Part / Accessory Cleaning Method
Clean the air fryer basket with a sponge or cloth and a solution of warm water
Air Fry Basket
Cooking Tray
Cooking Chamber
Exterior Clean with a soft, damp cloth or sponge and wipe dry.
and dish soap. Ensure that all grease and food debris are removed.
DO NOT immerse the basket in water or any other liquid.
DO NOT clean the basket in an automatic dishwasher.
Clean the cooking tray with a cloth or sponge and a solution of warm water and
dish soap or place it in an automatic dishwasher.
The cooking tray has non-stick coating. To avoid damage to the non-stick
coating, DO NOT use metal cleaning utensils.
Clean the cooking chamber with a sponge or cloth and a solution of warm
water and dish soap.
To remove baked-on grease and food residue from cooking chamber, spray
with a mixture of baking soda and vinegar and wipe clean with damp cloth.
For stubborn stains, allow the mixture to sit on the affected area for several
minutes before scrubbing clean.
Check the heating coil for oil spatter and food debris. Clean the heating coil
with a damp cloth as needed. Ensure the heating coil is completely dry before
next use.
WARN ING
Do not immerse the appliance in
water. Do not rinse the appliance
under a tap. Do not wet prongs of
power cord.
Without proper cleaning, food and
grease splatter may build up around
the heating element, causing the risk
of smoke, re, and personal injury.
If you see or smell smoke, touch
Cancel, unplug the appliance and
allow to cool. Remove food splatter
or grease with a soft cloth and dish
detergent.
Register your product today.
Contact Customer Care:
1-800-828-7280
support@instantappliances.com
instantappliances.com/#Chat
Problem Possible Reason Try This
Stop cooking immediately. Cancel the Smart Program, then
CAUTI ON
unplug the oven and allow it to cool to room temperature.
Use only cooking oils with a high smoke point, e.g.,
virgin or extra virgin olive, avocado, canola, soy-bean,
safower or rice bran oil.
Remove accessories.
Clean the cooking chamber and accessories
thoroughly.
Contact Customer Care at
support@instantappliances.com or
1-800-828-7280
Note: Do not attempt to repair the appliance.
Avoid air frying foods with a high fat content.
Touch Cancel, unplug the air fryer and allow it to cool to
room temperature.
Check the air fryer basket and cooking chamber for
excess oil or fat and clean as required.
Always pat-dry moist foods before air frying.
Do not add water or other liquid to cooking chamber
when air frying.
Lightly spray vegetables and meats with cooking oil
before seasoning to ensure that seasoning adheres to
food
Ensure the power cord is plugged into the outlet rmly.
Plug another appliance into the same outlet to conrm
that it is powered.
Plug the air fryer into another plug.
Ensure basket is fully inserted into cooking
chamber.
Black smoke
coming from
air fryer
White smoke
coming from
Air Fryer
Air fryer is
plugged in but
will not turn on
Oil used has a low
smoke point
Food residue on heating
coil, in cooking chamber
or on accessories
Faulty circuit or heating
element
Food has high fat
content, such as bacon,
sausage, and hamburger
Water is vaporizing,
producing thick steam
Seasoning on food has
blown into element
The appliance is not
properly plugged in
Outlet is not powered
Basket is not fully
inserted into cooking
chamber
2524

WarrantyTroubleshooting
Problem Possible Reason Try This
All controls
ash and
an error
code
appears on
the display
Non-functioning
E1
temperature sensor
Temperature sensor
E2
short circuit
Contact Customer Care at
support@instantappliances.com
or 1-800-828-7280.
Contact Customer Care at
support@instantappliances.com
or 1-800-828-7280.
Any other servicing should be performed by an authorized service representative.
Limited Warranty
This Limited Warranty is effective for one year from the date of original consumer purchase. Proof of original purchase
date and, if requested by an authorized representative of Ins tant Brands Inc. (“Instant Brands”), return of your appliance,
is required to obtain service under this Limited Warranty. Provided that this appliance is operated and maintained in
accordance with writ ten instructions attached to or furnished with the appliance, Instant Brands will, in its sole and
exclusive discretion, either: (i) repair defects in materials or workmanship; or (ii) replace the appliance. In the event that
your appliance is replaced, the Limited Warranty on the replacement appliance will expire 12 months from the date of
original consumer purchase.
This Limited Warranty extends only to the original purchaser and use of the appliance in
the United States of America and Canada. This warranty does not cover units that are used
outside of the United States of America and Canada.
Any modication or attempted modication to your appliance may interfere with the safe operation of the appliance and
will void this Limited Warranty. This Limited Warrant y does not apply in respect of any appliance or any part thereof that
has been altered or modied unless such alterations or modications were expressly authorized by an Instant Brands
representative.
Limitation and Exclusions
The liability of Instant Brands, if any, for any allegedly defec tive appliance or part shall in no circumstances exceed the
purchase price of a comparable replacement appliance.
This Limited Warranty does not cover:
1. Damage resulting from accident, alteration, misuse, abuse, neglect, unreasonable use, use contrary to the operating
instructions, normal wear and tear, commercial use, improper as sembly, disassembly, failure to provide reasonable
and necessary maintenance, re, ood, acts of God or repair by anyone unless directed by an Instant Brands
Representative;
2. Repairs where your appliance is used for other than normal, personal use or when it is used in a manner that is
contrary to published user or operator instructions; or
3. Use of unauthorized part s and accessories, or repairs to par ts and sys tems resulting from unauthorized repairs or
modications made to this appliance.
The cos t of repair or replacement under these excluded circumstances shall be paid by you.
26 27

Warranty
686-0101-51
Disclaimer of Implied Warranties
EXCEPT AS EXPR ESSLY PROVIDED HEREIN AND TO THE EX TENT PERMITTED BY L AW, INSTANT BRANDS MAKES NO
WARRANTIES, CONDITIONS OR REPRESENTATIONS, E XPRESS OR IMPLIED, BY STATUTE, USAGE, CUSTOM OF TR ADE OR
OTHERW ISE WITH RESPECT TO THE APPLIA NCES OR PARTS COVERED BY THIS WARRANTY, INCLUDING BUT NOT LIMITED
TO, WARRANTIES, CONDITIONS, OR REPRESENTATIONS OF WORKMANSHIP, MERCHANTABILITY, MERCHANTABLE QUALITY,
FITNESS FOR A PART ICULAR PU RPOSE OR DUR ABILIT Y.
Some states or provinces do not allow for the exclusion of implied warranties of merchantability or tness, so this
limitation may not apply to you. In these states and provinces, you have only the implied warranties that are expressly
required to be provided in accordance with applicable law.
Limitation of Remedies; Exclusion of Incidental and Consequential Damage
YOUR SOL E AND EXCLUSIVE REMEDY UNDER THI S LIMITED WAR RANTY SHALL BE A PPLIANCE REPAIR OR REPL ACEMENT AS
PROVIDED HEREIN. INSTANT BRANDS SHALL NOT BE LIABLE FOR INDIRECT, INCIDENTAL OR CONSEQUENTIAL DAMAGES
ARISING OUT OF OR IN CONNECTION WITH TH E USE OR PERFORMANCE OF THE APPLIANCE OR DAMAGES W ITH RESPECT
TO ANY ECONOMIC LOSS, PERSONAL INJU RY, LOSS OF PRO PERTY, LOSS OF RE VENUES OR PROFITS, LOSS OF ENJOYM ENT
OR USE, COSTS OF REMOVAL, INS TALL ATION OR OTHER INDIREC T, INCIDENTAL OR CONSEQUENT IAL DAMAGES OF ANY
NATURE OR KIND.
Instant Brands Inc.
11 - 300 Earl Grey Dr., Suite 383
Ottawa, Ontario
K2T 1C1
Canada
Register your product today:
instantappliances.com/support/register
Warranty Registration
Please visit www.instantappliances.com/support/register to register your new Instant Brands™ appliance
and validate your warrant y within thirty (30) days of purchase. You will be asked to provide the s tore name, date of
purchase, model number (found on the back of your appliance) and serial number (found on the bottom of your
appliance) along with your name and email address. The registration will enable us to keep you up to date with product
developments, recipes and contac t you in the unlikely event of a product safety notication. By registering, you
acknowledge that you have read and understand the instruc tions for use, and warnings set for th in the accompanying
instructions.
Warranty Service
To obtain service under this warranty, please contact our Customer Service Department by
phone at 1-800-828-7280 or by email to support@instantappliances.com. You can also create
a support ticket online at www.instantappliances.com/support. If we are unable to resolve
the problem, you may be asked to send your appliance to the Service Department for quality
inspection. Instant Brands is not responsible for shipping costs related to warranty ser vice,
save and except for shipping costs associated with the return of your appliance from Canada or
within the 48 contiguous states and the District of Columbia of the United States of America, as
provided herein. When returning your appliance, please include your name, mailing address,
email address, phone number, and proof of the original purchase date as well as a description
of the problem you are encountering with the appliance.
Contact Customer Care
1-800-828-7280
support@instantappliances.com
instantappliances.com/#Chat
instantappliances.com
store.instantappliances.com
Copyright © 2019 Instant Brands™ Inc
28
 Loading...