

Page 1

get started
INSTANT POT® PRO PLUS
112-0124-01-0101_IB_Pro-Plus_Interim_GSG_FINAL.indd 1112-0124-01-0101_IB_Pro-Plus_Interim_GSG_FINAL.indd 1 7/9/21 1:58 PM7/9/21 1:58 PM
Page 2

Table of contents
WELCOME .................................................................................................................... 4
Register your product .............................................................................................4
Product specications .............................................................................................4
Find your model name and serial number ..........................................................4
IMPORTANT SAFEGUARDS ....................................................................................... 5
Product, parts and accessories ................................................................................ 11
Get started .................................................................................................................. 13
Initial set up .............................................................................................................13
Initial test run (water test) ......................................................................................14
Cooking from the Instant Pot App ..........................................................................16
Pairing with the Instant Pot App .............................................................................. 17
Control panel .............................................................................................................18
Cooking progress bar ...........................................................................................18
Status messages .....................................................................................................20
Settings ....................................................................................................................21
Pressure cooking ....................................................................................................... 22
How pressurizing works ........................................................................................22
Releasing pressure .................................................................................................... 23
How to release pressure (Venting Methods) .....................................................24
Pressure control features .......................................................................................... 25
Pressure cooking lid .............................................................................................25
QuickCool™ ...........................................................................................................26
Steam Release Assembly ......................................................................................27
Antiblock shield......................................................................................................28
Sealing Ring ............................................................................................................28
Float Valve ...............................................................................................................29
2 | [email protected] | 1-800-828-7280
112-0124-01-0101_IB_Pro-Plus_Interim_GSG_FINAL.indd 2112-0124-01-0101_IB_Pro-Plus_Interim_GSG_FINAL.indd 2 7/9/21 1:58 PM7/9/21 1:58 PM
Page 3

Table of contents
Cooking ...................................................................................................................... 30
Pressure Cook, Rice and Canning ......................................................................31
About canning .......................................................................................................33
Filling jars for canning ..........................................................................................34
Nutriboost™ ...........................................................................................................35
Steam ......................................................................................................................36
Slow Cooking .........................................................................................................37
Sauté .......................................................................................................................38
Deglazing ...............................................................................................................39
Yogurt ......................................................................................................................40
Tips for yogurt making ..........................................................................................41
Sous Vide ................................................................................................................42
Reverse Searing ......................................................................................................43
Keep Warm .............................................................................................................44
Care, cleaning and storage ...................................................................................... 45
Removing and installing parts ..............................................................................47
Troubleshooting ........................................................................................................50
Warranty .....................................................................................................................54
instanthome.com | 3
112-0124-01-0101_IB_Pro-Plus_Interim_GSG_FINAL.indd 3112-0124-01-0101_IB_Pro-Plus_Interim_GSG_FINAL.indd 3 7/9/21 1:58 PM7/9/21 1:58 PM
Page 4
Welcome!
Thank you for purchasing you new Instant Pot® Pro Plus Multi-Use Pressure Cooker. We
hope you enjoy cooking with it for years to come.
Register your product
Help us keep in touch, in case we need to reach you.
Register at https://www.instanthome.com/support/instant-brands-product-registration.
Contact Us
When you have questions about your new InstantPot, we're here to help.
1-800-828-7280
[email protected]
instantbrands.com
Product Specifications
Model: Pro Plus 60 120 V ~ 60 Hz 1200 W 6 Quarts / 5.7 Litres 15.54 lb / 7.05 kg
Pro Plus 60
in: 13.18L x 13.03W x 12.7H
cm: 33.5L x 33.1W x 32.3H
Find your model name and serial number
Find the model name on the silver rating label on the back of the multicooker base, near
the power cord. The serial number is located on a white sticker beside the rating label.
4 | [email protected] | 1-800-828-7280
112-0124-01-0101_IB_Pro-Plus_Interim_GSG_FINAL.indd 4112-0124-01-0101_IB_Pro-Plus_Interim_GSG_FINAL.indd 4 7/9/21 1:58 PM7/9/21 1:58 PM
Page 5

IMPORTANT SAFEGUARDS
At Instant Brands™ your safety always comes rst. The Instant Pot® Pro Plus
was designed with your safety in mind, and we mean business. Check out
this Instant Pot’s long list of safety mechanisms on instanthome.com to
see what we mean.
As always, be cautious when using electrical appliances and follow basic
safety precautions.
01 READ ALL INSTRUCTIONS, SAFEGUARDS AND WARNINGS
BEFORE USE. FAILURE TO FOLLOW THESE SAFEGUARDS
AND INSTRUCTIONS MAY RESULT IN INJURY AND/OR
PROPERTY DAMAGE.
02 Use only the Instant Pot Pro Plus lid with the Instant Pot Pro Plus
multicooker base. Using any other pressure cooker lids may cause
injury and/or damage.
03 For household use only. Not for commercial use. Do not use the
appliance for anything other than its intended use.
04 For countertop use only. Always operate the appliance on a stable, non-
combustible, level surface.
• Do not place on anything that may block the vents on the bottom of
the appliance.
• Do not place on a hot stove.
05 Heat from an external source will damage the appliance.
• DO NOT place the appliance on or close to a hot gas or electric
burner, or a heated oven.
• DO NOT use the appliance near water or ame.
• DO NOT use outdoors. Keep out of direct sunlight.
06 DO NOT touch the appliance’s hot surfaces. Only use the side handles
for carrying or moving.
• DO NOT move the appliance when it is under pressure.
• DO NOT touch accessories during or immediately after cooking.
• DO NOT touch the metal portion of the lid when the appliance is in
operation; this could result in injury.
WARNING
Read this manual carefully and completely and retain for future reference. Failure
to adhere to safety instructions may result in serious injury or damage.
instanthome.com | 5
112-0124-01-0101_IB_Pro-Plus_Interim_GSG_FINAL.indd 5112-0124-01-0101_IB_Pro-Plus_Interim_GSG_FINAL.indd 5 7/9/21 1:58 PM7/9/21 1:58 PM
Page 6

IMPORTANT SAFEGUARDS
• Always use proper hand protection when removing hot accessories,
and to handle the hot inner pot.
• Always place hot accessories on a heat-resistant surface or cooking
plate.
07 The removable inner pot can be extremely heavy when full of
ingredients. Care should be taken when lifting the inner pot from the
multicooker base to avoid burn injury.
• Extreme caution must be used when the inner pot contains hot food,
hot oil or other hot liquids.
• Do not move the appliance while it is in use and use extreme caution
when disposing of hot grease.
08
Overlling may cause a risk of clogging the steam release
pipe and developing excess pressure.
• DO NOT ll over the Max PC Fill line as indicated on the inner pot.
• DO NOT ll the inner pot over the Half Fill line (as indicated on the
inner pot) when cooking foods that expand during cooking such as
rice or dried vegetables.
09
This appliance cooks under pressure. Any pressure in
the appliance can be hazardous. Allow the appliance to depressurize
naturally or release all excess pressure before opening. Inappropriate
use may result in burns, injury and/or property damage.
• Make sure the appliance is properly closed before operating. Refer to
Pressure control features: pressure cooking lid.
• DO NOT cover or obstruct the steam release valve and/or oat valve
with cloth or other objects.
• DO NOT attempt to open the appliance until it has depressurized,
and all internal pressure has been released. Attempting to open the
appliance while it is still pressurized may lead to sudden release of
hot contents and may cause burns or other injuries.
• DO NOT place your face, hands or exposed skin over the steam
release valve or oat valve when the appliance is in operation or has
residual pressure.
WARNING
Read this manual carefully and completely and retain for future reference. Failure
to adhere to safety instructions may result in serious injury or damage.
6 | [email protected] | 1-800-828-7280
112-0124-01-0101_IB_Pro-Plus_Interim_GSG_FINAL.indd 6112-0124-01-0101_IB_Pro-Plus_Interim_GSG_FINAL.indd 6 7/9/21 1:58 PM7/9/21 1:58 PM
Page 7

IMPORTANT SAFEGUARDS
• DO NOT lean over the appliance when removing the lid, as heat and
steam escape when the lid is removed.
• The unit keeps releasing steam for non-pressure settings in order to
avoid pressure building inside the cooking pot.
• If steam escapes from the sides of the lid, turn the appliance off and
make sure the sealing ring is properly installed. Refer to Pressure
control features: sealing ring.
• DO NOT attempt to force the lid off the Instant Pot multicooker base.
Refer to Releasing pressure.
10 When cooking meat with skin (e.g. sausage with casing), the skin can
swell when heated. Do not pierce the skin while it is swollen; this could
result in scalding injury.
11 When pressure cooking food with a doughy or thick texture, or a high
fat/oil content, contents may splatter when opening the lid. Follow recipe
instructions for pressure release method. Refer to Releasing pressure.
12 Oversized foods and/or metal utensils must not be inserted into the
inner pot as they may cause risk of re and/or personal injury.
13 Proper maintenance is recommended before and after each use:
• Check the steam release valve, steam release pipe, anti-block shield
and oat valve for clogging;
• Before inserting the inner pot into the multicooker base, make sure
both parts are dry and free of food debris;
• Let the appliance cool to room temperature before cleaning or
storage.
14 Do not use this appliance for deep frying or pressure frying with oil.
15 To disconnect, select Cancel, then remove plug from power source.
Always unplug when not in use, as well as before adding or removing
parts or accessories, and before cleaning. To unplug, grasp the plug
and pull from the outlet. Never pull from the power cord.
WARNING
Read this manual carefully and completely and retain for future reference. Failure
to adhere to safety instructions may result in serious injury or damage.
instanthome.com | 7
112-0124-01-0101_IB_Pro-Plus_Interim_GSG_FINAL.indd 7112-0124-01-0101_IB_Pro-Plus_Interim_GSG_FINAL.indd 7 7/9/21 1:58 PM7/9/21 1:58 PM
Page 8

IMPORTANT SAFEGUARDS
16 Regularly inspect the appliance and power cord. Do not operate the
appliance if the power cord or plug is damaged, or after the appliance
malfunctions or is dropped or damaged in any manner. For assistance,
contact Customer Care by [email protected] or by phone
at 1-800-828-7280.
17 Spilled food can cause serious burns. A short power-supply cord is
provided to reduce the hazards resulting from grabbing, entanglement
and tripping.
• DO NOT let the power cord hang over edges of tables or counters, or
touch hot surfaces or open ame, including the stovetop.
• DO NOT use below-counter power outlets, and never use with an
extension cord.
• Keep the appliance and cord away from children.
18 Do not use any accessories or attachments not authorized by
Instant Brands Inc. The use of parts, accessories or attachments not
recommended by the manufacturer may cause a risk of injury, re or
electric shock.
• To reduce the risk of pressure leakage, cook only in an authorized
stainless-steel Instant Pot inner pot made for this model.
• DO NOT use the appliance without the removable inner pot installed.
• To prevent personal injury and damage to the appliance, only replace
the sealing ring with an authorized Instant Pot sealing ring.
19 DO NOT attempt to repair, replace or modify components of the
appliance, as this may cause electric shock, re or injury, and will void
the warranty.
20 Do not tamper with any of the safety mechanisms, as this may result in
injury or property damage.
21 The multicooker base contains electrical components. To avoid
electrical shock:
• DO NOT put liquid of any kind into multicooker base;
• DO NOT immerse power cord, plug or the appliance in water or other
liquid;
• DO NOT rinse the appliance under tap.
WARNING
Read this manual carefully and completely and retain for future reference. Failure
to adhere to safety instructions may result in serious injury or damage.
8 | [email protected] | 1-800-828-7280
112-0124-01-0101_IB_Pro-Plus_Interim_GSG_FINAL.indd 8112-0124-01-0101_IB_Pro-Plus_Interim_GSG_FINAL.indd 8 7/9/21 1:58 PM7/9/21 1:58 PM
Page 9

IMPORTANT SAFEGUARDS
22 Do not use the appliance in electrical systems other than 120 V ~ 60 Hz
for North America. Do not use with power converters or adapters.
23 This appliance is NOT to be used by children or by persons with
reduced physical, sensory or mental capabilities. Close supervision
is necessary when any appliance is used near children and these
individuals. Children should not play with this appliance.
24 Do not leave the appliance unattended while in use. Never connect
this appliance to an external timer switch or separate remote-control
system.
25 Do not store any materials in the multicooker base or inner pot when not
in use.
26 Do not place any combustible materials in the multicooker base or inner
pot, such as paper, cardboard, plastic, Styrofoam or wood.
27 The inner pot is compatible with electric/gas stoves, induction heating,
and oven up to 400°F. Do not use the included accessories in a
microwave, toaster oven, ceramic cooktop, electric coil or outdoor grill.
SAVE THESE INSTRUCTIONS.
WARNING
To avoid injury, read and understand the instructions in this user manual before
attempting to use this appliance.
WARNING
Electrical shock hazard. Use grounded outlet only.
• DO NOT remove ground.
• DO NOT use an adapter.
• DO NOT use an extension cord.
Failure to follow these instructions may result in electric shock and/or serious injury.
WARNING
THE FAILURE TO FOLLOW ANY OF THE IMPORTANT SAFEGUARDS AND/OR
THE INSTRUCTIONS FOR SAFE USE IS A MISUSE OF YOUR APPLIANCE THAT
CAN VOID YOUR WARRANTY AND CREATE THE RISK OF SERIOUS INJURY.
WARNING
Read this manual carefully and completely and retain for future reference. Failure
to adhere to safety instructions may result in serious injury or damage.
instanthome.com | 9
112-0124-01-0101_IB_Pro-Plus_Interim_GSG_FINAL.indd 9112-0124-01-0101_IB_Pro-Plus_Interim_GSG_FINAL.indd 9 7/9/21 1:58 PM7/9/21 1:58 PM
Page 10

IMPORTANT SAFEGUARDS
Special cord set instructions
Per safety requirement, a short power supply cord is provided to reduce the hazards
resulting from entanglement and tripping.
This appliance has a 3-prong grounding plug. To reduce the risk of electric shock, plug
the power cord into a grounded electrical outlet that is easily accessible.
NOTE: This equipment has been tested and found to comply with the limits for a
Class B digital device, pursuant to part 15 of the FCC Rules. These limits are designed
to provide reasonable protection against harmful interference in a residential
installation. This equipment generates, uses and can radiate radio frequency
energy and, if not installed and used in accordance with the instructions, may cause
harmful interference to radio communications. However, there is no guarantee that
interference will not occur in a particular installation. If this equipment does cause
harmful interference to radio or television reception, which can be determined
by turning the equipment off and on, the user is encouraged to try to correct the
interference by one or more of the following measures:
- Reorient or relocate the receiving antenna.
- Increase the separation between the equipment and receiver.
- Connect the equipment into an outlet on a circuit different from that to which the
receiver is connected.
- Consult the dealer or an experienced radio/ TV technician for help.
SAVE THESE INSTRUCTIONS.
WARNING
Read this manual carefully and completely and retain for future reference. Failure
to adhere to safety instructions may result in serious injury or damage.
10 | [email protected] | 1-800-828-7280
112-0124-01-0101_IB_Pro-Plus_Interim_GSG_FINAL.indd 10112-0124-01-0101_IB_Pro-Plus_Interim_GSG_FINAL.indd 10 7/9/21 1:58 PM7/9/21 1:58 PM
Page 11
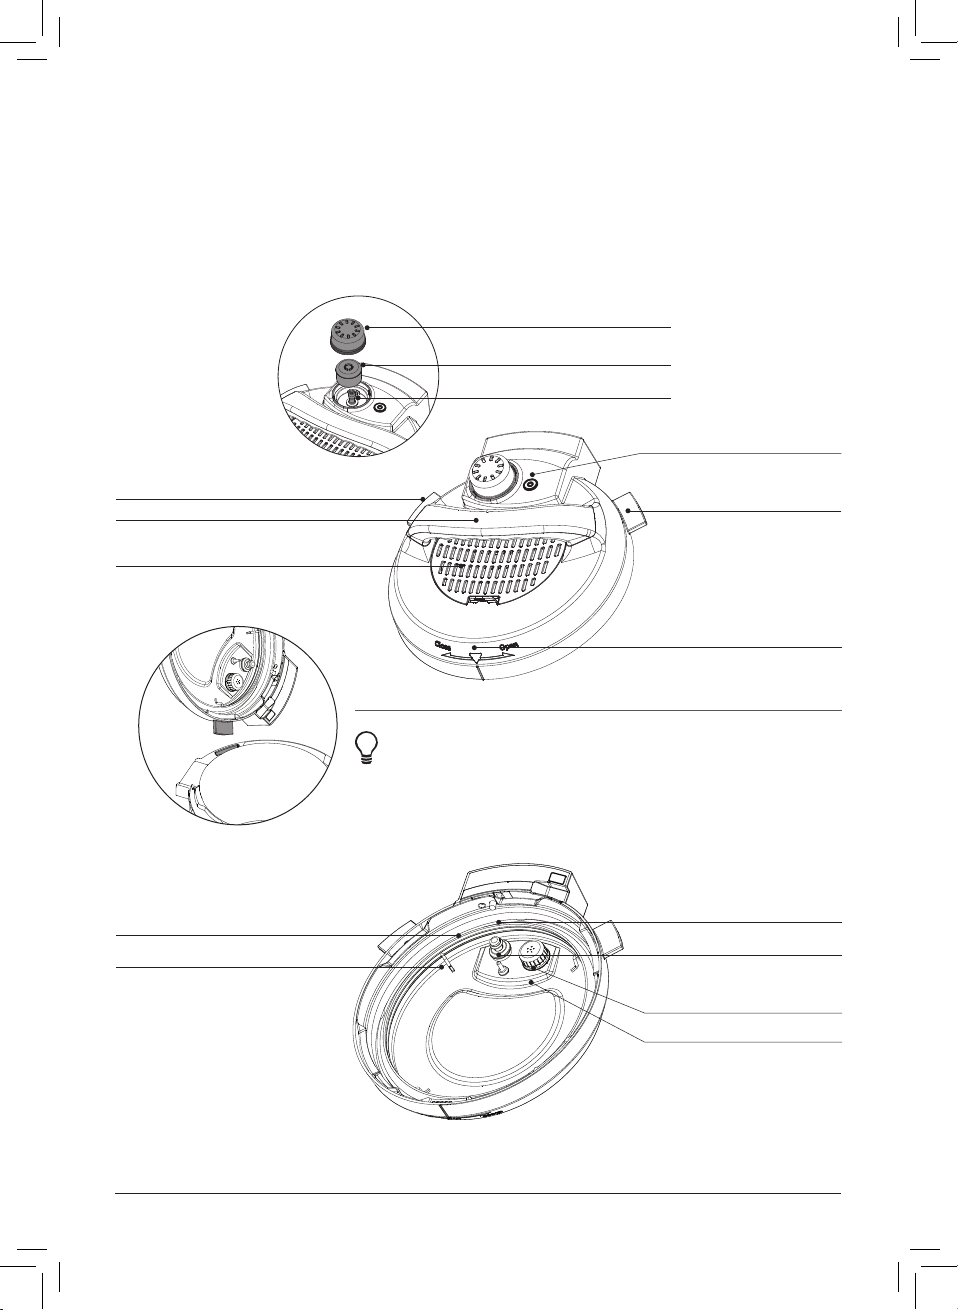
Product, parts and accessories
Before using your new Instant Pot Pro Plus, make sure everything is accounted for,
then see Care, cleaning and storage: Removing and installing parts to nd out how
everything ts together.
Top of lid
Steam release
assembly
Lid n
Lid handle
QuickCool protective cover
Bottom of lid
Steam release cover
Steam release valve
Steam release pipe
Float valve
Lid n
Lid position markers
Instant Tip: Stand the pressure cooking lid up to keep
it off your countertop. Insert the left or right lid n into
corresponding lid holders on the base to stand it up
and save some space!
Sealing ring
Sealing ring rack
(beneath the anti-block shield)
Illustrations in this document are for reference only and may differ from the actual product.
Always refer to the actual product.
instanthome.com | 11
112-0124-01-0101_IB_Pro-Plus_Interim_GSG_FINAL.indd 11112-0124-01-0101_IB_Pro-Plus_Interim_GSG_FINAL.indd 11 7/9/21 1:58 PM7/9/21 1:58 PM
Locking pin
Silicone cap
(bottom of oat valve)
Anti-block shield
Steam release pipe
Page 12
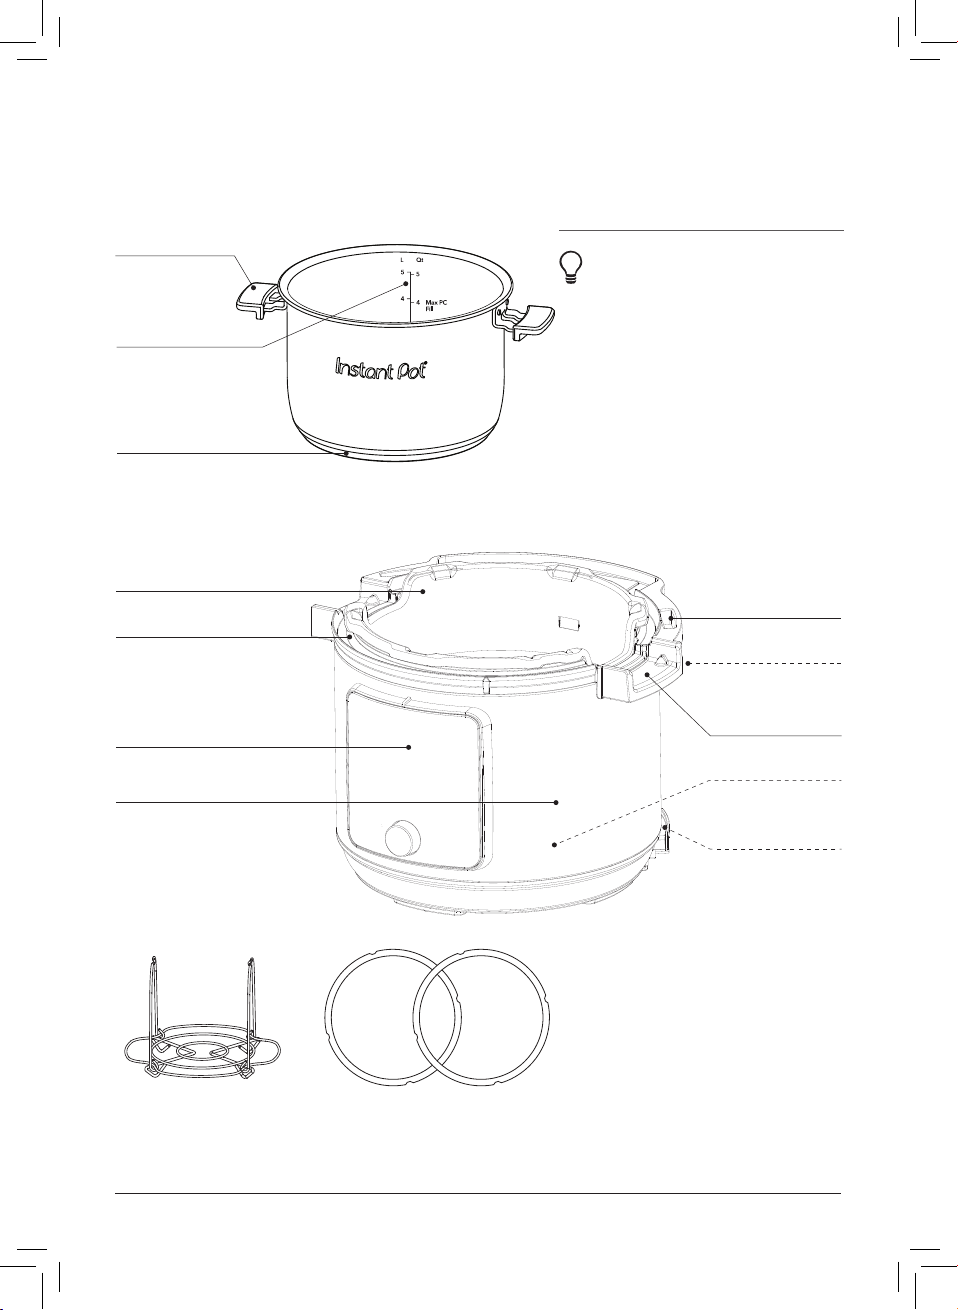
Product, parts and accessories
Inner pot
Easy Grab silicone
handles
Fill line indicators
Flat bottom
Multicooker base
Outer pot
Condensation rim
Instant Tip: Stove top and
oven-friendly up to 400°F!
The inner pot features a
cookware-grade impact
bonded tri-ply bottom, which
sounds complicated, but
really just means you can
use it just about anywhere —
from the multicooker base to
any electric, ceramic, gas or
induction cooktop.
Lid holder
Condensation collector
(rear)
Control panel
Black stainless-steel exterior
Multicooker handle
Heating element
(interior)
Cord holder
(rear)
Accessories
Steam rack Extra sealing ring
Illustrations in this document are for reference only and may differ from the actual product.
12 | [email protected] | 1-800-828-7280
112-0124-01-0101_IB_Pro-Plus_Interim_GSG_FINAL.indd 12112-0124-01-0101_IB_Pro-Plus_Interim_GSG_FINAL.indd 12 7/9/21 1:58 PM7/9/21 1:58 PM
Always refer to the actual product.
Page 13

Get started
Initial set up
01 Pull that Instant Pot Pro Plus out of the box!
02 Remove the packaging material and accessories from in and around the multicooker
and make sure all the parts are accounted for. See Product, parts and accessories for
a full parts breakdown.
Make sure to check under the inner pot!
03 Wash the inner pot in a dishwasher or with hot water and dish soap. Rinse it well with
warm, clear water and use a soft cloth to thoroughly dry the outside of the inner pot.
04 Wipe the heating element with a soft, dry cloth to make sure there are no stray
packaging particles left in the multicooker base.
Don’t remove the safety warning stickers from the lid (unless specied on the sticker!)
or the labels from the back of the multicooker base.
05 You may be tempted to put the Pro Plus on your stovetop — but don’t do it! Place
the multicooker base on a stable, level surface, away from combustible material and
external heat sources.
Is something missing or damaged?
Get in touch with a Customer Care Advisor by email at [email protected] or by
phone at 1-800-828-7280 and we’ll happily make some magic happen for you!
CAUTION
Read the Important
safeguards before using
the appliance. Failure
to read and follow those
instructions for safe use
may result in damage to the
appliance, property damage
or personal injury.
112-0124-01-0101_IB_Pro-Plus_Interim_GSG_FINAL.indd 13112-0124-01-0101_IB_Pro-Plus_Interim_GSG_FINAL.indd 13 7/9/21 1:58 PM7/9/21 1:58 PM
Do not place the
appliance on a
stovetop or upon
another appliance.
Heat from an external
source will damage the
appliance.
To avoid risk of property
damage and/or personal
injury, do not place anything
on top of the appliance, and
do not cover or block the
steam release assembly or
anti-block shield, located on
the appliance lid.
instanthome.com | 13
Page 14

Get started
Initial test run (water test)
Before using your new Pro Plus for the rst time, you must perform a pressure cooking
test run to ensure everything is working correctly.
Stage 1: Setting up the Pro Plus for
pressure cooking
01 Remove the inner pot from the
multicooker base and ll it to the rst
line (1) with water.
02 Insert the inner pot into the
multicooker base.
03 Connect the power cord to a 120 V
power source.
The display shows OFF.
04 Place and close the lid as described
in Pressure control features: Pressure
cooking lid.
The lid automatically seals for
pressure cooking.
Stage 2: “Cooking” (…but not really, this
is just a test!)
05 Touch Pressure Cook.
06 When the minutes field ashes, turn
the dial to adjust the cook time to
5 minutes (00:05).
Customizations are saved to the Smart
Program when cooking begins.
07 Touch the Venting field to toggle
between Natural, Pulse and Quick
release options.
Select Quick for a quick pressure
release after the test nishes.
See Releasing pressure for more
information.
08 Touch Keep Warm to turn automatic
warming off after the test nishes.
09 Touch Start to begin.
The display shows On and the cooking
progress bar shows Pre-heating.
While the multicooker does its thing,
read Pressure cooking 101 to nd out
how the magic happens.
Stage 3: Releasing pressure
When the Smart Program nishes, the
quick release icon ashes until venting
is nished
10 Check the pressure
indicator on the control
panel to make sure
the lid is safe to open,
then carefully open
and remove the lid as
described in Pressure
control features:
Pressure cooking lid.
Please read the Pressure Control
Features (pressure indicator) section
on page 29.
11 Using proper hand protection,
remove the inner pot from the
multicooker base, discard the water
and thoroughly dry the inner pot.
That’s it! You’re good to go :)
14 | [email protected] | 1-800-828-7280
112-0124-01-0101_IB_Pro-Plus_Interim_GSG_FINAL.indd 14112-0124-01-0101_IB_Pro-Plus_Interim_GSG_FINAL.indd 14 7/9/21 1:58 PM7/9/21 1:58 PM
Page 15
Get started
CAUTION
Pressurized steam releases through the top of the steam release valve. Keep
exposed skin away from the steam release valve to avoid burn injury.
DANGER
DO NOT attempt to remove the lid while the pressure indicator is on and
NEVER attempt to force the lid open. Contents are under extreme pressure.
Float valve must be down before attempting to remove the lid. Failure to follow
these instructions may result in serious personal injury and/or property damage
CAUTION
The inner pot will be hot after cooking. Always use appropriate heat protection
when handling a hot inner pot to avoid burn injury.
instanthome.com | 15
112-0124-01-0101_IB_Pro-Plus_Interim_GSG_FINAL.indd 15112-0124-01-0101_IB_Pro-Plus_Interim_GSG_FINAL.indd 15 7/9/21 1:58 PM7/9/21 1:58 PM
Page 16
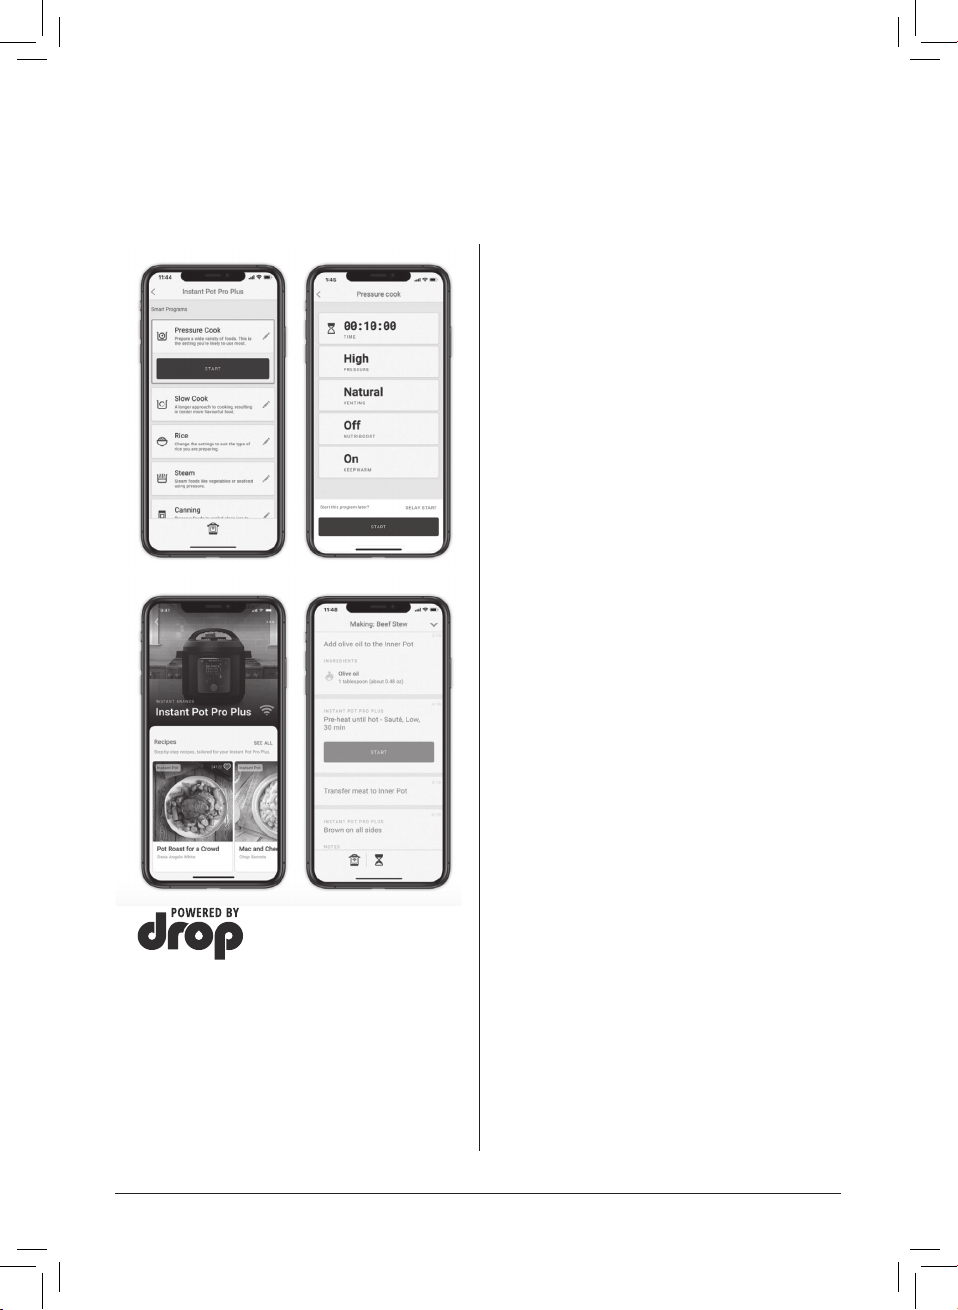
Cooking from the Instant Pot App
Make cooking simple and easy when you control your Instant Pot® Pro Plus using the
Instant Pot App from your mobile device. You have full control of the cooking programs,
plus access to 1000+ interactive guided cooking recipes.
Control cooking programs
The Pro Plus includes 9 cooking programs
and you can control each of them from
the App, and then monitor cooking
within the App. You can use the default
cooking settings, or choose your own
settings for things like time, pressure level,
temperature and venting type.
Guided recipes
The Instant Pot App includes over 1000
delicious recipes. But unlike standard
recipes, the App can interactively guide
your cooking on the Pro Plus. The App will
start the cooker, and control the settings
exactly as the recipe species. All you have
to do is prepare the ingredients and add
them to the cooker.
16 | [email protected] | 1-800-828-7280
112-0124-01-0101_IB_Pro-Plus_Interim_GSG_FINAL.indd 16112-0124-01-0101_IB_Pro-Plus_Interim_GSG_FINAL.indd 16 7/9/21 1:58 PM7/9/21 1:58 PM
Page 17

Pairing with the Instant Pot App
You can control your Pro Plus with the Instant Pot App using
your mobile device.
To download the App, either:
• Scan the QR code, or;
• Visit www.instanthome.com/app, or;
• Search “Instant Pot” in the Apple Store or the Google Play Store.
To get started, you'll need to create an account.
Requirements for pairing
You can use these compatible mobile devices to pair via WiFi.
• Android version 5.0 or later
• iOS version 12.0 or later
The Instant Pot can only connect to a 2.4GHz WiFi network.
Follow the steps below to start the pairing process.
Before you start, make sure you:
• Download the Instant Pot App and create an account if you don't
already have one
• Know your home WiFi network name and password
• Make sure your Pro Plus is plugged in and not currently cooking.
It should display OFF.
• Make sure you have your mobile device near the Pro Plus.
01 Open the App and select the Kitchen section, then select Add
an Appliance.
02 From the list of appliances, select "Instant Pot Pro Plus".
03 Follow the instructions in the App to start the pairing process.
When you're done, you're set to control your Pro Plus from your
App, and take advantage of even smarter, easier cooking!
Note: The Initial Water Test run can be done using the mobile
app. Ensure the device is connected using the steps above
before starting the test.
instanthome.com | 17
112-0124-01-0101_IB_Pro-Plus_Interim_GSG_FINAL.indd 17112-0124-01-0101_IB_Pro-Plus_Interim_GSG_FINAL.indd 17 7/9/21 1:58 PM7/9/21 1:58 PM
Page 18
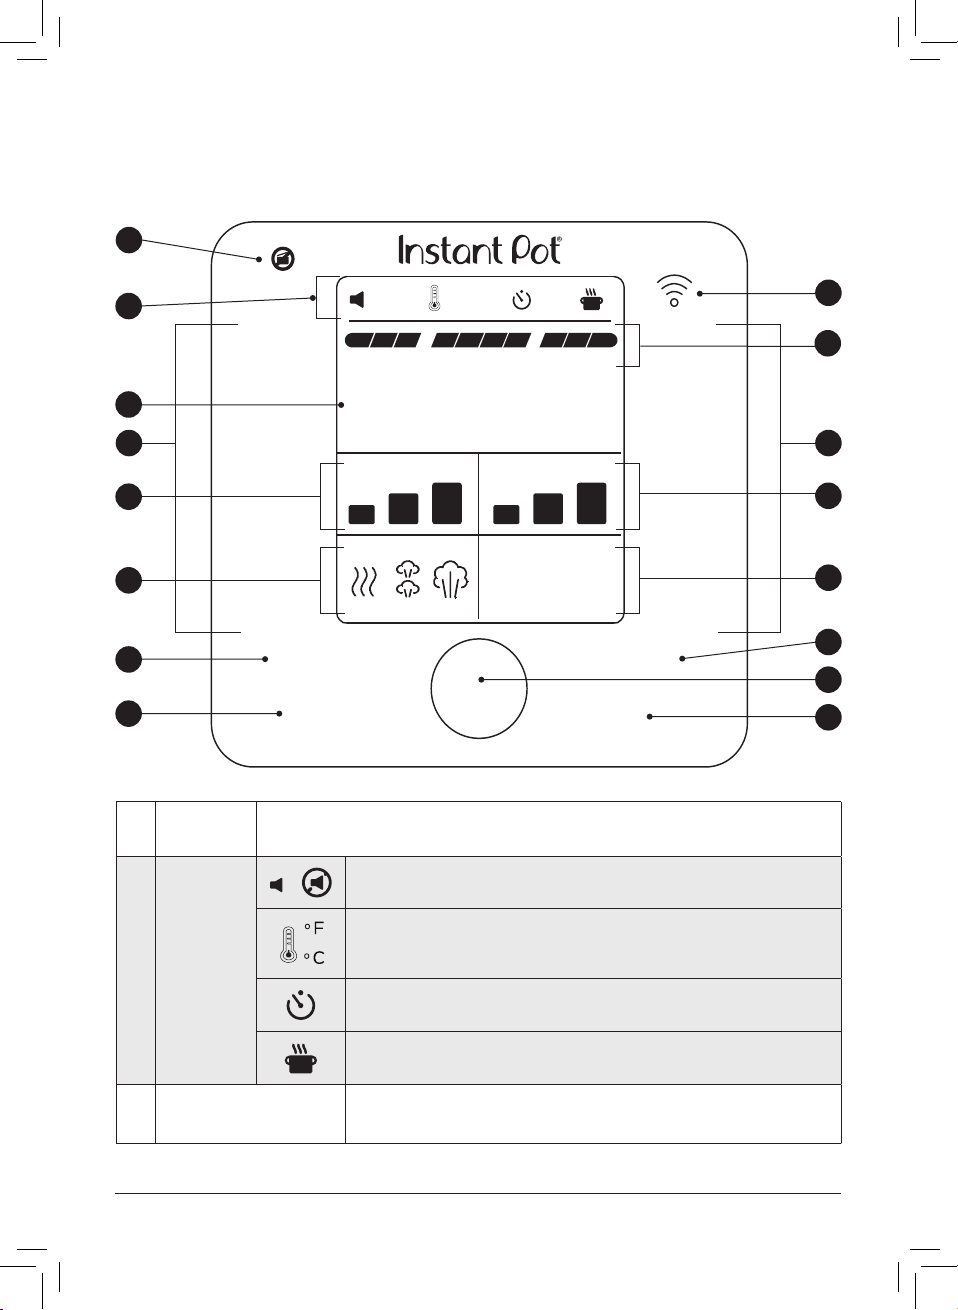
Control panel
Pressure
Cook
Pro Plus
Pressure
Pre-heating
On
º
F
AM
PM
º
C
Off
Cooking Keep Warm
Temperature
Venting
NutriBoost
TM
On
Off
Slow
Cook
Sous
Vide
Keep WarmDelay Start
Sauté
Cancel Start
Steam
Yogurt
Rice
Canning
05:20
Low High
Natural Pulse Quick
Max Low High Cus
The Pro Plus has a touch screen control panel that’s easy to use and understand.
1
12
14
2
3
5
6
44
7
9
8
10
11
11
15
1
Pressure
indicator
Lights up when there is pressure in the multicooker to show that the lid is locked and
cannot be removed.
Status
2
icons
3 WiFi indicator
18 | [email protected] | 1-800-828-7280
|
Illustrations in this document are for reference only and may differ from the actual product.
Shows if sounds are On or Off, as indicated.
Indicates if the temperature scale is showing in Fahrenheit (°F) or Celsius (°C).
See Control panel: Settings for details.
Delay Start or cooking timer is running.
Appears when Keep Warm is running, or is set to turn on after cooking nishes.
Lights up when paired with the Instant Pot App and connected to a device.
See WiFi for more information.
Always refer to the actual product.
112-0124-01-0101_IB_Pro-Plus_Interim_GSG_FINAL.indd 18112-0124-01-0101_IB_Pro-Plus_Interim_GSG_FINAL.indd 18 7/9/21 1:58 PM7/9/21 1:58 PM
Page 19
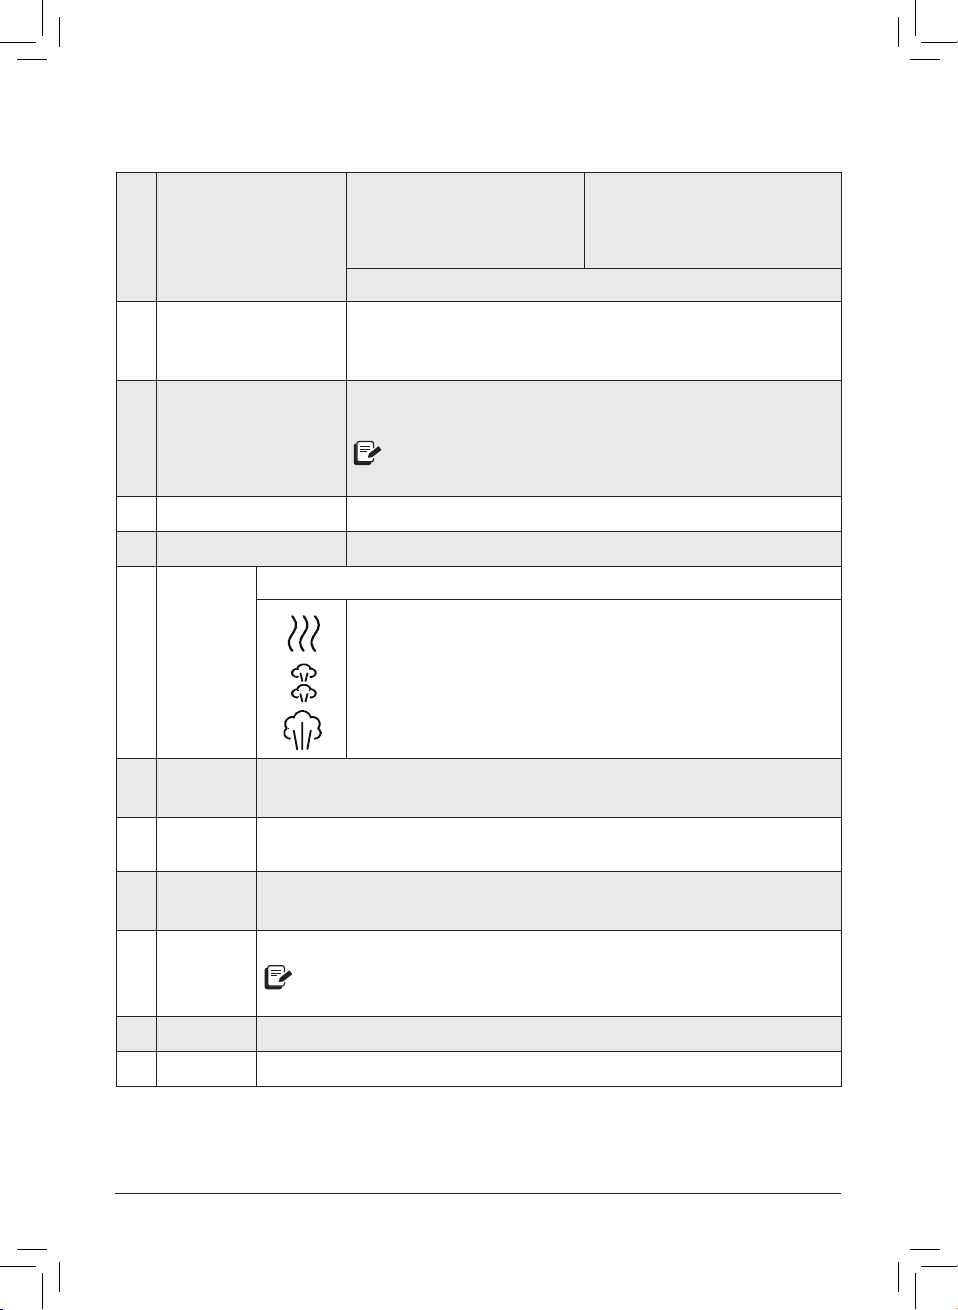
Control panel
4 Smart Programs
5 Cooking progress bar
6 Time display
7 Pressure
8 Temperature
Choose between 3 venting methods:
9 Venting
• Pressure Cook
• Rice
• Canning
• Sauté
See Cooking for details.
Shows when the multicooker is in Pre-heating, Cooking and Keep Warm
modes.
See Control panel: Cooking progress bar for more information.
In standby, shows OFF.
In a Smart Program, counts up or down, depending on the program.
Some Smart Programs display the temperature in
ºC (Celsius) or ºF (Fahrenheit).
Choose between Low, High and Max.
Choose between Low, High and Custom.
Natural release
Pulse release
Quick release
• Slow Cook
• Steam
• Yogurt
• Sous Vide
10 NutriBoost
Control
11
dial
12 Delay Start
13
Keep
Warm
14 Cancel
15 Start
112-0124-01-0101_IB_Pro-Plus_Interim_GSG_FINAL.indd 19112-0124-01-0101_IB_Pro-Plus_Interim_GSG_FINAL.indd 19 7/9/21 1:58 PM7/9/21 1:58 PM
Toggles the NutriBoost setting On and Off.
See Cooking: NutriBoost for more information.
Turn the dial to adjust the time and temperature.
Delay the start of cooking.
Doubles as a kitchen timer!
Turns Keep Warm on or off.
Can only be used with Pressure Cook, Rice, Canning and Slow Cook, or as a
standalone program when in standby.
Stops a Smart Program at any time and returns the multicooker to standby.
Begins the selected Smart Program.
instanthome.com | 19
Page 20
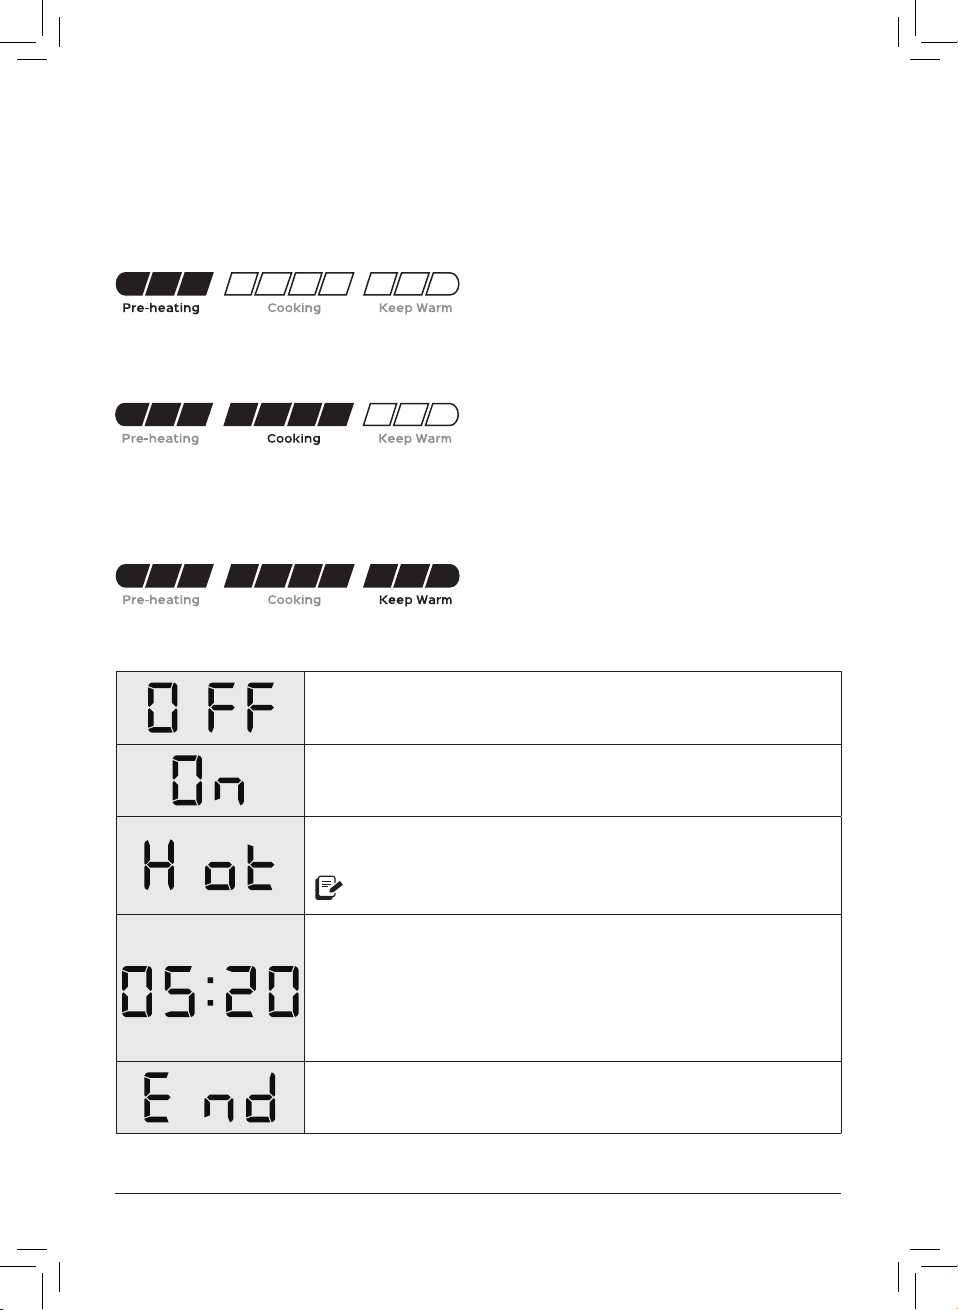
Control panel
Cooking progress bar
Pre-heating is in progress. The display shows On during the pre-heating stage to let you
know that it’s working on getting up to temperature.
Cooking is shown after the Pro Plus reaches the target pressure or temperature required
by the Smart Program.
Keep Warm comes on automatically (unless you've turned it off) after cooking nishes
to keep your meal at serving temperatures.
Only applies to Pressure Cook, Rice, Slow Cook and Canning.
Status messages
The Pro Plus is in standby mode, ready whenever you are.
The multicooker is Pre-heating.
The inner pot has reached the perfect cooking temperature
and food can be added.
Only applies to Sauté and Sous Vide.
Display shows one of the following:
• The remaining Cooking time when a Smart Program
is running,
• The Delay Start countdown,
• How long food has been in Keep Warm,
When cooking nishes, the display shows End until you remove
the lid or touch Cancel.
Do you see something else? See Troubleshooting for more information.
20 | [email protected] | 1-800-828-7280
112-0124-01-0101_IB_Pro-Plus_Interim_GSG_FINAL.indd 20112-0124-01-0101_IB_Pro-Plus_Interim_GSG_FINAL.indd 20 7/9/21 1:58 PM7/9/21 1:58 PM
Page 21
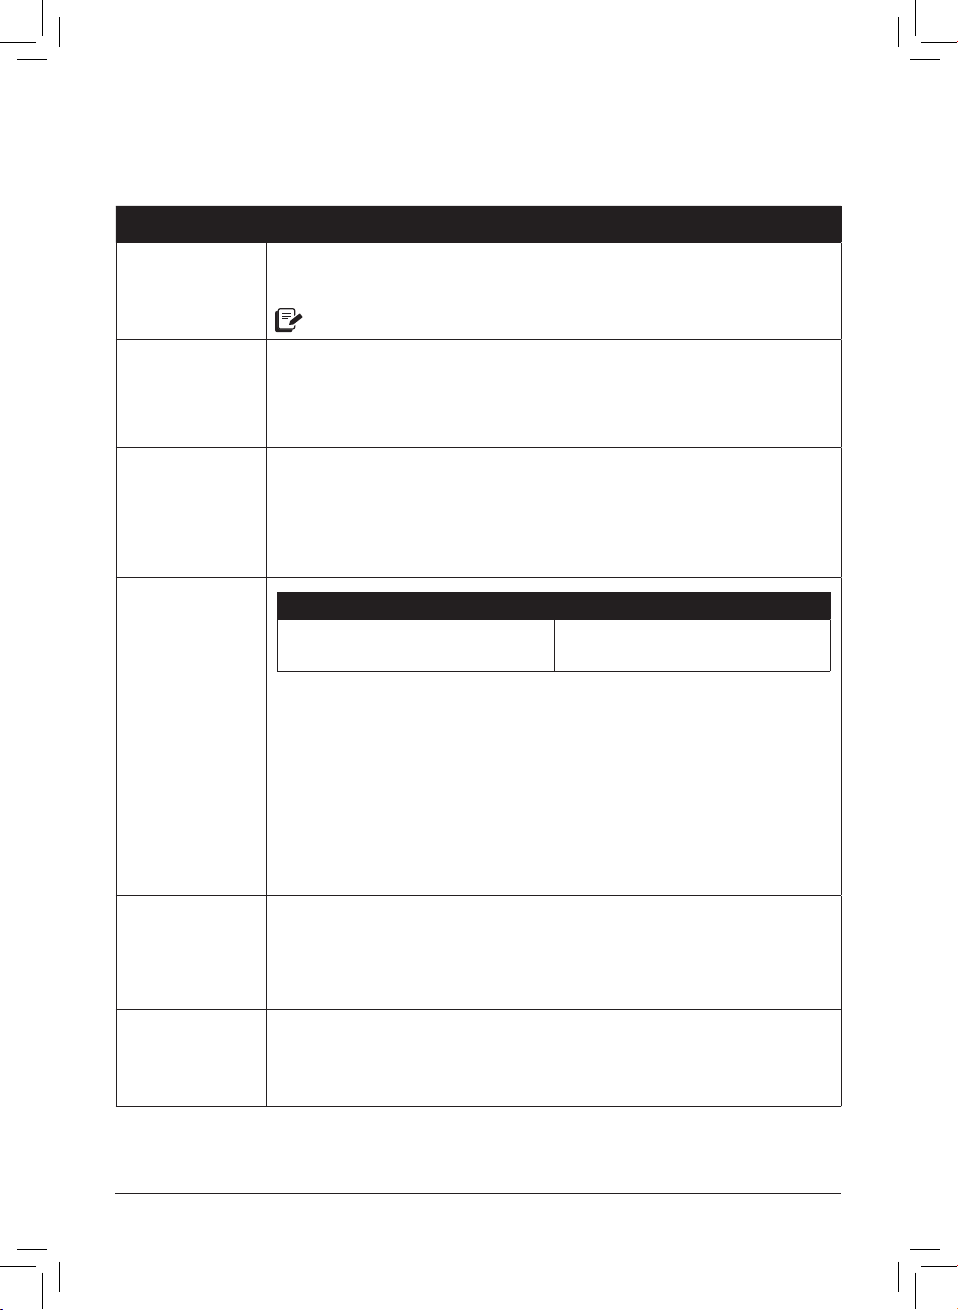
Settings
Setting Description
Turn sound
on or off.
Change
displayed
temperature
(°C and °F).
Adjust and
save custom
cooking
times and
temperatures.
Delay the start
of cooking.
When in standby, touch and hold the sound icon for 2 seconds to
toggle sounds on and off.
Audible safety and error message alerts cannot be turned off.
When in standby, touch and hold the thermometer icon for
2 seconds to toggle between displaying °C and °F.
Once a Smart Program is selected, changes to the cooking time,
temperature and pressure level are saved once the Smart Program
begins.
Default time Time range
6 hours (06:00)
10 minutes to 24 hours
(00:10 to 24:00)
01 Select and set up an applicable Smart Program.
02 When you're ready, touch Delay Start.
The hours field ashes.
03 Turn the dial to adjust the hours field as needed.
04 Touch the minutes field to toggle to it.
Turn the dial to adjust the minutes field as needed.
05 Press Start to begin the delay countdown.
Delay Start cannot be used with Sauté, Yogurt or Sous Vide.
Reset an
individual
Smart
Program.
When in standby, touch and hold the Smart Program button you
want to reset for 3 seconds.
The Smart Program’s cooking time, pressure level and temperature
are restored to the factory default setting.
When in standby, touch and hold Cancel until the multicooker beeps.
Reset all Smart
Programs.
All Smart Program cooking times, pressure levels and temperatures
are restored to factory default settings.
instanthome.com | 21
112-0124-01-0101_IB_Pro-Plus_Interim_GSG_FINAL.indd 21112-0124-01-0101_IB_Pro-Plus_Interim_GSG_FINAL.indd 21 7/9/21 1:58 PM7/9/21 1:58 PM
Page 22

Pressure cooking
Pressure cooking uses pressure to raise the boiling point of water above 100ºC / 212ºF.
These high temperatures allow you to cook food way faster than normal.
When pressure cooking, the Instant Pot Pro Plus goes through 3 stages.
How pressurizing works
Pre-heating
What you see
The cooking
progress bar
shows Pre-heating.
The display
shows On.
Cooking
What you see What you don’t see Tips
The cooking progress
bar moves over to
Cooking.
The display switches
to the cooking
countdown timer.
Depressurization
What you see What you don’t see Tips
If Keep Warm is on
after cooking, the
cooking progress bar
moves over to Keep
Warm, and the timer
counts up from 00:00.
If not, the multicooker
begins venting and
the venting icon
ashes until nished.
What you don’t see Tips
While the multicooker
pre-heats, it vaporizes
liquid to create steam.
Once enough steam has
built up, the oat valve
pops up and locks the
lid in place.
When the Instant Pot reaches
the required pressure level,
cooking begins.
The Instant Pot Pro Plus
automatically maintains at
Low, High or Max pressure
throughout cooking.
Although food has
nished cooking, the
multicooker is still
pressurized and hot.
The time it takes the multicooker
to pressurize depends on things
like food and liquid temperature
and volume.
Frozen foods have the longest preheating time. For the fastest results,
thaw your food before cooking it.
A higher pressure means
higher temperature.
Smart Program settings
(e.g., cooking time,
pressure level, etc.) can
be adjusted at any time
during cooking.
Follow your recipe instructions
when choosing a venting method.
Venting releases pressure, lowers
the temperature and allows you to
safely remove the lid.
See Releasing pressure:
Venting methods on the next
page for information on safe
venting techniques.
22 | [email protected] | 1-800-828-7280
112-0124-01-0101_IB_Pro-Plus_Interim_GSG_FINAL.indd 22112-0124-01-0101_IB_Pro-Plus_Interim_GSG_FINAL.indd 22 7/9/21 1:58 PM7/9/21 1:58 PM
Page 23
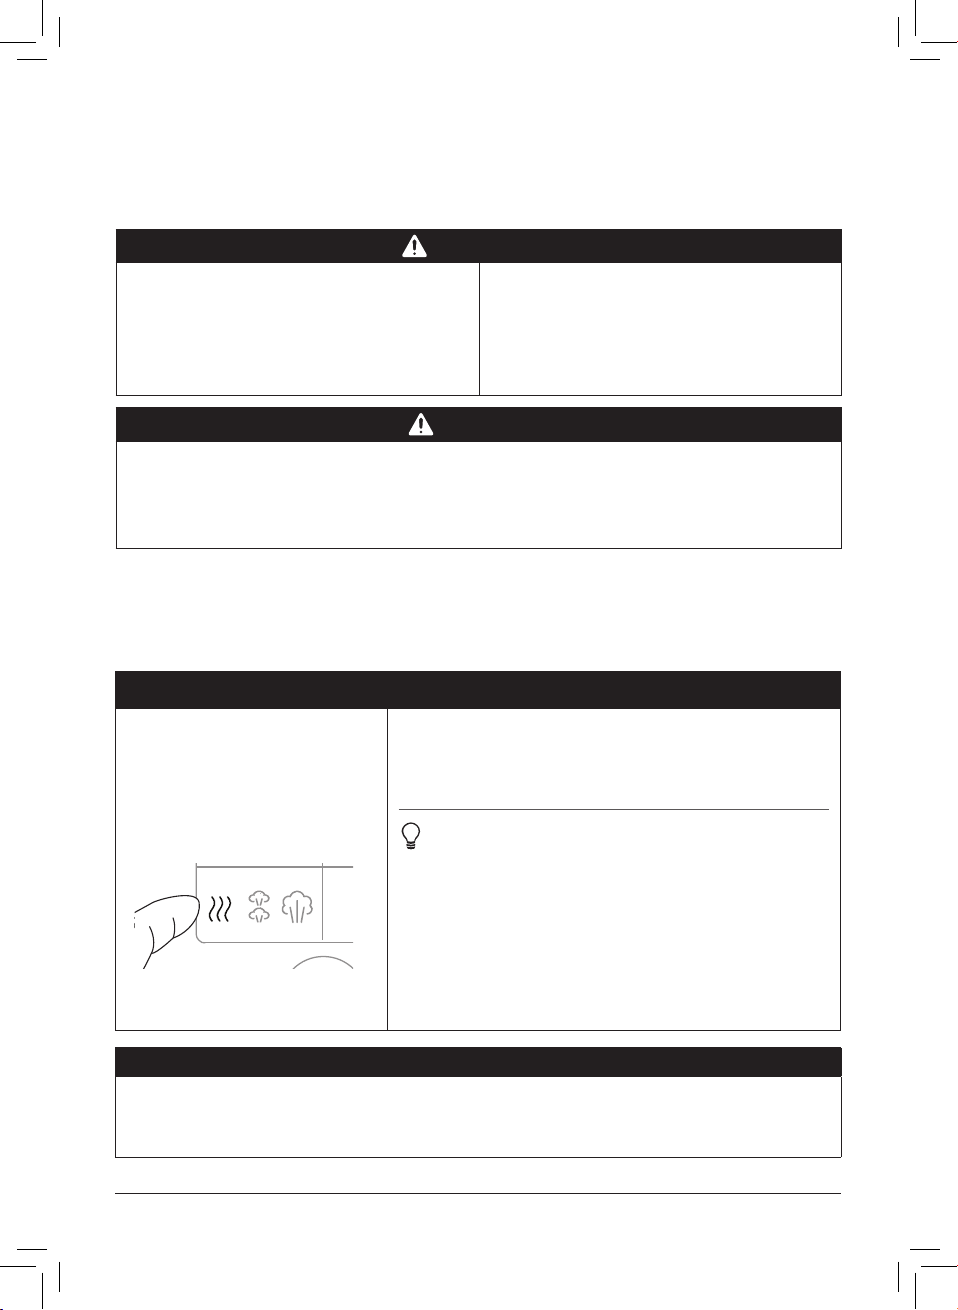
Releasing pressure
Pressure
Temperature
On
You must release pressure after pressure cooking before attempting to open the lid.
Follow your recipe’s instructions to choose a venting method.
WARNING
Steam ejected from the steam release
valve is hot. DO NOT place hands,
face, or any exposed skin over the
steam release assembly when releasing
pressure to avoid injury.
DO NOT attempt to remove the lid while the pressure indicator is on and
NEVER attempt to force the lid open. Contents are under extreme pressure.
Float valve must be down before attempting to remove the lid. Failure to follow
these instructions may result in serious personal injury and/or property damage.
Venting methods
Natural release (NR or NPR)
After the cooking nishes, the temperature within the multicooker drops gradually and
the multicooker depressurizes naturally over time.
What to do What to expect
Do not cover or obstruct the steam
release valve or cover to avoid injury
and/or property damage.
DANGER
When cooking nishes, the multicooker does not
vent, so your meal continues to cook even after the
Smart Program ends.
Touch the Venting field on
the control panel to toggle to
Natural.
Venting
é
Natural Pulse Quick
Instant Tip: This is called “carryover cooking” or “resting”, and
it’s great for large cuts of meat.
The depressurization time may vary based upon the
volume, type and temperature of food and liquid. It
can take up to 40 minutes with some dishes, so plan
ahead — it’s well worth the wait!
When pressure is fully released, the Pressure
indicator light turns off. Then it is safe to open the lid.
NOTICE
Use NR to depressurize the multicooker after cooking high-starch foods (e.g.,
soups, stews, chilis, pasta, oatmeal and congee) or after cooking foods that
expand when cooked (e.g., beans and grains).
112-0124-01-0101_IB_Pro-Plus_Interim_GSG_FINAL.indd 23112-0124-01-0101_IB_Pro-Plus_Interim_GSG_FINAL.indd 23 7/9/21 1:58 PM7/9/21 1:58 PM
instanthome.com | 23
Page 24
Releasing pressure
Pressure
Temperature
Venting
On
Pressure
Temperature
Venting
On
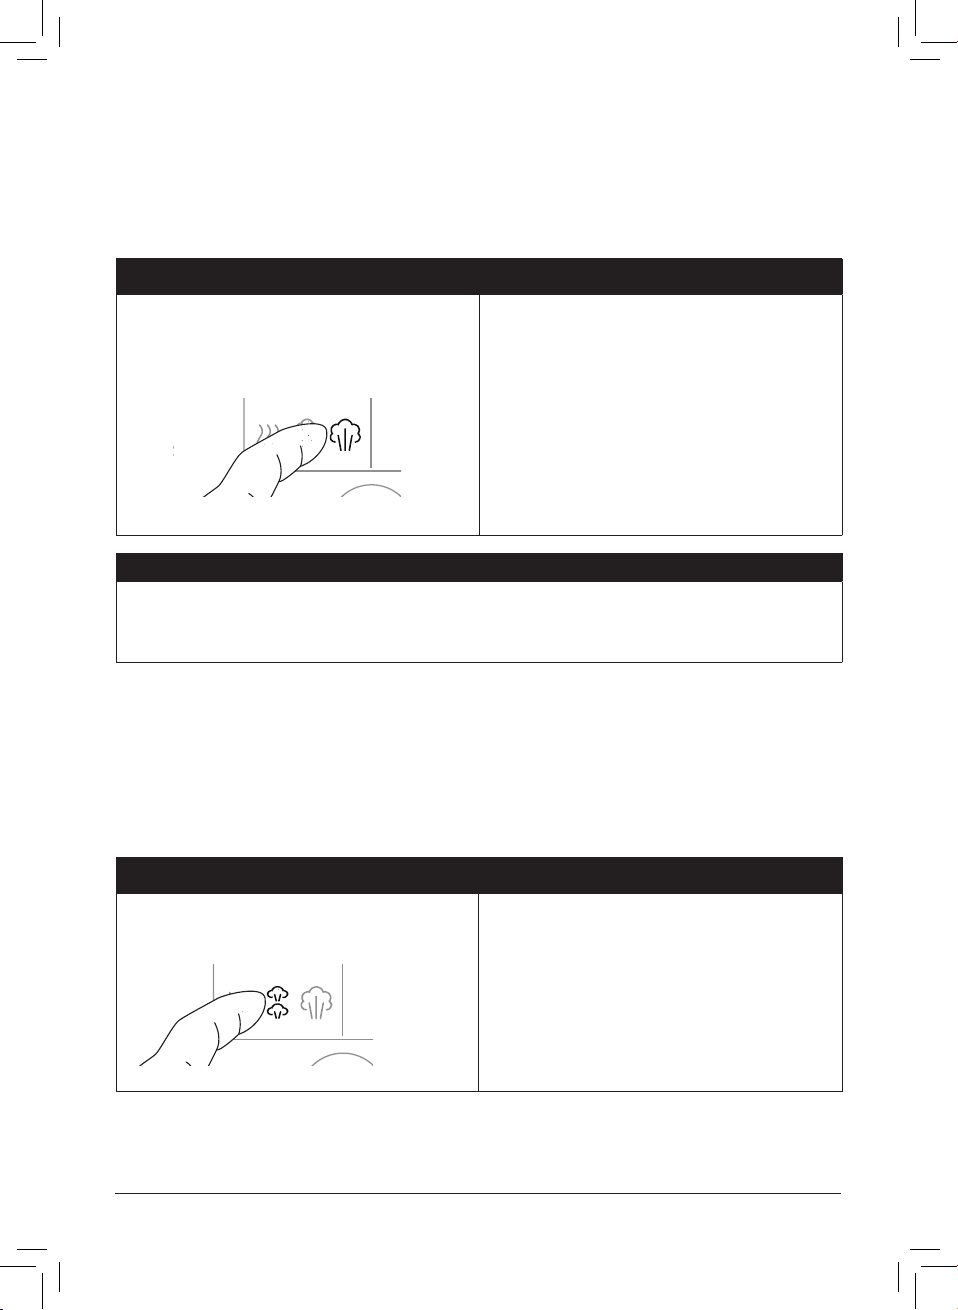
Quick Release (QR or QPR)
When cooking nishes, a quick release drops the pressure and temperature quickly to
prevent overcooking. Perfect for quick-cooking vegetables and delicate seafood!
What to do What to expect
When cooking nishes, the Pro Plus
Touch the Venting field on the control
panel to toggle to Quick.
PulseNatural
Quick
Do not use QR when cooking fatty, oily, thick or high-starch foods (e.g., stews,
chilis, pasta and congee) or when cooking foods that expand when cooked (e.g.,
beans and grains).
If you see a lot of spatter while releasing pressure, touch the Venting field to return to
Natural, then touch Start. Wait a few minutes before trying to release pressure again. If spatter
continues, use NR to safely release the remaining pressure.
releases a warning puff and beeps
3 times, followed by a steady stream
of steam from the top of the steam
release valve.
This is normal!
When pressure is fully released, the
Pressure indicator light turns off. Then it is
safe to open the lid.
NOTICE
Pulse release
When cooking completes, the Pro Plus releases timed bursts of steam to release pressure
– perfect for rice, grains, and much more.
What to do What to expect
Touch the Venting field on the control
panel to toggle to Pulse.
When cooking nishes, the multicooker
releases a short burst of steam every
15 seconds.
Natural
Pulse Quick
When pressure is fully released, the
Pressure indicator light turns off. Then it is
safe to open the lid.
24 | [email protected] | 1-800-828-7280
112-0124-01-0101_IB_Pro-Plus_Interim_GSG_FINAL.indd 24112-0124-01-0101_IB_Pro-Plus_Interim_GSG_FINAL.indd 24 7/9/21 1:58 PM7/9/21 1:58 PM
Page 25
Pressure control features
See Care, cleaning and storage for installation and removal of parts.
Pressure cooking lid
When it’s plugged in, the Pro Plus plays a little jingle when you open and close the lid.
What we love about it What you should know about it
When you close the lid, it automatically
gets ready to seal for seriously easy
pressure cooking.
It closes over the handles on the new
inner pot.
The lid handle is comfortable to use
whether you’re left or right-handed, and,
stands up in the multicooker base!
The lid is removable during non-pressure
cooking so you can taste-test as you go.
When pressure cooking, the lid only
locks into place once the multicooker has
pressurized.
Try not to remove the lid unnecessarily.
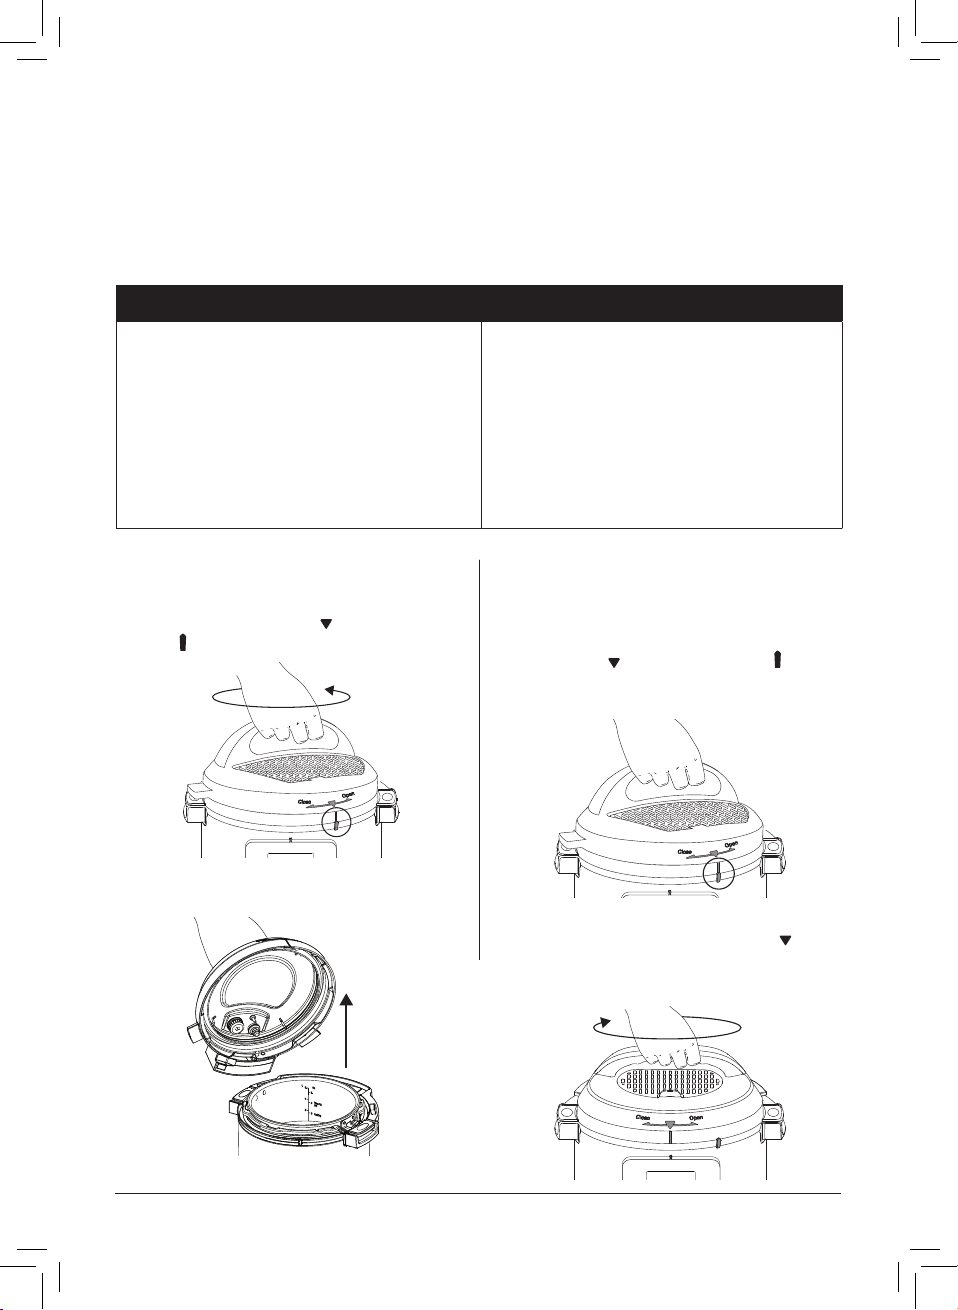
Removing the lid
01 Grip the handle and turn it counter-
clockwise to align the
the
on the rim of the multicooker base.
02 Lift the lid up and off the multicooker
base towards your body.
on the lid with
See Releasing pressure for safe
depressurization techniques.
Closing the lid
01 Align the
multicooker base, then lower the lid
onto the track.
02 Turn the lid clockwise until the
the lid aligns with the middle of the
control panel.
on the lid with the on the
on
instanthome.com | 25
112-0124-01-0101_IB_Pro-Plus_Interim_GSG_FINAL.indd 25112-0124-01-0101_IB_Pro-Plus_Interim_GSG_FINAL.indd 25 7/9/21 1:58 PM7/9/21 1:58 PM
Page 26

Pressure control features
QuickCool
For the fastest Natural release after pressure cooking, use the QuickCool tray*.
What we love about it What you should know about it
The metal portion of the lid gets
It’s a huge timer saver — you can release
pressure naturally up to 50% faster!
To use the QuickCool tray, ll it with ice or water and freeze it. Once frozen, position the
QuickCool tray on the exposed metal of the lid.
When the oat valve drops into the lid, remove the QuickCool tray, discard the water,
and open the lid.
*QuickCool tray sold separately at instanthome.com.
extremely hot, so don’t remove the
protective cover unless you’re using
QuickCool.
CAUTION
The lid will be hot during and after cooking. Do not touch the exposed metal with
bare skin to avoid injury.
CAUTION
The QuickCool tray is not intended to serve food or liquid. To avoid risk of
personal injury, do not consume food or liquid from the QuickCool tray.
26 | [email protected] | 1-800-828-7280
112-0124-01-0101_IB_Pro-Plus_Interim_GSG_FINAL.indd 26112-0124-01-0101_IB_Pro-Plus_Interim_GSG_FINAL.indd 26 7/9/21 1:58 PM7/9/21 1:58 PM
Page 27
Pressure control features
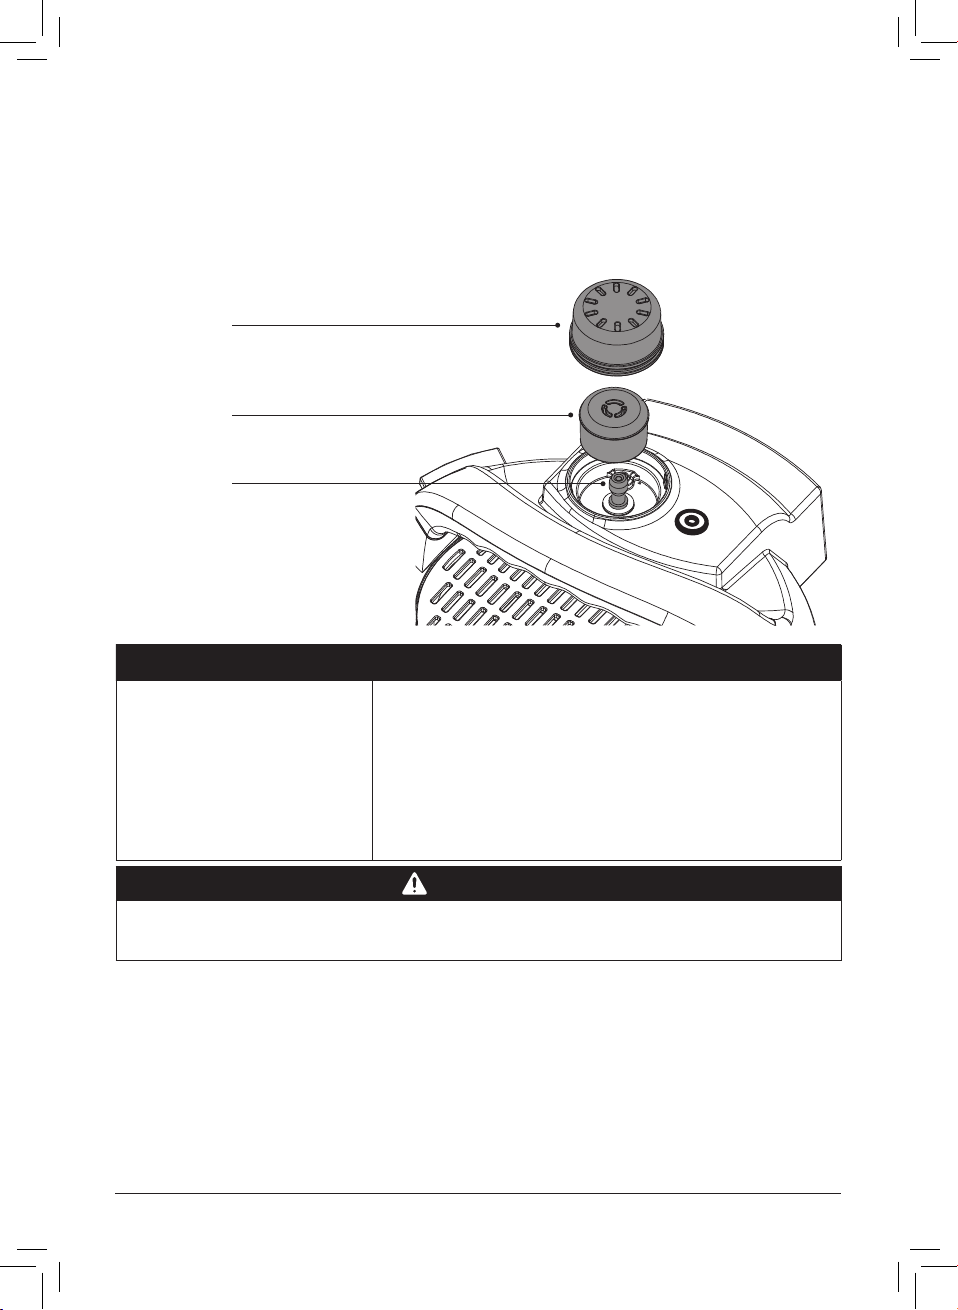
Steam release assembly
The steam release assembly must be fully installed before use.
Steam release cover
Steam release valve
Steam release pipe
What we love about it What you should know about it
The steam release valve sits loosely on the steam
release pipe.
The steam release cover
disperses the steam, so the
pressure releases gently.
When releasing pressure, steam travels up from the
inner cooking pot, through the steam release pipe
and steam release valve, and out the top of the
steam release cover. It's important to keep the area
clean and clear.
WARNING
Do not cover or block the steam release assembly in any way to avoid injury
and/or property damage.
instanthome.com | 27
112-0124-01-0101_IB_Pro-Plus_Interim_GSG_FINAL.indd 27112-0124-01-0101_IB_Pro-Plus_Interim_GSG_FINAL.indd 27 7/9/21 1:58 PM7/9/21 1:58 PM
Page 28
Pressure control features
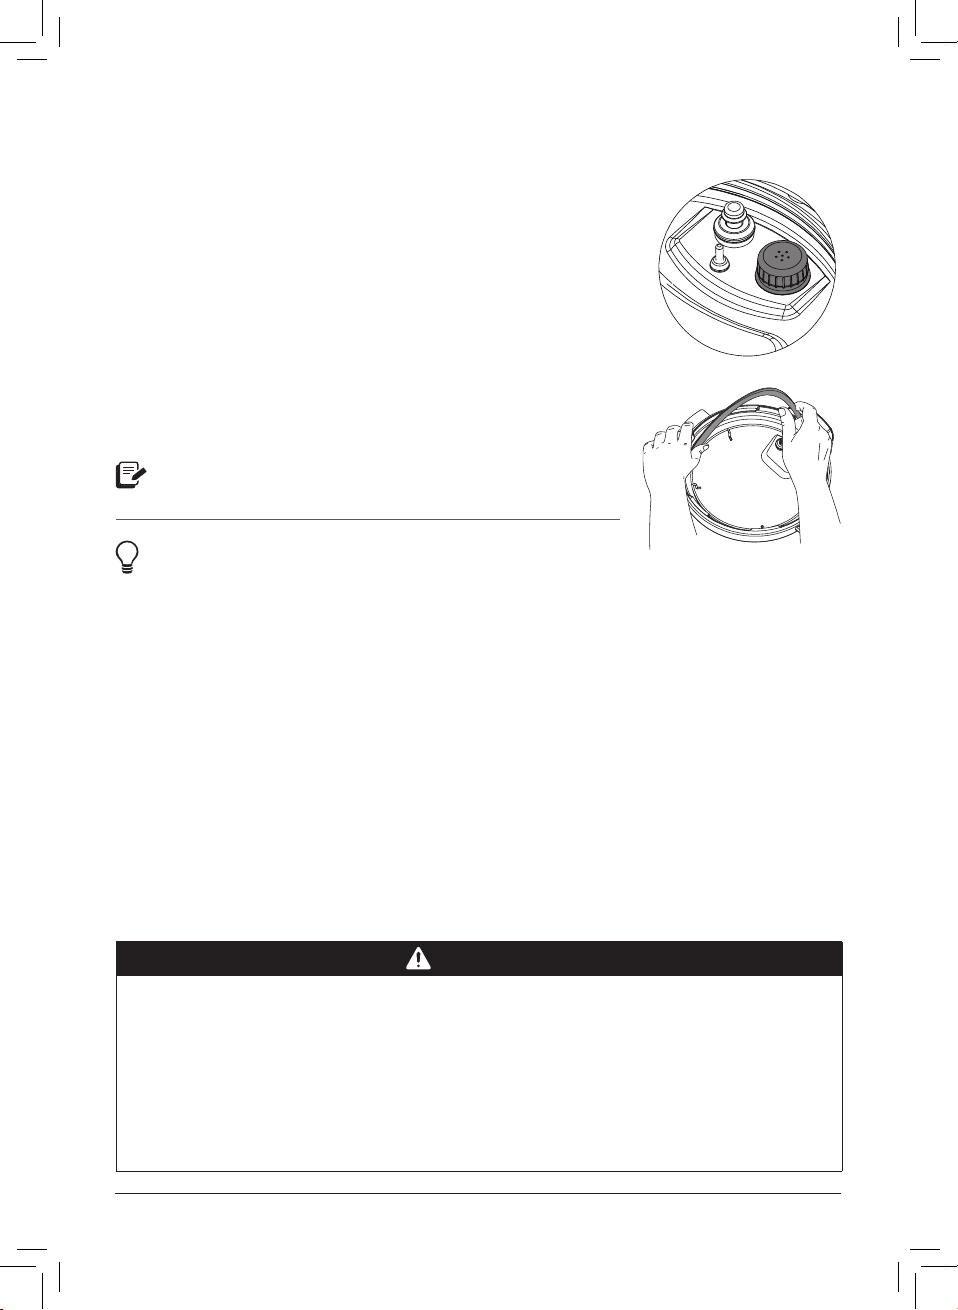
Anti-block shield
The anti-block shield prevents food particles from coming up
through the steam release pipe, which assists with pressure
regulation.
The anti-block shield is integral to product safety and necessary
for pressure cooking, so it must be installed before use.
Sealing ring
When the pressure cooking lid is closed, the sealing ring
creates an air-tight seal between the lid and the inner pot.
The sealing ring must be installed before use.
Only one sealing ring should be installed in the lid
at a time.
Instant Tip: Silicone is porous, so it absorbs strong aromas
and certain avors. Keep extra sealing rings on hand to
limit the transfer of those aromas and avors between
dishes. Visit our store to start color coding your cooking!
CAUTION
Always check for cuts, deformation and correct installation before cooking,
as sealing rings stretch over time with normal use. If you notice stretching,
deformation, or damage to your sealing ring, DO NOT use it.
Replace the sealing ring every 12 to 18 months or sooner, and only use
authorized Instant Pot sealing rings.
Failure to follow these instructions may cause food to discharge, which may lead
to personal injury or property damage.
28 | [email protected] | 1-800-828-7280
112-0124-01-0101_IB_Pro-Plus_Interim_GSG_FINAL.indd 28112-0124-01-0101_IB_Pro-Plus_Interim_GSG_FINAL.indd 28 7/9/21 1:58 PM7/9/21 1:58 PM
Page 29

Pressure control features
Pressure indicator
The pressure indicator on the control panel indicates when
the lid is safe to open.
• Pressurized
The pressure indicator icon will highlight in red indicating
it is not safe to open the lid.
• Depressurized
When the pressure indicator icon is not lit the unit is safe
to open.
The oat valve and silicone cap work together to seal in
pressurized steam. Do not attempt to operate the Instant Pot
without the oat valve properly installed.
DANGER
DO NOT attempt to remove the lid while the pressure indicator is lit and
NEVER attempt to force the lid open. Contents are under extreme pressure.
Float valve must be down before attempting to remove the lid. Failure to follow
these instructions may result in serious personal injury and/or property damage.
instanthome.com | 29
112-0124-01-0101_IB_Pro-Plus_Interim_GSG_FINAL.indd 29112-0124-01-0101_IB_Pro-Plus_Interim_GSG_FINAL.indd 29 7/9/21 1:58 PM7/9/21 1:58 PM
Page 30

Cooking
The Instant Pot Pro Plus is amazingly versatile in the kitchen. No matter what kind of
cooking you want to do, the Pro Plus has your back.
If you need to make changes to the cooking time, pressure level, venting or temperature
after a program has started, just touch the related eld, customize the Smart Program as
you like, then touch Start!
CAUTION
Always inspect the lid and inner pot carefully to make sure they are clean and in
good working condition before use.
• To avoid personal injury or damage to the appliance, replace the inner pot if it is
dented, deformed, or damaged.
• Use only authorized Instant Pot inner pots made for this model when cooking.
Always make sure the heating element is clean and dry before inserting the inner
pot into the multicooker base.
Failure to follow these instructions may damage the multicooker. Replace
damaged parts to make sure safe function.
WARNING
DO NOT ll inner pot higher than the
Max PC Fill line as indicated on the
inner pot.
When cooking foods that expand (e.g.,
rice, beans, pasta) do not ll the inner
pot higher than the Half Fill line as
indicated on the inner pot.
Always cook with the inner pot in place.
DO NOT pour food or liquid into the
multicooker base.
To avoid risk of personal injury and/or
property damage, place food and liquid
ingredients in the inner pot, then insert
the inner pot into the multicooker base.
CAUTION
When cooking meat, always use a meat thermometer to ensure the internal
temperature reaches a safe minimum temperature. Refer to the USDA’s
Safe Minimum Internal Temperature Chart or Health Canada's Cooking
Temperatures Chart for more information.
30 | [email protected] | 1-800-828-7280
112-0124-01-0101_IB_Pro-Plus_Interim_GSG_FINAL.indd 30112-0124-01-0101_IB_Pro-Plus_Interim_GSG_FINAL.indd 30 7/9/21 1:58 PM7/9/21 1:58 PM
Page 31
Cooking
Pressure Cook, Rice and Canning
Jump start magic! These programs use pressurized steam to cook food quickly, evenly,
and deeply, for delicious results every time!
For the best pressure cooking results, always follow an authorized Instant Pot recipe or
our tried, tested and true pressure cooking timetables which feature grain-to-water ratios
for making a variety of rice and grains.
Choose from 3 pressure levels, depending on the Smart Program.
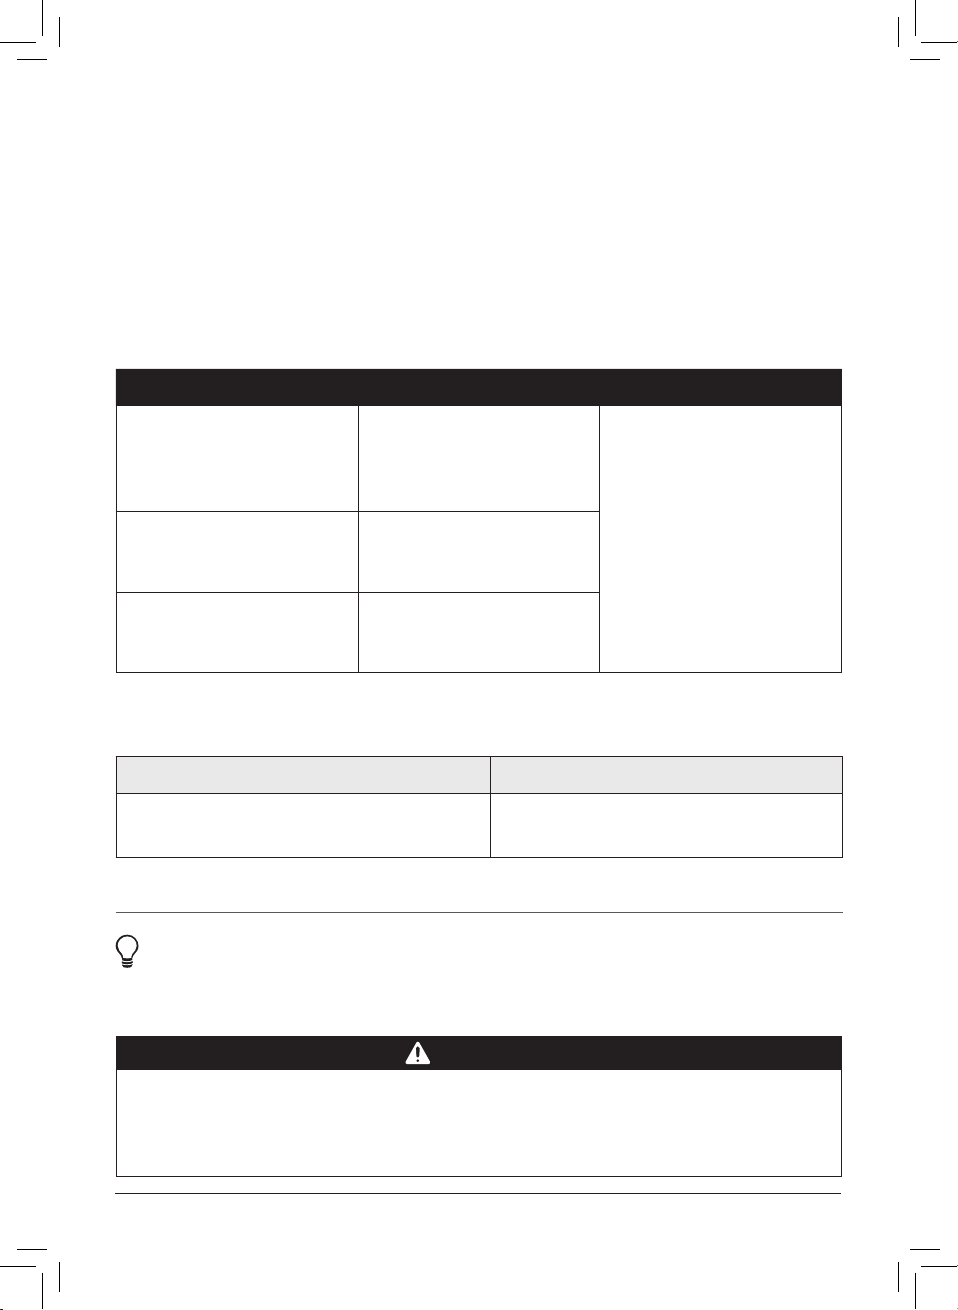
Pressure level Suggested use Notes
Fish and seafood, soft
Low 5.8 – 7.2 psi
(30 – 50 kPa)
High 10.2 – 11.6 psi
(70 – 90 kPa)
Max (15 psi)
(95 – 115 kPa)
Pressure cooking liquids should be water-based, such as broth, stock, soup or juice. If
using canned, condensed or cream-based soup, add liquid as directed below.
vegetables and rice.
Also for canning of
high-acid foods.
Eggs, meat, poultry, root
vegetables, oats, beans,
grains, bone broth, stew, chili.
Canning of low-acid foods,
tough cuts of meat and for
avorful broths.
When pressure cooking, the
pressure level controls the
cooking temperature, so a
higher pressure results in a
higher cooking temperature.
Instant Pot size Minimum liquid for pressure cooking*
6 Quarts / 5.7 Litres
1 ½ cups
(~12 oz / 375 mL)
*Unless otherwise specied in recipe.
Instant Tip: Use the multi-functional rack to heat food evenly, prevent nutrients from
leeching into the cooking liquid, allow oil and grease to drip off the food, and,
prevent food from scorching the bottom of the inner pot.
CAUTION
To avoid scorching or scalding injury, be cautious when pressure cooking with
more than 1/4 cup (~2 oz / 60 mL) oil, oil-based sauces, condensed cream-based
soups, and thick sauces. Add suitable liquid to thin sauces. Avoid recipes that call
for more than 1/4 cup (~2 oz / 60 mL) of oil or fat content.
instanthome.com | 31
112-0124-01-0101_IB_Pro-Plus_Interim_GSG_FINAL.indd 31112-0124-01-0101_IB_Pro-Plus_Interim_GSG_FINAL.indd 31 7/9/21 1:58 PM7/9/21 1:58 PM
Page 32
Cooking
Pressure Cook, Rice and Canning
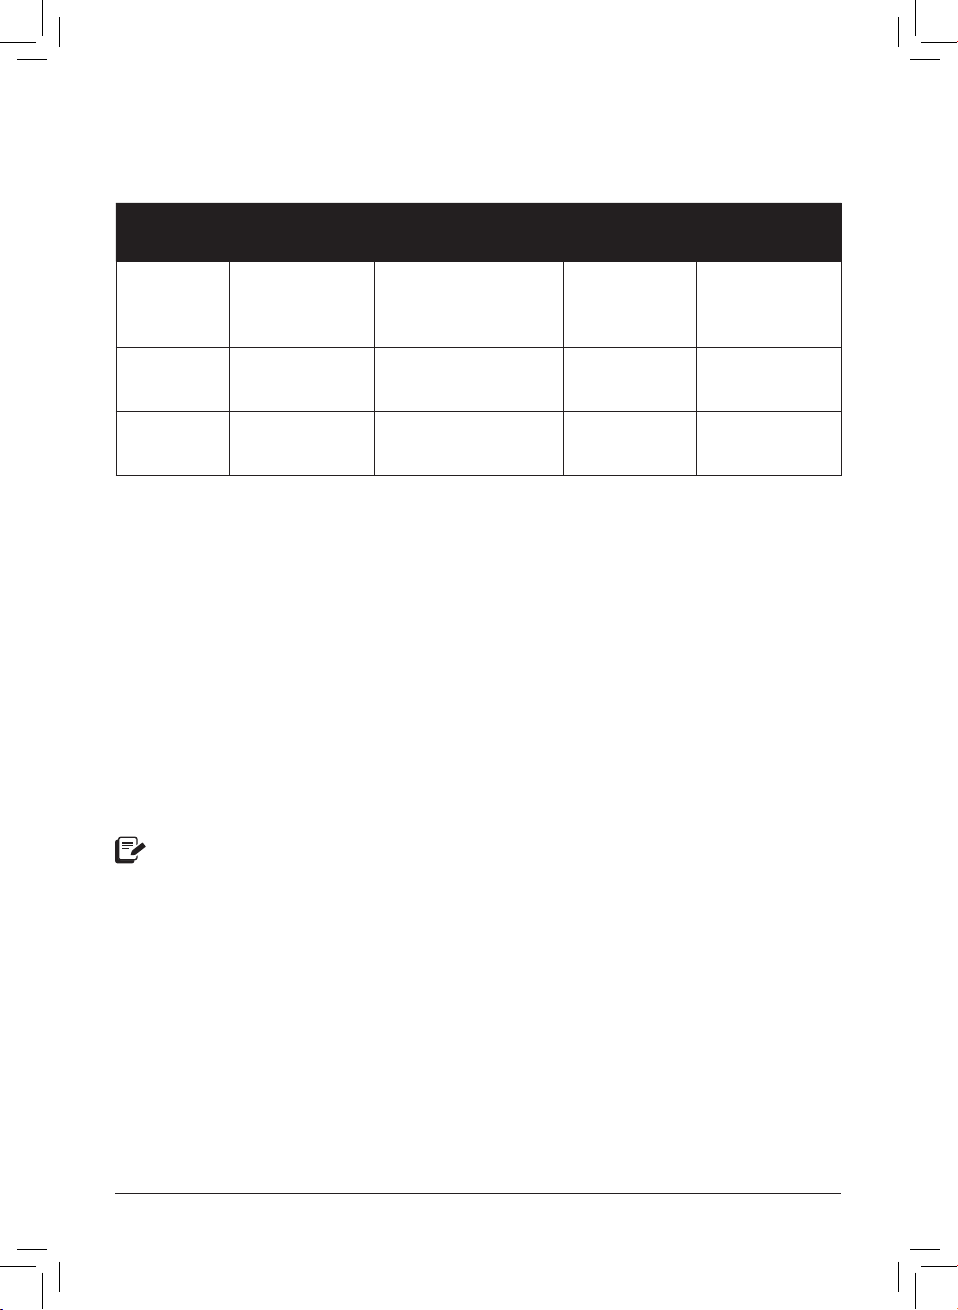
Smart
program
Pressure
Cook
Rice
Canning
01 Add food and liquid to the inner pot as indicated in your recipe.
02 Insert the inner pot into the multicooker base.
03 Place and close the pressure cooking lid as described in Pressure control features:
Pressure cooking lid.
04 Touch the Smart Program you want to use: Pressure Cook, Rice or Canning.
05 Touch the hours field or the minutes field, then turn the dial to adjust the cooking
time in hours and/or minutes.
06 Touch the Pressure field to toggle between available Low, High and Max
pressure levels.
07 Touch the Venting field to toggle between Natural, Pulse and Quick release options.
08 Touch Start to begin.
The display shows On and the cooking progress bar shows Pre-heating.
Read Pressure Cooking 101 to get a glimpse behind the curtain and nd out what’s
going on in that big ol’ magic pot.
09 When the Smart Program nishes the display shows End if Keep Warm is turned off. If
not, the timer begins counting from 00:00 up to 10 hours (10:00).
Keep Warm comes on automatically. If you don’t want the Pro Plus to Keep Warm after
cooking, press Keep Warm to turn it off any time.
A delay start timer can be set to automatically start pressure cooking. To set a delay start
timer, see Control panel: Settings.
Default
cooking time
10 minutes
(00:10)
12 minutes
(00:12)
30 minutes
(00:30)
Cooking time range
0 minutes to 4 hours
(00:00 to 04:00)
0 minutes to 1 hour
(00:00 to 01:00)
0 minutes to 4 hours
(00:00 to 04:00)
Default
pressure
High
Low
Max
Pressure levels
available
Low
High
Max
Low
High
Low
Max
32 | [email protected] | 1-800-828-7280
112-0124-01-0101_IB_Pro-Plus_Interim_GSG_FINAL.indd 32112-0124-01-0101_IB_Pro-Plus_Interim_GSG_FINAL.indd 32 7/9/21 1:58 PM7/9/21 1:58 PM
Page 33
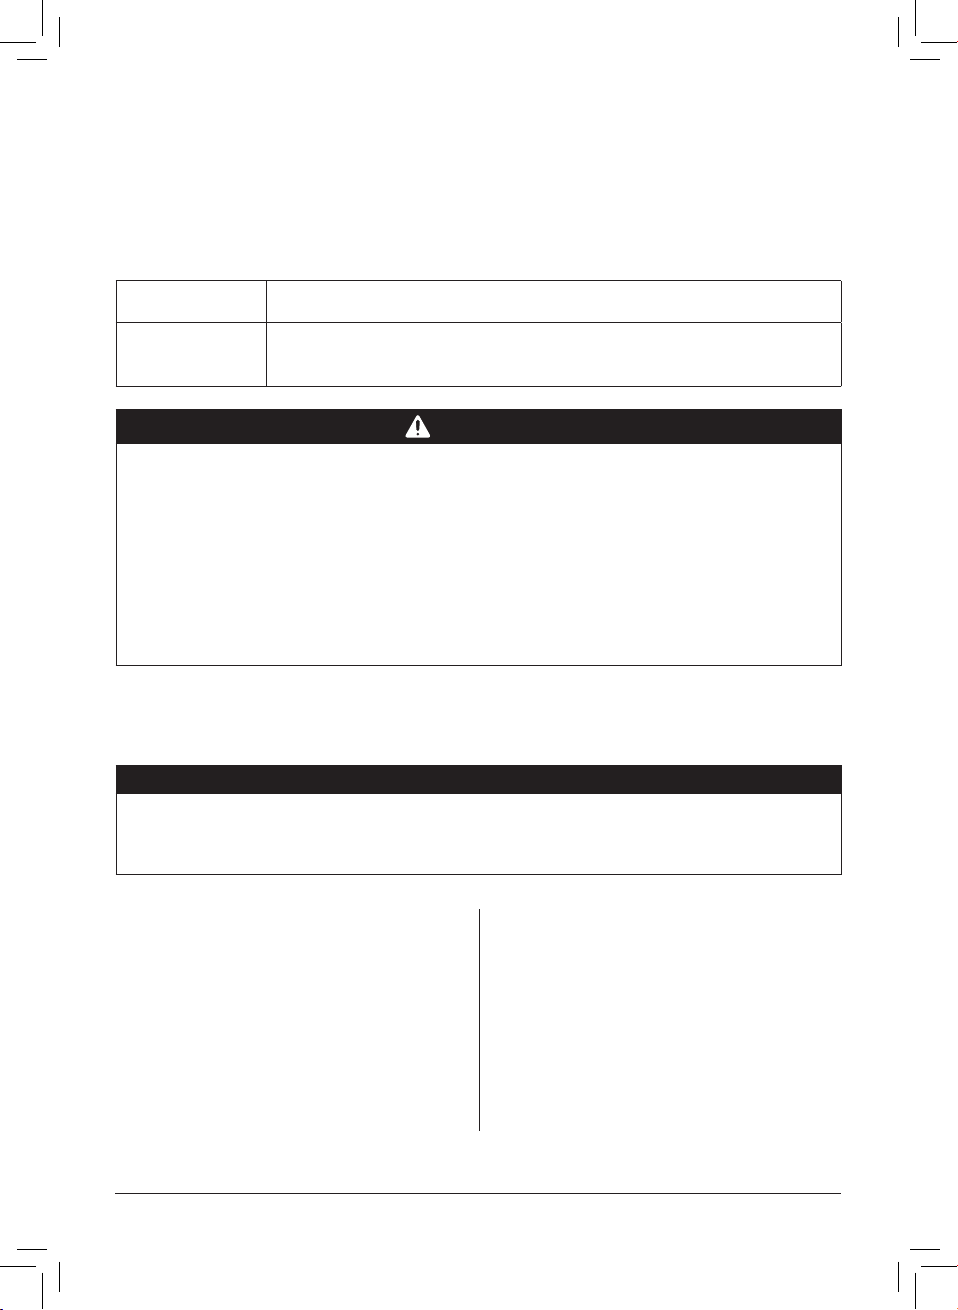
About Canning
The Canning Smart Program is a pressure cooking function based on traditional canning
principles. Following proper canning processes, canning can be an easy, economical way
to preserve quality food at home.
The Pro Plus uses 2 pressure canning settings:
Low
Max
Perfect for canning high-acid fruit, including sauces, jams and chutneys.
Store your amazing vegetarian sauces and high-acid vegetables, as
well as low-acid foods such as sauces and soups containing meat.
CAUTION
Recipes must be closely followed when canning. Modifying cooking times,
ingredients or temperatures can be dangerous. Use the exact time, temperature/
pressure and method specied in the recipe to protect the food from harmful
bacteria, molds and enzymes.
Improper canning may cause preserves to spoil, which may result in illness. Do
not pressure can at altitudes above 2000m (6600ft).
Read and carefully follow the instructions provided in the USDA’s Complete Guide
to Home Canning.
Sterilizing jars for canning
Your preserves must be placed into sterile, empty jars.
NOTICE
Always check your jars, lids, and seals for chips and other imperfections.
Sterilization of jars should occur just before lling. Excess contact with the air
should be avoided for safe canning.
01 Wash the jars with hot water and dish
soap, then rinse them thoroughly.
02 Place the inner pot into the cooker
base, then lay the steam rack on the
bottom of the inner pot.
03 Place the jars on the steam rack.
The pressure cooker will hold up to 4
x 16 oz. (500 mL) jars.
112-0124-01-0101_IB_Pro-Plus_Interim_GSG_FINAL.indd 33112-0124-01-0101_IB_Pro-Plus_Interim_GSG_FINAL.indd 33 7/9/21 1:58 PM7/9/21 1:58 PM
04 Fill the inner pot to the rst line (1)
with water.
05 Follow steps 03 to 07 in Pressure
Cook, Rice and Canning to program
the following:
a. Pressure level: Low
b. Time: 10 minutes (00:10)
c. Venting method: Quick
06 Touch Start to begin sterilization.
instanthome.com | 33
Page 34

Canning 101
Filling jars for canning
Choose a recipe that has been pre-tested and approved for pressure canning. Though
ingredients may vary, the process will be the same!
Refer to the USDA’s Complete Guide to Home Canning for tested recipes.
01 Fill warm, sterilized canning jars with
food and liquid.
Follow your recipe to allow for the
required headspace.
02 Use a sterilized, exible, nonporous
spatula, to remove trapped air
bubbles.
03 Place a sterilized lid on top of the jar,
then add a screw band. Hand-tighten
the band. Do not over-tighten.
Place the lled and sealed jars on the
steam rack in the inner pot.
04 Pour hot water into the inner pot until
the jars are ¼ of the way immersed
(approximately 6 cups [1½ L / 48 oz]).
05 Follow the steps in Cooking: Pressure
Cook, Rice and Canning (starting
at step 02) to set the appropriate
canning time and pressure levels for
your recipe.
34 | [email protected] | 1-800-828-7280
112-0124-01-0101_IB_Pro-Plus_Interim_GSG_FINAL.indd 34112-0124-01-0101_IB_Pro-Plus_Interim_GSG_FINAL.indd 34 7/9/21 1:58 PM7/9/21 1:58 PM
Page 35
Cooking
NutriBoost™
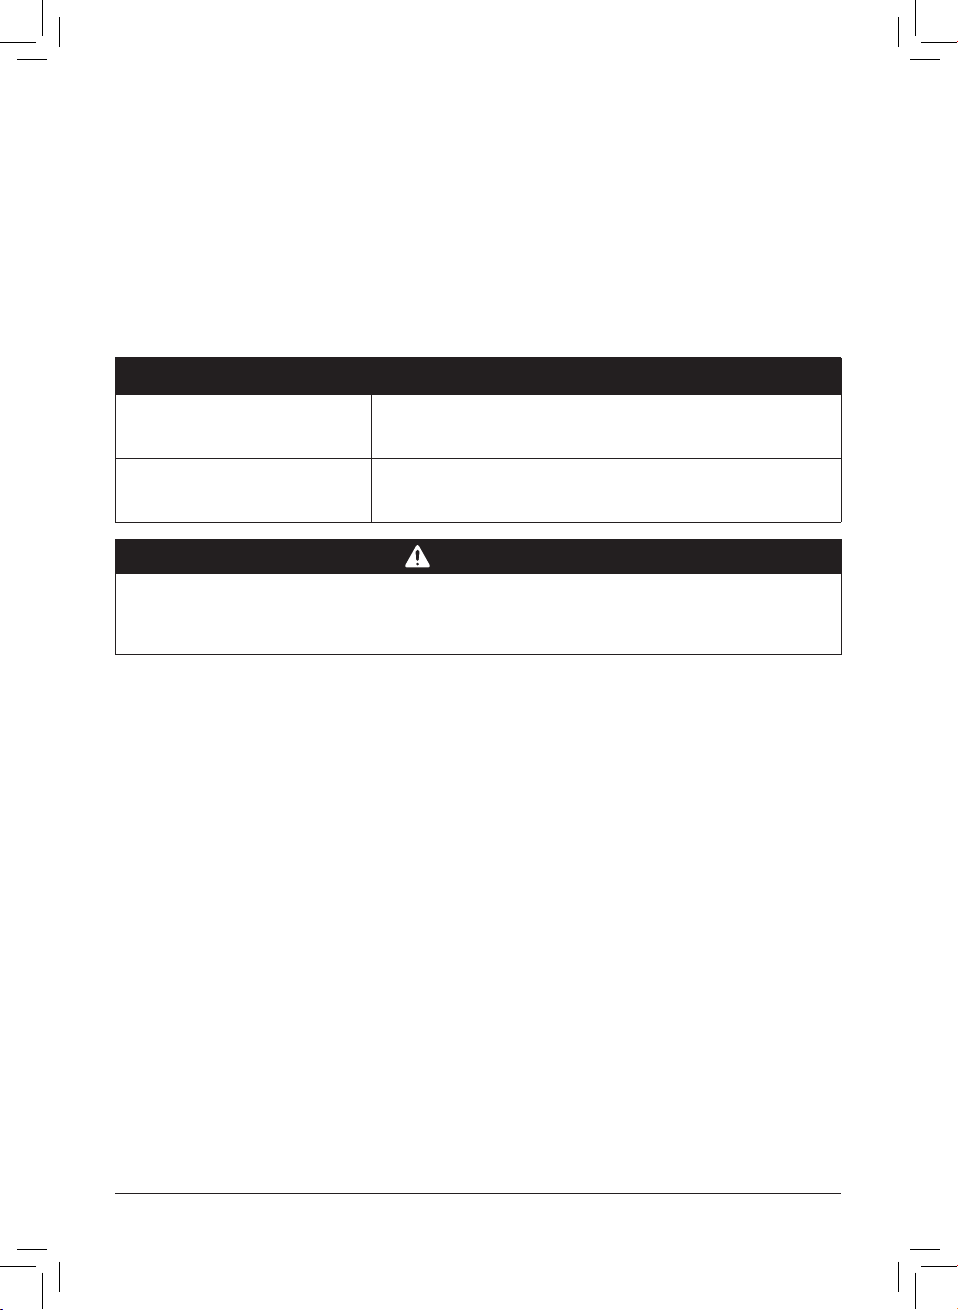
NutriBoost is a mid-cooking Pulse release setting that can be activated during the
Pressure Cook and Rice Smart Programs. The boiling motion effect helps to break down
food, which adds nutrients, enhances avors, and improves textures. Amazing for rich
bone broth and creamy risotto!
NutriBoost is super easy to use — just touch the NutriBoost field to turn it On and Off, as
you like.
Smart Program What you should know about it
Pressure Cook
Rice
The multicooker will release puffs of steam during the
last 15 minutes of the Cooking stage.
The multicooker will release puffs of steam during the
rst 3 minutes of the Cooking stage.
CAUTION
To avoid spatter and food ejection, do not use NutriBoost when cooking starchy
or foamy food like porridge, oatmeal or pasta. The multicooker should be closely
monitored when using NutriBoost.
instanthome.com | 35
112-0124-01-0101_IB_Pro-Plus_Interim_GSG_FINAL.indd 35112-0124-01-0101_IB_Pro-Plus_Interim_GSG_FINAL.indd 35 7/9/21 1:58 PM7/9/21 1:58 PM
Page 36
Cooking
Steam
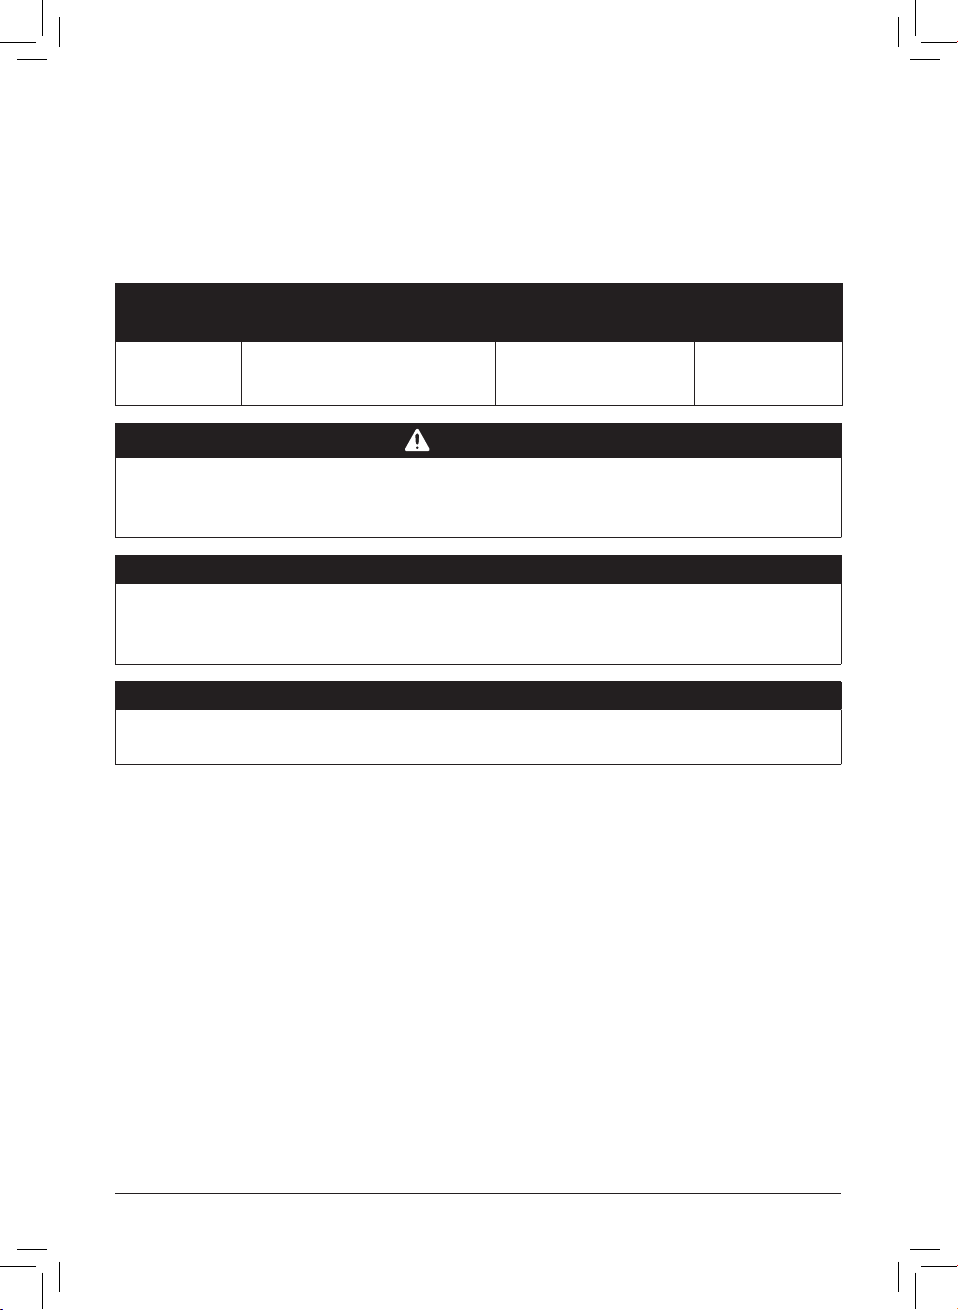
The Steam program works like a regular stovetop steamer, boiling liquid in the inner pot
to cook food with hot steam. When steaming, use the multi-functional rack to keep food
out of the boiling liquid.
Smart
Program
Steam
Default time Time range
10 minutes
(00:10)
1 minute to 1 hour
(00:01 to 01:00)
Default
temperature
98°C / 208°F
Not adjustable.
CAUTION
The inner pot and accessories will be hot during and after cooking. Always use
appropriate hand protection when adding to or removing food from a hot inner pot
to avoid injury and/or property damage.
NOTICE
The lid is removable throughout the cooking process for easy access. The product
keeps releasing steam under steam mode to avoid pressure building inside the
cooking pot.
NOTICE
If there is steam in the inner pot, you may notice some resistance when re-placing
the lid. Allow the lid to settle into the track completely before closing it.
01 Add water to the inner pot.
02 Insert the inner pot into the multicooker base.
03 Place and close the pressure cooking lid as described in Pressure control features:
Pressure cooking lid.
04 Touch Steam.
05 Turn the dial to adjust the cooking time.
06 Press Start to begin.
The display shows On and the cooking progress bar shows Pre-heating.
07 When the Pro Plus reaches the target temperature, the progress bar moves over to
Cooking and the timer counts down.
08 When the Smart Program nishes the display shows End.
Automatic Keep Warm cannot be used with Steam.
A delay start timer can be set to automatically start steaming while you're in bed,
working, running errands or busy with other dishes. To set a delay start timer,
see Control panel: Settings.
36 | [email protected] | 1-800-828-7280
112-0124-01-0101_IB_Pro-Plus_Interim_GSG_FINAL.indd 36112-0124-01-0101_IB_Pro-Plus_Interim_GSG_FINAL.indd 36 7/9/21 1:58 PM7/9/21 1:58 PM
Page 37

Cooking
Slow Cook
The Slow Cook program is comparable to a traditional slow cooker, so you can keep
using all your old family favorites!
Cooking time
range
30 minutes
to 24 hours
(00:30 to 24:00)
The lid is removable throughout the cooking process for easy access. The product keeps
releasing steam under slow cook mode to avoid pressure building inside the cooking
pot. See Releasing pressure for safe venting techniques.
01 Add food and liquid ingredients to the inner pot according to your recipe.
02 Insert the inner pot into the multicooker base.
03 Place and close the pressure cooking lid as described in Pressure control features:
Pressure cooking lid.
04 Touch Slow Cook.
05 Touch the hours field or the minutes field, then turn the dial to adjust the cooking
time in hours and/or minutes.
06 Touch the Temperature field to toggle between High and Low temperatures.
07 Press Start to begin.
The progress bar shows Pre-heating and the timer starts counting down immediately.
08 When the Pro Plus reaches the target temperature the progress bar moves over to
Cooking.
09 When the Smart Program nishes the display shows End if Keep Warm is turned off.
If not, the timer begins counting from 00:00 up to 10 hours (10:00).
Keep Warm feature comes on automatically after Slow Cook nishes. If you don’t want the
Pro Plus to Keep Warm automatically, press Keep Warm to turn it off any time.
A delay start timer can be set to automatically start slow cooking while you're in bed,
working, running errands or busy with other dishes. To set a delay start timer, see
Control panel: Settings.
Temperature
level
Low
High
Suggested use Notes
For that low and
slow, all-day kind
of cooking.
Slow cooking, but
a little bit faster.
You can use the pressure
cooking lid, or, if you want
to watch your food while it
cooks, any glass lid with a
venting hole will do.
Dishes should cook for at
least 3 hours (03:00) unless
otherwise stated in your
recipe.
instanthome.com | 37
112-0124-01-0101_IB_Pro-Plus_Interim_GSG_FINAL.indd 37112-0124-01-0101_IB_Pro-Plus_Interim_GSG_FINAL.indd 37 7/9/21 1:58 PM7/9/21 1:58 PM
Page 38
Cooking
Sauté
Like using a frying pan, griddle or at-top grill, use Sauté to simmer, reduce and thicken
liquids, stir-fry meals and to caramelize vegetables and sear meat before or after using
other cooking methods.
Instant Tip: If you prefer, you can use the inner pot on any electric, ceramic, gas and
induction cooktop. The silicone-grip handles make it easy to hold on to and stir
without slipping!
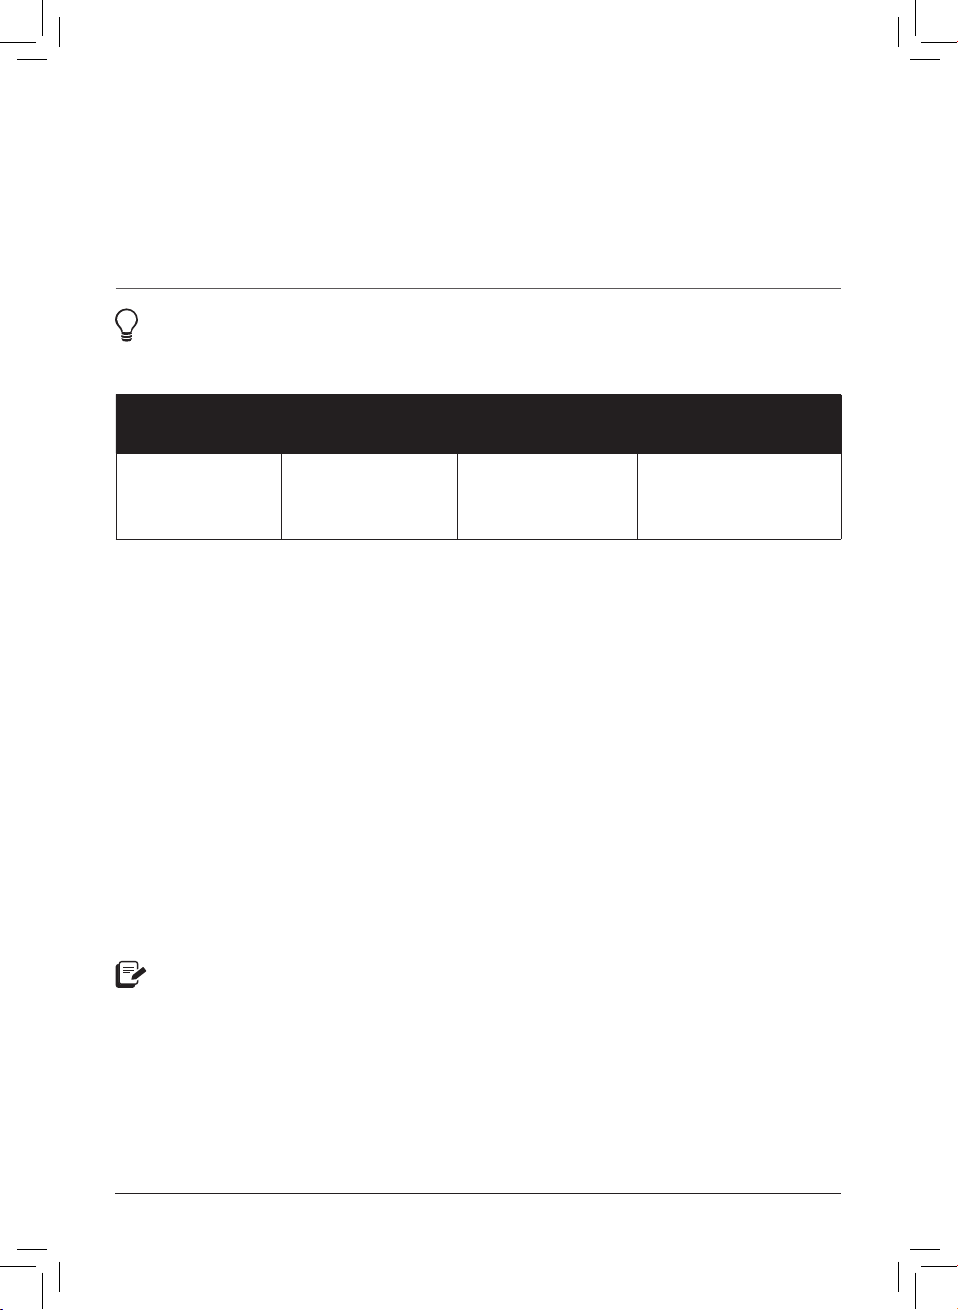
Default time Time range
30 minutes
(00:30)
01 Insert the inner pot into the multicooker base. Do not use a lid.
02 Touch Sauté.
03 Turn the dial to adjust the cooking time.
04 Touch the Temperature field to toggle between Low, High and Custom temperatures.
To set a custom temperature, turn the dial to select your preferred temperature level.
There are 6 levels of custom temperatures to choose from, shown as LE 1 (the lowest
temperature) through LE 6 (the highest temperature). These levels are similar to the
temperature levels on your stovetop.
05 Touch Start to begin.
The display shows On and the cooking progress bar shows Pre-heating.
06 When the Pro Plus reaches the target temperature the progress bar moves over to
Cooking and the display shows Hot for a few moments before switching over to the
countdown timer.
07 Add ingredients to the inner pot.
If your food ingredients are added before the inner pot has reached the target
temperature, the Hot message may not appear. This is normal.
08 If the ingredients nish cooking before the time runs out, touch Cancel to
end the Smart Program, otherwise, when the Smart Program nishes the display
shows End.
Delay Start and automatic Keep Warm cannot be used with Sauté.
1 minute to 1 hour
(00:01 to 01:00)
Default
temperature
High
Temperature range
High
Low
Custom: Levels 1 to 6
38 | [email protected] | 1-800-828-7280
112-0124-01-0101_IB_Pro-Plus_Interim_GSG_FINAL.indd 38112-0124-01-0101_IB_Pro-Plus_Interim_GSG_FINAL.indd 38 7/9/21 1:58 PM7/9/21 1:58 PM
Page 39
Cooking
Deglazing
Sautéing meat and vegetables before pressure cooking is the perfect way to boost
avors, as sugars caramelize from the high heat of the Sauté Smart Program. Deglazing
the inner pot lets you unlock those avors in amazing sauces, gravies and more.
To deglaze, remove food items from the inner pot and add a thin liquid, like water, broth
or wine to the hot surface. Use a wooden or silicone scraper to list up any food stuck to
the bottom of the inner pot and stir it into the liquid.
CAUTION
The Sauté Smart Program reaches high temperatures. If left unmonitored, food
may burn on this setting. DO NOT use a lid and DO NOT leave the multicooker
unattended while using Sauté.
Yogurt
Made for easy fermenting dairy and non-dairy yogurt recipes that you can make again
and again.
Instant Pot size Minimum milk volume Maximum milk volume
6 Quarts / 5.7 Litres
Temperature
level
Low Not adjustable
High Not adjustable
Custom
Default:
56°C / 133°F
Temperature
25 to 85°C
77 to 185°F
range
4 cups (32 oz / 1000 mL) ~4 quarts (128 oz / 3.8 L)
Default time Time range
30 minutes to
8 hours
(08:00)
boiL
8 hours
(08:00)
99 hours and
30 minutes
(00:30 to 99:30)
Not adjustable Pasteurization
30 minutes to
99 hours and
30 minutes
(00:30 to 99:30)
Suggested
use
Fermentation
Non-dairy
fermentation
instanthome.com | 39
112-0124-01-0101_IB_Pro-Plus_Interim_GSG_FINAL.indd 39112-0124-01-0101_IB_Pro-Plus_Interim_GSG_FINAL.indd 39 7/9/21 1:58 PM7/9/21 1:58 PM
Page 40

Cooking
Starting with... Do this!
Pasteurized or
unpasteurized milk
Ultra-pasteurized milk
What You’ll Need:
• Food Thermometer
• Milk or a non-dairy alternative
• Active yogurt culture
Step 1: Pasteurize milk
01 Add milk or milk alternative to the inner
pot, and any other ingredients that your
recipe calls for.
02 Place and close the pressure cooking
lid as described in Pressure control
features: Pressure cooking lid.
03 Touch Yogurt.
04 Touch the Temperature field to toggle
to High.
The pasteurization time and
temperature are preset and cannot be
adjusted.
05 Press Start to begin.
The display shows On and the
progress bar shows Pre-heating.
Boil will display as the progress bar
switches to cooking.
06 The display shows End when
pasteurization is complete.
Milk must reach a minimum of 72°C
/ 161°F to pasteurize properly. Use a
thermometer to check the temperature.
Step 2: Add starter culture
01 Using a thermometer, allow the milk to
cool to just below 43°C / 110°F.
Follow all the steps below
Skip to Step 2: Add starter culture.
This is the “cold start” method of yogurt making.
02 Add your starter culture to the milk
according to the instructions included
with the starter culture product.
Plain yogurt with active cultures can
be used as a starter. Follow a trusted
Instant Pot yogurt recipe when using
yogurt as a starter culture.
03 Place and close the pressure cooking
lid as described in Pressure control
features: Pressure cooking lid.
Step 3: Ferment milk
01 Touch Yogurt.
02 Touch the Temperature field to toggle
to Low.
To set a custom temperature, touch
the Temperature field to toggle to
Cus, then turn the dial to select a
temperature.
03 Touch the hours field or the minutes
field, then turn the dial to adjust the
fermentation time in hours and/or
minutes.
04 Touch Start to begin. The display shows
On and the progress bar shows
Pre-heating.
05 The display shows End when
fermentation is complete.
40 | [email protected] | 1-800-828-7280
112-0124-01-0101_IB_Pro-Plus_Interim_GSG_FINAL.indd 40112-0124-01-0101_IB_Pro-Plus_Interim_GSG_FINAL.indd 40 7/9/21 1:58 PM7/9/21 1:58 PM
Page 41

Cooking
Tips for yogurt making
• The thicker the milk, the thicker the yogurt!
• For even thicker yogurt, pasteurize your milk twice before fermenting.
• The longer you ferment your milk, the tangier the yogurt will be.
• Use a cheesecloth to strain out liquid whey to get rich Greek-style yogurt.
• Cool your fresh yogurt, then put it in the fridge (covered) for 12 to 24 hours to allow the
avors to develop.
• Honey, nuts, seeds and fresh fruit are perfect toppers for your homemade yogurt!
Using yogurt cups
Yogurt cups are a convenient way to portion out yogurt servings.
01 After Step 2: Add started culture, carefully pour the milk into your yogurt cups and
seal them tightly.
02 Place the steam rack on the bottom of the inner pot.
03 Position the yogurt cups on the rack and add water to the inner pot until the cups are
immersed halfway.
04 Follow the steps in Step 3: Ferment yogurt normally.
instanthome.com | 41
112-0124-01-0101_IB_Pro-Plus_Interim_GSG_FINAL.indd 41112-0124-01-0101_IB_Pro-Plus_Interim_GSG_FINAL.indd 41 7/9/21 1:58 PM7/9/21 1:58 PM
Page 42

Cooking
Sous Vide
Sous Vide cooking involves cooking food underwater, in an air-tight, food-safe bag,
for a long period of time. Food cooks in its own juices and comes out delicious and
unbelievably tender.
CAUTION
Do not overll the inner pot to avoid damage to the multicooker. Total contents
(water and food pouches) should leave at least 2″ (5 cm) of headspace between
the water line and the brim of the inner pot.
Default
cooking time
3 hours
(03:00)
You’ll need:
• Tongs
• Thermometer
• Food safe, airtight, re-sealable food pouches, or,
• Vacuum sealer and food-safe vacuum bags
Step 1: Set up the sous vide water bath
01 Fill the inner pot to the Half Fill mark as
indicated on your inner pot, then insert
it into the multicooker base.
02 Place and close the pressure cooking
lid as described in Pressure control
features: Pressure cooking lid.
Step 2: Setting up the Pro Plus for sous
vide cooking
03 Touch Sous Vide.
04 Touch the hours field or the minutes
field, then turn the dial to adjust the
cooking time in hours and/or minutes.
05 To set a custom temperature, touch the
Temperature field then turn the dial to
adjust the water bath temperature.
Time range
30 minutes to
99 hours and 30
minutes
(00:30 to 99:30)
temperature
06 Press Start to begin heating the water
Step 3: Get food ready
01 While the water heats, start by
02 When you’re ready, separate each
03 Remove all air from the pouches and
Default
56°C
133°F
in the inner pot.
The display shows On and the
progress bar shows Pre-heating.
seasoning your food as desired. See
Ingredients and seasonings below
for tips!
serving of food into individual
pouches.
seal them tightly.
Temperature range
25 to 90°C
77 to 194°F
42 | [email protected] | 1-800-828-7280
112-0124-01-0101_IB_Pro-Plus_Interim_GSG_FINAL.indd 42112-0124-01-0101_IB_Pro-Plus_Interim_GSG_FINAL.indd 42 7/9/21 1:58 PM7/9/21 1:58 PM
Page 43

Cooking
Step 4: Cook ‘em up!
01 Once the water bath is ready, the
display shows Hot for a few moments
before switching over to the countdown
timer.
02 Remove the lid and carefully immerse
the sealed pouches.
The food in the pouches should be
immersed, so add heated water to the
inner pot any time it’s needed, but, if
you’re using a re-sealable bag, make
sure the seal stays above the water.
03 Place and close the pressure cooking
lid as described in Pressure control
features: Pressure cooking lid.
04 When the Smart Program nishes
the display shows End. Open the
multicooker and use your tongs to
carefully remove the pouches from the
hot water.
05 Open the pouches and use a
thermometer to check for doneness.
Reverse Searing
Searing your meat after low and slow cooking is the easiest way to boost those already-
delicious avors through the roof without overcooking. Try reverse searing for tender,
juicy meat with a beautiful burnished crust.
01 After Sous Vide cooking, remove the meat from the cooking pouch and gently pat it dry
to remove as much moisture from the exterior of the meat.
It may seem counterintuitive, but don’t skip this step — you’ll end up with more avor and
a great-looking nish!
02 Use the Sauté program to give it a good sear, or use a cast iron pan, browning torch, or a
grill — anything hot to lock in that moisture!
03 Cover your meat with foil and let it rest for 5-20 minutes, depending on the size of the cut.
Ingredients and Seasonings
• Salt goes a long way when it has nowhere to go, so it’s better to use a little less than
you normally would, especially with meats, poultry, and sh. If you nd it needs more
after cooking, it’s easy to salt to taste.
• Use high quality, fresh ingredients when cooking sous vide to ensure the best
possible avor.
• Use fresh garlic instead of garlic powder. Garlic powder can turn bitter when cooked
sous vide. Fresh garlic will give you the best results.
instanthome.com | 43
112-0124-01-0101_IB_Pro-Plus_Interim_GSG_FINAL.indd 43112-0124-01-0101_IB_Pro-Plus_Interim_GSG_FINAL.indd 43 7/9/21 1:58 PM7/9/21 1:58 PM
Page 44
Cooking
Keep Warm
Perfect to reheat meals or warm food for long periods of time.
Default
time
10 hours
(10:00)
01 Touch Keep Warm.
02 Touch the hours field or the minutes field, then turn the dial to adjust the warming
time in hours and/or minutes.
03 Touch the Temperature field to toggle between Low, High and Custom
temperature levels.
To set a custom temperature, touch the Temperature field to toggle to Cus, then turn
the dial to choose a temperature.
04 Touch Start to begin. The progress bar shows Keep Warm and the timer starts
counting down immediately.
05 When Keep Warm completes, the display shows End.
Time range
10 minutes to 10 hours
(00:10 to 10:00)
Default
temperature
High
Temperature range
High
Low
Custom: 25 to 90°C
77 to 194°F
CAUTION
Thicker foods may prevent even heating, which can lead to spoiled food if left
unattended. When cooking thick foods like stew and chili, stir the contents of the
inner pot every 40 to 60 minutes to make sure that heat is evenly distributed.
44 | [email protected] | 1-800-828-7280
112-0124-01-0101_IB_Pro-Plus_Interim_GSG_FINAL.indd 44112-0124-01-0101_IB_Pro-Plus_Interim_GSG_FINAL.indd 44 7/9/21 1:58 PM7/9/21 1:58 PM
Page 45

Care, cleaning and storage
Clean your Instant Pot Pro Plus and its parts after each use. Failure to follow these cleaning
instructions may result in catastrophic failure, which may lead to property damage and/or
severe personal injury.
Always unplug your multicooker and let it cool to room temperature before cleaning.
Never use metal scouring pads, abrasive powders or harsh chemical detergents on any of
the Instant Pot’s parts or accessories.
Let all surfaces dry thoroughly before use, and before storage.
Parts Cleaning methods and instruction
Accessories
• Steam rack
Lid and parts
• Steam
release valve
• Steam
release cover
• Anti-block shield
• Sealing ring
• Float valve
• Silicone cap
• QuickCool cover
• Condensation
collector
Inner pot
Power cord
Multicooker base
Dishwasher safe if placed on the top rack.
Dishwasher safe if placed on the top rack.
Remove all the parts from the lid before cleaning. See Care, cleaning and storage:
Removing and installing parts.
• With the steam release valve and anti-block shield removed, clean the interior of the
steam release pipe with a pipe cleaner to prevent clogging.
• To drain water from the lid after dishwashing, grasp the lid handle and hold the lid
vertically over a sink, then turn it 360°— like turning a steering wheel.
• After cleaning and draining, store the lid upside down on the multicooker base to allow it
to air dry completely.
• Store sealing rings in a well-ventilated area to decrease residual odor of avorful meals.
To eliminate odors, add 1 cup (250 mL / ~8 oz) water and 1 cup (250 mL / ~8 oz) white
vinegar to the inner pot, then run Pressure Cook for 5 to 10 minutes and QR pressure.
• Check the condensation collector after each use and empty and clean it as needed.
Do not allow food or moisture to sit in the condensation collector, as harmful bacteria
may result.
Dishwasher safe.
• Acute hard water staining (rainbow, bluish or white discoloration) may require scrubbing
with a sponge dampened with vinegar or a nonabrasive cleanser like Bar Keeper’s Friend.
• For tough or burned food residue, add boiling water and dish soap to the inner pot and
let it sit for a few hours for easy cleaning.
• Make sure all exterior surfaces are dry before placing the inner pot in the multicooker base.
Wipe only.
• Use a barely damp cloth to remove particles from the cord.
• Wrap it around the multicooker base and tuck the end into the cord holder.
Wipe only.
• Wipe the inside of the outer pot as well as the condensation rim with a barely damp
cloth. Allow them to dry completely before inserting the inner pot.
• Clean the multicooker base and control panel with a soft, barely damp cloth or sponge.
Some discoloration may occur after machine washing, but this will not affect the
multicooker’s safety or performance.
instanthome.com | 45
112-0124-01-0101_IB_Pro-Plus_Interim_GSG_FINAL.indd 45112-0124-01-0101_IB_Pro-Plus_Interim_GSG_FINAL.indd 45 7/9/21 1:58 PM7/9/21 1:58 PM
Page 46

Care, cleaning and storage
WARNING
The multicooker base contains electrical components. To avoid re, electric
leakage and/or personal injury, make sure the multicooker base always stays dry.
• DO NOT immerse the multicooker base in water or other liquid or attempt to
cycle it through the dishwasher.
• DO NOT rinse the heating element.
• DO NOT submerge or rinse the power cord or the plug.
46 | [email protected] | 1-800-828-7280
112-0124-01-0101_IB_Pro-Plus_Interim_GSG_FINAL.indd 46112-0124-01-0101_IB_Pro-Plus_Interim_GSG_FINAL.indd 46 7/9/21 1:58 PM7/9/21 1:58 PM
Page 47
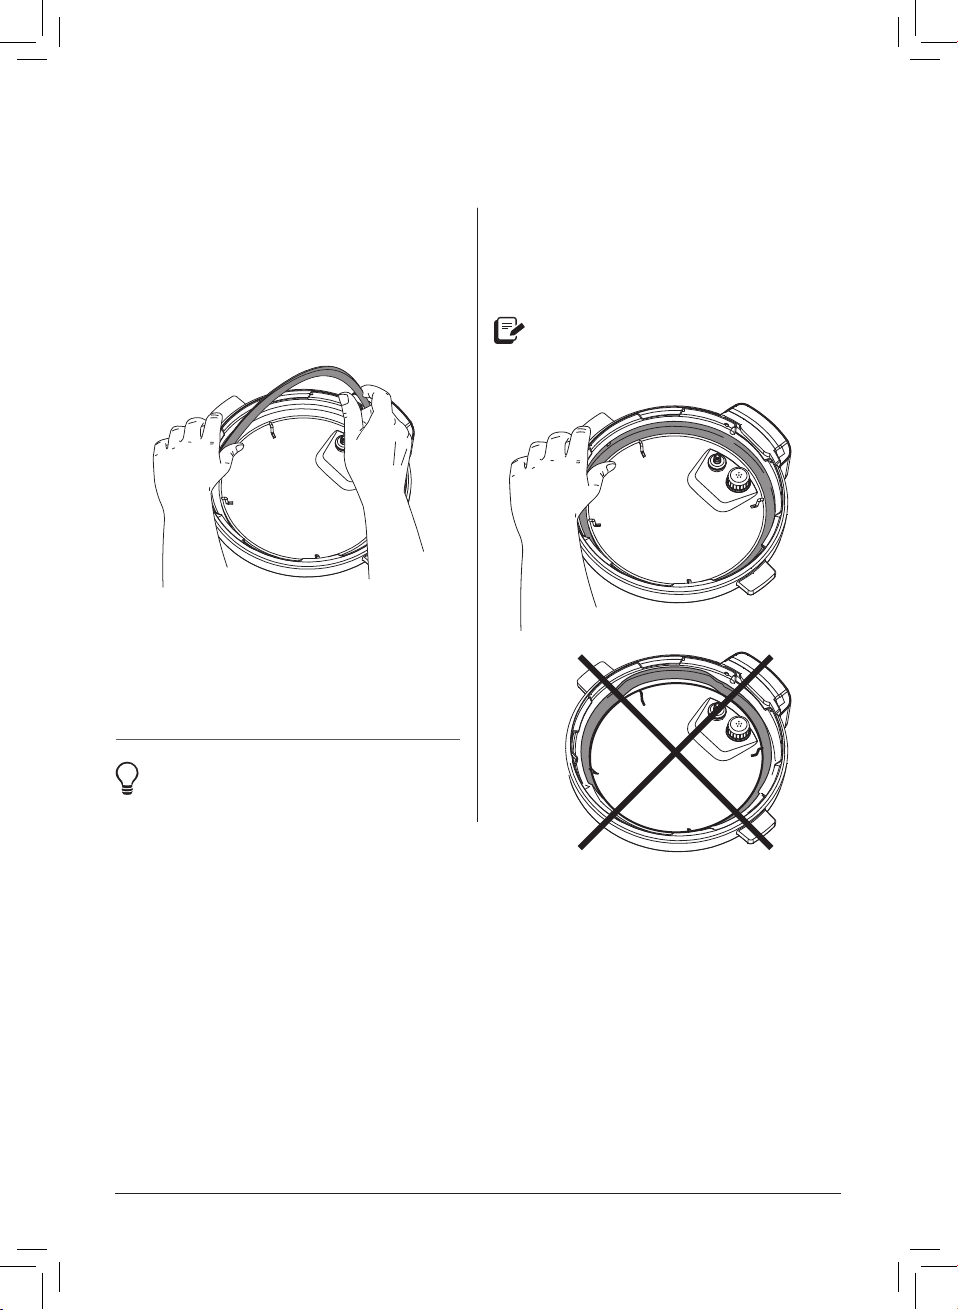
Care, cleaning and storage
Removing and installing parts
Silicone sealing ring
Remove the sealing ring
Grip the edge of the silicone and pull the
sealing ring out from behind the circular
stainless-steel sealing ring rack.
With the sealing ring removed, check
the ring rack to make sure it is secured,
centered, and an even height all the way
around the lid. Do not attempt to repair a
deformed ring rack.
Install the sealing ring
Place the sealing ring over the sealing ring
rack and rmly press it into place. Make
sure there’s no puckering.
It should be snug behind the sealing
ring rack. It can wiggle a bit but shouldn’t
fall out when you turn over the lid.
Instant Tip: The sealing ring is easiest
to remove and install when it is wet
and soapy.
instanthome.com | 47
112-0124-01-0101_IB_Pro-Plus_Interim_GSG_FINAL.indd 47112-0124-01-0101_IB_Pro-Plus_Interim_GSG_FINAL.indd 47 7/9/21 1:58 PM7/9/21 1:58 PM
Page 48
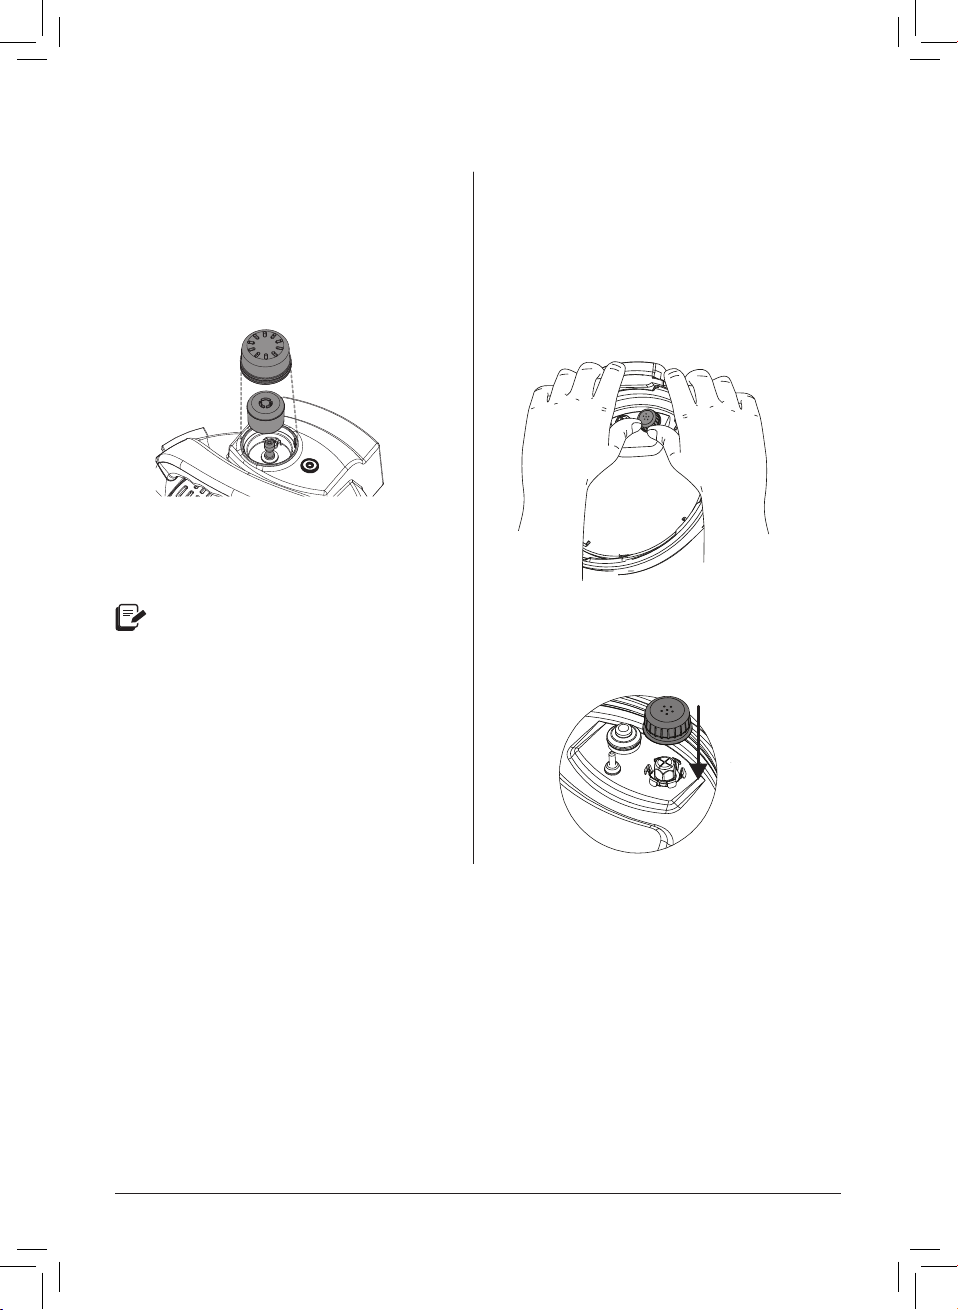
Care, cleaning and storage
Steam release assembly
Remove the steam release assembly
Remove the steam release cover, then
pull the steam release valve up and off
the steam release pipe.
Install the steam release assembly
Place the steam release valve on the
steam release pipe and press down rmly.
The steam release valve sits loosely
on the steam release pipe but should
remain in place when the lid is turned
over.
Place the steam release cover over the
steam release valve and press down. The
cover is pressure-t in place.
Anti-block shield
Remove the anti-block shield
Grip the lid like a steering wheel and use
your thumbs to press rmly against the
side of the anti-block shield (pressing
towards the side of the lid and up) until it
pops off the prongs underneath.
Install the anti-block shield
Place anti-block shield over prongs and
press down until it snaps into position.
48 | [email protected] | 1-800-828-7280
112-0124-01-0101_IB_Pro-Plus_Interim_GSG_FINAL.indd 48112-0124-01-0101_IB_Pro-Plus_Interim_GSG_FINAL.indd 48 7/9/21 1:58 PM7/9/21 1:58 PM
Page 49
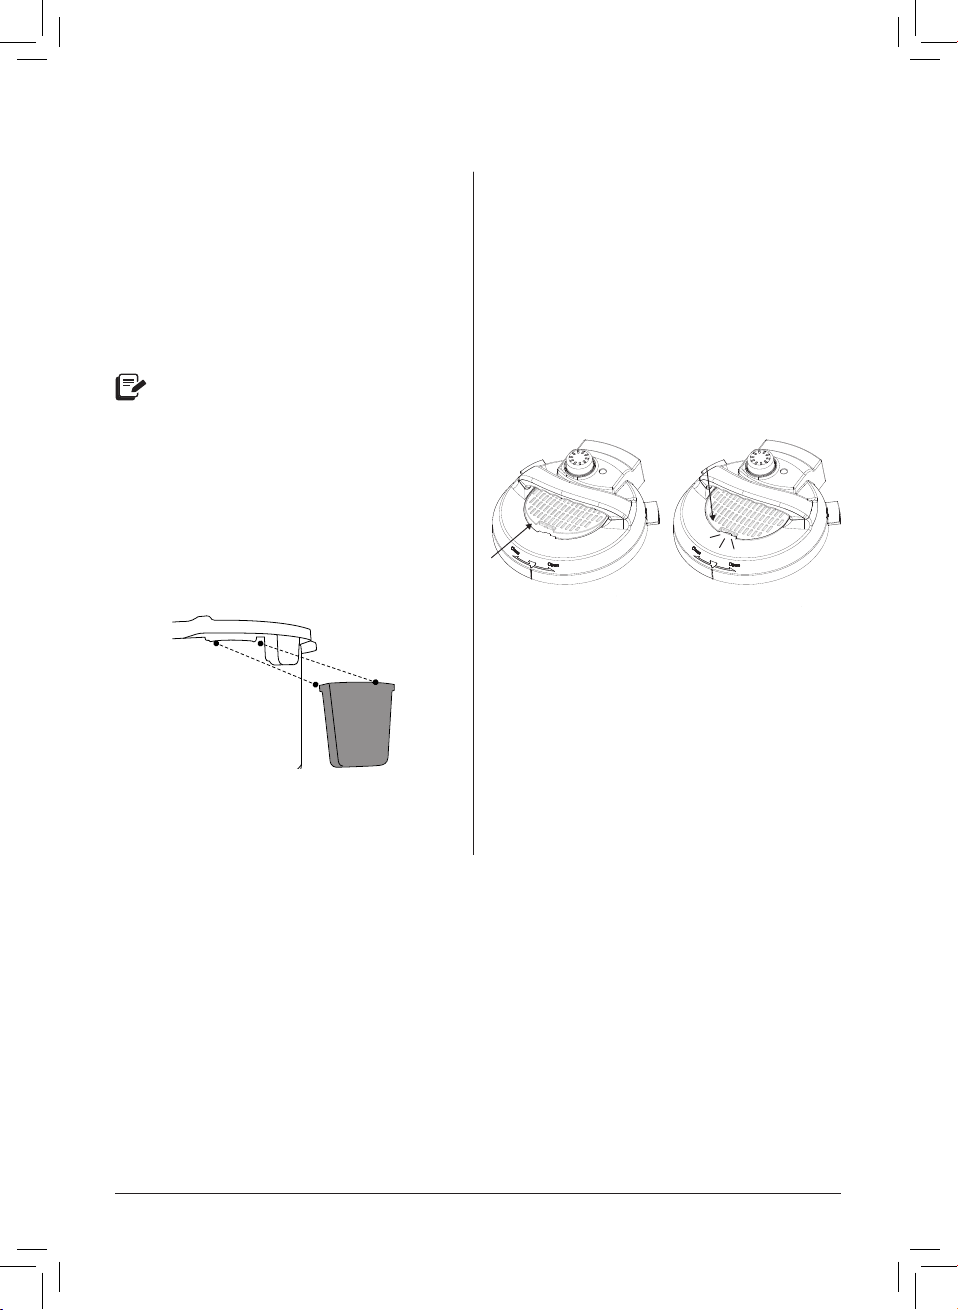
Care, cleaning and storage
Condensation collector
The condensation collector sits at the
back of the multicooker base and catches
any overow from the condensation rim.
Remove the condensation collector
Pull the condensation collector away from
the multicooker base; do not pull down.
The tabs on the multicooker base
and the grooves on the condensation
collector.
Install the condensation collector
Align the grooves on the condensation
collector over the tabs on the back
of the multicooker base and slide the
condensation collector into place like
closing a drawer.
QuickCool protective cover
Remove the protective cover
Grip the tab and push it towards the lid
handle, then pull it up, towards you,
and off.
Install the protective cover
Grip the tab and slide the cover towards
the back of the metal portion of the lid,
then press down until it clicks.
instanthome.com | 49
112-0124-01-0101_IB_Pro-Plus_Interim_GSG_FINAL.indd 49112-0124-01-0101_IB_Pro-Plus_Interim_GSG_FINAL.indd 49 7/9/21 1:58 PM7/9/21 1:58 PM
Page 50
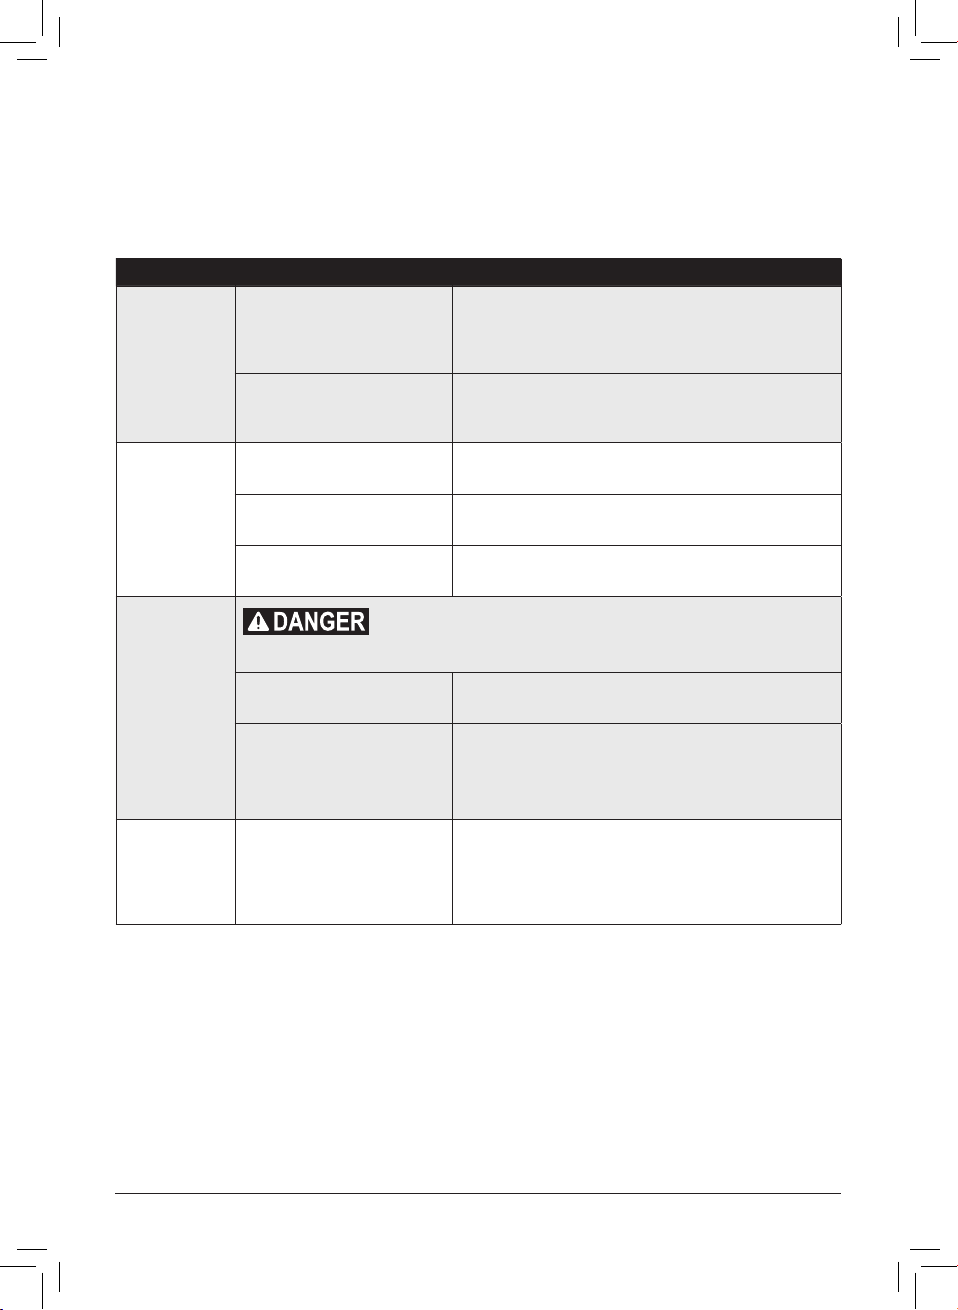
Troubleshooting
Register your Instant Pot Pro Plus today!
If your issue persists or you have any additional questions, get in touch with a Customer
Care Advisor by email at [email protected] or by phone at 1-800-828-7280.
Problem Possible reason Try this
The sound of power switching,
Occasional
clicking or light
cracking sound.
Difficulty
closing the lid.
Difficulty
opening the lid.
The inner pot
is stuck to the
lid when the
multicooker is
opened.
or the pressure board may be
expanding due to changing
temperatures.
Bottom of the inner pot
is wet.
Sealing ring is not properly
installed.
Float valve is in the popped-up
position.
Contents in multicooker are
still hot.
Contents may be under pressure. To avoid scalding
injury, DO NOT attempt to force the lid open.
Pressure inside the multicooker.
Float valve stuck due to food
debris or residue around the
oat valve.
Cooling of the inner pot may
create suction, causing the
inner pot to adhere to the lid.
This is normal; no action needed.
Wipe exterior surfaces of the inner pot. Make sure the
heating element is dry before inserting the inner pot into
the multicooker base.
Reposition the sealing ring. Make sure it is snug behind the
sealing ring rack.
Gently press the oat valve downward with a long utensil.
Lower the lid onto the multicooker base slowly, allowing
heat to dissipate.
Release pressure according to recipe. Only open the lid
after the pressure indicator is dim.
Make sure steam is completely released by quick releasing
pressure.
Open the lid cautiously, then thoroughly clean the oat
valve, surrounding area and lid before next use.
Select quick release to release all the pressure from the
inner pot.
50 | [email protected] | 1-800-828-7280
112-0124-01-0101_IB_Pro-Plus_Interim_GSG_FINAL.indd 50112-0124-01-0101_IB_Pro-Plus_Interim_GSG_FINAL.indd 50 7/9/21 1:58 PM7/9/21 1:58 PM
Page 51

Troubleshooting
Problem Possible reason Try this
No sealing ring in the lid. Install a sealing ring.
Steam leaks
from the side
of the lid.
Cooker can't
build pressure.
Minor steam
leaking or
hissing from
the steam
release
valve during
Cooking.
Steam gushes
from the steam
release valve
while the quick
release switch
is in the Seal
position.
The sealing ring is damaged or
not installed properly.
Food debris on the
sealing ring.
The lid is not closed properly. Open, then close the lid.
The sealing ring rack is warped
or off-center.
The inner pot rim may be
misshapen.
Food debris on the oat valve
or oat valve silicone cap.
Too little liquid in the inner pot.
Float valve silicone cap
damaged or missing.
Float valve obstructed by lidlocking mechanism.
No heat in the inner pot.
Inner pot base may be
damaged.
The multicooker is regulating
excess pressure.
Not enough liquid in the inner
pot.
Pressure sensor control failure. Contact Customer Care.
Steam release valve is not
seated properly.
Replace the sealing ring.
Remove the sealing ring and clean it thoroughly.
Remove the sealing ring from the lid, then check the
sealing ring rack for bends or warps. Contact Customer
Care.
Check for deformation and contact Customer Care.
Remove the oat valve from the lid and clean it thoroughly.
Perform the Initial test run to check for function and record
your ndings. Contact Customer Care.
Check for scorching on the bottom of the inner pot.
Add thin, water-based liquid to the inner pot according
to its size.
Contact Customer Care.
Contact Customer Care.
Perform the Initial test run to check for function and record
your ndings. Contact Customer Care.
Perform the Initial test run to check for function and record
your ndings. Contact Customer Care.
This is normal; no action required.
Add thin, water-based liquid to the inner pot according
to its size.
Release pressure, then make sure the steam release valve
is installed properly. See Care, cleaning and storage:
Removing and installing parts.
instanthome.com | 51
112-0124-01-0101_IB_Pro-Plus_Interim_GSG_FINAL.indd 51112-0124-01-0101_IB_Pro-Plus_Interim_GSG_FINAL.indd 51 7/9/21 1:58 PM7/9/21 1:58 PM
Page 52
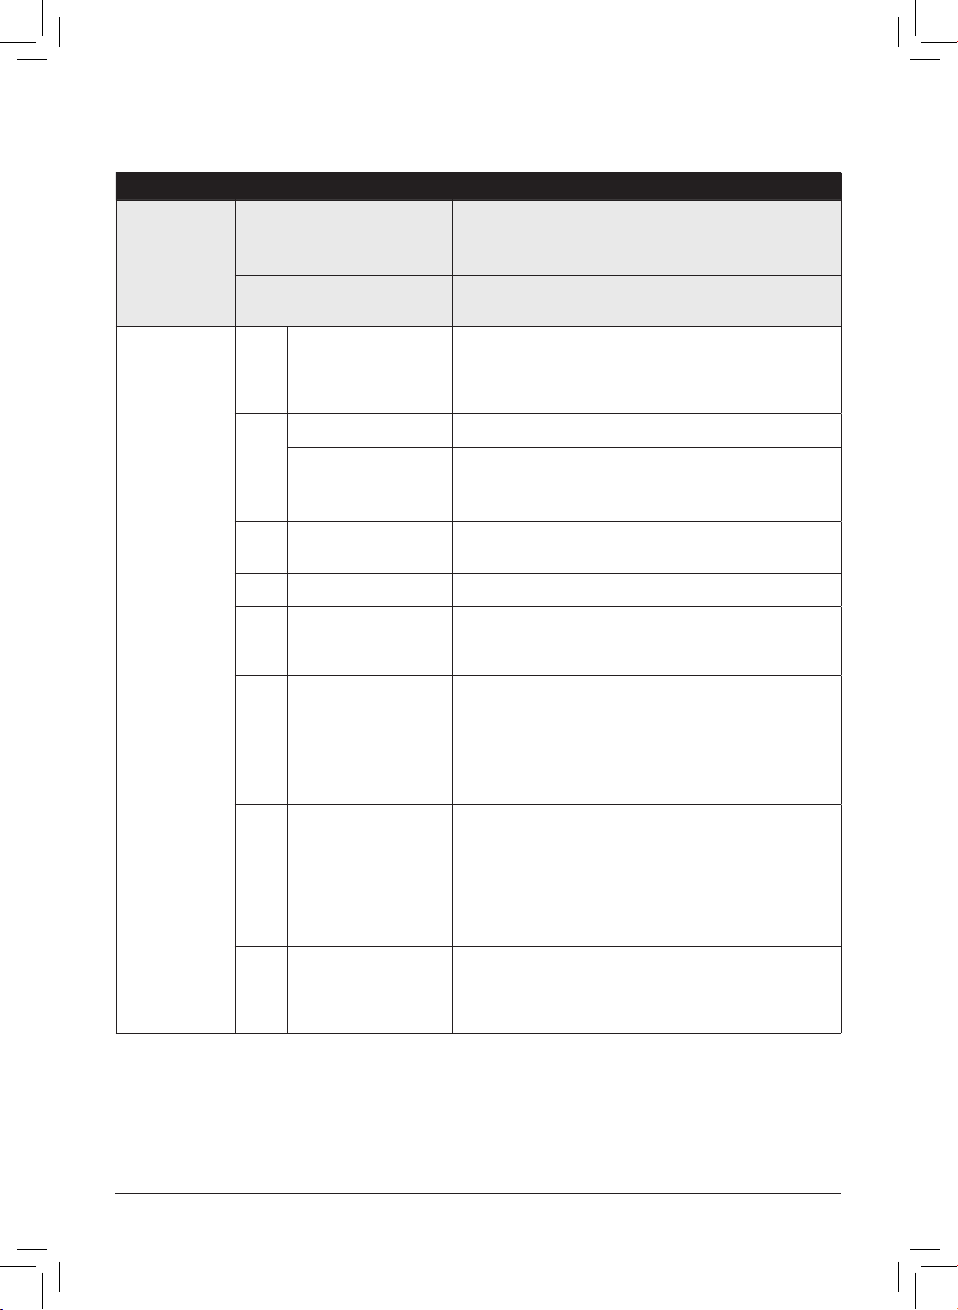
Troubleshooting
Problem Possible reason Try this
The display
remains
blank after
connecting the
power cord.
Error code
appears on the
display and the
multicooker
beeps
continuously.
Bad power connection or no
power.
The multiooker’s electrical fuse
has blown.
C1
C3
Faulty sensor. Contact Customer Care.
C4
C6
Heat element has failed. Contact Customer Care.
C7
Not enough liquid.
Incorrect inner pot is
C8
used.
C10 Wi error. Contact Customer Care.
The lid is not in the
Lid
correct position for the
selected program.
The target temperature
Alt
for safe canning was
not reached.
High temperature
was detected at the
bottom of the inner
Food
pot; the multicooker
burn
automatically reduces
the temperature to
avoid overheating.
Pressure has
accumulated during a
PrSE
non-pressure cooking
Smart Program.
Check outlet to make sure it is powered.
Inspect power cord for damage. If you notice damage,
contact Customer Care.
Contact Customer Care.
Add thin, water-based liquid to the inner pot according to
its size.
8 Qt: 2 cups (500 mL / (~16 oz)
Only use a stainless-steel Pro Series inner pot with easy grip
handles with the Pro Plus.
Open and close the lid.
Do not use a lid when using Sauté.
Touch Cancel. Check that all seals are clean, positioned
correctly, and undamaged. Make sure that you have at
least 1 cup of water in the inner pot before restarting.
Do not pressure can at altitudes above 2000 m (6600 ft).
Refer to the USDA’s Complete Guide to Home Canning
for procedures and limitations.
Starch deposits at the bottom of the inner pot may have
blocked heat dissipation.
Turn the multicooker off, release pressure and inspect the
bottom of the inner pot.
Touch Cancel and Quick Release pressure.
Any other servicing must be performed by an authorized representative.
52 | [email protected] | 1-800-828-7280
112-0124-01-0101_IB_Pro-Plus_Interim_GSG_FINAL.indd 52112-0124-01-0101_IB_Pro-Plus_Interim_GSG_FINAL.indd 52 7/9/21 1:58 PM7/9/21 1:58 PM
Page 53

Notes
instanthome.com | 53
112-0124-01-0101_IB_Pro-Plus_Interim_GSG_FINAL.indd 53112-0124-01-0101_IB_Pro-Plus_Interim_GSG_FINAL.indd 53 7/9/21 1:58 PM7/9/21 1:58 PM
Page 54

Warranty
One (1) Year Limited Warranty
This One (1) Year Limited Warranty applies to purchases made from authorized retailers of Instant
Brands Inc. (“Instant Brands”) by the original appliance owner and is not transferable. Proof of
original purchase date and, if requested by Instant Brands, return of your appliance, is required to
obtain service under this Limited Warranty. Provided the appliance was used in accordance with
the use & care instructions, Instant Brands will, in its sole and exclusive discretion, either: (i) repair
defects in materials or workmanship; or (ii) replace the appliance. In the event that your appliance is
replaced, the Limited Warranty on the replacement appliance will expire twelve (12) months from the
date of receipt. Failure to register your product will not reduce your warranty rights. The liability of
Instant Brands, if any, for any allegedly defective appliance or part will not exceed the purchase price
of a comparable replacement appliance.
What is not covered by this warranty?
1. Products purchased, used, or operated outside of the United States and Canada.
2. Products that have been modied or attempted to be modied.
3. Damage resulting from accident, alteration, misuse, abuse, neglect, unreasonable use,
use contrary to the operating instructions, normal wear and tear, commercial use, improper
assembly, disassembly, failure to provide reasonable and necessary maintenance, re, ood,
acts of God, or repair by anyone unless directed by an Instant Brands representative.
4. Use of unauthorized parts and accessories.
5. Incidental and consequential damages.
6. The cost of repair or replacement under these excluded circumstances.
54 | [email protected] | 1-800-828-7280
112-0124-01-0101_IB_Pro-Plus_Interim_GSG_FINAL.indd 54112-0124-01-0101_IB_Pro-Plus_Interim_GSG_FINAL.indd 54 7/9/21 1:58 PM7/9/21 1:58 PM
Page 55

Warranty
EXCEPT AS EXPRESSLY PROVIDED HEREIN AND TO THE EXTENT PERMITTED BY APPLICABLE
LAW, INSTANT BRANDS MAKES NO WARRANTIES, CONDITIONS OR REPRESENTATIONS,
EXPRESS OR IMPLIED, BY STATUTE, USAGE, CUSTOM OF TRADE OR OTHERWISE WITH RESPECT
TO THE APPLIANCES OR PARTS COVERED BY THIS WARRANTY, INCLUDING BUT NOT LIMITED
TO, WARRANTIES, CONDITIONS, OR REPRESENTATIONS OF WORKMANSHIP, MERCHANTABILITY,
MERCHANTABLE QUALITY, FITNESS FOR A PARTICULAR PURPOSE OR DURABILITY.
Some states or provinces do not allow for: (1) the exclusion of implied warranties of merchantability
or tness; (2) limitations on how long an implied warranty lasts; and/or (3) the exclusion or limitation
of incidental or consequential damages; so these limitations may not apply to you. In these states
and provinces, you have only the implied warranties that are expressly required to be provided in
accordance with applicable law. The limitations of warranties, liability, and remedies apply to the
maximum extent permitted by law. This limited warranty gives you specic legal rights, and you may
also have other rights which vary from state to state or province to province.
Product Registration
Please visit www.instanthome.com/register to register your new Instant Brands
to register your product will not diminish your warranty rights. You will be asked to provide the store
name, date of purchase, model number (found on the back of your appliance) and serial number
(found on the bottom of your appliance) along with your name and email address. The registration
will enable us to keep you up to date with product developments, recipes and contact you in the
unlikely event of a product safety notication. By registering, you acknowledge that you have read
and understand the instructions for use, and warnings set forth in the accompanying instructions.
Warranty Service
To obtain warranty service, please contact our Customer Care Department by phone at
1-800-828-7280 or by email to [email protected]. You can also create a support ticket
online at www.instanthome.com. If we are unable to resolve the problem, you may be asked to send
your appliance to the Service Department for quality inspection. Instant Brands is not responsible for
shipping costs related to warranty service. When returning your appliance, please include your name,
mailing address, email address, phone number, and proof of the original purchase date as well as a
description of the problem you are encountering with the appliance.
™
appliance. Failure
instanthome.com | 55
112-0124-01-0101_IB_Pro-Plus_Interim_GSG_FINAL.indd 55112-0124-01-0101_IB_Pro-Plus_Interim_GSG_FINAL.indd 55 7/9/21 1:58 PM7/9/21 1:58 PM
Page 56

Instant Brands Inc.
495 March Road, Suite 200
Kanata, Ontario, K2K 3G1 Canada
instanthome.com
© 2021 Instant Brands Inc.
112-0124-01-0101
112-0124-01-0101_IB_Pro-Plus_Interim_GSG_FINAL.indd 56112-0124-01-0101_IB_Pro-Plus_Interim_GSG_FINAL.indd 56 7/9/21 1:58 PM7/9/21 1:58 PM
 Loading...