

Instant POT DUO SV User Manual

Duo SV
User Manual
Important Safeguards
What’s Included
Produc t Overview
Gettin g Started
Controls & Features
System Setti ngs
Venting Methods
Initial Test Run (Water Test)
Smart Programs
Keep Warm
Delay Start
Care & Cleaning
Troubleshooting
Warranty
Download the Free
Instant Pot Recipe App
• 1000+ Recipes
• New User Tips
• Getting Started Videos

IMPORTANT SAFEGUARDS
When using electrical appliances, basic safety precautions should always be followed:
1. READ ALL INSTRUCTIONS.
2. Do not touch hot surfaces. Only use side handles for carrying or moving.
3.
4.
5.
6. Do not use appliance for anything other than intended use.
7. For household use only. Do not use outdoors. Not for commercial use.
8. This appliance cooks under pressure. Improper use may result in scalding injury. Make
9. Do not fill the appliance over 2/3 full. When cooking foods that expand during cooking
10. Before each use, check the steam release valve/handle, steam release pipe, anti-block
11. Do not open the appliance until the appliance has depressurized and all internal
CAUTION
or electric burner, or a heated oven; heat from an external source will damage
the appliance.
CAUTION
CAUTION
hot liquids. Do not move the appliance when it is under pressure.
certain the appliance is properly closed before operating. Refer to “Getting Started”.
such as rice or dried vegetables, do not fill the appliance over 1/2 full. Overfilling may
cause a risk of clogging the vent pipe and developing excess pressure. Refer to
“Pressure Cooking”.
shield and float valve for clogging. Refer to “Getting Started”.
pressure has been released. If the float valve is still up and/or the lid is difficult to open,
this indicates that the appliance is still pressurized – do not force it open. Any pressure
in the appliance can be hazardous. Refer to “Venting Methods” for information on
releasing pressure.
Do not place the appliance on or in close proximity to a hot gas
Do not use near water or flame. Please keep out of direct sunlight.
Extreme caution must be used when moving the appliance containing
12. Do not use this appliance for deep fr ying or pressure frying with oil.
13. Do not lean over or place your hands or face over the steam release valve/handle or
float valve when the appliance is in operation or has residual pressure. Do not touch
the metal portion of the lid when the appliance is in operation; this could result in injury.
14. Do not cover or obstruct the steam release valve/handle and float valve with cloth or
other objects. Obstructing the steam release valve/handle and float valve can create a
safety issue and may cause injury.
1
WARNING
Read thi s manual carefu lly and complet ely, and retain for fu ture referenc e.
Failure to a dhere to safety i nstruction s may result in ser ious injury.

IMPORTANT SAFEGUARDS
15. Turn the appliance off if steam escapes from the steam release valve/handle or float
valve in a steady stream for longer than 3 minutes. There may be residual pressure
in the appliance. Allow the appliance to depressurize naturally or release all excess
pressure before opening. Refer to “Troubleshooting”.
16. Turn the appliance off if steam escapes from the sides of the lid and ensure sealing ring
is properly installed. Refer to “Getting Started”.
17.
18. A short power supply cord (35 in / 0.9 m) is provided to reduce the hazards resulting
19. Always attach plug to appliance first, then plug cord into power source. To disconnect,
20. Unplug from outlet when not in use and before cleaning. Allow to cool before adding
21. Do not operate any appliance with a damaged cord or plug. Do not operate if the
22.
23. Intended for countertop use only. Keep the appliance on a stable, heat-resistant
24.
CAUTION
plugs, or appliance in water or other liquid.
from it being grabbed by children, becoming entangled in, or tripping over a longer cord.
select Cancel, then remove plug from power source.
or removing parts, and prior to cleaning or storage.
appliance malfunctions or has sustained damage of any kind, including damage
to the rim or bottom of the inner pot. Contact the Customer Care Team.
CAUTION
hot surfaces.
platform. Do not place on anything that may block the vents on the bottom of the
appliance. Do not place on hot stove.
WARNING
from children. Never drape cord over edge of counter, never use outlet below counter,
and never use with an extension cord.
To protect against electrical shock, do not immerse the power cord,
Do not let power cord hang over edge of table or counter or touch
Spilled food can cause serious burns. Keep appliance and cord away
25. When cooking meat with skin (e.g. sausage with casing), the skin can swell when
heated. Do not pierce the skin as long as it is swollen; this could result in scalding injury.
26. When pressure cooking food with a doughy or thick texture, or a high fat/oil content,
contents may splatter when opening the lid. Please follow recipe instructions for
pressure release method. Once steam is fully released, gently shake the appliance with
extreme caution and then if necessary, release the steam again before attempting to
open the lid. Refer to the “Venting Methods”.
WARNING
Read thi s manual carefu lly and complet ely, and retain for fu ture referenc e.
Failure to a dhere to safety i nstruction s may result in ser ious injury.
2

IMPORTANT SAFEGUARDS
27.
28. Do not attempt to repair, replace, or modify components of the appliance, as this may
29. Do not tamper with any of the safety mechanisms.
30. Do not use appliance in electrical systems other than 120V/60Hz for North America. Do
31. Close supervision is necessary when the appliance is used near children.
32. This appliance is NOT to be used by children or by persons with reduced physical,
33. To reduce the risk of pressure leakage, cook only in an authorized Instant Pot inner pot.
34. The use of accessory attachments not recommended by the appliance manufacturer
CAUTION
of the inner pot and heating element to ensure they are dry and free of food debris.
Refer to “Care & Cleaning”.
cause electric shock, fire or injury, and will void the warranty.
not use with power converters or adapters.
sensory, or mental capabilities. Close supervision is necessary when any appliance is
used near children. Children should not play with this appliance.
may cause injuries.
Before inserting the inner pot into the appliance, wipe the outer surface
SAVE THESE INSTRUCTIONS.
Product Specifications
Model: D uo SV 1000W 120V ~ 60 Hz
The models listed in this table are representative of al l models in the Duo SV Series .
3
WARNING
Read thi s manual carefu lly and complet ely, and retain for fu ture referenc e.
Failure to a dhere to safety i nstruction s may result in ser ious injury.
6 Quarts
5.7 L itres
11.8 lb
5.35 kg
in: 13.4L x 12.2W x 12.5H
cm: 34L x 31W x 31.7H
Page Title
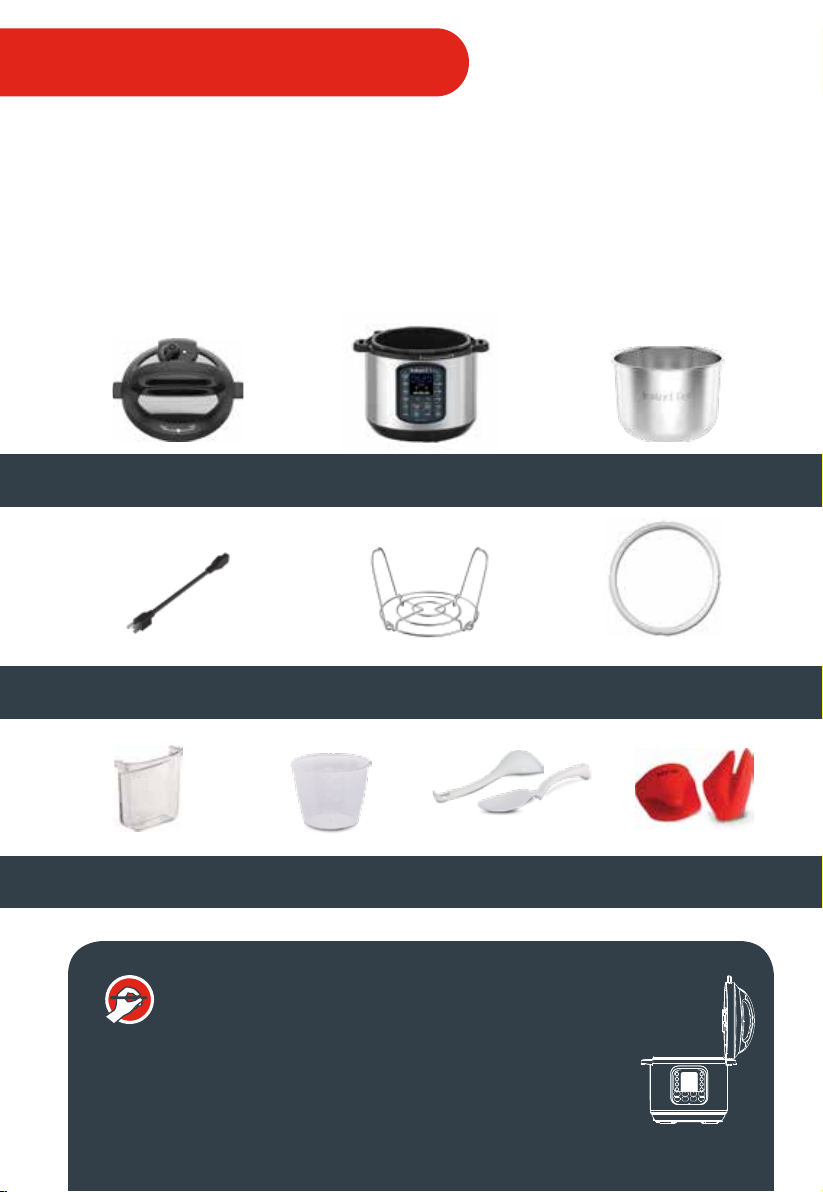
What’s Included
Before using the Instant Pot Duo SV, verify that all parts are accounted for. Remove all
packaging material from in and around cooker. Images are for reference only. Actual product
may differ. Refer to actual product.
Read instructions carefully, and pay attention to Important Safeguards and operation
instructions. Do not remove safety warning stickers from lid or rating label from back of
cooker base. Do not remove serial number from bottom of cooker base.
Lid Inner Pot
Detachable Power Cord
Condensation
Collector
INSTANT TIP: The Cooker Handles are also
a Lid Holder
The lid has been designed with lid fins that fit perfectly
inside the cooker handles on the left and right sides of
the cooker base.
Rice
Measuring Cup
Cooker Base
Steam Rack
Soup Spoon
& Rice Paddle
Silicone Sealing Ring x2
(installed within lid)
Mini Mitts
4

Page Title
Lid Structure
Top of Lid
Bottom of Lid
Steam Release Handle
Float Valve
Lid Handle
Lid Fin
Lid Position Symbol
Locking Pin
Anti-Block Shield
Float Valve Silicone Cap
Silicone Sealing Ring
Sealing
Ring Rack
Cooker Base
5
Condensation
Drain Hole
Heating
Element
Outer Pot
Cooker Handle
Control Panel
Base Connection
Socket (Rear)
Cooker Handle
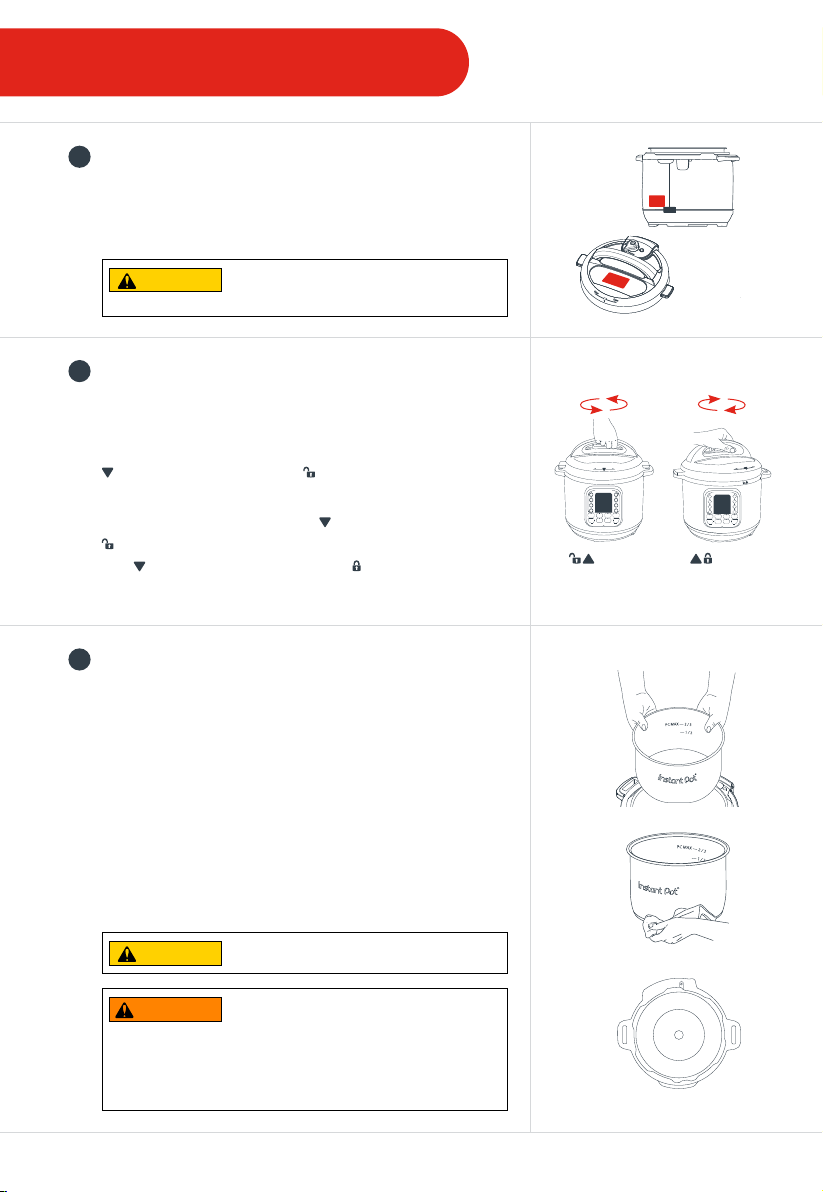
Getting Started
1
Read Manual & Place Cooker
Do not remove safety warning stickers from lid, or rating label
from back of cooker base.
Place cooker on a stable surface.
CAUTION
external source will damage appliance.
2
Open & Close Lid
If the sound is on, the cooker will jingle when the lid is opened
and closed.
Open: Grip handle and turn lid counter-clockwise until
symbol on lid is aligned with symbol on the rim
of cooker base. Lift lid up and off of cooker base.
Close: Grip handle and align the
symbol on rim of cooker base. Turn lid clockwise
until
symbol on the lid lines up with symbol on base.
Note: Always check lid for damage prior to cooking.
3
Remove & Clean Inner Pot
Remove inner pot from cooker base and wash with hot water
and dish soap before first use. Wipe outer surfaces of inner pot
and heating element to ensure they are dry and free of food
debris. Failure to do so may damage the cooker.
Place inner pot into cooker base before cooking. Food must be
placed in inner pot, not cooker base.
The inner pot is an integral part of product safety. Always use
an authorized Instant Pot inner pot when cooking. Failure to do
so may cause personal injury or property damage.
Note: Always check inner pot for dents or deformations prior to cooking.
Do not pla ce appliance o n or in close prox imity to a hot
gas or ele ctric burne r, or a heated ov en; heat from an
symbol on lid with
Open Close
CAUTION
WARNING
as indic ated on the inner p ot. Exercise ex treme cauti on when cooki ng and
venting food such as applesauce, cranberries, pearl barley, oatmeal, split peas,
noodles, etc., as t hese foods may foa m, froth, or spat ter, and may clog the s team
releas e pipe and/or steam releas e handle. Do not ll the inner pot higher than the
“— 1/2” li ne when cooki ng these foods.
To avoid risk of p ersonal injur y and/or prop erty
damage, d o not pour food or l iquid into cooke r base.
Do not ll the inner pot higher than the
“PC MAX — 2 /3” line (Pre ssure Cookin g Maximum),
6
Getting Started
4
Check Sealing Ring & Sealing Ring Rack
Remove: Pull sealing ring out from behind sealing ring rack.
Inspec t sealing ring rack. It should be centered in the lid and
an even height all the way around. Do not attempt to repair a
deformed ring rack.
Sealing ring must be installed before use.
Install: Place sealing ring over sealing ring rack and press into
place. Ensure sealing ring is snug behind sealing ring rack.
After closing the lid, the sealing ring creates an airtight seal
between lid and cooker base.
The sealing ring is an integral part of product safety. Replace
your sealing ring every 12-18 months or when deformation or
damage is noticed.
CAUTION
sealin g rings. Failure to f ollow these instruct ions may cause fo od to discharg e,
which m ay lead to persona l injury or pro perty dama ge.
5
Remove & Install Float Valve
The float valve has 2 positions. It pops up to indicate
when the cooker is pressurized, and lowers into the lid
when the cooker is depressurized.
Remove: Place one finger on the flat top of float valve. Turn
lid over. Detach silicone cap from bottom side of float valve.
Remove float valve from top of lid. Do not discard float valve or
silicone cap.
The float valve and silicone cap must be installed before use
to seal in pressurized steam.
Install: Drop float valve into float valve hole on top of lid. Place
one finger on the flat top of float valve. Turn lid over. Attach
silicone cap to bottom of float valve.
CAUTION
“Venti ng Methods” sec tion in this man ual for informa tion on releasi ng pressure.
Always c heck for cuts or d eformation s in sealing ring
prior t o cooking. Onl y use authorize d Instant Pot
While oat valve is up, contents of cooke r are
pressurized. Do not att empt to remove l id. Refer to
Remove
Install
Depressurized Pressurized
Top
Remove
Top
Install
Bottom
Bottom
INSTANT TIP: Color Coding Your Sealing Rings
Silicone rubber may hold on to strong aromas. To reduce aroma
transfer, try using different sealing rings for your various dishes!
Instant Pot sealing rings come in a variety of colors. See website
for details.
7
Page Title
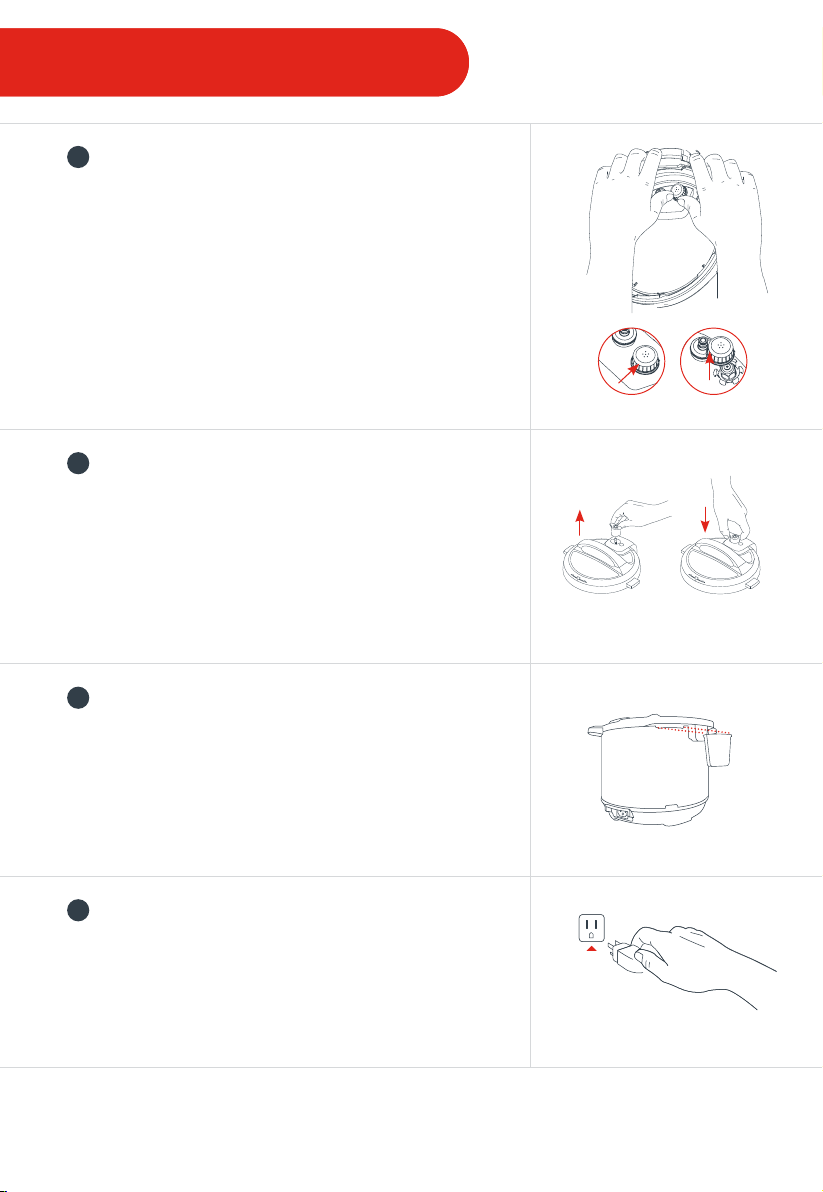
Getting Started
6
Remove & Install Anti-Block Shield
Remove: Grip lid and press firmly against side of anti-block
shield (pressing towards side of lid and up) until it pops off
the prongs underneath.
Anti-block shield must be installed before use and
cleaned frequently.
Install: Place anti-block shield over prongs and press down
until it snaps into position.
Anti-block shield prevents food particles from coming
up through the steam release pipe, assisting with
pressure regulation.
7
Remove & Install Steam Release Handle
Remove: Pull steam release handle up and off steam
release pipe.
Steam release handle must be installed before use,
and cleaned frequently.
Install: Place steam release handle on steam release pipe.
Press down. Fits loosely when installed properly, but will
remain in place when the lid is turned over.
Remove Install
8
Install Condensation Collector
Install: On back of cooker base, align grooves on condensation
collector over tabs and push condensation collector into place.
The condensation collector accumulates excess water and
should be installed before cooking. Must be emptied after use.
Remove: Pull condensation collector away from cooker base.
Do not pull down on condensation collector.
9
Secure Power Cord
Secure detachable power cord to base power socket.
Connect to a 120V power source. Ensure connection is tight.
To disconnect, press Cancel. Remove plug from power source,
then if applicable, remove detachable power cord from base
power socket.
8
 Loading...