

Page 1
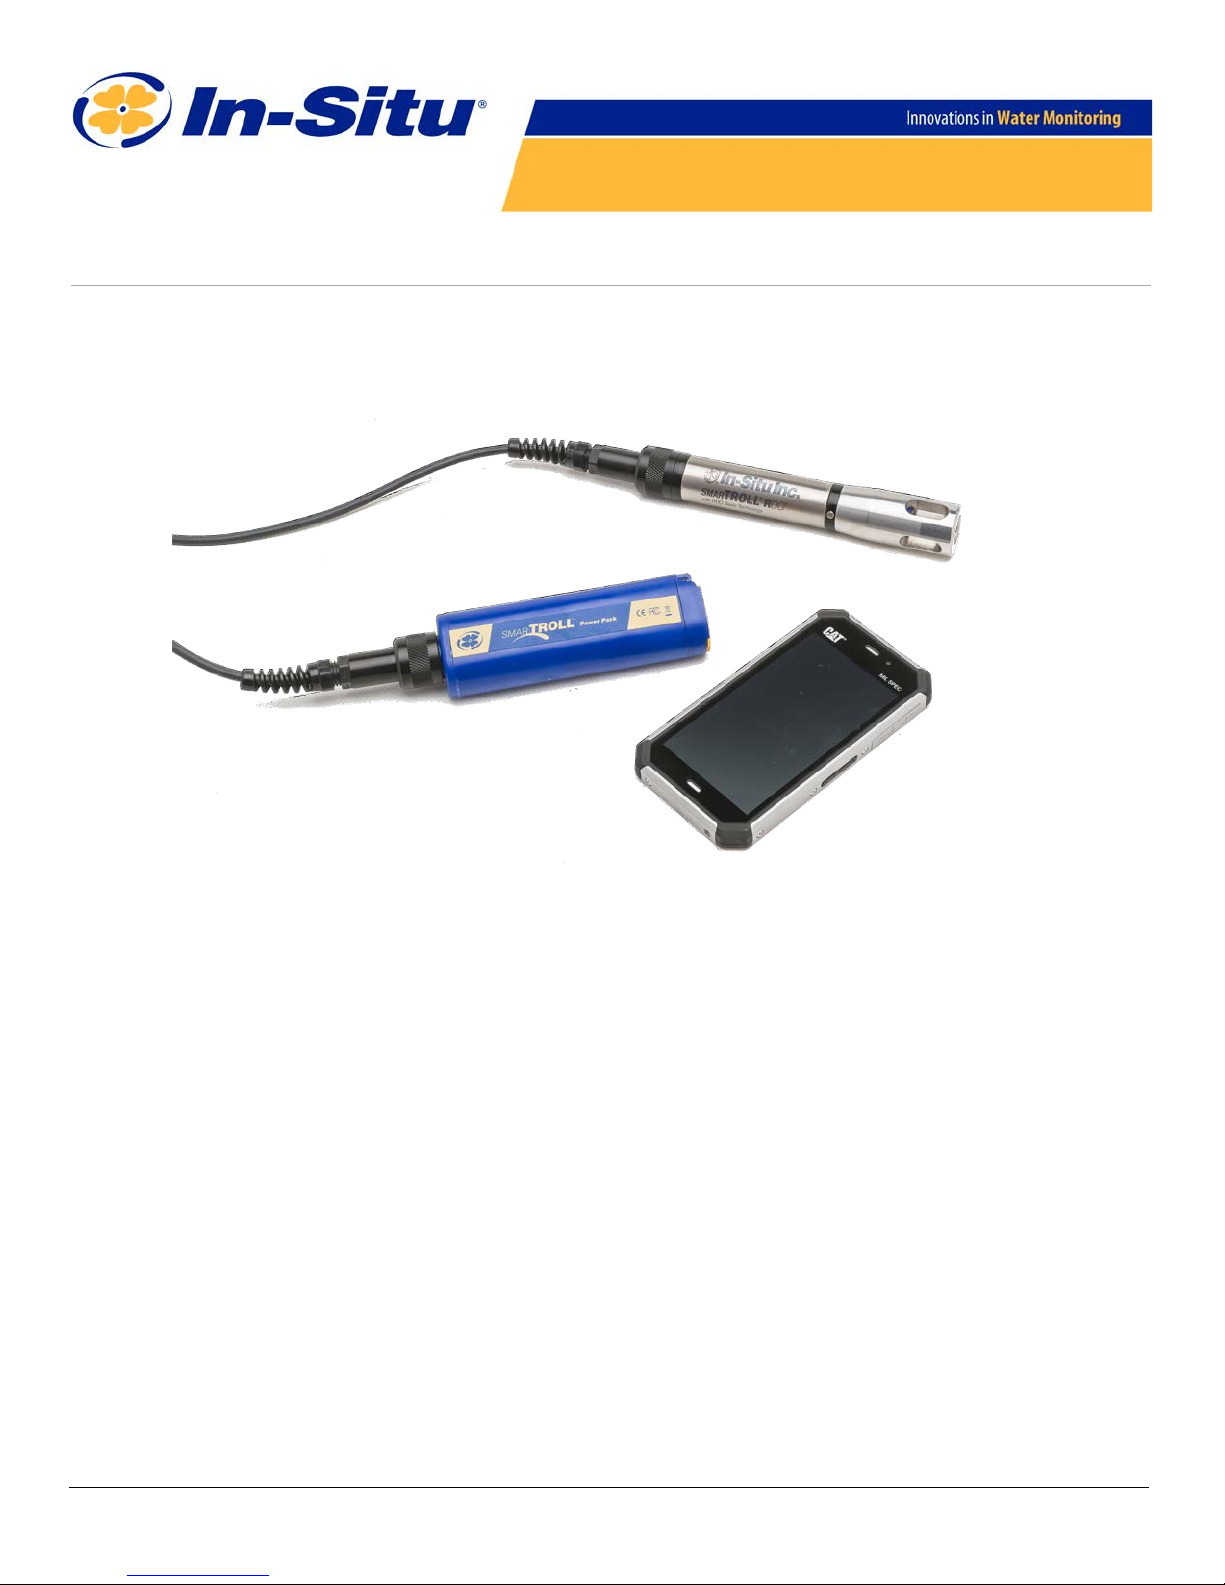
SMARTROLL™ RDO® for Android
Operator's Manual
Informationsubject to change without notice. In-Situ, In-Situ logo, Baro Merge, BaroTROLL, HERMIT, HydroVu™, iSitu, Pocket-Situ, RDO,
RuggedCable, RuggedReader, SmarTROLL™, TROLL, VuSitu, and Win-Situ are trademarks or registeredtrademarks of In-Situ Inc.©2015.
All rights reserved.
0099612 | Rev. 001 | 02/2016
Page 2
Copyright © 2015-2016 by In-Situ All rights reserved.
This document contains proprietary information which is protected by copyright. No part
of this document may be photocopied, reproduced, or translated to another language
without the prior written consent of In-Situ
Mailing and Shipping Address: Phone: 970-498-1500 (international & domestic)
In-Situ
221 East Lincoln Avenue
Fort Collins, CO 80524
U.S.A.
Fax: 970-498-1598
Internet:
www.in-situ.com
Support: 800-446-7488 (U.S.A. & Canada)
In-Situ makes no warranty of any kind with regard to this material, including, but not
limited to, its fitness for a particular application. In-Situ will not be liable for errors
contained herein or for incidental or consequential damages in connection with the
furnishing, performance, or use of this material.
In no event shall In-Situ Inc. be liable for any claim for direct, incidental, or
consequential damages arising out of, or in connection with, the sale, manufacture,
delivery, or use of any product.
In-Situ and the In-Situ logo, Win-Situ, TROLL, Baro Merge, BaroTROLL, HERMIT,
HydroVu™, iSitu, Pocket-Situ, RDO, RuggedCable, RuggedReader, SmarTROLL™,
TROLL, VuSitu™, and Win-Situ are trademarks or registered trademarks of In-Situ Inc.
Microsoft and Windows are registered trademarks of Microsoft Corporation. Pentium is
a registered trademark of Intel. Tefzel and Delrin are registered trademarks of E. I.
DuPont de Nemours and Company. Viton is a registered trademark of DuPont Dow
Elastomers. Kellems is a registered trademark of Hubbell Inc. Alconox is a registered
trademark of Alconox Company. Lime-A-Way is a registered trademark of Reckitt
Benckiser. Android is a trademark of Google Inc. iPod and iPhone are trademarks of
Apple Inc., registered in the U.S. and other countries. The Bluetooth word mark and
logos are registered trademarks owned by the Bluetooth SIG, Inc. and any use of such
marks by In-Situ Inc. is under license. NIST is a registered trademark of the National
Institute of Standards and Technology, U.S.A. Other brand names and trademarks are
property of their respective owners.
The presence of the Waste Electrical and Electronic Equipment (WEEE) marking on the product
indicates that the device is not to be disposed via the municipal waste collection system of any
member state of the European Union.
For products under the requirement of WEEE directive, please contact your distributor or local InSitu office for the proper decontamination information and take back program, which will facilitate
the proper collection, treatment, recovery, recycling, and safe disposal of the device.
0099612 | Rev. 001
1-800-446-7488
2
www.in-situ.com
Page 3

Table of Contents
1 Introduction
Serial Number Location 5
2 Safety
3 General Specifications
4 Sensor Specifications
Dissolved Oxygen RDO Fast Cap (Optical Sensor) Specifications 7
Temperature Sensor Specifications (Probe) 7
Fixed Salinity Correction 7
5 Power Pack Specifications
6 Instrument Overview
Instrument Description 9
7 System Components
Probe Dimensions with Restrictor On 10
Probe Dimensions with Restrictor Off 10
8 Power Pack Description
9 Installing the Sensor and Cable
5
5
6
7
8
9
9
11
13
10 Connecting to VuSitu
11 VuSitu Overview
About VuSitu 15
VuSitu Menu Options 15
Menu Options when Connected to Instrument 15
Live Readings Screen 16
Changing Parameters and Units 18
Record Data 18
12 VuSitu Locations
About VuSitu Locations 19
Create a New Location 20
Select a Location 20
Edit or Delete a Location 22
13 VuSitu Reports
About Data 22
View, Send, Delete Data 23
14
15
19
22
14 VuSitu Calibrations & Settings
About Calibration and Settings 25
Calibrate the Rugged Dissolved Oxygen Sensor (1-Point) 25
1-800-446-7488
25
3
www.in-situ.com
Page 4

Calibrate the Rugged Dissolved Oxygen Sensor (2-Point) 26
Calibrating the Rugged Dissolved Oxygen Sensor Using Concentration 27
RDO Salinity Setting 27
15 Care and Maintenance
Maintenance Schedule 28
User-Serviceable Parts 28
O-rings 28
RDO Fast Sensor Cap Replacement 28
28
1-800-446-7488
4
www.in-situ.com
Page 5
Introduction
This manual is intended to describe the characteristics, operation, calibration, and
maintenance of the smarTROLL RDO Handheld Instrument.
Serial Number Location
The probe serial number is engraved on the probe body.
The Power Pack serial number is on a sticker affixed to the battery pack casing.
Safety
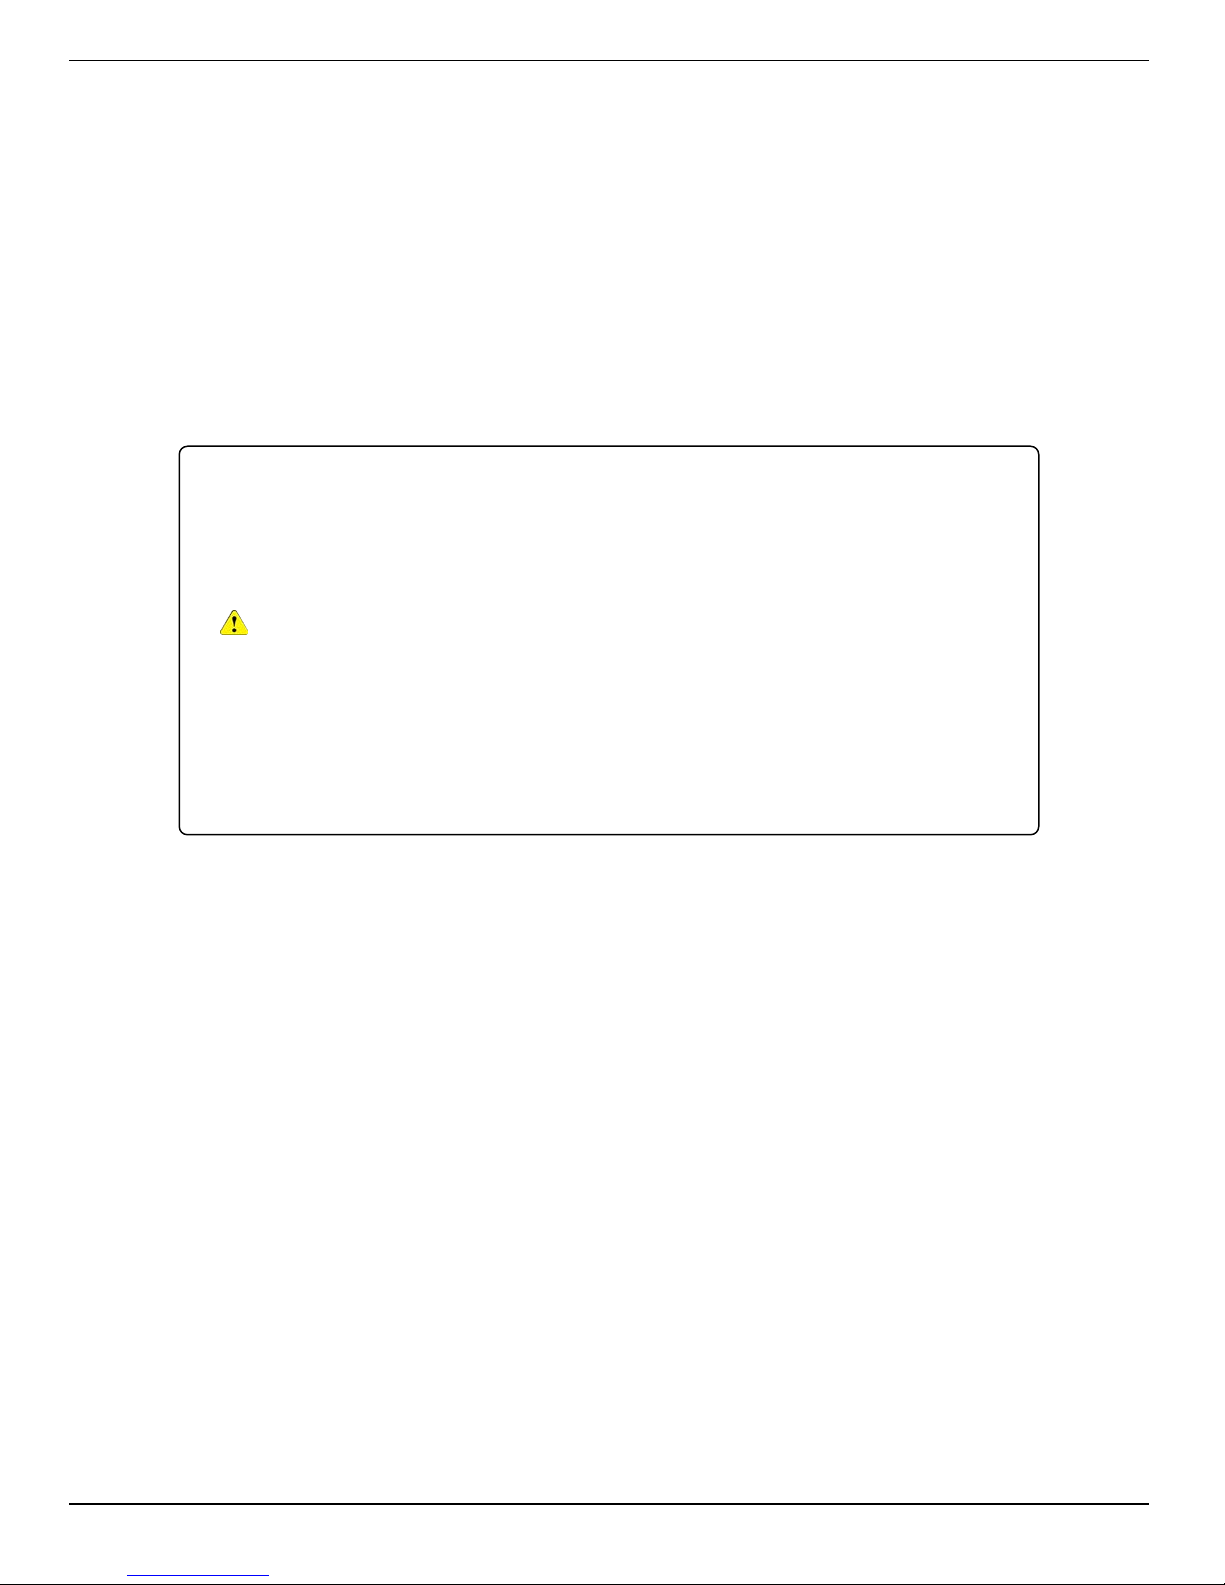
Do not submerge the Power Pack or the mobile display device in
liquid.
Ensure that the RDO Sensor Cap is pressed firmly over the
sensor lens and is flush with the instrument before submerging in
liquid.
Replace the cable if insulation or connectors are damaged.
Make sure the probe and sensor O-rings are clean and free of
damage.
1-800-446-7488
5
www.in-situ.com
Page 6
General Specifications
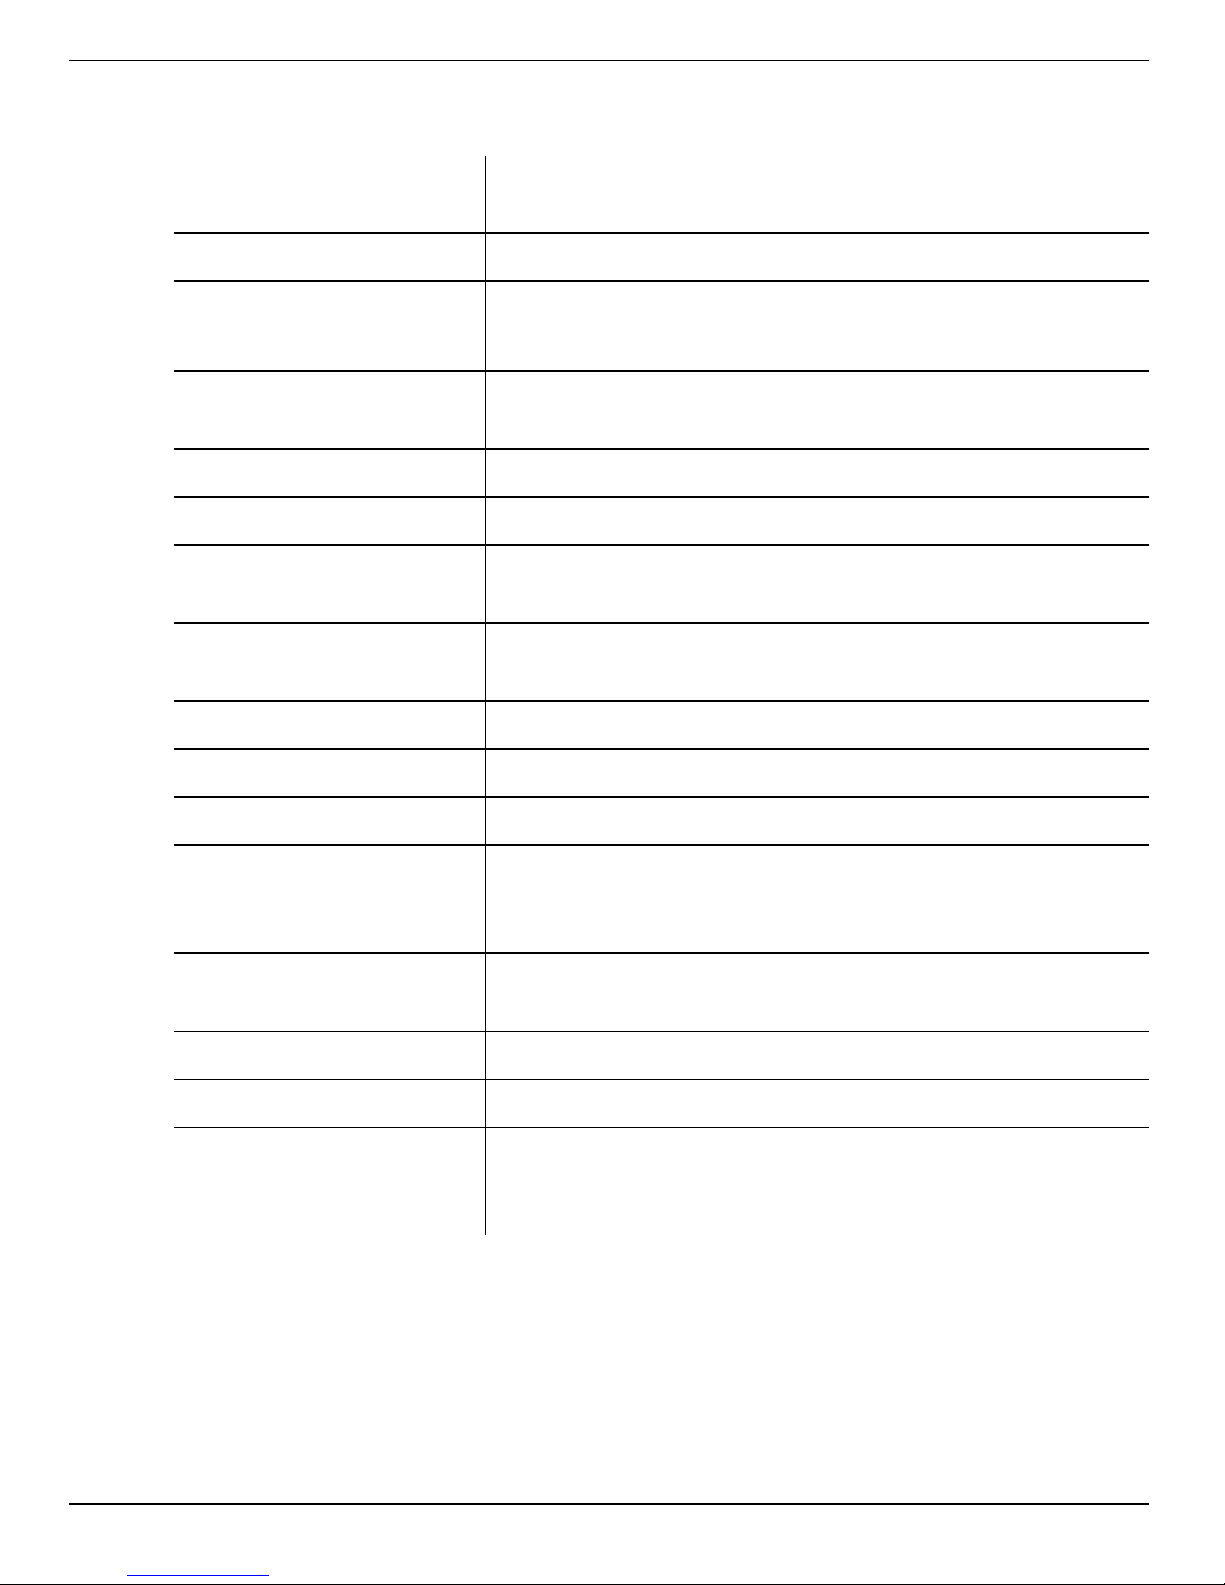
Operating
temperature
Storage temperature -40 to 65° C (-40 to 149° F)
Diameter
Dimensions
Weight 255 g (0.56 lbs)
Wetted materials Acetal, Titanium, 316SS, Viton, PC/PMMA
Environmental rating
Reading rate
Power 5 VDC from Power Pack
-5 to 50° C (23 to 122° F)
2.61 cm (1.03 in.)
2.84 cm (1.12 in.) with guard installed
2.8 cm x 16.76 cm (1.12 in. x 6.60 in.) D x L with guard
installed
IP68 with all sensors and cable attached. IP67 with
sensors removed and cable detached.
1 reading every 10 seconds; data logged to Android
device.
Output Options Modbus RS-485 to Power Pack
Max pressure rating 150 psi from 0-50° C
Android™ platform 4.4 (requires
Interface
Cable
Warranty 2-years
Certifications CE, FCC, WEEE
Notes
Download VuSitu for free on the Google Play store.
Used with Android Power Pack
Black polyurethane. Standard lengths available: 1.5
m, 4.6 m, 9.1 m (5 ft, 15 ft, 30 ft)
Bluetooth is a registered trademark of Bluetooth SIG,
Inc. Viton is a registered trademark of DuPont
Performance Elastomers L.L.C.
Bluetooth®
2.0)
1-800-446-7488
6
www.in-situ.com
Page 7
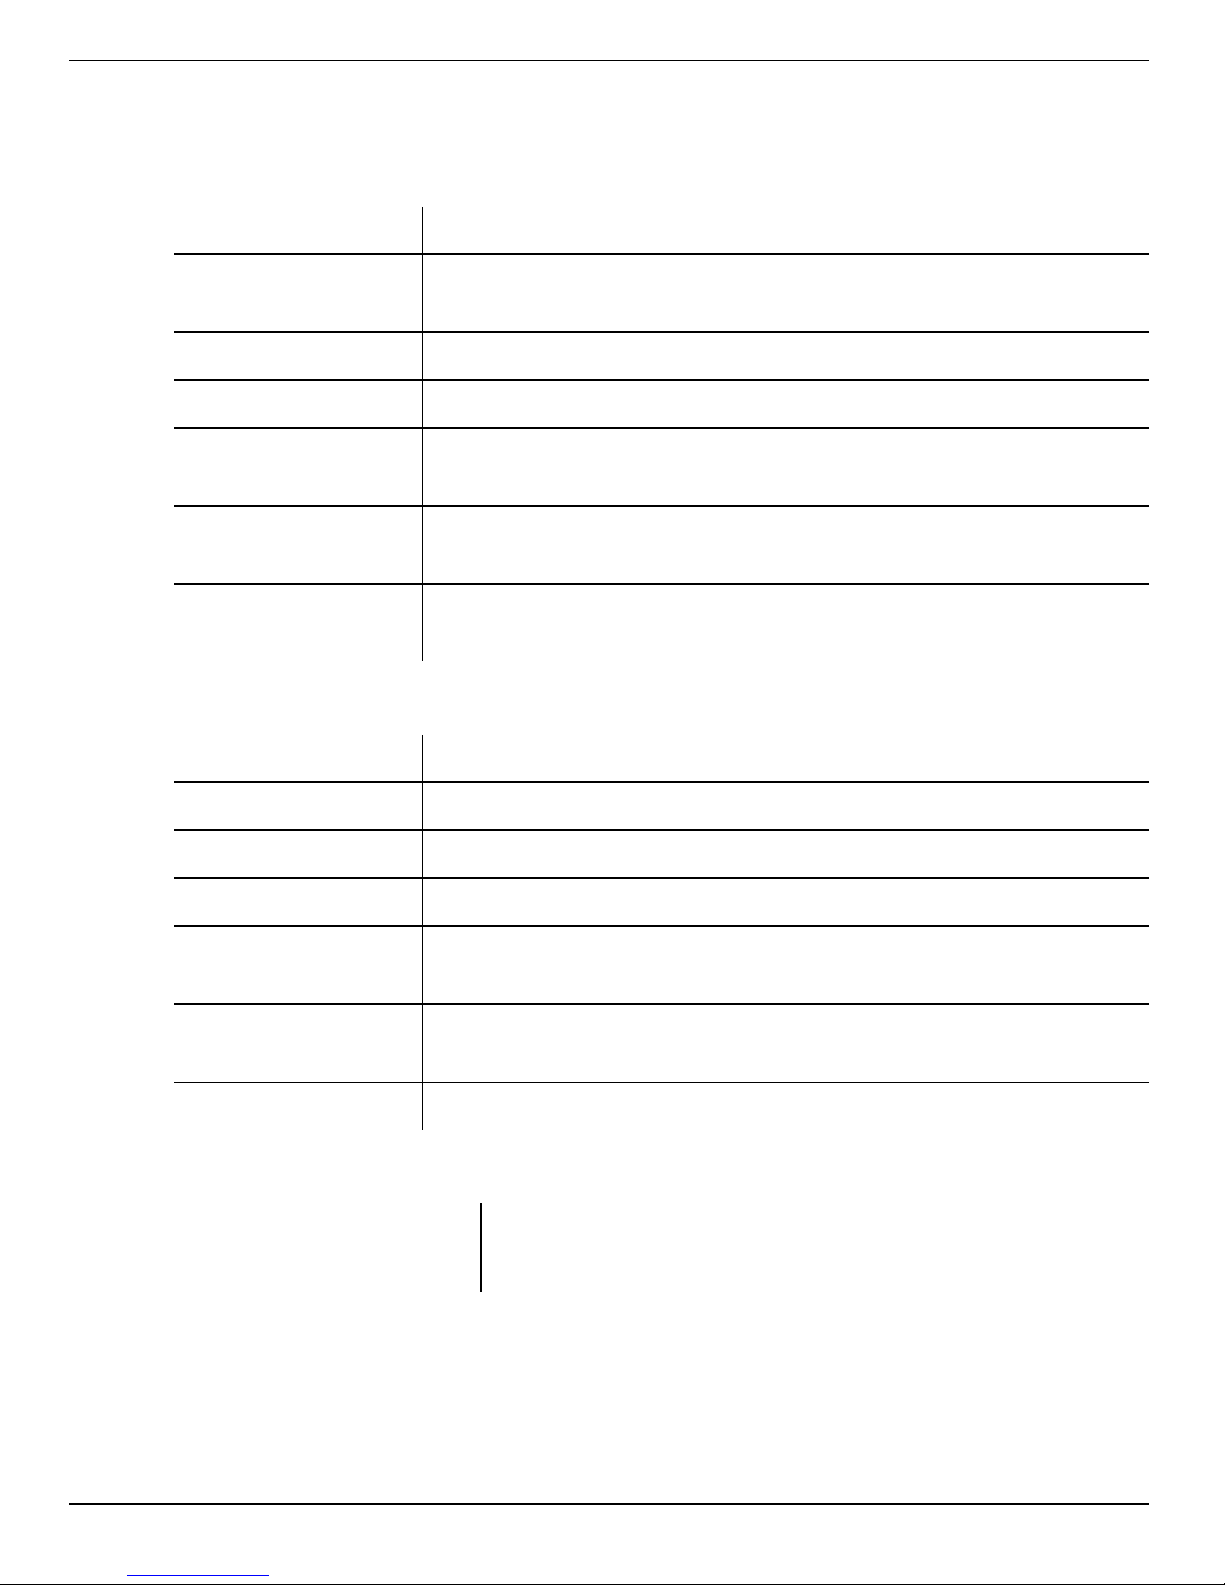
Sensor Specifications
Dissolved Oxygen RDO Fast Cap (Optical Sensor) Specifications
Accuracy ±0.1 mg/L; ±0.2 mg/L; ±10% of reading
Range
Resolution 0.01 mg/L
Sensor Type Fixed with replaceable RDO Fast Cap (life: 1 year typical)
Response
Time
Units of
Measure
Methodology
0 to 8 mg/L; 8 to 20 mg/L; 20 to 50 mg/L; Full operating
range: 0 to 50 mg/L
T90: <30 sec. T95: <45 sec.
mg/L, % saturation, ppm
EPA-approved In-Situ Methods 1002-8-2009 1003-8-2009
1004-8-2009
Temperature Sensor Specifications (Probe)
Accuracy ±0.1° C
Range -5 to 50° C (23 to 122° F)
Resolution 0.01° C or better
Sensor Type Fixed
Response
Time
Units of
Measure
Methodology EPA 170.1
Fixed Salinity Correction
Fixed Salinity
Correction
<30 sec.; temperature sensor only
Celsius, Fahrenheit
User-set value to match the salinity of water sample
Value appears in data log
1-800-446-7488
7
www.in-situ.com
Page 8
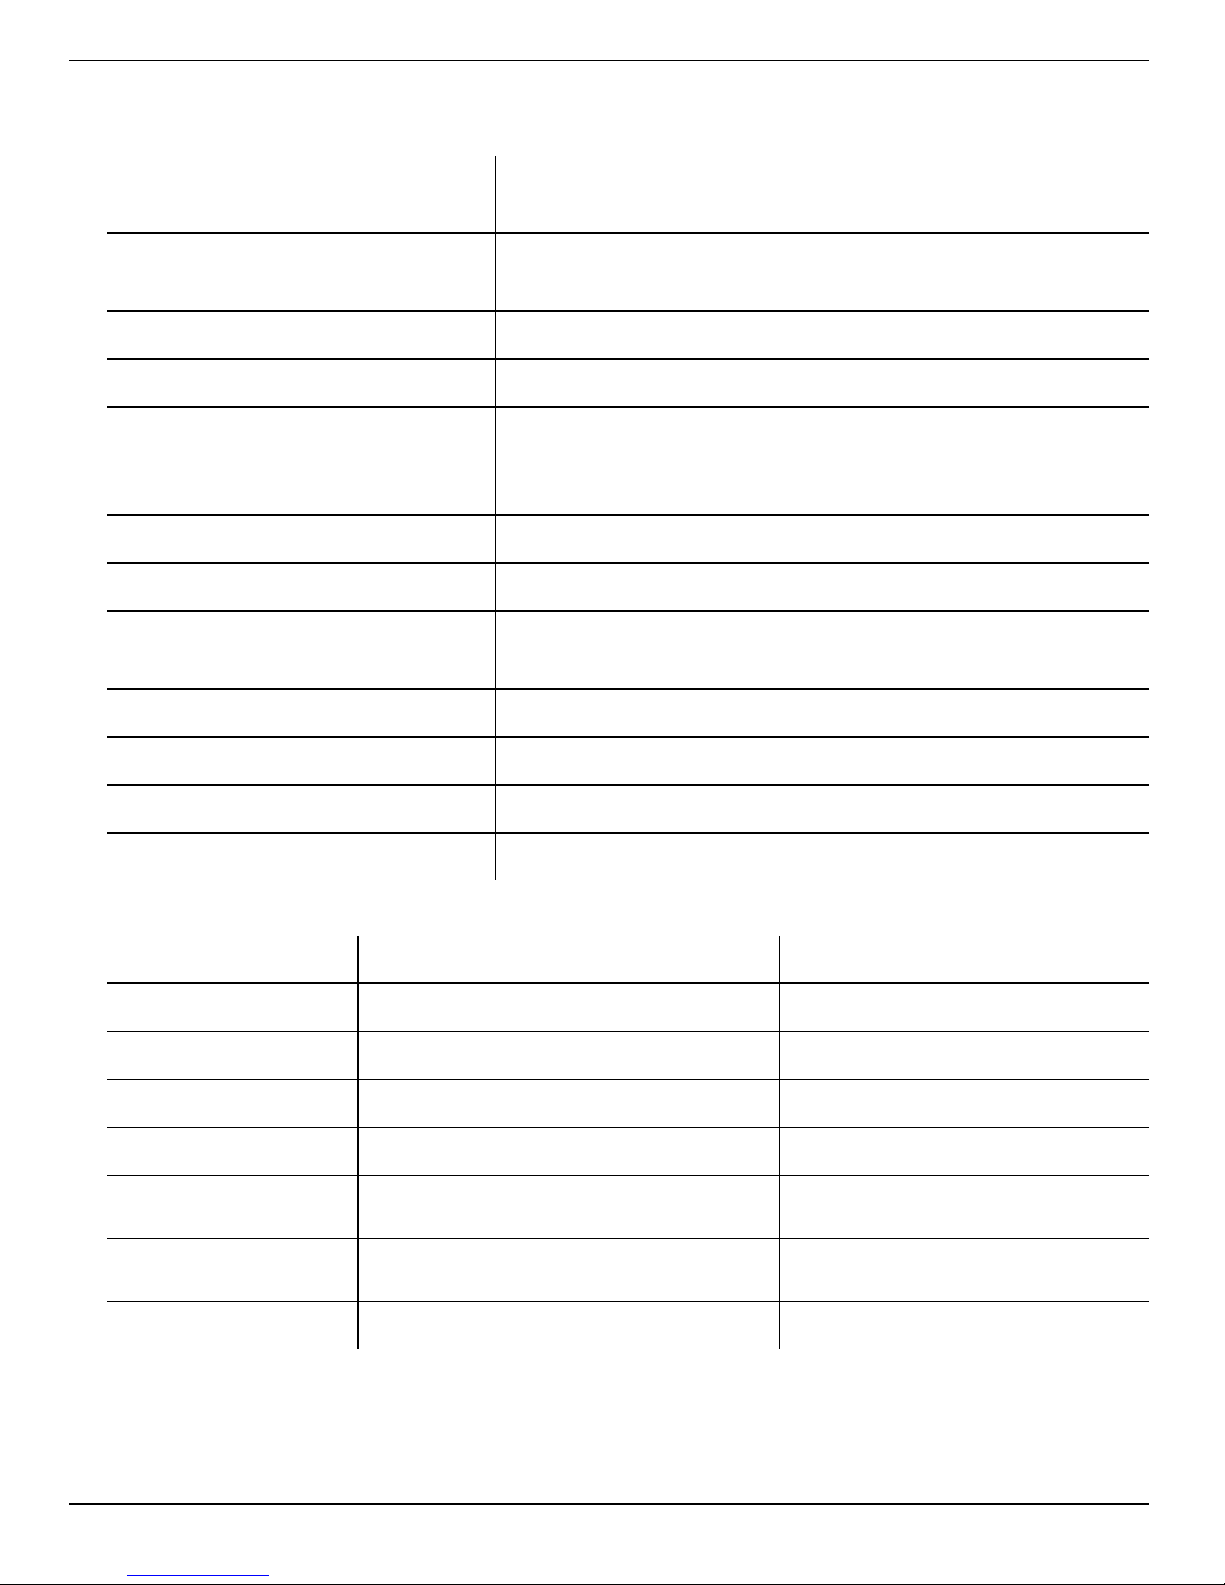
Power Pack Specifications
Operating temperature
Storage temperature
-5 to 50° C (23 to 122° F); 95% relative humidity, noncondensing
-20 to 50° C (-4 to 122° F); 95% relative humidity, noncondensing
Dimensions 14.4 x 4.3 x 3 cm (5.7 x 1.7 x 1.2 in.)
Weight 145 g (0.32 lb)
PC / ABS blend, Silicon, Urethane, Stainless steel, Brass,
Materials
Santoprene, Poron®, Polyethylene, Versapor®, Titanium,
PEEK, Viton
®
Environmental rating IP67
Output options
Communication protocol
Bluetooth
Android®: SPP
Windows®: SPP or USB
®
, USB
Battery type 3.7 V 8600 MWh Lithium rechargeable cell (UBBL19-FL)
Charging requirements 5 VDC USB charger (1 A or 500 mA)
Warranty 1 year
Certifications CE, FCC (SSSBC127-X), WEEE
Sensor Temperature Barometric Pressure
Accuracy ±2° C max ±3 mbar max
Range -20 to 70° C (-4 to 158° F) 300 to 1100 mbar
Resolution 0.1° C 0.01 mbar
Sensor type Fixed Fixed
Response time < 30 seconds
Units of measure Celsius or Fahrenheit
Instantaneous in thermal
equilibrium
psi, kPa, bar, mbar, mmHg, inHg,
Torr, atm
Method EPA 170.1 Piezoresistive
1-800-446-7488
8
www.in-situ.com
Page 9

Instrument Overview
Instrument Description
The SmarTROLL RDO Handheld Instrument is comprised of a mobile display, Power
Pack, cable, and an integrated optical Rugged Dissolved Oxygen (RDO®) Sensor. The
RDO Sensor Cap is replaceable.
System Components
The system includes the following components.
l Integrated RDO Sensor
l RDO Fast Sensor Cap
l Stainless steel restrictor
l Calibration cup
l Power Pack and cable
Accessories Purchased Separately
l Replacement RDO Fast Sensor Cap
l Calibration Kit (includes calibration cup, 3 sponge wafers, vented cap, and
storage cap)
l Cable 1.5 m (5 ft), 4.6 m (15 ft), 9.1 m (30 ft) and 30.5 m (100 ft.)
l Maintenance kit
l Replacement Power Pack
l Android™ platform 4.4 (requires Bluetooth® 2.0) Download VuSitu for free on the
Google Play store. Used with Android Power Pack
l Universal wall charger and cable
l Replacement wall charger and cable
1-800-446-7488
9
www.in-situ.com
Page 10
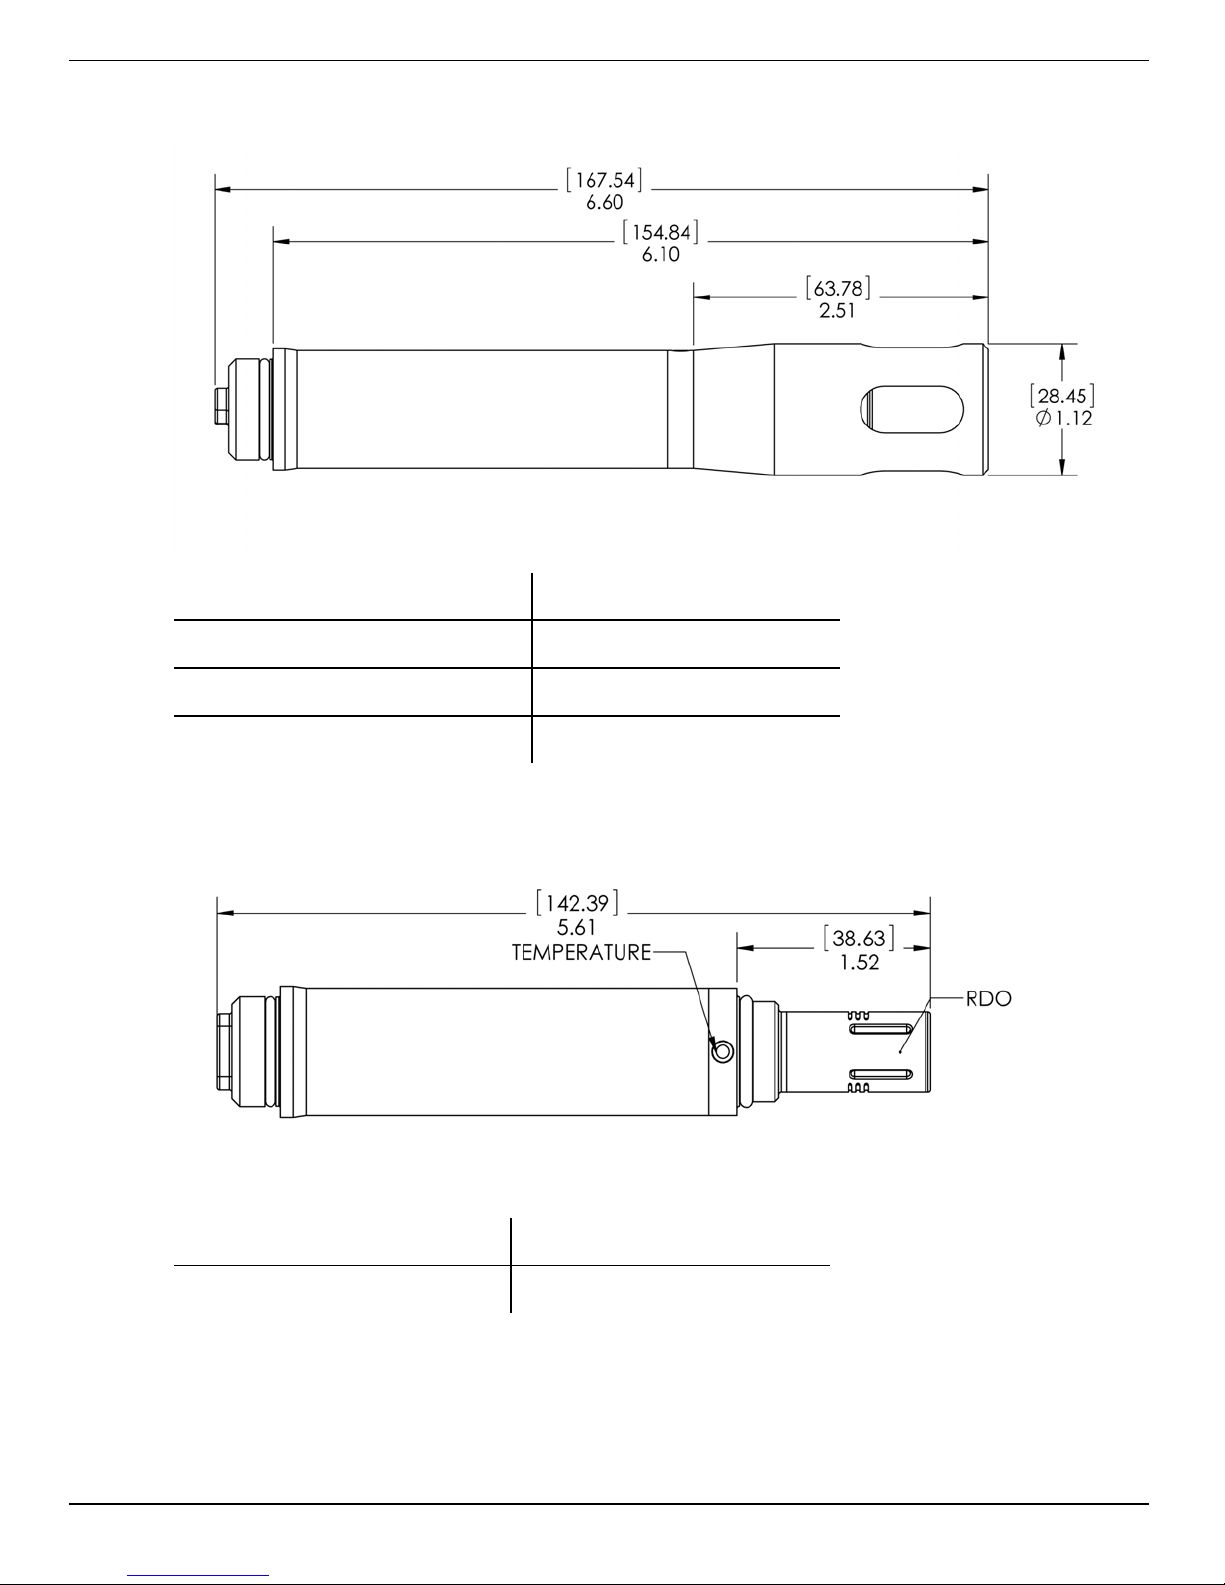
Probe Dimensions with Restrictor On
Total length with connector 167.54 mm (6.60 in.)
Total length without connector 154.84 mm (6.10 in.)
Restrictor length 63.78 mm (2.51 in.)
Diameter with restrictor 28.45 mm (1.12 in.)
Probe Dimensions with Restrictor Off
Total length with restrictor off 142.39 mm (5.61 in.)
Sensor length 38.63 mm (1.52 in.)
1-800-446-7488
10
www.in-situ.com
Page 11
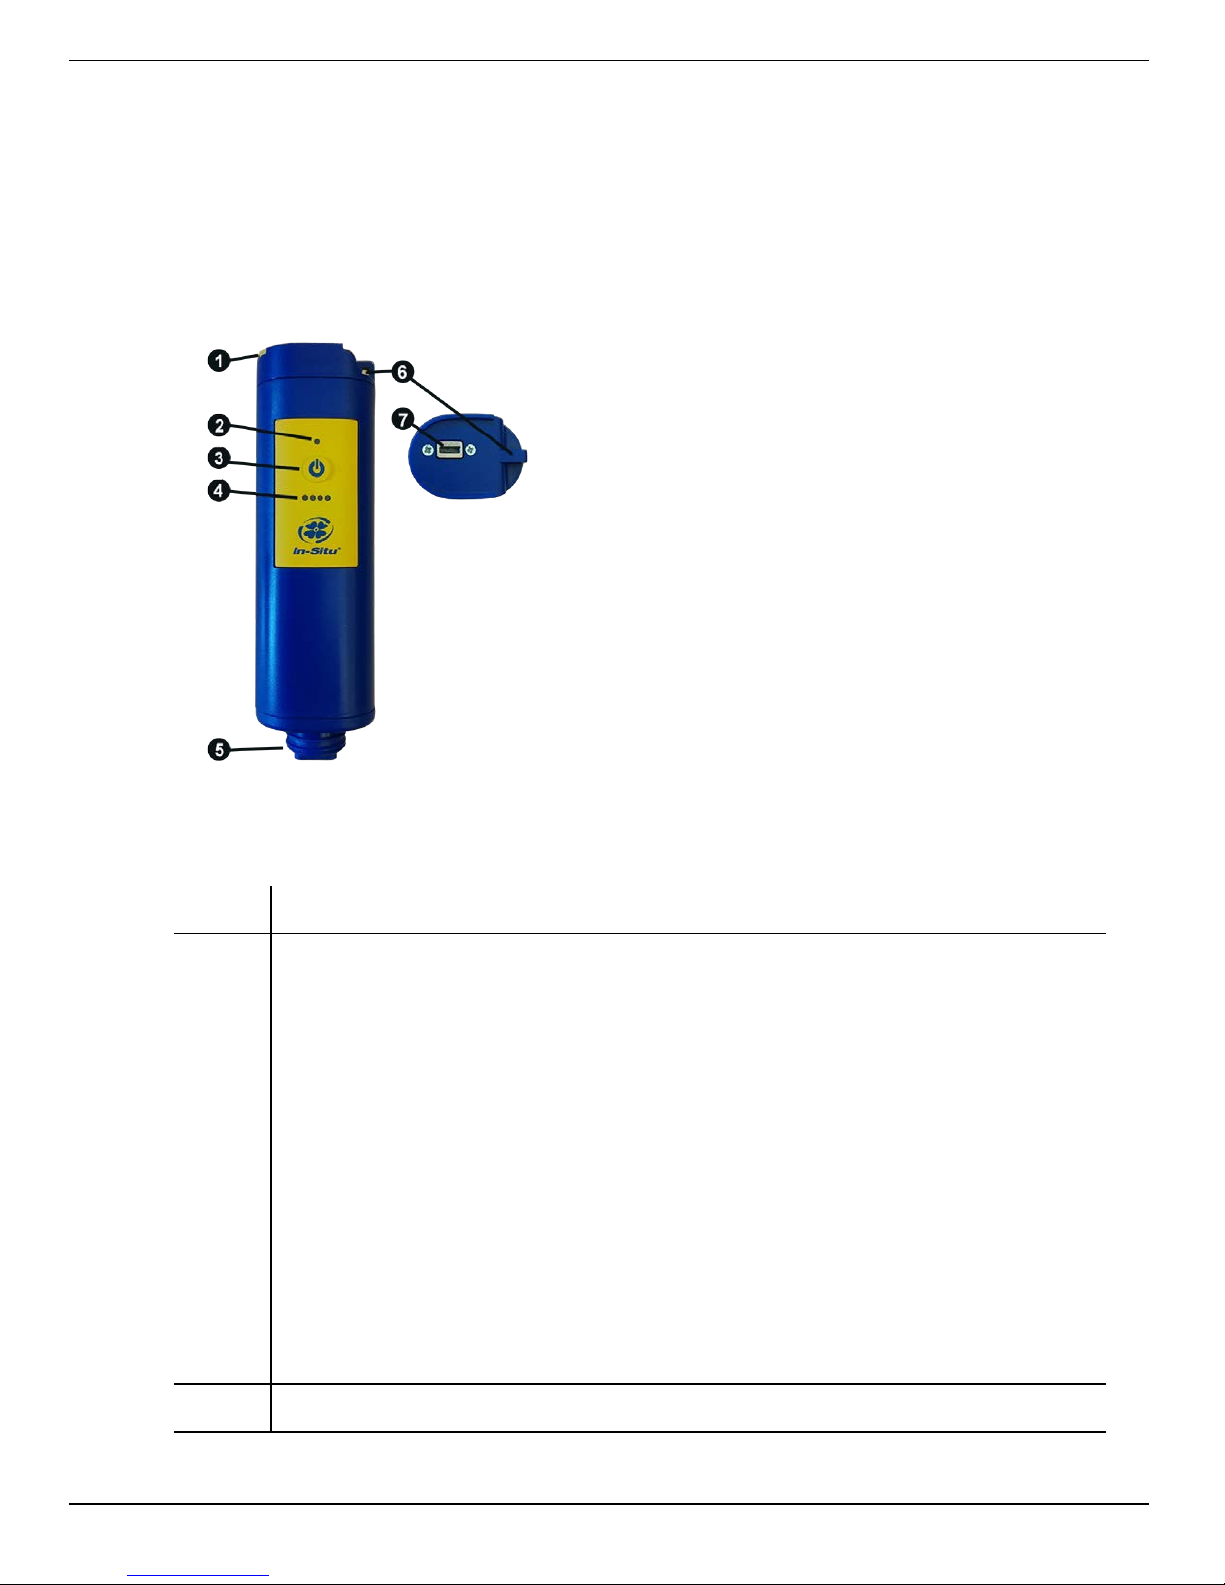
Power Pack Description
The Power Pack enables wireless communication between the Android device and the
probe and supplies power to the probe. The Power Pack provides a barometric
pressure measurement that is used to compensate depth and dissolved oxygen
measurements. The ambient temperature measurement is also provided by the Power
Pack.
A fully-charged Power Pack will run for approximately 40 continuous hours.
1 Dust cover for the USB connection
Connection status
Red (flashing) = The communication device, instrument, and
Bluetooth-enabled device are not connected.
Red (continuous) = The communication device and instrument are
connected, but the communication device is not connected to the
Bluetooth-enabled device.
2
-OR-
The communication device is connected via USB cable.
Green (flashing) = The communication device is connected to the
Bluetooth-enabled device, but is not connected to the instrument.
Green (continuous) = The communication device, instrument, and
Bluetooth-enabled device are connected.
3 On/Off button
1-800-446-7488
11
www.in-situ.com
Page 12
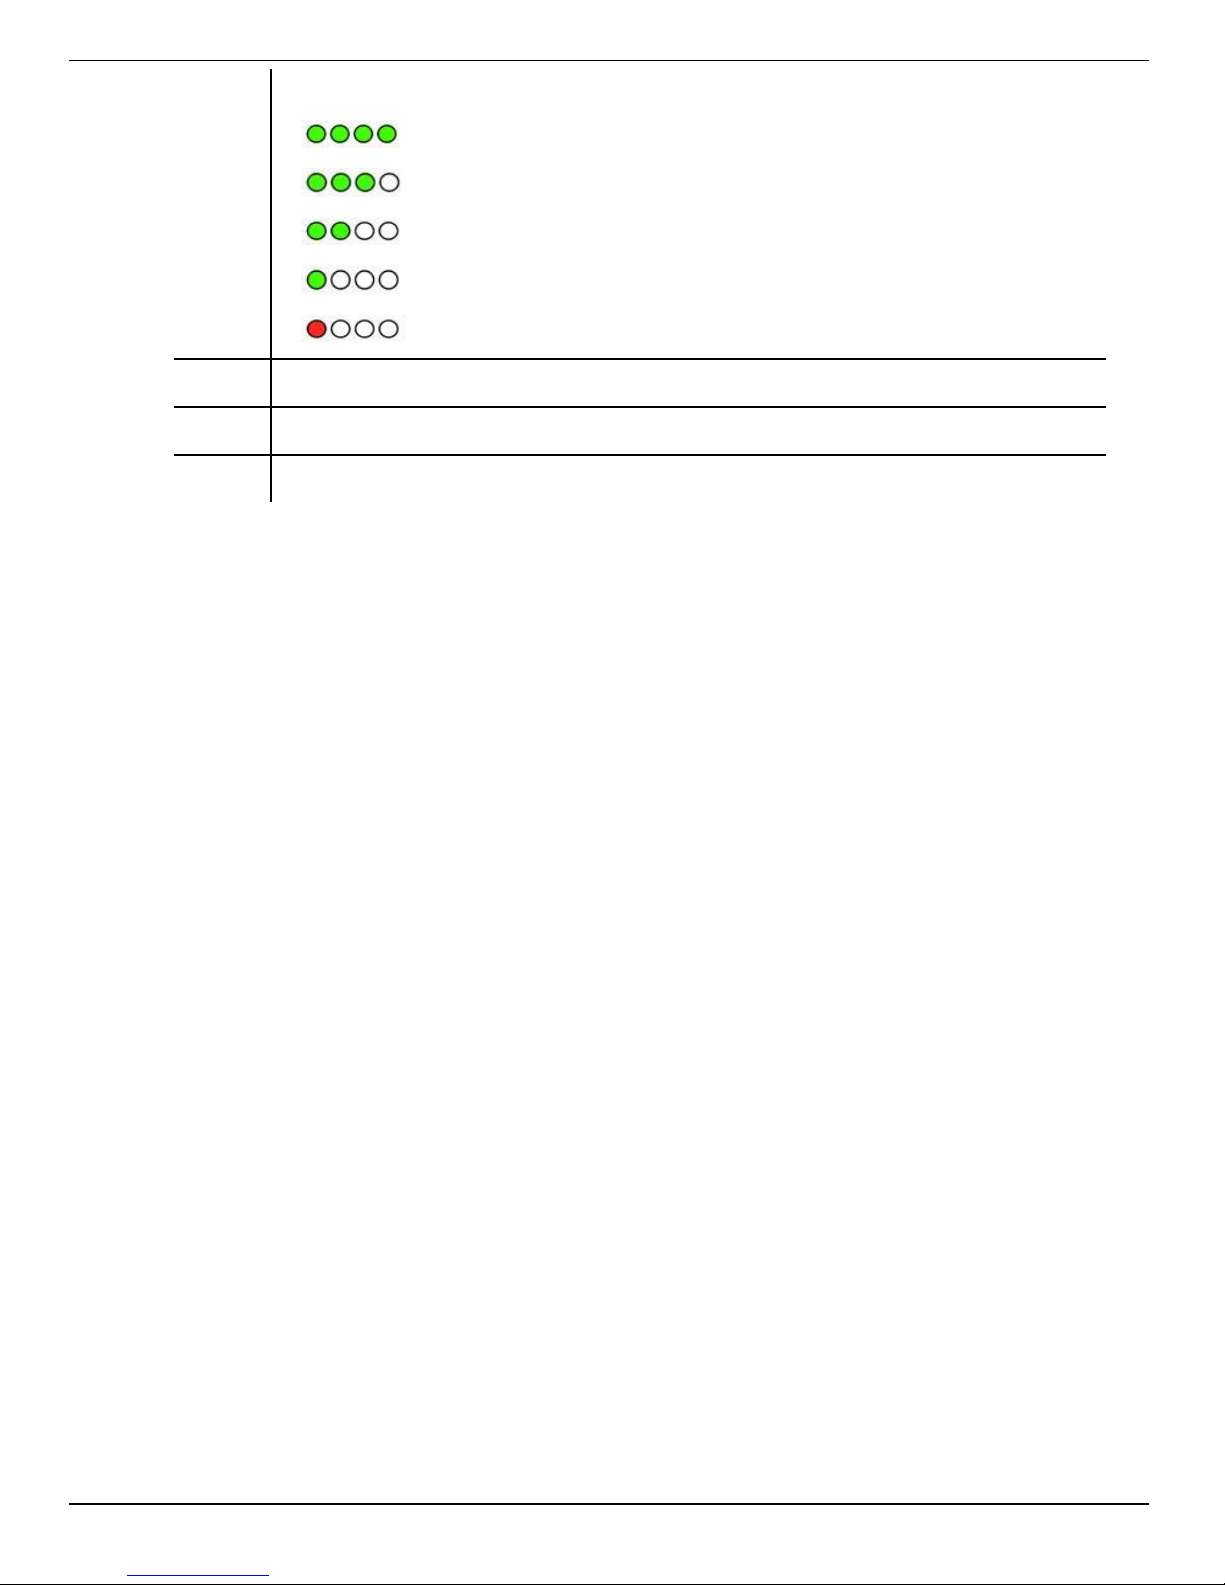
Battery charge status:
100% -90%
90% - 75%
4
75% - 50%
50% - 25%
Less than 25%
5 Cable connector to the instrument
6 Lanyard connector
7 USB connection to a power source for charging the internal battery
1-800-446-7488
12
www.in-situ.com
Page 13
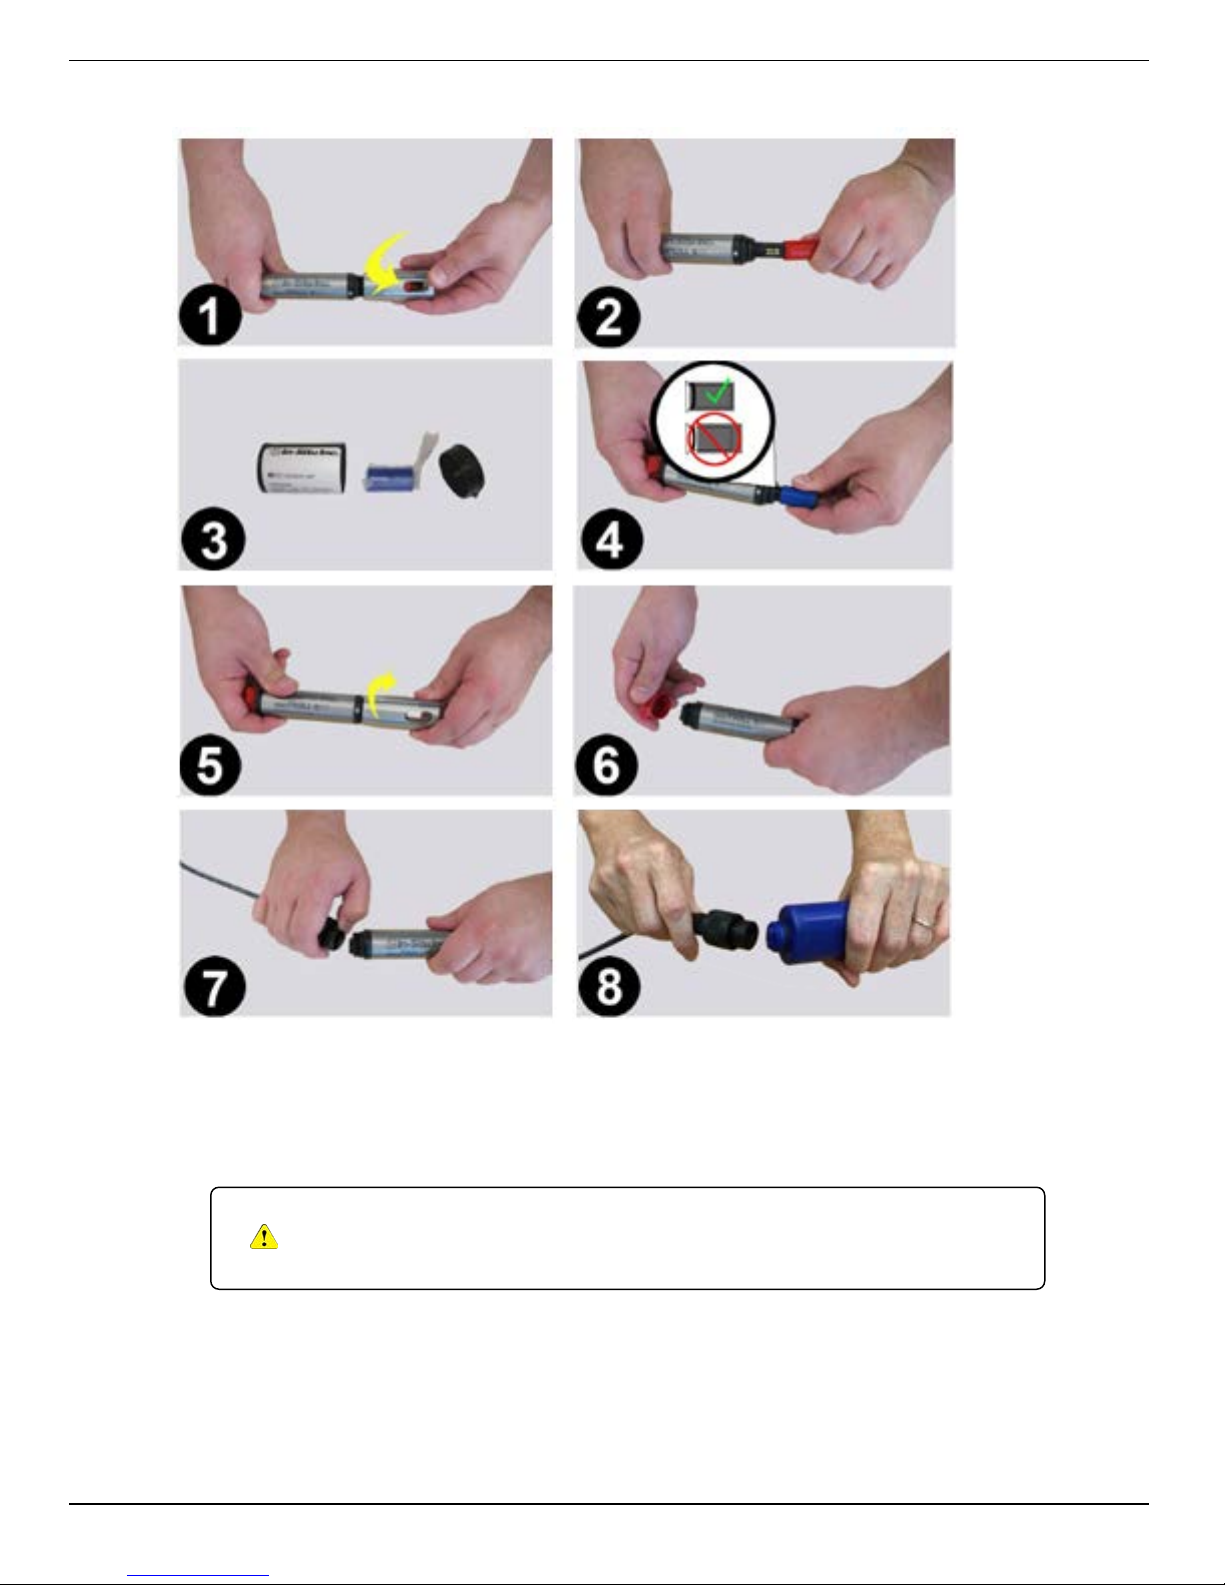
Installing the Sensor and Cable
1. Twist the restrictor off the probe.
2. Remove the dust cap from the sensor lens.
3. Locate the RDO Sensor Cap container and remove the cap from the packaging.
Important: Avoid touching the sensor lens and the sensing
material on top of the cap.
4. Align the flat edge of the RDO Sensor with the slotted edge of the RDO Cap and
press the cap into position. Push until the cap is firmly in place.
5. Twist the restrictor onto the probe.
6. Remove the dust cap from the cable connector.
1-800-446-7488
13
www.in-situ.com
Page 14
7. Align the pins on the cable with the pins on the probe, then twist the outer portion of
the connector until the connection is secure.
8. Align the pins on the cable with the pins on the Power Pack, then twist the outer
portion of the connector until the connection is secure.
Important: The RDO Sensor Cap must be installed firmly in place
to prevent water from entering the instrument.
Connecting to VuSitu
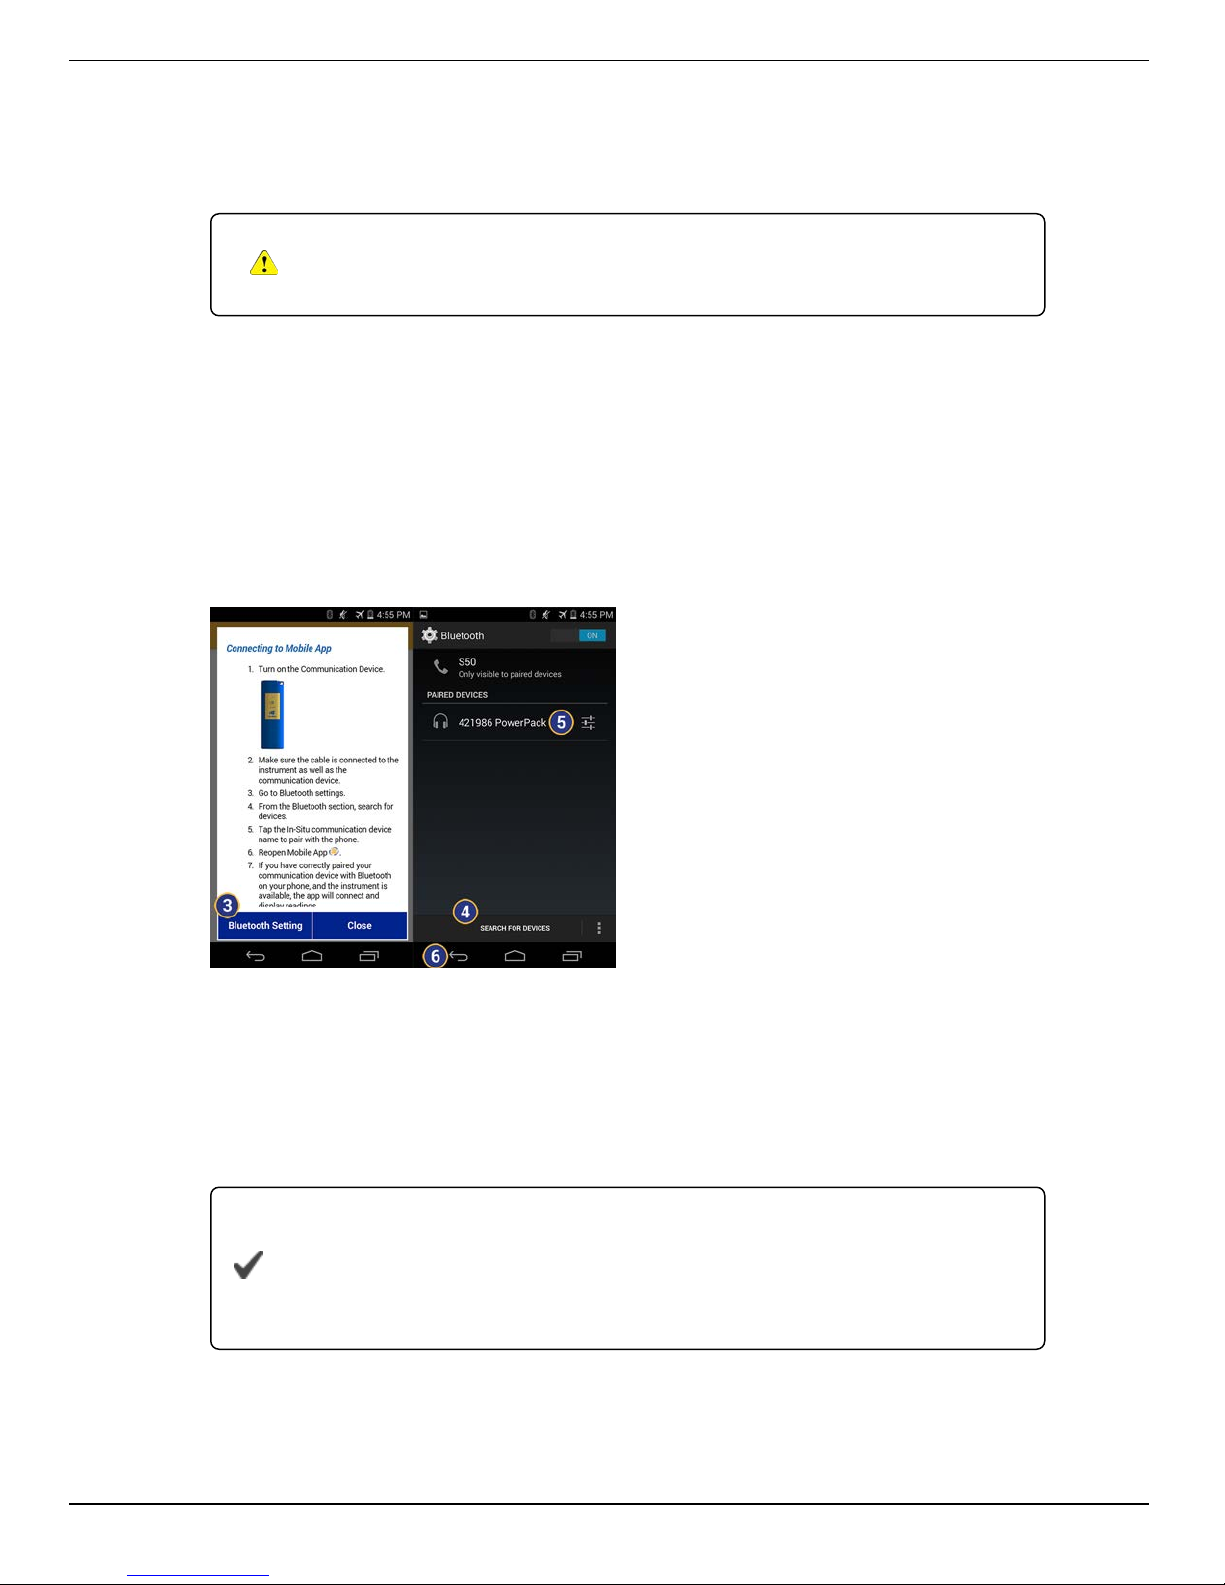
1. Turn on the Power PackWireless TROLL Com.
2. Make sure the cable is connected to the instrument as well as the communication
device.
3. Go to Bluetooth settings on the phone.
4. From the Bluetooth section, search for devices.
5. Tap the In-Situ Power PackWireless TROLL Com name to pair with the phone.
6. Tap the back arrow to return to the app.
7. If you have correctly paired your communication device with Bluetooth on your
phone, and the instrument is available, the app will connect and display readings.
In general, it is necessary to pair the devices only the first time you
use them. After you have paired the first time, turn on the
communication device and open the app for direct communication
with the instrument.
1-800-446-7488
14
www.in-situ.com
Page 15
VuSitu Overview
About VuSitu
The VuSitu Mobile App is the user interface and control application for In-Situ water
quality instruments. You can use VuSitu on mobile devices that use Android operating
system 4.4,
VuSitu allows you to accomplish the following tasks.
l View live readings that update every 10 seconds.
l Change parameters and units.
l Set up a data log.
l Record data.
l Email data in spreadsheet format.
l Download data to mobile device.
l Transfer data from mobile device to a computer.
l Organize data by Location.
Bluetooth
2.0, and newer.
l Calibrate Sensors and View Reports
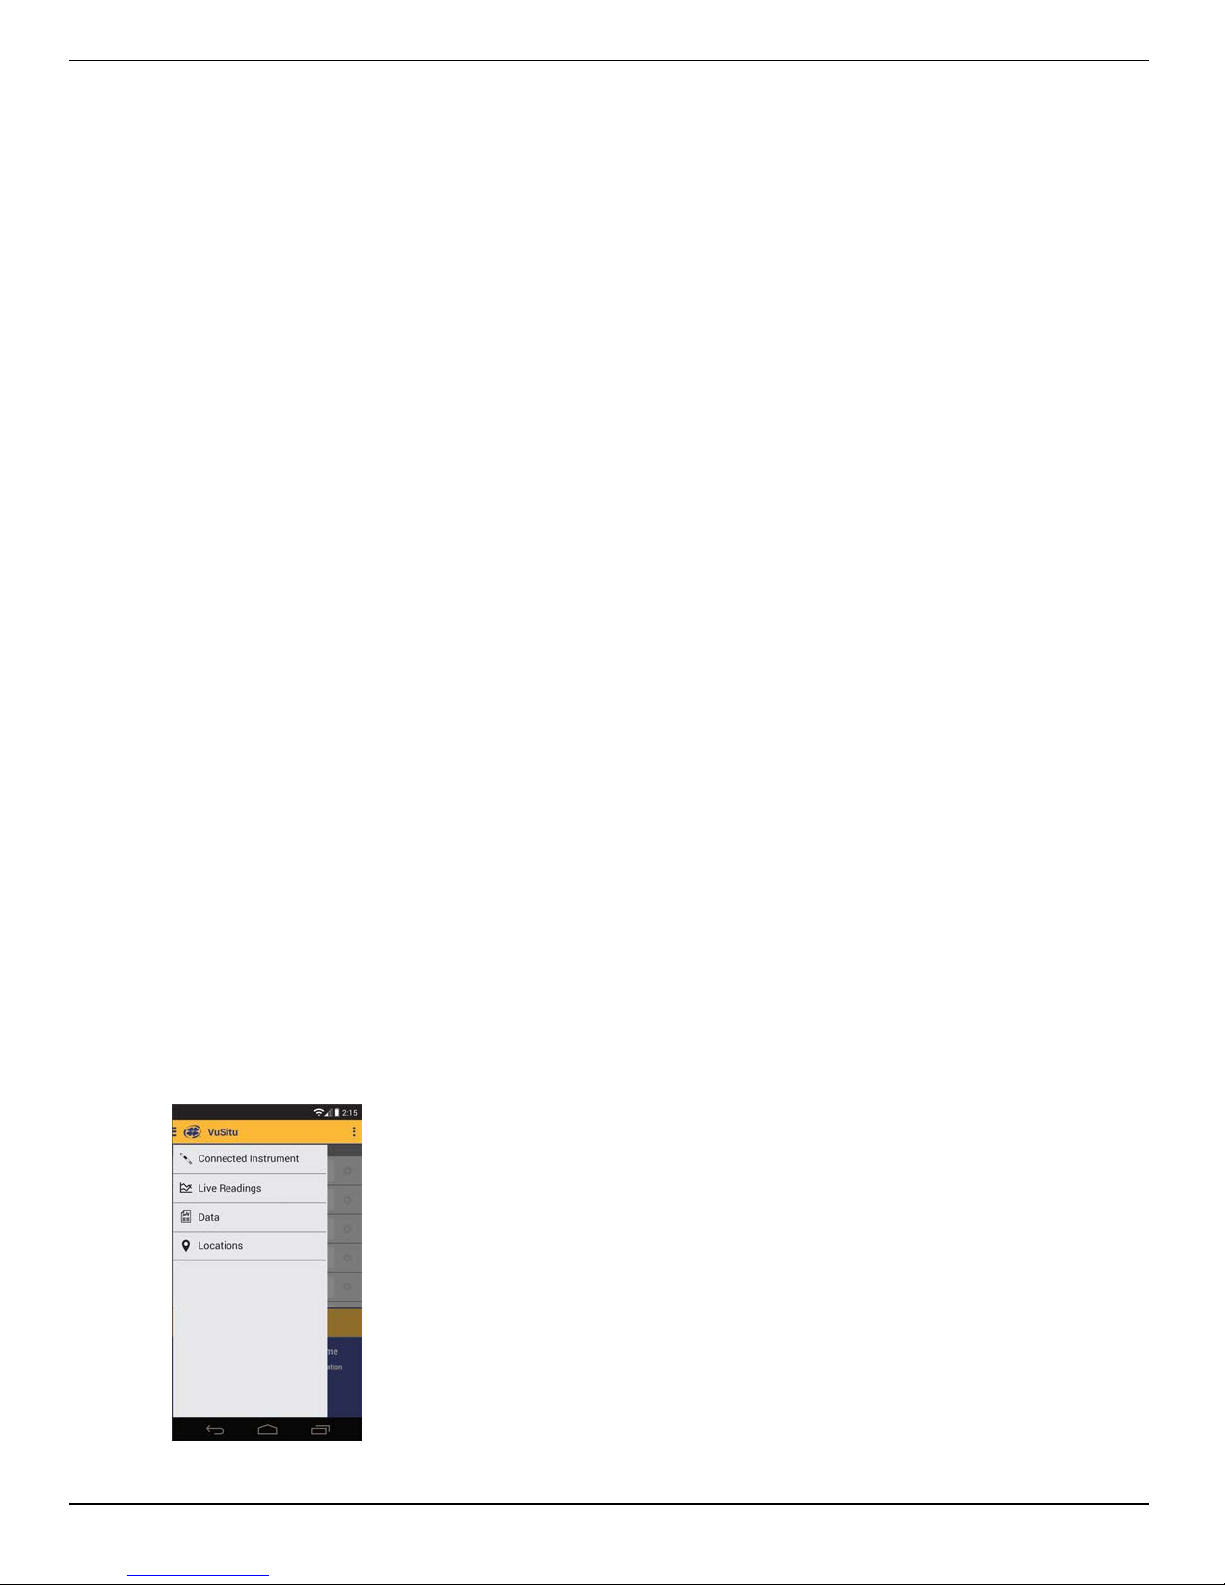
VuSitu Menu Options
The features available in the VuSitu Mobile App vary slightly depending on the
instrument with which it is connected. Tap the menu icon in the upper left portion of the
screen to view the features included in VuSitu. Tap the menu icon again to close the
menu.
Menu Options when Connected to Instrument
Some features, such as sensor calibration, are not available when you are not
connected to an instrument.
1-800-446-7488
15
www.in-situ.com
Page 16

Live Readings Screen
The live readings screen displays instrument readings when the app is connected to
the communication device and/or to the instrument via Bluetooth.
1-800-446-7488
16
www.in-situ.com
Page 17
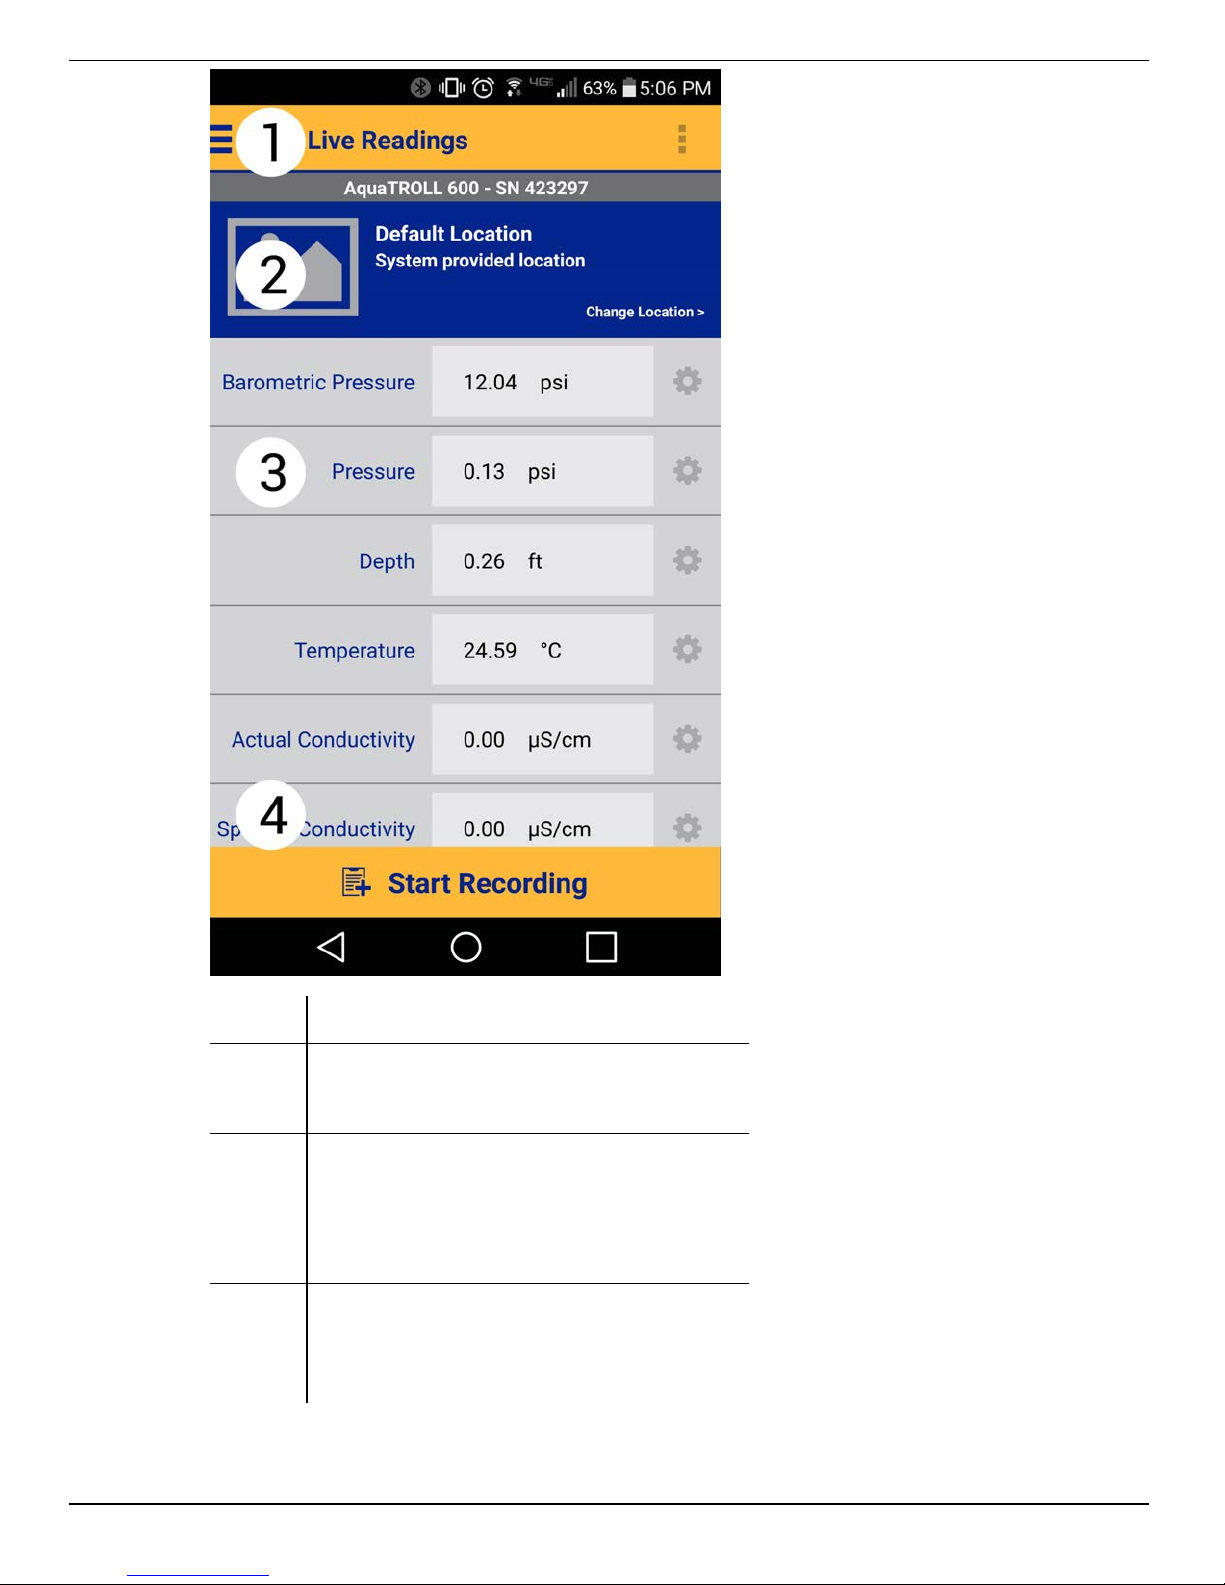
1 Main Menu
Selected Location
2
(Tap to change Location.)
Live Readings (scrollable)
3
Tap the settings wheel next to
each to change parameters and
units.
Tap to record readings
4
(Readings refresh every 10
seconds.)
1-800-446-7488
17
www.in-situ.com
Page 18
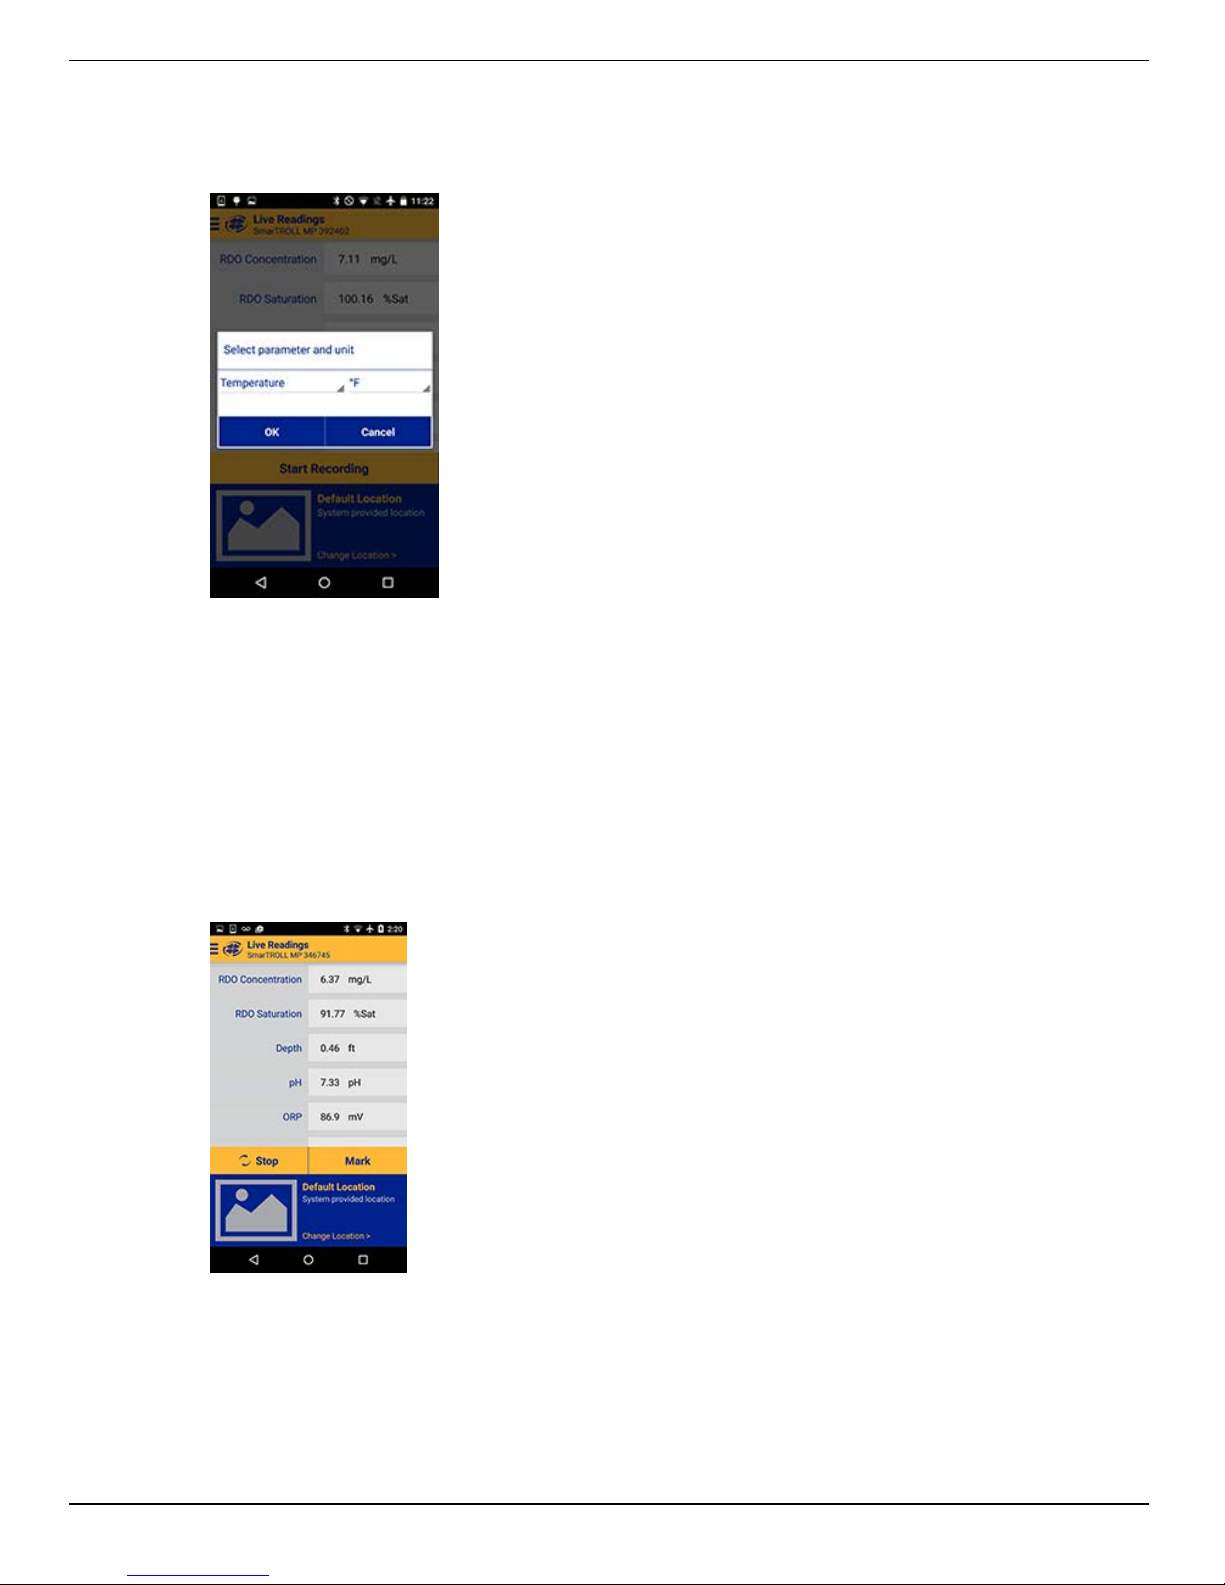
Changing Parameters and Units
1. From the Live Readings screen, tap the settings wheel next to the field that contains
the measurement value. When you release, the Parameter and Unit menu appears.
2. Tap the parameter drop-down arrow and tap the parameter you want to display.
3. Tap the units drop-down arrow and tap the unit you want to display.
4. Tap the OK button to set the options and return to the Live Readings screen.
Record Data
1. From the Live Readings screen, tap Start Recording. A new set of readings is
updated every 10 seconds and a counter of readings is displayed in the Stop button.
2. It is optional to mark a set of readings by tapping the Mark button.
3. When you have gathered enough data, tap the Stop button.
4. The recorded data appears on screen. If you have marked data it will appear as a
highlighted row.
1-800-446-7488
18
www.in-situ.com
Page 19
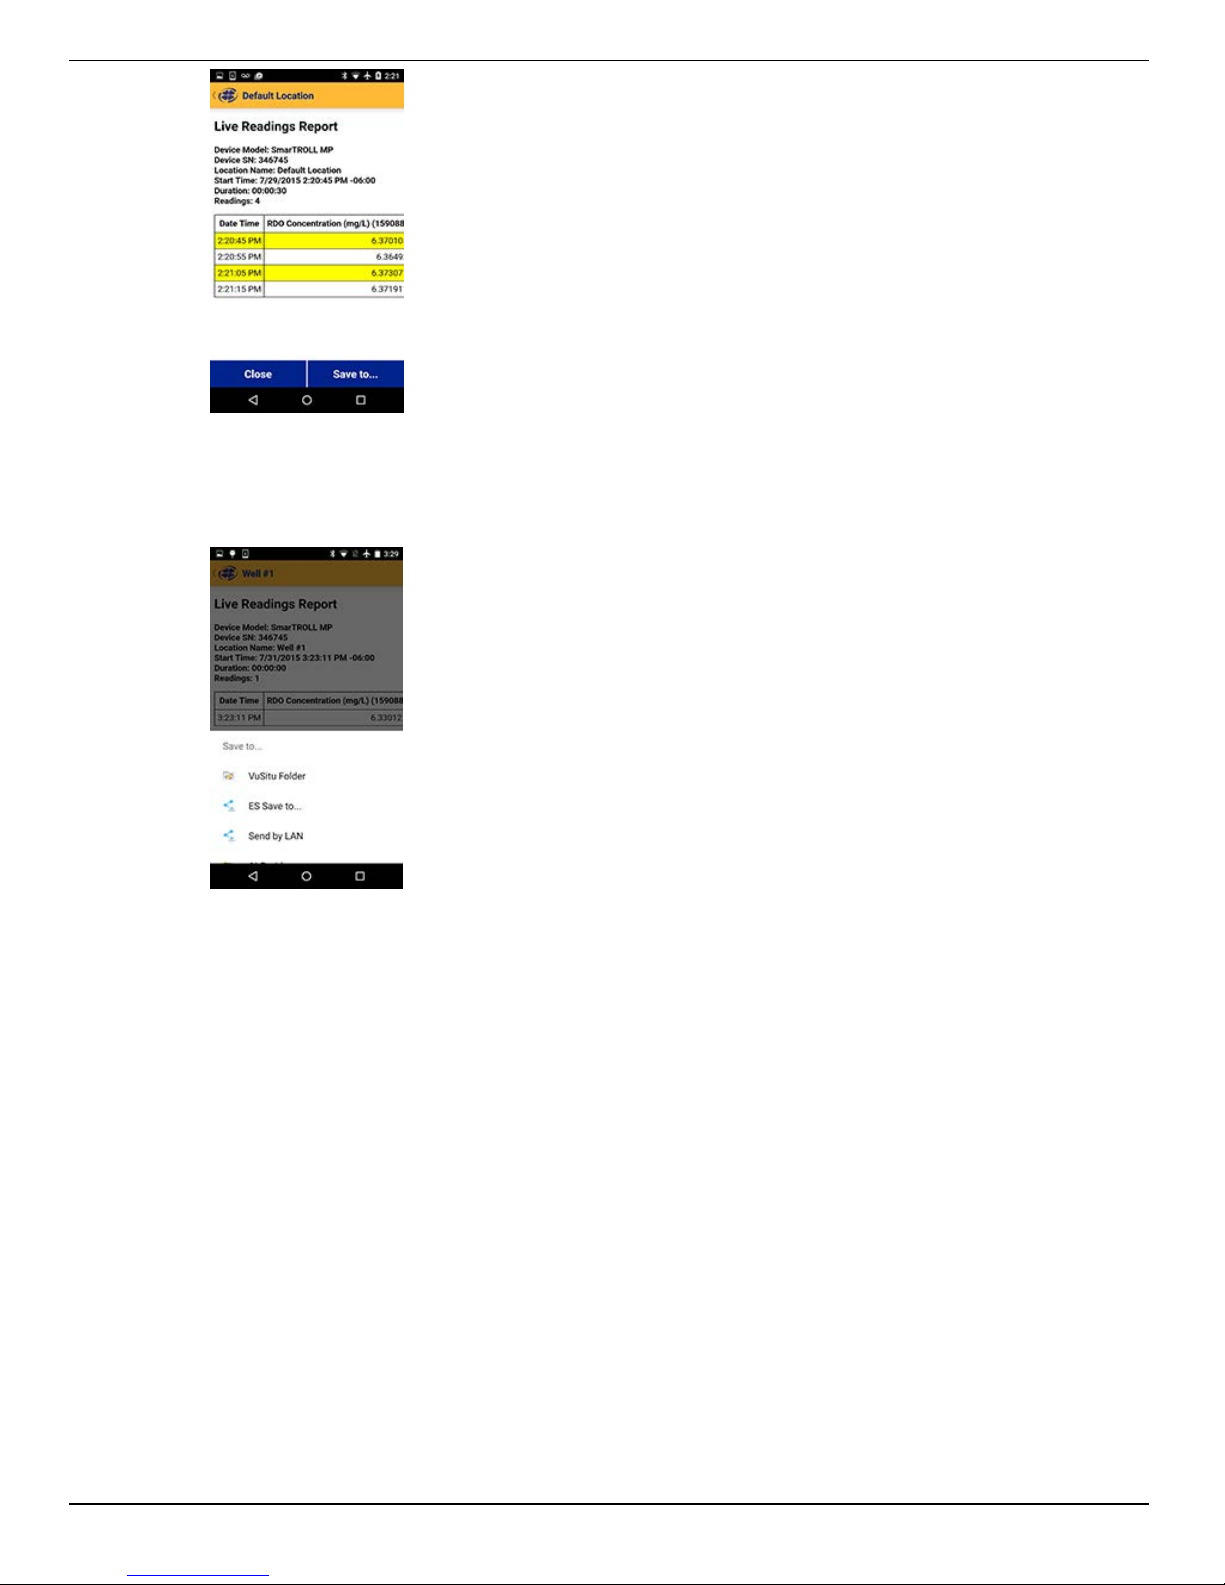
5. If you want to return to the Live Readings screen, tap the Close button. (Your data
can be accessed later in the Data section of the app.)
6. If you want to send your data, tap the Send To... button.
l Select the VuSitu Folder to later download your data to a computer via USB
connection.
or
l Select your email application to email the data.
VuSitu Locations
About VuSitu Locations
A Location represents the physical location at which an instrument collects data. For
example, you can create a Location to represent a lake, gauging station, well, tank,
number, or nearby landmark. If you do not set up a Location, your data will be
associated with Default Location. The Location name is displayed on the Live
Readings screen. You can access Locations through the Main Menu or by tapping the
Location displayed in the lower portion of the Live Readings screen.
1-800-446-7488
19
www.in-situ.com
Page 20
Create a New Location
1. You can create a new Location with which to associate your data by selecting
Locations from the main menu, or by tapping the location shown on the Live
Readings screen.
2. Tap Add New Location.
3. Enter a name for the Location.
4. It is optional to add a photo to the Location. Tap the camera icon, take a photo and
select the check mark to select the photo.
5. It is optional to add notes to the Location. Tap the Notes field to enter additional
information about the Location.
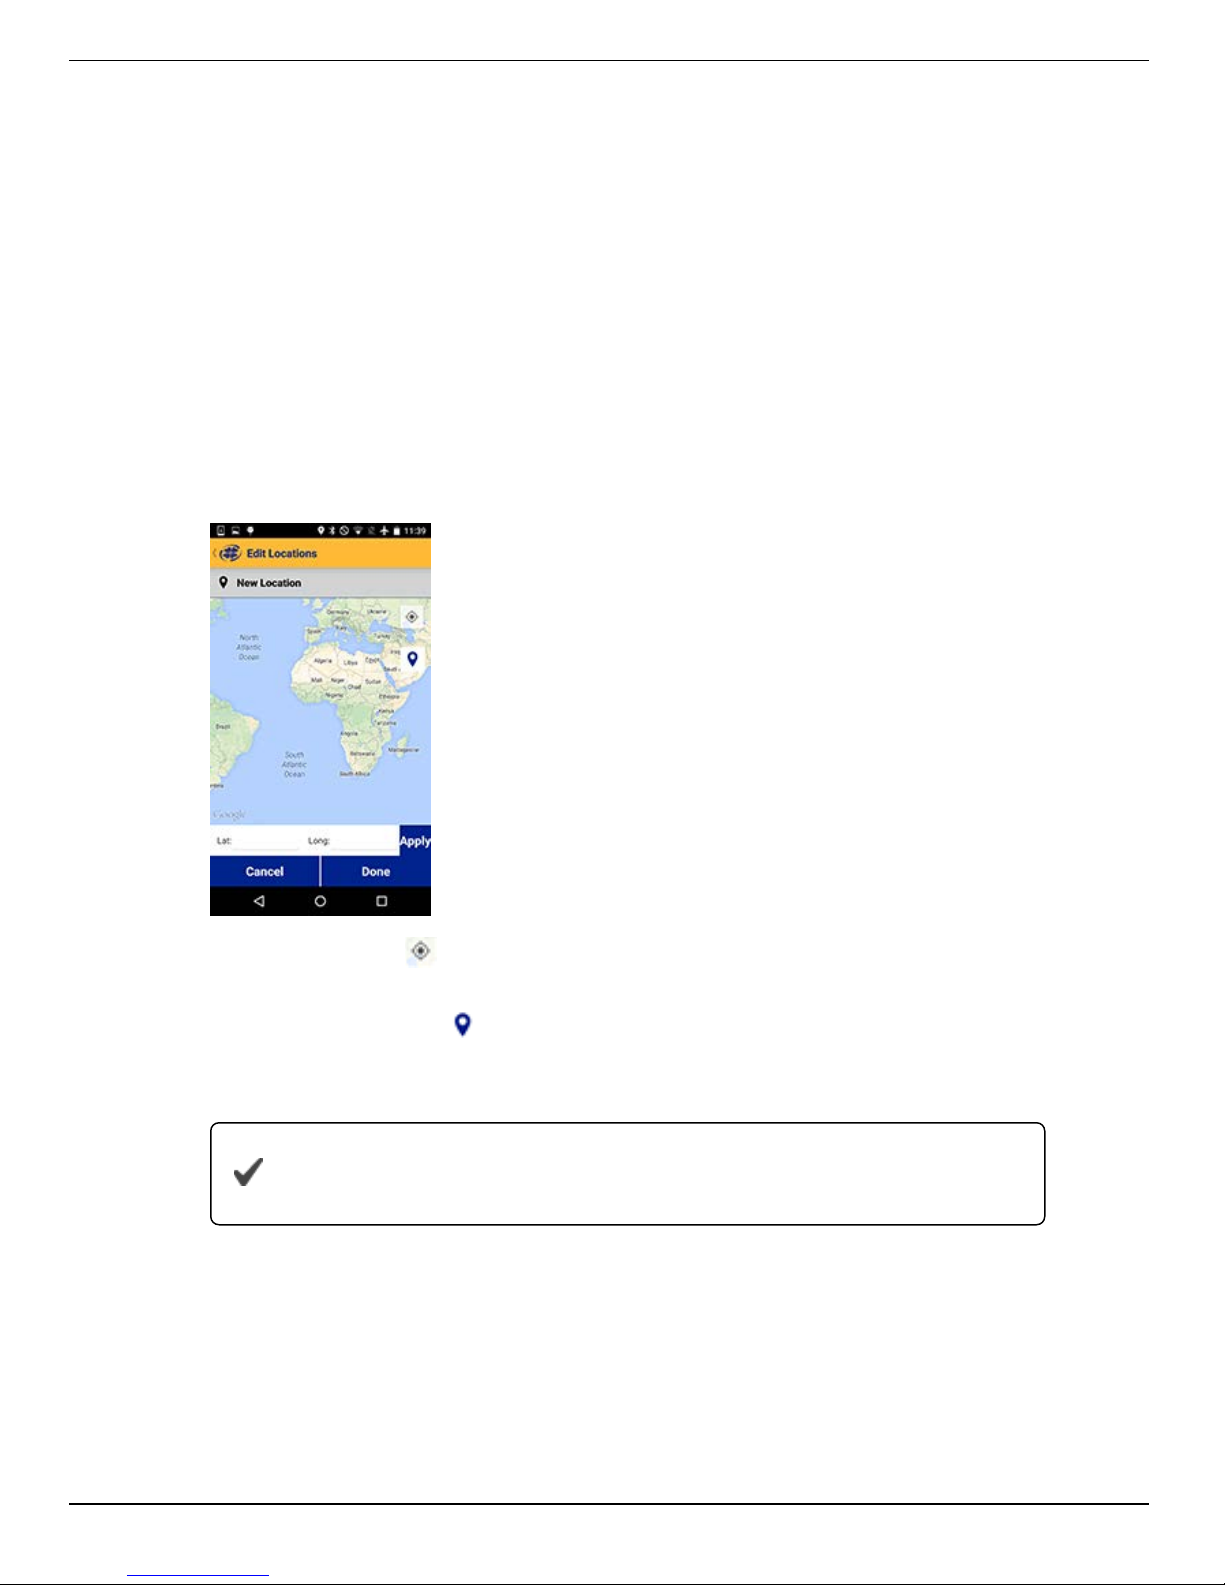
6. It is optional to associate latitude and longitude coordinates with the Location. Tap
the map to activate the mapping feature.
7. Tap the GPS icon in the upper-right portion of the screen to navigate to your
current physical location.
8. Tap the Location icon to select the point on the map as the Location.
9. To manually set a Location, tap and hold to drop a pin on a specific area of the map.
This associates latitude and longitude with your Location.
10. Tap Save.
Select a Location
Data is associated with the Location that is displayed on the Live readings screen.
After you have created a Location, you must select it in order for your data to be
associated with the Location.
As an alternative, you can manually enter latitude and longitude
values and tap Apply.
1-800-446-7488
20
www.in-situ.com
Page 21
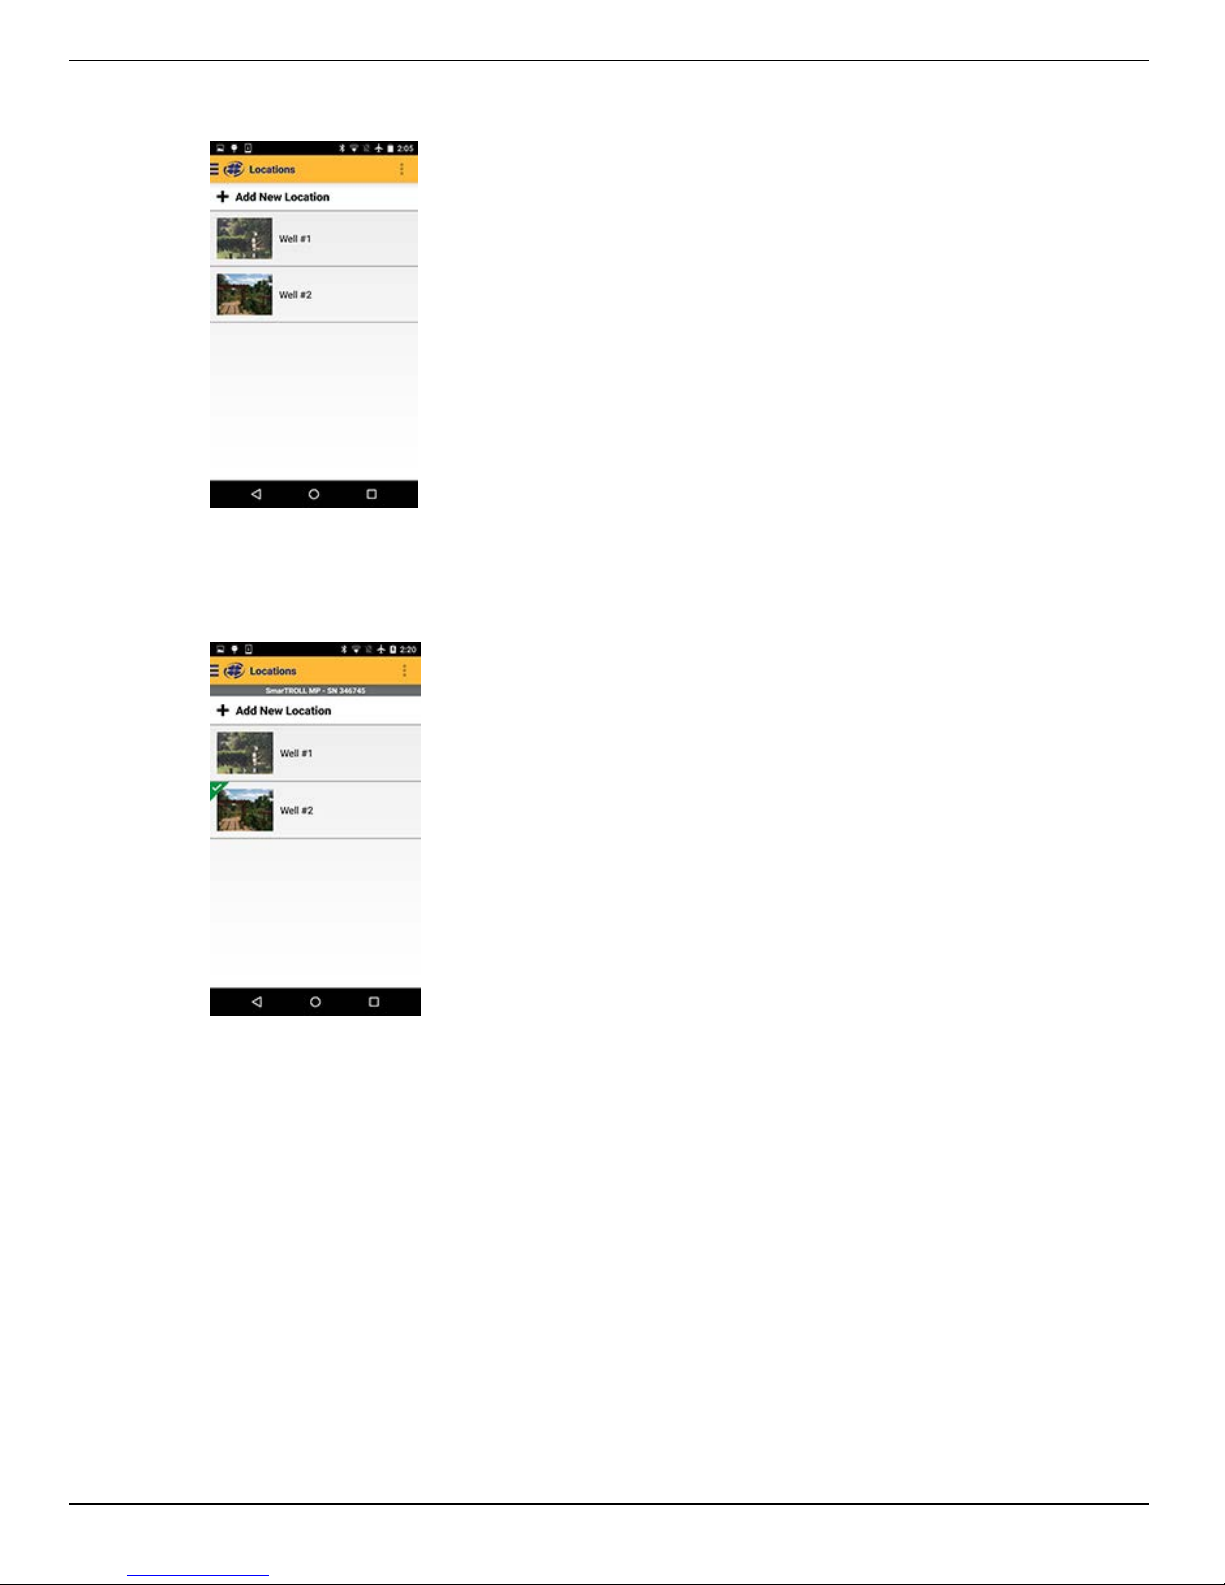
1. To Select a Location, tap the current Location displayed on the Live Readings
screen. The list of Locations appears.
2. The active Location is marked with a green check mark. If no Location has been
selected data will be associated with the Default Location.
3. Tap the desired location in the list.
4. The Live Readings screen appears with the site selected.
1-800-446-7488
21
www.in-situ.com
Page 22
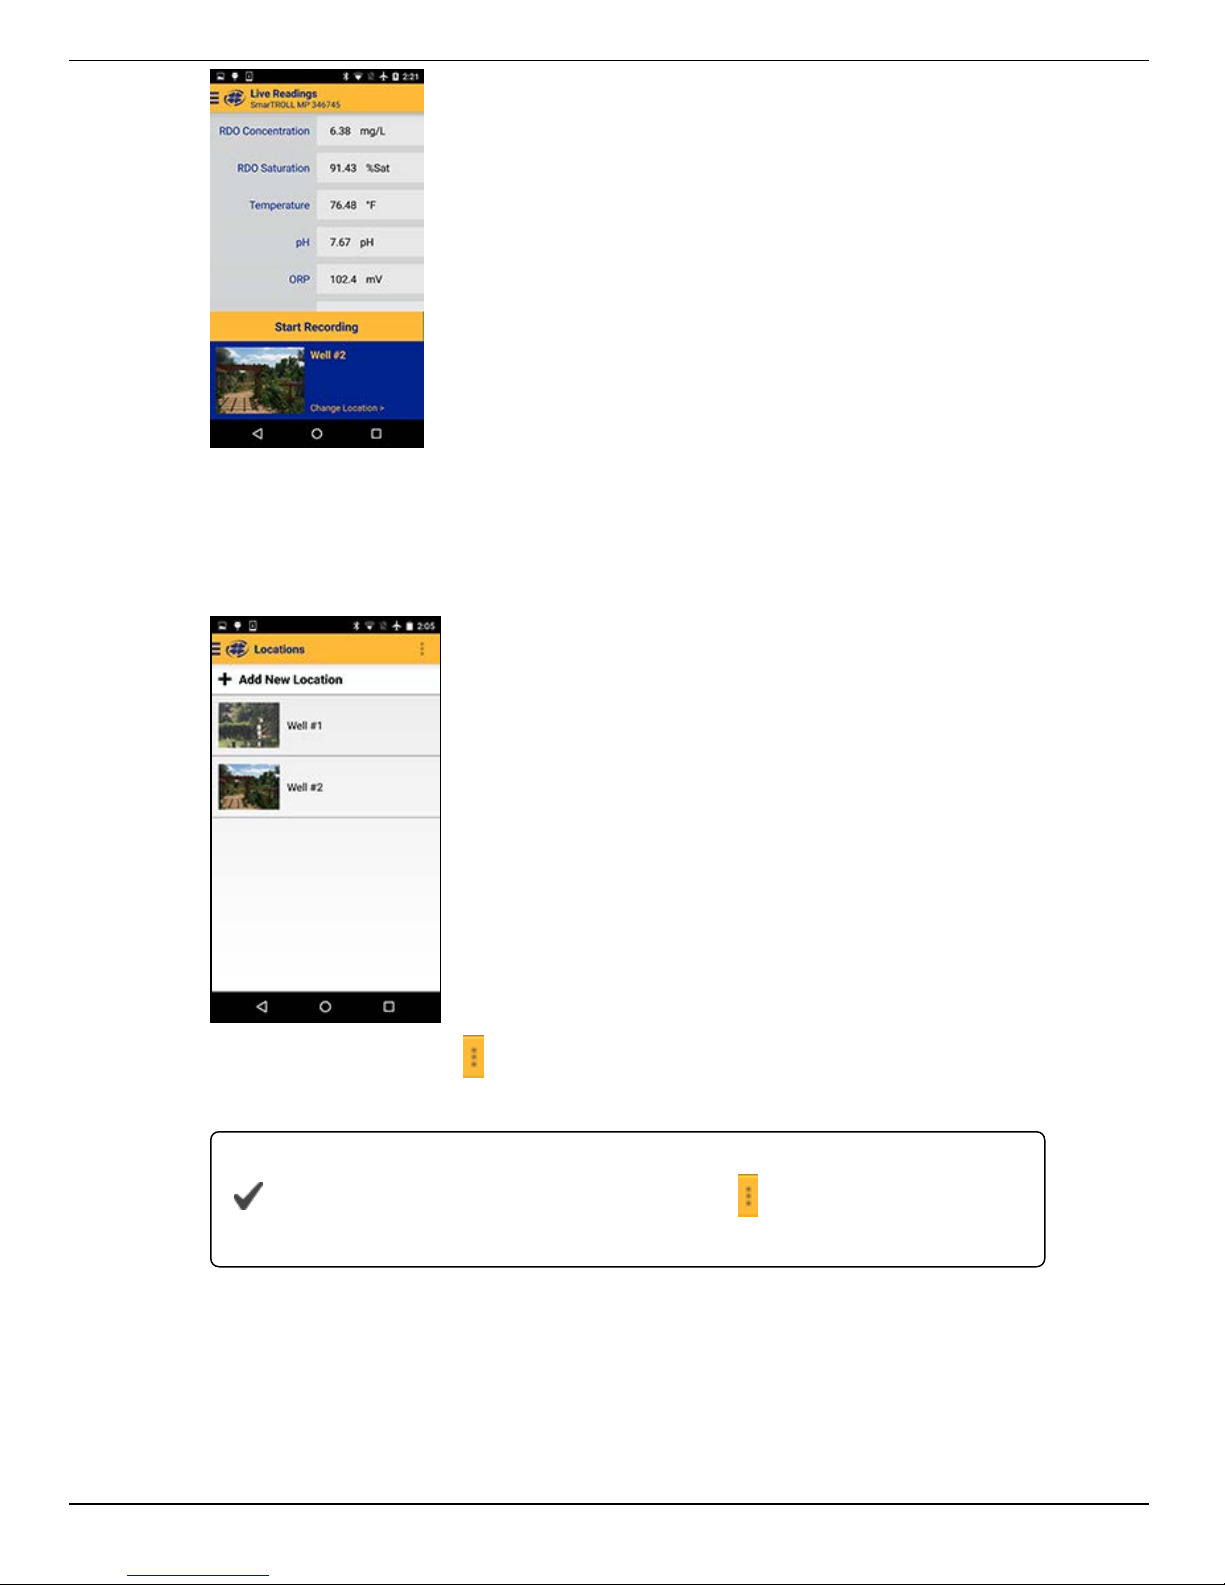
Edit or Delete a Location
1. From the Main Menu, tap Locations.
2. Tap the Location you want to edit.
3.
Tap the Overflow Menu in the upper-right portion of the screen.
4. Select Edit Location to make changes, or Archive Location to remove it from the list.
Archived Locations can be restored at any time by tapping the
Location, accessing the Overflow Menu and tapping Restore
Location.
VuSitu Reports
About Data
Recorded data from the Live Readings screen is stored in the VuSitu Data section of
the app. Data is organized by the Location that was active when the data was recorded.
1-800-446-7488
22
www.in-situ.com
Page 23
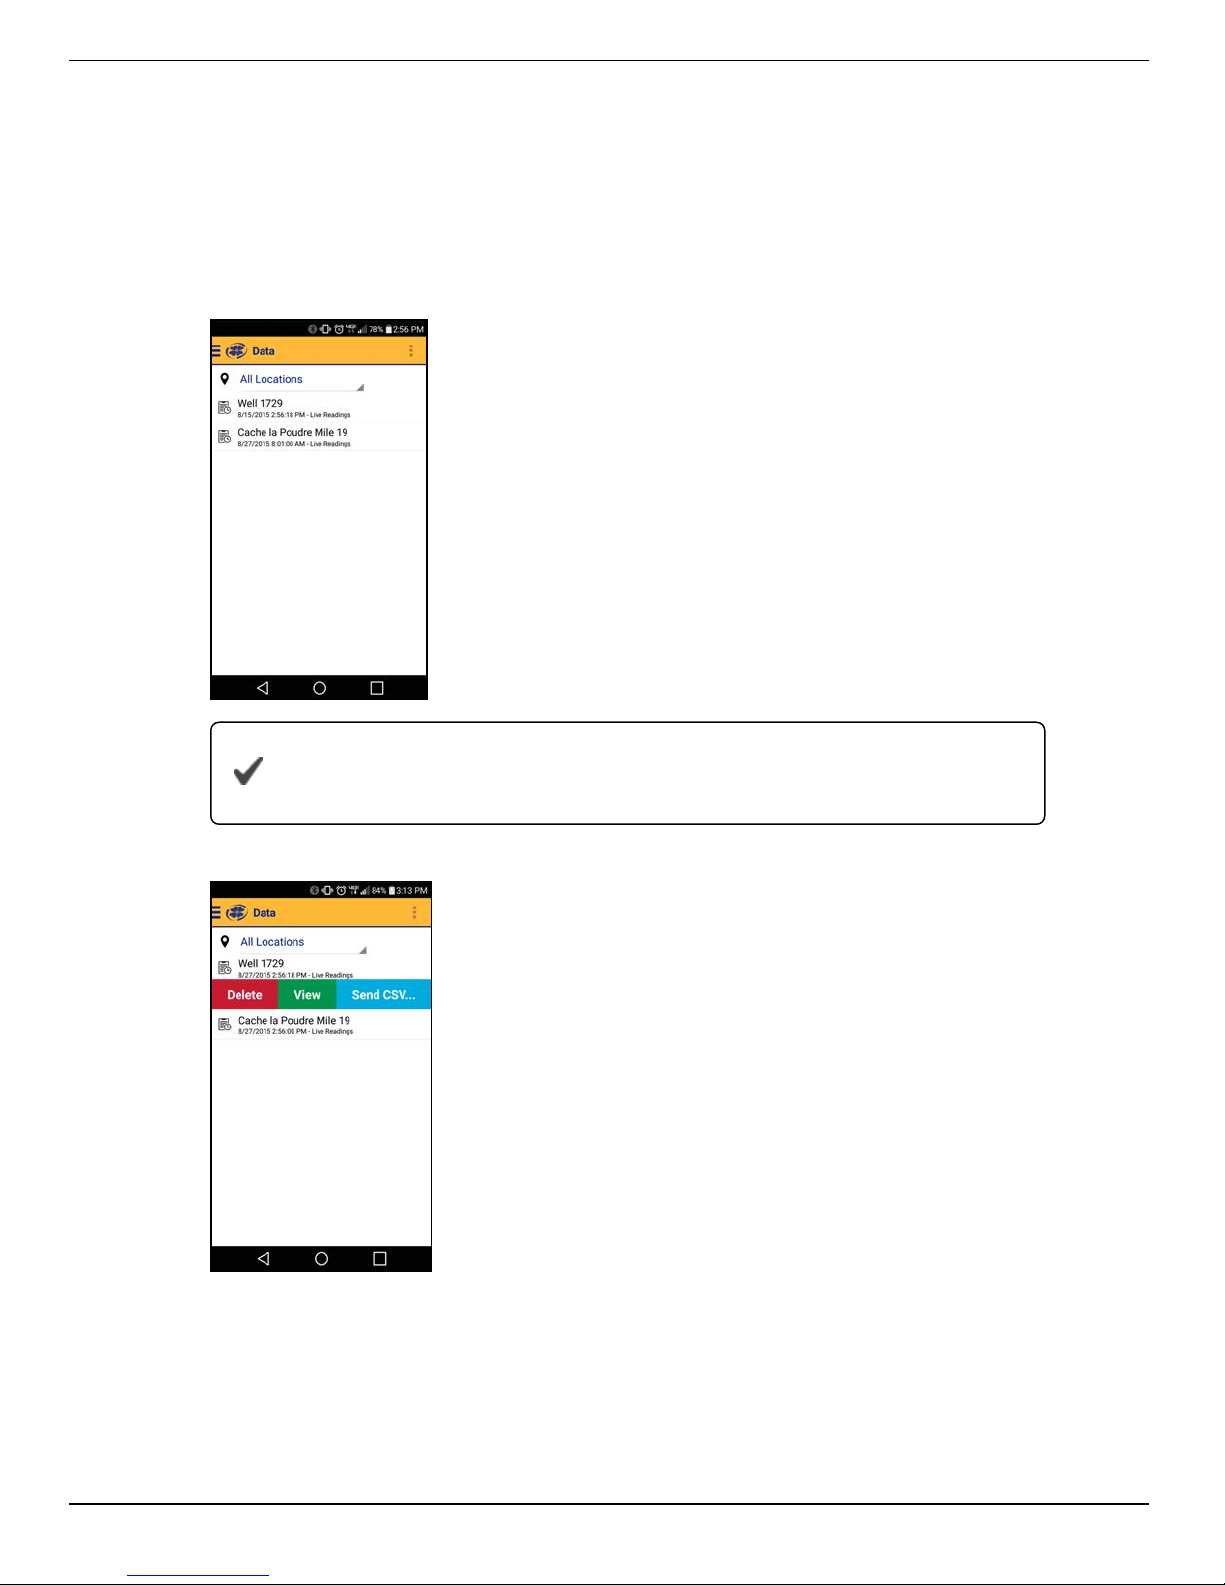
You can view data on the device, delete the data, send the data through email, or save
the data to the VuSitu Folder so that it can be downloaded to your computer via USB
connection.
View, Send, Delete Data
1. From the Main Menu, select Data.
It is optional to filter results by Location. Tap the drop-down list
and select a Location.
2. Tap the desired data.
l Tap Delete to remove the data from the data list.
l Tap View to see the data on the mobile device.
l Tap Send CSV to send an Excel-compatible file to email or the VuSitu Folder.
(When you send the report to the VuSitu Folder, you can later download the data
to a computer via USB cable.)
1-800-446-7488
23
www.in-situ.com
Page 24

1-800-446-7488
24
www.in-situ.com
Page 25
VuSitu Calibrations & Settings
About Calibration and Settings
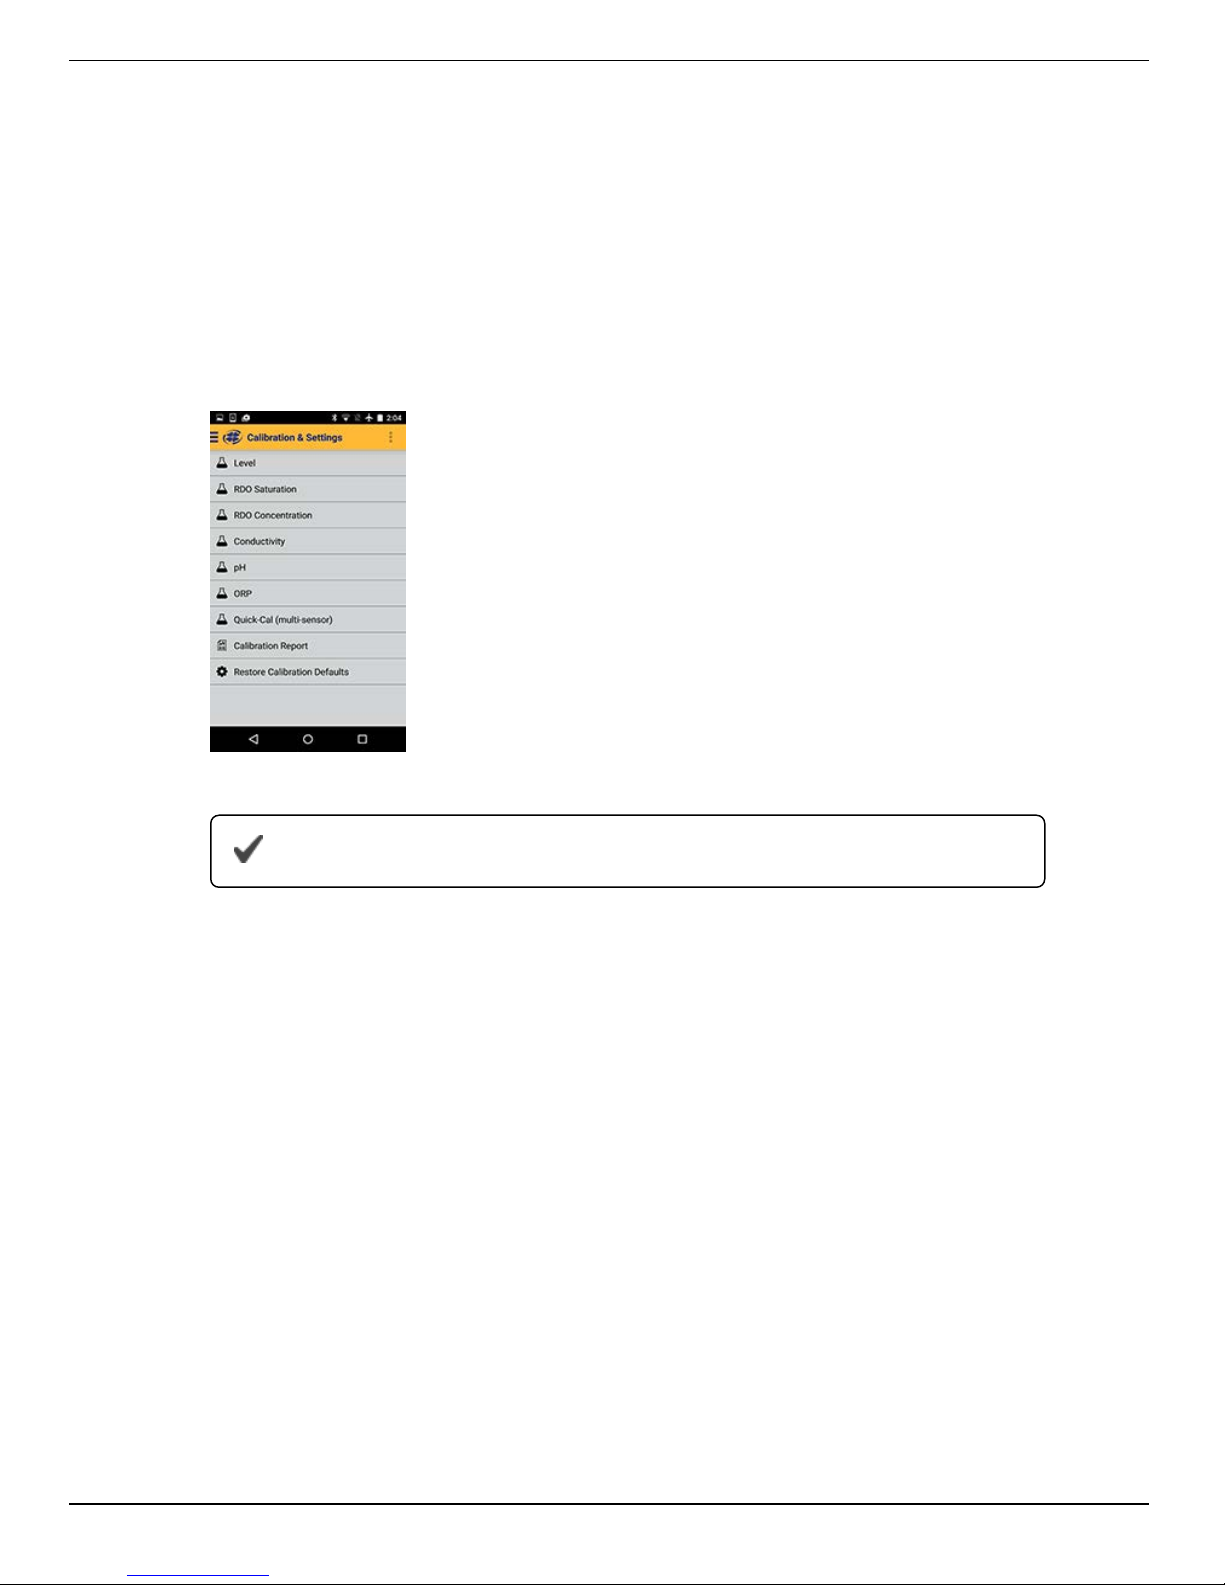
You can perform sensor calibrations, view a calibration report, or restore factory
calibration defaults when the instrument is connected to VuSitu.
1. Tap the VuSitu menu icon, and select Connected Instrument from the list.
2. Tap Calibrations.
3. The available calibrations and sensor settings appear.
4. Tap the calibration you want to perform.
You can also access the full Calibration Report from this menu.
Calibrate the Rugged Dissolved Oxygen Sensor (1-Point)
The optical Rugged Dissolved Oxygen sensor is very stable. The factory calibration
should produce readings within 3% accuracy. If you require readings with greater
accuracy we recommend that you perform a 1-point, 100% water-saturated air
calibration as described below.
100% Water-saturated Air Calibration
1. From the main menu, select Calibration & Settings.
2. From the Calibrations menu select RDO Saturation.
3. For a 1-point calibration, select 100% Saturation.
4. Make sure the vented cap is installed on the calibration cup and a water-saturated
sponge is placed in the bottom of the cup.
1-800-446-7488
25
www.in-situ.com
Page 26
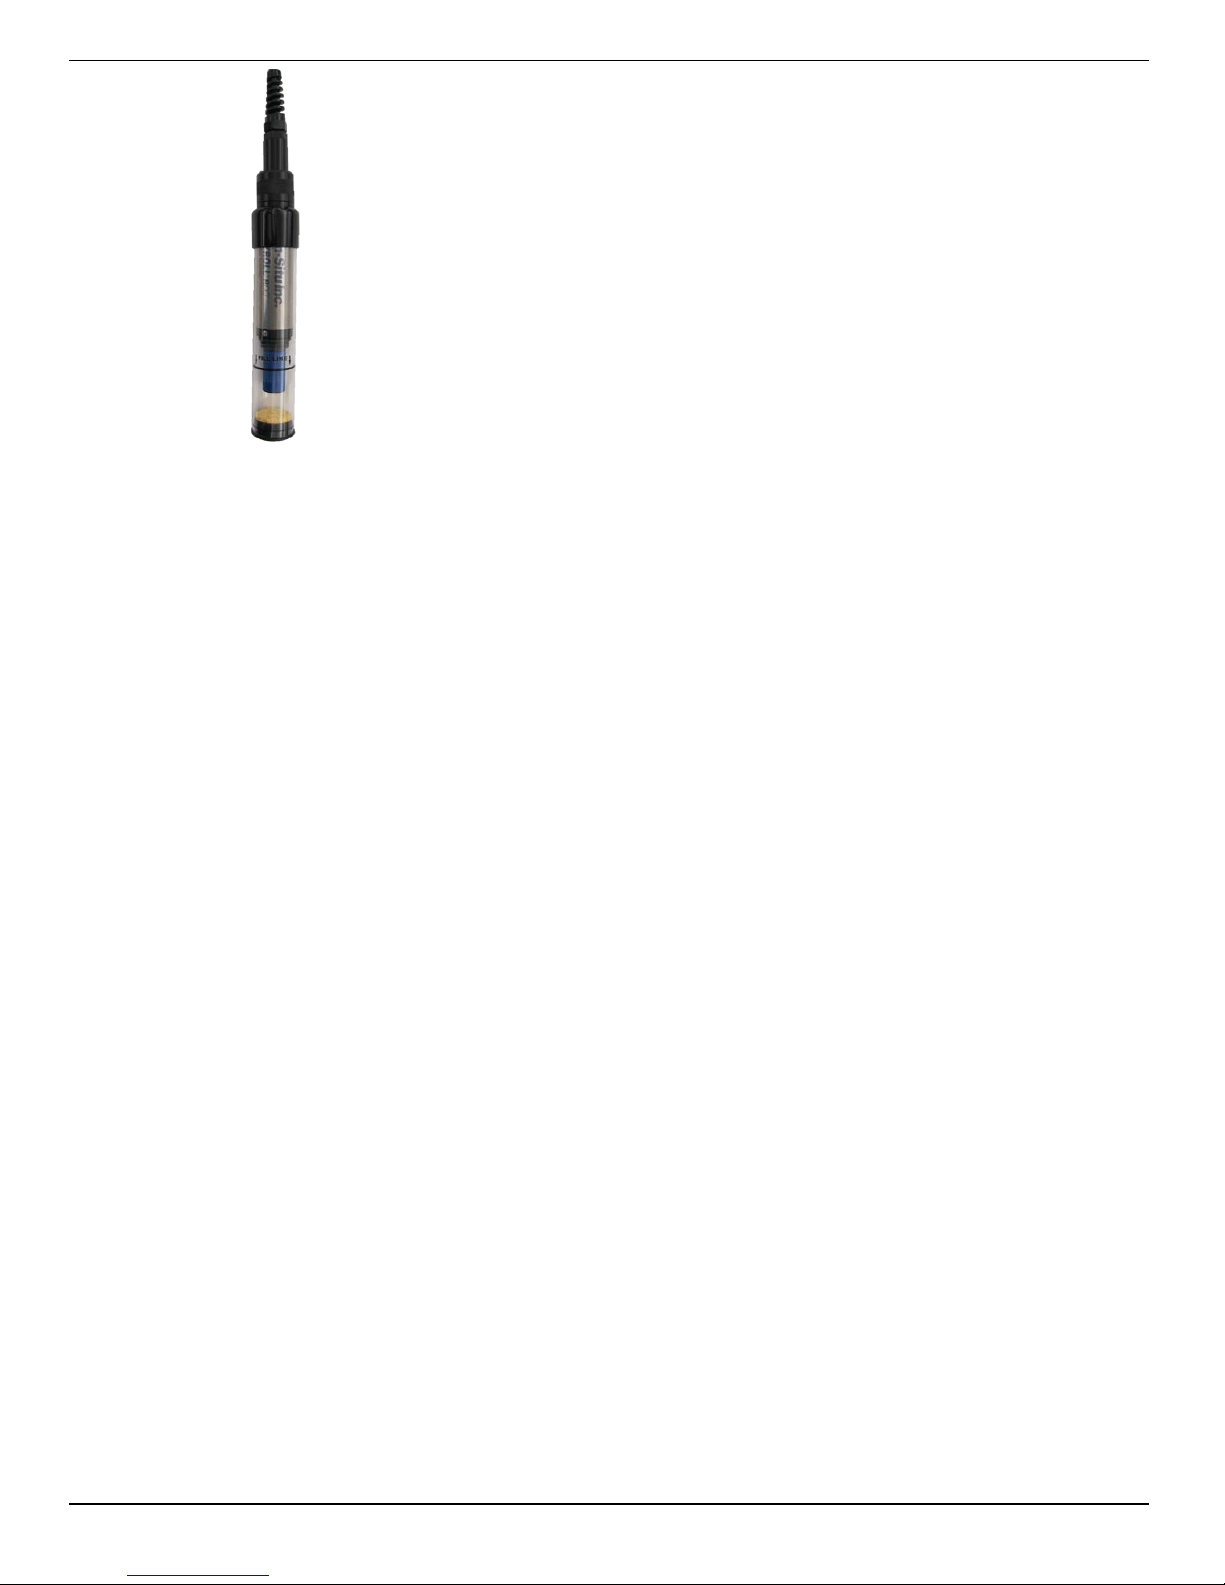
5. After the calibration is stable, select Accept.
6. The calibration values are applied to the sensor and appear on screen. You can
view a full calibration report for all sensors, or select Done to return to the
Calibration Menu.
7. Remove the sponge from the calibration cup.
Calibrate the Rugged Dissolved Oxygen Sensor (2-Point)
We recommend that you perform the 0 % oxygen calibration only if you intend to
measure dissolved oxygen at a concentration of less than 4 mg/L.
100% Water-saturated Air Calibration
1. From the main menu, select Calibration & Settings.
2. From the Calibrations menu select RDO Saturation.
3. For a 2-point calibration, select 100% and 0% Saturation.
4. Make sure the vented cap is installed on the calibration cup and a water-saturated
sponge is placed in the bottom of the cup.
5. After the calibration is stable, a prompt to prepare for the next calibration point
appears.
0-point Calibration
1. Remove the sponge from the calibration cup.
2. Fill the calibration cup to the fill line with sodium sulfite. Place the instrument in the
calibration cup.
1-800-446-7488
26
www.in-situ.com
Page 27
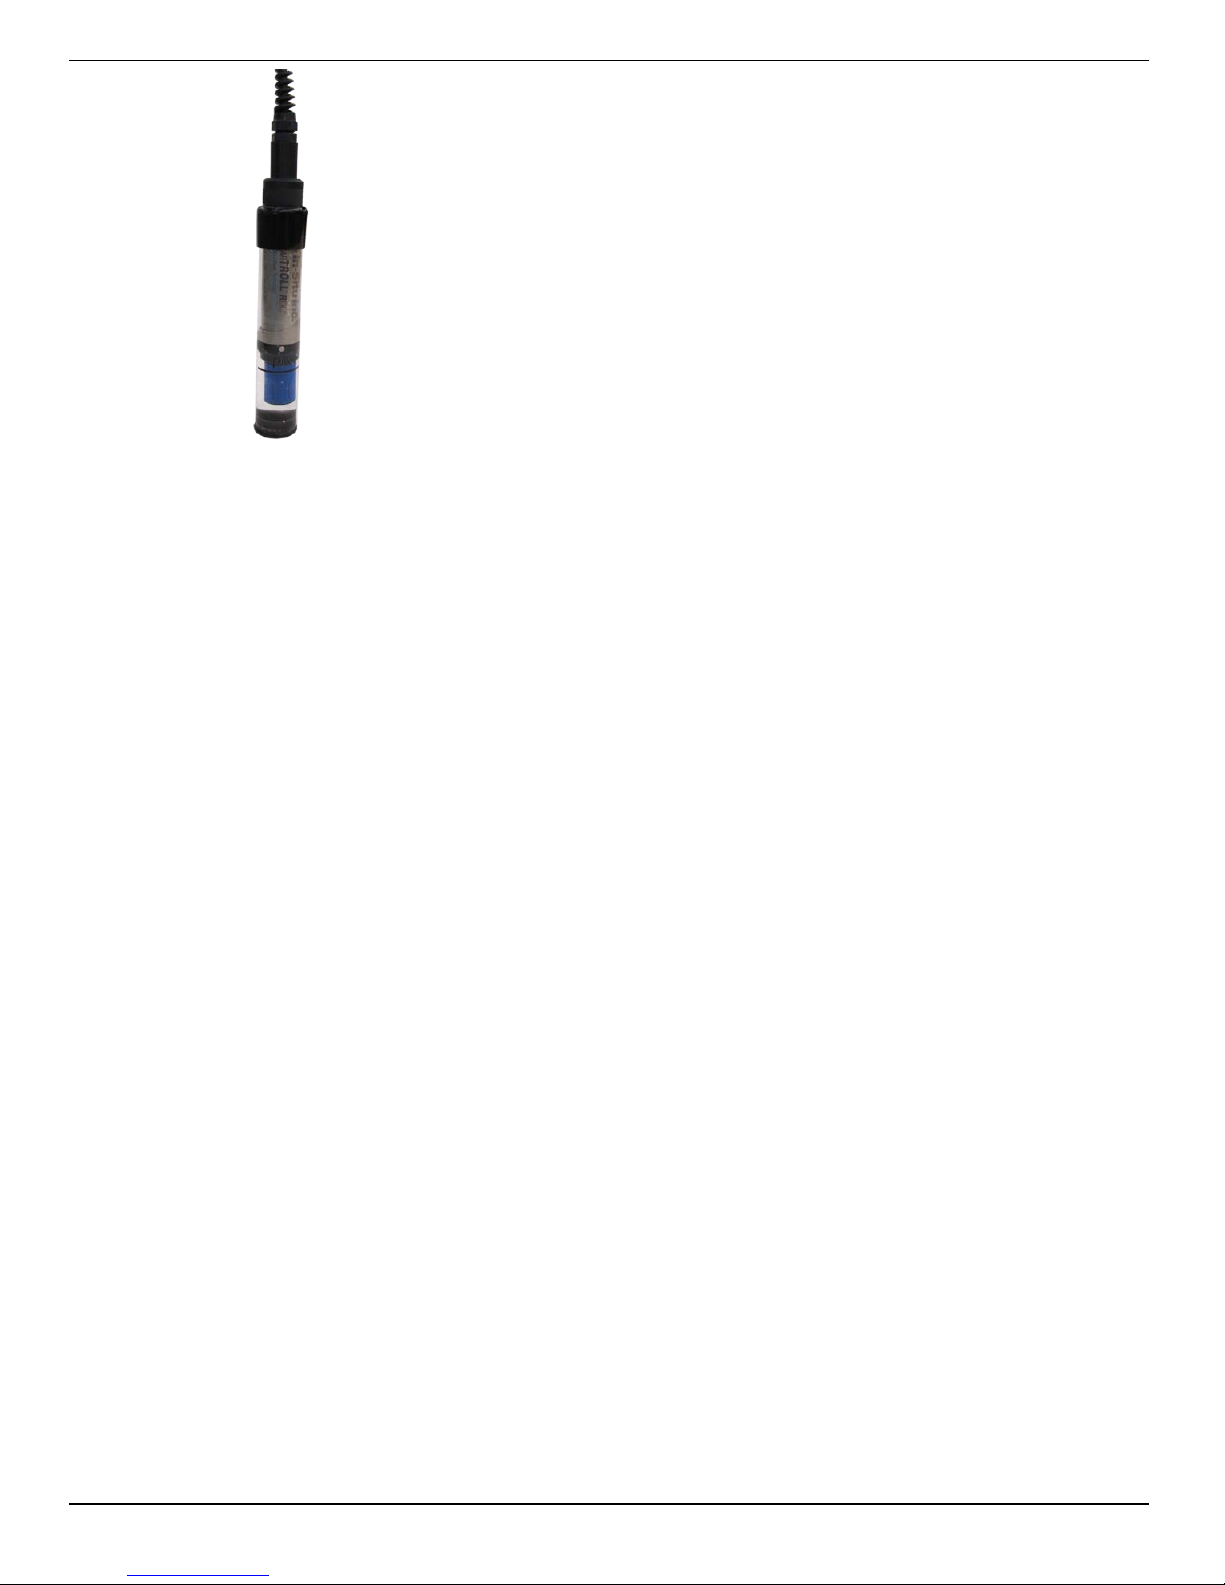
3. Select Next.
4. After the calibration is stable, select Accept.
5. The calibration values are applied to the sensor and appear on screen. You can
view a full calibration report for all sensors, or select Done to return to the
Calibration Menu.
6. Rinse the sensors and restrictor with DI water.
Calibrating the Rugged Dissolved Oxygen Sensor Using Concentration
The preferred method of calibrating the RDO sensor is using the 1-point 100%
Saturation calibration. However, you can also calibrate the sensor using a
concentration method.
1. From the main menu, select Connected Instrument.
2. Select Calibrations.
3. Tap RDO Concentration.
4. Place the instrument in reference solution and tap Next.
5. Enter the value of the reference solution.
6. After the calibration is stable, select Accept.
7. The calibration values are applied to the sensor and appear on screen. You can
view a full calibration report for all sensors, or select Done to return to the
Calibration Menu.
RDO Salinity Setting
The SmarTROLL RDO does not include automatic salinity compensation, so you must
set it manually.
1. From the main menu, select Connected Instrument.
2. Select Instrument Settings.
1-800-446-7488
27
www.in-situ.com
Page 28
3. From the Instrument Settings menu select Salinity Setting.
4. Select the appropriate setting for your sampling environment.
Care and Maintenance
Maintenance Schedule
For best results, send the instrument to the manufacturer for factory calibration every 12
to 18 months.
User-Serviceable Parts
The user-serviceable parts on the instrument include the O-rings, and the RDO Sensor
Cap.
O-rings
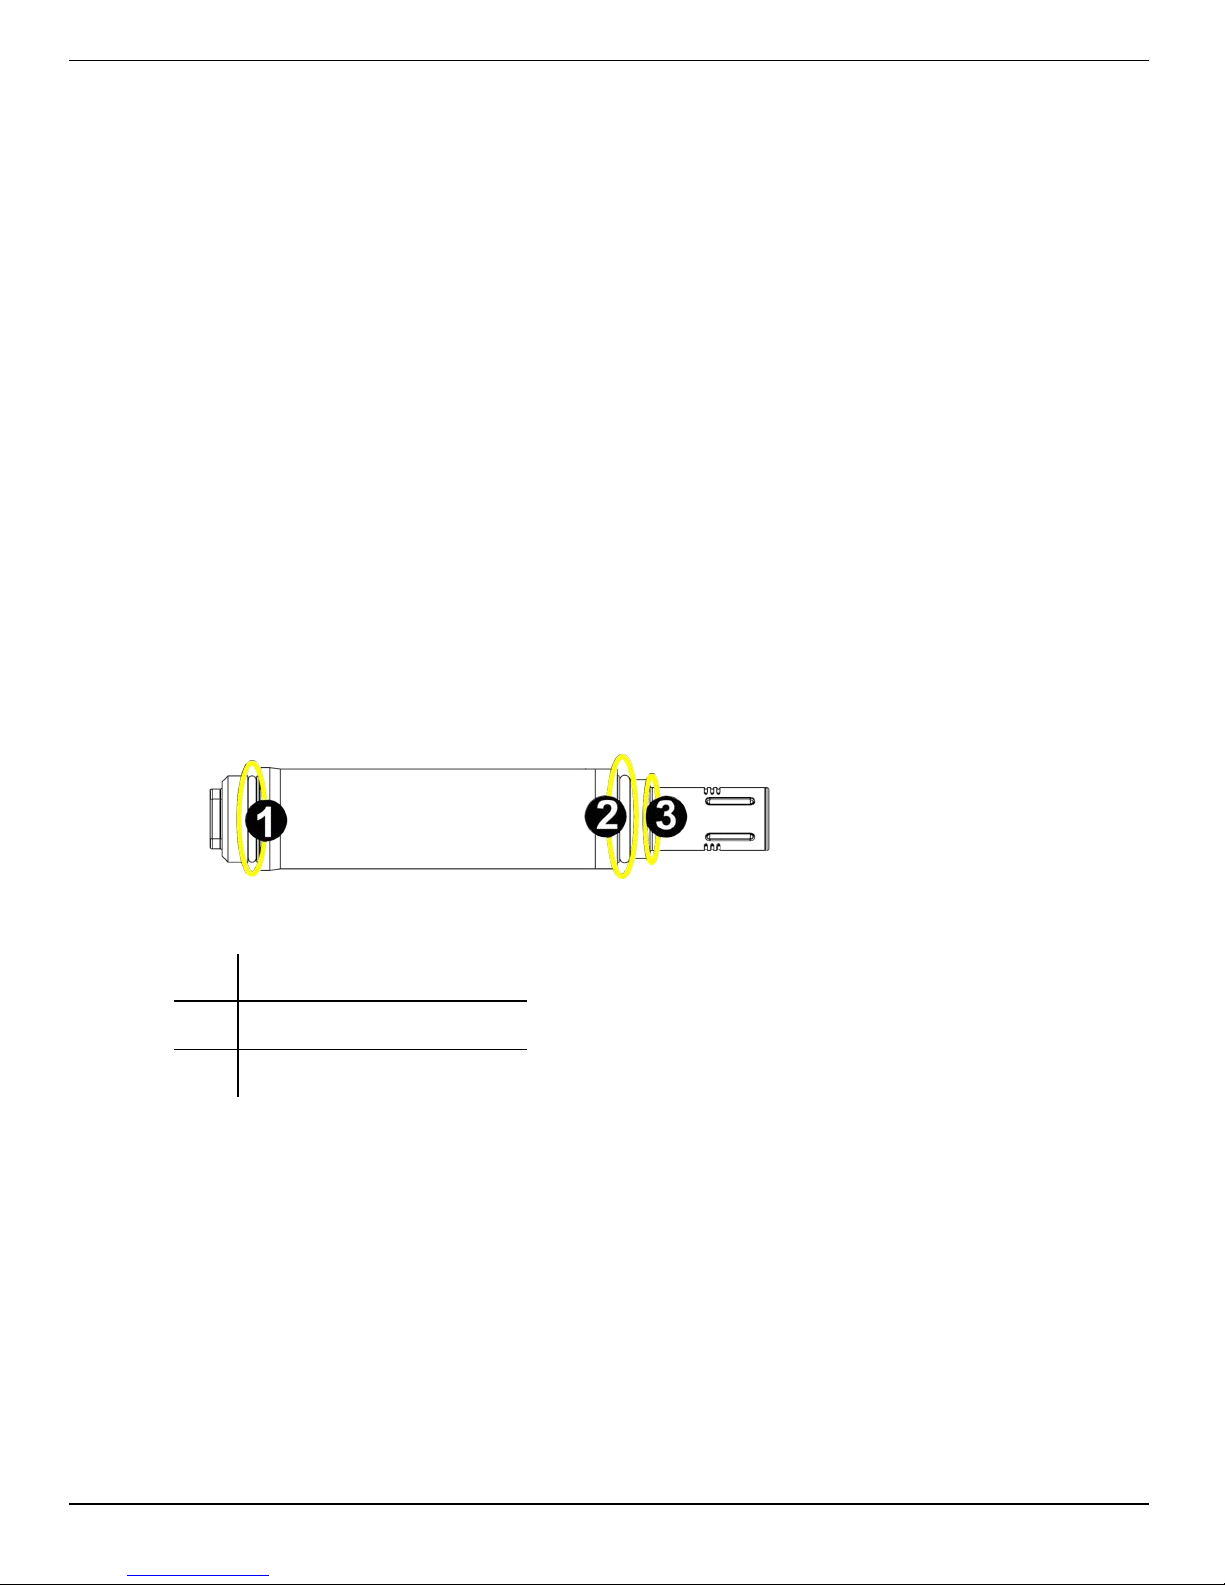
The instrument has several O-rings that can be maintained by the user in order to keep
moisture from entering the instrument and damaging the electronics. Apply a very thin
layer of vacuum grease to new O-rings upon installation. The O-rings are located in the
following areas.
1 Connector (1)
2 Instrument housing (1)
3 RDO Sensor Cap (2)
RDO Fast Sensor Cap Replacement
The RDO Fast Sensor Cap has a 1-year typical life (15 months of total usage) after the
sensor takes its first reading, or 36 months from the date of manufacture. Follow the
instructions included in the RDO Sensor Cap Replacement Kit. Replacement caps are
available from In-Situ Inc. or your authorized In-Situ distributor.
1-800-446-7488
28
www.in-situ.com
 Loading...